Valentine’s Day is basically my favorite excuse to play with heart-shaped forms, sweet little details, and all the cozy reds, pinks, and creamy neutrals. Here are my go-to Valentine’s Day clay projects—starting with the classics you’ll want to make on repeat and ending with a few fun curveballs.
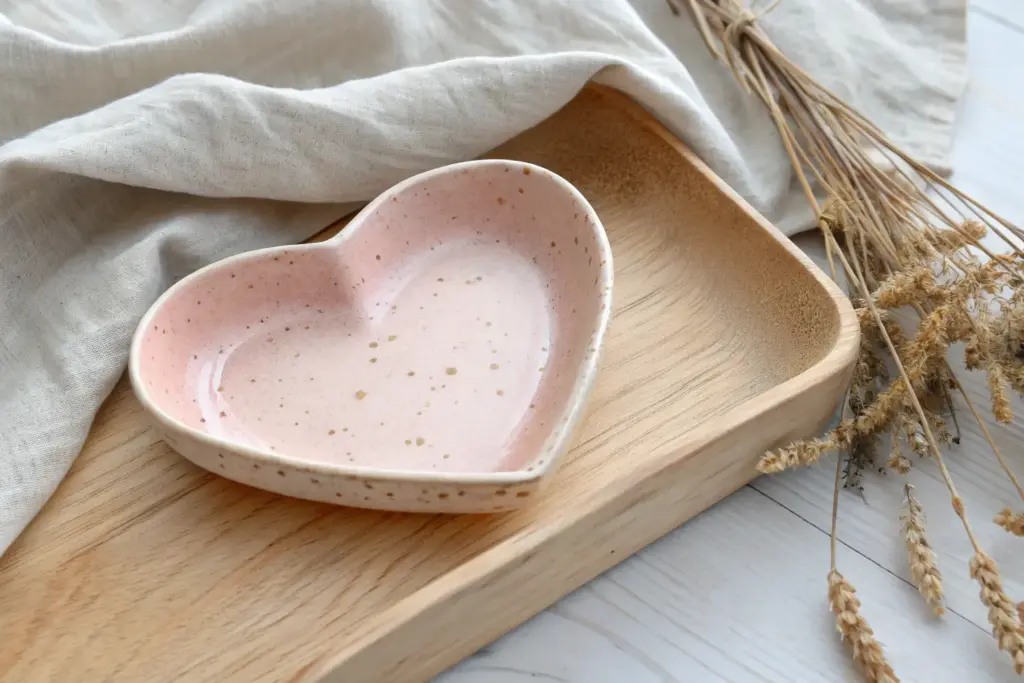
Heart-Shaped Trinket Dish
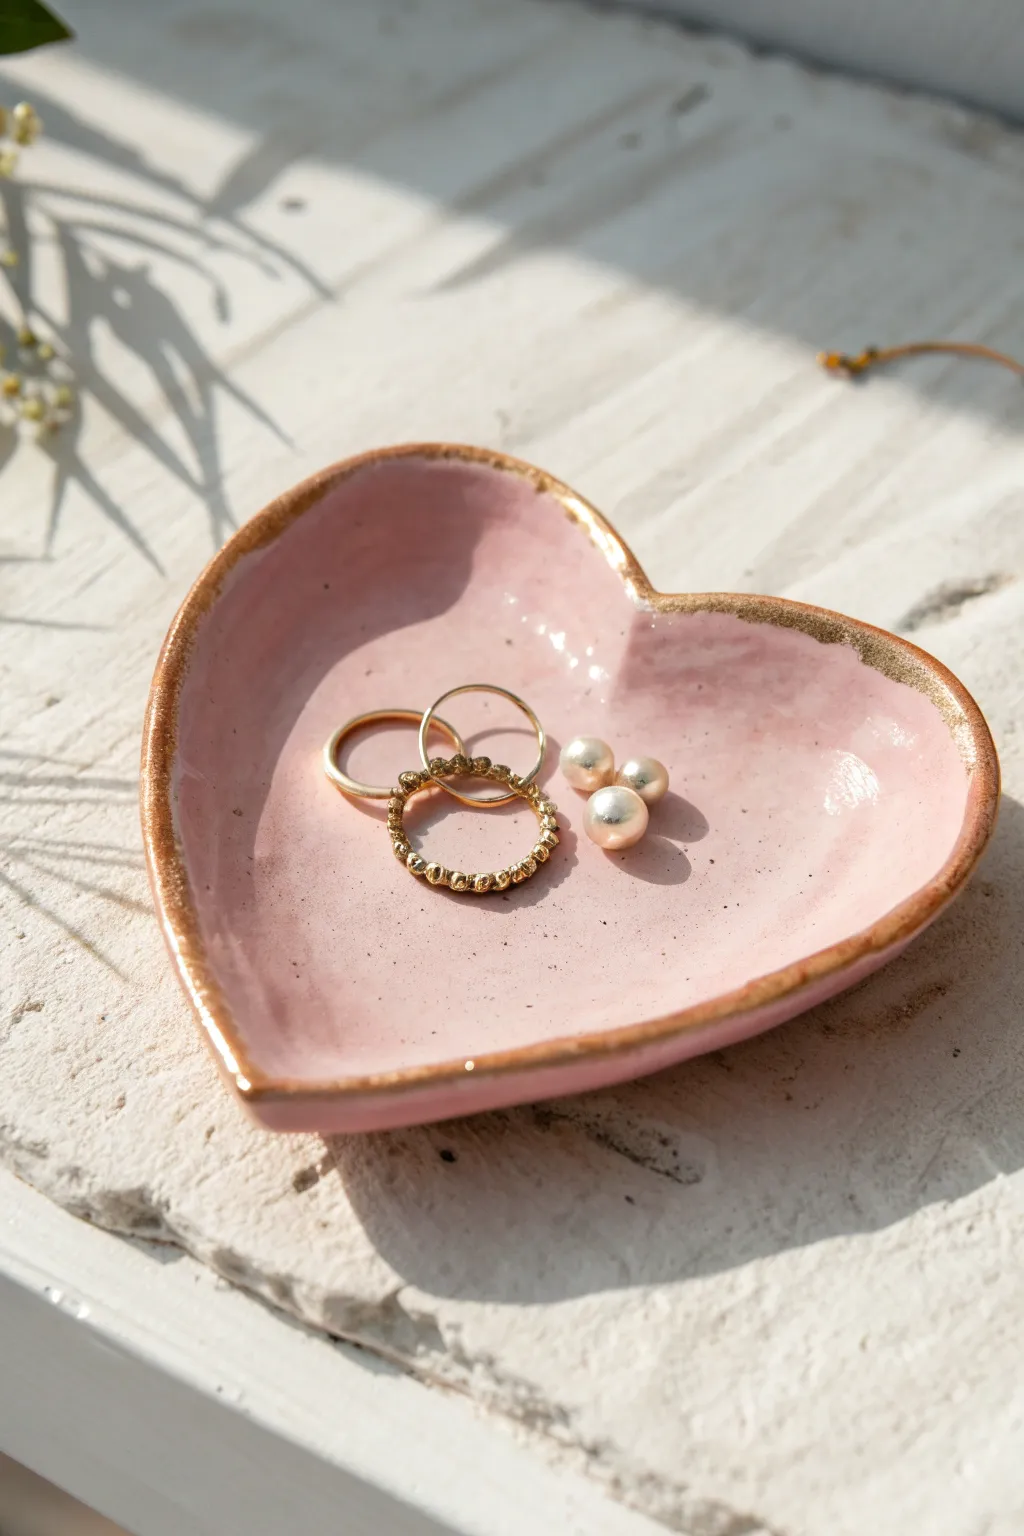
Capture the essence of romance with this sweet, handmade trinket dish, perfect for holding precious rings or earrings. The soft pink glaze paired with a striking gold rim creates a piece that feels both rustic and luxurious.
Step-by-Step Tutorial
Materials
- Air-dry clay or polymer clay (white)
- Small rolling pin
- Heart-shaped cookie cutter (medium size)
- Sandpaper (fine grit)
- Pink acrylic paint (soft pastel shade)
- Gold leaf paint or metallic liquid gilding
- High-gloss varnish or glaze
- Small fine-tip paintbrush
- Flat paintbrush
- Wait or sponge
- Bowl of water
Step 1: Shaping the Base
-
Prepare the clay:
Start by conditioning your clay. Knead a ball of white clay in your hands until it becomes warm, soft, and pliable, removing any air bubbles. -
Roll it out:
Using a small rolling pin, roll the clay out on a smooth surface until it is about 1/4 inch thick. Aim for an even thickness throughout to prevent cracking later. -
Cut the shape:
Press your heart-shaped cookie cutter firmly into the clay. Give it a little wiggle to ensure a clean cut, then gently remove the excess clay from around the shape. -
Form the curve:
Gently lift the clay heart and place it in the palm of your hand. Softly press the center down while curving the edges upward to create a shallow bowl shape. -
Smooth the edges:
Dip your finger in a little water and run it along the cut edges of the heart. This smooths out any harsh lines or jagged bits left by the cutter. -
Refine the surface:
I like to take a moment here to gently smooth the interior surface with a slightly damp sponge, ensuring the ‘dish’ part is seamless. -
Let it dry:
Place the formed dish on a piece of parchment paper or a drying rack. Allow it to air dry completely according to the package instructions (usually 24-48 hours).
Step 2: Painting and Finishing
-
Sand imperfections:
Once fully dry and hard, inspect the dish. Use fine-grit sandpaper to gently buff away any rough spots on the rim or the underside. -
Wipe clean:
Remove all sanding dust with a slightly damp tack cloth or paper towel. The surface needs to be dust-free for the paint to adhere properly. -
Apply base color:
Using a flat brush, apply a coat of soft pink acrylic paint to the entire dish. Don’t forget the bottom. -
Add a second coat:
Let the first layer dry to the touch, then apply a second coat of pink to ensure solid, opaque coverage without streakiness. -
Glaze the dish:
Once the pink paint is completely dry, apply a layer of high-gloss varnish over the entire piece. This mimics the look of fired ceramic glaze. -
Dry the glaze:
Allow the varnish to cure fully so the surface is hard and not tacky. This usually takes a few hours. -
Paint the rim:
Dip a fine-tip brush into your liquid gold gilding. Carefully paint the very edge of the rim. -
Create the irregular look:
Instead of a perfect line, allow the gold to be slightly thicker in some spots and thinner in others to match the photo’s organic, handmade aesthetic. -
Final cure:
Set the dish aside in a dust-free area for a final 24 hours to let the gold leaf and varnish fully harden and set.
Uneven Drying?
If the edges curl up too much while drying, weigh down the center gently with a small bag of rice or beans during the first few hours of drying.
Textured Touch
Imprint a piece of lace or a textured fabric into the wet clay before cutting the heart shape to add a subtle embossed pattern under the glaze.
Now you have a charming, custom-made dish ready to gift or keep on your nightstand


Imprinted Lace Texture Heart Ornaments

Create a delicate and vintage-inspired keepsake with this simple clay technique. By impressing real lace into soft white clay and adding a touch of soft pink, you’ll achieve an elegant texture that feels both timeless and romantic.
Step-by-Step
Materials
- Air-dry clay or polymer clay (white)
- Small rolling pin
- Heart-shaped cookie cutter (medium size)
- Scrap piece of textured lace or a doily
- Jute twine or rustic string
- Acrylic paint (soft dusty pink)
- Paper, sponge, or dry brush for wiping paint
- Small paintbrush
- Drinking straw or skewer (for the hole)
- Parchment paper or craft mat
- Fine-grit sandpaper (optional)
Step 1: Preparation and Rolling
-
Prepare your workspace:
Lay down a piece of parchment paper or work on a clean craft mat to prevent the clay from sticking to your table. -
Condition the clay:
Take a handful of white clay and knead it in your hands until it is soft, pliable, and free of cracks. -
Initial rolling:
Place the clay on your mat and use the rolling pin to flatten it out. -
Check thickness:
Aim for an even thickness of about 1/4 inch (6mm). You want it thick enough to be sturdy but thin enough to not be too heavy. -
Prepare the lace:
Select a piece of lace with a raised, distinct pattern. A coarser crochet lace works better than fine tulle for creating deep impressions.
Blurred Texture?
If your lace impression looks fuzzy, the clay might be too sticky. Lightly dust the clay surface with cornstarch before laying down your lace for a cleaner release.
Step 2: Creating the Texture
-
Position the lace:
Lay your chosen lace over the flattened clay. Be mindful of where the most interesting patterns, like flower motifs or scalloped edges, fall. -
Impress the pattern:
Using your rolling pin, roll firmly over the lace one single time. Press hard enough to push the fabric into the clay, but not so hard that you make the slab paper-thin. -
Reveal the design:
Carefully peel the lace back from one corner to reveal the imprinted texture. -
Cut the shape:
Position your heart-shaped cookie cutter over the best part of the texture design and press straight down. -
Remove excess clay:
Peel away the scrap clay from outside the cutter before lifting the cutter itself. -
Refine the edges:
Gently smooth the cut edges with your finger. If the clay dragged a bit, just tap it back into a neat shape. -
Create a hanging hole:
Use a straw or a skewer to punch a hole near the top center of the heart; make sure it’s large enough for your twine.
Step 3: Finishing Touches
-
Drying phase:
Move the heart to a drying rack or a flat baking sheet. Let it air dry completely according to package instructions (usually 24-48 hours). -
Sand edges:
Once fully dry and hard, use fine-grit sandpaper to briefly gently sand any rough spots on the outer rim. -
Apply the wash:
Water down a small amount of dusty pink acrylic paint. Brush it generously over the center area of the heart. -
Wipe back technique:
Immediately before the paint dries, use a damp paper towel or sponge to wipe the surface. This leaves pink in the recessed ‘valleys’ of the lace pattern while keeping the raised ‘peaks’ white. -
Add the hanger:
Cut a length of jute twine, thread it through the hole, and tie a simple knot to create a loop.
Add Subtle Sparkle
For a magical winter look, brush a very thin layer of Mod Podge over the white textured areas and sprinkle with ultra-fine iridescent glitter before sealing.
Hang these lovely textured hearts on a branch or use them as unique gift tags for someone special


Personalized Heart Gift Tags
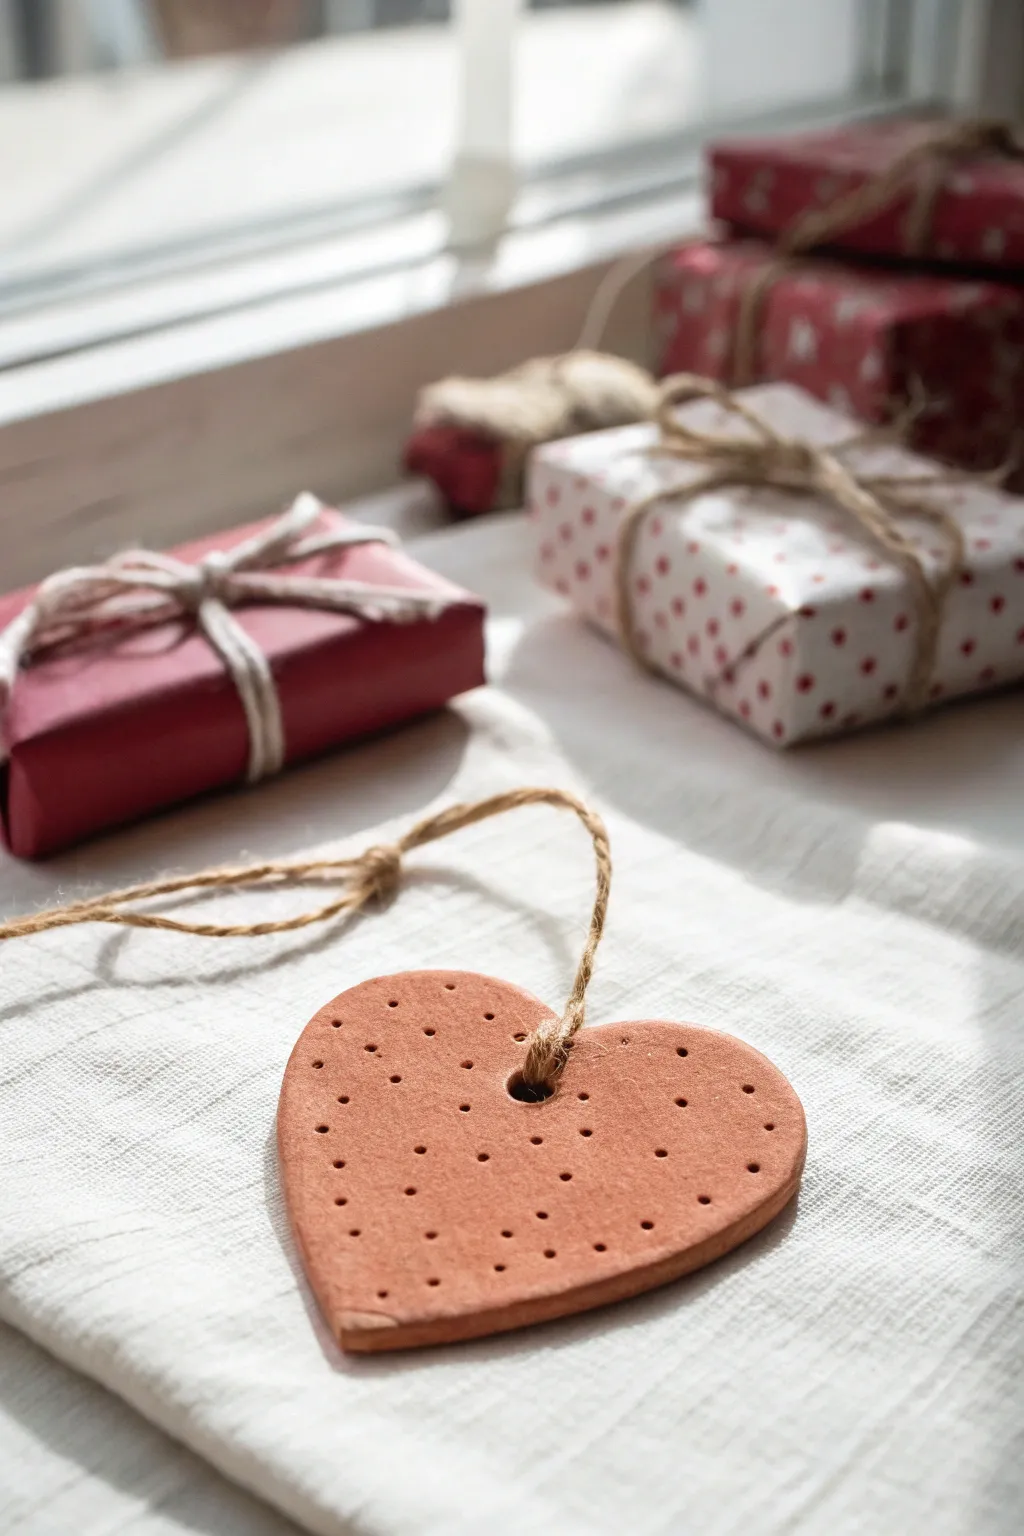
These charming heart-shaped tags add a warm, handmade touch to any Valentine’s gift with their earthy terracotta tone and simple dotted texture. The rustic finish pairs beautifully with natural twine and kraft paper wrapping for a cozy, heartfelt presentation.
Step-by-Step Guide
Materials
- Terracotta air-dry clay (or polymer clay)
- Rolling pin
- Heart-shaped cookie cutter (medium size)
- Toothpick or skewer
- Straw (standard drinking size)
- Sandpaper (fine grit)
- Jute twine or hemp cord
- Wax paper or parchment paper
- Small bowl of water
Step 1: Shaping the Clay
-
Prepare the workspace:
Lay down a sheet of wax paper or parchment paper to protect your table and prevent the clay from sticking. This also makes it easier to move the hearts later without distorting them. -
Condition the clay:
Take a handful of terracotta air-dry clay and knead it in your hands for a minute or two until it feels pliable and smooth. This removes air bubbles and prevents cracks. -
Roll it out:
Place the clay ball on your paper and use a rolling pin to flatten it. Aim for an even thickness of about 1/4 inch (6mm). If it’s too thin, the tag might be fragile; too thick, and it will be heavy. -
Cut the heart:
Press your heart-shaped cookie cutter firmly into the rolled clay. Give it a tiny wiggle to ensure a clean cut before lifting the cutter straight up. -
Smooth the edges:
Dip your finger into a small bowl of water and gently run it along the cut edges of the heart to smooth out any roughness or jagged bits left by the cutter.
Cracking Up?
If you see tiny hairline cracks as the clay dries, mix a tiny amount of fresh clay with water to make a paste (slip) and smooth it into the cracks with your finger.
Step 2: Adding Texture & Features
-
Create the hanging hole:
Position a drinking straw near the top center of the heart (the dip between the lobes). Press straight down and twist slightly to remove a plug of clay, creating a clean hole for the twine. -
Plan the pattern:
Visualize a simple pattern for the surface. The example uses a grid-like array of dots, but you don’t need to measure perfectly—eyeballing it adds to the rustic charm. -
Poke the first row:
Using a toothpick or a skewer, gently press distinct holes into the clay surface. Start with a vertical line down the center to anchor your design. -
Complete the texture:
Continue adding rows of dots on either side of your center line. I find it works best to stagger the rows slightly or keep them in a grid, pressing deep enough to see shadow but not all the way through the clay. -
Final smooth:
Check the back of the heart. Sometimes poking holes or cutting distorts the underside. Gently pat it flat against your work surface one last time.
Scented Surprise
Add 2-3 drops of essential oil (like lavender or cinnamon) to the clay while kneading. The porous terracotta holds the scent beautifully for a fragrant gift tag.
Step 3: Drying and Finishing
-
Let it dry:
Place the clay heart on a flat, dry surface. Allow air-dry clay to sit for 24 to 48 hours. Flip the heart over halfway through the drying process to ensure even drying and prevent curling. -
Inspect for dryness:
The clay will lighten in color and feel hard and room temperature (not cold) when it is fully dry. -
Sand edges:
Once fully cured, use a piece of fine-grit sandpaper to lightly buff the edges of the heart. This removes any sharp spots and gives it a professional ‘finished’ feel. -
Dust off:
Wipe the heart with a dry cloth or a soft brush to remove any clay dust from the sanding process, ensuring the holes remain clear. -
Cut the twine:
Cut a length of natural jute twine, approximately 12 inches long. -
Loop the twine:
Fold the twine in half. Push the folded loop end through the hole in the heart from front to back. -
Secure the knot:
Pass the loose ends of the twine through the loop and pull tight to create a lark’s head knot, securing the tag. -
Add a final knot:
Tie the two loose ends together in a simple overhand knot toward the top, creating a loop for hanging or attaching to a gift.
Now your heartfelt tag is ready to make someone’s Valentine’s gift extra special


Sweetheart Message Plaques
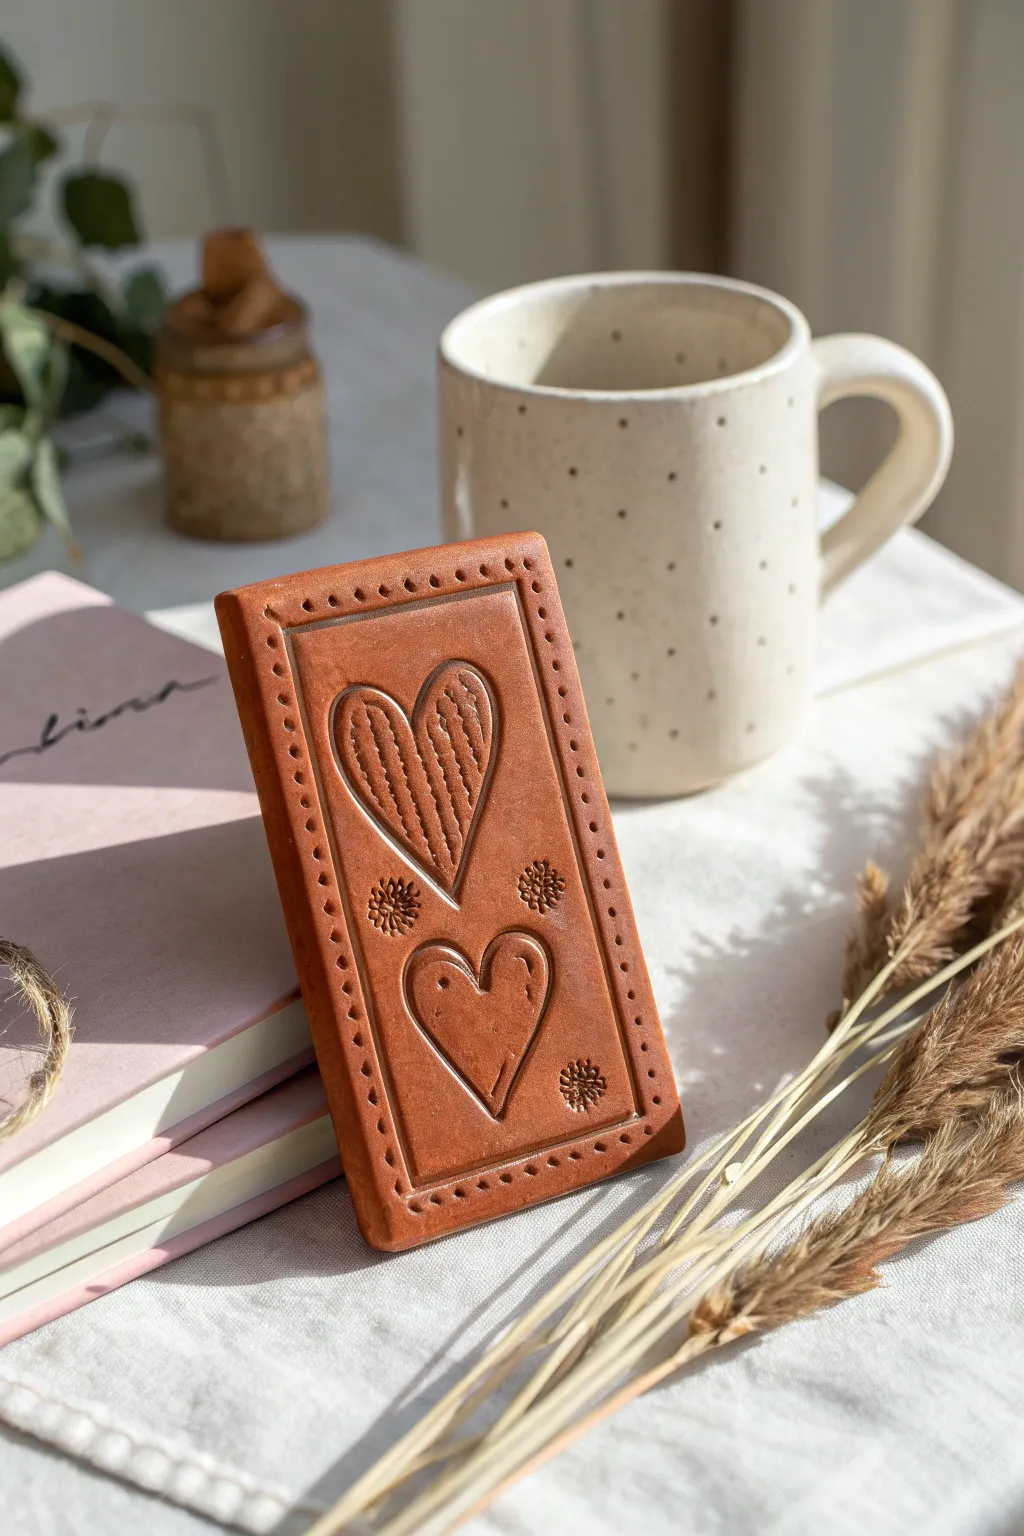
Capture the warmth of love with this rustic, terracotta-style clay plaque featuring charming embossed hearts. The simple line work and tactile details make it a perfect minimalist decoration or a thoughtful handmade Valentine’s gift.
How-To Guide
Materials
- Terracotta-colored polymer clay (or air-dry clay mixed with burnt orange acrylic paint)
- Rolling pin
- Parchment paper or craft mat
- Rectangle clay cutter (approx. 2×4 inches) or craft knife and ruler
- Needle tool or toothpick
- Small ball stylus or blending tool
- Small flower/snowflake stamp (optional, or use needle tool to draw)
- Texture sponge or fabric (optional)
- Dark brown acrylic paint (for antiquing)
- Paper towels or wet wipes
- Matte varnish
Step 1: Shaping the Base
-
Condition the clay:
Start by warming the terracotta clay in your hands, kneading it until it is soft, pliable, and free of air bubbles. If you are mixing custom colors, ensure they are fully blended for a uniform shade. -
Roll out the slab:
Place the clay on parchment paper and use your rolling pin to create an even slab. Aim for a thickness of about 1/4 inch (6mm) to ensure the plaque is sturdy enough to stand or lean. -
Cut the rectangle:
Use a rectangular cutter for the cleanest edges. If cutting by hand, use a ruler and a craft knife to cut a precise rectangle, approximately 2 inches wide by 4 inches tall. Smooth the cut sides gently with your fingertip to remove any sharp ridges.
Step 2: Detailing & Embossing
-
Create the inner border:
Using a ruler as a light guide, take your needle tool and gently press a rectangular line about 1/8 inch inside the outer edge. Do not slice all the way through; simply create an indentation to frame the design. -
Add the dotted frame:
Take a small ball stylus or a blunt toothpick. Press evenly spaced dots along the clay outside of the line border you just created, working your way around the entire perimeter. -
Outline the top heart:
In the upper half of the plaque, use the needle tool to lightly sketch a tall, slender heart shape. Once happy with the placement, retrace the line deeper to emboss it. -
Texture the top heart:
Fill the inside of the top heart with vertical, slightly vibrating lines using the needle tool. This striated texture gives the heart a lovely woven or wood-grain appearance. -
Outline the bottom heart:
In the lower half, emboss a second heart. Make this one slightly smaller and wider than the top one. Leave the center of this heart smooth for contrast. -
Add decorative accents:
Use a tiny flower stamp to press three accents around the hearts. If you don’t have a stamp, use the needle tool to draw small asterisks or snowflakes: one between the hearts on the left, one on the right, and one near the bottom right corner. -
Smooth the surface:
Before baking, give the piece a final inspection. I like to gently rub any raised burrs created by the needle tool with a fingertip to soften the look. -
Bake or Dry:
Follow the instructions for your specific clay. For polymer clay, place the plaque on a ceramic tile or baking sheet with parchment paper and bake at the manufacturer’s recommended temperature (usually 275°F/135°C) for 30 minutes.
Uneven Lines?
If your carved lines look messy or have burrs, wait until the clay is baked and cool. Then, gently sand the surface with fine-grit sandpaper (800+) to smooth out any raised clay bits.
Step 3: Finishing Touches
-
Cool down:
Allow the clay to cool completely inside the oven if possible, or on a wire rack. This prevents cracking due to thermal shock. -
Apply an antique wash:
To make the carved details pop, dilute a small amount of dark brown acrylic paint with water. Brush this wash over the entire front of the plaque, ensuring it gets into the grooves. -
Wipe back:
Immediately wipe the surface with a damp paper towel or wet wipe. This removes the paint from the raised areas but leaves it in the indented lines and dots, highlighting your design. -
Seal the piece:
Once the paint is fully dry, apply a thin coat of matte varnish to protect the surface and give it a professional finish without making it too shiny. -
Display:
Your plaque is ready to lean on a shelf or desk. If you want to hang it, you could glue a small magnet or a loop of ribbon to the back.
Hidden Message
Before baking, use small alphabet stamps to imprint a secret ‘I Love You’ or a special date on the back of the plaque. It adds a sentimental surprise for the recipient.
Enjoy displaying your beautiful clay love letter or gifting it to someone special.

The Complete Guide to Pottery Troubleshooting
Uncover the most common ceramic mistakes—from cracking clay to failed glazes—and learn how to fix them fast.
Heart Hoop Earrings
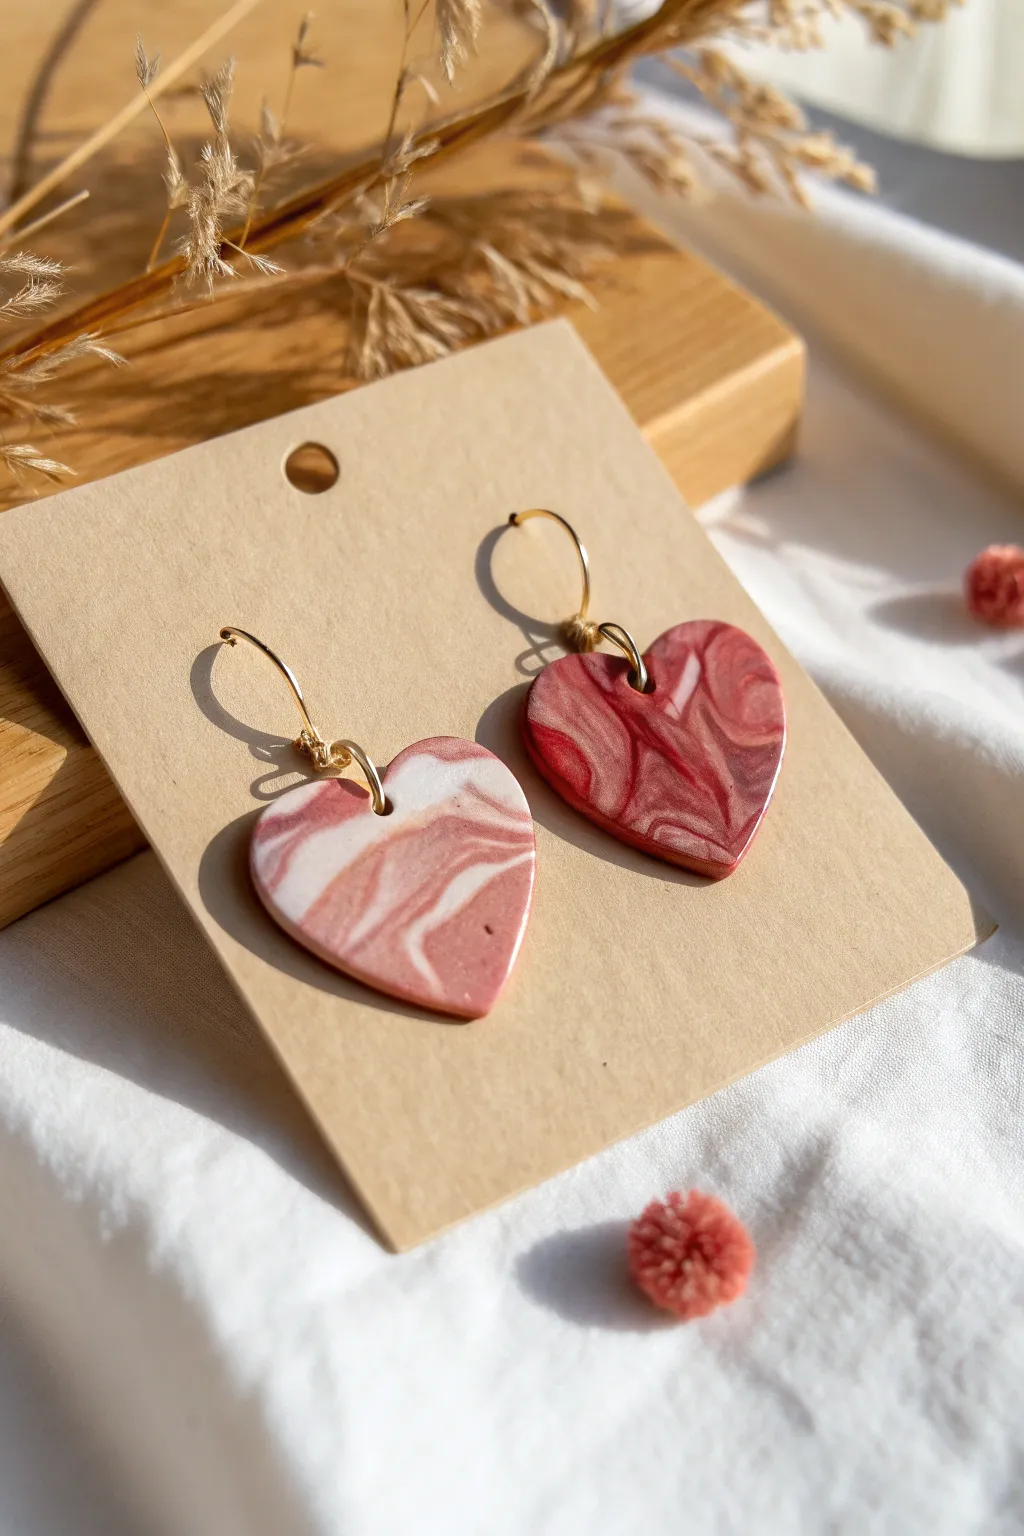
These elegant polymer clay earrings feature a dreamy marbled swirl of cranberry red, dusty pink, and soft white. Suspended from delicate gold hoops, they make a subtle yet romantic statement perfect for Valentine’s Day or everyday wear.
How-To Guide
Materials
- Polymer clay in three colors: deep red, light pink, white
- Rolling pin or pasta machine
- Heart-shaped clay cutter (approx. 1 inch)
- Small round cutter or piercing tool (for jump ring holes)
- Parchment paper or ceramic tile
- Tissue blade or sharp craft knife
- Plain gold hoop earrings (20mm-25mm)
- Gold jump rings (4mm-6mm)
- Jewelry pliers (flat nose and round nose)
- Oven for baking
Step 1: Creating the Marble Slab
-
Condition the clay:
Begin by kneading each color of polymer clay—white, pink, and red—separately until they are soft and pliable. This conditioning stage prevents cracks during baking. -
Roll out snakes:
Roll each color into a long, thin rope or ‘snake’. Aim for the snakes to be roughly the same length and thickness. -
Twist together:
Gather your three snakes and gently twist them together into one large rope. Fold this rope in half and twist it again. -
Smooth and roll:
Roll the twisted rope on your work surface to smooth it out into a single log shape. -
Re-twist for complexity:
Fold the log in half again and give it another twist. Repeat this process 2-3 times until you see the streaks of color becoming finer, but stop before the colors fully blend into a muddy single shade. -
Form a ball:
Squish your twisted log into a ball shape. Use your palms to roll it tight, ensuring there are no air pockets trapped inside. -
Flatten the slab:
Using an acrylic roller or pasta machine, flatten the ball into a sheet approximately 3mm thick. I prefer to roll in different directions to stretch the marble pattern organically.
Keep it Clean
Wipe your workspace and tools with baby wipes between colors. White clay picks up lint easily, so clean hands are crucial for a bright finish.
Step 2: Cutting and Baking
-
Select your pattern:
Look closely at your clay slab and find the areas with the most beautiful swirling. Position your heart cutter over these ‘sweet spots’ to ensure both earrings look equally intricate. -
Cut the shapes:
Press the heart cutter firmly into the clay. Give it a tiny wiggle before lifting to help release the clay cleanly from the table. -
Smooth the edges:
Gently run your finger along the cut edges of the hearts to smooth down any rough clay burrs or sharp corners left by the cutter. -
Create hanging holes:
Use a small piercing tool or a very tiny circle cutter to create a hole at the top centered dip of the heart. Ensure the hole is large enough for your jump rings. -
Bake the clay:
Transfer your hearts to a baking sheet lined with parchment paper. Bake according to your specific clay manufacturer’s instructions (usually around 275°F/135°C for 30 minutes). -
Cool down:
Allow the clay pieces to cool completely before handling. They are fragile when hot but harden significantly as they return to room temperature.
Step 3: Assembly
-
Open the jump rings:
Using two pairs of pliers, grip a jump ring on either side of the split. Twist one hand forward and one backward to open the ring sideways (never pull it apart outwards). -
Attach the hoop:
Thread the open jump ring through the hole in your clay heart. Then, slide the loop of your gold hoop component onto the jump ring as well. -
Seal the connection:
Use your pliers to twist the jump ring back into a closed position, ensuring the ends meet perfectly flush so the hoop doesn’t slip out. -
Repeat:
Repeat the assembly process for the second earring, checking that the length and orientation match the first one.
Make it Shine
Coat the baked hearts with UV resin or a glossy polymer clay glaze. This enhances the swirl contrast and gives it a polished, ceramic-like look.
You now have a stunning pair of custom marbled hearts ready to wear or gift to someone special
Rosebud Mini Charm Necklace

Capture the essence of romance with this delicate charm necklace, featuring a sculpted polymer clay rosebud and a dainty matching heart. The soft pink hues and gold accents create a timeless piece perfect for Valentine’s gifting or self-love treating.
Step-by-Step Tutorial
Materials
- Polymer clay (soft pink and a slightly darker rose shade)
- Gold chain necklace with clasp
- Gold eye pins (approx. 20mm)
- Gold jump rings (4mm or 5mm)
- Needle tool or toothpick
- Detailing tool or ball tool
- Clay blade or craft knife
- Round nose pliers
- Wire cutters
- Baking tile or parchment paper
- Oven
Step 1: Sculpting the Rose
-
Prepare the petals:
Condition your darker pink clay until distinctively soft and pliable. Roll out a very thin snake of clay and slice it into 6-8 tiny, equal-sized segments. Flatten each segment between your thumb and forefinger into thin, delicate teardrop shapes. -
Form the center:
Take the smallest petal and roll it tightly into a spiral to create the rosebud’s core. This central sworl sets the shape for the rest of the flower. -
Layer the petals:
Gently press the next petal against the center spiral, slightly overlapping the seam. Continue adding petals in a spiral pattern, placing each new one slightly higher than the last to create a blooming effect. -
Shape and refine:
As you add outer petals, gently curl the edges backward using your fingertip or a ball tool to make them look open and natural. I like to pinch the very bottom of the flower occasionally to keep the base from getting too bulky. -
Trim the base:
Once satisfied with the fullness, carefully slice off the excess clay at the bottom of the flower using your blade to create a flat surface. This ensures the charm sits nicely. -
Insert the hardware:
Trim an eye pin to about 1cm long. Gently push the straight end into the top of the rose, amidst the petals, until only the loop is visible. Smooth the clay around the wire base to secure it.
Step 2: Creating the Heart Charm
-
Condition the lighter clay:
Take the softer, lighter pink clay and condition it well. Roll a small ball, roughly the size of a pea. -
Form the heart shape:
Flatten the ball slightly into a thick disk. Pinch the bottom to form a point, then use a needle tool to press an indentation into the top center to create the heart’s cleft. -
Refine the edges:
Smooth out any fingerprints or sharp edges with your finger. The heart should look soft and puffy, resembling a candy sweet. -
Add the attachment point:
Trim another eye pin short. Insert it into the top of one of the heart’s lobes (off-center looks charming) or directly in the center cleavage depending on how you want it to hang.
Petal Perfection
To make the rose look realistic, thin out the very edges of each petal with your fingers before attaching. The thinner the edge, the more delicate and porcelain-like the final flower will appear.
Step 3: Baking and Assembly
-
Bake the charms:
Place both charms on a ceramic tile or baking sheet lined with parchment paper. Bake according to your clay manufacturer’s specific instructions (usually 275°F/135°C for 15-30 minutes). -
Cool down:
Allow the pieces to cool clearly and completely before handling. Polymer clay is strongest once fully cooled. -
Secure the pins:
If the eye pins feel loose after baking, pull them out gently, add a tiny drop of super glue to the wire, and slide them back in. -
Prepare the jump rings:
Using your pliers, twist open two small gold jump rings. Remember to twist the ends away from each other laterally rather than pulling them apart to maintain the circle’s shape. -
Attach the heart:
Slide the loop of the heart charm onto a jump ring, then loop that ring through a link near the center of your necklace chain. Close the ring securely. -
Attach the rose:
Repeat the process with the rose charm. For a clustered look like the photo, attach the rose to the very same chain link as the heart, or the immediate next link. -
Final check:
Hold the necklace up by the clasp to ensure the charms hang freely without tangling and that all jump rings are closed tight.
Glaze It Up
For a glossy finish that mimics ceramic or porcelain, coat your baked clay charms with a layer of UV resin or localized gloss varnish. This adds durability and a professional shine.
Wear your lovely handmade floral creation with pride or wrap it up in a sweet box for someone special


What Really Happens Inside the Kiln
Learn how time and temperature work together inside the kiln to transform clay into durable ceramic.
Heart Pinch Pot Candle Holder
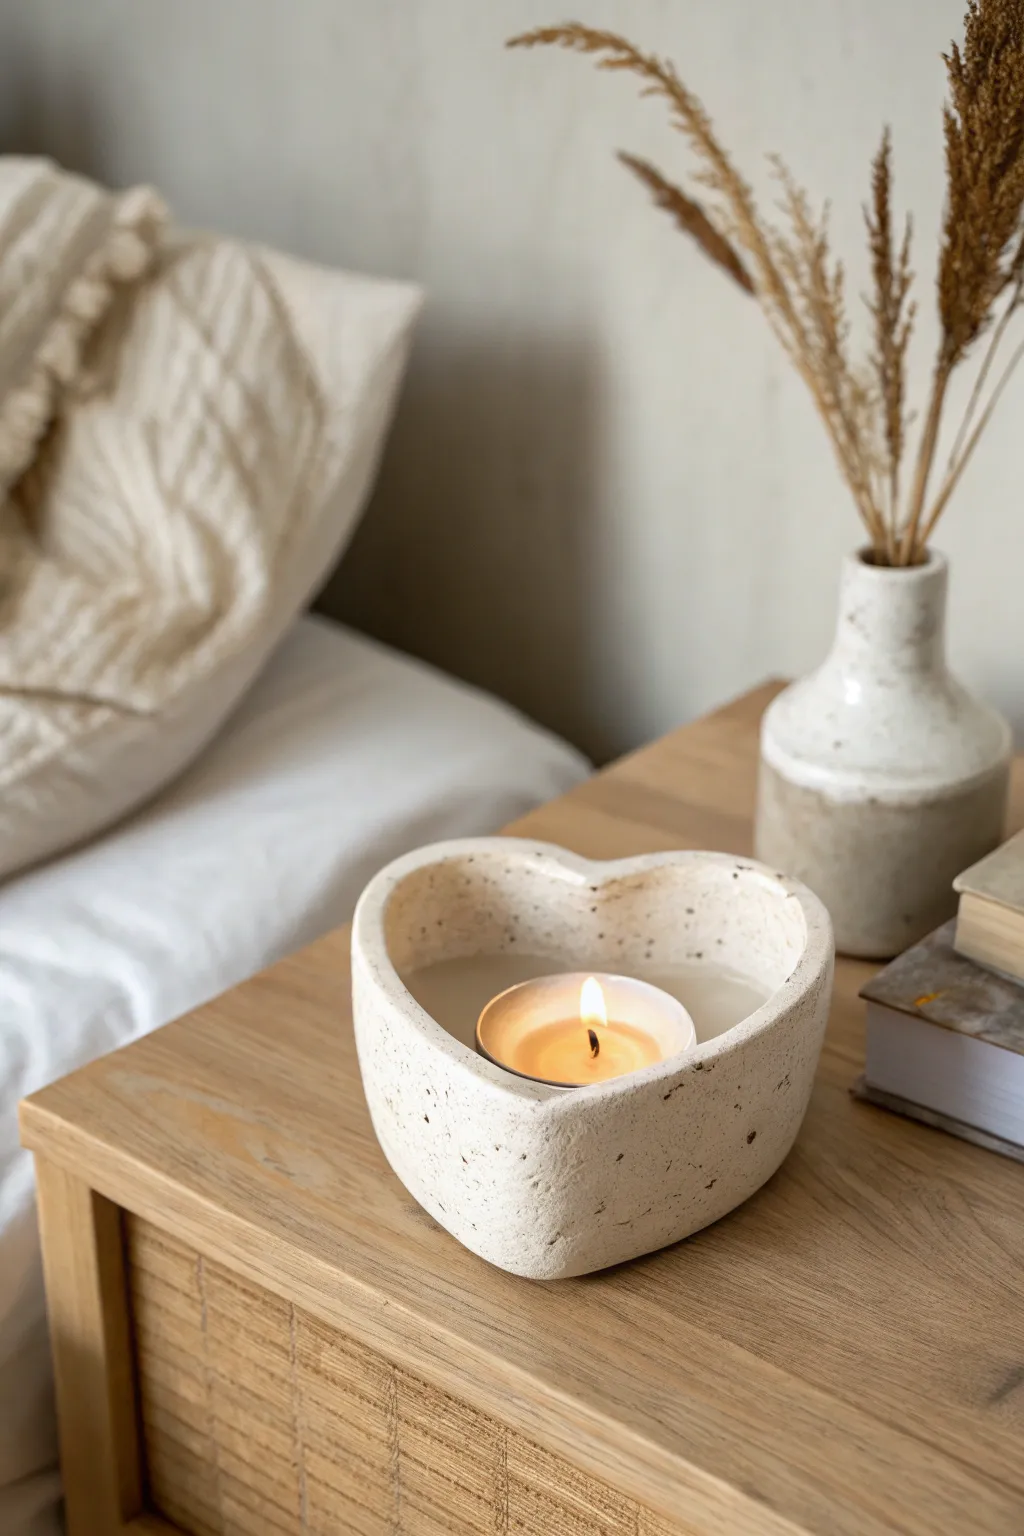
Create a cozy, romantic atmosphere with this hand-built clay candle holder featuring a soft heart shape and natural speckled finish. This project uses the simple pinch pot technique to form a vessel that holds a tealight floating in water or wax.
How-To Guide
Materials
- Air-dry clay or polymer clay (white or cream)
- Faux stone or speckled clay finish kit (or ground black pepper/dried coffee grounds)
- Rolling pin
- Small bowl of water
- Sponge
- Craft knife or clay modeling tool
- Sandpaper (fine grit)
- Matte or satin varnish
- Tea light candle
Step 1: Preparing the Clay
-
Mix the texture:
If your clay isn’t pre-speckled, knead a small amount of ground black pepper or dried coffee grounds into your white clay to mimic the stone-like texture seen in the photo. -
Form a ball:
Roll a large handful of clay into a smooth, tight sphere about the size of a large orange. Ensure there are no cracks or air pockets trapped inside. -
Begin the pinch pot:
Push your thumb into the center of the ball, stopping about half an inch from the bottom. This base thickness is important for weight and stability. -
Open the form:
Gently pinch the clay between your thumb and fingers, rotating the ball as you go to thin out the walls evenly. Aim for a consistent wall thickness of about 1/4 inch.
Cracking Up?
If small cracks appear while shaping the rim, dip your finger in a clay slip (water and clay mush) and smooth over the crack immediately to bond it back together.
Step 2: Shaping the Heart
-
Create the indent:
Once your bowl shape is established, choose one side of the rim and use the side of your finger to press a deep indentation inward. This forms the top dip of the heart. -
Refine the point:
Directly opposite the indentation, gently squeeze the clay outward to form a subtle point. You want a soft, rounded bottom rather than a sharp angle. -
Flatten the base:
Firmly tap the bottom of your pot against your work surface. I find this ensures the candle holder sits perfectly flat and won’t wobble later. -
Smooth the interior:
Since this will hold a candle, the inside floor needs to be relatively flat. Use your thumbs or a damp sponge to smooth out any bumps in the bottom well. -
Level the rim:
Check that the rim is level all the way around. You can gently slice off uneven distinct high points with a craft knife or simply press them down with your finger.
Waterproof Wonder
For a truly waterproof vessel suitable for floating candles, consider using polymer clay or a specifically rated waterproof sealant like a two-part epoxy resin.
Step 3: Finishing Touches
-
Refine the edges:
Dip your finger or a small sponge in water and run it along the rim to create that rounded, soft stone look. Eliminate any sharp edges from your shaping process. -
Initial drying:
Allow the piece to dry until it is leather hard. At this stage, it is firm but still cold to the touch and slightly workable. -
Add surface texture:
If you want a more rustic ‘hewn stone’ look, gently tap the exterior with a crumpled ball of aluminum foil or a rough stone while the clay is leather hard. -
Full cure:
Let the clay dry completely (24-48 hours for air-dry clay, or bake according to package instructions for polymer clay). -
Sanding:
Once fully cured, use fine-grit sandpaper to smooth out any unintentional rough patches, paying special attention to the rim. -
Sealing:
Apply a coat of matte or satin varnish to protect the clay. This is crucial if you plan to fill the holder with water for a floating candle, as air-dry clay is not waterproof on its own.
Place your tea light inside and enjoy the warm, flickering glow of your handmade creation
Marbled Heart Coasters
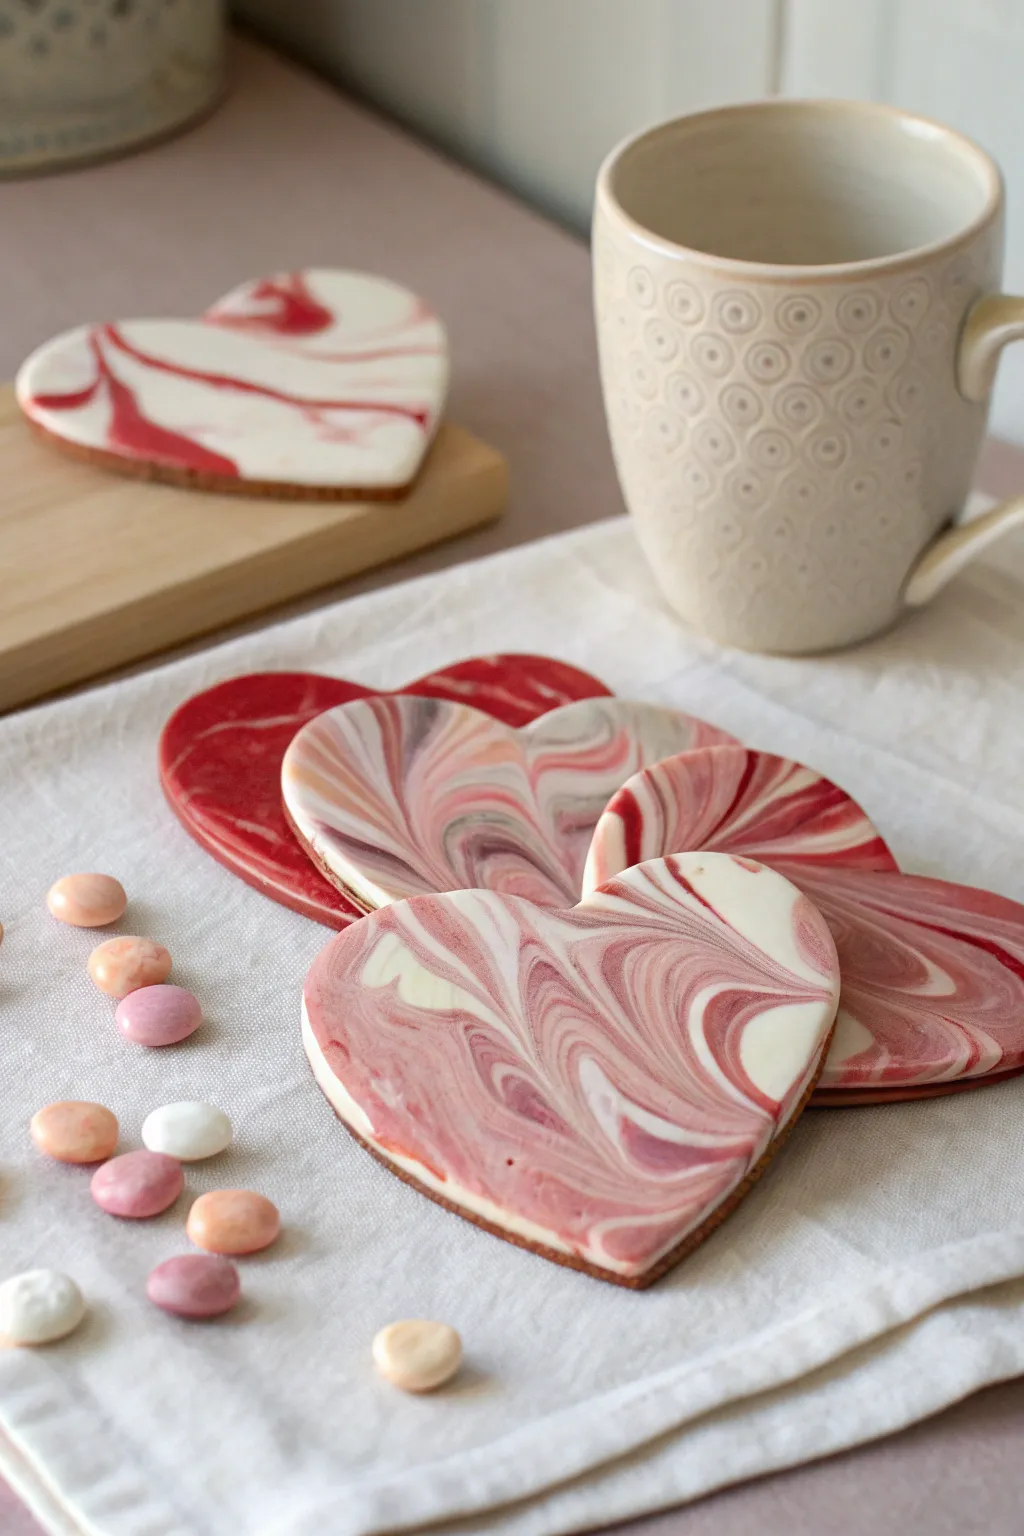
Bring a touch of romance to your coffee table with these elegant polymer clay coasters featuring swirling patterns of white, red, and pink. The marble effect ensures that no two hearts are exactly alike, creating a unique set that is perfect for Valentine’s Day gifting.
Detailed Instructions
Materials
- Polymer clay in White, Red, and Pink
- Rolling pin (acrylic or wooden)
- Heart-shaped cookie cutter (large enough for a mug)
- Parchment paper or silicone baking mat
- Craft knife or scalpel
- Baking sheet
- Fine-grit sandpaper (optional)
- Gloss or matte glaze (optional)
- Oven
Step 1: Preparing the Clay
-
Condition the clay:
Start by kneading each block of clay individually until it is soft, pliable, and warm to the touch. This conditioning step is crucial to prevent cracks later. -
Form ropes:
Roll each color of clay into long, snake-like ropes. You’ll want more white clay than red or pink to keep the marble light and airy, similar to the reference photo. -
Combine the ropes:
Twist the different colored ropes together into one large, multi-colored log. Fold the log in half and twist it again.
Step 2: Creating the Marble Effect
-
Mix gently:
Roll the twisted log into a ball, then roll it back out into a rope. Repeat this twisting and folding process a few times, but be careful not to over-mix, or the colors will turn muddy instead of distinct swirls. -
Form a slab:
Once you have beautiful striations of color, shape the clay into a rough ball and place it on your parchment paper. Press it down mostly flat with your palm. -
Roll it out:
Use your rolling pin to flatten the clay into a slab. Aim for a thickness of about 1/4 inch (approx. 5-6mm) to ensure the coaster is sturdy enough to hold a mug. -
Check the pattern:
Inspect your slab. If you aren’t happy with the swirl pattern, you can fold the clay over and roll it again, but remember that the pattern becomes finer with each roll.
Muddy Colors?
If your colors are blending into a single mushy shade, stop rolling immediately. Tear the clay into chunks and stack them randomly, then roll once to reset the marbling texture.
Step 3: Cutting and Baking
-
Cut the hearts:
Position your heart-shaped cutter over the most attractive parts of the marbled pattern. Press down firmly and wiggle slightly to cut through the clay cleanly. -
Remove excess:
Peel away the scrap clay from around the hearts. I like to save these scraps to re-roll for smaller charms or pendants so nothing goes to waste. -
Smooth the edges:
Before baking, run your finger gently around the edge of each heart to smooth out any rough textures left by the cutter. -
Bake:
Transfer the parchment paper with the hearts onto a baking sheet. Bake according to the manufacturer’s instructions on your specific package of clay (usually around 275°F or 130°C for 15-30 minutes). -
Cool down:
Allow the coasters to cool completely on the baking sheet before handling them, as hot clay is fragile.
Add Metallic Touches
For an extra fancy look, mix in small flakes of gold or silver foil leaf into the clay before the final roll-out. The metallic flecks will add a stunning shimmer to the marble.
Step 4: Finishing Touches
-
Sand edges:
Once cool, inspect the edges. If there are any sharp bits or irregularities, dip the coaster in water and sand the edges gently with wet fine-grit sandpaper. -
Clean surface:
Wipe the coasters with a damp cloth to remove any sanding dust or residue. -
Apply glaze:
For a glossy finish like the ones in the photo, apply a thin layer of polymer clay glaze or varnish. Let it dry completely according to the bottle instructions. -
Final cure:
If your glaze requires heat setting, pop them back in the oven briefly, otherwise let them air dry until hard and non-tacky.
Enjoy your lovely handmade coasters with your next warm cup of tea

TRACK YOUR CERAMIC JOURNEY
Capture glaze tests, firing details, and creative progress—all in one simple printable. Make your projects easier to repeat and improve.
Sgraffito Heart Tile Keepsakes
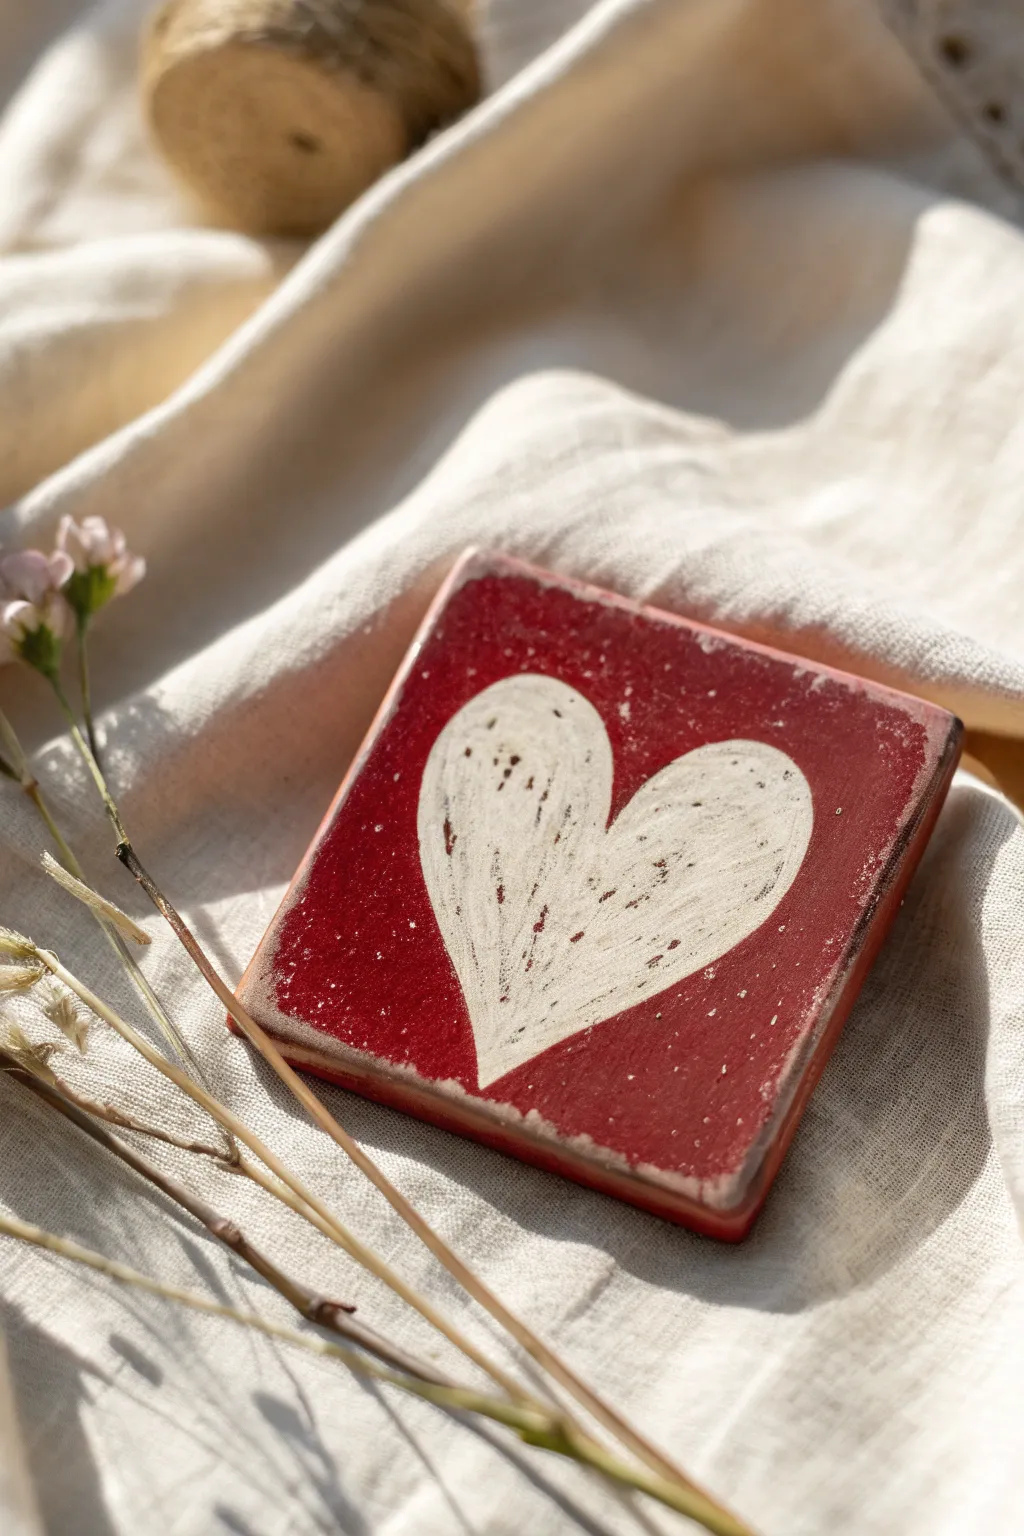
Capture a vintage, folk-art aesthetic with this charming clay tile project. Using the sgraffito technique, you’ll scratch through layers of color to reveal a simple, heartfelt design perfect for Valentine’s gifting.
Step-by-Step Guide
Materials
- Air-dry clay or polymer clay (white base)
- Rolling pin
- Square cookie cutter or knife
- Sandpaper (fine grit)
- Red acrylic paint (matte finish)
- White or cream acrylic paint
- Small flat paintbrush
- Needle tool, toothpick, or etching tool
- Clear matte varnish
- Aging wax or brown antique glaze (optional)
Step 1: Shaping the Base
-
Condition the clay:
Start by kneading your white clay until it is soft, pliable, and free of cracks. If using air-dry clay, keep your hands slightly moist to prevent it from drying out too quickly. -
Roll it out:
Roll the clay onto a smooth surface to an even thickness of about 1/4 inch. If you want a perfectly flat surface, use guide sticks on either side of your roller. -
Cut the shape:
Using a square cookie cutter or a sharp craft knife and ruler, cut out a clean square. The tile in the image looks to be about 3×3 inches, but feel free to adjust the size. -
Soften edges:
Dip your finger in a little water and gently run it along the cut edges to smooth out sharpness. You don’t want it perfect; a little unevenness adds to the rustic charm. -
Texture preparation:
Before drying, lightly tap the surface with a piece of canvas or textured fabric if you want a subtle fabric-like imprint, though a smooth surface works well for sgraffito too. -
Allow to cure:
Let the clay dry completely according to the package instructions. For air-dry clay, flip it occasionally to ensure even drying and prevent warping.
Step 2: Painting and Sgraffito
-
Sand imperfections:
Once bone dry, lightly sand the edges and surface to remove any unwanted burrs or bumps. Wipe away the dust with a barely damp cloth. -
Base coat:
Apply a coat of cream or off-white paint to the entire top surface. This step is crucial because this is the color that will show through when we scratch the design later. -
Seal (optional):
I sometimes apply a very thin layer of wax or a clear coat here. It creates a barrier that makes scratching off the top layer easier without digging into the clay itself. -
Top coat application:
Paint a solid layer of deep, matte red acrylic over the dried white base. You want good coverage, but don’t make it too thick or it will chip rather than scratch. -
Timing the scratch:
Wait until the red paint is *almost* dry but still slightly tacky. If it’s too wet, it will smear; if it’s bone dry, it may flake off in chunks. -
Outline the heart:
Using your needle tool or a toothpick, gently scratch the outline of a primitive heart shape into the center of the tile, revealing the white layer beneath. -
Fill the shape:
Continue scratching away the red paint inside the heart outline. Use directional strokes to create texture, rather than trying to clear it perfectly. -
It’s all in the details:
Leave small flecks and specks of red paint remaining inside the white heart area. This creates that wonderfully worn, aged look seen in the photo.
Use a Crayon Assist
Before painting the red layer, rub a white wax crayon heavily over the heart area. The red paint will struggle to stick to the wax, making the scratching process incredibly easy.
Step 3: Distressing and Finishing
-
Edge distressing:
After the paint is fully dry, take fine-grit sandpaper and gently rub the edges and corners of the tile. This will reveal the white clay base and simulate wear. -
Surface checking:
Review the heart. If you want more white showing, you can carefully scrape away more dried paint with a sharp blade or sanding block. -
Adding age:
To deepen the rustic feel, lightly brush a brown antique glaze or diluted brown paint over the surface, then immediately wipe it back with a paper towel. The dark pigment will settle into the scratched grooves. -
Final protection:
Seal your keepsake with a coat of matte varnish. This protects the sgraffito work without adding a glossy shine that would look too modern. -
Display prep:
Glue a small magnet to the back or attach a sawtooth hanger if you wish to display it on a wall.
Make it a Set
Create four tiles with different primitive symbols—a heart, a star, a house, and a flower—to make a cohesive rustic coaster set (just add cork backing!).
Now you have a timeless little piece of art that looks like a treasured heirloom
Heart Handle Mug Pair
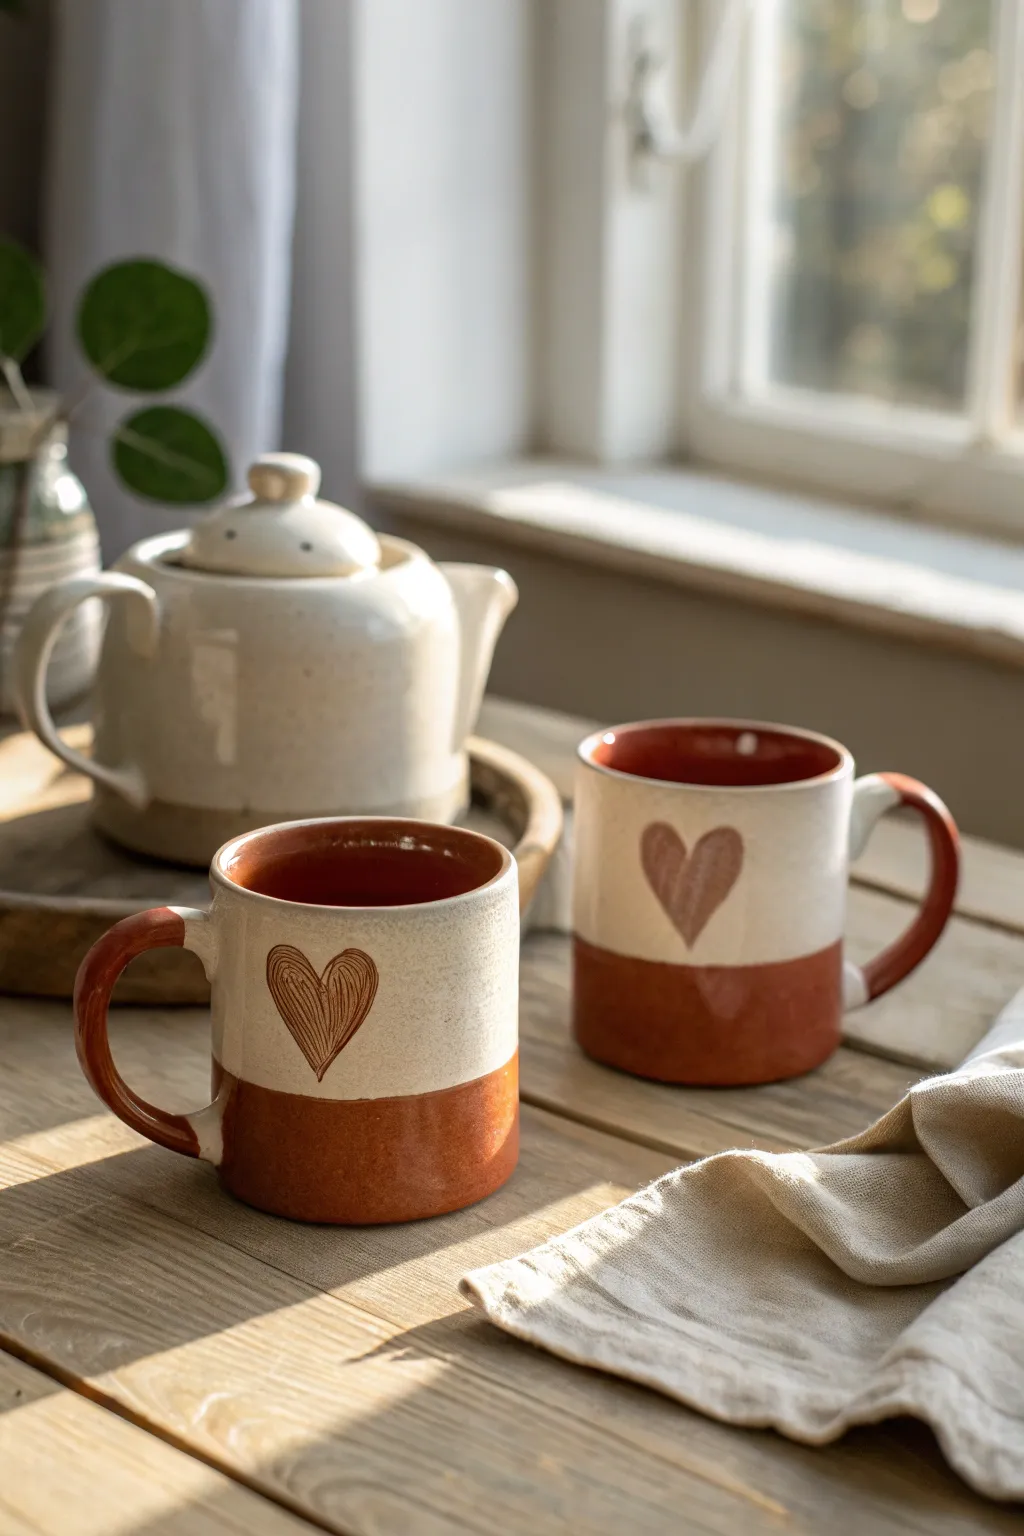
These cozy, handmade ceramic mugs feature a warm terracotta base dipped in a creamy, speckled white glaze that perfectly frames a simple heart motif. The rustic finish and comfortable handles make them an ideal project for creating a matching Valentine’s Day set that feels both modern and homespun.
Step-by-Step Guide
Materials
- Stoneware clay (smooth body with fine grog)
- Potter’s wheel (or slab roller/rolling pin for hand-building)
- Pottery tools (rib, needle tool, sponge, wire cutter)
- Loop tool for trimming
- Underglaze pencil or styling tool for sgraffito
- Wax resist emulsion
- Creamy white speckled glaze (cone 5/6 or suitable for your clay)
- Clear or transparent dipping glaze (optional)
- Brush for wax application
- Warm red-brown iron oxide slip or glaze (for interior/rim if not using clay color)
Step 1: Forming the Body
-
Wedge the clay:
Start by measuring out two equal balls of clay, roughly 1 pound each, and wedge them thoroughly to remove air bubbles and align the particles. -
Throw the cylinders:
Center your clay on the wheel and open it up. Pull the walls to create a straight-sided cylinder about 4 inches tall, keeping the rim slightly thicker for durability. -
Shape the profile:
Using a rib on the inside, gently belly out the form so it’s slightly wider at the bottom than the top, creating a stable, comforting shape. -
Refine the rim:
Chamois or sponge the rim to ensure it is smooth and pleasant to drink from, then wire the pot off the wheel and set it aside to stiffen to leather-hard. -
Trim the foot:
Once leather-hard, center the mug upside down on the wheel and trim the bottom to create a neat foot ring, removing excess weight from the base.
Step 2: Handle and Heart Construction
-
Pull the handles:
Pull a strap of clay for the handle directly from a lump of clay, tapering it slightly. Let it stiffen into a curve until it holds its shape but is still flexible. -
Attach the handles:
Score and slip the contact points on both the mug body and handle. Press firmly to attach, smooth the joints with a wooden tool, and wipe away excess slip. -
Outline the heart:
Determine the placement for your heart decal. Using a needle tool, very lightly sketch the heart shape into the clay surface. -
Detail the heart design:
For the scratched-heart look (sgraffito style), use a sharp styling tool or needle to scratch vertical lines inside your heart outline to create texture. -
Alternative painted heart:
For the solid heart variation seen on the right mug, paint the heart shape using a red iron oxide wash or underglaze at this stage. -
Bisque firing:
Allow the mugs to dry slowly and completely (bone dry) before loading them into the kiln for a bisque fire to roughly Cone 04.
Clean Lines Pro-Tip
For the crispest line on the bottom wax resist, place the mug on a banding wheel. Hold your brush steady against the pot while spinning the wheel slowly.
Step 3: Glazing and Finishing
-
Wax resizing:
Once bisqued, apply wax resist to the bottom inch of the mug (the ‘terracotta’ area) and the foot ring creating a sharp, straight line. -
Wax the heart:
Carefully paint wax resist over your textured or painted heart design. This prevents the white glaze from adhering to the heart, revealing the raw clay or underglaze beneath. -
Glaze the interior:
Pour a warm reddish-brown glaze inside the mug, swirl to coat completely, and pour out the excess. Wipe any drips off the rim immediately. -
Glaze the rim and handle:
I prefer to use a brush to apply the reddish-brown glaze to the handle and the top rim, ensuring it overlaps slightly where the white glaze will meet it. -
Dip the exterior body:
Holding the mug by the foot, dip the exterior into your creamy speckled white glaze. The wax at the bottom and on the heart will repel the glaze. -
Clean up:
Use a damp sponge to wipe any stray beads of white glaze off the waxed heart and the bottom section to ensure clean lines. -
Final wipe:
Double-check the foot ring is completely free of glaze so it doesn’t stick to the kiln shelf. -
Glaze firing:
Load the mugs into the kiln ensuring they don’t touch, and fire to the maturity temperature of your clay and glaze combination (typically Cone 5 or 6).
Level Up: Mix & Match
Try reversing the pattern for a pair: make one mug with a raw clay heart on a glazed background, and the other with a glazed heart on a raw clay background.
Now you have a charming set of handmade mugs ready to be filled with hot tea or cocoa
Valentine Heart Garland Tiles

Bring a touch of warm, earthy romance to your window or mantle with this textured garland. Combining smooth wooden beads with handmade clay hearts created in alternating finishes gives this piece a cozy, artisanal charm perfect for Valentine’s Day.
How-To Guide
Materials
- Air-dry clay or polymer clay (terracotta or dusty rose color)
- Wooden beads (various sizes, 10mm-20mm)
- Jute twine or heavy natural hemp cord
- Heart-shaped cookie cutters (small)
- Rolling pin
- Parchment paper or craft mat
- Toothpick or skewer
- Coarse sponge or sandpaper (for texture)
- Acrylic paint (optional composed dusty pink/rust)
- Fine glitter (rust or copper color – optional)
- Craft glue or Mod Podge
- Scissors
Step 1: Shaping the Clay Hearts
-
Prepare your workspace:
Lay down parchment paper or a silicone craft mat to prevent sticking. Knead your clay until it is soft, pliable, and free of cracks. -
Roll out the slab:
Using a rolling pin, flatten the clay to an even thickness of about 1/4 inch (6mm). If you want cleaner edges, place two guide sticks of equal thickness on either side of the clay. -
Cut the shapes:
Use your heart-shaped cookie cutter to stamp out numerous hearts. You’ll need about 10-15 hearts for a standard window garland, but cutting a few extras is always wise in case of breakage. -
Make hanging holes:
While the clay is still wet, use a toothpick or skewer to poke a hole through the top center of each heart. Ensure the hole is large enough for your jute twine to pass through easily. -
Create smooth variations:
Leave half of your hearts completely smooth. Dip your finger in a little water to gently buff away any rough edges left by the cutter. -
Add surface texture:
For the other half of the hearts, press a coarse dry sponge or a piece of crumpled foil gently into the wet surface to create a pitted, stone-like texture. This contrast is key to the final look. -
Dry thoroughly:
Allow the clay hearts to dry completely according to the package instructions. Flip them over halfway through the drying time to prevent curling.
Step 2: Finishing and Assembly
-
Sand edges:
Once bone dry, lightly sand the edges of the smooth hearts to ensure a professional, clean finish. -
Apply finish or glitter:
If you want the textured hearts to sparkle like the reference image, brush a thin layer of glue over them and coat with fine rust-colored glitter. Alternatively, paint them a slightly darker shade of terracotta for a matte stone look. -
Cut the main line:
Measure the window or space where you intend to hang the garland and cut a length of jute twine about 12 inches longer than that measurement to allow for knots and draping. -
Create vertical drops:
Cut several shorter pieces of jute, ranging from 4 to 8 inches long. These will act as the vertical lines that hold the hanging hearts. -
Attach hearts to drops:
Thread a clay heart onto the bottom of a short vertical string. Secure it by tying a decorative knot just above the heart, sitting close to the hole. -
Add bead accents:
Thread one or two wooden beads onto the vertical string above the heart. I like to secure them with a simple overhand knot so they float slightly above element. -
Thread the main garland:
Start threading wooden beads onto your main long horizontal twine. Create a pattern, such as five small beads followed by one large bead. -
Integrate the drops:
Tie the top of your vertical heart strings onto the main garland twine at regular intervals (every 6-8 inches works well). Secure tight knots so they don’t slide along the main line. -
Final adjustments:
Slide the main beads slightly to cover the knots where the vertical strings attach, creating a seamless flow. -
Secure ends:
Tie sturdy loops at both ends of the main garland for easy hanging.
Clean Hole Trick
When making the hole in the wet clay, twist the toothpick as you push it through, and push from both front and back to prevent the clay from pushing out.
Salted Clay Effect
For a faux-stone look without glitter, mix course salt or sand directly into your clay before rolling it out. It creates a beautiful organic speckle.
Hang your beautiful handmade garland in a sunny spot to let the textures catch the light perfectly
Gnome Holding a Heart Figurine
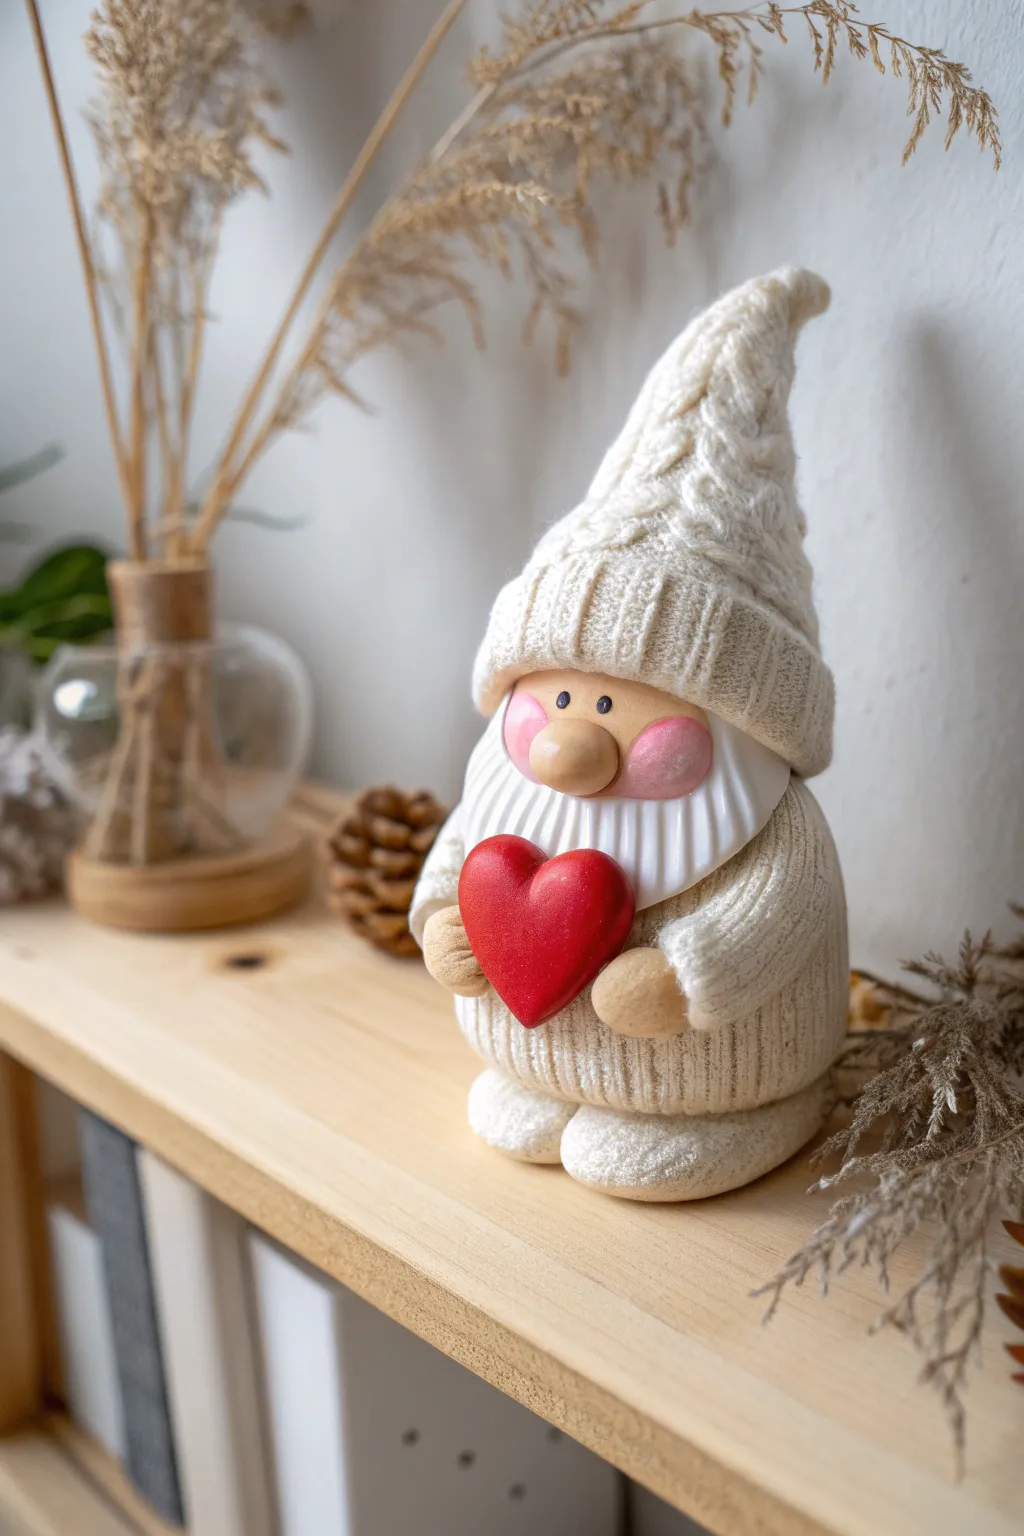
Capture the cozy charm of winter with this adorable clay gnome figurine holding a vibrant red heart. Despite looking like soft knitwear, this piece is entirely sculpted from clay using clever texturing techniques to achieve a realistic fabric effect.
Step-by-Step Tutorial
Materials
- Polymer clay (White, Beige/Flesh tone, Red)
- Texture tools (or an old sweater/fabric scrap for impression)
- Clay sculpting tools (needle tool, ball stylus)
- Rolling pin
- Aluminum foil (for the core)
- Soft pastel chalks (Pink)
- Small paintbrush
- Acrylic paint (Black, White) for eyes
- Gloss varnish (optional)
Step 1: Base & Body
-
Create the core:
Start by crumpling a piece of aluminum foil into a cone shape, about 3-4 inches tall. This acts as an armature to save clay and keep the figurine lightweight. -
Roll the body clay:
Condition a large block of white clay. Roll it out into a flat sheet, about 1/4 inch thick. -
Add knitted texture:
Before cutting, press a piece of heavy-knit fabric or a dedicated ‘sweater’ texture mat firmly into the clay sheet. I prefer lifting the texture mat slowly to ensure the pattern is deep and crisp. -
Cover the body:
Cut a rectangle from the textured clay large enough to wrap around the bottom half of your foil cone. Gently drape it around suitable for the gnome’s sweater, smoothing the seam at the back.
Pro Trick: Seamless Texture
Dust your texture tool or fabric with a tiny bit of cornstarch or baby powder before pressing it into the clay. This prevents sticking and keeps the knit pattern perfectly sharp.
Step 2: Head & Hat
-
Sculpt the face:
Roll a smooth ball of beige or flesh-toned clay. Flatten it slightly into an oval and attach it to the top of the body section, blending just the bottom edge onto the sweater. -
Add the nose:
Create a smaller oval of beige clay for the nose. Place it right in the center of the face. Don’t press too hard; you want it to stand out dimensionally. -
Form the beard:
Roll a thin sheet of white clay (smooth, not textured yet). Cut a crescent shape that fits under the nose and around the cheeks. Attach it, then use a needle tool to draw vertical lines for hair strands. -
Craft the hat cone:
Texture another sheet of white clay using your knitting method. Cut a large triangle and wrap it around the top point of the foil cone, creating the tall hat. -
Add the brim:
Cut a long, narrow strip of textured white clay. Wrap this around the base of the hat where it meets the face, creating a folded brim effect. -
Curve the hat tip:
Gently bend the top point of the hat slightly to the side or back for a whimsical, floppy look.
Level Up: Pattern Play
Instead of a plain knit texture for the hat, try twisting two thin ropes of clay together before flattening them to create a realistic cable-knit sweater pattern.
Step 3: Details & Assembly
-
Make the feet:
Form two small ovals from textured white clay. Flatten the bottoms and attach them to the base of the body so they poke out slightly. -
Attach the arms:
Roll two sausage shapes of textured white clay. Attach them to the sides of the body, curving them forward as if reaching for a hug. -
Create hands:
Roll two tiny balls of beige clay. Attach them to the ends of the sleeves. Use a knife tool to press a small indentation for the thumb. -
Sculpt the heart:
Condition red clay and form a plump, smooth heart shape. It should be big enough to fill the space between the hands. -
Place the heart:
Gently press the red heart against the gnome’s chest and wrap the beige hands over the edges of the heart to secure it in place. -
Apply blush:
Scrape a little pink soft pastel into powder. Use a soft, dry brush to gently dust rosy cheeks onto the face on either side of the nose.
Step 4: Finishing
-
Bake carefully:
Bake the figurine according to your clay package manufacturer’s instructions. A low, slow bake is usually best for maintaining the white color. -
Paint the eyes:
Once cool, use a fineliner brush or a dotting tool to paint two small black dots for eyes just above the nose. Add tiny white specks for a sparkle. -
Varnish touches:
Optional: Paint a layer of gloss varnish only on the red heart to make it shine against the matte ‘fabric’ body.
Now you have a charming, handcrafted keepsake that brings a touch of warmth to any shelf
Geode-Style Heart Paperweight

Transform simple clay into a stunning, geode-inspired keepsake that captures the raw beauty of natural crystals. This project combines smooth, blush-toned cement or clay with rugged salt crystals and gleaming gold accents for a sophisticated Valentine’s Day paperweight.
How-To Guide
Materials
- Powdered casting cement (white) or air-dry clay
- Pink acrylic paint or pigment powder (blush/terracotta tone)
- Course sea salt or Himalayan pink salt rocks (large chunks)
- Heart-shaped silicone mold (deep enough for embedding)
- Liquid gold leaf or metallic gold paint
- Fine detail paintbrush
- Gloss varnish or clear resin (optional)
- Sandpaper (fine grit)
- Water and mixing cup
Step 1: Casting the Base
-
Mix the medium:
Prepare your casting cement according to the package instructions. If using white cement, mix in a very small drop of pink acrylic paint or pigment powder to achieve a soft, muted blush limestone color. -
Pour the mold:
Pour the tinted mixture into your heart-shaped silicone mold. Tap the mold gently against the table several times to release any trapped air bubbles. -
Create the cavity:
Let the cement set for just a few minutes until it begins to firm up but is still pliable. Gently press a smaller object or use a spoon to scoop out a shallow, organic-looking depression in the center of the heart. -
Texturize the edges:
While the material is still damp, roughen the inner edges of your scooped-out section with a toothpick or sculpting tool to give it a natural, rocky appearance. -
Dry completely:
Allow the heart to cure fully according to the manufacturer’s timeline. This usually takes 24 hours for air-dry clay or a few hours for fast-setting cement. -
Refine the shape:
Once fully hard, demold the heart. Use fine-grit sandpaper to smooth out the flat back and the curved outer sides, leaving the recessed center rough.
Crystal Clarity
Don’t coat the salt crystals with varnish! Most sealants will dissolve the salt or make it look cloudy and plastic. Leave the salt raw for authentic sparkle.
Step 2: Creating the Geode Effect
-
Prepare the crystals:
Select several large chunks of coarse sea salt or rock salt. If they are too white, you can lightly mist them with watered-down pink watercolor and let them dry to match the rose quartz look. -
Apply adhesive base:
Paint a generous layer of clear drying craft glue or a thin layer of resin into the recessed cavity of the heart. -
Embed the crystals:
Press the salt rocks firmly into the adhesive. I find it best to vary the sizes, placing larger chunks in the center and smaller fragments near the edges for a realistic geode formation. -
Secure the stones:
If needed, drip a small amount of extra glue or resin between the cracks of the stones to ensure they stay permanently fixed.
Step 3: Gilded Transformation
-
Highlight the rim:
Dip a fine detail brush into liquid gold leaf or metallic gold paint. Carefully trace the irregular rim where the smooth clay meets the rough crystal center. -
Paint the inner walls:
Extend the gold paint slightly down into the inner walls of the cavity, surrounding the crystals to make them pop. -
Add exterior texture:
For the speckled look seen in the photo, use an old, stiff brush with a tiny amount of gold paint. Stipple or dab the bottom edge of the heart to create a textured, golden base. -
Final touches:
Inspect the piece for any dull spots. Add a second coat of gold to the rim if you want a richer, more metallic finish. -
Seal (optional):
For longevity, you can brush a matte varnish over the clay exterior, avoiding the crystals to keep their natural sparkle.
Level Up: Real Gemstones
Instead of salt, use real crushed rose quartz chips or clear quartz points found at bead stores. This adds weight and makes the energy of the piece authentic.
Place this shimmering heart on a desk or nightstand for a grounding reminder of love