
When I’m glazing vases, I’m really thinking about how color will move on a vertical curve—because gravity is absolutely part of the design. Here are my favorite vase glaze ideas that give you reliable classics first, then build up to the fun, weirder experiments.
Classic Single-Color Dip
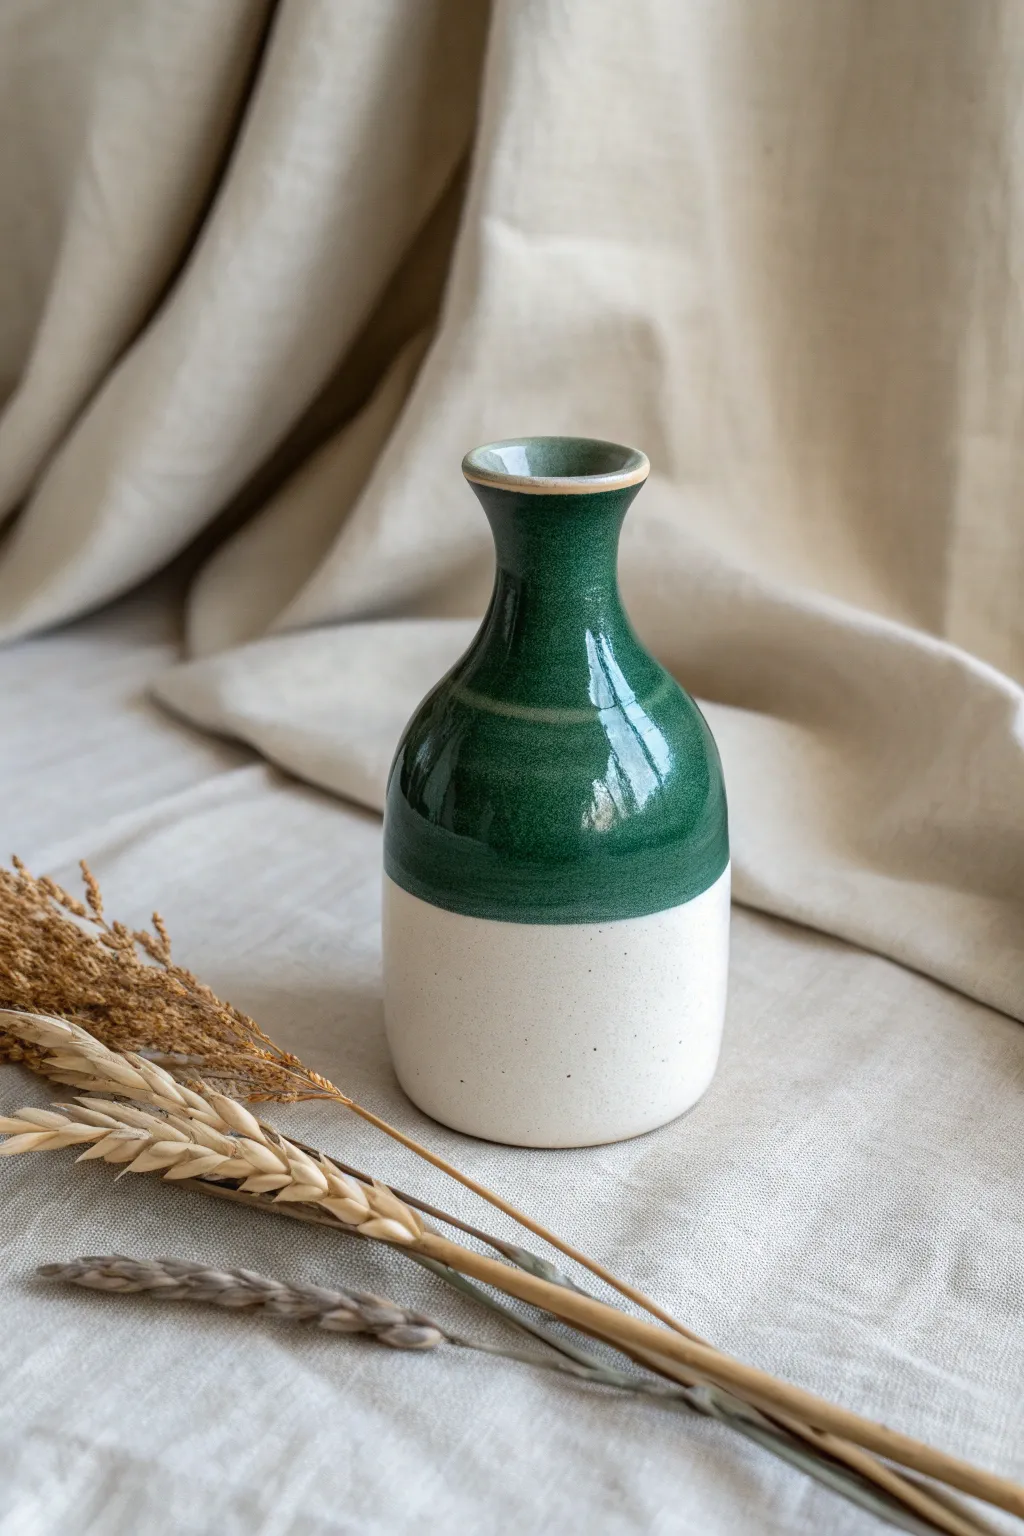
Achieve a timeless, modern aesthetic with this straightforward dipping technique that contrasts a rich, glossy emerald green against raw, speckled stoneware. The beauty lies in the crisp, intentional line where the glaze meets the natural clay body.
Step-by-Step Tutorial
Materials
- Bisque-fired ceramic bud vase (preferable white stoneware with speckles)
- Glossy dark emerald green glaze
- Wax resist (liquid latex or wax emulsion)
- Wide hake brush or soft synthetic brush
- Large bucket or bowl for dipping (wider and deeper than the vase)
- Glaze tongs (optional)
- Damp sponge
- Fettling knife or cleanup tool
Step 1: Preparation & Masking
-
Clean the Bisque:
Start by wiping down your bisque-fired vase with a clean, damp sponge to remove any kiln dust or oils from handling, which can cause glaze crawling. -
Determine the Line:
Visualize where you want the glaze line to sit. For this look, aim for a roughly 60/40 split, with the glaze covering the top 60% of the form. -
Apply Wax Resist (Bottom):
Use a brush dedicated to wax to apply a coat of wax resist to the bottom of the vase and up the sides to your determined line. This protects the raw clay look we want. -
Refine the Edge:
While the wax is drying, check the upper edge of your wax line. If it’s jagged, you can carefully clean it up with a fettling knife once dry to ensure a crisp horizon line. -
Allow to Dry:
Let the wax resist dry completely. It should feel tacky but not transfer to your finger; usually, 15-20 minutes is sufficient.
Drip Disaster?
If a drip runs down onto the bare clay section, don’t wipe it while wet—it smears pigment into the pores. Let it dry completely, then scrape it off cleanly with a sharp knife tool.
Step 2: Glazing Process
-
Prepare the Glaze:
Mix your emerald green glaze thoroughly with a whisk or mixing stick. Ensure there is no sediment at the bottom and the consistency resembles heavy cream. -
The Dip:
Hold the vase firmly by the base (where the wax is). In one smooth motion, plunge the vase upside down into the green glaze, stopping just past the wax line to ensure full coverage. -
Hold and Count:
Hold the vase submerged for about 3-4 seconds. Holding it too long can make the application too thick, while too short might leave it patchy. -
Remove and Drain:
Lift the vase straight up and out. Hold it upside down for a few moments to let excess glaze drip off the rim back into the bucket. -
Shake Off Drops:
Give the vase a gentle shake (still upside down) to dislodge the last heavy droplet from the rim before flipping it over. -
Check the Interior:
If you want the inside glazed as well, pour glaze inside, swirl to coat, and pour out before doing the exterior dip.
Try an Ombre Effect
Glaze the top section in a lighter green first, let dry, then dip the very top 2 inches into double-strength dark green for a subtle gradient shift.
Step 3: Cleanup & Firing
-
Wipe the Wax:
Even with wax resist, little beads of glaze will stick to the waxed bottom area. Use a damp sponge to firmly wipe the waxed section clean. -
Check the Foot:
Double-check the very bottom foot of the vase. It must be absolutely clear of glaze so it doesn’t fuse to the kiln shelf. -
Clean the Line:
Inspect the transition line. If the glaze ran slightly over the wax, use a precision tool or a clean, stiff brush to tidy up the edge for that sharp contrast. -
Smoothing:
I like to gently rub the dry glaze on the rim with a fingertip to smooth out pinholes, ensuring the lip feels soft after firing. -
Final Dry:
Allow the vase to dry completely for at least 24 hours before loading it into the kiln to prevent steam explosions. -
Fire:
Fire the piece to the temperature recommended by your clay and glaze manufacturer (typically Cone 6 for stoneware).
The contrast between the earthy base and the jewel-tone top creates a stunning vessel ready for your favorite dried stems


Rim Dip With Gentle Runs
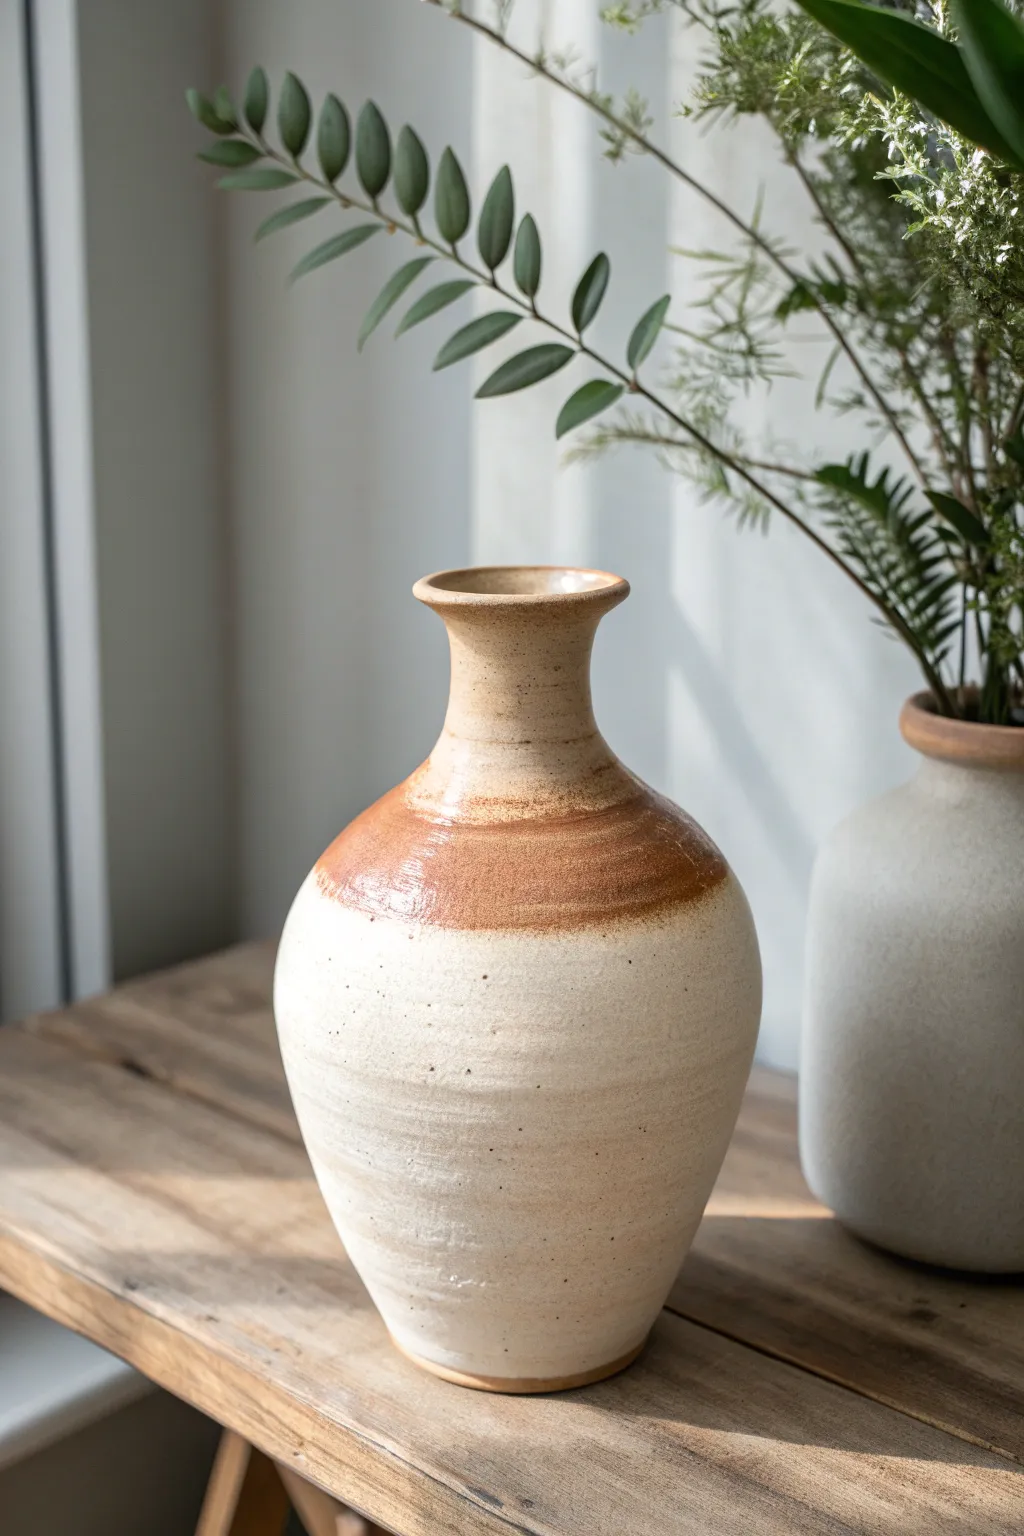
Achieve a timeless, rustic aesthetic by combining contrasting glaze textures and warm earth tones. This project features a speckled matte cream body accented by a rich, glossy terra cotta dip that highlights the vase’s shoulder and rim.
How-To Guide
Materials
- Bisque-fired stoneware vase (wheel thrown or cast)
- Matte cream or oatmeal speckled glaze (dipping consistency)
- Glossy iron-red or terra cotta glaze (dipping consistency)
- Wax resist emulsion
- Sponge or brush for wax application
- Large dipping tongs or glazing clamp
- Clean bucket of water
- Sponge for wiping feet
- Kiln capable of firing to Cone 6 (or specific glaze cone temperature)
Step 1: Preparation and Base Coat
-
Clean the bisque:
Start by wiping down your bisque-fired vase with a clean, slightly damp sponge to remove any kiln dust or oils from handling. -
Wax the foot:
Apply a liberal coat of wax resist to the bottom of the vase and about 1/4 inch up the side. This ensures the glaze doesn’t run onto your kiln shelf later. -
Let the wax dry:
Allow the wax resist to dry completely, usually about 15-20 minutes, until it feels tacky but firm to the touch. -
Mix the base glaze:
Thoroughly mix your matte cream speckled glaze. You want a consistency similar to heavy cream to ensure an even coat that isn’t too thick. -
Coat the interior:
Pour a generous amount of the cream glaze inside the vase. Rotate the vase quickly to coat all interior surfaces, then pour the excess back into your bucket. -
Dip the exterior body:
Using glazing tongs, submerge the entire vase into the matte cream glaze bucket. Hold it for a slow count of three to get good coverage. -
Shake off excess:
Lift the vase out and give it a gentle shake to remove excess drips. Let this base layer dry until it is powdery to the touch and no longer cool.
Step 2: Creating the Rim Dip
-
Prepare the accent glaze:
Stir your glossy iron-red or terra cotta glaze. If you want subtle runs, ensure this glaze is slightly thinner than the base glaze. -
Protect the lower body (optional):
If you are worried about splashing, you can lightly mask off the bottom two-thirds of the vase with paper or just use a steady hand. -
The crucial dip:
Invert the vase, holding it by the foot. Carefully dip the top portion—neck, rim, and shoulder—into the glossy iron-red glaze. -
Timing the dip:
Hold the vase in the accent glaze for only 1-2 seconds. Since the pot has already absorbed water from the first dip, a quick dip prevents the glaze from getting too thick. -
Create the transition:
Pull the vase straight up out of the bucket. Pause for a moment while still inverted to let the majority of the excess drip off the rim. -
Turn upright:
I flip the vase upright fairly quickly here. This encourages the second layer of glaze to settle and flow slightly down the shoulder, creating that soft, organic transition line. -
Refine the rim:
Check the very top lip of the vase. If the glaze is pooling too heavily, gently wipe it back slightly with a sponge to prevent running during firing, or leave it if you trust your glaze stability.
Fixing a Drippy Mess
If the second dip runs too fast, don’t wipe it all off. Let it dry slightly, then use a fettling knife to gently scrape down the thickest drips before firing.
Step 3: Firing and Finishing
-
clean up the foot:
Even with wax resist, check the foot of the vase. Use a damp sponge to wipe away any stray droplets of glaze that might have stuck to the wax. -
Final drying:
Let the fully glazed piece dry for at least 24 hours. The double layer of glaze on the top needs to be bone dry to prevent crawling. -
Load the kiln:
Place the vase in the kiln. If your accent glaze is known to be particularly runny, place a catch-plate or a junk cookie under the piece just in case. -
Fire to temperature:
Fire the kiln to the maturing temperature of your glazes (typically Cone 6 for this type of stoneware). A slow cooling cycle can help develop the matte texture of the base glaze.
Layering Pro Tip
For a softer blend where the glazes meet, wipe the base layer with a slightly damp sponge just at the shoulder line before doing the second dip.
Once cooled, fill your vase with simple greenery to complement the warm, natural tones of your glaze work


Pour-Over Waterfall Finish
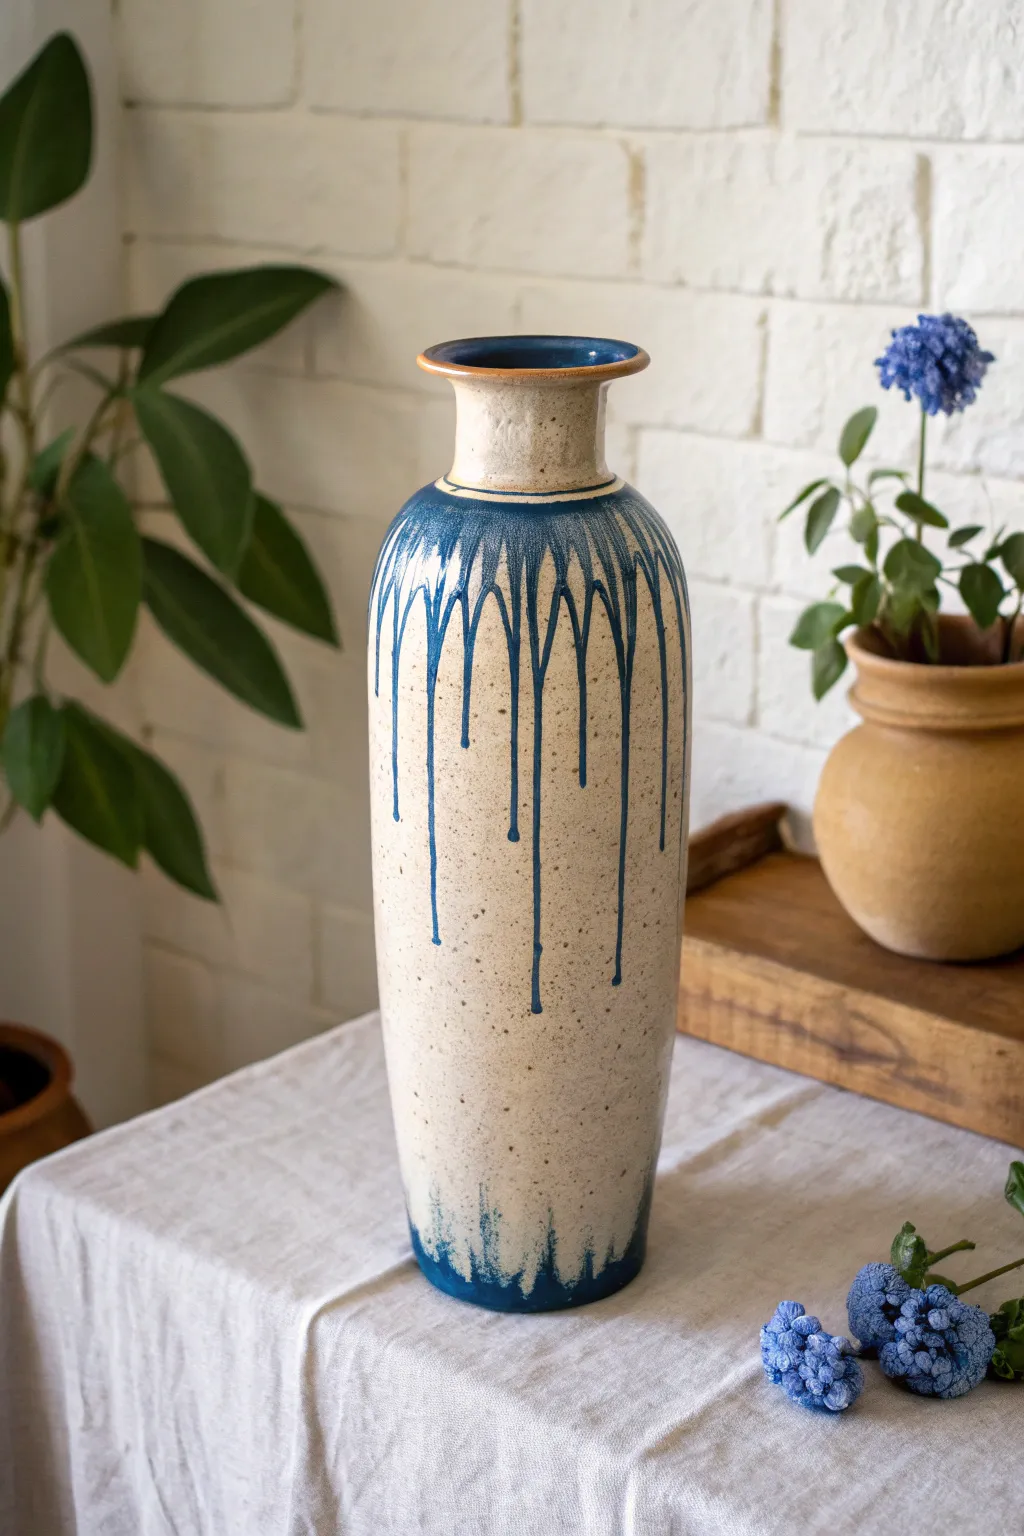
This elegant ceramic project combines a speckled creamy stoneware base with a dramatic, flowing cobalt blue glaze that mimics the movement of falling water. The high-contrast finish creates a stunning modern-rustic piece that looks equally beautiful empty or filled with blooms.
Step-by-Step Guide
Materials
- Tall stoneware bisque vase (cone 6 clay body)
- Speckled cream or oatmeal stoneware glaze (brushable)
- Cobalt blue fluid glaze (designed for movement/layering)
- Wax resist emulsion
- Soft fan brush
- Small detail brush
- Sponge
- Bowl of water
- Turning wheel or banding wheel (optional but helpful)
Step 1: Preparation & Base Coat
-
Clean the bisque:
Begin by wiping down your bisque-fired vase with a clean, damp sponge. This removes any kiln dust or oils from your hands that might prevent the glaze from adhering properly. -
Wax the foot:
Apply a coat of wax resist to the bottom foot ring of the vase and about 1/4 inch up the side. This is crucial for preventing the drippy blue glaze from running off the pot and fusing it to your kiln shelf later. -
Apply base glaze interior:
Pour a small amount of the speckled cream glaze inside the vase, swirl it around to coat the entire interior surface, and pour the excess back into your container. Wipe the rim clean immediately. -
Apply base glaze exterior:
Using a soft fan brush, apply three even coats of the speckled cream glaze to the exterior of the vase. Ensure you wait for the glaze to lose its sheen and become dry to the touch between each coat. -
Dry generally:
Allow the base coats to dry completely for at least an hour. The surface should feel room temperature, not cool to the touch, before proceeding to the decorative phase.
Step 2: Creating the Waterfall Effect
-
Protect the rim:
I prefer to carefully apply a thin line of wax resist just below the rim of the neck. This stops the blue glaze from creeping up onto the lip, keeping distinct separation between the top edge and the drip section. -
Load the blue glaze:
Load a large brush heavily with the cobalt blue glaze. You want it to be juicy and full of liquid. -
Create the shoulder ring:
Paint a thick, consistent band of blue glaze right around the shoulder of the vase, where the neck meets the body. -
Initiate the drips:
While the shoulder band is still wet, press your brush firmly against the band at irregular intervals to release extra glaze. Let gravity pull these beads of glaze down the sides of the vase. -
Vary the lengths:
For a natural look, vary the pressure and amount of glaze you release. Some drips should be long and thin, cutting almost to the middle, while others should be shorter and pool near the top. -
Layering the drips:
Go back over the initial drips with a second pass of blue glaze on the shoulder only. This adds volume to the ‘source’ of the waterfall and encourages further movement during firing. -
Add the base anchor:
Apply a jagged, uneven band of the blue glaze around the very bottom of the vase, just above your wax line coming up from the foot. Use upward strokes to create a flame-like or grassy texture that reaches up to meet the falling drips.
Trouble with crawling?
If the blue glaze separates or ‘crawls’ leaving bare spots, the underlying cream glaze was likely too dusty or oily. Keep layers clean and avoid touching the glazed surface.
Step 3: Rim Detail & Firing
-
Detail the rim:
Using a small detail brush, paint the very top rim of the vase with a contrasting iron oxide wash or a toasted orange glaze. This frames the opening and adds a finished, professional look. -
Clean the foot again:
Double-check the foot ring. If any blue drips have run down onto the waxed area, wipe them away cleanly with a damp sponge. -
Final drying:
Let the entire piece dry overnight. Thick drips take longer to dry than standard brushing, and firing wet glaze can cause crawling or defects. -
Loading the kiln:
Load the vase into the kiln, ensuring plenty of space around it. Because this is a runny glaze combination, place a ‘cookie’ (a sacrificial piece of kiln-washed bisque) underneath it just in case a drip runs too far. -
Firing:
Fire to Cone 6 (approx. 2232°F / 1222°C) with a medium speed cooling cycle to encourage crystal development in the matte glazes.
Level Up: Metallic Touch
For added luxury, apply a ring of gold luster over the brown rim after the main firing and re-fire at a lower temperature (Cone 018) for a gilded edge.
Once cooled, your vase will display a unique interaction of static stone texture and fluid motion, ready for your favorite arrangement


Layered Glaze Fade at the Top
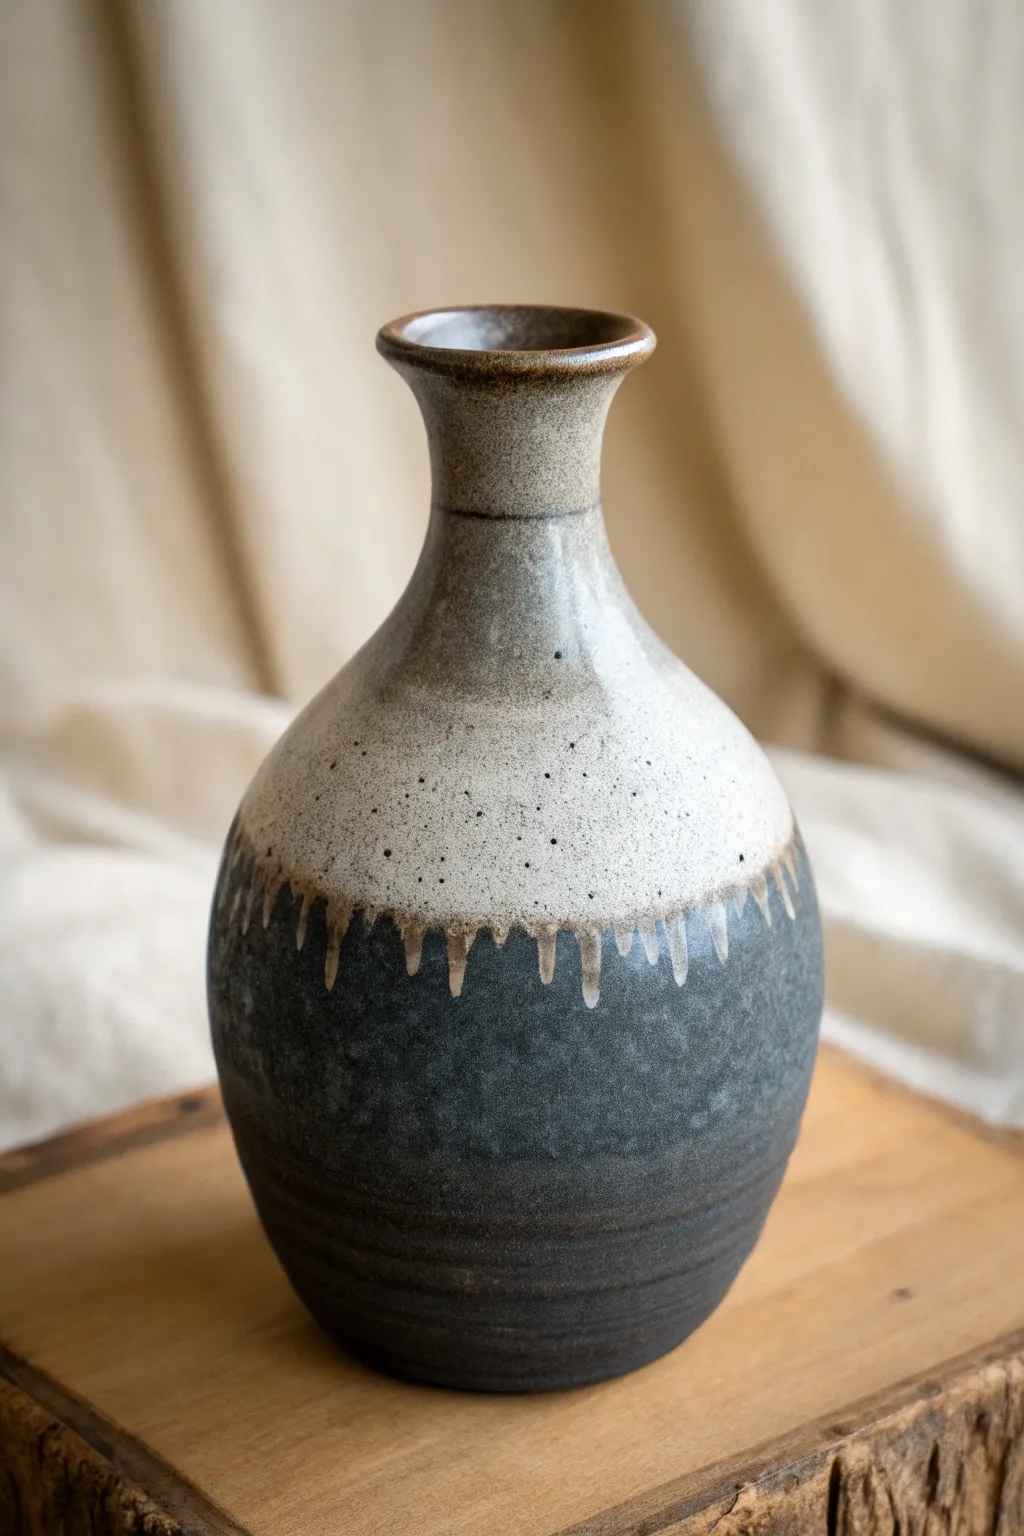
This project achieves a stunning contrast between a rustic, textured charcoal base and a smooth, speckled cream top. The magic happens where the two glazes meet, creating organic drips and a beautiful, hazy transition line perfect for a vase or sake bottle.
How-To Guide
Materials
- Bisque-fired ceramic vase (narrow-neck bottle shape recommended)
- Dark stoneware clay body (if making the form) or compatible clay
- Wax resist emulsion
- Sponge or wax brush
- Slate Grey or Charcoal matte glaze (dipping consistency)
- Oatmeal or Speckled Cream gloss glaze (dipping consistency)
- Large glazing tongs
- Fettling knife or clean-up tool
- Damp sponge
- Kiln (fired to Cone 6 or specific clay/glaze temperature)
Step 1: Preparation & Waxing
-
Clean the bisque:
Begin by wiping down your bisque-fired vase with a clean, slightly damp sponge. This removes any kiln dust or oils from handling that might repel the glaze. -
Wax the foot:
Apply a generous coat of wax resist to the very bottom foot of the vase and about 1/8th of an inch up the side wall. This ensures your pot won’t fuse to the kiln shelf. -
Let the wax dry:
Allow the wax to dry completely (usually 15-20 minutes) before moving to the glazing buckets. It should feel dry to the touch, not tacky.
Flux is Your Friend
To ensure better drips, look for a top glaze high in flux or add a pinch of flux to just the top dipping bucket. This encourages movement over the stiffer matte base.
Step 2: The Base Coat
-
Mix the dark glaze:
Thoroughly mix your Slate Grey/Charcoal matte glaze. Since matte glazes can settle quickly, ensure there is no sludge at the bottom of the bucket. -
Dip the exterior:
Using glazing tongs, grip the vase securely. Dip the entire exterior of the vase into the dark glaze for approximately 3 seconds. -
Drain and dry:
Lift the vase out and let the excess glaze run off. Hold it upside down for a moment to prevent a thick pool from forming at the rim. -
Touch up tong marks:
Once the glaze is dry on the surface (it will turn a lighter powdery color), gently rub a little extra glaze over the tiny spots left by the tong teeth using your fingertip. -
Initial clean up:
If any dark glaze got onto the waxed foot, wipe it away cleanly with a sponge now to prevent fume issues in the kiln later.
Step 3: The Top Fade
-
Prepare the second glaze:
Stir your Oatmeal or Speckled Cream gloss glaze. Ideally, this glaze should be slightly thicker than average to encourage nice, heavy drips without running all the way to the shelf. -
The second dip:
Hold the vase by the foot (base) with your hand. Invert the vase and dip the neck and shoulder into the cream glaze. -
Determine the depth:
Submerge the vase until the glaze line sits just where the shoulder begins to curve downward into the body. This is usually about 1/3 of the total height. -
Hold for absorption:
Keep the vase submerged for 4–5 seconds. I find holding it a second longer here helps build the volume needed for those cascading drips. -
Create the drip:
Pull the vase out straight up. Do not shake it. Flip it upright quickly and set it down. Gravity will now pull that heavy layer of cream glaze downward over the dry dark glaze. -
Rim check:
Inspect the rim immediately. If the double layer created a very thick bead, gently sponge it back just a fraction so it doesn’t run inside the neck too aggressively.
Add Texture First
Before the bisque firing, throw subtle horizontal rings near the base of the pot. The dark matte glaze will break over these ridges, adding depth to the bottom section.
Step 4: Firing & Finishing
-
Dry thoroughly:
Allow the vase to dry for at least 24 hours. The double application of liquid introduces a lot of water to the bisque, and it needs to evaporate completely to avoid steam explosions. -
Final foot cleaning:
Before loading, double-check that the drips haven’t traveled too far down. They should stop well above the foot. If a drip looks dangerous, scrape the bottom inch of it off with a fettling knife. -
Load the kiln:
Place the vase in the kiln. If you are nervous about the drips running, place a small preventative ‘cookie’ or catch-plate under the vase. -
Fire to temperature:
Fire the kiln to the maturity temperature of your clay and glazes (typically Cone 6 for this stoneware look). A slow cool-down cycle can often enhance matte crystals.
Unload your kiln to reveal a beautiful two-tone vessel where rustic texture meets elegant fluidity
Brushed Bands Around the Belly
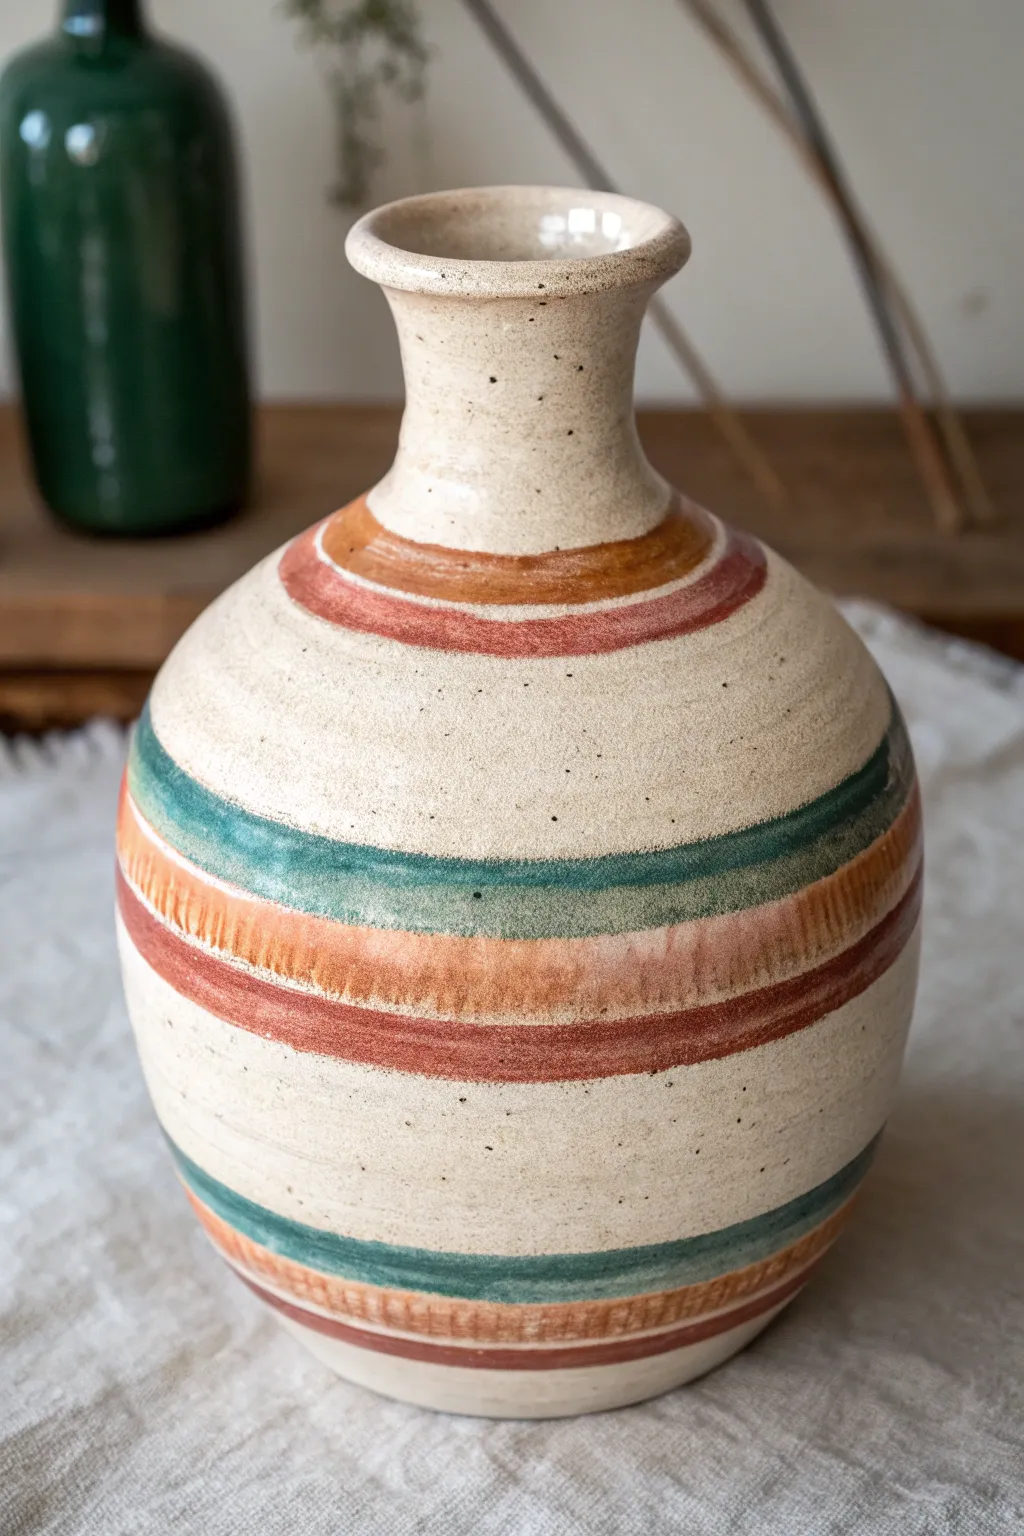
This project transforms a simple ceramic form into a piece of rustic elegance using freehand brushwork. By layering earthy tones of russet, teal, and brown over a speckled cream base, you’ll achieve a warm, organic look that feels both modern and timeless.
Step-by-Step
Materials
- Wheel-thrown or bisque-fired ceramic vase (bulbous shape with narrow neck)
- Speckled cream or oatmeal matte glaze
- Underglazes or colored glazes: Russet/Terracotta, Deep Teal/Green, Chocolate Brown
- Soft fan brush (medium size)
- Detail round brush (size 4 or 6)
- Banding wheel
- Sponge
- Bucket of water
- Kiln (appropriate for your clay/glaze fit)
Step 1: Preparation and Base Coat
-
Surface Prep:
Begin by wiping down your bisque-fired vase with a damp sponge. This removes any kiln dust or oils from your hands that might resist the glaze application. -
Wax the Foot:
Apply a coat of wax resist to the bottom foot ring of the vase to prevent glaze form sticking to the kiln shelf later. -
Base Glaze Application:
Pour your speckled cream glaze inside the vase, roll it around to coat the entire interior, and pour the excess back out. -
External Base Coat:
Using a dipping method or a large soft brush, apply an even coat of the speckled cream glaze to the entire exterior. If brushing, use cross-hatching strokes to minimize texture. Let this base layer dry until it’s powdery to the touch.
Band Wobble Problems?
If your lines are uneven, don’t wipe them off, which smears the base. Instead, wait for it to dry and gently scrape the edge clean with an X-Acto knife.
Step 2: Creating the Brushed Bands
-
Centering:
Place your glazed vase centered on a banding wheel. Spin the wheel slowly to check that it rotates evenly without wobbling. -
Mixing Consistency:
Prepare your accent colors (russet, teal, brown). If they are thick glazes, thin them slightly with water so they flow essentially like heavy cream from your brush. -
First Terracotta Band:
Load your medium fan brush with the russet/terracotta color. While spinning the banding wheel at a moderate, steady pace, hold the brush gently against the upper shoulder of the vase to create the top band. -
Applying the Belly Band:
Reload the rush with russet. Move down to the widest part of the belly. I find that holding my elbow against my torso helps stabilize my hand while the wheel does the work. Apply a thicker band here, allowing the brush hairs to create a slightly streaky, textured edge. -
Teal Accent:
Switch to a clean brush and load it with the teal/green glaze. Apply a band directly above the belly russet band, letting it slightly overlap or kiss the edge of the previous color. -
Lower Teal Line:
Add a matching teal band near the bottom third of the vase to balance the composition. -
Defining Lines:
Using the smaller round brush and the chocolate brown glaze, paint thin, defining lines bordering the wider terracotta bands. These don’t need to be mechanically perfect; a little wavering adds character. -
Adding texture:
For the middle orange band, you can take a nearly dry brush and drag it horizontally through the wet glaze to reveal some of the cream base underneath, enhancing the brushed look. -
Rim Detail:
Very carefully apply a subtle line of the cream or a light brown to the very rim of the vase to finish the lip cleanly.
Step 3: Firing
-
Cleanup:
Check the foot ring again. If any drips of the colored bands have traveled continuously down to the bottom, wipe them away with a sponge. -
Drying:
Allow the vase to dry completely for at least 24 hours. The thickest parts of the layered glaze need to be moisture-free to prevent crawling. -
Loading:
Load the vase into the kiln, ensuring it has at least half an inch of clearance from other pots. -
Firing Schedule:
Fire according to your clay and glaze specifications (typically Cone 5 or 6 for stoneware). A slow cooling cycle can help matte glazes develop a nicer satin finish.
Variation: Wax Mask
Apply thin strips of wax resist over the Cream base before brushing the colored bands. This creates crisp, negative-space pinstripes between colors.
Once cooled, your vase will display a lovely interplay of raw texture and smooth color ready for dried florals
Soft Ombre From Neck to Foot
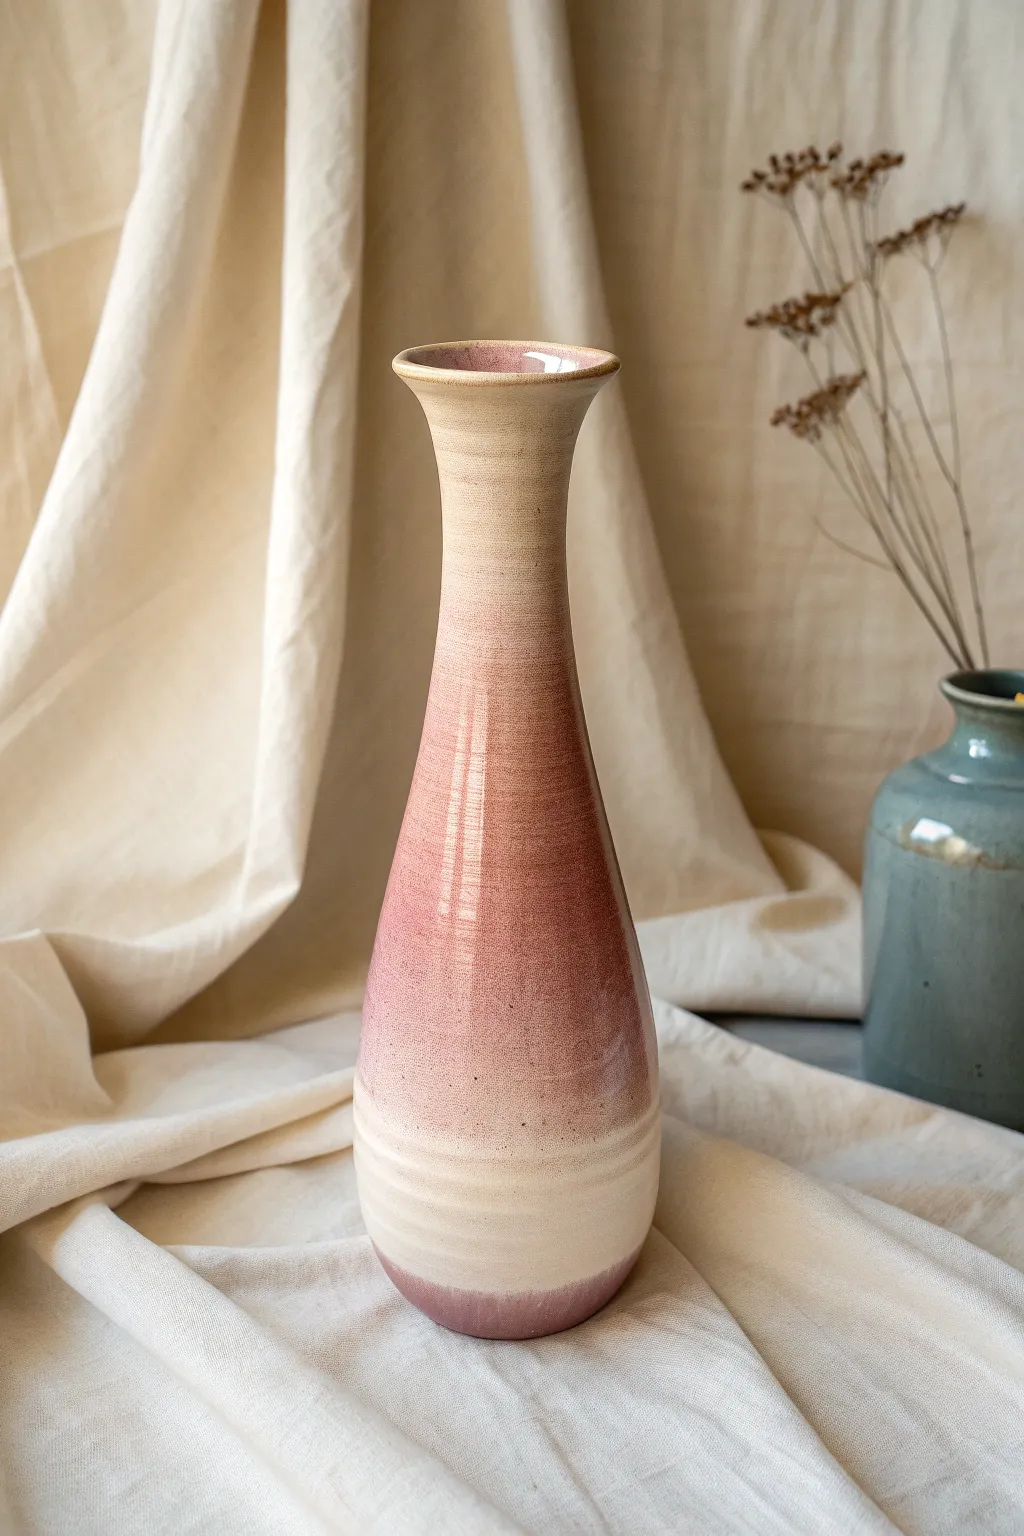
Achieve a sophisticated, hazy transition of color with this slender vase project that celebrates the subtle interplay of cream and dusty pink. The soft ombré effect creates a visually elongating look, perfectly complementing the tall, narrow neck of the vessel.
Detailed Instructions
Materials
- High-fire white stoneware or porcelain clay body
- Pottery wheel and throwing tools (rib, sponge, wire)
- Detail trimming loop tool
- Warm Cream dipping glaze
- Dusty Pink/Mauve dipping glaze (translucent)
- Wax resist
- Glaze tongs or a glazing stick
- Sponge and bucket of water
- Kiln
Step 1: Throwing the Form
-
Center and Open:
Begin with about 1.5 to 2 lbs of well-wedged clay. Center it on the wheel head, ensuring a tall, narrow cone before opening to encourage height. -
Establish the Base:
Open the clay and pull up a cylinder. Leave slightly more clay at the bottom third to shape the bulbous ‘belly’ of the vase later. -
Collar the Neck:
As you pull the walls higher, begin collaring the top two-thirds inward. Keep your hands wet and move quickly to prevent torque from twisting the clay. -
Refine the Belly:
Use a rib on the inside of the lower third to gently push the wall outward, creating a rounded, organic curve at the base. -
Flare the Rim:
Once the neck is sufficiently tall and narrow (about 1-2 inches wide), gently flare the very top rim outward with your thumb to create a soft, inviting opening. -
Smooth and Dry:
Use a metal rib to smooth the exterior surface, removing any throwing spirals for a clean canvas. Wire off and let dry to leather hard.
Layering Pro-Tip
For a smoother gradient, dampen the bisque ware slightly with a sponge before the second dip. This slows drying.
Step 2: Trimming and Bisque
-
Trim the Foot:
Place the leather-hard vase back on the wheel (using a chuck if necessary due to the height). Trim a clean, defined foot ring to give the vase a visual lift. -
Smooth the Surface:
Burnish the surface lightly with a soft rib or smooth river stone if you want that extra silky finish before firing. I find this helps the glaze break beautifully. -
Bisque Fire:
Load the bone-dry piece into the kiln and bisque fire to cone 04 (or your clay body’s specification).
Glaze Running?
If the double-dipped section runs during firing, add a ‘catch’ line of wax resist just above the foot on your next attempt.
Step 3: Applying the Ombré Glaze
-
Wax the Foot:
Wipe the bisque ware down with a damp sponge to remove dust. Apply wax resist carefully to the bottom of the foot ring. -
Base Cream Dip:
Dip the entire vase into the Warm Cream glaze. Hold it by the foot and submerge quickly but fully. Shake off excess and let it dry completely. -
Prepare the Pink:
Stir your Dusty Pink glaze thoroughly. It should be slightly thinner than the base glaze to allow for a soft, watercolor-like overlap. -
Top-Down Dip:
Hold the vase by the foot again. Dip it upside down into the pink glaze, stopping about 2 inches from the bottom. Pull it out slowly to encourage a gradient. -
Bottom Accents:
Dip just the very bottom edge (the foot) into the pink glaze for a second, creating a ‘sandwich’ effect where the cream band sits between pink zones. -
Sponge the Gradient:
If the line between the glazes looks too harsh, lightly tap the transition area with a slightly damp sponge to blur the edge while the glaze is still powdery. -
Clean the Foot:
Wipe any glaze drips off the waxed foot ring meticulously. -
Glaze Fire:
Fire the piece to cone 6 (or your glaze maturity temperature) in an oxidation atmosphere to maintain those crisp, bright tones.
Place your finished vase near a window where natural light can highlight the soft color transition.


Crackle Glaze With High Contrast
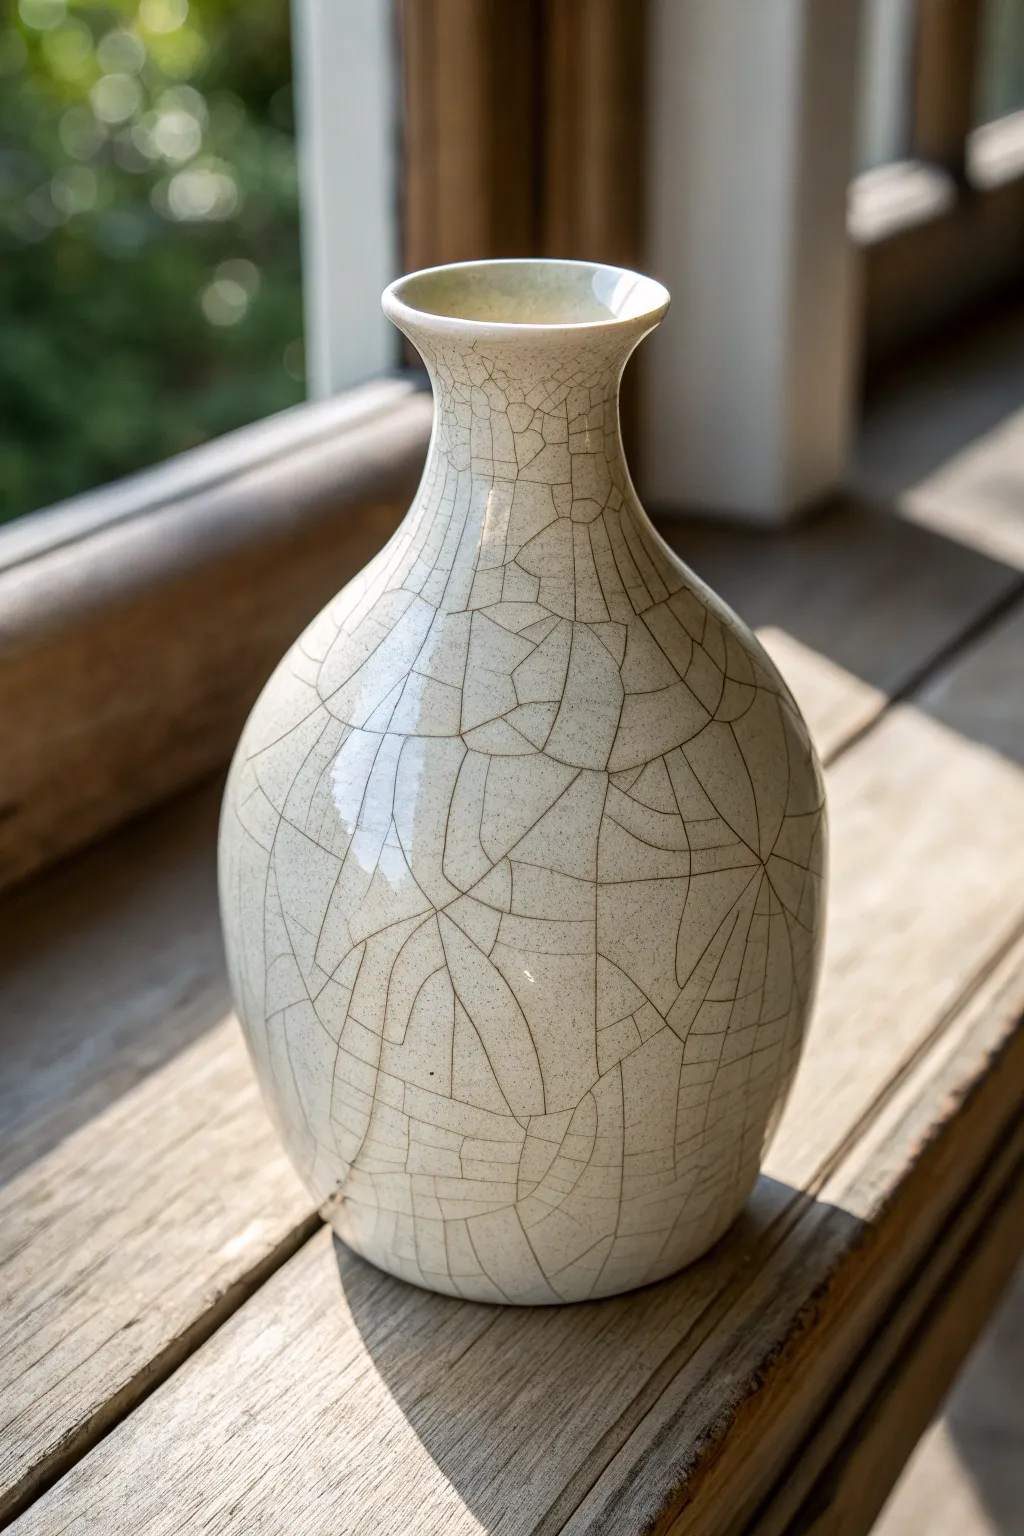
Achieve a stunning, time-worn aesthetic with this high-contrast crackle glaze technique that transforms a simple white vessel into a textured masterpiece. By highlighting the deliberate fissures in the glaze with dark ink or stain, you create a striking spiderweb pattern that emphasizes the organic beauty of the ceramic surface.
Step-by-Step
Materials
- Bisque-fired ceramic vase (stoneware or porcelain clay body)
- Commercial crackle glaze (white or clear)
- Kiln capable of reaching Cone 06 or Cone 6 (depending on glaze)
- India ink (black) or strong brewed tea/coffee
- Soft fan brush for glazing
- Clean sponge
- Lint-free cloth or paper towels
- Gloves
- Wax resist (optional but recommended for foot ring)
Step 1: Glaze Application & Firing
-
Prepping the Bisque:
Begin by wiping down your bisque-fired vase with a damp sponge to remove any kiln dust or oils from handling, as these can interfere with glaze adhesion. -
Wax the Foot:
Carefully apply wax resist to the bottom foot ring of the vase and about an eighth of an inch up the side to ensure the glaze doesn’t melt onto your kiln shelf. -
First Coat:
Using a soft fan brush, apply a generous, even coat of your chosen white crackle glaze. I like to brush horizontally around the pot for this first layer to ensure full coverage. -
Drying Time:
Allow the first coat to dry until it is no longer distinctively cool to the touch. -
Second & Third Coats:
Apply two additional coats, alternating the direction of your brushstrokes (vertical, then horizontal) to promote an even thickness. Thick application is crucial for crackle glazes, as a thicker layer generally produces larger, more distinct cracks. -
Firing:
Load the vase into your kiln and fire it according to the manufacturer’s instructions for the specific glaze—typically Cone 06 for low-fire or Cone 6 for mid-fire crackle glazes. -
Cooling Down:
Let the kiln cool naturally. You will likely hear a distinct ‘pinging’ sound as the kiln cools; this is the glaze fracturing, which is exactly what we want.
Cracks not appearing?
If the glaze looks smooth after firing, the application was too thin. Refire with an extra layer, or try shock-cooling by opening the kiln slightly at 400°F (carefully) to force thermal shock.
Step 2: Enhancing the Crackle
-
Safety First:
Once the vase is removed from the kiln and fully cool to the touch, put on a pair of protective gloves to keep ink off your hands. -
Applying the Stain:
Generously brush or pour black India ink (or a dark acrylic wash) all over the glazed surface of the vase. Ensure the liquid pools into every crack. -
Penetration Time:
Let the ink sit on the surface for about 10-15 minutes. This dwell time allows the pigment to seep deeply into the microscopic fractures in the glass. -
Initial Wipe:
Using a slightly damp paper towel, begin wiping away the excess ink from the surface. You’ll see the white glaze reappear while the cracks remain dark. -
Refining the Surface:
Switch to a clean, damp sponge or cloth and continue wiping until the surface is bright white again. The ink should now be trapped permanently inside the fissures. -
Sealing (Optional):
If you plan to use this vase for water, test it for watertightness first, as crackle glazes can sometimes seep. You may need to apply a masonry sealer to the interior if it leaks. -
Final Polish:
Give the vase one last buff with a dry microfiber cloth to make the glossy surface shine against the matte dark lines.
Pro Tip: Food Safety
Crackle glazes are rarely food safe because bacteria can grow in the fissures. Limit this technique to vases or decorative sculptural pieces rather than dinnerware.
Now you have a beautifully antiqued vessel that balances modern form with aged texture
Carved Texture With Breaking and Pooling
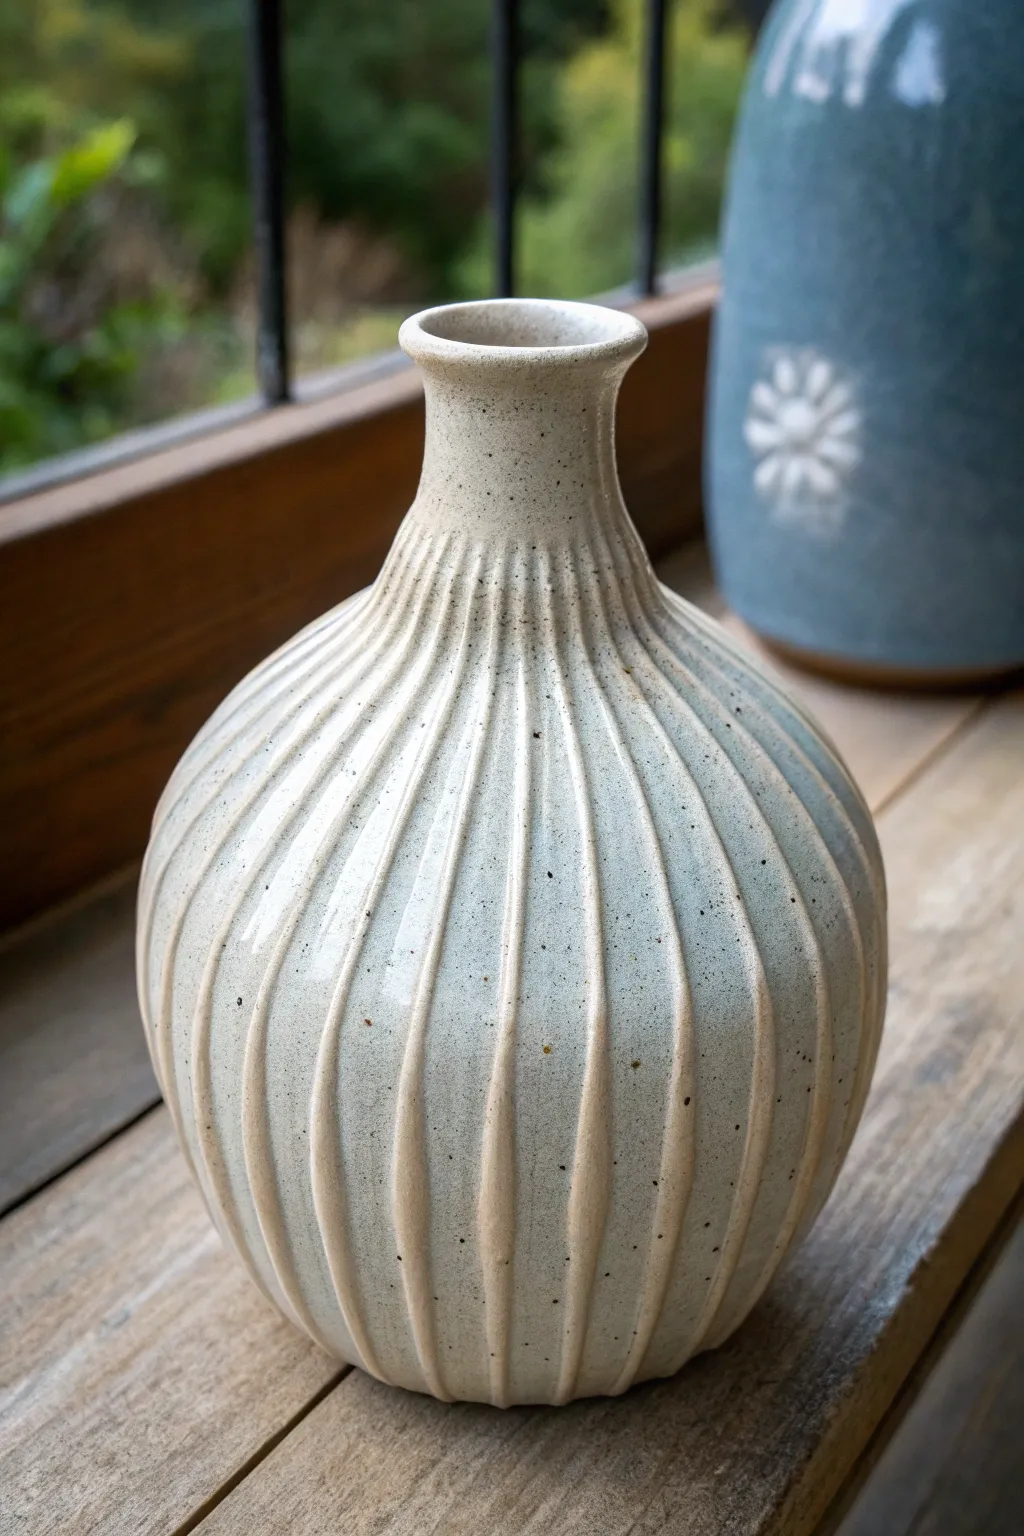
This project showcases how a simple breaking white glaze can transform a carved form into an elegant piece of decor. The glaze pools in the carved valleys while thinning over the sharp ridges, revealing the warm, sandy clay body beneath for a stunning high-contrast effect.
Detailed Instructions
Materials
- Speckled stoneware clay (mid-fire, cone 5-6)
- Pottery wheel and basic throwing tools
- Wire cutter
- Carving tool (fluting tool or wire loop)
- Sponge
- Soft rib
- Breaking White Glaze (or similar transparent/semi-opaque gloss)
- Wax resist
- Kiln
Step 1: Throwing and Shaping
-
Center and open:
Begin with about 2-3 lbs of speckled stoneware. Center the clay on the wheel and open it up, keeping the base somewhere between 3 ad 4 inches wide to support the round belly. -
Pull the walls:
Pull the walls up into a tall cylinder first. Don’t belly it out immediately; establish uniform wall thickness, slightly thicker than usual to account for the carving later. -
Shape the belly:
Using a rib on the outside and your hand inside, gently push the belly of the vase outward to create a spherical form. Smooth the curve so it transitions seamlessly. -
Collar the neck:
Gently collar the top third of the clay inward to form a narrow neck. Do this in stages to avoid twisting the clay, keeping the wheel speed moderate. -
Flare the rim:
Once the neck is narrow, use your fingertips or a chamois to gently flare the very top rim outward, giving it a classic trumpet shape. -
Trim the foot:
Wire the pot off the bat and let it dry to leather hard. Once sturdy, turn it over and trim a defined foot ring to elevate the round form.
Step 2: Carving Texture
-
Mark vertical guides:
While the pot is leather hard, lightly mark vertical lines from the rim to the foot to ensure your carving stays straight. -
Select your tool:
Choose a U-shaped wire loop tool. The width of the loop will determine the width of the fluting. -
Execute the carving:
Starting just under the flared rim, drag the tool downward in a confident, continuous stroke all the way to the foot. Repeat this around the entire circumference. -
Refine the ridges:
After carving, use a damp sponge to gently soften the sharpest burrs of clay, but don’t over-smooth; you want the ridges to remain crisp so the glaze breaks effectively. -
Bisque fire:
Allow the vase to dry completely (bone dry) before loading it into the kiln for a bisque firing to Cone 04.
Keep it Sharp
When sponging the carved lines, move the sponge vertically with the lines, not across them. Moving across will round over the edges too much and reduce the ‘breaking’ effect.
Step 3: Glazing and Firing
-
Clean the bisque:
Wipe down the bisque-fired vase with a damp sponge to remove any kiln dust ensuring the glaze adheres properly. -
Apply wax resist:
Paint a coat of liquid wax resist on the bottom of the foot ring and slightly up the side to prevent glaze from running onto the shelf. -
Mix the glaze:
Stir your ‘Breaking White’ glaze thoroughly. The consistency should be like heavy cream to ensure it pulls away from the high points. -
Dip the pot:
Using glazing tongs or your hand inside the neck, dip the entire vase into the bucket for about 3 seconds. Pull it out and give it a firm shake to dislodge excess glaze from the grooves. -
Check the thickness:
I like to scratch a tiny test spot near the bottom with a pin; if the glaze is too thick, it will obscure the carving. If it’s too thin, wash it off and re-dip. -
Clean the foot:
Use a sponge to wipe any stray glaze off the waxed foot area. -
Glaze fire:
Load the kiln and fire to Cone 5 or 6 (depending on your clay and glaze rating). Ensure a slow cool if possible to encourage crystal growth in the glaze.
Vary the Depth
Try varying the pressure on your carving tool. Press lightly at the neck, deeper at the belly, and light again at the foot to accentuate the vase’s swelling form.
Once cooled, your vase is ready to display stems or stand alone as a piece of sculptural art
Marbled Swirl Color Play
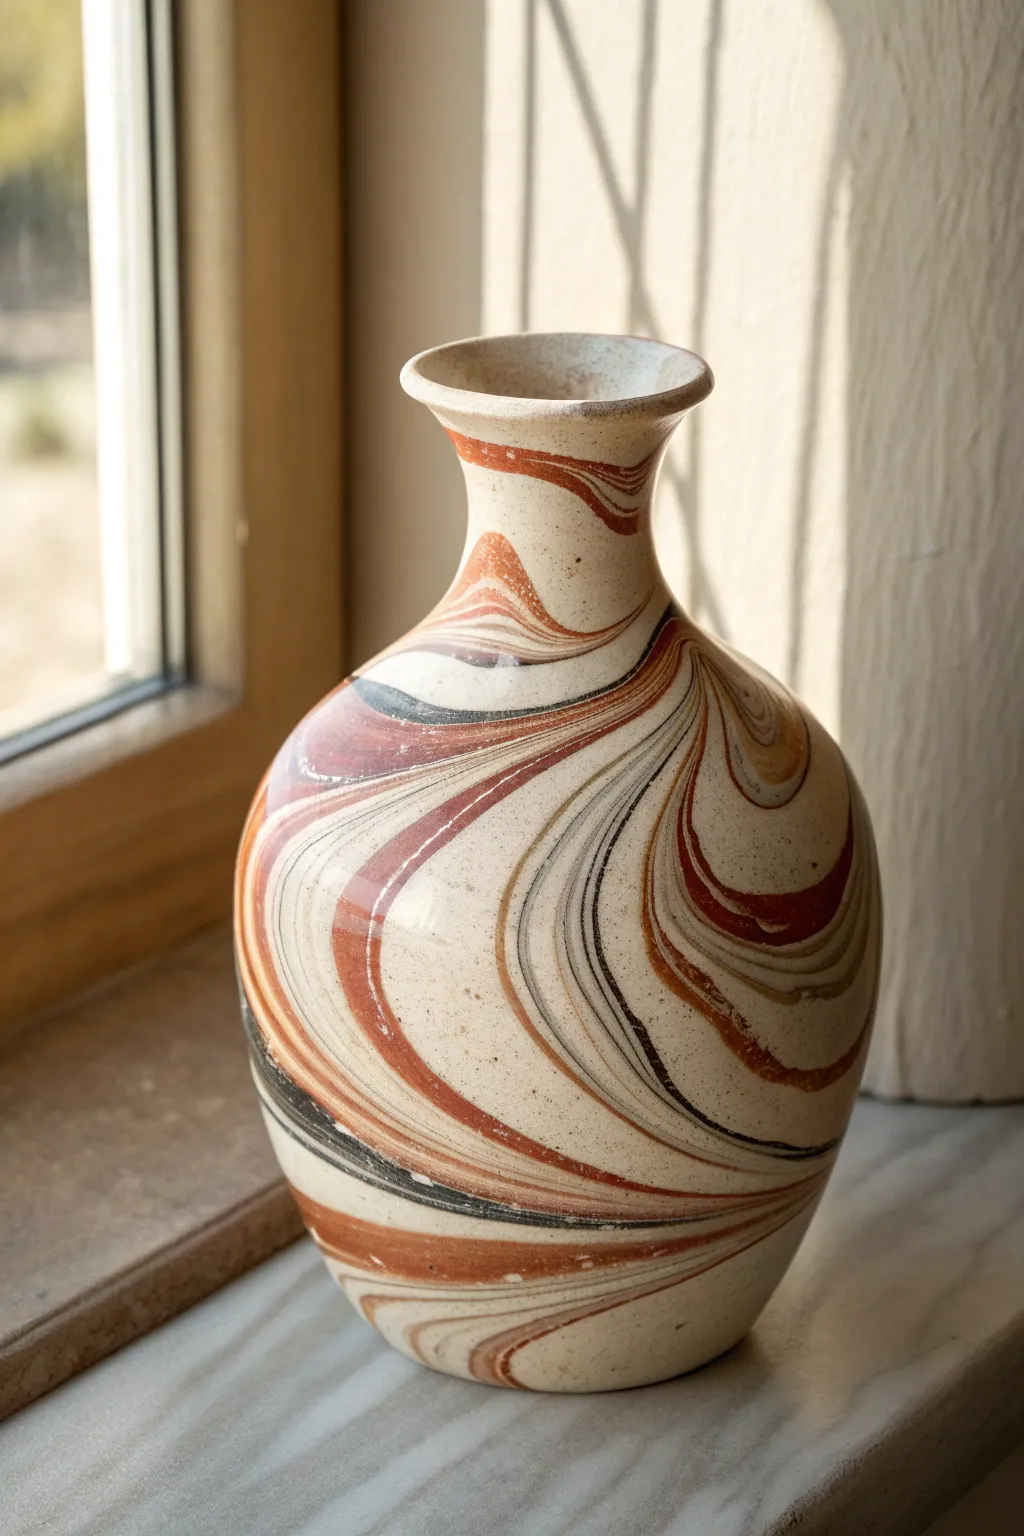
Capture the organic movement of geological strata with this stunning marbled vase technique. By layering contrasting clay bodies or colored slips, you can achieve natural, swirling waves of rust, cream, and charcoal that mimic the timeless beauty of agate stone.
Step-by-Step Tutorial
Materials
- White stoneware clay (mid-fire)
- Red earthenware or terracotta clay (for contrast)
- Black mason stain or black clay body
- Pottery wheel
- Wire cutter
- Rib tool (metal and rubber)
- Sponge
- Clear transparent glaze
- Kiln
Step 1: Preparing the Clay Palette
-
Color the dark clay:
Take a small portion of your white stoneware (about 1 lb) and knead in black mason stain until the color is uniform. Wear gloves for this step to avoid staining your hands. Alternatively, use a pre-mixed black clay body. -
Prepare the layers:
Shape your three clay types—the white stoneware, the red terracotta, and the black clay—into thick logs or slabs. -
Stack the stack:
Layer the clays on top of each other. I like to alternate thickness, keeping the white layers thickest and the black layers thinnest for that fine vein look seen in the photo. -
Create the marble block:
Twist and fold the stacked clay gently. Do not over-knead, or the colors will muddy into a single grey-brown tone. You want distinct separation. Slam the clay onto your wedging table a few times to compress the layers and remove air pockets.
Muddy colors?
If your lines look blurry or grey, you over-wedged the clay. Twist the clay log only 2-3 times max before throwing for bold separation.
Step 2: Throwing the Form
-
Center carefully:
Place your marbled ball on the wheel. Center the clay quickly to preserve the surface pattern; excessive friction can smudge the distinct lines. -
Open the vessel:
Open the pot as usual, pulling the floor flat. You will immediately see the rings of color begin to spiral on the interior. -
Vertical pulls:
Begin pulling up the walls. As the wall stretches, the marbled layers will elongate, creating the sweeping, vertical grain effect visible on the vase belly. -
Shape the belly:
Apply pressure from the inside to bulge the form outward. This expansion distorts the clay layers beautifully, widening the bands of color. -
Collar the neck:
Gently collar the clay inward to form the narrow neck. This compression will tighten the swirls near the top, creating a visual contrast with the wider swirls on the body. -
Flare the rim:
Use your thumb and forefinger to gently flare the very top rim outward, giving the vase a classic silhouette.
Step 3: Trimming and Refining
-
Rib the surface:
While the wheel is spinning slowly, run a metal rib up the exterior. This scrapes away the ‘slurry’ (the muddy surface water) which often hides the crispness of the marbling underneath. -
Dry to leather hard:
Allow the vase to dry slowly under plastic until it reaches a leather-hard state suitable for trimming. -
Trim the foot:
Invert the vase on the wheel and trim the foot ring. As you cut away excess clay, you will reveal even more intricate patterns hidden beneath the surface. -
Smooth the texture:
Burnish the surface lightly with a soft rubber rib or a polished stone to compress the clay particles and enhance the definition of the colors.
Level Up: Texture
Before the clay dries completely, crave shallow grooves into the white sections to create a physical texture that follows the marble flow.
Step 4: Firing and Glazing
-
Bisque fire:
Fire the vase to cone 04 (or your clay body’s bisque temperature). The red clay should turn a rich terracotta color, and the white will remain pale. -
Apply clear glaze:
Dip the entire vase into a clear, transparent glaze. Do not use an opaque glaze, or you will lose all your hard work. The clear glaze acts like varnish, making the colors pop. -
Glaze fire:
Fire to the final maturity temperature of your stoneware (typically cone 5 or 6). Ensure the firing schedule is appropriate for both clay bodies to prevent cracking.
Place your finished vase near a window where natural light can highlight the fluid movement of the earth tones.
Weathered Patina Metallic Look
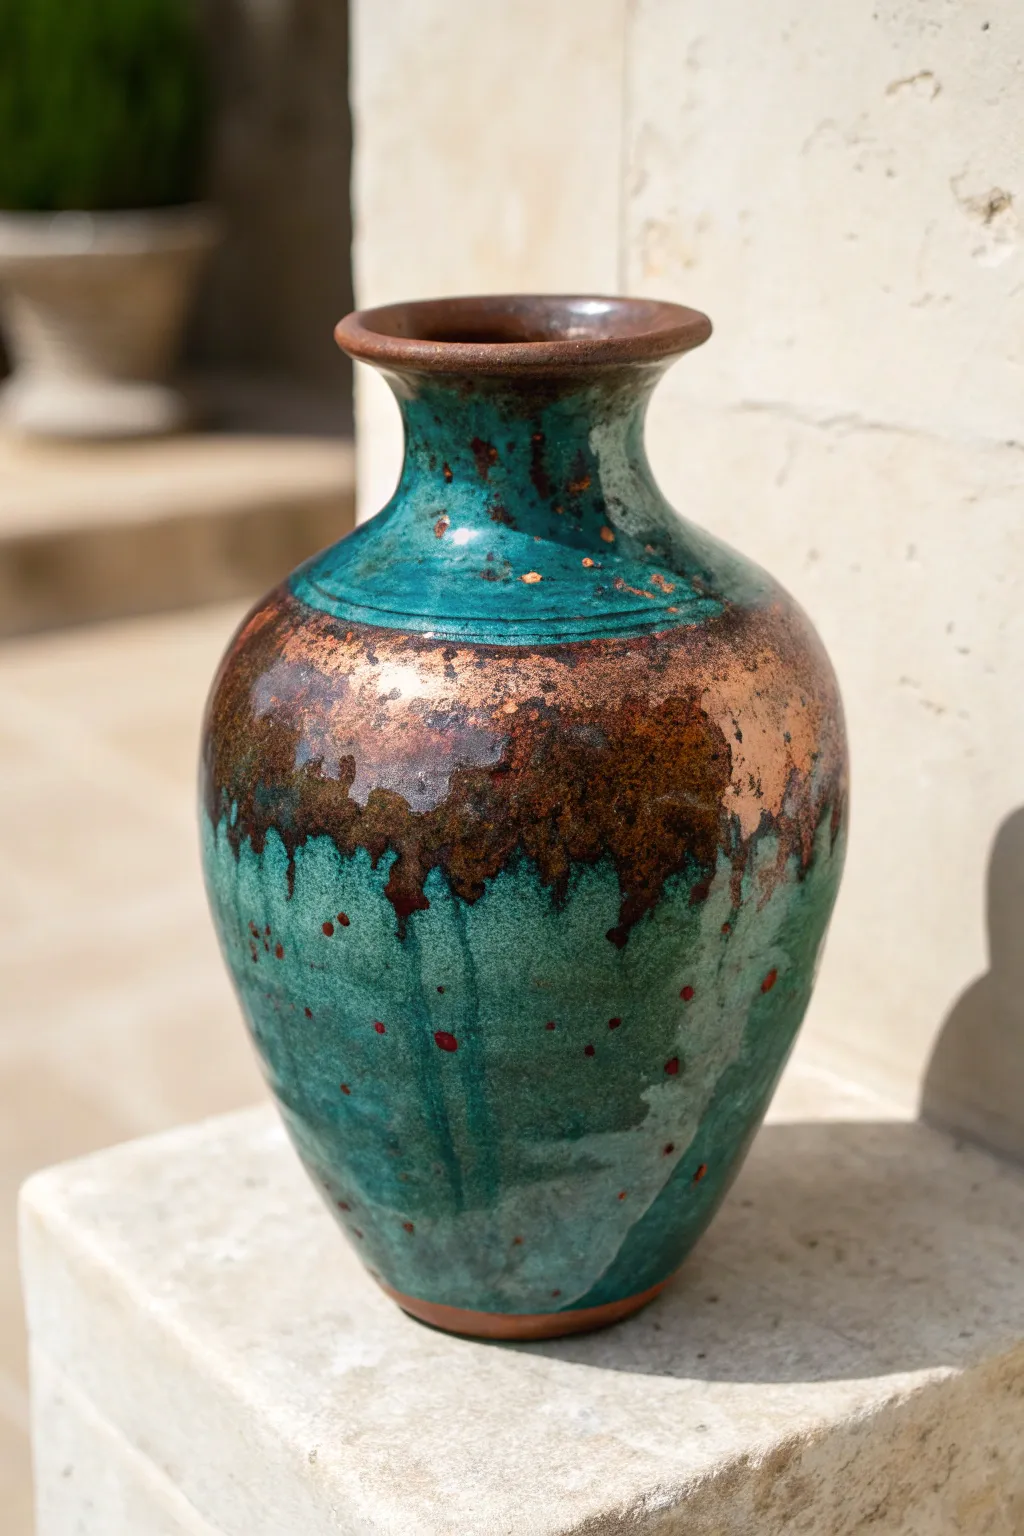
Transform simple bisque ware into a treasure that looks centuries old with this stunning patina technique. By layering reactive glazes, you will achieve a vibrant turquoise surface accented by a dramatic band of dripping, oxidized copper metallic tones.
Step-by-Step Guide
Materials
- Bisque-fired ceramic vase (stoneware or earthenware)
- Turquoise or Sea Green reactive glaze
- Metallic Bronze or Copper glaze (reactive)
- Black underglaze wash or iron oxide wash
- Wax resist
- Soft fan brush
- Small detail brush
- Sponge
- Clean water
- Glaze tongs (optional)
Step 1: Preparation and Base Coat
-
Cleaning the bisque:
Before applying any glaze, wipe down your bisque-fired vase with a damp sponge. This removes any dust or oils from handling, which can cause the glaze to crawl or adhere poorly. -
Protecting the foot:
Turn the vase upside down and apply a generous coat of wax resist to the bottom foot ring and about 1/4 inch up the side. This prevents the glaze from fusing your vase to the kiln shelf during firing. -
Applying the turquoise base:
Pour your turquoise reactive glaze into a container wide enough for dipping, or prepare to brush it on. If brushing, use a soft fan brush to apply the first even coat over the entire exterior of the vase, stopping just above your wax line. -
Building opacity:
Once the first coat is dry to the touch, apply a second coat of turquoise. For a rich, deep color like the example, I usually recommend a solid three coats to ensure full coverage and depth. -
Rim detailing:
With a damp sponge, carefully wipe away the turquoise glaze from the very top rim of the vase to expose the raw clay body slightly, or leave it thin so the clay color shows through after firing.
Control the Flow
Glaze runs more when thick. If your bronze drips are getting too close to the bottom, wipe them back slightly with a sponge before firing to prevent the vase from sticking to the shelf.
Step 2: The Metallic Drip Overlay
-
Positioning the metallic band:
Identify the ‘shoulder’ of your vase—the area just below the neck where it starts to widen. Load your brush heavily with the Metallic Bronze glaze. -
Applying the primary band:
Paint a thick, uneven band of the bronze glaze around the shoulder. Don’t worry about neatness; an irregular edge looks more organic. -
Creating the drips:
While the bronze band is still wet, add extra dollops of the metallic glaze along the bottom edge of the band. Let gravity pull the excess glaze down into natural drips. -
Feathering the transition:
Use a slightly damp brush to gently feather the top edge of the bronze band into the turquoise neck area, creating a softer transition rather than a hard line. -
Adding texture variance:
Dab a small sponge dipped in the bronze glaze randomly over the main band to create varied thickness, which will result in different metallic sheens during the firing process.
Step 3: Weathering and Firing
-
Iron spotting:
To create the speckled, aged look seen in the turquoise area, dip a stiff bristle brush (like a toothbrush) into an iron oxide wash or thinned black underglaze. -
Splatter technique:
Hold the brush near the vase and flick the bristles with your thumb to mist tiny droplets of the wash over the turquoise sections. Concentrate some heavier splatters near the bottom. -
Simulating corrosion:
Take a small detail brush with the metallic glaze and touch random spots in the lower turquoise area, creating isolated ‘rust’ sports that aren’t connected to the main drip. -
Rim darkening:
Apply a very thin wash of iron oxide or brown stain to the exposed clay at the rim to darken it and frame the piece. -
Final drying:
Allow the piece to dry completely for at least 24 hours. The thick metallic areas will take longer to dry than the base coats. -
Kiln loading:
Load the kiln carefully. Because we created deliberate drips, ensure there is extra space around the vase and perhaps use a cookie (a sacrificial piece of clay) under the vase to catch any running glaze. -
Firing schedule:
Fire to Cone 6 (or the specific temperature required by your reactive glaze). A slow cooling cycle can often enhance the crystallization and metallic effects of reactive glazes.
Texture Boost
Before glazing, gently paddle the raw clay while it’s leather hard to create subtle indentations. The reactive glaze will pool in these hollows, creating deeper pools of color.
Unload your kiln to reveal a piece that captures the timeless beauty of oxidized metal and sea-worn stone
Crystalline Blooms on a Smooth Form
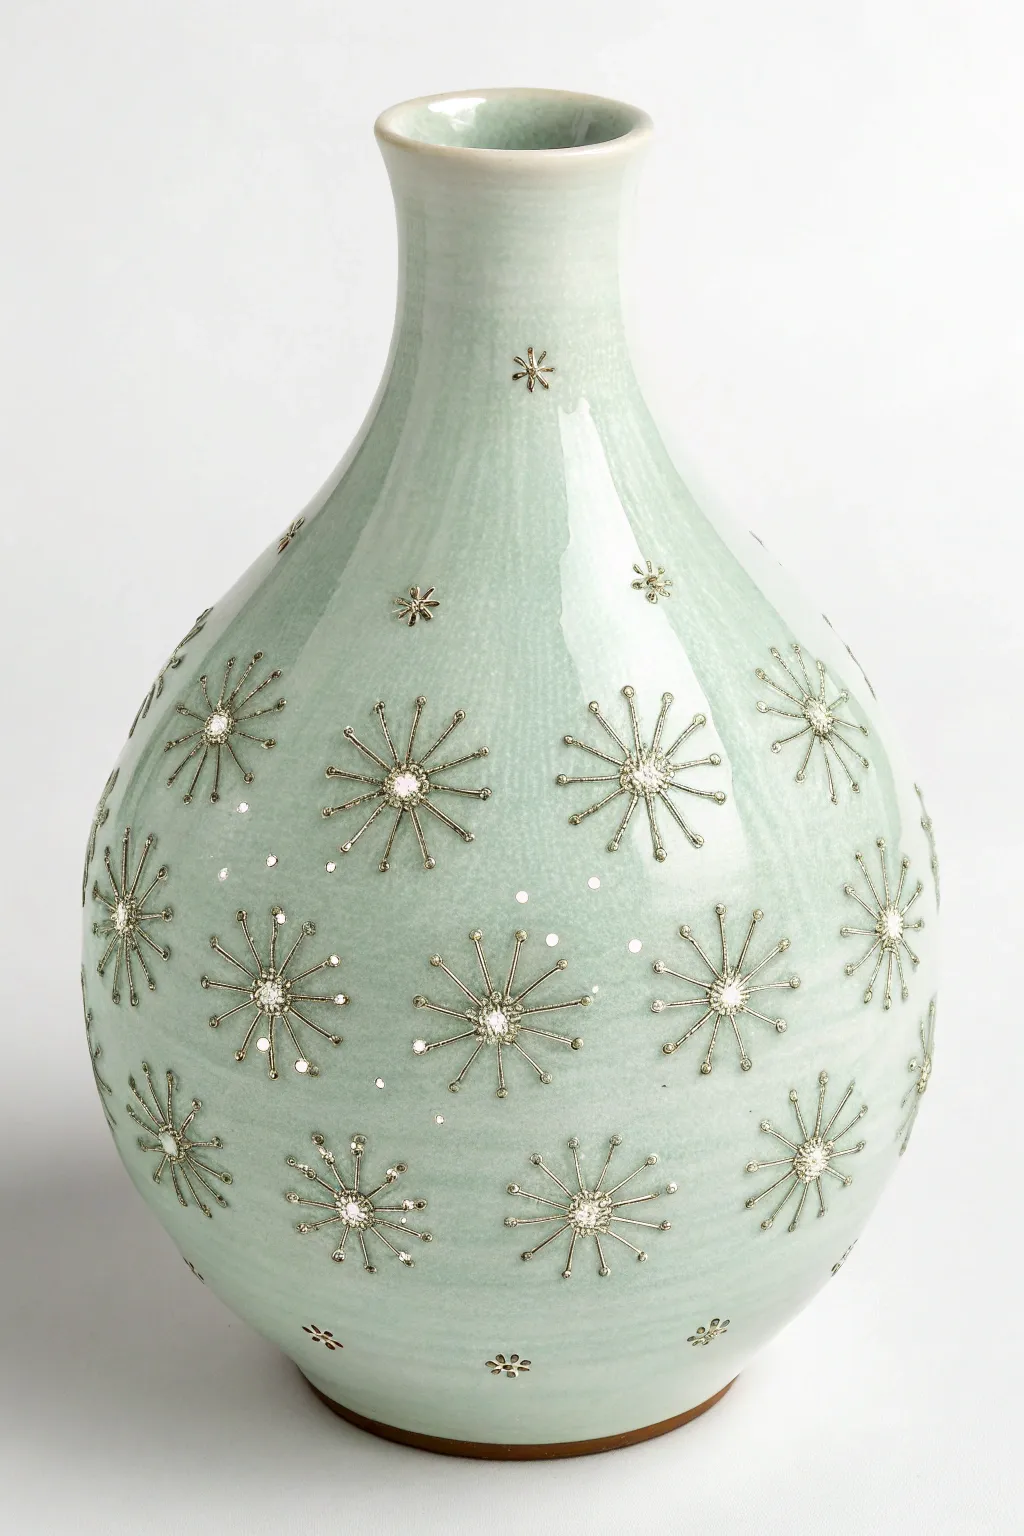
This classic globular vase achieves a stunning synthesis of form and surface decoration, featuring delicate, metallic-like starbursts floating on a pool of soft celadon green. The result is a piece that feels both mid-century modern and timelessly elegant.
Step-by-Step Tutorial
Materials
- High-fire stoneware or porcelain clay body
- Pottery wheel
- Throwing tools (ribs, sponge, wire cutter)
- Trimming tools
- Slip trailer or fine-point decorating bulb
- Wax resist emulsion based wax
- High-fire Celadon glaze (Cone 10 reduction recommended)
- Metallic oxide wash (Iron/Manganese blend) or a darker slip for inlay
- Sponge for wiping back
- Kiln capable of high-fire reduction
Step 1: Throwing and Shaping
-
Center and open:
Begin with about 3-4 lbs of well-wedged porcelain or white stoneware. Center the clay firmly on the wheel head and open the interior, establishing a base width of about 3-4 inches. -
Pull the cylinder:
Pull the walls up into a tall, even cylinder. Keep the walls consistent in thickness, as you will need to stretch this form significantly. -
Belly out the form:
Using a rib on the inside and a sponge on the outside, gently push the belly of the pot outward to create a globular shape. Work gradually from the bottom up to avoid collapsing the shoulder. -
Collar the neck:
As you round out the body, begin collaring the top third inward to form the narrow neck. Do this slowly, compressing the clay after each collaring pass to prevent buckling. -
Refine the rim:
Finish the neck with a slight flare at the very top rim for visual balance. Smooth the surface with a metal kidney rib to remove throwing lines.
Step 2: Drawing the Surface Design
-
Leather hard stage:
Allow the vase to dry to a sturdy leather-hard state. Trim the foot ring at this stage to give the pot a clean lift. -
Plan the grid:
Lightly visualize or mark a loose grid on the surface. You want the stars to be evenly spaced but not perfectly regimented; an offset pattern works best here. -
Apply the stars:
Using a slip trailer filled with a thick slip or a specialized underglaze raised-detail mix, draw the starburst patterns. Start with a central dot. -
Add radiating lines:
From the center dot, carefully trail lines radiating outward. Make 8-10 longer lines, interspersed with shorter ones to create that crystalline bloom effect. -
Add tiny details:
Place tiny dots of slip at the ends of the longest rays. This adds a finished, jewel-like quality to each star. -
Bisque fire:
Once the slip decoration is completely dry, bisque fire the vase to Cone 06.
Clean Lines
Add a tiny amount of black stain to your Wax Resist. This makes it visible so you can see exactly where you’ve painted it over the pale bisque.
Step 3: Glazing and Finishing
-
Apply wax resist:
This is crucial: carefully paint wax resist over every single starburst detail. I find using a very fine liner brush helps ensure you cover the slip lines perfectly without getting too much wax on the background. -
Glaze application:
Pour your celadon glaze inside the vase, swirl, and dump out. Then, using tongs, dip the exterior into the bucket for an even coat. -
Clean the resist:
Use a damp sponge to gently wipe any glaze droplets off the waxed starburst areas. The wax should repel the glaze, leaving the textured stars exposed. -
Loading the kiln:
Load the vase into your high-fire kiln. Ensure it isn’t touching other pots, as celadon can sometimes be fluid. -
The firing cycle:
Fire to Cone 10 in a reduction atmosphere. The reduction is what turns the iron in the glaze from a dull yellow-brown to that classic cool blue-green. -
Cooling and unloading:
Allow the kiln to cool naturally. When you open it, the unglazed slip stars should have toasted to a warm, metallic brown, contrasting beautifully against the glossy green.
Sparkle Effect
Mix a small amount of granular ilmenite into the slip used for the stars. It will bloom during firing to create tiny specks of metallic texture.
Place your finished vase near a window where natural light can catch the subtle crackle of the celadon surface