
If you love games and you love clay, combining them is basically the most satisfying mashup ever. These video game clay ideas are designed to be cute, recognizable, and totally doable at your own pace—no stress, just studio-fun.
Capsule Space Crewmate Figurines
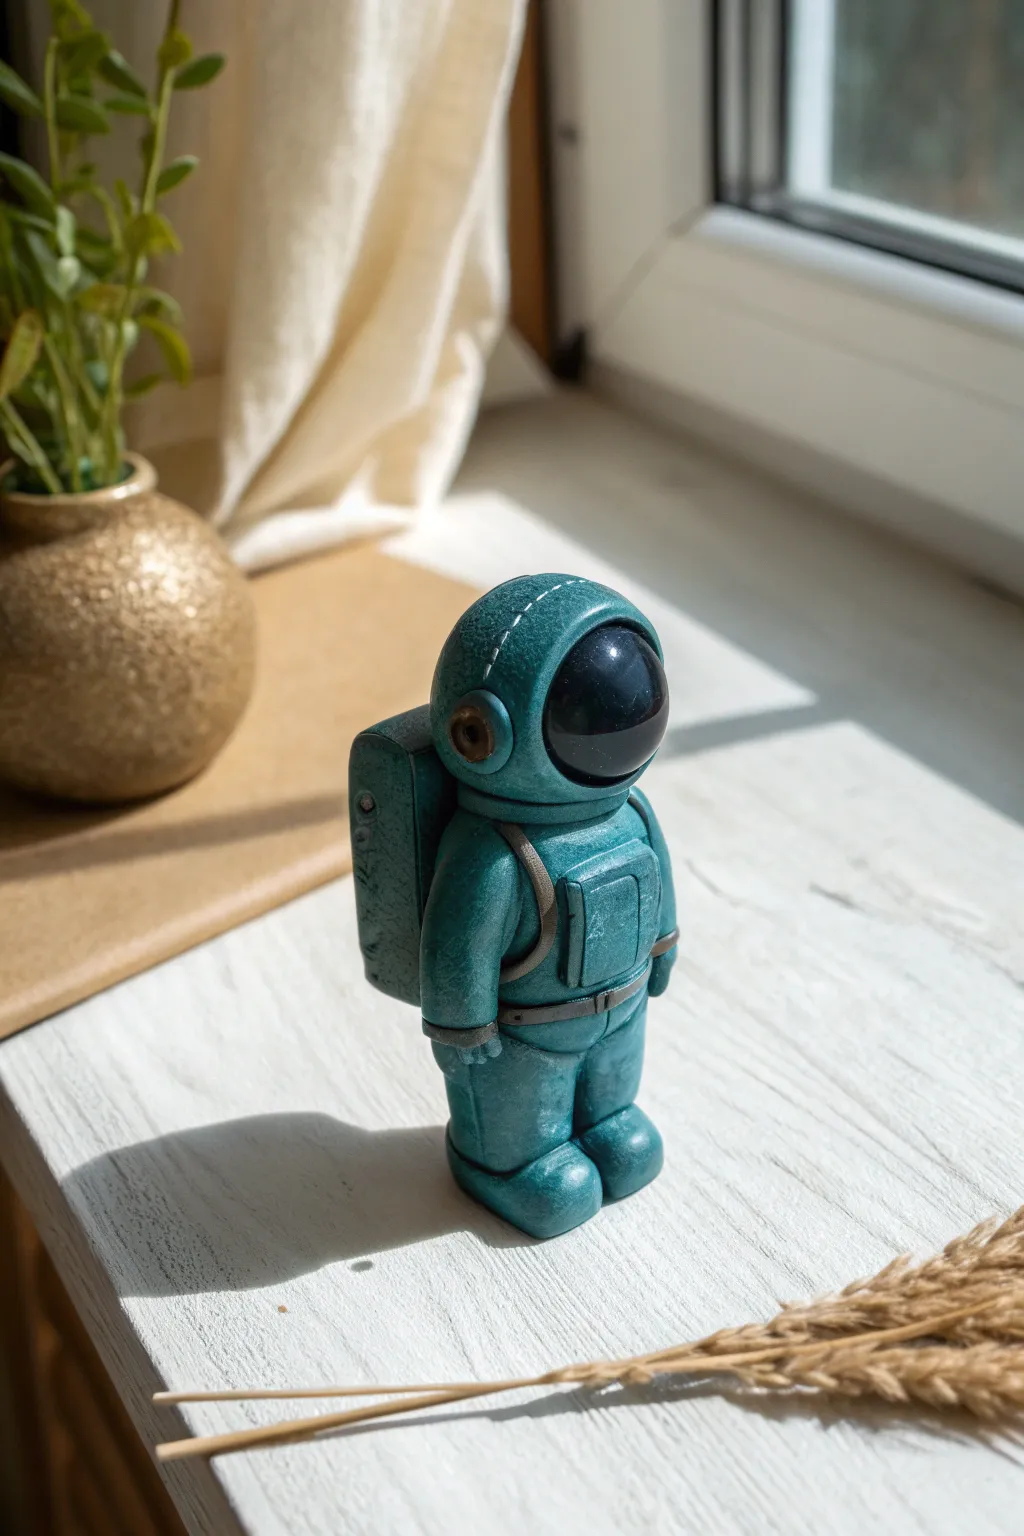
This charming teal space explorer brings a touch of cosmic wonder to your desk, featuring a handmade, textured finish mimicking a vintage spacesuit. The compact, rounded design evokes popular video game styles while adding realistic details like a glossy visor and structured life-support backpack.
How-To Guide
Materials
- Teal polymer clay (or blue mixed with emerald green)
- Black polymer clay
- Silver or grey polymer clay
- Glossy UV resin or high-gloss varnish
- UV lamp (if using resin)
- Clay sculpting tools (needle tool, ball stylus)
- Small rolling pin
- Acrylic paint (dark grey/black for antiquing)
- Small paintbrush
- Paper towel or sponge
- Aluminum foil (for armature core)
Step 1: Forming the Core Body
-
Create the foil armature:
Start by scrunching a small piece of aluminum foil into a pill shape. This saves clay and keeps the figurine lightweight while providing a sturdy base to build upon. -
Condition the main clay color:
Warm up your teal clay by kneading it thoroughly until it is soft and pliable. If you are mixing custom colors, ensure there are no streaks left. -
Wrap the torso:
Flatten a portion of teal clay and wrap it completely around your foil pill. Smooth the seams with your fingers until you have a seamless, pill-shaped torso. -
Split legs:
Use a modeling tool or knife to gently create an indentation at the bottom center of the pill shape to indicate the separation of the legs. Don’t cut all the way through; just define the two feet. -
Sculpt the boots:
Add small, flattened balls of teal clay to the bottom of each leg stump to create slightly oversized, grounded boots. Use a needle tool to create a separation line between the boot and the pant leg.
Head Heavy?
If the head keeps tilting or sliding off before baking, insert a short piece of toothpick or wire into the neck to act as a supportive internal spine connecting head to body.
Step 2: Building the Suit Details
-
Form the helmet:
Roll a large ball of teal clay for the head. It should be slightly wider than the body. Press it gently onto the top of the torso, blending the neck connection slightly so it stays secure. -
Indent the visor area:
Using a large ball stylus or your thumb, press a significant divot into the front of the head where the face shield will go. -
Add the backpack:
Shape a rectangular block of teal clay for the life-support system. Attach this securely to the back of the figure. You can add small indentations or vents on the side for extra technological detail. -
Attach the arms:
Roll two sausage shapes for arms. Attach them to the sides of the body, letting them hang naturally. Add a small cuff of clay at the wrist, then a tiny mitten-like hand shape below that. -
Strap details:
Roll very thin snakes of grey or silver clay. Drape these over the shoulders to create the harness straps that connect to the backpack. Press them down gently so they adhere to the suit. -
Chest control panel:
Create a small, flat square of teal clay and place it on the chest, slightly overlapping the straps. Outline the edges with a needle tool to make it look like a rigid plate.
Step 3: Texturing and Visor
-
Insert the black visor:
Roll a smooth ball of black clay. Press it into the indentation you made on the helmet earlier. Smooth the edges so it sits flush within the helmet opening. -
Stitching details:
Using a needle tool, carefully poke a line of tiny holes across the top center of the helmet to mimic a fabric seam. This adds a lovely handcrafted texture. -
Ear comms:
Make small circles of teal clay with a tiny grey center and press them onto the sides of the helmet for the communication earpieces. -
Surface texturing:
Take a piece of sandpaper or a stiff brush and very lightly tap the teal parts of the suit. This removes the ‘plastic’ look of the clay and gives it a fabric-like appearance. -
Baking:
Bake the figurine according to your polymer clay package instructions. I typically use a lower temperature for a slightly longer time to prevent scorching the teal color.
Cosmic Dust
Before glazing the visor, use a dry brush to dust a tiny amount of pearl or silver mica powder onto the knees and elbows to simulate space dust accumulation.
Step 4: Finishing Touches
-
Antiquing wash:
Once cool, water down some black or dark grey acrylic paint. Brush it over the entire teal suit, getting into the crevices. Wipe it away almost immediately with a paper towel, leaving darkness only in the seams and textures. -
Clean the visor:
Use a damp cotton swab or baby wipe to clean any paint wash off the black visor area completely. -
Glazing the visor:
Apply a drop of UV resin or high-gloss varnish solely to the black visor. Spread it to the edges with a toothpick. If using resin, cure it under a UV lamp until hard and glassy.
Place your finished crewmate near a window or plant to let the glossy visor catch the light


Round Puffball Character Desk Buddy
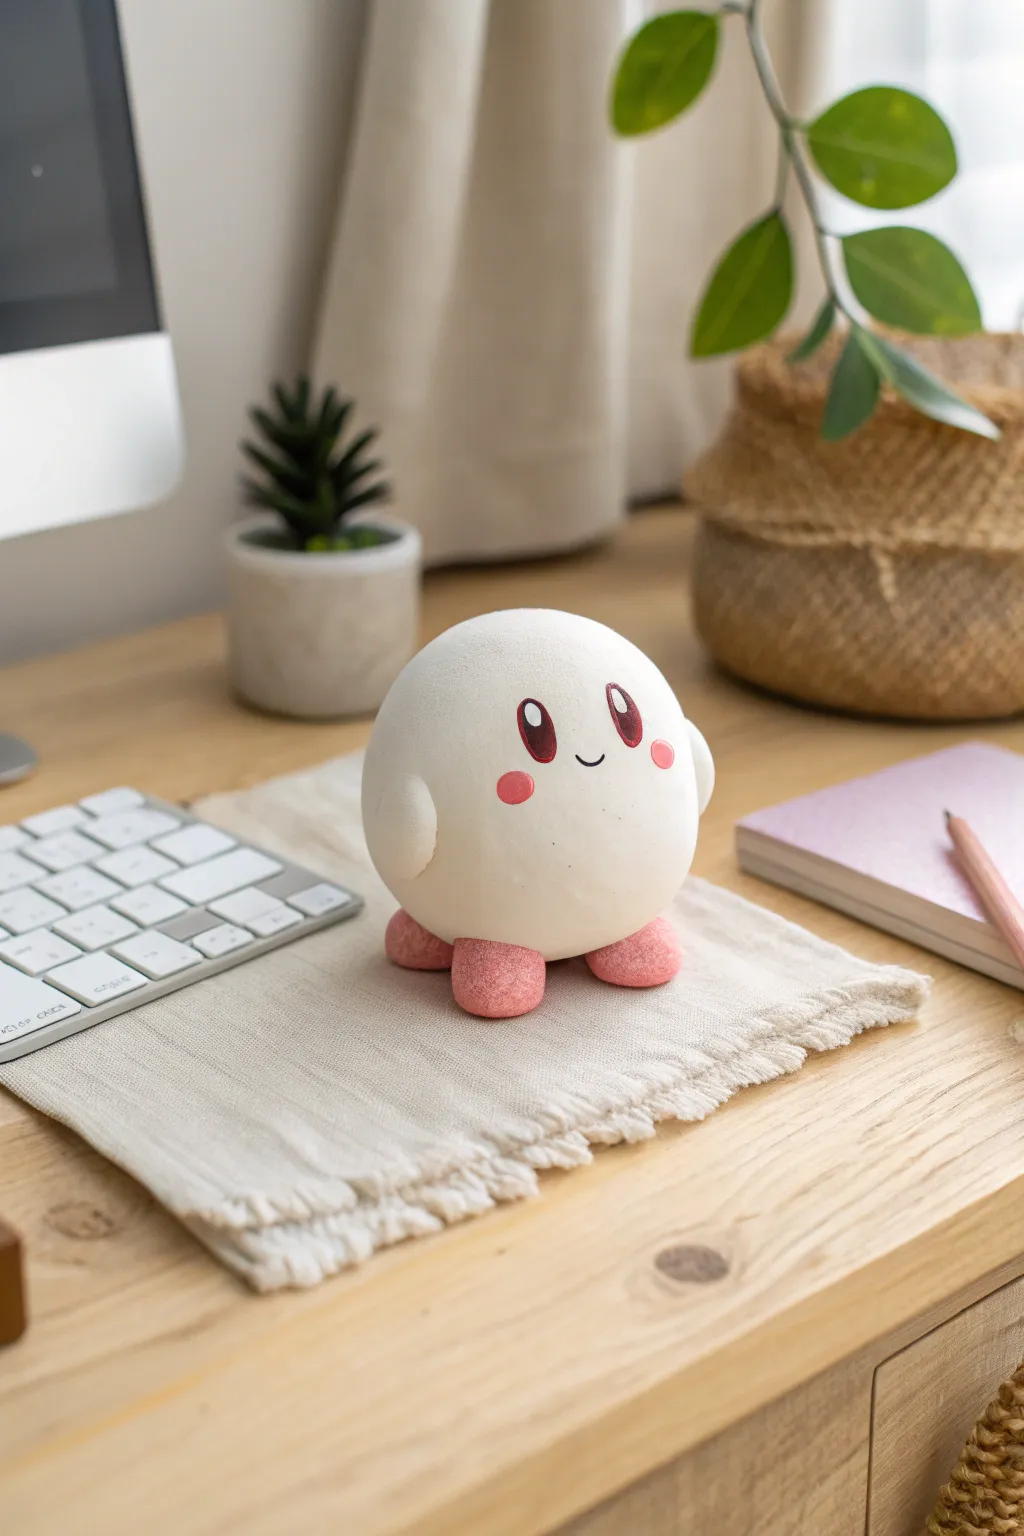
Create a charming, minimalist desk companion inspired by classic round video game heroes. This project uses basic clay sculpting techniques to form a delightfully simple, matte-finish character perfect for keeping you company while you work.
Step-by-Step
Materials
- White polymer clay or air-dry clay
- Pink polymer clay (soft pastel shade)
- Red and white acrylic paint (for eyes)
- Black fine-point marker or acrylic paint
- Small ball stylus tool
- Clay sculpting tools (knife, smoother)
- Aluminum foil (for core)
- Oven (if using polymer) or drying space
Step 1: Forming the Core Body
-
Prepare the Core:
Crumple a piece of aluminum foil into a tight ball, roughly 2 inches in diameter. This saves clay and keeps the figurine lightweight. -
Condition the Clay:
Knead your block of white clay thoroughly until it becomes soft, warm, and pliable. This conditioning prevents cracks later on. -
Cover the Core:
Flatten the white clay into a large pancake about 1/4 inch thick. Wrap this sheet around your foil ball, ensuring complete coverage. -
Smooth the Sphere:
Roll the clay-covered ball gently between your palms to smooth out seams and bumps. Aim for a perfectly round, seamless sphere. -
Refine the Surface:
If there are fingerprints, lightly buff the surface with a tiny bit of baby oil or cornstarch on your finger to get that matte, flawless finish seen in the photo.
Step 2: Adding Limbs and Details
-
Shape the Feet:
Take two small portions of pink clay and roll them into oval shapes. Flatten the bottom of each oval slightly to create stability. -
Attach the Feet:
Press the pink ovals firmly onto the bottom of the white sphere. Position them slightly apart and angled outward for a cute stance. -
Texture the Feet:
To mimic the textured look in the image, gently tap the surface of the pink clay with a stiff toothbrush or a texturing sponge. -
Make the Arms:
Roll two small balls of white clay into teardrop or nub shapes. These should remain quite stubby. -
Attach the Arms:
Press the arms onto the sides of the body, about halfway up. Blend the seams where the arm meets the body using a sculpting tool for a smooth transition.
Sticky Fingerprints?
Work with rubbing alcohol on your fingers or tools. It smooths out fingerprints instantly on polymer clay before baking.
Step 3: Face and Finishing Touches
-
Mark Eye Position:
Use a small dotting tool to very lightly mark where you want the eyes to sit. They should be tall ovals, widely spaced. -
Paint the Eyes Base:
Carefully paint tall red ovals for the eyes. I find a flat, small synthetic brush works best for getting crisp edges here. -
Add Eye Details:
Once the red is dry, add a darker red or black crescent at the top of the oval for depth, and paint a bright white highlight near the top. -
Create the Cheeks:
Mix a tiny amount of pink paint or use a small flattened disc of pink clay. Apply these as oval blushes right below the eyes. -
Draw the Mouth:
Using a fine-point black marker or a very thin liner brush with black paint, draw a tiny, simple ‘u’ shape between the eyes for the smile. -
Bake or Dry:
If using polymer clay, bake according to the package instructions (usually 275°F for 15-20 mins). If using air-dry clay, let it sit undisturbed for 24 hours.
Stable Stance
Before baking or drying, press the entire figure down gently on your work surface to flatten the feet bottoms evenly.
Place your new round buddy on your desk to bring a smile to your workday


Pixel Heart Health Tokens
Bring classic video game nostalgia to life with this clever clay project that mimics the look of an 8-bit health icon. By assembling individual clay cubes into a grid, you achieve an authentic pixelated texture that looks like it jumped right off the screen.
How-To Guide
Materials
- Polymer clay (Red, Dark Red/Burgundy, Light Pink, Hot Pink, White)
- Clay blade or craft knife
- Rolling pin or acrylic roller
- Grid paper (optional template)
- Baking sheet
- Parchment paper
- Smoothing tool or your finger
Step 1: Preparation & Mixing
-
Condition the base red:
Start by taking a large portion of your bright red clay. Knead and warm it in your hands until it is pliable and smooth. -
Mix custom shades:
To create the depth seen in the photo, you’ll need variety. Mix a little black or dark red into some bright red for shadow pixels. Mix white into red for a soft pink, and create a few very light pink squares for highlights. -
Create even slabs:
Roll each color out into a thick slab. Aim for a thickness of about 1/4 inch (6mm) so your final heart has a nice, chunky weight to it like a real token. -
Cut vertical strips:
Using your clay blade, cut straight vertical strips from your slabs. These strips should be exactly as wide as they are thick to form perfect squares later.
Uneven Pixels?
If your cubes aren’t uniform, try using a pasta machine to roll the initial slabs. This guarantees the exact same thickness for every single color block before you start cutting strips.
Step 2: Creating the Pixels
-
Cross-cut into cubes:
Turn your strips horizontally and slice them at the same intervals. You are essentially creating a pile of small, uniform cubes—or ‘pixels’—in your four or five different color shades. -
Sort your palette:
Separate your cubes into piles by color. This makes the assembly process much faster, like following a paint-by-numbers guide. -
Rough layout:
Before sticking them together, I find it helpful to lay the cubes out loosely on your work surface to plan the heart shape. Use the bright red for the main body and the darker red for the bottom and right edges to create a 3D shadow effect.
Level Up: Magnetize It
Before baking, press a small, strong neodymium magnet into the back of your pixel heart. Bake it right into the clay, and you’ll have an instant retro fridge magnet.
Step 3: Assembly & Finishing
-
Start the bottom row:
Begin assembling your heart from the bottom point up. Press the side of one cube gently against the next. The natural stickiness of raw polymer clay should hold them together without glue. -
Add highlights:
As you build upward, incorporate your light pink and white-pink cubes in the upper left quadrant of the heart to simulating a light source reflecting off the ‘glass’ of the heart. -
Check the grid:
Every few rows, use the flat side of your blade to gently push the edges inward. This squares up the grid and ensures your rows aren’t drifting crooked. -
Form the arches:
Construct the two top arches of the heart. Ensure the outer edges have a distinct ‘step’ pattern rather than a smooth curve to maintain that pixel art aesthetic. -
Surface smoothing:
Once assembled, place a piece of parchment paper over the heart and very lightly roll over it. You want to flatten the top surface so the pixels join seamlessly, but not so much that you lose the grid definition. -
Clean the edges:
Inspect the outer perimeter. If any pixels have squished out of shape, carefully nudge them back into perfect squares with your blade. -
Bake the project:
Transfer the heart to a baking sheet lined with parchment paper. Bake according to your specific clay manufacturer’s instructions—usually around 275°F (135°C) for 15-30 minutes per 1/4 inch of thickness. -
Final cool down:
Let the heart cool completely on the baking sheet before handling. Polymer clay is slightly fragile while hot but hardens significantly as it returns to room temperature.
Now you have a durable little life-token to keep on your desk or gift to your favorite player two


Power-Up Mushroom Charms
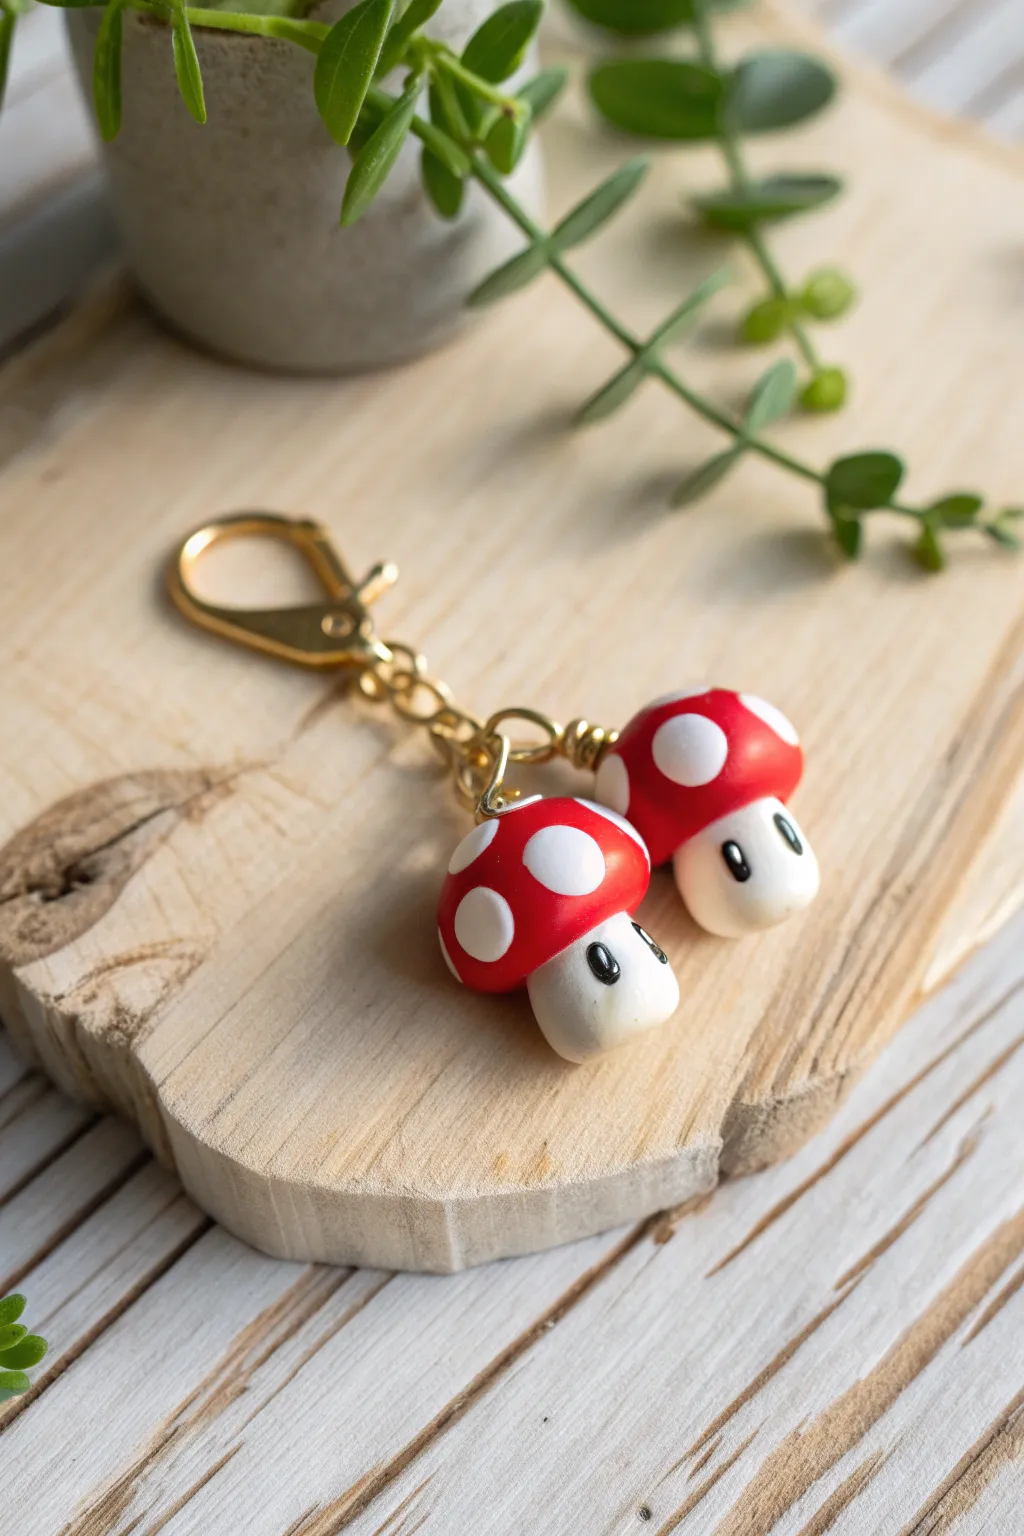
Bring a little 8-bit magic to your everyday carry with these adorable mushroom charms. Modeled after the iconic power-ups, these polymer clay creations feature a glossy finish and sweet little faces that are perfect for keychains or zipper pulls.
Step-by-Step
Materials
- Red polymer clay
- White polymer clay
- Black polymer clay
- Translucent liquid clay or bake-and-bond
- Gloss glaze or UV resin
- 2 Eye pins
- Split rings and keychain hardware
- Needle tool or toothpick
- Dotting tool or small ball tool
- Wet wipes
- Oven for baking
Step 1: Shaping the Base
-
Prepare the stems:
Start with the white clay. Condition it until soft, then roll two equal balls about the size of a blueberry. Gently roll these into short, thick cylinders to form the mushroom stalks. Flatten the bottoms slightly so they can stand on their own. -
Form the caps:
Takes the red clay and condition it well. Roll two balls that are slightly larger than your white stem pieces. Press them gently onto a flat surface to create a dome shape, rounding off the edges with your finger to get that classic mushroom cap look. -
Connect cap and stem:
Place the red dome on top of the white cylinder. If the clay is fresh, they should stick, but I prefer adding a tiny drop of liquid clay or bake-and-bond between the pieces to ensure a permanent hold once baked. -
Shape the connection:
Gently press the cap down so it slightly hugs the top of the stem. You want it to look like a single organic unit, not just a ball sitting on a cylinder. Smooth any fingerprints with a light touch.
Smudged White Clay?
Red pigments stain easily. Wash hands thoroughly between colors or use a dedicated damp wipe to clean the white stalks if red residue transfers during shaping.
Step 2: Adding Details
-
Create the spots:
Roll out a very thin sheet of white clay, or flatten tiny balls between your fingers. You need five spots per mushroom: one for the very top center, and four spaced evenly around the sides. -
Apply the spots:
Press the white circles onto the red caps. Use your finger to gently smooth them down so they become flush with the red surface rather than sticking out like bumps. -
Indent eye sockets:
Using a small dotting tool, make two small indentations on the white stem section for the eyes. These indentations help the black clay sit securely without protruding too much. -
Add the eyes:
Roll two minuscule specks of black clay into ovals. Place them vertically into the indentations you just made. The vertical oval shape is key to capturing that specific character style. -
Add eye highlights:
Roll incredibly tiny specks of white clay. Place one tiny white dot in the upper corner of each black eye oval. This ‘sparkle’ brings the character to life.
Custom 1-Up
Swap the red clay for bright green to make a ‘1-Up’ life mushroom, or purple for a poison mushroom. Make a whole set to gift to your gamer friends.
Step 3: Assembly and Finishing
-
clean up:
Before baking, give your mushrooms a once-over with a baby wipe or a q-tip dipped in rubbing alcohol to remove dust and fingerprints, especially on the white clay areas. -
Insert hardware:
Take your eye pins and trim them if they are too long. Dip the end in a little liquid clay and insert it straight down through the center of the red cap into the stem. -
Bake:
Bake the charms according to your clay manufacturer’s instructions. Usually, this is around 275°F (135°C) for 15-30 minutes. Let them cool completely before handling. -
Glaze:
Once cool, apply a coat of gloss glaze or UV resin. This gives them that plastic, toy-like sheen seen in the photo and protects the paint and clay. -
Attach to keychain:
Use pliers to open a jump ring or the loop of your keychain hardware. Slide the eye pin of the mushroom onto the ring and close it securely.
Clip these little guys onto your backpack and enjoy your handcrafted power-up

The Complete Guide to Pottery Troubleshooting
Uncover the most common ceramic mistakes—from cracking clay to failed glazes—and learn how to fix them fast.
Pixel Mystery Item Blocks
Bring the nostalgia of classic gaming into your home with these chunky, pixel-perfect mystery blocks. While they look like vintage wood toys, we’re sculpting them from clay to create a durable, stackable set featuring your favorite icons like coins, stars, and hearts.
Detailed Instructions
Materials
- Polymer clay (terracotta/brown and white/beige)
- Square cookie cutter or sharp clay blade
- Rolling pin with depth guides
- Acrylic paints (black, white, yellow, orange, brown, dark red)
- Fine detail paintbrush (size 0 or 00)
- Ruler
- Pencil
- Sandpaper (fine grit)
- Matte varnish/sealer
Step 1: Forming the Cubes
-
Condition the Clay:
Begin by thoroughly conditioning your polymer clay until it is soft and pliable. For the bottom two blocks, I like to use a terracotta or warm brown clay to mimic the darker wood look. For the top block, use a lighter beige or white clay. -
Shape the Blocks:
Roll the clay into a thick slab or form it into a rough cube shape by hand. Use a ruler or a square cutter to refine the edges, aiming for perfect 1.5-inch or 2-inch cubes. -
Refine the Faces:
Press each side of the cube against a flat work surface to ensure the faces are perfectly flat. This is crucial for painting the pixel grid later. -
Soften the Edges:
Gently tap the sharp corners with your finger to slightly round them. This gives the finished piece a softer, toy-like aesthetic rather than a sharp geometric feel. -
Bake the Cubes:
Bake the clay cubes according to the package instructions. Since these are thick blocks, you may need to bake them longer at a slightly lower temperature to prevent cracking.
Wobbly Lines?
If your hand is shaky while painting pixels, use a black fine-tip paint pen instead of a brush for the outlines. It gives you much more control over the square shapes.
Step 2: Preparing the Surface
-
Cool and Sand:
Allow the blocks to cool completely inside the oven. Once cool, lightly sand the faces with fine-grit sandpaper to create a tooth for the paint to adhere to. -
Base Coat (Optional):
If your clay color isn’t quite right, apply a thin wash of brown or beige acrylic paint. Let the natural texture of the clay or brushstrokes show through slightly for a faux-wood grain effect. -
Draw the Grid:
Using a ruler and a very light pencil touch, sketch a grid on each face where you plan to paint an icon. A 10×10 or 12×12 grid usually works well for these simple 8-bit designs.
Step 3: Pixel Painting
-
Outline the Icons:
Consult your reference image or a sprite chart. Using a fine detail brush and black acrylic paint, fill in the squares that make up the outline of your shape (star, diamond, question mark, etc.). -
Fill the Colors:
Once the black outline is dry, fill in the interior pixels. Use bright orange for the star and jewel highlights, white for the coin and question mark backgrounds, and deep red for the heart. -
Add Shading Details:
To make the pixels pop, add darker shades within the icons. For example, paint dark orange pixels on the bottom right of the star to simulate shadow. -
Clean Up Edges:
If your paint bled outside the lines, use a small brush with your base block color (brown or beige) to tidy up the edges of the pixels.
Level Up: Magnetic Stacking
Embed small round magnets into the top and bottom centers of the clay cubes before baking. Make sure the polarity is correct so they snap together when stacked!
Step 4: Finishing Touches
-
Dry Completely:
Allow the paint to dry fully for at least an hour. The thick layers of acrylic used for pixel art can sometimes take longer to set. -
Seal the Project:
Apply a coat of matte varnish over the entire block. This protects the paint from chipping and gives the clay a unified, profession finish. -
Distress (Optional):
For a vintage look, lightly sand the corners again after varnishing to reveal a bit of the clay underneath, making the blocks look well-loved.
Stack your new creations on a shelf to add a touch of pixelated charm to your decor
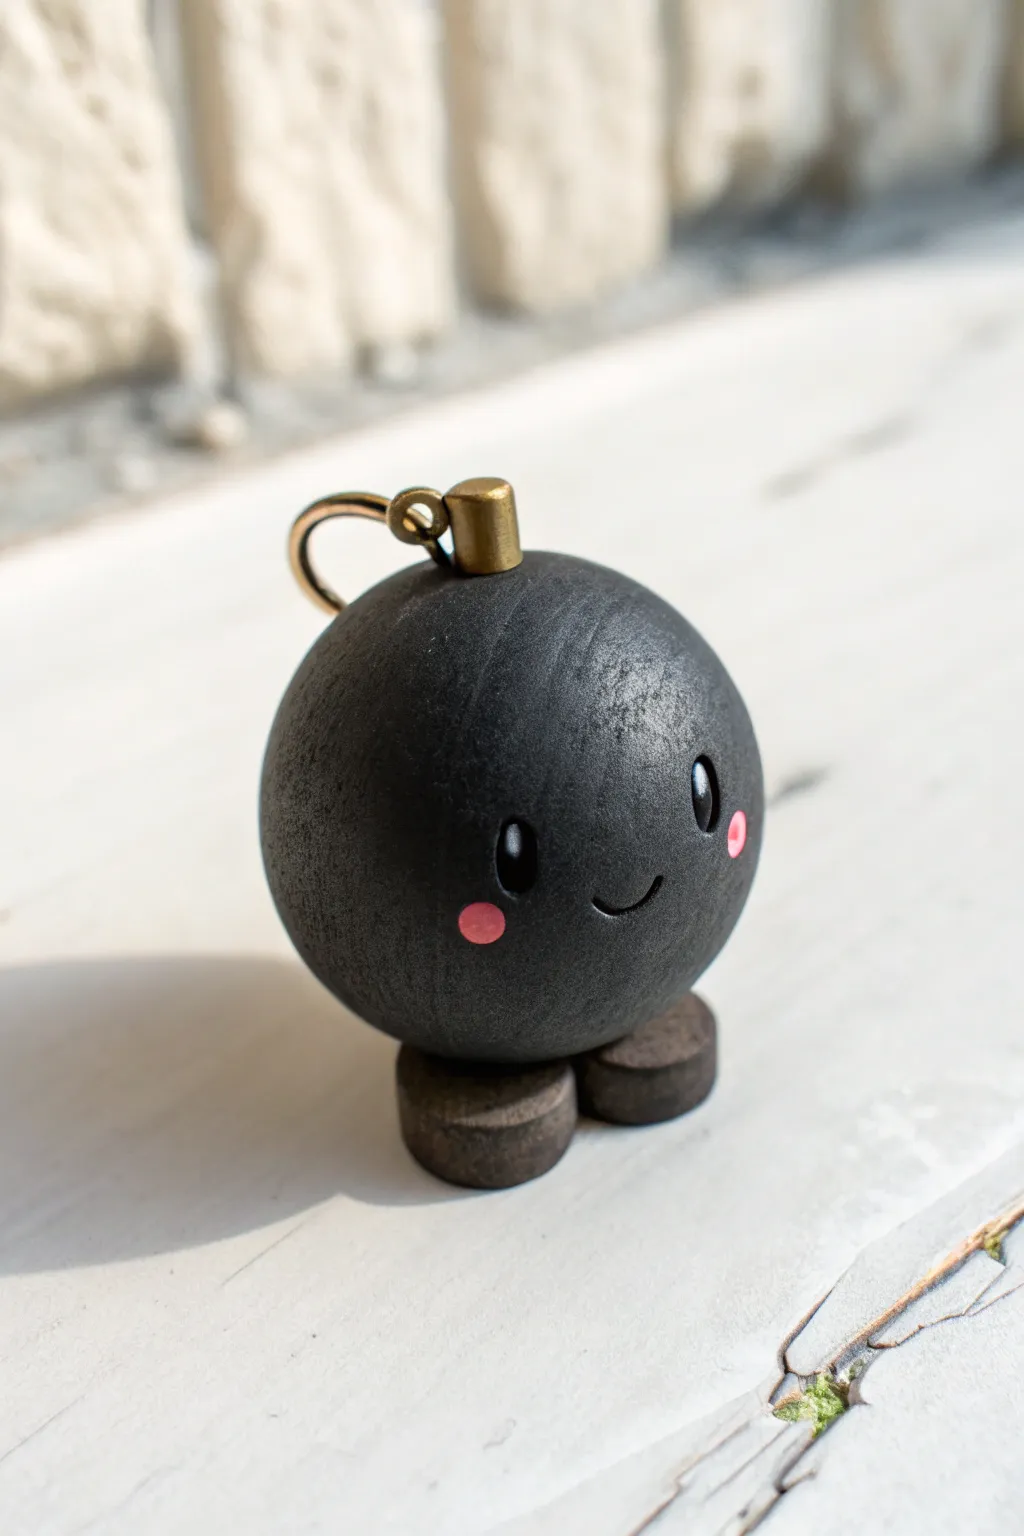
Wind-Up Bomb Buddy Figure
This adorable little explosive creates a charming desktop companion without any of the danger. With its matte black finish, blushing cheeks, and metallic fuse holder, this figurine captures a classic video game enemy in a surprisingly sweet style.
How-To Guide
Materials
- Polymer clay (black)
- Polymer clay (dark brown/bronze)
- Metallic gold or brass acrylic paint
- Matte black acrylic paint (optional for texture)
- Pink acrylic paint
- White acrylic paint
- Gloss varnish or UV resin
- Small metal jump ring or wire (gold color)
- Sculpting tools (ball styluses, needle tool)
- Fine detail paintbrush
- Texture sponge or stiff brush
Step 1: Sculpting the Base Form
-
Condition the Clay:
Begin by kneading your black polymer clay until it is soft, pliable, and free of any air bubbles. If the clay is too firm, mix in a tiny drop of clay softener or baby oil. -
Form the Body:
Roll the black clay into a perfect sphere, roughly the size of a golf ball or slightly smaller. Roll it gently between your palms to smooth out any fingerprints. -
Add Texture:
To mimic the slightly rustic, matte look in the image, gently tap a texture sponge or the bristles of an old toothbrush all over the sphere’s surface. This breaks up the smooth plastic look of raw clay. -
Flatten the Bottom:
Press the sphere very lightly onto your work surface to create a tiny flat spot so the body won’t roll away while we work on the feet.
Step 2: Feet and Fuse
-
Create the Feet:
Take a small amount of dark brown clay and roll it into a thick cylinder. Slice this cylinder into two equal discs, about the size of a dime but thicker. -
Attach the Feet:
Place the two discs side-by-side underneath the black sphere. Press firmly enough to adhere them, blending the seams underneath if necessary using a modeling tool. -
Sculpt the Fuse Cap:
Roll a small cylinder of clay for the top cap. Flatten the top and bottom to create a crisp cylindrical shape. -
Detail the Cap:
Use a needle tool to create a small hole specifically on the side of this cylinder, near the top edge. This is where the metal ring will attach later. -
Attach the Cap:
Place the cylindrical cap directly onto the top center of the sphere. If using polymer clay, a dab of liquid clay helps secure this bond permanently during baking. -
Baking:
Bake the entire sculpture according to your clay manufacturer’s specific instructions. I prefer to tent foil over the piece to prevent any scorching on the black clay.
Fixing Wobbly Feet
If your figure keeps tipping over, the feet might be too close together. Before baking, gently pull them slightly apart to create a wider, more stable tripod base with the body.
Step 3: Painting and Assembly
-
Base Painting:
Once cool, if you want extra texture, stipple a layer of matte black acrylic paint over the body. This enhances that stony, solid appearance. -
Gilding the Cap:
Paint the top cylindrical fuse holder with metallic brass or gold paint. You may need two thin coats for opaque coverage. -
Painting the Eyes:
Using your smallest detail brush or a ball stylus tool, paint two vertical ovals in black (or gloss black if the body is matte). Add a tiny dot of white in the upper corner of each eye for a highlight. -
Adding the Blush:
Dip a round tool or the end of a brush handle into pink paint. Dot two perfect circles just below and outside the eyes for the rosy cheeks. -
The Smile:
With an ultra-fine liner brush or a fine-tip paint pen, draw a small, thin ‘U’ shape between the blushes for the mouth. -
Glossing the Eyes:
Apply a tiny drop of gloss varnish or UV resin strictly over the black eye ovals. This makes them look wet and alive against the matte body. -
Adding the Hardware:
Take your gold jump ring. Using pliers, carefully open it, thread it through the hole you made in the fuse cap, and pinch it closed to finish the ‘wind-up’ key look.
Make it a Keychain
Instead of a side ring, insert a screw-eye pin into the top of the fuse cap before baking. Once baked, you can attach a full keychain or lanyard for a portable buddy.
Your little explosive friend is now ready to sit on your shelf and look menacingly cute


What Really Happens Inside the Kiln
Learn how time and temperature work together inside the kiln to transform clay into durable ceramic.
Mana Crystal Desk Paperweight
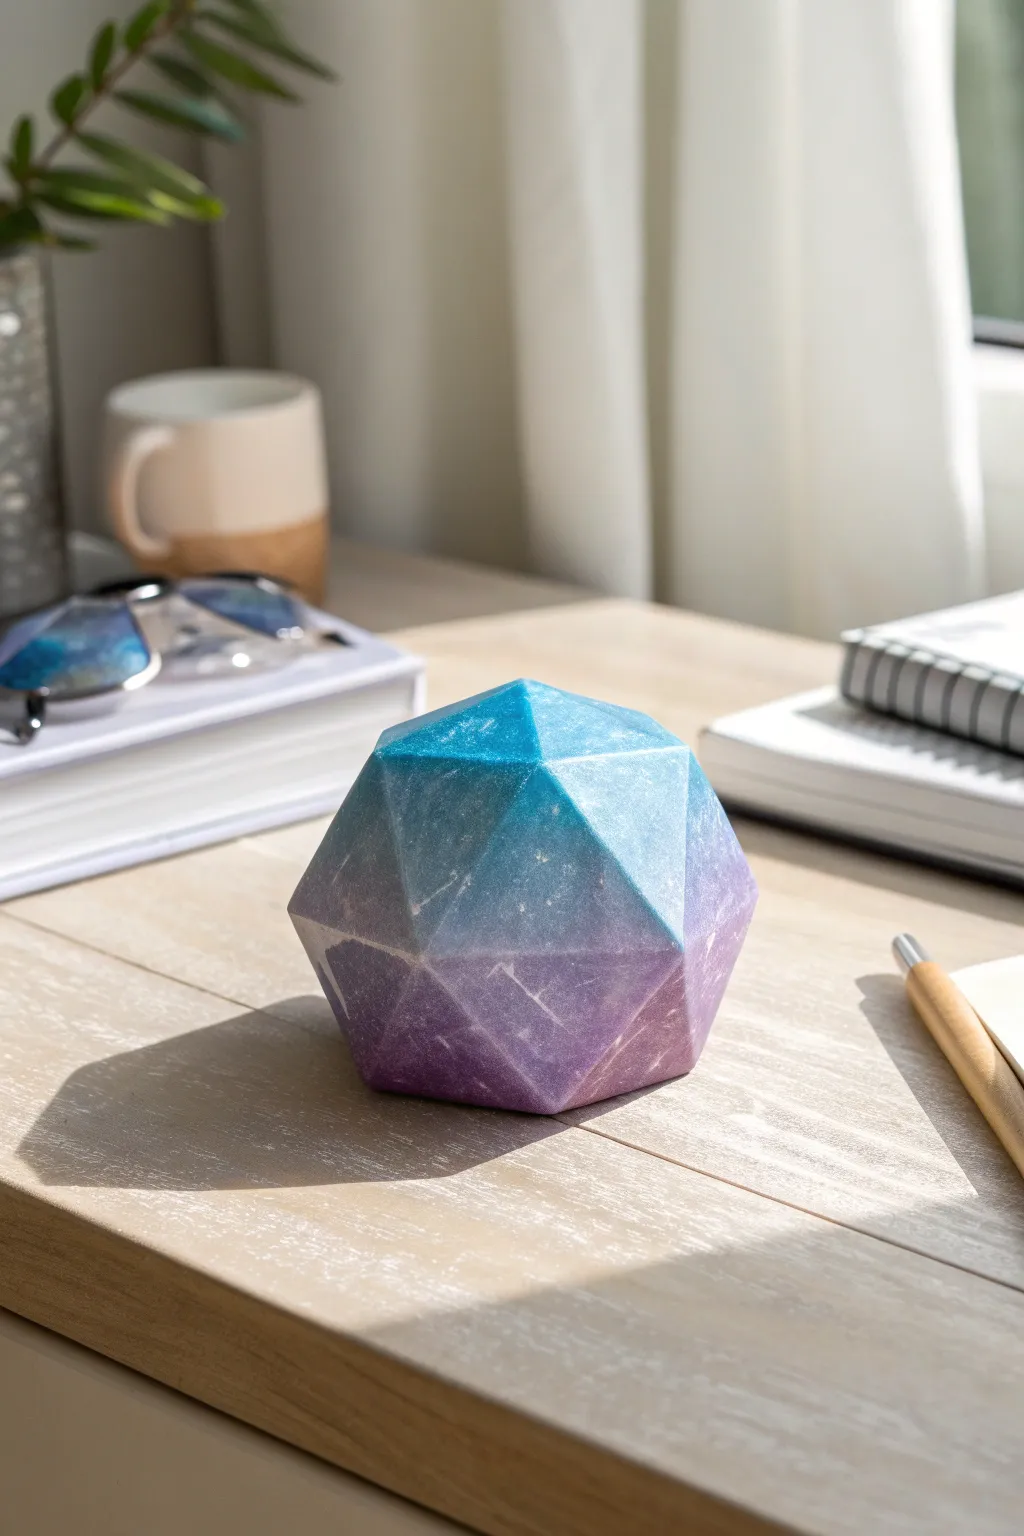
Channel the essence of a magic user with this striking mana crystal paperweight. Featuring a mesmerizing gradient from deep teal to royal purple and a satisfyingly heavy geometric weight, this piece brings a touch of RPG fantasy to your modern workspace.
How-To Guide
Materials
- Polymer clay (translucent or white recommended)
- Alcohol inks (teal/cyan and purple/magenta)
- Sharp blade or precision craft knife
- Rolling pin or pasta machine
- Fine-grit sandpaper (400 to 1000 grit)
- Gloss glaze or resin (for the shiny finish)
- Soft brush
- Protected work surface
- Optional: White acrylic paint for marbling effects
Step 1: Preparing the Gradient Clay
-
Condition the base:
Start by conditioning a large block of translucent or white polymer clay until it is soft and pliable. You want a substantial amount to create a heavy, palm-sized object. -
Divide and color:
Split your clay into two equal portions. Add a few drops of teal alcohol ink to one half and purple alcohol ink to the other, kneading until the color is fully incorporated. -
Create the blend:
Form each colored lump into a thick log. Join them together lengthwise and twist slightly to begin merging the boundary. -
Refine the gradient:
Roll the combined log into a ball, then flatten and fold it a few times. Don’t over-mix; you want a distinct transition where the teal flows into the purple, creating that magical ombre effect. -
Add texture veins (Optional):
For the stone-like veins seen in the photo, I like to take a very small amount of white paint or uncolored clay, shred it, and press it randomly into the surface before the final shaping.
Step 2: Shaping the Crystal
-
Form the basic sphere:
Roll your gradient clay into a smooth, tight ball. Ensure there are no air bubbles trapped inside, as these can distort the shape during baking. -
Chill the clay:
Place the ball in the refrigerator for about 15-20 minutes. Firm clay cuts much cleaner than warm, soft clay, which is crucial for sharp geometric edges. -
Cut the first facet:
Using your sharp blade, slice off the very top of the sphere to create a flat, hexagonal plane. Try to do this in a single, confident motion. -
Create the upper ring:
Work your way around the top face, slicing angled facets that connect to the edges of your first cut. Aim for symmetry, but organic variations make it look more like a hand-hewn crystal. -
Middle and bottom cuts:
Continue slicing facets around the equator and the bottom of the sphere. The goal is to remove all rounded surfaces, leaving only flat planes intersecting at sharp angles (an icosahedron style shape). -
Smooth the planes:
Gently gently run your finger over the flat surfaces to smooth out any blade drag marks, being careful not to round over the sharp ridges you just created.
Ice Cold Cuts
If your clay gets too sticky while slicing facets, re-freeze it for 5 minutes. The colder the clay, the sharper and more glass-like your geometric cuts will be.
Step 3: Baking and Finishing
-
Bake the crystal:
Place your polyhedron on a parchment-lined baking sheet. Bake according to your brand of clay’s instructions—usually 275°F (135°C) for 30 minutes per 1/4 inch of thickness. -
Cool down:
Allow the piece to cool completely in the oven with the door cracked open. This prevents thermal shock cracks. -
Wet sanding:
Once cool, dip the crystal in water and sand each facet with fine-grit sandpaper. This removes fingerprints and imparts a professional, smooth stone texture. -
Buffing:
Dry the piece thoroughly and buff it vigorously with a denim scrap or soft cloth to bring out a natural sheen. -
Apply the finish:
For that wet, magical look, brush on a coat of gloss glaze or a thin layer of UV resin. Let this cure or dry completely. -
Final inspection:
Check for any uneven spots in the glaze and touch up if necessary to ensure your mana crystal looks pristine.
Cloudy Finish?
If your crystal looks dull even after baking, it likely needs more sanding. Step up your grit from 400 to 1000, then buff vigorously before glazing.
Now you have a weighty, magical artifact to guard your desk papers or regenerate your creativity
Mini Retro Console With Controller
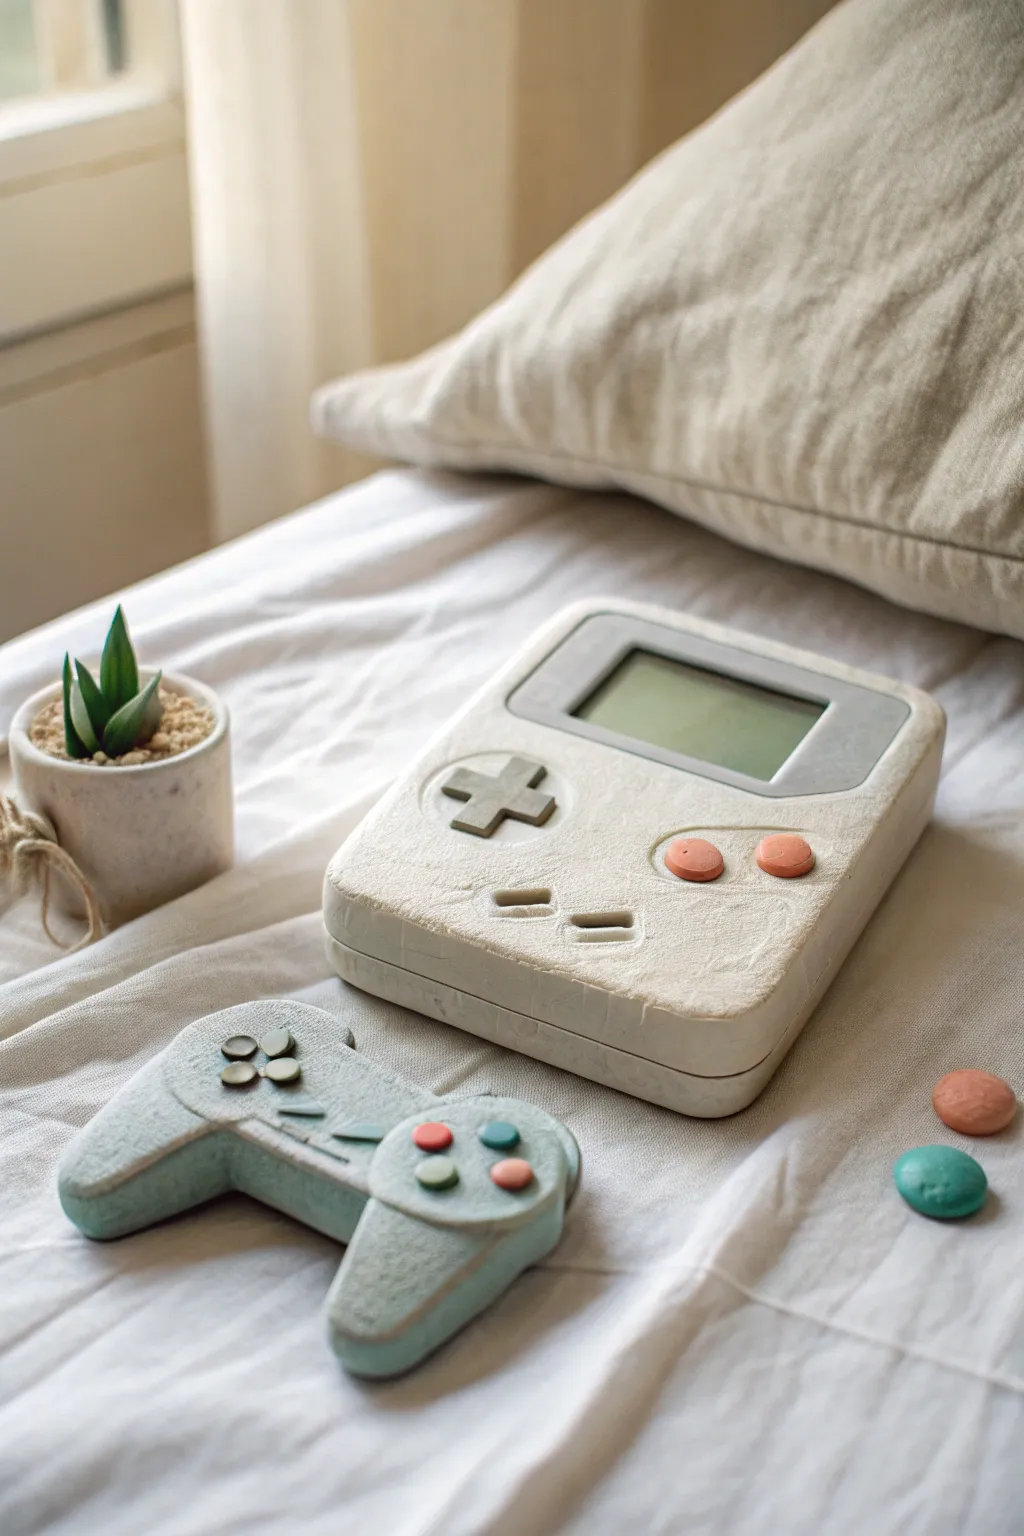
Capture the nostalgia of 90s handheld gaming with this charming clay sculpture set featuring a classic console and ergonomic controller. The finish has a lovely stone-like matte texture and soft pastel palette that brings a cozy aesthetic to your desk or shelf display.
Step-by-Step Guide
Materials
- Air-dry clay (white or light grey)
- Sculpting tools (needle tool, ball stylus, clay knife)
- Rolling pin
- Sandpaper (fine grit)
- Acrylic paints (Cream/Off-white, Sage Green, Salmon Pink/Terracotta, Light Grey, Dark Grey/Black)
- Matte varnish or sealant
- Paintbrushes (small flat and fine detail)
- Ruler
- Water and sponge for smoothing
Step 1: Sculpting the Handheld Base
-
Form the main block:
Start by rolling out a thick slab of clay, roughly 1 inch deep. Cut a rectangle approximately 3.5 inches by 5.5 inches to mimic the classic handheld shape. Round off the bottom two corners gently with your fingers while keeping the top corners relatively sharp. -
Define the screen area:
Roll out a thinner, separate rectangle of clay slightly smaller than the top half of your console. Press this firmly onto the top section to create the screen bezel. Use a modeling tool to smooth the seams where the two pieces of clay meet. -
Carve the screen inset:
Using a knife or a rectangular cutter, gently press into the center of the bezel you just made to mark the screen area. Carefully scoop out a shallow layer of clay here so the screen sits slightly recessed inside its frame. -
Score the side groove:
Take a needle tool and run a continuous line horizontally around the entire side edge of the console block to simulate the separation between the front and back casing.
Pro Tip: Clean Edges
To get cleaner edges on buttons like the D-pad, let the clay dry for about 30 minutes before cutting. It will be less sticky and hold sharp corners better than fresh wet clay.
Step 2: Adding Controls & Details
-
Create the D-pad:
Shape a small ‘plus’ sign from clay. It helps to cut two small rectangles and cross them rather than cutting a plus shape from a single piece, as it keeps the edges sharper. Attach this to the left side below the screen using a dab of water. -
Form the A and B buttons:
Roll two small, equal-sized balls of clay and flatten them slightly into discs. Attach these to the right side at a slight diagonal angle. Press them down gently so they look integrated but still raised. -
Add Select/Start buttons:
Make two tiny, pill-shaped ovals. Place these angled near the bottom center of the faceplate. Use a flat tool to sharpen their edges so they look like rubber buttons. -
Sculpt the detached controller:
Roll a thick log of clay and bend it into a wide chevron or boomerang shape. Flatten the front face slightly while keeping the back rounded and ergonomic. Smooth the ends into rounded grips. -
Detail the controller:
Add a circular D-pad on the left grip and four small button discs in a diamond pattern on the right grip using the same attachment method as the handheld console. Let all clay pieces dry completely for 24-48 hours.
Step 3: Painting & Finishing
-
Sand for texture:
Once fully dry, lightly sand the surfaces. Don’t aim for perfection; leaving a bit of surface texture enhances the stone-like, handmade aesthetic seen in the reference photo. -
Base coat the console:
Paint the entire body of the handheld console with an off-white or cream acrylic paint. I usually apply two thin coats rather than one thick one to avoid brush strokes. -
Paint the screen surround:
Mix a light grey paint and carefully fill in the bezel area around the screen. This mimics the classic grey plastic border of the original device. -
Color the buttons:
Paint the A and B buttons with a muted salmon or terracotta pink. Use a dark grey for the D-pad to create contrast against the cream body. -
Paint the controller:
For the separate controller, mix a soft sage green. Paint the entire body this color, then paint the four action buttons with contrasting colors—two salmon, two teal or dark green. -
Screen detail:
Paint the recessed screen area a muted olive-green tone to replicate the original LCD display. If you want it to look ‘off,’ keep it a solid matte color. -
Seal the work:
Finish both pieces with a matte spray varnish or brush-on matte sealant to protect the paint while maintaining that soft, non-glossy clay look.
Level Up: Audio Grille
Use a needle tool to poke a grid of 6 tiny holes at the bottom right corner of the handheld console before it dries. This creates a realistic speaker grille texture.
Place your finished retro set on your bedside table or desk for a touch of handmade gaming history

TRACK YOUR CERAMIC JOURNEY
Capture glaze tests, firing details, and creative progress—all in one simple printable. Make your projects easier to repeat and improve.
Cartridge Keychain Minis
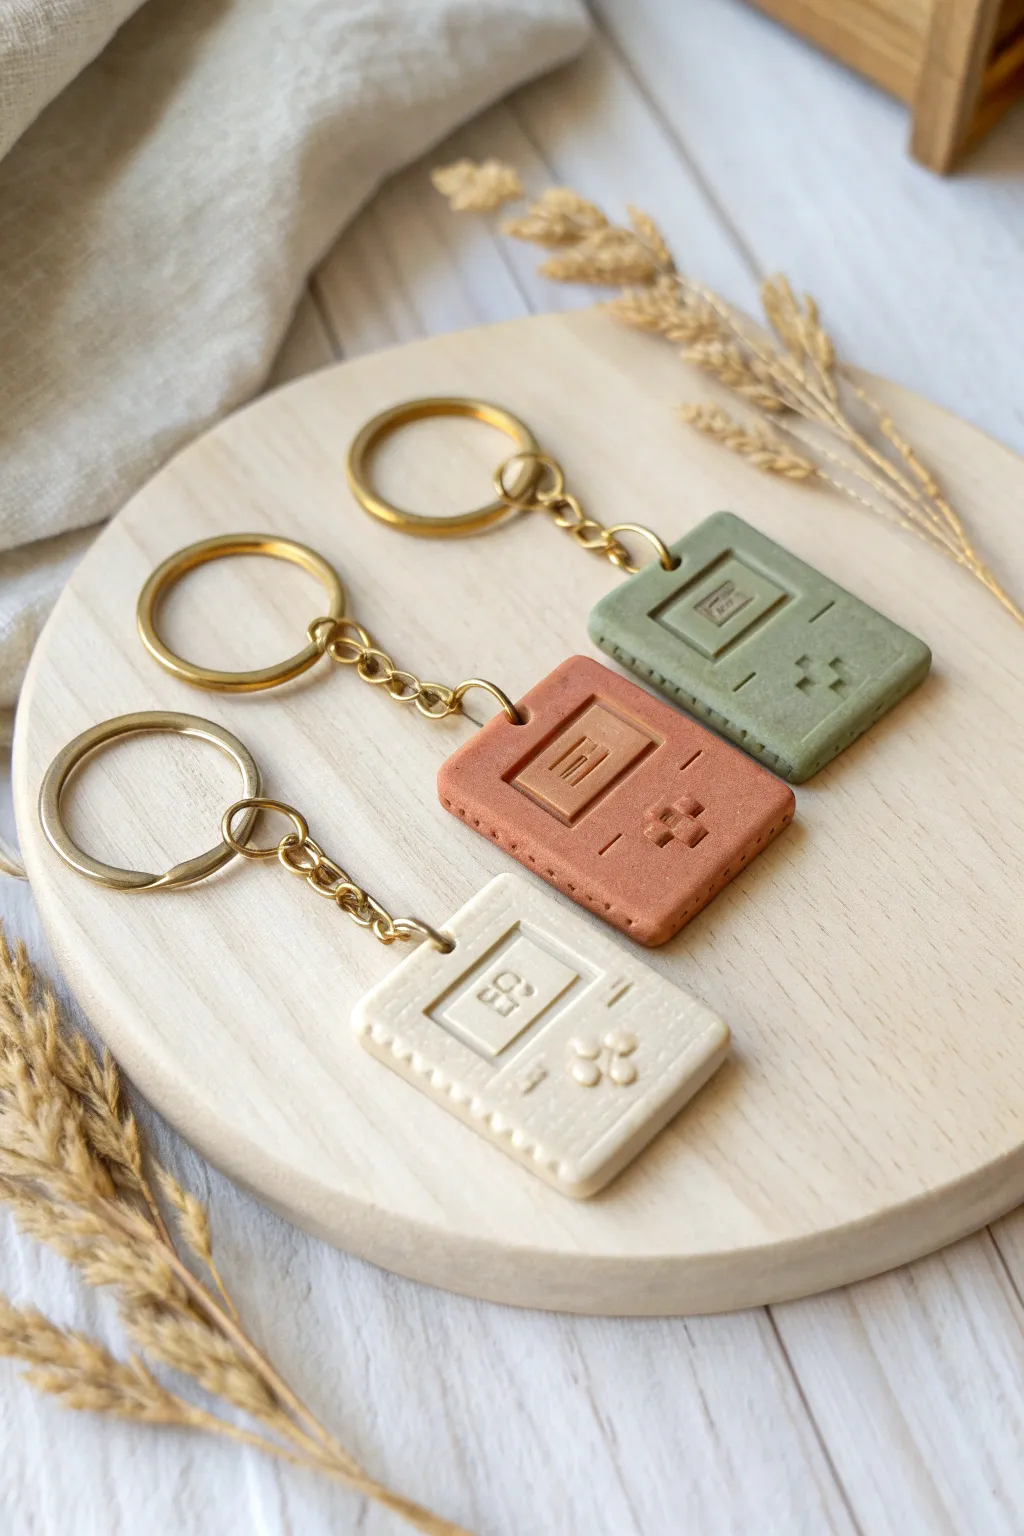
Capture the nostalgia of 90s gaming with these adorable, minimalist clay keychains. Modeled after the classic handheld console, these charms feature a soft, matte finish and subtle geometric details that look almost like sweet biscuits.
How-To Guide
Materials
- Polymer clay (olive green, terracotta, and cream colors)
- Clay roller or pasta machine
- Small rectangular cutter (approx. 1.5 inch x 2 inch)
- Needle tool or toothpick
- Small ball stylus tool
- X-Acto knife or craft blade
- Gold screw eye pins (3)
- Gold keychains with chain links
- Jewelry pliers
- Fine-grit sandpaper (optional)
- Parchment paper and baking sheet
Step 1: Creating the Base
-
Condition the clay:
Start by kneading your polymer clay until it is soft and pliable. You want a smooth consistency for the green, terracotta, and cream colors to prevent cracking. -
Roll out the slab:
Roll your clay out to a uniform thickness, about 1/4 inch (6mm). Using a pasta machine here helps ensure the surface is perfectly flat and even. -
Cut the rectangles:
Use your small rectangular cutter to punch out three base shapes. If you don’t have a cutter, measure and cut precise rectangles using a ruler and your craft blade. -
Soften edges:
Gently tap the sides and corners with your finger to round them off slightly. This gives the finished piece a softer, tactile feel rather than sharp, raw edges.
Clean Clay Tip
To keep lighter colors like cream pristine, clean your hands and work surface with baby wipes or rubbing alcohol before switching colors to avoid lint transfer.
Step 2: Adding Details
-
Outline the screen:
Using a blunt tool or the back of your knife, gently press a smaller rectangle into the upper half of the clay slab. Don’t cut through; just make an indentation. -
Create the screen interior:
Inside that first rectangle, press a slightly deeper, smaller square to represent the actual LCD screen area. -
Add screen glare:
Use your needle tool to sketch a tiny, angled line or two inside the screen area to mimic a reflection or digital text. -
Indent the D-pad:
On the lower left side, use a small square tool or the tip of your knife to press in a cross shape for the directional pad. -
Form the buttons:
On the lower right side, use your small ball stylus to press two circular indentations for the A and B buttons. Angle them slightly diagonally. -
Add the Select/Start buttons:
Use the very tip of a needle tool or knife to press two tiny, thin pill shapes near the bottom center for the ‘Select’ and ‘Start’ buttons. -
Texture the speaker:
In the bottom right corner, press a series of three or four small dots or lines to represent the speaker grill. -
Create decorative stitching:
I like to add a subtle texture around the very edge of the console. Use a needle tool to poke tiny, evenly spaced holes all along the perimeter, giving it a ‘stitched’ leather look. -
Insert hardware:
Screw a gold eye pin into the center of the top edge. Adding a drop of liquid clay or translucent lush on the threads helps secure it permanently during baking.
Step 3: Finishing
-
Bake the pieces:
Place your creations on parchment paper and bake according to your clay package instructions (usually around 275°F/135°C for 15-30 minutes). -
Cool down:
Let the pieces cool completely on the tray. Polymer clay is fragile when hot and hardens fully as it cools. -
Sand (optional):
If there are any rough fingerprints or lint, lightly buff the surface with fine-grit sandpaper for that professional matte finish seen in the photo. -
Attach the keychain:
Using your jewelry pliers, open the jump ring on the keychain assembly, loop it through the eye pin on your clay piece, and twist it securely shut.
Level Up: Screen Time
Mix a tiny amount of mica powder into liquid clay and fill the screen indentation before baking to create a glassy, ‘screen-on’ effect.
Now you have a set of retro gaming charms perfect for gifting to your player two
D-Pad and Button Stud Earrings
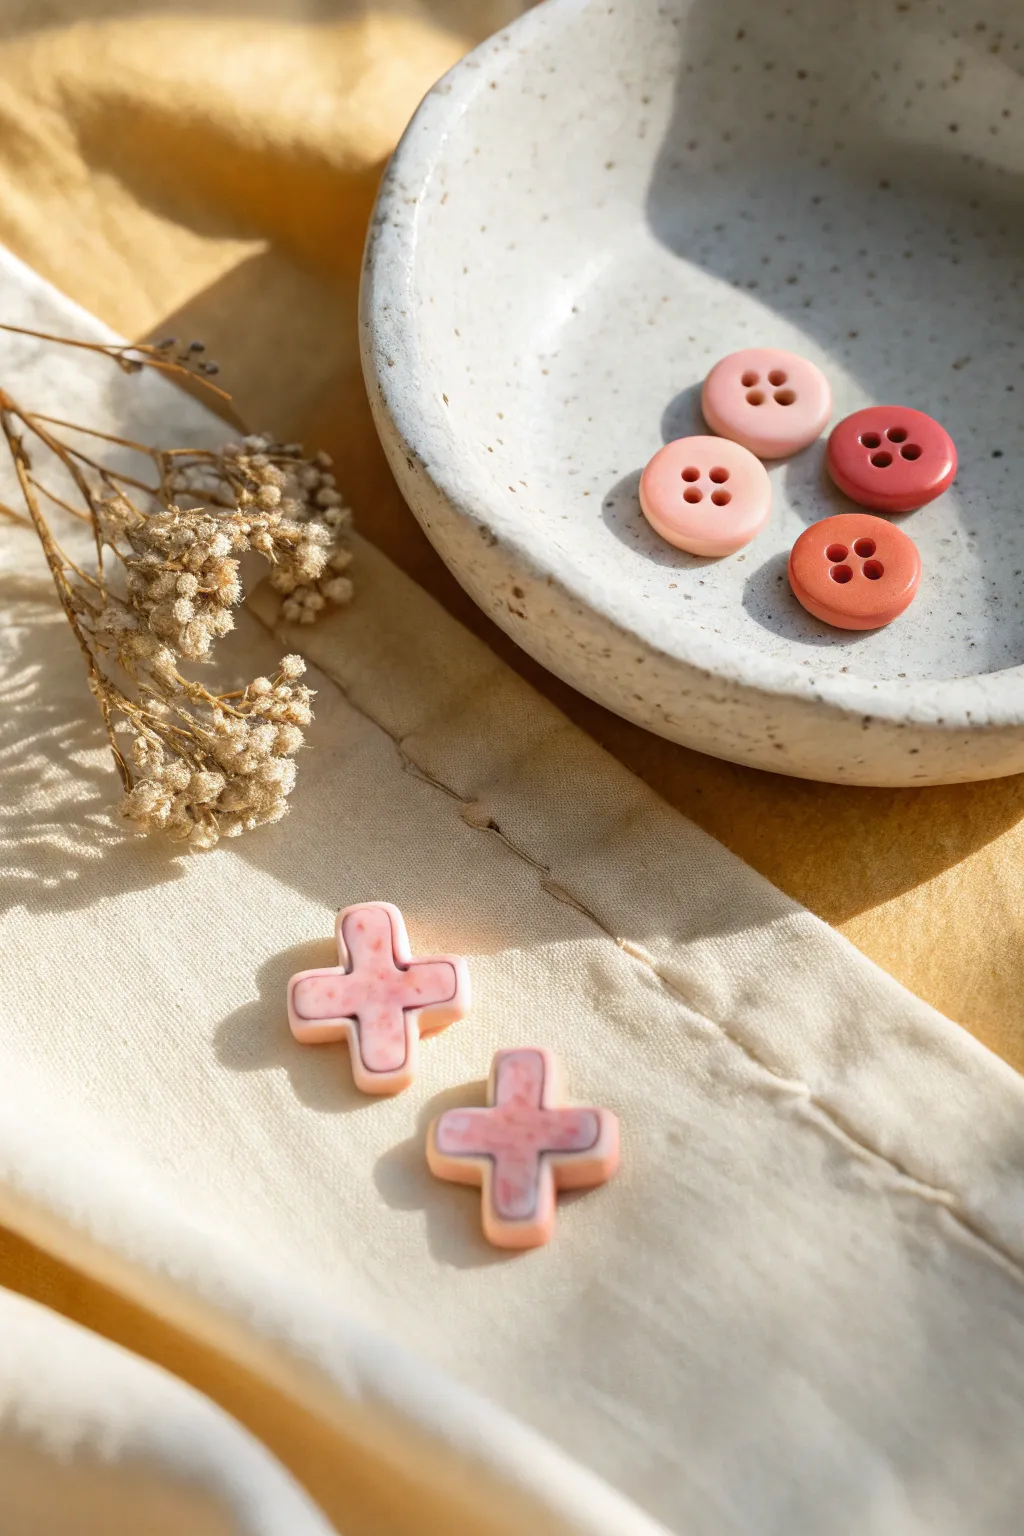
Level up your accessory game with these adorable polymer clay earrings inspired by classic game controllers. The set features four colorful action buttons alongside two classic D-pad crosses, all finished with a soft, matte texture that feels modern and chic.
Detailed Instructions
Materials
- Polymer clay in light pink, medium pink, coral red, and dark red (matte finish preferred)
- Liquid polymer clay or bake-and-bond
- Small round cutter (approx. 8mm)
- X-Acto knife or clay blade
- Needle tool or small ball tool
- Sandpaper (fine grit)
- Earring posts and backs (6 total)
- Super glue or E6000
- Rolling pin or pasta machine
- Clean ceramic tile or baking sheet
Step 1: Crafting the D-Pads
-
Mix the marbled center tone:
Start by taking a small amount of light pink clay and mixing in tiny specks of darker pink or red. Gently knead them together but stop before the color is uniform to create that subtle, speckled ‘stone’ effect seen in the cross centers. -
Shape the cross base:
Roll out a sheet of solid light pink clay to about 3mm thickness. Using your blade, cut out two identical plus-signs (‘+’). You can freehand this or print a small paper template to trace around for precision. -
Add the inner detail:
Roll out your speckled clay mix slightly thinner than the base. Cut narrower strips of this clay and overlay them onto the center of your plus-sign shapes, leaving a small border of the solid pink visible around the edges. -
Outline the shape:
To define the D-pad better, take a very thin snake of slightly darker pink clay and press it gently into the seam between the border and the inner cross. This simulates the separation of the buttons. -
Smooth the edges:
Use your fingertip or a soft silicone tool to gently round over the sharp corners of the cross so it looks like a comfortable, worn-in controller button.
Uneven Button Holes?
If your button holes aren’t symmetric, sketch a tiny ‘X’ lightly with a needle tool first. Use the four points of the X as a guide for where to press the holes.
Step 2: Making the Action Buttons
-
Prepare your colors:
Condition four shades of clay: a pale pink, a medium salmon pink, a warm coral, and a deeper red. Roll each color out to a uniform thickness of about 3mm. -
Cut the circles:
Using your small round cutter, punch out one circle from each color. If you don’t have a cutter this small, the end of a mechanical pencil cap or a straw can work in a pinch. -
Create the rim:
Gently press your thumb in the center of each circle to slightly depress it, leaving the very outer edge slightly raised. This mimics the tactile feel of a convex button. -
Add button holes:
Take a needle tool and carefully poke four symmetrical holes in the center of each button to create that classic sewn-button look. Ensure the holes don’t go all the way through if you want sturdy earrings, just deep enough to create shadows.
Step 3: Finishing and Assembly
-
Bake the batch:
Arrange all six pieces on your ceramic tile. Bake according to your brand of clay’s instructions (usually around 275°F/135°C for 15-30 minutes). -
Cool down:
Let the pieces cool completely. I like to let them sit inside the oven while it cools down to prevent any thermal shock cracking. -
Sand for smoothness:
Once cool, use fine-grit sandpaper to gently buff the edges and backs of the pieces. This gives them that professional, matte ceramic look shown in the photo. -
Attach the posts:
Apply a small dab of strong jewelry glue or E6000 to the flat pad of an earring post. -
Secure the backing:
Press the post firmly onto the center back of each clay piece. Let the glue cure fully (usually 24 hours) before wearing.
Glossy Power-Up
For a ‘shiny plastic’ controller look instead of matte ceramic, coat the finished baked pieces with a layer of UV resin or glossy polyurethane varnish.
Now you have a retro-gaming set perfect for mixing and matching with your favorite outfits
Handheld Console Phone Stand
Transform your desk setup with this nostalgic phone stand that mimics the look of a classic 90s handheld console. This project uses a stone-effect clay to create a sleek, minimalist tribute to retro gaming that doubles as functional decor.
How-To Guide
Materials
- Stone or granite effect polymer clay (e.g., Fimo Effect or Sculpey)
- Grey polymer clay (for buttons)
- Rolling pin or pasta machine
- Craft knife or clay blade
- Cardboard or cardstock (for templates)
- Ruler
- Sandpaper (various grits)
- Liquid clay or Bake & Bond
- Needle tool or toothpick
- Oven for baking
Step 1: Base Construction
-
Template Creation:
Begin by sketching a template on cardstock. You’ll need a rectangular shape for the console face (approximately 3.5 inches wide by 6 inches tall) with the top corners rounded off. You also need a base piece that is a thick, wedge-shaped block to support the weight. -
Prepare the Clay:
Condition your stone-effect clay until it is pliable. Roll it out into a thick slab, aiming for at least 1/4 inch (6mm) thickness to ensure the stand is sturdy enough to hold a phone. -
Cut the Main Panel:
Place your console template on the clay slab and cut around it cleanly with a clay blade. Smooth the cut edges with your finger to remove any sharp angles. -
Create the Screen Recess:
Measure your phone’s screen size. In the upper two-thirds of the clay panel, carefully cut out a rectangular window where the phone will sit. Since this is a stand, you aren’t cutting a hole all the way through; instead, create a raised border or simply embrace the flat surface if you want the phone to rest on top. -
Forming the Base:
Create the heavy base block. This should be a wedge shape—taller in the back and shorter in the front—about 1.5 inches tall at the rear. This angle is crucial so your phone leans back slightly. -
Adding the Lip:
Sculpt a small, raised ledge or lip at the very front of the base block. This little ridge is what will prevent the phone and the ‘console’ face from sliding forward. -
Speaker Grill Detail:
On the front of the lip you just made, use a needle tool or a small drinking straw to poke two rows of small holes. This mimics the classic speaker grill aesthetic.
Slumping Screens
If the upright panel droops while baking, prop it up from behind with a crumpled wad of aluminum foil or a ceramic mug to hold the angle until it hardens.
Step 2: Buttons and Assembly
-
Sculpting the D-Pad:
Switch to your stone-colored clay (or grey if you prefer contrast). Roll a small plus sign shape. Keep the edges sharp and boxy for that authentic 8-bit feel. -
Action Buttons:
Roll two small balls of grey clay and flatten them slightly into domes. These will be the A and B buttons. Adding a tiny texture or indentation in the center can add realism. -
Start and Select:
Form two very small, thin ovals from grey clay. These should be placed at an angle between the D-pad and the action buttons. -
Attach Components:
Use a small amount of liquid clay or Bake & Bond to attach the D-pad, round buttons, and oval buttons to the lower third of the main console panel. Press them down gently to ensure a good seal without deforming them. -
The Marriage:
This is the tricky part. You need to attach the console panel to the wedge base. Score the bottom edge of the panel and the top of the wedge where they meet. Apply liquid clay generously. -
Adding Support:
I usually add a small triangle or ‘rib’ of clay behind the panel where it meets the base, hidden from view. This prevents the face from flopping over during baking. -
Smoothing Seams:
Use a clay sculpting tool to blend the seam where the panel meets the base. You want it to look like one continuous, cast concrete object rather than two pieces stuck together. -
Final Texture Check:
Before baking, check for fingerprints. Because this is a stone effect, you can gently pat the surface with a stiff toothbrush or crumpled foil to hide imperfections and enhance the grainy look. -
Baking:
Bake the piece according to your clay manufacturer’s instructions. Since the base is thick, you may need to bake it longer at a slightly lower temperature to prevent cracking. Tent it with foil to stop scorching. -
Cooling and Sanding:
Let the stand cool completely in the oven. Once hard, use fine-grit sandpaper to smooth any rough edges on the sides or the speaker grill area for a professional finish.
Color Match
To get that perfect retro ‘grey-beige’ color if you can’t find it pre-mixed: mix 1 part white clay, a tiny dot of yellow, and a tiny streak of translucent clay.
Place your phone in its new retro home and enjoy a blast from the past every time you check your notifications
Mini Arcade Cabinet Coin Bank
This charming desktop accessory combines retro gaming nostalgia with practical savings. Crafted to look like a vintage arcade machine with a stone-like finish, it features colorful faux buttons and a classic directional pad.
Step-by-Step Tutorial
Materials
- Polymer clay (stone/granite effect)
- Polymer clay (red, yellow, teal, orange, black/dark grey)
- Rolling pin or clay machine
- Sharp craft knife or scalpel
- Ruler
- Cardboard (for template making)
- Square mini cutter (approx. 5mm)
- Liquid clay or bake-and-bond
- Sandpaper (various grits)
- Oven and baking tray
Step 1: Constructing the Core Structure
-
Create templates:
Begin by sketching the side profile of an arcade cabinet on cardboard to create a template. You’ll need two side panels with that distinctive angled ‘S’ curve, a back panel, a bottom base, a front kick plate, a control panel shelf, a screen frame, and a top roof piece. -
Roll out the main slabs:
Condition your stone-effect beige clay and roll it out to a consistent thickness of about 5mm (1/4 inch). This thickness is crucial for structural stability since it’s a hollow bank. -
Cut the panels:
Using your cardboard templates and a sharp knife, cut out all the beige body pieces. Be sure to cut straight down, not at an angle, so the seams will butt together cleanly. -
Create the coin slot:
On the top roof panel, carefully cut out a narrow rectangle for the coin slot. On the piece meant for the upper marquee (above the screen), cut a slightly wider, rounded slot for visual detail. -
Assemble the box:
Start assembling the structure. Apply liquid clay to the edges of the base and attach the back panel and side panels. Use blocks or tins to support the walls while the clay is raw. -
Add the front components:
Attach the kick plate (bottom front) and the angled control panel shelf. Score the clay lightly at the joining points and add more liquid clay to ensure a strong bond. -
Insert the screen:
Roll out a thin square of black or dark grey clay. Place this inside the cabinet against the back of the screen frame piece, then attach the frame to the main body. -
Finish the roof:
Place the top roof panel (with the coin slot) on the very top. Smooth all the outer seams with your finger or a clay tool to make the cabinet look like a single moulded piece.
Sagging Walls?
If the side panels droop while building, insert a crumpled ball of aluminum foil inside the cabinet as a temporary support structure. It can be baked right inside the clay.
Step 2: Adding the Retro Details
-
Make the keyboard buttons:
Roll out thin slabs of red, yellow, teal, and orange clay. Use a small square cutter (or a grid and knife) to cut roughly 20-25 tiny squares. I find keeping them slightly irregular adds to the handmade charm. -
Place the grid:
Apply a thin layer of liquid clay to the control panel shelf. arrange your colored squares in a grid pattern (roughly 5×4), leaving tiny gaps between them to mimic separate keys. -
Sculpt the D-Pad:
Using teal clay, cut out a thick cross shape. You can do this by cutting two rectangles and merging them, or cutting the cross from a single slab. Texture the surface slightly for a grippy look. -
Create the joystick button:
Roll a ball of red clay for the main action button and flatten the bottom slightly so it sits flush. Add two small, thin strips of black clay next to it to represent speaker vents or coin return slots. -
Attach lower controls:
Adhere the D-pad cross to the left side of the front kick plate and the red button to the right side using liquid clay. -
Add the marquee detail:
If you wish, add a thin, recessed rectangle in the space above the screen to mimic the lighted marquee area common on arcade machines.
Level Up: Audio
Hide a small, cheap sound module from a greeting card inside the body before sealing the roof. Position the button behind the red ‘joystick’ button for sound effects.
Step 3: Baking and Finishing
-
Reinforce the interior:
Before baking, double-check all internal seams. If you can reach them, add a small snake of clay along the inside joints to reinforce the box. -
First bake:
Bake the project according to your clay manufacturer’s instructions. A lower, slower bake is often safer for thick, hollow structures to prevent cracking. -
Cooling:
Let the bank cool completely in the oven. Removing it while hot can cause the heavy walls to warp. -
Sanding:
Once fully cured and cold, use fine-grit sandpaper to smooth out any fingerprints on the beige body. The stone-effect clay hides sanding marks very well. -
Matte finish:
Since this mimics stone or matte plastic, avoid glossy varnishes. Leave it natural or use a matte protective sealer if it will be handled frequently.
Start saving your spare change for your next crafting adventure with this retro masterpiece
RPG Inventory Icon Magnet Set
Bring your favorite role-playing game to your fridge with these nostalgic inventory icon magnets. These durable, colorful tokens look just like the items you’d find in your digital satchel, crafted from polymer clay with a clean, inlaid style.
Step-by-Step
Materials
- Polymer clay (green, brown, blue, yellow, red, white, grey, gold)
- Circle cookie cutter (approx. 2 inches)
- Rolling pin or clay pasta machine
- Precision craft knife (X-Acto)
- Needle tool or clay shaper
- Black acrylic paint
- Paper towels or wet wipes
- Strong round magnets
- Superglue or heavy-duty craft glue
- Glazing medium (matte or satin, optional)
- Baking sheet and parchment paper
Step 1: Base Preparation
-
Condition the Clay:
Begin by conditioning your colored clays warm in your hands until they are soft and pliable. You’ll need distinct colors for the backgrounds: forest green, royal blue, white, pale yellow, and a rust-red. -
Roll the Slabs:
Roll out each background color into a slab approximately 1/4 inch thick. A consistent thickness creates a uniform set, so using a pasta machine or thickness guides is helpful here. -
Cut the Coins:
Use your circle cutter to punch out the base tokens. Depending on the set you want, cut two greens (for sword and boot) and one of each of the other colors. Smooth the edges gently with your fingertip to remove any sharp lip left by the cutter.
Step 2: Creating the Icons
-
Sketch the Designs:
Lightly sketch your icon outlines directly onto the raw clay circles using a needle tool. Simple shapes work best: a sword, shield, potion bottle, chest, key, and boot. -
Carve the Outlines:
Using a very fine tool or the tip of your craft knife, deepen these sketched lines to create grooves. These grooves will eventually hold the black outline wash, so ensure they are clean and deep enough to catch paint. -
Add Raised Details:
For items like the shield’s rim or the sword’s hilt, roll out very thin snakes or small flat pieces of contrasting clay (like gold or grey). Press these firmly onto the base within your innovative outlines. -
Sculpt the Textures:
Add specific textures now. For example, press small lines into the boot’s fur cuff to simulate hair, or add tiny rivets to the treasure chest. Gentle pressure is key so you don’t distort the round base. -
Embed the Shapes:
Alternatively to layering on top, you can cut out the shape from the base (like the keyhole area) and insert the new color for a perfectly flat, inlaid surface. Smooth the seams carefully with the back of a spoon or a modeling tool.
Clean Lines Hack
Chill the clay in the fridge for 10 minutes before carving the initial icon outlines. The firmer clay resists dragging and allows for much sharper, cleaner cuts.
Step 3: Baking and Finishing
-
Bake the Tokens:
Preheat your oven according to your polymer clay package instructions (usually around 275°F or 130°C). Arrange the clay coins on parchment paper and bake for the recommended time, usually 15-30 minutes per 1/4 inch of thickness. -
Cool Down:
Allow the pieces to cool completely on a flat surface. Do not attempt to paint or glue while they are still warm, as the clay is slightly fragile until fully cured. -
Apply the Dark Wash:
Dilute a small amount of black acrylic paint with water. Brush this wash over the entire surface of a cooled magnet, ensuring the liquid flows into all the carved grooves and crevices. -
Wipe the Surface:
While the paint is still wet, quickly wipe the raised surfaces with a damp paper towel or wet wipe. I find that a light circular motion removes the surface paint while leaving the dark outlines bold and crisp in the recesses. -
Seal (Optional):
If you want extra durability or a specific shene, apply a thin coat of matte or satin clay varnish. This protects the paint wash from rubbing off over time. -
Attach the Magnet:
Apply a drop of strong superglue to the back of the clay coin. Press a round magnet firmly into the glue and let it set undisturbed for several hours to ensure a permanent bond.
Fixing Smudges
If the black paint dries on the surface before you can wipe it off, use a cotton swab dipped in rubbing alcohol to gently scrub away the excess without hurting the clay.
Now your fridge is fully equipped for your next culinary quest or daily adventure
Openable Loot Chest Trinket Box
Craft a charmingly rustic trinket box that looks like it was looted straight from an RPG dungeon. This polymer clay project features a realistic faux-leather texture and metallic gold accents, perfect for holding your tiniest treasures.
Step-by-Step Guide
Materials
- Terracotta or reddish-brown polymer clay
- Liquid polymer clay (optional, for bonding)
- Gold acrylic paint
- Small fine-point paintbrush
- Texturing tool (stiff toothbrush or sandpaper)
- Clay blade or craft knife
- Small brass hinge and latch set (for jewelry boxes)
- Super glue or E6000
- Rolling pin or pasta machine
- Oven and baking sheet
Step 1: Constructing the Base and Lid
-
Prepare the Clay slabs:
Condition your terracotta clay until soft and pliable. Roll it out into an even sheet, approximately 1/4 inch thick. You want it sturdy enough to hold its shape. -
Texture the surface:
Before cutting, press a stiff toothbrush or a piece of crumpled aluminum foil gently over the entire surface of the clay sheet. This creates that worn, leather-like grain visible in the reference. -
Cut the base pieces:
Cut out five rectangles for the bottom box: a base, two long sides, and two short sides. Measure carefully to ensure the sides will fit together flush on top of the base. -
Assemble the bottom box:
Join the four walls to the base. Score the edges slightly and use a dab of liquid clay to ensure a strong bond. Smooth the seams with your finger, but try to maintain the texture. -
Form the lid arches:
For the domed lid, cut two semi-circles that match the width of your box’s short sides. These will be the sides of the lid. -
Create the lid cover:
Cut a long rectangular strip that spans the length of the box and is wide enough to curve over the two semi-circles. -
Assemble the lid:
Drape the long strip over the two semi-circles to create the classic treasure chest dome. Blend the seams where the clay meets, smoothing the inside curve carefully. -
Refine the edges:
Check that the lid sits perfectly on the bottom box. If the clay has warped, gently reshape it now. I find lightly dusting the contact points with cornstarch stops them from sticking if you want to test the fit.
Step 2: Baking and Hardware
-
First Bake:
Place both the bottom box and lid on a baking sheet. Prop the curved lid up with some tissue paper inside so it doesn’t sag. Bake according to your clay package instructions. -
Cool down:
Let the pieces cool completely. The clay needs to be fully hardened before we attach the hardware. -
Attach the hinge:
Align your small brass hinge on the back of the box where the lid meets the base. Mark the holes, then use super glue to secure it in place. -
Attach the latch:
Glue the receiving part of the latch to the front center of the box base, and the hook part to the front center of the lid. Ensure they align perfectly so the box closes.
Sticky Situation?
If the lid sticks to the base during a test fit, dust the contact edges with cornstarch or baby powder. This acts as a release agent and washes off after baking.
Step 3: The Golden Details
-
Draft the strap design:
Using a very faint pencil line, mark where the vertical ‘metal’ straps satisfy the chest design—usually two on the sides and the central latch area. -
Paint vertical straps:
With a fine brush and gold acrylic paint, draw the vertical wavy lines up the sides of the box. The lines don’t need to be perfectly straight; a jagged edge mimics hammered metal. -
Paint lid details:
Continue these gold lines up and over the lid, ensuring they match up visually with the lines on the base when the box is closed. -
Highlight the rim:
Run a thin line of gold paint along the very rim of the lid where it meets the box, giving it a finished, metallic binding look. -
Add faux rivets:
Dip a toothpick in gold paint and add tiny dots along the straps or corners to simulate rivets or nails holding the chest together. -
Interior touch:
For the soft interior shown in the photo, you can either paint the inside a lighter reddish-pink or glue in small panels of felt for a luxurious lining.
Loot Drop Upgrade
Make tiny polymer clay coins or gems and glue a pile of them permanently to the bottom of the chest, so it always looks full of treasure when opened.
Now you have a perfect vessel for a single pearl or your favorite gaming dice
Boss Key Wall Hook
Bring a touch of fantasy adventure to your home with this oversized, rustic skeleton key crafted to look like weathered iron. It makes for excellent wall decor or a thematic prop for your next tabletop campaign.
Detailed Instructions
Materials
- Air-dry clay or polymer clay (terracotta or brown base preferred)
- Clay rolling pin
- Sculpting tools (needle tool, ball stylus)
- Thick jute twine or hemp cord
- Cotton macramé cord (beige/cream)
- Acrylic paints (burnt umber, rust orange, metallic bronze)
- Small paintbrush and a sponge
- Sandpaper (fine grit)
- Craft glue or strong adhesive
- Water bonding slip (if using air-dry clay)
Step 1: Sculpting the Head
-
Form the Base Loop:
Roll a thick snake of clay, approximately 3/4 inch in diameter. Join the ends to form a flattened oval or ‘loop’ shape for the top of the key. Smooth the seam thoroughly with a little water or slip so it disappears completely. -
Create the Attachment Point:
Make a smaller, secondary loop or arch out of clay and attach it firmly to the top center of your main loop. This is where the hanging twine will eventually thread through. -
Shape the Collar:
At the bottom center of the main loop, wrap a small, flat strip of clay to create a collar. This transition piece connects the head to the shaft. -
Refine the Surface:
Gently press a piece of rough sandpaper or a stiff-bristled brush against the wet clay. This texturing technique gives it an ancient, cast-metal appearance rather than looking like smooth plastic.
Cracking Up?
If hairline cracks appear while air-dry clay cures, mix a small amount of fresh clay with water to make a paste. Fill the cracks, smooth with a finger, and let dry again.
Step 2: Forming the Shaft and Teeth
-
Roll the Shaft:
Create a long, straight cylinder for the key’s shaft. It should be slightly thinner than the head but sturdy enough to support the weight. -
Add Decorative Rings:
Roll two or three very thin snakes of clay. Wrap them around the top of the shaft, just below where it will connect to the head, to mimic turned wood or forged metal details. -
Connect the Pieces:
Score and slip (scratch the surfaces and add water/clay mix) both the connecting points of the head and such shaft. Press them together firmly, smoothing the clay to ensure a strong bond. -
Draft the Teeth:
Cut a rectangular block of clay for the biting end of the key. Use your needle tool to carve out a ‘swastika’ or cross-shaped pattern, or keep it simple with a classic square notch design. -
Attach the Teeth:
Score and slip the side of the shaft near the bottom and attach your carved block. Blend the clay seams so it looks like one solid piece of metal. -
Reinforce the Structure:
If you are concerned about stability, carefully insert a stiff wire or bamboo skewer through the shaft before it dries. Let the entire piece dry completely—this may take 24-48 hours for air-dry clay.
Level Up: Magic Runes
Before the clay dries, gently press small rune stones or use a stamp to indent cryptic symbols along the shaft. After painting, fill these indents with glow-in-the-dark paint.
Step 3: Painting and Finishing
-
Base Coat:
Paint the entire key with a dark burnt umber acrylic paint. Ensure you get into all the textured nooks and crannies you created earlier. -
Add Rust Mechanics:
Mix a rust-orange color. Using a dry brush or sponge, lightly dab this color onto high points and random spots to simulate oxidation. -
Metallic Highlights:
I like to dry-brush a tiny amount of metallic bronze on the very edges of the key loops and teeth. This suggests where the ‘metal’ has been worn smooth from use. -
Seal the Work:
Apply a matte varnish spray to protect the paint job without making it look glossy and new.
Step 4: The Tassel Detail
-
Create the Hanger:
Cut a length of thick jute twine. Thread it through the top small loop of the key and tie it off so it can hang securely. -
Loop the Tassel Cord:
Take your cream cotton cord and loop a long piece around the ‘neck’ of the key (where the head meets the shaft). Use a lark’s head knot or a simple loop. -
Build the Tassel Body:
Cut 10-15 strands of cotton cord, roughly double your desired tassel length. Bundle them together. -
Attach and Wrap:
Use the cord hanging from the key to tie around the center of your bundle. Fold the bundle in half over the knot so all strands hang down. -
The Gathering Knot:
Take a separate piece of cord and wrap it tightly around the top of the bundle to form the ‘head’ of the tassel. Tuck the ends inside. -
Trim to Size:
Comb out the tassel strands with your fingers and trim the bottom in a straight line for a neat finish.
Hang your finished artifact near your gaming setup to remind everyone who holds the keys to the dungeon
Claymation-Style Creepy-Cute Monsters
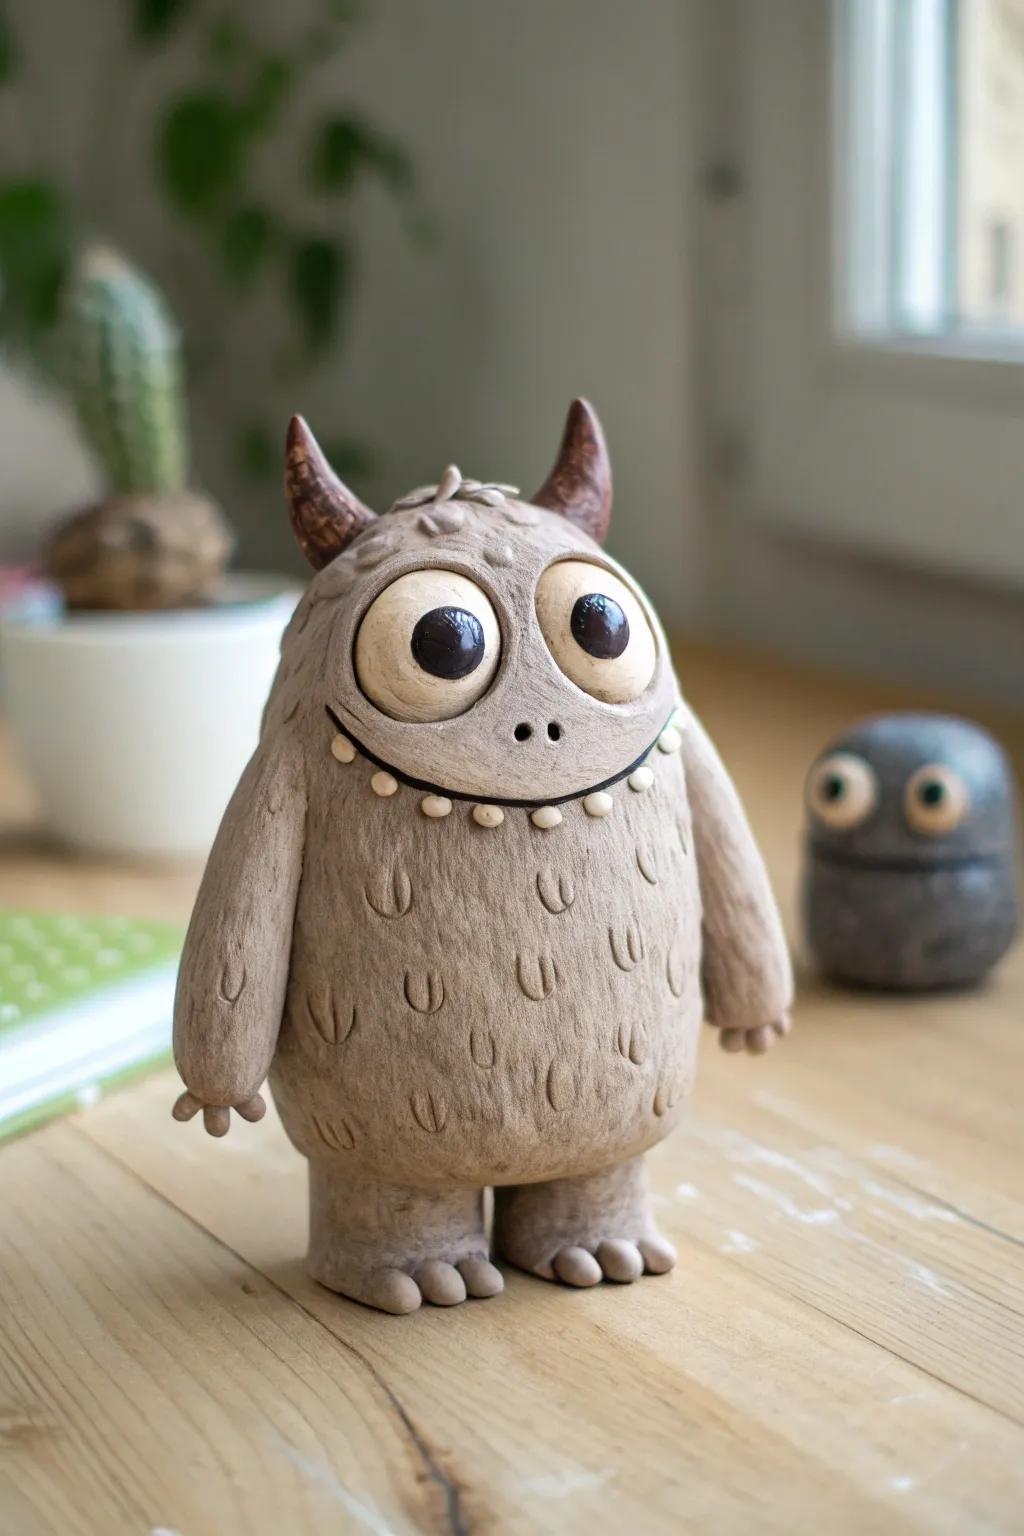
Bring your video game concepts to life with this charmingly chunky monster, perfect for a claymation-style adventure. Its textured ‘fur’ and oversized eyes give it a playful personality that bridges the gap between spooky and sweet.
Step-by-Step Guide
Materials
- Polymer clay (Beige/Tan for body, White for eyes/teeth, Dark Brown for horns/pupils)
- Aluminum foil (for armature core)
- Clay sculpting tools (needle tool, small loop tool, ball styluses)
- Acrylic rolling pin
- Gloss varnish (optional, for eyes)
- Soft pastel chalks or brown acrylic paint (for shading/antiquing)
- Oven for baking polymer clay
Step 1: Shaping the Base Body
-
Create a Foil Core:
Crumple a piece of aluminum foil into a firm, egg-shaped ball. This saves clay and keeps the figurine lightweight while baking. Make sure it’s tightly packed so there are no loose air pockets. -
Condition the Clay:
Warm up your beige or tan polymer clay by kneading it thoroughly in your hands until it’s soft and pliable. Roll it into a flat sheet about 1/4 inch thick using your acrylic roller. -
Cover the Core:
Wrap the clay sheet around your foil egg, smoothing the seams completely with your thumbs. Gently roll it on your work surface to create a seamless, slightly pear-shaped body that is wider at the bottom. -
Form the Legs:
Roll two short, thick sausages of beige clay for the legs. Press them firmly onto the bottom of the body so the monster stands stable. Blend the clay at the join so the legs look like an extension of the torso. -
Sculpt the Feet:
Flatten the ends of the legs slightly. Use a small tool to press indentations into the front edge to create three distinct, rounded toes on each foot.
Step 2: Adding Facial Features
-
Position the Eye Sockets:
Use a large ball tool or your thumb to press two shallow, large circular indentations into the upper half of the face where the eyes will sit. -
Create the Eyes:
Roll two balls of white clay that fit snugly into your sockets. Flatten them slightly as you press them in. They should be prominent and bulging. -
Add Pupils:
Take tiny pieces of dark brown or black clay, roll them into balls, and flatten them onto the white eyes. Off-center placement often gives a cuter, goofier expression. -
Sculpt the Mouth:
Use a needle tool or knife to carve a wide, curved smile line across the belly area. Deepen the line slightly to create a shadow. -
Add Teeth:
Roll tiny, rice-sized grains of white clay. Press them gently along the bottom edge of the smile line to create a row of small, rounded teeth. -
Nose and Horns:
Poke two small holes between the eyes for nostrils. For horns, shape two small cones of dark brown clay. Attach them to the top of the head, curving them slightly outward, and blend the base into the head.
Seamless Blending Tip
To smooth clay seams perfectly without fingerprints, apply a tiny drop of baby oil or clay softener to your finger before rubbing the joint.
Step 3: Texturing and Finishing
-
Attach the Arms:
Create two long teardrop shapes for arms. Attach the wider end to the shoulders and blend the seam. At the tips, use a knife tool to separate small, stubby fingers. -
Create Fur Texture:
I prefer to use a small U-shaped loop tool or the end of a straw cut in half for this step. Press shallow ‘U’ shapes all over the body clay in a random pattern to mimic tufted fur. -
Add Horn Detail:
Use a needle tool to scratch horizontal rings around the horns to give them a rough, organic growth texture. -
Shading (Optional):
Before baking, lightly brush crushed brown pastel chalk into the textured fur grooves and around the eyes to add depth and an aged look. -
Bake the Figurine:
Bake your monster according to the package instructions for your specific brand of polymer clay (usually 275°F/135°C for 15-30 minutes). Let it cool completely. -
Varnish touches:
Once cool, paint a layer of gloss varnish over just the eyes and the horns. This makes the eyes look wet and alive against the matte body.
Add a Companion
Create a smaller, rounder ‘minion’ monster using leftover grey clay, giving it mismatched eyes to contrast with your main creature.
Now you have a delightfully textured monster ready to star in its own stop-motion story
Mini Platformer Level Diorama in a Tin
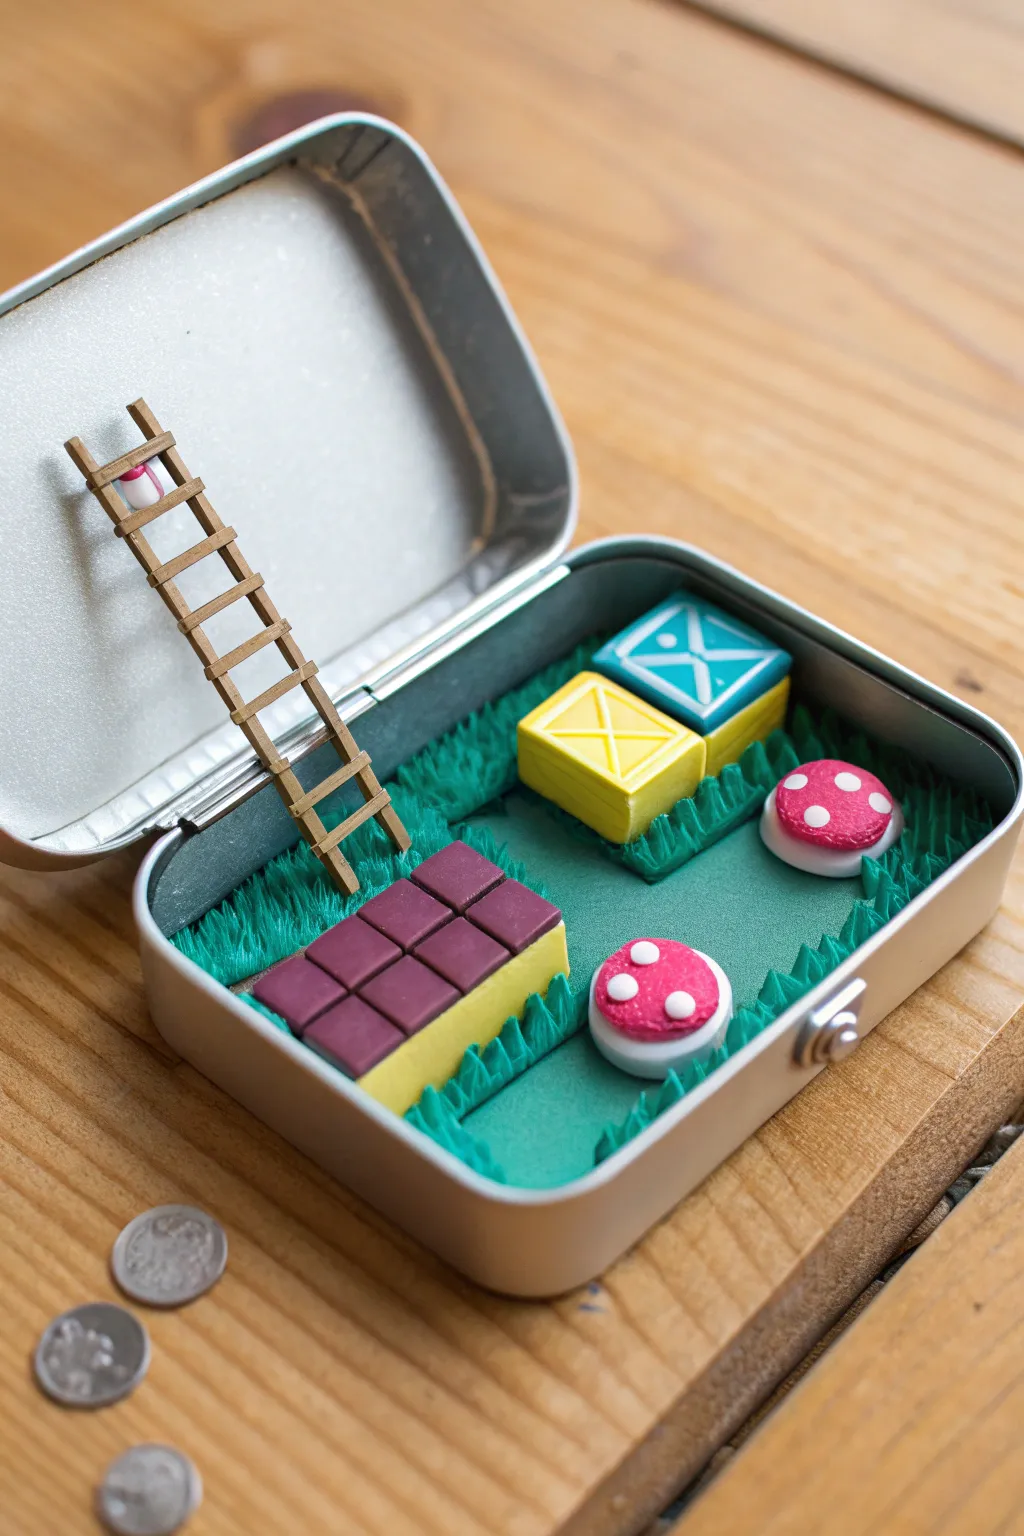
Turn an ordinary mint tin into a nostalgic gaming keepsake with this miniature polymer clay diorama. This tiny world features iconic elements like question blocks and mushrooms, all safely tucked away inside a portable metal case.
Step-by-Step
Materials
- Rectangular metal hinged tin (e.g., Altoids tin)
- Polymer clay (green, yellow, brown, red, purple, white, blue)
- Clay sculpting tools (needle tool, ball stylus)
- Rolling pin or pasta machine
- Liquid clay or bake-and-bond
- Craft knife
- Small square cookie cutter (optional)
- White acrylic paint (optional details)
- Superglue
- Sandpaper
Step 1: Preparing the Tin
-
Clean the Tin:
Thoroughly clean and dry your metal tin. If you want a smoother surface for the clay to adhere to, lightly sand the bottom interior of the tin with rough sandpaper to create some grip. -
Create the Base:
Roll out a sheet of green polymer clay to roughly 3mm thickness. Cut it to fit snugly into the bottom of the tin. Press it down firmly, smoothing out any air bubbles.
Sticky Situation?
If clay keeps sticking to your tools while making tiny details, dip the tool tip in water or cornstarch before shaping. This helps release the clay cleanly.
Step 2: Sculpting the Terrain
-
Texture the Grass:
To create the grass borders shown in the image, roll small snakes of green clay and press them along the edges of your base layer. Use a needle tool to pull up tiny spikes of clay, mimicking tufts of grass. -
Form the Brick Block:
Create a rectangular block using yellow clay for the base. Then, roll out a thin sheet of purple-brown clay and cut it into small squares. Arrange these squares in a grid pattern on top of the yellow block to look like bricks. -
Craft Question Blocks:
Form two small cubes—one yellow and one blue. Using a needle tool, gently etch a square border on the top face of each cube. -
Add Question Mark Details:
Roll extremely thin snakes of lighter clay (white or light yellow/blue) and carefully shape them into ‘X’ or question mark shapes inside your etched borders. Press them gently to bond.
Level Up: Hidden Coin
Hide a tiny magnet under the ‘question block’ and bake a tiny clay coin with a washer inside. Now you can magnetically attach a prize above the block.
Step 3: Accessories and Details
-
Make the Mushrooms:
Roll two small balls of white clay for stems and flatten them slightly. Create two red caps—one varying in size if desired—and place them on the stems. -
Dot the Mushrooms:
For the classic mushroom spots, roll tiny balls of white clay, flatten them into discs, and press three onto each red cap. -
Construct the Ladder:
Roll out two long, thin logs of tan or light brown clay for the ladder rails. Ensure they are long enough to reach from the tin floor to the open lid. -
Add Ladder Rungs:
Cut several short segments of the same brown clay. Carefully place them horizontally between the two long rails like rungs, pressing the joints together. You can add a tiny dab of liquid clay at the connection points for strength. -
Safety Check:
Before baking, place all your components (blocks, mushrooms) roughly where you want them inside the tin to ensure the lid can still close without crushing anything. However, do not bake them *inside* the tin just yet if you want easier painting access later.
Step 4: Baking and Assembly
-
Bake the Components:
Remove the loose pieces (blocks, mushrooms, ladder) and bake them on a separate tile according to your clay package instructions. Bake the tin with the green grass base inside as well. -
Cool Down:
Allow everything to cool completely. The metal tin will be extremely hot, so handle it with care. -
Glue the Scene:
Using strong superglue, attach the brick platform, question blocks, and mushrooms to the green base inside the tin. -
Attach the Ladder:
Glue the base of the ladder into the grass. Lean the top against the open lid. For a permanent display, glue the top to the lid; if you want to close the box, you might need to leave the ladder loose or hinge it carefully. -
Finishing Touches:
Check for any loose bits or needed paint touch-ups. I sometimes add a tiny bit of gloss varnish to the mushrooms to make them shine.
snap the lid shut on your pocket-sized world and enjoy your portable piece of gaming nostalgia