
If your pottery shelf is feeling a little too polite, it’s time to make something delightfully strange. These weird pottery ideas are all about taking familiar forms—mugs, bowls, planters—and giving them a tiny jolt of personality, humor, or mild chaos.
Face Mugs With Bug Eyes

This whimsical speckled mug features a sculpted relief face with wide staring eyes and a mischievous toothy grin. The rustic, earthy finish combined with the exaggerated facial features creates a charmingly weird piece that feels both ancient and playful.
Step-by-Step Tutorial
Materials
- Speckled buff stoneware clay
- Pottery wheel (or slab roller for hand-building)
- Needle tool
- Scoring tool (serrated rib)
- Wooden modeling tools
- Small loop tool
- Sponge
- Slip (clay slurry)
- Clear or transparent glossy glaze
- Small paintbrush
Step 1: Throwing the Base Form
-
Center and open:
Begin with about 1.5 lbs of speckled buff clay. Center it firmly on the wheel and open the clay to create a flat interior floor. -
Pull the walls:
Pull the walls up into a straight cylinder shape, aiming for a consistent thickness of about 1/4 inch. Avoid making the walls too thin, as you will need structural integrity to support the added facial features later. -
Refine the rim:
Compress the rim with a chamois or sponge to make it smooth and rounded for comfortable drinking. Cut the cylinder from the bat with a wire tool. -
Leather hard stage:
Allow the cylinder to dry to a leather-hard state. It should be firm enough to handle without deforming but soft enough to carve and attach clay to.
Attachment Issues
If facial features pop off during drying, your clay was likely too dry when attaching. Always score deeply and use plenty of slip on leather-hard clay.
Step 2: Sculpting the Face
-
Attach the nose:
Roll a carrot-shaped coil for the nose. Score and slip the center of the mug face and the back of the coil, then press it firmly into place. Blend the edges into the mug wall seamlessy. -
Form the eye sockets:
Roll two small balls of clay and flatten them slightly into ovals. Score and slip the area on either side of the nose bridge and attach these pads to form the base of the eyes. -
Define the eyelids:
Roll thin coils and wrap them around the eye pads to create defined eyelids. Use a small wooden modeling tool to blend the outer edges of the coils into the mug, keeping the inner eyelid line sharp. -
Adding pupils:
Use a small loop tool or the back of a paintbrush to gently press an indentation into the center of each eye. You can also add a tiny bead of clay in the center for a pupil, or simply carve a concentric circle. -
Create the smile:
Roll a long, thin coil for the mouth. Attach it in a wide U-shape beneath the nose. Blend the bottom edge downwards into the mug while keeping the top lip edge defined. -
Carve the teeth:
I prefer to use a needle tool for this delicate part. Gently incise vertical lines inside the mouth area to suggest teeth, followed by a horizontal line to separate the top and bottom sets. -
Refine the expression:
Use a damp sponge to smooth out any rough tool marks around the features. Accentuate the laugh lines around the eyes and nose with a modeling tool to give the face more character.
Step 3: Handle and Finishing
-
Pull a handle:
Pull a strap handle from a fresh pug of clay. Let it curve naturally and set it aside until it stiffens to the same leather-hard consistency as your mug. -
Attach the handle:
Score and slip the attachment points on the side of the mug (opposite the face) and the ends of the handle. Press firmly to attach and reinforce the join with a tiny coil of clay blended smooth. -
Slow drying:
Cover the mug loosely with plastic to ensure slow, even drying. This prevents the handle or facial features from cracking away from the body. -
Bisque fire:
Once bone dry, fire the piece in the kiln to a bisque temperature (usually cone 04). -
Apply wash (optional):
To highlight the textures, you can apply a red iron oxide wash into the crevices of the face and wipe away the excess with a damp sponge. -
Glaze and fire:
Dip or brush the entire mug with a transparent or clear glossy glaze. This allows the speckles of the clay body to show through. Fire to the clay’s maturity temperature (often cone 5 or 6).
Pro Tip: Eye Direction
Make the pupils look slightly in different directions or cross-eyed. This instantly amplifies the ‘weird’ and ‘bug-eyed’ look crucial for this style.
Enjoy sipping your morning coffee while staring back at this delightfully peculiar companion


Leggy Pots on Little Feet
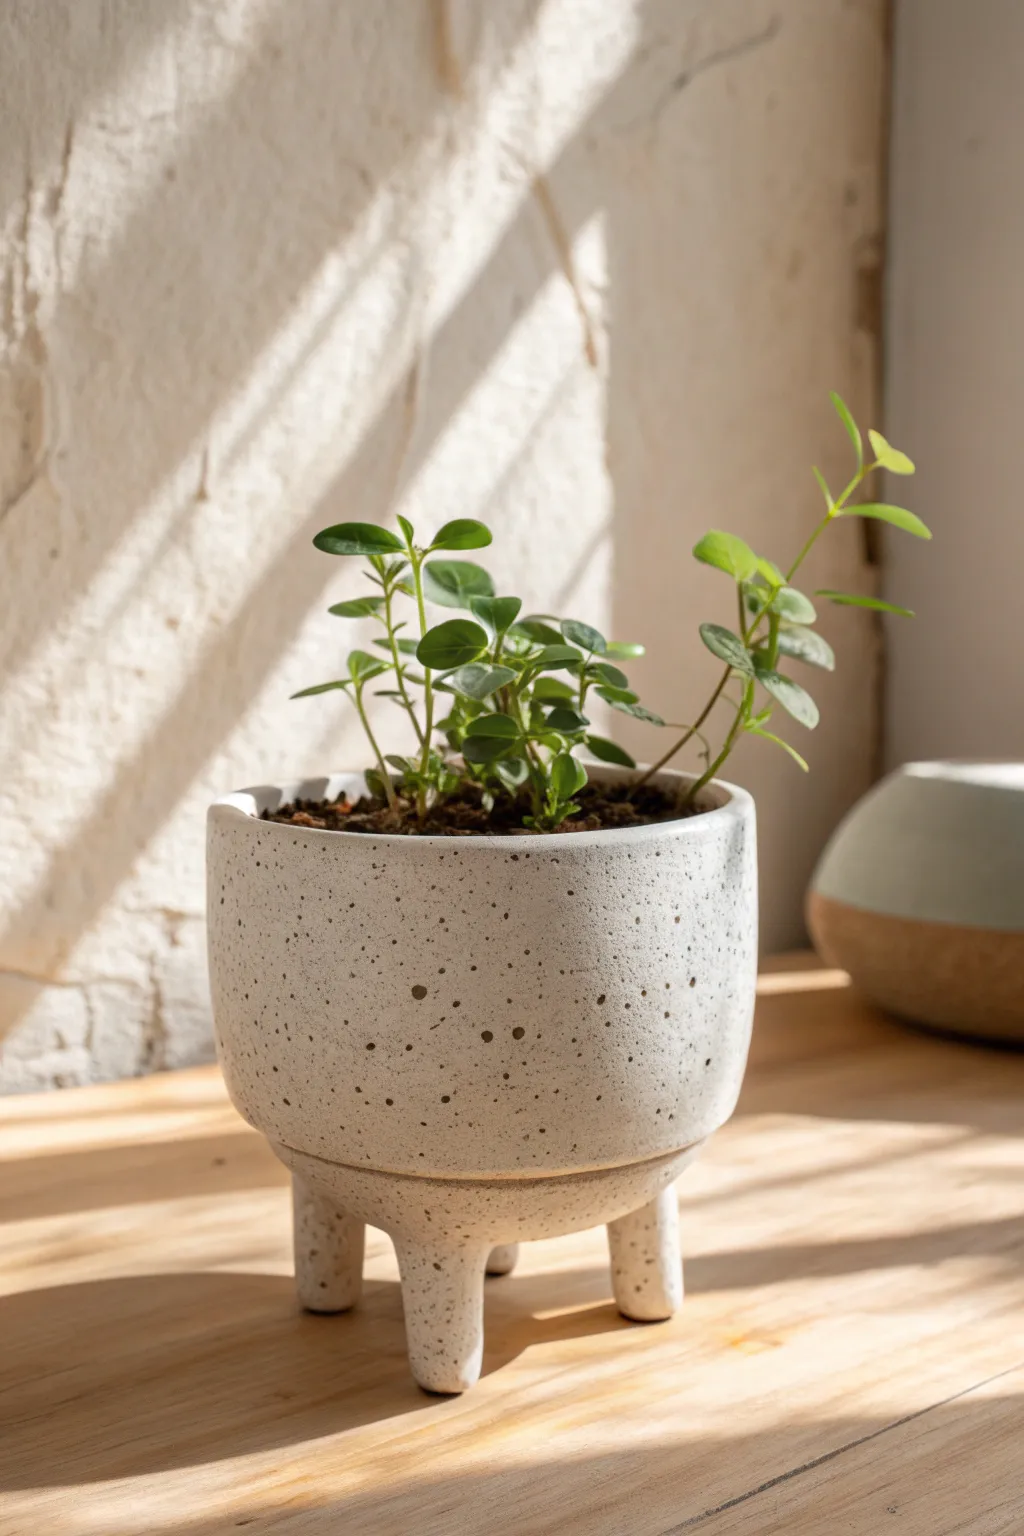
Elevate your favorite houseplant—literally—with this charming footed planter. Featuring a minimalist white glaze dappled with natural speckles and standing on three sturdy little legs, this project adds character and height to your windowsill garden.
How-To Guide
Materials
- Speckled clay body (stoneware recommended)
- Pottery wheel
- Throwing tools (sponge, wire cutter, rib)
- Trimming tools
- Needle tool
- Scoring tool or serrated rib
- Slip (made from your clay body)
- White matte glaze
- Kiln access
Step 1: Throwing the Bowl
-
Center the Clay:
Begin with a ball of speckled clay, weighing about 1.5 to 2 pounds. Thwack it onto the center of your wheel head and use water and firm pressure to center it perfectly. -
Open the Form:
Open the clay down to the bat, leaving about a half-inch of thickness for the floor. Since we are adding feet later, we don’t need a trimming foot ring, but we do need a sturdy bottom. -
Pull the Walls:
Pull the walls up vertically. Aim for a simple cylinder shape initially, keeping the walls even from bottom to top. -
Shape the Curve:
Using a rib on the inside and a sponge on the outside, gently belly out the form. You want a subtle, rounded curve at the bottom that straightens out near the rim, creating a slight U-shape. -
Refine the Rim:
Use a chamois or your sponge to compress and smooth the rim. A slight inward bevel looks nice on this style of pot. Wire cut the pot from the bat and set it aside to dry to leather-hard.
Wobbly Pot?
If the dried legs are uneven after firing, use a piece of sandpaper or a diamond sanding pad on a flat surface to grind down the longest leg until it sits perfectly flat
Step 2: Creating the Feet
-
Roll a Coil:
While the main pot dries, roll out a thick coil of the same clay, roughly an inch in diameter. -
Cut the Segments:
Cut three equal segments from the coil, each about 1.5 to 2 inches long. These will become the legs. -
Shape the Feet:
Tap one end of each segment onto the table to flatten it slightly—this will be the part that touches the shelf. Round over the edges so they look organic rather than sharp. -
Allow to Stiffen:
Let these leg segments dry until they match the moisture content of your pot (leather-hard). If they are too soft, the pot will slump.
Level Up: Texture
Before the clay dries, gently tap the outside with a stiff bristle brush or a rock to give the surface a pitted, stone-like texture that the glaze will break over comfortably
Step 3: Assembly and Trimming
-
Trim the Base:
Once the pot is leather-hard, flip it over onto a foam bat or Giffin Grip. Trim the bottom curve to match the interior shape, ensuring the bottom is rounded and smooth. -
Mark Leg Positions:
Flip the pot upside down. Divide the base into thirds visually and mark three spots where the legs will attach. They should be somewhat central but wide enough to provide stability. -
Score and Slip:
Vigorously score the attachment points on the pot and the top of each leg. Add a generous amount of slip to both surfaces. -
Attach the Legs:
Press the legs firmly onto the base. give them a little twist to lock them in. I usually check the profile at this stage to make sure they are vertical and not splaying out. -
Blend the Seams:
Use a modeling tool or your thumb to drag clay from the leg onto the pot, blending the seam until it’s invisible. Smooth the join with a damp sponge. -
Level Check:
Flip the pot right-side up carefully. Press gently down on the rim to ensure all three feet are touching the table evenly. Adjust as needed.
Step 4: Glazing and Firing
-
Bisque Fire:
Let the piece dry slowly and completely before loading it into the kiln for a bisque fire (usually Cone 04 or 06). -
Wax the Feet:
Apply wax resist to the bottom of the feet to prevent them from sticking to the kiln shelf. -
Apply Glaze:
Dip the entire pot into a matte white glaze. This semi-opaque finish allows the natural speckles of the clay body (iron pyrite) to burn through during the firing. -
Clean Up:
Wipe back any glaze drips from the feet with a damp sponge. -
Final Fire:
Fire the piece to maturity (Cone 5, 6, or 10 depending on your clay). The heat will draw the dark speckles through the white glaze.
Pop in a small herb or succulent and enjoy the whimsical lift this planter brings to your space


Eye Contact Espresso Cups
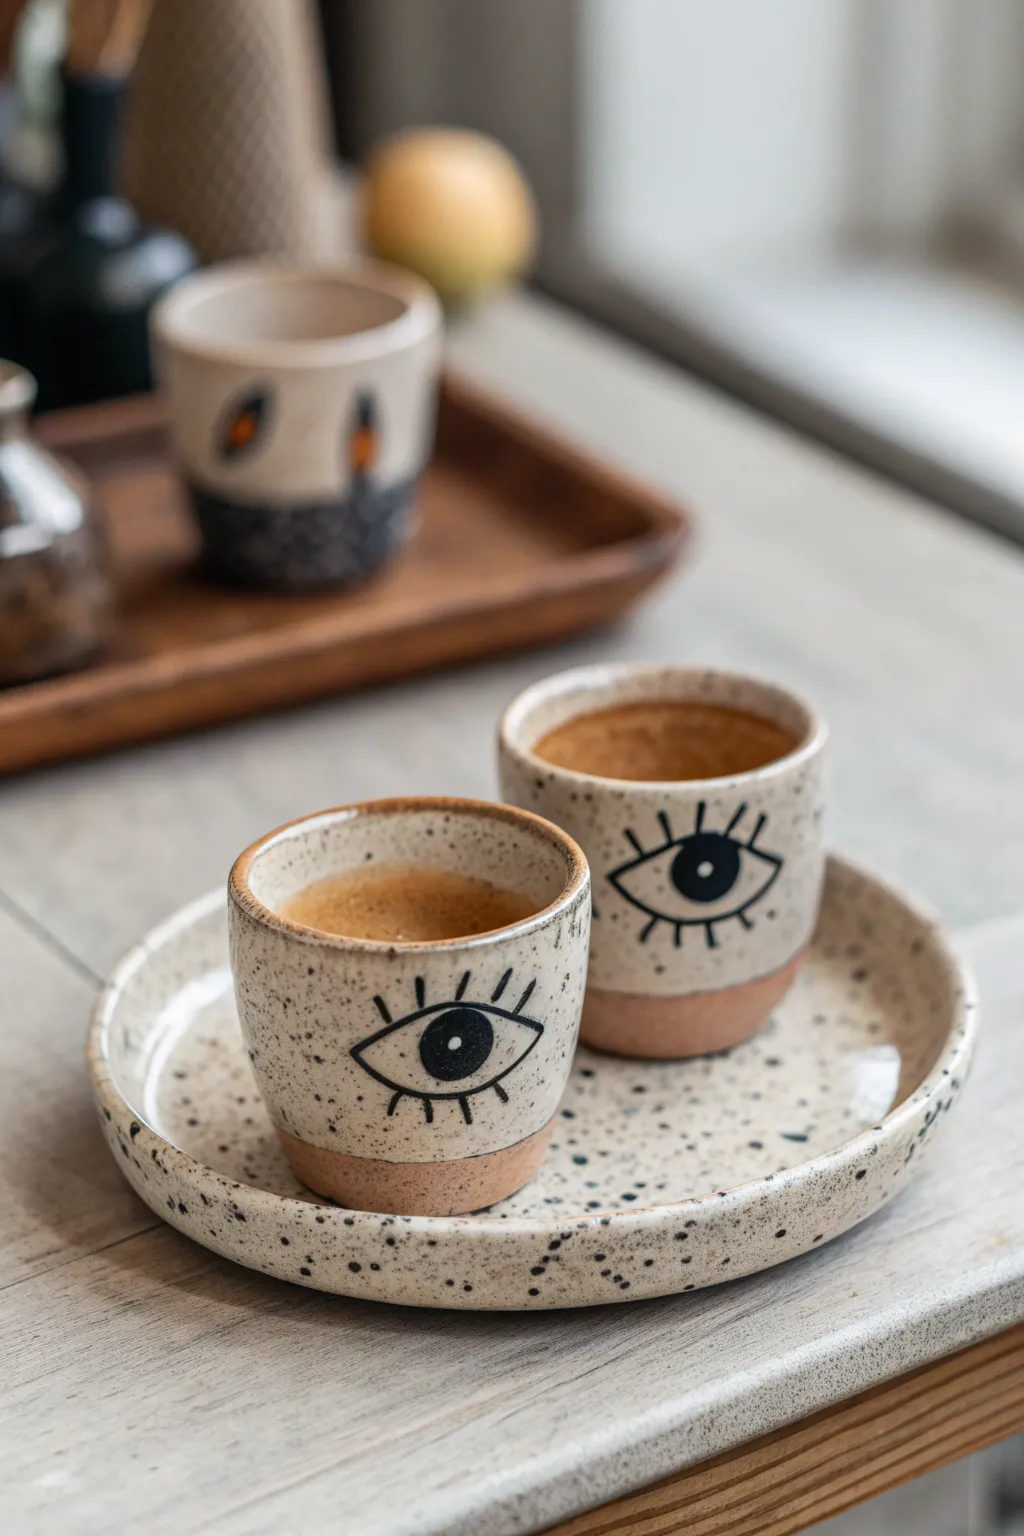
Elevate your morning ritual with this whimsical ceramic set that literally looks back at you. These handleless espresso cups feature a rustic speckled glaze, raw clay bases, and distinctively bold eye illustrations for a touch of surrealist charm.
Step-by-Step Tutorial
Materials
- Speckled stoneware clay (beige firing)
- Pottery wheel
- Throwing tools (sponge, needle tool, rib, wire cutter)
- Trimming tools
- Black underglaze
- Fine detail paintbrush (liner brush)
- Clear matte or satin glaze (food safe)
- Kiln
- Wax resist (optional)
Step 1: Throwing the Forms
-
Wedging:
Begin by thoroughly wedging your speckled stoneware clay to remove any air bubbles. Portion out three balls of clay: two smaller ones (approx. 250g each) for the cups and one medium ball (approx. 400g) for the saucer plate. -
Centering the cups:
Attach one of the small balls to the wheel head. Cone it up and down to center it, then open the clay, keeping a fairly narrow floor for an espresso cup shape. -
Pulling the walls:
Pull the walls up vertically, aiming for a height of about 2.5 to 3 inches. Shape the vessel into a cylinder with slightly straight sides, perhaps tapering in just barely at the rim to keep the espresso heat contained. -
Smoothing the rim:
Use a chamois or a piece of plastic to compress and round the rim. This is crucial for drinking comfort since these cups have no handles. -
Throwing the saucer:
Center the larger ball of clay and flatten it into a wide puck. Open it gently, leaving enough thickness in the floor for trimming later. Pull a short, shallow rim upwards to create a classic saucer lip. -
Drying to leather hard:
Wire the pieces off the bat and let them dry slowly until they reach a leather-hard state. They should be firm enough to handle without deforming but still cool to the touch.
Steadier Lines
Rest your pinky finger against the cup while painting the eye. This anchors your hand and prevents shakes, giving you crisp, confident brushstrokes.
Step 2: Trimming and refining
-
Centering for trimming:
Invert your cups onto the wheel head. Use small lugs of clay to secure them in place. -
Defining the foot:
Trim the excess clay from the bottom. For this specific look, you want to leave a distinct, unglazed band at the bottom, so ensure the transition from the wall to the foot is clean and sharp. -
Trimming the saucer:
Repeat the process for the saucer, carving a neat foot ring that mirrors the aesthetic of the cups. Smooth any rough grog with a damp sponge or a rubber rib.
Step 3: Decoration and Glazing
-
Bisque fire:
Load your bone-dry pieces into the kiln and bisque fire them (usually to Cone 04). This hardens the clay and prepares it for glazing. -
Waxing the base:
Apply wax resist to the bottom half-inch of the cups and the foot of the saucer. This ensures that the raw, earthy clay remains visible, creating the two-toned effect seen in the photo. -
Dipping the glaze:
Dip the cups and the saucer into a transparent or semi-transparent matte glaze. If your clay isn’t naturally speckled, use a ‘speckled white’ glaze instead. Wipe away any drips that run onto the waxed area. -
Sketching the design:
Once the glaze is dry to the touch, you can lightly sketch the eye design using a soft pencil. The graphite will burn off in the kiln, leaving only your painted lines. -
Painting the eye:
Using black underglaze and a liner brush, paint the eye motif directly over the unfired glaze (majolica style) or onto the bisque if using a transparent glaze over it. Start with the football-shaped outline of the eye. -
Adding pupils:
Fill in a solid black circle in the center. I find it helps to rotate the cup slightly while holding the brush steady to get a rounder pupil. -
Adding lashes:
Paint straight, radiating lines for the eyelashes. Keep them fairly graphic and evenly spaced—about 5 or 6 lashes on both the top and bottom lids creates that bold look. -
Final wipe:
Check the unglazed raw bottoms one last time. Use a damp sponge to clean off any stray glaze specks that might have settled on the textured clay during handling. -
Glaze fire:
Fire the pieces again to the maturation temperature of your specific clay and glaze (typically Cone 5 or 6 for stoneware). Allow the kiln to cool completely before opening.
Underglaze smudging?
If the black underglaze runs during firing, add a tiny bit of clear glaze to the underglaze mixture before painting. This acts as a flux to bind it.
Brew a fresh shot of espresso and enjoy the attentive company of your new ceramic set


Pinch Pots With Weird Noses
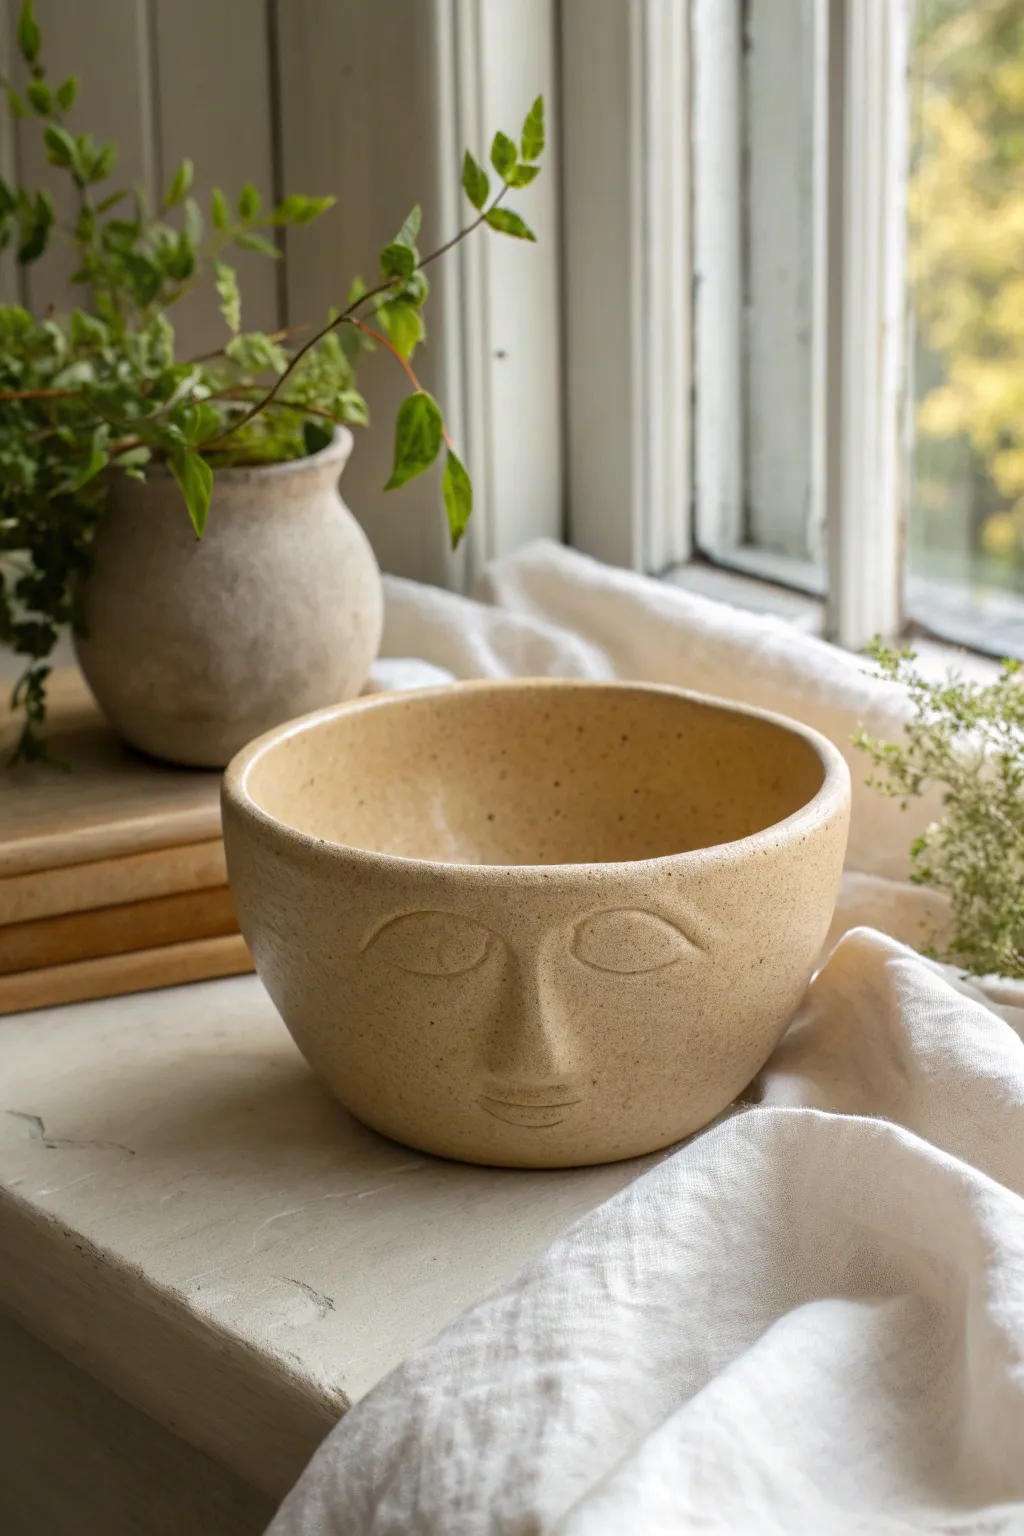
This serene, shallow bowl features a softly sculpted face emerging directly from the vessel’s wall, offering a peaceful presence to your home decor. Using a speckled stoneware clay body creates a natural, earthy finish that highlights the gentle curves of the nose and slumbering eyes.
Detailed Instructions
Materials
- Speckled stoneware clay (approx. 1.5 lbs)
- Small wooden sculpting tool
- Metal kidney rib
- Serrated rib or scoring tool
- Rubber finishing rib
- Needle tool
- Sponge
- Matte clear glaze or white satin glaze
Step 1: Forming the Base
-
Prepare the Clay:
Wedge your clay thoroughly to remove air bubbles and create an even consistency, then form it into a smooth ball about the size of a grapefruit. -
Open the Pinch Pot:
Hold the ball in one hand and press your thumb into the center, stopping about a half-inch from the bottom. This thickness is crucial to support the upcoming facial features. -
Pinch the Walls:
Gently pinch and rotate the clay between your thumb and fingers, working from the bottom up. Aim for a wide, open bowl shape rather than a tall cup. -
Assess Thickness:
Keep the walls slightly thicker than a standard bowl—about 3/8 inch—especially on the side where you plan to sculpt the face immediately, as you’ll need that excess clay to push outward. -
Smooth the Interior:
Use a damp sponge or a flexible rubber rib to compress and smooth the inside of the bowl, ensuring a clean curve before you start altering the exterior.
Push From Within
To get a natural look, support the nose from the inside of the bowl with one hand while shaping the outside. This creates a corresponding concave shape inside.
Step 2: Sculpting the Face
-
Mark Feature Placement:
Lightly scratch guidelines for the nose, eyes, and mouth with a needle tool. The nose should be centered, with the eyes placed evenly on either side. -
Build the Nose Bridge:
If your wall is thick enough, firmly push the clay from the *inside* of the bowl outward to create the protrusion for the nose. If the wall is thin, score the surface and add a small coil of clay, blending it seamlessly into the bowl’s curve. -
Define the Nostrils:
Using a small wooden tool, carve underneath the nose protrusion to suggest nostrils without making deep holes. Keep the bridge straight and blending into the forehead area. -
Add the Eye Mounds:
Take two small, equal balls of clay, flatten them slightly into ovals, and score and slip them onto the marked eye areas. These will become the eyelids. -
Carve the Eyelids:
Use a modeling tool to press a curved line across the bottom of each oval mound, defining the closed eyelid shape. Smooth the top edge into the forehead so it looks like a natural brow bone. -
Sculpt the Mouth:
Below the nose, add a very small, flat lozenge of clay for the lips. Blend the edges, then use a needle tool to gently press a horizontal line for the mouth opening. -
Refine the Expression:
I like to use a damp contour sponge to soften all the hard carving lines at this stage. The goal is a feature that looks like it is pressing through the clay, not stuck on top. -
Shape the Eyebrows:
Instead of adding clay, use a rounded wooden tool to indent the space just above the eyes, creating a shadow that implies the eyebrow ridge.
Step 3: Finishing and Glazing
-
Dry Slowly:
Cover the bowl loosely with plastic to let it dry very significantly slower than usual. The added clay thickness of the face can cause cracking if it dries too fast. -
Bisque Fire:
Once bone dry, fire the piece to cone 04 (or your clay body’s bisque temperature) in the kiln. -
Glaze Application:
Pour a matte clear or satin white glaze inside the bowl and swirl to coat. Dip the exterior or brush the glaze onto the face carefully. -
Reveal the Speckles:
If your glaze is too thick, it will hide the clay’s speckles. Wipe the face gently with a damp sponge after glazing to thin the application slightly on the high points (nose, brows), allowing the clay texture to show through. -
Final Fire:
Glaze fire to cone 5 or 6 (depending on your clay). The matte finish will give it that stone-like, ancient artifact appearance.
Fixing Cracks
If hairline cracks appear around the added nose or eyes during drying, compress the area with a damp spoon back immediately to seal them before firing.
Enjoy using your meditative face bowl as a unique catch-all or a peaceful planter

The Complete Guide to Pottery Troubleshooting
Uncover the most common ceramic mistakes—from cracking clay to failed glazes—and learn how to fix them fast.
Wobbly, Intentionally Wrong Vases
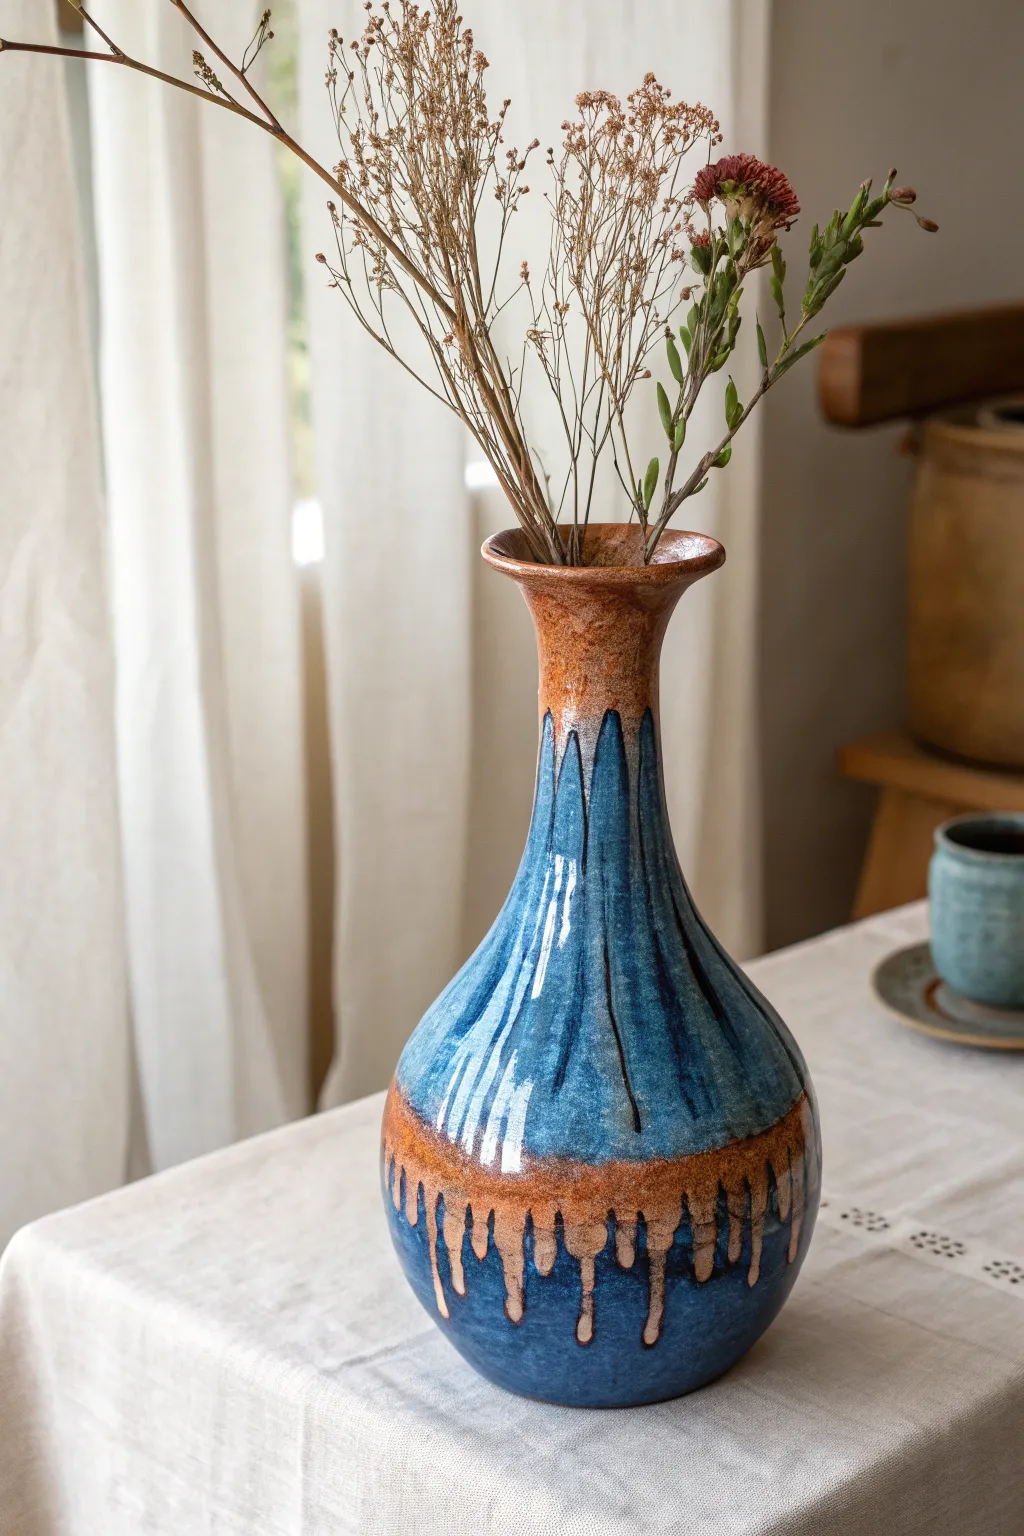
Embrace the beauty of controlled chaos with this striking bottle vase, featuring a mesmerizing interaction between glazes. The project focuses on layering techniques to achieve those distinct, gravity-defying drips over a classic, handmade form.
How-To Guide
Materials
- Stoneware clay (smooth or lightly groggy)
- Pottery wheel
- Throwing tools (sponge, rib, wire cutter)
- Trimming tools
- Bisque firing kiln access
- Glaze firing kiln access (Cone 6 or 10 depending on clay)
- Copper/rust colored glaze (base)
- Glossy cobalt or floating blue glaze (top coat)
- Wax resist
- Glaze brush or ladle
Step 1: Throwing and Shaping
-
Center the clay:
Start with a well-wedged ball of stoneware clay about 3-4 lbs. Center it firmly on the wheel head, ensuring there is no wobble before opening. -
Open and pull:
Open the clay and begin pulling up the walls into a cylinder. Keep the walls even, but leave slightly more thickness near the bottom to support the belly of the vase. -
Shape the belly:
Using a rib tool on the inside and gentle pressure from the outside, push the clay outward to form a rounded, bulbous bottom. I find working slowly here prevents the walls from collapsing. -
Collar the neck:
Gently collar the top section inward to narrow the neck. Do this in stages, compressing the rim frequently to keep the clay particles tight and prevent buckling. -
Refine the rim:
Once the neck is tall and slender, flare the rim outward slightly to create a distinct lip that will catch the glaze later. Smooth the surface with a metal rib to remove throwing lines. -
Dry and trim:
Wire the pot off the wheel and let it dry to a leather-hard state. Invert it on the wheel (using a chuck if necessary for the narrow neck) and trim a clean foot ring.
Glaze Viscosity Tip
Test your glaze combo on a vertical test tile first. If the blue absorbs the copper too much, apply the copper drips *over* the blue layer instead of under.
Step 2: Glazing the Drips
-
Bisque fire:
Fire the piece to cone 04 (or your clay’s specific bisque temperature). Ensure the piece is clean of dust before starting the glazing process. -
Apply wax resist:
Paint a generous layer of wax resist on the foot ring and about 1/4 inch up the bottom of the pot. This prevents the runny glaze from fusing your vase to the kiln shelf. -
Pour the interior:
Pour the copper/rust glaze inside the bottle, swirl it to coat the entire interior surface, and pour out the excess. Wipe any drips off the rim immediately. -
Dip the top section:
Holding the vase by the foot, dip just the neck and upper shoulder into the copper/rust glaze. Alternatively, brush two thick coats onto the neck and down onto the shoulder. -
Apply the bottom band:
Brush a wide band of the same copper/rust glaze around the very bottom of the vase, near the foot. Leave the middle section of the belly bare bisque for now. -
Apply the blue glaze:
Using a ladle or by dipping, apply the glossy blue glaze over the entire body, overlapping the copper glaze at the neck and stopping just above the bottom copper band. -
Create the drip effect:
Load a brush heavily with the copper glaze. Dab generous globs of it right at the transition line where the blue glaze meets the bottom copper band. -
Encourage running:
If your glazes are stable, you might need to add a flux or ‘runny’ clear glaze on top of those copper globs to ensure they travel down during firing. -
Clean the foot again:
Double-check the foot ring and the waxed area. Use a sponge to wipe away any stray droplets of glaze that might have splashed near the bottom. -
Glaze fire:
Load the kiln, making sure to place a ‘cookie’ (a flat piece of scrap clay with kiln wash) under the vase just in case the drips run further than expected. Fire to the maturity temperature of your clay and glazes.
Texture Variation
Before the bisque firing, use a chattering tool on the belly of the vase. The glaze will break over the texture, adding more depth to the vertical streaks.
Once cooled, fill with dried botanicals to complement the earthy tones of your stunning new vessel
Optical Illusion Carved Tumblers
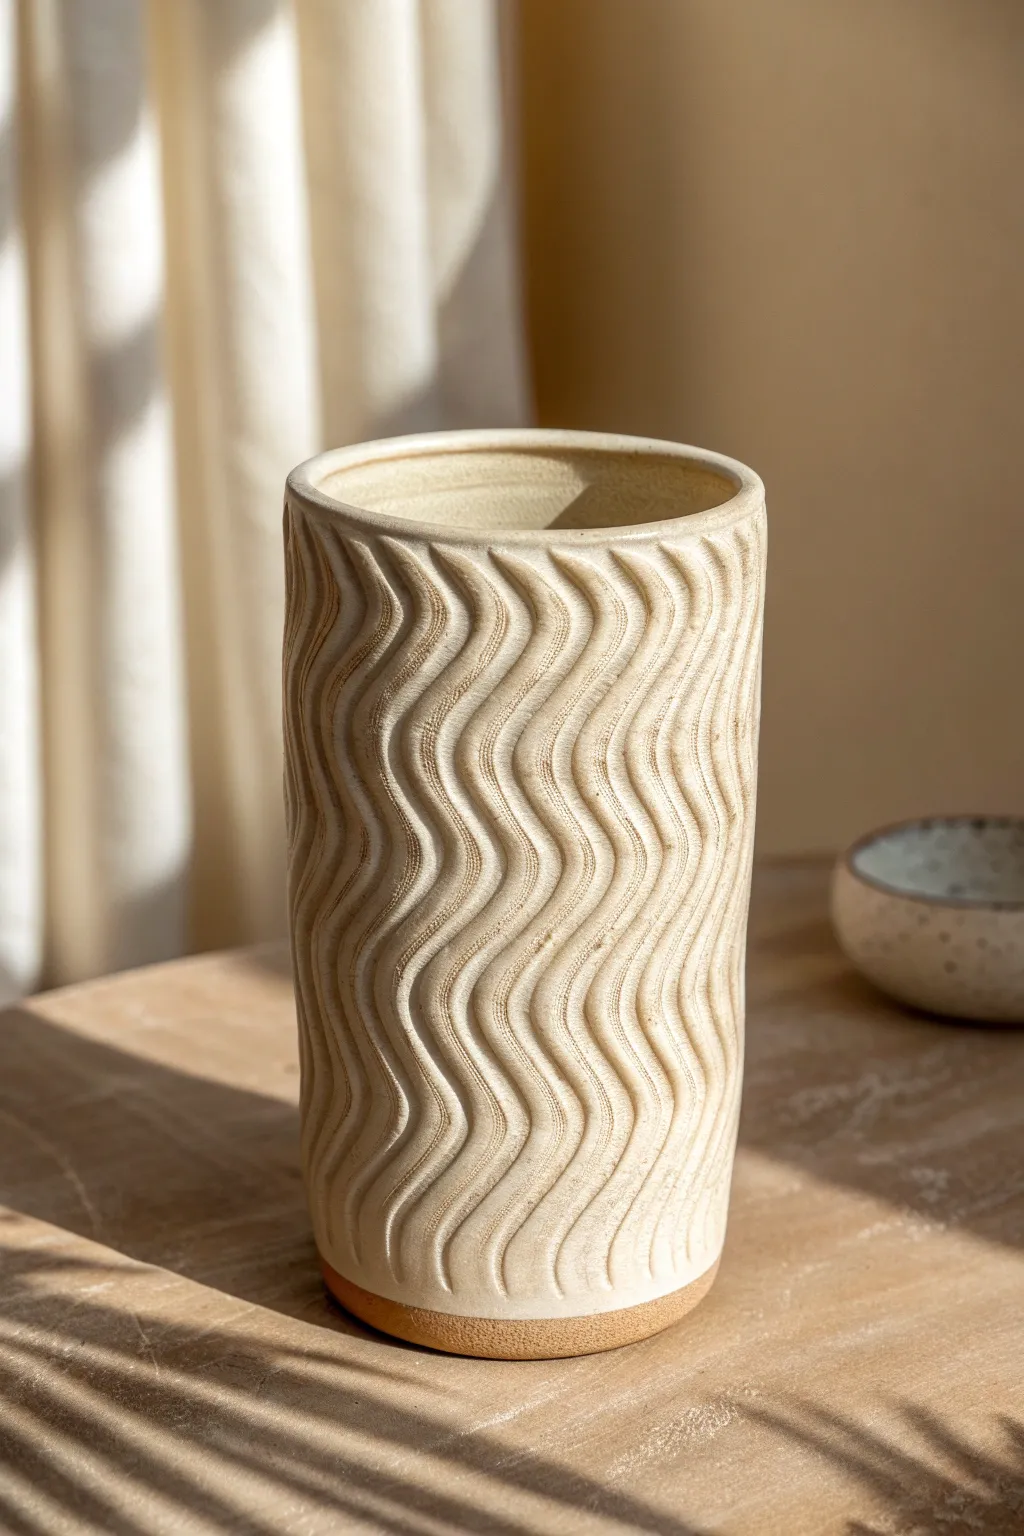
This stunning ceramic tumbler captivates the eye with its rhythmic, undulating texture that mimics the flow of water or draped fabric. By carving deep, precise waves into the clay surface, you create an optical illusion that feels as good in the hand as it looks on the shelf.
Step-by-Step
Materials
- Stoneware clay (buff or speckled works best)
- Potter’s wheel
- Wire cutting tool
- Rib tool (metal and rubber)
- Cylindrical trimming tool or diverse loop tools
- Sponge
- Needle tool
- Banding wheel (optional but helpful)
- Matte white or cream glaze
- Dark oxide wash (manganese or iron oxide)
Step 1: Throwing the Cylinder
-
Center and open:
Start with about 1.5 to 2 lbs of well-wedged stoneware clay. Center it firmly on the wheel and open up the floor to a width suitable for a tumbler, leaving roughly a quarter-inch thickness for the base. -
Pull the walls:
Pull the walls straight up into a tall cylinder. For this specific design, aim for slightly thicker walls than usual—perhaps 3/8 of an inch—because you will be carving away a significant amount of material later. -
Refine the shape:
Use a metal rib to straighten the sides and remove excess slip. The cylinder should be vertical with no belly. Compress the rim with a chamois or sponge to ensure it’s smooth and pleasant to drink from. -
Leather hard drying:
Cut the piece from the bat and let it dry slowly to a sturdy leather-hard stage. It needs to be firm enough to resist deformation when you press the carving tool against it, but soft enough to carve smoothly.
Uneven Waves?
If your waves look jagged, your clay might be too dry. Spray it lightly with water, wrap it in plastic, and let it rest for an hour to regain moisture before carving again.
Step 2: Carving the Optical Waves
-
Mapping the pattern:
Lightly trace a vertical sine wave pattern using a needle tool or pencil as a guide. This doesn’t have to be perfect, but it helps establish the rhythm of the curves before you commit with the carving tool. -
Starting the first cut:
Select a medium-sized U-shaped loop tool. Start at the top rim (leaving a small smooth band at the very lip) and carve downward in a wavy, S-curve motion all the way to the foot. -
Establish the depth:
Make this first cut relatively deep to set the standard for the relief. The contrast between the high points and low points is what creates the visual drama. -
Parallel carving:
Position your tool right next to the first cut. Carve a second line parallel to the first, following the exact same wavy trajectory. The ridge between cuts should be distinct but narrow. -
Rhythm and repetition:
Continue this process around the entire circumference of the tumbler. Maintain a steady hand speed to keep the width of the carved channel consistent. I find taking a deep breath before each stroke helps steady the line. -
Cleaning the crumbs:
Once the carving is complete, let the piece dry slightly more until the burrs (little clay crumbs) become brittle. Brush them away gently with a soft brush or rub them off with a finger; avoid using a wet sponge, which can blur the sharp edges.
Rib for Consistency
Before carving, use a serrated metal rib to scratch horizontal texture around the pot. This gives your carving tool a ‘grip’ and prevents it from sliding off course.
Step 3: Finishing and Glazing
-
Trimming the base:
Turn the piece over and trim a neat foot ring. Leave a small band of uncarved clay at the very bottom, creating a visual ‘stop’ for the texture, roughly matching the smooth band at the rim. -
Bisque fire:
Fire the detailed tumbler to bisque temperature (usually Cone 04 or 06) to prepare it for glazing. -
Applying the oxide wash:
Mix a thin wash of iron oxide or manganese dioxide. Brush this over the entire textured surface, ensuring it gets deep into the carved crevices. -
Wiping back:
Take a damp sponge and wipe away the oxide from the high points (the ridges) of the texture. The dark color should remain only in the valleys of your waves. -
Glazing:
Dip or pour a semi-opaque matte cream or white glaze over the exterior. The glaze should not be too thick, or it will fill in your texture. The goal is for the dark oxide to shadow through the lighter glaze in the recesses. -
Final wipe:
Clean the foot of the pot thoroughly to prevent sticking to the kiln shelf. -
Glaze fire:
Fire to the final maturity temperature of your clay (likely Cone 6 or Cone 10).
Once fired, hold your new tumbler up to the light to admire how the shadows play across those mesmerizing curves


What Really Happens Inside the Kiln
Learn how time and temperature work together inside the kiln to transform clay into durable ceramic.
Faux-Organic “Skin” Texture Pots
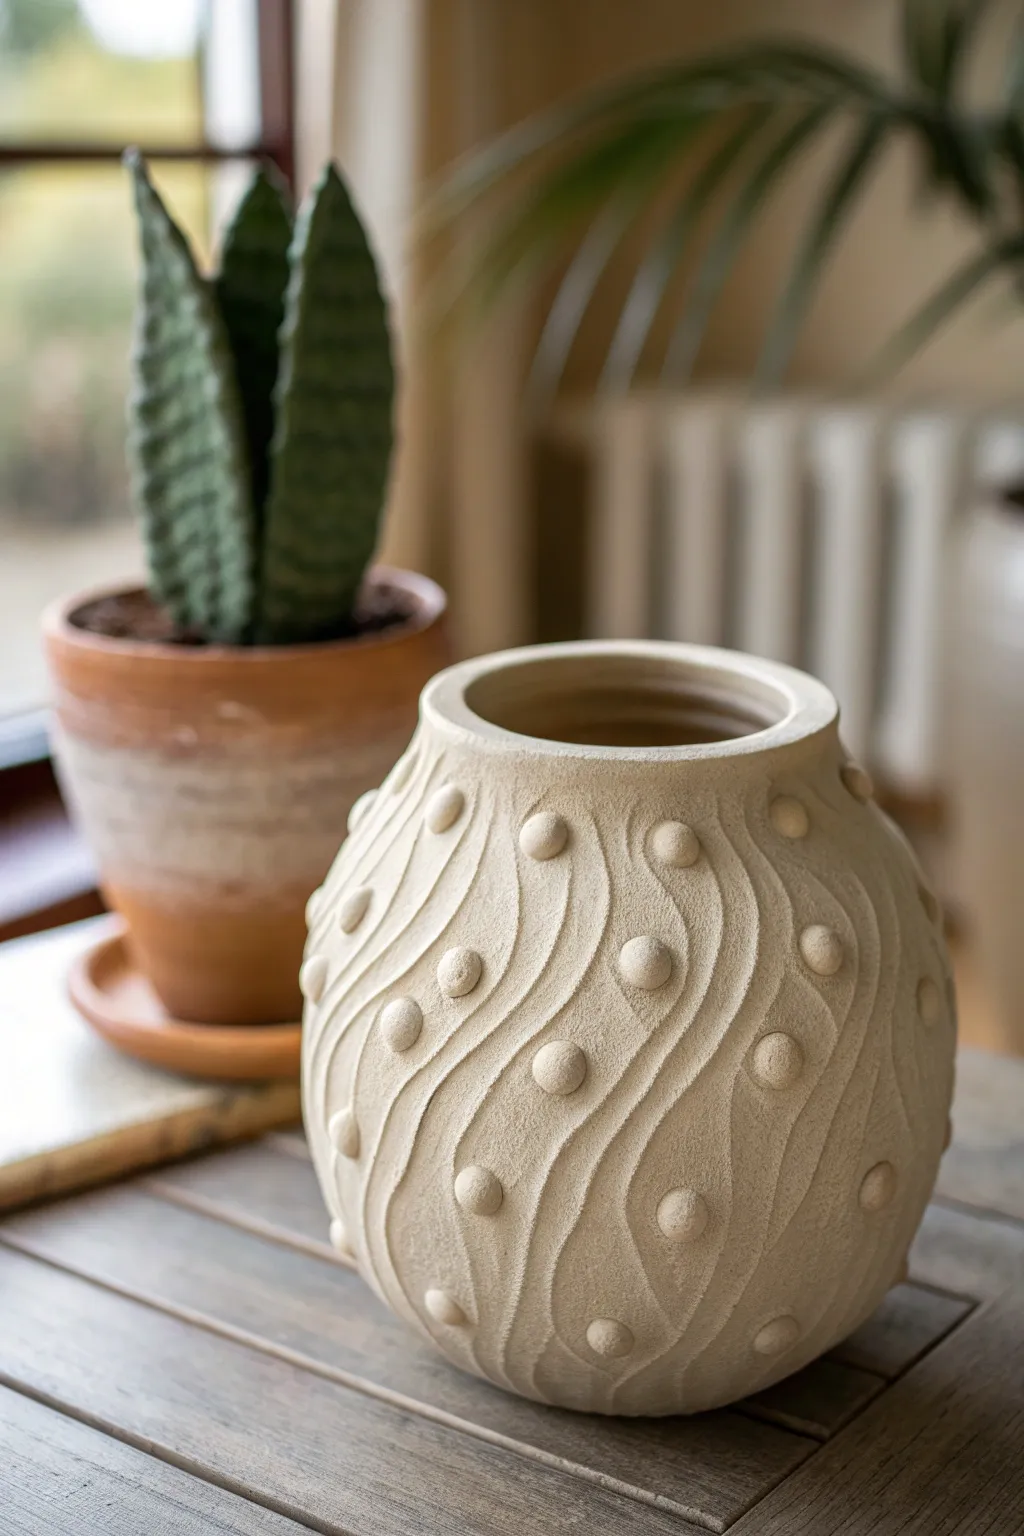
This project creates a captivating vase that mimics natural, oceanic textures with its undulating ridges and repetitive, raised nodules. The sandy, matte finish gives it an ancient, organic feel, perfect for adding a touch of tactile intrigue to any modern interior.
Step-by-Step
Materials
- Stoneware clay (buff or speckled with grog)
- Pottery wheel (or coil building supplies if hand-building)
- Metal kidney rib
- Wooden modeling tool with a rounded tip
- Loop tool (small)
- Slip (made from your clay body)
- Scoring tool or needle tool
- Sponge
- Spray bottle with water
- Matte cream or sand-colored glaze (optional, or leave raw if clay is suitable)
Step 1: Forming the Base Vessel
-
Center and open:
Begin by wedging about 3-4 pounds of clay to remove air bubbles. Center the clay on your wheel and open it up, creating a floor about 4 inches wide. -
Pull the walls:
Pull the walls up into a cylinder first to get your height. Aim for an even thickness of about 1/4 inch throughout the wall. -
Shape the belly:
Using a rib on the outside and your hand on the inside, gently push the belly of the pot outward to create a spherical, bulbous shape. Keep the neck slightly narrower but open, with a defined, flat rim. -
Smooth the surface:
Before adding texture, use a metal kidney rib to compress the exterior and remove any throwing lines. You want a smooth canvas for the carving and additions. -
Leather hard drying:
Allow the pot to dry to a firm leather-hard stage. It should be sturdy enough to handle pressure without deforming but still hold moisture for attachment.
Seamless Bumps
When attaching nodules, don’t just stick them on. Use a tool to blend the very bottom edge of the ball onto the pot slightly, then reshape the sphere. This prevents cracking.
Step 2: Creating the Texture
-
Map the waves:
Using a needle tool, lightly sketch vertical, wavy guidelines around the entire circumference of the pot. These S-curves will guide your carving. -
Carve the valleys:
Take a small loop tool and carve along your sketched lines. Vary the depth slightly to create gentle peaks and valleys, emphasizing the wavy movement. Smooth the carved edges with a damp sponge or finger. -
Prepare the nodules:
Roll out many small balls of clay, roughly pea-sized or slightly larger. I find making them all at once helps keep the size consistent. -
Score the attachment points:
Decide on the placement of your nodules. They should sit in the ‘valleys’ or between the waves. Score a small dot on the pot surface where each will go. -
Attach the nodules:
Add a tiny dab of slip to the scored area. Press a clay ball firmly onto the spot. Wiggle it slightly to ensure a strong bond. -
Clean connections:
Use a small brush or a wooden modeling tool to clean up any excess slip squeezing out from under the nodules. The connection should look seamless, as if the bump grew out of the pot.
Go Multicolored
Mix two different clay bodies (like white and tan) to make the applied dots. When fired, you’ll get a subtle, natural color variation across the surface texture.
Step 3: Finishing and Firing
-
Sand texture application:
To achieve that gritty, stone-like surface seen in the image, gently pat the surface with a coarse sponge. If your clay is smooth, you can even press a little sand or grog into the surface while it’s still slightly damp. -
Slow drying:
Cover the vase loosely with plastic to let it dry very slowly. This prevents the added nodules from popping off due to uneven shrinkage. -
Bisque fire:
Once bone dry, bisque fire the piece to Cone 04 (or your clay’s specific bisque temperature). -
Glazing choice:
For the look in the photo, use a very matte, dry glaze in a straw or sand color. Alternatively, if you used a beautiful stoneware clay, simply glaze the interior for functionality and leave the exterior raw. -
Final fire:
Fire the piece to its final maturity temperature (e.g., Cone 6 or 10). Ensure no glaze touches the kiln shelf.
Place your finished vase near a window where the light can catch the ridges and cast dramatic shadows across the surface
Spill-Proof Bowls With Fake Spills
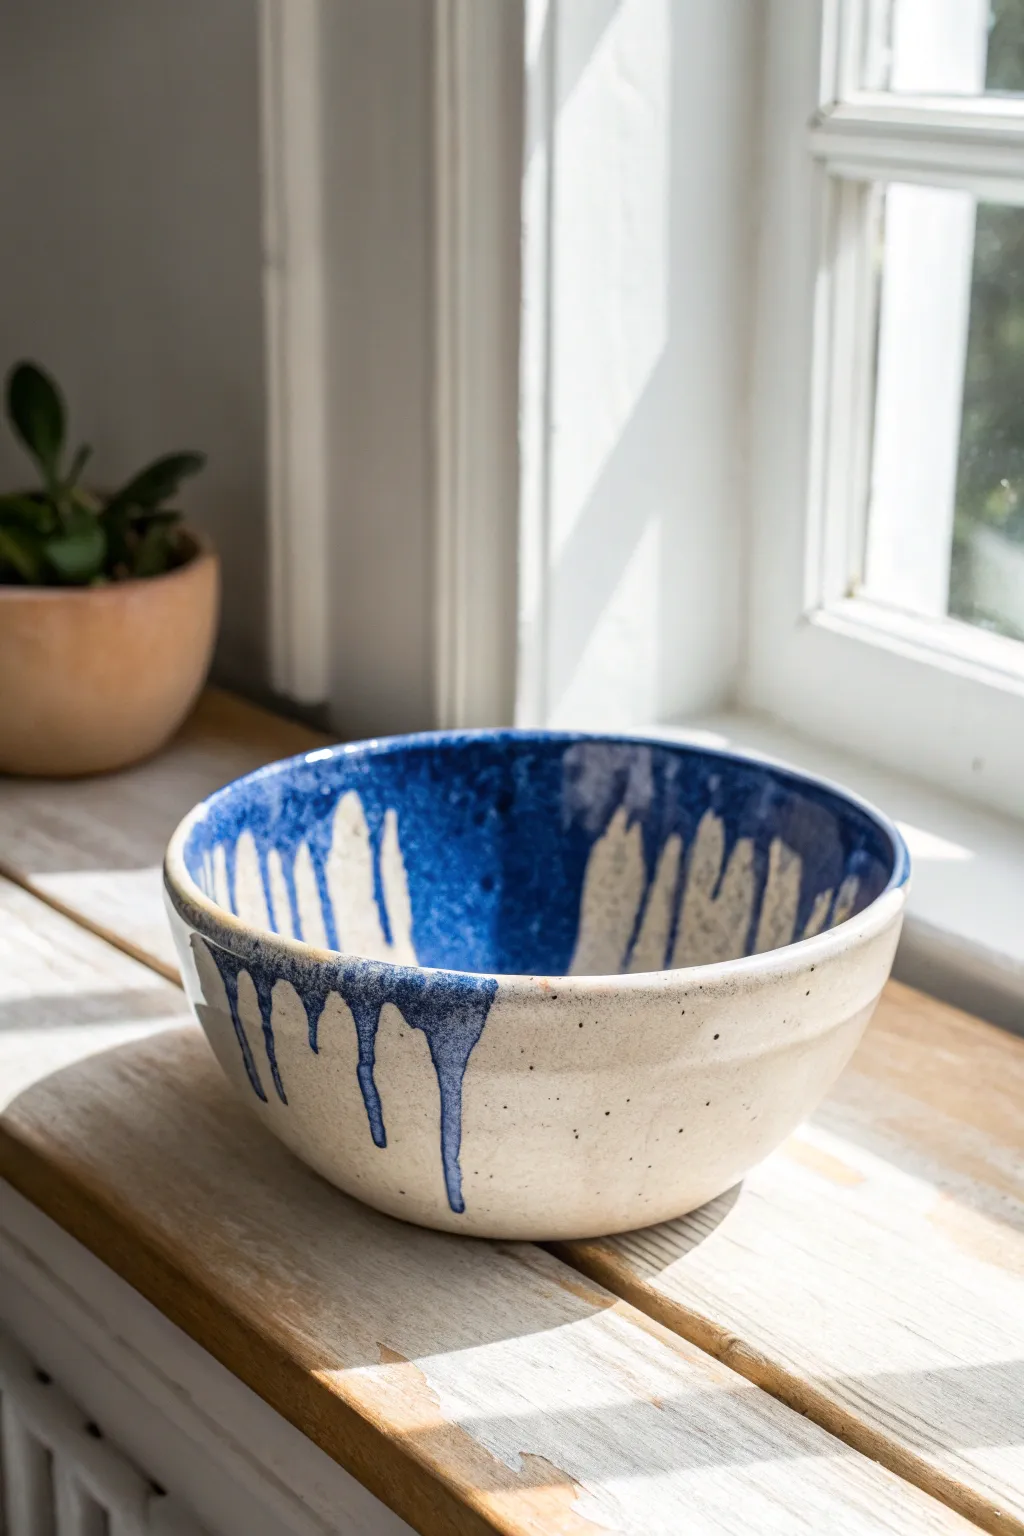
Capture the beauty of intentional imperfection with this stunning ceramic bowl, featuring a glossy cobalt interior that dramatically drips over a speckled cream exterior. The result is a dynamic contrast between the deep, fluid blue and the earthy, matte warmth of the clay body.
Step-by-Step
Materials
- Speckled buff stoneware clay
- Pottery wheel
- Throwing tools (sponge, wire cutter, rib, needle tool)
- Trimming tools
- Glossy cobalt blue glaze
- Satin white or clear glaze (for exterior, optional)
- Wax resist
- Brush for wax application
- Kiln
Step 1: Throwing and Shaping
-
Center the clay:
Start with about 2-3 pounds of speckled buff stoneware clay. Slam it onto the wheel head and use your palms to center it, ensuring it runs smooth and steady. -
Open the form:
Press your thumbs into the center to open the clay, pulling outwards to establish a wide, flat bottom for the bowl. -
Pull the walls:
Slowly pull the walls upward. I like to keep a slight outward curve as I pull, aiming for a classic, rounded bowl shape. -
Shape the curve:
Using a metal rib on the inside and a sponge on the outside, gently belly out the form to give it a generous internal volume. -
Define the rim:
Compress the rim with a chamois or sponge. Keep the lip slightly rounded rather than sharp, as this encourages the glaze to flow over it later. -
Wire off and dry:
Run your wire cutter underneath the bowl, then lift it off carefully. Set it aside until it reaches a leather-hard state.
Gravity Guide
Glaze flows more on vertical surfaces. For longer drips, keep the bowl walls steep near the rim; for shorter drips, flare the rim outward slightly.
Step 2: Trimming and Bisque
-
Trim the foot:
Center the leather-hard bowl upside down on the wheel. Trim away excess weight from the bottom and carve a neat foot ring. -
Smooth the surface:
Use a damp sponge or a soft rib to smooth out any trimming marks on the exterior, highlighting the speckled clay texture. -
Bisque fire:
Allow the bowl to become bone dry, then load it into the kiln for a bisque firing (mesh 04 or 06, depending on your clay).
Double Dip
Dip the rim into a second, lighter color glaze (like white or rutile) over the still-wet blue for a multi-layered, mesmerizing variegated drip.
Step 3: Glazing the “Spill”
-
Clean the bisque:
Wipe the fired bowl with a damp sponge to remove any kiln dust that might interfere with glaze adhesion. -
Glaze the interior:
Pour a generous amount of cobalt blue glaze inside the bowl. Roll it around to coat the entire interior surface evenly, then pour out the excess. -
Create the drip:
This is the crucial step. Instead of wiping the rim clean, dip the rim itself into the blue glaze, or use a large brush to apply a heavy coat right at the top edge. -
Encourage the flow:
Use a loaded brush to dab extra glaze on the outer rim in specific spots where you want distinct drips to form. Let gravity do the work. -
Glaze the exterior (Optional):
If you want a sealed exterior like the reference, dip the outside into a clear or semi-matte white glaze up to the rim, or leave it bare to show the raw clay speckles. -
Clean the foot:
Ensure the foot ring is completely free of glaze. If the blue drips look like they will reach the kiln shelf, wipe them back slightly. -
Final shaping of drips:
Before firing, if a drip looks too sharp or messy, you can gently round it with your finger, but try to keep the organic quality. -
Glaze fire:
Fire the piece to cone 5 or 6 (or your clay’s maturity temperature). The heat will cause the heavy rim application to melt and travel down the sides.
Once cooled, you will have a unique vessel that captures movement and color in a permanent, functional form