
When I’m craving that cozy western aesthetic, I reach for clay and start building little nods to desert sunsets, ranch details, and cowgirl icons. Here are my favorite western clay ideas—from quick jewelry shapes to rustic home pieces that still feel totally doable at your kitchen table.
Cowboy Boot Dangle Earrings
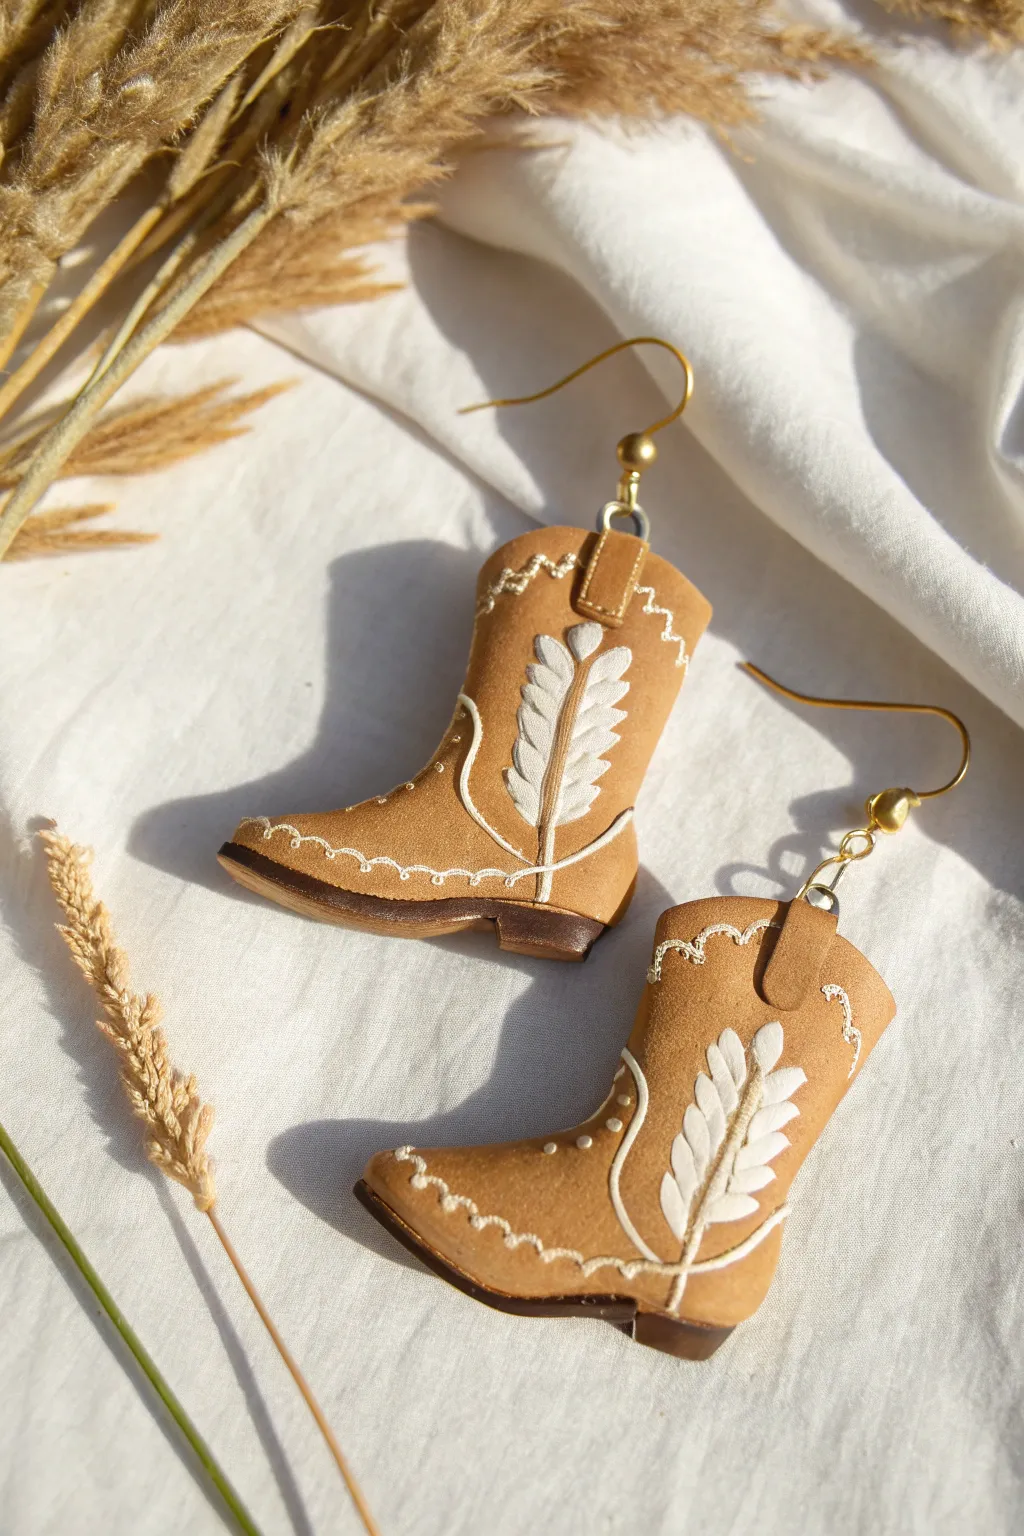
Giddy up with these charming cowboy boot earrings that bring a touch of the Wild West to your jewelry collection. Crafted from polymer clay, they feature intricate stitching details and a classic two-tone design that looks just like worn leather.
Step-by-Step Guide
Materials
- Polymer clay in tan/camel and dark brown
- Liquid polymer clay (translucent or white)
- White acrylic paint
- Fine detail paintbrush (000 size)
- Clay rolling pin or pasta machine
- X-Acto knife or clay blade
- Needle tool or toothpick
- Small jump rings (gold)
- Fishhook earring wires (gold)
- Jewelry pliers
- Oven for baking
- Glaze or varnish (optional)
Step 1: Shaping the Boot Base
-
Condition and Flatten:
Begin by conditioning your tan polymer clay until it is soft and pliable. Roll it out to a thickness of about 3-4mm using a rolling pin or pasta machine to ensure an even surface. -
Create a Template:
Sketch a small cowboy boot silhouette on a piece of cardstock, roughly 1 to 1.5 inches tall. Cut this out to use as your reusable template for both earrings. -
Cut the Shapes:
Place your template over the rolled clay and carefully trace around it with an X-Acto knife. Repeat this to create a mirror image for the second earring so you have a left and a right boot. -
Smooth the Edges:
Gently tap the cut edges with your finger to round them slightly, removing any sharp angles from the cutting process for a more organic, leather-like look.
Step 2: Adding Soles and Heels
-
Prepare the Dark Clay:
Roll out a small amount of dark brown clay, keeping it slightly thinner than the main boot body. -
Attach the Sole:
Place the bottom edge of your tan boot onto the dark brown clay sheet. Trim around the bottom edge of the boot to create a thin sole layer that adheres to the tan clay. -
Form the Heel:
Cut a small, blocky rectangle from the thick dark brown clay. Press this firmly onto the back bottom corner of the sole to form the boot’s heel. -
Define the Separation:
Use the back of your knife blade to gently press a line where the dark sole meets the tan leather, creating a crisp visual separation between the materials.
Clean Edges Pro-Tip
Before baking, use a cotton swab dipped in a tiny bit of rubbing alcohol or acetone to smooth out fingerprints and rough edges on the raw clay for a professional finish.
Step 3: Detailing and Baking
-
Sculpt the Pull Straps:
Fashion tiny rectangles of tan clay and fold them over the top edge of the boot shaft to mimic pull straps. Press them down gently to secure them without flattening the loop. -
Create Stitching Texture:
Using a needle tool, gently poke small, evenly spaced holes along the top edge of the boot shaft and around the ankle area to simulate stitching holes. I like to do this lightly so the paint catches later. -
Insert Hardware Holes:
Pierce a hole through the center of the pull strap at the top of the boot. Make sure the hole is large enough for your jump ring. -
Bake:
Place the boots on a baking tile or parchment paper. Bake according to your brand of clay’s specific instructions (usually 275°F for 15-30 minutes). Let them cool completely.
Paint Troubleshooting
If your painted lines are too thick or shaky, let the acrylic dry completely. Then, gently scrape away the excess paint with a needle tool or toothpick to refining the design.
Step 4: Painting and Assembly
-
Paint the Leaf Motif:
Using your fine detail brush and white acrylic paint, carefully paint a fern or leaf design running vertically up the boot shaft. Start with the center vein and add small strokes for leaves. -
Highlight the Stitching:
Dip your fine brush in white paint and carefully trace the needle holes you made earlier. You can also paint a scalloped line near the top edge for extra western flair. -
Add Decorative Dots:
Add tiny dots of white paint along the curved seam near the ankle to mimic rivet detailing or fancy embroidery. -
Seal (Optional):
Once the paint is fully dry, you can apply a thin layer of matte varnish to protect the paint, though bare clay often has a nice leather texture on its own. -
Attach Hardware:
Open a gold jump ring using two pairs of pliers. Thread it through the hole in the boot strap, add the fishhook earring wire, and close the ring securely.
Now you have a stylish pair of custom boots ready for your next rodeo or casual day out


Cactus Stud Earrings
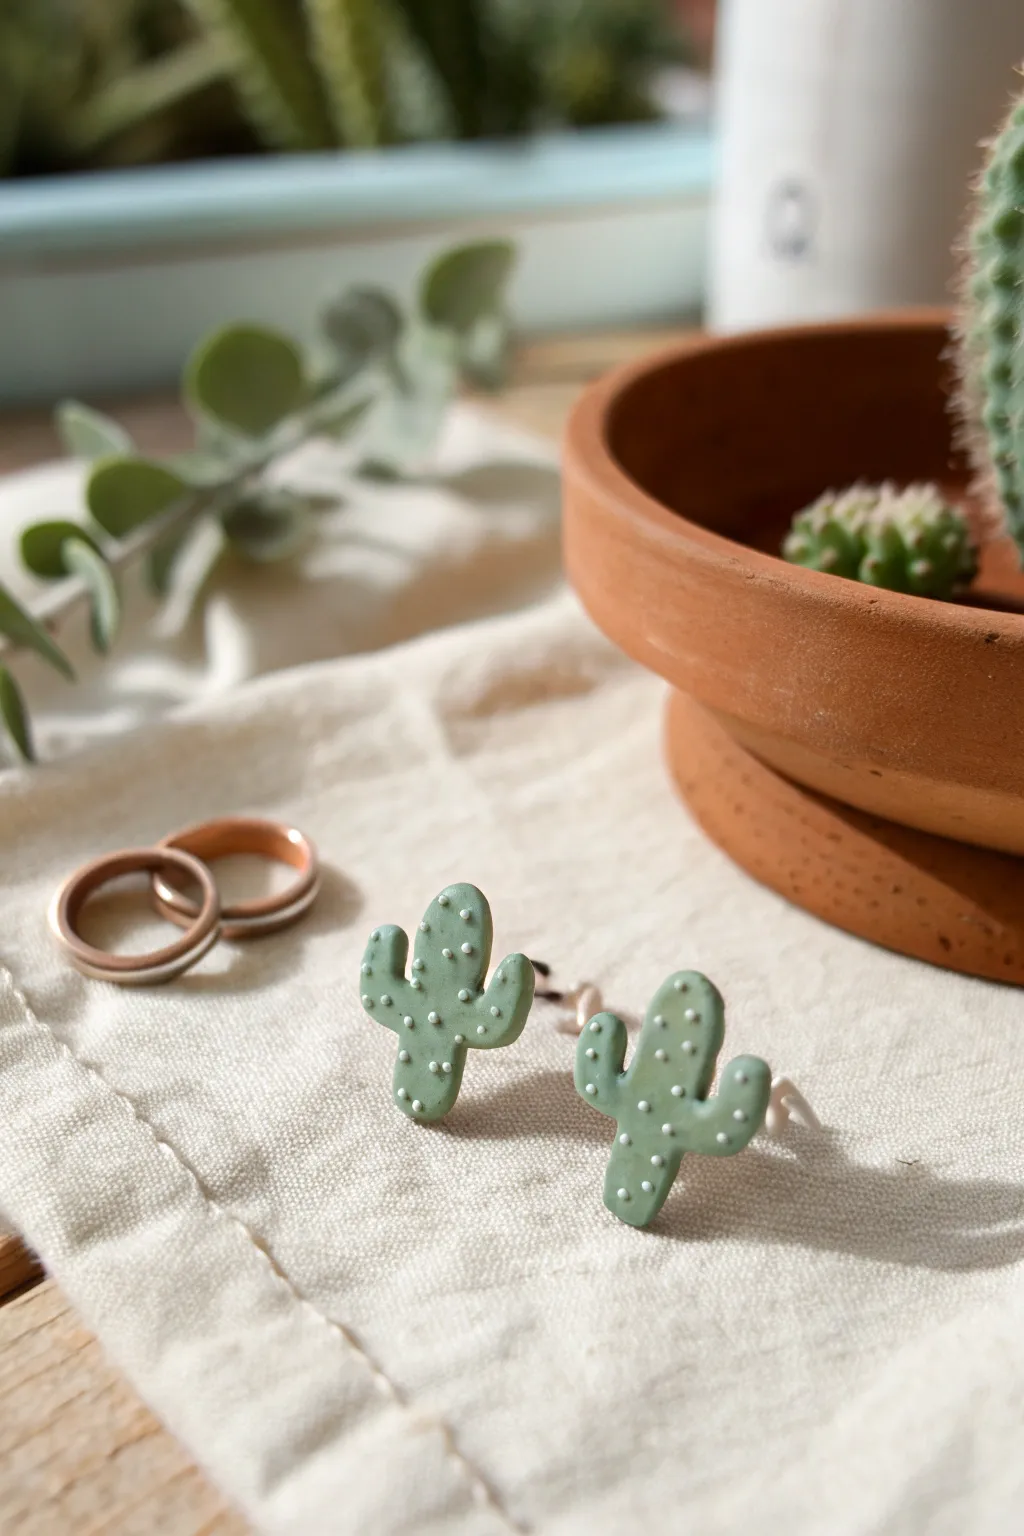
Bring a touch of the southwest to your jewelry collection with these adorable miniature saguaro cactus earrings. Crafted from polymer clay in a soft sage green, they feature delicate white detailing that mimics spines without the prickle.
Detailed Instructions
Materials
- Sage or olive green polymer clay
- White liquid polymer clay (or white acrylic paint with a tiny dotting tool)
- Clay roller or pasta machine
- Small cactus shape cutter (approx. 0.5 inch) or X-Acto knife
- Flat earring posts with backs
- Strong jewelry glue (like E6000)
- Ceramic tile or baking sheet with parchment paper
- Oven (for curing)
- Gloss or matte varnish (optional)
Step 1: Prepping and Shaping
-
Condition the clay:
Start by warming the green polymer clay in your hands. Knead and roll it until it’s soft, pliable, and free of air bubbles or cracks. -
Roll it out:
Using your acrylic roller or pasta machine, flatten the clay into an even slab. You want it to be about 3mm thick—sturdy enough to hold the earring post but light enough to wear comfortably. -
Cut the shapes:
If you have a mini cactus cutter, press it firmly into the clay to create two identical shapes. Wiggle slightly to separate the clay before lifting. -
Freehand alternative:
If you don’t have a cutter, use a needle tool to lightly sketch a saguaro outline (a central column with two upward-curving arms) onto the clay, then carefully cut along the lines with an X-Acto knife. -
Smooth the edges:
Gently tap the edges of your cut-outs with your finger to soften any sharp corners or jagged bits left by the cutting tool.
Needle Tool Trick
Use a needle tool to create tiny indentations where you want the white dots to go before baking. This helps the paint or liquid clay sit perfectly in place.
Step 2: Detailing and Baking
-
Prepare the details:
Squeeze a small amount of white liquid polymer clay onto a palette. If you don’t have liquid clay, you can do this step after baking using white acrylic paint. -
Apply the spines:
Dip a very fine dotting tool or a toothpick into the white liquid. Carefully apply tiny dots in vertical rows down the cactus body and arms. I find it easiest to work from top to bottom. -
Check spacing:
Ensure the dots are evenly spaced but not too crowded; you want the green base color to remain dominant. -
Final inspection:
Look closely at both pieces for any lint or fingerprints. You can gently brush them away with a little rubbing alcohol on a brush if needed. -
Bake carefully:
Place your cacti on a ceramic tile or a parchment-lined baking sheet. Bake according to your specific brand’s package instructions—usually around 275°F (135°C) for 15-30 minutes. -
Cool down:
Allow the clay pieces to cool completely inside the oven with the door cracked, or remove them and let them sit until they are room temperature.
Dull Colors?
If your white dots look transparent after baking, you likely used translucent liquid clay. Paint over the cured dots with white acrylic paint for a pop of brightness.
Step 3: Assembly
-
Prepare the posts:
Take your flat-pad earring posts and gently rough up the flat surface with sandpaper. This texture helps the glue adhere better. -
Glue placement:
Apply a tiny dab of strong jewelry glue to the back of the clay cactus. Aim for the center-upper section so the earring hangs correctly on the earlobe. -
Attach and set:
Press the earring post firmly into the glue. Hold it for a few seconds to ensure initial contact, then leave them upside down to cure fully for at least 24 hours. -
Optional sealing:
If you used acrylic paint for the dots, or just want extra durability, brush a thin layer of matte or gloss varnish over the front of the earrings once the glue is dry.
Now you have a charming pair of handmade accessories perfect for any casual outfit


Horseshoe Charm Necklace
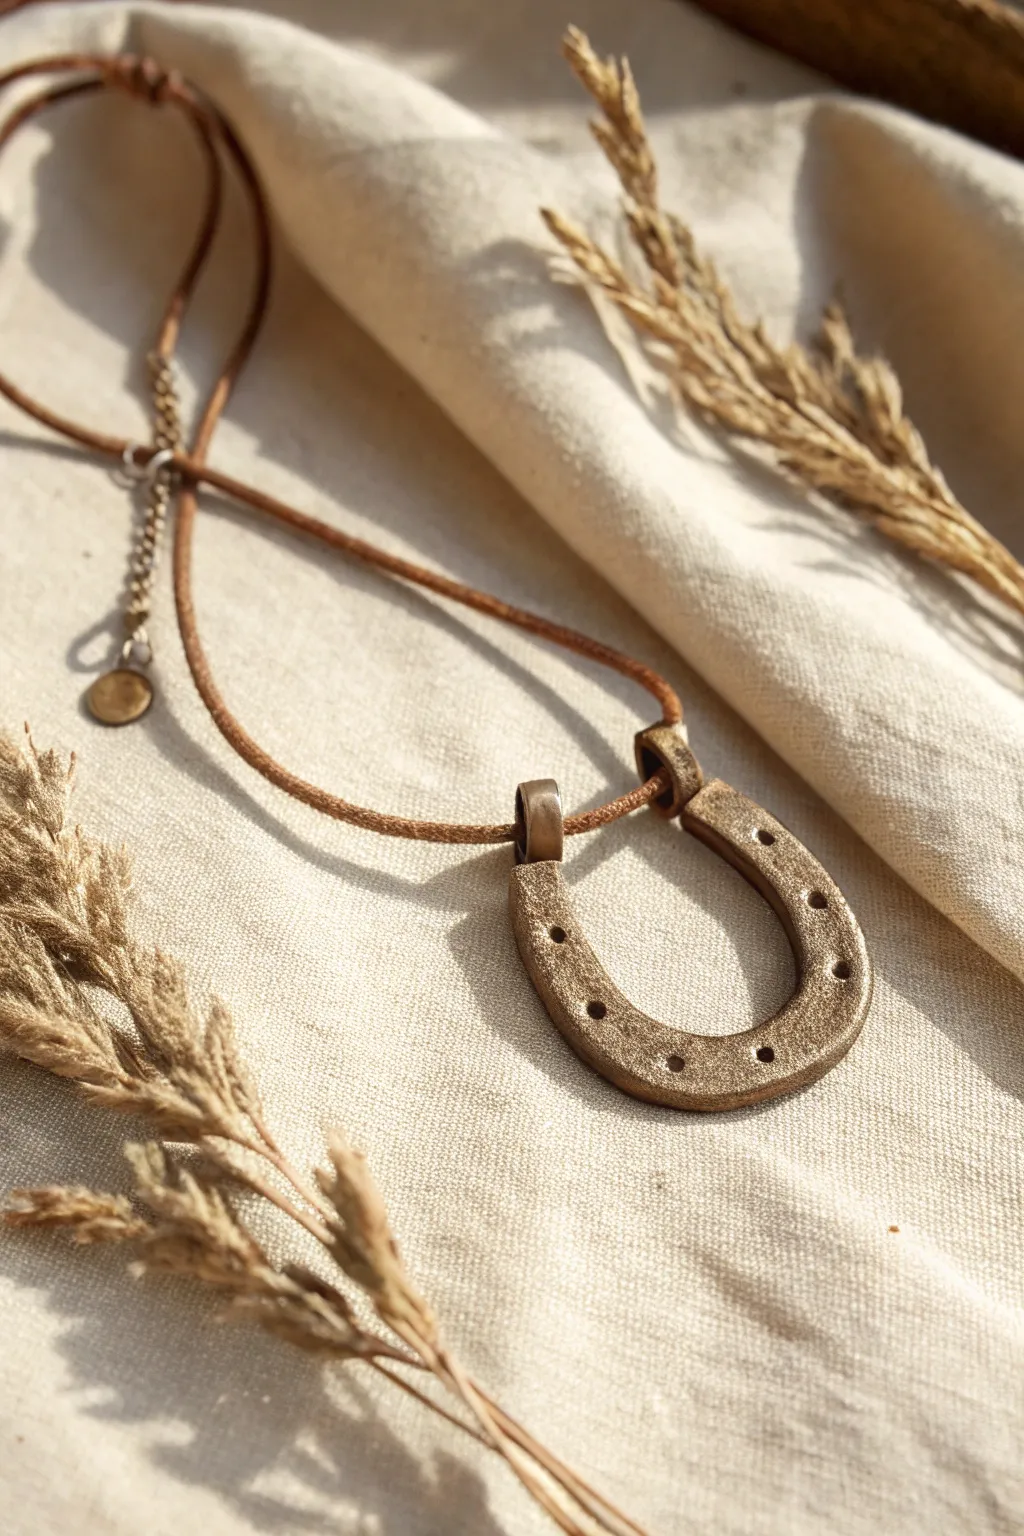
Bring a touch of the Wild West to your jewelry collection with this surprisingly simple clay project. Using polymer clay and metallic paints, you’ll sculpt a convincing faux-metal horseshoe that looks like a well-worn ranch heirloom.
Step-by-Step Guide
Materials
- Polymer clay (black or dark brown works best as a base)
- Acrylic rolling pin
- Craft knife or clay blade
- Small circle cutter (approx. 3-4mm) or a straw
- Metallic acrylic paint (bronze or antique gold)
- Dark brown or black acrylic paint (for antiquing)
- Small paintbrush
- Sponge or paper towel
- Brown leather or suede cord (2mm)
- 2 large jump rings (approx. 8-10mm)
- Jewelry clasp and extender chain
- Jewelry pliers
- Gloss or matte varnish (optional)
Step 1: Sculpting the Charm
-
Condition the Clay:
Start by kneading a walnut-sized ball of polymer clay until it is soft and pliable. If the clay feels too stiff, the heat from your hands will eventually soften it up. -
Roll a Snake:
Roll the conditioned clay into an even snake or log, roughly 4 inches long and about 1/4 inch thick. Try to keep the thickness consistent from end to end. -
Form the U-Shape:
Gently curve the clay log into a classic ‘U’ shape to form the horseshoe. Place it on your work surface and press down very slightly to flatten the top and bottom surfaces, but don’t squish it completely flat; you want it to retain some rounded volume. -
Trim the Ends:
Using your craft knife, cut the ends of the horseshoe straight across to create clean, blunt edges. Make sure both sides are equal in length. -
Create the Bails:
Roll a smaller, thinner snake of clay. Cut two small sections, roughly 3/4 inch long each. Loop each piece over the ends of the horseshoe limbs to create the attachment loops (bails) for the cord. Smooth the seams where the clay joins the main body so they look seamless. -
Add Nail Holes:
Using a small tool, like the end of a paintbrush, a toothpick, or a tiny circle cutter, press indentations into the face of the horseshoe to mimic nail holes. Aim for three or four evenly spaced holes on each side. -
Texture the Surface:
To give it that beaten metal look, lightly tap the surface with a crumpled ball of aluminum foil or a coarse sponge. This removes fingerprints and adds necessary ‘age’ to the piece. -
Bake:
Bake the clay according to the manufacturer’s instructions on the package. Usually, this is around 275°F (135°C) for 15-30 minutes. Let it cool completely before painting.
Paint Peeling?
If the acrylic paint peels off the baked clay easily, try lightly sanding the cured piece with fine-grit sandpaper before painting to give the surface more ‘tooth’.
Step 2: Finishing and Assembly
-
Base Coat:
Paint the entire cured pendant with your bronze or antique gold metallic acrylic paint. You may need two thin coats for full opacity. Let this dry fully. -
Antiquing Method:
Mix a small amount of water with your dark brown or black paint to create a wash. Brush this over the entire pendant, ensuring it gets into the nail holes and textured divots. -
Wipe Back:
Here I like to wait just a few seconds, then immediately wipe the surface gently with a damp paper towel or sponge. The dark paint will stay in the recesses, highlighting the texture, while the metallic shine returns to the raised areas. -
Seal (Optional):
If you want extra durability, apply a thin coat of matte or satin varnish. Avoid high gloss, as it ruins the rustic metal effect. -
Prepare the Jump Rings:
Open two large jump rings using your pliers. Thread one jump ring through the clay loop on the left side of the horseshoe, and the other through the right side. -
Attach the Cord:
Cut your leather cord to the desired necklace length plus 2 inches. Thread one end of the cord through the left jump ring and fold it back on itself. Secure it by wrapping a small piece of wire or using a cord crimp (or simply tie a tight knot if you prefer the rustic look shown). -
Complete the Loop:
Thread the other end of the cord through the right jump ring. This style creates a looped necklace where the cord doubles back. -
Add Clasp:
Attach cord ends (cimps work best for leather) to the ends of your leather strap, then attach your clasp and extender chain using small jump rings.
Make it Lucky
Embed tiny rhinestones into the nail holes before baking for a sparkling version, or stamping a personalized initial on the back for a custom gift.
Wear your lucky horseshoe with pride or gift it to a horse-loving friend


Cow Print Statement Earrings
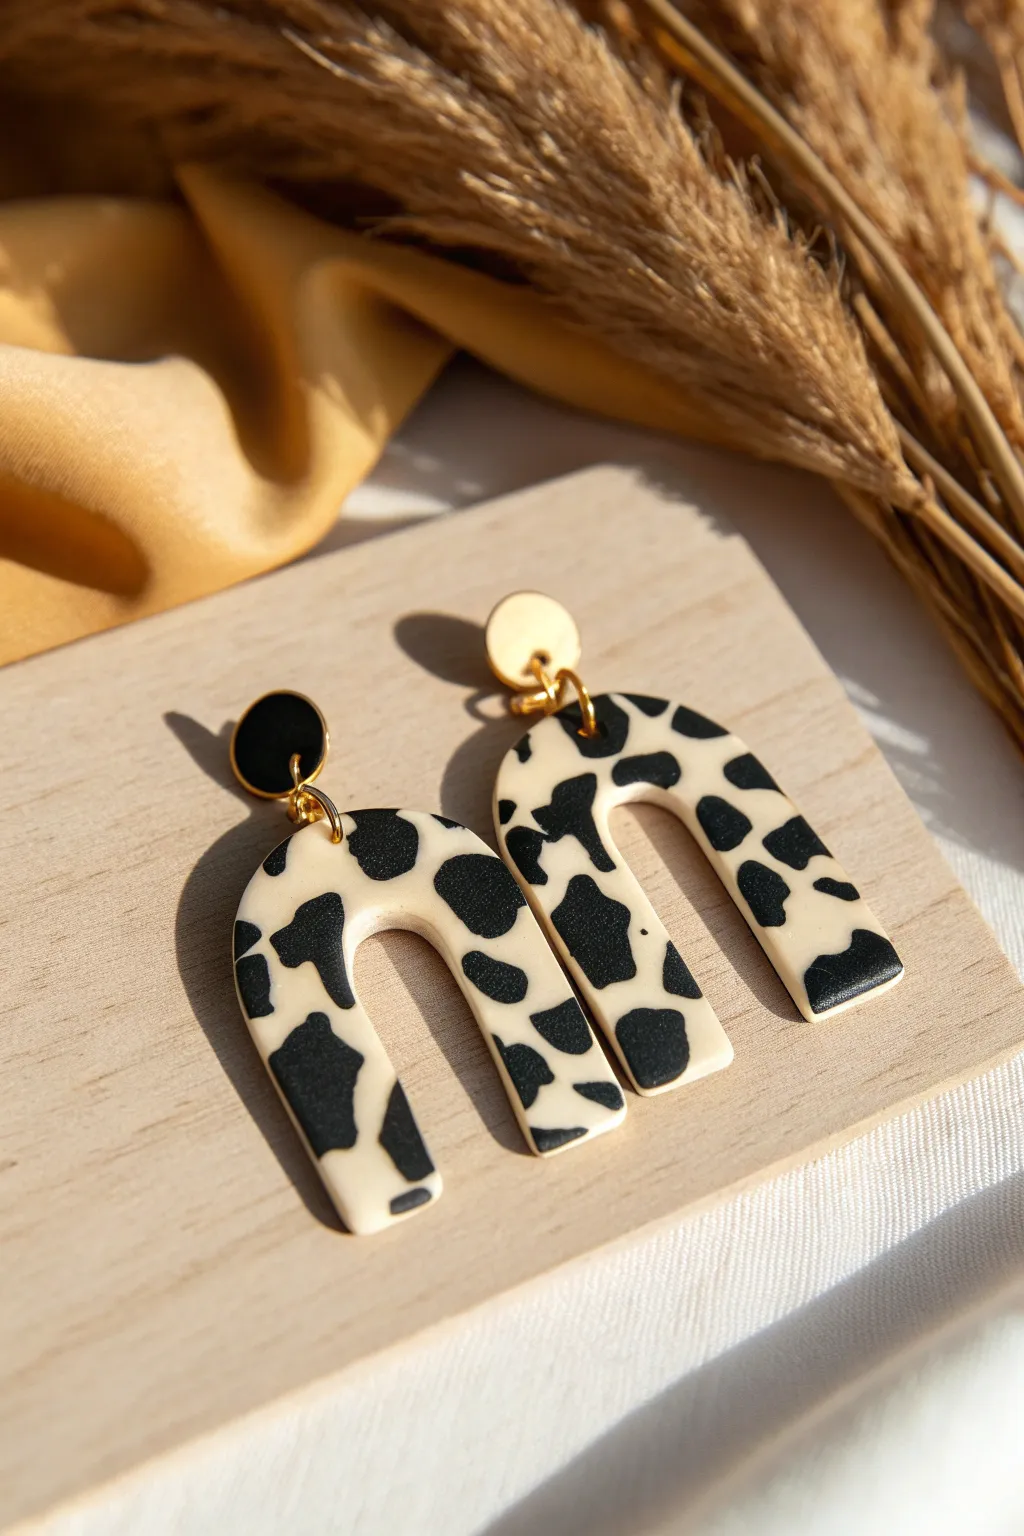
Embrace the modern western aesthetic with these bold cow print statement earrings. Featuring classic black and cream arches connected to mismatched studs, these polymer clay creations are surprisingly lightweight and fun to make.
Step-by-Step Tutorial
Materials
- Polymer clay (white or cream)
- Polymer clay (black)
- Acrylic rolling pin or pasta machine
- U-shape clay cutter (approx. 1.5 – 2 inches tall)
- Small circle clay cutter (approx. 10mm)
- X-Acto knife or tissue blade
- Gold jump rings (6-8mm)
- Earring posts and backs
- Super glue or liquid clay
- Hand drill or pin vibe
- Two pairs of jewelry pliers
- Parchment paper or baking tile
Step 1: Creating the Cow Pattern
-
Condition the white clay:
Start by thoroughly conditioning your white or cream clay until it is soft and pliable. Roll it out into a slab approximately 3mm thick using your acrylic roller or pasta machine. -
Condition the black clay:
Condition a smaller amount of black clay. Roll this into a very thin sheet, slightly thinner than the white base. -
Tear the spots:
Using your fingers, tear small, irregular organic shapes from the thin black sheet. Aim for variety—some jagged, some rounded, some long—to mimic natural cow hide markings. -
Apply the pattern:
Gently place the black torn pieces onto your white clay slab. Leave random spacing between them, allowing the cream background to show through clearly. -
Flatten the slab:
Once you are happy with the placement, gently roll over the entire slab with your acrylic roller. This presses the black clay flush into the white clay, creating a smooth, unified surface.
Step 2: Cutting and Baking
-
Cut out the arches:
Position your U-shape cutter over an area of the pattern that looks pleasing. Press down firmly to cut your first arch shape. Repeat for the second earring. -
Cut the studs:
For the mismatched look shown in the photo, cut one small circle from your leftover solid black clay and one from the solid white clay. Alternatively, you can cut both from the patterned slab. -
Clean the edges:
Before baking, gently smooth the cut edges with your fingertip or a silicone tool to remove any stray clay bits or rough spots. -
Pierce holes:
If you don’t have a drill for later, use a toothpick to poke holes at the top center of each U-arch and the bottom center of each stud circle now. -
Bake the pieces:
Place all pieces on a ceramic tile or parchment-lined baking sheet. Bake according to your brand of clay’s instructions—usually 275°F (135°C) for about 30-45 minutes. -
Cool down:
Allow the pieces to cool completely in the oven or on a wire rack before handling them to ensure maximum durability.
Clean Cut Tip
Place a piece of plastic wrap (cling film) over the clay before pressing your cutter down. This creates beautiful, soft, domed edges that require almost no sanding later.
Step 3: Assembly
-
Drill holes (optional):
If you didn’t pierce the holes before baking, use a hand drill or pin vibe to carefully drill a hole at the top of the arches and the bottom of the studs. -
Attach the posts:
Apply a tiny dot of super glue or bake a thin layer of liquid clay to attach the metal earring posts to the back of the small circular studs. Let this set fully. -
Open jump rings:
Using two pairs of pliers, twist your gold jump ring open laterally (twist ends away from each other, don’t pull apart). -
Connect the pieces:
Loop the open jump ring through the hole in the arch and the hole in the stud. I find it easiest to hook the arch first, then the stud. -
Close the rings:
Use your pliers to twist the jump ring back into a closed position, ensuring the gap is tight so the pieces don’t slip out. -
Final polish:
Wipe the surface with a soft cloth or a tiny bit of baby oil to remove any fingerprints and make the cow print really pop.
Level Up: Texture
Before cutting your shapes, lightly press a piece of coarse sandpaper or a stiff brush onto the white background clay to give it a realistic ‘hide’ texture.
Pair your new accessories with denim or neutrals for a look that is effortlessly chic

The Complete Guide to Pottery Troubleshooting
Uncover the most common ceramic mistakes—from cracking clay to failed glazes—and learn how to fix them fast.
Longhorn Skull Pendant
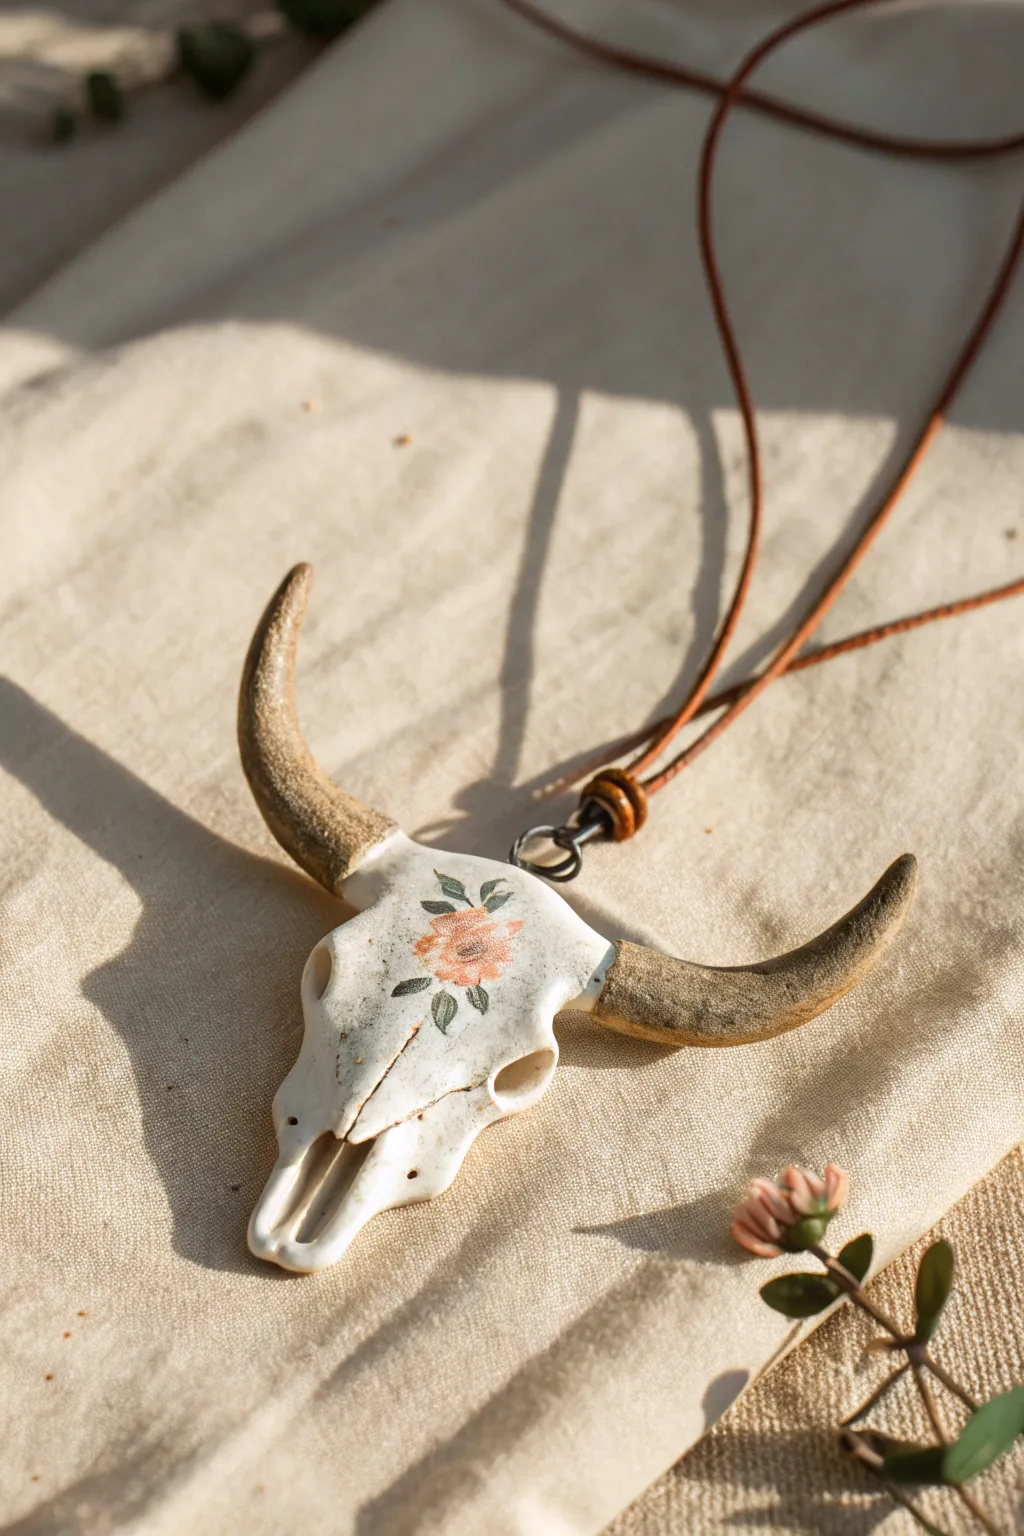
Capture the rustic spirit of the West with this delicate longhorn skull pendant, featuring soft floral detailing and weathered horns. This project combines sculpting and fine painting techniques to create a unique piece of wearable art that looks like a treasured prairie find.
Step-by-Step
Materials
- White polymer clay
- Translucent or beige polymer clay (optional for mixing)
- Acrylic paints (brown, black, peach, sage green, white)
- Fine detail paintbrush (0 or 00 size)
- Ball stylus tool or toothpick
- Jump ring (medium size)
- Leather cord
- Wooden bead (small, with large hole)
- Needle tool
- Sandpaper (fine grit)
- Matte varnish or sealant
- Sculpting tools (silicone shaper)
Step 1: Sculpting the Base Form
-
Prepare the Clay:
Condition your white polymer clay until it is soft and pliable. If you want a more natural bone look, mix in a tiny pinch of translucent or beige clay to break up the stark whiteness. -
Shape the Cranium:
Form a small ball of clay, roughly the size of a large marble, and flatten it slightly into an elongated triangle shape to serve as the main skull portion. -
Refine the Snout:
Gently pinch and pull the lower part of the triangle to create the snout area, squaring off the end slightly rather than leaving it perfectly pointed. -
Add Eye Sockets:
Use a medium-sized ball stylus or the end of a paintbrush to press deep indentations on either side of the head for the eye sockets. Angle them slightly outward for realism. -
Define the Nasal Cavity:
Use a needle tool or small knife to carve out the nasal opening near the bottom of the snout. Create two long, vertical recesses that meet near the bottom. -
Form the Horns:
Roll two equal-sized tapered logs of clay. These should be thicker at the base and curve upward into points. -
Attach the Horns:
Press the thicker ends of the horns onto the top corners of the skull. Blend the seams thoroughly with a silicone tool so the clay looks like one continuous piece. -
Texture the Horns:
Before baking, use a needle tool to scratch subtle, varying texture lines along the length of the horns to mimic the rough surface of real keratin. -
Create the Hanger:
Insert a strong jump ring into the top center of the skull, between the horns. Ensure the clay closes around the wire securely. -
Final Shaping and Bake:
Double-check symmetry and smooth out any fingerprints with a drop of baby oil. Bake according to your clay package instructions.
Bone Realism Trick
Before baking, gently rub the ‘bone’ areas with a piece of rough denim or canvas. This transfers a subtle texture that looks much more like real bone than smooth clay.
Step 2: Painting and Assembly
-
Base Coat the Horns:
Once cooled, paint the horns with a watered-down wash of brown and grey acrylic paint. Wipe away excess with a paper towel so the dark paint stays in the textured crevices. -
Add Bone Texture:
Lightly dry-brush a bit of beige or off-white paint over the horns to highlight the ridges and give them an aged, sun-bleached appearance. -
Shade the Skull:
I like to use a very diluted wash of brown paint to add subtle aging around the eye sockets, nasal cavity, and where the horns meet the skull. -
Paint the Central Flower:
Using your finest brush, paint a small, peachy-orange rosette in the center of the forehead. Start with a darker center and dab lighter peach tones outward in a circular motion. -
Add Leaves:
Paint tiny sage green leaves extending from the flower. Use short, controlled strokes to create the leaf shapes, adding a thin vein line in a darker green if possible. -
Detail the Cracks:
With a 00 brush and watered-down black paint, draw incredibly fine, shaky lines simulating bone fractures or cranial sutures running down the snout. -
Seal the Piece:
Coat the entire pendant with a matte varnish to protect the paint and give the ‘bone’ a natural, non-glossy finish. -
Prepare the Cord:
Cut a length of leather cord to your desired necklace size. Thread on a wooden bead with a large hole. -
Attach the Pendant:
Feed the leather cord through the jump ring on the skull. Slide the wooden bead down so it rests just above the ring, securing the look.
Turquoise Upgrade
Instead of painting a flower, embed a tiny faux turquoise stone or crystal into the forehead of the skull before baking for a different Southwestern vibe.
Wear your new western pendant with pride or gift it to a friend who loves desert aesthetics
Cowboy Hat Ring Dish
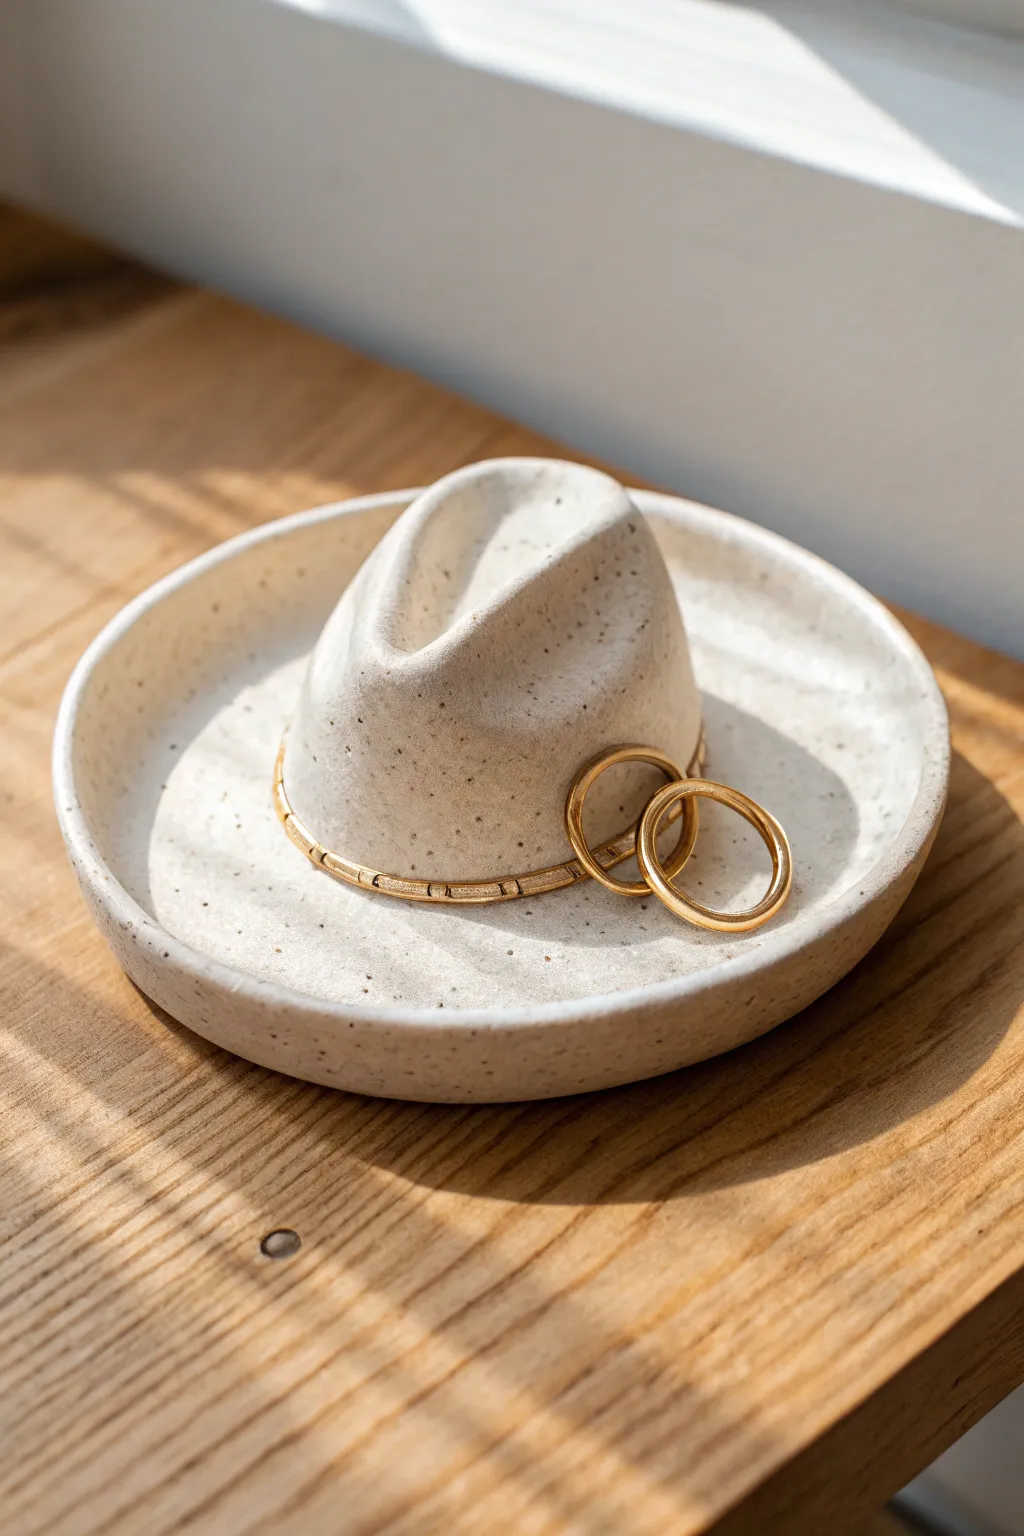
This charming ring holder combines Western flair with minimalist ceramic design, featuring a tiny cowboy hat crown rising from a simple catch-all dish. The speckled clay body gives it a natural, grainy texture that mimics sand or stone, perfect for displaying your favorite gold jewelry.
Detailed Instructions
Materials
- Speckled stoneware clay (e.g., Laguna Speckled Buff)
- Small rolling pin
- Rolling slats or guide sticks (approx. 1/4 inch thick)
- Circle cutter or template (approx. 4-5 inches diameter)
- Needle tool
- Soft rib tool (rubber or silicone)
- Sponge
- Small bowl or mold (for shaping the dish curvature)
- Scoring tool or serrated rib
- Slip (clay and water mixture)
- Modeling tool (rounded end)
- Clear matte or satin glaze
- Kiln access
Step 1: Shaping the Dish Base
-
Prepare the slab:
Begin by wedging a ball of speckled stoneware clay to remove any air bubbles. Roll it out into a smooth slab using guide sticks to ensure an even thickness of about 1/4 inch. -
Cut the circle:
Place your circle cutter or a paper template onto the slab. Cut out a perfect circle with your needle tool. Remove the excess clay and set it aside for the hat crown. -
Smooth the rim:
Before shaping, run a damp sponge or your finger gently around the cut edge of the circle. This softens the sharp angle and prevents future chipping. -
Form the curve:
Place your clay circle into a shallow bowl or over a slump mold. Press gently so the clay takes on a subtle, concave curve. This raised rim will keep your rings contained. -
Refine the surface:
Use a soft rubber rib to compress the inside of the dish. This smooths out any canvas textures from rolling and aligns the clay particles to prevent cracking.
Smooth Operator
Use a damp chamois strip on the rim of the dish while it’s leather hard. It creates an incredibly professional, compressed edge that feels smoother than sponge wiping.
Step 2: Sculpting the Hat Crown
-
Form the basic shape:
Take a small lump of the leftover clay, roughly the size of a golf ball. Roll it into an oval shape, slightly flatter on the bottom where it will attach to the dish. -
Pinch the crown:
Hold the oval in one hand and use your thumb and forefinger to gently pinch the top center, creating the classic lengthwise crease of a cowboy hat. -
Shape the dents:
Use your thumbs to press slight indentations into the sides of the crown near the front. I find that subtly tapering the top creates a more realistic silhouette. -
Hollow the crown (optional):
If your crown is quite thick (over 3/4 inch), carefully hollow out the bottom slightly with a loop tool to ensure even drying and prevent explosions in the kiln. If it’s small, you can leave it solid but ensure thorough drying. -
Check proportions:
Place the sculpted crown into the center of your dish without attaching it yet. Step back and check that the size feels balanced against the width of the ‘brim’ (the dish area).
Step 3: Assembly and Finishing
-
Score the surfaces:
Use your needle tool or a serrated rib to scratch up the center of the dish and the bottom of the hat crown where they will meet. This rough texture is crucial for a strong bond. -
Apply slip:
dab a generous amount of slip onto both scored areas. It should be the consistency of heavy cream. -
Attach the crown:
Press the hat crown firmly onto the center of the dish. Give it a tiny wiggle to lock the clay particles together and squeeze out air bubbles. -
Clean the seam:
A small coil of clay can be added around the base of the crown to smooth the transition, or you can use a modeling tool to blend the clay downwards seamlessly. Wipe away excess slip with a damp brush. -
Add the hat band:
Roll a very thin, tiny coil of clay. Wrap it around the base of the crown to mimic a hat band. Press it gently into place, adding bit of texture/markings with a tool if desired. -
Slow drying:
Cover the finished piece loosely with plastic. Let it dry slowly over several days to prevent the rim of the dish from warping as it shrinks. -
Bisque fire:
Once bone dry, fire the piece to bisque temperature (usually Cone 04) in a kiln. -
Glaze application:
Dip or brush the piece with a clear matte or satin glaze. This seals the clay while allowing the beautiful natural speckles to remain the star of the show. -
Final firing:
Fire again to the maturity temperature of your clay (typically Cone 5 or 6). Allow the kiln to cool completely before removing your new treasure.
Cracking Up?
If the crown detaches during drying, you likely didn’t score enough. Re-wet the connection points thoroughly, score deeper, and use plenty of slip before re-attaching.
Once cooled, your little ceramic hat is ready to corral your rings safely in style


What Really Happens Inside the Kiln
Learn how time and temperature work together inside the kiln to transform clay into durable ceramic.
Mini Spur Charm
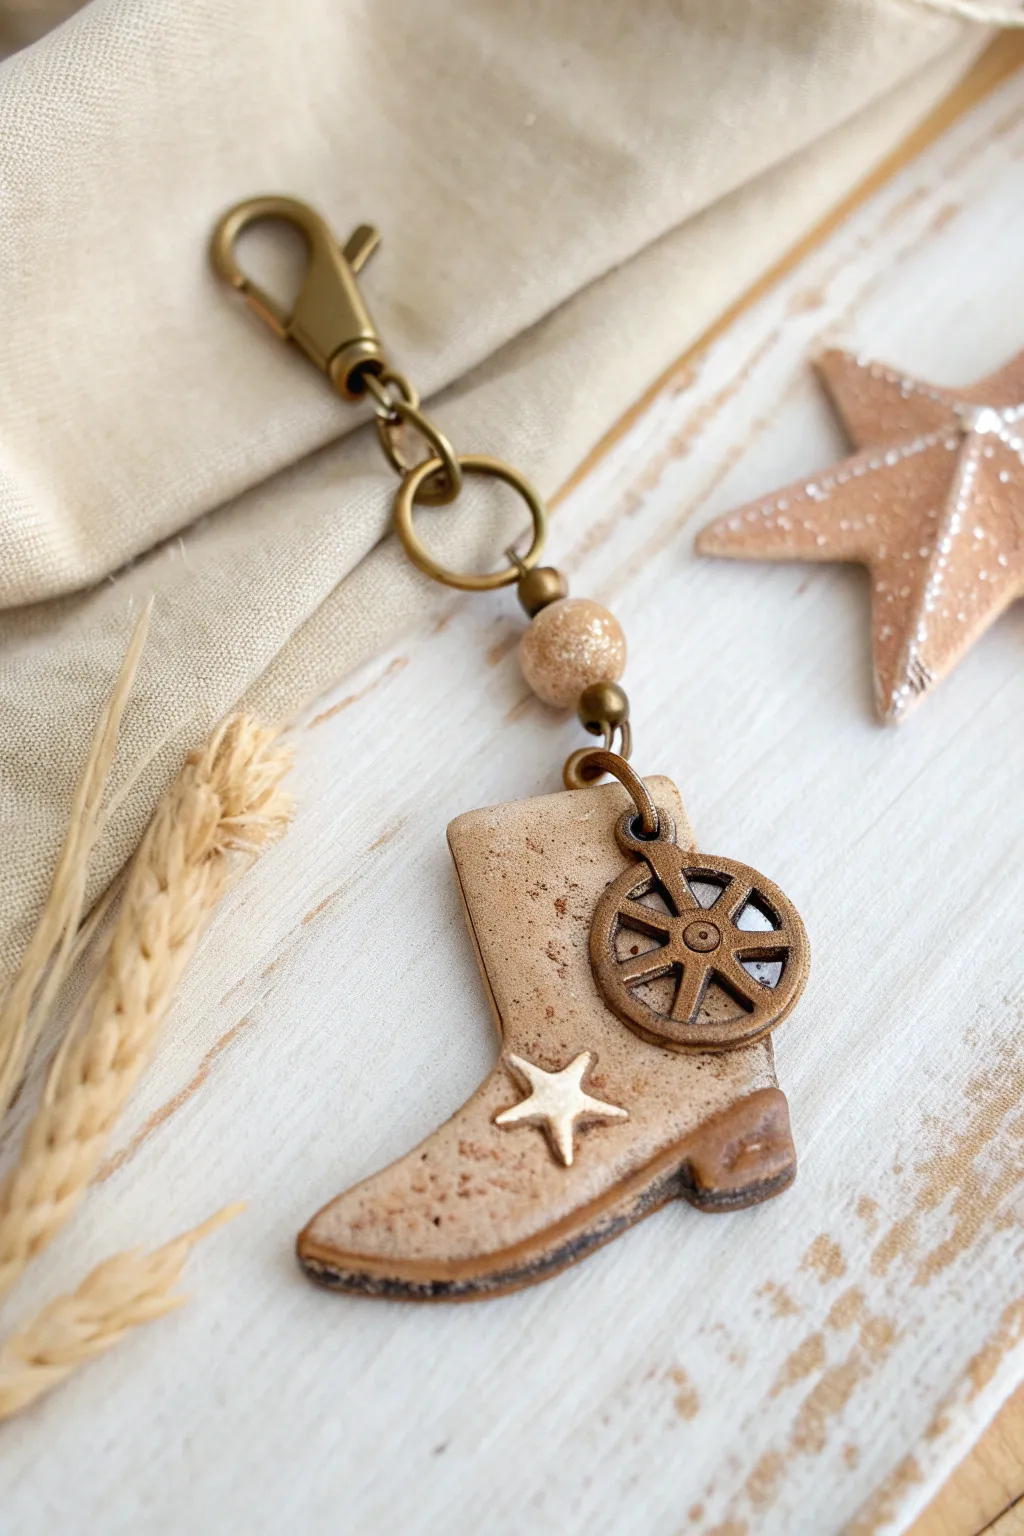
Bring a touch of the Wild West to your accessories with this charming polymer clay boot keychain. Featuring a speckled clay finish, a tiny sheriff’s star, and a clever wagon wheel charm acting as a spur, this project perfectly balances rustic texture with delicate details.
Step-by-Step
Materials
- Polymer clay (beige/granite effect, dark brown, white)
- Small wagon wheel charm (bronze tone)
- Bronze jump rings (6-8mm)
- Beige speckled bead and bronze spacer beads
- Lobster clasp keychain finding (bronze)
- Boot-shaped clay cutter (or printed template)
- Mini star cutter
- Headpin or eye pin
- Acrylic roller
- Needle tool
- Brown acrylic paint (for antiquing)
- Gloss or matte varnish (optional)
- Jewelry pliers (round nose and flat nose)
- Hand drill or pin vibe (if baking before making holes)
Step 1: Sculpting the Boot
-
Prepare the base clay:
Begin by conditioning the beige or granite-effect polymer clay until it is soft and pliable. Roll it out to a thickness of approximately 4-5mm to ensure the keychain is sturdy enough for daily use. -
Cut the shape:
Use your boot-shaped cutter to punch out the main form. If you don’t have a specific cutter, lightly trace a boot shape onto the clay with a needle tool and carefully cut it out with a craft knife. -
Smooth the edges:
Gently rub your finger along the cut edges of the boot to soften any sharp corners left by the cutter. A smooth, rounded edge looks more professional and finished. -
Add the sole:
Roll out a thin snake of dark brown clay. Flatten it slightly and press it along the bottom edge of the boot to create the sole and heel. Use your needle tool to trim any excess flush with the boot shape. -
Texture the sole:
Take a needle tool or the dull side of a craft knife and press a straight line separating the sole from the heel block for realistic detailing. -
Create the star detail:
Roll out a very thin piece of white clay. Use a mini star cutter to create the emblem. If having trouble handling such a tiny piece, I find picking it up with the tip of a craft knife helps place it accurately. -
Attach the Star:
Gently press the white star onto the ankle area of the boot. Ensure it bonds well with the base clay without squashing the star shape. -
Add texture:
To give the boot a worn, leather look, lightly dab the surface with a coarse sponge or crumpled aluminum foil. Avoid texturing the white star to keep it crisp. -
Insert the top hardware:
Establish the attachment point by inserting a bronze eye pin into the top center of the boot shank. Alternatively, poke a hole now if you plan to use a jump ring directly through the clay.
Step 2: Attaching the ‘Spur’ & Assembly
-
Create the spur hole:
Using a needle tool, create a small hole near the heel area where the ‘spur’ will hang. Make sure the hole is large enough to accommodate your jump ring after baking. -
Bake the clay:
Place your boot on a tile or parchment-lined baking sheet. Bake according to your polymer clay brand’s instructions (usually 275°F/135°C for 15-30 minutes). Let it cool completely. -
Antique the finish:
Dilute a small amount of brown acrylic paint with water. Brush it over the boot, getting into the textures, and then quickly wipe away the surface excess with a paper towel. This highlights the ‘stone’ speckles and leather texture. -
Seal (Optional):
If desired, apply a thin coat of matte varnish to protect the paint effect, or leave it raw for a more earthy feel. -
Attach the spur:
Open a small bronze jump ring using your pliers. Thread on the wagon wheel charm, then loop it through the hole you made near the heel. Close the ring securely. -
Prepare the beaded link:
Take a headpin or piece of wire and thread on your large beige speckled bead, flanked by small bronze spacer beads. Create a loop at the top with round nose pliers. -
Final Assembly:
Connect the bead link to the eye pin on top of the boot using a jump ring. Finally, attach the lobster clasp to the top of the bead link.
Fixing a Stuck Cutter
If your clay gets stuck inside the intricate boot cutter, dust the clay surface lightly with cornstarch or dip the cutter in water before pressing it down. This acts as a release agent.
Level Up: Leather Look
Before baking, use a stitching wheel tool along the seams of the boot sole to mimic real leather stitching lines. It adds incredible realism to the miniature.
Clip this adorable western charm onto your purse or keys and enjoy your handmade handiwork
Desert Sunset Trinket Tray
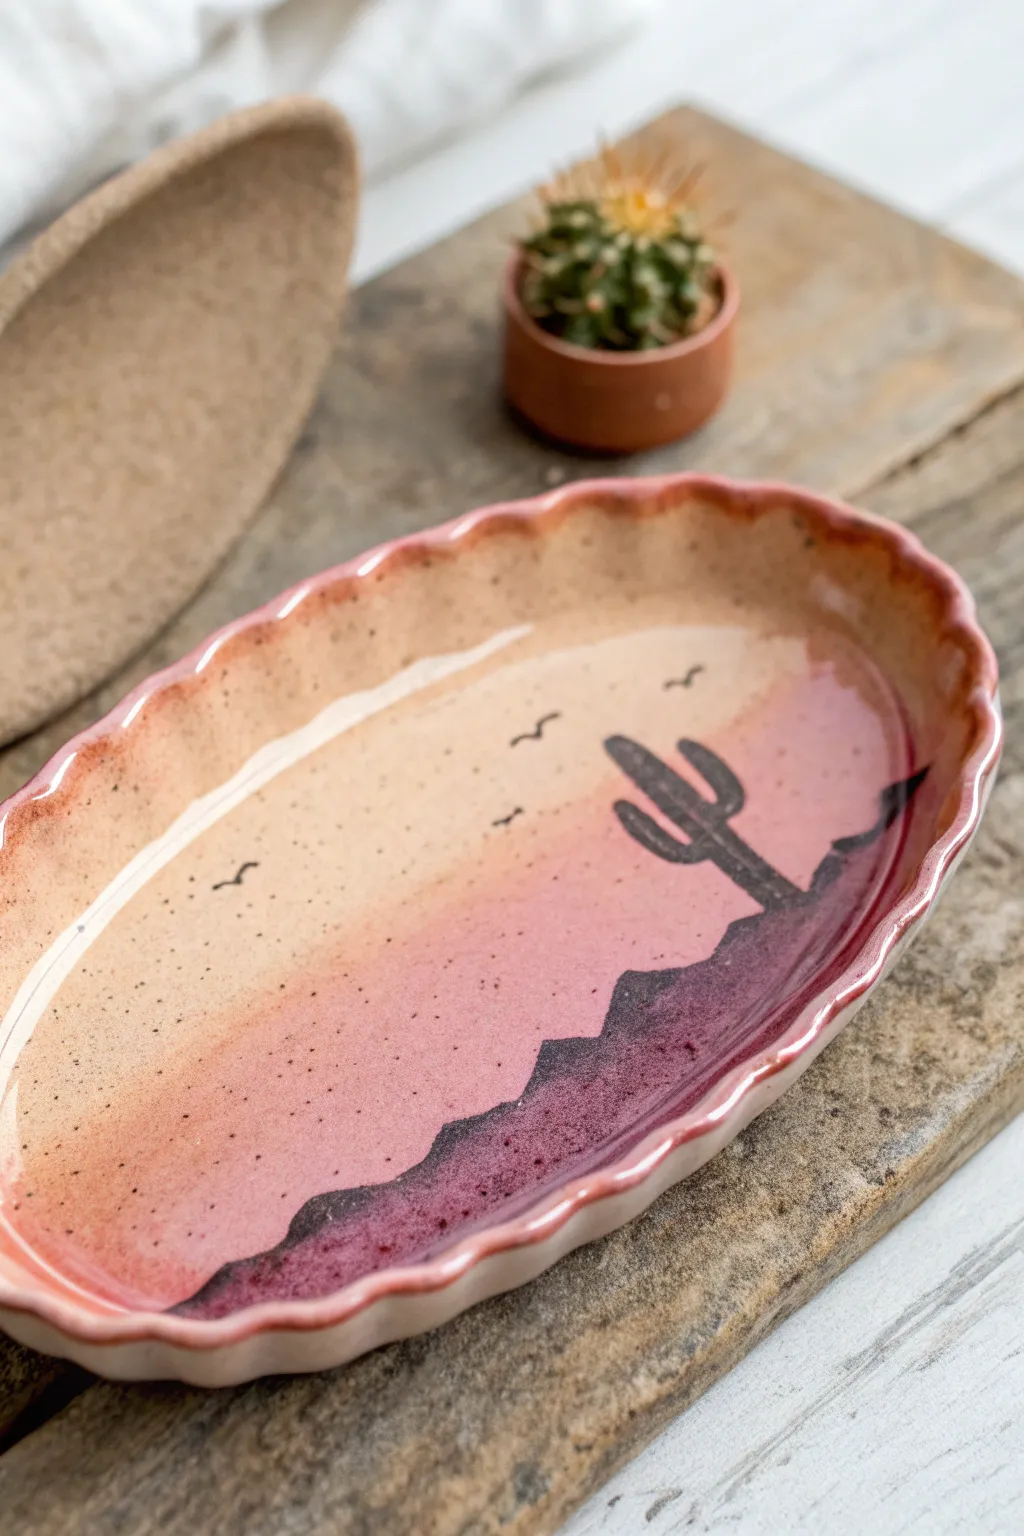
Capture the warmth of a western evening with this charming trinket tray, featuring a hand-painted gradient sunset and silhouette landscape. The scalloped edges and speckled finish give it an authentic, handmade pottery feel that’s perfect for holding jewelry or keys.
Step-by-Step Guide
Materials
- White or speckled stoneware clay
- Rolling pin
- Oval template (paper or cardstock)
- Fettling knife or needle tool
- Rib tool
- Basic clay sculpting tools (for smoothing)
- Small sponge
- Underglazes: Cream/light yellow, soft pink, deep purple, and black
- Soft fan brush (for glaze application)
- Fine detail brush (size 0 or 1)
- Clear transparent glaze
Step 1: Forming the Tray
-
Prepare the slab:
Begin by wedging your clay thoroughly to remove air bubbles. Roll it out into a smooth, even slab that is roughly 1/4 inch thick using your rolling pin. -
Cut the shape:
Place your oval template onto the slab. Using a fettling knife or needle tool, carefully trace around the template to cut out the base shape. -
Smooth the surface:
Run a rib tool gently across the surface of the clay to compress it and remove any canvas texture or rolling pin marks, ensuring a pristine canvas for your painting later. -
Lift the edges:
Gently lift the outer rim of the oval upwards with your fingers to create a shallow dish shape. You aren’t building a wall, just curving the existing slab. -
Create the scalloped rim:
Support the outside of the rim with one hand while using the thumb of your other hand to gently press indents into the clay from the inside out. Repeat this rhythmically around the entire circumference to create the fluted, pie-crust edge. -
Refine the rim:
Take a slightly damp sponge and run it along the scalloped edge to soften any sharp corners or cracks that formed during the shaping process.
Rim Protection
Use a band of colored slip or oxide on the very tip of the scalloped rim. This highlights the shape and frames your painting beautifully.
Step 2: Painting the Sunset Design
-
Mix your colors:
Prepare your underglaze palette. You will need a gradient of colors, so have your cream, pink, and purple ready. -
Apply the base sky:
Start with the lightest color. Paint the cream or light yellow underglaze across the top third of the tray’s interior using a soft fan brush. -
Blend the mid-tones:
While the first layer is still slightly damp, apply the pink underglaze across the middle section. Use slightly wet bristles to gently drag the pink up into the cream area, creating a soft, Ombré transition. -
Deepen the horizon:
Paint the bottom third of the tray with the deep purple underglaze, blending it upward into the pink section just like you did with the sky tones. -
Add speckles:
If you aren’t using speckled clay, I like to dilute a tiny bit of darker brown or black underglaze and flick it off a toothbrush onto the surface to mimic that natural stoneware look. -
Bisque fire:
Let the tray dry completely (bone dry) and then fire it to bisque temperature according to your clay’s instructions. This sets the background colors.
Make it a Set
Create different sized oval trays using this same method to serve as a nesting set, perhaps painting a moon on the larger one for a night scene.
Step 3: Silhouettes and Glazing
-
Paint the landscape:
Using a fine detail brush and black underglaze, carefully paint the silhouette of the rolling hills at the bottom, covering the purple section partially. -
Add the cactus:
Extend a cactus shape upward from the hills on the right side. Keep the lines simple—a main stem with two or three curved arms works best. -
Detail the birds:
In the sky portion (the cream/pink area), paint tiny ‘v’ or ‘m’ shapes to represent birds flying in the distance. Vary their sizes slightly for perspective. -
Apply clear glaze:
Once the black underglaze is completely dry, dip the entire tray into a clear transparent glaze, or brush on three even coats. -
Final wipe:
Wipe the bottom of the tray clean with a sponge to prevent it from sticking to the kiln shelf. -
Glaze fire:
Fire the piece a final time to the temperature required for your specific glaze and clay body.
Enjoy the warm desert vibes every time you reach for your favorite ring or trinket

TRACK YOUR CERAMIC JOURNEY
Capture glaze tests, firing details, and creative progress—all in one simple printable. Make your projects easier to repeat and improve.
Bandana Pattern Coasters
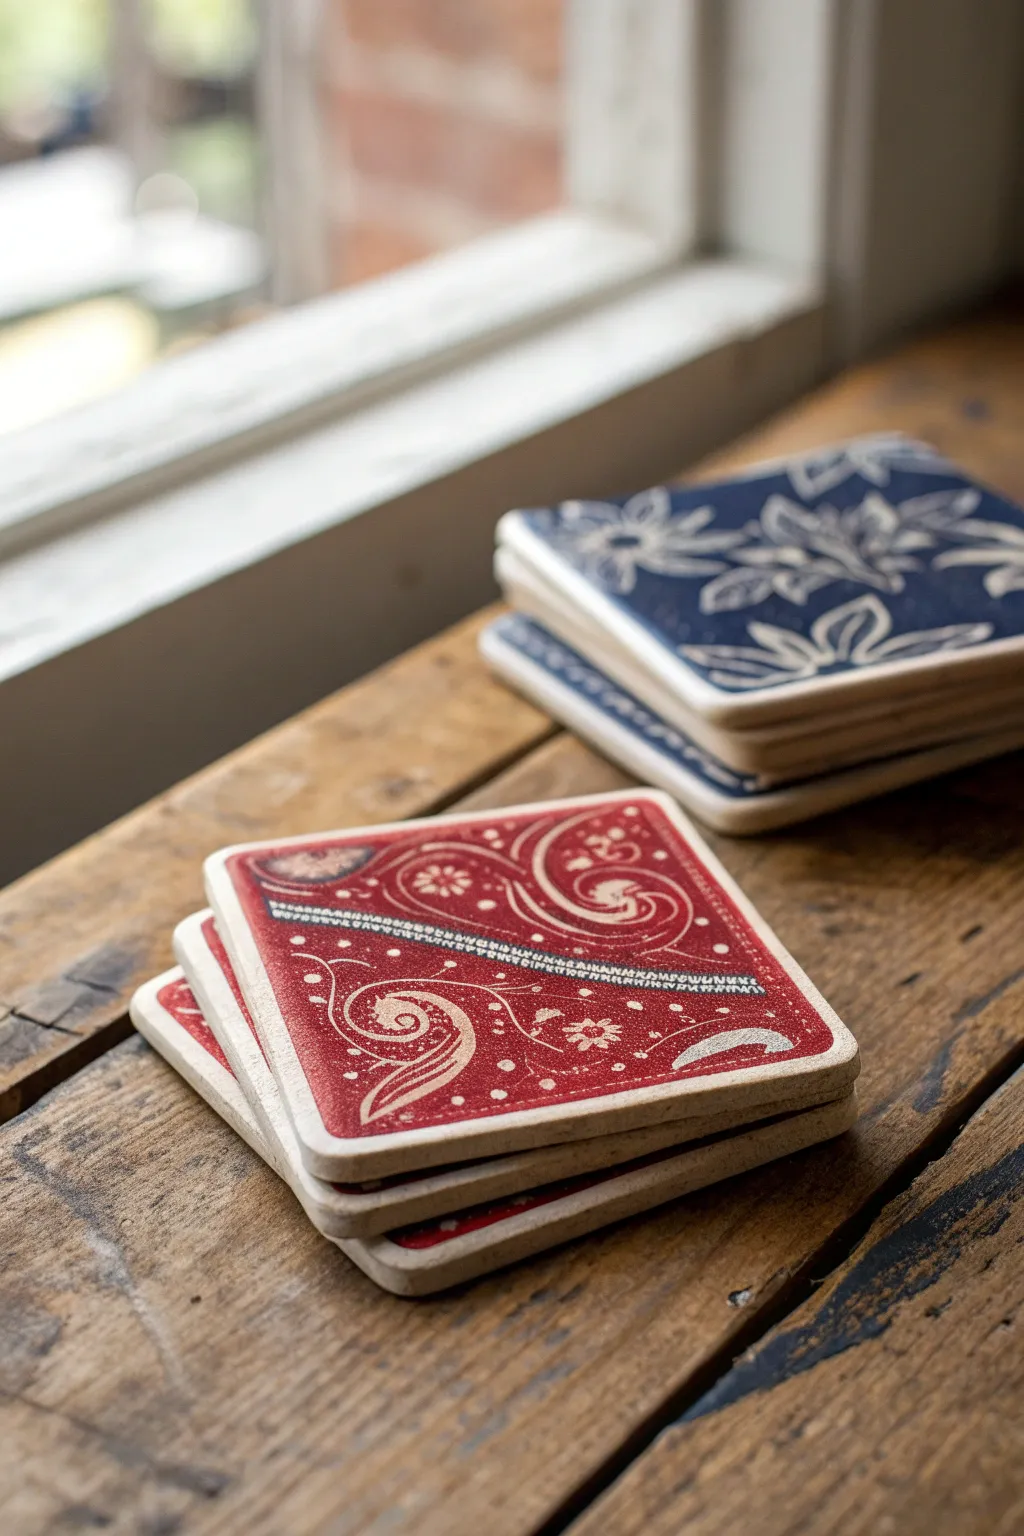
Bring a touch of the Wild West to your table setting with these durable ceramic coasters featuring classic paisley bandana designs. They combine the rustic charm of unglazed clay edges with the striking contrast of bold red and blue glazes engraved with delicate white lines.
Detailed Instructions
Materials
- Stoneware clay (buff or white)
- Square cookie cutter (4×4 inch)
- Red and navy blue underglazes
- Sgraffito tool or fine needle tool
- Wide soft paintbrush
- Rolling pin
- Guide sticks or slab roller (1/4 inch thickness)
- Clear matte or satin glaze
- Clean sponge
- Canvas working mat
Step 1: Shaping the base
-
Roll the slab:
Begin by wedging your clay thoroughly to remove air bubbles, then roll it out into a smooth, even slab. I prefer using 1/4 inch guide sticks to ensure every coaster is perfectly uniform in thickness. -
Cut the squares:
Using a 4×4 inch square cutter, punch out your coaster shapes. If you don’t have a cutter, you can make a paper template and slice around it with a fettling knife for a similar result. -
Round the corners:
Gently tap the sharp corners of each square with your finger or a smoothing tool to create the rounded, soft edges seen in the bandana style. -
Smoothing:
Run a damp sponge along the edges and surface to compress the clay particles and remove any canvas texture. -
Let them stiffen:
Allow the clay squares to dry to a ‘leather-hard’ state. This is crucial—if the clay is too wet, the carving tool will drag; if too dry, it will chip.
Step 2: Decorating
-
Apply background color:
Paint 2-3 even coats of red underglaze on half of your coasters and navy blue on the others. Leave a small border of raw clay around the very edge if you want that framed look. -
Dry to the touch:
Wait until the underglaze is dry to the touch and no longer tacky before moving to the carving step. -
Sketch the design:
Lightly scratch or trace your paisley bandana pattern onto the surface. You can freehand the swirls, dots, and teardrop shapes, or use a stencil for precision. -
Sgraffito contouring:
Using a fine loop tool or sgrafitto tool, carve away the colored underglaze to reveal the white clay body beneath. Start with the main paisley swirl outlines. -
Add details:
Carve delicate floral centers and small accent dots around the main swirls. Vary your pressure to create slightly thicker or thinner lines for visual interest. -
Create the border:
Carve a dotted or hatched line border that runs diagonally or straight across the coaster to mimic the folded hem or stitching of a fabric bandana. -
Clean up crumbs:
Use a large, dry, soft brush to gently sweep away the clay burrs and crumbs created by carving. Do not wipe with water, or you’ll smear the clay dust back into the specific color.
Keep it clean
When carving sgraffito, keep a vacuum nearby or work over a catch tray. Clay dust spreads easily, and keeping the carved lines crisp white requires a dust-free surface.
Step 3: Firing and finishing
-
Bisque fire:
Once bone dry, load the coasters into the kiln for a bisque firing to cone 04 (or your clay’s specification). -
Apply clear glaze:
Dip or brush a thin layer of clear matte or satin glaze over the top surface to seal the design and make it waterproof. -
Wipe the bottoms:
Ensure the bottom and the very raw clay edges are free of glaze so they don’t stick to the kiln shelf. -
Glaze fire:
Fire the coasters a second time to the maturation temperature of your glaze and clay body. -
Sand the bottom:
After cooling, briefly sand the bottom of the coasters to ensure they won’t scratch any table surfaces.
Mix & match set
Instead of just red and blue, try dusty turquoise or mustard yellow underglazes for a vintage, faded western aesthetic. Make a mismatched set of 4 for a great gift.
These charming coasters are now ready to protect your furniture with genuine western flair
Sheriff Star Pins
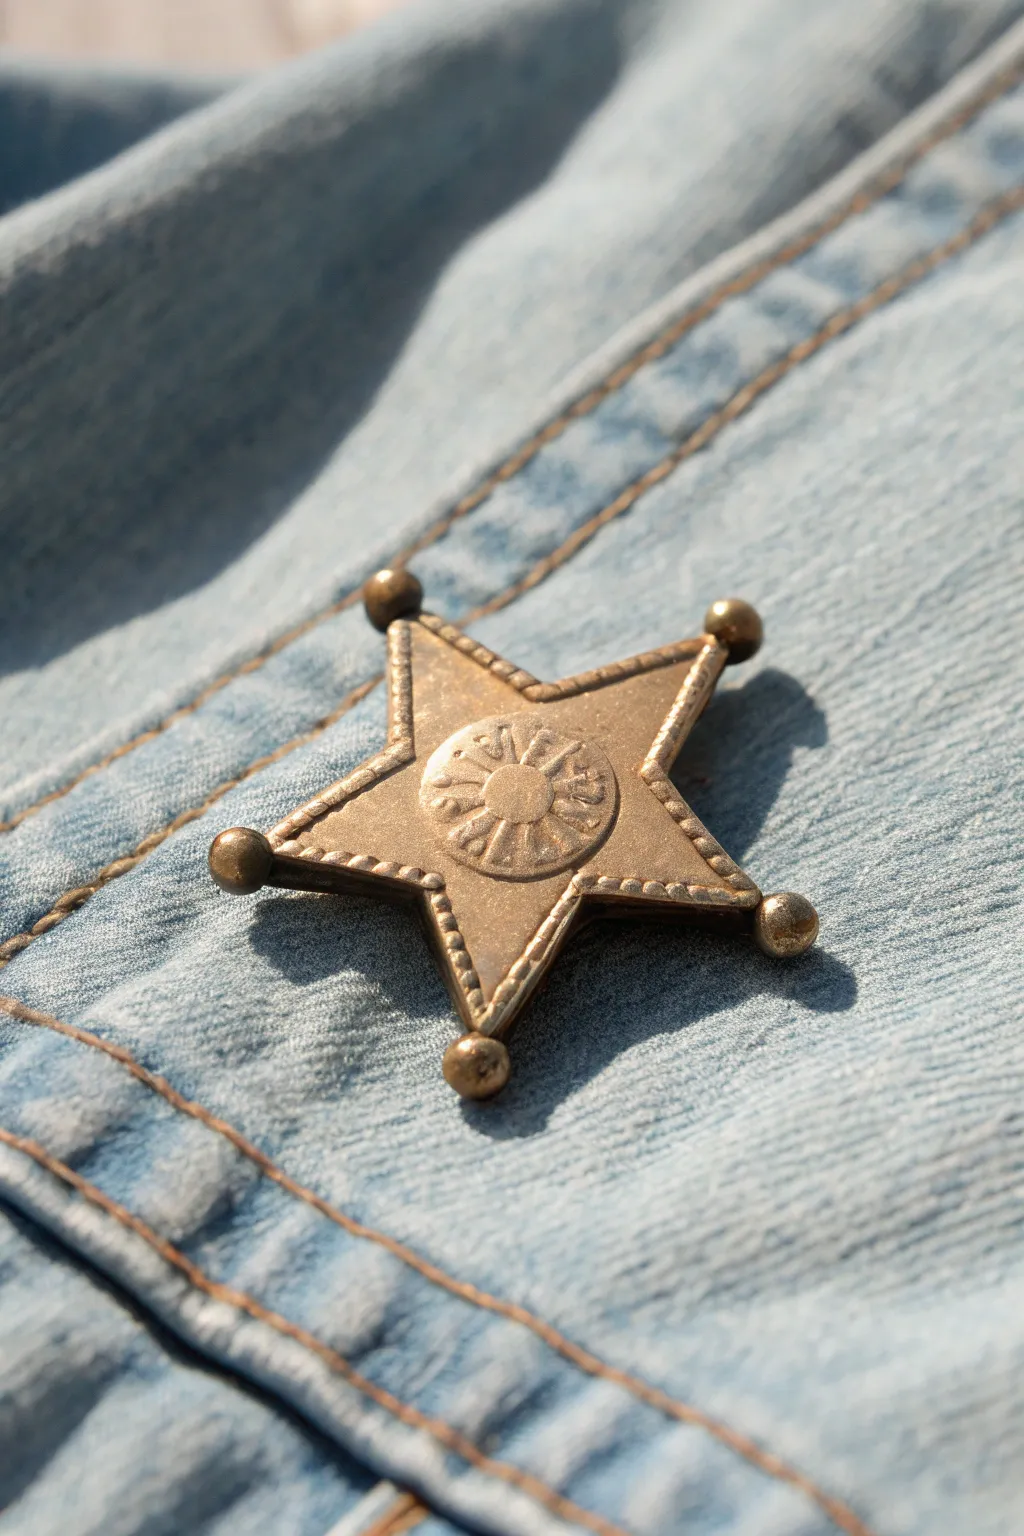
Capture the spirit of the Wild West with this faux-metal sheriff’s star pin. Using polymer clay and metallic powders, you can create a convincing antique bronze finish that looks great on a denim jacket.
Step-by-Step
Materials
- Gold or bronze metallic polymer clay
- Basic crafting clay tools (rolling pin, knife)
- Small round piping tip or straw (optional)
- Needle tool or toothpick
- Ball stylus tool
- Small spherical beads (metal or clay)
- Mica powder (antique gold/bronze)
- Black acrylic paint
- Paper towel or rag
- Pin back mechanism
- Strong craft glue (E6000 or similar)
- Sealer or varnish (matte or satin)
Step 1: Sculpting the Star Base
-
Condition the Clay:
Begin by thoroughly kneading your metallic polymer clay until it is soft and pliable. This prevents cracks during baking. -
Roll out a Slab:
Use your rolling pin to create a smooth, even slab of clay, approximately 1/4 inch thick. You want it substantial enough to hold the details without being too heavy. -
Create a Template:
Draw or print a 5-point star shape on paper to use as a guide. Cut it out and place it gently onto your clay slab. -
Cut the Star Shape:
Using a craft knife, carefully trace around your template to cut out the basic 5-point star shape. Remove the excess clay and smooth the rough edges with your finger. -
Define the Center:
Lightly press a small round cutter or bottle cap into the exact center of the star to mark the circle area. Don’t cut through; just create an impression. -
Add the Center Detail:
Roll a small ball of clay, flattened slightly, and place it in the very center of your circle impression. Then, use a needle tool to press radiating lines outward from this button to the edge of the circle, creating the sunburst pattern shown in the photo.
Step 2: Adding Texture and Trim
-
Create the Beaded Rim:
Roll a very thin snake of clay. Carefully lay this along the outer edge of the star shape to create a raised border. Trim any excess where the points meet. -
Texture the Rim:
Using your needle tool or a small blunt object, press small evenly spaced indentations along that raised border strip to mimic a rope or beaded texture. -
Add the Ball Points:
Roll five small, identical spheres of clay. Attach one to the very tip of each star point. Press them gently to adhere, or use a tiny dab of liquid clay for a stronger bond. -
Apply Mica Powder:
Before baking, lightly brush gold or bronze mica powder over the raised surfaces. This enhances the metallic sheen of the clay. -
Bake the Clay:
Place your star on a baking sheet and bake according to your clay manufacturer’s specific temperature and time instructions. Let it cool completely.
Uneven Points?
If your hand-cut star points look shaky, use a star-shaped cookie cutter instead. You can gently stretch the points afterward to make them longer if needed.
Step 3: Antiquing and Assembly
-
Apply Black Wash:
Water down a small amount of black acrylic paint. Brush this wash over the entire cooled star, ensuring it gets into all the crevices of the sunburst and the beaded rim. -
Wipe Away Excess:
I prefer to use a damp rag immediately to wipe the paint off the raised surface areas. The black will stay trapped in the textured lines, creating that aged, vintage look. -
Let Dry:
Allow the paint to dry completely. This usually takes only a few minutes since the layer is thin. -
Seal the piece:
Apply a thin coat of matte or satin varnish to protect the paint and mica powder from wearing off over time. -
Attach the Pin Back:
Flip the star over. Apply a generous amount of strong craft glue to a metal pin back and press it firmly onto the center of the badge. Let the glue cure fully before wearing.
Use Liquid Clay
For maximum durability, put a drop of ‘Bake & Bond’ or liquid polymer clay under the ball tips before baking so they don’t snap off later.
Now pin your handcrafted badge to your favorite jacket and show off your new western flair
Lasso Rope-Rim Mug
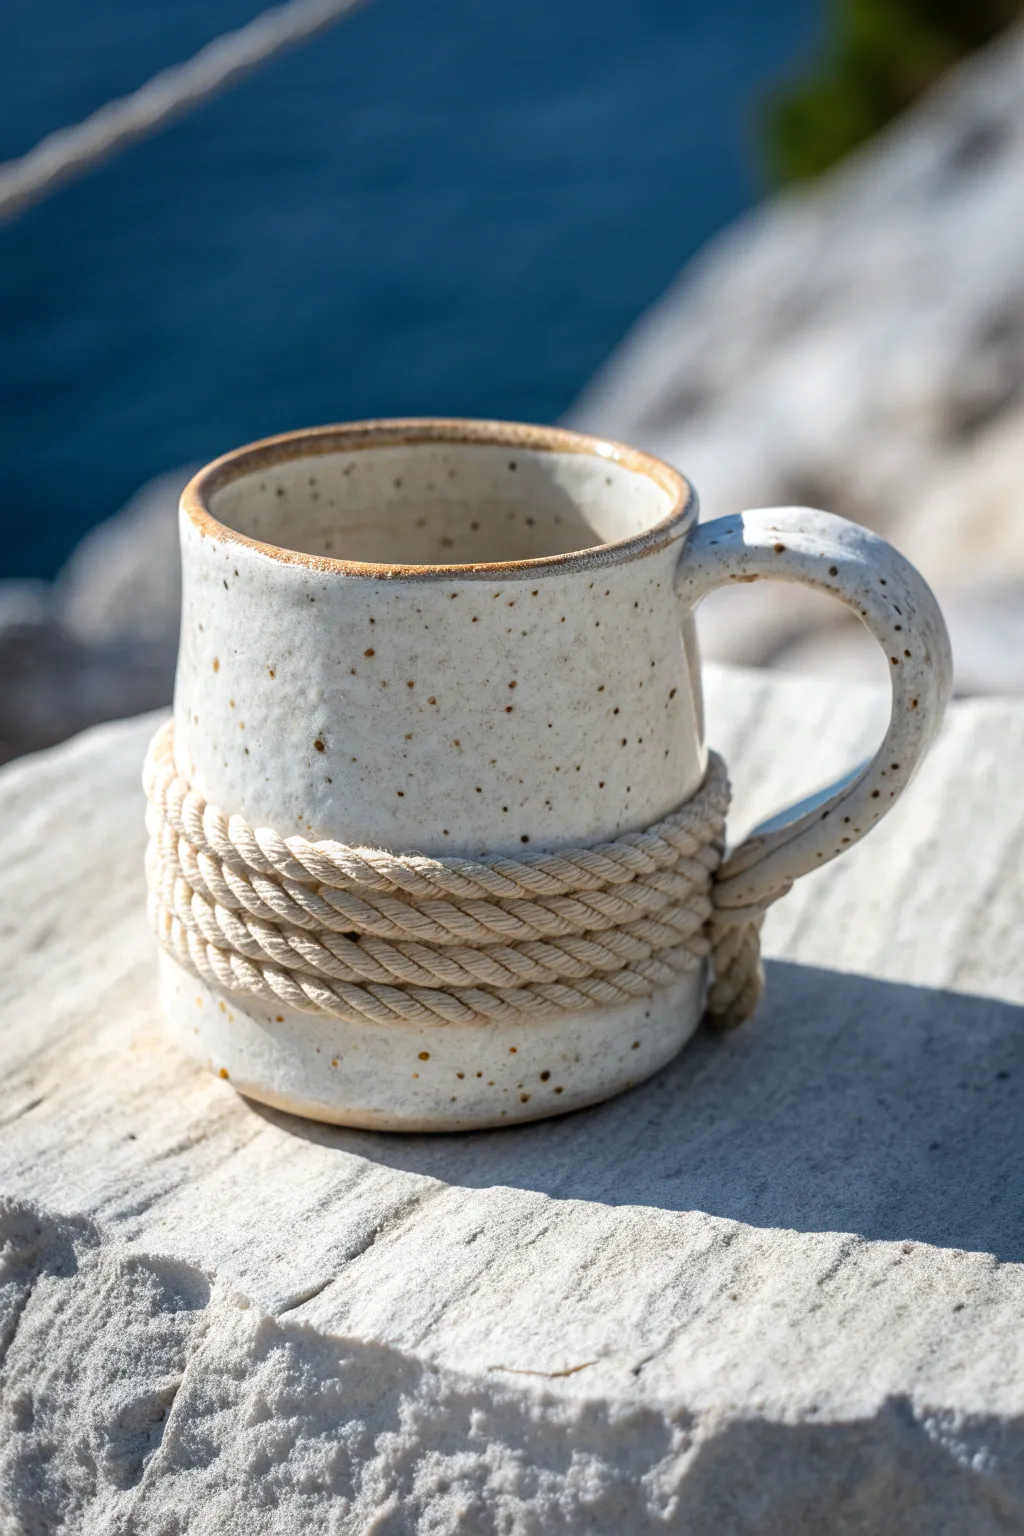
Embrace the spirit of the open range with this rugged, handcrafted mug that features a unique nautical or western twist. The speckled clay body and warm, toasted rim perfectly complement the texture of the natural rope wrapping for a vessel that feels solid and comforting in your hands.
How-To Guide
Materials
- Speckled stoneware clay (mid-fire)
- Pottery wheel (or slab roller for hand-building)
- Throwing tools (sponge, needle tool, rib, wire cutter)
- Trimming tools
- Clear matte or satin glaze
- Iron oxide wash or dark stain
- Medium-thickness natural cotton or hemp rope (approx. 4mm)
- High-strength epoxy adhesive or E6000
- Sandpaper (various grits)
- Kiln
Step 1: Shaping the Vessel
-
Wedge and Center:
Start by thoroughly wedging about 1 to 1.5 pounds of speckled stoneware clay to remove air bubbles. Center the ball firmly on your wheel head. -
Open and Pull:
Open the clay and begin pulling the walls. Aim for a simple cylinder shape, keeping the walls relatively straight with just a slight inward taper at the top to hold heat. -
Create the Recess channel:
This is the critical step: Using a square-edged wooden rib or your finger, gently press an indentation into the lower third of the mug’s exterior. This channel needs to be deep enough to accommodate the rope later so it sits flush-ish, but not so deep that it weakens the wall. -
Refine the Rim:
Smooth and compress the rim with a chamois or sponge. Make it slightly rounded for comfortable sipping. -
Wire Off:
Wire the mug off the wheel head and set it aside until it reaches leather-hard consistency.
Loose loops?
If the rope slips while wrapping, try using a few dabs of hot glue for an instant hold while the stronger epoxy cures underneath. This acts as a temporary clamp.
Step 2: Handle and Trim
-
Trimming the Foot:
Once leather hard, center the mug upside down on the wheel. Trim a clean foot ring, ensuring the bottom is smooth. -
Pull the Handle:
Pull a strap handle from a lug of matching clay. It should be thick and sturdy to match the mug’s aesthetic. Allow it to curve naturally. -
Attach the Handle:
Score and slip the contact points on both the mug and the handle. Attach the top of the handle near the rim and the bottom just above where your rope channel begins. -
Refining the Join:
Blend the clay at the attachment points smoothly. I find that leaving a slightly visible thumb mark at the top join adds to that handmade, rustic character. -
Bisque Fire:
Allow the mug to dry slowly and completely before loading it into the kiln for a bisque firing (usually Cone 04).
Step 3: Glazing and Finishing
-
Accent the Rim:
After bisque, wipe the mug down with a damp sponge. Apply a thin band of iron oxide wash or a toasted clay stain to the very rim of the mug to create that burnt-orange outline. -
Glaze Application:
Dip or brush the entire mug in a clear matte or satin glaze. This allows the natural speckles of the clay body to shine through without being obscured. -
Glaze Fire:
Fire the mug to maturity (typically Cone 5 or 6 for stoneware). Let the kiln cool completely before unloading. -
Sand the Base:
Once cooled, wet-sand the bottom of the foot ring so it won’t scratch your table surface.
Knotty ideas
Instead of a simple wrap, try finishing with a decorative sailor’s knot or a small Turk’s Head knot right where the handle meets the body for extra nautical flair.
Step 4: The Rope Detail
-
Prepare the Rope:
Measure the circumference of your recessed channel and cut a length of rope sufficient to wrap around it 4-5 times. -
Anchor the End:
Apply a small dab of strong adhesive (like E6000) to the beginning of the recessed channel. Press the raw end of the rope firmly into the glue. -
Wrap Tightly:
Slowly wind the rope around the mug, keeping it tight and pushing each new coil snugly against the previous one. Add small dots of glue periodically to keep it secure. -
Secure the Finish:
When you reach the end of the channel, tuck the final tail of the rope underneath the previous loop if possible, or cut it at an angle and glue it flush. Hold it in place with painter’s tape until the glue cures fully.
Now you have a rugged, functional piece of art ready for your morning coffee on the porch
Wagon Wheel Tea Light Holder
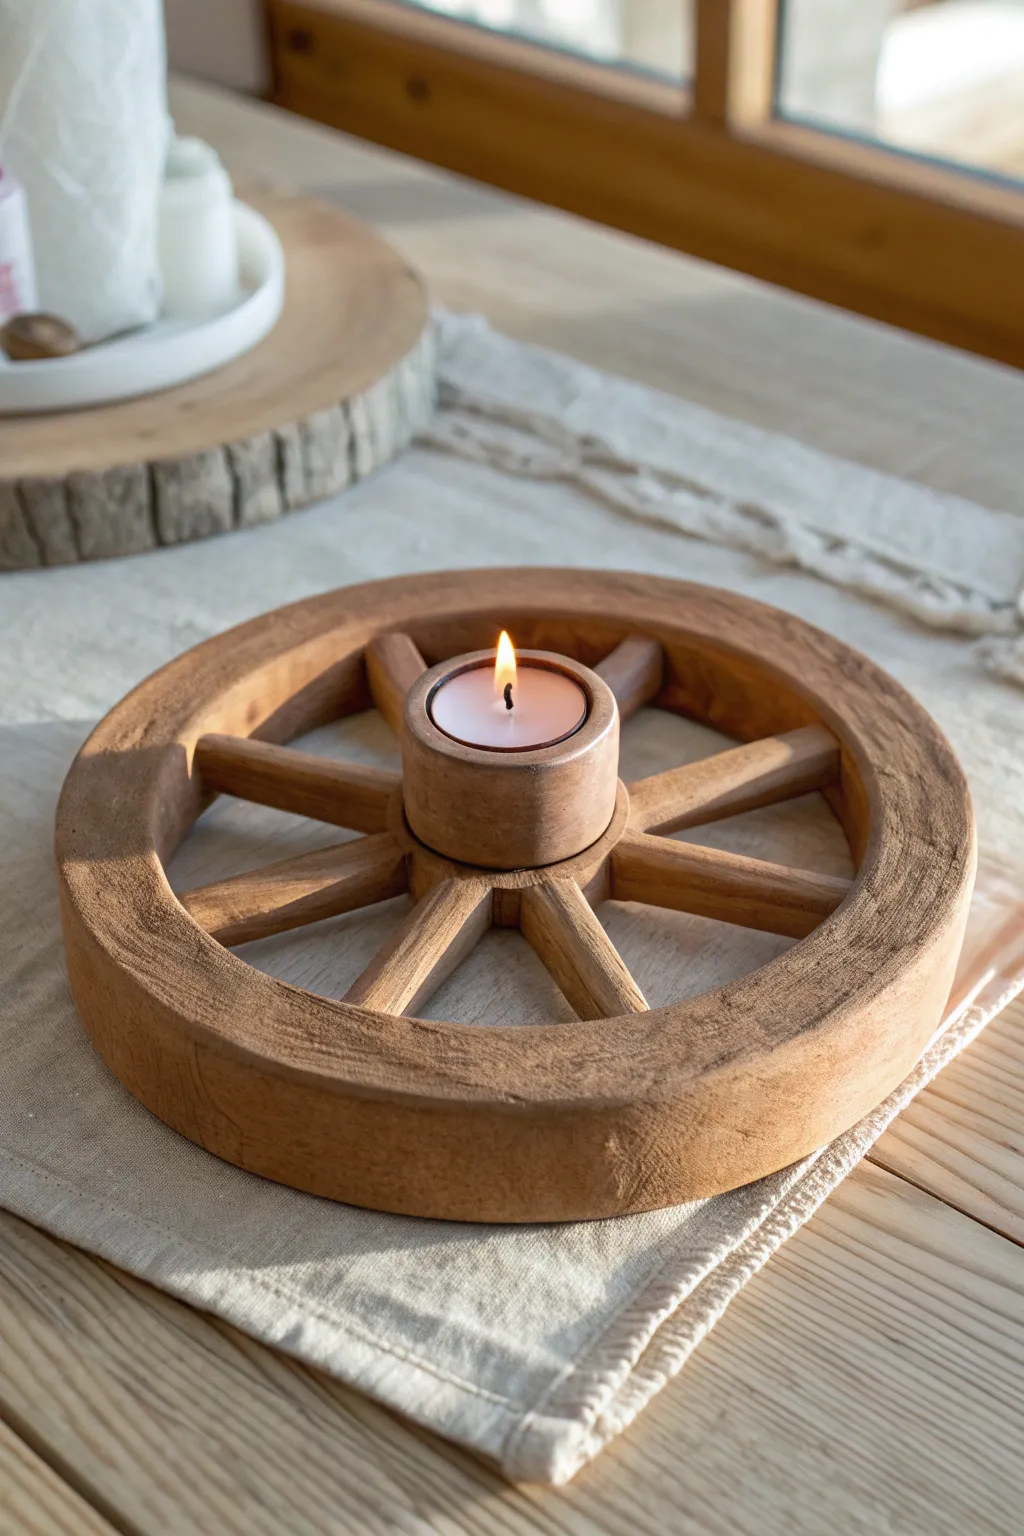
Bring a touch of the frontier to your table with this rustic, faux-wood candle holder sculpted from clay. This charming wagon wheel design perfectly cradles a single tea light, offering a warm and nostalgic glow.
Step-by-Step Tutorial
Materials
- Air-dry clay (terra cotta or white works best)
- Rolling pin
- Circle cutters (large approx. 6-7″, small approx. 2″)
- Craft knife or scalpel
- Ruler
- Brown acrylic paints (dark walnut, burnt sienna, tan)
- Texture tool or stiff bristle brush
- Sandpaper (fine grit)
- Matte sealant spray or varnish
- Tea light candle for sizing
- Clay adhesive or slip
Step 1: Forming the Wheel Structure
-
Create the Hub:
Start by rolling a thick cylinder of clay, roughly 2 inches in diameter and 1.5 inches tall. Press a tea light gently into the top to create the perfect indentation, ensuring the walls remain thick enough to hold their shape. -
Roll the Rim:
Roll out a long, thick snake of clay, or cut a strip from a flattened slab that is about 1 inch high and 0.5 inches thick. -
Shape the Outer Circle:
Form the strip into a large circle around your central hub, leaving a gap of about 2-3 inches between the hub and the rim. Use a large circle template or bowl to keep it perfectly round. -
Secure the Rim Seam:
Ideally, score and slip the ends of your rim together, blending the clay with your fingers or a tool until the seam is invisible.
Cracking Issues?
If hairline cracks appear while drying, don’t panic. Mix a tiny bit of fresh clay with water to make a paste and patch the cracks, then sand smooth once dry.
Step 2: Crafting the Spokes
-
Cut the Spokes:
Roll out a slab of clay to about 1/4 inch thickness. Using your ruler and knife, cut eight equal strips to serve as the spokes. They should be just slightly longer than the gap between your hub and rim. -
Shape the Spokes:
Gently roll each rectangular strip between your fingers to round off the sharp edges, giving them a more hand-hewn, wooden dowel appearance. -
Attach First Spoke:
Score the connection points on the hub and the inner rim. Apply a dab of clay slip or water, then press your first spoke firmly into place. -
Complete the Wheel:
Attach the remaining spokes in a cross pattern first (12, 6, 3, and 9 o’clock) to ensure symmetry, then fill in the diagonals. Smooth the connection points so the clay looks integrated.
Rust It Up
For an even older look, paint a metallic ‘band’ around the hub using iron-colored paint and dab on cinnamon-mixed paint for a realistic faux rust effect.
Step 3: Texturing and Finishing
-
Add Wood Grain:
Before the clay dries, drag a stiff bristle brush or a needle tool along the lengths of the rim and spokes. Create long, flowing lines to mimic natural wood grain. -
Create Imperfections:
I like to add a few small divots or knotholes with a sculpting tool to enhance the aged, weathered western look. -
Dry Thoroughly:
Let the piece dry completely for 24-48 hours. Turn it over halfway through the process to ensure the bottom dries evenly. -
Sand Smooth:
Once bone dry, lightly sand any sharp burrs or rough patches, but act gently to preserve your wood grain texture. -
Base Coat:
Paint the entire piece with a medium brown tone like burnt sienna. Ensure you get the brush into all the nooks between the spokes. -
Dry Brushing:
Dip a dry brush into a lighter tan paint, wipe most of it off, and lightly drag it over the raised texture. This highlights the ‘wood grain’ and gives it dimension. -
Antique the Crevices:
Water down some dark walnut paint and brush it into the corners where the spokes meet the rim. Wipe away excess with a paper towel to leave shadows in the deep spots. -
Seal the Project:
Finish with a matte spray sealant to protect the paint and give the clay a durable, non-shiny finish that mimics old wood.
Place a tea light in your finished wheel and enjoy the cozy, rustic atmosphere it creates
Prairie Wildflower Bud Vase
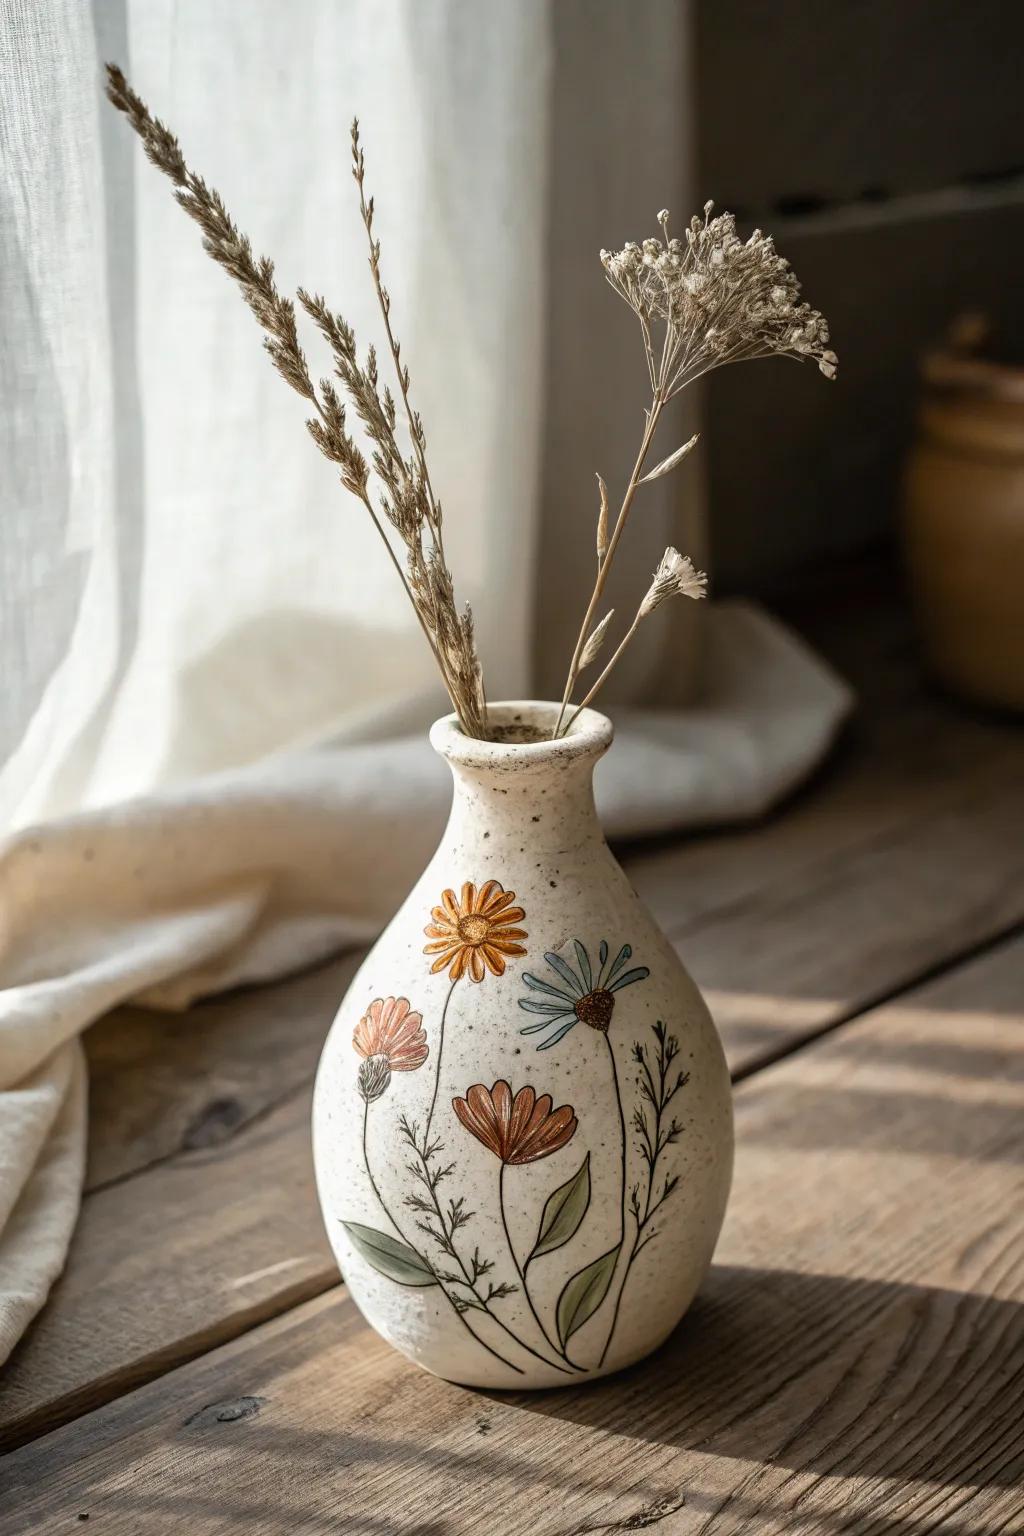
Capture the rustic charm of the open plains with this speckled stoneware bud vase, featuring delicate hand-painted wildflowers. Its narrow neck and earthy palette make it the perfect vessel for displaying dried grasses or a single fresh bloom.
Step-by-Step Tutorial
Materials
- Speckled buff stoneware clay (approx. 1-1.5 lbs)
- Pottery wheel
- Throwing tools (sponge, needle tool, wire cutter, ribs)
- Trimming tools
- Underglazes: Burnt orange, rust red, sage green, cornflower blue, and black
- Fine detail brushes (liner and small round)
- Clear matte or satin glaze
- Kiln
Step 1: Throwing the Form
-
Center and open:
Begin by wedging your speckled clay thoroughly to remove air bubbles. Center the clay on the wheel head, ensuring a strong seal. Open the clay down to a depth of about 1/4 inch from the bat, keeping the base relatively narrow to support the bulbous shape. -
Pull the cylinder:
Slowly pull up the walls into a tall, even cylinder. Don’t worry about the shape yet; focus on getting consistent wall thickness from bottom to top. Aim for a height of about 5-6 inches. -
Belly out the form:
From the inside, use your fingers or a curved rib to gently push the clay outward, starting from the bottom third. Create a rounded, teardrop belly that tapers gradually back in as you move upward. -
Collar the neck:
Using both hands, gently collar (squeeze) the top third of the clay inward to create the narrow neck. Do this in several passes to avoid buckling the clay, compressing the rim after each pass to keep it thick and strong. -
Refine the rim:
Use a chamois or a wet sponge to round off and flare the lip slightly outward. This small flare gives the vase a finished, professional look. -
Trim the base:
Once the piece is leather hard, center it upside down on the wheel. Trim away excess weight from the bottom curve to create a clean foot ring or a smooth, flat bottom, depending on your preference.
Step 2: Painting the Wildflowers
-
Sketch the design:
Lightly sketch your floral composition directly onto the leather-hard clay using a pencil. The graphite will burn off in the kiln, so don’t worry about making mistakes. I like to vary the height of the stems to create visual interest. -
Outline the stems:
Using a very fine liner brush and black underglaze, paint the thin, wiry stems. Keep your hand loose to mimic the natural sway of prairie grass. -
Paint the leaves:
Mix a sage green underglaze and paint the elongated, lance-shaped leaves near the base. Add a few small, feathery sprigs along the stems using short, quick brushstrokes. -
Add the blue flower:
For the blue flower, use a cornflower blue underglaze to paint long, thin petals radiating from a center point. Keep the paint slightly translucent so the speckles of the clay show through later. -
Paint warm-toned blooms:
Use burnt orange and rust red for the other flowers. Paint these with fuller, rounded petals. Apply a second coat if you want the color to be more opaque against the speckled background. -
Add the centers:
Once the petal colors are dry to the touch, dot the centers of the flowers with a contrasting color like dark brown or deep gold to add dimension. -
Define with black lines:
Return with your finest liner brush and black underglaze. Carefully outline the petals and leaves. Use broken lines or varying line weights to keep the look organic rather than cartoonish. -
Add textural details:
Add tiny pollen dots around the flower centers and small hatch marks on the leaves using the black underglaze to suggest veins and texture.
Design Tip
Use a needle tool to lightly carve (sgraffito) through the underglaze petals before firing. This reveals the raw clay underneath and adds sharp, crisp definition to your flowers.
Step 3: Glazing and Firing
-
Bisque fire:
Once the underglaze is completely dry, load the vase into the kiln and bisque fire to Cone 04 (or your clay body’s recommendation). -
Apply clear glaze:
Wipe the bisque-fired piece with a damp sponge to remove dust. Dip the entire vase into a clear matte or satin glaze. A glossy glaze can sometimes cause the underglaze lines to run, so a matte finish is safer for this detailed work. -
Clean the foot:
Thoroughly wipe off any glaze from the bottom of the vase (and the foot ring if you trimmed one) to prevent it from sticking to the kiln shelf. -
Final firing:
Fire the piece to maturity (likely Cone 5 or 6 for stoneware). Allow the kiln to cool completely before removing your vase to prevent thermal shock.
Make it a Set
Create a trio of vases in graduated heights (e.g., 4, 6, and 8 inches). Keep the floral theme consistent but change the dominant flower color on each one for a cohesive collection.
Fill your new vase with dried bunny tails or wheat for an authentic western aesthetic
Desert Rock Textured Jewelry Dish
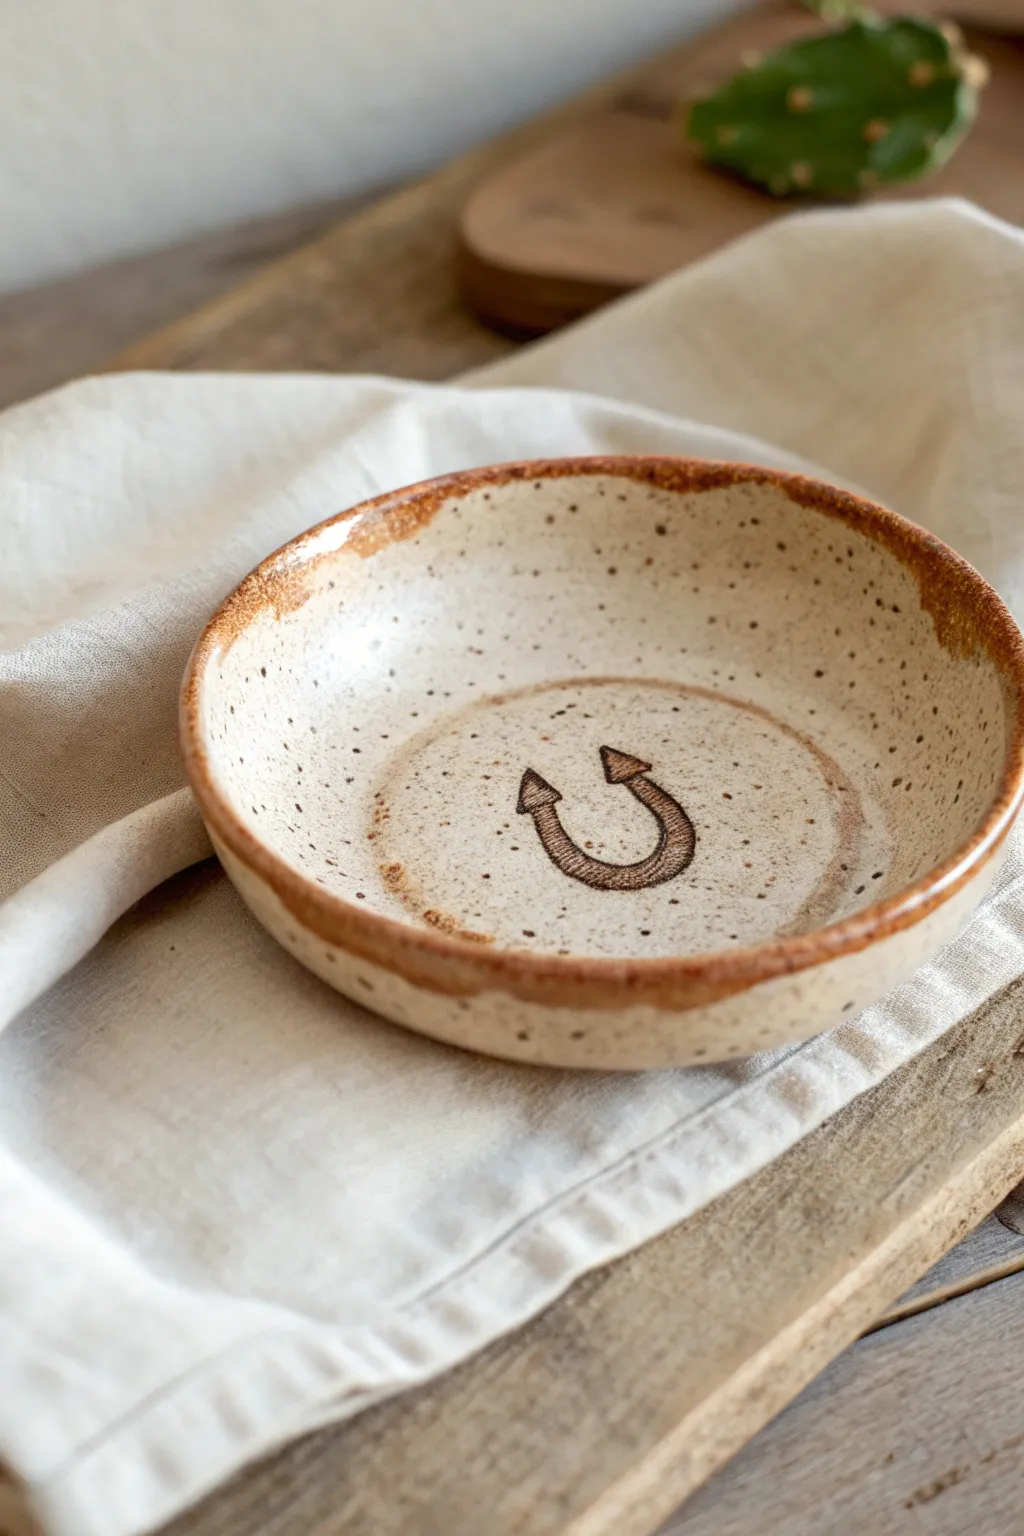
Capture the rustic spirit of the West with this speckled clay jewelry dish featuring a hand-carved horseshoe motif. The warm, toasted rim and natural speckling give it an authentic desert-rock feel perfect for holding rings or studs.
How-To Guide
Materials
- Speckled buff stoneware clay (or polymer clay with faux speckles)
- Small rolling pin
- 4-inch round cookie cutter or bowl template
- Carving tool or needle tool
- Small sponge
- Shallow bowl (for use as a mold)
- Brown iron oxide wash or underglaze
- Clear matte glaze
- Fine-grit sandpaper (if using polymer clay)
- Kiln (if using stoneware)
Step 1: Shaping the Form
-
Prepare the Clay:
Begin by wedging your speckled clay body thoroughly to remove any air bubbles. If using polymer clay, condition it until soft and pliable. -
Roll the Slab:
Roll the clay out into an even slab, aiming for a thickness of about 1/4 inch. Keep your pressure consistent to avoid lumpy areas. -
Cut the Circle:
Place your 4-inch round cutter or bowl template onto the slab. Press down firmly or trace around the template with a needle tool to cut out a clean circle. -
Smooth the Edges:
Dip your finger in a little water (or baby oil for polymer) and run it gently along the cut rim of the circle to round off any sharp angles. -
Form the Curve:
Gently lift your clay circle and press it into a shallow bowl lined with a paper towel or cornstarch. This slump mold technique creates the gentle, organic curve of the dish.
Step 2: Carving the Design
-
Mark the Center:
Lightly find the center of your dish. You can make a tiny dot with your needle tool as a guide, or just eyeball it if you prefer a looser look. -
Sketch the Horseshoe:
Very lightly scratch the outline of a horseshoe shape into the center. Position the open ends facing upwards for good luck. -
Carve the Outline:
Using a fine carving tool, deepen the lines of your sketch. Remove small ribbons of clay to create a shallow trench for the outline. -
Add Texture:
Inside the horseshoe shape, create short, directional hatch marks that mimic the texture of woven rope or aged iron. -
Add Arrow Details:
At the two tips of the horseshoe, carve small triangular arrowheads pointing inward to complete the stylized symbol. -
Initial Drying:
Allow the clay to dry to a leather-hard state. This usually takes a few hours to a day depending on humidity.
Oxide Magic
Don’t wipe the rim too clean! Leaving a heavier deposit of oxide on the edge creates that beautiful, toasted ‘burnt’ look seen in the photo.
Step 3: Firing and Glazing
-
First Firing:
Bisque fire the piece according to your clay’s instructions (usually Cone 04). If using polymer clay, bake it now according to package directions. -
Apply Oxide Wash:
Mix brown iron oxide with water (or use thinned brown acrylic for polymer). Paint this into the carved horseshoe lines and heavily around the rim of the dish. -
Wipe Back:
Take a damp sponge and wipe away the excess oxide from the high points of the dish. The color should remain trapped in the carvings and create a stained halo on the rim. -
Center Glazing:
Leave the very center of the horseshoe unglazed or apply a thin wash if you want the raw clay texture to show through clearly. -
Apply Top Coat:
Dip or brush the entire interior with a clear matte glaze to seal the speckles and oxide without making it too shiny. -
Rim Detail:
Ensure the rim glaze is wiped back slightly so the toasted oxide color is the dominant feature at the edge. -
Final Firing:
Glaze fire the piece to the temperature required for your clay body (typically Cone 5 or 6 for stoneware).
Wobbly Lines?
If your carving feels shaky, let the clay dry just a bit longer. Carving into leather-hard clay is much crisper than carving into fresh, soft clay.
Place this charming little dish on your dresser to keep your favorite turquoise pieces safe and stylish
Campfire Mini Diorama
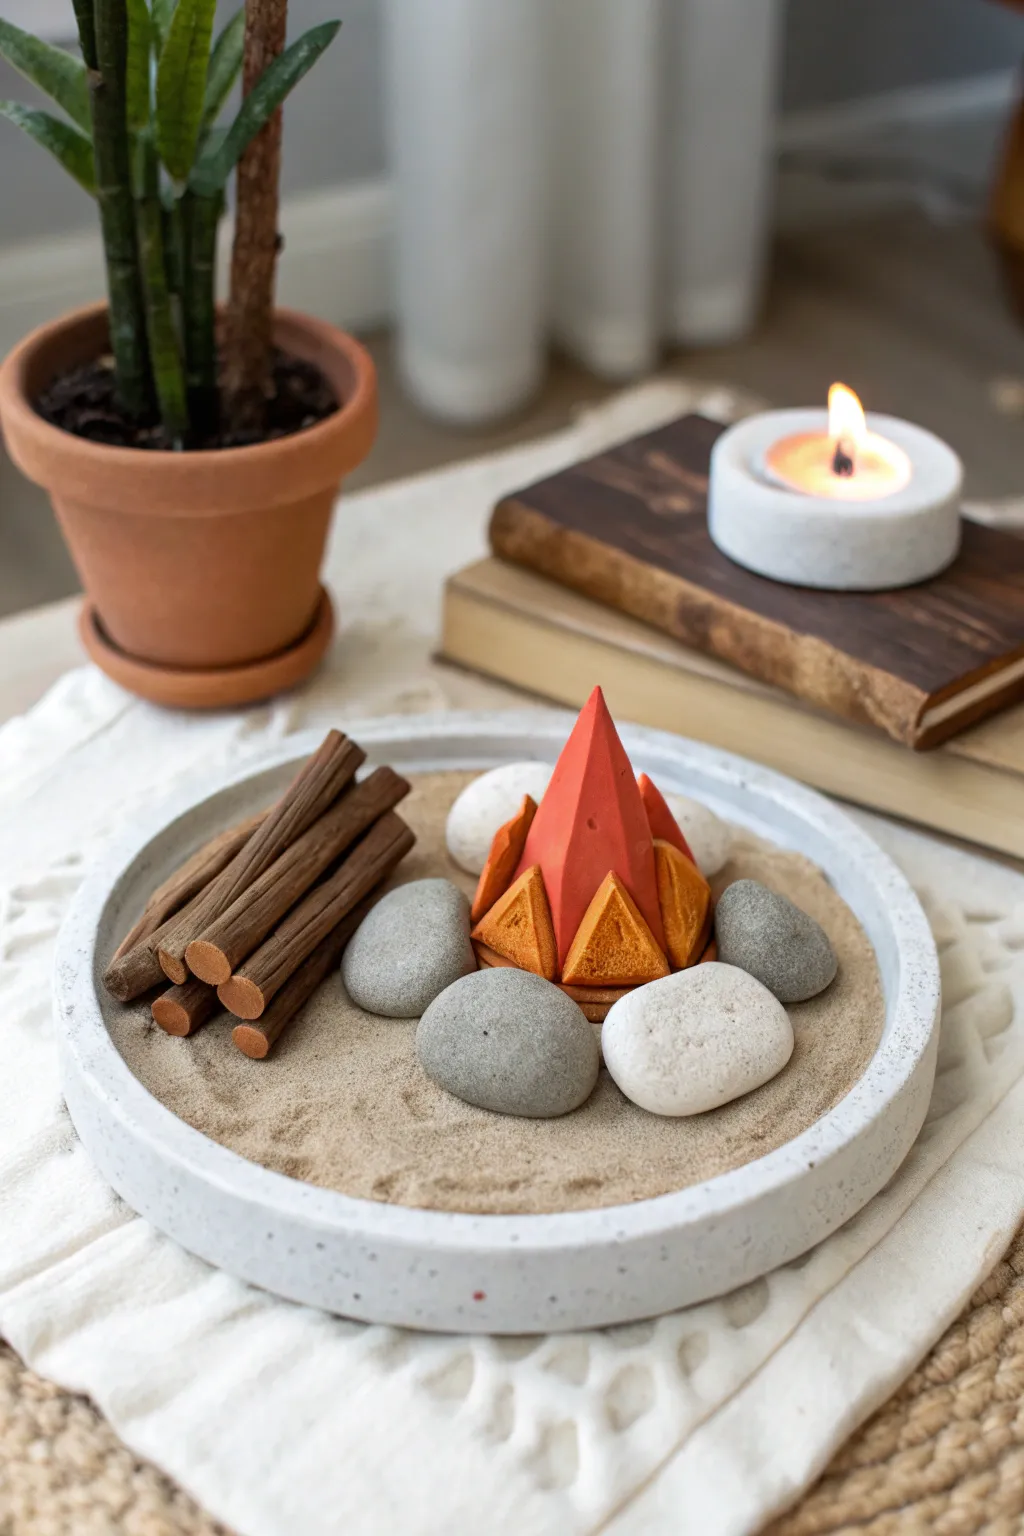
Bring the warmth of a western evening indoors with this stylized miniature campfire scene. Nestled in a speckled clay dish, this diorama combines natural textures with geometric clay art for a modern, cozy accent piece.
Step-by-Step Tutorial
Materials
- Air-dry clay or polymer clay (terracotta, white, orange, yellow found)
- Speckled pottery clay or grey cement mix
- Fine beige crafting sand
- Clean, smooth river stones (5-7 pieces)
- Craft knife or scalpel
- Rolling pin
- Brown acrylic paint (burnt umber)
- Matte varnish or sealant
- Small paintbrush
- Strong craft glue or hot glue gun
- Round plate mold or bowl (approx. 6-8 inches)
Step 1: Creating the Base Dish
-
Prepare the speckled clay:
Start by kneading your speckled clay or mixing your cement according to the package instructions. If using plain white clay, mix in some decorative black sand or glitter specks to achieve the stony look shown in the photo. -
Form the shallow dish:
Roll out a thick slab of clay, about 1/4 inch thick. Use your round mold or bowl as a template to cut a perfect circle, then hand-build a low, vertical rim around the edge, smoothing the seam where the wall meets the base. -
Smooth and dry:
Dip your finger in water to smooth out any fingerprints or rough edges on the rim. Allow the dish to dry completely (24-48 hours for air-dry clay) before proceeding to sanding or creating the filling.
Step 2: Sculpting the Campfire Components
-
Mixing the fire colors:
To get that warm, glowing effect, you’ll need two shades of clay. Use a pure orange for the tall flame and a lighter marigold or yellow-orange for the smaller base flames. You can achieve this by mixing yellow and red clay until satisfied. -
Forming the central flame:
Take the orange clay and form a tall, slender pyramid or cone shape. Use your craft knife to slice the sides flat, giving it sharp, geometric angles rather than a rounded look. -
Creating the embers:
With the lighter yellow-orange clay, cut out several smaller, thick triangles. Texture the faces of these triangles by lightly stippling them with a toothbrush or needle tool to mimic the porous look of burning wood. -
Sculpting the logs:
Roll out thin snakes of brown clay (or white clay you plan to paint later) to create the firewood logs. Cut them into equal lengths, roughly 3 inches long. -
Adding wood texture:
Before the clay hardens, use a needle tool or the back of your knife to gently score lines down the length of the logs, replicating bark texture. -
Baking or curing:
Arrange your fire pieces and logs on a baking sheet. Follow the specific baking instructions for your brand of polymer clay, or let them air dry completely if using earthen clay.
Geometry Trick
Make the fire stand out by sharpening the edges of your clay pyramid with a flat blade after forming it. The harder angles contrast beautifully with the round stones.
Step 3: Painting and Assembly
-
Painting the logs:
If you used plain clay, paint the logs with burnt umber acrylic paint. I find that wiping off a bit of the wet paint with a paper towel helps the ‘bark’ texture pop by leaving darker pigment in the grooves. -
Painting the ends:
Mix a lighter tan paint color and carefully dab it onto the circular ends of each log to simulate cut wood. -
Filling the base:
Once your dish is fully cured and solid, fill it nearly to the brim with fine beige crafting sand. Smooth the surface so it is flat and level. -
Arranging the fire pit:
Place your tall angular flame in the center of the sand. Surround the base of this flame with the smaller, textured yellow triangles, angling them upward. -
Placing the stones:
Select 3-4 smooth grey stores and nestle them into the sand around the geometric fire, creating a classic campfire ring boundary. -
Stacking the wood:
Take your painted clay logs and stack them neatly on the left side of the dish, separate from the fire. Pile them in a crisscross or pyramid fashion for a tidy, prepared campsite look. -
Final touches:
Place one or two final white stones on the opposite side to balance the composition visually. Use a soft brush to sweep any stray sand grains off the stones or clay pieces.
Loose Sand?
If you want the sand permanent rather than interactive, mix it with diluted white glue (50/50 water and glue mix) before pouring it into the dish bottom.
This peaceful miniature scene now serves as a reminder of starry western nights right on your coffee table
Rustic Western Mixed-Media Clay Plaque
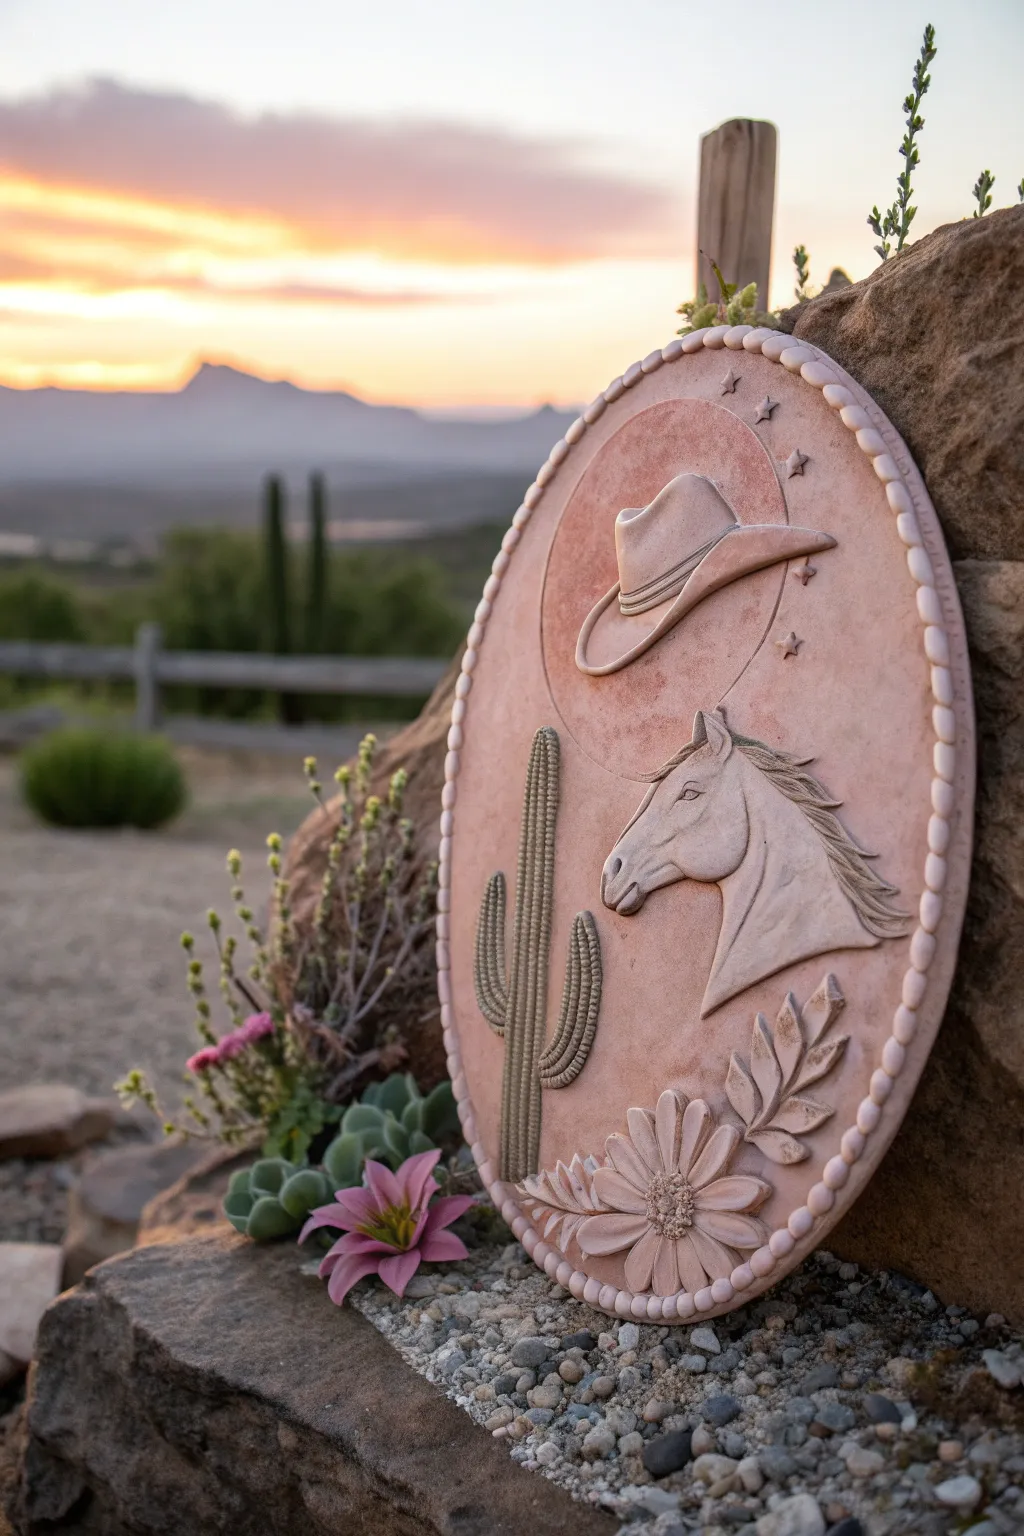
Capture the spirit of the desert with this stunning monochromatic relief plaque, sculpted to mimic the warmth of traditional terracotta. Featuring classic Western icons like a saguaro, a wild mustang, and a Stetson, this piece relies on layering and texture to bring the scene to life.
Step-by-Step
Materials
- Light terracotta or salmon-colored polymer clay (approx. 2-3 blocks)
- Oval clay cutter or paper template (approx. 6-8 inches tall)
- Rolling pin with depth guides
- Detail modeling tools (needle tool, ball stylus, small knife)
- Texture sheets or sandpaper (for subtle surface noise)
- Clay extruder (optional, for the rope border)
- Small circle cutter (approx. 3-4mm)
- Soft pastel shavings (darker browns for shading)
- Soft brush
- Baking sheet and parchment paper
- Liquid polymer clay (optional adhesive)
Step 1: Base Preparation
-
Condition and Roll:
Begin by thoroughly conditioning your terracotta clay until it is pliable. Roll out a large slab to a thickness of about 1/4 inch; you need a sturdy base to support the added relief elements. -
Cut the Oval shape:
Using an oval cutter or a paper template with a sharp craft knife, cut out the main background shape. Smooth the edges with your finger to remove any harsh cutting lines. -
Add Texture:
Gently press a piece of fine-grit sandpaper or a subtle stone-texture sheet over the entire surface. This gives the background that authentic, gritty sandstone look rather than a shiny plastic finish.
Sticky Situation?
If your relief pieces won’t stick to the base, create ‘scratch and slip’ scoring on both surfaces and use a drop of liquid polymer clay as glue.
Step 2: Sculpting the Motifs
-
Sculpt the Saguaro:
Roll thin snakes of clay to form the main trunk and arms of the cactus. Press them onto the left side of the plaque, flattening slightly. Use a needle tool to scratch vertical ribs down the length of the cactus and poke tiny holes to simulate spines. -
Create the Horse Profile:
Form a flat, triangular wedge of clay for the horse’s head. Place it on the lower right quadrant. Use your modeling tools to crave the eye socket, nostril, and jawline definition. Add thin, tapered strips for the flowing mane. -
Fashion the Hat:
Shape a small dome for the crown of the hat and a curved, flat strip for the brim. Position this in the upper right. Ensure the brim curls up distinctly on the sides for that classic cowboy silhouette, blending the seams where the crown meets the brim. -
Floral Additions:
For the bottom flower, create teardrop shapes for petals and arrange them in a circle. Press a textured tool into the center. Add leaves to the side by cutting leaf shapes and scoring vein lines with your knife. -
Adding the Moon & Stars:
Lightly scribe a large circle behind the hat to represent the sun or moon. Inside the upper right curve of the plaque, press in tiny star shapes or sculpt miniature stars and attach them.
Step 3: Border and Finishing
-
Create the Beaded Border:
Roll a long, even snake of clay. Cut it into many small, equal-sized segments and roll each into a perfect ball. -
Attach the Border:
Place the clay balls side-by-side around the entire perimeter of the oval. Press them down firmly so they adhere to the base and flatten slightly into rounded pearl shapes. -
Inner Rope Detail:
Just inside the beaded edge, add a very thin twisted rope of clay or simply score a line to separate the border from the artwork. -
Shading with Pastels:
Before baking, use a soft brush to dust dark brown pastel shavings into the deep recesses—specifically the cactus ribs, the horse’s mane, and under the hat brim. This enhances the relief effect. -
Final Surface Check:
Look over the piece for fingerprints. I like to lightly brush the whole piece with a little baby oil or clay softener to smooth out imperfections before the final cure. -
Bake:
Bake according to your clay manufacturer’s instructions, usually at 275°F (135°C) for 30-45 minutes depending on thickness. Let it cool completely on the baking sheet to prevent warping.
Display Ideas
Before baking, poke two holes at the top or embed a wire loop into the back so you can hang your finished Western masterpiece on a wall.
Once cooled, your rustic relief plaque is ready to bring a touch of the wild west to your home decor