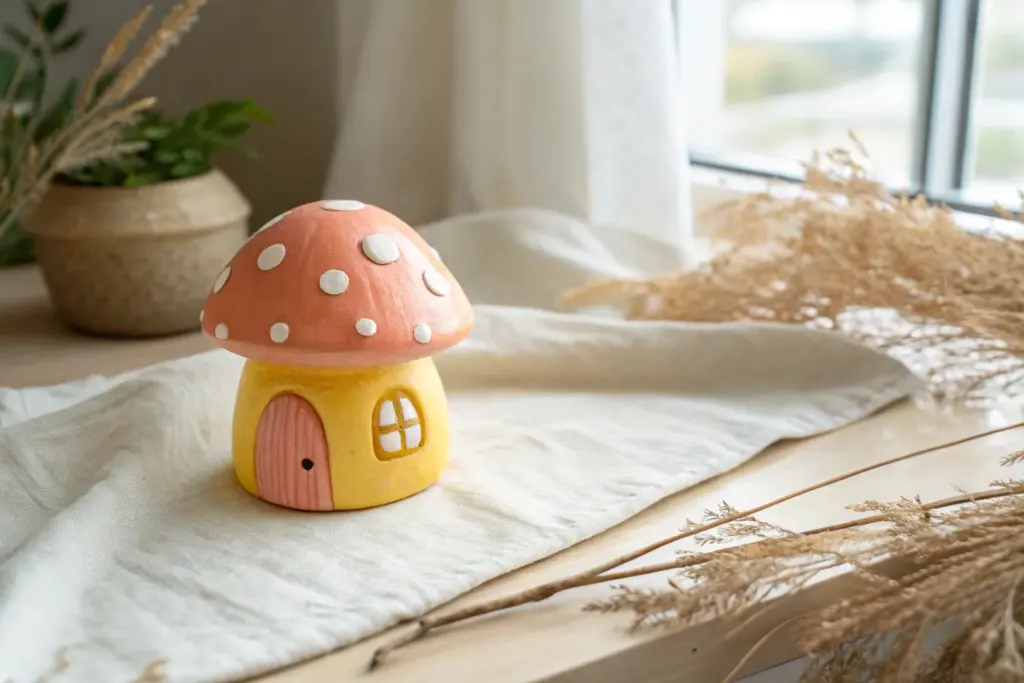
Whenever you’re staring at a lump of clay and thinking, “Okay… now what?”, I’ve got you. These what to make out of clay ideas are the kind of satisfying, beginner-friendly projects you can actually finish—whether you’re using air dry clay, polymer clay, or classic ceramic clay.
Pinch Pot Trinket Dishes
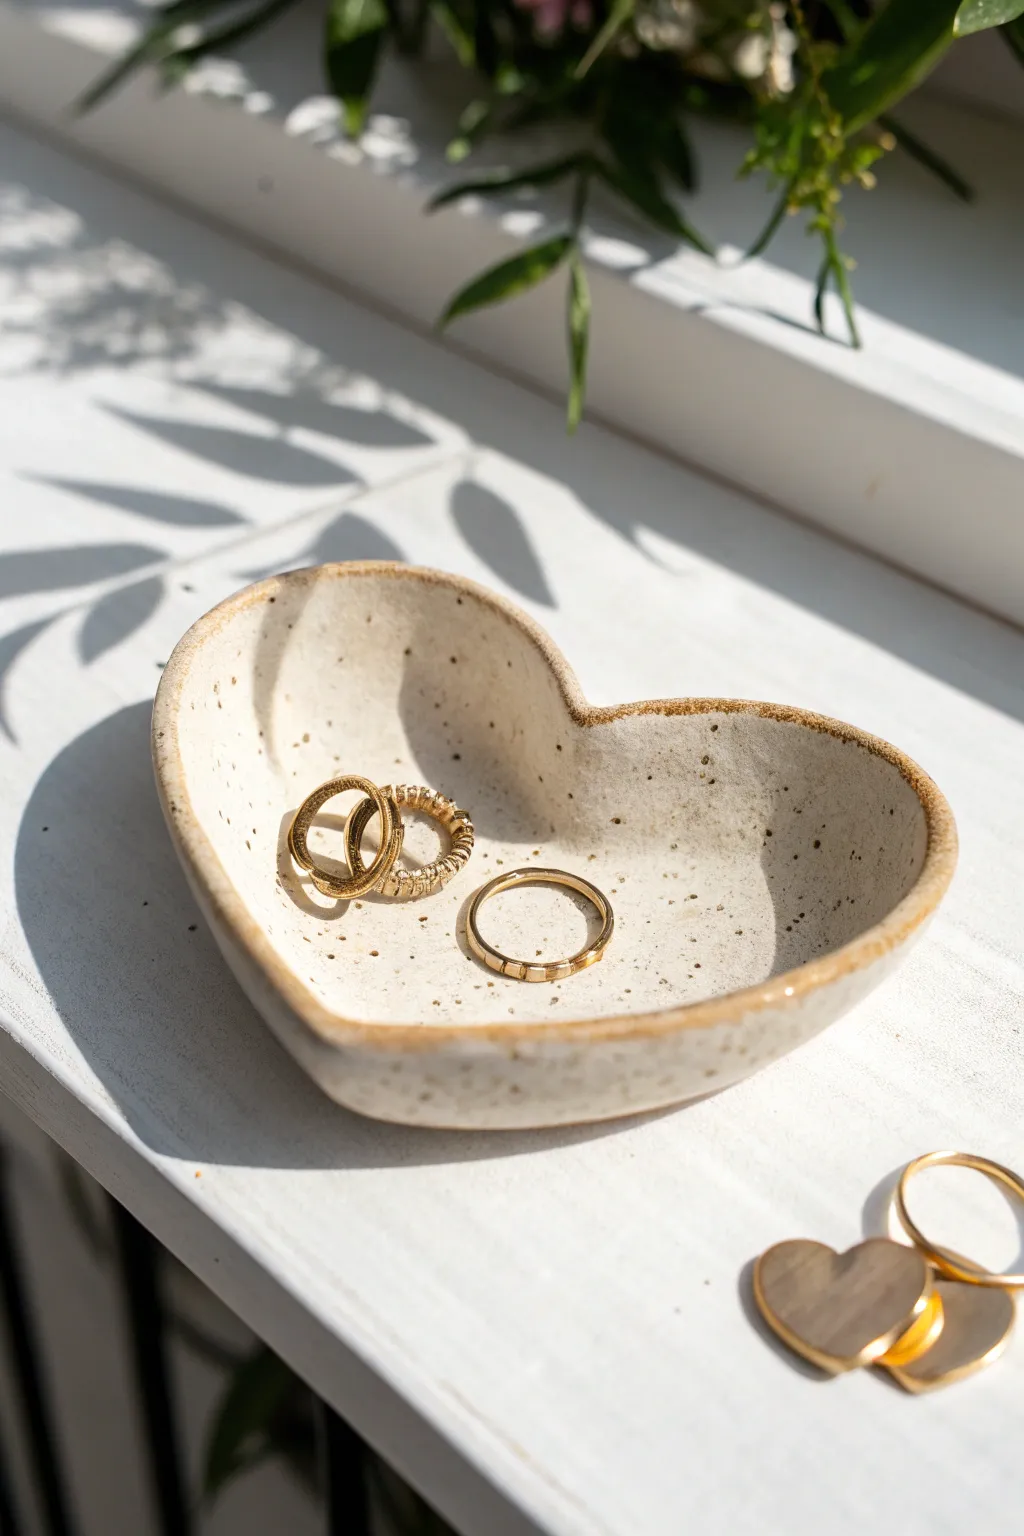
This charming, heart-shaped trinket dish is the perfect landing spot for your daily jewelry. Its organic shape and speckled finish give it a warm, handcrafted feel that looks beautiful on any nightstand or windowsill.
Detailed Instructions
Materials
- Speckled stoneware clay (or white clay with speckles)
- Small bowl of water
- Pottery sponge
- Needle tool or toothpick
- Rib tool (kidney shaped) or smooth stone
- Clear or milky white ceramic glaze
- Small paintbrush
- Kiln (or access to a firing service)
Step 1: Shaping the Clay
-
Condition the Clay:
Start by wedging a small ball of speckled clay, about the size of a golf ball, to remove air bubbles and ensure it’s pliable. -
Begin the Pinch Pot:
Hold the clay ball in one hand and gently press your thumb into the center, leaving about a quarter-inch of clay at the bottom. -
Pinch the Walls:
Slowly rotate the ball while gently pinching evenly between your thumb and fingers to thin out the walls and widen the opening. -
Flatten the Base:
Once you have a rough bowl shape, gently tap the bottom against your work surface to create a flat, stable base so the dish won’t rock. -
Form the Heart Shape:
To create the cleft of the heart, gently press one side of the rim inward with your finger. -
Refine the Point:
Directly opposite the cleft, pinch the rim together slightly to form the pointed bottom of the heart. -
Smooth the Rim:
Use a damp sponge or your finger dipped in water to smooth out any cracks or rough edges along the rim.
Step 2: Refining and Drying
-
Check Wall Thickness:
Run your fingers along the walls to ensure they are even; aim for a uniform thickness to prevent warping during drying. -
Smooth the Interior:
Use a rubber rib tool or a smooth stone to compress the inside surface, removing fingerprints and creating a professional finish. -
Clean the Base:
Turn the heart over gently and sponge the bottom smooth, ensuring there are no sharp bits of clay sticking out. -
Dry Slowly:
Place your heart dish loosely covered with plastic for a day to dry slowly, then uncover it and let it dry completely to the bone-dry stage. -
Bisque Fire:
Your piece needs to be fired in a kiln for the first time (bisque firing) to harden the clay before glazing.
Rim Definition
Using a slightly thicker glaze application on the rim creates a darker, ‘toasted’ look where the glaze breaks over the edge.
Step 3: Glazing and Finishing
-
Wipe Down:
After the bisque fire, wipe the dish with a slightly damp sponge to remove any kiln dust that might resist the glaze. -
Apply Glaze:
Using a soft brush, apply 2-3 coats of a clear or milky white transparent glaze to the *inside* of the dish only. -
Glaze the Rim:
Carefully run your brush along the very top edge of the rim, allowing the glaze to create that defined border seen in the photo. -
Clean the Exterior:
I like to leave the outside unglazed to show the raw clay texture, so wipe away any stray glaze drips on the exterior. -
Final Fire:
Fire the piece again according to your clay and glaze instructions (usually cone 5 or 6 for stoneware) to melt the glaze.
Gold Luster Accent
For extra luxury, apply a real gold overglaze to the rim after the glaze firing and fire a third time at a lower temperature.
Once cooled, your durable little dish is ready to hold your favorite rings and keepsakes


Classic Coil Bowl
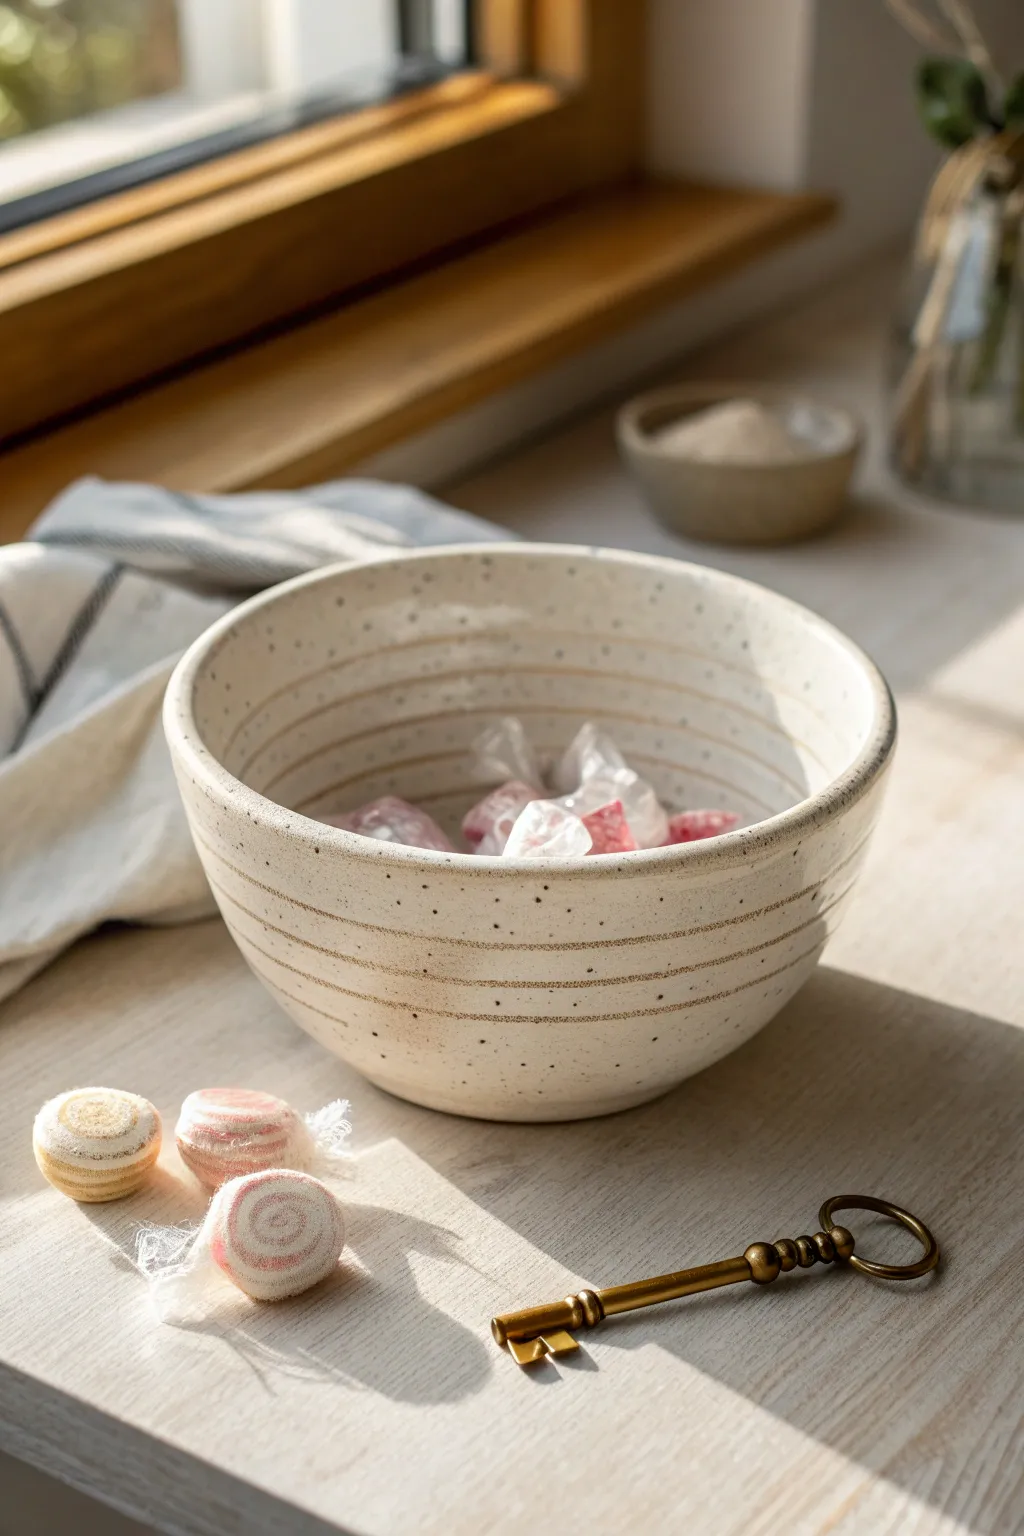
This charming, rustic bowl features a gentle speckled finish and subtle horizontal ridges that give it a handmade warmth. It’s perfect for holding sweet treats or trinkets on a sunny windowsill.
Step-by-Step Guide
Materials
- Speckled stoneware clay (white or light buff)
- Pottery wheel (optional, can be hand-built)
- Rib tool (metal or rubber)
- Needle tool
- Sponge
- Wire cutter
- Transparent or glossy white glaze
- Kiln
Step 1: Preparation & Farming
-
Wedge the clay:
Begin by wedging your speckled stoneware clay thoroughly to remove any air bubbles. This ensures a smooth throwing or building process later on. -
Center the clay:
Place a ball of clay approx. 2-3 lbs onto the wheel head. With wet hands, center the clay until it spins without wobbling. -
Open the form:
Create a well in the center of your clay mound, pressing down until you are about a quarter-inch from the bat. -
Pull the walls:
Gently pull the clay upward to create cylinder walls. Keep your speed steady and your hands lubricated with slip.
Highlighting Texture
To make the horizontal grooves pop, try wiping a dark oxide wash into the lines before glazing, then sponge off the high points.
Step 2: Shaping & Texturing
-
Shape the bowl:
Apply slight pressure from the inside hand to push the wall outward, creating a gentle curve. Aim for a wide opening that slightly tapers down to the foot. -
Smooth the interior:
Use a sponge or a smooth rib tool to compress the inside floor and walls, ensuring a clean, seamless surface for the glaze later. -
Create the grooves:
While the wheel is spinning slowly, take a needle tool or the corner of a wood tool. Gently press into the exterior wall at regular intervals to create the horizontal striations seen in the photo. -
Refine the rim:
Use a chamois or a wet sponge to round off the rim. A rounded rim is much more durable and pleasant to touch than a sharp edge. -
Cut off the wheel:
Run a wire cutter underneath the bowl to separate it from the bat. Leave it to dry until it reaches a leather-hard state.
Step 3: Trimming & Finishing
-
Trim the foot:
Once leather-hard, flip the bowl over and center it on the wheel. Use a trimming tool to carve out a neat foot ring, removing excess weight from the bottom. -
Smooth the texture:
I like to lightly run a damp sponge over the exterior grooves one last time. This softens the edges of the lines so they look organic rather than sharp. -
Bisque fire:
Place the bone-dry bowl into the kiln for the bisque firing (usually Cone 04). This hardens the clay and prepares it for glazing. -
Apply glaze:
Dip the bowl into a transparent or milky white glaze. If your clay already has specks, a clear glaze will let them show through distinctly. -
Check the grooves:
Ensure the glaze hasn’t filled the grooves too thickly, or you might lose that lovely texture. You can wipe a little away with a sponge if needed. -
Glaze fire:
Fire the bowl again to the maturity temperature of your clay body (likely Cone 5 or 6 for stoneware). This melts the glaze into that glossy finish. -
Sand the bottom:
Once cool, check the foot/bottom for any rough patches. Use sandpaper or a sanding block to smooth the unglazed foot so it won’t scratch your table.
Cracks in the Bottom?
S-cracks often happen if water sat in the bottom too long while throwing. Compress the floor with a rib tool repeatedly to prevent this.
Now your speckled bowl is ready to bring a touch of handcrafted elegance to your home


Slab-Built Catchall Tray
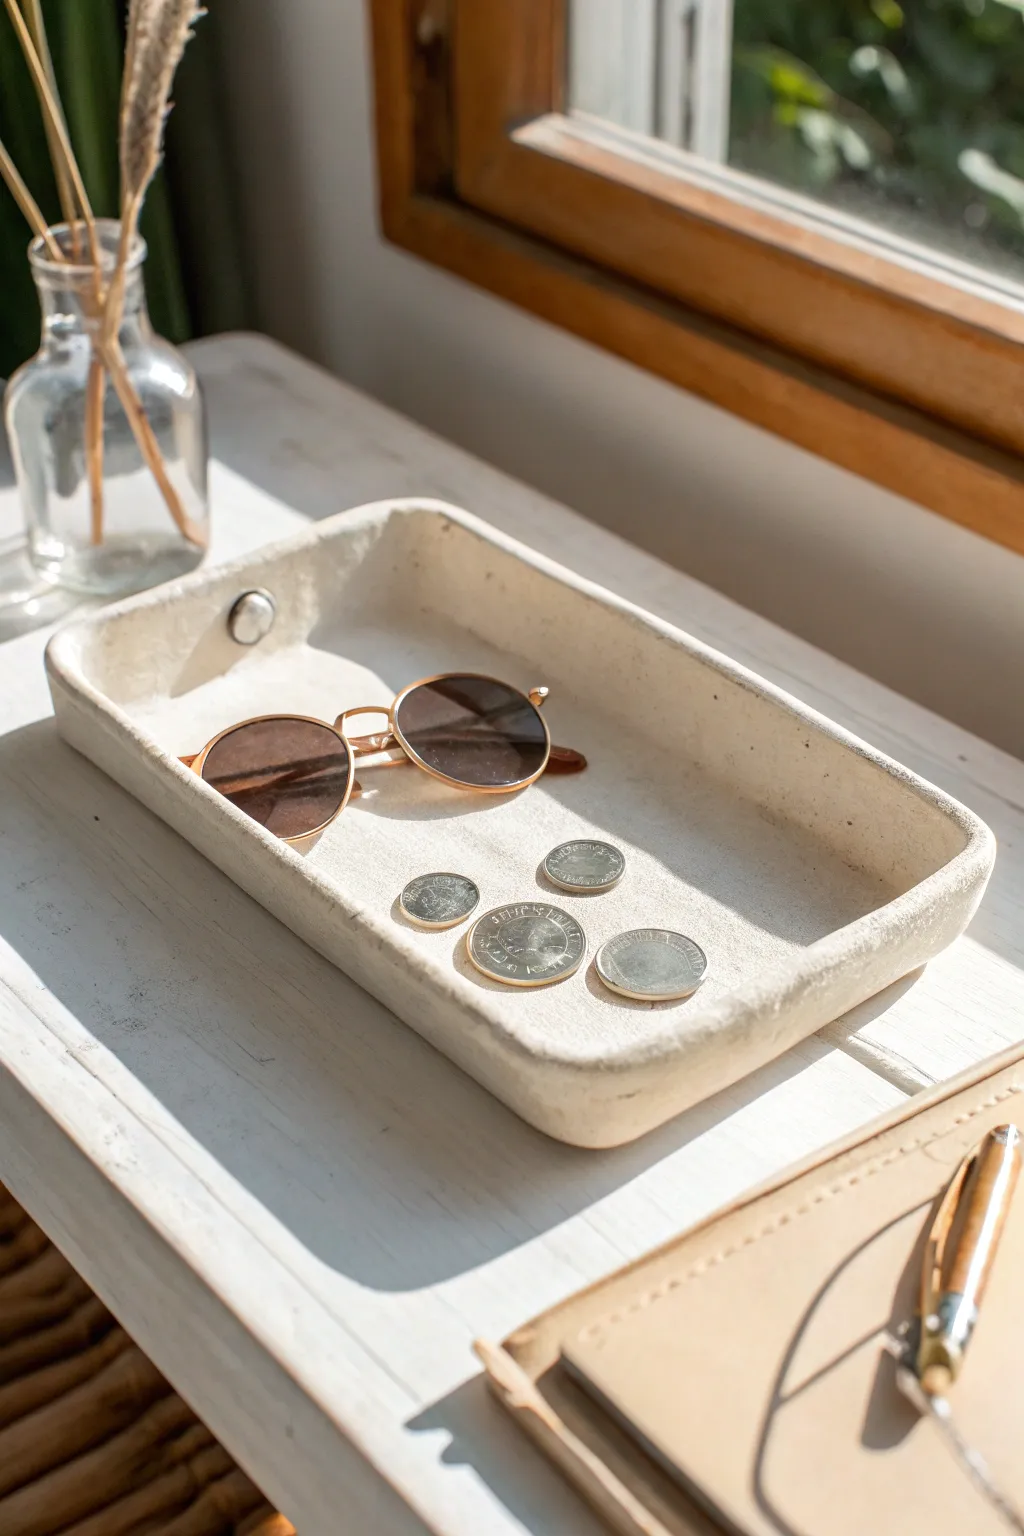
This elegant catchall tray combines modern simplicity with organic texture, featuring a soft, rectangular form and a subtle rivet detail. It’s the perfect size for organizing your daily essentials like sunglasses and loose change while adding a touch of handmade charm to your entryway.
Step-by-Step Tutorial
Materials
- Light-colored stoneware clay (speckled optional)
- Slab roller or rolling pin with guide strips
- Fettling knife or needle tool
- Rectangular paper template (approx. 6×9 inches)
- Small bowl with water
- Scoring tool or serrated rib
- wooden modeling tool
- Sponge
- Canvas or ware board
- Small round cutter or bottle cap (for the button detail)
Step 1: Preparation & Cutting
-
Prepare the slab:
Begin by rolling out a slab of clay to a consistent thickness of about 1/4 inch. If you are using a rolling pin, use guide strips on either side to ensure the slab is perfectly even. -
Smooth the surface:
Before cutting, take a damp sponge or a soft rib and compress the clay on both sides. This removes any canvas texture and aligns the clay particles which helps prevent warping later. -
Cut the primary shape:
Place your rectangular paper template onto the slab. Using your fettling knife or needle tool, cut cleanly around the perimeter. Don’t discard the scraps yet; keep them under plastic.
Wall Support
If your walls are sagging while the clay is soft, prop them up with small sponges or crumpled newspaper until the clay stiffens.
Step 2: Forming the Tray
-
Create the walls:
Instead of adding coils, we will fold up the edges of the single slab. Measure about 3/4 of an inch in from the edge and lightly mark a line all suitable around the rectangle without cutting through. -
Cut corner darts:
To allow the sides to fold up without bunching, cut a square notch out of each of the four corners where your marked lines intersect. -
Score the seams:
Thoroughly score (rough up) the edges of the cut corners that will touch when the sides are folded up. Apply a small amount of water or slip to these scored areas. -
Fold and join:
Gently lift the four sides to a 90-degree angle. Press the scored corner seams together firmly to create a box shape. -
Reinforce the interior:
Take a tiny coil of soft clay and press it into the interior corner seams. Use a wooden tool to blend this coil smoothly into the walls, rounding off the sharp inner angle for that seamless look shown in the photo. -
Smooth the exterior:
On the outside corners, use a rib or your thumb to smudge the clay across the join line until it disappears completely. The corner should look like a continuous piece of clay.
Step 3: Refining & Detailing
-
Soften the rim:
Run a damp sponge or a piece of chamois leather along the top rim of the tray. We want to remove sharp edges and create a soft, rounded lip. -
Shape the corners:
Gently push the corners from the inside out and the outside in to round them slightly. The goal is to move away from a sharp, mechanical box shape to a softer, more organic rectangle. -
Create the rivet detail:
I like to roll a small ball of clay and flatten it slightly to create the decorative button seen on the inner wall. Score the back of the button and the spot on the wall where you want to place it. -
Attach the detail:
Press the clay button firmly onto the interior wall. Clean up any oozing slip with a small brush so the join looks clean and intentional. -
Final compression:
Run a rubber rib over the interior floor of the tray one last time to ensure it is flat and smooth.
Customize It
Add texture to the exterior before folding up the walls by pressing lace or fabric into the slab for a hidden tactile detail.
Step 4: Drying & Finishing
-
Slow drying:
Place the tray on a ware board and cover it loosely with plastic. Let it dry slowly for a day or two to prevent the corners from cracking. -
Bisque fire:
Once bone dry, fire the piece to bisque temperature (usually Cone 04) based on your clay body’s specifications. -
Glazing:
To achieve the look in the image, apply a matte, off-white or cream glaze. If your clay has speckles, use a semi-opaque glaze so they show through. -
Final firing:
Glaze fire the piece to the final maturity temperature for your specific clay and glaze combination.
Enjoy styling your new handmade tray on a sunny windowsill or bedside table


Ring Holder Cone or Twist
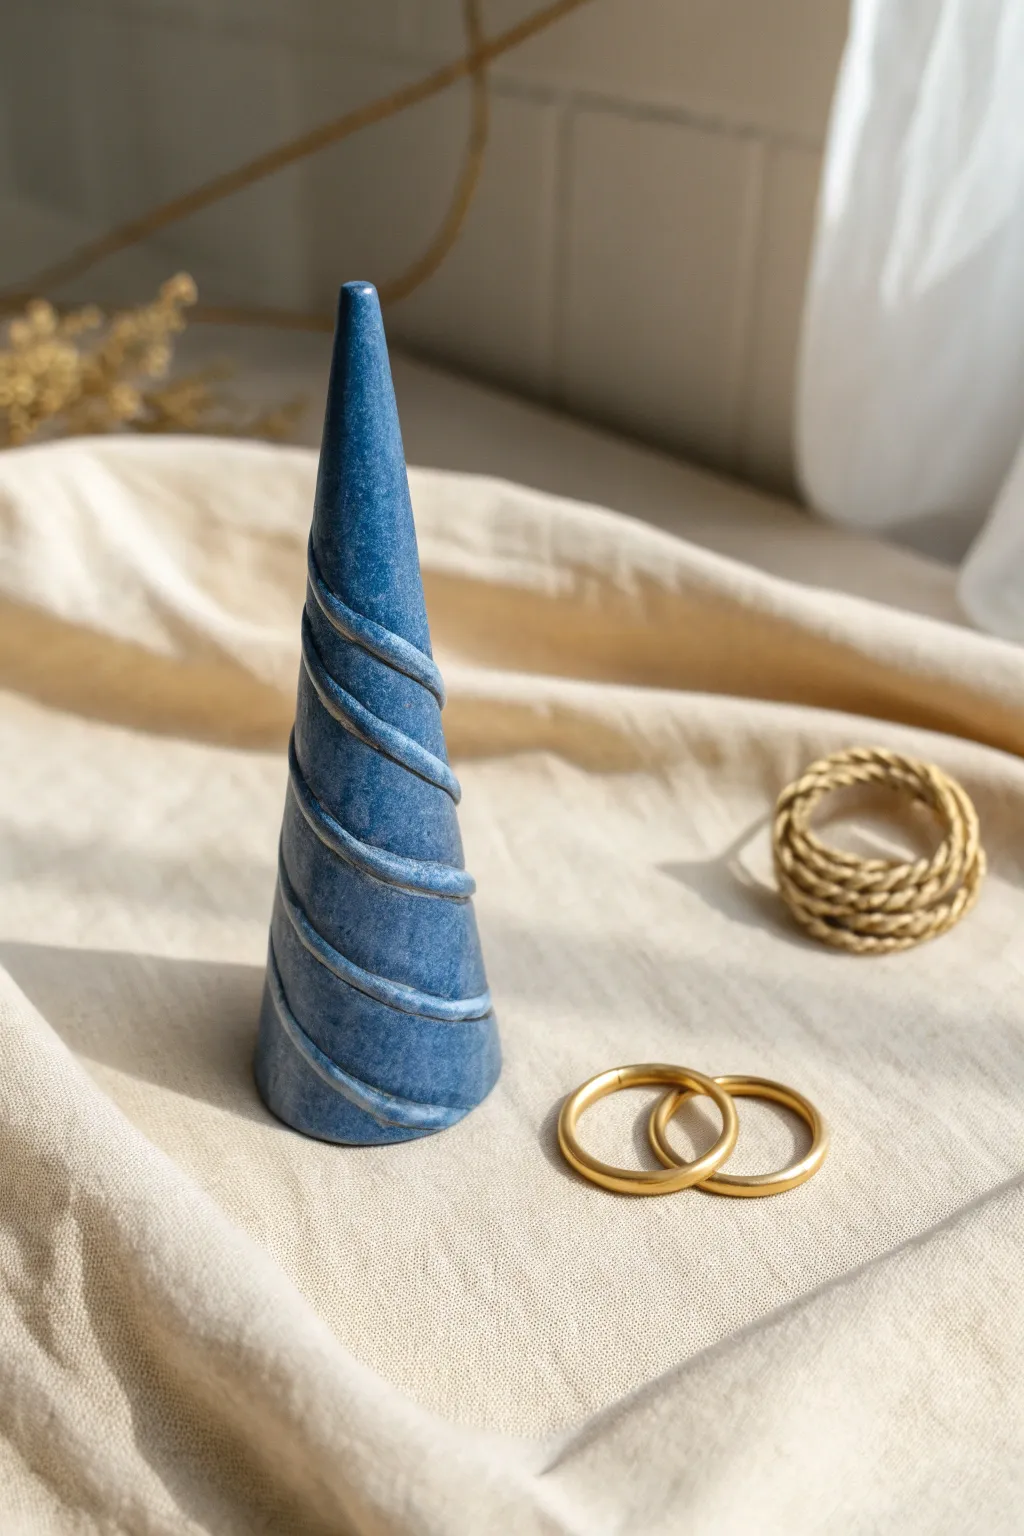
Sculpt a sophisticated home for your favorite rings with this stone-effect clay cone featuring an elegant spiral relief. This functional piece mimics the look of polished blue granite while adding a modern, sculptural touch to your vanity.
Step-by-Step
Materials
- Blue granite-effect polymer clay (e.g., Fimo or Sculpey)
- Acrylic rolling pin
- Flexible clay blade or craft knife
- Clean work surface (tile or glass)
- Oven for baking
- Sandpaper (fine grit, wet/dry)
- Matte or satin varnish (optional)
Step 1: Preparing the Base
-
Condition the Clay:
Begin by taking a generous amount of your blue granite polymer clay. Knead it thoroughly in your hands until it becomes soft, pliable, and warm to the touch. -
Form a Ball:
Roll the conditioned clay between your palms to create a smooth, crack-free sphere. Aim for a size roughly slightly smaller than a golf ball. -
Shape the Cone:
Place the ball on your work surface. rolling it back and forth while applying more pressure to one side to elongate it into a teardrop or cone shape. -
Refine the Height:
Continue rolling until you have a cone approximately 3 to 4 inches tall. Keep the base wide enough to be stable, about 1 inch in diameter. -
Flatten the Bottom:
Stand the cone upright and press it gently onto your work surface to flatten the base perfectly. It needs to stand straight without wobbling. -
Smooth the Surface:
Use your fingers to gently smooth out any fingerprints or bumps on the sides of the cone. I find lightly brushing it with a touch of cornstarch can help smooth it without dragging.
Step 2: Creating the Spiral
-
Roll a Snake:
Take a smaller piece of the same clay and roll it into a very long, thin snake or coil. Try to keep the thickness consistent, about 2-3mm wide. -
Check the Length:
Ensure the snake is long enough to wrap around your cone from base to tip multiple times. If it’s too short, you can splice pieces together, but a single piece looks cleaner. -
Begin Wrapping:
Attach one end of the clay snake to the very bottom edge of your cone. Press it gently to adhere. -
Spiral Upwards:
Slowly wind the snake up the cone, maintaining even spacing between each turn of the spiral. Aim for about 5-6 rotations to match the reference look. -
Finish at the Tip:
When you reach the top point of the cone, trim any excess clay snake carefully with your blade and blend the end into the tip smoothly. -
Secure the Spiral:
Gently press the entire length of the spiral into the cone base so it bonds well, but don’t flatten it completely; you want it to remain raised and rounded.
Uneven Spiral Fix
If your spiral spacing looks uneven, use a clay tool to gently nudge the coil up or down before baking. Do this lightly to avoid denting the main cone.
Step 3: Finishing Touches
-
Double Check Stability:
Give the cone one final check to ensure it sits flat. If the wrapping distorted the base, press it gently onto the table again. -
Bake:
Place the cone on a baking sheet or tile. Bake according to the specific temperature and time instructions on your package of polymer clay. -
Cool Down:
Allow the piece to cool completely in the oven with the door cracked open to prevent thermal shock cracks. -
Inspect and Sand:
Once cool, check the bottom for roughness. If needed, wet sand the base lightly with fine-grit sandpaper to ensure it won’t scratch your furniture. -
Optional Varnish:
If you prefer a shinier stone look, apply a thin coat of satin varnish. The reference image has a matte finish, so leaving it raw is perfectly fine for that natural stone texture.
Marbled Effect
Mix a tiny amount of translucent or white clay into your blue granite clay but stop kneading before it’s fully blended for a realistic, swirly stone vein effect.
Place your new ring holder on your dresser and admire how the blue stone texture makes your gold jewelry pop

The Complete Guide to Pottery Troubleshooting
Uncover the most common ceramic mistakes—from cracking clay to failed glazes—and learn how to fix them fast.
Mini Planters for Small Plants
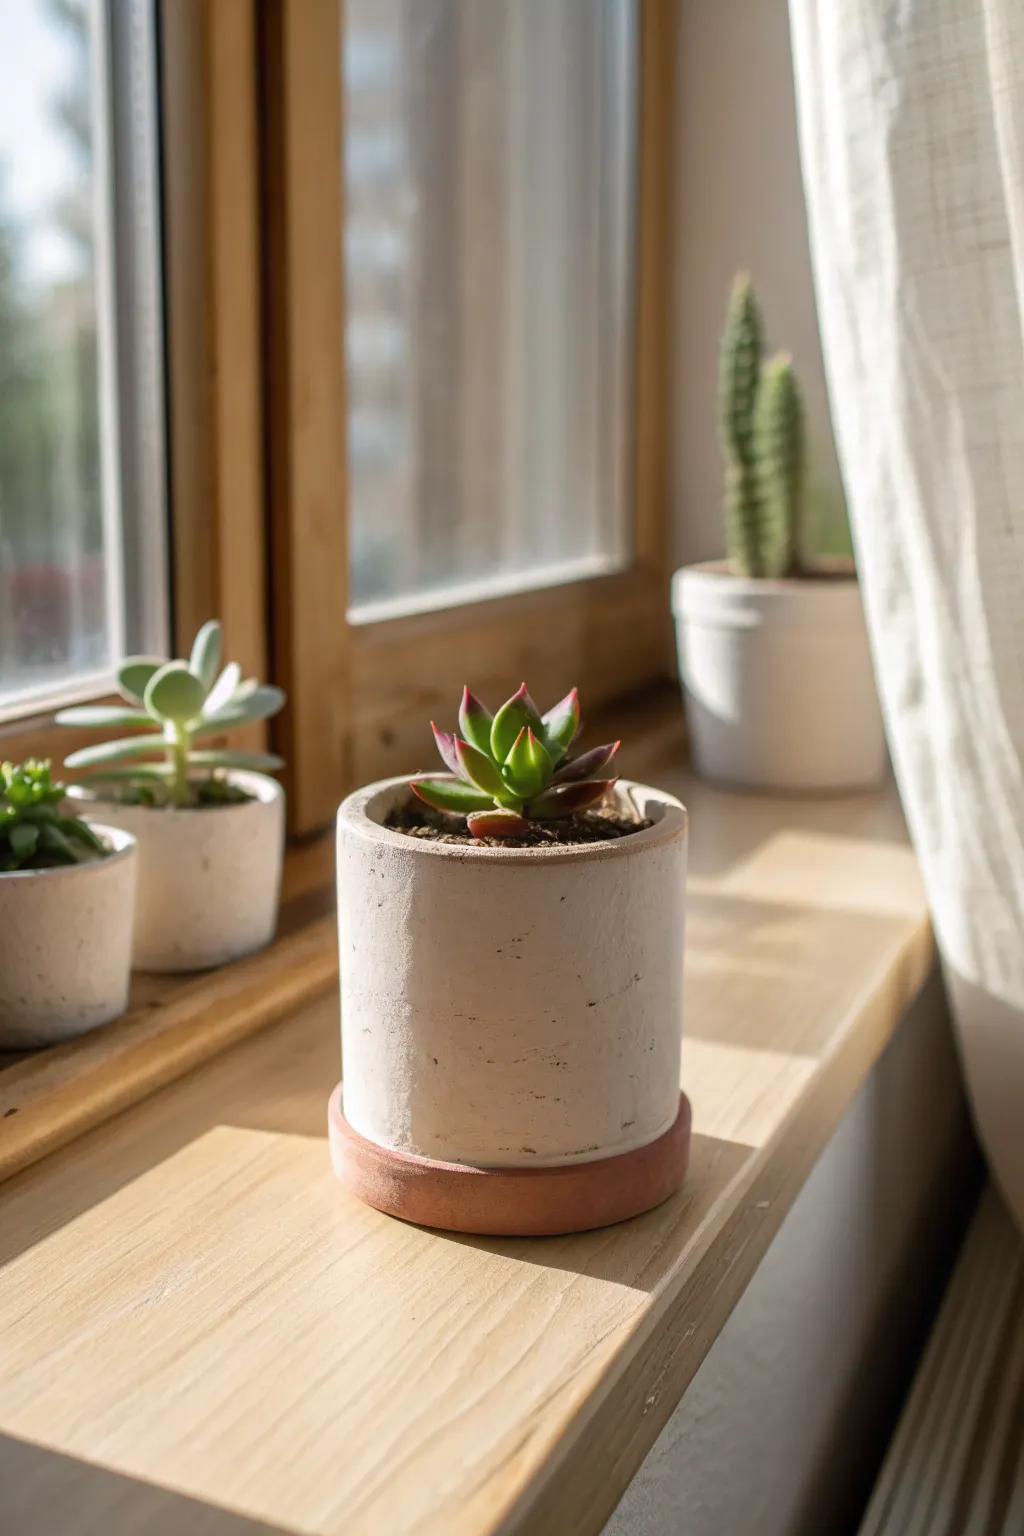
Recreate the clean, modern aesthetic of Scandinavian design with this simple cylindrical planter project. Its textured white body and contrasting terracotta base create a perfect home for your favorite small succulent.
Step-by-Step Guide
Materials
- White polymer clay or air-dry clay (approx. 200g)
- Terracotta-colored polymer clay (approx. 50g)
- Round cookie cutters (two sizes: one for the base, slightly larger for the saucer)
- Rolling pin
- Ruler
- Craft knife
- Smooth jar or can (to use as a form)
- Parchment paper
- Clay adhesive (optional but helpful)
- Fine-grit sandpaper
Step 1: Forming the Main Cylinder
-
Prepare the workspace:
Lay down a sheet of parchment paper to prevent sticking and knead your white clay until it is pliable and smooth. -
Roll the slab:
Use your rolling pin to flatten the white clay into a long, even rectangular slab. Aim for a thickness of about 4-5mm for sturdiness. -
Measure and cut:
Using a ruler and craft knife, trim the clay slab into a clean rectangle. The height should be about 3 inches, and the length must be long enough to wrap around your chosen jar form. -
Wrap the form:
Wrap your jar or can with a piece of parchment paper first to ensure easy removal later. Then, wrap your clay rectangle around the form. -
Join the seam:
Where the two ends of the clay meet, overlap slightly or butt them together closely. Use your finger or a modelling tool to smudge the seam until it disappears completely. -
Smooth the exterior:
I like to gently roll the jar on the table surface to ensure the clay cylinder is perfectly round and the outside texture is uniform. -
Create the bottom:
Roll out a separate piece of white clay. Use the jar (with the clay wrapped around it) to gently impress a circle size, or use a cutter that matches the diameter of your cylinder. -
Attach the bottom:
Score the edges of the bottom circle and the bottom rim of your cylinder. Apply a little water or liquid clay adhesive, then press the bottom piece firmly onto the cylinder. -
Blend the bottom seam:
Carefully smooth the clay where the bottom meets the wall so it looks like one solid piece. Remove the jar carefully if possible, or leave it to provide support while drying/baking if it’s oven-safe.
Cracking Seams?
If the vertical seam reopens during drying, patch it immediately with a small slurry of clay and water (or liquid clay), then smooth it over.
Step 2: Creating the Terracotta Base
-
Condition the accent clay:
Clean your hands and workspace thoroughly to avoid color transfer, then knead the terracotta-colored clay until soft. -
Cut the base disc:
Roll this clay slightly thicker than the white clay. Use a cookie cutter that is slightly larger than the diameter of your white pot to cut a perfect circle. -
Add a lip (optional):
If you want the saucer look shown in the photo, roll a very thin snake of terracotta clay and attach it to the outer rim of your terracotta circle, blending it upwards slightly. -
Check fit:
Gently place your white cylinder (still soft or partially firmly) onto the terracotta base to ensure the proportions look right.
Faux Concrete Hack
Mix black pepper or dried used coffee grounds into the white clay before rolling. This mimics a speckled ceramic or stone effect perfectly.
Step 3: Finishing Touches
-
Final texture check:
Inspect the white pot. If you want that rustic, stone-like texture from the image, you can gently dab the surface with a coarse sponge or a crumpled ball of foil. -
Bake or dry:
Follow the manufacturer’s instructions for your specific clay. If using polymer clay, bake the pot and saucer separately on parchment paper. -
Cool down:
Let the pieces cool completely before handling. This is crucial as the clay hardens fully only after cooling. -
Sand for perfection:
Once hard, use fine-grit sandpaper to smooth out the top rim of the white pot and any rough edges on the base. -
Assembly:
Set the white pot onto the terracotta saucer. You can glue them together for a permanent piece or keep them separate for drainage.
Pop in your favorite succulent and enjoy the serenity this little pot brings to your windowsill
Tiny Bud Vases
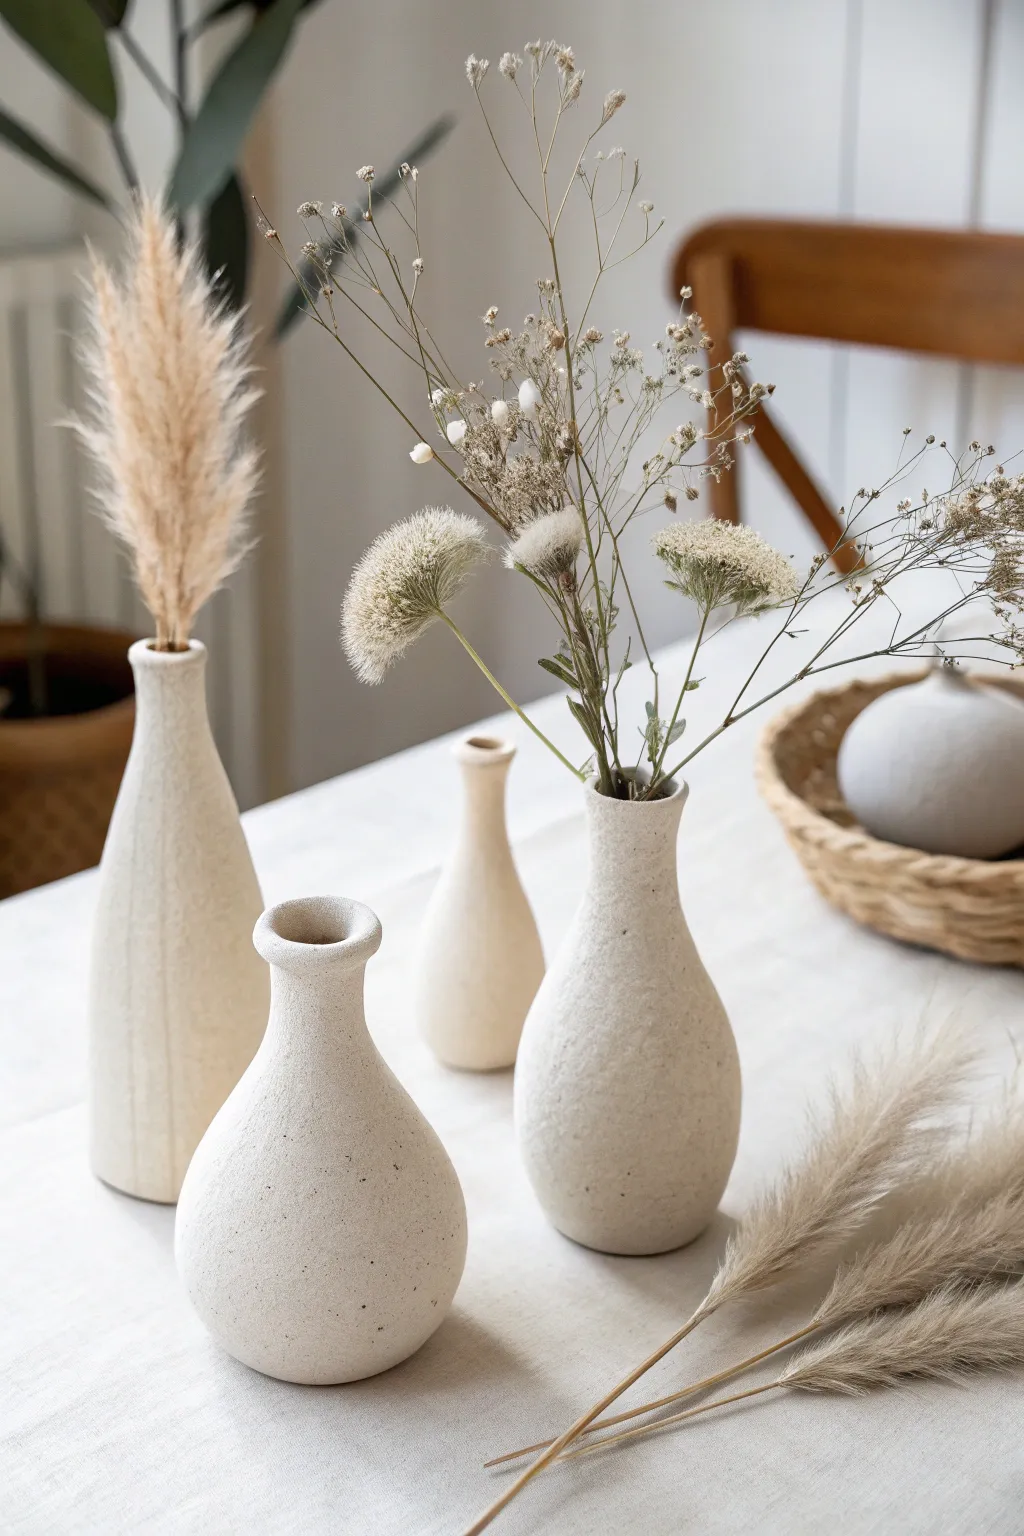
Bring an organic, minimalist touch to your home with this set of varied-height bud vases, featuring a lovely sandy texture and subtle speckling. These vases are perfect for holding dried grasses or delicate wildflowers, adding a quiet elegance to any table setting.
How-To Guide
Materials
- White or light beige air-dry clay (or polymer clay)
- Speckled sand or ground coffee (for texture)
- Small rolling pin
- Wooden sculpting tools
- Sponge
- Water cup
- Fine-grit sandpaper
- Matte sealant or varnish
- Wire cutter or fettling knife
- Small paintbrush
Step 1: Preparing the Textured Clay
-
Mix your texture:
Begin by taking a large handful of your white air-dry clay. To achieve that beautiful organic speckled look, knead in a small amount of dark sand or even dry coffee grounds until it is evenly distributed throughout the clay. -
Condition the clay:
Continue kneading the clay until it is warm, pliable, and free of air bubbles. If the clay feels too dry or cracks while folding, dip your fingers in water and work the moisture back in. -
Section your portions:
Divide your clay into three uneven balls. Make one larger for the tall bottle vase, a medium one for the pear-shaped vase, and a smaller one for the squat background vase.
Natural Speckles
Running low on specialty clay? Knead cracked black pepper into plain white clay. It mimics the look of ceramic stoneware perfectly once dry.
Step 2: Forming the Tall Bottle Vase
-
Start the pinch pot base:
Take your largest ball of clay and press your thumb into the center, pinching the walls gently while rotating the clay to create a cylinder shape. -
Elongate the form:
Gradually work the clay upwards. I place the base on the table and gently squeeze the clay upward between my palms to help gravity keep it straight. -
Narrow the neck:
As you reach the top third of the vase, apply more pressure to taper the clay inward, creating a long, slender neck that distinguishes this bottle shape. -
Refine the rim:
Use a damp finger to smooth the top rim. It should be slightly uneven and organic, not perfectly machine-cut.
Step 3: Sculpting the Pear-Shaped Vase
-
Create a rounded base:
For the medium vase, focus on keeping the bottom half bulbous. Pinch the walls out wider near the bottom before narrowing them drastically near the shoulders. -
Form the collar:
Unlike the tall bottle, this vase has a distinct collar. Pinch the neck tightly, then flare the very top rim outwards slightly to create a lip. -
Smooth the transition:
Use a wooden tool or your thumb to ensure the curve from the belly to the neck is smooth and continuous, blending any fingerprints away with a damp sponge.
Cracking Issues?
If small cracks appear while drying, mix a tiny bit of wet clay into a paste (slip) and fill the crack, then smooth it over with a damp finger.
Step 4: Creating the Soft Teardrop Vase
-
Shape the teardrop:
With your final piece of clay, form a simpler teardrop shape. Keep the weight at the bottom and create a gentle, shorter slope up to the opening. -
Add surface variation:
If you want the subtle vertical ridge seen on the taller vases, use the side of a wooden tool to gently press a faint vertical line into the side of the clay.
Step 5: Refining and Finish
-
Sponge finish:
Before the clay dries, take a slightly damp sea sponge and dab the entire surface of all three vases. This enhances the stone-like texture and removes harsh tool marks. -
Let them dry:
Allow the vases to dry thoroughly for 24-48 hours. Rotate them occasionally so the bottoms dry evenly. -
Sand for softness:
Once fully dry, use fine-grit sandpaper to gently smooth the rims and any sharp bumps. Don’t over-sand, or you’ll lose that lovely speckled texture. -
Seal the work:
Apply a coat of ultra-matte varnish to protect the clay. Since these are likely for dried flowers, you don’t need a waterproof resin inside. -
Style your arrangement:
I like to grab some dried pampas grass or seed pods to test the height of the vases once the varnish is dry, trimming the stems to suit each vessel.
Place your trio on a linen tablecloth or a wooden shelf to enjoy the serene, earthy vibe they bring to your space


What Really Happens Inside the Kiln
Learn how time and temperature work together inside the kiln to transform clay into durable ceramic.
Toothbrush or Makeup Cup
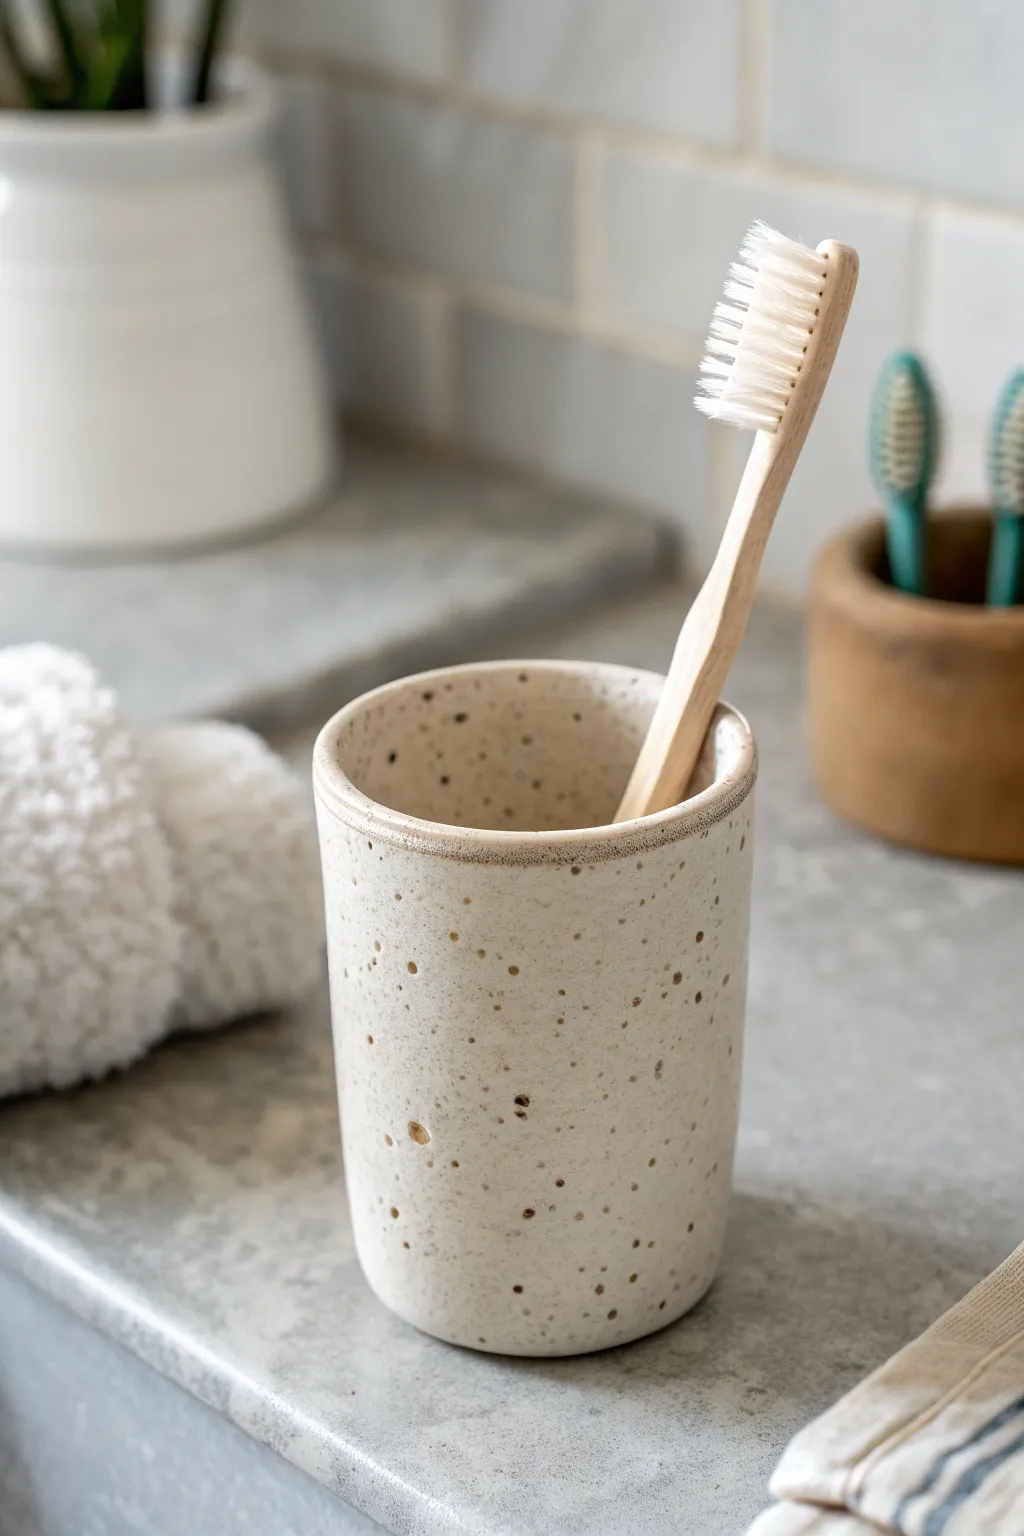
Bring an earthy, minimalist aesthetic to your bathroom vanity with this handcrafted toothbrush cup. Featuring a creamy matte glaze with natural brown speckles and a subtle unglazed rim, this project is perfect for beginners looking to practice consistent cylinder forms.
Step-by-Step Tutorial
Materials
- Stoneware clay (speckled or buff)
- Pottery wheel (or slab roller/rolling pin for hand-building)
- Needle tool
- Wire cutter
- Sponge
- Rib tool (metal or wood)
- Trimming tools
- Matte cream or off-white glaze
- Clear glaze (optional interior liner)
- Kiln
Step 1: Forming the Cup
-
Prepare your clay:
Start by wedging about 1 to 1.5 pounds of stoneware clay. If you want the speckles to come from the clay body itself, choose a speckled buff clay; otherwise, you can rely on a speckled glaze later. -
Center on the wheel:
Throw the clay onto the center of the wheel head. Use your palms and firm pressure to center the clay, coning it up and down twice to ensure all air bubbles are removed. -
Open the clay:
Press your thumbs into the center to create the opening, leaving about a half-inch thick floor at the bottom. Check the thickness with a needle tool if you’re unsure. -
Pull the walls:
Slowly pull the walls upward to create a cylinder. Aim for straight, vertical sides rather than a tapered bowl shape. I usually do three steady pulls to get the height right. -
Refine the shape:
Use a straight rib tool on the exterior while supporting the interior with your hand to smooth the walls and ensure the cylinder is perfectly vertical. -
Compress the rim:
Use a damp sponge or piece of chamois leather to gently compress and round the rim. This prevents cracking and feels nicer to the touch. -
Cut from the wheel:
Run a wire cutter underneath the pot and carefully lift it off the wheel. Place it on a ware board to dry until leather-hard.
Rim Contrast
For a darker rim contrast, brush a thin layer of iron oxide wash onto the exposed rim after wiping off the glaze, but before the final firing.
Step 2: Trimming and Bisque
-
Center for trimming:
Once leather-hard, place the cup upside down on the wheel. Secure it with small coils of clay. -
Details the foot:
Trim away excess clay from the bottom to create a slight curve leading into the base. Unlike a mug, this cup needs a flat, stable bottom without a deep foot ring, so just clean it up until it sits flat. -
Smooth the surface:
Run a smooth rib or the back of a spoon over the exterior to remove any grog or rough texture before firing. -
Bisque fire:
Load the bone-dry piece into the kiln and bisque fire it to cone 04 (or according to your clay body’s instructions).
Step 3: Glazing and Finishing
-
Clean surface:
Wipe the bisque-fired cup with a damp sponge to remove any dust that might resist the glaze. -
Wax the bottom:
Apply wax resist to the bottom of the cup and slightly up the side wall if you want a clean break. -
Apply liner glaze:
Pour a liner glaze inside the cup, swirl it to coat the entire interior, and pour out the excess. A clear or white glossy glaze works well for easy cleaning. -
Dip exterior:
Use tongs to dip the exterior into your matte cream glaze. If your clay isn’t speckled, ensure your glaze has iron speckles added. -
Create the exposed rim:
Immediately after dipping, use a damp sponge to wipe the glaze off the very top edge of the rim. This creates the contrasting brown line seen in the original project. -
Clean the foot:
Ensure no glaze is on the bottom of the cup where it will touch the kiln shelf. -
Final firing:
Load the cup into the kiln for the glaze firing, typically to cone 5 or 6 depending on your stoneware. Let the kiln cool completely before opening.
Bottom Heavy?
If your cup feels too heavy at the base, you didn’t trim enough clay away. Use a needle tool to measure floor depth before trimming next time.
Now you have a beautifully simple vessel ready to organize your morning routine
Textured Clay Coasters
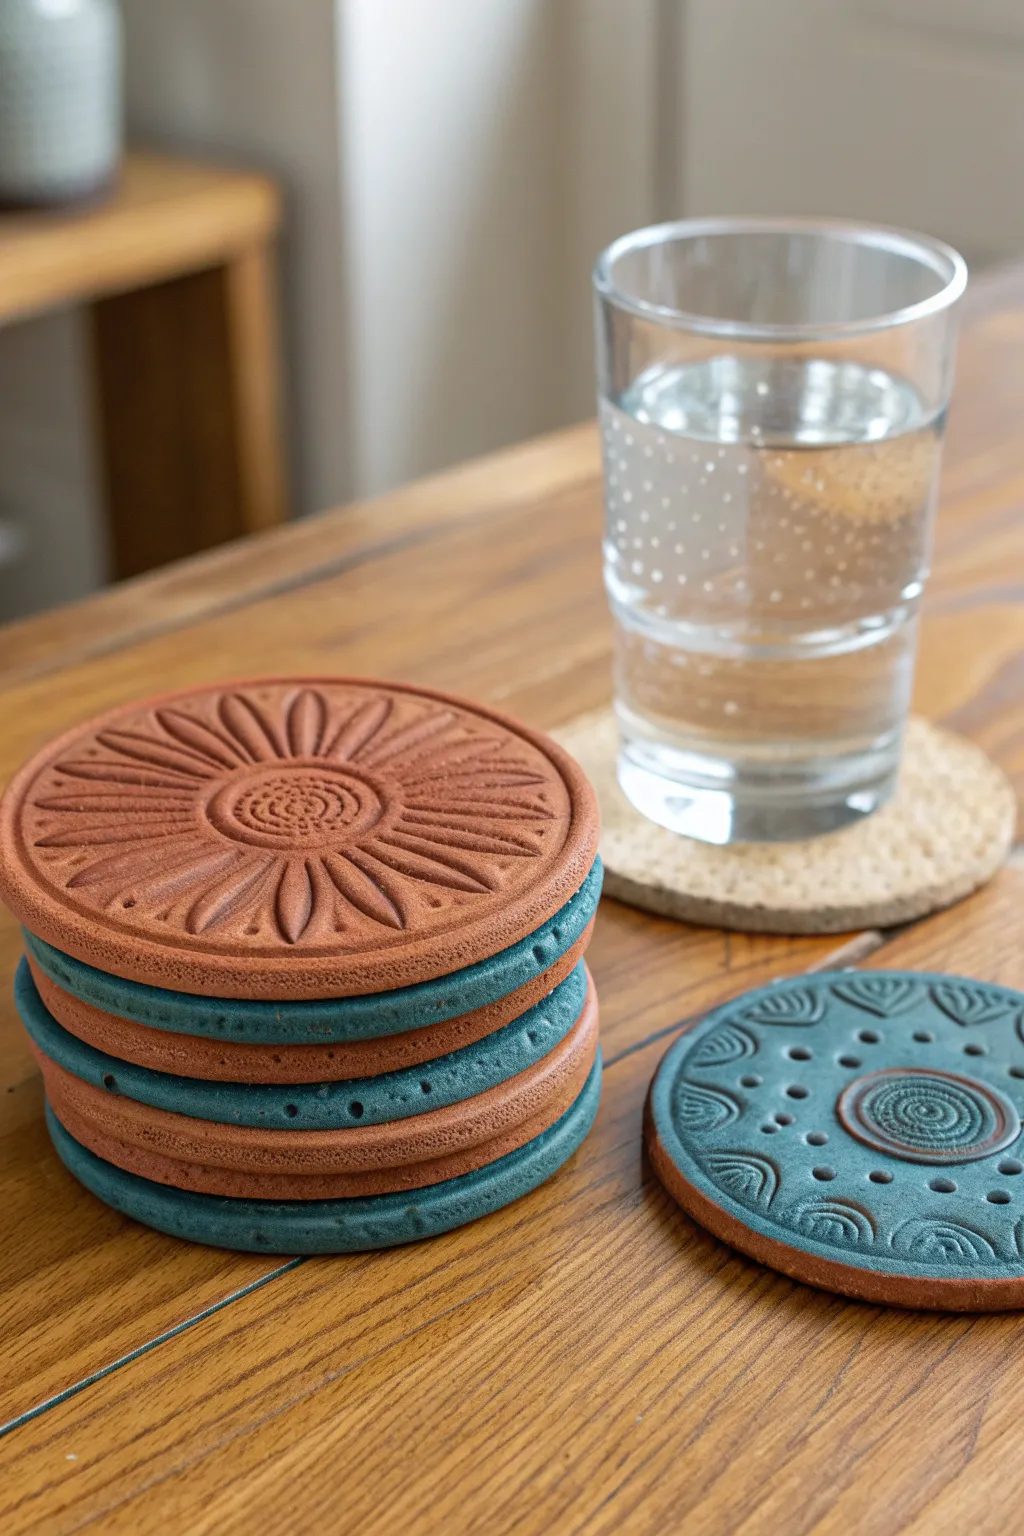
These charming, two-toned coasters bring an earthy warmth to your table with their intricate patterns and rustic terracotta look. By combining simple slab building with texture tools, you can create a beautiful set perfect for your morning glass of water or evening tea.
Step-by-Step Guide
Materials
- Terracotta air-dry clay (or polymer clay)
- White or grey air-dry clay (optional for color variation)
- Teal acrylic paint (if using only terracotta clay)
- Rolling pin
- Round cookie cutter (approx. 4 inches)
- Texture sheets, stamps, or fondant impression mats
- Detail needle tool
- Sandpaper (fine grit)
- Matte varnish or sealant
- Two wooden guide strips (1/4 inch thick)
Step 1: Preparing the Clay Slabs
-
Condition the clay:
Begin by taking a handful of your terracotta clay and kneading it thoroughly in your hands until it feels warm and pliable, removing any air bubbles. -
Set up your workspace:
Place a sheet of parchment paper or a canvas mat on your table to prevent sticking. Lay your two wooden guide strips on either side of your workspace. -
Roll the first slab:
Place your clay ball between the guide strips and use your rolling pin to flatten it into an even slab. The guides ensure every coaster is the exact same thickness. -
Smooth the surface:
Take a slightly damp sponge or your finger and gently smooth out the surface of the clay to erase any imperfections or tiny cracks. -
Create color variations:
If you want the blue-toned layers shown in the stack, repeat this rolling process with your secondary clay color, or plan to paint the edges later.
Step 2: Designing Patterns
-
Select your texture:
Before cutting the circle, position your chosen texture sheet, mandala stamp, or impression mat over the clay slab. -
Imprint the design:
Firmly roll over the texture tool with your rolling pin once. Apply even pressure so the design is deep and crisp, but careful not to thin the clay too much. -
Cut the shape:
Position your round cookie cutter over the most interesting part of the pattern to frame your design perfectly. -
Press and release:
Press the cutter straight down. Give it a tiny wiggle to separate the edges, then lift it away. Peel away the excess clay scrap from outside the circle. -
Refine the edges:
Dip your finger in water and gently run it along the cut edge of the circle to smooth down any sharpness or burrs left by the cutter. -
Add detail accents:
Use a needle tool or the back of a small paintbrush to add extra dots or lines if your stamped pattern needs a little more definition.
Stamp Sourcing
Don’t have clay stamps? Look in your kitchen! The bottom of heavy cut-glass tumblers or vintage faceted glassware often make incredible mandala-like impressions.
Step 3: Finishing Touches
-
Dry the coasters:
Move your coasters to a flat board to dry. Flip them over every few hours for the first day to ensure they dry evenly and don’t curl at the edges. -
Wait for full cure:
Allow the clay to dry completely, which usually takes 24 to 48 hours depending on humidity and clay thickness. -
Sand for smoothness:
Once bone dry, take fine-grit sandpaper and lightly buff the edges and the flat bottom to ensure the coaster sits perfectly flat on a table. -
Apply teal accents:
If you used only terracotta clay, mix a watery wash of teal acrylic paint. Brush it over the textured surface, letting it sink into the grooves. -
Wipe back paint:
Before the paint dries fully, wipe the surface with a damp paper towel. This leaves the teal color deep in the texture while revealing the terracotta on the raised areas. -
Paint the edges:
For the specific look in the photo, create a solid teal edge on some coasters by painting the rim and the underside with opaque acrylic paint. -
Seal the piece:
Apply two coats of a matte varnish or water-resistant sealant to protect the clay from moisture, as these will be holding drinks.
Two-Tone Effect
Layer a thin sheet of blue clay on top of a thick sheet of terracotta clay before rolling. When you stamp, the red clay will peek through the blue surface.
Stack your finished coasters on the coffee table to admire your handiwork before using them

TRACK YOUR CERAMIC JOURNEY
Capture glaze tests, firing details, and creative progress—all in one simple printable. Make your projects easier to repeat and improve.
Minimal Incense Holder
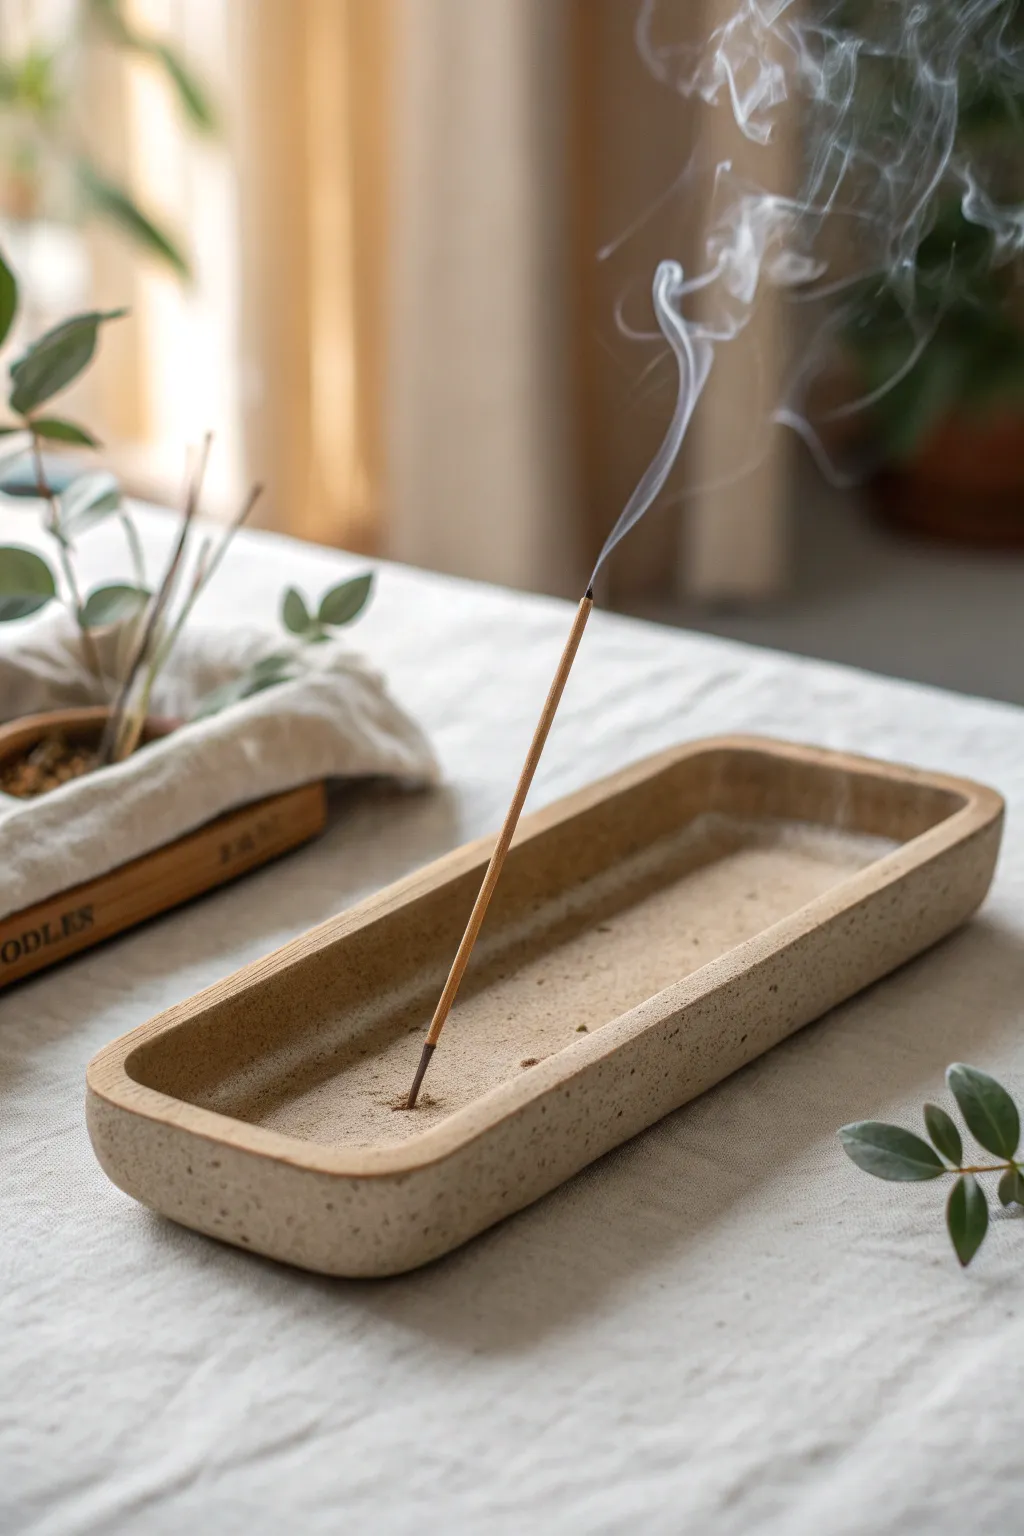
Embrace simplicity with this minimalist incense holder that captures the calming aesthetic of zen gardens. Using speckled stoneware clay, you’ll create a low-profile, rectangular tray perfect for catching ash while looking effortlessly chic on any tabletop.
Step-by-Step Tutorial
Materials
- Speckled sandstone or stoneware clay
- Rolling pin
- Two wooden guide strips (approx. 1/4 inch thick)
- Fettling knife or clay cutting tool
- Small sponge
- Rib tool (wooden or silicone)
- Needle tool or thin dowel (sized to your incense sticks)
- Ruler
- Scoring tool (or fork)
- Slip (clay mixed with water)
Step 1: Creating the Base Slab
-
Roll the slab:
Begin by wedging your clay to remove air bubbles. Place the clay between two wooden guide strips on a canvas surface and use your rolling pin to create a smooth, even slab about 1/4 inch thick. -
Measure the base:
Using a ruler, lightly mark a rectangle on the clay surface. A good dimension for this project is approximately 3 inches wide by 8 inches long to ensure it catches all the ash. -
Cut the rectangle:
With your fettling knife held vertically, cut along your marked lines. Keep the excess clay nearby; you will need it for the walls. -
Smooth the surface:
Take a damp sponge or a soft rib tool and gently wipe the surface of your base slab to remove the canvas texture and any imperfections.
Cracking at the seams?
If walls separate during drying, you didn’t score deep enough. Make a ‘slurry’ paste of clay and vinegar to fill the crack, compress firmly, and dry very slowly under plastic.
Step 2: Building the Walls
-
Cut wall strips:
Roll out the remaining clay to the same thickness as the base. Cut long strips that are approximately 3/4 inch tall. I like to cut these slightly longer than the perimeter of the base to allow for trimming. -
Score the edges:
Use a scoring tool or fork to scratch up the outer edges of your rectangular base and the bottom edge of your clay strips. This rough texture is crucial for a strong bond. -
Apply slip:
Dab a generous amount of slip onto the scored areas of the base using a brush or your finger. -
Attach the strips:
Place the clay strips onto the scored edge of the base. Press down firmly but gently to secure them. -
Join the seams:
Where the ends of the strips meet, cut them at a 45-degree angle for a cleaner join, score, slip, and press together. -
Reinforce the connection:
Use a wooden modeling tool to smudge the clay from the strip down onto the base on the inside and outside seams, ensuring the two pieces become one.
Add a sandy texture
For an even earthier look, mix a small amount of fine sand or grog into your clay body before rolling, or gently press sand into the exterior walls while the clay is leather hard.
Step 3: Refining and Finishing
-
Round the corners:
The example image features soft, rounded corners rather than sharp angles. Use your thumb or a damp sponge to gently mold the exterior corners until they have a smooth, organic curve. -
Level the rim:
If the top edge of your wall is uneven, use a rasp or slice off the excess with a wire cutter. Then, run a damp piece of chamois or a sponge over the rim to create a soft, rounded lip. -
Texture the surface:
To achieve that natural, stony look, lightly tap the exterior walls with a stiff-bristled brush or a textured sponge. This enhances the speckled quality of the clay. -
Create the holder mechanism:
Find the center point toward one end of the tray. Fashion a tiny pea-sized ball of clay and press it firmly into the floor of the tray to create a small mound. -
Pierce the hole:
Using your needle tool or a thin dowel, poke a hole into the center of the small mound at a slight angle (pointing toward the long end of the tray). Wiggle it slightly so the hole is just larger than an incense stick. -
Final smooth:
Do one last pass with a barely damp sponge to clean up any fingerprints or slip marks. -
Dry slowly:
Loosely cover the piece with plastic for the first day to let the moisture equalize, then uncover to let it dry completely to bone dry. -
Fire appropriately:
Fire the piece according to your clay body’s instructions. A matte, clear glaze on the inside will make cleaning ash easier, while leaving the outside unglazed highlights the texture.
Once fired, fill the bottom with a thin layer of sand to help hold the incense stick even more securely and complete the calming visual aesthetic
Cute Face Magnets
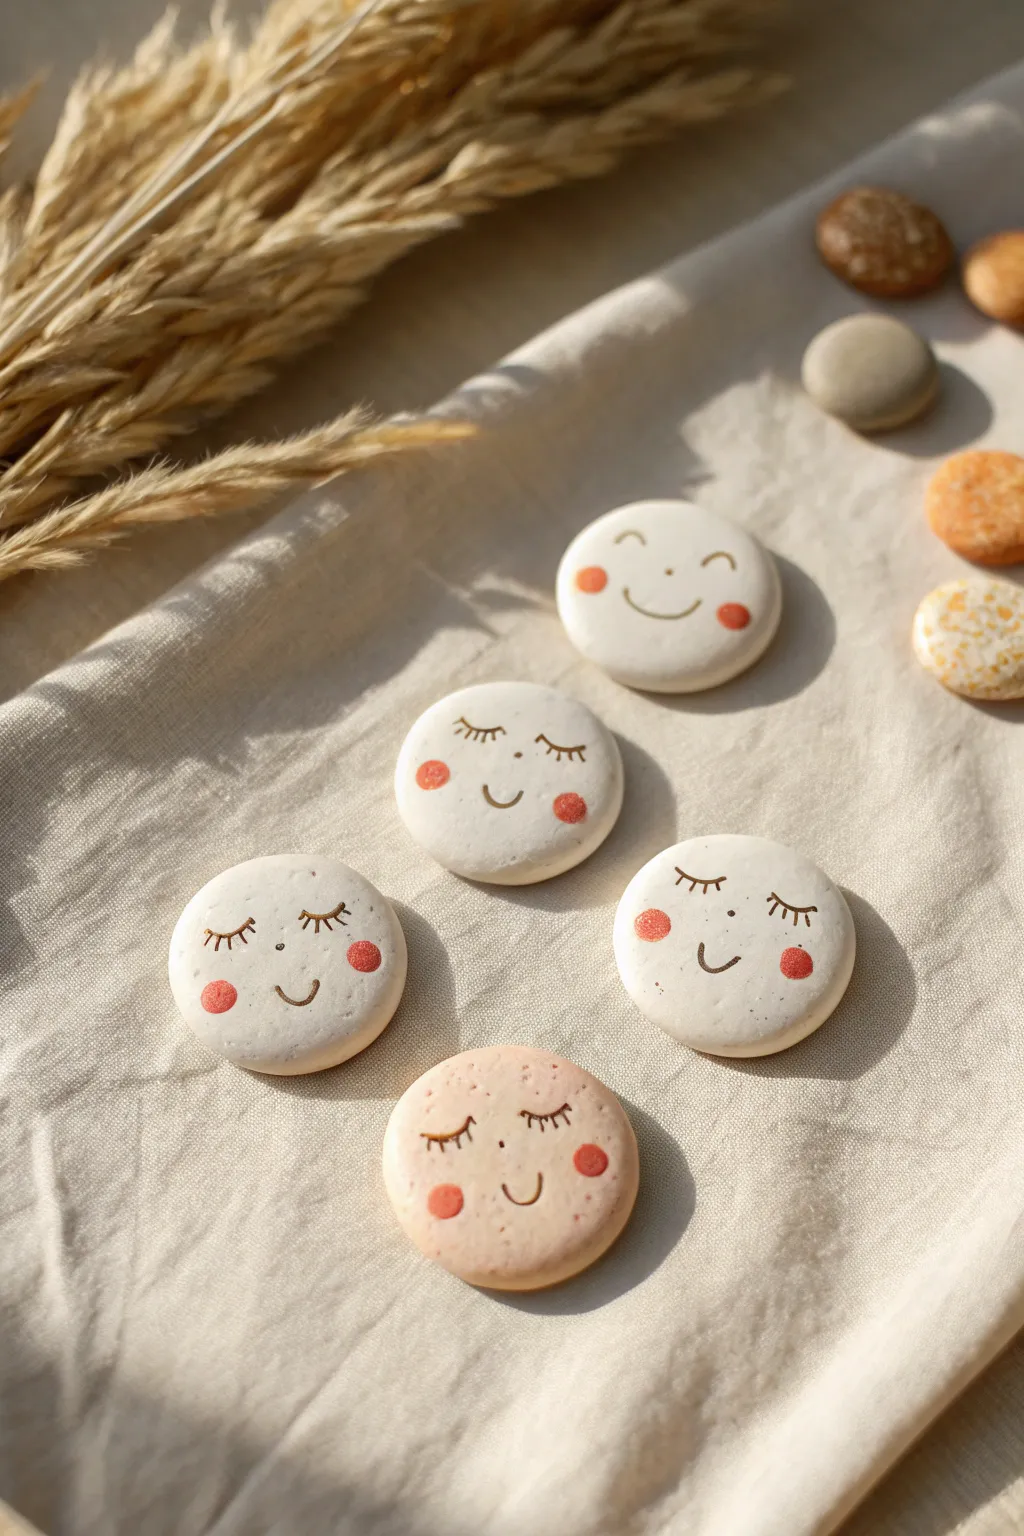
These charming little clay magnets bring a sense of peaceful whimsy to your fridge or magnetic board. With their soft, matte finish and minimalist expressions, they are a simple yet delightful project perfect for beginners.
Detailed Instructions
Materials
- White air-dry clay or polymer clay
- Peach or light pink air-dry clay (optional)
- Small circle cookie cutter (approx. 1.5 inches)
- Rolling pin
- Fine-grit sandpaper
- Fine-tip brown permanent marker or brown acrylic paint with a 0000 brush
- Pink acrylic paint or soft pastel chalks
- Small round sponge brush or q-tip
- Matte spray varnish
- Strong round craft magnets
- strong adhesive (like E6000 or super glue)
Step 1: Shaping the Base
-
Prepare your workspace:
Lay down a smooth work mat or parchment paper to prevent the clay from sticking. Ensure your hands are clean and free of lint. -
Condition the clay:
Take a chunk of white clay and knead it in your hands until it becomes warm, soft, and pliable. If you want to make the blush-colored face, mix a tiny amount of red or orange clay into white, or use pre-colored peach clay. -
Roll the slab:
Use your rolling pin to flatten the clay into an even slab. Aim for a thickness of about 1/4 inch (6mm)—thick enough to be sturdy but not too heavy for the magnet. -
Cut the circles:
Press your circle cutter firmly into the clay slab. Give it a tiny wiggle before lifting to ensure a clean cut. -
Smooth the edges:
Gently pop the clay circles out of the cutter. Dip your finger in a little water (for air-dry clay) or baby oil (for polymer) and run it around the circumference to smooth out any sharp ridges or uneven seams. -
Initial curve:
To get that soft, pillow-like look, gently tap the center of the circle with your thumb to slightly domed the edges, or leave them perfectly flat if you prefer a modern look. -
Drying or Baking:
If using polymer clay, bake according to the package instructions (usually 275°F for 15-30 mins). If using air-dry clay, let them sit in a cool, dry place for 24-48 hours, flipping them occasionally to ensure even drying.
Smudgy Marker?
If your marker bleeds into the clay, seal the clay with a thin layer of matte varnish FIRST, let it dry, and then draw the face on top.
Step 2: Adding the Details
-
Sand for smoothness:
Once fully cured and dry, check for any fingerprints or bumps. Lightly buff the surface with fine-grit sandpaper until it feels like smooth porcelain. Wipe away dust with a damp cloth. -
Draft the face:
Using a very light pencil, sketch out the position of the eyes and mouth. Place the eyes wide apart and slightly lower than the center line for an extra cute look. -
Draw the features:
Trace over your pencil lines using a fine-tip brown permanent marker. Alternatively, I prefer painting thin lines with diluted brown acrylic paint for a more organic feel. -
Add the lashes:
Add three small, curved lashes to each closed eyelid. Keep them delicate and varying slightly in length. -
Create the cheeks:
For the rosy cheeks, you have two options. You can dip a round sponge dauber/pouncer into pink acrylic paint, dab most of it off on a paper towel, and gently press onto the clay. -
Alternative cheek method:
For a softer, airbrushed look, scrape some pink soft pastel chalk into a powder. Pick up the powder with a q-tip or soft dry brush and rub it in circular motions onto the cheek area. -
Seal the artwork:
Take the pieces outside or into a well-ventilated area. Apply a light coat of matte spray varnish to protect the paint and detailed drawing from smudging over time. -
Let dry:
Allow the varnish to dry completely according to the can’s instructions, ensuring the surface is no longer tacky. -
Attach the magnet:
Flip the clay face over. Apply a dab of strong adhesive like E6000 to the center of the back. -
Press and hold:
Press a round craft magnet into the glue. Let the adhesive cure for at least 12 hours before sticking your new creation onto the fridge.
Pro Tip: Texture
Before the clay dries, gently press a piece of canvas or linen fabric onto the surface to give it a subtle textile texture.
Now you have a set of adorable faces to brighten up your kitchen organization
Photo or Card Holders
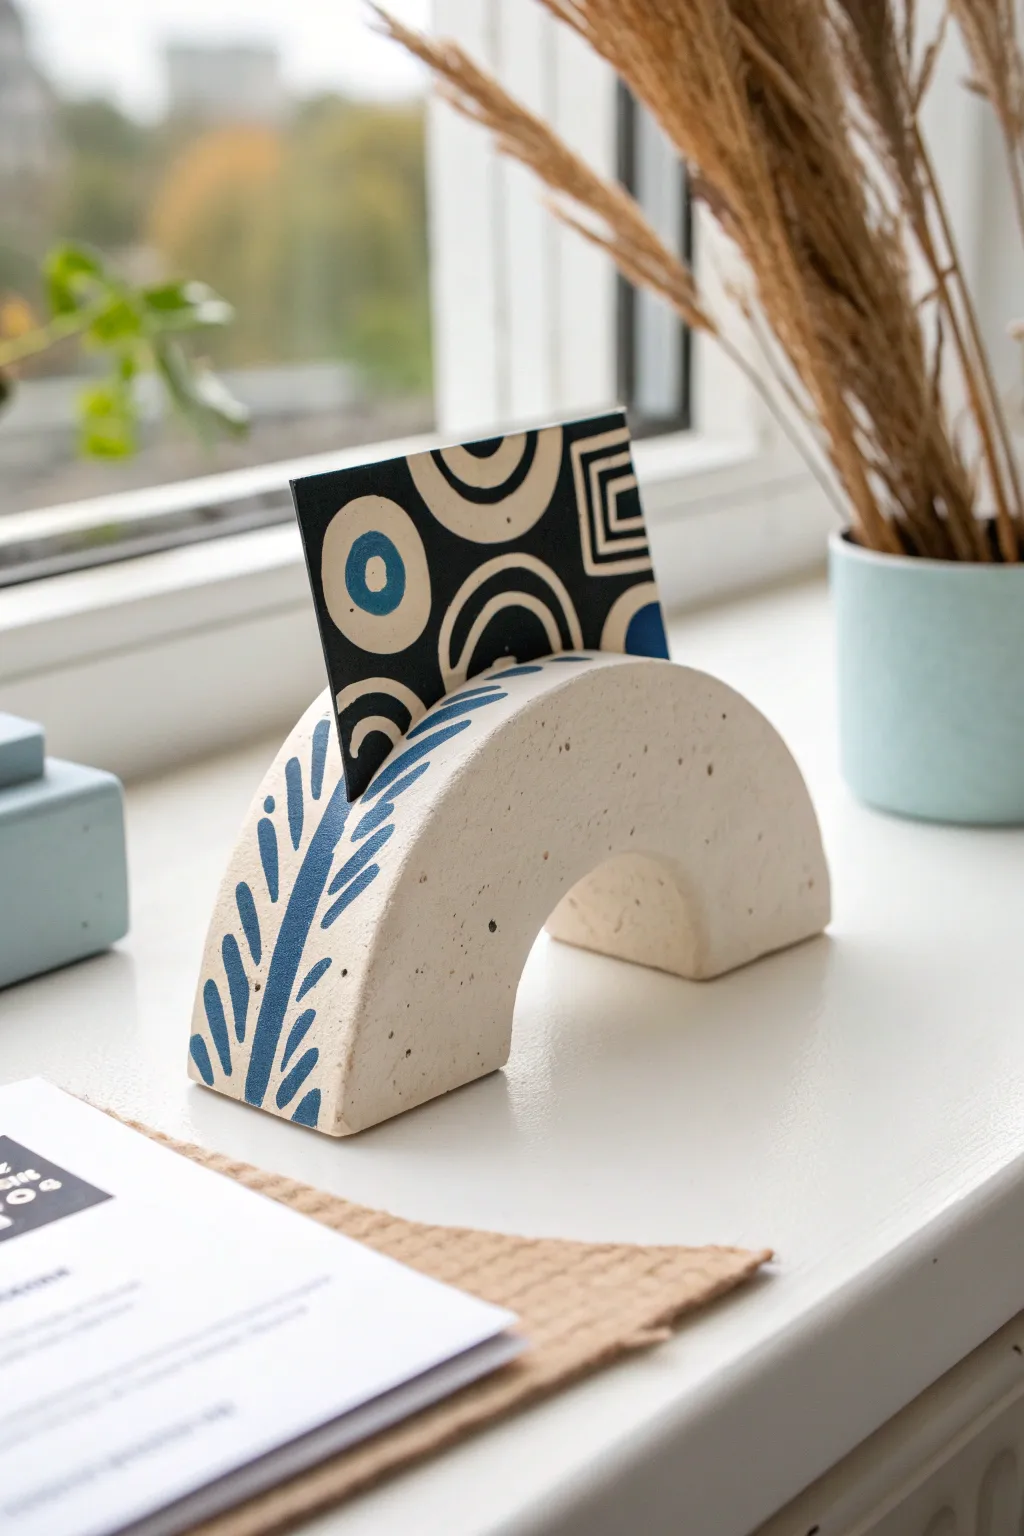
This minimalist card holder mimics a modern rainbow arch shape, featuring a raw, speckled finish and delicate hand-painted blue foliage. It serves as both a functional stand for favorite photos or postcards and a petite sculpture for your desk or windowsill.
How-To Guide
Materials
- Air-dry clay (white or cream)
- Rolling pin
- Craft knife or clay blade
- Round cookie cutter or a bowl (approx. 4-5 inches diameter)
- Smaller round cutter or bottle cap
- Sandpaper (fine grit)
- Acrylic paint (Deep cobalt or navy blue)
- Fine detail paintbrush (size 0 or 1)
- Clear matte varnish or sealant
- Water cup for smoothing
- Dried coffee grounds or speckled craft sand (optional for texture)
Step 1: Shaping the Clay Arch
-
Prepare the Clay:
Begin by conditioning a large handful of air-dry clay. Knead it until soft and pliable. If you want that speckled stone look shown in the photo, mix in a pinch of dried coffee grounds or craft sand during this kneading stage. -
Roll the Slab:
Roll the clay out into a thick, even slab. You want this quite chunky for stability, ideally about 3/4 inch to 1 inch thick. -
Cut the Base Shape:
Use your large round cutter or trace a bowl to cut a perfect circle from the slab. -
Create the Arch:
Slice the circle exactly in half using your craft knife. You now have two semi-circles; set one aside for another project or combine them for a wider holder. -
Cut the Inner Arch:
Use a smaller round cutter to remove a semi-circle from the bottom center of the straight edge. This creates the legs of the arch. -
Smooth the Edges:
Dip your finger in a little water and gently smooth all raw cut edges. Round off sharp corners slightly to give it a soft, organic feel. -
Create the Slot:
Using a ruler or the back of your knife, press a groove into the very top center of the arch. Gently wiggle the tool to widen it enough to hold heavy cardstock, ensuring the cut goes about halfway down into the clay.
Step 2: Refining and Decorating
-
Dry Completely:
Allow the piece to dry fully. Since the clay is thick, I recommend letting it sit for at least 24-48 hours, flipping it occasionally for even airflow. -
Sand for Finish:
Once bone dry, take fine-grit sandpaper and gently buff the surface. Focus on the bottom feet so it stands perfectly flat without wobbling. -
Plan the Design:
Lightly sketch a vine pattern on the front face of the arch using a pencil. Start with a central stem following the curve of the arch. -
Paint the Stem:
Load your fine brush with navy blue acrylic paint. Paint a continuous line for the central stem, starting from the bottom left leg and curving up towards the top. -
Add Leaves:
Paint small, simple leaf shapes branching off the stem. Use a ‘press and lift’ motion with your brush to get tapered ends on the leaves. -
Detail the Curve:
Ensure the leaves angle upwards and follow the flow of the arch shape for a harmonious look. -
Seal the Project:
After the paint is fully dry, apply a coat of matte varnish. This protects the clay from dust and moisture while keeping that natural, stony appearance.
Clean Lines Pro-Tip
For a straighter card slot, fold a piece of thick cardstock, wrap it in plastic wrap, and press it into the wet clay. Leave it there until the clay is leather-hard, then remove.
Level Up: Reversible Art
Paint a different pattern on the reverse side—perhaps geometric dots or a solid color block—so you can flip the holder around to match your mood or the season.
Place your favorite geometric postcard in the slot and enjoy your handmade decor piece
Polymer Clay Earrings and Charms
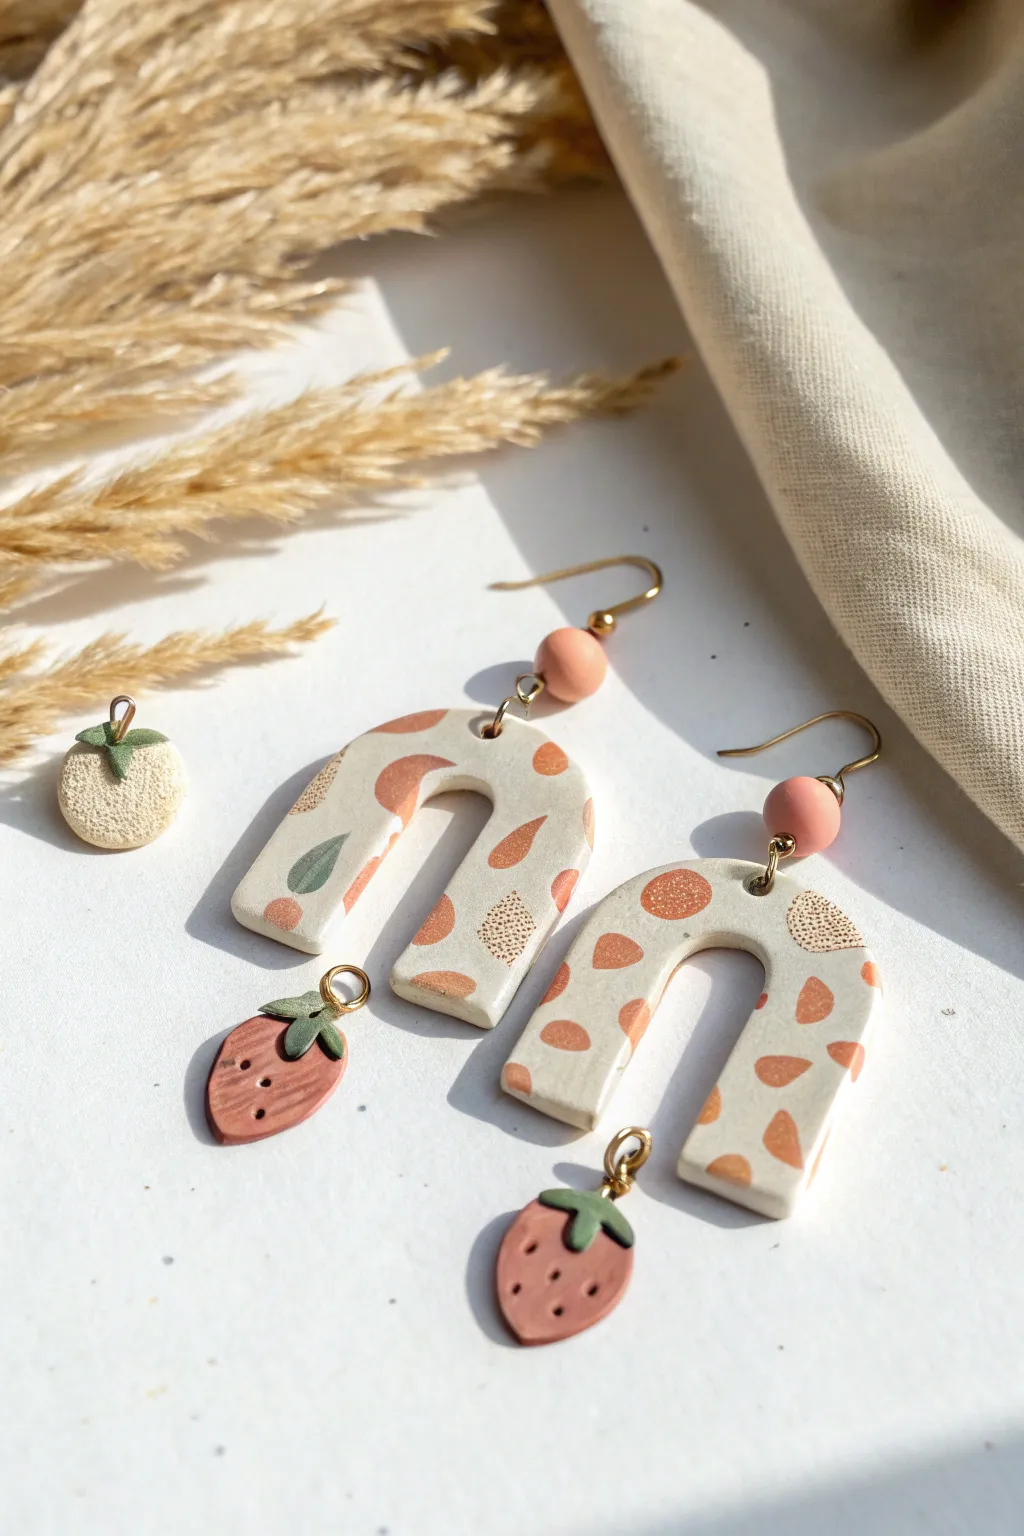
These statement earrings combine modern, abstract arch shapes with the whimsy of tiny fruit charms. With a warm color palette of cream, terracotta, and leafy green, they offer a playful yet sophisticated look perfect for everyday wear.
Detailed Instructions
Materials
- Polymer clay (cream/beige, terracotta/rust, moss green, black for seeds)
- Clay roller or pasta machine
- U-shaped arch cutter (approx. 1.5 – 2 inches)
- Small teardrop cutter or strawberry cutter
- Circle cutter (optional for stud topper)
- X-Acto knife or tissue blade
- Texture tool (toothbrush or needle tool)
- Gold jump rings (6mm and 4mm)
- Gold earring hooks
- Beige or terracotta round beads (approx. 6mm)
- Hand drill or needle tool for piercing
- Baking sheet/tile and parchment paper
- Jewelry pliers
Step 1: Creating the Terrazzo Slab
-
Base Preparation:
Condition your cream-colored polymer clay until it is soft and pliable. Roll it out into a flat sheet, about 3mm thick. This will be the canvas for your terrazzo pattern. -
Mixing Chips:
Take small amounts of the terracotta clay and roll it into a very thin sheet. Tear off tiny, irregular pieces—these will be your main color chips. Do the same with a small amount of moss green clay for subtle leaf accents. -
Adding Texture Details:
To mimic the textured spots seen in the design, take a tiny bit of cream clay, mix it with some black or brown specks (or use pre-mixed granite clay), and flatten small bits onto your workspace. -
Applying the Pattern:
Scatter your torn terracotta pieces, green bits, and textured speckles randomly over the cream base sheet. Aim for an organic, non-uniform look where some areas are denser than others. -
Integrating the Slab:
Gently run your roller over the sheet to press the chips into the base. Roll in different directions to ensure the surface is completely smooth and level. The chips should stretch slightly, becoming part of the clay rather than sitting on top.
Sticky Cutters?
If your clay is sticking inside the small cutters, dip the cutter into water or cornstarch before pressing it into the clay. This helps it release cleanly without distorting the shape.
Step 2: Cutting and Shaping
-
Cutting the Arches:
Place your U-shaped cutter on the most visually interesting parts of your slab. Press down firmly to cut out two arch shapes. If the clay sticks, you can gently pat a little cornstarch on the lush surface first. -
Forming Strawberries:
Condition the terracotta clay and roll a small sheet. Use a teardrop cutter or freehand cut two small strawberry shapes. For the leaves, cut tiny stars or triangles from moss green clay and gently press them onto the top of the ‘berries’. -
Adding Seeds:
Using a needle tool, poke tiny indentations across the surface of the strawberry shapes to mimic seeds. I find that varied pressure makes them look more natural. -
Making the Texture Charm:
For the additional round charm shown, roll a ball of cream clay, flatten it into a thick disc, and press a toothbrush or stiff brush against it to create a stippled surface. Add a tiny green stem on top. -
Piercing Holes:
Before baking, use a needle tool to create holes for assembly. You need a hole at the very top center of each arch, and a hole at the bottom of each arch leg for the charms. Don’t forget holes at the top of your strawberries.
Smooth Edges
Before baking, dip your finger in a tiny bit of baby oil or water and gently rub the raw edges of your cut shapes. This smooths out any rough burrs and saves you from sanding later.
Step 3: Baking and Assembly
-
Baking:
Arrangement your pieces on a parchment-lined baking sheet or ceramic tile. Bake according to your polymer clay manufacturer’s instructions (usually 275°F for 15-30 minutes per 1/4 inch of thickness). -
Cooling:
Allow the pieces to cool completely inside the oven or on the tray. Handling them while warm can cause warping. -
Connecting the Charms:
Open a small jump ring using two pairs of pliers. Thread it through the top of a strawberry charm and closing it around the bottom hole of one arch leg. Repeat for the other strawberry. -
Creating the Top Assembly:
Take a bead pin or piece of wire, create a loop at the bottom, and attach it to the top hole of the arch using a jump ring. Slide your round beige bead onto this pin. -
Final Hook Attachment:
Create a loop at the top of the bead wire (trimming excess wire if needed) and attach your gold earring hook. Ensure all jump rings are closed tightly so pieces don’t slip out.
Now you have a stunning pair of handmade earrings ready to add a pop of artisan style to your outfit
Knot Paperweights
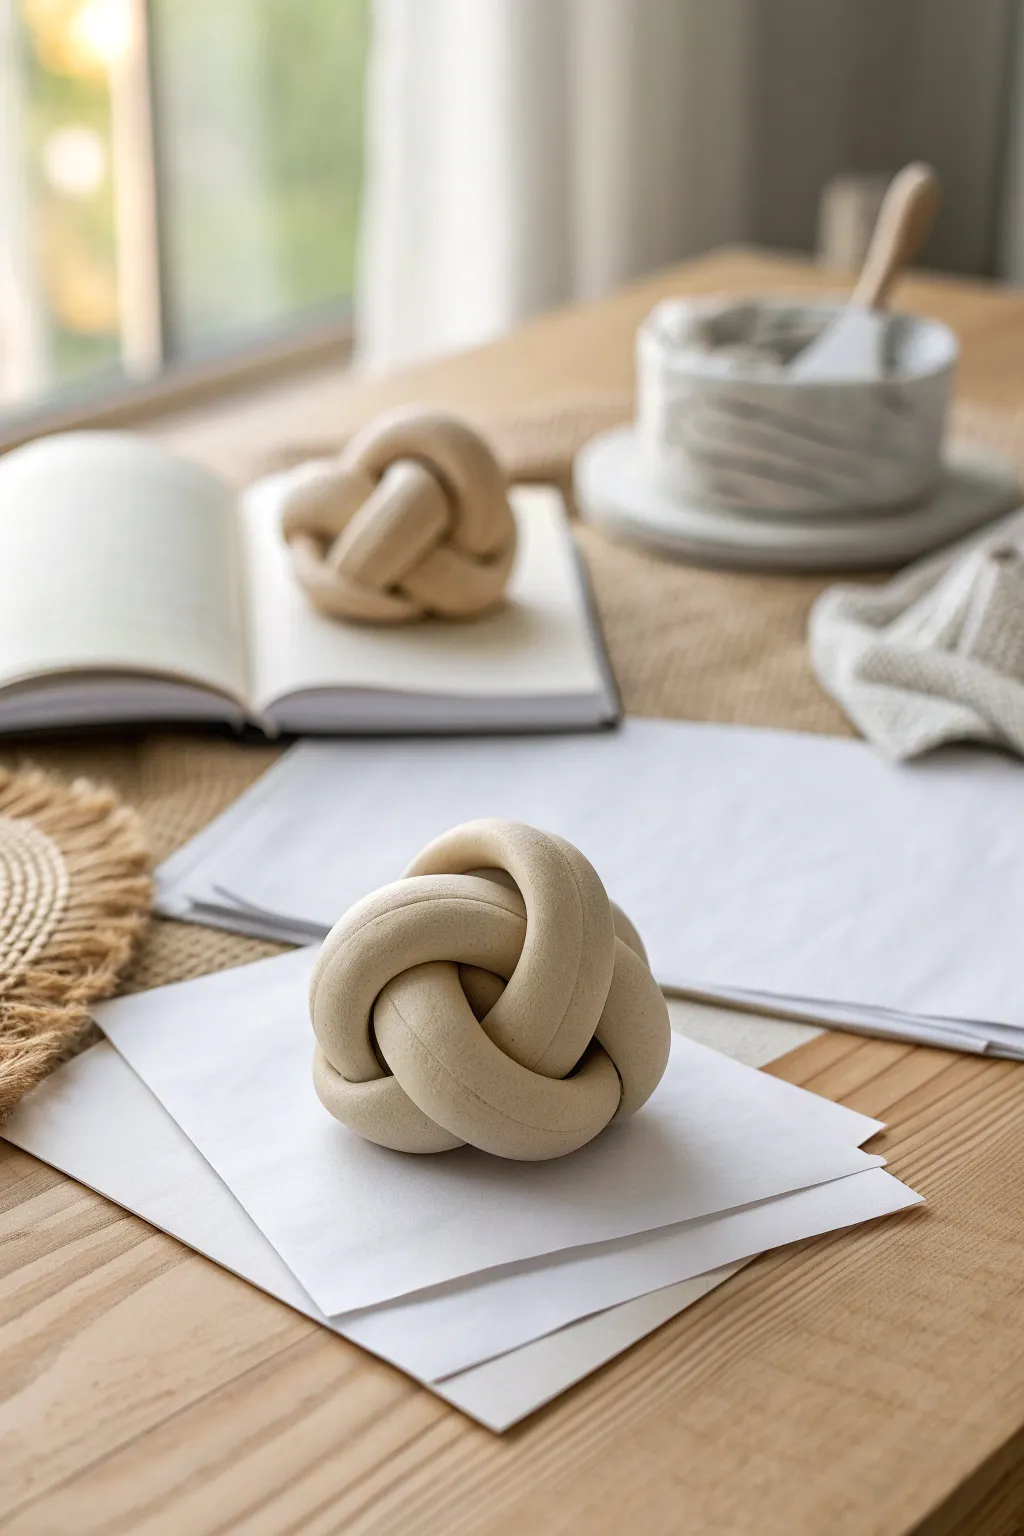
Elevate your desk decor with these minimalist, sculptural knot paperweights that blend form and function perfectly. Their smooth, intertwined curves create a sophisticated focal point while keeping your documents securely in place.
Step-by-Step Guide
Materials
- Air-dry clay or polymer clay (white or beige)
- Rolling pin or acrylic roller
- Clean work surface or silicone mat
- Small bowl of water (for smoothing)
- Fine-grit sandpaper (220-400 grit)
- Matte finish sealant or varnish
- Soft paintbrush
- Clay cutting tool or knife
Step 1: Preparation & Rolling
-
Condition the clay:
Start by taking a generous handful of your chosen clay. Knead it thoroughly in your hands until it becomes warm, pliable, and free of any air bubbles. This conditioning step is crucial for preventing cracks later. -
Create a log shape:
Begin rolling the clay between your palms to form a thick cylinder. Once it starts to take shape, transfer it to your work surface. -
Roll a long coil:
Using the palms of your hands, roll the clay back and forth on the table to extend it into a long snake or coil. Apply even pressure as you move from the center outwards to keep the thickness consistent. -
Check thickness and length:
Aim for a coil that is approximately 1 inch (2.5 cm) in diameter and about 18-20 inches long. If the clay gets too thin, squash it back together and re-roll; you need substantial thickness for that chunky look. -
Smooth the surface:
Dip your finger lightly in water and run it along the length of the coil to smooth out any small cracks or wrinkles before you start knotting.
Step 2: Forming the Knot
-
Make the initial loop:
Take one end of your clay snake and create a loose, open loop. Think of this like the beginning of tying a shoelace, but keep everything very open and relaxed. -
Weave the first pass:
Bring the long tail of the clay up and through the initial loop. Do not pull it tight; you want to maintain the round volume of the clay snake. -
Create the second loop:
Guide the tail end around the structure you’ve started, looking for a natural gap to pass it through again. I usually aim for a classic ‘monkey fist’ or simple overhand knot structure, but abstract tangles work beautifully too. -
Tuck the ends:
Take the two visible ends of your coil and tuck them underneath the main body of the knot. You want them hidden so the knot looks like an endless loop. -
Secure the connections:
Gently press the tucked ends into the clay on the underside to secure them. Use a little water to blend the seams so they don’t pop open during drying. -
Adjust the shape:
Cup the entire knot in your hands and gently squeeze or nudge the loops until the overall shape is pleasingly spherical or domed.
Seamless Finish
Keep a small sponge damp while working. wiping the wet clay coil periodically keeps it slick, preventing those tiny surface micro-cracks from forming as you bend it.
Step 3: Refining & Finishing
-
Initial smoothing:
Inspect the knot for fingerprints or dents. Use a wet finger or a damp soft brush to stroke the clay gently, erasing these marks. -
Let it dry:
Set the paperweight aside in a cool, dry place. If using air-dry clay, let it cure for at least 24-48 hours. Turn it over halfway through specifically to ensure the bottom dries evenly. -
Sand for perfection:
Once fully hard, take your fine-grit sandpaper and gently sand the surface. Focus on any rough patches or seam lines to get that ultra-matte, stone-like texture visible in the photo. -
Dust off:
Wipe the sculpture down with a slightly damp cloth or dry brush to remove all the sanding dust. -
Apply protection:
Coat the entire piece with a matte varnish or sealant. This will protect the clay from dirt and oils while preserving that natural, unglazed aesthetic.
Terrazzo Twist
Before rolling your coil, mix in small, chopped-up bits of dried colored clay. When you sand the finished knot later, a beautiful speckled terrazzo pattern will appear.
Now you have a stylish and functional piece of art to organize your workspace
Hanging Ornaments and Wall Tiles
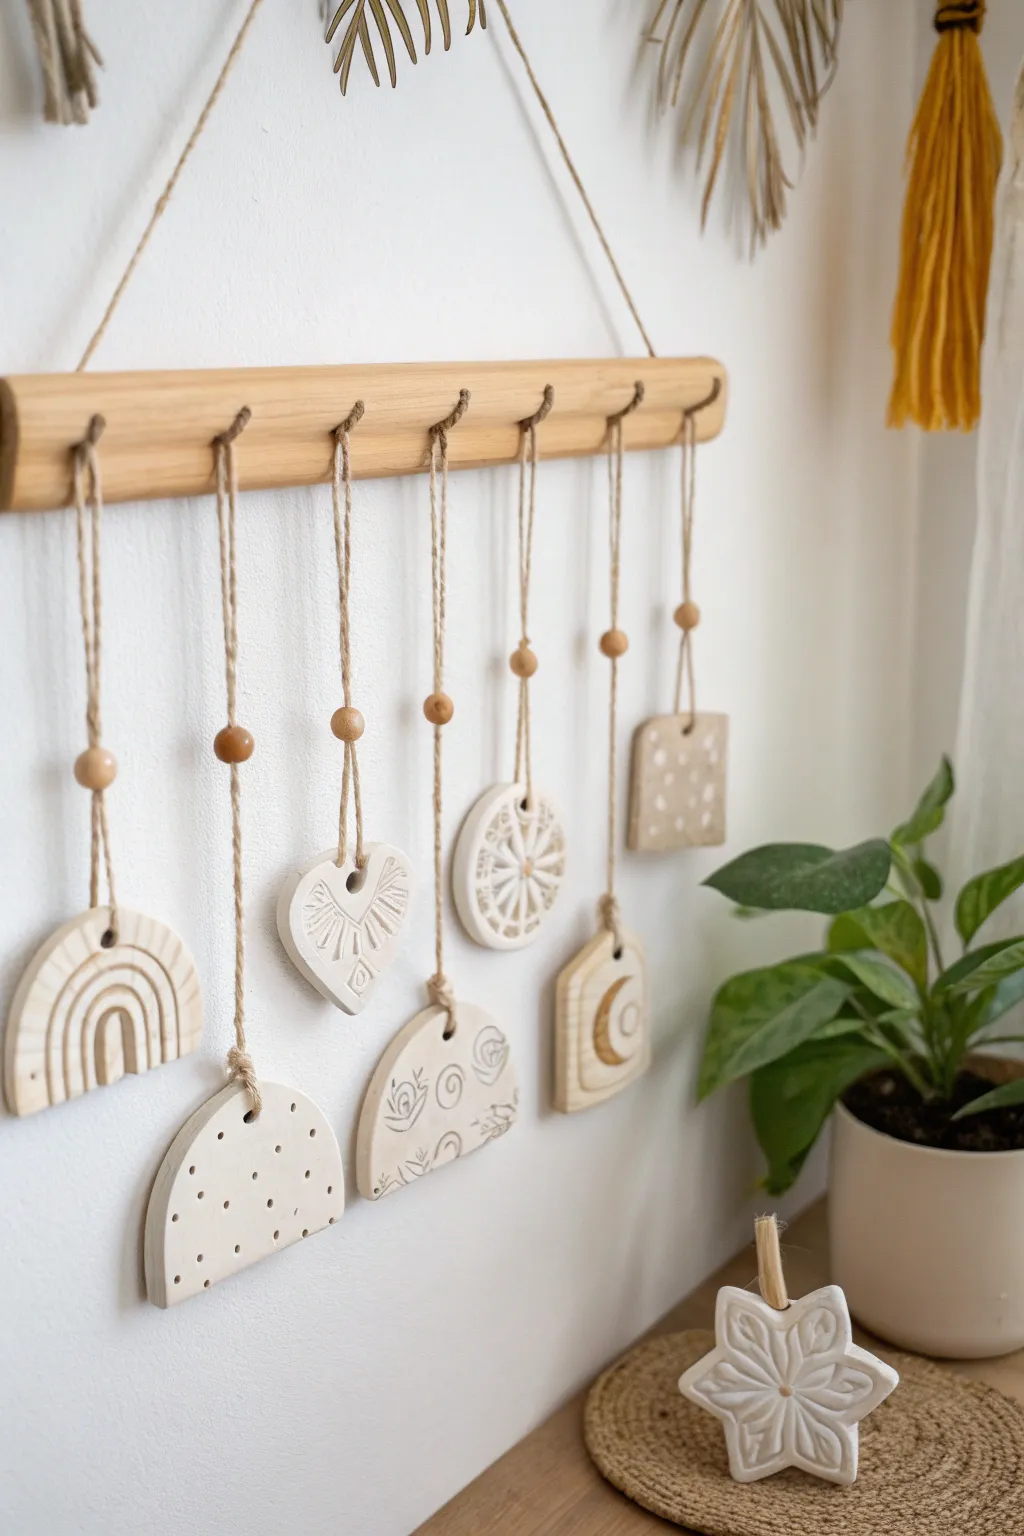
Create a stunning piece of wall art using simple clay shapes and natural textures. This minimalist mobile combines earthy wooden elements with delicate, hand-carved clay ornaments for a serene, bohemian aesthetic.
How-To Guide
Materials
- White styling clay (air-dry or polymer)
- Rolling pin
- Parchment paper or canvas mat
- Cookie cutters (circle, heart, square)
- Needle tool or toothpick
- Drinking straw or small piping tip
- Wooden dowel or flat wooden hanging bar (approx. 12-15 inches)
- Jute twine or hemp cord
- Wooden beads
- Scissors
- Fine-grit sandpaper
- Clear matte sealant (optional)
Step 1: Prepping and Shaping the Clay
-
Condition the clay:
Start by taking a large chunk of your white clay and kneading it in your hands until it becomes warm, pliable, and free of cracks. -
Roll it out:
Place the clay on a sheet of parchment paper. Use your rolling pin to flatten it to an even thickness of about 1/4 inch. If you want perfectly even ornaments, place two magazines or guide sticks on either side of the clay to rest the rolling pin on. -
Cut the basic shapes:
Using your cookie cutters or a knife, cut out your desired shapes. For this project, you’ll need a mix: a rainbow shape, a semi-circle, a heart, a circle, a tag or house shape, and a square or rectangle. -
Freehand the unique shapes:
For the rainbow and semi-circle shapes, you might need to cut freehand. Use a needle tool to lightly sketch the outline on the clay slab first, then cut through cleanly once you are happy with the proportions. -
Smooth the edges:
Dip your finger in a little bit of water and run it along the cut edges of each shape to smooth out any roughness or loose bits of clay.
Step 2: Adding Textures and Details
-
Create the hanging holes:
Use a drinking straw or a small circular cutter to punch a hole at the top of each ornament. Make sure the hole is not too close to the edge to prevent tearing later. -
Carve the rainbow:
On the rainbow-shaped piece, use your needle tool to carve three or four concentric arches. Go over the lines a few times to make the grooves deep and visible. -
Texture the semi-circle:
Take the semi-circle piece and use the blunt end of a small paintbrush or a dotting tool to press a pattern of small dots across the surface. -
Design the heart:
For the heart, scratch a radiating sunburst pattern starting from the center and extending outward. Add small V-shapes or lines to create a feathery look. -
Imprint the circle:
On the circular disk, press the needle tool to create wheel-spokes, and then add small dots or distinct textures between the spokes for variety. -
Detail the remaining shapes:
Finish the rectangular and tag shapes with your choice of spirals, floral doodles, or simple geometric dots. The beauty is in the handmade imperfection, so don’t worry about being too precise.
Stamp It Out
Don’t limit yourself to drawing—use stamps, lace, or even the bottom of a textured glass to press intricate designs into the wet clay effortlessly.
Step 3: Finishing and Assembly
-
Let them dry:
Allow all your clay pieces to dry completely according to the package instructions. For air-dry clay, I usually flip them over halfway through the drying process to ensure the bottoms dry evenly without curling. -
Sand for perfection:
Once bone dry, take fine-grit sandpaper and gently buff the edges and surface of each ornament to remove any burrs or sharp points. -
Cut the suspension cords:
Cut 7 lengths of jute twine. Vary the lengths slightly so the ornaments will hang at different heights, ranging from about 8 to 14 inches long. -
Thread the ornaments:
Fold a piece of twine in half. Thread the loop end through the hole in a clay ornament, then pass the loose ends through the loop and pull tight to create a lark’s head knot. -
Add beads:
Slide a wooden bead down the twine until it sits just above the knot on the clay piece. This adds a nice polished transition. -
Attach to the bar:
Tie the loose ends of each twine cord onto your wooden dowel or flat bar. Space them out evenly. Tie a final knot at the top of the bar to secure them. -
Create the main hanger:
Cut a long piece of twine to serve as the main hanger. Tie each end securely to the far left and right sides of the wooden bar. Hang your masterpiece on the wall and adjust the ornaments until they sit straight.
Fixing Cracks
If small cracks appear as the clay dries, make a paste with a tiny bit of clay and water (slip) to fill the gaps, then sand smooth once dry.
Enjoy the calming atmosphere your new handmade decor brings to the room