Whenever you’re staring at a fresh lump of clay and thinking, “Okay… now what?”, I’ve got you. These what to make with clay ideas are the kind of small, satisfying projects that feel doable in one or two chill crafting sessions.
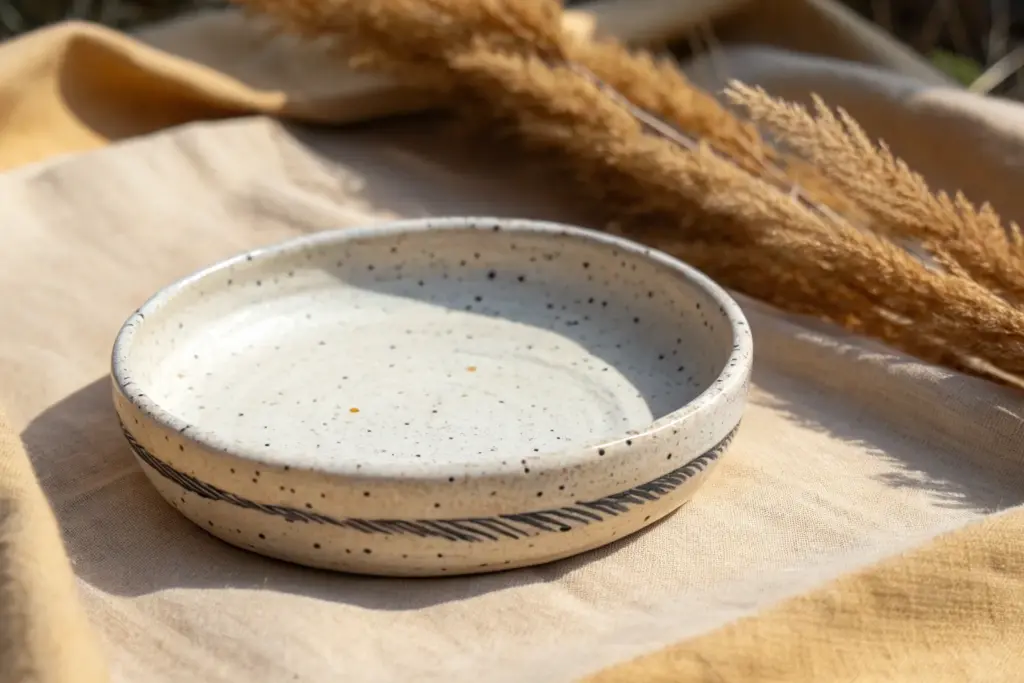
Ring Dishes and Trinket Bowls
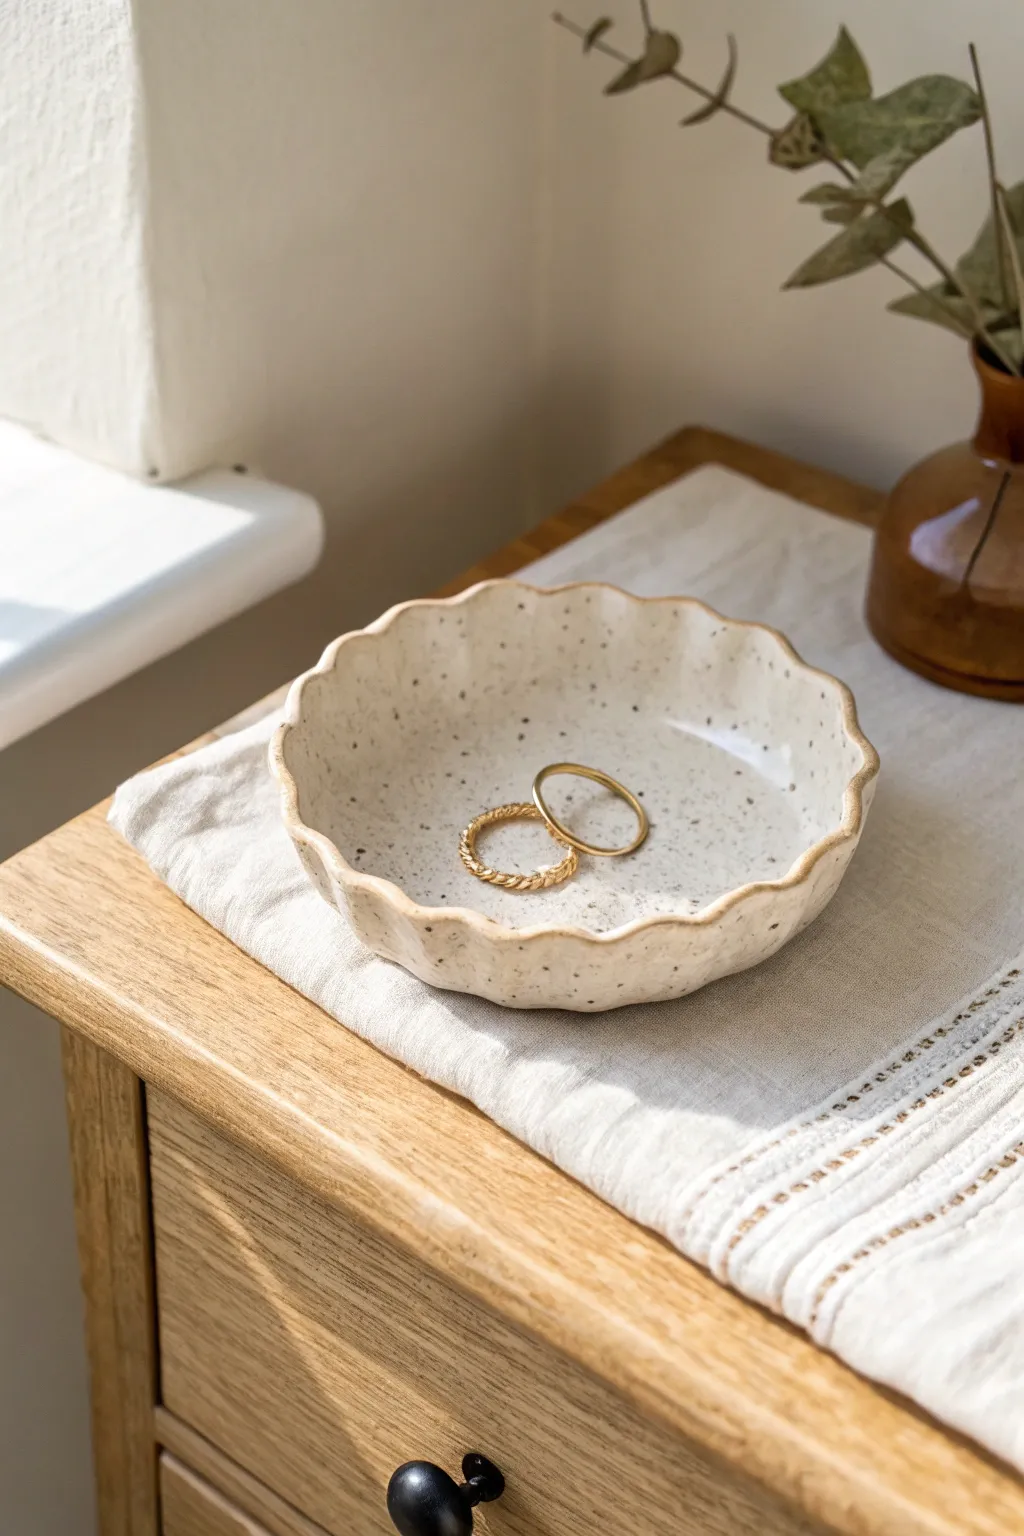
Bring a touch of organic elegance to your dresser with this handmade speckled clay dish featuring a delicate, wavy rim. Its neutral glaze and subtle texture make it the perfect minimalist home for your favorite gold rings.
How-To Guide
Materials
- Speckled stoneware clay (or polymer clay with faux granite effect)
- Rolling pin
- Canvas mat or non-stick rolling surface
- Circular cookie cutter or bowl (approx. 4-5 inches diameter)
- Small bowl for shaping (slump mold)
- Needle tool or craft knife
- Smoothing sponge
- Clear or translucent white glaze (if using ceramic clay)
- Optional: Gold luster for rim detailing
- Kiln (for ceramic) or Oven (for polymer)
Step 1: Shaping the Base
-
Prepare your clay:
Start with a ball of speckled stoneware clay about the size of a tennis ball. Wedge it thoroughly to remove any air bubbles, ensuring a smooth consistency for rolling. -
Roll the slab:
Place your clay on a canvas mat or non-stick surface. Use your rolling pin to flatten the clay into an even slab, aiming for a consistent thickness of about 1/4 inch. -
Check thickness:
Run your fingers lightly over the surface to ensure there are no lumps or thin spots. Uniform thickness is crucial to prevent cracking during the drying process. -
Cut the circle:
Press a circular cookie cutter or place a bowl upside down onto the clay slab to use as a template. If using a bowl, trace around the edge with a needle tool to cut out a perfect circle. -
Smooth the edges:
Lift the clay circle gently. Dip a sponge in a little water and run it along the cut edge to soften the sharp corners, rounding them off for a more finished look. -
Create the sloped form:
Gently lift your clay circle and drape it inside your chosen slump mold bowl. Press it lightly so the center sits flat, but allow the sides to curve up naturally.
Step 2: Sculpting the Scalloped Rim
-
Mark the intervals:
Visually divide the rim of your bowl into equal sections. You can make light indentations with a needle tool to guide where each wave will go. -
Form the waves:
Support the clay wall with one hand on the outside. With your other hand, use your index finger to gently press the rim inward at your marked intervals to create the ‘trough’ of the wave. -
Define the peaks:
Between each inward press, pinch the clay slightly outward to emphasize the ‘peak’ of the scallop. This creates that delightful ruffled edge seen in the photo. -
Refine the shape:
Go around the rim once more, smoothing the curves with a damp fingertip. I find this helps removing any maker’s marks or fingerprints essentially erasing slight imperfections. -
Dry slowly:
Let the dish dry slowly to the leather-hard stage while still inside the mold to maintain its shape. Avoid direct sunlight or drafts to prevent warping. -
Remove and dry completely:
Once the clay holds its shape but is still cool to the touch (leather hard), gently pop it out of the mold. Let it bone dry completely on a shelf.
Use a Plastic Barrier
Place a thin sheet of plastic wrap inside your slump mold before adding the clay. This prevents sticking and makes lifting the wet clay out much easier.
Step 3: Glazing and Finishing
-
Bisque fire:
Load your bone-dry piece into the kiln for the initial bisque firing. Follow the specific cone temperature guidelines for your chosen stoneware clay. -
Clean the bisque:
After the kiln cools, wipe the piece down with a damp sponge to remove any kiln dust. This ensures the glaze adheres properly to the surface. -
Apply the glaze:
Pour a milky white or translucent glaze inside the bowl. Pour out the excess and ensure the coating is even. This allows those beautiful clay speckles to show through. -
Wipe the foot:
Use a sponge to wipe any glaze completely off the bottom of the dish where it will touch the kiln shelf. This prevents it from fusing to the shelf during firing. -
Glaze fire:
Place the dish back in the kiln for the final glaze firing. This vitrifies the clay and turns your glaze into that smooth, glassy surface. -
Optional metallic rim:
If you want that extra sparkle, apply a thin line of gold luster to the very edge of the scallops and fire a third time at a much lower temperature (luster firing).
Fixing Cracks
If you see tiny hairline cracks on the rim while drying, immediately dab them with a heavy unwanted ‘slip’ (clay mud) and compress the area with a sculpting tool.
Now you have a charming, speckled dish ready to hold your most treasured jewelry.


Pinch Pot Trinket Cups
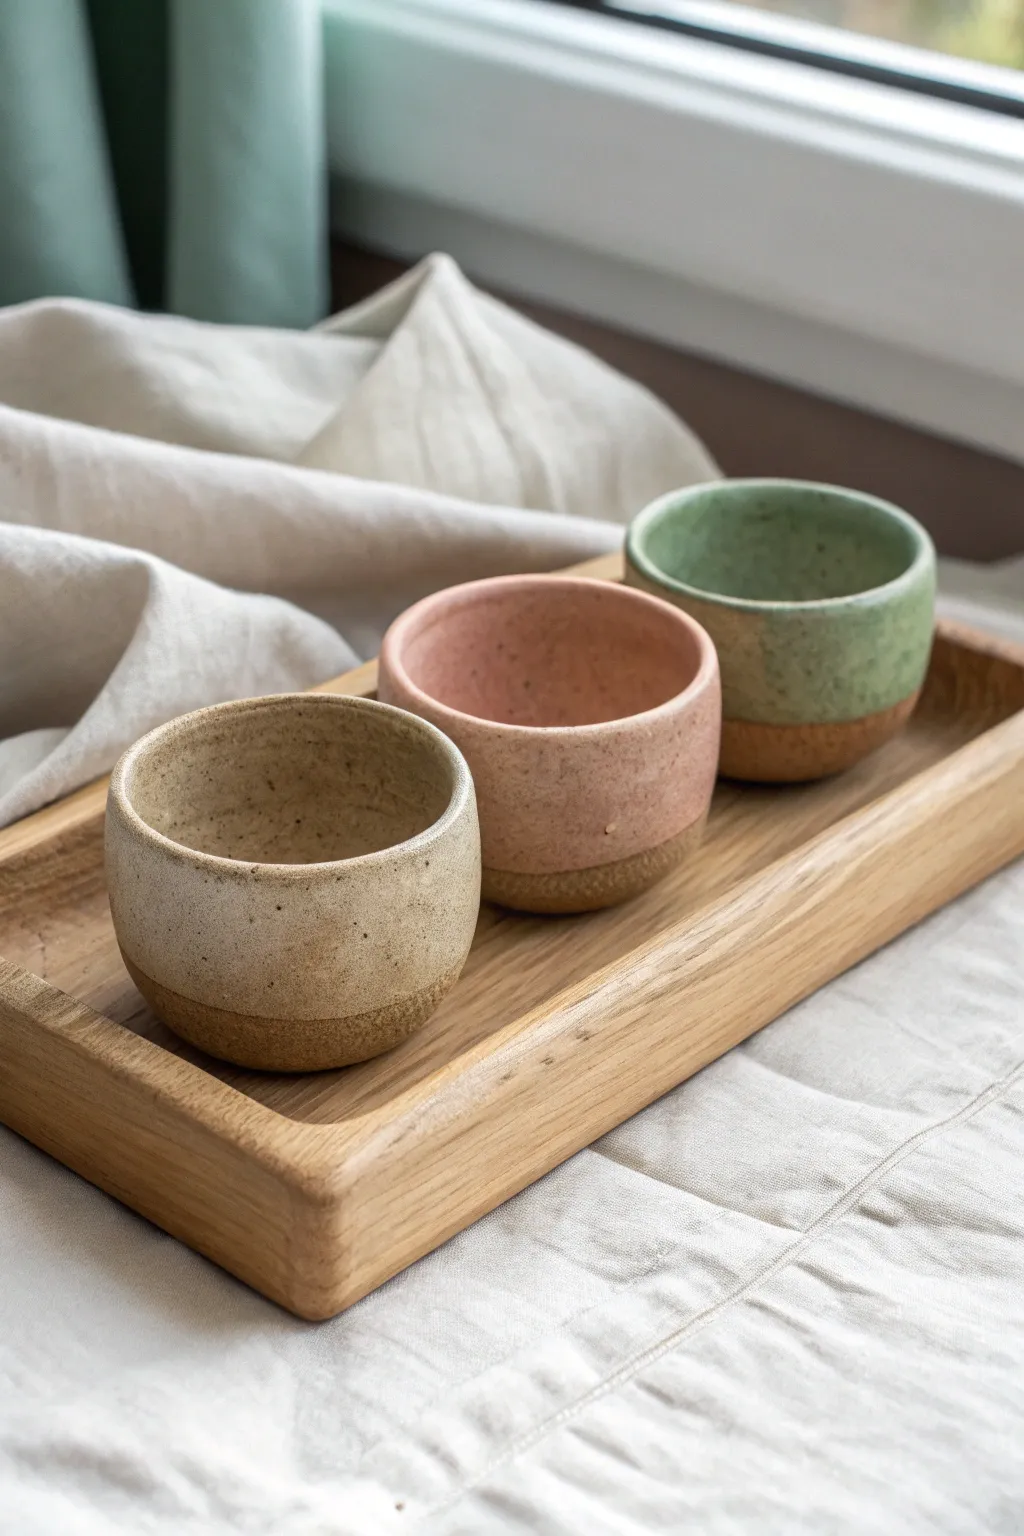
These charming, palm-sized vessels combine raw, speckled clay texture with soft pastel glazes for a modern rustic look. Perfect for holding trinkets, espresso, or stubborn succulents, they showcase the beauty of simple hand-building techniques.
Detailed Instructions
Materials
- Speckled stoneware clay (mid-fire recommended)
- Pottery wire cutter
- Sponge
- Bowl of water
- Wooden modeling tool or old credit card
- Dipping glazes (matte cream, blush pink, sage green)
- Wax resist (liquid)
- Paintbrush for wax
- Kiln access (or use air-dry clay + acrylics for a non-food-safe version)
Step 1: Shaping the Base
-
Portioning the clay:
Cut a slice of clay from your block and divide it into three equal balls, each roughly the size of a tangerine. Pat them firmly to ensure they are round and compact. -
Opening the form:
Hold a clay ball in your non-dominant hand. Press your thumb gently into the center, stopping about a half-inch from the bottom to leave enough thickness for the base. -
Pinching the walls:
With your thumb still inside and fingers on the outside, begin pinching the clay walls gently. Rotate the ball slightly with each pinch to ensure even thickness all around. -
Refining the cylinder:
As the walls grow taller, focus on pulling the clay slightly upward rather than just outward to create a cup shape rather than a bowl. -
Smoothing the rim:
Once you reach a height of about 2.5 inches, use a slightly damp sponge to compress the rim, smoothing away any cracks. This also strengthens the lip of the cup. -
Creating the flat bottom:
Tap the bottom of the pot gently against your table or work surface to flatten it so the cup stands stable without rocking.
Clean Lines Pro-Tip
For a super crisp glaze line, use masking tape instead of freehand wax. Apply tape around the base, wax below it, then peel the tape off before dipping.
Step 2: Refining and Drying
-
Surface smoothing:
Wait until the clay is leather-hard. Use a flexible rib or an old credit card to smooth the outside walls, removing prominent fingerprints while keeping that handmade character. -
Cleaning the foot:
If the bottom edge where the wall meets the table looks sharp or ragged, run a finger or wooden tool around it to create a soft bevel. -
Bisque firing:
Allow the pots to dry completely (bone dry). Fire them in a kiln to a bisque temperature (usually Cone 04), preparing them for glazing.
Speckle Level Up
If using plain white clay, knead in granular manganese or iron oxide sand before shaping. This will bloom through the glaze during firing for that trendy speckled look.
Step 3: Glazing and Finishing
-
Waxing the base:
Since we want a beautiful exposed clay line, paint distinct wax resist on the bottom third of the outside of each cup, as well as the entire underside bottom. -
Checking the line:
Ensure the wax line is relatively straight but natural. I like to rotate the cup on a banding wheel while holding the brush steady to get a clean horizon line. -
Selecting glaze colors:
Prepare your three pastel dipping glazes. Stir them thoroughly so the consistency is like heavy cream to ensure an opaque, matte finish. -
Dipping the pots:
Hold a cup by the waxed bottom and dip it swiftly upside down into the glaze, submerging it just past the wax line. Hold for 3 seconds and lift straight up. -
Clean up:
Once the glaze is dry to the touch, use a damp sponge to wipe any stray glaze droplets off the waxed area, ensuring that sharp contrast between the raw clay and the color. -
Final wipe:
Check the very bottom again to make sure no glaze is on the foot, as this will fuse your cup to the kiln shelf. -
Glaze firing:
Fire the pieces again to the maturity temperature of your clay and glaze (likely Cone 5 or 6 for stoneware).
Now you have a trio of lovely vessels ready to bring a touch of earthy elegance to your home decor


Decorative Mini Bud Vases
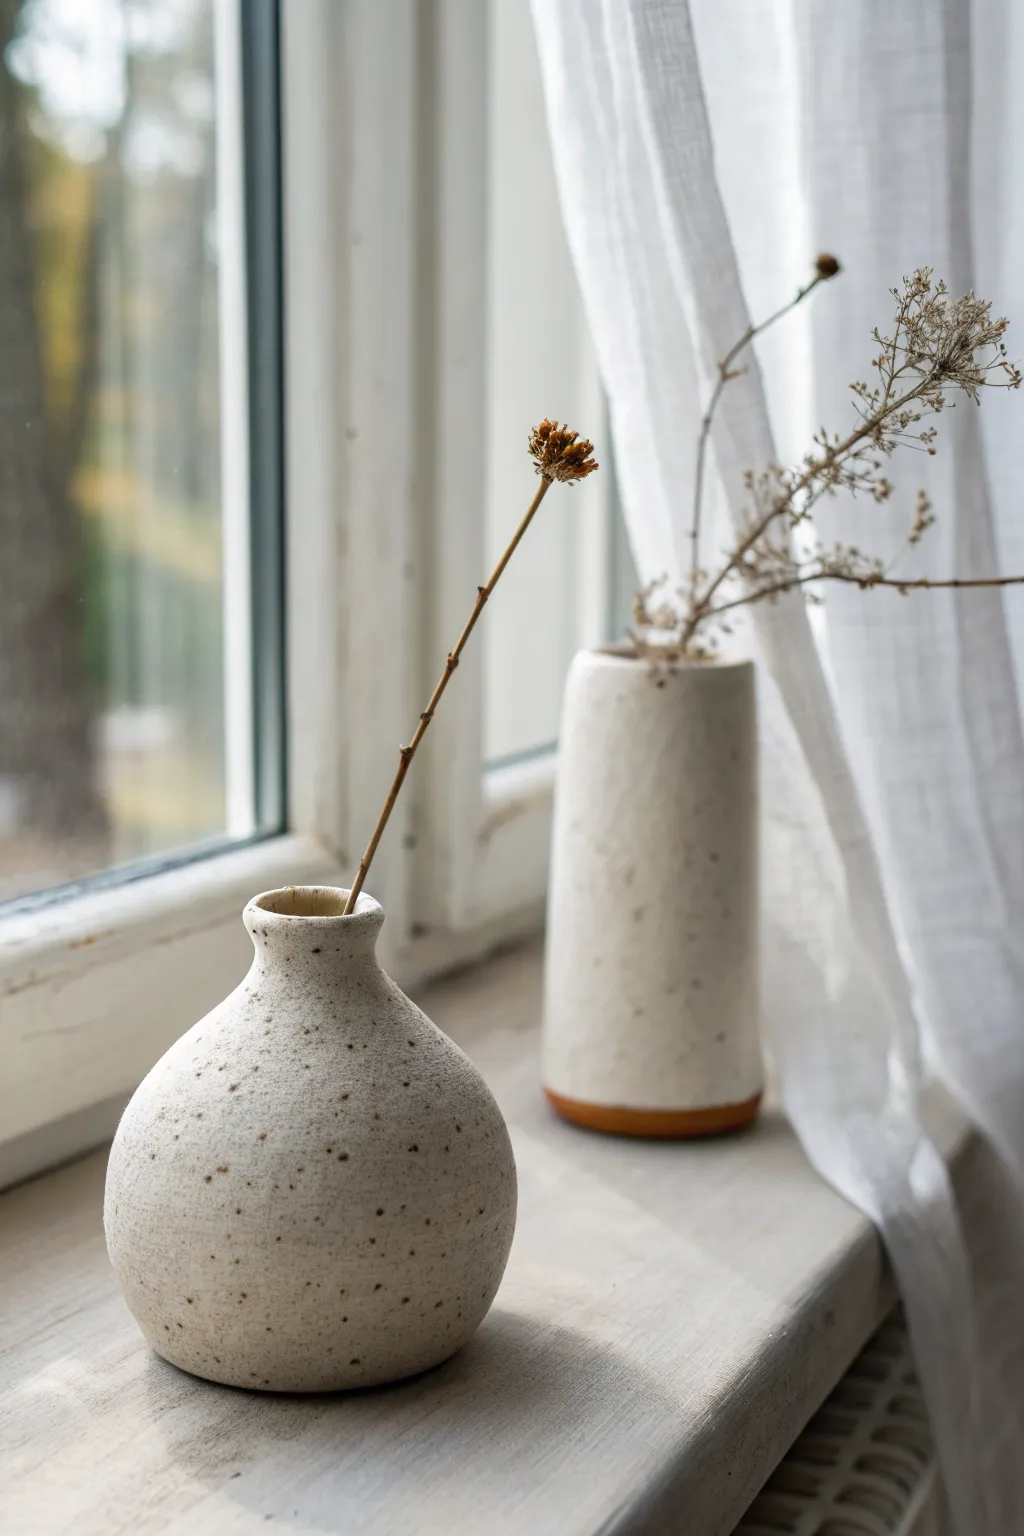
Capture the essence of cozy minimalism with these handmade ceramic bud vases, featuring a soft speckled white glaze and hints of raw clay. The contrasting shapes—one round and bulbous, the other tall and cylindrical—create a perfectly imperfect pair for holding dried stems.
Step-by-Step Tutorial
Materials
- Speckled clay body (buff stoneware with iron specks)
- White or cream matte glaze
- Pottery wheel (or can be hand-built with coils)
- Throwing sponge
- Pin tool
- Wire cutter
- Rib tool (metal and rubber)
- Trimming tools
- Paintbrush for glazing
- Wax resist (optional)
Step 1: Shaping the Round Vase
-
Center the clay:
Start with a small ball of speckled clay, about 1 pound. Slam it onto the center of your wheel head and use wet hands to center it, coning up and pressing down until it runs smooth without wobbling. -
Open and widen:
Press your thumbs into the center to open the clay, leaving about a quarter-inch for the floor. Pull the opening outwards to establish the width of the vase’s belly. -
Raise the walls:
Using a knuckle pull or finger pull, bring the walls up. Focus on maintaining a rounded inner curve. Don’t worry about the narrow neck yet; just get the height and thickness even. -
Belly out the form:
From the inside, gently push the clay outward with the sponge while supporting the outside with a rib tool. Create a full, spherical bottom section. -
Collar the neck:
Place both hands around the top rim and gently squeeze inward while the wheel spins (collaring). Do this in gradual passes to prevent the clay from buckling. -
Finish the rim:
Refine the small opening with your chamois or sponge to smooth the lip. Cut the vase off the bat with your wire tool.
Iron Speck Magic
If you don’t have speckled clay, mix 1-2% granular ilmenite or coarse iron oxide into regular white clay before throwing to get those spots.
Step 2: Shaping the Cylinder Vase
-
Establish the cylinder:
With a second ball of clay, repeat the centering and opening process. When pulling the walls, focus on pulling straight upward rather than creating a curve. -
Refine the profile:
Use a metal rib on the exterior to scrape away slip and create a very straight, vertical line. I find this creates that modern silhouette that contrasts nicely with the round vase. -
Add surface texture:
Lightly dab the surface with a coarse sponge or leave slight finger ridges if you want the organic texture visible in the reference image.
Collaring Collapse?
If the neck buckles while squeezing it in, you are collaring too fast or the clay is too dry. Add a drop of water and squeeze gently in multiple passes.
Step 3: Trimming and Drying
-
Leather hard stage:
Allow both pieces to dry to a leather-hard state. They should be firm enough to handle without deforming but still cool to the touch. -
Trim the round vase:
Center the round vase upside down on the wheel. Trim the bottom to create a neat foot ring, removing excess weight from the base. -
Trim the cylinder:
For the tall vase, you want a distinct definition at the bottom. Trim a clean line about half an inch up from the base—this will be your glazing guide later. -
Bisque fire:
Once bone dry, load the vases into the kiln for a bisque firing (usually cone 04 or 06).
Step 4: Glazing
-
Prepare for glazing:
Wipe the bisque ware with a damp sponge to remove any dust. For the cylinder vase, apply wax resist to the bottom half-inch area you trimmed earlier to keep the raw clay exposed. -
Apply the white glaze:
Pour a matte white glaze inside each vase first, swirl to coat, and pour out. Then, dip the exterior of the round vase entirely. -
Dip the cylinder:
Dip the cylinder vase, stopping exactly where the wax resist begins or where you want the raw clay line to show. The iron specks in the clay will bleed through the white glaze during firing. -
Final wipe:
Check the bottoms of both vases. Wipe away any stray glaze droplets on the foot rings with a sponge to prevent them from sticking to the kiln shelf. -
Glaze fire:
Fire the pieces to maturity (likely cone 5 or 6 depending on your clay and glaze choice). allow the kiln to cool completely before opening.
Place your finished vases near a window to let natural light highlight the beautiful speckled texture


Easy Succulent Planters
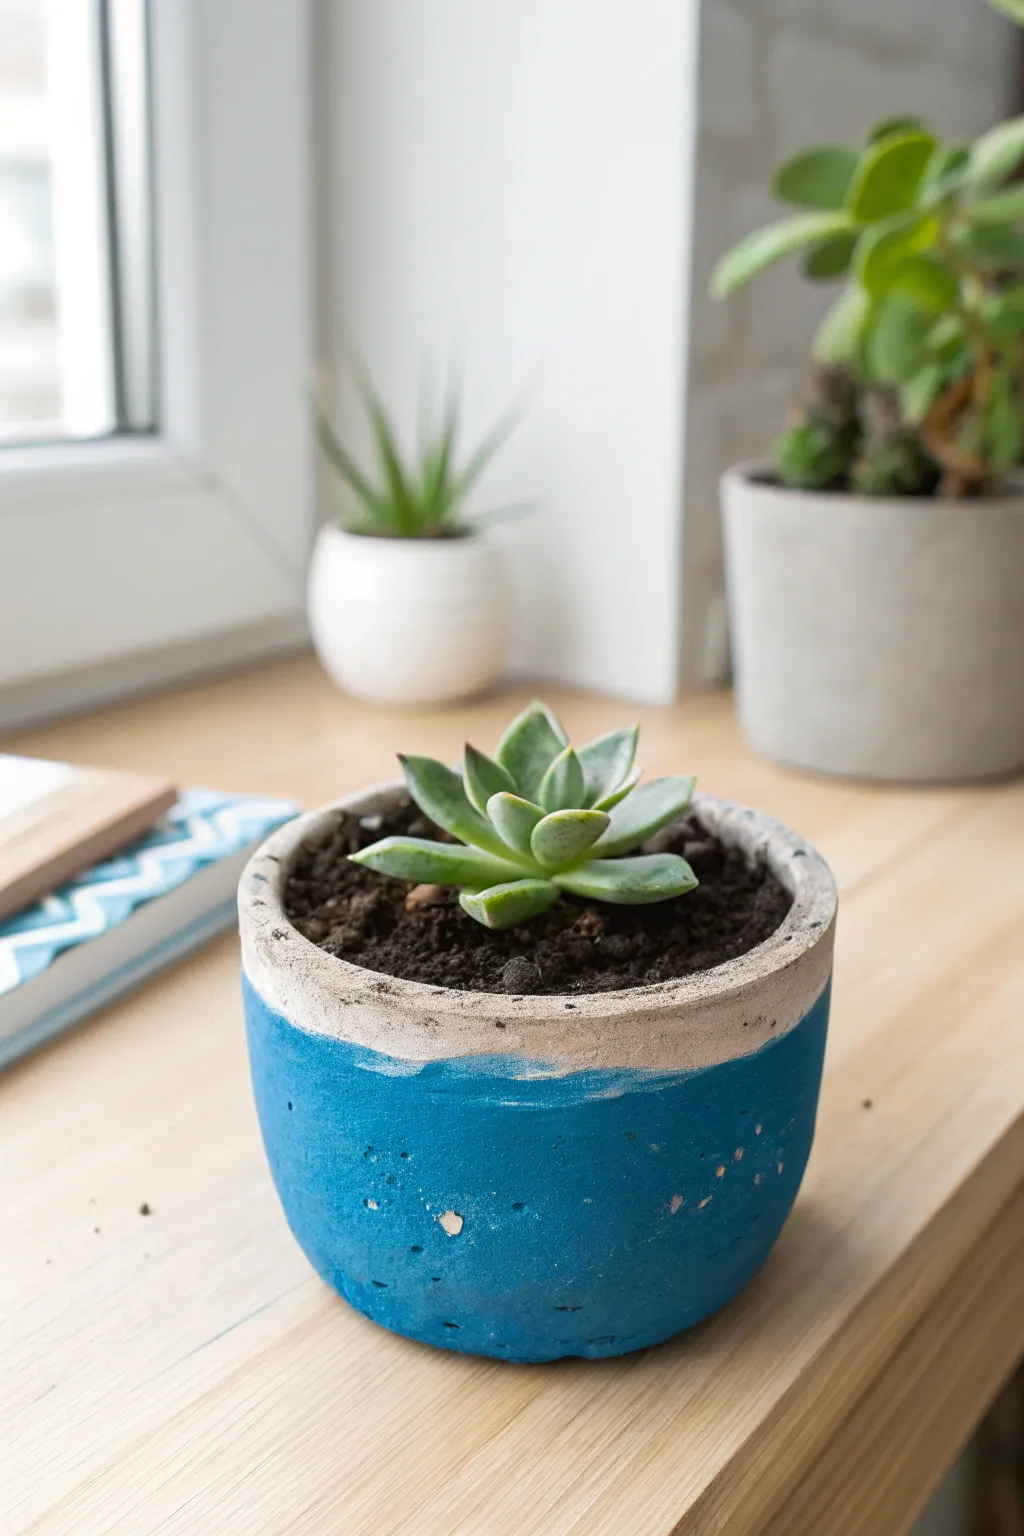
This charming little vessel combines the raw, industrial texture of concrete with a vibrant pop of ocean blue for a modern, two-toned look. It’s perfect for housing small succulents like the Echeveria shown here, bringing a breath of fresh air to any windowsill.
How-To Guide
Materials
- Grey air-dry clay or rapid-set cement mix
- Two nesting plastic containers (one large for the mold, one smaller for the void)
- Cooking spray or vegetable oil (release agent)
- Fine-grit sandpaper (220 grit)
- Painter’s tape or masking tape
- Cerulean blue acrylic paint
- White acrylic paint (optional for mixing)
- Flat paintbrush
- Matte clear sealant spray
- Small stones or weights
Step 1: Casting the Vessel
-
Prepare the molds:
Select your containers. The larger one determines the outer shape, and the smaller one creates the space for the plant. Clean and dry them thoroughly. -
Apply release agent:
I always make sure to lightly coat the *inside* of the larger container and the *outside* of the smaller container with cooking spray or oil. This ensures your pot pops out easily later. -
Mix the medium:
If using cement, mix it with water according to package directions until it reaches a peanut butter consistency. If using air-dry clay, knead it until soft and pliable. -
Fill the base:
Pour or press your mixture into the larger container, filling it about one-third of the way up. Tap the container on the table firmly to release any trapped air bubbles. -
Insert the inner mold:
Press the smaller container strictly into the center of the wet mixture. Push down until the walls rise to your desired height, but ensure you leave at least half an inch of thickness at the bottom. -
Weigh it down:
The inner cup will try to float up if you’re using wet cement. Place small stones or coins inside the smaller cup to hold it in place while the material sets. -
Let it cure:
Allow the project to dry completely. For cement, this might be 24-48 hours; for air-dry clay, it could take longer depending on thickness. Patience is key here.
Tap It Out
Vibrate the mold vigorously after pouring cement by tapping the sides. This brings trapped air bubbles to the surface, creating that flawed-yet-cool ‘pockmarked’ texture seen in the photo.
Step 2: Finishing and Painting
-
Demold the planter:
Gently wiggle the inner cup out first. Then, turn the larger container upside down and tap or squeeze gently until your raw planter slides out. -
Sand the rim:
The top edge will likely be rough or sharp. Take your fine-grit sandpaper and smooth the rim in a circular motion until it feels flat and even to the touch. -
Dust it off:
Wipe the entire surface with a slightly damp cloth to remove sanding dust, as this prevents the tape from sticking properly. -
Tape the line:
Apply a strip of painter’s tape horizontally around the planter, roughly half an inch below the rim. Press the edge of the tape down firmly with your fingernail to prevent paint bleed. -
Mix your color:
Squeeze out your cerulean blue acrylic paint. If you want a slightly softer hue, mix in a tiny drop of white, though the vibrant blue straight from the tube works beautifully. -
Paint the base:
Using a flat brush, paint the entire area below the tape line. Use vertical strokes for a clean look, covering the bottom of the pot as well. -
Apply a second coat:
Let the first layer dry for about 20 minutes. If the grey concrete is still showing through, add a second coat for full, opaque coverage. -
Peel and reveal:
While the second coat is still slightly tacky (not fully dry), carefully peel off the painter’s tape at a 45-degree angle to reveal a crisp line. -
Seal the surface:
Once fully dry, spray the entire pot—inside and out—with a matte clear sealant. This protects the paint and prevents water from seeping through the porous material.
Stuck Mold?
If the plastic container won’t release the dried planter, carefully cut the plastic down the side with heavy-duty scissors or a utility knife to peel it away without damaging the clay.
Fill your new creation with succulent soil and your favorite plant to complete this modern window display

The Complete Guide to Pottery Troubleshooting
Uncover the most common ceramic mistakes—from cracking clay to failed glazes—and learn how to fix them fast.
Flower-Shaped Coasters
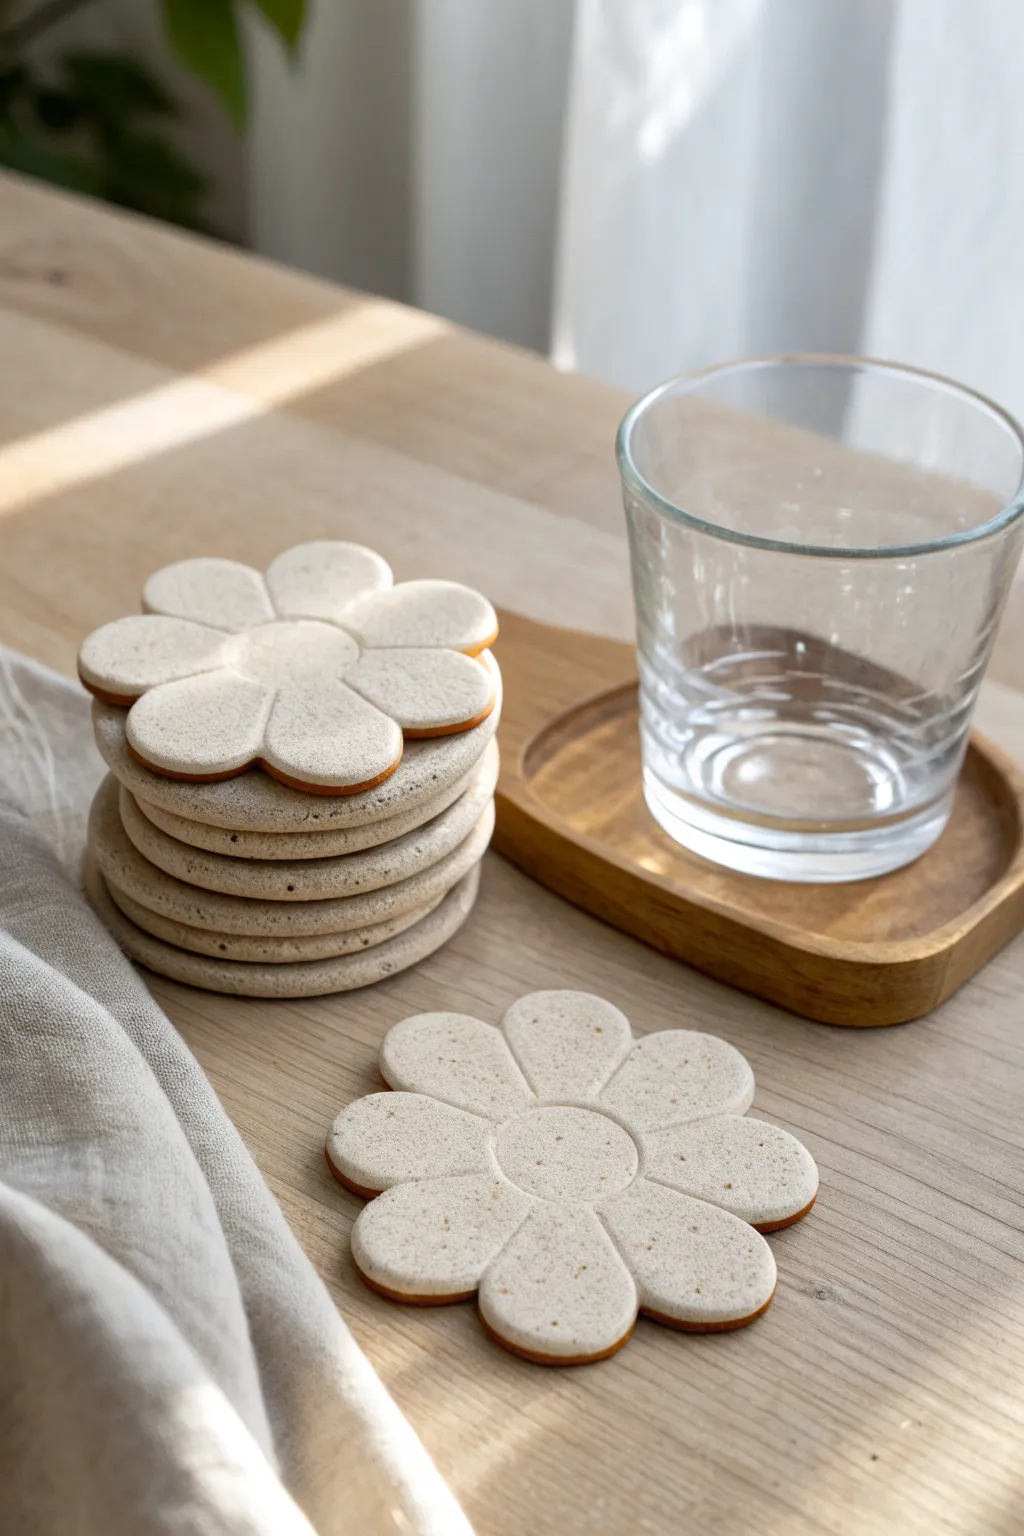
Bring the softness of spring to your coffee table with these charming, minimalist flower coasters. Featuring an organic petal shape and a distinctive speckled finish that mimics stoneware, they offer a sturdy and stylish resting place for your favorite beverages.
Step-by-Step
Materials
- White air-dry clay or polymer clay
- Rolling pin
- Flower-shaped cookie cutter (approx. 3.5 inches)
- Small round cutter or bottle cap (approx. 1 inch)
- Sandpaper (fine grit)
- Acrylic paint (warm beige or cream)
- Acrylic paint (dark brown or black)
- Old toothbrush or stiff bristle brush
- Clear matte or satin varnish (waterproof)
- Rolling guides or wooden slats (approx. 1/4 inch thick)
- Parchment paper or canvas mat
Step 1: Shaping the Base
-
Condition the Clay:
Begin by taking a handful of your white clay and kneading it thoroughly until it is soft, pliable, and free of cracks. If using polymer clay, the warmth of your hands will make this easier. -
Roll to Thickness:
Place the clay between two rolling guides or wooden slats on your parchment paper. This ensures an even thickness of about 1/4 inch (6mm), which gives the coasters a substantial, quality feel. -
Cut the Shape:
Press your flower-shaped cutter firmly into the rolled clay. Wiggle it slightly to ensure a clean cut all the way through, then lift the cutter. Carefully peel away the excess clay from the outside. -
Create the Center:
Using your smaller round cutter or a bottle cap, gently press into the exact center of the flower. Do not cut all the way through; imply the center disk by pressing down just about 1-2mm to create an indented ring. -
Smooth the Edges:
Dip your finger in a little water (for air-dry clay) or baby oil (for polymer) and run it along the cut edges of the petals to soften any sharp ridges or burrs left by the cutter. -
Define the Petals:
To enhance the puffy look seen in the image, use a modeling tool or your fingertip to gently press along the lines between the petals, extending from the center ring to the outer edge.
Warping Woes?
If air-dry clay curls while drying, place a heavy book on top of the coasters once they are semi-dry but still slightly flexible to flatten them back out.
Step 2: Drying and Refining
-
Initial Drying:
If using air-dry clay, transfer the coasters to a wire rack to ensure air circulation underneath. Let them dry for 24-48 hours. I usually flip them over halfway through to prevent warping. -
Baking (Polymer Option):
If you used polymer clay, bake according to the manufacturer’s package instructions on a parchment-lined sheet. -
Sanding:
Once fully cured or dry, use fine-grit sandpaper to gently smooth the rim and surface. Pay special attention to the flower petal curves to ensure they are perfectly rounded. -
Dust Clean:
Wipe the coasters down with a slightly damp cloth to remove any clay dust before moving on to the decoration phase.
Create a Set
Vary the sizes by using nesting flower cutters. A large 6-inch trivet for a teapot paired with smaller matching coasters creates a stunning gift set.
Step 3: Decoration and Sealing
-
Base Color:
Even if your clay was white, apply a thin coat of warm beige or cream acrylic paint if you want that specific creamy stoneware tone shown in the image. -
Rim Detail:
Using a small detail brush, carefully paint the vertical side edge of the coaster with a warm brown or amber color. This creates the illusion of a glazed ceramic edge or a ‘toasted’ biscuit look. -
Techinque: Speckling:
Dilute a tiny amount of dark brown paint with water. Dip an old toothbrush into this mixture. -
Applying Speckles:
Hold the toothbrush over the coasters and run your thumb across the bristles to flick tiny droplets of paint onto the surface. Test on a paper towel first to get the density right. -
Sealing:
Once the paint is completely dry, apply a coat of waterproof varnish. This is crucial for coasters to prevent water stains from condensation. -
Final Coat:
Allow the first layer of varnish to dry, then add a second coat for extra durability. A matte finish looks most natural, but satin adds a nice ceramic sheen.
Now you have a set of adorable coasters ready to protect your surfaces with a touch of handmade elegance
Taper Candle Holders
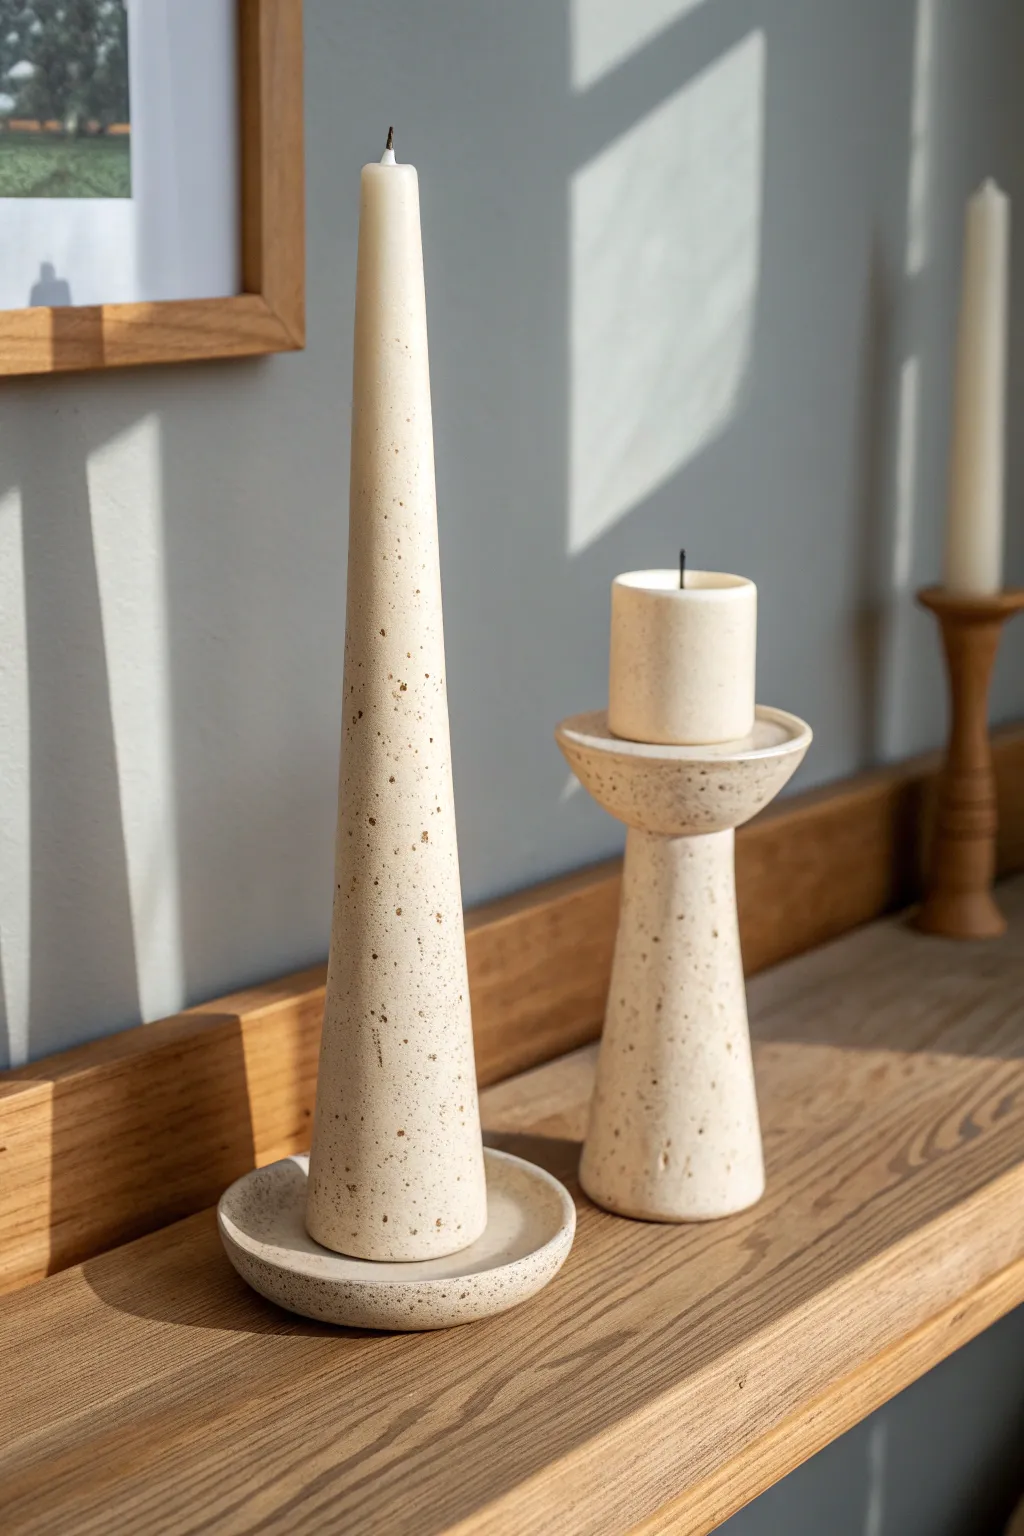
These elegant, minimalist candle holders bring a touch of modern rustic charm to any mantle or shelf. With their speckled matte texture and geometric silhouettes, this project creates a stunning pair—one tall cone for height and a classic pillar stand for balance.
Step-by-Step Guide
Materials
- Speckled stoneware clay (buff or white with grog)
- Rolling pin
- Guide strips or slats (1/4 inch)
- Clay knife or needle tool
- Cardboard or stiff paper (for templates)
- Slip (clay mixed with water)
- Scoring tool or fork
- Sponge
- Smoothing rib (wood or rubber)
- Pottery wheel (optional, can be hand-built)
- Clear matte glaze (optional, for inside saucer only)
Step 1: Forming the Tall Cone
-
Roll your slab:
Start by wedging your speckled clay to remove air bubbles, then roll out a smooth slab about 1/4 inch thick using guide strips to ensure evenness. -
Cut the cone shape:
Create a template from stiff paper in the shape of a large triangle with a slightly curved bottom edge. Lay this over your slab and cut out the shape cleanly with your needle tool. -
Bevel the edges:
To make a seamless join, cut the two long side edges of your triangle at a 45-degree angle so they will overlap flush when creating the cylinder. -
Form the cone:
Carefully lift the clay and curve it around into a cone shape. Score the beveled edges thoroughly and apply a generous amount of slip. -
Seal the seam:
Press the edges together firmly. Use a wooden modeling tool to blend the seam on both the inside and outside until the join is invisible, then smooth with a damp sponge. -
Create the base saucer:
Roll a small ball of clay and press it flat or cut a 4-inch circle from your remaining slab. Gently curve the edges upward to create a shallow dish shape. -
Attach cone to saucer:
Score the bottom of the cone and the center of the saucer. Apply slip and press the cone firmly into place. I like to run a small coil of clay around the seam for extra strength before smoothing it out.
Keep it Clean
To maintain the pristine raw clay look, wash your hands often during construction preventing dirt transfer. Sand any rough spots only after the piece is bone dry.
Step 2: Building the Pillar Stand
-
Roll the main column:
For the shorter holder, cut a rectangle from your slab tall enough for your desired height. Roll this into a cylinder, scoring and slipping the seam just like the cone. -
Taper the column:
Gently roll the cylinder on your work surface, applying slightly more pressure at the top to narrow it slightly, giving it a tapered waist. -
Form the top cup:
Pinch a small bowl shape from a ball of clay. Flatten the bottom slightly so it sits level on top of the column. -
Assemble the pieces:
Score the top rim of your column and the bottom of the cup deeply. Apply slip and join them, smoothing the clay downward from the cup to the column to create a unified shape. -
Check sizes:
While the clay is still workable, test your fit with actual candles to ensure the openings or platforms are wide enough to hold a taper (for the cone) or a pillar candle (for the stand).
Functional Finish
Apply a clear satin glaze only to the indentation where the candle sits. This makes it much easier to clean out dripped wax later without ruining the matte finish.
Step 3: Refining and Finish
-
Smooth the surfaces:
Once the pieces are leather hard (stiff but cool to the touch), use a rubber rib to compress the surface and smooth away any fingerprints or tool marks. -
Reveal the speckles:
Wipe the surface gently with a damp sponge. This removes a fine layer of clay and exposes the grog or speckles, enhancing that stone-like texture shown in the photo. -
Dry slowly:
Cover the pieces loosely with plastic to let them dry slowly over several days. This prevents the seams from cracking as the clay shrinks. -
Bisque fire:
Fire the bone-dry pieces in a kiln to bisque temperature (usually cone 04). -
Final firing:
Since the goal is a raw clay look, you can skip glazing the outside. Fire to the maturity temperature of your clay body (likely cone 5 or 6) to vitrify the stoneware.
Place your finished candle holders together for a serene display that celebrates the natural beauty of the clay


What Really Happens Inside the Kiln
Learn how time and temperature work together inside the kiln to transform clay into durable ceramic.
Polymer Clay Statement Earrings
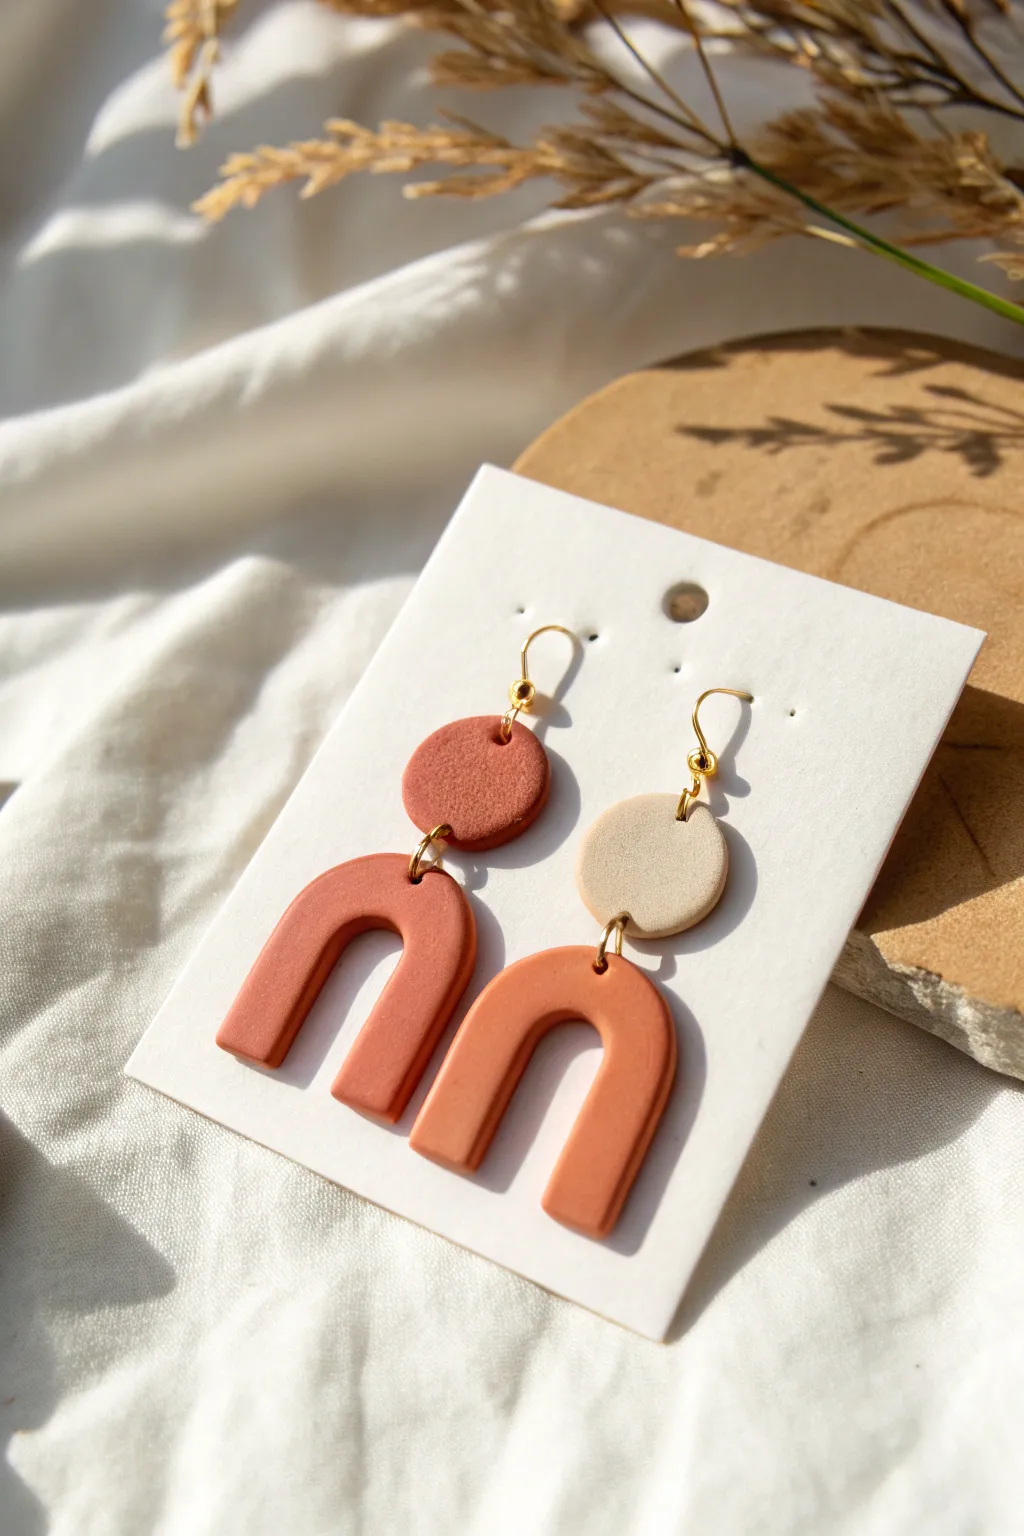
Embrace warm, earthy tones with these simple yet striking polymer clay earrings featuring a classic arch design. The subtle texture and minimalist shapes make them a versatile accessory perfect for everyday wear.
Step-by-Step
Materials
- Polymer clay in terracotta (burnt orange) and beige (sand color)
- Acrylic rolling pin or pasta machine
- U-shaped clay cutter (approx. 1 inch wide)
- Small circle clay cutter (approx. 10-12mm)
- Tissue blade or craft knife
- Hand drill or pin vibe with small drill bit
- 4 gold jump rings (6-8mm)
- 2 gold earring hooks (fishhook style)
- Flat-nose jewelry pliers
- Parchment paper or ceramic tile for baking
- Fine grit sandpaper (optional)
Step 1: Preparing the Clay
-
Condition the clay:
Begin by taking a chunk of the terracotta clay and kneading it in your hands until it becomes soft, pliable, and warm. Repeat this process separately with the beige clay to ensure both are ready for rolling. -
Roll out slabs:
Using your acrylic roller or pasta machine, roll the terracotta clay into a slab that is roughly 3mm thick. Do the same for the beige clay, ensuring an even thickness across both colors for a professional finish. -
Texturize gently (optional):
If you want that slightly matte, stone-like texture seen in the photo, you can gently press a piece of coarse sandpaper or a stiff sponge onto the surface of the clay slabs before cutting.
Smooth Operator
Wipe the unbaked clay with a baby wipe or a Q-tip dipped in rubbing alcohol to remove fingerprints and lint before baking.
Step 2: Cutting the Shapes
-
Cut the arches:
Press your U-shaped cutter firmly into the terracotta slab to create two identical arch shapes. If the clay sticks to the cutter, you can dip the cutter in a little cornstarch first. -
Create the circle tops:
Using the small circle cutter, cut one circle from the terracotta slab and one circle from the beige slab. This mismatch creates the stylish asymmetry seen in the design. -
Clean edges:
Before baking, I like to gently smooth the cut edges with my fingertip or a rubber tipped tool to remove any stray bits of clay or sharp corners. -
Pierce holes:
Use a needle tool or toothpick to carefully poke a hole at the top dead-center of each arch and at the bottom edge of each circle. Also, add a hole at the top of each circle for the earring hook. Make sure the holes are large enough for your jump rings.
Textured Touch
Mix black pepper or dried used coffee grounds into the beige clay before rolling for a speckled, faux-ceramic pottery look.
Step 3: Baking and Assembly
-
Bake the pieces:
Arrange your clay shapes on a ceramic tile or a baking sheet lined with parchment paper. Bake according to the manufacturer’s instructions on your specific package of clay (usually around 275°F for 15-30 minutes). -
Cool down:
Let the pieces cool completely inside the oven or on the tray before handling them, as warm clay can be brittle. -
Sand for finish:
Once cool, use fine-grit sandpaper to lightly sand the edges if any roughness remains, though pre-smoothing usually minimizes this step. -
Open jump rings:
Using two pairs of pliers (or pliers and your fingers), twist the jump rings open sideways—never pull them apart—to maintain their circular shape. -
Connect the pieces:
Thread an open jump ring through the top hole of the terracotta arch and the bottom hole of the corresponding terracotta circle. Close the jump ring securely. -
Assemble the second pair:
Repeat the connection process for the second earring, attaching the terracotta arch to the beige circle piece. -
Attach hooks:
Open the small loop at the base of your earring hook. Thread it through the top hole of the circle component and close it up tightly. -
Final check:
Hold the earrings up to ensure all rings are closed properly and the pieces dangle freely with the correct front-facing orientation.
Now you have a chic, modern set of earrings ready to match any outfit in your wardrobe
Cute Clay Charms
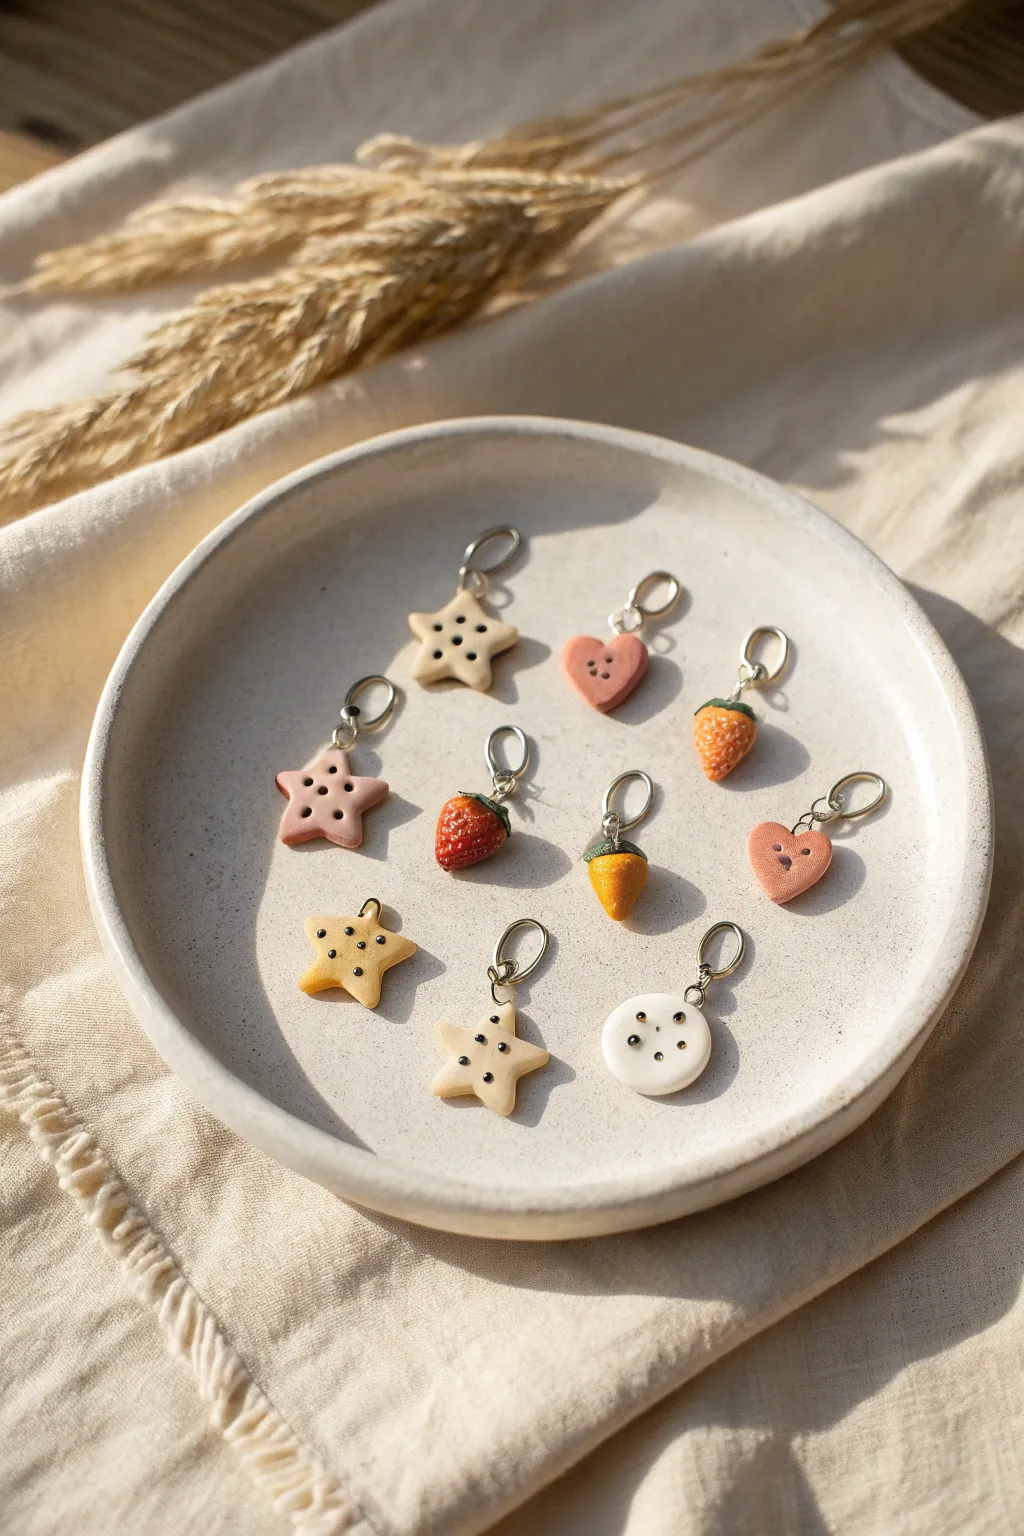
These adorable, miniature charms mimic sweet treats and playful shapes, perfect for creating personalized stitch markers or jewelry. With their soft, matte finish and tiny speckled details, they add a touch of handcrafted sweetness to any knitting project or necklace.
Step-by-Step Tutorial
Materials
- Polymer clay (beige/tan, pink, white, red, green, orange)
- Tiny black seed beads (for eyes/seeds)
- Small rolling pin
- Needle tool or toothpick
- Small star, heart, and circle cookie cutters (approx. 1-2cm)
- Metal jump rings
- Eye pins (if baking directly into clay)
- Jewelry pliers
- Parchment paper-lined baking sheet
- Oven
- Texture tool (clean toothbrush or sandpaper)
Step 1: Shaping the Base Forms
-
Condition the clay:
Begin by warming small amounts of each clay color in your hands, kneading until soft and pliable to prevent cracking during shaping. -
Roll out the slab:
For the flat shapes (stars, hearts, buttons), roll out the tan, pink, and white clay to an even thickness of about 3-4mm. -
Cut the shapes:
Use your mini cookie cutters to punch out several stars in tan, a few hearts in pink, and circles in white. Smooth the rough edges gently with your fingertip. -
Sculpt the strawberries:
Roll small balls of red clay, then pinch the bottom gently to form a rounded cone shape. -
Sculpt the carrot:
Create a similar cone shape using orange clay, but elongate it slightly to mimic a carrot’s root.
Fixing Fingerprints
If you notice fingerprints on your raw clay, lightly brush them with a tiny amount of baby oil or cornstarch before baking to smooth them out completely.
Step 2: Adding Details & Texture
-
Add strawberry leaves:
Flatten tiny bits of green clay and press them onto the top of your red strawberry cones. Use a needle tool to drag the green down slightly to look like sepals. -
Texture the fruit:
While holding the strawberry or carrot gently, use a clean toothbrush or texture sponge to lightly tap the surface, giving it a realistic, matte texture rather than a shiny plastic look. -
Insert seed details:
For the stars and button shapes, gently press tiny black seed beads into the surface. I find using tweezers helps create precise, symmetrical patterns like buttons or eyes. -
Create indentations:
If you don’t use beads, use a needle tool to poke small holes in the pink hearts to mimic buttonholes.
Step 3: Assembly preparations
-
pierce the clay:
Carefully poke a hole through the top of each charm using a needle tool. Ensure the hole is large enough for your jump ring to pass through later. -
Optional eye pins:
Alternatively, you can trim an eye pin short and push it directly into the top of the strawberries or carrots before baking for a secure hold.
Add Realistic Shading
Before baking, use a soft brush to dust dry chalk pastels (in slightly darker shades) onto the edges of the stars and fruit for a baked or ripened effect.
Step 4: Baking & Finishing
-
Arrange on baking sheet:
Place all charms on a parchment-lined tray, ensuring none are touching. -
Bake the charms:
Bake according to your specific polymer clay’s package instructions (usually around 230°F/110°C for 15-30 minutes). -
Cool down completely:
Let the charms cool fully on the tray. Handling them while warm can cause fingerprints or warping. -
Open jump rings:
Using two pairs of pliers, twist your jump rings open sideways (never pull them apart). -
Attach the hardware:
Thread the open jump ring through the hole you created or the eye pin loop, then twist it closed securely.
You can now use these darling miniatures to decorate gifts or charm bracelets

TRACK YOUR CERAMIC JOURNEY
Capture glaze tests, firing details, and creative progress—all in one simple printable. Make your projects easier to repeat and improve.
Happy Face Fridge Magnets
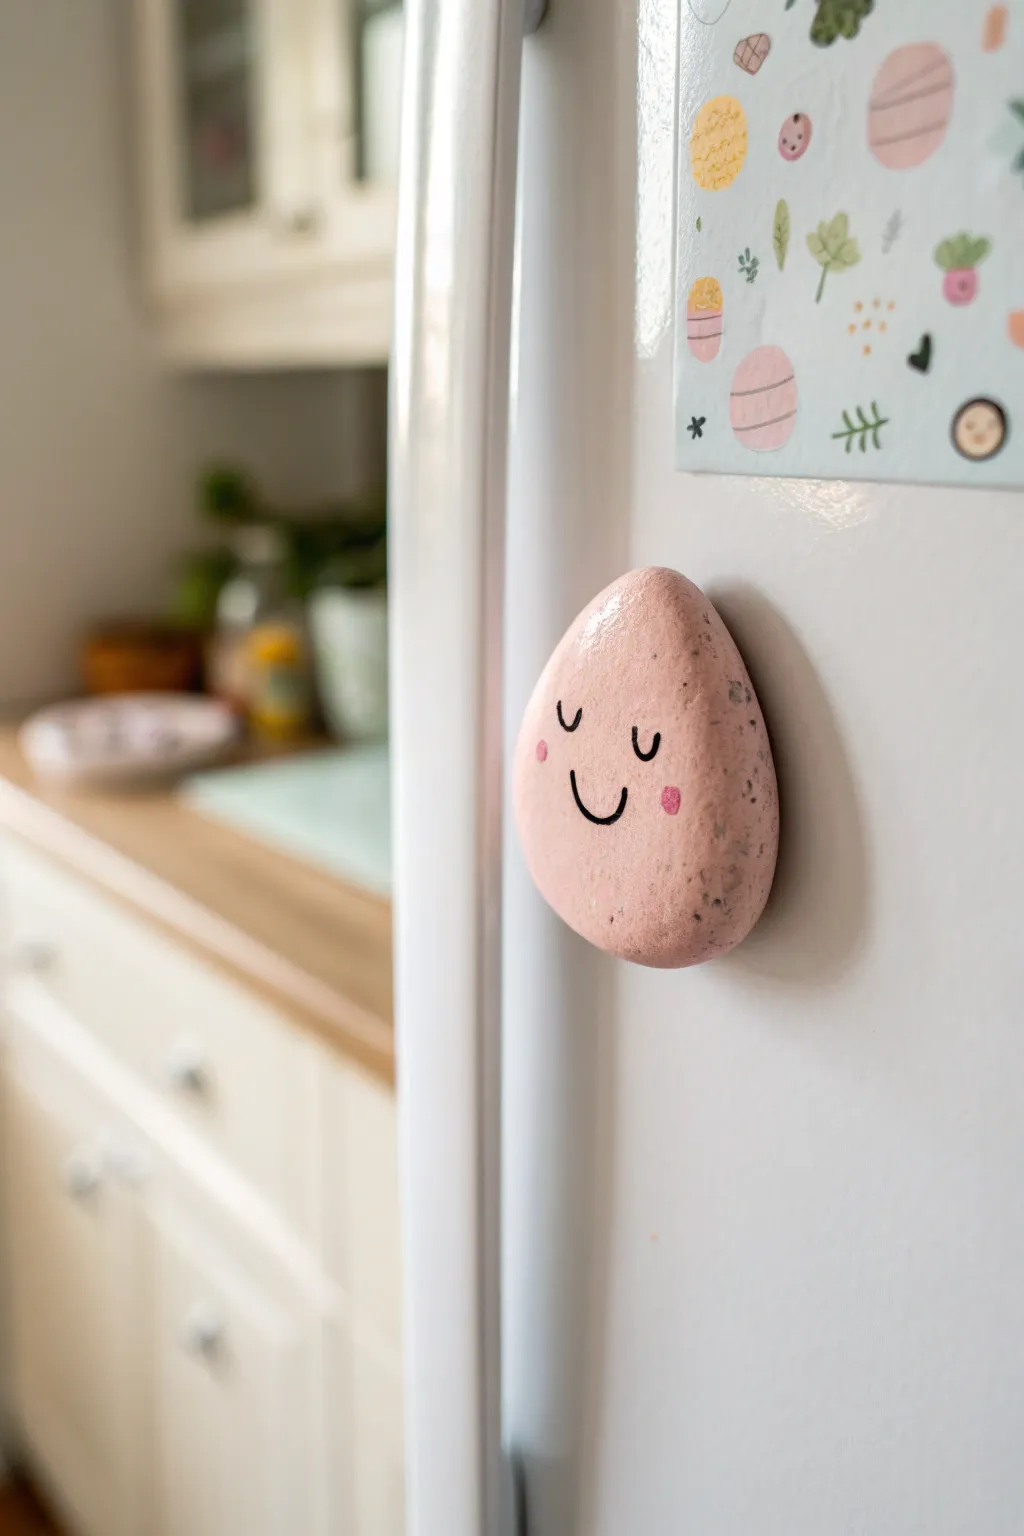
Recreate the charm of a smoothed river stone with this adorable clay magnet project. These smiling, pink teardrop shapes add a gentle touch of whimsy to your kitchen decor while holding up your favorite photos.
Step-by-Step
Materials
- Polymer clay (white or light beige)
- Pink acrylic paint (soft pastel shade)
- Black acrylic paint or extra-fine permanent marker
- Darker pink acrylic paint (for cheeks)
- Strong round craft magnets (neodymium preferred)
- Super glue or E6000 adhesive
- Fine-grit sandpaper (optional)
- Matte or satin sealant/varnish
- Aluminum foil
- Paintbrush (small flat and fine detail)
Step 1: Shaping the Clay
-
Condition the clay:
Begin by warming a small amount of polymer clay in your hands, kneading it until it is soft, pliable, and free of cracks. -
Form a ball:
Roll the clay between your palms to create a smooth, tight sphere about the size of a walnut. -
Create the teardrop shape:
Gently pinch and roll one side of the sphere to elongate it slightly, creating a subtle egg or teardrop shape that mimics a natural river stone. -
Flatten the back:
Press the shape down onto your work surface to flatten the back completely. This ensures it will sit flush against the refrigerator door. -
Smooth the surface:
Use your thumb to gently smooth out any fingerprints. The goal is an organic, rounded front surface. -
Embed the magnet (Method A):
If you want the magnet flush, press your magnet into the back of the clay now to create an impression, then pop it out before baking. This makes a perfect recessed spot for gluing later. -
Refine the texture:
Inspect the clay ‘stone’ for any sharp edges and gently tap them down. Real pebbles are tumbled smooth, so aim for soft curves. -
Bake the clay:
Place your clay piece on an aluminum foil-lined baking sheet. Bake according to your specific clay package’s temperature and time instructions. -
Cool down:
Allow the clay piece to cool completely before moving to the painting stage. I like to leave it for at least an hour to ensure the core is set.
Magnet slipping?
If the magnet slides down the fridge, the clay is likely too heavy. Use a stronger neodymium magnet or make the clay layer thinner.
Step 2: Painting and Finishing
-
Apply the base coat:
Paint the entire surface of the clay stone with a soft pastel pink acrylic paint. You may need two coats for full opacity, letting the first dry completely before applying the second. -
Add stone texture (optional):
To mimic the speckled look in the photo, dip an old toothbrush in slightly darker grey or brown paint and lightly flick a tiny spray of mist onto the pink surface. -
Sketch the face:
Once the base is dry, lightly visualize where the face will go. The eyes should be closed ‘U’ shapes placed toward the middle-top, widely spaced. -
Paint the features:
Using a very fine detail brush and black paint (or a permanent marker if you have a steady hand), draw the two curved eyes and a small, simple smile in the center. -
Add rosy cheeks:
Dip the back end of a paintbrush into darker pink paint and dot it gently onto the ‘cheeks’ just outside the smile line. -
Seal the artwork:
Protect your paint job with a coat of matte or satin varnish. This prevents chipping and gives it that finished, ceramic-like sheen. -
Attach the magnet:
Apply a small drop of super glue or E6000 to the back of the clay (or into the recessed hole you made earlier) and press the magnet firmly in place. -
Final dry time:
Let the adhesive cure undisturbed for the manufacturer’s recommended time before placing it on your fridge.
Add Variety
Create a whole family by making different sizes and painting them in various pastel tones like mint green, serenity blue, or lavender.
Now you have a cheery little companion to brighten up your kitchen every time you reach for a snack
Photo and Card Holders
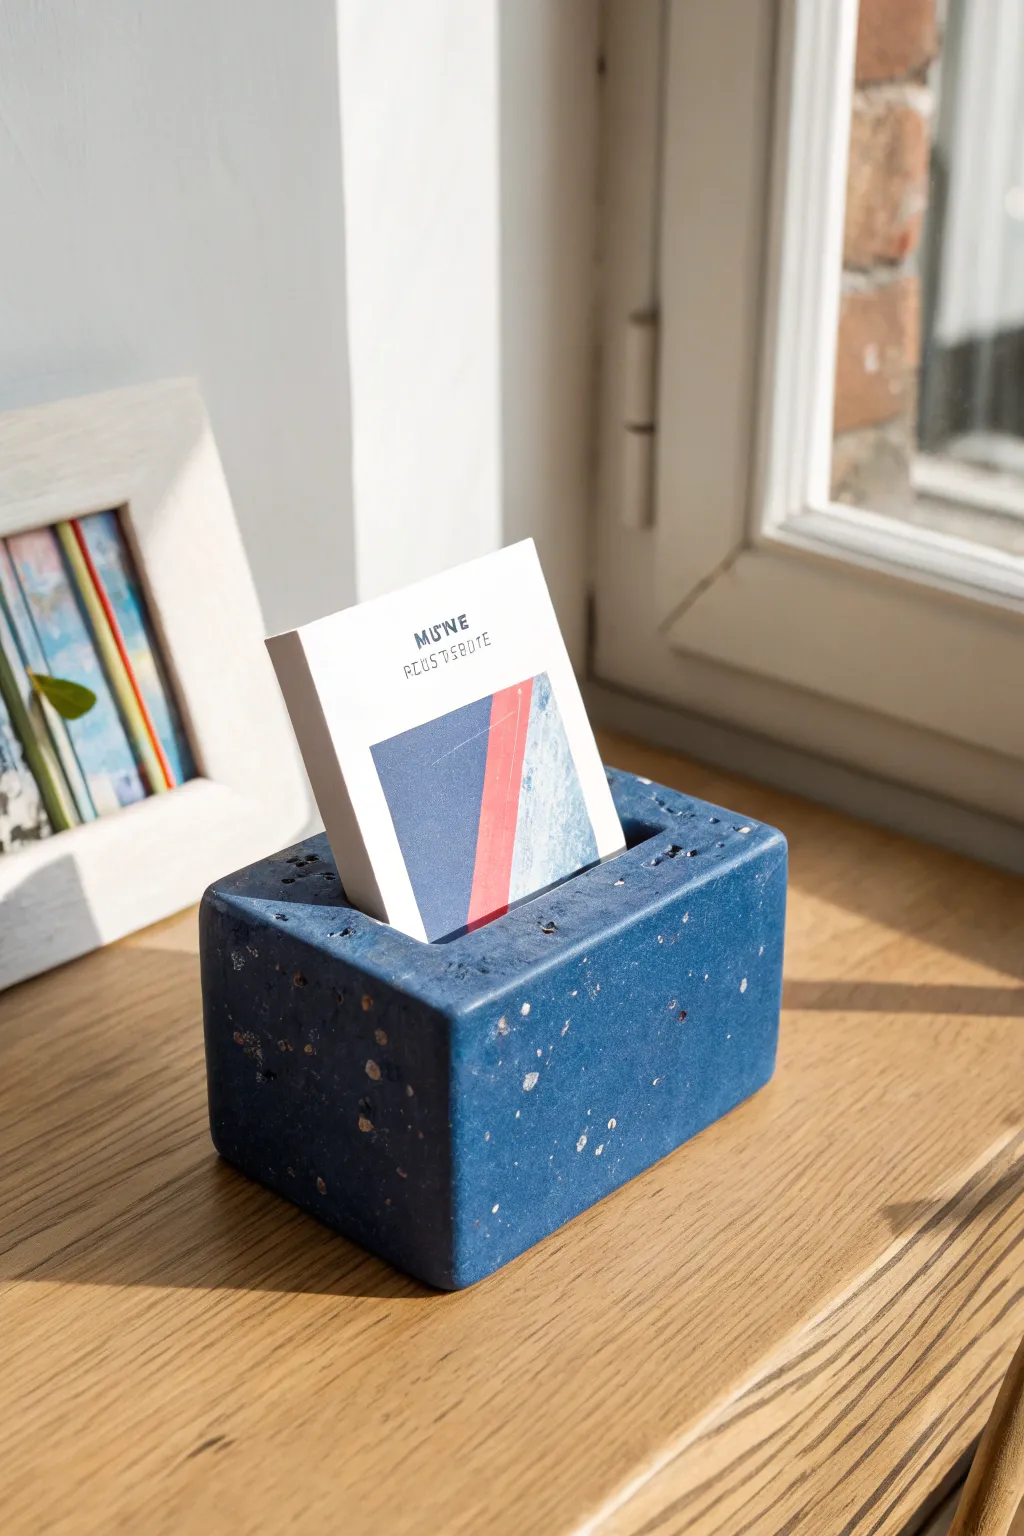
Elevate your desk organization with this minimalist, stone-effect card holder that mimics the look of blue terrazzo. Using clever clay techniques, you’ll create a sturdy, geometric block perfect for displaying photos, business cards, or mini prints.
Step-by-Step Guide
Materials
- Navy blue polymer clay (1 large block)
- White or light grey polymer clay (small amount)
- Bronze or gold polymer clay (small amount)
- Clear liquid polymer clay (optional but helpful)
- Rectangular cookie cutter or a sharp clay blade
- Rolling pin or pasta machine
- Sandpaper (various grits: 400, 600, 1000)
- Buffing cloth or denim scrap
- Ruler
- Cornstarch (for release)
- Oven and baking tray
Step 1: Preparing the Terrazzo Mix
-
Condition the base:
Start by thoroughly conditioning your navy blue clay until it is soft and pliable. This will act as the bulk of your block, so ensure there are no air bubbles trapped inside. -
Create the inclusions:
Roll out very thin sheets of the white and bronze clays. Bake these sheets for just 5-10 minutes to harden them slightly, which makes them easier to chop. -
Chop the fragments:
Once the thin sheets are cool, use your blade to chop them into irregular, tiny shards. Vary the sizes from dust-like specks to small chunks to create a realistic stone aggregate look. -
Mix the clay:
Sprinkle the baked shards onto your soft navy blue clay. Fold the blue clay over and knead it gently to distribute the chips throughout the block without crushing them.
Uneven Chips?
If your ‘stone’ chips aren’t showing up after sanding, you likely didn’t sand deep enough. Keep going with the coarse grit until the pattern emerges.
Step 2: Shaping the Block
-
Form the rectangle:
Shape the clay into a rough rectangular prism. Use your hands to press it firmly into a block shape, aiming for dimensions around 3 inches long by 1.5 inches wide. -
Refine the edges:
Place the block on your work surface and use a firm flat object, like an acrylic block or the side of a wide blade, to press against the sides. This ensures the walls are perfectly vertical and the corners are sharp. -
Create the slot:
Use a thick ruler or a specialized clay tool to press a deep groove into the center of the top face. This slot should be wide enough to hold a thick card but narrow enough to keep it upright. -
Smooth the surface:
Dip your finger in a little cornstarch and gently rub the surface of the clay to smooth out any fingerprints. The stone chips might be hidden just below the surface for now, which is perfectly fine. -
Final check:
Verify that the bottom is perfectly flat so the holder won’t wobble. If needed, slice a thin layer off the bottom with your blade for stability.
Step 3: Baking and Finishing
-
Bake the project:
Place your block on a ceramic tile or a baking sheet lined with paper. Bake according to the manufacturer’s instructions for the specific brand of clay you used; thicker pieces often require slightly longer at lower temperatures. -
Cool down:
Allow the block to cool completely inside the oven by turning it off and cracking the door. This slow cooling helps prevent cracks in thick clay objects. -
Wet sanding:
This is where the magic happens. Under running water or in a bowl of water, sand the surface with 400-grit sandpaper. Sand until the top layer of blue clay wears away to reveal the white and bronze chips. -
Refining the finish:
Move sequentially to 600-grit and then 1000-grit sandpaper. The surface should feel increasingly smooth, almost like a river stone. -
Buff for sheen:
Vigorously rub the dry block with a piece of denim or a buffing wheel. This will give the clay a natural, matte sheen rather than a glossy plastic look. -
Clean the slot:
If dust has accumulated in the card slot, use a folded piece of sandpaper or a damp cotton swab to clean it out thoroughly.
Level Up: Heaviness
For a truly heavy feel, embed a small, clean stone or a crumpled ball of aluminum foil inside the clay block before shaping to add realistic weight.
Now you have a sophisticated accent piece ready to showcase your favorite memories on your desk
Desk Catchall and Organizer Trays
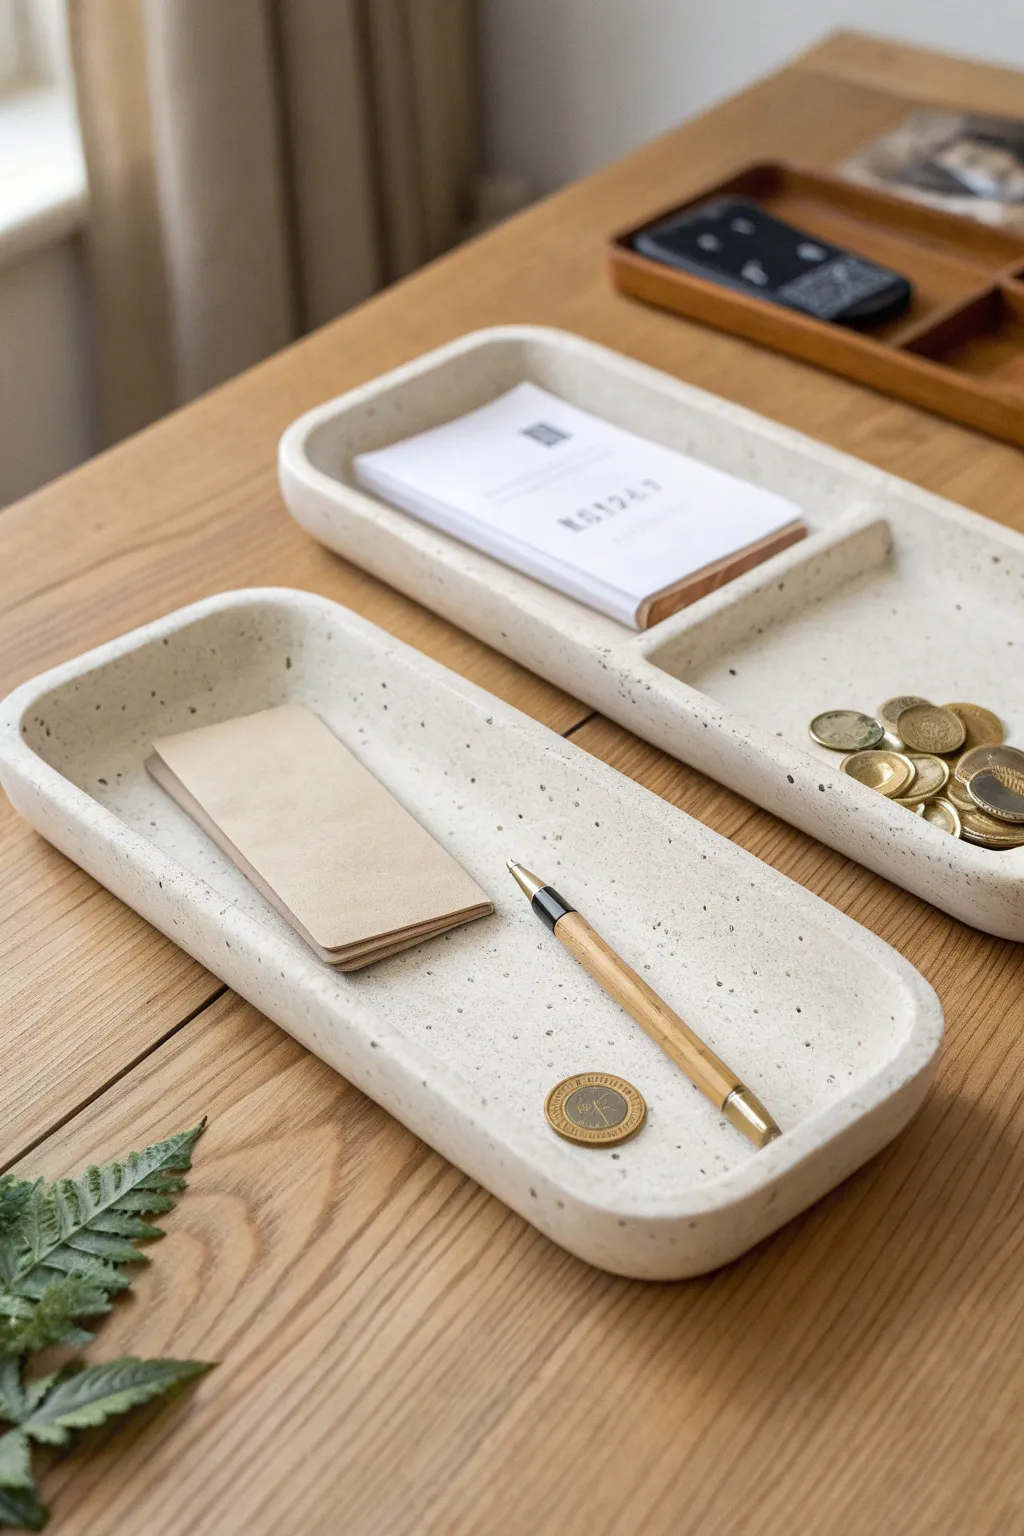
Bring a touch of minimalist organization to your workspace with these sleek, stone-effect catchall trays. Using air-dry or polymer clay with a faux-granite finish creates a sophisticated, modern look perfect for corralling loose change and stationery.
How-To Guide
Materials
- White air-dry clay or polymer clay (approx. 500g)
- Black pepper or dried coffee grounds (for speckling)
- Rolling pin
- sharp craft knife
- Ruler
- Sandpaper (fine grit)
- Small bowl of water
- Matte acrylic varnish
- Soft paintbrush
- Canvas or wax paper work surface
Step 1: Preparation & Mixing
-
Prepare your workspace:
Lay down your canvas or wax paper to protect your table. Having a smooth surface is crucial so the underside of your trays remains flat. -
Condition the clay:
Knead your block of white clay thoroughly until it is soft, pliable, and free of cracks. Warm clay is much easier to work with. -
Create the speckled effect:
Flatten the clay slightly and sprinkle small pinches of coarse black pepper or dried coffee grounds over the surface. Fold the clay over and knead again to distribute the particles evenly. Repeat until you achieve your desired speckle density.
Uneven Walls?
If walls are slumping while wet, prop them up with small cardboard boxes or blocks wrapped in plastic wrap until the clay stiffens enough to hold its shape.
Step 2: Forming the Trays
-
Roll out the slab:
Using your rolling pin, roll the speckled clay into a large, even slab about 1/4 inch (6mm) thick. Rotate the clay occasionally to ensure it doesn’t stick. -
Cut the bases:
Measure and cut two identical rectangular bases using your ruler and craft knife. One will become the simple tray, and the other the divided organizer. -
Prepare the walls:
Gather the remaining clay and roll it into long snakes or coils. Flatten these coils slightly into strips that match the thickness of your base. -
Attach the outer walls:
Score the edges of your rectangular bases and the clay strips with your knife. Dab a little water (or liquid clay if using polymer) on the scored areas as a slip glue. -
Build the perimeter:
Press the clay strips onto the perimeter of the bases. I like to overlap the corners slightly and then trim the excess for a sharp 90-degree angle. -
Smooth the seams:
Using your finger or a modelling tool, blend the clay from the wall down into the base on both the inside and outside. The seam should disappear completely so it looks like one solid piece. -
Add the divider:
For the divided tray, cut a smaller strip of clay to fit the width. Score, slip, and attach it about one-third of the way down the tray length to create two separate interior compartments.
Level Up: Color Contrast
Before sealing, paint just the inside bottom of the tray with a muted pastel color like sage green or terracotta for a chic, two-tone discovery detail.
Step 3: Refining & Finishing
-
Refine the shape:
Gently pinch the corners to sharpen them and use a straight edge to ensure the walls are vertical, not sloping outward. -
Round the lips:
Dip your finger in water and run it along the top rim of the walls to soften the edge, giving it that smooth, cast-stone appearance seen in the photo. -
Initial drying:
Allow the trays to dry (for air-dry clay) or bake them according to package instructions (for polymer clay). If air-drying, turn them over halfway through to prevent warping. -
Sanding:
Once fully cured and dry, use fine-grit sandpaper to smooth out any fingerprints or rough textures on the rims and sides. -
Clean up:
Wipe away all sanding dust with a slightly damp cloth or tack cloth. Dust left behind will ruin the final finish. -
Seal the piece:
Apply a thin coat of matte acrylic varnish. This protects the clay from moisture and stains without adding an artificial gloss, maintaining that natural stone look.
Place these on your desk to instantly elevate your workspace with organized, handmade charm
Boho Geometric Wall Hanging
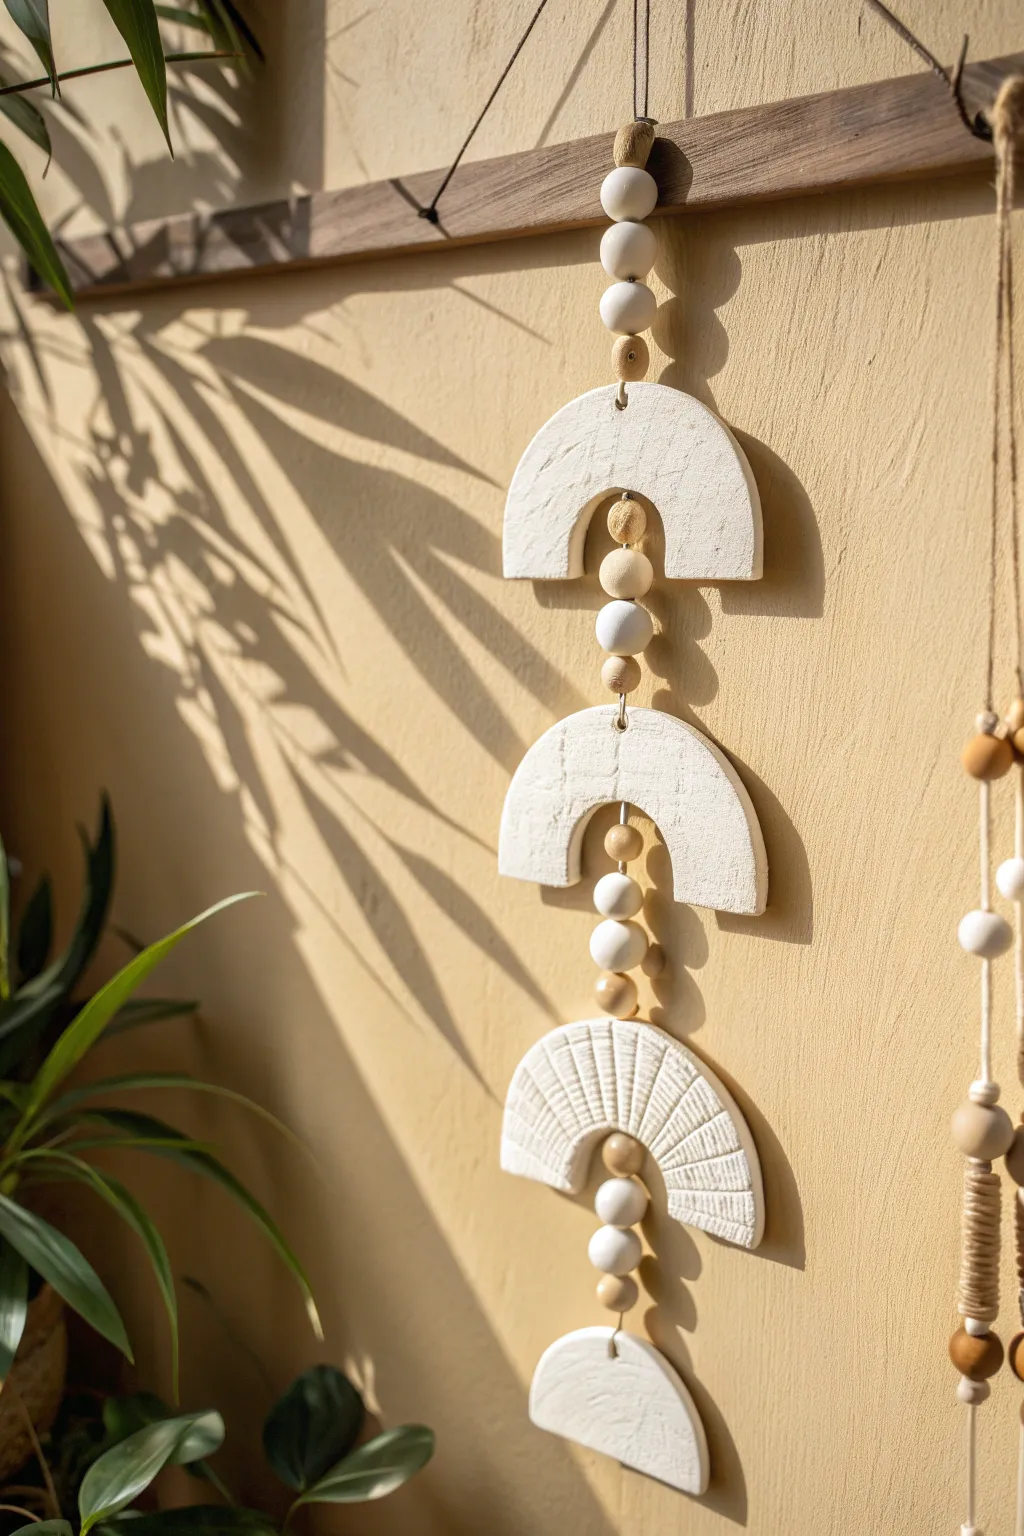
Bring textural warmth to your space with this stunning geometric wall hanging, featuring cascading arches and natural wood tones. This project perfectly balances clean lines with organic textures, making it a beautiful statement piece that catches the sunlight just right.
Detailed Instructions
Materials
- White air-dry clay (or polymer clay)
- Acrylic rolling pin
- Clay knife or craft knife
- Printed U-shape or arch paper template
- Texture tools (comb, wire brush, or stamps)
- Sandpaper (fine grit)
- Wooden dowel or strong twig (approx 12 inches)
- Wooden beads (assorted sizes: 10mm, 15mm, 20mm; natural and white)
- Strong cotton cord, jute twine, or nylon beading thread
- Large-eye needle
- Drill with small bit (or toothpick for wet clay)
- Scissors
Step 1: Shaping the Clay Elements
-
Roll out the slab:
Begin by conditioning your clay, kneading it until soft and pliable. Use your acrylic rolling pin to roll out a smooth slab that is an even 1/4-inch thickness. -
Cut the arches:
Place your paper template onto the clay slab. Using a sharp craft knife, carefully trace around the template to cut out three identical arch shapes and one semi-circle for the bottom piece. -
Smooth the edges:
Dip your finger in a little water and gently run it along the cut edges of your shapes to smooth out any roughness or sharp corners. -
Add texture:
For the third arch down, use a clay tool or a clean comb to press vertical lines into the surface, creating a ribbed fan effect. Keep the other pieces relatively smooth for visual contrast, though a light dabbing with a sponge can add a subtle stone look. -
Create holes:
Use a toothpick or skewer to poke holes in each piece while the clay is wet. You’ll need a hole at the very top center and bottom center of each arch. The bottom semi-circle needs just one hole at the top center. Ensure the holes are large enough for your cord. -
Dry thoroughly:
Let your clay pieces dry completely on a flat surface. I like to flip them over halfway through the drying process to prevent curling. This usually takes 24-48 hours depending on humidity.
Clay Shaping Tip
If your air-dry clay cracks slightly while drying, make a slip paste by mixing a tiny bit of clay with water and fill in the cracks, then sand smooth once dry.
Step 2: Refining and Prep
-
Sand for perfection:
Once bone dry, take fine-grit sandpaper and gently buff the edges of your clay pieces to remove any remaining imperfections or sharp burrs. -
Seal (optional):
If you want extra protection, apply a matte varnish to the clay pieces. This preserves the raw, earthy look while making them easier to dust later. -
Cut the cord:
Cut a length of cord approximately 3-4 feet long. Fold it in half to create a loop at the top for hanging, and knot it onto the center of your wooden dowel using a lark’s head knot.
Make It Yours
Mix dried tea leaves or coffee grounds into the white clay before rolling it out to create a gorgeous, speckled granite effect.
Step 3: Assembly
-
Begin the bead pattern:
Thread both ends of the cord through your large-eye needle. Slide on your first sequence of wooden beads directly under the dowel—start with a mix of natural wood and white painted beads. -
Attach the top arch:
Thread the cord through the top hole of your first plain clay arch. Pull the cord down behind the arch and act as a hidden support, or thread it through the body if you prefer a different look, but letting it hang keeps the clay flat. -
Secure the arch:
Bring the cord out through the bottom hole of the first arch. Tie a knot immediately underneath the clay hole to secure the piece in place so it doesn’t slide down. -
Add connector beads:
Thread a smaller sequence of beads (try a pattern like: small wood, large white, small wood) onto the cord. This acts as the visual spacer between your first and second arch. -
Attach the second arch:
Repeat the threading process for the second plain arch, passing the cord through the top hole and securing it below the bottom hole with a sturdy knot. -
Add second spacer beads:
Add your next set of beads. Varying the size here adds nice rhythm; try using slightly smaller beads for this section. -
Attach the textured arch:
Now attach the third arch—the one with the ribbed texture. Secure it with a knot below the bottom hole just like the previous ones. -
Attach the final pendant:
Thread a final few beads, then attach the bottom semi-circle piece. Tie a secure double knot at the back of this piece and trim any excess cord.
Hang your new geometric art piece in a bright spot where the shadows can play against the wall
Stamped Texture Tiles

Capture the delicate details of nature with these elegant stamped texture tiles, perfect for displaying on a sunny windowsill. The project highlights the organic beauty of leaves through three distinct styles—dotted imprint, incised relief, and raised appliqué—creating a cohesive yet varied trio.
How-To Guide
Materials
- Air-dry clay (white or off-white) or polymer clay
- Rolling pin
- Square cookie cutter (approx. 4-5 inches) or a knife and ruler
- Fresh leaves with prominent veins (fern, broad leaf, small sprig)
- Modeling tools or a dull needle tool
- Small sponge
- Water bowl
- Fine-grit sandpaper
- Canvas or parchment paper (work surface)
Step 1: Preparation & Shaping
-
Prepare the clay:
Begin by kneading your clay until it is smooth, pliable, and free of air bubbles. If it feels too dry, wet your hands slightly to add moisture. -
Roll out the slab:
Roll the clay out onto a piece of canvas or parchment paper to a uniform thickness of about 1/4 to 1/2 inch. Keep the roller even to avoid lopsided tiles. -
Cut the squares:
Use a square cookie cutter to stamp out three identical tiles. Alternatively, measure 4×4 inch squares with a ruler and cut cleanly with a sharp knife. -
Smooth the edges:
Dip your finger or a small sponge in water and gently run it along the cut edges of each tile to soften any sharp corners or burrs.
Step 2: Tile 1: The Dotted Fern Imprint
-
Position the fern:
Take your fern leaf and place it centrally on the first tile. Press it gently so it adheres slightly to the moist surface. -
Roll the impression:
Use your rolling pin to firmly roll over the leaf once. Apply enough pressure to embed the veins into the clay without distorting the square shape. -
Remove the leaf:
Carefully peel the fern away by the stem to reveal the intricate negative impression left behind. -
Add texture:
Using a blunt needle tool or the end of a paintbrush, poke small accent holes around the perimeter of the fern leaf to frame the design with texture.
Clean Impressions
If the clay is sticky, lightly dust your leaves with cornstarch before pressing them down. This acts as a release agent and prevents the leaf from tearing when you peel it off.
Step 3: Tile 2: The Incised Broad Leaf
-
Draft the shape:
For the middle tile, lightly sketch a large, broad leaf shape onto the surface using a needle tool. You can trace a real leaf or freehand it. -
Carve the relief:
Instead of pressing a leaf in, use a carving tool to dig out the background space around the leaf shape, or incise deep lines for the veins to create a sketch-like quality. -
Texture the background:
I like to use a stiff brush or a crumpled ball of foil to dab texture into the corners outside the leaf outline, creating contrast between the smooth leaf and the rough background.
Earth Tone Wash
Once dry, apply a watered-down brown acrylic paint wash over the tiles and immediately wipe it off with a rag. The paint will stay in the crevices, highlighting the textures.
Step 4: Tile 3: The Raised Appliqué
-
Create individual leaves:
Roll out a thin separate scrap of clay. Cut out small almond shapes to serve as individual leaves for this 3D design. -
Score and slip:
Score (scratch) the back of each small leaf and the spot on the tile where it will go. Add a tiny dab of water or clay slurry to act as glue. -
Assemble the branch:
Press the leaves onto the tile in a branching pattern. Use a modeling tool to press a center vein into each applied leaf, which also helps secure it to the base. -
Roll the stem:
Roll a very thin snake of clay for the central stem, score the path, and press it gently between the leaves to connect them.
Step 5: Finishing Touches
-
Check for warping:
As the tiles sit, ensure they remain flat. If the edges start to curl up, gently press them back down. -
Dry thoroughly:
Allow the tiles to air dry completely for 24–48 hours away from direct heat sources. Flip them over halfway through to ensure even drying. -
Sand and refine:
Once bone dry, use fine-grit sandpaper to smooth out any rough edges or uneven spots on the surface. -
Seal (optional):
To protect the finished piece, you can apply a matte varnish or sealant, though leaving them raw maintains that lovely natural stone look.
Enjoy arranging your new botanical trio to bring a touch of earthy calm to your space
Tiny Animal Desk Buddies
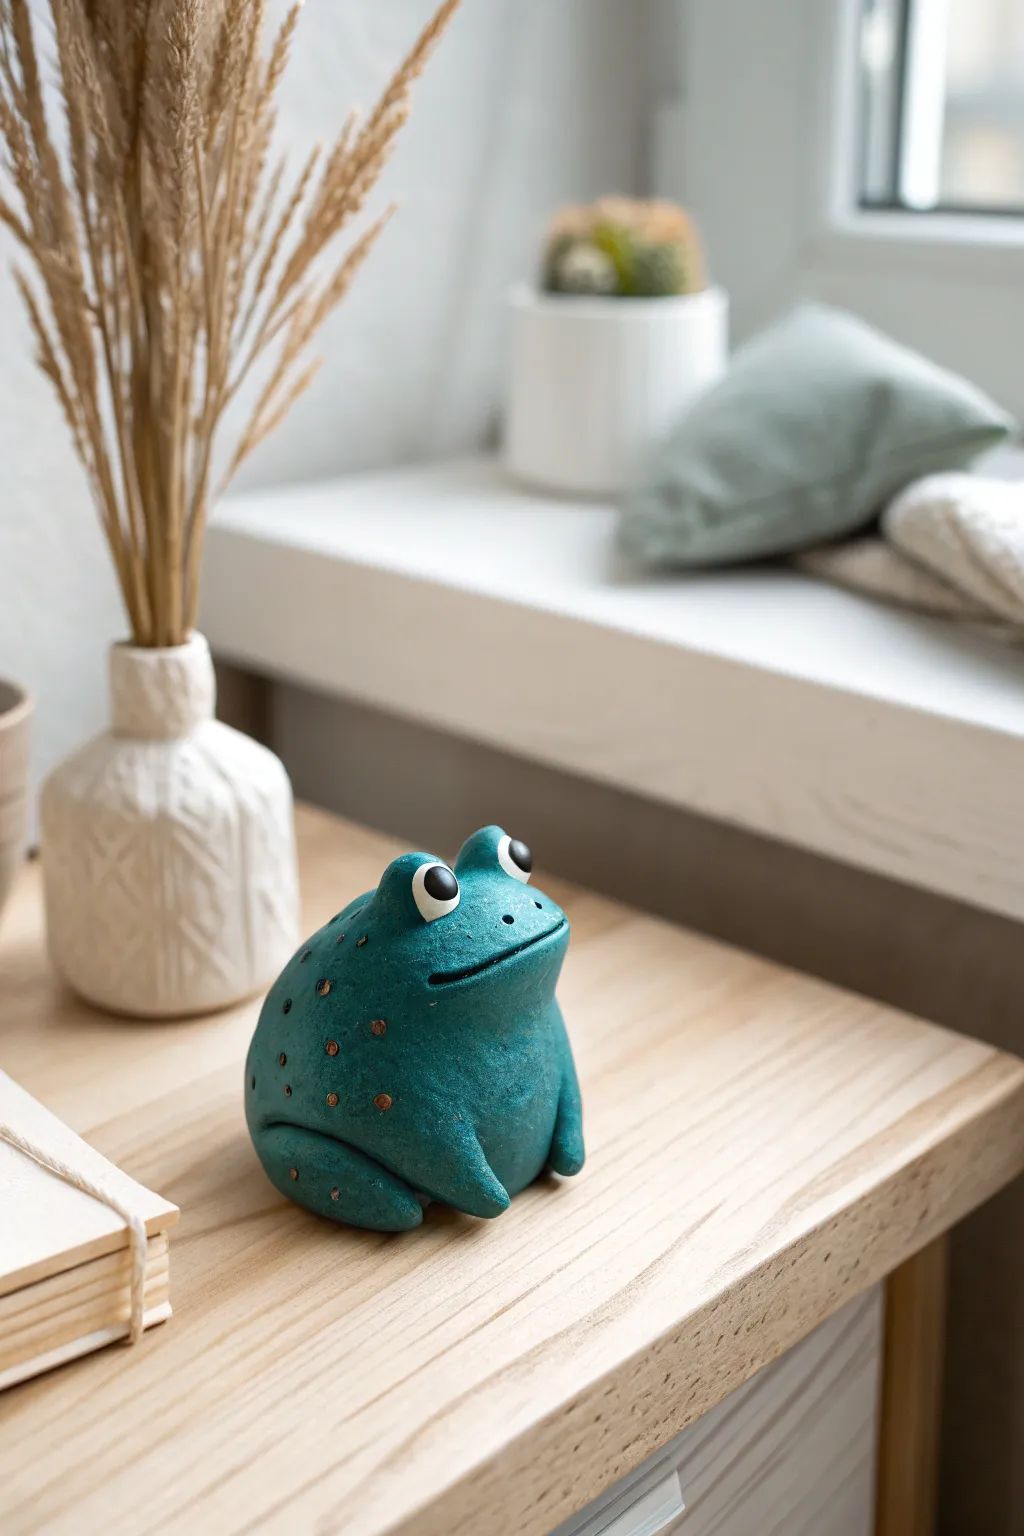
Sculpt a calming presence for your workspace with this charming, textured teal frog. Its rounded forms and speckled finish give it an organic, handmade feel that adds character to any desk or shelf.
Step-by-Step Guide
Materials
- Polymer clay (Teal or Blue-Green)
- White polymer clay
- Black polymer clay
- Acrylic paint (Brown or Bronze)
- Fine-tipped paintbrush or toothpick
- Aluminum foil
- Texturing sponge or sandpaper
- Needle tool
- Clay sculpting tools (ball stylus)
- Gloss glaze (optional)
Step 1: Basic Form
-
Create the core:
Start by crumpling a small ball of aluminum foil—about the size of a golf ball—into a rough, flattened sphere. This saves clay and keeps the figurine lightweight. -
Condition the body clay:
Take your primary teal or blue-green clay and knead it until it is soft and pliable. -
Cover the core:
Flatten the conditioned teal clay into a pancake and wrap it completely around your foil core, ensuring there are no air bubbles trapped inside. -
Shape the body:
Gently roll the clay form on your work surface to smooth it out. Shape it into a slightly squat, gumdrop-like mound that sits flat on its base.
Step 2: Sculpting Features
-
Define the mouth:
Using a clay knife or needle tool, make a wide, horizontal cut near the top third of the body for the mouth. Slightly curve the ends upward for a subtle smile. -
Smooth the lips:
Use a silicone tool or your finger to gently soften the edges of the mouth cut so it looks like a natural fold, giving the frog a slight pout. -
Form the eye sockets:
Roll two small balls of teal clay and press them firmly onto the top of the head. Blend the bottom edges into the main body so they look integrated, not just stuck on. -
Create the eyes:
Roll two smaller balls of white clay and press them into the teal sockets. Then, add tiny flat circles of black clay for the pupils, placing them off-center for a quirky look. -
Shape the front legs:
Roll two thick, short logs of teal clay. Taper one end of each log. -
Attach the legs:
Press the legs vertically against the front of the body. Blend the top seam into the body but leave the bottom defined as feet. -
Make the thigh detail:
Roll a long, thin snake of teal clay. Wrap this around the lower sides of the body to suggest folded hind legs, observing how the thigh shape curves around the frog’s bottom. -
Blend the seams:
Carefully smooth the edges of the hind legs onto the body using a blending tool, ensuring the connection is seamless.
Pro Tip: Weighted Base
Before wrapping the foil core, press a heavy washer or a small stone into the bottom of the foil. This lowers the center of gravity so your frog won’t tip over easily.
Step 3: Texture and Finishing
-
Add skin texture:
Before baking, gently dab a coarse sponge or a piece of sandpaper over the entire teal surface. This gives the skin a lovely, stone-like texture rather than smooth plastic. -
Poke nostrils:
Use your needle tool to poke two small holes just above the mouth for the nostrils. -
Bake the piece:
Bake your frog according to your clay manufacturer’s instructions (usually around 275°F or 130°C for 15-30 minutes). Let it cool completely. -
Paint the spots:
Dip a toothpick or fine brush into bronze or brown acrylic paint. Dot small, irregular speckles across the frog’s back and sides. -
Add a wash (optional):
For more depth, I like to mix a very watery black paint wash, brush it over the textured skin, and immediately wipe it off, leaving shadow in the crevices. -
Highlight the eyes:
Once the paint is dry, add a tiny dot of white paint to each black pupil to bring the expression to life. -
Seal the work:
Apply a matte varnish to the body if you want to protect the paint, or use a gloss glaze just on the eyes to make them look wet.
Troubleshooting: Fingerprints
If you struggle with fingerprints while smoothing, lightly dust your fingers with cornstarch or use a tiny bit of baby oil to glide over the clay without leaving ridges.
Place your new amphibian friend near a plant or window for the perfect habitat vibe
Mini Domino Set From Clay
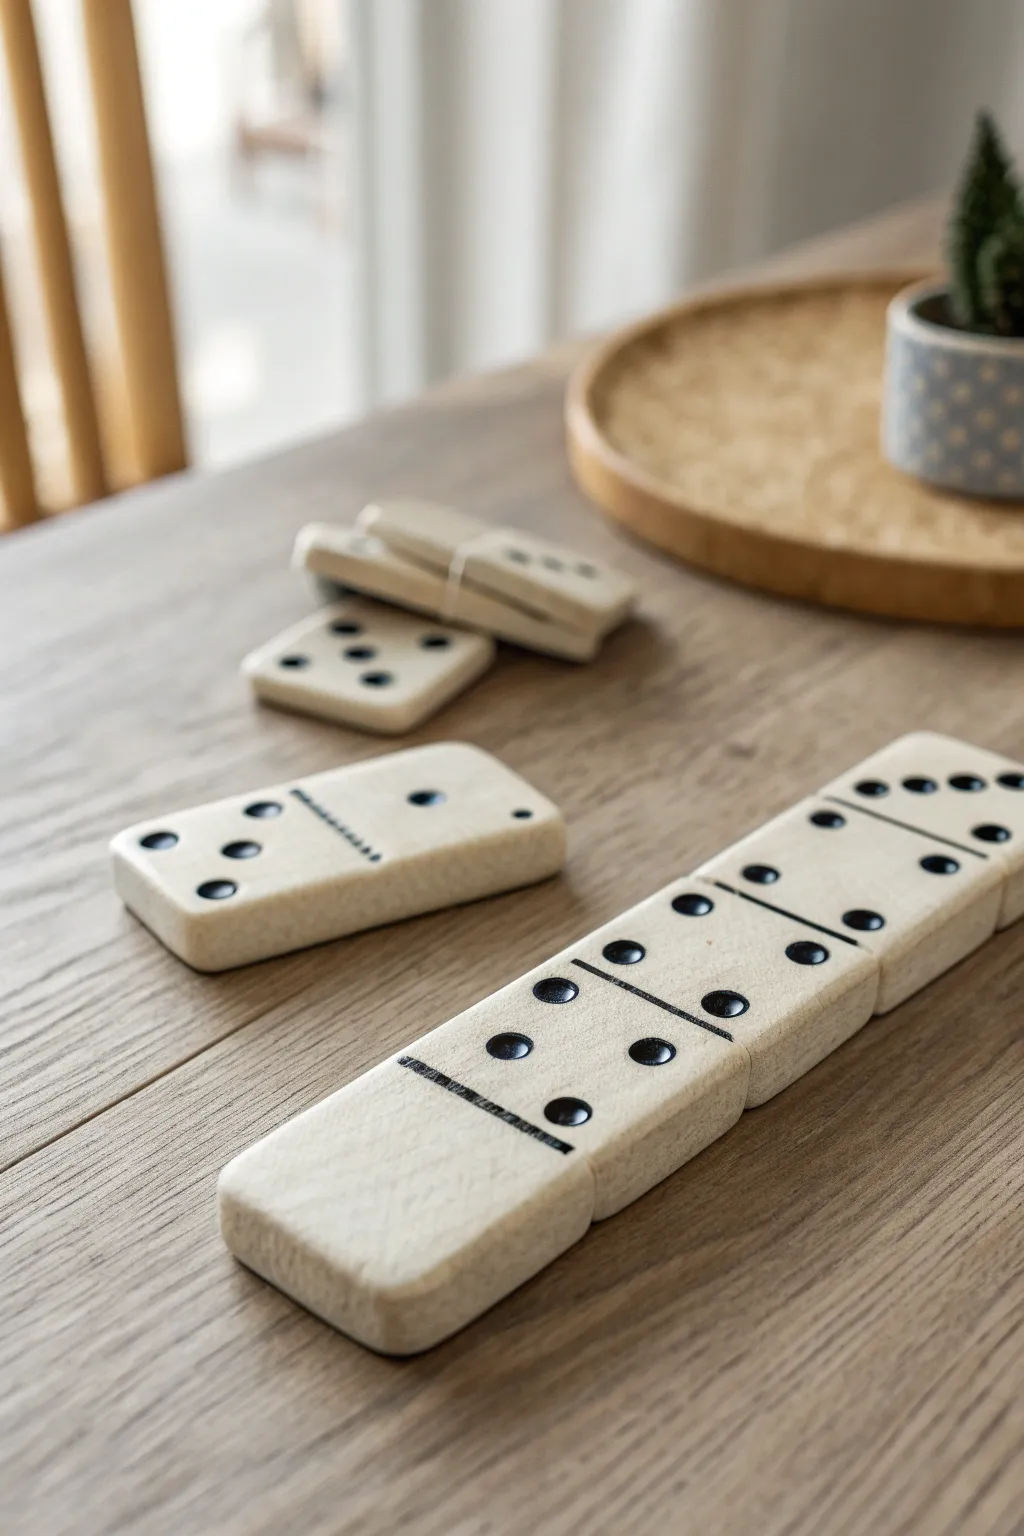
Create a timeless game set with a modern, organic twist using simple clay techniques. These chunky, cream-colored dominoes feature deep-set indents and a smooth, stone-like finish that makes them beautiful enough to display when playtime is over.
Step-by-Step
Materials
- Air-dry clay (stone or white color)
- Acrylic rolling pin
- Rolling guides or two wooden rulers (approx. 1/4 inch thick)
- Rectangular cookie cutter or a sharp craft knife
- Ruler
- Sandpaper (fine grit)
- Small ball stylus tool or the end of a paintbrush
- Black acrylic paint
- Fine detail paintbrush
- Matte sealant or varnish
- Parchment paper
Step 1: Shaping the Tiles
-
Prepare your workspace:
Lay down a sheet of parchment paper to prevent sticking. Unwrap a generous portion of your air-dry clay and knead it well until it feels pliable and warm in your hands. -
Roll the slab:
Place your rolling guides or rulers on either side of the clay ball. Roll the clay out into a uniform slab, ensuring the rolling pin rests on the guides to maintain a consistent thickness of about 1/4 inch. -
Cut the rectangles:
Using a rectangular cutter (standard domino size is roughly 1×2 inches) or a ruler and craft knife, cut out 28 identical tiles. If using a knife, wipe the blade occasionally to keep cuts clean. -
Smooth the edges:
Dip your finger in a little water and gently run it along the cut edges of each tile to soften any sharpness. You want them to look rectangular but feel soft to hold. -
Dry the tiles:
Arrangement the tiles on a flat surface to dry. I like to flip them over halfway through the drying process—usually after 12 hours—to prevent them from warping. Let them dry completely, which may take 24-48 hours depending on humidity.
Uneven Clay?
If your clay tiles curl up at the corners while drying, place a heavy book on top of them (with parchment paper in between) once they are ‘leather hard’ to force them flat.
Step 2: Adding Details
-
Sand for perfection:
Once fully dry and hard, lightly sand the edges and surface of each tile with fine-grit sandpaper. This removes any fingerprints or uneven texture left during the cutting phase. -
Mark the center:
It’s time to create the dividing line. Using a ruler and a dull pencil, lightly mark the exact center of each tile. -
Indenting the line:
Use the edge of your ruler or a flat sculpting tool to press a straight indentation across the center mark you just made. -
Drill the pips:
Referencing a standard double-six domino chart, use a small drill bit by hand or a specialized carving tool to twist-drill shallow, circular holes for the pips (dots). Start with the double six and work your way down to the blank tiles. -
Clean the dust:
Use a dry brush or a quick puff of air to remove any clay dust that has gathered inside the drilled holes and the center line.
Color Pop
Swap the classic black pips for gold leaf paint or a bright neon acrylic for a modern art vibe. You can even paint the backs a solid contrasting color.
Step 3: Painting and Finishing
-
Paint the indents:
Load a fine detail brush with black acrylic paint. Carefully dab paint into each drilled hole and paint a thin line into the center indentation. -
Wipe excess paint:
If you get paint on the surface, don’t panic. Quickly wipe it away with a slightly damp paper towel, leaving the paint only in the recessed areas. -
Let the paint set:
Allow the black paint to dry completely. This usually takes just 15-20 minutes since the clay is porous. -
Seal the set:
Apply a coat of matte varnish over the entire tile. This protects the clay from oils on your hands during gameplay and gives the set a finished, professional look. -
Final cure:
Let the varnish cure according to the manufacturer’s instructions before stacking the dominoes or playing your first game.
Now you have a durable, heirloom-quality game set ready for your next family night