There’s something ridiculously satisfying about white clay—it’s calm, clean, and makes even the simplest shape look intentional. If you’re craving easy projects with that crisp, minimalist feel, these white clay craft ideas will keep your studio (or kitchen table) happily busy.
White Clay Ring Cone Holder
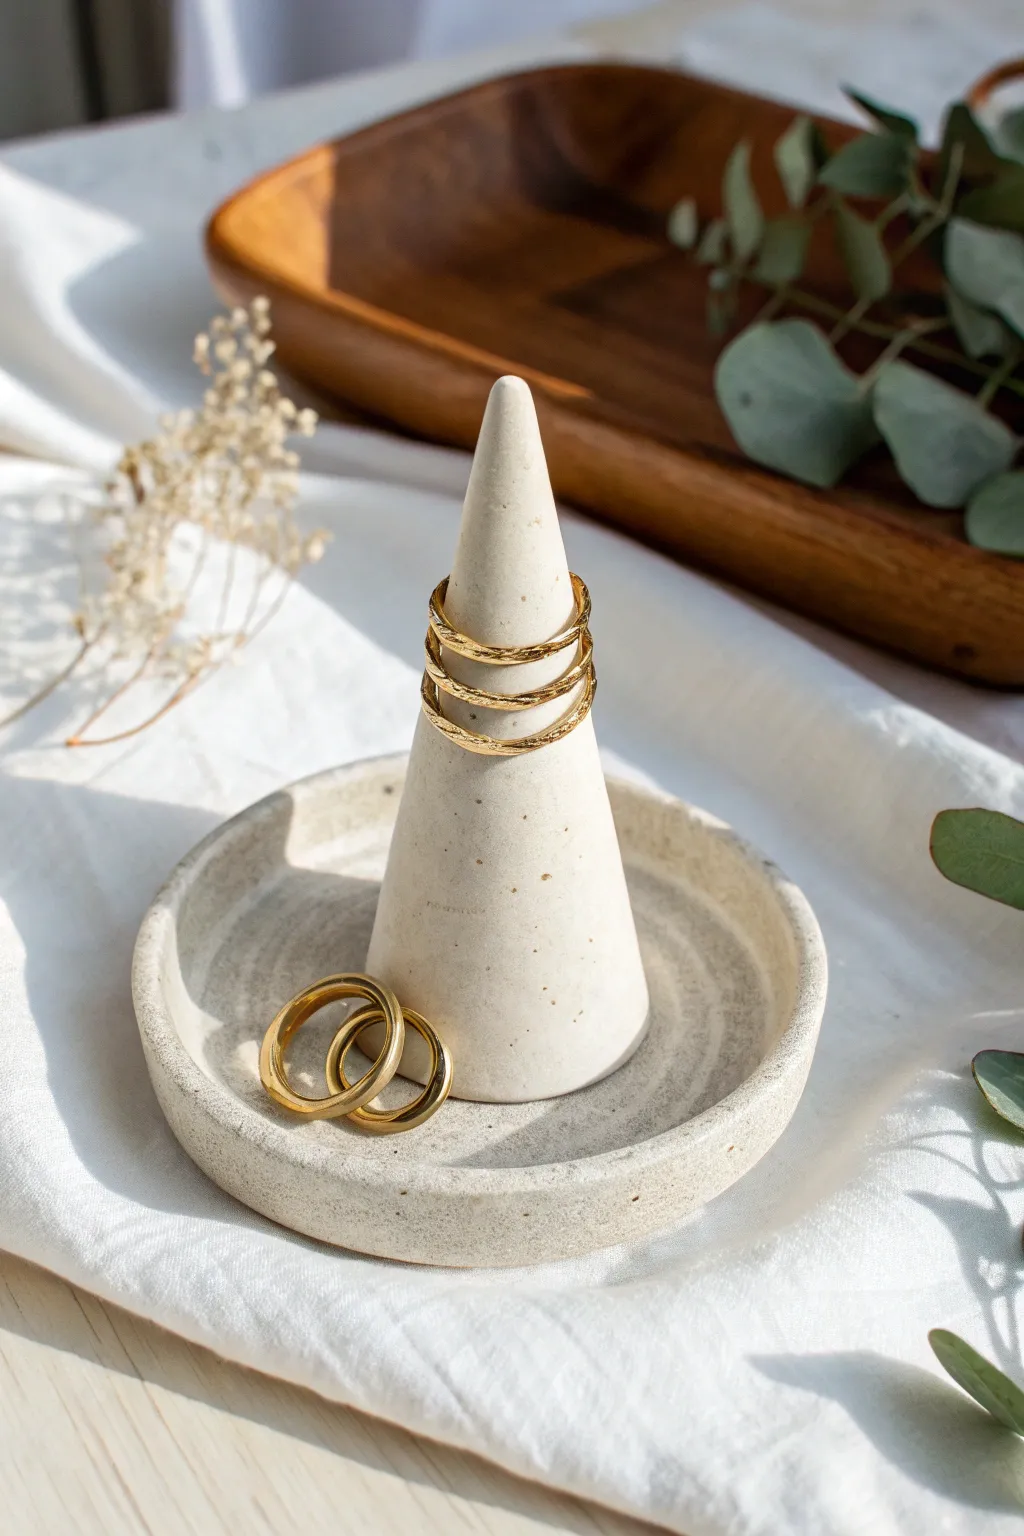
This minimal jewelry holder combines a sleek conical form with a shallow catch-all dish for versatile storage. The speckled white clay finish gives it a trendy, raw ceramic look that beautifully highlights gold accessories.
How-To Guide
Materials
- White polymer clay or air-dry clay (approx. 200g)
- Black pepper or dried coffee grounds (for speckling)
- Rolling pin
- X-Acto knife or craft blade
- Circle cookie cutter (approx. 4 inches)
- Sandpaper (fine grit)
- Small bowl of water (if using air-dry clay)
- Gloss or matte varnish (optional)
Step 1: Preparing the Clay
-
Condition the clay:
Start by warming up your white clay in your hands, kneading it until it becomes soft and pliable. -
Create the speckles:
To achieve that faux-stone look seen in the image, flatten your clay slightly and sprinkle in a pinch of ground black pepper or dried coffee grounds. -
Mix thoroughly:
Fold the clay over the speckles and knead repeatedly until the particles are evenly distributed throughout the white base. -
Separate portions:
Divide your clay into two uneven balls: a smaller one for the cone (about 1/3) and a larger one for the dish (about 2/3).
Stone Effect Hack
Use different coarseness of pepper or add bits of dried tea leaves to vary the size and color of your ‘stone’ speckles.
Step 2: Forming the Ring Cone
-
Roll a snake:
Taking the smaller ball, roll it into a thick log or snake shape on your work surface. -
Shape the taper:
Using the palm of your hand, focus rolling pressure on just one end of the log to begin tapering it into a point. -
Refine the cone:
Stand the clay up on its flat end. Gently pinch and smooth upwards to create a uniform cone shape, ensuring the tip is rounded but distinct. -
Check the height:
Compare the cone to your ring sizes; it should be tall enough to stack 3-5 rings, roughly 3 to 4 inches high. -
Smooth the surface:
I like to dampen my finger slightly here to smooth out any fingerprints or tiny cracks on the cone’s surface.
Make it Luxe
Once dry, paint just the very tip of the cone or the rim of the dish with liquid gold leaf for an elegant, high-end finish.
Step 3: Clicking the Catch-All Dish
-
Roll the slab:
Take the larger clay ball and roll it flat with your rolling pin until it is about 1/4 inch thick. -
Cut the circle:
Press your circle cutter into the slab to create a perfect round base. If you don’t have a cutter, trace a bowl and cut with your knife. -
Create the rim:
Gently curb up the edges of the circle with your thumbs to create a slight lip. This keeps loose jewelry contained. -
Add texture:
As seen in the photo, you can add subtle concentric rings inside the dish using a sculpting tool or just lightly dragging your finger in a spiral. -
Join the pieces (Optional):
If you want the cone permanently attached, score the bottom of the cone and the center of the dish, add a dab of water or liquid clay, and press them together firmly.
Step 4: Finishing Touches
-
Initial dry:
Allow your piece to dry (for air-dry) or bake it according to the package instructions (for polymer). Ensure it is fully cured. -
Sand for smoothness:
Once hard, take your fine-grit sandpaper and gently buff the cone and the rim of the dish to remove any sharp edges or bumps. -
Seal the piece:
Apply a thin layer of matte varnish to protect the surface while maintaining that raw, natural stone aesthetic.
Now you have a chic, modern display to organize your favorite everyday jewelry


White Clay Leaf-Imprint Bowl
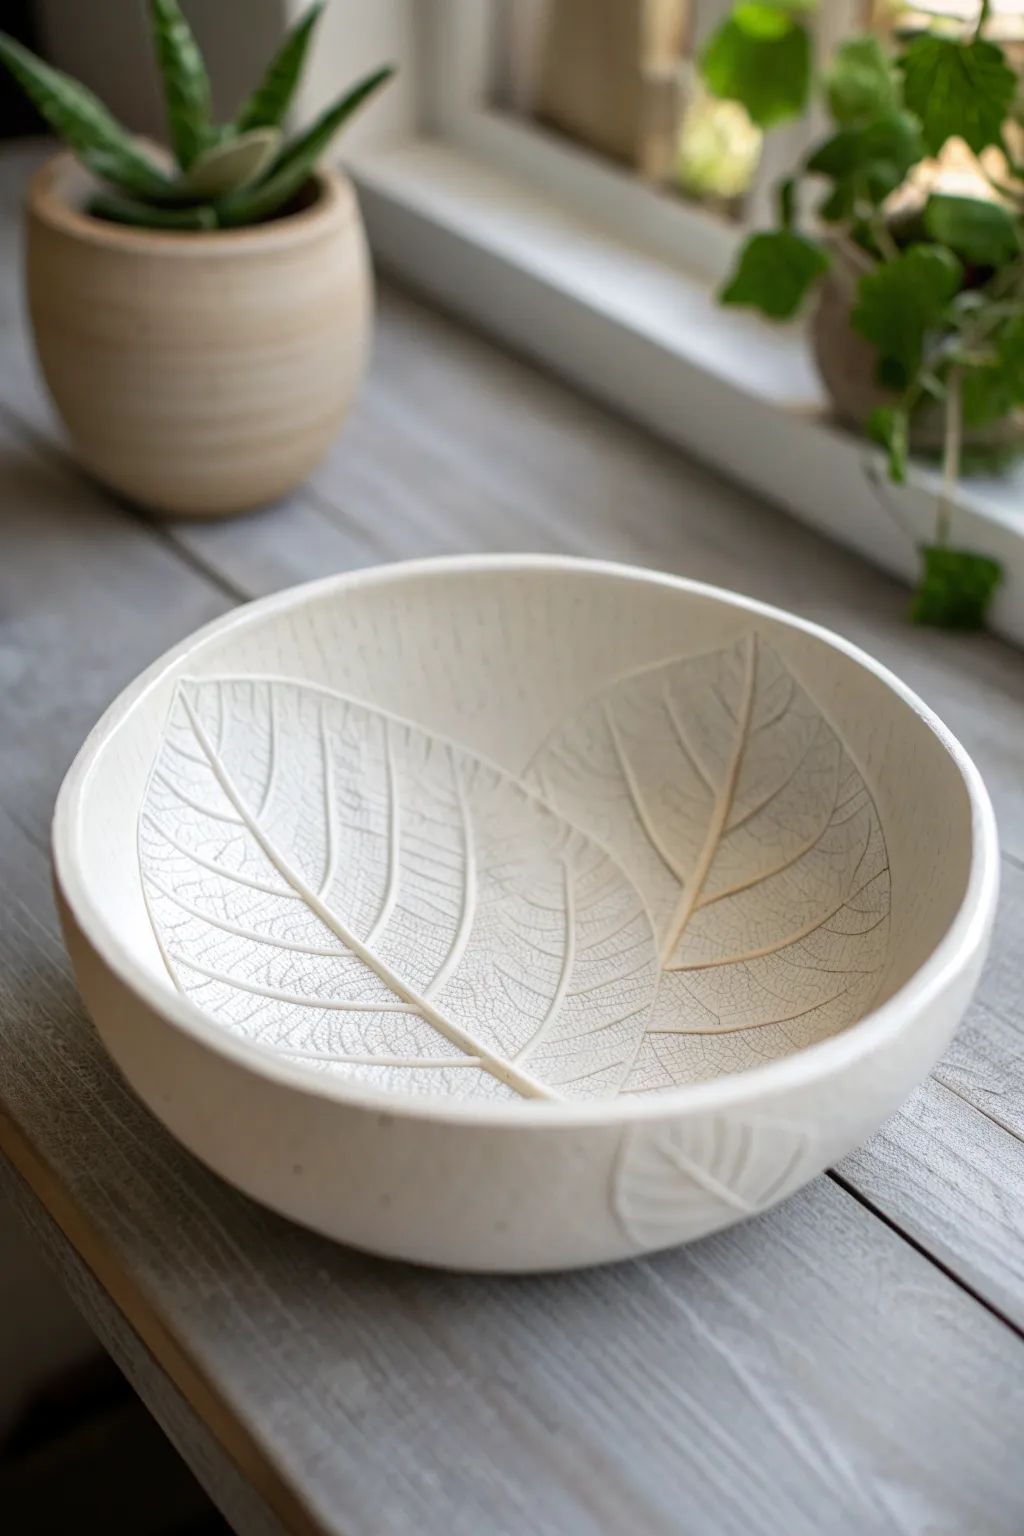
Capture nature’s intricate details forever with this elegant white clay bowl featuring delicate leaf imprints. The texture of the veins creates a stunning, fossil-like relief against the smooth, matte finish of the clay.
Step-by-Step Guide
Materials
- Air-dry white clay or white polymer clay
- Rolling pin
- Large, fresh leaves with prominent veins (like Hydrangea or Hosta)
- Bowl to use as a mold (smooth interior)
- Vegetable oil or clay release spray
- Craft knife or scalpel
- Fine-grit sandpaper (200-400 grit)
- Sponge
- Small bowl with water
- Matte spray varnish or sealant (optional)
Step 1: Preparation & Rolling
-
Prepare your workspace:
Clean a flat surface and lay down a piece of parchment paper or a silicone mat to prevent the clay from sticking. This also makes moving the slab easier later. -
Condition the clay:
Take a generous amount of white clay and knead it thoroughly in your hands until it becomes soft, warm, and pliable. This prevents cracks from forming during the rolling process. -
Roll the slab:
Using your rolling pin, roll the clay out into an even circle. Aim for a thickness of about 1/4 inch (approx. 6mm). If it’s too thin, the bowl will be fragile; too thick, and it will be heavy. -
Check for bubbles:
Scan the surface for any air bubbles. If you spot one, gently pierce it with a needle and smooth over the hole with your fingertip.
Step 2: Creating the Impressions
-
Select and place leaves:
Choose two or three large leaves with thick, raised veins on the back. Place them vein-side down onto your clay slab in an artistic arrangement, overlapping them slightly if desired. -
Embed the texture:
Gently roll over the leaves with your rolling pin. Apply firm, even pressure to push the veins deep into the clay without thinning the slab too much. -
Reveal the imprint:
Carefully lift the stem of each leaf and peel it away from the clay. I love this moment—seeing the intricate network of veins transferred perfectly onto the smooth white surface is so satisfying. -
Refine the details:
If any small bits of leaf debris remain in the clay, use tweezers to carefully remove them without marring the surface.
Cracking Up?
If you see hairline cracks while drying, mix a tiny bit of clay with water to make a paste (slip). Smooth it into the cracks with your finger and let it dry again.
Step 3: Shaping & Drying
-
Cut the shape:
Place a circular template (or a bowl rim) over your imprinted clay to frame the design. Use a craft knife to cut a clean circle, ensuring the leaf patterns are centered nicely. -
Prepare the mold:
Take the bowl you intend to use as a mold. Lightly wipe the *inside* with a tiny bit of vegetable oil. This acts as a release agent so your clay doesn’t get stuck. -
Form the bowl:
Gently lift your clay circle and place it inside the mold. Carefully press it down into the curve, starting from the center and working outward to avoid trapping air. -
Add exterior texture (Optional):
Looking at the reference image, there is a subtle leaf relief on the outside too. If you have extra clay, press a small leaf into a scrap, cut it out, and attach it to the exterior using a little water as ‘glue’. -
Smooth the rim:
Dip your finger or a small sponge in water and run it along the top edge of the clay to round off any sharp cuts left by the knife. -
Initial drying:
Let the clay sit in the mold for about 24 hours (or until it’s leather-hard) so it holds its shape.
Vein Definition
For deeper textures, softer clay works best. If your clay is too firm, incorporate a few drops of water or baby oil before rolling to make it more receptive to the leaf veins.
Step 4: Finishing Touches
-
Remove from mold:
Once the clay is firm enough to hold its own weight but not bone dry, carefully tilt the mold to slide the clay bowl out. -
Complete drying:
Place the bowl on a wire rack to allow air to circulate around the entire piece. Let it dry completely for another 24-48 hours depending on humidity. -
Sand for perfection:
Use fine-grit sandpaper to gently smooth any rough spots on the rim or the exterior. Avoid sanding the interior leaf texture to keep the details sharp. -
Seal the piece:
To protect the white finish from dust and fingerprints, spray a light coat of matte varnish over the entire bowl. This keeps the natural, unfinished look while providing durability.
Place your finished bowl near a window where natural light can highlight the beautiful organic textures you have created


White Clay Minimal Coasters
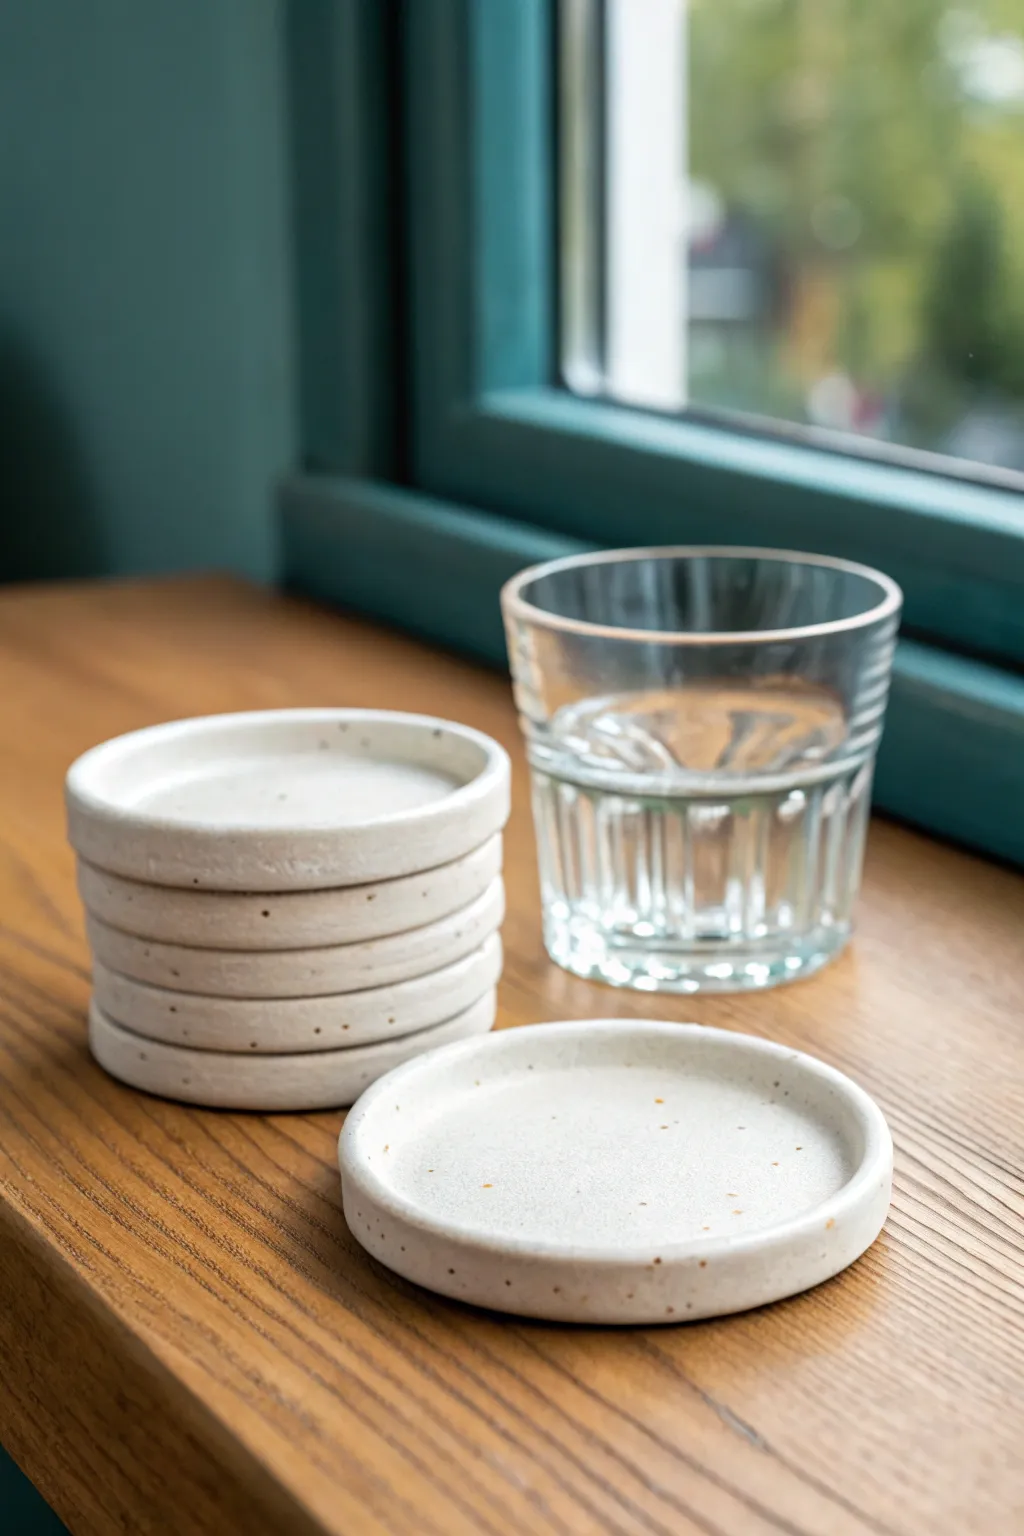
These minimalist coasters feature a clean, white finish with subtle natural speckling that gives them an earthy, handmade charm. The clever lipped edge is not just a stylish detail; it also helps contain any condensation from your cold drinks.
Step-by-Step Tutorial
Materials
- White air-dry clay or polymer clay
- Dried coffee grounds or coarse black pepper (for speckling)
- Circle cutter (approx. 3.5 inches)
- Small rolling pin
- Two paint stir sticks or clay depth guides (1/4 inch)
- Sandpaper (fine grit)
- Water in a small dish
- Sponge or smoothing tool
- Matte sealant or varnish
Step 1: Preparing the Clay Body
-
Condition the clay:
Begin by taking a generous amount of your white clay and kneading it in your hands to warm it up. If you are using polymer clay, this conditioning step is crucial to prevent cracking. For air-dry clay, just ensure it’s pliable and smooth. -
Add the speckles:
Sprinkle a small pinch of dried coffee grounds or coarse black pepper onto your flattened clay. Fold the clay over the grounds and knead thoroughly until the speckles are evenly distributed throughout the batch. -
Set up guides:
Place your two depth guides (paint stir sticks) parallel to each other on your work surface. These will ensure your coasters have a completely uniform thickness, which is vital for stacking. -
Roll the slab:
Place the ball of speckled clay between the guides. Using the rolling pin, roll the clay flat until the rolling pin rests on the guides. Flip the clay occasionally to prevent sticking.
Bumpy Rims?
If your rims look uneven after attaching the coil, place a flat object (like a book) gently on top of the wet clay coil and press down lightly to level everything at once.
Step 2: Shaping the Coasters
-
Cut the circles:
Press your circle cutter firmly into the rolled slab to cut out your coaster bases. Gently lift away the excess clay. If the suction makes the clay stick to the cutter, I find gently popping it out from the back helps keep the shape. -
Create the rim coils:
Roll out a separate long, thin snake of clay, aiming for about 1/4 inch thickness. This coil will become the raised lip of the coaster. -
Score and slip:
Take a needle tool or toothpick and scratch rough lines (scoring) around the top outer edge of your base circle. Dab a little water (slip) onto these scratches to act as glue. -
Attach the rim:
Gently place the clay coil onto the scored edge of the base. Press it down lightly to adhere it, cutting off any excess coil where the ends meet. -
Blend the seams:
Using a modeling tool or your thumb, smooth the clay where the coil meets the base, both on the inside and the outside. The goal is to make the coaster look like one solid piece rather than two pieces attached together.
Step 3: Refining and Finish
-
Smooth the surface:
Dip your finger or a sponge in water and gently run it over the rim and the flat surface to remove fingerprints and tool marks. Pay special attention to leveling the top of the rim. -
Allow to dry:
Place the finished coasters on a drying rack or a sheet of parchment paper. If using air-dry clay, let them dry for 24-48 hours, flipping halfway through. If using polymer clay, bake according to the package instructions. -
Sand the imperfections:
Once fully cured or dry, inspect your coasters. Use fine-grit sandpaper to gently buff away any sharp edges or uneven spots on the rim for a professional feel. -
Clean dust:
Wipe the coasters down with a slightly damp cloth to remove all sanding dust before applying any finish. -
Apply sealant:
Brush on a coat of matte varnish or sealant. This step seals the speckles in place and protects the white clay from staining when used with coffee or tea. -
Final cure:
Let the sealant dry completely according to the manufacturer’s timeframe before stacking them or setting a drink down.
Add Cork Bottoms
To prevent scratching your table and make the coasters quieter, cut circles of thin cork adhesive sheet and stick them to the underside of each finished coaster.
Enjoy using your sleek new set for your morning hydration ritual


White Clay Pinch Pots

These charming, minimalist bowls showcase the raw beauty of white clay with an organic, hand-modeled texture. They are perfect for holding small trinkets, salts, or rings, adding a touch of wabi-sabi elegance to any surface.
Step-by-Step Guide
Materials
- Air-dry clay (white) or polymer clay
- Small bowl of water
- Sponge
- Wooden modeling tool or spoon back
- Smooth work surface (canvas or silicone mat)
- Fine-grit sandpaper (optional)
- Matte sealant or varnish
Step 1: Forming the Base
-
Prepare the Clay:
Start by cutting off a chunk of white clay roughly the size of a golf ball or a small tangerine. Knead it in your warm hands for about a minute to condition it, making it pliable and preventing cracks. -
Roll a Sphere:
Roll the conditioned clay between your palms until you have a smooth, round ball. Try to eliminate any major seams or folds during this rolling process. -
Start the Pinch:
Hold the clay ball in your non-dominant hand. With your dominant thumb, gently press directly into the center of the sphere, stopping about a half-inch from the bottom to leave a sturdy base. -
Open the Shape:
Begin pinching the clay between your thumb (inside) and fingers (outside). Rotate the ball slightly after each pinch, working your way around the clay in a spiral motion. -
Build the Walls:
Continue pinching upward from the base to the rim. Aim for an even thickness of about a quarter-inch throughout the wall. -
Refine the Rim:
Once you have the height you want, gently tap the rim of the pot upside down on your work surface to level it out, or leave it organic.
Cracks Appearing?
If small cracks form while pinching, dip your finger in water and smooth the clay paste (slip) over the crack immediately to bond it back together.
Step 2: Texturing and Shaping
-
Create the Facets:
This is the defining feature of these pots. Instead of smoothing the outside perfectly, use the pad of your thumb or a flat wooden tool to press small indentations all over the exterior. -
Accentuate the Texture:
Work around the bowl, overlapping these thumb-pressed divots slightly. The goal is a hammered metal look, but soft and matte. -
Smooth the Inside:
While preserving the rough exterior, clean up the inside. Dip your finger or a small piece of sponge in water and run it smoothly around the interior to erase fingerprints or cracks. -
Check the Base:
Tap the bottom of the pot gently against the table one last time to ensure it sits flat and doesn’t wobble. -
Rest and Dry:
Place your pots on a clean board to dry. I prefer to let them dry slowly away from direct heat to prevent warping. Wait 24-48 hours depending on humidity.
Step 3: Finishing Touches
-
Light Sanding:
Once fully dry (bone white and hard), check the rim. If it feels too sharp or jagged, gently swipe it with fine-grit sandpaper, but leave the exterior body untouched to keep that lovely texture. -
Clean Up Dust:
Wipe the pot down with a slightly damp cloth or a dry brush to remove any clay dust from the sanding process. -
Sealing:
Apply a thin coat of matte varnish or sealant. This protects the clay from moisture and dirt while maintaining that natural, unglazed appearance shown in the photo. -
Final Cure:
Allow the sealant to dry completely according to the bottle instructions before placing any items inside.
Speckled Finish
Knead in a pinch of dried coffee grounds or black pepper before forming the ball to give the white clay a trendy, speckled ceramic look.
Now you have a set of minimal, organic bowls ready to organize your treasures

What Really Happens Inside the Kiln
Learn how time and temperature work together inside the kiln to transform clay into durable ceramic.
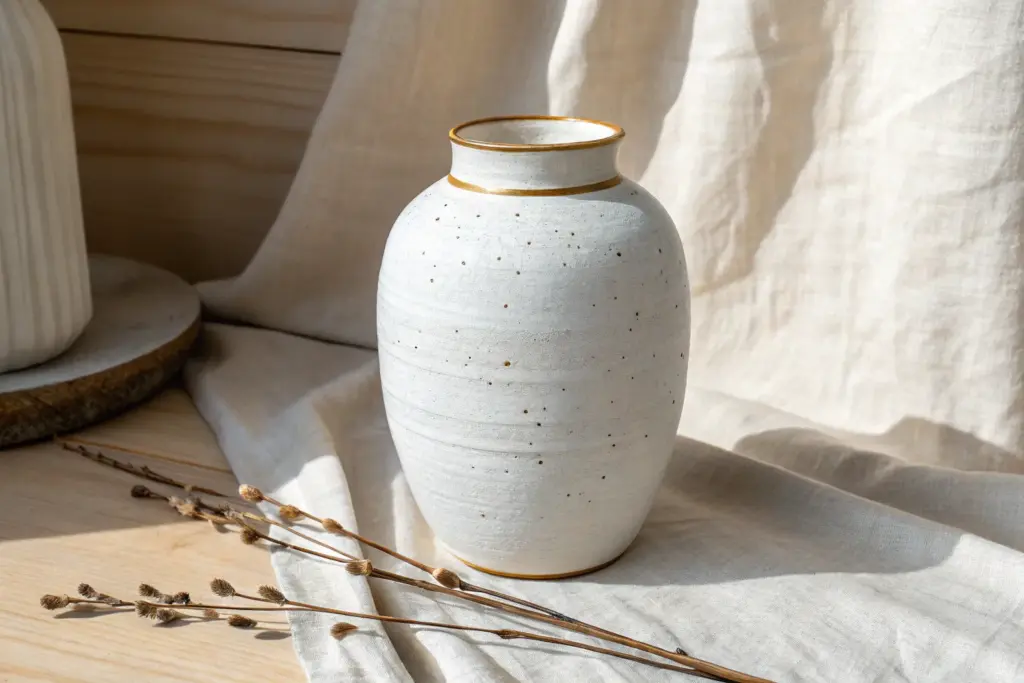
White Clay Bud Vases
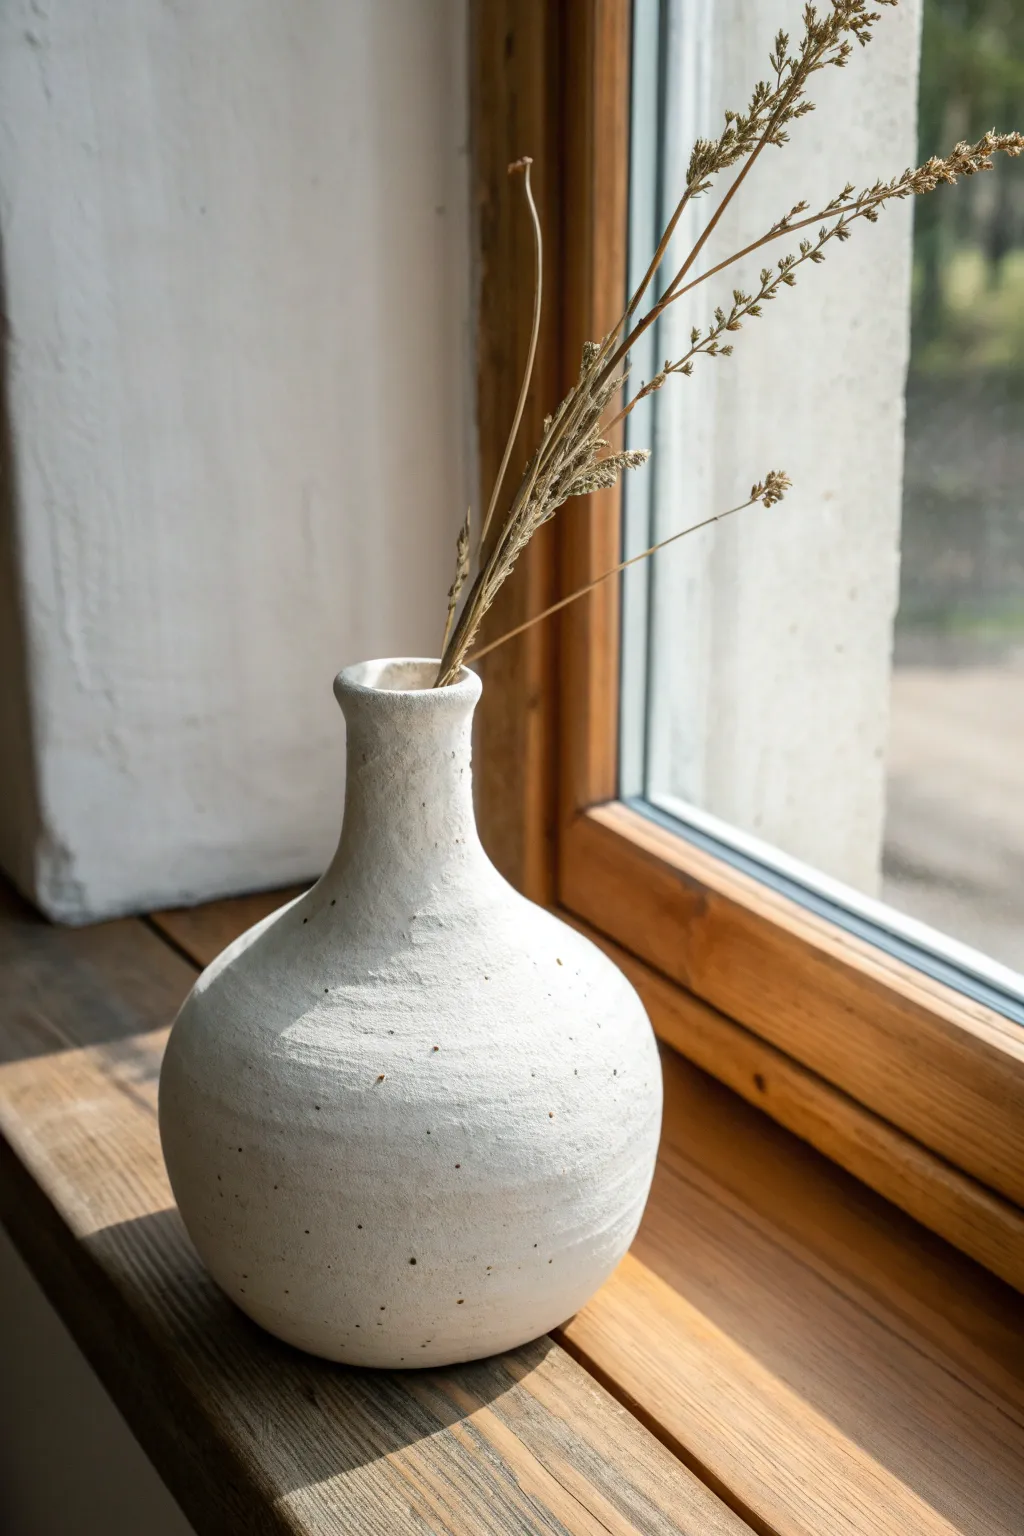
This charming, bulbous vase gets its character from a wonderfully imperfect texture and natural speckling that mimics weathered stone. It’s a perfect beginner-friendly project that focuses on hand-building techniques to create an organic, earthy vessel for your dried botanicals.
Detailed Instructions
Materials
- White stoneware clay or white air-dry clay
- Dried coffee grounds or coarse black pepper (for speckling)
- Small bowl of water
- Potter’s needle tool or wooden skewer
- Sponge
- Wooden modeling tool or old spoon
- Rolling pin
- Canvas mat or non-stick work surface
- Fine-grit sandpaper (optional, for after drying)
- Matte clear sealant (if using air-dry clay)
Step 1: Preparing the Clay Body
-
Wedge the clay:
Begin with a ball of clay about the size of a large grapefruit. Wedge it thoroughly on your canvas mat to remove any air bubbles. -
Add the speckles:
Flatten the clay slightly and sprinkle a teaspoon of dried coffee grounds or coarse black pepper over the surface. Fold the clay over itself and wedge again until the speckles are evenly distributed throughout the mass. -
Divide the clay:
Pinch off about one-third of the clay and set it aside for the neck. Keep the larger portion for the body of the vase.
Step 2: Forming the Pinch Pot Base
-
Start the pinch pot:
Roll the larger clay ball into a smooth sphere. Hold it in one hand and dazzling push your thumb into the center, stopping about half an inch from the bottom. -
Open the form:
Gently pinch the clay between your thumb and fingers, rotating the ball as you go. Work from the bottom upward to widen the opening. -
Shape the belly:
Continue pinching to thin the walls, focusing on pushing the clay outward to create a round, bulbous ‘belly’ shape. Aim for a wall thickness of about 1/4 inch. -
Close the shoulder:
As you reach the top of the curve, gently angle your pinching inward to narrow the opening slightly, creating the shoulder of the vase.
Uneven Texture
Don’t use water while shaping the main body. Keeping the clay ‘dry’ creates those beautiful drag marks and natural cracks visible in the photo.
Step 3: Building the Neck and Finishing
-
Create a coil:
Take the reserved smaller piece of clay and roll it into a thick coil or ‘snake’ on your table. It should be wide enough to form the neck. -
Form a cylinder:
Wrap the coil into a circle that matches the size of your base’s opening. Smooth the seam where the ends meet to create a short cylinder. -
Score and slip:
Use your needle tool to scratch cross-hatch marks on top of the vase body and the bottom of the neck cylinder. Dab a little water (slip) onto the scratched areas. -
Attach the neck:
Press the cylinder firmly onto the base. Use your thumb or a wooden tool to blend the clay downwards from the neck to the body on the outside, and upwards on the inside, ensuring a seamless connection. -
Elongate the neck:
Slowly pinch and pull the neck upwards to lengthen it. I find it helpful to support the inside with a finger while smoothing the outside to keep it straight. -
Refine the rim:
Gently flare the very top lip of the vase outward slightly for a softer look. Smooth the rim with a damp sponge so there are no sharp edges. -
Add surface texture:
Instead of smoothing the vase perfectly, tap the exterior lightly with the back of a wooden spoon or a roughly textured sponge. This enhances the organic, rustic feel. -
Dry slowly:
Place your vase away from direct heat or drafts. Let it dry slowly over 24-48 hours to prevent cracking, especially at the neck joint. -
Seal or fire:
If using air-dry clay, apply a matte sealant once fully dry. For ceramic clay, fire it according to the manufacturer’s bisque and glaze instructions, preferably with a matte clear glaze to keep the raw look.
Two-Tone Look
Before sealing, dry-brush a tiny amount of diluted white acrylic paint over just the textured high points to emphasize the rough surface.
Now you have a timeless, handcrafted vessel ready to hold your favorite dried stems or grasses
White Clay Mini Planters
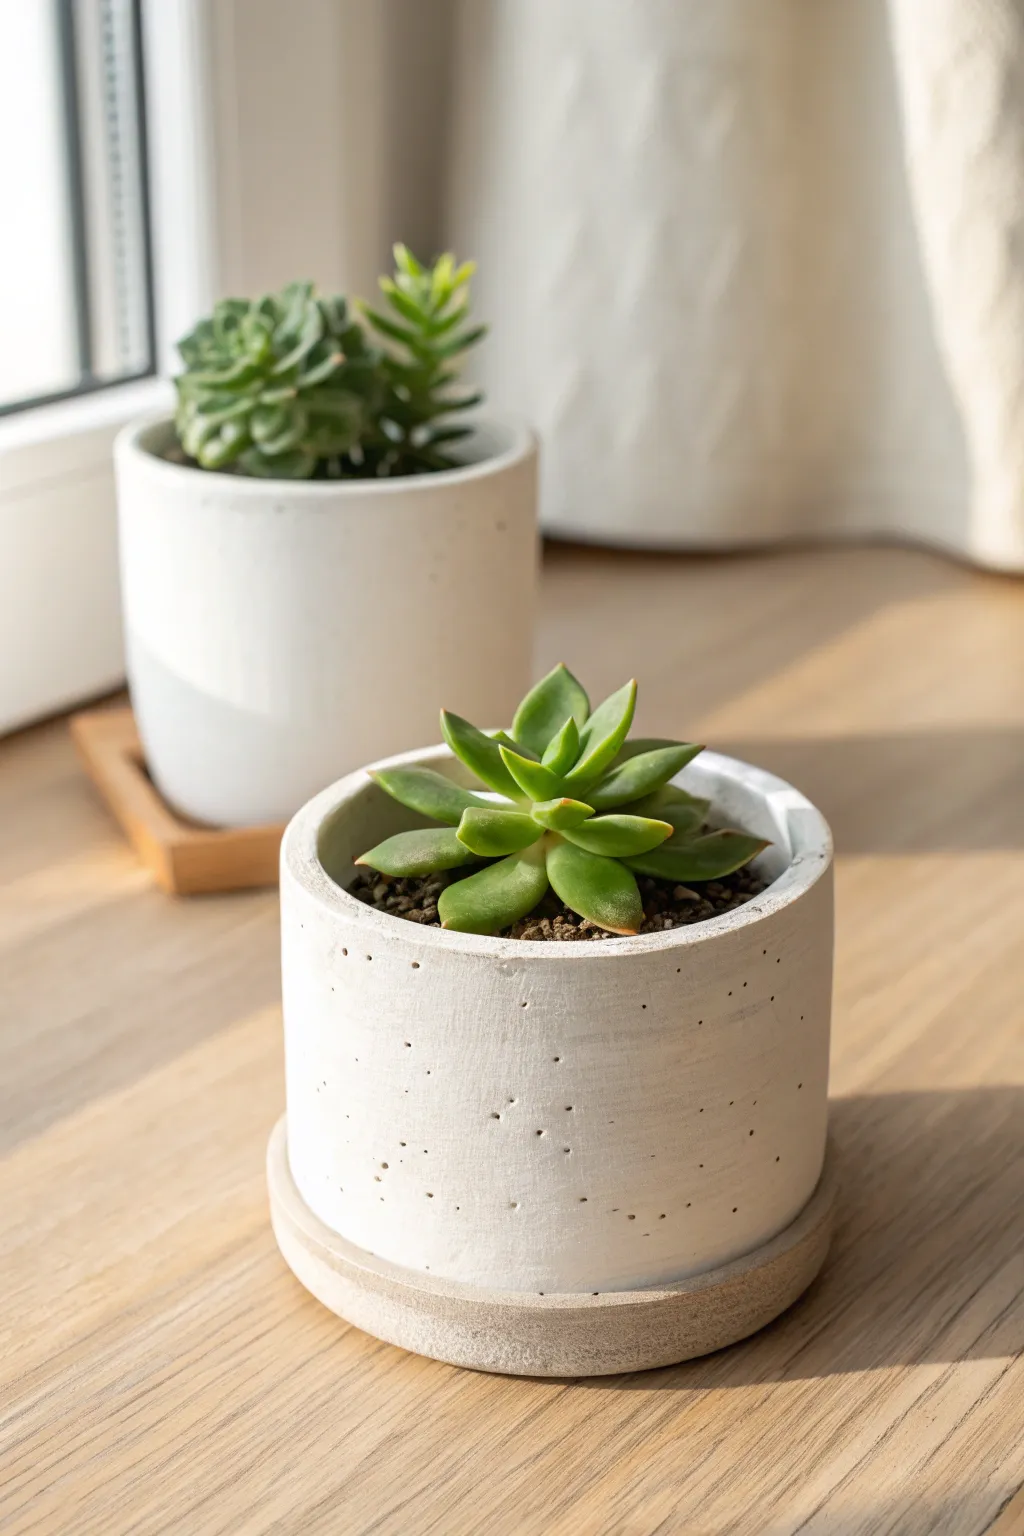
These charmingly simple cylindrical planters feature a subtle speckled texture and a matching saucer, bringing a modern, minimalist aesthetic to your windowsill. The raw white clay finish mimics polished concrete or stone, providing perfect contrast for vibrant green succulents.
How-To Guide
Materials
- Air-dry white clay or polymer clay (white)
- Rolling pin
- Parchment paper or craft mat
- Craft knife or clay slicer
- Cylindrical mold (like a heavy glass jar or a section of PVC pipe)
- Toothbrush or stippling brush
- Needle tool or toothpick
- Small bowl of water
- Sandpaper (fine grit)
- Matte sealant/varnish (optional)
- Coarse black pepper or dried coffee grounds (for speckling effect)
Step 1: Prepping and Rolling the Clay
-
Prepare your workspace:
Lay down a sheet of parchment paper on a flat surface to prevent sticking. This makes it much easier to peel your clay off later without distorting the shape. -
Condition the clay:
Knead a generous handful of white clay until it is soft and pliable. If the clay feels too stiff, warm it up in your hands for a few minutes. -
Add the texture:
For that lovely stone-like speckle seen in the photo, sprinkle a tiny pinch of coarse black pepper or dried coffee grounds into the clay. Knead it thoroughly until the specks are evenly distributed throughout the white mass. -
Roll out the slab:
Use your rolling pin to flatten the clay into a long, even rectangle. Aim for a thickness of about 1/4 inch (6mm) to ensure the pot is sturdy enough to hold soil.
Step 2: Forming the Cylinder
-
Measure and cut:
Place your cylindrical mold on the clay to estimate the length needed to wrap around it fully. Use the craft knife to cut a clean, straight rectangular strip. Save the excess clay for the base. -
Wrap the mold:
Gently lift the clay strip and wrap it around your mold. Sometimes I lightly dust the mold with cornstarch first so the clay slides off easily later. -
Join the seam:
Where the two ends meet, overlap them slightly and cut through both layers simultaneously for a perfect flush fit. Remove the excess scraps. -
Smooth the connection:
Score the raw edges with a needle tool, dab a little water on them, and press them together. Use your finger or a modeling tool to smooth the seam until it disappears completely.
Crack Control
If you see tiny cracks forming while the clay dries, smooth a slurry of water and clay dust (slip) into the crack with your finger immediately to bond it back together.
Step 3: Creating the Base and Saucer
-
Cut the bottom:
Roll out the remaining clay. Place your clay-wrapped mold directly onto this fresh slab and trace around it with your needle tool to create a perfectly sized circle for the pot’s bottom. -
Attach the bottom:
Score and wet the edges of the circle and the bottom rim of your cylinder. Press the circle firmly into place. Use your thumb to blend the clay from the bottom up onto the walls to secure the bond. -
Create drainage (optional):
If you plan to plant directly into the pot, use a straw to punch a small hole in the center of the bottom for water drainage. -
Form the saucer:
Roll a slightly thicker slab for the saucer. Cut a circle that is about 1/2 inch wider than your pot’s diameter. Gently press the center to concave it slightly, or add a small raised rim by attaching a thin coil of clay around the edge.
Faux Terrazzo
Mix tiny chunks of colored clay (grey, beige, or black) into your white base before rolling. Once sanded, these chips appear as a stylish terrazzo pattern.
Step 4: Finishing Touches
-
Add surface texture:
Before the clay dries, take a stiff toothbrush or a stippling brush and gently tap it all over the exterior surface. This creates the porous, concrete-like texture shown in the image. -
Refine the rim:
Check the top rim of the pot. If it looks too sharp or uneven, dampen your finger and run it along the edge to soften and level it. -
Poke decorative holes:
The image shows subtle pitting; use a needle tool to create tiny, random pinpricks on the surface, mimicking air bubbles found in cast concrete. -
Dry the project:
Carefully slide the mold out. Let the pot and saucer air dry for 24-48 hours (or bake according to package instructions if using polymer clay). Turn them occasionally for even drying. -
Sand and seal:
Once fully cured, use fine-grit sandpaper to smooth any rough patches on the rim or base. Apply a matte sealant to protect the clay from moisture, especially on the inside.
Now you have a chic, custom planter ready to showcase your favorite succulent


The Complete Guide to Pottery Troubleshooting
Uncover the most common ceramic mistakes—from cracking clay to failed glazes—and learn how to fix them fast.
White Clay Candle Holders
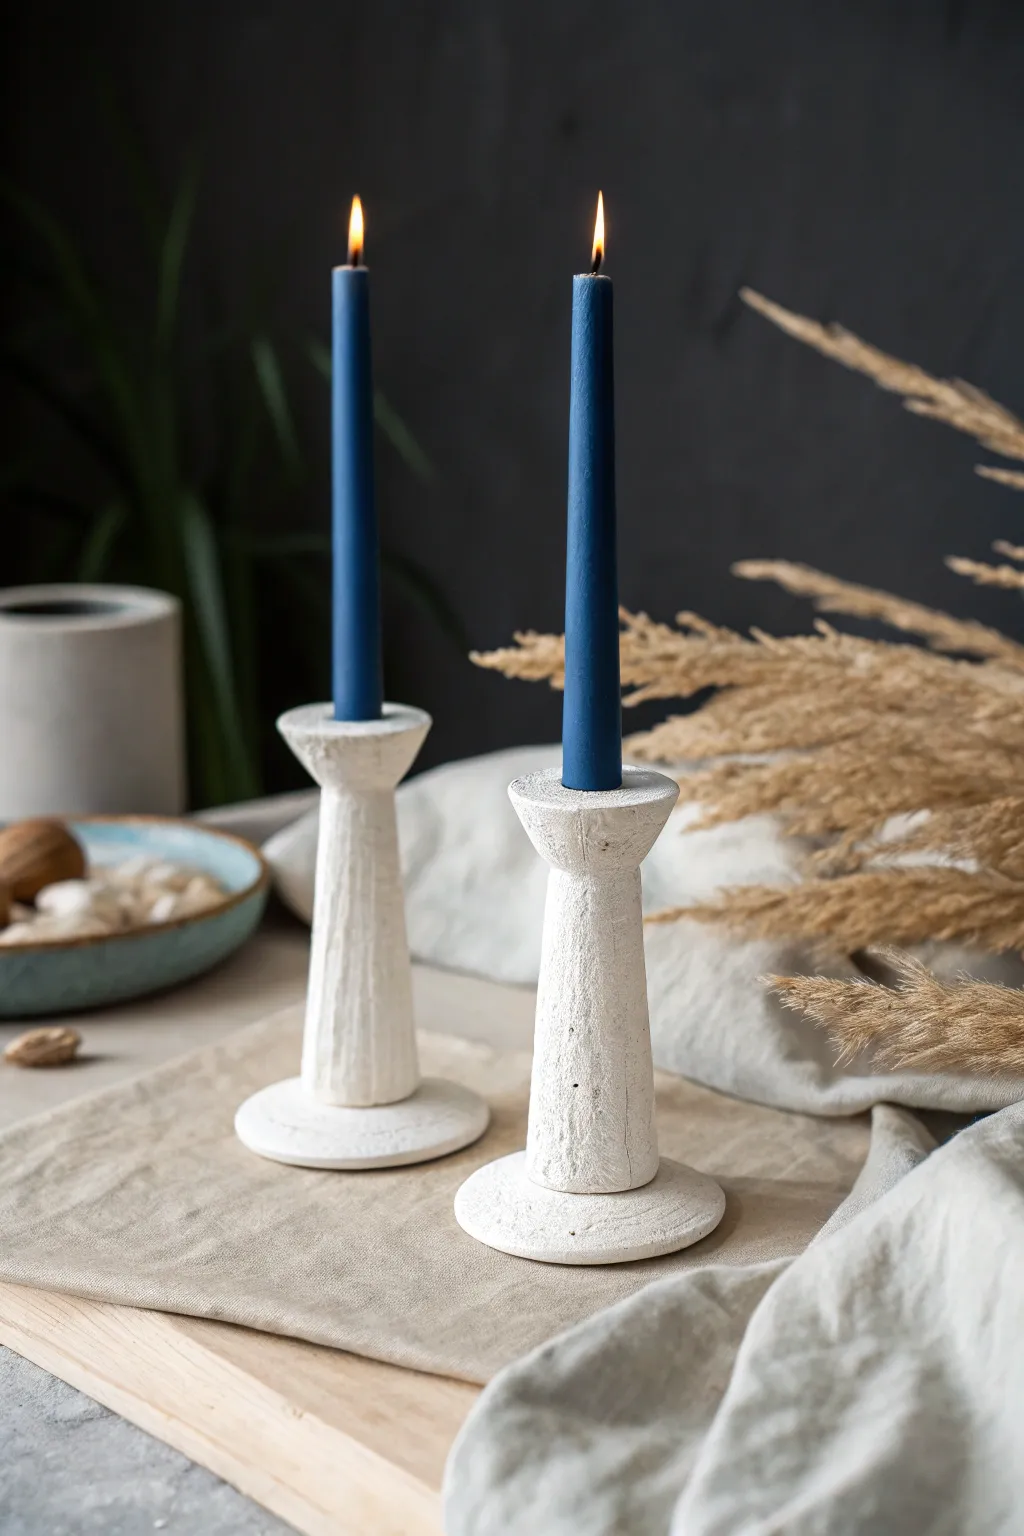
Create an elegant atmosphere with these slender, faux-stone candle holders that blend rustic texture with modern form. The rough, grainy finish on the white clay mimics the look of aged limestone, making a perfect contrast for bold colored taper candles.
Step-by-Step
Materials
- Air-dry white clay (or polymer clay)
- Small rolling pin
- Cardboard or sturdy cardstock (for conical mold)
- Masking tape
- Craft knife or clay cutter
- Small cup of water
- Old toothbrush or stippling sponge
- Fine-grit sandpaper
- Matte white acrylic paint (optional)
- Baking soda (optional for texture)
Step 1: Forming the Base Structure
-
Prepare the conical form:
Cut a piece of cardboard or sturdy cardstock and roll it into a tall, narrow cone shape. Tape it securely. This will act as the internal support for your candlestick stem. -
Roll the clay slab:
Roll out your white clay to a uniform thickness of about 1/4 inch. It needs to be thick enough to hold texture but thin enough to wrap easily. -
Wrap the stem:
Cut a rectangle of clay large enough to wrap around your cardboard cone. Gently wrap it around the form, overlapping the edges slightly. -
Seamless connection:
Dip your finger in a little water and smooth the seam where the clay overlaps until it disappears completely. The stem should taper slightly narrower toward the top. -
Create the base:
Roll a small ball of clay and flatten it into a thick disc, roughly 3 inches wide. This will be the sturdy foot of your holder. -
Attach stem to base:
Score the bottom of your wrapped stem and the center of the disc base. Apply a little water or slip (liquid clay) and press them firmly together. -
Reinforce the join:
Use a modeling tool or your finger to smooth clay downward from the stem onto the base, ensuring there is no visible crack between the two pieces.
Stone Effect Tip
Don’t over-smooth your clay initially. Leaving small lumps, bumps, and fingerprints actually helps the final piece look more like organic, hand-carved stone.
Step 2: Adding the Candle Cup and Texture
-
Form the top cup:
Create a smaller, inverted cone shape from solid clay. It should flare outwards, wider than the top of the stem. -
Hollow the socket:
Press a real candle (or a dowel of the same size) into the top of this flared piece to create the hole. Wiggle it slightly to ensure fit, then remove it carefully. -
Attach the cup:
Score and slip the top of the stem and the bottom of your flared cup. Press them together firmly, blending the clay at the seam for a unified look. -
Texturize the surface:
This is the crucial step for that stone look. Take an old toothbrush or a stiff stippling brush and tap it repeatedly all over the surface. -
Add vertical imperfections:
I like to gently drag the bristles vertically up the stem to create those subtle striations seen in the reference image. -
Refine the edges:
While texturing, make sure the rim of the base and the top cup aren’t too sharp. Gently tap them with your finger to soften the profile.
Step 3: Finishing Touches
-
Dry thoroughly:
Allow the clay to dry completely. For air-dry clay of this thickness, this usually takes 24-48 hours. Turn it occasionally for even drying. -
Remove the core:
Once fully dry and rigid, carefully pull the cardboard form out from the bottom if possible, or simply leave it inside if it is hidden. -
Mix textured paint:
Mix white acrylic paint with a teaspoon of baking soda. This creates a chalky, plaster-like paste. -
Apply the finish:
Paint the entire candlestick with your textured mix. Use a dabbing motion rather than long strokes to enhance the stone effect. -
Final cure:
Let the paint dry completely before inserting your tall taper candles.
Level Up: Speckled Granite
Dilute a tiny drop of black or grey paint with water on an old toothbrush. Flick the bristles to lightly spatter the dry white surface for a realistic granite look.
Now light your candles and enjoy the serene, artisanal vibe these holders bring to your table setting
White Clay Incense Tray
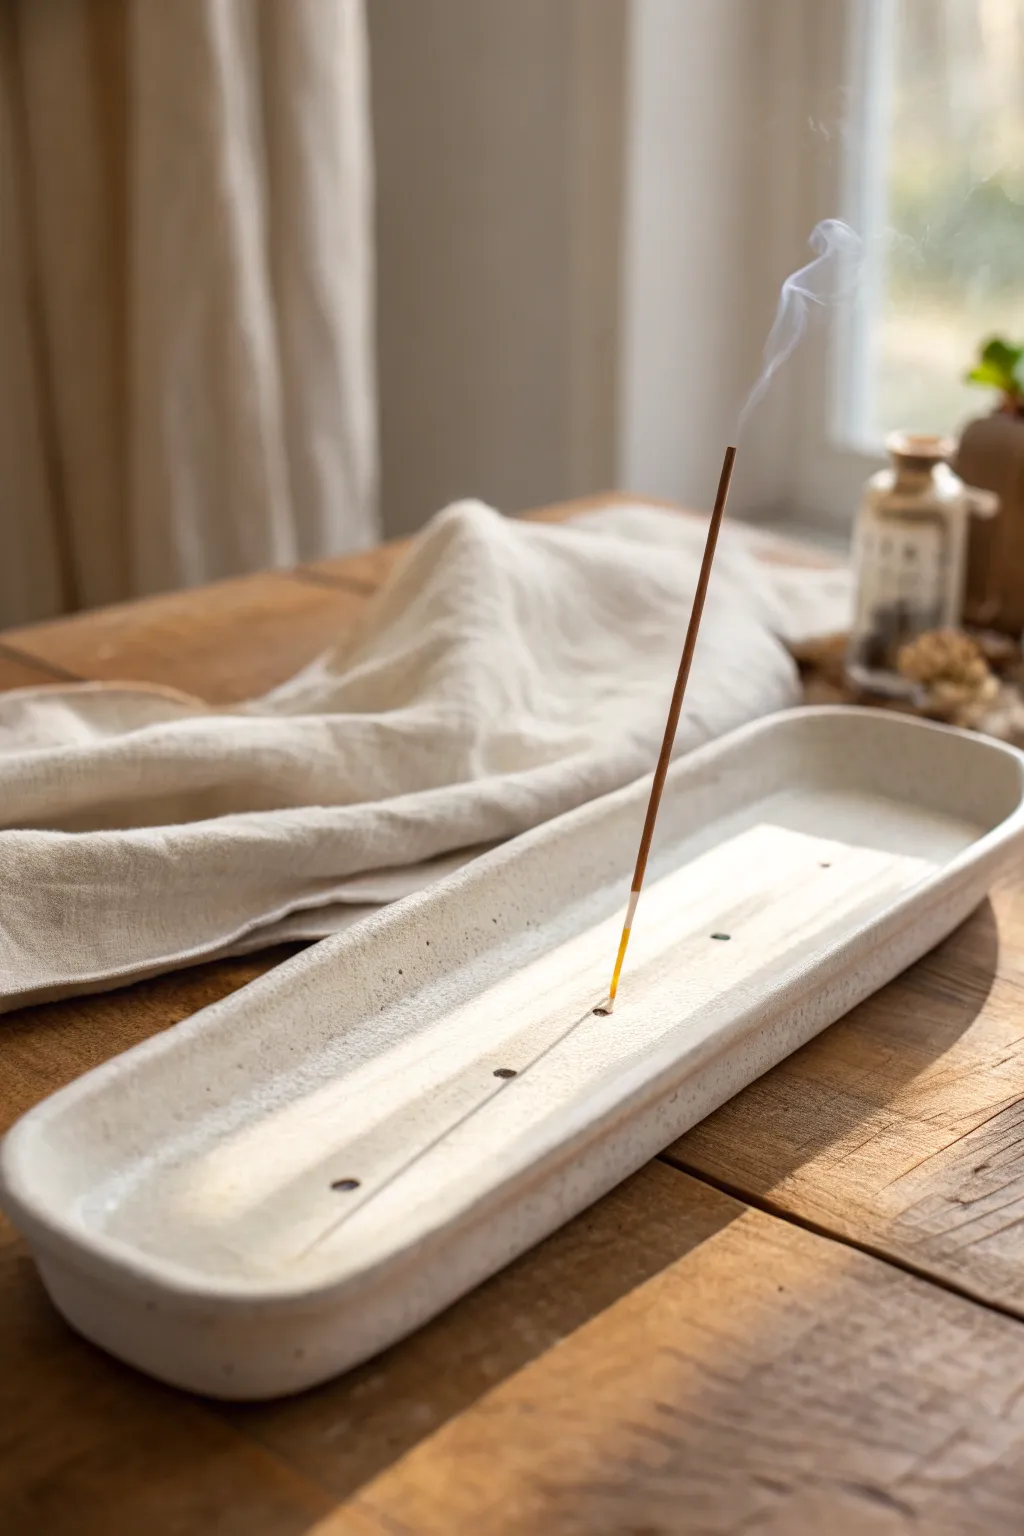
This minimalist incense tray combines functional simplicity with a soft, speckled aesthetic that fits perfectly in any modern space. The elongated design acts as both a holder and an ash catcher, featuring a gentle rim and holes for multiple incense stick sizes.
How-To Guide
Materials
- White air-dry clay or polymer clay (approx. 500g)
- Speckling agent (dried coffee grounds, black pepper, or coarse sand)
- Rolling pin
- Parchment paper or canvas mat
- Craft knife or scalpel
- Ruler
- Small bowl of water
- Sponge
- Needle tool or small drill bits (various sizes)
- Fine-grit sandpaper (220-400 grit)
- Matte sealant or varnish
Step 1: Preparing the Speckled Clay
-
Condition the clay:
Begin by kneading your white clay until it is soft, pliable, and free of cracks. Warmth from your hands will make this easier. -
Add texture:
Flatten the clay slightly and sprinkle your chosen speckling material over it. I like to use dry used coffee grounds for an organic look, but cracked pepper works too. -
Knead repeatedly:
Fold the clay over the speckles and knead thoroughly. Continue folding and kneading until the specks are evenly distributed throughout the entire block.
Rim Separation?
If the clay rim cracks away from the base while drying, fill the gap with a fresh mix of wet clay and vinegar (for air-dry) or liquid clay (for polymer) and smooth over.
Step 2: Shaping the Tray
-
Roll the slab:
Place the clay on parchment paper and roll it out into a long oval or rectangle shape, aiming for a consistent thickness of about 1/4 inch (6mm). -
Cut the base shape:
Using a ruler and craft knife, cut a clean rectangle approximately 10-12 inches long and 2.5 inches wide. You can freehand rounded corners now or trim them later. -
Create the walls:
Roll a long, thin coil (snake) of clay, roughly the thickness of a pencil, long enough to go around the perimeter of your base. -
Score and slip:
Rough up the edges of the base and the bottom of the coil using your needle tool. Dab a little water (or liquid clay if using polymer) on these scored areas to act as glue. -
Attach the rim:
Press the coil firmly onto the edge of the base. Gently blend the clay of the coil down into the base on the inside and outside using your thumb or a modeling tool until the seam disappears. -
Refine the shape:
Smooth the walls to create a uniform height. Use a slightly damp sponge to soften the top edge of the rim and round off the corners of the rectangle for that gentle look shown in the image.
Stone Effect
Mix in small amounts of grey or beige clay before adding the speckles. Don’t mix it completely—leave it slightly marbled for a natural stone effect.
Step 3: Adding Details and Finishing
-
Mark the center:
use a ruler to lightly visualize the center line of the tray. This ensures your incense will stand straight and ash will fall inside. -
Create incense holes:
Using a needle tool or small drill bit, poke holes along the center line. Create 3-4 holes spread out, varying the angles slightly or making them different sizes to accommodate different stick thicknesses. -
Check hole depth:
Ensure the holes go about halfway through the base thickness so the stick is stable, but be careful not to poke all the way through to the table. -
Dry the piece:
Allow the clay to dry according to package instructions. For air-dry clay, loosely cover with plastic for the first 12 hours to prevent warping, then let air dry completely for 24-48 hours. -
Sand smooth:
Once fully cured, use fine-grit sandpaper to smooth any rough edges on the rim or bumps on the surface. Wipe away the dust with a barely damp cloth. -
Seal the surface:
Apply a coat of matte varnish or sealant. This protects the porous clay from ash marks and makes cleaning easier later.
Place your favorite incense stick in the holder and enjoy the calm atmosphere you have created

TRACK YOUR CERAMIC JOURNEY
Capture glaze tests, firing details, and creative progress—all in one simple printable. Make your projects easier to repeat and improve.
White Clay Photo Stand
Embrace the beauty of modern simplicity with this elegant arch-shaped photo holder. Its clean lines and white, matte finish mimic the look of shaped stone, making it the perfect understated accessory for displaying your favorite Polaroid memories on a desk or shelf.
Step-by-Step
Materials
- White classic air-dry clay (or polymer clay)
- Roller or rolling pin
- Craft knife or clay blade
- Ruler
- Small bowl relative to your desired arch size
- Fine-grit sandpaper (400-600 grit)
- Water in a small cup
- Parchment paper or a silicone mat
- A spare card or thick cardstock (to create the slot)
Step 1: Shaping the Clay
-
Prepare your clay:
Start with a generous handful of white air-dry clay. Knead it in your hands for a minute or two to warm it up and ensure it is pliable and free of air bubbles. -
Roll out a slab:
Place the clay on your parchment paper or silicone mat. Using your roller, flatten the clay into a thick, even slab. Aim for a thickness of about 1 inch (2.5 cm) to ensure the stand is stable and heavy enough. -
Trimming the base:
Using your ruler and craft knife, cut a straight line across the bottom of your slab. This will be the flat base that sits on your desk, so make sure the cut is clean and perpendicular to the surface. -
Create the arch outline:
Find a small bowl or a round cookie cutter that matches the inner curve you want. Lightly press it into the clay to mark the inner semi-circle, centering it above your flat base. -
Cut the outer shape:
Freehand or use a larger bowl to mark the outer curve, keeping a consistent width of about 1.5 inches around the inner arch. Carefully cut along this outer line with your craft knife. -
Cut the inner void:
Now, carefully cut out the inner semi-circle you marked earlier. Remove the excess clay from the center. -
Refine the edges:
Dip your finger in a little water and smooth down all the sharp cut edges. I find that spending extra time here to round the corners slightly gives it that soft professionally-cast look. -
Check stability:
Stand the arch up on its base to ensure it doesn’t wobble. If it leans, gently tap the bottom against your work surface to flatten it further.
Smooth Cuts
If your knife drags through the clay, apply a tiny bit of lotion or oil to the blade. This helps it glide through the thick slab without distorting the shape.
Step 2: Adding the Slot & Finishing
-
Create the photo slot:
While the clay is still wet, take your spare card or a piece of thick cardstock. Press it firmly into the very top center of the arch, creating a slit about 0.5 inches deep. Wiggle it slightly front-to-back to ensure the slot is wide enough for a photo. -
Smooth the opening:
The clay may have bulged slightly around the slit. Use a damp finger or a clay tool to gently smooth the surface back down without closing the hole. -
Initial drying phase:
Let the piece dry upright in a cool, dry place away from direct sunlight. Rotate it every few hours if possible to ensure even drying. -
Full cure:
Allow the clay to dry completely for 24 to 48 hours. The clay will turn from a greyish tone to a bright, chalky white when fully dry. -
Sanding for texture:
Once bone dry, take your fine-grit sandpaper and gently sand the entire surface. This removes fingerprints and creates that beautiful matte, stone-like texture visible in the photo. -
Dusting off:
Wipe the piece down with a dry cloth or a soft brush to remove the clay dust from sanding. -
Optional sealing:
Identify if you want a protective coat. For this specific raw look, you can leave it unsealed, or apply a very matte varnish to protect it without adding shine.
Speckled Stone Effect
Mix a small pinch of used coffee grounds or black pepper into the white clay before rolling. Once sanded, this creates a convincing faux-granite look.
Place your favorite snapshot in the slot and enjoy your chic new display piece
White Clay Wall Hanging Tiles

This minimalist wall hanging brings a touch of modern bohemian charm to any space with its simple, rhythmic semi-circles. The textured white clay and natural twine create an organic, airy feel that’s perfect for adding subtle dimension to a bare wall.
How-To Guide
Materials
- White air-dry clay (approx. 1 lb)
- Rolling pin
- Circle cookie cutter (approx. 3-4 inches diameter) or a round bowl
- Sharp craft knife or clay slicing tool
- Natural jute twine or hemp cord
- Straw or wooden skewer (for piercing holes)
- Fine-grit sandpaper
- Parchment paper or canvas mat
- Bowl of water
- Driftwood branch or dowel (optional, for mounting)
Step 1: Shaping the Clay Tiles
-
Prepare your workspace:
Lay down parchment paper or a canvas mat to prevent the clay from sticking. Knead your white clay briefly until it is pliable and smooth, working out any air bubbles. -
Roll out the slab:
Roll the clay out evenly until it is about 1/4 inch thick. Aim for a consistent thickness across the entire slab so all your pieces dry at the same rate. -
Cut the circles:
Use your large circle cutter or trace around a bowl to cut out three perfectly round discs. If you want a longer hanging with more segments, cut out four or five circles. -
Create semi-circles:
Take your sharp craft knife and slice each circle exactly in half. You will now have six (or more) semi-circular pieces. This geometric shape is the foundation of the design. -
Smooth the edges:
Dip your finger in a little bit of water and run it gently along the cut edges of each semi-circle to soften any sharpness or crumbling bits.
Uneven Drying?
If your clay tiles are curling while drying, gently flip them over every few hours. Weighing them down lightly with a book once they are ‘leather hard’ also keeps them perfectly flat.
Step 2: Adding Holes & Drying
-
Pierce the top holes:
Using a straw or skewer, poke a hole in the center of the curved top edge of each semi-circle. Make sure the hole is largely enough for your twine to pass through easily, usually about 1/4 inch from the edge. -
Pierce the bottom holes:
For all pieces *except* the one that will hang at the very bottom, pierce a second hole in the center of the straight bottom edge. This allows you to chain them together. -
Check hole alignment:
I like to line the pieces up vertically on the table to ensure the top and bottom holes align visually. This ensures the mobile hangs straight later. -
Initial drying:
Let the pieces dry flat on the parchment paper for at least 24-48 hours. Place a lightweight board or book on top of them (sandwiching them between parchment) if they start to curl up at the edges. -
Sanding:
Once fully dry and hard, take fine-grit sandpaper and gently buff the edges and surface. This removes any fingerprints or uneven texture, giving it that professional matte stone look.
Step 3: Assembly
-
Cut the twine:
Cut a long piece of jute twine, roughly 4 feet long to be safe. You can always trim the excess later. -
Start from the bottom:
Take the bottom-most semi-circle (the one with only a top hole). Thread the twine through the hole and tie a secure double knot. The knot should sit on the front or back depending on your preference, but usually, a knot resting just above the hole holds it well. -
Adding the next tier:
Thread the twine up through the bottom hole of the next semi-circle and out through its top hole. Slide this piece down the string until it sits about 1-2 inches above the first piece. -
Knotting for spacing:
To keep the piece from sliding down, tie a knot in the twine right where you want the piece to sit. The knot needs to be larger than the hole, so tie it twice or three times if your twine is thin. -
Repeat the process:
Continue adding pieces, tying support knots underneath each one to maintain consistent spacing between the tiles. -
Attaching to the wood:
Once all semi-circles are attached, tie the remaining top length of the twine securely around the center of your driftwood branch or dowel. -
Hang the wood:
Cut a separate piece of twine to create a hanging loop for the branch itself. Tie one end to the left side of the branch and one to the right. -
Final adjustments:
Hang your artwork on the wall and gently rotate the semi-circles to ensure they are all facing forward and hanging straight.
Level Up: Texture
Before cutting your shapes, press a piece of lace, linen fabric, or even a leaf into the wet clay slab. This transfers a subtle, beautiful texture that catches the light.
Now step back and admire the calm, rhythmic beauty of your handcrafted wall hanging
White Clay Stamped Ornaments
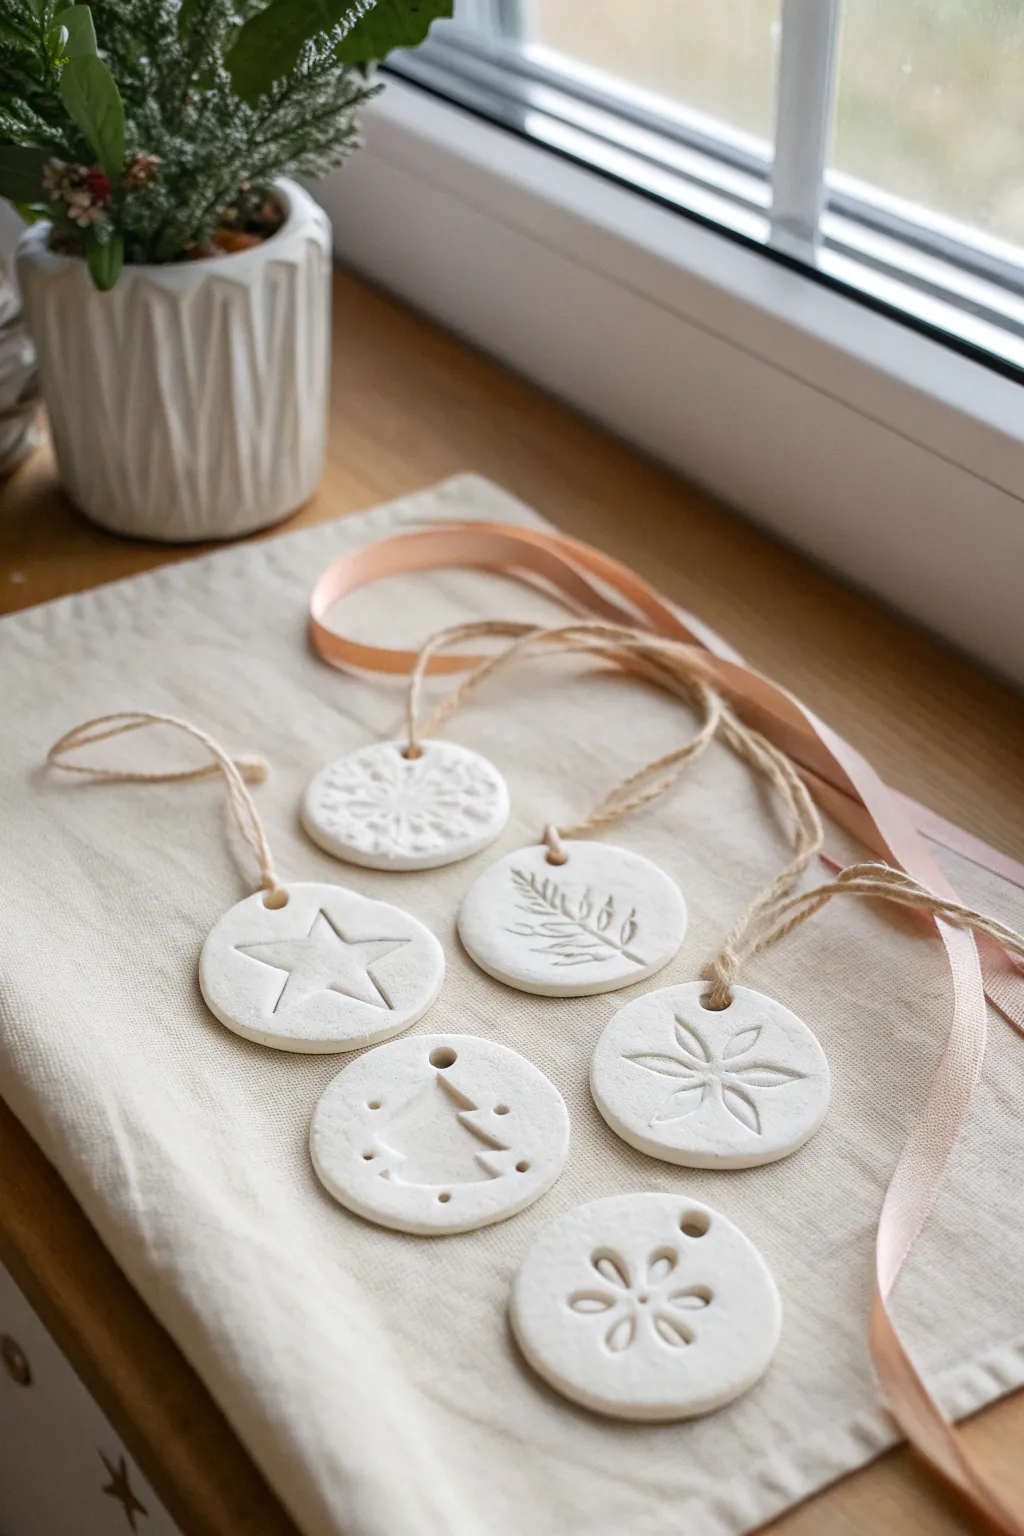
Create a set of minimalist and timeless holiday decorations using simple white clay and everyday textures. These delicate circular ornaments feature botanical and geometric imprints that look stunningly high-end despite being incredibly easy to make.
Step-by-Step Tutorial
Materials
- Air-dry white clay (or polymer clay)
- Rolling pin
- Circle cookie cutter (approx. 2.5-3 inches)
- Stamps or texture tools (rubber stamps, cookie stamps, fresh foliage)
- Drinking straw or skewer
- Fine-grit sandpaper
- Jute twine or thin hemp cord
- Parchment paper or non-stick mat
- Clear matte sealant (optional)
Step 1: Preparation & Cutting
-
Condition the clay:
Begin by taking a handful of white clay and kneading it in your hands to warm it up. This conditioning process prevents cracks and makes the clay more pliable for rolling. -
Roll it out:
Place your clay on a piece of parchment paper or a non-stick mat. Using your rolling pin, roll the clay out evenly until it is about 1/4 inch thick. Try to keep the thickness consistent so all ornaments dry at the same rate. -
Cut the shapes:
Press your circle cookie cutter firmly into the rolled clay. Give it a tiny wiggle before lifting to ensure a clean cut. Repeat to create as many discs as your clay allows. -
Smooth the edges:
Before the clay starts to dry, dip your finger in a little water and gently run it around the circumference of each circle to smooth out any rough or sharp edges left by the cutter.
Cracking Up?
If you notice tiny hairline cracks while drying, mix a tiny bit of fresh clay with water to make a paste (slip) and smooth it into the cracks with your finger.
Step 2: Imprinting Designs
-
Select your stamps:
Choose your design tools. You can use standard rubber stamps for the snowflake and geometric flower patterns, or use a small cookie cutter to gently press a star shape without cutting all the way through. -
Create botanical prints:
For the fern or leaf design, lay a small sprig of greenery directly onto a clay disc. Gently roll over it once with your rolling pin to embed the veins into the surface, then carefully peel the leaf away. -
Freehand textures:
For the Christmas tree design, you can use a small sculpting tool or even the edge of a credit card to press straight lines into the clay to form a triangular tree shape. -
Add detail dots:
If your designs need extra flair, like the ornaments on the tree or the center of the flowers, use the blunt end of a skewer to press small, uniform dots. -
Check impression depth:
Ensure your impressions are deep enough to be visible but not so deep that they warp the circle shape or make the clay too thin in spots.
Go Gilded
For a luxe upgrade, paint just the impressed lines of your stamp with gold liquid leaf paint, or dip the bottom third of the dried ornament in gold glitter glue.
Step 3: Finishing Touches
-
Pierce the hanging hole:
Use a drinking straw to punch a clean hole near the top of each ornament. A straw removes the core of the clay cleanly, whereas a stick might just push the clay aside. -
Initial drying phase:
Leave the ornaments on the parchment paper in a flat, dry area. Let them sit undisturbed for 24 hours. Flip them over halfway through this time to ensure the bottoms dry evenly and prevent curling. -
Sand for perfection:
Once fully cured and hard, check the edges again. If any roughness remains, take a piece of fine-grit sandpaper and lightly buff the rim of the ornament until it feels smooth to the touch. -
Optional sealing:
To protect the pure white finish from dust over time, you can apply a thin coat of clear matte sealant. I find this helps them last for years, though leaving them raw gives a lovely rustic texture. -
Stringing the ornaments:
Cut lengths of jute twine or hemp cord, approximately 8 inches long. Thread one end through the hole of an ornament. -
Secure the loop:
Bring the ends of the twine together and tie a secure overhand knot. Trim any excess fuzz from the knot for a tidy appearance.
Hang your beautiful handmade ornaments on the tree or use them as sophisticated gift tags for friends and family
White Clay Minimal Earrings
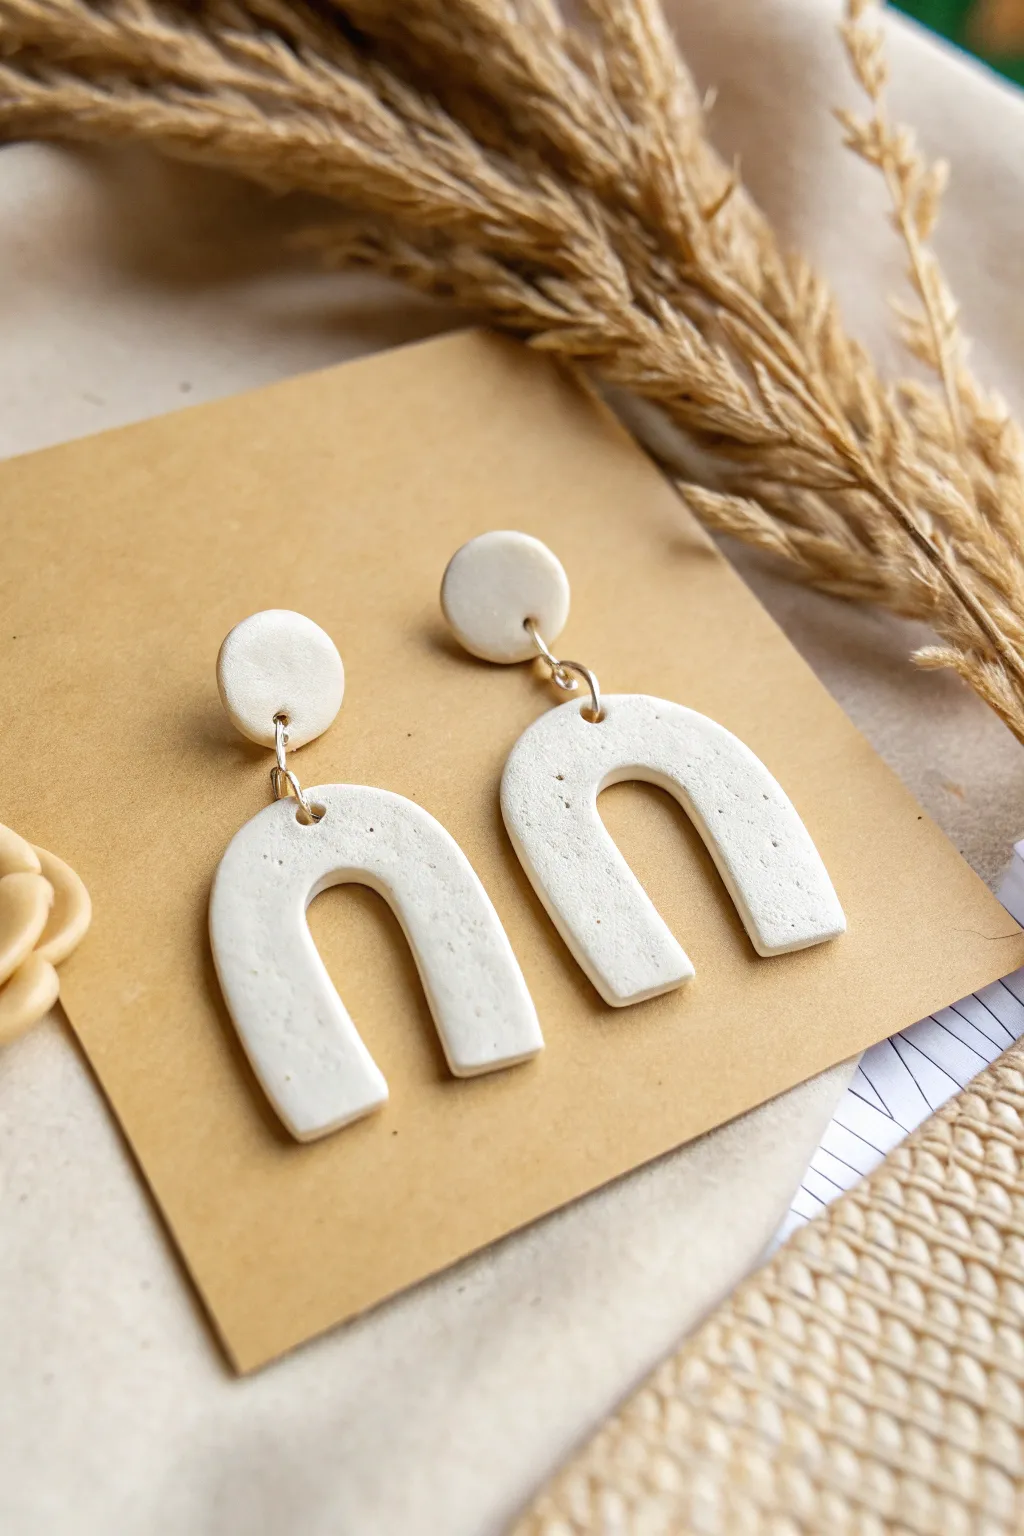
These minimal arch earrings combine a clean white clay base with a subtle, organic granite texture for a sophisticated modern look. Their lightweight design makes them comfortable for everyday wear while adding an artisanal touch to any outfit.
Detailed Instructions
Materials
- White polymer clay (cernit or fimo soft)
- Black pepper or dried vanilla bean specks
- Rolling pin or acrylic roller
- U-shaped clay cutter (or craft knife)
- Small round clay cutter (approx. 1 cm)
- Parchment paper or ceramic tile
- Hand drill or needle tool
- Jump rings (silver or gold)
- Earring posts and backs
- Jewelry glue (optional)
- Fine grit sandpaper
- Two pairs of flat-nose jewelry pliers
Step 1: Preparing and Shaping the Clay
-
Condition the clay:
Start by kneading the white polymer clay in your hands until it becomes soft and pliable. This step prevents cracks during baking, so take your time until the clay feels warm. -
Add the texture:
To achieve that beautiful speckled ‘salt and pepper’ look, sprinkle a very small pinch of ground black pepper or scraped vanilla bean seeds onto your flattened clay. Fold the clay over and knead it again to distribute the specks evenly throughout the block. -
Roll it out:
Place your clay on parchment paper or a smooth ceramic tile. Use your acrylic roller to flatten the clay to a uniform thickness, ideally around 3mm. If you have pasta machine rollers, use a medium setting. -
Cut the arch shapes:
Press your U-shaped cutter firmly into the clay to create the main body of the dangling earring. If you don’t have a specific cutter, you can print a U-shape template on cardstock, place it over the clay, and trace around it carefully with a sharp craft knife. -
Cut the studs:
Using the small round cutter, punch out two circles. These will form the top part of the earring that sits on the lobe. -
Smooth the edges:
Before baking, gently run your finger dipped in a little cornstarch or water along the cut edges of all four pieces to soften any sharp corners.
Step 2: Drilling and Baking
-
Create connection holes:
Use a needle tool or toothpick to pierce a hole at the very top center of each U-shape arch. Make sure the hole is large enough for your jump rings to move freely. -
Pierce the studs:
Similarly, pierce a hole at the bottom edge of each round stud circle. Ensure it aligns vertically with where the arch will hang. -
Bake the pieces:
Transfer your parchment paper or tile directly onto a baking sheet. Bake according to the manufacturer’s instructions on your clay package (usually around 230°F – 265°F / 110°C – 130°C for 30 minutes). -
Cool down:
Once bakes, turn off the oven and let the pieces cool down completely inside or on a cooling rack. They will be slightly flexible when warm but harden as they cool. -
Sand for perfection:
If there are any rough spots left after cooling, dip the pieces in water and gently sand the edges with fine-grit wet/dry sandpaper for a professional matte finish.
Fixing Fingerprints
Did you leave fingerprints on the raw clay? Dip a Q-tip in acetone or rubbing alcohol and gently wipe the surface of the unbaked clay to smooth them away instantly.
Step 3: Assembly
-
Open the jump rings:
Take two jump rings. Using your two pairs of pliers, grip a ring on either side of the split and twist one hand forward and one backward to open it (never pull them apart horizontally). -
Connect the pieces:
Slide the open jump ring through the hole in the U-shaped arch and then through the hole in the round stud. I like to double-check that the textured sides are both facing forward. -
Close the rings:
Use the pliers to twist the jump ring back into a closed position until the ends meet perfectly. -
Attach the posts:
Turn the earrings over so the back side is facing up. Apply a small dot of strong jewelry glue to the back of the round stud piece. -
Secure the hardware:
Press the metal earring post firmly into the glue. Let the adhesive cure fully according to the glue instructions—usually at least 24 hours—before wearing.
Embedded Posts
For extra durability, bake the metal post directly into the clay by sandwiching the post base between the stud circle and a tiny, thin scrap of clay on the back.
Now you have a stunning, salon-quality pair of earrings ready to gift or wear
White Clay Bead Necklace
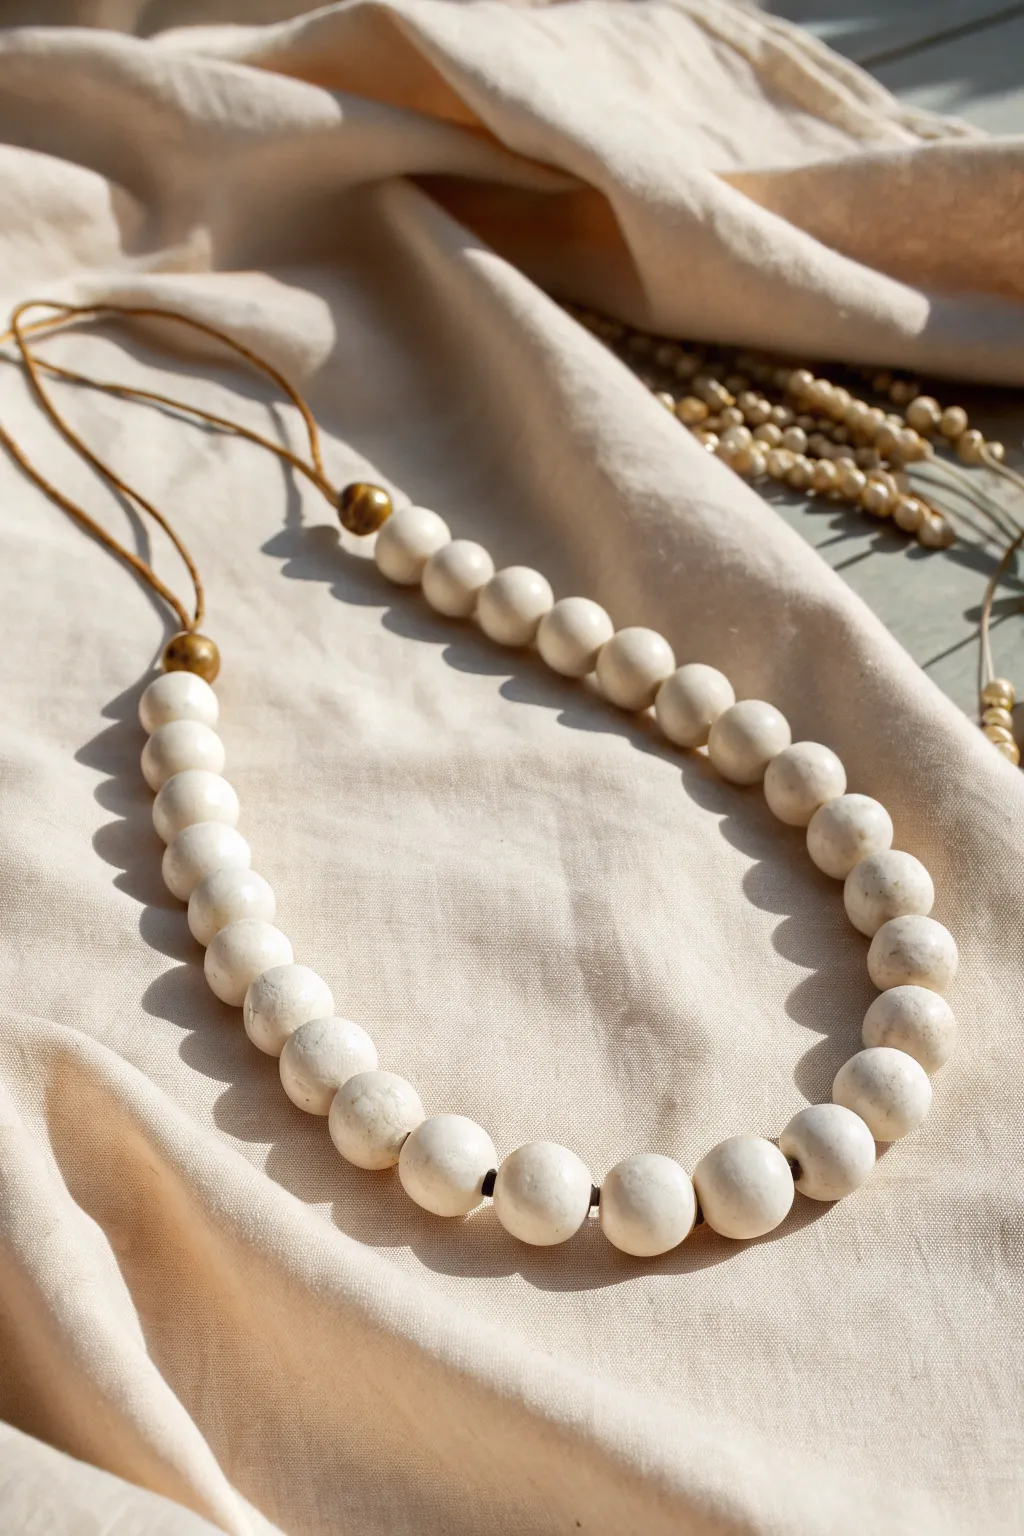
Embrace earthy elegance with this statement necklace featuring chunky, hand-rolled white clay beads. The natural matte finish of the clay paired with simple leather cord creates a timeless accessory that perfectly balances rustic texture with modern design.
Step-by-Step Guide
Materials
- White polymer clay or air-dry clay (approx. 8 oz)
- Brown leather or suede cord (2mm thickness)
- 2 large wooden or brass accent beads (approx. 10-12mm)
- Skewer or knitting needle (for piercing holes)
- Fine-grit sandpaper (400 grit)
- Parchment paper or baking tile
- Ruler
- Scissors
Step 1: Prepping and Shaping the Beads
-
Condition the Clay:
Begin by warming the white clay in your hands. Knead it thoroughly until it is soft, pliable, and free of cracks. This conditioning step is crucial for achieving a smooth finish later. -
Portion the Clay:
Roll the clay into a thick log or ‘snake’ about 1 inch in diameter. Using a blade or knife, slice the log into roughly equal segments. You will need about 25 to 30 segments for a standard necklace length. -
Check for Consistency:
If you want perfectly uniform beads, you can weigh each segment on a kitchen scale, but for this organic look, eyeballing the sizes works beautifully. -
Roll the Spheres:
Take one segment and roll it between your palms using a circular motion. Apply gentle pressure initially to form a ball, then lighten your touch to smooth out the surface. -
Refine the Shape:
Continue rolling until the bead is perfectly round. Repeat this process for all your clay segments. I like to line them up on parchment paper as I go to ensure the sizes look cohesive.
Clean Up While Raw
Before baking polymer clay, wipe each bead gently with a baby wipe or a dab of rubbing alcohol. This removes dust and fingerprints, saving you sanding time later.
Step 2: Piercing and Curing
-
Create the Bead Holes:
Hold a clay sphere gently in one hand without squishing it. Using your skewer or knitting needle, carefully pierce through the center. Using a twisting motion helps the tool slide through without deforming the bead. -
Widen the Hole:
Ensure the hole is wide enough to accommodate your leather cord doubled over, plus a little extra wiggle room. Wiggle the skewer slightly to enlarge the opening if necessary. -
Smooth the Exits:
Check the entry and exit points of the hole. If the clay has puckered out, gently pat it back down with your finger to keep the bead spherical. -
Cure the Clay:
If using polymer clay, bake according to the package instructions (usually 275°F for 15-30 minutes) on a parchment-lined baking sheet or tile. If using air-dry clay, allow the beads to dry completely for 24-48 hours. -
Cool Down:
Once baked, let the beads cool completely before handling. They are slightly fragile while warm.
Marbled Effect
Before rolling, mix a tiny pinch of beige or grey clay into your white clay. Don’t fully blend it—stop when you see streaks—to create a faux-stone marble look.
Step 3: Finishing and Assembly
-
Sand for Texture:
To achieve that soft, stone-like matte finish seen in the photo, lightly buff each bead with fine-grit sandpaper. This removes any fingerprints and adds a lovely organic texture. -
Cut the Cord:
Cut a long length of brown leather cord, roughly 40 inches. This generous length allows for adjustable knotting later. -
Start Stringing:
Thread one gold or wooden accent bead onto the cord first. Slide it down to the center temporarily. -
Add the Clay Beads:
Begin stringing your white clay beads. You can string them all at once, letting them rest in the center of the cord. The visual weight should be substantial but comfortable. -
Secure the Strand:
Once all white beads are on, add the second accent bead to the other side of the group. These accent beads frame the white section beautifully. -
Tie the Side Knots:
Push the beads together so they are snug but not stiff. Tie a simple overhand knot with the leather cord immediately after the accent bead on both sides to keep the beads centered. -
Create the Closure:
Bring the two loose ends of the cord together. You can tie a simple adjustable sliding knot, or just tie the ends together at your desired length and trim the excess.
Now you have a stunning, handcrafted piece of jewelry that complements any outfit with its natural charm
White Clay Terrazzo Tray
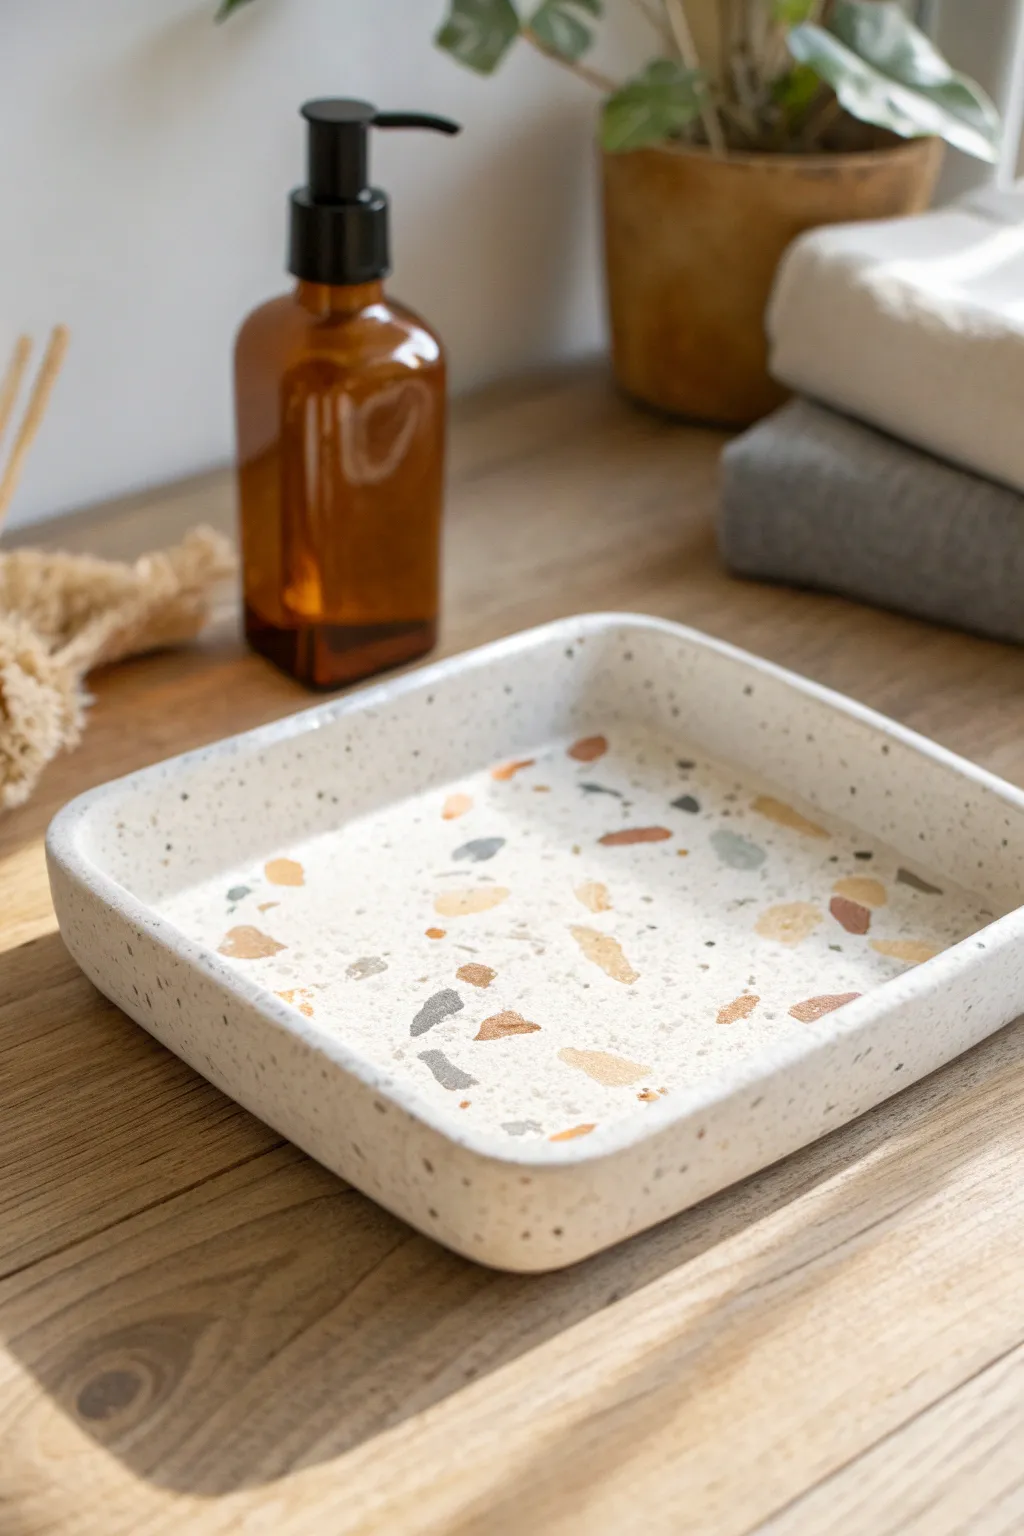
Bring the classic Italian terrazzo look to your vanity with this sophisticated white clay tray project. Featuring embedded chips of earth-toned clay in a speckled white base, this versatile piece is perfect for holding jewelry or bathroom essentials.
Detailed Instructions
Materials
- White polymer clay (approx. 4oz)
- Small amounts of colored polymer clay (terracotta, slate grey, beige, mustard)
- Black pepper or dried coffee grounds (optional for speckling)
- Acrylic rolling pin
- Square cookie cutter or square template
- X-Acto knife or clay blade
- Baking sheet with parchment paper
- Fine grit sandpaper (400, 600, and 1000 grit)
- Matte or satin sealant (optional)
Step 1: Preparing the Terrazzo Chips
-
Condition the colors:
Start by thoroughly conditioning your small amounts of colored clay (terracotta, grey, beige, mustard) until they are soft and pliable. You only need a pea-sized amount of each. -
Flatten the colors:
Roll each colored piece into a very thin sheet, roughly 1-2mm thick. The thinner they are, the easier they will be to incorporate later. -
Initial bake:
Place these thin colored sheets on parchment paper and bake them for just 10-15 minutes at the temperature recommended on your clay package. They should be hard enough to snap but not fully cured. -
Create the chips:
Once cool, crumble the baked sheets into small, irregular shards using your fingers or chop them with your craft blade. Aim for a variety of sizes for a natural look.
Chips Won’t Stick?
If the baked chips aren’t embedding well into the raw clay, rub a tiny drop of liquid polymer clay or PVA glue onto the white base before scattering them to act as an adhesive.
Step 2: Forming the Base
-
Condition the white clay:
Take your large block of white clay and condition it until it’s warm and easy to work with. This is the main body of your tray. -
Add texture (optional):
To achieve the speckled stone effect seen in the photo, mix a tiny pinch of ground black pepper or dried coffee grounds into the white clay. Knead it until evenly distributed. -
Roll out the slab:
Roll the white clay into a thick slab, approximately 1/4 inch thick. Make sure it’s slightly larger than your desired final tray size.
Pro Tip: Wet Sanding
Always sand your clay under running water or in a bowl of water. This prevents harmful dust from getting into the air and keeps the sandpaper from clogging up too quickly.
Step 3: Embedding the Pattern
-
Scatter the chips:
Sprinkle your pre-baked colored chips over the surface of the white clay slab. I like to be random here, but ensure the edges get some love too. -
Press them in:
Use your acrylic roller to firmly press the chips into the white base. Roll over the slab repeatedly until the surface is completely flat and the chips are flush with the white clay. -
Cut the shape:
Place your square template or cutter over the patterned slab and cut out your base shape. Remove the excess clay. -
Create the walls:
Roll out a long snake of white clay (without chips) to create the rim. Flatten it into a long strip about the same thickness as your base. -
Attach the rim:
Wrap the strip around the edges of your square base. Score the contact points slightly to help them grip, then blend the clay seams on the inside and outside using a smoothing tool or your finger. -
Refine the shape:
Gently shape the corners to be slightly rounded rather than sharp, mimicking the soft look of the reference image.
Step 4: Finishing Touches
-
Final smooth:
Check for any fingerprints or uneven seams. Use a tiny bit of baby oil on your fingertip to buff them away before baking. -
Bake the project:
Bake the assembled tray according to the clay manufacturer’s full cure instructions (usually 30 minutes per 1/4 inch of thickness). -
Sanding for exposure:
Once fully cooled, wet-sand the surface. Start with 400 grit to really expose the terrazzo chips, then move to 600 and 1000 grit to polish the surface smooth. -
Clean up:
Wash off any sanding dust with water and dry the tray completely with a lint-free cloth. -
Seal (optional):
For extra durability, apply a thin layer of matte varnish to protect the surface from moisture and scratches.
Enjoy your stylish new tray as a modern addition to your home decor
White Clay Cutout Luminary
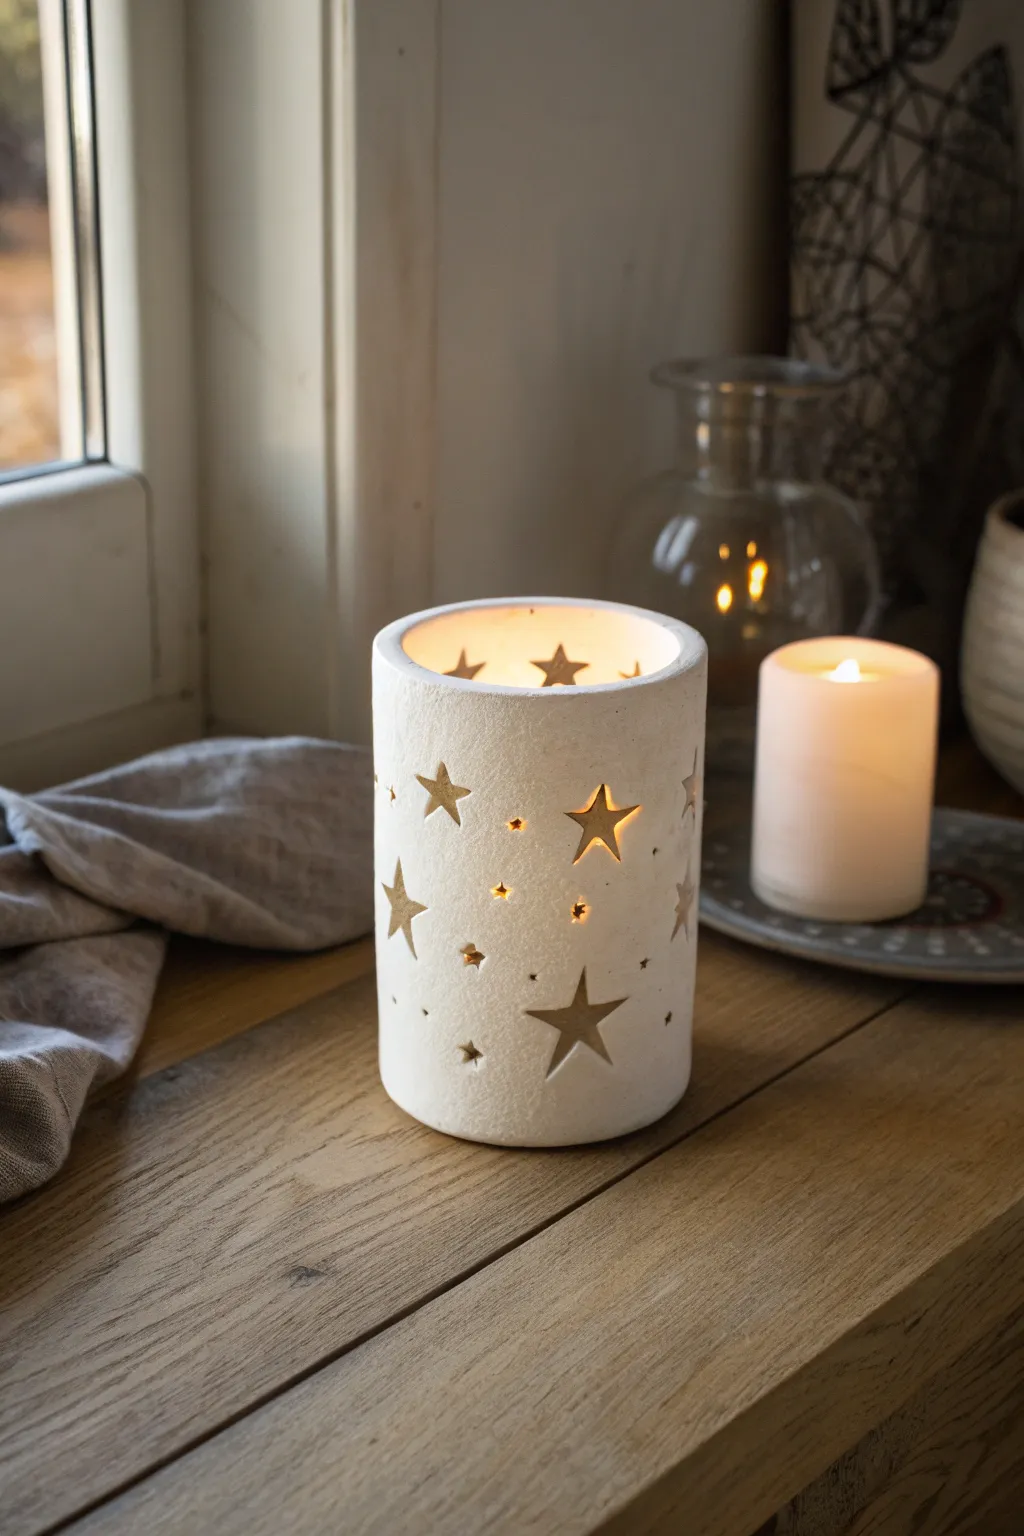
Bring the magic of a starry night indoors with this elegant white clay luminary. The cutout star motifs cast a warm, twinkling glow that transforms any windowsill into a cozy winter scene.
Step-by-Step
Materials
- White styling clay (air-dry or oven-bake)
- Rolling pin
- Parchment paper or non-stick craft mat
- Empty glass jar or cylinder vase (for mold)
- Star-shaped mini cookie cutters or clay cutters (various sizes)
- Craft knife (X-Acto style)
- Small straw or cocktail stick (for tiny dots)
- Sanding sponge or fine-grit sandpaper
- Small bowl of water
- Ruler
Step 1: Preparation and Rolling
-
Prepare your workspace:
Lay down your parchment paper or non-stick mat. This is crucial for peeling up your clay later without warping the shape. -
Condition the clay:
Take a large chunk of your white styling clay and knead it in your hands until it becomes soft, pliable, and free of cracks. -
Roll out the slab:
Use your rolling pin to flatten the clay into a long, rectangular slab. Aim for a consistent thickness of about 1/4 inch (6mm) to ensure structural integrity. -
Measure the circumference:
Wrap a piece of string or paper around your glass jar mold to find the exact length needed. Add about half an inch to this measurement for the overlap seam. -
Trim to size:
Using a ruler and your craft knife, cut the rolled clay into a clean rectangle based on your measurements. I like to keep the height slightly taller than the jar if I’m using an LED candle inside.
Collapsing Clay?
If the clay slumps when wrapped, your slab might be too thin. Re-roll to at least 1/4 inch thick, or let the flat slab dry for 15 minutes before wrapping to stiffen it slightly.
Step 2: Decorating the Surface
-
Plan your stars:
Before cutting, lightly press your cutters into the clay just to mark where you want the stars to go. A random scattering usually looks more organic and pleasing. -
Cut the large stars:
Using your medium and large star cutters, press firmly through the clay slab. Wiggle slightly and lift to remove the cutout pieces. -
Add detail with small stars:
Use your smallest star cutter to fill into the gaps between the larger shapes. -
Create twinkling dots:
Take a straw or a cocktail stick and poke tiny round holes scattered among the stars. These little dots add extra dimension to the light pattern. -
Clean the edges:
If your cuts left any ragged edges, gently smooth them with a finger dipped in a tiny bit of water.
Textured Finish Idea
Before cutting the stars, gently roll a piece of textured fabric or a crumpled ball of foil over the clay slab to give the surface a stone-like, rustic appearance.
Step 3: Assembly and Finishing
-
Wrap the form:
Carefully lift your clay rectangle and wrap it around your glass jar or cylinder mold. The parchment paper helps here—you can use it to lift the clay without stretching it. -
Seal the seam:
Where the two ends meet, overlap them slightly. Wet your finger and press the clay together, smoothing the seam until it disappears into a continuous cylinder. -
Refine the top rim:
Check the top edge of your cylinder. If it’s uneven, trim it gently with the craft knife or tap it lightly against the table surface to flatten it. -
Let it dry:
Leave the clay on the mold for the first few hours until it starts to firm up. If using air-dry clay, slide the mold out carefully once the clay is leather-hard but not fully dry. -
Full cure:
Allow the piece to dry completely according to package instructions (24-48 hours for air-dry). If using oven-bake clay, follow the temperature and time on the packet. -
Smooth the surface:
Once fully cured and hard, use a fine-grit sanding sponge to gently buff away any fingerprints or rough spots on the rim. -
Light it up:
Place a battery-operated tea light or pillar candle inside to see your starry constellation come to life.
Place your finished luminary near a window to enjoy the cozy atmosphere it creates as the sun goes down
White Clay Abstract Sculpture Stack

Embrace modern minimalism with this striking geometric sculpture that stacks clean forms into a harmonious totem. Featuring a sturdy arch base and balanced spheres, the textured white clay finish gives it the sophisticated look of carved stone.
Detailed Instructions
Materials
- White air-dry clay (approx. 2 lbs)
- Rolling pin
- Clay knife or craft blade
- Water in a small cup
- Sponge or brush for smoothing
- Sandpaper (medium and fine grit)
- Strong craft glue or clay slip
- Heavy object or cylindrical form (like a large jar) for shaping the arch
- Wire or toothpick (optional, for internal support)
- Texturing tool (old toothbrush or stiff bristle brush)
Step 1: Forming the Arch Base
-
Condition the clay:
Start by kneading a large portion of your white air-dry clay until it is warm, pliable, and free of cracks. This ensures the structure will be strong once dried. -
Roll a thick slab:
Roll the clay into a long, thick sausage shape first, then gently flatten it with your rolling pin until you have a slab about 1 inch thick. Keep the edges squared off for a chunky, architectural look. -
Shape the arch:
Gently bend your clay slab into a ‘U’ shape. To keep the curve uniform, you can drape it over a cylindrical object like a glass jar laid on its side. Ensure the bottom legs are cut perfectly flat so the arch stands straight. -
Refine the edges:
Before the clay hardens, use your fingers and a bit of water to smooth out any sharp ridges or bumps. The goal is a smooth, rounded top surface with flat sides. -
Initial drying:
Let this arch piece dry partially for about 1-2 hours until it’s ‘leather hard’—firm enough to hold weight but still workable.
Stone Effect
Mix dried coffee grounds or sand into your clay before sculpting. This creates gorgeous natural speckles and grit that look just like real limestone.
Step 2: Creating the Spheres
-
Roll the medium sphere:
Take a ball of clay slightly smaller than the width of your arch. Roll it vigorously between your palms to create a perfect sphere. Tap it gently on a flat surface to create a tiny flat spot on the bottom for stability. -
Roll the top sphere:
Repeat the process with a smaller amount of clay to make the top sphere. This should be roughly two-thirds the size of the middle sphere. -
Add texture:
To mimic the stone-like finish in the photo, gently tap the surface of both spheres and the arch wih an old toothbrush or stiff bristle brush. This stippling creates a lovely porous texture. -
Dry all components:
Allow all three pieces—the arch and two spheres—to dry completely. This usually takes 24-48 hours depending on humidity. Flip the pieces occasionally so air reaches all sides.
Internal Support
For extra stability, insert a toothpick or piece of wire into the centers of the spheres and arch while wet. It acts like a hidden dowel when you assemble them.
Step 3: Assembly and Finish
-
Sand for perfection:
Once bone dry, take medium grit sandpaper to smooth out any major imperfections or fingerprints. Switch to fine grit for a velvety finish, being careful not to sand away your intentional texture. -
Prepare for stacking:
Check the balance. Place the medium sphere on the arch and the small sphere on top. If they wobble, lightly sand the contact points to create flatter mating surfaces. -
glue the structure:
Apply a generous dab of strong craft glue to the center of the arch. Press the medium sphere firmly onto it. Repeat for the top sphere. I usually rotate the pieces slightly as I press them down to spread the glue evenly. -
Conceal the seams:
If there are visible gaps where the pieces join, mix a tiny bit of fresh clay with water to make a paste (slip). Use a small brush to paint this into the cracks, blending it out for a seamless customized look. -
Final texture touch-up:
While the seam filler is wet, dab it with your texturing brush to match the rest of the sculpture. -
Final drying:
Let the glue and slip cure completely overnight. -
Matte finish (optional):
If desired, spray the entire sculpture with a matte clear acrylic sealer to protect the white clay from dust while maintaining that natural, unglazed appearance.
Place your finished sculpture on a floating shelf or entryway table where the light can catch those subtle textures