When the weather gets chilly, I always reach for air-dry clay or polymer clay and start making little winter cuties that instantly cozy up a shelf or tree. Here are my favorite winter clay ideas—from classic, can’t-miss designs to a few creative twists that’ll make your studio time feel extra magical.
Classic Snowman Ornaments
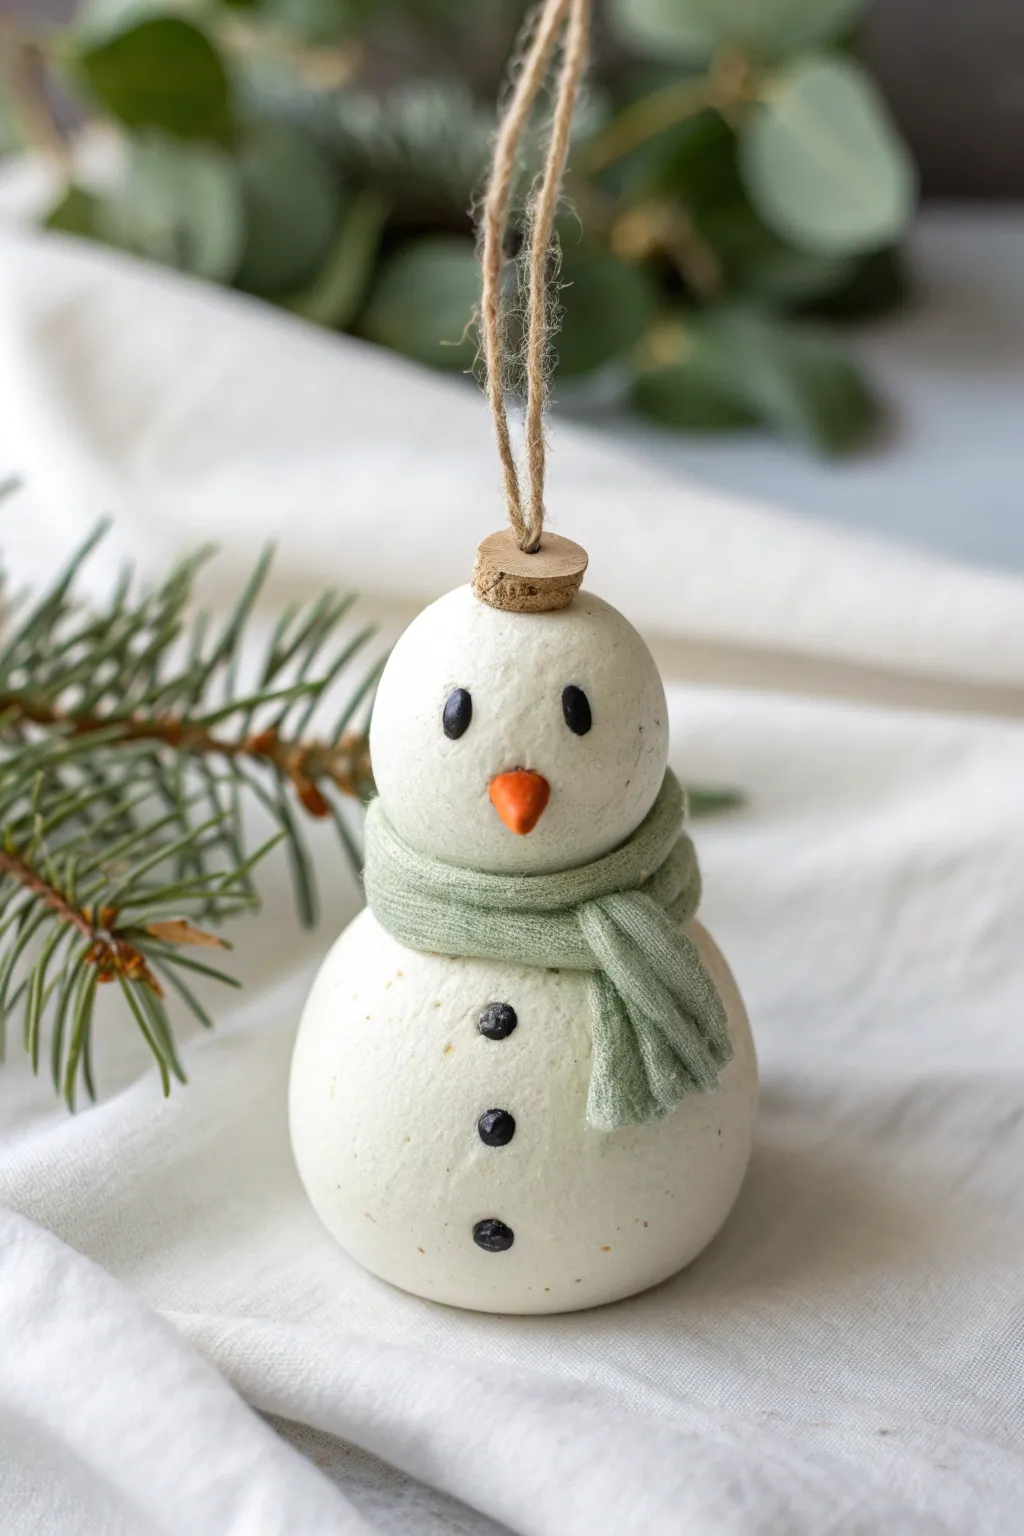
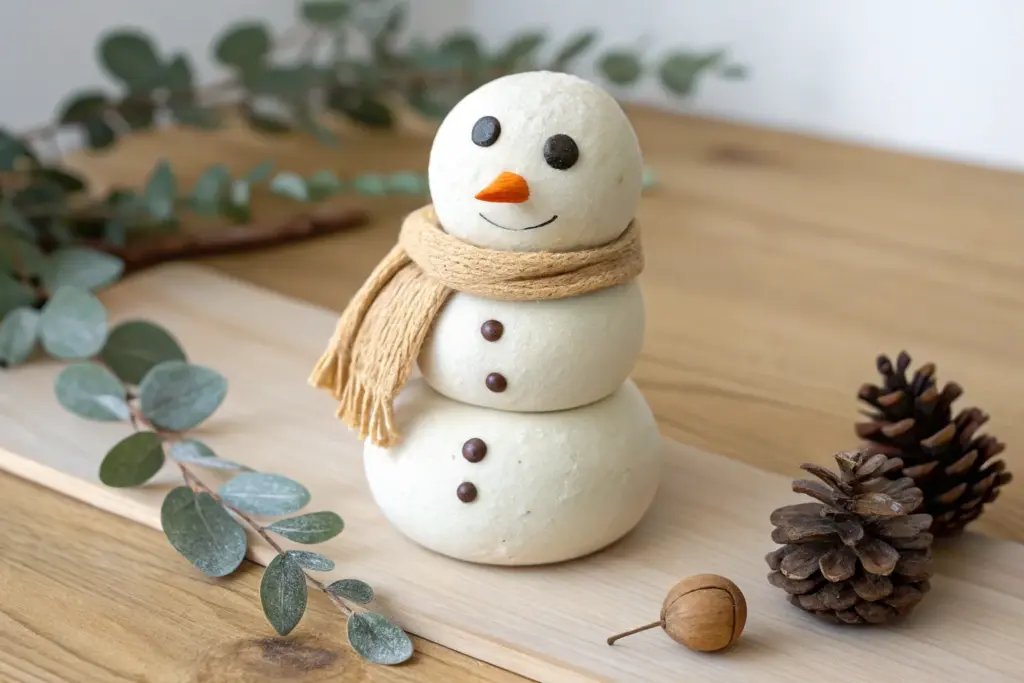
Bring a touch of cozy charm to your tree with this simple yet adorable clay snowman. Its matte, speckled finish and tiny knitted scarf give it a timeless, handcrafted feel perfect for winter decor.
Step-by-Step Guide
Materials
- White polymer clay or air-dry clay (something with a slight granite effect works well)
- Small piece of sage green jersey fabric or knit fabric
- Small cork stopper (miniature size)
- Jute twine
- Black acrylic paint or black seed beads
- Orange acrylic paint or orange clay
- Fine-grit sandpaper
- Superglue or heavy-duty craft glue
- Needle tool or toothpick
- Scissors
Step 1: Shaping the Clay Base
-
Review Your Materials:
Before starting, ensure your clay is conditioned. If you want that speckled look shown in the photo but only have plain white clay, knead in a tiny pinch of dried coffee grounds or black pepper. -
Roll the Body:
Take a walnut-sized piece of clay and roll it into a smooth ball. Gently tap the bottom on your work surface to create a flat base so the snowman can stand upright. -
Form the Head:
Roll a second, slightly smaller ball for the head. It should be roughly two-thirds the size of the body to keep the proportions cute and chubby. -
Connect the Parts:
Place the head on top of the body. If using polymer clay, blend the seam slightly or use a dab of liquid clay to bond them. For air-dry clay, score the touching surfaces and add a drop of water. -
Create the Nose:
Roll a tiny cone of clay for the carrot nose. You can mix orange paint into white clay now, or shape it white to paint later. Press it firmly into the center of the face. -
Add Facial Features:
For the eyes, you can either press two small black seed beads into the clay or use a dotting tool to create small indentations to paint later. -
Add Buttons:
Repeat the process for the buttons, pressing three beads or making three indentations vertically down the front of the body sphere. -
Insert the Hanger:
Press the small cork stopper gently into the very top of the head to make an indentation, then remove it. Poke a hole through the center of the cork for the twine, but don’t glue it yet.
Make It Look like Stone
For a speckled ‘faux stone’ look without buying special clay, mix fine black pepper or dried used coffee grounds into white clay before rolling.
Step 2: Finishing Touches
-
Bake or Dry:
Follow your clay manufacturer’s instructions. If it’s polymer clay, bake it on a dedicated sheet. If it’s air-dry, leave it in a cool, dry place for 24-48 hours. -
Sand for Texture:
Once fully cured and cooled, lightly sand the surface with fine-grit sandpaper. I find this removes fingerprint marks and gives the snowman that lovely matte, stone-like texture. -
Paint Details:
If you didn’t use pre-colored beads or clay, use a fine-tip brush to paint the eyes and buttons black. Paint the nose a bright carrot orange. -
Prepare the Scarf:
Cut a long, thin strip of sage green jersey or knit fabric. Tug on the ends slightly so the edges roll inward, mimicking a real scarf. -
Wrap the Scarf:
Wrap the fabric strip around the neck indentation where the two snowballs meet. Tie a simple overhand knot slightly off-center. -
Trim the Scarf:
Snip the ends of the scarf to your desired length. Cutting little slits at the very ends creates a cute fringe effect. -
Secure the Cork:
Thread a loop of jute twine through the hole in your cork stopper and knot it securely. Apply a dab of superglue to the bottom of the cork and press it into the indentation on the head.
Add Some Sparkle
Brush a very thin layer of pearlescent mica powder or white glitter over the unbaked clay to give your snowman a frosty, fresh-snow shimmer.
Hang your new frosty friend on a sturdy branch to show off his charming scarf


Snowflake Wreath Tiles
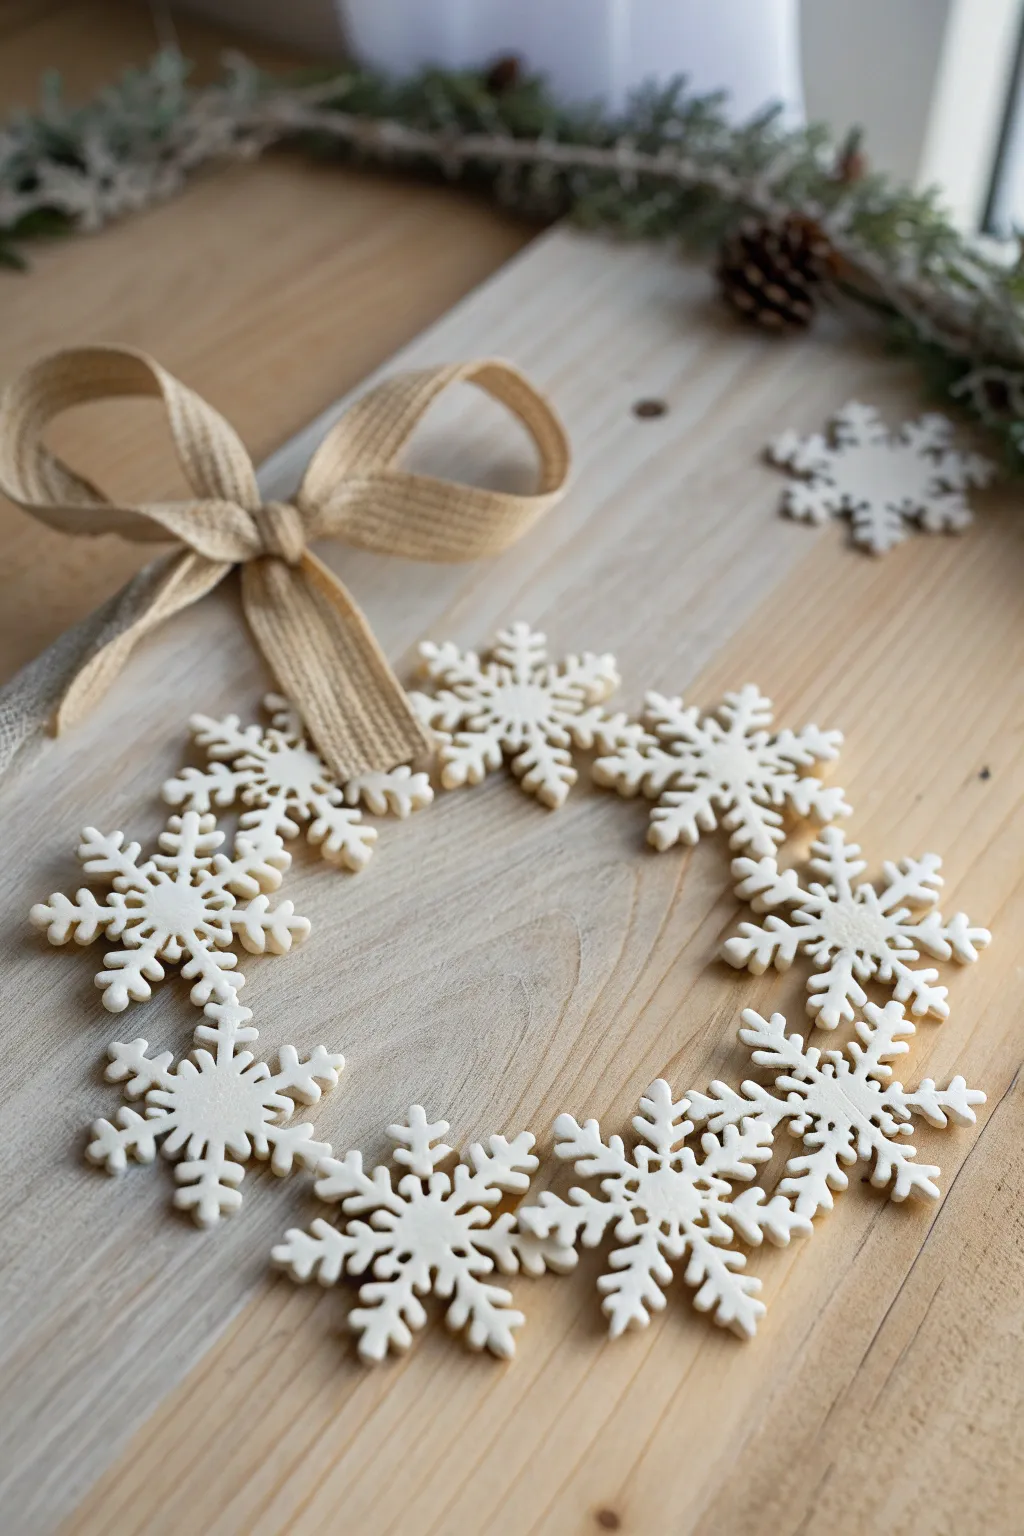
Capture the delicate beauty of falling snow with this elegant ceramic-style wreath made from simple air-dry clay. Individual snowflake tiles are linked together to create a stunning, minimalist piece of holiday decor that looks beautiful hanging against warm wood or a festive door.
Step-by-Step
Materials
- White air-dry clay or polymer clay
- Rolling pin with guide rings (approx. 1/4 inch)
- Snowflake cookie cutters (various sizes/patterns)
- Refined sandpaper (400 grit)
- White acrylic paint (optional, for a brighter finish)
- Matte or satin sealant spray
- Strong craft glue (e.g., E6000) or heavy-duty hot glue
- Burlap or linen ribbon (approx. 1.5 inches wide)
- Wax paper or silicone mat
- Small detail knife or needle tool
Step 1: Creating the Snowflakes
-
Prepare your workspace:
Lay down a sheet of wax paper or a silicone mat to prevent sticking. Knead your clay thoroughly until it is soft, pliable, and free of any air bubbles. -
Roll the clay slab:
Using a rolling pin, flatten the clay into a consistent slab. I find that using guide rings or placing two paint stirrers on either side helps maintain an even thickness of about 1/4 inch. -
Cut the shapes:
Press your snowflake cookie cutters firmly into the clay. For a wreath of this size, you will need approximately 8-10 large snowflakes and a few extras just in case of breakage. -
Clean the edges:
Carefully remove the excess clay from around the cutters before lifting the shapes. If the clay sticks, gently push it out from the cutter’s backside using a soft brush handle. -
Refine the details:
While the clay is still wet, use a needle tool or detail knife to smooth out any rough burs on the edges of the snowflakes. A little water on your fingertip works wonders for smoothing surface imperfections. -
Let them dry:
Arrange the moist snowflakes on a flat surface lined with parchment paper. Allow them to air dry completely according to the package instructions, turning them over halfway through to ensure even drying and prevent warping.
Clean Cuts Pro-Tip
Dip your cookie cutter into a small dish of cornstarch or flour before pressing into the clay. This acts as a release agent and prevents the intricate snowflake arms from sticking or tearing.
Step 2: Finishing and Assembly
-
Sand for smoothness:
Once bone dry, take your 400-grit sandpaper and very gently buff the edges and surface of each snowflake to remove any remaining rough spots. -
Arrange the layout:
Place your dried snowflakes on your work surface in a circle. Adjust the spacing so the tips of the snowflakes slightly overlap their neighbors. This overlap is crucial for structural integrity. -
Gluing the structure:
One by one, lift a snowflake, apply a dab of strong craft glue to the overlapping points, and press it firmly back into place. Ensure every connection point is secure. -
Reinforce the back:
For extra stability, you can cut small strips of scrap felt or use additional clay ‘bandages’ with glue on the backside of the joints where it won’t be seen. -
Allow glue to cure:
Let the wreath sit undisturbed until the adhesive is fully cured. Rushing this step can cause the fragile connections to snap. -
Painting (Optional):
If your clay dried to an off-white or greyish tone, apply two thin coats of white acrylic paint to achieve that crisp, snowy look. -
Seal the piece:
Spray the entire wreath with a matte or satin sealant. This protects the clay from humidity and gives it a finished, professional porcelain appearance. -
Adding the ribbon:
Cut a length of burlap ribbon and tie it into a simple bow. Leave two long tails flowing downwards. -
Attach the hanger:
Loop a second, smaller piece of ribbon through the top-most snowflake opening or glue the bow directly to the top junction of the wreath, creating a loop for hanging.
Sparkle Level-Up
While the white paint is still wet, sprinkle ultra-fine iridescent white glitter over the snowflakes. It mimics fresh frost and catches the light beautifully.
Hang your delicate winter creation in a prominent spot where it can be admired all season long


Mini Evergreen Tree Figurines
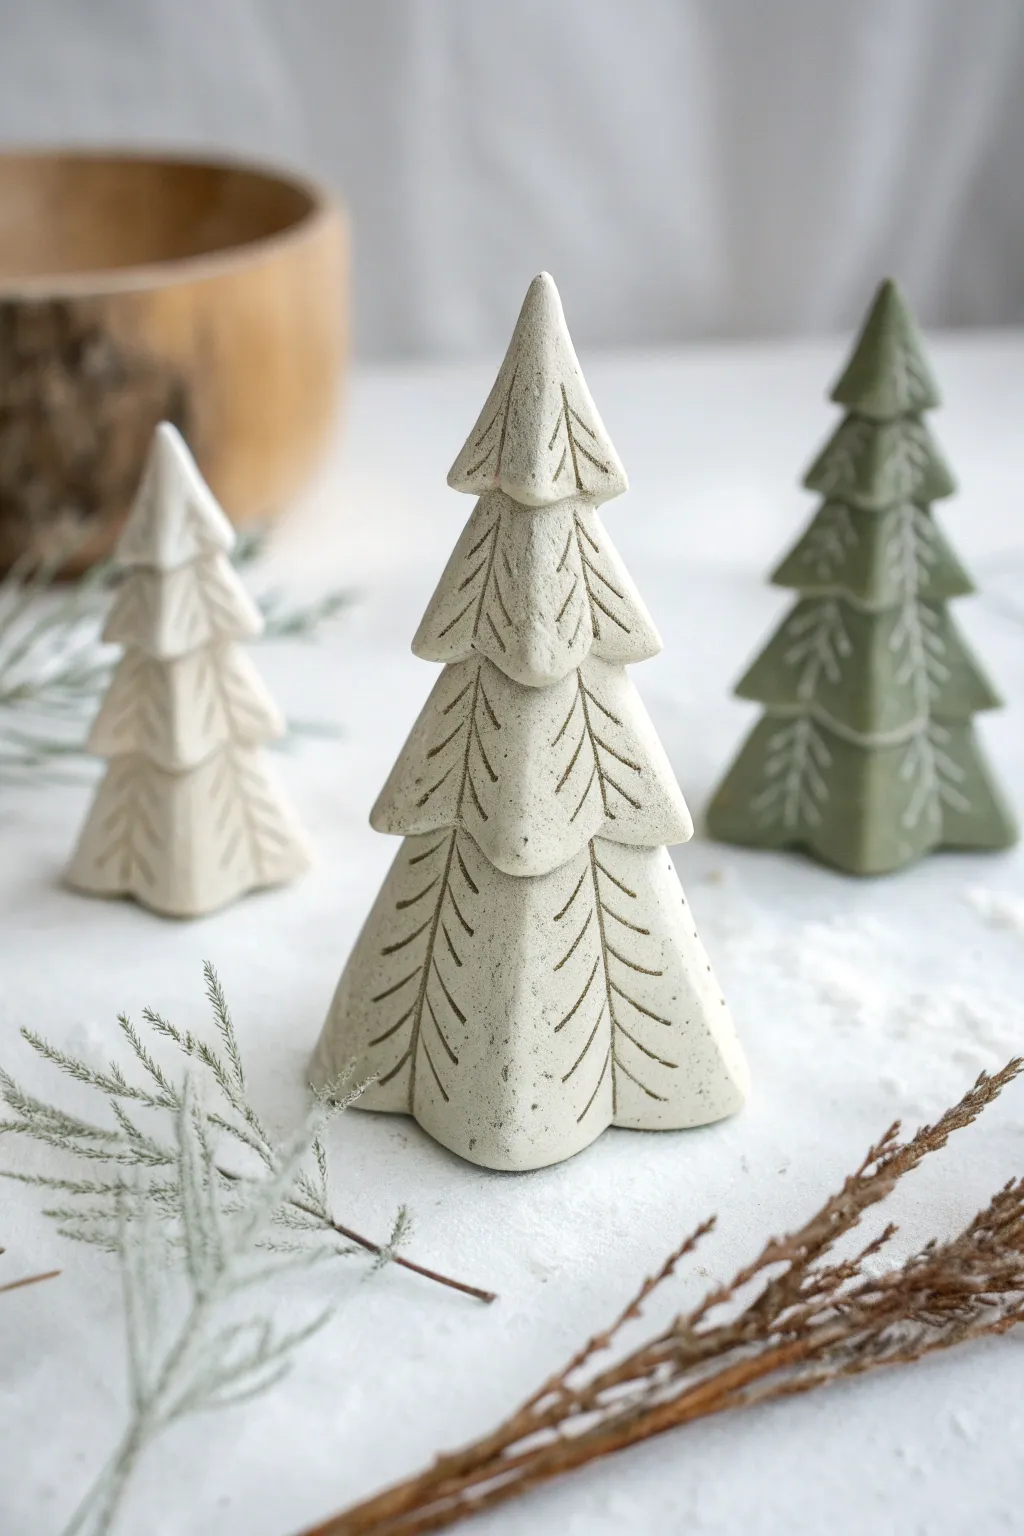
Bring the quiet beauty of a winter forest indoors with these minimalist clay pine tree figurines. Featuring distinct tiers and hand-carved needle details, these sturdy little evergreens have a charming, stone-like matte finish that fits perfectly with modern holiday decor.
Step-by-Step Tutorial
Materials
- White or light grey air-dry clay (or polymer clay)
- Clay rolling pin
- Fettling knife or craft knife
- Needle tool or sharp carving tool
- Small cup of water (for smoothing)
- Cone-shaped form (optional, for support)
- Medium-grit sandpaper
- Matte acrylic paints (sage green, off-white)
- Stiff bristle brush
- Paper towels
- Clear matte varnish (spray or brush-on)
Step 1: Shaping the Base Cones
-
Condition the clay:
Start by taking a handful of your chosen clay and kneading it thoroughly in your hands until it becomes pliable and warm, removing any air bubbles that might be trapped inside. -
Roll a cylinder:
On a clean, flat surface, roll the clay into a thick, smooth cylinder. The width of the cylinder will determine the base width of your tree. -
Form the basic cone:
Begin tapering one end of the cylinder by rolling it back and forth while applying more pressure to the top side, gradually forming a solid cone shape. You want a relatively steep angle, as this provides height for your tiers. -
Flatten the bottom:
Once you have a cone, tap the wide base firmly against your work surface to create a flat bottom so the tree stands straight without wobbling. -
Refine the surface:
Dip your finger in a little water and smooth out the exterior of the cone, erasing any fingerprints or cracks. Getting this surface smooth now creates a better canvas for the layers later.
Stone Effect Pro Tip
For a gritty, realistic stone texture, mix a pinch of used coffee grounds or fine sand directly into your clay block before shaping the cones.
Step 2: Carving the Tiers
-
Mark the sections:
Using your needle tool, lightly scratch horizontal rings around the cone to mark where each tier of branches will sit. Aim for 3 to 4 sections depending on the height of your tree. -
Carve the bottom overhang:
Starting at the bottom-most line, use your knife to cut slightly upward into the clay, creating an overhang. You aren’t cutting the piece off; you are defining the bottom edge of the foliage skirt. -
Define the tier shape:
Carefully remove a shallow wedge of clay just below the line of the *next* tier up. This creates the visual separation between the layers of branches. -
Repeat up the tree:
Continue this process for the middle and top tiers. As you move upward, make the tiers slightly smaller. I find it easiest to rotate the tree constantly while carving to keep the symmetry. -
Shape the peak:
Refine the very top tip of the tree into a sharp point. If it feels too fragile, you can leave it slightly rounded. -
Create vertical segments:
Press the side of your knife or a sculpting tool vertically into the skirt of each tier at regular intervals. This divides the continuous ring of clay into distinct, triangular boughs.
Step 3: Adding Texture & Finishing
-
Sketch the needles:
Take your sharp needle tool or carving pick. On each triangular bough section, etch a central line running from the top of the tier to the bottom. -
Add angled details:
Carve short, angled lines branching off that central spine, pointing downward like pine needles. Keep these lines relatively deep so they catch the paint later. -
Clean up crumbs:
Use a soft dry brush to sweep away any little clay crumbs created by the carving process. -
Dry thoroughly:
Allow the clay to dry completely according to package instructions. For thicker air-dry clay pieces like this, it may take 24-48 hours. Rotate them occasionally for even drying. -
Sand imperfections:
Once bone dry, gently sand the bottom and any sharp, unintentional ridges with medium-grit sandpaper to give it a weathered stone feel. -
Apply base color:
Paint the entire tree with your chosen matte acrylic color—either a soft sage green or a creamy off-white. -
The whitewash technique:
To mimic the snowy look in the photo, dilute a little white or light grey paint with water. Brush it over the textured areas, then immediately wipe the surface with a paper towel. -
Reveal the texture:
The wiping action leaves the light paint inside the carved needle lines while revealing the base color on the raised surfaces, making the details pop. -
Seal the piece:
Protect your work with a coat of clear matte varnish. Avoid glossy finishes, as the matte look is essential to the rustic, stony aesthetic.
Fixing Cracks
If cracks appear while drying, don’t panic. Mix a small amount of fresh clay with water to create a paste (slip) and fill the cracks, then smooth it out.
Group these charming trees on a mantle or windowsill to create your own miniature winter wonderland forest


Gingerbread House Trinket Dish
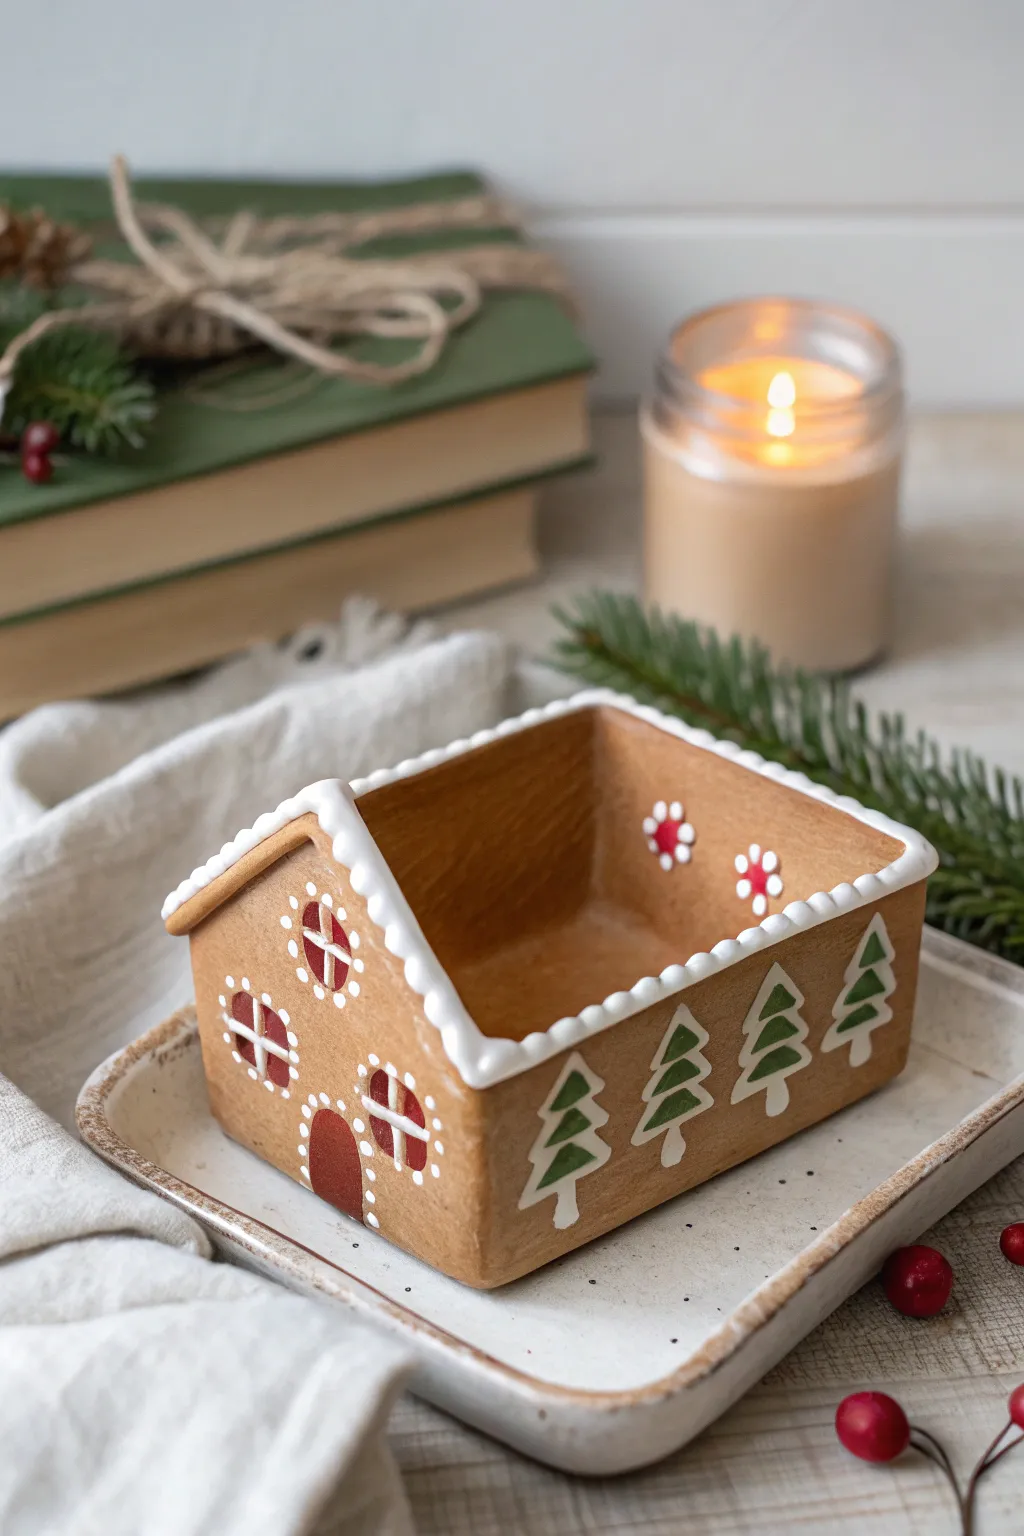
This charming trinket dish combines the nostalgic warmth of holiday baking with the durability of clay. By imitating the texture of baked gingerbread and adding ‘icing’ details, you create a cozy, functional vessel perfect for holding jewelry or small holiday treasures.
Step-by-Step Guide
Materials
- Light brown/tan polymer clay (or air dry clay)
- White liquid polymer clay (or thick white acrylic paint for air dry)
- Red and green acrylic paints
- Rolling pin with depth guides (about 1/4 inch)
- Ruler
- Craft knife or scalpel
- Toothbrush or stiff bristle brush
- Fine detail paintbrush (sizes 0 or 00)
- Dotting tool or toothpick
- Soft artist pastels (brown/orange)
- Oven (if using polymer clay) or drying rack
Step 1: Shaping the Structure
-
Prepare the Clay:
Condition your tan clay until it is soft and pliable. If using polymer clay, mix in a tiny pinch of translucent clay to give it that realistic, slightly waxier ‘baked good’ depth. -
Roll the Slabs:
Roll out the clay to an even slab, approximately 1/4 inch thick. Using depth guides on your rolling pin ensures the walls are sturdy enough to stand upright. -
Cut the Walls:
Using a ruler and craft knife, cut two rectangular side panels and two pentagon-shaped ‘house’ panels (rectangular bottom with a triangular top). Ensure the vertical sides of all four pieces are exactly the same height so they meet flush. -
Texture the Surface:
Before assembling or baking, gently tap the entire surface of your cut pieces with a toothbrush or stiff bristle brush. This creates a realistic porous texture that mimics baked cookie dough. -
Add ‘Baked’ Shading:
Scrape some brown and orange soft pastel chalk into a fine powder. With a soft brush, gently dust the edges and corners of your clay pieces to simulate the darker, crispier edges of a real cookie. -
Assemble the Box:
Stand the four walls up, joining the corners. Reinforce the inside seams by smoothing a thin snake of clay into the corners. Ensure the box is square and the walls are vertical. -
Add the Base:
Place your assembled walls onto a remaining piece of rolled clay and trace the bottom. Cut out this rectangle and attach it to the bottom of your walls, smoothing the seams so it sits flat. -
Bake or Dry:
If using polymer clay, bake according to package instructions (usually 275°F/135°C for 15-30 minutes). If using air-dry clay, allow it to dry fully for 24-48 hours until hard.
Uneven Walls?
If your clay walls are sagging before they can dry or bake, support the inside of the box with lightly crumpled aluminum foil or cardstock to hold the shape rigid while it hardens.
Step 2: Decoration & Icing
-
Prepare the Icing:
For polymer clay, use white liquid clay. For air-dry clay, use heavy-body white acrylic paint or a dimensional fabric paint. The consistency should be thick enough to hold a peak, just like royal icing. -
Create the Front Windows:
Paint three circular shapes on the front gable using red acrylic paint. Once dry, use your white ‘icing’ to pipe a cross over them, creating window panes, and dot small pearls around the perimeter. -
Add the Door:
Paint a small, rounded arch in the center bottom with deep reddish-brown paint. Outline this arch with white dots to define the doorway. -
Paint the Pine Trees:
On the long rectangular sides, paint a row of stylized pine trees using dark green acrylic paint. Simple triangles stacked on top of each other work perfectly for this folk-art look. -
Detail the Trees:
Once the green paint is dry, outline the trees with thin white lines to make them pop against the ‘gingerbread’ background. Add a small white trunk at the base of each. -
Decorate the Interior:
I like to add a surprise detail inside, so paint small red flowers with white centers on the inner walls using a dotting tool. -
Pipe the Roofline:
Apply a uniform line of your white icing material along the very top edge of the walls. Use a dotting tool or the tip of the nozzle to pull the icing down slightly on the exterior, mimicking dripping snow. -
Final Seal:
If you used acrylic paints on polymer clay, or if you used air-dry clay, coat the entire piece in a matte varnish. Avoid glossy finishes, as real cookies have a matte texture.
Make it Sparkle
While your white ‘icing’ or paint is still wet, sprinkle ultra-fine clear or iridescent glitter over the roof edges. This mimics the look of crystallized sugar or fresh glittering snow.
Now you have a sweet little container that captures the holiday spirit without adding any crumbs to your table

The Complete Guide to Pottery Troubleshooting
Uncover the most common ceramic mistakes—from cracking clay to failed glazes—and learn how to fix them fast.
Hot Cocoa Mug Charms
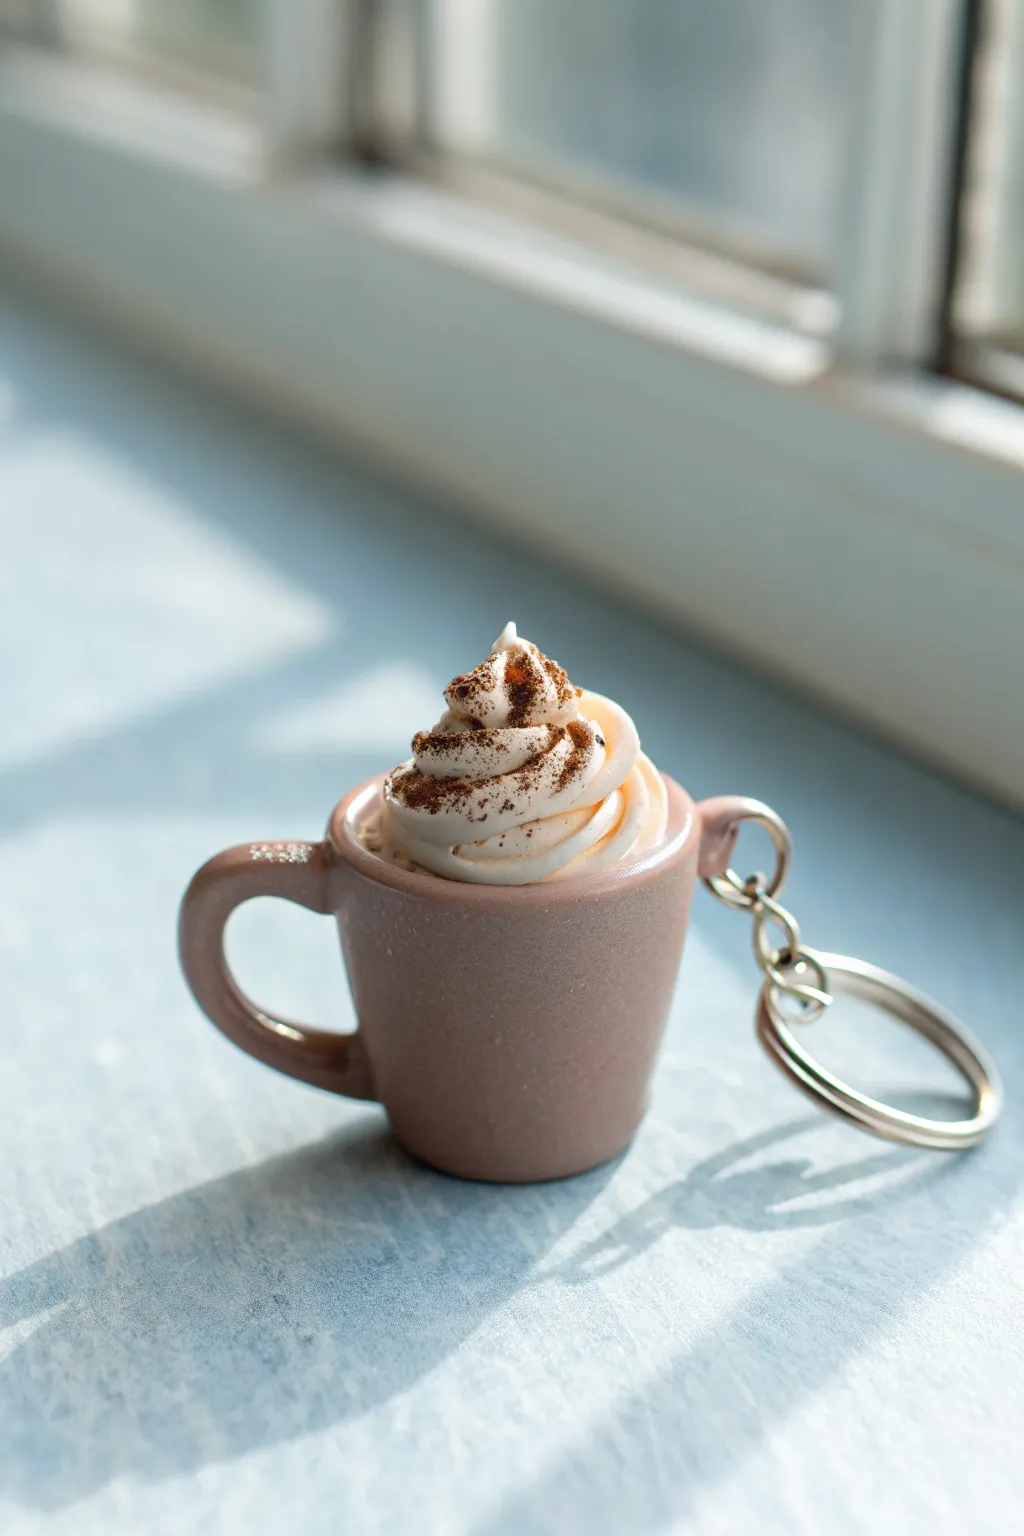
Capture the cozy essence of winter with this adorable polymer clay mug charm, overflowing with fluffy whipped cream and a dusting of cocoa. This tiny, mauve-hued accessory makes a perfect keychain or a sweet gift for the coffee lover in your life.
Step-by-Step
Materials
- Polymer clay (dusty rose/mauve and translucent white)
- Liquid polymer clay (white)
- Soft artist pastels (dark brown for the ‘cocoa’ dust)
- Ceramic mug or round cutter (approx. 1 inch)
- Needle tool or toothpick
- Ball stylus tool
- Eye pin or screw eye
- Keychain hardware (jump rings and split ring)
- Craft knife
- Sandpaper (fine grit)
- Gloss glaze (optional)
Step 1: Shaping the Mug Base
-
Prepare the clay:
Condition your dusty rose polymer clay by kneading it until it is soft and pliable, ensuring there are no air bubbles trapped inside. -
Form the cylinder:
Roll a smooth ball of clay about the size of a large marble, then gently flatten the top and bottom against your work surface to create a squat cylinder shape. -
Hollow out the cup:
Using a large ball stylus or the rounded end of a paintbrush, press into the center of the cylinder to create the cup’s opening. Gently widen it, keeping the walls even, but don’t go too deep as we need a base for the cream. -
Smooth the rim:
Refine the top edge of the mug with your fingertip to ensure it’s rounded and smooth, not sharp. -
Create the handle:
Roll a thin snake of total clay about 2mm thick. Cut a small segment, approximately 1cm long. -
Attach the handle:
Curve the small snake segment into a ‘C’ shape. Press one end near the top rim and the other near the base. Use a silicone tool or toothpick to blend the seams seamlessly into the mug body so it doesn’t fall off later. -
Pre-bake the base:
I find it helpful to bake the mug base for about 10-15 minutes at the temperature recommended on your clay package. This makes it rigid enough to handle while adding the delicate cream topping.
Step 2: Adding the Whipped Topping
-
Mix the cream:
In a small container, mix white liquid polymer clay with a small amount of white solid clay until you achieve a thick, frosting-like consistency. It needs to hold peaks. -
Fill the mug:
Fill the hollow of your cooled mug base with a small ball of scrap clay to act as a filler, stopping just below the rim. -
Pipe the swirl:
Using a piping bag with a tiny star tip (or a plastic bag with a corner snipped), pipe the clay mixture onto the mug in a spiral motion, building it up into a classic soft-serve peak. -
Create cocoa dust:
Take a dark brown soft pastel chalk and scrape it with a craft knife to create a fine powder. -
Apply the dusting:
Dip a soft, dry paintbrush into the brown pastel powder and gently tap it over the wet liquid clay cream. Let the ‘cocoa’ speckles fall naturally onto the high points of the swirl.
Cream Texture Tip
If you don’t have liquid clay, you can soften white clay with baby oil until it’s sticky, then apply it with a needle tool in swirling motions.
Step 3: Assembly and Finish
-
Insert hardware:
Trim an eye pin to the correct length and dip the end in a tiny bit of liquid clay for extra grip. Carefully insert it into the side of the mug, near the handle, or directly into the cream depending on how you want it to hang. -
Final bake:
Bake the entire piece again for the full time recommended by the manufacturer (usually 20-30 minutes) to cure the liquid clay completely. -
Cool down:
Allow the charm to cool completely inside the oven or on a ceramic tile to prevent cracking. -
Secure the pin:
Once cool, gently tug the eye pin. If it feels loose, remove it, add a drop of super glue, and reinsert it immediately. -
Glaze (optional):
If you want a ceramic look, brush a thin coat of gloss glaze over the mug part only, avoiding the whipped cream to keep its realistic matte texture. -
Attach keychain:
Use pliers to open a jump ring, thread it through the eye pin loop and your keychain hardware, and close it securely.
Festive Twist
Add a tiny clay candy cane sticking out of the cream or sprinkle tiny polymer clay ‘peppermint’ bits on top for a holiday version.
Enjoy carrying a little warmth with you wherever you go with your new custom charm
Cozy Stocking Gift Tags
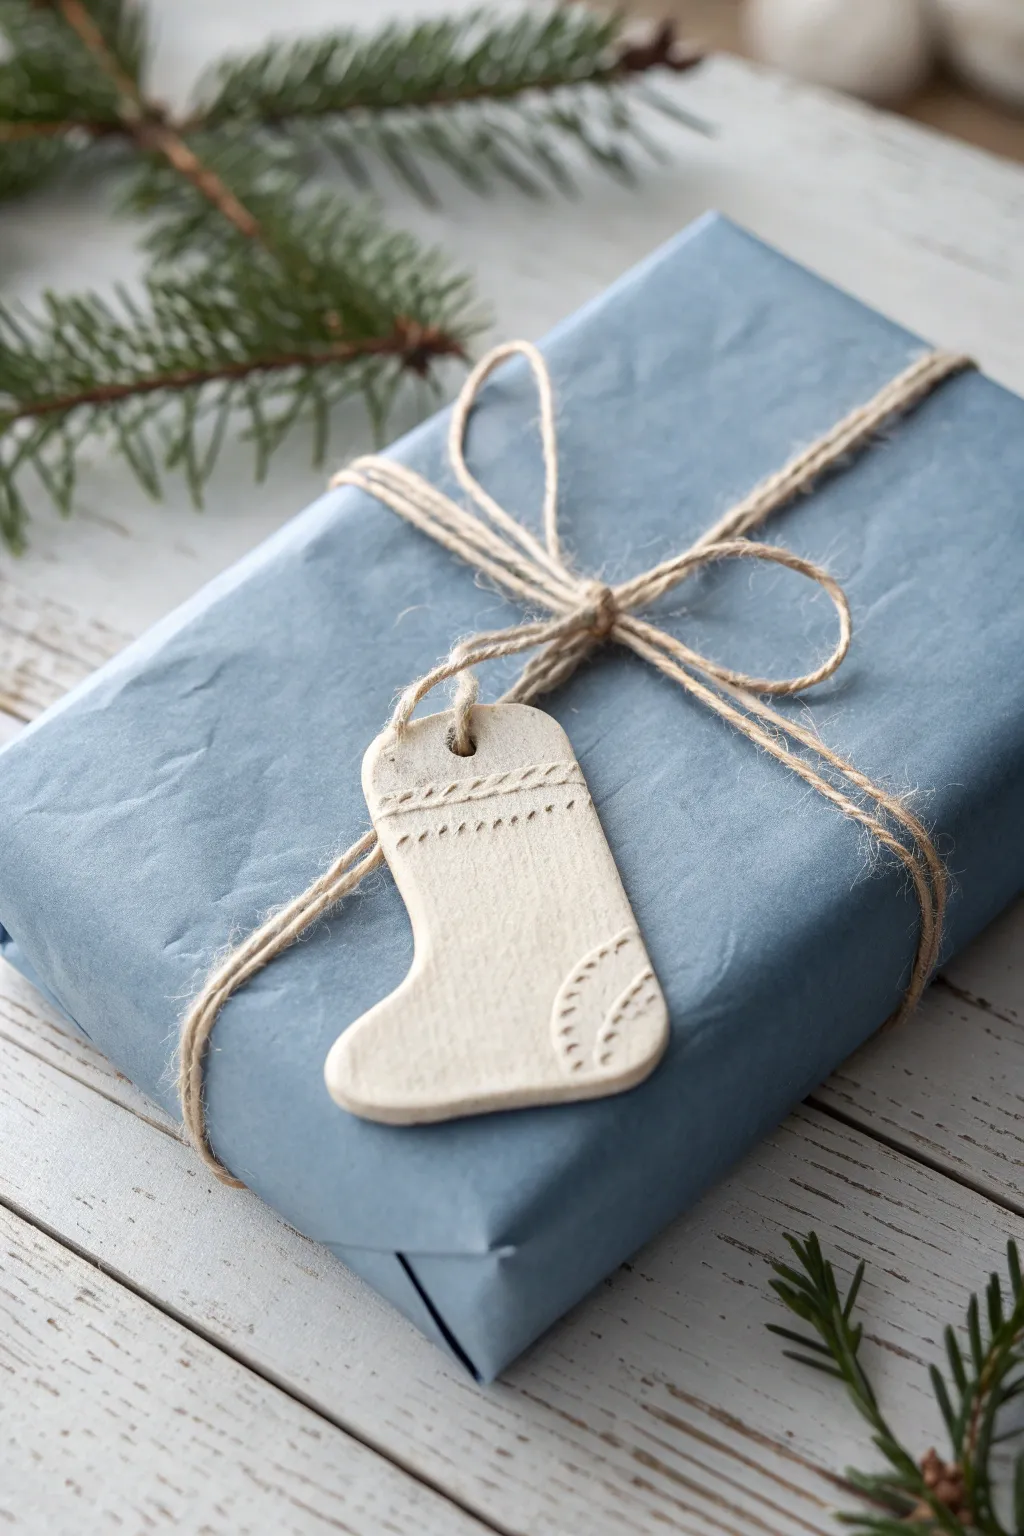
Elevate your gift wrapping this season with these charming, rustic-style stocking tags made from simple clay. Their matte white finish and delicate stitched texture pair perfectly with natural twine and muted paper for a thoughtful, handmade presentation.
Step-by-Step Tutorial
Materials
- White classic air-dry clay (or white polymer clay)
- Rolling pin
- Parchment paper or non-stick craft mat
- Stocking-shaped cookie cutter (approx. 2-3 inches)
- Needle tool or toothpick
- Small straw or drinking straw (for the hole)
- Natural jute twine
- Blue textured wrapping paper
- Fine-grit sandpaper (optional)
- Clear matte varnish (optional)
Step 1: Shaping the Stockings
-
Prepare the workspace:
Lay down a sheet of parchment paper or a non-stick silicone mat to protect your table and prevent the clay from sticking. -
Condition the clay:
Take a handful of air-dry clay and knead it in your hands until it becomes soft, pliable, and free of cracks. If it feels too dry, you can wet your fingers slightly. -
Roll out the slab:
Use your rolling pin to flatten the clay to an even thickness. Aim for about 1/4 inch (6mm) thick—thick enough to be sturdy but thin enough to lie flat on a gift. -
Cut the shapes:
Press your stocking cookie cutter firmly into the rolled clay. If you don’t have a cutter, you can sketch a shape on paper, cut it out, and trace around it with a needle tool. -
Smooth the edges:
Gently lift the cut-out shape. Dip your finger in a tiny bit of water and run it along the cut edges to smooth out any roughness or jagged bits from the cutter. -
Create the hanging hole:
Use a small straw to punch a hole at the top corner of the stocking cuff. Rotate the straw slightly as you pull it out to get a clean hole.
Step 2: Adding Texture & Drying
-
Mark the cuff line:
Using your needle tool or a dull knife, gently score a horizontal line across the top of the stocking to define the ‘cuff’ area. -
Add stitch details:
To create the knit-like texture, press the side of your needle tool or toothpick into the clay at an angle. Make a row of small diagonal indentations along the cuff line. -
Detail the toe and heel:
Repeat this stitching pattern on the toe and heel areas. Draw a curved line to define the section, then add small dashes along the inside of that curve to mimic reinforcement stitching. -
Flip for flatness:
Carefully flip the tag over occasionally during the first hour of drying to ensure it dries flat and doesn’t curl at the edges. -
Let it cure:
Allow the clay to dry completely according to the package instructions. This usually takes 24 to 48 hours for air-dry clay. It will turn a chalky white when fully dry. -
Sand imperfections:
Once fully hard, inspect the edges. If there are any sharp points or rough spots, gently buff them away with fine-grit sandpaper.
Curled Edges?
If your clay starts curling while drying, place a lightweight book on top of it (sandwiching the clay between parchment paper) once it’s leather-hard to force flatness.
Step 3: Assembly and Wrapping
-
Wrap the gift:
Wrap your box neatly in the muted blue textured paper. Create sharp creases at the edges for a professional look. -
Measure the twine:
Cut a long length of natural jute twine. You’ll need enough to wrap around the box multiple times plus extra for the bow. -
Secure the twine base:
Wrap the twine around the width of the box three to four times to create a bundled look. Tie a simple knot in the center to hold the strands together. -
Attach the tag:
Thread one end of the loose twine through the hole in your clay stocking. Slide the tag down until it rests near the knot. -
Tie the bow:
Finish simply by tying a generous bow on top of the knot. Leave the loops slightly loose and floppy for a relaxed, cozy aesthetic. -
Adjust placement:
Gently nudge the stocking tag so it lays flat against the paper, visible just beneath the bow loops.
Make it Scented
Add a hidden sensory element by dropping essential oil onto the porous back of the dried clay tag. Cinnamon or pine oil adds a lovely festive touch.
Your charming, personalized gift wrap is now ready to impress before the box is even opened.


What Really Happens Inside the Kiln
Learn how time and temperature work together inside the kiln to transform clay into durable ceramic.
Penguins in Scarves
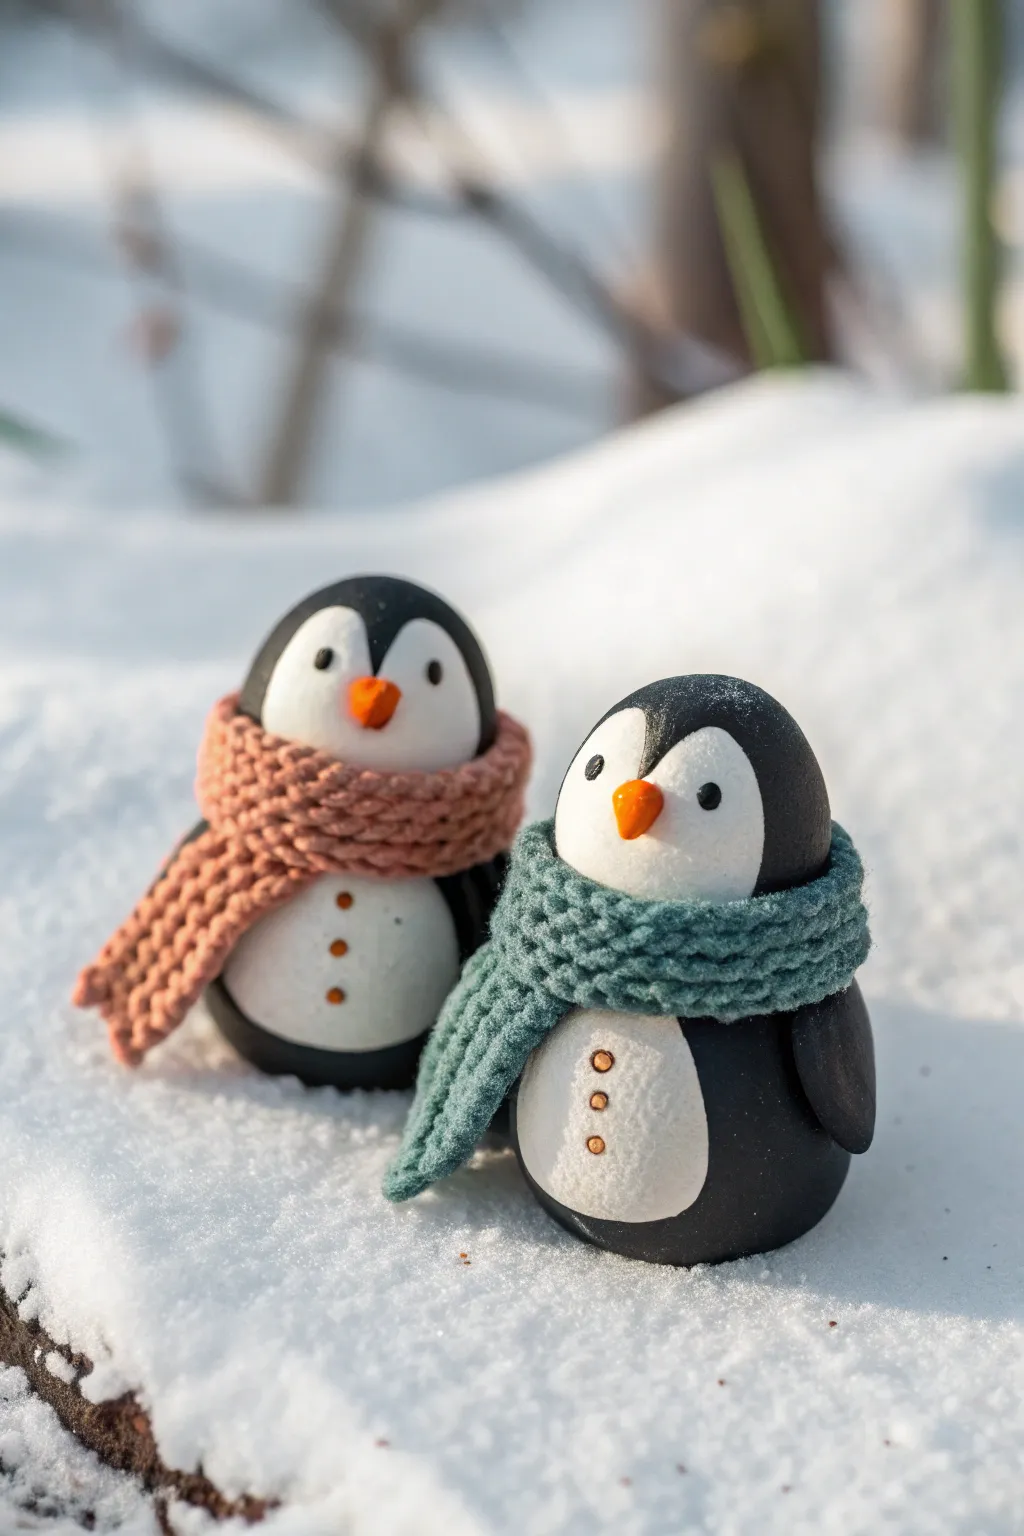
Create a charming duo of winter friends ready to brave the snow with their miniature scarves. These smooth, round penguins feature sweet button details and textured accessories that look just like real knitwear.
Step-by-Step
Materials
- Polymer clay (black, white, orange, muted pink, teal/sage green)
- Clay roller or pasta machine
- Ball tool or dotting tool
- Pointed sculpting tool (or toothpick)
- Texture sheet or fine mesh (for scarf texture)
- X-acto knife or clay blade
- Oven for baking
- Glaze or varnish (optional)
Step 1: Shaping the Bodies
-
Form the core:
Start by conditioning your black clay until it’s pliable. Roll a walnut-sized ball for each penguin. Gently flatten the bottom against your work surface so the figures stand stable and upright. -
Refine the shape:
Shape the ball into a smooth egg-like form, slightly tapering towards the top for the head area. Smooth out any fingerprints with a light touch. -
Create the tummy:
Roll a smaller ball of white clay and flatten it into a thin oval. Press this gently onto the front of the black body, focusing on the lower two-thirds to creating a rounded white tummy. -
Add the face mask:
Take a tiny amount of white clay and shape it into a heart or sideways figure-eight. Place this on the upper third of the body, overlapping the top of the tummy slightly, to form the white markings for the face. -
Add the flippers:
Shape two small teardrops of black clay. Flatten them slightly and attach one to each side of the body, curving them downward to hug the penguin’s sides.
Texturing Trick
Twist two very thin strands of clay together before flattening them to create an ultra-realistic cable knit pattern for the scarves.
Step 2: Tiny Details
-
Attach the beak:
Roll a tiny speck of orange clay into a cone shape. Press this securely into the center of the white face area, angling it slightly upward for a cute expression. -
Add the eyes:
Use a small ball tool to make two indentations on either side of the beak. Roll minuscule balls of black clay and press them into these sockets. -
Place the buttons:
On the penguin with the white scarf, roll three microscopic balls of light brown or orange-tinted clay. Press them vertically down the center of the white tummy. -
Detail the second penguin:
Repeat the button step for the second penguin, using a similar contrasting color to stand out against the white belly.
Clean Prints
If you smudge black clay onto the white tummy, use a cotton swab dipped in a tiny bit of rubbing alcohol or baby oil to wipe it away before baking.
Step 3: Knitting the Scarves
-
Prepare the pink scarf:
Roll out a thin snake of the pink clay. Flatten it slightly with your roller into a long, thin strap. -
Texture the clay:
Here I prefer to gently press a piece of coarse fabric or a specialized clay texture sheet onto the strip to mimic a knit pattern. Alternatively, make tiny diagonal indentations with a needle tool. -
Wrap the first penguin:
Drape the pink strip around the neck of the first penguin. Bring one end over the other to create a simple loop, letting the ends hang down the front. -
Create fringe:
Use your knife to make tiny vertical cuts at the very ends of the scarf to simulate fringe. -
Make the green scarf:
Repeat the rolling and texturing process with the teal or sage green clay for the second penguin. -
Fold the green scarf:
Wrap this scarf around the second penguin’s neck, perhaps tying it a bit looser or layering it differently to give them individual personalities.
Step 4: Finishing Up
-
Bake:
Place your penguins on a ceramic tile or baking sheet. Bake according to your clay manufacturer’s specific temperature and time directions. -
Cool down:
Allow the figures to cool completely inside the oven if possible, to prevent thermal shock cracks. -
Seal (Optional):
If you want a snowy shine, brush a thin layer of matte or satin varnish over the eyes and beak, leaving the scarf matte to keep the fabric look.
Enjoy displaying your adorable winter duo on a shelf during the snowy months
Polar Bears With Sweater Texture
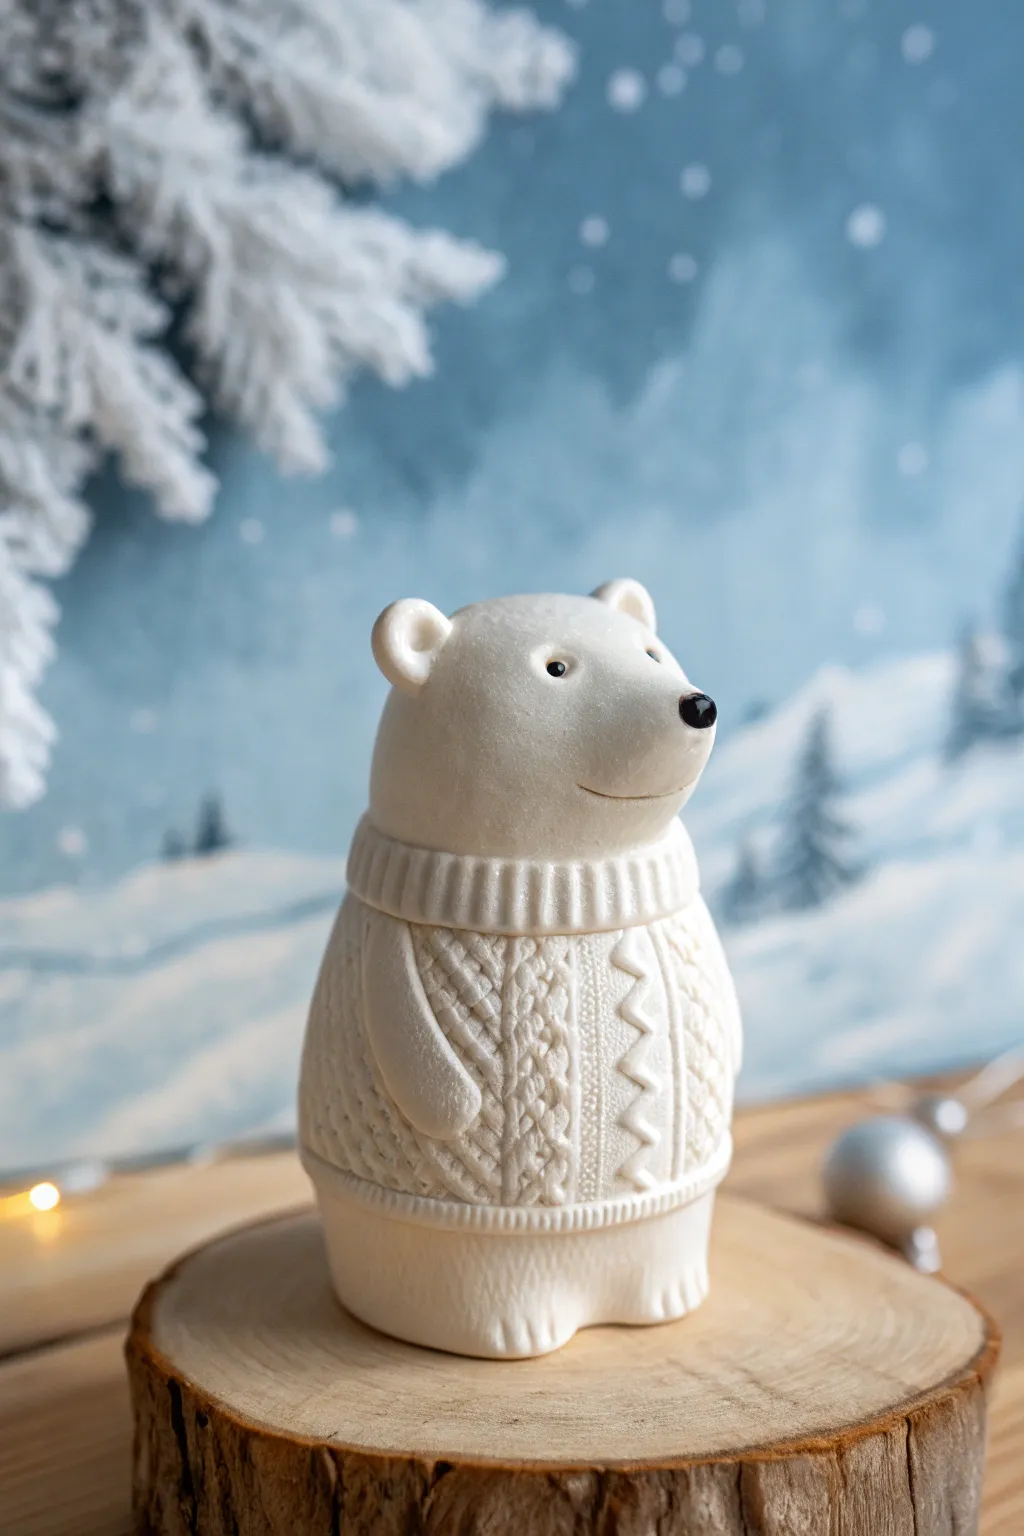
This adorable polar bear sculpture features a wonderfully tactile sweater texture that looks just like real knitting but is surprisingly easy to achieve with clay. The pure white finish gives it a modern, minimalist winter charm perfect for seasonal decor.
Detailed Instructions
Materials
- White polymer clay (approx. 2-3 blocks)
- Clean rolling pin or pasta machine
- Modeling tools (ball tool, needle tool)
- Texture sheet (knitted pattern) or stiff fabric/real sweater piece
- Clay blade or craft knife
- Small black beads or black clay for eyes
- Gloss glaze (optional, for nose/eyes)
- Baking sheet and parchment paper
- Aluminum foil (for armature core)
Step 1: Forming the Core Body
-
Create the armature:
Start by scrunching a piece of aluminum foil into a cylinder shape, slightly wider at the bottom like a gumdrop. This saves clay and keeps the sculpture lightweight. -
Condition the clay:
Warm up your white polymer clay in your hands until it is soft and pliable. Roll out a large sheet, about 1/4 inch thick using your rolling pin or pasta machine. -
Cover the form:
Wrap the clay sheet around your foil armature, smoothing out the seams with your thumb until the foil is completely hidden and the surface is uniform. -
Tape the shape:
Gently gently roll the clay-covered form on your work surface to create a smooth, tapered cylinder. The top should be slightly narrower for the neck/head transition, and the bottom should be flat so it stands securely.
Clean Slate Strategy
White clay picks up dust instantly. Work on a glass surface and keep a designated pack of baby wipes nearby to clean your hands and tools constantly.
Step 2: Creating the Sweater Texture
-
Prepare the sweater sheet:
Roll out a fresh strip of white clay, thinner than the body layer. Dust it lightly with cornstarch or baby powder to prevent sticking if you are using a textured tool. -
Apply the texture:
Press a knitting-pattern texture sheet firm into the clay strip. If you don’t have a texture sheet, I sometimes press a scrap of actual coarse linen or a piece of heavy knit fabric into the clay to pick up the weave. -
Cut the sweater panel:
Using your clay blade, cut a clean rectangle from the textured clay. This needs to be tall enough to cover the bear’s torso but leave space for the head and bottom ruffle. -
Dress the bear:
Carefully wrap the textured rectangle around the middle section of the bear’s body. Join the seam at the back, blending it gently so the pattern isn’t disrupted too much. -
Add the collar:
Roll a small snake of clay and flatten it slightly. Use a needle tool to press vertical lines into it to mimic ribbing, then wrap this around the top edge of the sweater to create a turtleneck collar. -
Add the bottom hem:
Create a second ribbed strip using the same technique as the collar. Attach this to the bottom edge of the sweater section to finish the ‘knitted’ look.
Step 3: Head and Details
-
Shape the head:
Form a smooth ball of white clay for the head. Shape it slightly into a pear form to create a protruding snout area. -
Attach the head:
Place the head onto the collar area. You may need to insert a short piece of toothpick or wire between the body and head for extra stability before pressing them together. -
Add the ears:
Roll two tiny balls of clay and flatten them slightly. Use a ball tool to indent the centers, then attach them to the top of the head. -
Create the arms:
Roll two logs of clay for the arms. Flatten one end of each log slightly to create a paw, and curve them to fit against the side of the body. Press them firmly onto the textured sweater surface. -
Refine the face:
Use a needle tool or blade to gently carve a curved mouth line just under the snout. Keep the expression simple and sweet. -
Place the features:
Press two small black beads into the clay for eyes. Roll a tiny triangle of black clay for the nose and place it at the tip of the snout. -
Final texture check:
Use a toothbrush or a ball of foil to gently tap texture onto the ‘fur’ areas (head, paws, and lower body) to contrast with the smooth sweater ribbing. -
Bake and finish:
Bake according to your clay manufacturer’s instructions (usually 275°F/130°C for 15-30 minutes). Once cool, you can add a tiny dab of gloss varnish to the nose and eyes for a wet look.
Smudged Texture Fix
If you accidentally flatten the sweater texture while attaching the arms, use a needle tool to gently re-trace the knit lines while the clay is still soft.
Place your finished bear on a wooden slice or shelf to enjoy a touch of winter warmth

TRACK YOUR CERAMIC JOURNEY
Capture glaze tests, firing details, and creative progress—all in one simple printable. Make your projects easier to repeat and improve.
Mitten Garland Ornaments
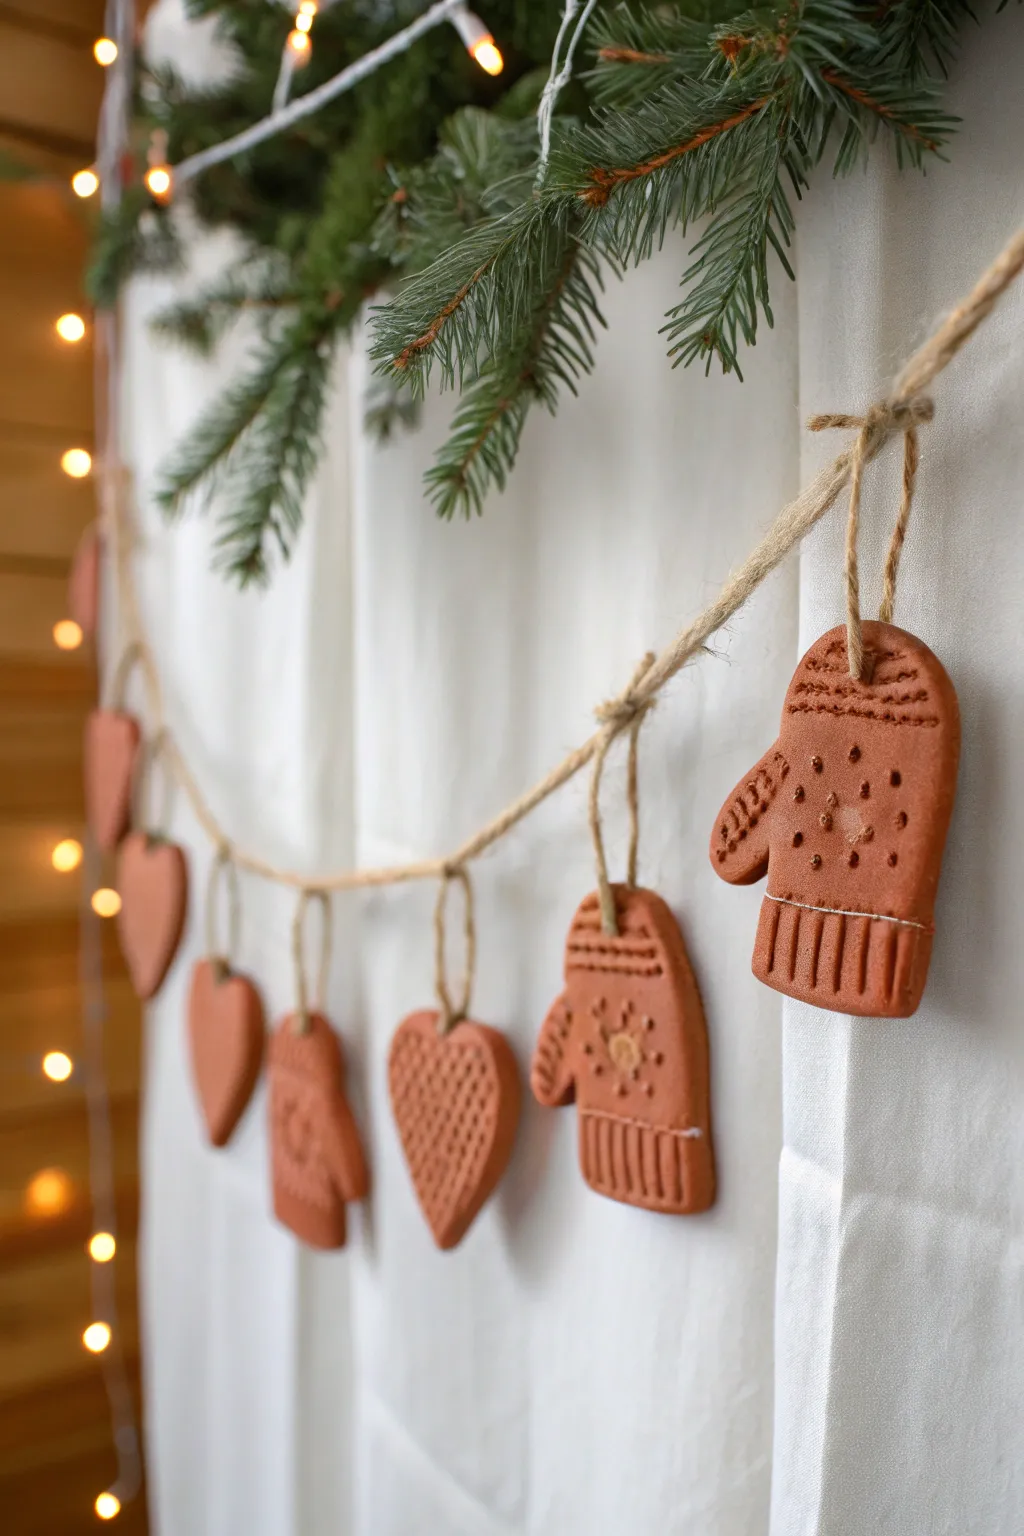
Warm up your winter decor with this charming garland featuring handmade clay mittens and hearts in rich, earthy tones. The textured details and natural twine suspension give it a cozy, rustic feel perfect for hanging across a window or mantle.
Step-by-Step
Materials
- Terracotta-colored air-dry clay (or polymer clay)
- Small rolling pin
- Parchment paper or craft mat
- Mitten and heart-shaped cookie cutters
- Needle tool or toothpick
- Straw or small circle cutter (for hanging holes)
- Jute twine
- Sandpaper (fine grit)
- Scissors
Step 1: Shaping the Ornaments
-
Prepare your workspace:
Lay down parchment paper or a craft mat to prevent the clay from sticking. This also makes cleanup much easier later. -
Condition the clay:
Take a chunk of your terracotta clay and knead it in your hands until it becomes soft, pliable, and free of cracks. -
Roll it out:
Use your rolling pin to flatten the clay to an even thickness, aiming for about 1/4 inch (6mm). If it’s too thin, the ornaments might be fragile; too thick, and they get heavy. -
Cut the shapes:
Press your mitten and heart cookie cutters firmly into the clay. Give them a little wiggle before lifting to ensure a clean cut. -
Create hanging holes:
While the clay is still wet, use a straw or a small circle tool to punch a hole at the top of each shape. For mittens, center it on the cuff; for hearts, verify it’s centered. -
Smooth the edges:
Dip your finger in a tiny bit of water and gently run it along the cut edges of each shape to smooth out any ragged bits from the cutter.
Smooth Operator
Keep a small bowl of water nearby while working. A slightly damp fingertip is the best tool for erasing fingerprints or accidental dents before the clay dries.
Step 2: Adding Texture & Drying
-
Define the cuffs:
On the mitten shapes, use a needle tool or toothpick to draw a horizontal line separating the ‘cuff’ from the hand part. -
add ribbing detail:
Below that horizontal line, press vertical indentations into the clay to mimic the ribbed knitting of a sweater cuff. Don’t cut all the way through; just press firmly. -
Create the patterns:
Use your needle tool to poke small dots or scratch tiny ‘x’ shapes onto the main part of the mitten. You can create snowflakes, polka dots, or simple dashed lines. -
Texture the hearts:
For the heart ornaments, try pressing a piece of lace or a textured fabric into the wet clay, or stipple the surface with your needle tool for a varied look. -
Let them dry:
Place all ornaments on a flat surface to dry. If using air-dry clay, this usually takes 24-48 hours. Flip them halfway through so the backs dry evenly. -
Sand imperfections:
Once fully cured and hard, gently sand any rough edges with fine-grit sandpaper for a professional finish.
Snowy Highlights
After the clay dries, use a dry brush with a tiny amount of white acrylic paint to lightly dust the textured areas, making the patterns pop like fake snow.
Step 3: Assembly
-
Cut the main line:
Measure the space where you want to hang the garland and cut a length of jute twine, adding about 12 inches of extra slack for loops at the ends. -
Create individual loops:
Cut smaller pieces of twine, about 4-5 inches each, to attach the ornaments to the main line. -
Thread the ornaments:
Feed a small piece of twine through the hole in an ornament. Tie a simple knot to create a loop, ensuring the ornament hangs freely. -
Tie to the garland:
Take the loose ends of your ornament loop and tie them securely onto the main long piece of twine. I like to space mine about 4 inches apart. -
Alternate shapes:
Continue attaching ornaments, alternating between mittens and hearts for visual interest, until your garland is full.
Hang your cozy creation near some fairy lights to highlight the beautiful clay texture
Icicle Drop Earrings

Capture the serene beauty of a winter morning with these elegant, tapered drop earrings. Featuring a soft gradient from snowy white to glacial blue, they are finished with a delicate shimmer that mimics frozen water catching the light.
How-To Guide
Materials
- White polymer clay
- Translucent polymer clay
- Light blue polymer clay (or alcohol inks to tint translucents)
- Fine silver glitter or mica powder
- Silver eye pins (2)
- Silver earring hooks (2)
- Jump rings (4)
- Jewelry pliers (round nose and flat nose)
- Clay roller or pasta machine
- Tissue blade
- UV resin or gloss glaze
- Small brush or applicator
Step 1: Preparing the Clay Gradient
-
Condition the white clay:
Begin by thoroughly conditioning a small block of white polymer clay until it is soft and pliable. Roll it into a small log about half an inch thick. -
Mix the blue shimmer:
Take a portion of translucent clay and mix in a very small amount of blue clay to tint it a pale, icy blue. Knead in a pinch of fine silver glitter to create an internal sparkle. -
Create the transition shade:
Blend a small piece of your pure white clay with a small piece of the glittery blue mix to create a transition color. This will help the gradient look seamless later. -
Assemble the plugs:
Arrange your clay balls in a line: pure white, the mixed transition shade, and the glittery blue. Press them together gently to form a rough cylinder.
Step 2: Shaping the Icicles
-
Initial rolling:
Roll the tri-colored cylinder on your work surface using the palm of your hand. Focus on smoothing the seams where the colors meet so they blend naturally. -
Divide the clay:
Use your tissue blade to cut the long blended log exactly in half. This ensures both earrings will have the same amount of clay and roughly the same gradient ratio. -
Tapering the form:
Take one half and begin rolling it into a long cone shape. Apply more pressure at the blue end to thin it out, keeping the white end thicker and rounded. -
Refining the tip:
Continue rolling until you have a sharp, delicate point at the bottom. The shape should resemble a elongated carrot or icicle, roughly 1.5 to 2 inches long. -
Smooth the surface:
Lightly stroke the surface with your finger to remove any fingerprints. If the clay is getting too soft, let it rest in the fridge for ten minutes before this step. -
Insert the hardware:
Trim an eye pin so the stem is about half an inch long. Carefully insert it into the center of the white (top) end of the cone. Gently pinch the clay around the wire to secure it. -
Repeat the process:
Shape the second piece of clay to match the first one as closely as possible. Lay them side-by-side to check that the lengths and widths are symmetrical.
Sparkle Tip
Add a tiny pinch of black pepper or dark grit to the white clay before shaping. It mimics natural stone or speckled pottery clay for a more organic, earthy look.
Step 3: Baking and Finishing
-
Bake the pieces:
Preheat your oven according to the clay manufacturer’s instructions (usually around 275°F or 130°C). Bake the cones for 30–45 minutes. I recommend baking them upright in a mound of cornstarch to prevent flat spots. -
Cool down:
Allow the pieces to cool completely inside the oven before removing them. This tempering process makes the clay stronger. -
Add external sparkle:
For extra frostiness, mix a tiny amount of glitter into UV resin or a gloss glaze. Brush a very thin layer over the blue bottom half of the icicle, fading it out as you go up. -
Cure the finish:
If using UV resin, cure under a UV lamp for 2–3 minutes. If using glaze, allow it to air dry fully according to the bottle instructions. -
Open the jump rings:
Use two pairs of pliers to twist open your jump rings. Never pull them apart; always twist side-to-side to maintain their circle shape. -
Attach the hooks:
Loop a jump ring through the eye pin at the top of the icicle, then attach the earring hook. Close the jump ring securely by twisting it back into place. -
Final check:
Give the earrings a gentle shake to ensure all connections are secure and the movement is fluid.
Level Up: Crystal Dip
Before baking, dip the very tip of the blue end into liquid clay and then into clear glass micro-beads. It creates a crunchy, frozen texture right at the point.
Now you have a stunning, frosty accessory to wear all winter long or gift to a friend
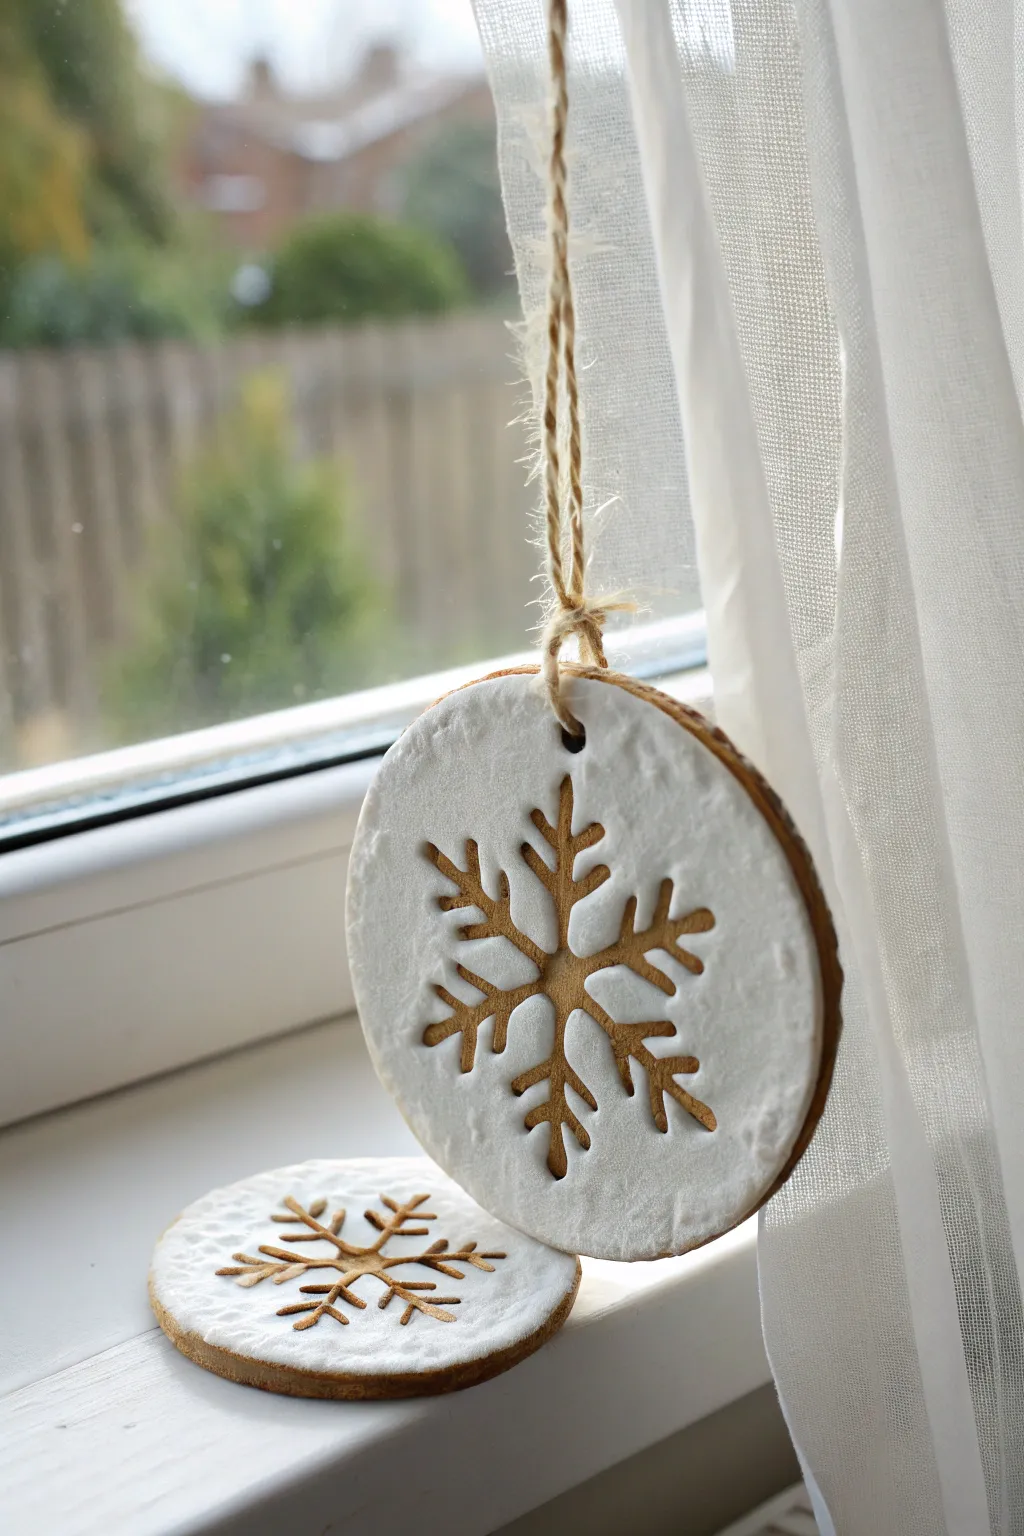
Pinecone-Imprint Winter Ornaments
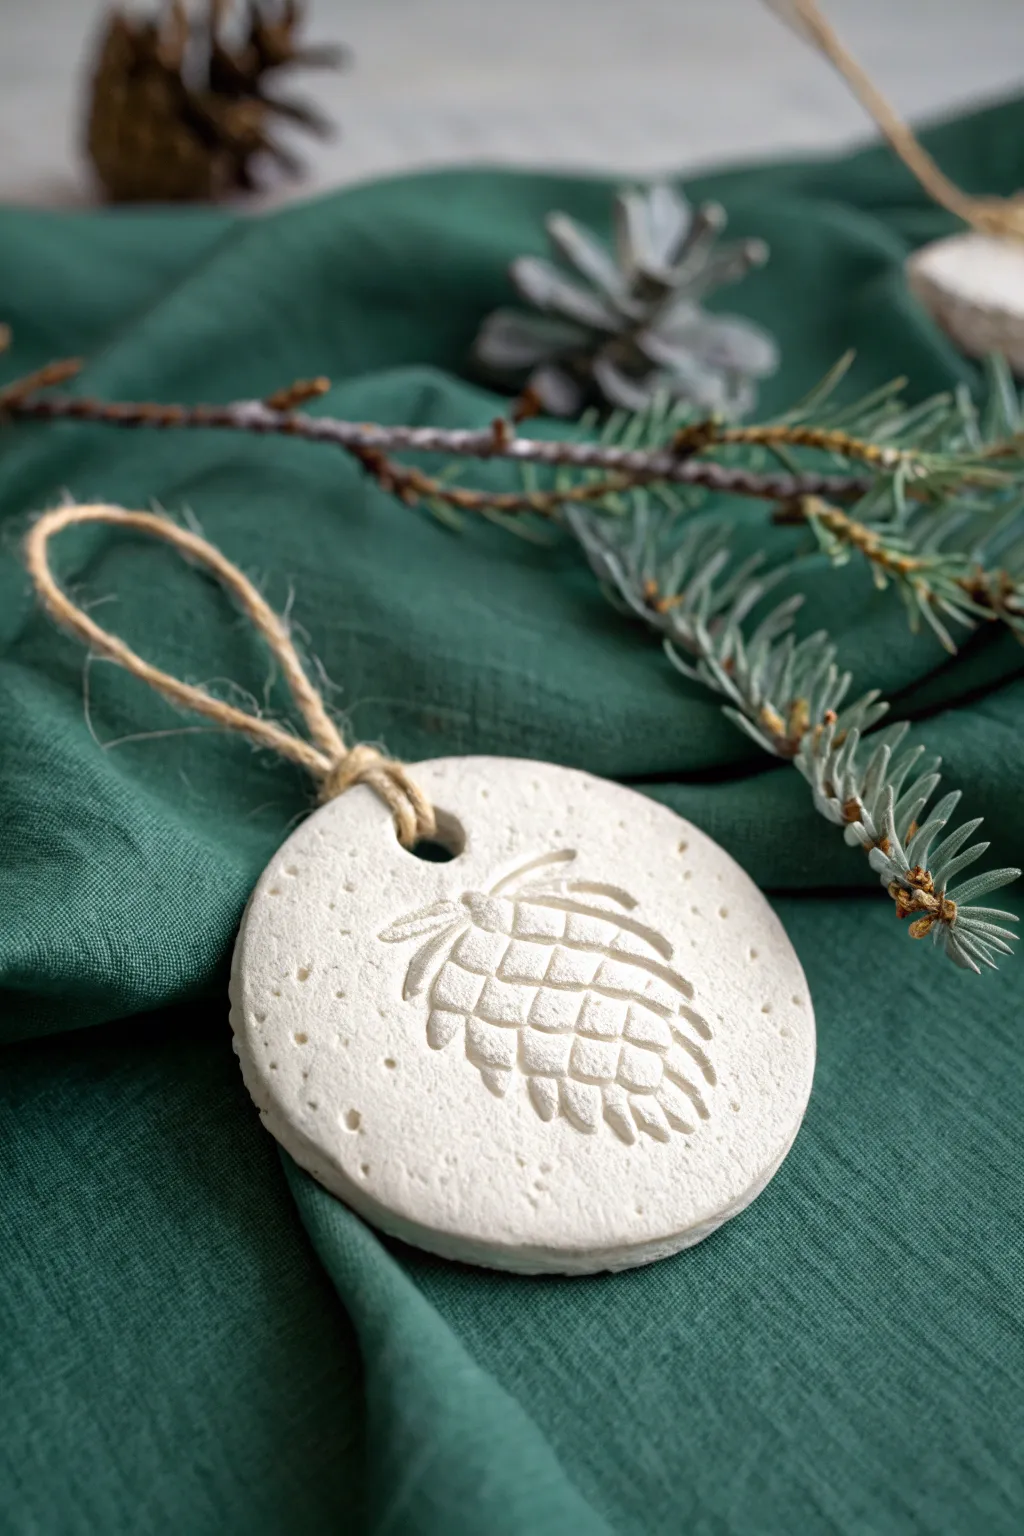
Capture the delicate details of winter flora with this elegant air-dry clay ornament. The resulting piece features a crisp, embossed pinecone design on a smooth white disc, finished with natural jute twine for a timeless and organic look.
Step-by-Step Guide
Materials
- White smooth air-dry modeling clay
- Rolling pin
- Parchment paper or silicone mat
- Round cookie cutter (approx. 3-4 inches)
- Small pinecone stamp or a clean, sturdy pinecone for pressing
- Plastic straw or small circular cutter (for the hole)
- Fine-grit sandpaper (optional)
- Natural jute twine
- Water in a small cup
- Sponge or paper towel
Step 1: Preparation & Rolling
-
Setup:
Begin by covering your work surface with parchment paper or a silicone mat. This prevents the clay from sticking and keeps the back of your ornament smooth. -
Condition the clay:
Take a handful of white air-dry clay and knead it gently in your hands. You want it warm and pliable, but not sticky. If it feels too dry, dip your finger in water and work it in. -
Roll it out:
Place the clay ball in the center of your mat. Using a rolling pin, flatten the clay to an even thickness of about 1/4 inch (6mm). Try to keep the thickness consistent so it dries without warping. -
Cut the shape:
Press your round cookie cutter firmly into the rolled clay. Give it a tiny wiggle to detach the edges, then lift the cutter away. Peel away the excess scrap clay, leaving just the perfect circle.
Clean Release Tip
Before pressing your pinecone or stamp into the clay, lightly dust it with cornstarch or baby powder. This acts as a release agent and ensures the clay doesn’t get stuck in the deep crevices of the stamp.
Step 2: Imprinting & Texturing
-
Position the stamp:
Identify the center of your clay circle. If you are using a real pinecone, choose the side with the most distinct scales. -
Create the impression:
Press your pinecone stamp or actual pinecone firmly into the clay. Apply even pressure to ensure all the little details transfer, but be careful not to push all the way through the disc. -
Lift carefully:
Slowly lift the stamp or pinecone straight up. If any clay lifts with it, gently push it back down with a fingertip. You should now have a crisp, indented image. -
Add subtle texture:
For a snowy effect, you can lightly tap a rough sponge or a toothbrush around the empty spaces of the circle to create tiny indentations, mimicking falling snow or stone texture. -
Smooth the edges:
Dip your finger in a little water and run it gently around the rim of the circle to smooth out any sharp ridges left by the cookie cutter. -
Create the hanging hole:
Use a plastic straw to punch a hole near the top edge of the ornament. Make sure it’s centered above the pinecone design and not too close to the very edge to prevent cracking.
Step 3: Drying & Finishing
-
Initial drying:
Leave the ornament on the parchment paper to air dry. Place it in a safe spot away from direct heat sources, which can cause cracking. -
Flipping:
After about 12 hours, or when the top feels dry to the touch, gently flip the ornament over. This helps the bottom dry evenly and prevents the edges from curling up. -
Full cure:
Allow the clay to dry completely for another 24 hours. The clay will turn a bright, chalky white and feel hard when fully cured. -
Sanding:
Once bone dry, inspect the edges. If there are any rough spots, lightly buff them with fine-grit sandpaper for a professional finish. -
Prepare the twine:
Cut a piece of natural jute twine, approximately 8-10 inches long. -
Looping:
Fold the twine in half. Push the folded loop end through the hole in the ornament from front to back. -
Securing the knot:
Open the loop you just pushed through and pull the two loose ends of the twine through that loop. Pull tight to create a secure lark’s head knot right at the top of the disc. -
Tie the ends:
Tie the two loose ends of the twine together in a simple overhand knot to close the Hanger loop.
Add a Wash
Mix a tiny drop of brown acrylic paint with water to create a wash. Brush it over the dried imprint and wipe the surface immediately. Paint stays in the grooves, highlighting the pinecone details.
Now you have a beautifully simple piece of winter decor ready to hang on the tree or gift to a friend
Woodland Winter Animal Totems
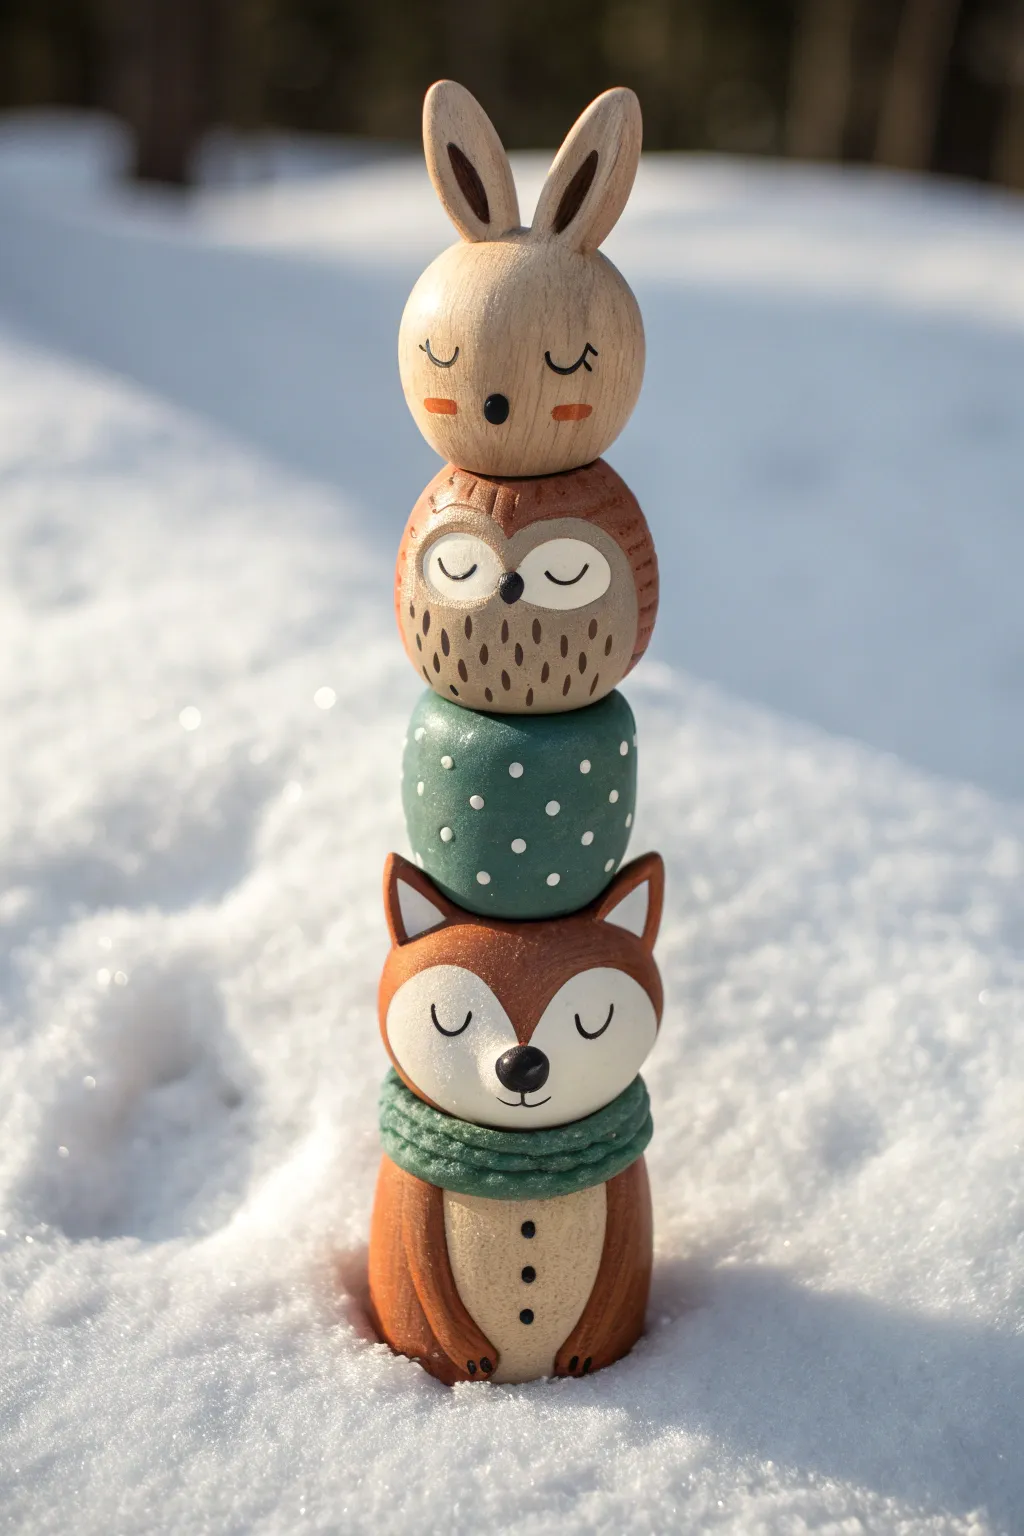
Create a whimsical sense of woodland magic with this stacked animal totem, featuring a sleepy fox, a cozy owl, and a bunny perched on top. The smooth, rounded forms mimic the look of turned wood, making this a charming winter decoration to nestle into a snowy scene or display on a mantle.
Detailed Instructions
Materials
- Polymer clay (white, beige/tan, terracotta/fox orange, forest green)
- Acrylic paints (black, white, brown)
- Fine detail paintbrush (00 or 000 size)
- Dotting tools or ball stylus
- Aluminum foil (for armature)
- Needle tool
- Matte varnish or sealant
- Toothpick or wire (for internal structural support)
Step 1: Sculpting the Fox
-
Build the Base:
Start by rolling a ball of terracotta-colored clay into a smooth cylinder that tapers slightly at the top for the fox’s body. Flatten the bottom so it stands securely. -
Add the Tummy:
Flatten a small oval of beige clay and press it onto the front of the body cylinder to create the lighter chest and stomach area, blending the edges for a seamless join. -
Form the Arms:
Roll two thin sausage shapes of terracotta clay. Press these along the sides of the body, curving them inward so the paws rest gently on the belly. -
Create the Collar:
Roll a snake of forest green clay. Wrap it around the top of the body cylinder where the head will attach. Use a needle tool to scratch texture into the clay, simulating a knitted scarf. -
Sculpt the Head:
Roll a slightly flattened sphere of terracotta clay for the head. Press a heart-shaped piece of white clay onto the lower half for the face mask. -
Add Ears:
Shape two small triangular ears from terracotta clay with white inner triangles. Attach these securely to the top of the head. -
Assemble the Fox:
Insert a toothpick or wire vertically into the body center, leaving enough sticking up to secure the head. Gently press the head down onto the scarf.
Step 2: Sculpting the Spacer & Owl
-
Green Spacer Layer:
Roll a medium-sized ball of forest green clay, slightly smaller than the fox’s head. Flatten the top and bottom slightly so it stacks well. Pierce the center with your wire/skewer to ensure it fits over the support rod. -
Texture the Spacer:
For that dotted fabric look, use a small dotting tool to gently impress tiny divots regularly around the green sphere, or simply paint them later. -
Form the Owl:
Create a sphere of light brown clay. Press a bi-convex (lens shape) of lighter beige clay onto the front to form the eye mask area. -
Owl Details:
Indent the surface of the owl’s body with a needle tool to suggest feathers. Attach this ball on top of the green spacer using the central support wire.
Leaning Tower?
If your totem leans, your clay might be too soft. Chill the clay in the fridge for 15 minutes before stacking, or bake the bottom fox section first to create a solid base.
Step 3: Sculpting the Bunny & Finishing
-
Bunny Head:
Roll a sphere of beige clay for the bunny. This should be roughly the same size as the owl. -
Bunny Ears:
Shape two long, teardrop ears. Flatten them slightly and attach them high on the head. I find using a tiny bit of liquid clay helps bond these fragile parts securely. -
Final Stack:
Place the bunny head at the very top of your totem stack. Smooth out any fingerprints with a drop of baby oil on your finger before baking. -
Bake:
Bake the entire totem according to your polymer clay package instructions. Let the piece cool completely before handling. -
Paint Construction:
Using black acrylic paint and a fine brush, carefully paint the sleeping eyes (curved U-shapes) on all three animals. Dot the noses in black. -
Final Details:
Paint or seal the white dots on the green spacer. Add blushing cheeks with diluted pink paint, and paint the inner ear details on the bunny and owl with dark brown. -
Seal:
Apply a coat of matte varnish to the entire piece to protect the paint and give it that soft, wood-like finish.
Wood Grain Effect
To mimic real wood, lightly sand the baked clay in one vertical direction with coarse sandpaper, then apply a thin wash of brown acrylic paint to settle into scratches.
Place your finished totem in a winter diorama or on a windowsill to enjoy its peaceful vibe all season long
Melting Snowman Candle Holder
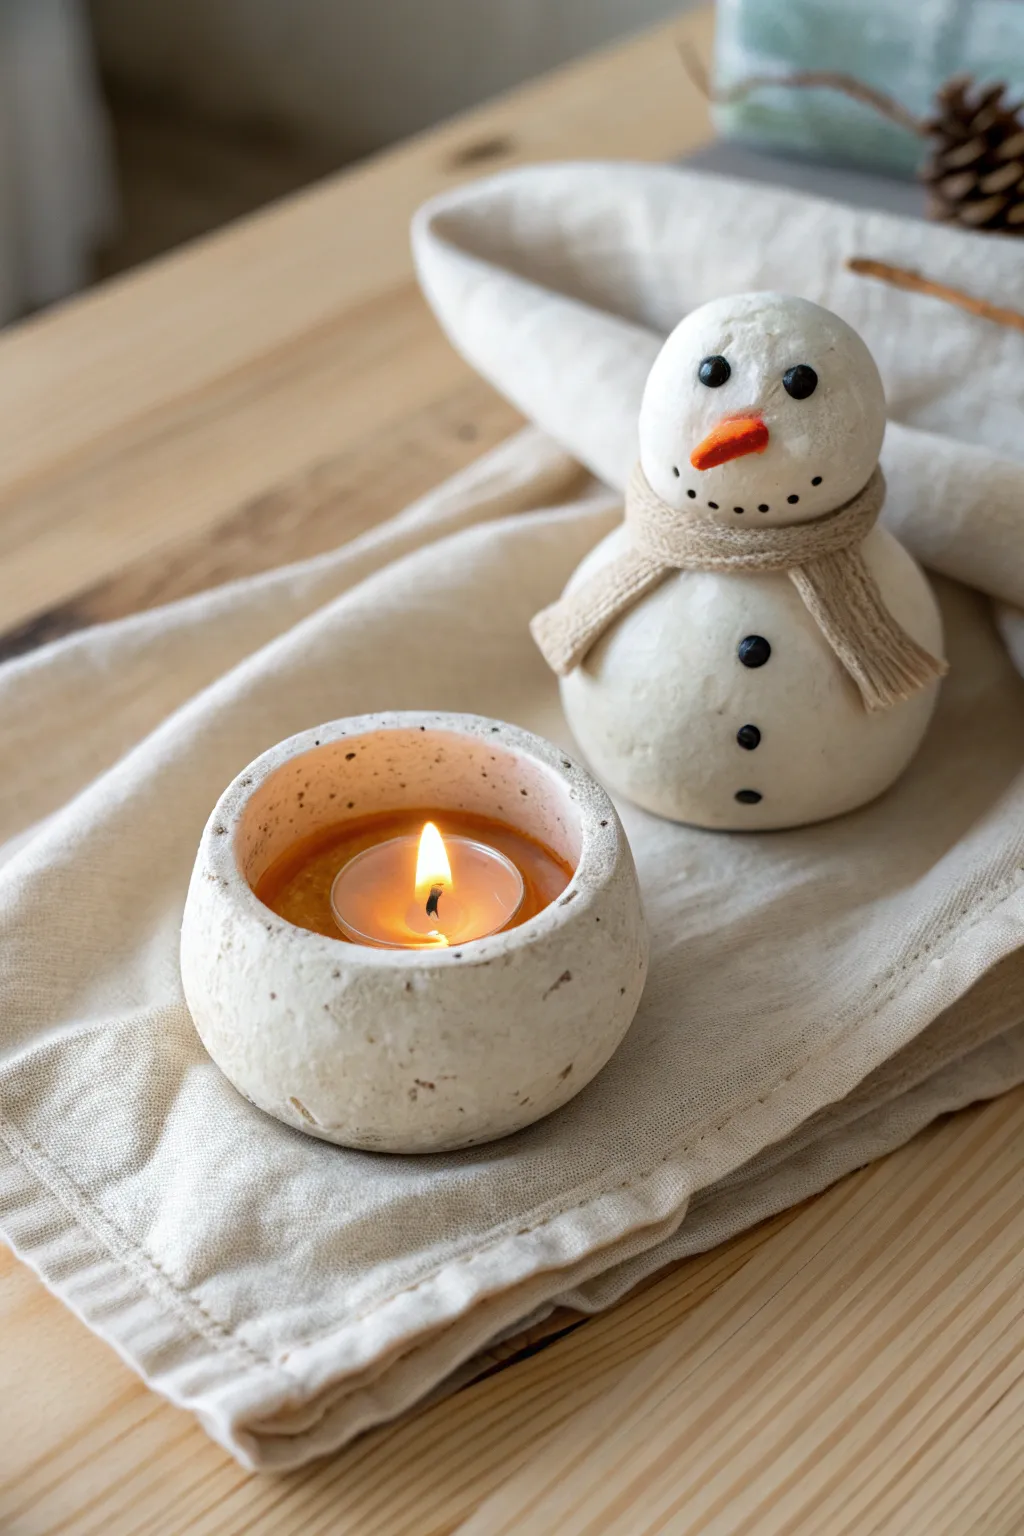
Embrace the cozy side of winter with a charming duo: a round-bellied snowman figurine and a matching textured votive holder. Crafted from air-dry clay with a stone-like finish, this pair brings a warm, artisanal glow to any holiday table setting.
Step-by-Step Tutorial
Materials
- White air-dry clay (or polymer clay)
- Small textured fabric or burlap scrap
- Orange acrylic paint
- Black acrylic paint
- Small paintbrush
- Tea light candle
- Rolling pin
- Needle tool or toothpick
- Water bowl
- Sandpaper (fine grit)
- Clear matte varnish (optional)
Step 1: Shaping the Snowman
-
Roll the body:
Start with a ball of clay roughly the size of a tangerine for the snowman’s base. Roll it between your palms until it’s smooth, then gently tap the bottom against your work surface to create a flat base so it stands securely. -
Create the head:
Roll a second, smaller ball of clay—about half the size of the body—for the head. Ensure it’s perfectly round before attaching it. -
Join the parts:
Score the top of the body and the bottom of the head with a needle tool to create a rough texture. Dab a little water (or clay slip) on the scored areas and press the head firmly onto the body to bond them. -
Roll the scarf:
Take a small pinch of clay and roll it out into a thin, long snake. Flatten this snake gently with a rolling pin carefully to create a ribbon shape. -
Texture the scarf:
Press a piece of burlap or textured fabric lightly onto the flat clay ribbon to imprint a woven pattern. This simulates the look of a knitted scarf. -
Wrap the scarf:
Drape the clay scarf around the snowman’s neck where the head joins the body. Cross the ends over each other at the front, letting them hang down slightly, and use a tool to scratch fringe lines into the ends. -
Add the nose:
Form a tiny cone of clay for the carrot nose. Attach it to the center of the face with a drop of water, slightly tilting it upward for a cheerful expression.
Step 2: Crafting the Votive Holder
-
Start the pinch pot:
Form a ball of clay similar in size to the snowman’s body. Push your thumb into the center, but don’t go all the way through to the bottom. -
Shape the walls:
Gently pinch and rotate the clay between your thumb and fingers to thin out the walls and widen the opening. Aim for a distinct, rounded bowl shape. -
Sizing check:
Insert your tea light into the opening to ensure it fits comfortably with a little room to spare. The walls should curve inward slightly at the top to cradle the candle. -
Texturing the surface:
While the clay is still damp, gently pat the exterior of both the snowman and the votive holder with a crumpled paper towel or sponge. This gives it that organic, snowy, stone-like texture visible in the photo. -
Drying time:
Allow both pieces to dry completely according to your clay package instructions. This usually takes 24-48 hours depending on humidity.
Cracking Up?
If you see small cracks forming while drying, mix a tiny bit of fresh clay with water to make a paste and smooth it into the cracks with a brush.
Step 3: Finishing Touches
-
Sanding:
Once dry, lightly sand any sharp edges or unwanted bumps, but leave the main surface texture intact. -
Painting the details:
Paint the nose a bright, matte orange. Use a very fine brush or the end of a toothpick dipped in black paint to dot the eyes, the smile, and the three buttons down the snowman’s belly. -
Stone effect (optional):
To enhance the texturing on the votive, I like to mix a tiny bit of brown paint with water and do a light wash over the exterior, wiping it off immediately so pigment only stays in the crevices. -
Seal (optional):
Apply a matte varnish to protect your work, especially on the painted areas. -
Final assembly:
Place a tea light inside the votive holder and arrange your pair together on a wooden surface.
Make it Sparkle
Before the clay dries or sealer sets, sprinkle ultra-fine iridescent glitter over the snowman’s body to mimic the shimmer of fresh snow.
Light your candle and enjoy the warm atmosphere your handcrafted winter friends create
Frosted Window Suncatcher Discs
Capture the delicate beauty of falling snow with these charming window ornaments. Featuring a crisp white clay finish over a warm base, the recessed snowflake design allows light to cast lovely shadows, creating a cozy winter vignette.
Step-by-Step Guide
Materials
- Air-dry clay (white)
- Small wooden discs (approx. 3-4 inch diameter) or brown polymer clay
- Snowflake cookie stamp or embossing tool
- Rolling pin
- Round cookie cutter (matching the wooden disc size)
- PVA glue or strong craft adhesive
- Jute twine or rustic string
- Drill with small bit (if wooden discs don’t have holes)
- Fine-grit sandpaper
- Small paintbrush
- Water bowl
Step 1: Preparing the Base
-
Select your base:
For the warm, brownish foundation seen in the photo, you have two options. The easiest is to use pre-cut wooden round discs. Alternatively, roll out brown polymer clay or gingerbread-colored salt dough to about 1/4 inch thickness. -
Create hanging holes:
If using wood slices that aren’t pre-drilled, carefully drill a small hole near the top edge for the string. If using clay, use a straw or skewer to poke a hole before baking or drying. -
Smooth the surface:
Ensure your base is completely clean and smooth. If using wood, give it a quick pass with fine-grit sandpaper to remove any splinters that might interfere with the top layer.
Fixing the Curl
If the white clay edges lift while drying, place a sheet of wax paper over the discs and weigh them down with a heavy book for the final few hours of drying.
Step 2: Creating the Frosted Layer
-
Condition the white clay:
Take a portion of white air-dry clay and knead it in your hands until it becomes pliable and warm. This prevents cracking later on. -
Roll out the clay:
Roll the white clay out on a smooth surface until it is quite thin, approximately 1/8 of an inch. You want it to look like a delicate layer of icing, not a thick slab. -
Texture the surface:
Before cutting, gently dab the surface of the clay with a crumpled piece of aluminum foil or a textured sponge. This gives it the slightly organic, ‘frosted’ look rather than being perfectly smooth plastic. -
Cut the circles:
Use your round cookie cutter to punch out circles from the white clay. These should match the diameter of your base discs perfectly. -
Stamp the design:
Place your snowflake stamp directly into the center of the wet white clay circle. Press down firmly enough to cut all the way through the clay layer to reveal the surface underneath, but be gentle so you don’t distort the outer circle shape. -
Remove the cutouts:
Very carefully lift the stamp. Use a needle tool or toothpick to gently tease out the clay pieces from inside the snowflake arms, leaving a negative space design. -
Refine the edges:
Dip your finger in a little water and smooth the outer edges of the clay circle to remove any sharpness from the cutter.
Sparkle Upgrade
While the white clay is still wet, lightly dust it with iridescent white glitter or clear embossing powder to mimic the glistening effect of fresh snow.
Step 3: Assembly and Finishing
-
Apply adhesive:
Brush a thin, even layer of PVA glue onto the face of your wooden or brown clay base. Make sure to avoid clogging the hanging hole with glue. -
Mount the white layer:
Gently lift your white snowflake circle and place it directly onto the glued base. I find it helpful to align the holes first, then smooth the rest of the disc down. -
Clear the opening:
If the white clay has slightly covered the hanging hole during placement, use your skewer or drill bit to clear the path again while the clay is still wet. -
Dry completely:
Allow the assembled ornament to dry flat in a cool, dry place for at least 24 hours. Drying it too fast near a heater might cause the white clay to curl away from the base. -
Add the hanger:
Cut a length of jute twine, about 8 inches long. Fold it in half to create a loop at the bottom. -
Secure the decorative knot:
Thread the loop end through the hole from front to back. Pass the loose ends through the loop and pull tight to create a ‘lark’s head’ knot, exactly like the one in the photo. Tie the loose ends at the top to complete the hanger.
Hang these in a sunny window and enjoy the wintery charm they bring to your view
Mini Igloo Desk Buddy
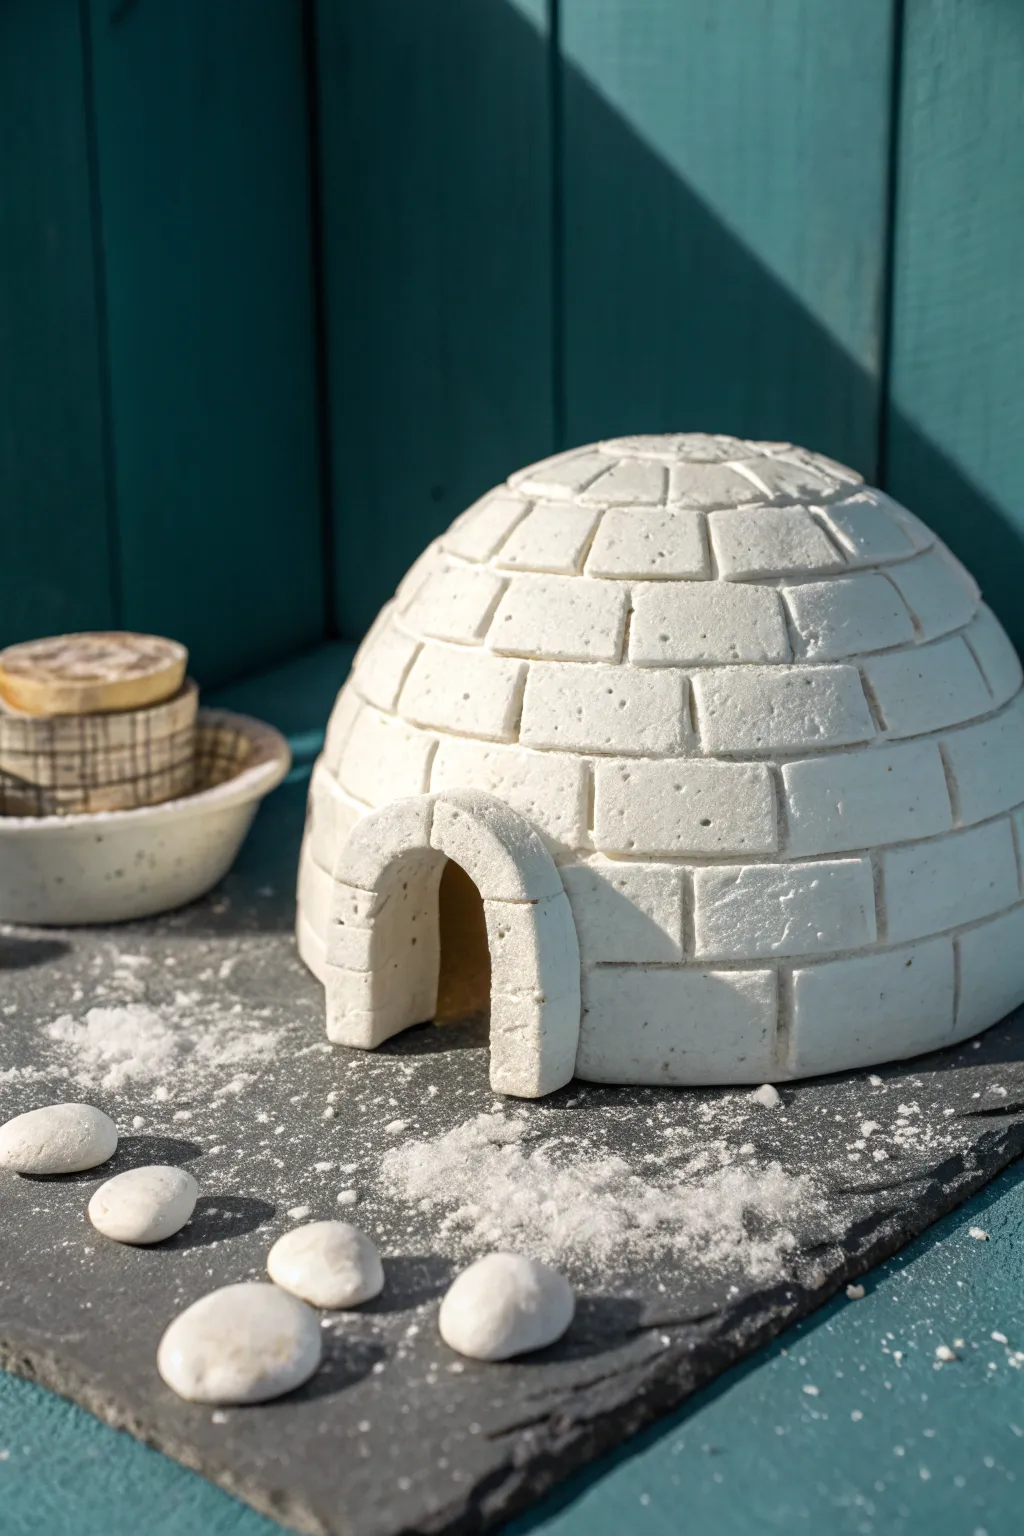
Bring a touch of the arctic to your workspace with this adorable textured clay igloo. The crisp white finish and realistic brick detailing make it a charming seasonal decoration that looks surprisingly professional despite its simple construction.
Step-by-Step
Materials
- White air-dry clay (or polymer clay)
- Small styrofoam ball (approx. 3-4 inches diameter)
- Rolling pin
- Parchment paper or craft mat
- Clay knife or plastic sculpting tool
- Small bowl of water
- Needle tool or toothpick
- Fine-grit sandpaper
- White acrylic paint (optional)
- Matte sealant spray
Step 1: Forming the Base Structure
-
Prepare the dome mold:
Cut your styrofoam ball in half using a craft knife to create a perfect dome shape. This will serve as the internal support for your igloo while it dries. -
Roll out the clay sheet:
Take a large chunk of white clay and knead it until soft. Roll it out on parchment paper to an even thickness of about 1/4 inch. -
Cover the mold:
Gently drape the clay sheet over the styrofoam dome. Carefully smooth it down to conform to the shape, trimming away excess clay at the bottom with your knife. -
Create the entrance tunnel:
Roll a smaller, separate thick slab of clay. Cut out a small arch shape—this will be the front facade of the doorway. -
attach the entrance:
Score the back of the arch and the spot on the dome where it will attach. Use a dab of water to join them, smoothing the seam with your finger or a clay tool so it looks like one cohesive unit.
Cracked Clay Fix
If small cracks appear while drying, don’t panic. Mix a tiny bit of fresh clay with water to make a paste and fill the cracks, then smooth over.
Step 2: Detailing the Bricks
-
Mark horizontal guides:
Using a needle tool, very lightly trace horizontal lines around the entire circumference of the dome. These will guide your brick rows. -
Carve the vertical lines:
Press your clay knife into the clay to create the vertical lines between bricks, staggering them row by row just like real masonry. -
Deepen the horizontal grooves:
Go back over your horizontal guide lines with the knife, pressing firmly to create deep definition between the varied brick layers. -
Detail the entrance arch:
Carve a radiating pattern of lines around the arched doorway to simulate a stone archway construction. -
Add texture:
Take a clean toothbrush or a crumpled ball of aluminum foil and gently tap it against the surface of each ‘brick’ to remove the smooth finish and give it a pitted, icy look. -
Create the pebble accents:
Using your leftover clay, roll several small, irregular pebble shapes. Flatten them slightly so they won’t roll away later.
Step 3: Finishing Touches
-
Allow to dry:
Let the sculpture sit for 24-48 hours. I prefer to let it dry slowly away from direct heat to prevent cracking. -
Remove the mold:
Once the outside is firm, carefully gently pry the styrofoam mold out from underneath. Let the inside dry for another few hours if needed. -
Sand the edges:
Use fine-grit sandpaper to gently smooth the bottom rim and any overly sharp peaks on the brick texture. -
Apply a paint wash (optional):
If your clay dried slightly grey, give the whole piece a coat of matte white acrylic paint for a bright, snowy effect. -
Seal the project:
Spray the igloo and the pebbles with a matte sealant to protect the clay from humidity. -
Style your scene:
Place your igloo on a dark slate or desk surface. Arrange the pebbles leading to the door and sprinkle a pinch of baking soda or fake snow powder around for that freshly-fallen snow look.
Make It Glow
Cut a hole in the back and insert a battery-operated LED tea light inside the dome for a cozy, glowing winter night light effect.
Your tiny winter shelter is now ready to add a calm, chilly vibe to your warm indoor space
Winter Village Shelf Houses
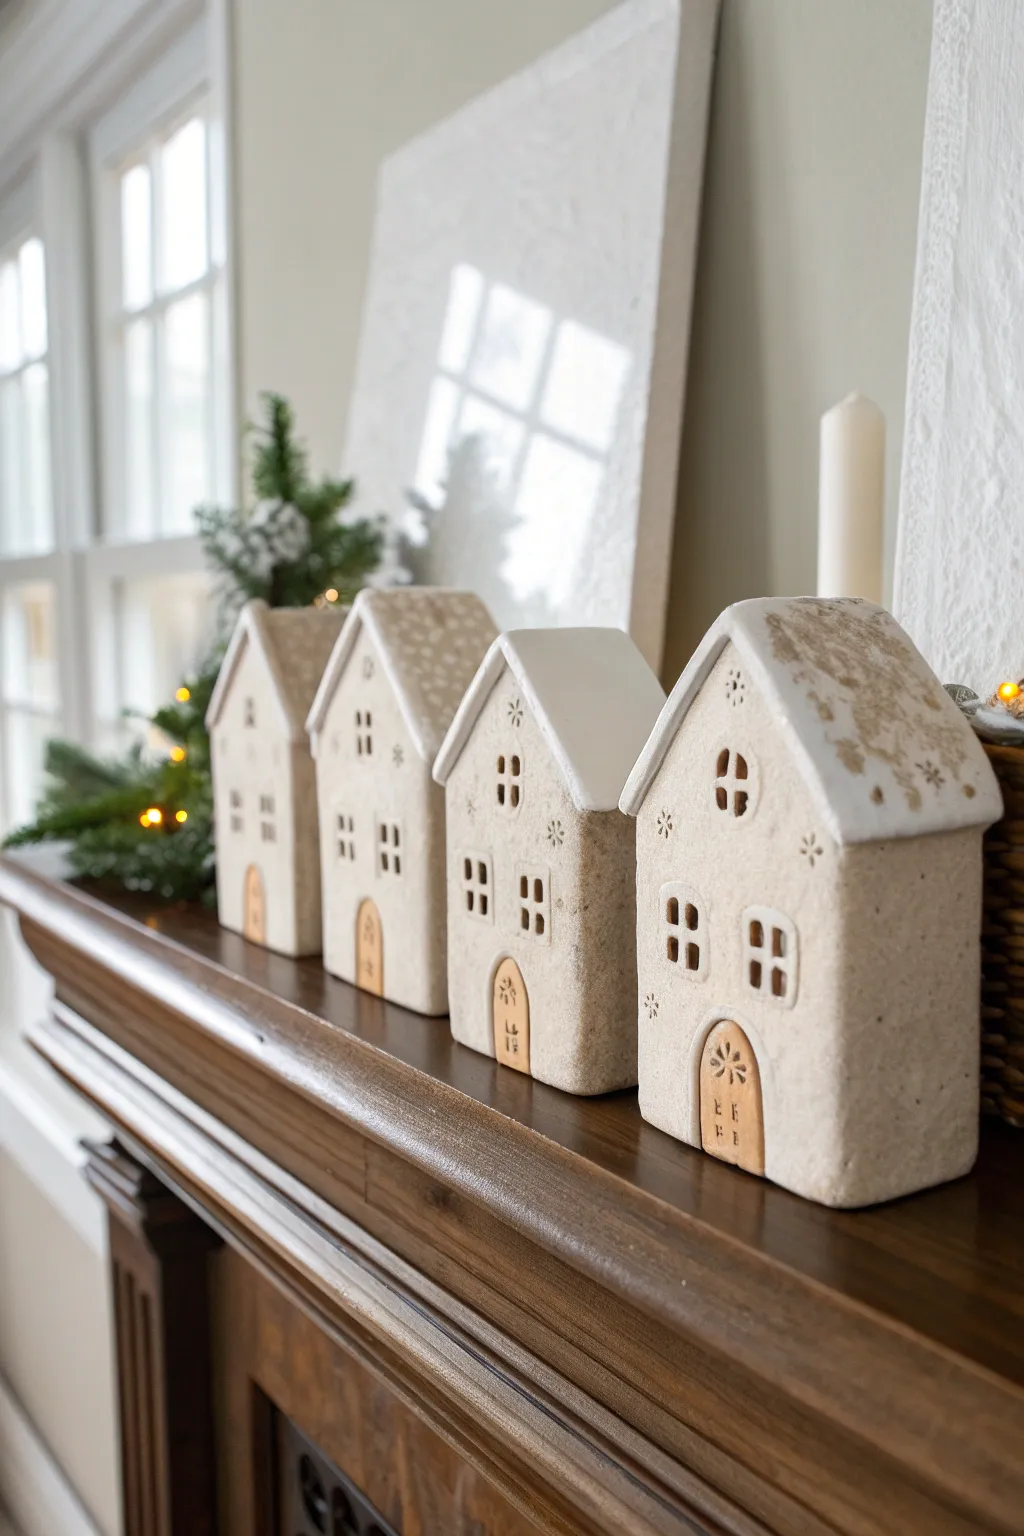
Bring the charm of a snow-dusted European hamlet into your home with these textured clay houses. Their speckled finish and simple, hand-formed look create a cozy, minimalist winter vignette perfect for any mantelpiece.
Detailed Instructions
Materials
- White or speckled stoneware clay (or polymer clay with faux stone effect)
- Rolling pin with guide rings (1/4 inch thickness)
- Clay knife or craft blade
- Paper templates (simple house shapes)
- Small square and circle clay cutters
- Needle tool
- Slip and scoring tool (if using ceramic clay) or liquid clay (if polymer)
- White acrylic paint or white ceramic glaze
- Small paintbrush
- Sponge
- Sandpaper (fine grit)
Step 1: Shaping the Structures
-
Prepare your workspace:
Begin by laying down a canvas mat or parchment paper to prevent the clay from sticking. Wedge your clay thoroughly to remove air bubbles if using ceramic clay, or condition it until pliable if working with polymer. -
Roll out the slabs:
Use your rolling pin to flatten the clay. Aim for a consistent 1/4 inch thickness for stability; guide rings are incredibly helpful here to ensure the walls are even. -
Cut the walls and roof:
Using paper templates you’ve pre-designed, cut out two pentagon shapes for the front and back, two rectangles for the side walls, and two rectangles for the roof panels. I like to keep the shapes simple and slightly imperfect for a rustic feel. -
Add window details:
Before assembling, cut out windows on the front panel using small square cutters. Don’t worry if they aren’t perfectly aligned; that adds character. Use a needle tool to gently impress a cross shape into the open window space to mimic windowpanes. -
Texture the surface:
For that weathered stone look shown in the photo, gently dab a coarse sponge or a crumpled ball of foil over the surface of your clay pieces to create a subtle pitted texture. -
Create decorative elements:
Use a needle tool or small stamp to press tiny snowflake or star patterns into the upper sections of the front wall. Keep these sparse and delicate.
Step 2: Assembly and Refining
-
Bevel the edges:
Cut the connecting edges of your walls at a 45-degree angle. This mitering helps the corners fit together snugly without bulky seams. -
Score and slip:
If using ceramic clay, scratch the edges (score) and apply clay slurry (slip). For polymer clay, apply a thin line of liquid clay. Press the four walls together firmly to create the box structure. -
Attach the roof:
Repeat the bonding process for the roof panels. Allow the roof to overhang slightly on the sides for a classic cottage silhouette. -
Smooth the seams:
Use your finger or a smoothing tool to blend the clay at the joints. You want the house to look like a solid unit, though leaving the corners slightly soft preserves the handmade charm. -
Form the door:
Roll a small, arched piece of clay slightly thinner than the walls. Press a wood-grain texture into it using your needle tool, then attach it to the front bottom center. -
Final drying or baking:
If using air-dry or ceramic clay, let the houses dry slowly under loose plastic to prevent cracking. If using polymer clay, bake according to the package instructions.
Sagging Roofs?
If the clay roof sags during assembly, support it from the inside with a small block of floral foam or a crumpled ball of paper until it stiffens or bakes.
Step 3: Finishing Touches
-
Sand for smoothness:
Once fully cured or fired, use fine-grit sandpaper to gently smooth any sharp edges or rough spots on the corners. -
Apply the ‘snow’:
Dip a sponge or stiff brush into white paint (or white glaze). Dab it heavily onto the roof panels to simulate a fresh layer of snow. -
Add frosted details:
With a drier brush, lightly drag some white paint down the top edges of the walls and around the window frames to create a frosty, wind-blown effect. -
Highlight the texture:
Mix a tiny amount of water with light brown or grey paint (a wash). Brush this over the walls and immediately wipe it back with a cloth. The color will settle into your sponge textures, making the ‘stone’ pop.
Level Up: Illumination
Cut a large hole in the bottom or back wall before drying. This allows you to place a battery-operated tea light inside for a warm, glowing village at night.
Arranged together on a shelf with some greenery, these little houses create a serene winter atmosphere
Snow Globe Scene Topper
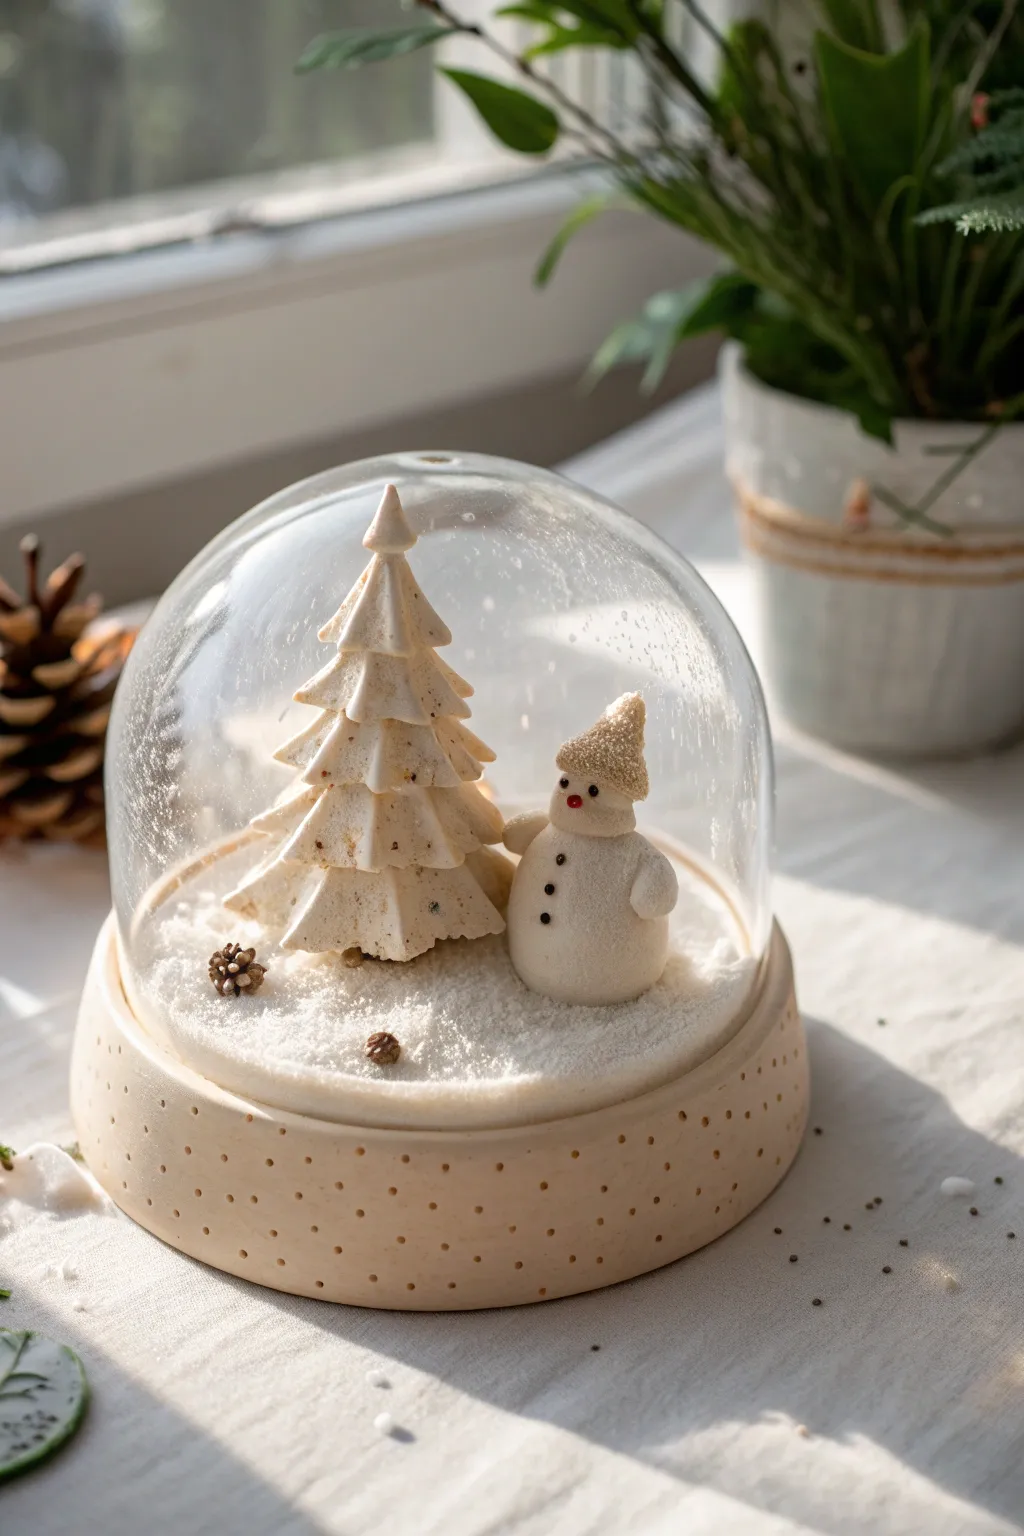
Capture the magic of a silent winter night with this charming clay cloche scene. The minimalist white aesthetic, paired with subtle texture and a dusting of faux snow, looks elegant on any mantelpiece or holiday table.
How-To Guide
Materials
- White air-dry clay or polymer clay
- Glass cloche dome (miniature size)
- Circular cookie cutter (sized to fit the cloche base)
- Clay sculpting tools (knife tool, needle tool)
- Small rolling pin
- Textured sandpaper or toothbrush
- Tiny red and black beads (for eyes/buttons)
- Gold acrylic paint or gold glitter dust
- Miniature pinecones (real or clay)
- White faux snow powder or glitter
- Clear craft glue
- Toothpick
Step 1: Sculpting the Components
-
Form the Base:
Start by rolling out a thick slab of white clay, about 1/2 inch thick due to the visible base height. Use your circular cutter to create a clean round base that is slightly wider than your glass cloche dome. -
Add Base Texture:
Before the clay hardens, use a needle tool or toothpick to poke small, evenly spaced holes all around the side edge of the base. This creates a decorative, almost stitched look. -
Create the Snow Mound:
Add a smaller, thinner circle of white clay on top of your main base. Smooth the edges down with your thumb to create a gentle, sloping hill for your figures to stand on. -
Technique: White Tree:
Roll a cone shape for the tree body. Using a sharp clay knife or scissors, make small, upward-angled snips into the clay starting from the bottom and working your way up. Gently pull these snipped sections outward to mimic branches. -
Refine the Tree:
Add a tiny cone on top for the peak. If you want a speckled look like the photo, you can mix a tiny pinch of black pepper or dried herbs into the clay before sculpting. -
Assemble the Snowman Body:
Roll two smooth white balls of clay, one slightly larger than the other. Stack the smaller one on top and press gently to adhere. Insert a toothpick through the center if you need extra stability. -
Snowman Details:
Fashion two tiny balls for arms and press them to the sides. Sculpt a small cone shape for the hat, slightly curving the tip for character. -
Headgear Texture:
To give the hat a knitted or fabric texture, press a piece of sandpaper or a clean toothbrush bristles gently against the wet clay of the hat cone.
Step 2: Finishing Touches
-
Painting the Hat:
Once the snowman is dry or baked (depending on your clay type), paint the hat with metallic gold acrylic. While the paint is tacky, you can sprinkle a little fine gold glitter for extra sparkle. -
Adding Facial Features:
Use a tiny dot of glue to attach the micro-beads for the eyes and buttons. For the nose, a tiny sliver of orange clay or a painted red dot works perfectly. -
Positioning Elements:
Arrange the tree and snowman on the white clay mound. Glue them securely in place. I like to offset them slightly from the center to make the composition more dynamic. -
Accents:
Glue a few tiny pinecones near the base of the tree. These add a wonderful natural contrast to the stark white clay. -
The Snowy Effect:
Brush a thin layer of clear glue over the entire base (‘ground’) area around the figures. Liberally sprinkle your faux snow powder or white glitter over the wet glue. -
Final Assembly:
Once everything is completely dry, place the glass cloche dome over the top. It should rest just inside the rim of your thick clay base if you sized it correctly, or sit squarely on top.
Clean Cuts
To prevent your tree branches from looking smushed when cutting the clay, chill your clay cone in the fridge for 10 minutes beforehand to firm it up.
Make it Glow
Before drying the base, poke a hole through the bottom center. Once finished, you can insert a tiny LED fairy light from underneath to illuminate the cloche.
Now you have a peaceful winter vignette that captures the stillness of the season