When I’m craving an instant mood boost in the studio, I reach for yellow clay—it practically turns itself into something cute. These ideas are all about simple shapes and big charm, whether you’re using polymer clay or air-dry clay.
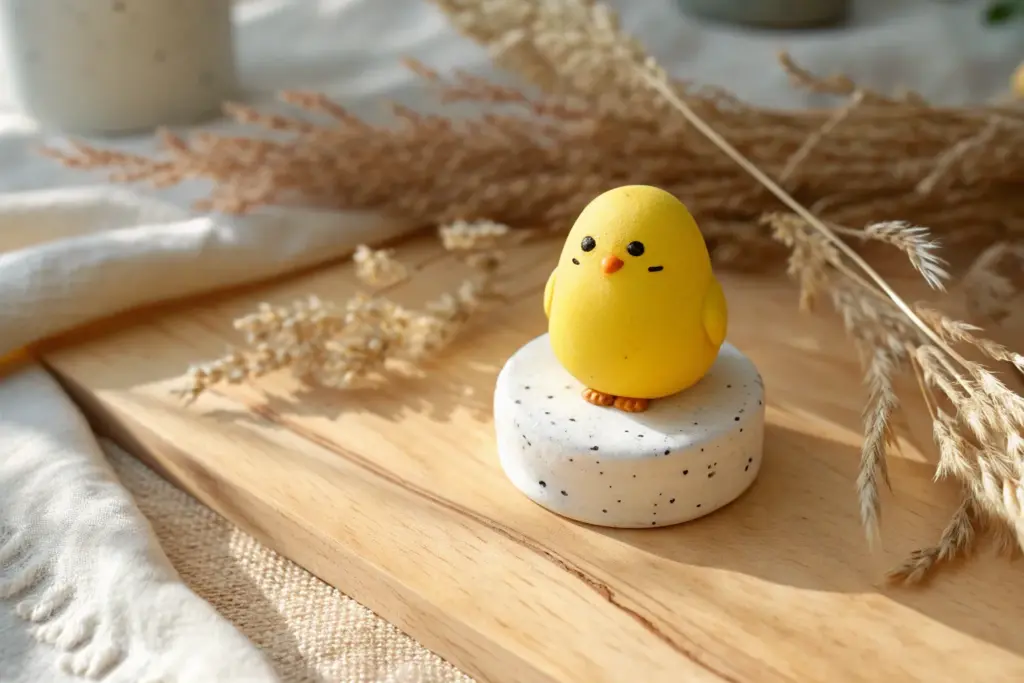
Kawaii Yellow Chick Minis
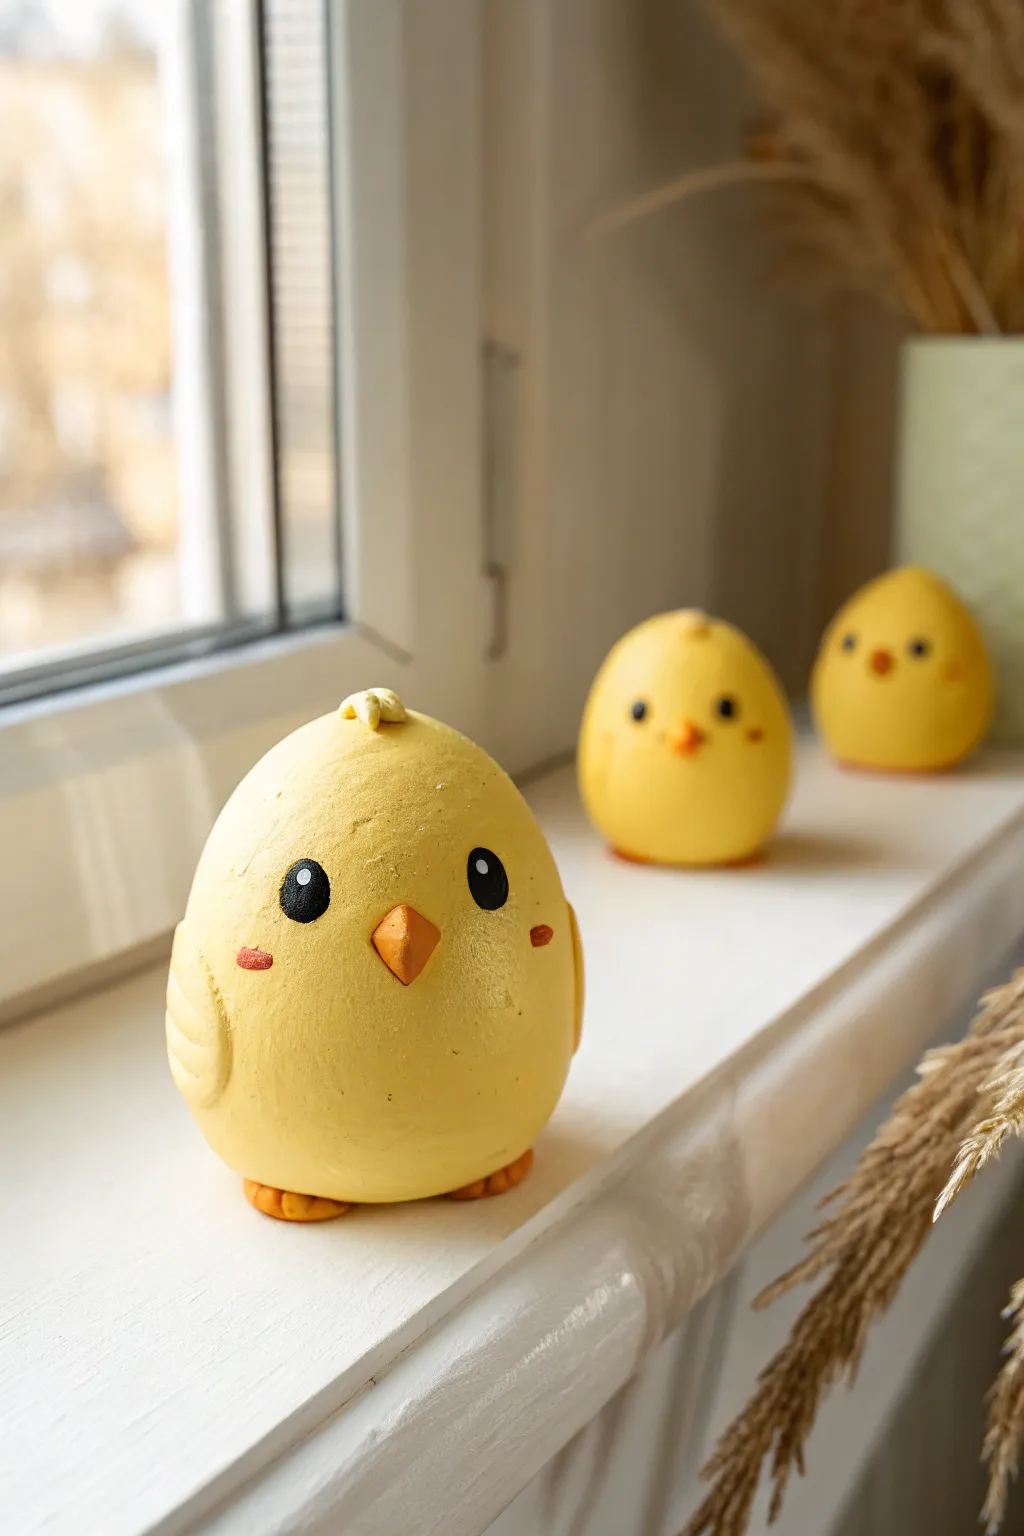
These adorable egg-shaped friends bring a burst of sunshine to any shelf with their simple shapes and expressive little faces. Crafted with smooth yellow clay, they are perfect for beginners looking to master basic sculpting forms while creating something undeniably cute.
Step-by-Step Guide
Materials
- Yellow polymer clay (primary color)
- Orange polymer clay (beak and feet)
- Black acrylic paint or clay (eyes)
- White acrylic paint (eye highlights)
- Red or pink soft pastel chalk (cheeks)
- Clay sculpting tools (needle tool, ball tool)
- Small paintbrush
- Aluminum foil (optional, for core)
- Oven (for baking polymer clay)
Step 1: Shaping the Body
-
Condition the Clay:
Start by taking a generous amount of yellow clay and kneading it in your hands until it becomes soft, pliable, and warm. -
Form the Base Shape:
Roll the clay into a smooth ball between your palms to remove any seams or cracks. -
Refine the Egg Silhouette:
Gently taper the top of the ball slightly while leaving the bottom round and wide, creating a soft egg shape that sits flat on your work surface. -
Create the Core (Optional):
If you want to save clay or make lighter figures, you can ball up a piece of aluminum foil first and cover it with a layer of yellow clay.
Fixing Fingerprints
Before baking, lightly brush your figurine with a tiny bit of baby oil or cornstarch to smooth out stubborn fingerprints.
Step 2: Adding Wing Details
-
Make the Wings:
Pinch off two small, pea-sized pieces of yellow clay and flatten them into teardrop shapes. -
Attach the Wings:
Press one teardrop onto each side of the body, positioning them slightly lower than the midline. -
Blend the Seams:
Use a sculpting tool or your finger to gently smooth the connection point where the wing meets the body, so it looks like part of the chick. -
Score Feathers:
Take a needle tool or a dull blade and press two or three horizontal indentations into each wing to simulate feathers.
Seasonal twists
Make a hatching version by rolling a thin sheet of white clay, tearing the edges, and wrapping it around the chick’s bottom like a shell.
Step 3: Facial Features
-
Sculpt the Beak:
Take a tiny amount of orange clay and roll it into a very small cone or diamond shape. -
Place the Beak:
Press the orange cone into the center of the face area. I like to use a needle tool to create a tiny horizontal slit across the beak for a mouth. -
Create Eye Sockets:
Use a ball tool to make two shallow indentations where the eyes will go, ensuring they are symmetrical above the beak. -
Add the Eyes:
Roll two tiny balls of black clay and press them into the sockets. Alternatively, you can paint these on after baking for a flatter look. -
Add the Tuft:
Roll a very small piece of yellow clay into a tiny three-petaled flower shape or simple coil and attach it to the very top of the head.
Step 4: Feet and Finishing
-
Form the Feet:
Create two small, flat ovals from orange clay and use a tool to press two lines into each, creating three toes. -
Attach Feet:
Place the feet under the front of the body so they just peek out, anchoring the chick securely. -
Blushing Cheeks:
Scrape a little red or pink pastel chalk into a powder and brush it gently onto the cheeks using a soft, dry paintbrush before baking. -
Bake the Clay:
Bake your chick according to the instructions on your specific package of polymer clay. -
Add Highlights:
Once cool, use a toothpick to dot a tiny speck of white acrylic paint onto each black eye to bring the character to life.
Now you have a cheerful little companion to brighten up your workspace


Bumblebee Stripe Beads
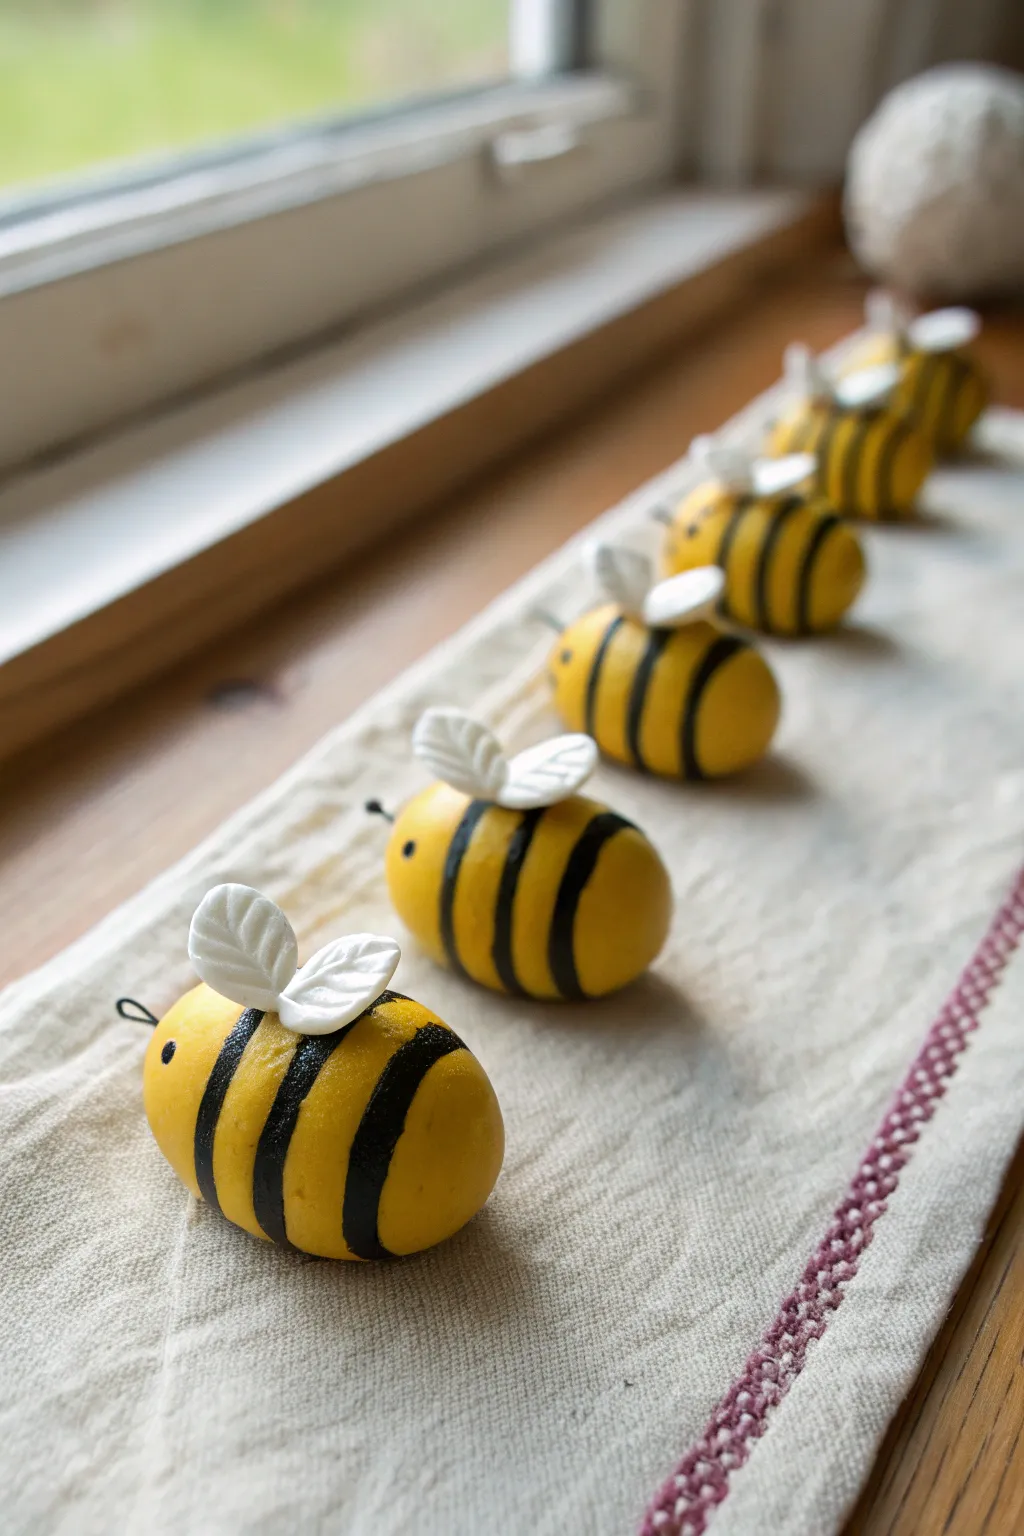
These adorable, chunky bumblebees are perfect for brightening up a windowsill or turning into charming jewelry beads. With their bright yellow bodies, crisp black stripes, and delicate textured wings, they capture the fuzzy essence of summer in a durable clay form.
Step-by-Step Guide
Materials
- Yellow polymer clay
- Black polymer clay
- White polymer clay
- Translucent liquid clay (optional)
- Black crafting wire (24 gauge)
- Wire cutters
- Needle tool or toothpick
- Small round cutter or circle mold
- Clay roller or pasta machine
- Craft blade
- Small eye pins (if making beads/charms)
Step 1: Shaping the Bodies
-
Prepare the yellow clay:
Begin by conditioning your yellow polymer clay until it is soft and pliable. Use your hands to warm it up, ensuring there are no air bubbles trapped inside. -
Form the base shapes:
Roll the yellow clay into a smooth log, then cut it into equal segments to ensure your bees are all roughly the same size. -
Refine the ovals:
Take each segment and roll it into a smooth ball between your palms. Gently elongate the ball just slightly to create a plump egg or oval shape for the bee’s body. -
Check for smoothness:
inspect the surface for fingerprints. If you see any, lightly buff them out with a fingertip dipped in a tiny bit of cornstarch or baby oil.
Smudge Alert
Black clay loves to smudge onto yellow. Wash your hands thoroughly or use baby wipes immediately after handling the black strips before touching the yellow body again.
Step 2: Adding the Stripes
-
Prepare the black clay:
Condition the black clay and roll it out into a very thin sheet. I prefer to use the thinnest setting on a pasta machine for consistency, but a roller works fine too. -
Cut the strips:
Using your craft blade, slice distinct, thin strips from the black sheet. Aim for about 2-3mm in width. -
Apply the first stripe:
Pick up a black strip and wrap it carefully around the middle of a yellow body. Overlap the ends slightly at the bottom and trim away the excess looking for a seamless join. -
Add secondary stripes:
Place another stripe near the rear of the bee and one closer to the front, depending on how much space you have. Three stripes usually look best on this shape. -
Integrate the clay:
Gently roll the bee on your work surface again. This helps press the black stripes flush into the yellow clay so they don’t look stuck on top.
Make it Sparkle
For a magical touch, brush a tiny amount of mica powder or pearl ex onto the white wings before baking. It gives them an iridescent, bug-like shimmer.
Step 3: Wings and Details
-
Create the wings:
Roll two tiny balls of white clay for each bee. Flatten them into teardrop shapes with your thumb. -
Texture the wings:
Use a needle tool or the edge of a toothpick to press a central vein and small angled lines into each wing, mimicking a leaf or feather pattern. -
Attach the wings:
Press the pointed ends of two wings together onto the top of the bee’s back, right between the shoulder stripes. A dab of liquid clay here helps ensure a permanent bond. -
Make the eyes:
Roll two minuscule balls of black clay. Press them onto the front of the yellow face area to create cute, beady eyes. -
Insert antennae:
Cut very short lengths of black wire (about 5mm). Gently push two pieces into the forehead area above the eyes to serve as antennae. -
Add bead hardware (optional):
If you are making these as beads or charms, insert a headpin or eye pin horizontally through the body or vertically through the back now, before baking. -
Bake the project:
Place your bees on a ceramic tile or baking sheet lined with cardstock. Bake according to your specific polymer clay’s package instructions (usually 275°F/135°C for 15-30 minutes). -
Cool down:
Allow the bees to cool completely in the oven before handling them to prevent the clay from cracking due to thermal shock.
Once cooled, these cheerful little bees are ready to be strung onto a necklace or simply arranged in a happy row on your desk


Banana Slice Charm Set
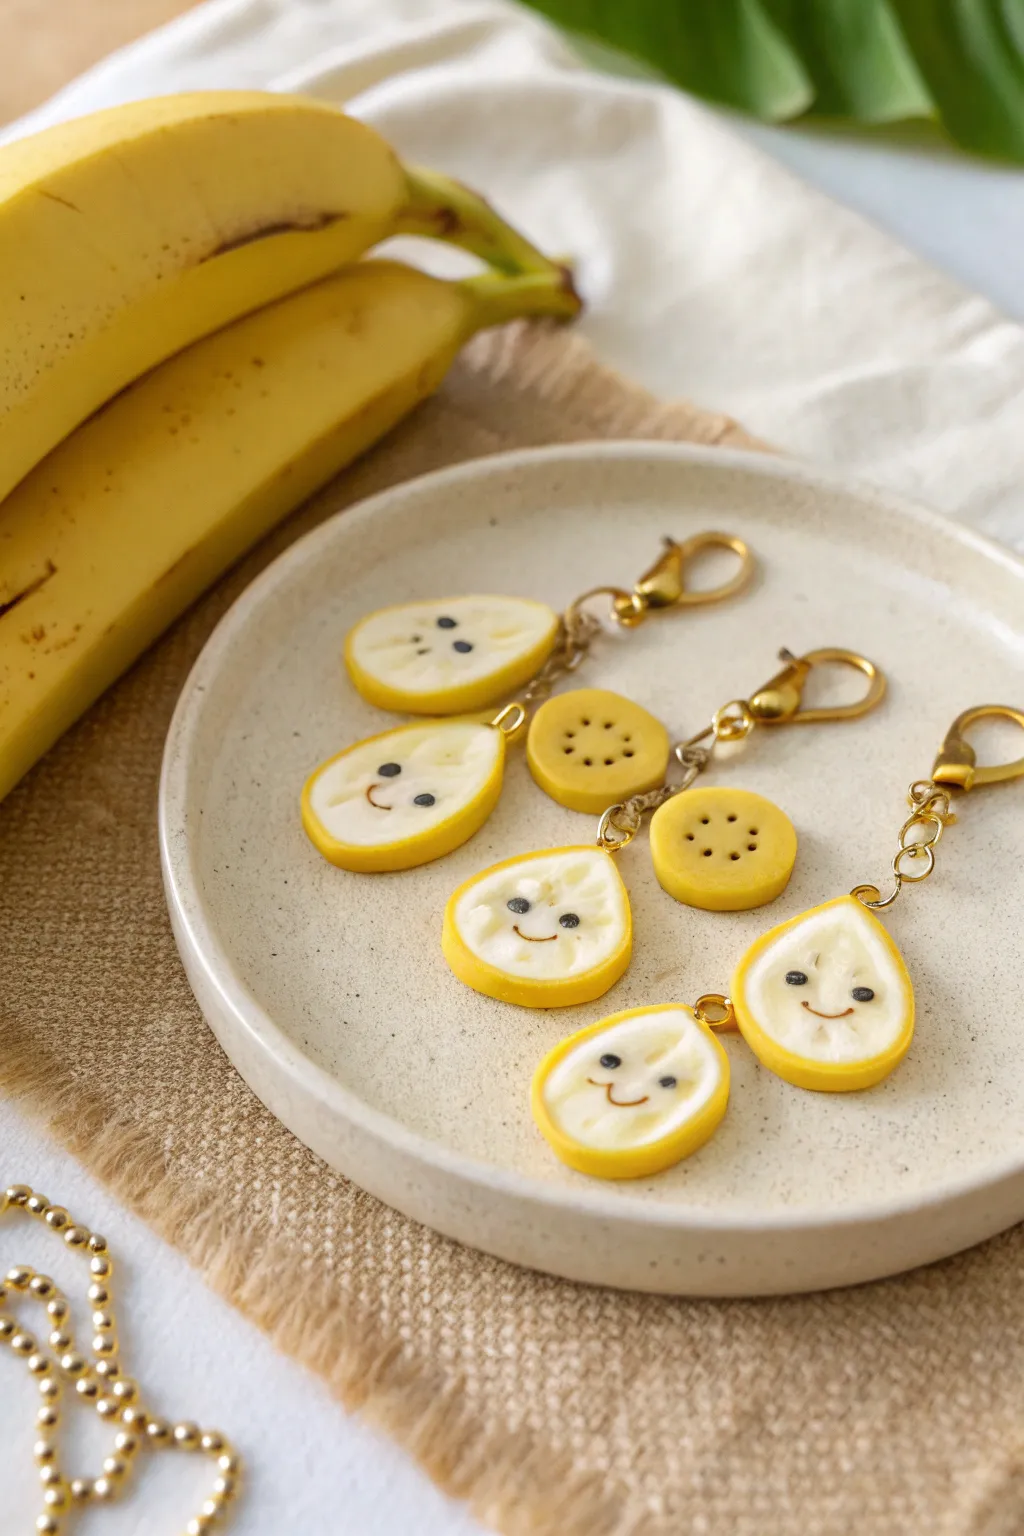
These adorable polymer clay charms capture the sweetness of banana slices with cheerful little faces and realistic textures. Perfect as zipper pulls, stitch markers, or a whimsical necklace pendant, this set combines simple shaping with cute detailing.
How-To Guide
Materials
- Polymer clay (Bright Yellow, Translucent White or Cream, Black, Dark Brown)
- Liquid polymer clay (optional, for softening)
- Clay roller or pasta machine
- Small circle cutter (approx. 1/2 inch)
- Sharp blade or X-Acto knife
- Needle tool or toothpick
- Small gold eye pins
- Gold jump rings (4mm and 6mm)
- Gold chain links
- Lobster clasps
- Jewelry pliers (round nose and flat nose)
- Oven for baking
Step 1: Creating the Banana Cane
-
Prepare the core color:
Start by mixing translucent white clay with just a tiny pinch of yellow. You want a creamy, pale banana flesh color, not bright yellow. Condition it until soft and roll it into a thick log, about 1 inch in diameter. -
Indent ridges:
Using a knitting needle or the handle of a paintbrush, press three longitudinal indentations along the length of your pale log. Real bananas are segmented, so this mimics that natural structure. -
Add inner details:
Roll very thin ‘snakes’ of translucent clay mixed with a speck of brown. Place these thin lines into the indentations you just made to create faint segmentation lines inside the slice. -
Wrap the skin:
Roll out a sheet of bright yellow clay on a medium setting. Wrap this sheet smoothly around your pale log, trimming the excess creates a seamless yellow ‘peel’ border. -
Reduce the cane:
Gently squeeze and roll the log on your work surface to reduce its diameter. Aim for a thickness of roughly 1/2 to 3/4 inch. Let the cane rest in the fridge for 15 minutes to firm up before slicing.
Step 2: Slicing and Shaping
-
Cut your slices:
Use your sharpest blade to cut slices from the cane. Aim for about 3-4mm thickness. Don’t worry if they squash slightly; we’ll shape them next. -
Form the teardrops:
Take a few slices and gently pinch one side to create a teardrop shape. This mimics a banana slice cut at a diagonal angle. Leave some slices round for variety. -
Smooth the edges:
Use your finger to gently soften the sharp cut edges of the clay, giving the slice a more organic, fruit-like appearance. -
Add texture:
Take an old toothbrush or a stiff bristled brush and gently tap the surface of the pale flesh area. This creates a realistic, porous fruit texture.
Freshness Tip
Mix a tiny amount of translucent clay into your yellow peel color. This makes the peel look waxy and realistic rather than like flat plastic
Step 3: Adding Faces and Details
-
Create the eyes:
Roll extremely tiny balls of black clay. Place two on the upper half of your teardrop slices. Press them down gently so they bond with the base. -
Make the smiles:
Roll a super thin thread of dark brown clay. Cut tiny segments and curve them into a ‘U’ shape. Place these centered below the eyes. I find a needle tool helps maneuver these delicate bits. -
Detail the round slices:
For the plain round slices, use your needle tool to poke a small circle of dots in the center, mimicking the seed pattern found in the middle of a banana. -
Insert eye pins:
Trim eye pins to about 1/4 inch long. Carefully insert the pin into the top of each banana slice. Secure with a tiny dab of liquid clay if desired. -
Bake:
Bake the charms according to your clay package directions (usually 275°F/135°C for 15-30 minutes). Let them cool completely before handling.
Make it a Bunch
Instead of single charms, attach 3-4 slices to a single larger jump ring to create a ‘bunch’ keychain that clacks together satisfyingly
Step 4: Assembly
-
Prepare the links:
Using your pliers, open a small jump ring and attach a short length of gold chain (about 3-4 links) to the eye pin loop on the baked banana. -
Attach the clasp:
Open a slightly larger jump ring. Thread it through the top of the chain segment and the bottom loop of a lobster clasp. -
Secure everything:
Close all jump rings tightly with your pliers so there are no gaps for the chain to slip through. -
Link plain slices (optional):
For a clustered look like the photo, you can attach a plain round slice to the *same* chain as a face slice using a jump ring mid-way down the chain.
Now you have a sweet set of fruity charms ready to brighten up your accessories


Peeled Banana Pendant
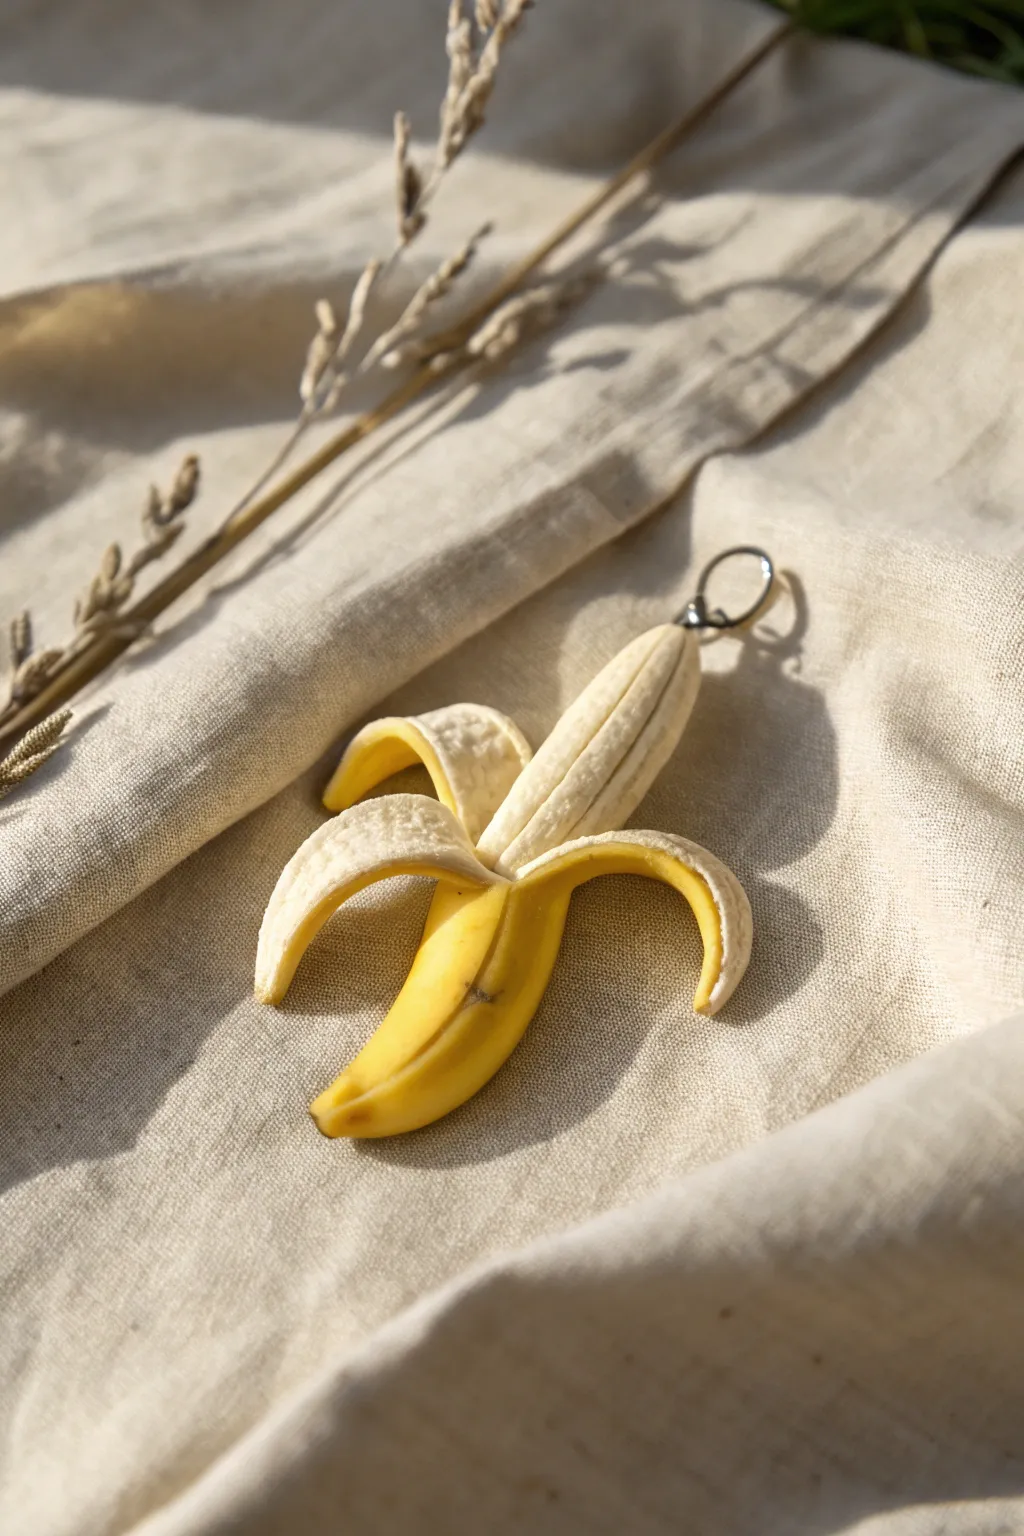
This quirky little pendant captures the realistic textures of a half-peeled banana with surprising accuracy. It is a whimsical charm perfect for a necklace or keychain, blending playful pop art vibes with detailed sculpting techniques.
Detailed Instructions
Materials
- Yellow polymer clay
- White or translucent polymer clay
- Brown soft pastel or acrylic paint
- Liquid polymer clay (optional)
- Small metal eye pin
- Needle tool or toothpick
- Toothbrush (for texture)
- X-acto knife or craft blade
- Soft paintbrush
- Glaze or varnish (matte or satin)
Step 1: Forming the Banana Core
-
Mix the inner color:
Start by mixing white polymer clay with a tiny speck of yellow. You want an off-white, creamy shade rather than a stark white, as real bananas aren’t pure white inside. -
Shape the fruit:
Roll a small snake of clay about an inch long. Taper one end slightly to form the top where the stem would be, and keep the body cylindrical. -
Add vertical texture:
Using the back of your X-acto knife or a needle tool, gently press vertical lines down the length of the ‘fruit’. These shouldn’t be deep cuts, just subtle indentations to mimic the fibrous structure. -
Create surface texture:
Take an old toothbrush and very lightly tap it against the surface of the clay. This breaks up the smoothness and gives it that organic, starchy look.
Step 2: Creating the Peel
-
Prepare the yellow clay:
Condition your yellow clay until soft. Flatten it into a thin sheet, roughly 1-2mm thick. You can use a rolling pin or a pasta machine for an even thickness. -
Cut the peel strips:
Cut a rectangle large enough to wrap around the bottom half of your white core. Then, cut three or four triangular strips extending upwards from this base, creating the ‘peels’ that will fold down. -
texture the inside peel:
For the inside of the peel (which will be visible when folded down), mix a tiny bit of white clay with translucent clay. Apply a very thin layer of this to the inner side of your yellow strips. -
Detail the inner pith:
Use your needle tool to scratch messy, fibrous lines into that inner whiter layer. Banana peels have a stringy texture on the inside, so don’t be too neat here. -
Attach the base:
Wrap the solid bottom part of the yellow sheet around the base of the white fruit core. Smooth the seam at the back so it disappears. -
Attach the strips:
Gently press the base of the triangular strips against the fruit, leaving the top halves free.
Fixing Fingerprints
Since the yellow and white surfaces are smooth, fingerprints show up easily. Lightly brush the unbaked clay with a little baby oil or cornstarch to smooth them away.
Step 3: Refining and Assembly
-
Peel it back:
Carefully curl the yellow strips downwards and away from the core. Bend them naturally; some can curl more than others for a realistic, asymmetrical look. -
Shape the stem:
Pinch the bottom of the yellow peel to form the banana’s end tip. It should look slightly squared off or nubby. -
Add the eye pin:
Trim a metal eye pin to size. Dip the end in a little liquid clay (or bake and bond glue) and insert it deeply into the center of the top white fruit section. -
Pre-bake shading:
Shave a little brown soft pastel into a powder. With a small dry brush, lightly dust the very tip of the banana end and the edges of the peel stems to simulate bruising or ripeness.
Make it a Pair
Make a second identical charm to create quirky earrings. Or, slice the ‘fruit’ part before baking to make banana slices for a matching bracelet.
Step 4: Details and Finishing
-
Adding ridge details:
Real bananas have distinct ridges. Use a modeling tool to gently enhance the vertical ridges on the outside of the yellow peel. -
Spotting:
If you want a riper banana, use a fine-point tool to add tiny brown specks of clay or paint to the yellow skin. -
Bake the piece:
Bake the charm according to your clay manufacturer’s instructions. Usually, this is around 275°F (130°C) for 15-30 minutes, depending on thickness. -
Add the stem dark spot:
Once cooled, paint the very tip of the bottom stem dark brown or black. Allow this to dry completely. -
Varnish:
Coat the piece with a matte varnish to protect the surface pastels. Avoid glossy finishes, as real banana skins have a natural matte or satin sheen.
This charming little fruit is ready to hang on a chain or add a pop of color to your bag

What Really Happens Inside the Kiln
Learn how time and temperature work together inside the kiln to transform clay into durable ceramic.
Lemon Wedge Studs
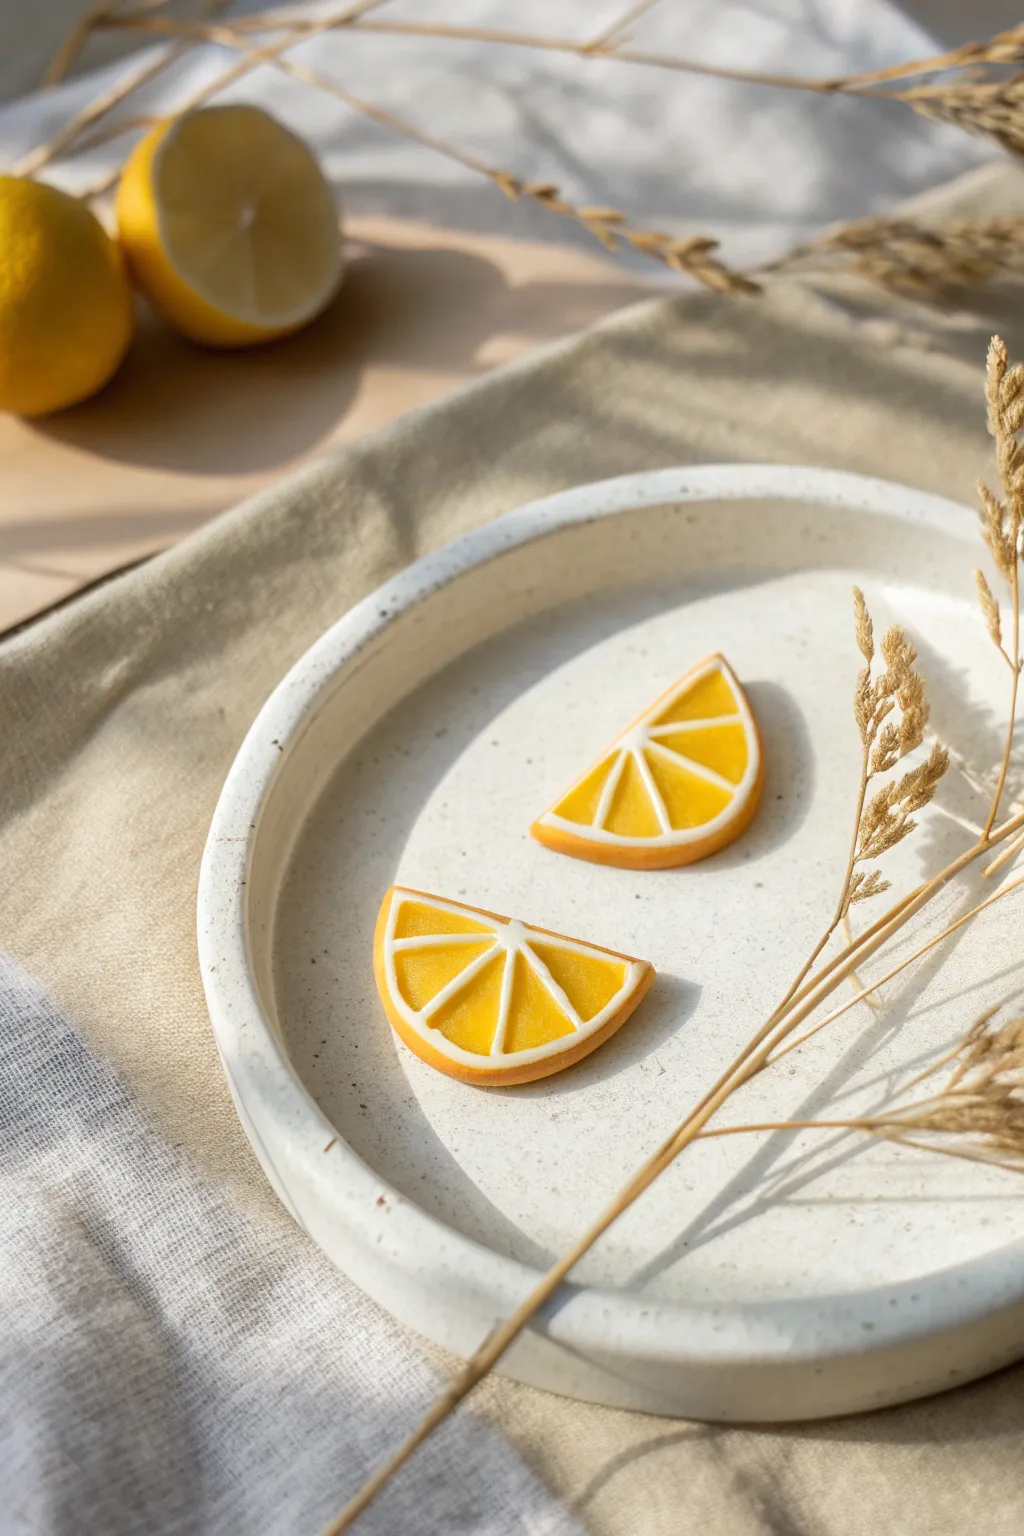
Brighten up your accessories collection with these juicy, summery lemon wedge earrings made from polymer clay. The realistic pith details and vibrant citrus tones make them a fresh, playful addition to any outfit.
Step-by-Step Guide
Materials
- Bright yellow polymer clay
- Translucent white polymer clay (or regular white)
- Orange-yellow polymer clay (for the rind)
- Liquid polymer clay (translucent or yellow)
- Acrylic roller or pasta machine
- Scalpel or sharp craft knife
- Needle tool
- Small round cutter (approx. 2-3cm diameter)
- Earring posts and backs
- Super glue or E6000
- Gloss glaze (optional)
Step 1: Creating the Lemon Cane
-
Condition the clay:
Start by thoroughly conditioning your bright yellow clay until it is soft and pliable. Roll it into a thick log about 1 inch in diameter. -
Prepare the pith:
Condition the white clay and roll it into a thin sheet. I find the growing number 4 setting on a pasta machine works best for this. Wrap this white sheet around your yellow log, trimming any excess so the seam meets cleanly. -
Reduce and shape:
Gently squeeze and roll the log to reduce its diameter slightly and ensure the white clay adheres to the yellow core. Then, pinch one side of the log along its entire length to create a teardrop shape. -
Slice into segments:
Cut the teardrop log into 6-8 equal lengths. These will become the individual segments of your lemon slice. -
Assemble the core:
Arrange these teardrop segments into a circle, pointing the narrow ends inward so they touch in the center. Place a very thin snake of white clay in the center to fill the tiny gap. -
Add separation lines:
Before pressing them together firmly, place a thin sheet of white clay between each segment to create the distinctive white membrane lines seen in citrus fruit. -
Wrap the core:
Once your segments are assembled into a round log shape, wrap the entire bundle in another layer of flattened white clay to form the inner pith.
Step 2: Adding the Rind and Shaping
-
Add the zest layer:
Roll out a sheet of the orange-yellow clay (slightly darker than the inner flesh). Wrap this around the white-covered log to create the outer skin. -
Reduce the cane:
Gently compress and roll the cane on your work surface to reduce it to your desired diameter. For studs like the ones pictured, you’ll want a diameter of about 1.5 to 2 cm. -
Let it rest:
This is crucial—let the cane rest for about 20-30 minutes, or pop it in the fridge for 10. Slicing warm clay can distort the intricate pattern you just built. -
Slice the rounds:
Using your sharpest tissue blade, cut thin, even slices from the cane. Aim for a thickness of about 3-4mm so they are sturdy enough for earrings. -
Cut into wedges:
Take a full round slice and cut it precisely in half to create two semi-circles. You can leave them as semi-circles or cut them again for smaller wedges, though the photo shows semi-circle ‘wedges’.
Clean Cuts
Rotate the cane slightly after every slice to prevent the bottom from flattening out, keeping your circles perfectly round.
Step 3: Finishing Touches
-
Soften edges:
Gently tap the cut edges with your finger to soften the sharpness slightly, giving it a more organic look. -
Texture (Optional):
If you want extra realism, gently texture the yellow flesh areas with a needle tool or toothbrush to mimic juice sacs. -
Bake:
Bake the pieces on a ceramic tile or parchment paper according to your clay manufacturer’s instructions (usually 275°F/130°C for 15-30 minutes). -
Cool and clean:
Allow the pieces to cool completely. If there are any rough nuances on the back or sides, smooth them out with fine-grit sandpaper. -
Attach posts:
Apply a small dab of strong glue to the back of the clay wedge and press the earring post firmly into place. Let it cure fully. -
Seal (Optional):
For a juicy finish, apply a thin layer of gloss glaze or UV resin over the front surface.
Fresh Twist
Switch the yellow clay for pink or orange to make pink lemonade or orange slices using the exact same technique.
Enjoy wearing your vibrant citrus creations all summer long
Whole Lemon Trinket Bowl
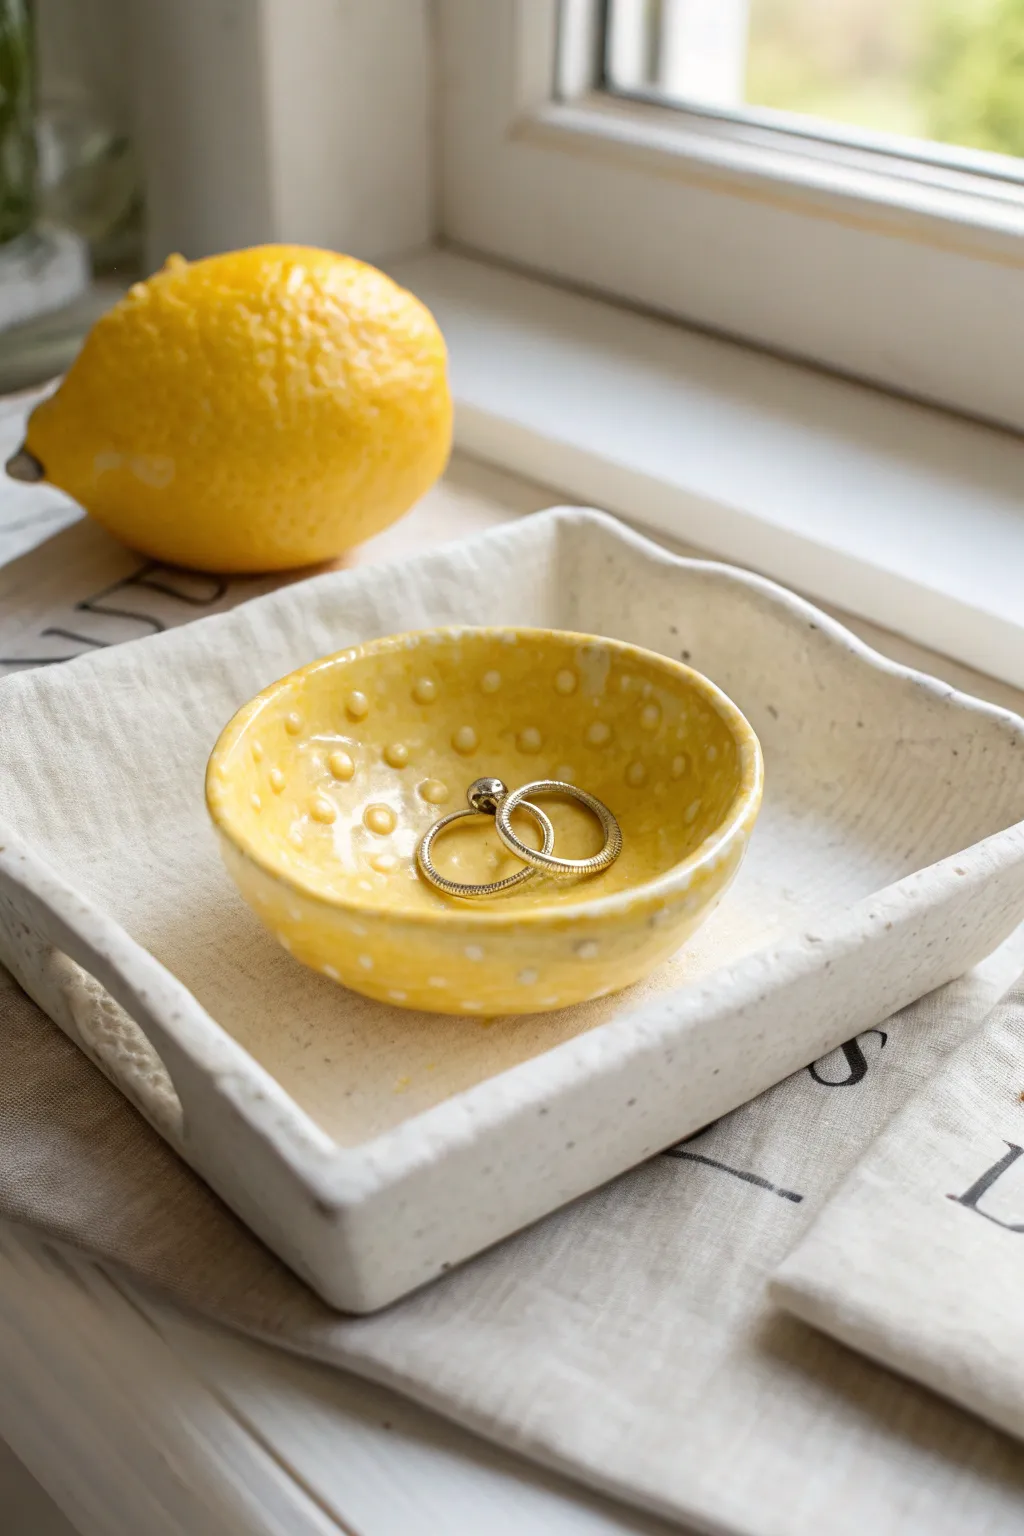
Capture the zest of summer with this charming little trinket dish that mimics the texture and color of a fresh lemon. Its organic shape and tactile, bumpy surface make it a delightful spot to keep your favorite rings safe.
Step-by-Step
Materials
- Air-dry clay (white) or polymer clay
- Acrylic paint (lemon yellow and white)
- High-gloss varnish or glaze
- Rolling pin
- Small round bowl or cutter (approx. 3-4 inches)
- Small spherical tool (stylus) or the end of a paintbrush handle
- Fine grit sandpaper
- Paintbrushes (soft bristle)
- Palette for mixing
Step 1: Shaping the Clay
-
Condition the clay:
Begin by taking a handful of white air-dry clay. Knead it in your hands for a few minutes until it becomes warm, pliable, and free of cracks. -
Roll it out:
Using a rolling pin, flatten the clay into a slab that is roughly 1/4 inch thick. Aim for an even thickness to ensure the bowl dries uniformly. -
Cut the circle:
Place your round cutter or a small bowl upside down onto the slab. Press down firmly to cut out a perfect circle, then peel away the excess clay from the edges. -
Form the curve:
Gently lift the clay circle and cup it in the palm of your hand. Use your thumb to smooth the edges and create a subtle, shallow bowl shape. You want it to feel organic, so slight irregularities are welcomed. -
Create the texture:
This is the fun part. Using a small ball stylus or the rounded end of a paintbrush, gently press divots into the interior surface of the bowl. However, look closely at the image—you actually want *raised* bumps for a true lemon texture. I prefer to push the clay *up* from the outside, or roll tiny balls of clay and attach them inside. -
Alternative texture method:
To match the image perfectly, roll many tiny, seed-sized balls of clay. Press them gently onto the inside surface of the bowl, spacing them slightly apart. Smooth the base of each little bump so it integrates seamlessly with the bowl. -
Refine the rim:
With a bit of water on your finger, run it along the rim of the bowl to smooth out any sharpness or rough texture left from the cutting process. -
Set up for drying:
Place your shaped clay into a small bowl lined with paper towel or plastic wrap to help it hold its curved shape while drying. Let it air dry completely, usually for 24-48 hours depending on humidity.
Zesty Texture Tip
For a super realistic lemon skin look, press a real lemon peel or a piece of coarse sandpaper against the outside of your clay while it’s still wet.
Step 2: Painting and Finishing
-
Sand imperfections:
Once fully dry and hard, inspect your bowl. Use fine-grit sandpaper to gently smooth any unwanted rough spots on the rim or the exterior. -
Mix the base color:
Squeeze out bright yellow acrylic paint. Mix in just a touch of white to create a creamy, sunny lemon shade rather than a neon yellow. -
Apply the first coat:
Paint the entire bowl—inside, outside, and the rim. Use a soft brush to get into the crevices between the textured bumps. Let this layer dry. -
Highlighting the texture:
To make the texture pop, mix a slightly lighter shade of yellow (add more white). Gently dry-brush this lighter color over the tops of the raised bumps. This mimics the light catching the pores of a lemon skin. -
Clean up the rim:
If you want a cleaner look, you can leave the very top edge of the rim a slightly paler yellow or white to define the shape, or simply ensure your yellow coverage is solid. -
Seal carefully:
Apply a coat of high-gloss varnish or glaze essentially everywhere. This gives the piece that wet, fresh citrus look and protects the paint from scratching when you toss your jewelry in. -
Final cure:
Allow the varnish to cure fully according to the manufacturer’s instructions before placing any rings or jewelry inside to prevent sticking.
Help, My Clay Cracked!
Small cracks happen during drying. Mix a tiny bit of wet clay into a paste (slip) and fill the crack, smooth it over, and let it dry again before painting.
Place your sunny new creation on a windowsill and enjoy the bright pop of color it brings to your room


The Complete Guide to Pottery Troubleshooting
Uncover the most common ceramic mistakes—from cracking clay to failed glazes—and learn how to fix them fast.
Mini Pineapple Charm
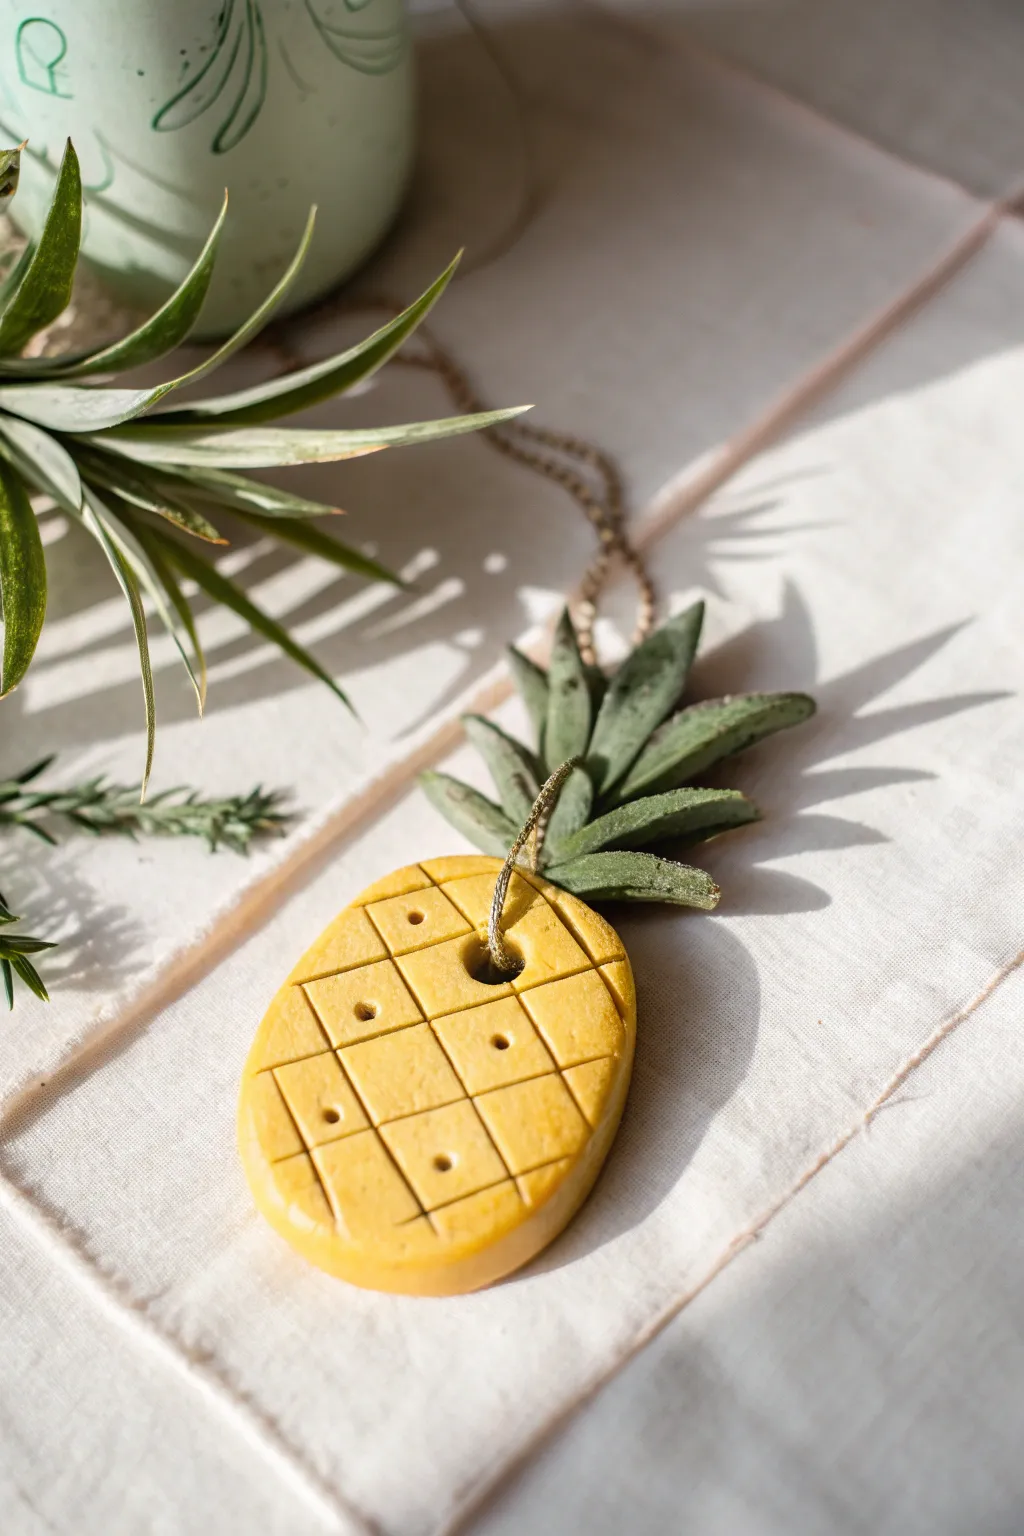
Brighten up your day with this adorable clay pineapple charm that captures the fruit’s texture in a sweet, simplified style. With just a few basic tools and some vibrant yellow clay, you can sculpt a summery accessory perfect for necklaces or keychains.
Step-by-Step Tutorial
Materials
- Polymer clay (Yellow)
- Polymer clay (Green)
- Clay roller or rolling pin
- Oval cookie cutter (small) or craft knife
- Needle tool or toothpick
- Clay sculpting tool (flat edge)
- Headpin or eye pin (optional based on hanging method)
- Thin gold cord or jump ring
- Oven for baking
Step 1: Shaping the Fruit Base
-
Condition the Yellow Clay:
Begin by warming up a chunk of yellow polymer clay in your hands. Knead it thoroughly until it is soft, pliable, and free of any cracks. -
Form the Original Slab:
Roll the conditioned clay into a smooth ball, then flatten it slightly against your work surface. Use a roller to create an even slab that is roughly 1/4 inch thick—thick enough to hold its shape but light enough for a charm. -
Cut the Oval Shape:
Using a small oval cutter, press down to cut out the base shape. If you don’t have a cutter, you can freehand a rounded oval shape using a craft knife and smooth the edges with your finger. -
Refine the Edges:
Gently tap the edges of the oval to soften any sharp cuts. I like to lightly press the top and bottom to make the oval slightly more rectangular, giving it that classic pineapple silhouette. -
Create the Hanging Hole:
Using a needle tool or a small straw, punch a clean hole near the top center of the yellow oval. This is where your cord will thread through later.
Clean Lines Tip
To prevent the clay from sticking to your tools while making the diamond grid, lightly dust your knife edge or sculpting tool with cornstarch before pressing down.
Step 2: Texturing the Details
-
Score Diagonal Lines:
Take your flat-edged sculpting tool or the back of a knife. Press gently into the clay to create diagonal lines running from the top right to bottom left. Space them evenly. -
Create the Grid:
Repeat the previous step, this time creating diagonal lines in the opposite direction. This will form the characteristic diamond grid pattern on the fruit’s surface. -
Add Texture Dots:
Use the tip of your needle tool or a small dotting tool to press a single dot into the center of each diamond. This mimics the small spikes found on real pineapples.
Make It Sparkle
Before baking, brush a tiny amount of gold mica powder over the textured grid lines and leaf tips. It adds a sun-kissed shimmer that catches the light beautifully.
Step 3: Crafting the Crown
-
Prepare Green Clay:
Condition a small amount of green clay. Roll it into a thin sheet, slightly thinner than your yellow base. -
Cut Leaf Shapes:
Using a craft knife, cut out 5-7 small, pointed leaf shapes. They should vary slightly in length, with some longer ones for the center and shorter ones for the sides. -
Texture the Leaves:
For a realistic touch, lightly scratch the surface of each leaf with your needle tool or a toothbrush to give it a rough, organic texture. You can smudge a tiny bit of darker green pastel dust here if you want depth. -
Attach the Leaves:
Arrange the leaves at the top of the yellow oval, fanning them out behind the hole you created earlier. Press them firmly onto the back of the yellow clay or use a drop of liquid clay for a stronger bond. -
Adjust the Flare:
Gently curl the tips of a few leaves outward. This simple movement adds dimension and makes the crown look less stiff.
Step 4: Finishing Up
-
Double Check the Hole:
Before baking, ensure the hole at the top hasn’t been blocked by the green leaves or distorted during handling. Re-insert your tool if necessary to clear the path. -
Bake the Charm:
Place your pineapple on a parchment-lined baking sheet. Bake according to your specific clay manufacturer’s instructions (usually around 275°F for 15-30 minutes per 1/4 inch of thickness). -
Cool and Clean:
Let the charm cool completely before handling. If there are any rough fingerprints, you can lightly sand them away with fine-grit sandpaper. -
String It Up:
Take a piece of gold threading cord or a jump ring and loop it through the hole in the fruit. Tie it securely, and your tropical charm is ready to wear.
Enjoy wearing your slice of summer all year round
Sunny Sunflower Magnets
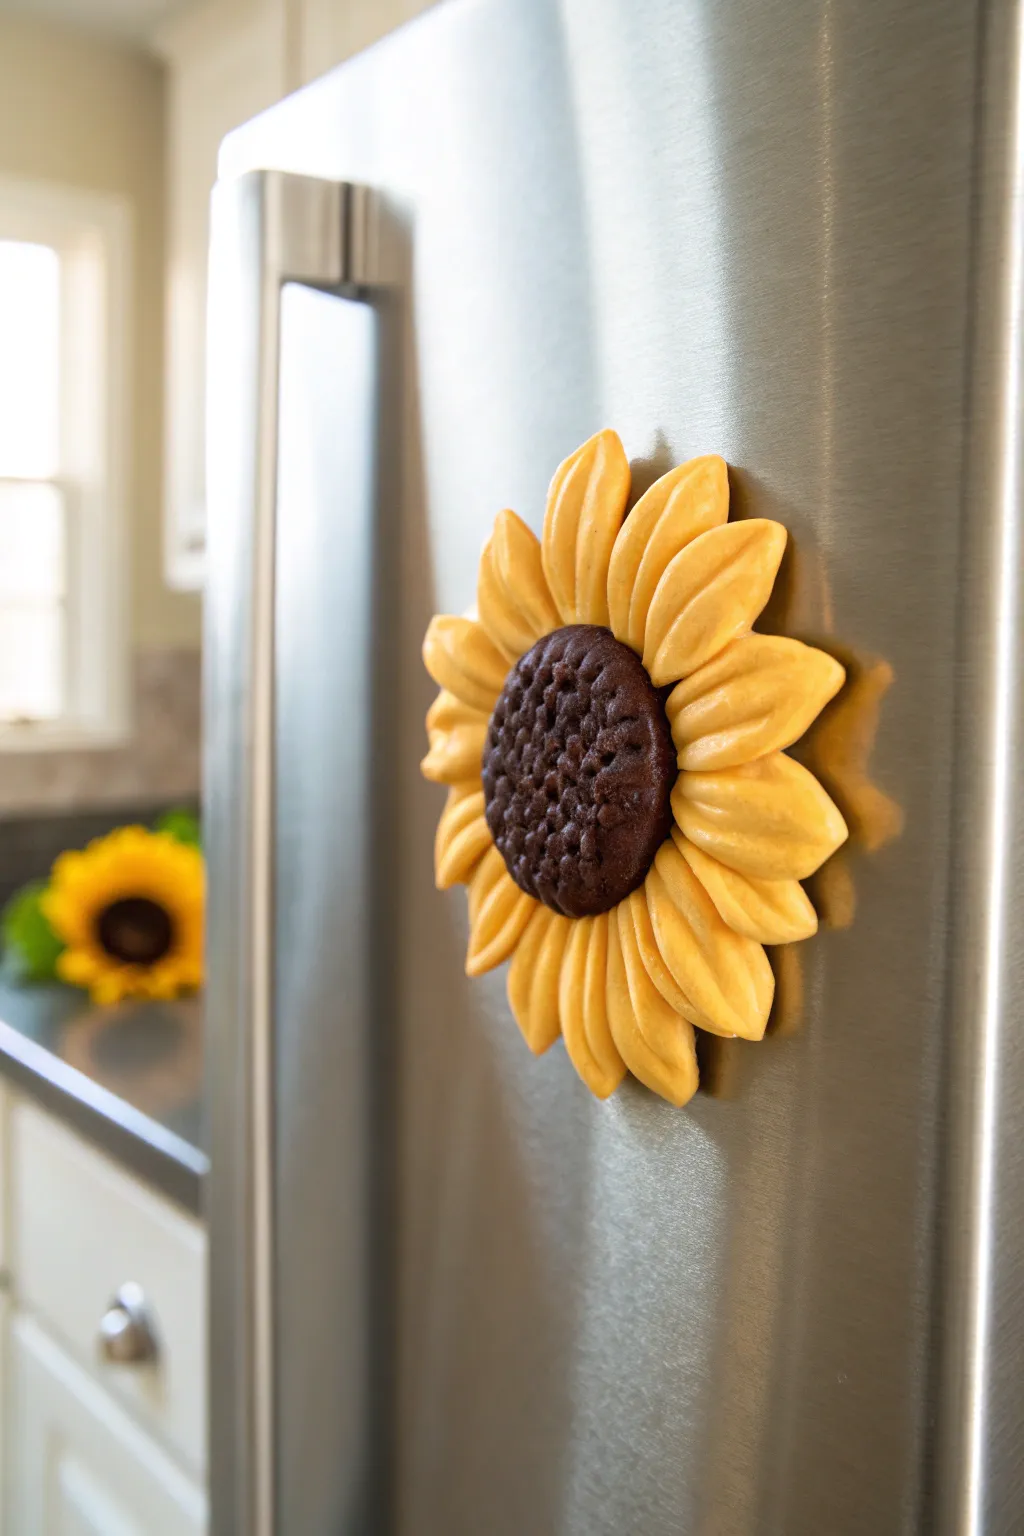
Bring a permanent burst of summer into your kitchen with these charmingly sculpted sunflower magnets. Their tactile petals and textured centers add a pop of cheerful yellow that stands out beautifully against stainless steel or white appliances.
Step-by-Step
Materials
- Polymer clay (Yellow)
- Polymer clay (Dark Brown)
- Circular clay cutter (approx. 1.5 inch)
- Ball stylus tool or a stiff toothbrush
- Veining tool or a dull knife
- Strong craft magnet (neodymium or ceramic)
- Strong adhesive (E6000 or super glue)
- Rolling pin or pasta machine
- Parchment paper or baking tile
Step 1: Preparing the Center
-
Condition the brown clay:
Start by warming up a small chunk of dark brown clay in your hands. Knead it thoroughly until it is soft, pliable, and free of cracks. -
Form the base disc:
Roll the conditioned brown clay into a ball, then flatten it gently against your work surface to create a thick disc. This will serve as the seed head. -
Add the seed texture:
Using a small ball stylus tool, press repeatedly into the surface of the brown disc to create a pitted, seed-like texture. Cover the entire face, leaving no smooth spots. -
Refine the edges:
If the texture has distorted the round shape, gently tap the edges back into a perfect circle with your finger. Set this center piece aside on your baking tile.
Natural Texture
For a realistic seed texture without special tools, press a piece of coarse sandpaper or a stiff wire brush into the brown clay center.
Step 2: Sculpting the Petals
-
Prepare the yellow clay:
Clean your hands to avoid mixing brown clay into the yellow. Condition the yellow clay until soft and roll it out into a sheet about 1/8 inch thick. -
Cut basic shapes:
Instead of cutting individual petals immediately, use your small circular cutter to punch out a circle. This acts as a guide for size. -
Form individual teardrops:
Pinch off small, equal-sized amounts of yellow clay. Roll each one into a ball, then roll one end between your fingers to create a teardrop shape. -
Flatten the petals:
Gently press each teardrop flat. You want them to be slightly thick in the middle and tapered at the edges for a dimensional look. Make about 12-15 petals. -
Add the center vein:
Support a petal in your palm. I prefer using a dull knife or a veining tool to press a single line down the center of the petal, stopping just before the tip.
Shading Depth
Before baking, lightly brush orange soft pastel powder into the creases of the yellow petals to add visual warmth and depth.
Step 3: Assembly and Finish
-
Attach the bottom layer:
Arrange a circle of petals on your baking surface. Press the wide ends together in the center so they radiate outward like a starburst. -
Add the second layer:
Place a second layer of petals on top of the first, positioning them in the gaps between the bottom petals to create fullness. -
Mount the center:
Take your textured brown center and press it firmly onto the middle of the petal arrangement. Ensure it bonds well with the yellow clay beneath. -
Curve the petals:
For a natural gesture, gently curl the tips of a few petals upward or slightly to the side so the flower doesn’t look rigid. -
Bake the clay:
Bake the sunflower according to your package instructions (usually 275°F/130°C for 15-30 minutes). Let it cool completely before moving it. -
Attach the magnet:
Flip the hardened sunflower over. Apply a dab of strong adhesive to the back center and press your magnet firmly into place. -
Final cure:
Allow the glue to cure fully—usually 24 hours for maximum strength—before placing your new art on the fridge.
Your kitchen will now have a little spot of sunshine regardless of the weather outside

TRACK YOUR CERAMIC JOURNEY
Capture glaze tests, firing details, and creative progress—all in one simple printable. Make your projects easier to repeat and improve.
Crescent Moon Earrings in Yellow
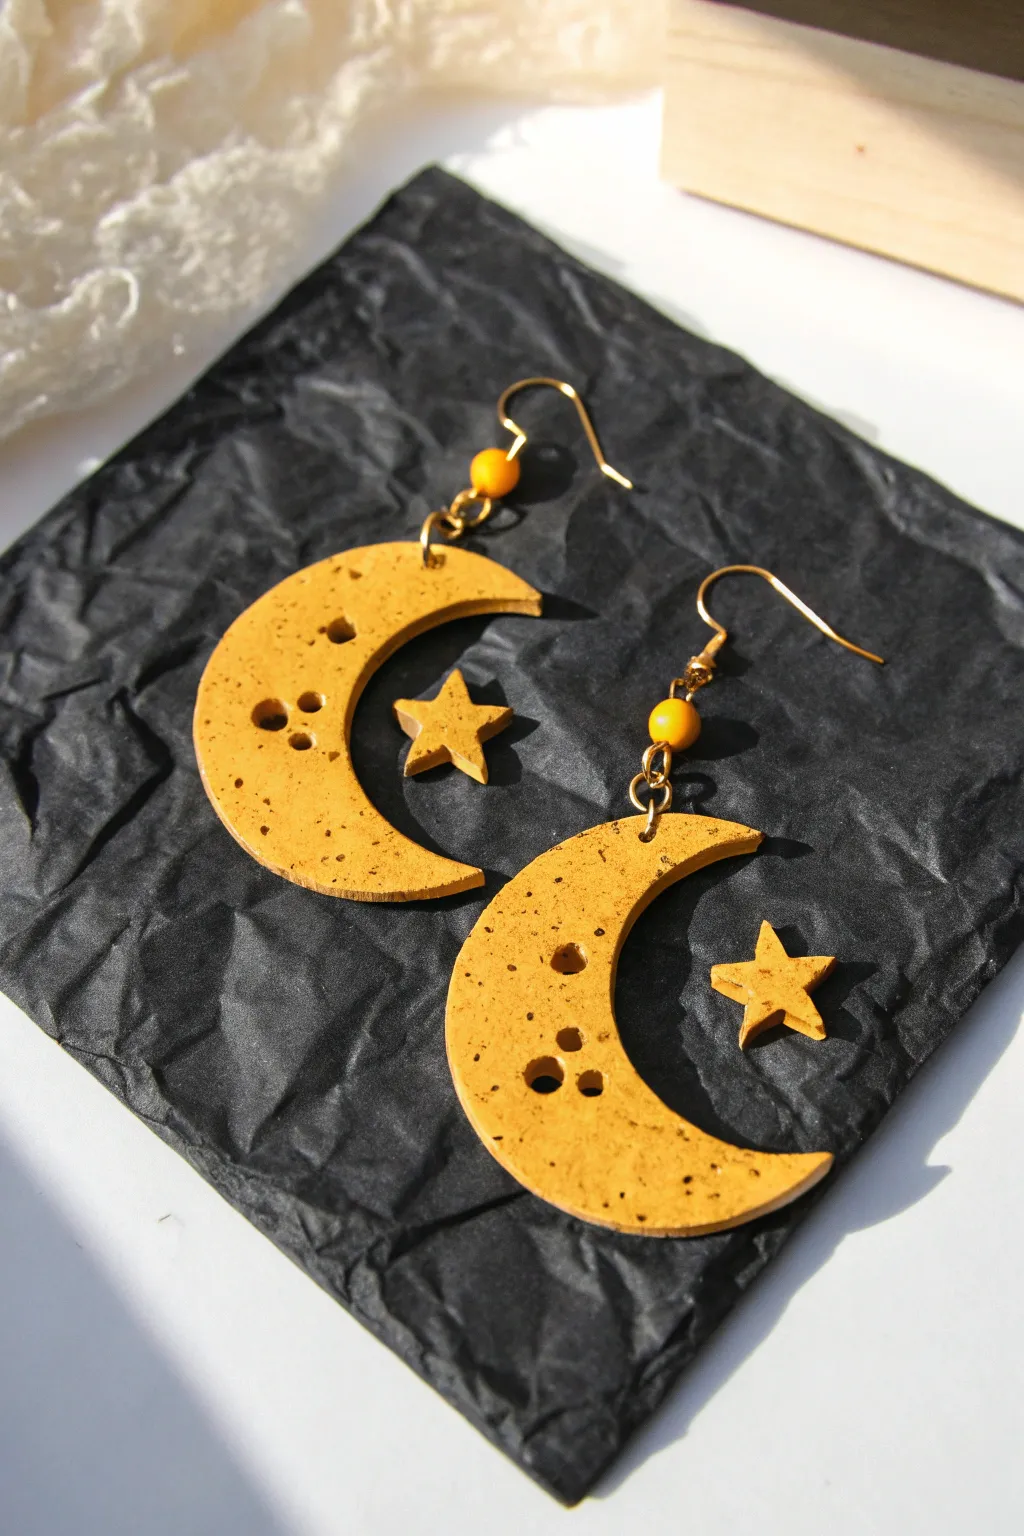
Capture the magic of the night sky with these charming crescent moon earrings crafted from yellow polymer clay. The subtle speckling and cutout stars add a touch of whimsy, making them the perfect celestial accessory for any outfit.
How-To Guide
Materials
- Yellow polymer clay (mustard or golden yellow tone)
- Black acrylic paint or brown craft paint
- Old toothbrush
- Rolling pin or clay machine
- Crescent moon clay cutter (medium size)
- Small star clay cutter
- Small round piping tip or straw (for decorative holes)
- Needle tool or toothpick
- Super glue or strong jewelry adhesive
- 2 Gold earring hooks
- 2 Yellow glass or acrylic beads (approx. 6mm)
- 4 Gold eye pins
- Jump rings (gold)
- Round nose pliers and wire cutters
- Parchment paper or baking tile
- Oven
Step 1: Shaping the Clay
-
Condition the clay:
Start by kneading your yellow polymer clay until it is soft and pliable. This conditioning step ensures your clay won’t crack during baking and makes it easier to work with. -
Roll out the slab:
Using a rolling pin or a clay machine, roll the conditioned clay out to an even thickness of about 3mm. Make sure the surface is smooth and free of air bubbles or lint. -
Cut the shapes:
Press your crescent moon cutter firmly into the clay slab to cut out two moon shapes. Next, use the small star cutter to cut out two tiny stars. -
Smooth the edges:
Gently run your finger along the cut edges of the clay shapes to smooth out any harsh lines or jagged bits left by the cutters.
Fixing Paint Blobs
If your toothbrush splatters a large blob of paint instead of fine mist, quickly wipe it away with a wet wipe or cotton swab dipped in rubbing alcohol before it dries.
Step 2: Adding Texture & Detail
-
Create the craters:
Using a small round piping tip, a straw, or the blunt end of a paintbrush, press gently into the surface of the moon shapes to create ‘craters.’ Vary the pressure to create different depths, but don’t punch all the way through. -
Pierce assembly holes:
Use a needle tool to poke a small hole at the very top of each moon shape for the jump ring. Ensure the hole is large enough for your hardware but not so close to the edge that it tears. -
Add speckles:
Dip an old toothbrush into a small amount of diluted black or dark brown acrylic paint. Run your thumb across the bristles to flick tiny speckles of paint onto the clay pieces. I like to practice on a scrap piece of paper first to control the spray. -
Bake the pieces:
Place your moons and stars on a parchment-lined baking sheet or ceramic tile. Bake according to the manufacturer’s instructions on your clay package (usually around 275°F or 135°C for 15-30 minutes). Let them cool completely before handling.
Level Up: Glossy Finish
After baking and cooling, brush a thin layer of UV resin or glossy polyurethane varnish over the moons to make the yellow pop and protect the paint speckles.
Step 3: Assembly
-
Attach the stars:
Once the clay is cool, apply a tiny dot of super glue to the back of each star and adhere them to the center-right area of the crescent moons, or simply position them hanging freely if you pierced an extra hole for them. -
Prepare the bead link:
Slide one yellow bead onto an eye pin. Trim the excess wire to about 1cm above the bead. -
Create the loop:
Using your round nose pliers, bend the trimmed wire into a loop to close the bead link. Repeat this process for the second bead. -
Connect the moon:
Open a jump ring with your pliers and thread it through the hole at the top of the clay moon. Attach the bottom loop of your bead link to this jump ring and close it securely. -
Add the hook:
Open the small loop on your earring hook. Slide the top loop of the bead link onto the hook and pinch it closed. -
Final check:
Repeat the assembly steps for the second earring. Give everything a gentle tug to make sure all connections are secure and the paint speckles are dry.
Enjoy wearing your celestial creations and let them shine bright all day long
Little Yellow Star Charms
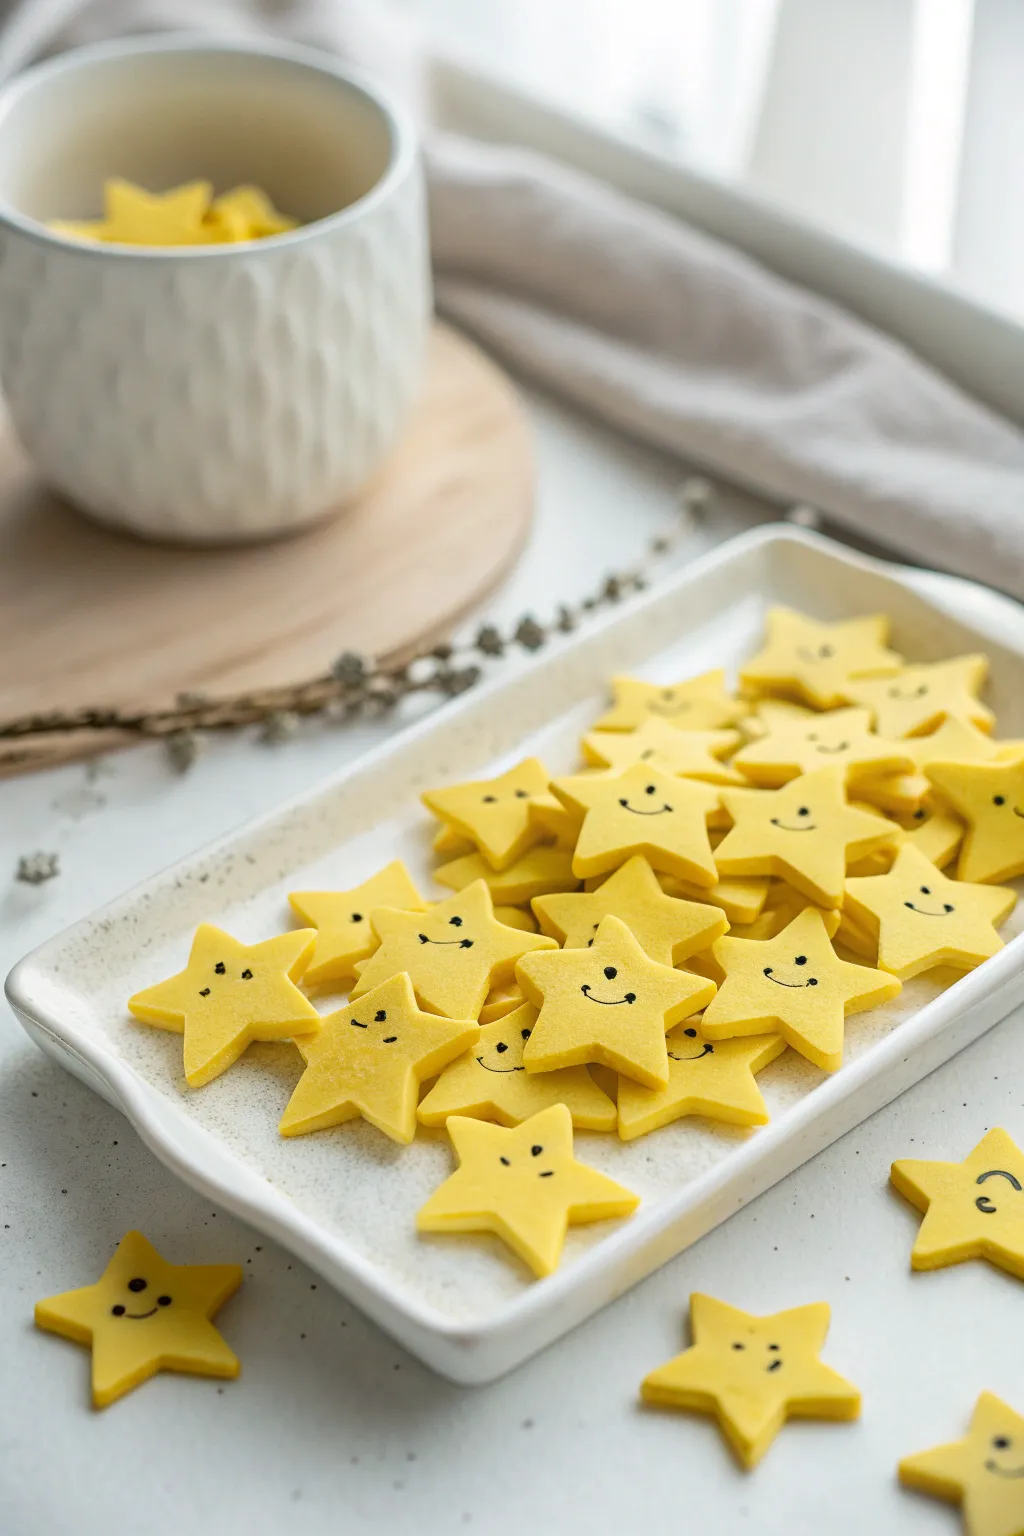
Brighten up your day with these incredibly cute little yellow star charms, featuring adorable hand-drawn smiley faces. Their soft matte finish and simple design make them perfect for scattering as table confetti, turning into jewelry, or using as cheerful scrapbook embellishments.
Step-by-Step Tutorial
Materials
- Yellow polymer clay (soft, workable consistency)
- Small star-shaped cookie cutter (approx. 1 inch)
- Acrylic rolling pin or pasta machine
- Parchment paper or ceramic tile (work surface)
- Fine-point black permanent marker or black acrylic paint pen
- Fimo gloss or matte varnish (optional)
- Oven for baking
- Baking tray
Step 1: Prepping and Cutting
-
Condition the clay:
Begin by taking a chunk of your yellow polymer clay and kneading it thoroughly in your hands. You want it to be warm, pliable, and free of any cracks. -
Roll it out:
Place the conditioned clay on your parchment paper. Using your acrylic rolling pin, roll the clay out into an even sheet. Aim for a thickness of about 3mm to 4mm—thick enough to be sturdy, but thin enough to look delicate. -
Cut the stars:
Press your star cutter firmly into the clay sheet. Give it a tiny wiggle before lifting to ensure a clean cut. -
Release the shape:
If the clay sticks inside the cutter, gently push it out using the blunt end of a paintbrush. Repeat this process until you have as many stars as you desire. -
Smooth the edges:
Once your stars are cut, inspect the edges. I find that lightly running a finger along the cut sides helps to soften any sharp ridges left by the cutter, giving the star a more finished, professional look.
Clean Cuts Every Time
Dip your star cutter into a little cornstarch or water before pressing it into the clay. This acts as a release agent and prevents the clay from sticking inside the metal shape.
Step 2: Baking and Decorating
-
Arrange for baking:
Transfer your cut stars onto a baking tray lined with parchment paper. Leave a little space between each one so they bake evenly. -
Bake the clay:
Bake in a preheated oven according to the manufacturer’s instructions on your specific package of clay. Typically, this is around 230°F to 265°F (110°C to 130°C) for 15-30 minutes. -
Cool down completely:
Remove the tray from the oven and let the stars cool completely. Do not attempt to draw on them while they are warm, or the ink will bleed. -
Test your pen:
Before drawing on your stars, test your black marker on a scrap piece of baked clay or paper to ensure the ink flows smoothly and isn’t dried out. -
Draw the eyes:
Carefully dot two small eyes onto the upper half of a star using the fine tip of your marker. Keep them relatively close together for that cute ‘kawaii’ look. -
Add the smile:
Draw a small, simple curved line between and slightly below the eyes. A tiny upward curve works best. -
Vary the expressions:
Feel free to mix it up! Try drawing winking eyes (a lush curve with eyelashes), surprised mouths (tiny ‘o’ shapes), or side-smiles to give your stars individual personalities. -
Let the ink set:
Allow the ink to dry for at least 10-15 minutes to prevent smudging. -
Seal the deal (optional):
If these will be handled frequently, brush a thin layer of matte or gloss varnish over the surface to protect the ink and clay.
Ink Smudging?
If your marker smudges when you seal it, switch to a water-based varnish or let the ink dry for 24 hours. Solvent-based varnishes often react with permanent markers.
Now you have a whole galaxy of cheerful stars ready to bring a smile to anyone who sees them
Smiley Face Yellow Buttons

Bring a dose of cheer to your sewing stash with these adorable handmade yellow clay buttons. Mimicking the warm, matte finish of wooden toggles, this project mixes classic button styles with happy smiley faces for a unique, fastener-ready collection.
How-To Guide
Materials
- Yellow polymer clay (ochre or sunshine yellow)
- Small round circle cutter (approx. 1 inch)
- Acrylic rolling pin or clay machine
- Drinking straw or small piping tip (for cutting holes)
- Needle tool or toothpick
- Black acrylic paint
- Fine-grit sandpaper
- Gloss or matte varnish (optional)
- Parchment paper
- Baking sheet
Step 1: Preparation & Shaping
-
Condition the Clay:
Begin by warming the yellow polymer clay in your hands to condition it. Knead it thoroughly until it is soft, pliable, and free of any cracks. -
Roll the Sheet:
Roll your clay out into a uniform sheet about 1/8 inch thick (approx 3mm). I like to use playing cards on either side of my roller as guides to ensure the thickness is perfectly even. -
Cut the Circles:
Using your small round cutter, punch out as many circles as the clay allows. Twist the cutter slightly before lifting to ensure clean edges. -
Smooth the Edges:
Gently pick up each circle and run your finger around the rim to soften the sharp cut edge, giving it a more finished, button-like appearance.
Paint Smudges?
If acrylic paint dries on the surface outside the grooves, don’t panic. A cotton swab dipped in Isopropyl alcohol or fingernail polish remover will clean it right up.
Step 2: Detailing the Buttons
-
Create the Bead Rim (Optional):
For a distinct rim, gently press a slightly smaller circle cutter or a washer halfway into the clay surface, not cutting all the way through. -
Poke Thread Holes:
For the standard buttons, use a drinking straw or a small detailing tool to poke two or four holes in the center. Ensure the holes are large enough for a needle and thread to pass through. -
Make the Eyes:
For the smiley buttons, use the same tool to poke two small, shallow indentations for the eyes. Don’t go all the way through unless you want ‘open’ eyes. -
Carve the Smile:
Use a needle tool or a bent piece of wire to gently press a curved smile into the clay below the eyes. Rock the tool back and forth slightly to widen the groove for the paint later. -
Texture Check:
Inspect all buttons for fingerprints. Lightly brush them with a little cornstarch or baby oil if you need to smooth out imperfections before baking.
Step 3: Baking & Finishing
-
Bake the Clay:
Arrange the buttons on a parchment-lined baking sheet. Bake according to your brand’s package instructions (usually around 275°F/135°C for 15-30 minutes). -
Cool Completely:
Let the buttons cool completely on the tray. They will be slightly soft when hot but will harden as they cool down. -
Sand the Edges:
Once cool, use fine-grit sandpaper to gently buff the edges or the back of the buttons if there are any rough spots. -
Paint the Details:
Dilute a small amount of black acrylic paint with water. Use a fine brush to fill in the eyes and smile grooves of the face buttons. -
Wipe Excess Paint:
Immediately wipe the surface with a damp paper towel or barely damp baby wipe. This leaves paint only in the recessed grooves, creating a crisp outline. -
Seal the Buttons:
To make them durable for laundry, coat each button with a thin layer of matte or satin varnish. Let them dry fully before sewing onto garments.
Uniform Thickness
Use a pasta machine on the thickest setting to roll your clay. This guarantees every single button is exactly the same height, which looks much more professional.
Now you have a jar full of sunshine ready to brighten up cardigans, bags, or crafts
Corn on the Cob Keychain
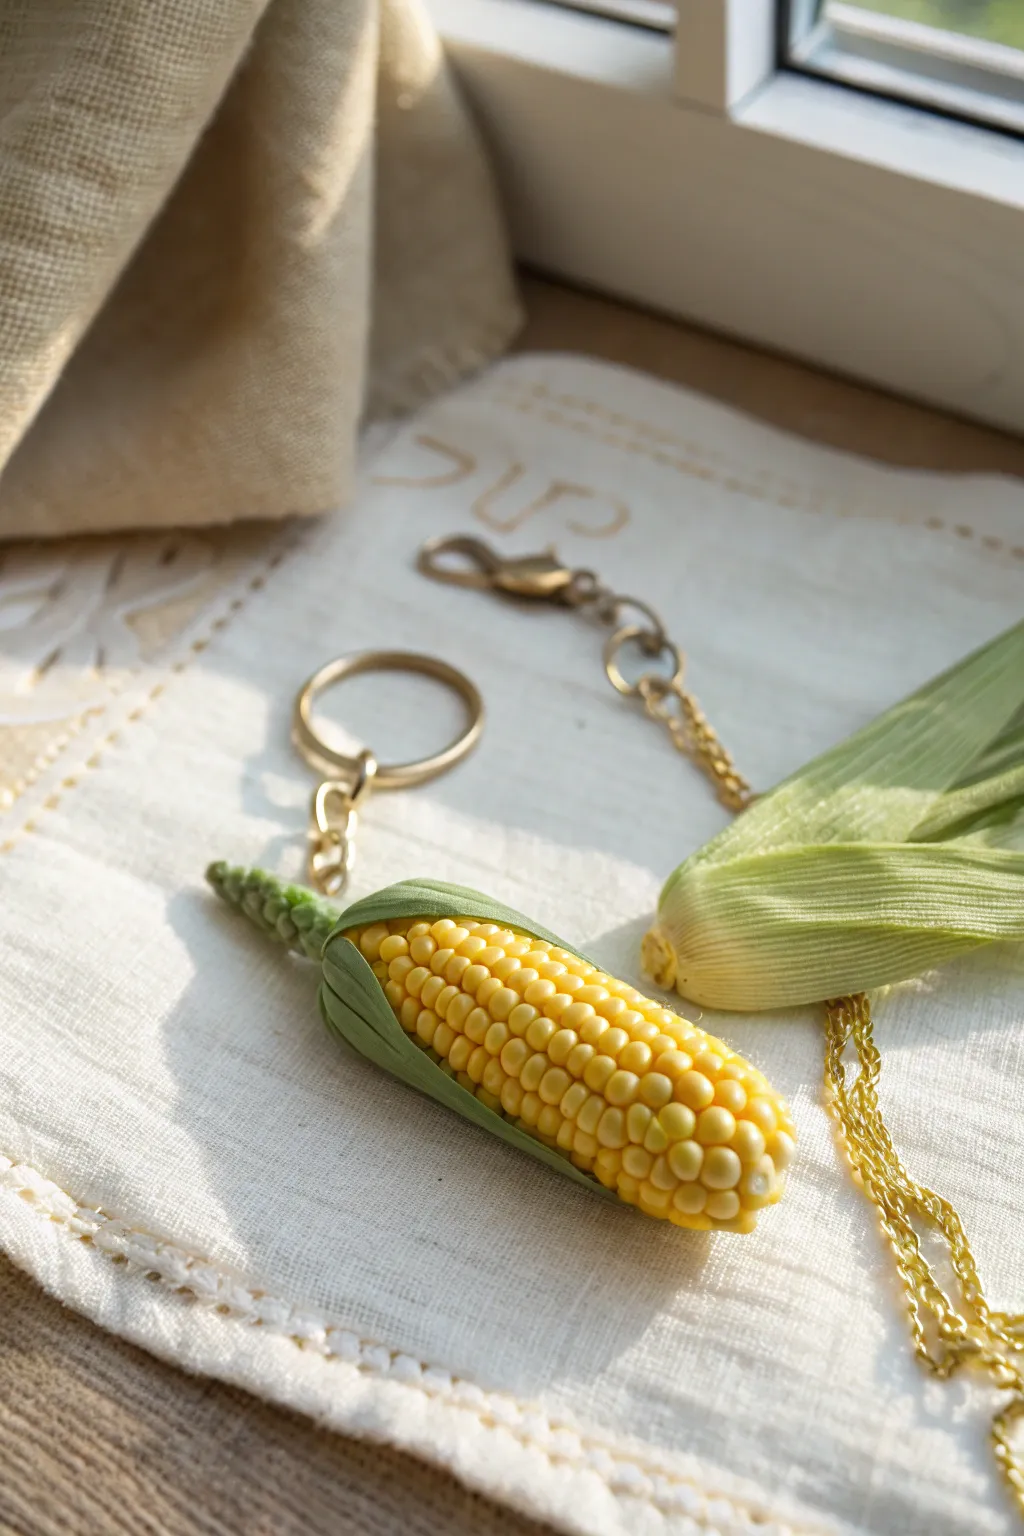
Capture the charm of late summer with this realistically textured corn on the cob keychain made from polymer clay. The subtle gradient of yellow kernels nestled in textured green husks makes for a delightful and durable accessory.
Step-by-Step Guide
Materials
- Polymer clay (translucent yellow, opaque yellow, white, olive green)
- Liquid polymer clay (translucent)
- Needle tool or dental pick
- Small ball stylus tool
- Toothbrush or texture sponge
- Pastel chalks (orange, golden yellow, brown)
- Small paintbrush
- Eye screw or headpin
- Keychain hardware (split ring and chain)
- Craft knife or blade
- Gloss glaze (optional)
Step 1: Preparing the Core and Kernels
-
Mix the kernel color:
Blend translucent yellow clay with a small amount of opaque yellow and a tiny pinch of white. You want a creamy, semi-translucent shade that mimics fresh corn. -
Form the cob base:
Take a piece of scrap clay or white clay and roll it into a tapered log shape, about 2 inches long. This will be the hidden core of your corn. -
Create kernel strips:
Roll your yellow mix into several very thin, long snakes or ropes. Aim for a diameter consistent with a real corn kernel scale. -
Apply the first row:
Lay one yellow snake vertically along the length of the white core. Gently press it down so it adheres without flattening it completely. -
Cut the kernels:
Using the back of your craft knife or a thin blade, gently press horizontal indentations into the snake at regular intervals to define individual kernels. -
Round the edges:
I like to use a small ball stylus to gently round the corners of each little square you just marked, giving them that organic, plump look. -
Cover the cob:
Repeat this process, laying strips side-by-side and texturing them until the entire core is covered in rows of kernels. Stagger the horizontal lines slightly for realism.
Step 2: Adding the Husks and Hardware
-
Roll out the husk clay:
Condition your olive green clay and roll it into a thin sheet. Usually, a pasta machine on a medium-thin setting works best here. -
Texture the husks:
Before cutting, press a toothbrush or a fine texture sponge onto the green sheet to give it a fibrous, leafy surface. -
Cut leaf shapes:
Cut out 3 to 4 elongated, leaf-like triangles. They should be long enough to cover the bottom half of the cob and extend slightly past the stem. -
Draw leaf veins:
Use a needle tool to drag parallel vertical lines down the length of each green leaf to mimic natural veins. -
Attach the husks:
Apply a tiny dab of liquid clay to the base of the yellow cob. Press the green leaves around the bottom, letting them overlap slightly and hug the kernels. -
Refine the stem:
Twist the excess green clay at the bottom into a small, textured stalk. Trim it neatly with your blade. -
Create the silk tip:
Roll a very tiny snake of green clay for the top tip (where the silk would be) and texture it heavily with a needle tool to look rough and organic. -
Insert the hardware:
Dip the threads of an eye screw into liquid clay for a secure bond. Screw it firmly into the center of the top green tip.
Kernel Realism Hack
Make your kernels slightly irregular sizes. Nature isn’t perfect! Varying the pressure on your tool creates a more organic, convincing look.
Step 3: Shading and Finishing
-
Apply shading:
Shave some orange and golden yellow pastel chalk into a fine powder. Use a dry brush to dust this powder into the crevices between the kernels to add depth. -
Highlight the husks:
Brush a tiny amount of brown pastel powder near the base of the husks and the stem to make them look earthy and ripened. -
Bake the piece:
Bake the corn according to your polymer clay manufacturer’s instructions. Usually, this is around 275°F (130°C) for 30 minutes. -
Add a shine:
Once cool, you can brush a light coat of gloss glaze over just the kernels (keeping the husk matte) to make them look juicy. -
Assemble the keychain:
Use pliers to open the jump ring on your keychain hardware and attach it to the eye screw on your finished corn.
Loose Kernels?
If kernel strips aren’t sticking to the core, brush a very thin layer of liquid polymer clay onto the white base before applying the yellow clay.
Attach your new harvest charm to your keys or bag and enjoy a little piece of nature wherever you go
Honey Drip Charm in Yellow
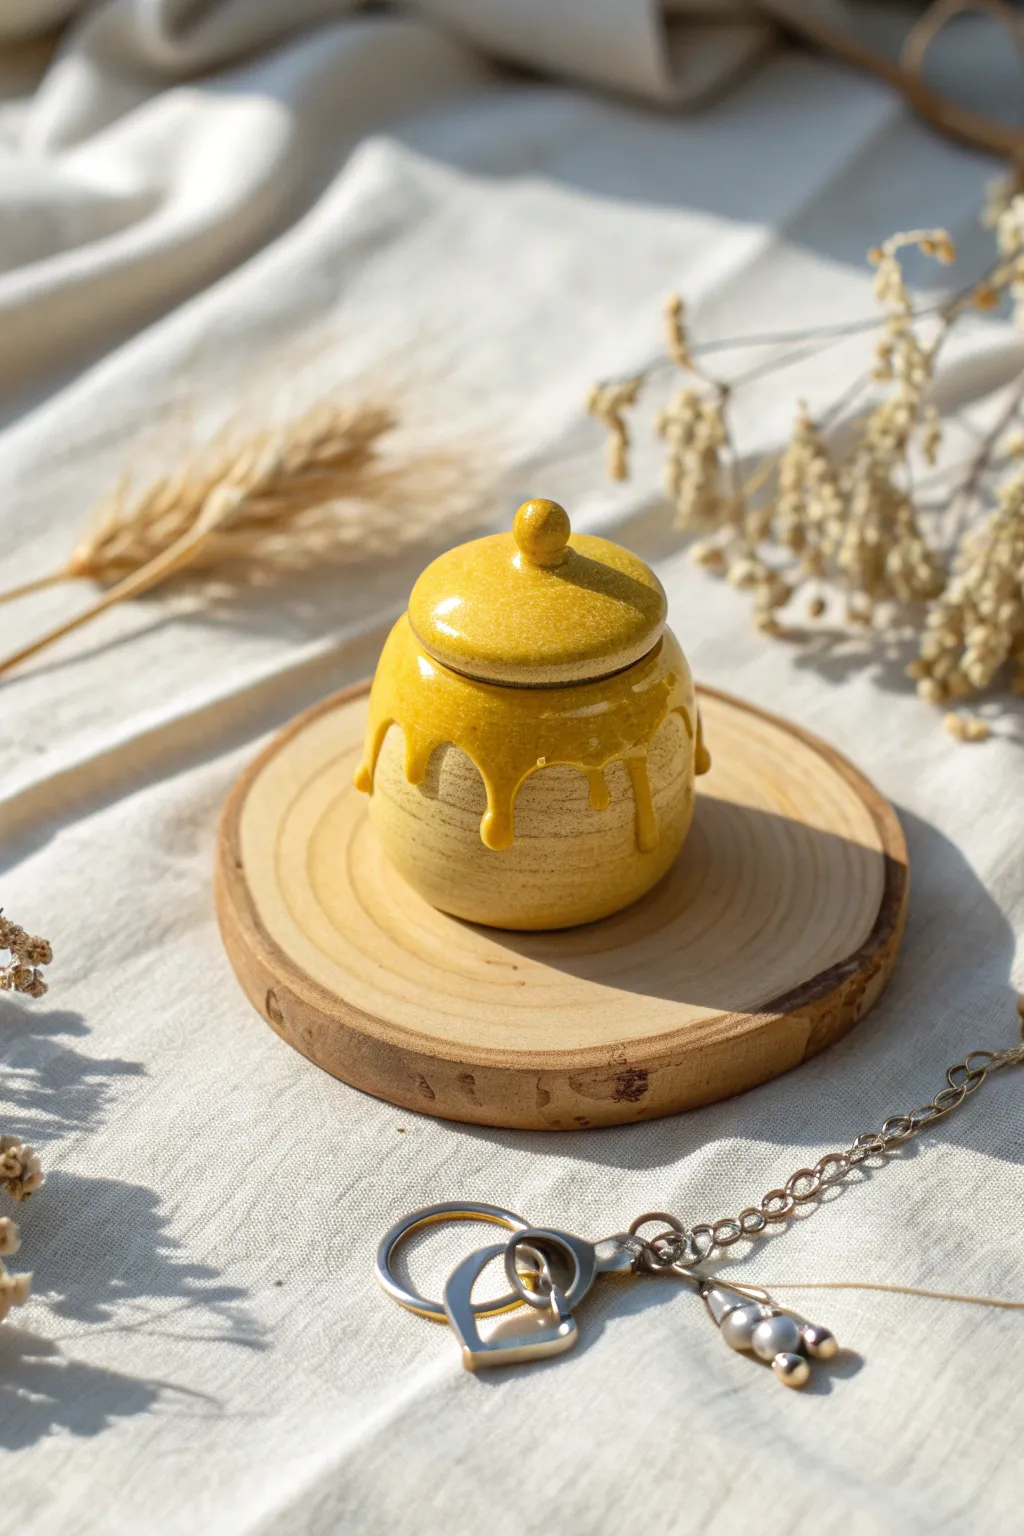
Capture the whimsy of spilled honey with this adorable miniature clay pot, featuring a textured base and a glossy, dripping glaze effect. This charming vessel mimics traditional ceramic techniques but can be made right at home for a sweet addition to your decor.
Step-by-Step Tutorial
Materials
- Polymer clay (yellow ochre or pale yellow for the base)
- Liquid polymer clay (yellow/translucent mix)
- Yellow alcohol ink or clay dye
- Pottery or sculpting tools (needle tool, small ball stylus)
- Small round cookie cutter
- Acrylic roller or pasta machine
- Gloss glaze or UV resin
- Sandpaper or texture sponge
- Oven for curing
Step 1: Shaping the Vessel
-
Base Formation:
Start by conditioning your base yellow clay until it is soft and pliable. Roll a ball of clay about the size of a golf ball and gently press your thumb into the center to create a hollow opening. -
Pinching the Walls:
Use a pinching motion with your thumb and forefinger to thin the walls of the pot, rotating it constantly to keep the circular shape even. Aim for a slightly rounded, bulbous bottom that tapers slightly inward at the neck. -
Smoothing the Rim:
Gently tap the rim against your work surface to flatten it slightly, ensuring a good surface for the lid to sit on later. -
Adding Texture:
To mimic the earthy look of thrown pottery, lightly roll a textured sponge or a piece of crumpled aluminum foil over the exterior. I like uses horizontal strokes here to simulate potter’s wheel lines.
Drip Control
If your liquid clay is too runny and dripping too fast, let it sit on a piece of paper for 10 minutes to leach out some plasticizer before applying.
Step 2: Creating the Lid
-
Sizing the Lid:
Roll a smaller ball of the same clay and flatten it into a disc that is slightly wider than the opening of your pot. -
Doming the Top:
Gently press the center of the disc onto a curved surface (like a lightbulb or round measuring spoon) to give it a domed shape. -
Adding the Knob:
Roll a tiny bead of clay for the handle. Place it in the exact center of the domed lid and smooth the seams where they connect using a small ball stylus. -
Fitting Test:
Place the lid gently onto the pot to ensure it fits. If it’s too heavy, thin out the underside of the lid slightly.
Bee Creative
Make a tiny bumblebee out of black and yellow clay scraps and attach it to the side of the drip before the final bake for extra cuteness.
Step 3: The Honey Drip Effect
-
First Cure:
Bake the pot and lid separately in the oven according to your clay package instructions. Let them cool completely before proceeding. -
Mixing the ‘Honey’:
In a small cup, mix liquid polymer clay with a few drops of yellow alcohol ink. You want a color that is vibrant and slightly darker than your base clay, reminiscent of golden honey. -
Applying the Drips:
Using a needle tool or toothpick, carefully drip the liquid clay mixture onto the shoulder of the pot. Let gravity do the work—allow big droplets to run down the sides. -
Connecting the Flows:
Guide the liquid clay so that it encircles the rim, creating a continuous ‘overflowing’ look. Make some drips longer than others for a natural, organic feel. -
Glazing the Lid:
Coat the entire top surface of the lid with the same liquid clay honey mixture. It should look like the honey was poured right over the top. -
Setting the Drips:
Bake the pieces again to cure the liquid clay. Watch the oven temperature closely to prevent the vivid yellow from darkening.
Step 4: Finishing Touches
-
Glossing for Shine:
Once cool, apply a high-gloss glaze or a thin layer of UV resin specifically over the ‘honey’ parts. This contrast between the matte base and shiny drips is crucial for realism. -
Refining the Base:
If the bottom is uneven, gently sand it flat so your pot sits perfectly straight on a shelf.
Now you have a delightfully sweet little vessel that captures the warmth of summer all year round
Golden Mushroom Cap Minis
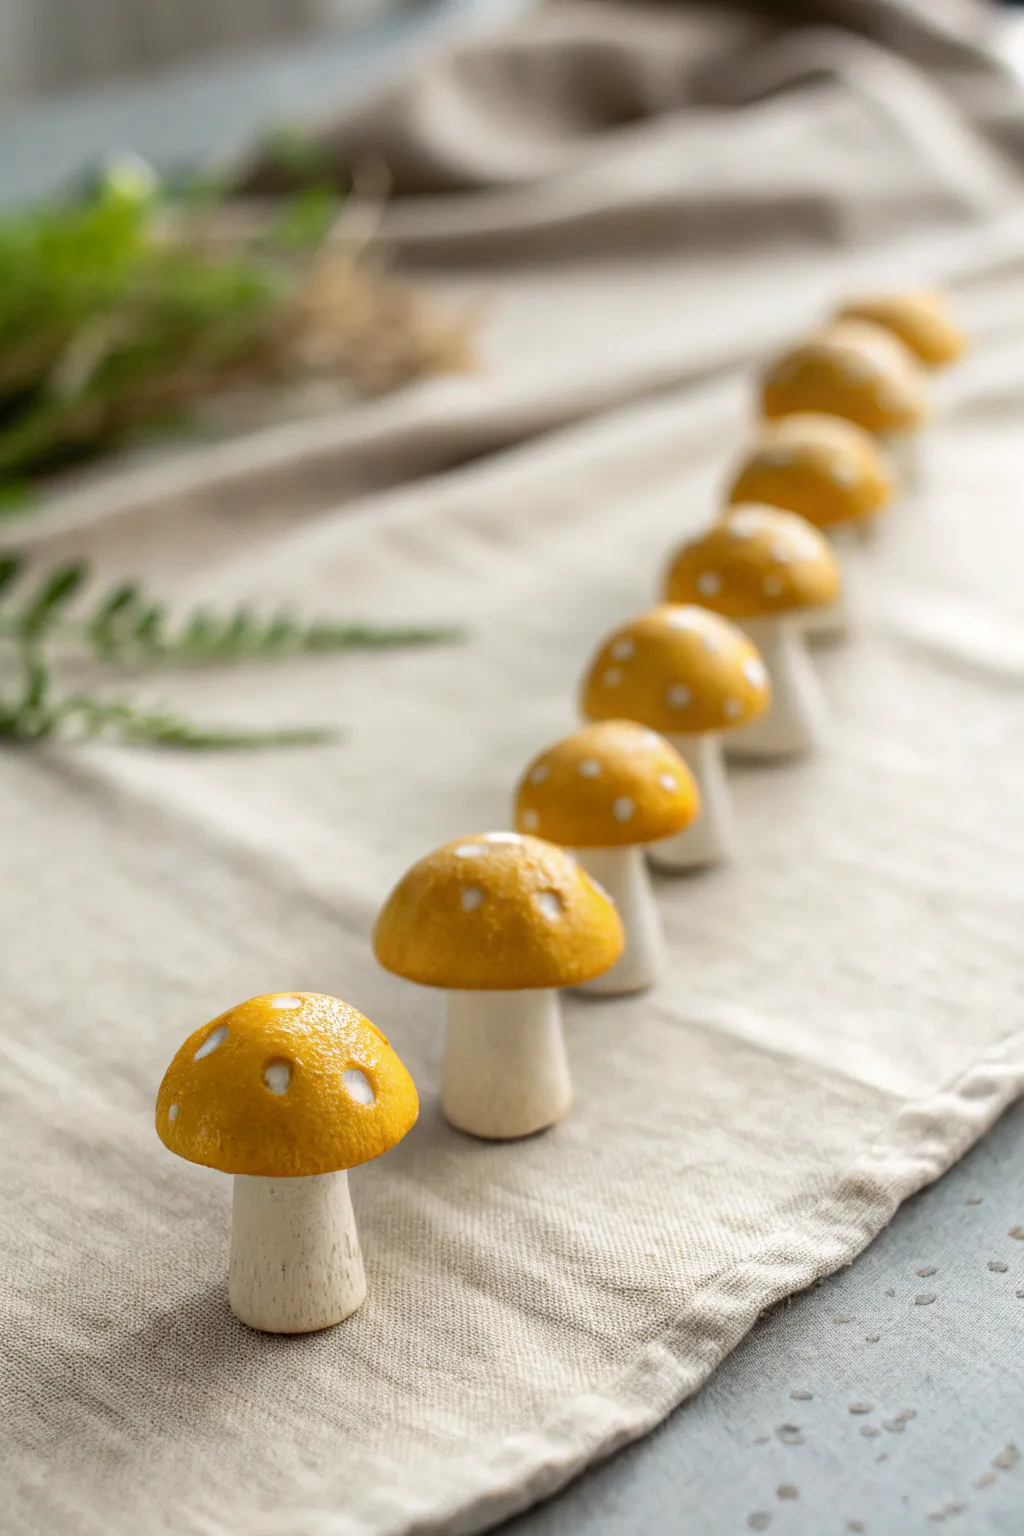
Bring a touch of forest whimsy to your décor with these delightful golden-capped mushrooms. Featuring an organic, pitted texture and creamy stalks, they look freshly plucked from a fairytale woodland.
Step-by-Step Guide
Materials
- Polymer clay (white or beige)
- Polymer clay (golden yellow)
- White liquid clay or thick white acrylic paint
- Aluminum foil
- Citrus peel, sandpaper, or stiff toothbrush (for texturing)
- Gloss varnish or resin
- Modeling tools (or toothpicks)
- Acrylic paint (warm cream or light beige)
- Matte varnish
- Oven (for curing)
Step 1: Forming the Bases
-
Create the core:
Start by rolling small balls of aluminum foil, roughly the size of a large marble. This saves clay and keeps the mushrooms lightweight. -
Mix the stem color:
Condition your white or beige polymer clay until soft. If the color feels too stark, mix in a tiny pinhead amount of brown to warm it up. -
Shape the stalks:
Roll the clay into thick, sturdy cylinders. The base should be slightly wider than the top to ensure they stand upright on their own. -
Refine the stem shape:
Gently pinch the waist of the cylinder to create a varied, organic silhouette. These shouldn’t look like perfect factory-made tubes. -
Texture the stalks:
Lightly drag a needle tool or toothpick vertically down the sides of the stems to mimic fibrous mushroom stalks.
Step 2: Sculpting the Caps
-
Prepare the cap clay:
Condition the golden yellow clay. Ensure it is very soft and pliable to accept texture easily. -
Wrap the cores:
Flatten the yellow clay into a disk and wrap it over your aluminum foil balls, smoothing the underside to close it. -
Dome the shape:
Rolled the clay-covered ball in your palms, then gently press it onto a work surface to flatten the bottom slightly where it will meet the stem. -
Join cap to stem:
Center the yellow cap onto the beige stem. Press down firmly enough to bond them, or use a dab of liquid clay as glue for a stronger hold. -
Add signature texture:
This is the most crucial step for the ‘lemon peel’ look seen in the photo. Press a piece of real orange peel, coarse sandpaper, or a stiff toothbrush all over the yellow cap to create tiny pits.
Citrus Hack
For the most realistic texture shown in the photo, actually press a dried piece of lemon or orange peel against the raw clay. It creates perfect organic pitting.
Step 3: Details & Finishing
-
Indent the spots:
Using a small ball tool or the rounded end of a paintbrush, gently press shallow divots into the yellow cap where you want the white spots to sit. -
Fill the spots:
carefully drop distinct dots of white liquid clay into the divots. If you don’t have liquid clay, you can paint these after baking. -
Bake the mushrooms:
Place your mushroom army on a baking sheet lined with parchment paper. Bake according to your clay manufacturer’s instructions (usually 275°F/130°C for 15-30 minutes). -
Cool down:
Let the mushrooms cool completely before handling them to ensure the structure hardens properly. -
Enhance the stem:
To get that raw ceramic look on the stem, apply a coat of matte varnish. This contrasts beautifully with the shiny cap. -
Glaze the cap:
Apply a thick, even coat of high-gloss varnish or UV resin specifically to the yellow cap. This mimics the wet, shiny look in the reference image.
Ombré Effect
Mix a tiny bit of orange clay into the yellow near the very top of the cap for a natural, sun-ripened gradient that adds depth.
Arrange your lineup of mushrooms on a shelf or windowsill to enjoy a permanent piece of autumn magic
Yellow Rain Boot Planter
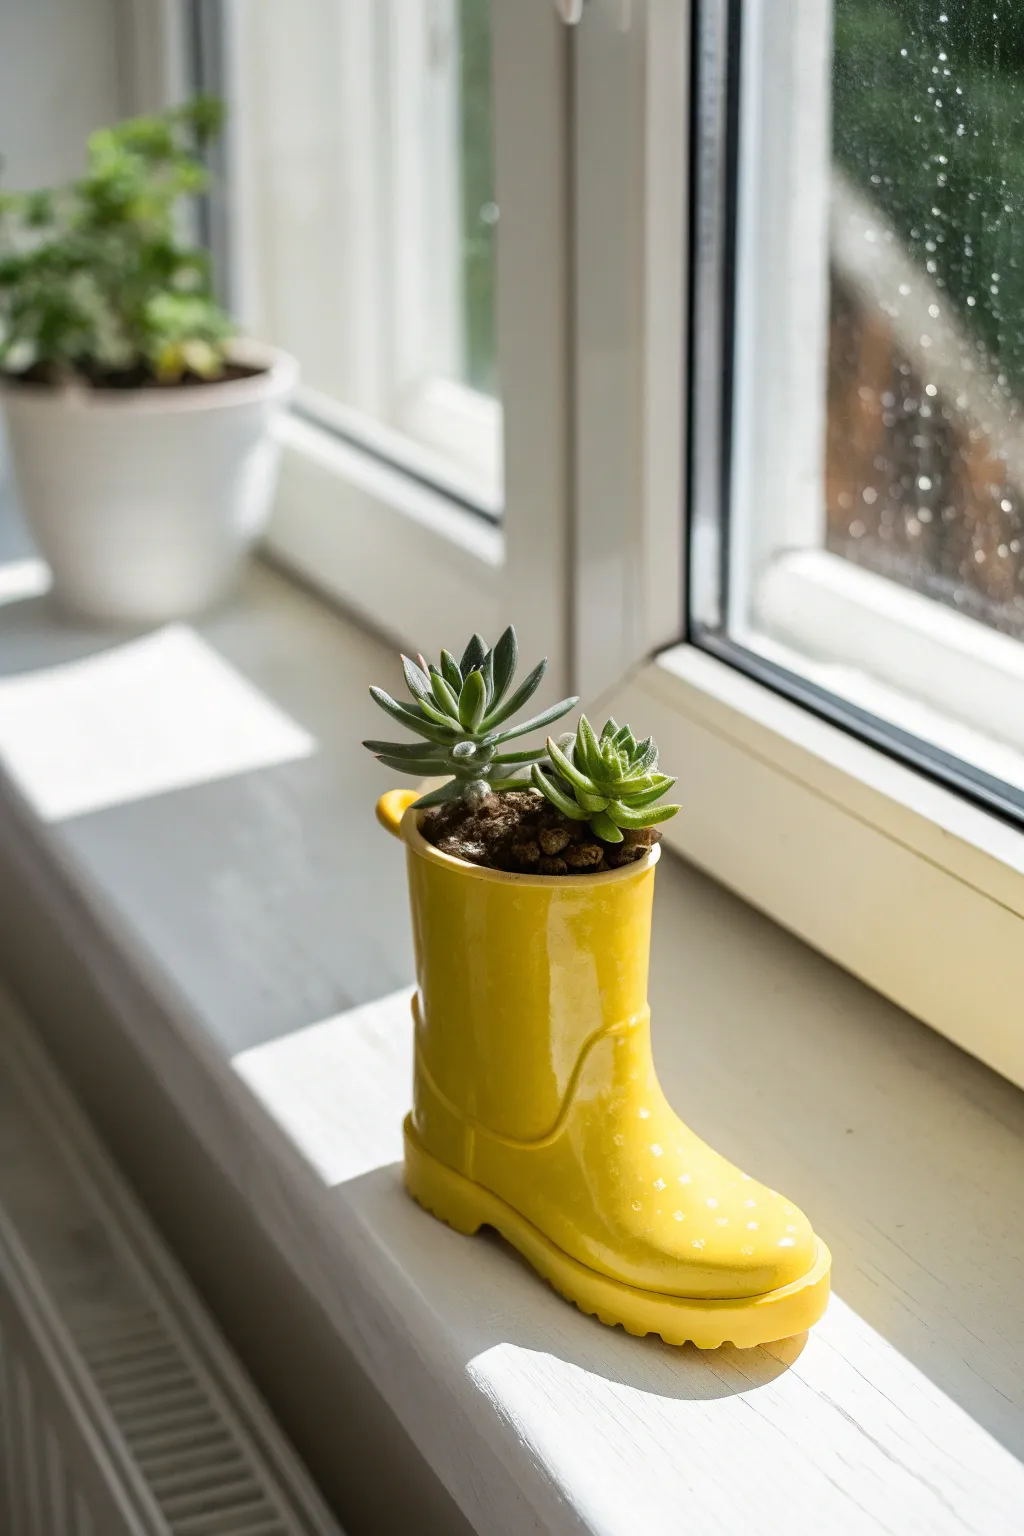
Brighten up your windowsill with a cheerful planter that looks just like a tiny rubber rain boot. Crafted from yellow polymer or air-dry clay and finished with a high-gloss glaze, this project is perfect for housing small succulents.
Step-by-Step
Materials
- Yellow polymer clay (or air-dry clay)
- Aluminum foil
- Rolling pin
- Clay sculpting tools (knife, needle tool)
- Glossy varnish or glaze
- Small paintbrush
- Cardboard or cardstock (for the template)
- Potting soil and small succulents
Step 1: Building the Core Structure
-
Create the foil armature:
Begin by scrunching aluminum foil into an L-shape to form the core of the boot. Make sure the ‘foot’ part is oval and the ‘leg’ part is a cylinder rising from the heel. -
Refine the shape:
Pack the foil tightly so it creates a firm base. You want the top to be slightly wider than the ankle area to mimic the look of a real boot. -
Create space for the plant:
Press a deep indentation into the top of the foil cylinder. This will be the hollow space where your soil and plant will eventually sit.
Step 2: Sculpting the Boot
-
Condition the clay:
Knead your yellow clay until it is soft and pliable. If you are using polymer clay, the warmth from your hands will make it much easier to work with. -
Roll out a slab:
Using your rolling pin, flatten the clay into a smooth sheet about 1/4 inch thick. Aim for an even thickness to prevent cracking later. -
Cut the sole:
Cut an oval shape from the clay sheet that is slightly larger than the bottom of your foil foot. This will serve as the chunky sole of the boot. -
Wrap the foil:
Cut a large rectangular piece to wrap around the vertical ‘leg’ of the boot, and a curved piece to cover the toe. Gently press the clay onto the foil armature, smoothing the seams where the pieces join. -
Blend the seams:
Use a sculpting tool or your finger to smooth out the connection between the wall of the boot and the sole. I like to drag the clay down slightly to ensure a strong bond before smoothing it back up. -
Form the opening:
Mold the clay over the lip of the foil indentation at the top, ensuring the foil is completely covered and hidden.
Water Drainage
Since this planter is small and likely won’t have a drain hole, use a layer of tiny pebbles at the very bottom before adding soil to prevent root rot.
Step 3: Adding Details
-
Add the sole tread:
Roll a thin snake of clay and wrap it around the very bottom edge of the boot. Use the side of a knife or a needle tool to press vertical indentations all around it, mimicking the grip of a rain boot. -
Create the reinforcing strips:
Roll very thin, flat strips of clay. Attach one running vertically up the back of the heel, and another curving around the ankle area to create that classic rubber boot construction look. -
Add the pull tab:
Form a small U-shaped loop of clay and attach it to the back rim of the boot opening. This little pull tab adds a lot of character. -
Smooth everything out:
Dip your finger in a tiny bit of water (or baby oil for polymer clay) and gently rub the entire surface to remove fingerprints and create a flawless, rubber-like finish.
Pro Tip: Shinier Finish
For the ultimate wet-look shine, apply two or three thin coats of glaze rather than one thick one, letting each coat dry fully in between.
Step 4: Finishing Touches
-
Bake or dry:
If using polymer clay, bake according to the package instructions (usually 275°F for 15-30 minutes). If using air-dry clay, let it sit in a dry spot for 24-48 hours until fully hardened. -
Apply the glaze:
Once cool or dry, paint the entire exterior with a high-gloss varnish. This step is crucial for achieving that wet, shiny ‘rain boot’ appearance. -
Add subtle texture (optional):
Before the glaze dries completely, you can gently dab a few spots with a texture sponge if you want a slightly worn look, though a smooth finish usually looks best. -
Plant your greens:
Fill the hollow top with a small amount of potting soil and nestle your succulent into place gently.
Place your little yellow boot in a sunny spot and enjoy the splash of color it brings to the room
Butterfly Magnets in Bright Yellow
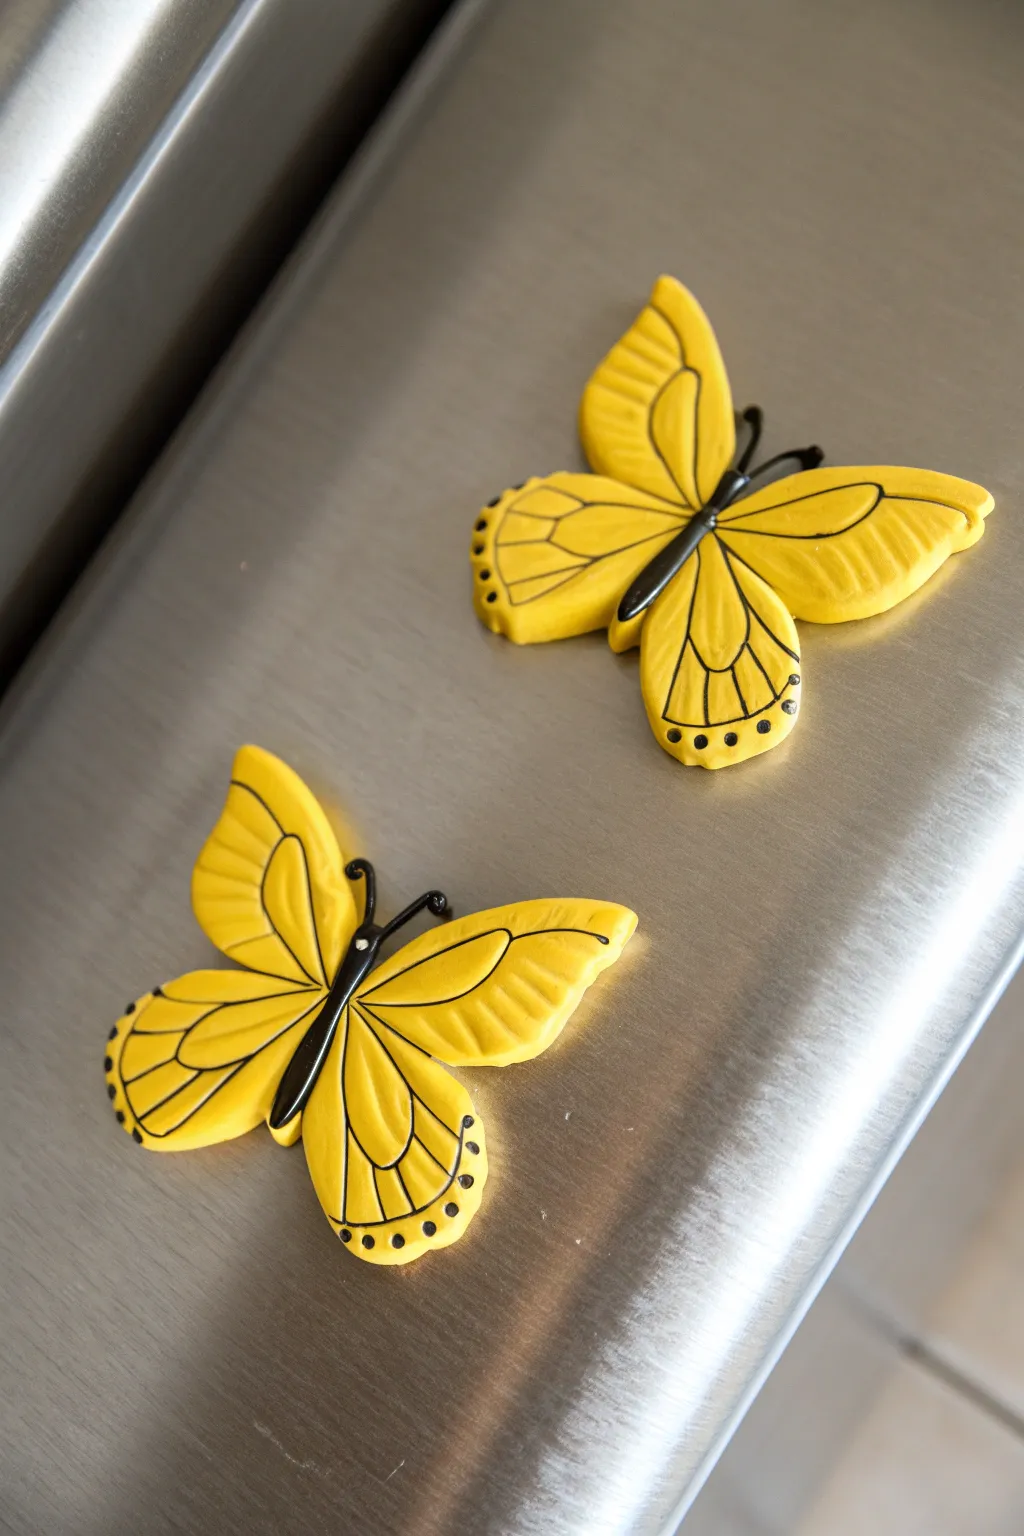
Brighten up your kitchen with these cheerful yellow butterfly magnets, sculpted from polymer clay with delightful textured wings. The contrasting black details give them a illustrative, graphic look that pops against stainless steel appliances.
Step-by-Step Guide
Materials
- Yellow polymer clay
- Black polymer clay
- Clay roller or pasta machine
- Butterfly shaped clay cutter (or a sharp craft knife and paper template)
- Modeling tool (needle tool or toothpick)
- Black acrylic paint or fine-point permanent marker
- Strong craft magnets
- Super glue (E6000 or gel formula)
- Oven for baking clay
- Parchment paper
Step 1: Sculpting the Wings
-
Condition the clay:
Start by kneading your yellow polymer clay until it is soft and pliable. This conditioning step prevents cracks during baking. -
Roll out a sheet:
Roll the clay into a flat sheet, approximately 1/8 inch thick. It needs to be sturdy enough to handle sculpting but not too heavy for the magnet. -
Cut the shapes:
Use a butterfly cutter to punch out your shapes. If you don’t have a cutter, I like to sketch a simple butterfly outline on paper, cut it out, place it on the clay, and trace around it with a craft knife. -
Refine the edges:
Gently smooth the cut edges with your fingertip to remove any roughness left by the cutter or knife. -
Create wing separation:
Using the side of a modeling tool or the back of a knife, gently press indentation lines to visually separate the upper wings from the lower wings. -
Texture the wings:
To create the ribbed texture seen in the photo, take your needle tool and gently press lines radiating from the center of the butterfly outward toward the wing tips. Do not cut all the way through. -
Shape the wings:
Lift the butterfly slightly and gently curve the wings upward just a bit. This gives the insect a sense of movement, like it has just landed.
Clean Lines Only
Use a baby wipe to clean your hands and tools before switching from black clay back to yellow. Black clay pigment transfers easily and can stain the bright yellow.
Step 2: Adding the Body
-
Form the body:
Take a very small amount of black polymer clay and roll it into a tiny, thin snake or log shape that fits the length of the butterfly’s center. -
Attach the body:
Press this black log gently into the slight depression between the wings. The clays should bond naturally, but a drop of liquid clay can help if they are dry. -
Add antennae:
Roll two extremely thin threads of black clay for the antennae. Gently press them onto the head area, curling the tips slightly outward.
Step 3: Finishing Details
-
Bake the clay:
Place your butterflies on a parchment-lined baking sheet. Bake according to your specific clay package instructions (usually 275°F for 15-30 minutes). -
Cool completely:
Let the butterflies cool fully before handling. Polymer clay is fragile when hot. -
Paint the veins:
Using a very fine brush and black acrylic paint, or a permanent marker, trace over the main indented lines you created on the wings. This highlights the texture. -
Add wing spots:
Paint small dots along the outer edges of the lower wings to mimic the patterns of a real Swallowtail or Monarch. -
Seal the paint:
Once the paint is completely dry, you can apply a thin coat of matte or satin glaze to protect the detailing, though this is optional. -
Attach the magnet:
Flip the butterfly over. Apply a strong dab of super glue to the center back and press your magnet firmly into place. Let it cure for 24 hours.
Make it Sparkle
Before baking, lightly brush the yellow wings with gold mica powder. It adds a subtle shimmer that catches the light beautifully when hanging on the fridge.
Now your kitchen has a permanent touch of summer regardless of the season outside
Cute Canary Figurine
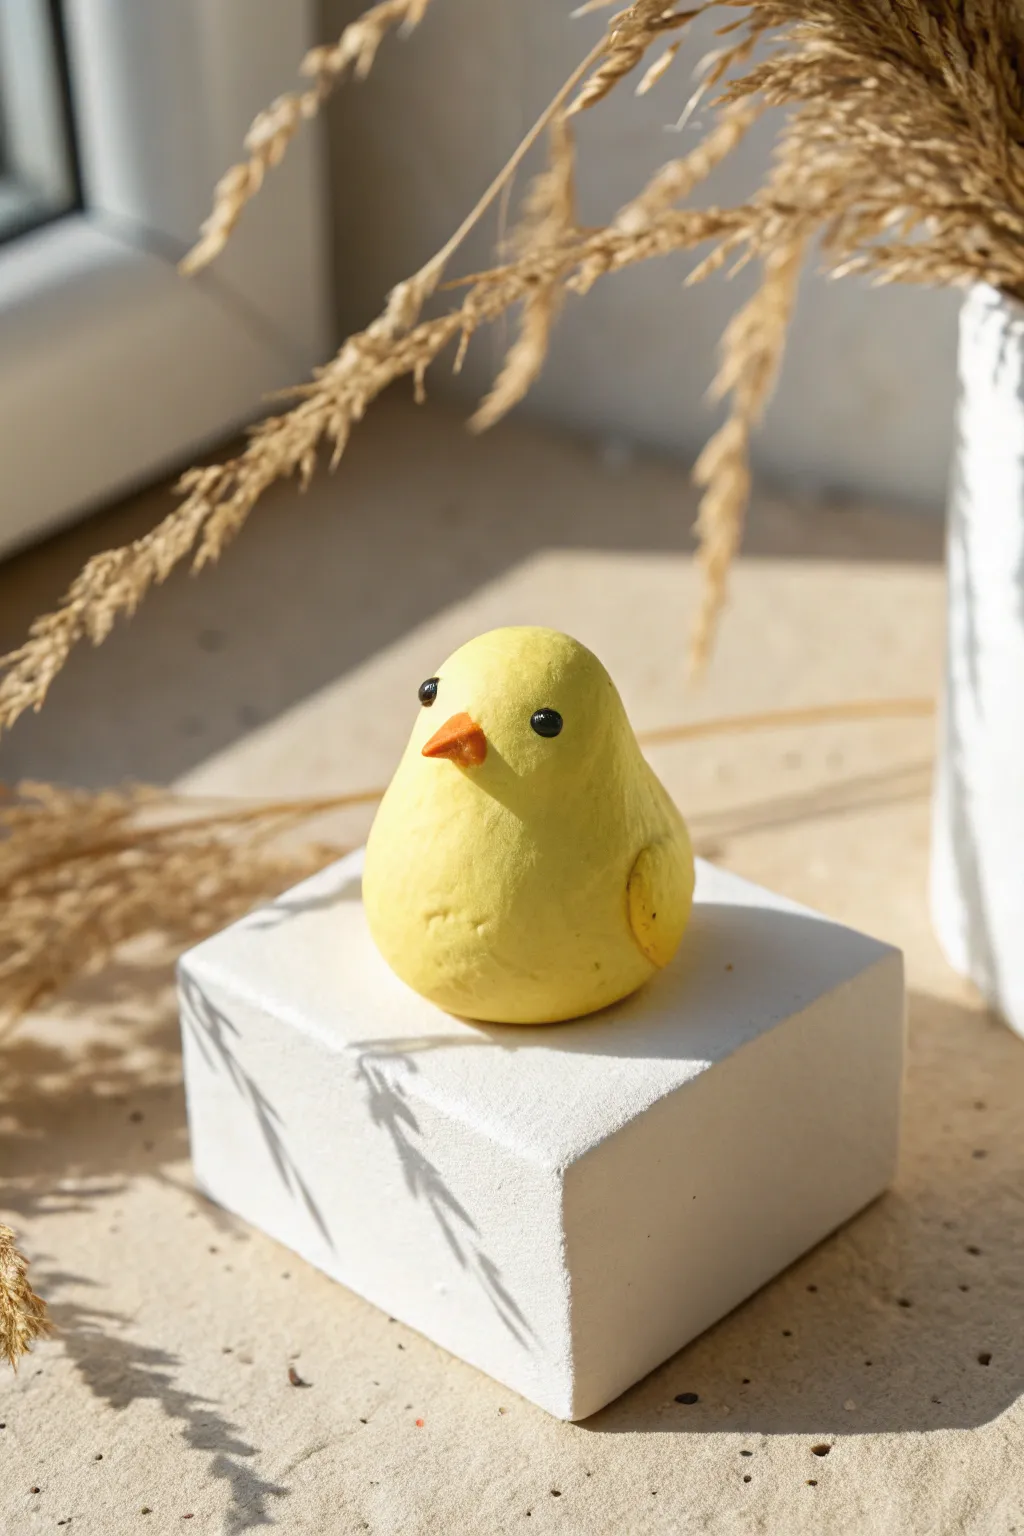
Bring a touch of springtime cheer to your desk with this simple yet charming canary figurine. Its sunshine-yellow body and minimalist design make it a perfect beginner project for clay enthusiasts looking for a quick and rewarding sculpt.
Detailed Instructions
Materials
- Yellow air-dry clay or polymer clay
- Small amount of orange clay
- Two small black beads or black clay
- Sculpting tools (needle tool, small spatula)
- Aluminum foil (optional for core)
- Water (for smoothing air-dry clay) or Baby oil (for polymer)
- Fine sandpaper (optional)
- Matte varnish (optional)
Step 1: Farming the Body
-
Condition the Clay:
Begin by taking a generous amount of yellow clay and kneading it thoroughly until it is soft, pliable, and free of cracks. Warm clay is much easier to shape without leaving fissures. -
Create the Base Shape:
Roll the clay into a smooth ball. If you want to save materials, you can create a small core from crumpled aluminum foil and wrap the clay around it, but for a piece this small, solid clay works fine. -
Establish the Silhouette:
Gently gently roll the ball between your palms, applying slightly more pressure on one end to create a teardrop or pear shape. The bottom should be wider and heavier. -
Define the Posture:
Set the pear shape down on your work surface. Press it down lightly to flatten the base so the bird sits stably on its own without rolling over. -
Shape the Head:
Using your fingers, smooth and round out the top tapered part of the pear to define the head. It shouldn’t be separate from the body; aim for a continuous, flowing line from neck to back.
Smooth Operator
Before baking or drying, use a soft paintbrush dipped in baby oil (polymer) or water (air-dry) to brush the entire piece. It melts away fingerprints instantly.
Step 2: Adding Details
-
Form the Wings:
Pinch off two small, equal-sized pieces of yellow clay. Roll them into tiny balls and then flatten them into elongated teardrop shapes. -
Attach the Wings:
Press one wing onto each side of the body, positioning them fairly low and slightly towards the back. I like to blend the top edge of the wing into the body using a modeling tool while leaving the bottom edge slightly raised for definition. -
Prepare the Beak:
Take a very tiny pinch of orange clay. Roll it into a small cone shape. Ensure the point is sharp but the base is wide enough to attach securely. -
Attach the Beak:
Place the orange cone in the center of the face area. Press it gently to adhere. You can use a needle tool to drag a tiny amount of the orange clay at the base onto the yellow face to lock it in. -
Create Eye Sockets:
Use a small ball-end tool or the back of a paintbrush to make two small indentations on either side of the beak. This ensures the eyes sit flush rather than bulging out awkwardly. -
Insert the Eyes:
Place your small black beads into the sockets you just created. If you are using black clay instead, roll tiny spheres and press them into place. Ensure they are symmetrical. -
Add Texture (Optional):
If you want a more rustic look, you can lightly tap the surface with a stiff brush or a textured sponge to give the appearance of fluffy feathers, though the example image is kept smooth.
Make a Nest
Don’t stop at the bird! Create a small nest using brown clay extruded through a garlic press to create realistic twiggy textures for your canary to sit in.
Step 3: Finishing Touches
-
Final Smoothing:
Dip your finger in a little water (for air-dry clay) or baby oil (for polymer clay) and gently run it over the entire figurine. This removes fingerprints and smoothes out any accidental dents. -
Curing or Drying:
If using polymer clay, bake according to the manufacturer’s temperature and time instructions. For air-dry clay, leave it in a dry, room-temperature spot for 24-48 hours. -
Sanding:
Once fully cured or dried, check for any rough spots. You can gently sand these away with very fine-grit sandpaper for a professional finish. -
Sealing:
To protect your canary, brush on a coat of matte varnish. This will seal the clay and keep the colors vibrant without adding an artificial glossy shine.
Place your sunny creation near a window or plant to enjoy its cheerful presence year-round
Ombre Yellow Marble Clay Swirls
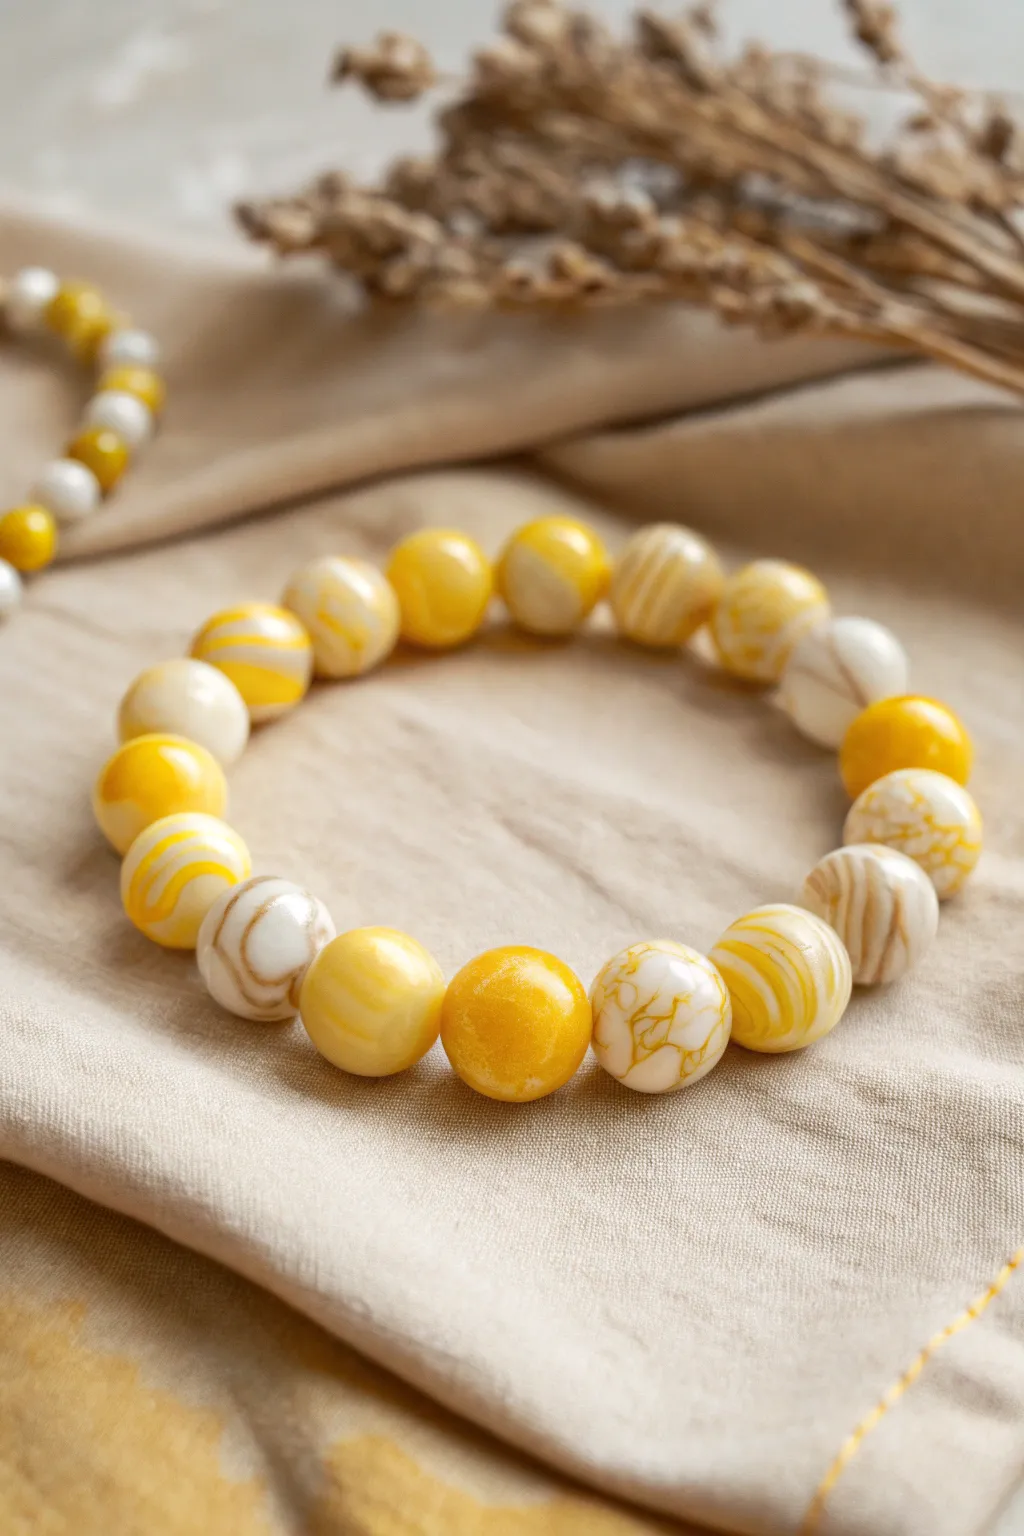
Capture the warmth of a summer afternoon with this cheerful polymer clay bracelet featuring a stunning array of marbled, solid, and crackled beads. The interplay of buttery yellows, crisp whites, and metallic veining creates a sophisticated yet playful accessory perfect for brightening any outfit.
Step-by-Step
Materials
- Polymer clay (sunflower yellow)
- Polymer clay (translucent or pearl white)
- Polymer clay (opaque white)
- Gold leaf sheets or metallic gold acrylic paint
- Bead rolling tool or acrylic block
- Needle tool or bead piercing pins
- Elastic jewelry cord (0.8mm)
- Super glue or jewelry cement
- Wet/dry sandpaper (400-800 grit)
- Gloss glaze or resin (optional)
- Oven or toaster oven dedicated to clay
Step 1: Preparing the Clay Canes
-
Condition the Clay:
Begin by thoroughly conditioning your yellow, opaque white, and translucent white clay separately until they are soft and pliable. Warm clay mixes better and prevents cracking. -
Create the Marbled Blend:
Roll a snake of yellow clay and a snake of opaque white clay. Twist them together like a candy cane. -
Fold and Roll:
Fold the twisted snake in half and roll it smooth again. Repeat this twist-fold-roll process 3-4 times, stopping before the colors fully blend so you maintain distinct streaks. -
Create the Gold-Veined Mix:
Take a portion of white clay and roughly chop it into small chunks. Coat these chunks in gold leaf or small amounts of gold paint, then press them back together into a log without over-kneading.
Muddy Colors?
If your marble swirls are turning into a solid light yellow, you are over-mixing. Stop rolling sooner! Distinct bands of color require fewer folds and twists
Step 2: Forming the Beads
-
Portion Control:
Slice your clay logs (solid yellow, solid white, the yellow marble mix, and the gold-veined white) into equal-sized segments to ensure consistent bead size. -
Roll the Spheres:
Roll each segment between your palms to form a rough ball. For a perfectly spherical shape, I like to use a bead roller or gently rotate the ball under an acrylic block using a circular motion. -
Create the Swirl Effect:
For the swirled beads, take a small ball of yellow and a small ball of white, press them together, and roll them between your palms until smooth swirls appear. -
Refine the Cracks:
For the gold-veined beads, roll them gently; the gold leaf inside will break apart, creating delicate metallic fissures or ‘cracked’ effects on the surface. -
Check for Imperfections:
Smooth out any fingerprints by lightly buffing the raw beads with a tiny amount of baby oil or cornstarch on your finger. -
Pierce the Holes:
Using your needle tool or piercing pin, carefully bore a hole through the center of each bead. Twist the tool as you push to avoid squashing the sphere.
Add Sparkle
Mix a pinch of translucent glitter clay into your yellow bands. It adds a subtle shimmer that catches the light beautifully when worn outdoors
Step 3: Baking and Finishing
-
Bake the Beads:
Arrange the beads on a baking sheet or suspended on a bead rack. Bake according to your customized clay brand’s package instructions (usually 275°F/135°C for 30 minutes). -
Cool and Quench:
Remove from the oven. If using translucent clay, plunge the beads immediately into ice water to maximize their transparency. -
Light Sanding:
Once fully cool, use wet sandpaper to smooth away any rough edges near the holes or surface bumps. -
Seal (Optional):
Apply a thin coat of gloss glaze to the beads to protect the gold leaf and make the yellow colors pop. -
Stringing the Design:
Cut a piece of elastic cord about 10 inches long. Pre-stretch it by pulling firmly on both ends to prevent the bracelet from sagging later. -
Arrange the Pattern:
Thread your beads onto the cord, alternating between solid, swirled, and gold-veined beads to create a balanced, organic look. -
Tie the Knot:
Tie a surgeon’s knot (a square knot with an extra twist). Pull it tight, securing it with a tiny drop of super glue on the knot itself. -
Hide the Knot:
Trim the excess cord and gently tug the bracelet so the knot slips inside the hole of the nearest bead.
Enjoy wearing your radiant new accessory that brings a touch of sunshine to your day