When I’m craving instant joy at the worktable, I reach for yellow polymer clay—it’s basically sunshine you can sculpt. Here are my favorite yellow-forward ideas, starting with the classic crowd-pleasers and moving into some fun, unexpected twists.
Lemon Slice Charms
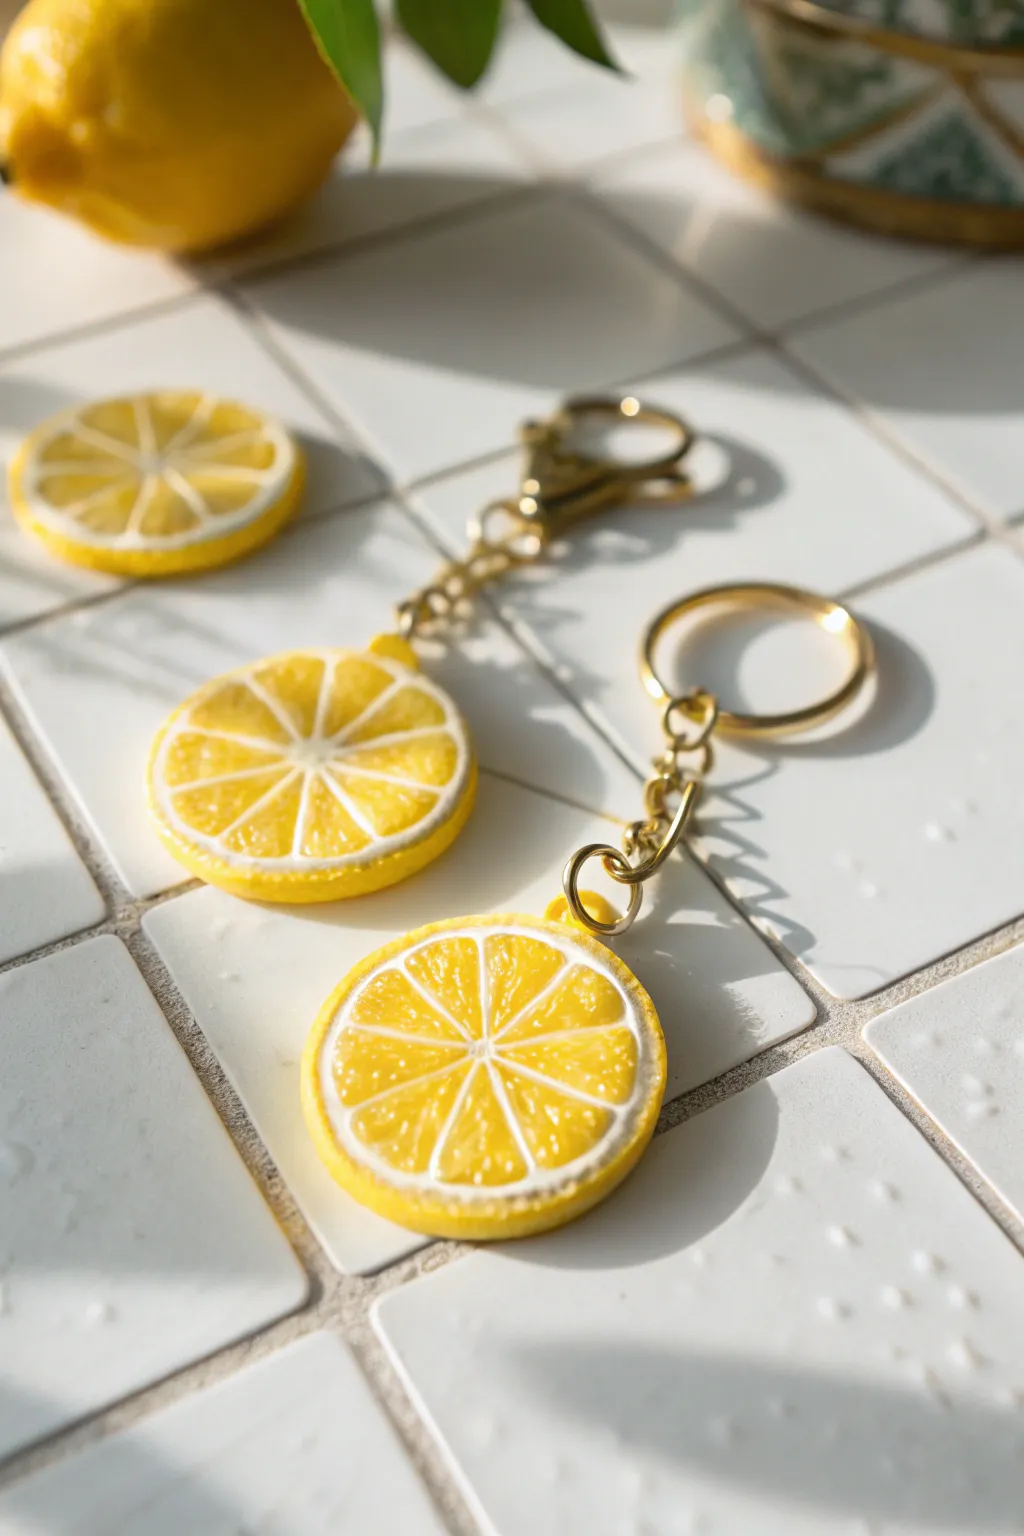
Capture the refreshing essence of summer with these hyper-realistic lemon slice charms. Featuring translucent pith detailing and a textured, juicy surface, these vibrant accessories are perfect for brightening up keychains or purses.
How-To Guide
Materials
- Yellow polymer clay (opaque)
- Translucent yellow polymer clay
- White or ecru polymer clay
- Liquid polymer clay (translucent)
- Round clay cutter (approx. 1.5 inch)
- Needle tool or toothpick
- Sandpaper or texturing sponge
- Eye pins
- Gold keychains with jump rings
- Gloss glaze or UV resin
- Pasta machine or rolling pin
Step 1: Creating the Lemon Cane
-
Prepare the segments:
Begin by conditioning your translucent yellow clay and rolling it into a log about 1 inch thick. This will form the juicy interior of the lemon segments. Cut this log into 8 equal-sized wedges. -
Wrap the segments:
Roll out a very thin sheet of white or ecru clay. Carefully wrap each of the 8 yellow wedges with this thin white layer to create the membrane between segments. -
Reform the core:
Reassemble the 8 wrapped wedges back into a circular log shape. Gently squeeze and roll the log to ensure the wedges stick together without distorting the internal pattern. -
Add the pith and rind:
Roll out a medium-thickness sheet of white clay and wrap it around the entire segmented log. Follow this with a slightly thicker layer of opaque yellow clay to create the outer lemon zest. -
Reduce the cane:
Gently compress and roll the cane to reduce its diameter to your desired charm size. I aim for about 1.5 inches wide, similar to a real lemon slice. -
Slice the clay:
Using a very sharp tissue blade, slice the cane into coins approximately 5mm thick. Keep the blade clean to avoid smearing the yellow into the white lines.
Realistic Rind Tip
Mix a tiny speck of translucent clay into your opaque yellow rind color. This adds depth and prevents the lemon skin from looking like flat plastic.
Step 2: Adding Texture and Hardware
-
Texture the rind:
Take a piece of rough sandpaper or a stiff texturing sponge and gently press it against the outer yellow edge of each slice to mimic the dimpled texture of lemon skin. -
Create the juicy texture:
Use a needle tool to gently poke and disturb the surface of the translucent yellow segments. Create tiny little divots and scratches to simulate pulp vesicles. -
Refine the shape:
If the slicing or texturing distorted the circle, gently pat the edges back into a perfect round shape. -
Insert eye pins:
Carefully push a gold eye pin into the top edge of each lemon slice, ensuring it goes deep enough for security but doesn’t poke through the face of the charm. -
Bake:
Place your charms on a ceramic tile or baking sheet lined with parchment paper. Bake according to your brand of polymer clay instructions (usually around 275°F/135°C for 20-30 minutes).
Level Up: Pink Lemonade
Swap the translucent yellow interior for a soft translucent pink to create trendy ‘pink lemonade’ variety lemons, perfect for a mismatched accessory set.
Step 3: Finishing Touches
-
Cool and inspect:
Allow the clay to cool completely. Check the eye pins; if any are loose, secure them with a drop of superglue. -
Gloss the fruit:
Apply a coat of gloss glaze or UV resin specifically to the cut face of the lemon. I prefer UV resin because it creates a wet, freshly-sliced look. -
Avoid the rind:
Be careful not to glaze the outer yellow rind; keeping that part matte enhances the realism against the glossy fruit interior. -
Cure the glaze:
Let the glaze air dry or cure the resin under a UV lamp until hard and tack-free. -
Assemble keychain:
Using pliers, open the jump ring on your gold keychain hardware and attach it to the eye pin loop on the charm. Close the jump ring securely.
Enjoy styling these citrusy bursts of sunshine on your favorite bag or set of keys


Bee Stripe Earrings
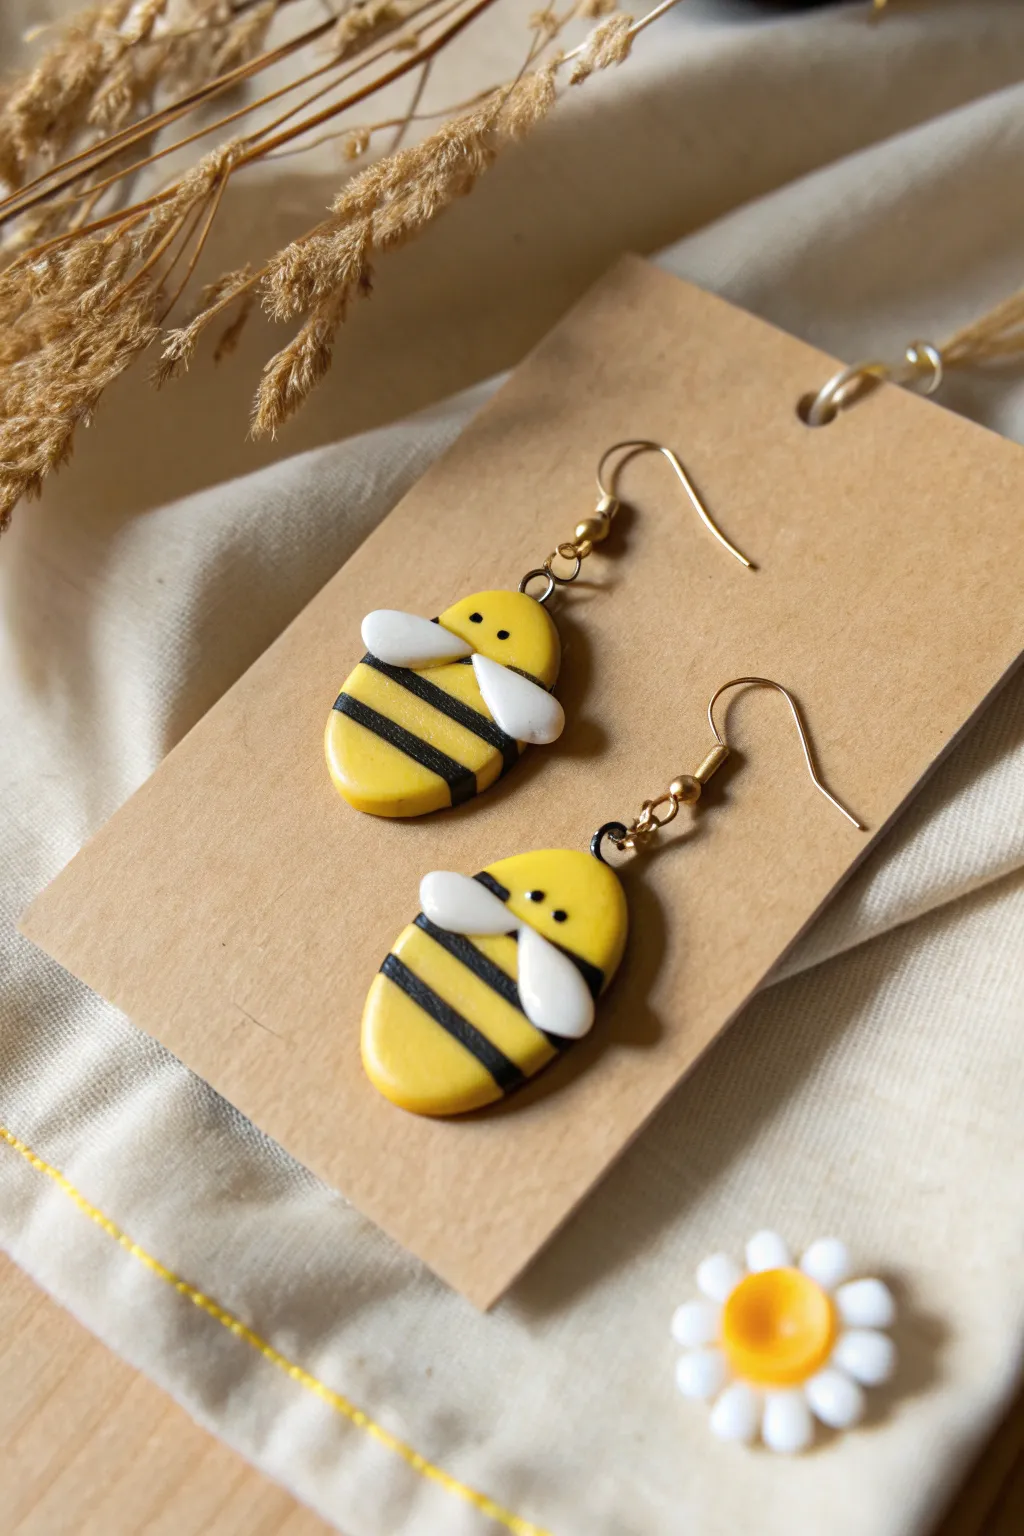
These charmingly chubby bees capture the essence of spring with their vibrant yellow bodies and stark black stripes. Their simple, rounded shapes and delicate white wings make them a perfect beginner project that results in professional-looking jewelry.
Step-by-Step
Materials
- Yellow polymer clay
- Black polymer clay
- White or pearlescent polymer clay
- Rolling pin or pasta machine
- Clay blade or craft knife
- Dotting tool or toothpick
- Small circle cutter or oval cutter (approx. 1 inch)
- Eye pins (silver or gold tone)
- Earring hooks (fishhook style)
- Needle nose pliers
- Oven for baking
Step 1: Shaping the Bees
-
Prepare the yellow base:
Condition your yellow polymer clay until it is soft and pliable. Roll it into a sheet about 3mm to 4mm thick. You want it substantial enough to hold the eye pin securely but not too heavy for ears. -
Cut the body shapes:
Use an oval cutter to punch out two identical shapes. If you don’t have an oval cutter, you can use a circle cutter and gently stretch the clay slightly to elongate it into a bean-like bee shape. -
Smooth the edges:
Gently rub the edges of your cut shapes with your fingertip to remove any sharp ridges or loose bits left by the cutter. The goal is a nice, rounded finish like a polished stone. -
Prepare the stripes:
Roll out a very thin sheet of black polymer clay, or use an extruder to create a flat ribbon. Use your blade to slice thin, uniform strips about 2mm wide. -
Apply the first stripe:
Place one black strip across the lower third of the yellow body. Gently press it down so it adheres without squashing the yellow shape underneath. -
Add the second stripe:
Place a second black strip parallel to the first, leaving a gap of yellow in between. Trim any excess black clay that hangs off the sides with your blade for a flush finish. -
Integrate the stripes:
To ensure the stripes don’t pop off later, very gently roll over the entire piece with your roller just once. Use light pressure—you just want to level the surface, not flatten the bee entirely.
Clean Stripe Tip
Before baking, use a cotton swab dipped in rubbing alcohol to wipe the yellow sections. This cleans up any black clay smudges that might have transferred.
Step 2: Adding Details & Hardware
-
Form the wings:
Take a small amount of white clay and roll two tiny balls per bee (four total). Shape each ball into a teardrop or rice grain shape. -
Attach the wings:
Place two wings on the upper back of each bee, angled slightly outward like a ‘V’. Press them down firmly, or use a tiny dab of liquid clay if they aren’t sticking well. -
Create the face:
Roll two miniscule specks of black clay for the eyes. Position them near the top of the yellow oval. I find using a needle tool helps transfer these tiny bits more precisely than fingers. -
Insert eye pins:
Trim your eye pins to an appropriate length (about 1cm stem). Carefully inert the pin into the top center of the bee’s head. If the clay distorts, reshape it gently. -
Final smooth:
Check for fingerprints. If you see any, lightly brush them away with a drop of baby oil on your finger or a soft brush. -
Bake carefully:
Place the bees on a parchment-lined baking sheet or ceramic tile. Bake according to your clay manufacturer’s instructions, typically around 275°F (130°C) for 15-20 minutes. -
Cool down:
Allow the clay to cool completely in the oven or on the counter. The clay is strongest once fully cooled. -
Assemble earrings:
Open the loop on your earring hook using pliers. Slide it onto the eye pin loop extending from your bee, then close the hook loop securely.
Texture It Up
Use a texturing sponge on the white wings before attaching them to give them a feathery, organic look distinct from the smooth body.
Give your new little bee friends a gentle shake to test the hardware and enjoy wearing your buzz-worthy creation


Sunflower Studs
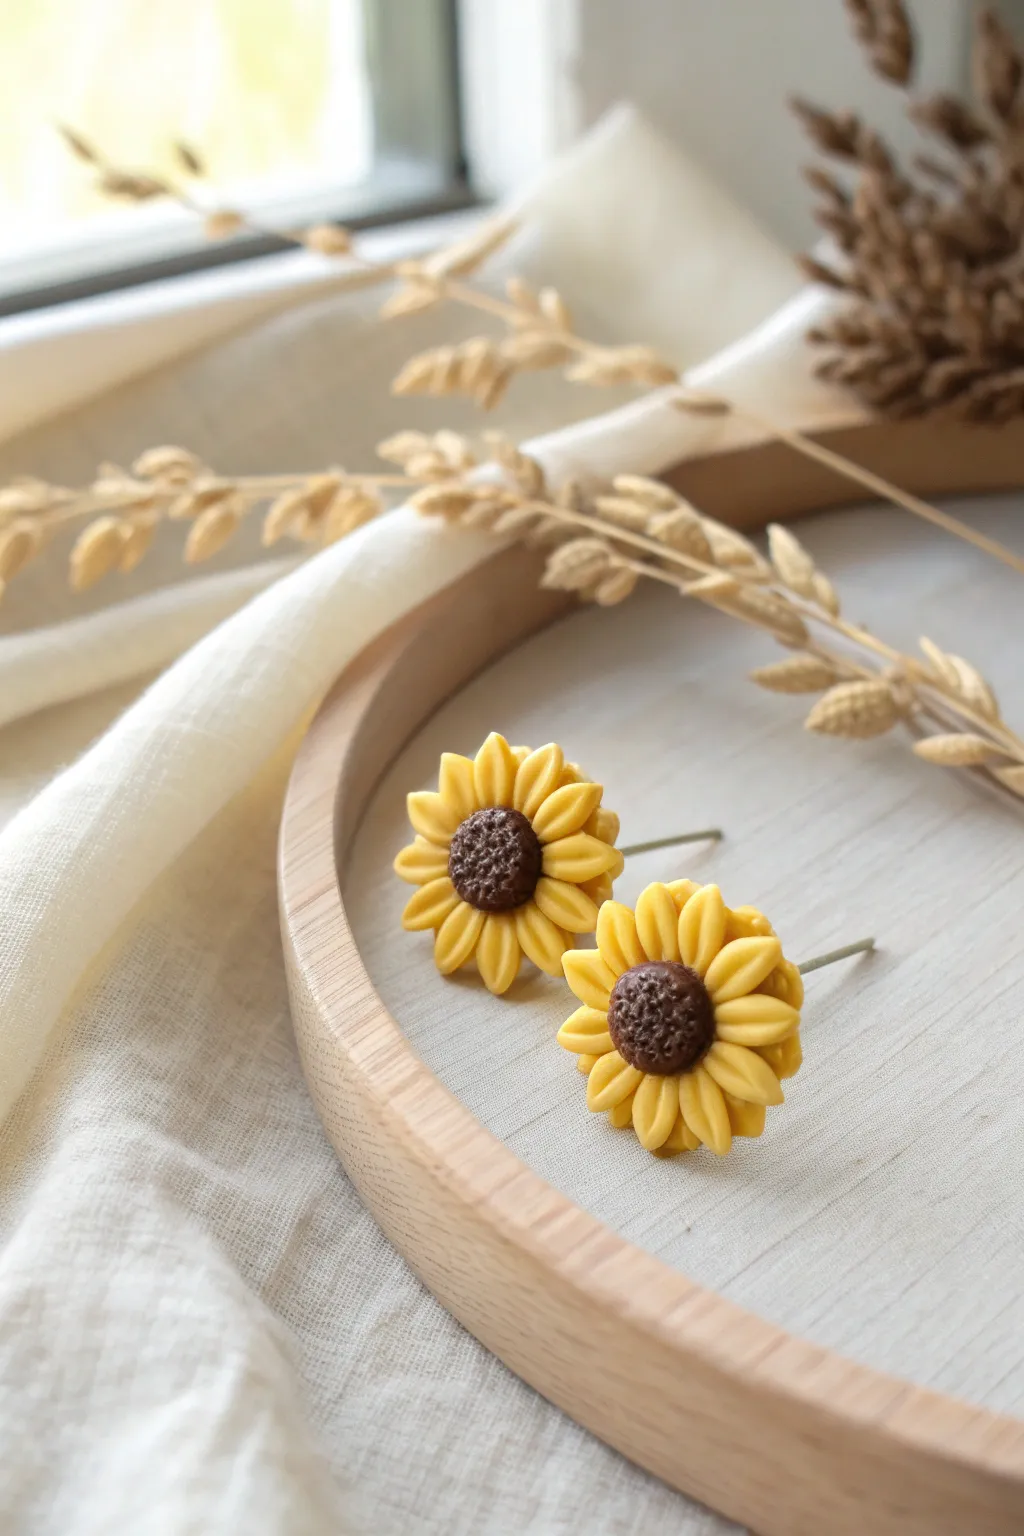
Brighten up any outfit with these delightful miniature sunflower earrings, featuring detailed yellow petals and a textured brown center. These little studs capture the warmth of summer in polymer clay, making them perfect for personalized gifts or your own jewelry collection.
How-To Guide
Materials
- Bright yellow polymer clay
- Dark brown or chocolate polymer clay
- Earring posts (flat pad)
- Strong jewelry glue (E6000 or similar)
- Small needle tool or toothpick
- Small ball stylus
- Small blade or X-Acto knife
- Ceramic tile or glass work surface
- Oven for baking
Step 1: Creating the Flower Centers
-
Prepare the base:
Start by conditioning a small amount of dark brown clay until it is soft and pliable. -
Form the domes:
Roll two tiny portions of the brown clay into spheres, roughly 4-5mm in diameter. Gently press them onto your work surface to flatten the bottom, creating a smooth dome shape. -
Texture the seeds:
Using a needle tool or toothpick, gently stipple the surface of the brown domes. Press lightly and repeatedly to create a realistic, seeded texture across the entire curved surface.
Step 2: Sculpting the Petals
-
Condition yellow clay:
Condition your yellow clay thoroughly. I find that warming it up in your hands a bit longer helps prevent tiny cracks when forming thin petals. -
Roll a coil:
Roll the yellow clay into a thin, even snake or log shape, approximately 3mm thick. -
Cut uniform segments:
Use your blade to slice off small, equal-sized segments from the yellow coil. You will need about 12-14 segments per flower. -
Shape teardrops:
Take one small yellow segment and roll it into a ball, then pinch one end to form a teardrop shape. -
Flatten delicately:
Gently press the teardrop flat with your finger. Do not make it paper-thin; keep a little volume so the petals look plush. -
Add center vein:
Use the needle tool or the back of your knife blade to press a single indentation down the center of the petal, starting from the pointed tip and fading towards the base. -
Repeat the process:
Continue shaping all the required petals for both earrings, trying to keep them consistent in size.
Needle Tool Trick
To get that fuzzy seed look in the center, try poking the clay and then dragging the needle upwards slightly as you pull it out.
Step 3: Assembly & Baking
-
Attach the first layer:
Begin placing the yellow petals around the base of the textured brown center. Press the wide end of the teardrop gently against the side of the brown dome. -
Blend the seams:
Use a small ball stylus or tool to gently push the clay from the petal base into the brown center underneath, ensuring they bond securely. -
Complete the circle:
Work your way around the entire center, placing petals side-by-side until the first row creates a full sunflower shape. -
Add a second tier (Optional):
If you want extra depth, place a few additional petals in the gaps between the first row, slightly underneath to create layers. -
Refine the shape:
Check the flower from all angles. If any petals were squished during assembly, gently reshape them with your needle tool now. -
Prepare for baking:
Bake the flowers according to your clay package instructions (usually around 275°F or 130°C for 15-30 minutes). -
Cool down completely:
Allow the clay pieces to cool fully on the baking tray before touching them to avoid fingerprints on the warm clay.
Add Some Shading
Before baking, brush a tiny amount of orange pastel chalk dust at the base of the yellow petals for a deeper, more realistic glow.
Step 4: Final Touches
-
Prepare the posts:
Apply a small dab of strong jewelry glue to the flat pad of your earring posts. -
Attach the hardware:
Press the glued post firmly onto the flat back of the baked sunflower. -
Let it set:
Allow the glue to cure completely according to the manufacturer’s timeline (often 24 hours) for a durable hold.
Now you have a charming pair of handmade floral earrings ready to wear or gift


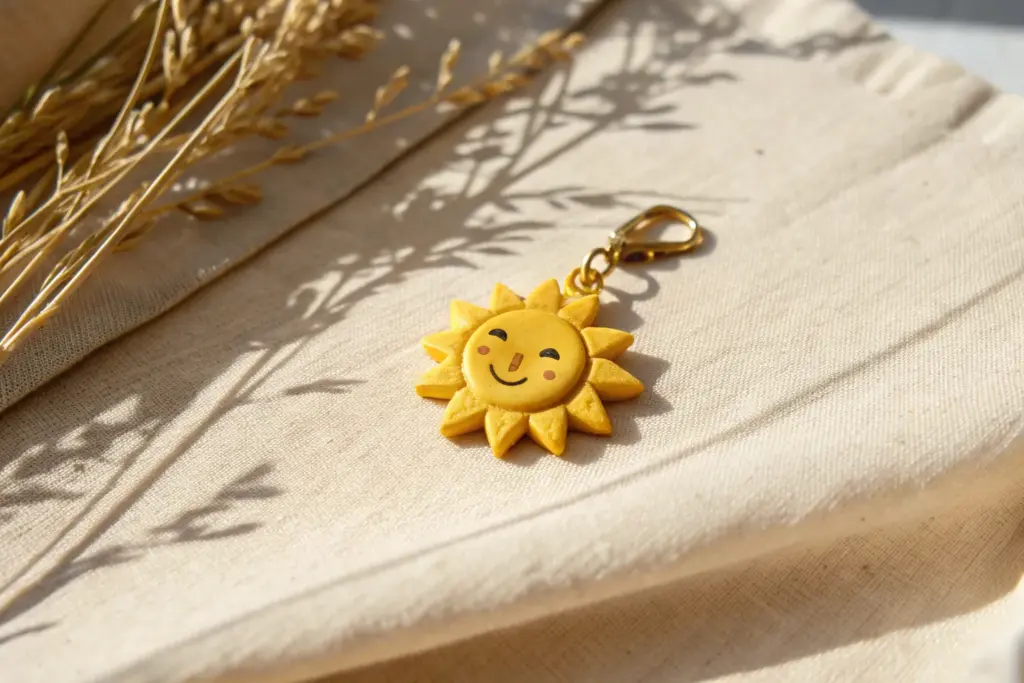
Emoji-Style Face Charms
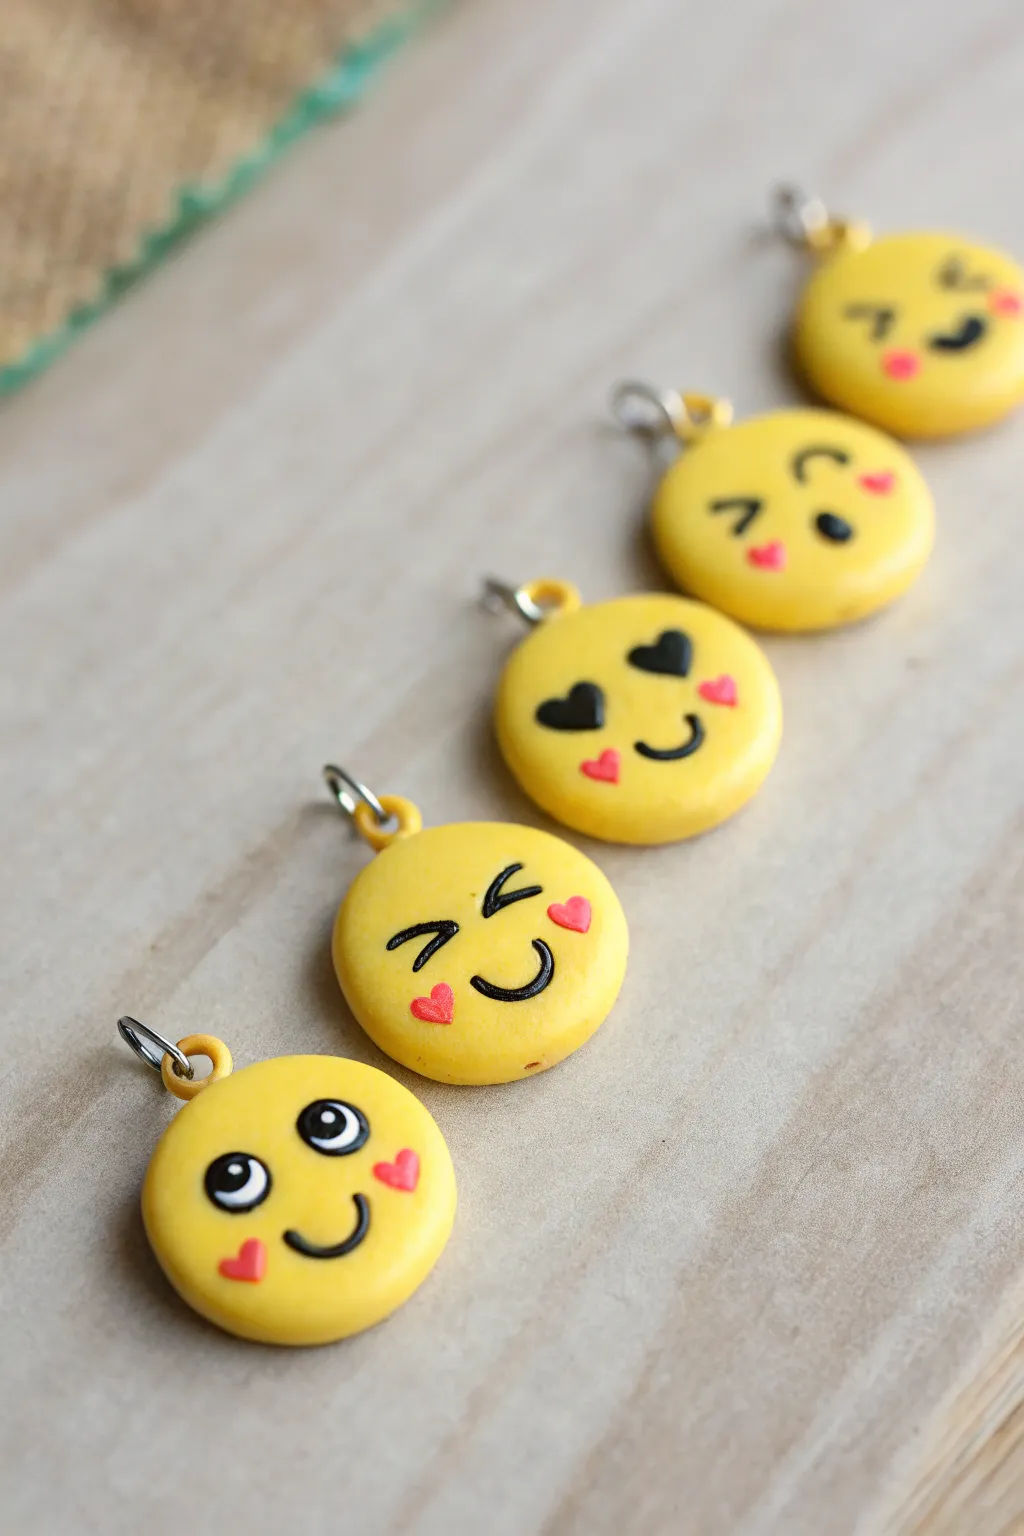
Express yourself with this adorable set of handmade polymer clay charms featuring classic emoji expressions. These bright yellow discs are perfect for keychains, bracelets, or stitch markers and add a playful pop of color to any accessory.
Step-by-Step Guide
Materials
- Yellow polymer clay
- Black polymer clay
- Red or pink polymer clay (for cheeks/hearts)
- White polymer clay (optional, for eyes)
- Small eye pins (silver or gold tone)
- Clay roller or pasta machine
- Small circle cutter (approx. 2-3 cm)
- Detail needle tool or toothpick
- Dotting tools (various sizes)
- Gloss glaze or polyurethane varnish
- Small brush
- Oven for curing
Step 1: Base Preparation
-
Condition the Clay:
Begin by thoroughly kneading your yellow polymer clay until it is soft, pliable, and free of any air bubbles. -
Roll the Sheet:
Roll the yellow clay out into a smooth, even sheet. Aim for a thickness of about 3mm to 4mm—thick enough to hold the eye pin securely but light enough for jewelry. -
Cut the Circles:
Using your small circle cutter, punch out five discs. If the edges are slightly rough, smooth them gently with your fingertip. -
Insert Eye Pins:
Carefully insert a metal eye pin into the top edge of each yellow disc. Push it down into the center of the clay layer so it doesn’t poke out the front or back, and pinch the clay slightly around the pin to secure it.
Smudged Clay?
Black clay stains easily. Use rubbing alcohol on a Q-tip to wipe away any black smudges on the yellow clay before baking.
Step 2: Creating Expressions
-
Make the Clay ‘Ink’:
For the finest black lines, roll tiny snakes of black clay. I find it easiest to roll these threads as thin as sewing thread against a glass surface or acrylic block. -
The Classic Smile:
For the standard smiley, take a small piece of your black thread and curve it into a ‘U’ shape. Press it gently onto the lower half of the first yellow disc. -
Adding Eyes:
Roll two tiny black balls for eyes, flatten them slightly, and press them onto the clay above the smile. For the ‘winking’ face, use a small piece of black thread shaped into a ‘<' symbol for one eye. -
Heart Eyes Variation:
For the love-struck emoji, create two larger flattened droplets of black clay (or simple triangles) for the eyes. Shape a smiling mouth underneath using your thin black clay thread. -
Intricate Eyes:
For the starry-eyed or wide-eyed faces, you can add a tiny flattened disc of white clay first, then layer a slightly smaller black disc on top. Add a microscopic dot of white inside the black pupil for a ‘sparkle’ effect. -
Adding Cheeks and Hearts:
Take tiny amounts of pink or red clay. Roll them into minuscule balls for cheeks or shape them into tiny triangles for hearts. Place these near the corners of the mouths or winking eyes as shown in the reference. -
Secure the Details:
Once all facial features are placed, use a flat tool or your finger to very gently press them down so they bond with the yellow base without smashing the design.
Glitter Upgrade
Mix a tiny pinch of gold mica powder into your yellow clay before rolling it out for a subtle, shimmery finish.
Step 3: Finishing Touches
-
Bake the Charms:
Arrange your charms on a parchment-lined baking sheet or ceramic tile. Bake according to the manufacturer’s instructions for your specific brand of clay (usually around 275°F/135°C for 15-30 minutes). -
Cool Down:
Allow the charms to cool completely in the oven with the door cracked, or remove them and let them sit for at least an hour. The clay hardens fully as it cools. -
Glaze Application:
Dip a soft brush into gloss glaze or polyurethane varnish. Apply a thin, even coat over the front and sides of each charm to seal the features and give them a professional plastic shine. -
Dry and Assemble:
Let the glaze dry completely according to the bottle instructions before attaching jump rings or phone straps.
String these cheerful charms onto a bracelet or zipper pull to keep a smile with you all day long.

What Really Happens Inside the Kiln
Learn how time and temperature work together inside the kiln to transform clay into durable ceramic.
Pineapple Texture Keychain
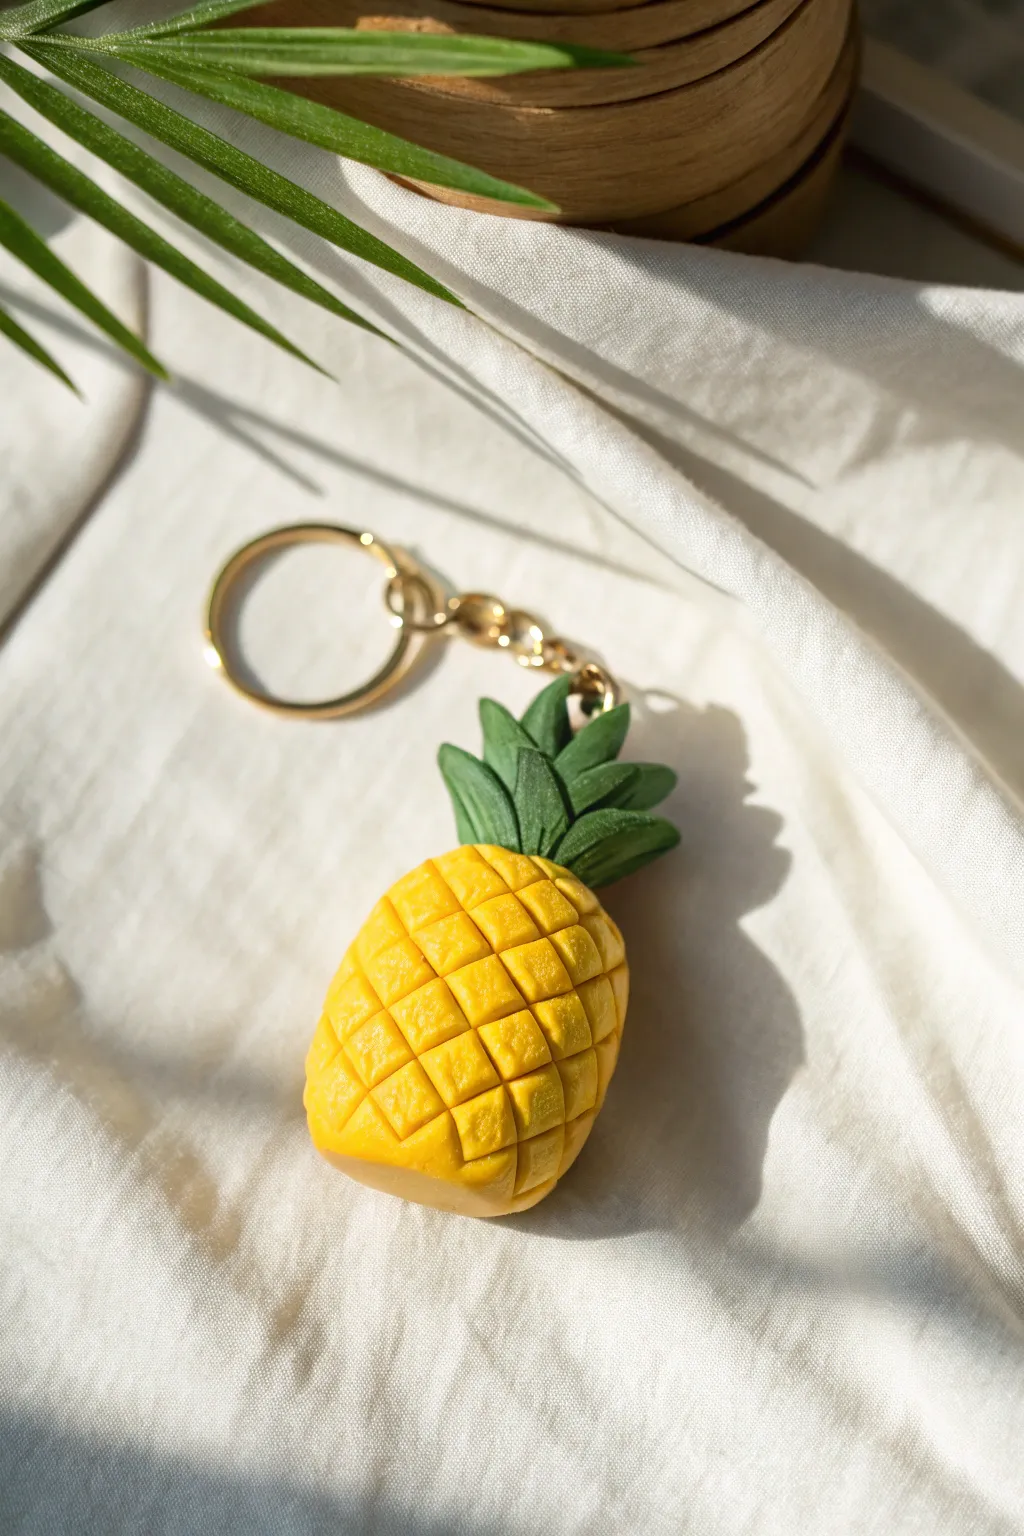
Bring a splash of summer to your keys or bag with this adorable pineapple keychain made from polymer clay. This project features a satisfyingly geometric texture and a lush green crown, perfectly capturing the fruit’s playful vibe in a durable little accessory.
Step-by-Step
Materials
- Yellow polymer clay (sunny or lemon yellow)
- Green polymer clay (leaf or forest green)
- Translucent liquid clay or Bake & Bond
- Gold keychain hardware (ring and chain)
- Eye pin (gold finish preferred)
- Needle tool or toothpick
- Blade or X-Acto knife
- Acrylic roller
- Sandpaper (optional)
- Gloss glaze (optional)
Step 1: Sculpting the Base
-
Prepare the yellow clay:
Begin by conditioning your yellow polymer clay until it is soft and pliable. Use your hands to warm it up, rolling and kneading it to remove any air bubbles. -
Form the body:
Roll the yellow clay into a smooth ball about the size of a large walnut. Then, gently roll it between your palms while applying slightly more pressure to the top to create a rounded oval or egg shape. -
Flatten the base:
To give the pineapple a slightly geometric look and ensure it’s not too round, gently press the bottom against your work surface to create a flat base. I sometimes tap the sides lightly to square off the shape just a tiny bit.
Needle Tool Trick
When separating the diamond segments, rock the needle tool slightly back and forth. This rounds the edges of each ‘eye’ rather than just slicing it.
Step 2: Creating the Texture
-
Score diagonal lines:
Using the back of your blade or a needle tool, gently press diagonal lines across the entire surface of the yellow body. Space them about 3-4mm apart, starting from top right to bottom left. -
Cross-hatch pattern:
Repeat the previous step, but this time angle the lines from top left to bottom right. This will create a grid of small diamond shapes all over the pineapple. -
Deepen the cuts:
Go back over your diamond grid and press a bit deeper to separate the individual segments, making them look like the ‘eyes’ of the fruit. -
Add texture detail:
Take your needle tool and make a tiny poke or small indentation in the center of each diamond. This mimics the prickly texture of real pineapple skin.
Step 3: Forming the Crown
-
Condition the green clay:
Condition your green clay until soft. Pinch off several small pieces, varying slightly in size. -
Shape the leaves:
Roll each small green piece into a teardrop shape, then flatten them between your fingers to create pointed leaves. -
Detail the leaves:
Use your needle tool to draw a central vein down the middle of each leaf for added realism. -
Assemble the crown:
Arrange the leaves in a cluster. Start with 3 or 4 larger leaves as the base, pinching them together at the bottom. Then, layer smaller leaves inside this circle to build height and volume. -
Trim the base:
Using your blade, slice off the very bottom of the leaf cluster to create a flat surface for attachment.
Make It Sweet
Before baking, lightly dust the edges of the yellow diamonds with soft brown pastel chalk using a dry brush to give the fruit a ‘ripe’ and roasted look.
Step 4: Assembly and Baking
-
Connect the parts:
Apply a small drop of liquid clay or Bake & Bond to the top of the yellow pineapple body. Press the flat bottom of the green leaf cluster firmly onto the center. -
Insert the hardware:
Take your gold eye pin and trim it if it’s too long. Push it down through the center of the leaves and into the yellow body. Ensure the loop at the top sits snugly against the leaves. -
Bake:
Place your pineapple on a tile or parchment-lined baking sheet. Bake according to your clay package instructions (usually 275°F/135°C for 15-30 minutes per 1/4 inch thickness). -
Cool and finish:
Let the piece cool completely before handling. Once cool, attach your gold keychain ring and chain to the eye pin loop using pliers.
Now you have a refreshing tropical accessory ready to brighten up your daily routine
Honeycomb Pendant Tiles
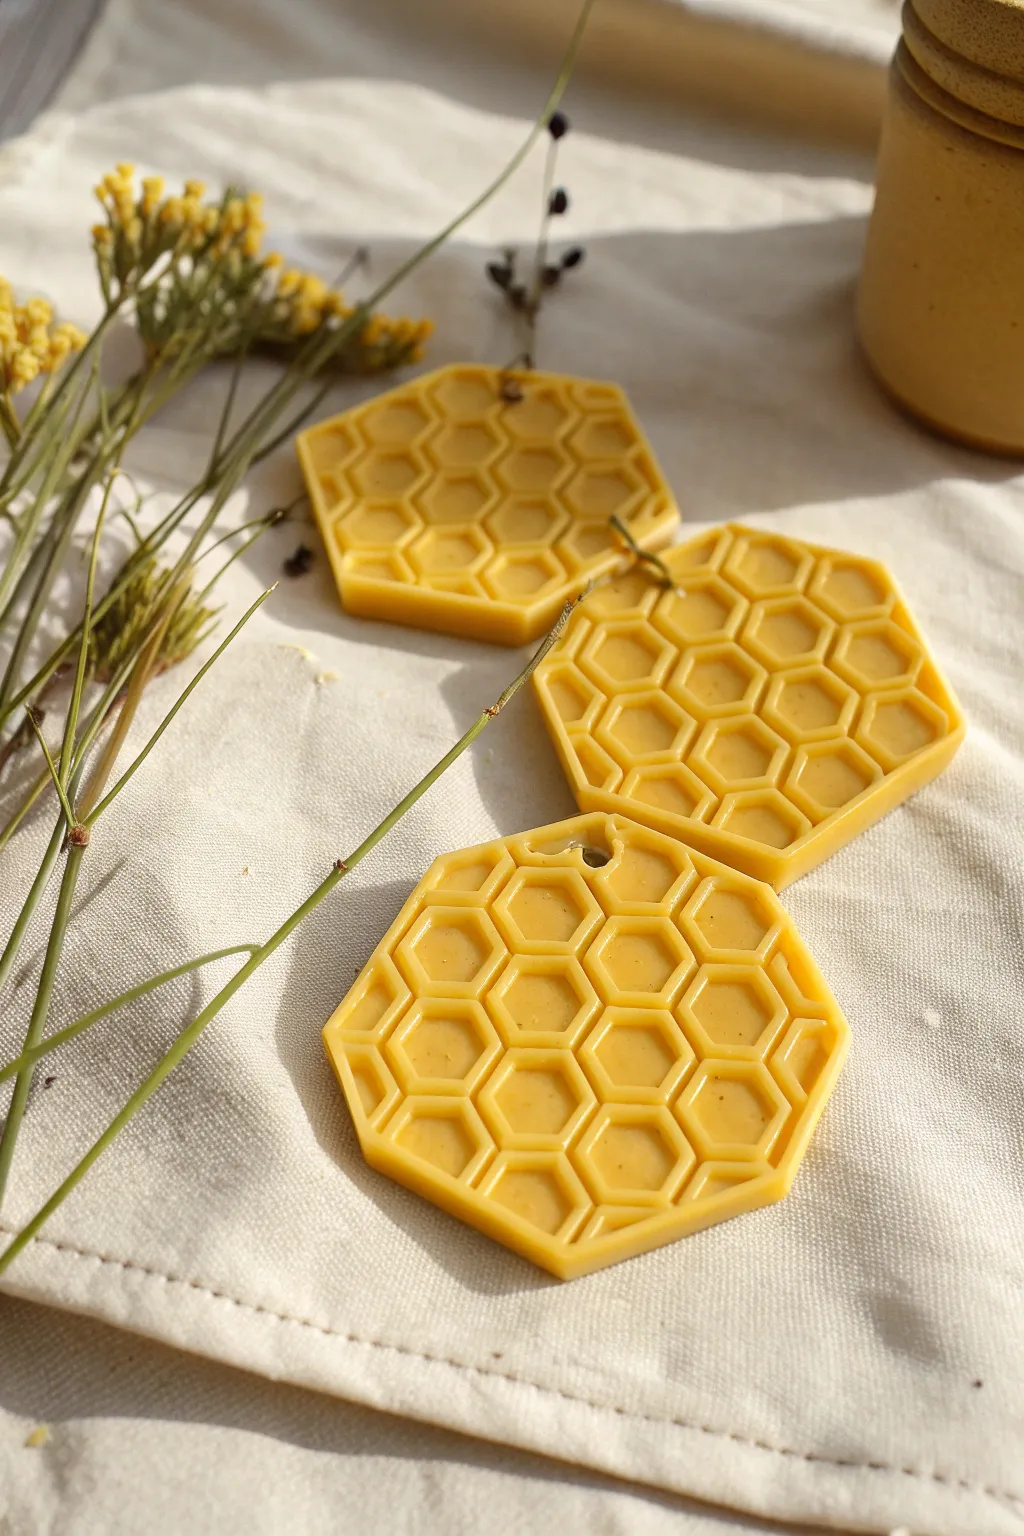
Capture the sweetness of summer with these delightful honeycomb pendant tiles. Their rich, golden-yellow hue and realistic geometric texture make them a charming addition to necklaces or decorative mobiles.
Step-by-Step Tutorial
Materials
- Yellow polymer clay (e.g., Soufflé or Premo in Cadmium Yellow)
- Translucent polymer clay (optional, for depth)
- Small amount of brown or orange clay (for tinting)
- Honeycomb pattern texture sheet or individual hexagon cutter (small)
- Large hexagon cutter (for the outer shape)
- Acrylic roller or pasta machine
- Cornstarch or water (release agent)
- Needle tool or toothpick
- Ceramic tile or baking sheet
- Gloss glaze or UV resin (optional)
Step 1: Mixing the Perfect Honey Shade
-
Condition the Clay:
Start by thoroughly conditioning your yellow polymer clay until it is soft and pliable. Warm clay is essential for getting a crisp impression later. -
Tint for Realism:
To achieve that warm, organic beeswax look rather than a flat primary yellow, mix in a very small pinch of orange or brown clay. I like to add a bit of translucent clay here as well—it gives the final piece a wax-like quality that light can penetrate slightly. -
Sheet the Clay:
Roll your conditioned clay into a smooth, even sheet about 3mm to 4mm thick. You want it thick enough to take a deep impression without becoming flimsy.
Step 2: Creating the Texture
-
Prepare the Release Agent:
Lightly dust the surface of your clay or your texture tool with cornstarch. This prevents the clay from sticking inside the small hexagonal grooves. -
Impress the Pattern:
If using a texture sheet, press it firmly and evenly into the clay sheet. If you are using a single small hexagon cutter to build the pattern manually, press it repeatedly in a grid formation, ensuring the walls between cells are thin and uniform. -
Check the Depth:
Lift the tool carefully. The impression should be deep enough to create significant shadows, simulating real honeycomb cells.
Sticky Situation?
If your texture sheet keeps pulling up the clay, try spritzing the clay surface lightly with water instead of cornstarch. It acts as a great resist and evaporates during baking.
Step 3: Cutting and Refining
-
Cut the Outer Shape:
Position your large hexagon cutter over the textured clay. Try to align the edges so the internal honeycomb pattern looks symmetrical within the frame. -
Press and Cut:
Press down firmly to cut out the pendant shape. Give the cutter a slight wiggle before lifting to separate the shape cleanly from the excess clay. -
Smooth the Edges:
Gently run your finger around the cut edges to smooth out any sharpness or burrs left by the cutter. -
Add a Hole:
Using a needle tool or a small straw, pierce a hole near one of the corners or edges if you plan to hang this as a pendant or ornament.
Bee Creative
Make tiny bees out of black and yellow clay scraps and attach them to the surface before baking, or glue on small metal bee charms afterward for an adorable 3D detail.
Step 4: Baking and Finishing
-
Bake:
Place your tiles on a ceramic tile or baking sheet lined with parchment paper. Bake according to your specific brand of clay’s instructions (usually 275°F/135°C for 30-45 minutes). -
Cool Down:
Allow the pieces to cool completely in the oven or on a wire rack before handling them. -
Wash:
If you used cornstarch earlier, gently wash the cured pieces with cool water and a soft brush to remove any white residue. -
Optional Glaze:
For a ‘wet honey’ look, you can apply a thin layer of gloss glaze or UV resin, focusing on pooling it slightly inside the cells.
String your new honey-hued creations onto a cord or chain to enjoy a touch of warmth year-round


The Complete Guide to Pottery Troubleshooting
Uncover the most common ceramic mistakes—from cracking clay to failed glazes—and learn how to fix them fast.
Drippy Honey Pot Charm
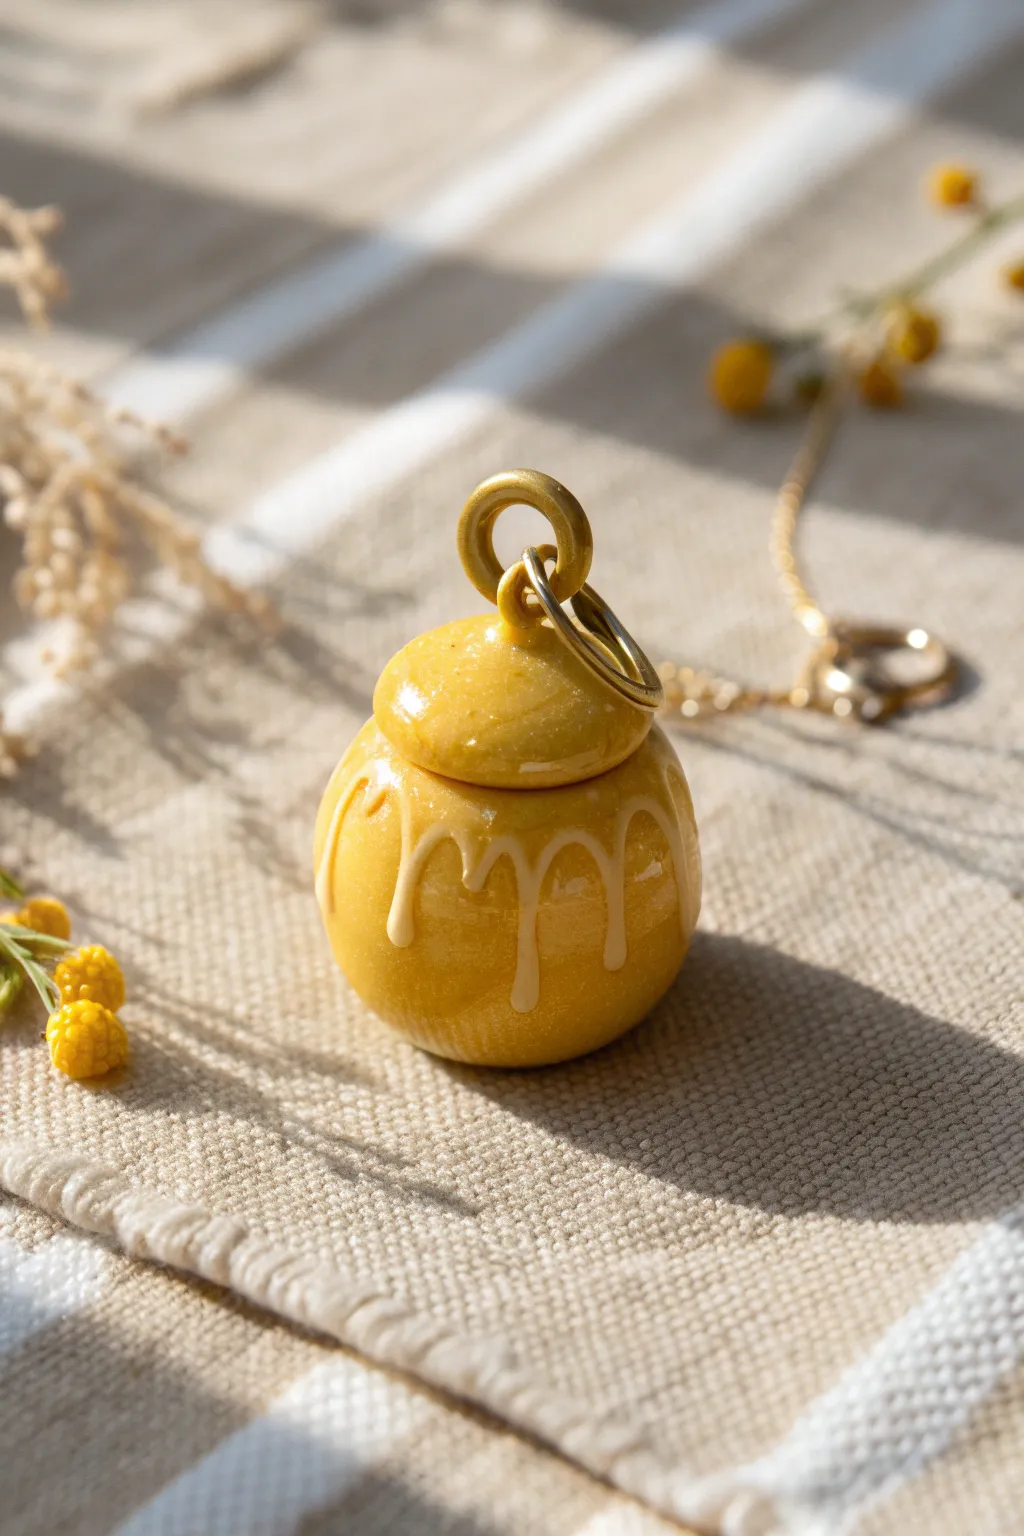
This adorable little charm captures the sweetness of honey in a warm, glossy polymer clay design. With its realistic dripping effect and shiny finish, it makes for a perfect necklace pendant or a cute addition to a charm bracelet.
Step-by-Step Guide
Materials
- Yellow polymer clay (mustard or golden yellow)
- Translucent liquid polymer clay
- Yellow alcohol ink or chalk pastel
- Gold-colored eye screw pin
- Large gold jump ring
- Glossy polyurethane varnish or UV resin
- Needle tool or toothpick
- Small dotting tool
- Clay roller or pasta machine
- Ceramic tile or baking sheet
- Small brush for glazing
Step 1: Shaping the Pot Base
-
Condition the Clay:
Begin by conditioning your yellow polymer clay until it is soft and pliable. If the yellow is too bright, mix in a tiny pinch of brown or orange to achieve a warm, honey-like mustard tone. -
Form the Main Body:
Roll a medium-sized ball of clay, roughly 1 inch in diameter, to form the base of the pot. Gently flatten the bottom against your work surface so it stands upright on its own without tipping. -
Create the Neck:
Using your thumb and forefinger, gently pinch the sphere about three-quarters of the way up to create a slight indentation. This separates the round belly of the pot from the neck area. -
Smooth the Shape:
Roll the indented area gently between your fingers to smooth out any fingerprints, ensuring the transition from the belly to the neck is curved and natural, not sharp. -
Make the Lid:
Take a smaller piece of yellow clay and roll it into a ball, then flatten it slightly into a thick disc. This should be just slightly wider than the neck opening you created. -
Attach the Lid:
Press the lid firmly onto the top of the pot. Use your finger to smooth the seam where the lid meets the neck just a little, though a distinct line is okay as it mimics a separate lid. -
Add the Handle Loop:
Roll a very thin snake of clay and form a small circle. Attach this vertically to the center of the lid to look like a ceramic handle. Alternatively, if you plan to use this strictly as a charm, you can skip this clay loop and rely on metal findings later. -
Insert the Hardware:
Take your eye screw pin and carefully twist it into the center of the lid. I sometimes dip the tip in a bit of liquid clay before inserting it to ensure it bonds permanently during baking.
Step 2: Adding the Drip Detail
-
Prepare the ‘Honey’:
In a small container or on a palette, mix a few drops of translucent liquid polymer clay with a scraping of yellow chalk pastel or a drop of yellow alcohol ink. You want a color that is slightly lighter and clearer than your pot base. -
Apply the Drips:
Using a needle tool or toothpick, pick up a small amount of the liquid mixture. Carefully dab it onto the ‘shoulder’ of the pot, right where the wider belly begins. -
Drag the Drips Down:
Gently drag the liquid clay downwards in uneven intervals to simulate gravity pulling heavy honey down the sides. Stop the lines at different lengths for realism. -
Connect the Drips:
Use the tool to connect the tops of the drips horizontally around the circumference of the pot, creating a continuous scalloped rim of oozing honey. -
Refine the Ends:
Add a tiny extra dot of the mixture to the bottom of each drip line. This creates a rounded, bulbous end that makes the fluid look thick and heavy.
Sticky Situation?
If your liquid clay honey is too runny and dripping too far down, let the mixture sit open for 20 minutes before applying. This allows it to thicken up slightly for better control.
Step 3: Baking and Finishing
-
Bake the Piece:
Place your charm on a ceramic tile and bake according to your clay manufacturer’s instructions. Usually, this is around 275°F (130°C) for 15-30 minutes depending on thickness. -
Cool Completely:
Allow the charm to cool completely inside the oven or on the counter. Do not attempt to glaze it while it is hot, or the finish may bubble. -
Apply Glaze:
Brush a coat of glossy polyurethane varnish or UV resin over the entire piece. The high gloss is crucial here—it makes the ‘honey’ look wet and sticky and gives the pot a glazed ceramic appearance. -
Cure or Dry Glaze:
Let the varnish dry fully or cure the UV resin under a lamp. Ensure no dust settles on the sticky surface during this time. -
Assemble the Jewelry:
Using pliers, open a large gold jump ring. Loop it through the eye screw pin (and the clay loop if you made one) and close the ring securely. Your charm is now ready to hang.
Bee-utiful Addition
Make tiny balls of black and yellow clay to form a miniature bumblebee. Attach it to the side of the pot before baking for an extra touch of whimsy and storytelling.
Now you have a sweet, glossy charm that looks good enough to eat—just remember not to
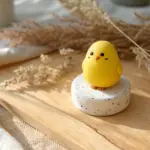
Tiny Chick Figurines
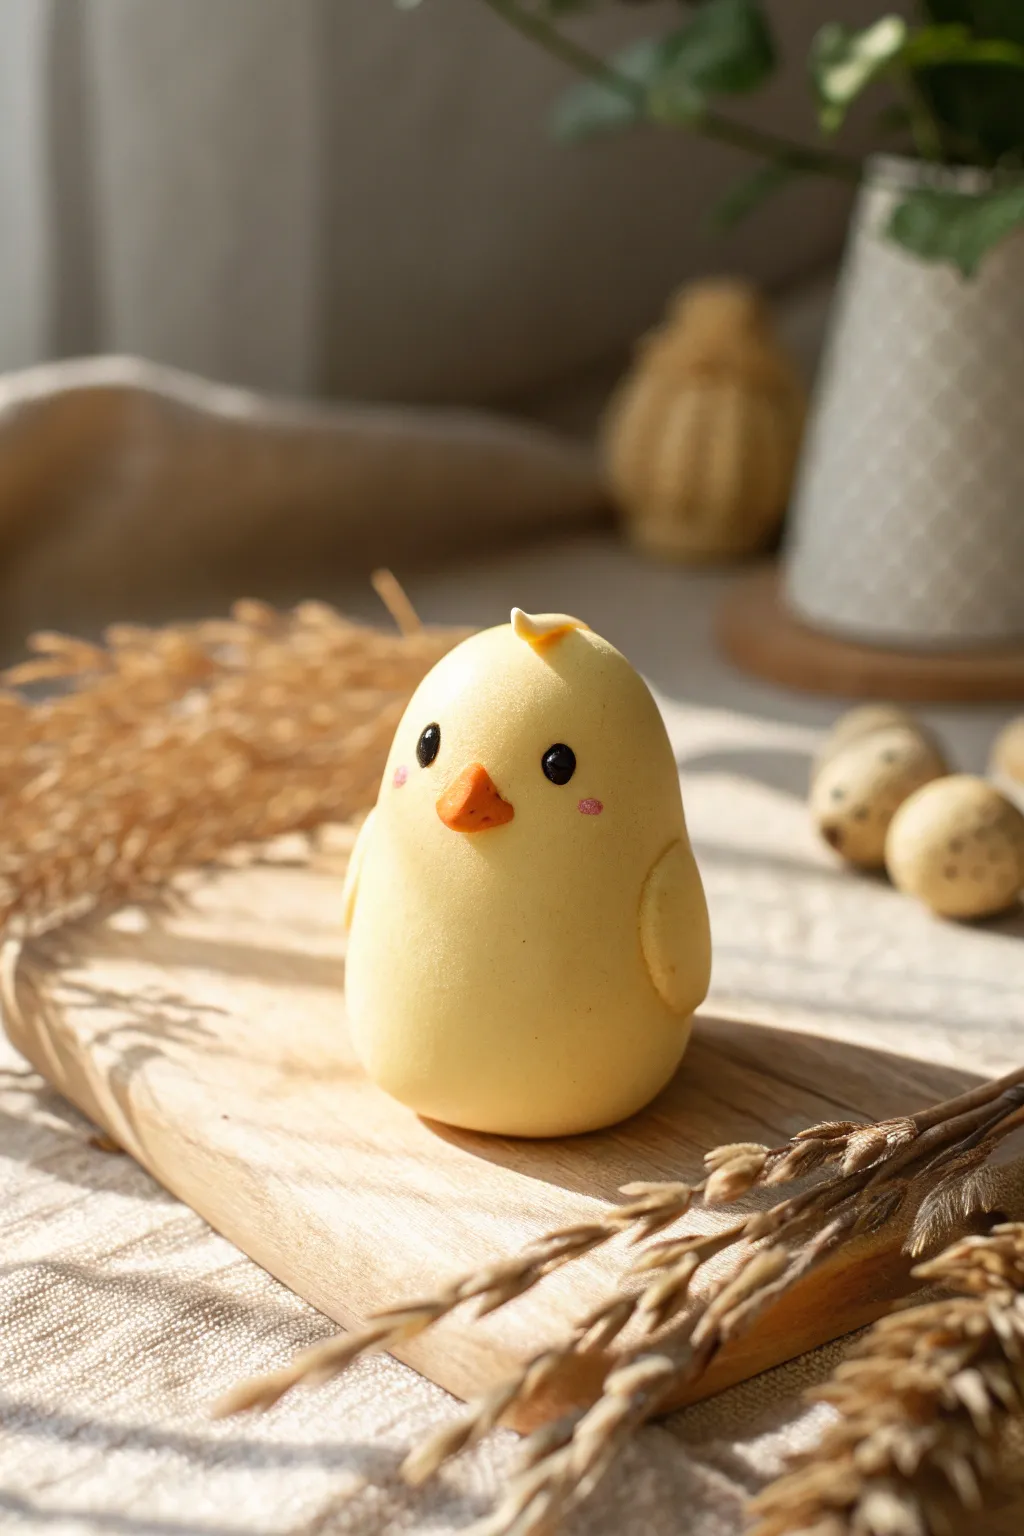
Brighten up your desk or shelf with this wonderfully smooth and adorable yellow chick figurine. Its simple egg-shaped body and dainty features make it a perfect beginner-friendly project that radiates charm.
Step-by-Step Tutorial
Materials
- Soft yellow polymer clay
- Orange polymer clay
- Black polymer clay
- Pink soft pastel chalk (for blush)
- Small paintbrush or cotton swab
- Sculpting tools (needle tool, ball tool)
- Oven for baking
- Smooth work surface (ceramic tile or glass)
- Wet wipes (to keep colors clean)
Step 1: Shaping the Base
-
Condition the clay:
Start by thoroughly kneading a golf-ball-sized amount of yellow clay until it is soft and pliable. This conditioning step is crucial to prevent cracks later on. -
Roll a smooth sphere:
Roll the yellow clay between your palms to create a perfectly smooth sphere continuously checking for lint or dust. -
Form the egg shape:
Gently taper the top of the sphere slightly by rolling it back and forth with a bit more pressure on the upper half, forming a chubby egg shape with a wide base so it stands securely. -
Refine the surface:
Inspect the body for any fingerprints. I like to lightly buff the surface with a fingertip dipped in a tiny bit of baby oil or cornstarch to smooth them away.
Clean Hands, Clean Clay
Yellow clay shows every speck of dust! Clean your hands with a wet wipe before starting, and keep a scrap piece of ‘waste clay’ nearby to roll in your hands and pick up lint.
Step 2: Adding Wings and Tail
-
Create wing portions:
Take two small pea-sized pieces of yellow clay and roll them into balls, then flatten them into teardrop shapes. -
Attach the wings:
Press one teardrop onto each side of the body, positioning them slightly lower than the midline. Blend the top edge of the wing into the body seamlessly while leaving the bottom curve distinct. -
Form the tuft:
Pinch off a tiny speck of yellow clay and shape it into a small, curved comma or tuft. -
Attach the head tuft:
Place this little tuft right on the very top center of the head, blending the base so it looks like a natural feather sticking up.
Make a Nest Scene
Don’t stop at one! Make three chicks and create a small nest using brown clay extruded through a garlic press to look like straw or twigs.
Step 3: Face Details
-
Mark eye placement:
Use a needle tool or small ball tool to gently mark two symmetrical indents where the eyes will go. Keeping them relatively wide apart adds to the cuteness. -
Shape the beak:
Roll a tiny amount of orange clay into a small cone. Flatten the underside slightly so it isn’t round. -
Attach the beak:
Press the orange beak into the center of the face, slightly below the eye line. Use a needle tool to gently texture it or define the edges if needed. -
Create the eyes:
Roll two extremely small balls of black clay. They should be identical in size. -
Place the eyes:
Carefully insert the black balls into the indents you made earlier. Press them in gently so they are secure but still slightly rounded and protruding. -
Prepare the blush:
Scrape a little bit of pink soft pastel chalk into a fine powder on a piece of paper. -
Apply rosy cheeks:
Dip a small dry paintbrush or cotton swab into the pink powder. Dab off the excess, then gently brush small pink circles on the cheeks just below the eyes.
Step 4: Baking and Finishing
-
Final inspection:
Do one last check for dust particles or lint, especially on the yellow clay. Carefully pick them off with a needle tool if found. -
Bake the figurine:
Place your chick on a baking sheet or ceramic tile. Bake according to your clay manufacturer’s instructions (usually around 275°F/130°C for 15-30 minutes depending on thickness). -
Cool down:
Turn off the oven and let the figurine cool down completely inside the oven or on a cooling rack before handling to ensure durability.
Now you have a sweet little companion to keep you company on your desk

TRACK YOUR CERAMIC JOURNEY
Capture glaze tests, firing details, and creative progress—all in one simple printable. Make your projects easier to repeat and improve.
Sweet Duckling Magnet

Brighten up your fridge or magnetic board with this adorable, chubby duckling sculpted from yellow polymer clay. Its simple, rounded shapes and sweet expression make it a perfect beginner project that radiates cheerful charm.
Detailed Instructions
Materials
- Yellow polymer clay (primary color)
- Orange polymer clay (beak)
- Black polymer clay (eyes)
- Small round neodymium magnet
- Sculpting tool with a curved edge
- Pin or needle tool
- Smooth work surface (glass or tile)
- Oven for baking
Step 1: Shaping the Head
-
Condition the clay:
Start by kneading a chunk of yellow polymer clay until it is soft, warm, and pliable. This conditioning step ensures your duck won’t crack later. -
Roll the head sphere:
Take a portion of the yellow clay about the size of a large marble and roll it between your palms into a perfect, smooth sphere. -
Create the beak:
Pinch off a tiny amount of orange clay. Roll it into a small cone shape, then flatten it slightly to create a triangular beak. -
Attach the beak:
Press the flattened side of the orange triangle onto the center-front of the yellow head sphere. Smooth the seam gently with your finger or a tool so it stays put. -
Form the eye sockets:
Using a small ball tool or the rounded end of a paintbrush, make two tiny indentations on either side of the beak where the eyes will go. -
Insert the eyes:
Roll two minuscule balls of black clay. carefully place them into the indentations you made and press gently to secure them. Using a tool is easier than fingers here.
Step 2: Sculpting the Body
-
Roll the body shape:
Take a larger portion of yellow clay—about double the size of the head—and roll it into a smooth ball. -
Taper the tail:
While rolling the ball on your work surface, apply slightly more pressure to one side to create a teardrop shape. Pinch the pointy end upwards slightly to form the perky duck tail. -
Flatten the base:
Gently tap the bottom of the body on your work surface to create a flat base so the duck sits upright without rolling over. -
Connect head and body:
Place the head on the wider, rounded end of the body. I like to insert a small piece of wire or a toothpick cut to size between the two pieces for extra structural strength. -
Blend the neck seam:
If you want a seamless look, use a sculpting tool to drag a little clay across the neck join, but for this stylized look, simply pressing them firmly together works well.
Dust Bunny Alert
Yellow clay shows every speck of dust! Keep a piece of scrap white clay nearby to roll in your hands periodically—it pulls off lint and dirt before you touch your project.
Step 3: Adding Details & Magnet
-
Make the wings:
Roll two small balls of yellow clay, then flatten them into oval patties roughly the size of a dime. -
Shape the feathers:
Press one side of the oval to make it slightly pointed (teardrop shape). Use your curved sculpting tool to impress two or three lines into the clay to suggest wing feathers. -
Attach the wings:
Press one wing onto each side of the body, positioning them so the pointed ends face backward toward the tail. -
Prepare the magnet:
Flip the duck over gently. Press your round magnet strictly into the flat bottom of the duck until it is flush with the clay surface. -
Secure the magnet:
If the magnet doesn’t stick well, you can bake the duck first with the indentation, glue the magnet in afterwards, or bury the magnet slightly under a thin layer of clay. -
Final smooth:
Check the entire figure for fingerprints. Lightly brush over them with a drop of baby oil or water to smooth them out before baking. -
Bake:
Bake your duckling according to the manufacturer’s instructions on your pack of clay, usually at around 275°F (130°C) for 15–20 minutes per quarter inch of thickness.
Glossy & Wet Look
After baking and cooling, coat just the eyes and the orange beak with a high-gloss polyurethane varnish. It makes the duckling look bright, alert, and shiny.
Once cooled, your little yellow friend is ready to hold up your grocery lists in style
Daisy Dangle Earrings

Brighten up any outfit with these delightful daisy dangle earrings featuring crisp white petals and cheery yellow centers. The gold hardware adds a touch of simple elegance, making them perfect for everyday wear or a spring picnic.
How-To Guide
Materials
- White polymer clay
- Yellow polymer clay (sunflower or bright lemon shade)
- Clay roller or pasta machine
- Small teardrop cutter (approx. 1 cm) or a craft knife
- Small circle cutter (approx. 5mm) for the center
- Pointed clay tool or toothpick
- Gold-tone jump rings (4mm and 6mm)
- Gold-tone earring hooks
- Small eye pins (gold)
- Jewelry pliers (round nose and flat nose)
- Liquid polymer clay (optional, for bonding)
- Oven for baking
Step 1: Sculpting the Daisies
-
Condition the white clay:
Start by thoroughly conditioning your white polymer clay until it is soft and pliable. This prevents cracks later. Roll it out into a sheet about 3mm thick. -
Cut the petals:
Using your small teardrop cutter, punch out sixteen petals total (eight for each earring). If you don’t have a cutter, shape small balls of clay into teardrops by hand and flatten them gently. -
Refine petal shape:
Take each white petal and use your fingers to smooth any rough edges. You want them to look soft and organic, not perfectly geometric. -
Create the base:
Roll a very small, flat disk of white clay to serve as the hidden backing for your flower. This gives you a surface to attach the petals to. -
Assemble the flower:
Arrange eight white petals in a circle on top of your base disk. Press the pointed ends of the teardrops together in the center so they fan out evenly. -
Add texture:
Using a toothpick or a dull blade helper, gently press a single line down the center of each white petal to give it dimension and a realistic floral look. -
Make the centers:
Condition your yellow clay. Roll it into a ball and flatten it slightly to create a dome shape, approximately 5-6mm in diameter. You’ll need two of these. -
Texture the centers:
Before attaching, tap the surface of the yellow domes repeatedly with a toothbrush or stiff brush to create a fuzzy, pollen-like texture. -
Attach the centers:
Place a tiny drop of liquid clay in the middle of your petal arrangement, then press the textured yellow dome firmly into the center. Repeat for the second daisy.
Step 2: Baking & Assembly
-
Insert eye pins:
Trim two gold eye pins so they are just short enough not to poke through the bottom of the flower. Insert the straight end into the top of each daisy, right between two petals, pushing into the clay center. -
Bake the pieces:
Place your daisies on a ceramic tile or baking sheet lined with parchment paper. Bake according to your specific brand of clay’s instructions—usually around 275°F (130°C) for 15-30 minutes. -
Cool down:
Allow the clay pieces to cool completely inside the oven or on a wire rack. Don’t rush this, as warm clay is fragile. -
Open the jump rings:
Using two pairs of pliers, twist your larger jump rings open sideways (never pull them apart outward) to preserve their circle shape. -
Connect hardware:
Thread an open jump ring through the loop of the eye pin embedded in your daisy. Close the jump ring securely using your pliers. -
Add dimension:
I like to add a second, smaller jump ring to the first one before attaching the hook; this extra link allows the earring to dangle and sway more freely. -
Attach the hook:
Finally, attach the earring hook to the top jump ring and close the loop. Ensure all metal connections are tight.
Clean Clay Tip
White clay picks up dust easily. Keep baby wipes nearby to clean your hands and tools before handling the white clay, or roll a piece of scrap clay in your hands first to pick up debris.
Level Up: Glossy Finish
After baking, apply a layer of UV resin or glossy polyurethane varnish just to the yellow center. This makes the ‘pollen’ pop and adds a professional, high-end shine to the jewelry.
Enjoy wearing your cheerful new accessories and bringing a bit of sunshine wherever you go
Yellow Star Charms
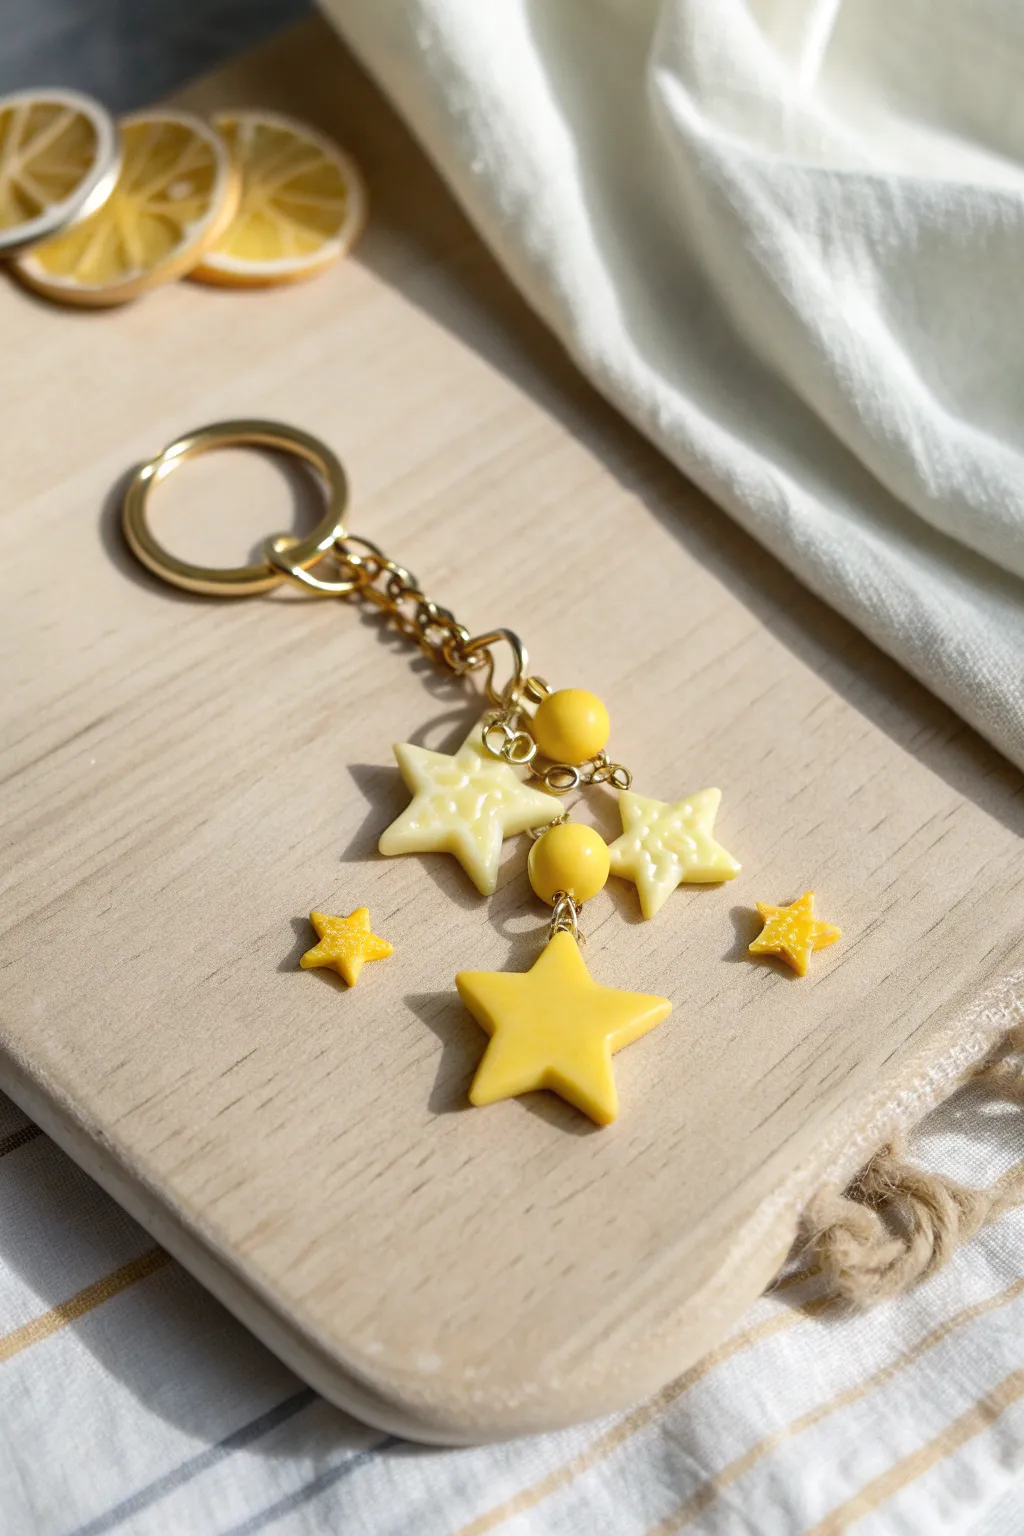
Brighten up your keys with this cheerful cluster of lemon-yellow polymer clay stars, featuring a delightful mix of smooth, textured, and glittery finishes. This project combines simple cookie-cutter shapes with elegant jewelry assembly for a professional-looking accessory that captures the warmth of sunshine.
Step-by-Step
Materials
- Polymer clay in pale lemon yellow
- Polymer clay in bright sunshine yellow
- Polymer clay in golden yellow (or orange-yellow)
- Small star-shaped clay cutters (3 graduated sizes)
- Patterned texture sheet or stamp (floral or geometric)
- Gold or iridescent glitter
- Two 8mm yellow round beads
- Gold tone keychain ring with chain attached
- Gold tone eye pins (approx. 6-8)
- Gold tone open jump rings (4mm and 6mm)
- Round nose pliers
- Chain nose pliers
- Wire cutters
- Acrylic rolling pin
- Ceramic tile or baking sheet
- Gloss glaze (optional)
Step 1: Creating the Clay Stars
-
Condition the clay:
Start by thoroughly kneading your pale lemon yellow clay in your hands until it is soft and pliable. Roll it out on your work surface to an even thickness of about 1/4 inch (6mm). -
Cut the large pale star:
Using your largest star cutter, press firmly into the pale lemon sheet. Wiggle the cutter slightly to ensure clean edges before lifting it away. -
Make textured stars:
Roll out a second piece of pale lemon clay. Lightly mist a texture sheet with water (as a release agent) and press it firmly onto the clay. Use a medium-sized cutter to cut two textured stars from this patterned area. -
Create the sunshine yellow star:
Condition the bright sunshine yellow clay and roll it out. Cut one medium-sized star. I like to smooth the edges of this one with my finger to give it a soft, puffy look. -
Make the glitter stars:
Mix a pinch of gold glitter into a small amount of golden-yellow clay. Roll this out thinly and cut two very small stars to act as floating accent charms. -
Insert eye pins:
Carefully trim your eye pins to about 1/2 inch in length. Insert the straight end into the top point of each star charm. Gently pinch the clay around the wire to secure it. -
Bake:
Arrange all clay pieces on a ceramic tile or baking sheet lined with parchment paper. Bake according to your brand of polymer clay instructions (usually 275°F/135°C for 15-30 minutes) and let them cool completely.
Step 2: Assembling the Charm Cluster
-
Prepare the beads:
Take two eye pins and slide a yellow round bead onto each one. Using round nose pliers, bend the remaining wire 90 degrees just above the bead. -
Loop the beads:
Trim the excess wire to about 1cm. Grasp the end of the wire with your round nose pliers and roll it back towards the bead to create a neat, closed loop. -
Attach jump rings:
Using two pairs of pliers, twist open your jump rings (never pull them apart). Attach a jump ring to the eye pin loop of every baked star charm. -
Start the chain assembly:
Identify the bottom links of your keychain’s main chain. This is where you will start building the cluster. -
Attach the main star:
Attach the largest pale yellow star and the solid sunshine yellow star to the very bottom link of the chain using their jump rings. -
Add the beaded links:
Attach the looped yellow bead charms to links slightly higher up on the chain. This adds vertical variation and hides the metal chain segments. -
Layer the textured stars:
Connect the two textured pale stars to the chain, placing them so they overlap slightly with the larger stars below. -
Place the tiny accents:
Finally, attach the tiny golden glitter stars near the top of the chain cluster or even directly onto the jump rings of the larger stars for a layered effect. -
Seal (Optional):
If you want extra shine and durability, brush a thin layer of gloss glaze over the stars, paying attention not to clog the texture patterns.
Clean Cuts Pro-Tip
Before cutting your star shapes, place a piece of plastic wrap over the clay. Press the cutter down through the plastic. This creates lovely beveled, rounded edges without needing to sand later.
Level Up: Scent it!
For a true sensory experience, mix a drop of lemon essential oil into the clay before baking, or add a scented felt pad to the keychain assembly for a charm that smells as fresh as it looks.
Clip your new sunny creation onto a bag or set of keys to carry a little light with you everywhere you go
Yellow Terrazzo Slab Earrings
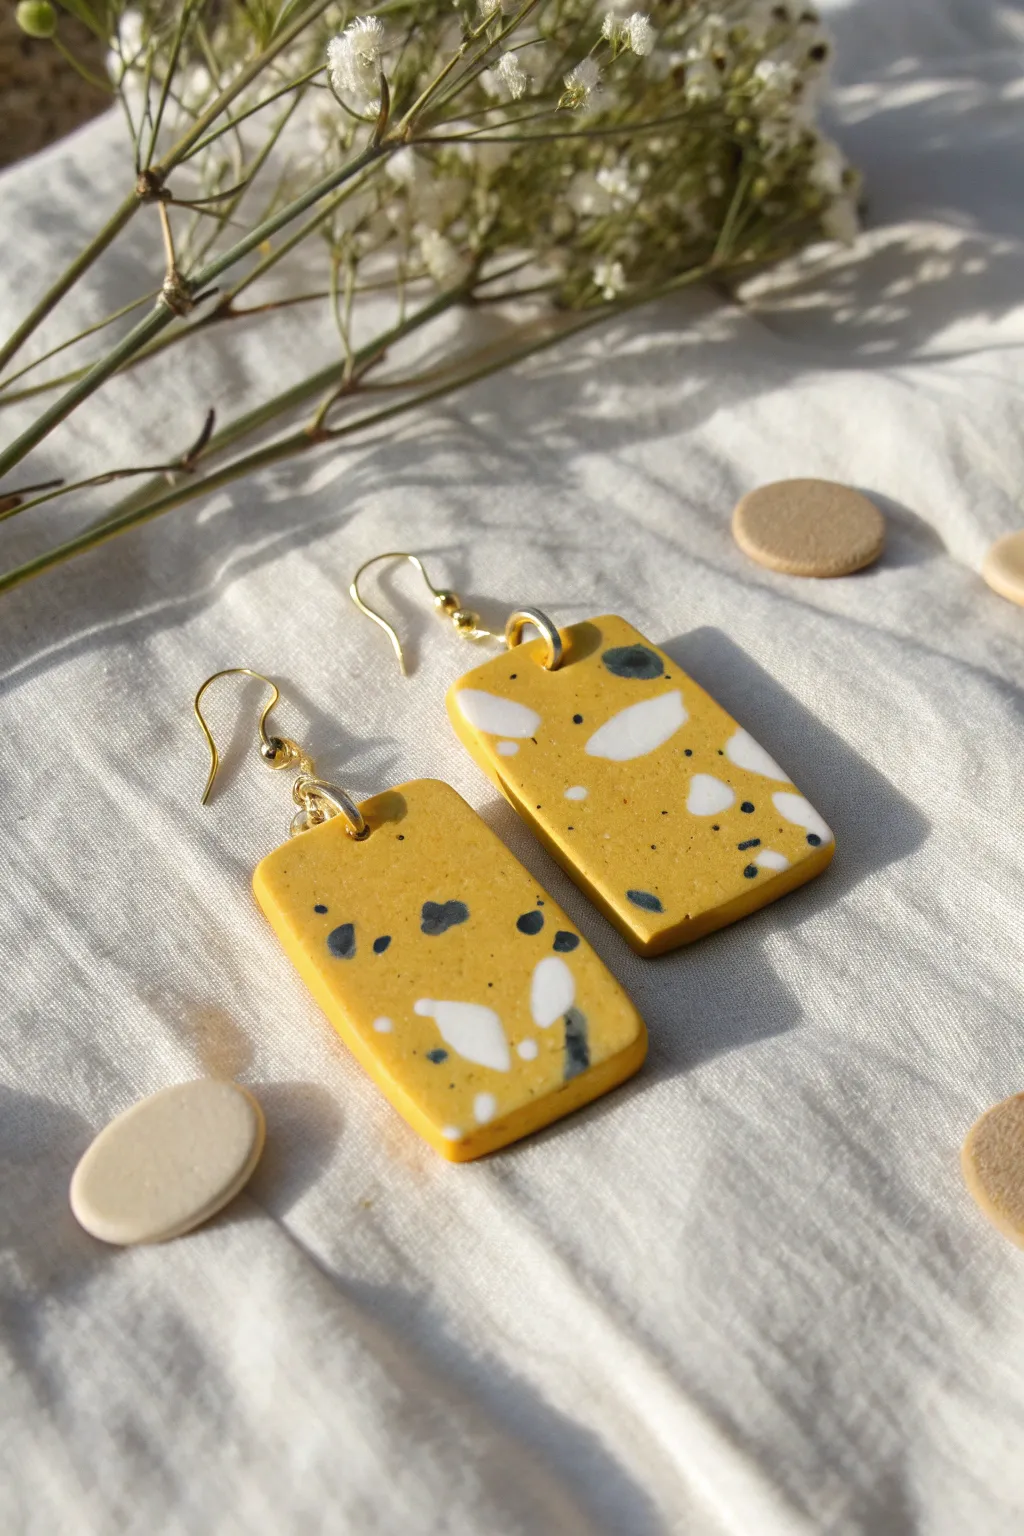
These vibrant rectangular earrings feature a classic mustard yellow base speckled with an abstract confetti of white and dark grey shards. The trendy terrazzo effect adds modern flair to a simple shape, creating a lightweight accessory perfect for brightening up any outfit.
Step-by-Step
Materials
- Mustard yellow polymer clay
- White polymer clay
- Dark grey or black polymer clay
- Acrylic rolling pin or pasta machine
- Sharp tissue blade
- Rectangular clay cutter (approx. 1.5 inches)
- Small jump rings (gold)
- Fishhook earring wires (gold)
- Pliers (round nose and flat nose)
- Parchment paper or ceramic tile for baking
- Hand drill or pin vibe
- Fine grit sandpaper (optional)
Step 1: Prepping the Clay
-
Condition the base color:
Begin by conditioning the mustard yellow clay until it is soft and pliable. Roll it into a smooth ball. -
Roll the slab:
Flatten the yellow ball and use your acrylic roller or pasta machine to create a slab about 3mm thick. This will be the base for your design. -
Create the terrazzo chips:
Condition small amounts of white and dark grey clay separately. Roll these out very thinly, much thinner than your base slab. -
Chop the chips:
Use your tissue blade to chop the thin white and grey sheets into irregular, angular shards. Aim for a mix of sizes—some tiny specks and some larger geometric chunks.
Step 2: Creating the Pattern
-
Scatter the confetti:
Gently pick up your clay shards and scatter them onto the yellow slab. Place the larger white pieces first, followed by the grey accents, ensuring a balanced but random distribution. -
Embed the design:
Place a piece of parchment paper over the slab to prevent sticking. Use your roller to firmly press the chips into the base clay until the surface is completely smooth and level. -
Check the surface:
Run your finger over the clay; if you can still feel the edges of the chips, roll over it again gently until everything is flush.
Smudged Colors?
If your terrazzo chips smear while rolling, your clay might be too soft. Pop the slab in the fridge for 10 minutes before rolling over the chips to keep edges crisp.
Step 3: Cutting and Baking
-
Cut the shapes:
Position your rectangular cutter over the most pleasing parts of the pattern. Press down firmly to cut out two matching rectangles. -
Clean the edges:
Gently lift the shapes and smooth any rough edges with your fingertip. If the cutter left a slight drag mark, I find a quick tap with a finger smooths it right out. -
Pierce the holes:
Use a needle tool or toothpick to poke a hole centered near the top edge of each rectangle. Make sure the hole is big enough for your jump rings. -
Bake:
Transfer the pieces to a ceramic tile or baking sheet lined with parchment paper. Bake according to your brand’s specific instructions (usually 275°F/135°C for 30 minutes). -
Cool down:
Allow the pieces to cool completely before handling them. They harden fully only after cooling.
Make it Shine
Coat the baked pieces with UV resin or a gloss varnish. This deepens the yellow color and makes the terrazzo pattern pop with a glass-like finish.
Step 4: Finishing Touches
-
Sand (Optional):
If the edges feel sharp or the surface isn’t perfectly flat, gently sand the baked pieces under running water with fine-grit sandpaper. -
Open jump rings:
Using two pairs of pliers, twist a gold jump ring open sideways (never pull it apart). -
Assemble:
Slide the jump ring through the hole in the clay rectangle, then loop on the earring hook. -
Close the ring:
Twist the jump ring back into a closed position, ensuring the ends meet perfectly so the hook doesn’t slip off. -
Repeat:
Repeat the assembly process for the second earring to complete your sunny set.
Enjoy wearing your cheerful, handmade statement pieces
Marbled Yellow Swirl Beads
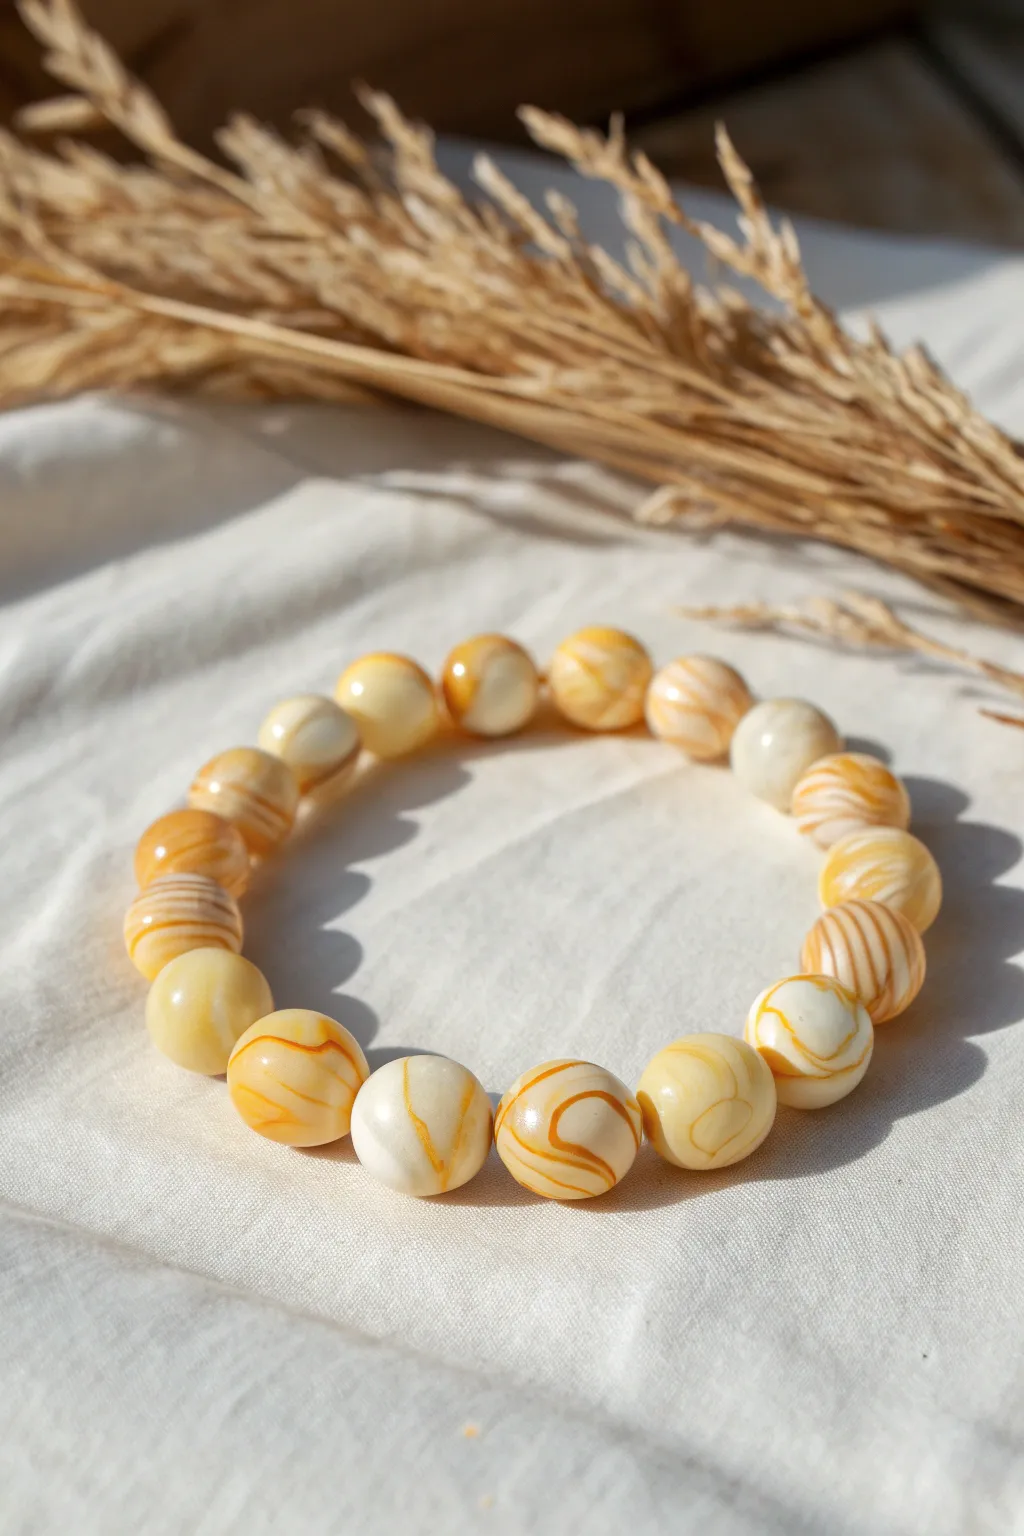
Capture the warmth of golden hour with these luminous swirled beads that blend creamy white with translucent amber tones. The organic marbling technique ensures that no two beads are exactly alike, creating a truly unique piece of jewelry.
Step-by-Step Guide
Materials
- Translucent yellow or amber polymer clay
- Opaque white polymer clay
- Translucent white or ‘frost’ polymer clay (optional, for depth)
- Acrylic roller or pasta machine
- Clay blade (tissue blade)
- Bead piercing pins or metal skewers
- Cornstarch or baby powder
- Wet/dry sandpaper (400 to 2000 grit)
- Buffing wheel or denim scrap
- Elastic cord for stringing
Step 1: Preparing the Clay Cane
-
Condition the Clay:
Start by thoroughly conditioning your translucent yellow and opaque white clay separately until they are soft and pliable. Warm clay mixes better and reduces the risk of cracking later. -
Create Logs:
Roll the translucent yellow clay into a thick log, about 1 inch in diameter. Roll the white clay into several much thinner snakes. -
Combine Colors:
Place the thin white snakes lengthwise along the yellow log. I like to twist the entire bundle gently to start the integration process. -
Marbling Technique:
Roll the twisted log into a long snake, fold it in half, and twist it again. Repeat this ‘roll, fold, twist’ process about 3-4 times. Stop before the colors blend completely into a new shade; you want distinct streaks. -
Form the Final Log:
Once you are happy with the swirl pattern, roll the clay into a smooth, even log approximately the thickness you want your final beads to be.
Clean Hands, Clear Clay
Translucent and white clays pick up dust easily. Wipe your hands and work surface with a baby wipe or alcohol before rolling to keep your yellow swirls bright and spotless.
Step 2: Shaping and Piercing
-
Sectioning:
Use your clay blade to cut the log into equal-sized segments. Keeping the cuts consistent will ensure your bracelet looks uniform. -
Rolling Spheres:
Take a segment and roll it between your palms to create a sphere. Apply gentle pressure at first, then lighten your touch to smooth out any fingerprints. -
Refining the Shape:
Check the swirls on each bead. If the pattern is too simple, you can give the bead a tiny extra twist and re-roll it to create more complex veining. -
Piercing the Beads:
Dip your bead piercing pin into a little cornstarch to prevent sticking. Gently twist the pin through the center of the bead while rotating the bead itself to keep the hole centered. -
Baking Prep:
Leave the beads on the piercing pins if possible, and suspend the pins over a baking tray (resting edges on foil snakes) so the beads don’t develop flat spots. -
Baking:
Bake according to your clay manufacturer’s instructions. For translucent clay, I often lower the temperature slightly and bake longer to prevent scorching or browning.
Add Some Sparkle
Mix a tiny pinch of gold mica powder or gold leaf flakes into the translucent yellow clay during the conditioning phase for a subtle, shimmering inner glow.
Step 3: Finishing and Assembly
-
Cooling and Quenching:
Immediately drop the hot beads into a bowl of ice water straight from the oven. This ‘shocking’ process increases the clarity of translucent clay. -
Sanding:
Once cool, wet sand the beads starting with 400 grit and working up to 2000 grit. This removes fingerprints and reveals the depth of the marbling. -
Buffing:
Rub the beads vigorously with a piece of denim or use a buffing wheel on a rotary tool to achieve a glass-like shine. -
Stringing:
Measure your wrist and cut a length of elastic cord. Thread your polished beads onto the cord. -
Securing the Knot:
Tie off the elastic with a surgeon’s knot (right over left twice, then left over right). Add a tiny dot of superglue to the knot for security before trimming the ends.
Enjoy the sunshine on your wrist with your new handmade bracelet
Sunrise Ombre Pendant
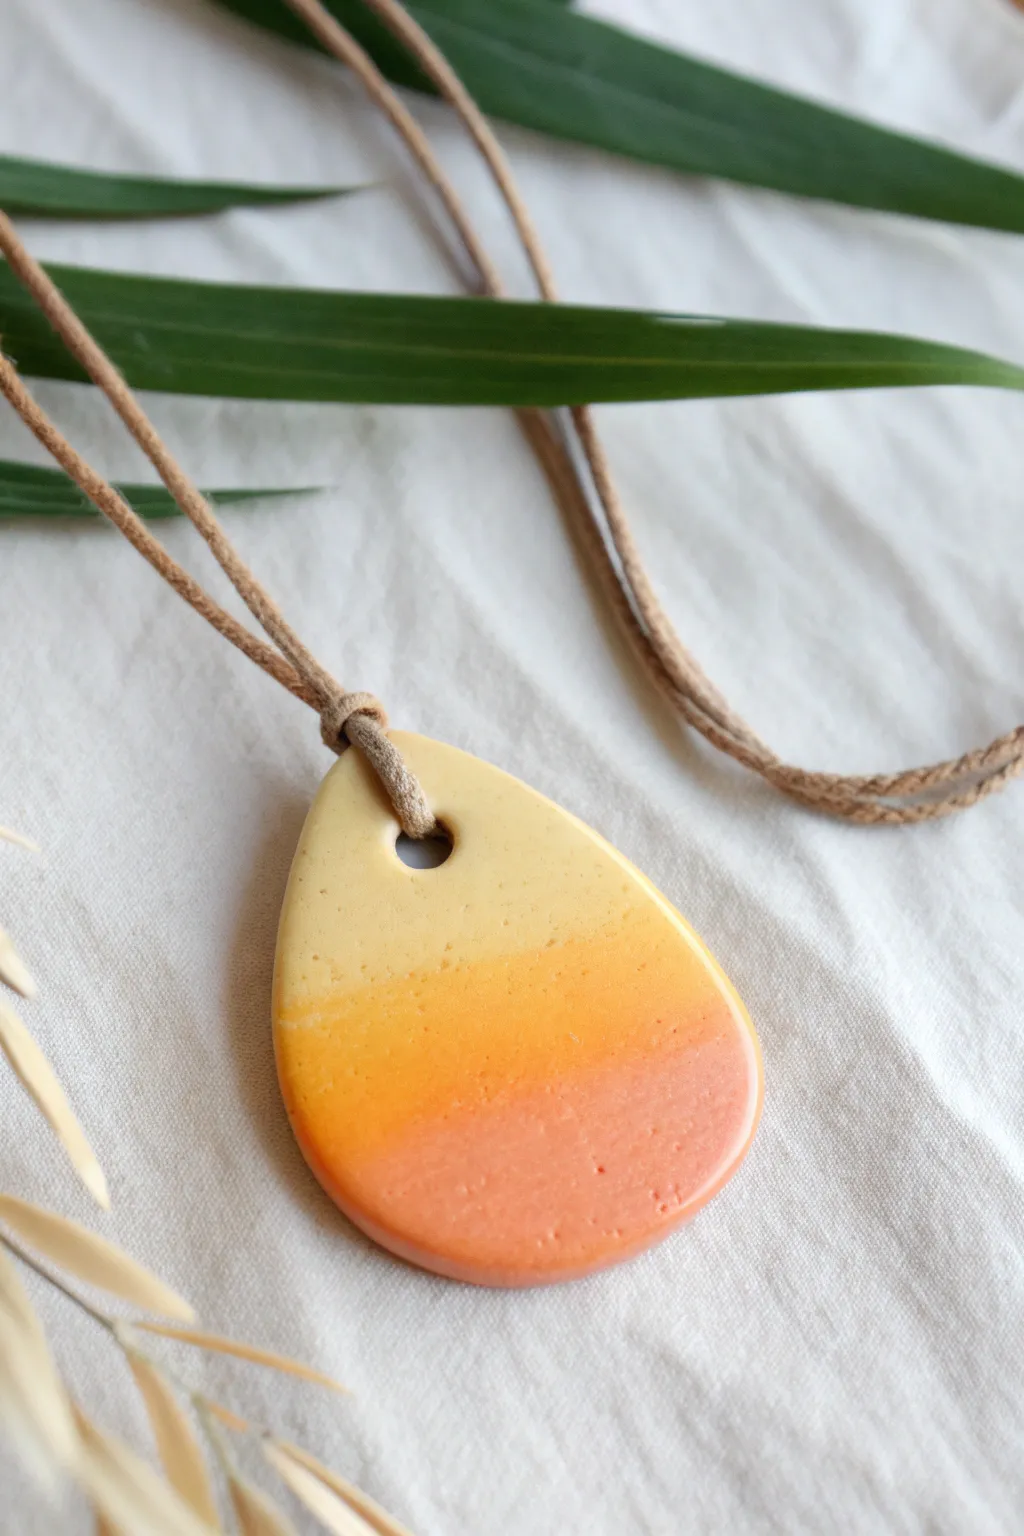
Capture the soft, warm hues of dawn with this sleek polymer clay pendant featuring a seamless ombre effect. The smooth transition from pale yellow to deep coral mimics the early morning sky, creating a wearable piece of art that feels both modern and organic.
Step-by-Step Tutorial
Materials
- Polymer clay in pale yellow
- Polymer clay in bright orange
- Polymer clay in coral or deep peach
- Acrylic rolling pin or pasta machine
- Teardrop clay cutter (approx. 2 inches)
- Small circular cutter or straw (for the hole)
- Blade or craft knife
- Fine-grit sandpaper (400 to 1000 grit)
- Gloss or matte glaze (optional)
- Soft suede or leather cord
- Oven for baking
Step 1: Preparing the Gradient
-
Condition the Clay:
Begin by thoroughly conditioning each of your three clay colors—pale yellow, bright orange, and coral—until they are soft and malleable. -
Create Individual Sheets:
Roll each color into a small, thick sheet of roughly equal size. Thickness doesn’t need to be perfect yet, just consistent enough to work with. -
Shape Triangles:
Cut each colored sheet into a right-angled triangle. This is the classic method for creating a ‘Skinner blend’ or gradient. -
Assemble the Block:
Lay the triangles next to each other to form a rectangle. Arrange them in your desired gradient order: yellow (lightest) at the top, orange in the middle, and coral (darkest) at the bottom. -
First Roll:
Gently press the seams together to join the clay, then pass the sheet through your pasta machine or roll it flat with your acrylic roller. -
Fold and Feed:
Fold the sheet in half, bringing the bottom color up to the top color. Feed it into the machine fold-first. Repeat this process—folding bottom-to-top and rolling—numerous times. -
Achieve Smoothness:
Continue the folding and rolling process until the harsh lines between colors disappear and you see a seamless, blurry transition from yellow to coral.
Step 2: Shaping and Baking
-
Final Sheet Thickness:
Once your gradient is perfect, roll the sheet out to your final desired thickness, usually about 1/4 inch (6mm) for a sturdy pendant. -
Position the Cutter:
Place your teardrop cutter over the clay. Adjust the position carefully to capture the full spectrum of the gradient, ensuring the yellow is at the narrow top and the darker coral fills the wide bottom. -
Cut the Shape:
Press down firmly to cut out the pendant shape. If the clay sticks to the surface, I find sliding a thin blade underneath before lifting helps prevent distortion. -
Smooth the Edges:
Gently run your finger around the cut edge of the clay to smooth out any harsh lines or burrs left by the cutter. -
Create the Suspension Hole:
Use a small circular cutter or a sturdy straw to punch a hole near the top, narrow part of the teardrop. Ensure it is centered and large enough for your cord to pass through. -
Bake:
Place the pendant on a ceramic tile or baking sheet lined with parchment paper. Bake according to your brand of polymer clay’s specific temperature and time instructions.
Clean Edges Trick
Before baking, gently rub a tiny amount of baby oil or cornstarch over the surface. This smooths out fingerprints without needing heavy sanding later.
Step 3: Finishing Touches
-
Cool Down:
Let the piece cool completely inside the oven with the door cracked open to ensure durability. -
Sanding:
Once cool, wet-sand the edges and surface lightly with fine-grit sandpaper to remove any fingerprints or texture irregularities, giving it that stone-smooth feel. -
Buff or Glaze:
You can leave the finish matte for a natural look, or apply a thin layer of satin glaze or buff the piece with a soft cloth for a gentle sheen. -
Add the Cord:
Cut a length of suede cord. Fold it in half to create a loop. -
Lark’s Head Knot:
Push the folded loop through the hole in the pendant from front to back. Then, pull the loose ends of the cord through that loop and tighten to secure the pendant.
Muddy Colors?
If your gradient looks brown or muddy, you may have folded the clay in the wrong direction. Always fold the same colors onto themselves (yellow to yellow).
Wear your sunrise pendant simply over a t-shirt or layer it for a boho look