Whenever I want something stylish and handmade without a whole production, I reach for air dry clay—it’s basically instant creative confidence in a block. Here are my favorite unique air dry clay ideas that feel modern, functional, and totally display-worthy.
Stamped Air Dry Clay Trinket Dish
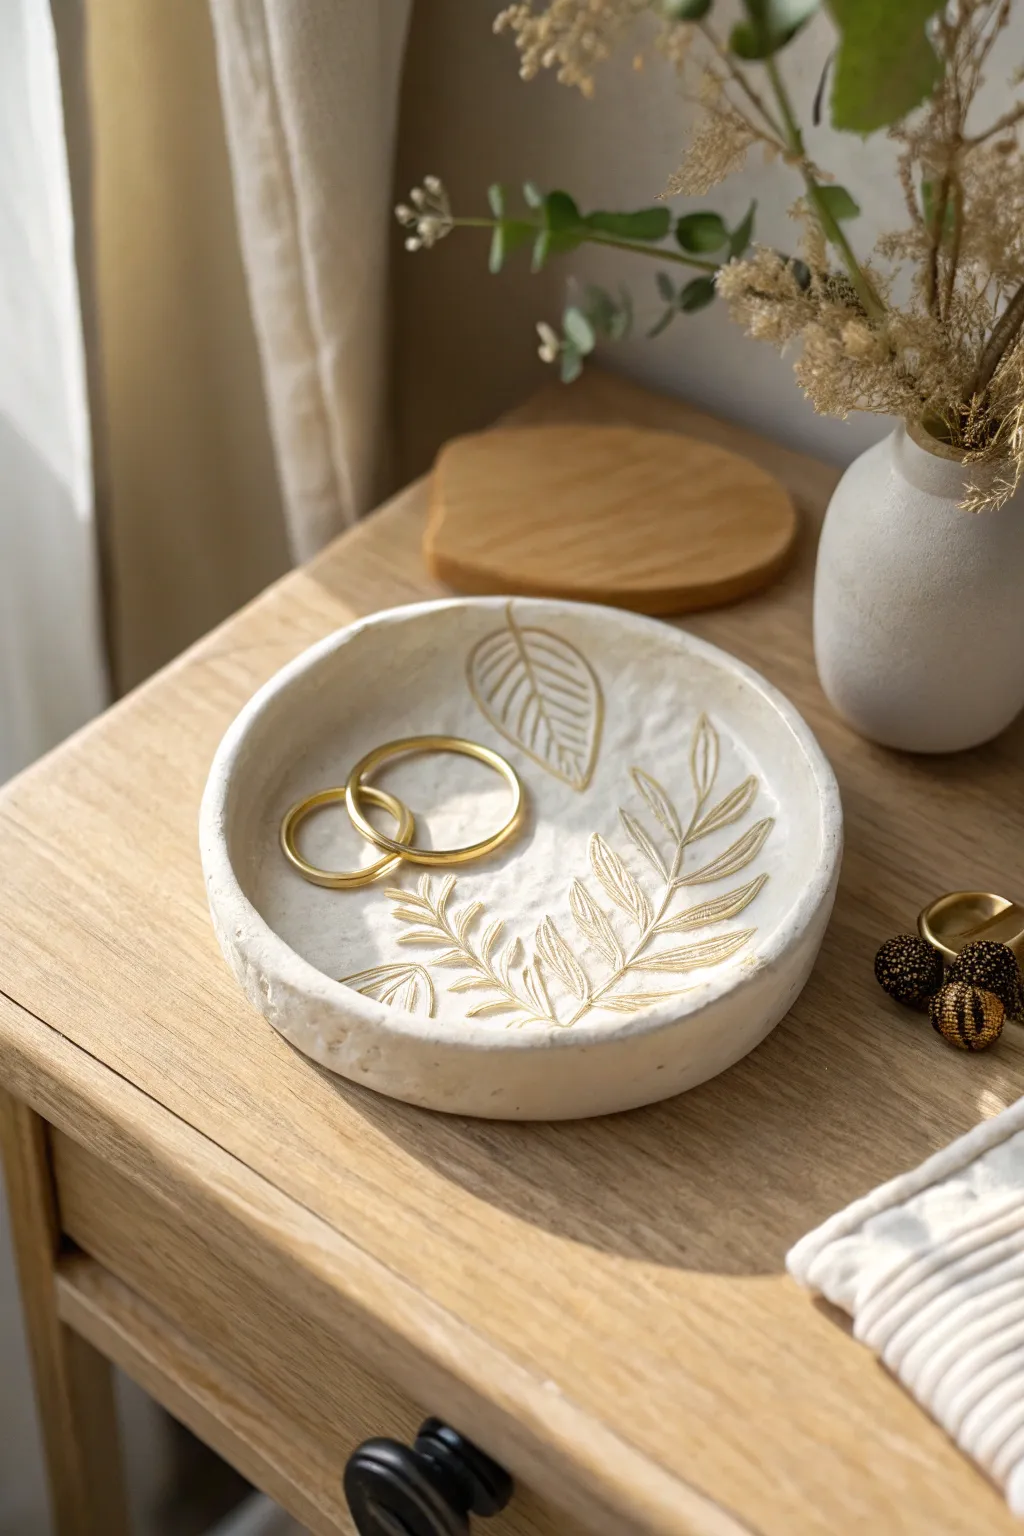
Transform a simple lump of clay into an elegant jewelry holder featuring delicate leaf impressions. The contrast between the organic, white stone-like texture and the shimmering gold detailing creates a sophisticated piece perfect for holding your favorite rings.
Detailed Instructions
Materials
- White polymer clay or premium air-dry clay (stone effect preferred)
- Small rolling pin
- Circle cutter or a small bowl (approx. 4-5 inches diameter)
- Craft knife
- Fresh leaves or leaf stamps (fern and single broad leaf shapes)
- Gold acrylic paint or liquid gold leaf
- Fine detail paintbrush (size 0 or 1)
- Small bowl or sandpaper sponge (for shaping)
- Clear varnish or sealant (matte finish)
Step 1: Shaping the Base
-
Prepare the Clay:
Start by kneading a tennis-ball-sized amount of white clay until it is soft and pliable. If you want a more natural, stone-like texture like the photo, don’t smooth it out perfectly—embrace the slight fissures. -
Roll out the Slab:
Roll your clay out on a smooth surface to a thickness of about 1/4 inch. Try to keep the thickness consistent, though slight variations add to the handmade charm. -
Cut the Circle:
Place your circle cutter or bowl template onto the clay slab. Press down firmly to cut a clean circle, using your craft knife to trace around the bowl if necessary. -
Create the Lip:
Gently lift the edges of the circle upwards to create a rim. You can pinch the clay slightly between your thumb and forefinger as you go around to build a vertical wall about 1/2 inch high. -
Smooth the Edges:
Dip your finger in a little water and run it along the rim to smooth out any sharp cuts or rough spots, rounding off the top edge for a softer look. -
Prepare for Stamping:
Before the clay starts to dry, ensure the inside bottom surface is flat. If you manipulated it too much while making the rim, gently press the center down again.
Cracked edges?
If small cracks appear while folding up the rim, dip your finger in water (or vinegar for polymer clay) and smooth over the crack immediately to bond it back together.
Step 2: Stamping and Drying
-
Position the Leaves:
Lay your fresh leaves or stamps onto the clay surface. Arrange a fern-like frond curving up one side and a broader leaf near the top, mimicking the asymmetrical design in the image. -
Impress the Design:
Use your rolling pin to gently roll over the leaves, or press them firmly with your fingertips. I like to apply pressure specifically on the veins to ensure a deep, crisp impression. -
Reveal the Texture:
Carefully peel the leaves or stamps away from the clay. Use a needle tool or toothpick to deepen any lines that didn’t transfer clearly if needed. -
Add Texture (Optional):
To match the reference photo’s rustic feel, lightly tap a crumpled piece of aluminum foil over the empty areas of the clay to give it a subtle, weathered stone texture. -
Let it Dry:
Place the dish in a spot with good airflow. Allow it to air dry completely for 24–48 hours. Rotate it occasionally so the bottom dries evenly.
Step 3: Gilding and Finishing
-
Sand Imperfections:
Once fully dry and hard, use a fine-grit sandpaper sponge to gently smooth the rim and outer walls. Be careful not to sand away the internal texture you created. -
Prepare the Gold:
Shake your liquid gold leaf or mix your gold acrylic paint well. We want a rich, metallic opacity for the design to stand out. -
Paint the Inlay:
Using your fine detail brush, carefully paint inside the impressed lines of the leaves. Let the paint pool slightly in the deepest grooves for a bolder look. -
Clean Up Edges:
If any gold paint strays outside the lines, quickly wipe it away with a damp cotton swab or wait for it to dry and gently scrape it off with a craft knife. -
Add Rim Detail (Optional):
For an extra touch of luxury, you can run a very dry brush with a tiny amount of gold along the very top edge of the rim, though the original piece keeps the rim plain. -
Seal the Dish:
Apply a coat of matte clear varnish or sealant over the entire dish to protect the clay from moisture and prevent the gold leaf from tarnishing over time.
Level Up: Gemstones
Before the clay dries, gently press tiny crystals or beads into the center of the flower impressions for a mixed-media 3D effect.
Place your finished dish on your nightstand to catch your rings and enjoy the handmade elegance every day


Minimal Cone Ring Holder
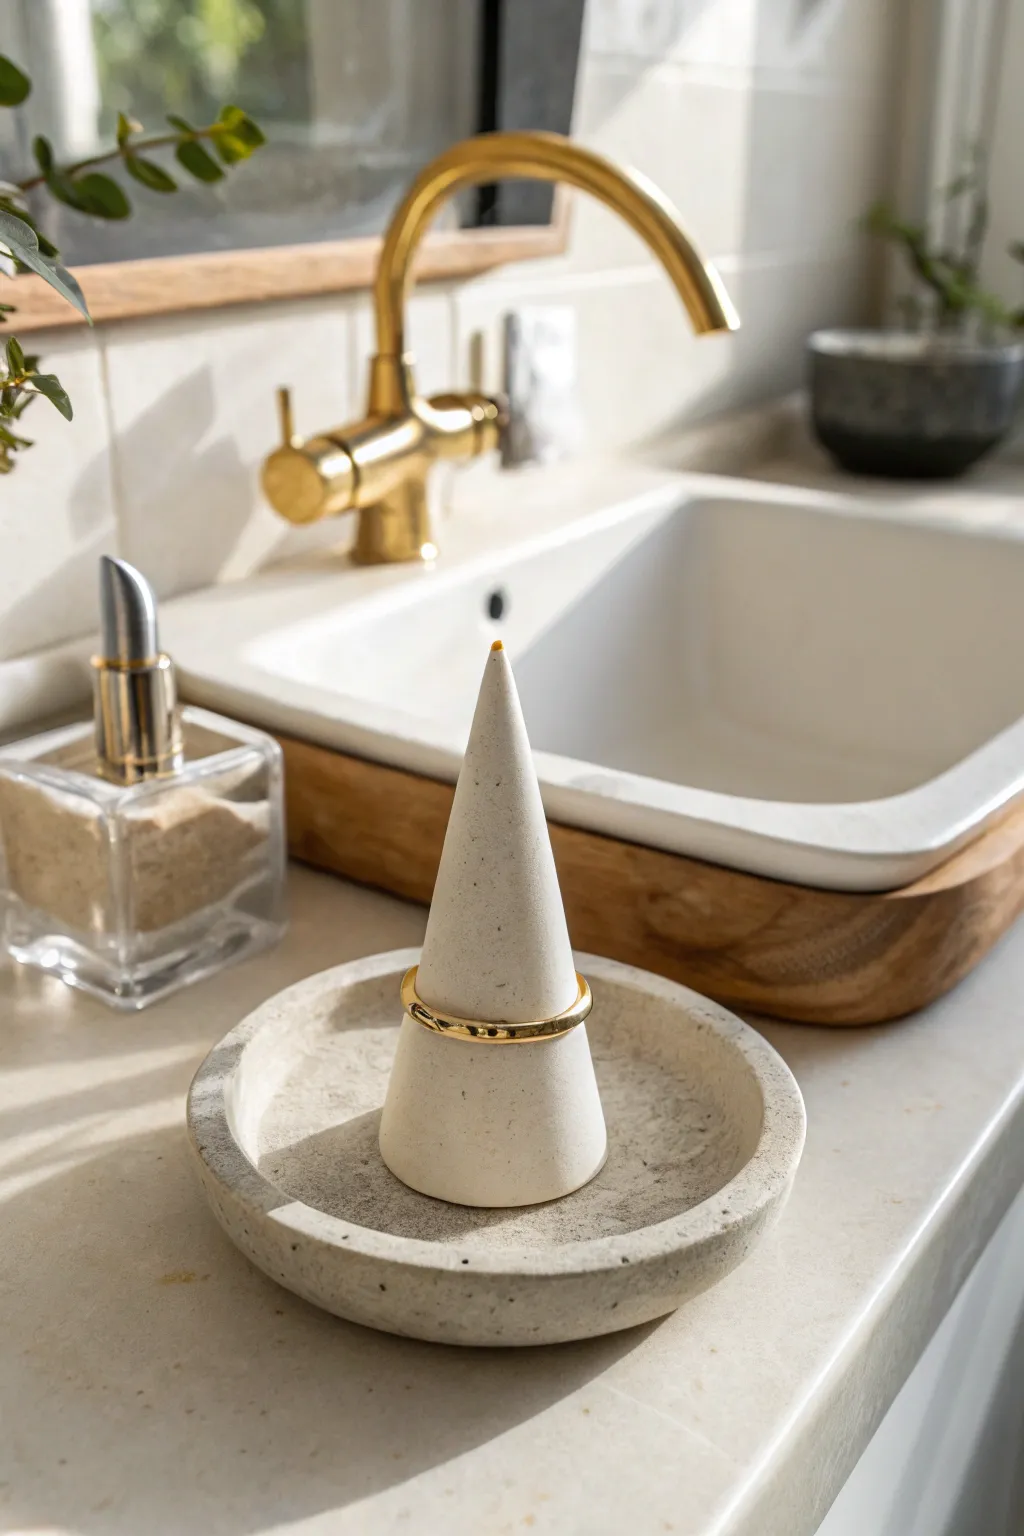
Elevate your vanity with this sophisticated two-piece ring holder that combines a sleek vertical cone with a practical catch-all base. The textured, speckled finish gives it a high-end ceramic look without needing a kiln, while the subtle gold accents add a touch of modern luxury.
Step-by-Step Tutorial
Materials
- White air-dry clay
- Dried coffee grounds or fine black sand (for speckles)
- Clear acrylic rolling pin
- Craft knife or scalpel
- Needle tool or toothpick
- Small bowl of water
- Sponge
- Fine-grit sandpaper (220-400 grit)
- Gold acrylic paint
- Fine detail paintbrush
- Matte varnish or sealant
- Cookie cutter (circle, approx. 4 inches) or a bowl to trace
Step 1: Preparing the Clay
-
Create the Speckled Texture:
Begin by taking a generous handful of white air-dry clay. To achieve that beautiful stone-like appearance seen in the photo, flatten the clay slightly and sprinkle in a pinch of dried coffee grounds or fine black sand. -
Knead Thoroughly:
Fold the clay over the grounds and knead continuously until the speckles are evenly distributed throughout the entire ball. Add more grounds if you want a denser texture, but keep the clay workable. -
Divide the Batch:
Separate your speckled clay into two portions: about one-third for the cone and two-thirds for the dish base.
Step 2: Forming the Cone
-
Roll a Coil:
Take the smaller portion of clay and roll it into a thick, smooth ball, then gently begin rolling it back and forth on your surface to create a short, fat cylinder. -
Shape the Peak:
Focus your rolling pressure on just one end of the cylinder to begin tapering it. Stand the clay up and use your palms to smooth upwards, refining it into a tall, classic cone shape with a sharp point. -
Flatten the Bottom:
The bottom needs to be perfectly flat to stand upright. Press the cone gently onto your work surface. If it’s uneven, I like to slice a thin layer off the bottom with the craft knife for a flush edge. -
Smooth the Surface:
Dip your finger in a little water and run it over the cone to erase any fingerprints or bumps. Alternatively, a damp sponge works wonders for a flawless finish.
Smooth Seams Pro-Tip
Use a clean, damp makeup sponge to wipe the clay before it dries. This acts like a ‘fine sanding’ while the clay is wet, removing fingerprints and smoothing the transition between the dish floor and walls.
Step 3: Creating the Catch-All Dish
-
Roll the Slab:
Take the remaining clay and roll it out into an even slab, approximately 1/4 inch thick. Ensure the thickness is consistent so the dish dries evenly. -
Cut the Circle:
Use a large circular cookie cutter or trace around a small bowl with your craft knife to cut out a perfect circle base. -
Create the Lip:
Roll a long, thin snake (coil) of clay. Score the outer edge of your circular base and brush on a little water to act as glue. -
Attach the Walls:
Lay the coil onto the scored edge of the base. Gently pinch and smooth the coil downward into the base to merge them into a single piece. -
Refine the Dish Shape:
Wet your fingers and smooth the transition seam between the wall and the base completely so it looks like one solid piece. Smooth the top rim of the dish so it is rounded and soft.
Level Up: Marbled Effect
Instead of mixing the coffee grounds fully, mix them into only half the clay. Then twist the two clay colors together (plain white and speckled) for a subtle marbled stone effect.
Step 4: Finishing and Assembly
-
Drying Time:
Place both the cone and the dish in a cool, dry area away from direct sunlight. Let them dry for 24-48 hours, flipping the dish occasionally to prevent warping. -
Sanding:
Once fully cured and bone dry, gently sand any rough edges or uneven spots with fine-grit sandpaper. This will enhance the stone texture. -
Painting the Detail:
Using a very fine detail brush, paint a tiny dot of gold acrylic paint on the very tip of the cone. This small detail elevates the entire look. -
Sealing the Piece:
Apply a coat of matte varnish to both pieces. This protects the clay from moisture and gives it a finished, professional feel. -
Final Assembly:
You can choose to glue the cone into the center of the dish with strong adhesive, or leave it loose so you can rearrange your styling as desired.
Set your new creation on your bathroom counter and enjoy the organized elegance it brings to your morning routine


Bubble-Texture Coasters Set
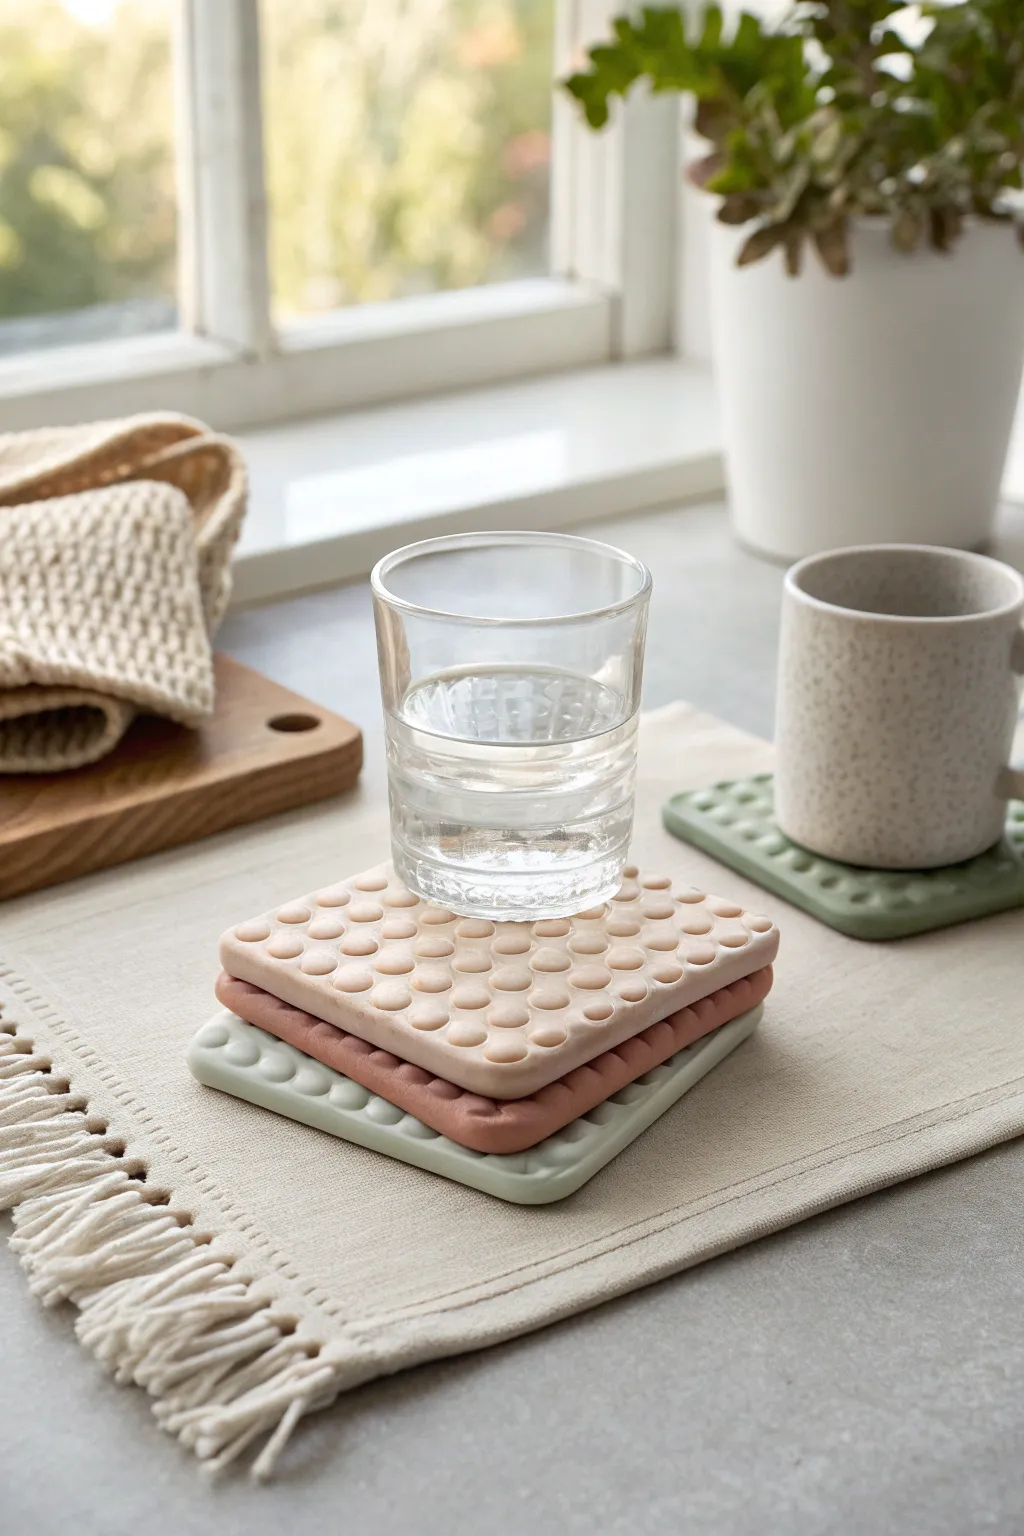
These delightfully tactile coasters add a pop of modern texture to your table setting with their uniform bubble pattern. Made from air-dry clay, they are surprisingly simple to create and offer a satisfyingly smooth finish that looks high-end.
Detailed Instructions
Materials
- Air-dry clay (stone, terracotta, or white)
- Acrylic rolling pin
- Two wooden dowels or depth guides (approx. 5-6mm)
- Square cookie cutter (approx. 3.5 – 4 inches) or ruler and craft knife
- Bubble wrap (small bubble size, clean)
- Fine-grit sandpaper (220-400 grit)
- Water and a small bowl
- Matte spray varnish or acrylic sealer (water-resistant)
- Felt or cork backing (optional)
Step 1: Preparation & Rolling
-
Prepare your workspace:
Set up a clean, non-stick surface like a silicone mat or a piece of parchment paper taped to your table to prevent the clay from sticking. -
Condition the clay:
Take a handful of air-dry clay and knead it well in your hands until it becomes warm, pliable, and free of air bubbles. -
Set up depth guides:
Place your two wooden dowels or depth guides on either side of your clay ball to ensure an even thickness when rolling. -
Roll the slab:
Using your acrylic rolling pin, roll the clay out across the guides until the rolling pin touches the wood on both sides and the clay is perfectly flat.
Don’t Pop The Fun!
Check your bubble wrap before rolling. Avoid sections with popped bubbles, as these will leave flat spots rather than nice deep craters in your clay design.
Step 2: Creating the Bubble Texture
-
Position the bubble wrap:
Cut a piece of small-bubble bubble wrap slightly larger than your intended coaster size. Place it bubble-side down onto the smooth clay slab. -
Embed the texture:
Gently roll your rolling pin over the bubble wrap one time with firm, even pressure. I find one confident pass works better here than rolling back and forth, which can shift the pattern. -
Reveal the pattern:
Carefully peel back the bubble wrap to reveal the grid of raised indentations. -
Cut the shape:
Position your square cookie cutter over the best part of the texture and press down firmly to cut the shape. Alternatively, use a ruler and sharp craft knife to cut a precise square. -
Release the coaster:
Remove the excess clay from around the square, then gently lift the coaster. If it sticks, slide a blade or thread underneath to release it.
Tinting Technique
Knead a small dab of acrylic paint directly into white clay before rolling. This creates the solid, uniform pastel colors seen in the image without needing to paint them later.
Step 3: Refining & Drying
-
Smooth the edges:
Dip your finger in a little water and gently run it along the cut edges of the square to soften any sharpness without disturbing the bubbles on top. -
Initial drying:
Place the coasters on a wire rack or a clean piece of mesh to allow air to circulate underneath. -
Flip occasionally:
Let them dry for 24-48 hours. Carefully flip them every few hours during the first day to prevent the corners from curling upward. -
Check for moisture:
Ensure the clay is fully cured; it should feel room temperature to the touch, not cold.
Step 4: Finishing Touches
-
Sand gently:
Once fully dry, use fine-grit sandpaper to lightly buff the edges and corners for a professional finish. Be extremely careful not to sand down the bubble texture. -
Dust off:
Wipe the coaster with a slightly damp cloth or a dry brush to remove any clay dust before sealing. -
Apply sealer:
In a well-ventilated area, spray a thin, even coat of matte varnish over the entire coaster. Let it dry according to the can’s instructions. -
Seal again:
Apply 2-3 additional thin coats of sealer to ensure the clay is water-resistant against condensation from glasses. -
Add backing (optional):
Cut a square of cork or felt slightly smaller than the coaster and glue it to the bottom to protect your furniture surfaces.
Stack your new set on the coffee table and enjoy the modern, geometric charm they bring to your living space


Leaf-Shaped Catchall Tray
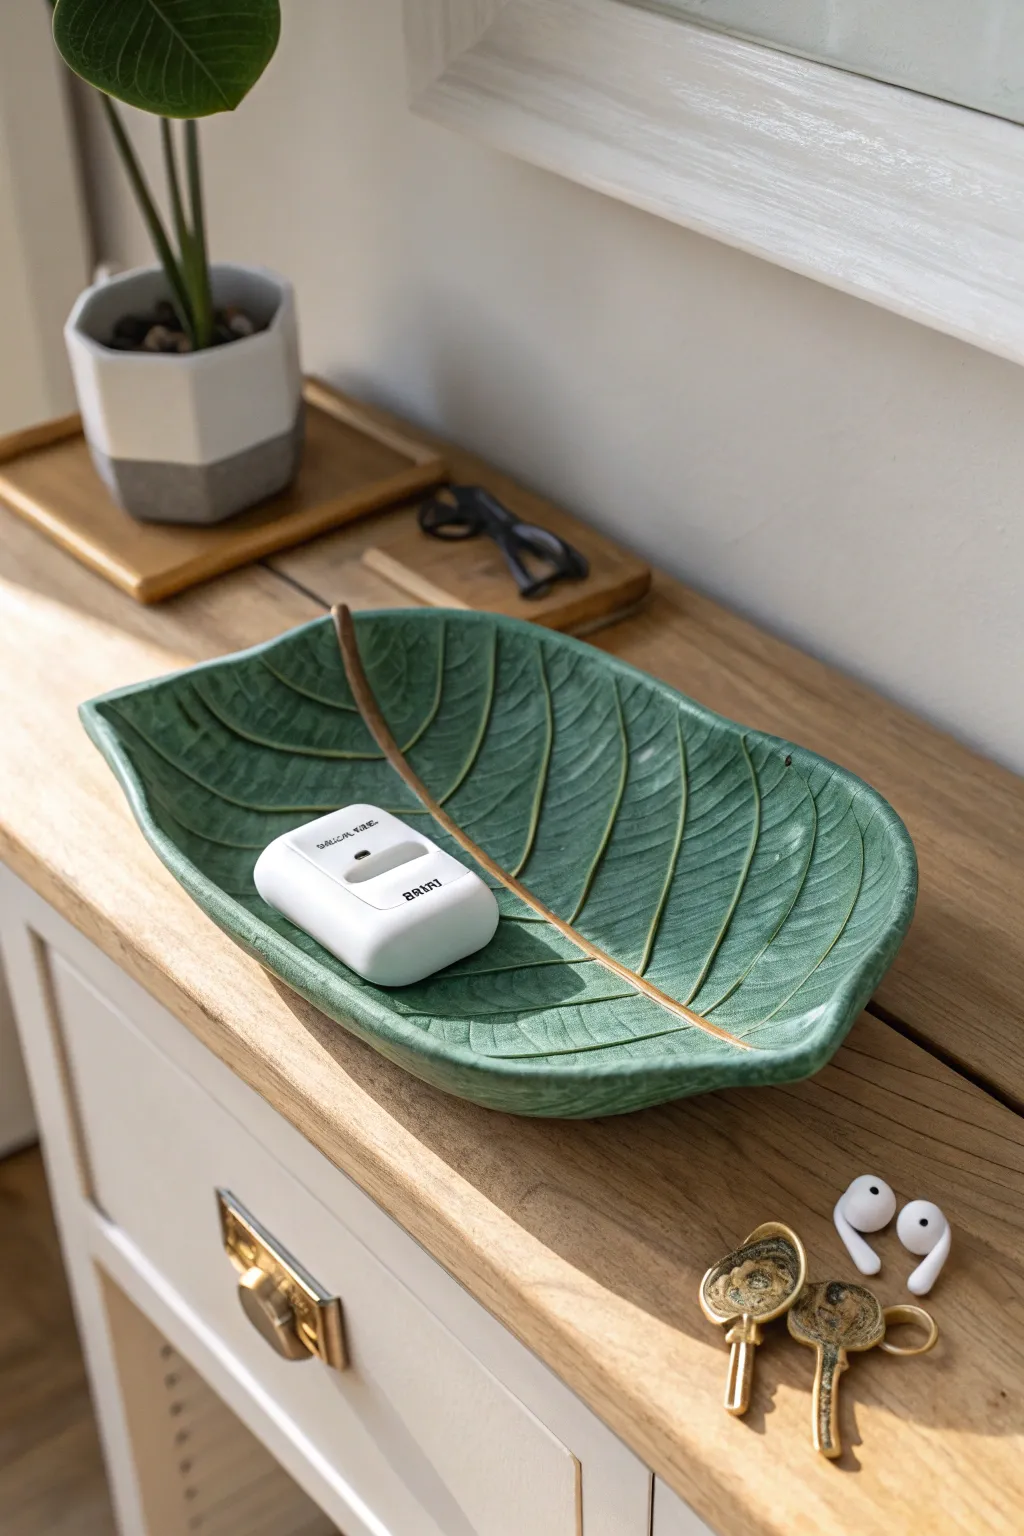
Bring a touch of nature indoors with this stunningly detailed leaf-shaped tray, perfect for holding keys or wireless earbuds. The realistic texture and deep green glaze give it a sophisticated, organic look that mimics high-end ceramic decor.
Step-by-Step Tutorial
Materials
- White or terracotta air dry clay (approx. 500g)
- A large, fresh leaf with prominent veins (e.g., Hosta, Hydrangea, or Monstera)
- Rolling pin
- Parchment paper or canvas mat
- Craft knife or scalpel tool
- Needle tool or toothpick
- Small bowl or curved surface (for drying form)
- Fine-grit sandpaper (220-400 grit)
- Acrylic paints: Deep forest green, black, antique gold/bronze
- Paintbrushes (medium flat brush and fine liner brush)
- Gloss or satin varnish/sealant
- Water and sponge for smoothing
Step 1: Shaping the Leaf
-
Prepare your clay:
Start by kneading your air dry clay until it is soft, warm, and pliable. This conditioning step is crucial to prevent cracking later on. -
Roll the slab:
Place the clay between two sheets of parchment paper or on a canvas mat. Use your rolling pin to flatten it into an even slab, aiming for a consistent thickness of about 1/4 inch (6mm). -
Imprint the texture:
Choose a large leaf with deep, interesting veins. Place the leaf face down (vein side down gives the best impression) onto your clay slab. Gently but firmly roll over the leaf with the rolling pin to press the veins into the clay. -
Cut the shape:
Leaving the leaf in place as a guide if you wish, or removing it carefully, use a sharp craft knife or scalpel to cut around the perimeter of the leaf shape. Clean vertical cuts work best here. -
Enhance the details:
Carefully peel the real leaf away. If the impression is faint in areas, lightly re-trace the main central vein and side veins with a needle tool to deepen them slightly. -
Smooth the edges:
Dip your finger in a little water and run it along the cut edges of the clay to smooth out any sharpness or roughness left by the knife. I like to round the edges just slightly for a more finished ceramic look. -
Form the curve:
Carefully lift the clay leaf and place it inside a large, shallow bowl or drape it over a curved object. This will give the tray its cupped shape as it dries. Ensure the curve is gentle so items won’t slide to the center too aggressively.
Step 2: Drying and Refining
-
Initial drying:
Let the clay sit in the mold for at least 24 hours. Keep it away from direct heat sources to prevent wrapping. -
Flip and finish drying:
Once the top feels firm, carefully remove it from the bowl and flip it over to allow the underside to dry completely. This may take another 24-48 hours depending on humidity. -
Sand imperfections:
When the tray is bone dry, use fine-grit sandpaper to gently smooth the rim and the underside. Avoid sanding the textured top surface where the veins are. -
Dust off:
Wipe the entire piece down with a slightly damp sponge or cloth to remove all clay dust before painting.
Cracking Up?
If small hairline cracks appear during drying, make a slip paste (clay mixed with water) and fill the cracks immediately, then smooth over.
Step 3: Painting and Finishing
-
Base coat:
Paint the entire top surface with a solid coat of deep forest green acrylic paint. Let this layer dry completely. -
Create depth with a wash:
Mix a very small amount of black paint with water to create a thin, watery wash. Brush this over the green surface, letting the dark liquid settle into the deep vein crevices. -
Wipe back:
Before the black wash dries, use a paper towel or damp cloth to wipe the surface gently. This removes the dark color from the raised areas while leaving shadows in the veins. -
Highlighting texture:
Use a dry-brushing technique with a lighter green or yellowish-green to lightly graze the raised sections of the leaf. This enhances the texture further. -
Paint the stem:
Using a fine liner brush and antique gold or bronze metallic paint, carefully paint the central stem and the primary vein running down the middle of the leaf. -
Seal the piece:
Once all paint is fully dry, apply two coats of gloss or satin varnish. This protects the clay from moisture and gives it that glazed ceramic appearance.
Gilded Edges
For an extra luxurious touch, paint the very rim of the leaf with the same gold paint used for the stem to frame the piece.
Now you have a functional piece of art that looks like it came straight from a high-end boutique

What Really Happens Inside the Kiln
Learn how time and temperature work together inside the kiln to transform clay into durable ceramic.
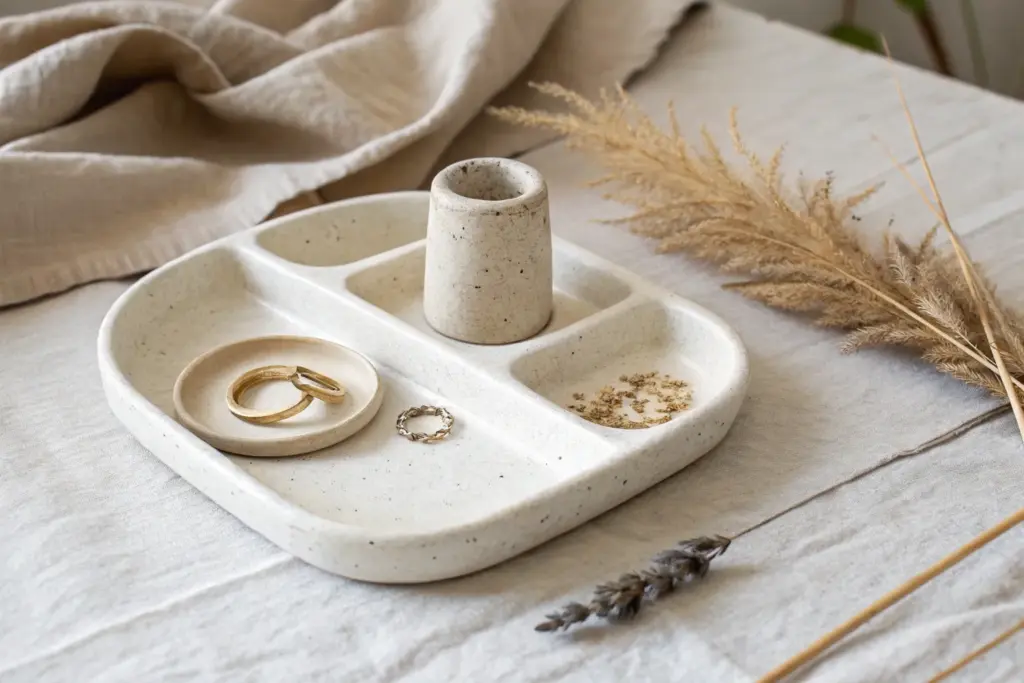
Terrazzo-Style Jewelry Tray
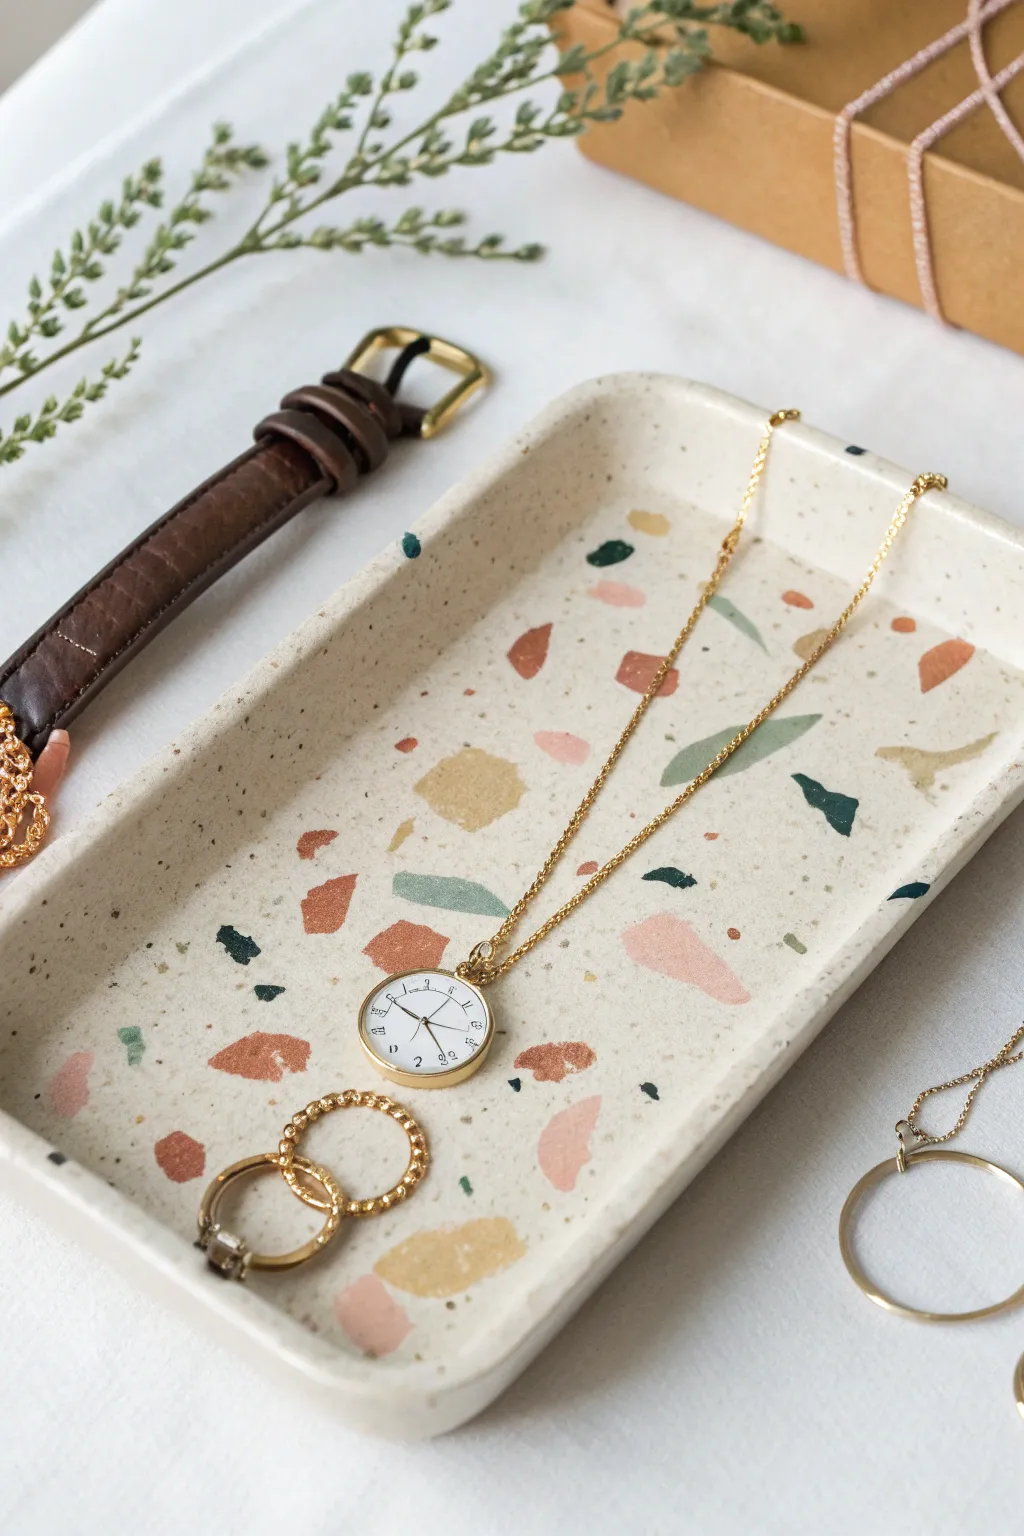
Achieve the high-end look of polished stone for a fraction of the price with this surprisingly simple air dry clay project. The speckles of muted earth tones embedded in a creamy white base create a sophisticated home for your favorite necklaces and rings.
Step-by-Step Guide
Materials
- White or cream air dry clay
- Colored air dry clay (terracotta, sage green, mustard, teal) OR acrylic paints to dye the clay
- Rolling pin
- Clay knife or X-Acto knife
- Rectangular template (card stock or cardboard)
- Small bowl of water
- Sandpaper (medium and fine grit)
- Gloss or satin varnish/sealer
- Paintbrush
Step 1: Creating the Chips
-
Prepare the colors:
If you don’t have pre-colored clay, take small pea-sized balls of white clay and knead in a drop of acrylic paint until the color is uniform. You’ll need about four or five distinct earth tones. -
Flatten the colors:
Roll out each colored ball of clay very thinly, aiming for the thickness of a thick sheet of cardstock. -
Create the shards:
Tear the flattened colored clay into small, jagged irregular shapes. Keep them varied in size—some tiny specks and some larger chunks—to mimic real stone aggregate. -
Let them firm up:
Set these colored chips aside for 15-20 minutes. You want them to be slightly leathery so they don’t smear immediately when rolled, but not fully dry.
Fixing Smears
If your colored chips smeared while rolling, don’t worry. Keep sanding deeper during the finishing phase—the pattern usually becomes crisp again underneath the surface.
Step 2: Building the Base
-
Roll the main slab:
Take a large handful of white clay and roll it out into a smooth slab about 1/4 inch thick. Ensure it’s large enough to fit your rectangular template. -
Scatter the chips:
Sprinkle your colored clay chips randomly over the white slab. Don’t overthink the placement; randomness is key to the terrazzo look. -
Embed the pattern:
Gently roll over the slab again with your rolling pin. Press firmly enough to force the colored chips flush into the white base, creating a flat surface. -
Cut the shape:
Place your rectangular template onto the patterned clay and cut around it using a clean clay knife. -
Create the walls:
With the leftover patterned clay scraps, roll out long, thin snakes or strips to serve as the rim of the tray. -
Score and slip:
Use a tool to scratch up the edges of the rectangular base and the underside of your clay strips. Dab a little water (slip) on these rough areas to act as glue. -
Attach the rim:
Press the clay strips onto the edge of the base to build up the walls. I like to pinch the corners gently to round them off rather than keeping them sharp 90-degree angles. -
Smooth the seams:
Wet your finger slightly and run it along the inside and outside seams where the wall meets the base, blending the clay until it looks like one solid piece. -
Dry thoroughly:
Let the tray dry completely for 24-48 hours. Turning it over halfway through can help the bottom dry evenly.
Step 3: Finishing and Revealing
-
Sand for clarity:
Once bone dry, sand the surface vigorously. This is the magic step: sanding removes the top distinct layer of haze and reveals the crisp, sharp edges of your colored chips. -
Refine the edges:
Switch to a finer grit sandpaper to smooth the rim and rounded corners, ensuring there are no sharp bits that could snag jewelry. -
Clean up dust:
Wipe the entire tray down with a slightly damp cloth or paper towel to remove all white clay dust. -
Seal and protect:
Apply a coat or two of gloss or satin varnish. This not only protects the clay but also deepens the colors of the terrazzo chips, making them pop against the white background.
Go Geometric
Instead of random shards, use a small cutter or knife to cut triangles or squares of colored clay for a modern, geometric ‘Memphis design’ style terrazzo pattern.
Place your new tray on a dresser or nightstand and enjoy the bespoke, artistic touch it adds to your room
Textured Mini Planter Pot
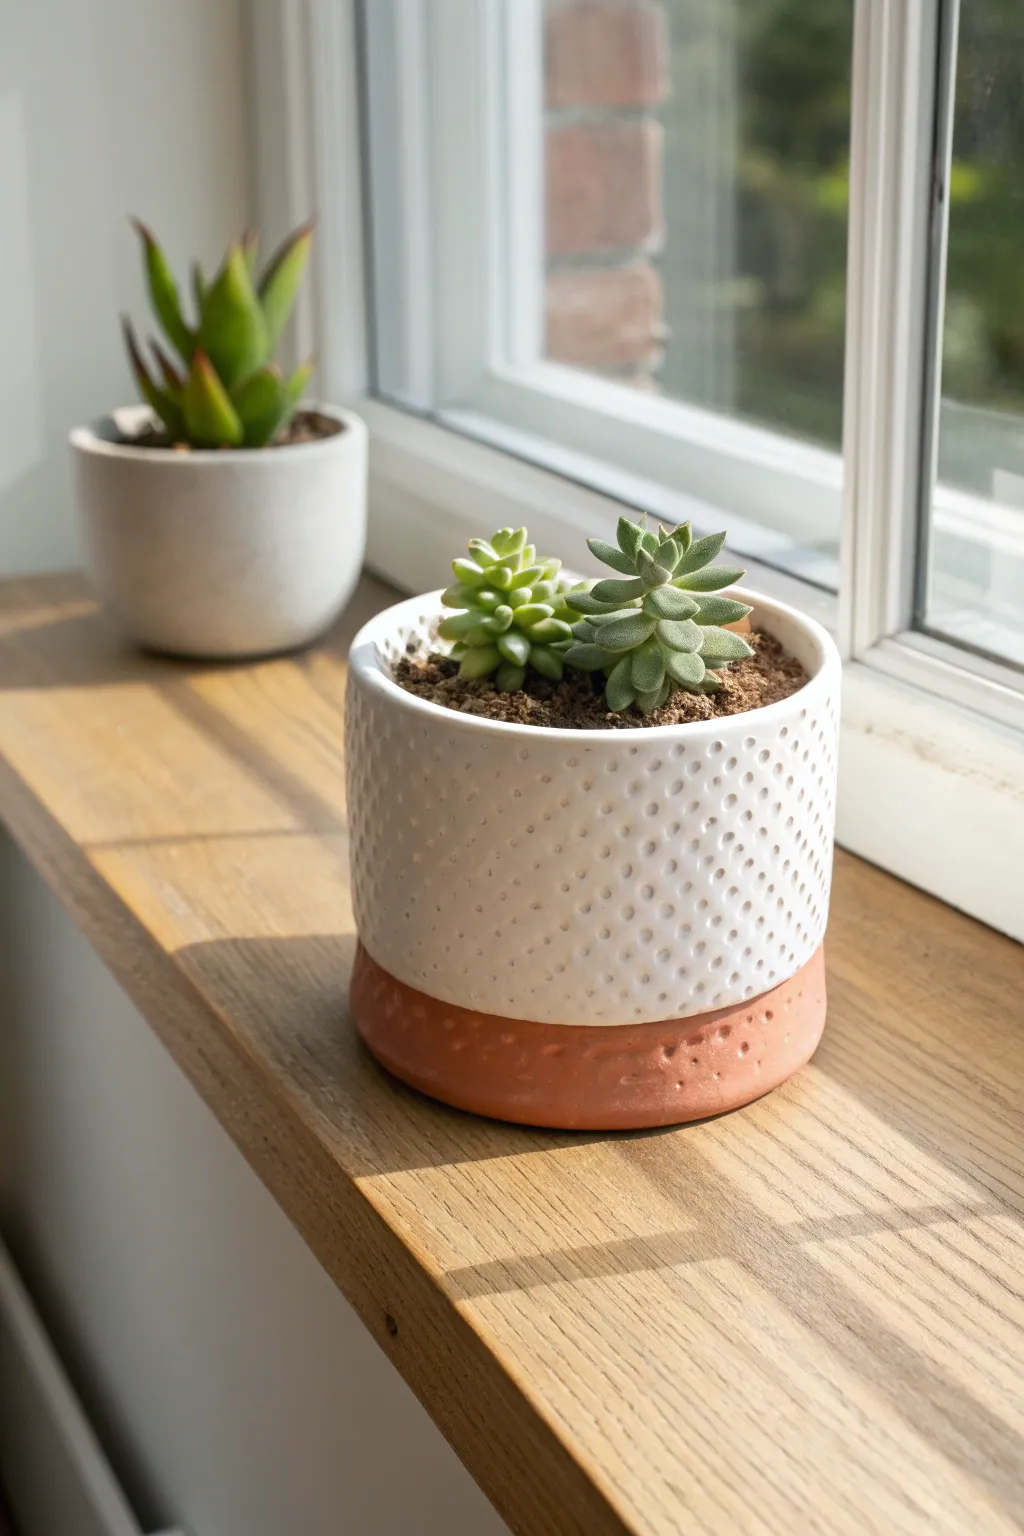
Bring a touch of modern charm to your windowsill with this adorable textured planter. Featuring a playful dotted pattern and a stylish two-tone finish, this project creates the perfect cozy home for your favorite little succulents.
Step-by-Step
Materials
- White polymer clay or air dry clay (approx. 1 lb)
- Terracotta-colored air dry clay or acrylic paint
- Rolling pin
- Small circular cookie cutter or a drinking glass (approx. 3-4 inches diameter)
- Small dotting tool or the blunt end of a wooden skewer
- Craft knife
- Sandpaper (fine grit)
- Clear waterproof varnish or sealant
- Water and sponge (for smoothing)
- Small bowl (to use as a mold)
Step 1: Forming the Base
-
Prepare the Clay:
Start by conditioning your white air dry clay. Knead it in your hands until it is pliable, warm, and free of cracks. This ensures the pot will be sturdy once dry. -
Roll the Slab:
Using a rolling pin, roll the clay out into a long rectangular slab. Aim for a consistent thickness of about 1/4 inch (6mm). If you want a perfectly even edge, lay two wooden paint stirrers on either side of the clay as thickness guides. -
Cut the Wall:
Measure the circumference of your intended base (or the bowl you are using as a mold guide). Use a craft knife to cut a clean rectangle of clay that is long enough to wrap around the base plus a tiny bit of overlap. -
Create the Base:
Roll out a separate, smaller piece of clay. Use your circular cutter or glass to cut a perfect circle for the bottom of the pot.
Clean Texture Trick
Does your dotting tool get stuck? Dip the tip into a tiny bit of cornstarch or water before pressing it into the clay. This releases the tool cleanly every time without dragging the clay.
Step 2: Assembly and Texture
-
Attach the Wall:
Wrap the rectangular slab around the circular base. Carefully score the edges where they meet (make little hatch marks) and add a dab of water to create ‘slip’ before pressing them together. -
Smooth the Seam:
Use your fingers or a smoothing tool to blend the vertical seam where the wall connects. You want this to be invisible, so take your time smoothing the clay upwards and downwards until the join disappears. -
Define the Two-Tone Line:
Lightly etch a horizontal line around the circumference of the pot, about one-quarter of the way up from the bottom. This will guide your texturing. -
Create the Dotted Texture:
Using the blunt end of a skewer or a small ball tool, press indentations into the clay above your etched line. I find it easiest to work in diagonal rows to create a uniform, quilted look. -
Texturize the Base:
For the bottom section, dab the clay gently with a crumpled ball of aluminum foil or a coarser sponge. This creates a slightly rougher, stone-like texture that contrasts beautifully with the smooth, dotted top. -
Smooth the Rim:
Check the top rim of your pot. Dip your finger in water and run it along the edge to smooth out any sharpness or uneven areas.
Drainage Hole Upgrade
Before drying, use a straw to punch a hole in the center of the base. This provides essential drainage for succulents, preventing root rot and keeping your plants infinitely happier.
Step 3: Finishing Touches
-
Dry Completely:
Set the pot aside in a cool, dry place. Allow it to air dry for 24-48 hours. Turn it distinct occasionally to ensure the bottom dries evenly. -
Sand for Perfection:
Once fully cured, use fine-grit sandpaper to gently buff out any fingerprints or rough spots on the white section, being careful not to sand away your dots. -
Paint the Base:
If you didn’t use colored clay for the base, mask off the top section with painter’s tape exactly where the textures change. Paint the bottom section with a terracotta or rust-colored acrylic paint. -
Seal the Pot:
This is crucial for planters! Apply 2-3 coats of a waterproof varnish or sealant to both the inside and outside. This protects the clay from moisture when you water your plants. -
Planting:
Once the sealer is cured, add a small layer of gravel at the bottom for drainage, followed by soil and your succulents.
Place your new textured pot in a sunny spot and enjoy the custom look you created


The Complete Guide to Pottery Troubleshooting
Uncover the most common ceramic mistakes—from cracking clay to failed glazes—and learn how to fix them fast.
Tiny Magnetic Bud Vase
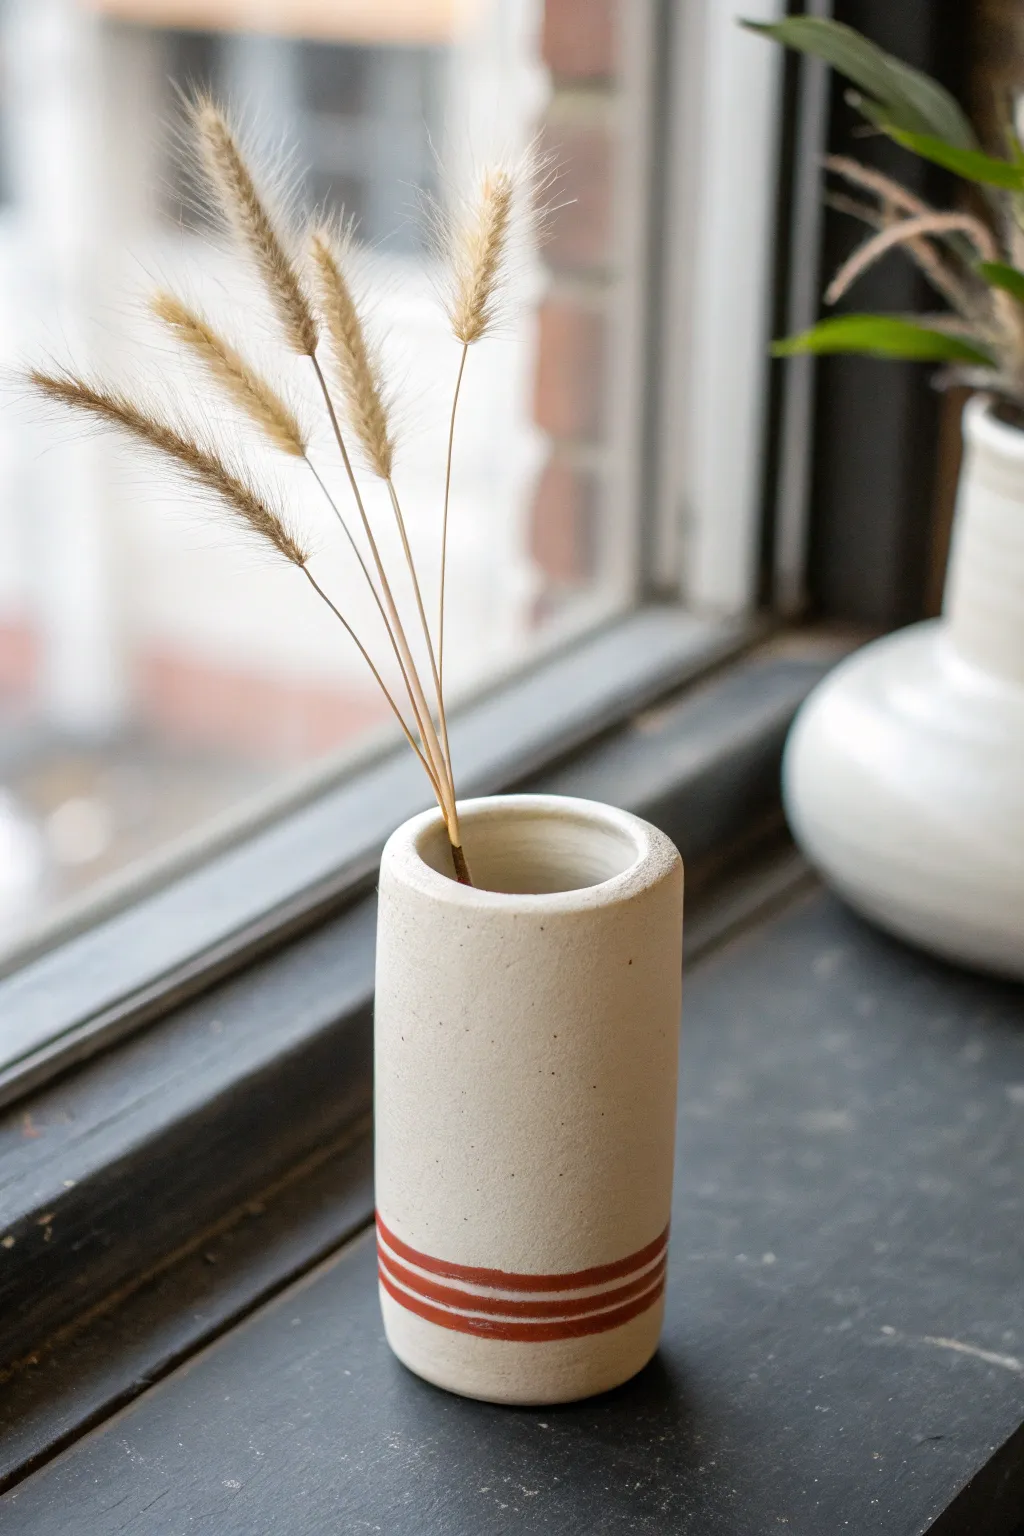
This charming, minimalist bud vase brings a touch of handcrafted warmth to any small space, sticking conveniently to metal surfaces thanks to a hidden magnet. With its natural, stone-like texture and rustic burnt-orange stripes, it is the perfect vessel for a few delicate stems of dried grass or wildflowers.
How-To Guide
Materials
- White or speckled air-dry clay
- Rolling pin
- Small circular cookie cutter (approx. 1.5 inches)
- Craft knife or scalpel blade
- Small but strong neodymium magnet
- Water and a small sponge
- Burnt orange acrylic paint
- Thin paintbrush (liner or rigger brush)
- Fine-grit sandpaper (220-400 grit)
- Matte clear varnish or sealant
Step 1: Forming the Cylinder
-
Condition the Clay:
Start by taking a handful of air-dry clay and kneading it in your hands until it becomes soft, pliable, and free of air bubbles. -
Roll the Base:
Roll out a small portion of the clay to about 1/4 inch thickness. Use your circular cutter to punch out a perfect circle which will serve as the base. -
Embed the Magnet:
Gently press your neodymium magnet into the bottom center of the circular base. I like to smooth a tiny bit of fresh clay over it to embed it completely, ensuring the bottom remains flat. -
Create the Walls:
Roll out a larger slab of clay into a long, rectangular strip. Aim for an even thickness of about 1/4 inch to match the base. -
Cut to Size:
Using a ruler and craft knife, trim the clay strip so it is roughly 3-4 inches tall and long enough to wrap around the circumference of your base circle. -
Wrap and Join:
carefully wrap the rectangular strip around the base circle. Score (scratch) and slip (wet) the edges where the walls meet the base and where the side seam connects. -
Blend the Seams:
Use a modeling tool or your fingers to smooth the vertical seam and the connection to the base until they disappear completely. The cylinder should look like one continuous piece.
Step 2: Refining and Finishing
-
Smooth the Rim:
Dip your finger in a little water and run it around the top rim of the vase. Round off any sharp edges created by the knife cut. -
Adding Texture:
If you want that speckled, stone-like look and didn’t use speckled clay, gently tap the surface with a stiff toothbrush or a textured sponge while the clay is still damp. -
Dry Completely:
Set the vase in a cool, dry place away from direct sunlight. Let it dry for at least 24-48 hours until it turns a chalky white and feels room temperature to the touch. -
Sand for Smoothness:
Once fully dry, take your fine-grit sandpaper and lightly buff the exterior. Focus on making the cylinder walls even and removing any fingerprints. -
Wipe Clean:
Use a dry cloth or a slightly damp paper towel to remove all the sanding dust before you start painting. -
Paint the Stripes:
Mix your burnt orange acrylic paint. Using a thin liner brush, carefully paint two or three horizontal stripes near the bottom third of the vase. You can use masking tape if you want crisp lines, but a freehand approach adds organic charm. -
Seal the Project:
Apply a coat of matte varnish over the entire piece, inside and out. This protects the clay from humidity, though remember air-dry clay is never 100% waterproof. -
Add Florals:
Find some dried lagurus (bunny tails) or wheat grass, trim their stems to size, and place them inside your finished magnetic vase.
Magnet Won’t Stick?
If the magnet feels weak after drying, the clay bottom layer might be too thick. Sand the bottom exterior carefully until the magnet’s pull becomes stronger.
Faux Stone Effect
Mix dried coffee grounds or cracked black pepper into your white clay during the kneading phase. This creates realistic specks throughout the vessel.
Pop your new vase onto the fridge or a window frame for an instant dash of organic style
Arched Photo and Card Holder
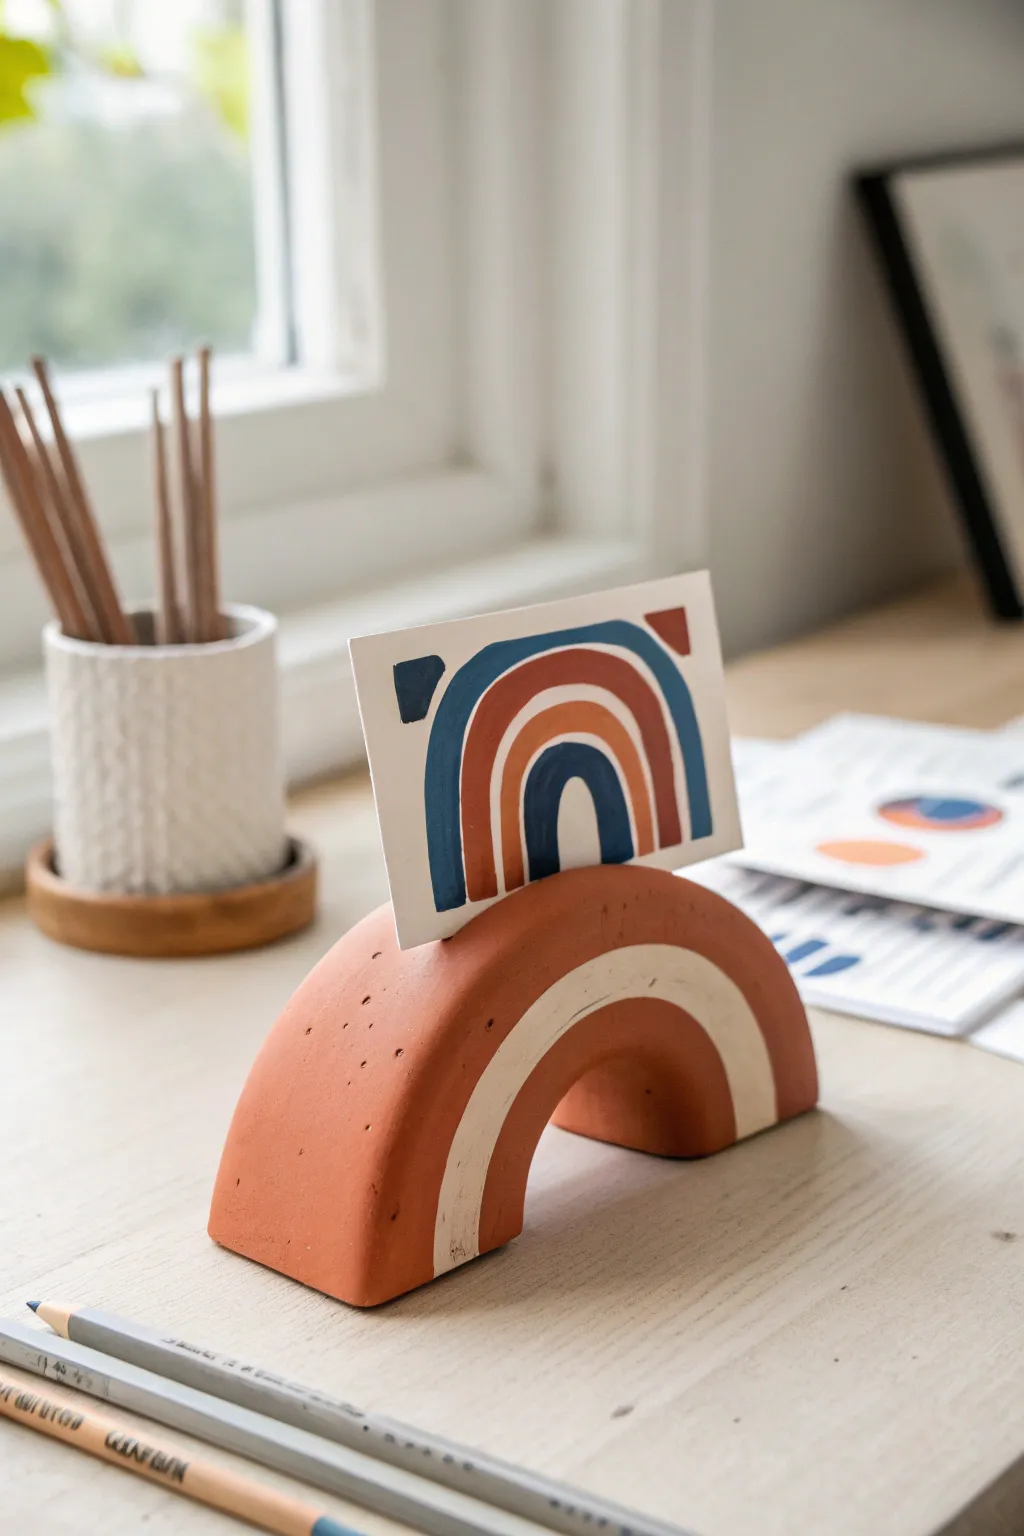
Bring a touch of modern warmth to your desk with this sculptural photo holder that mimics the look of fired terracotta. Its sturdy arched shape and hand-painted details create the perfect minimalist frame for your favorite postcards or photos.
Step-by-Step Tutorial
Materials
- Air dry clay (standard white or terracotta color)
- Acrylic rolling pin
- Sharp craft knife or clay blade
- Ruler
- Sandpaper (fine grit)
- Terracotta colored acrylic paint (burnt sienna mixed with a touch of white)
- Cream or off-white acrylic paint
- Flat paintbrushes (medium and small)
- Matte varnish or sealant
- Water bonding slip (water and clay mix)
- Sponge
Step 1: Sculpting the Base Form
-
Condition the clay:
Begin by taking a substantial chunk of air dry clay and kneading it thoroughly in your hands until it becomes warm, pliable, and free of cracks. -
Roll a log:
Roll the clay into a thick, even cylinder shape on your work surface. Aim for a thickness of about 1.5 to 2 inches to ensure the holder is stable enough to stand on its own. -
Form the arch:
Gently bend the cylinder into a ‘U’ shape to create the arch. Press the two ends onto the table so they flatten slightly, giving the piece a solid footing. -
Refine the shape:
Use your fingers and a damp sponge to smooth out the curve. You want a consistent width throughout the arch, so gently pat down any bulging areas. -
Create flat sides:
To get that crisp, architectural look, lay the arch on its side and gently flatten the front and back faces with your rolling pin or a flat block of wood.
Step 2: Adding the Card Slot
-
Cut the slot:
While the clay is still wet, take your craft knife or a ruler edge and press a deep groove into the very top center of the arch. This will hold your photo. -
Widen the groove:
Slightly wiggle the tool back and forth to widen the slot just enough to fit a standard cardstock thickness, ensuring it’s deep enough (about 0.5 inches) for stability. -
Smooth imperfections:
Re-smooth any clay that was displaced during the cutting process. Dip your finger in water to erase fingerprints and soften sharp edges. -
Drying time:
Place the piece in a cool, dry spot away from direct sunlight. Let it cure fully for 24-48 hours until it turns chalky white and feels room temperature to the touch. -
Sand for finish:
Once bone dry, use fine-grit sandpaper to remove any bumps or uneven texture. Pay special attention to the flat sides and the bottom feet.
Smooth Surface Secret
Before drying, wipe the wet clay with a tiny bit of baby oil on your finger. It eliminates fingerprints better than water and prevents cracking.
Step 3: Painting and Finishing
-
Base coat color:
Mix your burnt sienna and white acrylics to create a warm, earthy terracotta shade. Apply this all over the arch, covering every surface including the bottom. -
Second coat:
Allow the first layer to dry completely, then apply a second coat for a rich, opaque finish that looks like real ceramic. -
Draft the stripe:
For the decorative detail, lightly pencil in a curved stripe on the side face of the arch, following the contour of the rainbow shape. -
Paint the accent:
Using a small flat brush and cream-colored paint, carefully fill in the stripe area. I find steadying my pinky finger on the table helps keep the lines crisp. -
Touch ups:
If the cream paint looks streaky, add a second layer once dry. Fix any wobbly edges by cutting back in with your terracotta base color. -
Seal the piece:
Protect your work with a layer of matte varnish. This seals the paint and gives the clay a cohesive, professional finish that resists dust.
Terrazzo Twist
Mix small chips of colored dried clay into your wet white clay before rolling. Sand after drying to reveal a colorful terrazzo stone effect.
Pop in your favorite art print or photo and enjoy your handmade piece of decor

TRACK YOUR CERAMIC JOURNEY
Capture glaze tests, firing details, and creative progress—all in one simple printable. Make your projects easier to repeat and improve.
Wavy Catchall Bowl With Color Block
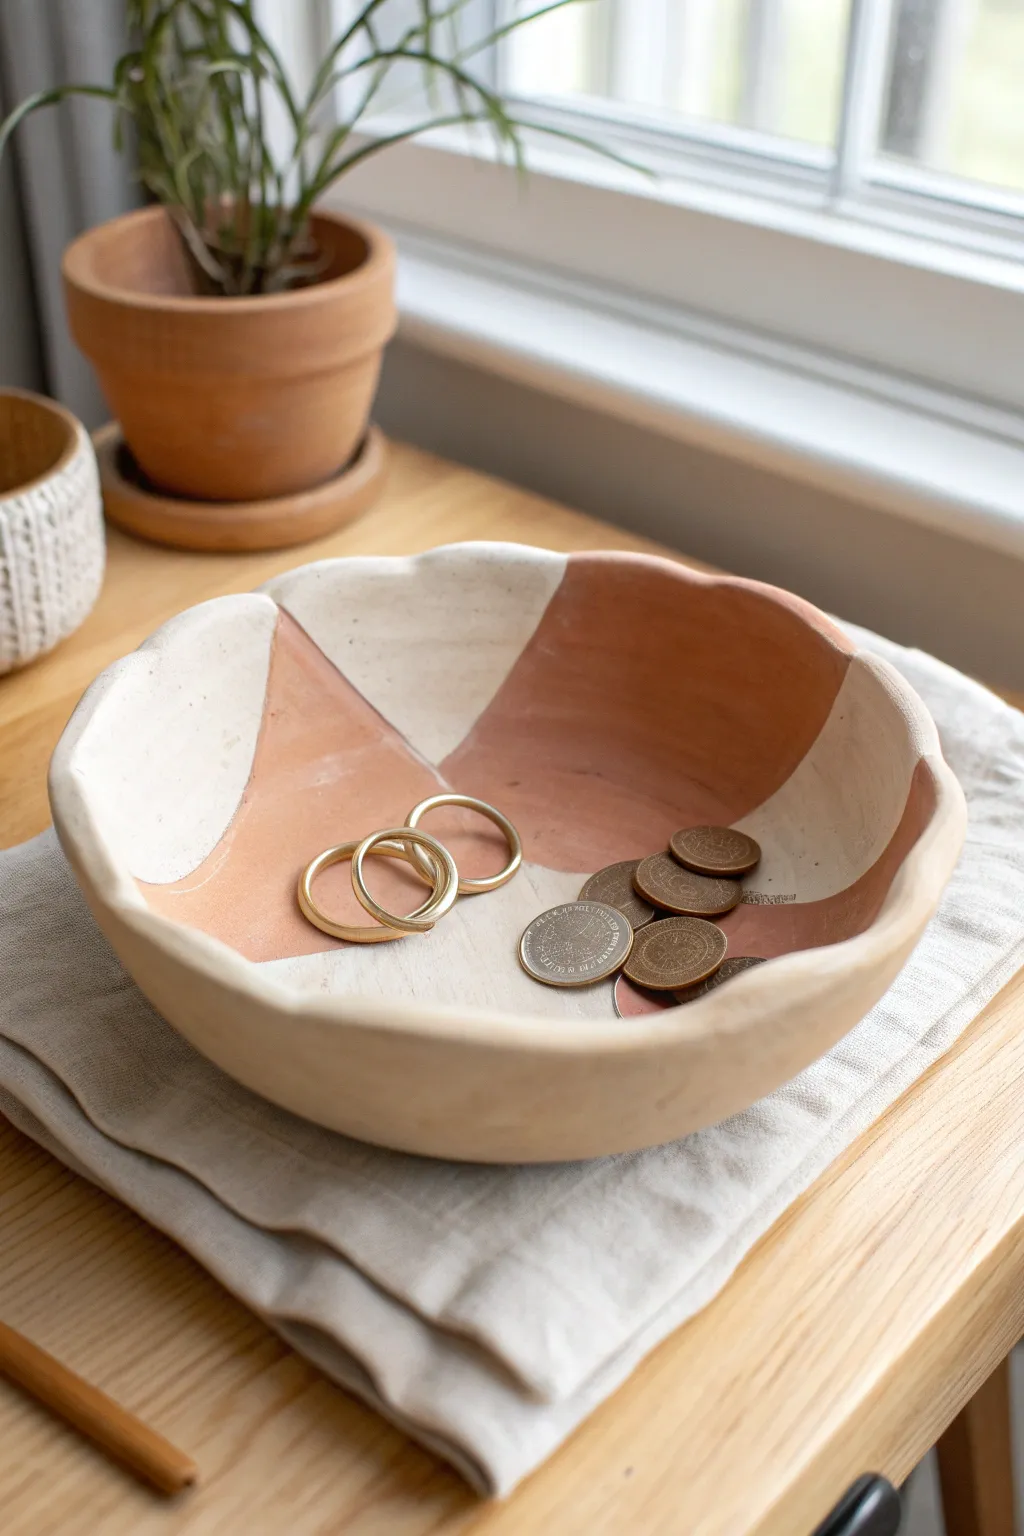
Embrace the organic beauty of handmade pottery without needing a kiln with this stylish catchall bowl. Featuring a unique wavy rim and a chic terracotta-and-white color block design, this piece is perfect for holding jewelry, keys, or loose change.
How-To Guide
Materials
- White air-dry clay (approx. 1 lb)
- Rolling pin
- Rolling guides or wooden slats (approx. 1/4 inch thick)
- Medium-sized bowl (for molding)
- Canvas mat or parchment paper
- Fettling knife or craft knife
- Sponge
- Small cup of water
- Sandpaper (fine grit)
- Acrylic paint (Terracotta/Burnt Sienna color)
- Painter’s tape or masking tape (optional)
- Flat paintbrush
- Matte sealant or varnish
Step 1: Shaping the Bowl Form
-
Preparation:
Begin by covering your workspace with a canvas mat or parchment paper to prevent sticking. Take a large handful of air-dry clay and knead it briefly until it is pliable and smooth. -
Rolling:
Place the clay on your mat. Use your rolling guides on either side of the clay to ensure an even thickness, then roll the clay out into a slab that is roughly 1/4 inch thick. Aim for a circle slightly larger than the bowl you plan to use as a mold. -
Cutting the Circle:
Place your molding bowl upside down onto the slab as a guide. Use your craft knife to cut a rough circle around it, leaving about 2-3 extra inches of diameter beyond the bowl’s rim. -
Molding:
Carefully lift your clay slab and drape it *inside* your molding bowl. Using the inside allows for a smoother interior surface. Gently press the clay down to fit the curve of the bowl, ensuring no air bubbles are trapped underneath. -
Creating the Waves:
The rim of the bowl in the image is organic and undulating. Use your fingers to gently push down on sections of the rim while pulling up mainly on others, creating a freeform, wavy edge. Don’t worry about perfection; the unevenness is part of the charm. -
Smoothing:
Dip your finger or a small sponge into water—just a tiny amount—and smooth out the rim and the interior surface. Remove any fingerprints or small cracks that may have formed during shaping. -
Drying:
Let the clay dry inside the mold for about 24 hours until it holds its shape on its own. Then, carefully remove it from the mold and flip it over on a drying rack for another 24-48 hours to ensure the bottom dries deeply.
Smooth Operator
To get that super smooth, professional finish, dip your finger in a vinegar-water mix (1 tsp vinegar to 1 cup water) while smoothing raw clay. It breaks down the surface slightly for a slick finish.
Step 2: Refining and Painting
-
Sanding:
Once the bowl is bone dry and chalky white, take your fine-grit sandpaper and gently sand the rim and any rough patches. Wipe away the dust with a slightly damp cloth or a dry brush. -
Sketching the Design:
Look at the geometrical pattern in the reference image. It uses large triangular sections. You can either freehand this by visualizing a ‘pie chart’ layout or lightly mark the dividing lines with a pencil. -
Taping (Optional):
For crisp lines, apply painter’s tape along the pencil marks. Press the edges of the tape down firmly to prevent paint from bleeding under. Alternatively, if you prefer the hand-painted look shown here, skip the tape. -
Painting First Section:
Load your flat brush with terracotta-colored acrylic paint. Fill in alternating sections of the bowl, painting from the center outward to the rim. Keep the paint application somewhat sheer or layered to mimic the texture of real terracotta clay. -
Painting the Rim:
Continue the color up and over the wavy rim. The image shows the color wrapping slightly over the edge, emphasizing the bowl’s organic shape. -
Touch Ups:
If you dripped any paint onto the white sections, simply wait for it to dry and paint over it with a bit of white acrylic, or gently sand it off if the clay is unsealed. -
Sealing:
Once the paint is completely dry, apply a coat of matte sealant or varnish to the entire bowl. This protects the clay from moisture and gives it a finished ceramic look.
Cracking Up?
Air dry clay shrinks as it dries, which can cause cracks. If you spot hairline factures while it’s drying, mix a tiny bit of fresh clay with water to make a paste and fill them in immediately.
Place your finished bowl on an entryway table or dresser to add a touch of modern, earthy elegance to your decor
Moon Phase Wall Hanging
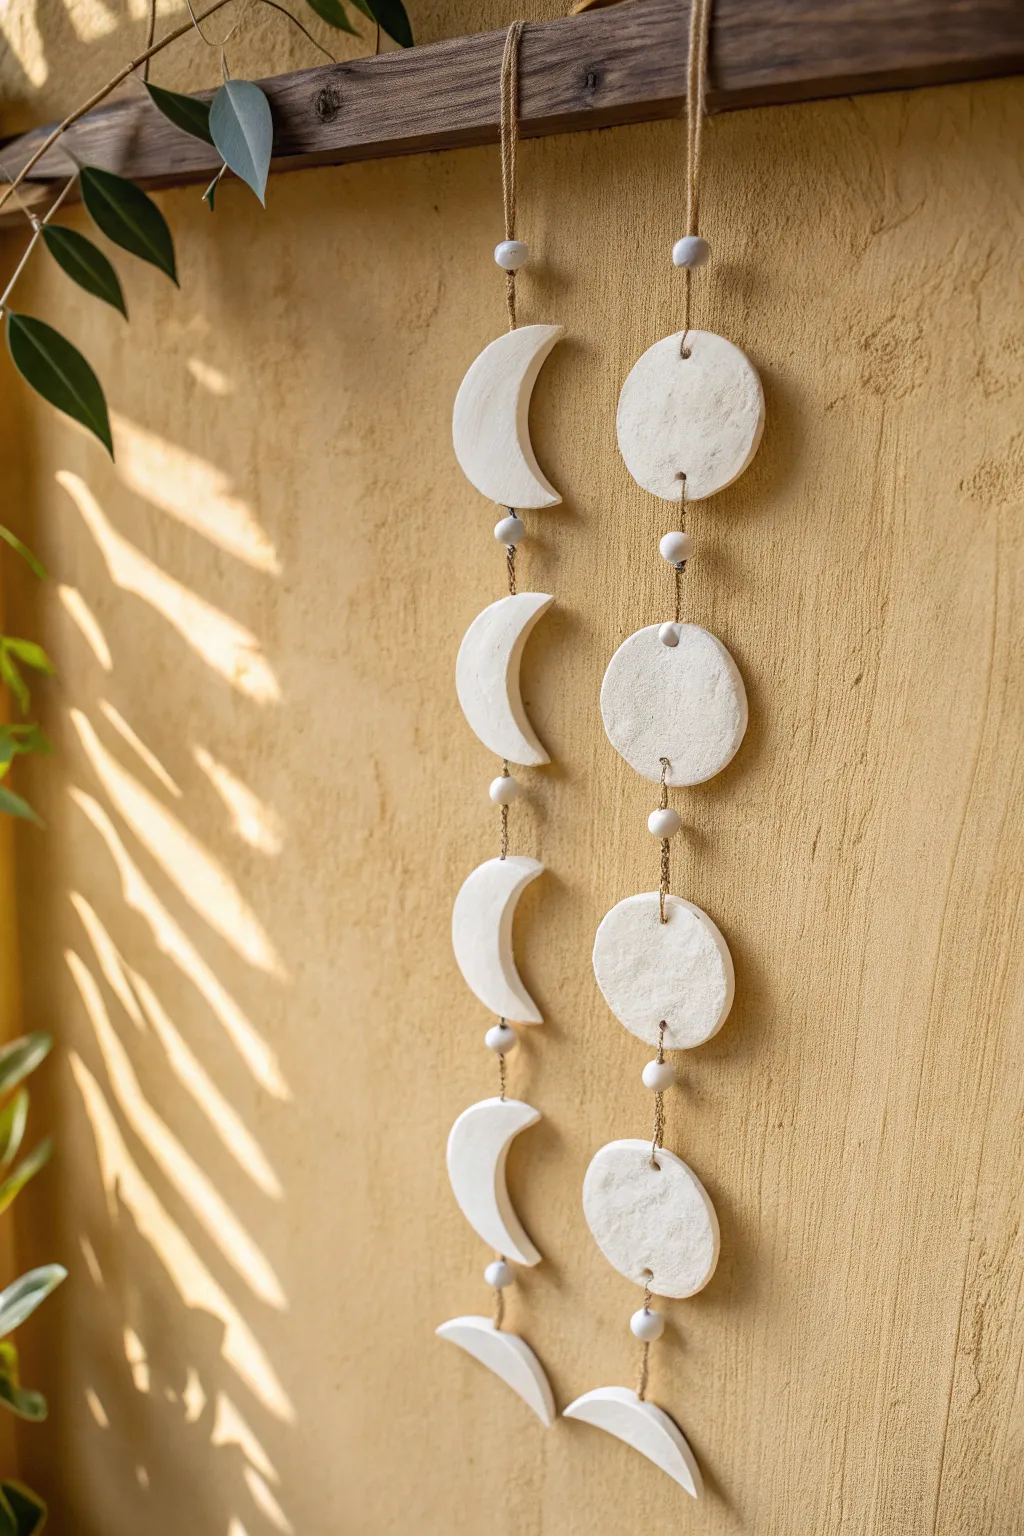
Bring a touch of cosmic energy into your space with this textured, minimalist moon phase wall hanging. The raw white clay against the natural twine creates an earthy, bohemian aesthetic that perfectly captures the cycle of the moon.
Step-by-Step Guide
Materials
- White stone air dry clay
- Rolling pin
- Circle cookie cutter (approx. 2.5-3 inches)
- Small round cutter or straw (for holes)
- Sandpaper (fine grit)
- Natural jute twine
- Wooden beads (unpainted, small with large holes)
- Scissors
- Driftwood or wooden dowel for hanging
Step 1: Shaping the Moons
-
Prepare the Clay:
Begin by kneading a large handful of air dry clay until it feels pliable and warm in your hands. This activates the binders and prevents cracking later suitable for flat pieces. -
Roll It Out:
Roll the clay out on a smooth surface or canvas mat to an even thickness of about 1/4 inch. If you want that lovely organic texture seen in the photo, don’t smooth the surface perfectly—little imperfections add character. -
Cut the Circles:
Use your large circle cookie cutter to stamp out five perfect circles. These will serve as your full moons and the base for your crescent moons. -
Form the Crescents:
Take three or four more circles (depending on how long you want your strands) and use the same circle cutter to slice a crescent shape out of them. Position the cutter off-center over the clay circle to create the classic ‘C’ shape. -
Pierce the Holes:
While the clay is still wet, use a straw or small tool to poke holes at the top and bottom of each shape. For the bottommost pieces (like the bottom crescent), you only need one hole at the top. -
Smooth the Edges:
Dip your finger in a little water and gently run it along the cut edges of your moons to soften any sharp ridges left by the cutter.
Step 2: Drying and Refining
-
Dry Flat:
Lay all your celestial shapes on a flat board or wire rack. To prevent curling, I usually place a light book or board on top of them once they are leather-hard (about 2-3 hours in). -
Flip and Wait:
Flip the pieces every few hours to ensure even airflow. Let them dry completely for at least 24 to 48 hours until they turn a chalky white color. -
Sand for Texture:
Once bone dry, take fine-grit sandpaper and lightly sand the edges. You can also scuff the surface vertically to enhance that stone-like texture visible in the reference.
Clean Edges Trick
Before the clay dries, dip your finger in water and smooth specifically the *inside* of the holes you punched. This protects the twine from snagging on sharp clay bits later.
Step 3: Assembly
-
Cut the Twine:
Cut two long lengths of jute twine, measuring about 3 feet each to give yourself plenty of slack for knotting. -
Start the Top Strand:
Tie the top of your first string to your driftwood branch or dowel. Thread a wooden bead onto the string and slide it up. -
Attach First Hanging Shape:
Thread the twine through the top hole of your first shape (e.g., a crescent). Tie a knot behind the shape or thread it through and loop it to secure it in place. -
Add Spacers:
Thread the twine through the bottom hole of that first shape, then add another wooden bead. This bead acts as a visual spacer between your moon phases. -
Continue the Pattern:
Repeat this pattern—bead, clay shape, bead—working your way down the strand. Ensure you leave a small gap of twine between components so the mobile moves freely. -
Secure the End:
Once you reach the final bottom piece, thread the string through the single top hole, tie a sturdy double knot on the back side, and trim the excess twine close to the knot. -
Repeat for Second Strand:
Assemble the second strand exactly like the first, perhaps alternating the order of circles and crescents for variety, and attach it to the wood dowel beside the first one.
Gilded Edges
For a luxe upgrade, paint just the thin side edges of your moons with metallic gold liquid leaf paint. It adds a subtle shimmer when the mobile turns.
Hang your new moon phases near a window to watch the light play across the textured surfaces throughout the day
Abstract Shape Wall Garland
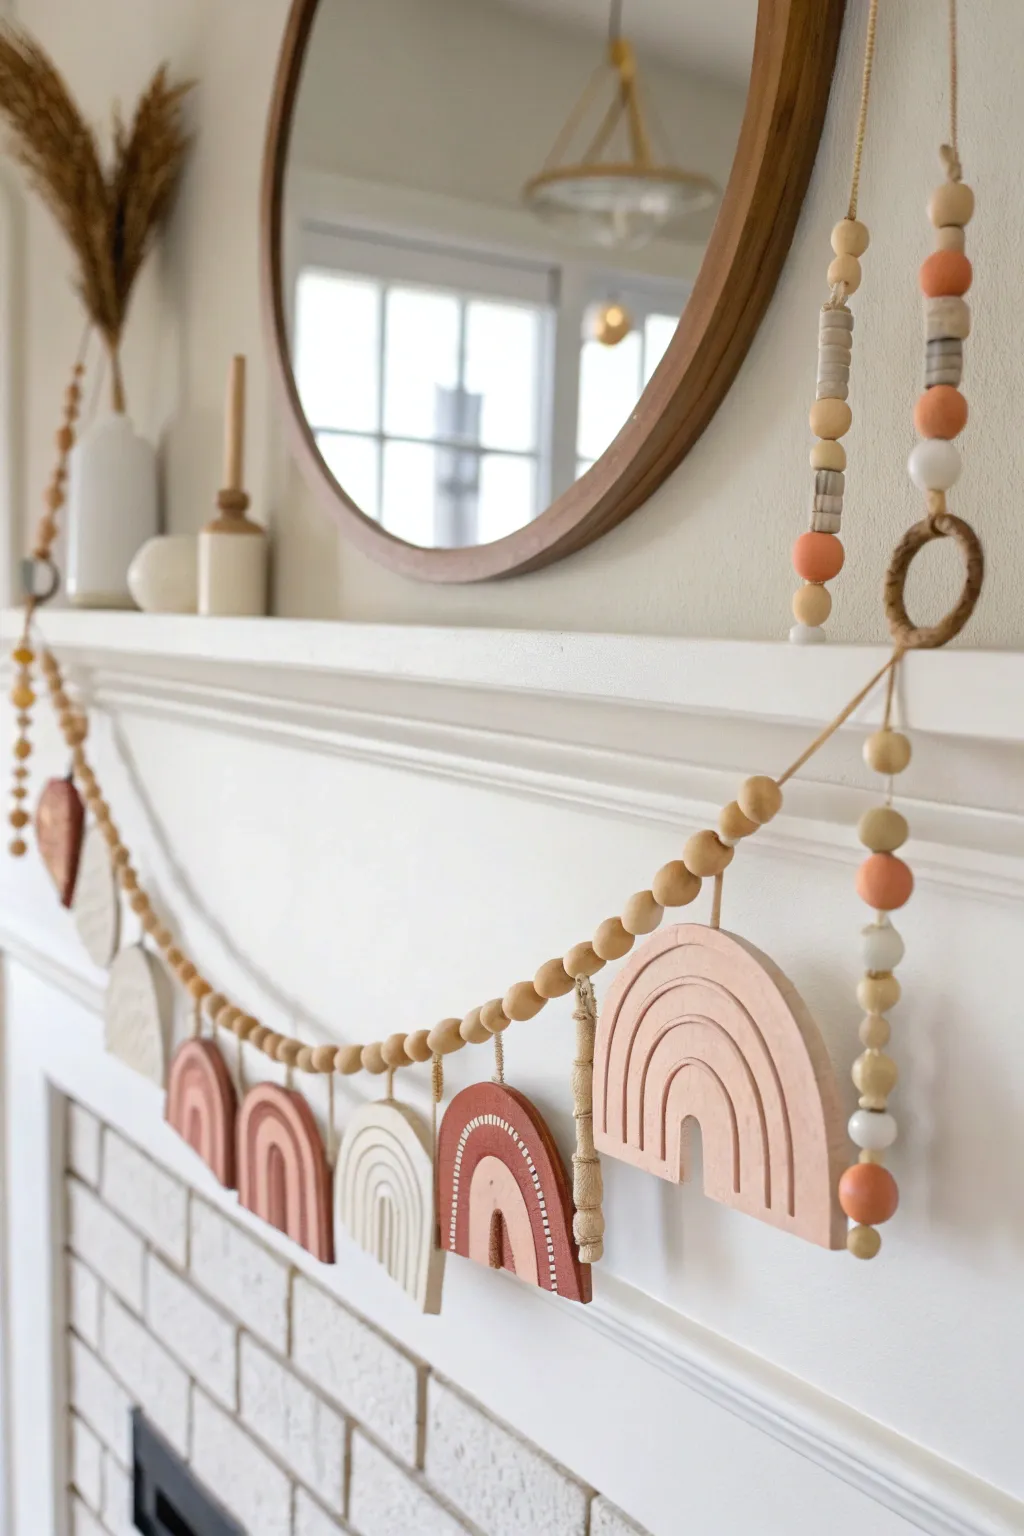
Bring cozy, earthen textures to your mantle or nursery with this delightful beaded garland featuring handcrafted air-dry clay rainbows. The mix of natural wood beads and matte, terracotta-toned clay creates a warm, Scandinavian-inspired accent that looks lovely year-round.
Detailed Instructions
Materials
- Air-dry clay (white or terracotta)
- Acrylic paints (terracotta, cream, blush pink, white)
- Rolling pin
- Clay knife or craft knife
- Straw or skewer (for poking holes)
- Bakers twine or heavy-duty string (neutral color)
- Wooden beads (assorted sizes: 10mm, 16mm, 20mm)
- Colored wooden beads (matching clay tones)
- Fine grit sandpaper
- Small flat paintbrush
- Detail brush (for white accents)
- Matte finish sealant (optional)
Step 1: Sculpting the Rainbows
-
Roll the clay slab:
Begin by rolling out a generous portion of your air-dry clay on a smooth surface until it is about 1/4 inch thick. Aim for an even thickness so all your rainbow pieces dry at the same rate and have a uniform look. -
Cut the base shapes:
Using a craft knife, cut out semi-circle arch shapes. A great trick is to use a large cookie cutter or a bowl rim to impress a circle, then cut it in half to get two perfect arches at once. -
Carve the arches:
For the defined rainbow look, use your clay knife to gently score curved lines into the semi-circles to mimic separate rainbow bands. Don’t cut all the way through; you just want deep grooves to create dimension. -
Alternative method: coil building:
If you prefer a more tactile look, roll three snakes of clay of varying lengths. Arch them inside one another and gently press the sides together to fuse them into a rainbow shape, smoothing the back with a little water. -
Add suspension holes:
Before the clay begins to harden, take your plastic straw or skewer and poke a hole through the top center of the outermost arch. Ensure the hole is large enough for your twine to pass through easily. -
Dry completely:
Lay your shapes on a drying rack or parchment paper. Let them dry for 24-48 hours, flipping them occasionally to prevent warping as the moisture evaporates.
Step 2: Painting and Finishing
-
Sand edges:
Once fully dry, use fine-grit sandpaper to gently smooth any rough edges or uneven spots on the perimeter of your rainbows. -
Apply base colors:
Paint your rainbows in alternating earth tones. Paint one solid blush pink, another deep terracotta, and keep some natural cream. Using a flat brush helps get smooth coverage without visible strokes. -
Add detailed patterns:
Once the base coats are dry, use your detail brush to add interest. Paint thin white arches inside the grooves of the terracotta rainbows, or add small dashed lines for a stitched look. -
Seal (optional):
If you want extra durability, apply a coat of matte sealant. I find this helps protect the paint from chipping when the garland is stored.
Pro Tip: Hidden Strength
Add a drop of clear craft glue inside the bead holes flanking the clay rainbows. This keeps the beads snug against the clay piece so it doesn’t slide around or flip backward while hanging.
Step 3: Assembling the Garland
-
Prepare the string:
Cut a length of baker’s twine or heavy cord to your desired mantle length, leaving about 12 inches of extra slack on each end for hanging loops. -
Tie end loops:
Create a loop at one end of the string and secure it with a knot. Thread a large wooden ring or a few large beads immediately after the knot to anchor the design. -
Start beading:
Begin threading your wooden beads. Create a pattern by alternating sizes—perhaps three small beads followed by one large bead—to create visual rhythm. -
Attach the rainbows:
After a section of beads (about 6-8 inches), thread the string through the hole of your first clay rainbow. If you want the rainbow to hang lower, you can tie it onto a small vertical drop of string instead of threading it directly. -
Continue the pattern:
Repeat the beading and rainbow attachment process across the length of the string, ensuring the rainbows are spaced evenly apart. -
Create vertical accents:
To match the photo, create vertical distinct hangers by tying a separate string to the main garland line, threading beads vertically, and attaching a rainbow at the bottom. -
Finish the strand:
Once you reach the end, verify the spacing matches your first side, then tie off the final loop and trim any excess string.
Troubleshooting: Warped Clay
If your rainbow arches curl up while drying, weigh them down gently with a heavy book placed over a sheet of parchment paper once they are “leather hard” (partially dry but firm).
Hang your beautiful new garland and enjoy the warmth it brings to your space.
Modern Desk Organizer Trio
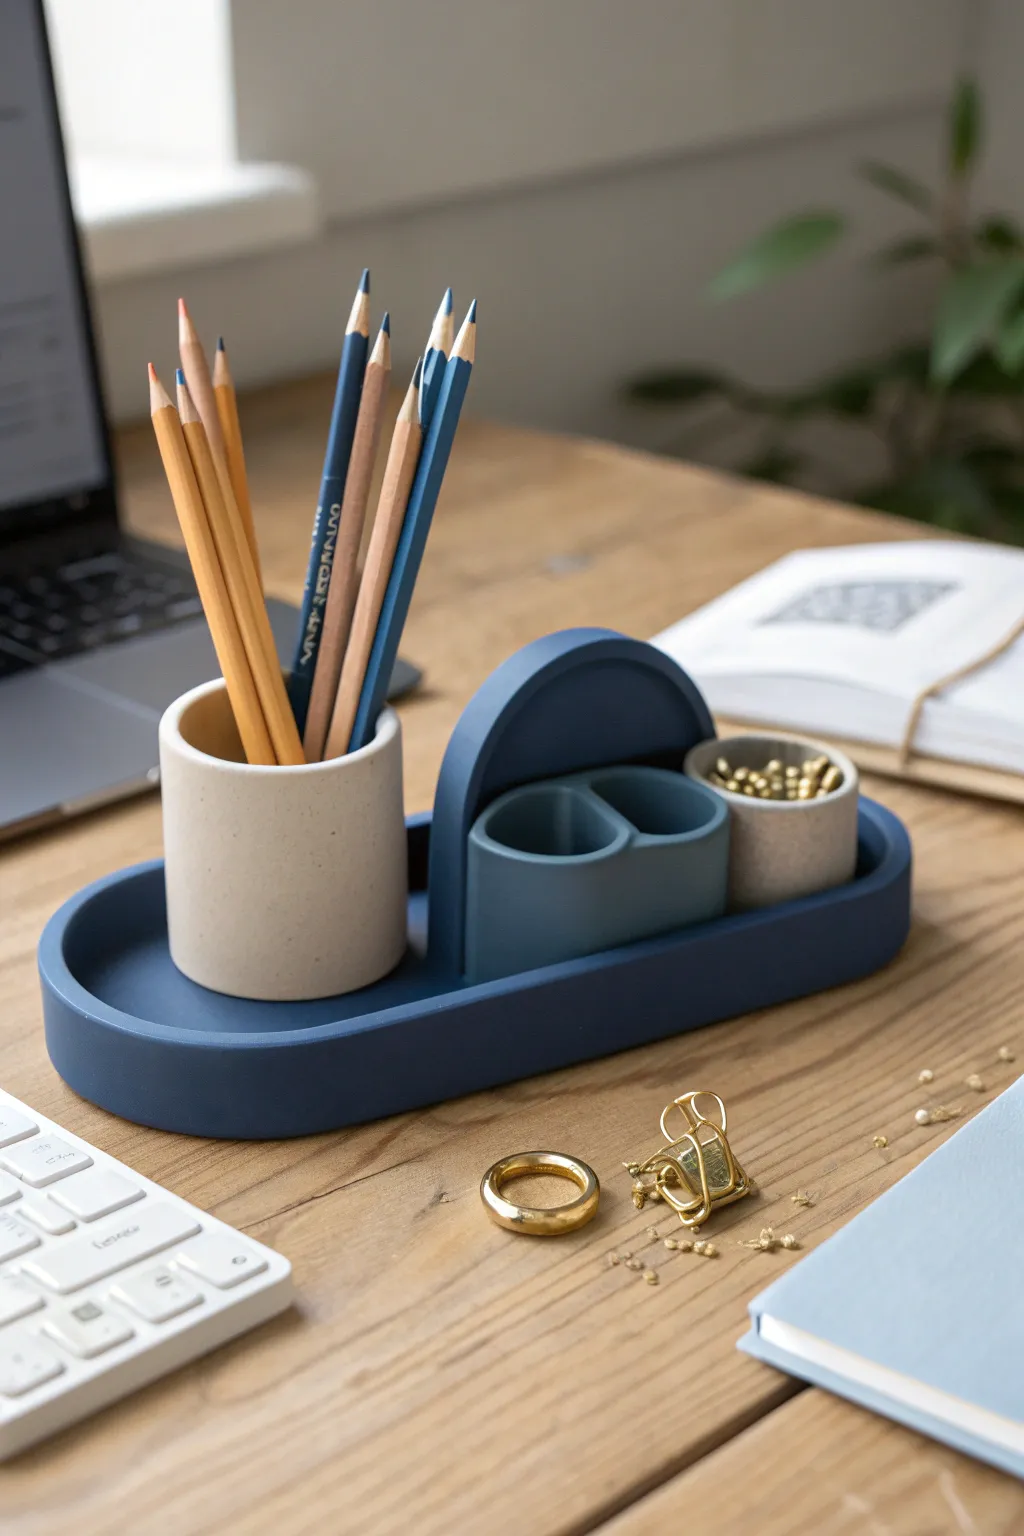
Elevate your workspace with this sleek, modular desk organizer that combines functional storage with contemporary design. Using air dry clay, you’ll create a unified tray system featuring a pencil cup, a catch-all dish, and a unique arched divider.
Step-by-Step
Materials
- Air dry clay (white or grey)
- Rolling pin
- Clay knife or craft knife
- Sandpaper (medium and fine grit)
- Acrylic paints (navy blue, off-white/cream)
- Matte varnish or sealant
- Water and sponge for smoothing
- Circular cookie cutters or cups (various sizes)
- Ruler
- Cardboard for templates
Step 1: Base Construction
-
Roll the base slab:
Start by conditioning a large chunk of clay and rolling it out to a uniform thickness of about 1/4 inch. This needs to be sturdy enough to hold the other components. -
Cut the oval shape:
Create a pill-shaped template from cardboard (a long rectangle with rounded ends) about 8-10 inches long. Place this on your clay slab and cut around it cleanly with your craft knife. -
Form the rim coil:
Roll a long, even snake of clay, approximately the thickness of a pencil. Flatten it slightly with your finger or a roller to create a ribbon shape. -
Attach the rim:
Score and slip the edges of your oval base. Attach the flattened clay ribbon around the perimeter to create a raised rim, smoothing the seam on both the inside and outside so it looks like one solid piece.
Seamless Connections
Use a wet paintbrush instead of just your fingers to smooth tight corners where the cups meet the tray. This creates a flawless, manufactured look.
Step 2: Creating the Components
-
Form the tall cylinder:
Roll out another slab of clay. Cut a rectangular strip and wrap it around a tube or glass (dusted with cornstarch to prevent sticking) to form the pencil cup. Use a circle cutter to make a base and attach it. -
Smooth the cylinder:
Once the seam is joined and the base attached, gently slide it off your form. Wet your fingers to smooth out any connection points until the cylinder is seamless. -
Create the arched divider:
Cut a thick semi-circle from a slab (about 1/2 inch thick). This acts as the visual anchor and backplate for the smaller compartments. -
Build the central connector:
Create a small, chunky rectangular block or a double-slot holder that will sit in front of the arch. This piece adds weight and visual interest to the center. -
Make the small dish:
Using the same coil or slab method as the first cup, create a much shorter, wider cylinder to serve as the catch-all for clips. Ensure the walls are the same thickness as your main pencil cup. -
Test the arrangement:
Place all your wet components onto the base tray to ensure they fit comfortably. I like to mark their positions lightly with a tool so I know exactly where to glue them later.
Preventing Warping
If the long base tray starts curling up at the edges while drying, gently place a small weighted board on top of the empty areas to keep it flat.
Step 3: Assembly and Finishing
-
Join the components:
Score the bottom of each component and the corresponding spot on the base tray. Apply slip and press them firmly into place. The arch should sit near the center, with the block in front of it. -
Refine the seams:
Use a small clay tool or brush to blend the bottom of each container into the base tray. The goal is to make it look like a single-molded plastic piece. -
Initial slow drying:
Cover the project loosely with plastic wrap for the first 24 hours to prevent cracking. Then, remove the plastic and let it air dry completely for another 24-48 hours. -
Sanding for smoothness:
Once fully dry, sand the entire piece. Start with medium grit to level bumps, then switch to fine grit to get that ultra-smooth, modern finish. -
Base coat painting:
Apply a coat of navy blue acrylic paint to the entire tray base, the arch, and the central block. You may need two coats for full opacity. -
Accent painting:
Paint the tall pencil cup and the small clip dish in an off-white or cream color. Use a fine brush to get a crisp line where the cups meet the blue base. -
Speckle effect:
For the stone-like texture on the cream cups, dilute a tiny bit of brown or grey paint. Dip an old toothbrush in it and flick the bristles to spray tiny speckles over the white areas. -
Seal the project:
Finish with a matte varnish to protect the paint and give the organizer a professional, high-end look.
Place your new organizer on your desk and enjoy the satisfaction of a tidy workspace
Statement Air Dry Clay Earrings
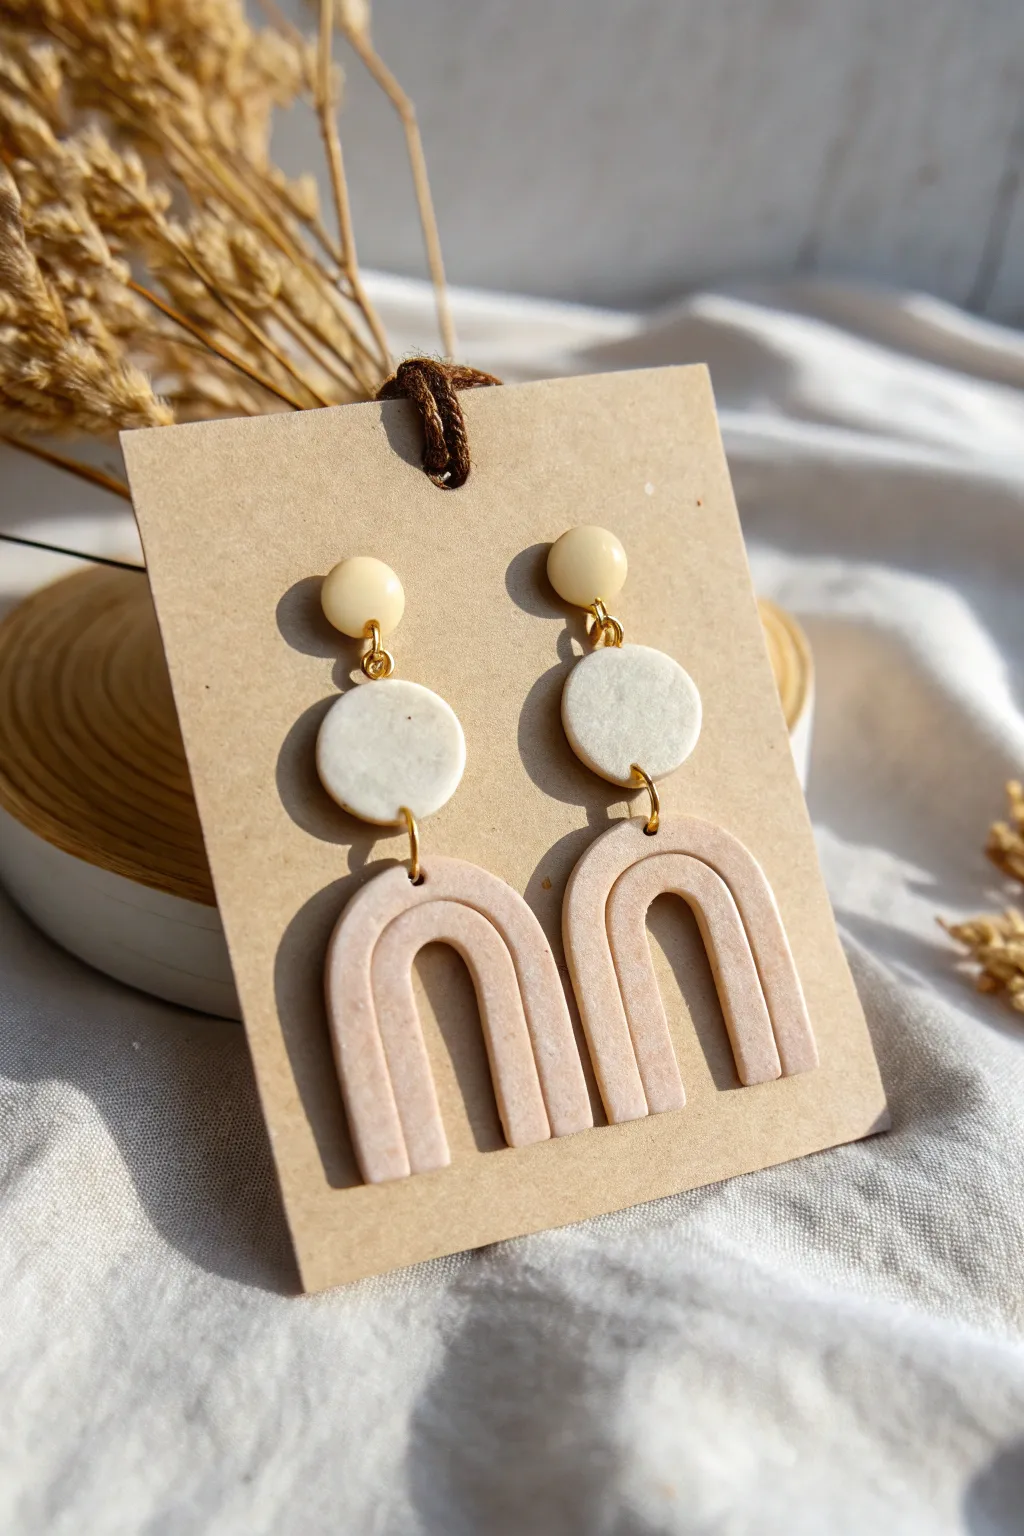
Embrace a warm, minimalist aesthetic with these textured arched statement earrings. Combining three distinct shapes and subtle neutral tones, they offer a sophisticated yet handmade charm perfect for everyday wear.
Detailed Instructions
Materials
- Air dry clay (white)
- Acrylic paint (beige, light ochre, pink)
- Small rolling pin
- Clay cutters (small circle, medium circle, arch shape)
- Toothpick or needle tool
- Jump rings (gold)
- Earring posts and backs
- Strong craft glue (E6000 or similar)
- Fine-grit sandpaper
- Pliers (flat nose and round nose)
- Used coffee grounds or black pepper (for texture)
- Gloss varnish or clear nail polish
Step 1: Prepping and Mixing
-
Condition the Clay:
Start by taking a chunk of white air dry clay and kneading it in your hands until it becomes soft, pliable, and free of cracks. -
Create the Speckled Texture:
To achieve that natural, stone-like look, sprinkle a tiny pinch of used dry coffee grounds or coarse black pepper into the clay. Knead thoroughly until the speckles are evenly distributed. -
Tint the Clay:
Divide your clay into three small balls. Leave one plain (or barely tinted off-white) for the middle circles. Mix a tiny drop of beige and pink paint into the second ball for the arches. Mix a drop of ochre and beige into the third for the top studs.
Smooth Surface Secret
Dip your finger in a tiny bit of water and glide it over the raw clay edges before drying. It smooths out imperfections instantly, saving you sanding time later.
Step 2: Shaping the Components
-
Roll Out the Clay:
Using your rolling pin, roll out the pink-beige clay to an even thickness of about 3-4mm. I like to use playing cards on either side of the roller as depth guides to keep it perfectly flat. -
Cut the Arches:
Use your arch-shaped clay cutter to punch out two identical arch shapes. If you don’t have a cutter, print a template on paper, lay it over the clay, and carefully trace around it with a needle tool. -
Add Detail Lines:
Using a needle tool or a blunt side of a knife, gently press an indentation creating an inner arch line that follows the contour of the shape. Don’t cut all the way through; just create a surface groove. -
Cut Middle Circles:
Roll out the white speckled clay next. Use a medium-sized circle cutter to punch out two discs. -
Form the Top Studs:
For the top studs, roll two small balls of the ochre-tinted clay. Press them gently onto your work surface to flatten the back while keeping the top slightly domed. -
Pierce Holes:
Before the clay dries, use a toothpick or needle tool to poke holes for the jump rings. You need holes at the top of the arches, both top and bottom of the middle circles, and near the bottom lip of the top studs.
Oh No, It Curled!
If your flat pieces curl up while drying, place a heavy book on top of them once they are partially dry (leather-hard) to force them flat again.
Step 3: Finishing and Assembly
-
Dry Completely:
Place your pieces on a clean, flat surface to dry. This usually takes 24-48 hours depending on humidity. Flip them over halfway through to ensure even drying. -
Sand Edges:
Once bone dry, take fine-grit sandpaper and gently smooth the edges of all pieces to remove any rough spots or burrs. -
Apply Varnish:
For the top studs specifically, apply a coat of gloss varnish or clear nail polish to give them that shiny, ceramic-like finish visible in the photo. Leave the other pieces matte for contrast. -
Glue Earring Posts:
Turn the domed studs over and apply a dab of strong craft glue to the flat back. Press an earring post into the glue and let it cure fully according to the glue instructions. -
Open Jump Rings:
Using two pairs of pliers, twist your gold jump rings open sideways (never pull them apart). -
Connect the Arch:
Loop a jump ring through the top of the arch and the bottom of the white circle. Close the ring securely. -
Connect the Stud:
Loop a second jump ring through the top of the white circle and the hole you made in the stud component. Close the ring to complete the assembly.
Now you have a stunning, lightweight pair of custom earrings ready to elevate any outfit.
Marble-Effect Air Dry Clay Beads
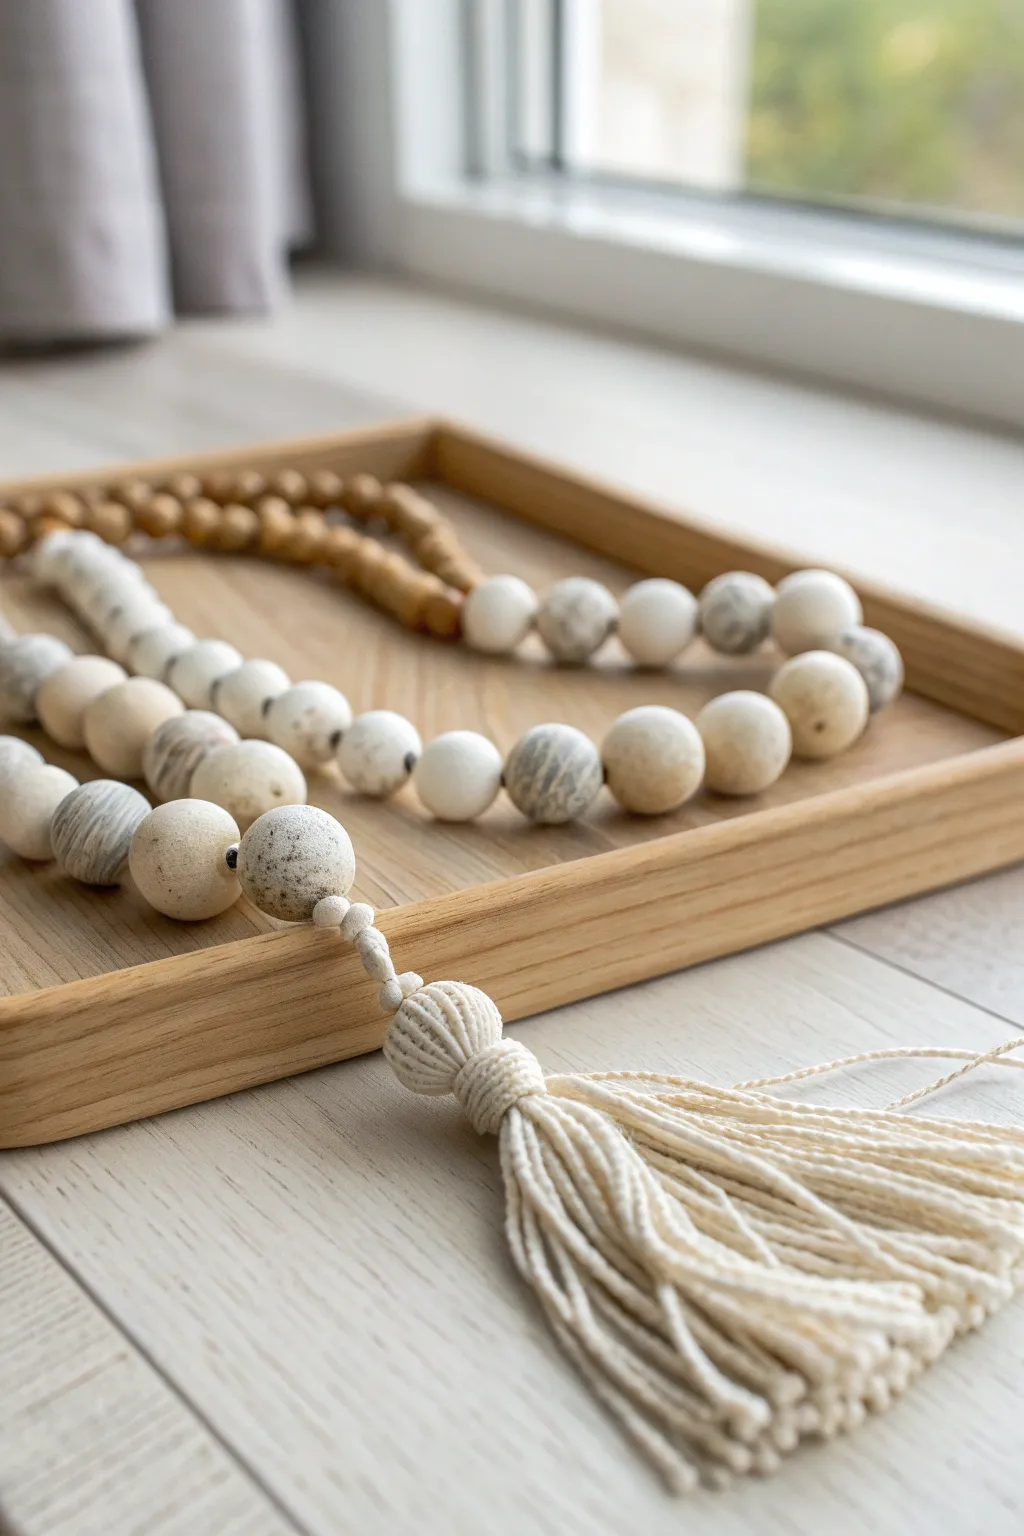
Create a serene accent for your home or a wearable piece of art with this DIY mala necklace project. Using air-dry clay, you’ll craft a strand of oversized beads featuring a subtle, organic grey-and-white marble effect.
Step-by-Step
Materials
- White polymer air-dry clay
- Grey or black polymer air-dry clay (for marbling)
- Black acrylic paint (optional, for speckling)
- Thick cotton cord or jute twine
- Toothpicks or a bamboo skewer
- Sandpaper (fine grit)
- Old toothbrush (optional)
- Scissors
- Sealer (matte varnish, optional)
Step 1: Marbling the Clay
-
Prepare the base:
Start by conditioning a large block of white air-dry clay in your hands until it is pliable and smooth. -
Add the contrast:
Take a very small amount of grey or black clay—less is more here—and break it into tiny bits. -
Begin mixing:
Press the dark bits into the white clay block randomly. Fold the white clay over the dark pieces. -
Twist and fold:
Twist the clay into a rope shape, then fold it in half, and twist again. Repeat this motion until you see streaks appearing. -
Stop early:
Be careful not to overmix; stop twisting when you have distinct swirls rather than a solid grey color.
Step 2: Forming the Beads
-
Portion the clay:
Roll your marbled clay into a long, even log and cut it into equal segments to ensure your beads are roughly the same size. -
Roll spheres:
Roll each segment between your palms to create a smooth sphere. I prefer to use a light touch to keep the shape perfectly round. -
Creating the hole:
While the clay is still wet, carefully push a toothpick or skewer through the center of each bead. Wiggle it slightly to ensure the hole is large enough for your cord. -
Speckle effect (optional):
To mimic the speckled stoneware look in the photo, dip an old toothbrush in watered-down black paint and flick tiny droplets onto a few random beads. -
Solid beads:
Create a few smaller beads using unmixed solid beige or wood-toned clay if you want to recreate the two-tone look at the back of the strand. -
Drying time:
Place the beads on a drying rack or parchment paper. Rotate them every few hours so they don’t develop flat spots as they dry overnight.
Cracking Issues?
If beads crack while drying, you can repair them by mixing a tiny bit of fresh clay with water to make a ‘slip’ paste. Fill the crack, smooth it, and let dry again.
Step 3: Assembly and Tassel
-
Refine the surface:
Once fully dry, use fine-grit sandpaper to gently smooth out any fingerprints or rough ridges on the beads. -
Seal:
Apply a coat of matte varnish to protect the clay while maintaining that natural, stony appearance. -
Stringing:
Cut a long length of thick cotton cord. Tie a knot at one end (leaving a long tail) and thread your beads, alternating the marbled ones with any accent beads you made. -
Creating the tassel skeleton:
Wrap your cotton cord around a piece of cardboard (about 4 inches long) 30-40 times. -
Securing the loops:
Slide the loops off the cardboard. Take the tail ends of your beaded necklace and tie them firmly around the midpoint of the looped yarn bundle. -
Making the tassel head:
Fold the loops down so both sides meet. Cut a separate piece of cord and wrap it tightly around the top neck of the bundle to form the bead-like head of the tassel. -
Trimming:
Cut the bottom loops of the tassel and trim the fringe so it is straight and even. -
Final connection:
Ensure the knot connecting the tassel to the necklace is pulled tight and hidden inside the tassel head.
Scent Diffuser
Leave the beads unsealed to use them as an essential oil diffuser. The porous clay will absorb drops of oil and release scent slowly over time.
Drape your finished beads over a wooden tray or hang them on a wall hook for an instant touch of texture and calm
Chunky Clay Chain Link Sculpture
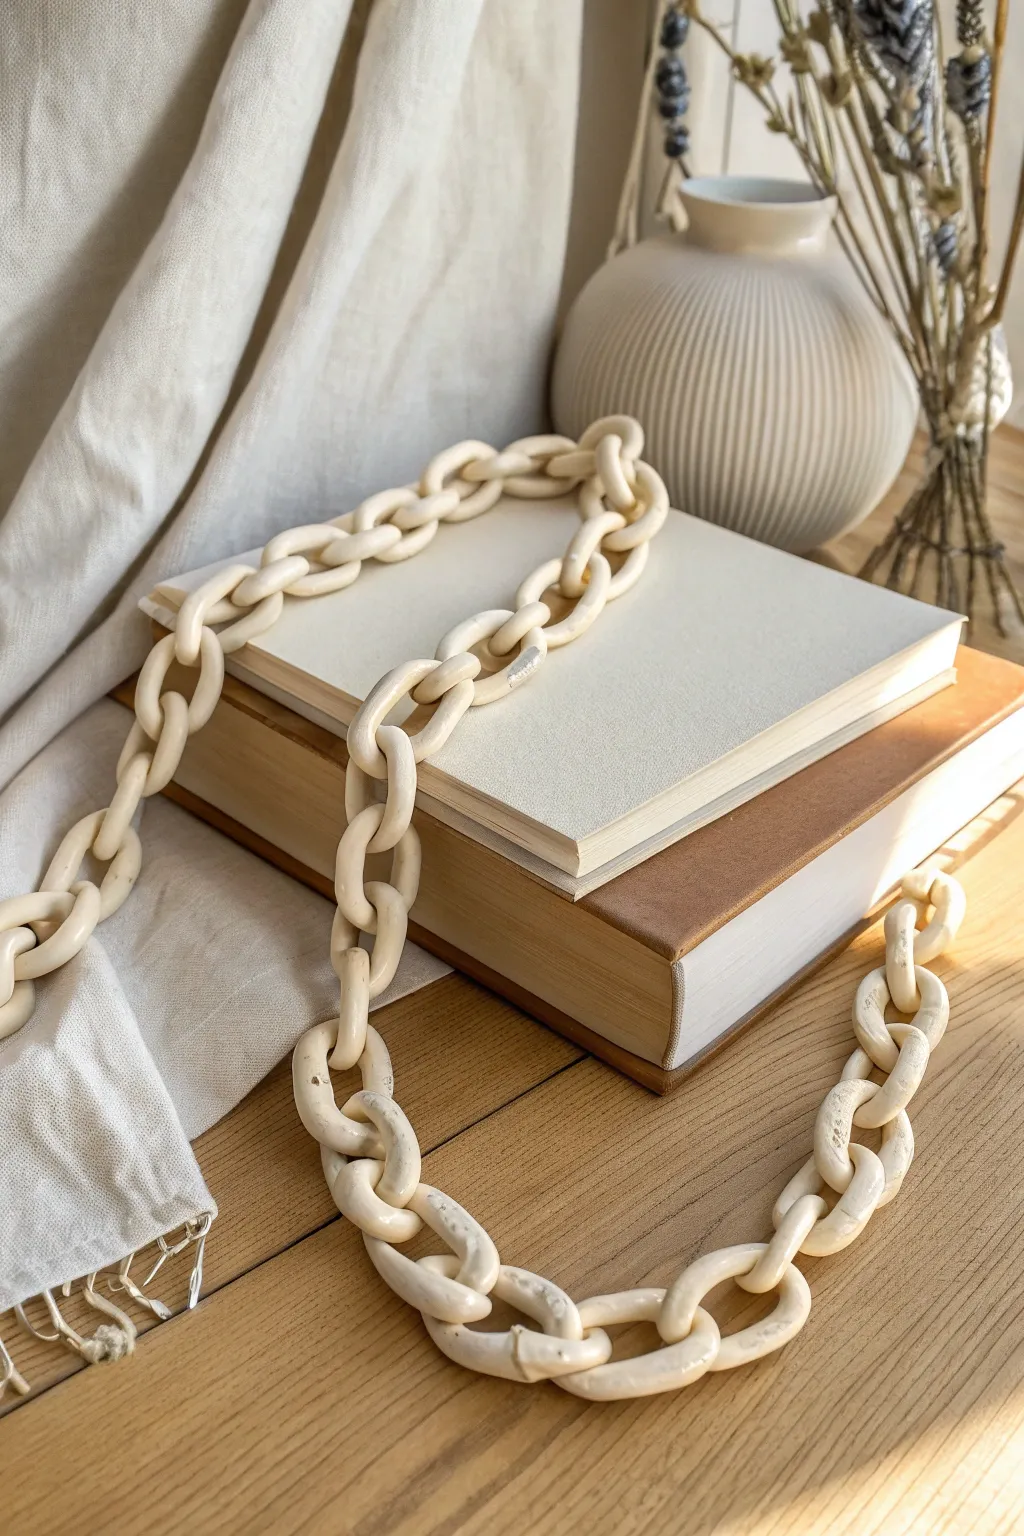
Transform simple air dry clay into a high-end designer dupe with this oversized chain link sculpture. Its matte, creamy finish and organic texture make it the perfect statement piece for styling coffee tables or bookshelves.
Step-by-Step Tutorial
Materials
- White or natural air dry clay (approx. 1kg)
- Acrylic rolling pin
- Ruler or measuring tape
- Cutting tool (clay knife or smooth kitchen knife)
- Small cup of water
- Sandpaper (fine grit)
- Soft paintbrush
- Opaque white or cream acrylic paint (optional)
- Matte sealant spray
Step 1: Forming the Link Base
-
Prep your clay:
Start with a large chunk of clay and knead it thoroughly in your hands to warm it up. This conditioning step is crucial to prevent cracking later on. -
Roll the first snake:
Take a portion of clay roughly the size of a plum and roll it into a long, even coil or ‘snake’ on a smooth surface. Aim for a thickness of about 1/2 inch to 3/4 inch. -
Measure for consistency:
For alternating sized links like the inspiration photo, decide on two lengths. Cut your first coil to roughly 5 inches long for a standard link. -
Create the first loop:
Bring the two ends of your coil together to form an oval shape. Overlap the ends slightly or press them firmly against each other to close the loop.
Step 2: Connecting the Chain
-
Seamless joinery:
Dip your finger in a tiny bit of water and smooth the seam where the ends meet. You want the join to disappear completely, blending the clay until it looks like one continuous piece. -
Start the second link:
Roll out your next coil of clay, maintaining that same thickness. Thread this new straight coil physically through the center of your first finished link *before* you close it up. -
Seal and repeat:
Join the ends of the second link just like the first, smoothing the seam with water. Continue this process, linking each new coil through the previous loop. -
Vary the shapes:
To match the organic look of the photo, make some links slightly more circular and others more elongated ovals. This subtle variation adds to the handmade charm. -
Check the drape:
As your chain grows, gently lift it to ensure the links move freely and aren’t sticking together at the contact points. If they stick, gently separate them while the clay is still damp. -
Final length check:
Continue adding links until you reach your desired length—usually about 15-20 links is perfect for draping over books.
Cracks Appearing?
Mix a tiny amount of raw clay with water to create a paste (slip). Fill the crack with this paste, smooth it with a finger, and let it dry again.
Step 3: Refining and Finish
-
Initial drying:
Lay the chain out flat on a clean surface or parchment paper to dry. I find it helpful to rotate the links every few hours so the bottom side gets airflow and doesn’t flatten out too much. -
Full cure time:
Let the piece dry completely for at least 24-48 hours. The clay will turn from a cool grey to a chalky white when fully dry. -
Sanding for smoothness:
Once bone dry, take your fine-grit sandpaper and gently buff out any fingerprints, bumps, or rough seams. Be gentle, as dried clay can be brittle. -
Dust off:
Use a dry, soft paintbrush to sweep away all the sanding dust from every crevice of the chain. -
Painting (Optional):
For that uniform creamy look shown in the image, apply a coat of diluted cream acrylic paint. This evens out the color while keeping the texture natural. -
Distressing approach:
If you want the weathered look seen in the photo, lightly sand the painted edges again to reveal a bit of the raw clay underneath. -
Final protectant:
Finish with a light mist of matte sealant spray to protect your sculpture from dust and moisture without adding unwanted shine.
Texture Pro-Tip
For a stone-like texture, mix a teaspoon of baking soda into your paint or dab the wet paint with a paper towel instead of brushing smoothly.
Style your new sculpture over a stack of hardcover books or coiled inside a decorative bowl for an effortless decorative touch
Cutout Air Dry Clay Suncatcher
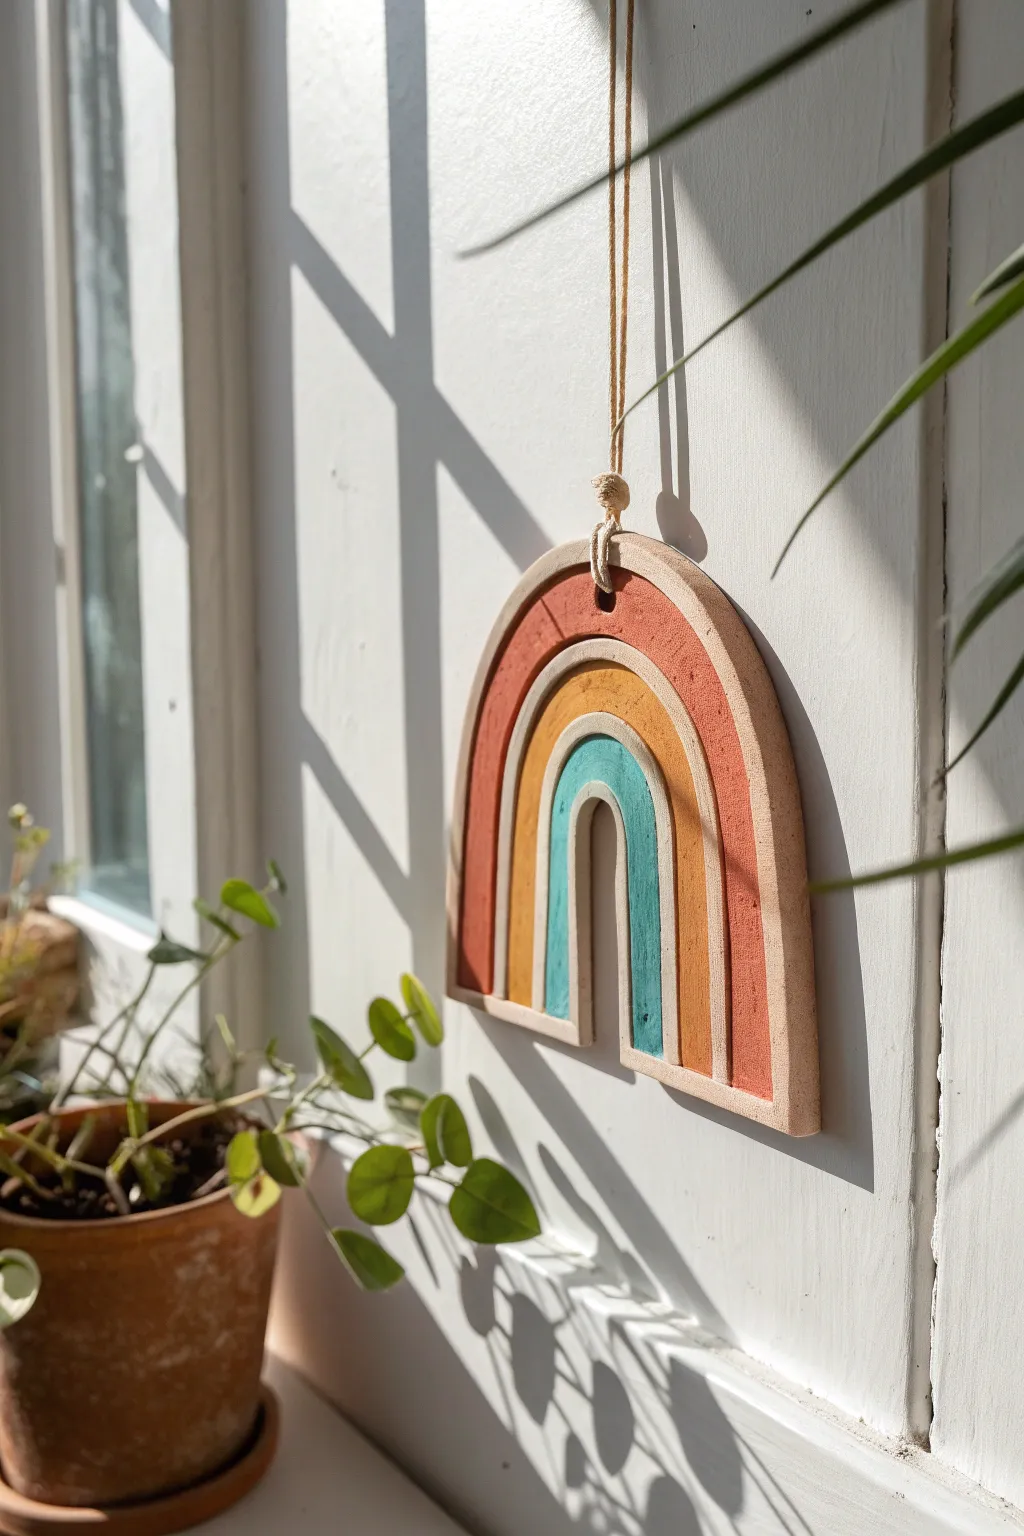
Bring a touch of desert-inspired warmth to your window or wall with this charming cutout rainbow. Crafted from air dry clay, this piece features earthy terracotta, ochre, and teal tones separated by unique negative space for a modern, architectural look.
How-To Guide
Materials
- Air dry clay (white or terracotta)
- Rolling pin
- Parchment paper or smooth work surface
- Craft knife (X-Acto)
- Ruler
- Printable rainbow template (or compass/circle cutter)
- Small round piping tip or straw (for hanging hole)
- Fine-grit sandpaper (200-400 grit)
- Acrylic paints (terracotta/rust, mustard yellow, teal)
- Small flat paintbrushes
- Matte sealant or varnish (optional)
- Jute twine or leather cord
Step 1: Planning & Rolling
-
Prepare your surface:
Lay down a sheet of parchment paper on a flat, stable table. Tape the corners down so the paper doesn’t shift while you are rolling out the clay. -
Condition the clay:
Take a generous handful of air dry clay and knead it in your hands for a minute or two. This warms it up and ensures there are no air bubbles trapped inside. -
Roll the slab:
Place the clay on the parchment and use your rolling pin ensure an even thickness. Aim for a slab that is about 1/4 inch (6mm) thick. Uniformity is key here to prevent warping later. -
Check for imperfections:
Lightly run your fingers over the slab to feel for lumps or divots. If you find any, gently smooth them out with a tiny bit of water on your fingertip.
Step 2: Cutting & Shaping
-
Create the outline:
If using a paper template, place it gently on the clay. Trace the outer arch shape first using a needle tool or very light pressure with your craft knife. -
Mark the internal bands:
Mark the three distinct arches. The unique feature of this design is the ‘cutout’ or recessed look between the bands. Draw the lines for the outer terracotta band, the middle yellow band, and the inner teal band. -
Cut the outer shape:
Using a sharp craft knife, cut carefully along the outermost perimeter line. Keep your knife vertical to ensure square edges rather than beveled ones. -
Create the negative space:
Here comes the tricky part. Carefully cut out the thin slivers of clay *between* the arches, but—and this is crucial—do not cut all the way through the bottom connecting bar if you want a single piece. Alternatively, you can score deep grooves to mimic separation without cutting all the way through. -
Refine the gaps:
If you chose to cut the gaps completely (creating floating arches connected at the base), use a damp brush to smooth the raw inside edges immediately after cutting. -
Add the hanging hole:
At the very top center of the largest arch, press a straw or a small round piping tip through the clay to create a clean hole for the cord.
Clean Cuts Secret
Use a tiny amount of lotion or oil on your craft knife blade before slicing. This helps the blade glide through the clay without dragging or snagging.
Step 3: Drying & Refining
-
Slow drying process:
Let the clay dry on the parchment paper. To prevent curling edges, I find it helpful to place a lightweight book on top of the clay (with parchment in between) once the surface is dry to the touch, usually after a few hours. -
Wait for full cure:
Allow the piece to dry completely for 24-48 hours. The clay will turn opaque and feel room temperature (not cold) when fully dry. -
Sand the edges:
Using fine-grit sandpaper, gently buff the outer edges and the inside of the cutout areas. This removes sharp burrs and gives the piece a professional, finished look. -
Dust off residue:
Wipe the entire piece down with a dry cloth or a soft brush to remove all clay dust before painting.
Make it Shine
Mix a tiny bit of baking soda into your acrylic paint to give the rainbow a textured, ‘ceramic’ feel, or use gold leaf on the edges for a luxe touch.
Step 4: Painting & Finishing
-
Paint the outer arch:
Load a flat brush with terracotta or rust-colored acrylic paint. Carefully paint the face of the largest, outermost arch. Keep a steady hand near the grooves. -
Paint the middle arch:
Use a mustard yellow or ochre shade for the middle band. Apply 2-3 thin coats rather than one thick coat for the smoothest finish. -
Paint the inner arch:
Fill in the smallest arch with a muted teal or turquoise paint. Ensure the paint gets right up to the edge but doesn’t spill into the negative space gaps. -
Detail the edges:
You can leave the sides and the ‘gaps’ natural white clay for contrast, or paint them a sandy beige. Leaving them natural really makes the colors pop. -
Seal (Optional):
Once the paint is totally dry, apply a coat of matte varnish to protect the surface from dust and UV light. -
String it up:
Cut a length of jute twine. Fold it in half, push the loop through the hole from front to back, and pull the tails through the loop to create a lark’s head knot.
Hang your finished rainbow in a spot that catches the afternoon light and enjoy the handmade charm
Tiny Air Dry Clay Room Diorama
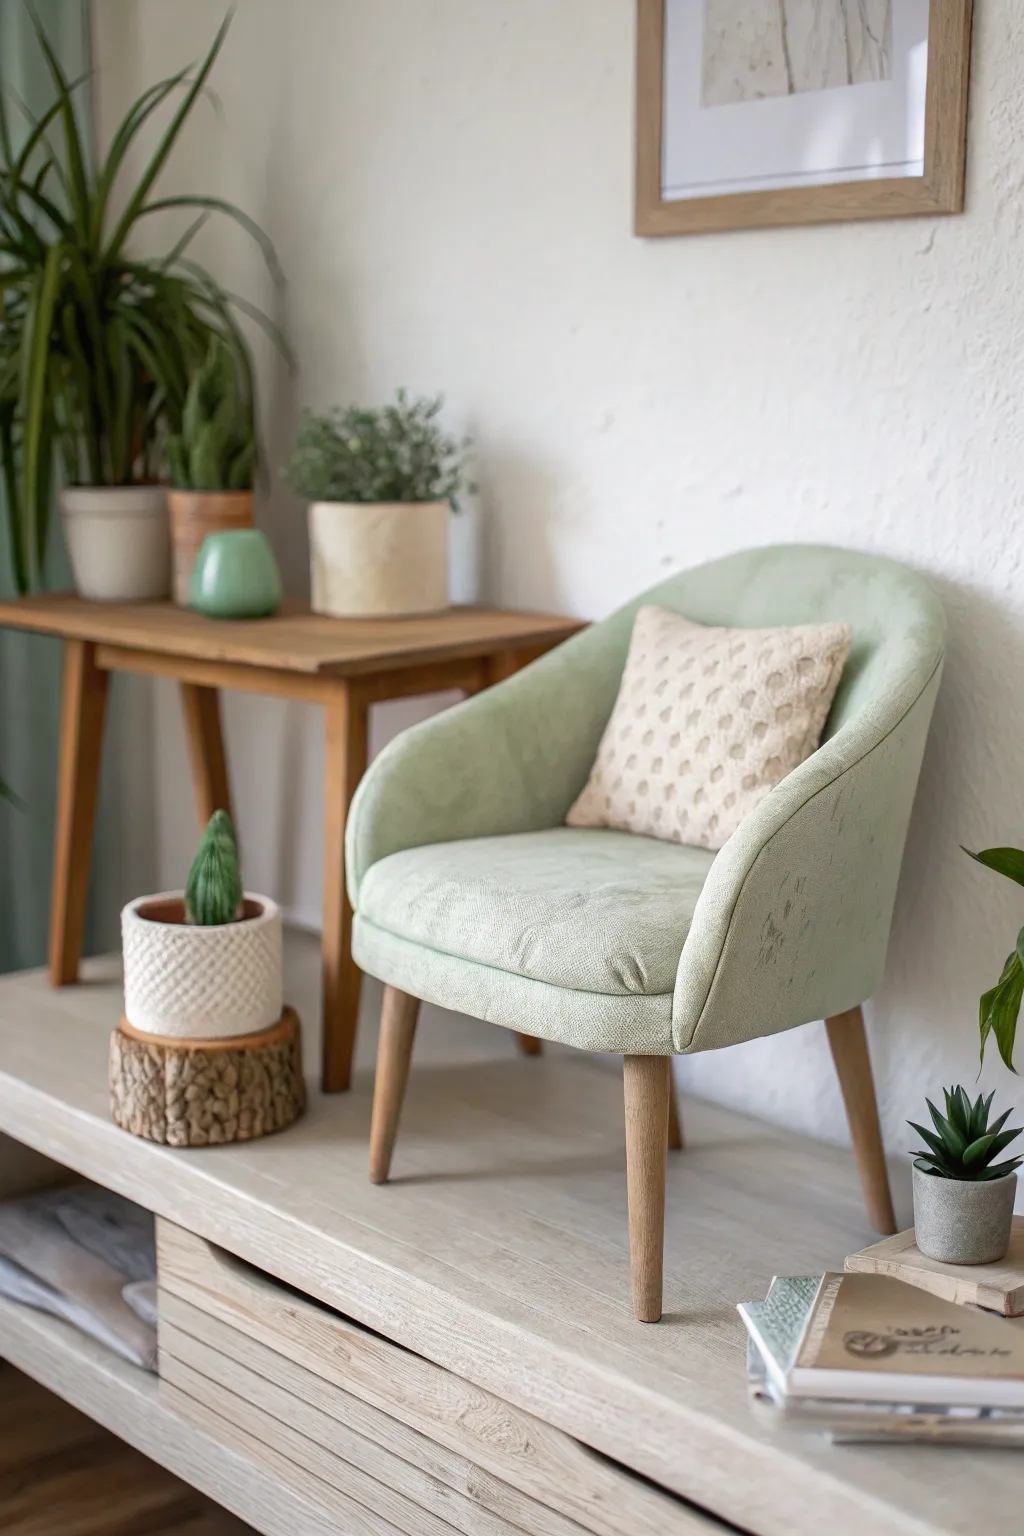
Create a stunningly realistic miniature living room scene completely from scratch using air dry clay. This detailed diorama features a textured armchair, tiny potted plants with individual leaves, and perfectly scaled wooden-style furniture.
Step-by-Step Tutorial
Materials
- High-quality white air dry clay
- Rolling pin and parchment paper
- Precision clay sculpting tools (needle tool, ball stylus)
- Texture tools (wire brush, crumpled foil, or real coarse fabric)
- Acrylic paints (sage green, cream, burnt sienna, raw umber, deep green)
- Fine detail paintbrushes (sizes 00 and 1)
- Balsa wood strips or thin cardboard (for structural framing)
- Craft knife and cutting mat
- Strong craft glue or PVA
- Matte varnish spray
Step 1: Sculpting the Armchair
-
Form the base:
Start by shaping a solid block of clay into a rounded seat shape. It should look like a flattened semi-circle, slightly wider at the front. -
Build the backrest:
Roll out a thick slab of clay and cut a curved strip to form the back and arms of the chair. Attach this to your base using the score and slip method, smoothing the seams until invisible. -
Add upholstery texture:
While the clay is still soft, gently press a piece of coarse fabric or a wire texture brush over the entire surface. This crucial step mimics the look of woven upholstery fabric. -
Refine the cushion:
Add a thin, slightly domed layer of clay to the seat area to represent the cushion. Use a needle tool to create gentle indentations where a person would sit, enhancing the realism. -
Create the legs:
Roll four small tapered cylinders for the legs. Insert a small piece of toothpick or wire into the top of each for stability, but don’t attach them to the chair body until everything is painted.
Leg Stability Fix
If clay legs keep breaking, use actual toothpick pieces or matchsticks for the internal structure and coat them with a thin layer of clay before painting.
Step 2: Crafting the Furniture & Décor
-
Build the console table:
Cut thin slabs of clay into rectangles for the table top and legs. Let these dry flat on parchment paper to prevent warping before assembly. -
Assemble the table:
Once leather-hard, glue the legs to the table top. Reinforce the underside with small triangular clay wedges if needed for stability. -
Pillow sculpting:
Shape a small square of clay into a pillow. Use a needle tool to poke a repeating pattern of dots or diamonds to simulate a knit texture. -
Miniature planters:
Form small cylinders and rounded pots of varying sizes. Hollow them out slightly with a ball tool to make room for your ‘plants’. -
Tiny foliage:
Roll minuscule snakes of clay for snake plants or press tiny balls of clay flat for leafy greens. Arrange these inside your pots while the clay is soft.
Step 3: Painting and Assembly
-
Base coat the chair:
Mix a soft sage green acrylic paint. Apply it to the chair body in thin layers to avoid clogging the beautiful texture you created. -
Wood effects:
Paint the table and chair legs with a base of light brown. Once dry, dry-brush a darker raw umber over them to simulate wood grain direction. -
Detailing the pillow:
Paint the pillow a warm cream color. If you’re feeling steady, add a tiny wash of darker beige into the impressed dots to make the pattern pop. -
Greenery gradients:
Paint your plants with a deep green base, then highlight the tips with a lighter yellow-green for a lively, sun-kissed look. -
Final assembly:
Glue the painted legs onto the armchair. Arrange the pillow on the chair and position the plants and table on your display base. -
Seal the scene:
Spray the entire setup with a matte varnish. This removes any plasticky shine from the paints and unifies the sheen of the different elements.
Add a Rug
Level up by rolling a paper-thin sheet of clay, texturing it with a toothbrush, and painting a geometric pattern for a mini floor rug.
Now you have a serene little corner that fits right in the palm of your hand