When I need a thoughtful birthday gift that feels personal (but still totally doable), I reach for air dry clay. These ideas are my go-to projects for making something that looks boutique-level handmade without needing a kiln.
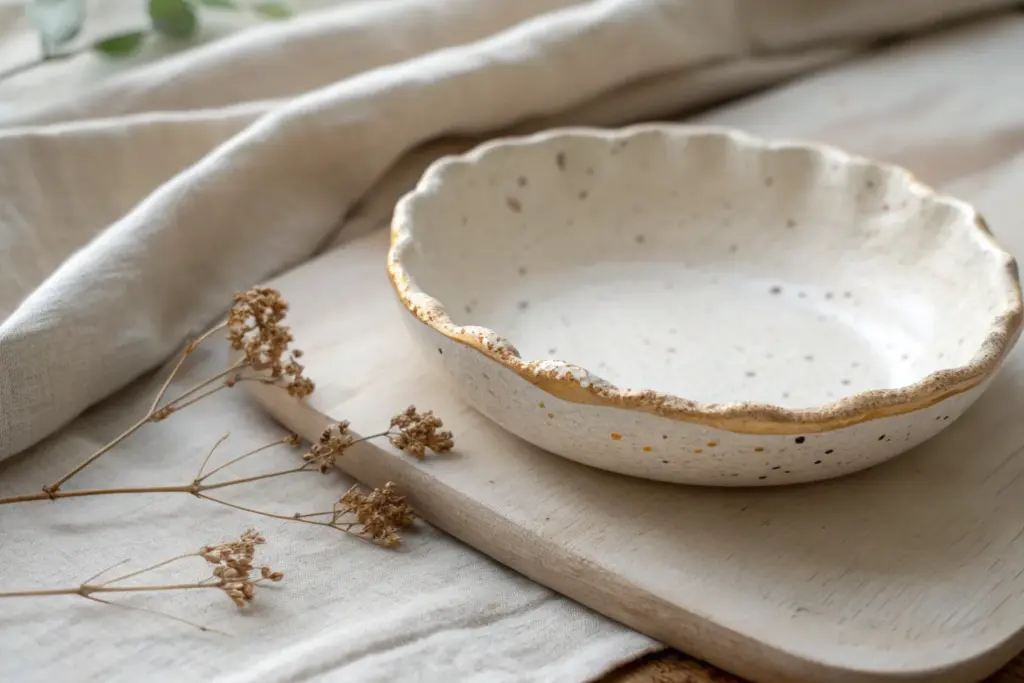
Personalized Jewelry Dish
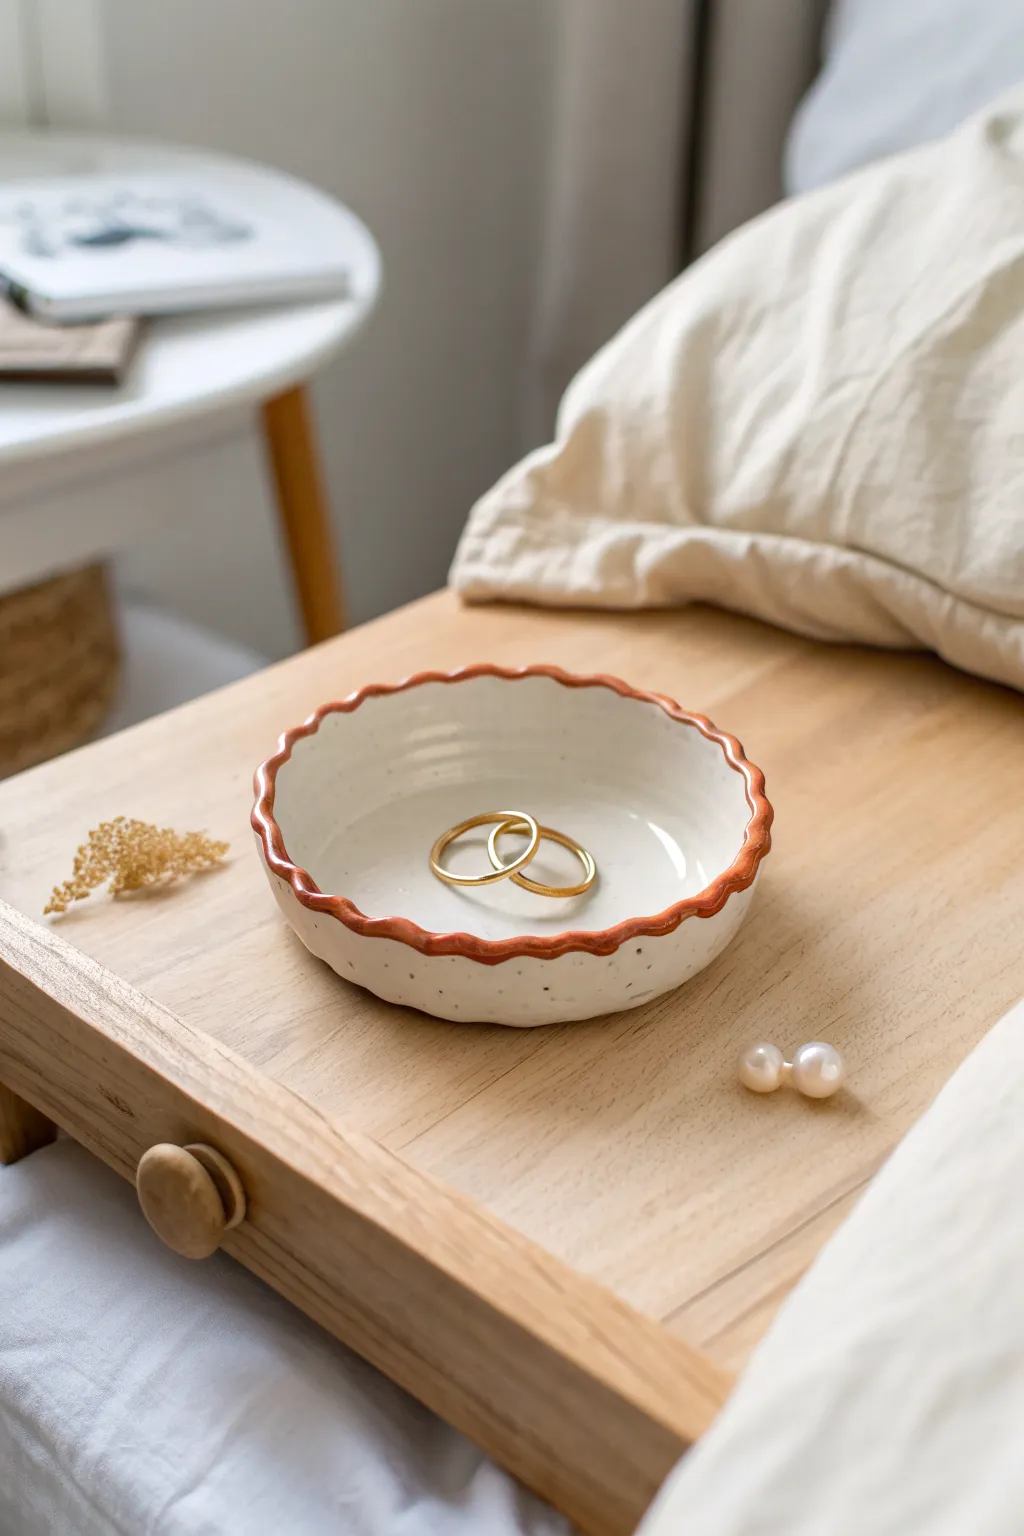
This elegant little dish features a glossy white finish accented by a charming terracotta-colored wavy rim, perfect for holding everyday jewelry. Its organic shape and subtle speckled texture give it a high-end ceramic look without needing a kiln.
Step-by-Step
Materials
- White styling air dry clay
- Rolling pin
- Craft knife or clay tool
- Small bowl (for use as a mold)
- Sandpaper (fine grit)
- Acrylic paints (glossy white, terracotta/rust orange, black/gray)
- Glaze or varnish (glossy finish)
- Paintbrushes (flat shader and fine detail)
- Old toothbrush
- Water cup and sponge
Step 1: Shaping the Base
-
Prepare the Clay:
Start with a ball of white air dry clay roughly the size of a tennis ball. Knead it in your hands until it is warm, pliable, and free of cracks. -
Roll out the Slab:
Using a rolling pin, flatten the clay ball into an even slab about 1/4 inch thick. Rotate the clay frequently to ensure it doesn’t stick to your work surface. -
Cut the Circle:
Find a bowl or round object slightly larger than your desired finished dish size. Place it upside down on the slab and trace around it with a craft knife to cut a perfect circle. -
Form the Dish Shape:
Take your clay circle and gently press it into a small bowl that will serve as your mold. Ensure the clay conforms to the curve of the bowl bottom without trapping air bubbles. -
Create the Scalloped Rim:
With the clay still in the mold, use your thumb and forefinger to gently pinch the rim at regular intervals. Push the clay outward between your fingers to create a wavy, fluted edge. -
Smooth the Edges:
Dip your finger in a little water and run it along the scalloped edge to smooth out any roughness or sharp cuts. I find this step crucial for a professional finish. -
Initial Drying:
Let the clay sit in the mold for about 24 hours so it holds its shape while drying. If you remove it too early, the walls might slump. -
Remove and Finish Drying:
Carefully pop the dish out of the mold. Flip it upside down on a drying rack to let the bottom dry completely, which usually takes another 24-48 hours.
Rim Shaping Trick
To get perfectly even waves, use the handle of a paintbrush. Place it under the rim and press the clay down on either side of the handle, repeating around the circle.
Step 2: Surface Refining and Sanding
-
Sand Imperfections:
Once fully dry and hard, use fine-grit sandpaper to smooth any bumps on the surface or rough spots along the rim. Wipe away the dust with a slightly damp cloth. -
Check for Cracks:
Inspect the dish for tiny dryness cracks. If you find any, mix a tiny bit of fresh clay with water to make a paste and fill them in.
Sticky Clay Fix
If your clay sticks to the bowl mold, place a layer of plastic wrap inside the bowl before pressing the clay in to ensure easy removal later.
Step 3: Faux Ceramic Painting
-
Base Coat:
Paint the entire dish, front and back, with a glossy white acrylic paint. You may need two or three thin coats to get full, opaque coverage. Let each coat dry. -
Create the Speckles:
Dilute a small amount of black or dark gray acrylic paint with water. Dip an old toothbrush into the mixture, then run your thumb across the bristles to flick tiny speckles onto the dish. -
Control the Speckling:
Aim for a random distribution. If you get a splatter that’s too big, quickly dab it up with a wet paper towel before it dries. -
Paint the Rim:
Using a fine detail brush and terracotta or rust-orange acrylic paint, carefully paint just the very top edge of the wavy rim. Follow the curves slowly to keep the line consistent. -
Clean Up Lines:
If the rim paint bleeds onto the white section, wait for it to dry and then touch it up with a bit of white paint. -
Seal the Dish:
Apply two coats of a high-gloss varnish or glaze over the entire piece. This mimics the look of fired ceramic and protects the paint from scratches. -
Final Cure:
Allow the varnish to cure fully according to the bottle instructions before placing jewelry inside.
Now you have a sophisticated, custom jewelry dish that looks handcrafted by a professional potter


Heart Trinket Tray With Stamped Message
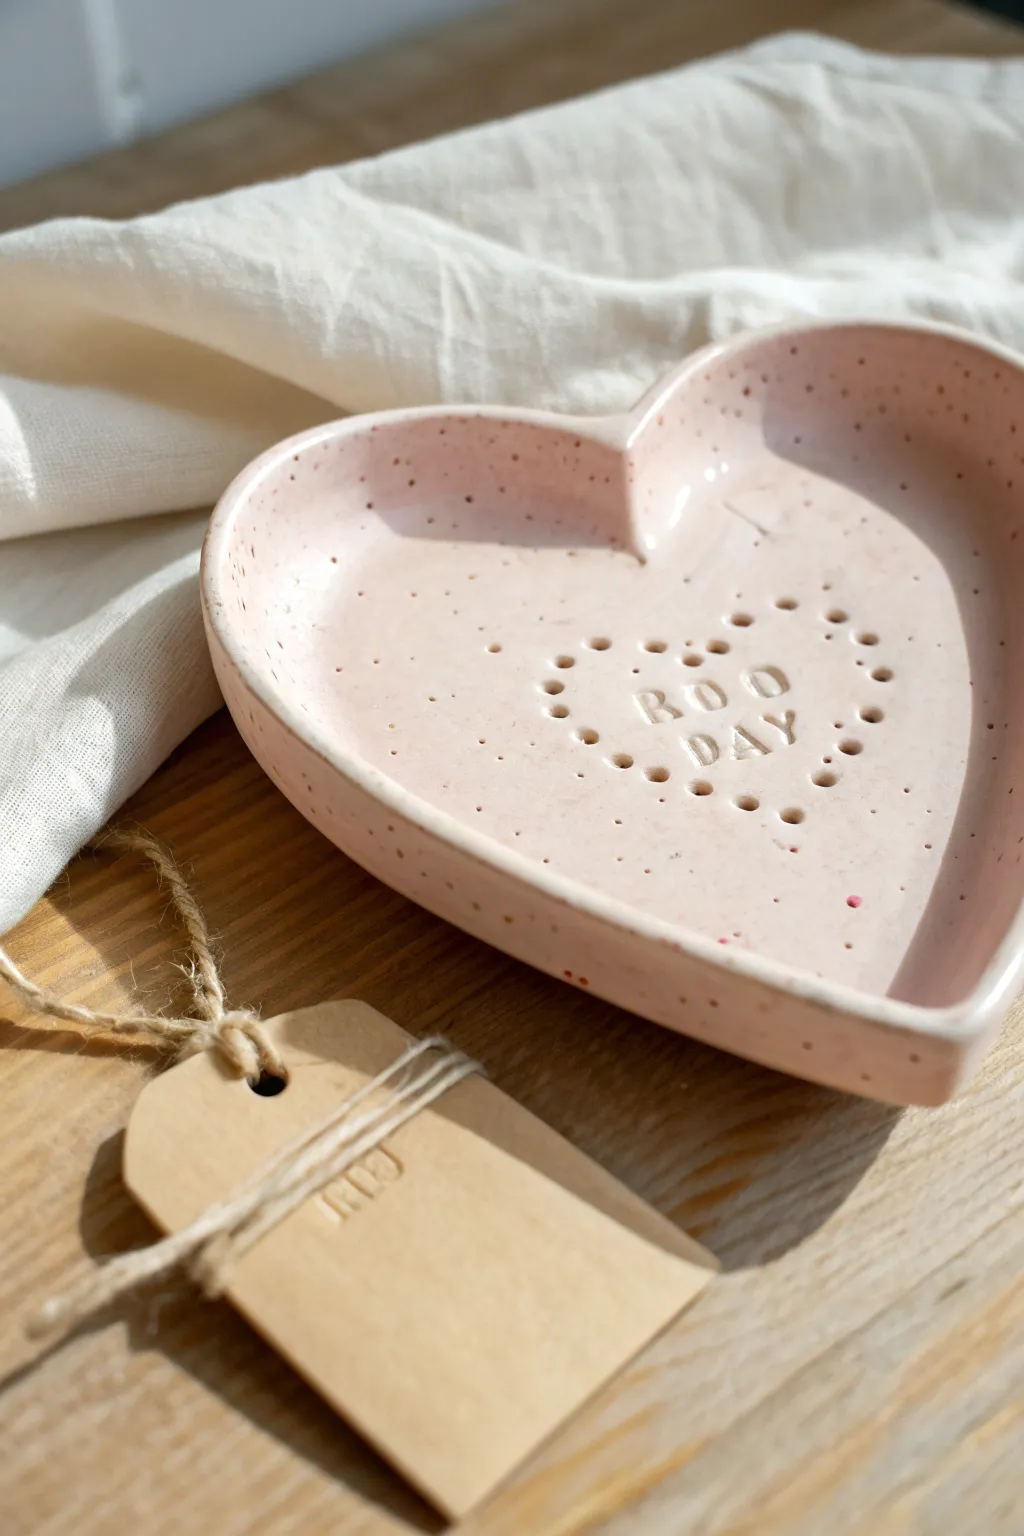
This charming heart-shaped trinket dish features a playful speckled finish and a personalized stamped message. With its glossy glaze and gentle pink hue, it makes for a sweet, modern repository for rings and small treasures.
Step-by-Step Tutorial
Materials
- White smooth air dry clay
- Rolling pin
- Heart-shaped cookie cutter (large) or paper template
- Wooden skewer or toothpick
- Letter stamp set (small)
- Sandpaper (fine grit)
- Acrylic paint (pale pink and brown/terracotta)
- Old toothbrush
- Glossy varnish or sealant
- Small bowl of water
- Sponge
Step 1: Shaping the Base
-
Roll out the clay:
Begin by conditioning a handful of air dry clay until it is soft and pliable. Roll it out on a smooth surface to an even thickness of about 1/4 inch. If you notice any air bubbles, pop them gently and smooth the clay back down. -
Cut the heart shape:
Press a large heart-shaped cutter firmly into the clay. If you don’t have a cutter large enough, carefully cut around a paper template using a craft knife. -
Smooth the edges:
Dip your finger in a little water and run it along the cut edges of the heart to remove any sharpness or fraying left by the cutter. This ensures a professional finish later. -
Create the rim:
Gently curve the edges of the heart upwards to create a shallow dish shape. You can do this by cupping the clay in your palm or pressing the center down slightly while lifting the sides.
Water Smoothing Tip
Keep a small bowl of water nearby while sculpting. A tiny drop on your fingertip works wonders for erasing cracks instantly.
Step 2: Adding Details
-
Mark the center:
Visualise where you want your central design to sit. Lightly mark the center point with a tool so you can keep everything symmetrical. -
Stamp the message:
Using your letter stamps, press the words “BOO DAY” (or your chosen phrase) into the center of the heart. Press firmly enough to leave a clear impression but not so hard that you warp the tray’s shape. -
Create the dotted outline:
Take a wooden skewer or a blunt toothpick. Carefully poke a series of holes to form a smaller heart shape surrounding your text. Try to keep the spacing between dots consistent. -
Final smoothing:
Check the rim and back of the dish one last time. Use a barely damp sponge to smooth out any fingerprints or marks caused during the stamping process. -
Let it dry:
Place the tray in a safe, dry spot away from direct heat. Let it dry completely for 24-48 hours. I find flipping it over halfway through the drying process helps prevent curling.
Gold Leaf Accent
After glazing, carefully paint the very rim of the heart with liquid gold leaf or metallic paint for a luxurious, high-end edge.
Step 3: Painting and Finishing
-
Sand imperfections:
Once fully dry and hard, use fine-grit sandpaper to gently buff the edges and surface. This is crucial for that super-smooth ceramic look. -
Apply the base coat:
Paint the entire dish with a pale, soft pink acrylic paint. You may need two thin coats for full opacity, allowing the first to dry before applying the second. -
Prepare the speckle mix:
Dilute a small amount of terracotta or brown acrylic paint with water until it has an inky consistency. -
Splatter the speckles:
Dip an old toothbrush into the diluted brown paint. Hold it over the dish and run your thumb across the bristles to flick tiny speckles onto the surface. Practice on paper first to control the spray. -
Seal the deal:
After the paint is bone dry, apply a coat of glossy varnish. This not only protects the clay from moisture but gives it that high-shine, kiln-fired appearance.
Wrap this lovely little tray in tissue paper for a truly heartfelt handmade gift


Ring Cone Stand
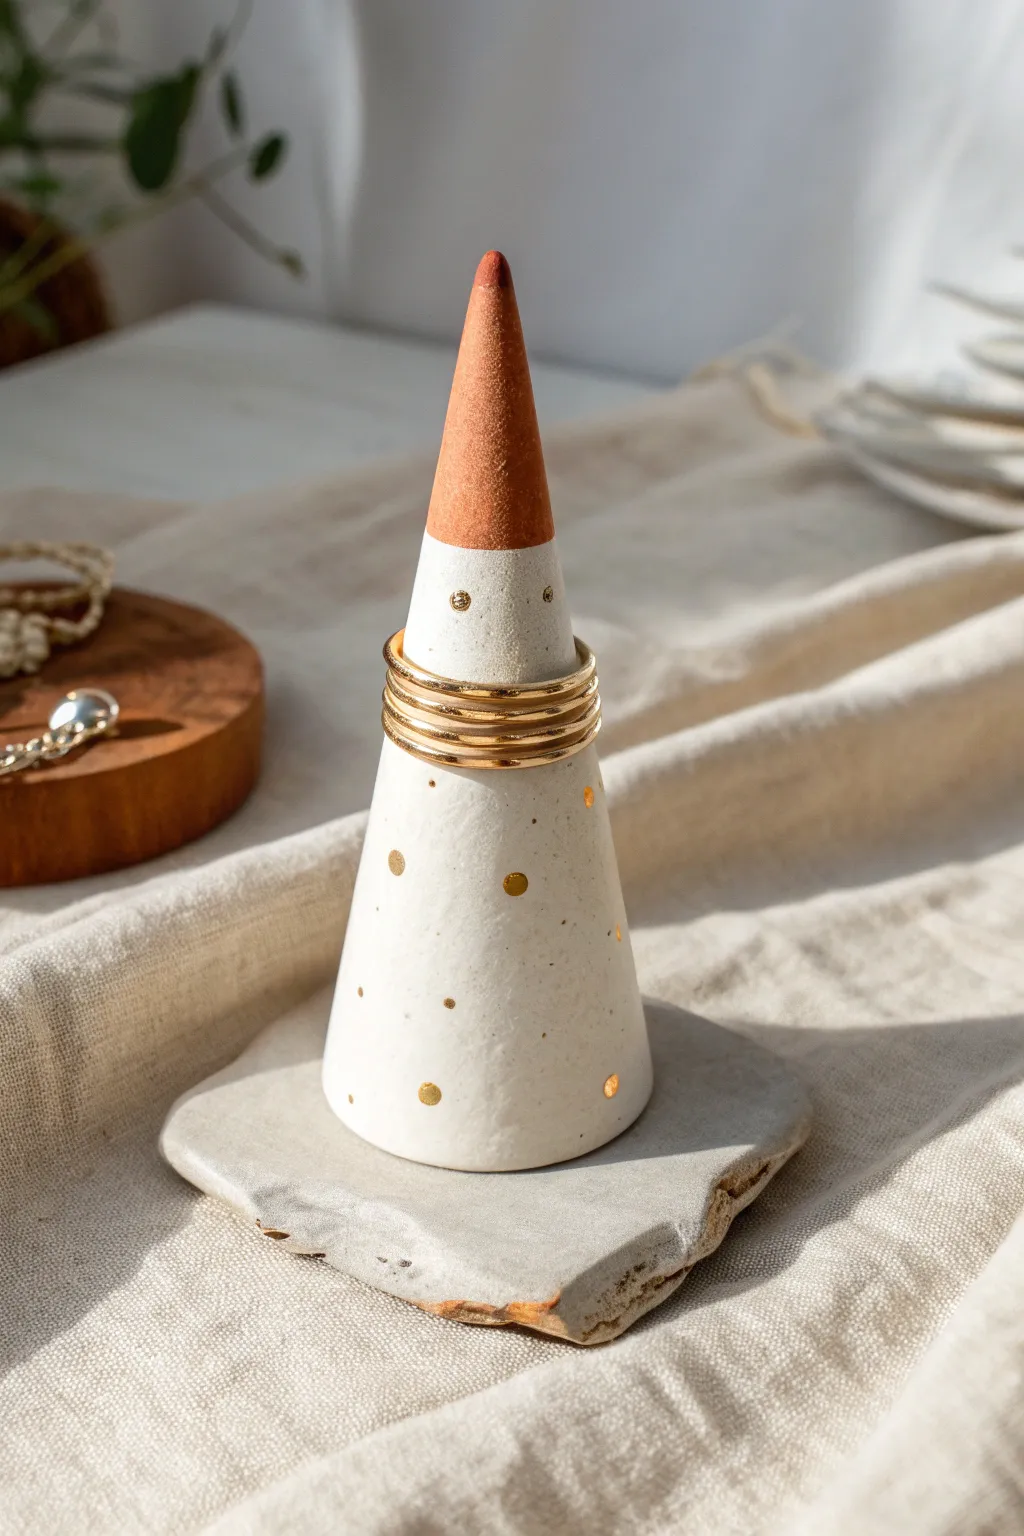
This elegant little ring cone combines earthy terracotta tones with touches of gold for a sophisticated, modern look. It’s the perfect size for stacking everyday bands and makes a thoughtful, handmade gift that doubles as decor.
Step-by-Step Guide
Materials
- Air dry clay (white)
- Acrylic paint (terracotta/burnt sienna and white)
- Gold leaf paint or metallic gold marker
- Rolling pin
- Craft knife
- Fine grit sandpaper
- Small paintbrush
- Clear acrylic sealant (matte or gloss)
- Small bowl of water
- Parchment paper
Step 1: Shaping the Cone
-
Condition the Clay:
Start by taking a golf-ball-sized amount of white air dry clay. Knead it in your hands for a minute until it feels warm, pliable, and free of cracks. -
Form a Cylinder:
Roll the clay between your palms or on a flat surface to create a smooth, thick cylinder shape. -
Shape the Cone:
Place the cylinder on your parchment paper. Using the flat part of your palm, roll just one end of the cylinder back and forth while applying gentle pressure. This will taper the top into a point while keeping the base wide. -
Flatten the Base:
Once you have a cone shape, pick it up and tap the wide bottom repeatedly against your table to create a perfectly flat base so it stands straight. -
Smooth the Surface:
Dip your finger in a tiny bit of water and run it over the cone to smooth out any fingerprints or tiny imperfections. Set this aside to dry.
Step 2: Creating the Base
-
Roll the Slab:
Take a second piece of clay and roll it out with a rolling pin until it is about 1/4 inch thick. I aim for a roughly square shape with organic, uneven edges. -
Texture the Edges:
Instead of cutting the edges clean with a knife, gently tear or pinch the edges of the slab to give it that raw, stone-like aesthetic seen in the photo. -
Dry Completely:
Allow both the cone and the base slab to dry completely. This usually takes 24-48 hours depending on humidity. Flip them occasionally to ensure even drying.
Keep it Straight
For a super crisp line between the terracotta tip and the white body, wrap a piece of masking tape or washi tape around the cone before painting the top section.
Step 3: Painting and Decoration
-
Sand for Smoothness:
Once fully dry, lightly sand the cone with fine-grit sandpaper to remove any bumps, focusing on the main body where the rings will sit. -
Base Coat:
Paint the entire cone with a coat of white acrylic paint if your clay isn’t naturally bright white. Let it dry. -
Add the Color Block:
Mix a burnt sienna or terracotta acrylic paint. Carefully paint just the top tip of the cone, creating a sharp horizontal line where the color ends. -
Dot the Gold:
Using a very fine paintbrush or the tip of a gold paint marker, gently dab small, irregular dots scattered across the white portion of the cone. -
Decorate the Base Slab:
Paint the flat base slab a warm grey or keep it natural. You can add a subtle rim of gold along the torn edges for extra flair. -
Assembly:
You can glue the cone to the base with strong craft glue, or leave them separate so the recipient can use the dish for earrings and the cone for rings.
Cracked Clay?
If small cracks appear as the clay dries, mix a tiny bit of fresh wet clay with water to make a paste (slip) and fill in the cracks, then sand smooth once dry.
Step 4: Sealing
-
Apply Sealer:
Finish both pieces with a clear acrylic spray or brush-on varnish to protect the paint and clay from moisture.
Now you have a chic, modern jewelry display ready for gifting


Set of Modern Clay Coasters
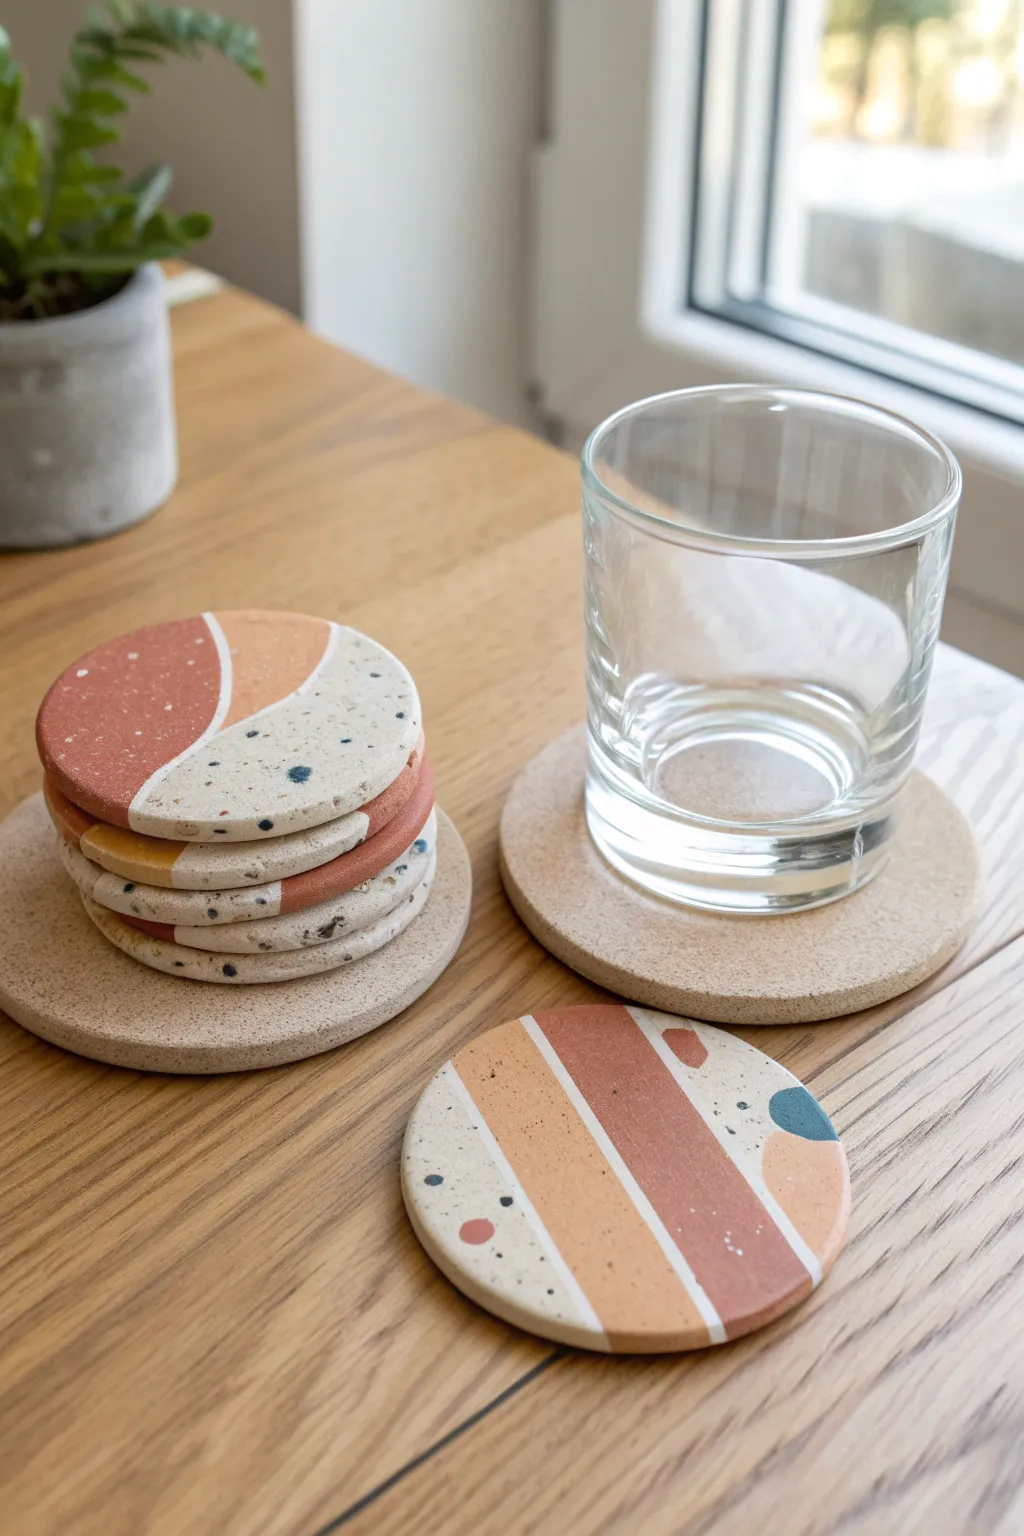
These stylish, modern coasters combine earthy terracotta and peach tones with a fun, splatter-paint confetti effect that mimics expensive terrazzo stone. They make a sophisticated, handmade gift that looks perfectly at home on any coffee table.
Step-by-Step Tutorial
Materials
- White air dry clay (approx. 500g)
- Acrylic rolling pin
- Circular cookie cutter (approx. 3.5 – 4 inch diameter)
- Fine grit sandpaper (200-400 grit)
- Acrylic craft paints (burnt sienna, light peach, white, navy blue, black)
- Small flat paintbrushes and fine detail brushes
- Old toothbrush
- Waterproof sealant/varnish (Mod Podge or polyurethane)
- Cork sheet or pre-cut cork round backings
- Strong craft glue or E6000
- Parchment paper or silicone mat
- Bowl of water and sponge
Step 1: Shaping the Base
-
Prepare your workspace:
Lay down a silicone mat or parchment paper to prevent the clay from sticking. This ensures a smooth bottom surface for your coasters. -
Roll out the clay:
Take a large handful of white air dry clay and knead it briefly to warm it up. Roll it out using your acrylic rolling pin until you have an even slab that is about 1/4 inch thick. Don’t make them too thin, or they may warp. -
Cut the circles:
Using your circular cookie cutter, press firmly into the clay to cut out your coaster shapes. Create a set of four or six to make a complete gift set. -
Smooth the edges:
Dip your finger into a little water and run it along the cut edges of the raw circles to smooth out any harsh ridges or unevenness from the cutter. -
Let them dry fully:
Place the clay rounds on a wire rack or leave them on parchment paper to dry. Flip them over halfway through the drying process to ensure both sides dry evenly. Allow 24-48 hours depending on humidity. -
Sand for perfection:
Once fully cured and hard, take your fine-grit sandpaper and gently sand the edges and the top surface. You want a super smooth canvas for painting, so take your time here to buff out any small imperfections.
Step 2: Planning and Painting
-
Tape your design (Optional):
While these can be free-handed for that organic look shown in the photo, you can use thin washi tape to mask off distinct sections if you prefer crisper straight lines. -
Mix your colors:
Prepare a palette with a burnt sienna (terracotta), a soft peach color, and keep some white handy. The goal is a warm, desert-inspired color story. -
Paint the abstract shapes:
Using a flat brush, paint large, sweeping geometric sections. Create curves and thick stripes. Leave some of the raw white clay exposed or paint those sections cream for negative space. -
Second coat:
Let the first layer dry for 10 minutes, then apply a second coat to the colored sections to ensure the paint looks opaque and bold. -
Create the splatter effect:
Now for the fun part: dilute a tiny bit of black and navy blue paint with water. Dip an old toothbrush into this mixture. -
Flick the paint:
Hold the toothbrush over your coasters and run your thumb along the bristles to flick tiny specks of paint onto the surface. This creates that trendy terrazzo look. Practice on paper first to control the spray. -
Add larger ‘stone’ details:
For the larger dots seen in the design, use the back end of a paintbrush handle or a detail brush to manually place a few larger navy or black dots among the splatter.
Smooth Surface Secret
Use a barely damp sponge to wipe the raw clay surface before it dries. This smooths out fingerprints and texture better than sanding later.
Step 3: Finishing Up
-
Seal the surface:
Because coasters handle liquid, waterproofing is crucial. Apply 2-3 coats of a waterproof sealant or varnish, allowing ample drying time between each coat. A satin finish looks most like real stone. -
Prepare the backing:
If you are using cork sheets, trace your coaster shape onto the cork and cut it out. If using pre-cut rounds, insure they are slightly smaller than your clay circle so they don’t peek out. -
Attach the cork:
Apply a strong craft glue or E6000 to the back of the clay coaster and press the cork firmly in place. I generally place a heavy book on top for an hour while the glue sets to ensure a tight bond.
Make it a Set
Create a matching trivet for a teapot by simply using a larger bowl as your template instead of a cookie cutter.
Wrap your set with a simple twine bow and you have a beautiful, artisan-style gift ready for giving

The Complete Guide to Pottery Troubleshooting
Uncover the most common ceramic mistakes—from cracking clay to failed glazes—and learn how to fix them fast.
Mini Bud Vase Cover
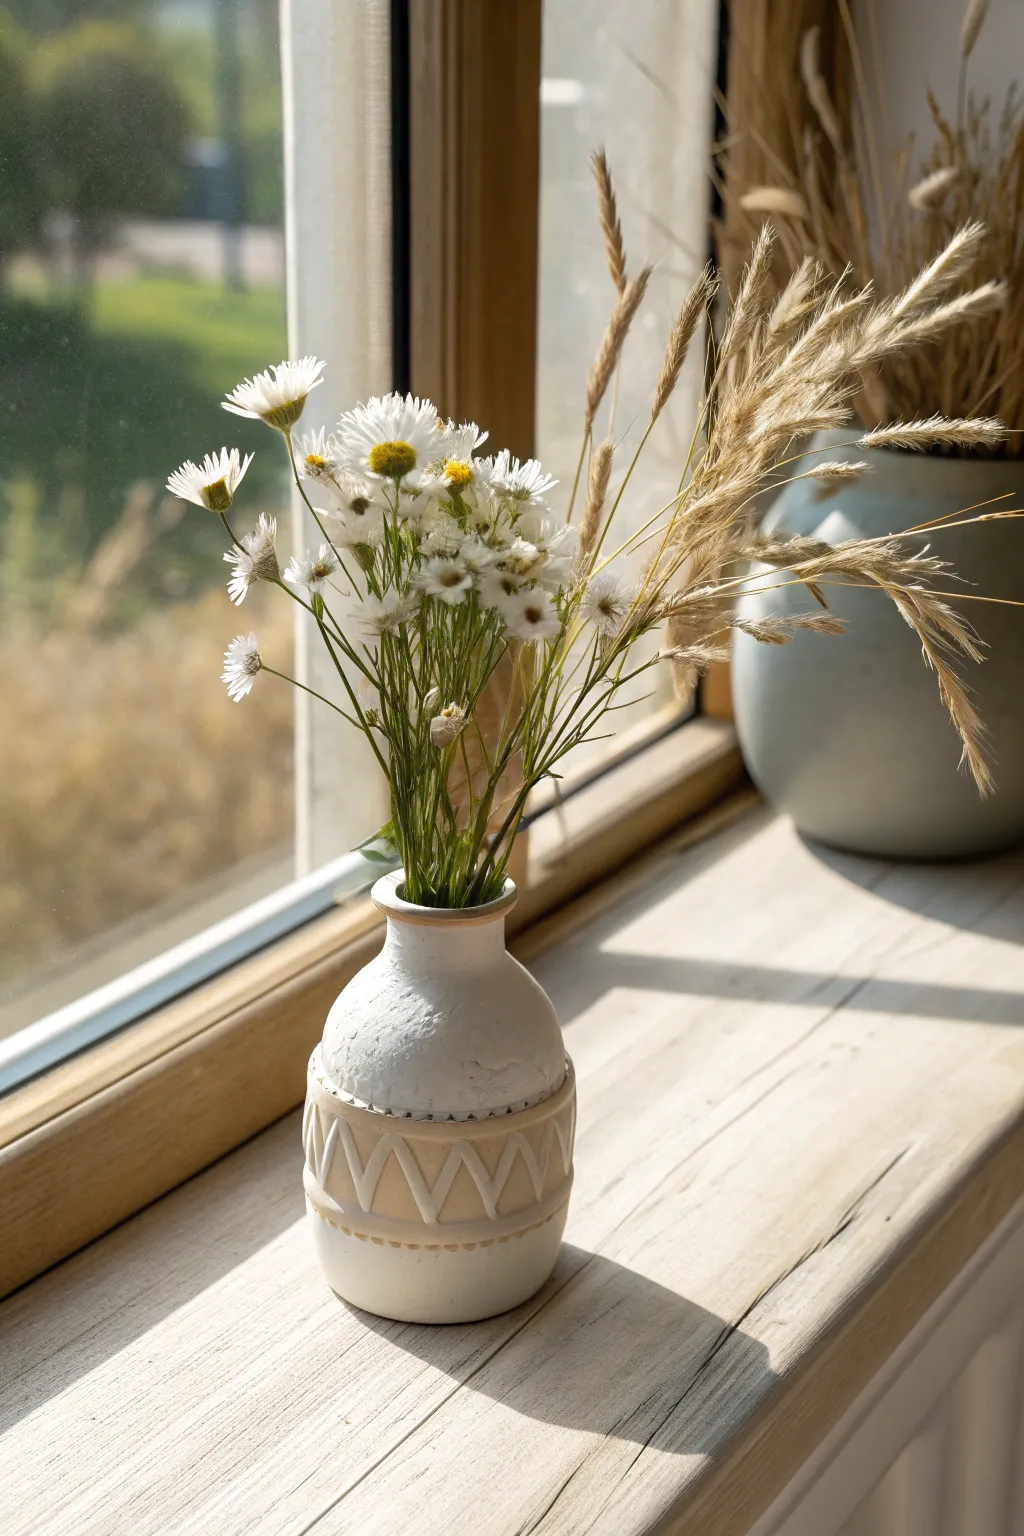
Transform a plain glass bottle into a charming piece of decor with this textured air-dry clay vase cover. The finished piece features a rustic matte white top, a warm tan carved section, and delicate zig-zag detailing that brings earthy warmth to any windowsill.
Step-by-Step Guide
Materials
- Small glass bottle (recycled spice jar or juice shot bottle)
- White polymer air-dry clay (or standard white air-dry clay)
- Rolling pin
- sharp craft knife or X-Acto blade
- Needle tool or toothpick
- Sponge
- Water cup
- Beige or tan acrylic paint
- Small flat paintbrush
- Matte spray sealant or varnish
Step 1: Preparing the Clay Base
-
Clean your vessel:
Start by thoroughly washing and drying your chosen glass bottle to ensure no oil or residue remains, which helps the clay adhere better. -
Roll out the clay:
Take a generous handful of white air-dry clay and condition it in your hands until it warms up. Roll it out on a flat surface to an even thickness of about 1/4 inch. -
Measure the bottle:
Cut a rectangle from your rolled clay that is slightly taller than your bottle and wide enough to wrap completely around the circumference with a small overlap. -
Wrap the glass:
Carefully lift the clay sheet and wrap it around the glass bottle. Press the seam edges together firmly. -
Smooth the seam:
Dip your finger in a little water and rub the joined seam until it disappears completely, blending the clay together into a continuous cylinder. -
Shape the neck:
Gently gently press the clay inward at the top of the bottle to mimic the bottleneck shape, smoothing it over the rim so no glass is visible. -
Create the texture:
I like to dampen a sponge slightly and dab it all over the upper half of the vase to create that subtle, stony texture seen in the photo.
Cracks Appearing?
If hairline cracks form while drying, mix a tiny bit of fresh clay with water to make a paste (slip) and fill the cracks. Smooth over with a finger and let dry again.
Step 2: Carving and Detailing
-
Define the bottom section:
Using a needle tool, lightly score two horizontal parallel lines around the lower third of the vase. This will define the area for your geometric pattern. -
Carve the zig-zags:
Between your two horizontal lines, use a sharp craft knife or carving tool to carefully cut out a continuous zig-zag pattern. You want to carve deep enough to create relief but do not cut all the way through to the glass. -
Add dot details:
Use the tip of your needle tool to poke a series of small, evenly spaced holes along the top edge of your carved band for extra texture. -
Clean up the cuts:
If your carving left any little crumbs or rough edges, smooth them gently with a damp fingertip or brush. -
Allow to dry:
Set the vase in a safe, dry place. Depending on humidity and clay thickness, let it dry for 24-48 hours until it is hard and completely white.
Pro Tip: Weight it Down
Before wrapping the clay, fill the glass bottle with dried rice or beans. The extra weight stabilizes the bottle so it doesn’t tip over while you are carving heavily.
Step 3: Painting and Finishing
-
Mix your paint:
Prepare a watered-down beige or sandy tan acrylic paint. You want a consistency that is thin enough to sink into crevices but opaque enough to show color. -
Paint the carved band:
Apply the tan paint specifically to the recessed areas of your zig-zag carving and the band around the bottom. Don’t worry if it gets on the raised triangles. -
Wipe back excess:
While the paint is still wet, use a slightly damp paper towel to wipe the surface of the raised triangles. This leaves the paint in the deep cuts while revealing the white clay on top. -
Clean the top section:
Ensure the upper texturized section of the vase remains stark white. If you got any beige on it, dab a little white paint over the mistake to cover it. -
Seal the piece:
Once all paint is dry, take the vase outside and apply a coat of matte spray sealant to protect the clay from moisture and dust.
Pop in some dried chamomile or wildflowers to complete this earthy, handmade look
Simple Arch Photo Holder
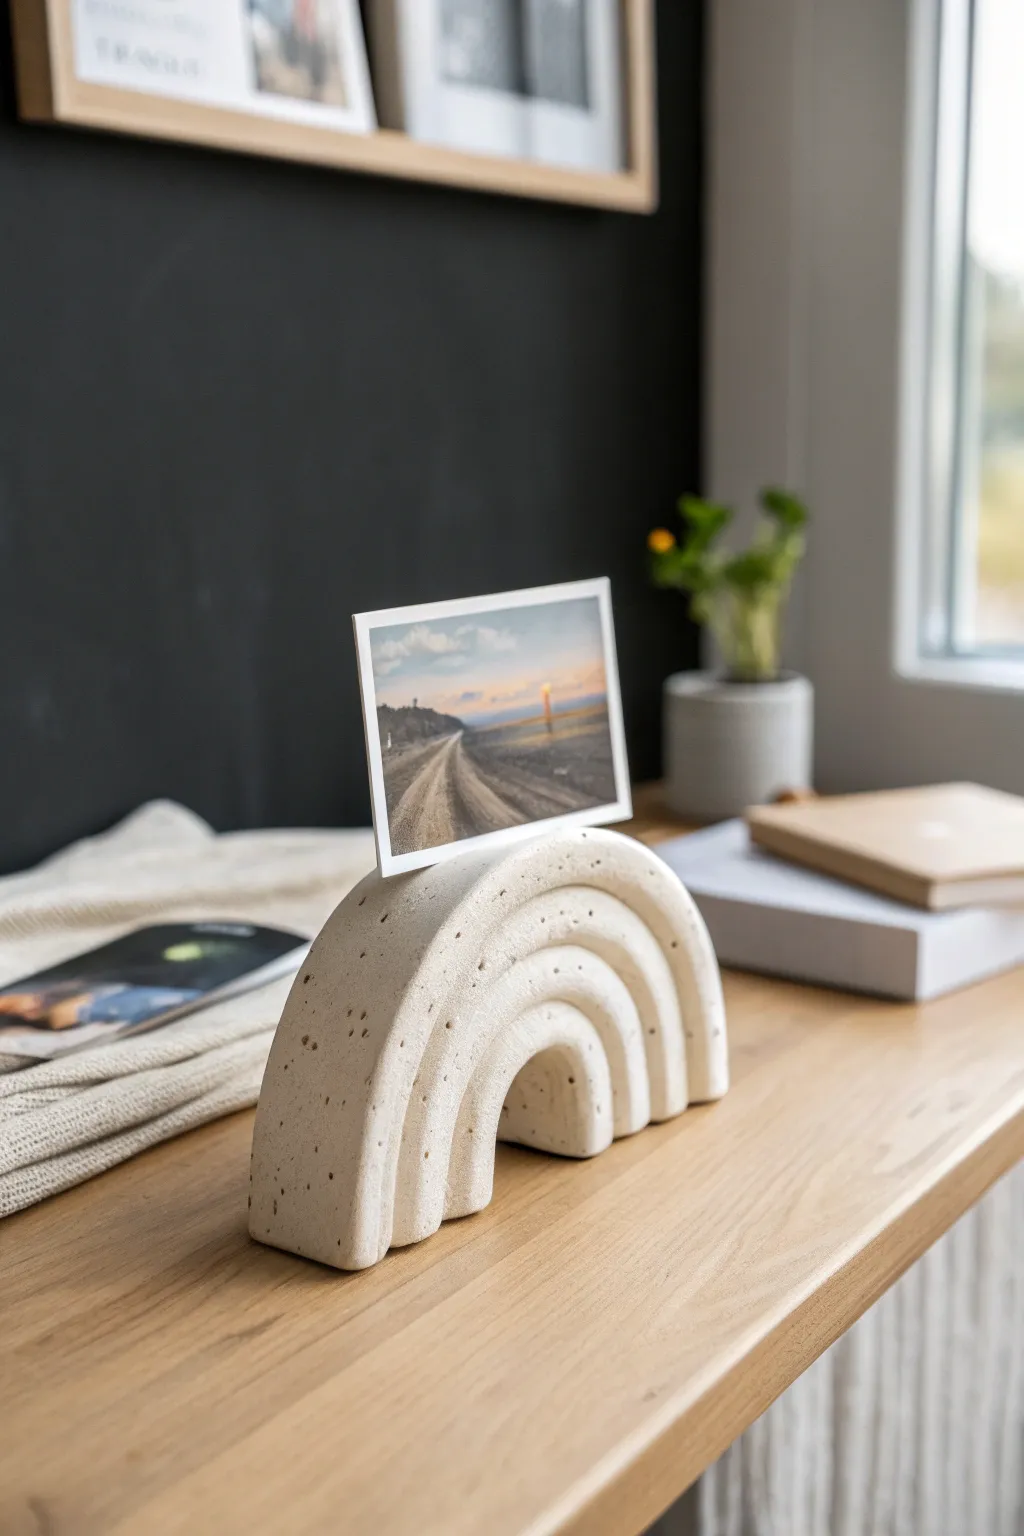
This minimal rainbow arch serves as both a sculptural décor piece and a functional photo display. The speckled finish gives ordinary air dry clay a high-end, stoneware ceramic look without needing a kiln.
Step-by-Step
Materials
- Air dry clay (white or light grey)
- Rolling pin
- Sharp crafting knife or clay wire
- Sandpaper (fine and medium grit)
- Acrylic paint (cream/beige, brown, black)
- Old toothbrush
- Paintbrush
- Water cup
- Ruler
- Cardboard scraps
Step 1: Shaping the Arches
-
Roll the clay:
Begin by conditioning a large chunk of air dry clay in your hands until it’s pliable. Roll it out on a flat surface into a thick slab, approximately 1 inch thick. You want it substantial enough to stand upright on its own. -
Cut strips:
Using a sharp blade or rulers as distinct guides, cut three long strips of equal width. The width determines how thick the rainbow ‘bands’ will be—usually about 3/4 inch works well. -
Form the center arch:
Take the shortest strip and bend it gently into a tight U-shape. This will be the innermost arch. Stand it up to ensure the feet are level; trim the bottoms if necessary. -
Layer the middle arch:
Take the second strip and drape it directly over the first arch. Apply a tiny amount of water or clay slip between the layers to help them adhere. Gently press them together without squishing the definition. -
Add the final arch:
Repeat the process with the longest strip, draping it over the top layer. Again, use a smear of water to bond the clay. Smooth the back side so it forms a solid unit, but keep the front grooves distinct.
Clean Lines Hack
To keep the separation between the rainbow bands crisp, run a damp rounded sculpting tool or the back of a paintbrush into the grooves while the clay is still wet.
Step 2: Adding Functionality & Drying
-
Trim the base:
Stand the rainbow up. If it wobbles, slice a thin layer off the bottom of all the legs simultaneously with your wire or long blade to create a perfectly flat base. -
Create the photo slot:
While the clay is still wet, use a thin piece of cardboard or a dedicated clay tool to press a slit into the very top center of the rainbow. Ensure it is deep enough (about 0.5 inch) to hold a photo securely. -
Refine the edges:
Dip your finger in water and smooth out any rough cutting marks on the faces of the arches. Soften the sharp corners slightly for a more organic, ceramic feel. -
Slow drying:
Set the piece aside in a cool, dry place. I prefer to rotate it every few hours so all sides dry evenly. Let it cure fully for 24-48 hours until it is hard and room temperature to the touch. -
Sand for smoothness:
Once bone dry, use medium grit sandpaper to remove any major bumps. switch to fine grit to polish the surface until it feels like smooth bisque ware.
Textured Upgrade
Before drying, mix dried coffee grounds or sand directly into your clay. This creates genuine texture inside the material rather than just painted speckles.
Step 3: Faux Stone Finish
-
Base coat:
Mix a cream or light beige acrylic paint. Apply two even coats over the entire sculpture, letting the first coat dry completely before adding the second. -
Prepare the speckle mix:
Dilute a small amount of dark brown paint with water until it is very runny and inky. Do the same with a tiny drop of black paint in a separate spot. -
Splatter technique:
Dip an old toothbrush into the watered-down brown paint. Hold it near the sculpture and run your thumb across the bristles to flick tiny specks onto the surface. -
Layer the speckles:
Repeat the splatter process with the diluted black paint, but use less pressure for finer dots. This variation in color creates a realistic stone effect. -
Seal (Optional):
If you want extra protection, apply a matte varnish spray over the dried paint. Avoid glossy finishes if you want to maintain the natural stone look.
Now slide your favorite memory into the top slot and enjoy your handmade display piece


What Really Happens Inside the Kiln
Learn how time and temperature work together inside the kiln to transform clay into durable ceramic.
Minimal Shape Earrings

These elegant earrings combine earthy clay tones with a minimalist geometric design for a trendy, boutique-style look. The subtle speckled texture adds depth to the cream-colored arches, making them a sophisticated handmade gift perfect for everyday wear.
Step-by-Step Tutorial
Materials
- White or cream air dry clay (or polymer clay)
- Terracotta or peach air dry clay
- Sage or light green air dry clay
- Ground black pepper or dried coffee grounds (for speckling)
- Acrylic rolling pin
- Small round cutter (approx. 10-12mm)
- U-shape or arch cutter (approx. 25-30mm)
- X-Acto knife or clay slicing blade
- Needle tool or small drill bit
- Fine grit sandpaper (400-600 grit)
- Gold jump rings (6mm or 7mm)
- Gold earring hooks (French wires)
- Two pairs of jewelry pliers
- Parchment paper or silicone mat
Step 1: Preparing the Clay
-
Condition the white clay:
Take a chunk of your white or cream-colored clay and knead it well in your hands until it becomes soft, pliable, and free of cracks. This conditioning step is crucial for preventing breakage later. -
Create the speckled effect:
To achieve the beautiful granite-like finish shown in the photo, sprinkle a very small pinch of ground black pepper or dried used coffee grounds onto your white clay. Fold the clay over itself and knead thoroughly until the specks are evenly distributed throughout the batch. -
Roll out the slab:
Place your speckled clay on a piece of parchment paper or a silicone mat. Using your acrylic rolling pin, roll the clay into an even slab about 3mm to 4mm thick. Ensuring uniform thickness is key for professional-looking edges. -
Prepare the colored clays:
Clean your workstation and hands to avoid color transfer. Repeat the conditioning and rolling process for your terracotta and sage green clays. Aim for the exact same 3mm to 4mm thickness as your white clay so the pieces hang evenly.
Smooth Moves
Dip your finger or a brush in water to smooth edges *before* drying. It’s much easier to fix imperfections on wet clay than sanding them later.
Step 2: Cutting and Piercing
-
Cut the arches:
Press your U-shaped cutter firmly into the speckled white clay slab. Wiggle it slightly to ensure a clean cut, then lift. Cut as many arches as needed for your sets (two per pair). -
Cut the circles:
Using your small round cutter, punch out circles from the terracotta and sage green slabs. You will need two circles for every pair of earrings. -
Smooth the edges:
Before the clay dries, gently tap the edges of your cut shapes with your finger to smooth down any rough clay ‘burrs’ or sharp corners created by the cutters. I prefer to use a tiny bit of water on my fingertip for air dry clay to help blend the edges. -
Pierce holes for assembly:
Using a needle tool, poke a hole at the very top center of each U-shape arch. Then, poke two holes in each circle: one near the bottom edge (to connect to the arch) and one near the top edge (to connect to the hook). Make sure the holes are large enough to fit your jump rings, keeping in mind clay shrinks slightly when drying.
Step 3: Refining and Assembly
-
Let them dry completely:
Lay all your pieces flat on clean parchment paper and set them aside in a draft-free area. Allow air dry clay to cure for at least 24-48 hours. Flip the pieces over halfway through the drying process to ensure both sides dry evenly and stay flat. -
Sand for a professional finish:
Once fully rock-hard, use fine-grit sandpaper to gently buff the edges and flat surfaces. This step removes any fingerprints or uneven texture, giving the earrings that high-end matte look. -
Open the jump rings:
Using two pairs of jewelry pliers, grip a gold jump ring on either side of the split. Twist one hand forward and the other backward to open the ring sideways (never pull it apart outwards, as this weakens the metal). -
Connect the pieces:
Slide the open jump ring through the top hole of the speckled arch and the bottom hole of a colored circle. Twist the jump ring closed using the same motion as before, ensuring the ends meet perfectly flush. -
Attach the earring hooks:
Open the small loop at the bottom of your earring hook (or use a second smaller jump ring if needed). Thread it through the top hole of the colored circle. Close the loop securely. -
Final smooth check:
Give the earrings a final wipe with a soft cloth to remove any sanding dust. Verify all jump rings are tightly closed so pieces won’t slip off during wear.
Make it Shine
Coat the dry clay with a thin layer of gloss varnish or UV resin. This adds durability and creates a ‘ceramic’ look without firing a kiln.
Now you have a stunning set of geometric statement earrings ready to wrap up for a special birthday
Initial Keychain Tag
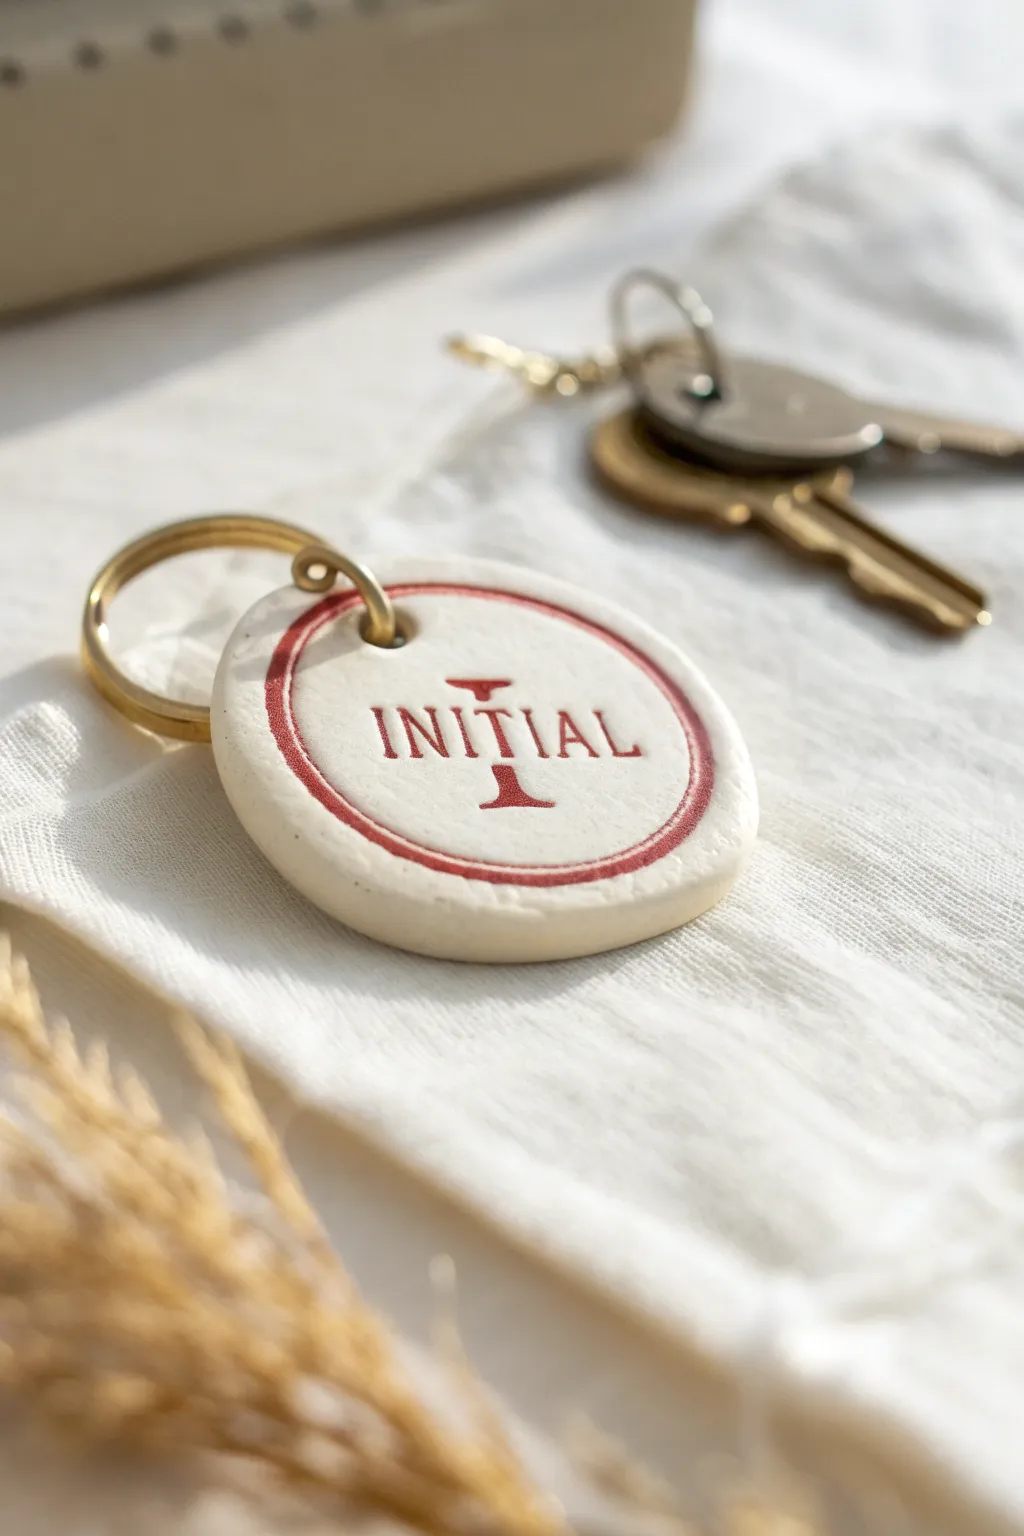
Create a personalized keepsake with this sophisticated yet simple air dry clay keychain. The design features a smooth, round clay tag stamped with a bold initial and playful lettering, finished with a classic red border that evokes a vintage wax seal aesthetic.
Step-by-Step Guide
Materials
- White air dry clay
- Rolling pin or smooth glass jar
- Wax paper or craft mat
- Circle cookie cutter (approx. 2 inches)
- Small straw or cocktail stick
- Alphabet stamp set (serif font)
- Red acrylic paint (crimson or deep red)
- Fine detail paintbrush (size 0 or 00)
- Fine grit sandpaper (320-400 grit)
- Gold finish keyring hardware
- Small jump ring
- Jewelry, needle-nose pliers
- Clear matte varnish or sealant
Step 1: Shaping the Clay Base
-
Condition the Clay:
Begin by taking a small handful of white air dry clay and kneading it in your palms until it is warm, pliable, and free of cracks. -
Roll it Out:
Place the clay on wax paper or a craft mat and roll it out evenly to a thickness of about 1/4 inch (6mm). You want it thick enough to be sturdy but not bulky. -
Cut the Circle:
Using your circle cookie cutter, press firmly into the clay to cut out a clean round shape. -
Smooth the Edges:
Dip your finger in a tiny bit of water and gently run it around the cut edge of the circle to smooth down any roughness or loose clay bits. -
Create the Hardware Hole:
Near the top edge of the circle, use a small straw or a cocktail stick to poke a hole for the jump ring. Ensure it isn’t too close to the edge to prevent breaking later. -
Refine the Hole:
Gently wiggle the straw or stick to clean up the hole’s interior, ensuring there’s enough clearance for your metal jump ring.
Step 2: Adding the Design
-
Plan Your Spacing:
Before stamping, lightly hover your stamps over the clay to visualize the layout. The large initial ‘I’ goes in the center, with ‘INITIAL’ overlaid across the middle bar. -
Stamp the Central Initial:
If you have a large letter stamp, press it into the center. If not, you can hand-paint this later, or use small stamps to create the word ‘INITIAL’ first as the focal point. -
Stamp the Text:
Using your smaller alphabet stamp set, carefully press the word ‘INITIAL’ (or your recipient’s name) horizontally across the center of the medallion. Press evenly but not so deep that it distorts the circle. -
Impress the Border (Optional):
To help guide painting later, you can lightly press a slightly smaller circle cutter or a lid into the clay to create an indented ring guide, or just leave it smooth for freehand painting. -
Let it Dry:
Place the clay piece on a clean, flat surface to dry. I find flipping it over gently after about 12 hours helps the bottom dry evenly. Total drying time usually takes 24-48 hours depending on humidity.
Cracking Clay?
If tiny cracks appear while drying, don’t panic. Mix a tiny bit of fresh clay with water to make a paste and smooth it into the cracks with your finger.
Step 3: Finishing Touches
-
Sand for Smoothness:
Once fully cured and hard, use fine-grit sandpaper to gently buff the edges and surface, removing any fingerprints or sharp ridges. -
Wipe Clean:
Use a dry, soft cloth or brush to remove all sanding dust from the letters and surface before painting. -
Paint the Lettering:
Dip your fine detail brush into crimson red acrylic paint. Carefully fill in the impressed letters. If you go outside the lines, quickly wipe it away with a damp Q-tip. -
Paint the Large Initial:
If you are hand-painting the large background letter like the ‘I’ shown, carefully paint the serif details behind the smaller text, creating a layered look. -
Add the Red Border:
Load your brush with red paint and slowly paint a thin, consistent ring around the inner perimeter of the circle. Using a record-player motion (spinning the clay while holding the brush still) can help stabilize your line. -
Seal the Clay:
Apply a thin coat of clear matte varnish or sealant over the entire piece, front and back, to protect it from moisture and scratches. -
Attach the Hardware:
Use two pairs of pliers to twist open a gold jump ring. Thread it through the hole in the clay. -
Connect the Keyring:
Before closing the jump ring, slide on the large gold keyring loop. -
Secure the Loop:
Twist the jump ring back into a closed position with your pliers, ensuring the gap is completely shut so the clay tag doesn’t slip off.
Make it Shine
Swap the matte varnish for a high-gloss glaze or UV resin topcoat. This gives the tag a professional, ceramic-like finish that looks kiln-fired.
Now you have a thoughtful, personalized gift that looks professionally made and is ready for wrapping

TRACK YOUR CERAMIC JOURNEY
Capture glaze tests, firing details, and creative progress—all in one simple printable. Make your projects easier to repeat and improve.
Textured Tealight Holder
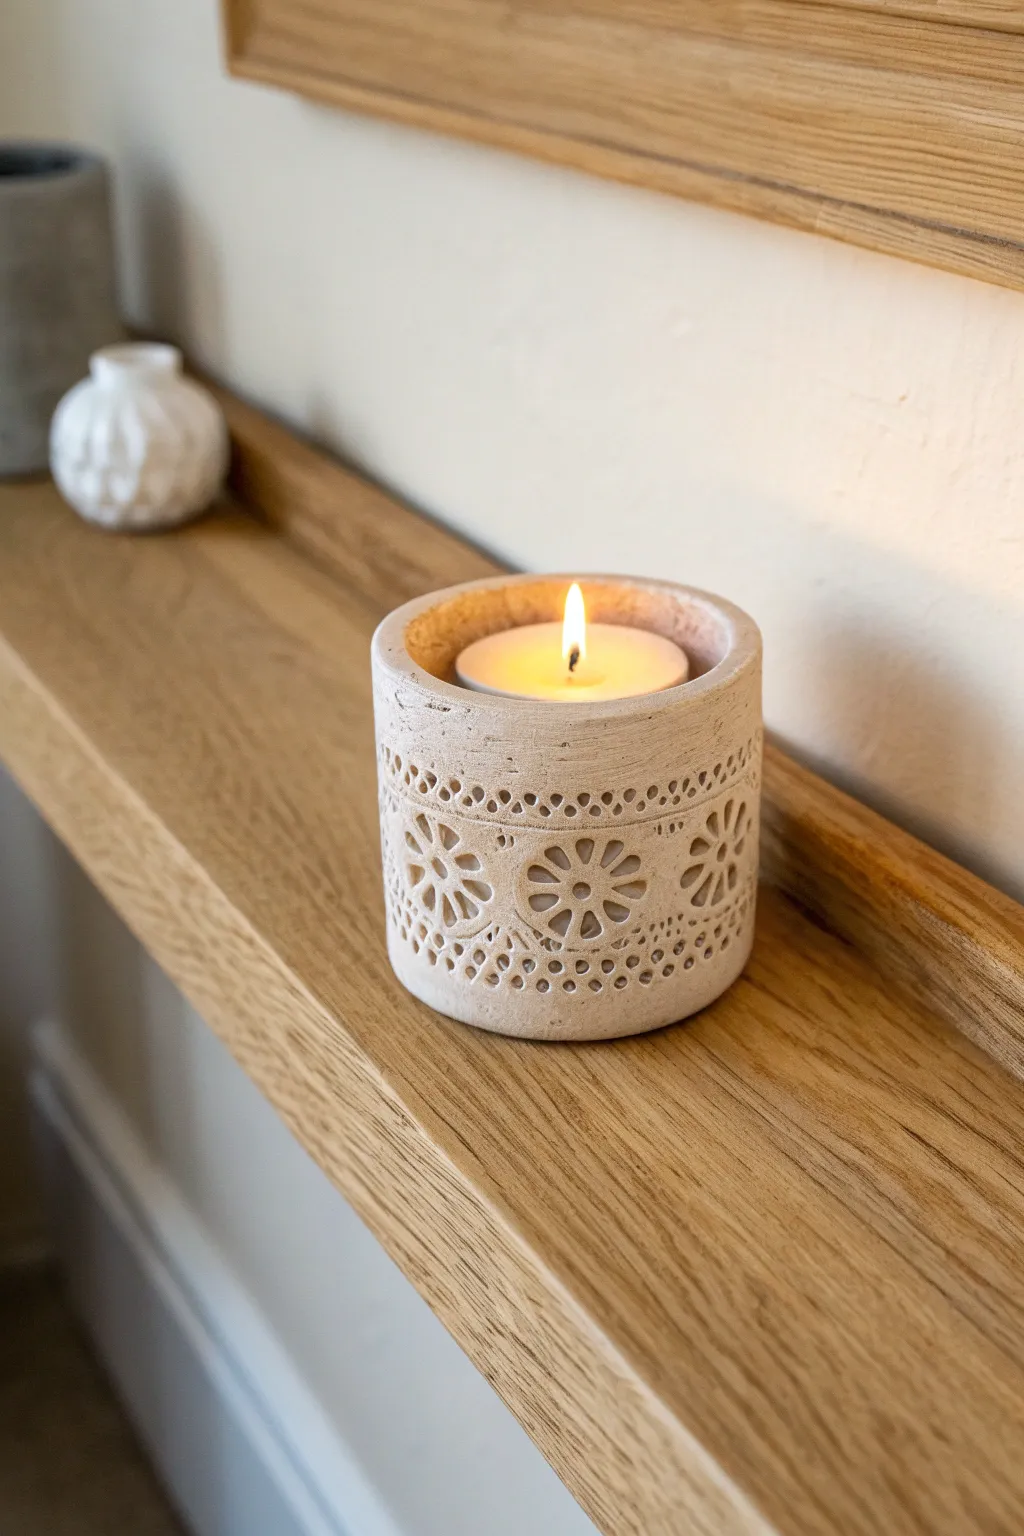
This charming tealight holder combines organic texture with a modern silhouette, looking for all the world like carved stone. Using a simple slab technique and everyday objects for stamping, you’ll create a lovely, warm accent that glows beautifully when lit.
How-To Guide
Materials
- White air dry clay (approx. 300g)
- Rolling pin
- Sharp craft knife or clay blade
- Ruler
- Empty cylindrical jar or can (for forming the shape)
- Small lace doily or textured stamp
- A straw or small circular piping tip
- Small bowl of water
- Fine-grit sandpaper (optional)
- Clear matte varnish
Step 1: Preparing the Slab
-
Condition the clay:
Start by kneading your chunk of air dry clay until it feels pliable and warm in your hands. This removes air bubbles and prevents cracking later. -
Roll out the base:
On a clean, flat surface, roll the clay out into a long rectangular slab. Aim for an even thickness of about 4-5mm to ensure the walls are sturdy but not chunky. -
Measure the circumference:
Take your forming jar or can and wrap a piece of string around it to find the circumference. Add about 1cm to this measurement for overlap. -
Cut the rectangle:
Using your ruler and craft knife, cut the clay slab into a precise rectangle based on your circumference measurement. The height should be slightly taller than a standard tealight candle, around 5-6cm.
Step 2: Adding Texture
-
Position your texture tool:
Before joining the cylinder, lay your clay strip flat. Place your lace doily or designated stamps along what will become the center band of the holder. -
Imprint the design:
Gently roll your rolling pin over the lace or press your stamps firmly. Use even pressure so the depth of the impression is consistent across the strip. -
Add detail dots:
To mimic the look in the photo, take a small circular tool—like the end of a paintbrush or a toothpick—and press a row of small dots above and below your main floral pattern. -
Pierce the pattern:
For maximum glow, you can punch completely through the clay in the center of your flower shapes using a straw. This lets the candlelight peek through the walls.
Crack Control
If hairline cracks appear while drying, don’t panic. Mix a tiny amount of clay with water into a paste and smudge it into the cracks using a damp finger, then let dry again.
Step 3: Assembly & Finishing
-
Score the edges:
Take your craft knife and gently cross-hatch small scratches (scoring) on the two short ends of your clay rectangle where they will meet. -
Apply slip:
Dab a little water or ‘slip’ (clay and water paste) onto the scored edges. This acts as the glue for your seam. -
Form the cylinder:
Carefully wrap the clay strip around your jar or can. I find it easiest to do this standing up so gravity works with you. -
Seal the seam:
Press the scored ends together firmly. Use a wet finger to smooth the seam line on the inside and outside until it disappears. Be careful not to smudge your beautiful texture. -
Create the base:
Roll out a small separate piece of clay. Place your cylinder on top and trace around the bottom. Cut out this circle. -
Attach the bottom:
Score and slip the bottom edge of the cylinder and the edge of the circle base. Press them together, smoothing the join with a modeling tool or your finger to ensure it is watertight. -
Refine the rim:
Dip your finger in water and run it along the top rim of the holder to smooth out any sharp edges or unevenness from the initial cutting. -
Slow drying:
Remove the support jar carefully. Set the holder in a cool, dry place away from direct sunlight. Let it dry slowly for 24-48 hours to minimize warping. -
Sanding and sealing:
Once bone dry, lightly sand any rough spots. Finish with a coat of matte varnish to protect the surface and give it that finished stone look.
Stone Effect
To get the faux-stone look from the photo, lightly sponge on a mix of white and watered-down beige paint after drying, wiping most of it off so color stays only in the crevices.
Place a tea light inside and enjoy the soft patterns cast on your wall by this handmade piece
Tiny Succulent Planter
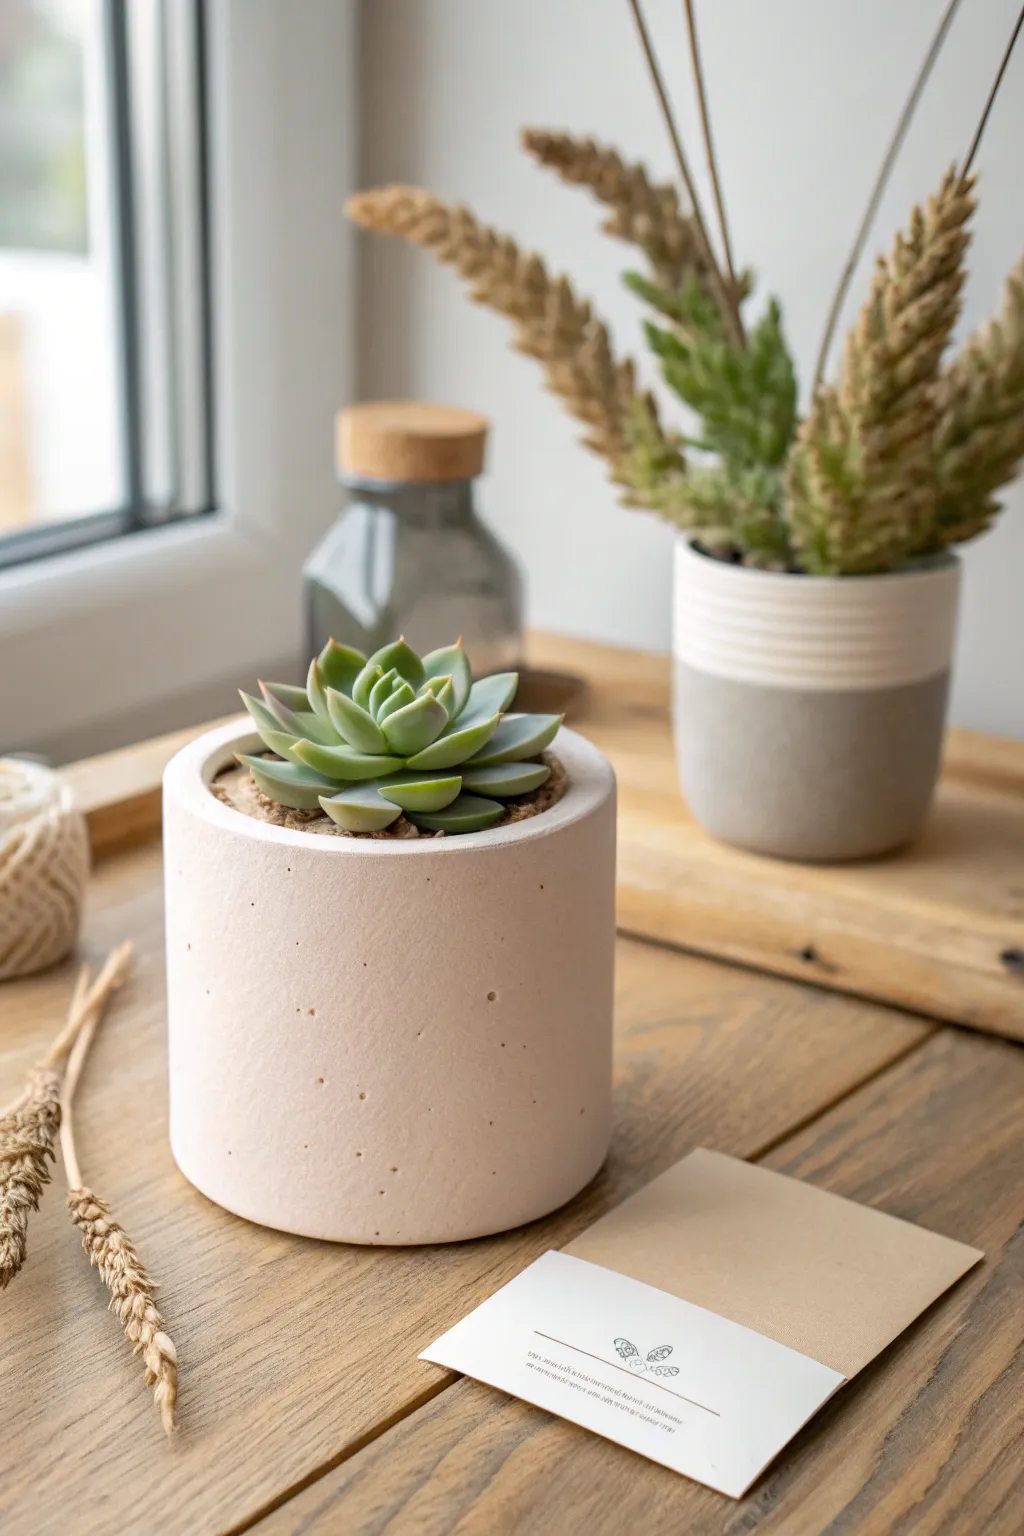
Create a minimalist, modern home for your favorite tiny succulent with this sleek cylindrical planter. By adding a simple texture to white air-dry clay, you can achieve a stunning faux-sandstone finish that looks high-end but is incredibly easy to make.
Step-by-Step
Materials
- White air-dry clay (approx. 500g)
- Small rolling pin or glass jar
- Circle cutter or a round glass (approx. 3-4 inches diameter)
- Craft knife
- Sandpaper (medium and fine grit)
- Small bowl of water
- Used coffee grounds or black pepper (for speckling)
- Sealer (matte varnish or dishwasher-safe Mod Podge)
- Ruler
- Wax paper or craft mat
Step 1: Preparation & Base
-
Condition the Clay:
Begin by taking a chunk of white air-dry clay and kneading it in your hands until it’s soft, warm, and pliable. This prevents cracking later on. -
Add the Texture:
To get that speckled stone look, sprinkle a very small pinch of dried used coffee grounds or cracked black pepper onto the clay. Knead it thoroughly until the flecks are evenly distributed throughout the white mass. -
Roll out the Base:
Flatten a portion of your speckled clay on wax paper to about 1/4 inch thickness. Use your circle cutter or a glass to cut out a perfect circle—this will be the bottom of your pot. -
Smooth the Edges:
Dip your finger in water and gently run it along the edge of your clay circle to smooth out any rough cuts.
Cracks appearing?
If you see tiny hairline cracks while drying, mix a small amount of fresh clay with water to make a paste and fill them in. Use a damp finger to smooth it out before sanding.
Step 2: Building the Walls
-
Measure the Circumference:
Use a piece of string or flexible tape measure to find the exact circumference of your base circle. This tells you how long your wall strip needs to be. -
Roll the Rectangular Slab:
Roll out the remaining clay into a long, rectangular strip. Aim for the same 1/4 inch thickness as your base to ensure the pot dries evenly. -
Cut to Size:
Using a ruler and craft knife, cut a clean rectangle. The length should match your base’s circumference, and the height should be about 3-4 inches, depending on how deep you want the pot. -
Check fit:
Loosely wrap the strip around your base circle just to ensure the ends meet perfectly without too much overlap. Trim if necessary.
Step 3: Assembly
-
Score the Surfaces:
Use your craft knife or a needle tool to make cross-hatch scratches (‘scoring’) along the outer edge of the base circle and the bottom edge of the rectangular wall strip. -
Apply Slip:
Dab a little water or ‘slip’ (clay mixed with water) onto the scratched areas to act as glue. -
Attach the Wall:
Carefully wrap the wall around the base, pressing the scored edges together. Join the two vertical ends of the wall together as well. -
Blend the Seams:
This is the most crucial part for a seamless look. Use a modeling tool or your wet finger to smooth the clay over the seams—both exactly where the wall meets the base and the vertical seam on the side—until they disappear completely. -
Refine the Shape:
Because handling the clay can warp it, place a cylindrical object (like a soda can wrapped in plastic) inside gently to help push the walls back into a perfect circle.
Elevate the look
For a two-tone effect like the background pot, mask off the bottom third with tape after drying and paint the top section white, leaving the bottom raw and speckled.
Step 4: Finishing Touches
-
Slow Drying:
Let the pot dry slowly away from direct sunlight for 24-48 hours. Turning it upside down halfway through helps the bottom dry evenly. -
Sanding:
Once bone dry, take your medium grit sandpaper and gently sand the outside wall to remove fingerprints and bumps. Finish with fine grit for a velvety smooth touch. -
Create Pockmarks:
To mimic the porous texture seen in the photo, use a thick needle or toothpick to gently poke a few tiny, shallow holes sporadically around the exterior. -
Sealing:
Apply 2-3 coats of a matte waterproof sealer inside and out. Since air-dry clay isn’t water-tight, this step is vital if you plan to put a real plant inside.
Pop in a small succulent and you have a beautiful, minimalist gift ready to be wrapped
Terrazzo Pen Cup
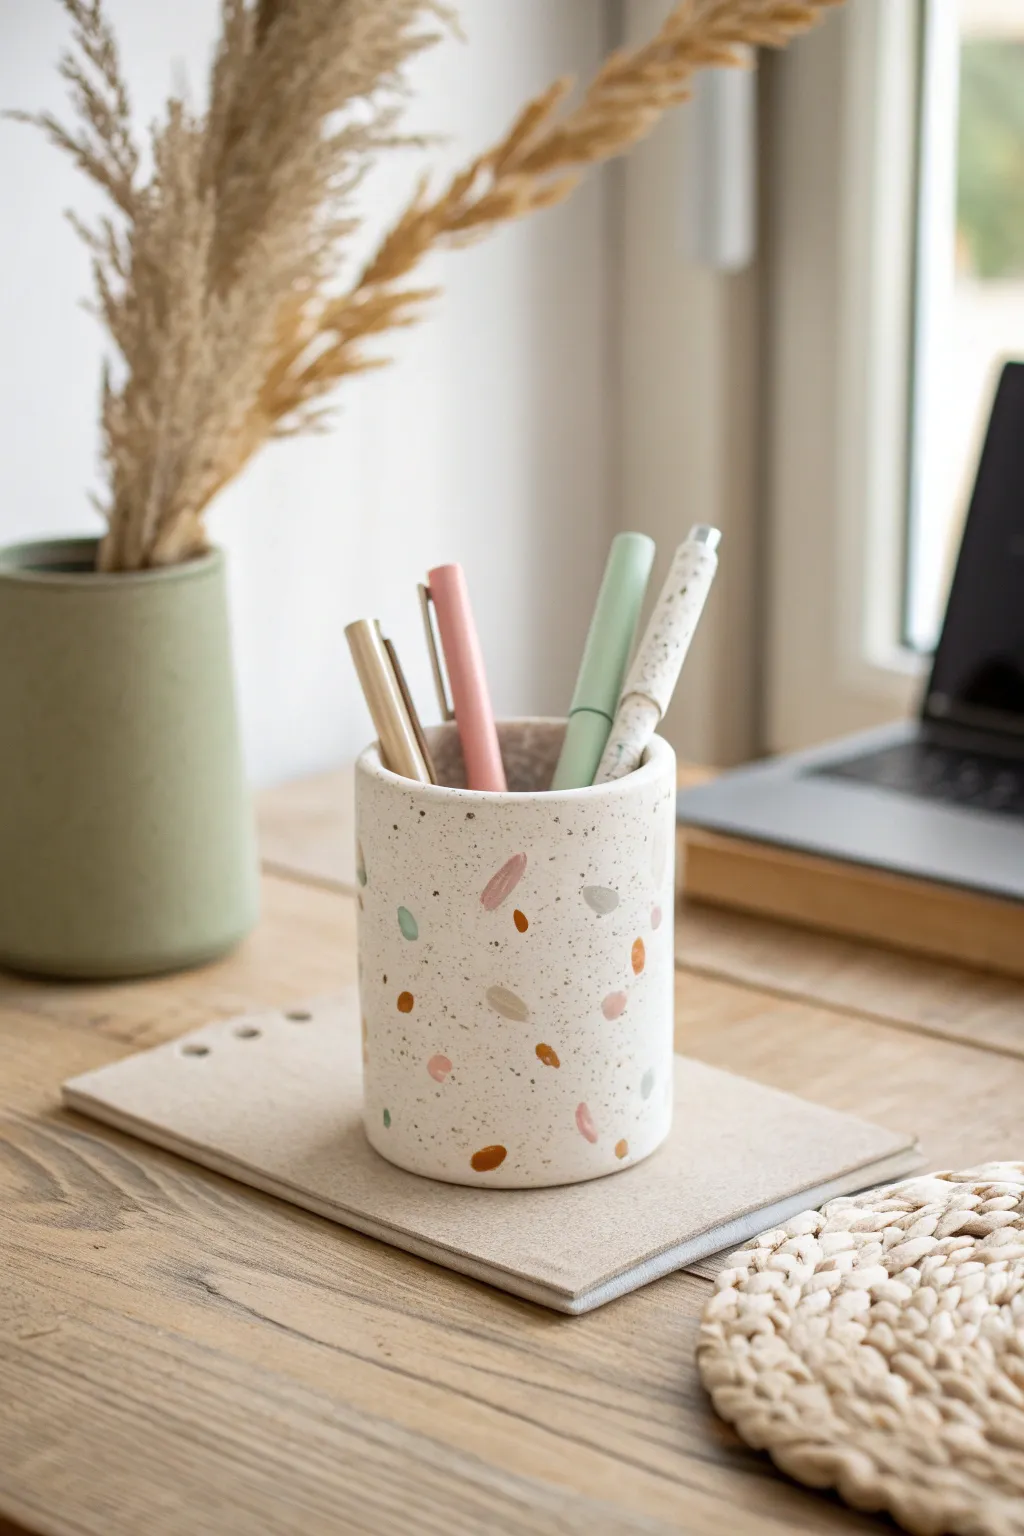
Bring a stylish, modern touch to any workspace with this trendy terrazzo-style pen cup. The speckled design looks high-end, but creating it with air dry clay is surprisingly simple and incredibly satisfying.
How-To Guide
Materials
- White air dry clay (approx. 500g)
- Acrylic paints (pastel pink, teal, mustard yellow, burnt orange)
- Rolling pin
- Empty can or jar (to use as a mold)
- Parchment paper
- Craft knife or clay cutter
- Small bowl of water
- Fine grit sandpaper
- Gloss or matte varnish (sealant)
- Small paintbrush
Step 1: Creating the Terrazzo Chips
-
Prep the colored clay:
Pinch off four small, walnut-sized pieces of white clay. Separately mix a drop of acrylic paint into each piece—one pink, one teal, one mustard, one orange—kneading until the color is solid and uniform. -
Flatten the colors:
Roll each colored ball flat until it is very thin, almost like paper. Let these sit out for about 15-20 minutes to firm up slightly; this makes them easier to cut without smearing. -
Make the chips:
Tear or cut the flattened colored clay into irregular, tiny shards. Aim for a mix of sizes, from tiny specks to small jagged triangles, to mimic real stone chips.
Clean Color Tip
Wash your hands and rolling pin thoroughly between kneading each color. This prevents muddy streaks and keeps your white base clay bright and crisp.
Step 2: Building the Cup Form
-
Roll the base slab:
Take a large portion of white clay and roll it out on parchment paper into a smooth rectangle about 1/4 inch thick. -
Apply the pattern:
Scatter your colored clay chips onto the white slab. Press them gently into the surface, arranging them randomly so no two same-colored pieces are touching. -
Embed the chips:
Use your rolling pin to go over the slab again firmly. This forces the colored chips flush with the white clay, creating a smooth, unified surface. -
Cut the rectangle:
Measure the height and circumference of your chosen mold (the can or jar). Cut the clay slab into a clean rectangle that matches these dimensions, adding a tiny bit of overlap length. -
Prepare the mold:
Wrap your mold (can or jar) in parchment paper so the clay doesn’t stick to it permanently. -
Form the cylinder:
Carefully lift your clay rectangle and wrap it around the parchment-covered mold. Bring the two ends together. -
Seal the seam:
Score the edges where they meet (scratch cross-hatching marks), apply a dab of water, and press them together. Smooth the seam with your finger or a modeling tool until it disappears. -
Create the base:
Roll out a small scrap of white clay and place your wrapped mold on top of it. Trace around the bottom with your knife to cut a perfect circle for the floor of the cup. -
Attach the bottom:
Score and wet the bottom edge of the cylinder and the edge of the circle base. Press them together firmly, smoothing the clay upwards from the base to join the pieces seamlessly.
Level Up: Gold Accents
After the varnish dries, paint the very top rim of the cup with liquid gold leaf or metallic gold paint for an ultra-luxe, finished look.
Step 3: Finishing Touches
-
Initial dry:
Let the clay dry on the mold for a few hours until it holds its shape, then gently slide the mold out. This helps the inside dry evenly. -
Paint speckles:
Once fully dry (usually 24-48 hours), I like to use a small brush to flick or dab tiny dots of black or dark grey paint onto the surface for added texture and depth. -
Sand for smoothness:
Gently sand the exterior with fine-grit sandpaper. This reveals the crisp edges of your terrazzo chips and makes the surface feel like polished stone. -
Clean up dust:
Wipe the entire cup with a slightly damp cloth or paper towel to remove all the sanding dust. -
Seal the piece:
Apply two coats of varnish to protect the clay and make the colors pop. Let it dry completely before filling with pens.
This custom piece is now ready to organize a desk in style or serve as a thoughtful handmade gift.
Quote Bunting Wall Decor
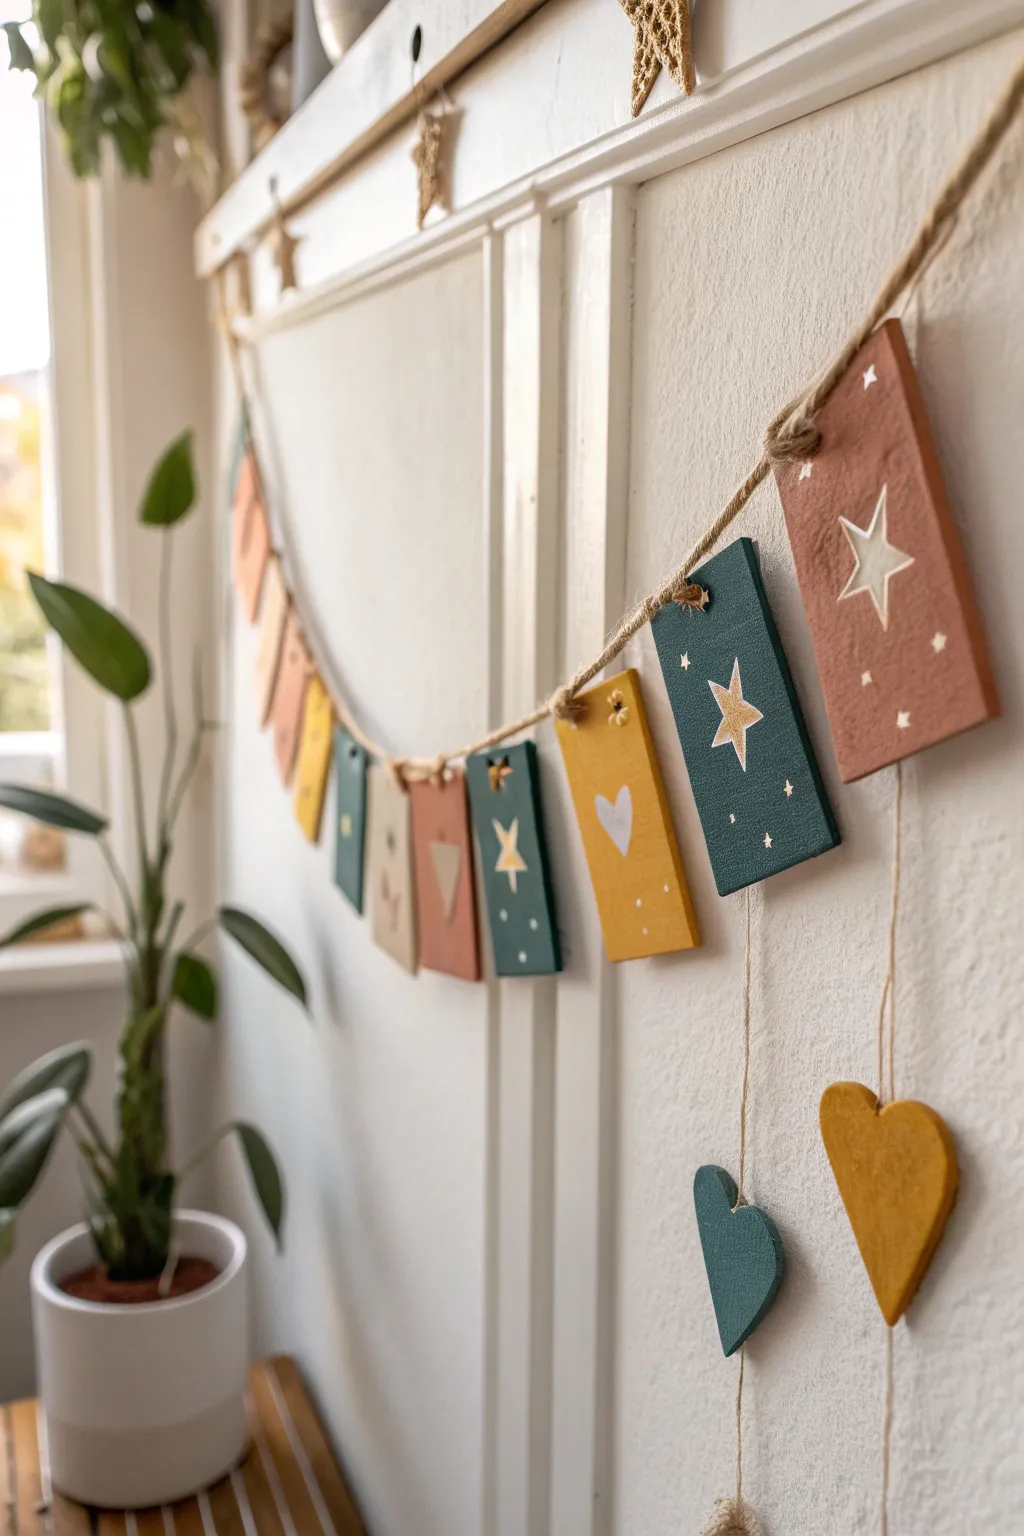
Bring a touch of celestial charm to any room with this handmade air dry clay bunting, featuring warm earth tones and whimsical star motifs. It makes a thoughtful, personalized gift that adds texture and warmth to a nursery, bedroom, or cozy reading nook.
Step-by-Step
Materials
- Air dry clay (white or terracotta)
- Rolling pin
- Rectangle cookie cutter or knife and ruler
- Small heart cookie cutter (optional)
- Acrylic paints (terracotta, hunter green, mustard yellow, beige)
- Fine detail paintbrush
- White or gold paint pen (or fine brush with paint)
- Jute twine or rustic string
- Plastic straw or skewer (for making holes)
- Sandpaper (fine grit)
- Matte varnish or sealant
Step 1: Shaping the Clay Tiles
-
Roll out the clay:
Start by kneading your air dry clay until it is soft and pliable. Roll it out on a smooth surface to an even thickness of about 4-5mm. If the clay sticks, you can use a little wax paper underneath. -
Cut the rectangles:
Using a rectangular cutter or a ruler and knife, cut out several tall rectangles. For the bunting shown, aim for approximately 2 inches wide by 3.5 inches tall. Make enough tiles to spell out a word or span your desired length. -
Cut the hanging hearts:
From the remaining rolled clay, cut out two or three small heart shapes. These will dangle from the main bunting later for extra charm. -
Create hanging holes:
While the clay is still wet, use a straw or a skewer to poke two holes at the top corners of each rectangle. Make sure they are not too close to the edge to prevent cracking. -
Add holes to hearts:
Pierce a single small hole at the top center of each heart shape so they can be suspended vertically. -
Detail the surface:
If you want a rustic texture like the original image, gently press a piece of rough fabric or sandpaper onto the wet clay surface, then smooth the edges with a little water on your finger. -
Let it dry:
Place all your clay pieces on a flat wire rack to dry. This usually takes 24-48 hours depending on humidity. Flip them occasionally to ensure they dry flat without curling.
Keep it Flat
Clay tends to curl while drying. Place a heavy book on top of the pieces (sandwich them between parchment paper first) once they are ‘leather hard’ to ensure they dry perfectly flat.
Step 2: Painting and Decorating
-
Sand imperfections:
Once fully dry and rigid, lightly sand any rough edges with fine-grit sandpaper for a professional finish. -
Apply base colors:
Paint the rectangles in alternating earthy tones. I recommend using a matte mustard yellow, a deep hunter green, and a warm terracotta or rust color. Paint the hearts to match the scheme. -
Second coat:
Let the first coat dry completely, then add a second layer if the clay white is showing through. Ensure the color is solid and opaque. -
Paint the large stars:
Using a contrasting light beige or cream paint, outline a large, five-pointed open star in the center of selected rectangles. Fill the surrounding star outline if desired, or leave it hollow for a sketched look. -
Add simple hearts:
On the yellow rectangles, paint a simple white heart in the center instead of a star to vary the pattern. -
Add starry details:
Dip the tip of a fine paintbrush or a toothpick into white or gold paint. Add tiny dots, small flecks, and little four-pointed ‘sparkle’ stars randomly around the main motifs to create a night sky effect. -
Seal the pieces:
Protect your artwork with a coat of matte varnish. This will keep the colors vibrant and prevent the clay from absorbing moisture over time.
Add a Message
Use alphabet stamps to press a name or ‘Happy Birthday’ into the wet clay before drying. Paint the indented letters in gold for a personalized keepsake.
Step 3: Assembly
-
String the rectangles:
Measure a long piece of jute twine. Thread it through the top holes of your rectangles, going in through the front of the first hole and out through the front of the second, so the string shows across the back. -
Attach the dangling hearts:
Cut shorter lengths of twine or thinner string (about 6-8 inches). Tie one end through the hole of a clay heart and the other end to the main bunting string, letting them hang down between the rectangles. -
Secure the spacing:
Adjust the spacing of the tiles so they hang evenly. You can add a tiny dab of glue to the back of the twine if they slide around too much. -
Create loops:
Tie a secure loop at both ends of the main twine for easy hanging on the wall.
Hang your new personalized garland on a shelf or wall to enjoy the cozy, handcrafted atmosphere it creates
Birthday Number Keepsake Topper
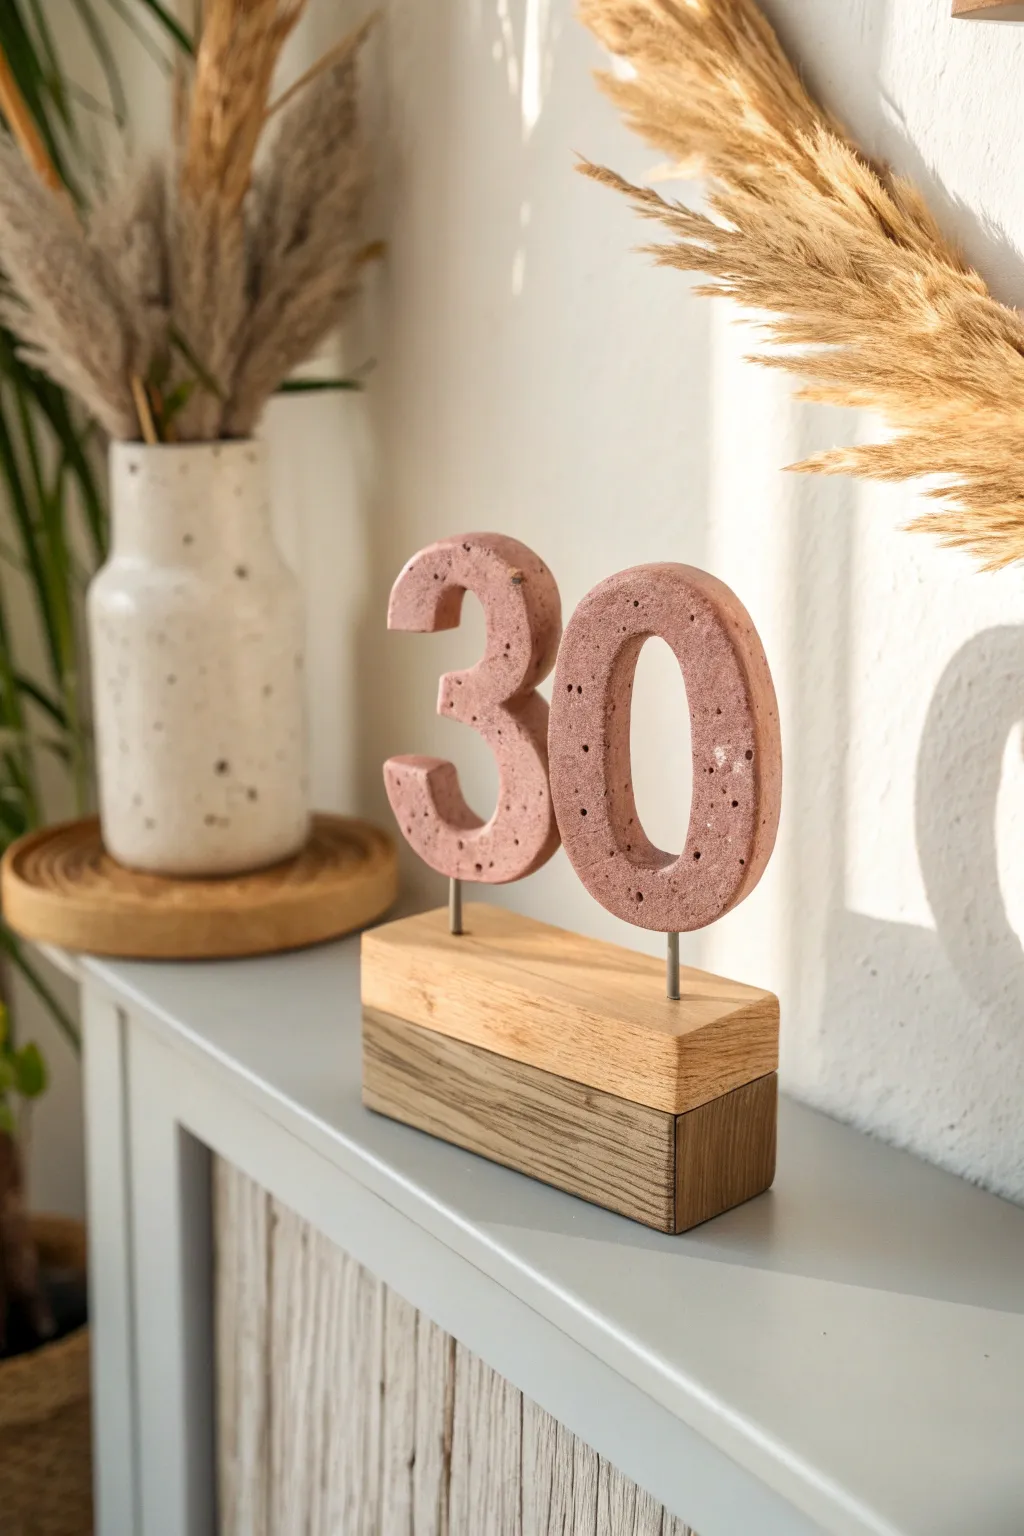
Celebrate a milestone with this chic, industrial-meets-boho centerpiece featuring sturdy air-dry clay numbers mounted on a layered wooden base. The unique speckled finish mimics rose-tinted concrete, creating a sophisticated keepsake that looks beautiful on a mantelpiece long after the candles are blown out.
How-To Guide
Materials
- Air dry clay (white or terracotta)
- Acrylic paint (dusky pink/rose, brown, white)
- Large number cookie cutters (or a printed template and craft knife)
- Two blocks of scrap wood (different stains or grains preferred)
- Thick metal wire or heavy-gauge floral wire
- Wire cutters
- Hand drill with a small bit matching the wire gauge
- Strong craft glue (E6000 or wood glue)
- Old toothbrush or stiff bristle brush
- Fine grit sandpaper
- Rolling pin
- Parchment paper
Step 1: Shaping the Numbers
-
Condition the clay:
Start by kneading a large handful of air dry clay until it’s warm and pliable. If you want the base color to be pink throughout (which helps if chipped later), knead a small amount of pink acrylic paint directly into the white clay until uniform. -
Roll out the slab:
Place the clay between two sheets of parchment paper. Roll it out to a thickness of at least 1/2 inch to 3/4 inch. You want these numbers to be chunky and substantial, not flat like a cookie. -
Cut the shapes:
Press your number cutters firmly into the slab. If you don’t have cutters, place a paper template on the clay and carefully trace around it with a craft knife, keeping your blade vertical for clean edges. -
Smooth the imperfections:
Dip your finger in a little water and gently run it along the cut edges to smooth out any harsh lines or jagged bits. This is the time to ensure the curves of your ‘3’ or ‘0’ are perfectly rounded. -
Add wire holes:
While the clay is still wet, carefully insert a short piece of your wire into the bottom center of each number to create a pilot hole roughly 1 inch deep. Remove the wire gently; this ensures you won’t crack the dry clay later. -
Texture the surface:
To mimic concrete, lightly press a crumpled ball of aluminum foil or a coarse sponge against the front and sides of the wet numbers. You want subtle pitting, not deep craters. -
Dry thoroughly:
Let the numbers dry flat on a wire rack for 24-48 hours. Flip them occasionally to ensure even drying.
Stone Texture Secret
Mix a teaspoon of baking soda into your acrylic paint before applying. It creates a gritty, authentic stone-like texture that looks amazing once dry.
Step 2: Creating the Faux Concrete Finish
-
Base coat:
Paint the dried numbers with a matte dusky pink or terracotta acrylic paint. I usually apply two coats to get a solid, opaque finish. -
Create the splatter mix:
Mix a small amount of dark brown or charcoal grey paint with water until it has an inky consistency. -
Apply speckles:
Dip an old toothbrush into the watery dark paint. Run your thumb across the bristles to flick tiny speckles onto the numbers. Practice on paper first to control the spray. -
Add dimension:
Repeat the splatter process with a slightly lighter white or cream wash to add depth to the ‘stone’ texture. -
Seal (optional):
Once the paint is fully dry, apply a matte varnish to protect the surface without adding unnatural shine.
Make It Personal
Swap the generic wood block for a piece of driftwood for a coastal vibe, or use a slice of raw birch log for a rustic, woodland theme.
Step 3: Assembling the Wooden Stand
-
Prepare the wood blocks:
Select two rectangular blocks of wood. Ideally, one should be slightly narrower or different in tone to create visual interest. Sand any rough edges. -
Stack and glue:
Apply a strong wood glue between the two blocks and clamp them together (or place a heavy book on top) until the glue sets securely. -
Drill the base:
Mark two spots on the top wooden block where you want your numbers to stand. Drill holes straight down, about half an inch deep, using a bit that matches your wire thickness. -
Cut the supports:
Cut two pieces of sturdy wire, about 2-3 inches long. -
Final assembly:
Dip one end of each wire into super glue or E6000 and insert into the holes in the bottom of the clay numbers. Let set. Then, place the other ends into the holes in the wood block (glue is optional here if the fit is snug).
Place this stylish topper on a shelf or sideboard to commemorate the big day with a modern, artistic touch
Favorite Fruit or Food Magnets
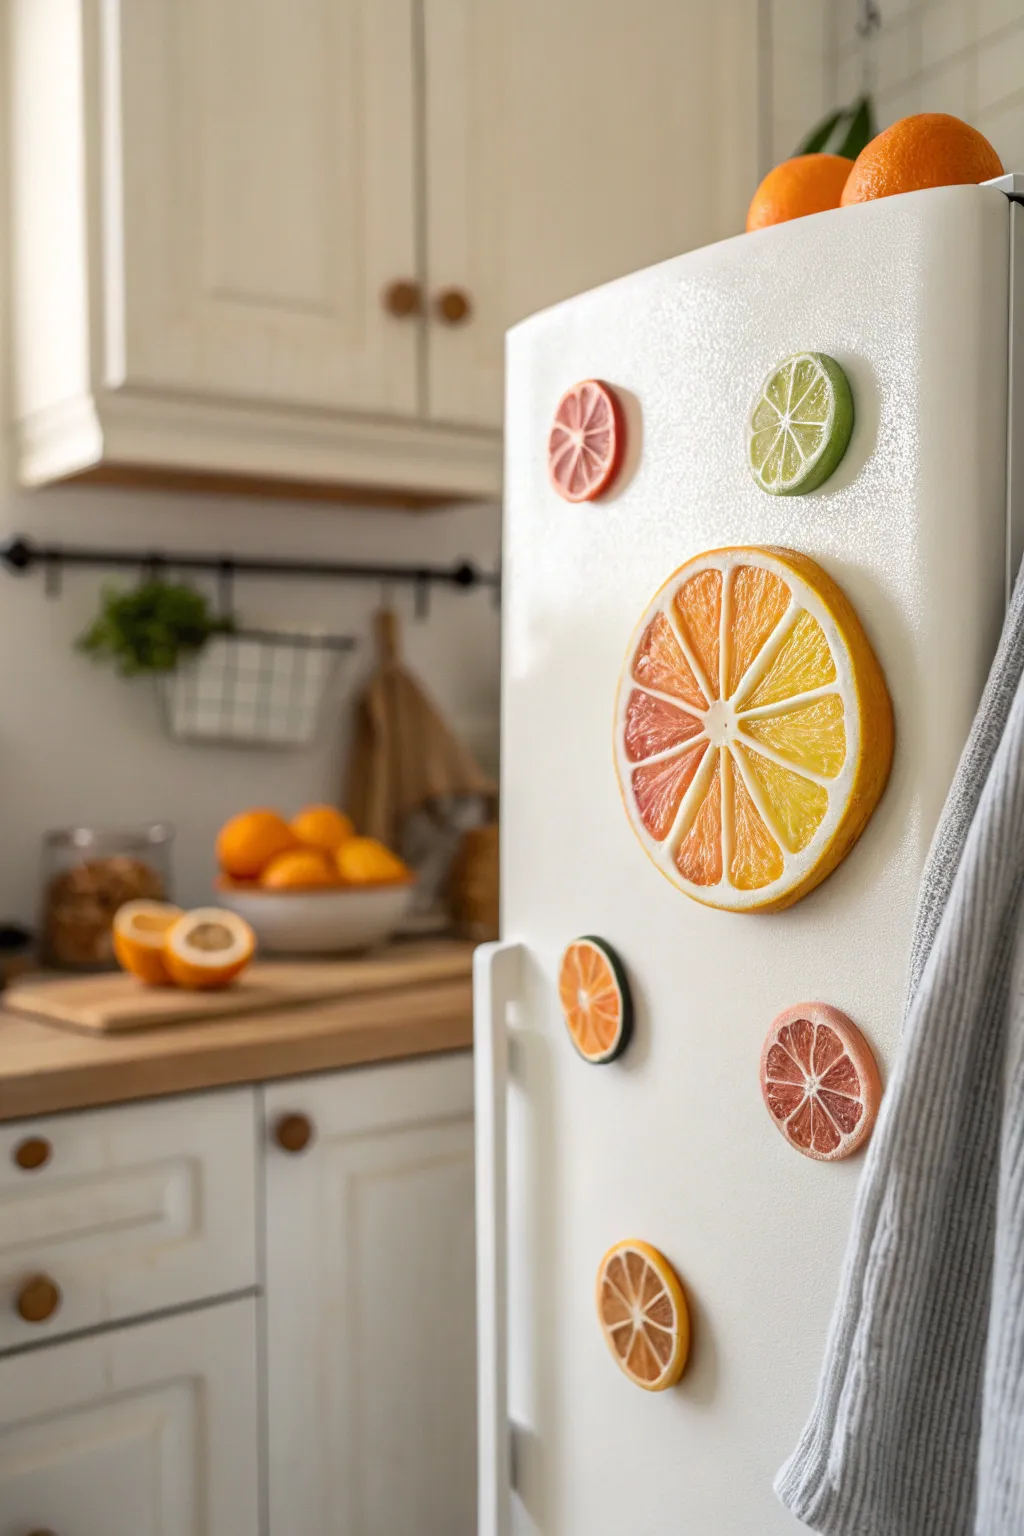
Brighten up any kitchen with these delightfully realistic citrus slice magnets made from air dry clay. From the textured pith to the juicy-looking segments, these durable little fruits make a refreshing and practical birthday gift.
Step-by-Step Guide
Materials
- White classic air dry clay
- Acrylic paints (Titanium White, Cadmium Yellow, Orange, Yellow Ochre, Lime Green, red/pink shades)
- Round cookie cutters (various sizes)
- Sculpting tools (needle tool and small ball stylus)
- Small craft magnets
- Strong craft glue (E6000 or similar)
- High-gloss varnish or UV resin
- Fine grit sandpaper
- Rolling pin
- Small paintbrushes (flat and fine liner)
Step 1: Sculpting the Base
-
Preparation:
Begin by conditioning your air dry clay, kneading it until it is soft, pliable, and free of cracks. Roll it out on a smooth surface to an even thickness of about 1/4 inch (6mm). -
Cutting the rounds:
Select round cutters in different sizes to mimic various fruits—large for grapefruits, medium for oranges, and smaller ones for lemons in limes. Press firmly to cut clean circles. -
Smoothing edges:
Dip your finger in a little bit of water and run it gently around the cut edges of each clay circle to remove any sharpness or burrs left by the cutter. -
Defining the rind:
Using a needle tool, lightly scribe a circle about 2-3mm inside the outer edge. This marks the boundary between the white pith/rind and the juicy fruit flesh. -
Marking segments:
Find the center point of your circle. Using a ruler or straight edge, lightly impress lines radiating outward like wheel spokes to mark the individual fruit segments. Aim for 8-10 segments per fruit. -
Sculpting the membranes:
With a small ball stylus or a blunt sculpting tool, press down the clay in the triangular areas *between* your spoke lines. You want the spoke lines (the membranes) to remain raised while the fruit flesh areas are depressed slightly.
Juicy Texture Trick
Mix clear gloss gel medium into your colored paint for the fruit segments. It builds physical volume and translucency simultaneously.
Step 2: Adding Texture & Detail
-
Texturing the flesh:
Texture is crucial for realism here. Take a needle tool or a stiff toothbrush and stipple the depressed triangular segments vigorously. This mimics the juice vesicles of real citrus. -
Refining the center:
Press a small hole or indentation in the very center where all the segments meet, ensuring the radiating lines disconnect slightly for a natural look. -
Texturing the rind:
Use a toothbrush or a piece of crumpled aluminum foil to gently tap along the outer rim (the rind) to give it that characteristic porous skin texture. -
Magnet indentation:
Flip the slice over gently. Press your magnet slightly into the back to create a shallow recess, then remove the magnet. This ensures it will sit flush later. -
Drying:
Let the pieces dry completely on a wire rack for 24-48 hours. Flip them occasionally to prevent warping.
Make It a Gradient
Create a ‘blood orange’ or ‘pink grapefruit’ by blending two colors (like red into yellow) within each segment for a stunning Ombré effect.
Step 3: Painting & Finishing
-
Base coat:
Paint the entire face of the slice with Titanium White acrylic paint. This primer layer ensures the subsequent colors pop and the pith looks bright. -
Painting the rind:
Carefully paint the outer rim edge with your chosen peel color (orange, yellow, or green). Bring this color just slightly onto the front face. -
Filling the segments:
Mix a watery wash of your fruit color (e.g., translucent orange). Paint inside the textured triangular segments, letting the paint pool in the nooks of the texture. Be careful to leave the raised membrane lines white. -
Refining membranes:
If you accidentally got color on the raised white lines, use a very fine liner brush with white paint to tidy them up once the colored wash is dry. -
Creating dimension:
I like to add a tiny touch of darker orange or yellow near the outer corners of the segments to create a shadow effect, making the fruit look rounder. -
Varnishing:
Coat only the colored ‘flesh’ segments with a thick layer of high-gloss varnish or UV resin. Leave the white pith and outer rind matte or satin. This contrast makes the fruit look wet and juicy. -
Attaching the magnet:
Once dry, glue the magnet into the recess on the back using strong adhesive.
Stick these onto the fridge and enjoy a splash of summer color every time you reach for a snack.
Birthdate Pocket Worry Stone
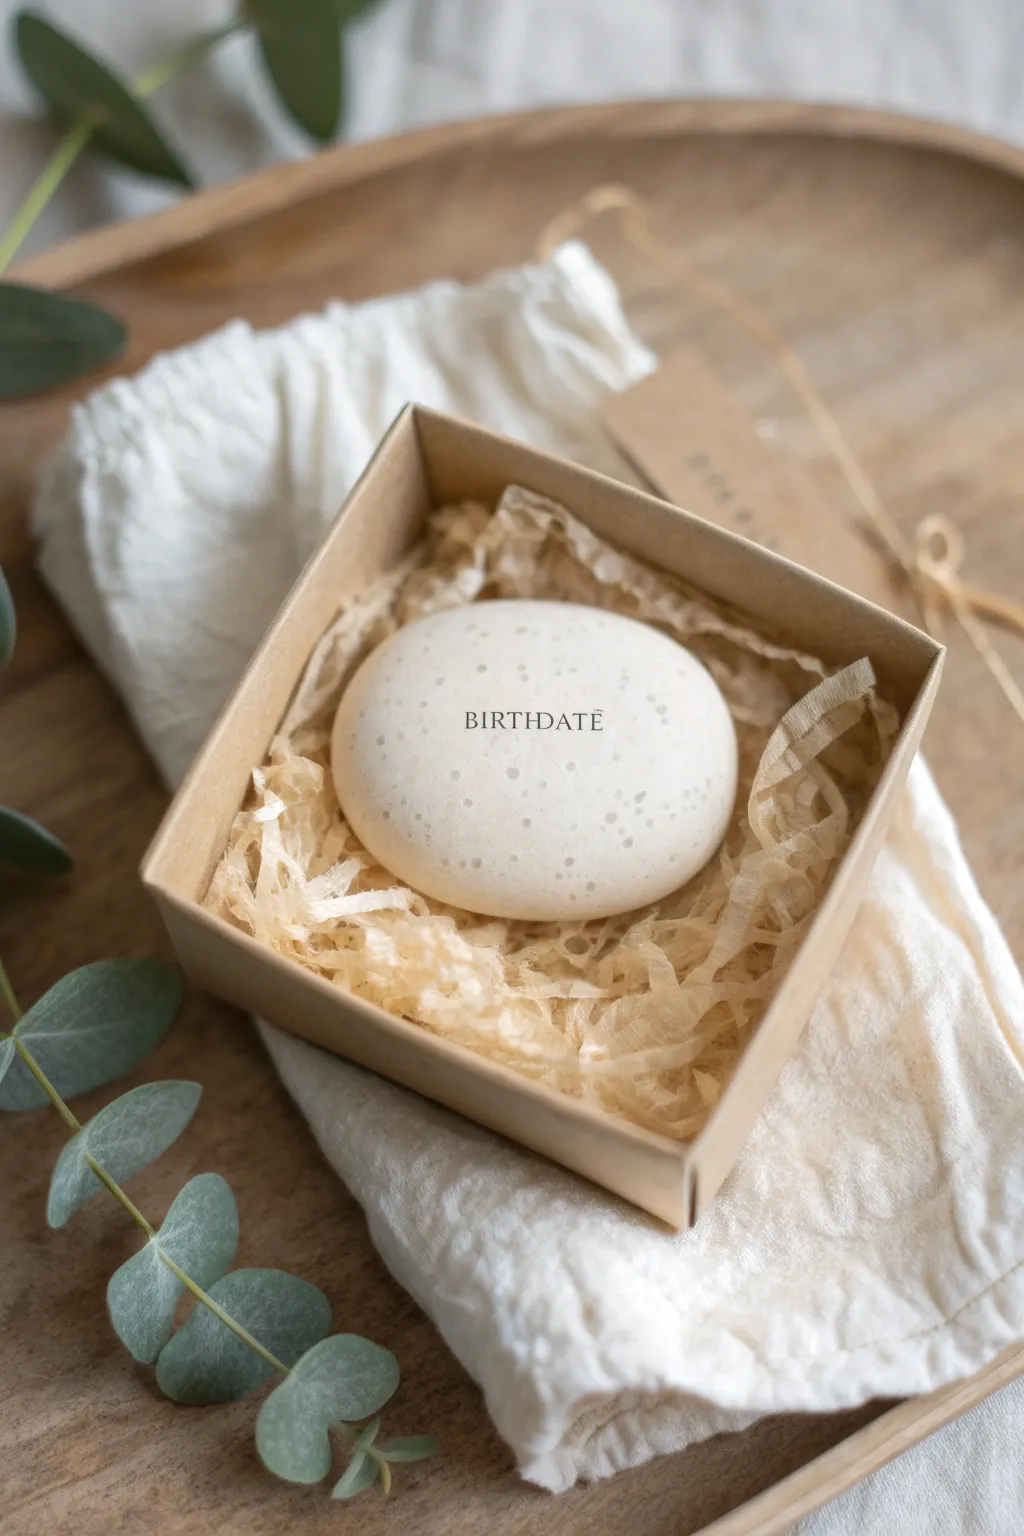
This elegant, tactile keepsake turns a simple piece of clay into a meaningful memento. Its smooth, speckled finish and crisp typography make it a sophisticated birthday gift that feels wonderful to hold in the hand.
How-To Guide
Materials
- White air dry clay (Das or Crayola)
- Small letter stamps (serif font)
- Black ink pad suitable for porous surfaces
- Fine grit sandpaper (320 and 600 grit)
- Acrylic paint (light grey or beige) for speckling
- Old toothbrush
- Matte varnish or sealant
- Rolling pin
- Small bowl of water
- Smooth work surface (silicone mat or wax paper)
Step 1: Shaping the Stone
-
Condition the clay:
Begin with a lump of white air dry clay about the size of a golf ball. Knead it thoroughly in your hands to activate the fibers and make it distinctively pliable and crack-free. -
Form the initial shape:
Roll the clay into a smooth sphere between your palms. Gently press it down onto your work surface with the palm of your hand to flatten it slightly into a thick disc. -
Refine the edges:
Pick up the clay disc and using your thumb and forefinger, gently smooth the edges to create a soft, rounded oval shape. You aren’t looking for a perfect circle, but rather an organic, stone-like pebble. -
Create the smooth dome:
Use a tiny amount of water on your finger to glide over the top surface, buffing out any fingerprints or tiny cracks. The top should be slightly domed, just like a river stone.
Step 2: Stamping and Detailing
-
Prepare the stamps:
Arrange your letter stamps to spell ‘BIRTHDATE’ (or a specific date). It helps to tape them together for straight alignment, or you can stamp them individually for a more handcrafted look. -
Test strike:
Do a practice stamp on a scrap piece of clay first. You want a clear impression without sinking the stamp borders deep into the soft clay. -
Stamp the clay:
Lightly tap your stamps into the black ink pad. Position them centered on your clay stone and press down firmly but gently. Lift straight up to avoid smudging the ink. -
Add subtle texture:
Dilute a drop of light grey acrylic paint with water until it’s very runny. Dip an old toothbrush into the mixture. -
Speckle effect:
Hold the toothbrush about 6 inches above the clay. Run your thumb across the bristles to flick tiny splatter droplets onto the surface. Keep this extremely subtle—less is more to maintain that clean look.
Stamp Clarity Trick
If your ink smudges on wet clay, stamp into the clay dry first to create the impression, let it dry, then carefully paint inside the indented letters with a fine liner brush.
Step 3: Drying and Finishing
-
Slow drying:
Place the stone in a cool, dry area away from direct sunlight. Let it air dry for 24 to 48 hours. I find flipping it over exclusively halfway through helps the bottom dry evenly. -
Initial sanding:
Once bone dry, take your 320 grit sandpaper and very gently sand any rough edges or irregularities on the bottom or sides. Be careful near the stamped ink. -
Polishing:
Switch to the 600 grit sandpaper for a final polish. This will make the clay feel incredibly smooth and luxurious to the touch, mimicking a real polished stone. -
Dusting off:
Wipe the stone with a slightly damp cloth or a soft large brush to remove all fine clay dust before sealing. -
Sealing:
Apply a thin coat of matte varnish. Matte is crucial here to preserve the natural, stone-like appearance shown in the photo; glossy varnish will make it look ceramic. -
Packaging:
Place the finished stone in a small kraft box lined with shredded tissue paper or raffia for that perfect gift presentation.
Make it Organic
Mix a tiny pinch of used coffee grounds or cracked black pepper directly into the white clay while kneading to create natural, built-in texture instead of painting it on.
Once packaged, you have a sophisticated and surprisingly durable gift that captures a special moment in time
Tiny Trinket Box With Lid
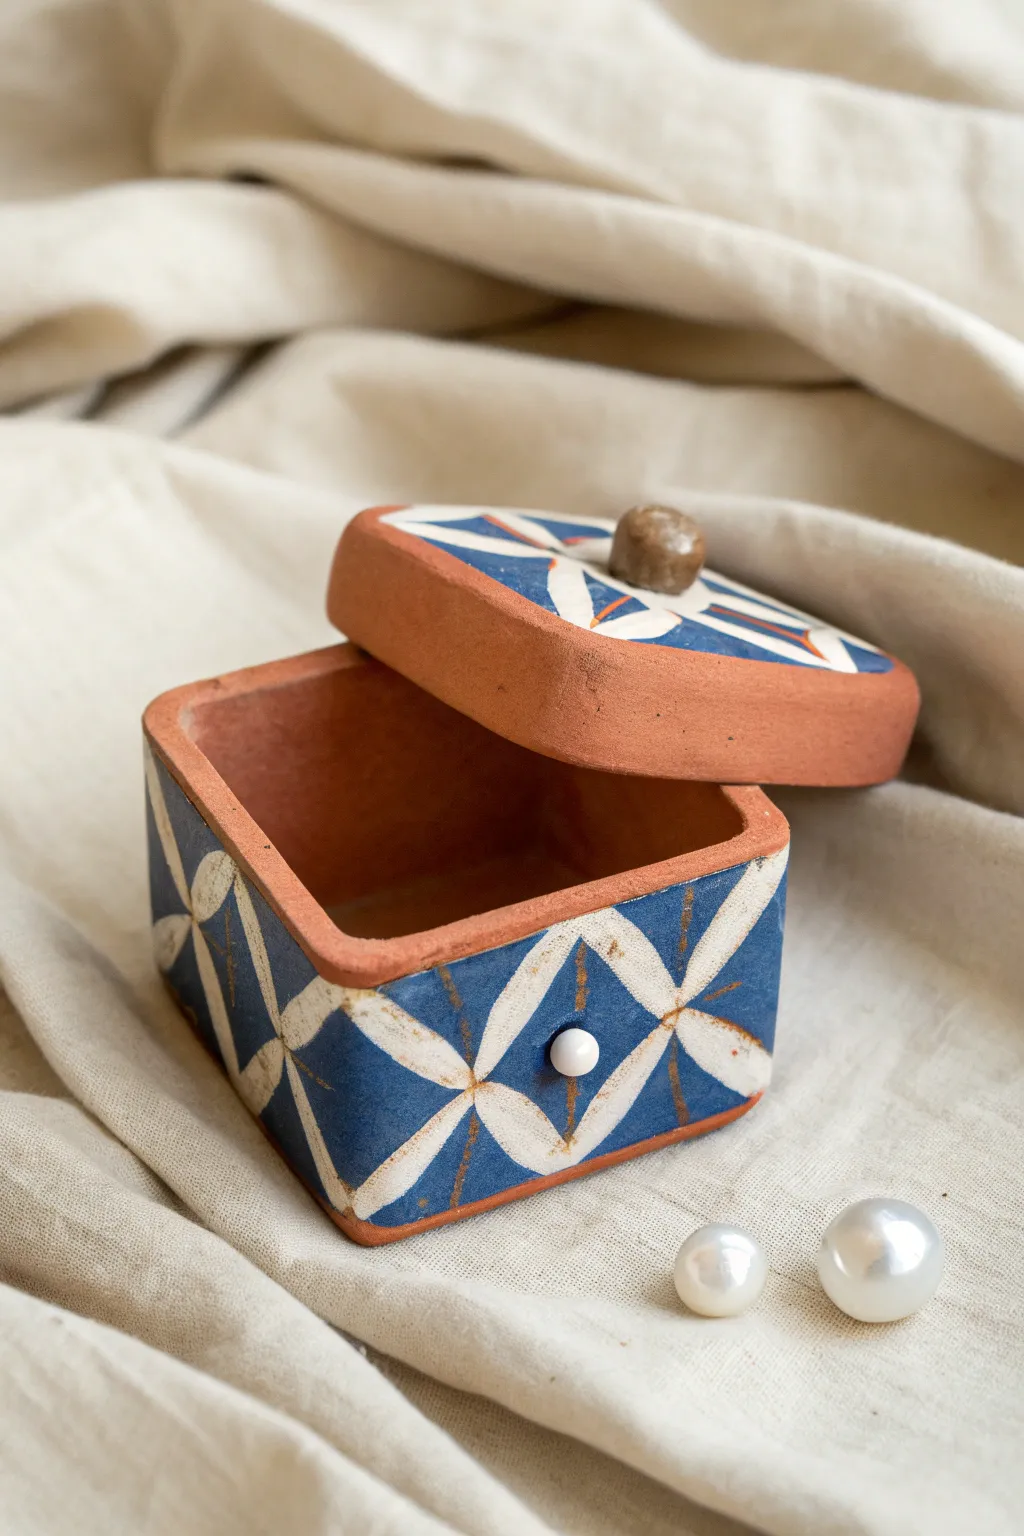
This charming little box combines the rustic warmth of terracotta with a graphic punch of indigo and white geometric patterns. It’s the perfect size for holding rings, studs, or other small treasures, making it a thoughtful keepsake gift.
Step-by-Step Tutorial
Materials
- Terracotta colored air-dry clay
- Rolling pin
- Ruler
- Craft knife or clay cutter
- Small bowl of water
- Pottery sponge
- Small wooden bead (or scrap clay)
- Small white bead (or scrap clay)
- Acrylic paints: Indigo blue, white, and terracotta (for touch-ups)
- Small flat paintbrush
- Fine detail paintbrush
- Matte spray varnish
- Sandpaper (fine grit)
Step 1: Sculpting the Box Base
-
Roll the clay slab:
Start by conditioning a chunk of terracotta air-dry clay until it’s pliable. Roll it out into an even slab, approximately 1/4 inch thick. I find using guides on either side helps keep the thickness consistent. -
Cut the base square:
Using a ruler and craft knife, cut out a perfect square for the bottom of your box. Let’s aim for about 3×3 inches for a nice petite size. -
Cut the wall strips:
Cut a long strip of clay (or four separate strips) that measures the same thickness as your base. The height should be about 2 inches. Measure carefully to ensure the walls fit perfectly around your base square. -
Assemble the walls:
Score the edges of the base and the bottom of your wall strips with a craft knife to create texture. Apply a little water or slip (clay mixed with water) to the scored areas. -
Join the seams:
Press the walls onto the base firmly. Smooth the outer and inner seams with your finger or a tool so the joins disappear completely. -
Level the top:
Once assembled, gently flip the box upside down onto a flat surface to ensure the top rim is perfectly level. Smooth any rough edges with a slightly damp sponge.
Uneven Drying?
If the lid curls while drying, flip it over every few hours. Weighing it down gently with a book during the last stage of drying helps keep it perfectly flat.
Step 2: Creating the Lid & Details
-
Measure the lid size:
Measure the outer dimensions of your finished box base. You want the lid to be slightly larger—add about 1/8 inch to your measurement so it sits comfortably on top without falling in. -
Cut the lid slab:
Roll out another slab of clay, slightly thicker than the walls. Cut your lid square based on the measurements you just took. -
Add a stopper lip (optional):
To keep the lid from sliding off, you can attach small clay tabs or a smaller square of clay to the *underside* of the lid, inset slightly from the edge. -
Attach the knob:
Take a small wooden bead, or roll a small ball of clay, and attach it to the center of the lid using the score-and-slip method. Press it down securely. -
Add the decorative pearl:
Attach a tiny white bead or a very small ball of white clay to the front center of the box base. This mimics a clasp or button detail. -
Dry thoroughly:
Set both pieces aside in a cool, dry place. Let them dry for at least 24-48 hours until they are light in color and hard to the touch.
Crisp Lines Trick
For super sharp geometric lines, use thin washi tape or painter’s tape to mask off the grid before painting the indigo sections.
Step 3: Painting the Design
-
Sand for smoothness:
Once fully dry, use fine-grit sandpaper to gently smooth out any fingerprints or sharp corners on the box and lid. -
Mark the grid:
Lightly sketch a grid pattern onto the sides of the box and the top of the lid with a pencil. Draw ‘X’ shapes inside the grid squares to create the geometric guide. -
Paint the background:
Using a small flat brush, paint the negative space around your pencil lines with indigo blue acrylic paint. Leave the ‘X’ lines and the rim unpainted to show the raw terracotta color. -
Add the petals:
With white acrylic paint and a detail brush, paint the petal shapes inside the indigo sections. Each petal should start thin near the center intersection and widen out, creating that four-pointed star effect. -
Refine the lines:
If your lines get messy, you can use a tiny bit of terracotta paint to tidy up the raw clay sections between the blue diamonds. -
Seal the piece:
Finish by applying a coat of matte spray varnish to protect the paint and clay from moisture and handling.
Now you have a beautifully handcrafted box ready to be filled with love and small gifts
Zodiac Dish or Charm Set
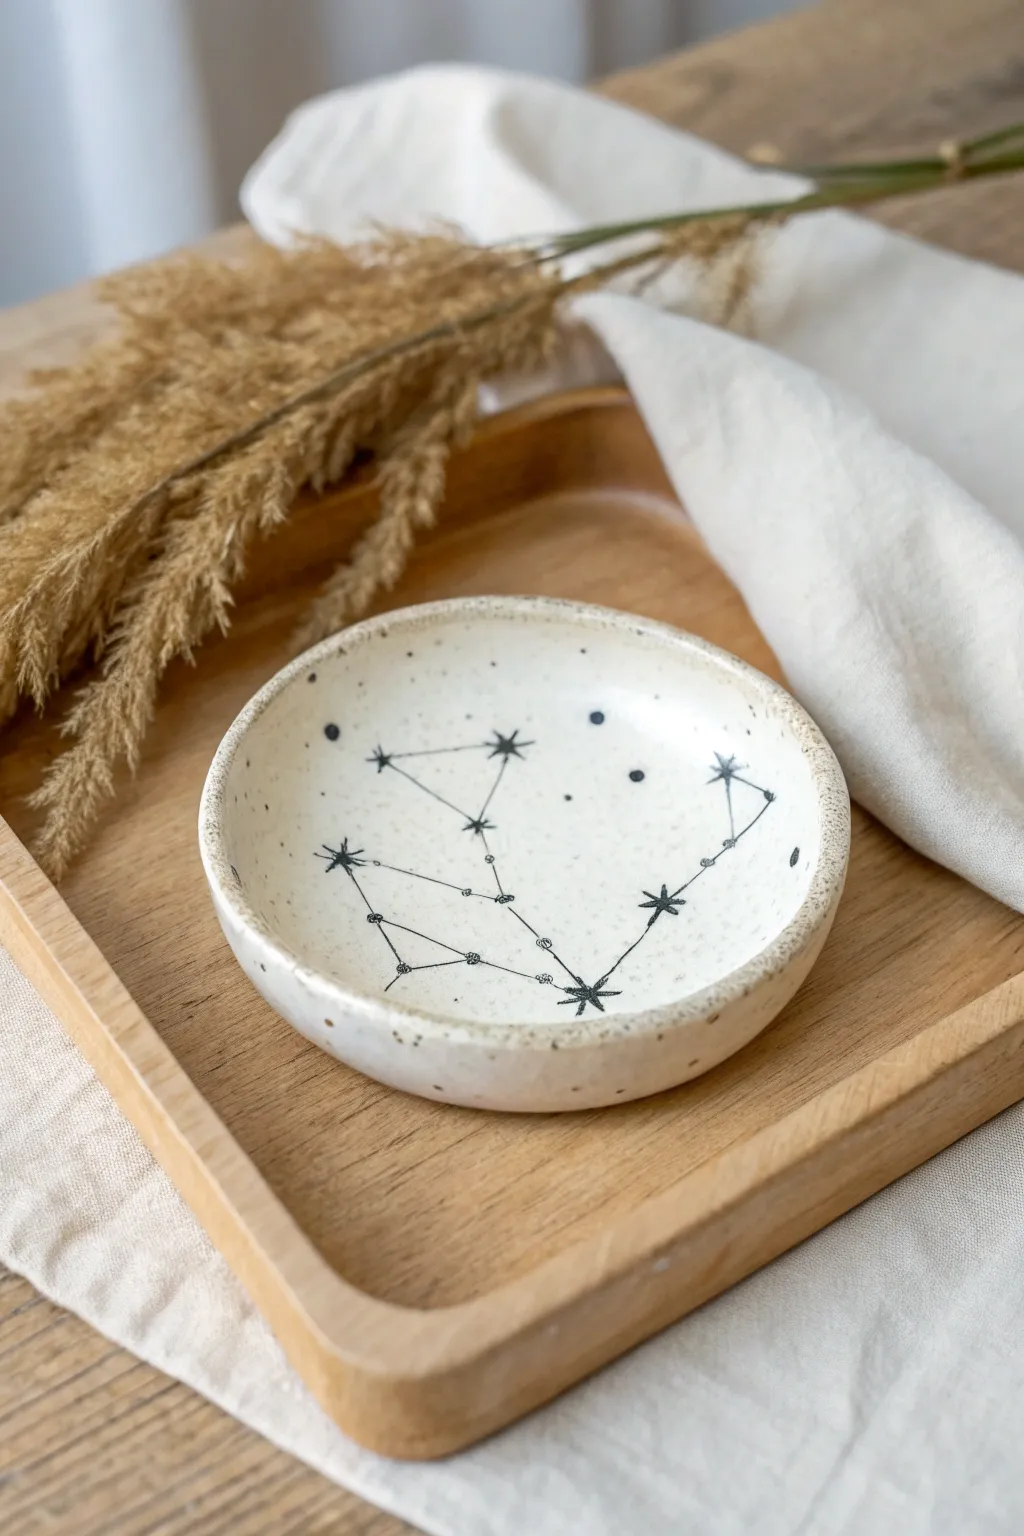
Celebrate a birthday by capturing the stars in this elegant, minimalist zodiac dish. The speckled, creamy finish mimics high-end ceramic stoneware, making it the perfect personalized spot for rings and treasures.
Step-by-Step
Materials
- White air-dry clay (approx. 200g)
- Wooden rolling pin
- Circle template (small bowl or cookie cutter, approx. 4 inches)
- Small sponge
- Bowl of water
- Sandpaper (fine grit, 220-400)
- White acrylic paint (matte or satin)
- Tan/beige acrylic paint (for speckling)
- Black ultra-fine tip permanent marker or fine liner paint pen
- Stiff bristle toothbrush (for speckling)
- Gloss or satin varnish/sealant for clay
- Pencil and paper (for sketching the constellation)
- Precision craft knife
Step 1: Shaping the Dish
-
Prepare the clay:
Begin by taking a handful of white air-dry clay and kneading it in your hands until it feels soft, conditioned, and pliable, ensuring there are no air bubbles trapped inside. -
Roll the slab:
Place the clay on a clean, smooth surface or canvas mat. Use your rolling pin to flatten the clay into an even slab, aiming for a consistent thickness of about 1/4 inch. -
Cut the circle:
Place your circle template (like a small bowl or cookie cutter) directly onto the slab. Using a precision craft knife, trace around the edge carefully to cut out a perfect circle. -
Smooth the edges:
Dip your finger into a little water and run it along the cut edge of the clay circle to smooth out any sharpness or roughness left by the knife. -
Form the rim:
Gently lift the edges of the circle upwards to create a shallow bowl shape. Use your thumbs to pinch and guide the clay up, creating a vertical rim about half an inch high. -
Refine the shape:
Work your way around the dish, smoothing the transition between the base and the rim with a damp sponge so it looks seamless and organic rather than angular. -
Drying time:
Set the dish aside in a cool, dry place away from direct sunlight. Let it dry completely for 24-48 hours until it turns chalky white and feels hard to the touch.
Uneven Rims?
If your rim looks wavy while drying, gently sand it flat after the clay hardens. Placing the sandpaper on a table and rubbing the upside-down dish against it ensures a level top.
Step 2: Painting and Finishing
-
Sand for perfection:
Once fully dry, take your fine-grit sandpaper and gently sand the rim and surface to remove any fingerprints or bumps. Wipe away the dust with a slightly damp cloth or dry brush. -
Apply base coat:
Paint the entire dish—front, back, and rim—with white acrylic paint. You may need two thin coats for full opacity, letting the first coat dry before applying the second. -
Create the speckles:
Mix a small amount of tan or beige paint with a tiny drop of water to thin it. Dip an old toothbrush into this mixture. -
Flick the paint:
Hold the toothbrush over the dish and run your thumb across the bristles to flick tiny speckles onto the surface. Practicing on a paper towel first helps you control the effortless, ceramic-like look. -
Plan the constellation:
Look up the zodiac constellation for your gift recipient. Lightly sketch the star placement onto the dish using a pencil, marking dots where the main stars should reside. -
Draw the stars:
Using your ultra-fine black marker, draw the stars over your pencil marks. Create variety by drawing some as simple dots, some as small filled circles, and the brightest stars as five or six-pointed asterisk shapes. -
Connect the lines:
Carefully draw thin, straight lines connecting the specific stars to form the constellation pattern. Keep your hand steady, but don’t worry if the lines have a slight organic jitter. -
Add detail dots:
For extra charm, add a few tiny, stray black dots around the constellation to represent distant stars, filling any negative space that feels too empty. -
Seal the artwork:
Wait for the ink to dry completely to avoid smudging. Apply a coat of gloss or satin varnish over the entire dish to seal the paint and give it that finished, fired-glaze appearance. -
Final cure:
Allow the varnish to cure according to the manufacturer’s instructions, usually overnight, before handling or wrapping it up for the birthday celebration.
Pro Tip: Faux Stone
Mix a tiny amount of baking soda into your white acrylic base paint. This adds gritty texture that makes the air-dry clay look and feel even more like real stoneware pottery.
This personalized celestial dish is now ready to hold jewelry or trinkets while reminding someone of their special place in the stars
Mini Room Scene Keepsake
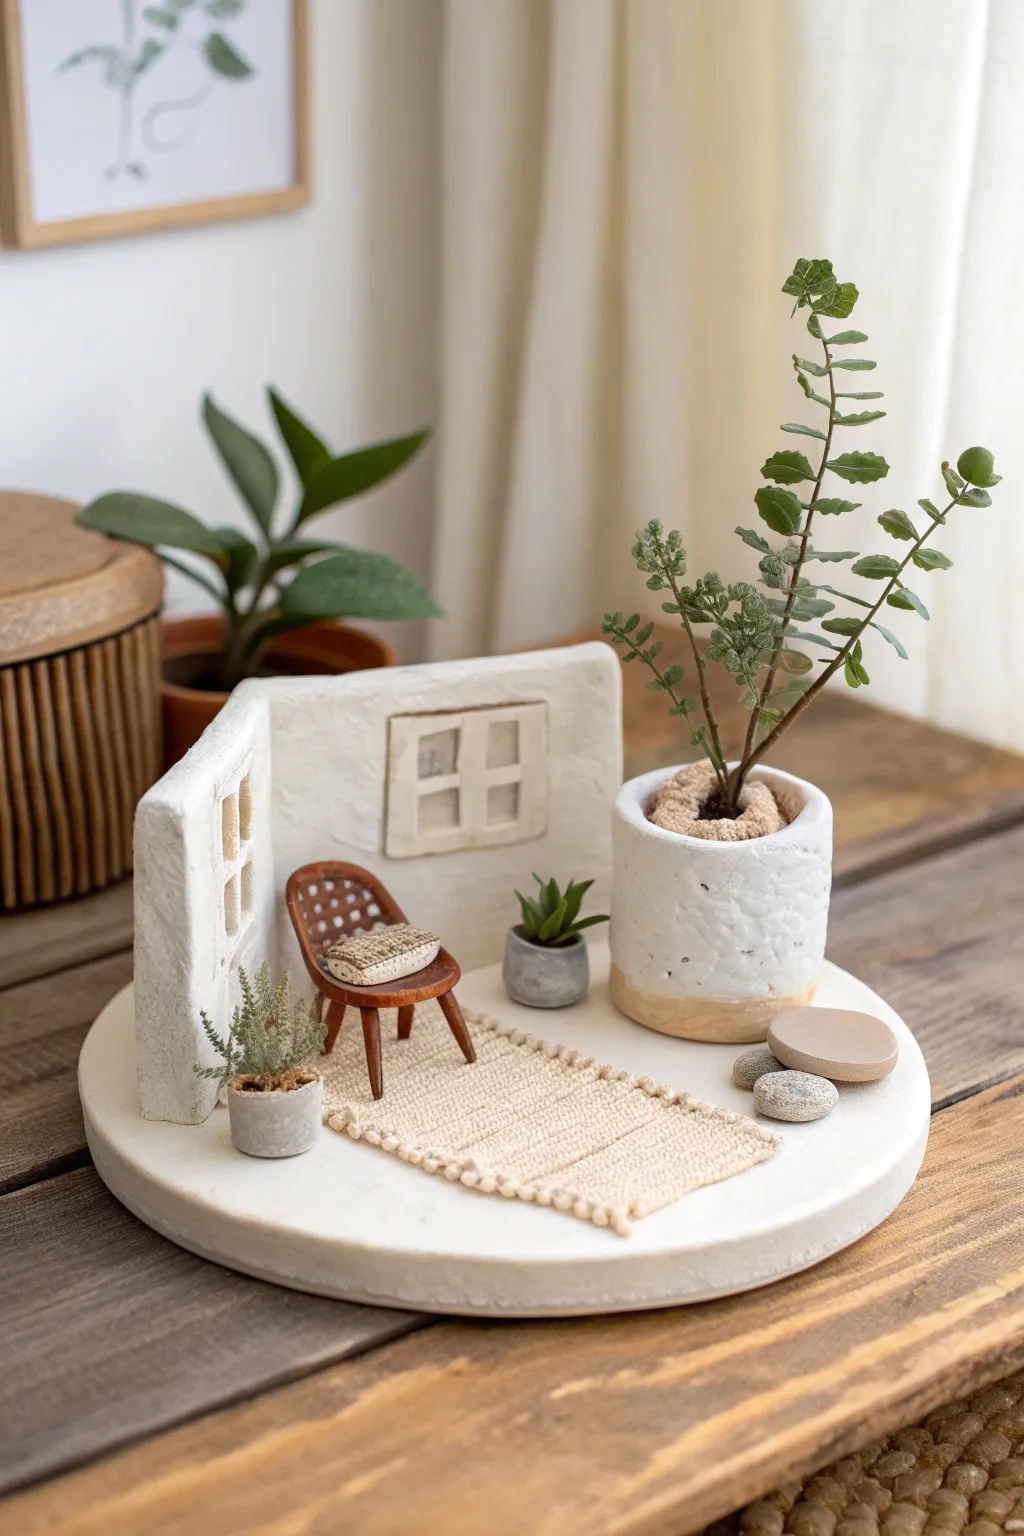
This charming, minimalist diorama captures a peaceful corner of a room with breezy boho vibes. Using air-dry clay and simple sculpting techniques, you’ll build a tiny sanctuary complete with textured walls, miniature furniture, and everlasting greenery.
Step-by-Step Guide
Materials
- White air-dry clay (approx. 500g)
- Small rolling pin
- Craft knife or scalpel
- Cardboard or foam core (for wall structure templates)
- Texture tools (sandpaper, toothbrush, or stiff bristle brush)
- Small wooden chair legs (toothpicks or small dowels stained brown)
- Artificial greenery stems (fern or eucalyptus style)
- Cream or beige cotton fabric scrap (texture like waffle weave or monk’s cloth)
- Acrylic paints (brown, grey, white, terracotta)
- Fine-grit sandpaper
- Strong craft glue or hot glue gun
- Small smooth pebbles
- Gloss varnish (optional for water effect)
Step 1: Base and Walls
-
Shape the base:
Roll out a thick slab of clay, about 1/2 inch deep. Use a large bowl or round cutter (approx. 6-7 inches diameter) to cut a perfect circle for your room’s foundation. Smooth the edges with a little water on your finger. -
Create the wall structure:
Cut two rectangles from your clay slab to form an ‘L’ shape corner. The longer wall should span about half the base’s diameter. Ensure they are thick enough (approx. 1/4 inch) to stand without sagging, or lean them against a cardboard form while working. -
Add window details:
Carefully cut square openings into the walls using your craft knife. Roll thin snakes of clay to create the window frames and mullions (the crossbars), pressing them gently into the openings to secure them. -
Texture the walls:
Before the clay dries, tap the surface of the walls with a stiff bristle brush or a crumpled ball of aluminum foil. This mimics a rustic plaster or stucco finish. -
Assemble the structure:
Score the bottom of the walls and the area of the base where they will sit. Apply a little water or liquid clay slip to join them. I like to prop the walls up with mugs/jars while they dry overnight to ensure they stay perfectly vertical.
Pro Tip: Hidden Supports
If your walls are sagging during the drying phase, insert toothpicks vertically inside the clay wall slab (like rebar in concrete) to provide invisible structural strength.
Step 2: Furniture and Accessories
-
Mold the large planter:
Form a cylinder from a ball of clay for the main tree pot. Make it roughly 2 inches tall. Create a slightly indented rim at the top and texture the sides heavily to look like rough stone or concrete. -
Create tiny pots:
Roll two very small balls of clay. Use the back of a paintbrush to create a hollow in each one for the smaller plants. Shape one into a straight cylinder and the other into a rounded bowl shape. -
Sculpt the chair seat:
Fashion a small, rounded ‘L’ shape out of clay for the chair’s seat and backrest. Use a needle tool to poke a grid pattern into the backrest to simulate woven cane or rattan. -
Assemble the chair legs:
Once the seat is semi-dry but still pierceable, insert four small lengths of stained toothpick or dowel into the bottom to act as legs. Glue these in place for stability. -
Make the rug:
Cut a small rectangle from your textured cream fabric. Fray the short edges slightly to look like tassels. Alternatively, you can sculpt a flat rectangle of clay and texturize it with a fabric stamp. -
Form the cushion:
Create a tiny, pillow-shaped square of clay. Use a texture tool to give it a fabric look, matching the rug if you like, and place it on the chair seat.
Troubleshooting: Cracking Joints
If the seam between the wall and floor cracks while drying, fill the gap with a ‘slip’ paste made of clay dissolved in a little water, then smooth it over with a finger.
Step 3: Assembly and Finishing
-
Painting the details:
Once all clay parts are bone dry (wait 24-48 hours), paint the tiny pots grey and terracotta. Paint the chair seat with a brown wash to look like wood. Keep the walls and large pot natural white or give them a light whitewash. -
Planting the greenery:
Fill the large pot with a scrap of foam or extra clay. Insert your large greenery branch to create the ‘tree.’ Glue some brown fabric or dried coffee grounds at the base of the stem to simulate soil. -
Potting the succulents:
Glue tiny snippets of plastic greenery into your two miniature pots. These represent the succulents. -
Final arrangement:
Glue the rug onto the center of the base. Position the chair partly on the rug. Place the large planter to the right and the tiny pots near the wall or rug edge. -
Adding texture elements:
Glue a few small smooth pebbles near the edge of the base or beside the rug for a natural, zen touch.
Place your miniature room on a bookshelf or desk to bring a moment of calm to your daily routine