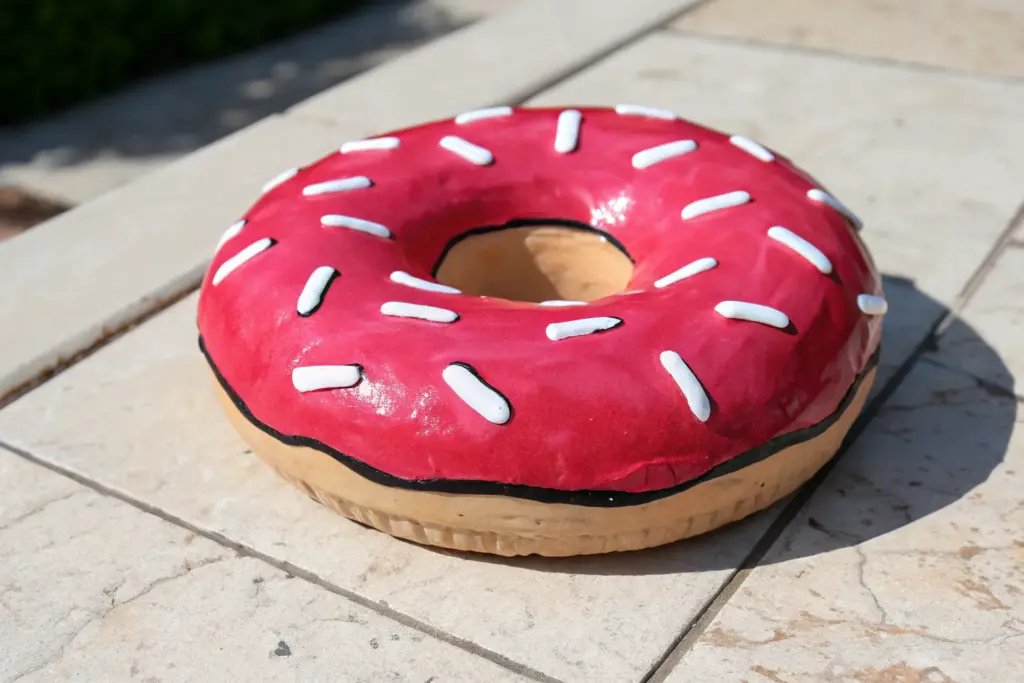
Whenever I’m craving a project that feels loud, playful, and instantly mood-lifting, I reach for pop art vibes—think everyday objects turned into shiny little sculptures with attitude. These pop art clay ideas are all about primary colors, bold black outlines, and that irresistible “fresh from an ad” gloss.
Stacked Burger Sculpture
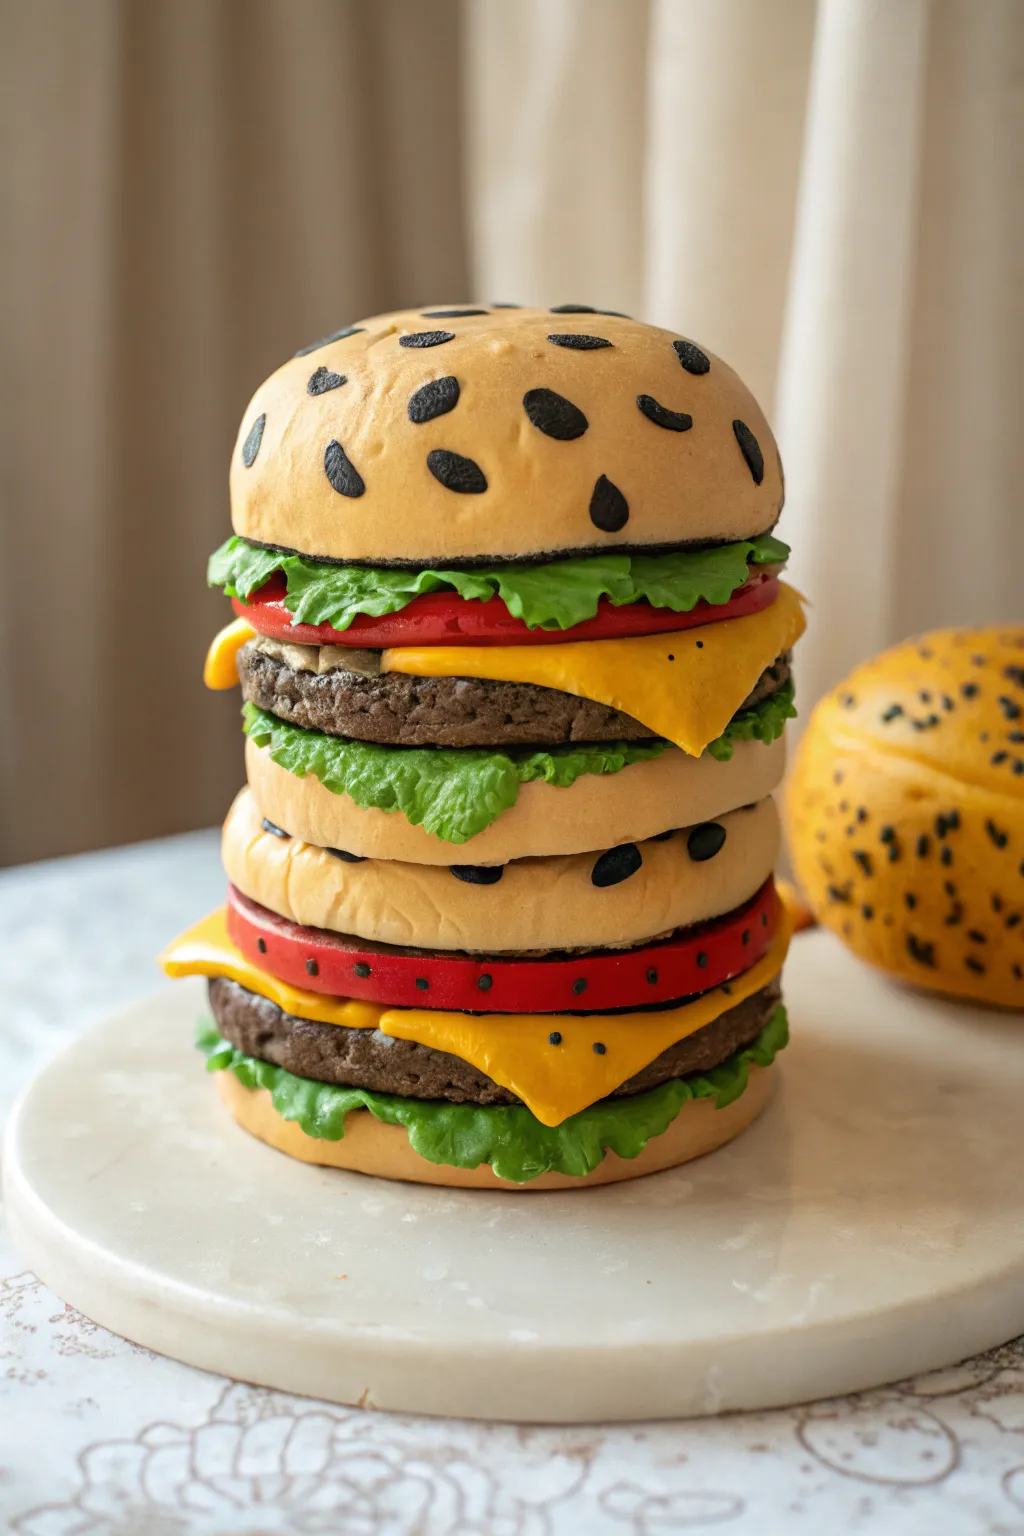
This whimsical sculpture takes fast food to new heights with its exaggerated, cartoon-like features and vibrant, stacked layers. It captures a playful pop art aesthetic perfect for a desk accessory or kitchen shelf decor.
How-To Guide
Materials
- Polymer clay (tan/beige, dark brown, red, yellow, vibrant green, black)
- Aluminum foil
- Rolling pin or pasta machine
- Circle cutters (large)
- Texture tools (toothbrush, needle tool, ball styling tool)
- Baking sheet and parchment paper
- Liquid polymer clay (optional, for adhesion)
- Matte varnish
Step 1: The Foundation and Buns
-
Bulking the Core:
To save clay and reduce weight, crumple a ball of aluminum foil tightly to form the core of your bottom and top buns. Flatten the bottom foil slightly so the sculpture sits stable. -
Rolling the Dough:
Condition your tan packaging clay until pliable. Roll it out into a thick, even sheet, about 1/4 inch thick. This ensures the foil won’t peek through. -
Covering the Buns:
Drape the clay sheet over your foil cores. Smooth the clay down the sides, trimming excess underneath and blending the seams until invisible. Use your palms to perfect the dome shape. -
Adding Texture:
For a realistic baked look, gently tap a toothbrush over the surface of the buns. I find this creates that perfect porous bread texture without being too messy. -
The Middle Bun:
Create a solid disk of tan clay for the middle bread layer (the ‘club’ section). Keep the edges slightly rounded rather than sharp to mimic soft bread.
Leaning Tower Troubles?
If your burger keeps tilting, insert a long piece of uncooked spaghetti or a wire through the center (top to bottom) to act as an internal dowel while baking.
Step 2: Creating the Fillings
-
Patty Texturing:
Form two thick disks using dark brown clay. Use a needle tool to aggressively poke and drag across the edges to simulate the crumbly texture of ground beef. -
Melting the Cheese:
Roll out bright yellow clay very thinly. Cut squares that are slightly larger than your patties. Gently pull the corners to elongate them, then drape them over the patties so the corners droop down naturally. -
Slicing Tomatoes:
Create thick disks of red clay. Smooth the edges so they look like distinct slices. For the pop art look, you can add tiny black dots around the rim later with paint or clay, as seen in the bottom layer. -
Ruffling Lettuce:
Roll a snake of vibrant green clay and flatten it significantly. Use a ball tool to thin and ruffle the edges, making them wavy. Tear this strip into sections. -
Sesame Seeds:
Roll tiny teardrop shapes out of black clay. Press these firmly onto the top bun and the middle bun layer in a random pattern. Flatten them slightly so they don’t fall off.
Go Mega-Size
Turn this into a photo holder! Before baking, insert a curled wire note holder into the very center of the top bun. It makes a perfect quirky desk accessory.
Step 3: Assembly and Finish
-
Stacking the Bottom:
Begin assembly on your baking surface. Place the bottom bun, followed by ruffled lettuce strips around the perimeter. Place the patty-and-cheese unit on top. -
Adding the Tomato:
Place your red tomato disk on top of the cheese. If the clay is dry, use a dab of liquid clay between layers to act throughout the baking process as glue. -
Building the Second Tier:
Add the middle bun layer. Repeat the stacking process: lettuce, patty with cheese, tomato. Ensure the stack remains centered so it doesn’t tip during baking. -
Crowning the Burger:
Place the final sesame-seeded top bun. Press down gently but firmly to ensure all layers make contact without squishing the details. -
Baking:
Bake according to your clay manufacturer’s instructions. Since the piece is thick, you may need a slightly longer bake time at a lower temperature to prevent scorching. -
Sealing:
Once fully cooled, brush the entire sculpture with a matte varnish to protect the surface and unify the sheen.
Now you have a delicious-looking piece of pop art that will never go bad


Drippy Cheese Pizza Slice
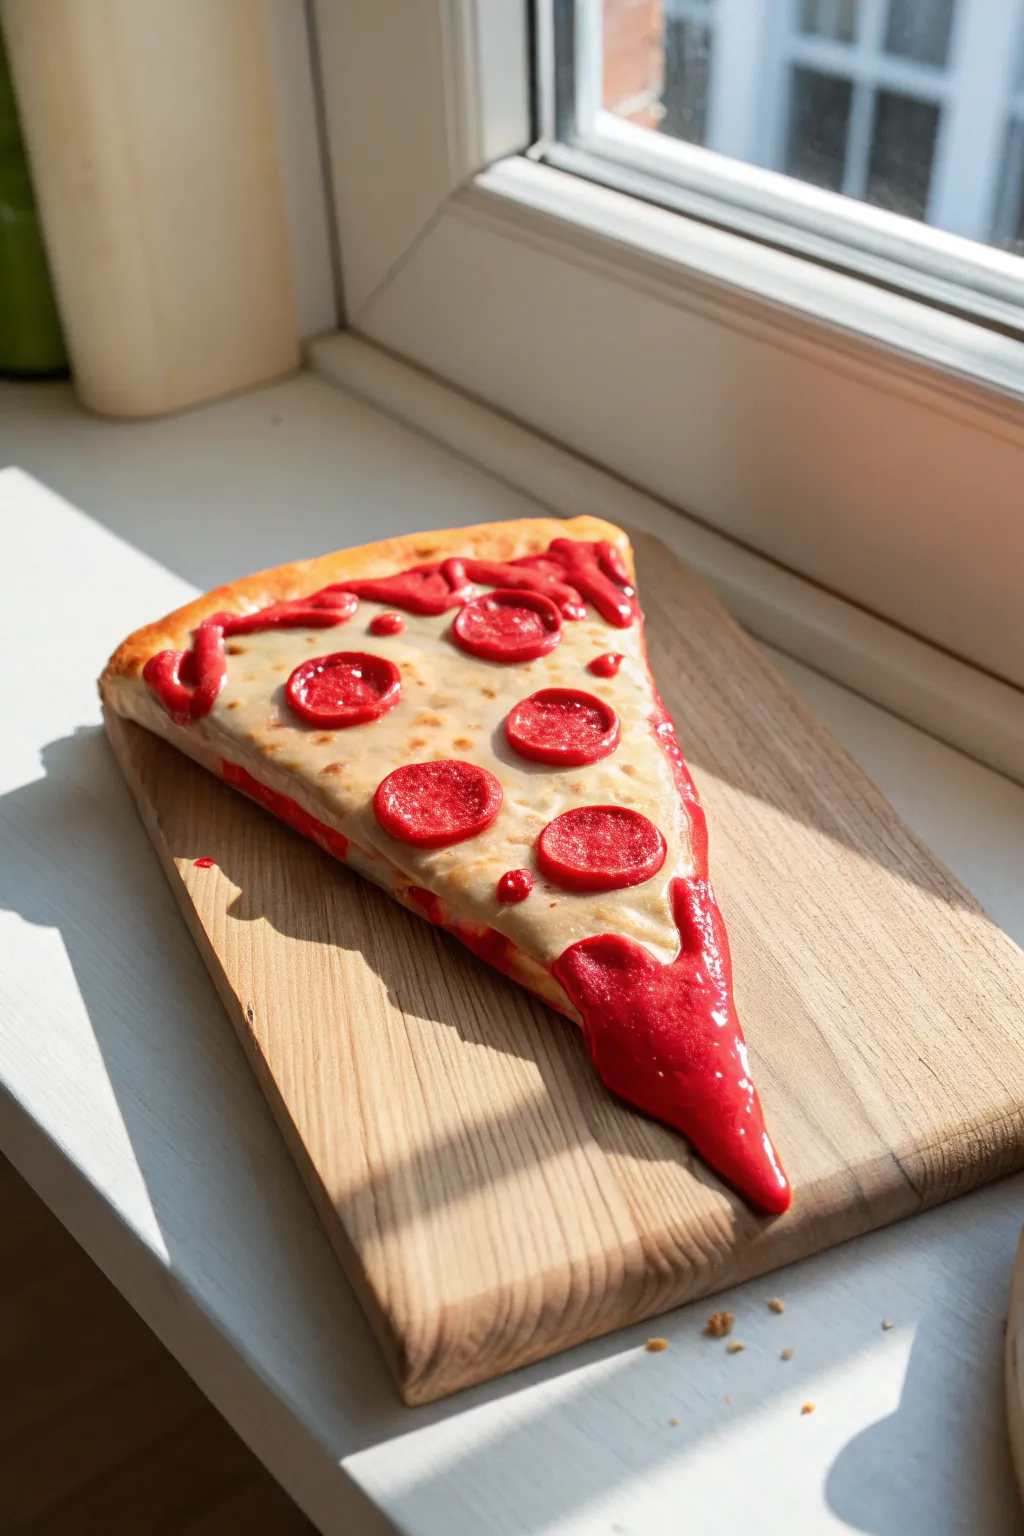
Embrace the bold, playful aesthetic of pop art with this hyper-glossy, melting pizza slice sculpture. The oversized pepperoni and exaggerated, bright red sauce drips give it a surreal, cartoon-like quality that looks good enough to eat but is purely for display.
Step-by-Step Tutorial
Materials
- Polymer clay (beige/tan for crust, white for cheese, red for sauce/pepperoni)
- Translucent liquid polymer clay (optional but recommended for sauce)
- Glossy polyurethane varnish or UV resin
- Rolling pin or clay pasta machine
- Aluminum foil (for the core armature)
- Clay sculpting tools (needle tool, ball stylus)
- Soft shadeless pastels or acrylic paint (ochre, brown, orange) for shading
- Paintbrush (soft bristle)
- Small round cutter or bottle cap
- Baking sheet and parchment paper
- Oven
Step 1: Forming the Base Structure
-
Create the foil core:
Start by shaping a wedge of aluminum foil into a large triangle. This saves clay and keeps the piece lightweight. Compress the foil tightly so there aren’t too many air pockets. -
Mix the crust color:
Knead beige polymer clay until it’s soft. If it looks too pale, mix in a tiny pinch of brown or orange to get that perfect golden-dough tone. -
Cover the foil:
Roll out a sheet of your crust-colored clay, about 1/4 inch thick. Wrap it completely around your foil wedge, smoothing the seams with your thumb so the foil is hidden. -
Sculpt the crust edge:
Add a thick snake of beige clay to the back (wide) end of the triangle. Blend the bottom edge into the slice but leave the top rounded and puffy to mimic a rising pizza crust. -
Texture the dough:
Use a crumpled ball of aluminum foil or a toothbrush to gently tap texture all over the crust area. This removes fingerprints and makes it look like baked bread.
Sauce too runny?
If your liquid clay sauce is running too fast off the tip, let it sit on a piece of cardboard for 20 mins to ‘leech’ out some oil, thickening the texture before application.
Step 2: Adding Toppings & Details
-
Layer the cheese:
Roll out a thin, uneven sheet of off-white or pale yellow clay. Lay this over the top of the slice, letting it drape slightly over the sides but stopping before the back crust. -
Shade the cheese:
Before baking, use a dry brush to dust some shaved orange and brown pastel chalks onto the cheese. Focus on the edges to make it look toasted and gooey. -
Create pepperoni slices:
Roll out bright red clay. Use a small circle cutter to punch out several pepperoni rounds. I like to slightly texture the surface of these with a needle tool for realism. -
Position the pepperoni:
Press the pepperoni slices firmly into the cheese layer. Use a ball tool to indent the centers slightly, which makes the edges curl up like they’ve been sizzling in an oven. -
Initial Bake:
Bake the pizza slice according to your clay manufacturer’s instructions (usually 275°F for 15-30 minutes). Let it cool completely before moving to the next phase.
Size it up!
Make a whole pizza! Create 6-8 of these slices and mount them on a round wooden board painted like a retro pizzeria tablecloth for massive wall art impact.
Step 3: The Pop Art Drip
-
Prepare the sauce mixture:
Mix liquid polymer clay with red oil paint or heavy body acrylic until you have a vibrant, opaque red goo. Alternatively, soften solid red clay with a drop of baby oil until it’s like frosting. -
Apply the sauce outline:
Using a small tool, apply this red mixture around the pepperoni and near the crust edge. It needs to look thick and generous. -
Create the signature drip:
Apply a large dollop of the red mixture at the sheer tip of the slice. Drag it downward so it hangs off the point, creating that heavy, gravity-defying drip seen in the photo. -
Connect the flows:
Add smaller connecting drips along the side edges, making sure they look fluid and connect naturally to the top sauce layer. -
Second Bake:
Bake the piece again for about 15 minutes to set the liquid clay sauce. Keep an eye on it so the thin drips don’t scorch.
Step 4: Finishing Glaze
-
Sealing the crust:
Once cool, paint a matte varnish over the crust area only. This keeps the bread looking dry and floury. -
Glossing the toppings:
Apply a thick coat of high-gloss polyurethane varnish or UV resin over the cheese, pepperoni, and especially the red sauce. -
Emphasizing the wet look:
Add a second coat of gloss to the red drip at the tip. The extra shine is what sells the ‘fresh from the oven’ pop art illusion.
Display your drippy slice on a wooden cutting board near a window to catch that shiny reflection on the sauce.


Comic Speech Bubble Plaque
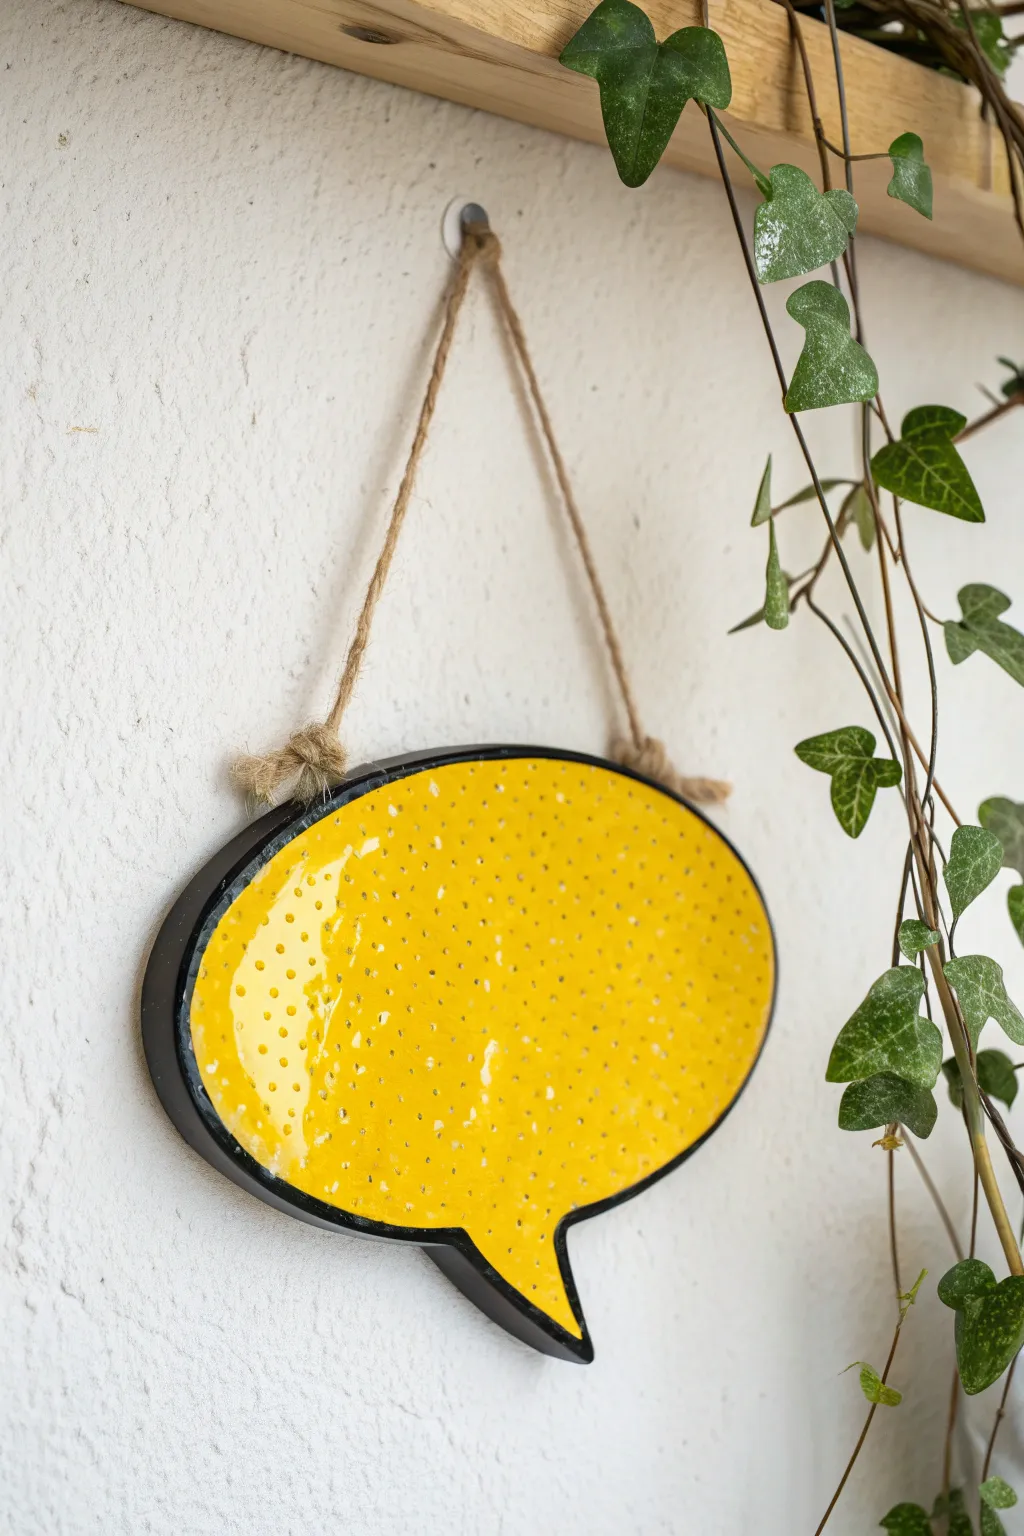
Bring your walls to life with this vibrant, glossy ceramic speech bubble that looks like it jumped straight out of a comic book. Its bright yellow glaze, distinct dotted texture, and bold black outline make it an unforgettable statement piece for any room.
Detailed Instructions
Materials
- Air-dry clay or polymer clay (enough to roll a 6-8 inch slab)
- Rolling pin
- Two wooden guide sticks (approx. 5mm thick)
- Printout of a speech bubble template
- Craft knife or clay cutter
- Sandpaper (fine grit)
- White gesso or primer
- Bright yellow acrylic paint (glossy finish preferred)
- Black acrylic paint
- Small round tool or dotting tool
- Paintbrushes (flat wide brush and fine detail brush)
- High-gloss varnish or epoxy resin
- Jute twine or rustic cord
- Strong craft glue or E6000
- Small metal hanging loop (optional)
Step 1: Shaping the Clay
-
Prepare your workspace:
Set up a clean, flat surface covered with parchment paper or a canvas mat to prevent sticking. -
Condition the clay:
If using polymer clay, knead it until soft. If using air-dry clay, ensure it is moist and pliable without cracks. -
Roll the slab:
Place your clay between two wooden guide sticks. Roll it out into a smooth, even slab about 5mm thick. The sticks help maintain a uniform thickness. -
Cut the shape:
Lay your paper speech bubble template gently on top of the slab. Trace around the edge with a craft knife or needle tool to cut out the clean speech bubble silhouette, including the tail. -
Smooth the edges:
Dip your finger in a little water (for air-dry clay) or baby oil (for polymer) and run it along the cut edges to smooth out any sharpness or burrs.
Step 2: Adding Texture and Curing
-
Add the dots:
While the clay is still soft, take your small round tool and gently press rows of tiny indentations across the entire surface. This subtle texture mimics the Ben-Day dots used in vintage comic printing. -
Pierce holes for hanging:
At the top of the curve, create two small holes spaced a few inches apart using a straw or skewer. Make sure they go all the way through. -
Dry or bake:
Follow the instructions for your specific clay. For air-dry, let it sit for 24-48 hours until rock hard. For polymer, bake it in an oven at the manufacturer’s recommended temperature. -
Sand the flaws:
Once fully cured and cooled, lightly sand the edges and surface with fine-grit sandpaper to ensure a professional, smooth finish.
Uneven Drying?
If your air-dry clay curls up while drying, gently weigh it down with a heavy book once it’s semi-dry but still slightly flexible to flatten it back out.
Step 3: Painting and Finishing
-
Prime the surface:
Apply a coat of white gesso or primer. This is crucial for making the yellow pop later on. Let it dry completely. -
Paint the yellow base:
Using a flat brush, apply 2-3 coats of bright yellow acrylic paint. Allow each layer to dry fully before adding the next to avoid streaks. -
Highlight the texture:
Here I like to lightly dry-brush a slightly lighter yellow over the raised areas if the dots got filled in too much, keeping that textured look visible. -
Paint the rim:
Use a steady hand and a smaller brush to paint the side edges black. Extend this black border slightly onto the front face to create a bold, cartoony outline. -
Seal it up:
Apply a thick coat of high-gloss varnish or a layer of resin. This gives it that wet, ceramic-like shine seen in the photo. -
Attach the hanger:
Thread your jute twine through the holes you made earlier. Knot them securely on the front or back, depending on your preference. If you forgot holes, glue a loop of twine to the back.
Use Lettering
Before the final varnish, paint a classic comic phrase like ‘POW!’ or ‘HELLO!’ in the center using black paint or a Posca marker for extra character.
Hang your new conversation starter on the wall and enjoy the playful pop of color it adds to your space


Action Word Tiles
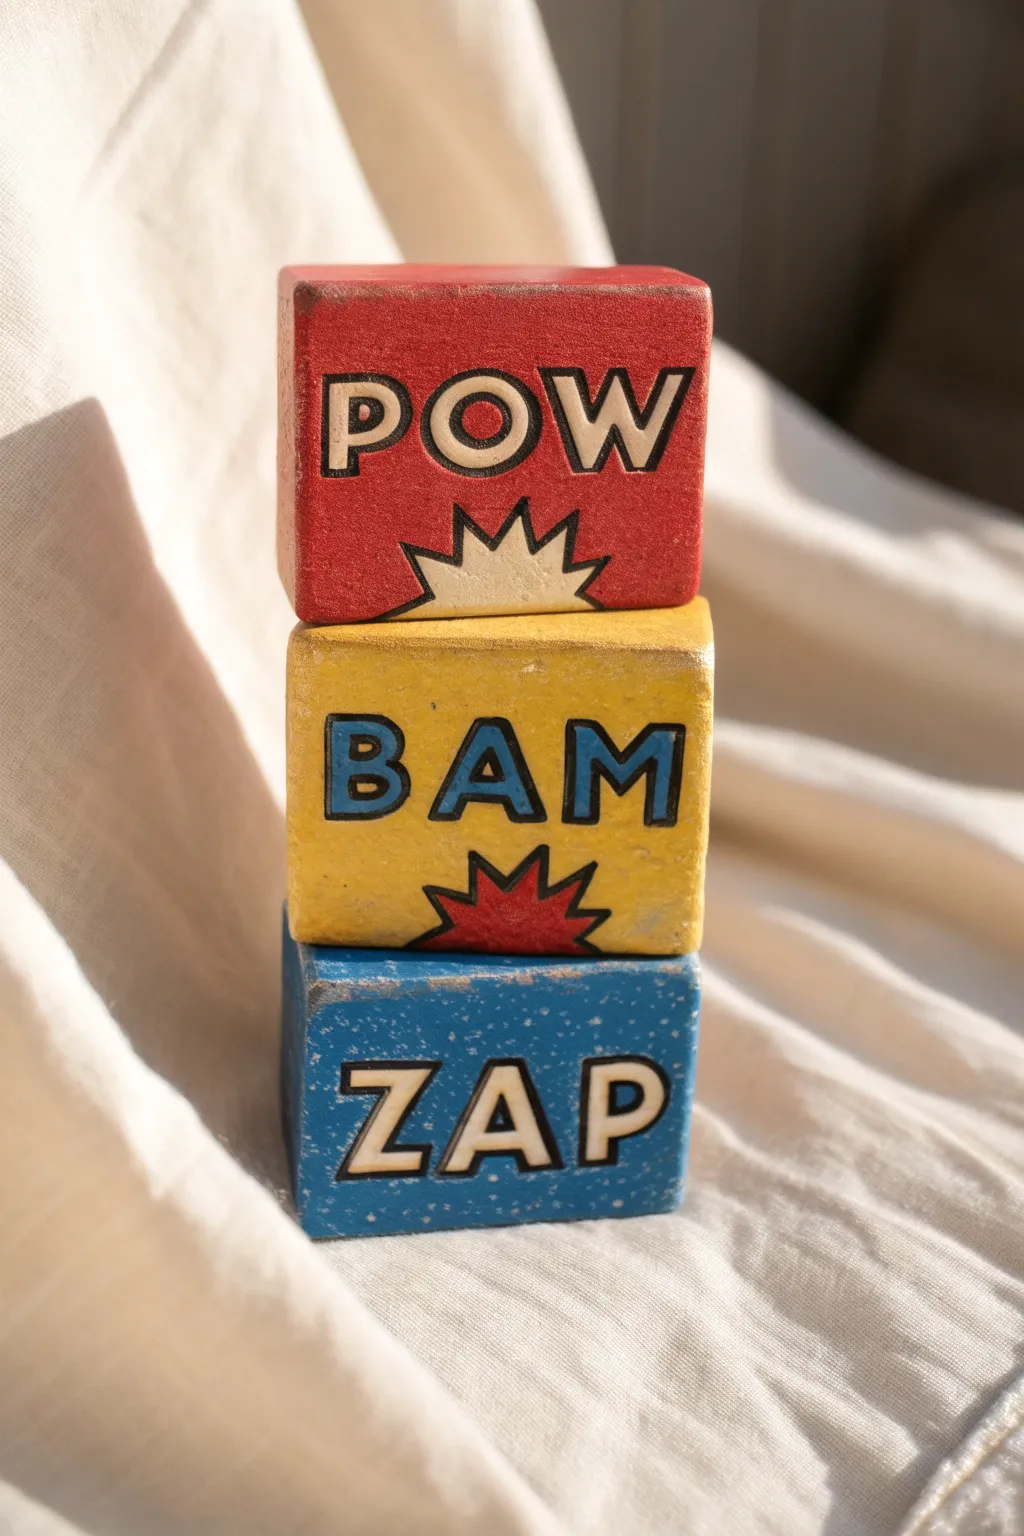
Channel the energy of vintage superhero comics with these stacked clay cubes featuring classic onomatopoeia. This project captures the bold colors and graphic lines of pop art, creating a playful decorative accent that practically shouts from the shelf.
How-To Guide
Materials
- Polymer clay (white or light grey is best for painting)
- Acrylic paints (primary red, cadmium yellow, cobalt blue, white, black)
- Clay roller or pasta machine
- Square clay cutter (approx. 1.5 – 2 inches) or crisp blade
- Fine grit sandpaper (400-600 grit)
- Fine tip paintbrush (round size 0 or 1)
- Flat shader brush (size 6 or 8)
- Black paint pen (fine tip) or permanent marker
- Pencil
- Ruler
- Matte or satin varnish
Step 1: Shaping the Base
-
Condition the clay:
Start by thoroughly kneading your polymer clay until it is soft and pliable. This prevents cracks later on. -
Form the cubes:
Roll the clay into a thick sheet or block. Using a sharp blade or a square cutter, cut six equal square panels for each block if constructing hollow, or shape a solid block if you have enough material. -
Refine the edges:
Press the sides against a flat work surface to ensure they are perfectly square. I find that tapping each side gently on the table helps sharpen the corners. -
Smooth the surface:
Rub a tiny bit of baby oil or cornstarch over the surface to remove any fingerprints before baking. -
Bake the blocks:
Bake the clay cubes according to the manufacturer’s instructions. Usually, this is around 275°F (135°C) for 15-30 minutes depending on thickness. Let them cool completely. -
Sand for texture:
Once cool, lightly sand the surfaces and edges. You want to scuff the clay slightly to help the paint adhere and to mimic the worn edges seen in the reference photo.
Step 2: Applying the Pop Art Design
-
Base coat painting:
Paint one block entirely red, one yellow, and one blue. You will likely need 2-3 coats for solid, opaque coverage. Allow each layer to dry fully before adding the next. -
Distress the edges:
For that vintage look, use fine sandpaper to gently sand back the paint just along the sharpest corners and edges, revealing the raw clay underneath. -
Sketch the letters:
Lightly pencil in the words ‘POW’ on the red block, ‘BAM’ on the yellow, and ‘ZAP’ on the blue. Use a ruler to keep the tops and bottoms aligned. -
Draw the starbursts:
Below ‘POW’ and ‘BAM’, sketch a jagged, half-starburst explosion shape coming up from the bottom edge. -
Outline in black:
Using a fine paint brush or a black paint pen, carefull outline your penciled letters and starburst shapes. Keep the lines consistent in thickness for that graphic novel style. -
Fill the details:
Paint the interior of the starburst on the red block with white. On the yellow block, paint the starburst interior red. For the blue block’s ‘ZAP’, simply outline the chunky letters. -
Letter filling:
Fill the letters ‘POW’ with a creamy off-white color. Fill ‘BAM’ with blue paint. Fill ‘ZAP’ with white. -
Add texture to blue:
For the blue ‘ZAP’ block, dip an old toothbrush or stiff brush into white paint and flick fine speckles across the surface to mimic a starry night or cosmic background. -
Final outlines:
Go back over any black outlines that might have been obscured by the fill colors to make them crisp and bold again.
Wobbly Lines?
If painting straight letters is difficult, print the words in a comic font, cut them out, and use them as a stencil or trace them onto the clay using transfer paper.
Step 3: Finishing Touches
-
Seal the work:
Apply a coat of matte or satin varnish to protect the paint. Avoid glossy finishes, as that detracts from the vintage wooden toy aesthetic. -
Stack and display:
Once the varnish is dry, stack the blocks in your desired order, ensuring the colors contrast nicely against each other.
Level Up: 3D Impact
Instead of painting the letters flat, cut them out of a thin sheet of clay and adhere them to the blocks before baking for a tactile, raised relief effect.
Now you have a dynamic set of retro-styled blocks ready to bring some action to your decor

The Complete Guide to Pottery Troubleshooting
Uncover the most common ceramic mistakes—from cracking clay to failed glazes—and learn how to fix them fast.
Retro Phone Trinket Dish
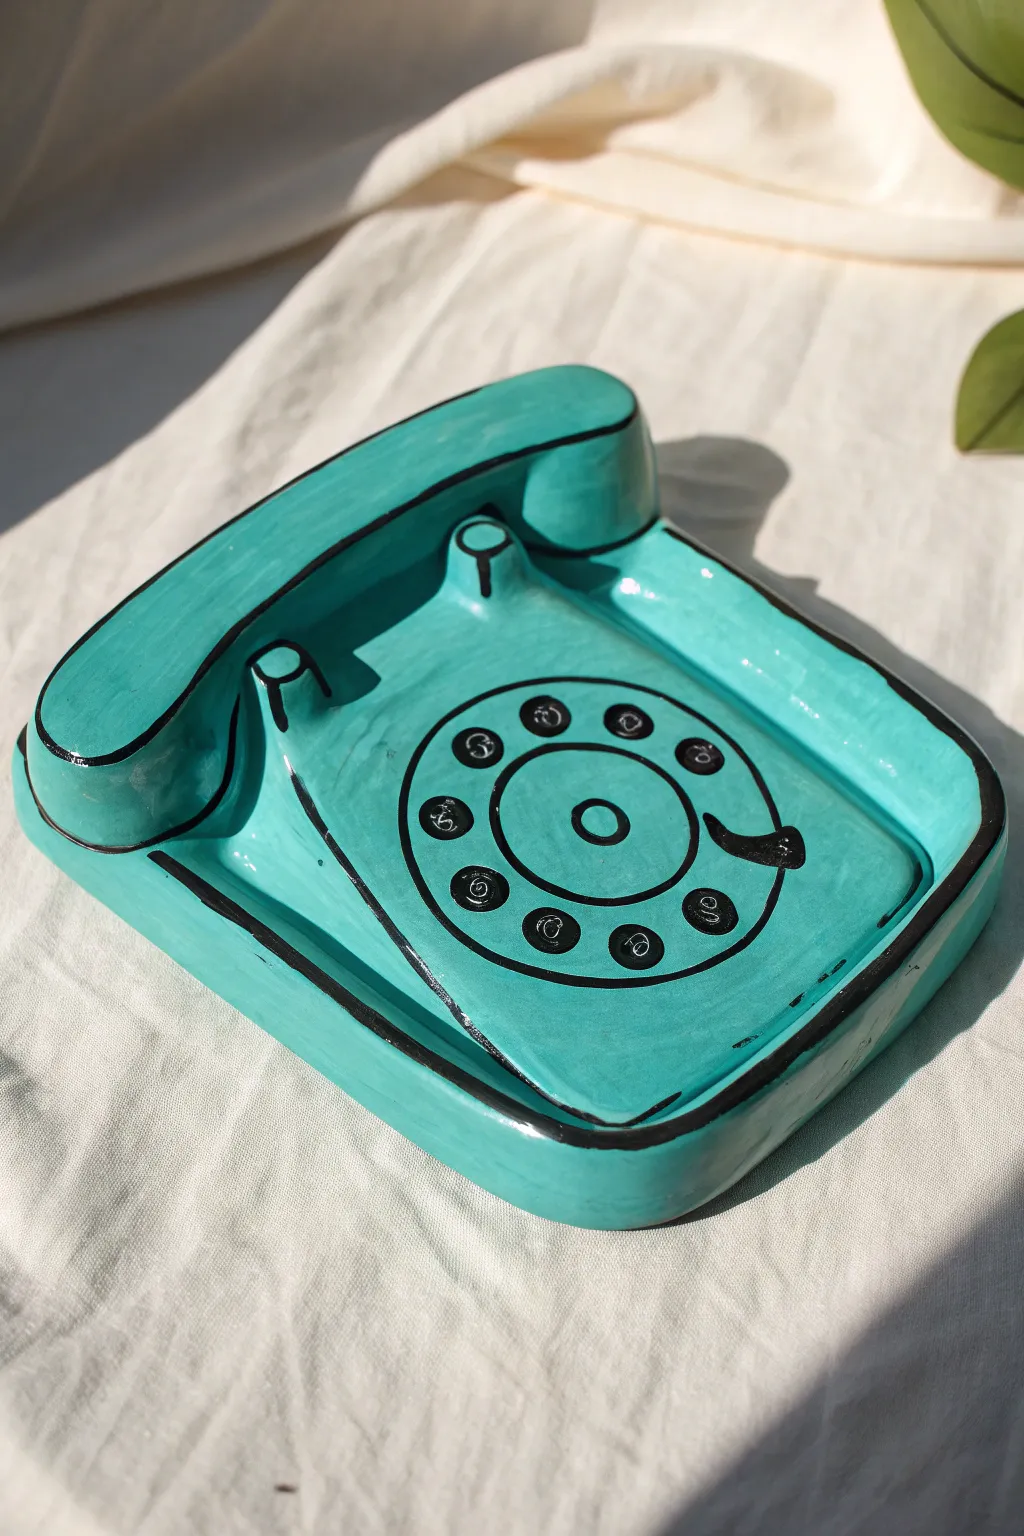
Transform a classic retro icon into a functional piece of decor with this cheeky pop art trinket dish. The illustrative black outlines give it a surreal, cartoon-like quality that looks like a drawing come to life.
Detailed Instructions
Materials
- Air-dry clay or polymer clay (approx. 500g)
- Clay roller or rolling pin
- Clay carving tools (needle tool, ribbon tool)
- X-Acto knife or craft blade
- Slip (clay and water mixture) or liquid clay
- Water and sponge for smoothing
- Acrylic paints: Bright turquoise/teal and black
- Fine detail paintbrushes (size 0 and 2)
- High-gloss varnish or resin
- Sandpaper (fine grit)
Step 1: Sculpting the Base
-
Roll the foundation:
Begin by rolling out a flattened slab of clay about 1/4 inch thick. Cut this into a rectangle with rounded corners, roughly 5×6 inches, to serve as the main body of the phone. -
Build the incline:
Add a wedge of clay underneath the top half of your rectangle to create a gentle slope. Smooth the seams where the wedge meets the slab so the phone body appears to tilt upwards towards the back. -
Create the cradle:
Mold two curved, C-shaped humps of clay. Attach them securely to the top left and top right of the sloped base using scoring and slip (scratching the surface and adding wet clay). These formed the ‘ears’ that will hold the handset. -
Form the handset:
Roll a thick coil of clay and flatten it slightly into a long, curved banana shape. Flare out both ends to mimic the earpiece and mouthpiece of a vintage receiver. -
Test the fit:
Gently place your handset onto the cradle ‘ears’ to ensure it sits naturally. Adjust the cradle height if necessary, then remove the handset to let both pieces dry separately. -
Define the dial:
Cut a large circle from a thin sheet of rolled clay. Attach this to the center of the slanted body. Use a small circular cutter or a pen cap to gently impress varying circles around the perimeter, mimicking the rotary dial holes.
Step 2: Refining and Painting
-
Dry and sand:
Allow the clay to dry completely (24-48 hours for air-dry). Once solid, sand all surfaces with fine-grit sandpaper to remove fingerprints and bumps, focusing on getting sharp, clean edges. -
Base coat application:
Paint the entire surface of both the base and the handset with a bright turquoise or teal acrylic paint. I usually apply two or three thin coats rather than one thick one to ensure rich, opaque coverage. -
Outline the edges:
Using a size 2 brush and black acrylic paint, trace every outer edge of the phone. The line should be slightly thick and uneven to mimic a marker drawing or comic book style. -
Detail the cradle:
Paint contour lines around the base of the cradle ‘ears’ where they meet the body. This emphasizes the 3D shape while maintaining the 2D illustration illusion. -
Paint the dial:
Outline the large dial circle in black. Inside the smaller impressed circles, paint black spirals or numbers to represent the digits. Add a small ‘stopper’ hook shape on the right side of the dial. -
Handset details:
Paint a thick black line around the perimeter of the handset top and bottom. Add a horizontal line across the middle of the ‘ear’ and ‘mouth’ sections to suggest separate plastic components. -
Assemble and finish:
Once the paint is fully dry, you can choose to glue the handset in place or leave it loose. Finish by applying a thick coat of high-gloss varnish or resin to give it that shiny, wet-ceramic look typical of plastic phones.
Wobbly Lines?
If your black outlines look too shaky, switch to a broad-tip black Posca paint marker. It offers more stability than a brush but gives that same opaque, graphical look.
Make It Functional
Carve a small slot in the center of the cradle area before drying. This transforms the decoration into a functional stand that can prop up your actual smartphone vertically.
Now you have a groovy desk accessory that perfectly captures the retro vibe without the busy signal
Soda Bottle Bud Vase
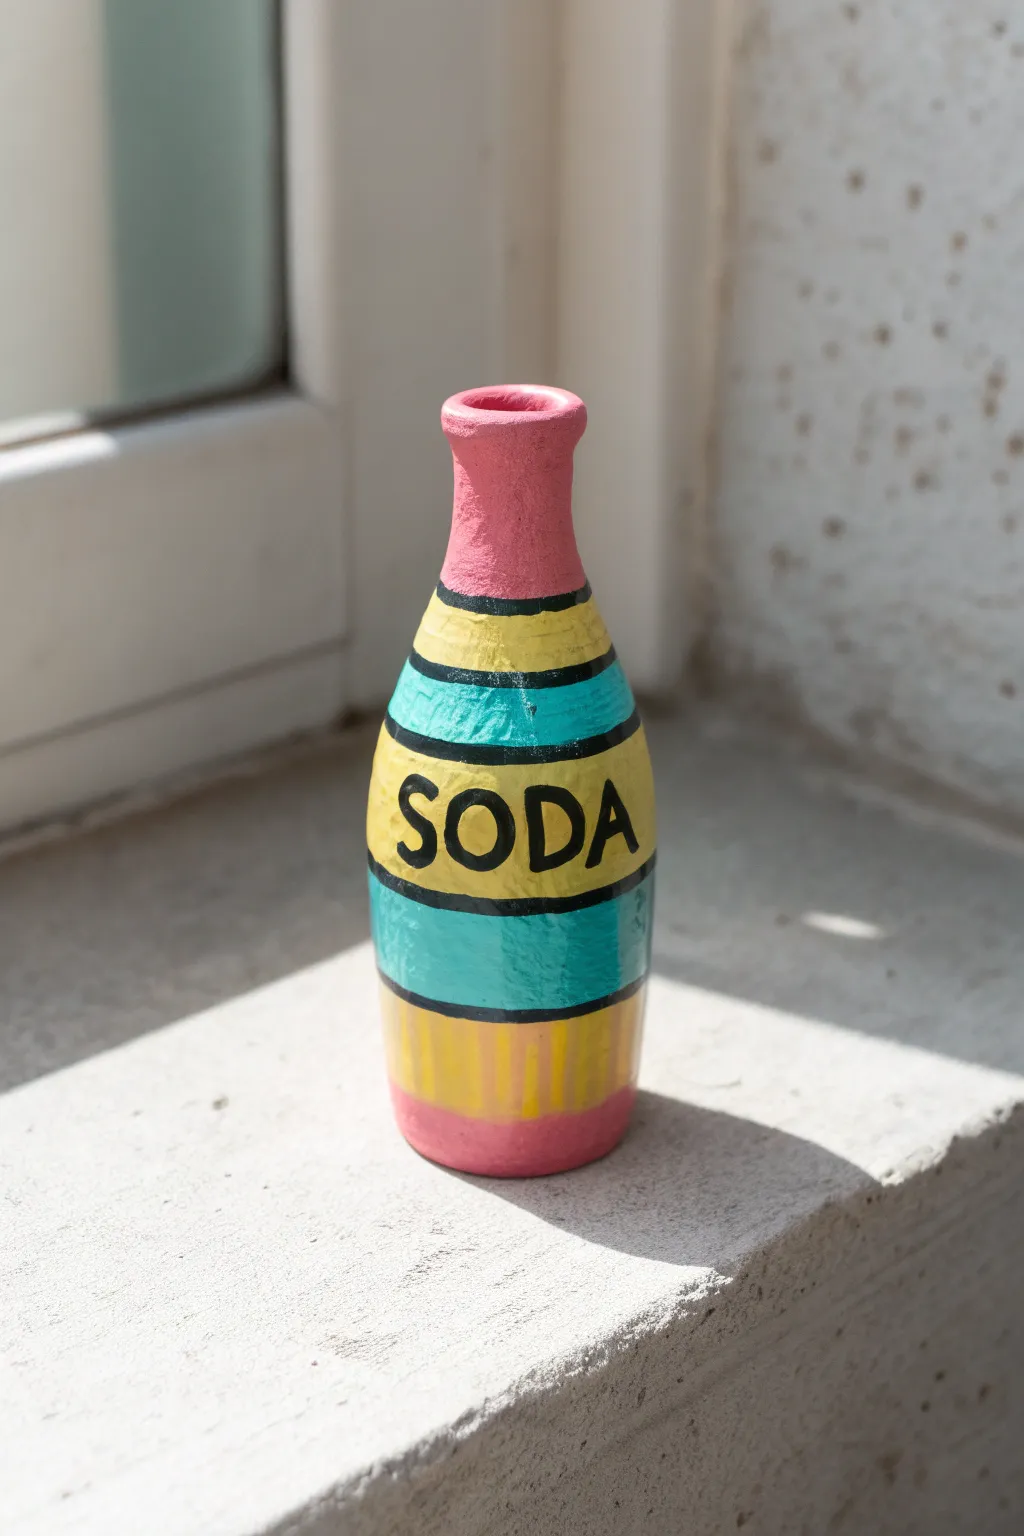
Brighten up any windowsill with this charming miniature bud vase that mimics a vintage soda bottle. The playful, hand-painted pop art style and bold stripes give it a wonderfully imperfect, cartoonish quality that feels totally unique.
How-To Guide
Materials
- Air-dry clay (white or terracotta)
- Small rolling pin
- Clay sculpting tools (specifically a needle tool and a smoothing rib)
- Water and a small sponge
- Sandpaper (fine grit)
- Acrylic paints: Bright Pink, Lemon Yellow, Turquoise, Black
- Paintbrushes: Small flat brush and a fine liner brush
- Matte or satin varnish
Step 1: Sculpting the Bottle Form
-
Prepare the Clay:
Start by conditioning a fist-sized ball of air-dry clay. Knead it in your hands until it’s warm and pliable to prevent cracks later. -
Form the Base:
Roll the clay into a thick log shape. Gently tap the bottom against your work surface to create a flat, stable base so the bottle creates a nice vertical stance. -
Taper the Neck:
Using your thumb and forefinger, gently pinch and pull the top third of the clay log upwards to narrow it. You want to create a bottleneck shape that flares out slightly at the very top for the rim. -
Hollow the Vase:
Carefully push a smooth tool handle or your pinky finger down through the neck opening. Don’t go all the way to the bottom; creating a channel about 2 inches deep is sufficient for a single dried flower stem. -
Smooth the Surface:
Dip your finger in a little water and run it over the clay to smooth out major bumps. I usually keep the surface slightly textured rather than perfectly smooth to maintain that handmade look. -
Refine the Rim:
Use a modeling tool to define the lip of the bottle, making sure it looks distinct from the neck. -
Dry Completely:
Let the sculpture dry for 24-48 hours. It should be uniform in color and hard to the touch before you proceed to sanding.
Step 2: Painting the Design
-
Sand the imperfections:
Once fully dry, lightly sand any sharp edges or rough patches. Wipe away the dust with a barely damp cloth. -
Base Coat Stripes:
Visualize the bottle in horizontal sections. Paint the neck and the very bottom base in Bright Pink. Let this layer dry. -
Add Yellow Sections:
Paint two thick bands of Lemon Yellow: one just below the neck and one near the bottom (above the pink base). The middle section should remain unpainted for now. -
Paint Turquoise Bands:
Fill the remaining middle section with a thick band of Turquoise. Add another thinner turquoise stripe between the top yellow band and the pink neck. -
Outline with Black:
Using a fine liner brush and black paint, carefully draw a dividing line between every color change. This ‘comic book’ outline is key to the pop art style. -
Lettering:
In the center of the large yellow band, paint the word ‘SODA’ in bold, black capital letters. I find it helps to paint the ‘O’ and ‘D’ first to center the spacing. -
Add Texture Details:
If you want the distressed look seen in the photo, lightly dry-brush some vertical streaks of darker yellow or orange over the bottom yellow section. -
Seal the piece:
Once the paint is cured, apply a coat of matte or satin varnish to protect your work and give the colors a finished sheen.
Uneven Lines?
Don’t stress if your black outlines are shaky! That wobble adds to the charming, illustrative aesthetic of this project. It’s meant to look hand-drawn.
Use a Template
Sketch the ‘SODA’ letters lightly with a pencil directly on the dried paint before going in with black acrylic. This ensures you won’t run out of room.
Place your finished vase on a sunny shelf with a dried bloom to enjoy your colorful creation


What Really Happens Inside the Kiln
Learn how time and temperature work together inside the kiln to transform clay into durable ceramic.
Takeout Cup Pencil Holder
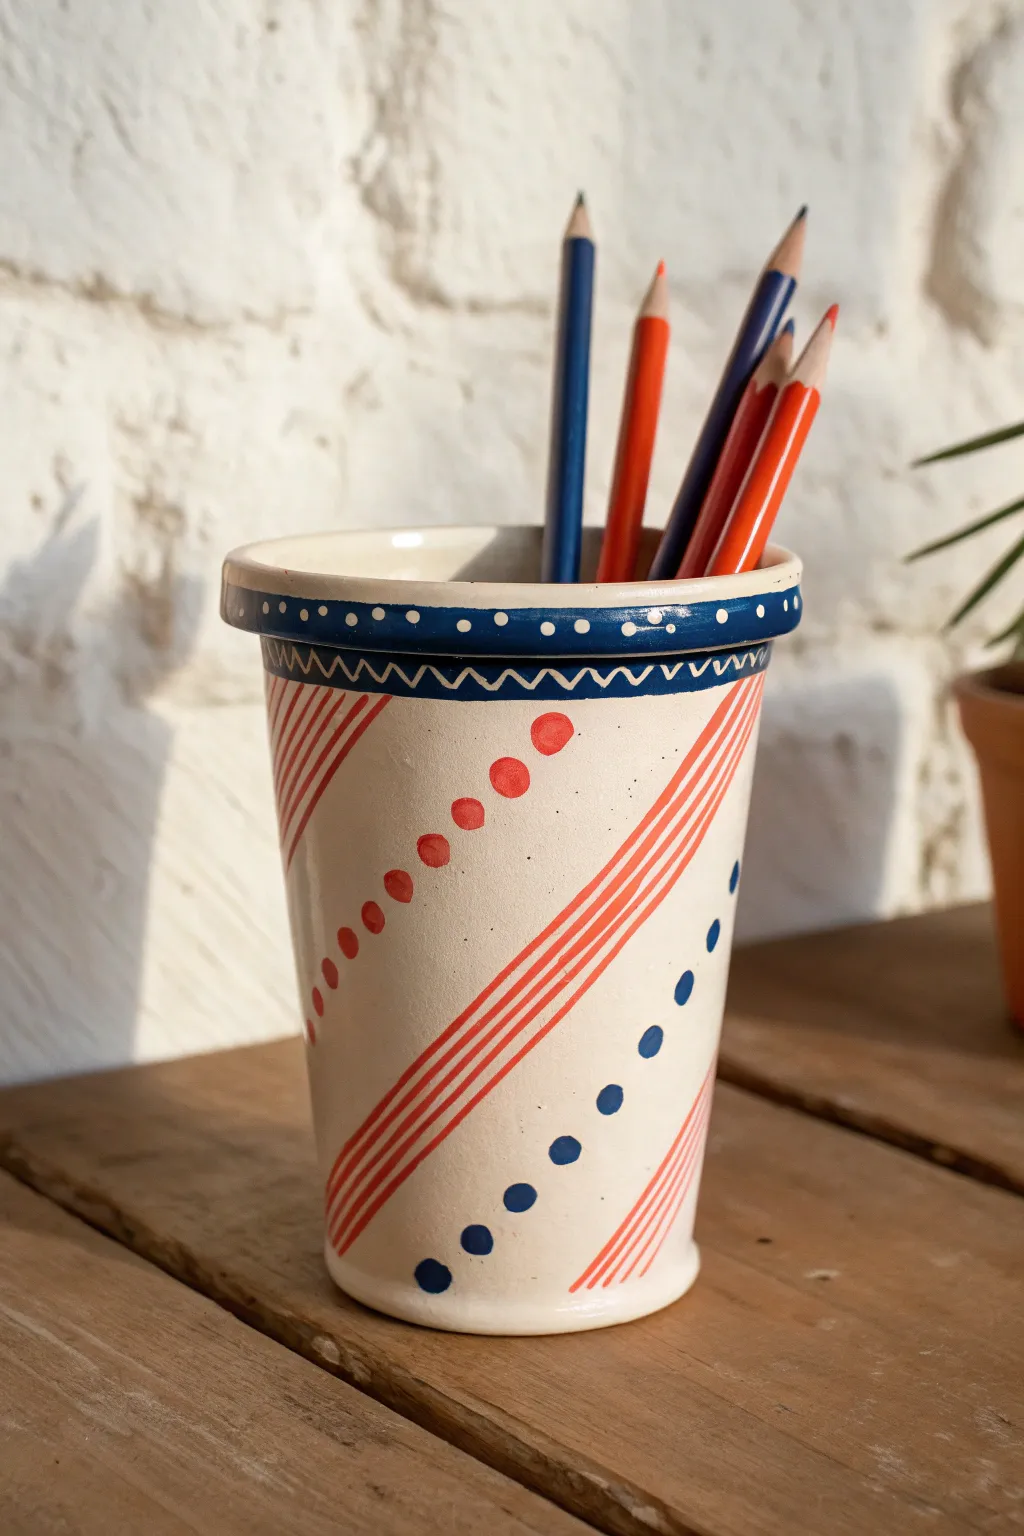
Reimagine your desk organization with this charming ceramic piece that mimics a classic paper takeout cup. While the recognizable shape feels familiar, the geometric red and blue hand-painted designs add a playful pop art twist.
Step-by-Step
Materials
- White earthenware or stoneware clay
- Rolling pin
- Clay knife or fettling knife
- Slip and scoring tool
- Underglaze paints (Bright Red, Navy Blue)
- Small round paintbrushes (sizes 0 and 2)
- Clear transparent glaze
- Sponge
- Template (trapezoid shape for cup body)
- Circular cookie cutter (for base)
Step 1: Building the Cup Form
-
Roll your slab:
Begin by rolling out your white clay on a canvas board to a consistent thickness, roughly 1/4 inch. Smooth out any canvas texture with a rib tool to ensure a clean surface for painting later. -
Cut the shapes:
Using a paper template shaped like a slightly curved trapezoid, cut out the main wall of the cup. Then, use a circular cutter to create the base piece. -
Bevel the edges:
To create a seamless join, cut the two short vertical edges of your cup wall at a 45-degree angle. This allows them to overlap cleanly without adding bulk. -
Assemble the cylinder:
Score the beveled edges and the perimeter of the base. Apply slip, then wrap the wall around the base, pressing the sides together. Use a modeling tool to smooth the seam inside and out until it’s invisible. -
Create the rolled rim:
Roll a small coil of clay, about the thickness of a pencil. Score the top edge of your cup and attach the coil. Gently flatten and smooth it downwards to mimic the rolled lip of a paper cup. -
Drying time:
Set the piece aside to dry slowly to the leather-hard stage. This is crucial—if the clay is too wet, painting precise geometric lines will be difficult.
Straight Line Secret
For perfectly straight diagonal stripes, apply thin masking tape or automotive detailing tape to the leather-hard clay before painting. Peel it off carefully when the underglaze is semi-dry.
Step 2: Adding the Pop Art Design
-
Sketch the zones:
Lightly use a pencil to mark the rim area, the band just below it, and the diagonal sections for the stripes. Don’t press too hard; the pencil graphite will burn off in the kiln. -
Paint the rim:
Using your navy blue underglaze and a steady hand, paint the entire rolled rim. Ensure solid coverage, applying two coats if necessary. -
Add rim details:
Once the blue rim is dry to the touch, use a fine tip brush or a needle tool dipped in wax resist to add the small white dots around the center of the blue band. Alternatively, you can scrape away tiny circles of blue to reveal the white clay. -
Create the zig-zag border:
Paint a thinner blue band immediately below the rim. While the paint is wet, scratch a zig-zag line through it, or carefully paint the negative space with a very fine brush to create the pattern. -
Stripe the diagonals:
Load a size 2 brush with bright red underglaze. Paint parallel diagonal lines in groups of four or five, leaving wide white spaces between the groups. -
Paint the descending dots:
In the white spaces between your red stripe groups, paint a line of descending dots. Start with large red dots near the top and transition to smaller blue dots as you move downward. -
Check the spacing:
Ensure the transition from red to blue dots happens roughly around the middle of the cup for a balanced look. I usually test my dot spacing on a scrap piece of paper first. -
Clean up:
Use a barely damp sponge to wipe away any underglaze smudges on the white areas or the bottom of the cup.
Step 3: Firing and Glazing
-
Bisque fire:
Once the piece is bone dry, fire it to bisque temperature (usually Cone 04) to set the shape and underglazes. -
Apply clear glaze:
Dip the entire bisqued cup into a clear transparent glaze. Shake gently to remove excess drips. -
Wipe the foot:
Thoroughly sponge off any glaze from the very bottom of the cup so it doesn’t stick to the kiln shelf. -
Final fire:
Fire the piece again to the maturity temperature of your clay and glaze (often Cone 06 or Cone 6).
Level Up: Coffee Sleeve
Add physical texture by wrapping a thin sheet of corrugated cardboard-textured clay around the middle to simulate a protective coffee sleeve before firing.
Fill your new cup with your favorite drawing tools and enjoy the pop of color on your desk
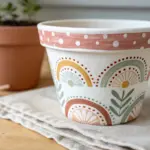
Candy Wrapper Pinch Pot Bowl
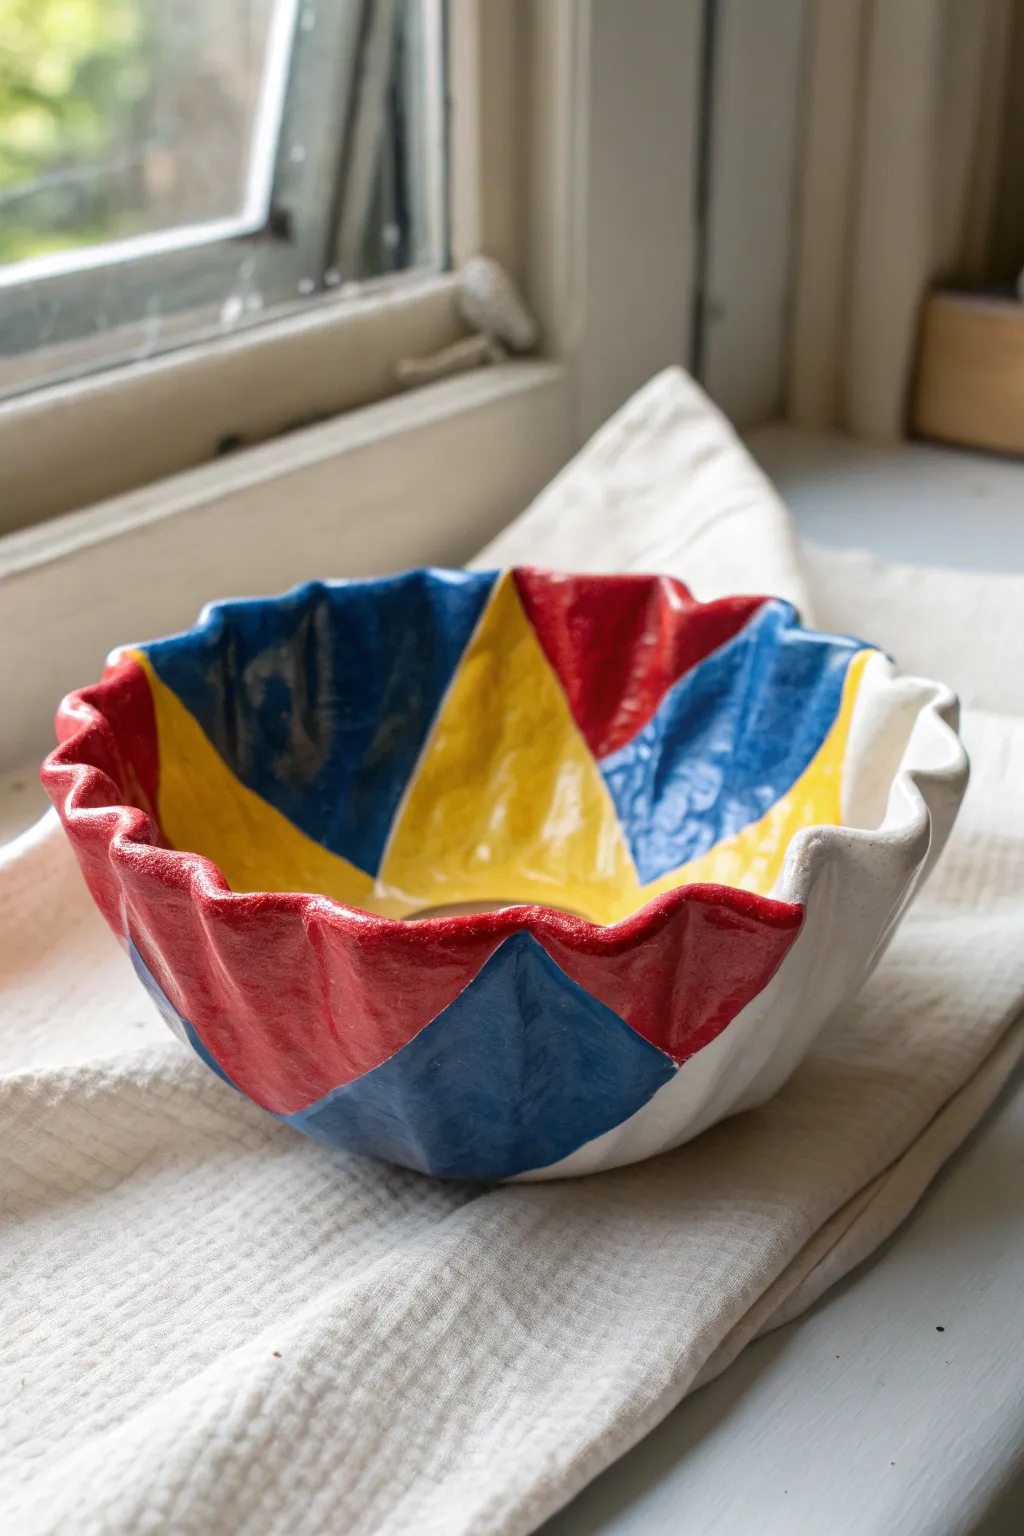
Transform a simple lump of clay into a playful, ruffled bowl inspired by the nostalgic crinkle of hard candy wrappers. This project combines beginner-friendly pinch pot techniques with bold Pop Art colors for a functional yet sculptural piece.
Step-by-Step Tutorial
Materials
- White creativity air-dry clay or polymer clay (approx. 500g)
- Acrylic paints (primary red, bright blue, sunny yellow, white)
- High-gloss varnish or Mod Podge (gloss finish)
- Medium flat paintbrush
- Small detail paintbrush
- Rolling pin (optional)
- Masking tape or painter’s tape (thin width)
- Cup of water
- Sponge or paper towel
Step 1: Shaping the Clay Base
-
Prepare your clay:
Start with a ball of clay roughly the size of a grapefruit. Knead it well in your hands to warm it up and remove any air bubbles, ensuring a smooth, crack-free consistency. -
Form the pinch pot:
Press your thumb into the center of the ball, leaving about a half-inch of thickness at the bottom. Gently pinch the clay between your thumb and fingers, rotating the ball as you work, to thin out the walls evenly. -
Widen the rim:
Continue pinching upward and outward to create a wide, open bowl shape. Don’t worry about keeping the rim perfectly straight; a little irregularity adds character. -
Create the ruffled edge:
To mimic a candy wrapper, use your thumb and forefinger to gently crimp the rim. Push out from the inside with one finger while pushing in from the outside with two fingers next to it, creating a wavy, undulating pattern all around the top. -
Smooth the surfaces:
Dip your finger in a little water and run it over the clay to smooth out any fingerprints or small cracks. Pay special attention to the transition between the ruffled rim and the bowl body. -
Flatten the base:
Gently tap the bowl on your work surface to create a flat, stable bottom so it won’t rock when finished. -
Let it dry:
Allow the clay to dry completely according to the package instructions. For air-dry clay, this usually takes 24-48 hours. I find flipping it over halfway through helps the bottom dry evenly.
Smooth Moves
If you notice deep cracks while crimping the edges, use a clay slip (water + clay mush) to fill them immediately before smoothing.
Step 2: Painting the Pop Art Design
-
Apply the base coat:
Once fully dry, paint the entire bowl—inside and out—with a solid coat of white acrylic paint. This primes the surface and ensures your colors pop. Let this dry completely. -
Plan the sections:
Visualize the bowl divided into triangular ‘slices’ radiating from the center bottom, similar to a pinwheel. You can lightly pencil these lines in if you need a guide. -
Start with yellow:
Using your flat brush, paint large triangular sections in bright yellow. These triangles should start narrow at the center bottom and widen as they reach the ruffled rim. -
Add the red sections:
Paint alternating triangular sections in primary red. On the exterior, try to match the placement so the red section on the outside mirrors the red section on the inside. -
Fill in with blue:
Paint the remaining sections in bold blue. The wavy rim makes straight lines tricky, so embrace the organic flow of the ruffles as you guide your brush near the edge. -
Refine the edges:
Use your small detail brush to neaten the lines where the colors meet. You want crisp, sharp boundaries between the yellow, red, and blue to achieve that graphic Pop Art look. -
Leave negative space:
Optionally, leave one or two sections white to break up the intense primary colors, or repaint a specific section white if your design feels too crowded. -
Check for coverage:
Look over the piece for any patchy areas. Apply a second coat to any color that looks translucent, ensuring a solid, opaque finish. -
Seal the deal:
Once the paint is bone dry, apply a generous coat of high-gloss varnish. This not only protects the paint but gives the bowl that shiny, plastic-wrapper sheen essential to the theme.
Clean Lines
For ultra-crisp geometric lines on the curved surface, try using thin automotive masking tape or flexible washi tape instead of painter’s tape.
Place your colorfully crinkled bowl near a window to catch the light and show off that glossy finish

TRACK YOUR CERAMIC JOURNEY
Capture glaze tests, firing details, and creative progress—all in one simple printable. Make your projects easier to repeat and improve.
Sprinkled Ice Cream Bar Charm
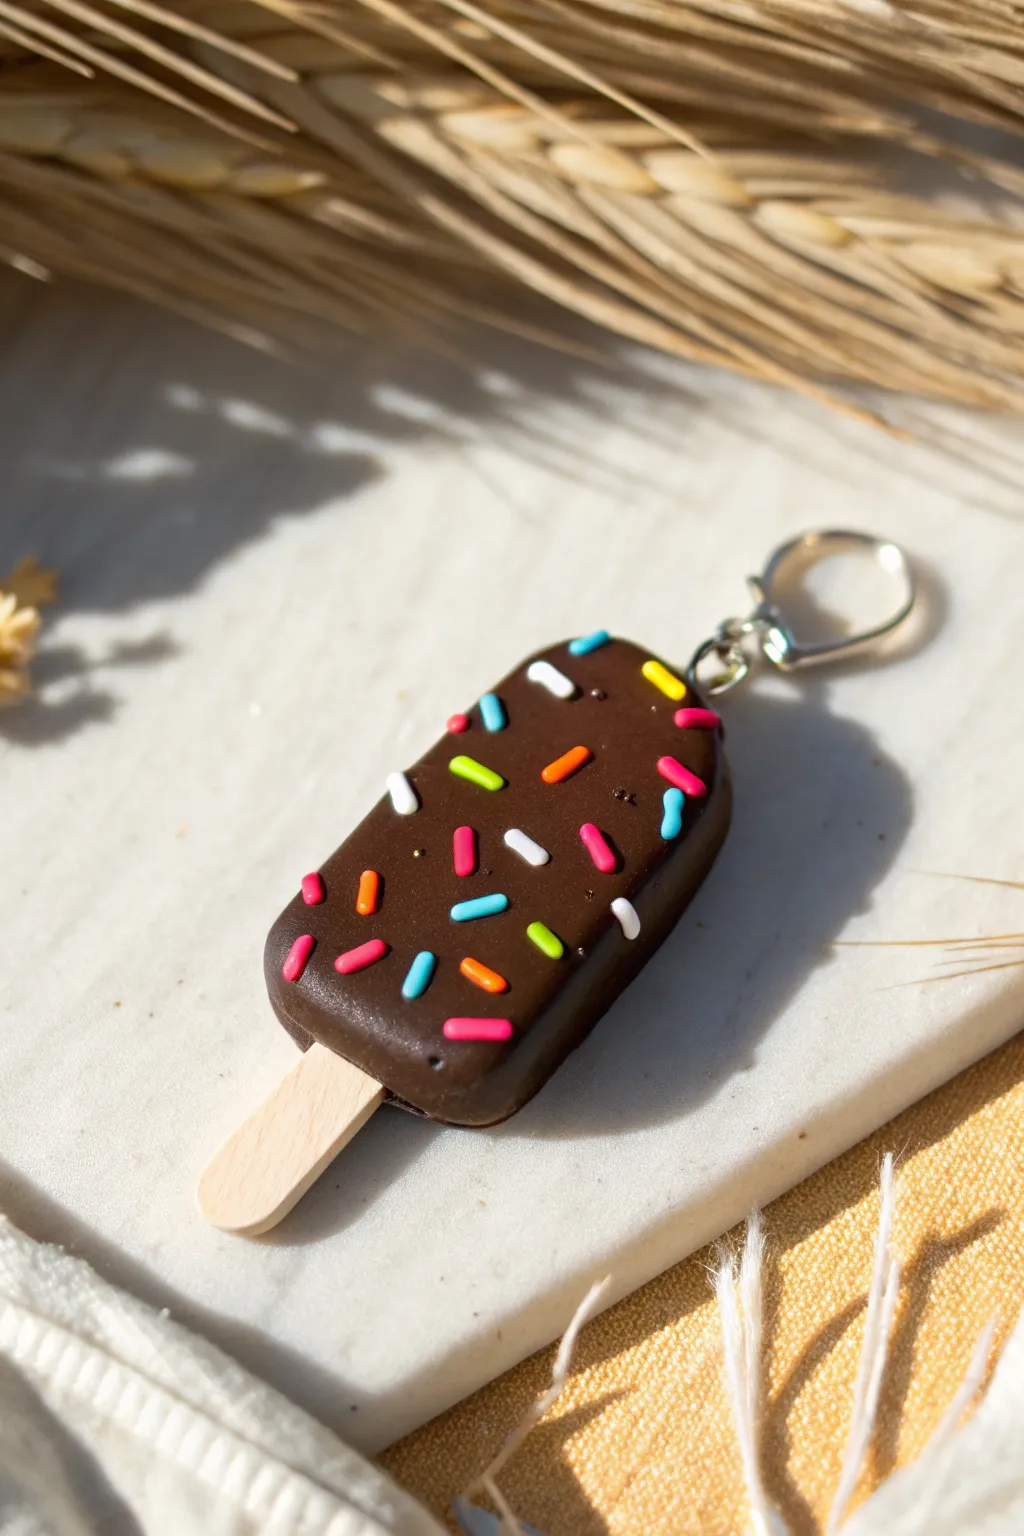
This realistic-looking ice cream bar charm features a smooth, chocolate-dipped coating and is scattered with cheerful rainbow sprinkles. It’s the perfect sweet treat for your keychain or jewelry collection, bringing a playful pop of color to your day.
Detailed Instructions
Materials
- Polymer clay (dark brown for chocolate)
- Polymer clay (assorted bright colors like pink, blue, yellow, white, green)
- Liquid polymer clay (translucent or chocolate color)
- Small wooden popsicle stick (or craft stick cut to size)
- Baking tile or parchment paper
- Rolling pin or pasta machine
- Small oval or rounded rectangle cutter (optional)
- Needle tool
- Eye pin
- Key ring finding
- Jewelry pliers
- Gloss glaze (optional)
Step 1: Shaping the Base
-
Condition the main clay:
Start by taking a chunk of your dark brown polymer clay. Knead it thoroughly in your hands until it becomes soft, pliable, and free of any cracks. -
Form the initial shape:
Roll the conditioned brown clay into a smooth ball, ensuring there are no seams. Once smooth, flatten it slightly between your palms. -
Refine the rectangle:
Using your fingers or a flat work surface, gently press the sides to form a thick, rounded rectangle. Aim for the classic ice cream bar shape—rounded at the top and slightly squared at the bottom. -
Smooth the surface:
Rub your finger lightly over the surface of the clay to remove any fingerprints. If the clay is getting too warm, I like to let it sit for a few minutes to firm up before continuing. -
Prepare the stick:
Take your small wooden craft stick. If it’s too long, trim it with scissors so only about half an inch will protrude from the bottom of the ice cream bar. -
Insert the stick:
Carefully push the cut end of the stick into the center of the bottom edge of your clay rectangle. Push it in deep enough to be secure, but be careful not to distort the shape of the bar.
Sprinkles falling off?
If sprinkles fall off after baking, don’t worry. Just use a tiny dot of superglue or E6000 to reattach them individually to the finished piece.
Step 2: Adding the Details
-
Prepare the sprinkles:
It’s time to make the sprinkles. Take tiny amounts of your bright colored clays (pink, blue, yellow, white, orange, green). Roll each color into a very thin snake, similar to the thickness of a piece of spaghetti. -
Bake the sprinkle snakes:
Place these long thin snakes on a baking sheet and bake them for just 5-10 minutes according to package directions. Pre-baking makes them firm and easier to cut without squishing. -
Cut the sprinkles:
Once the snakes have cooled, use a sharp craft blade to chop them into tiny, uniform bits. These will act as your realistic sprinkles. -
Apply liquid clay:
To make the sprinkles stick firmly, brush a very thin layer of liquid polymer clay over the surface of your brown chocolate bar. This acts as the glue. -
Place the sprinkles:
Using tweezers or your needle tool, pick up individual pre-baked sprinkles and place them randomly onto the wet liquid clay surface. Angle them in different directions for a natural look. -
Secure the sprinkles:
Once you are happy with the arrangement, gently tap them down with your finger so they embed slightly into the tacky surface.
Textured Bite
Make it look eaten! Before baking, use a scalloped flower cutter to remove a corner chunk, then texture the inside white to look like vanilla ice cream.
Step 3: Finishing Up
-
Add the hardware:
Take a metal eye pin. If the stem is too long, trim it down. Dip the end in a little liquid clay for extra grip. -
Insert the eye pin:
Push the eye pin into the top center of the ice cream bar. Ensure the loop is facing the direction you want your keychain to hang. -
Final inspection:
Check the charm from all angles. Smooth out any accidental fingerprints on the chocolate area one last time. -
Final Bake:
Place your finished charm on a baking tile. Bake according to your specific polymer clay’s instructions (usually 275°F/135°C for about 15-20 minutes depending on thickness). -
Cool and glaze:
Let the piece cool completely. For that realistic melted chocolate shine, apply a coat of semi-gloss or gloss glaze over the brown area and sprinkles, avoiding the wooden stick. -
Attach the ring:
Using two pairs of jewelry pliers, twist open the small jump ring on your keychain finding. Loop it through the eye pin on your charm and twist it closed securely.
Now you have a sweet, calorie-free accessory to brighten up your keys or zipper pull
Halftone Dot Mini Plate
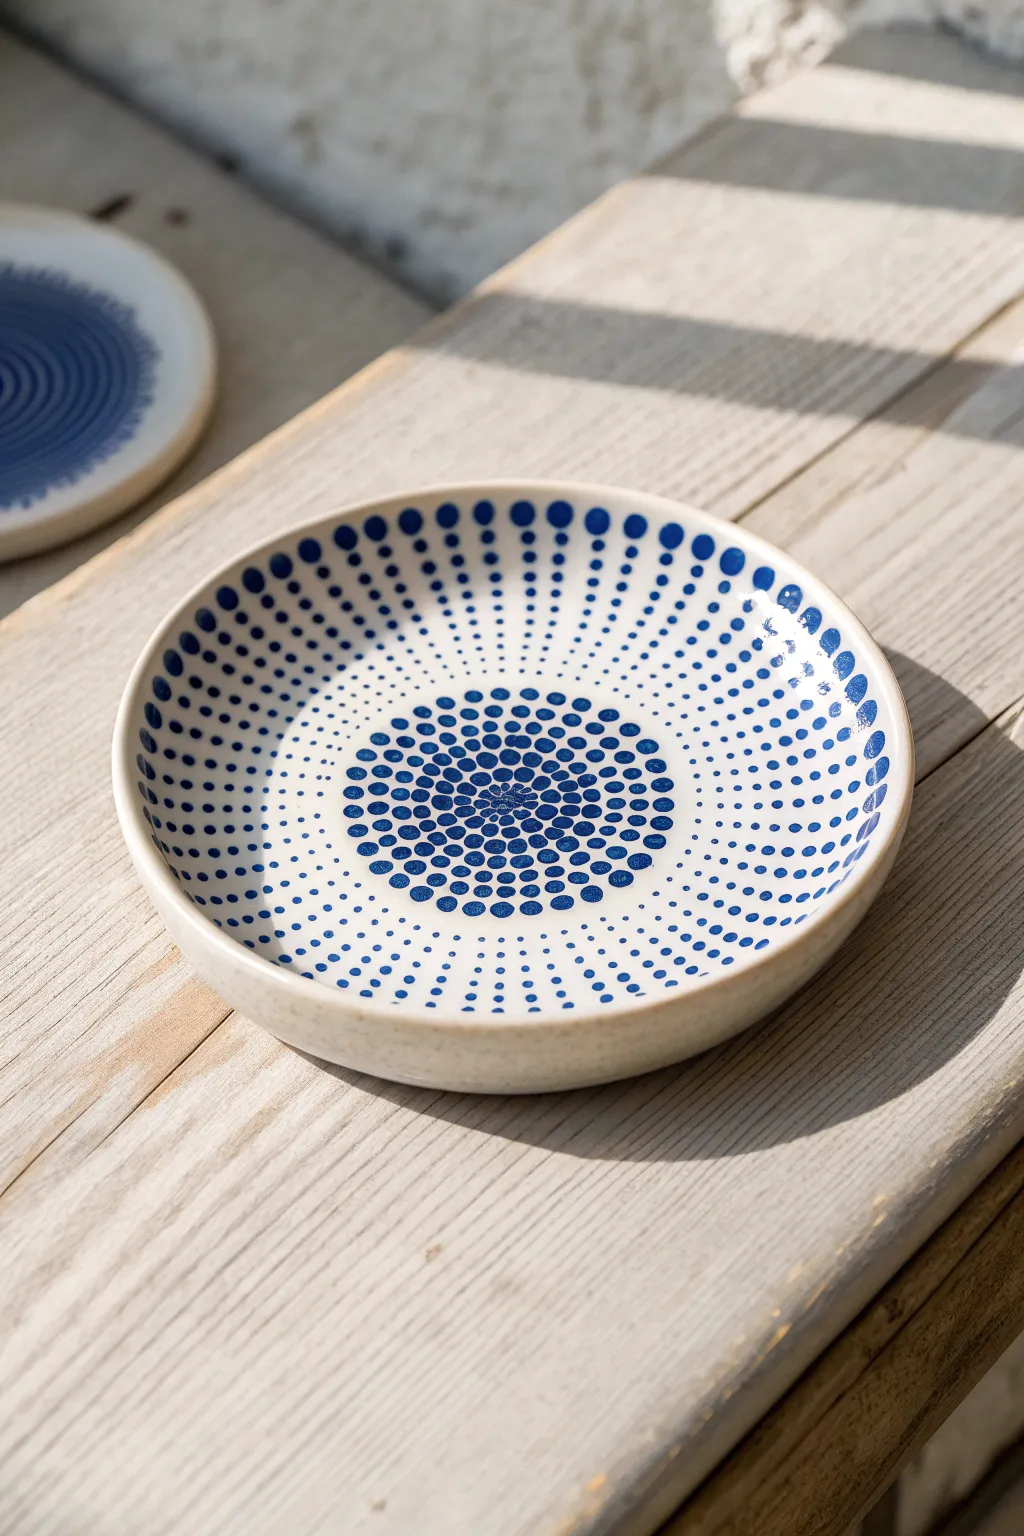
Channel the retro vibe of pop art imagery with this mesmerizing geometric dot plate. Using simple tools and a steady hand, you can transform plain clay into a dynamic optical illusion that looks great holding jewelry or display pieces.
Step-by-Step
Materials
- White or speckled stoneware clay
- Rolling pin
- Circle template or cutter (approx. 5-6 inches)
- Small sponge
- Underglaze (Cobalt or Navy Blue)
- Various applicator tips or needle tools
- Slip trailer bottle (very fine tip)
- Clear transparent glaze
- Kiln (or oven if using polymer/air-dry alternatives)
Step 1: Shaping the Base
-
Prepare the Clay:
Begin by wedging your stoneware clay thoroughly to remove air bubbles. This ensures a smooth, crack-free surface for your detailed painting later. -
Roll the Slab:
Roll the clay out into an even slab, aiming for a thickness of about 1/4 inch. If you are using speckled clay like in the example, the natural flecks add lovely texture. -
Cut the Circle:
Place your circular template or cutter onto the slab and press down firmly to cut out the base shape. -
Smooth the Edges:
Dip your finger or a small sponge in a little water and run it along the cut rim to soften the sharp edge. -
Form the Curve:
Gently lift the edges of the circle to create a shallow dish shape. You can do this by placing the clay into a shallow bowl mold or using a slump mold. -
Bisque Fire:
Allow the clay to dry slowly to the bone-dry stage. Once dry, load it into the kiln for a bisque firing to make it porous and ready for glazing.
Pro Choice: Dotting Tools
Don’t just rely on brushes! Drill bits, the flat ends of skewers, or ball styluses create perfectly round, uniform dots much easier than brush bristles can.
Step 2: Creating the Halftone Pattern
-
Plan the Center:
Once your bisque ware is cool, wipe it down with a damp sponge to remove dust. Locate the exact center of the plate; I find marking a faint pencil dot helps guide the initial symmetry. -
Start the Inner Spiral:
Using a slip trailer or a fine-point applicator filled with blue underglaze, dot a tight cluster in the very center. Keep these dots relatively large and close together to create visual weight. -
Radiating Outward:
Begin adding dots in concentric circles moving outward from the center. Maintain the size of the dots for the first few rings to create a solid-looking core. -
Graduating Size:
As you move past the center core (about an inch out), switch to a smaller applicator tip or apply less pressure. You want the dots to gradually become smaller to create the ‘fading’ effect. -
Creating Negative Space:
Continue spiraling outward, but start increasing the spacing between the dots slightly. This introduces white space, which is crucial for the optical illusion. -
The Outer Rim Pattern:
When you reach the area where the plate curves upward, stop the spiral pattern. Now, switch back to larger dots to create the bold outer rim border. -
Filling the Transition:
Add radial lines of dots connecting the rim to the center pattern. Start with larger dots near the rim and taper them down to tiny specks as they extend inward toward the center. -
Checking Consistency:
Step back and look at the plate from a distance. If you see uneven gaps, add tiny micro-dots of underglaze to balance the density. -
Clean the Rim:
Ensure the very edge of the rim paints a distinct line or series of bold dots to frame the piece cleanly.
Level Up: Color Shift
Instead of one color, use a gradient. Start with dark navy in the center and gradually mix in white underglaze as you move outward for an ombré effect.
Step 3: Finishing
-
Glaze Application:
Let the underglaze dry completely. Dip the entire plate into a bucket of clear transparent glaze, or brush on three smooth coats. -
Wipe the Foot:
Use a sponge to wipe any glaze off the bottom ‘foot’ of the plate so it doesn’t stick to the kiln shelf. -
Final Firing:
Fire the piece again to the temperature required by your specific clay and glaze, usually Cone 5 or 6 for stoneware.
Once cooled, your plate is ready to add a graphic pop to any surface in your home
Cartoon Outline Mug
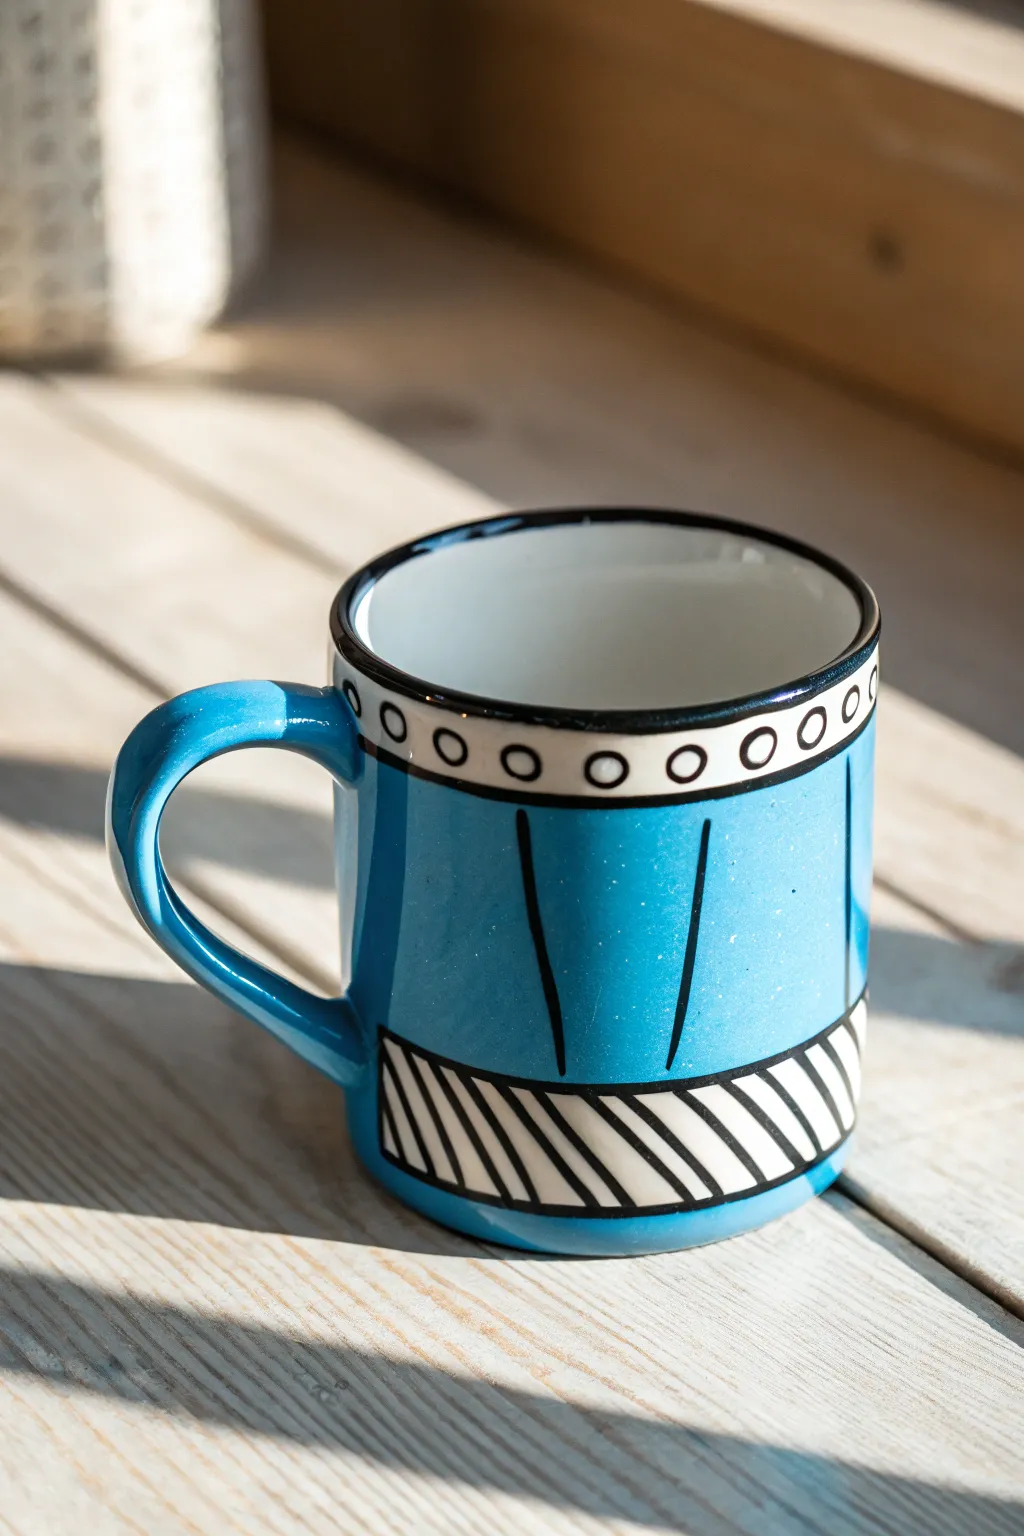
Transform a standard ceramic mug into a piece of playful pop art that looks like it jumped right out of a comic strip. This project uses bold black outlines and flat color blocking to create a clever optical illusion that mimics 2D animation in a 3D space.
Step-by-Step Tutorial
Materials
- Bisque-fired ceramic mug (or wheel-thrown piece)
- Underglazes: Bright Cyan/Sky Blue, White, Black
- Soft fan brush
- Detail liner brush (size 0 or 00)
- Medium round brush
- Clear dipping glaze (transparent)
- Pencil (for sketching lines)
- Sponge and water
- Kiln access
Step 1: Base Coating
-
Prep the Surface:
Begin by gently wiping your bisque-fired mug with a damp sponge to remove any dust or debris, which ensures the glazes adhere properly. -
Clean the Interior:
Pour white underglaze into the inside of the mug. Roll it around to coat the entire interior surface evenly, then pour out the excess. Smooth any drips on the rim with a damp finger. -
Apply Blue Base:
Using a soft fan brush, apply three thin, even coats of bright cyan or sky blue underglaze to the exterior of the mug, including the handle. Allow each coat to dry until it’s matte before applying the next to avoid dragging the pigment. -
Check for Opacity:
Ensure the blue coverage is solid and opaque. If you can still see the clay body through the paint, add a cautious fourth coat.
Steady Hand Pro Tip
Rest your painting pinky finger against the mug surface for stability. If working on a wheel, keep your elbows tucked into your ribs to minimize hand shaking while painting lines.
Step 2: Designing the Bands
-
Establish the Top Band:
Using a medium round brush and white underglaze, paint a thick horizontal band about half an inch below the rim. I find it helpful to use a banding wheel if you have one to keep the line steady. -
Establish the Bottom Band:
Paint a similar white band near the very bottom of the mug, just above the foot. Both white bands should be opaque, so you may need 2-3 coats to completely cover the blue layer underneath. -
Dry Completely:
Let the white bands dry thoroughly. They must be completely set before you start the detail work to prevent the black from bleeding.
Smudged the Black?
Did a black line go astray? Don’t wipe it while wet! Let it dry completely, then gently scratch the mistake off with a needle tool or an X-Acto knife.
Step 3: The Cartoon Outline
-
Outline the Rim:
Dip a detail liner brush into black underglaze. carefully paint a solid black line along the very top rim of the mug, creating a distinct border between the inner white and outer blue. -
Define the Top Band:
Paint thin black border lines on the top and bottom edges of your upper white band. This ‘boxes in’ the white area. -
Add Circles:
Inside the top white band, paint small, evenly spaced black circles. They don’t need to be perfect; a little wobble actually adds to the hand-drawn cartoon aesthetic. -
Stripe the Base:
Outline the bottom white band with black lines on its top and bottom edges. Then, fill the band with diagonal black stripes, keeping the spacing relatively consistent. -
Outline the Handle:
To enhance the 2D effect, paint a black line along the edges of the handle where the light would naturally hit or where seams would be in a drawing.
Step 4: Finishing Accents
-
Vertical Accent Lines:
Add two long, slightly angled vertical lines on the main blue body of the mug. These act as ‘motion lines’ or shading lines typical in comic art. -
Refine Edges:
Check all your black lines. If any look too faint, carefully go over them again for that bold, marker-pen look. -
Glaze Application:
Once the underglaze is bone dry, apply a coat of clear transparent glaze. Dipping provides the smoothest finish, but brushing works if you are careful not to smudge the black lines. -
Final Fire:
Load the mug into the kiln and fire it according to the temperature guidelines of your specific clay and glaze combination.
Enjoy sipping from your new mug that looks deceptively like a drawing
3D Line-Drawn Object Sculpture
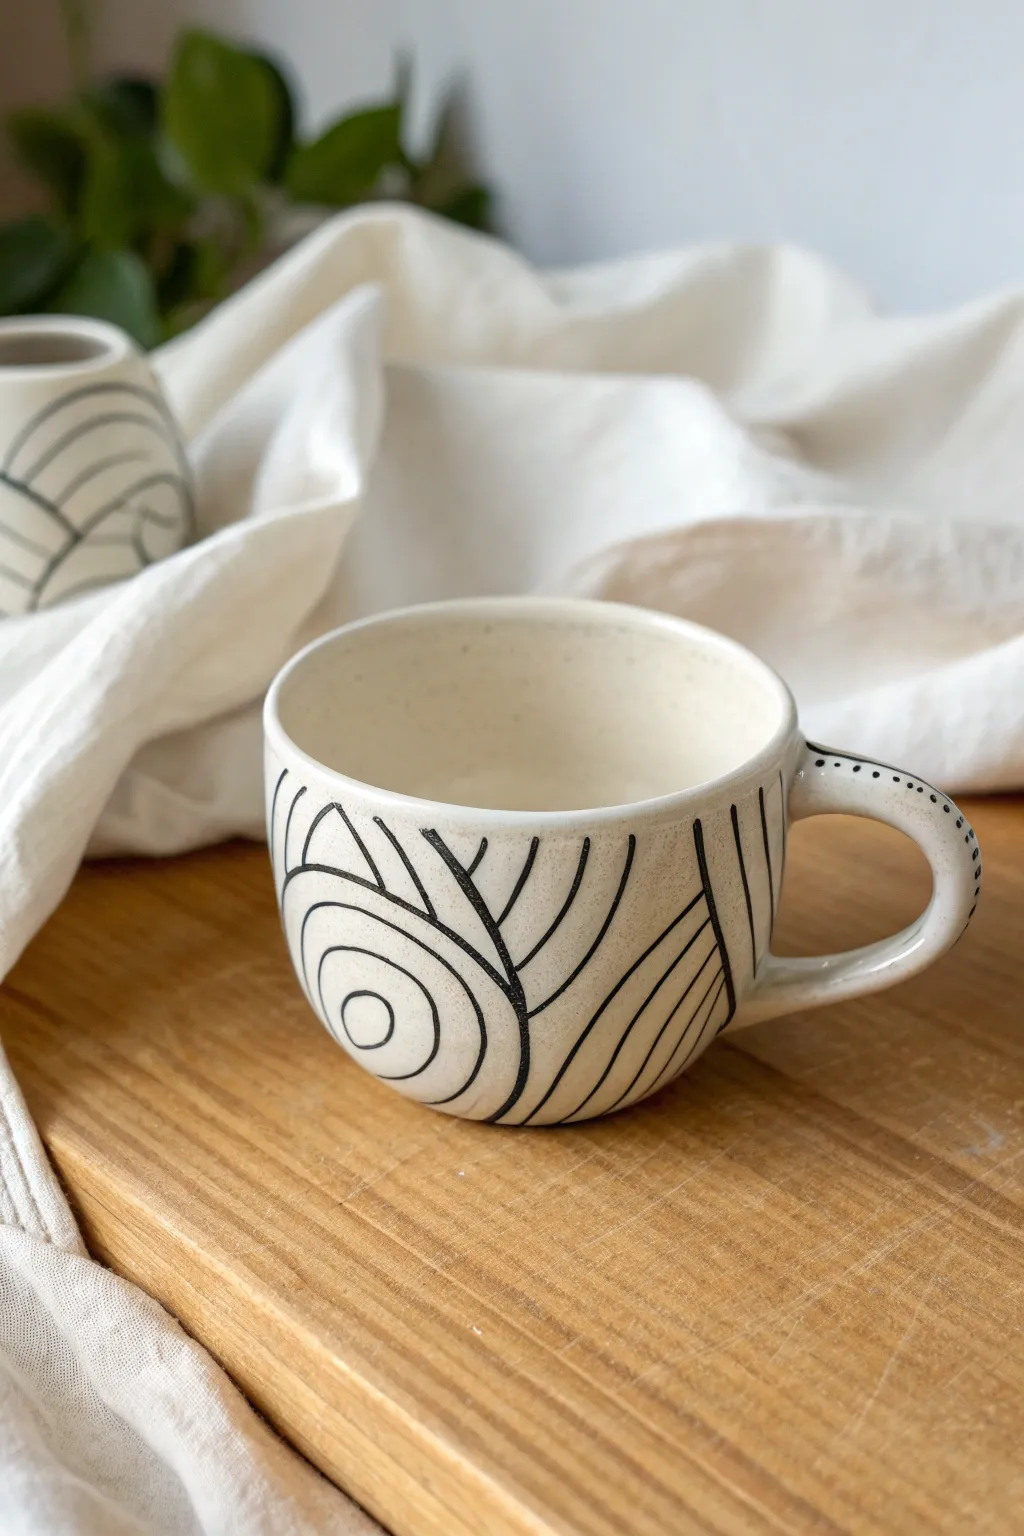
Bring a touch of pop art into your morning routine with this striking handmade ceramic mug. Featuring flowing black lines against a soft white glaze, this project transforms simple doodles into a sophisticated, 3D line-drawn sculpture.
Step-by-Step
Materials
- White stoneware clay body
- Rolling pin
- Canvas work surface
- Mug template (paper or cardstock)
- Fettling knife
- Scoring tool or needle tool
- Slip (clay slurry)
- Pottery wheel (optional, for slab/coil combo) or hand-building tools
- Black underglaze (or underglaze pencil)
- Fine detail paintbrush (size 0 or 1)
- Clear transparent glaze
- Sponge
Step 1: Shaping the Vessel
-
Prepare your clay:
Begin by wedging your white stoneware clay thoroughly to remove any air bubbles. This ensures a smooth, even surface for your future line work. -
Roll out a slab:
Use your rolling pin to create an even slab of clay, aiming for about 1/4 inch thickness. I like to flip the clay over periodically while rolling to keep the texture consistent on both sides. -
Cut the wall:
Using a rectangular paper template sized for your desired mug height and circumference, cut a strip from the slab with your fettling knife. -
Form the cylinder:
Score the short ends of your rectangular strip and apply a dab of slip. Gently curve the slab into a cylinder, overlapping the scored ends and pressing them firmly together to create a seam. -
Attach the base:
Place your cylinder on a fresh piece of slab and trace around it. Cut out this circle, score both the bottom of the cylinder and the edge of the circle, slip, and attach securely. -
Smooth the seams:
Use your fingers or a modeling tool to blend the seams on both the inside and outside until they are invisible. Smoothing here is crucial for that polished, finished pot look. -
Round the rim:
Use a damp sponge or piece of chamois leather to gently compress and round the rim of the mug, making it comfortable for drinking. -
Pull and attach the handle:
Pull a small strap of clay for the handle or roll a thick coil. Shape it into a ‘C’ or ear shape. Score and slip the attachment points on the mug body and the handle ends, then press firmly to attach. -
Bisque fire preparation:
Allow the mug to dry slowly to the bone-dry stage. Once completely dry, fire it in the kiln to a bisque temperature (usually cone 04 or 06).
Steady Hands Tip
Rest your pinky finger against the mug surface while painting to stabilize your hand. This acts as a pivot point and greatly improves line control on curved surfaces.
Step 2: Designing the Lines
-
Clean the bisque:
Wipe your bisque-fired mug with a damp sponge to remove any kiln dust. This helps the underglaze apply smoothly without crawling. -
Plan the pattern:
Lightly sketch your design directly onto the bisque using a regular graphite pencil. Don’t worry about mistakes; the graphite will burn off completely in the kiln. -
Draw the main curves:
Using a fine detail brush loaded with black underglaze, carefully trace your pencil lines. Start with the large, sweeping curves that define the flow of the design. -
Create the focal points:
Paint the concentric, slightly irregular circles or ‘bullseyes’ near the base. Vary the spacing slightly to keep that organic, hand-drawn feel. -
Fill the negative space:
Add parallel lines that echo the main curves, filling in the spaces between your larger shapes. Maintain a steady hand, but embrace slight wobbles as they add character. -
Decorate the handle:
For a thoughtful detail, add a row of small dots along the top spine of the handle. Use the very tip of your brush or a needle tool dipped in underglaze. -
Set the underglaze:
Allow the black underglaze to dry completely. If you made any smudges, you can gently scratch them off with a needle tool once dry. -
Apply clear glaze:
Dip the entire mug into a clear transparent glaze. Ensure an even coat and shake off any excess drips before setting it down. -
Final wipe:
Use a sponge to wipe the foot (bottom) of the mug completely clean so it doesn’t stick to the kiln shelf. -
Glaze fire:
Fire the mug a final time to the temperature appropriate for your clay and glaze (often cone 5 or 6). Once cool, your pop-art piece is ready.
Mishima Variant
Instead of painting, carve the lines into leather-hard clay, fill recesses with black slip, and scrape the surface clean for a crisp inlaid look.
Enjoy your morning coffee knowing you are holding a completely unique piece of modern art
Melting Pattern Cup
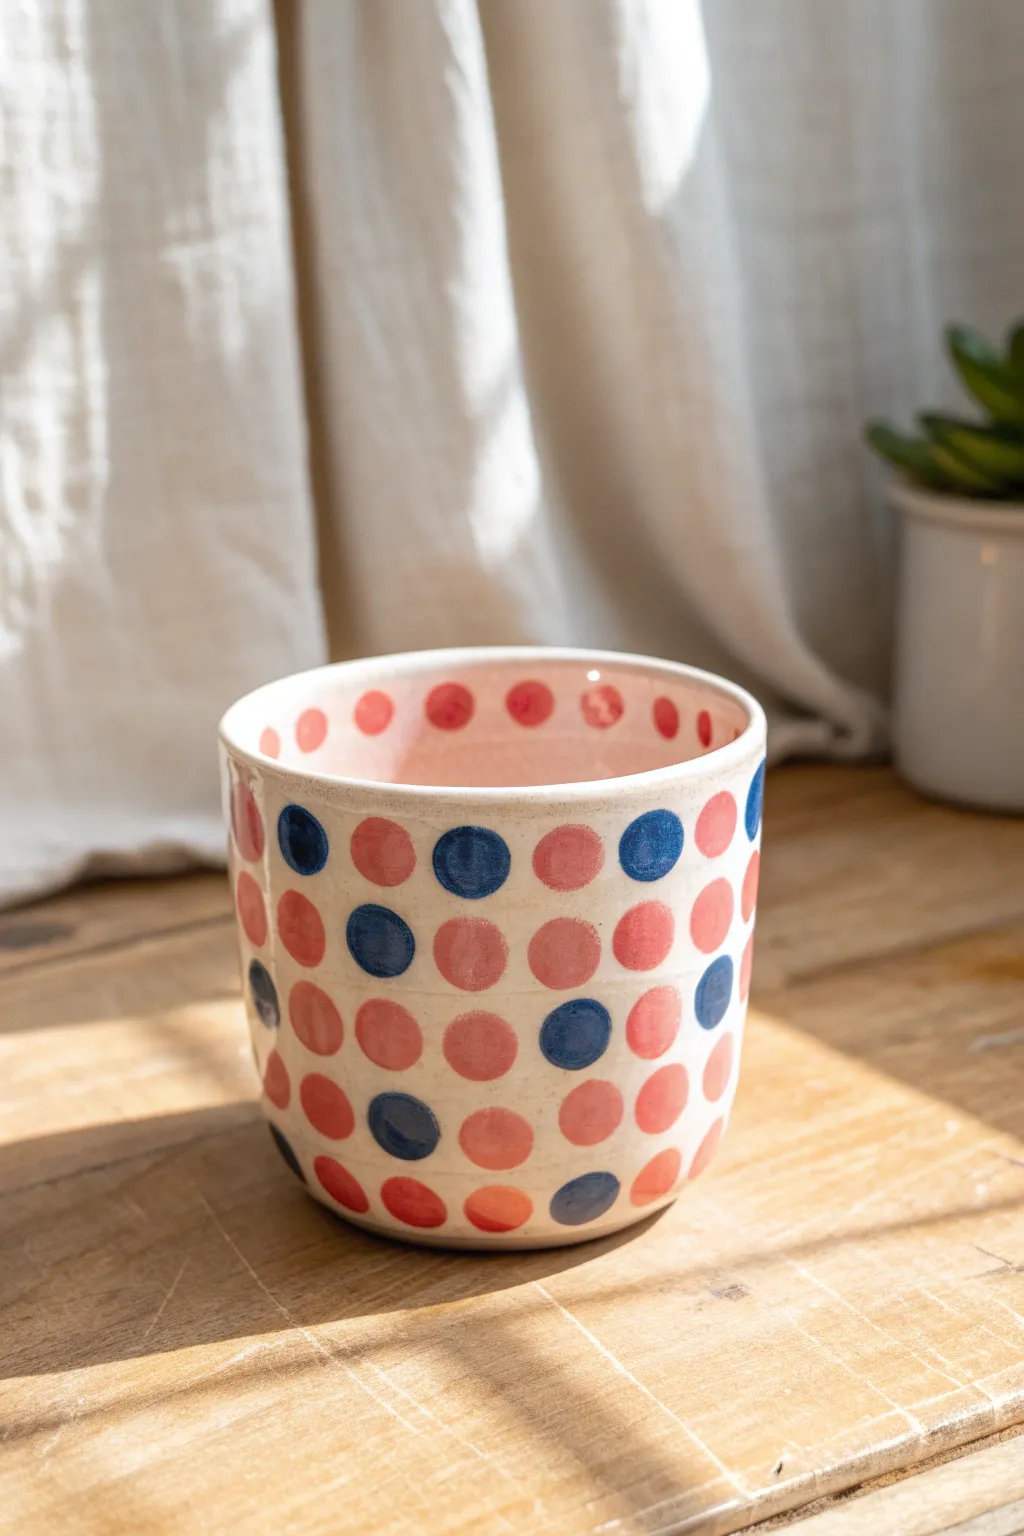
Brighten up your windowsill with this cheerful, hand-painted ceramic vessel featuring a playful arrangement of pink and navy polka dots. The creamy white glaze base makes the candy-colored spot pattern pop, creating a charmingly imperfect, hand-crafted look perfect for small succulents.
Step-by-Step Tutorial
Materials
- White earthenware or stoneware clay
- Rolling pin
- Canvas mat or cloth
- Circle template or cookie cutter (approx. 4-inch base)
- Fettling knife or needle tool
- Scoring tool (or an old fork)
- Slip (clay mixed with water)
- Sponge
- Underglazes: Salmon Pink, Navy Blue
- Clear transparent glaze (food safe if using for drinking)
- Small round paintbrush (size 4 or 6)
- Medium flat paintbrush
- Kiln (or access to firing services)
Step 1: Building the Form
-
Prepare the slab:
Begin by rolling out your white clay on a canvas mat until it is an even thickness, roughly 1/4 inch thick. Use guide sticks if you have them to ensure uniformity. -
Cut the components:
Using a needle tool, cut out a long rectangular strip for the walls (approx. 4 inches tall by 13 inches long) and a circular base piece that matches the length of your strip. -
Bevel the edges:
Slice the short edges of your rectangular strip at a 45-degree angle. This beveling helps create a seamless join when you form the cylinder. -
Score and slip:
Rough up the beveled edges and the perimeter of the circular base with your scoring tool. Apply a generous amount of slip to these textured areas. -
Assemble the cylinder:
Curve the rectangular slab into a cylinder, pressing the beveled edges together firmly. I like to support the inside wall with one hand while smoothing the seam on the outside. -
Attach the base:
Place the cylinder onto the scored base. Use a modeling tool to blend the clay from the wall down onto the base, sealing the bottom completely. -
Smooth the surface:
Take a slightly damp sponge and run it over the entire piece to remove fingerprints and smooth out the rim. The goal is a clean, modern shape.
Step 2: Applying the Design
-
Bisque fire:
Allow your piece to dry slowly until bone dry, then bisque fire it in the kiln according to your clay body’s specifications (usually cone 04). -
Base interior color:
Using a flat brush, apply two coats of salmon pink underglaze to the interior of the cup. Let the first coat dry to the touch before adding the second for solid coverage. -
Plan the polka dots:
Visualize a grid pattern on the exterior. The dots should be aligned in rows but can have a hand-painted, slightly organic feel rather than perfect geometric precision. -
Paint the pink dots:
Load a round brush with salmon pink underglaze. Paint circular dots in columns, leaving specific spots blank where you intend to place the blue accents. I find twisting the brush slightly helps keep the circle round. -
Add the blue accents:
Clean your brush thoroughly, then dip into the navy blue underglaze. Fill in the skipped spaces with blue dots to create that distinctive pop art contrast. -
Interior details:
Don’t forget the inside rim! Add a row of pink dots just inside the lip of the cup to continue the pattern visibly from the top. -
Clear glaze application:
Once the underglaze is completely dry, dip the entire piece into a clear transparent glaze. Shake off any excess drips, especially around the rim. -
Final firing:
Load the glazed piece into the kiln for the final glaze firing. Use stilts if you glazed the very bottom, though wiping the foot ring clean is usually safer.
Circle Perfection
If you struggle with freehand circles, use a round foam pouncer or the end of a wine cork dipped in underglaze to stamp perfectly consistent dots.
Make It a Mug
Before the clay dries in the building phase, pull a simple C-shaped handle and attach it to the side to transform this planter vessel into a functional coffee mug.
Once cooled, your spotted creation is ready to hold your morning coffee or favorite plant
Pop Art Portrait Cameo Medallion
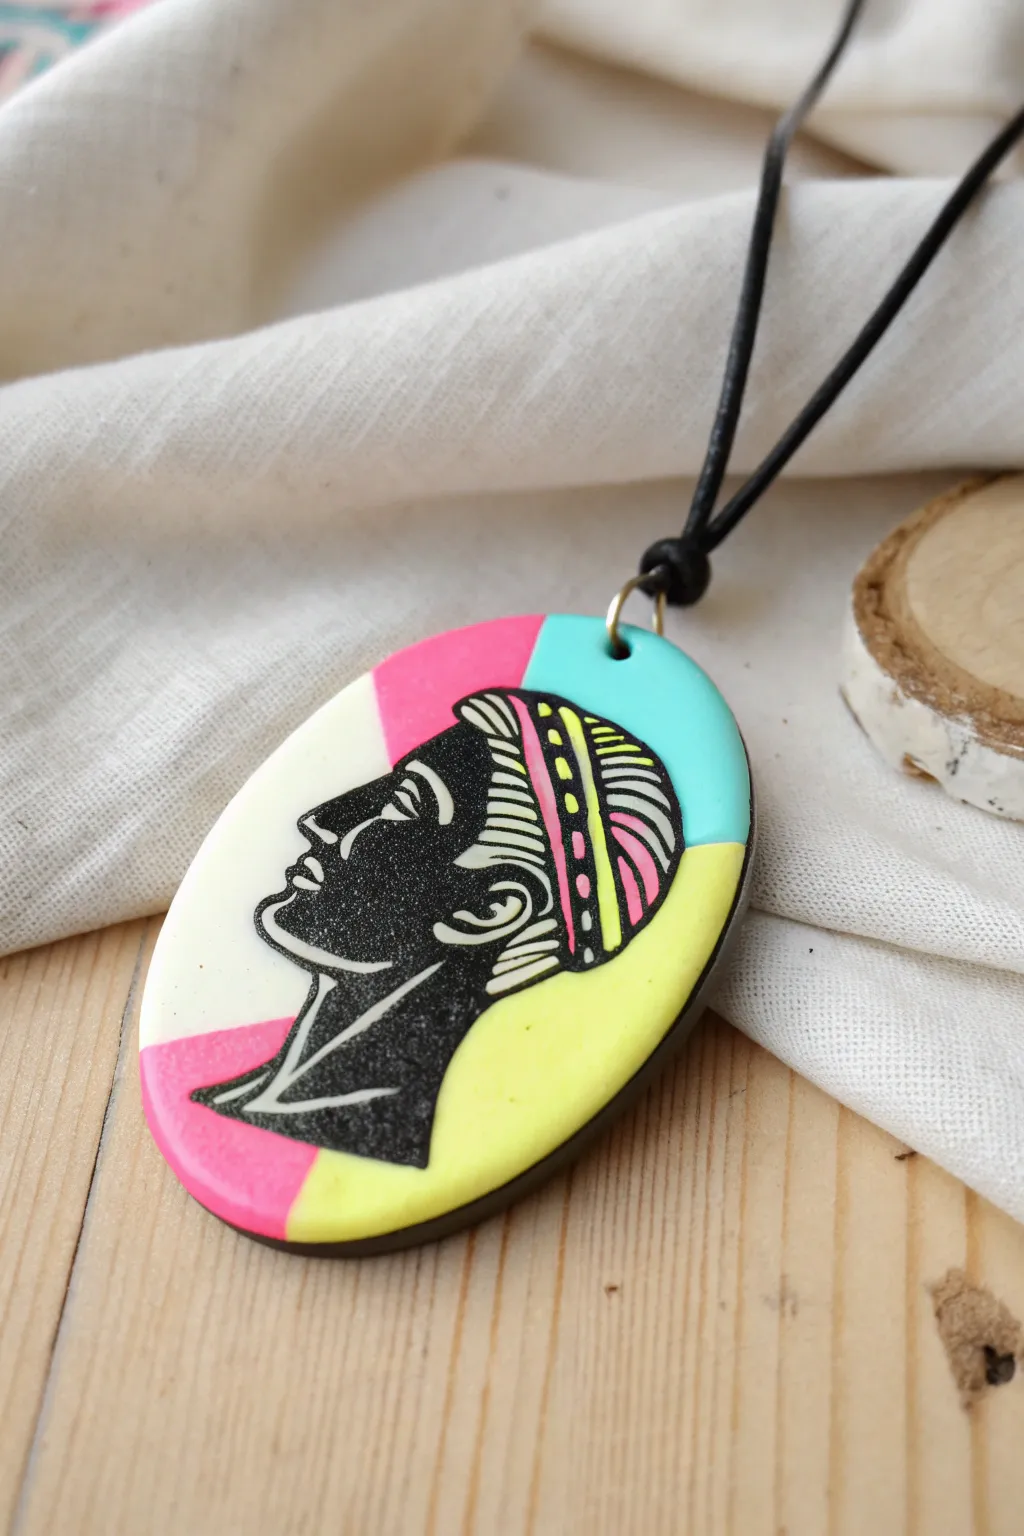
Blend the timeless elegance of ancient cameo portraits with the electric energy of 80s pop art in this striking polymer clay pendant. The bold black silhouette pops against a fractured background of turquoise, hot pink, and neon yellow, creating a wearable piece of art that bridges millennia.
Step-by-Step
Materials
- Polymer clay (Black, White, Neon Pink, Turquoise, Neon Yellow)
- Oval clay cutter (approx. 2-3 inches)
- Pasta machine or acrylic roller
- Tissue blade or X-Acto knife
- Tracing paper and pencil
- Needle tool or fine-point etching tool
- Rubbing alcohol
- Sandpaper (various grits)
- Small jump ring and jewelry pliers
- Cord or leather necklace
- Gloss glaze or resin (optional)
Step 1: Creating the Background Canvas
-
Condition the colors:
Begin by thoroughly conditioning your white, neon pink, neon yellow, turquoise, and black polymer clay until they are soft and pliable. Run them through a pasta machine on a medium setting to creating uniform sheets. -
Cut the base shapes:
Using your tissue blade, cut jagged, geometric shards from the white, pink, yellow, and turquoise sheets. Think of these as puzzle pieces—you want sharp angles rather than curves to emphasize the pop-art aesthetic. -
Assemble the slab:
Arrange these colored shards on a plain workspace or a scrap backing sheet. Press the edges together firmly so they bond. The goal is to create a multi-colored slab where the seams are tight. -
Smoothing the surface:
Cover your assembled multi-colored slab with a piece of parchment paper. Roll over it firmly with an acrylic roller to flatten the seams and ensure the surface is perfectly level. -
Cut the oval:
Position your oval cutter over the most interesting intersection of colors. Press down firmly to cut out the main shape of your pendant. Smooth the edges with your finger to remove any burrs.
Step 2: Sculpting the Silhouette
-
Prepare the black profile:
Roll out a thin sheet of black clay (setting 4 or 5 on a pasta machine). Trace or draw a simple classical profile onto tracing paper, then place the paper on the black clay. -
Transfer and cut:
Gently trace the outline with a dull tool to transfer the impression to the clay. Remove the paper and use a sharp craft knife to carefully cut out the silhouette profile. -
Mounting the profile:
Lift the black cutout carefully with your blade. Position it centrally on your colored oval base. Gently press it down, starting from the center and working outward to avoid trapping air bubbles.
Sticky Situation?
If the black clay smears onto the light background while cutting or placing, use a Q-tip dipped in rubbing alcohol to wipe the background clean before baking.
Step 3: Detailing and Finishing
-
Etching the details:
This is where the magic happens. Using a needle tool, scratch through the black layer to reveal detail lines. Start with the hair, creating rhythmic, graphic lines. -
Adding color accents:
For the headband, etch out the shape and then carefully inlay tiny slivers of pink and yellow clay into the etched channels, or simply use acrylic paint later if that feels too tricky. I find inlaying gives a cleaner finish. -
Refining the eye and ear:
carefully etch the eye, eyebrow, and ear details. Don’t worry about being hyper-realistic; bold, graphic lines work best for this style. Use a cotton swab with rubbing alcohol to clean up any black smudges on the colored background. -
Create the hanging mechanism:
Insert a jewelry eye pin into the top of the oval, or pierce a hole near the top edge using a small straw or hollow bead tool. -
Baking:
Bake the piece according to your clay manufacturer’s instructions (usually 275°F/130°C for about 30-45 minutes). Cover it with a foil tent to prevent the light colors from scorching. -
Sanding and buffing:
Once cool, wet sand the edges and surface with high-grit sandpaper (400 up to 1000) to get a buttery smooth finish. -
Assembly:
Attach a heavy jump ring to the hole or eye pin. Thread a black leather cord through the jump ring to complete the necklace.
Sharper Lines
Chill the black clay sheet in the fridge for 10 minutes before cutting the silhouette. Cold clay drags less under the knife, giving you crisper profile edges.
Wear your new modern cameo with pride knowing you’ve created a unique fusion of history and modern art style
Collage-Style Image Transfer Coasters

Bring the bold energy of the 1960s to your coffee table with these vibrant comic-book-inspired coasters. Using simple image transfer techniques, you can turn plain clay or ceramic tiles into striking pieces of functional art featuring Benday dots and striking primary colors.
Step-by-Step Tutorial
Materials
- White polymer clay or 4×4 ceramic tiles
- Rolling pin (if using clay)
- Square cookie cutter (if using clay)
- Laser printer color photocopies of pop art designs
- Transfer medium (e.g., Mod Podge Photo Transfer or dedicated gel medium)
- Foam brush
- Sponge
- Bowl of warm water
- Polyurethane sealer or resin
- Cork backing sheet
- Sharp craft knife
- Sandpaper (fine grit)
Step 1: Preparing the Base
-
Prepare the workspace:
Clean a flat work surface thoroughly to prevent dust from sticking to your materials. If using clay, ensure your rolling pin and hands are clean. -
Form the coaster base:
If you are using polymer clay, condition a block of white clay until it is soft and pliable. Roll it out to an even thickness of about 1/4 inch. -
Cut to shape:
Use a 4-inch square cookie cutter or a ruler and craft knife to cut out your coaster shape. Smooth the edges with your finger to remove any harsh ridges. -
Bake the clay:
Bake the clay square according to the manufacturer’s instructions (usually 275°F for 15-30 minutes). Place it between two sheets of parchment paper and weigh it down with a ceramic tile to keep it perfectly flat while baking. Let it cool completely. -
Prep the surface:
Whether using your baked clay or a pre-made ceramic tile, wipe the surface down with a little rubbing alcohol to remove oils.
Laser Is Key
You MUST use a laser print or photocopy. Inkjet ink is water-soluble and will smear into a mess when you apply the medium.
Step 2: Applying the Image
-
Graphic selection and printing:
Choose a high-contrast pop art image with bold black lines and comic-style dots. Print this on standard printer paper using a laser printer—inkjet ink will bleed. Remember to mirror the image horizontally before printing if there is text. -
Trim the image:
Cut your paper image to be slightly larger than your coaster, leaving a small overhang on all sides to ensure full coverage. -
Apply transfer medium:
Using a foam brush, apply a thick, even coat of transfer medium to the printed side of the paper. I find it works best if you apply a thin layer to the coaster surface as well. -
Adhere the paper:
Place the paper image-side down onto the coaster. Starting from the center, smooth it out firmly to push out any air bubbles. Use a credit card or brayer to ensure full contact. -
Dry thoroughly:
This is the hardest part—waiting. Allow the coaster to dry for at least 24 hours. Don’t rush this step, or the image will lift.
Step 3: Revealing the Design
-
Wet the paper:
Once fully dry, dampen a sponge with warm water and lay it on top of the paper backing. Let it sit for 2-3 minutes until the paper becomes translucent. -
Rub away paper:
Gently rub the wet paper with your fingertips using a circular motion. The paper fibers will start to pill and roll off. Be gentle to avoid rubbing through the ink. -
Repeat as needed:
You will likely need to let it dry, re-wet it, and rub again two or three times to remove the hazy white paper residue completely. The final colors should look bright and clear. -
Trim edges:
Once the image is revealed and dry, use a sharp craft knife to trim the excess paper overhang flush with the coaster’s edge. -
Clean up edges:
Use fine-grit sandpaper to smooth the edges of the transfer where it meets the coaster, blending it for a professional finish.
Fixing White Haze
If a white haze reappears after drying, dampen your finger with a tiny drop of oil (baby or olive) and rub it in to make the image transparent again.
Step 4: Finishing Touches
-
Sealing the artwork:
Apply a clear topcoat to protect the design from moisture. A spray polyurethane works well, or you can pour a thin layer of resin for a high-gloss, glass-like finish. -
Add backing:
Cut a square of adhesive cork backing slightly smaller than your coaster and attach it to the bottom. This prevents the coaster from scratching your furniture.
Stack your set of coasters on the table and enjoy flexible, modern art with your morning coffee
Comic Panel Tile Set
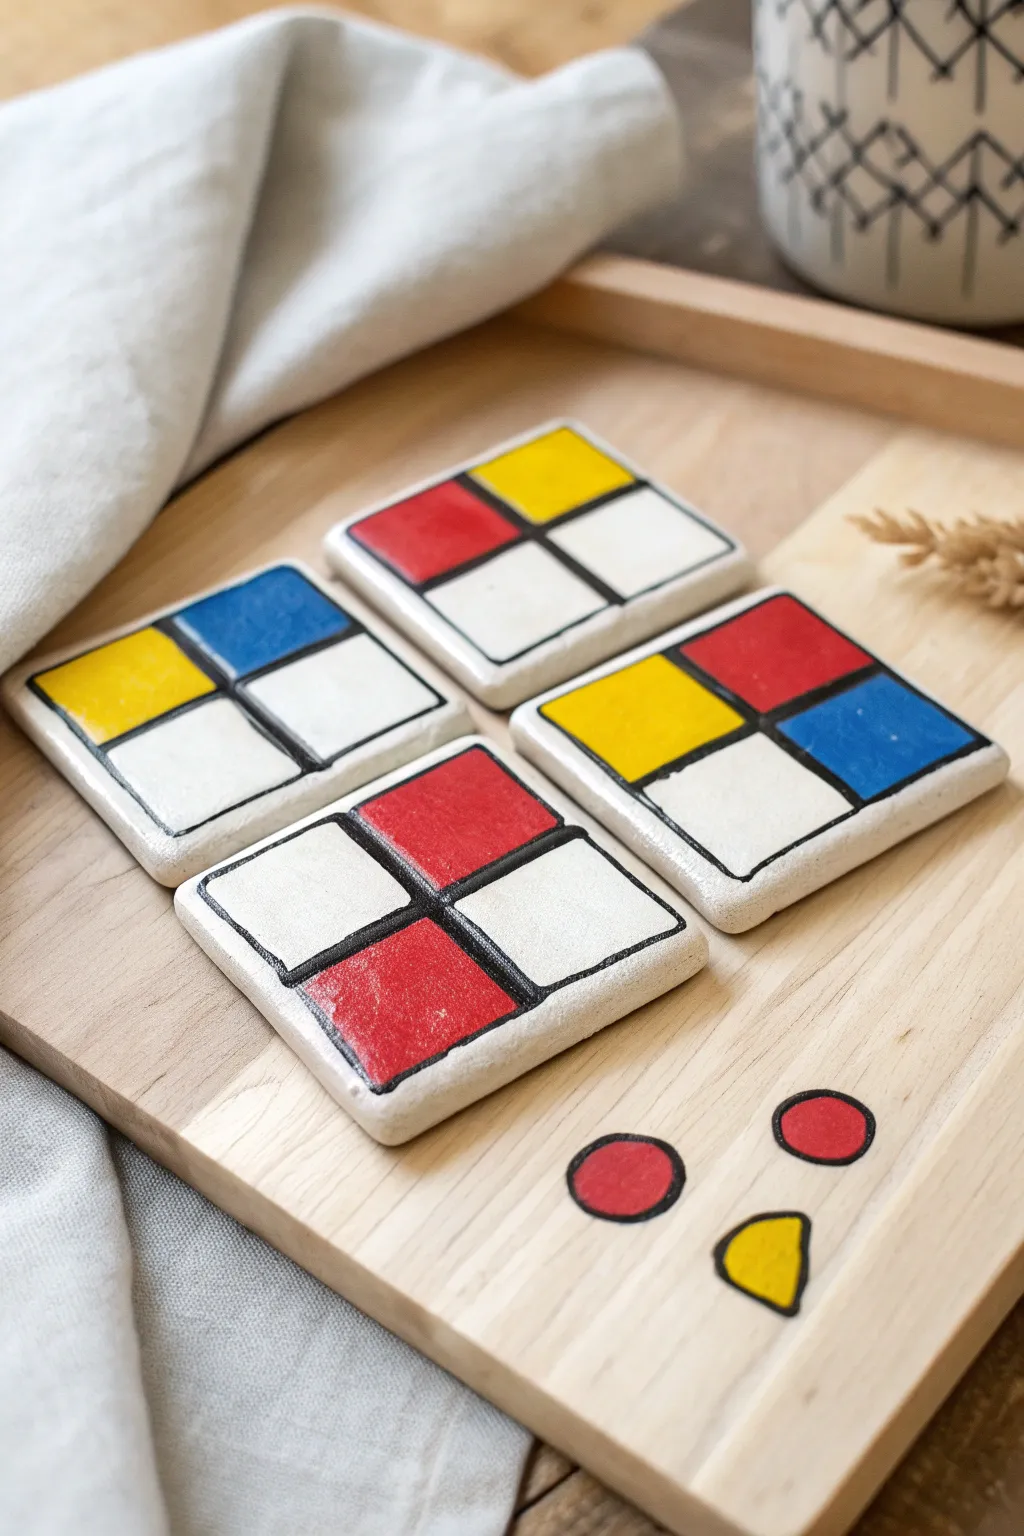
Bring a touch of De Stijl movement to your coffee table with this striking set of geometric clay coasters. Featuring bold primary colors and stark black lines, these tiles are a perfect beginner project that looks impressively modern.
How-To Guide
Materials
- Polymer clay (white) or air-dry clay
- Rolling pin
- Square cookie cutter (approx. 3.5 inches) or craft knife and ruler
- Acrylic paints (primary red, primary blue, primary yellow, black)
- Fine detail paintbrush
- Flat shader paintbrush
- Gloss varnish or resin sealant
- Sandpaper (fine grit)
- Black fine-tip paint marker (optional)
- Parchment paper
Step 1: Shaping the Tiles
-
Condition the clay:
Begin by kneading your white clay until it is soft, pliable, and free of air bubbles. If using polymer clay, the warmth of your hands will make this easier. -
Roll out the slab:
Place the clay between two sheets of parchment paper or on a non-stick mat. Roll it out to an even thickness of about 1/4 inch. I like to use guide rings on my rolling pin to ensure the surface is perfectly flat. -
Cut the shapes:
Using a square cookie cutter, punch out four identical squares. If you don’t have a cutter, measure and cut sharp 3.5-inch squares using a ruler and craft knife. -
Smooth the edges:
Dip your finger in a little water (for air-dry clay) or baby oil (for polymer) and gently run it along the cut edges to soften the sharp corners slightly giving them a finished, stone-like look. -
Cure or dry:
Follow the manufacturer instructions for your specific clay. Bake polymer clay in the oven on a dedicated sheet, or let air-dry clay sit undisturbed for 24-48 hours until fully hardened.
Step 2: Designing the Grid
-
Sand the surface:
Once fully cured and cool, lightly sand the surface and edges with fine-grit sandpaper to remove any fingerprints or texture. -
Sketch the layout:
Lightly draw a cross on each coaster with a pencil. Vary the center point for each coaster—some centered, some off-center—to create dynamic variety in your set. -
Create the black lines:
Using a fine detail brush and black acrylic paint, paint over your pencil lines to create the thick black grid. Alternatively, a black paint marker can give you cleaner, sharper control. -
Let the outlines dry:
Allow the black grid lines to dry completely before moving on to color to prevent smudging.
Fixing Wobbly Lines
If painting straight lines is tricky, use thin washi tape or painter’s tape to mask off sections. Peel it away while paint is still wet for crisp edges.
Step 3: Adding Pop Art Color
-
Paint the red sections:
Select one quadrant on two or three tiles and fill them in with bright primary red. Use a flat shader brush for smooth, stroke-free coverage. -
Add yellow accents:
Rinse your brush thoroughly and paint selected quadrants with primary yellow. Looking at the reference, diagonal placement from other colors creates good balance. -
Fill in the blue:
Paint the final color blocks with primary blue. Leave at least one or two quadrants distinctively white on each coaster to maintain that classic modernist aesthetic. -
Apply second coats:
Acrylics can be translucent; apply a second or third coat to each colored section once the previous layer is dry to achieve solid, opaque saturation. -
Touch up lines:
If your color painting went over the lines, go back in with your black liner brush or pen to tidy up the grid borders.
Make It a Set
Paint a simple wooden serving tray with matching geometric shapes (like the dots and triangle shown) to create a cohesive serving station.
Step 4: Finishing Touches
-
Seal the artwork:
Once the paint is bone dry, apply a coat of gloss varnish. This protects the paint from cup condensation and gives the tiles a ceramic-like sheen. -
Add backing (optional):
Glue thin cork or felt pads to the bottom of the tiles to prevent them from scratching your table surface.
Enjoy styling your table with these vibrant little pieces of functional art
Mini “Grocery Box” Charms
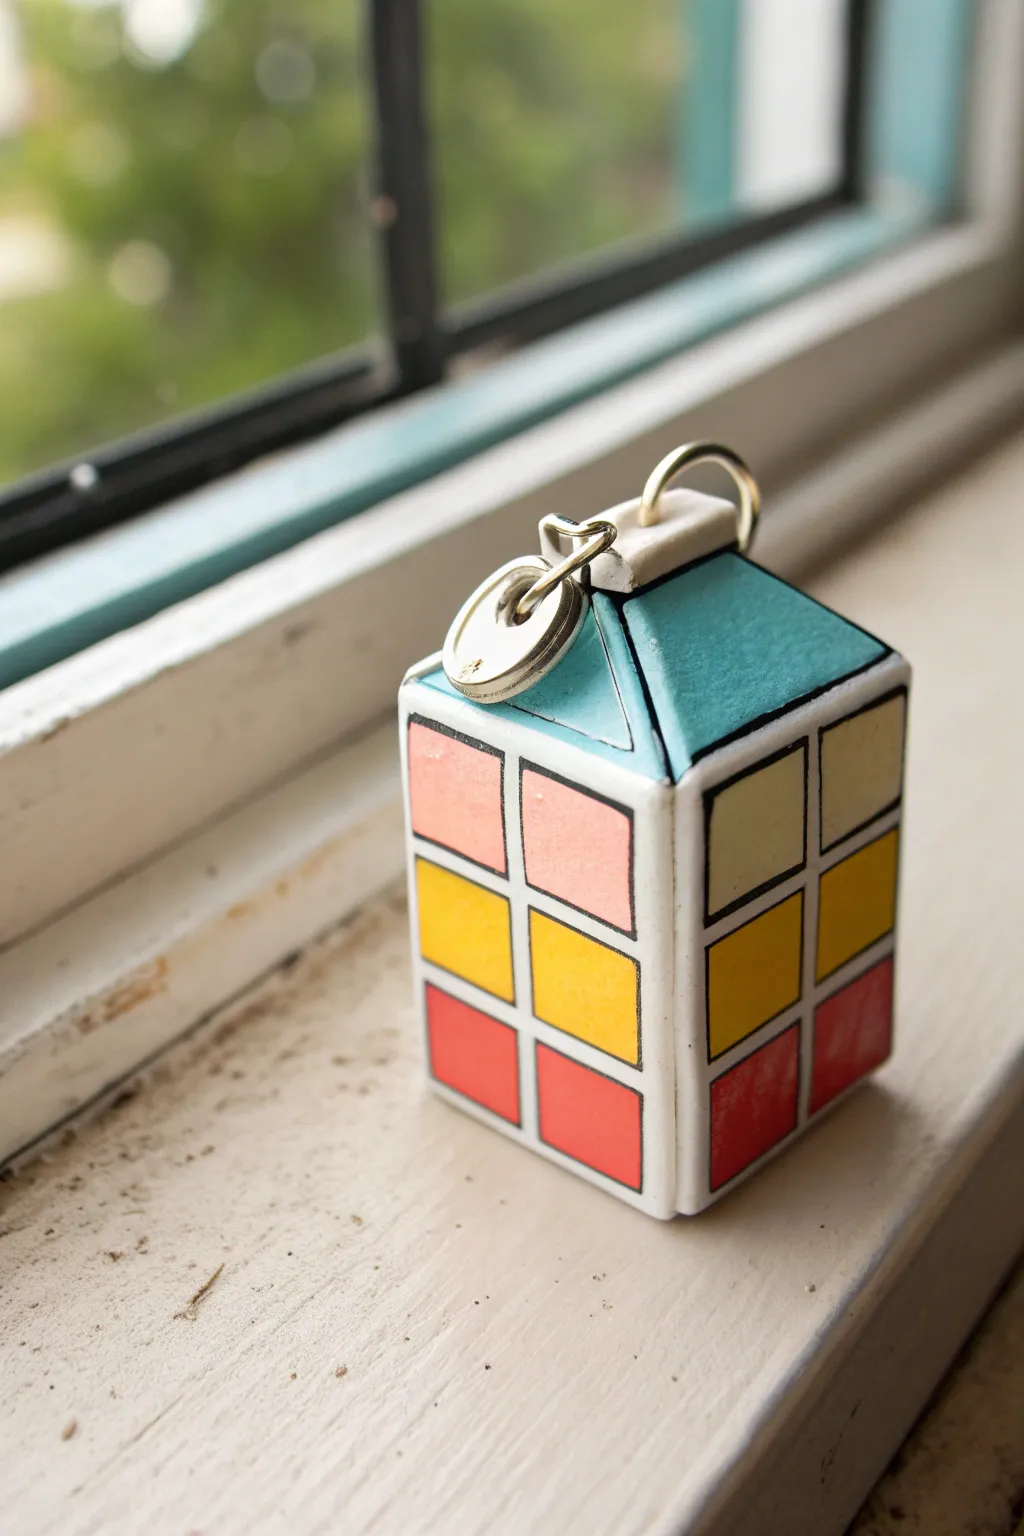
Bring a splash of distinctive pop art color to your keychain with this geometric mini milk carton charm. Featuring bold black outlines and a playful grid of pastel and primary colors, this stylized ceramic piece turns an everyday grocery item into wearable art.
Step-by-Step Tutorial
Materials
- White or light-colored polymer clay
- Rolling pin or clay machine
- Precision craft knife or tissue blade
- Ruler
- Needle tool
- Two small jump rings
- Two eye pins or U-shaped wire
- Acrylic paints (teal, peach, light yellow, golden yellow, orange-red, black)
- Fine detail paintbrush (sizes 0 or 00)
- Glaze or varnish (satin or gloss finish)
- Oven for baking
Step 1: Sculpting the Carton Base
-
Condition the Clay:
Begin by warming and conditioning your white polymer clay in your hands until it becomes soft and pliable. This prevents cracks later on. -
Shape the Main Block:
Form a solid rectangular block roughly 1 inch wide and 1.5 inches tall. Use your work surface to flatten the sides, ensuring all four walls are equal and the corners are sharp. -
Form the Gable Top:
Pinch the top section of the block gently to start forming the slanted roof shape characteristic of a milk carton. The two opposing sides should angle inward to meet at a central ridge. -
Refine the Roof Angles:
Use your blade to carefully slice the angled sides to make them flat and precise. The triangular gable ends should be recessed slightly compared to the front and back panels. -
Create the Top Ridge:
Add a thin, small rectangular strip of clay along the very top ridge where the two angled sides meet. This mimics the sealed flap of a real carton. -
Insert Hardware:
Before baking, insert a U-shaped piece of wire or two small eye pins into the top ridge. These loops will hold your jump rings later. -
Smooth the Surfaces:
Go over the entire piece with your finger or a smoothing tool to remove any fingerprints. Smooth clay makes for much cleaner painted lines later. -
Bake the Piece:
Bake your clay charm according to the manufacturer’s instructions for time and temperature. Let it cool completely before moving to the painting phase.
Clean Lines
If your hand is shaking while painting black lines, try using a fine-tip permanent black marker or paint pen instead of a brush for steadier control.
Step 2: Painting the Pop Art Grid
-
Outline the Structure:
Using black acrylic paint and a very fine brush, paint distinct lines along every outer edge of the carton. This defines the pop art look. -
Draft the Grid:
Lightly sketch or freehand paint a grid pattern on the four main sides. You want a 2×3 grid—two squares wide and three squares tall—on the front and back faces. -
Paint the Top Squares:
Fill the top two squares of your grid with a soft peach or pink color. I find that applying two thin coats gives better coverage than one thick blooey one. -
Paint the Middle Squares:
Paint the middle row of squares with a bright yellow. Keep the paint inside your black structural lines. -
Paint the Bottom Squares:
Fill the bottom row with a vibrant orange-red color. This creates a gradient-like effect from light to dark down the carton. -
Color the Roof:
Paint the slanted roof panels with a teal or turquoise blue. Leave the very top ridge strip white for contrast. -
Side Panel Details:
On the side panels of the carton, paint corresponding squares using slightly different shades if desired—try a pale yellow for the top and a darker mustard for the middle to suggest shadow. -
Re-line the grids:
Once the colored blocks are dry, go back over the grid lines with your black paint. Thicken the lines to clearly separate each colored square, mimicking a comic book style. -
Seal and Finish:
Apply a coat of satin or gloss varnish to protect the paint. Once dry, attach your sturdy jump rings to the wire loops on top.
Wonky Shapes?
If the clay distorts while slicing the roof angles, pop the clay block in the fridge for 15 minutes before cutting to firm it up.
Clip this charming little carton onto your bag or keys and maximize your daily dose of retro style
Giant Button Statement Bowl
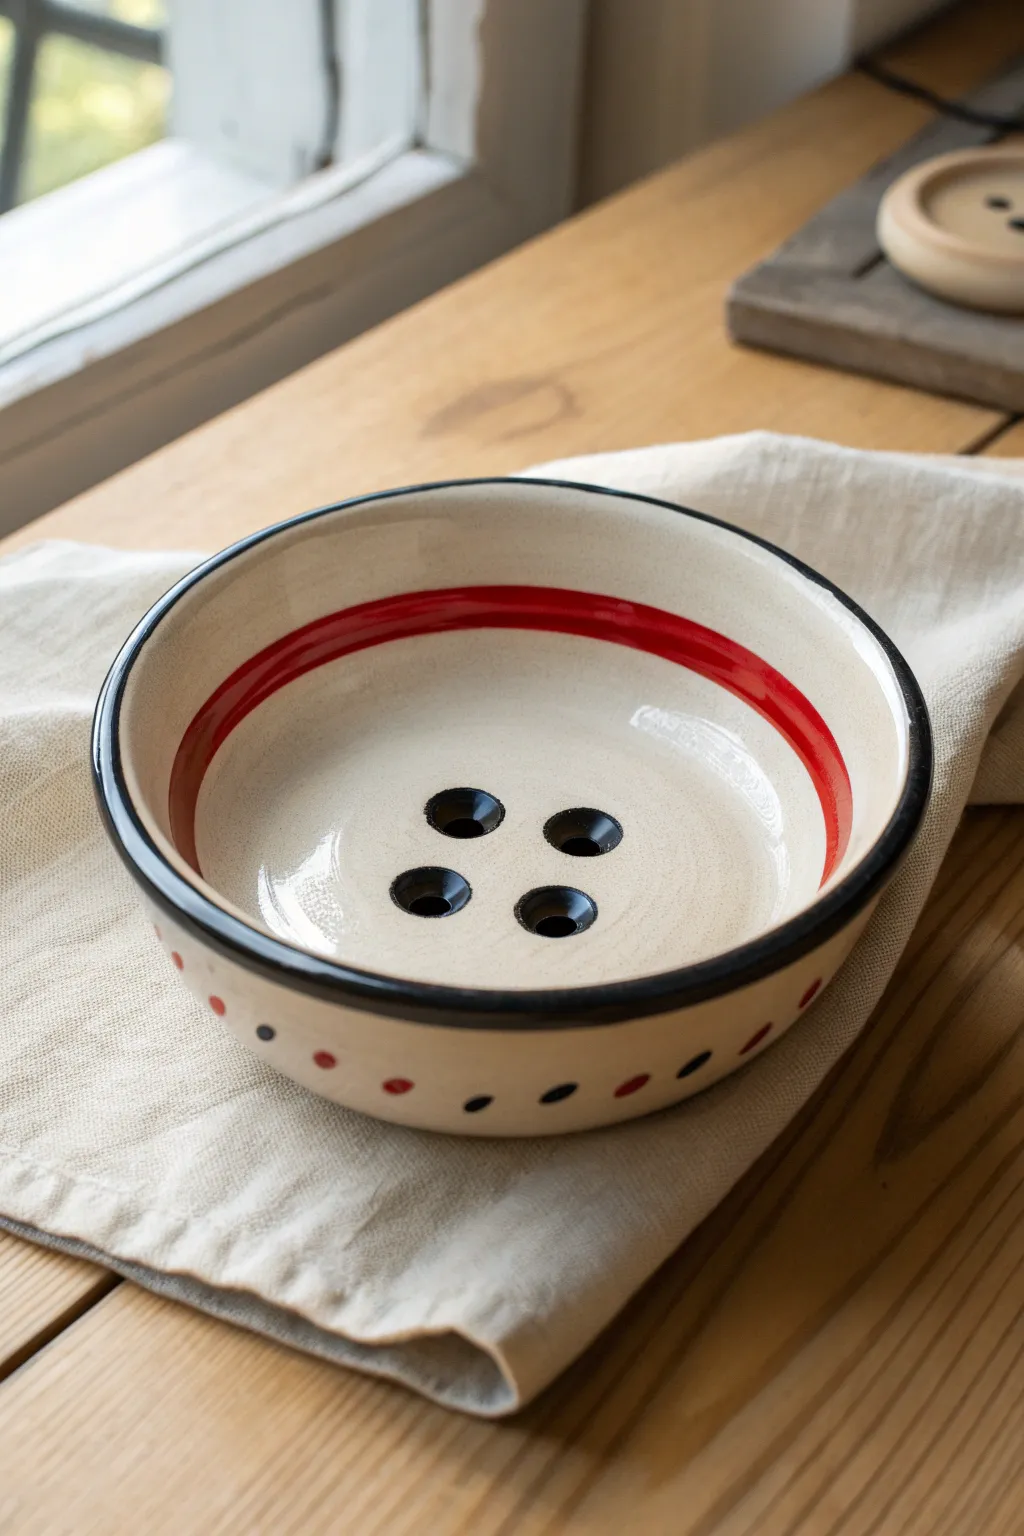
Transform everyday utility into whimsical pop art with this playful ceramic bowl shaped like a classic four-hole button. Featuring bold red striping and distinct black details, this functional piece brings a touch of oversize fun to any table setting.
Step-by-Step Guide
Materials
- White stoneware clay or earthenware clay
- Pottery wheel (or rolling pin and slump mold for hand-building)
- Rib tool
- Needle tool
- Sponge
- Drill bit tool or circular hole cutter (approx. 1/2 inch)
- Black underglaze
- Red underglaze
- Clear transparent glaze
- Fine liner brush
- Medium round brush
- Kiln
Step 1: Forming the Bowl
-
Prepare the clay:
Begin by thoroughly wedging about 2-3 pounds of white stoneware clay to remove any air bubbles and ensure an even consistency. -
Center on the wheel:
Throw the clay onto the wheel head and center it firmly. If you are hand-building, roll out a slab to 1/4 inch thickness and drape it over a slump mold instead. -
Open and pull:
Open the centered clay and pull up the walls to create a wide, shallow bowl shape. Aim for a slightly flattened bottom to mimic the face of a button. -
Shape the rim:
Compress the rim with a chamois or sponge to round it off. Create a distinct, slightly thickened edge that resembles the raised ridge often found on button perimeters. -
Smooth the interior:
Use a rib tool to smooth the interior curve, ensuring the transition from the floor to the wall is seamless but structural. -
Create the button center:
While the wheel represents the button shape, you actually need to carve the center divot. Use a trimming tool to carefully carve a shallow, circular depression in the very center of the bowl floor, leaving a raised ridge around it. -
Dry to leather hard:
Allow the piece to dry slowly until it reaches a leather-hard state. I find covering it loosely with plastic helps it dry evenly without warping. -
Trim the foot:
Flip the bowl over on the wheel and trim a clean foot ring. This elevates the bowl and gives it a professional finish.
Wobbly Lines?
If painting the red stripe is tricky, rest your pinky finger on the bowl’s edge for stability or use masking tape for a crisp edge.
Step 2: Detailing and Biscuit Firing
-
Mark the holes:
Locate the exact center of the interior depression. Use a needle tool to lightly mark four points in a square formation where the ‘button holes’ will go. -
Carve the faux holes:
Using a small carving tool or a hole cutter, create four deep indentations. Do not punch all the way through the clay; these are decorative divots to hold glaze, not actual drainage holes. -
Smooth the edges:
Use a slightly damp sponge to soften any sharp burrs created by the carving tool around the four holes. -
First firing:
Let the bowl dry completely to the bone-dry stage. Load it into the kiln and bisque fire it to Cone 04 (or according to your clay’s specifications).
Step 3: Glazing and Finishing
-
Paint the button holes:
Using a fine liner brush and black underglaze, carefully fill in the four recessed holes. Paint slightly up the sides of the divots to emphasize depth. -
Apply the rim stripe:
Place the bisque bowl back on a banding wheel. Spin the wheel slowly and use a steady hand to paint a thin black line directly on the top edge of the rim. -
Add the red accent:
Move about an inch down into the interior of the bowl. While spinning the banding wheel, paint a bold, thick band of red underglaze. Ensure it is opaque by applying two or three coats. -
Add the exterior dots:
On the outside wall of the bowl near the bottom, paint a pattern of alternating red and black polka dots using the tip of a round brush. -
Apply clear glaze:
Once the underglaze is dry, dip really carefully or brush the entire piece with a clear transparent glaze. This will seal the clay and make the colors pop. -
Final firing:
Load the glazed bowl into the kiln for the final glaze firing, usually to Cone 5 or 6 depending on your clay and glaze choice.
Level Up: Thread
Create a ‘sewn’ look by placing a coil of clay through diagonal holes before firing to look like thread.
Once cooled, your oversized button bowl is ready to hold fruit, keys, or just admiration