A simple clay paw print is already sweet, but paint is what turns it into a real keepsake you’ll want to display year-round. Here are my favorite paint ideas I use in the studio to make those little toe beans pop, from classic and elegant to artsy and unexpected.
Metallic Fill-in Paw Pads
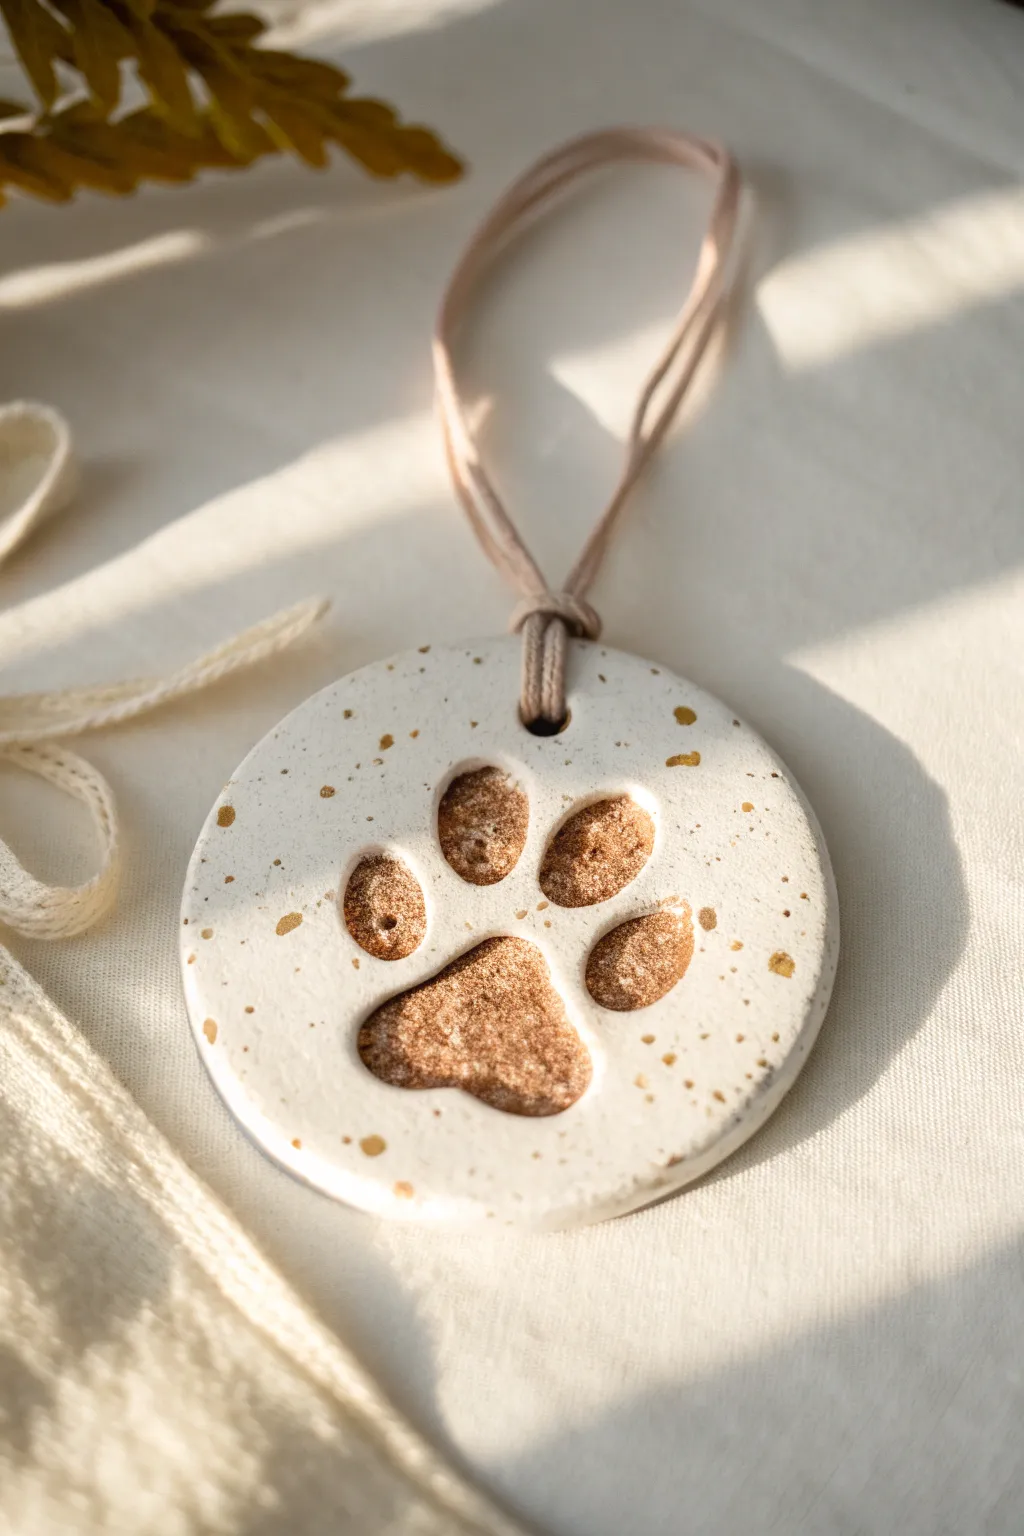
Transform a simple clay keepsake into a sparkling treasure with this elegant gold-accented design. The combination of a creamy white base with textured, glittering paw pads creates a sophisticated look perfect for holiday ornaments or year-round decor.
Step-by-Step Guide
Materials
- Air-dry clay or polymer clay (white)
- Circle cookie cutter (approx. 3-4 inches)
- Drinking straw or small hole punch tool
- Rolling pin
- Your pet’s paw (clean and dry)
- Fine-grit sandpaper
- Gold acrylic paint (metallic finish)
- Gold glitter or embossing powder
- Clear craft glue or Mod Podge
- Small stiff paintbrush
- Old toothbrush or splatter brush
- Beige or tan soft leather cord
Step 1: Shaping and Printing
-
Prepare the Clay:
Begin by kneading your white clay until it is soft and pliable. Roll it out on a smooth surface to an even thickness of about 1/4 inch, ensuring there are no air bubbles. -
Cut the Shape:
Using your circle cookie cutter, press firmly into the clay to create a clean, round disc. Lift away the excess clay from the edges. -
Make the Impression:
Gently but firmly press your pet’s paw into the center of the clay disc. You want a deep enough impression to hold the glitter filling later, but not so deep that it thins the backing too much. -
Create the Hanging Hole:
Before the clay starts to dry, use a drinking straw or small circular tool to punch a hole near the top edge for the cord. -
Smoothing:
Dip your finger in a little water and run it gently around the outer edge of the circle to smooth out any rough cutting marks. -
Initial Drying:
Set the clay aside to dry completely according to the package instructions. For air-dry clay, I usually let it sit for at least 24-48 hours, flipping it occasionally to prevent curling.
Step 2: Painting and Gilding
-
Sand for Perfection:
Once fully cured, gently sand the edges and surface with fine-grit sandpaper if there are any bumps or fingerprints you want to remove. -
Base Coat (Optional):
If you want a pristine finish, paint the entire surface (excluding the paw indentation) with a matte white acrylic paint. Let this dry completely. -
Fill the Pads:
Mix a small amount of clear glue with your gold glitter to create a thick paste. Alternatively, paint the inside of the paw impressions with gold paint first for a base color. -
Apply Glitter Texture:
Carefully paint the glue-glitter mixture into the recessed paw pads. Use a small stiff brush to push the glitter into the corners. Pile it slightly to create that textured look shown in the reference. -
Seal the Glitter:
Once the glitter layer is dry, dab a thin coat of clear sealant over just the paw pads to ensure the glitter stays put and doesn’t shed.
Uneven Drying?
If your clay disc creates a ‘bowl’ shape while drying, place a heavy book on top of it once it’s mostly dry but still slightly flexible to flatten it back out.
Step 3: Finishing Touches
-
Gold Splatter Prep:
Dilute a small drop of gold metallic acrylic paint with water until it has an inky consistency. -
Apply Splatters:
Dip an old toothbrush into the diluted gold paint. Hold it over the ornament and run your thumb across the bristles to flick tiny speckles onto the white surface. -
Control the Spray:
Aim for a random distribution, focusing slightly more around the edges. If you get a drop that’s too big, quickly dab it with a paper towel. -
Final Dry:
Allow the splatter paint to dry completely. This usually takes only about 20 minutes. -
Add the Cord:
Fold a length of soft leather cord in half. Pass the folded loop through the hole from front to back. -
Secure the Loop:
Thread the loose ends of the cord through the loop and pull tight to create a lark’s head knot at the top of the ornament.
Add a Name
Before the clay dries, use tiny alphabet stamps to press your pet’s name along the bottom curve for a personalized touch that matches the indented style.
Hang this sparkling keepsake in a sunny spot to catch the light and celebrate your furry friend


Classic Black-on-White Contrast
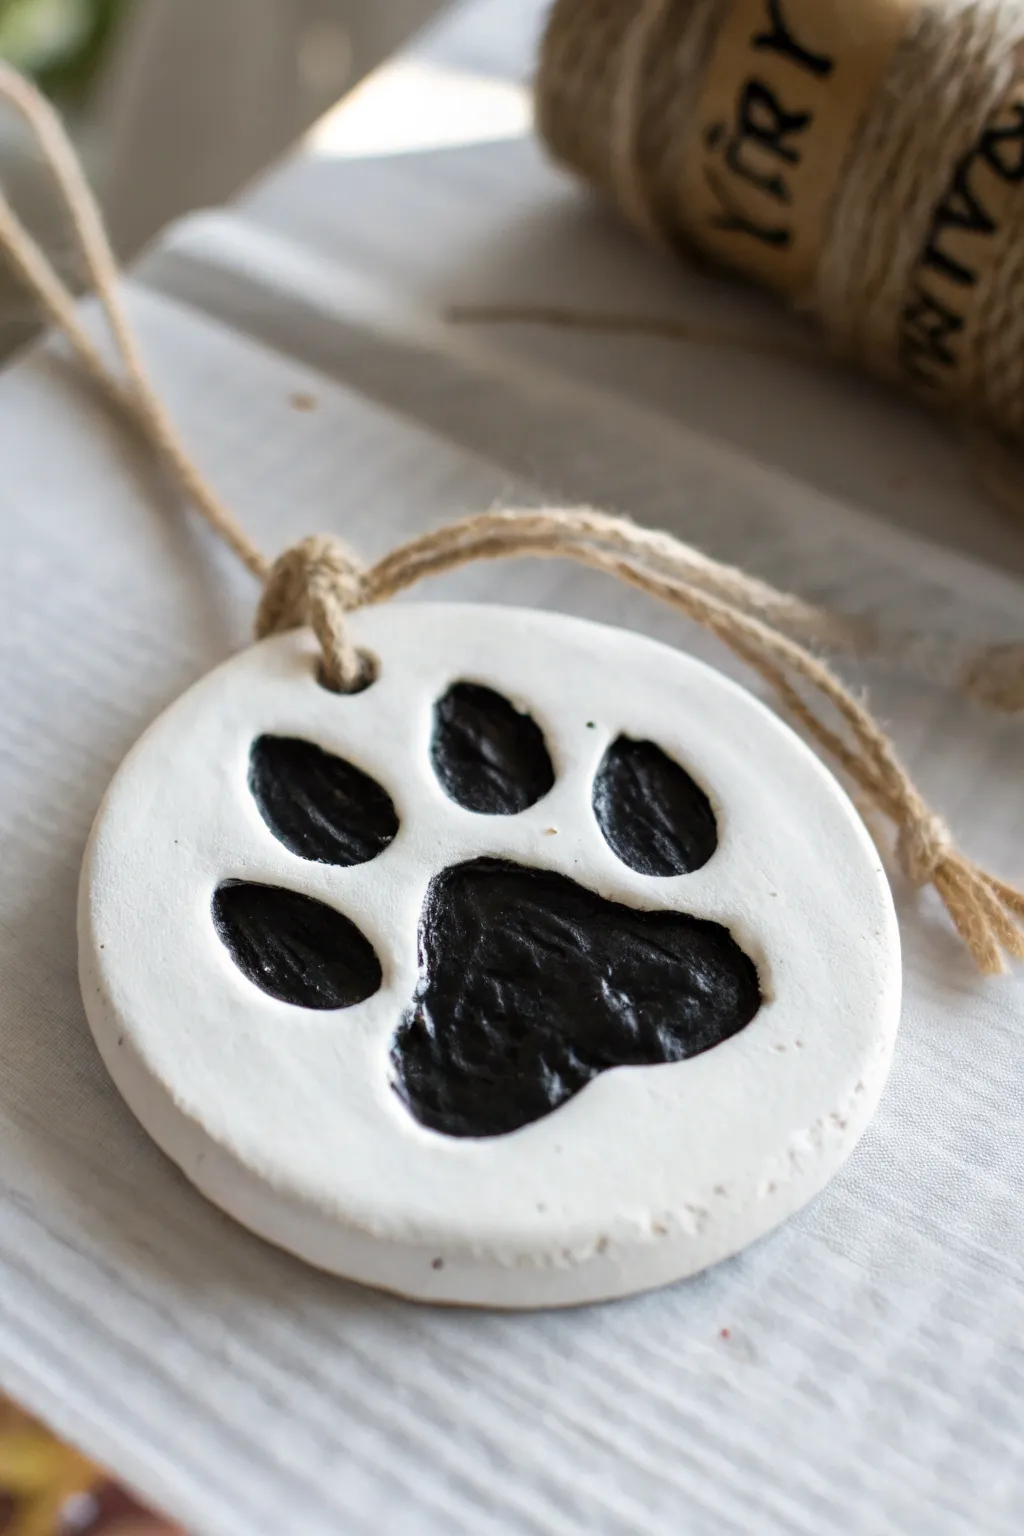
This striking ornament relies on the timeless elegance of high-contrast black and white to capture your furry friend’s memory. The deep black paint filling the impression creates a bold silhouette against the clean white clay, making every textured detail of the paw print pop.
How-To Guide
Materials
- White air-dry clay (or salt dough)
- Round cookie cutter or jar lid (approx. 3-4 inches)
- Small rolling pin
- Drinking straw or dowel (for the hole)
- Fine grit sandpaper (optional)
- Black acrylic paint
- Small detail brush (round size 2 or 4)
- Matte or satin clear sealant (optional, spray or brush-on)
- Jute twine or rustic string
- Parchment paper or craft mat
Step 1: Preparing the Clay Base
-
Condition the clay:
Begin by kneading a handful of white air-dry clay until it is soft, pliable, and free of cracks. -
Roll it out:
Place the clay on a piece of parchment paper to prevent sticking. Use your rolling pin to flatten the clay to an even thickness of about 1/4 inch. If it’s too thin, the impression might break through; too thick, and it will take ages to dry. -
Cut the shape:
Press your round cookie cutter or jar lid firmly into the clay to create a perfect circle. Peel away the excess clay from the outside. -
Smooth the edges:
Dip your finger in a tiny bit of water and gently run it along the cut edge of the circle to smooth out any rough spots or burrs left by the cutter.
Clean Edges Secret
If you struggle to paint clean edges, try slightly thinning your black acrylic with a drop of water. This helps the paint flow into the crevices naturally without needing heavy pressure.
Step 2: Capturing the Impression
-
Position the paw:
Gently press your pet’s clean paw into the center of the clay disc. Apply firm, even pressure to the center pad and each toe bean to ensure a deep, clear impression. -
Lift and inspect:
Carefully lift the paw straight up to avoid smudging the sides of the print. Check to make sure the details are crisp. -
Create the hanging hole:
Use a drinking straw or a small dowel to punch a hole near the top edge of the circle. Twist the straw as you pull it out to get a clean hole. -
Drying time:
Allow the clay to dry completely according to the package instructions. This usually takes 24-48 hours. I recommend flipping it over gently halfway through so the bottom dries evenly. -
Sand for perfection:
Once fully dry and hard, lightly stand the surface and edges with fine-grit sandpaper if there are any unwanted bumps or fingerprints.
Step 3: Painting and Finishing
-
Load your brush:
Squeeze a small amount of black acrylic paint onto a palette. Using a small round brush (size 2 or 4 works best), pick up a generous amount of paint. -
Fill the impression:
Carefully paint inside the depressed areas of the paw print. The goal is to flood the impression with black while keeping the top white surface clean. -
Refine the edges:
Work slowly near the rim of the impression. If your brush feels too dry, the lines will be scratchy, so keep the paint flowing smoothly. -
Clean up mistakes:
If you accidentally get a speck of black on the white surface, let it dry for a moment and then gently scrape it off with a craft knife or sandpaper, or dab it with a wet Q-tip immediately. -
Seal the art:
After the black paint is fully dry (give it at least an hour), apply a coat of matte or satin sealant over the entire ornament to protect it from moisture and dust. -
Add the hanger:
Cut a length of jute twine, about 8-10 inches long. Thread one end through the hole at the top. -
Tie the knot:
Bring the ends of the twine together and tie a secure knot to form a loop. You can trim any excess twine ends for a tidier look, or leave them slightly frayed for rustic charm.
Cracking Clay?
If small cracks appear while the clay dries, mix a tiny bit of fresh wet clay with water to make a paste (slip) and smooth it into the cracks with your finger before painting.
Hang your new keepsake in a special spot where the stark contrast will catch the eye and remind you of your companion

Soft Pastel Paw Print Pop
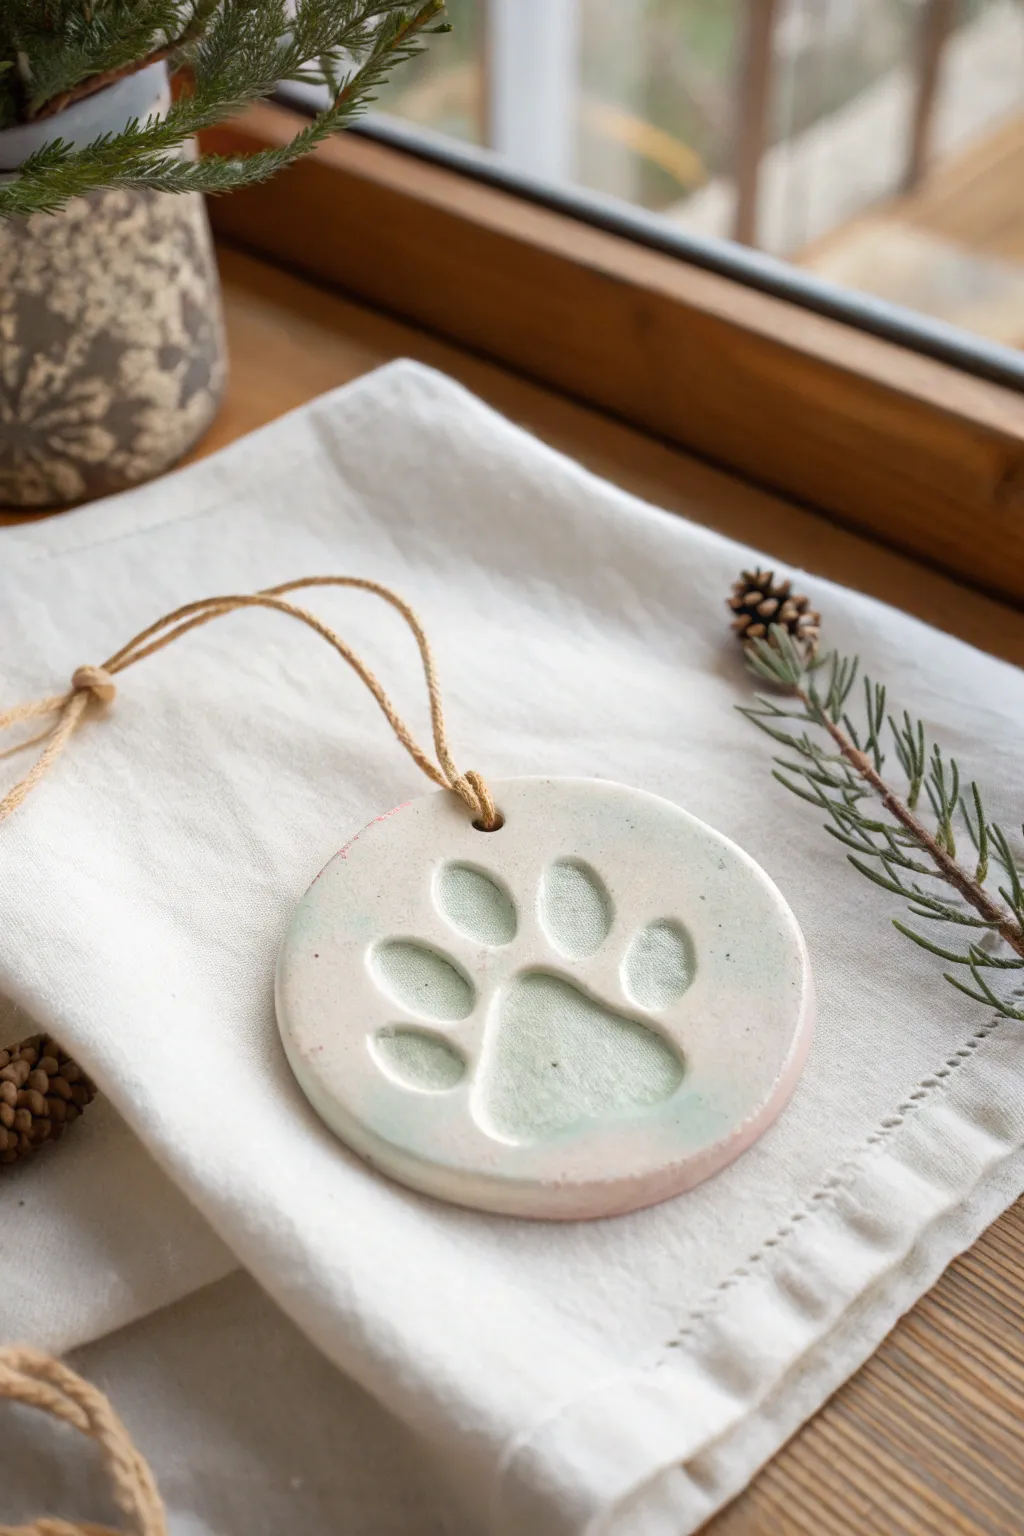
Create a gentle, dreamy keepsake with this soft pastel paw print project. The finish uses a wash technique to achieve a delicate, watercolor-like effect that highlights the texture of the clay without overwhelming the precious impression.
Step-by-Step Guide
Materials
- Air-dry clay (white) or polymer clay
- Rolling pin
- Round cookie cutter (approx. 3-4 inches)
- Small straw or skewer (for hole)
- Fine-grit sandpaper (400 grap or higher)
- Acrylic paints (Soft pink, mint green, white)
- Mixing palette or small dish
- Soft synthetic paintbrush
- Paper towels
- Cup of water
- Natural jute twine or cord
- Matte clear sealant spray (optional)
Step 1: Preparation & Impression
-
Condition the clay:
Begin by kneading a ball of white clay in your hands until it becomes soft, pliable, and free of cracks. Warm clay captures details much better than cold clay. -
Roll it out:
Place the clay on a smooth surface or parchment paper. Use a rolling pin to flatten it to an even thickness of about 1/4 inch. Avoid making it too thin, as it needs to withstand the paw pressure. -
Cut the shape:
Press your round cookie cutter firmly into the clay to create a clean circle. Remove the excess clay from around the edges before lifting the cutter. -
Smoothen edges:
Dip your finger in a tiny bit of water (if using air-dry clay) and gently run it around the cut edge to soften any sharp corners or roughness. -
Create the print:
Gently but firmly press the pet’s paw into the center of the disk. Ensure you press on each toe pad individually to get a deep, clear impression. -
Add a hanging hole:
Use a straw to punch a hole near the top edge of the ornament. A straw creates a cleaner hole than a skewer, which is helpful when threading thicker twine later. -
Let it dry:
Allow the clay to dry completely according to the package instructions. This usually takes 24-48 hours for air-dry clay. Flip it over halfway through the process to prevent curling. -
Sand imperfections:
Once fully dry and hard, use fine-grit sandpaper to buff away any fingerprints or rough spots on the surface or edges.
Clean Press Tip
If using sticky air-dry clay, place a piece of plastic wrap loosely over the clay before pressing the paw. It prevents fur from sticking and creates rounded, soft edges in the impression.
Step 2: Painting & Finishing
-
Prepare the paint wash:
On your palette, mix a drop of mint green paint with a significant amount of water. You want a consistency similar to skim milk—translucent, not opaque. -
Apply the first wash:
Brush the watery green mix randomly over parts of the disk, focusing partly on the paw impression area. The watery paint will naturally pool in the deeper crevices of the print. -
Blot excess:
Immediately use a paper towel to gently dab the surface. This lifts the pigment from the high points but leaves a soft tint in the texture and depressions. -
Mix the pink wash:
Repeat the mixing process with your soft pink paint and water. I like to keep this wash very dilute to blend seamlessly with the green without creating muddy colors. -
Layer the second color:
Apply the pink wash to the areas that are still white or overlap slightly with the green. The goal is a cloudy, marbled effect rather than distinct stripes. -
Refine the look:
If the colors look too strong, wipe them back further with a damp cloth. If they are too faint, let the first layer dry for five minutes and add a second wash. -
Dry completely:
Allow the paint moisture to evaporate fully from the porous clay. The colors typically lighten slightly as they dry. -
Seal (optional):
To protect that soft finish, lightly mist the ornament with a matte clear sealant. Avoid glossy sprays, as they detract from the natural, stone-like aesthetic. -
String it up:
Cut a length of natural jute twine. Fold it in half, push the loop through the hole, and pull the tails through the loop to create a lark’s head knot.
Cracks Appearing?
Small hairline cracks can happen as clay shrinks. Mix a tiny bit of fresh clay with water to make a paste (slip) and smooth it into the cracks with your finger, then let dry again.
Hang this sweet memento in a sunny spot to let the subtle hues shine


Rainbow Toe Beans
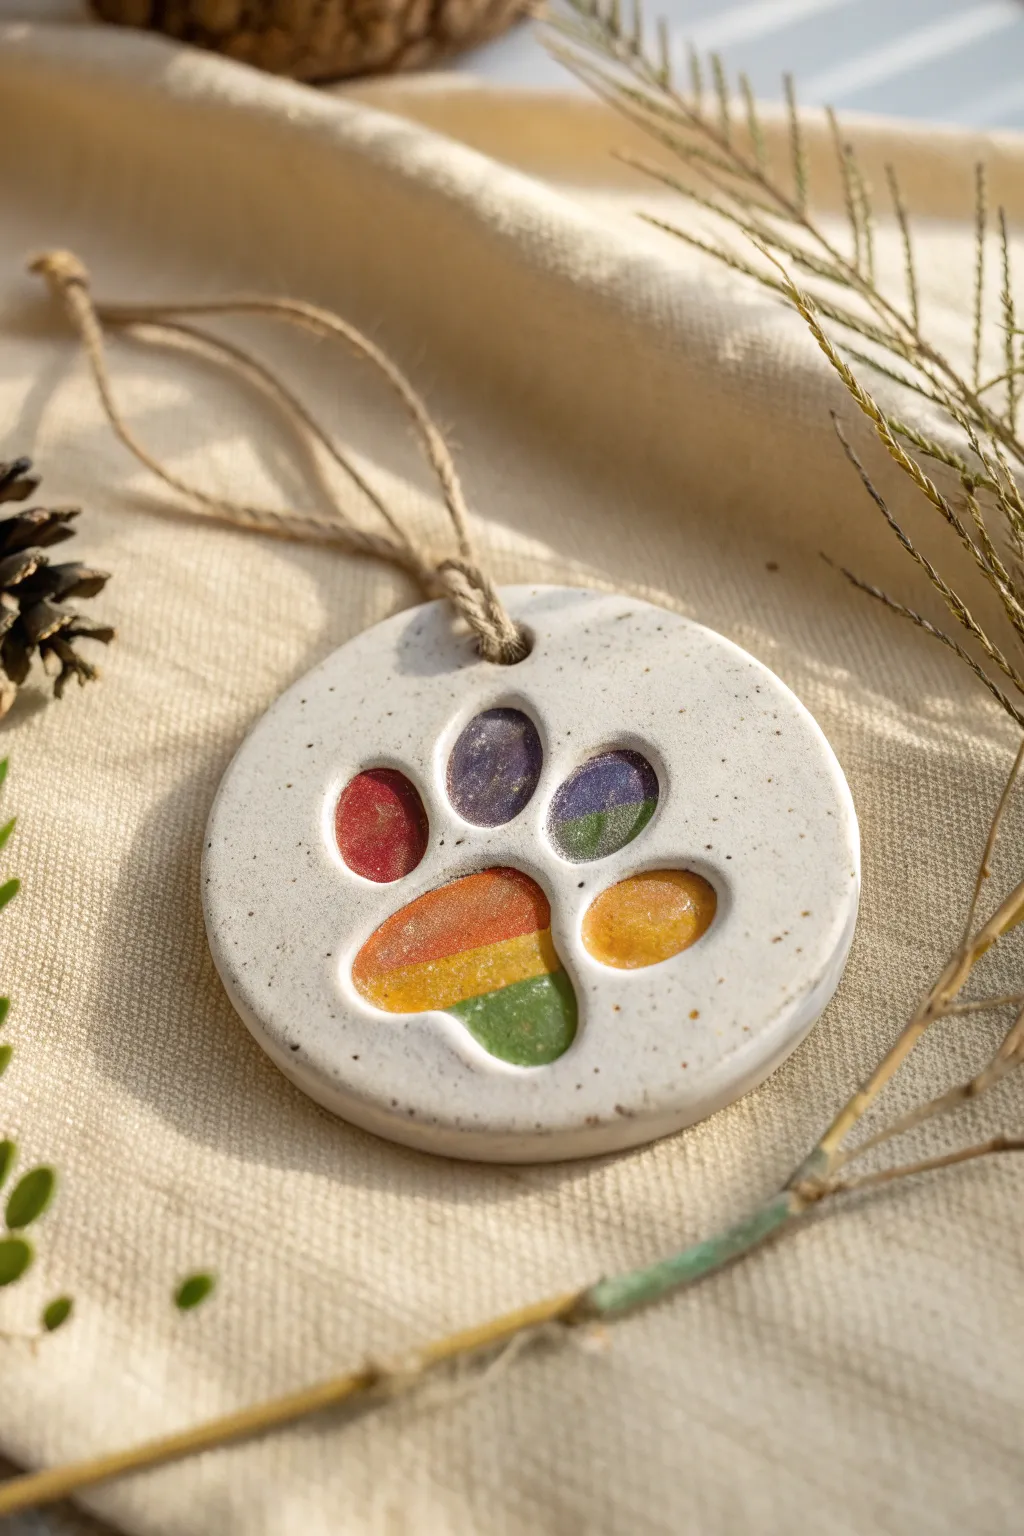
Celebrate your furry friend’s colorful personality with this speckled clay keepsake featuring a stunning gradient effect. The glossy, glass-like finish of the rainbow toe beans creates a beautiful contrast against the matte, natural texture of the clay disc.
Detailed Instructions
Materials
- White polymer clay or air-dry clay (preferably with speckles)
- Circle cookie cutter (approx. 3-4 inches)
- Your pet’s paw (for the impression)
- UV resin or 2-part epoxy resin
- Alcohol inks or mica powders (Red, Orange, Yellow, Green, Blue, Purple)
- Toothpicks or fine-tip silicone tools
- UV lamp (if using UV resin)
- Jute twine
- Straw or stylus tool (for the hanging hole)
- Sandpaper (fine grit)
- Rolling pin
- Parchment paper
Step 1: Shaping the Base
-
Prepare the Clay:
Begin by conditioning your white speckled clay until it is soft and pliable. If you don’t have pre-speckled clay, you can knead in some cracked black pepper or dried tea leaves into plain white clay for that organic look. -
Roll It Out:
Roll the clay onto a sheet of parchment paper to a thickness of about 1/4 inch. You want it thick enough to take a deep impression without breaking. -
Cut the Circle:
Use your circle cutter to punch out a clean, round disc. Smooth the edges gently with your finger to remove any sharp burrs left by the cutter. -
Make the Impression:
Gently but firmly press your pet’s paw into the center of the disc. Ensure you apply even pressure to the large pad and each toe to create distinct, deep wells. -
Create the Hanging Hole:
Use a straw to punch a hole near the top edge of the ornament. Make sure it’s centered above the paw print. -
Cure or Dry:
Bake the clay according to the manufacturer’s instructions (for polymer) or let it air dry completely for 24-48 hours. Once hard, lightly sand the surface if needed.
Clean Edges Only
If you overfill a ‘bean’ and resin spills onto the white clay, wipe it immediately with an alcohol-soaked Q-tip before curing. Sanding resin off textured clay later is difficult.
Step 2: Creating the Rainbow Gradient
-
Prepare the Resin:
In a small mixing trimming, prepare a small amount of clear resin. I find UV resin works best here for quick layering, but epoxy works too if you have patience. -
Mix the Colors:
Divide your resin into tiny batches and tint them with alcohol inks or mica powder to create your rainbow spectrum: red, orange, yellow, green, blue, and purple. -
Fill the Main Pad – Part 1:
Start with the large main pad. Pour a tiny drop of red resin on the left side and orange in the middle. Use a toothpick to gently nudge them until they touch. -
Fill the Main Pad – Part 2:
Add yellow resin next to the orange, followed by green on the far right. Swirl the borders slightly with your toothpick to create a soft transition rather than hard lines. -
Cure the Main Pad:
Flash cure this section with your UV lamp for 30 seconds to lock the gradient in place so the colors don’t mud together completely. -
Fill the Toes:
Move onto the toe beans. Fill the leftmost toe with red, the next with a mix of orange/yellow, then blue/green, and the final toe with purple or indigo. -
Add Sparkle (Optional):
Before the resin hardens, you can sprinkle a tiny pinch of gold mica powder or glitter into the wet resin for extra dimension. -
Final Cure:
Place the entire ornament under the UV lamp for 2-3 minutes (or let epoxy cure for 24 hours) until the resin is hard, glossy, and tack-free. -
Attach the Twine:
Cut a length of jute twine, thread it through the top hole, and tie a secure knot to create the hanging loop.
Bubbles Be Gone
Tiny bubbles in your resin rainbow? Pass a lighter flame quickly over the surface of the wet resin, or prick them with a sharp needle before curing.
Now you have a vibrant, permanent memory of those precious paws to hang in your home

The Complete Guide to Pottery Troubleshooting
Uncover the most common ceramic mistakes—from cracking clay to failed glazes—and learn how to fix them fast.
Ombre Fade Inside the Print
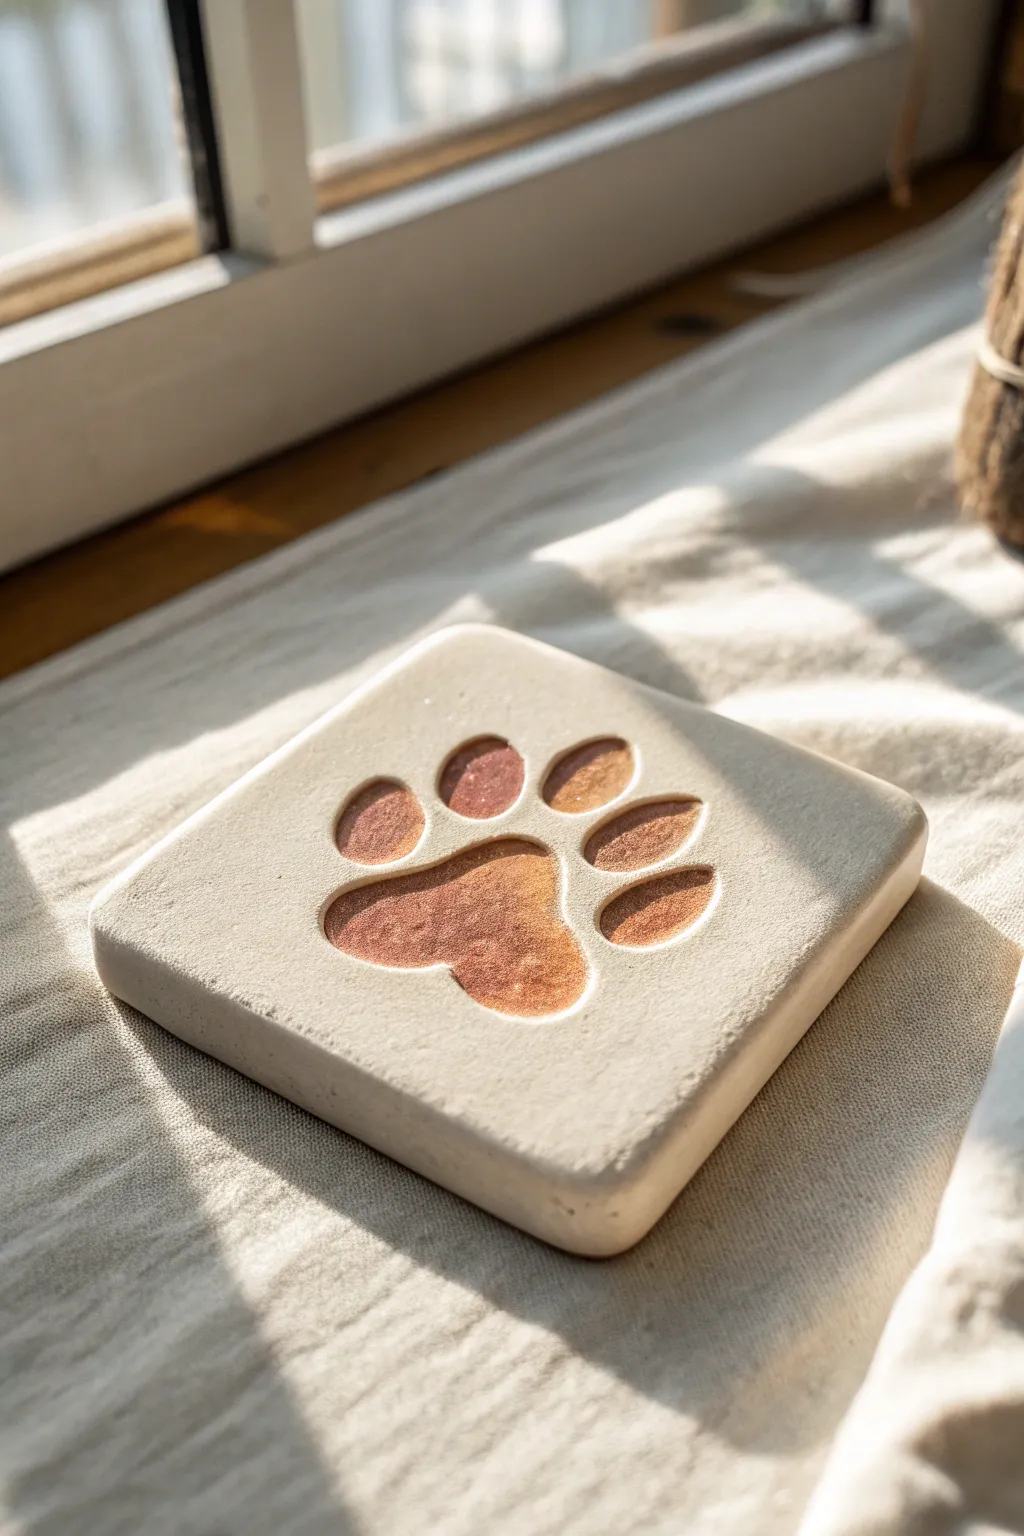
This elegant keepsake features a recessed paw print filled with a warm, shimmering gradient that mimics the look of a sunset. The contrast between the matte white clay and the glossy, metallic interior creates a sophisticated and timeless tribute to your furry friend.
Step-by-Step Guide
Materials
- White or light-colored air-dry clay (or polymer clay)
- Square cookie cutter or knife
- Rolling pin
- Sandpaper (fine-grit)
- Metallic acrylic paints (copper, bronze, gold)
- Fine glitter glaze or iridescent medium
- Small flat brush
- Small detail brush
- Gloss varnish or clear resin (optional)
Step 1: Shaping the Base
-
Prepare the Clay:
Start by kneading your white air-dry clay until it is smooth and pliable. Roll it out on a non-stick surface to an even thickness of about half an inch. You want it thick enough to take a deep impression without cracking. -
Cut the Square:
Using a large square cookie cutter or a sharp knife with a ruler, cut out a perfect square shape. Smooth the edges with a little water on your finger to remove any harsh cut lines. -
Create the Impression:
Gently press your pet’s paw into the center of the clay. Apply firm, even pressure to each toe pad and the main pad to ensure a deep, clear recess. If the impression isn’t distinct enough, you can reshape the clay and try again. -
Dry Completely:
Set the tile aside in a cool, dry place away from direct sunlight to prevent warping. Let it cure fully according to the package instructions, which usually takes 24 to 48 hours for a piece this thick. -
Sand for Smoothness:
Once the clay is bone dry, lightly sand the surface and edges with fine-grit sandpaper. This creates that pristine, matte stone look seen in the photo. Wipe away dust with a slightly damp cloth.
Step 2: Painting the Gradient
-
Base Color Selection:
Selecting the right metallic paints is key. I like to lay out a copper (darkest), a bronze (medium), and a gold (lightest) on my palette before starting to ensure the tones harmonize. -
Apply the Darkest Tone:
Start with the copper paint. Using your small flat brush, paint the left side of the main pad and the left-most toe pads. Don’t worry about perfect coverage yet; just place the color. -
Apply the Mid-Tone:
While the copper is still wet, add the bronze paint to the center of the main pad and the middle toes. Allow the wet edges of the bronze to touch the wet copper. -
Feather the Blend:
Clean your brush slightly and gently stroke back and forth where the copper and bronze meet. The goal is to blur the line so the color shifts gradually. -
Add the Highlight:
Apply the gold paint to the far right side of the main pad and the right-most toe pad. Blend this into the bronze mid-tone just as you did before. -
Refine the Edges:
Use a detail brush to carefully paint up to the very edge of the recess walls. Keep the paint strictly inside the impression to maintain the clean contrast with the surface.
Uneven Gradients?
If the paint dries too fast to blend, mix in a drop of acrylic retarder or water to keep the paint workable longer specifically for the blending phase.
Step 3: Glazing and Finishing
-
Add Shimmer:
Once the ombre base is dry, mix a tiny amount of fine copper or gold glitter into a clear gloss medium or glaze. -
Apply the Glaze:
Paint a thin layer of this glitter mixture over the entire painted area. This unifies the gradient and gives it that sparkly, wet look. -
Clean Up:
If any paint accidentally got onto the white surface, gently scrape it off with a craft knife or sand it away lightly. -
Final Seal:
For extra durability and shine, you can carefully pool a small amount of gloss varnish or UV resin into the paw print recess, creating a glass-like finish.
Level Up: Hidden details
Before the clay dries, use a tiny stamp to impress your pet’s name or the date on the back or the side edge of the tile for a secret personalized touch.
Place your finished tile on a sunny windowsill where the light can catch the metallic gradient throughout the day
Watercolor Wash Background
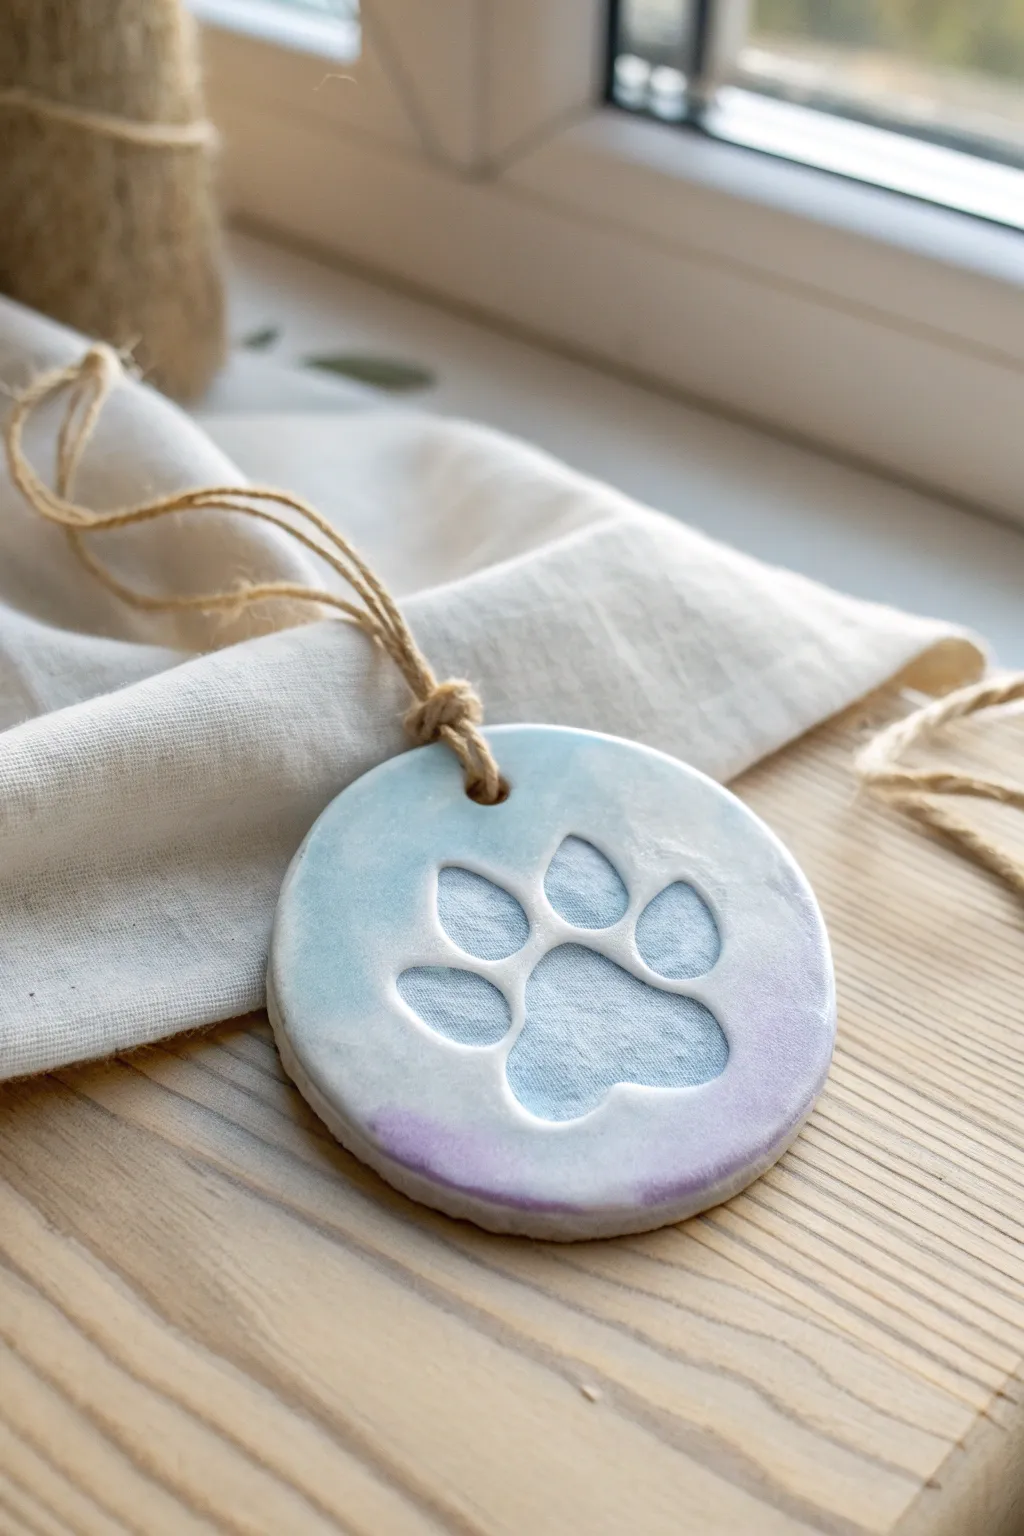
This project captures the delicate beauty of a misty sunrise with a soft, blended watercolor effect on a ceramic keepsake. The gentle transition from sky blue to violet creates a serene background that makes the simple paw impression truly shine.
Step-by-Step Tutorial
Materials
- Air-dry clay or polymer clay (white)
- Rolling pin
- Circle cookie cutter (approx. 3-4 inches)
- Paw print stamp or model (or your pet’s actual paw!)
- Straw or skewer (for hole)
- Sandpaper (fine grit)
- Watercolor paints (Blue and Purple shades)
- Soft round paintbrush (size 6 or 8)
- Cup of water
- Paper towels
- Clear matte or glossy sealant spray
- Twine or ribbon
Step 1: Shaping the Clay Canvas
-
Prepare the clay:
Begin by taking a handful of white clay and kneading it in your hands until it becomes soft, pliable, and free of cracks. -
Roll it out:
Using a rolling pin, flatten the clay on a smooth surface to an even thickness of about 1/4 inch. Ensure the surface is level to prevent warping later. -
Cut the circle:
Press your circle cookie cutter firmly into the clay to create a clean, round base. Remove the excess clay from around the edges. -
Make the impression:
Position your paw print stamp or carefully press your pet’s clean paw into the center of the circle. Apply even pressure to get a deep, clear impression of the pads. -
Create the hanging hole:
Use a straw or a skewer to punch a small hole near the top edge of the circle. Make sure it’s centered above the paw print design. -
Smooth the edges:
Dip your finger in a little water and gently run it along the cut edges of the clay to smooth out any roughness or sharp bits. -
Initial drying:
Set the clay aside to dry completely according to the manufacturer’s instructions. For air-dry clay, this usually takes 24-48 hours. Turn it over halfway through to ensure even drying. -
Sand for perfection:
Once fully dry and hard, lightly sand the surface and edges with fine-grit sandpaper to remove any remaining imperfections or fingerprints.
Fix Patchy Paint
If the clay absorbs paint too fast and looks blotchy, prime the dry clay with a thin layer of white gesso before painting. This creates a smoother surface for blending.
Step 2: Applying the Watercolor Wash
-
Wet the surface:
This is a wet-on-wet technique. Take a clean brush dipped in water and lightly dampen the entire front surface of the clay ornament, avoiding puddles. -
Load the blue:
Load your wet brush with a diluted sky blue watercolor paint. You want a translucent wash, not opaque coverage. -
Apply the first color:
Gently dab the blue paint onto the upper left and center areas of the circle. Let the water on the surface help spread the pigment naturally. -
Introduce purple:
Rinse your brush and pick up a soft violet or purple shade. Apply this to the bottom right edge of the circle. -
Blend the transition:
Where the blue and purple meet, use a slightly damp, clean brush to encourage them to bleed into each other, creating a dreamy gradient. -
Focus on the impression:
Allow some of the watery blue paint to pool naturally inside the depressed areas of the paw print. This darkens the recess slightly, highlighting the shape. -
Lift excess color:
If the color gets too dark or pools too much, touch a corner of a paper towel to the wet spot to lift the pigment away. -
Dry completely:
Let the paint dry fully. The colors will lighten slightly as the water evaporates from the clay.
Add Some Sparkle
While the watercolor is still wet, sprinkle a tiny pinch of salt onto the paint. Brush it off once dry for a beautiful textured starburst effect.
Step 3: Finishing Touches
-
Seal the artwork:
To protect the watercolor from moisture or smudging, spray the ornament with a clear matte or glossy sealant. Two light coats work best. -
Add the hanger:
Cut a length of natural twine or ribbon. Thread it through the hole at the top. -
Secure the loop:
Tie a secure knot at the base of the loop or at the ends to create a hanger, completing your custom keepsake.
Hang your beautiful new ornament in a sunny spot to enjoy the soft watercolor hues every day


What Really Happens Inside the Kiln
Learn how time and temperature work together inside the kiln to transform clay into durable ceramic.
Marbled Swirl Around the Paw
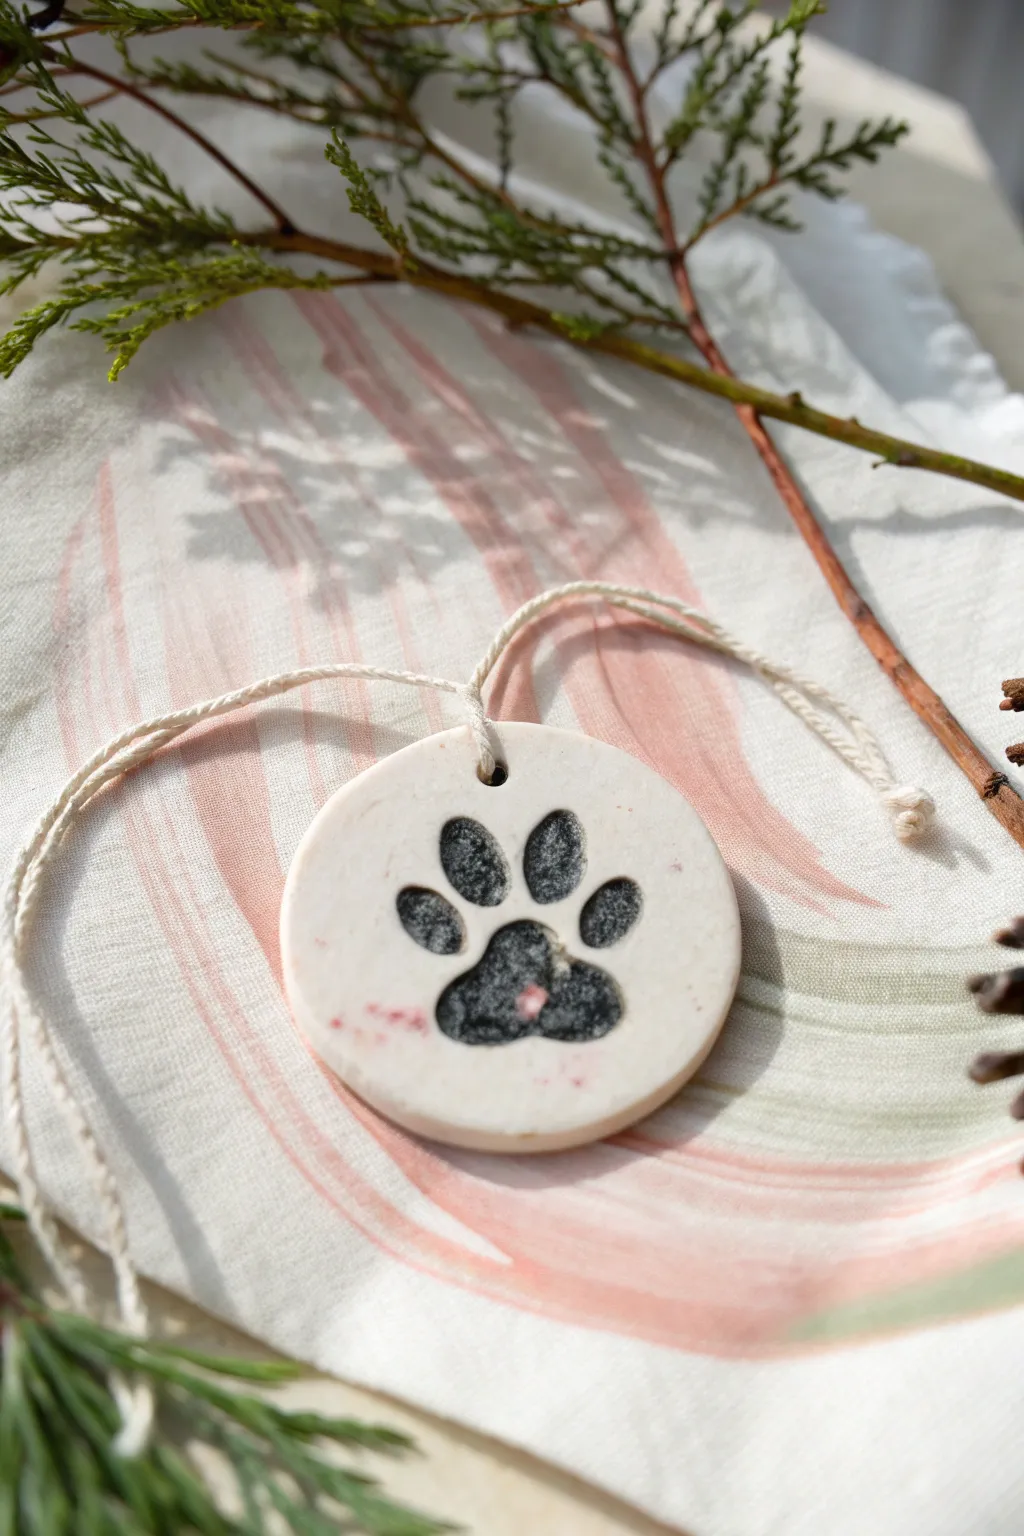
This elegant keepsake captures a pet’s paw print in a soft, marbled ceramic disc, speckled with delicate hints of pink. The result is a sophisticated, naturally textured ornament that preserves a memory in timeless clay.
Step-by-Step Guide
Materials
- White polymer clay or air-dry clay (approx. 2 oz)
- Small amount of pink polymer clay (for marbling)
- Black acrylic paint
- Small flat paintbrush
- Rolling pin or smooth glass jar
- Round cookie cutter (approx. 3-4 inches)
- Straw or skewer (for the hole)
- White cotton twine or string
- Fine-grit sandpaper (optional)
- Gloss or matte varnish (optional)
Step 1: Preparing the Marbled Clay
-
Condition the white clay:
Start by kneading a ball of white clay until it is soft, pliable, and free of cracks. This ensures a smooth base for your ornament. -
Add pink accents:
Take a tiny pinch of pink clay—about the size of a peppercorn—and crumble it into very small flecks. -
Incorporate the color:
Sprinkle these pink flecks over your ball of white clay. Fold the white clay over the pink bits and knead gently. -
Create the marble effect:
Don’t over-mix. Just twist and fold the clay a few times until the pink is distributed as faint streaks or speckles rather than turning the whole ball pink. -
Roll it out:
Use a rolling pin to flatten the clay ball into a smooth slab about 1/4 inch thick. Check both sides to see which has the prettiest speckling pattern.
Clean Impressions
To prevent the paw from sticking to the clay during the impression step, lightly dust the paw pads with cornstarch or baby powder before pressing down.
Step 2: Creating the Ornament
-
Cut the shape:
Press your round cookie cutter firmly into the clay slab to create a perfect circle. Remove the excess clay from around the edges. -
Smooth the edges:
Dip your finger in a little water (if using air-dry clay) or baby oil (if using polymer) and gently run it around the cut edge to soften any sharpness. -
Make the impression:
Gently press your pet’s clean paw into the center of the disc. If you can’t use a live paw, you can use a paw-shaped stamp or mold to create the indentation. -
Add a hanging hole:
Use a straw to punch a clean hole near the top edge of the circle. Make sure it isn’t too close to the edge to prevent tearing. -
Bake or dry:
Follow the manufacturer’s instructions for your specific clay. Bake polymer clay in the oven as directed, or let air-dry clay sit for 24-48 hours until fully hardened.
Step 3: Finishing Touches
-
Fill the print:
Once the ornament is hard and cool, dip a small brush into black acrylic paint. -
Paint the depression:
Carefully paint inside the paw indentation. I find it helps to dab the paint into the deeper crevices first, then smooth it out towards the edges of the print. -
Clean up edges:
If any black paint gets potentially onto the surface, wipe it away immediately with a damp paper towel or cotton swab for a crisp look. -
Let the paint dry:
Allow the black paint to dry completely. This usually takes about 15-20 minutes. -
Seal the piece:
Apply a thin layer of varnish over the entire ornament if you want to protect it from moisture and give it a finished sheen. -
Add the hanger:
Cut a length of white twine, thread it through the top hole, and tie a secure knot to create a loop.
Gilded Touch
Paint the rim of the circle or the inside of the hole with liquid gold leaf for a hint of metallic luxury that complements the marble.
Hang this lovely speckled creation on your tree or wall to honor your furry friend
Simple Outline and Shadow
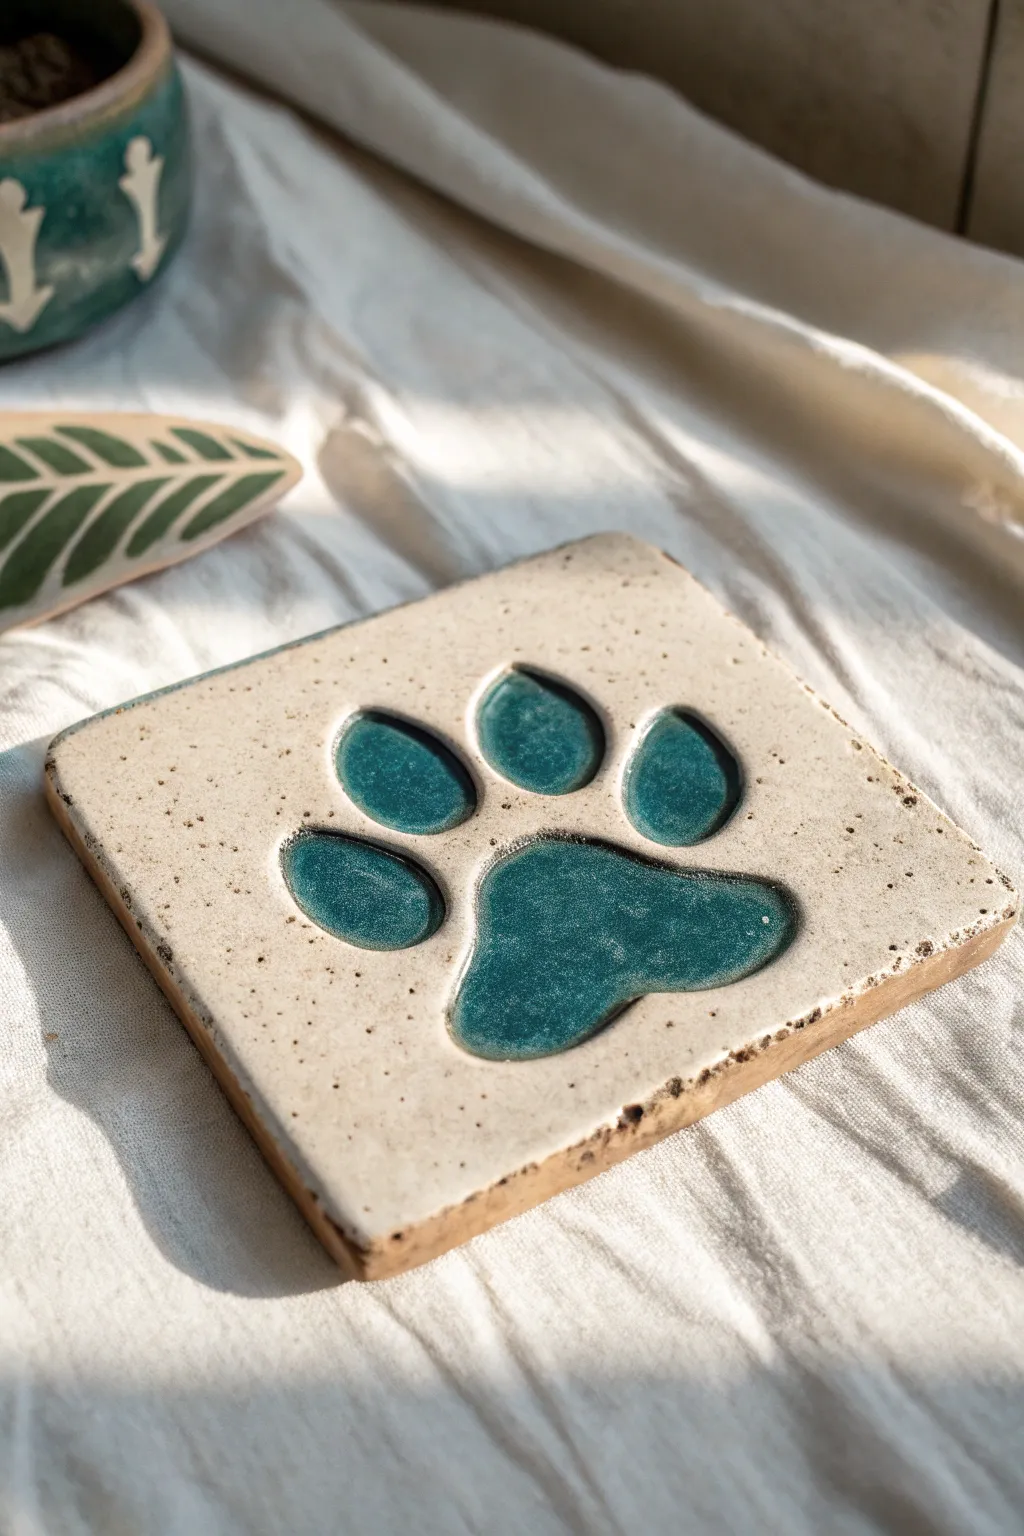
This elegant ceramic project transforms a simple paw impression into a glossy, jewel-toned keepsake. By filling the recessed areas with a rich teal glaze against a creamy, speckled background, you achieve a sophisticated contrast that highlights the unique shape of your pet’s print.
Step-by-Step Tutorial
Materials
- Light-colored stoneware clay (speckled variety recommended)
- Square tile cutter or ruler and knife
- Rolling pin with spacing guides
- Sponge
- Water bowl
- Pet safe paw wax or plastic wrap (optional, for impression)
- Small carving tool or loop tool
- Creamy white matte glaze (brush-on)
- Teal blue glass glaze or celadon glaze (for the recesses)
- High-grit sandpaper
- Kiln access
Step 1: Shaping the Clay Base
-
Roll out the slab:
Start by rolling out your ball of speckled stoneware clay on a canvas board. Aim for an even thickness of about 1/4 to 3/8 inch. Using spacing guides on your rolling pin helps ensure the tile is perfectly flat. -
Cut the square:
Place your square clutter or ruler over the slab. Cut a clean square shape, leaving yourself a little extra room as clay shrinks during firing. Be sure your corners are sharp and clean. -
Smooth the surface:
Take a slightly damp sponge and gently wipe the surface of the clay. This removes canvas texture marks and compresses the clay particles, which helps prevent warping later. -
Create the impression:
Press the paw firmly into the center of the wet clay slab. If you are using a real paw and want to keep it clean, you can lay a thin piece of plastic wrap over the clay first. Ensure the pads make a deep enough indentation to hold the glaze later. -
Clean up the edges:
Once the paw print is made, check the edges of the impression. If the clay pushed up around the toes, use your finger or a soft tool to gently smooth those ridges back down level with the tile surface. -
Slow drying:
Allow the tile to dry slowly between two pieces of drywall or under loose plastic for several days. This slow process is crucial to prevent the corners from curling up as the moisture leaves the clay. -
Bisque fire:
Once bone dry (greenware), fire the tile in a kiln to cone 04. This turns it into bisque, making it porous and ready to accept glaze.
Clean Recess Tip
Apply liquid wax resist inside the paw impression *before* glazing the white background. The white glaze will bead off the paw area instantly.
Step 2: Glazing the Impression
-
Sand imperfections:
Inspect your bisque tile. If there are any sharp burs on the edges, lightly sand them away. Wipe the tile with a damp sponge to remove any dust, as dust will prevent the glaze from adhering. -
Apply base background:
Using a soft fan brush, apply two to three even coats of the creamy white matte glaze to the top surface and sides of the tile. Avoid getting glaze inside the deep paw recesses for now. -
Clean the recesses:
I find it helpful to take a damp cotton swab and wipe out any white glaze that accidentally dripped into the paw print holes. You want raw bisque inside those depressions. -
Fill the pads:
Switch to a smaller round brush. Load it generously with your teal glass glaze. Carefully drop the glaze into the recessed toe pads and main pad. You want this layer to be thick so it pools beautifully. -
Layering for depth:
Once the first coat of teal is dry to the touch, add a second heavy layer inside the paw print. Pooling glazes work best when applied thickly in horizontal areas. -
Wipe the rim:
If you want that exposed clay look around the rim shown in the example, take a damp sponge and carefully wipe the glaze off the very sharp edge of the square, revealing the toasted clay color underneath. -
Bottom cleaning:
Ensure the bottom of the tile is entirely free of glaze. A wax resist applied to the bottom can help, but double-check and wipe it clean so it doesn’t stick to the kiln shelf.
Bubbles in Glaze?
If the pooled glaze has rough bubbles, the glaze was likely too thick or fired too fast. Try a slightly thinner application or a ‘hold’ at top temp.
Step 3: Final Firing
-
Glaze fire:
Load the tile into the kiln for the final glaze firing, usually to cone 5 or 6 depending on your clay and glaze specifications. Ensure the tile is flat on the shelf. -
Cooling down:
Let the kiln cool completely before opening. Opening too early can cause the thick glass glaze in the paw print to craze or crack from thermal shock. -
Inspect the pool:
Check the finished tile. The teal glaze should have melted into a smooth, glassy pool that sits slightly lower than the surface of the white matte glaze.
Place your finished tile on a prominent shelf or use cork backing to turn it into a functional coaster that celebrates your furry friend forever

TRACK YOUR CERAMIC JOURNEY
Capture glaze tests, firing details, and creative progress—all in one simple printable. Make your projects easier to repeat and improve.
Name and Date Curve Lettering
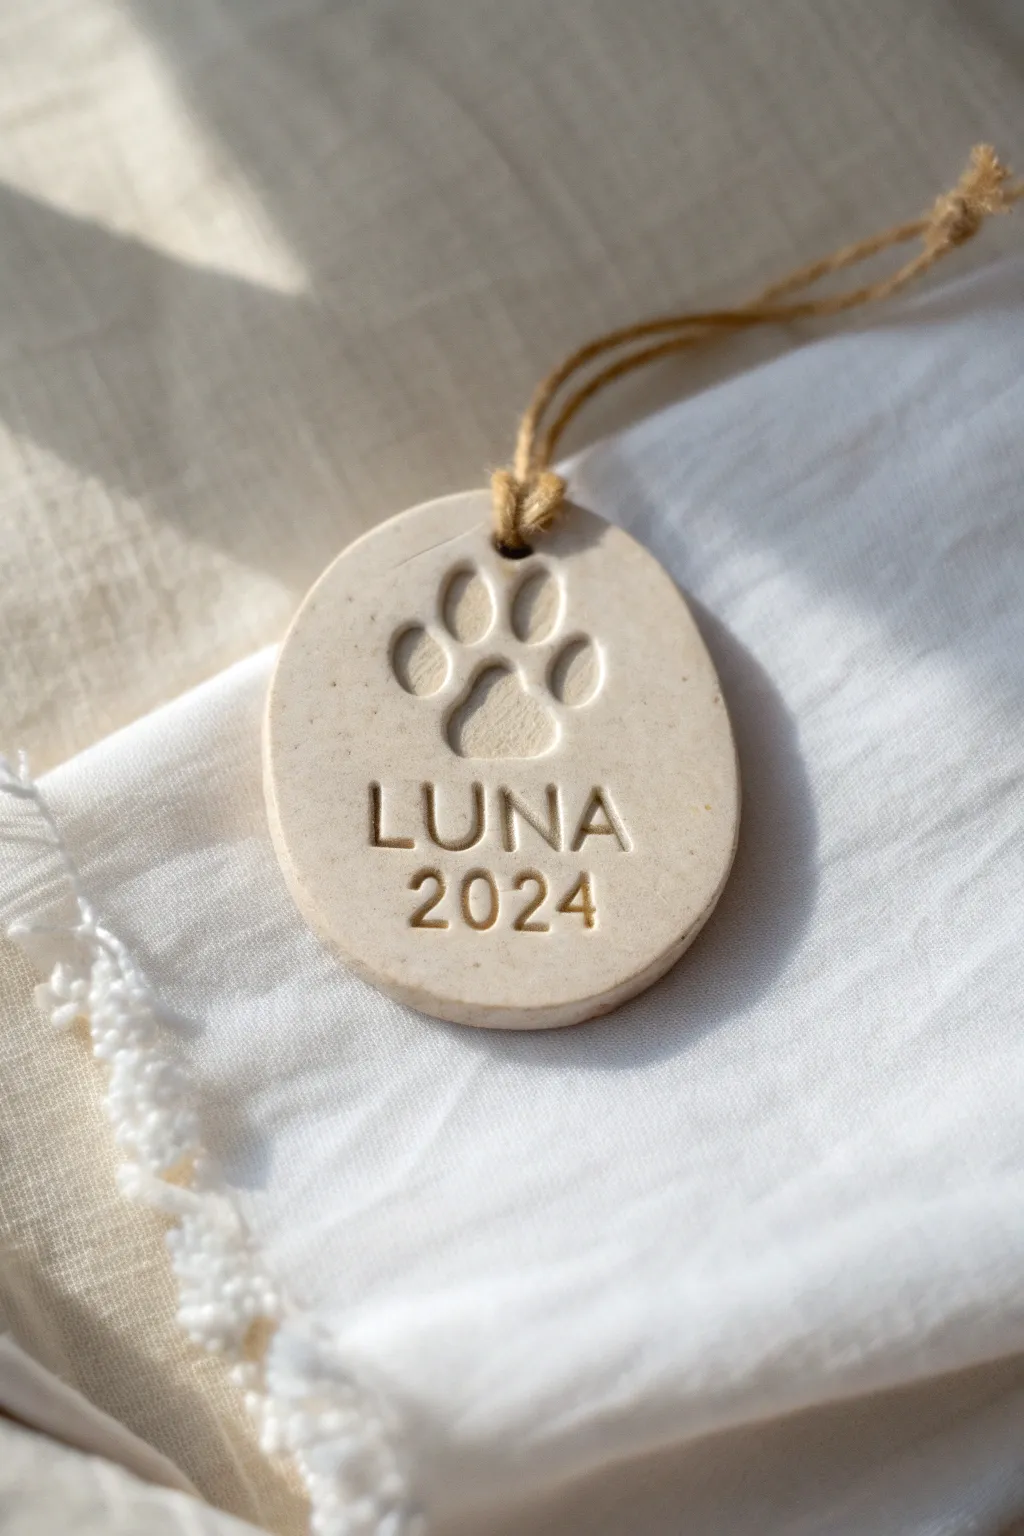
Create a minimalist and elegant keepsake for your furry friend using simple air-dry clay and stamping techniques. This project captures a classic look with a smooth, neutral finish that highlights deep, crisp impressions of a name, year, and paw print.
Step-by-Step Guide
Materials
- White or natural air-dry clay (or polymer clay in beige/light tan)
- Rolling pin
- Oval cookie cutter (approximately 3-4 inches tall)
- Letter and number stamp set (small sans-serif font)
- Paw print stamp or object to create impression
- Straw or cocktail stick (for the hole)
- Fine-grit sandpaper (optional)
- Jute twine or rustic cord
- Parchment paper or smooth work surface
- Small bowl of water (for smoothing)
Step 1: Prepping and Shaping the Base
-
Condition the Clay:
Begin by taking a handful of your air-dry or polymer clay. Knead it in your hands for a few minutes until it is warm, soft, and completely pliable. This prevents cracks from forming later. -
Roll the Slab:
Place the clay on a sheet of parchment paper to prevent sticking. Use a rolling pin to flatten the clay into a smooth, even slab. Aim for a thickness of about 1/4 inch (6mm)—too thin and it breaks easily; too thick and it looks chunky. -
Cut the Oval:
Position your oval cookie cutter over a smooth section of the clay. Press down firmly and evenly to cut the shape. If you don’t have a cutter, you can trace an oval shape onto paper, cut it out, place it on the clay, and carefully cut around it with a craft knife. -
Smooth the Edges:
Once the oval is cut, dip your finger slightly in water (for air-dry clay) and gently run it along the cut edges. Smooth down any sharpness or jagged bits until the perimeter feels rounded and soft. -
Create the Hanging Hole:
Use a drinking straw or a thick cocktail stick to punch a hole at the very top center of the oval. Make sure the hole is at least 1/4 inch away from the edge so the clay doesn’t snap later under the weight of the twine.
Cracked Clay Rescue
If tiny cracks appear while drying, mix a small amount of fresh clay with water to make a paste (slip). Rub this into the cracks and smooth it over before fully drying.
Step 2: Stamping and Impressions
-
Plan the Layout:
Before pressing anything into the clay, hover your stamps over the oval to visualize spacing. You want the paw print in the upper center, the name just below the middle, and the date at the bottom. -
Impress the Paw Print:
Press the paw print stamp firmly into the upper third of the oval. Apply even pressure so all toes and the pad make a clear, deep indentation. -
Arrange the Name:
Select the letters for your pet’s name from your stamp kit. If your kit allows, slot them into a holder to keep them straight. I prefer to stamp one letter at a time to control the kerning better for curved surfaces. -
Stamp the Name:
Press the letters into the clay right below the paw print. Rock the stamp slightly to ensure the impression is deep and legible. -
Add the Date:
Finish the design by stamping the year (e.g., 2024) centered directly underneath the name. Ensure the depth matches the lettering above for a cohesive look.
Pro Tip: Depth Check
Before stamping your final piece, practice pressing your stamps into a scrap piece of clay to learn exactly how much pressure is needed for a clean, deep imprint.
Step 3: Finishing Touches
-
Final Cleanup:
Check the clay for any accidental fingernail marks or fingerprints. Gently buff them away with a slightly damp finger or the back of a spoon. -
Drying Process:
Place the clay on a flat surface or a wire rack to air dry. If using air-dry clay, let it sit for 24-48 hours, flipping it occasionally to ensure even drying. -
Baking (If Polymer):
If you used polymer clay, bake it according to the manufacturer’s instructions (usually around 275°F/135°C for 15-30 minutes). -
Sanding (Optional):
Once fully cured and hard, you can gently sand the edges with fine-grit sandpaper if they aren’t perfectly smooth. -
Stringing the Ornament:
Cut a length of jute twine, about 8 inches long. Thread it through the hole at the top. -
Tie the Knot:
Use a simple loop knot (Lark’s head) or just tie the two ends together. The rustic twine complements the natural, stone-like color of the clay perfectly.
Now you have a beautifully simple, personalized memento that honors your pet with style and permanence
Holiday Ornament Colors
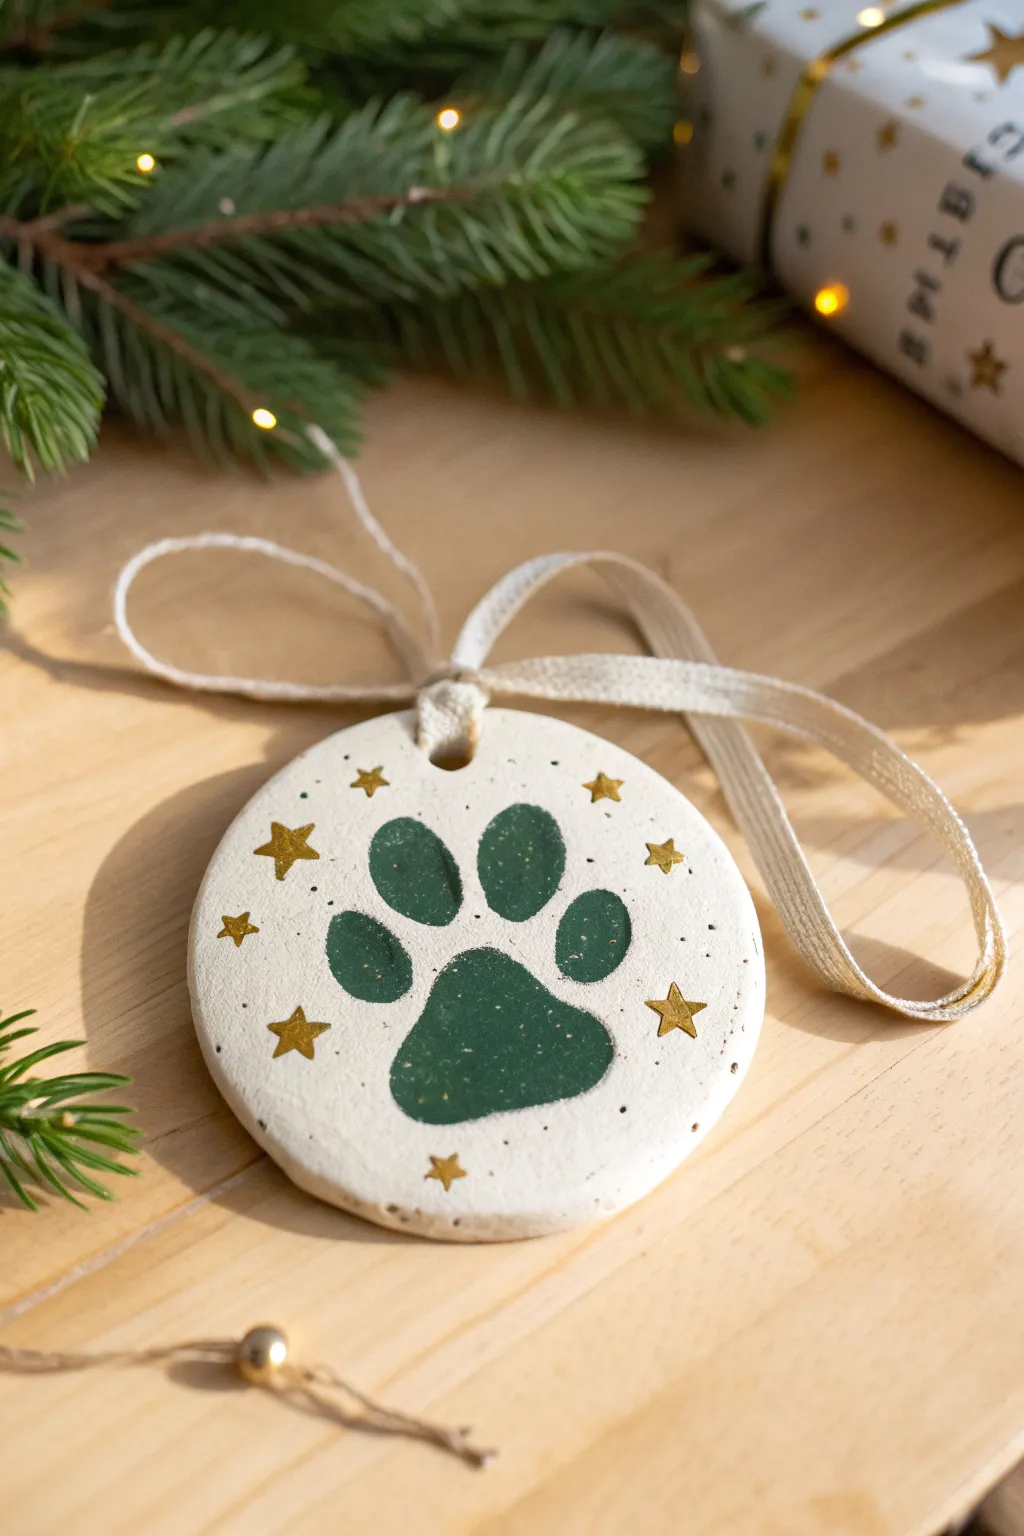
Celebrate your furry friend with this elegant keepsake ornament featuring deep forest green tones and celestial accents. The speckled white finish gives it a polished, ceramic-like quality that looks stunning on any holiday tree.
Detailed Instructions
Materials
- White polymer clay or air-dry clay
- Rolling pin
- Round cookie cutter (approx. 3-4 inches)
- Small straw or cocktail stick (for the hole)
- Your pet’s paw or a paw print stamp
- Dark forest green acrylic paint
- Gold acrylic paint or paint pen
- Black acrylic paint (watered down) or toothbrush
- Small round paintbrush
- White ribbon or twine
- Fine-grit sandpaper (optional)
- Matte or satin varnish
Step 1: Shaping the Base
-
Prepare the Clay:
Condition your clay by kneading it in your hands until it becomes soft and pliable. This prevents cracks from forming later. -
Roll it Out:
Roll the clay onto a clean surface until it is about 1/4 inch thick. Aim for an even thickness so it dries or bakes uniformly. -
Cut the Shape:
Press your round cookie cutter firmly into the clay to create a clean circle. Remove the excess clay from around the edges. -
Create the Impression:
Gently press your clean pet’s paw into the center of the circle. If using a stamp, press it evenly to get a clear outline without going all the way through. -
Add a Hanging Hole:
Use a straw or cocktail stick to punch a hole near the top edge. Make sure it’s large enough for your ribbon to pass through later. -
Smooth the Edges:
Dip your finger in a little water (for air-dry clay) or baby oil (for polymer) and run it along the cut edges to smooth out any roughness. -
Dry or Bake:
Follow the instructions for your specific clay. Bake polymer clay in the oven as directed, or let air-dry clay sit for 24-48 hours until fully hardened.
Uneven Texture?
If the dried clay surface feels rough before painting, gently sand it with fine-grit sandpaper. Wipe away all dust with a damp cloth before applying your paint.
Step 2: Painting & Decoration
-
Base Coat (Optional):
If your clay isn’t bright white, paint the entire surface (excluding the paw indentation) with white acrylic paint. Let this dry completely. -
Paint the Paw:
Using a small round brush, carefully fill in the paw impression with dark forest green paint. Depending on opacity, you might need two thin coats. -
Create the Speckles:
Thin down a tiny drop of black paint with water. Dip a toothbrush or stiff brush into it, and flick the bristles with your thumb to spray tiny speckles over the ornament. This mimics a ceramic glaze. -
Dry the Speckles:
I like to wait about 15 minutes here to ensure the speckles don’t smudge during the next step. -
Paint the Stars:
Using a very fine brush or a gold paint pen, draw small five-pointed stars randomly around the paw print. Vary the angles for a natural look. -
Seal the Ornament:
Once all paint is totally dry, apply a layer of matte or satin varnish to protect the artwork and deepen the colors. -
Add the Ribbon:
Cut a length of white ribbon or fabric strip. Fold it in half, push the loop through the hole, and pull the tails through the loop to secure it creates a Lark’s Head knot.
Add Dimension
After the green paint dries, add a layer of clear gloss varnish JUST inside the paw print impression. This makes the paw print look wet and gives the ornament a high-end feel.
Hang this charming ornament on a prominent branch where the gold stars can catch the holiday lights
Memorial Sky and Clouds
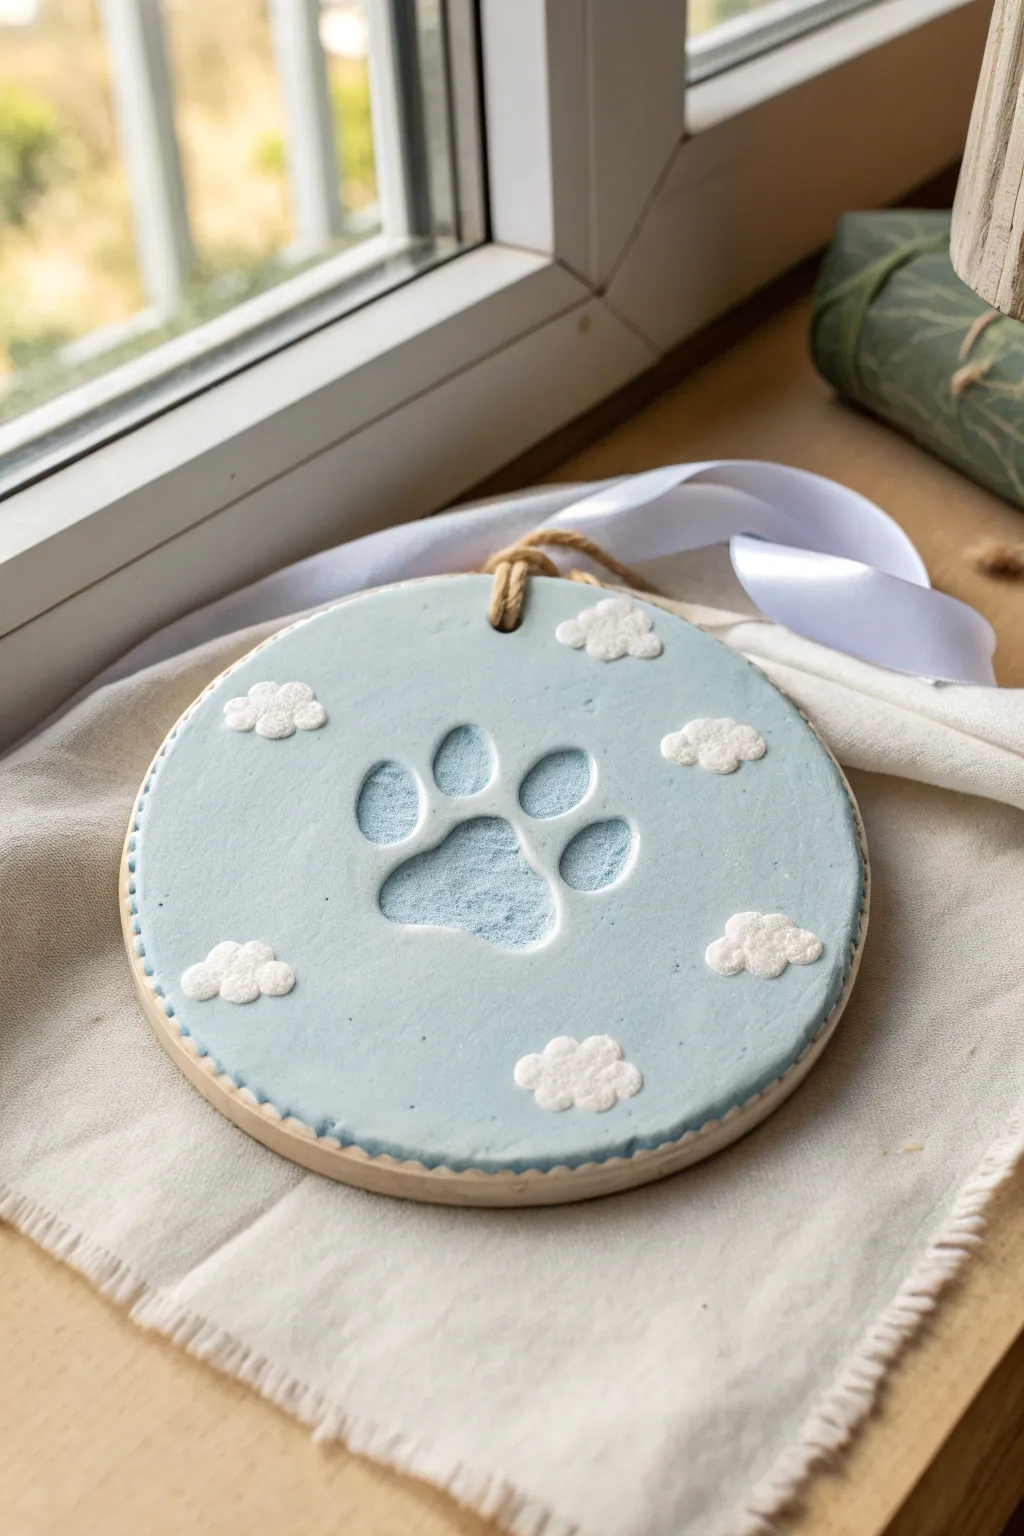
Create a soothing tribute to a furry friend with this sky-inspired clay keepsake. The soft powder blue base and dimensional fluffy clouds frame a precious paw print, turning a simple impression into a serene piece of art perfect for hanging in a sunny window.
Step-by-Step Guide
Materials
- Air-dry clay or polymer clay (white)
- Acrylic paint (powder blue, titanium white)
- Rolling pin
- Circle cutter or bowl (approx. 4-5 inches)
- Small cloud clay cutters or craft knife
- Paintbrushes (flat brush and fine detail brush)
- Twine or rustic rope
- White satin ribbon
- Straw or skewer (for hole punching)
- Fine-grit sandpaper
- Matte sealant or varnish
Step 1: Creating the Base
-
Prepare the Clay:
Knead a large ball of white clay until it is soft, pliable, and free of cracks. Ensure your work surface is clean to keep the clay pristine. -
Roll Out the Slab:
Using a rolling pin, flatten the clay to an even thickness of about 1/4 to 1/2 inch. Avoid rolling it too thin, as you need depth for the impression. -
Cut the Circle:
Press your large circle cutter or the rim of a bowl firmly into the clay slab to cut out the main ornament shape. Lift away the excess clay. -
Smooth the Edges:
Dip your finger in a little water and gently run it along the cut edge of the circle to smooth out any roughness or sharp ridges. -
Make the Impression:
This is the most crucial moment. Gently but firmly press the pet’s paw into the center of the clay circle. Apply even pressure on each toe pad and the main pad to get a clear, deep print. -
Punch the Hanging Hole:
Before the clay hardens, use a straw or skewer to poke a hole near the top edge. Make sure it’s large enough to thread your rustic twine through later.
Paw Print Troubles?
If the paw print lines aren’t crisp, don’t worry. After the clay dries, use a fine-grit sandpaper sponge to gently refine the edges of the impression before painting.
Step 2: Adding the Sky Details
-
Create Cloud Appliqués:
Roll out a separate, smaller piece of clay very thinly. Use mini cloud cutters or a craft knife to cut out 5-7 small fluffy cloud shapes. -
Attach the Clouds:
Score the back of each cloud and the corresponding spot on the main disk with a needle tool. Dab a tiny bit of water or liquid clay (slip) on the scored areas and press the clouds onto the disk, surrounding the paw print. -
Dry the Clay:
Allow the entire piece to dry completely according to your clay package instructions. I find it helpful to flip the piece gently halfway through drying to prevent curling. -
Sand Imperfections:
Once fully cured and hard, use fine-grit sandpaper to gently smooth the edges of the disk and the surface of the clouds if they look too sharp.
Step 3: Painting and Finishing
-
Base Coat Painting:
Using a soft flat brush, paint the entire surface of the disk—avoiding the raised clouds—with a soft powder blue acrylic paint. -
Paint the Paw Print:
Carefully paint inside the paw impression with the same blue shade. Ensure the paint gets into the crevices but doesn’t pool too heavily at the bottom. -
Highlight the Clouds:
Switch to white acrylic paint. Carefully paint the raised cloud shapes opaque white. You might need two coats to ensure the blue doesn’t show through. -
Optional Rim Detail:
For a finished look, you can leave the outer rim of the disk unpainted (natural clay color) or paint it white to match the clouds. -
Seal the Piece:
Once all paint is dry, apply a layer of matte varnish or sealant over the entire ornament to protect the paint and give it a uniform finish. -
Add the Twine:
Cut a short length of rustic twine or rope. Thread it through the hole at the top and knot it securely to create a loop. -
Tie the Ribbon:
Take a length of white satin ribbon and tie it into a beautiful bow around the base of the twine loop or directly through the hole for an elegant touch.
Textured Clouds
Before attaching the clay clouds, lightly dab them with a clean toothbrush or a balled-up piece of foil. This creates a fluffy, textured surface that looks great when painted white.
Hang this beautiful remembrance in a spot where the light catches the details to honor your beloved companion
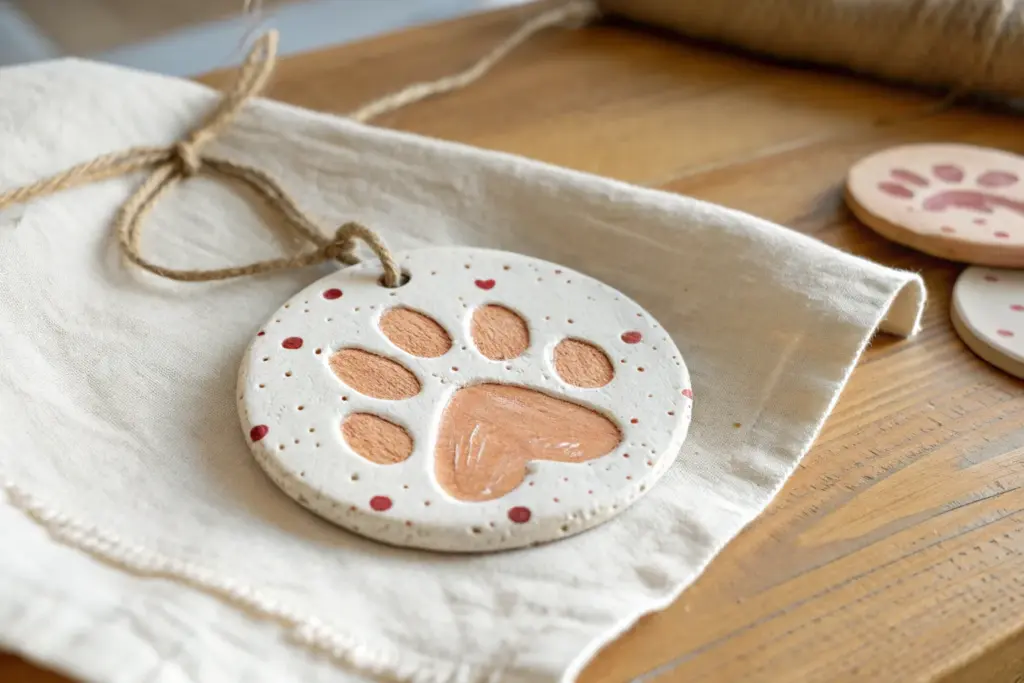
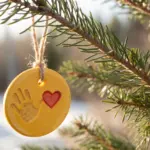
Heart Halo Around the Print
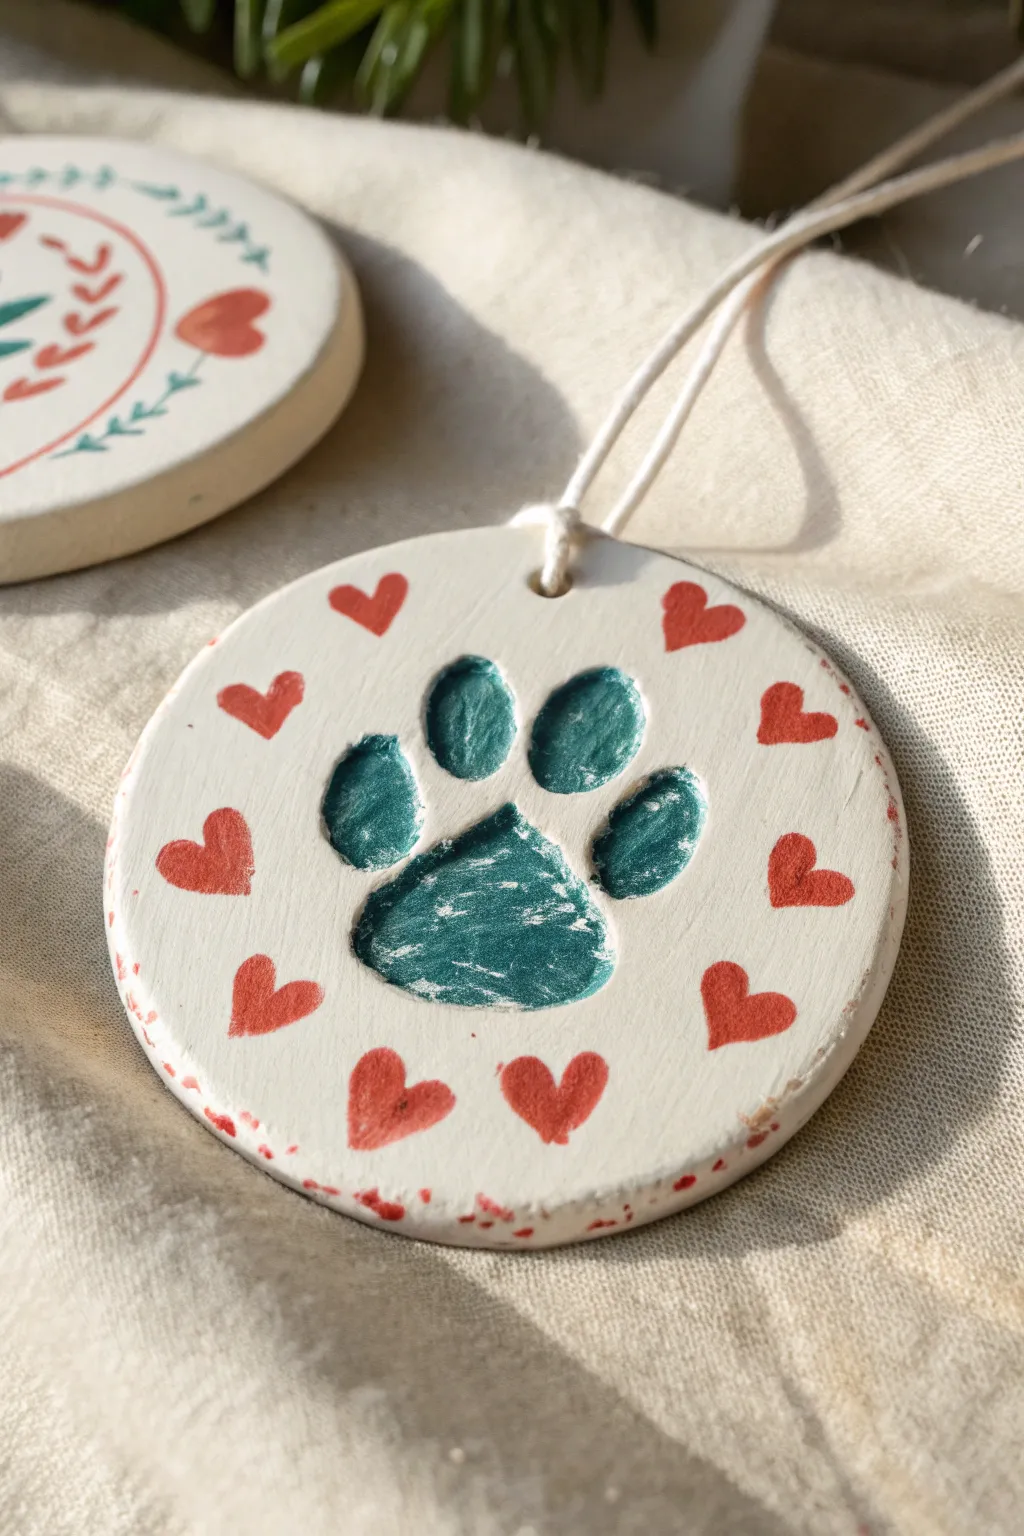
Celebrate your furry friend with this charming clay keepsake featuring a deep teal paw impression surrounded by a halo of hand-painted red hearts. The rustic, distressed edges add a lovely handmade touch to this simple yet sentimental ornament.
Step-by-Step Tutorial
Materials
- White air-dry clay or polymer clay
- Rolling pin
- Circle cookie cutter (approx. 3-4 inches)
- Your pet’s paw (for the impression)
- Sandpaper (fine grit)
- Acrylic paint: Deep teal/green
- Acrylic paint: Bright red
- Acrylic paint: White (optional, for touch-ups)
- Small flat paintbrush
- Fine detail paintbrush
- Straw or skewer (to make the hole)
- White twine or ribbon
- Clear matte sealant or varnish
Step 1: Shaping the Clay Base
-
Condition and roll:
Begin by kneading your white clay until it is soft and pliable. Roll it out on a clean, flat surface to a thickness of about 1/4 inch. You want it sturdy enough not to crack but thin enough to hang. -
Cut the circle:
Use your circle cookie cutter to punch out a clean, round shape. If the edges are a bit jagged, smooth them gently with a dampened finger. -
Create the impression:
Gently press your pet’s clean, dry paw into the center of the clay circle. Apply firm, even pressure to the toe beans and the main pad to get a clear indent, then carefully lift the paw straight up. -
Add the hanging hole:
Using a drinking straw or a skewer, poke a hole near the top edge of the circle. Make sure it goes all the way through and has enough clay above it so it won’t break later. -
Dry the clay:
Allow the clay to dry completely according to the package instructions. For air-dry clay, this usually takes 24-48 hours. I like to flip it over halfway through so both sides dry evenly.
Uneven Drying?
If the clay starts curling while drying, place a light book on top of it (sandwich it between parchment paper first) once it’s mostly dry but still slightly flexible to flatten it.
Step 2: Painting the Paw
-
Smooth the surface:
Once fully sharp and dry, lightly sand the edges and surface with fine-grit sandpaper to remove any rough bumps or fingerprints. -
Fill the impression:
Load a small flat brush with the deep teal acrylic paint. Carefully fill in the indented areas of the paw print. -
Create texture:
Don’t worry about getting the coverage perfectly solid. A slightly streaky application allows the texture of the paw print to show through, enhancing the rustic look. -
Clean the edges:
If any teal paint gets onto the flat white surface, wipe it away immediately with a damp cloth or wait for it to dry and paint over it with a bit of white acrylic.
Add a Date
Flip the ornament over and use a fine-tip permanent marker or a small stamp set to add your pet’s name and the year on the back for a complete memory.
Step 3: Adding the Heart Halo
-
Plan the spacing:
Visualizing a clock face, imagine where the hearts will go to ensure they are evenly spaced around the paw print. You can make tiny pencil marks if needed. -
Paint the first hearts:
Using your fine detail brush and bright red paint, paint a small heart at the 12, 3, 6, and 9 o’clock positions. Point the bottom of the hearts outward, away from the paw. -
Fill the gaps:
Paint the remaining hearts in between your four main guide hearts. They don’t need to be identical; slight variations add character. -
Distress the rim:
Take a nearly dry brush with a tiny amount of red paint. Gently dab or stipple it along the very outer edge of the clay circle to create a speckled, weathered frame.
Step 4: Finishing Touches
-
Seal the piece:
Once all paint is completely dry, apply a coat of clear matte sealant to protect the artwork from chipping or fading over time. -
String it up:
Cut a length of white twine or ribbon. Fold it in half, thread the loop through the hole, and pull the tails through the loop to secure it. -
Tie the knot:
Tie the ends of the twine together at your desired length to complete the hanger.
Hang this adorable keepsake on your tree or wall to keep a piece of your furry friend’s love close by
Wildflower Border Frame
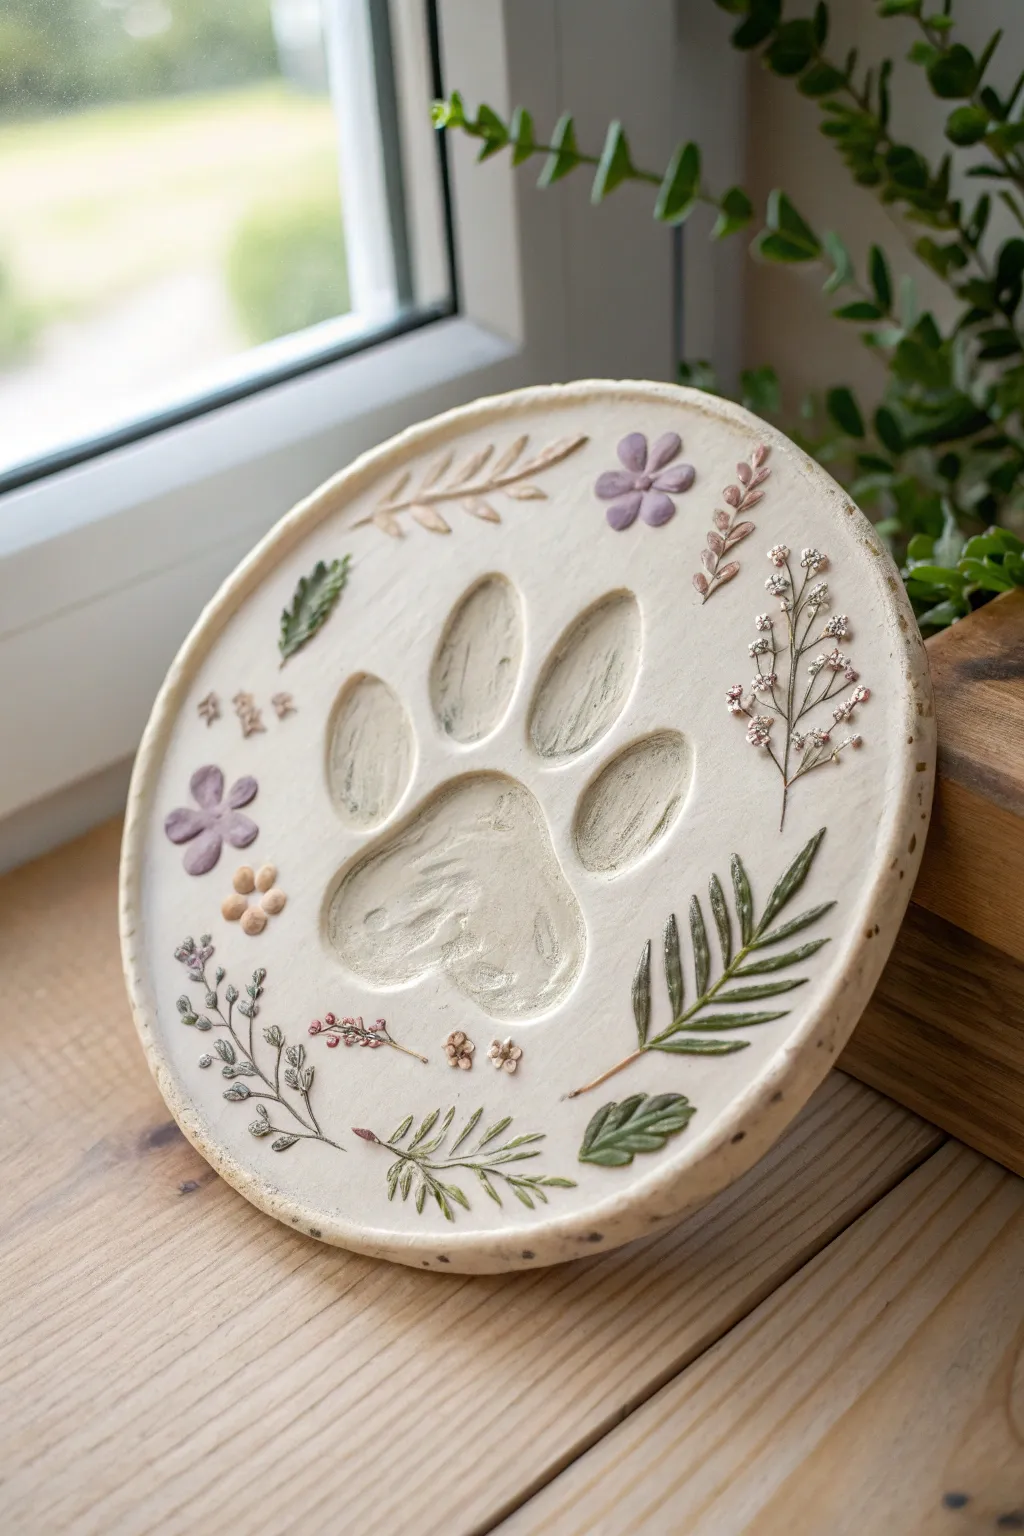
Capture your furry friend’s presence forever with this delicate wildflower-themed keepsake. This project combines a classic paw impression with an intricate border of pressed botanicals, finished with soft, natural paint hues for a timeless look.
Detailed Instructions
Materials
- White air-dry clay (or polymer clay)
- Small rolling pin
- Round cookie cutter or bowl (approx. 6 inches diameter)
- Fresh or dried small wildflowers and leaves (ferns, tiny blooms)
- Acrylic paints (sage green, lavender, muted rose, cream)
- Fine detail paintbrushes (size 0 and 00)
- Clear matte varnish or sealant
- Sandpaper (fine grit)
- A smooth work surface (silicone mat or parchment paper)
- Small bowl of water
Step 1: Preparation & Impression
-
Prepare the Clay:
Start by kneading a large ball of white air-dry clay until it is warm, pliable, and free of cracks. If the clay feels too dry, dip your fingers in water and work it in. -
Roll the Slab:
Place the clay on your smooth work surface. Use the rolling pin to flatten it into a consistent slab about 1/2 inch thick. Keep it thick enough to take a deep impression without tearing. -
Cut the Shape:
Position your round cutter or bowl over the slab and press down deeply to cut a clean circle. Remove the excess clay from the edges and smooth the rim with a wet finger to remove any sharp ridges. -
Create the Paw Print:
Gently press your pet’s clean paw into the center of the circle. Apply even pressure to each toe pad and the main pad. Rock the paw slightly to ensure a deep imprint, then lift straight up. -
Smooth Imperfections:
Check the paw print for any crumbled edges or nail marks you don’t want. Use a slightly damp finger or a clay tool to smooth these areas out gently while the clay is still wet.
Fixing Cracks
Did small hairline cracks appear while drying? Mix a tiny amount of fresh clay with water to make a paste (slip) and adhere it into the cracks, then smooth over.
Step 2: Floral Design
-
Arrange the Botanicals:
Select small fern fronds, tiny leaves, and petite flowers. Lightly lay them around the paw print to plan your border design, ensuring you have a balanced variety of shapes. -
Press the Pattern:
Once happy with the layout, firmly press each stem and leaf into the clay. You can use the rolling pin gently over them or press with your fingers. They need to leave a distinct texture, not just a surface outline. -
Remove Vegetation:
Carefully peel the plant materials out of the clay using tweezers or a needle tool. If any bits get stuck, gently pick them out without ruining the impression. -
Add Texture Details:
If some impressions look faint, use a needle tool or toothpick to deepen the central veins of the leaves or the centers of the flowers to ensure they catch the paint later. -
Drying Time:
Allow the clay to dry completely. For air-dry clay, this usually takes 24-48 hours. Turn it over halfway through so the bottom dries evenly and prevents warping. -
Sanding:
Once bone dry, take your fine-grit sandpaper and lightly circle the edges of the disk to smooth out any roughness. Wipe away the dust with a dry cloth.
Stamp Alternative
If you don’t have fresh flowers or it’s winter, use rubber craft stamps or the textured ends of jewelry charms to press the border design into the clay.
Step 3: Painting & Finishing
-
Base Tinting (Optional):
To achieve the warm, antique look in the reference, create a wash of heavily watered-down cream or light beige paint. Brush it over the entire piece and immediately wipe it back with a paper towel, leaving subtle color in the recesses. -
Painting the Ferns:
Load a fine brush with sage green paint. Carefully fill in the fern impressions. I find it helps to keep the paint consistency slightly fluid so it flows into the textured veins naturally. -
Painting the Flowers:
Switch to lavender and muted rose colors for the floral elements. Paint the petals carefully, keeping the edges crisp. Use a tiny dot of yellow or cream for the flower centers. -
Highlighting the Paw:
Mix a very watery grey-brown wash. Paint this inside the paw print depression to create depth and shadow, highlighting the texture of the print itself. -
Adding Speckles:
Dilute some dark brown paint on an old toothbrush or stiff brush. Run your thumb over the bristles to flick tiny speckles onto the clay surface for a natural, pottery-style finish. -
Sealing:
Once the paint is fully dry, apply a coat of clear matte varnish to protect the clay from moisture and preserve the colors.
Display your new custom artwork on a shelf stand or attach a ribbon to the back for hanging
Plaid or Gingham Backdrop
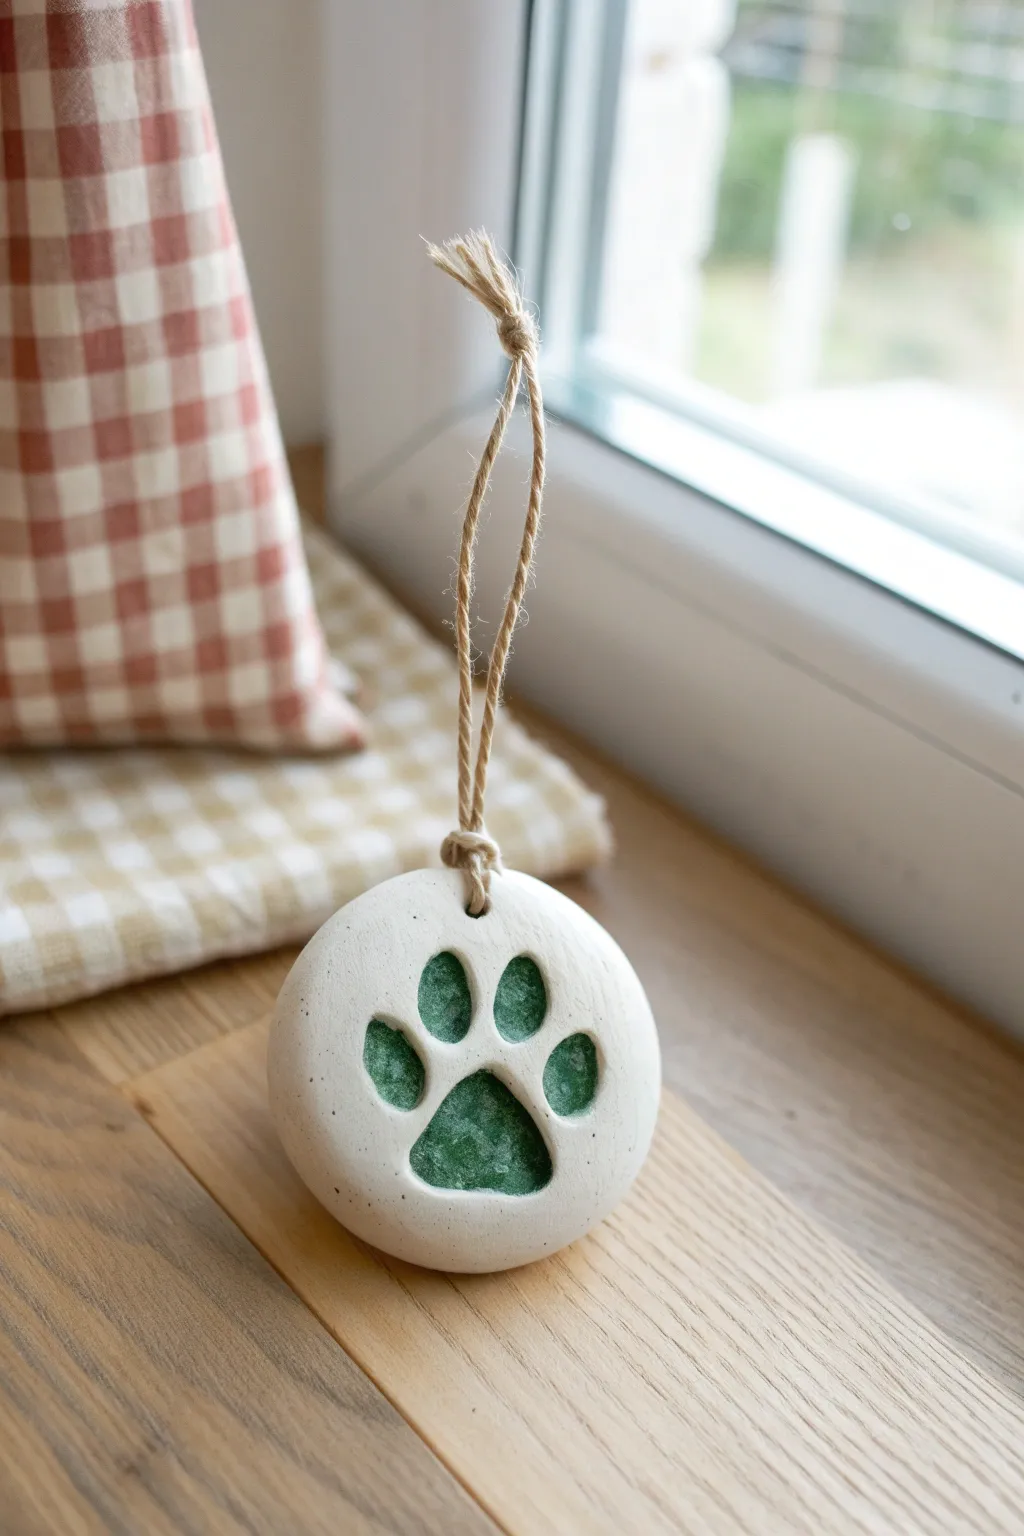
Capture your furry friend’s presence forever with this simple yet charming hanging ornament. The clean white clay contrasts beautifully with a soft, moss-green paint filling the impression, creating a rustic and natural look perfect for any home decor.
Step-by-Step Guide
Materials
- White air-dry clay or oven-bake polymer clay
- Rolling pin
- Round cookie cutter (approx. 3-4 inches)
- Small straw or skewer (for the hole)
- Fine-grit sandpaper
- Acrylic paint (moss green or sage)
- Small flat paintbrush
- Matte sealant or varnish (optional)
- Jute twine or hemp cord
- Scissors
- Parchment paper
Step 1: Preparing the Clay Base
-
Knead the clay:
Start by taking a handful of white clay and kneading it in your hands until it becomes soft, pliable, and free of cracks. Warmth from your hands helps condition it perfectly. -
Roll it out:
Place the clay on a sheet of parchment paper to prevent sticking. Use a rolling pin to flatten the clay to an even thickness of about 1/4 to 1/2 inch. Keep it relatively thick to ensure durability. -
Cut the shape:
Press your round cookie cutter firmly into the rolled clay. Wiggle it slightly to ensure a clean cut, then lift the cutter away. Remove the excess clay from around the circle. -
Smooth the edges:
Dip your finger in a little water and gently run it around the circumference of the clay circle to smooth out any rough edges or stray bits left by the cutter.
Step 2: Creating the Impression
-
Make the paw print:
Gently press your pet’s paw into the center of the clay disc. Apply even pressure on individual toe pads and the main pad to get a deep, clear impression. I find it helps to place the clay on a movable board so you can bring it to your pet rather than the other way around. -
Check and refine:
Lift the paw straight up. If result is blurry or shallow, ball up the clay and restart the rolling process. If it looks good, smooth any small fingernail marks with a damp finger. -
Add a hanging hole:
Use a straw or skewer to punch a hole near the top edge of the circle. Make sure the hole is large enough to thread your twine through later, but not so close to the edge that it might break. -
Dry or bake:
If using air-dry clay, let it sit in a dry spot for 24-48 hours, flipping occasionally for even drying. If using polymer clay, bake according to the package instructions (usually 275°F for 15-30 minutes).
Clean Paws Tip
Place a layer of cling film over the clay before pressing the paw. This keeps your pet’s foot clean and creates a softer, rounded impression edge without dirt.
Step 3: Painting and Finishing
-
Sand the surface:
Once the ornament is completely dry and hard, lightly sand the surface and edges with fine-grit sandpaper to remove any fingerprints or imperfections. -
Prepare the paint:
Squeeze a small amount of moss green acrylic paint onto a palette or paper plate. You may want to dilute it very slightly with a drop of water to help it flow into the crevices. -
Fill the impression:
Using a small flat brush, carefully paint only the inside of the paw print depression. Take your time to get crisp edges where the paint meets the surface of the clay. -
Clean up edges:
If any paint gets onto the top surface, quickly wipe it away with a damp cloth or paper towel before it dries. Alternatively, you can let it dry and gently sand it off. -
Apply a second coat:
Let the first layer of paint dry for about 20 minutes. Apply a second coat if the color looks streaky or translucent to get that solid, vibrant green. -
Seal the ornament:
For longevity, brush a thin layer of matte varnish or sealant over the entire piece. This protects the clay from moisture and keeps the paint from chipping. -
Attach the twine:
Cut a piece of jute twine to your desired hanging length (about 8-10 inches). Fold it in half and thread the loop end through the hole in the clay. -
Secure the loop:
Pass the loose ends of the twine through the loop you just threaded and pull tight to create a lark’s head knot. Tie the loose ends together in a simple knot at the top to complete the hanger.
Cracking Issues?
If air-dry clay cracks while drying, fill the fissures with a ‘slip’ made of clay mixed with water. Smooth it over and let dry again before sanding.
Hang this sweet keepsake in a sunny spot to remember the pitter-patter of paws every day
Leopard Spots With a Paw Center
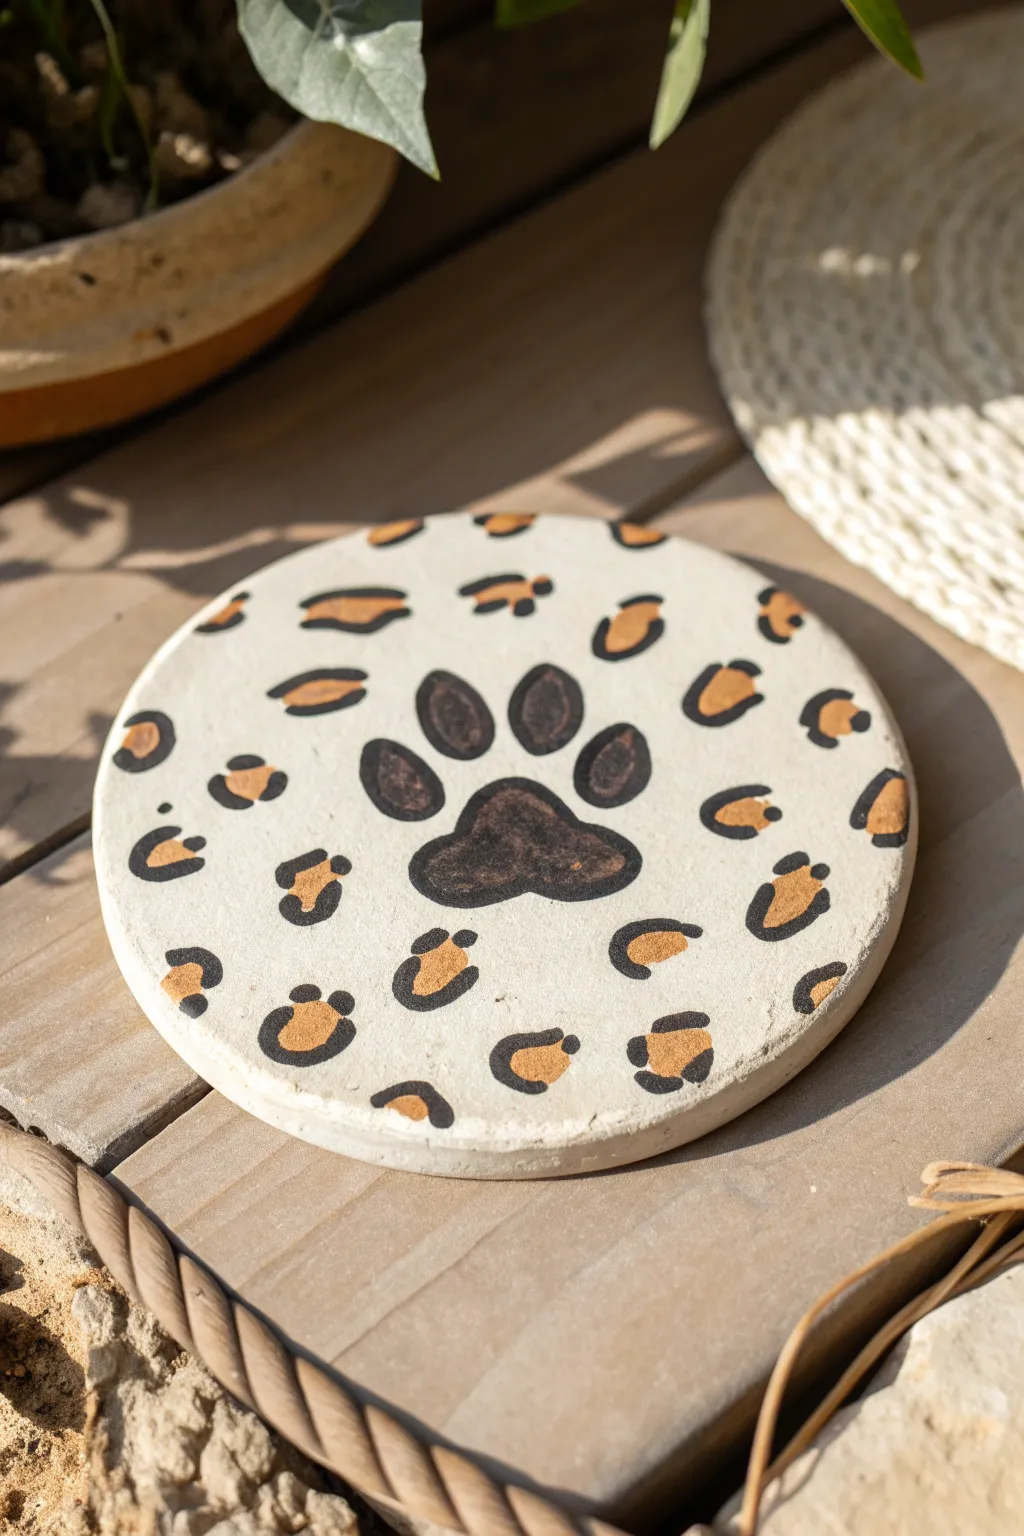
Unleash your inner wild cat with this chic, safari-inspired clay project. Featuring a bold central paw print surrounded by classic hand-painted leopard spots, this design turns a simple round of clay into a stylish decor piece perfectly suited for animal lovers.
Detailed Instructions
Materials
- Air-dry clay or polymer clay (white)
- Circular clay cutter (approx. 4-5 inches) or a bowl to trace
- Rolling pin
- Sandpaper (fine grit)
- Acrylic paints: Black, Golden Tan/Ochre, Cream (optional)
- Small round paintbrush (size 2 or 4)
- Very fine detail paintbrush (size 0 or 00)
- Matte or satin clear sealant spray
- Pencil (optional)
Step 1: Shaping the Base
-
Roll the clay:
Start by conditioning your clay until it is soft and pliable, then roll it out on a smooth surface to an even thickness of about 1/4 inch. -
Cut the circle:
Using a large circular cutter or by tracing around a bowl with a craft knife, cut out a perfect circle. -
Smooth the edges:
Dip your finger in a little water and run it along the cut edge to smooth out any roughness or jagged bits before the clay dries. -
Let it dry:
Allow the clay disc to dry completely according to the package instructions; flip it over halfway through the drying process to prevent warping. -
Sand the surface:
Once fully bone-dry, lightly sand the top surface and edges with fine-grit sandpaper to create a smooth canvas for your painting.
Natural Texture
Don’t aim for perfect circles when painting the tan spots. Wobbly, organic shapes look much more realistic when turned into leopard print.
Step 2: Painting the Paw
-
Base coat (optional):
If your clay isn’t perfectly white or you want a creamier background, apply an even coat of cream acrylic paint and let it dry. -
Outline the main pad:
Using a pencil very lightly, sketch the central paw print shape in the middle of the disc. The main pad looks like a rounded triangle with a dip at the top. -
Sketch the toes:
Add four oval toe pads curved above the main pad, keeping them evenly spaced. -
Fill in the paw:
Take your dark brown or black paint and a small round brush to fill in the paw shapes. I find stippling the paint slightly gives it a nicer texture than long strokes. -
Add dimension:
To give the print depth, mix a tiny bit of lighter brown into your dark color and dab it into the center of the main pad while the paint is still wet.
Step 3: Creating the Leopard Print
-
Paint the spots:
Dip your brush into the golden tan or ochre paint and create random, irregular blobs all around the central paw print. -
Vary the sizes:
Make some spots larger and some smaller, leaving plenty of white space between them for the black outlines. -
Outline technique:
Switch to your fine detail brush and black paint. Instead of circling the gold spots completely, paint two or three broken brackets or ‘C’ shapes around each one. -
Vary the lines:
Keep your black lines uneven—thick in some places and thin in others—to mimic the natural irregularity of animal fur. -
Add filler spots:
In the larger empty white spaces between your leopard rosettes, add small, solid black dots or tiny dashes to balance the pattern. -
Dry completely:
Let all the paint work dry thoroughly before moving to the finishing step. -
Seal the piece:
Spray the entire coaster with a matte or satin clear sealant to protect the paint from chipping and moisture.
Imprint Option
Before the clay dries, gently press your actual pet’s paw into the center to create a relief texture, then paint inside the depression later.
Place your finished coaster on a side table to add a touch of handmade charm to your home decor
Galaxy Night-Sky Paw Print
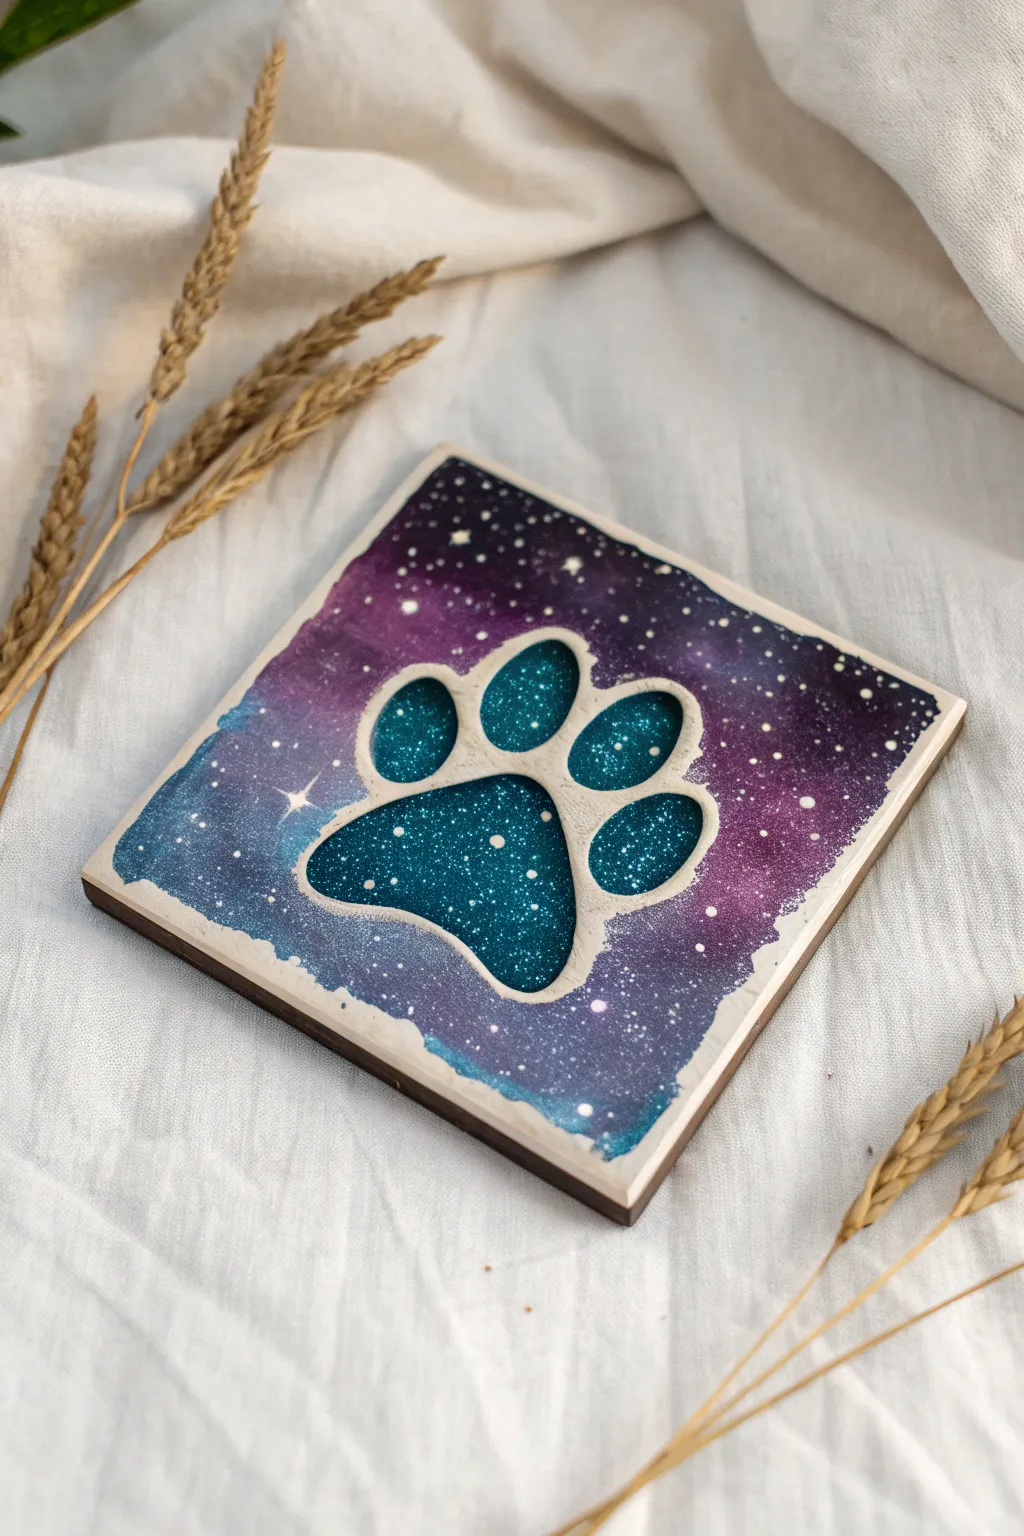
Transform a simple paw print impression into a window to the universe with this striking galaxy-themed design. Using layered acrylics and a touch of sparkle, this project captures the magic of the night sky framed around your pet’s mark.
Step-by-Step Tutorial
Materials
- Square ceramic tile or air-dry clay square (dried)
- Acrylic paints (Dark Purple, Navy Blue, Black, Teal, White)
- Fine glitter (Teal or holographic)
- Glossy sealant (Mod Podge or resin)
- Small sponge pieces
- Fine detail paintbrush
- Old toothbrush (for splatter)
- Palette or paper plate
- Water cup and paper towels
Step 1: Creating the Galaxy Base
-
Prepare the surface:
Ensure your clay tile is completely dry and free of dust. If the surface is very porous, you might want to apply a thin coat of white gesso first to help the colors pop, though bare clay works fine too. -
Sponge on the darks:
Squeeze a small amount of navy blue and dark purple onto your palette. dampen a small piece of sponge, dab it into the purple, and blot off the excess. Lightly sponge color onto the corners and edges of the tile, avoiding the paw indentation for now. -
Layer the blues:
Using a fresh side of the sponge or a new piece, pick up the navy blue. Dab this randomly over the purple and into the empty spaces, blending the edges where the two colors meet to create a soft transition. -
Add depth with black:
To give the galaxy depth, take a very small amount of black on your sponge. Lightly dab this into the darkest corners and a few random spots in the purple areas. Be sparing here; you can always add more, but it’s hard to take away. -
Brighten with teal:
Introduce a lighter nebula effect by sponging small clouds of teal paint near the center or clustered areas. Blend this outwards into the darker blue to create a glowing effect. -
Clean the edges:
If any paint got into the paw print indentation or over the raised rim of the print, use a damp cotton swab or a clean brush with water to wipe it away immediately. You want a crisp border for the print.
Nebula Nuance
Don’t over-mix your galaxy colors on the sponge. Let them sit side-by-side or barely overlap to keep the ‘cloudy’ nebula distinctive rather than muddy.
Step 2: Stars and Details
-
Create distant stars:
Thin down a small amount of white acrylic paint with a drop of water so it’s inky. Dip an old toothbrush into this mixture. -
Splatter technique:
Test the splatter on a scrap paper first. Then, hold the toothbrush over the tile and run your thumb across the bristles to flick tiny specks of white paint across the galaxy background. I usually cover the paw print with a paper cutout to keep it clean. -
Paint larger stars:
Using your finest detail brush and pure white paint, add a few distinct dots for closer stars. You can create a ‘twinkle’ effect by painting a small cross or four-pointed star shape on the larger dots. -
Let it dry:
Allow the galaxy background to dry completely before moving on to the center. This prevents wet paint from smearing into your paw print fill.
Step 3: Filling the Paw
-
Base coat the print:
Paint the inside of the paw indentation with a solid coat of dark teal or blue. This provides a rich background color for the glitter. -
Apply glitter mix:
Mix a generous amount of fine teal glitter with clear gloss medium or Mod Podge. Carefully paint this mixture into the paw print, ensuring it reaches all the edges of the impression. -
Add dimension:
While the glitter mix is wet, sprinkle a tiny pinch of white or silver glitter into the center of the large pad to simulate a highlight or reflection. -
Final sealing:
Once the entire piece is fully dry, coat the galaxy surface (avoiding the glittery paw if you want to keep its texture, or coat everything for a smooth glass-like finish) with a high-gloss varnish to seal the paint and make the colors vibrant.
Clean Edges
Paint bled into the paw print? Don’t panic. Wait for it to dry completely, then re-paint the edges of the indentation with white or cream to sharpen the outline.
Display your cosmic keepsake on a small easel or mount it in a shadow box to catch the light
Tiny Scenic Mural With Paw Tracks
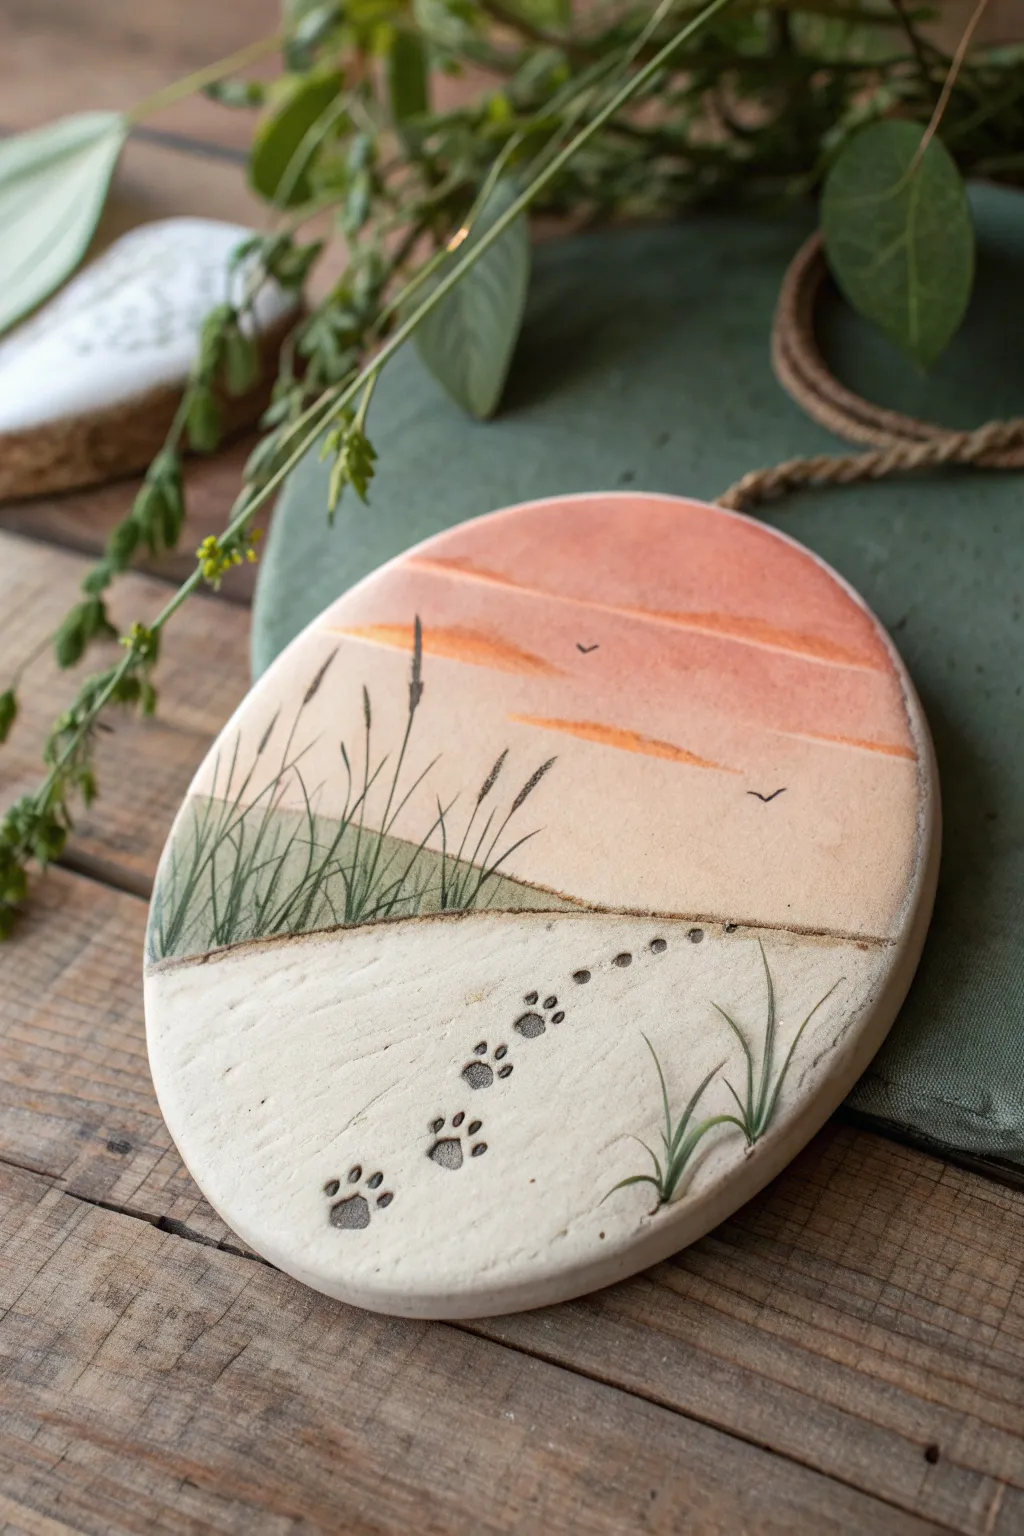
Immortalize your pet’s journey with this serene clay artwork, featuring a dreamy sunset landscape and a trail of adorable paw prints. The combination of painted hues and impressed textures brings a beachside dune scene to life on a simple oval canvas.
Detailed Instructions
Materials
- Air-dry clay (smooth white)
- Small oval cookie cutter or craft knife
- Rolling pin
- Sandpaper (fine grit)
- Acrylic paints (peach, coral, soft orange, sage green, off-white, dark brown)
- Fine detail paintbrushes
- Pet paw stamp tool or small sculpting tool
- Faux air plant sprigs or dried moss
- Matte sealant or varnish
- Twine or jute cord
- Water cup and palette
Step 1: Shaping the Base
-
Roll the Clay:
Begin by conditioning your air-dry clay until it is pliable. Roll it out on a smooth surface to an even thickness of about 1/4 inch. -
Cut the Shape:
Use an oval cutter to create your shape. If you don’t have a cutter, lightly sketch an oval with a toothpick and cut it out carefully using a craft knife. -
Smooth the Edges:
Dip your finger in a little water and run it along the cut edges to smooth down any roughness or sharp debris. -
Add Texture Holes:
Using a needle tool or toothpick, poke two tiny holes near the bottom right edge where the faux grass will eventually be inserted.
Step 2: Creating the Impressions
-
Plan the Path:
Visualize a curving line starting from the bottom left and moving toward the center right horizon line. -
Impress or Sculpt Prints:
Use a small paw print stamp to press the footprints into the wet clay. If sculpting by hand, use the rounded end of a paintbrush for the main pad and a smaller stylus for the toes. -
Create the Horizon:
Lightly etch a horizontal line across the middle of the oval to separate the sand from the sky, curving it slightly to mimic a dune. -
Add Hanging Hole:
Don’t forget to pierce a hole at the very top for the twine hanger. -
Dry Completely:
Allow the clay to dry fully according to the package instructions, usually 24-48 hours. Turn it over halfway through to prevent warping.
Paw Print Definition
If the paint fills the paw depressions too much, use a damp Q-tip to wipe the surface immediately, leaving dark paint only in the deep crevices.
Step 3: Painting the Scene
-
Paint the Sand:
Once dry and lightly sanded, paint the bottom half of the oval with an off-white or cream color. Let it dry. -
Base the Sky:
Paint the top half with a soft peach color, blending it down to meet the sand dune line. -
Add Sunset Layers:
While the peach is still slightly tacky, brush horizontal strokes of coral and soft orange across the sky to create cloud bands. -
Darken the Prints:
Mix a diluted grey-brown wash and carefully fill in the recessed paw prints to make them pop against the pale sand. -
Paint the Dunes:
Using sage green diluted with a drop of water, paint a semi-transparent hill shape on the left side, slightly overlapping the horizon. -
Detail the Grass:
With your finest brush and dark brown or black paint, flick thin, quick lines upward from the green dune to create wild beach grass. -
Add Birds:
Paint two tiny, distant ‘V’ shapes in the sky to represent seagulls.
Add Sparkle
Mix a tiny pinch of ultra-fine glitter into the white sand paint to give the beach a glistening, sun-kissed effect.
Step 4: Finishing Touches
-
Seal the Piece:
Coat the entire front of the ornament with a matte sealant to protect the paint and clay. -
Insert Greenery:
Dab a tiny amount of glue into the small holes you made earlier and insert small sprigs of faux air plant or dried moss. -
Attach Hanger:
Thread a piece of jute twine through the top hole and tie a secure knot to finish the hanger.
Hang this lovely tribute in a sunny window where the light can catch the textures of the sand and sky
Faux Tile Pattern and Paw Medallion
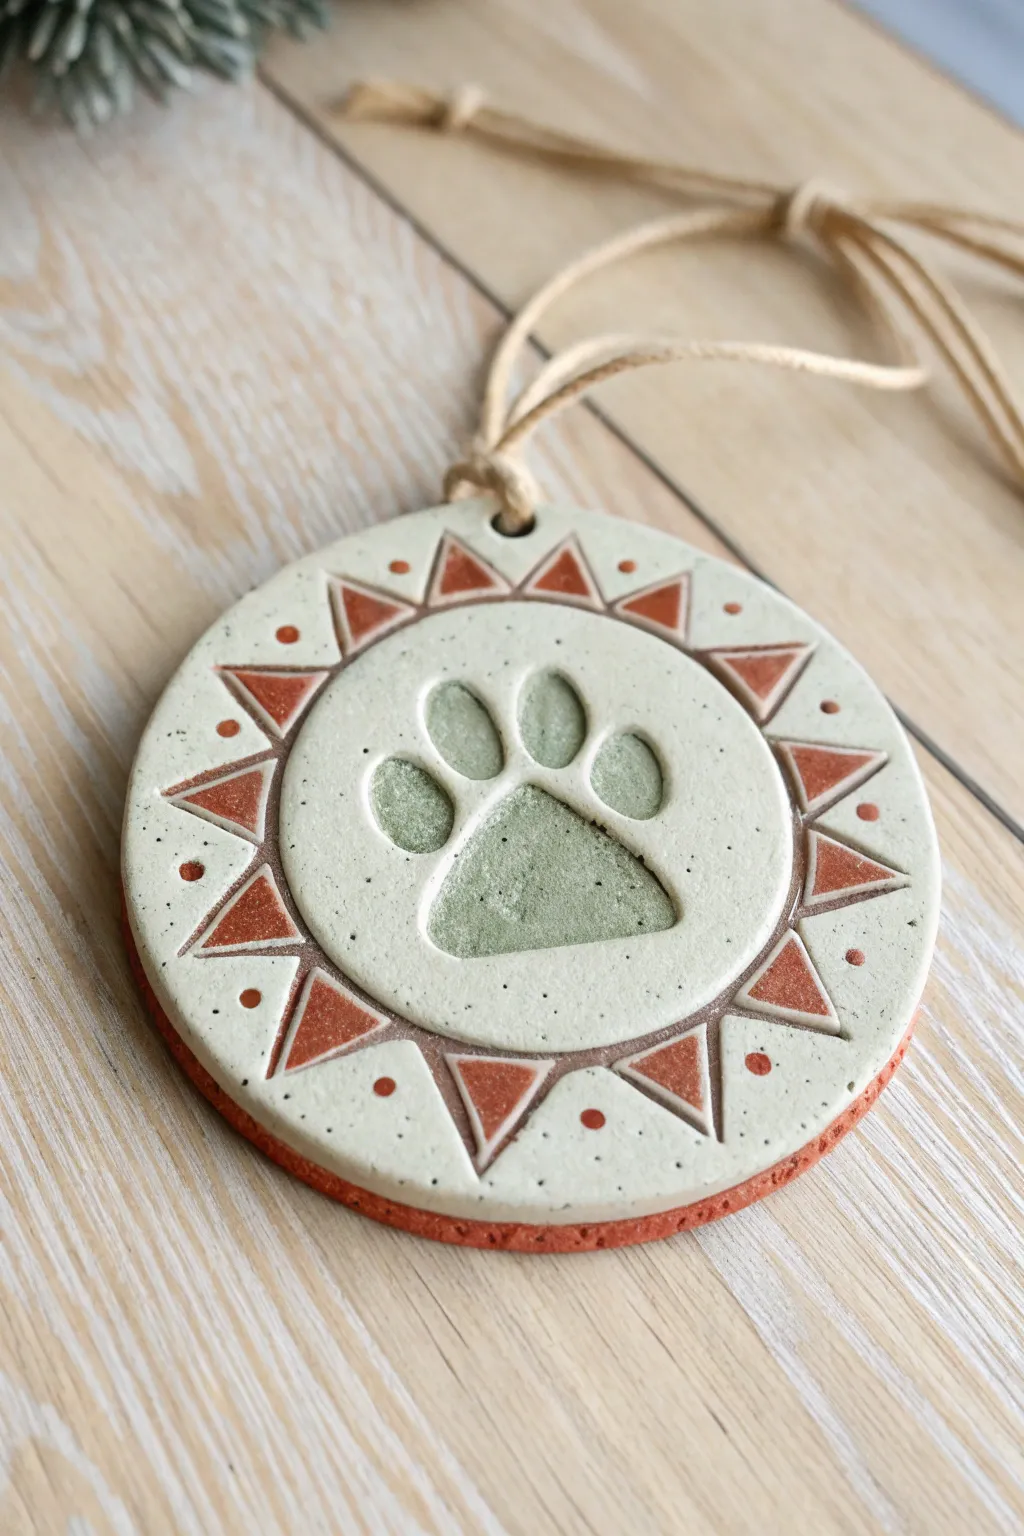
This earthy, sun-inspired medallion turns a simple paw impression into a stylish piece of decor that mimics the look of etched ceramic tile. With warm terracotta accents and a sage green center, it brings a natural, bohemian vibe to your keepsake collection.
Step-by-Step Tutorial
Materials
- White air-dry clay or polymer clay
- Rolling pin
- Round cookie cutter (approx. 3-4 inches)
- Small carving tool or toothpick
- Terracotta colored acrylic paint
- Sage green acrylic paint
- Fine grit sandpaper
- Small round paintbrush
- Natural jute twine
- Matte sealant spray or varnish
- Straw or pen cap (for making the hole)
Step 1: Prepping the Clay Base
-
Roll and Cut:
Begin by rolling out your white clay on a smooth surface until it is about 1/4 inch thick. Use your large round cookie cutter to punch out a perfect circle. -
Create the Texture:
For that authentic, slightly speckled stone look seen in the photo, you can gently press a piece of coarse sandpaper or a rough fabric onto the surface of the wet clay before continuing. -
Make the Paw Impression:
Center your pet’s paw or a paw-print stamp in the middle of the circle. Press down firmly to get a deep, clean impression of the pads and toes. -
Create the Hanging Hole:
Using a straw or the cap of a pen, punch a small hole near the top edge of the circle. Make sure it’s not too close to the rim to prevent cracking later.
Step 2: Etching the Design
-
Carve the Inner Circle:
Using a carving tool or a toothpick, lightly scribe a circle around the paw print, leaving about a half-inch buffer between the print and your line. -
Mark the Triangles:
In the outer ring (the space between your scribed circle and the edge), carve a series of V-shapes or triangles pointing outward, radiating like sun rays. -
Add Decorative Dots:
Between each triangle point, gently press the rounded end of a paintbrush handle or a dotting tool into the clay to create small, indented dots. -
Smooth the Edges:
Dip your finger in a little water and run it along any rough edges or clay burrs created by the carving process to soften them. -
Drying Time:
Allow the clay to dry completely according to the package instructions. If using air-dry clay, I usually flip it over halfway through drying so it stays flat.
Clean Lines Hack
Using a sharp tool to ‘scratch’ the design in before painting creates a physical barrier that helps stop paint from bleeding outside the lines.
Step 3: Painting and Finishing
-
Fill the Paw:
Load a small brush with sage green paint. Carefully fill in the indented paw print, letting the paint pool slightly in the deep crevices for a rich color. -
Paint the Triangles:
Switch to your terracotta paint. Carefully fill in the carved triangles on the border. Using a small angled brush can help you stay strictly inside the etched lines. -
Accent the Dots:
Using the very tip of your brush or a toothpick, dab a small amount of the terracotta paint into each of the circular indentations around the rim. -
Clean Up Mistakes:
If any paint strayed onto the raised surface, wait for it to dry completely, then very lightly sand the surface with fine-grit sandpaper to remove the excess. -
Seal the piece:
Once all paint is dry, apply a coat of matte sealant. This protects the finish without making it look plasticky or shiny. -
Add the Cord:
Cut a length of natural jute twine. Fold it in half, push the loop through the hole, and pull the tails through the loop to create a lark’s head knot.
Make it Speckled
Mix dried tea leaves or black pepper into your white clay before rolling. This creates a faux-stone, speckled pottery effect naturally.
Now you have a timeless, handcrafted tribute to your furry friend ready to hang
Stained-Glass Color Blocking
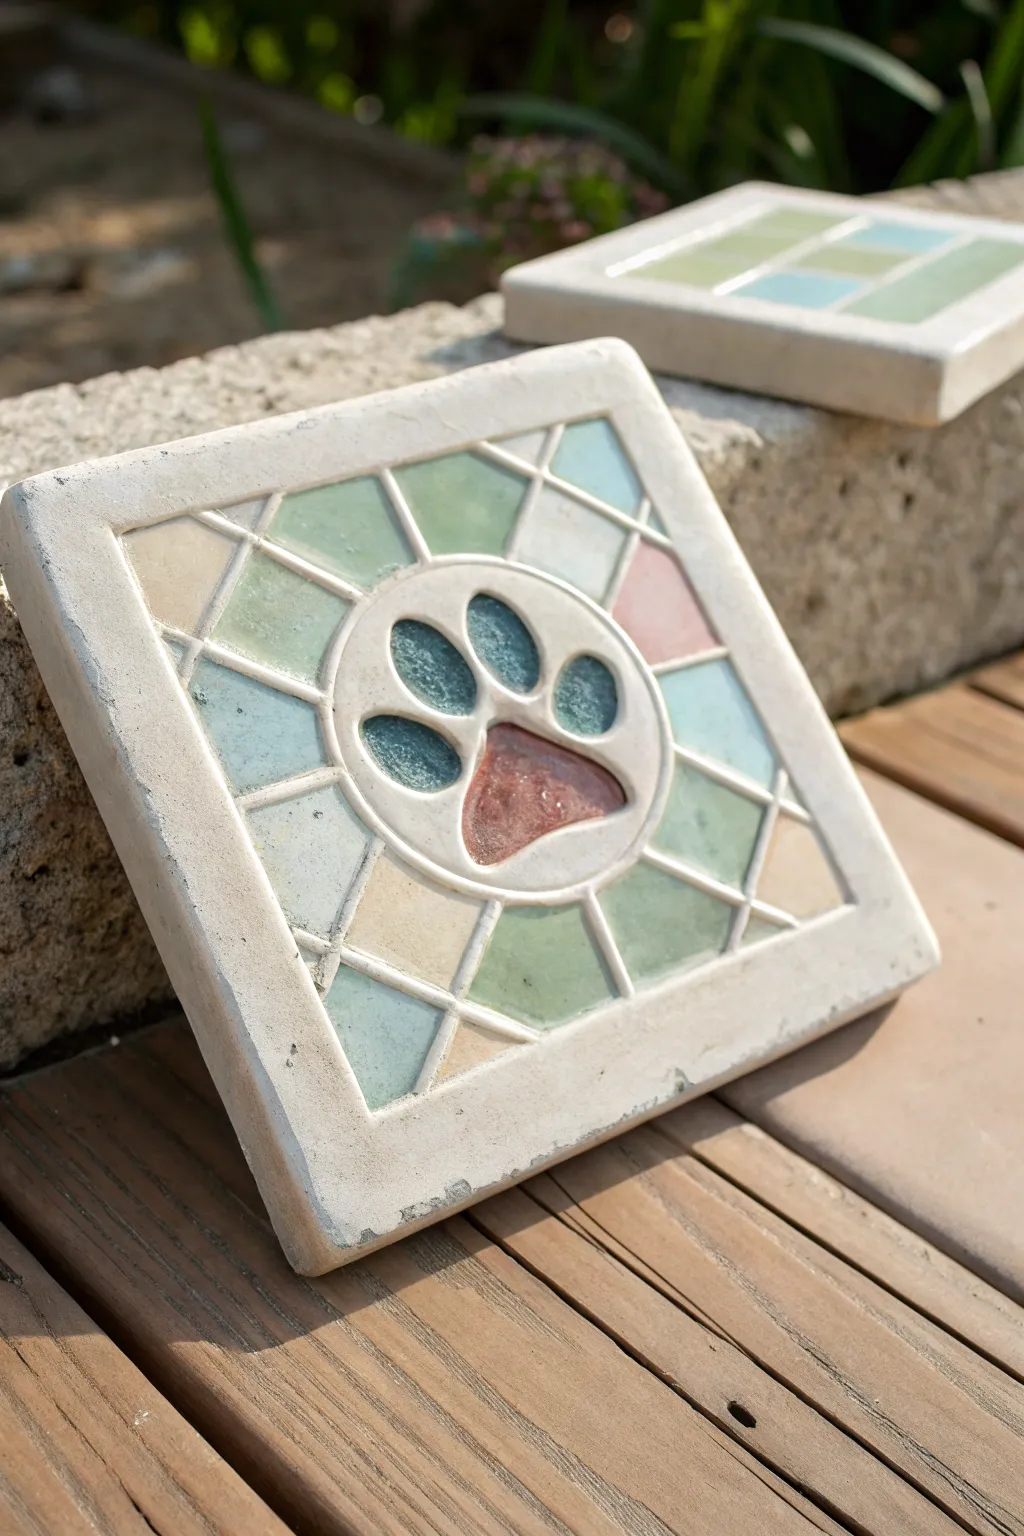
Transform a simple concrete stepping stone into a glowing piece of garden art with this clever painting technique. By using translucent washes on a relief-style paver, you can mimic the elegant look of leaded stained glass without any of the fragility.
How-To Guide
Materials
- Square concrete stepping stone with embossed paw print design
- Acrylic paints (Phthalo Green, Sky Blue, Raw Sienna, Burnt Sienna, White, Rose)
- Glazing medium or water (for thinning)
- Small flat synthetic brush (size 4 or 6)
- Fine detail brush (size 0 or 1)
- Sandpaper (medium grit)
- Clean rags or paper towels
- Outdoor matte or satin spray sealer
- Painter’s tape (optional)
Step 1: Preparation
-
Clean surface:
Begin by thoroughly cleaning your concrete paver. Use a stiff brush and water to scrub away any dust, loose grit, or manufacturing residue that might prevent paint adhesion. -
Sand rough edges:
Inspect the raised ridges of the design. If there are any sharpburrs or uneven concrete bumps on the ‘lead lines,’ gently sand them down with medium-grit sandpaper until they are smooth to the touch. -
Dry completely:
Let the stone bone dry. Concrete is porous, and any trapped moisture will cause your paint to bubble or peel later. I prefer to leave it in the sun for a full afternoon just to be safe.
Glazing Pro-Tip
Work flat! Keep the stone horizontal while painting so the watery glaze pools evenly in the recesses rather than dripping down the side.
Step 2: Creating the Translucent Effect
-
Mix the glaze:
To achieve the stained-glass look, your paint needs to be semi-transparent. Mix a dab of Phthalo Green with a generous amount of glazing medium (roughly a 1:4 ratio). If you don’t have medium, water works too, but the paint may run faster. -
Test opacity:
Brush a tiny bit of your green mix onto a scrap piece of paper or the back of the stone. You want a watercolor-like consistency that shows the texture of the stone underneath, rather than an opaque coat. -
Paint the green sections:
Identify the geometric segments you want to be green. Using your small flat brush, pool the liquid paint into the recessed areas. Let the liquid naturally settle into the texture of the concrete. -
Vary the tones:
For a realistic glass effect, don’t make every green pane identical. Add a tiny dot of blue to your mix for some sections, and a touch of yellow for others, creating a subtle variation in the stained glass grid. -
Paint the blue sections:
Clean your brush and mix a Sky Blue glaze. Apply this to the alternating geometric shapes around the paw print circle. Be careful not to let the liquid spill over the raised ridges. -
Add pink accents:
Mix a very dilute Rose or light pink glaze. Apply this to just a few select corner panes to act as ‘accent glass,’ which adds warmth to the cool palette.
Colors Bleeding?
If glaze bleeds under the ridge lines, let it dry completely, then paint over the raised line with opaque white paint to mask the mistake.
Step 3: Painting the Central Motif
-
Color the toes:
For the paw print toes, mix a slightly darker, more saturated blue-green teal. Applying this color a bit more heavily than the background glass makes the main subject pop. -
Fill the main pad:
Mix Burnt Sienna with a drop of Red to create a warm, reddish-brown glaze. Carefully fill the large central pad of the paw print. -
Create texture:
While the paint in the paw pad is still wet, dab it gently with a dry paper towel. This lifts a little pigment and creates a mottled texture that looks like old, hammered glass.
Step 4: Finishing Touches
-
Clean the ridges:
Inevitably, some glaze will have gotten onto the raised concrete lines. Take a damp cloth wrapped tightly around your finger or a sanding block and wipe the top surface of the ridges to reveal the clean, white concrete. -
Touch up lines:
If wiping didn’t clear the lines enough, use a small brush with opaque White or Off-White paint to carefully re-trace the raised grid lines, making them look crisp and distinct. -
Dry thoroughly:
Allow the painted stone to dry for at least 24 hours. The porous concrete holds onto moisture longer than canvas. -
Seal the stone:
Finish by spraying the entire paver with two to three thin coats of clear outdoor sealer. A matte or satin finish is best to maintain the natural stone look while protecting the color from UV fading.
Now you have a charming, weather-resistant garden accent that captures the light beautifully