Every year, I end up making a fresh batch of Christmas clay crafts because nothing beats decorating with pieces you actually made. These ideas are all about approachable, feel-good projects—mostly holiday ornaments and a few cozy extras you can finish in a weekend.
Pine and Leaf Imprint Ornaments
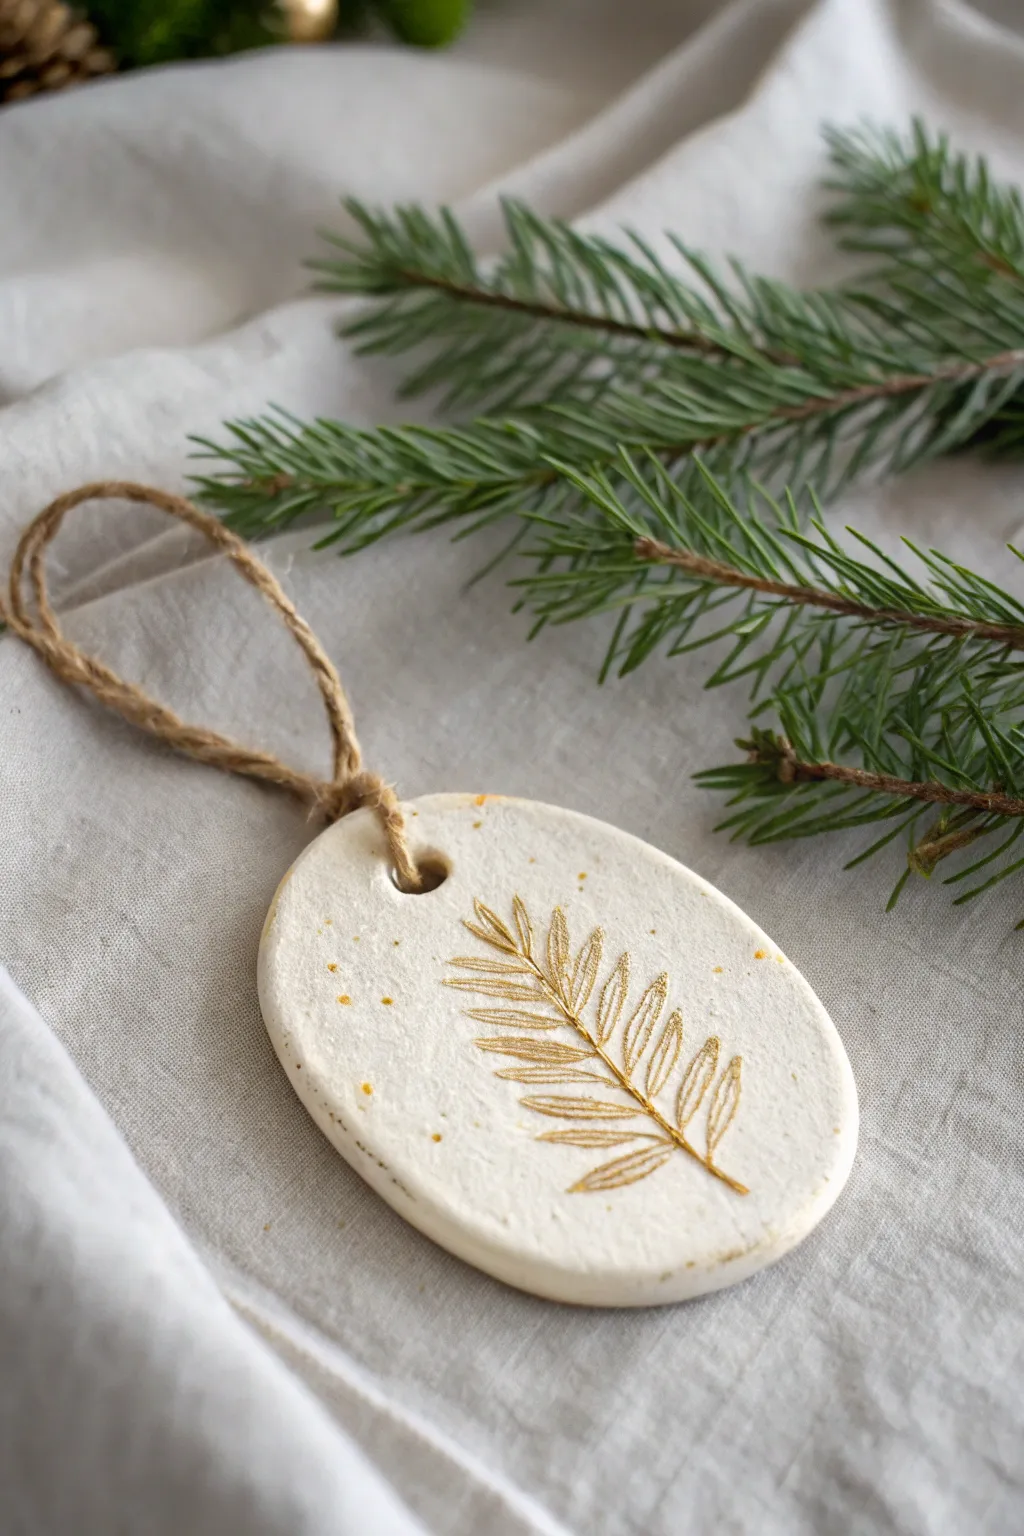
Capture the delicate beauty of nature with these elegant clay ornaments features a stunning metallic leaf imprint. The combination of white clay and shimmering gold creates a sophisticated, minimalist decoration perfect for any Christmas tree.
Detailed Instructions
Materials
- Air-dry clay (white)
- Small rolling pin
- Oval cookie cutter (or a knife and template)
- Fresh fern frond or pine sprig
- Gold acrylic paint or metallic pigment powder
- Fine detail paintbrush
- Gold glitter (fine)
- Drinking straw or skewer
- Jute twine or rustic string
- Parchment paper
- Fine-grit sandpaper (optional)
- Clear matte sealant spray (optional)
Step 1: Preparation & Shaping
-
Prepare your workspace:
Lay down a sheet of parchment paper on a flat surface to prevent sticking. Take a handful of white air-dry clay and knead it in your hands until it becomes soft, pliable, and free of cracks. -
Roll out the clay:
Place the clay on the parchment paper and use your small rolling pin to flatten it. Aim for a thickness of about 1/4 inch (approx. 6mm) so the ornament is sturdy but not too heavy. -
Cut the shape:
Press your oval cookie cutter firmly into the rolled clay. If you don’t have a cutter, lightly trace an oval shape with a toothpick first, then carefully cut around it with a craft knife. -
Smooth the edges:
Dip your finger in a tiny bit of water and run it along the cut edges of the oval to smooth out any roughness or jagged bits left by the cutter.
Cracked Clay Fix
If hairline cracks appear while drying, mix a tiny bit of fresh clay with water to make a paste (‘slip’) and smooth it into the cracks with your finger.
Step 2: Imprinting & Drying
-
Select your botanical:
Choose a fresh fern frond or a small pine sprig. Ensure the leaf is clean and dry. Place it carefully in the center of your clay oval. -
Create the impression:
Gently roll over the leaf with the rolling pin once, applying firm, even pressure to embed it into the clay. I prefer to do just one solid pass so the image doesn’t ghost or shift. -
Reveal the design:
Use a pair of tweezers or a needle tool to carefully lift the stem edge of the leaf and peel it away from the clay, revealing the detailed impression underneath. -
Make the hanging hole:
Before the clay hardens, use a drinking straw to punch a clean hole near the top of the oval. -
Dry the ornament:
Let the ornament dry completely according to your clay package instructions. This usually takes 24-48 hours. flip it over halfway through to ensure even drying and prevent curling. -
Sand imperfections:
Once fully hard, check the edges again. If they feel sharp or uneven, lightly sand them with fine-grit sandpaper for a professional finish.
Try Metallic Wax
Instead of paint, rub gold metallic wax (like Rub ‘n Buff) into the imprint with your finger, then wipe the surface clean for an antique look.
Step 3: Gilding & Finishing
-
Paint the imprint:
Dip a fine detail brush into gold acrylic paint. Carefully paint inside the depressed lines of the fern imprint. The grooves will help guide your brush. -
Add speckles:
Dilute a small amount of gold paint with a drop of water. Dip an old toothbrush or stiff brush into it, then run your thumb over the bristles to flick tiny gold speckles across the white surface of the clay. -
Apply glitter accents:
While the paint is still slightly tacky, or by adding tiny dots of glue, sprinkle a pinch of fine gold glitter over the leaf design for extra sparkle. -
Seal the piece:
To protect the finish and keep the glitter in place, spray the ornament with a light coat of clear matte sealant. Allow this to dry completely in a well-ventilated area. -
Attach the hanger:
Cut a length of jute twine, about 8 inches long. Thread it through the hole at the top of the ornament. -
Tie the knot:
Bring the ends of the twine together and tie a secure overhand knot. Trim any excess string if necessary to keep it looking tidy.
Now your handcrafted nature ornament is ready to bring a touch of woodland elegance to your holiday decor


Simple Star and Snowflake Cutouts
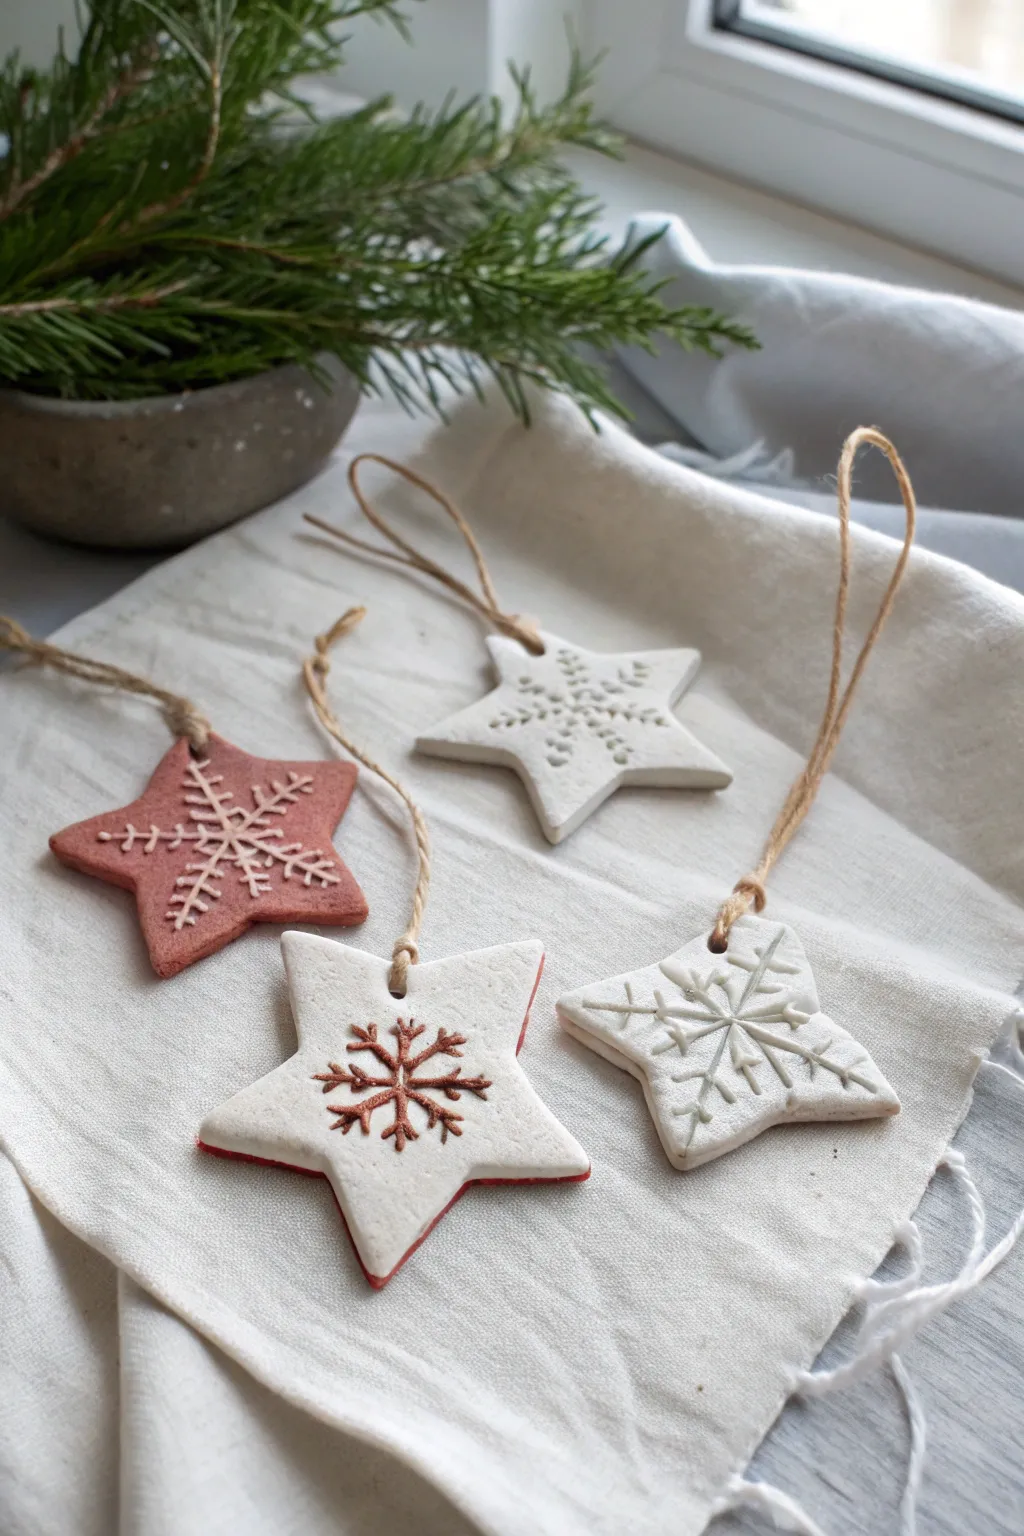
These charming, minimalist ornaments combine traditional snowflake motifs with the earthy texture of air-dry clay. Using contrasting white and terracotta tones creates a sophisticated, rustic look perfect for a Scandinavian-inspired holiday tree.
Step-by-Step Guide
Materials
- White air-dry clay (or polymer clay)
- Terracotta or brown-colored air-dry clay
- Star-shaped cookie cutter (medium size)
- Rolling pin
- Parchment paper or canvas mat
- Snowflake rubber stamps or embossed texture plate
- Wooden skewer or strong straw
- Natural jute twine
- Fine-grit sandpaper (optional)
- Matte sealant or varnish (optional)
- Small craft knife
Step 1: Preparing the Clay Bases
-
Condition the clay:
Begin by taking a chunk of your white clay and kneading it in your hands until it becomes pliable and warm. Do the same with a separate piece of the terracotta clay. This prevents cracking later on. -
Roll out the slabs:
Place your clay on parchment paper. Roll the white clay out to a thickness of about 1/4 inch (6mm). Repeat this process for the terracotta clay, aiming for the same uniform thickness. -
Create the two-tone effect:
For the layered ornament shown on the bottom right, stack a thinner sheet of white clay on top of a terracotta sheet. Roll them gently together just enough so they bond without distorting the layers too much. -
Cut the shapes:
Press your star-shaped cookie cutter firmly into the rolled clay. Create a mix of pure white stars, pure terracotta stars, and the layered version. Pull away the excess clay carefully before lifting the stars. -
Smooth the edges:
Dip your finger in a little bit of water and gently run it along the cut edges of each star to remove any roughness or stray clay crumbs left by the cutter.
Step 2: Adding the Snowflake Texture
-
Position the stamp:
Select a snowflake rubber stamp that fits comfortably within the center of your star. If your stamp has ink residue, clean it thoroughly first to avoid staining the white clay. -
Impress the design:
Press the stamp firmly and evenly into the center of the damp clay star. You want a deep, clear impression, but be careful not to push all the way through the clay. -
Detail the terracotta star:
For the reddish-brown star, you can use a fine needle tool or a white paint pen later to highlight the snowflake lines, but for now, act quickly while the clay is soft to get that deep impression. -
Add the hanging hole:
Using a wooden skewer or a straw, punch a hole near the top point of one of the star’s arms. Make sure the hole is big enough for your twine, accounting for slight shrinkage as the clay dries. -
Create the inlaid look (Optional):
I particularly love the look of the bottom-left star. To achieve this, roll a tiny ‘snake’ of terracotta clay, lay it into the impressed grooves of a white star, and gently flatten it so the brown clay fills the pattern.
Stamp Getting Stuck?
If your stamp sticks to the damp clay, lightly dust the surface of the clay or the stamp itself with cornstarch or baby powder before pressing down.
Step 3: Drying and Assembly
-
Initial drying phase:
Transfer the stars to a flat, clean surface lined with parchment paper. Let them dry undisturbed for about 24 hours in a cool, dry place away from direct heat. -
Flip for even drying:
After the first day, gently flip the stars over. This helps expose the bottom side to air and prevents the edges from curling upward as moisture evaporates. -
Check for dryness:
Wait another 24 hours. The clay should turn a lighter, chalkier color and feel room temperature rather than cool to the touch when fully dry. -
Sand imperfections:
If there are any rough spots on the edges, lightly buff them away with fine-grit sandpaper. Be gentle with the tips of the stars as they can be fragile. -
Highlight the snowflake (Optional):
For the white star with the greyish/brown snowflake pattern, create a very watery wash of brown acrylic paint. Brush it into the grooves and immediately wipe the surface with a damp cloth, leaving pigment only in the recessed lines. -
Seal the ornaments:
To protect against humidity, apply a thin coat of matte varnish or sealant. This step preserves the natural look while adding durability. -
Prepare the hanger:
Cut a length of natural jute twine, approximately 8 inches long. Fold it in half to create a loop. -
Attach the twine:
Thread the folded end through the hole in the star, then pass the loose ends through the loop and pull tight (a layout hitch knot). Alternatively, just thread it through and tie a simple knot at the top.
Pro Tip: Better Definition
For sharper snowflake lines, freeze the rolled clay slab for 5 minutes before stamping. The slightly firmer clay holds detailed impressions much better.
Hang these rustic beauties near a window or on your tree to enjoy their simple elegance all season long


Candy Cane Twist Ornaments
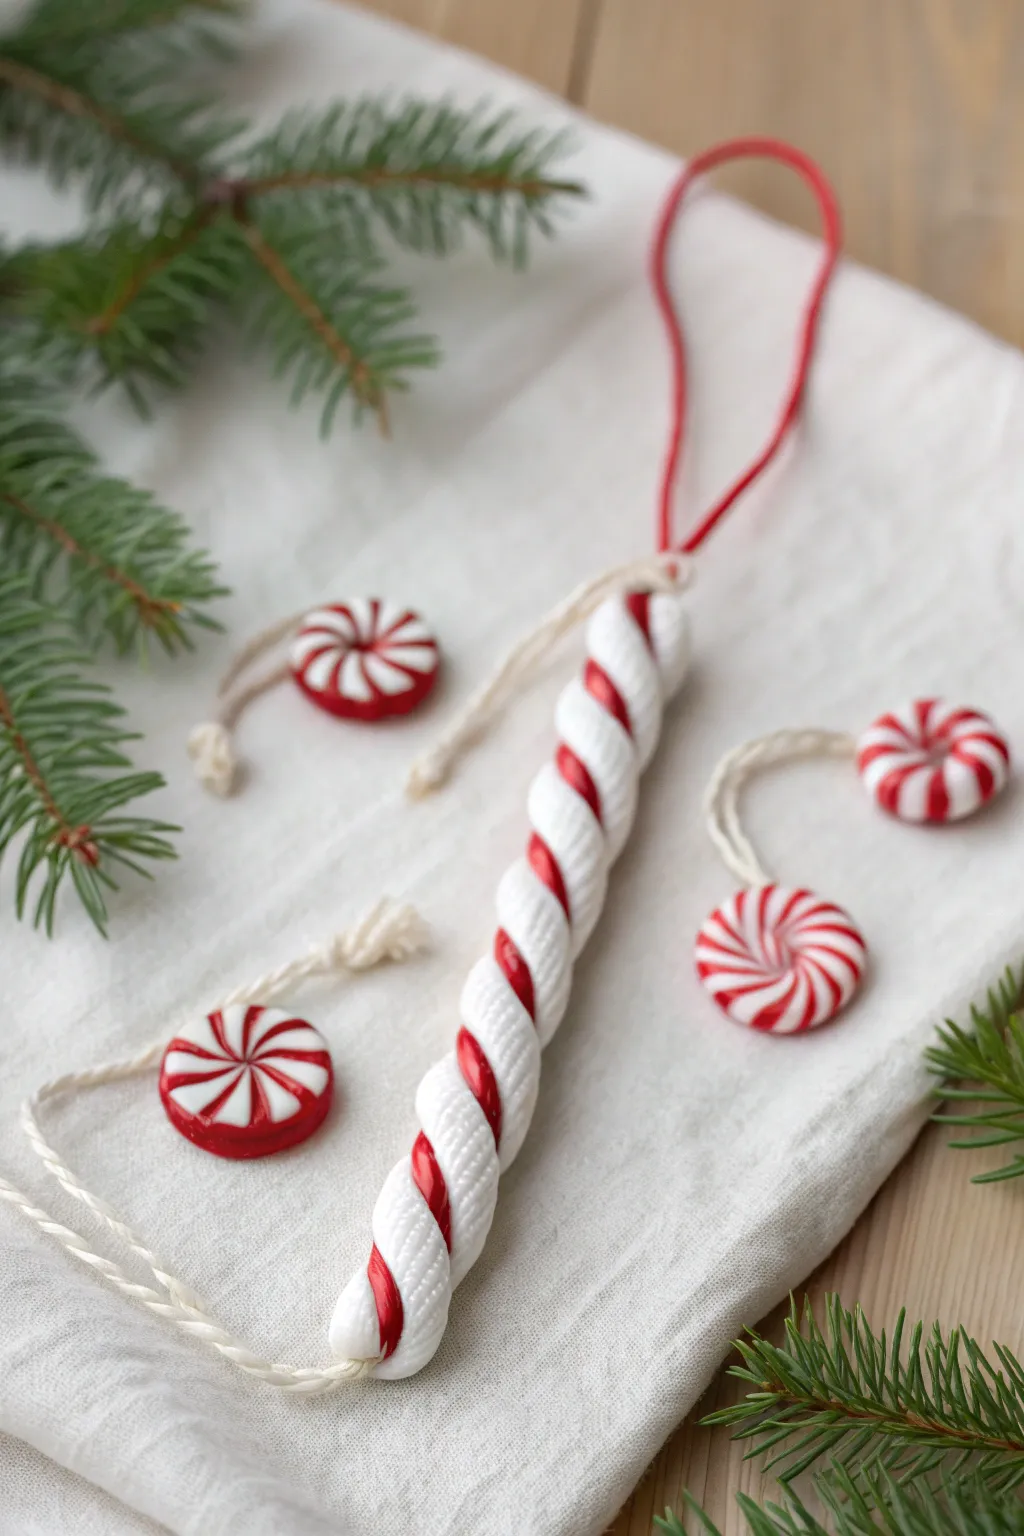
These elegant polymer clay ornaments combine the classic red and white of candy canes with a sophisticated, textured twist. The set includes a long, spiraled icicle shape and matching peppermint roundels, all hung with rustic twine for a cozy holiday look.
How-To Guide
Materials
- White polymer clay
- Red polymer clay
- Clay extruder (optional but helpful)
- Acrylic roller or pasta machine
- Sharp crafting blade or X-Acto knife
- Needle tool or toothpick
- Sandpaper or texture sponge (fine grit)
- Red cord or ribbon
- Natural twine
- Oven and baking sheet
- Gloss glaze (optional)
Step 1: Prepping the Clay
-
Condition the clay:
Start by warming up your white and red polymer clay in your hands separately until they are soft and pliable. This prevents cracking later. -
Create thick white ropes:
Roll out a thick log of white clay, roughly half an inch in diameter. You want this to be the substantial base for your twist. -
Prepare thin red strands:
Roll out very thin snakes of red clay. Alternatively, if you have a clay extruder, use a small round disc to push out perfectly even strands of red spaghetti. -
Texture the white clay:
Before assembling, lightly roll your white clay log over a piece of fine-grit sandpaper or press a texture sponge against it to give it that sugar-dusted, non-smooth surface seen in the photo.
Step 2: Forming the Icicle
-
Apply the red stripe:
Take one of your thin red strands and gently press it onto the white log, running it lengthwise from top to bottom. -
Begin the twist:
Hold one end of the log in your left hand and the other in your right. Gently twist your hands in opposite directions. The red stripe will start spiraling around the white base. -
Deepen the ridges:
As you continue twisting, the clay will naturally create deep groves between the white sections where the red line sits. Keep twisting until the red stripe is buried deep in the crevice, accentuating the puffy white sections. -
Refine the shape:
Gently roll the twisted log on your work surface to even it out, tapering one end slightly to look like an icicle tip. I prefer to keep the top slightly thicker for the hanging hole. -
Create the hanging loop:
Using a needle tool, pierce a hole through the thicker top end of the twisted icicle. make sure the hole is wide enough to fit your twine later.
Fixing Smudges
Red clay stains white clay easily! Wipe hands and tools with baby wipes or rubbing alcohol between colors. If smudges happen, use a q-tip with rubbing alcohol to clean the raw white clay.
Step 3: Creating the Peppermint Rounds
-
Make a striped cane:
With leftover clay, form a thick cylinder of white clay and place four thin strips of red clay lengthwise around it, evenly spaced. -
Roll and reduce:
Roll this cylinder on your table to embed the red strips into the white surface, making the whole log longer and thinner. -
Twist the cane:
Twist the entire log tightly so the stripes spiral around, similar to the icicle but much tighter. -
Coil into a round:
Take this long, thin twisted snake and coil it into a flat spiral circle, like a lollipop. Smooth the outer edge with your finger. -
Pierce for hanging:
Use your needle tool to poke a hole near the edge of the round ornament. Wiggle it slightly to ensure a clean opening.
Sparkle Finish
Before baking, lightly brush the white parts with white glitter or mica powder. This mimics the look of real sugar or gleaming snow on the finished ornament.
Step 4: Baking and Finishing
-
Bake the batch:
Place all your formed pieces on a baking sheet lined with parchment paper or cardstock. Bake according to your clay manufacturer’s instructions (usually around 275°F/135°C for 15-30 minutes). -
Cool down:
Let the ornaments cool completely on the baking sheet before handling them. They are fragile while warm. -
Clean up stripes:
If any red clay smeared onto the white parts, you can gently scrape it off with a craft knife or lightly sand it away now that the clay is hard. -
Add the red loop:
Cut a length of red leather cord or satin ribbon. Thread it through the hole of the icicle ornament and tie a knot to form the main hanging loop. -
Attach rustic twine:
Cut a piece of natural beige twine. Loop it through the hole as well (or tie it around the base of the red loop) and knot the ends for a decorative, rustic touch. -
String the peppermints:
Thread natural twine through the small peppermint rounds, tying a simple knot to create their hangers.
Hang these sweet treats on your tree for a classic festive touch that will last for years


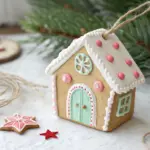

Mini Gingerbread House Ornaments
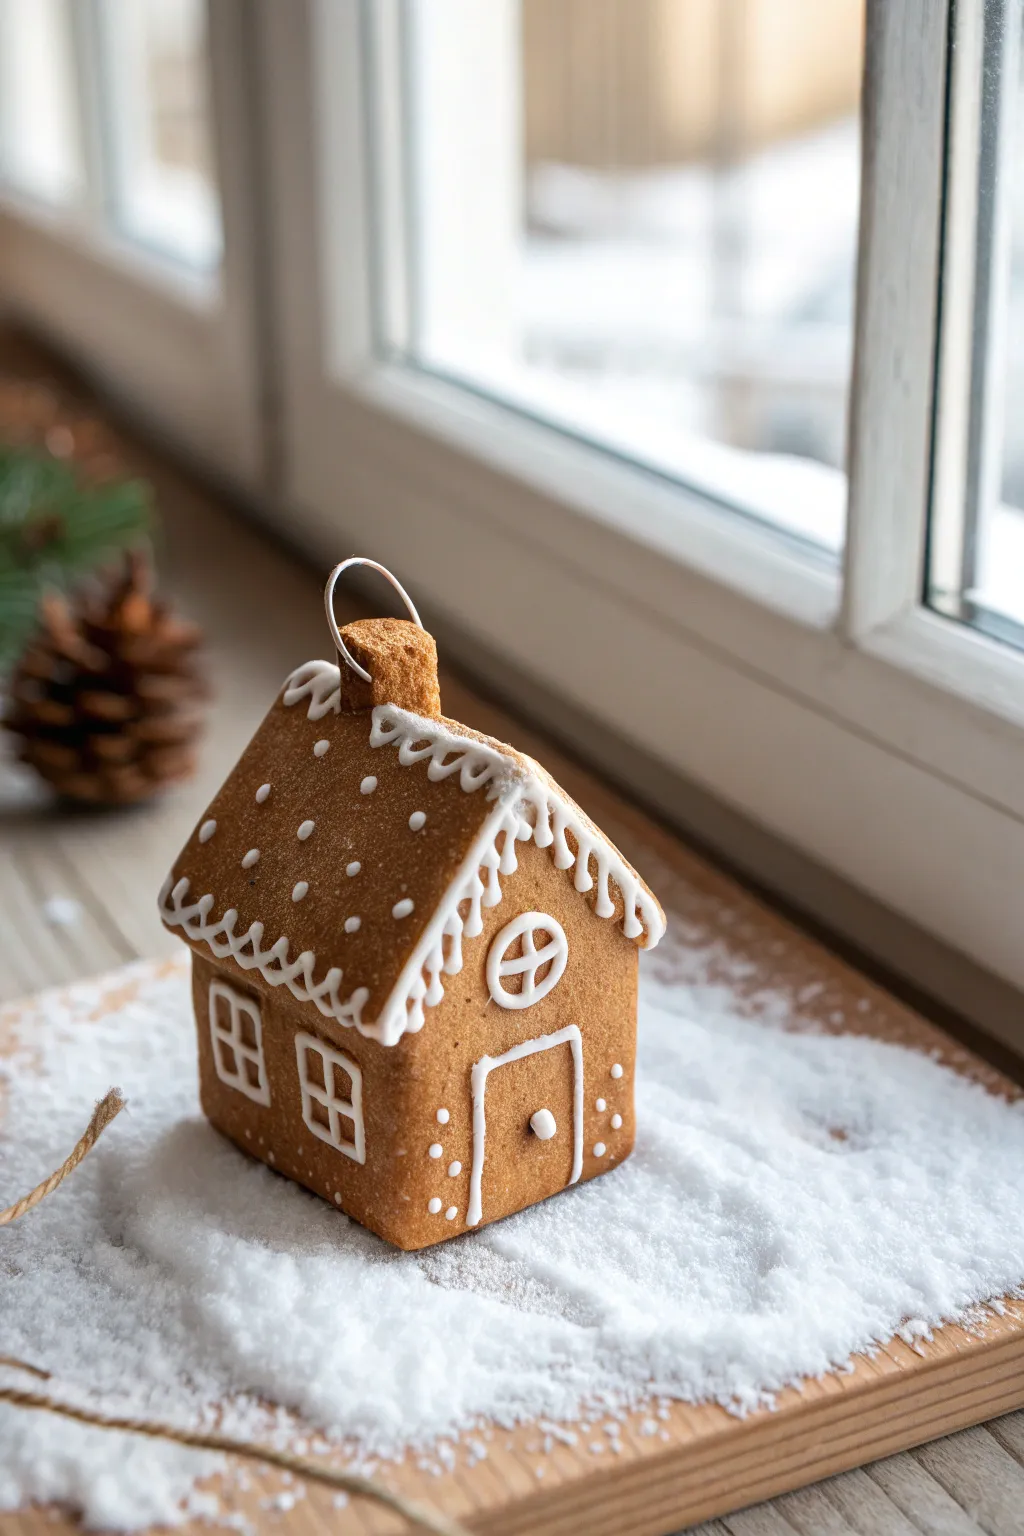
Create the warmth of holiday baking without the expiration date using this realistic clay gingerbread house tutorial. This charming miniature features textured “cookie” walls and delicate puffy paint piping that looks good enough to eat.
Step-by-Step Guide
Materials
- Light brown polymer clay (or air-dry clay)
- Terra cotta polymer clay (for mixing)
- Texturing tool (clean toothbrush or sandpaper)
- Rolling pin
- Sharp craft knife
- White liquid clay or white 3D fabric paint (puffy paint)
- Small eye hook or wire loop
- Ruler
- Baking sheet and oven (if using polymer clay)
Step 1: Preparing the Dough
-
Mix the clay color:
Begin by conditioning your light brown clay. To achieve that perfectly baked gingerbread hue, I like to mix in a small amount of terra cotta clay. Knead until the color is completely uniform. -
Roll the slab:
Roll out the clay on a smooth work surface to a thickness of about 1/4 inch. You want it sturdy enough to stand but not too chunky. -
Add texture:
Before cutting, thoroughly texture the entire surface of the clay slab using a clean toothbrush or the rough side of a sponge. Press gently to create the porous look of baked cake.
Fixing Sagging Roofs
If the roof sags during assembly, place a small ball of crumpled aluminum foil inside the house structure to support the clay while it bakes or dries.
Step 2: Cutting and Assembling
-
Cut the walls:
Using a craft knife and ruler, cut out your house components: two pentagons for the front and back (squares topped with triangles), two rectangular side walls, and two rectangular roof panels. Keep the pieces small, roughly 1.5 to 2 inches wide. -
Cut the chimney:
Cut four tiny pieces to form a square chimney. You’ll need to angle the bottom edges of two sides to match the pitch of your roof. -
Assemble the base:
Stand up the four wall pieces. Press the seams together firmly from the inside. You can use a bit of liquid clay or water (for air-dry clay) as glue at the joints. Smooth the outer corners gently with your finger. -
Attach the roof:
Place the two roof panels on top. Ensure they overhang the walls slightly. Press the peak where the two panels meet to secure the bond. -
Attach the chimney:
Position your chimney pieces on one side of the roof slope and blend the clay at the base so it sits flush. -
Insert the hook:
Push a small metal eye hook or a loop of wire into the peak of the chimney or directly into the center of the roof ridge. -
Refine the texture:
During assembly, you likely smoothed out some texturing. Go back over the joints and touched areas with your texturing tool to hide fingerprints and seamless lines.
Sugar Effect
For a sugary finish, sprinkle clear scenic glitter or fine white sand over the wet puffy paint or liquid clay before it dries to simulate granulated sugar.
Step 3: Baking and Decorating
-
Bake or dry:
If using polymer clay, bake according to the package instructions (usually 275°F for 15-30 minutes). If using air-dry clay, let it sit for 24-48 hours until fully hardened. -
Prepare the icing:
Once the house is cool and hard, prepare your ‘icing.’ You can use white liquid polymer clay (which requires a second bake) or white 3D puffy paint (no baking required). -
Pipe the roof details:
Squeeze a wavy line of icing along the very edge of the roof eaves. Let small drops pull downward to mimic dripping glaze. -
Add roof shingles:
Pipe small dots or ‘U’ shapes across the roof panels to create a pattern. Keep the spacing somewhat random for a rustic look. -
Outline windows:
On the side walls, carefully pipe four-pane window squares. Keep your hand steady and use even pressure. -
Create the front door:
Outline a simple rectangular door on the front. Add a tiny dot for the doorknob. -
Decorate the loft window:
In the triangle peak above the door, pipe a small circular window with a cross in the center. -
Final drying:
Allow the paint or liquid clay to set completely. If you used liquid clay, return it to the oven for a short bake to set the white details.
Now your permanent gingerbread house is ready to hang on the tree or display on a snowy windowsill

The Complete Guide to Pottery Troubleshooting
Uncover the most common ceramic mistakes—from cracking clay to failed glazes—and learn how to fix them fast.
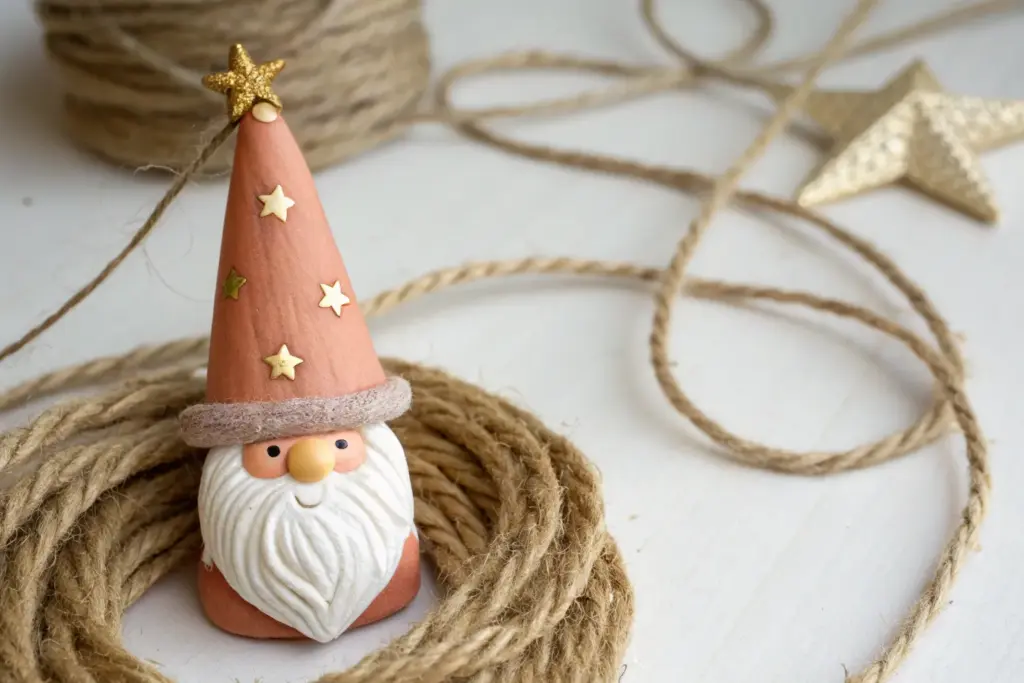
Santa Face Ornaments
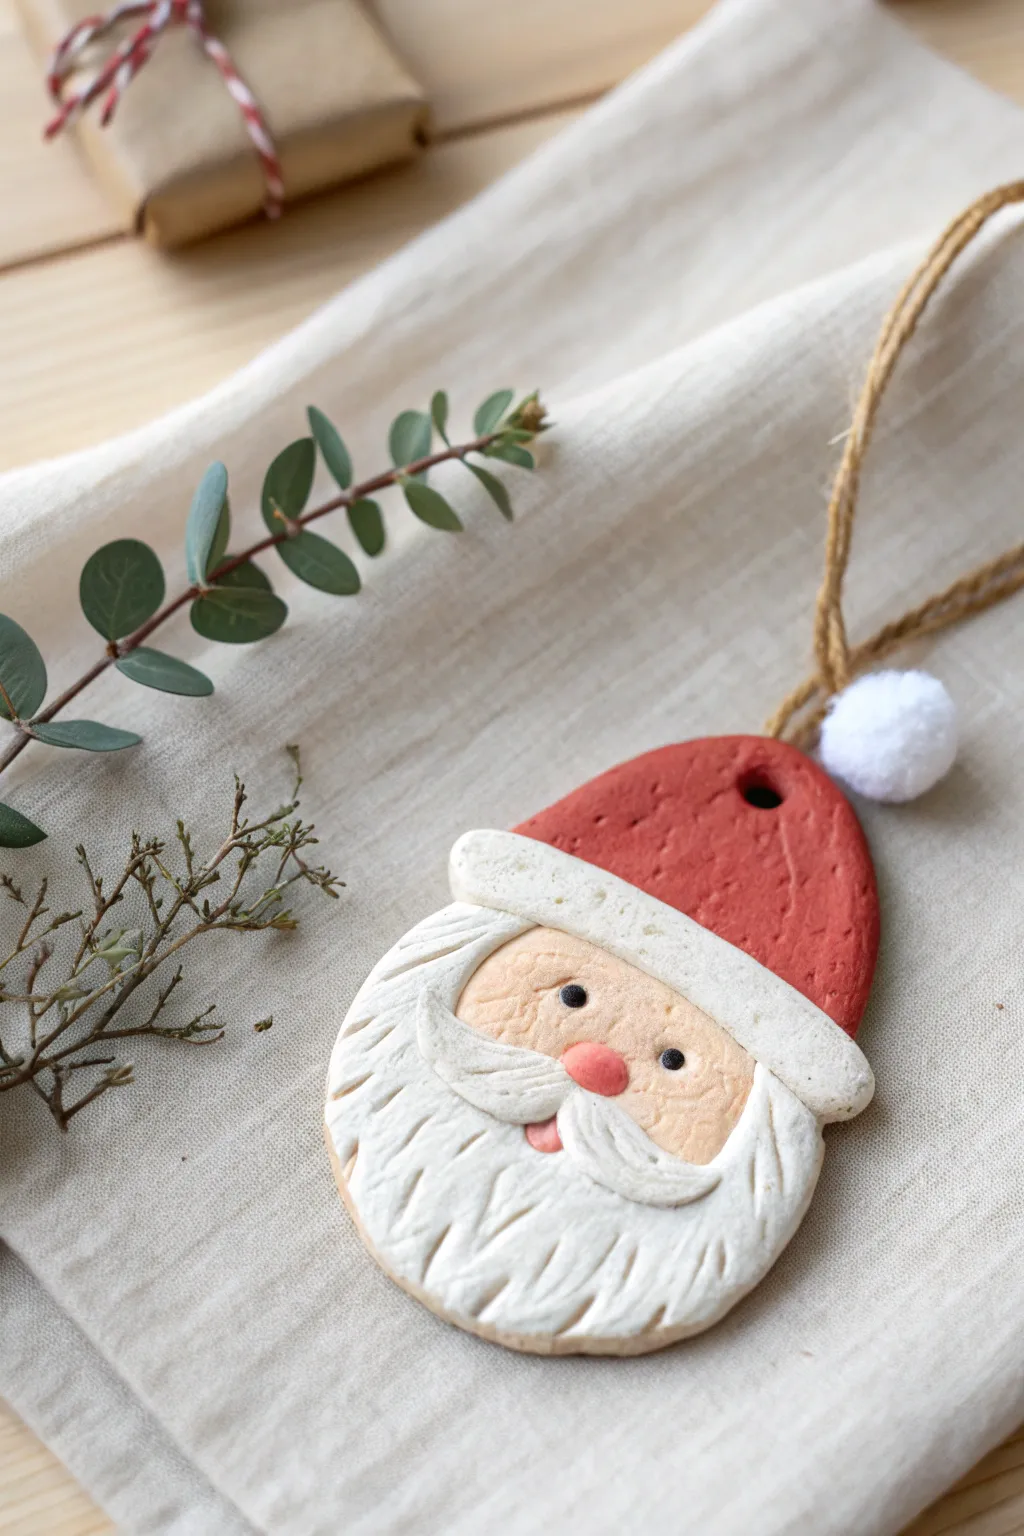
Capture the jolly spirit of the season with this handcrafted Santa face ornament, featuring charming details like a textured beard and a rosy nose. The combination of painted clay and a soft pom-pom adds a delightful mix of materials that looks wonderful hanging on the tree.
Step-by-Step
Materials
- White air-dry clay or polymer clay
- Rolling pin
- Sharp craft knife or clay tool
- Needle tool or toothpick
- Acrylic paints (red, flesh tone, pink, black, white)
- Fine detail paintbrushes
- Small white pom-pom
- Jute twine or ribbon
- Glue (craft glue or hot glue)
- Small straw or skewer (for hole punching)
- Clear sealant (optional)
Step 1: Shaping the Base
-
Condition the clay:
Start by taking a chunk of your clay and kneading it in your hands until it becomes soft, pliable, and easy to work with. -
Roll out the slab:
Using your rolling pin, flatten the clay to an even thickness of about 1/4 inch. Aim for a smooth surface without cracks. -
Cut the outline:
With a craft knife, cut out the main shape of the ornament. You want a teardrop or rounded triangle shape that includes the hat area at the top and the rounded beard area at the bottom. -
Punch the hanging hole:
While the clay is still wet, use a straw or skewer to poke a hole near the top tip of the hat. Make sure it’s large enough for your twine to pass through later.
Step 2: Adding Details & Texture
-
Create the hat brim:
Roll a small snake of clay and flatten it slightly. Attach this horizontally across the shape, separating the hat area from the face area. Press it down gently to secure it. -
Form the nose:
Roll a tiny ball of clay and press it into the center of the face area, just below where the eyes will go. -
Add the mustache:
Shape two small, elongated teardrops of clay. Attach them under the nose, curving outward like a mustache. Use a modeling tool to score lines into them for hair texture. -
Add the mouth:
Press a tiny semi-circle of clay just beneath the mustache to create a smiling lower lip. -
Texture the beard:
Using a needle tool or toothpick, carve flowing vertical lines into the bottom half of the clay shape. Start from the cheeks and mustache and pull the strokes down to the bottom edge to simulate a fluffy beard. -
Texture the brim:
Dab the flat brim strip with a stiff brush or a textured sponge to give it a fluffy, fur-like appearance. -
Dry the ornament:
Place your Santa on a flat surface to dry completely. Depending on your clay type, this could take 24-48 hours. Turn it over halfway through to ensure even drying.
Fixing Cracks
If small cracks appear as the clay dries, mix a tiny bit of fresh clay with water to make a paste. Smooth this paste into the cracks and let it dry again before painting.
Step 3: Painting & Assembly
-
Paint the hat:
Once dry, paint the top hat section with a bright festive red. Be careful to paint around the white brim. -
Paint the face:
Fill in the face area (between the brim and the beard) with a flesh-toned acrylic paint. I find a small flat brush works best for getting neat edges here. -
Add facial features:
Paint the nose a rosy pink and add two small black dots for the eyes. Use the very tip of your smallest brush or a toothpick for the eyes. -
Highlight the beard and brim:
Keep the beard and hat brim white. If you used off-white clay, give them a coat of white paint. You can also dry-brush a little white over the mustache details to make them pop. -
Paint the mouth:
Carefully paint the small lower lip detail with a soft pink or red. -
Attach the pom-pom:
Glue a small white pom-pom to the side of the hat or near the top loop for a classic festive touch. -
Seal (Optional):
To protect your paint job, apply a thin coat of matte or satin varnish over the entire piece. -
String the hanger:
Thread a piece of jute twine through the hole at the top and tie a secure knot to create a loop for hanging.
Textured Effect
For the hat brim, tap the wet clay with an old toothbrush instead of a smooth tool. This creates a realistic ‘fur’ texture that looks amazing once painted.
Now your charming Santa is ready to bring a touch of handmade joy to your holiday decor
Snowman Stack Ornaments

These charming snowman ornaments bring a rustic, handmade touch to your tree with their textured finish and cozy fabric scarves. Using simple salt dough or air-dry clay, you can mold these three-tiered figures to create timeless winter keepsakes.
How-To Guide
Materials
- White air-dry clay or homemade salt dough (2 cups flour, 1 cup salt, 1 cup water)
- Aluminum foil (optional, for cores)
- Jute twine for hanging
- Small black beads or black peppercorns (for eyes and buttons)
- Orange polymer clay or orange paint for the nose
- Pink or red scrap fabric (gauze or linen works well)
- Toothpick or skewer
- Craft glue
- Clear matte sealant spray (optional)
- Fine grit sandpaper
Step 1: Shaping the Snowman Body
-
Prepare the Dough:
Knead your white air-dry clay or salt dough until it is smooth and pliable. If the dough feels too sticky, dust your hands with a little flour or cornstarch. -
Form the Base Sphere:
Roll a medium-sized ball of clay for the bottom section of the snowman. I prefer to roll it firmly between my palms to eliminate cracks, then gently flatten the bottom so it can stand upright. -
Create the Middle Section:
Roll a second sphere that is slightly smaller than the base. Check the proportions by stacking it briefly on top of the base to ensure it looks balanced. -
Form the Head:
Roll a third, smallest sphere for the head. This one should be round and smooth, serving as the perfect canvas for the snowman’s face. -
Texture the Surface:
To mimic the compacted snow look seen in the photo, gently tap the surface of all three spheres with a stiff paintbrush or an old toothbrush to add a subtle, stony texture.
Step 2: Assembly and Details
-
Structure the Stack:
Insert a toothpick or small skewer vertically into the center of the base sphere. Leave enough sticking out to impale the middle and top spheres, which helps hold the stack together. -
Stack the Components:
Slide the middle sphere onto the skewer, securing it with a dab of craft glue between the layers. Repeat this process for the head sphere. -
Add Hanging Mechanism:
While the clay is still soft, create a small vertical hole through the very top of the head using a needle tool or thick wire. This is where your twine will pass through later. -
Create the Eyes:
Press two small black beads or peppercorns deep into the face to serve as eyes. If using hole-less beads, push them in flush with the clay surface. -
Add Buttons:
Press two or three matching beads or peppercorns into the middle and bottom spheres to act as the snowman’s buttons. -
Sculpt and Attach the Nose:
Roll a tiny cone shape from orange clay (or white clay that you paint later). Use a dot of glue and press it firmly into the center of the face. -
Dry the Ornament:
Allow the snowman to dry completely. If using salt dough, bake at a low temperature (200°F/95°C) for several hours. If using air-dry clay, let it sit for 24-48 hours until hard.
Collapsing Snowman?
If the clay is too heavy and squats down while wet, insert a crumpled ball of aluminum foil inside each sphere to reduce weight and keep shape.
Step 3: Finishing Touches
-
Sand Imperfections:
Once fully dry, use fine-grit sandpaper to gently smooth any rough seams or unintended sharp bumps, being careful not to scratch the beads. -
Seal the Surface:
Spray the entire ornament with a clear matte sealant. This protects the clay from moisture and gives it a finished, professional look. -
String the Hanger:
Cut a length of jute twine, fold it in half, and thread the loop end through the hole in the head. Secure it with a knot at the loop base if desired, or tie a knot inside the head hole before fully assembling if possible. -
Prepare the Scarf:
Cut a thin strip of pink gauze or linen fabric. Keep the edges raw and slightly frayed to match the rustic aesthetic shown in the final result. -
Tie the Scarf:
Wrap the fabric strip around the snowman’s neck area (between the head and middle sphere). Tie a simple overhand knot and fluff the ends so they drape naturally.
Rustic Texture Tip
Mix a teaspoon of used coffee grounds or fine sand into your white clay before rolling. This creates a speckled, organic stone effect without painting.
Hang your finished snowman on a sturdy branch and enjoy the cozy winter vibe it adds to your decor


What Really Happens Inside the Kiln
Learn how time and temperature work together inside the kiln to transform clay into durable ceramic.
Reindeer and Winter Animal Minis
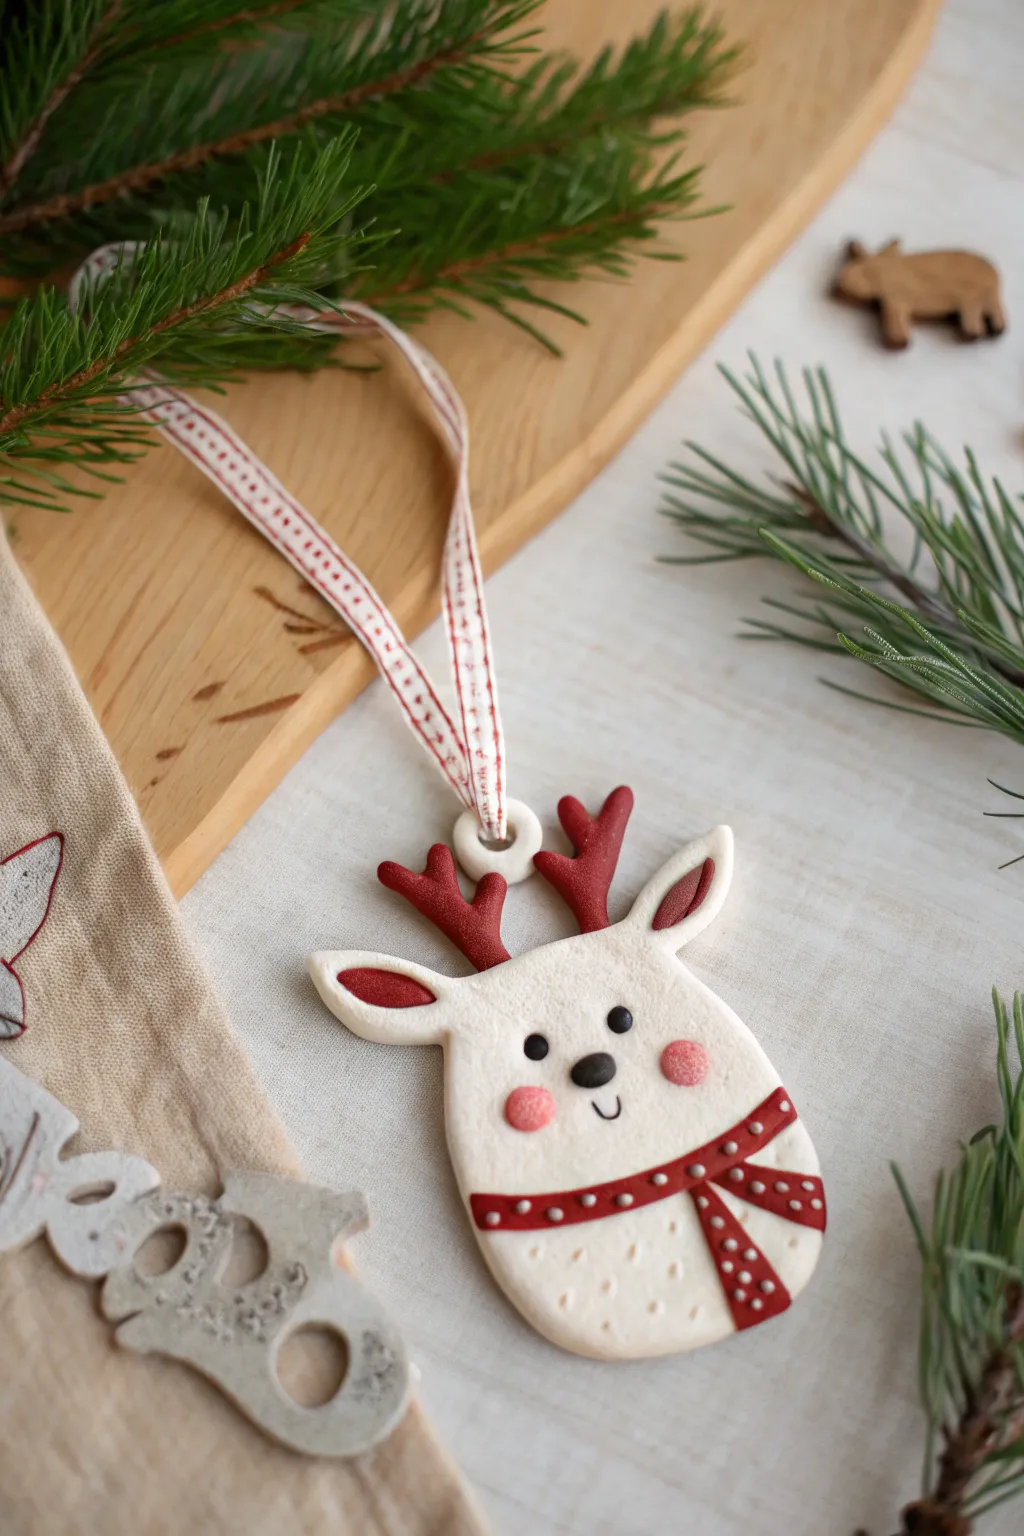
This charming reindeer ornament brings a touch of handmade warmth to your holiday decor with its sweet expression and festive red accents. Crafted from simple white clay and detailed with care, this mini project is perfect for hanging on the tree or gifting as a personalized tag.
Step-by-Step Tutorial
Materials
- White polymer clay or air-dry clay
- Red polymer clay (or red acrylic paint if painting later)
- Black polymer clay (tiny amount for eyes/nose)
- Pink soft pastel chalk or pink clay
- Rolling pin
- Oval cookie cutter (approx. 2-3 inches) or knife
- Modeling tools (ball tool, needle tool)
- Small straw or drinking straw (for hole)
- Red and white stitched ribbon
- White acrylic paint (for dots)
- Small detail paintbrush or toothpick
- Baking sheet and parchment paper (if using polymer)
Step 1: Shaping the Base
-
Condition the clay:
Start by kneading your white clay until it is soft, pliable, and free of any cracks. This ensures a smooth finish for the reindeer’s face. -
Roll out the slab:
Roll the white clay out to a thickness of about 1/4 inch. You want it sturdy enough to hang but not too heavy. -
Cut the shape:
Use an oval cutter to stamp out the main head shape. If you don’t have a cutter, you can freehand a rounded egg shape with a craft knife and smooth the edges with your finger. -
Create the loop attachment:
Roll a small snake of white clay into a loop or ring. Attach this firmly to the top center of the head. Use a small straw to punch a clean hole through the center of this ring for the ribbon later.
Sticky Situation?
If your white clay is picking up lint or red pigment from your hands, keep a pack of baby wipes nearby. Clean your hands thoroughly before switching back to touching the white sections.
Step 2: Adding Features
-
Form the ears:
Shape two small teardrops of white clay. Flatten them slightly and attach them to the upper sides of the head, blending the seams at the back so they stay secure. -
Add inner ear details:
Take tiny pieces of red clay, roll them into smaller, thinner teardrops, and press them into the center of the white ears. I find using a ball tool helps press these in flush with the surface. -
Sculpt the antlers:
Roll two small logs of red clay. Create branch-like forks at the top of each. Press these firmly onto the top of the head, just inside the ears. -
Make the face:
Roll three tiny balls of black clay. Use two for the eyes and a slightly larger oval one for the nose. Press them gently into the center of the face. -
Carve the mouth:
Use a needle tool or a small curved blade to gently impress a small ‘u’ shape directly under the nose for a smiling mouth. -
Add rosy cheeks:
If using clay, flatten two tiny circles of pink clay and press them onto the cheeks. Alternatively, shave a little pink pastel chalk into dust and brush it on dry with a soft brush for a softer, blushed look.
Step 3: The Festive Scarf
-
Create the scarf strip:
Roll a thin strip of red clay. Lay it across the bottom portion of the reindeer’s ‘neck’ area, curving it slightly to look like it’s draped. -
Add the scarf tail:
Cut a shorter piece of the red strip and attach it vertically hanging down from the main scarf piece, mimicking a tied knot. -
Texture the scarf:
Use a needle tool or toothpick to add tiny indentations for texture, or leave it smooth if you plan to paint dots later. -
Texture the body:
Below the scarf, use a needle tool to poke tiny, random shallow holes into the white clay to give the ‘sweater’ area a knit-like texture.
Blush Master
Apply the pastel chalk blush BEFORE baking polymer clay. The pigment bonds with the raw clay during the baking process, making the rosy cheeks permanent without needing paint.
Step 4: Finishing Touches
-
Bake or dry:
Follow the manufacturer’s instructions for your specific clay. If using polymer, bake on parchment paper at the recommended temperature. If using air-dry, let it sit for 24-48 hours. -
Paint details:
Once cool or dry, use a toothpick dipped in white acrylic paint to add tiny polka dots to the red scarf for a festive winter pattern. -
Add the ribbon:
Thread a length of red and white stitched ribbon through the top loop and tie a knot to finish your ornament.
Now your adorable reindeer is ready to hang on the tree or be wrapped up as a special handmade gift for a friend.
Stocking and Mitten Flat Ornaments
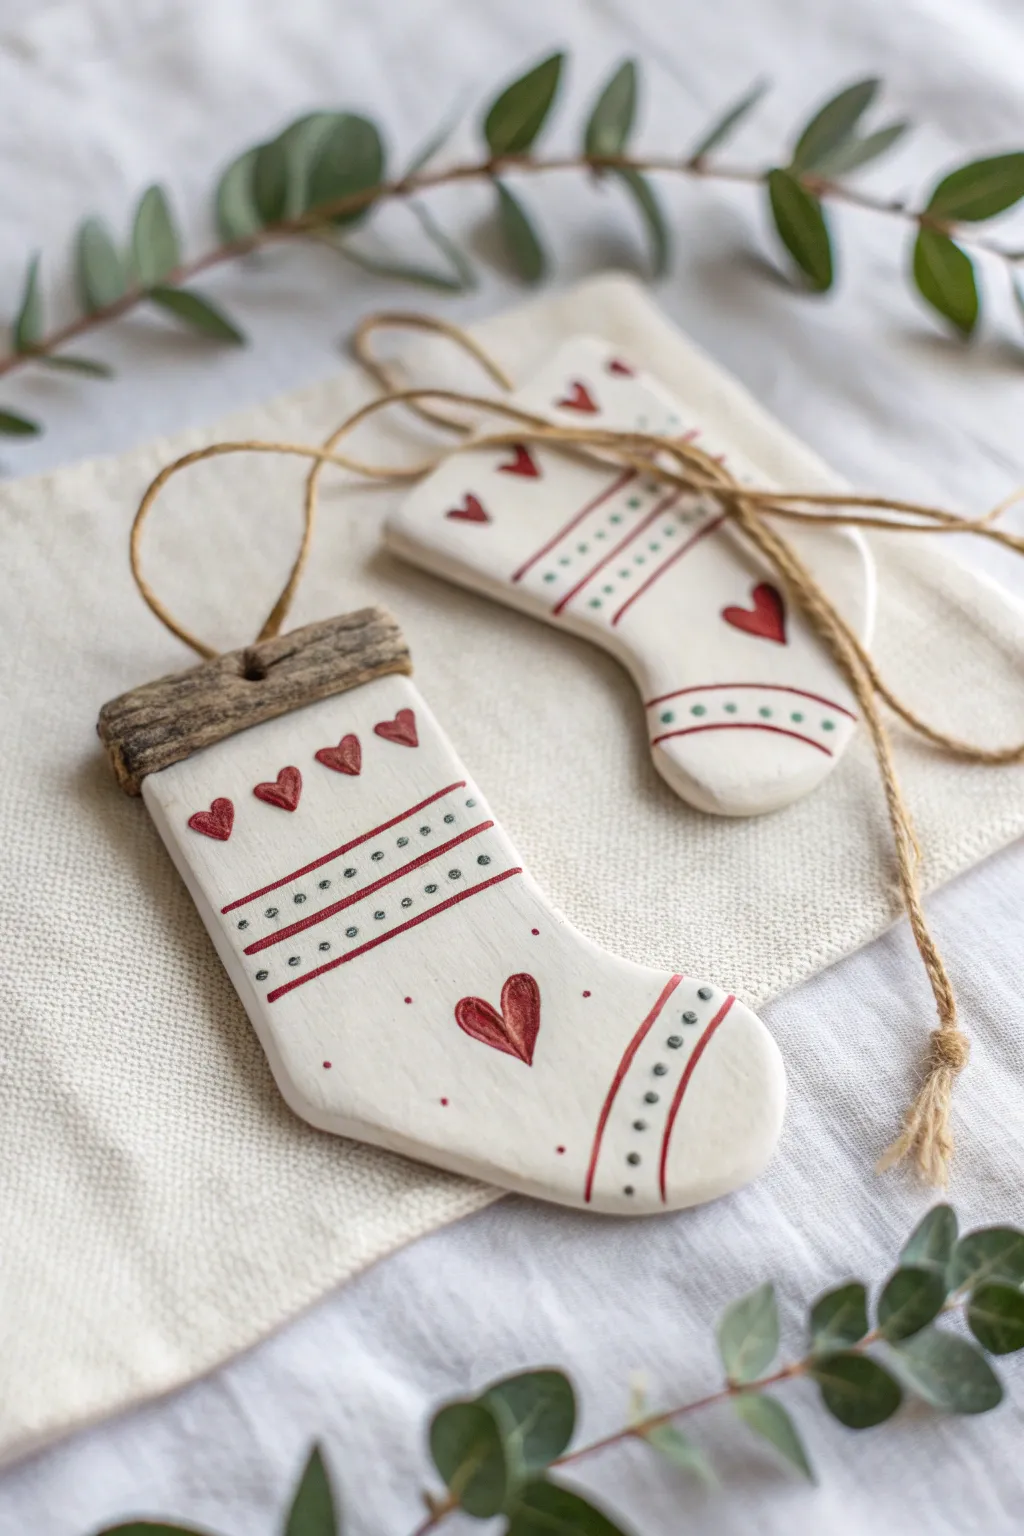
These charming sock-shaped ornaments bring a touch of cozy Scandi style to your Christmas decor with their simple red and green details. The addition of a small driftwood topper gives them a unique, rustic finish that contrasts beautifully with the smooth white clay.
How-To Guide
Materials
- White polymer clay or air-dry clay
- Rolling pin
- Stocking cookie cutter (or a cardstock template and craft knife)
- Small piece of driftwood or bark (approx. 1 inch long)
- Acrylic paints (Red, Forest Green, Dark Brown/Black)
- Fine detail paintbrush (00 or 0 size)
- Small dotting tool or toothpick
- Jute twine
- Strong craft glue (e.g., E6000) or superglue
- Sandpaper (fine grit)
- Clear matte varnish (optional)
Step 1: Shaping the Clay Base
-
Condition the clay:
Start by kneading your white clay until it is soft, pliable, and free of cracks. Warm clay is much easier to work with and results in smoother edges. -
Roll out the slab:
Roll the clay out to an even thickness of about 1/4 inch (6mm). If you want perfectly even ornaments, use depth guides or skewers on either side of your roller. -
Cut the shapes:
Press your stocking cookie cutter firmly into the clay. If you don’t have a cutter, place a paper template on the clay and carefully trace around it with a sharp craft knife. -
Smooth the edges:
Dip your finger in a little water (for air-dry clay) or cornstarch (for polymer) and gently run it along the cut edges to soften any harsh lines or burrs.
Driftwood Alternative
No driftwood? Create a faux wood top by adding a rectangle of textured clay to the top of the stocking before baking, then paint it dark brown.
Step 2: Creating the Rustic Hanger
-
Prepare the wood tops:
Select small pieces of driftwood or bark that are roughly the same width as the top of your clay stocking. Break or saw them to size if needed. -
Drill the loop hole:
Using a small hand drill or a Dremel tool, carefully drill a hole through the center of the wood piece. This is where your twine hanger will go later. -
Dry or bake the clay:
Allow your clay stockings to dry completely (24-48 hours for air-dry) or bake them according to the package instructions for polymer clay. I like to let air-dry clay sit on a wire rack to ensure airflow to the bottom. -
Sand for perfection:
Once hardened, specific areas might need touch-ups. Use fine-grit sandpaper to smooth out any remaining rough spots on the edges or surface.
Step 3: Painting the Scandi Patterns
-
Paint the cuff lines:
Dip your fine brush into red acrylic paint. Paint two parallel horizontal lines across the upper portion of the stocking, leaving space between them for dots. -
Paint the toe detail:
Repeat the parallel line pattern near the toe of the stocking, creating a curved detail that mimics the seam of a sock. -
Add the green dots:
Using a dotting tool or the tip of a toothpick dipped in forest green paint, carefully place a row of small dots between the red parallel lines you painted on the cuff and toe. -
Create the heart accents:
Paint a row of small red hearts just below the wooden cuff line. Start with two dots and drag them down to meet at a point. -
Paint the central heart:
Paint a larger, focal heart in the center of the stocking’s foot area. You can add a tiny white highlight line later to give it dimension. -
Add floating dots:
To fill empty space without cluttering, add very tiny red dots sporadically around the central heart. -
Seal the piece:
Once the paint is fully dry, apply a thin coat of clear matte varnish to protect your design from scratches and dust.
Vintage Patina
For an aged look, mix a tiny bit of brown paint with water and wash over the white clay, then wipe it off immediately to leave color in the recesses.
Step 4: Assembly
-
Attach the wood:
Apply a strong adhesive to the top edge of the clay stocking and press the drilled wood piece firmly onto it. Let the glue cure completely. -
Add the twine:
Cut a length of jute twine about 8 inches long. Thread it through the hole in the wood. -
Secure the loop:
Tie a secure knot at the ends of the twine to create a hanging loop, trimming any excess fray.
Hang these adorable stockings on your tree or use them as personalized gift tags for a handmade holiday touch

TRACK YOUR CERAMIC JOURNEY
Capture glaze tests, firing details, and creative progress—all in one simple printable. Make your projects easier to repeat and improve.
Tiny Clay Wreath Ornaments
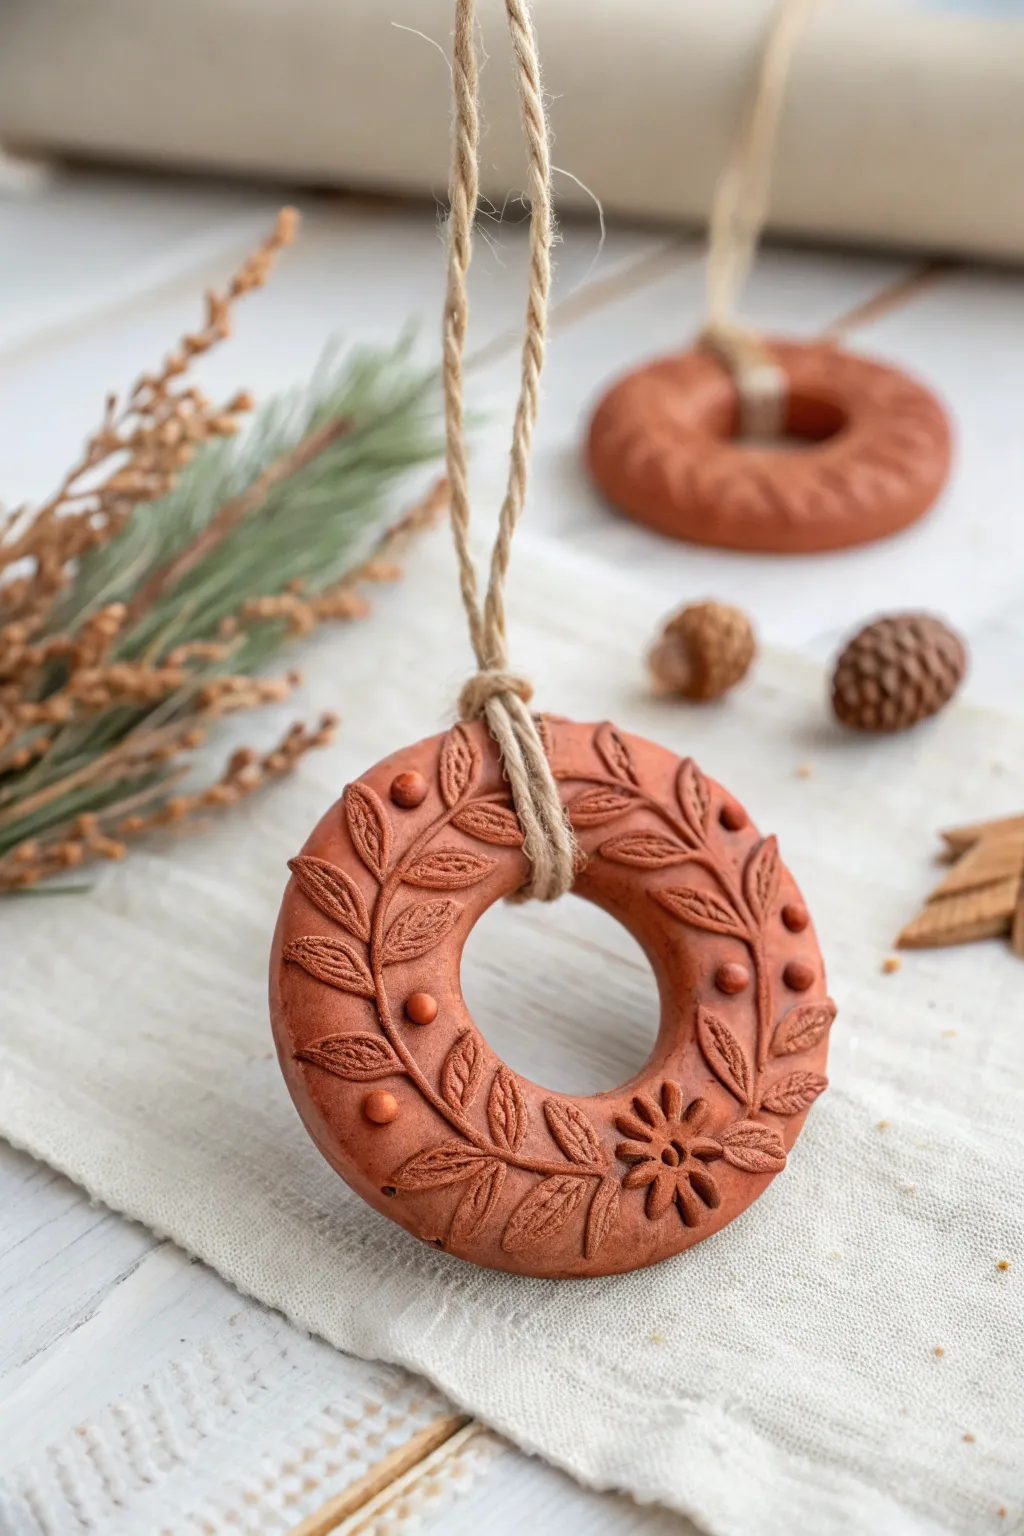
These miniature ceramic-style wreaths bring a touch of earthy elegance to your holiday tree, featuring delicate raised leaf patterns and subtle berry accents. The warm, terracotta hue and natural twine hanger create a cozy, nostalgic aesthetic perfect safely preserving the charm of handmade holidays.
Step-by-Step Tutorial
Materials
- Terracotta-colored air dry clay (or polymer clay)
- Small rolling pin
- Circular cookie cutter (approx. 2.5-3 inches)
- Smaller circular cutter (approx. 1 inch for the center)
- Needle sculpting tool or toothpick
- Small ball stylus tool
- Leaf veining tool or small knife
- Water in a small cup
- Fine-grit sandpaper
- Jute twine
- Clear matte varnish (optional)
Step 1: Creating the Base Form
-
Condition the clay:
Begin by taking a chunk of your terracotta clay and kneading it thoroughly in your hands until it becomes warm, soft, and pliable. This prevents cracks from forming later. -
Roll the slab:
Place the clay on a smooth work surface or parchment paper. Use your rolling pin to flatten it into an even slab, aiming for a thickness of about 1/4 inch to ensure sturdy ornaments. -
Cut the outer shape:
Press your larger circular cutter firmly into the clay slab. Give it a gentle wiggle before lifting to ensure a clean cut. -
Create the wreath hole:
Center the smaller circular cutter inside the clay disc you just made. Press down to remove the center, creating the classic doughnut wreath shape. -
Smooth the edges:
Dip your finger lightly in water and run it around both the inner and outer edges of the clay ring to smooth out any shaggy bits left by the cutters.
Clean Cuts Every Time
If your clay sticks to the cookie cutter, dust the cutter edges with a tiny bit of cornstarch or dip it in water before pressing into the clay.
Step 2: Sculpting the Botanicals
-
Roll tiny coils:
Pinch off very small amounts of fresh clay and roll them into thin, tapered coils. These will become the stems for the leaves. -
Attach the stems:
Gently press these thin coils onto the surface of the wreath in curved, flowing lines. Using a tiny dab of water acts as glue to help them adhere. -
Form the leaves:
Make several small, tear-drop shapes from tiny balls of clay. Flatten them slightly between your fingers. -
Place the leaves:
Arrange the flattened teardrops along the stems you applied earlier. I like to alternate them left and right for a natural, organic look. -
Press and detail:
Use your needle tool or a small knife to gently press the leaves onto the base. At the same time, score a centerline down each leaf to create a vein. -
Add texture:
With the very tip of your tool, scratch tiny diagonal lines branching from the center vein of each leaf to mimic realistic foliage texture. -
Sculpt a flower accent:
If desired, create a small flower by arranging five tiny teardrop shapes in a circle, pressing them flat at the center point. -
Indent the center:
Press your ball stylus tool into the center of the flower petals to secure them and add a decorative dimple. -
Add berry details:
Roll extremely small spheres of clay for berries. Press these onto the wreath in open spaces, using the ball tool or needle to create a small dimple if you wish.
Step 3: Finishing Touches
-
Final inspection:
Look over the ornament for any fingerprints or rough spots. Smooth them out gently with a slightly damp finger or a soft brush. -
Allow to dry:
Set the wreath on a wire rack or piece of cardboard to dry. If using air-dry clay, let it sit for 24-48 hours away from direct heat. -
Sand edges:
Once fully cured and hard, gently sand the outer and inner edges of the ring with fine-grit sandpaper to perfect the silhouette. -
Optional varnish:
Apply a coat of clear matte varnish if you want to protect the clay from moisture, though leaving it raw preserves the rustic pottery look. -
Attach the hanger:
Cut a length of jute twine. Fold it in half, pass the loop through the center of the wreath, and pull the loose ends through the loop (a cow hitch knot) to secure it.
Solving Clay Cracks
If surface cracks appear while drying, mix a tiny bit of fresh clay with water to make a paste (slip) and conduct a patch repair, then sand smooth.
Hang these charming little wreaths on your tree or use them as sophisticated gift toppers this season
Holly Leaf and Berry Garland Tiles
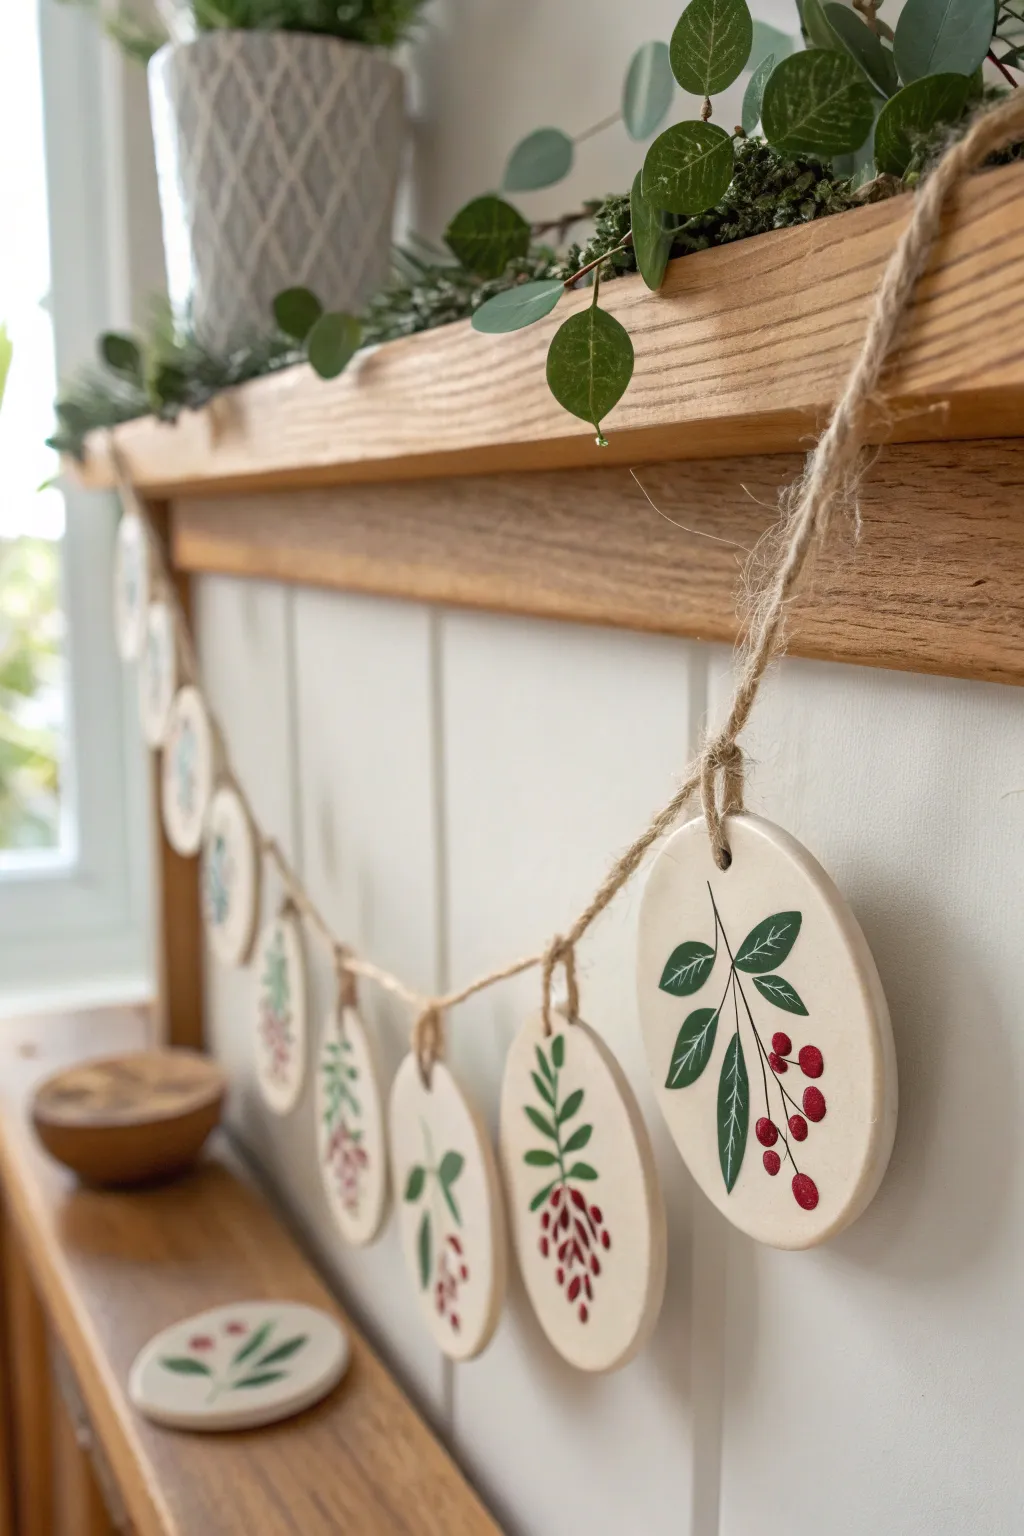
Bring a touch of organic elegance to your holiday mantle with this simple yet stunning clay garland. Featuring smooth, creamy white discs hand-painted with delicate holly sprigs and berries, this project combines the rustic charm of jute twine with festive botanical art.
Step-by-Step Guide
Materials
- Air-dry clay (white) or polymer clay
- Rolling pin
- Round or oval cookie cutter (approx. 3 inches)
- Sandpaper (fine grit)
- Acrylic paints (Forest Green, Deep Green, Red, Berry Red)
- Fine detail paintbrushes (sizes 0 and 00)
- Straw or small dowel (for piercing holes)
- Jute twine
- Matte sealant or varnish (spray or brush-on)
- Baking sheet and parchment paper (if using polymer clay)
Step 1: Shaping the Clay Base
-
Prepare your workspace:
Lay down a smooth mat or parchment paper to prevent the clay from sticking. Knead your white clay until it is soft, pliable, and free of air bubbles. -
Roll out the slab:
Using a rolling pin, flatten the clay to an even thickness of about 1/4 inch. Try to keep the surface as smooth as possible, as this will be your canvas. -
Cut the shapes:
Press your round or oval cutter firmly into the clay to create your tiles. You will need roughly 7-9 tiles for a standard mantle garland, but feel free to make extras for practice. -
Smooth the edges:
Dip your finger in a little water and gently run it around the cut edges of each tile to soften any sharpness or stray bits of clay. -
Create the hanging holes:
Use a sturdy straw or a small wooden dowel to punch a hole near the top edge of each tile. Make sure the hole is big enough for your jute twine to pass through easily. -
Dry or bake:
If using air-dry clay, manipulate the pieces slightly as they dry over 24-48 hours to keep them flat. If using polymer clay, bake according to the package instructions. -
Sand for perfection:
Once fully cured and hard, lightly sand the surface and edges with fine-grit sandpaper to remove any imperfections or fingerprints.
Step 2: Painting the Botanicals
-
Plan your stems:
With a very fine brush and forest green paint, lightly sketch a central stem line down the middle of the tile. Vary the curve and direction slightly on each tile for a natural look. -
Add leaf outlines:
Paint simple almond or lancet shapes branching off the main stem. I like to keep the leaves relatively small to leave plenty of negative space on the white background. -
Fill in the greens:
Fill the leaf shapes with your green paint. For depth, you can mix a tiny bit of white or yellow into the green for some leaves, creating subtle variation. -
Add vein details:
Once the green base is dry, use your thinnest brush (size 00) and a contrasting shade—either much darker green or white—to paint a thin center line and delicate veins on each leaf. -
Paint the berries:
Dip the back end of a paintbrush into red paint and dot it onto the clay near the stem base to create perfect round berries. Group them in clusters of three or five. -
Add berry highlights:
For a professional touch, add a minuscule dot of white or light pink to the top right of each red berry to mimic a light reflection. -
Seal the artwork:
Allow the paint to dry completely, then apply a coat of matte varnish or sealant. This protects the paint from chipping and gives the clay a finished feel.
Smoother Surfaces
Use a tiny bit of water on your fingertip to smooth clay edges before drying. This saves tons of sanding time later and gives a porcelain-like finish.
Step 3: Assembly
-
Cut the twine:
Measure the length of your mantle or hanging space and cut a piece of jute twine, adding at least 2 feet of extra length on each end for draping. -
String the tiles:
Thread the twine through the hole of your first tile. Slide it to the center (or wherever you want the arrangement to start). -
Knot carefully:
To keep the tiles from sliding into each other, tie a simple overhand knot in the twine directly above the hole of each tile. This secures its position. -
Space evenly:
Measure about 4-6 inches along the twine, tie another knot, thread the next tile, and tie a locking knot on the other side. Repeat until all tiles are attached.
Texture Twist
Before the clay dries, gently press a real evergreen branch into the surface to imprint a texture, then paint inside the debossed lines.
Hang your finished garland and enjoy the handmade warmth it adds to your seasonal decor
Personalized Name and Year Keepsake Tags
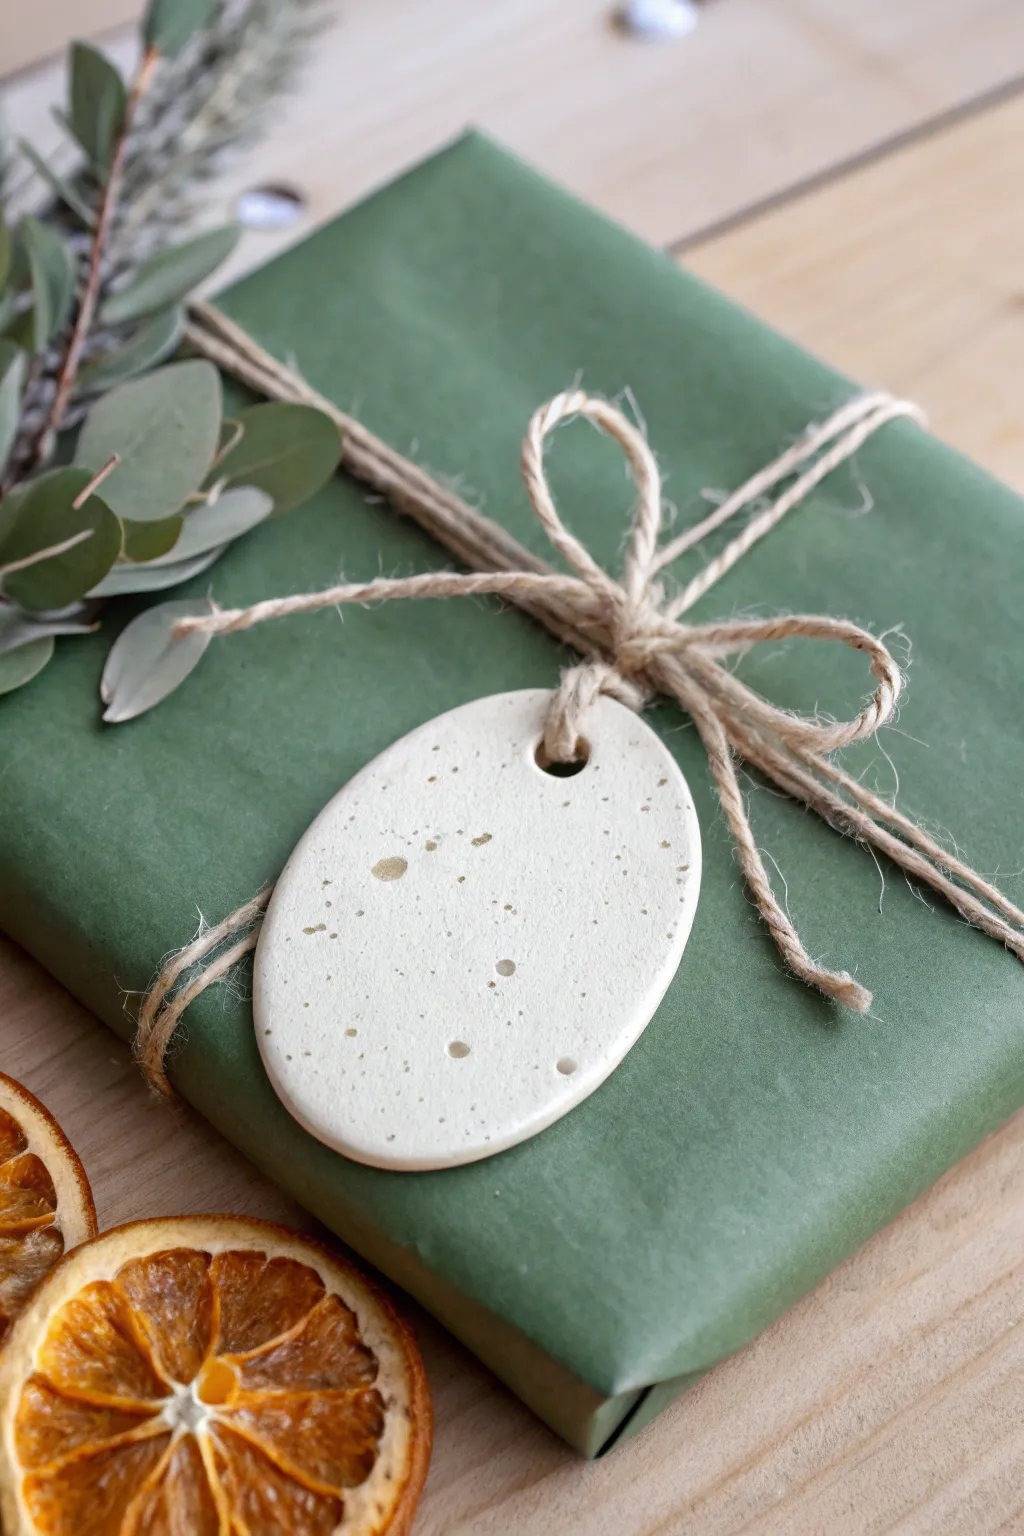
These elegant, minimalist gift tags add a sophisticated touch to your holiday wrapping with their creamy finish and delicate golden flecks. They are surprisingly simple to make and create a lasting keepsake that recipients can hang on their tree long after the gift is opened.
Step-by-Step Tutorial
Materials
- Air-dry clay (white or cream)
- Rolling pin
- Oval cookie cutter (approx. 3-4 inches)
- Drinking straw or small circular cutter
- Sandpaper (fine grit)
- Gold acrylic paint or metallic ink
- Old toothbrush or stiff bristle brush
- Wax paper or parchment paper
- Small bowl of water
- Clear sealant spray (optional)
Step 1: Shaping the Clay
-
Condition the clay:
Begin by taking a handful of air-dry clay and kneading it in your hands until it feels warm, pliable, and smooth. This prevents cracks from forming later. -
Roll it out:
Place the clay on a sheet of parchment or wax paper to prevent sticking. Use your rolling pin to flatten the clay to an even thickness of about 1/4 inch. -
Cut the shape:
Press your oval cookie cutter firmly into the clay. Give it a tiny wiggle to ensure it cuts all the way through, then lift the cutter. Peel away the excess clay from around the shape. -
Create the hole:
Using a drinking straw, punch a hole near one of the narrower ends of the oval. Twist the straw slightly as you pull it out to get a clean circle; this is where your twine will go. -
Smooth the edges:
Dip your finger in a small bowl of water and gently run it along the cut edges of the oval to soften any sharp ridges or burrs left by the cutter. -
Initial drying:
Leave the tag on the parchment paper to dry in a cool, dry place. Flip the tag over after about 12 hours to ensure both sides dry evenly and to prevent curling.
Step 2: Refining and Decorating
-
Check dryness:
Wait until the clay is completely bone dry and has turned a chalky white color. This usually takes 24-48 hours depending on humidity. -
Sand for perfection:
Take a piece of fine-grit sandpaper and lightly buff the surface and edges of the tag. I find this step crucial for getting that professional, porcelain-like finish. -
Prepare the splatter:
Squeeze a small amount of gold acrylic paint onto a palette or plate. If the paint is very thick, dilute it with just a drop or two of water to make it more fluid. -
Load the brush:
Dip the bristles of an old toothbrush into the gold paint. Tap off any huge globs on a paper towel first. -
Apply the speckles:
Hold the toothbrush over the clay tag and run your thumb across the bristles, flicking the paint downward. Practice on a scrap piece of paper first to control the spray pattern. -
Vary the texture:
Aim for a random distribution. You want some areas to have tiny mists of gold and others to have slightly larger droplets for visual interest. -
Let paint dry:
Allow the gold splatter to dry completely, which should only take about 15-20 minutes. -
Seal the tag (Optional):
If you want extra durability, lightly mist the tag with a clear matte or satin sealant spray. This protects the gold flakes from scratching off.
Clean Edges Tip
If your straw leaves a ragged hole, wait until the clay is leather-hard (partially dry) before punching. It cuts much cleaner than wet clay.
Step 3: Finishing Touches
-
Add the twine:
Cut a length of natural jute or hemp twine. Fold it in half to create a loop. -
Attach to gift:
Thread the loop through the hole in the tag, then pull the loose ends through the loop to secure it with a lark’s head knot, or simply tie it directly onto your package like the photo.
Stamp It
Before drying, use small alphabet stamps to press a name or the current year into the clay for a truly personalized keepsake texture.
Your beautifully speckled tag is now ready to make someone’s holiday gift feel extra special
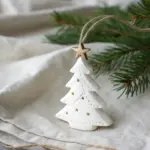
Thumbprint Christmas Light Tree Ornaments
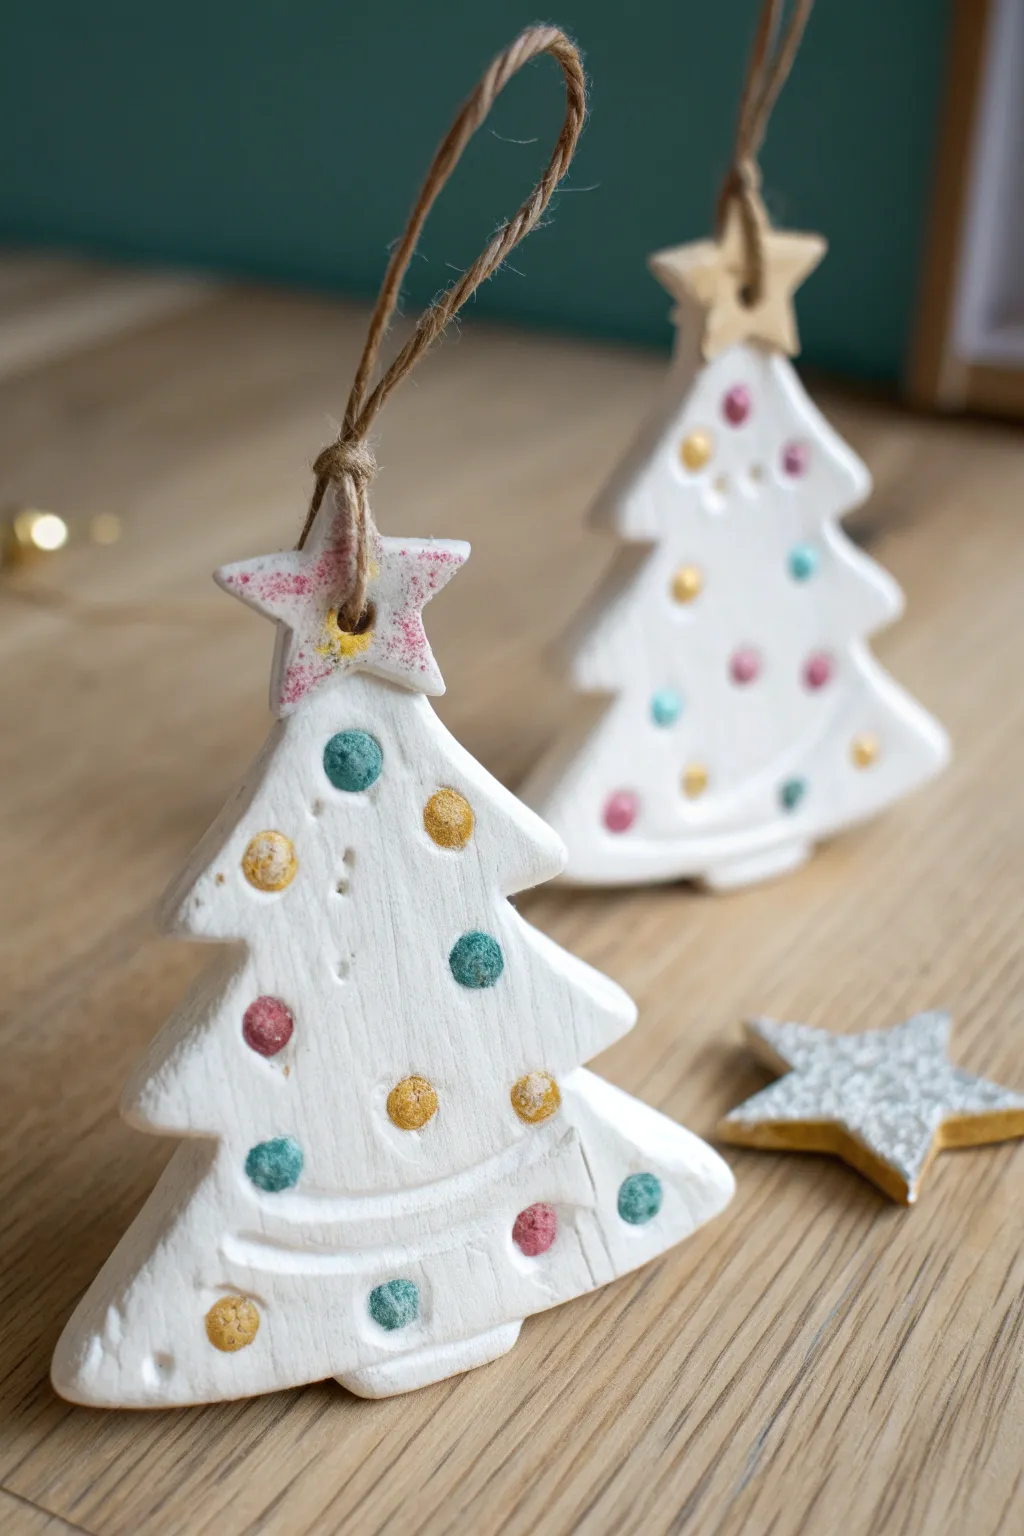
These charming ornaments capture a minimalist holiday spirit with their clean white finish and festive pops of color. Crafted from simple air-dry clay, they feature playful indentations painted in teal, pink, and gold, making them perfect for a modern rustic tree.
Detailed Instructions
Materials
- White polymer or air-dry clay (smooth texture)
- Christmas tree cookie cutter (approx. 4-5 inches)
- Small star cookie cutter (approx. 1 inch)
- Rolling pin
- Parchment paper or silicone mat
- Ball stylus tool or the end of a rounded paintbrush handle
- Acrylic paints: Metallic gold, teal/turquoise, berry pink, silver
- Fine detail paintbrush
- Jute twine or rustic string
- Drinking straw (for making the hole)
- Sandpaper (fine grit)
- Gloss or matte varnish (optional)
Step 1: Shaping the Clay
-
Condition the clay:
Begin by kneading your white clay until it is soft, pliable, and free of air bubbles. If you are using air-dry clay, keep your hands slightly moist to prevent cracking. -
Roll out the slab:
Place the clay on parchment paper or a silicone mat. use a rolling pin to flatten it into an even slab, aiming for a thickness of about 1/4 inch so the ornaments are sturdy but not too heavy. -
Cut the tree shape:
Press your Christmas tree cookie cutter firmly into the clay slab. Wiggle it slightly side-to-side to ensure a clean cut before lifting it away. -
Create the star topper:
Roll out a small scrap piece of clay to the same thickness. Use the small star cutter to create a star shape. Alternately, cut a star shape directly out of the top of the tree if your cutter allows, but attaching a separate star looks more dimensional. -
Attach the star:
Score the back of the star and the top tip of the tree with a needle tool or toothpick. Dab a tiny bit of water (for air-dry) or liquid clay (for polymer) between them and press the star firmly onto the tree’s apex. -
Make the hanging hole:
Use a drinking straw to punch a clean hole right through the center of the star. This ensures you have a neat opening for the twine later. -
Smooth the edges:
Dip your finger in a little water and gently run it along the cut edges of the clay to smooth out any roughness from the cookie cutter.
Prevent Cupping
If your air-dry clay curls up while drying, place a heavy book on top of it (with parchment paper in between) once it is partially dry but leathery.
Step 2: Adding Texture and Detail
-
Create the ‘lights’:
Using a ball stylus tool or the rounded end of a paintbrush handle, press circular indentations into the surface of the tree. I like to scatter them randomly to mimic ornaments, ensuring they differ slightly in depth for a hand-crafted look. -
Add swooping lines:
Use a modeling tool or a dull toothpick to gently carve curved, horizontal swoops across the bottom section of the tree, giving the impression of garland. -
Dry or Bake:
If using polymer clay, bake according to the package instructions (usually 275°F for 15-30 minutes). If using air-dry clay, let it sit in a dry spot for 24-48 hours, flipping it halfway through to prevent curling. -
Sanding:
Once fully cured and cool, lightly sand any rough edges with fine-grit sandpaper for a professional finish.
Step 3: Painting and Finishing
-
Paint the indentations:
Using a fine detail brush, carefully fill the circular indentations with paint. Alternate between teal, berry pink, and metallic gold. Painting just the inside of the depression keeps the look clean. -
Detail the star:
Mix a tiny bit of pink or gold with water to create a subtle wash, or dry brush the star lightly so it has a hint of color without being opaque. -
Highlight the garland:
If you carved garland lines, you can leave them white for contrast or run a very watered-down grey or silver paint into the grooves to create shadow. -
Seal the ornament:
Protect your work by brushing on a layer of matte or gloss varnish. This will seal the paint and keep the white clay looking bright year after year. -
Attach the hanger:
Cut a length of jute twine approx 8 inches long. Thread it through the hole in the star and tie a knot at the top to create a loop for hanging.
Add Sparkle
While the paint inside the dots is still wet, sprinkle a tiny pinch of clear or iridescent glitter into them to make the ‘lights’ truly shimmer.
Hang your new handcrafted heirloom on a branch where it can catch the holiday lights
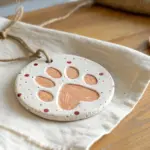
Paw Print Holiday Keepsake Ornaments
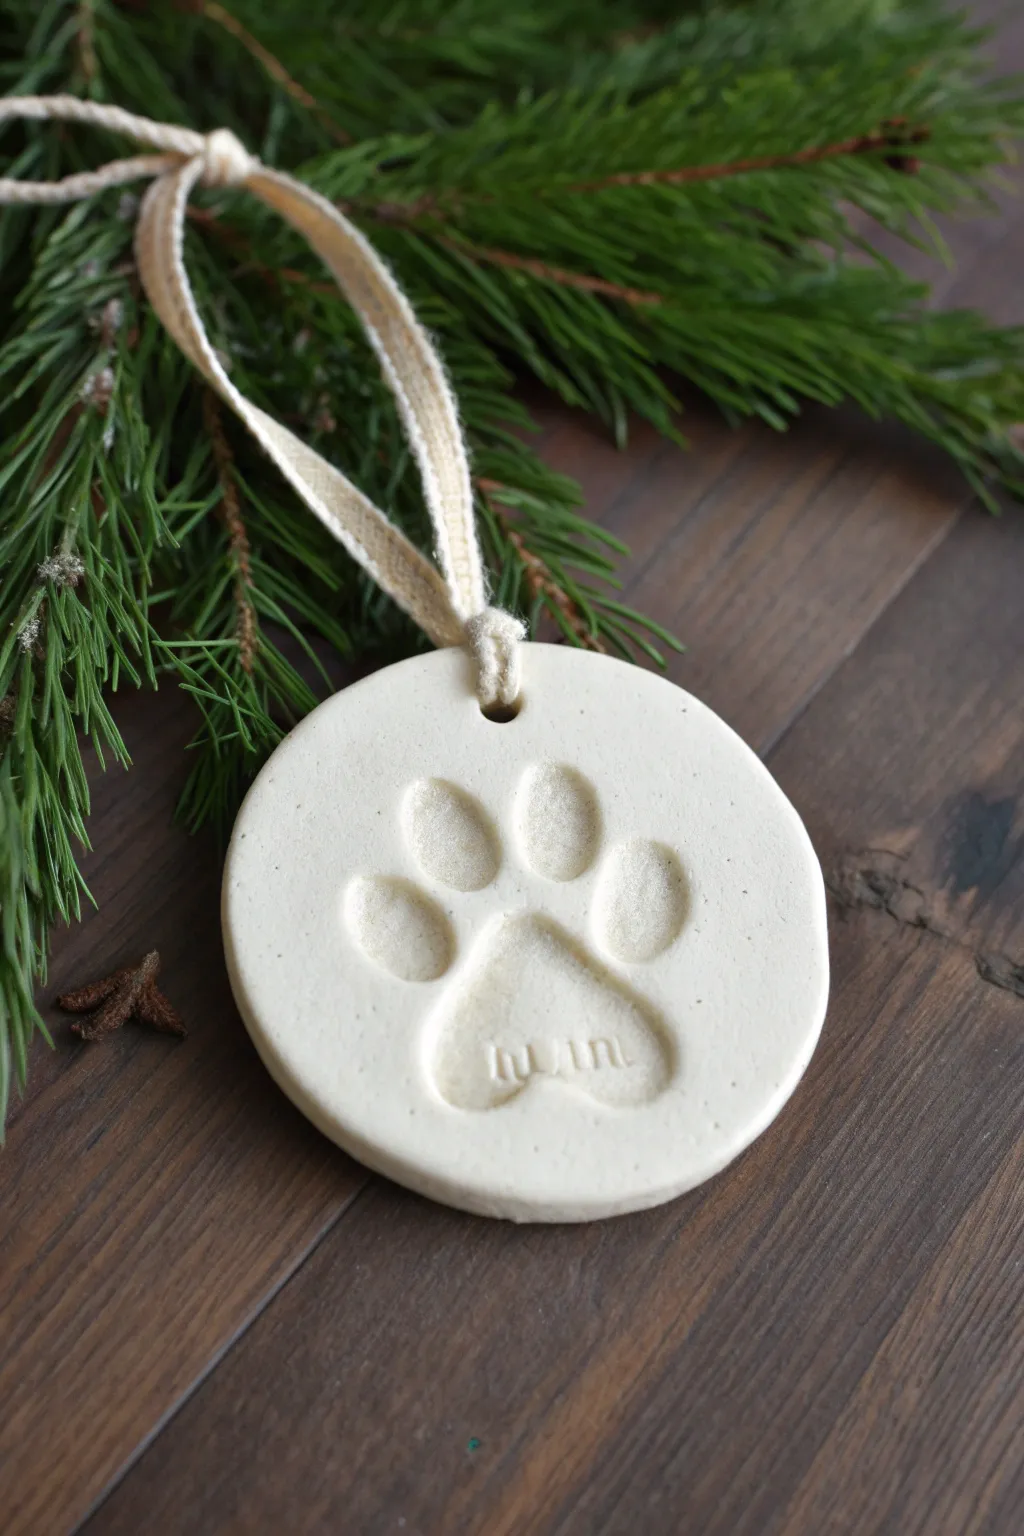
Immortalize your furry friend’s presence on your tree with this minimalist white clay keepsake. Featuring a deep impression of a paw print and a personalized name stamp, suspended by a rustic cream ribbon, it brings a touch of elegant sentimentality to holiday decor.
How-To Guide
Materials
- White air-dry clay or polymer clay (white)
- Rolling pin
- Round cookie cutter (approx. 3-4 inches)
- Parchment paper
- Straw or skewer (for hole punching)
- Small alphabet stamps
- Cream or natural cotton ribbon (1/4 inch width)
- Fine-grit sandpaper
- Matte sealant or Mod Podge (optional)
Step 1: Preparing the Clay Base
-
Condition the clay:
Begin by taking a handful of white clay and kneading it in your hands until it becomes warm and pliable. This conditioning step prevents cracks from forming later. -
Roll it out:
Place the clay on a sheet of parchment paper to prevent sticking. Use a rolling pin to flatten the clay to an even thickness of about 1/4 inch. Avoid making it too thin, or the impression won’t be deep enough. -
Cut the shape:
Press your round cookie cutter firmly into the rolled clay. Give it a tiny wiggle to ensure a clean cut before lifting it away. -
Smooth the edges:
Dip your finger in a tiny bit of water and run it gently around the circumference of the circle to smooth out any rough edges left by the cutter.
Clean Print Secret
If you’re worried about clay sticking to fur, lay a piece of plastic wrap over the clay before pressing the paw. It keeps paws clean and creates a soft, rounded edge.
Step 2: Creating the Impression
-
Prepare the paw:
Ensure your pet’s paw is clean and dry. If using a particularly sticky clay, you might want to lightly dust the paw with cornstarch. -
Press the print:
Place the clay, still on the parchment paper, on a hard surface like the floor. Gently guide your pet’s paw onto the center of the circle and press down firmly on each toe pad and the main pad to get a clear impression. -
Refine the print:
If the impression looks a little shallow or uneven after lifting the paw, you can carefully deepen the pads using your thumb or a rounded modeling tool. -
Punch the hole:
Use a straw to punch a clean hole near the top edge of the ornament. Position it centered above the paw print, leaving enough clay margin so it won’t break.
Step 3: Personalizing and Finishing
-
Stamp the name:
Take your small alphabet stamps. Press the name of your pet firmly into the clay inside the large main paw pad impression. I find alignment is easier if you start with the middle letter and work outward. -
Let it dry:
Allow the ornament to dry completely according to your clay’s package instructions. For air-dry clay, turn it over halfway through the drying process (usually 24-48 hours total) to prevent curling. -
Sand for perfection:
Once fully cured and hard, gently sand the edges and surface with fine-grit sandpaper to remove any fingerprints or imperfections. -
Seal the surface:
Apply a thin coat of matte sealant or Mod Podge to protect the white clay from discoloration over time. -
Thread the hanger:
Cut a length of cream cotton ribbon. Fold it in half to create a loop. -
Secure the loop:
Push the folded end of the ribbon through the hole from the front to the back. -
Create the knot:
Thread the loose ends of the ribbon through the loop you just pushed through the hole and pull tight to secure it with a lark’s head knot. -
Tie the ends:
Finally, knot the two loose ends of the ribbon together at your desired hanging length.
Gilded Touch
After drying, use a small brush to paint liquid gold leaf into the impressed paw pads and letters for a luxurious, shimmering finish.
Hang this treasured keepsake on a sturdy branch to enjoy year after year
Mini Christmas Village Shelf Decor

Create a serene, snowy vignette for your shelf with these charming handmade clay houses. The textured snow-covered roofs and glowing windows bring a cozy warmth to any holiday display.
Detailed Instructions
Materials
- White polymer clay or air-dry clay
- Rolling pin
- Craft knife or clay blade
- Ruler
- Textured snow paste or white coarse glitter mixed with mod podge
- Small paintbrush
- Battery-operated tea lights (optional for illumination)
- Round ceramic or concrete tray
- Faux snow powder or Epsom salt
- Miniature bottle brush tree (white)
- Small wooden tree accent
Step 1: Constructing the Tall House
-
Roll the clay:
Begin by conditioning your clay until soft, then roll it out into a slab about 1/4 inch thick to ensure the walls are sturdy enough to stand. -
Cut the walls:
Using a ruler and craft knife, cut out four rectangular wall panels. Make two wider panels for the front and back, and two narrower ones for the sides. Remember to cut peaked triangles at the top of the two wider panels for the roofline. -
Carve the windows:
On the front panel, carefully cut out four small square windows using the tip of your craft knife. Arrange them in a two-by-two grid to mimic a two-story home. -
Add window details:
For a realistic touch, use a thin clay tool or toothpick to gently press cross-bars into the window openings without cutting all the way through if purely decorative, or leave them open for light to shine through. -
Assemble the structure:
Score the edges where the walls will meet and apply a tiny bit of liquid clay or water (if using air-dry) as glue. Press the walls together to form a box, smoothing the seams with your finger. -
Form the chimney:
Shape a small rectangle of clay into a square tube and attach it to one side of the roof peak before you add the roof panels. -
Add the roof:
Cut two rectangular slabs for the roof. Attach them to the peaked walls, ensuring they overlap slightly at the top and overhang the edges.
Clean Cuts Pro Tip
Pop your rolled clay sheet in the fridge for 10 minutes before cutting. The slightly chilled clay is firmer, resulting in much sharper window corners and straighter walls.
Step 2: Building the Cottage
-
Shape the cottage walls:
Repeat the rolling process for the smaller house. Create a shorter, squat structure with a steep roof pitch for that cozy cottage look. -
Create the entryway:
Instead of a standard door, roll a thin snake of clay and form an arch shape on the front panel. Use a needle tool to gently etch a vertical line and a tiny doorknob indentation inside the arch. -
Cut attic windows:
Slice two small square windows near the peak of the roof on the front face, just above the arched door. -
Texture the roof:
After assembling the cottage walls and attaching the roof panels, take a dotting tool or the end of a paintbrush and press rows of small indents across the roof surface to simulate tiles or heavy snow texture.
Sagging Roof Fix
If the roof sags during assembly, crumple a small ball of aluminum foil or paper towel and place it inside the house structure to support the roof while it bakes or dries.
Step 3: Finishing and Assembly
-
Bake or dry:
Place both houses on a parchment-lined sheet. Bake according to your polymer clay package instructions, or let air-dry clay set for 24-48 hours until completely hard. -
Apply the snow:
Once cool, use a small brush to apply textured snow paste generously to the roofs and chimneys. I like to dab the brush up and down to create fluffy peaks. -
Frost the surface:
While the paste is wet, dust the roofs with a little extra fine white glitter or faux snow powder to catch the light. -
Arrange the scene:
Fill your round tray with a bed of faux snow or Epsom salt. Nestle the two houses into the snow so they sit level. -
Add greenery:
Place the white bottle brush tree and the small wooden tree next to the houses to complete the village landscape. -
Light it up:
If your houses are hollow and open at the bottom, tuck small battery-operated tea lights underneath so the windows glow warmly.
Enjoy the peaceful glow of your handcrafted village all season long
Modern Marbled Ornaments With Metallic Accents
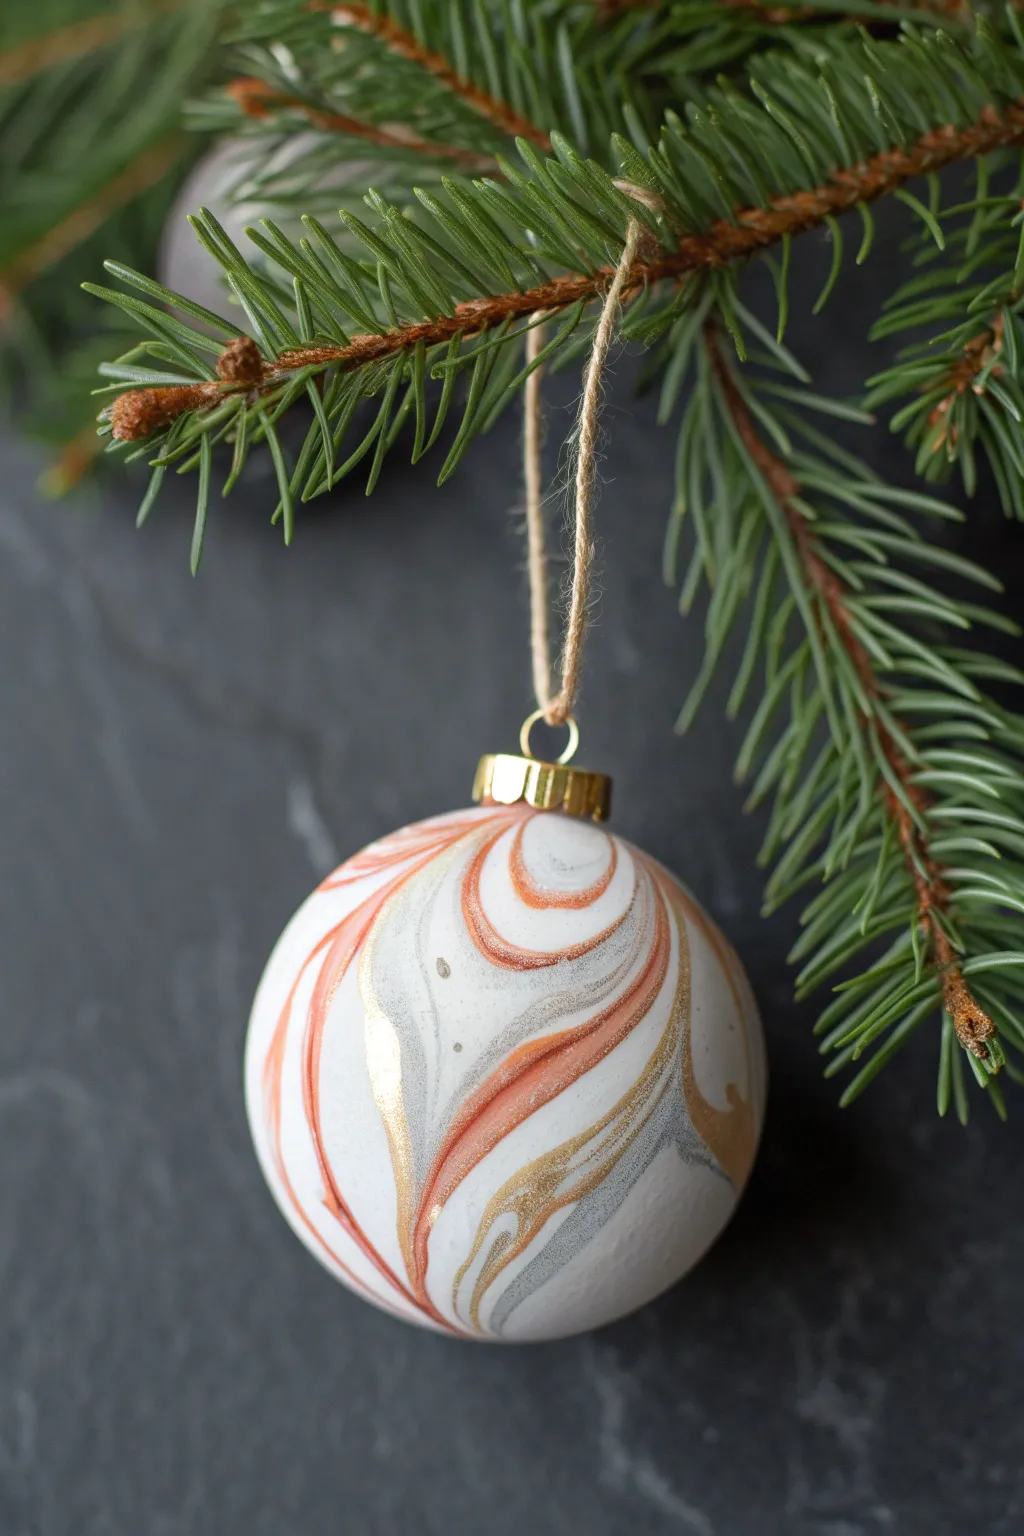
These sophisticated ornaments bring a modern, artistic touch to traditional holiday decor, featuring swirls of terracotta, grey, and shimmering gold against pristine white clay. The organic marbling technique ensures that no two pieces are exactly alike, giving you a custom collection of miniature art pieces.
Step-by-Step Guide
Materials
- White polymer clay (approx. 2 oz per ornament)
- Terracotta or rust-colored polymer clay
- Grey polymer clay
- Gold polymer clay or metallic gold leaf flakes
- Acrylic rolling pin
- Circle cookie cutters (approx. 3 inches)
- Parchment paper or clay work mat
- Toothpick or straw
- Baking sheet
- Sandpaper (fine grit, optional)
- Gold cap and jewelry wire or twine for hanging
- Gloss glaze (optional)
Step 1: Preparing the Clay
-
Condition the white clay:
Begin by taking a large chunk of white clay and kneading it thoroughly in your hands until it becomes soft, pliable, and warm. This forms the base color, so you’ll need significantly more of this than the accent colors. -
Prepare accent colors:
Condition small amounts of the terracotta, grey, and gold clay separately. You only need very small quantities—think pea-sized amounts compared to a golf ball-sized amount of white. -
Create snakes:
Roll the white clay into a thick log, about an inch in diameter. Then, roll your accent colors into very thin, long snakes or strands.
Step 2: Creating the Marbling
-
Apply accents:
Lay the thin colored strands lengthwise along the white log. I like to alternate the colors randomly to create visual interest. -
Twist the log:
Grasp both ends of the clay log and twist them in opposite directions. Keep twisting until you have a tight, candy-cane-like spiral. -
Fold and roll:
Fold the twisted log in half, effectively doubling it over. Roll this folded piece on your work surface to smooth it back into a single log shape. -
Repeat the twist:
Twist the log again. Generally, repeating the fold-and-twist process 2-3 times creates the perfect level of marbling. Be careful not to over-twist, or the colors will muddy into a single shade. -
Form a ball:
Once you are happy with the color distribution, roll the entire log into a smooth ball. You should see interesting swirls starting to appear on the surface.
Clean Clay Tip
Keep baby wipes nearby to clean your hands and roller between colors. Even a tiny smudge of dark grey on your fingers can dirty the pristine white clay base.
Step 3: Shaping the Ornament
-
Roll out the slab:
Place the marbled ball on parchment paper. Using your acrylic rolling pin, flatten the ball into a slab approximately 1/4 inch thick. Roll in different directions to stretch the swirls into organic shapes. -
Check the pattern:
Inspect your slab. If you want more gold prominence, you can press small flakes of gold leaf onto the surface now and gently roll over them to embed them into the clay. -
Cut the shape:
Use your circle cutter to press firmly into the most aesthetically pleasing part of the marbled slab. Lift the excess clay away from the cutter before removing the circle. -
Smooth the edges:
Gently run your finger around the cut edge of the clay circle to smooth out any roughness or sharp ridges left by the cutter. -
Create a hanging hole:
If you aren’t using a glue-on cap, use a straw or toothpick to poke a clean hole near the top edge for the string. Make sure it’s not too close to the edge to prevent tearing.
Level Up: 3D Shape
Instead of a flat disc, carefully mold the marbled clay sheet around a clear glass ornament ball before baking for a truly spherical, seamless bauble.
Step 4: Baking and Finishing
-
Bake the clay:
Transfer the parchment paper with the ornaments to a baking sheet. Bake according to your specific polymer clay’s package instructions (usually around 275°F for 15-30 minutes per 1/4 inch of thickness). -
Cool down:
Allow the ornaments to cool completely on the baking sheet before handling. They are fragile while warm. -
Attach the cap:
For the look in the photo, use superglue to attach a gold ornament cap to the top edge of the cooled clay disc. -
Add twine:
Thread a piece of rustic twine or metallic ribbon through the cap loop or the hole you created. Tie a secure knot.
Hang your new modern heirloom on the tree and enjoy the subtle shimmer of the metallic details