If you love clay projects with bold color and satisfying texture, basketball clay ideas are such a fun lane to play in. I’m sharing my favorite basketball-themed makes—from super classic mini balls to little display pieces that feel like a mini moment on your shelf.
Realistic Textured Mini Basketball
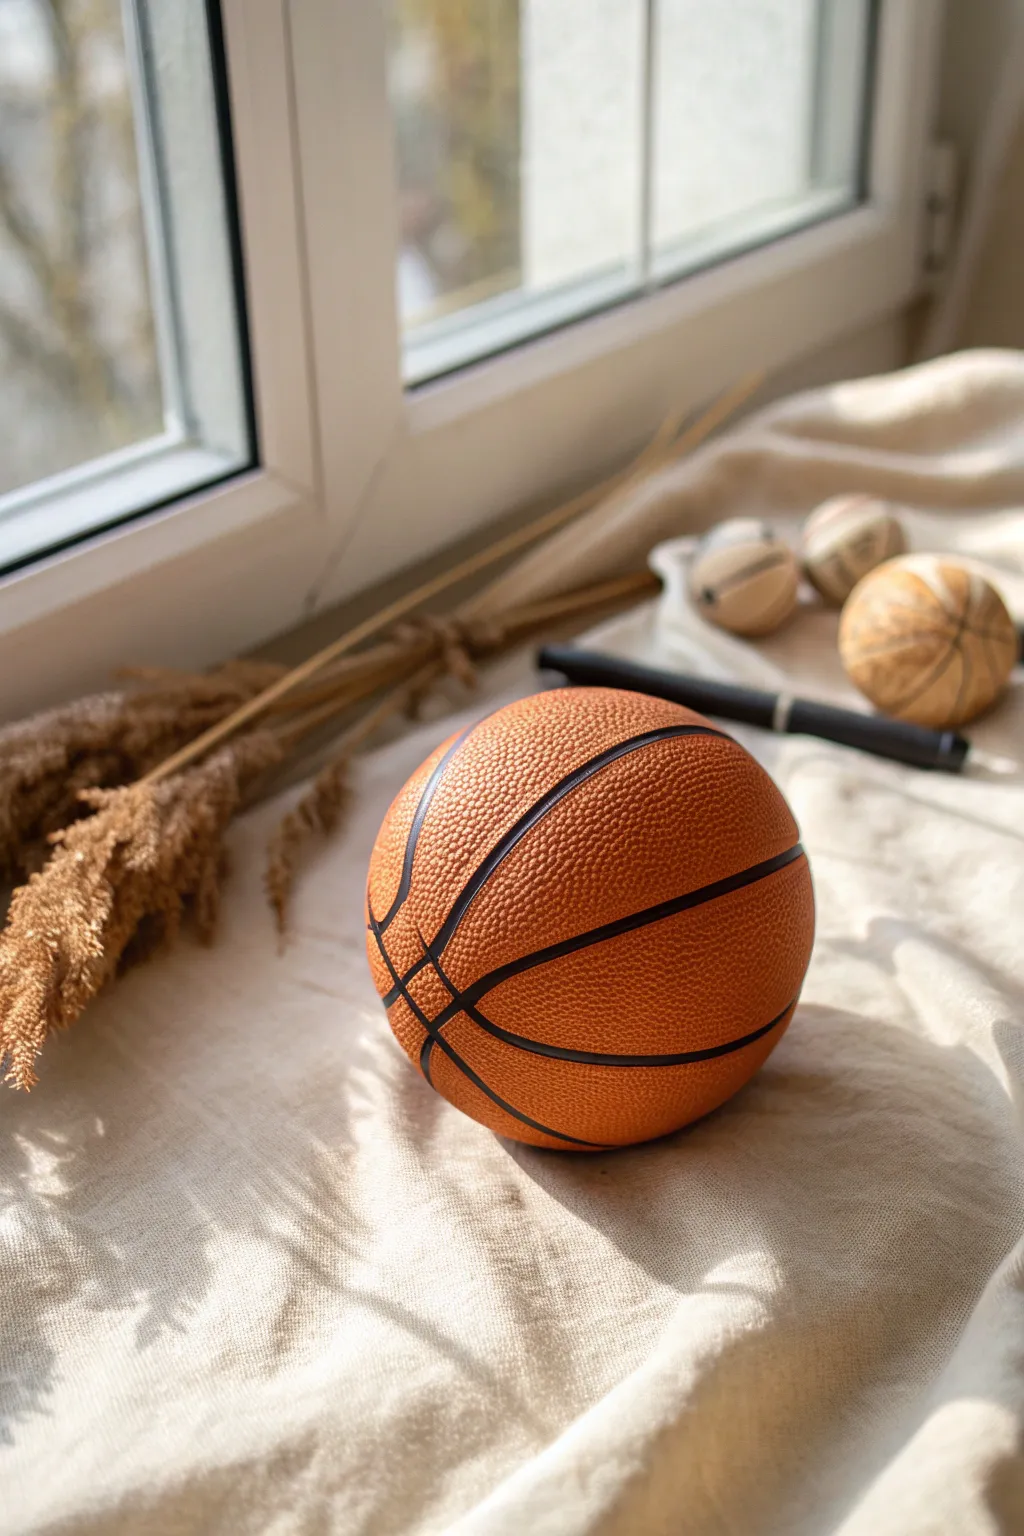
Bring the court to your desk with this incredibly realistic miniature basketball sculpted from polymer clay. The secret to its lifelike appearance lies in capturing that distinct pebbled leather texture using simple household tools.
How-To Guide
Materials
- Orange polymer clay (terracotta or pumpkin shade)
- Black polymer clay
- Liquid polymer clay (optional)
- Small dotting tool or stiff toothbrush
- Needle tool
- Rolling pin
- Sandpaper brush (or stiff bristle brush)
- Blade or craft knife
- Oven for baking
Step 1: Forming the Core
-
Condition the clay:
Begin by kneading your orange clay until it is soft, pliable, and free of any air bubbles. This ensures a smooth base without cracks. -
Shape the sphere:
Roll the clay between your palms to form a perfect sphere. Aim for a size roughly 2 to 3 inches in diameter, or whatever fits your display needs. -
Smooth imperfections:
Inspect the ball for any fingerprints or uneven spots. Gently roll it on a glass surface or smooth tile to perfect the roundness.
Pro Tip: Avoiding Flat Spots
Bake your ball on a dedicated bead baking rack or a pile of polyester batting. This suspends the shape so gravity doesn’t create a flat bottom.
Step 2: Creating the Lines
-
Mark the primary line:
Using a dull blade or the side of a needle tool, gently press a continuous line around the circumference of the ball to mark the equator. -
Add the perpendicular line:
Mark a second line that crosses the first one at a 90-degree angle, dividing the ball into four equal quadrants. -
Carve the curved lines:
This is the tricky part: draw a sine wave (a smooth, continuous curve) that touches the remaining open spaces. Look at a reference photo of a real basketball to get the curve shape just right. -
Deepen the channels:
Once you are happy with the placement, retrace all lines with a needle tool to create deeper, U-shaped grooves. These channels will hold the black clay later.
Troubleshooting: Smudged Lines
If black clay smears onto the orange, use a Q-tip dipped in rubbing alcohol to gently wipe the surface cleanly before baking.
Step 3: Adding Texture
-
Texture the surface:
Take a stiff toothbrush, a sandpaper block, or a dedicated texturing sponge and press it firmly all over the orange sections. Avoid damaging the grooves you just carved. -
Refine the pebble look:
For an ultra-realistic look, I sometimes go over specific areas with a very small dotting tool to emphasize the ‘pebbled’ leather effect. -
Clean the grooves:
If the texturing process pushed any clay into your channels, run the needle tool through them one last time to clear the path.
Step 4: Inlaying the Black Lines
-
Prepare the black strips:
Roll out a very thin snake of black polymer clay. It needs to be thin enough to fit snugly inside the grooves you carved. -
Insert the clay:
Carefully lay the black snake into the grooves. Do this in sections if needed, gently pressing it down so it adheres to the raw orange clay. -
Secure with liquid clay:
If the black clay isn’t sticking well, a tiny amount of liquid polymer clay brushed into the groove acts as an excellent adhesive. -
Flatten the lines:
Use your finger or a smooth tool to press the black clay flush with the surface of the ball. The lines shouldn’t protrude; they should look embedded. -
Clean up edges:
If the black clay smeared onto the orange texture, carefully scrape it away with a craft knife or needle tool.
Step 5: Final Touches
-
Re-texture if needed:
Inspect the areas right next to the black lines. If they were smoothed out during the inlay process, gently re-apply texture. -
Bake the project:
Place the basketball on a bed of cornstarch or polyester batting to prevent a flat spot from forming on the bottom. Bake according to your clay manufacturer’s instructions. -
Cool and inspect:
Let the ball cool completely inside the oven to prevent cracking. Once cool, brush off any cornstarch residue.
Now you have a perfect miniature replica ready to display on a shelf or turn into a unique keychain


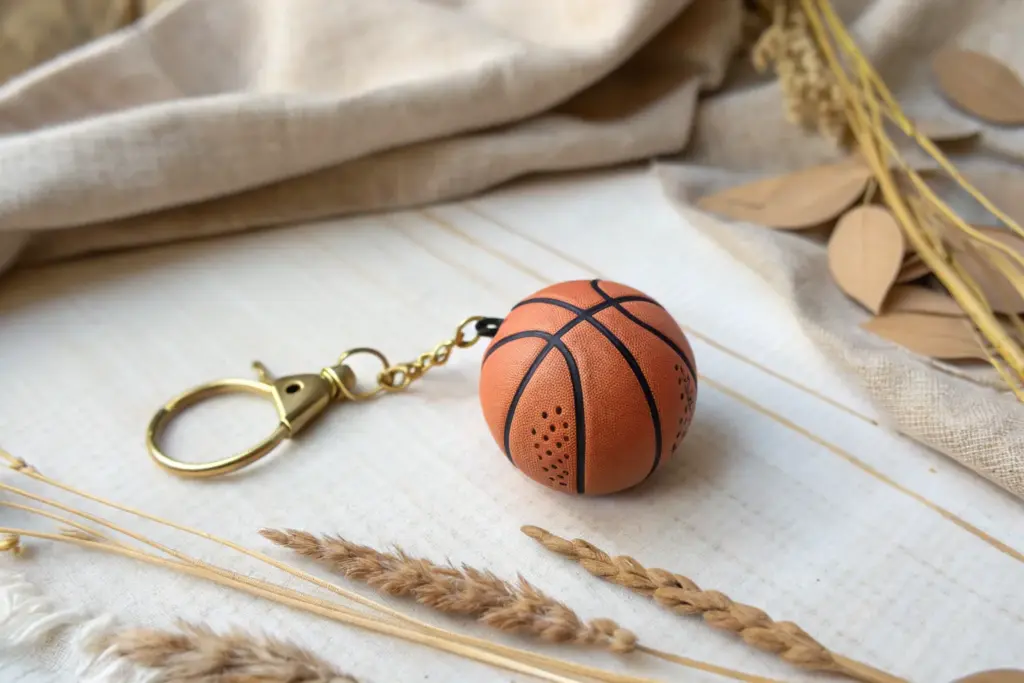
Basketball Flat Charm Keychain
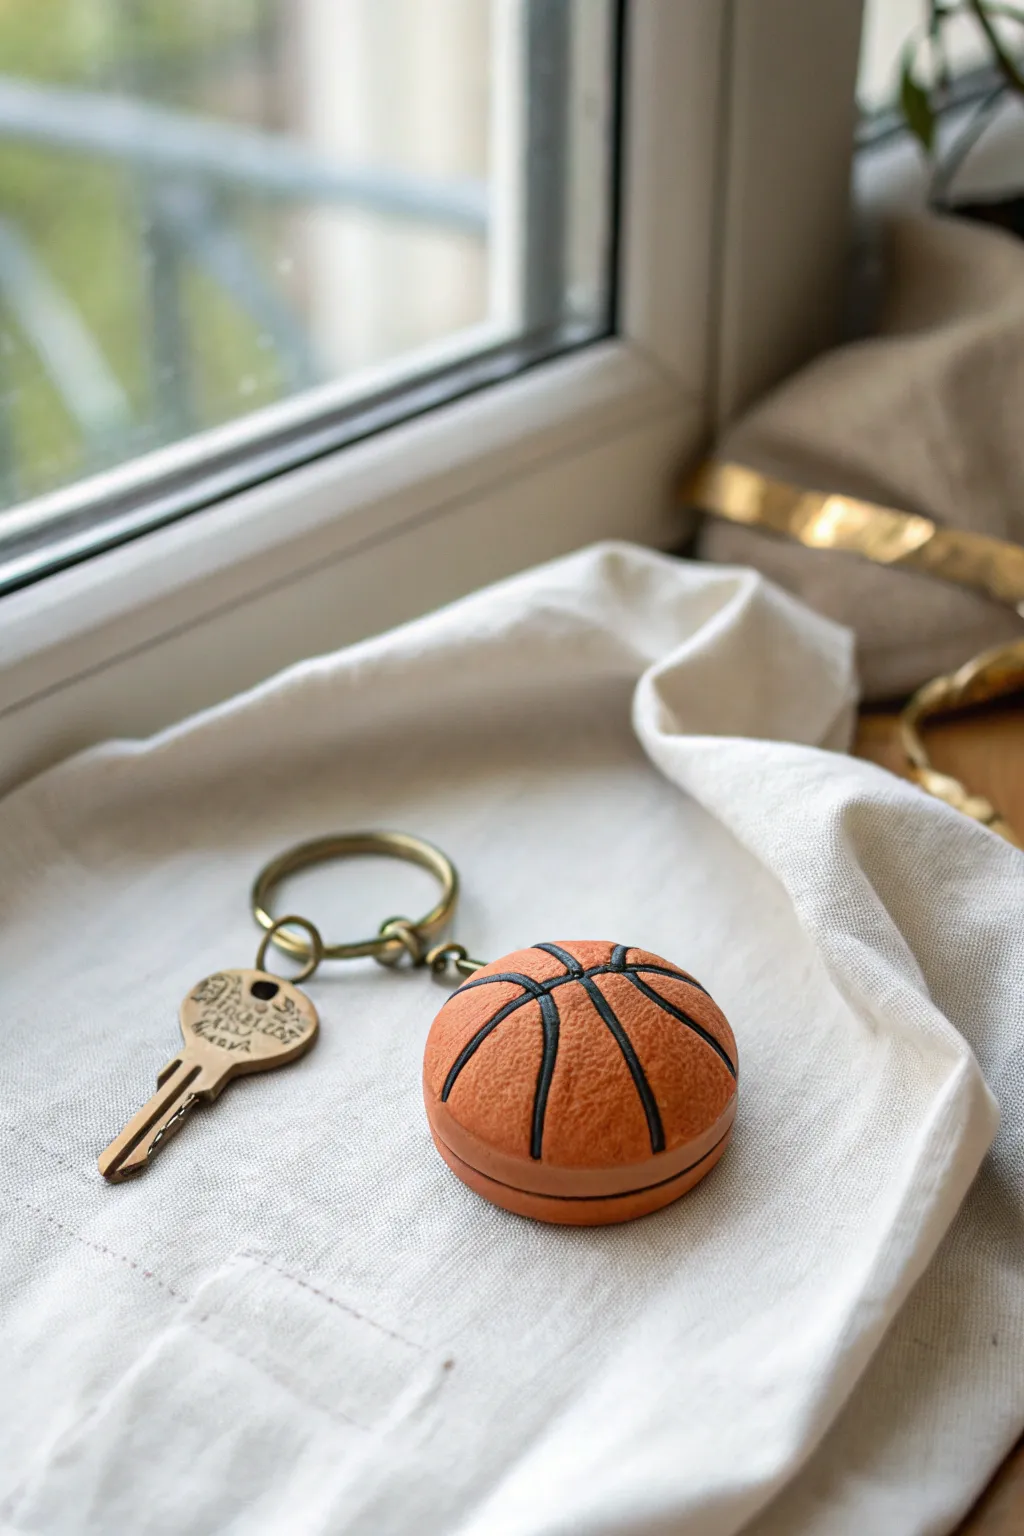
Carry a piece of the court with you everywhere with this realistic basketball keychain. The textured orange surface and deeply grooved black seams give this domed charm an authentic look and feel that fits perfectly in your pocket.
Detailed Instructions
Materials
- Polymer clay (burnt orange or basketball orange)
- Black liquid clay (or heavy body black acrylic paint)
- Circle clay cutter (approx. 1.5 – 2 inches)
- Domed mold or glass cabochon (optional, for shaping)
- Needle tool or clay detailing tool
- Toothbrush or sandpaper (medium grit) for texturing
- Small eye screw (brass or antique gold finish)
- Keyring and chain hardware
- Gloss or matte varnish (optional)
- Oven for baking
Step 1: Shaping the Base
-
Condition the clay:
Begin by thoroughly conditioning your orange polymer clay. Knead it in your hands until it is soft, pliable, and free of any air bubbles. -
Create a smooth ball:
Roll the clay into a smooth sphere. Ensure there are no cracks or seams, as these will show up in the final piece. -
Flatten into a dome:
Gently press the ball onto your work surface to flatten the bottom. You want a thick, domed shape rather than a flat pancake. Think of it like a hamburger bun or a macaron shell. -
Optional forming tip:
If you want a perfectly uniform dome, you can press the clay gently into a silicone dome mold, then pop it out.
Fixing messy lines
If black paint gets into the textured orange areas, use a Q-tip dipped in rubbing alcohol to gently lift the pigment from the high points without removing it from the deep grooves.
Step 2: Texturing and detailing
-
Add the pebble texture:
Take an old toothbrush or a piece of medium-grit sandpaper. Press it firmly and repeatedly all over the surface of the orange dome. -
Refine the surface:
Rotate the piece as you work to ensure the texture is completely even. Don’t worry about smoothing it out; the rougher, the more authentic the leather look will be. -
Mark the center line:
Using a needle tool, lightly score a single line horizontally across the center of the dome to guide your seam placement. -
Draw the curves:
Now mark the signature curved lines of a basketball. Draw a vertical line intersecting the horizontal one, then add the two curved side lines. -
Deepen the grooves:
Go back over your guide lines with the needle tool, pressing deeper this time to create distinct channels. Widen them slightly so they can hold the black filler. -
Insert hardware prep:
Before baking, twist your small eye screw into the top edge of the basketball. I prefer to remove it, add a tiny drop of liquid clay or glue to the hole, and screw it back in for a secure hold.
Step 3: Finishing the Seams
-
Bake the clay:
Bake the piece according to your clay manufacturer’s instructions (usually 275°F for 15-30 minutes). Let it cool completely. -
Fill the seams:
Carefully trace the grooved lines with black liquid clay. The liquid clay should naturally flow into the channels you carved. -
Alternative paint method:
If you don’t have liquid clay, you can paint the grooves with black acrylic paint after baking, quickly wiping away any excess on the orange surface with a damp paper towel. -
Second bake (if using liquid clay):
If you used liquid clay for the lines, pop the piece back in the oven for about 15 minutes to set the black lines. -
Add a finish:
For a protective coat, you can brush on a thin layer of matte varnish to keep that leathery look, or gloss if you want a shiny, new-ball appearance. -
Assemble the keychain:
Use pliers to open the jump ring on your keychain hardware. Attach it to the eye screw on your basketball charm and close the ring securely.
Personalize it
Before baking, use small alphabet stamps to impress a jersey number or initials into one of the textured panels for a custom player gift.
Now you have a durable, sporty accessory ready to organize your keys or gift to your favorite teammate


Basketball Beads for Jewelry
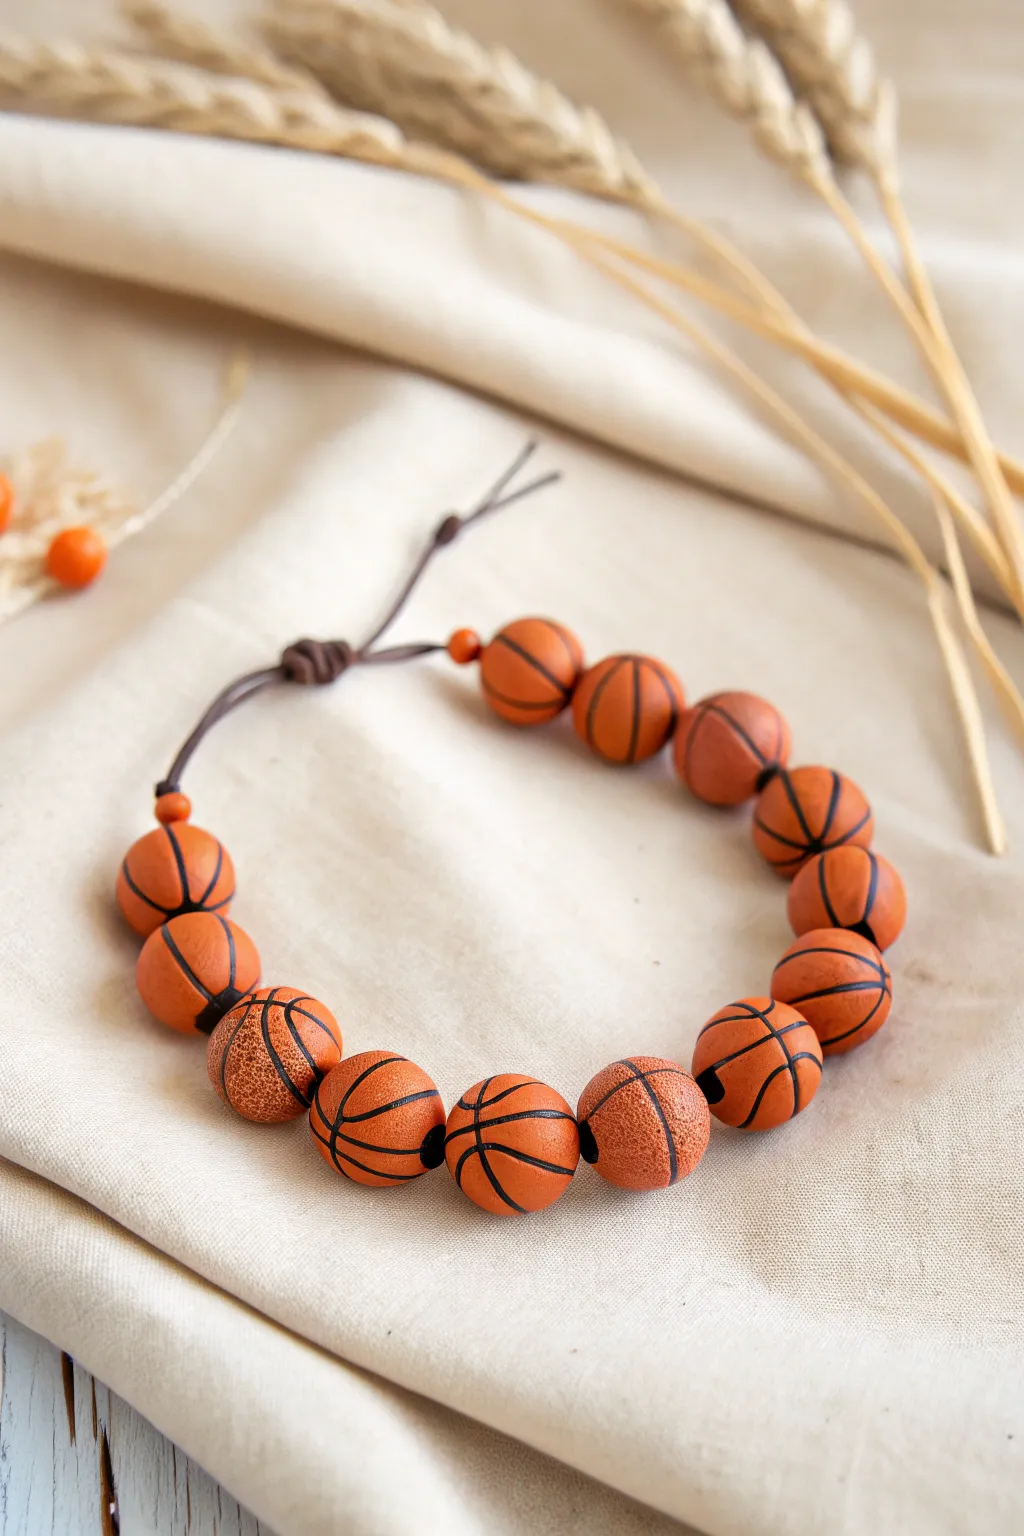
This sporty bracelet captures the texture and energy of the game with incredibly realistic miniature basketball beads. Hand-sculpted from polymer clay, each bead features the iconic pebbled surface and black rubber channel lines for an authentic gym-ready look.
Step-by-Step
Materials
- Orange polymer clay (terracotta or pumpkin shade)
- Black polymer clay (or black acrylic paint)
- Bead piercing tool or thick needle
- Toothbrush or rough sandpaper (for texturing)
- Dark brown waxed cotton or leather cord (approx. 1mm thick)
- Clay sculpting tools (specifically a small knife or needle tool)
- Wet wipes
- Small paintbrush (if using paint)
- Oven for baking clay
Step 1: Sculpting the Basketball Base
-
Condition the clay:
Start by warming the orange polymer clay in your hands until it becomes soft and pliable. This prevents cracking later on. -
Portion the beads:
Roll the clay into a long log of even thickness. Slice the log into equal segments to ensure all your basketballs will be roughly the same size. -
Shape spheres:
Take each segment and roll it between your palms to form a smooth, perfect sphere. Aim for a diameter of about 10-12mm. -
Create texture:
To mimic the bumpy surface of a real basketball, gently roll the surface of each orange sphere against a clean toothbrush or a piece of coarse sandpaper. Press hard enough to leave an impression but not so hard that you deform the ball. -
Pierce bead holes:
Carefully insert your bead piercing pin directly through the center of each sphere. Rotate the pin as you push to avoid squashing the ball. Leave the beads on the pin or remove them carefully to maintain the hole shape.
Step 2: Adding the Black Lines
-
Mark the lines:
Using a needle tool or small knife, gently score the iconic basketball line pattern onto each bead. You need one continuous line dividing the ball in half, and then the curved lines on either side. -
Prepare black clay strings:
If using clay for the lines, roll out a very thin snake of black clay. It needs to be hair-thin to look realistic. -
Embed the lines:
Lay the thin black strings into the scored grooves on your orange beads. Gently press them down so they are flush with the surface but distinct. -
Alternative paint method:
For a possibly easier method, you can bake the textured orange beads first, then carefully paint the lines with black acrylic paint using a fine-tipped brush after they cool. -
Make spacer beads:
Create two tiny spacer beads from orange or brown clay to sit at the ends of the bracelet near the knot, as seen in the inspiration image.
Uneven Lines?
If your black clay lines look wobble, try baking the orange balls first. Once hard, carve the grooves with a file, then fill them with black paint and wipe away the excess for crisp lines.
Step 3: Baking and Assembly
-
Bake the beads:
Arrangement your beads on a baking tray or suspend them on the piercing pins. Bake according to your clay manufacturer’s instructions (usually around 275°F/130°C for 15-30 minutes). -
Cool down:
Allow the beads to cool completely before handling. They are fragile when hot. -
Cut the cord:
Cut a length of dark brown cord, roughly 12 inches long, to allow enough room for knotting. -
String the beads:
Thread your beads onto the cord. Start with one small spacer bead, followed by your basketballs, and finish with the second spacer bead. -
Secure with knots:
Tie a simple overhand knot tightly against the beads on both sides to keep them centered on the cord. -
Create the closure:
Bring the two loose ends of the cord together. Tie a sliding knot or a simple loop-and-knot closure to make the bracelet adjustable. I find a sliding square knot works best for longevity. -
Final trim:
Trim any excess cord from the ends, leaving just enough to grip when adjusting the fit.
Jersey Numbers
Personalize the bracelet by painting a tiny jersey number on one of the basketballs in white or gold paint to represent a favorite player or team member.
Wear your new bracelet to the next game to show off your love for the sport


Basketball Pinch Dish Catchall
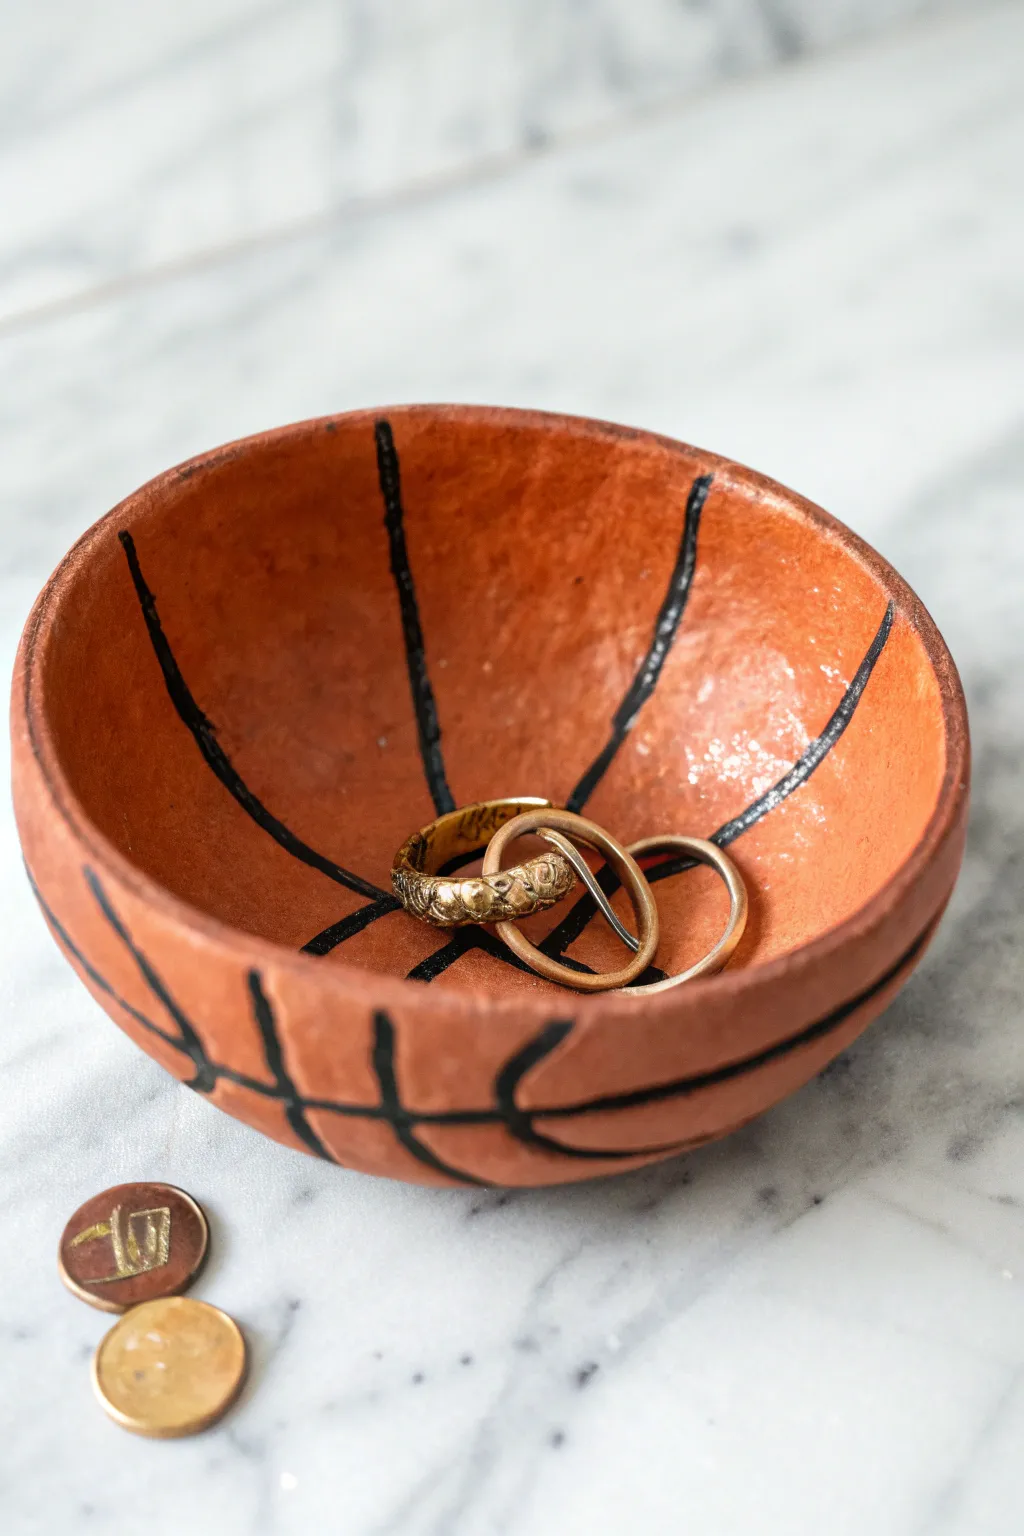
Turn a simple lump of clay into a sporty accessory tray perfect for holding rings, coins, or keys. This beginner-friendly project uses the classic pinch pot technique to mimic the distinct texture and lines of a basketball.
Detailed Instructions
Materials
- Air-dry clay (terra cotta color works best)
- Acrylic paint (black and orange if not using colored clay)
- Fine-tip paintbrush
- Small bowl of water
- Sponge or paper towel
- Gloss varnish or clear sealant (optional)
- Sandpaper (fine grit)
Step 1: Shaping the Base
-
Prepare your clay:
Start with a ball of clay about the size of a tennis ball. Knead it in your hands for a minute to warm it up and remove any potential air pockets, which helps prevent cracking later. -
Form the initial sphere:
Roll the clay between your palms until you have a smooth, round sphere. Try to get it as round as possible, as this determines the final shape of your basketball dish. -
Open the pinch pot:
Hold the sphere in one hand and gently press your thumb into the center of the ball. Push down until you are about half an inch from the bottom—don’t push all the way through. -
Pinch the walls:
Using your thumb on the inside and fingers on the outside, gently pinch the clay while rotating the ball in your hand. Work your way from the bottom up to the rim. -
Even out the thickness:
Aim for a consistent wall thickness of about a quarter-inch all the way around. I find that keeping the walls slightly thicker helps maintain that sturdy, athletic equipment look. -
Smooth the surfaces:
Dip your finger in a little water and run it over the interior and exterior to smooth out fingerprints. If you want a perfectly round rim, gently invert the bowl onto a flat surface and press lightly.
Symmetry Hack
Look at an actual basketball or a photo of one while drawing your lines. The curve of the seams is tricky to memorize, and a reference helps immensely.
Step 2: Adding the Details
-
Dry the form:
Set your bowl aside to dry. For air-dry clay, this usually takes 24-48 hours depending on humidity. Refer to your package instructions and wait until the clay is light in color and hard to the touch. -
Sand imperfections:
Once fully dry, use a fine-grit sandpaper to gently buff away any rough spots on the rim or the outside curve, wiping away the dust with a slightly damp sponge afterward. -
Base coat (optional):
If you didn’t use terra cotta colored clay, apply two coats of orange acrylic paint now. Mix in a tiny dot of brown to get that burnt-orange leather look rather than a neon pumpkin shade. -
Draft the lines:
Lightly trace the basketball seam pattern with a pencil. Start with one continuous line around the middle (the equator), then add the curved lines that intersect it. -
Paint the seams:
Using a fine-tip brush and black acrylic paint, go over your penciled lines. You don’t need a ruler-straight edge; a slightly organic, hand-painted line adds to the charm. -
Refine the lines:
Depending on the opacity of your black paint, you might need a second pass over the lines once the first dries to ensure they are bold and dark. -
Add texture (optional):
If you want a pebbled leather effect, you can gently stipple a little extra orange paint on the negative spaces using a stiff creates a subtle texture. -
Seal the piece:
To protect your jewelry dish from moisture and scratches, apply a coat of gloss varnish or clear sealant. This also gives the ‘leather’ a slight sheen similar to a real ball.
Cracked Clay?
If small cracks appear while the bowl is drying, mix a tiny bit of fresh wet clay with water to make a paste (slip) and fill in the cracks, then smooth over.
Place your finished dish on a nightstand or counter to catch your daily essentials in style

The Complete Guide to Pottery Troubleshooting
Uncover the most common ceramic mistakes—from cracking clay to failed glazes—and learn how to fix them fast.
Mini Hoop and Backboard Desk Decor
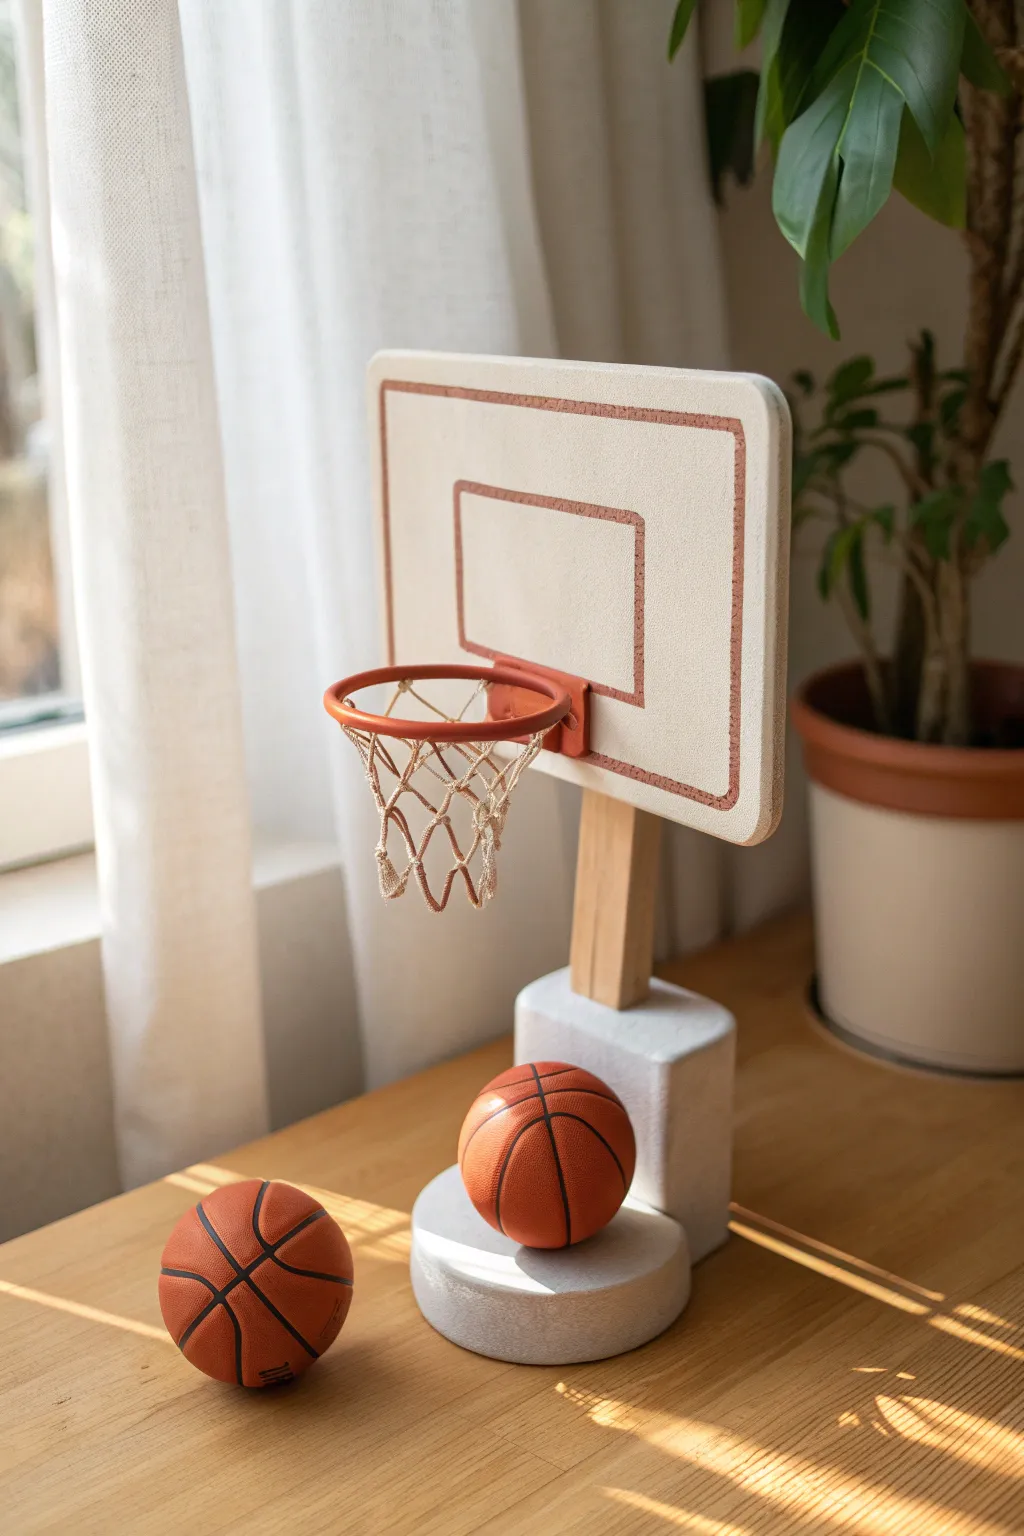
Bring the court to your workspace with this charming miniature basketball hoop sculpture. Featuring a textured clay backboard, realistic mini basketballs, and a stylish wooden stand, this piece serves as both playful decor and a functional paperweight.
Step-by-Step Tutorial
Materials
- White air-dry clay or polymer clay
- Terracotta or orange polymer clay (for balls and rim)
- Square wooden dowel (approx. 1 inch thick)
- Small wooden block or clay for the base
- Jute twine or thick beige thread
- Rolling pin
- Craft knife
- Black fine-point marker or acrylic paint
- Texture tool (sponge or toothbrush)
- Strong craft glue or E6000
- Ruler
- Sandpaper
Step 1: Crafting the Backboard & Rim
-
Shape the backboard:
Roll out a slab of white clay to about 1/4 inch thickness. Cut a neat rectangle (approx. 4×3 inches) using your craft knife and ruler. Smooth the edges with a bit of water on your finger to remove any sharp cuts. -
Add surface texture:
Before the clay hardens, gently press a clean sponge or a textured fabric onto the surface of the backboard to give it a realistic, stippled appearance similar to professional backboards. -
Create the rim and mount:
Roll a snake of orange clay of medium thickness. Form it into a perfect circle for the hoop, joining the ends seamlessly. Create a small rectangular block of the same orange clay to serve as the mounting bracket that connects the rim to the backboard. -
Sculpt the border details:
Roll very thin snakes of orange clay. Carefully press these onto the white backboard to create the outer border rectangle and the smaller inner target square. Use a flat tool to press them flush so they look painted on but have dimension. -
Assemble the hoop components:
Attach the rim to the small orange mounting block. Then, attach this entire assembly to the center of the backboard’s lower section. If using polymer clay, bake now according to package instructions; if air-dry, let everything cure completely.
Drooping Net?
If the string net looks messy or won’t hold its shape, dip your fingers in a mixture of white glue and water, then gently coat the string. Shape it while damp and let it dry stiff.
Step 2: Weaving the Net
-
Prepare the strings:
Cut 8-10 equal lengths of beige thread or thin jute twine, each about 3 inches long. Fold them in half to create loops. -
Attach to the rim:
Using a simple lark’s head knot, attach the folded loops evenly around the circumference of your clay rim. You can secure these with a tiny dot of glue on the underside of the rim for extra stability. -
Knot the first row:
Take one strand from a loop and tie it to the adjacent strand of the next loop with a simple overhand knot. Continue this all the way around the hoop to form the first row of diamonds. -
Finish the net:
Repeat the knotting process for a second row to taper the shape. Trim the excess string at the bottom to create an even, open net.
Step 3: Stand Construction & Assembly
-
Prepare the base:
Form a sturdy base using a large block of white clay. You can shape it like a heavy pedestal with a rounded bottom step and a rectangular top block. Ensure there is a slot or flat area to attach the wooden post. -
Insert the post:
Cut your square wooden dowel to your desired height (around 6-8 inches). If your base is still wet clay, press the wood in to form a socket, then remove it to let the clay dry. Glue it swiftly into place once dry. -
Mount the backboard:
Apply a strong adhesive to the top of the wooden post and the back of your finished backboard. Press them together firmly and prop up the structure so it stays level while the glue sets.
Make it Functional
Embed a strong magnet inside the back of the backboard before the clay dries. This turns your desktop decor into a functional note holder for important reminders.
Step 4: Sculpting the Basketballs
-
Form the spheres:
Roll two balls of orange clay. I like to roll them between my palms for a full minute to ensure they are perfectly spherical and smooth. -
Texture the surface:
Gently tap the surface of the clay balls with a toothbrush or steepled sponge to mimic the pebbled leather texture of a real basketball. -
Add the lines:
Once the clay is dry (or baked and cooled), use a fine-point black marker or a very steady hand with black paint to draw the iconic curved lines of the basketball. -
Add branding details:
For a final realistic touch, add a tiny brand logo or size number near the bottom of the ball using your finest marker tip.
Place your hoop on your desk and enjoy a mini free-throw break whenever you need a moment to recharge
Hardwood Court Slab Display Base
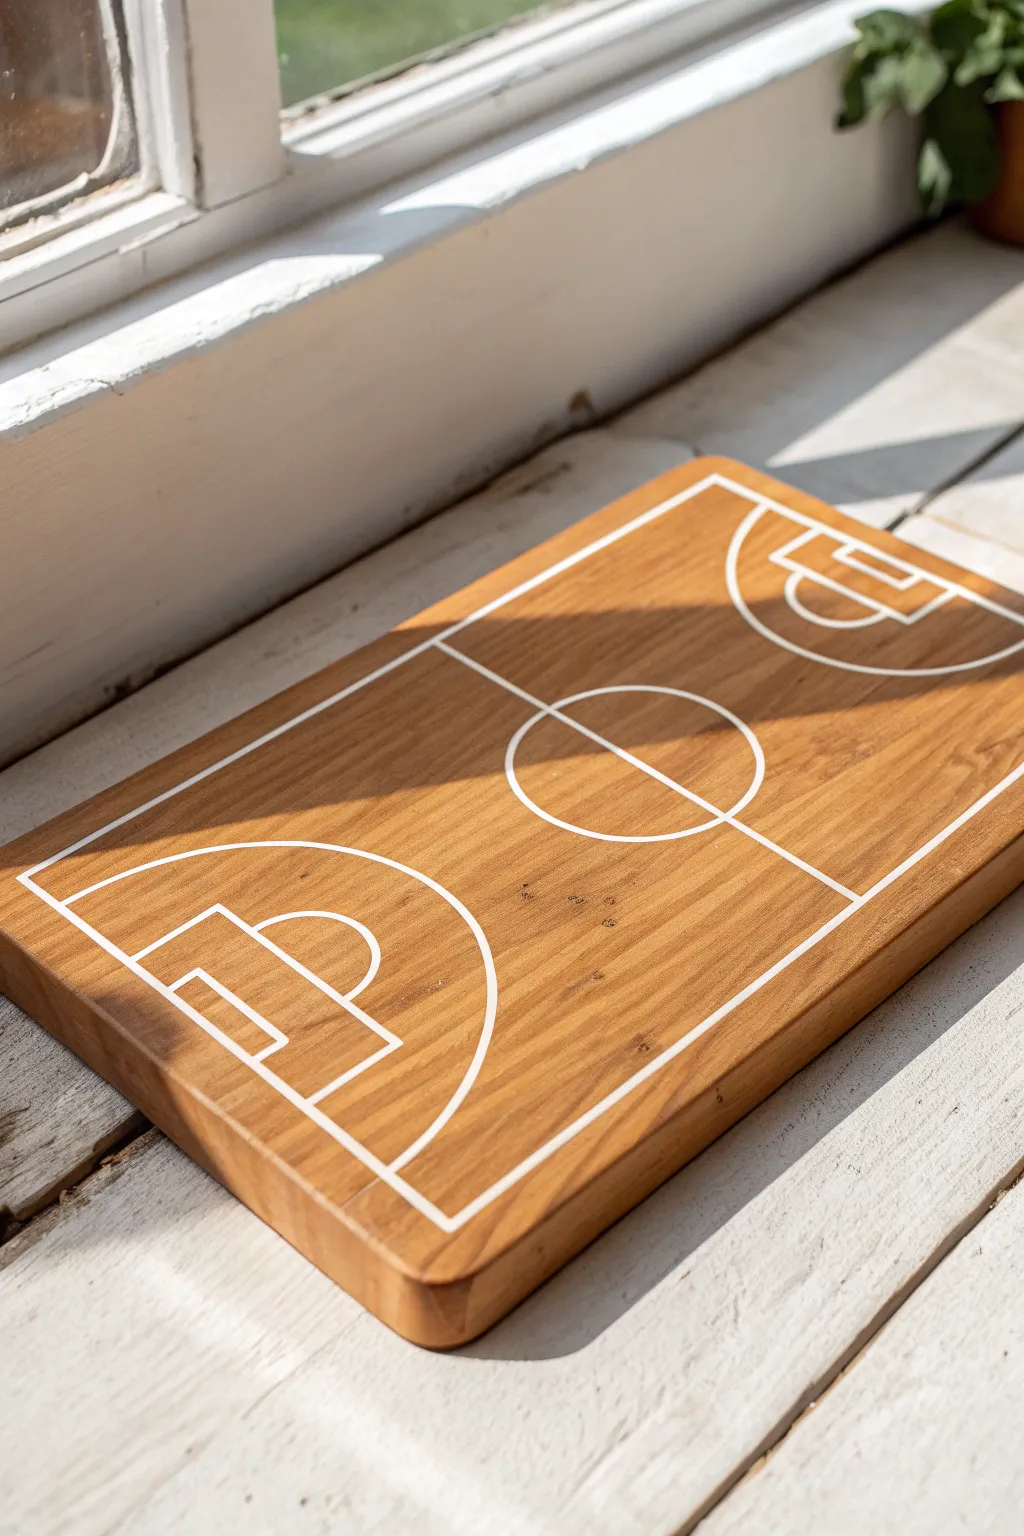
Elevate your clay basketball creations by placing them on this realistic hardwood court slab. This solid wood base features crisp white court markings, turning simple figurines into a professional-looking diorama display.
Step-by-Step
Materials
- Rectangular hardwood cutting board or prepared wood block (approx. 8×12 inches)
- White acrylic paint or specialized wood paint marker
- Fine-grit sandpaper (220 grit)
- Painters tape or masking tape (various widths)
- Ruler and pencil
- Compass or circular template
- Small craft paintbrush (size 0 or 1)
- Matte or satin polyurethane varnish
- Tack cloth or microfiber towel
Step 1: Preparation & Mapping
-
Prepare the surface:
Start with a clean, smooth piece of hardwood. If you are using a raw block, sand it thoroughly with 220-grit sandpaper until it feels silky to the touch, then wipe away all dust with a tack cloth. -
Find the center:
Using your ruler, measure the length and width of the board to find exact center points. Mark a faint cross in the very middle with your pencil to guide the rest of the layout. -
Draw the perimeter:
Measure inward about a half-inch from each edge of the board. Lightly draw a rectangle that will serve as the out-of-bounds line for your court. -
Mark the center circle:
Place your compass point on the center mark you made earlier. Draw a circle that spans roughly one-third of the board’s width, keeping your pencil pressure light so it’s easy to erase later. -
Sketch the key areas:
At both ends of the court, draw the rectangular ‘paint’ or key area. Ensure these are centered on the baseline and extend evenly toward the center line. -
Add the free-throw circles:
At the top of each rectangular key, use your compass (set to the same width as the rectangle) to draw the semi-circle for the free throw line. -
Refine the lines:
Go over your pencil sketch visually to ensure symmetry. The beauty of this project relies on clean geometry, so take a moment here to correct any lopsided areas.
Paint Marker Pro Tip
Struggling with brushes? Use a 2mm white oil-based paint marker instead. It acts like a pen, giving you superior control over curves and consistent line width without the need for masking tape.
Step 2: Painting the Lines
-
Mask the straight lines:
For the crispest results, apply painter’s tape along the straight pencil lines of the perimeter and the key areas. I like to press the tape edge down firmly with a fingernail to prevent paint bleed. -
Paint the straight sections:
Using a small brush and white acrylic paint, fill in the space between your tape guides. Apply thin layers; two thin coats are better than one thick, gloppy one. -
Freehand the curves:
Remove the tape carefully while the paint is still slightly tacky. Now, switch to a very fine brush or a white paint marker to carefully trace over your curved pencil lines for the center circle and free-throw arcs. -
Thicken the lines:
Go over the curved lines a second time to match the thickness of your straight taped lines. A steady hand is key here, so rest your wrist on the table for stability. -
Clean up edges:
If any paint bled under the tape or your hand slipped, wait for it to dry completely. Then, gently scrape the excess away with an X-Acto knife or a tiny bit of sandpaper. -
Erase pencil marks:
Once the white paint is fully cured (give it at least an hour), use a clean eraser to gently remove any visible pencil guidelines.
Make it a Team Court
Customize the center circle by painting a simple logo or using a stencil to add your favorite team’s mascot in the middle before sealing the wood.
Step 3: Sealing & Finishing
-
Apply the first seal coat:
Protect your court lines by brushing on a thin layer of polyurethane varnish. Brush with the grain of the wood to minimize visible strokes. -
Light sanding:
After the first coat dries, very lightly scuff the surface with fine sandpaper. This knocks down any raised wood grain and ensures a super smooth finish. -
Final coat:
Wipe off the dust and apply a second, smooth coat of varnish. This locks in the design and gives the wood that classic gym-floor sheen. -
Let it cure:
Allow the board to dry overnight in a dust-free area before placing any clay figures on top.
Now you have a sturdy, professional base ready to showcase your favorite basketball figurines


What Really Happens Inside the Kiln
Learn how time and temperature work together inside the kiln to transform clay into durable ceramic.
Slam Dunk Silhouette Figurine
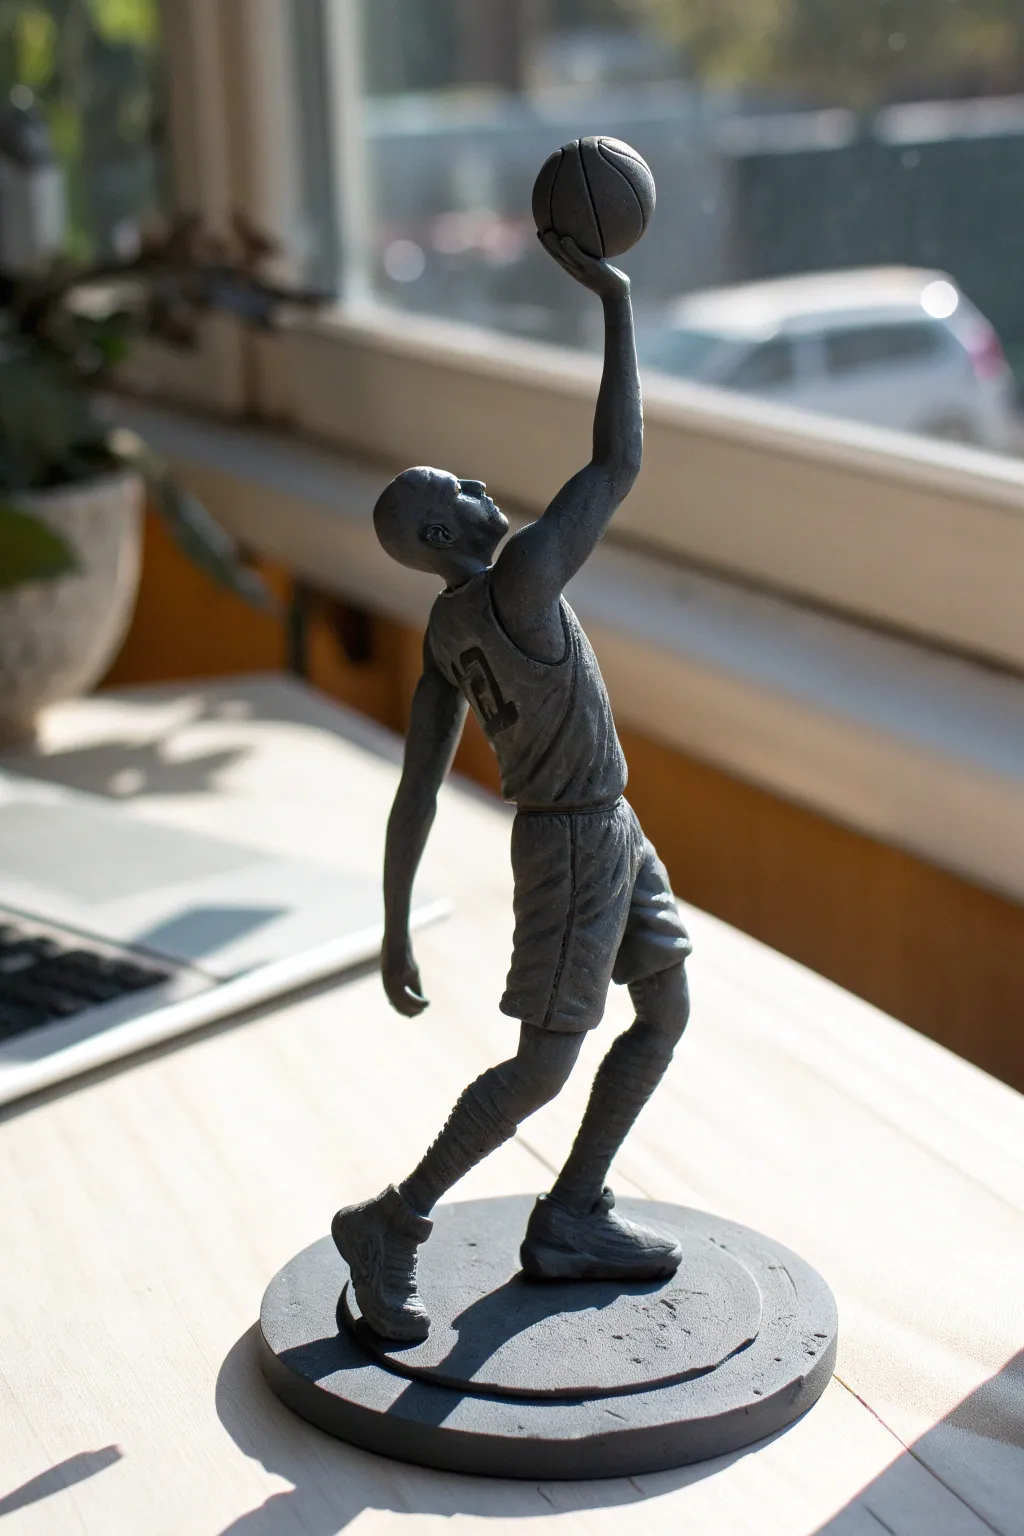
Capture the incredible athleticism of a basketball player in mid-flight with this dynamic monochromatic sculpture. Using dark grey polymer clay, you’ll build an armature-supported figure performing a layup or dunk, finished with a sleek, silhouette-like matte texture.
How-To Guide
Materials
- Dark grey polymer clay (firm consistency recommended)
- Strong aluminum armature wire (approx. 1.5mm or 2mm)
- Thinner wire (approx. 0.8mm) for wrapping
- Aluminum foil
- Wooden base or smooth tile for baking
- Sculpting tools (needle tool, rubber shapers, ball stylus)
- Wire cutters and pliers
- Texture sponge or stiff brush
- Acrylic sealer (matte)
Step 1: Armature Construction
-
Measure the pose:
Cut a length of thick armature wire approximately 12 inches long. Create a loop in the center for the head, then twist the wire down to form the spine, hips, and two long legs, leaving extra length at the bottom to mount into the base. -
Form the arms:
Cut a second piece of wire for the arms. Twist it securely around the ‘shoulder’ area of your spine wire. Bend the right arm upwards high (holding the ball) and the left arm downwards and slightly back for balance. -
Anchor to base:
Create the circular base first using a thick disc of clay (about 0.5 inches thick). Insert the foot wires deep into this base to ensure the figure stands upright. You might need to bake the base and wire skeleton first for maximum stability, though it’s optional. -
Foil bulking:
Wrap aluminum foil tightly around the wire skeleton to build up the core muscle mass. Focus on the torso, thighs, and calves. This saves clay and keeps the sculpture lightweight.
Balance Check
Before adding detail, ensure the center of gravity is over the base. If the figure tips, bend the ankles slightly to shift the weight backward.
Step 2: Sculpting the Figure
-
Apply the clay skin:
Condition your dark grey clay until pliable. Flatten sheets of clay and wrap them over the foil armature, smoothing the seams together with your fingers or a rubber tool so no foil is visible. -
Define the torso:
Add small clay snakes to build the chest and back muscles. Smooth them into the main body form. Following anatomical references here is helpful to get the arch of the back just right. -
Sculpt the jersey:
Instead of sculpting a naked body and adding clothes, I prefer to sculpt the jersey directly over the torso form. Layer thin sheets for the tank top, adding wrinkles around the twisting waist. -
Create the shorts:
Wrap wider strips of clay around the upper legs for the shorts. Use a needle tool to create deep folds and fabric bunching where the legs bend. The shorts should look loose and flowing. -
Legs and socks:
Shape the calves and knees. To mimic the look of scrunched athletic socks or leg sleeves, roll thin coils of clay and wrap them around the lower shins, blending them slightly for texture. -
Sneaker details:
Pack clay around the wire loops at the feet to form high-top sneakers. Use a small knife to carve outlines for the sole, laces, and heel structure.
Smooth Operator
Fingerprints showing up on the skin areas? Lightly brush the raw clay with a little baby oil or clay softener before baking to melt them away.
Step 3: Refining and Finishing
-
The basketball:
Roll a perfect sphere of clay. Gently press it into the upraised right hand. Blend the clay from the palm onto the ball slightly to secure it physically. -
Ball texture:
Use a needle tool to score the curved lines of the basketball. Stipple the surface of the ball with a toothbrush or wire brush to replicate the pebbled leather texture. -
Facial features:
Keep the face relatively simple to maintain the silhouette style. Define the brow ridge, nose, and jawline, but don’t worry about eyes or detailed lips. -
Jersey numbers:
Cut out a number from a very thin slab of clay (like the ‘7’ in the image) and press it gently onto the back of the jersey. You can outline it with a needle tool for sharpness. -
General texturing:
Go over the clothing with a texture sponge to give it a fabric look, contrasting it with the smoother ‘skin’ areas of the arms and head. -
Base detailing:
Texture the circular base to look like concrete or asphalt by pressing a rough stone or crumpled foil against it. You can add a rim around the edge for a polished look. -
Baking:
Bake the sculpture according to your polymer clay package instructions. Since the core is foil, ensure you bake long enough to cure the clay all the way through. -
Cooling and sealing:
Allow the figure to cool completely. If desired, brush on a matte varnish to protect the surface and unify the sheen.
Now you have a dynamic moment frozen in time that celebrates the energy of the game
Basketball Jersey Number Pendant
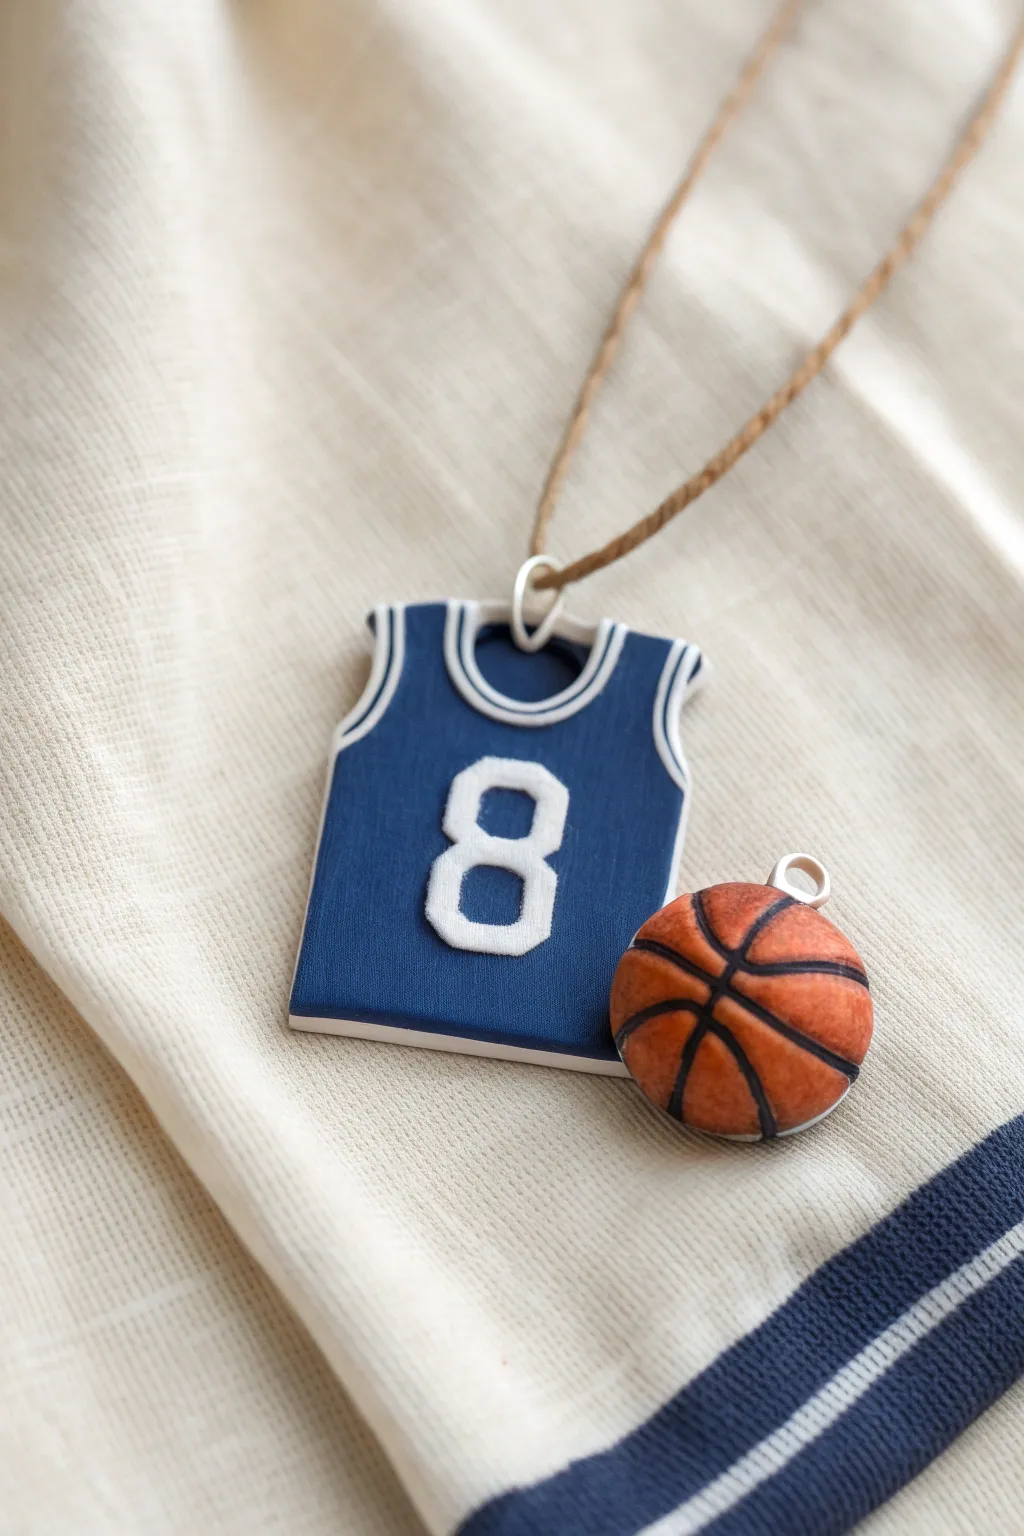
Show off your team spirit with this adorable duo of miniature clay charms. The textured basketball and clean lines of the team jersey make for a sporty accessory that looks complex but comes together with simple shapes.
Step-by-Step
Materials
- Navy blue polymer clay
- Orange polymer clay (burnt orange shade)
- White liquid clay or white soft polymer clay
- Clay roller or pasta machine
- X-Acto knife or sharp blade
- Needle tool or toothpick
- Small eye pins (silver)
- Black acrylic paint
- Small paintbrush
- Paper towel
- Jewelry pliers
- Twine or necklace cord
- Oven (for baking polymer clay)
Step 1: Sculpting the Jersey
-
Roll the base:
Condition the navy blue clay until it’s soft and pliable, then run it through a pasta machine or use a roller to create an even slab about 3-4mm thick. -
Cut the shape:
Use your sharp blade to cut a rectangle roughly 1.5 inches tall. Carefully trim away the top corners to create the armholes and cut a shallow ‘U’ shape at the top center for the neckline. -
Refine the edges:
Gently smooth the cut edges with your finger to remove any harsh angles or burrs from the cutting process. -
Create the trim:
Roll a very thin snake of white clay. Carefully lay this outline around the armholes and neckline, pressing it gently so it bonds. If you prefer, you can use white liquid clay piped from a fine-tip bottle for a raised 3D effect. -
Add the number:
Roll a small snake of white clay and shape it into an ‘8’ (or your favorite player’s number) on your work surface first. Once shaped perfectly, transfer it to the center of the jersey and press lightly. -
Insert the hardware:
Trim an eye pin to size and carefully insert it into the top center of the jersey neckline, ensuring the loop sits flush against the clay.
Sticky Situation?
If the white clay smudges onto the navy blue jersey, use a cotton swab dipped in rubbing alcohol to gently wipe away the mistake before baking.
Step 2: Crafting the Basketball
-
Form the sphere:
Roll a piece of burnt orange clay into a smooth ball, roughly 0.75 inches in diameter. -
Add texture:
Take a clean toothbrush or a crumpled ball of aluminum foil and gently press it all over the surface of the ball to create a realistic leather texture. -
Mark the lines:
Use a needle tool to sketch the standard basketball rib lines. Start with a continuous line around the middle, then a perpendicular line, and finally the curved lines on the sides. -
Deepen the grooves:
Go over your sketched lines again, pressing a bit deeper to create distinct channels for the paint later. -
Add the hardware:
Insert a small eye pin into the top of the ball. I find adding a tiny dab of liquid clay on the pin shaft helps it hold permanently after baking.
Pro Tip: Clean Lines
Pop the sculpted jersey in the freezer for 5 minutes before slicing the shape. Cold clay cuts cleaner and deforms less under the pressure of the knife.
Step 3: Finishing Touches
-
Bake the clay:
Place both pieces on a tile or parchment-lined baking sheet and bake according to your clay manufacturer’s instructions (usually around 275°F/135°C for 15-30 minutes). -
Cool down:
Let the pieces cool completely before handling them to ensure they harden fully. -
Antique the basketball:
Dilute a small amount of black acrylic paint with water. Wash this over the basketball, making sure it gets into the grooves. -
Wipe the surface:
Quickly wipe the surface of the basketball with a damp paper towel. The black paint should stay in the grooves and texture pockets, emphasizing the details. -
Seal (optional):
If desired, coat the pieces with a matte clay varnish for protection. -
Assembly:
Thread your twine or cord through the loops of both charms to create a finished necklace.
Wear your new basketball jewelry to the next big game and cheer your team on in style

TRACK YOUR CERAMIC JOURNEY
Capture glaze tests, firing details, and creative progress—all in one simple printable. Make your projects easier to repeat and improve.
Basketball Stud Earrings Set
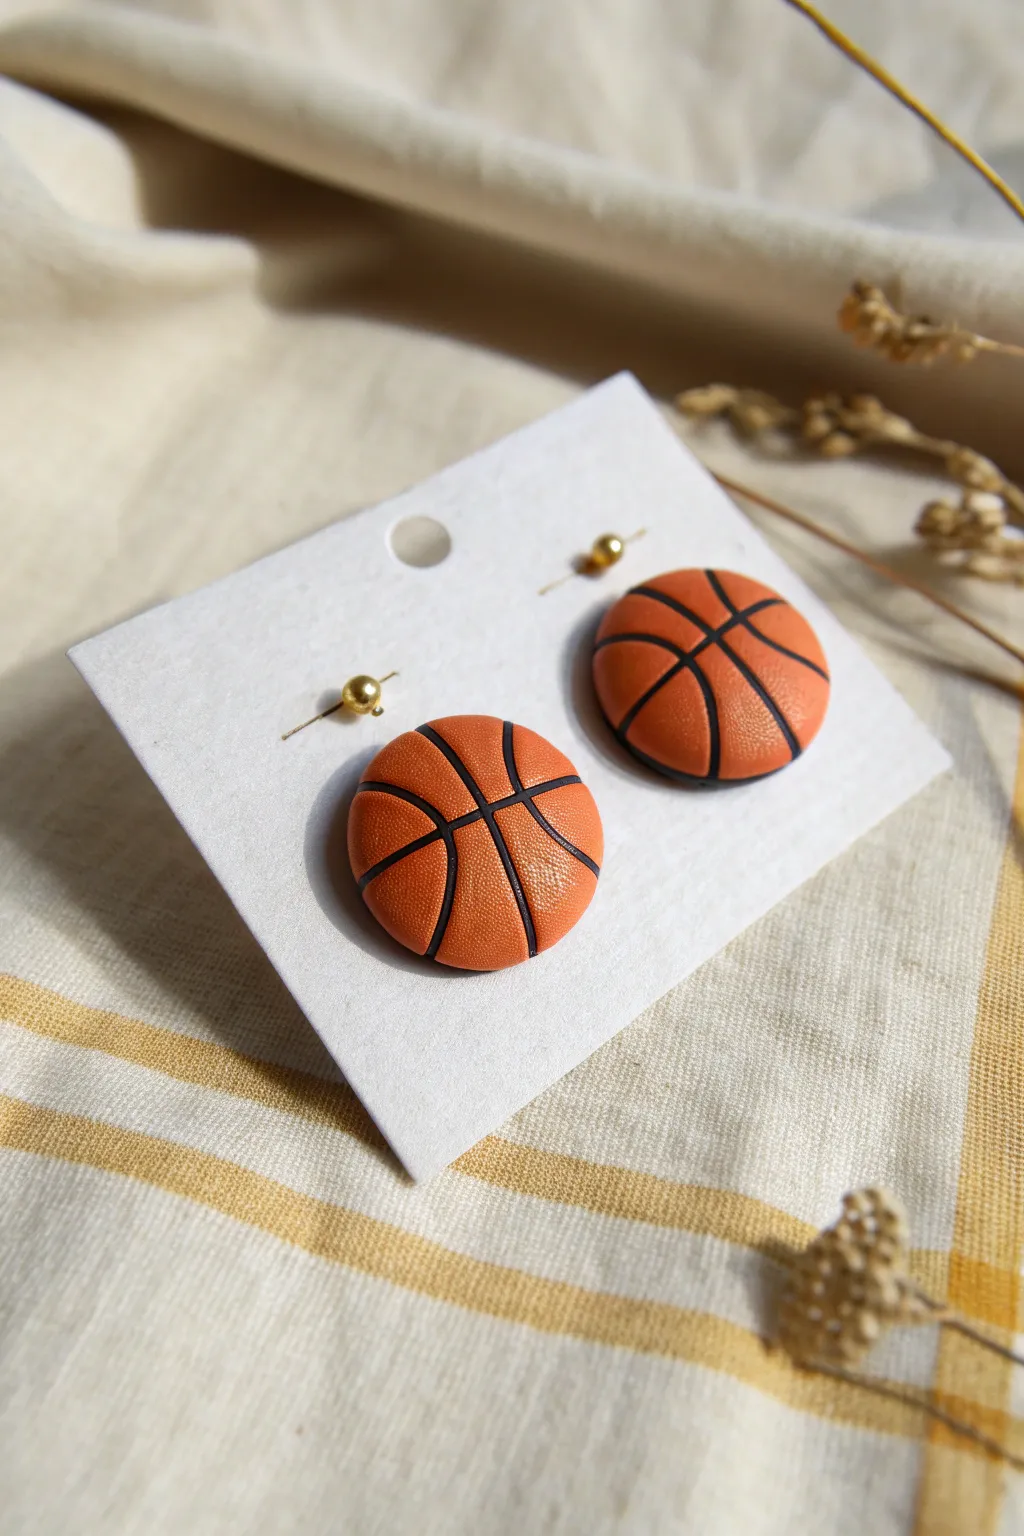
Capture the spirit of the game with these miniaturized basketball stud earrings. Featuring a realistic pebbled texture and bold black seams, these polymer clay creations are perfect for sports fans looking for a subtle yet spirited accessory.
How-To Guide
Materials
- Orange polymer clay (true basketball orange)
- Black polymer clay
- Earring stud posts (surgical steel or gold-plated)
- Strong craft glue (E6000 or similar)
- Texture tool (sandpaper, toothbrush, or specialized stipple sponge)
- Needle tool or toothpick
- Small round cutter (approx. 10-12mm)
- Acrylic rolling pin
- Clay slicer or precision knife
- Oven for baking
Step 1: Prepping the Base
-
Condition the clay:
Start by kneading your orange polymer clay until it is soft, pliable, and free of any air bubbles. This ensures a smooth working surface and prevents cracking during baking. -
Roll out the sheet:
Using your acrylic rolling pin, flatten the conditioned orange clay into a sheet approximately 3mm to 4mm thick. You want it sturdy enough to hold the post but not too heavy for the ear. -
Cut the shapes:
Press your small round cutter firmly into the clay to create two identical circles. Lift away the excess clay carefully so you don’t distort the perfect round shape.
Step 2: Adding Texture & Lines
-
Create the pebble texture:
This is the secret to realism. Gently press your texture tool—I find a clean toothbrush or rough sandpaper works wonders—over the entire domed surface of both orange circles. Don’t press too hard; you just want surface indentations. -
Mark the seam guides:
Using the very tip of your needle tool or a dull knife, lightly sketch the curved lines of a basketball onto the textured surface. Draw one vertical line and one horizontal line that curve with the shape, creating that classic intersection. -
Deepen the grooves:
Once you are happy with the placement, go back over your sketched lines with the needle tool, pressing slightly deeper to create a distinct channel where the black clay will sit.
Uneven Lines?
If your black coils look wobbly, try rolling the black snake on a piece of glass. If the clay gets too sticky and stretches, pop it in the fridge for 5 minutes to firm it up before placing.
Step 3: Applying the Seams
-
Prepare black clay:
Condition a very small amount of black polymer clay. Roll it into an extremely thin snake or ‘coil’—think as thin as a thread or sewing needle. -
Lay the first line:
Carefully pick up a piece of the black thread and lay it into one of the grooves you created. Use your needle tool to gently nudge it into place so it sits flush. -
Trim excess:
Snip off any black clay hanging over the edge of the orange circle with your precision blade to keep the outline crisp. -
Complete the pattern:
Repeat this process for all intersecting lines on both earrings. Ensure the black lines connect smoothly where they meet. -
Embed the lines:
With a flat finger or the back of a spoon, give the entire surface a very gentle press. You want to fuse the black lines into the orange base without flattening the beautifully textured surface you made earlier.
Pro Tip: Liquid Clay
For extra durability, coat the grooves with a tiny amount of liquid polymer clay before laying down the black strips. This acts as a bonding agent and prevents the lines from popping out later.
Step 4: Finishing Up
-
Bake the pieces:
Place your earrings on a baking sheet lined with parchment paper. Bake according to your specific clay manufacturer’s instructions (usually 275°F/135°C for 15-30 minutes). -
Cool down:
Allow the clay pieces to cool completely inside the oven or on a wire rack before handling. They are fragile while hot. -
Prepare the posts:
Apply a small dot of strong craft glue to the flat pad of your earring post. -
Attach hardware:
Press the glued post firmly onto the center of the back of each basketball. Let the glue cure for the recommended time (often 24 hours) for maximum durability.
Now you have a sporty, handmade set of studs ready to wear to the next big game
Basketball Magnet for Locker or Fridge
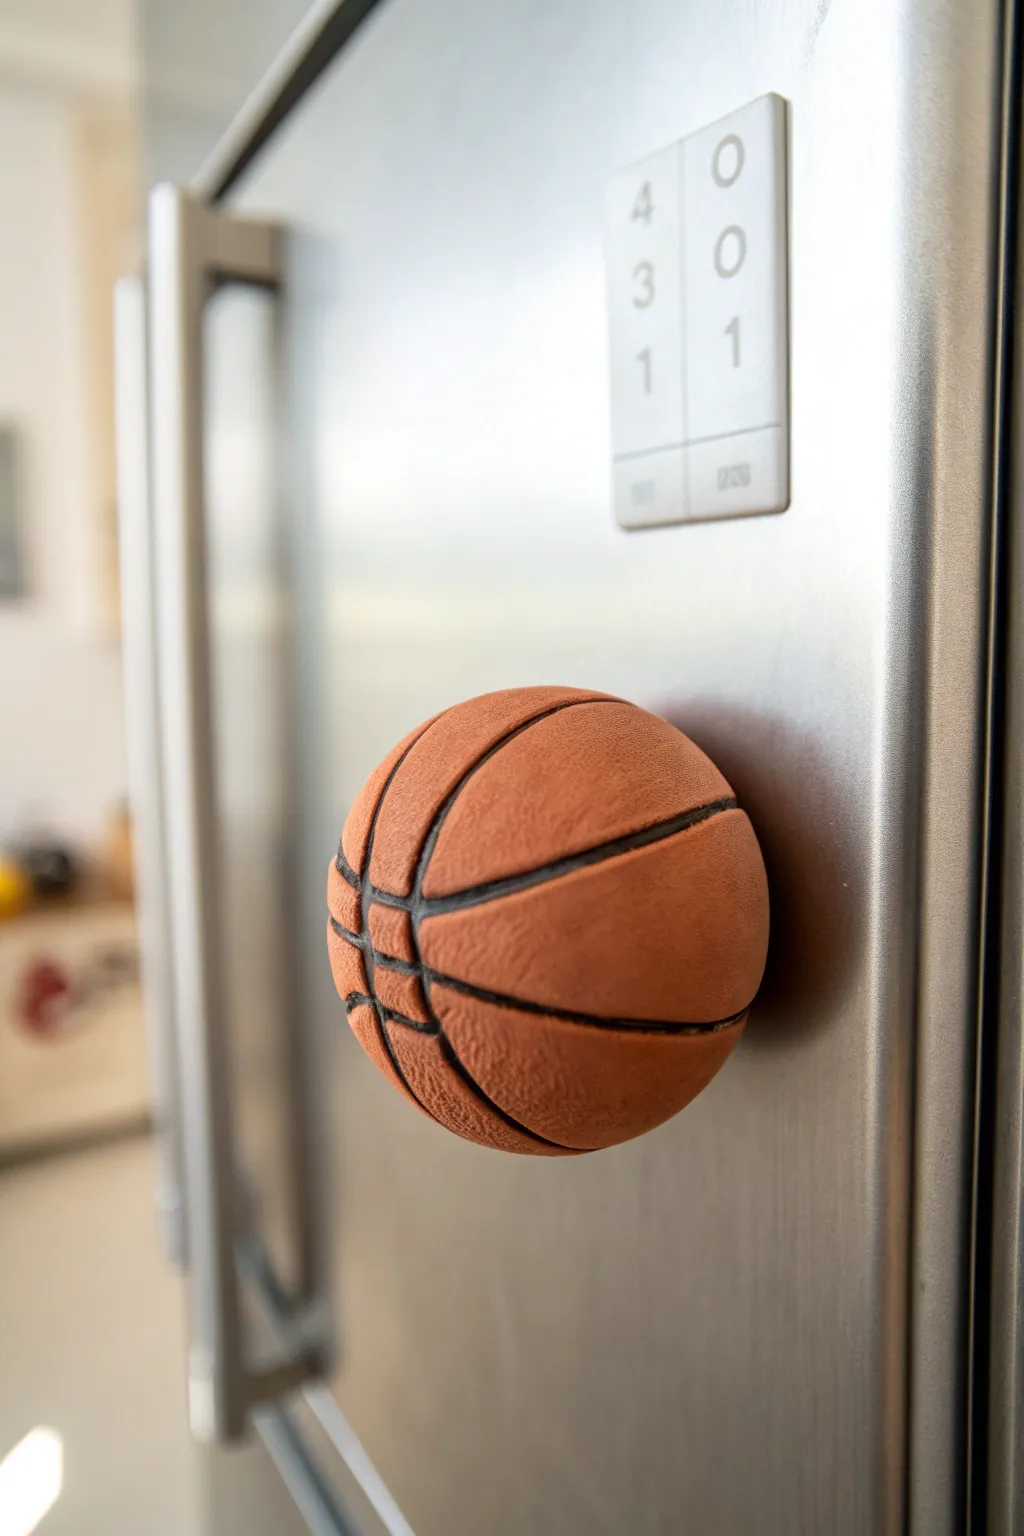
Bring the excitement of center court into your kitchen with this realistic, half-round basketball magnet. Sculpted from polymer clay, it features an authentic pebbled texture and makes a perfect sporty accent for any locker or refrigerator door.
Step-by-Step Tutorial
Materials
- Orange polymer clay (burnt orange or terracotta)
- Black acrylic paint
- Fine detail paintbrush (size 0 or 00)
- Strong round ceramic or neodymium magnet (approx. 1 inch)
- Strong adhesive (E6000 or super glue)
- Texture tool (toothbrush, stiff stipple brush, or sandpaper)
- Sculpting tools (needle tool and ball stylus)
- Aluminum foil
- Rolling pin or acrylic roller
- Wet wipe or baby wipe
Step 1: Sculpting the Ball Base
-
Condition the clay:
Start by taking a chunk of your orange polymer clay. Knead it firmly in your hands for several minutes until it becomes warm, soft, and pliable. -
Form the core:
Crumple a small amount of aluminum foil into a tight half-sphere shape. This will act as the core, saving clay and reducing baking time. -
Roll out the clay:
Roll your conditioned clay into a flat sheet, about 1/4 inch thick. Ensure it is wide enough to cover your foil core completely. -
Cover the core:
Drape the clay sheet over the rounded side of your foil dome. Gently press and smooth the clay down to encase the foil, trimming away any significant excess at the flat bottom. -
Shape the hemisphere:
Roll the clay-covered dome on your work surface or between your palms to smooth out any seams or fingerprints. You want a perfect, smooth half-sphere shape.
Clean Texture Tip
Dust the clay surface lightly with cornstarch before texturing with a toothbrush. This prevents the bristles from sticking and dragging the clay.
Step 2: Adding Details and Texture
-
Mark the lines:
Using a needle tool or a dull knife, lightly sketch the iconic basketball lines onto the dome. Start with one vertical line dividing the ball, then add the horizontal line, followed by the curved side lines. -
Create the channels:
Once you are happy with the placement, retrace those lines with a ball stylus tool. Press firmly to create deep, consistent grooves where the black lines will eventually go. -
Texturize the surface:
To mimic genuine leather skin, gently press a clean toothbrush or stiff-bristled stipple brush all over the orange sections. Be careful not to mash the overall shape—just dimple the surface. -
Clean the grooves:
If your texturing tool accidentally roughed up the inside of your channeled lines, run the ball stylus through them one last time to smooth them out. -
Double-check the shape:
Verify that your half-sphere hasn’t flattened out too much during texturing. Gently reshape the dome with your fingers if necessary.
Make it Personal
Before baking, use small alphabet stamps to imprint a jersey number or initials into one of the panels for a custom team player gift.
Step 3: Finishing Touches
-
Bake the clay:
Place your creation on a baking sheet or tile. Bake according to the specific temperature and time directions on your polymer clay package. I usually let it cool down completely inside the oven to prevent cracking. -
Paint the lines:
Dip your fine detail brush into black acrylic paint. Carefully paint inside the grooves you created earlier. It helps to water the paint down slightly so it flows smoothly into the channels. -
Clean up overflow:
If any black paint gets onto the textured orange surface, quickly wipe it away with a damp paper towel or wet wipe before it dries. -
Seal the surface (Optional):
For a matte finish that protects the paint, create a very light wash of matte varnish or use a specific polymer clay sealer over the entire piece. -
Prepare the back:
Turn the hardened clay piece over to the flat side. If the foil is exposed or uneven, you can sand it slightly flat, though the magnet usually helps bridge any gaps. -
Attach the magnet:
Apply a dab of strong adhesive, like E6000, to the center of the flat back. Press your magnet firmly into the glue. -
Final cure:
Allow the glue to cure fully (usually 24 hours for best results) before sticking your new basketball magnet onto the fridge.
Now your fridge is ready to handle the full-court press of your daily schedule
Basketball Trinket Box With Lid
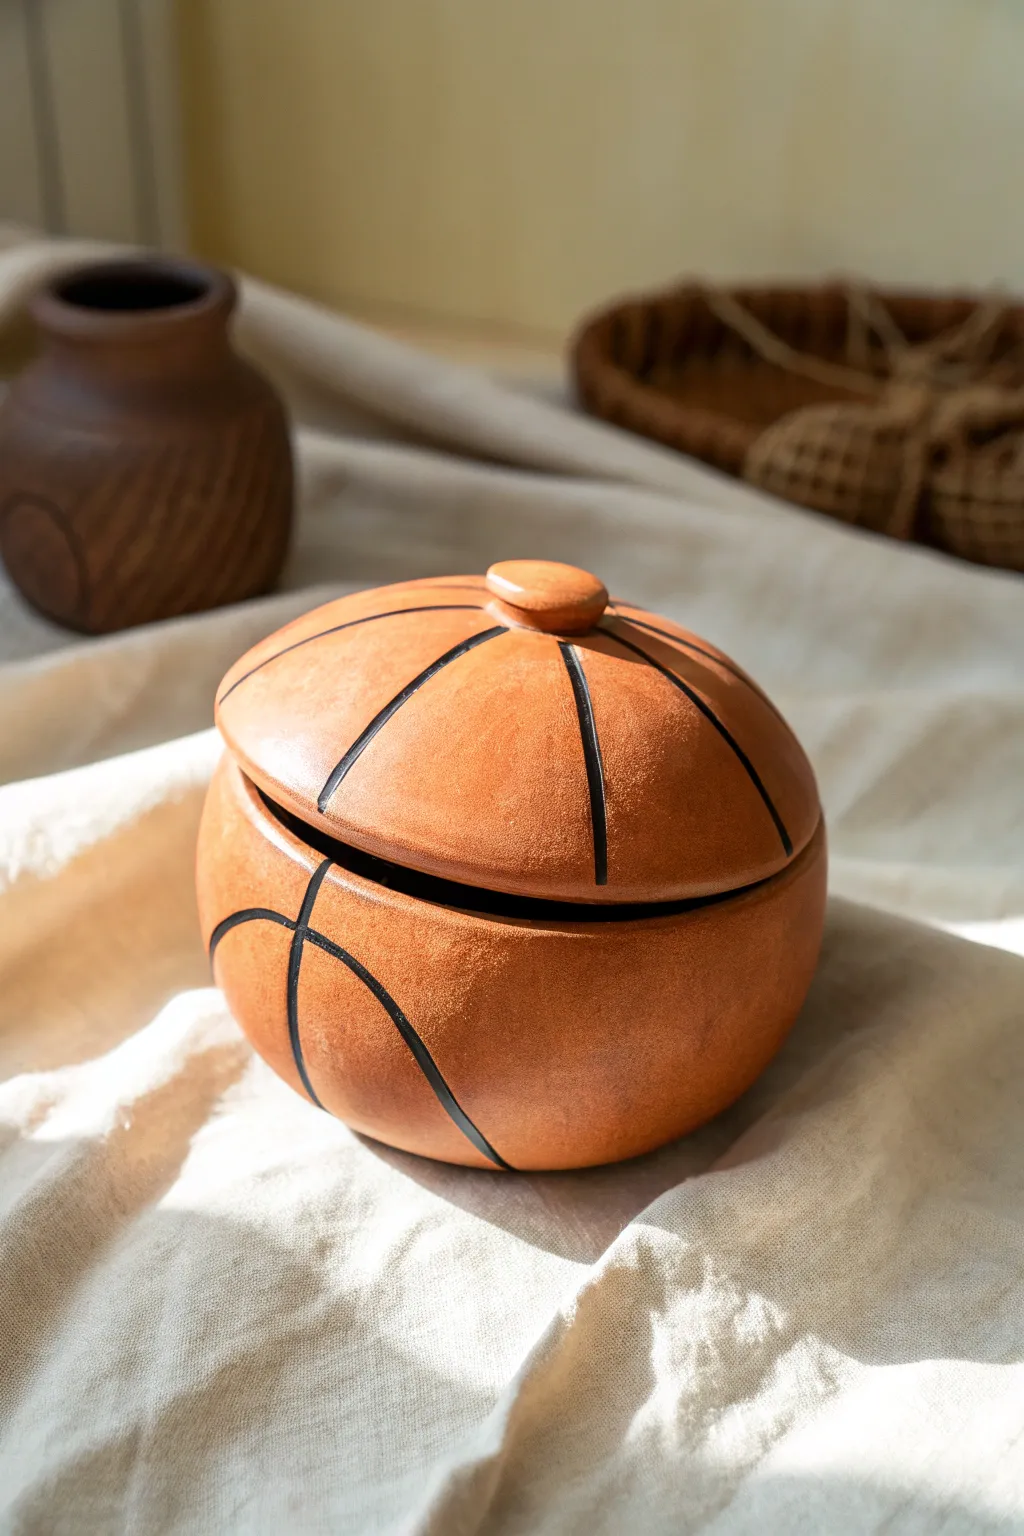
Sculpt a slam dunk for your desk with this charming basketball trinket box. This functional piece features a warm, terracotta finish and classic court markings, making it the perfect hideaway for small treasures or spare change.
Step-by-Step
Materials
- Terracotta-colored air-dry clay or polymer clay
- Small rolling pin
- Sphere mold (foam ball or small bowl)
- Plastic wrap
- Clay knife or needle tool
- Slip (clay and water mixture) or liquid clay adhesive
- Fine-grit sandpaper
- Black acrylic paint
- Fine-tip paintbrush
- Matte sealant/varnish
Step 1: Forming the Base
-
Prepare the Clay:
Start by conditioning your terracotta clay until it is soft and pliable. If you are using air-dry clay, keep your hands slightly damp to prevent cracking. -
Roll a Slab:
Roll out a portion of the clay into an even slab, approximately 1/4 inch thick. Aim for a consistent thickness to ensure the walls of your box are sturdy. -
Mold the Bowl Shape:
Take your sphere mold (like a small bowl or foam ball) and cover it with plastic wrap to prevent sticking. Gently drape the clay slab over the mold, smoothing it down to take the shape of a half-sphere. -
Trim the Excess:
Using your clay knife, trim away the excess clay at the equator of your mold to create a clean, flat rim. Smooth this edge with your finger or a little water. -
Initial Drying:
Let this bottom half sit on the mold until it is firm enough to hold its shape (leather hard). Once firm, carefully remove the mold and plastic wrap.
Step 2: Creating the Lid
-
Form the Top Dome:
Repeat the molding process to create a second half-sphere. I like to make this one slightly shallower than the base so it looks more like a lid than a second bowl. -
Add a Lip (Optional):
To keep the lid secure, you can roll a small coil of clay and attach it to the *inside* rim of the lid using scoring and slip. This creates an inner ledge that will sit inside the base. -
Sculpt the Knob:
Roll a small ball of clay and flatten it slightly into a thick disc. This will be the handle. -
Attach the Knob:
Score the bottom of the knob and the very top center of your lid. Apply slip or adhesive and press them firmly together. Smooth the seam where they join so it looks seamless. -
Dry Completely:
Allow both the base and the lid to dry completely according to your clay’s package instructions. This usually takes 24-48 hours for air-dry clay.
Smooth Operator
Use a damp sponge to smooth out fingerprints before the clay dries. This saves you tons of sanding time later and keeps the surface professional.
Step 3: Refining and Painting
-
Sand Smooth:
Once bone dry, gently sand any rough edges, particularly around the rims where the two halves meet. Wipe away any dust with a slightly damp cloth. -
Draft the Lines:
Lightly sketch the basketball seam pattern onto the box using a pencil. Start with a continuous line around the middle, then add the perpendicular curved lines to mimic the ball’s design. -
Paint the Seams:
Using a fine-tip brush and black acrylic paint, carefully trace over your pencil lines. You really want a steady hand here to keep the lines crisp. -
Add Texture (Optional):
If you want that nubby leather texture, you can gently stipple the unpainted orange areas with a dry sponge before sealing. -
Seal the Project:
Finish by applying a coat of matte sealant. This protects the paint and enhances that natural clay look without making it unnaturally shiny.
Texture Up
Before drying, gently pres a piece of rough sandpaper or a clean scouring pad against the wet clay. This instant stippling mimics real basketball leather perfectly.
Place your finished basketball box on a shelf to show off your crafty crossover skills
Basketball Cane Slice Charms
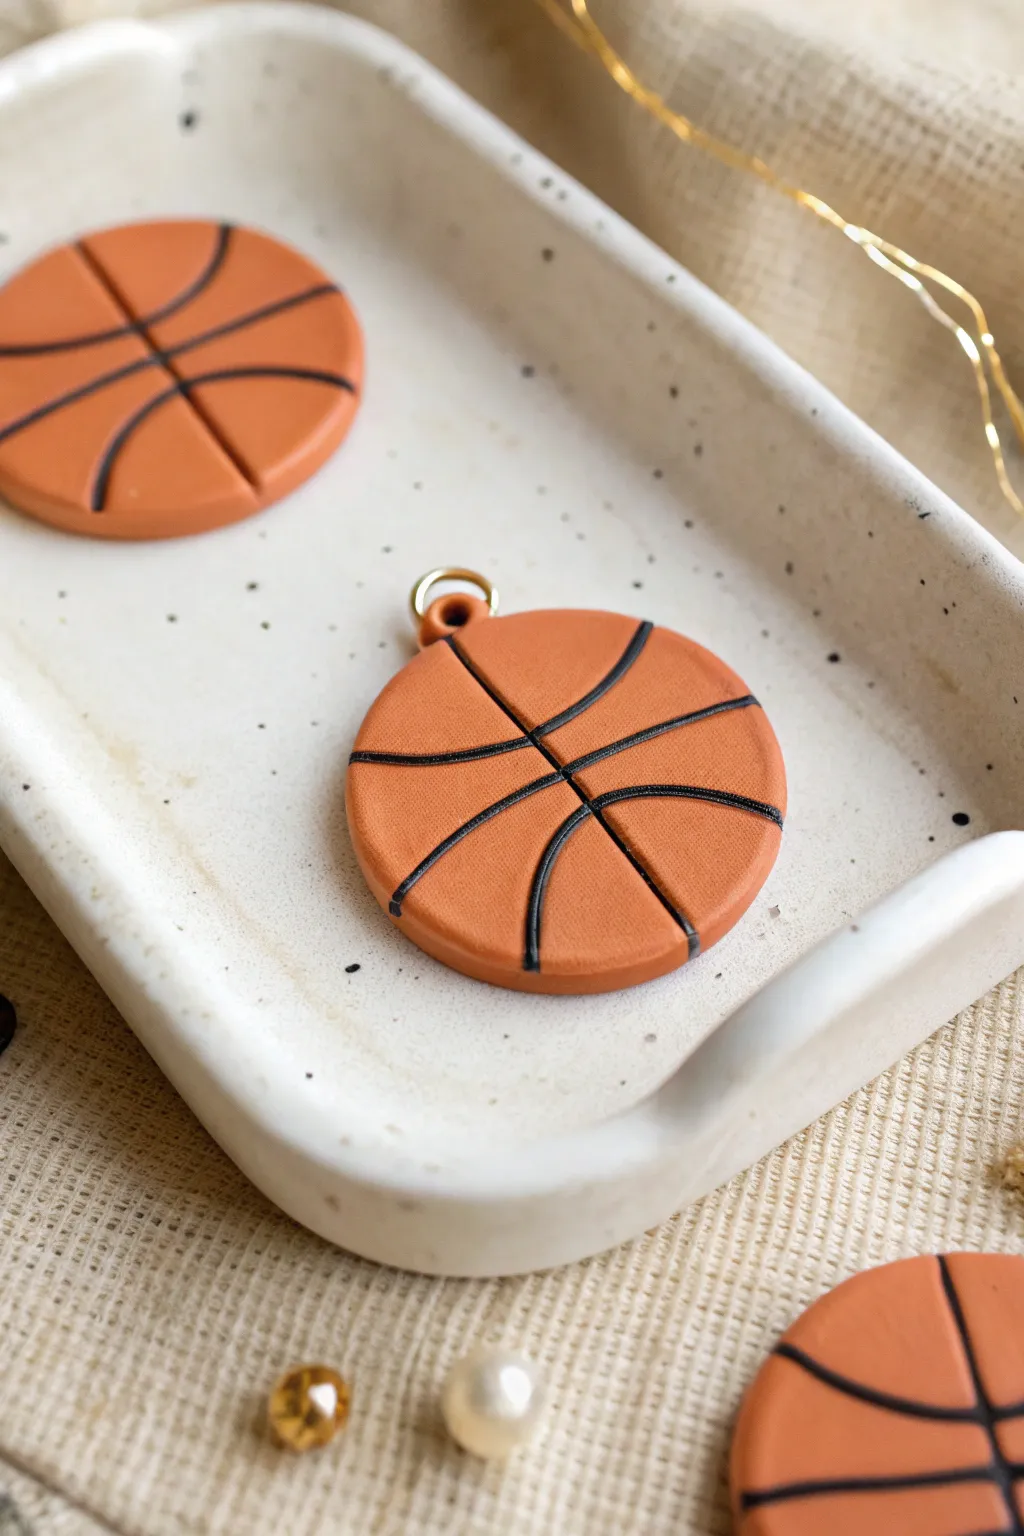
These simple yet striking basketball charms capture the texture and classic look of the sport in miniature form. Perfect for earrings, keychains, or pendants, this project uses basic polymer clay techniques to create crisp, clean lines and a professional finish.
Step-by-Step Guide
Materials
- Orange polymer clay (burnt orange or mix pure orange with a touch of brown)
- Black polymer clay (very small amount)
- Acrylic roller or pasta machine
- Round clay cutter (approx. 1 inch diameter)
- Small jump rings (gold or silver)
- Needle tool or toothpick
- Liquid polymer clay or Bake & Bond (optional)
- Fine-grit sandpaper (optional)
- Small pliers for jewelry assembly
- Oven for baking
Step 1: Base Preparation
-
Condition the Clay:
Start by thoroughly conditioning your orange polymer clay until it is soft and pliable. If the orange is too bright, I prefer mixing in a tiny speck of brown to achieve that authentic, slightly muted basketball leather tone. -
Roll Out the Slab:
Roll the conditioned orange clay into a flat sheet. Aim for a thickness of about 3mm to 4mm—any thinner and it might be fragile; any thicker and it can look bulky. -
Cut the Circles:
Using your round clay cutter, press firmly into the clay sheet to cut out your circles. Lift them carefully to avoid distorting the shape, and smooth the edges gently with your finger if needed.
Step 2: Creating the Lines
-
Mark the Center Line:
Take your needle tool and gently press a horizontal line across the center of the circle. Create a groove rather than just scratching the surface, as this channel will hold the black clay later. -
Add the Vertical Curve:
Press a vertical line that curves slightly, mimicking the spherical shape of a ball. It should intersect your horizontal line at a 90-degree angle in the center. -
Form the Side Curves:
Carefully press in two curved lines on either side of the vertical line. These should curve outward toward the edges of the circle, creating the classic basketball pattern. -
Deepen the Grooves:
Go back over your lines with the needle tool to ensure the channels are deep enough to accept the black clay inlay without being too wide.
Clean Cuts Pro Tip
Cover your clay with a piece of plastic wrap before cutting the circle with your cutter. This creates a lovely domed, pillow-like edge instead of a sharp, harsh cut.
Step 3: Inlaying the Details
-
Prepare Black Strings:
Roll out a very thin snake of black polymer clay. You want this to be extremely fine—like a thread—so it fits perfectly into the grooves you just made. -
Insert the Clay:
Lay the black thread into the grooves on your orange circle. Gently press it down so it sits inside the channel. -
Trim Excess:
Use a craft knife or your needle tool to trim any black clay that hangs over the edge of the circle. -
Smooth the Surface:
Once all lines are filled, gently roll over the surface with your acrylic roller. This will flatten the black clay into the orange clay, merging them into a single smooth surface.
Smudged Lines?
If the black clay smudges onto the orange while rolling, wait until after baking and gently sand the surface with fine-grit sandpaper to reveal crisp lines again.
Step 4: Texture and Finishing
-
Add Texture:
To mimic the pebbled leather of a real basketball, take a toothbrush or a piece of sandpaper and gently press it onto the orange sections. Be careful not to distort your black lines too much. -
Insert Hardware or Drill Hole:
If you want the hardware embedded, press a small jump ring into the top edge of the clay now. Alternatively, use a small tool to poke a hole near the top edge for adding a ring after baking. -
Final Inspection:
Check for any fingerprints or dust. You can use a bit of baby oil on your finger to smooth out any imperfections before baking. -
Bake:
Place your charms on a ceramic tile or baking sheet. Bake according to your polymer clay manufacturer’s instructions (usually around 275°F or 130°C for 15-30 minutes depending on thickness). -
Cool Down:
Let the charms cool completely in the oven or on the baking sheet before handling them, as hot clay is fragile. -
Assembly:
Once cool, use your pliers to attach a jump ring if you didn’t embed one earlier. Your charm is now ready to be turned into a keychain or necklace.
Now you have a set of sporty charms ready to wear or gift to your favorite teammate
Mini Scoreboard and Ball Display
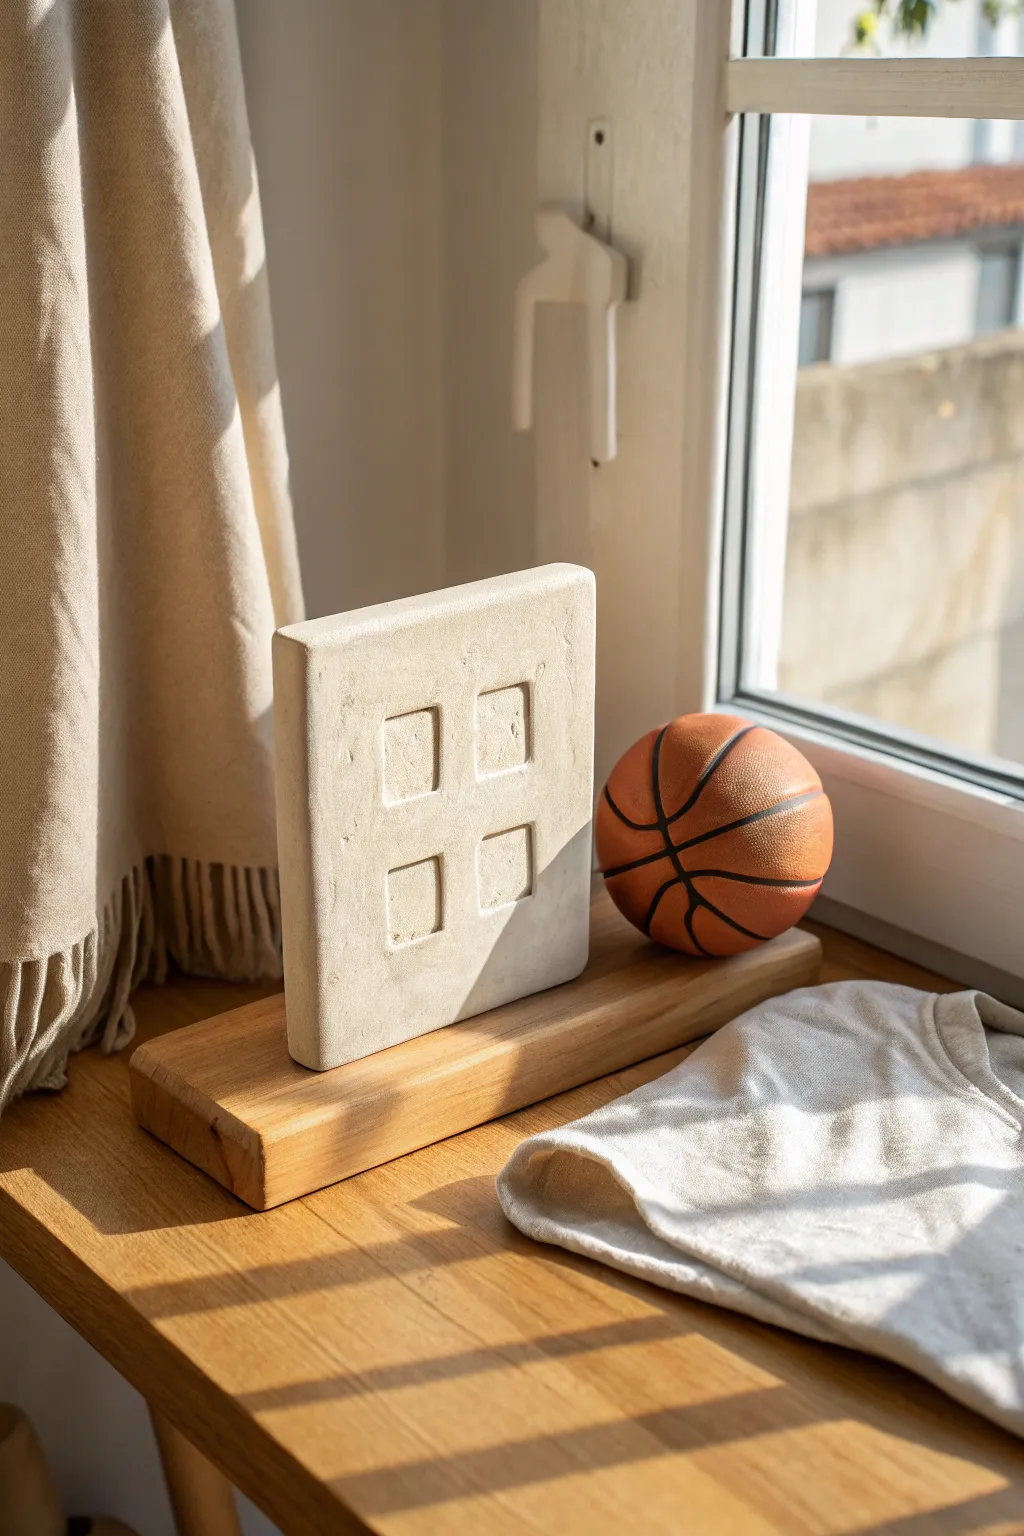
This sleek, architectural display piece brings a contemporary gallery feel right to your windowsill. Featuring four recessed ‘window’ squares on a smooth clay tablet, it pairs perfectly with a miniature basketball for a stylish sports vignette.
Step-by-Step
Materials
- Air-dry clay (white or light grey stone effect)
- Wooden rolling pin
- Two guide sticks (0.75-inch thickness)
- Ruler
- Craft knife or clay slicer
- Square cookie cutter (approx. 1.5 inch) or square template
- Small flat sculpting tool or palette knife
- Fine-grit sandpaper (220 and 400 grit)
- Water and sponge for smoothing
- Matte sealant or varnish (optional)
- Wooden block for the base
Step 1: Shaping the Tablet
-
Prepare the workspace:
Lay down a non-stick silicone mat or a sheet of parchment paper on a flat, sturdy surface. Secure it with tape if necessary to prevent slipping while rolling. -
Condition the clay:
Take a large block of air-dry clay and knead it thoroughly. This warms up the material and removes air bubbles, ensuring a smooth, crack-free finish later on. -
Roll the slab:
Place your two guide sticks on either side of the clay ball. Using the rolling pin on top of the guides, roll the clay out into a thick, even slab. Aim for about 3/4 inch thickness to give it that substantial, stone-like weight. -
Cut the rectangle:
Measure a rectangle approximately 6 inches wide by 8 inches tall. Use your ruler as a straight edge and slice cleanly through the clay with your craft knife to create the main tablet shape. -
Smooth the edges:
Dip your finger in a little water and run it along the cut edges. Gently round them off just slightly so they aren’t sharp, mimicking the soft wear of hewn store.
Clean Lines Trick
Use a small, damp paintbrush to smooth the inside corners of your recessed squares while the clay is wet. It acts like a mini mop for crumbs.
Step 2: Creating the Recessed Windows
-
Mark the grid:
Lightly measure and mark the center of your clay tablet. Plan a 2×2 grid of squares in the upper two-thirds of the slab, leaving equal spacing between them. -
Impress the squares:
If using a square cutter, press it gently into the clay to mark the outline. Don’t cut all the way through; just create a guide about 1/4 inch deep. -
Excavate the clay:
Using a small loop tool or a flat sculpting tool, carefully scoop out the clay from inside your marked squares. I prefer to work from the center outwards to keep the corners crisp. -
Refine the recesses:
Smooth the bottom of each recessed square with the back of a small tool or your finger. Try to get the depth consistent across all four ‘windows’ for a uniform look. -
Clean the corners:
Use a sharp tool or the tip of a knife to sharpen the inside corners of the squares. Clean 90-degree angles are key to the architectural aesthetic.
Texture Twist
Before drying, gently press a piece of canvas fabric onto the surface to give the clay a subtle textile weave texture that catches the light.
Step 3: Finishing and Display
-
Slow drying:
Place the tablet on a wire rack to dry. Cover it loosely with a plastic bag for the first 24 hours to prevent the outside from drying too fast and cracking. Let it dry completely for 48-72 hours. -
Sanding:
Once bone dry, take your 220-grit sandpaper and gently sand the entire surface. Pay special attention to the edges and the flat faces between the recessed squares. -
Final polish:
Switch to 400-grit sandpaper for a final pass. This will leave the surface feeling incredibly smooth, almost like polished concrete. -
Sealing (optional):
Apply a coat of matte varnish if you want to protect the piece from dust and fingerprints, though leaving it raw preserves that natural texture shown in the photo. -
Prepare the base:
Select a chunky wooden block that is slightly wider than your clay tablet. If needed, sand the wood to remove splinters and apply a light oil to enhance the grain. -
Assembly:
Simply rest the finished clay tablet on the wooden block. You can secure it with a strong adhesive like E6000 for permanence, or just lean it for a flexible display. -
Styling:
Place a mini basketball or other memorabilia on the wooden shelf next to the tablet to complete the sporty-chic composition.
Now you have a striking, modern sculpture ready to showcase your favorite small items with style
Basketball Hoop Photo Holder Stand
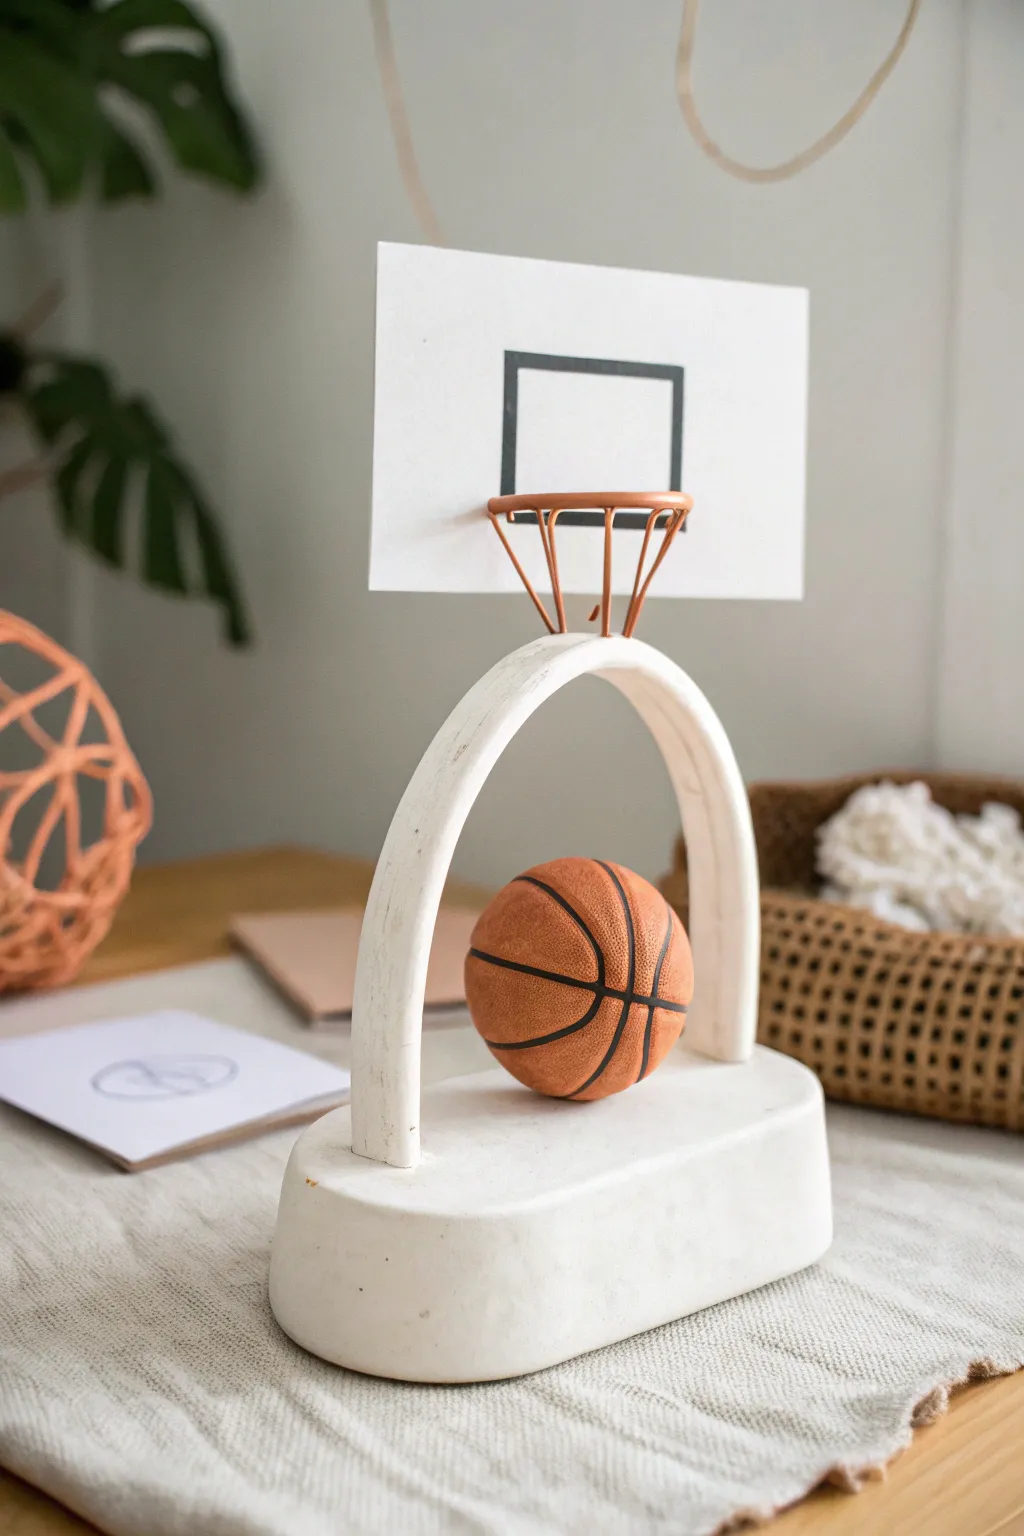
Bring the energy of the game to your desk with this minimalist basketball hoop photo stand. Featuring a sturdy arched clay frame and a clever copper wire net that doubles as a clip, it is the perfect spot to display your favorite memories or motivational cards.
Detailed Instructions
Materials
- White sculpting clay (polymer clay or air-dry clay)
- Thick copper aluminum crafting wire (approx. 12-14 gauge)
- Small foam ball (approx. 1.5 inches)
- Acrylic paint (burnt orange, black, white)
- Paintbrushes (small detail brush and medium flat brush)
- White cardstock
- Black marker or black paint pen
- Rolling pin
- Craft knife
- Super glue or strong craft adhesive
- Wire cutters and pliers
- Sandpaper
Step 1: Sculpting the Base Framework
-
Form the base:
Start with a large chunk of white clay and condition it until pliable. Shape it into a thick, elongated oval slab, roughly 1 inch tall and 4 inches long, to serve as the heavy bottom weight. -
Roll the arch:
Roll out a thick snake or coil of clay, keeping it consistent in thickness (about 3/4 inch diameter). Cut it to length so it creates a tall U-shape that fits comfortably onto your oval base. -
Attach and smooth:
Place the U-shaped coil onto the oval base. Use a modeling tool or your fingers to blend the seams where the arch meets the base, ensuring the clay becomes one solid unit. Smooth out any fingerprints with a little water if using air-dry clay. -
Level the top:
Gently press down on the very top center of the arch to create a slight flat spot. This will make attaching the hoop mechanism much easier later on. -
Dry or bake:
Follow your specific clay’s instructions to cure the piece. For air-dry clay, let it sit for 24-48 hours; for polymer, bake according to package directions.
Step 2: Creating the Basketball and Hoop
-
Shape the ball:
While the base cures, create the basketball. You can sculpt a sphere from clay or use a small foam ball for a lighter texture. If using clay, impress a subtle texture by rolling it gently over sandpaper. -
Form the rim:
Take your copper wire and form a small circle, roughly 2 inches in diameter. Twist the ends together or overlap them slightly to close the loop. -
Create the net struts:
Cut 4 to 6 short pieces of wire, about 1.5 inches long. These will act as the vertical lines of the ‘net’ and the support stand. -
Assemble the wire structure:
Bend the short wire pieces into a V-shape. Attach the top of the V’s to your wire rim loop. The bottom points of the V’s should all meet at a central point below the rim, forming a cone shape. -
Secure the net:
I find it helpful to use a dab of super glue or a small twist of thinner wire to secure all the bottom points together into a single stem that will stick into the clay arch.
Wobbly Hoop?
If the wire rim keeps tilting, wrap the bottom stem with a tiny bit of masking tape before gluing it into the clay hole for a tighter, more secure fit.
Step 3: Painting and Assembly
-
Paint the ball base:
Mix a warm burnt orange acrylic paint and coat the ball entirely. You may need two coats for full coverage. -
Detail the lines:
Using a very fine liner brush and black paint, carefully draw the intersecting curved lines characteristic of a basketball. A steady hand is key here. -
Sand the main sculpture:
Once your clay base is fully cured, use fine-grit sandpaper to smooth out any rough bumps or unevenness on the white arch and base. -
Drill the mounting hole:
Carefully drill a small hole into the flat spot you created on top of the clay arch. The hole should be just large enough to fit the bundled wire stem of your hoop. -
Install the hoop:
Apply a drop of super glue into the hole and insert the wire stem of the copper hoop. Hold it steady for a minute until the glue sets. -
Finalize the basket assembly:
Glue the painted basketball onto the center of the base, sitting directly under the arch. -
Make the backboard:
Cut a rectangle from stiff white cardstock. Use a black marker to draw a slightly smaller rectangle in the center, mimicking the ‘shooter’s square’ on a real backboard. -
Display your photo:
Slide the cardstock backboard into the back of the wire rim so it stands up. You can now clip a photo or note in front of it using the wire tension.
Texture Trick
For a concrete look on the white arch, dab a crumpled paper towel over the wet clay or wet paint to add a subtle, stony texture.
Now you have a stylish, sporty sculpture ready to hold your favorite snapshot
Tiny Street Court Diorama Scene
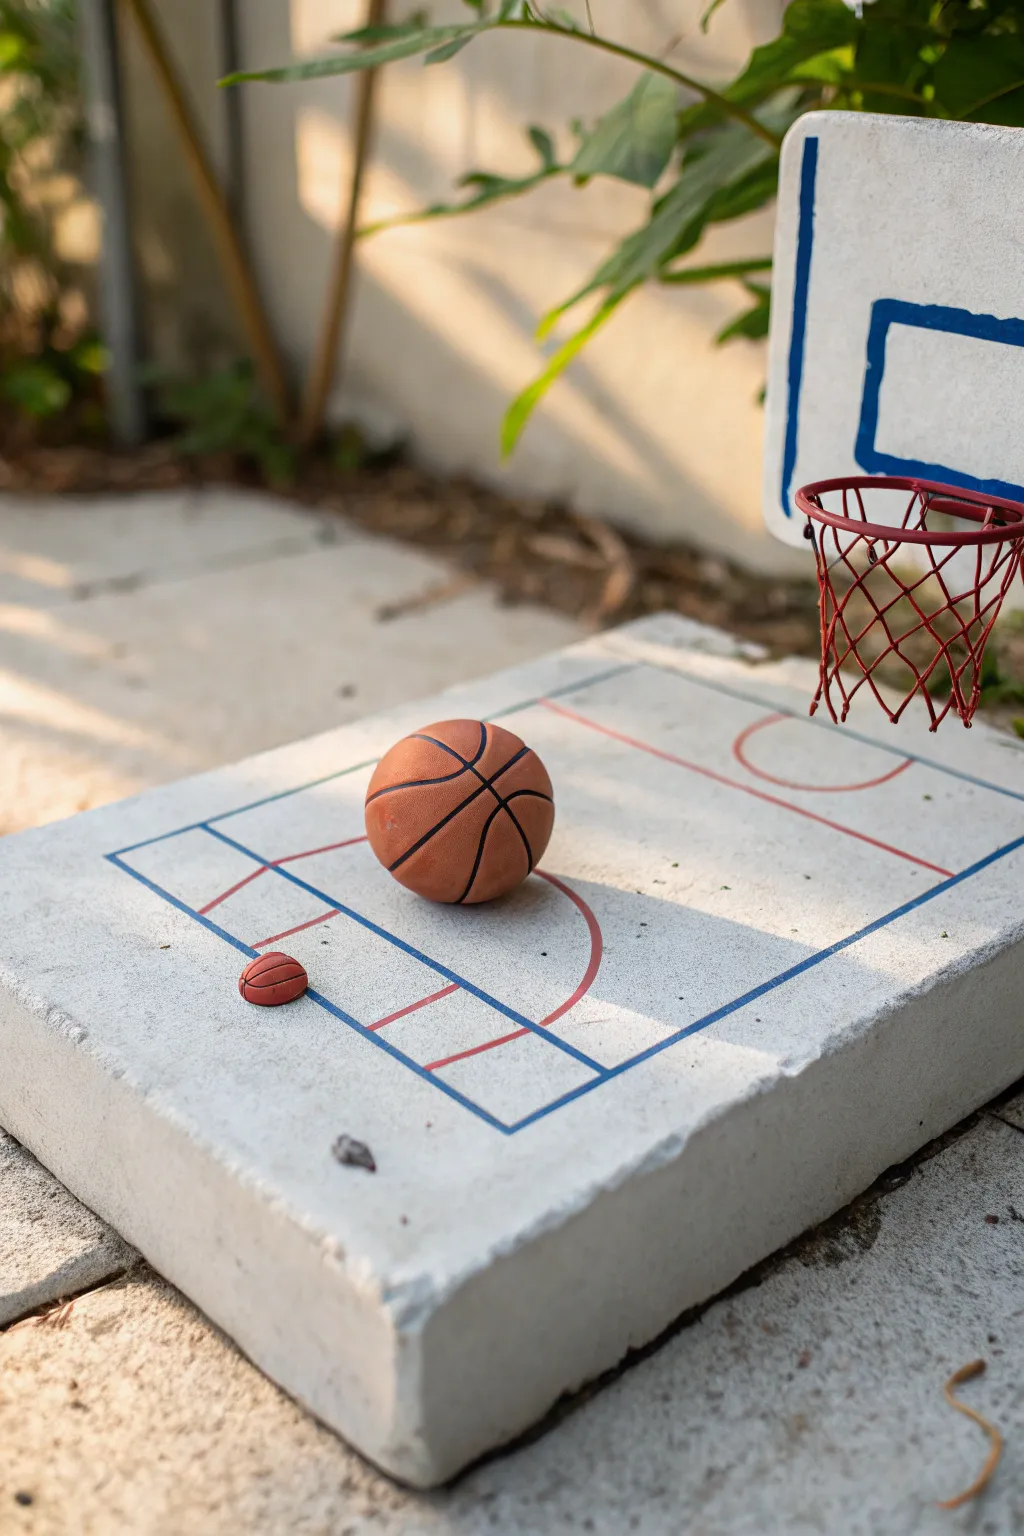
Capture the gritty charm of street ball with this incredibly detailed miniature diorama, featuring a textured concrete base and hand-sculpted accessories. It’s the perfect desktop tribute for basketball lovers, blending rugged textures with precise clay work.
Step-by-Step Guide
Materials
- Polymer clay (terracotta/orange, black)
- Air-dry clay or white polymer clay (for backboard)
- Small rectangular mold (e.g., a plastic container or silicone mold approx. 6×4 inches)
- Plaster of Paris or fine concrete mix
- Water and mixing container
- Sandpaper (medium and fine grit)
- Acrylic paint (blue, red, white)
- Fine detail paintbrush
- Thin crafting wire (red and silver/grey)
- Wire cutters and needle-nose pliers
- Super glue or strong craft adhesive
- Ruler
- Sculpting tools (needle tool, ball stylus)
- Matte varnish (optional)
Step 1: Casting the Concrete Base
-
Prepare the Mold:
Select a rectangular plastic container to serve as your mold. Lightly grease the inside with cooking spray or petroleum jelly to ensure the finished slab releases easily. -
Mix the Material:
Mix your Plaster of Paris or fine concrete according to the package instructions. You want a consistency similar to pancake batter—pourable but thick enough to hold some solidness. -
Pour and Tap:
Pour the mixture into the mold until it is about 1 to 1.5 inches thick. Tap the mold firmly on your table several times to release trapped air bubbles and level the surface. -
Cure and De-mold:
Allow the slab to cure completely (usually 24 hours for concrete, less for plaster). Carefully flex the mold to pop out your miniature ‘concrete’ slab. -
Creating Texture:
If the surface is too smooth, rough it up slightly with medium-grit sandpaper to mimic the texture of asphalt. Wipe away the dust with a damp cloth.
Step 2: Sculpting the Basketballs
-
Form the Sphere:
Take a piece of terracotta-colored polymer clay and roll it into a perfect sphere. For the main ball, aim for the size of a large marble (approx. 1 inch diameter). -
Add Texture:
Gently roll the clay ball over a piece of sandpaper or use an old toothbrush to stipple the surface, creating that classic pebbled leather texture. -
Carve the Lines:
Using a needle tool or the back of a hobby knife, carefully press in the grooves for the basketball seams. Follow the standard curved pattern of a real ball. -
Inlay the Seams:
Roll extremely thin snakes of black polymer clay. Lay them into the grooves you just carved. Gently smooth them down so they are flush with the surface, preserving the texture. -
Creating the Mini Ball:
Repeat the process with a much smaller amount of clay to create the tiny, thumbnail-sized basketball shown in the image detail. -
Bake the Clay:
Bake the basketballs according to your polymer clay package instructions. I usually prop them on a bed of cornstarch or batting so they don’t get flat spots while baking.
Cracked Concrete?
If your plaster cracks while drying, don’t throw it away! Fill the crack with a dark grey wash of watered-down paint. It adds incredible realism.
Step 3: Building the Hoop and Painting
-
Form the Backboard:
Roll out a flat slab of white clay (or cut a piece of sturdy plastic/wood). Cut it into a rectangle with rounded top corners. If using clay, bake or dry it now. -
Create the Rim:
Wrap red crafting wire around a marker or cylindrical object to form a perfect circle for the hoop. Twist the ends together, leaving a small stem to attach to the backboard. -
Weave the Net:
Using thinner wire (or red thread stiffened with glue), create a simple lattice pattern hanging from the red rim to mimic the chain or nylon net. Attach this to your red rim. -
Paint Court Lines:
Using a ruler and a very fine brush, paint the court markings on your concrete slab. Use blue for the perimeter and lane lines, and red for the free-throw circle and lane accents. -
Weathering the Lines:
Once the paint is dry, lightly sand over the lines with fine-grit sandpaper. This fades the paint slightly, making it look like a worn street court. -
Detail the Backboard:
Paint the inner square and outer border on the backboard using blue acrylic paint. Let it dry completely. -
Assembly:
Drill a tiny hole in the backboard or use strong glue to attach the rim. Secure the backboard to a support post (a wooden dowel or strong wire) and glue the post to the back of the concrete slab. -
Final Placement:
Arrange and glue the basketballs onto the court. You can glue the large ball centrally and the tiny ball near the baseline for a playful sense of scale.
Make it Shine
Add a tiny drop of UV resin or glossy varnish to the ‘pebbles’ of the basketball texture to make it look like a brand new, sweat-slicked ball.
Now you have a rugged, miniature slice of the game ready to display on your shelf.