Fall is basically clay season in my studio—warm colors, cozy textures, and all the cutest little shapes you can make in an afternoon. If you’re craving projects that feel festive but still totally doable, these cute fall clay ideas are the sweet spot.
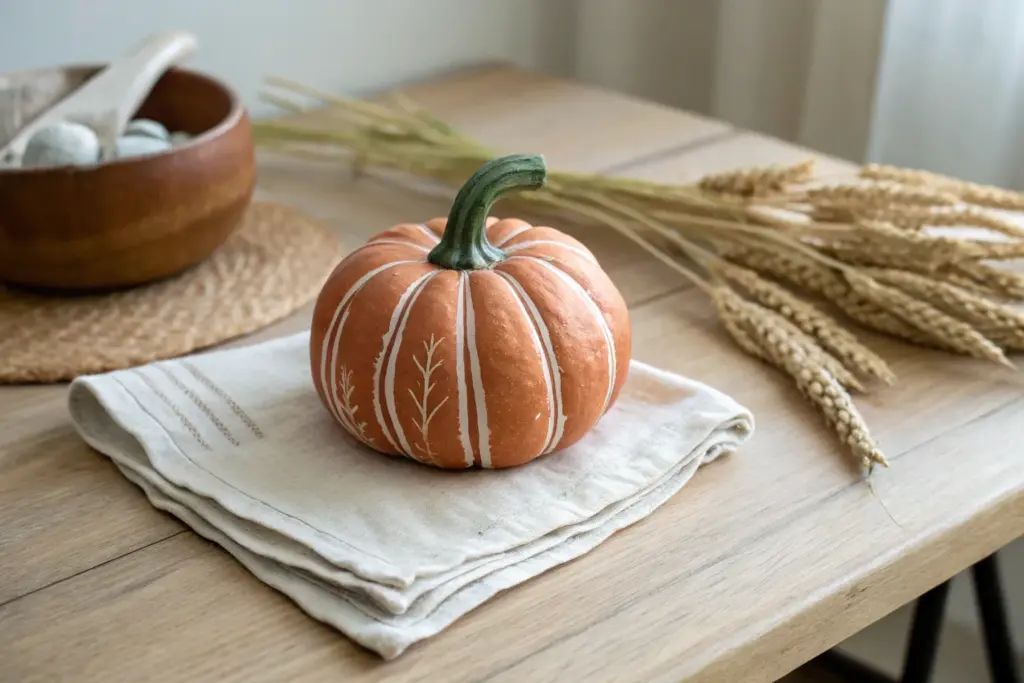
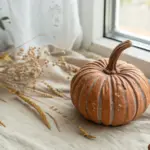
Mini Pumpkin Patch Trio

Capture the essence of autumn with these remarkably realistic miniature pumpkins, sculpted from clay to achieve a soft, matte finish. This trio features organic shapes and lifelike stems that bring a cozy, rustic charm to any seasonal display.
Step-by-Step Tutorial
Materials
- Oven-bake polymer clay (Burnt Orange, Translucent, and Forest Green)
- Pastel chalks (brown, yellow ochre, green)
- Sculpting tools (needle tool, ball stylus)
- Small soft paintbrush
- Liquid clay or Bake & Bond
- Toothbrush or texture sponge
- Small black beads or seeds (optional for accent details)
- Acrylic rolling pin
- Aluminum foil
Step 1: Preparing the Clay Body
-
Mix your custom orange:
Start by conditioning your Burnt Orange clay. I like to mix in a small amount of Translucent clay (about a 4:1 ratio); this gives the pumpkins a waxy, realistic vegetable quality rather than looking like flat plastic. -
Create the foil core:
To save clay and reduce baking time, scrunch a small piece of aluminum foil into a tight ball. Make three of these balls in slightly varying sizes—one large, one medium, and one small. -
Cover the cores:
Roll your mixed orange clay into sheets about 1/4 inch thick. Wrap each foil ball completely, smoothing the seams with your fingers until you have three perfect orange spheres. -
Shape the pumpkin form:
Gently press down on the top and bottom of each sphere to create a slightly squat, flattened shape. Pumpkins are rarely perfect circles, so don’t worry if they become a bit asymmetrical.
Step 2: Sculpting the Ribs and Texture
-
Mark the center:
Use a ball stylus to press a deep indentation into the top center of each sphere. This is where your stem will eventually sit. -
Score the segments:
Using a needle tool or the back of a knife, lightly score vertical lines from the top center indentation down to the bottom center. Divide the pumpkin into 8 to 10 sections. -
Deepen the ridges:
Use a modeling tool or your finger to smooth and broaden the grooves you just marked. You want deep, pillowy sections between the lines, giving that classic ribbed pumpkin look. -
Add surface texture:
Take an old toothbrush or a piece of texturing sponge and gently tap it all over the surface of the clay. This creates a realistic, porous skin texture. -
Apply shading:
Scrape some brown and yellow ochre pastel chalk into a fine powder. With a soft dry brush, dust this powder into the deep crevices and grooves to add depth and an aged organic look.
Skin Texture Secret
Before baking, lightly dust the raw clay with cornstarch. It prevents stickiness and creates an ultra-realistic matte skin texture that looks soft to the touch.
Step 3: Creating the Stems
-
Mix the stem color:
Condition your Forest Green clay and mix in a tiny bit of brown to dull it down. Roll this into three tapered logs, thicker at the base and thinner at the tip. -
Texture the stems:
Use a needle tool to scratch vertical lines along the length of the stems. Twist the clay slightly as you work to mimic the fibrous, dried look of a real pumpkin stem. -
Attach the stems:
Put a drop of liquid clay into the indentation on top of your pumpkins. Press the thick end of the stem firmly into the hole. Use a small tool to blend the very edge of the green clay onto the orange skin for a seamless connection. -
Shape the stems:
Bend and curl the stems slightly. Give each one a unique personality—maybe one curves left, one is short and stubby, and one is long and twisted.
Curly Tendrils
Wrap a paper-thin snake of green clay around a needle tool to create a tiny distinct coil. Bake it, slide it off, and glue it near the stem for a super cute vine tendril.
Step 4: Final Details and Baking
-
Add character details:
For the “spotted” pumpkin look shown in the image, press small black beads or seeds into the clay skin of one pumpkin in a random pattern. -
Final dusting:
Lightly dust the very top of the pumpkin shoulders near the stem with a bit of green pastel powder to suggest unripened areas. -
Bake the trio:
Place your creations on a ceramic tile or baking sheet. Preheat your oven according to the manufacturer’s instructions for your specific brand of polymer clay. -
Cooling down:
Once baked, turn the oven off and let the pumpkins cool completely inside. This gradual cooling prevents cracks. -
Matte finish (Optional):
If the clay looks too shiny after baking, apply a very thin coat of matte water-based varnish to seal in the pastel chalks and restore that velvety vegetable finish.
Arrange your finished trio on a plate with some dried eucalyptus for a display that invites the harvest season indoors


Smiling Ghost With Tiny Pumpkin
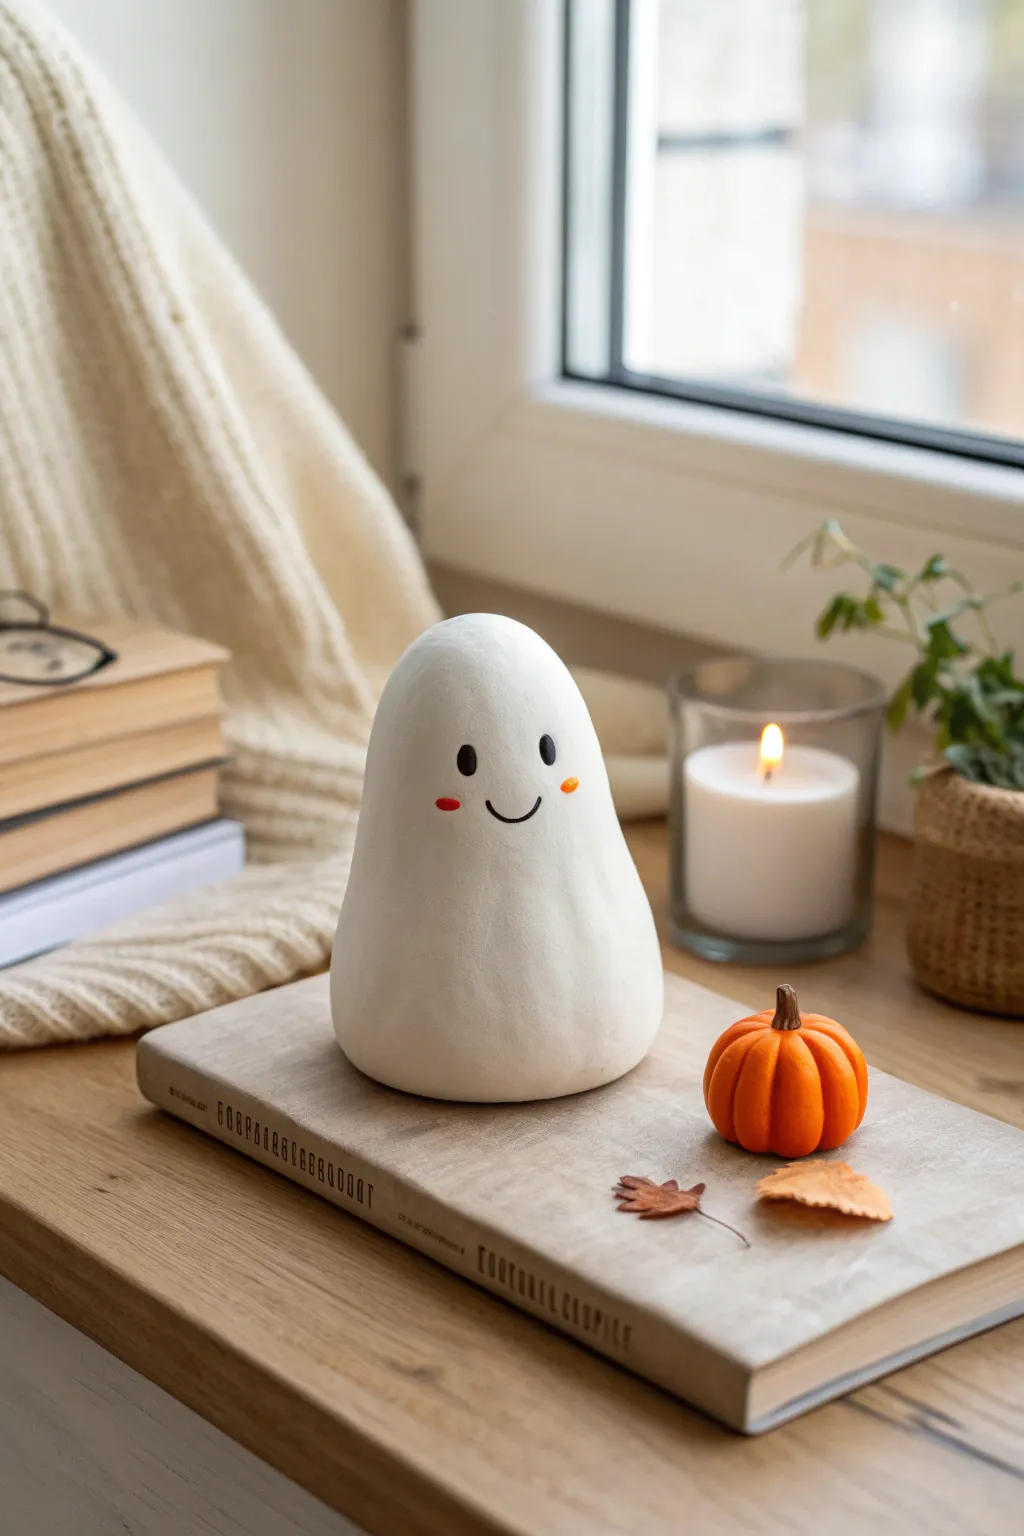
Bring a touch of friendly spookiness to your autumn decor with this adorable clay ghost and his miniature pumpkin companion. This smooth, minimalist figure features a gentle teardrop shape and simple painted details that make him impossible not to love.
Step-by-Step
Materials
- Air-dry clay (white)
- Small amount of orange clay (or orange acrylic paint)
- Small amount of brown clay (or brown acrylic paint)
- Black acrylic paint
- Pink or rosy red acrylic paint
- Fine grit sandpaper
- Water in a small cup
- Fine detail paintbrush
- Dotting tool or toothpick
- Rolling pin or smooth glass jar
- Sculpting tool or plastic knife
- Matte finish varnish (optional)
Step 1: Sculpting the Friendly Ghost
-
Condition the white clay:
Start by taking a generous handful of white air-dry clay. Knead it thoroughly in your hands until it feels warm, pliable, and free of any cracks. -
Form the base shape:
Roll the clay into a large, smooth ball on your work surface. Once smooth, begin to gently taper the top half, rolling it back and forth between your palms to create a teardrop or pear shape. -
Flatten the base:
Press the wider bottom of your teardrop firmly onto your flat work surface. You want the ghost to stand independently, so rotate the figure and inspect it to ensure it isn’t leaning too much to one side. -
Refine the silhouette:
Using your thumbs, smooth the upward slope of the ghost’s body. The transition from the wide base to the rounded head should be gradual and soft, with no sharp angles. -
Smooth the surface:
Dip your finger into a little water and run it over the entire surface of the ghost. This ‘slip’ acts like an eraser for fingerprints and tiny imperfections.
Water Smoothing Trick
Keep a small bowl of water nearby while sculpting. Constantly wetting your fingertips prevents cracking and creates that ultra-smooth, ceramic-like finish before drying.
Step 2: Creating the Pumpkin Pal
-
Prepare the orange clay:
Take a small piece of orange clay (or mix orange paint into white clay) about the size of a large marble. Roll it into a tight, neat sphere. -
Add pumpkin ridges:
Using the side of a toothpick or a sculpting tool, press vertical indentations around the sphere. Start from the top center and curve down to the bottom to mimic the segments of a real pumpkin. -
Shape the pumpkin:
Gently press down on the top and bottom of the sphere to squish it slightly. This gives it that characteristic squat, pumpkin-like appearance rather than being perfectly round. -
Add the stem:
Roll a tiny sliver of brown clay into a small cone. Attach this to the center of the pumpkin’s depression. I like to twist the very tip slightly for a natural, dried-stem look. -
Drying time:
Set both the ghost and the pumpkin aside in a dry, ventilated area. Allow them to dry completely for at least 24-48 hours until they are hard to the touch and lighter in color.
Make it a Luminary
Hollow out the bottom of the ghost while the clay is wet and cut out the eyes instead of painting them. Place an LED tea light underneath for a glowing nightlight effect.
Step 3: Finishing Details
-
Sand for perfection:
Once fully dry, check your ghost for any rough spots. Gently buff the surface with fine-grit sandpaper until it feels perfectly smooth like porcelain. -
Paint the eyes:
Using a dotting tool or the handle end of a paintbrush dipped in black acrylic paint, gently stamp two oval eyes onto the upper third of the ghost’s face. -
Add the smile:
Switch to your finest detail brush. Carefully paint a thin, small u-shape curve between the eyes to create a sweet, subtle smile. -
Rosy cheeks:
Dip a toothpick or small dotting tool into pink or red paint. Place two small dots just outside and slightly below the eyes to give him a blushing expression. -
Seal the project:
To protect your work, apply a coat of matte varnish over both the ghost and the pumpkin. This seals the paint and gives the finish a professional, unified look.
Place your new ghostly friend on a stack of books or a windowsill to enjoy the autumn vibes all season long


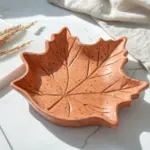
Leaf-Shaped Trinket Dish
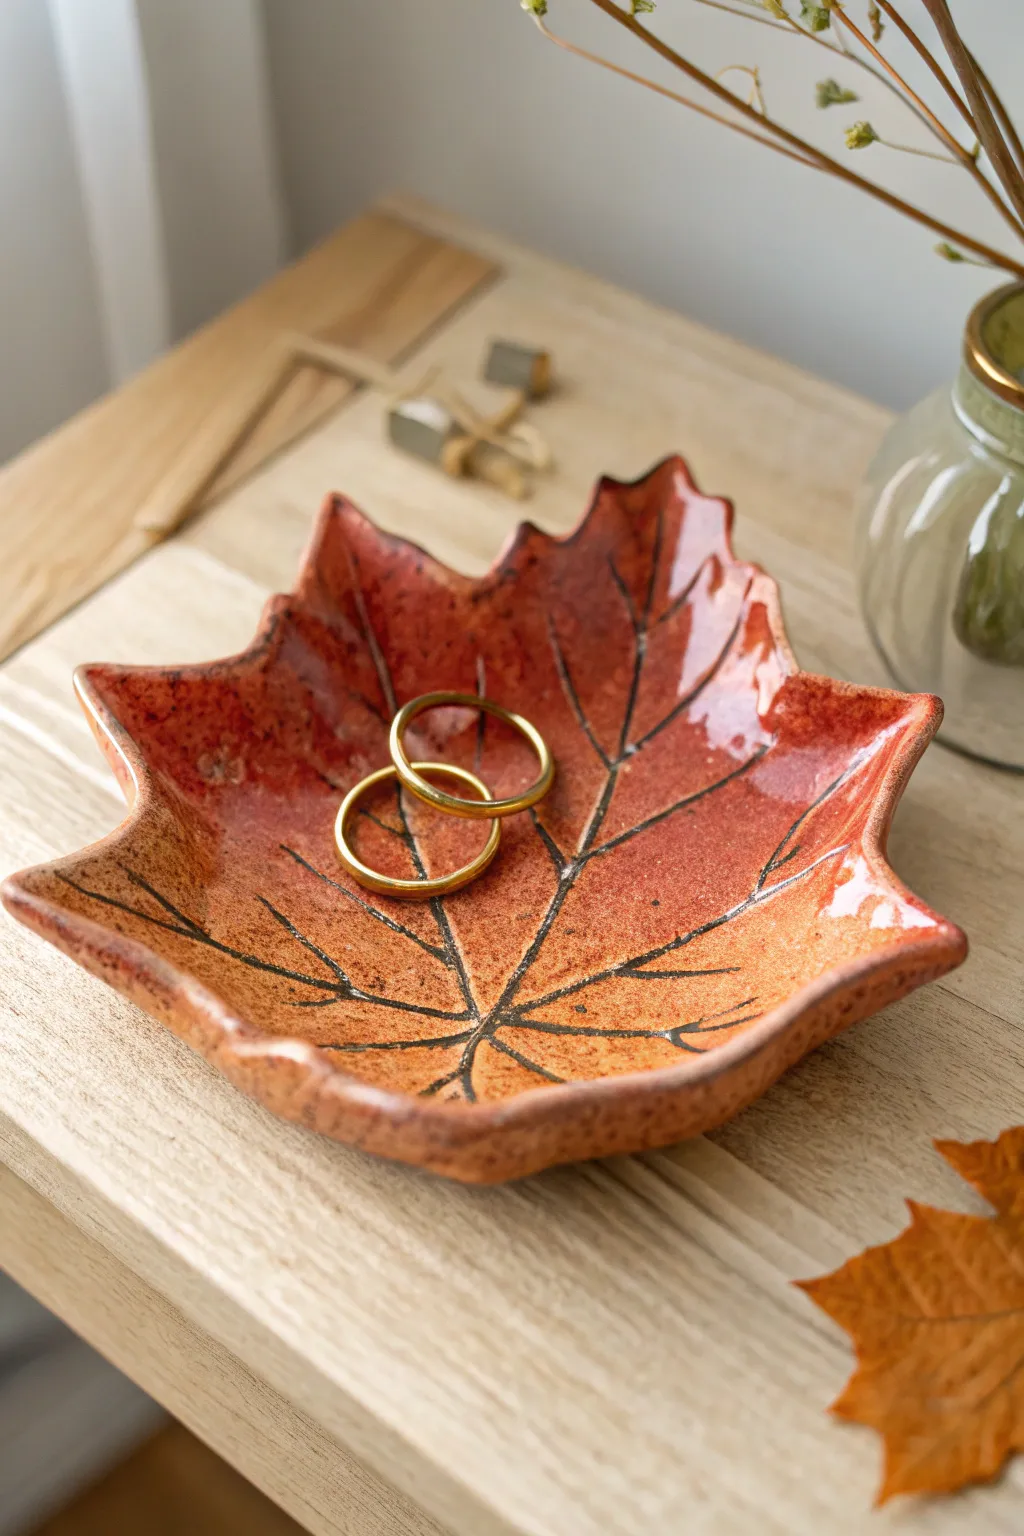
Capture the fleeting beauty of autumn with this warm, rust-colored ceramic dish shaped like a maple leaf. The organic edges and hand-painted vein details make it a perfect seasonal perch for your favorite rings or trinkets.
Detailed Instructions
Materials
- Air-dry clay (white or terracotta)
- Fresh maple leaf (medium size) or a leaf template
- Rolling pin
- X-acto knife or clay cutting tool
- Small bowl (for shaping)
- Sponge and water
- Needle tool or toothpick
- Acrylic paints (burnt orange, rust red, ochre yellow)
- Black fine-tip paint pen or black acrylic paint with liner brush
- High-gloss varnish or sealant
Step 1: Shaping the Clay
-
Prepare the workspace:
Lay down a piece of canvas or parchment paper to prevent your clay from sticking. Tape the edges down so it doesn’t shift while you work. -
Roll out the slab:
Take a generous handful of air-dry clay and condition it in your warm hands until pliable. Roll it out into an even slab, approximately 1/4 inch thick. Avoid going too thin, as the edges will become fragile. -
Position the leaf guide:
Place your fresh maple leaf (or paper template) directly onto the clay slab. If using a real leaf, position it vein-side down to press a subtle texture into the surface. -
Trace the shape:
Use a rolling pin to gently press the leaf into the clay. Then, take your X-acto knife or cutting tool and carefully cut around the perimeter of the leaf. Move slowly around the jagged points to keep them crisp. -
Refine the edges:
Remove the excess clay and peel away the leaf. Dip your finger or a small sponge in water and smooth out the cut edges of the clay leaf to remove any sharpness or burrs. -
Create the curvature:
Gently lift your clay leaf and drape it inside a small bowl. Press the center down lightly so the leaf takes on a cupped, dish-like shape. Make sure the points of the leaf flare outward slightly. -
Dry completely:
Allow the clay to dry in the bowl for at least 24-48 hours. I like to flip it over halfway through the process to ensure the bottom dries evenly.
Step 2: Painting and Glazing
-
Sand imperfections:
Once bone dry, check for any rough spots. Use fine-grit sandpaper to gently smooth the rim or surface if needed, then wipe away any dust with a barely damp cloth. -
Apply base coat:
Mix ochre yellow with a touch of burnt orange to create a warm base color. Paint the entire surface of the dish, including the underside. -
Add depth and mottling:
While the base is still slightly tacky, sponge on layers of rust red and deeper orange. Concentrate the darker colors near the edges and the center to mimic the natural variation of a turning leaf. -
Speckle effect:
To get that organic, textured look seen in the photo, dip an old toothbrush into diluted brown paint and flick tiny speckles across the surface. -
Draw the veins:
Using a fine-tip black paint pen or a liner brush with black acrylics, carefully draw the central vein running from the stem to the tip. Branch out smaller veins toward each leaf point. Keep the lines thin. -
Seal the piece:
Once the paint is fully cured, apply two to three generous coats of high-gloss varnish. This protects the clay and gives it that ceramic-like shine shown in the image.
Cracking Issues?
If small cracks appear while drying, mix a tiny amount of fresh clay with water to make a paste (slip). Fill the cracks, smooth it over, and let it dry again.
Pro Tip: Real Textures
Use a deeply veined leaf (like a hydrangea or maple) and press firmly. The paint will naturally settle into these impressions, doing the detailing work for you.
Place your shiny new dish on a bedside table to hold your daily treasures


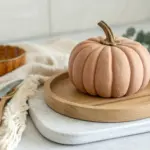
Pumpkin Tea Light Holder
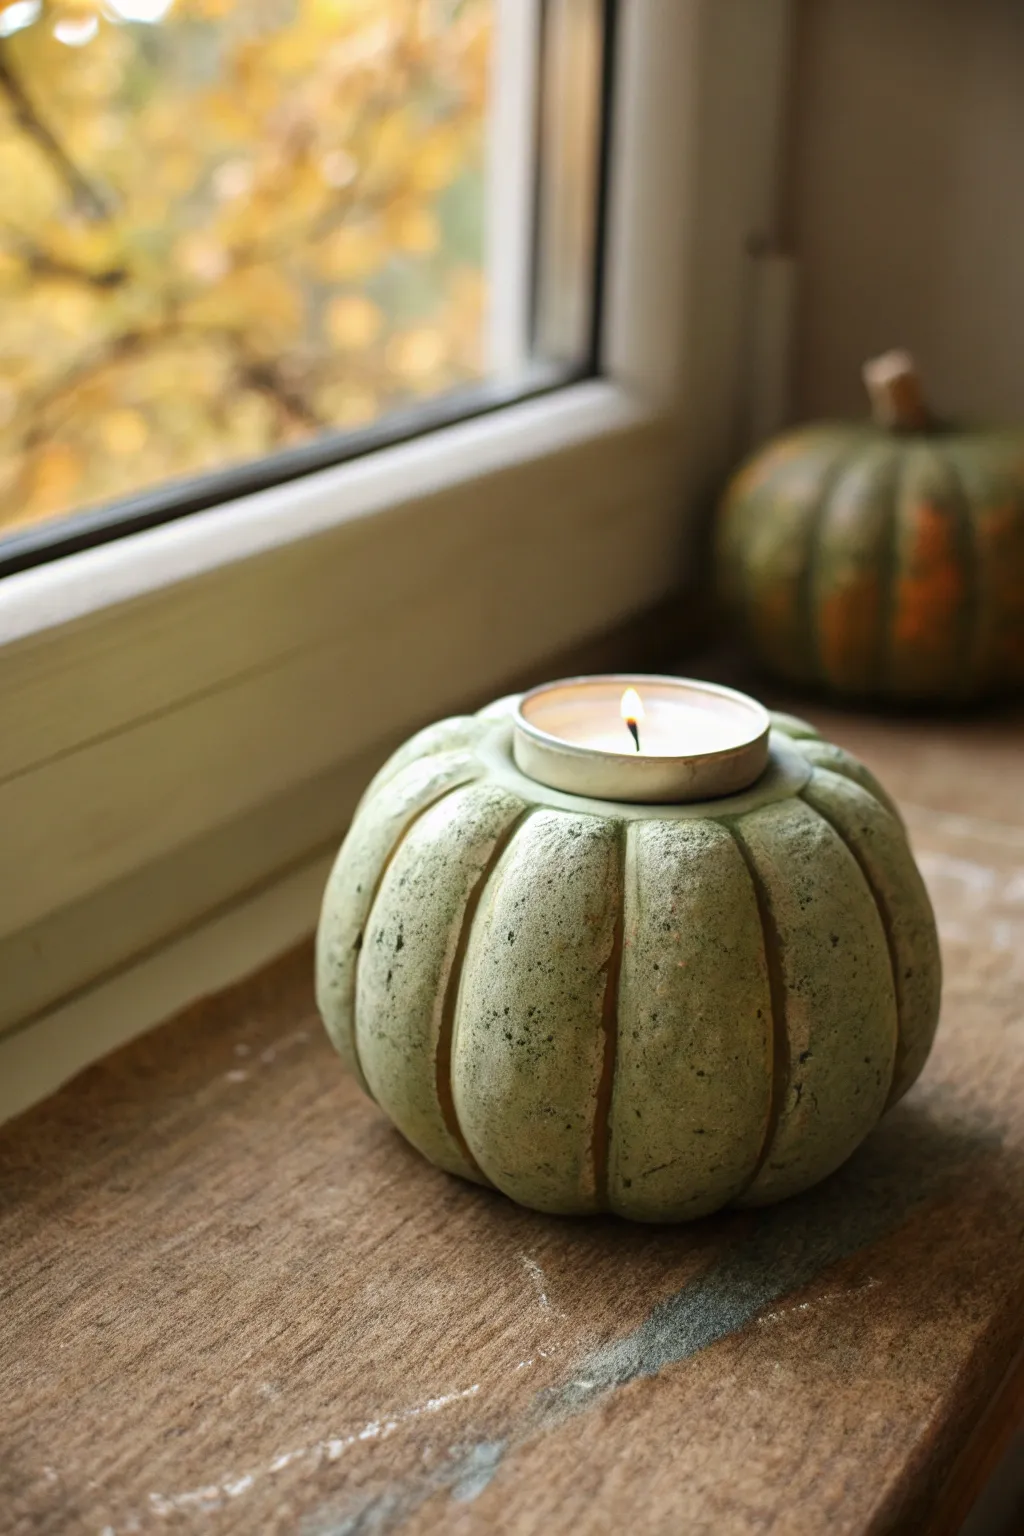
Bring the cozy warmth of autumn indoors with this charming clay pumpkin tea light holder. Its soft sage green hue and textured, rustic finish make it a perfect centerpiece for your windowsill.
Step-by-Step Tutorial
Materials
- Air-dry clay (white or light grey)
- Standard tea light candle (for sizing)
- Acrylic rolling pin
- Modeling tools (or a butter knife)
- Sponge or textured foam
- Sage green acrylic paint
- Brown antique wax or thinned brown paint
- Matte sealant spray
- Water cup
- Aluminum foil
Step 1: Shaping the Base
-
Prepare the clay:
Start by conditioning a fist-sized ball of air-dry clay. Knead it in your hands until it’s warm, pliable, and free of any major cracks. -
Form the sphere:
Roll the clay into a smooth, solid ball. Tap the bottom gently on your work surface to create a flat base so the pumpkin stands securely without wobbling. -
Create the opening:
Take your metal tea light casing (remove the wax candle for now to keep it clean) and press it firmly into the center of the top of the sphere. -
Deepen the well:
Press down until the tea light rim is flush with the clay surface. Gently wiggle it side-to-side to widen the hole slightly, accounting for clay shrinkage as it dries. -
Initial shaping:
With the tea light casing still inserted to hold the shape, use your palms to round out the sides, making the pumpkin look plump and full.
Cracks Appearing?
If you see small cracks forming while the clay dries, mix a tiny bit of fresh clay with water to make a paste (slip) and fill them in with a small brush.
Step 2: Adding Texture and Detail
-
Mark the segments:
Using a modeling tool or the back of a butter knife, lightly score vertical lines from the top rim down to the base to divide the pumpkin into 8-10 equal sections. -
Deepen the grooves:
Go back over your scored lines, pressing deeper to create distinct lobes. Smooth the edges of these grooves with a wet finger so they look soft and organic, not sharp. -
Refine the lobes:
Use your thumb to gently press the center of each pumpkin section outwards, enhancing the curved, bulbous shape. -
Add surface texture:
I like to take a coarse sponge or a crumpled ball of aluminum foil and dab it all over the surface. This creates that realistic, slightly pitted skin texture seen in the photo. -
Remove the insert:
Carefully remove the tea light casing. Smooth out the inner rim with a drop of water to ensure a clean finish. -
Drying time:
Let the pumpkin dry completely for 24-48 hours. Turn it upside down halfway through so the bottom dries thoroughly.
Step 3: Painting and Finishing
-
Base coat application:
Mix a muted sage green acrylic paint. Apply a solid coat over the entire pumpkin, ensuring you get paint into all the textured pits. -
Dry brushing:
Once the green is dry, mix a very small amount of white into your green. Use a dry brush to lightly whisk this lighter shade over the raised areas of the lobes to add dimension. -
Antiquing the grooves:
Dilute some brown acrylic paint with water (or use antique wax). Paint this into the deep vertical grooves you carved earlier. -
Wipe back:
Immediately use a damp paper towel to wipe away the excess brown paint from the high points. The dark color should remain only in the recesses and textured pits, creating an aged look. -
Final rim detail:
Add a tiny touch of the darker brown shading right around the rim of the candle opening to define the edge. -
Seal the piece:
Once all paint is fully dry, spray the entire piece with a matte sealant to protect the finish and prevent the clay from absorbing moisture.
Make it Metallic
For a glamorous twist, dry brush a subtle layer of gold or copper metallic paint over the finished sage green to catch the candlelight.
Place your new creation on a window ledge and enjoy the cozy autumn ambiance

The Complete Guide to Pottery Troubleshooting
Uncover the most common ceramic mistakes—from cracking clay to failed glazes—and learn how to fix them fast.
Cute Acorn Buddy Charms
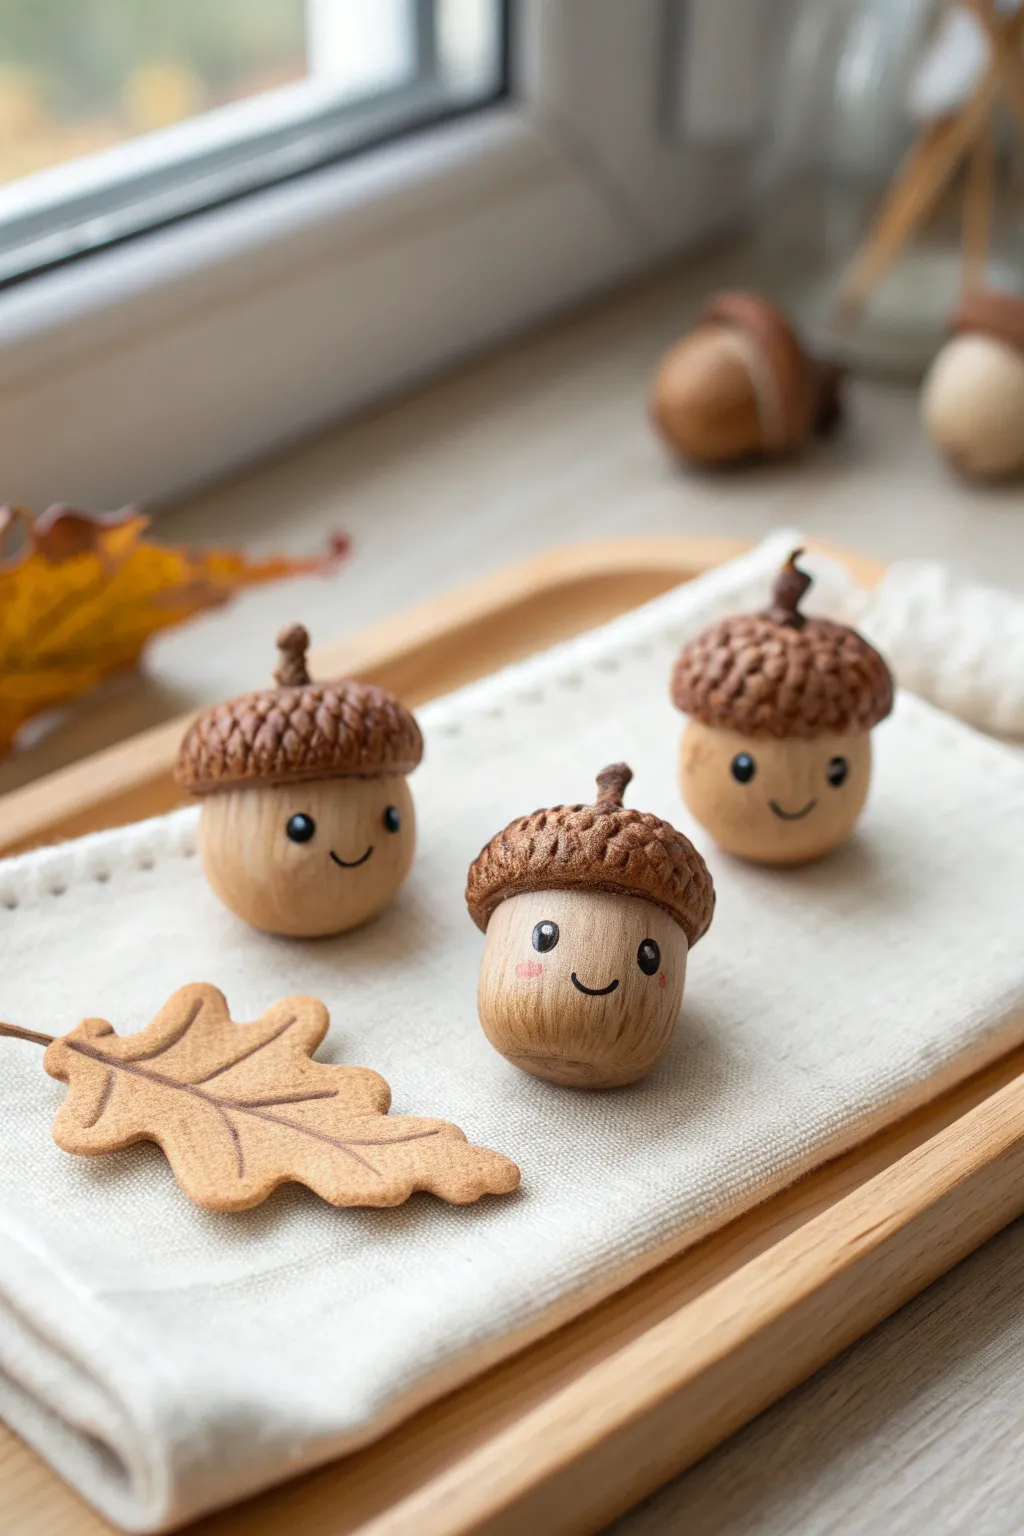
Embrace the cozy vibes of autumn with these irresistibly sweet acorn charms that mimic the look of natural wood. With their textured caps and tiny, hand-painted smiles, they make perfect pocket companions or table decor.
Step-by-Step Guide
Materials
- Polymer clay (beige/light wood tone, dark brown)
- Acrylic paint (black, white, pink)
- Liquid polymer clay or bake-and-bond
- Detailing needle tool or toothbrush
- Ball stylus tool (small)
- Fine detail paintbrush (000 size)
- Matte varnish
- Soft pastel chalks (brown/ochre – optional)
- Sculpting blade
Step 1: Shaping the Bodies
-
Mix the base color:
Start with a beige or light tan polymer clay. To get that realistic wood-grain warmth, I sometimes mix in a tiny pinch of translucent clay. -
Form the spheres:
Roll the clay into smooth spheres about the size of a large grape. Ensure there are no cracks or fingerprints by rolling gently between your palms. -
Create the taper:
Gently pinch and roll the bottom third of the sphere to create a slight taper, mimicking the natural shape of an acorn nut rather than a perfect circle. -
Flatten the top:
Press the wider top end slightly against your work surface to create a flat area where the cap will eventually sit. -
Add wood texture (optional):
For extra realism, lightly drag a needle tool verticaly down the sides to simulate subtle wood grain lines, though keeping them smooth is also very cute.
Pro Tip: Seamless Caps
Before texturing, blend the seam where the cap meets the body slightly with a rubber tool, then re-texture over the join. This makes the cap look grown-on rather than stuck-on.
Step 2: Crafting the Textured Caps
-
Prepare the cap clay:
Condition your dark brown clay until it is soft and pliable. Flatten a small ball into a thick disk slightly wider than the acorn body. -
Attach the cap:
Place the dark brown disk onto the flattened top of your beige body. Curve the edges down so it hugs the top of the acorn snuggly. -
Texture the surface:
This is the fun part. use a stiff toothbrush or a needle tool to stipple the entire surface of the dark brown cap. Press repeatedly to create a rough, bumpy texture. -
Refine the texture:
Go over the texture again, ensuring there are no smooth fingerprints left. The rougher it is, the more realistic the contrast will be. -
Add the stem:
Roll a tiny snake of dark brown clay, twist it slightly for a gnarled look, and attach it to the center of the cap. Use a dab of liquid clay to secure it if needed.
Level Up: Autumn Leaf Tray
Use leftover beige clay to sculpt a matching oak leaf charm. Roll it flat, cut a leaf shape, and use a needle tool to draw veins. Bake it alongside your acorns for a full set.
Step 3: Adding Personality & Baking
-
Pre-bake shading:
Shave a little brown soft pastel into a powder. Use a soft brush to dust the bottom of the acorn body for a ‘toasted’ look before baking. -
Bake the clay:
Place your acorns on a ceramic tile or baking sheet. Bake according to your clay manufacturer’s instructions (usually 275°F/135°C for 15-30 minutes). -
Cool down completely:
Let the acorns cool fully before painting. Painting on warm clay can make the acrylics dry too strictly and clump up.
Step 4: Painting the Faces
-
Paint the eyes:
Using the back of a small paintbrush or a dotting tool, dip into black acrylic paint and place two small dots wide apart on the face area. -
Add the smile:
With your finest detail brush and black paint mixed with a drop of water (to make it flow like ink), paint a tiny, U-shaped smile between the eyes. -
Highlight the eyes:
Once the black is dry, use a sewing pin or toothpick to add a minuscule white dot to the top right corner of each eye for a spark of life. -
Blush the cheeks:
This step makes them irresistible. Mix a watery pink glaze or use pink pastel chalk dust to gently dab rosy cheeks just below the eyes. -
Seal the piece:
Finish by coating the entire acorn with a matte varnish to protect the paint and give it that soft, wooden toy finish.
Arranging these little buddies together brings a touch of woodland magic to any room
Cozy Sweater Pumpkin Texture
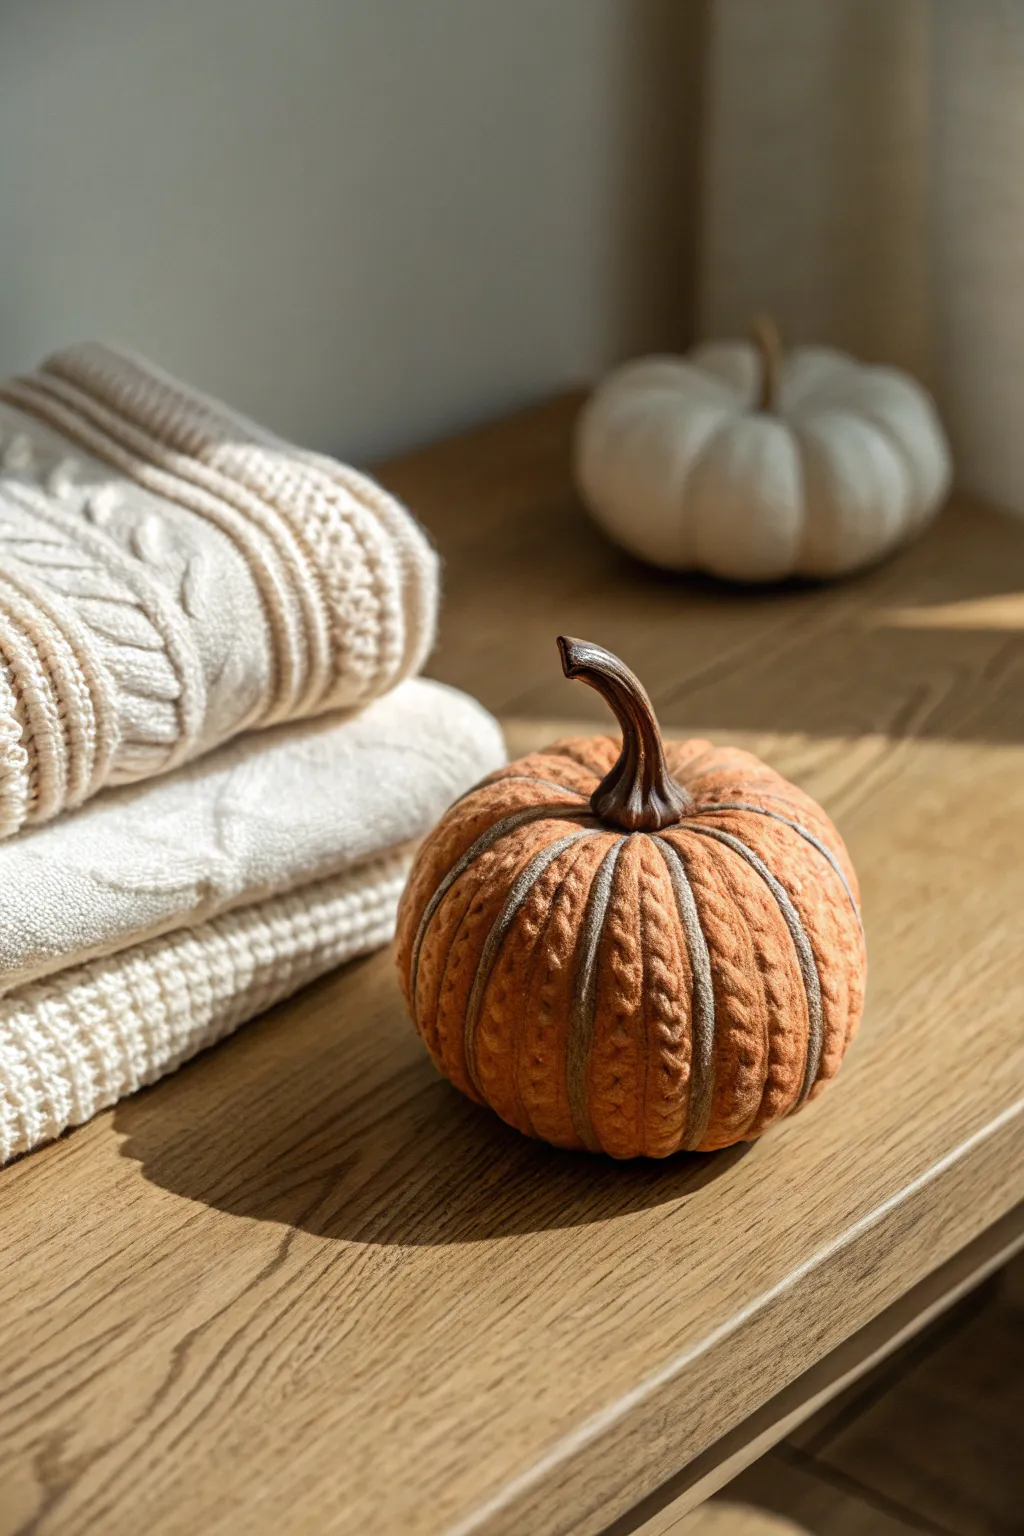
Capture the cozy essence of autumn with this faux-knit pumpkin crafted entirely from clay. The detailed cable-knit pattern and warm burnt-orange glaze give it a realistic, textile-like appearance perfect for your seasonal shelf styling.
How-To Guide
Materials
- Polymer clay or air-dry clay (orange/terracotta base)
- Grey polymer clay (for accents)
- Dark brown polymer clay (for the stem)
- Acrylic paint (thinned brown or burnt umber for antiquing)
- Matte varnish or sealant
- Sculpting tools (needle tool, small ball stylus)
- Extruder tool (optional, for even coils)
- Soft paintbrush
- Paper towels or soft cloth
- Texture roller (optional)
Step 1: Forming the Base
-
Prepare the Core:
Start by conditioning your orange clay until it is soft and pliable. Roll a large ball of clay roughly the size of a grapefruit, or whatever finished size you prefer for your pumpkin. -
Shape the Pumpkin:
Gently press the top and bottom of the sphere to flatten it slightly into a squat, pumpkin shape. Use your thumb to create a deep depression in the center of the top where the stem will eventually sit. -
Define the Sections:
Using a needle tool or a dull knife, lightly score vertical lines from the top well to the bottom center, dividing the pumpkin into 8-10 even sections. These guidelines will help you place your ‘knit’ texture symmetrically.
Pro Tip: Seamless Texture
For ultra-realism, use a stiff toothbrush to gently tap over your smooth clay strands before baking. This adds a microscopic ‘fuzz’ texture that mimics real wool yarn.
Step 2: Creating the Cable Knot Texture
-
Make the Clay Strands:
Roll out many long, thin snakes of orange clay. An extruder tool is incredibly helpful here to ensure every strand has a uniform thickness, which is key for a realistic yarn look. -
Twist the Cables:
Take two clay strands and gently twist them together to form a simple rope. Create several of these twisted ropes, as they will form the primary cable-knit pattern. -
Apply the First Ribs:
Lay a twisted rope vertically down the center of one of your section guidelines. Press it gently onto the pumpkin base so it adheres but doesn’t flatten out completely. -
Add Side Accents:
Roll very thin strands of grey clay. Place one single strand on either side of your orange cable twist to act as a border or ‘purl’ stitch definition. -
Fill the Gaps:
Between the cabled sections, fill the remaining orange base space with texture. I like to use a small ball stylus or needle tool to poke tiny, dense holes or dashes, simulating the look of a fuzzy moss stitch. -
Repeat Around:
Continue twisting ropes and lining them with grey strands until every section of the pumpkin is covered in this varied ‘knit’ pattern. -
Refine the Top:
Trim any excess clay at the top depression. Ensure the ends of your ‘yarn’ strands tuck neatly into the center hole so the transition to the stem will be clean.
Step 3: Stem and Finishing
-
Sculpt the Stem:
Condition a piece of dark brown clay. Roll it into a thick log, tapering it slightly at one end. -
Add Wood Grain:
Twist the stem slightly to give it an organic curve. Use a needle tool to drag deep vertical grooves into the clay, mimicking the fibrous texture of a dried pumpkin stem. -
Attach the Stem:
Press the wider bottom of the stem firmly into the top depression of your pumpkin. Blend the clay slightly at the connection point if needed, or use a little liquid bakeable clay (if using polymer) for a strong bond. -
Initial Cure or Dry:
If using polymer clay, bake according to the package instructions. If using air-dry clay, allow it to dry completely for 24-48 hours until hard.
Level Up: Ombré Effect
Blend two shades of orange clay for your ‘yarn’ snakes. As you move up the pumpkin, transition to the lighter shade for a sun-faded autumn look.
Step 4: Antiquing and Sealing
-
Apply a Wash:
Mix a small amount of dark brown acrylic paint with water to create a thin wash. Brush this over the entire pumpkin, making sure it gets into all the crevices of the cable twists. -
Wipe Back:
Immediately use a damp paper towel or soft cloth to gently wipe the paint off the raised surfaces. This leaves the dark color in the deep textures, highlighting the ‘knit’ effect. -
Dry and Seal:
Allow the paint wash to dry completely. Finally, coat the entire piece with a matte varnish to protect the surface without making it look glossy or plastic.
Now you have a charming piece of autumn decor that looks soft to the touch but will last for years.


What Really Happens Inside the Kiln
Learn how time and temperature work together inside the kiln to transform clay into durable ceramic.
Black Cat On Pumpkin Stack
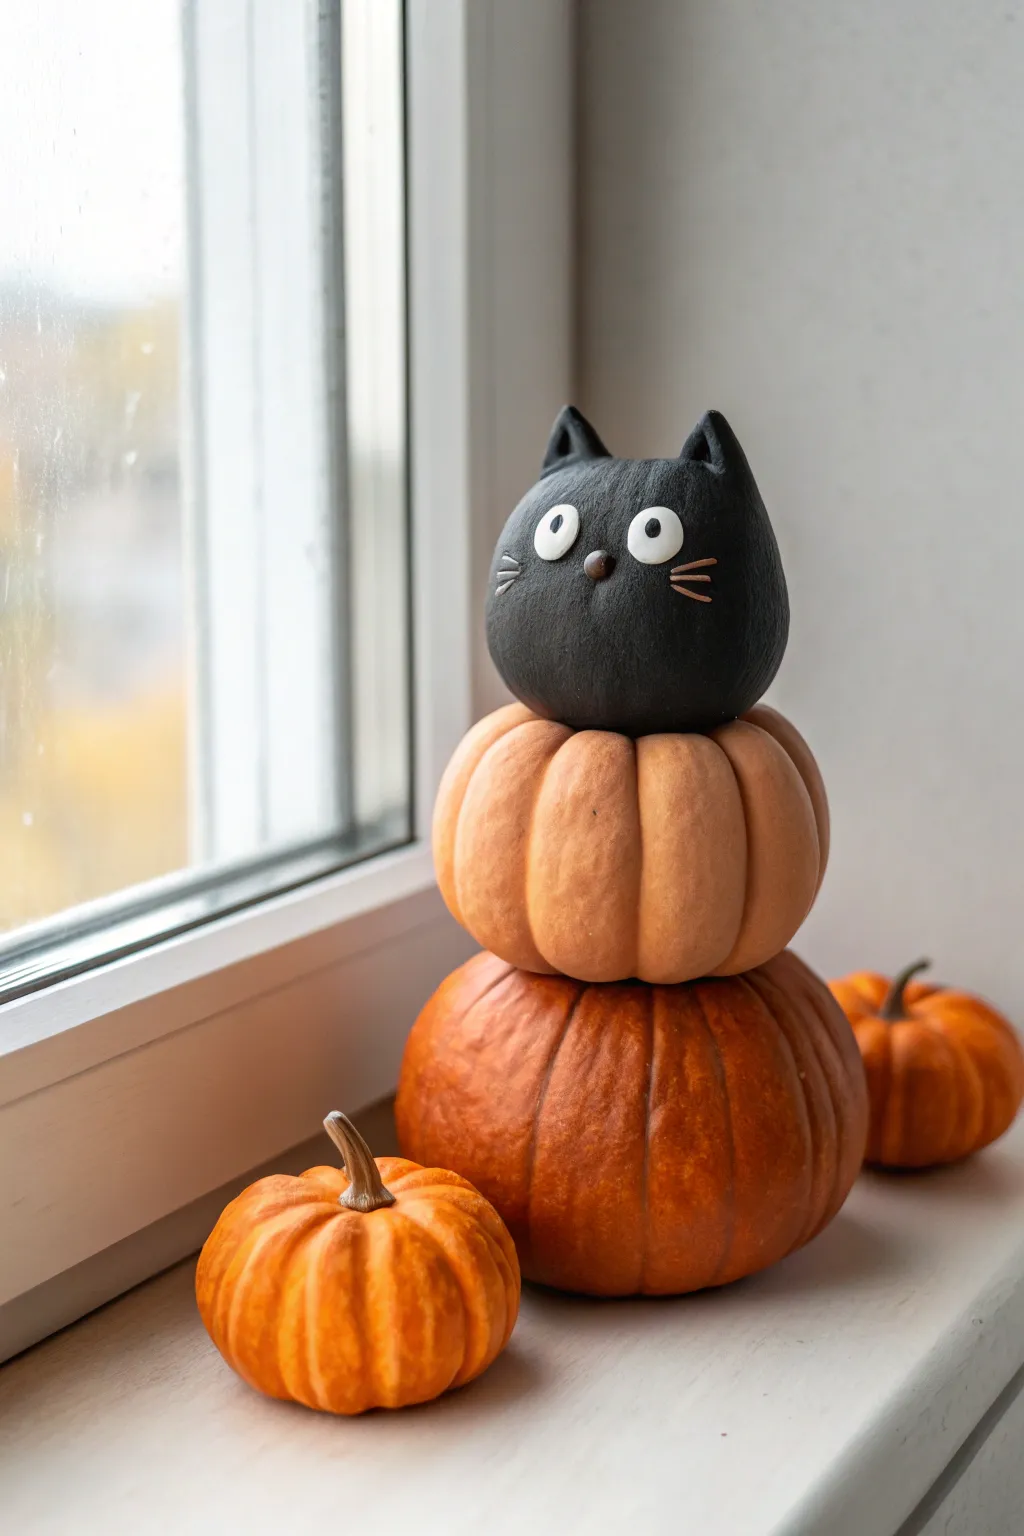
This adorable clay stack features two plump, textured pumpkins topped with a wide-eyed black cat head that balances perfectly on its autumnal perch. With its minimalist face and smooth finish, it makes for a charming windowsill decoration that captures the cozy spirit of fall.
Step-by-Step Tutorial
Materials
- Polymer clay (Orange, Dark Orange, Black, White)
- Small ball tool or dotting tool
- Pointed sculpting tool or toothpick
- Small blade or craft knife
- Soft pastel chalks (orange, brown) – optional for shading
- Small paintbrush
- Translucent liquid clay or strong craft glue
- Oven for baking (if using polymer clay)
Step 1: Sculpting the Pumpkin Base
-
Form the large base:
Start by conditioning a large ball of dark orange clay until soft and pliable. Roll it into a smooth sphere and then gently flatten the top and bottom to create a squat, pumpkin-like shape. -
Create the segments:
Use the side of a toothpick or a dull sculpting tool to press vertical indentations all around the sphere, dividing it into roughly equal segments. These lines define the pumpkin’s ribs. -
Soften the shape:
Gently press your thumb into the center of each segment to puff them out slightly, making the pumpkin look ripe and full rather than just a ball with lines. -
Make the second pumpkin:
Repeat the previous steps with a slightly lighter shade of orange clay, creating a pumpkin that is about two-thirds the size of the base. Ensure the top and bottom are flat enough to stack securely. -
Texture the skin:
For a realistic touch, lightly tap the surface of both pumpkins with a stiff brush or a crumpled piece of aluminum foil to give the clay a subtle, organic texture instead of leaving it perfectly smooth. -
Stack them up:
Apply a tiny dot of liquid clay or creating a small divot in the center of the large pumpkin to nest the smaller one on top. Press them together gently to bond without squashing the segments.
Step 2: Creating the Cat Head
-
Roll the head:
Condition a ball of black clay that is roughly the same diameter as the middle pumpkin. Roll it into a smooth sphere, ensuring there are no cracks or fingerprints. -
Shape the ears:
Pinch two small triangles from the top of the sphere to form the ears. I like to use a small ball tool to gently hollow out the front of these triangles to give the ears depth. -
Position the head:
Place the black cat head onto the stack of pumpkins. Press down slightly so the bottom of the head conforms to the shape of the orange pumpkin beneath it. -
Make the eyes:
Roll two very small balls of white clay and flatten them into discs. Press these onto the face, spacing them somewhat wide apart for a cute, startled expression. -
Add pupils:
Roll two miniscule specks of black clay and place them in the center of the white discs. Tap them gently to secure. -
Add the nose:
Create a tiny oval of black or dark grey clay and place it centrally below the eyes to serve as the nose. -
Draw whiskers:
Using a very sharp needle tool or craft knife, scratch three delicate lines on each cheek to represent whiskers. The lines should be subtle, revealing the texture of the clay.
Clean Clay Tip
Black clay loves to pick up dust and lint. Wipe your hands and work surface thoroughly with a baby wipe before handling the black clay, or wear fingertip gloves.
Step 3: Finishing Touches
-
Shade with pastels:
Before baking, use a dry paintbrush to dust a little brown pastel chalk into the crevices of the pumpkin ribs to enhance the depth and make them pop. -
Check stability:
Ensure the stack is standing straight. If it leans, gently reshape the bottom of the lowest pumpkin to create a wider, flatter base. -
Create companion pumpkins:
If you have leftover orange clay, quickly form two miniature pumpkins using the same method as the base. Don’t forget to add tiny curled stems using a scrap of brown or green clay. -
Bake the project:
Bake the sculpture according to your clay manufacturer’s specific instructions (usually 275°F/135°C for 15-30 minutes depending on thickness). -
Cool and display:
Let the sculpture cool completely in the oven before moving it to prevent cracking. Once cool, it’s ready for your mantle.
Make It Glossy
After baking, apply a layer of water-based polyurethane gloss varnish specifically to the cat’s eyes and nose to make them look wet and lively.
Now you have a perfect little autumn stack that brings a whimsical touch to your seasonal decor
Candy Corn-Inspired Mini Pots
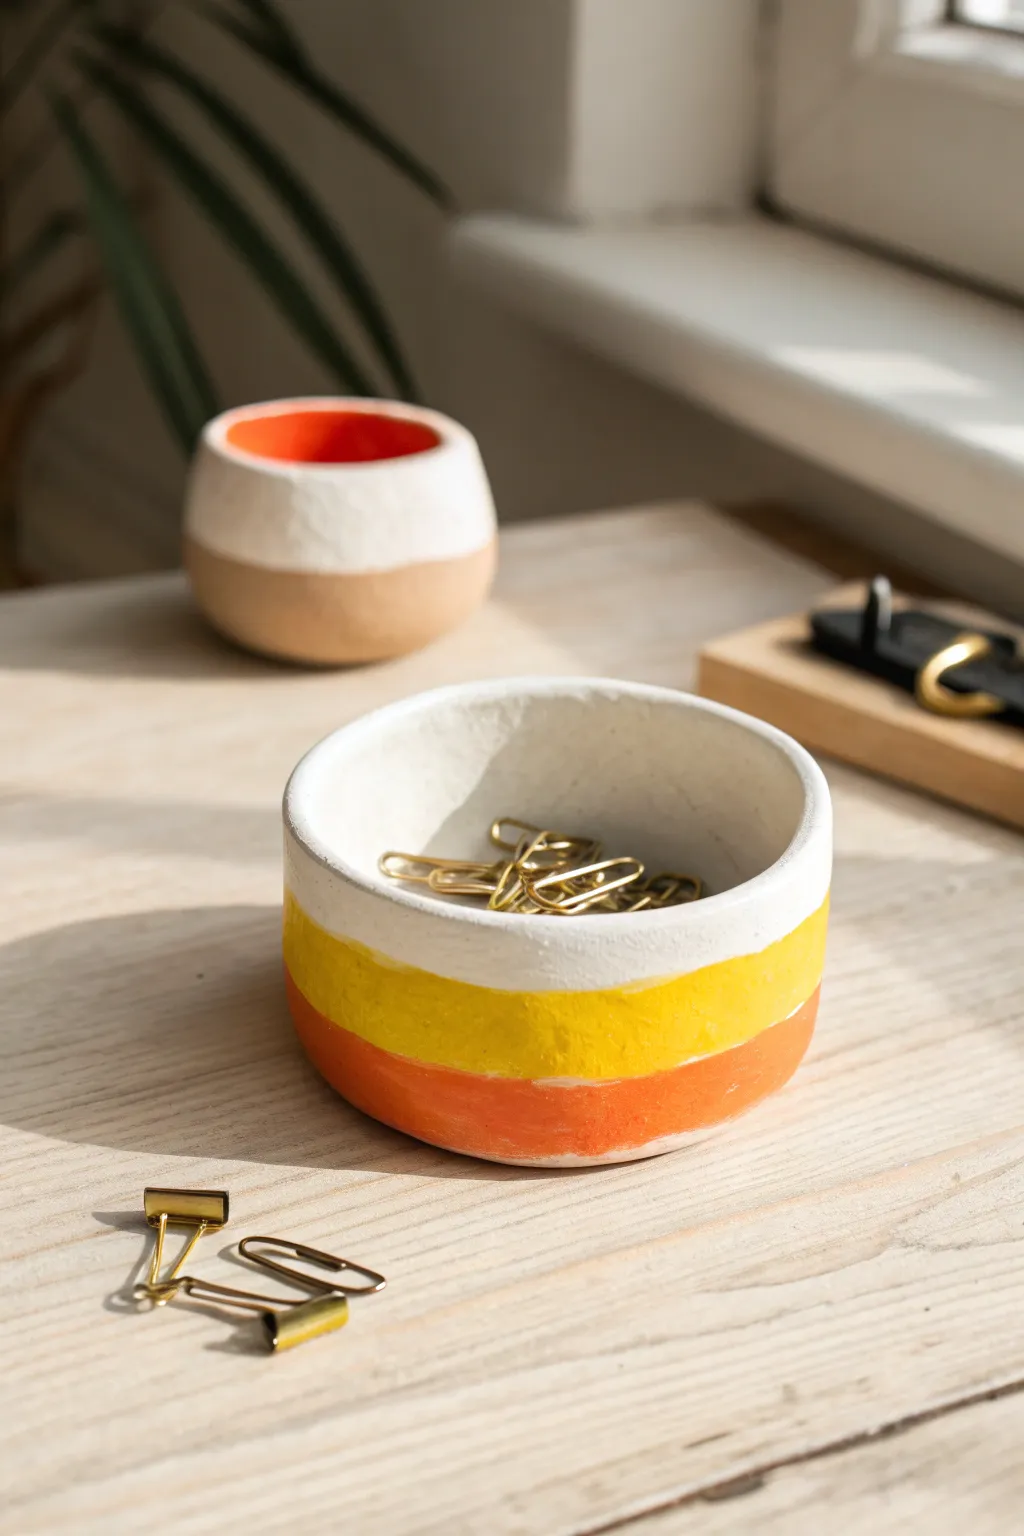
Bring a subtle touch of autumn to your desk with this minimalist, candy corn-inspired trinket dish. Its simple geometric bands of white, bright yellow, and pumpkin orange create a cheerful spot for organizing small office supplies.
Step-by-Step Guide
Materials
- Air-dry clay (white or terra cotta)
- Acrylic paint (white, bright yellow, orange)
- Small rolling pin
- Circular cookie cutter or a drinking glass (approx. 3-4 inches)
- Small bowl or sphere for molding
- Sandpaper (fine grit)
- Flat paintbrush (medium size)
- Paint palette or disposable plate
- Matte varnish or sealant (optional)
- Small bowl of water
- Sponge
Step 1: Shaping the Clay Base
-
Prepare the workspace:
Lay down a sheet of parchment paper or a silicone mat to prevent the clay from sticking to your table. -
Condition the clay:
Take a handful of air-dry clay and knead it in your hands until it becomes soft, pliable, and free of cracks. -
Roll it out:
Using your rolling pin, flatten the clay to an even thickness of about 1/4 inch. Try to keep the thickness consistent so the drying time is uniform. -
Cut the circle:
Press your circular cutter or the rim of a glass firmly into the clay to create a perfect circle base. -
Form the sides:
Instead of building coils, we will mold the circle. Gently drape your clay circle over a small upside-down bowl or sphere to give it a cupped shape. -
Flatten the bottom:
While it’s on the mold, gently press the very center flat so the finished pot will sit stably on a table without wobbling. -
Smooth the edges:
Dip your finger in a little water and run it along the rim of the clay to smooth out any rough cuts or sharp edges. -
Let it dry:
Allow the clay to dry completely according to the package instructions, usually 24-48 hours. I find flipping it over halfway through helps the inside dry evenly.
Step 2: Sanding and Refining
-
Inspect the surface:
Once fully hard, check for any bumps or uneven spots that formed during drying. -
Sand the exterior:
Use fine-grit sandpaper to gently smooth the outside walls, creating a canvas-like surface for your paint. -
Refine the rim:
Pay special attention to the top rim, sanding it flat so it looks deliberate and crisp. -
Wipe clean:
Use a slightly damp sponge or cloth to wipe away all the clay dust before opening your paints.
Smooth Lines
For a sharper line between colors without using tape, rest your hand on the table or a book to stabilize your brush while rotating the pot itself.
Step 3: Painting the Candy Corn Stripes
-
Paint the base white:
Start by painting the entire interior and a wide band around the top exterior rim with white acrylic paint. -
Add a second coat:
Allow the first layer to dry to the touch, then add a second coat of white to ensure full opacity. -
Adding the yellow band:
Paint the middle section of the exterior with bright yellow paint. Don’t worry about using painter’s tape; a freehand line adds organic charm. -
Painting the orange base:
Fill in the bottom third of the pot with orange paint, blending it slightly where it meets the yellow if you prefer a softer transition. -
Touch up the interior:
Check the inside of the pot and add one final coat of white if any stray yellow or orange marks accidentally got inside. -
Seal the piece:
Once the paint is completely dry, apply a thin coat of matte varnish to protect the finish from scratches.
Gilded Touch
Mix a tiny amount of gold metallic paint into the orange band or paint the very top rim gold for a more sophisticated, grown-up Halloween look.
Now your workspace is ready for autumn with this sweet and functional handmade organizers

TRACK YOUR CERAMIC JOURNEY
Capture glaze tests, firing details, and creative progress—all in one simple printable. Make your projects easier to repeat and improve.
Mushroom And Leaf Candle Duo
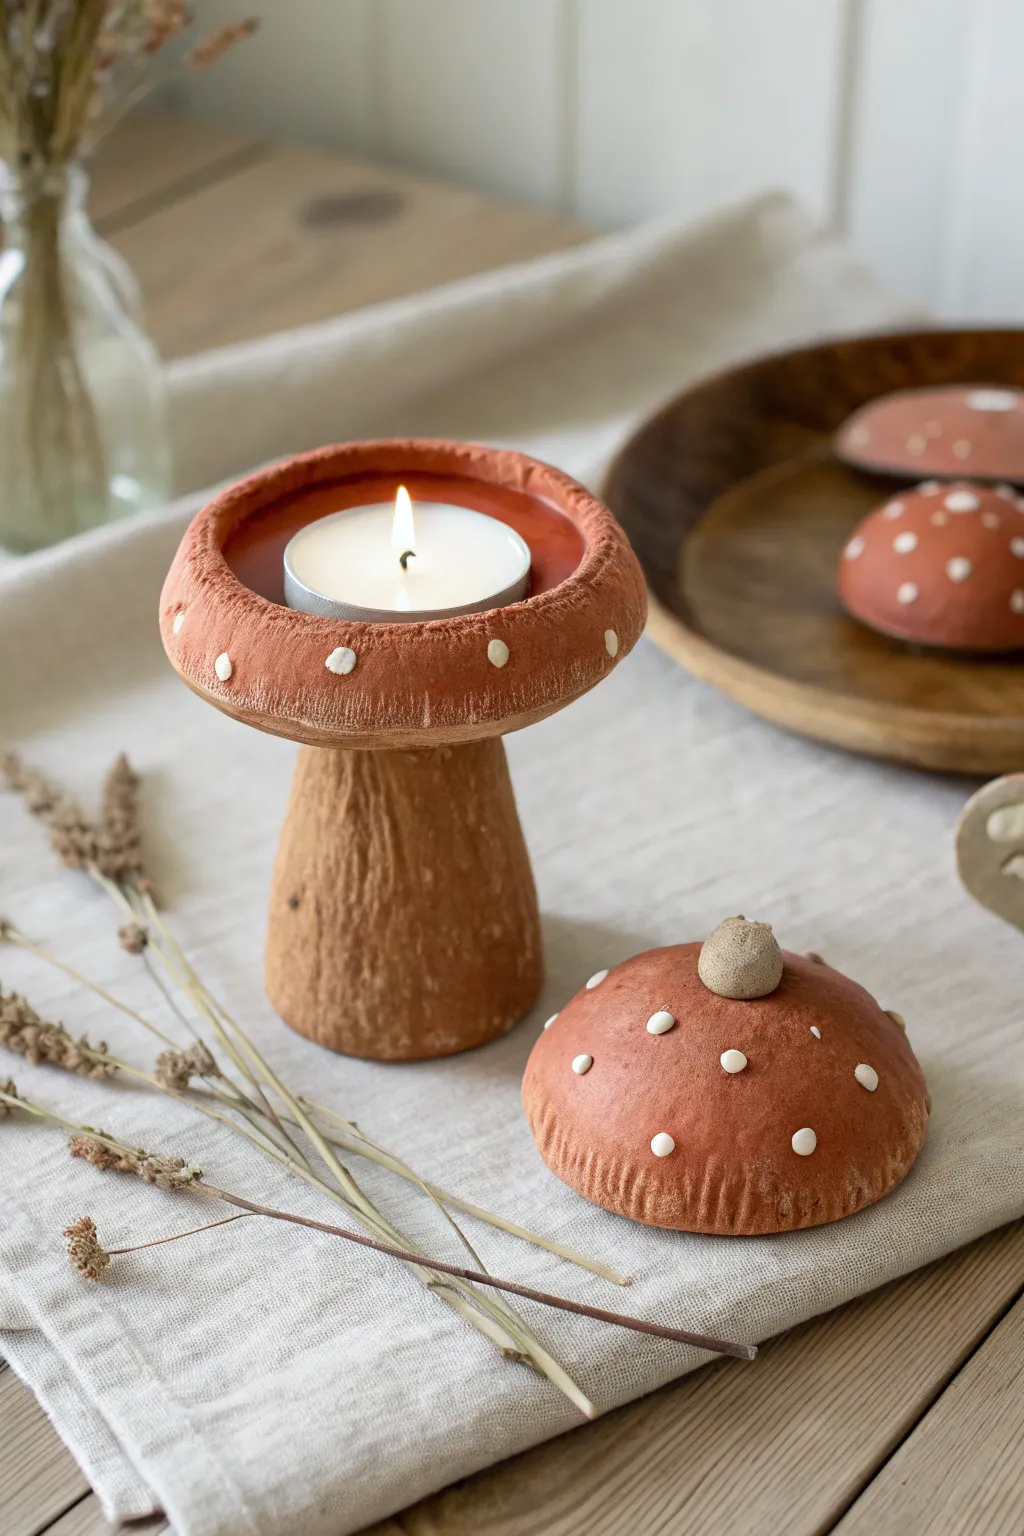
Embrace the cottagecore aesthetic with this charming two-piece mushroom candle holder that doubles as woodland decor. Featuring a hollow stem base for height and a removable cap that nests perfectly on top, this project brings a warm, earthy glow to your autumn table.
Step-by-Step
Materials
- Terracotta air-dry clay (or oven-bake polymer clay in terra cotta)
- Small tealight candle (for sizing)
- Rolling pin
- Clay sculpting tools (needle tool, loop tool)
- Small bowl of water (for smoothing)
- White acrylic paint
- Small round paintbrush or dotting tool
- Aluminum foil
- Sandpaper (fine grit)
- Matte varnish (optional)
Step 1: Sculpting the Base
-
Prepare the stem core:
Start by crumpling a cylinder of aluminum foil to act as an armature. This saves clay and keeps the stem lightweight. Keep the top flat and the bottom slightly wider for stability. -
Wrap the stem:
Roll out a slab of your terracotta clay to about 1/4 inch thickness. Wrap this around your foil cylinder, blending the seam with your fingers and a touch of water until it’s invisible. -
Shape the silhouette:
Gently gently squeeze the middle of the stem to give it a slight curve, flaring out at the bottom. Flatten the top surface so it’s perfectly level to support the ‘cap’. -
Add texture:
Using a needle tool or a stiff bristled brush, drag vertical lines down the stem to mimic the fibrous texture of a real mushroom stalk.
Step 2: Crafting the Cap
-
Form the basic dome:
Take a larger ball of clay and press your thumb into the center, pinching and turning to create a bowl shape. Keep the walls relatively thick, about 1/2 inch at the edges. -
Size the candle opening:
Place your actual tealight candle into the center of the underside (the concave part) of the cap. Press it down gently to create an indentation, or carve out a recess with a loop tool so the candle sits flush. -
Create the rim:
Roll the edges of the cap inward slightly to create a rounded, puffy lip. This gives it that classic toadstool look rather than just looking like a bowl. -
Texture the gills:
Flip the cap over so the underside feels accessible. Use your needle tool to verify faint lines radiating from the center hole to the outer edge, simulating mushroom gills. -
Make the lid handle:
Roll a tiny, separate ball of clay or a small nub. Attach this securely to the very top exterior of the mushroom cap using the score-and-slip method (scratching both surfaces and adding water). -
Dry fitting:
Before drying, gently place the cap onto the stem to ensure they balance well. If the stem top is too slippery, rough it up slightly for better grip.
Cracking Issues?
If you see cracks appearing as the clay dries, mix a tiny bit of fresh clay with water to make a paste (slip) and fill the cracks immediately. Smooth over with a damp finger.
Step 3: Finishing Touches
-
Drying or baking:
If using air-dry clay, let the pieces sit for 24-48 hours until fully hardened and light in color. If using polymer, bake according to the package instructions. -
Sanding:
Once completely cured, take your fine-grit sandpaper and gently smooth out any harsh fingerprints or sharp edges on the rim, but leave the stem texture rough. -
Painting the spots:
Dip a small round brush or a dotting tool into white acrylic paint. Dab small, irregular dots around the rim of the cap and scattered across the top lid surface. -
Detailing the stem:
To enhance the earthy look, you can dry-brush a tiny amount of darker brown paint into the crevices of the stem texture, wiping away the excess immediately. -
Sealing:
Apply a coat of matte varnish to protect the clay, especially if you plan to use this outdoors or near moisture. Let it cure completely before lighting a candle.
Make it a Set
Create a whole forest floor by making three mushrooms at varying heights. Try making one with a wide, flat cap and another with a tall, pointy cap for visual interest.
Once the paint is dry, pop in a tealight and enjoy the warm, flickering light of your handcrafted autumn piece
Pumpkin Spice Mug Ornament
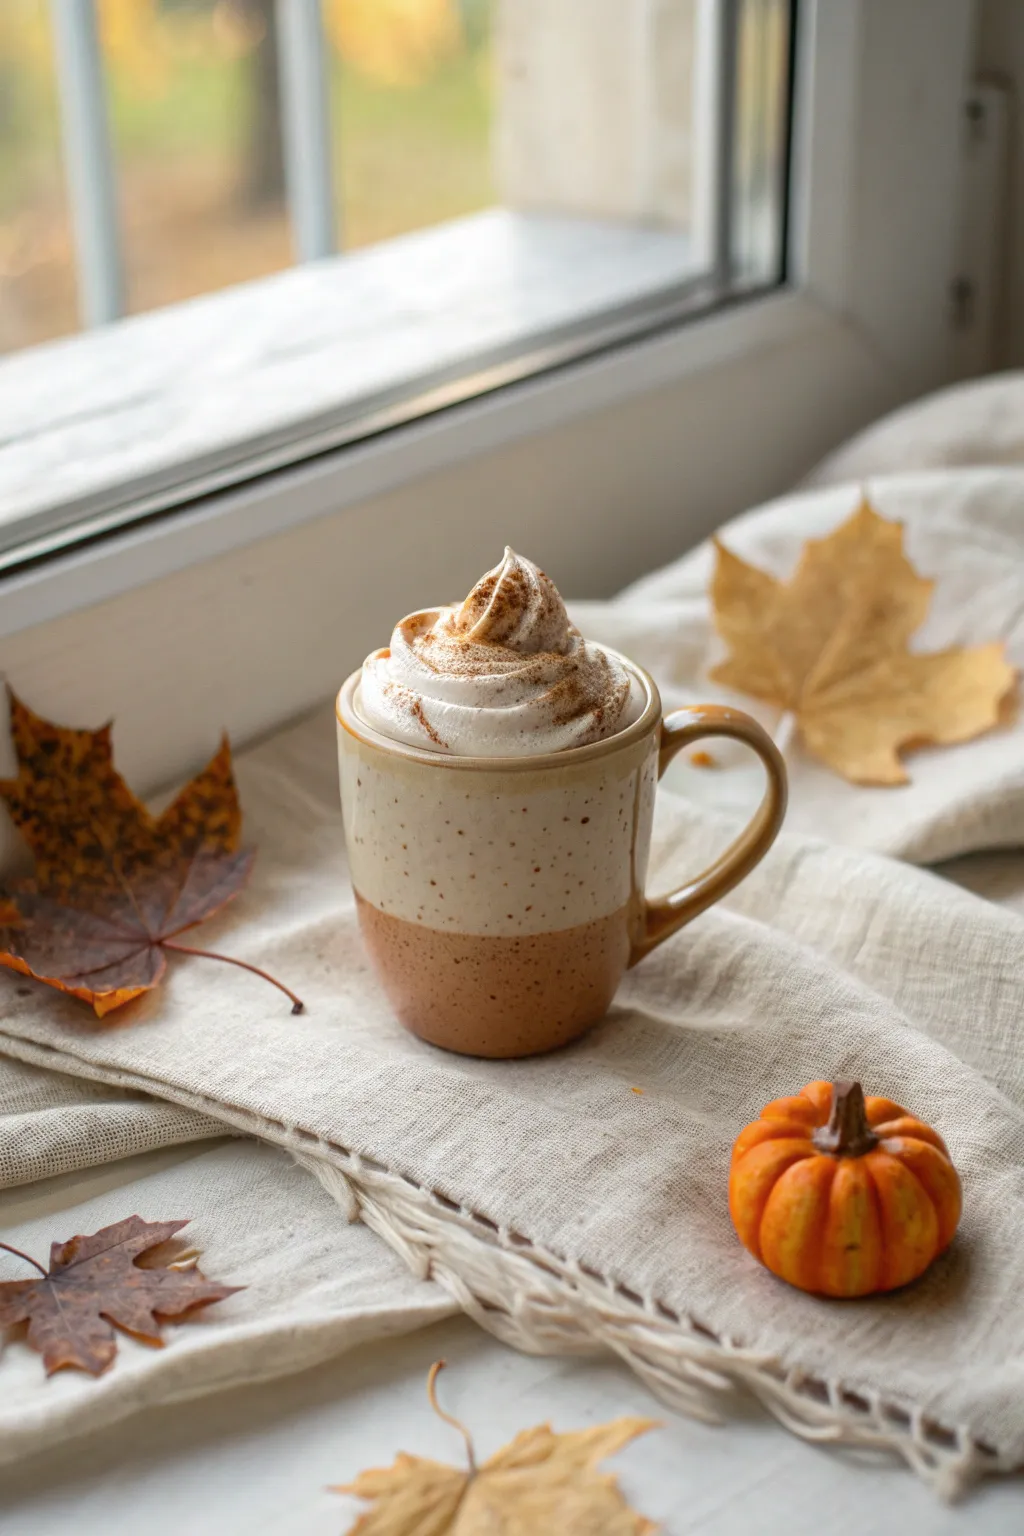
Capture the cozy essence of autumn with this adorable miniature mug sculpture, complete with fluffy whipped cream and a dusting of spice. This detailed clay project mimics the look of speckled ceramic and frothy foam for a delightful seasonal decoration.
Step-by-Step Tutorial
Materials
- Polymer clay (white, beige/tan, terracotta/brown)
- Liquid polymer clay (translucent or white)
- Actual cinnamon or brown pastel chalk
- Course black pepper or black sand (optional for speckling)
- Dotting tools and needle tool
- Small craft paintbrush
- Gloss glaze (polyurethane or resin)
- Toothbrush or crumpled foil (for texturing)
- Small circle cutter
- Baking sheet and parchment paper
- Blade or craft knife
Step 1: Creating the Speckled Mug Base
-
Mix the clay colors:
Begin by conditioning your beige clay. To achieve that realistic speckled ceramic look, knead in a tiny pinch of coarse black pepper or black sand until evenly distributed. -
Form the bottom section:
Take a portion of terracotta or warm brown clay and roll it into a thick cylinder for the base of the mug. Flatten the bottom slightly so it stands straight. -
Form the top section:
Roll your speckled beige clay into a cylinder of equal diameter to the brown base. Join them carefully by stacking the beige cylinder on top of the brown one. -
Blend the seam:
Use your finger or a smoothing tool to gently blend the seam between the two colors, keeping the transition fairly straight but smooth to the touch. -
Hollow the mug:
Press a larger ball tool into the top center of the beige cylinder to create the cup’s opening. Don’t go too deep; you just need a shallow well to hold the ‘drink’ later. -
Refine the shape:
Roll the combined cylinder gently on your work surface to ensure the sides are perfectly smooth and the join is flushed.
Step 2: Adding the Handle & Details
-
Form the handle coil:
Roll a small snake of the terracotta clay. Taper the ends slightly. -
Shape the handle:
Bend the snake into a ‘C’ or ear shape. Attach the top end to the beige section and the bottom to the brown section of the mug. -
Secure the blend:
Use a small rubber shaper or needle tool to smudge the clay from the handle onto the mug body for a strong bond. -
Create the rim:
For a subtle detail, roll a very thin snake of terracotta clay and press it gently around the top rim of the mug to define the edge.
Creamy Realism
For ultra-realistic whipped cream, mix white clay with liquid clay until it’s a frosting consistency, then pipe it through a real miniature icing tip.
Step 3: The Latte and Whipped Cream
-
Fill the mug:
Mix liquid polymer clay with a tiny bit of brown clay or pastel shavings to make a latte color. Pour a small amount into the hollow of your mug. -
Make the whipped cream:
Take white polymer clay and roll it into a long, tapering snake. Twist this snake tightly to mimic the piped texture of whipped cream. -
Coil the topping:
Coil the twisted snake into a pyramid shape, starting wide at the base and spiraling up to a peak. Place this directly onto the liquid clay inside the mug. -
Texture the cream:
I like to use a needle tool to gently tease tiny bits of clay upward on the spiral, making the foam look airy and realistic rather than plastic. -
Add the spice:
Scrape some actual brown pastel chalk into a fine powder. Using a dry brush, gently dust the top of the whipped cream to look like cinnamon or pumpkin spice.
Dirty Clay?
White clay attracts dust easily. Clean your hands and work surface with a baby wipe or alcohol just before shaping the white whipped cream topper.
Step 4: Baking and Finishing
-
Bake the project:
Place your mug on parchment paper and bake according to your polymer clay package instructions (usually 275°F/130°C for 15-30 minutes per 1/4 inch). -
Cool down:
Allow the piece to cool completely before handling so the clay hardens fully. -
Glaze the mug:
Apply a coat of gloss glaze to the ceramic parts of the mug (the beige and brown sections) to make them look like glazed pottery. -
Leave the cream matte:
Be careful not to glaze the whipped cream; keeping it matte maintains the fluffy, edible texture contrast.
Display your cozy creation on a tiny coaster or turn it into a seasonal ornament with an eye screw
Fall Gnome With Pumpkin Hat

This adorable little gnome combines the whimsy of fairytale creatures with the rustic charm of autumn pumpkins. Using clay, you’ll sculpt a cheerful, textured character with a squat pumpkin body and a tall, tapered hat perfect for your fall windowsill.
How-To Guide
Materials
- Polymer clay (Orange, White/Cream, Beige/Flesh tone)
- Small rolling pin
- Modeling tools (needle tool, ball stylus)
- Craft knife
- Aluminum foil (for armature core)
- Brown acrylic paint (for antiquing)
- Small paintbrush
- Paper towel or sponge
Step 1: Forming the Body
-
Create the core:
Ball up a small piece of aluminum foil into a squat, rounded shape about the size of a tangerine to serve as the core; this saves clay and reduces baking time. -
Cover with clay:
Roll out a sheet of orange clay to about 1/4 inch thickness and wrap it fully around your foil ball, smoothing the seams until you have a seamless sphere. -
Shape the pumpkin base:
Gently press the sphere down onto your work surface to flatten the bottom so it stands independently. -
Add ribbing:
Using a modeling tool or the back of a craft knife, press vertical indentations around the lower half of the body to mimic the ridges of a pumpkin. -
Add buttons:
Use a small needle tool to poke two distinct holes vertically aligned on the front of the body to suggest coat buttons.
Clean Clay Pro-Tip
Keep baby wipes nearby to clean your hands between colors. The white beard clay picks up orange pigment very easily, so scrub your fingers well before shaping the beard.
Step 2: Sculpting the Face and Beard
-
Apply the face:
Roll a small, flat oval of beige or flesh-toned clay and press it onto the upper front of the orange body where the head would be. -
Shape the beard:
Create a crescent moon shape from cream-colored clay that fits snugly under the face oval, wrapping around the sides slightly. -
Texture the beard:
Take a needle tool or a dull blade and score vertical lines into the cream clay to create a hair-like texture for the beard. -
Add the nose:
Roll a small ball of the beige clay and place it right in the center, overlapping where the face meets the beard. -
Detail the eyes:
Use a specialized curved tool or lightly press a small U-shape into the clay above the nose to create two happy, closed eyes.
Level Up: Glossy Boots
Add two small black balls of clay at the base for little boots. After baking, coat just the boots and the nose with a gloss glaze to make them shine against the matte body.
Step 3: Structuring the Hat
-
Form the cone:
Shape a generous amount of orange clay into a tall cone. Make it slightly taller than you think you need, as we will bend it. -
Create the texture:
Before attaching, use a sculpting tool to carve deep vertical grooves running from the brim to the tip, giving it a fibrous, vegetable-stem look. -
Attach the hat:
Place the cone firmly onto the top of the body, ensuring it slightly overlaps the top of the beige face piece and the back of the beard. -
Curve the tip:
Gently grasp the very top of the cone and bend it slightly backward or to the side to give the gnome a relaxed, organic feel. -
Define the brim:
Run a tool around the bottom edge of the hat to create a distinct separation line between the hat and the forehead.
Step 4: Finishing Touches
-
Bake the piece:
Bake your sculpture according to the specific instructions on your package of polymer clay (usually 275°F for 15-30 minutes depending on thickness). -
Cool down:
Allow the figure to cool completely before handling so the clay hardens fully. -
Prepare antiquing wash:
Mix a small amount of brown acrylic paint with water to create a thin, watery wash. -
Apply the wash:
Brush the brown wash generously over the entire figure, making sure it gets into all the textured grooves of the hat, beard, and pumpkin ribs. -
Wipe away excess:
Immediately use a damp paper towel or sponge to wipe the paint off the raised surfaces. The dark paint will remain in the crevices, highlighting the textures. -
Add speckling:
I like to finish by flicking a toothbrush loaded with slightly thicker brown paint over the hat to create tiny speckles for an aged pottery look.
Your charming clay gnome is now ready to watch over your autumn display with his friendly smile
Kawaii Leaf Face Magnets
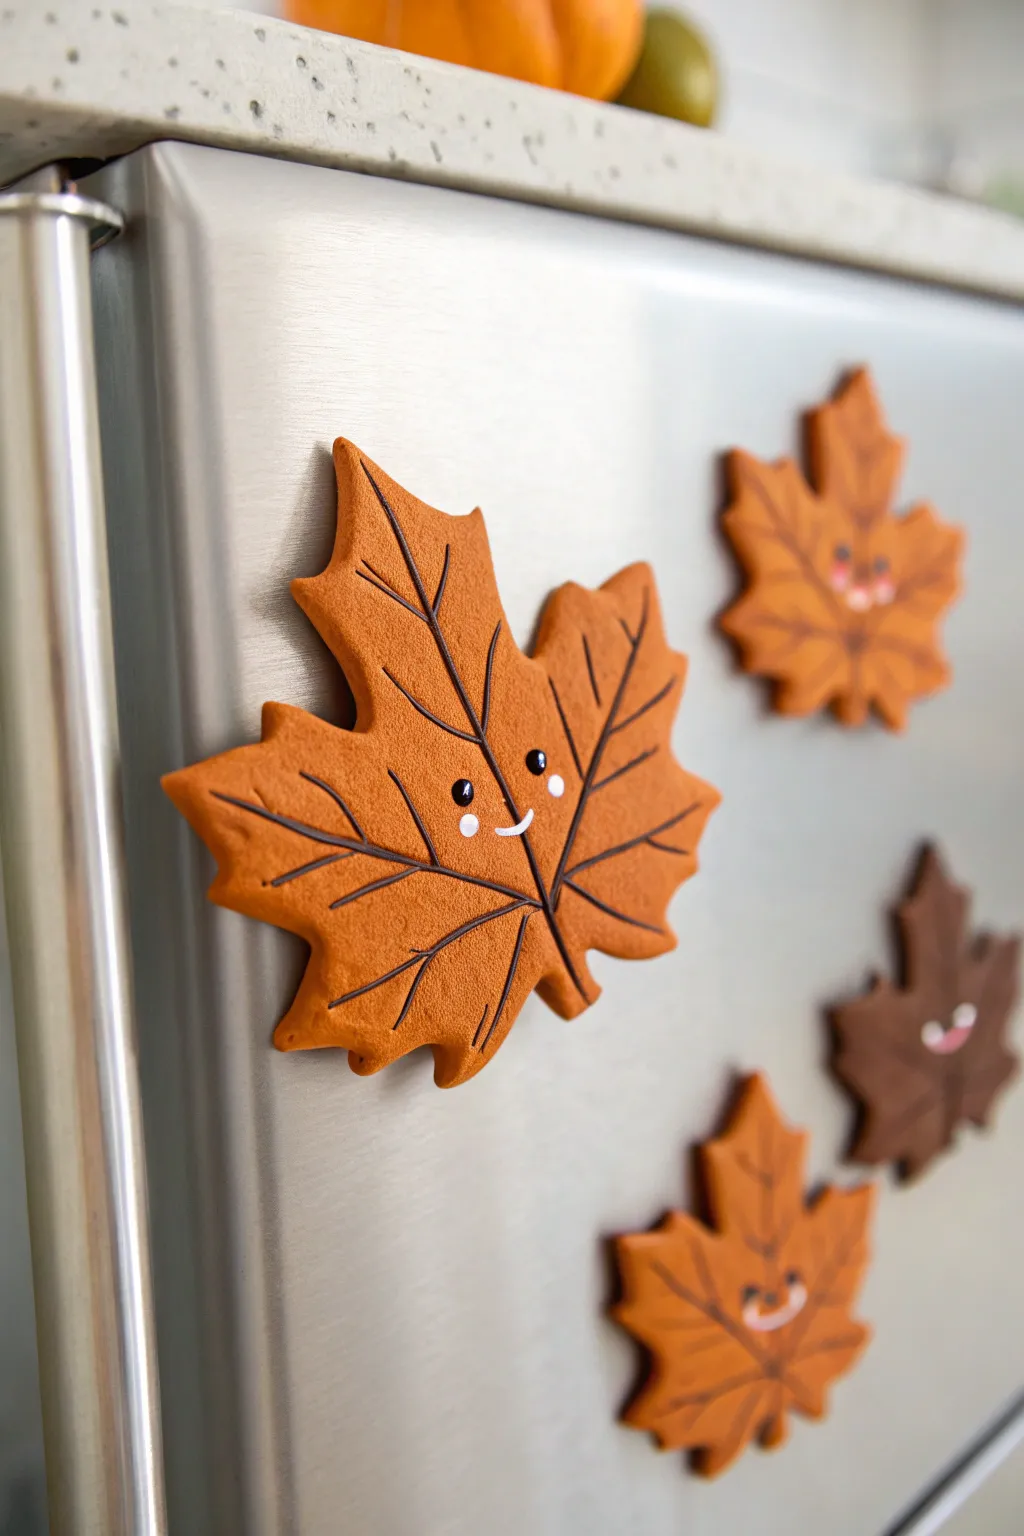
Bring cozy autumn vibes into your kitchen with these adorable polymer clay leaf magnets. Featuring realistic textures, sweet kawaii expressions, and warm fall colors, they are the perfect way to display your grocery lists or favorite photos.
Detailed Instructions
Materials
- Polymer clay (burnt orange, caramel brown, dark chocolate)
- Leaf-shaped cookie cutters (specifically maple leaf)
- Acrylic rolling pin
- Texture sponge or sandpaper (fine grit)
- Needle tool or clay knife
- Dark brown acrylic paint
- White acrylic paint
- Small dotting tool or toothpick
- Fine detail paintbrush
- Paper towels or baby wipes
- Strong round magnets
- Super glue or E6000 adhesive
- Matte or satin polymer clay varnish (optional)
Step 1: Shaping and Texturing
-
Condition the clay:
Start by warming up your orange or caramel-colored polymer clay in your hands until it is soft and pliable. This prevents cracks later on. -
Roll out the slab:
Using your acrylic roller, flatten the clay into an even sheet, approximately 1/4 inch thick. You want it sturdy enough to hold a magnet but not too heavy. -
Add surface texture:
Before cutting, gently press a texture sponge o sheet of fine-grit sandpaper onto the clay surface to mimic the organic, matte look of a real dry leaf. -
Cut the shapes:
Press your maple leaf cookie cutter firmly into the textured clay. Wiggle it slightly to ensure a clean cut, then release the shape. -
Smiles and details:
If you want to indent the mouth rather than paint it, use the edge of a small spoon or a curved tool to press a gentle smile into the lower half of the leaf. -
Bake the pieces:
Place your clay leaves on a parchment-lined baking sheet and bake according to your specific clay brand’s package instructions. Let them cool completely before handling.
Pro Tip: Realistic Veins
Instead of painting veins on top, lightly score lines into the raw clay with a needle tool before baking. After baking, wash dark acrylic paint over the grooves and wipe the surface for an inlaid look.
Step 2: Decorating the Leaf
-
Paint the veins:
Using a very fine detail brush and dark brown acrylic paint, draw a central vertical line from the stem to the top tip. -
Branching out:
Add diagonal lines branching from the center vein toward each leaf point. Keep your hand steady but allow for natural variations in line thickness. -
Create the eyes:
I usually dip a large dotting tool into black paint to create two oval or round eyes just above the intersection of the lower veins. Position them wide apart for maximum cuteness. -
Add the smile:
Paint a tiny, curved smile between the eyes using white or dark brown paint, depending on the look you prefer. The example uses a sweet little white mouth. -
Highlight the eyes:
Once the black eye paint is dry, use a toothpick to add a tiny white dot to the upper corner of each eye. This ‘sparkle’ brings the character to life. -
Rosy cheeks:
Mix a tiny bit of red into your orange paint or use pink pastel dust. Apply small, soft circles just below the eyes for blushing cheeks. -
Seal the design:
Protect your paint job by applying a thin layer of matte varnish over the entire leaf. This removes the ‘plastic’ shine of the clay and locks in the face.
Troubleshooting: Fingerprints
If you see fingerprints on your raw clay leaves, lightly brush them with a little cornstarch or baby oil before baking to smooth them out without losing your texture.
Step 3: Assembly
-
Prepare the back:
Flip the cooled and dry leaf over. You can lightly sand the spot where the magnet will go to help the glue adhere better. -
Attach the magnet:
Apply a small dot of strong adhesive (like E6000) to the back of the magnet and press it firmly onto the center of the leaf. -
Final cure time:
Allow the glue to cure fully—usually 24 hours for heavy-duty glues—before sticking your new friends onto the fridge.
Your fridge is ready for the season with these charming and cheerful autumn companions
Tiny Harvest Veggie Friends
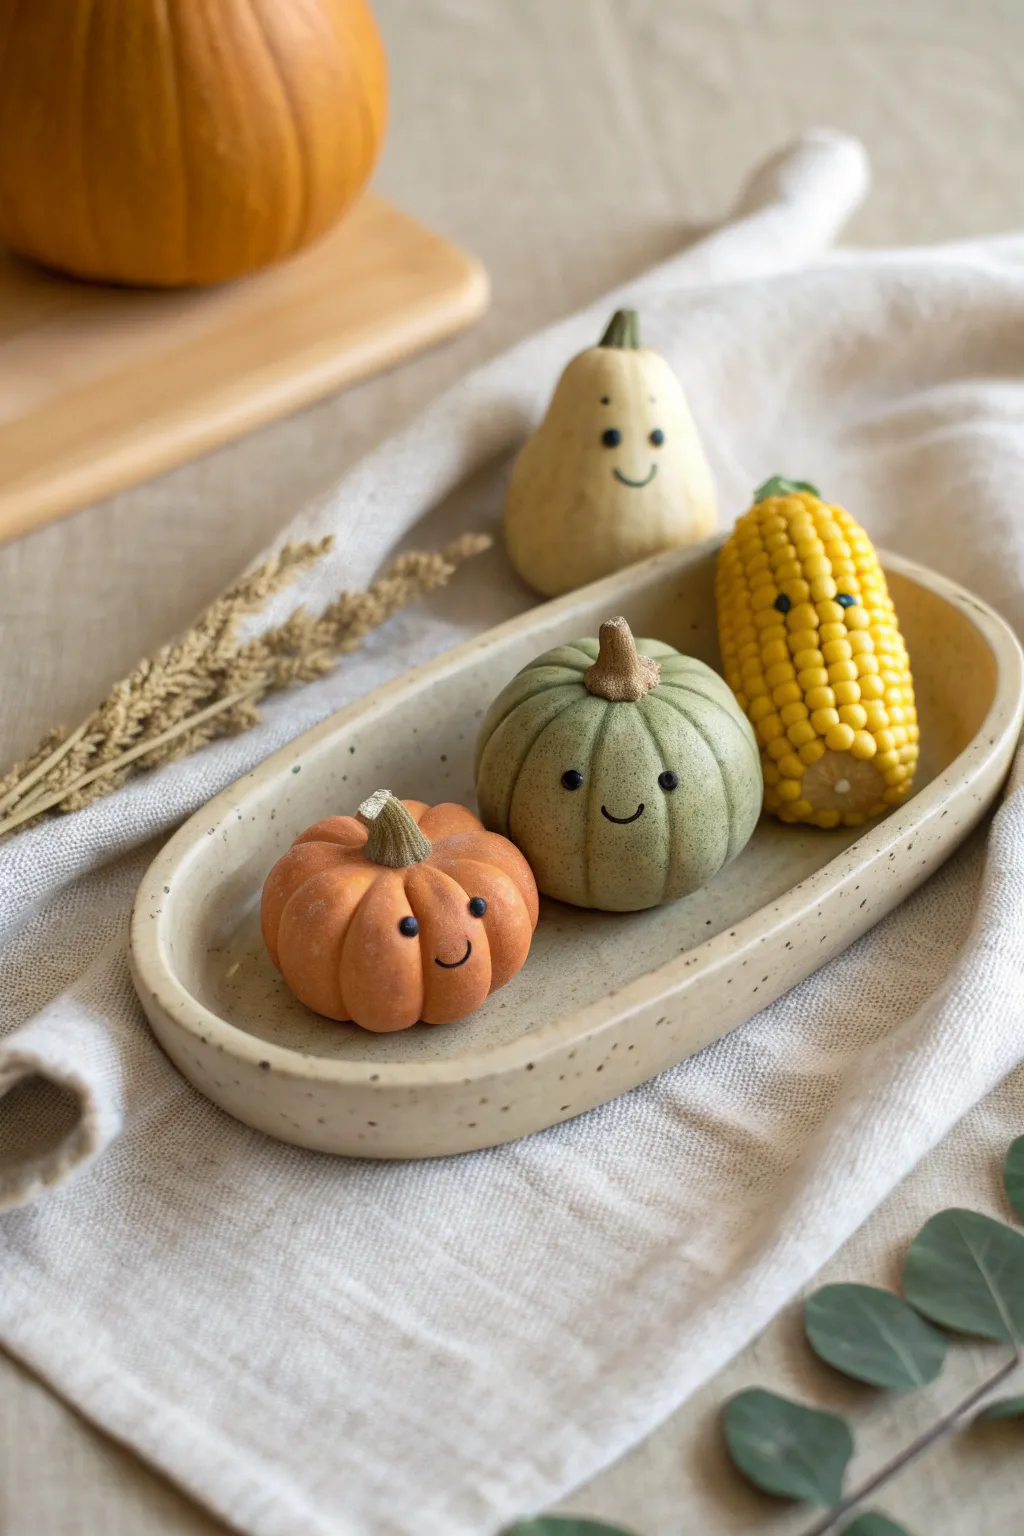
Celebrate the harvest with these impossibly cute clay figurines featuring tiny smiles and soft, matte finishes. This tutorial guides you through sculpting a plump orange pumpkin, an elegant green gourd, and a nubby ear of corn to sit in a custom speckled dish.
Step-by-Step
Materials
- Polymer clay (orange, sage green, yellow, beige/tan, dark brown/black)
- Needle tools or clay shaper set
- Ball stylus tool (small)
- Texture sponge or toothbrush
- Soft pastel chalks (browns and dark greens for shading)
- Small paintbrush
- Acrylic rolling pin
- Oven for baking
Step 1: The Orange Pumpkin
-
Form the base:
Start by conditioning a chunk of orange clay until it is soft and pliable, then roll it into a smooth, slightly flattened sphere about the size of a walnut. -
Add ribs:
Use a needle tool or the side of a toothpick to press vertical indentations from the top center to the bottom center all around the sphere, creating the classic pumpkin ribbed look. -
Texture the skin:
Gently dab the surface of the clay with a texture sponge or an old toothbrush to remove fingerprints and give the pumpkin a realistic, matte ‘skin’ texture. -
Create the stem:
Roll a tiny piece of beige or light brown clay into a tapered cylinder. Twist it slightly to look organic and press it firmly into the center indentation on top of your pumpkin. -
Sculpt the face:
Using a very small ball stylus, make two tiny indentations for eye sockets on one of the smooth sections between ribs. Press a small, curved smile just below them using a needle tool. -
Insert the eyes:
Roll two microscopic balls of black clay and gently press them into the eye sockets you created earlier.
Step 2: The Sage Green Gourd
-
Shape the gourd:
Take a piece of sage green clay, slightly larger than the orange pumpkin, and roll it into a ball. Flatten the top and bottom just a bit more than the pumpkin for a squat appearance. -
Define the sections:
Press deeper vertical lines down the sides to create more distinct, bulging lobes compared to the orange pumpkin. -
Add shading:
Here I like to use a soft brush and a little bit of brown pastel chalk dust to shade the crevices of the vertical lines, adding instant depth. -
Add the stem and face:
Attach a textured beige stem to the top, similar to the first pumpkin but slightly thicker. Add the same sweet face—tiny black clay eyes and an indented smile.
Clean Lines Tip
Keep baby wipes handy to clean your hands between colors. Orange and green clay can easily stain the lighter beige stems or the yellow corn.
Step 3: The Happy Corn Cob
-
Create the core:
Form a cylinder of yellow clay with rounded ends, making it slightly taller than the pumpkins. -
Add kernels:
Instead of rolling hundreds of balls, roll a texture tool or use a grid-patterned stamp over the yellow fondant to create the illusion of rows of kernels. Alternatively, score a cross-hatch pattern deeply with a knife tool. -
Refine the shape:
Gently squeeze the top to taper it slightly. Texture the bottom flat circular area with a beige clay disc to look like the cut stalk. -
Give it personality:
Clear a tiny smooth patch in the kernel texture for the face, then add the black clay eyes and a tiny smile. -
Make the dish:
Roll out beige clay into a slab and cut a long oval shape. Curve the edges upward to create a shallow rim. -
Speckle the dish:
Flick diluted brown or black paint lightly over the raw clay dish (or mix black pepper into the clay before rolling) to create a speckled ceramic effect. -
Bake everything:
Place your three veggie friends into the dish (or bake separately if you want them movable) and bake according to your clay package’s specific temperature and time instructions.
Make It a Magnet
Skip the dish and flatten the backs of your veggies slightly before baking. Glue strong neodymium magnets on the back once cool for seasonal fridge decor.
Now you have a charming little harvest family ready to sit on your desk or windowsill for the season
Ghosts In Leaf Blankets
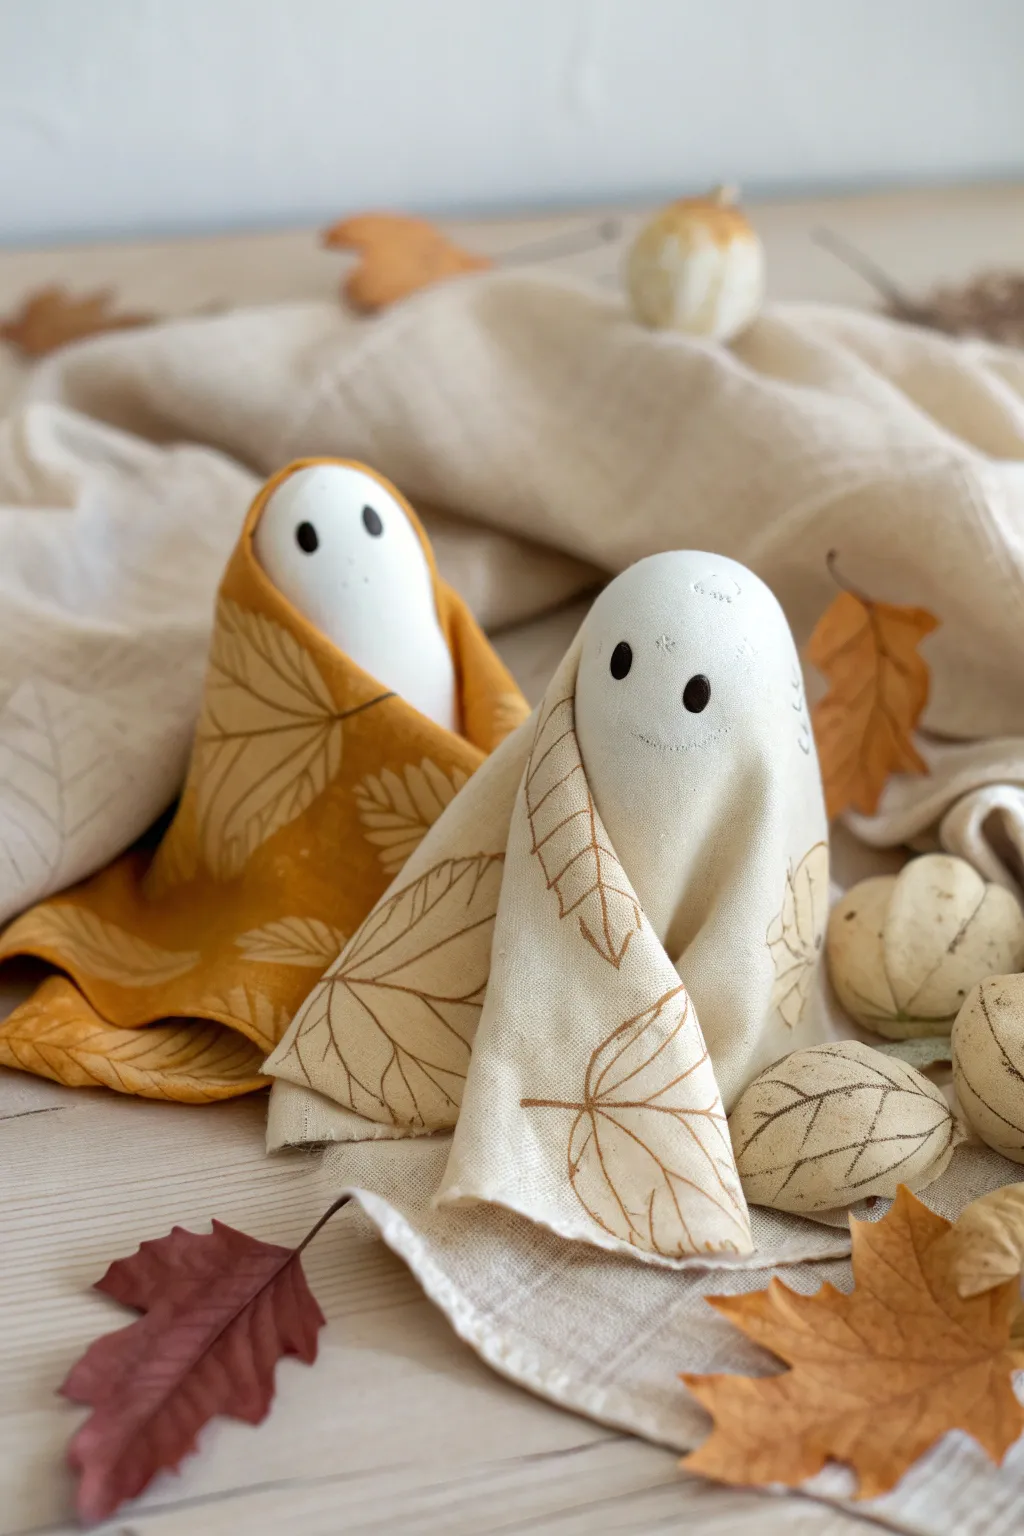
These adorable spectral friends combine the charm of simple clay modeling with elegant botanical textures. Draped in clay “blankets” stamped with leaf patterns, they make for sophisticated and sweet autumn décor.
Step-by-Step Tutorial
Materials
- White or light beige air-dry clay (or polymer clay)
- Mustard yellow air-dry clay (or acrylic paint to color white clay)
- Small rolling pin
- Real or artificial leaves with prominent veins
- Small knife or clay cutting tool
- Ball stylus tool or a toothpick
- Black acrylic paint
- Fine tip paintbrush
- Aluminum foil
- Matte varnish or sealant
Step 1: Sculpting the Ghost Base
-
Prepare the core:
Crumple a small piece of aluminum foil into a cone-shaped egg. This saves clay and keeps the ghost lightweight. -
Cover the form:
Roll out a portion of white clay to about 1/4 inch thickness. Wrap it completely around your foil core, smoothing out any seams with a little water or baby oil. -
Shape the body:
Gently roll the clay-covered form between your palms to create a smooth, elongated egg shape. Flatten the bottom slightly so the ghost stands upright without wobbling. -
Smooth the surface:
Use a damp finger to buf away any fingerprints. Let this base shape dry for about 30-60 minutes so it firms up enough to handle without denting.
Cracking Clay?
If the thin cloak cracks while draping, dip your finger in water (or clay softener for polymer) and smooth the fissure immediately before it dries deeper.
Step 2: Creating the Leaf Blanket
-
Preparing the blanket clay:
Take a separate ball of clay. For the yellow blanket, mix yellow pigment into white clay or use pre-colored clay. Keep it pliable. -
Rolling it out:
Roll this clay out very thinly, aiming for about 1/8 inch thickness or even slightly less. You want it to drape like fabric. -
Adding texture:
Place your leaves vein-side down onto the rolled-out clay. Roll over them firmly with the rolling pin to imprint the vein pattern deeply into the surface. -
Revealing the print:
Carefully peel the leaves away to reveal the botanical impressions. If the edges of the clay look rough, use your knife to trim them into a soft, organic triangular or rounded blanket shape. -
Highlighting the veins (Optional):
I prefer to lightly brush a darker shade of powder or watered-down brown paint into the veins now for contrast, but you can also do this after the clay dries.
Make a Scene
Make tiny accompanying pumpkins using leftover beige clay. Use a tool to press vertical ridges and paint the stems brown for a full autumn display.
Step 3: Assembly and Details
-
Draping the blanket:
Drape the textured clay sheet over the ghost’s head. Arrange the folds gently so it looks like a hooded cloak or a cozy blanket wrapping around them. -
Creating the face:
The face needs to peek out. Ensure the front of the drape is open enough to overlap the white body without covering the future eye area. -
Making the eyes:
Using a ball stylus or the back of a paintbrush, make two small indentations where the eyes will go. This adds depth. -
Painting the eyes:
Dip a fine paintbrush or dotting tool into black acrylic paint. Carefully fill the indentations to create simple, oval eyes. -
Adding the mouth:
Using a needle tool or toothpick, gently scratch a very faint, tiny curved smile or a small stitched mouth line just below the eyes. -
Drying:
Allow the entire sculpture to dry completely. For air-dry clay, this usually takes 24-48 hours depending on humidity. -
Final touches:
Once fully dry, you can dry-brush a little brown paint on the edges of the ‘blanket’ to give it a vintage, autumnal look. -
Sealing:
Apply a coat of matte varnish to protect your ghost. Avoid glossy finishes, as the matte look suits the natural, earthy vibe better.
Now you have a charming little duo ready to haunt your mantelpiece with cozy autumn vibes
Pumpkin Earrings With Cute Faces
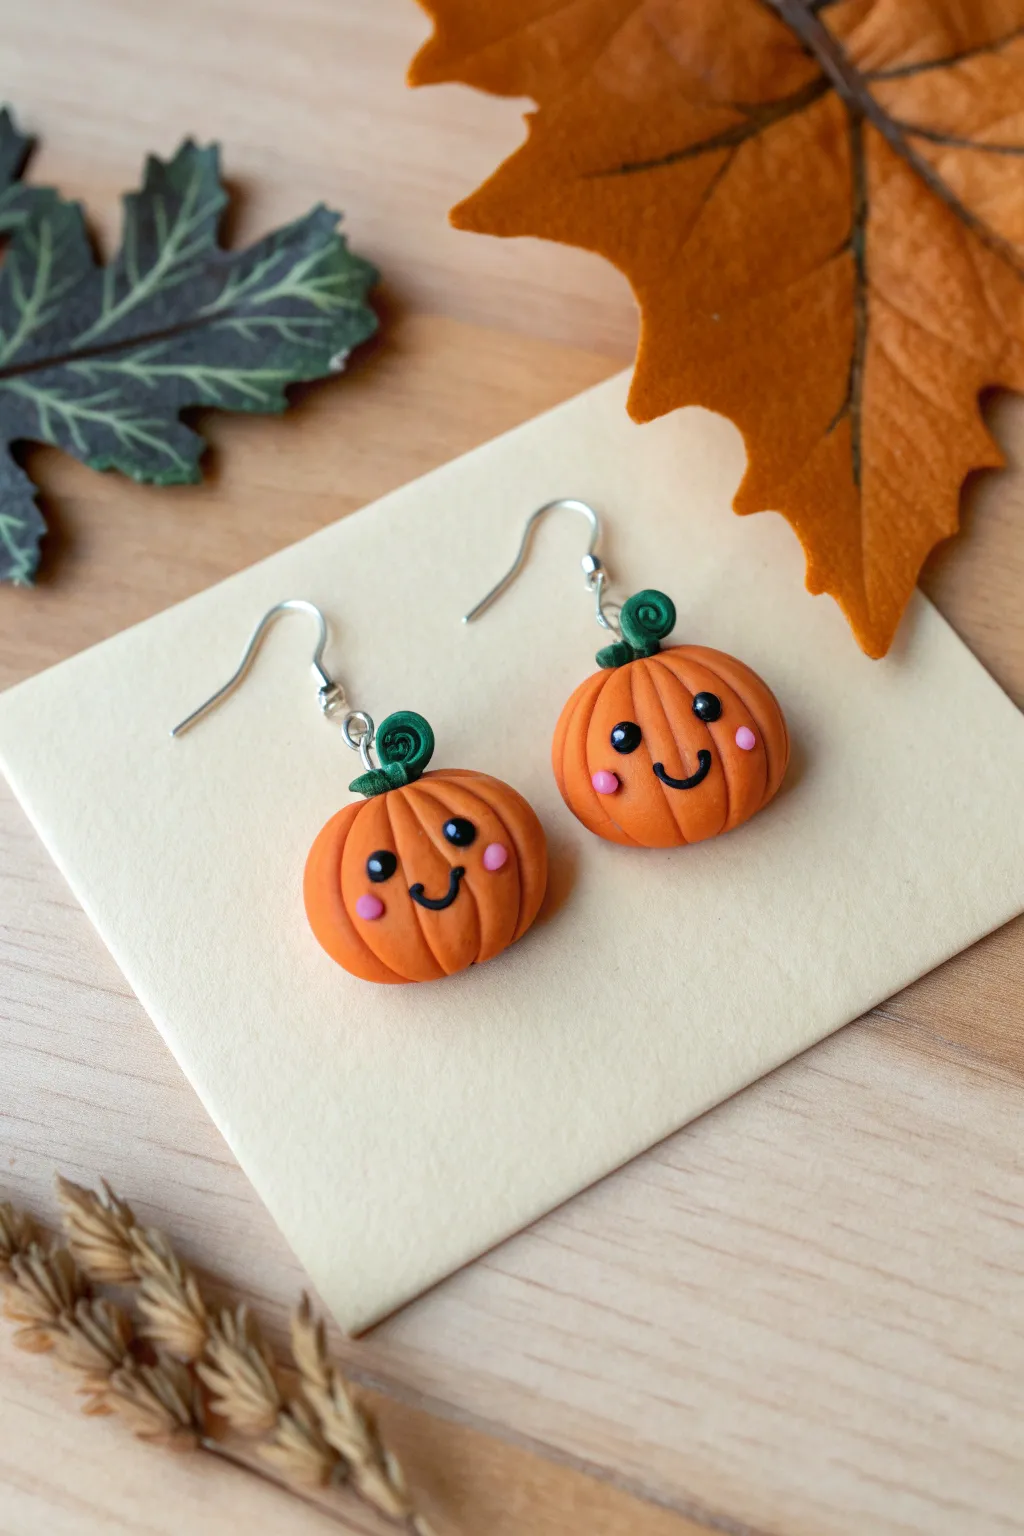
These adorable little pumpkin earrings are sure to bring a smile to anyone’s face with their cheerful expressions and coiled green stems. Sculpted from polymer clay, they capture the cozy essence of autumn in a wearable, miniature size.
Step-by-Step Guide
Materials
- Orange polymer clay
- Green polymer clay
- Black polymer clay (or black acrylic paint)
- Pink polymer clay (or pink acrylic paint)
- Ball stylus tool
- Go little round cutter or straw (optional)
- Needle tool or toothpick
- Eye pins (silver)
- Earring hooks (silver)
- Jewelry pliers (round nose and wire cutters)
- Gloss glaze (UV resin or polyurethane)
- Oven for baking
Step 1: Shaping the Pumpkin Base
-
Condition the clay:
Start by taking a small amount of orange polymer clay and kneading it in your hands until it becomes soft, pliable, and free of cracks. -
Create matching spheres:
Divide the orange clay into two equal portions. Roll each piece between your palms to form a smooth, seamless ball about the size of a blueberry (or slightly larger depending on preference). -
Flatten slightly:
Place the balls on your work surface and press down very gently with your thumb to create a slightly squat, pumpkin-like shape rather than a perfect sphere. -
Add texture lines:
Use a needle tool or the side of a toothpick to press vertical indentations around the side of each pumpkin ball. Start from the center top hole and drag down to the bottom to create the classic ribbed pumpkin texture. -
Create a stem socket:
Use a small ball tool or the tip of your needle tool to make a small indentation at the very top center of each pumpkin where the stem will eventually sit.
Clean Lines Tip
Before rolling light clay (like the pink cheeks) after handling dark clay (black eyes), wipe your hands with a baby wipe or alcohol to prevent color transfer.
Step 2: Sculpting the Stem
-
Roll the green clay:
Take a tiny amount of green clay and roll it into a very thin, snake-like cylinder. You want this to be quite delicate. -
Coil the stem:
Starting at one end, curl the green strand into a tight, spiral snail-shell shape. Leave a tiny bit of the straight end pointing down to act as an anchor. -
Attach the stem:
Press the straight anchor end of your green coil into the depression you made on top of the pumpkin. Gently blend the clay or press firmly to ensure it adheres. -
Repeat for the second earring:
Make a second coiled stem and attach it to the other pumpkin, trying to make them symmetrical. -
Insert eye pins:
Trim your metal eye pins to an appropriate length. Push the straight end down through the center of the green stem and into the pumpkin body so only the loop is visible at the top.
Glittery Level Up
Mix a tiny amount of gold mica powder or fine glitter into the orange clay before sculpting to give your pumpkins a magical, shimmering autumn glow.
Step 3: Adding the Cute Expressions
-
Make the eyes:
Roll two minuscule balls of black clay for the eyes. Press them onto the upper front of the pumpkin, spacing them comfortably apart. -
Shape the mouth:
Roll an extremely thin thread of black clay. Cut a tiny U-shaped segment and press it gently onto the pumpkin between and slightly below the eyes for a smile. -
Add rosy cheeks:
Roll two tiny balls of pink clay. Flatten them slightly and press them onto the pumpkin’s surface, just outside the corners of the smile. -
Recheck the shape:
Handling the clay might have distorted the pumpkin ribs. Gently go over your vertical lines again with the needle tool if they need defining.
Step 4: Baking and Assembly
-
Bake the pieces:
Place your pumpkins on a ceramic tile or baking sheet. Bake according to your brand of polymer clay instructions (usually around 275°F/135°C for 15-30 minutes). -
Cool down:
Allow the pieces to cool completely before determining if the eye pins are secure. If any are loose, secure them with a drop of superglue. -
Add shine (optional):
For a glossy finish like the photo, brush a thin layer of polyurethane glaze or UV resin over the pumpkins (avoiding the metal loop) and cure or dry. -
Attach hooks:
Using your jewelry pliers, open the loop on your earring hooks. Slide the pumpkin eye pin loop onto the hook and gently close the ring.
Now you have a sweet pair of harvested pumpkins ready to wear or gift.
Autumn Garland Clay Tags
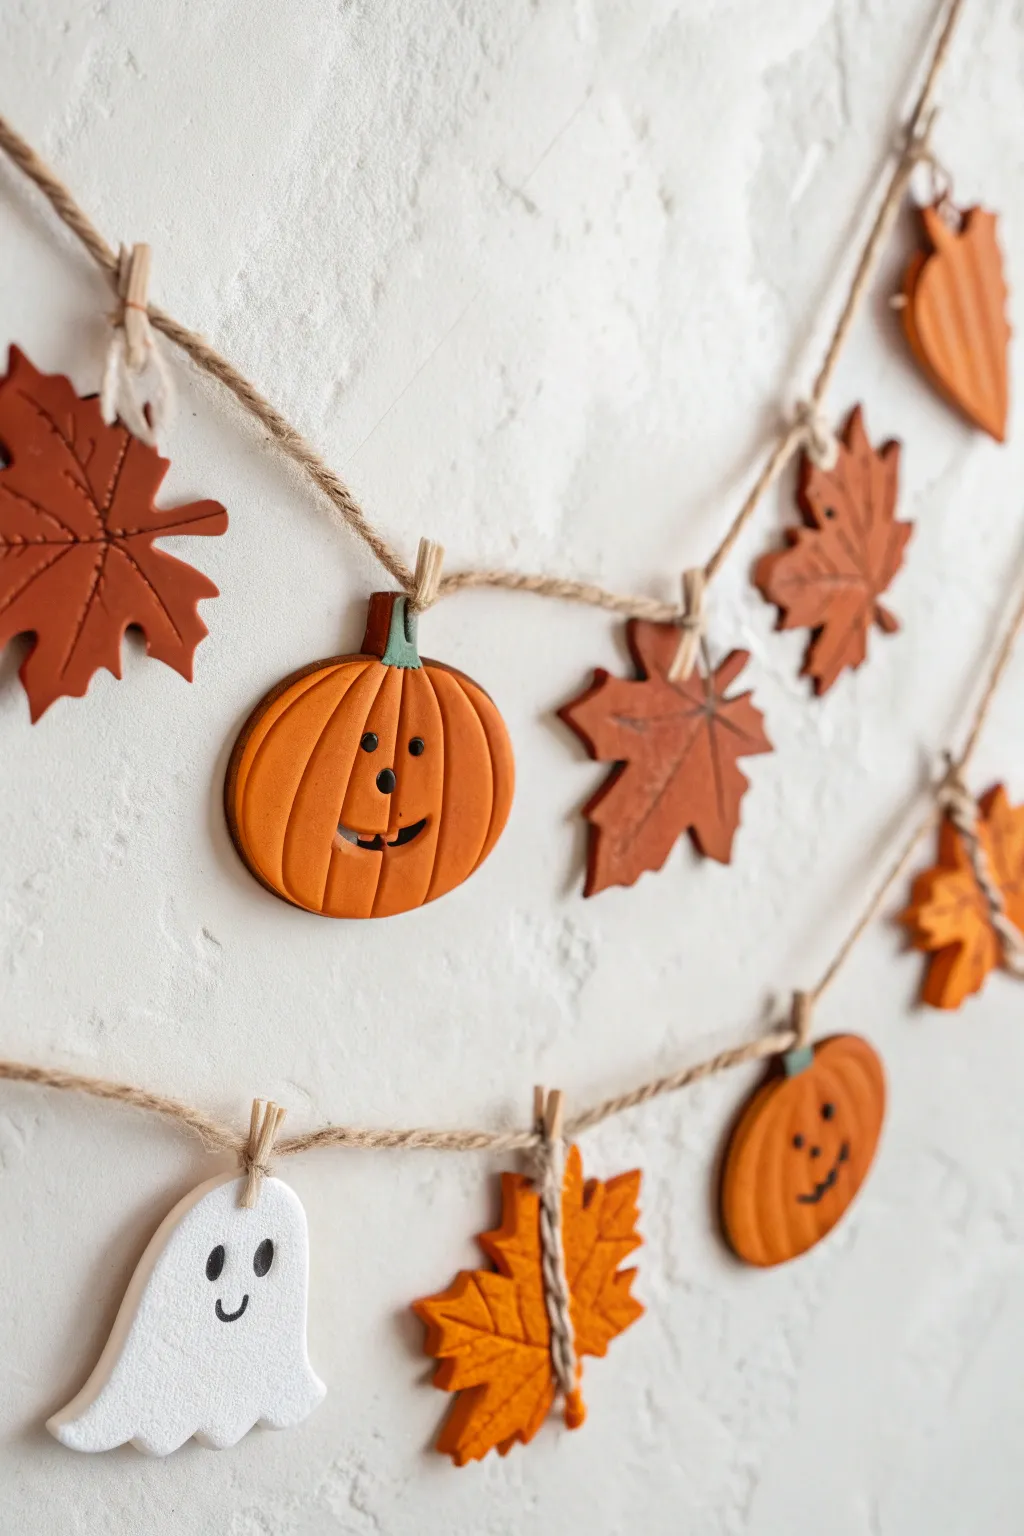
Bring the cozy charm of fall indoors with this delightful handmade garland featuring playful pumpkins, rustic leaves, and a friendly little ghost. Using simple clay techniques and natural twine, you’ll create a festive decoration that adds a warm, seasonal touch to any wall or mantle.
Detailed Instructions
Materials
- Polymer clay or air-dry clay (terracotta, orange, yellow-orange, and white)
- Acrylic paints (black, green, orange shades if using white clay)
- Rolling pin
- Leaf and pumpkin cookie cutters (optional, but helpful)
- Modeling tools (needle tool, ball stylus)
- Fine detail paintbrush
- Jute twine
- Mini wooden clothespins
- Baking sheet and parchment paper (if using polymer clay)
- Clear matte or satin varnish (optional)
Step 1: Shaping the Clay Elements
-
Condition the Clay:
Start by kneading your clay until it is soft and pliable. If you are mixing custom colors, blend them now to achieve that perfect autumnal terracotta or golden ochre shade. -
Roll it Out:
Roll your clay out onto a smooth surface to an even thickness of about 1/4 inch (6mm). This thickness ensures the tags are sturdy enough to hang without being too heavy. -
Cut the Shapes:
Use cookie cutters or a sharp craft knife to cut out your basic shapes: pumpkins, maple leaves, and ghosts. If freehand cutting, sketching a template on paper first can help keep sizes consistent. -
Smooth the Edges:
Dip your finger in a little water (for air-dry clay) or use baby oil (for polymer clay) to gently smooth down any rough edges left by the cutting tool.
Clay Cracking?
If using air-dry clay, cracks can happen during drying. fill them with a slurry (wet clay paste), smooth it over with a damp finger, and let it dry again before painting.
Step 2: Adding Texture and Detail
-
Detail the Leaves:
With a needle tool or a dull knife, gently press veins into the leaf shapes. Start with a central line and branch out diagonally to mimic a real maple leaf texture. -
Create Pumpkin Ribs:
For the pumpkins, use a modeling tool to press vertical curved lines from the top to the bottom, creating the segmented, ribbed look typical of a pumpkin. -
Add Stems:
Form tiny rectangles or trapezoids of clay (green or brown) and press them firmly onto the tops of your pumpkins. You can score the back of the join to ensure it sticks well. -
Shape the Ghost:
Ensure the bottom edge of your white ghost shape has a wavy, flowing line to make it look like it’s floating. Keep the surface smooth for a clean finish.
Level Up: Scented Clay
Knead a generous sprinkle of cinnamon, nutmeg, or pumpkin spice directly into the clay before rolling. Your garland will smell like autumn as it hangs on the wall.
Step 3: Baking and Painting
-
Dry or Bake:
Follow the manufacturer’s instructions for your specific clay. If baking polymer clay, place the pieces on parchment paper to prevent shiny spots. Let air-dry clay sit for 24-48 hours until fully hard. -
Paint Pumpkin Stems:
Once cool and dry, use a fine brush to paint the pumpkin stems a dusty green if you didn’t use colored clay. A slightly washed-out green adds a nice rustic feel. -
Paint the Faces:
Dip a fine-point brush or use a styling tool dipped in black acrylic paint. Carefully add two small dots for eyes and a simple curved smile. For the pumpkins, a little toothy grin adds extra character. -
Enhance Texture:
I like to mix a tiny bit of water with brown paint and run it into the leaf veins, then wipe the surface clean. This ‘antiquing’ technique highlights the texture wonderfully. -
Seal (Optional):
Apply a coat of matte varnish to protect your paint work, especially if you plan to reuse this garland year after year.
Step 4: Assembling the Garland
-
Measure the Twine:
Cut a length of jute twine as long as you need for your space, leaving generous loops at both ends for hanging hooks. -
Layout Your Design:
Arrange your finished clay pieces on a table in the order you want them. Alternating between leaves, pumpkins, and the ghost creates a balanced rhythm. -
Attach Clips:
Use the mini wooden clothespins to clip the stem or top edge of each clay figure directly onto the twine. Space them out evenly, leaving about 3-4 inches between each piece. -
Final Adjustments:
Hang the garland up and step back. Slide the clothespins along the twine to adjust spacing if items look too crowded or too sparse.
Enjoy the warmth this adorable handmade decoration brings to your home this season
Stackable Pumpkin Trinket Box
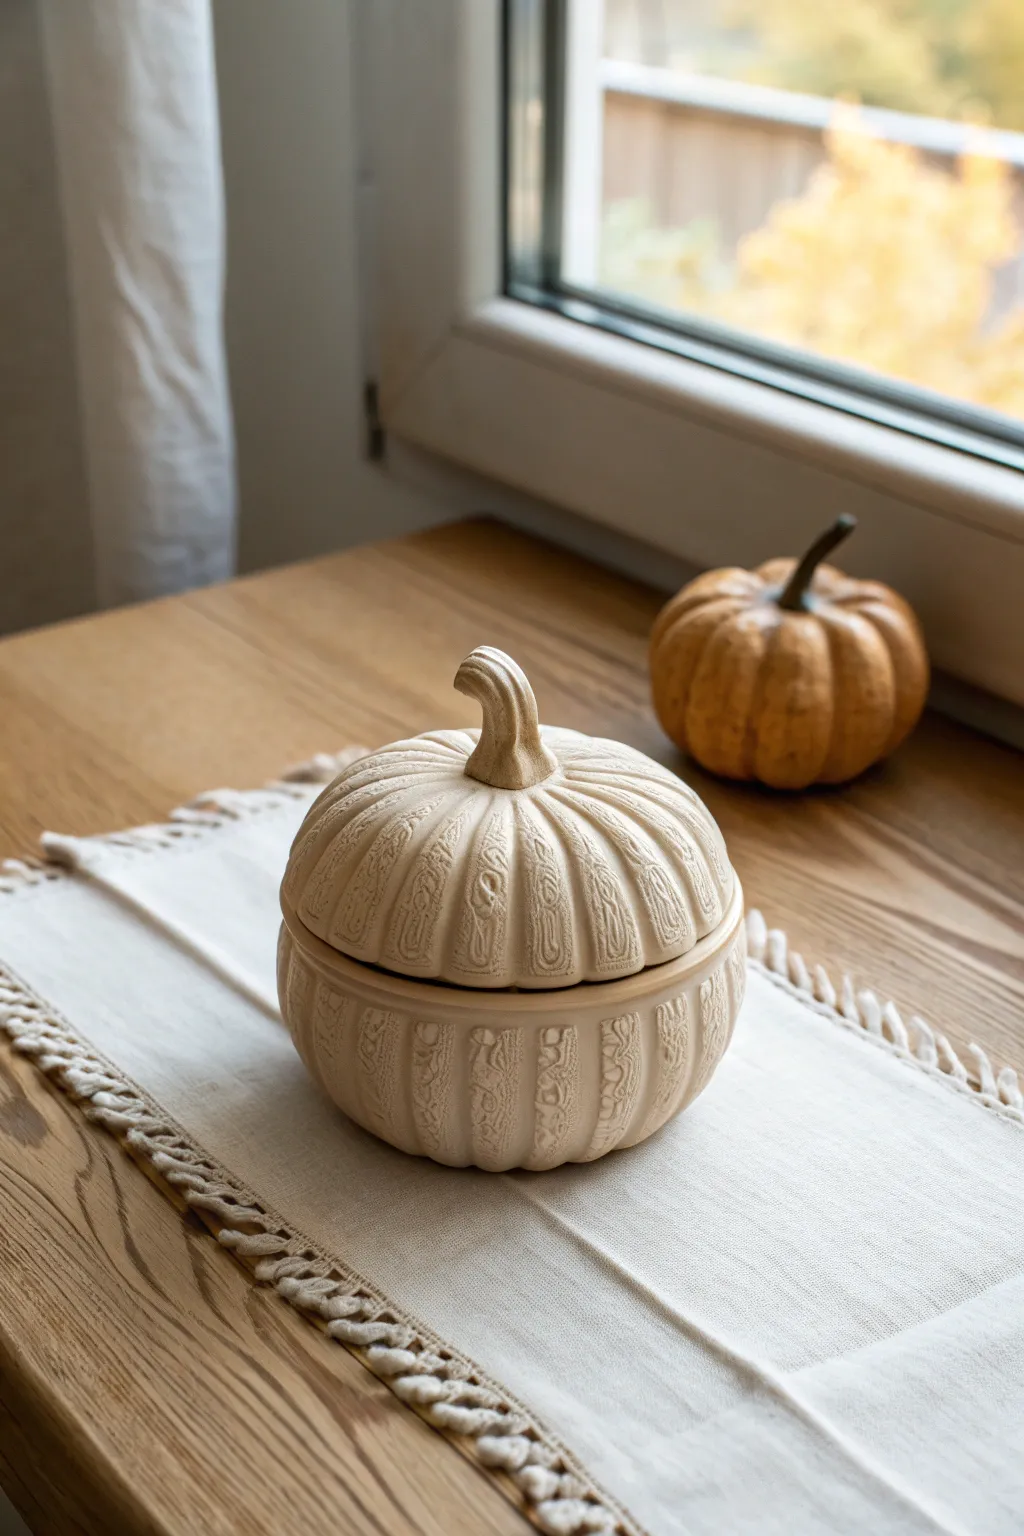
Embrace the cozy vibes of autumn with this darling two-piece pumpkin container that features a delicate, sweater-like texture. This stackable trinket box is perfect for hiding small treasures or simply adding a touch of rustic warmth to your seasonal decor.
Step-by-Step Tutorial
Materials
- Air-dry clay (white or cream)
- Spherical object for molding (foam ball or plastic ornament)
- Plastic wrap
- Rolling pin
- Clay sculpting tools (knife, smoothing tool)
- Old cable-knit sweater or textured fabric scrap
- Small bowl of water
- Sandpaper (fine grit)
- Sponge
Step 1: Creating the Base and Texture
-
Prepare the workspace:
Begin by covering your mold form (a foam ball or plastic ornament work well) with plastic wrap to prevent sticking. -
Roll out the clay:
Roll your air-dry clay into a slab about 1/4 inch thick. Aim for an even consistency to ensure the walls of your pumpkin aren’t lopsided. -
Add the texture:
This is the magic step. Lay your piece of textured fabric or cable-knit scrap over the clay slab and press down firmly with your rolling pin to imprint the pattern deeply into the surface. -
Mold the bottom half:
Cut a large circle from the textured slab. drape it gently over the bottom half of your mold form, texture side out. Press it lightly to shape it to the curve without smoothing out your beautiful knit pattern. -
Create the pumpkin ridges:
Using the side of a sculpting tool or a dull knife, gently press vertical indentations from the base to the rim to mimic the natural segments of a pumpkin. Do this carefully so you don’t ruin the overall spherical shape. -
Form the rim:
Trim the excess clay at the halfway point of your sphere to create a clean, flat rim. Smooth this edge with a little water on your finger so the lid will sit flush later. -
First drying phase:
Allow this bottom section to firm up for a few hours until it can hold its shape, then gently remove it from the mold form to dry completely.
Clean Impressions
Dust your textured fabric lightly with cornstarch before pressing it into the clay. This prevents the clay from sticking to the fibers and keeps your pattern crisp.
Step 2: Constructing the Lid and Stem
-
Mold the top half:
Repeat the rolling and texturing process for the lid. Drape this new slab over the top half of your mold form. -
Add matching ridges:
Aligning visually with your bottom piece, press in the same vertical pumpkin ridges so the lines will flow continuously when the box is closed. -
Create the inner lip:
Roll a small snake of clay and attach it to the underside of the lid’s rim using a bit of water and scoring. This creates a flange that keeps the lid from sliding off the base. -
Shape the stem:
Roll a thick coil of clay for the stem. Twist it slightly to give it an organic, vine-like look. Make the base of the stem slightly wider than the top. -
Attach the stem:
Score the top center of the lid and the bottom of the stem. Apply a dab of water (creation clay slip) and press the stem firmly in place. Blend the clay at the seam using a small tool so it looks seamless. -
Add stem details:
Use a needle tool or small knife to drag vertical lines up the stem, mimicking the fibrous texture of a real pumpkin stem. -
Final drying:
Let both pieces dry fully for 24-48 hours. I like to flip pieces occasionally to ensure the bottoms dry evenly.
Warping Woes
If the lid doesn’t fit after drying, tape fine sandpaper to a flat table. Rub the rim of the lid in a circular motion against it until it’s perfectly level.
Step 3: Finishing Touches
-
Sand for smooth fit:
Once bone dry, take your fine-grit sandpaper and gently sand the rim of the base and the lid to ensure they sit together perfectly flat. -
Refine the surface:
Lightly sand any rough spots on the untextured areas, being very careful not to sand away the cable-knit impression. -
Smoothing:
Wipe the entire piece down with a slightly damp sponge to remove clay dust and give the surface a uniform, matte finish resembling bisque ceramic.
Place this charming vessel on your coffee table or windowsill for an instant autumn update
Little Woodland Scene Tray
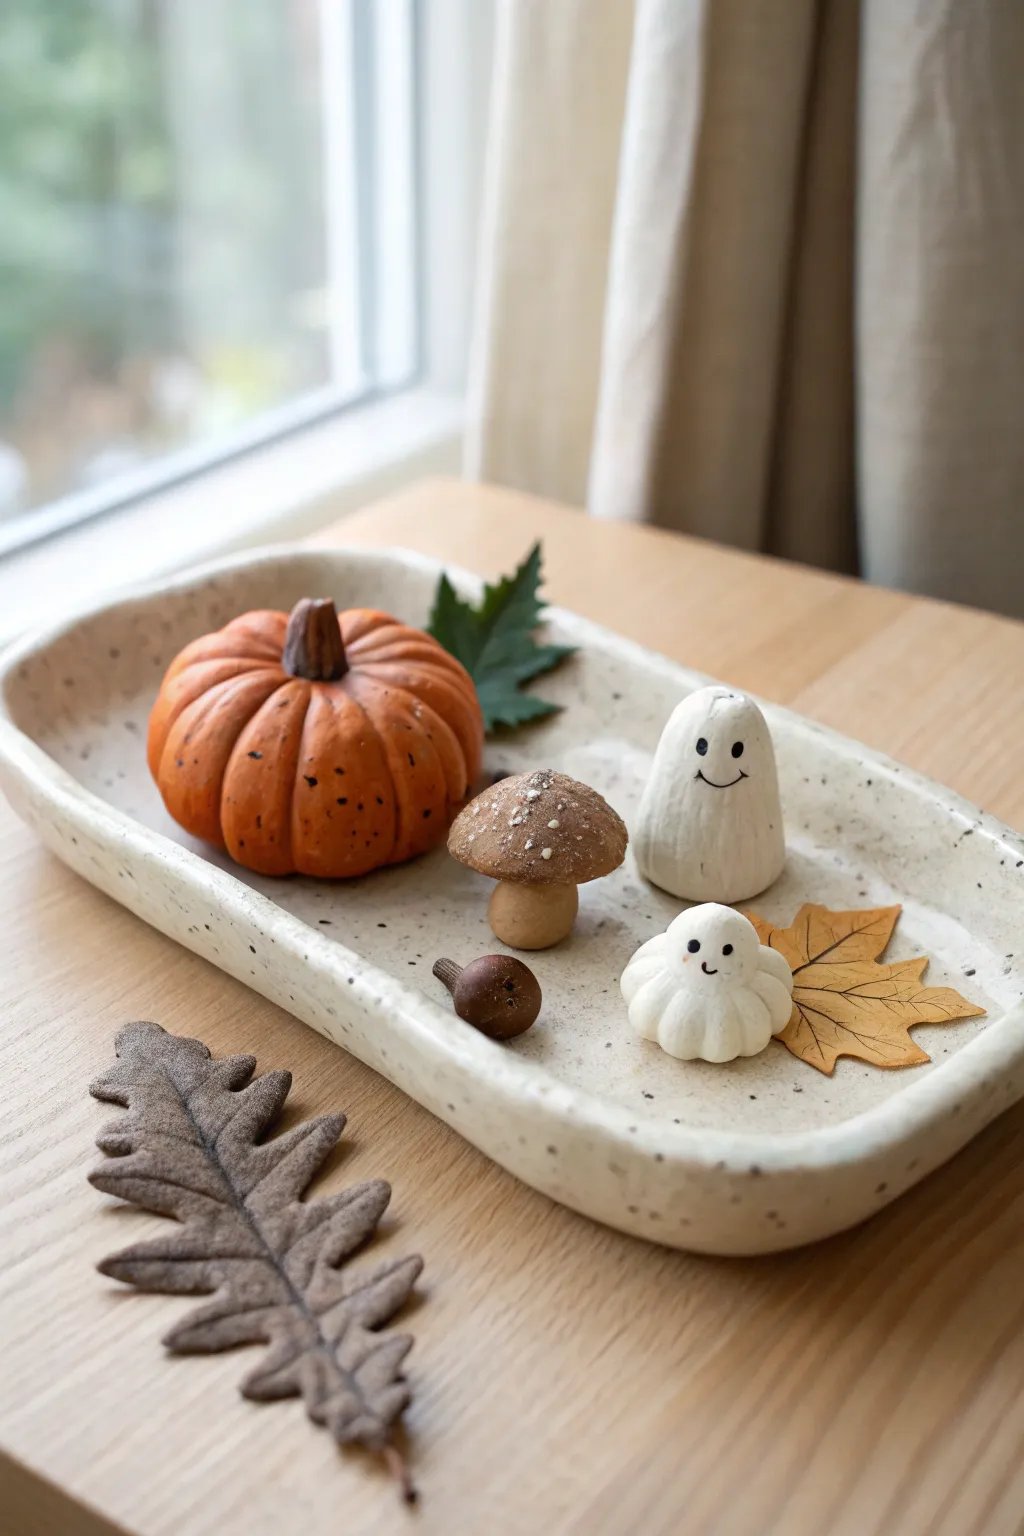
This adorable project combines spooky and sweet with a speckled clay tray holding a cheerful pumpkin, friendly ghosts, and woodland mushrooms. It’s a perfect introductory project for polymer or air-dry clay that results in a charming autumn display piece.
Step-by-Step
Materials
- White or beige polymer clay (or air-dry clay)
- Orange, brown, and black polymer clay (or acrylic paints)
- Speckled clay (optional, or mix black pepper/sand into white clay)
- Clay sculpting tools (needle tool, ball tool)
- Acrylic paints (if using white clay for everything)
- Matte varnish or sealant
- Rolling pin
- Fine grit sandpaper
Step 1: Creating the Speckled Tray
-
Prepare the speckled base:
Start with a large ball of cream or beige clay. To get that lovely speckled ceramic look, knead in a small amount of black pepper, craft sand, or pre-made ‘granite’ effect clay until evenly distributed. -
Roll out the slab:
Roll the clay out into a thick, oblong slab about 1/4 inch thick. Aim for an organic shape rather than a perfect rectangle to keep the rustic woodland vibe. -
Form the rim:
Gently lift the edges of your clay slab and pinch them upwards to create a raised rim. Smooth the inside curve with your finger so it transitions seamlessly from the base to the wall. -
Smooth the edges:
Use a little water (for air-dry clay) or baby oil (for polymer) on your finger to run along the rim, softening any sharp angles or cracks for a hand-thrown pottery appearance.
Uneven Tray Fix
If your tray warps while baking, place a heavy book on it immediately after taking it out of the oven (while still hot/warm) to flatten as it cools.
Step 2: Sculpting the Pumpkin
-
Shape the pumpkin body:
Roll a ball of orange clay about the size of a golf ball. If you are painting later, use scrap clay or white clay as your base. -
Add the ribs:
Use a needle tool or the side of a toothpick to press vertical indentations from the top center to the bottom center, dividing the ball into pumpkins ribs. Soften these lines with your finger so they look puffy, not sliced. -
Add texture:
Lightly tap the surface with a toothbrush or stiff brush to give the pumpkin skin a realistic, slightly pitted texture rather than smooth plastic. -
Attach the stem:
Form a small cone of dark brown clay. Press it firmly onto the top center of the pumpkin, blending the clay slightly at the base for a secure hold.
Step 3: Crafting the Woodland Friends
-
Form the tall ghost:
Roll a cylinder of white clay and round off the top. Flatten the bottom so it stands securely. It should be slightly shorter than your pumpkin. -
Sculpt the small ghost:
Make a smaller, squat ball of white clay. Use your needle tool to press vertical indentations around the sides, similar to the pumpkin, giving it a ‘gourd-ghost’ shape. -
Make the mushroom:
Create a thick stalk from beige clay. For the cap, shape a dome of brown clay and texture the top by pressing it gently against sandpaper or stippling with a brush. -
Create the acorn:
Roll a tiny oval of dark brown clay. Cap it with a slightly textured, lighter brown disc to represent the acorn top, adding a tiny stem.
Make It a Jewelry Dish
Don’t glue the ghosts or pumpkins down! Leave them loose so you can rearrange the scene or remove them to use the tray for rings and keys.
Step 4: Leaves & Finishing Details
-
Cut the clay leaves:
Roll out a thin sheet of brown or dark beige clay. Use a craft knife to cut out jagged oak leaf shapes and a classic maple leaf shape. -
Vein the leaves:
Use your needle tool to gently score a central vein and branching side veins into each leaf. Lift the edges slightly to give them a dried, curled look. -
Baking or drying:
Place all your pieces on the tray (or bake separately if you prefer painting them first) and cure according to your clay package instructions. -
Painting the details:
Once cured and cooled, use a fine detail brush and black acrylic paint to add two tiny eyes and a smile to both ghosts. I find using the very tip of a toothpick helps keep the eyes perfectly round. -
Adding speckles:
Dilute some brown or black acrylic paint with water. Dip a stiff brush or toothbrush in it and flick the bristles to spatter tiny speckles over the pumpkin, mushroom, and tray for a cohesive finish. -
Varnishing:
Finish everything with a coat of matte varnish to protect the paint and seal the clay, giving it a smooth, ceramic-like feel.
Arrange your little clay figures on the tray and enjoy this cozy slice of autumn on your desk
Marbled Fall Colors Swirl Charms
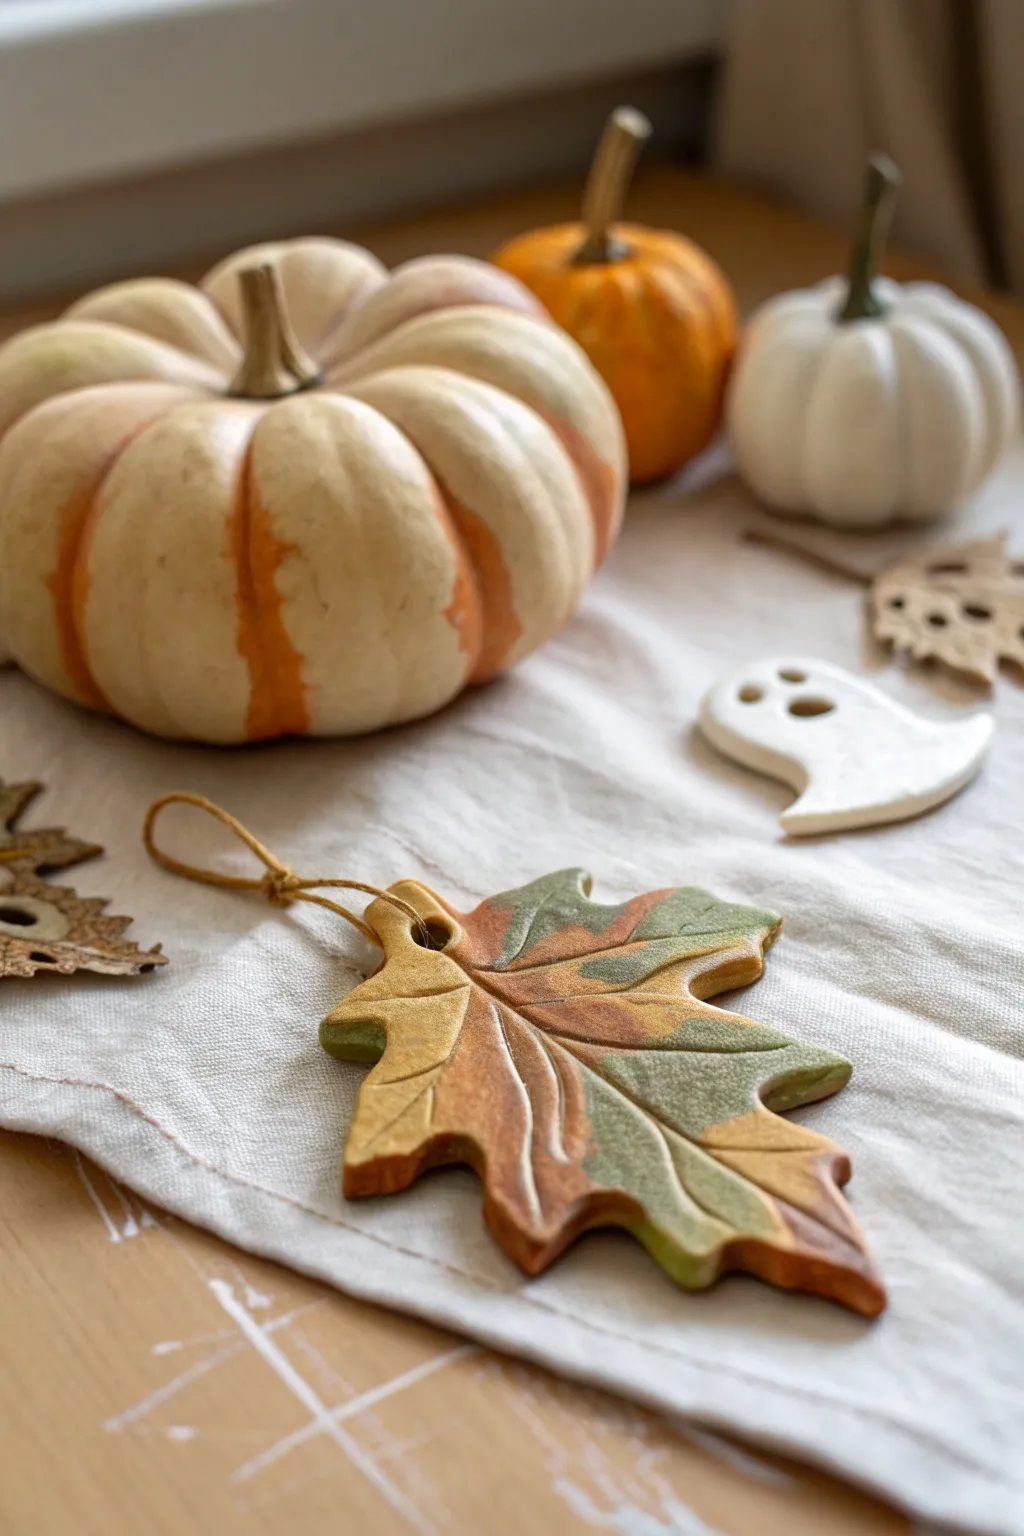
Capture the shifting hues of autumn with these sophisticated marbled clay charms. By blending earthy tones of ochre, sage, and rust, you can create a realistic leaf effect that looks lovely hanging from a seasonal branch or gift.
Step-by-Step Guide
Materials
- Polymer clay (Ochre/Mustard Yellow)
- Polymer clay (Sage/Olive Green)
- Polymer clay (Rust/Terracotta)
- White or Translucent clay (optional for softening colors)
- Leaf-shaped cookie cutters
- Rolling pin or pasta machine
- Plastic wrap (cling film)
- Modeling tool or needle tool
- Jute twine or leather cord
- Baking sheet and parchment paper
- Oven (for curing)
Step 1: Preparing the Marbled Slab
-
Condition the clay:
Begin by thoroughly kneading each color of clay—ochre, sage, and rust—until they are soft and pliable. This prevents cracking later on. -
Form snakes:
Roll each color into long snakes or ropes, about a 1/4 inch thick. You’ll want roughly equal amounts of each color, though varying the ratios can create interesting dominant tones. -
Twist and combine:
Gather your snakes together into a bundle. Twist them tightly around each other to form one large, multi-colored rope. -
Fold and roll:
Fold the twisted rope in half and roll it out again. Repeat this twisting, folding, and rolling process 3–4 times. Be careful not to over-mix; you want distinct swirls, not a muddy brown. -
Create the slab:
Once you have a nice marbled pattern, compress the clay into a ball and begin rolling it out flat with your rolling pin. Aim for a thickness of about 1/4 inch or roughly 5-6mm.
Pillowed Edges
Using plastic wrap (saran wrap) between the cutter and clay is the secret to that soft, high-end ceramic look shown in the photo.
Step 2: Cutting and Veining
-
Position the cutter:
Look at your clay slab and find the areas with the most beautiful color swirls. Place your leaf cutter over these spots. -
Soften the edges:
I like to place a piece of plastic wrap over the clay before pressing the cutter down. This creates a lovely pillowed, rounded edge rather than a harsh, straight cut. -
Cut the shape:
Press firmly through the plastic wrap and clay. Remove the cutter and the excess clay, then gently peel off the plastic. -
Add the hanging hole:
Use a straw or a small round cutter to punch a hole near the stem of the leaf for the twine. -
Score the center vein:
Using a needle tool or a dull knife, gently draw a curved line down the center of the leaf, starting from the stem. -
Add side veins:
Draw branching veins extending from the center line out toward the leaf points. Press deeply enough to see the texture but not so hard that you cut through. -
Texture the surface (optional):
For extra realism, you can lightly tap the surface with an old toothbrush or sandpaper to mimic organic leaf texture.
Step 3: Baking and Finishing
-
Prepare for baking:
Place your clay leaves onto a baking sheet lined with parchment paper. Ensure they are flat so they cure evenly. -
Bake the clay:
Bake according to your specific clay manufacturer’s instructions (usually around 275°F or 130°C for 15-30 minutes). -
Cool completely:
Let the leaves cool completely on the baking sheet to harden fully before handling. -
Sand edges (if needed):
If there are any rough spots on the edges, gently smooth them away with fine-grit sandpaper. -
Attach the twine:
Cut a length of jute twine. Fold it in half, push the loop through the hole, and pull the tails through the loop to secure it with a lark’s head knot.
Muddy Colors?
Stop mixing sooner! If colors are turning brown, you have over-blended. Stop when you still see distinct stripes of each original hue.
Now you have a set of durable, earthy decorations perfect for bringing the outdoors inside this season