I love turning tic tac toe into a little clay treasure you can actually play with on the coffee table. Below are my favorite clay board and game pieces ideas—ranging from super simple grids to themed sets that feel like tiny sculptures.
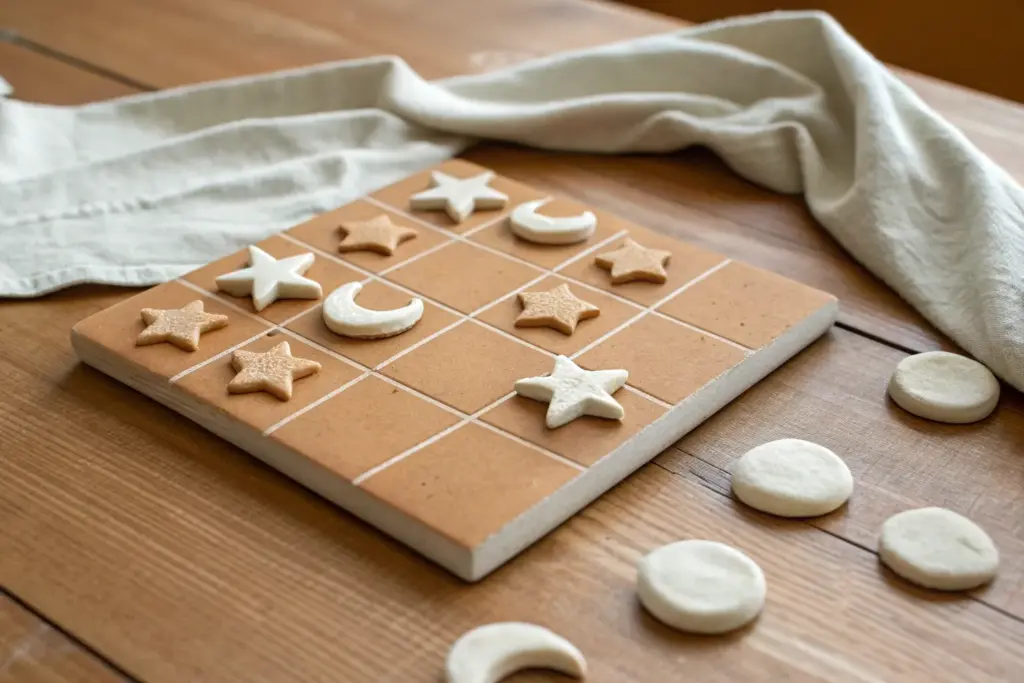
Classic Slab Board With Coil Grid
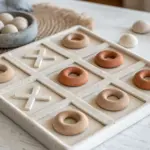
This elegant take on the classic game features a thick, substantial clay slab with a deeply carved grid and tactile playing pieces. The natural, unglazed finish highlights the simple geometry of the design, making it a beautiful coffee table accent even when not in play.
How-To Guide
Materials
- Light-colored clay (stoneware, polymer, or air-dry)
- Red/terracotta colored clay (for O pieces)
- Rolling pin
- Two 1/4-inch wooden depth guides
- Carving tool or linoleum cutter
- Circle cutter (approx 1.5 inch diameter)
- Ruler or straight edge
- Sponge
- Sandpaper (fine grit)
- Wire cutter
- Needle tool
Step 1: Creating the Board Base
-
Prepare the slab:
Begin by wedging your light-colored clay to remove air bubbles. Place it between your depth guides and roll it out into a thick, even slab. Aim for at least 1/4 to 1/2 inch thickness to give the board a substantial, stone-like feel. -
Cut the square:
Using a ruler and a needle tool, cut a perfect square from your slab. A 6×6 or 7×7 inch square works well for a standard game, leaving enough room for the pieces. -
Smooth the edges:
Moisten a sponge slightly and run it along the cut edges of the square to soften the sharp corners. You want the board to look refined, not sharp or unfinished. -
Mark the grid:
Lightly measuring with your ruler, mark the clay to divide the square into nine equal sections. Don’t cut deep yet; just make faint guide marks with the needle tool to ensure your spacing is perfectly symmetrical.
Step 2: Carving the Grid and Symbols
-
Carve the dividing lines:
Using a carving tool or a U-shaped loop tool, carefully carve out the channels along your grid marks. I prefer to do two passes—one shallow and one slightly deeper—to get clean, crisp lines without dragging the clay. -
Sketch the symbols:
In the center of each of the nine squares, lightly sketch an ‘X’ or an ‘O’. The board in the image features a mix of pre-carved symbols as a decorative element, creating a permanent game in progress, though you can leave them blank if you prefer a standard playable board. -
Carve the X’s:
For the X shapes, use the straight edge of a carving tool or a knife to remove a wedge of clay for each arm of the X. Keep the depth consistent with your grid lines. -
Carve the O’s:
For the circles, use a small loop tool to carve a shallow ring. Try to keep your hand steady to maintain a perfect circle shape. -
Refine the surface:
Once all carving is done, use a soft brush or your finger to smooth away any clay burrs or crumbs created during the carving process.
Clean Lines Pro-Tip
When carving lines into leather-hard clay, place a piece of plastic wrap over the surface before carving. This softens the edges instantly and prevents crumbled, jagged lines.
Step 3: Making the Playing Pieces
-
Prepare contrasting clay:
Take your terracotta-colored clay and the remaining light clay to create the playable pieces. Roll this clay into a rope or snake, approximately 1/2 inch in diameter. -
Form the O rings:
Wrap the clay rope around a cylindrical object (like a dowel or small rolling pin) to create uniform rings. Slice through the coil to separate individual rings and join the ends together smoothly. -
Make the X pieces:
Alternatively, if you prefer X pieces for the second player, create small X shapes by crossing two short logs of clay and pressing them together at the center. -
Check for scale:
Before they dry, place a few pieces on your board to ensure they fit comfortably inside the grid squares without overlapping the lines.
Level Up: Texture
Instead of a smooth finish, gently press a piece of coarse sandpaper or canvas into the damp clay slab before carving to give the board a realistic limestone or sandstone texture.
Step 4: Finishing Touches
-
Slow drying:
Place the board and pieces on a flat board to dry slowly. Cover them loosely with plastic for the first day to prevent warping, especially at the corners of the slab. -
Sanding:
Once bone dry (or fully cured if using polymer), take fine-grit sandpaper to the edges and top surface. This creates that smooth, matte stone finish shown in the photo. -
Final wipe down:
Remove all sanding dust with a slightly damp sponge. If you are using ceramic clay, the pieces are now ready for bisque firing. If using air dry, apply a matte sealant to protect the surface.
Place your finished board on a coffee table or shelf where the geometric shadows can catch the light

Minimalist Tile Board With Raised Lines
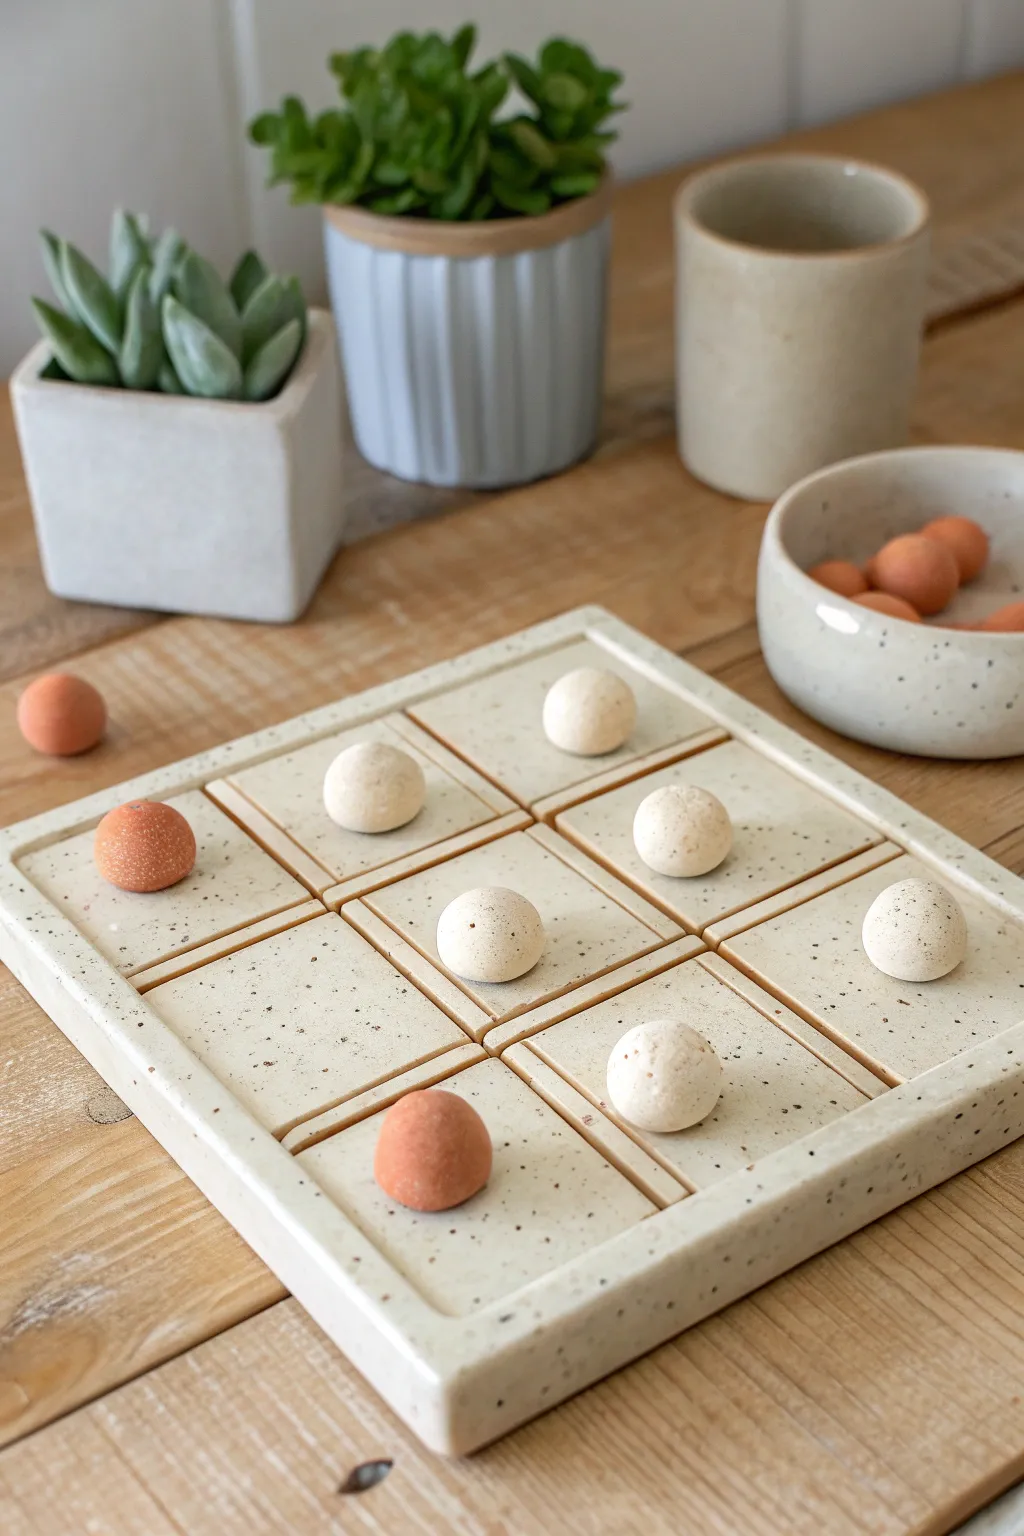
This project creates a sophisticated, minimalist game board that doubles as decor. Using polymer or air-dry clay with a faux-stone finish, you’ll craft a raised-grid board and perfectly round playing pieces for a timeless look.
Step-by-Step Guide
Materials
- White polymer clay (or air-dry clay)
- Terracotta colored polymer clay
- Coarse black pepper or dried coffee grounds (for speckling)
- Rolling pin with innovative depth guides (approx. 1/4 inch)
- Square clay cutter or sharp blade and ruler
- Thin wooden dowel or square rod (for grid lines)
- Sandpaper (fine grit)
- Acrylic roller
- Matte sealant or varnish
Step 1: Preparing the Clay Base
-
Condition the white clay:
Start by kneading a large block of white clay until it is soft and pliable. If you want that beautiful stoneware look shown in the photo, sprinkle in a generous pinch of coarse black pepper or fine dried coffee grounds and knead until the speckles are evenly distributed. -
Roll out the slab:
Place your clay on a smooth work surface. Using depth guides or rolling strips, roll the clay into a flat, even square slab that is approximately 1/4 to 1/2 inch thick. -
Cut the square:
Measure a perfect square, likely around 5×5 or 6×6 inches depending on your preference. Use a sharp blade or a large square cutter to slice the edges cleanly. Remove the excess clay. -
Smooth the edges:
Dip your finger in a little water (for air-dry) or baby oil (for polymer) and gently run it along the cut edges to soften the harsh corners, giving it that molded ceramic feel.
Step 2: Creating the Grid
-
Mark the grid lines:
Using a ruler, lightly mark where your tic-tac-toe grid lines naturally fall to divide the square into nine equal smaller squares. -
Form the raised barriers:
Roll out thin snakes of the same speckled white clay. Alternatively, use a square extruder disc for precision. -
Attach the grid:
Lay the thin clay strips onto your marked lines. I find using a little liquid clay (or slip for air-dry clay) helps them adhere permanently. -
Refine the intersections:
Where the clay strips cross in the middle, gently smudge the clay together so it looks like one continuous grid rather than layered strips. -
Clean connections:
Use a silicone shaping tool or a small brush to seal the seams where the grid strips meet the base board, ensuring there are no gaps.
Pro Tip: Seamless Grid
Instead of adding clay strips, use a square dowel to firmly press the grid indentation into the thick slab, creating a recessed rather than raised grid.
Step 3: Making the Game Pieces
-
Roll the light spheres:
Take your remaining speckled white clay and roll five equal-sized balls. Roll them between your palms in a circular motion to get them as spherical as possible. -
Prepare the contrast clay:
Condition your terracotta-colored clay. If you want a uniform texture, you can add speckling to this color as well, though the example keeps the orange pieces simpler. -
Roll the dark spheres:
Roll five balls from the terracotta clay to the same size as your white pieces. You need five of each color so the first player has enough pieces to win. -
Check for fit:
Before curing, gently place the balls into the grid squares to ensure they fit comfortably without feeling crowded.
Level Up: Stone Texture
Use an old toothbrush to flick diluted brown acrylic paint onto the baked white pieces for realistic, multi-tonal ceramic speckling.
Step 4: Finishing Up
-
Bake or dry:
If using polymer clay, bake according to the package instructions (usually 275°F for 15-30 minutes). If using air-dry clay, let it sit in a cool, dry place for 24-48 hours. -
Sand for imperfections:
Once fully cured and cooled, use fine-grit sandpaper to buff away any fingerprints or sharp edges on the board and the spheres. -
Apply sealant:
To mimic the matte ceramic look in the photo, apply a thin coat of matte varnish. Avoid glossy finishes as they will distract from the natural stone effect. -
Let it cure:
Allow the varnish to dry completely before stacking the pieces or playing your first game.
Now you have a stunning, modern game set to display on your coffee table or gift to a friend


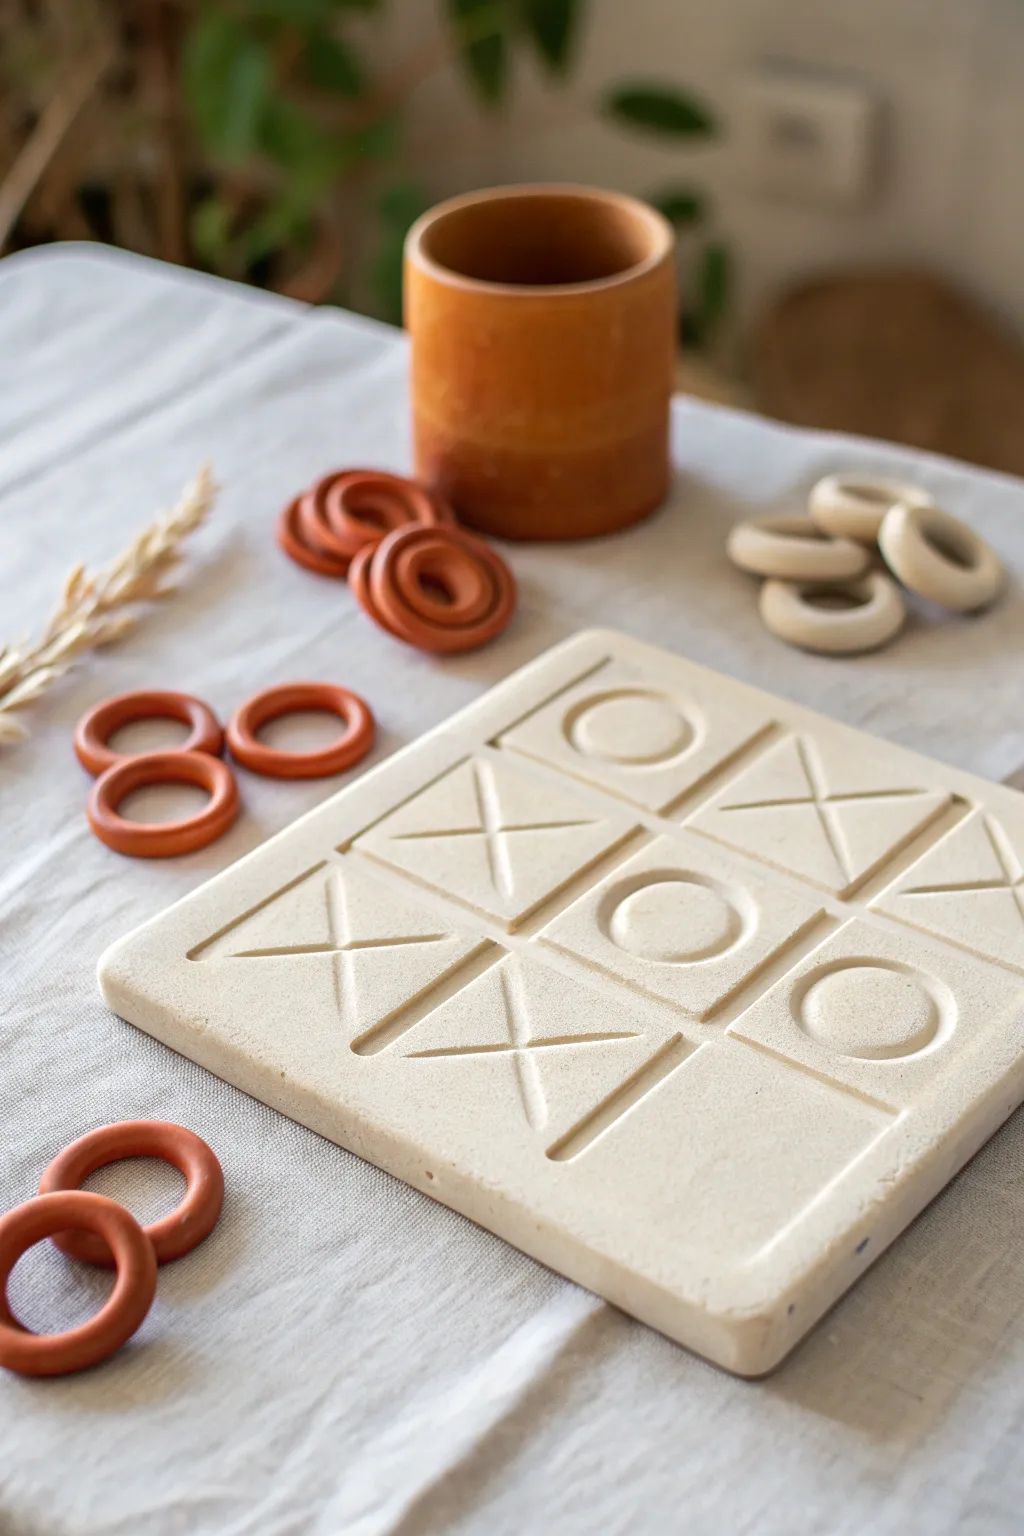
Round Dish Board With Rimmed Grid

This elegant take on the classic game combines a functional rimmed dish with a built-in playing grid, perfect for a coffee table centerpiece. Using speckled clay gives the piece a modern, artisanal look while the contrasting ring pieces add a pop of warm terracotta color.
How-To Guide
Materials
- Speckled air-dry clay or oven-bake polymer clay (white/cream base)
- Terracotta-colored clay (or acrylic paint)
- White or cream clay for game pieces
- Rolling pin with guide rings
- Round cookie cutters (large for the base, small for pieces)
- Ruler
- Needle tool or clay knife
- Sponge and water
- Fine-grit sandpaper
- Matte spray varnish or sealant
Step 1: Forming the Base Dish
-
Roll the Slab:
Begin by wedging your speckled clay to remove air bubbles. roll it out on a flat surface into a large, even slab about 1/4 inch thick. Using guide rings on your rolling pin helps ensure a consistent thickness across the board. -
Cut the Circle:
Place your largest round cutter or a paper template (approx. 8-10 inches diameter) onto the clay slab and cut out a perfect circle. Remove the excess clay and smooth the edges with a slightly damp finger. -
Create the Wall Strip:
Roll out a long, rectangular strip of the same speckled clay. This should be about 3/4 inch tall and long enough to wrap around the entire circumference of your base circle. -
Attach the Wall:
Score the outer edge of your base circle and the bottom edge of your clay strip. Apply a little slip (clay mixed with water) or liquid clay to the scored areas. Carefully wrap the strip around the base, pressing it gently to adhere. -
Reinforce the Seam:
Use a modeling tool to smooth the seam where the wall meets the base, both on the inside and outside. I like to run a damp sponge along the rim to soften any sharp edges created during cutting.
Clean Lines Pro Tip
For perfectly straight grid lines, press a ruler edge into the clay first to create a channel, then lay your thin colored coil directly into that groove.
Step 2: Creating the Grid
-
Measure the Playing Field:
Using a ruler, lightly mark four points on the rim to guide your grid implementation. You need two vertical lines and two horizontal lines that divide the inner circle into roughly equal spacing. -
Roll Coil Strips:
Roll out four very thin, even coils of terracotta-colored clay. Alternatively, you can cut thin strips from a flat sheet. These will become the inlaid lines of your grid. -
Inlay the Lines:
Lay the thin coils onto the base according to your marks to form a hash symbol (#). Press them gently into the soft base clay so they are flush with the surface, not sitting on top of it. Trim any excess that hits the wall. -
Smooth the Surface:
Gently roll over the entire base lightly with your rolling pin to fully embed the grid lines. The surface should feel smooth to the touch.
Step 3: Making the Game Pieces
-
Prepare Piece Clay:
You will need five pieces of one color (white) and five of another (terracotta). Condition both clay types until they are soft and pliable. -
Cut the Rings:
Roll out slabs of both colors. Use a small round cutter (about 1 inch) to cut the outer circle, and a smaller cutter to punch a hole in the center, creating a donut shape. -
Refine the Shapes:
Smooth the cut edges of each ring with your finger to give them a rounded, organic feel similar to stone or wood. Make sure they are small enough to fit comfortably inside the grid squares.
Cracking Up?
If you see tiny cracks forming as air-dry clay dries, mix a small amount of fresh clay with water to make a paste and fill them in immediately.
Step 4: Finishing Touches
-
Dry or Bake:
Follow the instructions for your specific clay type. If using air-dry clay, let the dish and pieces dry slowly for 24-48 hours away from direct heat to prevent warping. If using polymer clay, bake in the oven as directed. -
Sand for Smoothness:
Once fully cured and cooled, take a piece of fine-grit sandpaper and lightly buff the rim of the dish and the edges of the game pieces to remove any rough spots. -
Seal the Project:
Finish by applying a matte varnish or sealant. This protects the clay from dust and fingerprints while maintaining that lovely natural stone texture.
Now you have a stylish, playable sculpture ready for your next game night.


Pocket Pebble Tic Tac Toe Set

This charming, portable game set features smooth, pebble-like playing pieces and a sleek, textured board that feels wonderful to hold. The combination of matte sandstone finishes and rich terracotta and indigo tones creates a modern, organic aesthetic perfect for travel or coffee table decor.
Step-by-Step Tutorial
Materials
- White or speckled granite polymer clay (for the base)
- Terracotta colored polymer clay
- Deep indigo/navy polymer clay
- Liquid polymer clay (translucent)
- Acrylic roller or pasta machine
- Square clay cutter (approx. 3-4 inches)
- Small round cutter (approx. 0.75 inch)
- Needle tool or toothpick
- Fine grit sandpaper (400-800 grit)
- Navy blue acrylic paint
- Fine detail paintbrush
- Matte varnish (optional)
- Texturing sponge or toothbrush
Step 1: Creating the Game Board Base
-
Condition the Master Base:
Start by conditioning a large block of white or speckled granite clay until it is soft and pliable. Roll it out into a thick slab, approximately 1/2 inch thick, to give the board a substantial, stone-like weight. -
Cut the Square:
Use your large square cutter or a sharp blade to cut a perfect square for the main board. Smooth the edges with your finger to remove any sharpness, aiming for a slightly rounded, tumbled stone look. -
Texture the Stone:
Gently tap a texturing sponge or an old toothbrush over the entire surface and sides of the white square. This mimics the porous texture of real sandstone.
Sticky Situation?
If play pads slide around on the base before baking, texture the back of the pad and the board spot with a needle tool to create ‘tooth’ for the liquid clay to grip.
Step 2: Forming the Contact Pads
-
Roll the Terracotta Layer:
Condition the terracotta clay and roll it out relatively thin, about 1/8 inch. Cut four equal squares that are slightly smaller than one-quarter of your main base. -
Create the Top Surface:
Roll out a thin sheet of the speckled granite clay (same color as the base). Cut four squares matching the size of the terracotta squares you just made. -
Assemble the Pads:
Stack the granite squares on top of the terracotta squares to create a two-tone ‘sandwich.’ Gently press them together so they bond without distorting the shape. -
Mount the Pads:
Apply a thin layer of liquid polymer clay to the back of each terracotta/granite stack. Arrange these four raised pads onto your main stone base in a 2×2 grid, leaving a small channel of space between them to form the grid lines.
Step 3: Sculpting the Playing Pebbles
-
Shape the Terracotta Pieces:
Roll the remaining terracotta clay into a log and slice off five equal portions. Roll each portion into a ball in your palms, then gently flatten them into smooth, organic pebble shapes. -
Shape the Indigo Pieces:
Repeat the process with the deep indigo clay to create five opposing playing pieces. I like to vary the shapes slightly so they look like real river stones. -
Carve the Symbols:
Using a needle tool, press a simple ‘X’ or cross shape into current center of every single pebble—both the terracotta and indigo ones. Press deep enough to create a visible groove but not so deep you cut through. -
Baking:
Place the game board and all loose pebbles on a ceramic tile or baking sheet. Bake according to your clay package instructions (usually 275°F for 15-30 minutes depending on thickness).
Pro Tip: Better Pebbles
After rolling your pebble shapes, dampen your finger with a tiny bit of baby oil and rub it over the clay. This removes fingerprints instantly for a pro finish.
Step 4: Finishing Touches
-
Cooling and Sanding:
Allow all pieces to cool completely. Once hard, use fine-grit sandpaper to buff the edges of the board and the pebbles, ensuring they feel soft and pleasant in the hand. -
Painting the Board Grid:
Dip your fine detail brush into navy blue acrylic paint. Carefully paint a large ‘X’ or cross design that spans across the four raised pads on the board, connecting them visually. -
Refining the Lines:
The painted cross should look like it was stamped or printed on the stone. If your lines are shaky, you can gently scrape away excess dry paint with a craft knife for a cleaner edge. -
Sealing:
To protect the paint and the clay, apply a very light coat of matte varnish to the painted areas and the pebbles. Avoid glossy finishes to maintain that natural stone appearance.
Now you have a stylish, durable game set that brings a touch of handmade warmth to any gathering

The Complete Guide to Pottery Troubleshooting
Uncover the most common ceramic mistakes—from cracking clay to failed glazes—and learn how to fix them fast.
Lily Pad Pond Tic Tac Toe
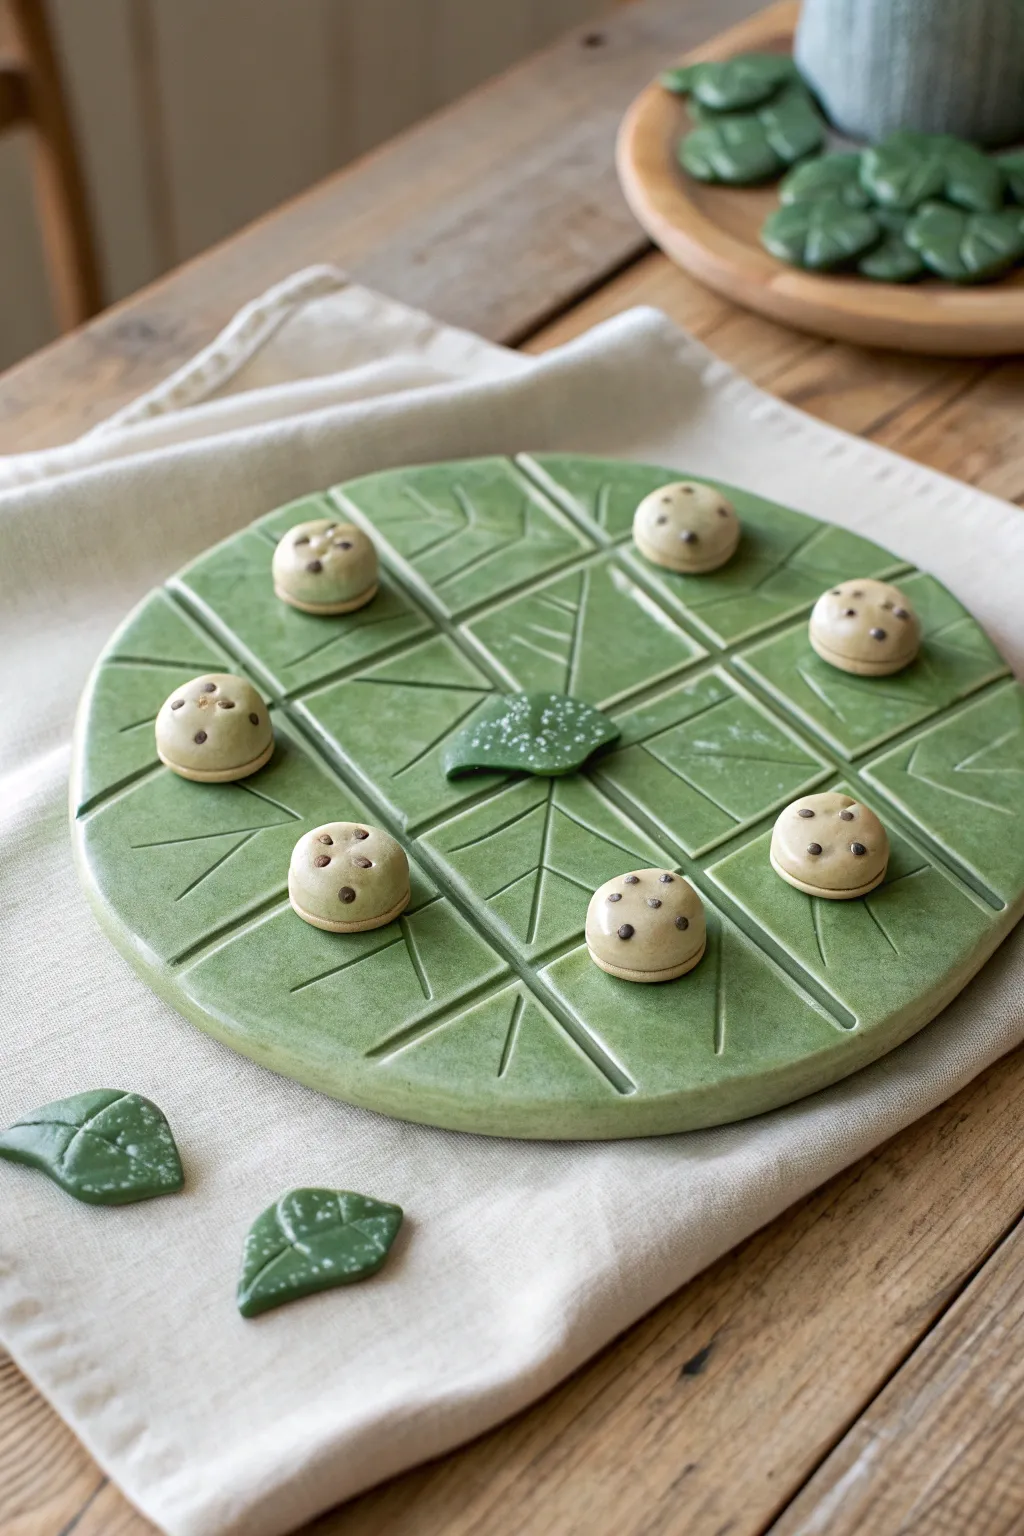
Bring the calming vibes of a woodland floor to your game night with this nature-inspired tic tac toe set. The project features a broad, leaf-textured circular base and adorable seed-pod game pieces, all finished in earthy greens and subtle spotting for a realistic look.
How-To Guide
Materials
- White air-dry clay or polymer clay
- Rolling pin
- Large circular cookie cutter or template (approx. 8 inches)
- Clay sculpting tools (needle tool and smooth modeling tool)
- Acrylic paints (moss green, sage green, dark brown, cream)
- Small synthetic paintbrushes
- Glossy varnish or clear coat sealer
- Fine grit sandpaper
- Small cup of water
Step 1: Sculpting the Leaf Board
-
Prepare the base:
Start by conditioning a large ball of white clay until it is pliable. Roll it out into a smooth, even slab that is approximately 1/4 inch thick; you want enough heft so the board doesn’t warp easily. -
Cut the circle:
Place your circular template or large bowl over the clay and cut out a perfect circle. Smooth the edges with a bit of water on your finger to remove any sharpness or burrs. -
Mark the grid:
Using a ruler and a needle tool, lightly sketch a classic tic-tac-toe grid (two vertical lines, two horizontal lines) directly onto the clay circle. -
Carve the main veins:
Deepen your grid lines using a modeling tool to create wide, V-shaped grooves. These distinct channels will act as the separation for the game spaces. -
Add leaf texture:
Within each grid square, carve diagonal lines radiating outward toward the edges, mimicking the vein patterns found on a large leaf. Keep these lines slightly shallower than your main grid lines. -
Create the center leaf:
Sculpt a small, separate leaf shape—about an inch wide—to serve as a decorative element or centerpiece. Use your needle tool to add fine vein details to its surface.
Smooth Operator
Before painting, lightly sand the dried clay with fine-grit sandpaper. This removes fingerprints and creates a professional surface that takes paint much more evenly.
Step 2: Creating the Game Pieces
-
Form the pods:
Roll ten small balls of clay, roughly the size of a walnut. Flatten the bottoms slightly by pressing them gently onto your work surface so they won’t roll away. -
Detail the edges:
Use a knife tool to create a horizontal indentation around the middle of each ball, making them look like sandwiched cookies or seed pods. -
Texture the tops:
With a fine needle tool or dotting tool, poke tiny, random holes or indents on the top dome of each piece to give them an organic, porous texture. -
Make extra leaves:
Use your leftover scraps to shape a few small, standalone leaves similar to the center piece. These make lovely decorative accents for the table setting. -
Dry completely:
Allow all your clay pieces to dry fully according to the manufacturer’s instructions, flipping the large board occasionally to ensure even drying and prevent curling.
Forest Variation
Make one player’s pieces classic ‘X’ shapes made of twigs and the other player’s pieces round polished stones or mushroom caps for more visual variety.
Step 3: Painting and Finishing
-
Base coat the board:
Paint the entire circular board with a light sage green. I find mixing a touch of yellow into the green helps it look more like fresh vegetation. -
Add depth:
Dilute some dark moss green paint with water to create a wash. Brush this into the carved grooves and veins, then wipe the surface gently with a paper towel, leaving the dark color in the crevices. -
Paint the pieces:
Paint the round game pieces in a creamy beige or pale biscuit color. Paint the small decorative leaf pieces in a deep forest green for contrast. -
Detail the pods:
Using the handle end of a small paintbrush or a dotting tool, dip into dark brown paint and add the characteristic ‘chocolate chip’ spots to the tops of the beige game pieces. -
Speckle effect:
For the leaf pieces (both the center emblem and loose leaves), flick a toothbrush loaded with diluted white paint to create a fine mist of speckles, simulating morning mist or natural variation. -
Seal the work:
Once all paint is bone dry, apply two coats of glossy varnish to everything. This gives the set that kiln-fired ceramic sheen and protects it from scratches during play.
Set up your board on a linen napkin and enjoy a relaxing game surrounded by your handmade art
Cat vs. Fish Marker Set
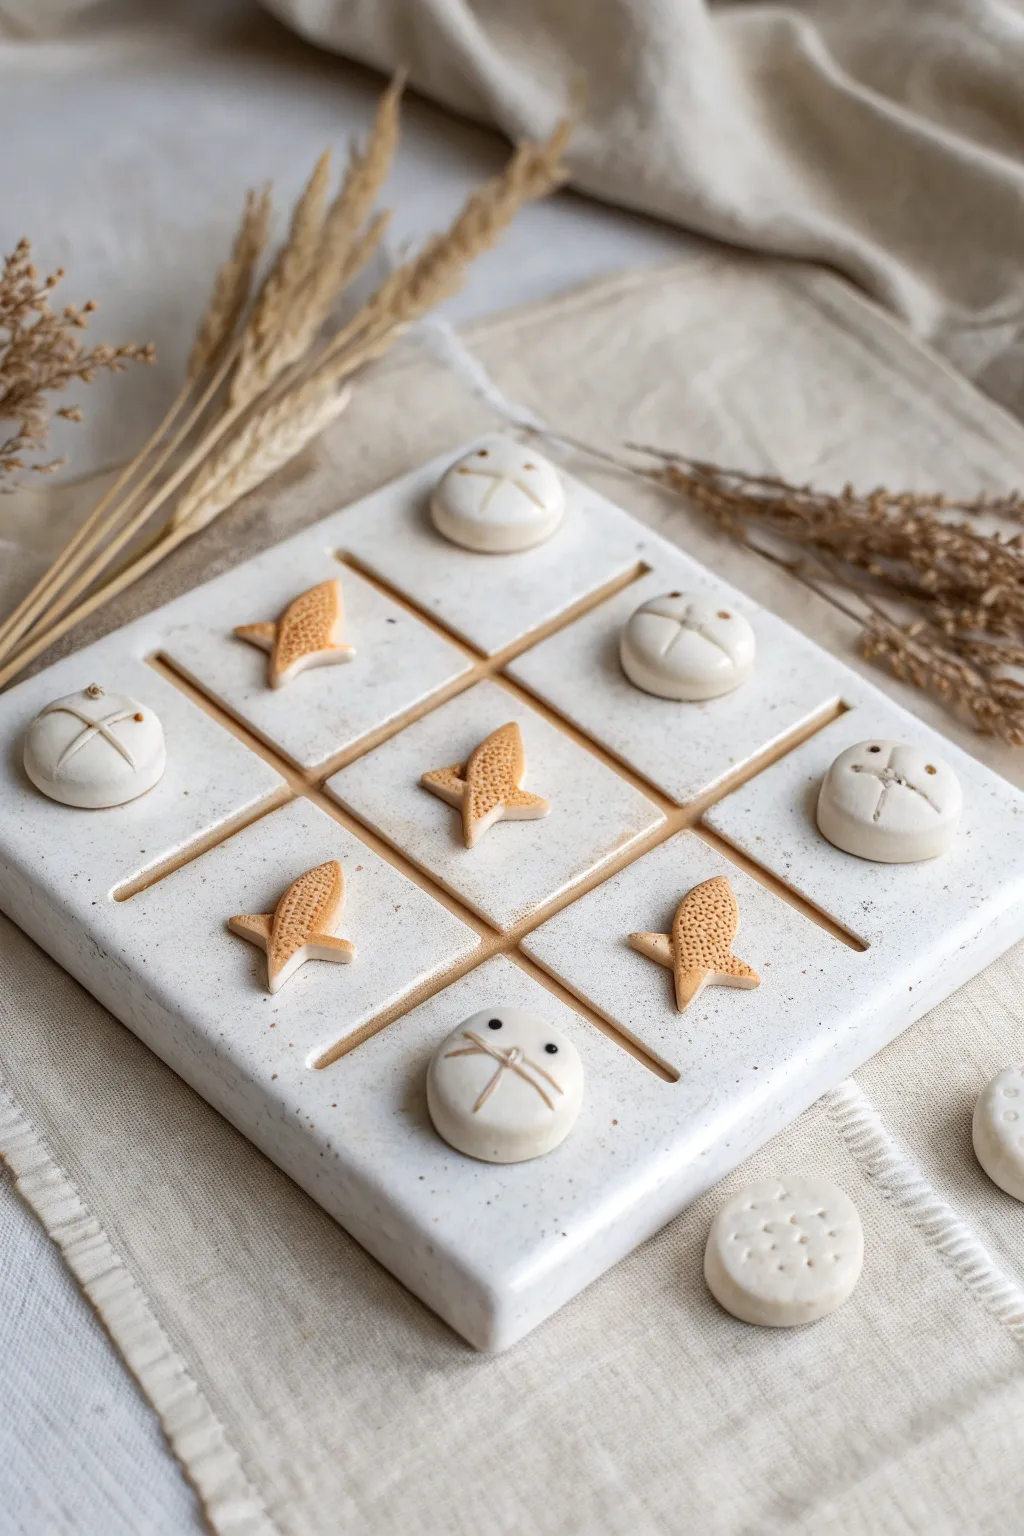
This charming tic-tac-toe set reimagines the classic Xs and Os as a playful standoff between hungry cats and their aquatic snacks. The chunky, speckled board and tactile game pieces make for a functional art object that is just as lovely to display as it is to play.
Step-by-Step Guide
Materials
- White stoneware clay (preferably with grog for stability)
- Rolling pin
- Two 1/4-inch wooden slats (for thickness guide)
- Square template (approx. 6×6 inches)
- Modeling tool or dull knife
- Needle tool
- Small round cutter (approx. 1 inch)
- Small star or leaf cutter (for fish shape)
- Speckled white glaze
- Orange/Tan underglaze
- Black underglaze (fine tip applicator or liner brush)
- Sponge
- Kiln
Step 1: Sculpting the Board
-
Roll the slab:
Begin by rolling out your white stoneware clay. Use the wooden slats on either side of your clay to ensure an even thickness, aiming for a substantial, chunky slab about 1/2 to 3/4 inch thick for the base. -
Cut the square:
Place your square paper template onto the slab. Using a needle tool, cut straight down around the edges to create a clean 6×6 inch square foundation. -
Smooth the edges:
Dip your finger in a little water or use a damp sponge to round off the sharp cut edges of the square. This softens the look and prevents chipping later. -
Mark the grid:
Lightly measure and mark the board into nine equal squares (a 3×3 grid). Don’t cut yet; just create faint guide dots with your needle tool. -
Carve the lines:
Using a modeling tool with a rounded or V-shaped profile, firmly press and drag along your guide marks to create the deep grooves that form the playing grid. I like to stop the lines just short of the outer edge for a framed look. -
Refine the grooves:
Run a damp brush or sponge through the carved grooves to smooth out any clay burrs or rough crumbs created during the carving process.
Step 2: Creating the Game Pieces
-
Shape the cat bodies:
Roll a coil of clay and cut five equal segments. Roll each into a smooth ball, then gently flatten them into thick, rounded discs roughly 1 inch in diameter. -
Add cat details:
Using a needle tool, press gently into the clay to create simple vertical lines for whiskers and a little ‘x’ or triangle for the nose area. Keep the features minimalist. -
Shape the fish:
Roll out a thinner slab of clay (about 1/4 inch). Use a cookie cutter shaped like a star or modify a diamond shape to create five fish. If hand-sculpting, pinch a central diamond and pull out two points for the tail fins. -
Texture the fish:
To mimic scales or a cracker texture, take your needle tool and gently stipple tiny holes all over the surface of the fish bodies. -
Dry slowly:
Place the board and all ten pieces (extras are good just in case!) on a ware board. Cover loosely with plastic to let them dry slowly and evenly to the bone-dry stage.
Warped Board?
Thick slabs can warp in the kiln. Dry very slowly between two pieces of drywall or ware boards, flipping the slab daily, to ensure it stays perfectly flat.
Step 3: Glazing and Firing
-
Bisque fire:
Load the bone-dry pieces into the kiln and fire to cone 04 (or your clay’s specific bisque temperature). -
Underglaze the fish:
Once cooled, paint the fish pieces with an orange or tan underglaze. Wipe back slightly with a damp sponge if you want the texture holes to remain darker or lighter for contrast. -
Detail the cats:
Use a fine-tip applicator or a very thin brush with black underglaze to paint small dots for the cats’ eyes. You can also deepen the whisker lines you carved earlier. -
Glaze the board:
Apply 2-3 coats of a speckled white glaze to the entire board. Ensure the glaze doesn’t pool too thickly in the grid grooves, or you’ll lose the definition. -
Glaze the cats:
Dip the cat pieces into a clear or semi-opaque white glaze, being careful not to obscure the black eye details. -
Final fire:
Stilt the glazed pieces in the kiln to prevent sticking and fire to your glaze’s maturity temperature (likely cone 5 or 6). Let the kiln cool completely before unloading.
Pro Tip
Make extra pieces! Ceramics can be unpredictable. Making 6 cats and 6 fish ensures you have a full playing set even if one cracks or explodes in the kiln.
Now you have an adorable, permanent game set ready for your next coffee table challenge


What Really Happens Inside the Kiln
Learn how time and temperature work together inside the kiln to transform clay into durable ceramic.
Frog vs. Fly Tic Tac Toe Pieces
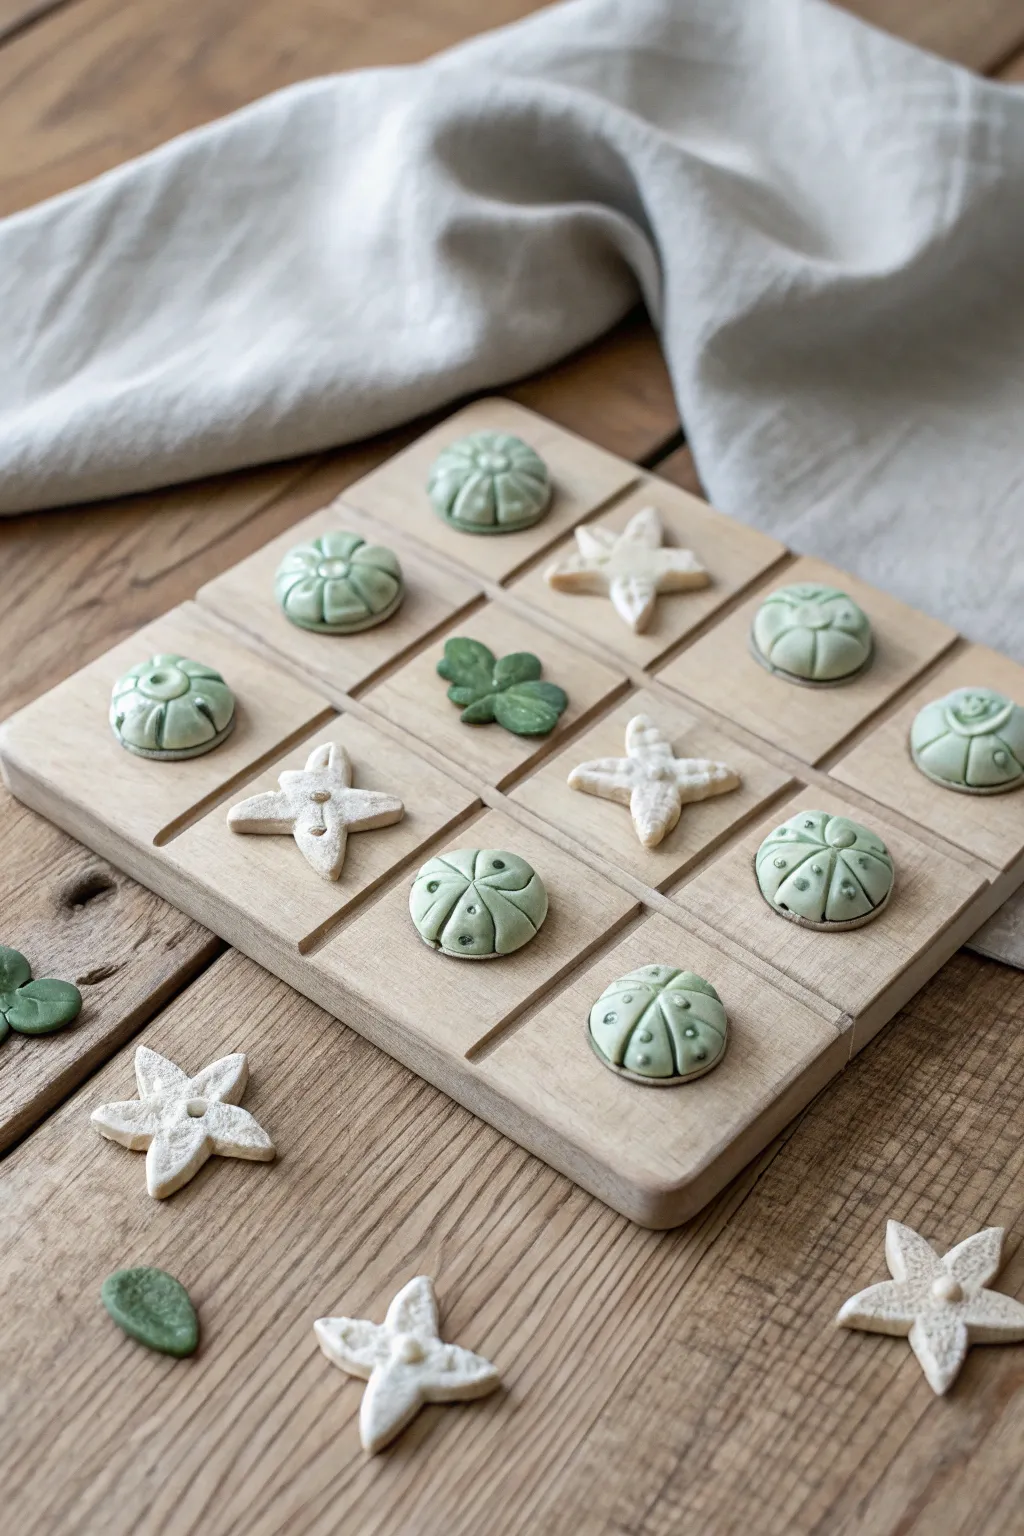
This charming, nature-inspired tic-tac-toe set trades traditional X’s and O’s for sculpted clay sea stars and stylized urchins. The muted green and white tones create a calm, organic aesthetic that looks beautiful even when the game isn’t in play.
Step-by-Step Tutorial
Materials
- Polymer clay (white and sage green)
- Wooden craft square (approx. 6×6 inches)
- Ruler
- Pencil
- Carving tool or linoleum cutter (V-gouge)
- Needle tool or toothpick
- Ball stylus tool
- Sandpaper (fine grit)
- Acrylic sealer (optional)
- Clean work surface (ceramic tile or glass)
Step 1: Sculpting the Pieces
-
Prepare the urchin clay:
Start by conditioning the sage green polymer clay until it is soft and pliable. Roll it into a smooth log and cut it into five equal segments to ensure your game pieces are uniform in size. -
Shape the urchin bodies:
Roll each green segment into a tight ball, then gently flatten the bottom against your work surface to create a dome shape. They should be distinct but not too tall. -
Add urchin details:
Using a needle tool or the back of a butter knife, press vertical indentations around the side of each dome to create the segments. Use a small ball stylus to press a tiny dimple into the center top of each segment for a textured, realistic look. -
Prepare the sea star clay:
Clean your hands thoroughly to avoid transferring green pigment. Condition the white clay and divide it into five equal portions, matching the volume of your green pieces. -
Form the star points:
Roll a portion of white clay into a ball, then pinch and pull gently to create five points. Flatten the shape slightly on your surface. -
Refine the star shape:
Sharpen the tips of the five points and smooth the curves between them. I find using a silicone sculpting tool helps smooth out fingerprints here without distorting the shape. -
Texture the stars:
Use your needle tool to prick the surface of the clay, creating a porous, coral-like texture. Add a slightly larger indentation in the very center of the star. -
Bake the pieces:
Arrange all ten pieces on a baking sheet lined with parchment paper. Bake according to your specific clay manufacturer’s instructions (usually 275°F for 15-30 minutes per 1/4 inch of thickness).
Step 2: Crafting the Board
-
Plan the grid:
While the clay cools, take your wooden square and measure it to find the thirds. Mark four points on the edges with a pencil to guide where your grid lines will go. -
Carve the lines:
Using a V-gouge scraping tool or a steady hand with a carving knife, carefully carve two vertical and two horizontal channels into the wood. Connect your pencil marks to create the nine-square grid. -
Sand the wood:
Take a piece of fine-grit sandpaper and gently sand the entire surface of the board, paying special attention to the edges of the carved grooves to remove any splinters or rough patches. -
Clean the grooves:
Wipe the board down with a tack cloth or slightly damp paper towel to remove all sawdust from the carving process. -
Optional sealing:
If you want to protect the wood, apply a thin layer of matte varnish or beeswax polish. Let this dry completely before placing any pieces on top. -
Double-check fit:
Place your cooled clay pieces onto the board squares to ensure they fit comfortably within the grid lines without overcrowding each other. -
Final touches:
If desired, you can add small felt pads to the bottom of the detailed clay pieces to prevent them from scratching the wooden board over time.
Sticky Situation
If your white clay picks up dust or lint, wipe it gently with a small amount of rubbing alcohol or acetone on a cotton swab before baking to restore the bright white color.
Make It Magnetic
Embed small magnets into the bottom of the clay pieces and drill matching holes in the board for magnets. This makes the set portable and perfect for travel.
Now you have a serene, handcrafted game set ready for display on your coffee table
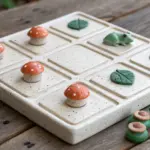
Mushroom vs. Snail Forest Theme
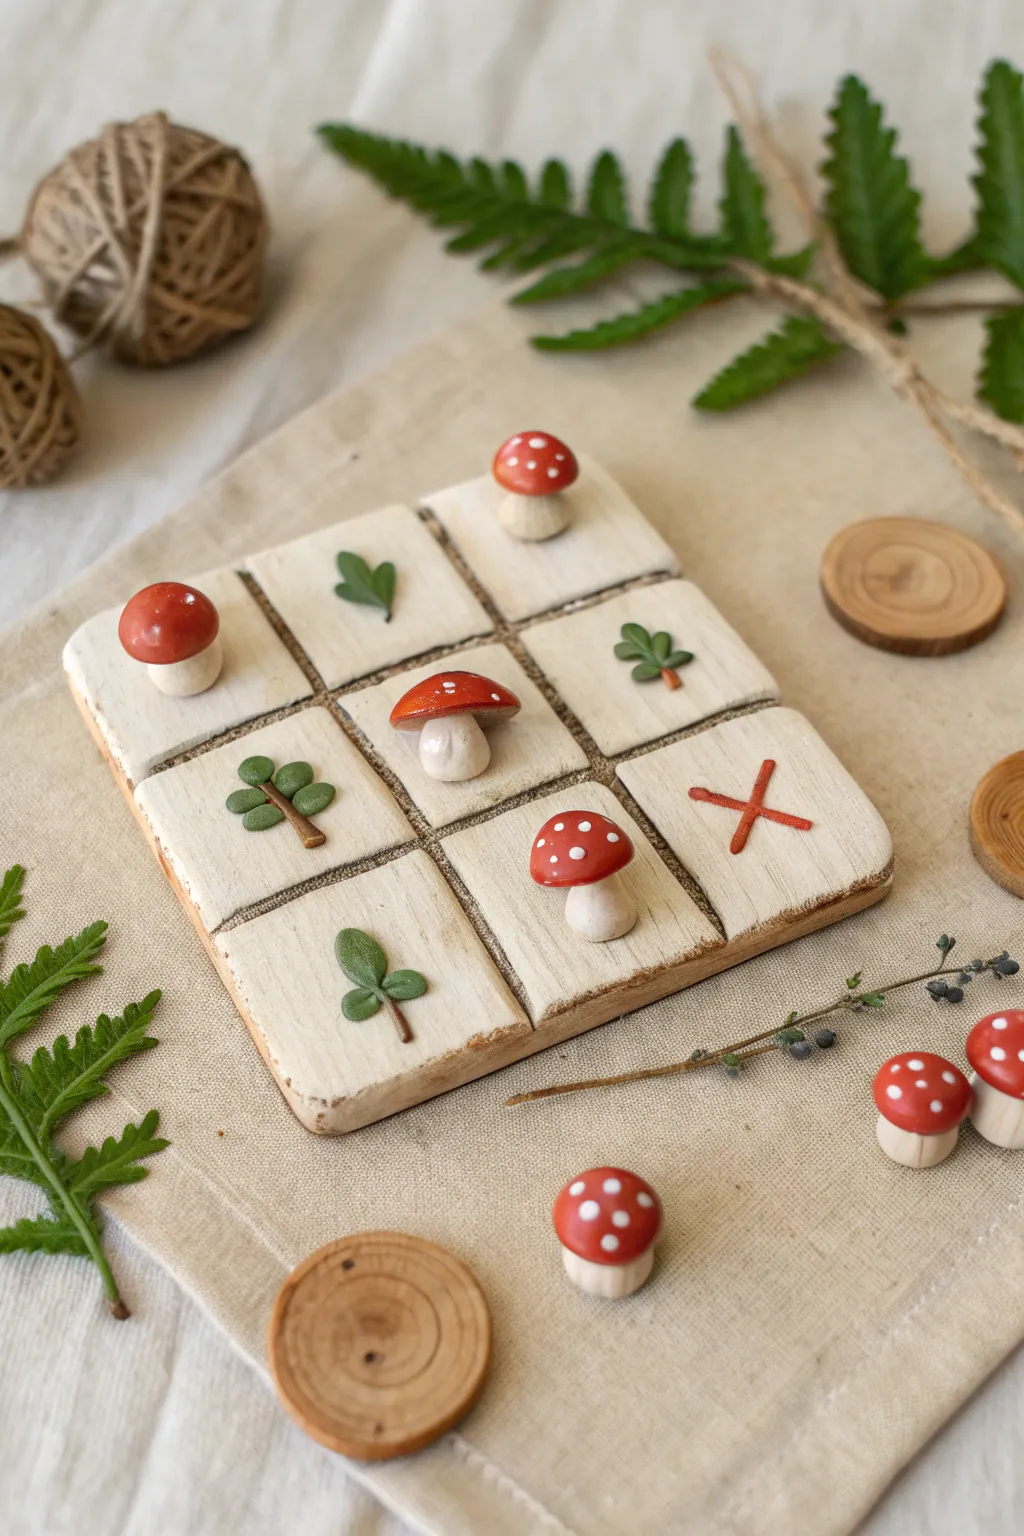
Bring the magic of the woodland floor to your game nights with this charming clay set featuring tiny toadstools and leafy markers. The rustic, textured board and hand-sculpted pieces make it a delightful display piece even when you aren’t playing.
Step-by-Step Guide
Materials
- Air-dry clay or polymer clay (white/cream)
- Rolling pin
- Square cookie cutter (approx. 2-3 inches)
- Clay knife or craft blade
- Texturing tools (or a rough stone/sponge)
- Acrylic paints (Red, White, Green, Brown, Black)
- Fine detail paintbrush
- Matte varnish or sealant
- Burlap or linen fabric
- Cardboard or thin wood backing (optional)
Step 1: Sculpting the Board
-
Prepare the base:
Roll out a large slab of white clay to about 1/4 inch thickness. You want this to be a substantial, sturdy base for your game. -
Cut the tiles:
Using a ruler and knife, cut out nine identical squares. Alternatively, cut one large square and deeply score the grid lines without cutting all the way through for a single-piece board. -
Add wood grain texture:
Gently drag a stiff bristled brush or a clay tool across the surface of the squares to create a subtle, wood-like grain effect. I like to keep this organic and imperfect. -
Create the grid lines:
If making a single board piece, widen the scored grid lines slightly with a modeling tool to distinctively separate the playing spaces. -
Distress edges:
Soften the sharp corners and edges of your squares by tapping them gently. You want them to look like worn, tumbled stones or weathered wood.
Step 2: Crafting the Markers
-
Shape mushroom caps:
Roll five small balls of clay and flatten the bottoms to create domes. These will be your red toadstool caps. -
Form mushroom stems:
Create five thick, sturdy cylinders of clay. Press the caps firmly onto the stems, blending the clay slightly if needed to secure the bond. -
Sculpt the leaf team:
For the opposing team, create five small motifs. As seen in the photo, you can mix designs like simple leaves, clover shapes, or tiny trees with brown trunks. -
Detailing the leaves:
Use a needle tool or knife tip to impress veins into your leaf shapes for added realism. -
Dry everything:
Set all pieces aside to dry completely according to your clay’s instructions. Air-dry clay usually needs 24-48 hours.
Weighted Pieces
For a premium feel, press a small metal washer or coin into the bottom of each playing piece while the clay is still wet to give them a satisfying weight.
Step 3: Painting and Assembly
-
Base coat the board:
Paint the board tiles with an off-white or cream color. Let the paint settle into the textured grooves. -
Antique the board:
Dry brush a light brown paint around the edges and over the textured surface to highlight the ‘wood grain’ and give it a vintage feel. -
Paint the mushrooms:
Paint the mushroom caps a vibrant red and the stems a creamy white. Allow the red to dry completely. -
Add signature spots:
Using a dotting tool or the back of a paintbrush, carefully add small white dots to the red mushroom caps. -
Color the foliage:
Paint your leaf and tree markers in various shades of natural green. Use brown for any tree trunks or stems. -
Paint the X symbol:
On the bottom right square of the board, paint a simple, rustic reddish-brown ‘X’ to mark the starting spot or just for decoration. -
Seal the project:
Apply a coat of matte varnish to all pieces to protect the paint handling during gameplay. -
Final assembly:
If you made individual tiles, glue them onto a piece of sturdy cardboard or burlap fabric, leaving small gaps between them to form the grid lines.
Natural Grid
Instead of painted lines, glue thin dried twigs or strips of twine between the board tiles to create a 3D grid that enhances the forest theme.
Now you have a whimsical, handcrafted game set ready for display or play

TRACK YOUR CERAMIC JOURNEY
Capture glaze tests, firing details, and creative progress—all in one simple printable. Make your projects easier to repeat and improve.
Sun vs. Moon Celestial Tic Tac Toe
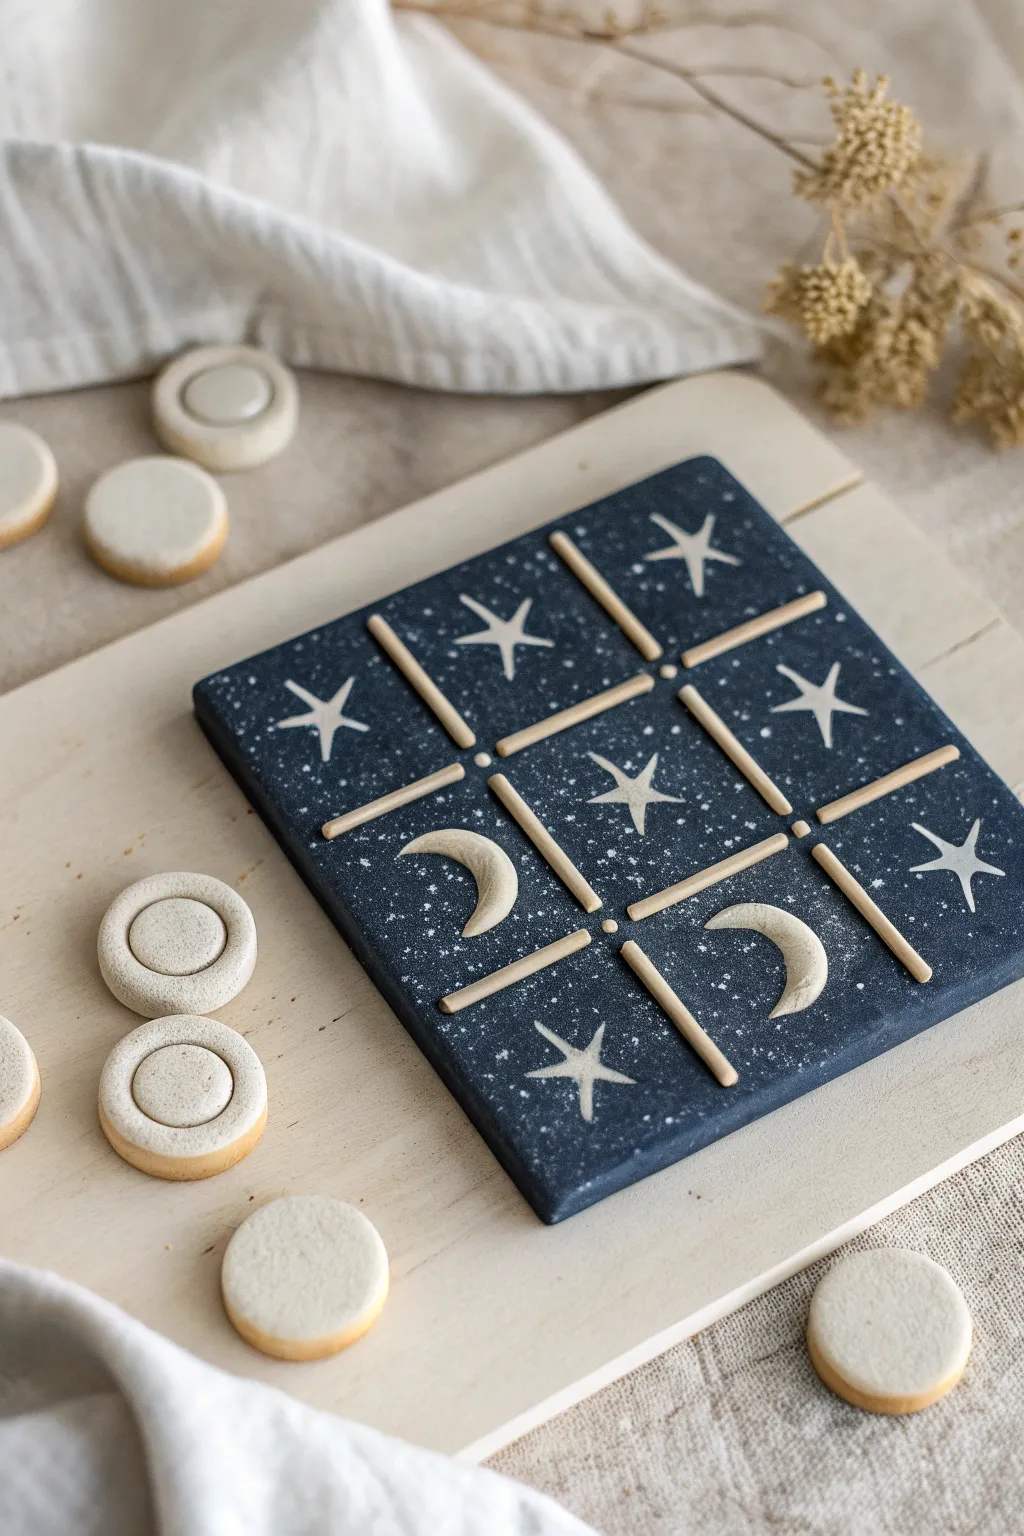
Bring the magic of the night sky to your game table with this celestial tic-tac-toe set. The deep indigo board features hand-painted constellations and raised moon phases, creating a dreamy contrast against the simple, creamy-white playing pieces.
Step-by-Step Tutorial
Materials
- Polymer clay (white or beige for pieces, dark blue for the board)
- Acrylic paint (white, tan/beige)
- Rolling pin or clay machine
- Square clay cutter or craft knife
- Small round cookie cutter (approx. 1 inch)
- Small circle indentation tool (or bottle cap)
- Fine detail paintbrush
- Old toothbrush (for speckling)
- Ruler
- Sculpting workspace or mat
- Oven for baking
Step 1: Crafting the Board
-
Roll the base:
Condition your dark blue polymer clay until it’s pliable. Roll it out into a smooth, even slab about 1/4 inch thick. Aim for a thickness that feels substantial but not too heavy. -
Cut the square:
Using a ruler and a craft knife (or a large square cutter if you have one), cut a perfect 5×5 inch square from the blue slab. Smooth out any rough edges with your finger. -
Create the grid lines:
Roll out very thin snakes of beige or light tan clay. These should be uniform in thickness. Lay them across the blue square to form a classic tic-tac-toe hashtag grid (#). Press them gently so they adhere to the base without flattening completely. -
Add celestial details:
Before baking, you need to add your permanent symbols. Roll out a small amount of tan clay flat. Using a tiny cutter or knife, create two crescent moon shapes. -
Placement:
Place the crescent moons into two of the grid squares. Press them gently to bond them to the blue background.
Fixing Warp
If the flat board curls up while baking, place a heavy book (with parchment paper in between) on top of it while it’s still warm from the oven to flatten it as it cools.
Step 2: Making the Playing Pieces
-
Roll the sheet:
Clean your work surface or switch to a clean mat to avoid dark clay transfer. Roll out white or cream clay to a thickness of about 3/8 inch—slightly thicker than the board. -
Cut the rounds:
Use your small round cutter to punch out at least 10 circles (5 for each player). It’s always smart to make a couple of spares in case of mishaps. -
Detailing Player One:
Leave 5 of the circles plain and smooth to represent full moons. Simply soften the top edge with your fingertip for a rounded look. -
Detailing Player Two:
For the other 5 pieces, use a slightly smaller circle tool or a bottle cap to press a ring indentation into the top center. This creates a crater or ‘sun’ effect. -
Bake everything:
Place the board and all pieces on a parchment-lined baking sheet. Bake according to your specific clay brand’s instructions (usually 275°F for 15-30 minutes). Let them cool completely.
Glow Up
Use glow-in-the-dark polymer clay for the stars, grid lines, and moon crater pieces. The game will look spectacular when played in a dimly lit room!
Step 3: Painting the Cosmos
-
The milky way effect:
Mix a small amount of white acrylic paint with a drop of water. Dip an old toothbrush into this mixture, point it at the cooled blue board, and run your thumb across the bristles to flick tiny speckles across the surface. -
Painting stars:
I prefer using a very fine detail brush here. Paint simple five-point stars or four-point sparkles in the empty spaces of the grid using white or light grey paint. -
Highlight the grid:
If your grid lines look a bit dull after baking, carefuly brush a thin layer of tan paint over the raised lines to make them pop against the dark universe background. -
Highlight the pieces:
To give the playing pieces depth, brush a very light wash of toasted beige paint around the edges or into the indented rings to mimic shadows and age. -
Seal (Optional):
Once all paint is dry, apply a matte varnish to protect your work and eliminate any tackiness.
Display your new celestial game on a coffee table for an interactive piece of art that invites play
Stars vs. Rings On a Marbled Board
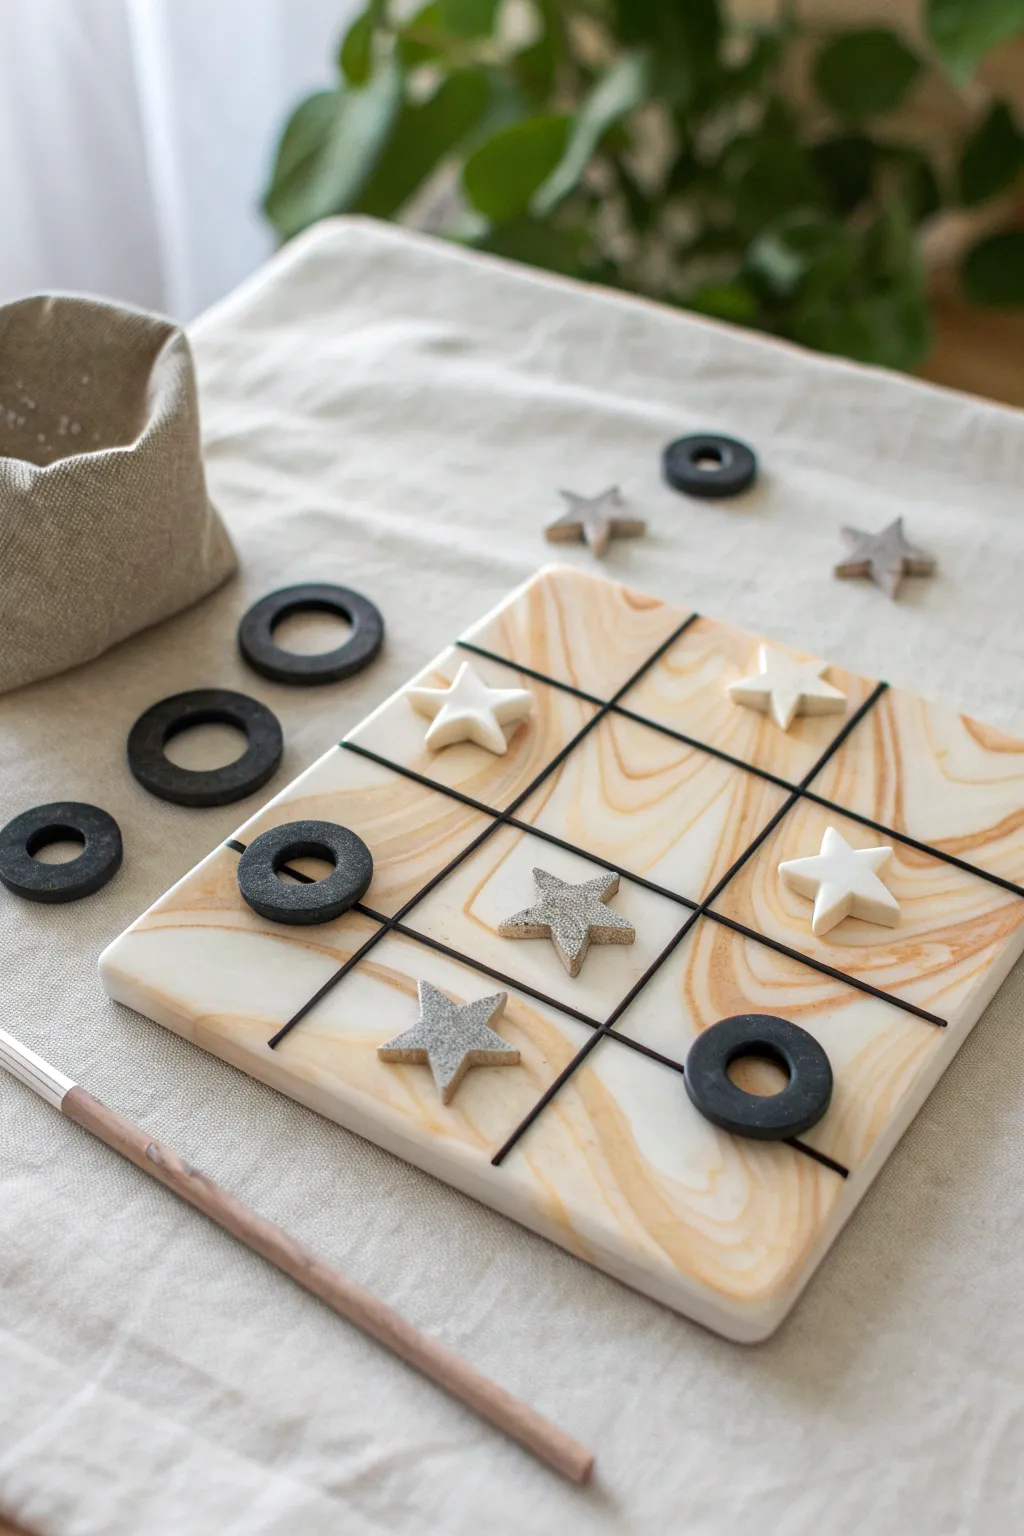
Elevate your game night with this sophisticated clay tic tac toe set featuring a stunning faux-marble board and custom playing pieces. The contrast between the matte black rings, the shimmering stars, and the golden-swirled base creates a modern, sculptural look that serves as a beautiful coffee table accent when not in use.
How-To Guide
Materials
- Polymer clay (white, translucent, gold/beige/tan, and black)
- Glittery or metallic grey polymer clay (or silver glitter)
- Clay roller or pasta machine
- Square clay cutter (approx. 5-6 inches) or craft knife and ruler
- Small star-shaped cookie cutter
- Two circle cutters (one larger, one smaller) to make rings
- Black acrylic paint or a fine-tip black paint marker
- Sculpting tools
- Fine-grit sandpaper (optional)
- Gloss glaze or matte varnish (optional)
Step 1: Marbling the Board
-
Prepare the Colors:
Begin by conditioning a large block of white clay until it’s soft and pliable. Then, condition smaller amounts of translucent clay and your chosen gold or tan accent color. -
Create Snakes:
Roll the white clay into a thick log. Roll the gold/tan and translucent clays into much thinner snakes. These accent colors will form the veins of the marble. -
Twist and Combine:
Lay the thin colored snakes lengthwise along the white log. Twist the entire bundle together like a candy cane to begin merging the colors. -
Fold and Roll:
Fold the twisted log in half and roll it out again. Repeat this twisting and folding process a few times, but be careful not to over-mix; you want distinct streaks, not a solid blended color. -
Form the Slab:
Roll the marbled clay into a ball, then flatten it slightly. Using an acrylic roller or pasta machine, roll it out into a smooth, even slab about 1/4 inch thick. -
Cut the Square:
Use a large square cutter or a sharp craft knife with a ruler to cut a perfect square for your game board. Smooth the edges with your finger to remove any sharpness.
Fixing Smears
Did the black paint smear onto the white marble? dip a Q-tip in rubbing alcohol and gently rub the stain. It usually lifts acrylic paint right off baked clay.
Step 2: Crafting the Playing Pieces
-
Cut Out Rings:
Roll out a sheet of black polymer clay slightly thinner than the board. Use the larger circle cutter to cut out five discs. -
Finish the Rings:
Use the smaller circle cutter to punch the centers out of those discs, creating perfect rings. Smooth any rough edges with a sculpting tool. -
Create White Stars:
Roll out a sheet of white clay. Use your star cutter to punch out roughly three stars. Gently press the rounded edges to give them a softer, puffier look if desired. -
Create Glitter Stars:
Roll out your glittery grey clay (or mix silver glitter into grey clay). Cut out another three stars to match the white ones. -
Baker’s Prep:
Transfer the board and all ten playing pieces onto a ceramic tile or baking sheet lined with parchment paper. -
Baking:
Bake the pieces according to the specific temperature and time directions on your package of polymer clay. I always recommend using an oven thermometer to ensure accuracy.
Level Up: Texture
Before baking the black rings, gently press a piece of coarse sandpaper or a toothbrush onto the surface to give them a realistic stone texture.
Step 3: Assembly and Detailing
-
Cool Down:
Allow all pieces to cool completely before handling them. The clay hardens fully as it cools. -
Mark the Grid:
Using a ruler and a pencil, very lightly mark the 3×3 grid lines on the marble board. Ensure the nine spaces are roughly equal in size. -
Paint the Lines:
Carefully trace over your pencil marks using black acrylic paint and a thin liner brush, or simply use a black paint marker for more control. -
Clean Up:
If your lines wobble, quickly wipe them away with a damp paper towel or cotton swab before the paint dries and try again. -
Seal (Optional):
For a protective finish, apply a thin coat of matte varnish or gloss glaze over the board and pieces, though the raw clay finish looks lovely and modern on its own.
Set up your stars and rings on the fresh grid and enjoy a stylish match
Magnetic Tic Tac Toe Fridge Board
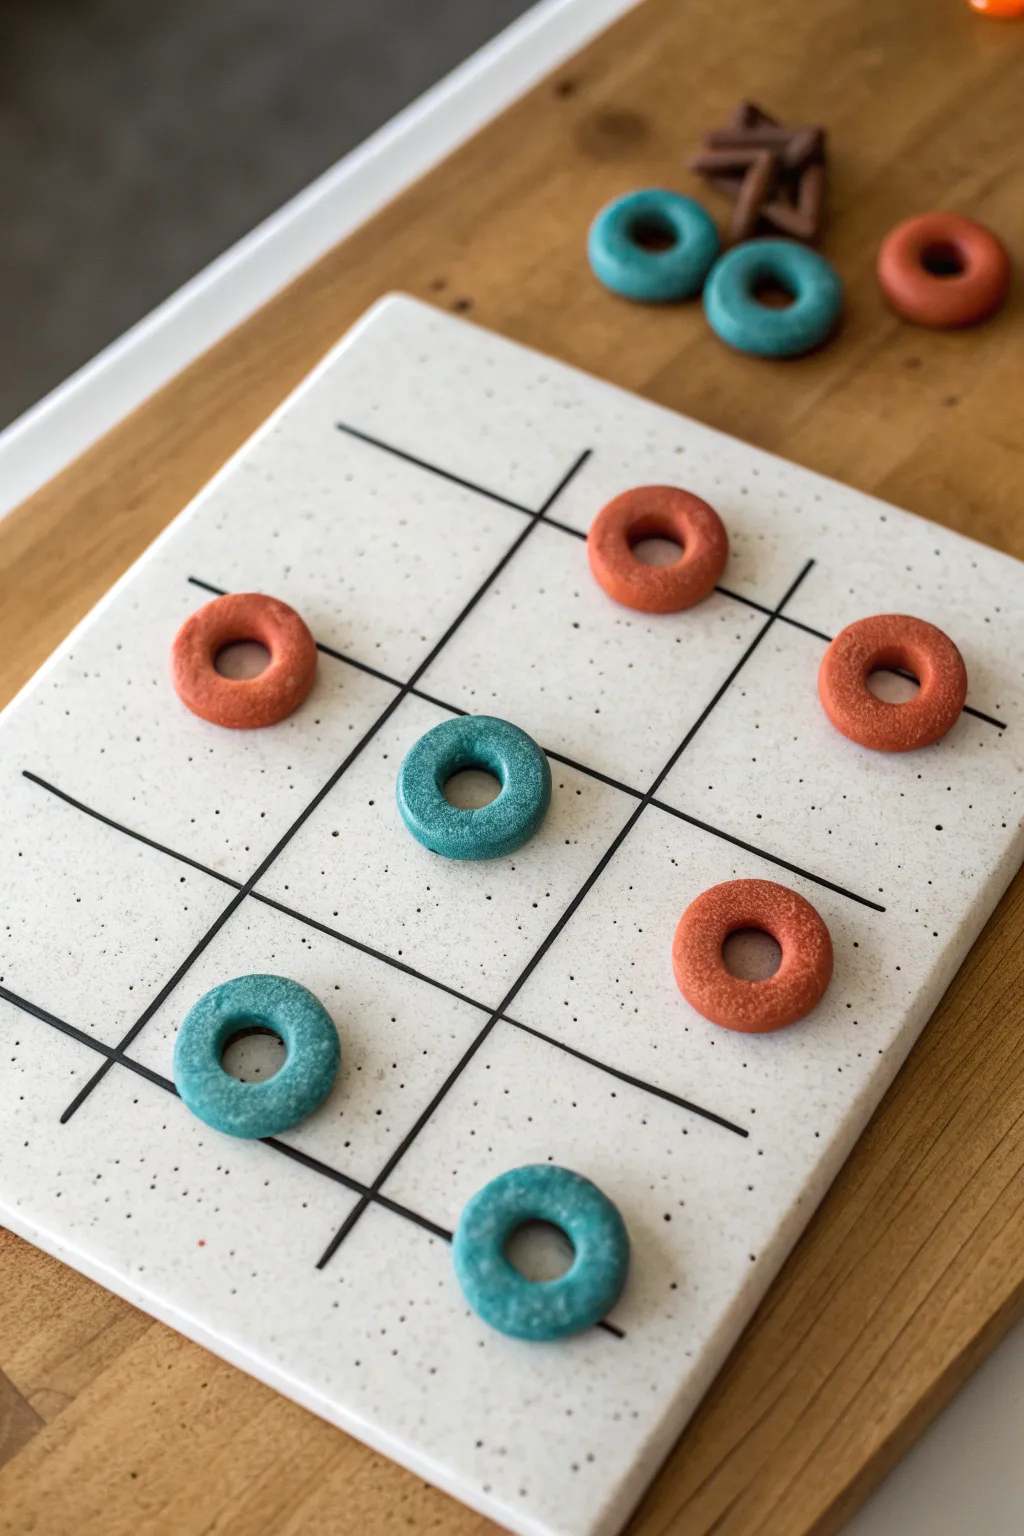
Create a modern, functional art piece for your fridge with this speckled clay tic tac toe set. The textured, donut-shaped playing pieces and sleek grid board combine minimalist design with playful practicality.
Step-by-Step Guide
Materials
- White polygon clay or air-dry clay
- Red and teal blue acrylic paint (or pre-colored clay)
- Black acrylic paint
- Fine-grit sandpaper
- Rolling pin
- Square cookie cutter (approx. 4-5 inches)
- Small round cutter (approx. 1 inch)
- Tiny round cutter or straw (for inner holes)
- Old toothbrush or stiff bristle brush
- Ruler
- Thin liner paintbrush
- Small round magnets (8-10 pieces)
- Strong craft glue (E6000 or superglue)
- Matte sealant spray or varnish
- Speckle medium (black paint thinned with water)
Step 1: Crafting the Board
-
Condition and Roll:
Start by conditioning your white clay until it is soft and pliable. Roll it out on a smooth surface to an even thickness of about 1/4 inch. -
Cut the Square:
Use your large square cutter or a knife guided by a ruler to cut a perfect square for the base. Smooth the edges with your finger if they look sharp or uneven. -
Apply Texture:
To achieve that stony, speckled look, dip an old toothbrush into slightly watered-down black paint. Run your thumb over the bristles to flick tiny specks of paint onto the wet clay surface. -
Create the Grid:
Once the speckles are dry enough to not smudge, use a ruler to lightly impress the tic tac toe grid lines into the clay using a dull knife or clay tool. Do not cut all the way through. -
Bake or Dry:
Follow your specific clay’s instructions to bake or air-dry the board. I find placing a heavy book on air-dry clay helps keep it perfectly flat as it cures.
Uneven Board?
If your board warps while baking, re-heat it slightly and press it under a heavy heavy book while it cools down to flatten it out again.
Step 2: Making the Playing Pieces
-
Form the Rings:
Roll out a fresh slab of clay, slightly thicker than the board. Use the 1-inch round cutter to punch out at least 10 circles. -
Punch the Centers:
Use the tiny cutter or a drinking straw to remove the very center of each circle, creating donut shapes. -
Texturizing:
Tap the surface of each ring gently with a stiff bristle brush or a balled-up piece of foil to give them a rough, stone-like texture. -
Cure the Pieces:
Bake or dry these pieces alongside your board.
Make it Luxe
Mix actual black pepper or dried tea leaves into the white clay before rolling it out for an authentic, embedded stone texture instead of paint.
Step 3: Painting and Assembly
-
Paint the Rings:
Divide your rings into two groups. Paint one set entirely in a deep terracotta red and the other in a teal blue. You may need two coats for full opacity. -
Paint the Grid:
Using a thin liner brush and black acrylic paint, carefully fill in the grid indentations on your white board to make the lines pop. -
Seal the Project:
Once all paint is completely dry, spray the board and all pieces with a matte sealant to protect the finish and lock in the speckles. -
Add Magnets to Board:
Flip the square board over. glue four strong magnets to the back corners so it will stick firmly to your fridge. -
Magnetize the Pieces:
Glue small magnets to the back of each donut piece. Ensure the polarity is correct if you plan to stack them for storage. -
Final Cure:
Allow the glue to cure fully for 24 hours before placing the set on a vertical surface.
Now you have a stylish, interactive game board ready for your kitchen fridge
Mini Book Cover Board With Tiny Books
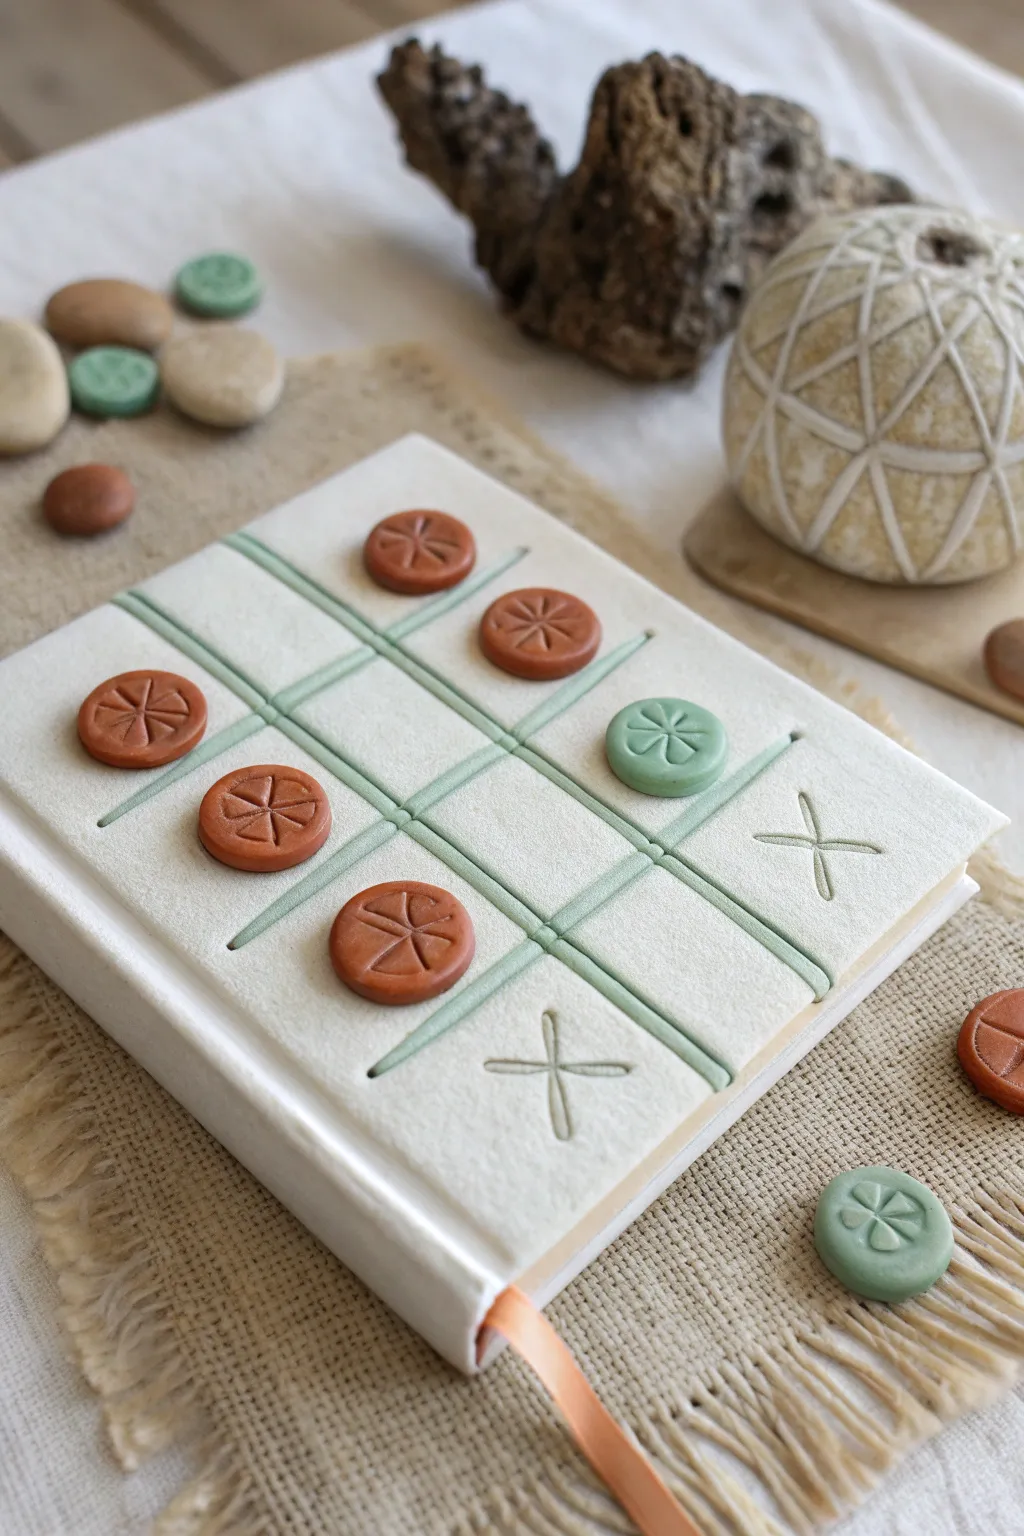
Transform a simple notebook into a portable game board with this clever polymer clay cover project. The soft, textured white clay mimics fabric while holding a playable grid, making it both a beautiful journal and a functional pastime.
Detailed Instructions
Materials
- Small hardbound notebook (A6 or similar size)
- White or cream polymer clay (for the cover)
- Terra cotta/rust colored polymer clay (for pieces)
- Sage green polymer clay (for pieces)
- Rolling pin or pasta machine
- Ruler
- Clay knife or craft blade
- Small circular clay cutter (approx. 1/2 inch or 1.5cm)
- Clay sculpting tools (needle tool and blunt shaping tool)
- Texture sponge or rough fabric (optional for texture)
- Flower stamp or small found object for embossing
- Liquid polymer clay or strong craft glue (E6000)
- Baking sheet and parchment paper
- Oven
Step 1: Creating the Game Board Cover
-
Prepare the Base Clay:
Condition a large block of white or cream polymer clay until it is soft and pliable. Roll it out into a flat sheet about 1/8 inch (3mm) thick, ensuring it is large enough to cover the front of your notebook with a little overhang. -
Size and Cut:
Place your notebook on top of the rolled clay to measure. Cut a rectangle that matches the dimensions of the front cover exactly, using your ruler and craft knife for clean, straight edges. -
Apply Texture:
Before attaching it to the book, gently press a texture sponge or a piece of coarse linen onto the surface of the clay sheet. This gives it the lovely, fabric-like finish seen in the photo rather than a smooth, plastic look. -
Map the Grid:
Using a ruler, lightly mark out a 3×3 tic-tac-toe grid in the center of the clay sheet. You aren’t cutting yet, just making guide marks to ensure your squares will be even. -
Create the Grid Lines:
Roll out very thin snakes of light green or teal clay (you can mix white with a tiny bit of green). These should be uniform in thickness. -
Embed the Lines:
Place these thin green clay snakes onto your marked grid lines. Gently press them into the white clay base using a flat tool or your finger so they are embedded but slightly raised. -
Add Decorative X’s:
In two or three of the squares where you don’t plan to put pieces permanently, use a sculpting tool to press an ‘X’ shape directly into the white clay. Make the grooves deep enough to be visible but not cut through the sheet.
Texturing Tip
To get that soft, paper-like texture on the white clay, gently dab the surface with an old toothbrush or stiff bristle brush before baking.
Step 2: Sculpting the Playing Pieces
-
Cut the Circles:
Roll out your terra cotta and sage green clay to a medium thickness (about 1/4 inch). Use your small circular cutter to punch out at least 5 rust-colored circles and 5 green circles. -
Soften the Edges:
Take each clay circle and gently tap the edges with your finger to round them off, removing the sharp cut look and making them look like smooth buttons. -
Stamp the Design:
Press a small flower stamp or a pattern tool into the center of each circle. If you don’t have a stamp, I like to use the end of a clay tool to press radiating lines from the center to mimic the design in the image. -
Pre-Bake Check:
Place the pieces on the unbaked cover to ensure they fit nicely within the grid squares without overcrowding. Adjust the size if necessary.
Make it Magnetic
Embed tiny magnets into the back of the game pieces and under the grid cover before baking so the pieces snap onto the book and stay put.
Step 3: Assembly and Baking
-
Baking Prep:
Carefully transfer the white cover sheet and the loose game pieces onto a parchment-lined baking sheet. Do not bake the notebook itself unless you are certain it is heat-safe (most are not). -
Bake:
Bake the clay pieces and the cover sheet according to the manufacturer’s instructions (usually 275°F/130°C for 15-30 minutes). Let them cool completely on a flat surface. -
Attach the Cover:
Once cool, spread a thin, even layer of strong craft glue or heavy-duty adhesive on the front of your notebook. -
Final Press:
Align the baked clay grid sheet carefully with the notebook cover and press down firmly. Place a heavy book on top while the glue cures to ensure a flat bond. -
Finishing Touches:
You can now play! Keep the loose pieces in a small pouch attached to the book, or use a tiny bit of repositionable adhesive putty if you want to display them on the cover permanently.
Now you have a charming, tactile game set that travels with you wherever you go