If you love the energy of soccer and the calm, squishy joy of working with clay, this theme is pure magic. I’m sharing my favorite soccer clay ideas—from classic mini balls to playful keepsakes you can gift, display, or actually use.
Classic Black-and-White Soccer Ball
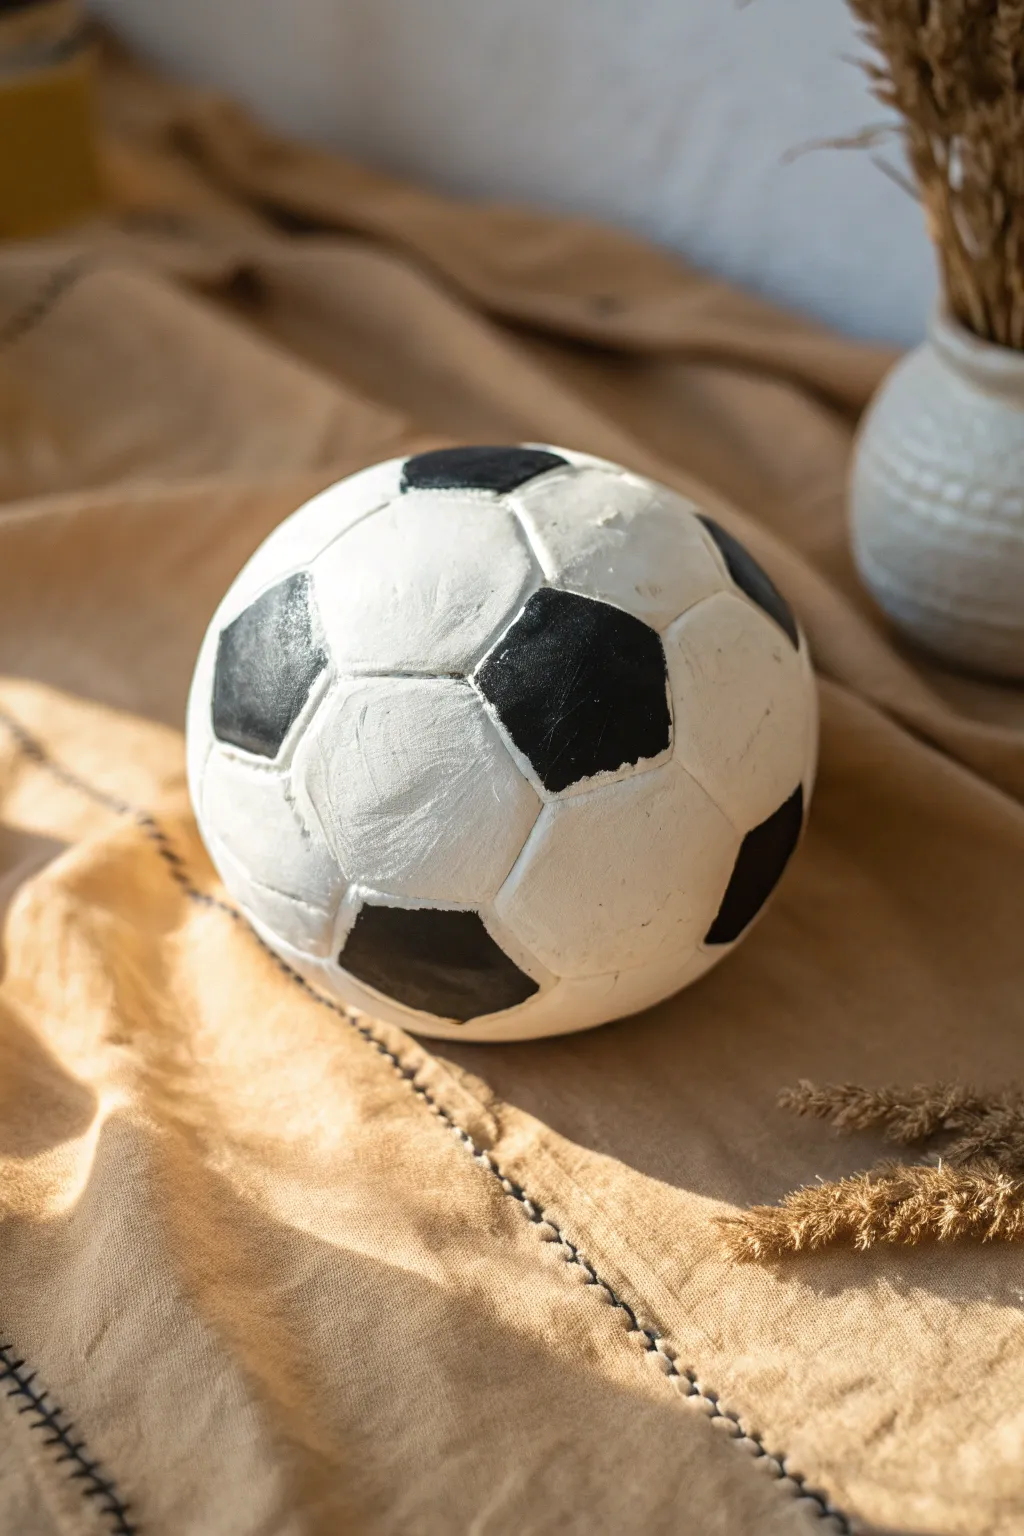
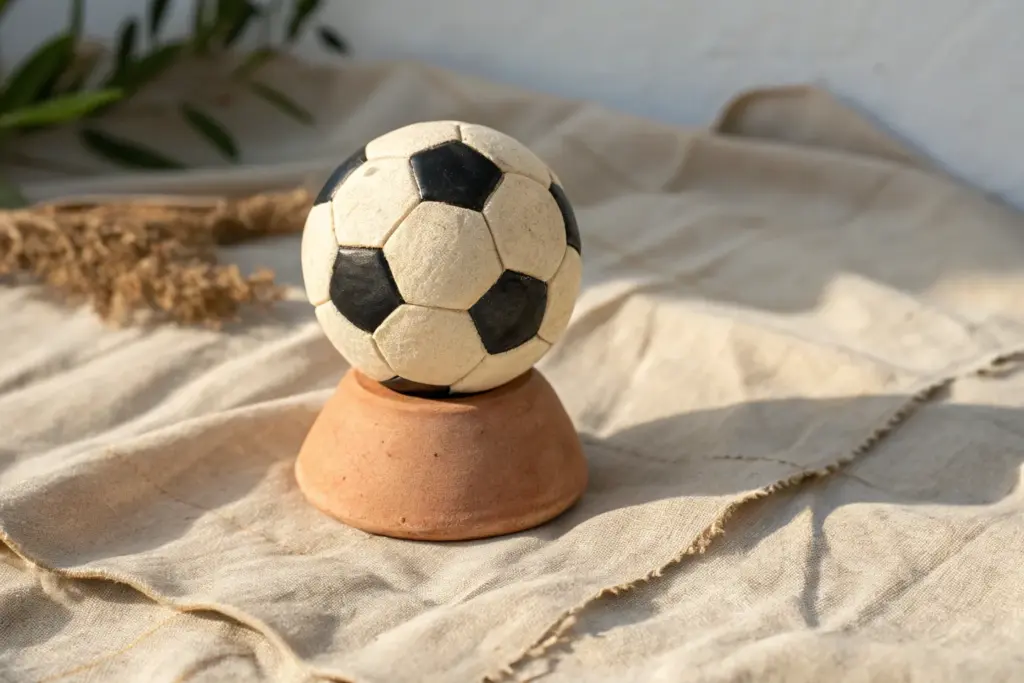
This charmingly rustic clay soccer ball captures the spirit of the game with an artistic, handmade touch. Its textured surface and classic black-and-white panels make it a perfect decorative piece for a sports-themed shelf or desk.
How-To Guide
Materials
- Air-dry clay (white)
- Acrylic paint (black and white)
- Small paintbrush (flat and round)
- Sculpting tools or a dull pencil
- Cup of water
- Fine-grit sandpaper (optional)
- Clear matte varnish
Step 1: Forming the Base
-
Condition the clay:
Start by grabbing a generous handful of white air-dry clay. Knead it thoroughly in your hands to warm it up and ensure it’s pliable and free of air bubbles. -
Shape the sphere:
Roll the clay between your palms or against a flat surface to create a sphere. Aim for a ball roughly the size of a grapefruit or large orange. -
Smooth the surface:
Dip your fingers in a little water and gently run them over the ball to smooth out any major cracks or deep crevices. Don’t worry about making it perfectly round; the imperfections add character.
Geometry Hack
Use a printable paper template of a pentagon to trace your shapes onto the wet clay for more consistent sizing.
Step 2: Sculpting the Pattern
-
Mark the first pentagon:
Using a dull pencil or a sculpting tool, lightly sketch a five-sided pentagon shape somewhere on the surface to serve as your starting point. -
Sketch surrounding hexagons:
Draw hexagon shapes (six-sided) connecting to each side of your initial pentagon. This honeycomb-like pattern is the secret to the classic soccer ball look. -
Complete the grid:
Continue adding alternating pentagons and hexagons until the entire sphere is covered. You might need to fudge the shapes slightly at the bottom to make them fit, which is totally fine for this rustic style. -
Deepen the lines:
Go back over your sketched lines with a sculpting tool, pressing deeper into the clay to create distinct grooves that separate the panels. -
Refine the edges:
Use your finger or a damp tool to slightly soften the sharp ridges of the grooves so they look worn rather than surgically cut. -
Texture the panels:
Lightly tap the surface of each panel with a stiff brush or a textured sponge to give the ‘leather’ a bit of grain. -
Allow to dry:
Set your ball in a safe spot to dry completely. This usually takes 24 to 48 hours depending on the thickness. Rotate it occasionally so the bottom dries evenly.
Make it a Trophy
Before drying, flatten the bottom slightly and carve a name or jersey number into one of the panels to personalize it.
Step 3: Painting and Finishing
-
Base coat:
Once dry, paint the entire ball with a layer of white acrylic paint. This seals the clay and provides a bright, uniform base. -
Paint the black panels:
Identify the pentagon shapes in your pattern—these are the ones that should be black. Carefully fill them in with black acrylic paint using a smaller brush. -
Clean up edges:
If your black paint strays into the grooves, wait for it to dry and then touch it up with white paint for a crisper look. -
Add a second coat:
I like to apply a second coat of white to the hexagonal panels to make the texture stand out and ensure solid coverage. -
Distress (optional):
For a vintage vibe, you can lightly dry-brush a tiny bit of grey paint over the white sections to highlight the texture. -
Seal the work:
Finish by applying a coat of clear matte varnish. This protects the paint and creates a nice, non-shiny finish like worn leather.
Now you have a unique piece of sports art ready to display


Tiny Soccer Ball Charms
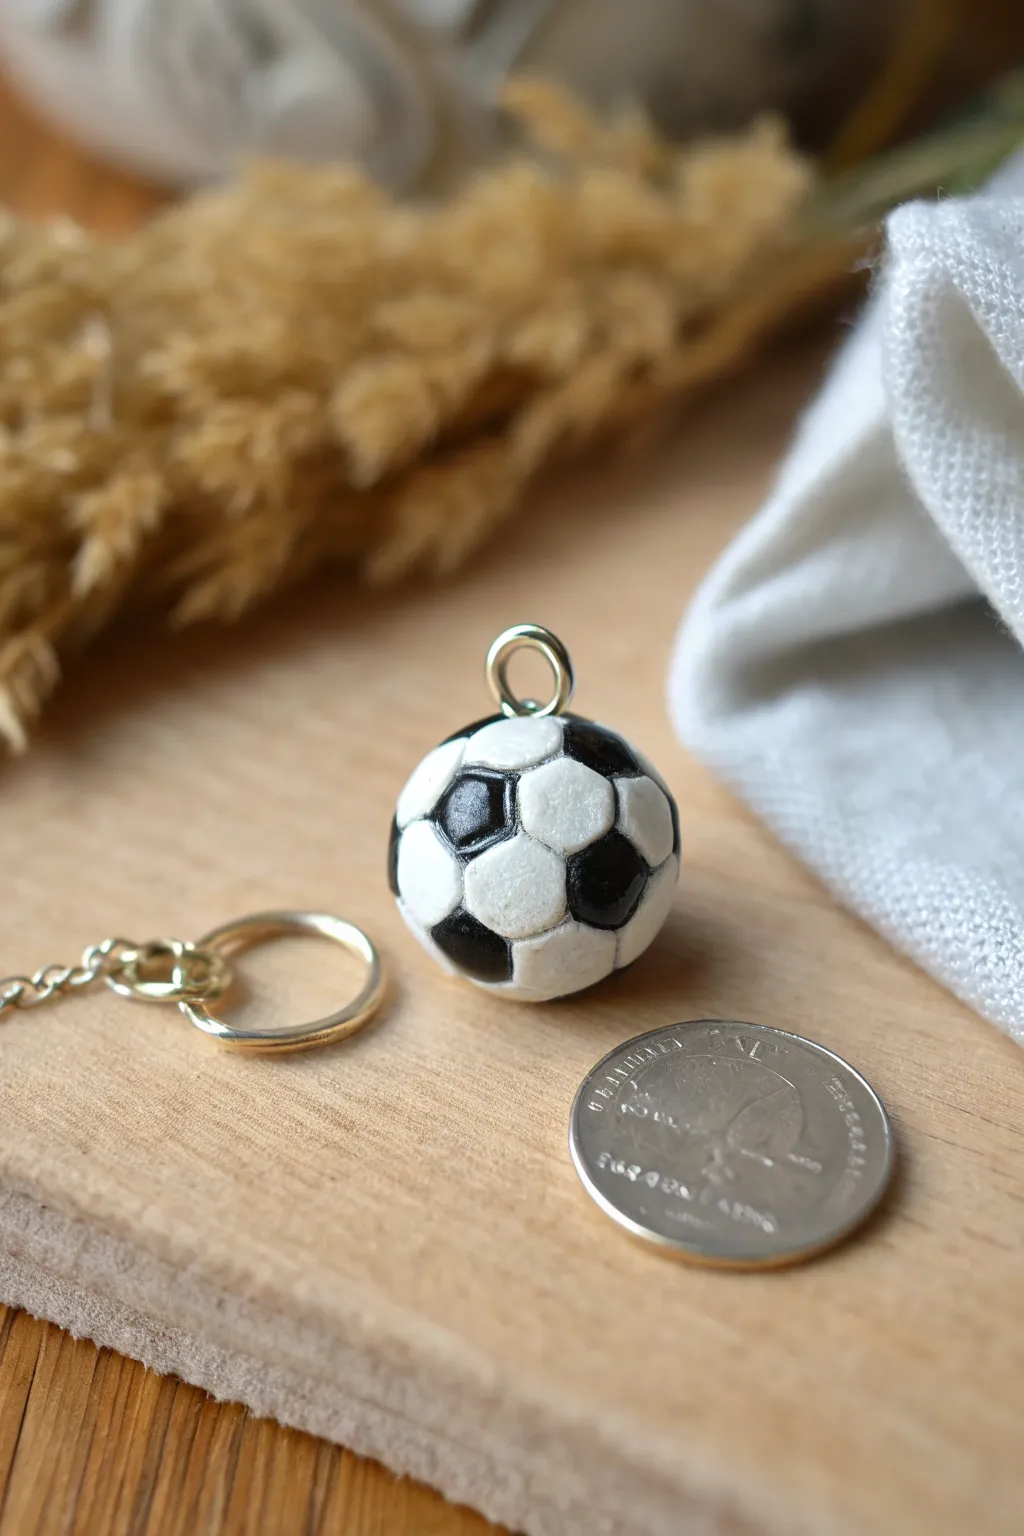
Create a sporty, pocket-sized accessory with this realistic miniature soccer ball charm tutorial. This tiny project captures the classic black and white pattern perfectly, making it an ideal gift for football fans or a cute addition to any keychain.
Step-by-Step
Materials
- White polymer clay
- Black polymer clay
- Liquid clay or bake and bond (optional)
- Small eye pin or screw eye
- Needle tool or toothpick
- Small round cutter (approx. 3-4mm diameter) or a straw
- Acrylic roller
- Gloss glaze or polyurethane varnish
- Soft paintbrush
- Oven for baking
Step 1: Forming the Core
-
Preparation:
Begin by conditioning both your white and black polymer clay until they are soft and pliable. Wash your hands after handling the black clay to avoid staining the white clay. -
Create the Base:
Roll a ball of scrap clay (or white clay) to create the core sphere. Aim for a size just slightly smaller than a marble, roughly 1.5 cm in diameter. Roll it between your palms until it is perfectly smooth. -
Insert Hardware:
Take your eye pin and trim it if necessary so it doesn’t poke through the bottom. Dip the end in a tiny bit of liquid clay for extra security and insert it straight down into the center of your base sphere.
Step 2: Creating the Pattern
-
Roll the Sheets:
Roll out a thin sheet of white clay and a thin sheet of black clay. They should be of equal thickness, roughly 1-2mm. -
Cut the Pentagons:
Using a tiny hexagonal or pentagonal cutter makes this easier, but to be specific to the ‘soccer ball’ geometry, you technically need black pentagons (5 sides) and white hexagons (6 sides). However, for a simplified style like the photo, using small circles that are pressed into shape works wonderfully. Use your small round cutter to cut out several black and white circles. -
Shape the Black Tiles:
Take a black clay circle and gently pinch five corners to create a soft pentagon shape. This doesn’t need to be mathematically perfect; soft edges look more like cushioned leather. -
Place the First Tile:
Place one black pentagon directly on the very top of your sphere, centered around the eye pin. You can carefully push the eye pin loop through the center of the first shape or place the shape right next to the hardware. -
Shape the White Tiles:
Taking your white circles, gently pinch six corners to suggest a hexagon shape. Again, keep the edges slightly rounded. -
First Layer Assembly:
Surround the central black pentagon with five white hexagons. Press them gently onto the sphere so their edges touch the black piece. They should fit snugly like puzzle pieces.
Geometry Hack
Don’t stress the exact geometry! If the shapes don’t fit perfectly at the bottom, just use white clay to fill the gaps. Since it’s the bottom, no one will notice the slight deviation.
Step 3: Completing the Sphere
-
Continue the Pattern:
Continue the pattern down the sides of the ball. Remember the rule: every black pentagon is surrounded by white hexagons. This geometry ensures the classic look. -
Closing Gaps:
As you work toward the bottom, you may need to gently stretch or squish the clay tiles slightly to make them fit the curvature of the sphere. The clay is forgiving, so nudge it into place. -
Smoothing the Seams:
Once the ball is covered, gently roll the entire soccer ball between your palms. Use a very light touch. This helps merge the seams and ensures the ball is round without flattening the texture. -
Adding Texture:
To mimic the stitched look of a real soccer ball, take your needle tool or a dull toothpick. Gently press into the seams where the black and white shapes meet. -
Refining the Shape:
I like to go back and slightly press the center of each tile with a rounded tool or my finger to make them look ‘puffed’ and full of air, enhancing the 3D effect shown in the image. -
Clean Up:
Inspect the white clay for any black smudges. You can carefully scrape them off with a craft knife or use a bit of rubbing alcohol on a Q-tip to clean the white sections.
Personalize It
Customize the charm for your favorite team by swapping the black clay for red, blue, or green. You can even paint a tiny jersey number on one of the white hexagons after baking.
Step 4: Baking and Finishing
-
Bake:
Bake the charm according to your clay manufacturer’s instructions. Usually, this is around 275°F (135°C) for 15-30 minutes, depending on the thickness. -
Cooling:
Let the piece cool completely before handling. It will be slightly soft when hot but hardens as it cools. -
Glazing:
For that shiny, sporty finish seen in the photo, apply a coat of gloss glaze or polyurethane varnish. This also helps protect the white clay from getting dirty over time. -
Final Assembly:
Once the varnish is dry, attach a jump ring to the eye pin loop, and connect it to your keychain or necklace chain.
Now you have a durable little charm ready to show off your love for the game


Soccer Ball Keychain Tag
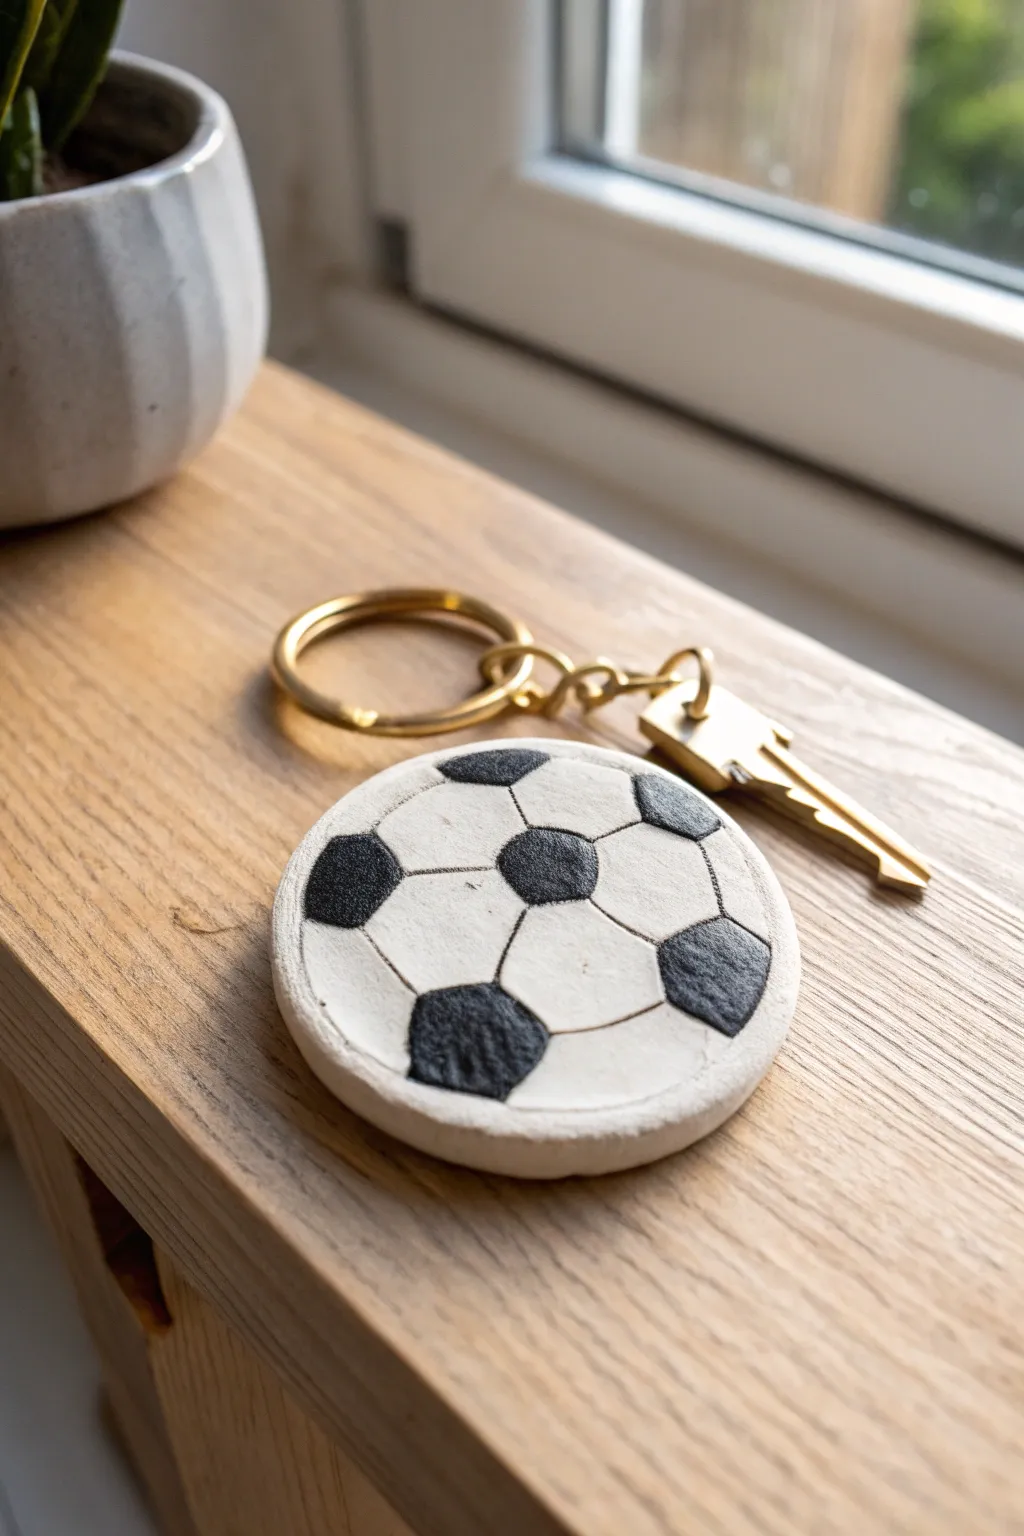
Carry your love for the game in your pocket with this rugged, handmade soccer ball tag. This simple clay project uses indented lines and careful coloring to create a tactile, durable accessory perfect for house keys or a gym bag.
How-To Guide
Materials
- White polymer clay or air-dry clay
- Rolling pin or acrylic roller
- Circular clay cutter (approx. 2 inches)
- Needle tool or toothpick
- Black fine-tip permanent marker or acrylic paint
- Small round paintbrush (if using paint)
- Sandpaper (fine grit)
- Gold keychain ring with chain and jump ring
- Straw or small drill bit
- Clear matte varnish (optional)
Step 1: Shaping the Base
-
Condition the Clay:
Begin by warming a chunk of white clay in your hands, kneading it until it is soft, pliable, and free of cracks. -
Roll it Out:
Use your rolling pin to flatten the clay into an even slab. Aim for a thickness of about 1/4 inch (6mm) to ensure the tag is sturdy enough for daily use. -
Cut the Circle:
Press your circular cutter firmly into the clay to create a clean, round disk. If you don’t have a cutter, trace a small jar lid with a craft knife. -
Smooth the Edges:
Dip your finger in a little water (for air-dry clay) or baby oil (for polymer) and gently run it around the cut edge to soften any sharp ridges. -
Create the Hole:
Use a drinking straw or a dedicated hole-punch tool to create an opening near the top edge for the hardware. Make sure it’s not too close to the rim, or it might break later.
Geometry Helper
Look at a real soccer ball or a photo while drawing. The pattern is always one black pentagon surrounded by white hexagons. Getting this logic right makes it look authentic.
Step 2: Designing the Pattern
-
Mark the Center:
With your needle tool, make a very tiny dot in the absolute center of the circle to guide your pattern. -
Draw the Central Pentagon:
Lightly sketch a pentagon (5-sided shape) in the center, using your guide dot. Don’t press too hard yet; just mark the shape. -
Add Radiating Lines:
From each of the five points of your center pentagon, draw a straight line extending outwards towards the edge of the circle. -
Form the Outer Hexagons:
Connect the ends of those radiating lines to create the surrounding hexagonal shapes. The pattern will drift off the edge of the circle, which gives it a realistic look. -
Deepen the Grooves:
Once you are happy with the layout, retrace all your lines with the needle tool, pressing firmly to create deep, visible grooves.
Distorted Clay?
If the circle stretches while you are carving lines, let the clay firm up in the fridge (polymer) or dry for 30 mins (air-dry) before carving to hold its shape better.
Step 3: Finishing Touches
-
Dry or Bake:
If using polymer clay, bake according to the package instructions. If using air-dry clay, let it sit in a dry, cool spot for 24-48 hours until fully hardened. -
Sand for Smoothness:
Once completely hard, use fine-grit sandpaper to gently buff the surface and edges, removing any fingerprints or rough burrs. -
Color the Pattern:
Identify the pentagons in your pattern (the center one and the partial ones near the edge). Fill these shapes in carefully with black acrylic paint or a black permanent marker. -
Clean Up Lines:
If any black color got into the white grooves, you can carefully scrape it away with your needle tool or paint over it with a tiny bit of white paint for a crisp look. -
Seal (Optional):
I prefer to brush on a thin coat of matte varnish to protect the paint from chipping in my pocket, but you can leave it raw for a more textured feel. -
Attach Hardware:
Open the jump ring with pliers, loop it through the hole you made earlier, and attach the gold keychain ring. Close the jump ring securely.
Clip your keys onto this sporty tag and enjoy a little reminder of the pitch every time you unlock the door


Soccer Ball Stud Earrings
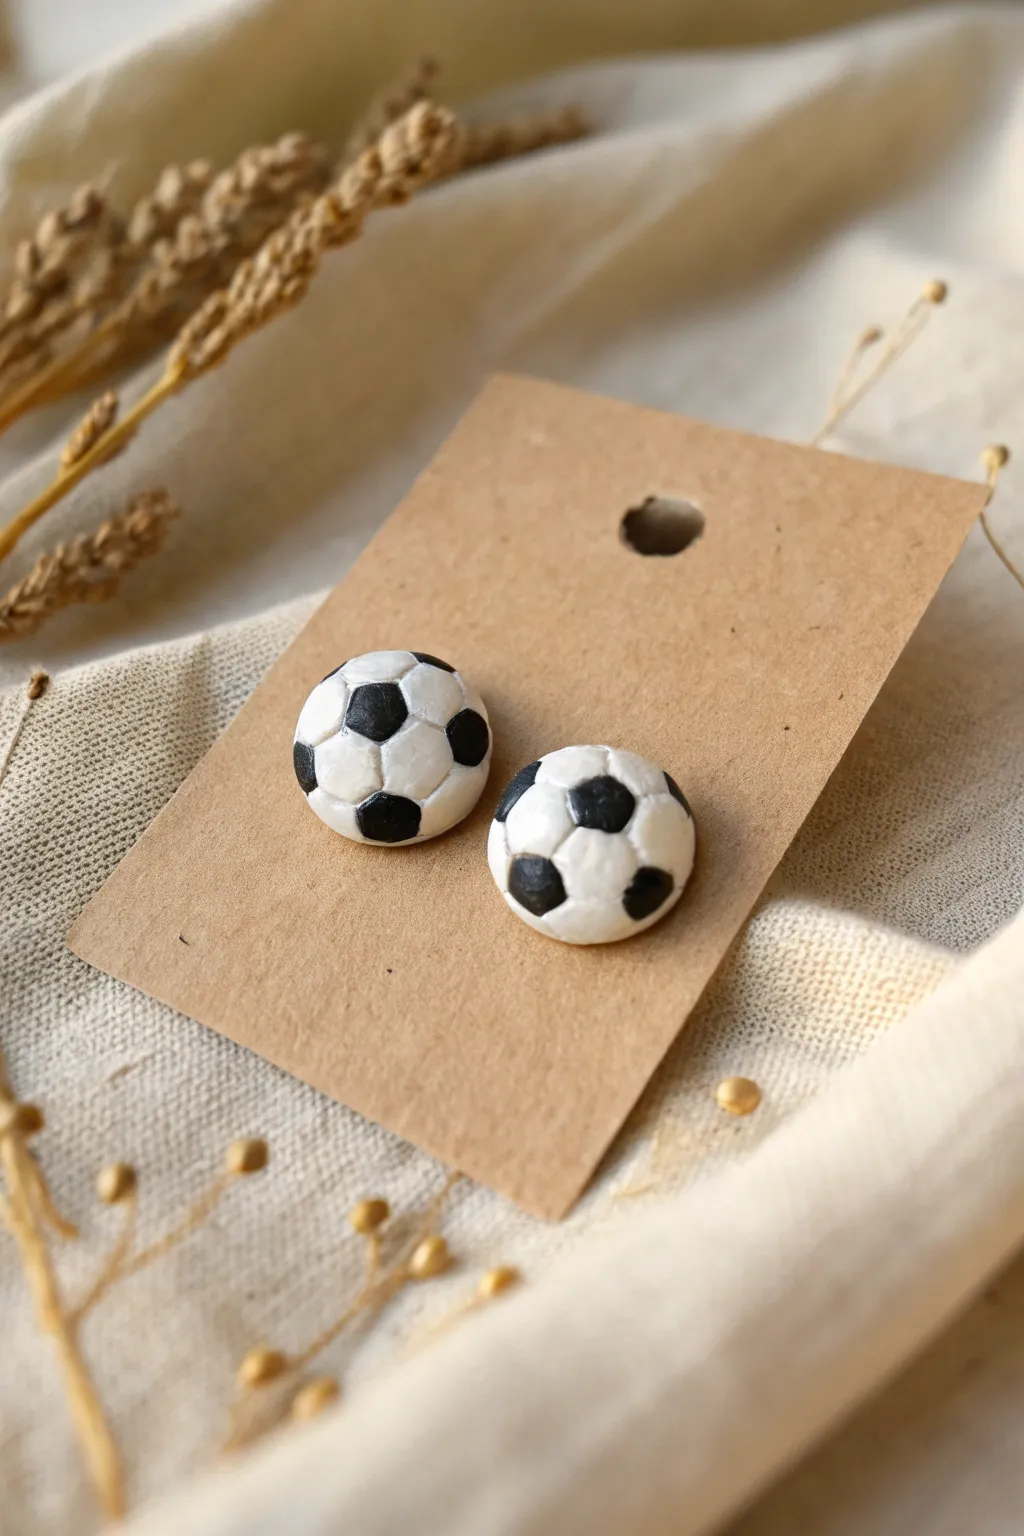
These charming stud earrings are perfect for sports fans, featuring the classic black-and-white soccer ball pattern in a petite, wearable size. The slightly textured finish gives them a delightful handmade quality rather than looking like mass-produced plastic.
Step-by-Step Tutorial
Materials
- White & Black polymer clay
- Small round cutter (approx. 10-12mm)
- Tiny hexagon cutter (optional) or X-Acto knife
- Ball stylus tool
- Acrylic rolling pin
- Earring stud posts (surgical steel or plastic)
- superglue or E6000
- Clay varnish or glaze (optional)
- Parchment paper or ceramic tile
Step 1: Creating the Base
-
Condition the white clay:
Begin by kneading a small amount of white polymer clay until it is soft and pliable. This conditioning step is crucial to prevent cracks during baking. -
Form the main domes:
Roll the conditioned white clay into a sheet about 3-4mm thick. Using your small round cutter, punch out two circles. -
Shape the studs:
Gently press the edges of each white circle downwards to round them off, creating a smooth, low-profile dome shape. These will be the core of your soccer balls.
Step 2: Building the Pattern
-
Prep the black clay:
Condition a tiny bit of black clay. Roll it out extremely thinly—much thinner than your base, almost paper-thin. -
Cut the pentagons:
If you have a micro-sized pentagon cutter, punch out several shapes. If not (which is likely for this scale!), use your X-Acto knife to cut tiny pentagons by hand. You’ll need about 5-6 per earring. -
Place the center pentagon:
Carefully lift one black pentagon with the tip of your knife or a needle tool and place it directly in the center of one white dome. -
Flatten the center:
Gently press the black shape into the white clay so it sits flush rather than resting on top. -
Add surrounding pentagons:
Place the remaining black pentagons around the sides of the dome, spacing them evenly. Imagine the white spaces between them forming the hexagons. -
Smooth the seams:
Once all black spots are placed, gently roll the entire dome in the palm of your hand or use an acrylic roller very lightly over the top to merge the clays together.
Smudged Black Clay?
Black clay stains easily. If you get smudges on the white parts, use a Q-tip dipped in a tiny bit of rubbing alcohol or acetone to gently wipe the white areas clean before baking.
Step 3: Detailing and Finishing
-
Define the panels:
Using a needle tool or the very edge of a knife, lightly press lines into the white clay connecting the corners of the black pentagons to create the soccer ball stitching effect. -
Clean up the shape:
If the rolling flattened your dome too much, gently cup it in your hands to restore the roundness. -
Bake the pieces:
Place your clay domes on a ceramic tile or parchment-lined baking sheet. Bake according to your specific clay brand’s instructions (usually around 275°F/130°C for 15-30 minutes). -
Cool down:
Allow the clay pieces to cool completely before touching them; they are fragile while hot. -
Prepare the posts:
Apply a small dot of strong adhesive, like E6000 or gel superglue, to the flat pad of your earring post. -
Attach the hardware:
Press the glued post firmly onto the flat back of the baked clay dome. I like to let these cure overnight to ensure the bond is unbreakable. -
Optional glaze:
If you want a shiny, sporty finish, brush a thin layer of polymer clay glaze over the surface and let it dry.
Make Them 3D!
instead of leaving the surface smooth, lightly indent the center of each white and black panel with a medium ball tool to give the ball a puffy, inflated look.
Now you have a sporty pair of accessories ready for gameday wear

The Complete Guide to Pottery Troubleshooting
Uncover the most common ceramic mistakes—from cracking clay to failed glazes—and learn how to fix them fast.
Soccer Ball Pendant Necklace
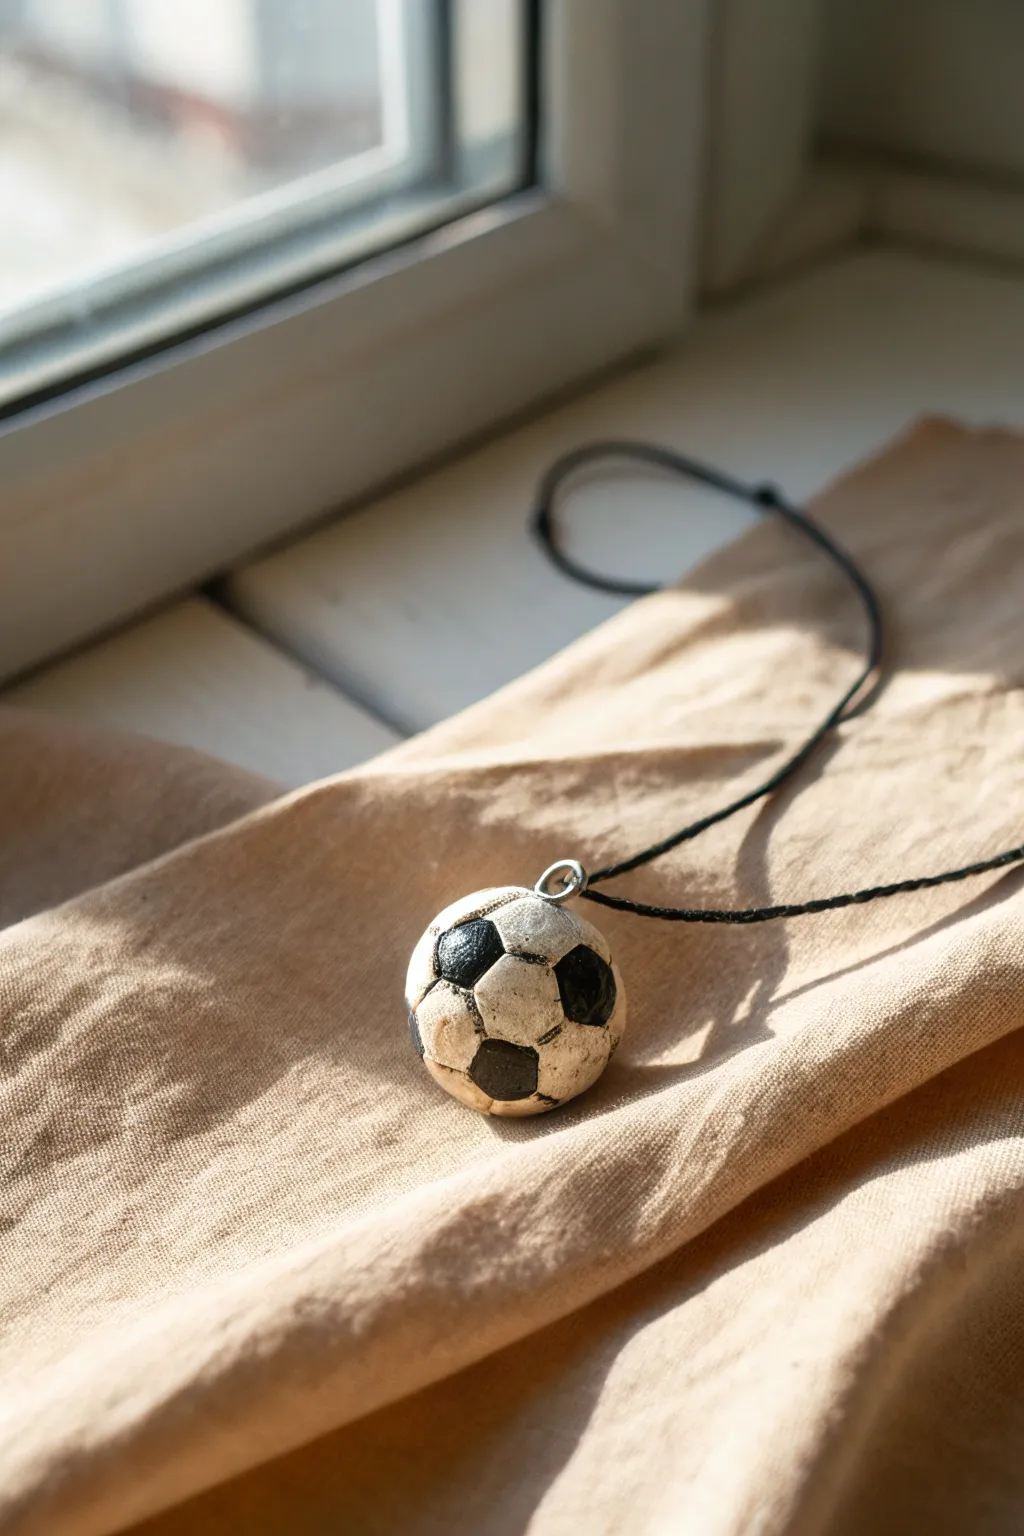
Create a sporty accessory with this charming handmade clay pendant that captures the classic look of a soccer ball. The rustic, hand-sculpted finish gives it a unique character, perfect for hanging on a simple cord.
Detailed Instructions
Materials
- White air-dry clay or polymer clay
- Black acrylic paint
- Fine detail paintbrush
- Small metal screw eye pin
- Fine-grit sandpaper
- Black cord or necklace chain
- Sculpting tool or toothpick
- Clear varnish or sealant (optional)
Step 1: Forming the Base
-
Condition the clay:
Start by taking a small amount of white clay, roughly the size of a large marble. Knead it in your hands until it becomes soft, pliable, and free of cracks. -
Roll a sphere:
Roll the clay between your palms to form a smooth, tight ball. Aim for a diameter between 0.75 and 1 inch, depending on how chunky you want the final pendant to be. -
Check for imperfections:
Examine the sphere closely. If you see any seams or cracks, smooth them out gently with a wet finger (for air-dry clay) or a smoothing tool. A smooth base is crucial for painting later. -
Insert the hardware:
While the clay is still soft, carefully insert the metal screw eye pin into the top of the sphere. Push it in until only the loop is visible. If using air-dry clay, adding a tiny dot of glue on the screw threads helps secure it permanently.
Step 2: Sculpting the Pattern
-
Map out the pentagons:
Using a toothpick or a very fine needle tool, very lightly sketch a pentagon shape (five sides) on the front center of the ball. This will be your starting point. -
Connect the hexagons:
Surround that central pentagon with hexagons (six sides). The classic soccer ball pattern consists of black pentagons surrounded by white hexagons. -
Continue the pattern:
Work your way around the sphere, lightly sketching the connecting lines. Don’t worry if they aren’t geometric perfection; the hand-drawn look adds to the charm. -
Create texture:
Once you are happy with the layout, retrace your sketched lines with slightly more pressure to create shallow grooves. This adds physical texture that separates the panels. -
Dry the bead:
Allow the clay to dry or cure completely according to the manufacturer’s instructions. For air-dry clay, I usually let it sit for at least 24 hours to ensure the core is hard.
Geometry Tip
Can’t get the pattern right? Remember: a classic ball has 12 black pentagons and 20 white hexagons. Just ensure every black shape is totally surrounded by white ones.
Step 3: Painting and Finishing
-
Prep for painting:
If there are rough spots after drying, gently buff them with fine-grit sandpaper. Wipe away any dust with a damp cloth. -
Paint the pentagons:
Dip a fine detail brush into black acrylic paint. Carefully fill in the pentagon shapes you etched earlier. Use a steady hand to keep the paint within the grooves. -
Touch up the white:
If the base clay isn’t bright white or if you got black paint on the wrong sections, you can paint the hexagon sections with white acrylic paint to clean up the edges. -
antiquing (optional):
To achieve the slightly weathered look seen in the photo, you can dilute a tiny drop of brown or grey paint with lots of water. Brush this wash over the ball and immediately wipe it off with a paper towel, leaving pigment only in the indented lines. -
Seal the piece:
Once the paint is fully dry, apply a thin coat of clear varnish or sealant. This protects the paint from chipping and gives the ball a finished sheen. -
String the pendant:
Thread your black cord through the metal eye loop. Tie a simple knot or add clasps to the ends of the cord to finish your necklace.
Personalize It
Instead of black and white, paint the pentagons in your favorite team’s colors, or add a tiny jersey number on one of the white panels for a custom player gift.
Now you have a sporty, custom piece of jewelry ready to wear to the next big match
Soccer Ball Magnets for the Fridge
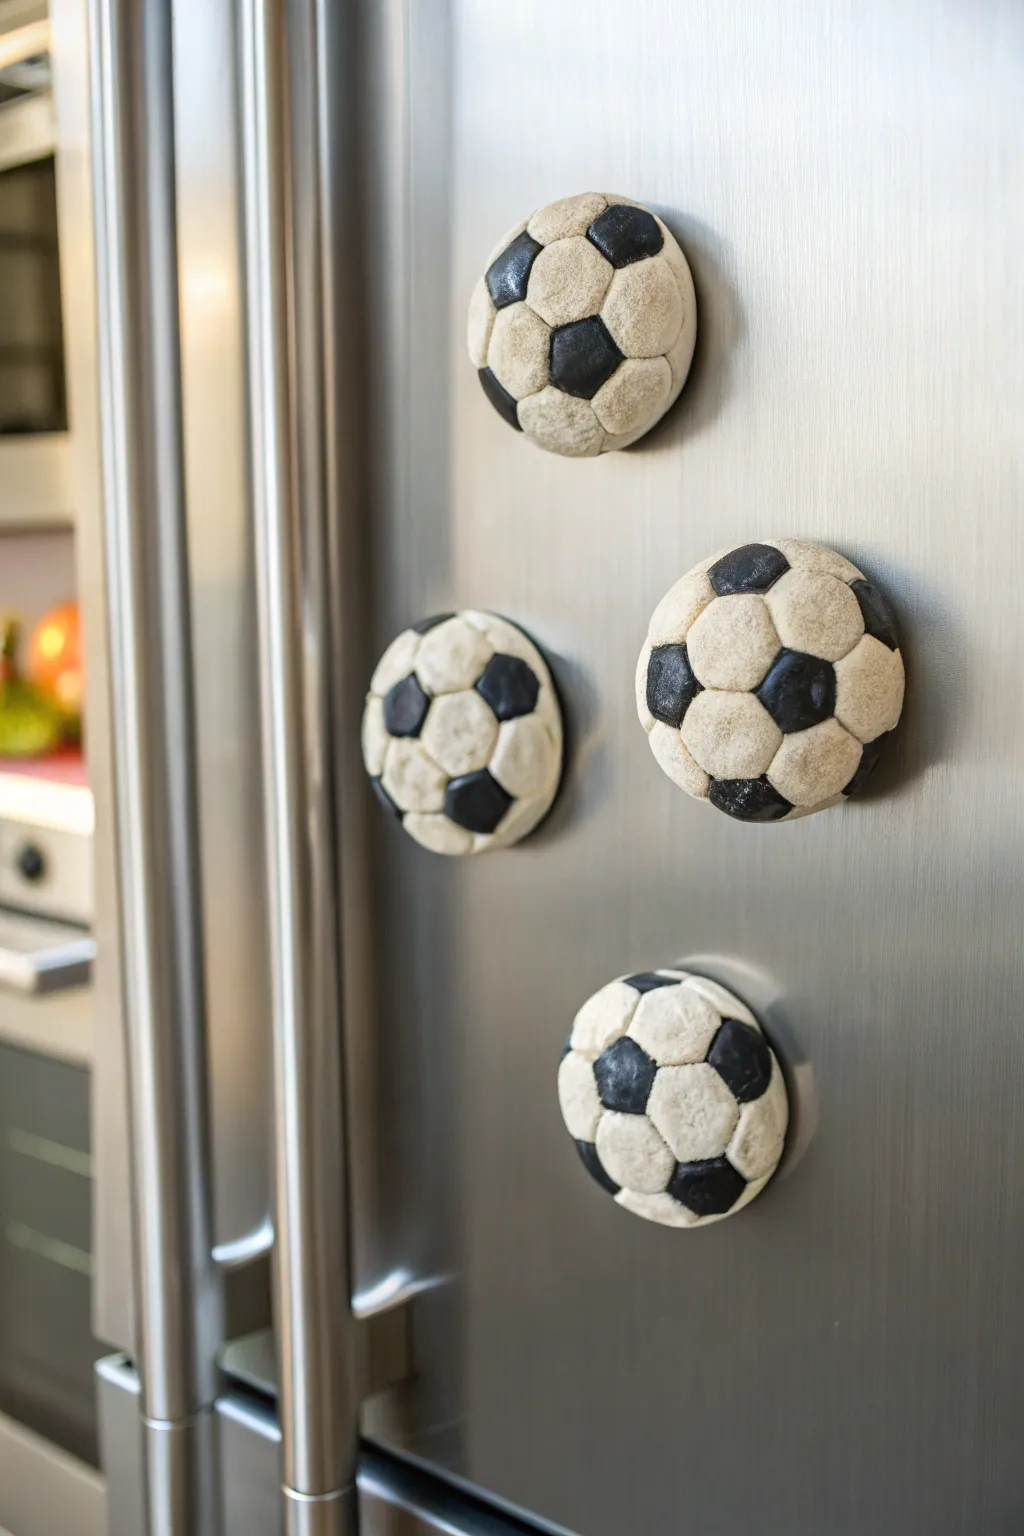
Create a sporty set of refrigerator magnets that look like miniature, textured stone soccer balls. These half-sphere clay creations add a fun, uniform pop of athletic charm to any metal surface.
How-To Guide
Materials
- White or light beige polymer clay
- Black polymer clay
- Strong round ceramic or neodymium magnets
- Super glue or strong craft adhesive
- Rolling pin (acrylic or glass)
- Small hexagon clay cutter (optional) or craft knife
- Small pentagon clay cutter (optional) or craft knife
- Baking sheet
- Parchment paper
- Oven (for baking polymer clay)
Step 1: Forming the Base
-
Prepare the base clay:
Start by conditioning your white or beige clay until it is soft and pliable. Roll four balls of equal size, approximately 1.5 inches in diameter. -
Shape the domes:
Cut each ball perfectly in half to create two hemispheres. You can also just press a ball against a flat surface and mold it into a dome shape, but cutting a sphere ensures a flat back. -
Smooth the surface:
Using your thumb, smooth the dome surface to remove any major fingerprints, but don’t worry about making it perfectly glass-smooth; a little texture adds character. -
Embed the magnet (optional method):
If you want the magnet embedded, press your magnet into the flat back of the dome now to create an indentation, then carefully remove it before baking. This ensures a flush fit later.
Step 2: Creating the Pattern
-
Roll out thin sheets:
Roll out a small amount of white clay and black clay into very thin sheets, roughly 1-2mm thick. -
Cut the shapes:
You will need small black pentagons (5 sides) and white hexagons (6 sides). Use tiny cutters if you have them, or print a small template and cut them out with a craft knife. -
Place the center piece:
I find it easiest to start at the very top center of the dome. Gently press one black pentagon onto the peak of the dome. -
Add first surrounding layer:
Surround that first black pentagon with five white hexagons. Each side of the black pentagon should touch one side of a white hexagon. -
Continue the pattern:
In the gaps between the white hexagons, place new black pentagons. Continue this tiling pattern down the sides of the dome. -
Trim the edges:
As you reach the bottom edge of the dome, the shapes will hang over. Use your craft knife to trim the shapes flush with the flat bottom of the dome.
Fixing Gaps
If gaps appear between your black and white shapes while placing them, don’t panic. Gently smudge the clay sideways to fill the void before doing the final texturing step.
Step 3: Texturing and Finishing
-
Merge the seams:
Gently roll the entire dome on your work surface or in your palms. This pushes the clay tiles together, closing the gaps and merging them into the base dome. -
Add store-bought texture:
To get that specific stone-like or rough fabric look seen in the photo, take a piece of sandpaper or a stiff-bristled toothbrush and tap it all over the surface of the clay. -
Refine the shape:
The texturing might have slightly deformed the dome. Give it one last check to ensure it’s still round and the bottom is flat. -
Bake the clay:
Place your finished domes on a baking sheet lined with parchment paper. Bake according to your polymer clay package instructions (usually 275°F for 15-30 minutes). -
Cool down:
Let the clay cool completely in the oven or on a wire rack before handling. The clay is fragile while hot. -
Attach the magnets:
Apply a dab of super glue or strong craft adhesive to the back of the clay dome (or into the indentation you made earlier). -
Final cure:
Press the magnet firmly into the glue and let it sit undisturbed for the full cure time recommended by your glue manufacturer.
Personalize It
Use a needle tool to lightly scratch initials or jersey numbers into one of the white hexagons before baking for a custom team gift.
Once the glue is fully set, your sporty magnets are ready to hold up schedules and photos with style


What Really Happens Inside the Kiln
Learn how time and temperature work together inside the kiln to transform clay into durable ceramic.
Soccer Coasters With Ball Pattern
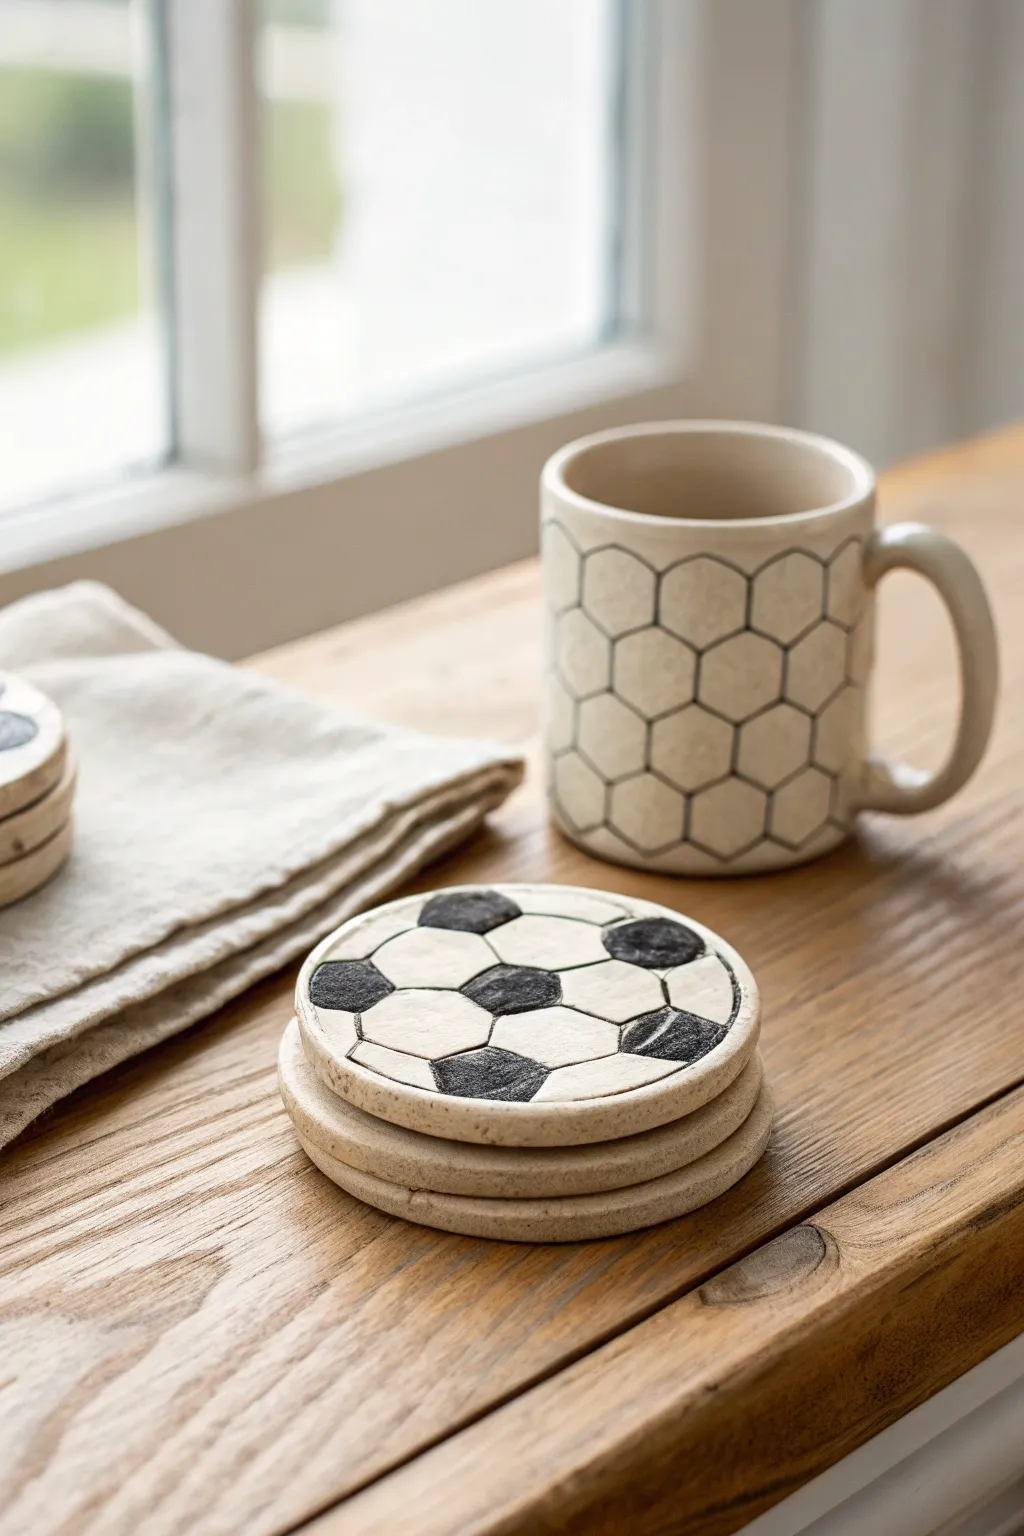
Bring the game to your coffee table with these charming, rustic ceramic coasters featuring a classic soccer ball pattern. The natural clay texture combined with simple black underglaze creates a beautiful, earthy finish that looks great in any living room.
Detailed Instructions
Materials
- Speckled stoneware clay (mid-fire)
- Rolling pin
- Guide sticks or slats (approx. 1/4 inch thick)
- Round cookie cutter (approx. 4 inches) or a template
- Fettling knife or needle tool
- Smoothing rib (rubber or metal)
- Sponge
- Black underglaze
- Small detail paintbrush
- Clear matte glaze
- Kiln (or access to a firing service)
Step 1: Preparation & Forming
-
Wedging the Clay:
Begin by thoroughly wedging a ball of speckled stoneware clay to remove air bubbles and ensure an even consistency. This is crucial for flat pieces to prevent warping later. -
Rolling the Slab:
Place your clay between two wooden guide sticks. Using your rolling pin, roll the clay out into a smooth, even slab. The guides ensure your coasters are perfectly uniform in thickness. -
Smoothing the Canvas:
Before cutting, take a rubber rib and compress the surface of the slab. I like to do this on both sides to align the clay particles, which significantly helps minimize warping during drying. -
Cutting the Rounds:
Use your round cookie cutter to punch out circles from the slab. If you don’t have a cutter large enough, trace around a wide mug or bowl with a needle tool. -
Refining Edges:
Once cut, the edges might be sharp. Gently wipe them with a damp sponge or smooth them with your finger to create a soft, rounded rim.
Troubleshooting: Warping
If your coasters curl up edges during drying, flip them over daily and dry them very slowly under loose plastic sheeting to equalize moisture loss.
Step 2: Designing the Pattern
-
Planning the Pentagons:
Lightly sketch the soccer pattern onto the leather-hard clay using a pencil. Start with a pentagon in the center, then draw hexagons surrounding it. The pencil lead will burn off in the kiln, so don’t worry about mistakes. -
Carving the Lines:
Using a needle tool or a fine sgraffito tool, gently carve or incise the lines you just sketched. You want a shallow groove that defines the shapes without cutting too deep into the coaster. -
Cleaning the Burrs:
Carving often leaves little clay crumbs or ‘burrs.’ Wait until the clay is bone dry to brush these away, or carefully smooth them down now with a barely damp sponge.
Level Up: Matching Set
Use the same hexagon pattern to carve a texture onto a matching wheel-thrown mug for a complete beverage set.
Step 3: Glazing & Firing
-
Bisque Firing:
Let your coasters dry slowly between two boards or under plastic to keep them flat. Once bone dry, fire them to cone 04 (bisque). -
Applying Underglaze:
On the bisqued ware, use a small detail brush to fill in the pentagons with black underglaze. Leave the hexagons bare to show off the raw speckled clay provided. -
Highlighting Lines:
You can also run a very thin line of black underglaze into the carved grooves to define the borders between the shapes. -
Waxing the Bottom:
Apply wax resist to the bottom of the coasters to prevent them from sticking to the kiln shelf. -
Clear Glazing:
Dip the top of the coaster or brush on a coat of clear matte glaze. This seals the clay and makes the coaster water-resistant while preserving that natural stone look. -
Final Firing:
Fire the coasters to the temperature required by your clay body (usually cone 5 or 6 for stoneware). Allow the kiln to cool completely before unloading. -
Adding Feet:
Stick small felt or cork pads to the bottom of the finished coasters to protect your wooden furniture from scratches.
Enjoy using your durable, handmade coasters for your next match-day gathering
Soccer Ball Trinket Dish
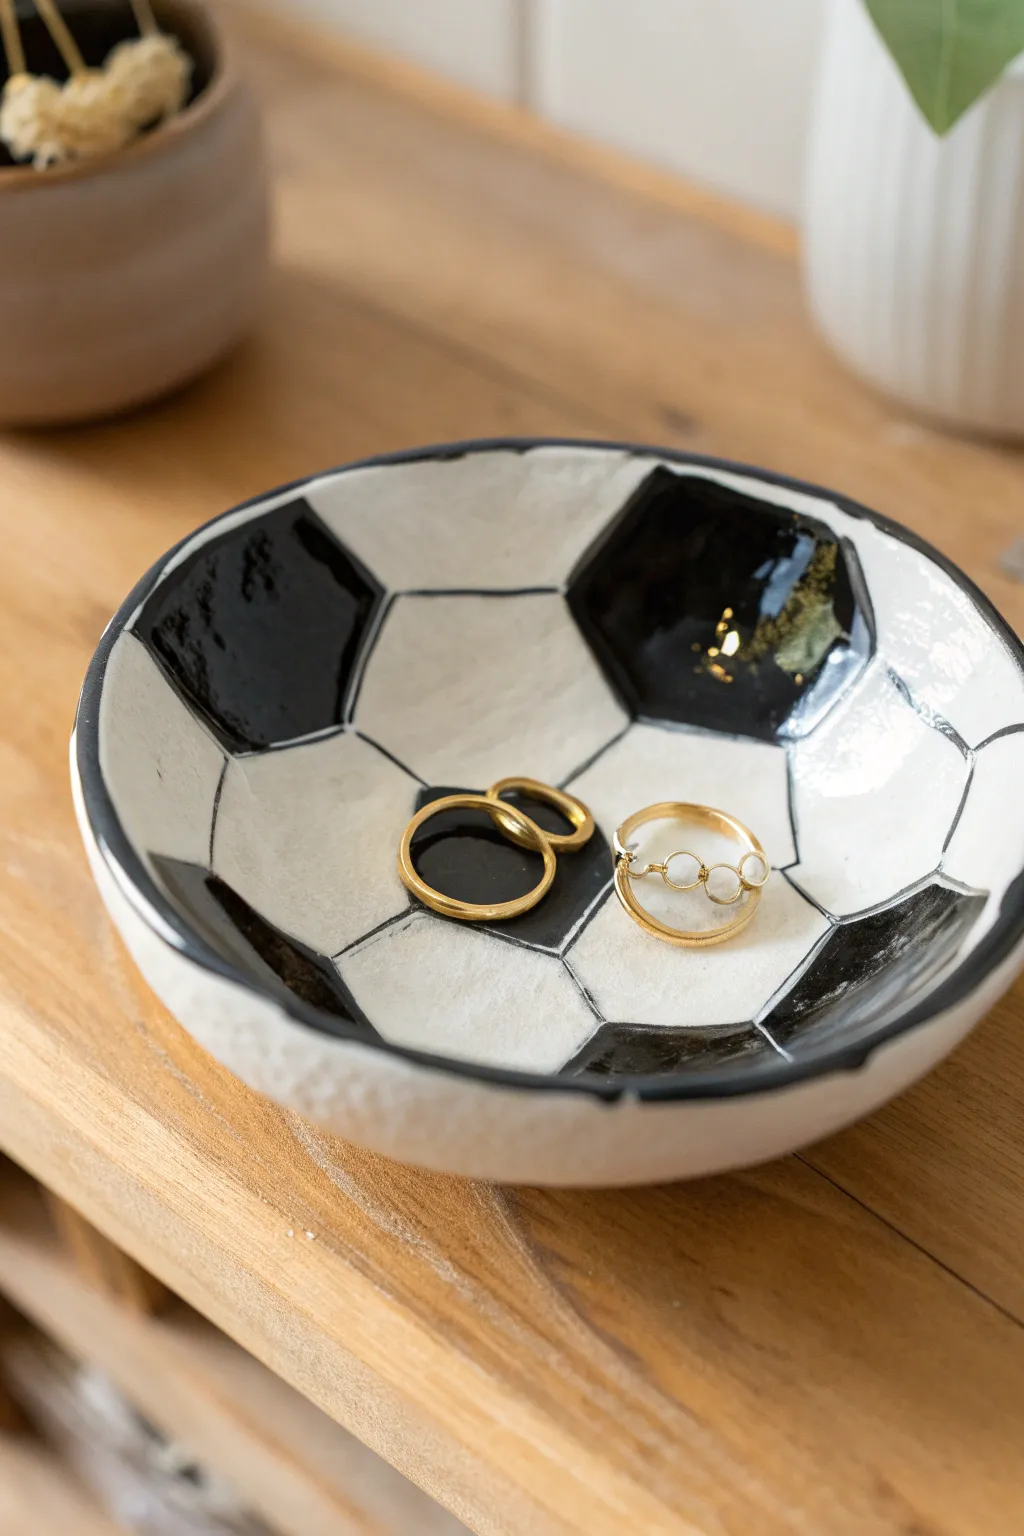
Keep your favorite rings safe in this charming, sporty trinket dish that looks just like a deflated soccer ball. Handmade from air-dry clay and painted with a classic black-and-white pattern, it’s the perfect functional decor piece for soccer fans.
Step-by-Step Tutorial
Materials
- Air-dry clay (white)
- Rolling pin
- Small bowl (to use as a mold)
- Craft knife or clay cutter
- Sandpaper (fine grit)
- Acrylic paint (black and white)
- Small detail paintbrush
- Flat shader brush
- Pencil
- Glossy varnish or sealant (Mod Podge or spray acrylic)
- Water cup
Step 1: Shaping the Base
-
Condition the clay:
Start by taking a handful of air-dry clay and kneading it in your hands until it becomes soft, pliable, and free of cracks. -
Roll it out:
Using a rolling pin, flatten the clay into an even slab. Aim for a thickness of about 1/4 inch (6mm) to ensure the dish is sturdy but not too heavy. -
Cut the circle:
Find a bowl or a large round cookie cutter that is roughly 4-5 inches wide. Place it face down on the clay and cut around it with your craft knife to create a perfect circle. -
Smooth the edges:
Dip your finger in a little bit of water and run it along the cut edge of the circle to smooth out any roughness or sharp debris. -
Mold the shape:
Gently lift your clay circle and place it inside your molding bowl. Press it down lightly so it takes on the curved shape of the bowl bottom. Don’t press too hard, or the clay might stick. -
Let it dry:
Allow the clay to dry completely inside the mold. This usually takes 24-48 hours depending on humidity. You’ll know it’s ready when the clay turns bright white and feels hard.
Wobbly Lines?
If painting straight lines is tricky, use a black acrylic paint marker or a permanent marker for the outlining step. It offers much more control than a brush.
Step 2: Creating the Soccer Pattern
-
Sand the surface:
Once fully dry, pop the clay out of the mold. Use fine-grit sandpaper to gently smooth out any bumps on the rim or the inside surface. -
Plan the center:
Using a pencil, lightly draw a pentagon (5-sided shape) in the very center of the dish. This will be the starting point for your soccer ball pattern. -
Draft the surrounding hexagons:
Draw lines extending from each point of the center pentagon. Connect these to form hexagons (6-sided shapes) surrounding the center shape. -
Extend to the rim:
Continue the pattern outward until you reach the rim of the dish. The shapes at the edge won’t be complete; just draw them as if they are cut off by the rim. -
Review the geometry:
Double-check your sketch. A standard soccer ball pattern alternates dark pentagons and white hexagons. I find it helpful to lightly mark a small ‘B’ inside the shapes that will be painted black to avoid confusion later.
Step 3: Painting and Sealing
-
Paint the black panels:
Using a small detail brush and black acrylic paint, carefully fill in the central pentagon. Then, paint the coordinating alternating shapes black according to your markings. -
Paint the white panels:
Rinse your brush thoroughly. Use white acrylic paint to fill in the remaining hexagon shapes. You may need two coats of white to make it opaque against the clay. -
Define the lines:
Use your thinnest brush with black paint to carefully go over the dividing lines between the shapes. This crisp outline makes the pattern pop. -
Detail the rim:
Paint the top rim of the dish black to create a finished border that frames the pattern nicely. -
Paint the exterior:
Flip the dish over and paint the outside. You can continue the pattern if you’re feeling ambitious, or simply paint it solid white for a cleaner look. -
Add the varnish:
Once all paint is totally dry, apply a coat of glossy varnish or sealant. This gives the dish that shiny, ceramic-like finish seen in the photo and protects the paint from chipping.
Pro Tip: Surface Texture
For a leather-like texture before drying, gently press a piece of real fabric or a sponge onto the wet clay surface before shaping it into the bowl.
Now you have a stylish spot to drop your jewelry after a long day on the field

TRACK YOUR CERAMIC JOURNEY
Capture glaze tests, firing details, and creative progress—all in one simple printable. Make your projects easier to repeat and improve.
Mini Soccer Cleat Figurine
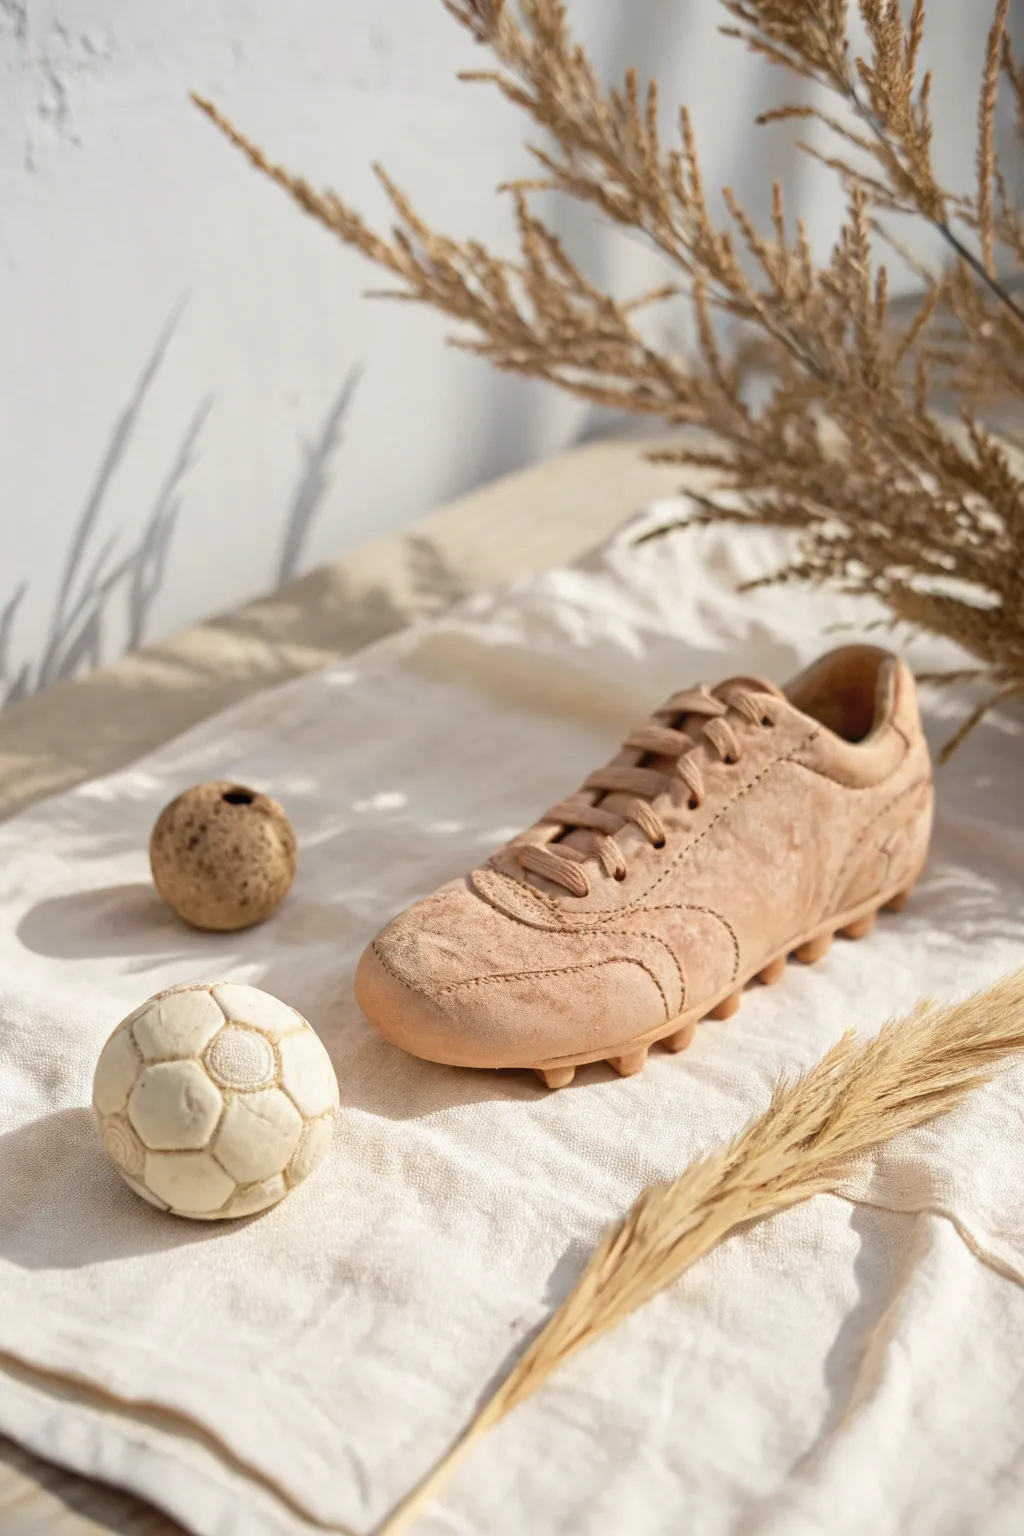
This project guides you through sculpting a remarkably realistic miniature soccer cleat, complete with stitching details and laces, paired with a small soccer ball. The finished piece has a natural, earthy finish that looks wonderful as a desk ornament or a unique gift for a football fan.
Detailed Instructions
Materials
- Polymer clay (beige or terracotta color) or air-dry clay
- Sculpting tools (needle tool, ball stylus, rubber shaper)
- Small rolling pin
- Reference photo of a soccer cleat
- Texture sponge or stiff brush
- Exacto knife or craft scalpel
- Aluminum foil (for armature)
- Thin clay extruder (optional, for laces)
- Water (if using air-dry clay) or clay softener
Step 1: Forming the Base Structure
-
Create the foil core:
Begin by crumpling aluminum foil into the rough shape of a shoe. This saves clay and keeps the sculpture lightweight. Make the heel rounded and the toe area slightly tapered and lower. -
Establish the sole:
Roll out a slab of clay about 1/4 inch thick. Place your foil armature on top and trace around it to create the sole, leaving a tiny bit of excess margin. -
Cover the armature:
Roll out a thinner sheet of clay and drape it over the foil form. Press it gently against the foil, smoothing the seams where it meets the sole plate underneath. Ensure the silhouette looks like a shoe before adding details.
Realism Trick
Before baking, lightly dust the textured areas with a slightly darker pastel chalk powder. This settles into the cracks and enhances the ‘leather’ look.
Step 2: Adding Shoe Panels and Details
-
Define the shoe opening:
Use your knife to carefully cut out the opening for the ankle. Smooth the edges of this rim with a finger or a rubber tool so it looks finished and rounded, not sharp. -
Add the heel counter:
Cut a curved strip of clay and attach it to the back heel area to simulate the reinforced heel counter found on real cleats. -
Create the toe cap:
Roll a small semi-circle of clay and layer it over the toe area. Use a needle tool to gently impress ‘stitch’ marks along the edge where this panel overlaps the main body. -
Score the stitching lines:
Using a needle tool or a very fine point, draw the decorative stitching lines usually found on the sides of leather cleats. I like to make small, rhythmic pokes to simulate individual thread holes. -
Texture the surface:
Take a texture sponge or a stiff bristle brush and gently tap it all over the ‘leather’ parts of the shoe. This removes fingerprints and gives the clay a realistic suede or worn leather appearance.
Collapsing Laces?
If your thin clay laces keep breaking or sagging, drape them over a small curve of paper or foil while you work, then remove the support after the clay hardens.
Step 3: Lacing and Soles
-
Make the tongue:
Fashion a small rectangular tongue piece and insert it just inside the front of the ankle opening, pressing it down so it sits naturally under where the laces will go. -
Create the eyelets:
Punch small holes in parallel lines running up the instep of the shoe to serve as the eyelets for your laces. -
Thread the laces:
Roll extremely thin snakes of clay (or use an extruder). Carefully cross them back and forth over the tongue, pressing the ends into the eyelet holes to make it look like they are threaded through. -
Form the studs:
Flip the shoe over gently. Roll small balls of clay, flatten them slightly into cones or cylinders, and attach them to the sole plate. Arrange them in a standard cleat pattern: usually four at the heel and several across the forefoot.
Step 4: Sculpting the Accessories
-
Form the ball core:
Roll a solid sphere of clay about 1.5 inches in diameter for the soccer ball. -
Mark the pentagons:
Lightly sketch a pentagon/hexagon pattern onto the sphere. It doesn’t need to be mathematically perfect; a slightly rustic look fits the style. -
Deepen the seams:
Use a modeling tool to press firmly along your sketched lines, creating deep grooves that separate the panels of the ball. -
Add ball texture:
Gently texture the surface of each panel with your sponge to match the matte finish of the shoe. -
Final drying or baking:
If using polymer clay, bake according to the package instructions (usually 275°F for 15-30 minutes). If using air-dry clay, leave it in a dry, warm spot for 24-48 hours until fully hard.
Once fully cured, your clay sculpture is ready to be displayed as a sophisticated tribute to the beautiful game
Soccer Jersey Name Plaque
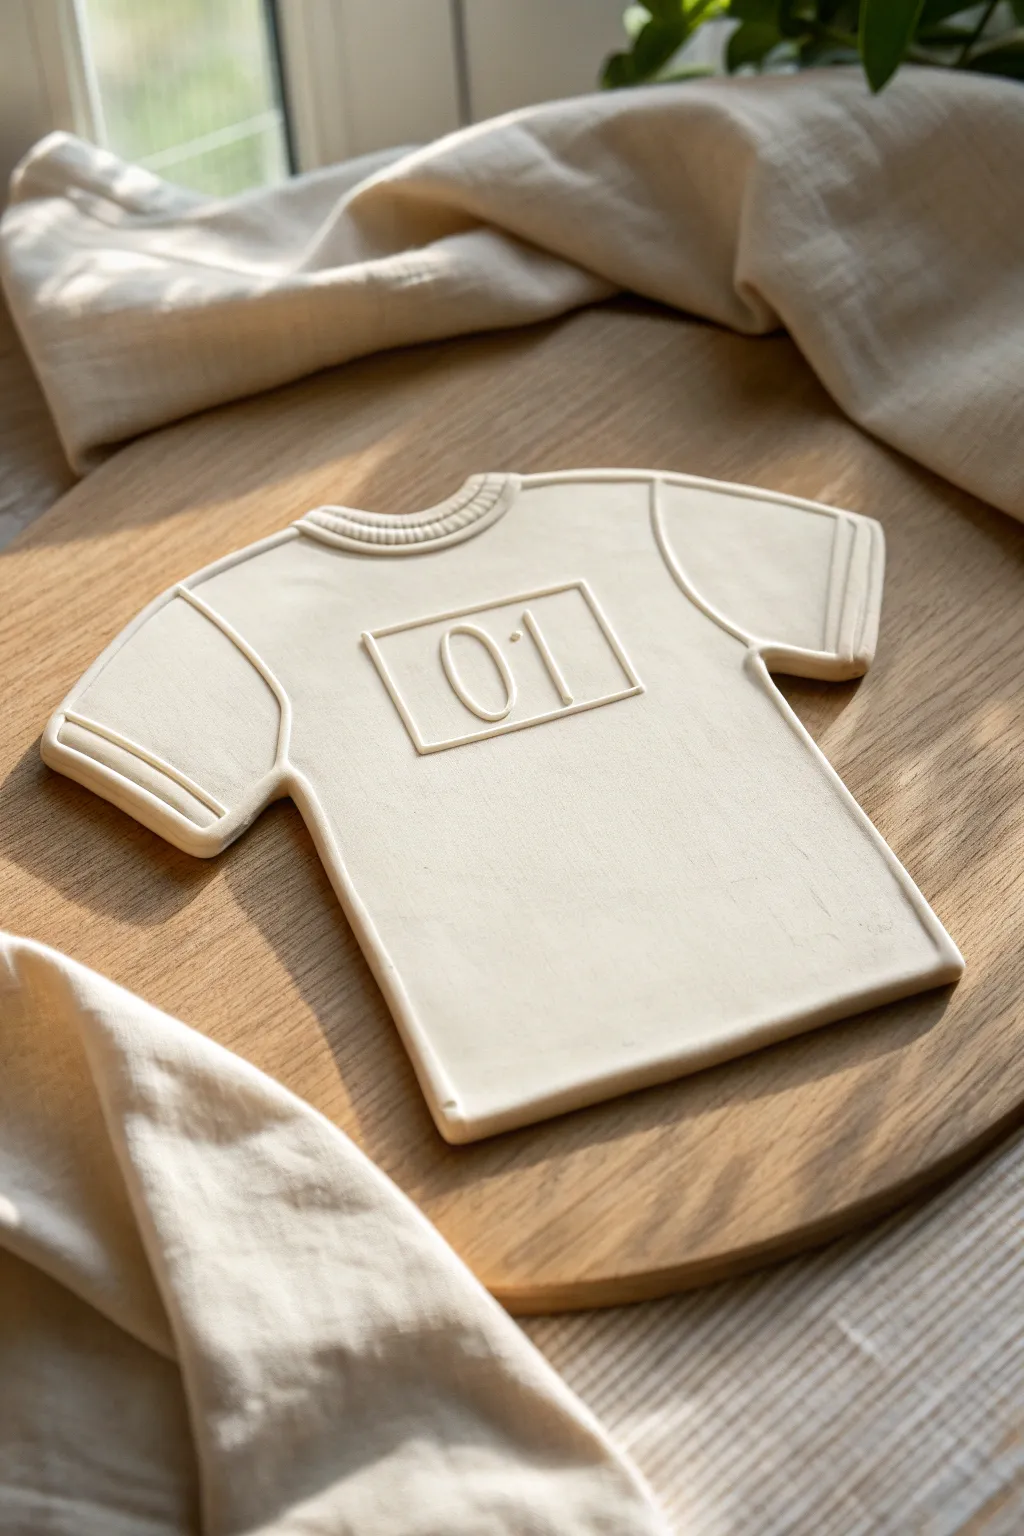
Capture the spirit of the game with this sleek, minimalist jersey plaque crafted from smooth white clay. It features charming embossed details like a ribbed collar and a jersey number, making it a perfect customized gift for the soccer fan in your life.
Step-by-Step Tutorial
Materials
- White smooth air-dry clay or polymer clay (approx. 200g)
- Rolling pin
- Parchment paper or clay mat
- X-Acto knife or sharp clay blade
- Jersey template (printed on paper)
- Needle tool or toothpick
- Small square cookie cutter (optional)
- Number stamps or small fondant cutters (numbers 0 and 1)
- Fine-grit sandpaper
- Water (for smoothing)
Step 1: Preparation and Cutting
-
Prepare your template:
Sketch a simple t-shirt outline on a piece of paper or cardstock to serve as your guide. Aim for a shape about 4-5 inches wide. Cut this paper template out. -
Condition the clay:
Take a generous handful of white clay and knead it until it is soft, pliable, and free of air bubbles. If using polymer clay, this might take a few minutes of warming it in your hands. -
Roll the slab:
Place the clay on parchment paper. Roll it out to an even thickness of about 1/4 inch (6mm). I prefer to use depth guides or wooden dowels on either side of the roller to ensure the thickness is perfect. -
Cut the shape:
Lay your paper template gently on top of the clay slab. Using your X-Acto knife, trace around the template carefully to cut out the jersey shape. Remove the excess clay.
Step 2: Adding Details
-
Smooth the edges:
Dip your finger in a tiny bit of water and run it along the cut edges of the jersey to soften any sharp angles left by the knife. The goal is a rounded, finished look. -
Create the collar:
Roll a very thin snake or coil of clay. Gently curve it around the neck opening of the jersey shape. Press it down lightly so it adheres. -
Texture the collar:
Use your needle tool to press tiny vertical lines into the collar coil you just added. This mimics the ribbed texture of a real t-shirt neckline. -
Define the sleeves:
Use a modeling tool or the back of your knife to gently indent curved lines where the sleeves attach to the body. Don’t cut through; just create a surface impression. -
Add sleeve cuffs:
Similar to the shoulder seams, press two parallel horizontal lines near the bottom of each sleeve to represent the hemmed cuff.
Stubborn Cracks?
If tiny cracks appear while air-dry clay is drying, mix a small amount of fresh clay with water to make a paste (slip). Fill the cracks with this paste and sand smooth once dry.
Step 3: Embossing the Number
-
Create the central box:
Lightly press a small square cutter into the center of the chest to create a frame. If you don’t have a cutter, carefully impress a square shape using a ruler and a modeling tool. -
Position the numbers:
Align your number stamps (or fondant cutters) inside the square frame. Center them carefully before applying pressure. -
Press the impression:
Press the numbers down firmly and evenly to create a deep, clean impression. Lift the stamps straight up to avoid distorting the clay. -
Cleanup:
Check for any nail marks or fingerprints. Smooth them away with a damp brush or finger. If any clay burrs appeared around the numbers, carefully poke them back in with a needle tool.
Team Colors
Before sealing, use diluted acrylic paint or watercolors to fill in the impressed numbers and collar lines. Wipe away excess surface paint for a cool ‘inlaid’ color effect.
Step 4: Finishing
-
Drying:
Allow the piece to dry completely. For air-dry clay, this usually takes 24-48 hours. Carefully flip it halfway through drying to prevent warping. -
Sanding:
Once fully cured or dry, use fine-grit sandpaper to gently buff the edges and surface for a professional, matte finish. -
Sealing (Optional):
Leave natural for the look in the photo, or apply a thin layer of matte varnish if you want to protect the surface from dust and fingerprints.
This refined little plaque looks wonderful displayed on a bookshelf or framed in a shadow box
Soccer Player Cake Topper Figure
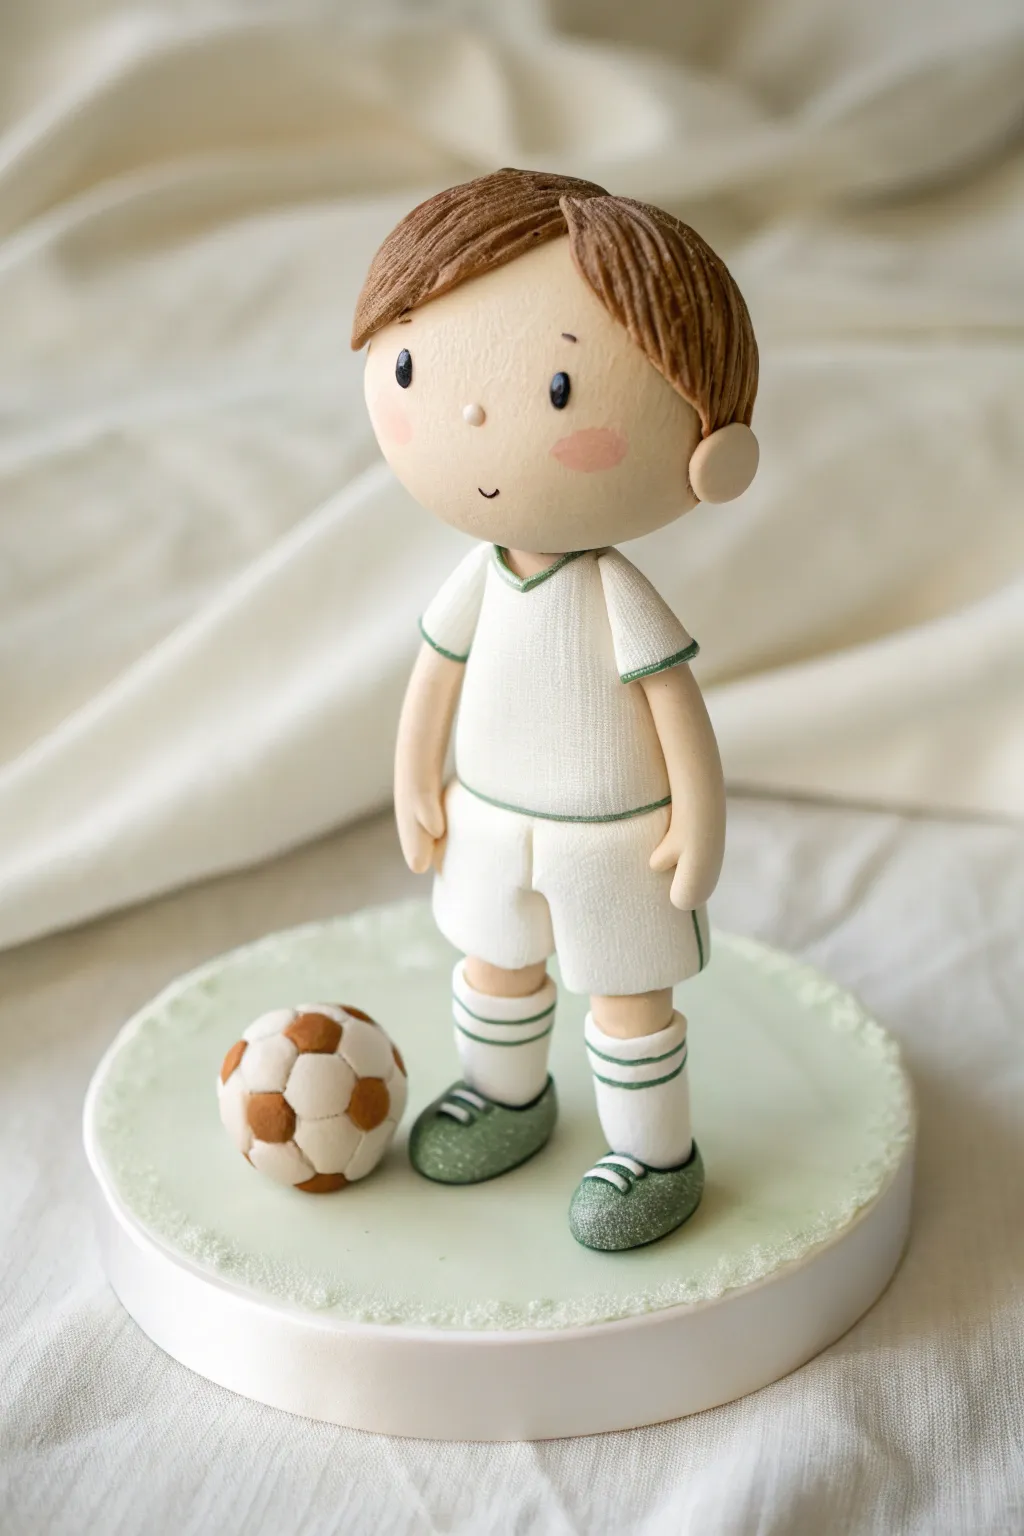
Create a charming, personalized centerpiece for any soccer lover’s birthday cake with this delightful clay figure. This stylized player features a crisp white kit with green accents and an adorably simple expression that’s sure to score big points.
Step-by-Step
Materials
- Polymer clay or fondant (flesh tone, white, brown, dark green)
- Small polystyrene ball (base for the head)
- Edible glue or strong craft glue (if using non-edible clay)
- Wooden skewers or toothpicks
- Rolling pin
- Modeling tools (ball tool, veining tool, cutting blade)
- Pink petal dust or soft pastel chalk
- Black acrylic paint or food marker (for eyes)
- Texturing mat or sponge (for fabric effect)
Step 1: Sculpting the Body
-
Form the legs:
Start by rolling two equal cylinders of flesh-toned clay for the legs. Insert a toothpick or small skewer into each one for structural stability, leaving enough wood exposed at the top to attach the torso later. -
Add the shorts:
Roll out white clay and cut two wide strips. Wrap these around the top of each leg cylinder to create the shorts. Gently smooth the seam at the back and use a modeling tool to create subtle creases where fabric would naturally bunch. -
Join the legs:
Press the tops of the legs together firmly. You can add a small piece of white clay between them to bridge the gap and form the hips. -
Create the torso:
Roll a smooth, rounded cone shape from white clay for the shirt. Gently press this onto the joined legs, ensuring the skewers go nicely into the torso for support. -
Add texture:
To mimic the texture of a dri-fit jersey, gently press a clean sponge or a fabric texture mat against the white clay of the shirt and shorts. It’s a subtle detail that makes a huge difference.
Sagging Figure?
If the fondant is too soft, the figure often slumps. Knead in tylose powder or CMC to stiffen the paste, or let the legs dry for 24 hours before adding the heavy torso.
Step 2: Arms and Head
-
Shape the arms:
Roll two thinner cylinders of flesh-toned clay for the arms. Flatten one end slightly to form the hands and use a knife tool to mark a thumb. -
Make the sleeves:
Cut two small triangles of white clay for sleeves. I like to wrap these around the top of the arms, blending the clay where it meets the shoulder, before attaching the arms to the sides of the body. -
Add green trim:
Roll extremely thin snakes of dark green clay. Carefully apply these as piping along the bottom of the sleeves, the hem of the shirt, the neckline, and the sides of the shorts. -
Cover the head base:
Take a small polystyrene ball and wrap it smoothly in flesh-toned clay. Roll it in your palms until all seams are invisible and the surface is perfectly smooth. -
Sculpt the face:
Using a small ball tool, press indentations for eye sockets if you want depth, though this style is quite flat. Add a tiny ball of clay for the nose in the center. -
Detail the face:
Use a black food marker or a fine brush with black paint to dot on two simple eyes. Add a tiny curved line for a smile. Brush on pink petal dust or shaved pastel chalk for rosy cheeks.
Textured Hair Trick
Instead of individual strands, drape a single sheet of clay over the head, then use a curved blade tool to deeply score the hair lines. It looks cleaner and is much faster.
Step 3: Hair and Accessories
-
Attach the hair:
Roll out brown clay and cut a circle to cover the back of the head. Then, shape individual teardrop pieces for the bangs, texturing them with a veining tool to look like strands of hair. Layer them naturally over the forehead. -
Add the ears:
Attach two tiny flattened balls of flesh clay to the sides of the head. Position them just under the hair line. -
Attach head to body:
Insert a toothpick into the neck of the torso and gently press the head down onto it. Secure with a dab of edible glue or water. -
Make the socks and cleats:
Add white cylinders to the bottom of the legs for socks and detail with green stripes. For shoes, shape dark green ovals, adding white laces and a textured sole. -
Sculpt the soccer ball:
Roll a ball of white clay. Press small pentagons of brown or black clay onto the surface. Gently roll the ball again between your hands to embed the patches flush with the surface. -
Final Assembly:
Prepare a round base covered in pale green clay to resemble grass (you can stipple it with a toothbrush). Place the figure and the ball onto the base, gluing them securely in place.
Once the figure has dried completely, place it proudly atop your cake for a winning finish
Cute Chibi Soccer Player With Ball
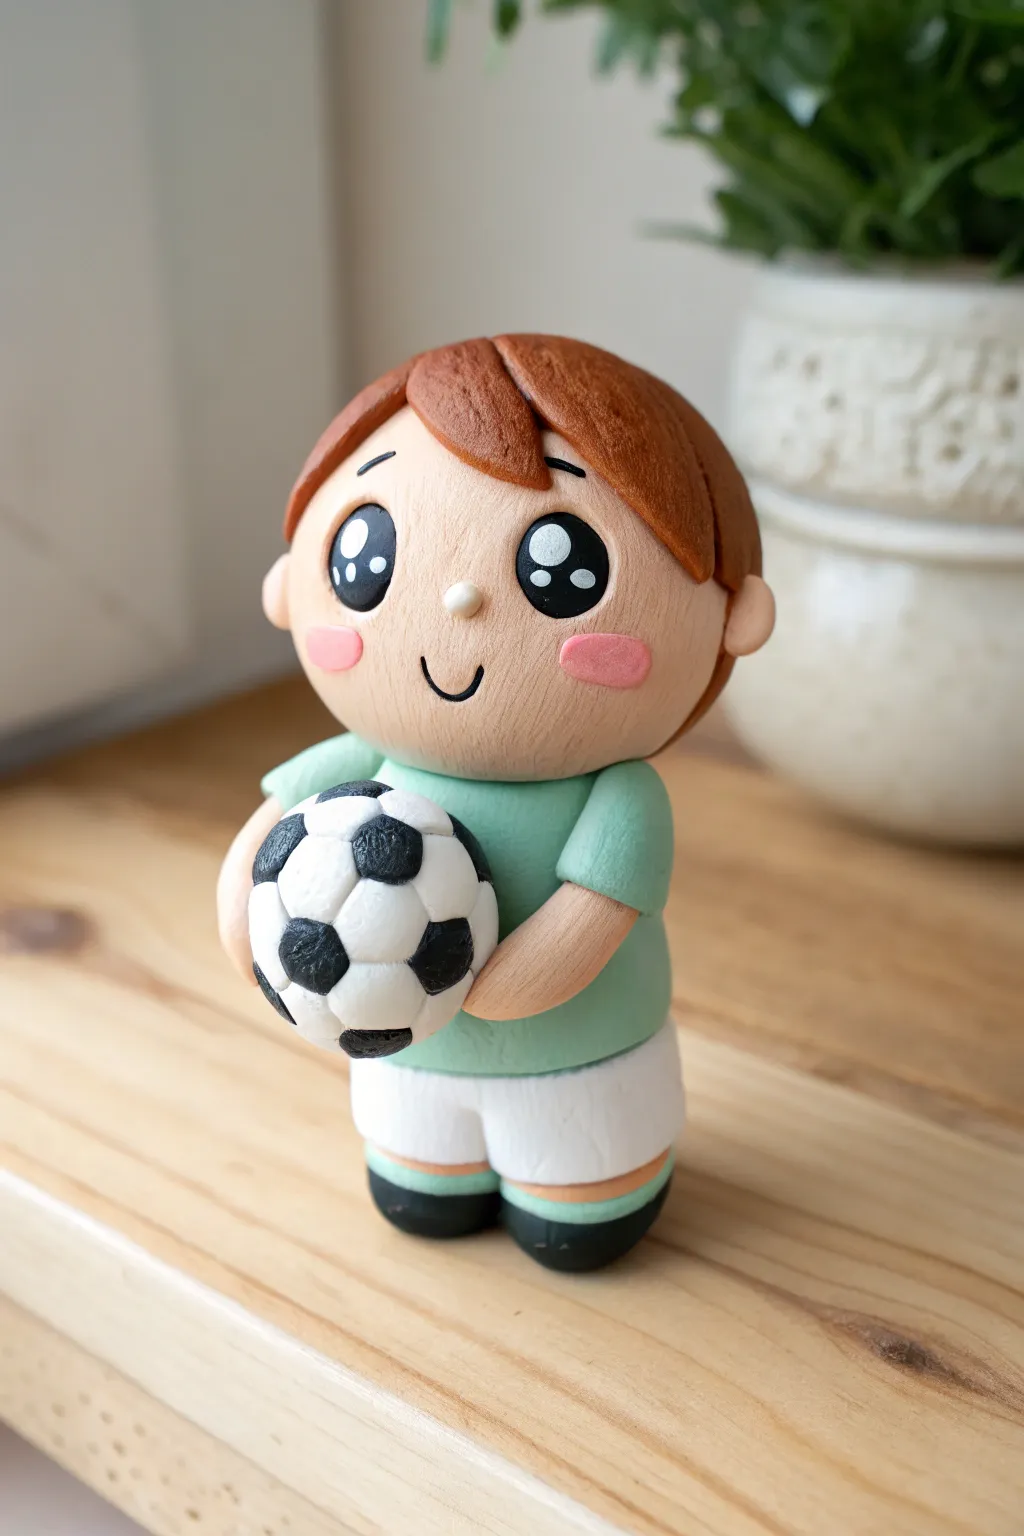
Capture the joy of the game with this adorable chibi soccer player figurine, perfect for sports fans or as a personalized cake topper. With its oversized eyes, rosy cheeks, and classic uniform, this clay project brings a touch of kawaii charm to the field.
Step-by-Step Guide
Materials
- Polymer clay (colors: skin tone, light brown, pastel green, white, black, pink)
- Set of clay sculpting tools (dotting tool, needle tool, knife tool)
- Rolling pin or pasta machine
- Aluminum foil (for armature core)
- Liquid polymer clay or bake and bond
- Wet wipes or baby oil (for smoothing fingerprints)
- Oven for baking
Step 1: Forming the Body and Head
-
Create the head base:
Start by rolling a ball of aluminum foil about the size of a walnut to save clay and keep the head light. Cover this foil ball completely with skin-tone clay, rolling it until smooth and spherical. -
Shape the torso:
Take a portion of pastel green clay and shape it into a rounded cylinder slightly smaller than the head. This will be the shirt. -
Add the shorts:
Roll a small amount of white clay into a disc and attach it to the bottom of the green shirt. Use your knife tool to create a vertical indentation in the center to suggest two legs of the shorts. -
Connect head and body:
Insert a short piece of wire or a toothpick into the top of the body and place the head on top. This internal support is crucial so his head doesn’t wobble.
Step 2: Face and Hair Details
-
Indent eye sockets:
Using a large ball tool or your thumb, gently press two shallow indentations into the face where the eyes will go. This adds depth to the chibi look. -
Create the eyes:
Roll two flattened ovals of black clay and press them into the sockets. Add two smaller white dots to each eye—one larger at the top right and a tiny one at the bottom left—for that sparkling anime effect. -
Add facial features:
Roll a tiny ball of skin-tone clay for the nose and place it centrally. Use a needle tool or a small curved blade to press a happy ‘U’ shape for the smile directly underneath. -
Apply rosy cheeks:
Take two small, flattened ovals of pink clay and press them gently onto the cheeks, just below the eyes. -
Sculpt the hair:
Roll a thin sheet of light brown clay. Cut out a circle for the back of the head and several pointed, leaf-shaped strands for the bangs. Layer the strands over the forehead, curving them slightly for a natural, swept look.
Clean Clay Tip
Work from lightest to darkest colors (white first, black last). If you touch black clay, wipe your hands and tools thoroughly with a baby wipe before touching the skin tone again.
Step 3: Limbs and Accessories
-
Form the legs:
Roll two small sausages of skin–tone clay for legs and attach them under the white shorts. Add tiny bands of pastel green clay around the ‘ankles’ for socks. -
Attach the shoes:
Shape two black ovals for shoes and attach them to the bottom of the legs. I find it helps to flatten the bottom of the shoes slightly against the table so the figure stands up on its own. -
Shape the arms:
Create two small cone shapes from pastel green clay for sleeves. Then, roll skin-tone clay into arms and attach them inside the sleeves, bending them forward as if ready to hold something. -
Make the soccer ball core:
Roll a perfect sphere of white clay. It should be sized to fit comfortably in the figure’s arms. -
Add pentagon patches:
Roll very tiny balls of black clay and flatten them into pentagon shapes. Press these onto the white ball in a geometric pattern. -
Detail the ball:
Use a needle tool or knife to gently score lines connecting the black patches, creating the stitched leather effect of a soccer ball. -
Final assembly:
Place the soccer ball against the figure’s stomach and gently press the hands onto the sides of the ball to secure it in place. Bake according to your clay manufacturer’s instructions.
Head Too Heavy?
If the head keeps tilting before baking, prop it up with a small piece of scrunched foil or a sponge directly under the chin. You can remove this support once the clay has cooled after baking.
Once baked and cooled, your little champion is ready to score a goal on your shelf
Goalkeeper Dive Figurine
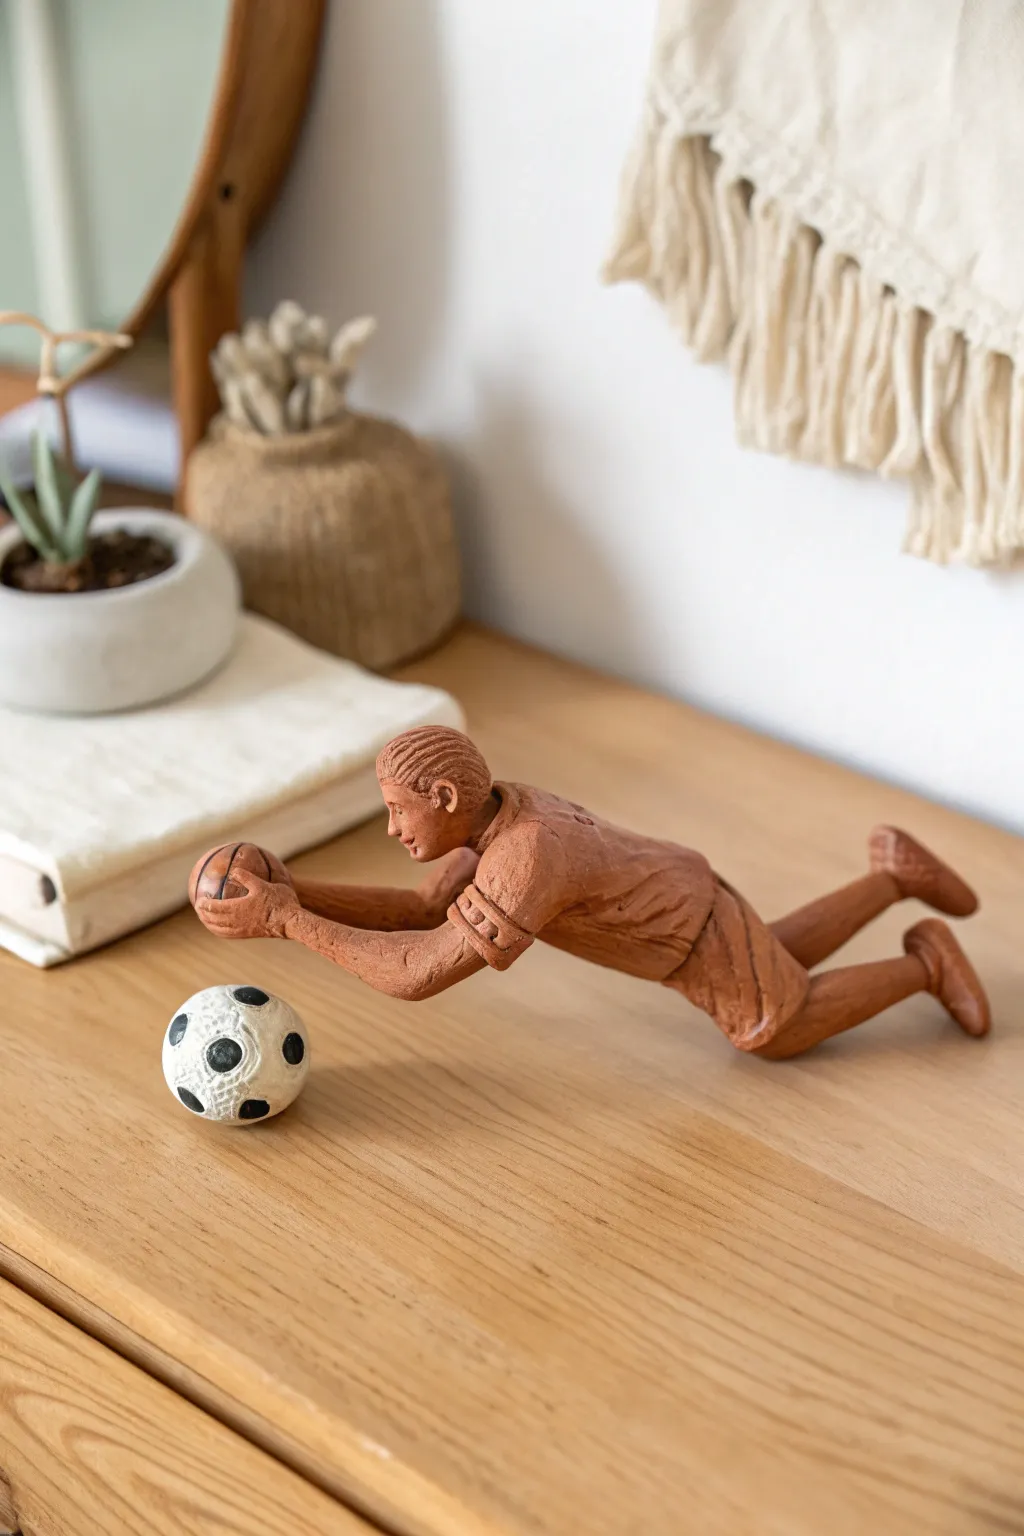
Capture the most thrilling moment of a match with this terracotta-style goalkeeper figurine frozen in mid-air. This project focuses on balance and anatomy to create the illusion of weightlessness as your player stretches for the save.
Step-by-Step
Materials
- Terracotta-colored polymer clay (or air-dry clay)
- White polymer clay
- Black polymer clay
- Aluminum wire (armature wire, roughly 1.5mm)
- Aluminum foil
- Clay sculpting tools (needle tool, ball stylus, rubber shaper)
- Wire cutters
- Pliers
- Acrylic rolling pin
- Oven (if using polymer clay)
Step 1: Building the Skeleton
-
Twist the armature:
Begin by cutting two lengths of aluminum wire. Twist them together at the center to form the torso, leaving four ends extending out: two for the arms and two for the legs. Create a small loop at the top for the head. -
Pose the wire:
Before adding any mass, bend the wire into the diving pose. One arm should be outstretched forward, the other slightly bent as if reaching for a ball. Kick one leg back and bend the other knee forward to simulate momentum. -
Bulk up with foil:
Wrap pieces of aluminum foil tightly around the wire frame. This saves clay and keeps the figurine lightweight. Shape the foil to resemble the basic muscle groups of the chest, thighs, and calves, but keep it thinner than your final desired volume.
Step 2: Sculpting the Goalie
-
base layer application:
Condition your terracotta clay until pliable. Flatten sheets of clay and wrap them entirely over the foil armature, smoothing the seams together so no foil is visible. -
Refine the torso:
Add small snakes of clay to build up the shirt area. Use a rubber shaper to smooth these into the form, creating the look of fabric stretching over the back and shoulders. -
Sculpt the shorts:
Wrap a thicker band of clay around the hip area. Use a needle tool to carve folds and creases where the legs are bending, giving the shorts a realistic, bunched-up fabric appearance. -
Detail the limbs:
Add small balls of clay for the knees and elbows. Roll out thin snakes to wrap around the tops of the calves to create the socks. Smooth the transition between the skin and the fabric. -
Form the head and face:
Roll a smooth ball of clay for the head. Press small indentations for eye sockets and attach a tiny pyramid of clay for the nose. Don’t worry about hyper-realism; a stylized profile works beautifully here. -
Add hair texture:
Apply a thin layer of clay over the scalp area. Using a needle tool or a small texturing comb, drag lines backward from the forehead to mimic swept-back hair. -
Sculpt the boots:
Shape two small wedge-like pieces for the shoes. Attach them to the wire ends at the ankles. use a knife tool to score laces and sole details. -
Adding the gloves:
Flatten two small pads of clay for the hands. Carefully cut separating lines for fingers. Curve the fingers slightly inward to cup the ball later. -
Create the arm ball:
This figurine is holding a ball. Make a small ball of terracotta clay. Mark distinct lines to resemble basketball or vintage leather ball seams, and place it firmly in the figurine’s hands.
Sagging Torso?
If the clay is too heavy and the figure sags during sculpting, rest the torso on a temporary sponge or block until baking keeps it rigid.
Step 3: The Soccer Ball & Finishing
-
Form the soccer ball core:
Roll a perfect sphere of white clay. Keep it separate from the main figurine, as it sits on the surface. -
Make the pentagons:
Roll out a very thin sheet of black clay. Use a small hexagonal cutter or a craft knife to cut out tiny pentagons. -
Apply the pattern:
Press the black pentagons onto the white sphere in a classic soccer pattern. I normally start with one on the top and arrange five around it. -
Texture the ball:
Gently roll the ball between your palms to flatten the black shapes into the white surface, ensuring it is smooth and round. Using a needle tool, poke tiny dots all over the white sections to mimic leather texture. -
Bake or dry:
If using polymer clay, bake your pieces according to the package instructions (usually 275°F/135°C for 15-30 minutes). Support the diving figure with crumpled paper towels so it doesn’t sag while baking.
Action Effect
Make small, thin clay snakes and attach them behind the feet or the ball to simulate ‘motion lines’ or kicked-up dirt for an extra dynamic look.
Once cooled, place your goalie and the separate ball on a shelf to freeze that game-winning save in time
Soccer Field Slab With Line Markings
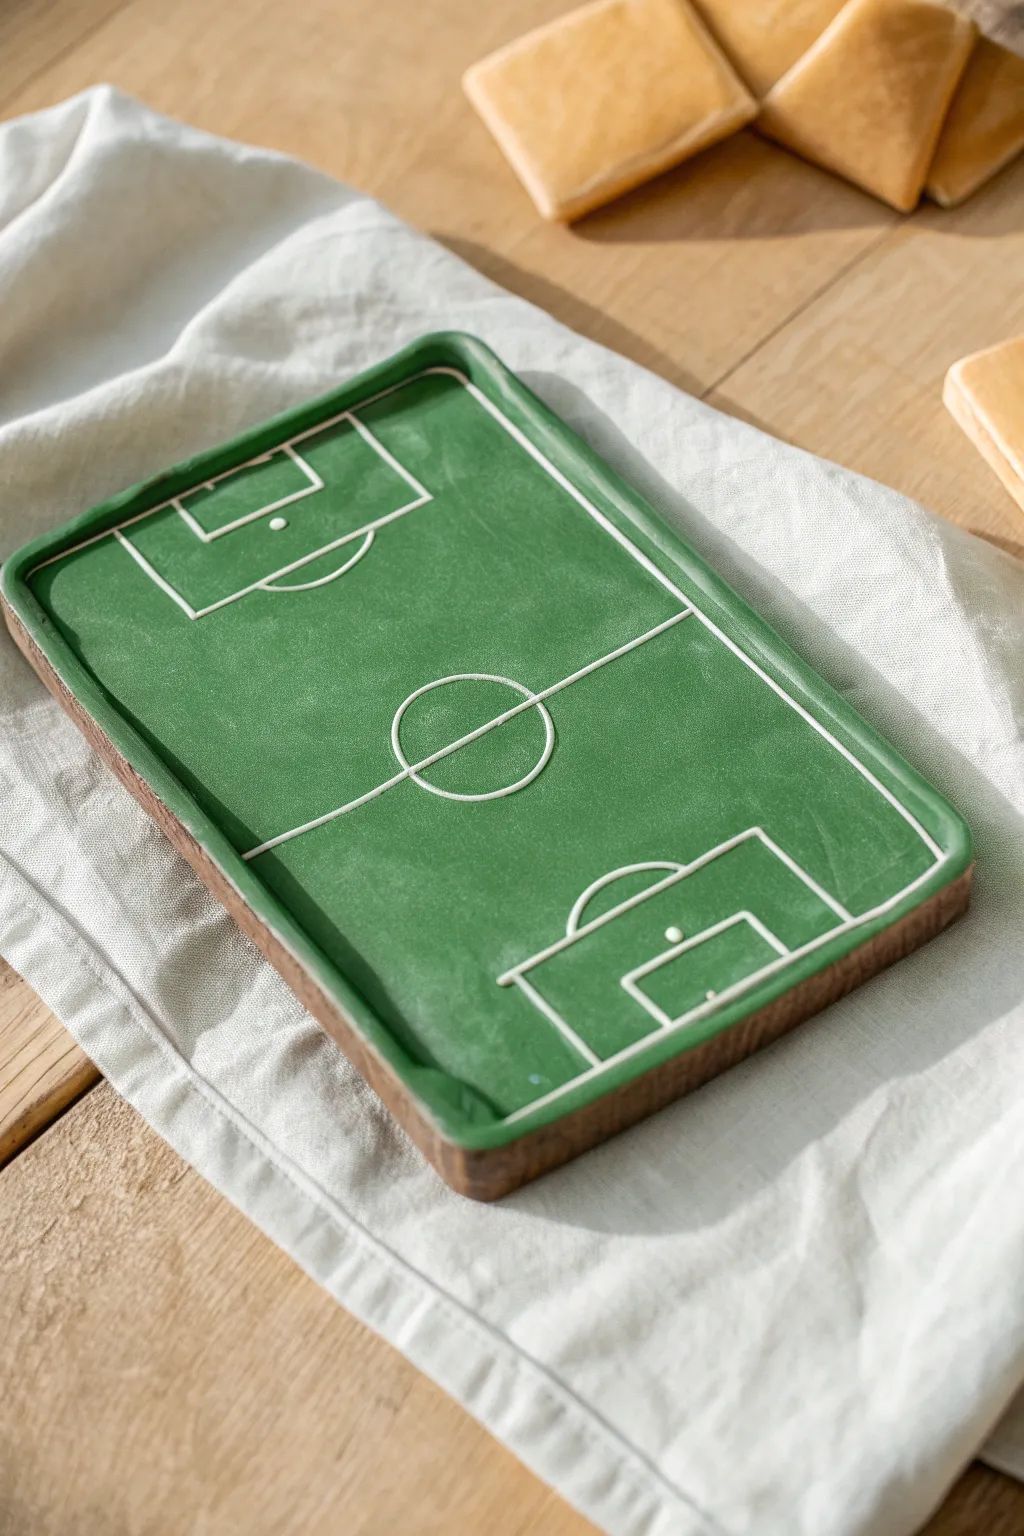
Transform a simple slab of clay into a functional and sporty decorative tray perfect for keys or coins. This project combines faux wood techniques with precise line work to create a charming miniature soccer pitch with a rustic edge.
Step-by-Step Tutorial
Materials
- Green polymer clay (grass green)
- Brown polymer clay (dark wood tone)
- White liquid polymer clay or white acrylic paint
- Fine-tip detail brush or needle applicator
- Rolling pin or clay machine
- Rectangular clay cutter or craft knife
- Texture tool (sandpaper or toothbrush)
- Ruler
- Matte varnish (optional)
Step 1: Creating the Base
-
Condition the brown clay:
Begin by thoroughly conditioning your brown polymer clay until it is soft and pliable. This will prevent cracks from forming later during the baking process. -
Roll the base slab:
Roll out the brown clay to a thickness of about 1/4 inch (6mm). This needs to be sturdy enough to serve as the tray’s foundation. -
Cut the rectangle:
Using a rectangular cutter or a ruler and craft knife, cut a clean rectangle. A size of roughly 4×6 inches works well for a trinket tray. -
Create the walls:
Roll a long snake of brown clay and flatten it slightly to create a strip about 1/4 inch high. Wrap this strip around the perimeter of your base rectangle to form the raised rim of the tray. -
Blend the seams:
Use a modeling tool or your finger to smooth the seam where the wall meets the base, ensuring the tray is water-tight and sturdy. -
Texturize for wood effect:
Run a coarse sandpaper or a wire brush gently along the outside of the brown walls to mimic a wood grain texture. I like to drag the tool horizontally for a realistic grain pattern.
Clean Corners Pro-Tip
When applying liquid clay lines, use a toothpick to drag the liquid slightly into corners. This creates sharp, crisp 90-degree angles for your penalty boxes instead of rounded blobs.
Step 2: Laying the Pitch
-
Prepare the green clay:
Condition your green clay. You want a consistent, vibrant green that contrasts well with the white lines you’ll add later. -
Roll the green insert:
Roll the green clay slightly thinner than the base, perhaps 1/8 inch (3mm). It needs to fit snugly inside the brown walls you just created. -
Cut to size:
Measure the interior dimensions of your brown tray carefully. Cut the green clay to exactly these measurements. -
Insert the pitch:
Gently place the green slab inside the brown frame. Press down lightly to adhere it to the brown base layer without distorting the shape. -
Texture the grass:
Take a toothbrush or a ball of aluminum foil and tap it repeatedly over the entire green surface. This stippling effect creates a subtle, grass-like texture that looks great once baked.
Step 3: Marking the Lines
-
Pre-bake option:
If you are worried about smudging the green clay while painting, you can bake the tray now according to the clay manufacturer’s instructions, then let it cool before adding lines. -
Mark the center line:
Using a ruler and a very light touch with a needle tool, score a shallow guide line horizontally across the exact center of the field. -
Draw the center circle:
Find a small round object (like a bottle cap) to gently impress a circle guide in the middle of your center line. -
Outline the penalty areas:
Lightly score the rectangular penalty boxes and goal areas at both short ends of the field. Using a ruler ensures these are perfectly straight and symmetrical. -
Apply the white lines:
Carefully trace over your scored guides using white liquid polymer clay in a fine-tip squeeze bottle. If you don’t have liquid clay, you can use white acrylic paint and a detail brush after baking. -
Add the penalty spots:
Place a tiny dot of white liquid clay or paint inside each penalty box and one in the very center of the center circle. -
Final bake:
Bake the project again to set the liquid clay lines. If you used paint, simply let it dry completely. -
Seal the tray:
Finish by applying a coat of matte varnish over the green area to protect the surface and eliminate any unwanted shine on the grass.
Wobbly Lines?
If your hand shakes while painting lines, use low-tack painter’s tape to mask off the green area. Paint between the tape strips, let dry slightly, and peel away for razor-sharp edges.
Now you have a sporty, durable catch-all tray that brings the excitement of match day to your desk or coffee table
Mini Goal and Ball Desk Decor
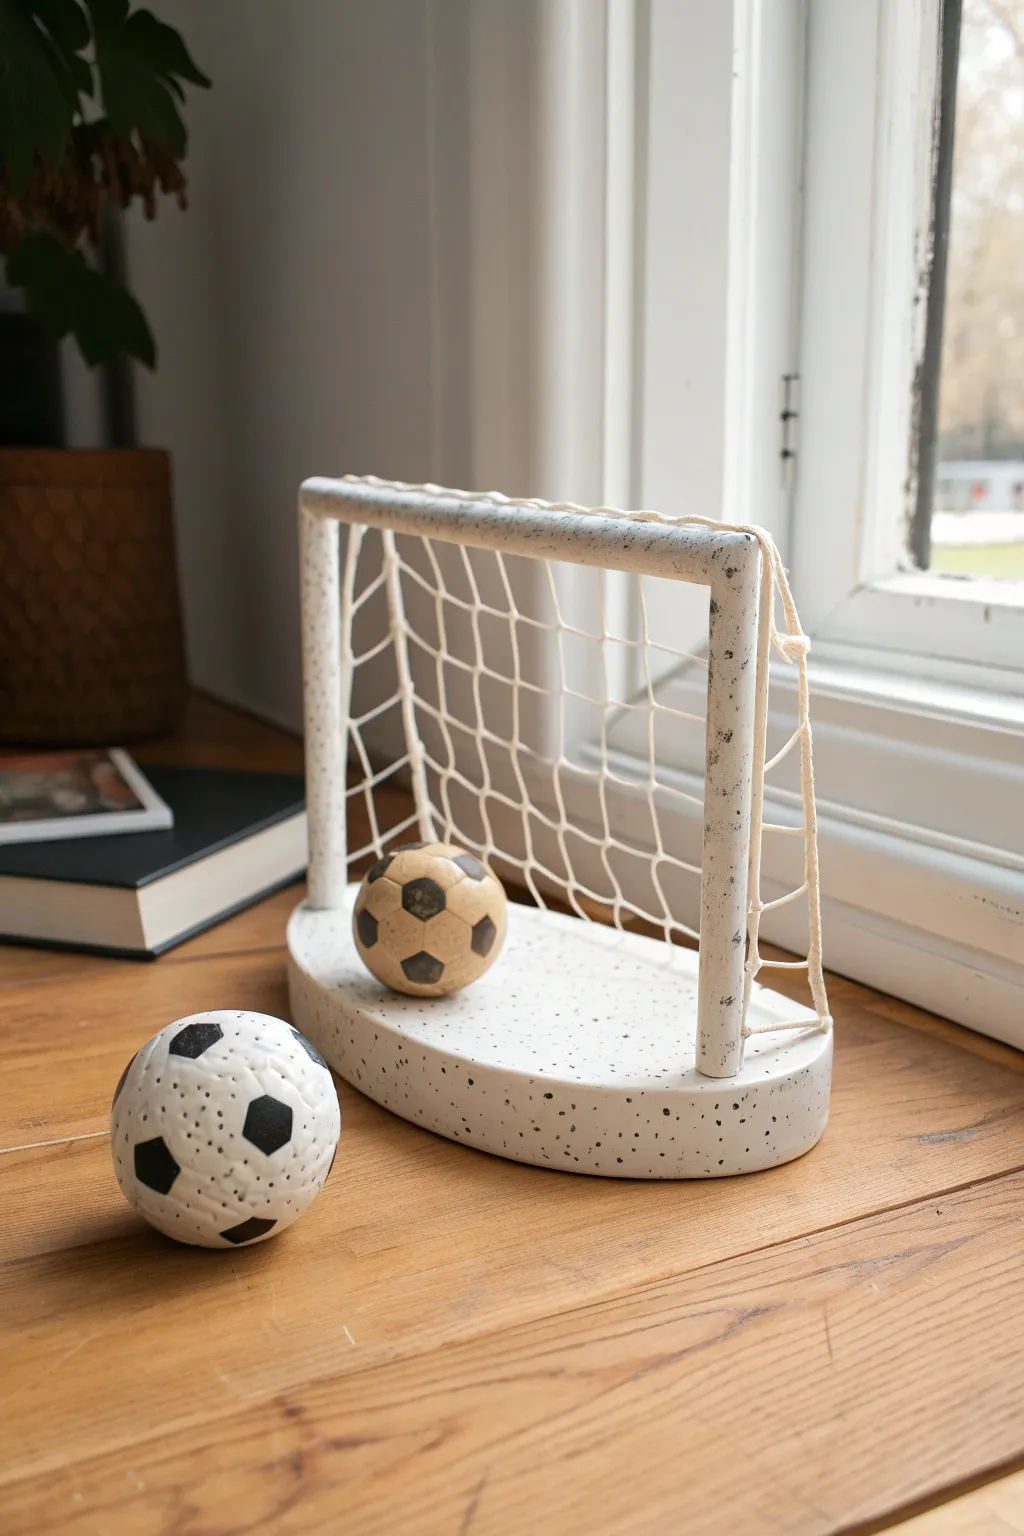
Bring the love of the game to your workspace with this charming speckled clay soccer goal set. Featuring a sturdy D-shaped base and hand-knotted netting, this modern minimalist piece serves as both decor and a playful fidget toy.
How-To Guide
Materials
- White polymer clay with black speckles (granite effect)
- Black polymer clay
- Tan or brown polymer clay
- Thick gauge wire or armature wire
- Small circle cutter (approx. 1/2 inch) or hex cutter
- Needle tool
- Liquid clay or Bake and Bond
- Onyx or white cotton twine
- Craft knife
- Acrylic rolling pin
- Sandpaper (various grits)
- Matte varnish (optional)
Step 1: Forming the Goal Structure
-
Prepare the Speckled Base:
Begin by conditioning a large block of speckled white clay. Roll it into a thick slab, approximately 3/4-inch deep. Use a large oval cutter or a knife to cut a ‘D’ shape, softening the flat back edge with your fingers to remove sharp corners. -
Build the Posts:
Cut two lengths of thick wire, about 4 inches each, and bend them into an inverted ‘U’ shape to create the goal frame skeleton. This internal support is crucial so the goal doesn’t sag during baking. -
Wrap the Posts:
Roll out a medium-thickness snake of the same speckled clay. Carefully wrap this clay around your wire frame, smoothing the seams together until the wire is completely hidden and the post looks uniform. -
Install Back Supports:
Create two angled back supports using the same wire-and-clay method. These should attach from the top corners of your goal frame down to the back curve of your D-shaped base. -
Assembly:
Press the main goal frame securely into the flat front edge of the base. Blend the clay downwards using a modeling tool so it becomes one seamless unit. Repeat this process for the back supports. -
Pre-pierce Net Holes:
Before baking, use a needle tool to poke evenly spaced holes along the top bar, side posts, and the back curve of the base. These holes will anchor your net string later, so make sure they go all the way through or are deep enough to glue string into.
Step 2: Crafting the Soccer Balls
-
Shape the Spheres:
Roll two balls of clay roughly the size of a ping pong ball. Make one from the white speckled clay and one from a tan or wood-tone clay. -
Create Hexagon Details:
Instead of trying to cut tiny pentagons, I find it easier to use the end of a small hexagonal tool or a small cutter to lightly impress the classic soccer pattern onto the surface of the spheres. -
Add Black Panels:
Roll out a very thin sheet of black clay. Cut small pentagons that match the size of your impressed pattern and carefully press them into the appropriate spots on the balls. -
Texture:
Roll the finished balls gently between your palms to embed the black clay flush with the surface. For texturing, lightly tap the surface with a stiff toothbrush or sandpaper. -
Bake:
Place the goal structure and the balls on a ceramic tile. Bake according to your clay package instructions, usually 275°F (135°C) for about 30 minutes. Let them cool completely in the oven.
Master the Texture
Mix dried tea leaves or ground black pepper into plain white clay if you can’t find pre-made ‘granite’ clay for a natural speckled look.
Step 3: Stringing the Net
-
Drill Holes (If Needed):
If your pre-poked holes closed up during baking, use a small hand drill or pin vise to re-open them along the frame. -
Vertical Strings:
Cut lengths of cotton twine. Thread them through the holes in the top bar and glue or tie them into the corresponding holes on the base. Keep them slightly taut. -
Horizontal Weaving:
Cut longer pieces of twine for the horizontal lines. Tie one end to a side post, then weave it over and under the vertical strings, knotting it at each intersection to create a realistic grid. -
Secure Knots:
Apply a tiny dot of super glue or clear craft glue to each knot to ensure the net maintains its shape and doesn’t unravel. -
Final Trim:
Trim any excess string tails with sharp scissors. If desired, coat the clay parts with a matte varnish to protect the surface and enhance the stone-like finish.
Sagging Goal Post?
If the clay posts droop before baking, prop the top bar up with a folded piece of cardstock or a crumpled aluminum foil support until it hardens.
Place your finished goal near a window to let the natural light highlight that beautiful speckled texture
Soccer Trophy-Inspired Mini Sculpture
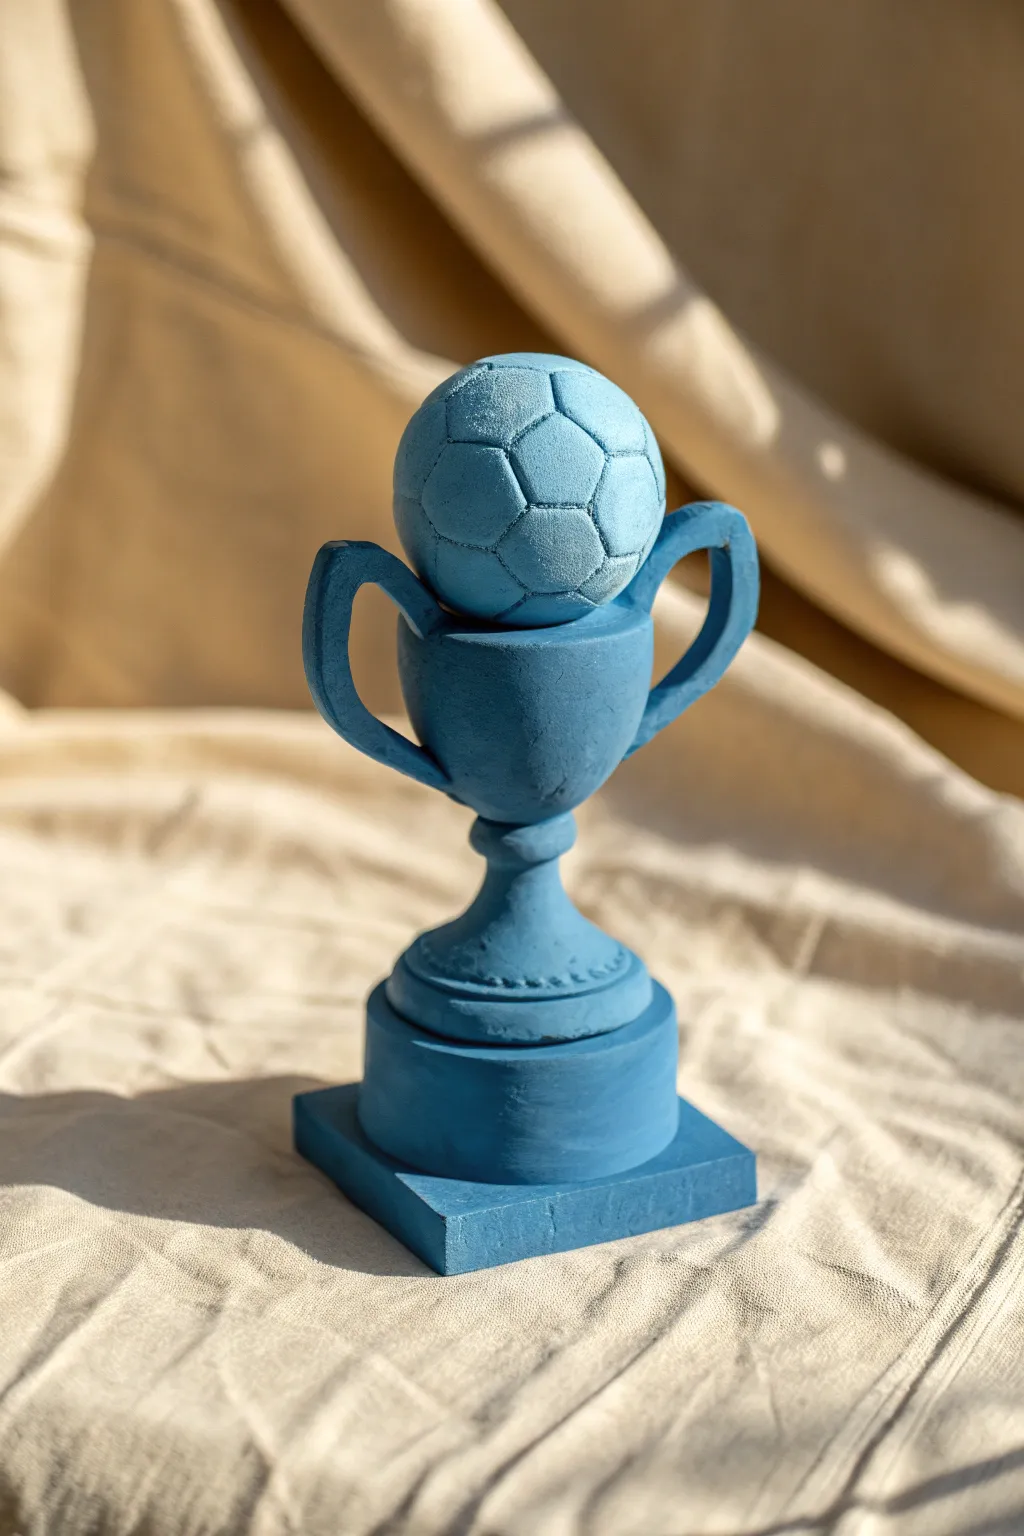
Celebrate a big win or just a love for the game with this striking, single-color sculpture. This project combines geometric forms with classic trophy aesthetics, finishing with a matte blue look that gives it a modern, artistic edge.
Step-by-Step
Materials
- Air-dry clay or polymer clay (white or grey base)
- Rolling pin
- Clay cutting tool or craft knife
- Small cup of water (for smoothing)
- Needle tool or toothpick
- Acrylic paint (matte medium blue)
- Paintbrush (medium flat and small detail)
- Sandpaper (fine grit)
- Strong craft glue (if baking parts separately)
Step 1: Building the Foundation
-
Form the base:
Start with a solid block of clay. Roll out a thick slab, about 1/2 inch high, and cut it into a perfect square. This square plinth will keep your trophy stable. -
Create the cylinder:
Roll a cylinder of clay slightly smaller in diameter than your square base. Flatten the top and bottom so it sits flush. Attach this to the center of your square base using scoring and a bit of water or slip. -
Shape the pedestal stem:
Mold a piece of clay into an hourglass-like shape—wider at the bottom and top, pinched in the middle. This acts as the elegant stem connecting the base to the cup. -
Add detail:
Roll a very thin snake of clay. Wrap it around the bottom of the stem where it meets the cylinder base to create a decorative rim. Use your needle tool to press tiny vertical lines into this rim for texture.
Seamless Smoothness
Use a wet paint brush (water for air-dry clay, baby oil for polymer) to brush over seams before drying. It smooths joins better than fingers alone.
Step 2: Sculpting the Cup
-
Make the cup bowl:
Roll a medium ball of clay. Use your thumb to press into the center, pinching the walls upwards to form a deep bowl shape. Keep the walls relatively thick for stability. -
Refine the shape:
Smooth the outside of the bowl with a little water on your finger. Tap the bottom gently on your work surface to create a flat area for attaching it to the stem later. -
Form the handles:
Roll two equal snakes of clay. Flatten them slightly to make ribbons. Curve them into ‘ear’ shapes. -
Attach the handles:
Score the sides of the cup and the ends of your handles. Press them firmly onto the cup body, smoothing the seams so they look like one continuous piece. -
Assemble the structure:
Attach the cup to the top of the pedestal stem. Ensure it is centered and straight. Check from all angles to make sure it isn’t leaning.
Step 3: The Soccer Ball Topper
-
Roll the ball:
Create a perfect sphere of clay that fits comfortably inside the rim of your cup. It should be large enough to look impressive but not so heavy it tips the trophy. -
Mark the pentagons:
Using a needle tool, lightly sketch the classic soccer ball pattern. Start with a pentagon in the center and draw lines extending out to form the surrounding hexagons. -
Deepen the grooves:
Once you are happy with the pattern, go over the lines again, pressing slightly deeper to create distinct grooves. This mimics the stitching on a real ball. -
Texture the surface:
I like to take a stiff-bristled toothbrush or a crumpled ball of foil and gently tap the surface of the clay ‘leather’ panels to give them a realistic, grainy texture. -
Final assembly:
Place the ball into the cup. You can use a dab of slip or glue to secure it in place so it doesn’t roll out later.
Personalize the Plinth
Before the clay dries, use small letter stamps to impress a name, date, or ‘MVP’ into the front of the square base for a custom touch.
Step 4: Finishing Touches
-
Dry or bake:
Follow the instructions for your specific clay. Ensure the piece is completely hard before moving on. If air drying, this might take 24-48 hours given the thickness. -
Sand smooth:
Use fine-grit sandpaper to gently smooth out any fingerprints or rough edges on the base and cup. Be careful not to sand away the texture on the soccer ball. -
Apply base coat:
Paint the entire sculpture with a coat of white acrylic paint or gesso. This primer layer ensures your blue color will pop and look opaque. -
Paint it blue:
Apply your matte blue acrylic paint. Use a medium brush for the large areas and a small detail brush to get into the grooves of the soccer ball and the handle curves. -
Second coat:
Let the first coat dry completely, then apply a second coat for a velvety, solid finish. Check for any missed white spots in the crevices.
Now you have a timeless award that looks great on any shelf
Numbered Soccer Ball Ornament
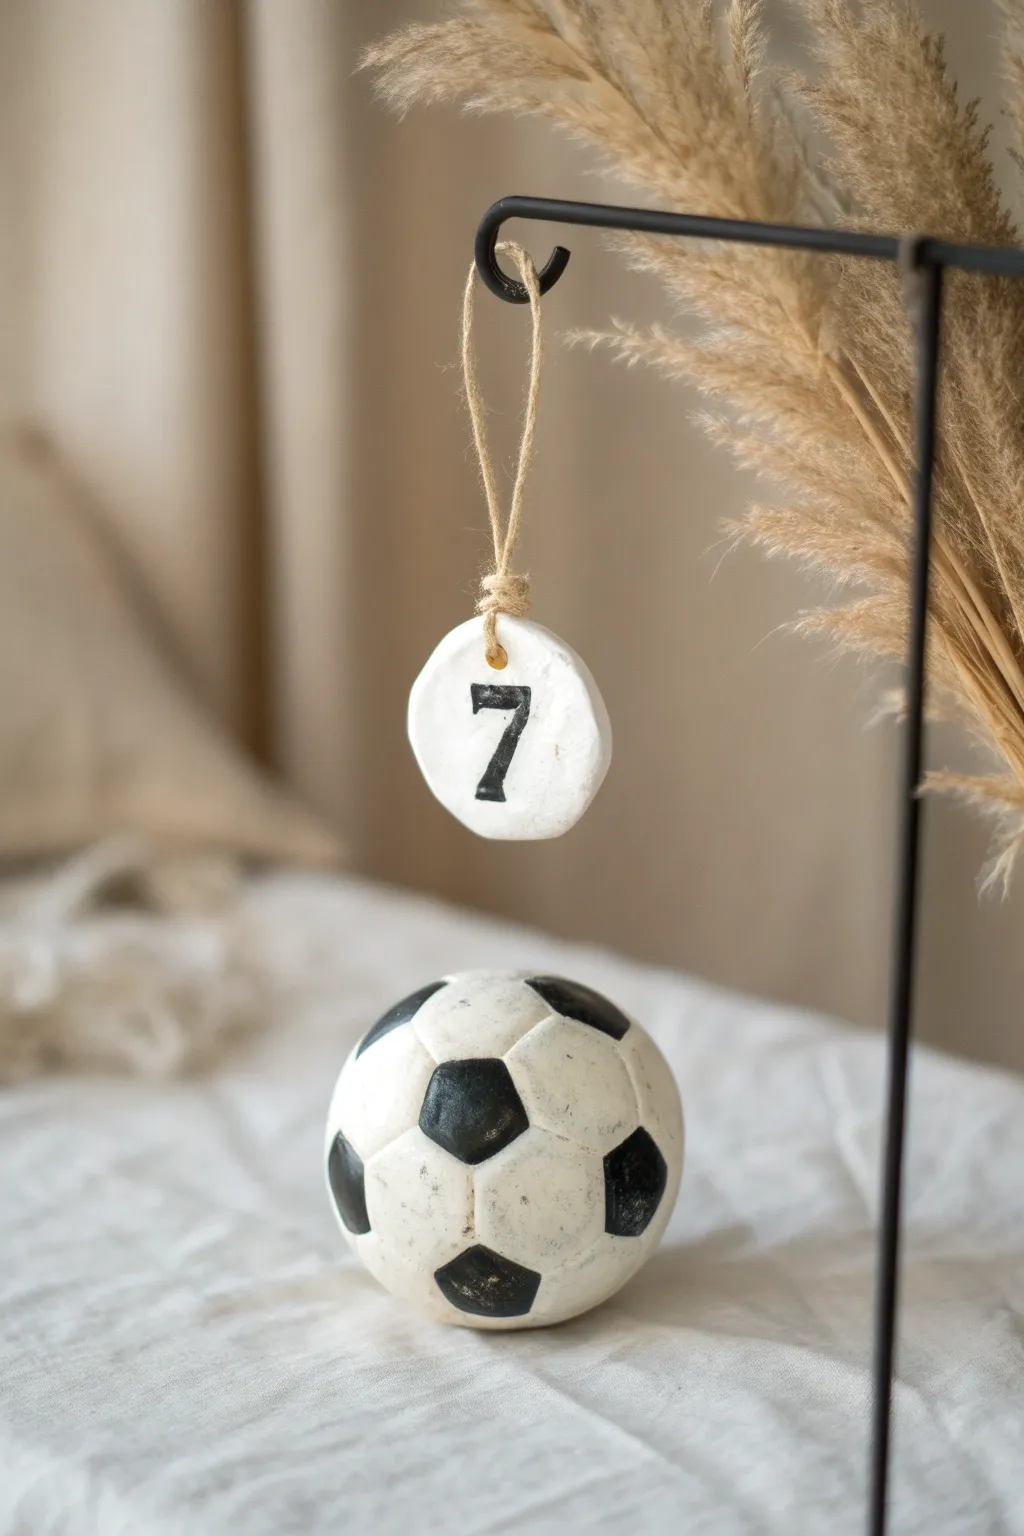
Celebrate a favorite player’s jersey number with this charming two-piece clay set. The rustic, handcrafted look of the soccer ball paired with a simple numbered tag makes for distinct milestone decor or a personalized keepsake.
Step-by-Step Tutorial
Materials
- White air-dry clay or polymer clay
- Rolling pin
- Circle cookie cutter (approx. 1.5 inches)
- Small straw or cocktail stick
- Modeling tools (ball stylus and knife tool)
- Black acrylic paint
- Fine detail paintbrush
- Jute twine
- Sandpaper (fine grit)
- Matte sealant or varnish (optional)
Step 1: Sculpting the Soccer Ball
-
Form the base:
Take a generous handful of white clay and roll it between your palms to create a smooth, solid sphere. Aim for the size of a tennis ball or slightly smaller. -
Mark the pentagons:
Using a knife tool or a toothpick, lightly sketch a pentagon shape directly in the center of the sphere. This will be your starting anchor point. -
Map the pattern:
Visualize the soccer ball pattern—surround that central pentagon with five hexagons. Lightly etch these connecting shapes into the clay surface so you have a guide for painting later. -
Create texture:
To give the ball dimension, use a modeling tool to gently press along the etched lines, creating shallow grooves that separate the panels. -
Refine the surface:
Smooth out any fingerprints or rough ridges with a drop of water on your finger. The ball should look slightly rustic but polished. -
Dry the sphere:
Set the ball aside to dry completely. If using air-dry clay, rotate it every few hours to prevent a flat spot from forming on the bottom.
Step 2: Creating the Number Tag
-
Roll the slab:
Roll out a small portion of clay until it is about 1/4 inch thick. You want it substantial enough to not crack, but not too heavy. -
Cut the shape:
Use a small, imperfect circle cutter or freehand a circle with a knife tool to mimic the organic shape seen in the photo. -
Add the hole:
While the clay is still wet, use a straw or cocktail stick to poke a hole near the top edge for the twine. -
Smooth the edges:
Dip your finger in water and run it along the cut edge of the tag to soften any sharp corners. -
Initial drying:
Let this tag dry fully alongside your soccer ball sphere.
Cracking Clay?
If small cracks appear during drying, make a paste of clay and water (slip) and fill them in, then sand smooth once dry.
Step 3: Painting and Assembly
-
Paint the pentagons:
Using black acrylic paint and a fine brush, carefully fill in the pentagon shapes on your dry clay ball. Leave the hexagons white. -
Distress the paint:
I like to dry brush a tiny amount of watered-down black paint lightly over the white sections to give it that worn, game-played texture shown in the image. -
Paint the number:
On the flat tag, paint a bold number ‘7’ (or your chosen jersey number) in the center using the black paint. -
Seal the pieces:
Once the paint is fully dry, apply a coat of matte varnish to protect the clay from moisture and dust. -
Prepare the twine:
Cut a length of jute twine, fold it in half, and thread the loop through the hole in your tag. -
Create the knot:
Pass the loose ends through the loop and pull tight to secure it, then tie the ends together to form a hanger. -
Final touch:
Wrap a small extra piece of twine around the base of the loop knot for a finished, decorative look.
Clean Lines
Use a black paint pen instead of a brush for the number and hexagon outlines if you have shaky hands.
Now you have a wonderful handcrafted tribute to display on a shelf or hang with pride
Soccer Team Color Ball Variations
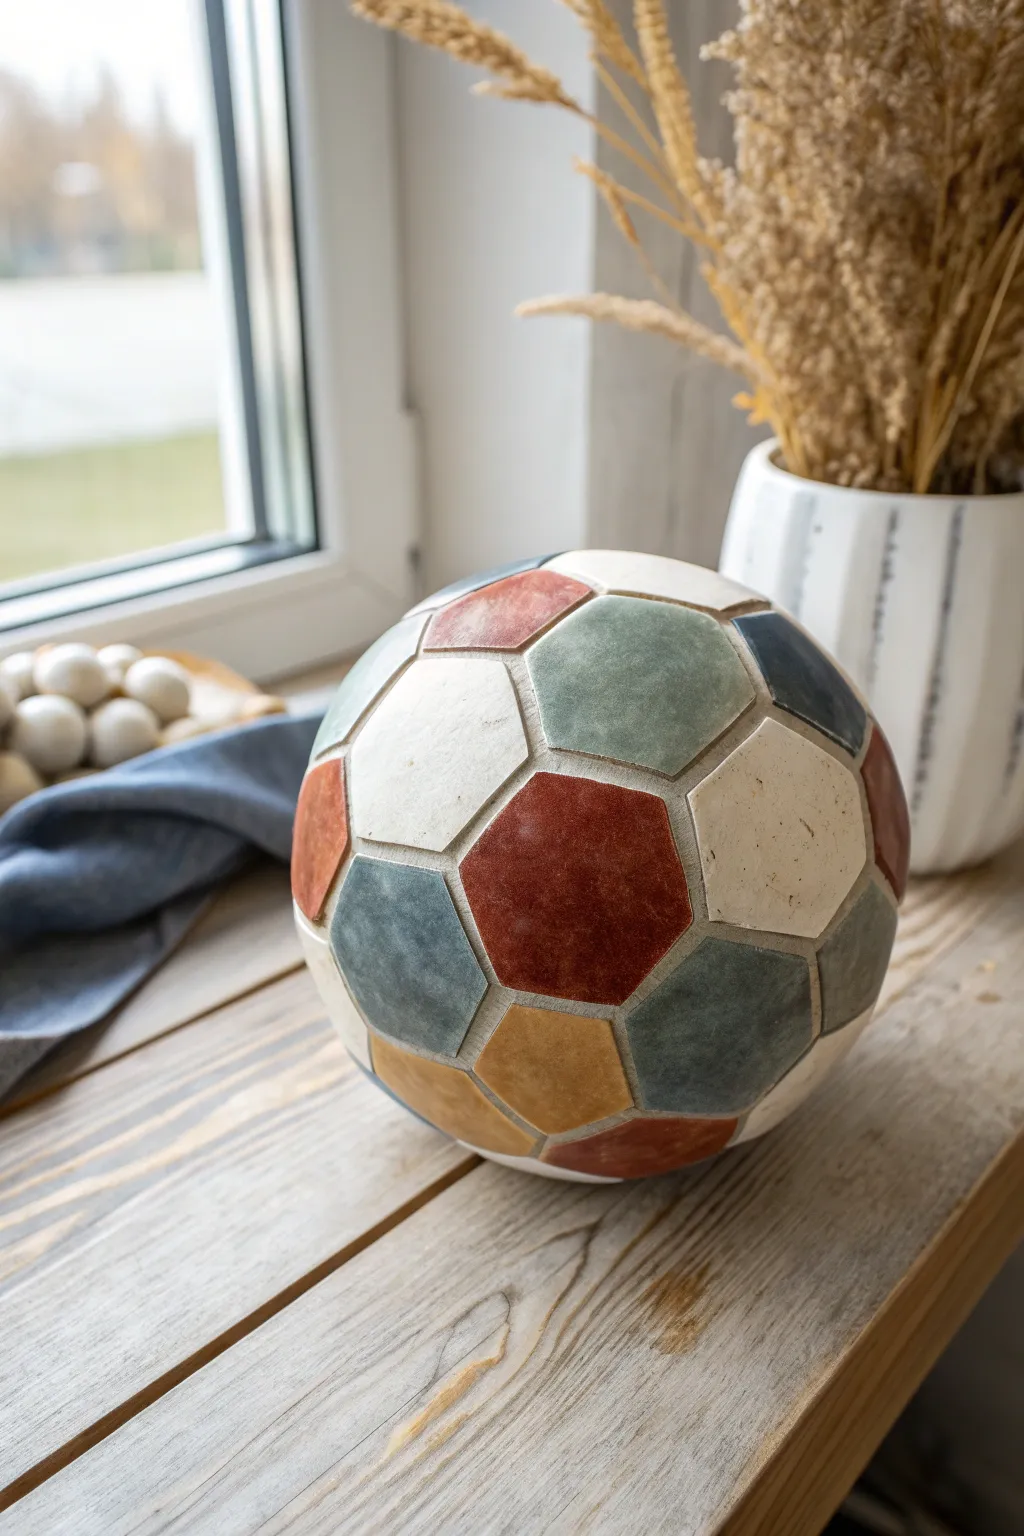
Transform a classic sports symbol into sophisticated decor with this geometric ceramic project. This stylized soccer ball features muted, earthy tones and a pieced-together, mosaic aesthetic that looks perfect on a sunlit windowsill.
Step-by-Step Guide
Materials
- White or speckled stoneware clay body (approx. 5 lbs)
- Spherical Styrofoam ball (6-8 inches diameter) to use as a form
- Newsprint or paper towels
- Rolling pin
- Guide strips or slab roller (set to roughly 1/4 inch)
- Hexagon and pentagon clay cutters (sized to fit your sphere)
- Scoring tool and slip
- Underglazes (terracotta red, creamy white, denim blue, slate blue, mustard yellow)
- Clear matte glaze
- Sponge and water
- Fettling knife or rib tool
- Kiln
Step 1: Preparation and Forming
-
Prepare the Form:
Wrap your Styrofoam sphere completely in a layer of newsprint or paper towels. This crucial separation layer prevents the clay from sticking to the foam and allows the clay to shrink slightly without cracking as it starts to dry. -
Roll the Slab:
Roll out a large slab of your stoneware clay to a uniform thickness of about 1/4 inch. Using guide strips is helpful here to ensure the tiles have consistent weight and thickness. -
Cut the Shapes:
Using your geometric cutters, punch out a significant number of hexagons and pentagons. A traditional soccer ball pattern uses 20 hexagons and 12 pentagons, but cut a few extras just in case. -
Refine Edges:
Before attaching, smooth the cut edges of each tile with a damp finger or soft sponge to remove any sharp burs or crumbs. -
Map the Base:
Start applying the tiles to your paper-covered sphere. Begin at the very top with a single pentagon to serve as your anchor point. -
Build the Pattern:
Surround the central pentagon with five hexagons. Score the back of each piece and the edges where they touch, adding a small amount of slip to join them securely. -
Continue the Mosaic:
Work your way down the sphere, alternating the pattern according to traditional soccer ball geometry (each pentagon is surrounded by hexagons). Keep the gaps between tiles tight but distinct to mimic deep grout lines. -
Smoothing the Joins:
As you place the tiles, gently press them against the form to curve them slightly. Use a rib tool to compress the tiles so they follow the round contour rather than sitting flat.
Step 2: Drying and Refining
-
Initial Drying:
Once the sphere is fully covered (leaving a small unseen hole at the bottom for air escape if you plan to close the form entirely, or creating a hollow vessel), let it set until leather hard. -
Remove the Form:
Carefully slice a section off the bottom or use an opening to extract the Styrofoam ball and paper. If you want a fully closed ball, you’ll need to re-attach the bottom section and smooth the seam, ensuring there is a tiny pinhole for air to escape during firing. -
Deepen the Grooves:
With the internal support gone, go over the seams between the tiles with a modeling tool to deepen the ‘grout’ lines, emphasizing the separate tile look. -
Bisque Fire:
Allow the piece to dry slowly and completely under plastic for several days to prevent warping. Once bone dry, bisque fire it to Cone 04.
Geometry Pro-Tip
Clay shrinks! Ensure your pentagon sides exactly match the length of your hexagon sides. If they are even slightly different sizes, the sphere won’t close properly.
Step 3: Glazing and Finishing
-
Clean the Surface:
Wipe the bisque-fired ball with a damp sponge to remove any kiln dust, which helps the glaze adhere properly. -
Apply Cream Tones:
Paint the ‘white’ panels using a creamy white underglaze. Don’t worry about perfect coverage; a little streakiness adds to the rustic, weathered look shown in the photo. -
Add Earthy Accents by Section:
Select specific panels for your accent colors. Paint individual tiles with the terracotta red, mustard yellow, and varying shades of slate and denim blue underglaze. I like to leave some texture in the brushstrokes here. -
Enhance the Grout Lines:
If you want the seams to pop, you can carefully brush a dark grey wash into the grooves and wipe away the excess from the tile surfaces. -
Matte Glaze Application:
Coat the entire sphere in a clear matte glaze. This seals the piece and protects the underglaze colors without adding a distracting high-gloss shine. -
Final Firing:
Fire the piece to the maturity temperature of your clay and glaze (typically Cone 5 or 6 for stoneware). Ensure the bottom is wiped clean of glaze or sits on stilts.
Level Up: Vintage Texture
Before glazing, lightly sand a few random spots on the tiles to reveal the raw clay speckles underneath. It mimics the scuffs found on a well-loved vintage ball.
Place your finished ceramic ball on a wooden shelf or by a window to enjoy the interplay of light on its geometric planes
Soccer Ball Mosaic Tile Look
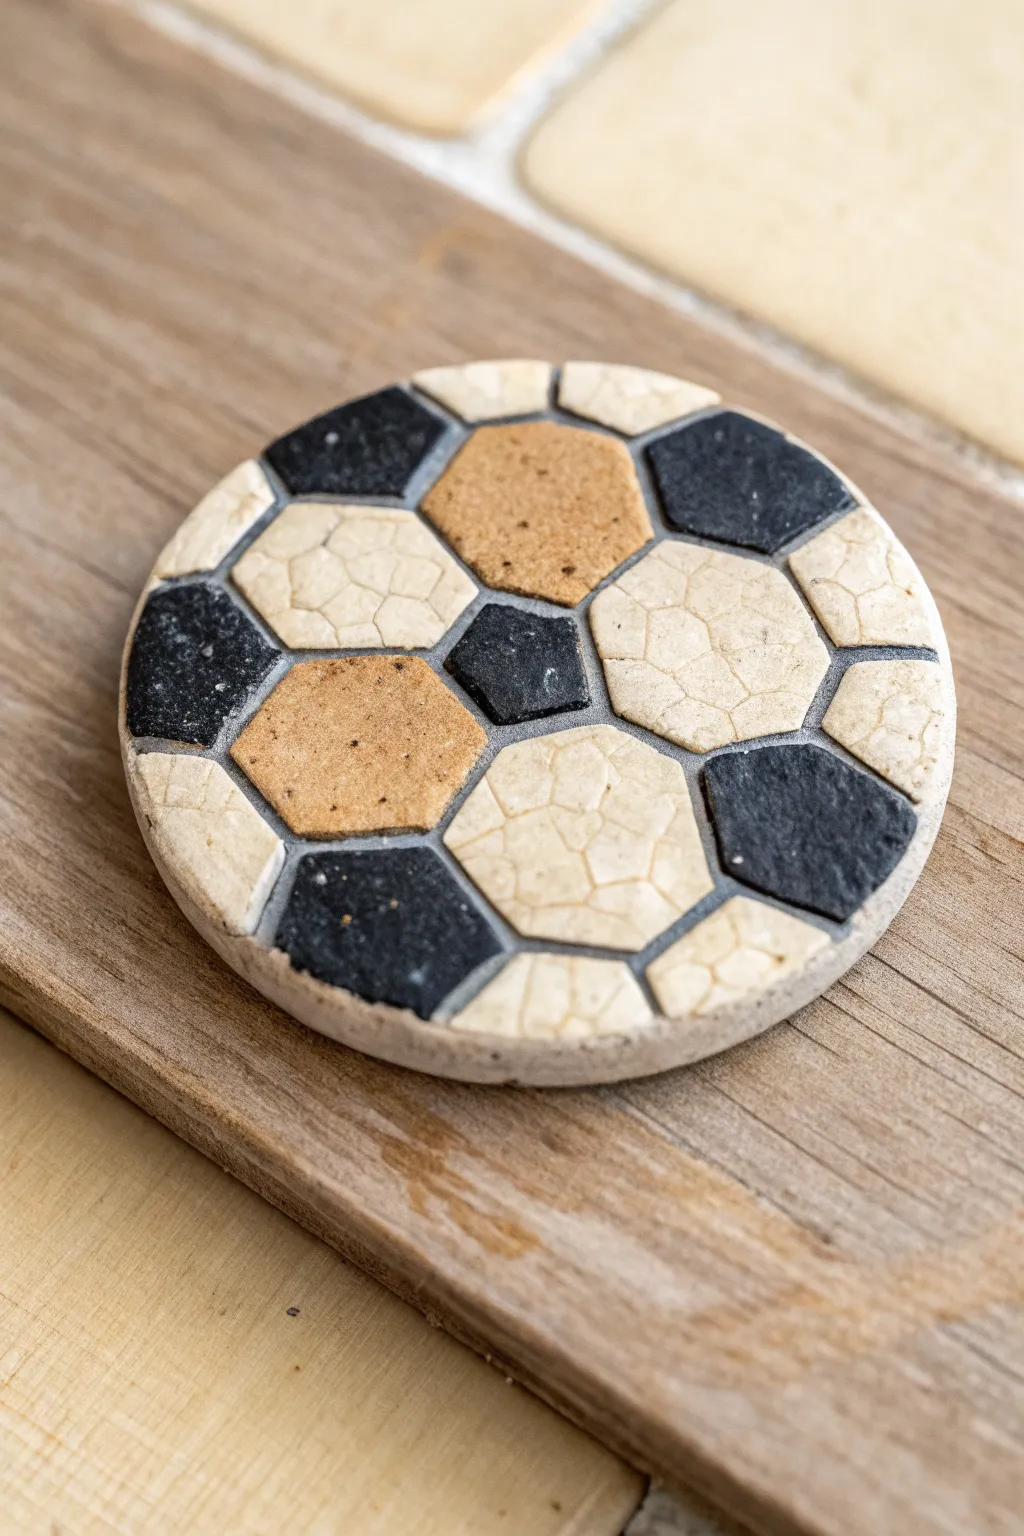
Capture the classic spirit of the game with this textured polymer clay coaster that perfectly mimics the look of a vintage mosaic tile. The combination of crackled white segments and speckled tan and black shapes gives this piece a rugged, authentic feel perfect for any sports fan’s coffee table.
Step-by-Step
Materials
- White polymer clay
- Black polymer clay
- Tan or beige polymer clay
- Liquid polymer clay (translucent or grey)
- Grey acrylic paint (if not using colored liquid clay)
- Coarse sand or salt (for texture)
- Hexagon and pentagon clay cutters (very small)
- Circular clay cutter (approx. 3.5 – 4 inches)
- Rolling pin or pasta machine
- Texture sponge or crumpled aluminum foil
- Needle tool or craft knife
- Oven for baking
- Polyurethane varnish (matte)
Step 1: Preparing the Clay Base
-
Condition the base:
Start by conditioning a large chunk of scrap clay or a neutral color. Creating a solid foundation is crucial for the coaster’s durability. -
Create the slab:
Roll this clay out into a thick, even sheet, approximately 1/4 inch thick. This will serve as the canvas for your mosaic work. -
Cut the circle:
Use your large circular cutter to punch out the main round shape of the coaster. Set this circle aside on your baking tile or parchment paper so you don’t have to move it later.
Stone Effect Pro-Tip
Mix translucent clay into your white clay (50/50 ratio) before texturing. This creates a deeply realistic ‘ceramic’ depth that plain opaque white clay can’t achieve on its own.
Step 2: Creating the Mosaic Tiles
-
Texture the white clay:
Roll out a sheet of white clay. To get that aged, crackled look seen in the photo, gently roll a textured sponge or crumpled ball of foil over the surface. -
Mix the tan clay:
For the tan sections, mix a small amount of coarse sand or black pepper into your beige clay. I find this really helps achieve that natural, stone-like appearance. -
Texture the black clay:
Roll out your black clay and give it a lighter texture than the white, perhaps just daubing it with a toothbrush to matte down the shine. -
Cut geometric shapes:
Using your small geometric cutters, punch out several hexagons from the white clay. You will need about 6-8 full ones. -
Cut accent shapes:
Cut out pentagons from the black clay and a few hexagons from the textured tan clay. Keep your shapes organized to make assembly easier.
Level Up: Dirty Wash
After baking, brush watered-down brown acrylic paint over the tiles and immediately wipe it off. Ideally the paint stays in the texture crevices, making the soccer ball look game-worn.
Step 3: Assembling the Pattern
-
Place the center:
Start near the center of your circular base. Place a black pentagon down, but don’t press it in firmly yet. -
Surround the center:
arrange white and tan hexagons around that central black pentagon. Leave a small, uniform gap of about 1-2mm between every single piece to simulate grout lines. -
Expand the pattern:
Continue adding shapes outward. Follow the classic soccer ball pattern: black pentagons are always surrounded by hexagons. -
Manage the edges:
As you reach the edge of the circle, let the geometric shapes hang over the rim of the base. -
Trim the excess:
Once the pattern covers the whole circle, take your large circular cutter again. Align it with the base underneath and cut through the mosaic layer to get a perfectly clean, round edge. -
Embed the pieces:
Gently roll over the entire surface with your rolling pin to press the mosaic tiles firmly into the base and ensure the top is level.
Step 4: Grouting and Finishing
-
Fill the gaps:
Mix liquid polymer clay with a tiny drop of grey paint or grey pastel shavings. Carefully squeeze this ‘grout’ into the channels between your tiles. -
Create the rim:
I like to run a little bit of the grey grout mixture around the outer edge as well to seal the layers together visually. -
Bake the coaster:
Bake the project according to your clay manufacturer’s instructions, usually at 275°F (130°C) for about 30-45 minutes since it is a thick piece. -
Cool down:
Let the coaster cool completely inside the oven to prevent cracking. -
Seal the surface:
Finish by applying a thin layer of matte polyurethane varnish to protect the surface from moisture while keeping the stony, non-glossy look. -
Backing (Optional):
Gluing a circle of cork or felt to the bottom adds a professional touch and protects your furniture.
Now you have a durable, custom piece of decor that celebrates the beautiful game with artistic flair
Soccer Diorama in a Mini Shadow Box
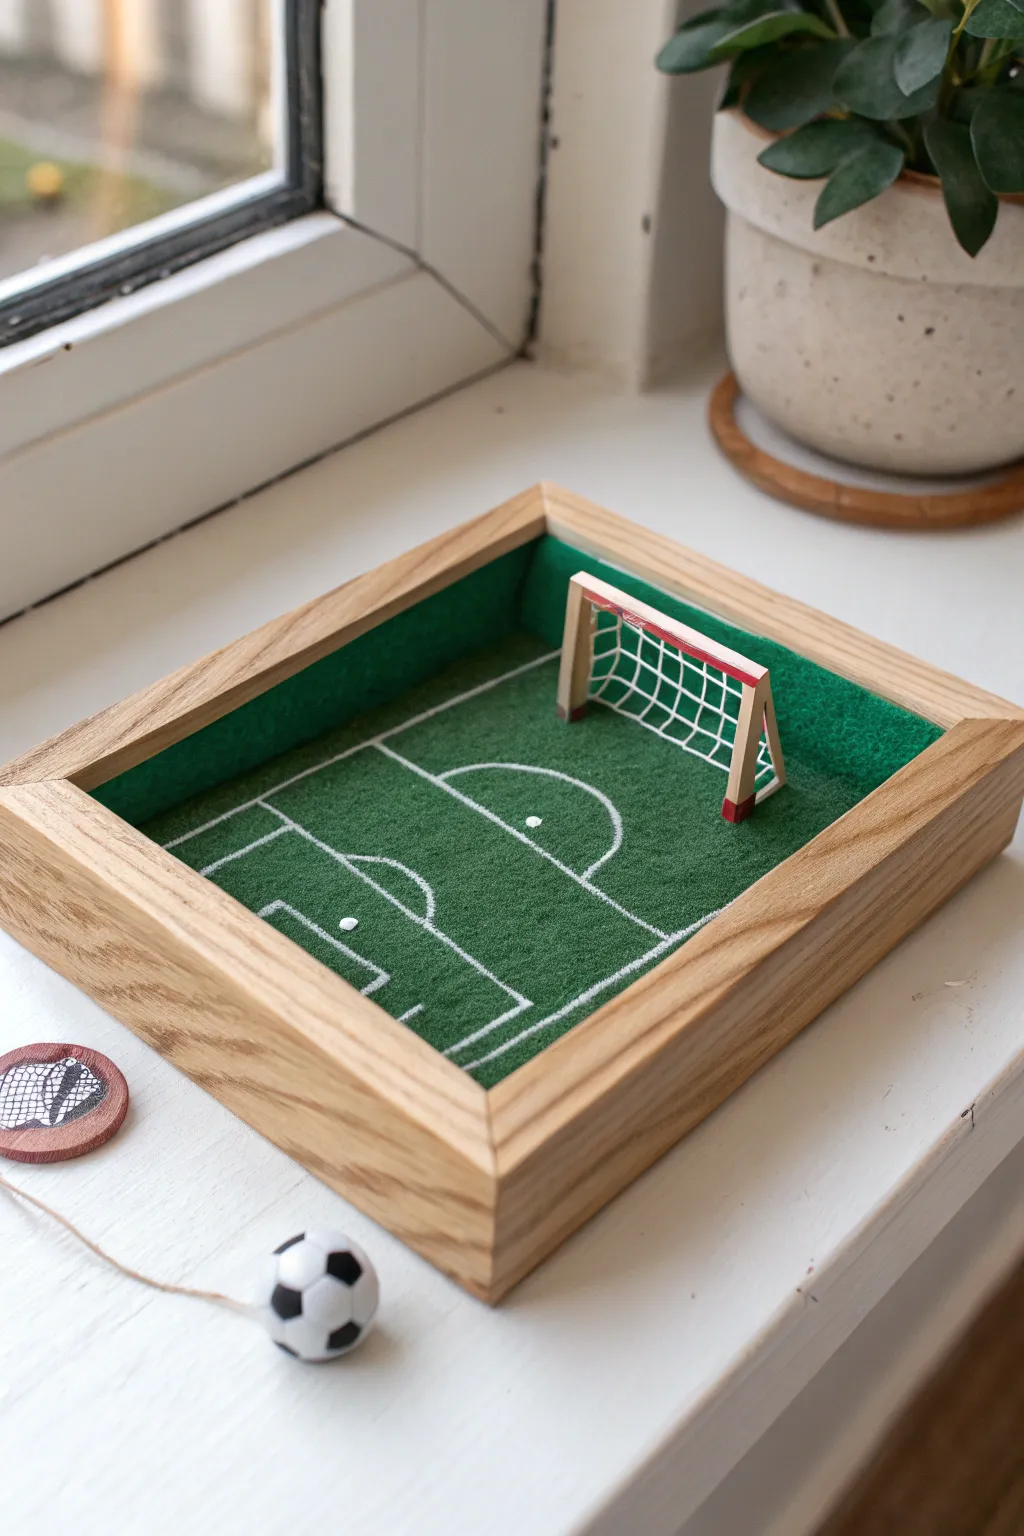
Bring the excitement of the stadium to your windowsill with this charming miniature soccer diorama. Enclosed in a simple wooden shadow box, the textured green field and tiny goal create a peaceful yet playful tribute to the beautiful game.
Step-by-Step Tutorial
Materials
- Small wooden shadow box frame (approx. 5×7 inches)
- Green felt or astroturf sheet
- White fabric paint or fine-tip paint pen
- Popsicle sticks or balsa wood strips
- White embroidery mesh or tulle
- Red acrylic paint
- Polymer clay (black and white)
- Strong craft glue or hot glue
- Ruler
- Scissors
- Sandpaper
Step 1: Preparing the Field
-
Measure the base:
Remove the back panel from your wooden shadow box. Use this panel as a template to trace a rectangle onto your green felt or astroturf sheet, ensuring it fits perfectly inside the frame. -
Cut materials:
Cut out the green rectangle with sharp scissors. Also measure and cut four thin strips of felt to line the inner vertical walls of the shadow box, creating a seamless green environment. -
Secure the turf:
Apply a thin, even layer of craft glue to the back panel and press the green rectangle onto it. Smooth out any air bubbles with your hand. Glue the side strips into the box interior. -
Mark the pitch lines:
Using a ruler and a very fine brush or white paint pen, draw the touchlines, goal area, penalty box, and center circle directly onto the green surface. I find stippling the paint slightly helps it adhere to fuzzy felt texture.
Glue Mastery
For the tiny goal net, use a toothpick to apply microscopic dots of super glue. This prevents messy globs that can clog the mesh holes.
Step 2: Constructing the Goal
-
Cut wood pieces:
Cut your popsicle sticks or balsa wood into three pieces: a crossbar and two upright posts. The size should be proportional to your box, usually about 1.5 inches high. -
Assemble the frame:
Glue the crossbar to the top of the two posts to form a basic U-shape. Let the glue set completely before moving on. -
Add color accents:
Once dry, paint the front face of the goalposts white. For a classic touch, paint the sides or back edges red, or add red stripes. -
Create the netting:
Cut a piece of white embroidery mesh or tulle into a rectangle that creates a scoop shape behind the goal frame. -
Attach the net:
Carefully glue the mesh to the back of your wooden goal frame. Trim any excess mesh that hangs below the bottom edge. -
Position the goal:
Glue the finished goal securely to one end of your green field, ensuring it stands upright.
Stadium Lighting
Install a tiny battery-operated LED wire light around the inner rim of the shadow box to create a ‘night game’ effect for your display.
Step 3: Creating the Accessories
-
Shape the ball core:
Roll a small amount of white polymer clay into a perfect sphere, roughly the size of a marble. -
Add black pentagons:
Flatten tiny balls of black clay into thin pentagon shapes. Carefully press these onto your white sphere in a soccer ball pattern. -
Smooth the surface:
Gently roll the ball between your palms to embed the black clay flush with the white, creating a smooth surface. -
Bake the clay:
Bake the clay ball according to the package instructions. If you want to make a team token like the one in the photo, shape a flat disc and add a mesh texture before baking. -
String attachment (optional):
If you want the ball attached to the frame so it doesn’t get lost, glue a piece of twine to the ball and tuck the other end under the frame edge.
Step 4: Final Assembly
-
Reassemble the box:
Place the field back panel into the wooden frame. The fit should be snug. -
Clean up:
Wipe down the wooden frame to remove any fingerprints or dust. -
Display:
Place the ball loosely on the field or alongside the frame for an interactive element.
Now you have a perfect slice of the sport ready to inspire dreams of the big leagues