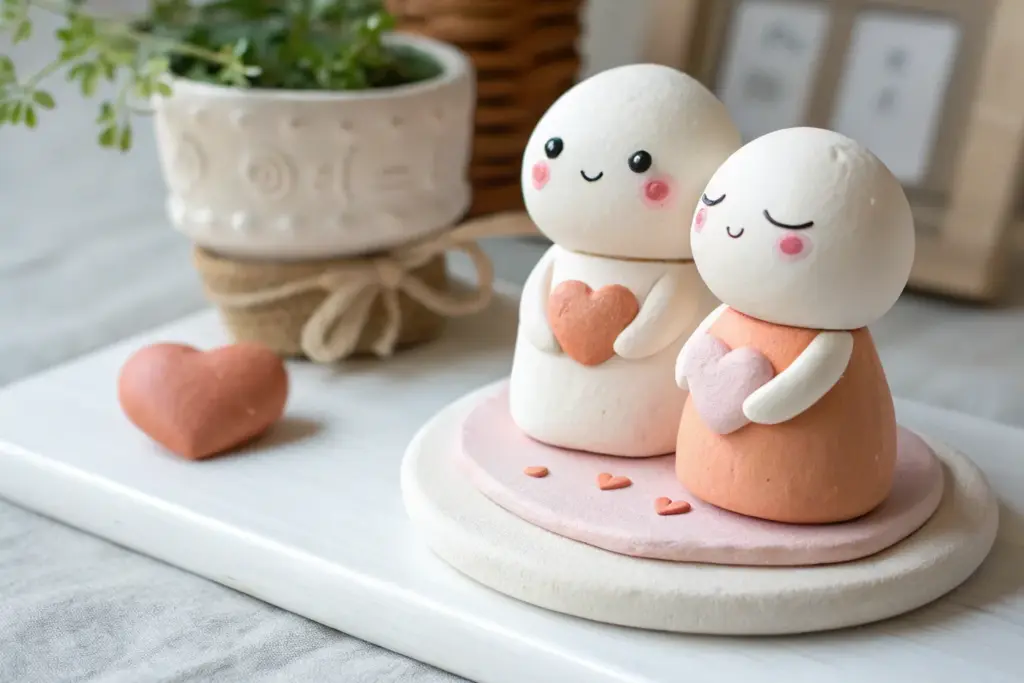
If you want a date night that’s cozy, creative, and actually leaves you with something cute to keep, air dry clay is my go-to. You don’t need fancy tools or a kiln—just a little time together, a shared table, and a willingness to laugh when something turns into an accidental blob.
Mini Photo Holders for Your Favorite Snapshot
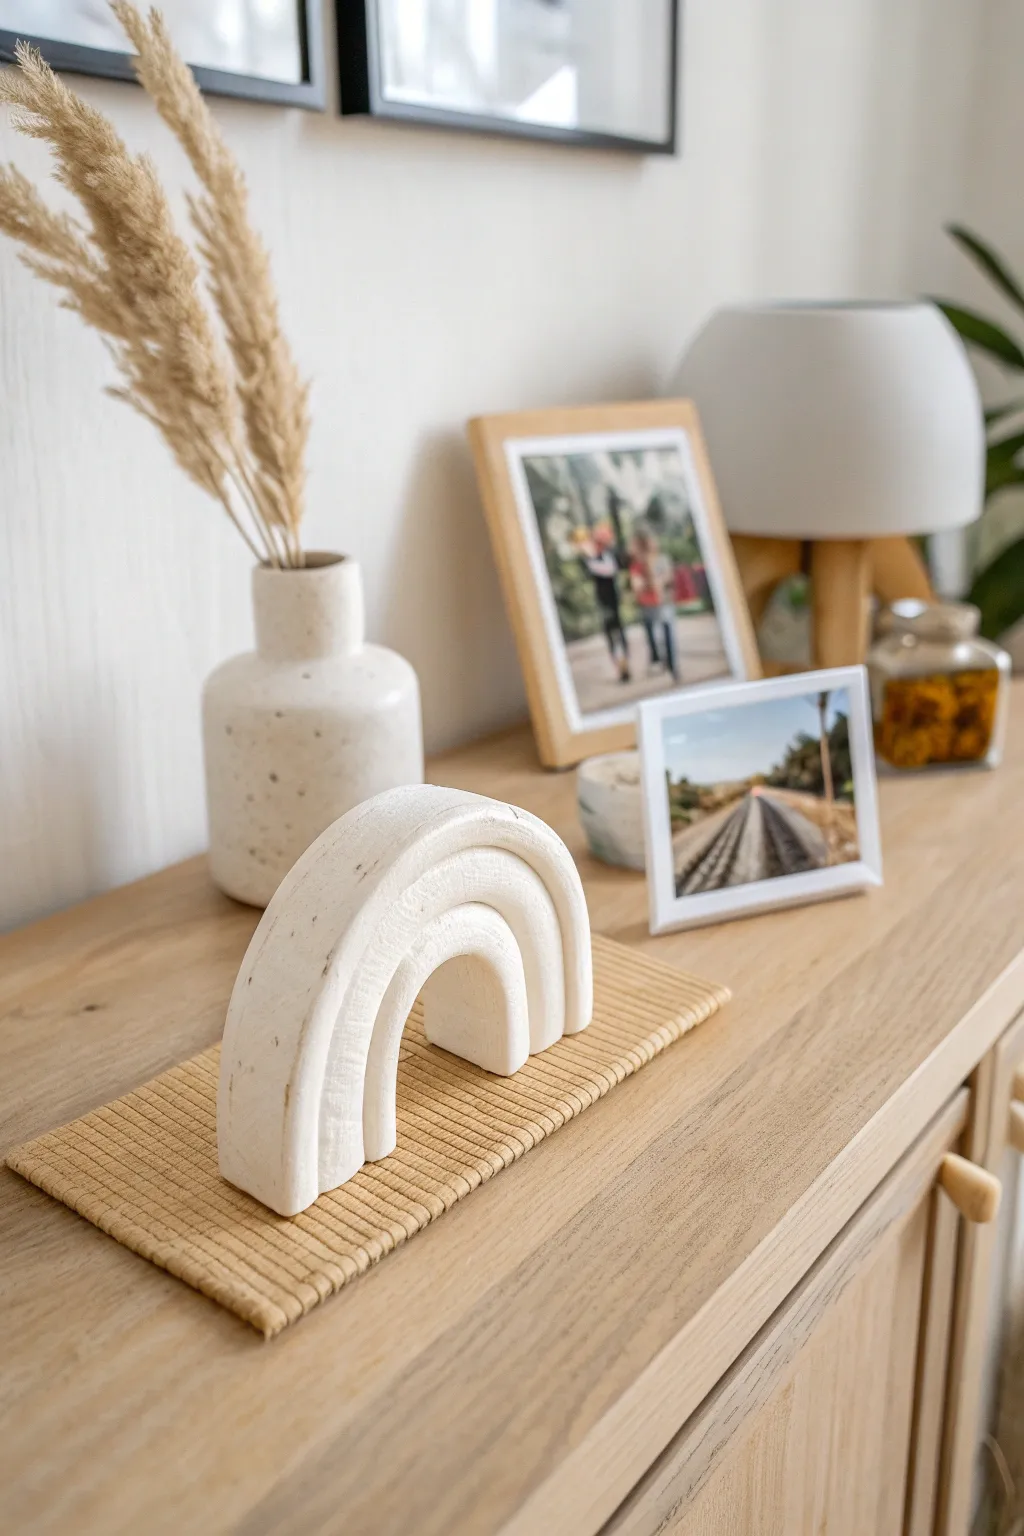
Create a stunningly simple piece of modern decor with this textured clay rainbow arch. Its clean lines and speckled finish mimic the look of unglazed ceramic or stone, perfect for adding a sculptural element to your shelves.
How-To Guide
Materials
- Air dry clay (white or stone-effect)
- Rolling pin
- Sharp crafting knife or clay cutter
- Ruler
- Sandpaper (medium and fine grit)
- Small bowl of water
- Sponge
- Acrylic sealer (matte finish)
Step 1: Shaping the Arches
-
Prepare the Clay:
Begin by kneading a large handful of air dry clay until it becomes soft and pliable. If the clay feels dry or cracks when you bend it, dip your fingers in water and work the moisture into the material. -
Roll Out Coils:
Divide your clay into three portions, slightly varying in size. Roll each portion on a flat surface to create long, thick snakes or ‘coils.’ Aim for a uniform thickness of about 3/4 of an inch (2 cm) for a chunky, substantial look. -
Flatten Sides:
Gently press the sides of each coil against your work surface to create a square or rectangular cross-section rather than a round one. You want flat sides so the arches sit flush against each other. -
Form the Center Arch:
Take the shortest coil and bend it into a tight U-shape to form the smallest, innermost arch. Stand it up to ensure it is balanced. -
Trim the base:
Use your ruler and craft knife to trim the bottom legs of this first arch so they are perfectly flat and even. -
Add the Middle Arch:
Take your second coil and gently drape it over the first arch. Press it lightly so it conforms to the shape of the inner piece. -
Add the Outer Arch:
Repeat the process with the longest coil, forming the final, largest arch over the previous two.
Step 2: Structuring and Refining
-
Score and Slip:
Separate the arches carefully. Use your knife to make small hatch marks (scoring) on the outer curve of the small arch and effectively inner curve of the middle arch where they will touch. Dab a little water (slip) on these rough areas. -
Join the Layers:
Press the layers back together firmly. The water and scoring act as glue, fusing the clay into one solid unit. -
Slice the Bottom:
Once all three layers are joined, check the bottom edge again. Use your long blade or a wire cutter to slice across the entire bottom in one motion, creating a perfectly flat base so the sculpture stands without wobbling. -
Smooth the Seams:
Run a damp finger or a wet sponge along the front and back faces of the arch to smooth out any fingerprints. I find it helpful to leave the define lines between the arches visible for that stacked look, so focus only on the faces. -
Initial Drying:
Place the sculpture on a piece of parchment paper or a wire rack. Let it dry for 24 to 48 hours depending on humidity. Rotate it occasionally to ensure even airflow.
Cracking Up?
If cracks appear while drying, mix a tiny bit of fresh clay with water to make a paste. Fill the crack, smooth it over, and let it dry again.
Step 3: Finishing Touches
-
Sanding:
Once bone dry, use medium-grit sandpaper to remove any sharp edges or major bumps. Follow up with fine-grit sandpaper for a smooth, velvety finish. -
Adding Texture (Optional):
To mimic the speckled stone look in the photo, you can flick a toothbrush loaded with slightly watered-down brown or grey acrylic paint across the surface. -
Sealing:
Apply a coat of matte acrylic sealer or varnish. This protects the clay from moisture and gives it a finished, professional appearance without adding unnatural shine.
Functional Twist
Before drying, use a knife to slice a thin slit into the top center of the outer arch. Now your sculpture doubles as a photo holder
This charming architectural piece brings a calm, artistic presence to any room


Tiny Magnet Set: One Theme, Two Styles
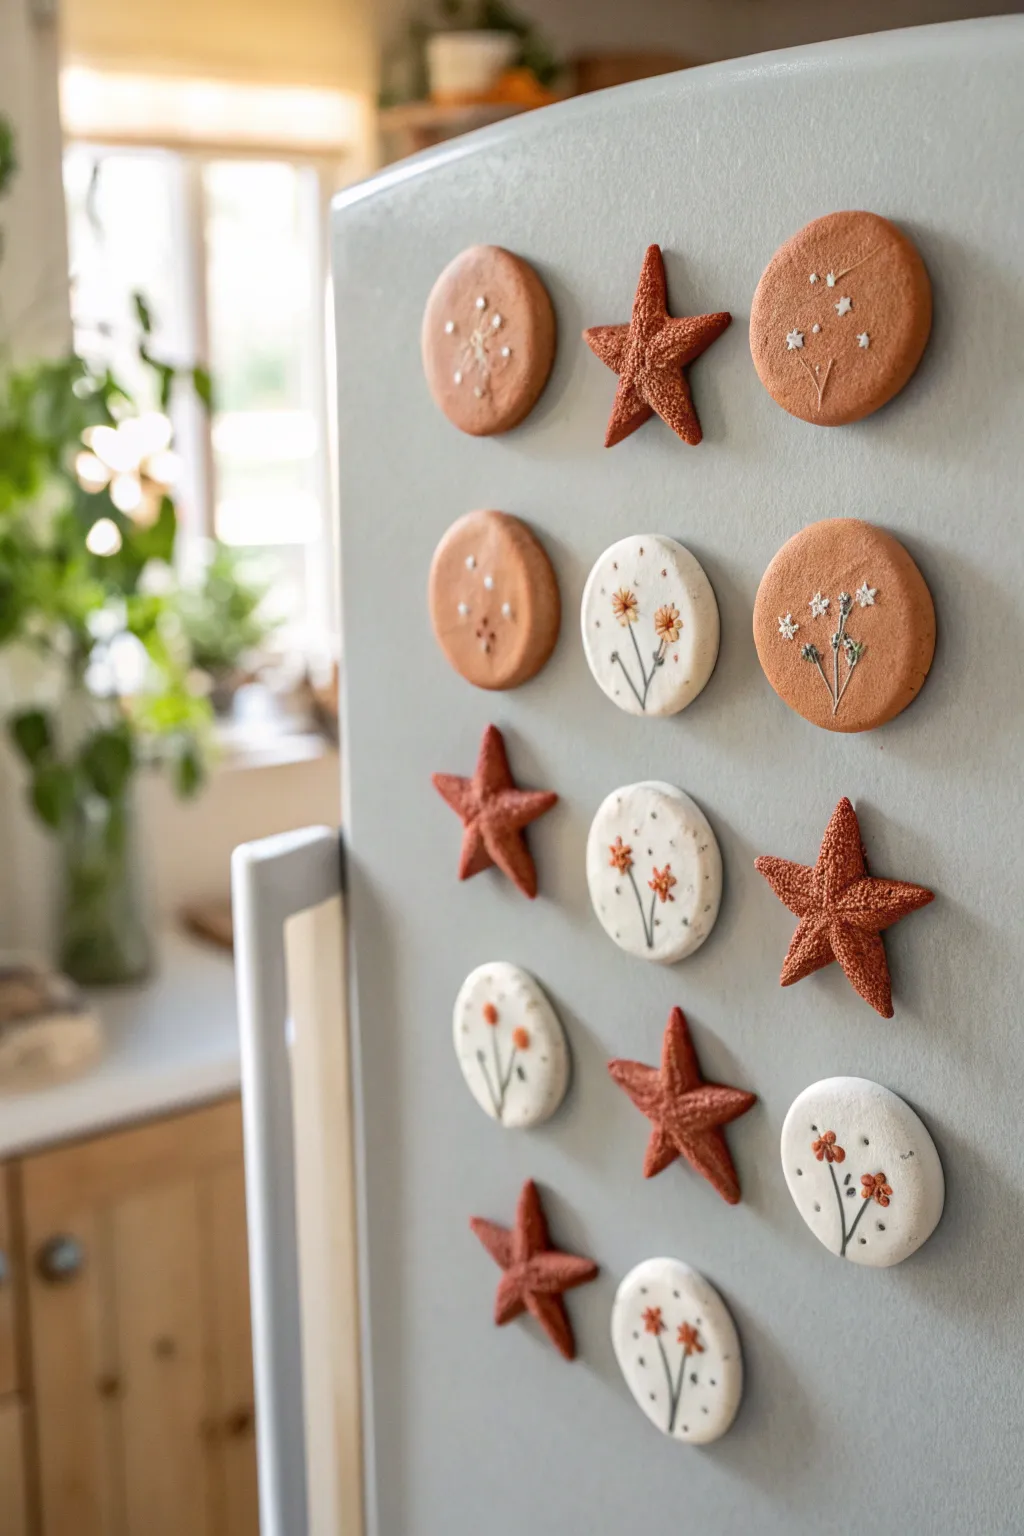
Create a unified collection of refrigerator magnets that blends warm terracotta tones with fresh white accents. This project combines simple geometric shapes with delicate botanical details for a cozy, handcrafted look perfect for a modern kitchen.
Step-by-Step
Materials
- White polymer or air-dry clay
- Terracotta-colored polymer or air-dry clay (or mix acrylic paint into white clay)
- Small round cookie cutter (approx. 1.5 – 2 inches)
- Small star cookie cutter
- Rolling pin
- Parchment paper
- Sandpaper (fine grit)
- Acrylic paints (White, Deep Green, Burnt Orange/Rust)
- Fine detail paintbrush (size 0 or 00)
- Matte sealant or varnish
- Strong round magnets
- Strong craft glue (e.g., E6000)
Step 1: Shaping the Clay
-
Prepare your workspace:
Lay down parchment paper on a flat surface to prevent your clay from sticking. Knead both the white and terracotta clays separately until they are soft, pliable, and free of cracks. -
Roll out the slabs:
Roll your white clay out to an even thickness of about 1/4 inch. Repeat this process for the terracotta clay. Try to keep the thickness consistent so the magnets look like a cohesive set. -
Cut the shapes:
Using your circle cutter, punch out several discs from both the white and terracotta slabs. Then, use the star cutter to create an equal number of terracotta stars. Wiggle the cutters slightly before lifting to get a clean edge. -
Smooth the edges:
Dip your finger in a tiny bit of water and gently run it along the cut edges of each shape to smooth out any roughness or sharp corners left by the cutters. -
Texturing the stars (Optional):
For the tactile look seen in the stars, tap the surface gently with a clean toothbrush or a crumpled ball of foil while the clay is still wet to create a pebbled texture. -
Drying or baking:
If using air-dry clay, leave the pieces on a flat surface for 24-48 hours, flipping them halfway through. If using polymer clay, bake according to the manufacturer’s package instructions.
Clean Lines Pro Tip
If you struggle with shaky hands for the stems, use an ultra-fine tip Posca paint pen or a permanent pigment liner instead of a brush for crisp lines.
Step 2: Adding Botanical Details
-
Prepare for painting:
Once fully dry (and cooled, if baked), lightly sand any remaining rough edges with fine-grit sandpaper. Wipe away the dust with a damp cloth. -
Paint the white florals:
On the smooth terracotta circles, use your fine detail brush and white acrylic paint to create delicate floral designs. Paint thin vertical stems first, then dot small clusters of ‘flowers’ or tiny stars at the tips. -
Detailing the white circles:
For the white clay circles, switch to dark green for the stems. Paint two or three intersecting lines to form a plant base. -
Adding color accents:
Dip your brush into the burnt orange or rust paint. Add small, five-petal flowers to the tips of the green stems on the white circles. I like to keep these loose and organic rather than perfectly symmetrical. -
Finishing touches:
Add tiny black or dark brown specks to the white circles to mimic a ceramic glaze effect. You can do this by flicking a stiff brush or carefully dotting with the tip of your detail brush. -
Seal the artwork:
Allow all paint to dry completely. Apply a thin coat of matte varnish over the top of each piece to protect the design and give the clay a finished, professional look.
Level Up: Impressed Texture
Before the clay dries, gently press real dried wildflowers or herbs into the surface, then remove them. Once dry, paint inside the impression for a debossed effect.
Step 3: Assembly
-
Attach the magnets:
Flip all your clay pieces over. Apply a dab of strong craft glue to the center of the back of each shape. -
Secure and set:
Press a round magnet firmly into the glue. Let them sit undisturbed for several hours (or overnight) to ensure a permanent bond before sticking them to your fridge.
Now you have a charming set of custom magnets to organize your photos and notes in style


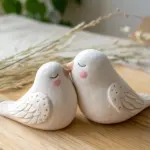
Sculpt a Pair of “Us” Little Desk Buddies
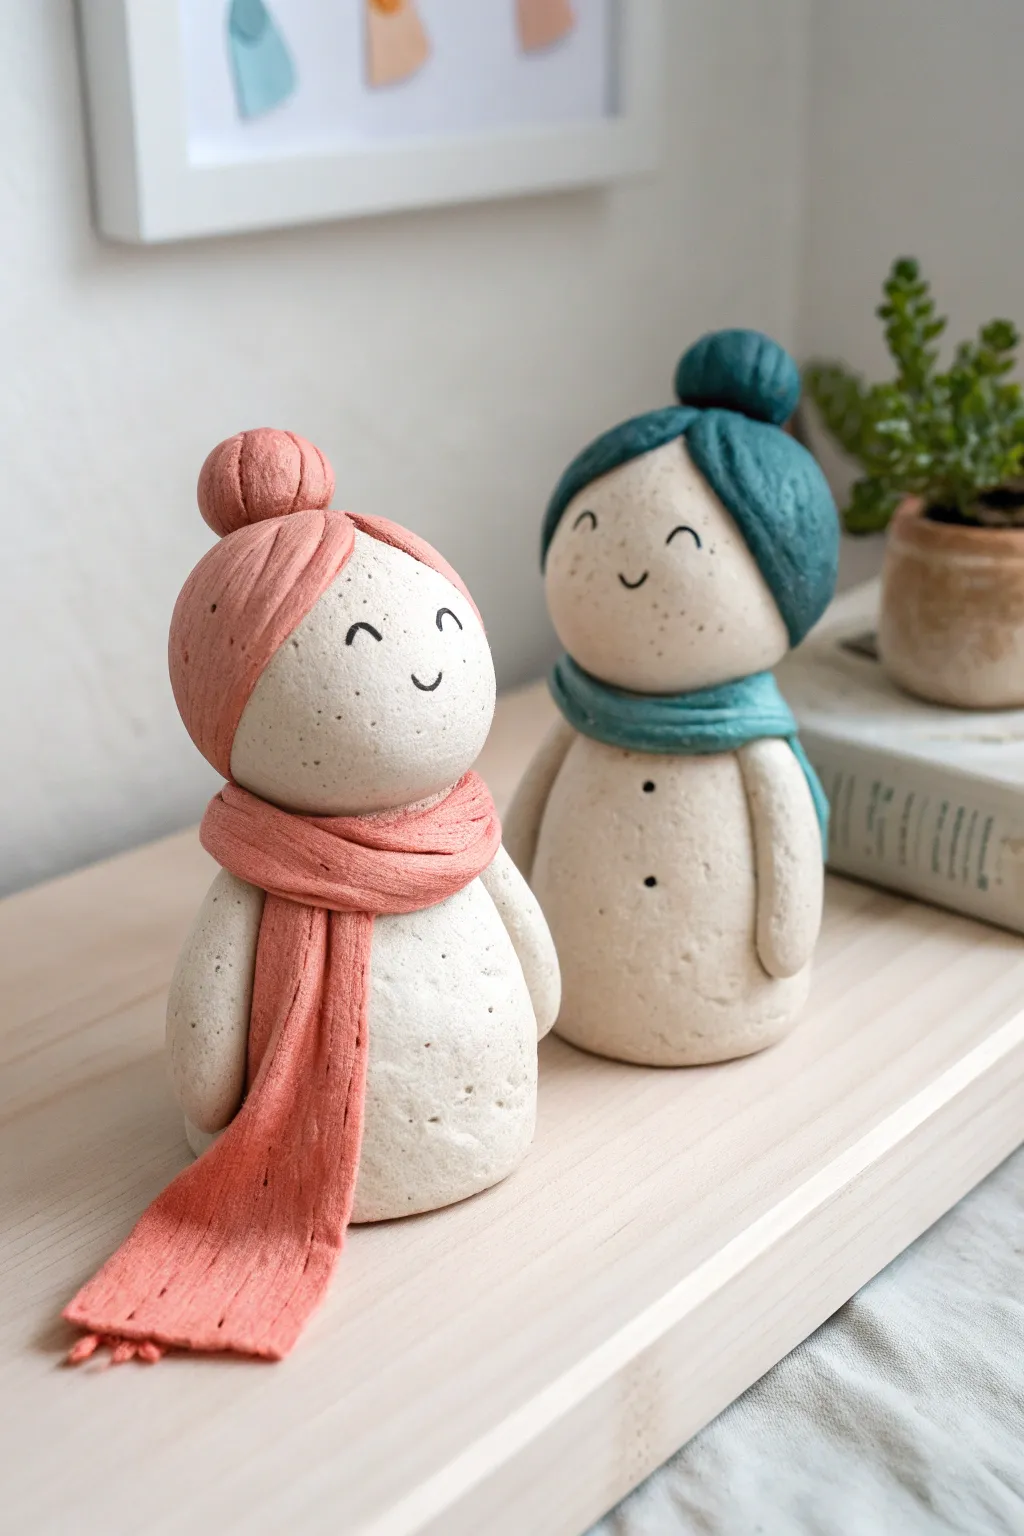
These charming, minimalist figurines are the perfect representation of connection, featuring smooth, simple forms and cozy scarves. Their sweetly speckled finish and serene expressions make them a soothing addition to any workspace, crafted right alongside your favorite person.
Step-by-Step Tutorial
Materials
- White air-dry clay (smooth texture)
- Acrylic paints (Soft Pink/Coral and Teal/Deep Green)
- Black fine-point felt tip marker or acrylic paint pen
- Sculpting tools (needle tool, modeling tool)
- Rolling pin
- Small cup of water
- Fine grit sandpaper
- Matte varnish or sealant
Step 1: F orming the Base Figures
-
Roll the body:
Start with a medium chunk of clay, rolling it into a smooth ball. Gradually taper the top slightly to create a very subtle pear shape, flattening the bottom so it stands sturdily on its own. -
Create the head:
Roll a second, slightly smaller ball for the head. It should be perfectly round. Use a little water to score (scratch) the top of the body and the bottom of the head, then press them together firmly to bond. -
Blend the neck:
Using a modeling tool or your fingertip, gently smooth the clay across the seam where the head meets the body. You don’t need a visible neck; the scarf will cover this area later, but structural integrity is key. -
Shape the arms:
Roll two small sausage shapes for arms. They should be simple and hand-less, tapering slightly at the bottom. Attach these to the sides of the body using the score-and-slip method, blending the shoulders into the torso. -
Repeat for partner:
Repeat this entire process to create the second figure. Try to make them complementary in size—perhaps one is slightly taller or wider to represent your distinctive traits.
Step 2: Adding the Cozy Details
-
Roll out the accessories:
Flatten a piece of clay with your rolling pin to about 1/8 inch thickness. You will need enough flat clay to cut strips for the head-wraps and the scarves. -
Create the hair wrap:
Cut a wide strip of the flattened clay. Drape it over the top of the head like a bandana or headband. Smooth the edges down so it looks like it’s hugging the skull. -
Sculpt the bun:
Roll a small ball of clay for the top knot. Press it gently onto the top center of the head wrap. Use a needle tool to draw vertical lines into the bun and the head wrap to mimic the texture of gathered fabric. -
Make the scarf:
Cut a long, thin rectangular strip for the scarf. Wrap it around the neck area where the head meets the body. For one figure, let the ends drape long down the front; for the other, wrap it snugly like an infinity scarf. -
Texture the fabric:
Use your needle tool to add fine, linear details to the scarf ends, creating a fringe effect. I also like to add subtle folds in the clay where the scarf wraps around the neck to make it look soft. -
Dry completely:
Let your figures dry for at least 24-48 hours. They should feel room temperature (not cool) to the touch when fully dry.
Smooth Seams Tip
To erase fingerprints while the clay is wet, lightly brush the surface with a tiny bit of water on your finger or a soft paintbrush.
Step 3: Painting and Finishing
-
Sand imperfections:
Once dry, use fine-grit sandpaper to gently smooth out any fingerprints or rough bumps on the face and body, wiping away the dust with a dry brush. -
Paint the accessories:
Paint the head wrap and scarf of one figure in a soft coral pink. Paint the accessories of the second figure in a deep teal. You might need two coats for opaque coverage. -
Create the speckled look:
Dilute a tiny bit of brown or grey paint with water on an old toothbrush. Run your thumb over the bristles to flick tiny speckles onto the unpainted white areas of the clay to mimic stoneware. -
Draw the faces:
Using a fine-point black marker or paint pen, draw two small arched eyes (like upside-down U’s) and a tiny curved smile. Keep the features centered and low on the face for that cute, ‘kawaii’ proportion. -
Add shirt buttons:
If desired, add two or three tiny black dots down the center of the body to represent buttons. -
Seal the work:
Finish with a coat of matte varnish to protect the paint and give the clay a professional, finished porcelain look.
Cracking Issues?
If small cracks appear while drying, don’t panic. Mix a tiny bit of fresh clay with water to make a paste and fill the cracks, then sand smooth once dry.
Place your finished duo on your desk as a sweet reminder of your creative evening together


Cute Food Miniatures: Pizza Slice vs. Burger
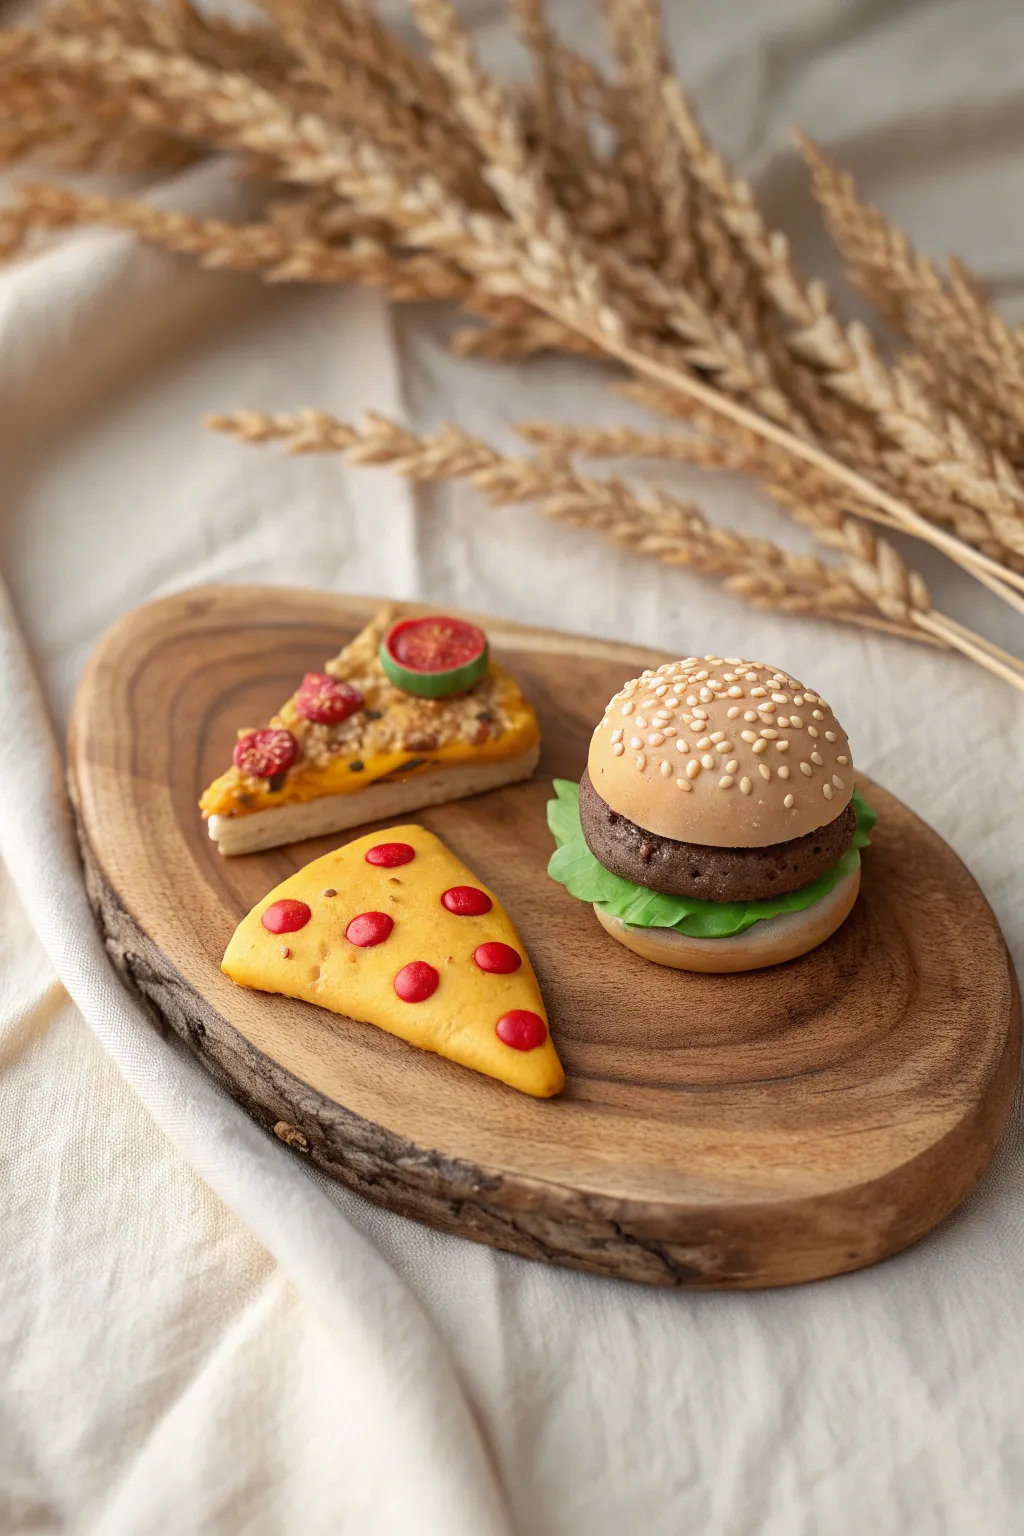
Transform a simple lump of air dry clay into an adorable trio of comfort food snacks perfect for a creative date night. This set features a textured pizza slice, a cheesy wedge, and a tiny, realistic burger complete with a sesame seed bun.
Step-by-Step
Materials
- Air dry clay (white or pre-colored)
- Acrylic paints (brown, yellow, red, green, beige)
- Set of small paintbrushes (fine tip and flat)
- Sculpting tools (needle tool, small ball tool)
- Toothbrush or balls of tin foil (for texturing)
- Rolling pin
- Cutting mat
- X-acto knife or clay blade
- Gloss varnish (optional)
Step 1: Sculpting the Pizza Slices
-
Base shape:
Start by rolling out a thick slab of clay for the pizza dough. Cut a triangle shape for the main slice and a slightly thinner triangle for the pepperoni cheese wedge. -
Crust details:
For the loaded slice, roll a small snake of clay and attach it to the wide end of the triangle to form the crust. Flatten the main triangle area slightly to create a depression for the toppings. -
Adding texture:
Use a toothbrush or a crinkled ball of tin foil to stipple the surface of the crust and the burger bun later. This creates that realistic baked-bread texture. -
Toppings construction:
Roll tiny balls of clay for the toppings. Flatten red balls for pepperoni and create small uneven clumps for ground meat or sausage. Press these firmly onto the larger pizza slice. -
The tomato slice:
Create a distinctive tomato slice by making a small disc with a raised rim. Use a needle tool to press tiny segment lines into the center. -
Pepperoni wedge:
For the second, simpler slice (the yellow one), keeps the surface smooth. Press small, flat red clay circles into the surface to represent pepperoni, leaving them slightly raised.
Realistic Bread Texture
For the most realistic bread look, gently tap the clay surface with a clean toothbrush or rough sandpaper before the clay dries.
Step 2: Building the Burger
-
Bun formation:
Roll two balls of clay for the bun. Flatten one slightly for the bottom, and form a dome shape for the top bun. Texture both with your foil or toothbrush. -
The patty:
Form a disc of clay slightly wider than the bun for the burger patty. Use a needle tool to prick the edges and surface repeatedly to mimic the texture of ground beef. -
Lettuce layer:
Roll a thin sheet of clay and tear off jagged, uneven pieces. Ruffle the edges with your fingers or a sculpting tool to look like fresh green leafy lettuce. -
Assembly:
Stack your burger pieces: bottom bun, lettuce, patty, and top bun. Use a tiny dab of water between layers to act as glue so they don’t slide apart while drying. -
Sesame seeds:
Roll extremely tiny tear-drop shapes of clay for the sesame seeds. Carefully press them onto the top bun while the clay is still damp.
Step 3: Painting and Finishing
-
Reference colors:
Allow the clay to dry completely (usually 24 hours). I like to mix a warm beige color for the bread areas first, using lots of white with a touch of yellow and brown. -
Painting the buns:
Paint the pizza crust and burger buns with your beige mix. For a baked look, dry brush a slightly darker golden-brown on the very tops and edges. -
Burger fillings:
Paint the patty a deep, dark brown. Paint the lettuce a bright, vibrant green, ensuring you get paint into the ruffled folds. -
Pizza details:
Paint the base of the loaded pizza with an orange-yellow ‘cheese’ color. Darken the sausage crumbles with brown and paint the tomato slice bright red with a green rind. -
Pepperoni wedge:
Paint the entire second triangle a bold yellow-orange. Carefully paint the pepperoni circles a bright red. -
Final touches:
Use a fine liner brush to paint the tiny sesame seeds on the bun white or cream. Once the paint is fully dry, you can add a coat of gloss varnish to the tomato and pepperoni for a greasy, appetizing shine.
Turn Them Into Magnets
Glue small, strong disc magnets to the back of each piece once dry to create a ridiculously cute set of refrigerator magnets.
Display your miniature feast on a small wooden coaster for the perfect rustic presentation

The Complete Guide to Pottery Troubleshooting
Uncover the most common ceramic mistakes—from cracking clay to failed glazes—and learn how to fix them fast.
Love Notes in Clay: Message Tokens
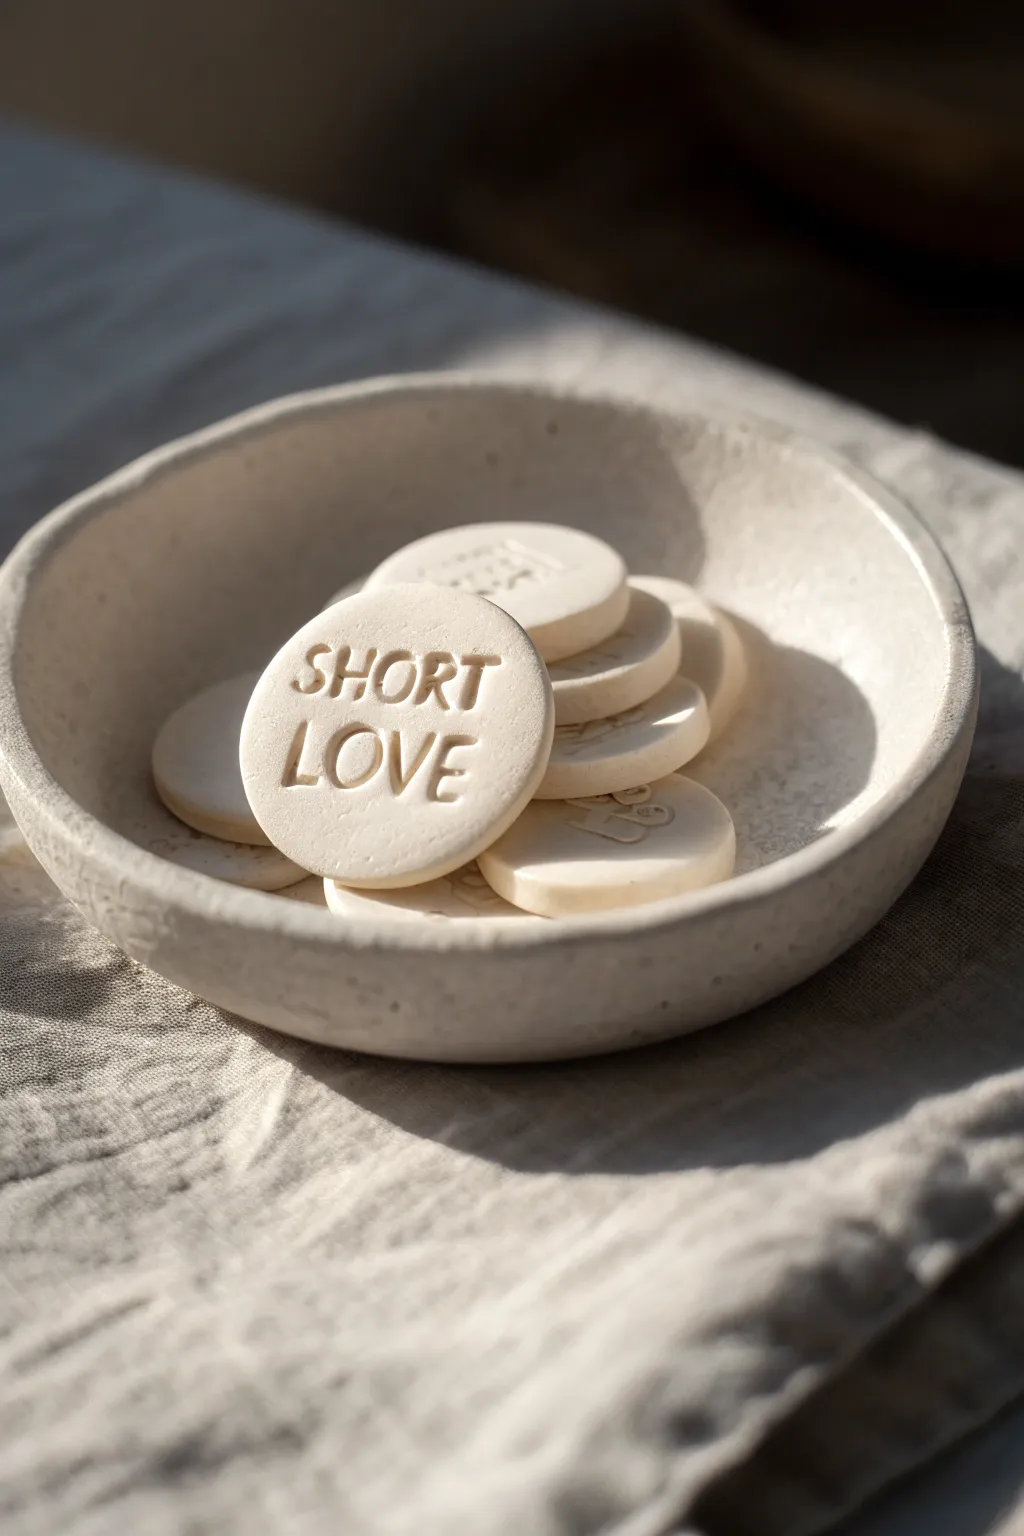
These minimalist clay tokens are a romantic and tangible way to leave sweet notes for your partner. Nested in a matching handmade dish, they capture a modern, stoneware aesthetic using simple air-dry clay.
Step-by-Step Guide
Materials
- White or cream air-dry clay (e.g., DAS or Crayola)
- Small individual letter stamps
- Rolling pin or smooth glass jar
- Small circle cookie cutter (approx. 1.5 – 2 inches)
- Medium bowl (to use as a mold)
- Fine-grit sandpaper (220-400 grit)
- Parchment paper
- Small sponge and water
- Acrylic matte varnish or sealant (optional)
Step 1: Preparation & Rolling
-
Prepare your workspace:
Lay down a sheet of parchment paper on a flat surface to prevent sticking. Grab a handful of clay and knead it in your warm hands for a minute to make it pliable and remove air bubbles. -
Roll out the slab:
Flatten the clay ball slightly with your palm. Use your rolling pin to roll it out to an even thickness of about 1/4 inch (6mm). Aim for a uniform surface without dips. -
Smooth the surface:
Before cutting, take a slightly damp sponge and very gently drag it across the clay surface to remove any canvas texture or rolling pin marks. Don’t use too much water, or the clay will become mushy.
Step 2: Creating the Tokens
-
Cut the circles:
Press your small circle cutter firmly into the clay slab. Twist slightly to ensure a clean cut, then lift. Cut as many tokens as you can fit on the slab, leaving a little space between them. -
Remove excess clay:
Carefully peel away the scrap clay from around the circles. Ball up this excess to use for the bowl later. -
Smooth the edges:
Dip your clean finger into a tiny bit of water and run it around the circumference of each disc to round off the sharp cut edges. -
Plan your messages:
Before stamping, decide on short, sweet phrases like ‘SHORT LOVE’, ‘KISS ME’, or ‘DATE NIGHT’. The discs are small, so brevity is key. -
Stamp the text:
Use your letter stamps to press the words into the clay. I like to practice on a scrap piece first to gauge how hard to press. Center the words carefully on each disc. -
Dry the tokens:
Transfer the parchment paper with the tokens to a flat drying area. To prevent curling, you can place a light book over them once they are leather-hard (after about 2 hours).
Stamp Alignment
Tape your individual letter stamps together with masking tape before pressing. This ensures your words are perfectly straight and evenly spaced.
Step 3: Crafting the Dish
-
Roll clay for the bowl:
Take the remaining clay scraps (or fresh clay) and roll out a larger slab, also about 1/4 inch thick. -
Cut the bowl shape:
Use a larger bowl or plate as a template to cut a circle approximately 5-6 inches in diameter. -
Form the curve:
Gently lift your large clay circle and drape it *inside* a medium bowl lined with parchment paper. Press it gently to confirm the simple curved shape. -
Refine the rim:
Use a damp sponge to smooth the rim of the bowl while it sits in the mold. You want an organic, handmade look, but no sharp bits. -
Allow to dry:
Let the bowl dry inside the mold for at least 24 hours. Once the top feels dry, carefully pop it out and let the bottom air dry for another day.
Add Color
Mix a tiny drop of acrylic paint into the white clay before rolling to create soft pastels or a marble effect for your tokens.
Step 4: Finishing Touches
-
Sand for perfection:
Once everything is bone dry (usually 48 hours total), take your fine-grit sandpaper and gently sand the edges of the tokens and the bowl rim. This gives that professional ‘stone’ finish. -
Dust off:
Wipe away any sanding dust with a dry cloth or a soft brush. -
Seal (Optional):
If you want to protect the pieces from moisture, apply a thin coat of matte acrylic varnish. The matte finish preserves the raw clay look shown in the photo.
Place your finished message tokens into the bowl and leave it somewhere special to surprise your partner
Tea Light Holders With Cutout Patterns
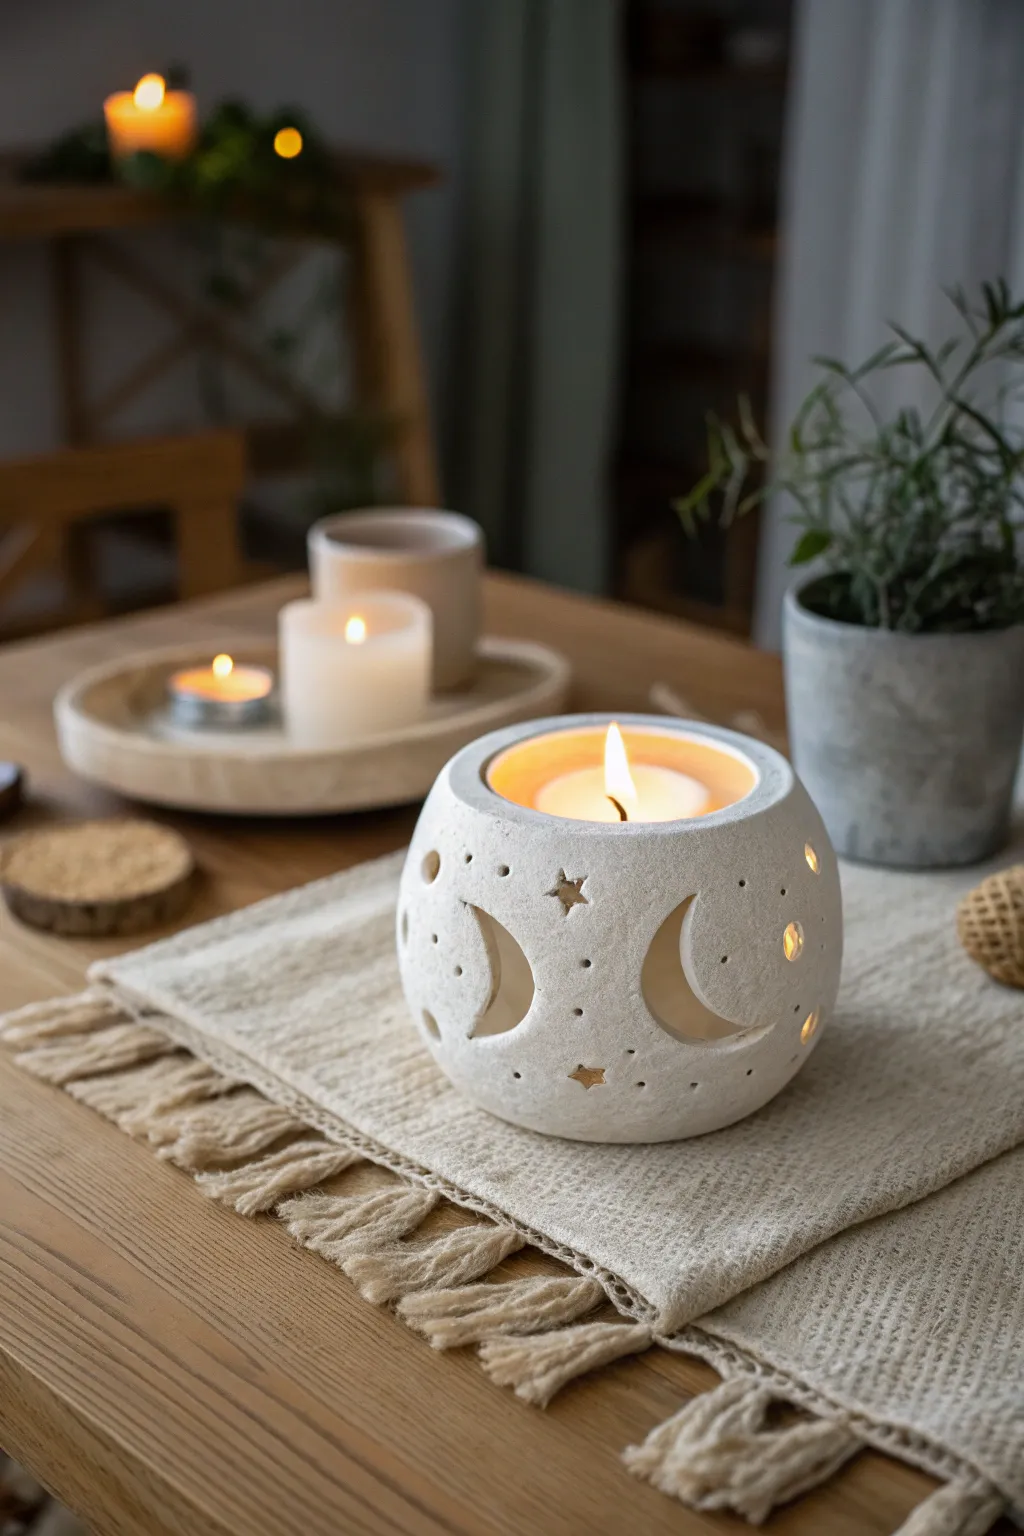
Create a cozy ambiance for your date night with this enchanting spherical tea light holder. Featuring delicate moon and star cutouts, this project uses white air-dry clay to cast a warm, starry glow across your table.
Step-by-Step Tutorial
Materials
- White air-dry clay (approx. 500g)
- Small rolling pin
- 4-inch Styrofoam ball (or similar sphere mold)
- Plastic wrap (cling film)
- Clay knife or craft knife (X-Acto)
- Small star-shaped fondant cutter (optional)
- Drinking straw or skewer (for dots)
- Small bowl of water
- Sponge
- Fine-grit sandpaper
Step 1: Prepping the Form
-
Prepare your mold:
Take your Styrofoam ball or spherical mold and wrap it tightly in plastic wrap. This is a crucial step to ensure the clay doesn’t stick to the form and can be removed easily later. -
Condition the clay:
Knead the air-dry clay in your hands for a few minutes until it is warm, soft, and pliable. This prevents cracks from forming while you work.
Step 2: Shaping the Sphere
-
Roll it out:
Roll your clay into a smooth slab that is roughly 1/4 inch thick. Aim for an even thickness throughout so the light shines through consistently. -
Cover the mold:
Gently drape the clay slab over your prepared sphere form. Use the palms of your hands to smooth the clay down the sides, cupping the shape. -
Trim the excess:
Cut away the excess clay at the bottom where the sphere curves under, but leave enough to create a stable base. You want the clay to cover about three-quarters of the ball, leaving the top open for the candle. -
Smooth the surface:
Dip your fingers or a sponge lightly in water and run them over the clay surface to remove any fingerprints, joins, or rolling marks. The texture should look stone-like but smooth. -
Create the opening:
Use a round cutter or freehand a circle at the very top of the sphere. This opening needs to be wide enough to easily insert and light a tea light candle later. -
Initial drying phase:
Let the clay sit on the form for about 1-2 hours until it is leather-hard. It needs to be firm enough to hold its shape when cut, but not fully dry.
Pro Tip: Crack Prevention
If you see tiny hairline cracks appearing while the clay dries, create a ‘slip’ paste (water + clay) and rub it into the cracks with your finger to seal them immediately.
Step 3: Adding the Designs
-
Mark the moons:
Once the clay is firm but still workable, lightly sketch your crescent moon shapes onto the surface with a needle tool or toothpick to ensure you like the placement. -
Cut the moons:
Carefully trace over your sketch lines with a sharp craft knife to cut out the moon shapes. Remove the cut pieces of clay gently. -
Add the stars:
Use a small star-shaped fondant cutter to punch out star shapes scattered around the moons. If you don’t have a cutter, carefully cut small diamond or star shapes with your knife. -
Create starlight dots:
Take a drinking straw or a bamboo skewer to poke small, round holes in the empty spaces between the moons and stars. Varying the size of these holes adds a lovely twinkling effect. -
Clean the edges:
Dip a finger in water and gently smooth the rough edges of every cutout. This prevents sharp or jagged bits from hardening into the final piece.
Level Up: Golden Glow
Once fully dry, paint the *inside* of the sphere with metallic gold acrylic paint. When lit, the candle will reflect off the gold interior for an extra warm, luxurious glow.
Step 4: Finishing Touches
-
Remove the form:
Carefully wiggle the Styrofoam ball out of the clay shell. The plastic wrap should help it slide out. Be gentle so you don’t warp your spherical shape. -
Full dry:
Set the clay sphere aside to dry completely. This usually takes 24-48 hours depending on humidity. Rotate it occasionally so the bottom dries too. -
Sanding:
Once bone dry, use fine-grit sandpaper to buff away any remaining uneven spots on the exterior and smooth the rim of the top opening. -
Optional painting:
If you want a more textured look like the photo, you can dab a slightly off-white or stone-colored acrylic paint on with a sponge, or leave it natural white.
Place a tea light inside and watch your celestial patterns dance on the walls


What Really Happens Inside the Kiln
Learn how time and temperature work together inside the kiln to transform clay into durable ceramic.
Puzzle Piece Pair: One You Each Make
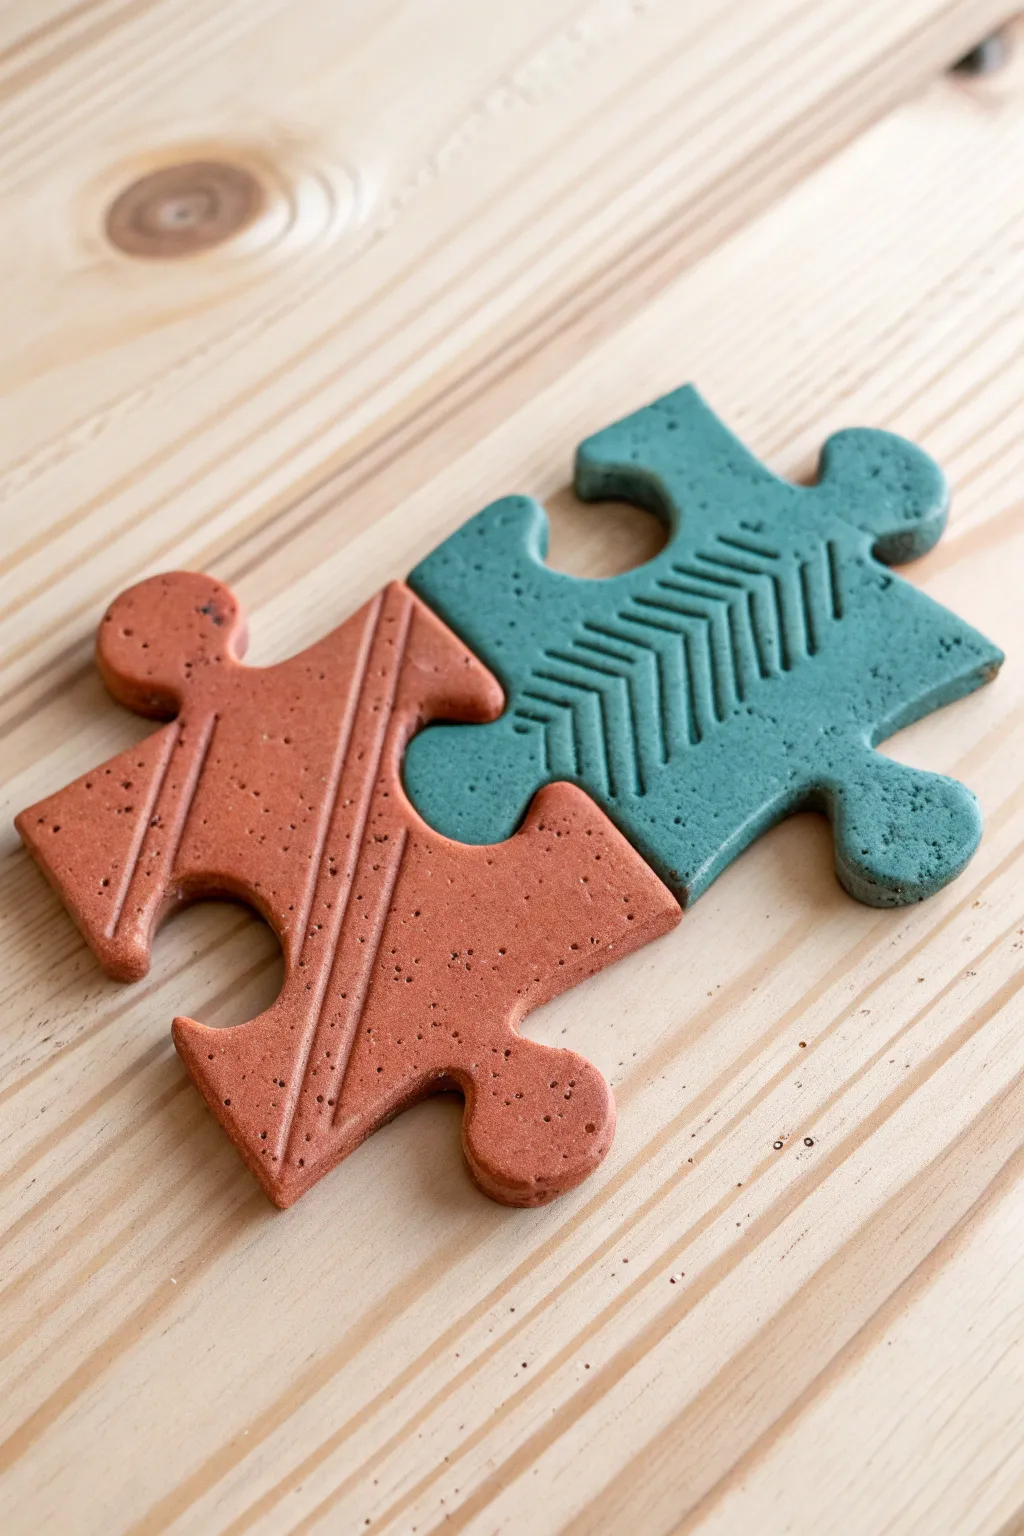
Create a tangible symbol of your connection with these interlocking puzzle pieces, designed to be made side-by-side. This project results in a textured, two-toned set where two individual pieces fit perfectly together to form a unified whole.
How-To Guide
Materials
- Air dry clay (white or terracotta)
- Acrylic rolling pin or smooth glass bottle
- Parchment paper or craft mat
- Jigsaw puzzle template (printed on cardstock) or a real large puzzle piece
- Craft knife or clay needle tool
- Water in a small cup
- Sponge or smoothing tool
- Texture tools (rulers, skewers, old credit cards)
- Fine-grit sandpaper (220 grit)
- Acrylic paints (terracotta/rust red and teal/sage green)
- Matte varnish or sealant
- Small flat paintbrush
- Stiff bristle brush (optional for speckling)
Step 1: Shaping the Puzzle
-
Prepare the workspace:
Lay down parchment paper or a craft mat to prevent the clay from sticking to your table. Take a handful of air dry clay and knead it in your hands for a minute to warm it up and make it pliable. -
Roll the slab:
Using your rolling pin, roll the clay out into a smooth slab. Aim for an even thickness of about 1/4 inch (6mm). If you want the pieces to lie perfectly flat, use guide sticks on either side of the clay. -
Position the template:
Place your puzzle piece template directly onto the clay. You can use two cutouts from a printed template or trace around actual large floor puzzle pieces if you have them handy. -
Cut the shapes:
Hold the template steady and use a craft knife or needle tool to cut vertically into the clay around the outline. Remove the excess clay carefully so you don’t distort the shapes. -
Check the fit:
Before moving on, gently slide the two clay pieces together to ensure they interlock correctly. If the fit is too tight, trim a tiny sliver off the edges; if too loose, gently press the connection points outward. -
Smooth the edges:
Dip your finger or a small sponge into a little water and run it along the cut edges. Smooth out any sharp angles or burrs left by the knife to give the pieces a finished, professional look.
Fixing a Warped Piece
If a piece curls while drying, dampen the concave side slightly with a mostly-dry sponge and weigh it down under a heavy book overnight to flatten it back out.
Step 2: Adding Texture
-
Create the linear pattern:
For the first piece (the one that will be red), use the edge of a ruler or a dull knife to press long, straight lines into the surface. Create two parallel grooves running diagonally across the piece. -
Add bordering details:
To enhance the linear design, create slightly wider or deeper channels next to your main lines. This adds dimension that will catch the paint beautifully later. -
Create the chevron pattern:
For the second piece (the one that will be teal), use a sculpting tool or the corner of a credit card to press a column of ‘V’ shapes or chevrons into the center. -
Frame the chevrons:
Add vertical lines on either side of your chevron column to box them in and make the design look intentional and geometric. -
Final smoothing:
Do a final check for any crumbs of clay created by the texturing process. Gently brush them away with a soft, dry brush so they don’t dry onto the surface. -
Drying time:
Place the pieces on a flat surface, flipping them carefully every 12 hours to prevent curling. Allow them to dry fully for 24-48 hours until they are hard and room temperature to the touch.
Make It Functional
Glue strong disc magnets to the back of each cured piece. Now your artwork serves as a sweet set of interlocking fridge magnets for holding up photos.
Step 3: Painting and Finishing
-
Sand imperfections:
Once fully dry, lightly sand the edges with fine-grit sandpaper if there are any rough spots remaining. Wipe away the dust with a barely damp cloth. -
Apply base colors:
Paint the linear-textured piece with a terracotta or rust-colored acrylic paint. Paint the chevron-textured piece with a teal or sage green shade. You may need two coats for opaque coverage. -
Add the speckled effect:
To replicate the stone-like look in the image, mix a tiny bit of black or dark brown paint with water. Dip a stiff toothbrush or bristle brush into it and run your thumb across the bristles to flick tiny specks onto both pieces. -
Seal the work:
Allow the paint to dry completely. Finish by applying a coat of matte varnish or sealant. This protects the paint and deepens the colors without making them look like plastic.
Display these interlocking creations side-by-side on a shelf or desk as a subtle reminder of how well you fit together
Mini “Our Place” House Facades
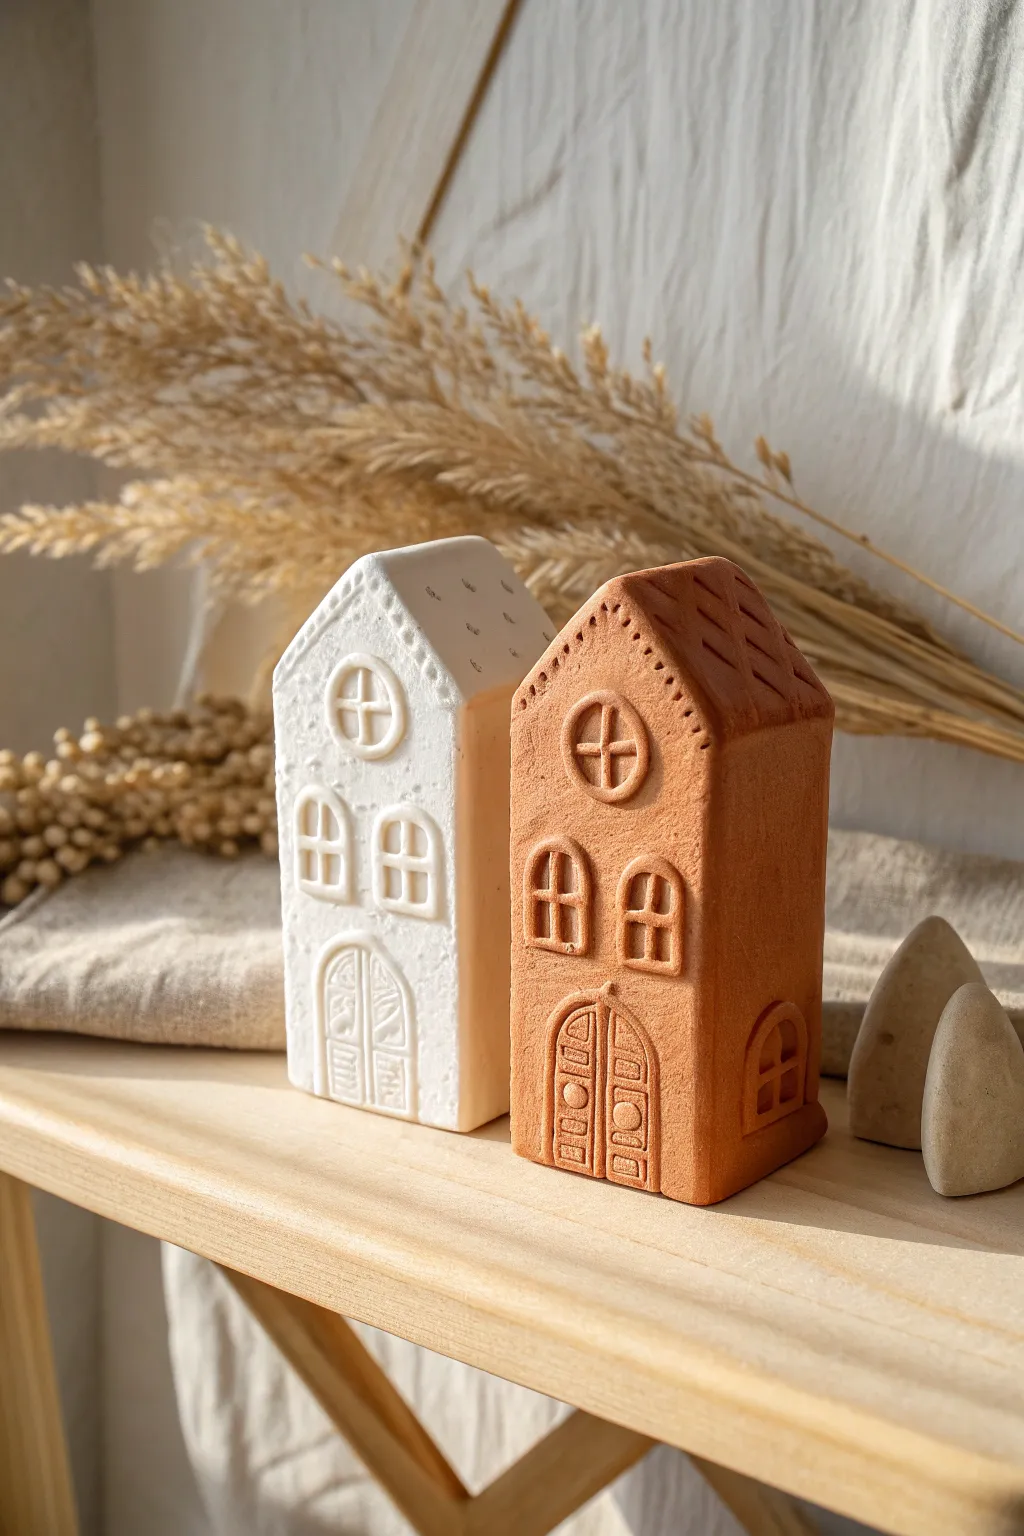
Capture the charm of your favorite dwelling with these stylized, textured house sculptures. Using contrasting clay tones creates a sophisticated, harmonious pair that looks beautiful on a mantle or bookshelf.
Step-by-Step
Materials
- White (or porcelain) air-dry clay
- Terracotta colored air-dry clay
- Rolling pin with guide rings (approx. 1/4 inch)
- Sharp crafting knife or X-Acto blade
- Ruler
- Small needle tool or toothpick
- Clay carving tools (small loop tool)
- Small sponge
- Fine grit sandpaper
- Water in a small cup
Step 1: Shaping the Base Structures
-
Condition the clay:
Begin by taking a generous amount of the white clay and kneading it in your hands until it is warm, soft, and pliable. Repeat this later for the terracotta clay house. -
Roll the slab:
Using a rolling pin, flatten the clay into a thick, even slab. Aim for a thickness of about 1/4 to 1/2 inch to ensure the house stands stably on its own. -
Cut the facade shape:
Use your ruler and craft knife to cut a tall rectangle. At the top, cut two angles to form a pitched roof peak. The white house in the example has a slightly asymmetrical roof, while the terracotta one is more traditional. -
Form the block:
Decide on the depth of your house. Cut side walls and a back piece from your remaining slab, or simply cut a solid block of clay if you prefer a heavier, more substantial sculpture. Join the seams by scoring (scratching) both surfaces and adding a localized dab of water. -
Smooth the surfaces:
Once the basic block shape is assembled, use a slightly damp sponge or your finger to smooth out any sharp edges or joining seams.
Step 2: Adding Architectural Details
-
Outline the windows:
Using a needle tool, lightly sketch the placement of the windows and door. The white house features two lower arched windows and a circular attic window. -
Create the window texture:
Instead of cutting all the way through, use a small loop tool to gently carve out the interior of the window shapes, creating a recessed effect. -
Add window panes:
Roll very thin ‘snakes’ or coils of clay. Cut small pieces to create the cross-bars (muntins) for the windows and gently press them into the recessed areas. -
Frame the features:
Roll slightly thicker coils to create the raised frames around the windows and the circular attic vent. Score the back of these coils and press them firmly onto the facade. -
Carve the door:
For the door, outline a large arch. Use your needle tool to incise deep lines for the door panels. On the white house, add botanical or abstract scribbles into the panels for texture. -
Detail the roof:
Using your needle tool, poke a row of decorative holes along the roofline or use the knife to gently score cross-hatching or tile patterns on the roof slope. -
Texture the walls:
To mimic the stone-like finish shown, gently tap the flat surfaces of the walls with a stiff-bristled toothbrush or a crumpled ball of aluminum foil.
Clean Lines
When applying the window frames, wipe your tools with a tiny bit of water/oil to drag the clay smoothly without snagging or tearing the delicate coils.
Step 3: Finishing the Set
-
Repeat for the second house:
Follow the same process with the terracotta clay. Try varying the architecture slightly—perhaps a different roof pitch or a double door with more geometric carvings. -
Add side details:
Don’t forget the sides of the house; the terracotta example features a small arched window on the side wall for added visual interest. -
Check stability:
Stand both houses up on a flat surface. If they wobble, gently tap the bottom against the table to flatten the base perfectly. -
Slow drying:
Place the houses in a cool area away from direct sunlight. Let them dry slowly for 24-48 hours. I like to loosely drape a plastic bag over them for the first night to prevent cracking. -
Final sanding:
Once completely bone dry, use fine-grit sandpaper to smooth out any rough fingerprints or sharp burrs left from the carving process.
Cracks Appearing?
If small cracks appear while drying, don’t panic. Make a paste of clay and water (slip) and fill the crack, then smooth it over with a damp finger.
Display your charming little neighborhood together on a shelf to celebrate the home you’ve built together