I love an air dry clay date night because it’s low-pressure, super chatty, and you end up with a keepsake you actually want to display. These air dry clay date ideas are intentionally beginner-friendly and built around matching sets, so you each make a piece that feels like it belongs with the other.
Matching Trinket Dishes With Initials
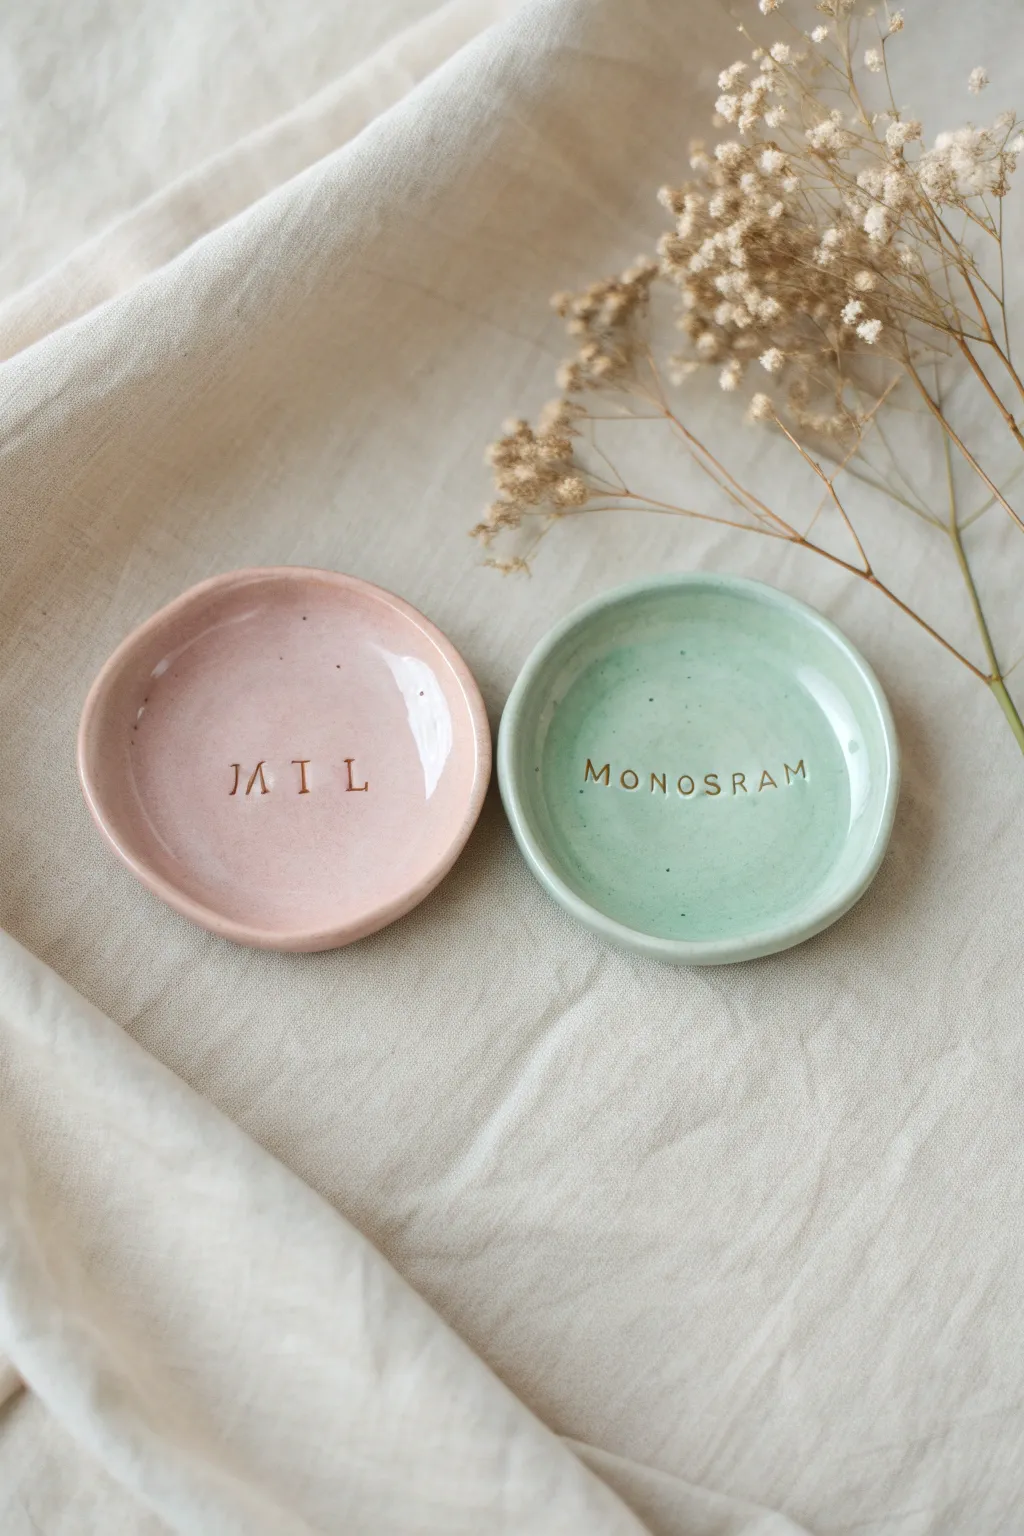
Create a lasting memento of your date night with these adorable, minimalist trinket dishes. Featuring soft pastel hues and personalized stamped lettering, they are perfect for holding rings, studs, or sentimental keepsakes.
Detailed Instructions
Materials
- White air dry clay
- Rolling pin
- Circle cookie cutter or a glass (approx. 3-4 inch diameter)
- Small bowl of water
- Sponge
- Letter stamps for clay
- Acrylic paints (pale pink, mint green, gold)
- Small flat paintbrush
- Fine detail paintbrush
- Gloss varnish or sealant
- Sandpaper (fine grit)
Step 1: Shaping the Dishes
-
Prep the clay:
Start by taking a handful of air dry clay and kneading it in your hands to warm it up. This makes it pliable and prevents cracks. If I feel the clay is a bit dry, I like to dip my fingers in water and work it in. -
Roll it out:
Place the clay on a clean, flat surface or a craft mat. Use the rolling pin to flatten the clay to an even thickness of about 1/4 inch. -
Cut the circles:
Press your circle cutter or the rim of a glass firmly into the clay to cut out two identical circles. Remove the excess clay from around the edges. -
Smooth the edges:
Dip your finger into a little bit of water and run it along the cut edge of the circle to smooth out any roughness or loose bits of clay. -
Form the rim:
Gently curve the edges of the circle upwards to create a shallow bowl shape. You can do this by pinching slightly or cupping the clay in your palm. -
Refine the shape:
Ensure the bottom remains flat so the dish will sit stable on a table. Smooth the inner curve with a damp sponge for a seamless finish.
Cracked edges?
Make a “slip” paste by mixing a small chunk of clay with water until it’s like thick yogurt. Use this to fill in any cracks before paint.
Step 2: Stamping and Drying
-
Plan your text:
Select the letters you want to stamp. It could be initials, a date, or a short word like in the example photo. Arrange the stamps beforehand to check spacing. -
Stamp the clay:
Press the stamps firmly into the center of the wet clay dish. Apply even pressure so the impression is deep enough to catch paint later, but not so deep it breaks through. -
Clean up imperfections:
If stamping caused the clay to displace slightly, gentle smooth the area around the letters with a damp finger. -
Let it dry:
Place your dishes in a safe, dry spot. Air dry clay typically takes 24-48 hours to cure completely. Flip them over halfway through to ensure the bottom dries evenly. -
Sand for smoothness:
Once fully hard and white, use fine-grit sandpaper to gently buff away any rough edges or bumps on the rim and surface.
Add some sparkle
For a luxe touch, paint the very rim of the dish with the same gold paint used for the lettering to frame the piece elegantly.
Step 3: Painting and Finishing
-
Mix your colors:
Prepare your acrylic paints. For the look in the photo, mix white with a tiny dot of red for the pink dish, and white with a touch of green and blue for the mint dish. -
Apply base coat:
Paint the entire surface of the dishes using a flat brush. Apply thin, even layers. You may need two coats for opaque coverage, letting the first dry before adding the second. -
Paint the letters:
Using a very fine detail brush and gold acrylic paint, carefully fill inside the stamped letters. If you go outside the lines, wipe it quickly with a damp cotton swab. -
Seal the dish:
Once all paint is completely dry, apply a coat of gloss varnish. This gives the ceramic-like shine seen in the photo and protects the dish from moisture.
Now you have a charming set of personalized dishes to remember your creative time together


Cute Couple Pinch Pots for Desk Treasures
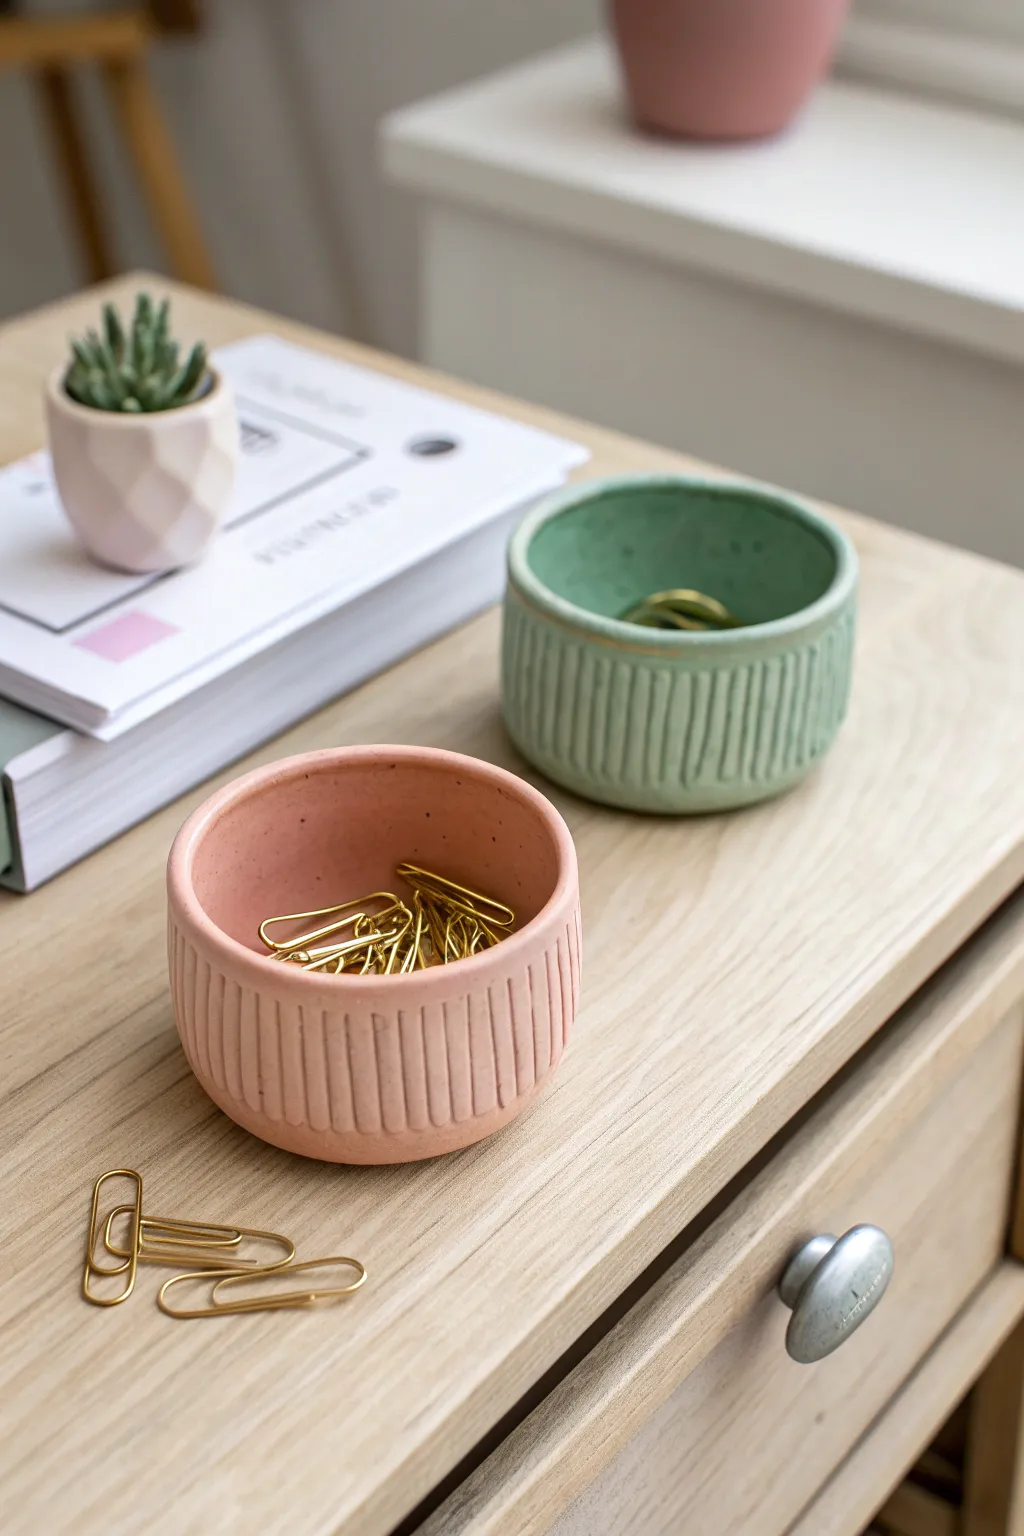
These charming little vessels prove that simple pinch pots can look surprisingly modern and refined. With their grooved texture and soft matte colors, they are perfect for holding desk treasures like paperclips or pushpins.
Step-by-Step Guide
Materials
- White air dry clay
- Rolling pin (optional)
- Small carving tool or toothpick
- Pottery sponge
- Water in a small bowl
- Acrylic paints (pastel pink and sage green)
- Matte finish clear coat
- Fine grit sandpaper
Step 1: Shaping the Base
-
Prepare the clay:
Start by taking a chunk of white air dry clay, roughly the size of a lemon for each pot you intend to make. -
Form a ball:
Roll the clay between your palms firmly. You want a smooth, tight sphere without any major cracks or air pockets. -
Create the opening:
Hold the clay ball in one hand. With your other thumb, press gently but firmly into the center of the ball, stopping about a half-inch from the bottom. -
Pinch the walls:
Insert your thumb into the hole and keep your fingers on the outside. Ideally, you should pinch gently while rotating the pot in your hand to thin the walls evenly.
Smooth Operator
To get perfectly straight sides, try rolling the outside of your cylinder against a flat table surface while shaping it.
Step 2: Refining the Form
-
Flatten the bottom:
Unlike a traditional round bowl, these pots have a stable, flat base. Tap the bottom of your pot firmly against your table surface to flatten it out. -
Straighten the sides:
Instead of flaring the walls outward like a bowl, gently pat the sides with a flat object or your hands to make them vertical. You are aiming for a short cylinder shape rather than a cup shape. -
Level the rim:
If the top edge is uneven, you can carefully trim it with a knife or simply tap the pot upside down on the table to level the rim. -
Smooth the surface:
Dip your finger or a pottery sponge lightly in water. Smooth out any fingerprints or cracks on both the inside and outside surfaces.
Level Up: Gold Rim
After the matte sealer dries, carefully paint just the top rim with liquid gold leaf or metallic gold paint for a chic accent.
Step 3: Adding Texture
-
Mark vertical guides:
While the clay is still workable but slightly firm, use a needle tool or toothpick to lightly mark where your vertical lines will go. -
Carve the grooves:
Using a carving tool or the side of a toothpick, press vertical lines around the exterior circumference. I like to keep the spacing consistent but not perfectly mechanical for that handmade charm. -
Clean up burrs:
Carving often leaves little crumbs of clay. Wait for them to dry slightly, then brush them away with a soft brush or your finger. Don’t smudge them while wet.
Step 4: Finishing Touches
-
Let it dry:
Place your pots in a spot with good airflow. Allow them to dry completely for 24-48 hours until the clay turns chalky white and feels room temperature. -
Sand for perfection:
Taking your fine grit sandpaper, gently sand the rim and any rough spots on the exterior. This creates that professional, matte ceramic look. -
Mix your colors:
Mix your acrylics to get soft, muted tones. For the pink, add a touch of white to a coral red. For the green, mute a bright green with a tiny bit of red or brown and plenty of white. -
Paint the interior:
Start by painting the inside of the pots. You may need two coats to get a solid, opaque color. -
Paint the exterior:
Paint the outside, carefully working the paint into the vertical grooves you carved earlier so no white clay shows through. -
Seal the work:
Once the paint is fully dry, apply a matte finish clear coat to protect the surface without making it glossy.
Place these side by side on your desk for an instant organizational upgrade


Heart-and-Hand Coaster Set
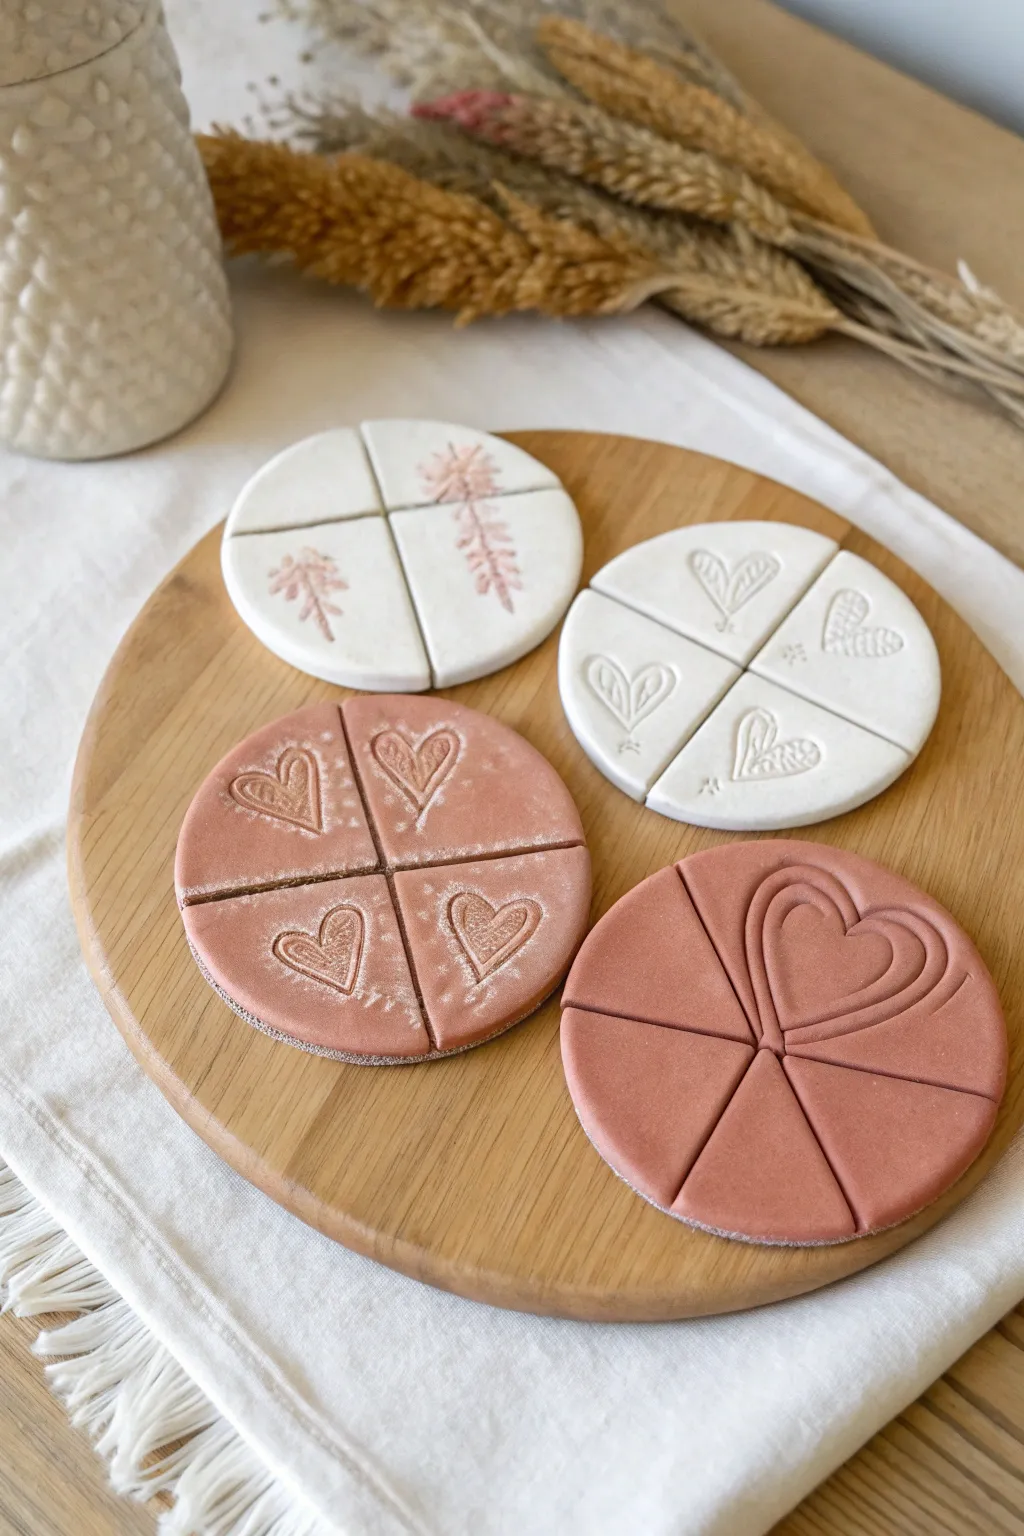
These charming rustic coasters mix modern geometry with organic warmth, featuring quartered designs stamped with hearts and botanicals. Whether you choose natural terracotta tones or crisp white clay, the result is a functional piece of art perfect for gifting.
Step-by-Step
Materials
- Air dry clay (white and terracotta)
- Rolling pin
- Round cookie cutter (approx. 4-inch diameter)
- Sharp crafting knife or blade tool
- Heart-shaped stamp or cookie cutter
- Dried botanicals or leaf stamps
- Sandpaper (fine grit)
- Acrylic varnish or sealant suitable for clay
- Small paintbrush
- Optional: Metallic acrylic paint (rose gold/copper)
- Cornstarch (for dusting)
Step 1: Shaping the Base
-
Prepare your workspace:
Lay down a clean mat or piece of parchment paper to prevent sticking. Dust the surface lightly with cornstarch if your clay feels particularly sticky. -
Roll out the clay:
Take a handful of either white or terracotta clay and knead it briefly to remove air bubbles. Roll it out to a consistent thickness of about 1/4 inch (6mm) to ensure sturdiness. -
Cut the circles:
Using your large round cutter, press firmly into the clay to create clean circles. Gently remove the excess clay around the edges. -
Smooth the edges:
Dip your finger in a little water and run it along the cut edge of the circle to smooth out any roughness or sharp remnants from the cutter.
Step 2: Designing the Patterns
-
Mark the quarters:
Use the back of your knife or a dedicated clay tool to gently score a cross shape into the clay, dividing the circle into four equal quadrants. Don’t cut all the way through yet; these are just guide lines. -
Classic heart imprint:
For the heart design, take a small heart stamp or cutter. Press it gently into the center of each quadrant. Create a variation by angling the hearts outward from the center. -
Botanical impressions:
For the floral design, take a dried sprig or a detailed botanical stamp. Press it into the clay across the guide lines so the pattern flows from one quadrant to the next. -
Pizza-slice variation:
For the radiating heart design (shown on the bottom right), score the clay into eight slices instead of four. Simply press a heart shape near the outer edge of one wedge, or carve concentric heart lines spanning across two or three wedges.
Fixing Cracks
If hairline cracks appear while drying, don’t panic. Mix a tiny bit of fresh clay with water to make a paste (slip) and fill the crack, then smooth it over.
Step 3: Refining and Cutting
-
Deepen the cuts:
Using your sharp crafting knife, cut firmly along your initial score lines. Slice all the way through the clay to separate the pieces completely. -
Separate gently:
Carefully pull the quarters (or eighths) slightly apart. This prevents them from fusing back together as they shrink during drying. -
Clean up the cuts:
Use your finger or a damp brush to smooth the newly cut inner edges of each wedge so they are soft to the touch.
Make it Magnetic
Attach small magnetic strips to the back of each quarter piece. Now they serve as a unique puzzle magnet set for your fridge when not holding drinks.
Step 4: Finishing Touches
-
Let it dry:
Place your pieces on a wire rack or leave them on parchment paper to dry. Flip them over halfway through the drying process (usually after 24 hours) to prevent warping. Allow 24-48 hours for full drying. -
Sanding:
Once bone dry, take fine-grit sandpaper and gently buff away any rough spots on the edges or surface. -
Adding definition:
To highlight the textures, dry brush a tiny amount of white paint or cornstarch into the crevices of the terracotta hearts. For the botanical prints, dab a touch of metallic rose gold paint into the impressions. -
Seal for protection:
Apply 1-2 coats of acrylic varnish or clay sealant. This is crucial for coasters to protect them from moisture damage when in use.
Enjoy styling your table with these custom, handcrafted coasters that double as conversation pieces


Two-Part Photo or Place Card Holders
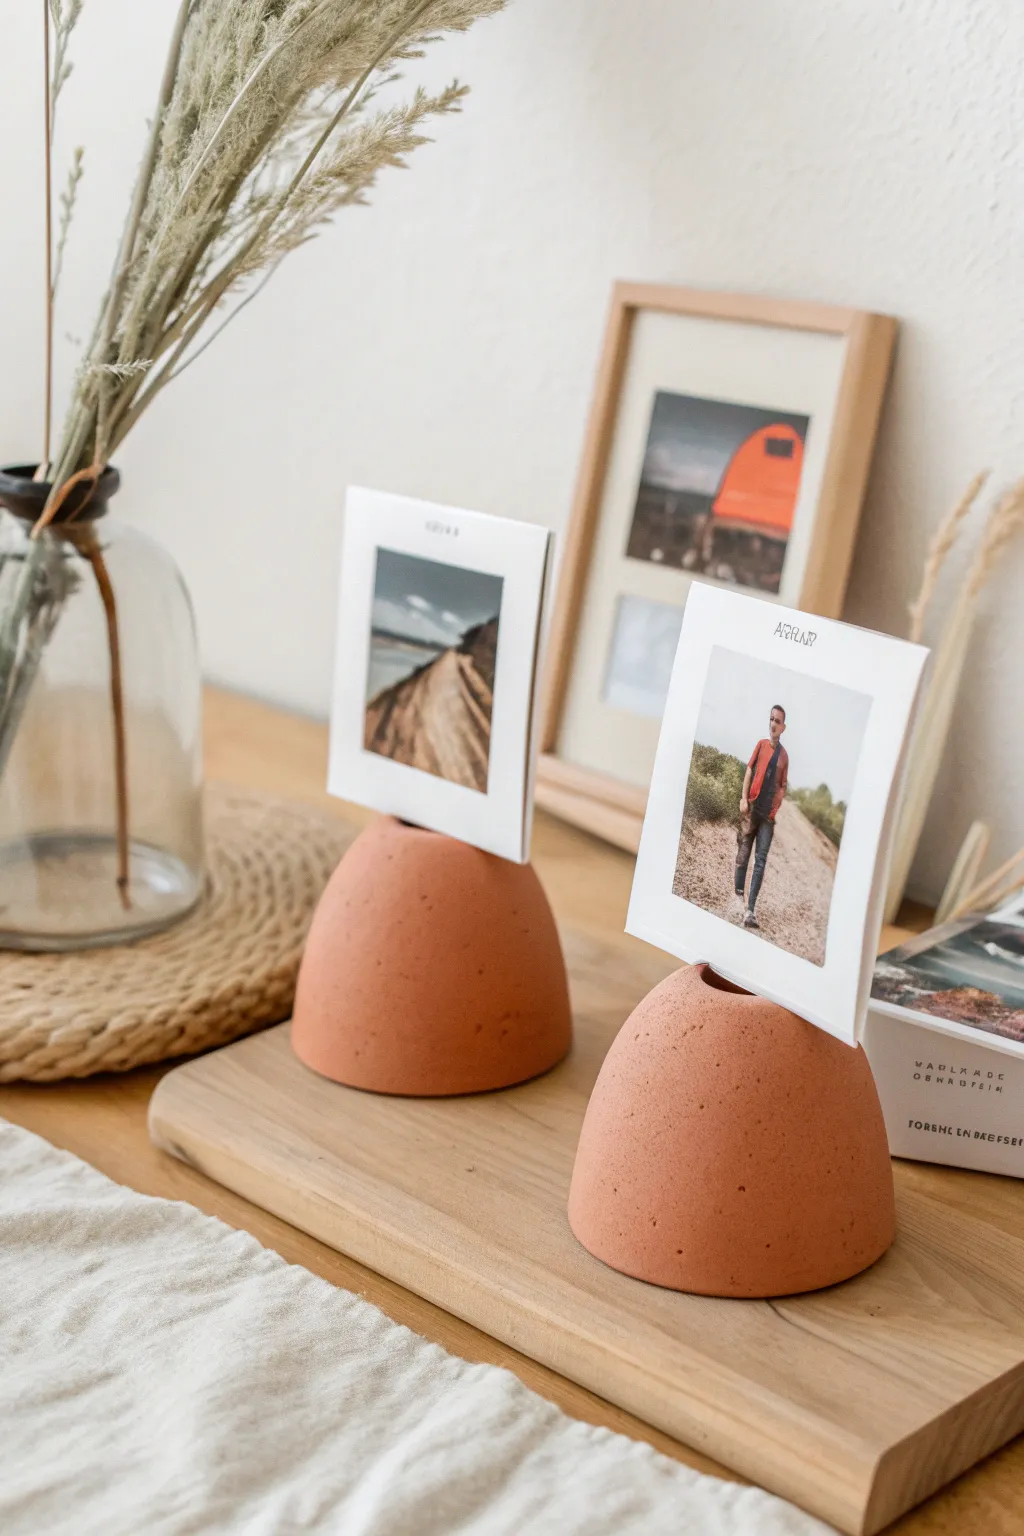
Create these minimalist, earthy photo holders to display your favorite memories or guide guests to their seats. Their smooth, bell-shaped curves and warm terracotta tone bring a modern yet grounded aesthetic to any table setting.
Step-by-Step Guide
Materials
- Air-dry clay (white or terracotta colored)
- Acrylic paint (burnt orange/terracotta shade if using white clay)
- Rolling pin
- Small bowl/cup (for shaping reference)
- Craft knife or plastic clay tool
- Credit card or hard plastic scraper (for smoothing)
- Sandpaper (fine grit)
- Sponge
- Water
Step 1: Shaping the Base
-
Prepare the Clay:
Begin by taking a generous handful of air-dry clay. Knead it thoroughly in your hands to warm it up and remove any air bubbles, which helps prevent cracks later on. -
Form a Ball:
Roll the clay between your palms or against a smooth work surface to create a tight, seamless sphere. You want it to be roughly the size of a tennis ball or slightly smaller. -
Flatten the Bottom:
Place your sphere on your work surface and press it down gently to flatten the bottom. You want a stable base so it doesn’t wobble, but keeps the rounded top. -
Shape the Dome:
Cup your hands around the clay and gently gently shape it upwards into a high dome or bell shape. The sides should slope gradually rather than going straight up. -
Smooth the Surface:
Dip your finger in a little water and smooth out any fingerprints or bumps. I find using a slightly damp sponge here gives the most uniform finish.
Water Weight
Don’t use too much water when smoothing! Excess water weakens air-dry clay and increases the chance of cracking as it evaporates.
Step 2: Creating the Holder
-
Cut the Slot:
Using a craft knife or a dedicated clay tool, carefully slice a straight line into the very top center of the dome. Press deep enough to hold a card securely, about half an inch. -
Widen the Gap:
Gently wiggle the blade side-to-side to widen the slot just enough for a thick piece of cardstock to fit. Don’t make it too wide, or your photo will lean too far backward. -
Clean the Edges:
Smooth the clay around the freshly cut slot with a damp fingertip to remove any jagged bits or raised edges caused by the knife. -
Initial Drying:
Set the domes aside in a cool, dry place away from direct sunlight. Let them dry for at least 24-48 hours. Rotate them occasionally to ensure the bottom dries evenly.
Step 3: Finishing Touches
-
Check for Cracks:
Once dry, inspect your domes. If small cracks appeared during drying, mix a tiny bit of fresh clay with water to make a paste and fill them in. -
Sand for Smoothness:
Take your fine-grit sandpaper and gently buff the entire surface. Focus on the bottom edge to make it crisp and the top curve to make it perfectly smooth. -
Dust Off:
Wipe the sculpture down with a barely damp cloth or a dry brush to remove all the sanding dust before painting. -
Mix Your Paint:
If you didn’t use terracotta-colored clay, mix burnt orange, a touch of brown, and a little white acrylic paint to achieve that natural earthy tone. -
Apply the Base Coat:
Paint the entire surface using a soft brush. Keep your brush strokes long and follow the curve of the dome to avoid visible streaks. -
Add Texture (Optional):
For a stone-like look, you can dab a dry sponge lightly over the wet paint or flick tiny specks of darker brown paint onto the surface using an old toothbrush. -
Final Dry:
Let the paint dry completely. If you want extra durability, apply a matte varnish spray to seal the color without adding artificial shine.
Faux Stone Finish
Mix baking soda into your acrylic paint before applying. It creates a grainy, realistic texture that looks exactly like real terracotta pottery.
Place your favorite square print inside and enjoy a stylish touch to your decor

The Complete Guide to Pottery Troubleshooting
Uncover the most common ceramic mistakes—from cracking clay to failed glazes—and learn how to fix them fast.
Mini Magnet Duo: Smiley Faces or Tiny Icons
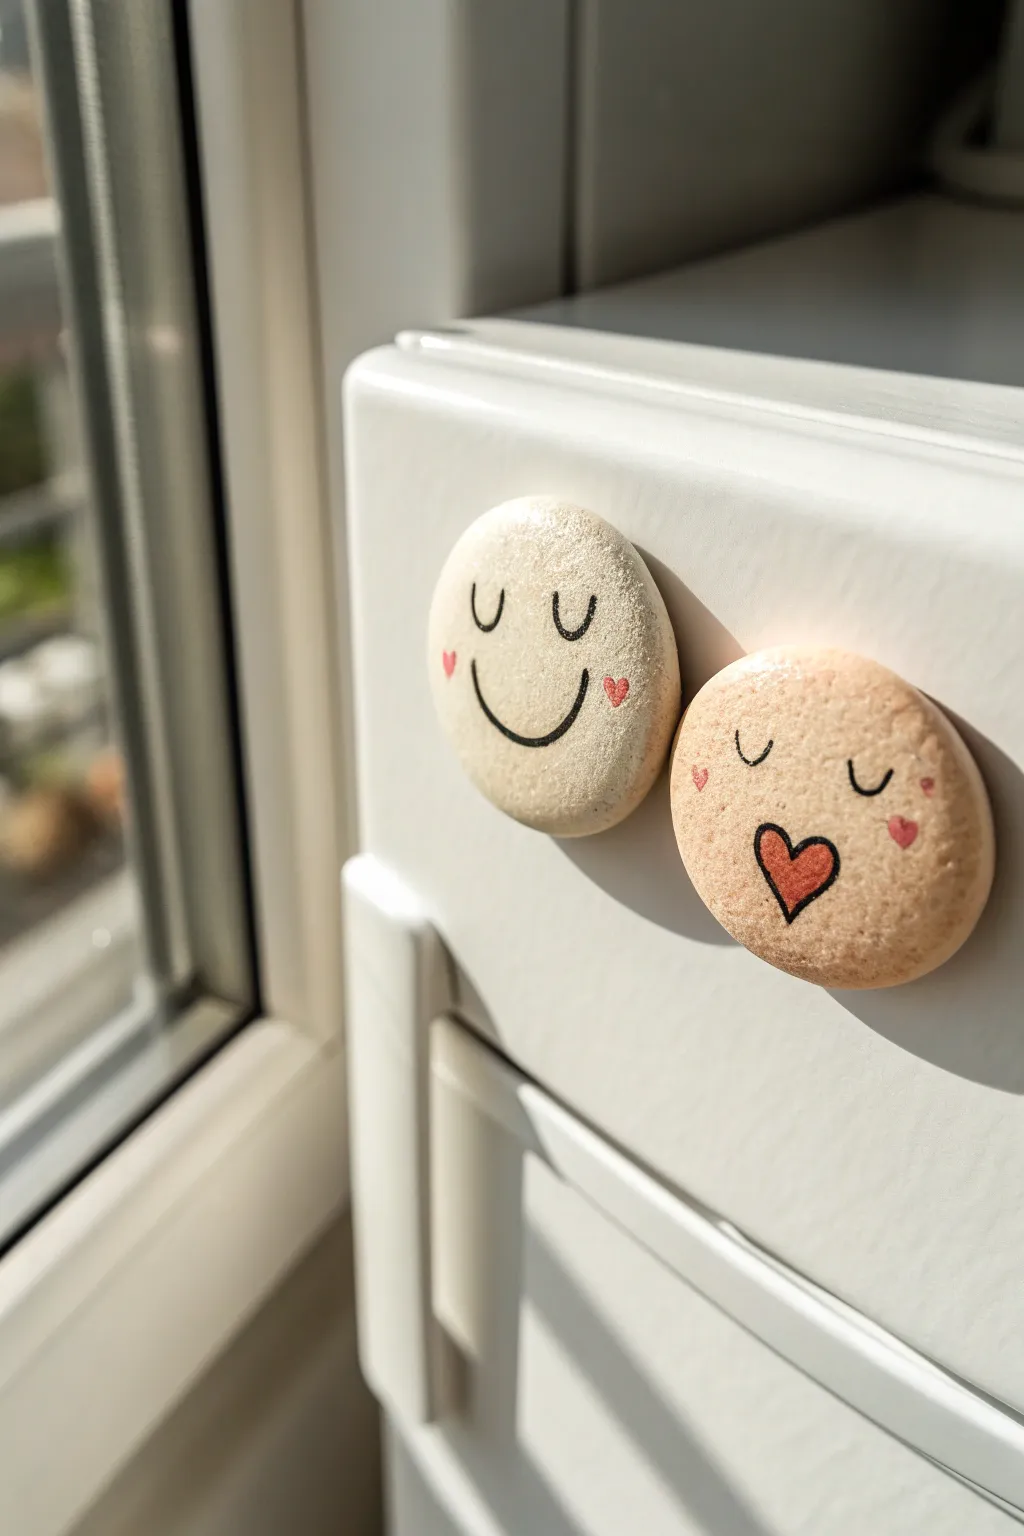
These charming, pebble-shaped magnets add a touch of sweetness to any appliance with their minimalist expressions and natural texture. By using air-dry clay to mimic the look of smooth river stones, you create a perfect canvas for tiny, heartfelt doodles.
How-To Guide
Materials
- White or natural air-dry clay
- Rolling pin
- Sponge or abrasive pad
- Fine-grit sandpaper
- Parchment paper
- Fine-point permanent marker (black)
- Red fine-point marker or acrylic paint
- Small round magnets
- Strong craft glue (E6000 or super glue)
- Small bowl of water
- Matte finish sealant (optional)
Step 1: Shaping the ‘Stones’
-
Condition the clay:
Start by taking a small amount of air-dry clay and kneading it in your hands until it feels warm and pliable. This prevents cracking later on. -
Form spheres:
Pinch off two equal-sized pieces, roughly the size of a walnut. Roll each piece between your palms to create a smooth, tight ball. -
Flatten gently:
Place the balls on a sheet of parchment paper. Use the palm of your hand or a small rolling pin to gently flatten them into thick discs, about 1/4 to 1/3 inch thick. -
Round the edges:
To get that river-stone look, dip your finger in a little water and smooth down the sharp edges of the disc so the top curves gently down to the bottom. -
Add texture:
Lightly tap the surface with a slightly damp sponge or abrasive pad. This removes fingerprints and gives the clay a natural, stone-like texture rather than being perfectly smooth. -
Dry completely:
Let the clay discs dry undisturbed on the parchment paper. Flip them over halfway through the drying process (usually after 12 hours) to ensure the bottom dries evenly.
Bleeding Markers?
If permanent marker bleeds into the clay, seal the surface with a thin layer of matte Mod Podge before drawing. Let it dry completely, then draw on top.
Step 2: Adding Personality
-
Sand for smoothness:
Once fully dry and hard, inspect your ‘stones.’ If there are any jagged bits on the back or sides, gently sand them down with fine-grit sandpaper. -
Sketch the faces:
Before committing to ink, I like to lightly sketch the facial expressions with a pencil to ensure the positioning is centered and cute. -
Draw the main lines:
Using a black fine-point permanent marker, carefully trace over your pencil lines. For the first face, draw two ‘U’ shapes for closed eyes and a wide, upturned curve for a smile. -
Create the second expression:
For the kissing face, draw two ‘U’ shapes for eyes again, but place a small heart shape in the center where the mouth would be to simulate puckered lips. -
Add blushing cheeks:
Using a red marker or a tiny dot of red paint, add small accents. Place tiny hearts on the cheeks of the smiling face or small dots near the eyes of the kissing face. -
Color the heart:
Fill in the heart-shaped mouth on the second stone with the red marker to make it pop against the pale clay background. -
Let ink set:
Allow the marker ink to dry completely for a few minutes to prevent any smudging during the sealing step.
Step 3: Assembly
-
Seal (Optional):
If you want these to last in a kitchen environment, apply a thin layer of matte varnish over the top to protect the drawing. Let it dry. -
Prepare the back:
Flip the stones over. Ensure the back surface is relatively flat; if the clay warped slightly, sand it flat now so the magnet sits flush. -
Apply adhesive:
Place a pea-sized dot of strong craft glue on the center of the back of the clay stone. -
Attach magnet:
Press the round magnet firmly into the glue. Hold it in place for 30 seconds to ensure initial adhesion. -
Final cure:
Leave the magnets face down to let the glue cure fully according to the manufacturer’s instructions before sticking them to your fridge.
Pro Tip: Custom Tints
Knead a tiny drop of acrylic paint (beige or grey) into raw white clay to create a more realistic base stone color without needing to paint the surface later.
Your adorable little stone magnets are now ready to hold up your favorite photos or important notes
Pair of Ring Cones for Nightstands
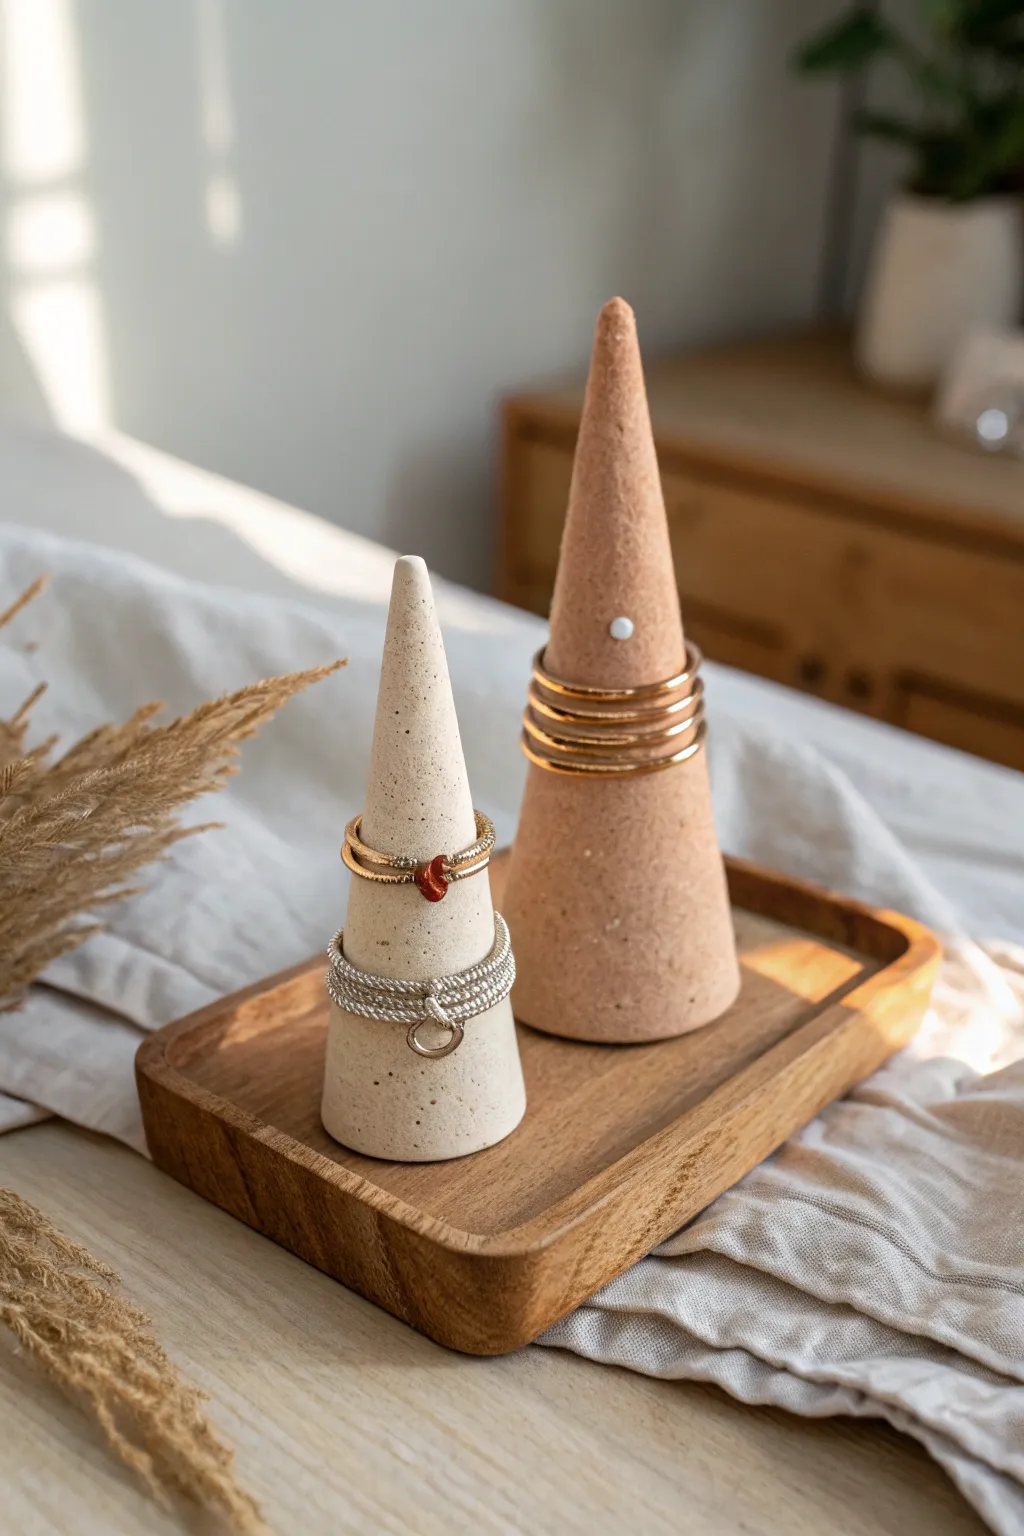
These minimalist ring cones are the perfect functional decor piece to keep your treasures organized while adding a touch of earthy charm to your nightstand. With their subtle speckled finish and complementary heights, they look effortlessly chic whether they’re holding jewelry or standing alone as sculptural objects.
Step-by-Step
Materials
- White or natural air dry clay
- Acrylic paint (beige/cream and terracotta/brown)
- Used coffee grounds or fine black sand (for speckles)
- Rolling pin
- sharp craft knife or blade
- Piece of cardstock or stiff paper (for template)
- Tape
- Small bowl of water
- Fine grit sandpaper
- Matte varnish or sealant
Step 1: Preparation & Shaping
-
Create templates:
Cut two semi-circles out of cardstock to serve as your cone templates. Make one radius about 4 inches for the tall cone and another about 3 inches for the smaller one. You can adjust these sizes based on how tall you want your final cones to be. -
Prepare the clay:
Take two balls of air dry clay. For the darker cone, knead in a small amount of terracotta-colored acrylic paint directly into the raw clay until the color is uniform. Leave the other ball natural or tint it with a drop of cream paint. -
Add texture:
To achieve that organic speckled look seen in the photo, sprinkle a pinch of used dried coffee grounds or fine black sand onto your work surface. Roll your clay balls over this, kneading slightly to distribute the specks throughout the material. -
Roll out slabs:
Roll each ball of clay out into a flat slab, aiming for a consistent thickness of about 1/4 inch. If the clay sticks, you can lay down a sheet of parchment paper first. -
Cut the shapes:
Place your cardstock templates onto the rolled clay slabs. Using your sharp craft knife, trace around the semi-circles to cut out your cone shapes clean and crisp. -
Form the cones:
Gently lift the cut clay and curl the straight edges toward each other to form a cone shape. Overlap the edges slightly or butt them together, depending on your preferred seam style. -
Seal the seam:
Dip your finger in a little water and smooth the seam where the edges meet. I find it helpful to run a modeling tool or the back of a spoon along the inside of the cone to reinforce the bond so it doesn’t pop open while drying.
Clean Seams
For an invisible seam, score (scratch) the edges before joining them, add a tiny bit of water to make ‘slip,’ and then smooth the clay over the join.
Step 2: Refining & Finishing
-
Smooth the surface:
Continuing with a damp finger, gently smooth the entire exterior of the cone to remove fingerprints. Pay special attention to the tip, making it slightly rounded rather than dangerously sharp. -
Level the base:
Stand the cone upright on your table. If it wobbles, gently press it down to flatten the bottom rim, or slice off any uneven excess with your knife to ensure it stands perfectly straight. -
Optional paint wash:
If the clay color dulled during working, you can brush a very watered-down layer of your acrylic paint over the wet clay now. This acts like a stain and won’t hide your beautiful speckles. -
Dry completely:
Set the cones aside in a cool, dry place. Let them dry for at least 24-48 hours. Rotate them occasionally so air can reach the inside of the cone for even drying. -
Sand for perfection:
Once fully cured and hard, use fine-grit sandpaper to buff away any remaining rough spots or unevenness on the base, giving it a professional, polished feel. -
Dust off:
Wipe the cones down with a barely damp cloth or a dry brush to remove all the sanding dust before the final step. -
Seal and protect:
Apply a coat of matte varnish or sealant. This protects the clay from moisture and gives the surface a finished look without making it too glossy.
Cracking Issues?
If small cracks appear as the clay dries, mix a tiny bit of fresh clay with water to make a paste and fill the cracks, then smooth it over.
Place your new ring cones on a tray or nightstand and enjoy organizing your jewelry in style


What Really Happens Inside the Kiln
Learn how time and temperature work together inside the kiln to transform clay into durable ceramic.
Matching Keychains With Thumbprint Texture
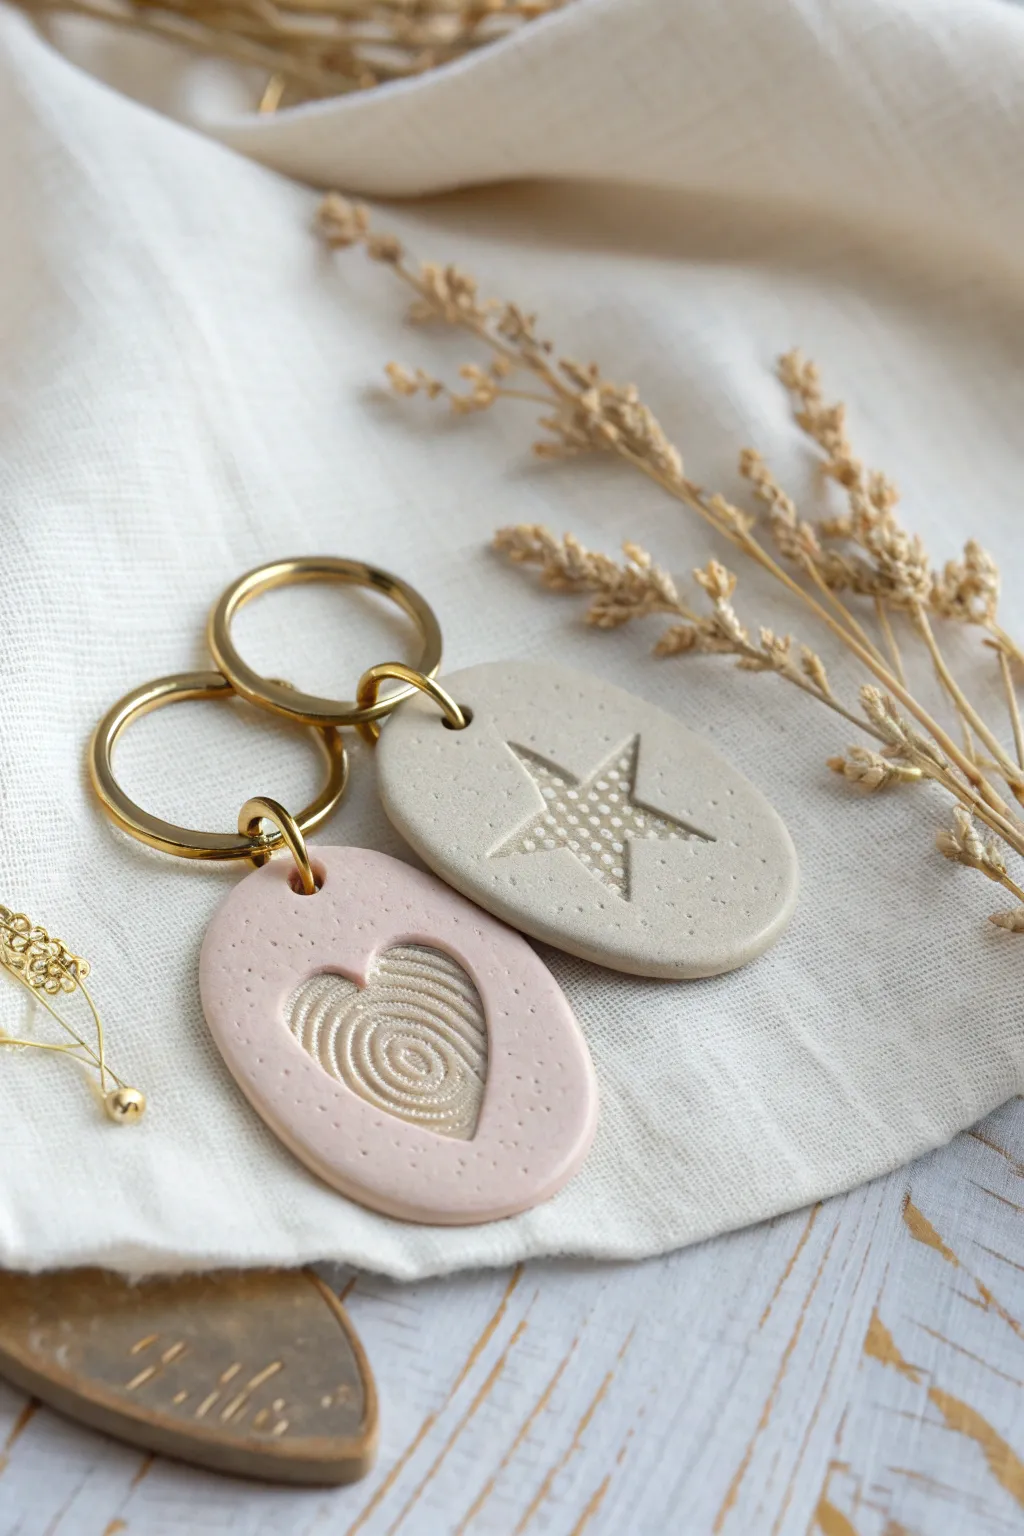
Capture a literal personal touch with these charming matching keychains, featuring indented shapes and intricate textures. The soft pastel tones and gold hardware give them a polished, modern look perfect for gifting.
Step-by-Step Tutorial
Materials
- Air dry clay (white)
- Acrylic paint (blush pink and oatmeal/beige)
- Rolling pin
- Small cookie cutters (oval, heart, star)
- Sandpaper (fine grit)
- Gold keychains with jump rings
- Hand drill or toothpick
- Gloss or matte varnish
- Piece of textured mesh or tulle (for the star)
- Pliers
Step 1: Preparing and Coloring Clay
-
Condition the clay:
Begin by taking a small handful of white air dry clay and kneading it in your hands until it becomes soft, pliable, and warm. -
Mix your colors:
Separate the clay into two balls. Add a tiny drop of blush pink acrylic paint to one and beige to the other. Knead fully until the color is uniform and streak-free. -
Add speckle texture:
To mimic the stone-like speckle seen in the example, you can knead in some dried cracked pepper or coffee grounds, or splatter tiny brown paint specs later; kneading in visible particles now is easiest. -
Roll it out:
I prefer to roll the clay to about 1/4 inch thickness. Use spacers or two same-sized rulers on either side of your rolling pin to ensure an even surface.
Step 2: Shaping and Impression
-
Cut the base shapes:
Use a medium-sized oval cutter to punch out two matching base shapes. Smooth the edges gently with a dab of water on your finger to remove any jagged bits. -
Create the heart impression:
Take the pink oval. Gently press a small heart cutter into the center, but do not cut all the way through—you just want a deep outline. Remove the cutter. -
Add the fingerprint:
Press your thumb firmly into the center of the heart indentation. Rock it slightly to ensure the unique ridges of your print transfer clearly into the clay. -
Create the star impression:
On the beige oval, lightly press a star cutter into the center to mark the shape, again not cutting through. -
Add mesh texture:
Place a small scrap of tulle or grid mesh over the star area and press down gently with a tool or finger to emboss a grid pattern inside the star shape. -
Poke holes for hardware:
Using a toothpick or a straw, create a hole near the top of each oval. Make sure it’s not too close to the edge to prevent cracking. -
Detailing the surface:
Use a needle tool or toothpick to gently poke random, shallow dots around the main shape to add extra surface interest and mimic the porous look of stone.
Cracked edges?
If edges crack while drying, mix a tiny bit of fresh clay with water to make a paste ‘slip’ and fill the cracks, then sand smooth once dry.
Step 3: Finishing and Assembly
-
Drying time:
Place the pieces on a piece of parchment paper and let them dry for 24-48 hours. Flip them halfway through so the bottom creates moisture evenly. -
Sand for smoothness:
Once fully cured and hard, use fine-grit sandpaper to smooth out the edges and surfaces. Wipe away the dust with a slightly damp cloth or baby wipe. -
Enhance the texture:
If the impressions are hard to see, you can mix a little metallic gold paint with water and do a ‘wash’ over the fingerprint or star, wiping away the excess so paint stays only in the grooves. -
Seal the piece:
Brush on a coat of gloss or matte varnish to protect the clay from moisture and everyday wear. -
Open the jump rings:
Use two pairs of pliers to twist (never pull apart) the gold jump rings open. -
Attach the hardware:
Thread the open jump ring through the hole in the clay oval and loop the keychain attachment onto it. -
Secure the closure:
Twist the jump ring back into a closed position, ensuring the ends meet perfectly flush so the clay piece doesn’t slip off.
Pro Tip: Clean Prints
Lightly dust your finger or the texture tool with cornstarch before pressing into the clay. This prevents sticking and keeps the impression sharp.
Now you have a sentimental keepsake that serves as a sweet reminder every time you grab your keys
Cozy Campfire Scene: Two Marshmallows and a Log
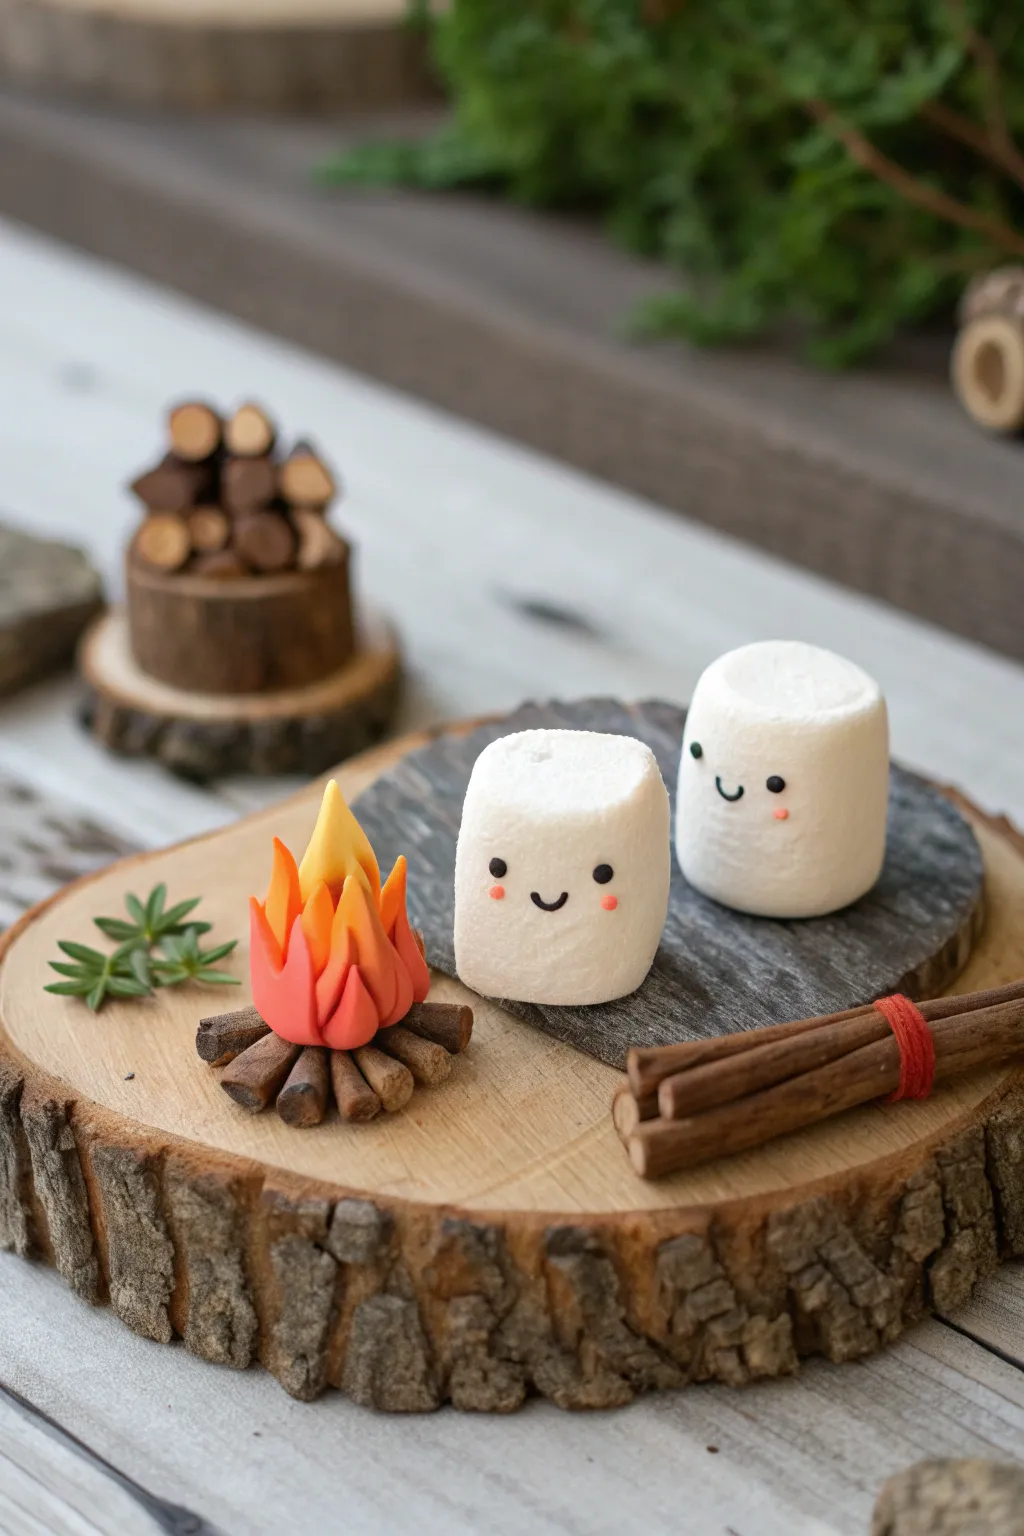
Create an adorable miniature scene featuring two happy marshmallow friends enjoying a tiny campfire. This charming diorama, built on a rustic wood slice, captures the cozy essence of camping without leaving your craft table.
Step-by-Step
Materials
- White, brown, orange, and yellow air dry clay
- Small wood slice (coaster size)
- Black and pink acrylic paint (or fine tip markers)
- Fine detail paintbrush or dotting tool
- Rolling pin
- Craft knife or clay scaling tool
- Toothbrush or texturing tool
- Tacky glue or strong craft glue
- Cinnamon sticks (optional)
- Small piece of slate or grey cardstock
Step 1: Crafting the Happy Marshmallows
-
Shape the bodies:
Take two equal portions of white air dry clay and roll them into smooth spheres. Gently tap the top and bottom of each sphere against your work surface to flatten them into thick cylinders with rounded edges, mimicking the soft puffiness of a real marshmallow. -
Texture the surface:
For a realistic look, lightly press a dry sponge or a toothbrush against the surface of the clay. This adds a subtle, sugary texture rather than leaving them perfectly smooth like plastic. -
Add facial features:
Using a very fine dotting tool or the tip of a toothpick, dip into black acrylic paint to create two small eyes on each marshmallow. Paint a tiny ‘U’ shape for a smile between the eyes. -
Rosy cheeks:
Mix a tiny bit of pink paint (or use watered-down red) and dab two small, soft dots onto the cheeks just below the eyes for a blushing effect.
Realistic Texture
Gently rubbing cornstarch on the marshmallows before drying gives them a powdery, authentic ‘soft’ look and reduces shine.
Step 2: Building the Campfire
-
Create the logs:
Roll brown clay into a thin snake, about the thickness of a pencil lead. Cut this into six or seven small sections, roughly 1/2 inch long. -
Texture the wood:
Take a craft knife and gently score lines lengthwise down each clay log to simulate glowing bark texture. Arrange these in a radial circle to form the base of your fire pit. -
Form the flames:
Blend small amounts of orange and yellow clay together, stopping before they are fully mixed to keep a marbled fire effect. Pinch off small, teardrop-shaped pieces. -
Assemble the fire:
Cluster the teardrop flame shapes together, pointing upward, and press them onto the center of your log circle. You can twist the tips slightly to make the flames look like they are dancing.
Clay Cracking?
If small cracks appear as the clay dries, dip your finger in water and smooth a tiny amount of fresh clay into the gap like spackle.
Step 3: Setting the Scene
-
Prepare the hearth:
Cut a small, irregular shape from a piece of grey slate, stone-textured paper, or even grey clay rolled flay. Glue this onto the center of your wood slice to act as a fireproof mat. -
Add greenery:
If you have green clay, pinch off tiny bits and shape them into small leaves or sprigs. Glue two small clusters to the left side of the wood slice for a touch of nature. -
Firewood bundle:
Break a real cinnamon stick into short lengths or create larger brown clay logs. Bundle three or four together and tie them with a piece of red embroidery thread or a thin strip of red clay. -
Final Assembly:
Apply a dab of strong craft glue to the bottom of the campfire assembly and place it on the left side of the grey hearth. -
Position the friends:
Glue your dried white marshmallows onto the grey hearth, positioning them so they are looking at the viewer but clearly enjoying the warmth of the fire. -
Place the bundle:
Glue the cinnamon stick bundle or clay log pile to the front right edge of the wood slice to balance the composition.
Place this heartwarming little scene on a shelf to remind you of warm nights and sweet treats

TRACK YOUR CERAMIC JOURNEY
Capture glaze tests, firing details, and creative progress—all in one simple printable. Make your projects easier to repeat and improve.
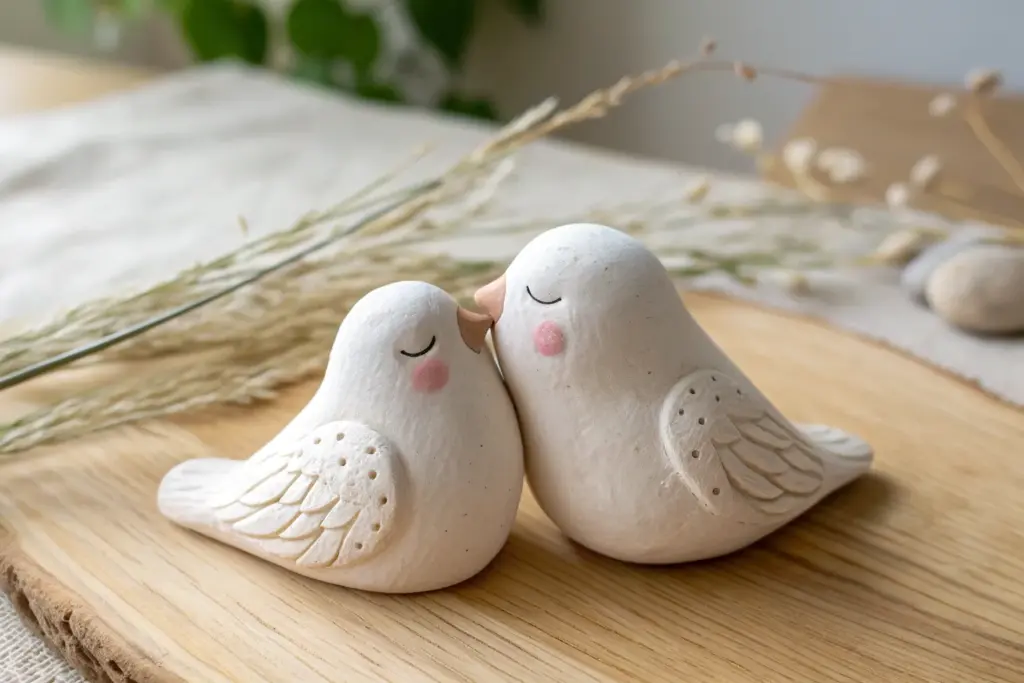
Mushroom Couple Shelf Sitters
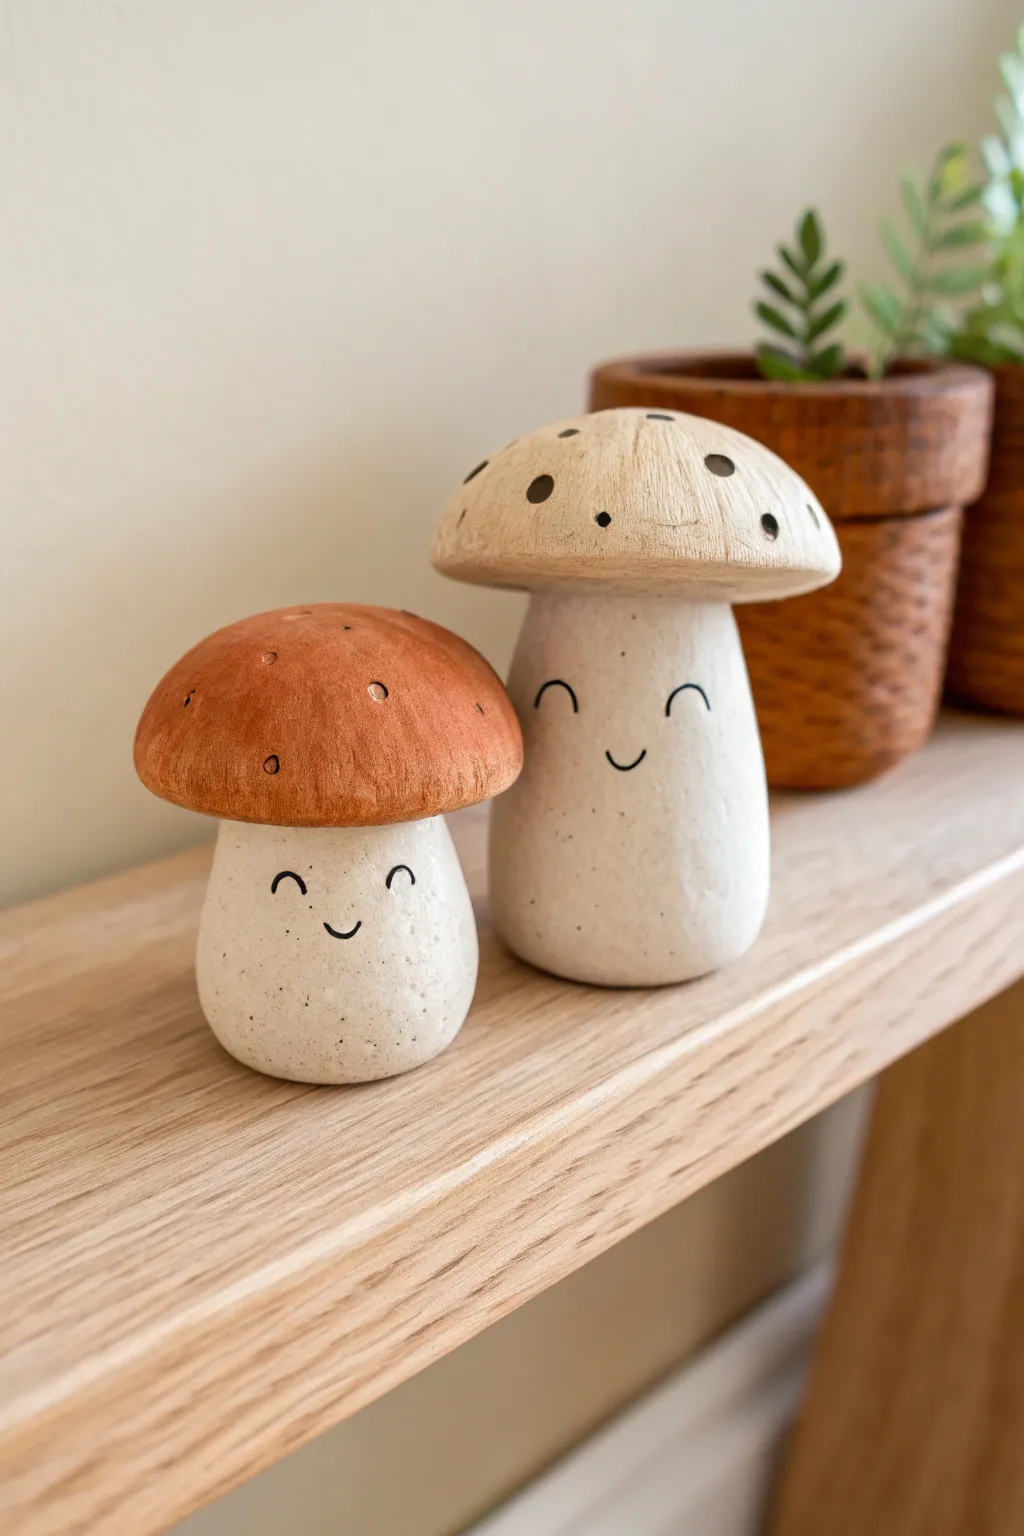
Sculpt a pair of adorable mushroom friends that add a touch of woodland whimsy to any shelf. These sitters feature charming, minimalist painted faces and naturally textured caps for an organic, handmade look.
Step-by-Step Tutorial
Materials
- Air dry clay (white or natural)
- Aluminum foil
- Water and a small sponge
- Sculpting tools (or a butter knife and toothpick)
- Acrylic paints (burnt sienna/rust orange, cream/beige, black)
- Fine grit sandpaper
- Sealant (matte varnish or Mod Podge)
Step 1: Sculpting the Base Forms
-
Create foil armatures:
To save clay and reduce drying time, crumple aluminum foil into four separate shapes: two thick, cylindrical stems (one slightly taller than the other) and two domed caps. -
Cover the stems:
Roll out a slab of air dry clay to about 1/4 inch thickness. Wrap the clay around your foil stem base, smoothing the seams together with a bit of water until the foil is completely hidden. -
Shape the bottoms:
Press the bottom of the covered stems firmly against a flat surface. This ensures your mushrooms will stand up straight on the shelf without wobbling. -
Round the stems:
Gently taper the top of the stems slightly inward, creating a smooth, rounded neck where the cap will eventually sit. Smooth out any fingerprints with a damp sponge. -
Cover the caps:
Cover the domed foil pieces with clay just like you did the stems. Work the clay over the curve, ensuring an even thickness all around. -
Texture the undersides:
Before attaching, flip the caps over. Use a sculpting tool or toothpick to gently score lines radiating from the center to the edge to mimic mushroom gills.
Cracked Clay?
Mix a tiny amount of fresh clay with water to make a paste. Fill the crack with this paste, smooth it over with your finger, and let it dry again.
Step 2: Assembly & Finishing
-
Score and slip:
Take a sharp tool and scratch up the top of the stem and the center underside of the cap. Apply a little water or liquid clay (slip) to these rough areas to act as glue. -
Attach the caps:
Firmly press the caps onto the stems. Use a tool to blend the clay slightly at the connection point just underneath the cap to ensure a strong bond, or leave it distinct if you prefer the ‘detached’ look. -
Add detail texture:
For that organic feel seen in the photo, gently dab the surface of the caps with a stiff beauty sponge or a crumpled ball of foil while the clay is still soft. -
Poke holes:
If you want the textured dots on the taller mushroom, use the back of a paintbrush to gently indent shallow divots into the cap. -
Allow to dry:
Set your mushrooms aside in a dry, room-temperature spot. Depending on thickness, they will need 24-48 hours to cure completely white and hard. -
Sand smooth:
Once fully dry, take your fine grit sandpaper and gently buff the stems. You want them smooth for the faces, contrasting with the textured caps.
Step 3: Painting the Personalities
-
Paint the tall cap:
Mix a diluted wash of cream or beige acrylic paint. Brush it over the taller mushroom cap, wiping away excess with a paper towel so the paint settles into the textures. -
Paint the short cap:
Paint the shorter mushroom cap with a solid coat of burnt sienna or rust orange. You might want to dab the paint on to enhance the stone-like texture. -
Add cap details:
Use a small detail brush to paint the indented dots on the tall mushroom dark brown or black. For the orange mushroom, you can add tiny faux-texture dots with a fine-tip brown marker. -
Speckle the stems:
Dilute a tiny bit of black or brown paint with water. Dip an old toothbrush in it and run your thumb over the bristles to flick tiny speckles onto the white stems for a natural stone look. -
Draw the faces:
Using a very fine black paint pen or a liner brush, draw simple curved lines for the eyes and a small ‘u’ for the smile. Place them low on the stem for maximum cuteness. -
Seal the work:
Finish by brushing on a coat of matte varnish. This protects the paint and creates a unified surface sheen.
Pro Tip: Weighty Matters
For extra stability, push a small pebble or metal washer into the bottom of the foil armature before adding clay to weigh the base down.
Place your finished mushroom couple together on a bookshelf or mantelpiece to bring a smile to anyone who walks by
Mini Food Date: Tiny Pizza Slices on a Plate

Create an adorable duo of tiny pizza slices complete with lifelike texture and delightful toppings. These air-dry clay replicas capture the charm of everyone’s favorite comfort food in a palm-sized format perfect for magnets or dollhouse play.
Detailed Instructions
Materials
- Air-dry clay
- Acrylic paints (terracotta, bright red, deep brown, leaf green, cream/white, ochre)
- Small rolling pin
- Precision craft knife
- Toothbrush or texturing tool
- Needle tool or toothpick
- Fine detail paintbrush
- Matte varnish
- Small circle cutter or straw (optional)
Step 1: Shaping the Crust Base
-
Tint the Clay:
Start by mixing a small amount of terracotta or light brown paint into your white air-dry clay. Knead it thoroughly until you have an even ‘baked dough’ color. -
Roll the Dough:
Roll your colored clay out on a flat surface until it is about 1/4 inch thick. Aim for a consistent thickness, just like real pizza dough. -
Cut the Wedge:
Use your craft knife to cut a crisp triangle shape. The wide end will be your crust edge, and the point is the front of the slice. Cut two identical slices if you’re making a pair. -
Form the Crust Edge:
Roll a small snake of the same dough-colored clay. Attach this along the wide top edge of your triangle, blending the seam underneath so it looks like a puffed crust. -
Texture the Dough:
Gently tap a clean toothbrush or texturing sponge over the entire surface, especially the raised crust edge, to mimic the porous texture of baked bread.
Step 2: Adding Sauce and Toppings
-
Create the Sauce Layer:
Mix red paint with a tiny bit of brown into a pea-sized ball of clay. Flatten this very thinly into a triangle slightly smaller than your base slice. -
Apply the Sauce:
Press the red layer onto the dough triangle, leaving the raised crust exposed at the top. Use a needle tool to stipple the red clay heavily, making it look like chunky, spread tomato sauce. -
Make Mozzarella Discs:
Roll tiny balls of white or cream clay and flatten them into discs. These represent fresh mozzarella slices. -
Texture the Cheese:
Place three cheese discs on each slice. Use a toothpick to poke two little indents or ‘eyes’ onto each disc, and perhaps a third small mark, giving them a melted, organic look. -
Tint the Cheese Details:
Once the cheese is placed, I like to take a tiny bit of ochre paint and dab it into the little indents on the cheese to simulate browned spots from the oven. -
Sculpt Basil Leaves:
Mix a fresh leaf green color into a small bit of clay. pinch off minuscule amounts and shape them into pointed ovals. -
Detail the Leaves:
Use your needle tool to gently score a central vein down each green oval. Gently curve the leaves so they don’t lie perfectly flat. -
Placement:
Press two or three basil leaves onto each slice, overlapping the sauce and cheese slightly for a natural arrangement.
Saucy Texture Tip
For ultra-realistic sauce, mix liquid clay or white glue with red acrylic paint and dab it onto the base instead of using solid clay. It dries with a natural sheen.
Step 3: Finishing Touches
-
Dry Texture Check:
Before the clay fully hardens, give the red sauce area one last pass with a stippling tool to ensure it looks distinct from the smoother crust. -
Curing:
Allow your pizza slices to dry completely for 24-48 hours. Turn them over halfway through so the bottom dries evenly. -
Shading the Crust:
Using a dry brush technique with some brown pastel powder or diluted paint, lightly dust the raised crust edge to give it a ‘toasted’ appearance. -
Sealing:
Finish with a coat of matte varnish to protect your work. If you want the sauce to look wet, you can use a touch of gloss varnish just on the red areas.
Make It a Magnet
Embed a small, strong round magnet into the back of the slice while the clay is still wet. Once dry, it’s ready to decorate your fridge.
Now you have a perpetual pizza slice that never gets cold and always looks delicious
Dessert Duo Charms: Strawberries and Cream Swirls
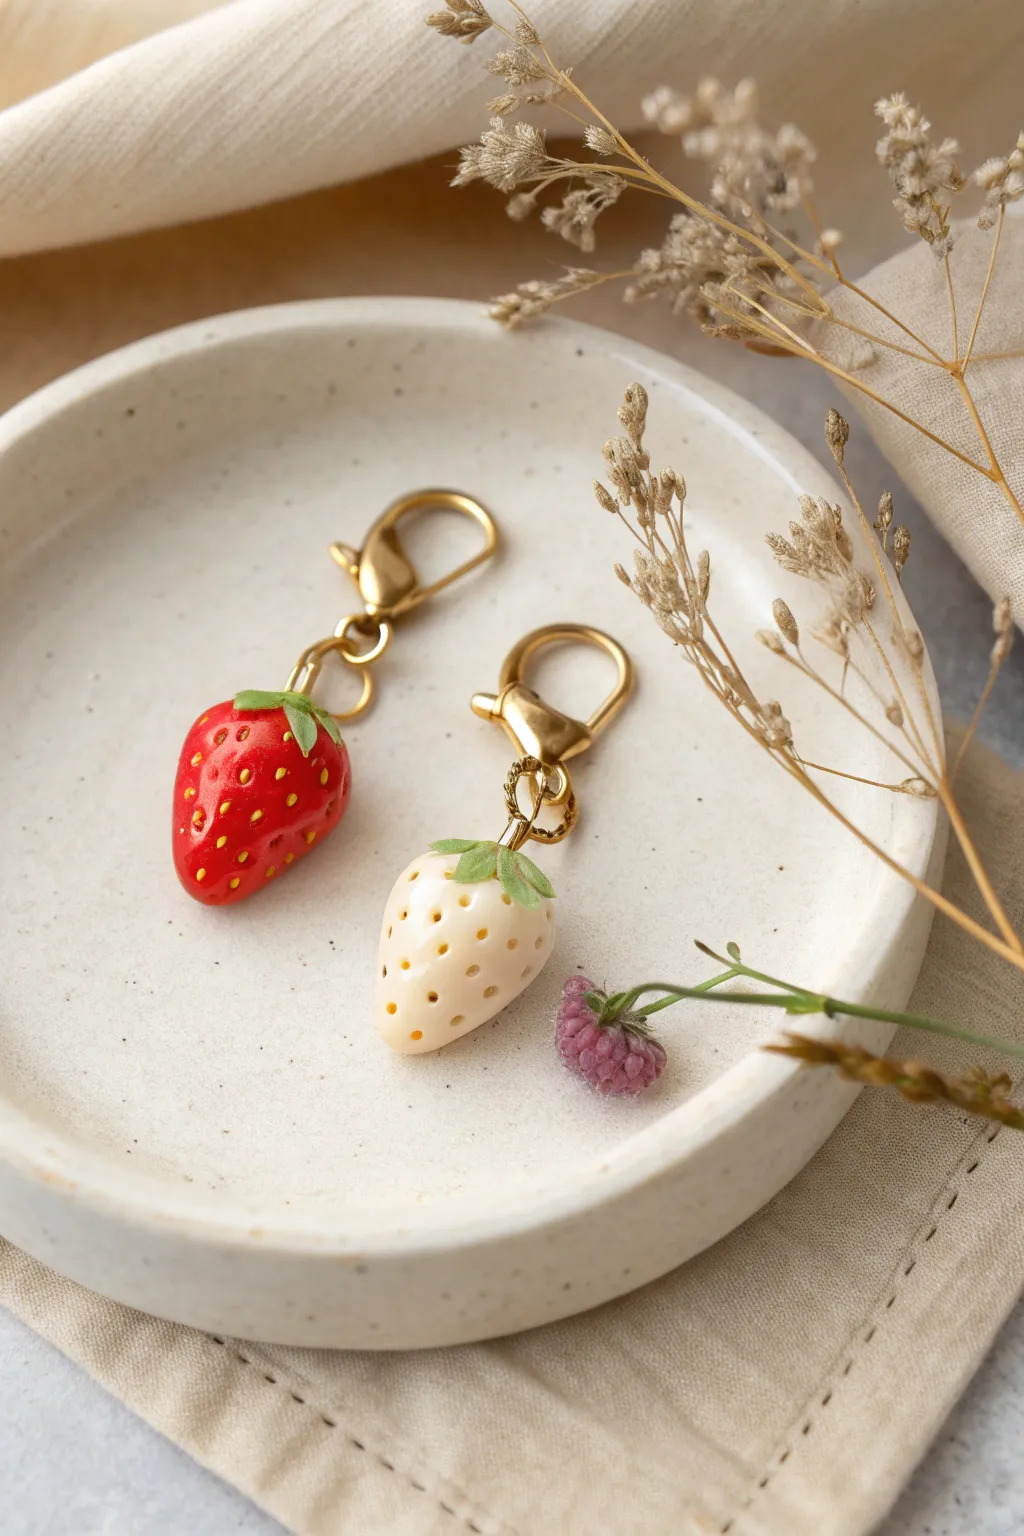
Create a pair of delightful strawberry charms, one a classic vibrant red and the other a creamy white variant. These petit accessories feature realistic seed textures and delicate green caps making them perfect for keychains or jewelry.
Step-by-Step Tutorial
Materials
- Air dry clay (white)
- Acrylic paints (red, green, yellow, creamy beige)
- Gloss varnish or resin (optional)
- Gold screw eye pins (2)
- Gold jump rings (6-8mm)
- Gold lobster clasps
- Pliers (round nose and flat nose)
- Tools: needle tool or toothpick, small detail brush
- Sandpaper (fine grit)
Step 1: Shaping the Strawberries
-
Condition the clay:
Start by taking a small amount of air dry clay, roughly the size of a large marble. Knead it thoroughly until it is smooth and pliable to prevent cracks later on. -
Form the base shape:
Roll two equal balls of clay. Gently shape each ball into a rounded cone or teardrop shape. Flatten the wider top slightly where the leaves will sit, while keeping the bottom pointed but soft. -
Refine the surface:
Use a little water on your finger to smooth out any fingerprints or bumps. The surface should be as pristine as possible before texturing. -
Create the seed texture:
Using a needle tool or the tip of a toothpick, gently poke small, shallow indentations all over the surface of both strawberries. I like to stagger these in rough rows to mimic nature’s pattern. -
Insert hardware:
Take your screw eye pins. Dip the screw end into a tiny bit of white glue or wet clay slip for extra hold, then screw them centrally into the top (flat part) of each strawberry.
Hardware Loose? Try This
If the screw eye pin feels loose after drying, unscrew it carefully, add a drop of superglue to the hole, and screw it back in. Let it set instantly.
Step 2: Adding the Leaf Caps
-
Prepare the greenery:
Take a very small pea-sized amount of clay for the leaves. Flatten it into a thin disk. -
Cut the leaf shapes:
Using a craft knife or sharp tool, cut a star-like shape with 5 or 6 points from the flattened disk. Alternatively, mold individual tiny teardrops and press them together. -
Attach the caps:
Apply a tiny dab of water around the eye pin on the strawberry. Thread the clay star over the eye pin loop and press it gently onto the top of the fruit. -
Texture the leaves:
Use your needle tool to drag lines from the center of the cap out to the tips of the leaves. Curl the very tips of the leaves slightly upwards for a realistic effect. -
Dry completely:
Let the strawberries dry for at least 24-48 hours. They must be fully hardened before painting.
Add Some Sparkle
Mix ultra-fine iridescent glitter into your gloss varnish for a ‘sugar-coated’ candy effect, or attach a small pearl bead to the jump ring for extra elegance.
Step 3: Painting and Finishing
-
Base coat the red berry:
Paint the first strawberry with a bright, vibrant red acrylic paint. You may need two coats for full opacity, letting it dry between layers. -
Base coat the white berry:
For the second berry, mix a tiny bit of yellow or brown into white paint to get a creamy, off-white shade. Paint the entire berry. -
Paint the leaves:
Carefully paint the leaf caps a lively green. Use a fine detail brush to avoid getting green on the fruit part. -
Highlight the seeds:
For the red strawberry, dip a very fine brush or toothpick into yellow paint and carefully dab it into the indentations you made earlier. For the white berry, use a slightly darker beige for subtle contrast. -
Seal the charms:
Once fully dry, coat both charms with a gloss varnish. This protects the paint and gives them that juicy, fresh fruit shine. -
Assemble the hardware:
Using your pliers, open a jump ring and thread it through the eye pin loop. Attach the lobster clasp to the jump ring. -
Final closure:
Close the jump ring securely with your pliers, ensuring there is no gap for the charm to slip through.
Attach these sweet charms to your keys or bag for a cheerful pop of color wherever you go
Pet-Inspired Couple Figurines (Yours and Mine)
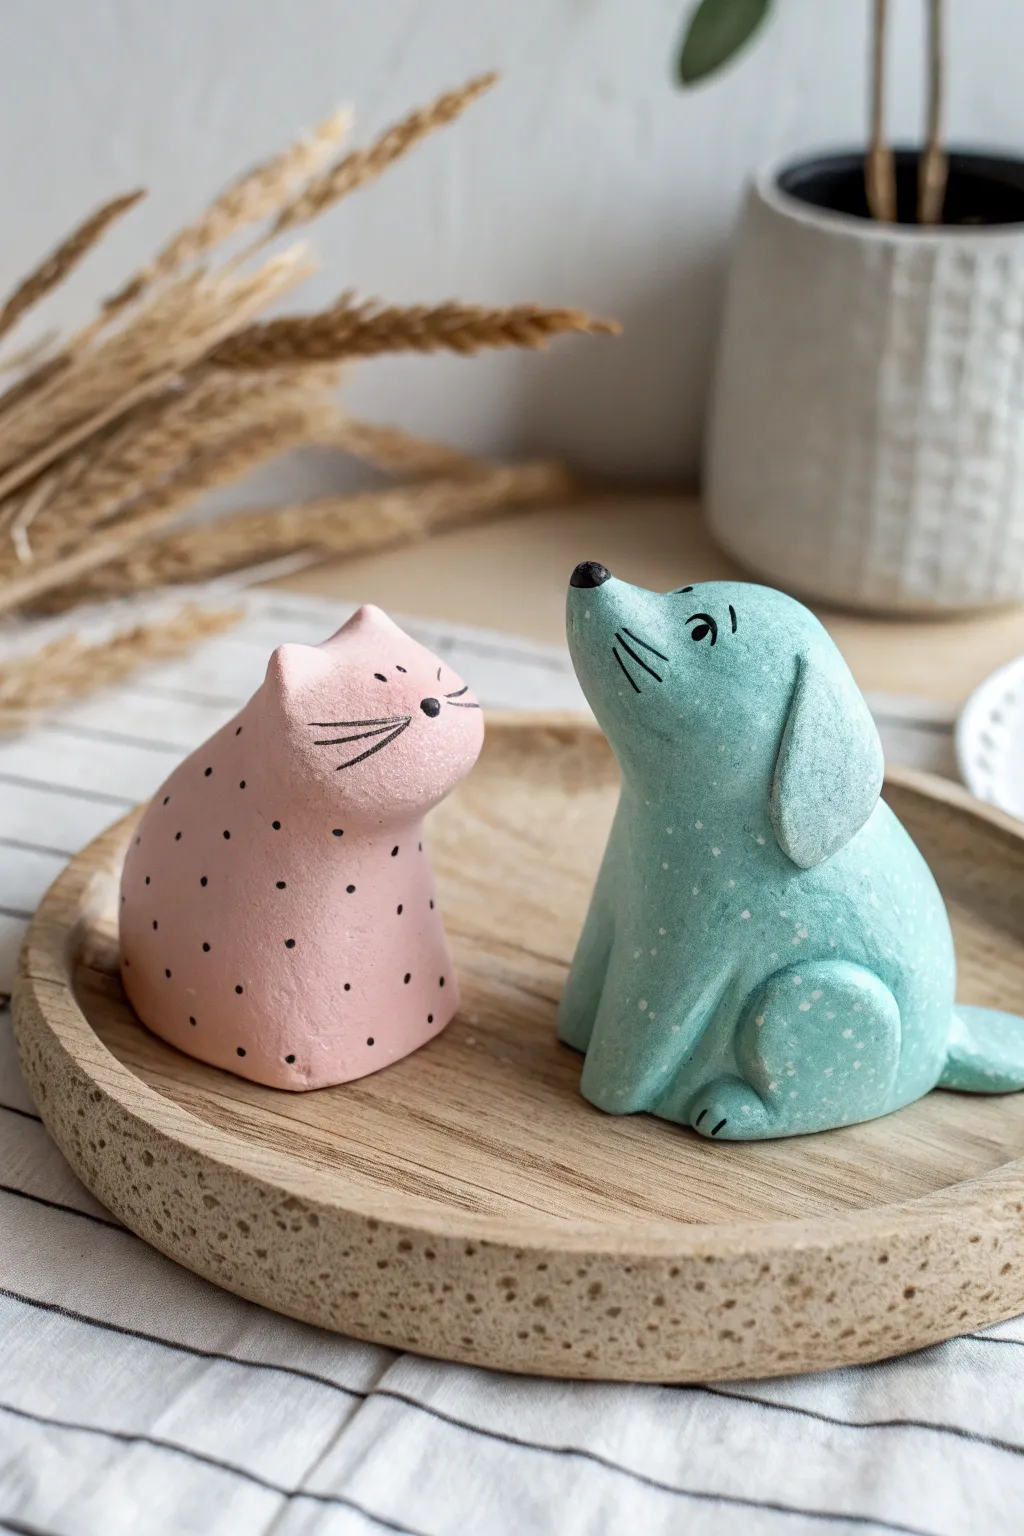
Capture the charm of a sweet animal friendship with these minimalist, stylized figurines. The soft pink cat and teal dog are sculpted with simple curves and finished with delicate painted patterns, making them a perfect project for a relaxing craft night.
Step-by-Step
Materials
- Air dry clay (white)
- Acrylic paints (pastel pink, teal/mint, black, white)
- Fine grit sandpaper
- Small cup of water
- Sculpting tools (or a toothpick and a dull knife)
- Fine detail paintbrush
- Flat paintbrush
- Matte varnish or sealant
Step 1: Sculpting the Cat
-
Form the base:
Start with a ball of clay roughly the size of a tangerine. Roll it until smooth, then gently flatten the bottom against your work surface to create a stable base so the figure won’t wobble. -
Shape the body:
Using your palms, gently gentle pull the top portion of the ball upwards and slightly to one side to create a teardrop shape. This upper point will become the head. -
Refine the head:
Mold the top of the teardrop into a rounded head shape, keeping it seamlessly connected to the body without a distinct neck divot. The look should be fluid and continuous. -
Pinch the ears:
Use your thumb and index finger to pinch two small triangles at the very top of the head. Smooth the clay around the base of the ears so they look integrated, not stuck on. -
Smooth the surface:
Dip your finger in a tiny bit of water and run it over the entire cat to smooth out any cracks or fingerprints. Set it aside to dry completely (24-48 hours).
Smooth Seams
For invisible joints when attaching ears or tails, use a ‘cross-hatch’ method: scratch both surfaces with a needle tool, add water, and press together.
Step 2: Sculpting the Dog
-
Create the dog’s body:
Start with a similar amount of clay as the cat. Roll a smooth ball, flatten the bottom, and then elongate the shape upwards into a tall, rounded cone. -
Pull the snout:
Pinch the top of the cone and gently pull it forward and slightly up to create the dog’s distinctive long snout. It should look like he’s looking up at the cat. -
Add the ears:
Roll two small, flat oval shapes of clay separately. Attach these to the sides of the head using a little water (slip) to act as glue, blending the seams at the top so they hang down naturally. -
Leg detail:
For the hind leg, roll a small ball and flatten it into a disc. Attach it to the lower side of the body. Mark a simple paw line at the bottom with a sculpting tool. -
Add the tail:
Roll a small snake of clay and attach it to the back base of the dog. Blend the connection point smoothly so it doesn’t break off later. Allow the dog to dry completely.
Step 3: Painting and Finishing
-
Sand imperfections:
Once bone dry, take fine grit sandpaper and gently buff away any rough bumps or fingerprints. Wipe away the dust with a dry brush or cloth. -
Base coat the cat:
Apply an even coat of pastel pink acrylic paint to the entire cat. I find that doing two thin layers usually looks better than one thick, gloopy layer. -
Base coat the dog:
Paint the dog figurine with a mint or teal acrylic paint. Ensure you get into the crevices around the ears and legs. Let both animals dry fully. -
Paint the cat’s details:
Using your finest brush and black paint, add two simple dots for eyes, a tiny nose, and three whiskers on each cheek. Then, add small black polka dots scattered across the body. -
Paint the dog’s details:
Paint a black nose on the tip of the snout, swooping eyes, and whiskers. Instead of black dots, use white paint to dab tiny speckles or ‘fur’ texture across the teal body. -
Add paw marks:
Use the black paint to add two small vertical lines on the dog’s front feet area and hind leg to suggest claws or toes. -
Seal the work:
Finish both pieces with a layer of matte varnish to protect the paint and give them a professional, unified finish.
Cracking Issues?
If small cracks appear while drying, don’t panic. Mix a tiny bit of fresh clay with water to make a paste and fill the crack, then sand smooth once dry.
Now you have a charming pair of handmade companions ready to brighten up your shelf
“Our Song” Lyrics Tile Plaque
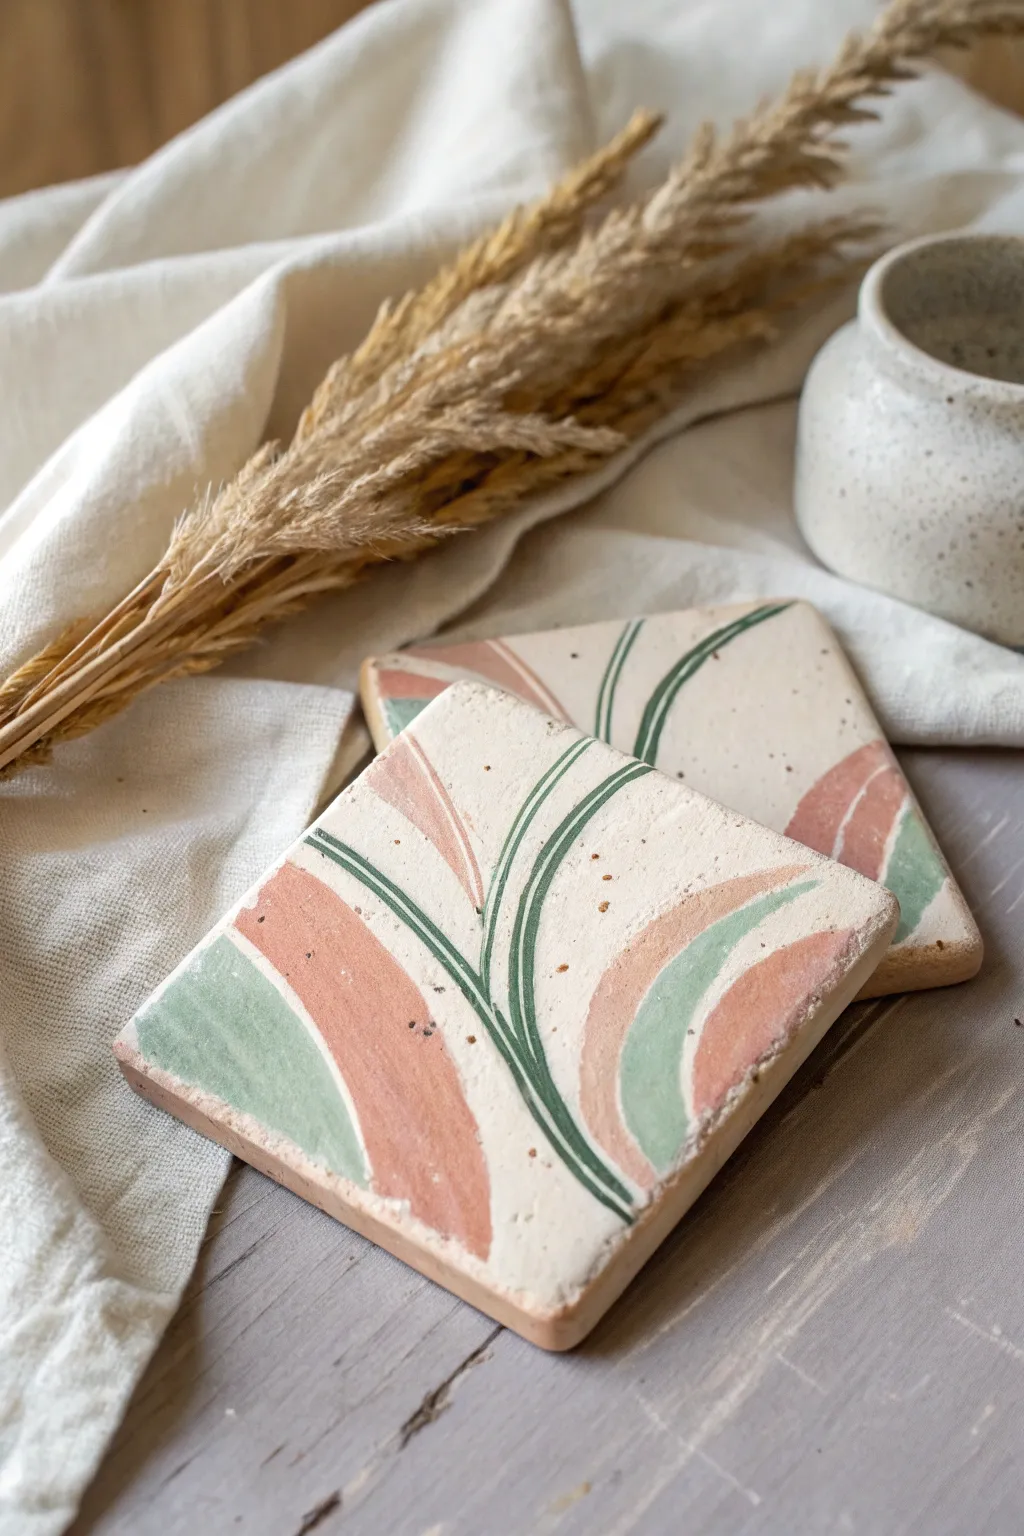
These two coordinating clay tiles bring an earthy, organic charm to any tabletop with their dusty pink and sage green palette. The sweeping curves and delicate line work create a sophisticated yet handmade aesthetic perfect for displaying your favorite lyrics or protecting surfaces.
Detailed Instructions
Materials
- Air-dry clay (white or light cream)
- Rolling pin
- Square cookie cutter (approx. 4×4 inches) or ruler and craft knife
- Sandpaper (fine grit)
- Acrylic paints: Terracotta/Dusty Pink, Sage Green, Dark Forest Green
- Small flat paintbrush
- Fine detail liner brush
- Palette (or paper plate)
- Cup of water
- Matte sealant or varnish (spray or brush-on)
- Parchment paper or canvas mat
Step 1: Shaping the Canvas
-
Prepare the workspace:
Lay down a piece of parchment paper or a canvas mat to prevent the clay from sticking to your table. Take a substantial chunk of air-dry clay and knead it briefly in your hands to warm it up and remove any internal air bubbles. -
Roll out the slab:
Use your rolling pin to flatten the clay into an even slab. Aim for a thickness of about 1/4 inch to ensure durability. If you want a consistent thickness, placing two wooden dowels on either side of the clay as guides while rolling is a great trick. -
Cut the squares:
Press a square cookie cutter firmly into the clay to create your tile shapes. Alternatively, use a ruler and a craft knife to measure and cut precise squares. Gently lift the shapes and smooth the rough edges with a slightly damp finger. -
Allow to dry:
Place the tiles on a clean, flat surface to dry. To prevent curling, flip the tiles over every 12 hours so both sides dry evenly. This process can take 24-48 hours depending on humidity. -
Sand for smoothness:
Once bone dry, take your fine-grit sandpaper and gently sand the surface and edges. The goal is to remove any fingerprints or sharp ridges, creating a smooth, professional-looking base for your painting.
Warping Woes?
If your tiles curl up while drying, lightly mist the concave side with water and weigh it down with a heavy book overnight to flatten it back out.
Step 2: Painting the Design
-
Mix your palette:
Prepare your acrylic paints. You’ll need a muted dusty pink (mix terracotta with a touch of white), a soft sage green, and a dark forest green. Adding a tiny drop of water to the paints can help them flow more smoothly on the absorbent clay surface. -
Paint the first curve:
Using a small flat brush, load up the dusty pink color. Starting from one corner, paint a broad, sweeping curve that arcs toward the center but doesn’t cross it. The shape should feel organic, wider at the edge and tapering slightly. -
Add the green accent:
Clean your brush and switch to the sage green. Paint a second curved shape adjacent to the pink one, or on the opposite corner, mirroring the movement. These soft blocks of color form the background for the detailed lines. -
Create the second tile:
While the first tile dries, repeat the color blocking on the second tile. Try to vary the placement slightly so they look like a set rather than identical twins—perhaps having the curves flow in a different direction. -
Paint the stems:
Switch to your fine detail liner brush and the dark forest green paint. Starting from the bottom center or a corner, paint thin, confident lines that curve upward, intersecting and overlapping the pink and sage shapes. -
Add leaf details:
I find it helpful to vary the pressure on the brush here; press down slightly for the thicker base of the stem and lift off as you reach the tip to create a tapered, grass-like effect. Add a few more lines to create a clustered look. -
Add subtle splatters:
Dilute a tiny bit of brown or dark grey paint with water until it’s very fluid. Load up a brush and tap it gently over the tiles to create tiny, subtle speckles. This mimics the look of natural stoneware pottery.
Step 3: Finishing Touches
-
Let the paint set:
Allow the painted design to dry completely. Acrylics dry fast, but give it at least an hour to ensure the moisture has evaporated from the clay pores. -
Apply sealant:
apply a coat of matte varnish or sealant over the entire top surface and sides. This protects the paint from chipping and seals the clay against moisture. -
Seal the back:
Once the front is dry, flip the tiles over and seal the bottom as well. Sealing both sides is crucial for preventing the clay from warping over time due to humidity changes. -
Add protective backing (optional):
If using these as coasters, you might want to glue small felt pads or a square of cork to the bottom to protect your furniture and give the tiles a little lift.
Pro Tip: Pencil First
Not confident freehanding the curves? Sketch your design lightly with a pencil directly on the dry clay before painting to guide your brushstrokes.
Place your finished tiles on your coffee table or display shelf to enjoy that custom, artisanal vibe every day
Tiny Memory Box Dish for Tickets and Notes
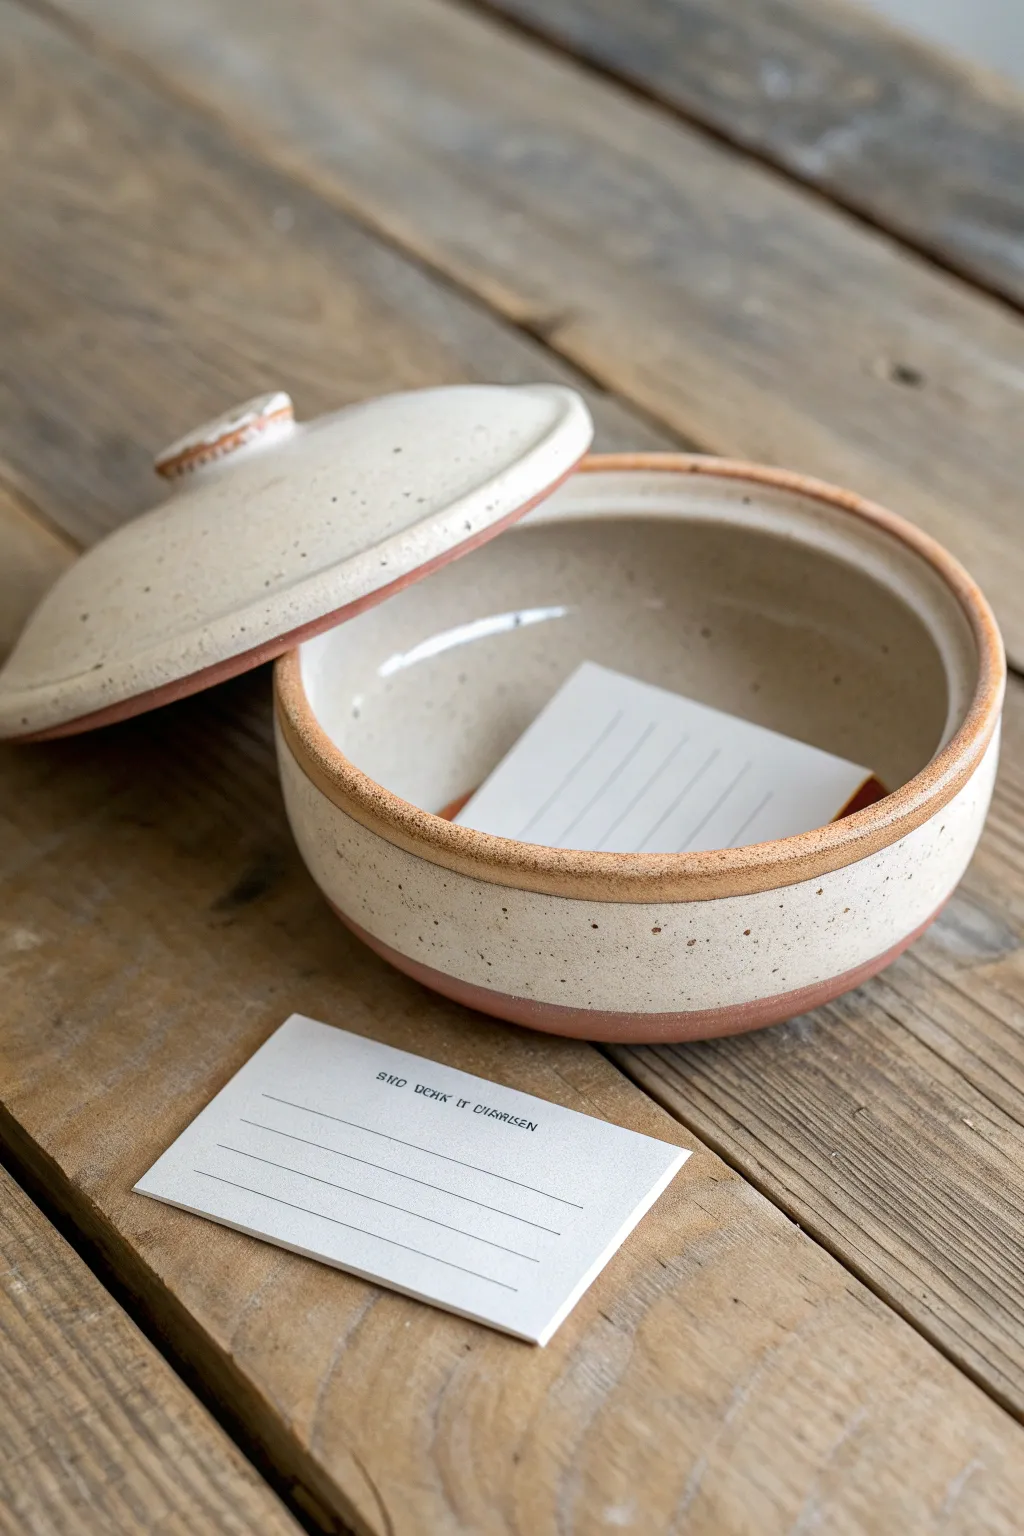
Craft a charming, rustic vessel perfect for stashing concert stubs, movie tickets, and handwritten notes. This air-dry clay project mimics the look of wheel-thrown stoneware with a speckled glaze finish and warm terracotta accents.
Step-by-Step Tutorial
Materials
- Air-dry clay (white or natural stone color)
- Acrylic rolling pin
- Circle templates or bowls (one strictly for the base, one slightly larger for the lid)
- Craft knife or clay needle tool
- Small bowl of water
- Sponge
- Sandpaper (fine grit)
- Acrylic paints (Cream/Off-White, Burnt Sienna/Terracotta, Dark Brown)
- Old toothbrush
- Gloss varnish or sealant
Step 1: Forming the Base
-
Roll the Slab:
Begin by conditioning a large chunk of clay until it is pliable. Roll it out into a smooth, even slab about 1/4 inch thick. Try to maintain a consistent thickness so the final piece dries evenly. -
Cut the Base:
Using a circle template or a small bowl as a guide, cut out a perfect circle for the bottom of your dish. Set this aside on a piece of parchment paper. -
Create the Wall Strip:
Roll a long, rectangular strip of clay. The width of the strip determines the height of your box—aim for about 2–3 inches. The length needs to be enough to wrap around the circumference of your base circle with a little overlap. -
Attach the Walls:
Score the outer edge of your base circle and one long edge of your strip with a needle tool. Apply a little water to create slip. Wrap the strip around the base, pressing the scored edges together firmly. -
Smooth the Seams:
Clean up the vertical seam where the wall overlaps by blending the clay with your fingers or a modeling tool. Do the same for the bottom seam where the wall meets the base, ensuring there are no gaps.
Smooth Operator
Use a damp sponge to smooth your clay while working. This reduces the need for heavy sanding later and creates a better surface for the faux-glaze paint.
Step 2: Creating the Lid
-
Shape the Lid:
Roll out a second slab of clay. You can either drape this over a slightly larger bowl to create a gentle dome shape or keep it flat for a simpler look. Cut it to a circle slightly larger than the opening of your base. -
Add a Flange:
Flip the lid upside down. Roll a small snake of clay and attach it in a circle on the underside of the lid. This ring should fit just *inside* the rim of the base to keep the lid from sliding off. -
Form the Handle:
Roll a small ball of clay and flatten it slightly into a button shape. Score and slip the center of the lid’s top side and attach the button securely. -
Dry Completely:
Set both pieces aside to dry. This usually takes 24–48 hours depending on humidity. Rotate pieces occasionally to prevent warping.
Step 3: Faux Ceramic Finish
-
Sand for Smoothness:
Once fully dry, lightly sand any rough edges or fingerprints. This is crucial for achieving that professional ceramic look. -
Paint the Terracotta Base:
I like to start by painting the bottom inch of the bowl and the very rim of the lid with a Burnt Sienna or Terracotta color. This simulates exposed raw clay. -
Apply the Glaze Color:
Paint the rest of the exterior and the lid with your Cream or Off-White paint. Overlap slightly with the terracotta color to create a dipped glaze effect. -
Create Speckles:
Dilute a small amount of dark brown paint with water. Dip an old toothbrush into this mixture, and run your thumb across the bristles to flick tiny speckles over the cream-painted areas. -
Seal the Project:
Once the paint is completely dry, coat the entire piece with a high-gloss varnish. This mimics the shine of fired ceramic glaze and protects your memory box.
Make it Personal
Before the clay dries, stamp a date or a word like ‘MEMORIES’ into the side of the bowl or the underside of the lid for a hidden detail.
Place your new dish on a console table and start collecting those quiet little mementos that bring you joy
Conversation Card Clay Stamps
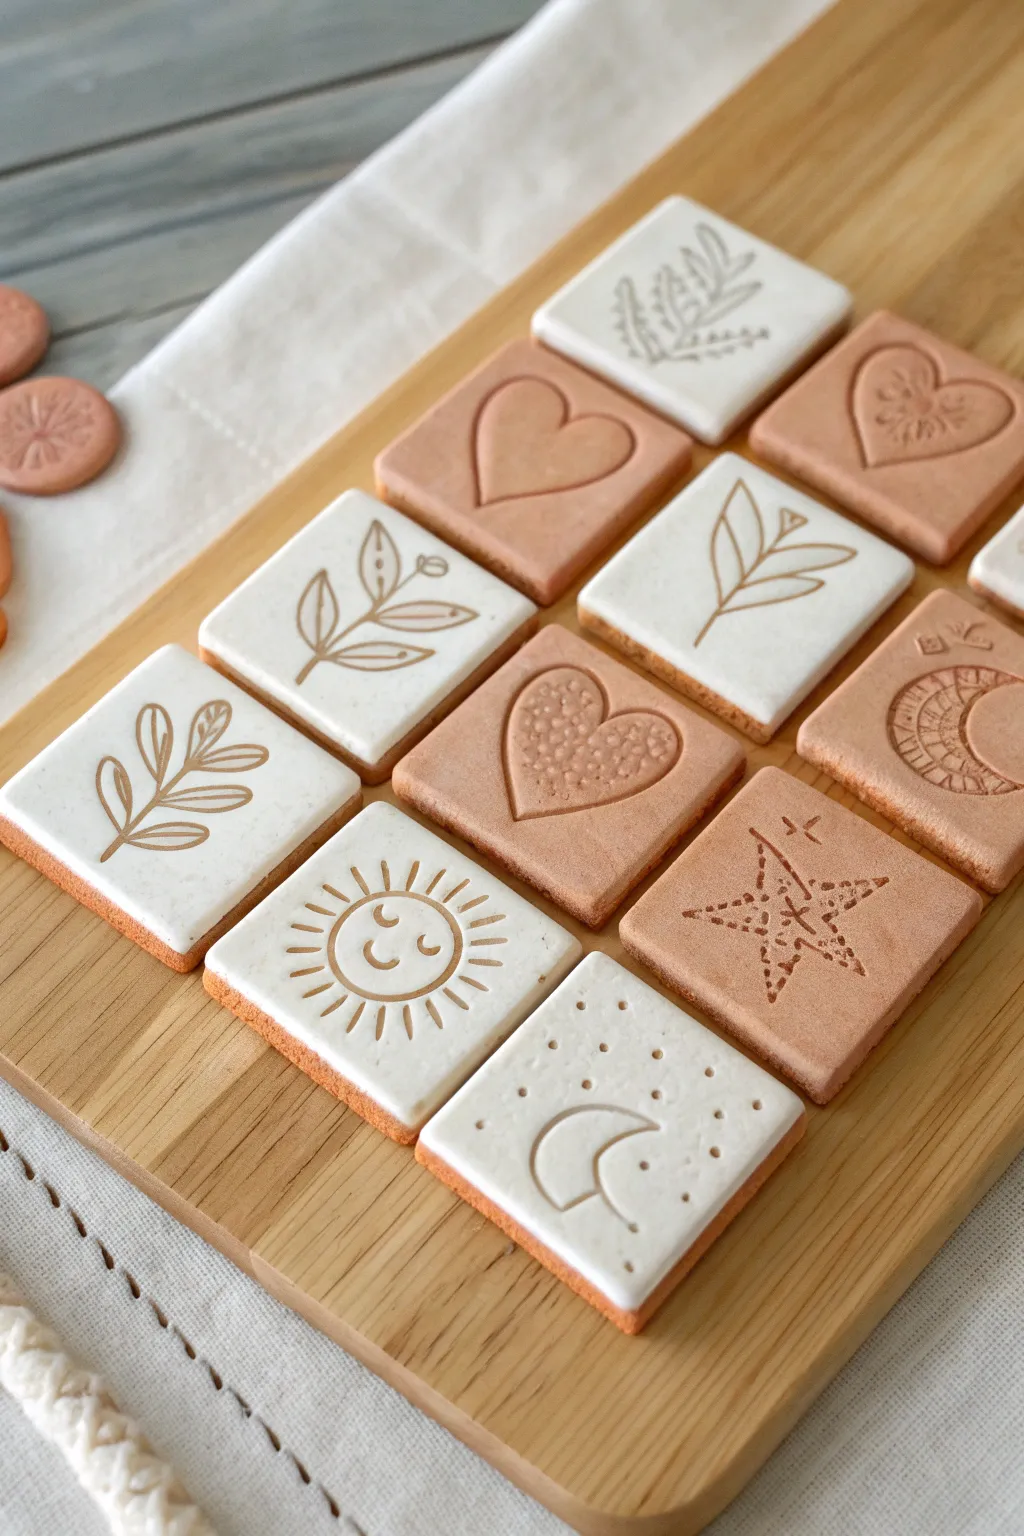
Create a set of charming, tactile clay tiles that double as unique conversation prompts for your next date night. Mixing warm terracotta tones with bright white layers creates a modern, high-contrast look that feels both rustic and refined.
How-To Guide
Materials
- Terracotta colored air-dry clay
- White or cream colored air-dry clay
- Rolling pin
- Square cookie cutter (approx. 2 inches)
- Set of small botanical and celestial rubber stamps or clay embossers
- Two 5mm wooden slats (for even rolling thickness)
- Sharp craft knife or clay blade
- Fine-grit sandpaper (optional)
- Matte spray varnish or acrylic sealer
Step 1: Preparing the Base
-
Condition the clay:
Start by taking a chunk of the terracotta air-dry clay and kneading it in your hands until it becomes warm, soft, and pliable without any cracks. -
Roll the first slab:
Place your wooden guide slats on a smooth surface about 6 inches apart. Place the clay ball between them and roll it flat with your pin until it rests evenly on the guides. -
Cut the squares:
Using your square cookie cutter, press firmly into the terracotta slab to cut out several uniform base tiles. You will need one base for every finished token. -
Smooth the edges:
Gently lift the squares and use a finger dipped in a tiny bit of water to smooth away any rough, ragged edges left by the cutter.
Step 2: Creating the Two-Tone Effect
-
Prepare the white layer:
Clean your hands thoroughly to avoid staining the white clay. Roll out a sheet of white air-dry clay much thinner than the base—aim for about 2mm thickness. -
Cut matching squares:
Cut an equal number of white squares using the same cutter you used for the terracotta bases. -
Join the layers:
Lightly scour one side of a terracotta square and one side of a white square using a toothbrush or needle tool. Dab a tiny bit of water on the scratched surfaces. -
Press together:
Lay the thin white square directly on top of the terracotta base. Gently roll over the stack just once with very light pressure to seal them together without distorting the shape. -
Design variety:
Leave some tiles as plain terracotta without a white top layer to create the alternating checkerboard aesthetic seen in the final project.
Stamp Stuck?
If your stamp is sticking to the damp clay, try lightly dusting the surface of the clay with cornstarch or baby powder before pressing down. This acts as a release agent.
Step 3: Stamping and Finishing
-
Select your stamps:
Choose designs that can act as prompts: a heart for romance, a sun for future plans, or a leaf for growth. I prefer using unmounted rubber stamps for better control. -
Imprint the design:
Press the stamp firmly into the center of the damp clay. Apply even pressure to ensure the lines are deep and crisp, then lift straight up. -
Add texture:
For stamps with open spaces, like the large heart, use a needle tool to add small dots or stippling inside the impression for extra visual interest. -
Slow drying:
Place all your stamped tiles on a wire rack or clean wooden board. Let them air dry slowly for 24-48 hours away from direct sunlight to prevent warping. -
Sanding:
Once fully dry and hard, very gently sand the edges with fine-grit sandpaper if there are any sharp points remaining. -
Seal the work:
Finish by spraying a light coat of matte acrylic sealer over the tiles to protect the surface from moisture and fingerprints during handling.
Make it a Game
Write specific questions or prompts on the back of each tile with a permanent marker (e.g., ‘Favorite memory’ behind the heart) to turn them into a functional game.
Arrange your beautiful tiles on a tray and get ready for meaningful conversation
Mini Room Diorama of Your Favorite Hangout
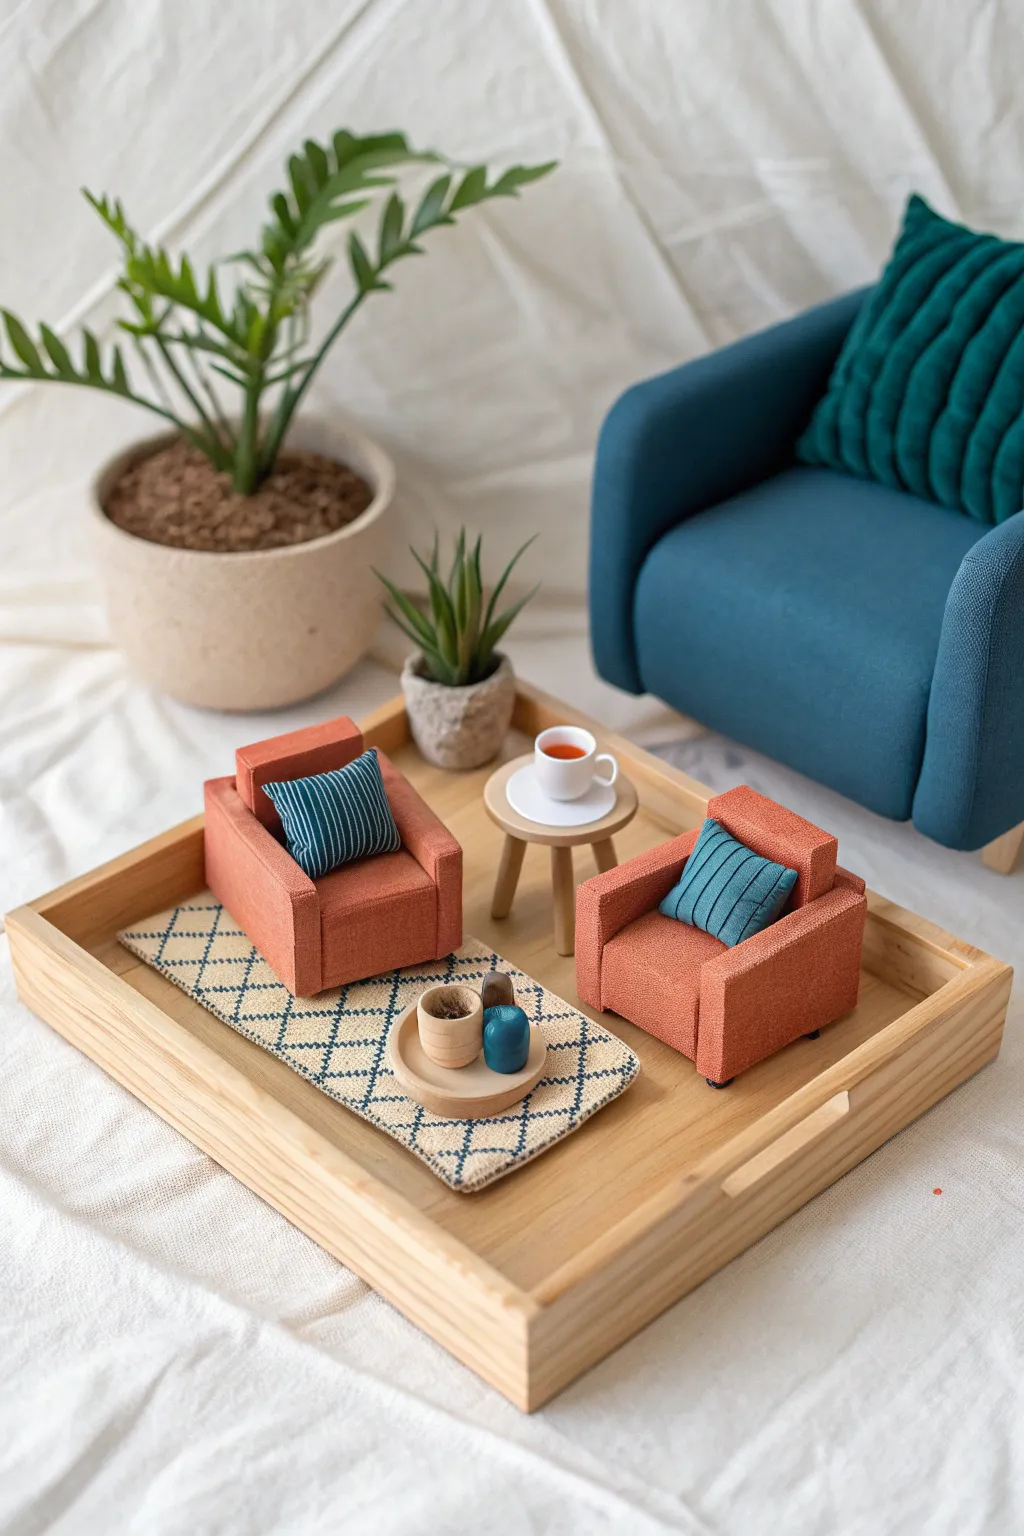
Capture the cozy essence of your favorite living space with this charming miniature diorama set inside a wooden tray. Using air-dry clay and simple fabrics, you’ll build a tiny, textured sanctuary perfect for display.
Step-by-Step
Materials
- Air-dry clay (terracotta or white)
- Wooden serving tray (square or rectangular)
- Fabric scraps (textured orange/rust for chairs, blue weave for pillows)
- Burlap or thick canvas (for the rug)
- Cardboard or foam core
- Acrylic paints (white, blue, brown, green)
- Tacky glue or strong craft glue
- Fine grit sandpaper
- Blue embroidery floss or thin yarn
- Needle
- Mod Podge or varnish (matte)
- Wood dowels (thin)
- X-acto knife and cutting mat
Step 1: Funiture Construction
-
Build the chair bases:
Cut four cubes from foam core or layers of cardboard to form the seat bases (approx. 1.5 inches square). Cut slightly taller rectangles for the backrests and shorter ones for armrests. -
Assemble the chair frames:
Glue the backrest and armrests to the seat base using tacky glue. Hold them in place for a few minutes until the bond is secure, creating two identical armchair structures. -
Upholster the main body:
Cut strips of your orange textured fabric. Apply a thin layer of glue to the foam frame and carefully wrap the fabric around the seat, back, and sides, tucking raw edges underneath for a clean finish. -
Create the cushions:
Cut small squares of foam core for the seat cushions. Wrap them neatly in the same orange fabric like tiny presents and glue them onto the seat bases. -
Sew tiny pillows:
Cut small rectangles of blue fabric. Fold them in half, glue or sew three sides, stuff with a tiny bit of cotton or scrap fabric, and seal the final edge. Glue these to the chair backs.
Step 2: Clay Elements
-
Sculpt the side table:
Roll a small ball of air-dry clay and flatten it into a perfect circle for the tabletop. Cut three equal lengths of thin wood dowel for legs and press them into the underside of the clay while it’s still soft. -
Create the tea set:
Roll a tiny pea-sized ball of white clay for the cup and press a dent in the center. Flatten a smaller ball for the saucer. Attach a microscopic snake of clay for the handle using a dab of water. -
Form the decorative accessories:
Shape two tiny cylinders from clay. Keep one hollow like a pot and the other solid. I find using a toothpick helps carve out the hollow center cleanly. -
Make the plant pot:
Mold a larger thimble-sized pot roughly the shape of a rock or textured planter. Use a tool to poke the surface for a stone-like texture. -
Sculpt the succulent:
Roll tiny tapered teardrops of green clay.Press them together in a rosette pattern to form a succulent shape and place it inside the textured pot. -
Dry time:
Set all clay pieces aside to dry completely for at least 24 hours. Flip the table occasionally to ensure the bottom dries evenly.
Cracks happen
If your tiny clay table cracks while drying, mix a small amount of fresh clay with water to make a paste (slip) and fill in the crack. Smooth it out with a finger.
Step 3: Rug and Assembly
-
Prepare the rug base:
Cut a rectangle of burlap or canvas that fits nicely between where your two chairs will sit. -
Embroider the pattern:
Using a needle and blue embroidery floss, stitch a simple diamond or crisscross pattern onto the rug material to mimic a geometric weave. -
Paint the accessories:
Once the clay is dry, paint the tea set white. Paint the tiny pot and solid cylinder in varying shades of blue or beige to match your color scheme. -
Assemble the tray:
Place a smaller wooden disc or a large button in the center of the rug to act as a serving tray. Glue the two tiny clay accessories onto it. -
Final Arrangement:
Position your rug, chairs, and side table inside the main wooden tray. Ensure the tea cup is glued to the table and the plant is placed near the back for depth.
Add realistic lighting
install a tiny battery-operated LED wire light behind the plant or under the table to give your miniature room a warm, cozy evening glow.
Now you have a permanent, tiny reminder of your favorite cozy hangout spot to display on a shelf
“Open When” Message Capsules Hidden in Clay Hearts
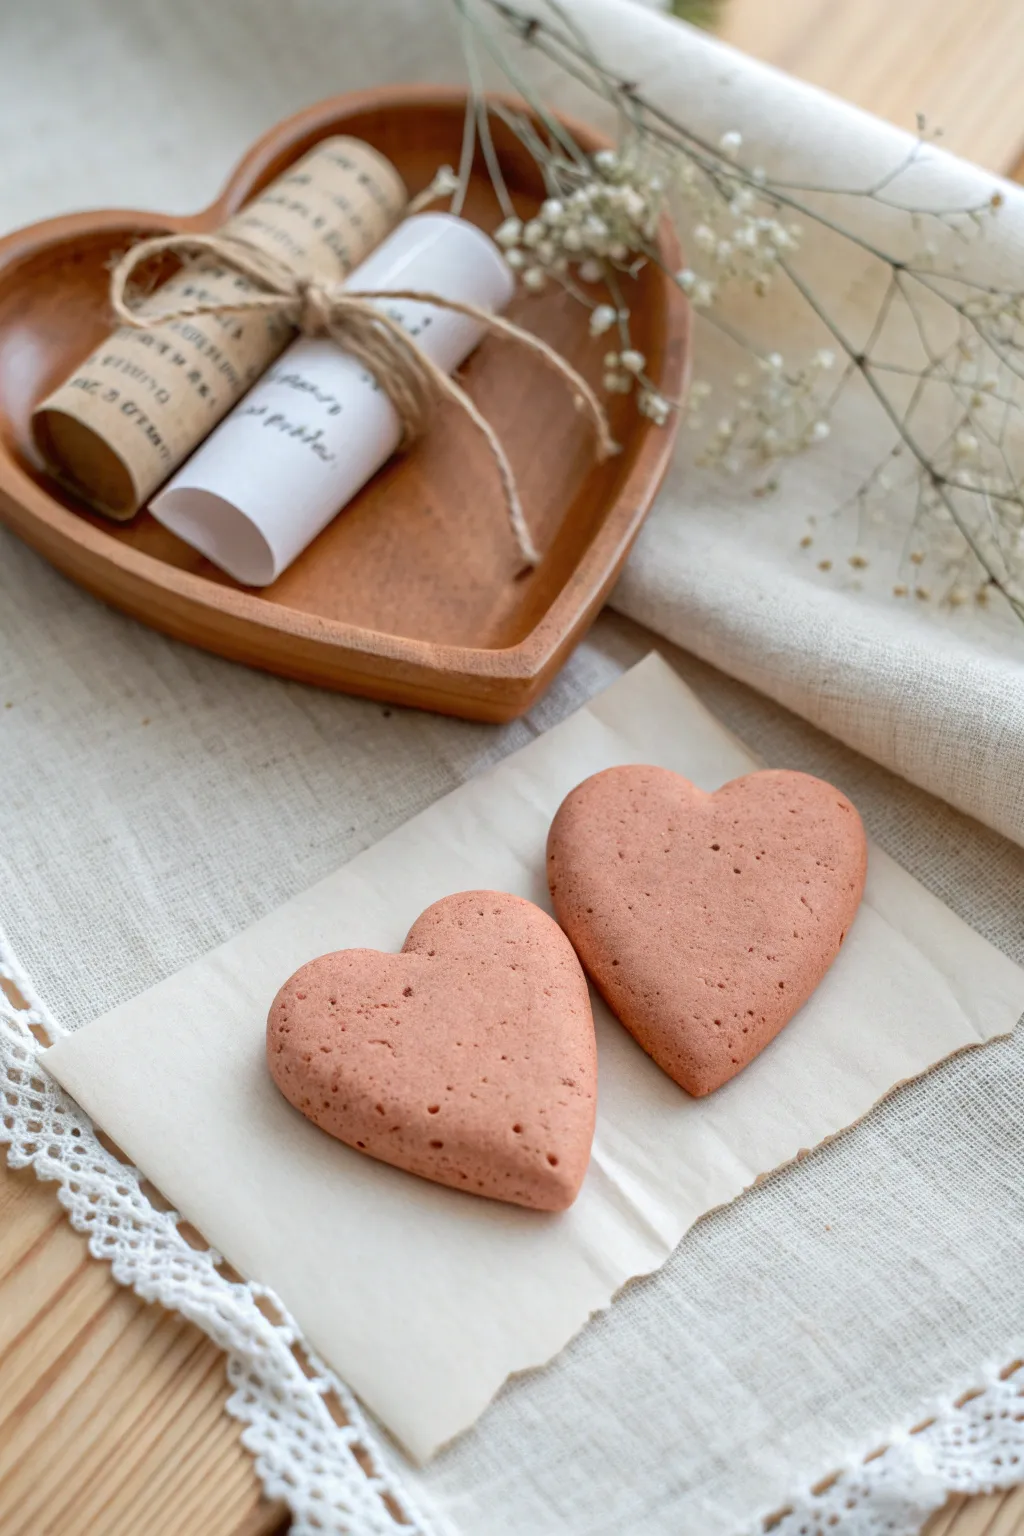
Create a sweet, smashable surprise with these tinted air-dry clay hearts designed to hide secret notes inside. Their soft terracotta-pink hue and simple shape make them a charming, interactive gift for someone special.
Detailed Instructions
Materials
- White air-dry clay (or homemade baking soda clay)
- Red or pink acrylic paint/food coloring
- Rolling pin
- Heart-shaped cookie cutter
- Parchment paper
- Small slips of paper for messages
- Pen
- Water in a small cup
- Smoothing tool or spoon
- Sandpaper (fine grit, optional)
Step 1: Preparing the Clay and Messages
-
Tint the clay:
Start with a ball of white air-dry clay about the size of a tennis ball. create a small well in the center and add a very small drop of red or pink paint. Knead the clay thoroughly until the color is even and reaches a soft, dusty pink shade. -
Write your notes:
Cut your paper into small, thin strips. Write your ‘Open When’ messages or sweet notes on them now, as you’ll need them ready before shaping the clay. -
Fold the messages:
Fold or roll each paper strip tightly so it is small enough to fit completely inside the center of your heart shape without sticking out the sides.
Seamless Smoothness
Keep a small bowl of water nearby. If the clay begins to crack while you are shaping it, a damp finger can smooth out imperfections instantly.
Step 2: Shaping the Hearts
-
Roll out the base:
Roll your pink clay out on a piece of parchment paper to a thickness of about 1/4 inch (approx. 6mm). Try to keep the thickness uniform. -
Cut the shapes:
Using your heart-shaped cookie cutter, cut out two identical hearts for every single capsule you want to make. You need a top and a bottom for each. -
Create a cavity:
Take one of the heart cutouts and use your thumb or a small spoon to gently press an indentation into the center. Don’t go all the way through; just create a shallow nest for the paper. -
Place the message:
Tuck your folded note securely into the indentation you just made. Ensure no paper edges are touching the outer rim where the clay needs to seal.
Step 3: Sealing and Finishing
-
Score the edges:
Use a toothpick or tool to lightly scratch or ‘score’ the outer rim of the bottom heart around the message, and do the same for the matching rim of the top heart. -
Apply slip:
Dab a tiny amount of water (or clay slip) onto the scored areas to act as glue. -
Join the halves:
Gently place the second heart cutout on top of the first, sandwiching the message inside. Align the edges carefully. -
Seal the seam:
Using your finger dipped in a little water, smooth the seam where the two hearts meet. Gently rub back and forth until the line disappears and the heart looks like one solid piece. -
Refine the shape:
The heart might have flattened slightly during sealing. Gently cup your hands around the sides to plump it back up and re-define the heart curve. -
Add texture (optional):
For the slightly porous, natural look seen in the photo, you can gently tap the surface with a stiff bristle brush or a crumpled ball of aluminum foil. -
Begin drying:
Place the finished hearts on a clean sheet of parchment paper in a cool, dry place. I find flipping them over gently every few hours helps them dry evenly. -
Wait patiently:
Let them dry completely for at least 24-48 hours. The clay will lighten in color and become hard to the touch. -
Final touches:
If there are any rough edges after drying, lightly sand them with fine-grit sandpaper for a smooth, professional finish.
Hidden Sparkles
Add a pinch of biodegradable glitter or confetti along with the paper note before sealing, creating a festive burst when broken open.
Present these lovely hearts on a wooden tray or inside a gift box, ready to be cracked open for a sweet discovery