Whenever I’m playing with polymer clay beads, I think of them like tiny little paint chips—your color palette and pattern choices do all the storytelling. Here are my favorite polymer clay bead design ideas (especially for heishi bead bracelets) that you can mix, match, and stack until they feel totally you.
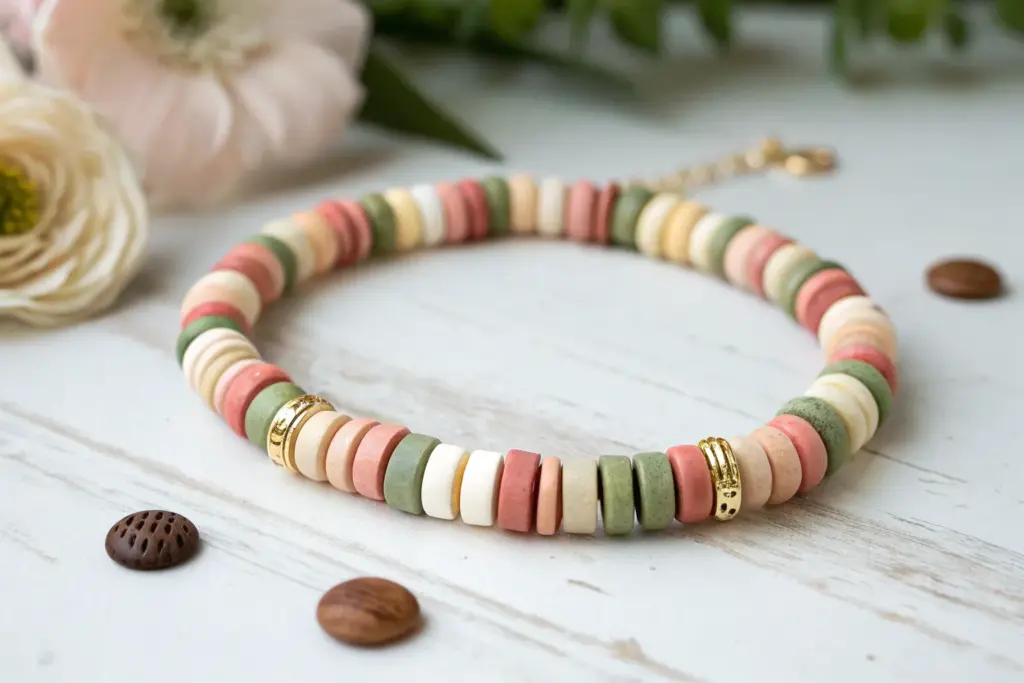
Classic Color-Blocked Heishi Strands
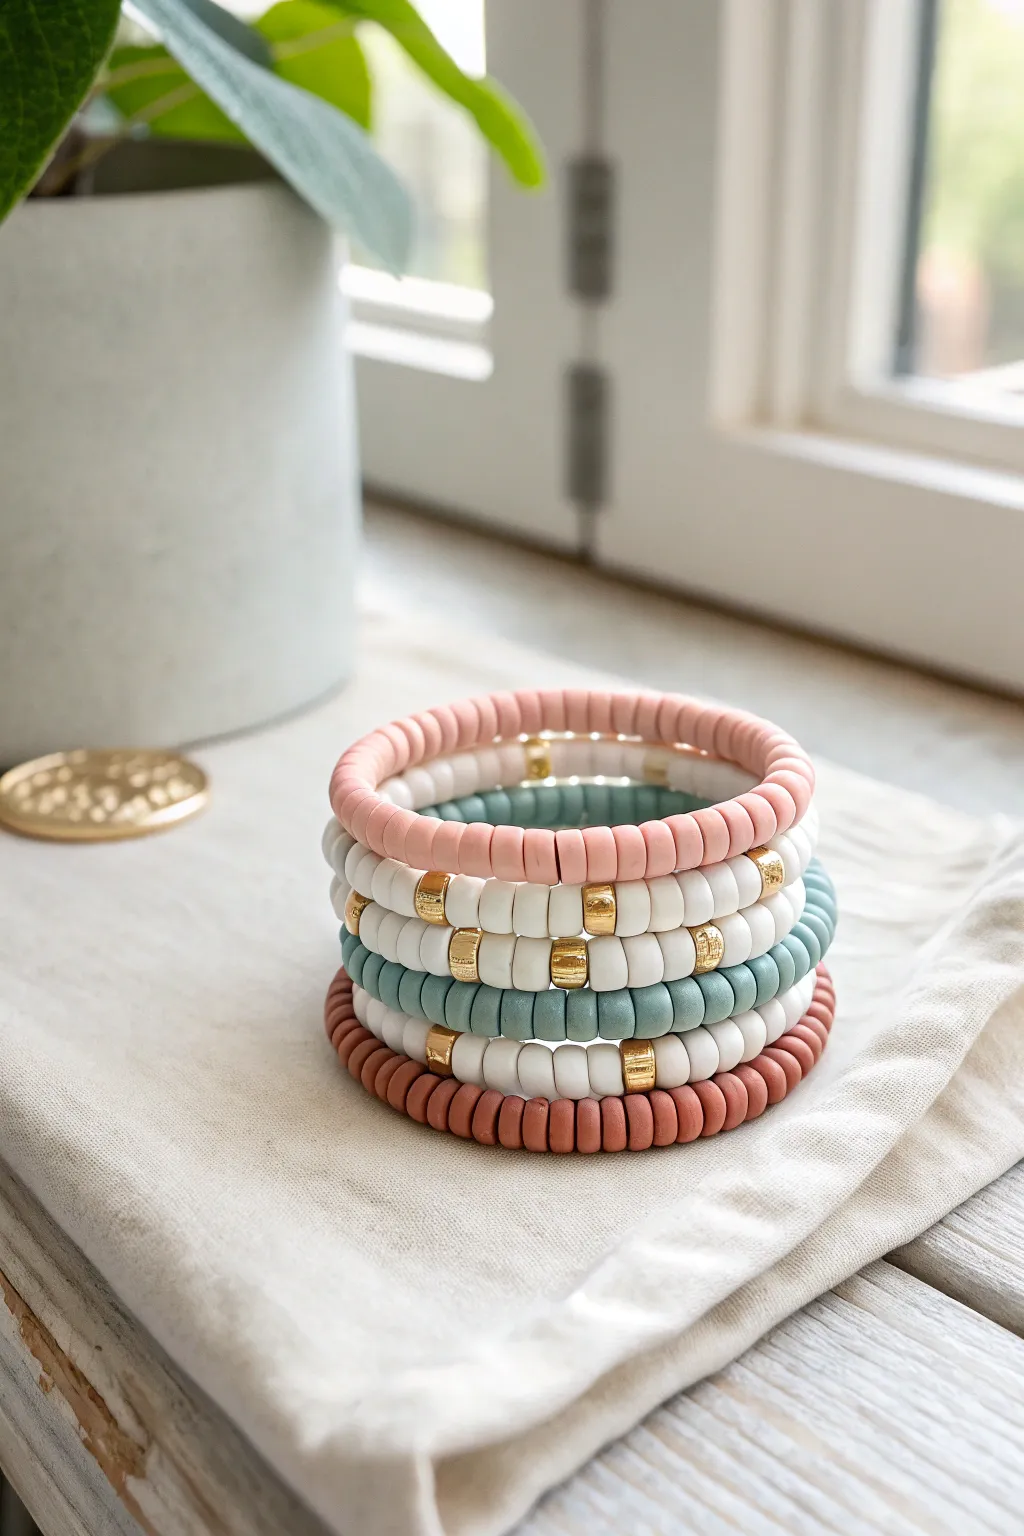
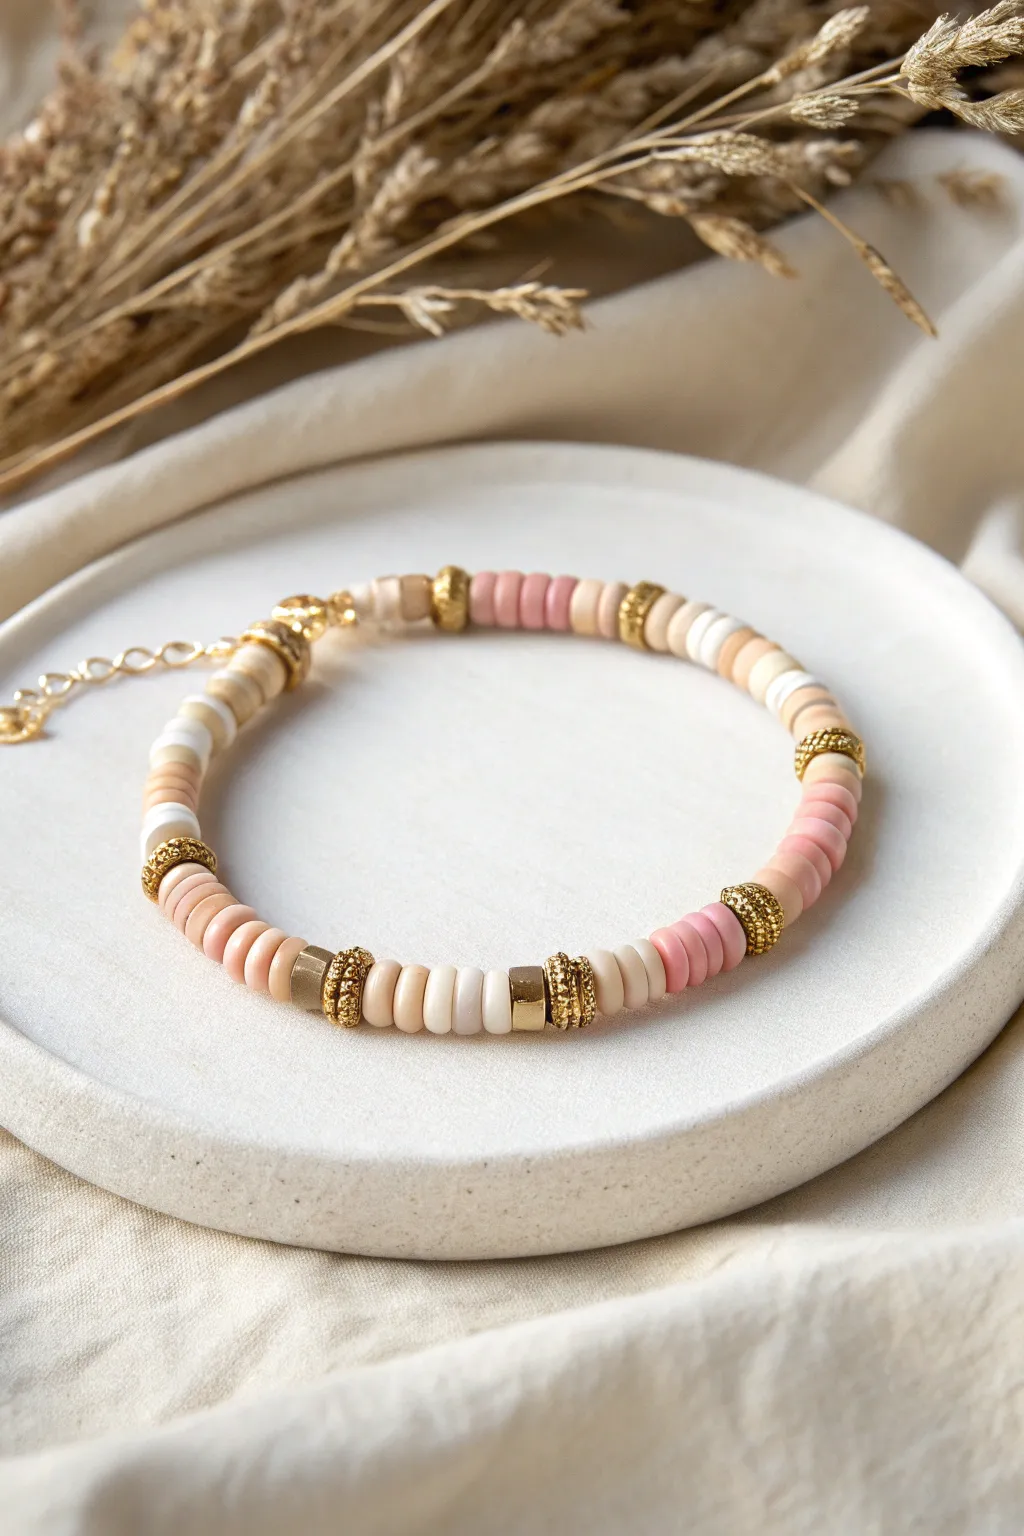
Create a sophisticated stack of stretchy bracelets featuring matte Heishi beads in a serene, nature-inspired palette. This project combines dusty rose, cream, sage, and terracotta hues with gold accents for a timeless, versatile accessory set.
How-To Guide
Materials
- Polymer clay Heishi beads (6mm or 8mm) in: Dusty Rose, Cream/Off-White, Sage Green, and Terracotta/Rust
- Gold plated cylinder or disc spacer beads (matching diameter)
- Strong elastic bead cord (0.8mm or 1mm thickness)
- Bead stopper or masking tape
- Jewelry glue (e.g., G-S Hypo Cement)
- Scissors or flush cutters
- Ruler or tape measure
Step 1: Preparation & Planning
-
Measure your wrist:
Before cutting any cord, measure your wrist circumference with a flexible tape measure. Add about 0.5 inches to this measurement for a comfortable fit that isn’t too tight. -
Cut the elastic:
Cut five lengths of elastic cord, making each one about 10-12 inches long. This generous length gives you plenty of room to tie secure knots later without struggling. -
Pre-stretch the cord:
Hold a piece of cut elastic between your hands and give it several firm tugs. Pre-stretching prevents the bracelets from stretching out and becoming loose after wearing them for a few days. -
Secure the ends:
Place a bead stopper or a piece of folded masking tape on one end of each cord to stop beads from sliding off while you design.
Smooth Seams
Make sure your knot is hidden inside a Heishi bead, not a gold spacer. Spacers often have larger holes but sharper edges that can fray the knot over time.
Step 2: Design & Assembly
-
The Solid Pink Strand:
Start with the top bracelet shown in the stack. Thread on dusty rose Heishi beads until you reach your desired length. This strand is solid color, acting as a soft anchor for the set. -
The Cream & Gold Strand:
For the second bracelet, use primarily cream or off-white beads. Introduce a gold cylinder spacer bead approximately every 10-12 clay beads to create a rhythmic, segmented look. -
The Cream Pattern Variation:
Create the third bracelet (the middle one) similar to the second, using cream beads. However, space the gold accents differently—perhaps every 6-8 beads—or offset them so they don’t line up perfectly with the previous bracelet when stacked. -
The Sage Green Strand:
String the sage green beads for the fourth bracelet. To mirror the top pink strand, keep this one solid without gold spacers, letting the muted green color stand on its own. -
The Mixed Anchor Strand:
For the final bottom bracelet, use the terracotta or rust-colored beads. You can add a single section of cream beads flanked by two gold spacers in the center as a focal point, or keep it solid depending on your preference. -
Check the sizing:
Wrap each unfinished strand around your wrist to verify the fit. The beads should touch comfortably without gaps, but shouldn’t dig into your skin.
Step 3: Finishing Touches
-
Tie the first knot:
Remove the bead stopper. Bring the two ends of the elastic together and tie a basic overhand knot, pulling it tight so the beads sit flush against each other. -
Secure with a surgeon’s knot:
Tie a second knot, but loop the elastic through twice before pulling tight (this is a surgeon’s knot). I find this extra loop prevents the slippery elastic from undoing itself. -
Apply adhesive:
Place a tiny drop of jewelry glue directly onto the knot. Be careful not to get glue on the visible sides of the beads, as it can discolor the clay. -
Hide the knot:
While the glue is still slightly tacky but not wet, gently pull the elastic so the knot slides inside the hole of the nearest bead. -
Final trim:
Once the glue is fully dried (check your glue’s instructions, usually 10-15 minutes), trim the excess elastic tails as close to the bead hole as possible using flush cutters. -
Repeat for the set:
Repeat the tying and gluing process for all five bracelets to complete your coordinated stack.
Mix Your Metals
Try swapping the gold spacers for matte black or brushed silver beads to give this earthy palette a more industrial or modern cool-toned vibe.
Now you have a chic, custom-sized stack of bracelets ready to wear or gift


Rainbow Order With Clean Breaks
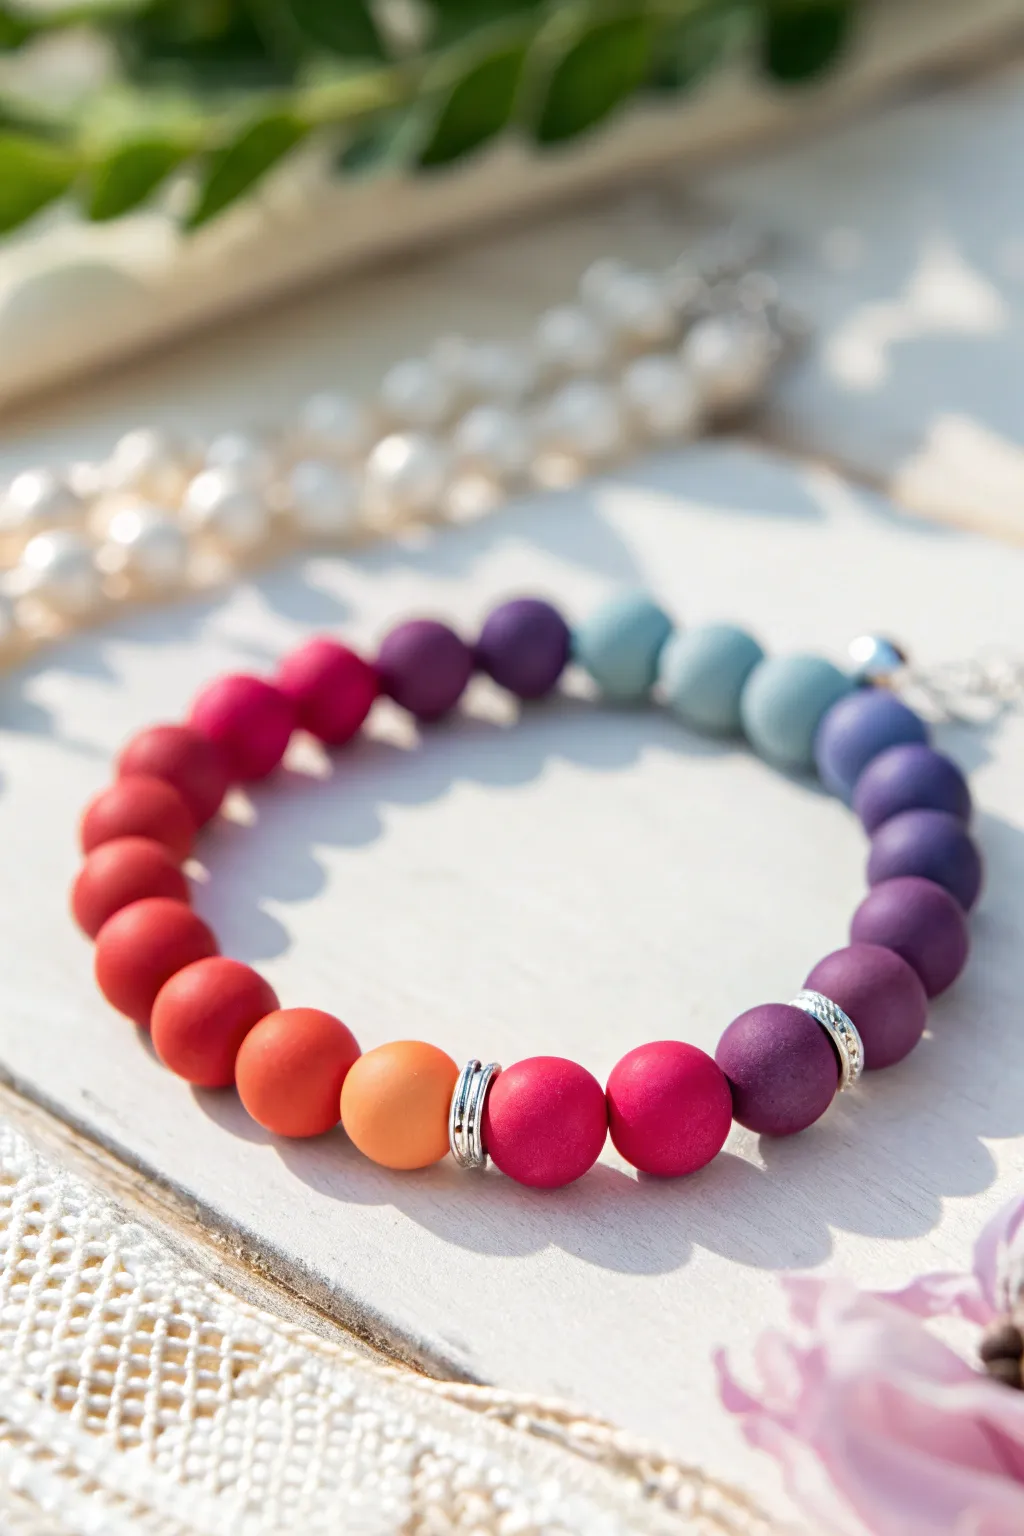
Achieve a sophisticated, modern look with this hand-rolled polymer clay bracelet featuring a smooth matte finish. The design relies on a satisfying color gradient that is punctuated by sleek silver accents for a clean, professional break.
Detailed Instructions
Materials
- Polymer clay (red, orange, magenta, purple, teal blue, lilac)
- Acrylic bead roller (optional but recommended for uniformity)
- Thick beading needle or toothpick
- Baking sheet and parchment paper
- Fine grit wet/dry sandpaper (400, 600, and 800 grit)
- Elastic beading cord (0.8mm or 1mm)
- Silver spacer rings or heishi beads (approx. 4-6 pieces)
- Scissors
- Jewelry glue (GS Hypo Cement recommended)
- Soft denim or cotton cloth
Step 1: Clay Preparation & Bead Forming
-
Condition the Clay:
Begin by conditioning each color of polymer clay separately until it is soft and pliable. Ensure you have clean hands between colors to avoid muddying the brighter shades like orange and teal. -
Portion the Clay:
Roll your clay into logs of equal thickness. Use a tissue blade to slice off equal-sized segments from each color log to ensure your finished beads will be the same size. -
Roll the Spheres:
Take a clay segment and roll it firmly between your palms to create a rough ball. I usually do this until I feel the heat generating, which helps smooth out seams. -
Perfect the Shape:
For perfectly round beads, place the rough sphere into an bead roller tool and slide it back and forth. If rolling by hand, use the flat of your palm on a glass surface with light pressure. -
Pierce the Hole:
Hold a bead gently between two fingers without squishing it. Using a needle tool or toothpick, twist—don’t push—through the center to create the bead hole. -
Repeat for All Colors:
Create approximately 3-4 beads of each color needed for your gradient. The sample shows a transition through reds, oranges, magentas, purples, and blues.
Step 2: Baking & Finishing
-
Bake the Beads:
Arrange your beads on a baking sheet lined with parchment paper. To prevent flat spots, you can place them on a bed of cornstarch or baking soda. -
Oven Time:
Bake according to your specific brand’s package instructions (usually 275°F/130°C for 30-60 minutes). Polymer clay creates a stronger bead when baked longer, so don’t rush this part. -
Cool Down:
Allow the beads to cool completely in the oven with the door cracked, or remove them and let them sit for at least an hour before handling. -
The Matte Finish:
This step is crucial for the milky look in the photo. Wet sand each bead under running water, starting with 400 grit, moving to 600, and finishing with 800 grit to remove fingerprints and shine. -
Buffing:
Vigorously rub the dry beads with a piece of denim or heavy cotton cloth. This doesn’t add gloss but creates that velvety, soft-touch sheen visible in the image.
Pro Tip: No Flat Spots
To ensure your round beads stay perfectly spherical while baking, string them onto a stiff wire and suspend the wire across the rim of an oven-safe dish so they hang freely in the heat.
Step 3: Assembly
-
Design the Layout:
Lay your beads out on a bead board or towel. Arrange them spectrum-style: Red, Orange, Magenta, Purple, Blue, Teal which creates the circular rainbow effect. -
Insert Spacers:
Identify where you want your ‘clean breaks.’ In the photo, silver spacers act as dividers between the warm orange/magenta section and the cool purple/blue section. -
String the Beads:
Cut a length of elastic cord about 10-12 inches long. Give it a gentle pre-stretch to prevent the bracelet from sagging later. -
Thread Pattern:
String your beads following your layout. When adding the silver accents, stack 2 or 3 thin silver rings together for a more substantial metallic look. -
Check fit:
Wrap the strand around your wrist to check the size. Add or remove beads as necessary, ensuring the pattern remains balanced. -
Tie the Knot:
Tie a surgeon’s knot (right over left twice, left over right once). Pull the elastic tight enough that the beads touch firmly but don’t buckle. -
Secure the Knot:
Apply a tiny drop of jewelry glue to the knot. Let it dry for a moment, then trim the excess cord and gently pull the knot inside one of the larger clay bead holes to hide it.
Level Up: Texture Play
Before baking, gently roll selected beads over sandpaper or a piece of coarse fabric. This adds a stone-like texture that contrasts beautifully with the smoothness of the regular beads.
Wear your new matte gradient bracelet individually or stack it with pearl strands for an elegant texture contrast


Monochrome Minimal With One Accent
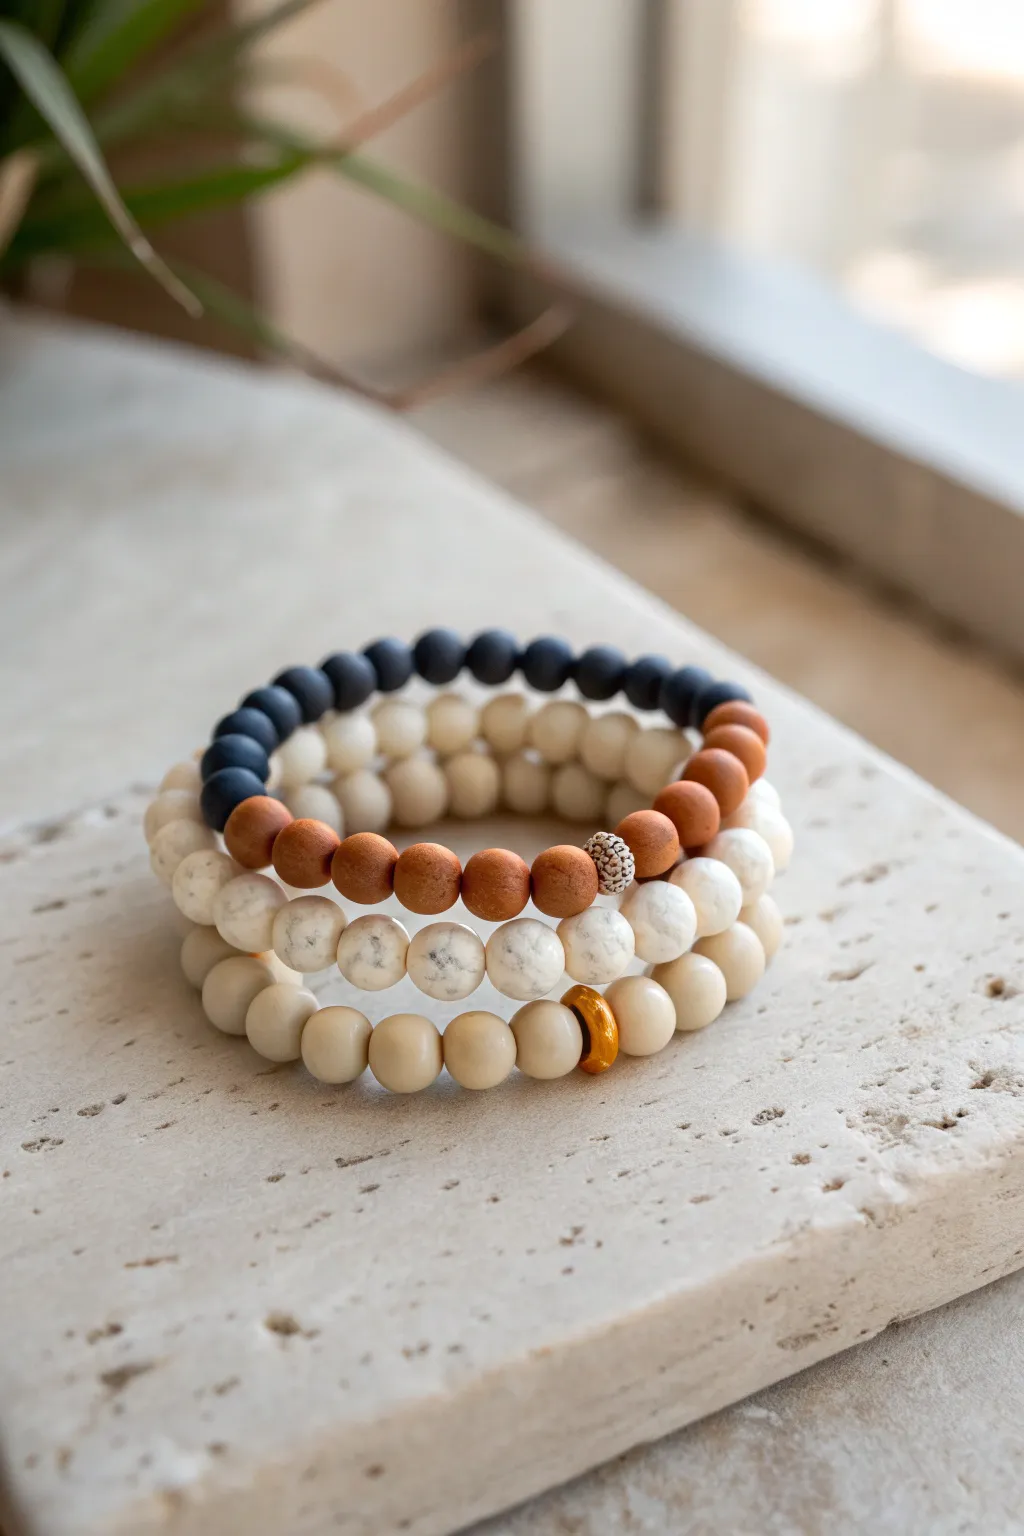
This set of three stretch bracelets combines matte textures with organic neutral tones for a grounded, modern look. The design balances stark monochrome sections with warm terracotta accents and subtle metallic focal points, perfect for everyday wear.
Step-by-Step Guide
Materials
- Polymer clay in black, cream/white, translucent, and terracotta colors
- Bead roller tool (for round beads)
- Needle tool or bead pins
- Elastic cord (0.8mm or 1mm)
- Super glue or jewelry adhesive
- Baking sheet and cardstock
- Oven
- Gold polymer clay or gold paint
- Textured sponge or sandpaper
Step 1: Creating the Clay Colors
-
Condition the clay:
Start by thoroughly conditioning your polymer clay blocks until they are soft and pliable. You will need separate piles for black, a creamy off-white, and a reddish-brown terracotta shade. -
Mix the marble effect:
For the middle bracelet which features white marbled beads, take a large portion of white clay and mix in a tiny pinch of black or grey. Twist and fold the clay just until streaks appear, avoiding over-mixing so the veins remain distinct. -
Prepare the matte finish:
Since these beads have a stone-like matte finish, avoid using glazes. If your clay is naturally shiny, plan to sand them after baking or use a matte-finish clay brand.
Step 2: Forming the Beads
-
Measure equal portions:
To ensure your beads are uniform in size, roll your clay into a snake of consistent thickness and cut equal segments. Alternatively, use a small circle cutter to punch out equal amounts of flat rolled clay. -
Roll the basic rounds:
Roll each segment into a smooth ball between your palms. You will need approximately 20-25 beads per bracelet, depending on wrist size. Create a set in solid black, solid cream, terracotta, and the white marble mix. -
Create the textured accent bead:
For the top bracelet, fashion a small bead from grey or silver clay. Before baking, roll it gently over a rough texture like sandpaper or a stiff sponge to give it a pitted, stippled surface. -
Make the gold focal bead:
For the bottom bracelet’s accent, create a slightly flatter, disc-like bead or a simple round bead. You can use gold mica clay, or paint a plain bead with gold leaf paint after baking. -
Pierce the holes:
Carefully pierce a hole through the center of each bead using a needle tool. I find that twisting the needle while pushing helps prevent the bead from squashing.
Hole Distortion?
If bead holes close up while baking, leave the bead on a piercing pin while it bakes. Suspending the pin on a foil rack keeps beads perfectly round.
Step 3: Baking and Finishing
-
Bake the beads:
Arrange your beads on a baking sheet lined with cardstock or batting to prevent flat spots. Bake according to your polymer clay manufacturer’s instructions, usually around 275°F (130°C) for 30-60 minutes. -
Cool and buff:
Let the beads cool completely. For that soft, matte stone look visible in the photo, buff the beads lightly with a denim cloth or very fine grit sandpaper to remove any fingerprints. -
Paint the gold accent:
If you are painting the focal bead for the bottom bracelet, apply your gold paint now and let it dry thoroughly.
Pro Tip: Cornstarch Haze
To get a truly ultra-matte, powdery finish on your beads, lightly dust the raw clay spheres with cornstarch before baking creating a stone-like texture.
Step 4: Assembly
-
Plan the top bracelet design:
For the multi-colored top bracelet, lay out a pattern on your table. Start with a section of about 10 matte black beads, then transitioning to cream beads, and finish with a small section of 5-6 terracotta beads with the textured silver accent nestled in the center. -
Plan the middle bracelet:
The middle bracelet is composed entirely of the white marbled beads. Arrange them in a line to check for size consistency. -
Plan the bottom bracelet:
The bottom bracelet uses solid cream beads. Place the single gold accent bead at the center point of your strand. -
String the beads:
Cut a piece of elastic cord about 12 inches long for each bracelet. Pre-stretch the cord by pulling on it firmly a few times to prevent it from sagging later. Thread your beads onto the cord according to your layout. -
Tie the knot:
Tie off each bracelet using a surgeon’s knot (right over left, left over right twice). Pull the knot tight. -
Secure the knot:
Place a tiny drop of super glue on the knot. Allow it to dry for a few seconds. -
Hide the knot:
Trim the excess cord and gently tug the elastic so the knot slides inside the hole of the nearest bead, hiding it from view.
Now you have a chic stack of bracelets that perfectly blends texture and tone for a sophisticated accessory


Ombre Fade Using One Color Family
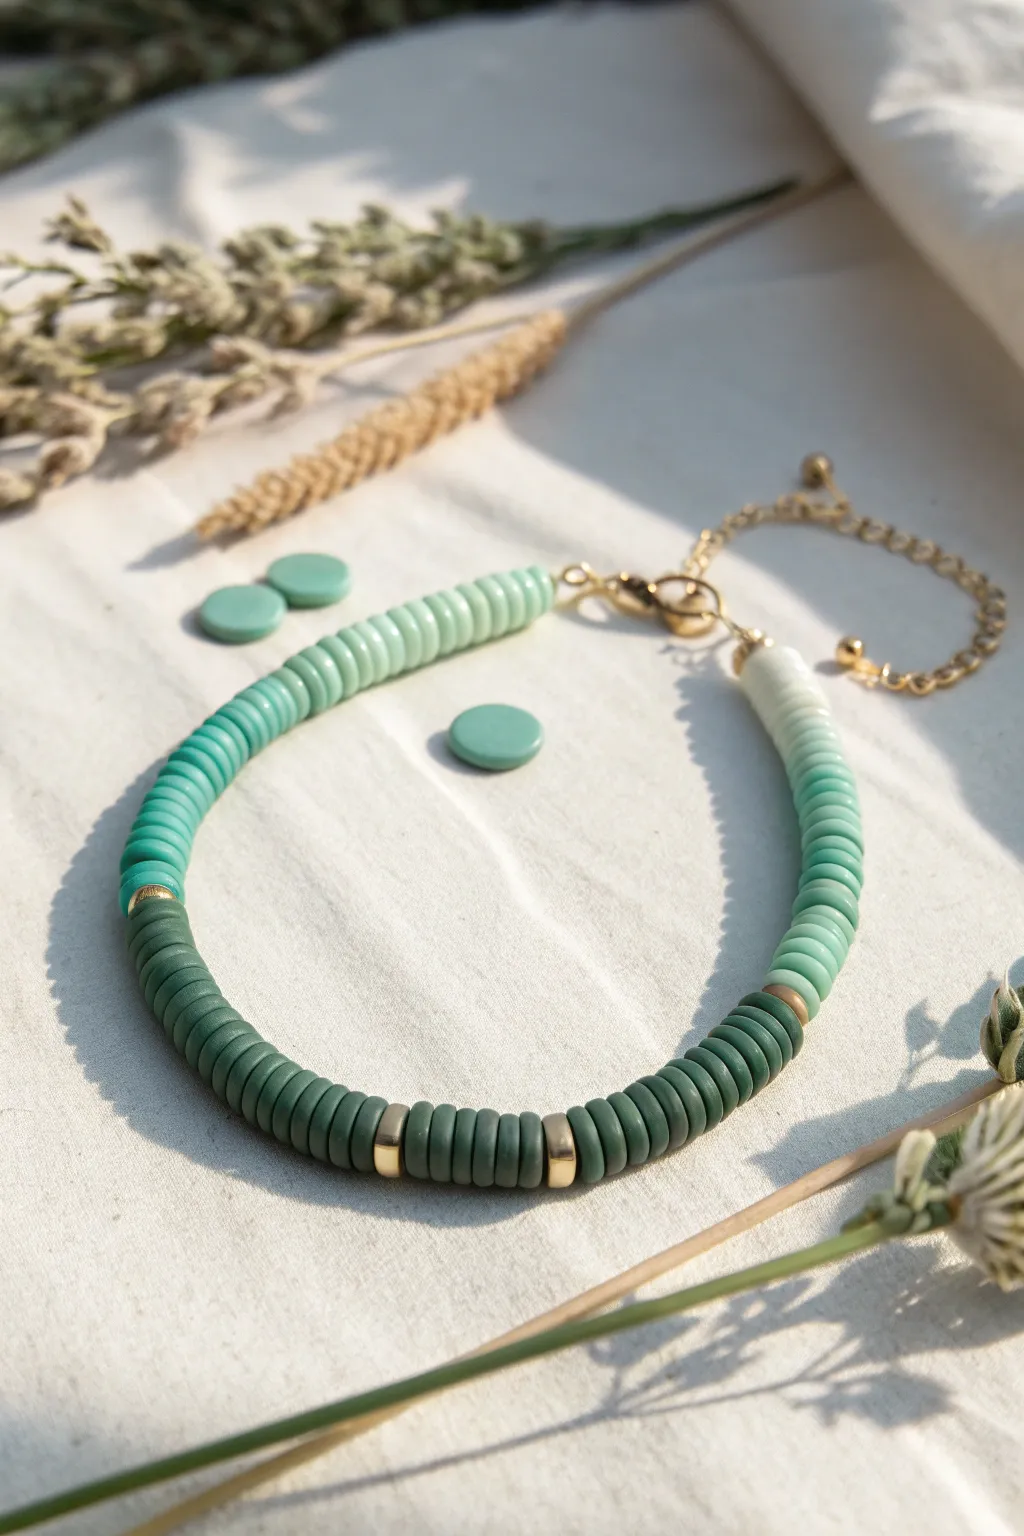
Master the art of color grading with this sophisticated heishi bead bracelet that transitions seamlessly from deep forest green to a soft mint. The gold spacers add a touch of luxury to the matte finish of the clay, creating a piece that feels both organic and modern.
How-To Guide
Materials
- Polymer clay in three shades: deep forest green, medium teal, and pale mint
- Gold-plated spacer beads (cylindrical or flat)
- Beading wire or strong elastic cord
- Gold-plated lobster clasp and jump rings
- Gold-plated extender chain
- Crimp beads
- Clay extruder with a small circle disc (or a rolling pin and small circle cutter)
- Blade or tissue slicer
- Needle tool or bead piercing pins
- Jewelry pliers (flat nose and cutting pliers)
- Oven and baking tray
Step 1: Creating the Clay Heishi Beads
-
Condition the Clay:
Begin by thoroughly kneading your three blocks of polymer clay—deep green, medium teal, and pale mint—until they are soft and pliable. This prevents cracks during baking. -
Form the Ropes:
Using a clay extruder with a small multi-hole disc works best for uniformity, but you can also roll snakes of clay by hand. Create long, even ropes for each of your three colors. -
Slice the Discs:
Lay your clay ropes onto a work surface. Using a sharp tissue blade, slice thin, consistent discs from the ropes. Aim for a thickness of about 1-2mm per bead. -
Pierce the Beads:
Gently pierce the center of each raw clay disc with a needle tool. If you are gentle, you won’t deform the circle shape too much, but don’t worry about perfection; slight irregularities add character. -
Bake the Beads:
Arrange your raw beads on a baking sheet or tile. Bake according to your brand’s package instructions (usually 275°F/135°C for 15-30 minutes). Let them cool completely before handling.
Smooth Edges
If your baked clay discs have rough edges from slicing, sand them gently with fine-grit sandpaper or a tumbled denim scrap before stringing them.
Step 2: Designing the Ombre Pattern
-
Sort Your Palette:
Once cool, separate your beads into three distinct piles. You should have a large quantity of the darkest green, a medium amount of the teal, and a smaller amount of the lightest mint. -
Plan the Layout:
To mimic the photo, lay out your design on a bead board. Start with a solid block of the darkest green beads for the center focal section. -
Insert Gold Accents:
Within the dark green section, place two gold spacer beads about an inch apart to break up the color and add shine. -
Create the Transition:
On either side of the dark center, begin transitioning colors. Place a small gold spacer, then switch to the medium teal beads for the sides of the bracelet. -
Finish with Light:
For the ends of the strand (near where the clasp will be), switch to your palest mint beads to complete the gradient effect.
Variation Idea
Instead of blocked sections, mix the colors slightly at the transition points (e.g., one dark, one teal, one dark) for a smoother, blended fade.
Step 3: Assembly
-
Prepare the Wire:
Cut a length of beading wire roughly 9 inches long. Clamp one end with a bead stopper or a piece of tape to prevent beads from sliding off. -
String the Beads:
Thread your beads onto the wire following the layout you designed. I find it easiest to pick them up directly with the wire tip to speed up the process. -
Check the Length:
Wrap the strand around your wrist to verify fit. Remember that the clasp and extender chain will add about an inch to the total length. -
Attach the First Crimp:
Thread a crimp bead onto one end, followed by a jump ring attached to the lobster clasp. Loop the wire back through the crimp bead. -
Secure the End:
Use your flat nose pliers to flatten the crimp bead securely. Trim the excess wire tail close to the crimp. -
Finish the Second End:
Repeat the crimping process on the other end, but attach the extender chain instead of the clasp. Make sure to pull the wire tight enough so there are no gaps between beads, but loose enough that the bracelet remains flexible. -
Final Polish:
Give your polymer beads a quick buff with a soft cloth to remove any fingerprints and ensure the gold spacers are shining bright.
Enjoy styling your new bracelet stack or gifting this handmade gem to a friend

The Complete Guide to Pottery Troubleshooting
Uncover the most common ceramic mistakes—from cracking clay to failed glazes—and learn how to fix them fast.
Confetti Mix “Bead Soup” Bracelet
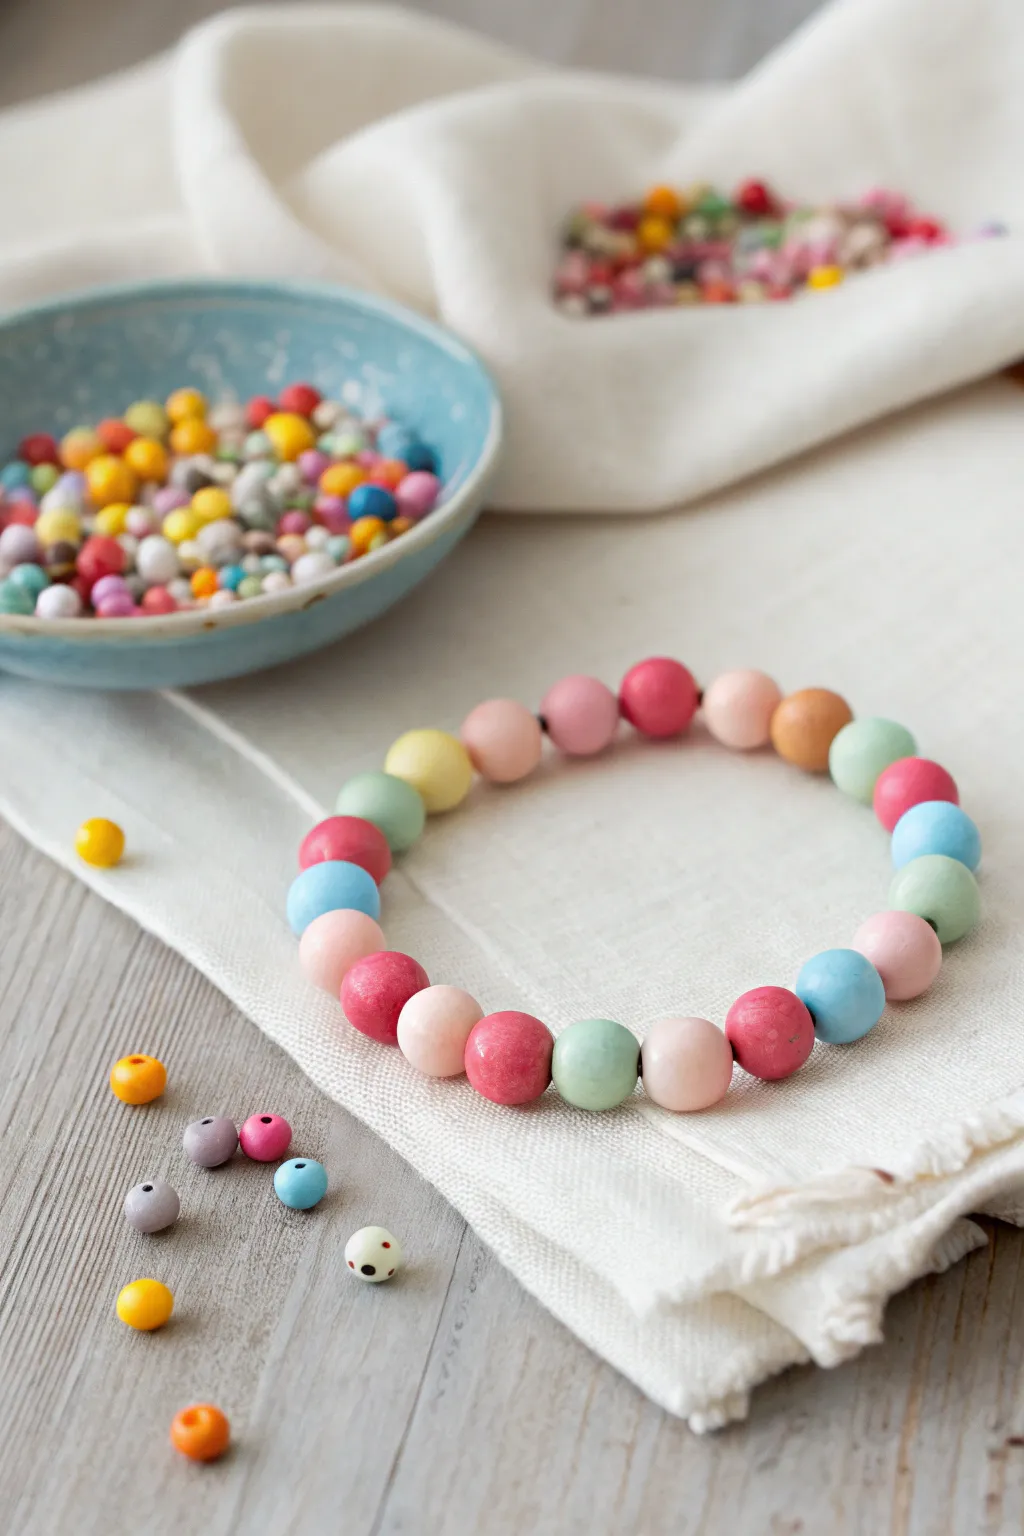
Turn leftover scraps of polymer clay into a charming accessory with this ‘bead soup’ concept. The result is a soft, matte-finish bracelet featuring perfectly round beads in a playful mix of pastel pinks, blues, greens, and yellows.
Step-by-Step Tutorial
Materials
- Polymer clay in assorted pastel colors (light pink, hot pink, baby blue, mint green, pale yellow, cream, peach)
- Bead rolling tool (acrylic block or dedicated bead roller)
- Needle tool or thick toothpick (2mm diameter)
- Baking sheet or ceramic tile
- Cardstock or parchment paper
- Wet/dry sandpaper (400, 600, and 800 grit)
- Elastic cord (0.8mm or 1mm transparent)
- Super glue or jewelry cement
- Soft cotton buffing cloth
- Optional: Bead reamer
Step 1: Creating the Bead ‘Soup’
-
Condition the Clay:
Begin by conditioning each color of polymer clay separately. Knead them warm in your hands until they are soft and pliable, ensuring there are no air bubbles trapped inside. -
Portion Control:
To keep your bracelet uniform, use a small circle cutter or a measuring spoon to portion out equal amounts of clay for each bead. Aim for balls roughly 1/2 inch (12mm) in diameter. -
Initial rolling:
Roll each portion of clay between your palms to create a rough sphere. Don’t worry about perfection just yet; just get the general shape started. -
Perfecting the Sphere:
Place a clay ball on your work surface and use an acrylic block or bead roller to rotate it in circular motions. This creates perfectly round, professional-looking spheres without fingerprints. -
Creating the Holes:
Gently hold a bead without squishing it and pierce the center with your needle tool. Use a twisting motion rather than pushing straight through to avoid distorting the shape. -
Double-Sided Piercing:
Push the needle tool until it just begins to poke through the other side, then withdraw it. Turn the bead around and pierce back through the exit hole to ensure a clean opening on both ends. -
Refining the Shape:
The piercing process might slightly flatten the bead. Give it one final, gentle roll with your acrylic block to restore its perfect roundness before baking.
Fixing Distortion
If your beads are squishing while piercing, pop them in the fridge for 15 minutes before creating holes. Firm clay resists fingerprints and distortion much better.
Step 2: Curing and Finishing
-
Prepare for Baking:
Accordion-fold a strip of cardstock and place your raw beads in the valleys of the folds. This prevents flat spots from forming where the bead touches the baking sheet. -
Bake the Beads:
Bake according to your specific brand of clay’s instructions (usually 275°F/130°C for 30-45 minutes). I always recommend using an oven thermometer to ensure the temperature is accurate. -
Cooling Down:
Allow the beads to cool completely in the oven with the door slightly ajar. Sudden temperature changes can sometimes cause cracking in thicker beads. -
Sanding for Smoothness:
Once cool, submerge the beads in a bowl of water with a drop of dish soap. Wet sand each bead using 400, then 600, and finally 800 grit sandpaper to achieve that buttery soft, matte finish. -
Buffing:
Vigorously rub the dry beads with a soft cotton cloth or denim scrap. This doesn’t add high gloss but deepens the colors and gives them a slight, natural sheen. -
Check the Holes:
Test the holes with your elastic cord. If any became clogged with sanding dust or tightened during baking, gently clear them out with a manual bead reamer.
Speckled Stone Effect
Mix black pepper or embossing powder into your pastel clay before rolling. After sanding, this creates a realistic faux-stone or terrazzo look.
Step 3: Assembly
-
Planning the Pattern:
Lay your finished beads out on a bead board or towel. Shuffle them around to create a pleasing, random ‘parti-colored’ arrangement, ensuring no two identical colors sit directly next to each other. -
Stringing:
Cut a length of elastic cord about 10 inches long. Pre-stretch the cord by pulling it firmly a few times to prevent the bracelet from sagging later. -
Threading:
Thread your chosen pattern onto the elastic. Check the length against your wrist occasionally; for an average wrist, you’ll likely need about 18-20 beads of this size. -
Tying the Knot:
Tie a surgeon’s knot (right over left, left over right twice). Pull the elastic tight enough that the beads touch firmly, but not so tight that they buckle. -
Securing:
Apply a tiny drop of super glue or jewelry cement directly onto the knot. Let it dry for a minute before trimming the excess cord tails. -
Hiding the Knot:
Gently pull the elastic until the glued knot slips inside the hole of the nearest bead, hiding it from view for a seamless finish.
Enjoy wearing your custom color-mixed bracelet stacked with others or as a solo statement piece
Striped Repeat Patterns That Feel Retro
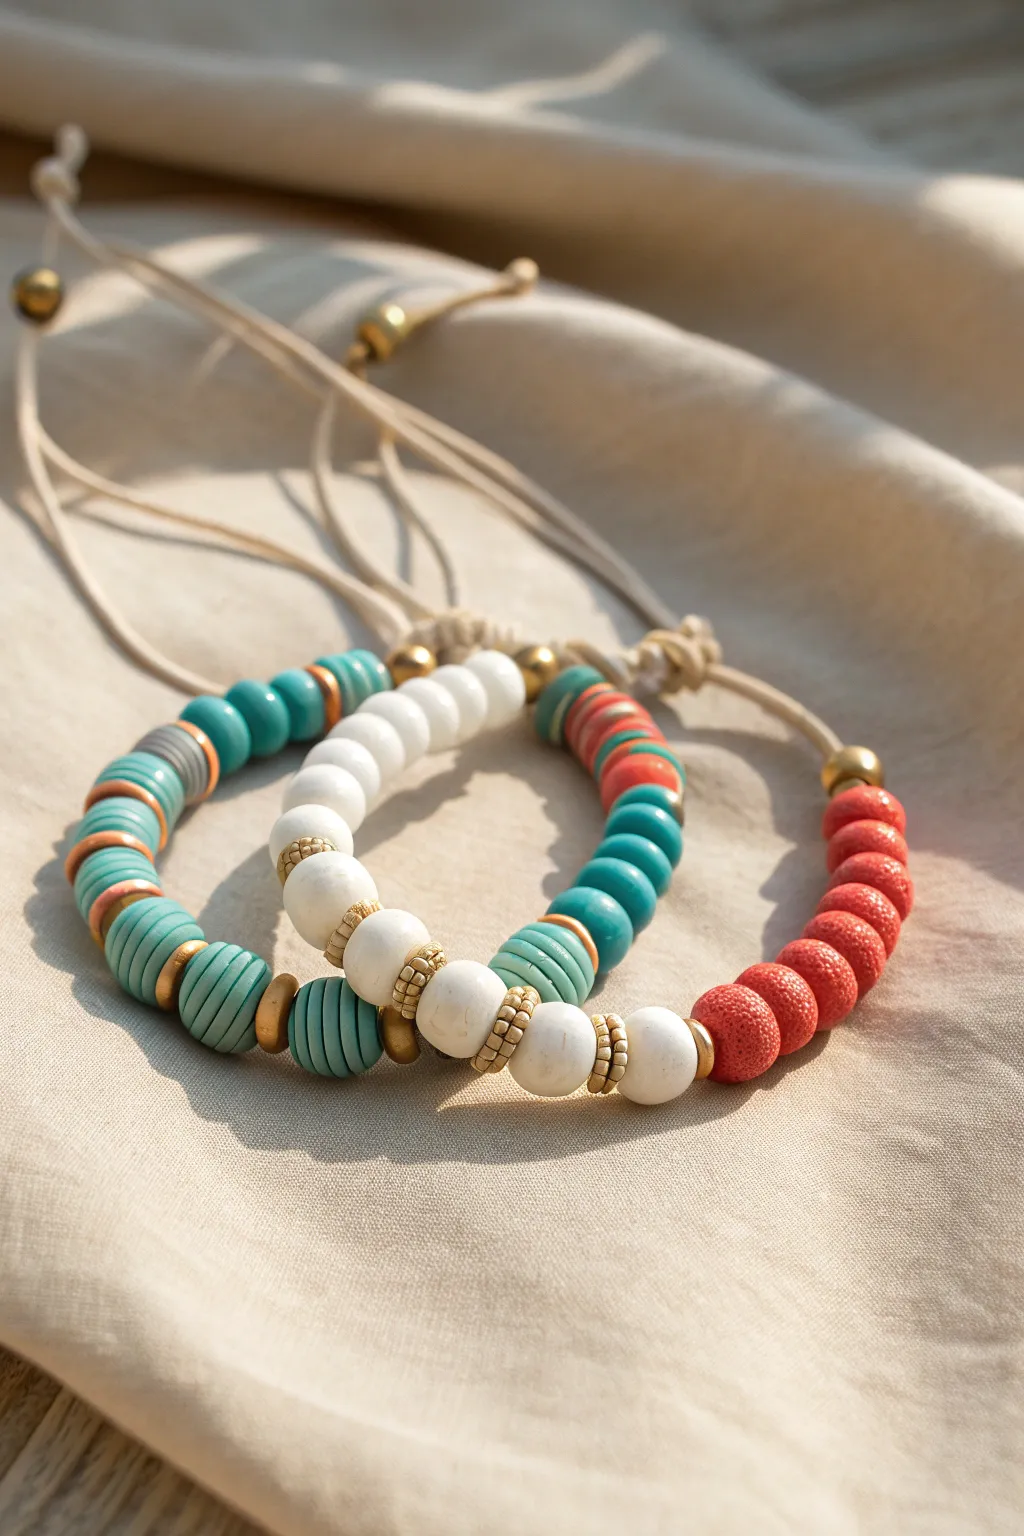
Capture the essence of vintage summer style with these textured polymer clay bead bracelets. Featuring a mix of ridged turquoise discs, smooth white rounds, and vibrant coral accents, this project combines retro vibes with gold spacers for a polished, stackable look.
Step-by-Step
Materials
- Polymer clay (turquoise/teal, white, coral red, soft grey)
- Gold tone heishi spacer beads (metal or brass)
- Gold tone crimp beads or decorative textured spacers
- Waxed cord or 1mm jewelry elastic (beige or tan)
- Bead reamer or toothpick
- Scalpel or craft knife
- Small round clay cutters (approx. 8mm – 10mm)
- Acrylic roller
- Oven for baking
Step 1: Creating the Ribbed Beads
-
Condition the teal clay:
Start by warming up your turquoise or teal clay in your hands until it’s soft and pliable. Roll it into a smooth, even log on your work surface, approximately 10mm in diameter. -
Slice the discs:
Using your craft knife, slice the log into relatively thick discs, about 3-4mm wide. Consistency is good, but slight variations add to the handmade organic charm. -
Refine the shape:
Take each slice and gently roll the edges against your work surface to round them off slightly, removing any sharp angles from the cut. They should look like little wheels. -
Add the texture:
To create the signature ribbed ‘stacked’ look, gently press the blunt back edge of your knife or a needle tool around the circumference of each teal bead three or four times. I like to rotate the bead on a toothpick while doing this to keep lines straight. -
Pierce the holes:
Use a bead reamer or toothpick to poke a hole through the center of each textured disc. Ensure the hole is large enough for your chosen cord.
Step 2: Making Smooth and Accent Beads
-
Create white rounds:
Condition the white clay. Instead of a log, roll small balls of clay in your palms until they are perfectly smooth spheres, approximately 8-10mm in size. -
Form the coral accents:
For the coral/orange beads seen on the second bracelet, follow the same method as the white beads to make rounds, but then gently press them to flatten the poles slightly for a rondelle shape. -
Create the striped accent bead:
Stack thin flattened pancakes of grey, orange, and teal clay together. Compress the stack gently, punch a hole through the center, and refine the edges to make the multi-colored cylindrical bead seen on the front bracelet. -
Bake the clay:
Arrange all your pierced beads on a baking sheet or tile. Bake according to your specific brand of clay’s instructions (usually 275°F/130°C for 15-30 minutes). Let them cool completely before handling.
Texturing Trick
To get perfectly even ribs on the teal beads, roll the clay bead gently over the clear threads of a long screw before baking.
Step 3: Assembly and Finishing
-
Prepare the cord:
Cut a length of tan waxed cord or elastic about 12 inches long. If using waxed cord for an adjustable closure, cut two lengths. -
Start stringing the teal section:
Begin threading your cooled teal ribbed beads. Between every 3 or 4 teal beads, insert a thin gold metal heishi spacer to break up the color. -
Add the focal section:
Transition to the white beads. Use a larger, textured gold spacer bead (like the granulated ones in the image) on either side of the white section to frame it elegantly. -
Incorporate accents:
Slide on your special striped grey/orange bead or the coral beads if making the second variation. This asymmetry gives the bracelet its retro character. -
Check the sizing:
Wrap the strand around your wrist to check the fit. Add or remove beads as necessary to ensure it sits comfortably. -
Secure the ends:
If using elastic, tie a strong surgeon’s knot and hide it inside a bead. If using waxed cord, gather the two ends and tie simple overhand knots at the very tips to prevent fraying. -
Create the sliding knot (optional):
For the adjustable look shown, overlap the cord ends and tie a square knot macramé slider using a separate short piece of cord. This allows you to tighten and loosen the bracelet easily.
Hole Distortion?
If piercing the beads squashes their shape, let the clay rest for an hour to cool down and firm up, or bake them on the piercing pin.
Stack these textured beauties together for an effortless summer look that goes with everything


What Really Happens Inside the Kiln
Learn how time and temperature work together inside the kiln to transform clay into durable ceramic.
Metal Spacer Rhythm for Instant Polish
This elegant bracelet balances soft, earthy pinks and creams with the satisfying weight of gold metal accents. By punctuating polymer clay heishi beads with textured spacers, you create a rhythmic pattern that instantly elevates a simple strand into jewelry-quality design.
How-To Guide
Materials
- Polymer clay heishi beads (6mm or 4mm) in: Dusty Rose, Blush Pink, Cream/White, and Latte/Beige
- Gold tone metal spacer beads (various textures: ribbed, faceted, or rondelle)
- Small gold cube spacer beads (approx 3-4mm)
- Gold crimp beads (2mm)
- Gold crimp covers (3mm)
- Gold jump rings (open, 4-6mm)
- Gold lobster clasp
- Gold extension chain (optional)
- Beading wire (choose a high-quality 7-strand or 19-strand in gold or clear)
- Wire cutters
- Chain nose pliers
- Crimping pliers
Step 1: Planning the Pattern
-
Establish the palette:
Begin by sorting your polymer clay heishi beads into piles by color. You will need a mix of dusty rose, blush pink, cream, and latte/beige to mimic the soft, tonal transition seen in the example. -
Select your metallics:
Gather your metal spacers. The key to this look is variety; select at least two different styles of gold spacers, such as a textured rondelle and a smooth or faceted cube. -
Create a design board:
Layout your beads on a bead board or a piece of felt. This prevents them from rolling away and helps you visualize the ‘rhythm’ of the metal spacers before you commit to stringing.
Spacer Strategy
Use textured spacers (ribbed or dotted) rather than smooth ones. The texture catches the light better and hides fingerprints, giving the piece a higher-end jewelry feel.
Step 2: Stringing the Design
-
Cut the wire:
Cut a piece of beading wire approximately 10-12 inches long. This gives you plenty of extra room to work with the clasp without struggling. -
Secure one end:
Thread a crimp bead onto one end of the wire, followed by a jump ring or the loop of your extension chain. Pass the wire back through the crimp bead. -
Crimp the start:
Use your crimping pliers to flatten the crimp bead securely, ensuring the loop is tight but still has movement. Trim the excess short tail wire. -
Cover the crimp:
Place a gold crimp cover over the flattened crimp bead. Gently squeeze it closed with chain nose pliers until it resembles a round gold bead. -
Start the pattern:
Begin stringing with a small section of mixed neutral heishi beads—alternate between cream, beige, and white for a natural, organic look. A segment of about 5-8 beads works well. -
Insert the first spacer:
Slide on a textured gold rondelle spacer. This first metal accent acts as a visual anchor and breaks up the softness of the clay. -
Build color blocks:
Create a new color block using the blush and dusty rose beads. String about 5-10 of these, occasionally mixing in a single beige bead to tie the sections together. -
Add the focal rhythm:
Now introduce a more complex metal sequence. Try sandwiching a section of 5 pale clay beads between two heavy gold rondelles. -
Incorporate the cubes:
Further along the strand, switch up your metal choice. Use the small gold cube spacers as bookends for a small group of white or cream beads. -
Repeat and vary:
Continue this process until you reach your desired length (usually about 6.5 to 7 inches for an average wrist). Don’t feel pressured to make the pattern perfectly symmetrical; random placement of the gold spacers looks more modern. -
Check the fit:
Wrap the unfinished strand around your wrist to check the size. Remember that the clasp will add about half an inch to the final length involved.
Step 3: Finishing Touches
-
Prepare the closure:
Thread a crimp bead onto the remaining open wire end, followed by the loop of your lobster clasp. -
Close the loop:
Pass the wire back down through the crimp bead and pull it tight, bringing the clasp close to the beads but leaving just a tiny bit of slack so the bracelet isn’t stiff. -
Final crimp:
Use the crimping pliers to secure the crimp bead firmly. I always give it a gentle tug here to ensure it won’t slip. -
Hide wire ends:
Feed the excess tail of the wire back through the first couple of beads on the strand before trimming it flush with your cutters. -
Apply the final cover:
Place the final crimp cover over the crimp bead and gently close it with pliers for a professional, polished finish.
Color Mixing Level-Up
Instead of solid color blocks, try an ombré effect. Start with your darkest pinks near the clasp and fade gradually into creams and whites at the center focal point.
Now you have a chic, everyday bracelet that stacks perfectly with your watch or other gold jewelry
Statement Bead Centerpiece on Heishi Basics
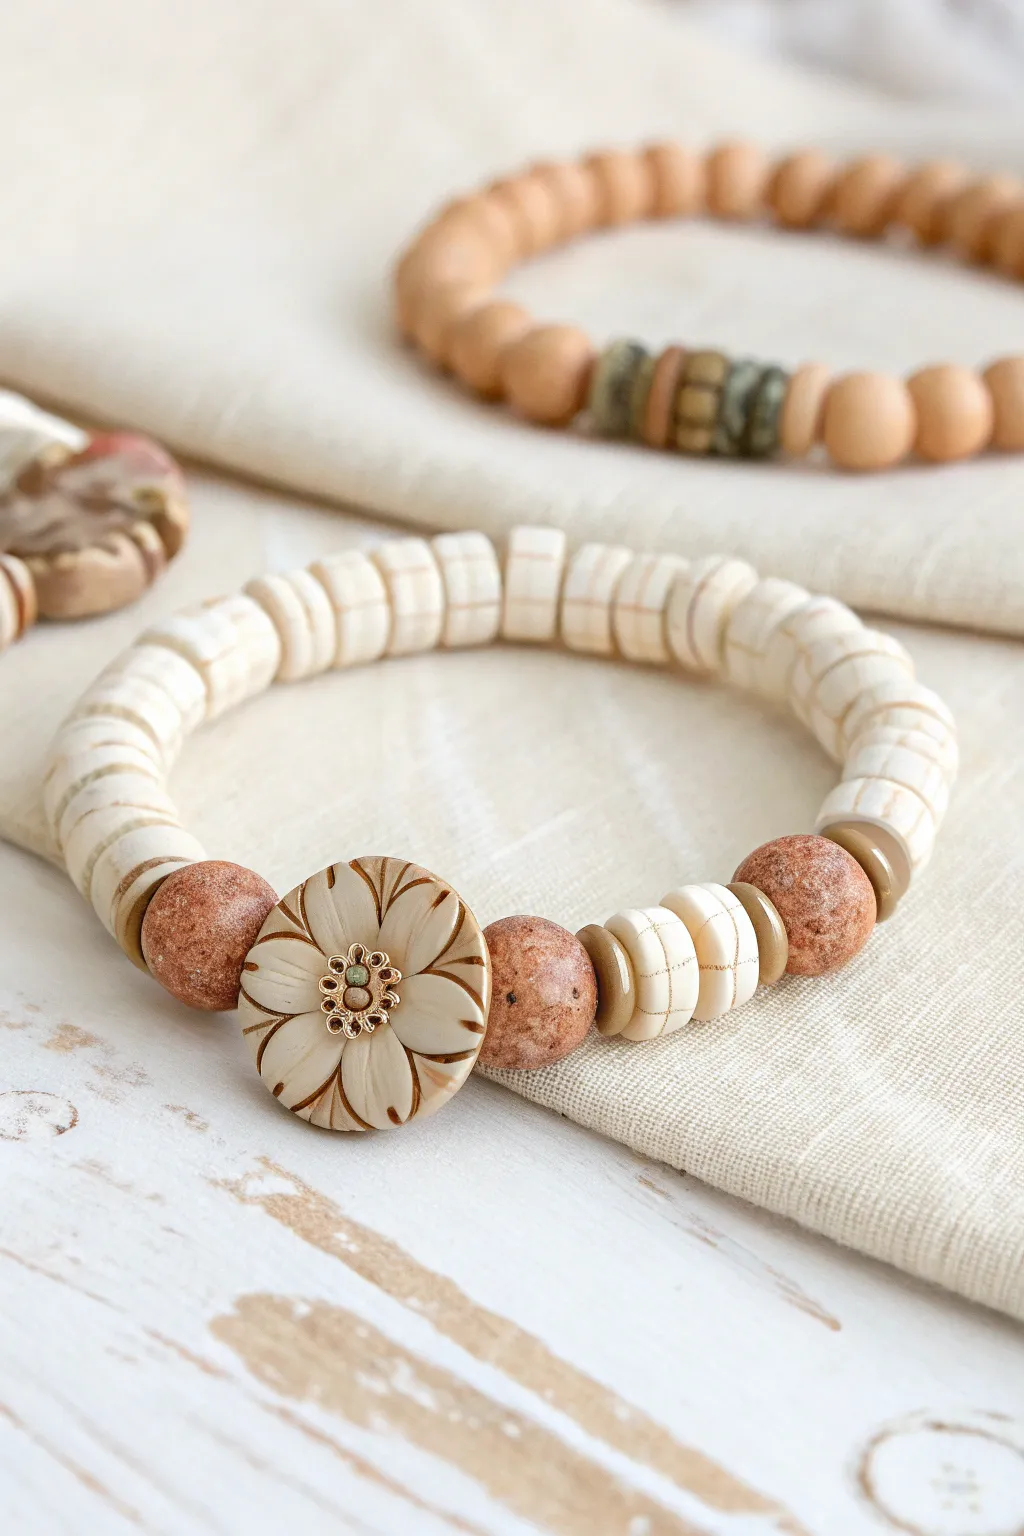
This elegant bracelet design elevates neutral basics by pairing patterned heishi beads with a striking floral focal point. The mix of creamy tones, etched details, and warm terracotta accents creates a sophisticated, earthy aesthetic perfect for wearing solo or stacking.
Step-by-Step
Materials
- Polymer clay (White or Translucent, and Burnt Umber/Terracotta)
- Gold acrylic paint or gold leaf pen
- Gold flower spacer or bead cap (small, for center)
- Small crystal or rhinestone (optional)
- Elastic beading cord (0.8mm or 1mm)
- Tissue blade or clay slicer
- Rolling pin or pasta machine
- Needle tool or toothpick
- Bead reamer tool (optional)
- Super glue or jewelry adhesive
- Fine grit sandpaper
- Acrylic roller
Step 1: Creating the Patterned Heishi Beads
-
Condition the Clay:
Begin by conditioning your white or cream polymer clay until it is soft and pliable. Roll it out into a slab approximately 3-4mm thick using your acrylic roller or pasta machine. -
Create the Grid Pattern:
Use a needle tool or the dull side of a craft knife to gently score a grid pattern into the surface of the clay slab. Ensure the lines are visible but don’t cut all the way through. -
Apply the Paint Wash:
Mix a small amount of gold or light brown acrylic paint with water to create a thin wash. Brush this over the textured clay slab, ensuring the pigment settles into the scored grid lines. -
Wipe and Reveal:
Before the paint dries completely, take a damp paper towel or wet wipe and gently drag it across the surface. This removes the surface paint while leaving the grid lines highlighted, creating that subtle plaid effect. -
Cut the Shape:
Once the paint is dry, use a small circle cutter (approx. 6-8mm) to punch out numerous discs from the slab. Alternatively, roll the slab into a log and slice thin, even discs for a more organic heishi look. -
Pierce the Holes:
Use your needle tool to carefully pierce a hole through the center of each disc. I prefer to twist the tool gently as I push to prevent the clay from distorting.
Step 2: Crafting the Floral Centerpiece
-
Form the Base:
Take a ball of the same cream clay, slightly larger than a coin (approx. 20mm diameter), and flatten it into a thick disc shape. -
Carve the Petals:
Using a carving tool or needle, etch deep curving lines radiating from the center to the edge to define twelve distinct petal shapes. Press deeper near the center and taper out toward the edge. -
Add Antique Detail:
Apply a brown acrylic paint wash into these carved grooves, just as you did with the heishi beads. Wipe away the excess to leave the brown definition in the recesses. -
Drill the Channel:
Carefully pierce the bead horizontally (side-to-side) so it lies flat against the wrist. Do this slowly to ensure the hole is straight. -
Make Accent Beads:
Roll two medium-sized round beads using terracotta or granite-effect polymer clay. You’ll also need smaller spacer beads; you can make these from scrap clay or use ready-made gold spacers. -
Bake the Components:
Arrange all your beads on a tile or parchment paper. Bake according to your brand of polymer clay instructions (usually 275°F/135°C for 15-30 minutes) and let them cool completely.
Hole Distortion?
If your heishi beads squish when piercing them raw, try baking the clay log first for 5 minutes to firm it up before slicing and drilling.
Step 3: Assembly
-
Prepare the Focal:
Glue a small gold flower spacer bead caps to the center front of your floral clay bead. Add a tiny crystal in the middle for a touch of sparkle. -
Start Stringing:
Cut a length of elastic cord about 10 inches long. Slide the large floral bead on first to center it. -
Add Flanking Accents:
On the left side of the flower, thread one terracotta round bead, followed by a spacer, then two heishi beads, a spacer, and another terracotta bead. Repeat this exact sequence on the right side. -
Complete the Strand:
Fill the rest of the bracelet length with your patterned white heishi beads until you reach the desired wrist size. -
Tie the Knot:
Pre-stretch the elastic slightly, then tie a secure surgeon’s knot (right over left, left over right). Add a dab of super glue to the knot before pulling it tight. -
Hide the Ends:
Trim the excess cord and gently tug the knot inside one of the adjacent beads to hide it from view.
Pattern Protection
Apply a very thin layer of matte varnish over the patterned heishi beads after baking to protect the acrylic paint wash from wearing off over time.
Enjoy styling this versatile bracelet that perfectly balances texture and focal interest

TRACK YOUR CERAMIC JOURNEY
Capture glaze tests, firing details, and creative progress—all in one simple printable. Make your projects easier to repeat and improve.
Pearl Mix-Ins for Soft Texture Contrast
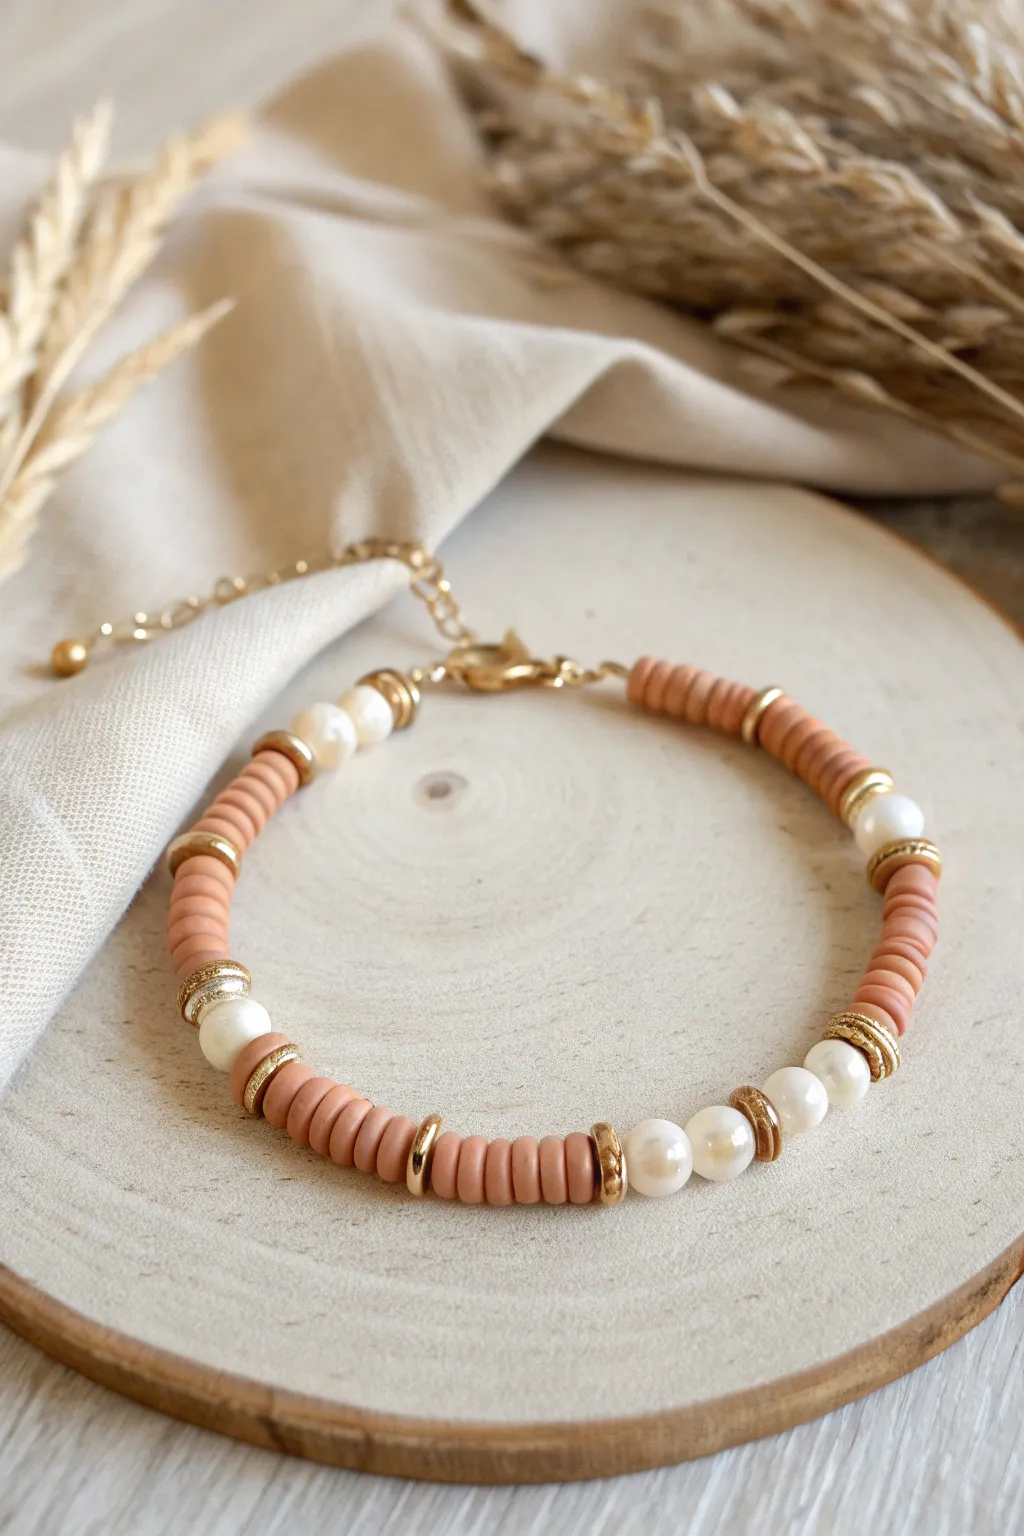
This bracelet perfectly illustrates how mixing materials can elevate a simple design. By combining matte terracotta-colored heishi beads with the lustrous shine of pearls and gold accents, you create a piece that feels both earthy and elegant.
Detailed Instructions
Materials
- Terracotta colored polymer clay heishi beads (approx. 4-6mm)
- Small faux pearl beads (white or cream, approx. 4-6mm)
- Gold tone spacer beads (wheel or rondelle shape)
- Gold tone textured spacer rings (slightly larger highlight beads)
- Beading wire (e.g., 0.38mm or 0.45mm nylon-coated wire)
- 2 Crimp beads
- 2 Crimp covers (gold tone)
- 2 Wire guardians (gold tone, optional but recommended)
- Jump rings (gold tone)
- Lobster clasp (gold tone)
- Extension chain with charm (optional)
- Wire cutters
- Chain nose pliers
- Crimping pliers
Step 1: Planning and Setup
-
Measure the wire:
Cut a piece of beading wire approximately 10 inches long. This gives you plenty of extra room to work with the clasps and keeps beads from sliding off while you work. -
Secure the first end:
Thread a crimp bead onto one end of the wire, followed by a wire guardian. Loop the wire through the guardian and back through the crimp bead. -
Attach the clasp:
If you aren’t using a wire guardian, loop the wire directly through the loop of your lobster clasp and back through the crimp. Squeeze the crimp bead firmly with your crimping pliers to lock it. -
Cover the crimp:
Place a gold crimp cover over the smashed crimp bead. Gently round it closed with your pliers to make it look like a seamless gold bead.
Step 2: Creating the Pattern
-
Start with clay discs:
Begin stringing your beads. Start with a section of the terracotta polymer clay heishi beads. Thread on about 10-12 discs to create a solid block of color. -
Add a gold accent:
Slide on one of the simple gold spacer beads to break up the matte clay texture. -
Insert the pearl block:
Add three small pearl beads. The luster creates a beautiful contrast against the matte clay. -
Cap the pearls:
Finish this focal section with another gold spacer bead. -
The shorter clay section:
Add a slightly shorter section of terracotta heishi beads, perhaps 6-8 discs this time. -
Add a textured highlight:
This time, use one of the larger, textured gold spacer rings followed by a single pearl, and then another textured ring. This creates a focal point. -
Repeat the pattern:
Continue adapting this rhythm—changing the length of the heishi bead sections and alternating between blocks of three pearls and single pearl accents framed by gold. -
Check the length:
Periodically wrap the strand around your wrist. I usually aim for about 6.5 to 7 inches of beaded length for an average wrist, excluding the clasp. -
Finish the symmetry:
Try to end the pattern so it mirrors how you started, finishing with a block of terracotta heishi beads to ensure the bracelet looks balanced when worn.
Pro Tip: Sorting Thickness
Polymer clay heishi beads often vary in thickness. Sort through your strand first and discard any ultra-thin or unevenly sliced wafers to ensure your bead blocks look uniform and high-quality.
Step 3: Finishing Touches
-
Pre-crimp set up:
Thread a crimp bead onto the remaining wire tail. -
Add the end hardware:
Thread on a wire guardian (or loop directly) and attach a closed jump ring or the start of your extension chain. -
Thread back:
Pass the wire tail back through the crimp bead and through the first few beads of your design. Pull everything tight enough so there are no gaps, but loose enough that the bracelet drapes flexibly. -
Secure the end:
Flatten the crimp bead with your crimping pliers. Give the wire a gentle tug to ensure it is secure. -
Cover and trim:
Place the second crimp cover over the crimp bead and close it carefully. Trim the excess wire tail as close to the beads as possible using your flush cutters. -
Attach extension:
If you are using an extension chain for adjustability, attach it now to the jump ring using your chain nose pliers.
Troubleshooting: Stiff Bracelet
If the bracelet feels rigid and doesn’t encircle the wrist smoothly, you strung the beads too tightly. Leave a tiny gap (hair’s width) of wire before crimping to allow the beads to rotate and settle.
Now you have a stunning accessory that balances rustic clay tones with classic pearl elegance, ready to wear or gift
Checkerboard Pattern Using Two Colors
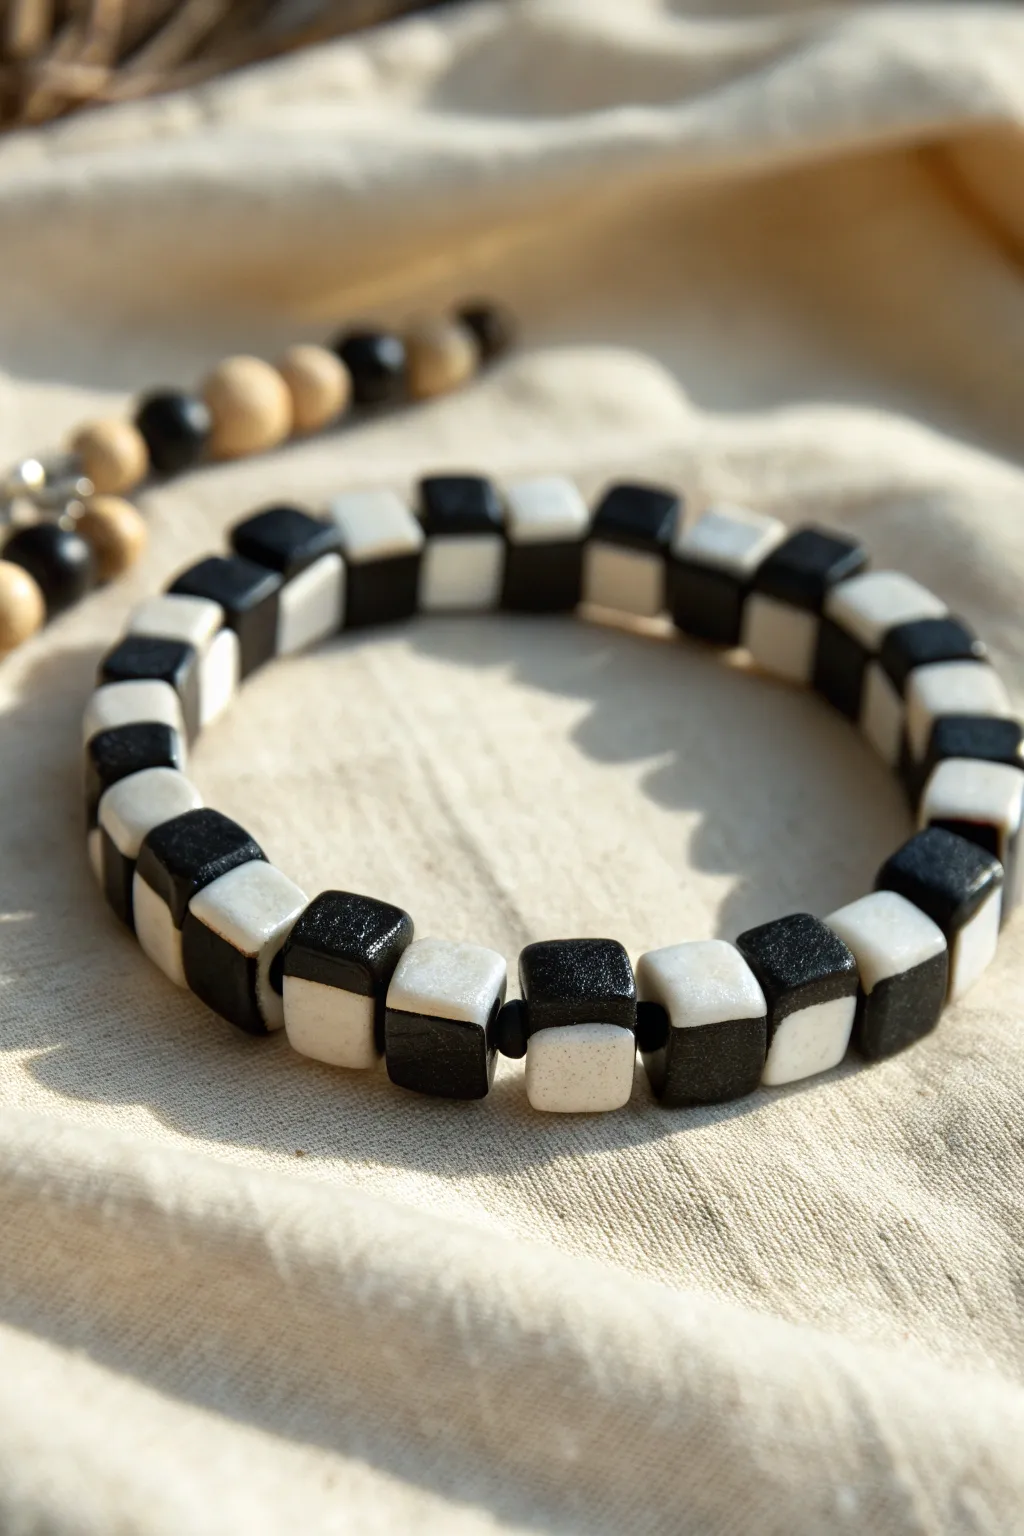
Achieve a bold, modernist look with this stunning black and white checkerboard bracelet. By using the polymer clay cane technique, you will construct uniform cubes that reveal their striking pattern from every angle.
Step-by-Step Guide
Materials
- Black polymer clay (polyclay)
- White or translucent white polymer clay
- Tissue blade or sharp clay slicer
- Pasta machine or acrylic roller
- Beading awl or needle tool
- Elastic beading cord (0.8mm or 1mm)
- Super glue or jewelry glue
- Wet sandpaper (400 to 1000 grit)
- Buffing wheel or denim scrap
Step 1: Prepping and Stacking
-
Condition the Clay:
Start by thoroughly conditioning your black and white clay separately until both are pliable and smooth. Warm clay is much less likely to crack during the building process. -
Create Sheets:
Roll both colors into thick slabs of equal thickness using your pasta machine on the widest setting or an acrylic roller with guide rails. You want substantial slabs about 5-6mm thick. -
Cut Strips:
Using your tissue blade, cut the slabs into long, rectangular logs that are square in cross-section. Aim for 6mm x 6mm dimensions for each strip to ensure the final beads are perfectly cubic. -
Stack the First Layer:
Begin building your cane by placing a black strip next to a white strip. Press them gently together so they adhere without distorting the shape. -
Stack the Second Layer:
Place a white strip on top of the bottom black strip, and a black strip on top of the bottom white strip. You should see a 2×2 checkerboard pattern on the end. -
Compress the Log:
Gently squeeze the combined square log from all four sides to fuse the strips completely. This eliminates air gaps between the colors which can cause separation later.
Smudged Colors?
If black smears onto the white during cutting, wipe your blade with an alcohol wipe between every single slice. Clean tools equal crisp lines.
Step 2: Shaping and Piercing
-
Slice Cubes:
Once your long checkerboard log is consolidated, use your sharpest blade to slice off cube-shaped segments. Try to make the length of the slice equal to the width of the log for a perfect cube. -
Smooth the Edges:
Pick up each bead and gently tap the corners against your work surface or smooth them with your finger to soften the sharp cut edges slightly. This gives the finished bead a more polished, professional feel. -
Chill the Clay:
I find it helpful to pop the beads in the fridge for about 15 minutes before piercing. This firms up the clay so your handling doesn’t squish the delicate checker pattern. -
Pierce the Hole:
Using a needle tool or awl, carefully drill a hole through the center of the bead. Using a twisting motion rather than pushing straight through prevents the exit hole from blowing out. -
Bake:
Arrange the beads on a ceramic tile or baking sheet tailored for polymer clay. Bake according to your clay manufacturer’s instructions, typically around 275°F (130°C) for 30-45 minutes.
Step 3: Finishing the Bracelet
-
Cool and Sand:
Let the beads cool completely. Dip them in water and sand lightly with wet sandpaper to remove any fingerprints or lint, starting with 400 grit and moving to higher grits for smoothness. -
Buff for Sheen:
Rub the beads vigorously with a piece of denim or use a buffing wheel. For the satin matte look in the photo, avoid high-gloss varnish; natural buffing is perfect. -
String the Beads:
Cut a length of elastic cord about 3 inches longer than your wrist size. Pre-stretch the cord slightly to prevent it from sagging later. -
Arrange the Pattern:
Thread the beads onto the cord. Ensure the checkerboard faces align consistently or alternate them for a more chaotic look, depending on your preference. -
Tie the Knot:
Tie a secure surgeon’s knot (right over left, left over right) to close the loop. Pull tight to ensure no gaps show between the beads. -
Secure the Knot:
Add a tiny drop of super glue or jewelry cement to the knot for extra security. Once dry, trim the excess cord carefully and tuck the knot inside a bead hole if possible.
Go 3D
For a complex twist, cut your 4-strip log in half, stack the havles again in opposite colors, and create a 4×4 micro-checkerboard cane.
Wear your striking geometric bracelet with pride or stack it with other monochrome accessories
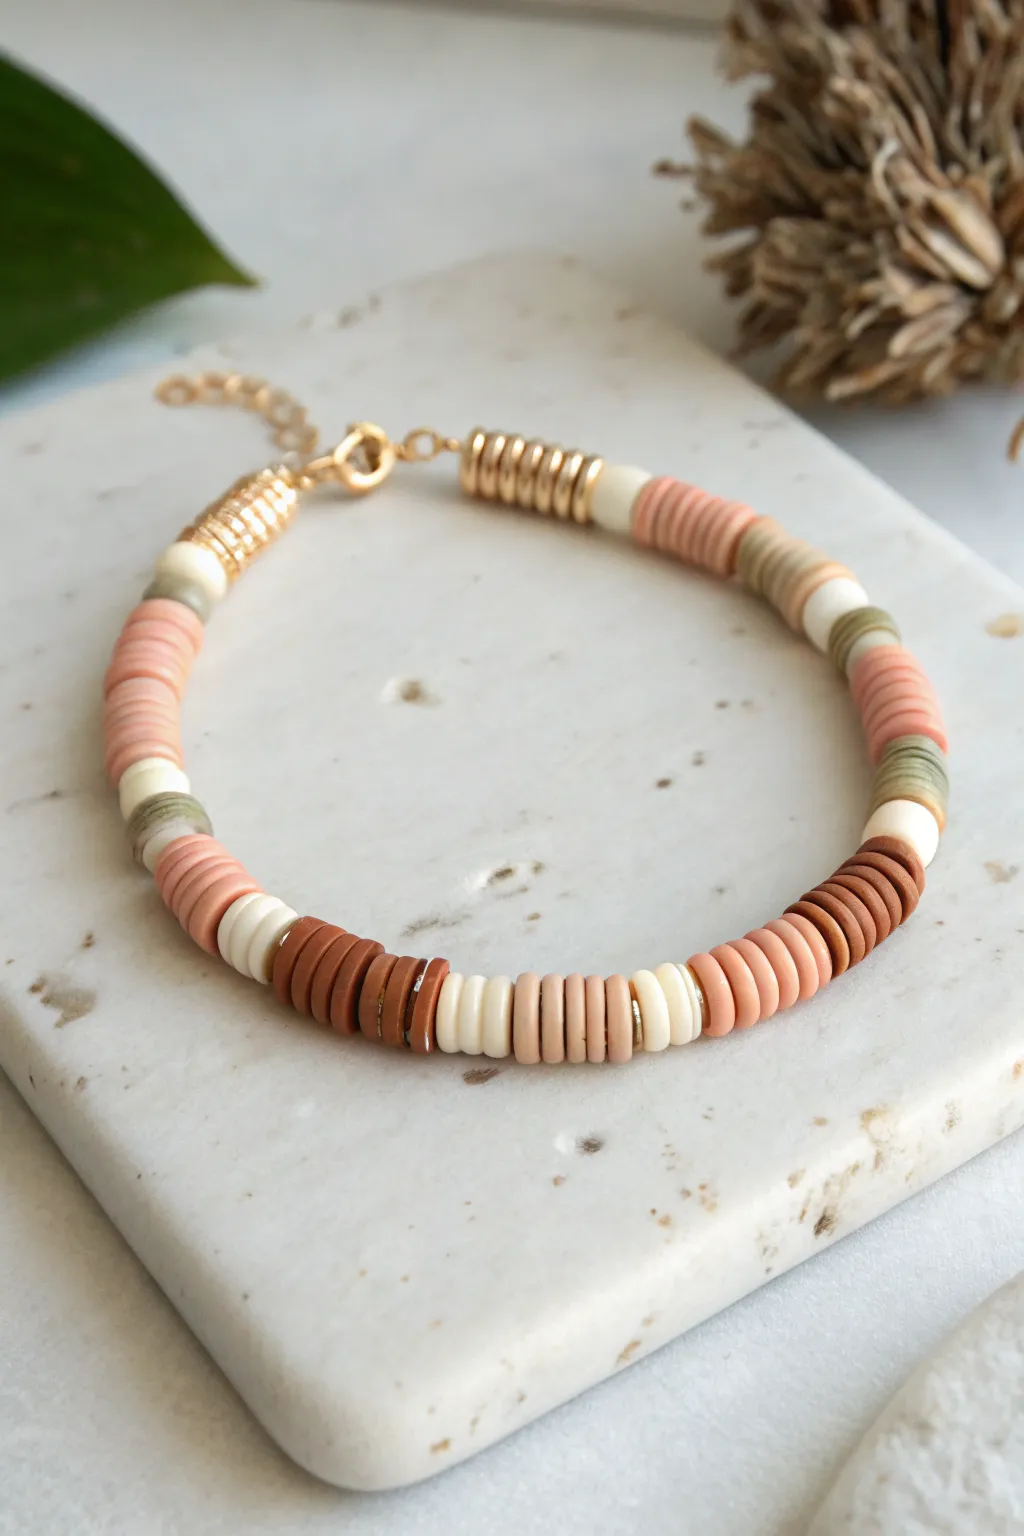
Half-and-Half Split Bracelet Design

This earthy yet vibrant bracelet combines the uniform look of polymer clay heishi discs with the organic feel of speckled round beads. It features a playful, asymmetric pattern separated by elegant gold spacers, making it a perfect everyday accessory.
Step-by-Step Tutorial
Materials
- Terracotta color polymer clay heishi beads (approx. 4-6mm)
- Round polymer clay beads (8-10mm) in teal, peach, speckled pink, speckled cream, beige, and grey
- Gold tone metal spacer beads (disc or ring shape)
- Gold tone ridged/fluted geometric spacer beads
- Elastic stretch cord (0.8mm or 1mm)
- Jewelry glue (e.g., G-S Hypo Cement)
- Scissors
- Tape (optional)
- Bead stopper or clip
- Gold tone crimp bead cover (optional to hide the knot)
Step 1: Planning and Preparation
-
Measure your wrist:
Wrap a flexible measuring tape around your wrist to find your size. Add about 0.5 inches to this measurement so the bracelet fits comfortably without pinching. -
Cut the cord:
Cut a piece of elastic cord about 10-12 inches long. This extra length is crucial for tying a secure knot at the end. -
Secure the end:
Attach a bead stopper or simply use a piece of heavy tape on one end of the cord to prevent your beads from sliding off while you work. -
Layout your design:
Before stringing, lay your beads out on a bead board or a piece of felt. I find this helps visualize the spacing between the heishi sections and the round statement beads.
Step 2: Stringing the Beads
-
Start with heishi beads:
Begin by feeding a stack of about 6-8 terracotta heishi beads onto the cord. These flat discs create the repeating ‘base’ sections of the bracelet. -
Add a gold spacer:
Slide on a thin gold disc spacer or a small gold ring to delineate the transition from the flat beads to the round ones. -
Add a round accent bead:
Thread on a round teal bead. The contrast between the flat terracotta and the round teal adds immediate visual interest. -
Place a fluted spacer:
On either side of your larger focal beads (like the speckled pink or cream ones), try using the thicker, fluted gold spacers for a more premium look. -
Create the focal section:
In the center of your design, group three round beads together—for example, a peach, a speckled pink, and a speckled cream—separating each with those substantial gold fluted spacers. -
Continue the pattern:
Return to a section of terracotta heishi beads (another stack of 8-10) to create a visual break. -
Mirror or mix:
Continue adding sections. You can mirror the design from the center out, or keep it random like the example, alternating between heishi stacks and colorful round beads. -
Check the fit:
Periodically wrap the strand around your wrist. You want the ends to meet comfortably without stretching the cord just yet.
Knot Security Tip
When tightening your knot, pull on the bead strands, not just the cord tails. This snugs the beads up against the knot, removing unsightly gaps.
Step 3: Finishing the Bracelet
-
Pre-stretch the cord:
Once all beads are strung, hold both ends and give the cord a few gentle tugs. This pre-stretching prevents the bracelet from loosening up after you wear it. -
Tie the knot:
Remove the bead stopper and tie a surgeon’s knot (right over left, left over right, and loop through an extra time) to secure the bracelet. -
Secure with glue:
Apply a tiny dot of jewelry glue directly onto the knot. Let it dry for a distinct moment before trimming any excess. -
Hide the knot:
If one of your beads has a large enough hole, gently pull the knot inside it. Alternatively, cover the knot with a gold crimp cover for a professional finish. -
Trim excess cord:
Using sharp scissors, trim the tails of the elastic cord close to the knot (or the bead hiding it), being careful not to nick the main cord.
Level Up: Texture Play
Swap the smooth round beads for lava stone beads. This adds a porous texture and allows the bracelet to double as an essential oil diffuser.
Slip on your new creation and enjoy the customized pop of color on your wrist
Terrazzo-Inspired Speckled Polymer Beads
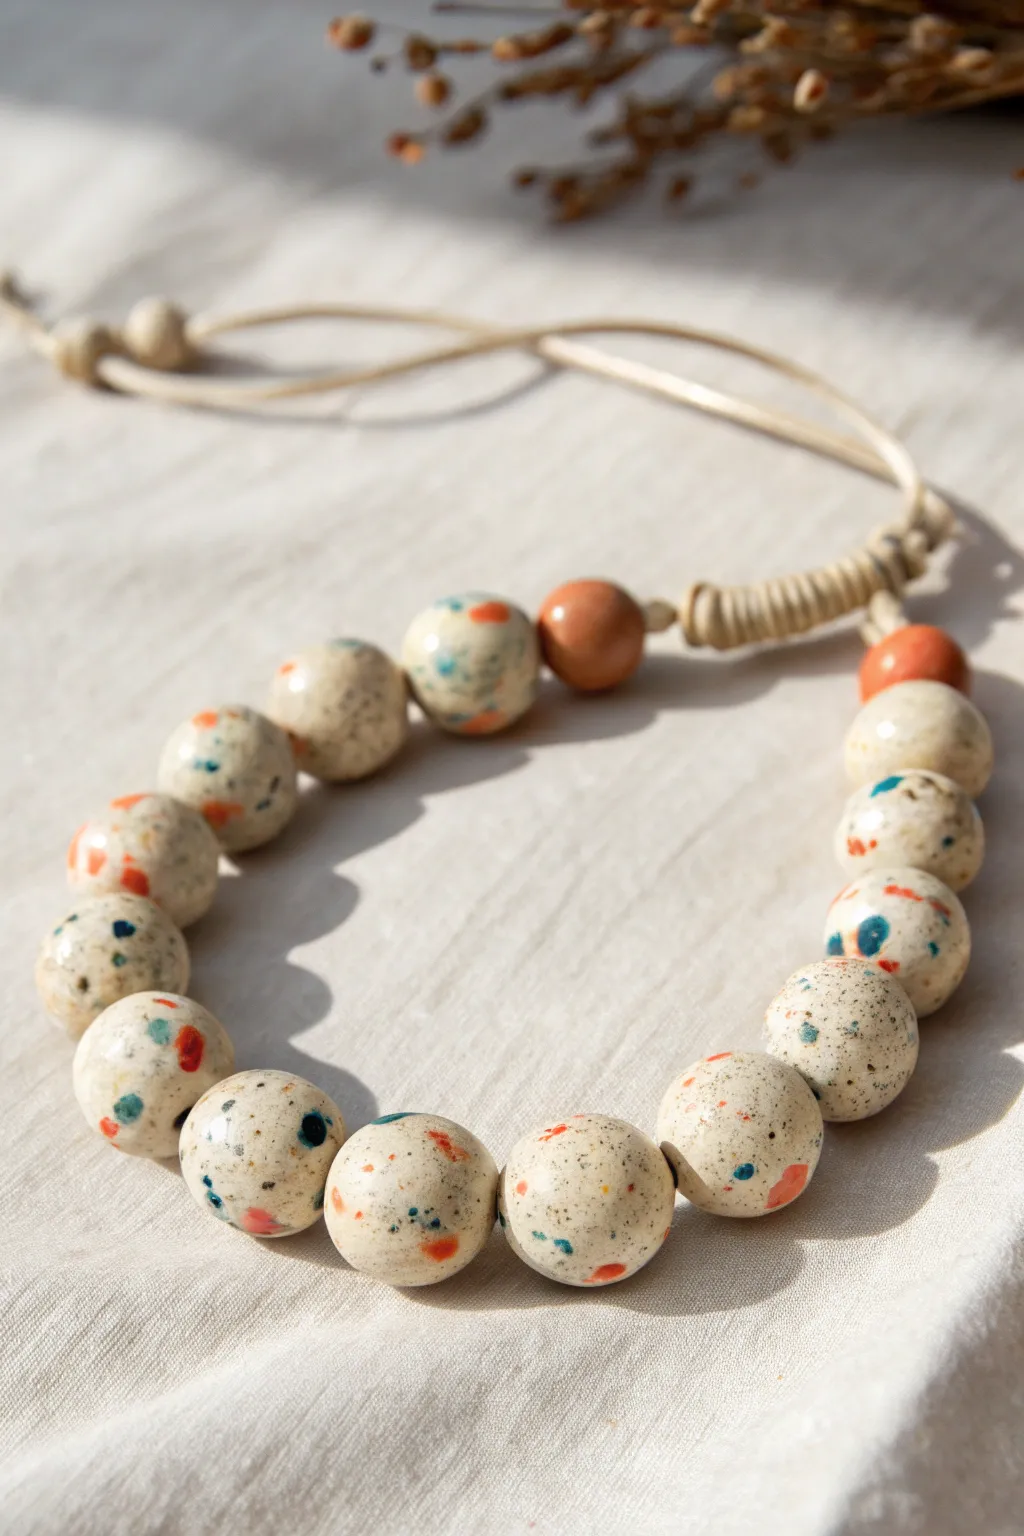
Embrace the playful yet sophisticated look of terrazzo with this chunky statement necklace. By embedding colorful clay fragments into a neutral base, you’ll create unique, artistic beads that look like polished stone.
Detailed Instructions
Materials
- Polymer clay (colors: cream/beige, burnt orange, teal/dark cyan, black)
- Acrylic rolling pin or clay machine
- Tissue blade or craft knife
- Bead piercing pins or toothpicks
- Cornstarch or baby powder (optional)
- Wet/dry sandpaper (400, 600, 800 grits)
- Polyester or waxed cotton cord (1.5mm – 2mm)
- Oven for baking
Step 1: Preparing the Terrazzo Chips
-
Condition the colors:
Start by thoroughly conditioning your burnt orange, teal, and black polymer clay separately until they are soft and pliable. -
Create thin sheets:
Roll each colored clay into a very thin sheet. Aim for the thickness of cardstock (setting 6 or 7 on a pasta machine works well). -
Bake the sheets:
Place these thin sheets on a baking tray and bake according to package instructions for about 10-15 minutes. Baking them first ensures sharp, defined edges for your terrazzo chips rather than smeared lines. -
Chop into fragments:
Once cool, use your tissue blade to chop the baked sheets into tiny, irregular confetti-like pieces. Keep the colors separate or mix them now depending on your preference.
Clean Cuts
When slicing your bead segments, let the clay log rest for 20 minutes first. Cooler clay distorts less when cut, keeping your portions accurate.
Step 2: Forming the Beads
-
Prepare the base:
Condition a large block of the cream or beige clay. This will form the bulk of your beads. -
Incorporate the chips:
Sprinkle your chopped colored fragments over the raw cream clay. Fold the clay over and roll it gently to distribute the chips throughout the block without blending the colors. -
Portion the clay:
Roll the chipped clay into a thick log. Cut equal segments to ensure your beads are consistent in size. For this design, you’ll need about 13-15 large segments. -
Roll into spheres:
Roll each segment between your palms to form smooth, round balls. The chips might poke out slightly; that’s okay for now. -
Make spacer beads:
Using plain, raw burnt orange clay, roll two or three smaller beads to act as accents near the closure. -
Final smoothing:
Give the large beads a final roll to ensure they are as spherical as possible. If the clay feels sticky, I sometimes dust my hands with a little cornstarch here. -
Pierce the holes:
Use a bead pin to pierce a hole through the center of each bead. Twist the pin gently as you push through to avoid distorting the shape.
Step 3: Baking and Finishing
-
Bake the beads:
Inspect beads for fingerprints, then bake them on a tile or baking sheet according to your clay manufacturer’s full instructions (usually 275°F/130°C for 30-45 minutes). -
Sand for the reveal:
Once completely cool, wet sand the beads under running water. Start with 400 grit to remove the top layer of cream clay, revealing the sharp, colorful terrazzo chips underneath. -
Refine the surface:
Progress to 600 and then 800 grit wet sandpaper to buff out scratches and create a silky, matte stone-like finish. -
Wash and dry:
Wash the beads with a drop of dish soap to remove sanding residue and dry them thoroughly with a lint-free cloth.
Stone Effects
Add a small amount of translucent clay to your cream base mixture. After baking, this adds depth that mimics the look of real polished granite.
Step 4: Assembly
-
String the beads:
Cut a long length of cord (approx. 30 inches). Thread your beads, placing the smallest spacer beads at the ends of the sequence. -
Knot spacers:
Tie a simple overhand knot immediately after the last bead on each side to keep the beads centered and secure. -
Create sliding closure:
Create a macramé square knot or a simple sliding knot mechanism using the cord ends, wrapping one end around the other multiple times before pulling tight. -
Finish ends:
Tie small knots at the very tips of the cord and trim any excess material.
Enjoy the satisfying weight and smooth texture of your new handmade jewelry piece
Marbled Swirl Beads as Accent Sections
Embrace warm, neutral tones with this stunning Heishi-style beaded bracelet project. The combination of soft terracotta, cream, olive, and cocoa brown creates a versatile accessory perfect for everyday wear.
Step-by-Step Guide
Materials
- Polymer clay in Terracotta, White/Cream, Olive Green, and Chocolate Brown
- Gold tone crimp beads and covers
- Gold tone jump rings and lobster clasp
- Gold tone chain extender
- Flexible beading wire (0.38mm or similar)
- Gold heishi spacer beads or gold wire for coiling
- Clay roller or pasta machine
- Small round clay cutters (approx. 4-6mm)
- Needle tool or bead piercing pins
- Jewelry pliers (round nose and flat nose)
- Wire cutters
- Oven for baking clay
Step 1: Creating the Clay Discs
-
Condition the Clay:
Begin by conditioning each color of polymer clay separately until it is soft and pliable. Warm the clay in your hands to prevent cracking later. -
Roll Flat Sheets:
Roll each color into a thin, even sheet using a clay roller or pasta machine. Aim for a thickness of about 1mm to 1.5mm to achieve that classic heishi look. -
Cut the Discs:
Use your small round cutter to punch out numerous circles from each color sheet. You will need roughly 40-50 discs total, depending on wrist size, but make extras just in case. -
Pierce the Centers:
Gently poke a hole through the exact center of each clay circle using a needle tool. I find it easiest to do this while the clay is still flat on the work surface to avoid distortion. -
Bake the Beads:
Arrangement the discs on a baking tile or parchment-lined tray. Bake according to your brand’s package instructions (usually 275°F/135°C for 15-30 minutes) and let them cool completely.
Smooth Edges Tip
To get perfectly smooth edges on your discs, dip your cutter in cornstarch before punching the clay, or gently sand the edges after baking with a fine-grit block.
Step 2: Assembling the Bracelet
-
Prepare the Wire:
Cut a length of beading wire approximately 9 inches long. This gives you plenty of room to work with the clasps. -
Start the Clasp:
Thread a crimp bead onto one end of the wire, followed by a jump ring attached to the clasp. Loop the wire back through the crimp bead. -
Secure the End:
Use flat nose pliers to flatten the crimp bead securely. Cover it with a gold crimp cover for a polished finish if desired. -
Gold Coil Accent:
Begin stringing by adding a stack of gold spacer beads, or create a coiled look by wrapping gold wire around the base before starting your clay beads. -
String the Pattern:
Ideally, create sections of color blocking. Thread on 4-5 cream beads, followed by a matching section of terracotta. -
Add Variation:
Introduce the olive green beads individually or in pairs between larger blocks of pink and cream to break up the pattern. -
Create the Focal Section:
Towards the center of the bracelet, create longer runs of the chocolate brown discs interspersed with single cream or gold accents for contrast. -
Mirror the Design:
Continue the pattern in reverse or a random complementary sequence until the bracelet reaches your desired length (usually 6.5 to 7 inches). -
Finish with Gold:
End the beading sequence with another stack of gold spacers to match the beginning of the bracelet. -
Close the Loop:
Thread a crimp bead onto the end, followed by the jump ring for the chain extender. Pass the wire back through the crimp and a few adjacent beads. -
Final Secure:
Pull the wire taut but not stiff, flattened the crimp bead with pliers, and trim the excess wire close to the bead.
Troubleshooting Distortion
If your holes aren’t centered or the beads warp when piercing, try refrigerating the clay sheet for 10 minutes before cutting and piercing.
Now you have a chic, handmade accessory ready to stack with other favorites or wear solo.
Faux Stone Palette for Grown-Up Stacks
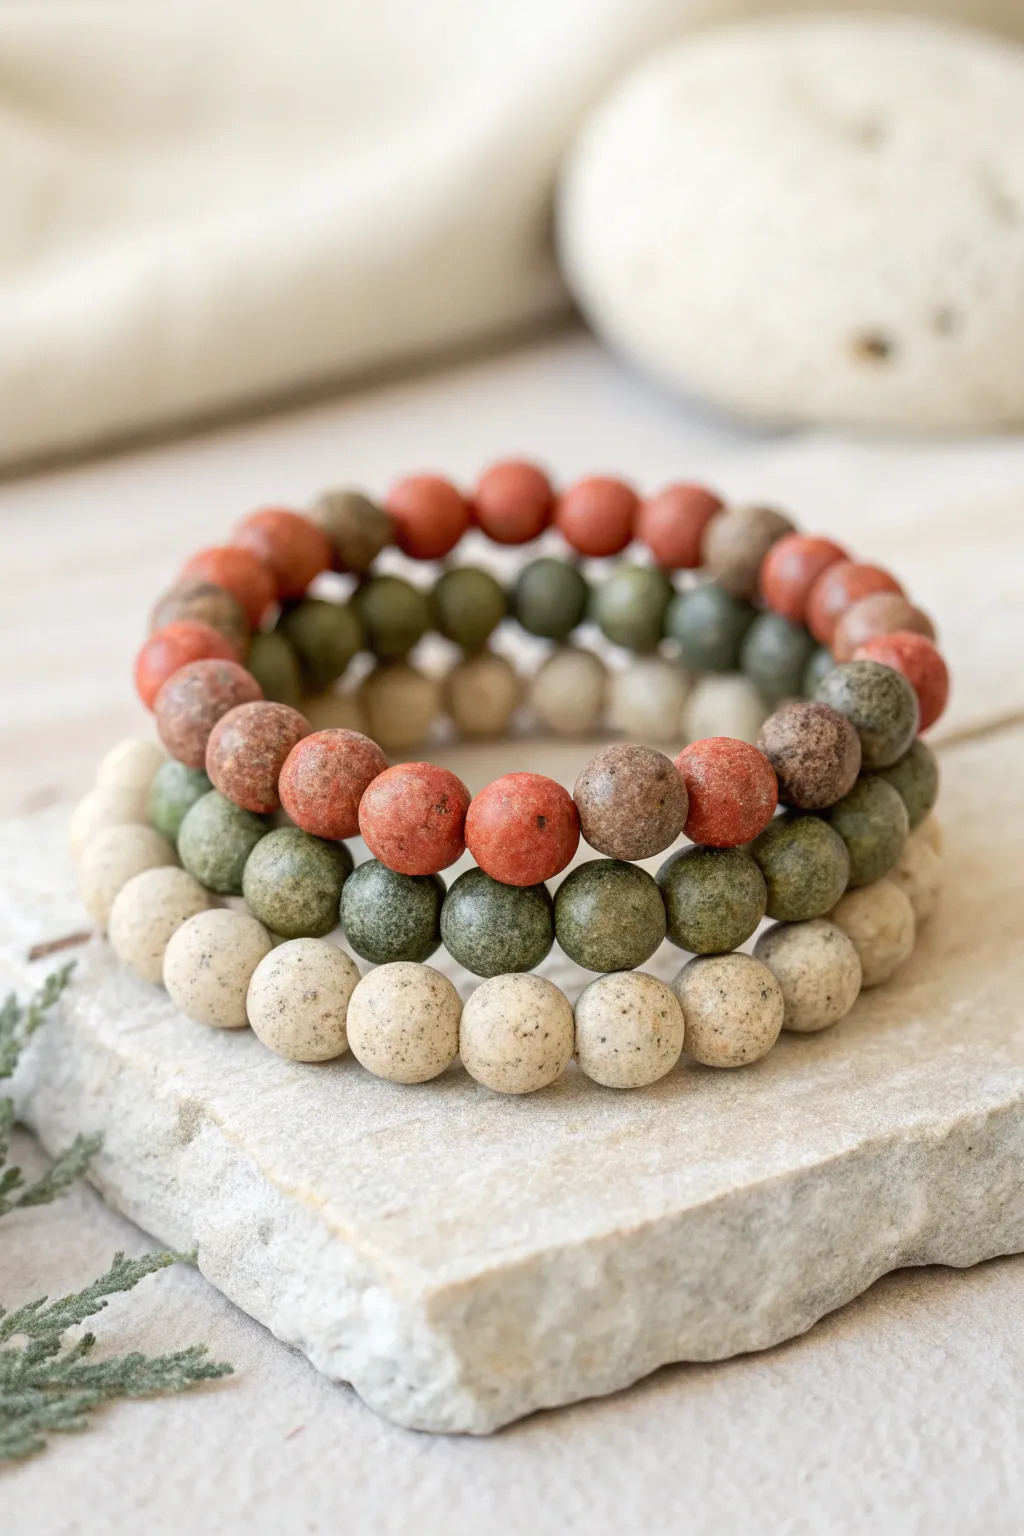
Achieve the sophisticated look of tumbled river stones using polymer clay and a few simple texturing tricks. This project creates a harmonious stack of three bracelets in varying earthy hues—terracotta, olive, and speckled sandstone—perfect for adding a natural touch to any outfit.
Step-by-Step Tutorial
Materials
- Polymer clay in three colors: terracotta/brick red, moss/olive green, ecru/beige
- Translucent polymer clay
- Coarse black pepper or black embossing powder
- Sand or dried coffee grounds (for texture)
- Acrylic sheet or rolling pin
- Bead piercing pins or toothpicks
- Baking sheet and cardstock
- Coarse sandpaper or a denim scrap
- Strong elastic cord (0.8mm or 1mm)
- Super glue or jewelry cement
Step 1: Mixing the Faux Stone Clay
-
Prepare the base:
Start by conditioning your three main clay colors separately until they are soft and pliable. Since pure colors can look too ‘plastic,’ we’ll be modifying them significantly. -
Add translucence:
Mix one part translucent clay into two parts of your colored clay for each hue. This adds depth so the beads don’t look flat and opaque like children’s beads. -
Create the speckled inclusion:
Flatten each clay mixture into a pancake. Sprinkle a pinch of coarse black pepper or black embossing powder onto the clay. For the beige clay, I like to add a tiny pinch of dried coffee grounds for extra warmth. -
incorporate the inclusions:
Fold the clay over the inclusions and roll it repeatedly. You want the specks to be distributed evenly throughout the block, not just on the surface.
Too shiny?
If your baked beads look too plastic-like, buff them vigorously with 0000 steel wool or a coarse denim cloth to dull the sheen and enhance the stone effect.
Step 2: Shaping the Beads
-
Create size consistency:
Roll each color of clay into a long snake of even thickness, roughly 1/2 inch in diameter. Lay the snakes next to each other to ensure they are similar in size. -
Cut segments:
Use a tissue blade or knife to cut equal segments from the snakes. Aim for cubes that are roughly uniform to ensure your final beads are all the same size. -
Hand rolling:
Take each segment and roll it briskly between your palms. Don’t worry about being perfectly spherical yet; the goal is just to get a basic round shape.
Stone Variation
Mix tiny bits of the beige clay into the red and green batches—don’t blend fully! This creates subtle swirls mimicking natural agate or jasper striations.
Step 3: Texturing and Piercing
-
Apply stone texture:
To get that matte, pitted stone look, roll your raw beads gently over a piece of coarse sandpaper or a textured scrubbing sponge. This removes fingerprints and adds essential grit. -
Set the shape:
For a smoother matte finish instead of a pitted one, you can roll the beads vigorously against a scrap of denim fabric. -
Piercing the holes:
Ideally, let the beads rest in the fridge for 15 minutes to firm up so they don’t squish. Then, gently twist a bead piercing pin or toothpick through the center of each bead. -
Refining the hole:
Once the pin is through, gently roll the bead back and forth while it’s still on the pin to ensure the hole is clean and the bead remains round.
Step 4: Baking and Assembly
-
Rack them up:
Place your pierced beads on a piece of cardstock on your baking sheet. The cardstock prevents shiny flat spots from forming where the bead touches the metal. -
Bake:
Bake according to your specific brand of polymer clay’s instructions. Usually, this is around 275°F (135°C) for 45-60 minutes. Longer baking makes for stronger beads. -
Cool down:
Allow the beads to cool completely in the oven with the door slightly ajar. Sudden temperature changes can sometimes cause cracking. -
Sorting layout:
Lay out your beads on a design board or towel. You can create solid color strands or mix them up, but the image shows distinct color-blocked bracelets for maximum impact. -
Stringing:
Cut a piece of elastic cord about 10 inches long. Pre-stretch the cord by pulling it firmly a few times—this prevents the bracelet from stretching out later. -
Thread the beads:
String the beads onto the elastic until the length fits comfortably around your wrist (usually about 7 inches for an average adult sizes). -
The surgeon’s knot:
Tie the ends together using a surgeon’s knot (right over left twice, then pull tight). Add a tiny drop of super glue to the knot for security. -
Hide the knot:
Trim the excess cord and gently tug the knot inside the hole of one of the beads to conceal it.
Wear your new stack all together for a statement look or separate them for a subtle pop of earth-toned color
Textured Stamped Beads for a Tactile Twist
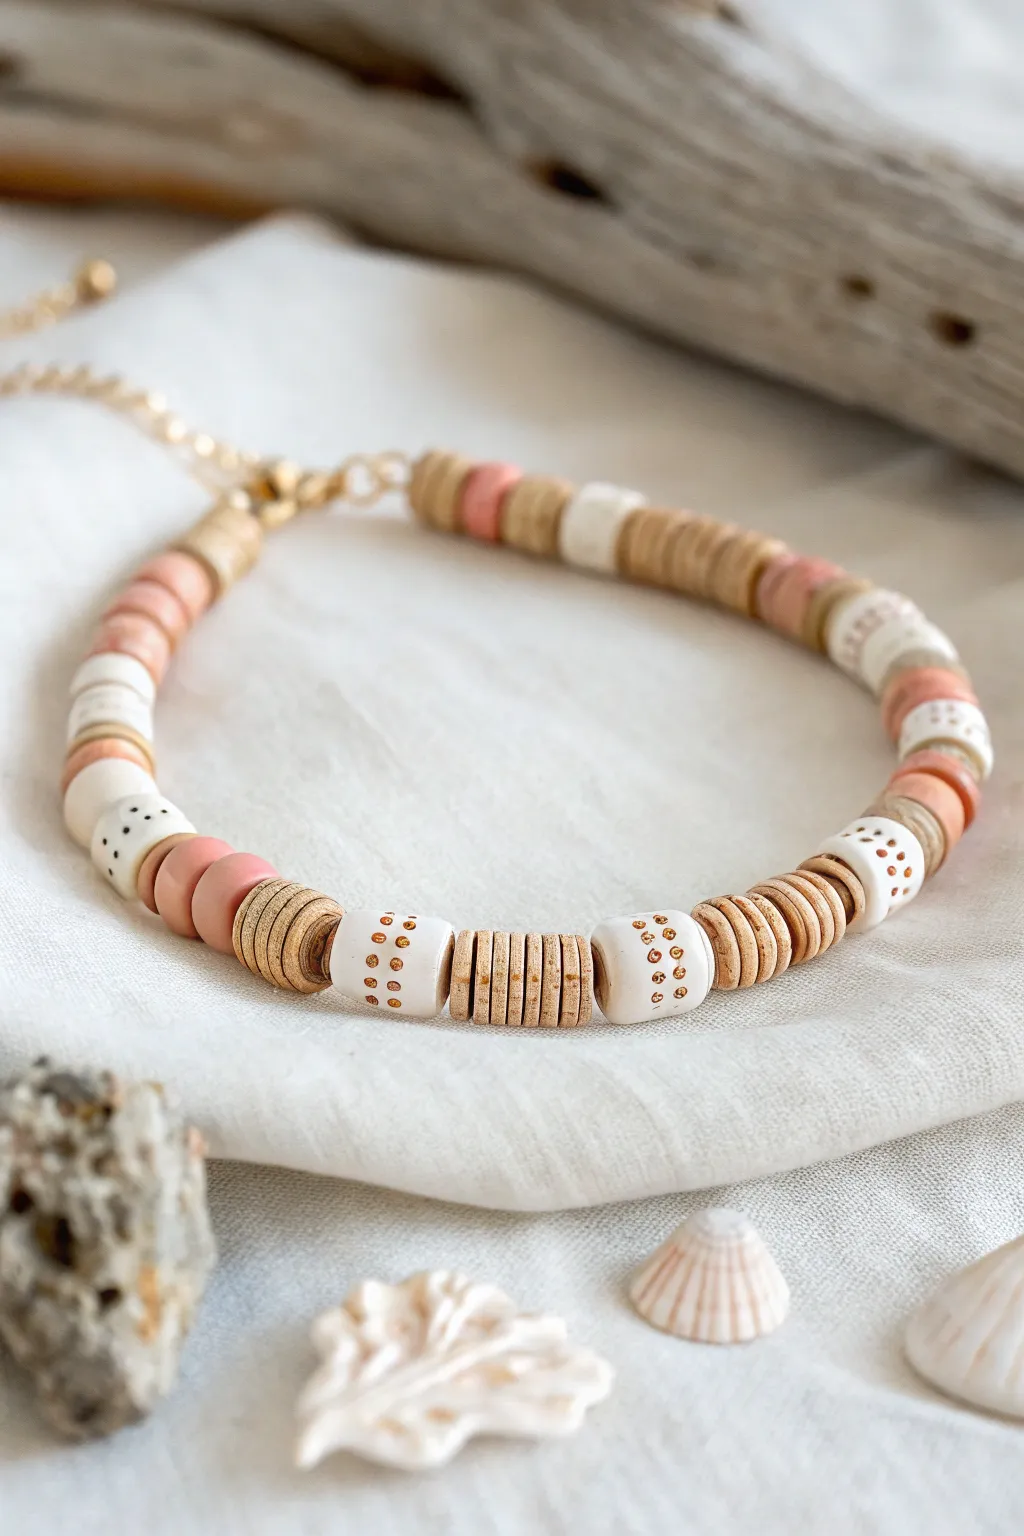
This project combines the rustic charm of wood-textured polymer clay with delicate, stamped geometric patterns for a sophisticated coastal look. The mix of soft pinks, natural tans, and stamped white beads creates a tactile accessory perfect for stacking.
Step-by-Step Guide
Materials
- Polymer clay in beige/light tan, white, and soft coral/terracotta
- Gold acrylic paint or gold leaf pen
- Black fine-tip permanent marker or acrylic paint
- Beading wire or elastic cord
- Gold jump rings and lobster clasp
- Crimp beads
- Texture sponge or sandpaper
- Small dotting tool or toothpick
- Clay roller or pasta machine
- Small circle cutter (approx. 6-8mm)
- Needle tool or bead piercing pin
- Gloss or matte varnish (optional)
Step 1: Creating the Wood-Effect Discs
-
Condition and Mix:
Begin by conditioning your beige or tan polymer clay until it is soft and pliable. If you want a more realistic wood look, streak in a tiny amount of darker brown clay but don’t mix it completely smooth. -
Roll the Strand:
Roll the clay into a long, consistent snake or rope, approximately 6-8mm in diameter, depending on how chunky you want your bracelet to be. -
Texture the Surface:
Before slicing, gently roll the clay rope over a texture sponge or coarse sandpaper. This imitates the porous surface of wood and adds that crucial tactile element. -
Slice the Discs:
Using a sharp tissue blade, slice the textured rope into thin, even discs. Aim for about 2-3mm thickness per bead to mimic the look of Heishi beads. -
Pierce the Holes:
Use a needle tool to pierce a hole through the center of each disc. To prevent squishing the bead, twist the needle gently as you push through rather than pressing straight down.
Step 2: Crafting the Stamped Cylinder Beads
-
Shape the Cylinders:
Condition your white polymer clay and roll it into a slightly thicker rope than the previous step. Cut segments that are about 8-10mm long to create cylinder shapes. -
Refine the Shape:
Gently roll each white segment between your fingers to smooth the cut edges, forming a neat barrel or tube shape. Pierce the center hole now. -
Add Stamped Texture:
Using a very small dotting tool or a dull toothpick, press rows of tiny indentations into the surface of the white beads. Create bands of three or four vertical dots. -
Create Smooth Accents:
Repeat the disc-making process with the coral/terracotta clay, but leave these smooth without the ‘wood’ texture for a nice visual contrast.
Squished Beads?
If your beads distort when piercing holes, pop the clay rope in the fridge for 20 minutes before slicing and piercing. The slightly firmer clay holds its shape much better.
Step 3: Baking and Finishing
-
Bake the Beads:
Arrange all your beads on a baking sheet lined with parchment paper. Bake according to your brand of polymer clay instructions (usually 275°F/130°C for 15-30 minutes). -
Cool and Clean:
Allow the beads to cool completely. If any edges feel rough or sharp, give them a quick buff with fine-grit sandpaper. -
Highlight the Stamping:
Take your gold acrylic paint or a gold leaf pen and carefully dab it into the indented dots on the white cylinder beads. Wipe away surface excess quickly so the gold remains only in the pits. -
Alternative Dotting:
For the black speckled beads shown, use a fine-tip marker or a toothpick dipped in black paint to add tiny random dots to the surface of smooth white barrel beads. -
Seal (Optional):
If you want extra durability, lightly brush a matte varnish over the painted beads.
Pattern Pro Tip
Vary the number of ‘wood’ spacer beads between the focal beads. Irregular spacing (like 3 discs, then 5 discs) makes the bracelet feel more organic and handmade.
Step 4: Assembly
-
Plan the Pattern:
Lay out your design on a bead board. The pattern in the image alternates groups of 5-6 wood-textured discs with a single white cylinder or a few coral accent beads. -
Stringing:
Cut a length of beading wire. Attach a crimp bead and jump ring to one end, then thread your pattern. I find it helps to periodically hold the strand up to your wrist to check the length. -
Secure the Clasp:
Once the strand is full, thread on a final crimp bead and the lobster clasp. Loop the wire back through the crimp bead and pull tight. -
Final Crimp:
Use crimping pliers to flatten the crimp bead securely. Trim the excess wire and tuck the tail into the adjacent beads for a clean finish.
Enjoy wearing your handcrafted piece that perfectly balances texture and modern design
Mismatch Stack With One Unifying Color
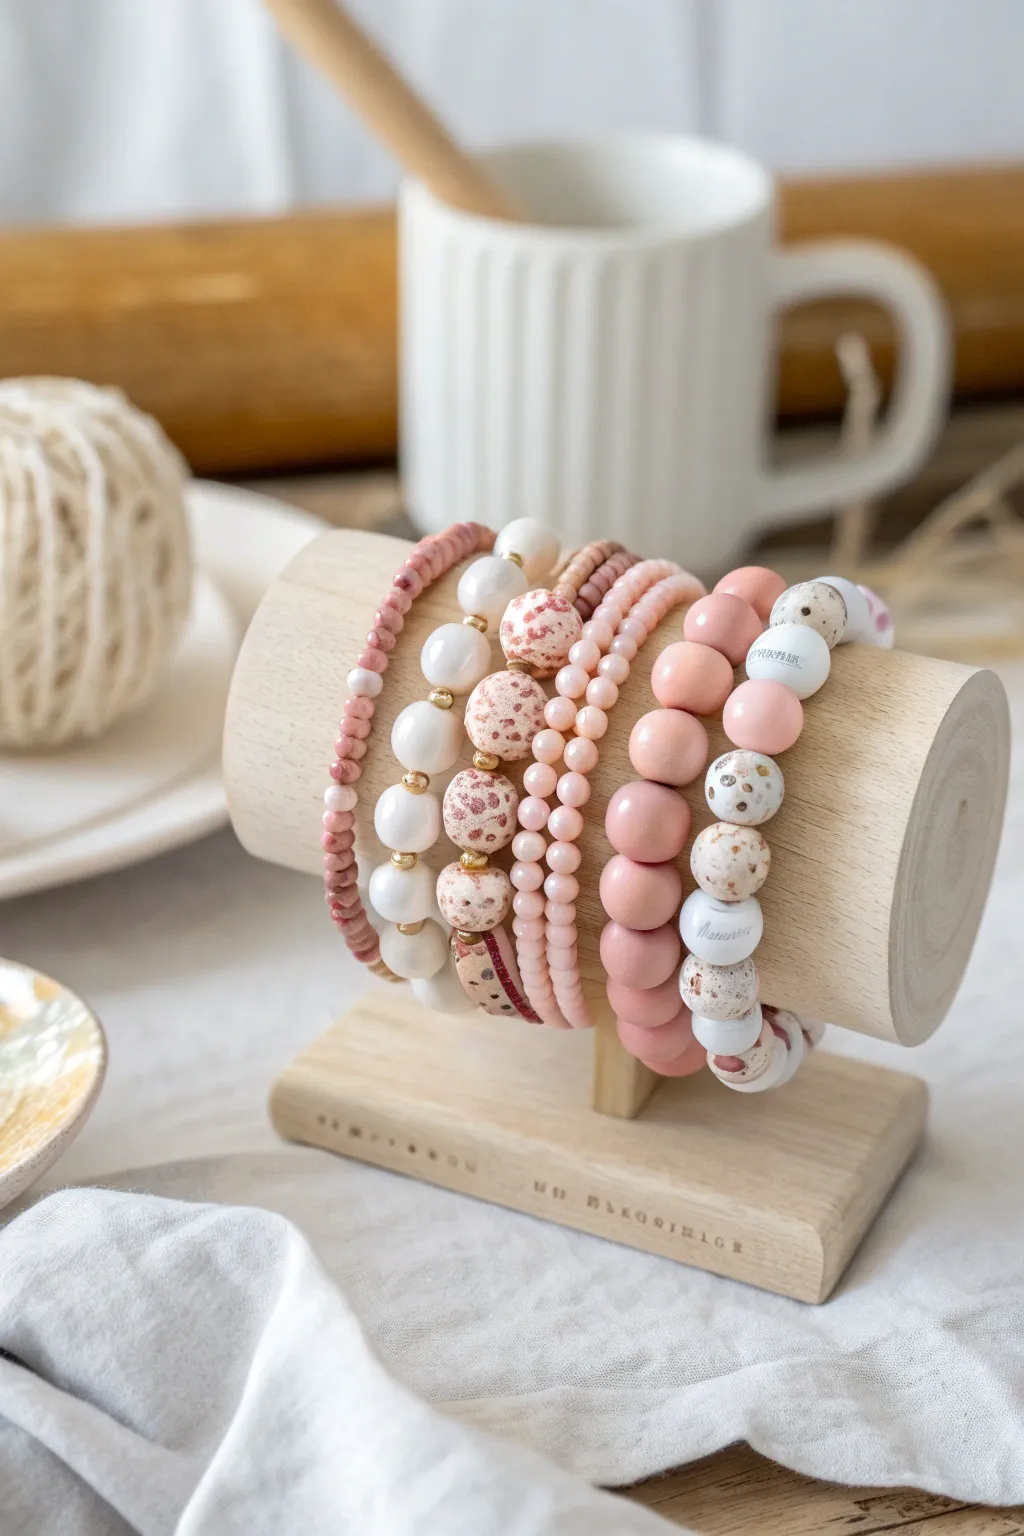
Embrace the beauty of subtle variation with this coordinated stack of polymer clay bracelets. By mixing different bead sizes, textures, and patterns while sticking to a unifying palette of soft rose and cream, you’ll create a sophisticated set that looks eclectic yet intentional.
Step-by-Step Tutorial
Materials
- Polymer clay (white, translucent, dusty rose, light pink, granite/speckled, gold)
- Acrylic roller or pasta machine
- Bead rollers (round and oval shapes)
- Needle tool or bead piercing pins
- Baking tile or cardstock
- Elastic beading cord (0.8mm clear)
- Super glue or jewelry cement
- Gold spacer beads (small rounds)
- Bead baking rack (optional)
- Fine grit sandpaper (400-800 grit)
- Varnish (satin or matte, optional)
Step 1: Prepping the Clay & Colors
-
Condition the clay:
Start by thoroughly conditioning your white, translucent, and pink polymer clays separately until they are soft and pliable. This prevents cracking later. -
Mix custom shades:
Create the specific ‘unifying colors’ for this stack. Mix white with a tiny dot of dusty rose for a pale blush, and keep some pure dusty rose for the solid beads. For the speckled beads, mix white clay with a small amount of granite or ‘pre-speckled’ effect clay. -
Create the terrazzo slab:
To make the large focal beads, roll out a thick sheet of white clay. Finely chop bits of dusty rose and gold clay into irregular crumbs. Press these crumbs into the white sheet and roll flat to embed them, creating a terrazzo effect.
Hiding the Knot
Drill the hole of one bead slightly larger than the rest. Plan your stringing so your knot lands next to this bead, allowing you to easily pull the knot inside for an invisible finish.
Step 2: Forming the Beads
-
Roll the small spacers:
For the smallest bracelet (far left), roll very thin snakes of dusty rose clay and slice them into tiny discs. Smooth the edges slightly with your finger, but keep them fairly uniform. -
Shape the medium rounds:
Using the pale blush mixture, pinch off equal amounts of clay. Roll them into smooth spheres between your palms. I find using a small bead roller tool helps keep every bead the exact same size. -
Create the large speckled focal beads:
Take your terrazzo-patterned clay and form larger, slightly flattened round beads. These should be the largest in your set, acting as the statement pieces. -
Make the solid accents:
Create a set of solid dusty rose beads that are slightly larger than the pale blush ones but smaller than the terrazzo beads. This size variation is crucial for the ‘mismatch’ look. -
Craft the white accents:
Roll pure white clay into medium-sized round beads. You can also form a few slightly oval or ‘organic’ shapes for added texture. -
Pierce the beads:
Gently pierce a hole through the center of each bead using a needle tool or bead pin. Twist the tool as you push through to avoid deforming the round shape.
Step 3: Baking and Finishing
-
Bake the beads:
Arrange your beads on a baking tile or bead rack. Bake according to your brand of polymer clay instructions (usually 275°F/135°C for 15-30 minutes). Letting them cure fully is key for durability. -
Cool and sand:
Allow the beads to cool completely. Use fine-grit sandpaper under running water to smooth out any fingerprints or rough edges, buffing them to a soft matte finish. -
Optional varnishing:
If you prefer a slight sheen or want to protect the terrazzo pattern, apply a thin coat of satin varnish to the beads and let them dry.
Level Up: Texture Play
Before baking, roll your unbaked solid pink beads over a piece of sandpaper or a textured sponge to give them a stone-like surface that contrasts beautifully with the smooth beads.
Step 4: Assembly
-
Layout the designs:
Plan your four distinct bracelets. Bracelet 1: Tiny dusty rose discs. Bracelet 2: White rounds alternated with gold spacers. Bracelet 3: Solid blush rounds. Bracelet 4: A mix of the large terrazzo beads, solid pinks, and white accents. -
String Bracelet 1 (Heishi style):
Thread the tiny dusty rose disc beads onto the elastic cord until you reach your desired wrist length (usually 6.5-7 inches). -
String Bracelet 2 (Alternating):
Thread the medium white beads, inserting a small gold metal spacer bead between every single clay bead for a touch of elegance. -
String Bracelet 3 (Solid):
String the uniform pale blush beads together. Keep this one simple to balance the busier patterned beads. -
String Bracelet 4 (The Mix):
Create the focal bracelet by alternating the large terrazzo beads with the solid dusty rose beads. You can add a special ‘word bead’ or a unique white accent bead in the center if desired. -
Tie the knots:
Pre-stretch your elastic cord slightly. Tie a surgeon’s knot (looping twice) for each bracelet. Pull tight to secure. -
Secure and trim:
Add a tiny drop of super glue or jewelry cement to the knots. Once dry, trim the excess cord carefully, ideally pulling the knot inside a bead to hide it.
Slide your new stack onto your wrist and enjoy the bespoke, handcrafted feel of your jewelry collection