If you love that satisfying look of stacked clay heishi beads, you’re about to have way too many fun options to try. I pulled together my go-to color palettes, patterns, and “vibe” formulas so you can mix, match, and make them feel totally you.
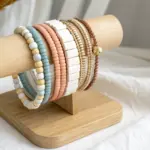
Arm Party Heishi Bracelet Stack
This stunning arm party combines the muted earth tones of clay heishi beads with the elegance of pearls and gold accents. The result is a versatile, textured stack perfect for everyday wear or dressing up a casual outfit.
Detailed Instructions
Materials
- Elastic stretch cord (0.5mm or 0.8mm clear)
- 6mm Polymer clay heishi beads in matte terracotta
- 6mm Polymer clay heishi beads in matte peach/beige
- 6mm Olive green wooden or ceramic round beads
- White freshwater pearls (approx. 4-6mm)
- Small gold seed beads (size 11/0 or 8/0)
- Gold tone spacer beads (various: flat discs, small balls)
- Medium wood round beads (approx. 6-8mm)
- Faceted gold accent beads
- Textured gold or beige focal beads
- Jewelry glue or clear nail polish
- Scissors
Step 1: Planning and Prep
-
Measure your wrist:
Before cutting any cord, measure your wrist and add about 1/2 inch for a comfortable fit. Cut your elastic cord to this length plus an extra 3-4 inches on each side to make tying knots easier. -
Pre-stretch the cord:
Hold a length of your elastic cord and give it a few gentle tugs. This pre-stretching prevents the bracelets from stretching out and losing their shape after the first time you wear them. -
Organize your palette:
Lay out your beads on a bead mat or towel. Group them by type: the flat terracotta clay discs, the peach discs, the olive rounds, the white pearls, and your gold accents. Seeing them all together helps ensure your color balance is perfect.
Step 2: Creating the Heishi Strands
-
Start the terracotta strand:
Thread your needle if you’re using one, or simply stiffen the end of the cord with a dab of glue. Begin stringing the matte terracotta heishi beads. This bracelet is simple texture, so just string a solid line of these clay discs until you reach your desired length. -
Knot and secure:
Tie a surgeon’s knot (right over left, left over right twice). Pull tight to secure. Add a tiny dab of jewelry glue to the knot, let it dry for a moment, and trim the excess cord. If possible, slide a bead over the knot to hide it. -
Create the peach strand:
Repeat the previous process with the peach/beige heishi beads. I like to occasionally check the length against the first bracelet to ensure uniformity in the stack.
Knot Hiding Trick
Use a bead with a larger hole (like the wooden ones) next to your knot. You can gently tug the knot inside this bead to make it completely invisible.
Step 3: Designing the Accent Bracelets
-
String the olive rounds:
For the green strand, thread the olive-colored round beads. These look like dyed wood or matte ceramic. Simply string them continuously. Their round shape provides a nice contrast to the flat heishi discs nearby. -
Assemble the pearl strand:
String your white freshwater pearls. Since natural pearls vary in shape, try to alternate slightly different shapes for an organic look. Keep stringing until it matches the length of your other bracelets. -
Build the mixed focal bracelet:
This is the ‘statement’ strand on the far left. Start with a pattern of white round beads separated by flat gold disc spacers. About halfway through, add your focal elements: a textured beige bead or a gold nugget bead. -
Finish the mixed strand pattern:
Continue the pattern on the other side of the focal bead. Add a few medium wood beads near the closure area to tie in the earth tones from the rest of the stack. Tie off and glue exactly like the previous strands.
Stacking Trouble?
If bracelets feel too tight when stacked, make each one about 2mm longer than the last. Wrists widen slightly up the arm, so varied sizing helps them sit flat.
Step 4: The Beaded Gold Details
-
Create the gold spacer strand:
For the delicate gold bracelet, string small gold seed beads. Every inch or so, interrupt the seed beads with a larger gold spacer or a white bead to add rhythm to the design. -
Assemble the final mixed texture strand:
The final bracelet (Right side) combines elements. String sections of small gold spacers, followed by a white bead, then a wooden bead. This bracelet acts as a bridge, pulling all the materials (wood, gold, white) together into one piece. -
Check the stack:
Put all the bracelets onto a stand or your wrist. Check for any gaps or loose knots. Snip any remaining tail ends of the elastic cord close to the knots for a clean finish.
Slide your new set onto your wrist and enjoy the rich textures of your handmade creation


Clean Color-Blocked Sections
Embrace a warm, earthy palette with this sophisticated take on the classic friendship bracelet. Using matte clay heishi beads in blocks of peach, sage, and cream separated by textured gold accents creates a piece that feels both trendy and timeless.
How-To Guide
Materials
- 6mm flat clay heishi beads (Peach/Coral)
- 6mm flat clay heishi beads (Sage Green)
- 6mm flat clay heishi beads (Cream/Bone)
- 6mm flat clay heishi beads (Taupe/Sand – used briefly in one section)
- Gold plated brass spacer beads (smooth and textured variants)
- Strong elastic stretch cord (0.8mm or 1mm)
- Super glue or jewelry cement
- Scissors
- Optional: Bead stopper or binder clip
- Optional: Gold crimp covers (if not knotting directly)
Step 1: Preparation & First Section
-
Measure and Cut:
Cut a piece of elastic cord about 10-12 inches long. This generous length gives you plenty of room to tie secure knots later. Pre-stretch the cord by pulling it gently a few times; this prevents the finished bracelet from sagging after wear. -
Secure the End:
Attach a bead stopper or simply tape one end of the cord to your work surface so your beads don’t slide off while you work. -
Start with Coral:
Begin your pattern by threading on five peach/coral clay heishi beads. This establishes the first block of color. -
Add Gold Accents:
Slide on one textured gold spacer bead. These specific spacers add a lovely metallic shine that breaks up the matte finish of the clay. -
Sage Transition:
Thread on two sage green heishi beads immediately after the gold spacer.
Loose Beads?
If gaps appear between beads when worn, you may have tied the knot too loosely. Ensure beads are pushed snugly together before that final knot tightening pull.
Step 2: Building the Pattern
-
Cream Section:
Add another gold spacer bead, followed by three cream/bone colored heishi beads. Notice how the odd numbers (3 beads vs 2 beads) create a slight asymmetry that feels organic rather than rigid. -
Gold Break:
Place another textured gold spacer bead onto the cord. -
Long Coral Block:
Create a longer section now by adding approximately 4-5 peach/coral beads. Varying the length of the color blocks is key to this specific design’s look. -
Green & Gold Repeat:
Slide on a smooth gold spacer, then two sage green beads, followed by another smooth gold spacer. -
Taupe Accent:
Add a small section of taupe or beige beads—about three or four—followed by a gold spacer. This neutral tone grounds the brighter coral color. -
Main Coral Stretch:
Add a significant block of peach/coral beads, roughly 6-8 beads long, followed by a gold spacer. -
Sage and Cream Finish:
Create a block of 3-4 sage green beads, a gold spacer, and then a block of 3 cream beads.
Step 3: Finishing Up
-
Check the Fit:
Wrap the strand around your wrist. The ends should touch comfortably without stretching the cord tight. If it’s too short, add a few more beads in a new color block; if too long, remove a couple. -
The Surgeon’s Knot:
Remove the bead stopper. Cross the left end over the right, then loop it through twice (not just once). Pull tight. This represents the first half of a surgeon’s knot. -
Secure the Knot:
Cross the ends again and loop through once more to complete the knot. Pull the cord ends firmly to tighten the knot down close to the beads. -
Glue and Trim:
Dab a tiny drop of jewelry glue or super glue directly onto the knot. I find using a toothpick helps control the glue amount so it doesn’t flood the adjacent beads. -
Hide the Knot:
Once the glue is tacky but not fully set, slide a nearby gold spacer bead explicitly over the knot to hide it. -
Final Trim:
Let the glue dry completely, then trim the excess cord ends as close as possible to the bead.
Go Luxe
Swap the standard gold spacers for 14k gold-filled beads or freshwater pearl nuggets between the clay sections for a higher-end, boutique jewelry finish.
Stack this piece with gold chains or other monochromatic bracelets for a curated wrist look


Simple Stripes and Repeat Patterns
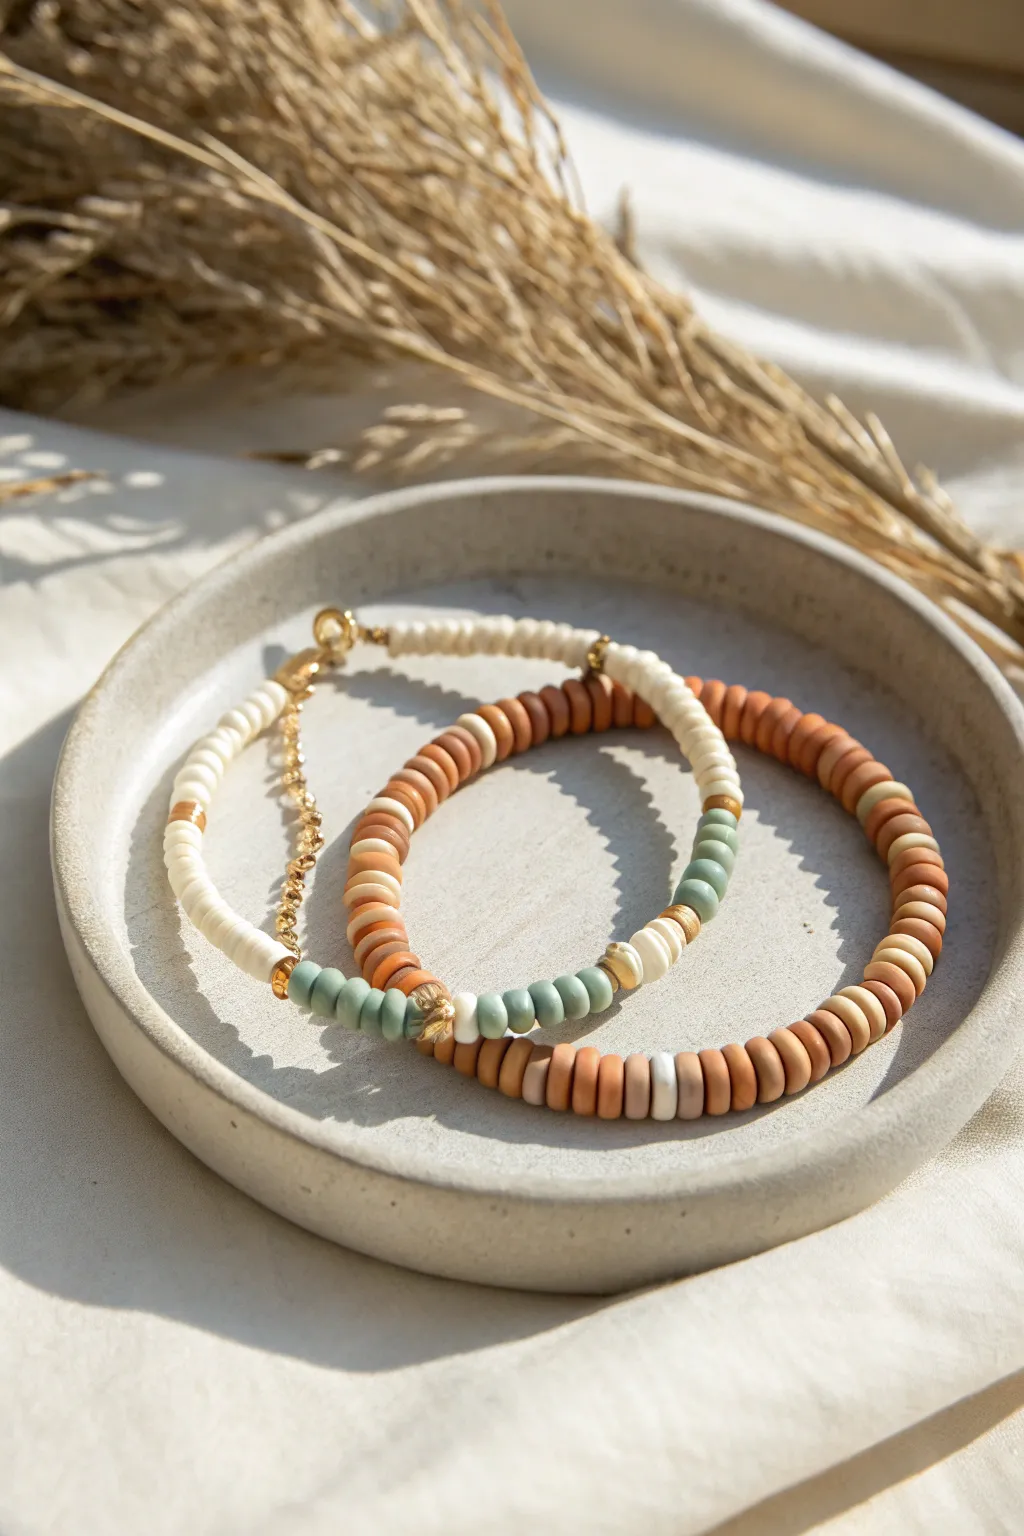
These two coordinating bracelets celebrate natural textures by pairing warm terracotta with cool sage green and creamy whites. The look is elevated with subtle gold spacer beads and professional clamshell endings for a polished finish.
Step-by-Step
Materials
- Polymer clay heishi beads (6mm or similar): Terracotta/Rust
- Polymer clay heishi beads: Cream/Off-White
- Polymer clay heishi beads: Sage Green
- Gold plated spacer beads (small discs or rondelles)
- Beading wire (flexible, 0.45mm)
- 2 Gold clamshell bead tips (calottes)
- 2 Crimp beads
- Gold lobster clasp
- Gold extension chain
- 2 Gold jump rings (4-5mm)
- Flat nose pliers
- Wire cutters
Step 1: Planning the Pattern
-
Analyze the outer bracelet:
First, let’s break down the predominately terracotta bracelet. It features a long run of rust-colored beads interrupted by a small focal section of sage green and cream. -
Analyze the inner bracelet:
The second bracelet mirrors the first but in reverse. It is primarily cream-colored, with a matching focal section of rust and sage green to tie the set together. -
Measure your wrist:
Wrap a measuring tape comfortably around your wrist. Add about half an inch to this measurement to account for the thickness of the heishi beads. -
Cut the wire:
Cut a length of beading wire about 10 inches long. This gives you plenty of extra room to work with the clasps without beads sliding off.
Stiffness Solution
Does the bracelet stand up like a stiff hoop? You pulled the wire too tight. Leave a millimeter of wiggle room so the beads can flex comfortably.
Step 2: Stringing the Terracotta Bracelet
-
Secure the end:
Thread a crimp bead onto the wire, followed by the loop of a clamshell tip. Feed the wire back through the crimp bead and use flat nose pliers to squash it flat. Close the clamshell over the crimp. -
Start the base color:
Begin stringing the terracotta beads. You will modify the number based on size, but aim to fill about 75% of your target length with just this solid color. -
Add a gold accent:
Slide on one gold spacer bead to mark the start of the design change. -
Create the focal section:
Add 2 cream beads, followed by one gold spacer. Then add 5 sage green beads. This creates that distinct pop of color shown in the image. -
Transition back:
After the green section, add one gold spacer, then 2 cream beads, and another gold spacer. -
Finish the strand:
Resume stringing terracotta beads until you reach your total desired length. Check the fit around your wrist before closing.
Step 3: Stringing the Cream Bracelet
-
Prep the second wire:
Repeat the starting process: secure your wire with a crimp bead and clamshell tip. -
Start the cream base:
String the cream-colored beads for the majority of the length, mirroring the proportions of the first bracelet. -
Insert the color block:
To match the photo, create a section using about 10-12 terracotta beads. Flank this section with gold spacers to make it stand out. -
Add the sage detail:
Immediately following the terracotta block, add a small run of roughly 6 sage green beads, flanked again by gold spacers. -
Complete the strand:
Finish the rest of the wire with cream beads to match the beginning section.
Kink Prevention
Flexible beading wire can kink easily if bent sharply. Keep your wire in a gentle curve while working; once kinked, it creates a permanent weak spot.
Step 4: Finishing Touches
-
Close the strands:
On the open end of each bracelet, thread on a clamshell tip (facing outward) and a crimp bead. -
Secure the crimp:
Pull the wire taut so there are no gaps between beads, but not so tight the bracelet becomes stiff. Flatten the crimp bead with pliers. -
Trim and close:
Trim the excess wire close to the crimp bead and gently squeeze the clamshell tip closed over it. -
Attach hardware:
Open a jump ring with your pliers. Hook it through the loop on the clamshell tip and attach the lobster clasp. Close the jump ring securely. -
Add the extension chain:
On the other end of the bracelet, use a jump ring to attach the extension chain. This allows for adjustable sizing and gives that professional dangle look seen in the photo.
Now you have a stunning, stackable set that perfectly balances warm and cool tones


Rainbow Order With a Twist
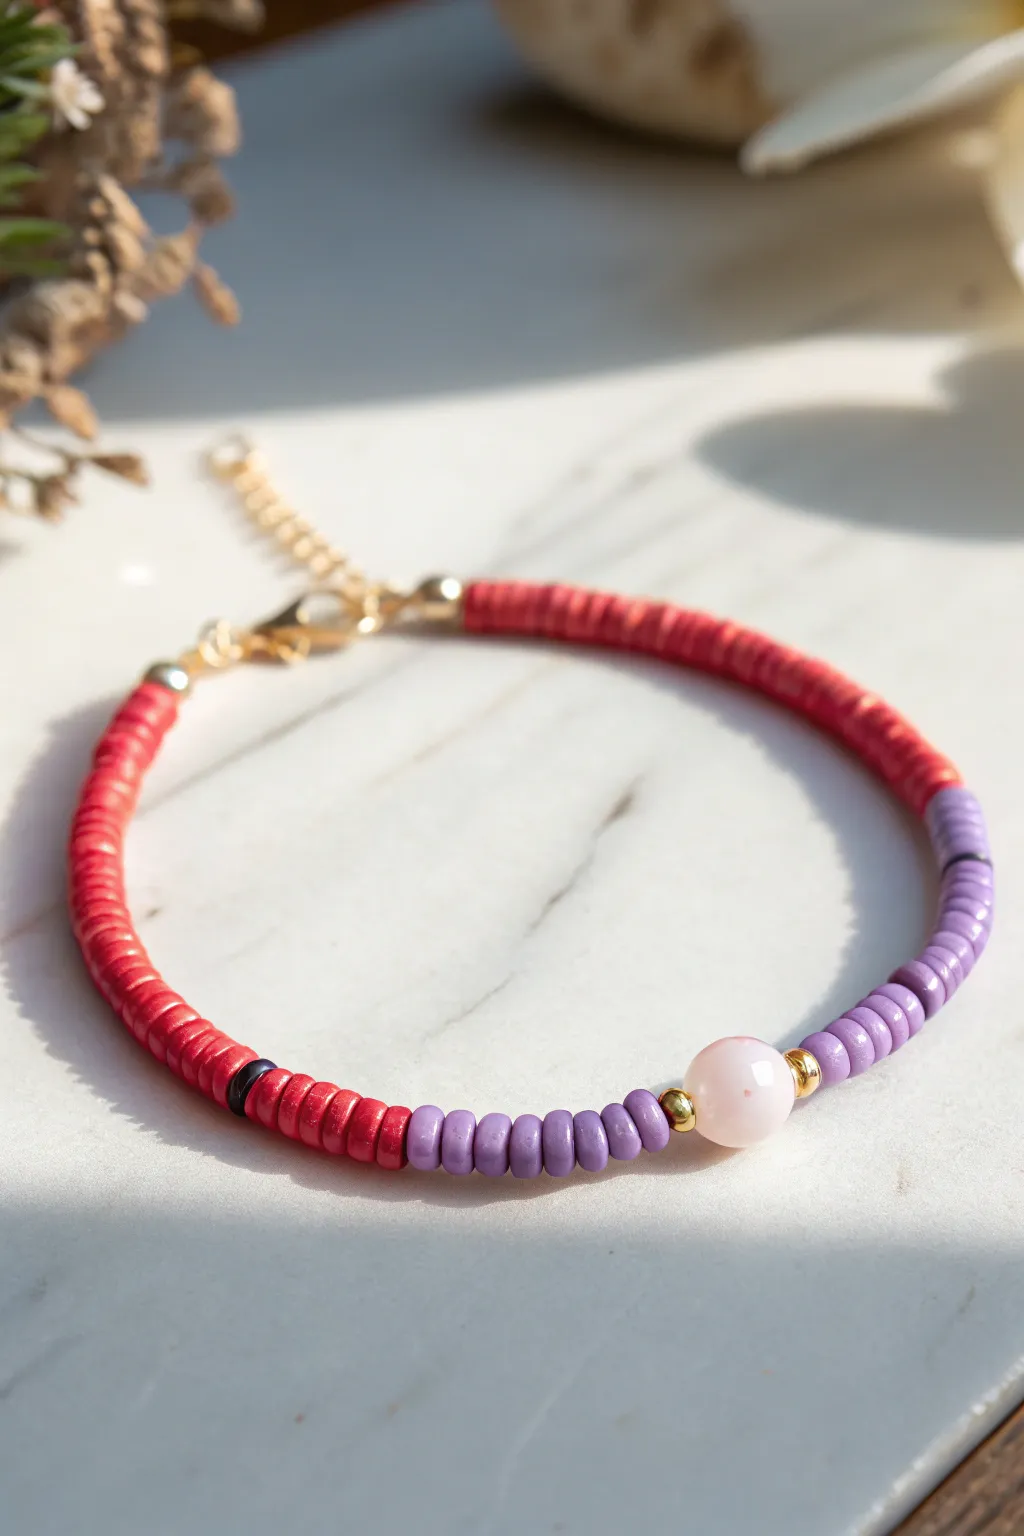
This elegant bracelet design takes a departure from the typical full rainbow, opting instead for a striking color block effect. By pairing rich berry reds with soft lavender and centering them around a semi-precious stone, you get a piece that feels both modern and sophisticated.
Step-by-Step Tutorial
Materials
- Red clay heishi beads (approx. 4-6mm)
- Lavender/Purple clay heishi beads (approx. 4-6mm)
- One large round pink focal bead (Rose Quartz or Pink Opal, 8-10mm)
- Two small gold round spacer beads (3-4mm)
- One gold crimp bead cover (optional)
- Gold beading wire or strong stretch cord
- Two gold crimp tubes (if using wire)
- Gold lobster clasp
- Gold jump rings
- Gold chain extender (approx. 1-2 inches)
- Wire cutters
- Flat nose pliers
Step 1: Preparation
-
Measure your wrist:
Wrap a flexible measuring tape around your wrist to determine your size. Add about half an inch to this measurement to ensure the bracelet fits comfortably without being too tight. -
Cut the wire:
Cut a piece of beading wire approximately 9-10 inches long. Having this extra length makes it much easier to manipulate the ends when you are attaching the clasp later. -
Secure one end:
Thread a crimp tube onto one end of the wire, followed by a jump ring or wire guardian. Loop the wire back through the crimp tube and use your flat nose pliers to flatten the tube securely. This creates your starting anchor.
Uneven Tension?
If the bracelet feels stiff or kinks, you crimped too tightly. Leave a tiny gap (1-2mm) of exposed wire near the clasp to allow the beads to drape naturally.
Step 2: The Purple Section
-
Start with purple:
Begin stringing your lavender heishi beads. You’ll want to cover approximately one-third of your total bracelet length with this color. -
Check the symmetry:
Hold the strung section up to your wrist. It should reach from the clasp to just before the center of your wrist. Adjust the number of beads if necessary to get the proportion right. -
Add a gold accent:
Slide on one of the small gold round spacer beads. This little metallic flash acts as a frame for your centerpiece.
Step 3: The Centerpiece
-
Add the focal stone:
Thread your large pink focal bead onto the wire. Make sure the hole is large enough for your wire to pass through smoothly. -
Complete the frame:
Add the second gold round spacer bead immediately after the focal stone, mirroring the other side.
Texture Play
Swap the single dark accent bead for a freshwater pearl or a faceted crystal to catch the light and add a different texture to the matte clay.
Step 4: The Red Section
-
Switch to red:
This is where the ‘twist’ happens—switch entirely to your red heishi beads. String these until the bracelet reaches your desired total length. -
Monitor the length:
Bring the ends together carefully to check the fit against your wrist one last time. Remember that the clasp and jump ring will add a few millimeters to the final size. -
Add the accent bead:
Looking closely at the design, slip on a single dark bead (black or dark blue) near the end of the red section for a tiny, unexpected pop of contrast. -
Finish the red strand:
Add just a few more red heishi beads after the dark accent bead to finish off the strand.
Step 5: Finishing Touches
-
Prepare the closure:
Thread a crimp tube onto the open end of the wire. -
Attach the clasp component:
Thread the wire through the loop of your lobster clasp (or a jump ring that will hold the clasp). -
Create the loop:
Feed the wire back down through the crimp tube and pull it tight, but leave just enough slack so the beads can move slightly and the bracelet remains flexible. -
Crimp firmly:
Use your flat nose pliers to smash the crimp tube flat, securing the wire. Give it a gentle tug to ensure it holds. -
Trim excess wire:
I prefer to thread the excess tail wire back through the first two or three red beads before snipping it close with wire cutters for a cleaner finish. -
Add the extender:
Open a jump ring using your pliers and attach the chain extender to the side opposite the lobster clasp. Close the jump ring securely.
Now you have a chic, asymmetrical accessory ready to stack or wear solo

The Complete Guide to Pottery Troubleshooting
Uncover the most common ceramic mistakes—from cracking clay to failed glazes—and learn how to fix them fast.
Ombre Fade From Dark to Light
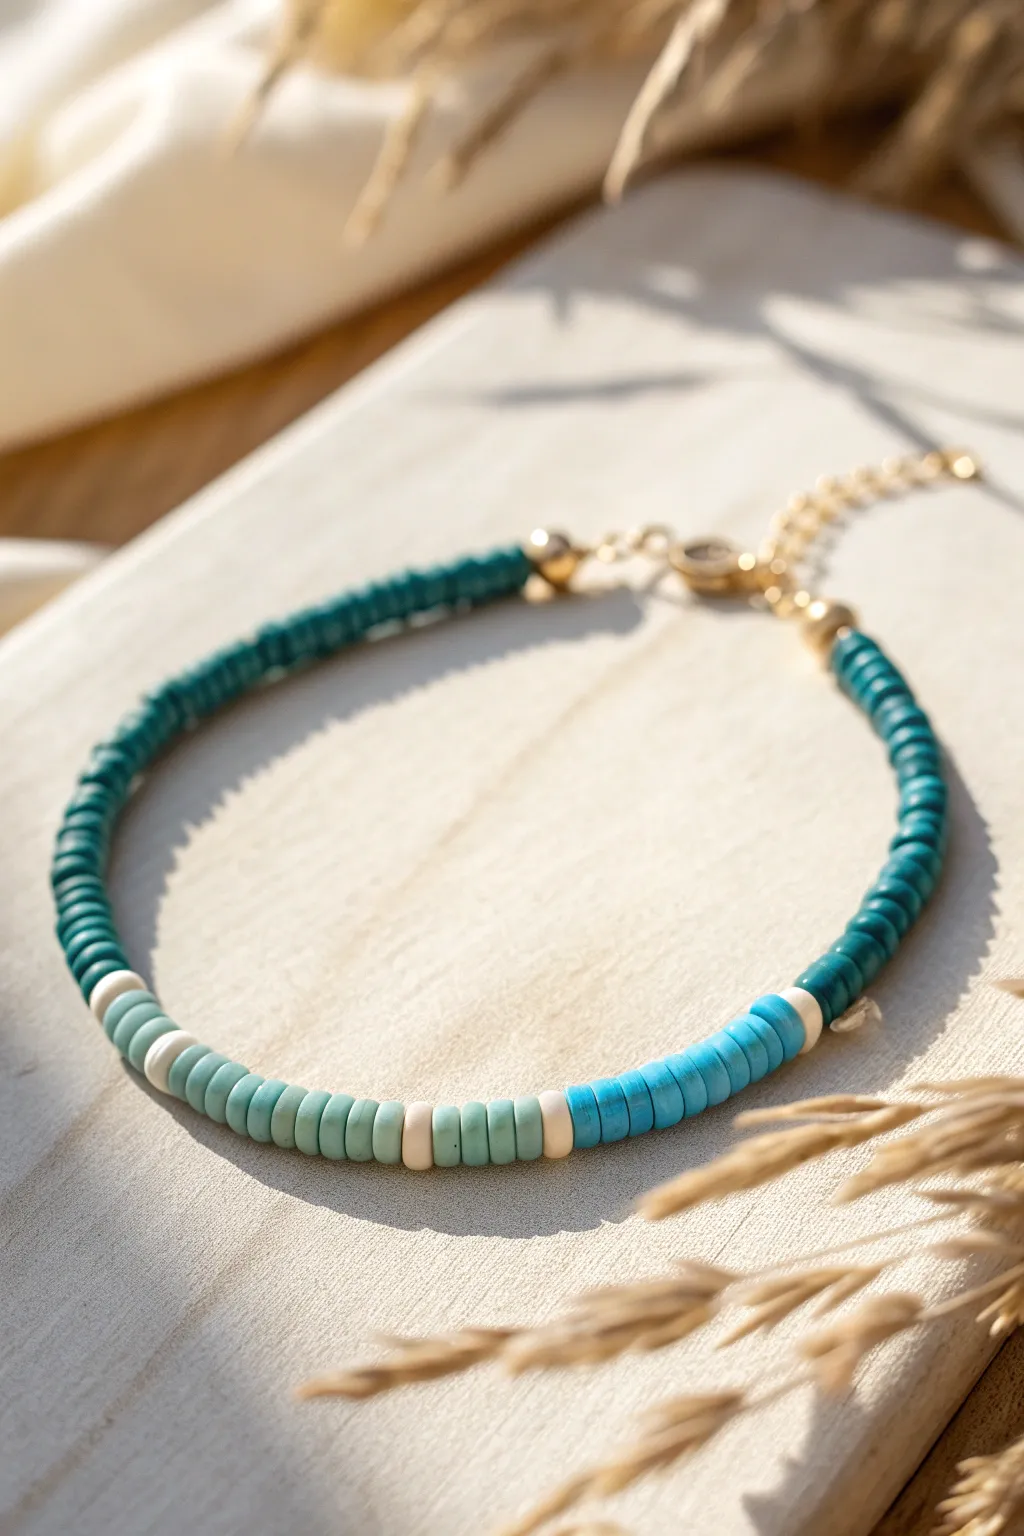
Capture the serene transition of ocean depths to shallow waters with this elegant heishi bead bracelet. The design uses a strategic color-blocking technique to create a soft, gradient effect that looks professionally strung.
How-To Guide
Materials
- 6mm polymer clay heishi beads (Dark Teal)
- 6mm polymer clay heishi beads (Medium Aqua/Turquoise)
- 6mm polymer clay heishi beads (Light Mint/Pastel Green)
- 6mm polymer clay heishi beads (Cream/Off-White)
- 0.8mm elastic cord or jewelry wire
- 2 small gold crimp beads
- 2 gold bead tips (clam shells)
- 2 gold jump rings
- Gold lobster clasp
- Gold extender chain
- Jewelry pliers (flat nose and chain nose)
- Scissors or wire cutters
- Beading board or ruler
Step 1: Preparation
-
Measure your wrist:
Wrap a flexible measuring tape around your wrist to find your size. Add about 1/2 to 1 inch to this measurement depending on how loose you want the fit. -
Cut the cord:
Cut a length of wire or elastic cord about 3-4 inches longer than your final bracelet size. I always give myself extra room to make tying knots or attaching crimps easier. -
Secure the end:
If using beading wire, thread one end through a bead tip and a crimp bead. Flatten the crimp bead with pliers, close the bead tip over it, and trim the excess wire. If using elastic, you can simply tape one end down for now.
Clean Lines Tip
Make sure your heishi beads are uniform in thickness. If you find a wonky or uneven bead in your pack, discard it, as it will make the straight column of beads look crooked.
Step 2: Creating the Ombre Pattern
-
Start with the darkest shade:
Begin threading your Dark Teal heishi beads. You will need a substantial section here, roughly 2 to 2.5 inches, to act as the main ‘base’ color of the bracelet. -
Add the first transition:
Slide on one single Cream/Off-White bead. -
Introduce the medium tone:
Thread on about 3 to 4 beads of the Medium Aqua/Turquoise color. This short segment acts as a bridge between the dark and light sections. -
Barrier bead:
Add another single Cream/Off-White bead to separate the colors clearly. -
The light section:
String approximately 1.5 to 2 inches of the Light Mint/Pastel Green beads. This creates the softest part of the gradient. -
Second barrier:
Slide on another single Cream/Off-White bead. -
Return to medium tone:
Add a slightly longer section of the Medium Aqua/Turquoise beads compared to the first time—aim for about 0.75 inches here. -
Final transition:
Add your last single Cream/Off-White bead. -
Finish with dark teal:
Fill the remaining length of your bracelet with the Dark Teal beads until you reach your desired total length.
Gold Highlighting
Swap the Cream/Off-White spacer beads for 3mm gold-plated rondelle spacers or tiny gold discs. This gives the bracelet a more luxurious, high-end jewelry finish.
Step 3: Finishing Touches
-
Check the fit:
Wrap the unfinished strand around your wrist to ensure the ombre pattern sits where you want it and the length is correct. -
Attach the second crimp:
Feed the open end of wire through a bead tip and then a crimp bead. -
Secure the crimp:
Pull the wire taut so there are no gaps between beads, flatten the crimp bead with your pliers, and close the bead tip shell. -
Add hardware:
Use pliers to open a jump ring. Loop it through the hook of one bead tip and attach your lobster clasp. Close the jump ring securely. -
Attach the chain:
Open a second jump ring. Connect the other bead tip loop to the extender chain and close the ring.
Now you have a stunning gradient bracelet ready to stack or wear solo
Metallic Spacer Bead “Sprinkles”

This elegant bracelet design elevates humble clay discs with the strategic placement of textured gold spacers, creating a sophisticated piece that looks store-bought. The soft palette of dusty rose, cream, and peach provides a warm, neutral foundation that lets those metallic accents truly shine.
Step-by-Step Tutorial
Materials
- Polymer clay heishi beads (6mm or similar) in dusty pink
- Polymer clay heishi beads in peach/creamsicle
- Polymer clay heishi beads in off-white/cream
- Gold textured spacer beads (various widths)
- Small smooth gold spacer beads
- Elastic beading cord (0.8mm recommended)
- Jewelry adhesive or clear nail polish
- Scissors
Step 1: Planning and Preparation
-
Measure your wrist:
Before you begin stringing, wrap a piece of string or a measuring tape around your wrist to determine the desired length. Add about half an inch to this measurement to ensure the bracelet sits comfortably without being too tight. -
Cut the cord:
Cut a length of elastic cord about 10-12 inches long. Having this extra length makes tying the final knot significantly easier than struggling with short ends. -
Pre-stretch the elastic:
Gently pull on the elastic cord several times. This pre-stretching step helps prevent the bracelet from sagging or loosening permanently after you first wear it. -
Secure the end:
Attach a piece of tape or a bead stopper to one end of your cord so your beads don’t slide right off while you work.
Gold Preservation
To keep your metallic spacers shining bright, coat them with a thin layer of clear nail polish before stringing. This helps prevent tarnishing from skin oils.
Step 2: Designing the Pattern
-
Sort your palette:
Pour out small piles of your pink, peach, and cream clay beads, along with your gold spacers. -
Create the first color block:
Start by threading on about 4-5 cream-colored clay beads. This establishes the light, neutral base of the pattern. -
Add metallic texture:
Slide on one of your thicker, textured gold spacer beads. Follow this immediately with a thinner gold spacer to create a layered metallic look. -
Transition to peach:
Now, thread on a small block of 3-4 peach-colored beads. Keeping the color blocks relatively short creates a more dynamic, speckled rhythm. -
Insert a gold highlight:
Add a single, textured gold spacer bead after the peach section to break up the matte clay texture. -
Introduce the pink:
String on 4-5 dusty pink beads. Notice how the gradient is building from light to dark. -
Create a focal accent:
Place a larger gold accent here, perhaps sandwiching a few clay beads between two thin gold spacers for variety.
Step 3: Assembling the Full Length
-
Repeat the sequence:
Continue the pattern of alternating color blocks (Cream -> Peach -> Pink) separated by random gold spacers. Don’t worry about being mathematically perfect; a little asymmetry adds organic charm. -
Check sizing frequently:
I like to wrap the strand around my wrist every inch or so to gauge the fit and ensuring the pattern will close nicely. -
Mix up bead counts:
Occasionally vary your color blocks—make one pink section 6 beads long and the next only 3 beads. This prevents the design from looking too rigid. -
Verify the length:
Once you reach your desired length, ensure the ends meet comfortably without stretching the elastic too much. -
Final bead placement:
Make sure your final bead is a clay disc rather than a gold spacer if the starting bead was gold, or vice versa, so the join looks seamless.
Loose Pattern?
If gaps appear between beads when wearing it, your knot might be spacing them out. Try to tie the knot while the bracelet is slightly stretched.
Step 4: Finishing Touches
-
Prepare to knot:
Remove the tape or bead stopper carefully while holding both ends of the elastic firmly. -
Tie a surgeon’s knot:
Cross the ends, wrap one end around the other twice, and pull tight. This extra loop provides much more security than a standard granny knot. -
Reinforce the knot:
Apply a tiny dab of jewelry glue or clear nail polish directly onto the knot. Let it dry for a distinct moment before moving on. -
Hide the knot:
If one of your gold spacer beads has a large enough hole, gently tug on the elastic to slide the knot inside the bead, concealing it perfectly. -
Trim the excess:
Use your scissors to trim the excess cord ends close to the knot (or the bead hiding it), being careful not to nick the main structural cord.
Slip on your new bracelet stack to add a touch of warm, metallic glimmer to your daily outfit


What Really Happens Inside the Kiln
Learn how time and temperature work together inside the kiln to transform clay into durable ceramic.
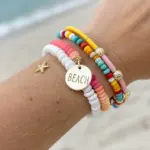
Beachy Shell-and-Heishi Anklet
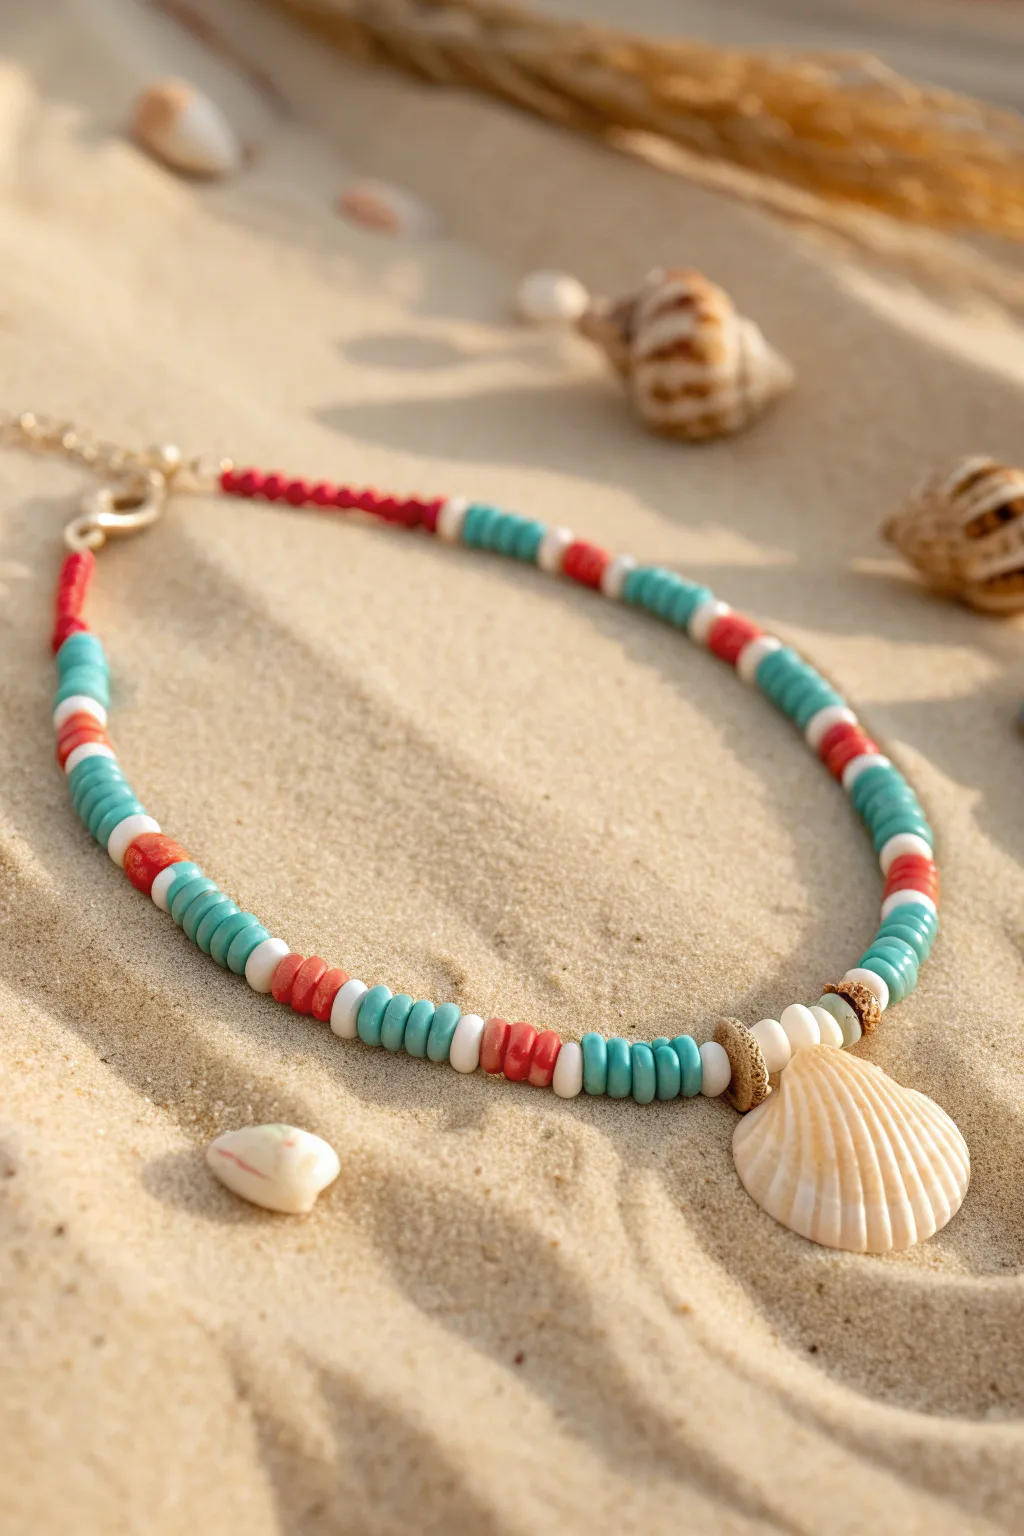
Capture the spirit of summer with this vibrant, surf-style anklet featuring bright turquoise and coral polymer clay discs. The centerpiece is a natural white scallop shell that rests perfectly against the ankle, making it the ultimate accessory for beach days and boardwalk strolls.
Detailed Instructions
Materials
- 4mm polymer clay heishi beads (turquoise/teal)
- 4mm polymer clay heishi beads (coral red)
- 4mm polymer clay heishi beads (white)
- One small natural scallop shell (drilled)
- Gold-plated lobster clasp
- Gold-plated extender chain
- 2 gold jump rings (4mm)
- 2 gold rough-textured spacer beads or bead caps (large hole)
- Beading wire (flexible, 7-strand)
- 2 crimp beads (gold)
- Wire cutters
- Crimping pliers
- Chain nose pliers
- Measuring tape
Step 1: Preparation & Planning
-
Measure your wire:
Cut a piece of beading wire approximately 12 inches long. This gives you plenty of extra room to work with, even if your ankle measurement is smaller. -
Secure the first end:
String one crimp bead onto the wire, followed by the loop of your extender chain. Thread the wire back through the crimp bead to create a loop. -
Crimp firmly:
Slide the crimp bead close to the chain (but not too tight, so it can wiggle), then use your crimping pliers to flatten and secure the bead. Trim the excess short tail of wire. -
Start the pattern:
Begin beading with a solid section of color. Thread on approximately 10-12 coral red heishi beads to hide the crimp area.
Uneven Shell Hang?
If the shell twists or won’t lay flat against the skin, add a small 2mm gold round bead inside the shell’s hanging loop to act as a buffer on the wire.
Step 2: Design the Pattern
-
Create the first segment:
Switch to your alternating pattern. Add three beads: one white, then one turquoise, then one white. This acts as a separator. -
Build the turquoise block:
String on about 4-5 turquoise beads. I find that odd numbers often look more organic in patterns like this. -
Add a white spacer:
Add a single white bead. -
Add the coral flash:
Add 2-3 coral red beads for a pop of contrasting color. -
Repeat until halfway:
Continue this approximate rhythm—blocks of turquoise separated by white and small flashes of coral—until you reach the middle point of your desired length.
Organic Spacing
Don’t stress about perfect symmetry. Varying the number of turquoise beads (e.g., 4 beads in one section, 5 in another) makes the piece feel more beachy and relaxed.
Step 3: Attaching the Focal Shell
-
Prepare the center:
Stop your pattern with a white bead. Slide on one of the textured gold spacer beads. -
Thread the shell:
Pass the wire through the pre-drilled hole in the top of your scallop shell. Ensure the shell is facing outward/convex side up. -
Secure the other side:
Slide on the second textured gold spacer bead. These gold spacers frame the shell beautifully and protect the clay beads from rubbing against the shell’s edges.
Step 4: Finishing the Strand
-
Mirror the pattern:
Resume your beading on the other side of the shell. Start with a white bead to match the other side. -
Continue patterning:
Replicate the sequence of turquoise blocks, coral accents, and white spacers in reverse order compared to the first half. -
End with coral:
Finish the strand with a solid block of 10-12 coral red beads, matching the start of the anklet. -
Add the final crimp:
String a crimp bead onto the wire, followed by a jump ring attached to your lobster clasp. -
Close the loop:
Pass the wire back through the crimp bead and through the first few coral beads for extra security. -
Final secure:
Pull the wire taut so there are no gaps between beads, but leave just enough slack for the anklet to bend. Crimp the bead tightly. -
Trim and polish:
Snip the excess wire tail flush against the coral beads using your flush cutters.
Slip on your new custom accessory and enjoy the relaxed, coastal vibe it brings to your outfit
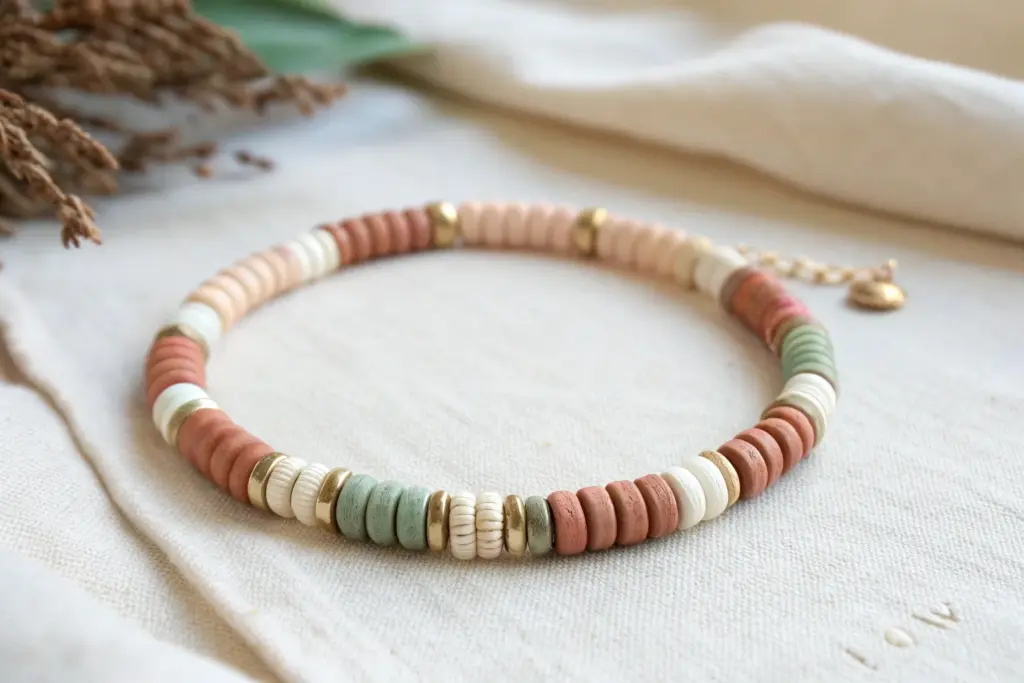
Minimal Heishi Choker Necklace
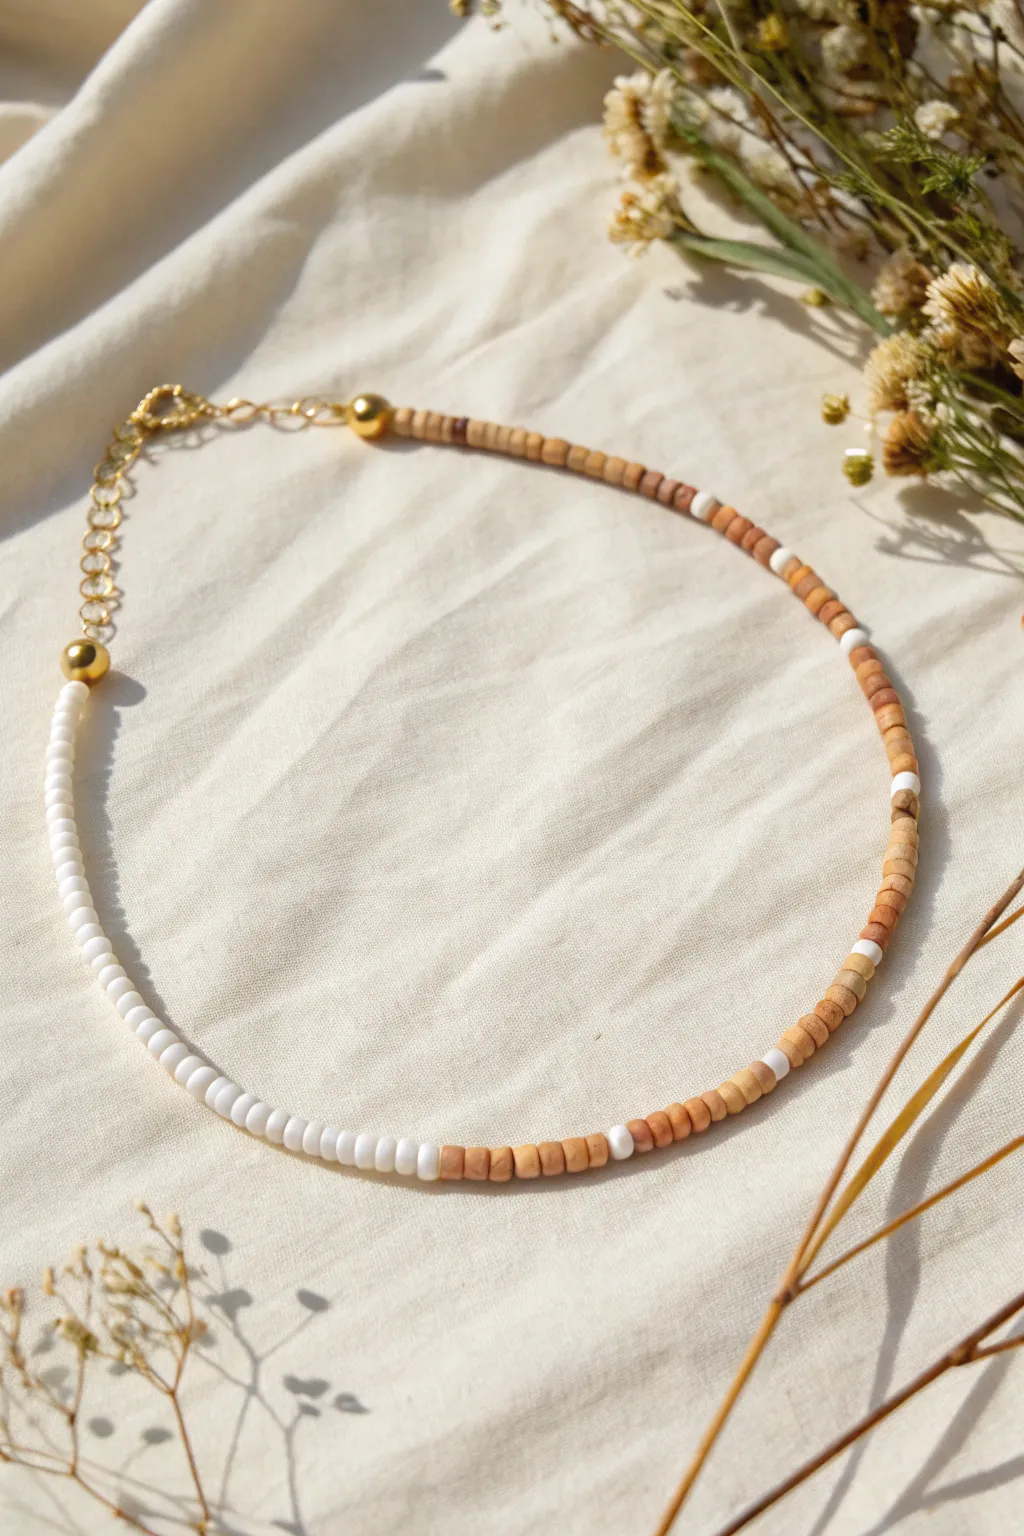
This elegant choker blends natural textures with clean lines, featuring a dual-tone design that splits between crisp white seed beads and warm, earthy clay heishi discs. It’s the perfect understated accessory that feels both bohemian and modern.
Step-by-Step Guide
Materials
- Small white glass seed beads (size 8/0 or 10/0)
- Tan/brown polymer clay heishi beads (approx. 4mm)
- Small gold spacer beads or crimp covers (gold-plated)
- Two large gold focal beads (round, approx. 6mm)
- Beading wire (gold or clear, flexible)
- Two gold crimp beads
- Gold chain extender
- Gold lobster clasp
- Two gold jump rings
- Crimping pliers
- Wire cutters
Step 1: Preparing the Pattern
-
Measure your wire:
Cut a length of beading wire approximately 18-20 inches long. This gives you plenty of slack to work with for a standard choker length (usually 14-16 inches). -
Secure the first end:
Thread a crimp bead onto one end of the wire, followed by a jump ring attached to your lobster clasp. -
Loop and crimp:
Pass the tail end of the wire back through the crimp bead to create a small loop holding the clasp. Use your crimping pliers to flatten the crimp bead securely, ensuring the wire doesn’t slip. -
Add a visual anchor:
String on one of the large 6mm gold focal beads immediately after the crimp. Tuck the short leftover tail of wire into this bead to hide it.
Natural Variation
Clay heishi beads often vary slightly in thickness. Don’t discard the thinner or uneven ones; using them adds that authentic, handmade organic texture that defines this style.
Step 2: Stringing the White Section
-
Begin the white segment:
Start threading your small white seed beads. You want this section to cover slightly less than half of the necklace’s total length. -
Check the length:
Continue adding white beads until you have about 5 to 6 inches of beaded length. I like to hold it up to my neck occasionally to visualize where the transition point will sit.
Stiff Necklace?
If the necklace hangs rigidly rather than draping, you crimped too tightly. Leave a tiny gap (about 1mm) of slack wire before the final crimp to allow beads to move.
Step 3: Creating the Transition
-
The center point:
Add the second large gold focal bead. This acts as the striking divider between the stark white beads and the earthy clay tones. -
Start the clay section:
Switch to your tan heishi beads. Thread about 1 inch of solid tan beads. -
Add a pattern interrupt:
Thread one single white seed bead to break up the color. -
Continue the pattern:
Add another section of tan heishi beads (about 1.5 inches), followed by another single white seed bead accent. -
Finish the clay sequence:
Continue stringing the tan heishi beads, occasionally interspersed with a single white bead every inch or so, until the necklace reaches your desired total length (typically 14-15 inches total beading).
Step 4: Finishing Touches
-
Prepare the final crimp:
Thread a crimp bead onto the end of the wire. -
Attach the extender chain:
Thread the wire through the last link of your gold extender chain. -
Create the loop:
Pass the wire back down through the crimp bead and through the last few heishi beads you strung. -
Tighten and secure:
Pull the wire snug so there are no gaps between beads, but not so tight that the necklace becomes stiff. Crimp the bead firmly with pliers. -
Trim excess:
Use your flush cutters to trim the remaining wire tail as close to the beads as possible. -
Optional crimp cover:
If you want a more polished look, gently close gold crimp covers over your flattened crimp beads using pliers to make them look like smooth round beads.
Enjoy wearing your handcrafted necklace that perfectly balances brightness and warmth

TRACK YOUR CERAMIC JOURNEY
Capture glaze tests, firing details, and creative progress—all in one simple printable. Make your projects easier to repeat and improve.
Pearl-and-Heishi Texture Mix
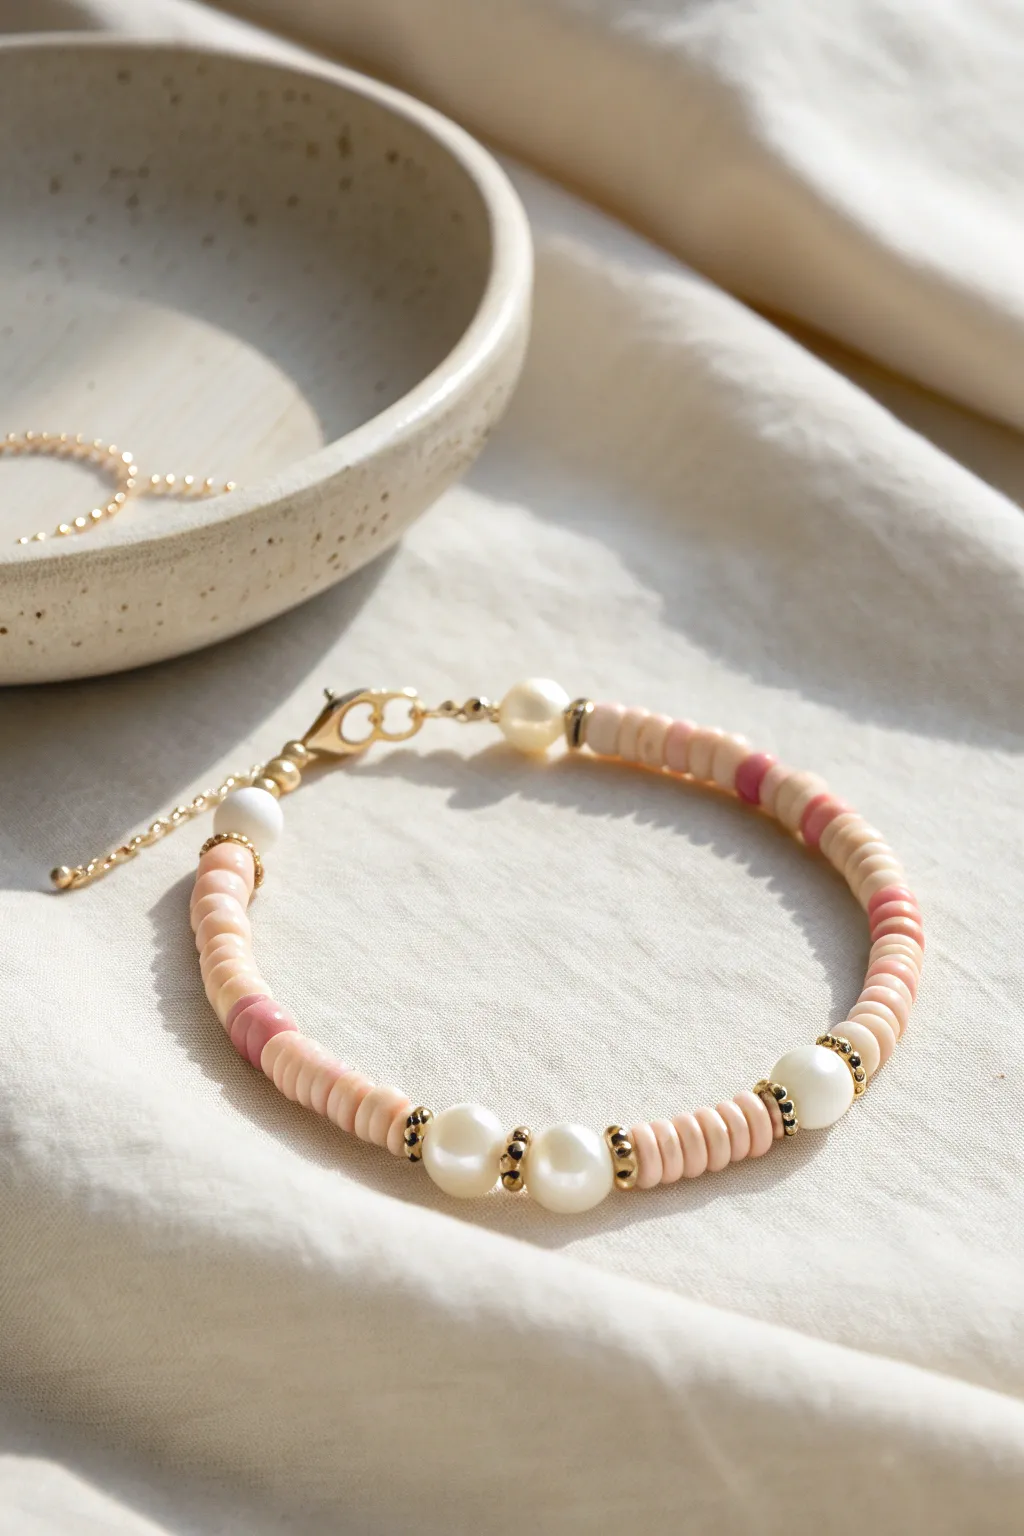
This elegant design merges the casual, beachy vibe of heishi clay beads with the timeless sophistication of pearls. The soft blush and terracotta tones create a warm palette that pairs perfectly with gold accents for a summer-ready accessory.
Detailed Instructions
Materials
- 6mm heishi polymer clay beads (light peach/blush)
- 6mm heishi polymer clay beads (terracotta/darker pink)
- Freshwater pearls or high-quality imitation pearls (approx. 6-8mm)
- Gold rondelle spacer beads with crystal or textured accents
- Small gold bead caps/spacers
- Gold crimp beads
- Gold lobster clasp
- Gold extender chain with teardrop charm
- Beading wire (medium flexibility, gold color if possible)
- Crimping tool
- Wire cutters
- Needle-nose pliers
Step 1: Planning and Preparation
-
Measure your wrist:
Wrap a measuring tape around your wrist to determine your desired length. Add about 0.5 to 1 inch to this measurement to account for the bulk of the beads and the clasp. -
Cut the wire:
Cut a piece of beading wire roughly 10-12 inches long. Having extra length makes it much easier to finish the ends without frustration. -
Start the clasp:
Thread a crimp bead onto one end of the wire, followed by the lobster clasp. -
Secure the wire:
Loop the wire back through the crimp bead, creating a small loop around the clasp attachment. -
Crimp firmly:
Use your crimping pliers to flatten the crimp bead securely, locking the wire in place. I like to give a gentle tug to ensure it holds before moving on. -
Hide the tail:
Thread a gold crimp cover (optional) over the flattened crimp or simply slide the first few beads over the excess wire tail to hide it.
Step 2: Creating the Pattern
-
Begin the sequence:
Start by threading on a small gold spacer bead, followed by one single pearl. -
Add first clay section:
Thread on approximately 8-10 of the light peach heishi beads. This establishes the base color. -
Introduce contrast:
Add a single terracotta/dark pink heishi bead for a pop of color. -
Repeat heishi base:
Follow the dark bead with another segment of 8-10 light peach heishi beads. -
Create the focal pearl section:
For the centerpiece, slide on a gold decorative rondelle spacer, then a pearl, another spacer, a pearl, a spacer, a pearl, and a final spacer. -
Mirror the design:
Reverse the pattern you started with: add 8-10 peach heishi beads, one dark pink bead, and another 8-10 peach heishi beads. -
Complete the beadwork:
Finish the beading sequence with one final pearl and a small gold spacer bead to match the beginning.
Stiff Bracelet?
If the finished piece feels rigid, you crimped too tightly against the beads. Leave a tiny gap (about 1-2mm) of bare wire before the final crimp to allow flexibility.
Step 3: Finishing Touches
-
Prepare the closure:
Thread a crimp bead onto the remaining wire, followed by the link of your gold extender chain. -
Loop and secure:
Feed the wire back through the crimp bead and pull tight, leaving just enough slack so the bracelet moves fluidly and isn’t stiff. -
Final crimp:
Flatten the final crimp bead securely with your pliers. -
Trim excess wire:
Trim the remaining wire tail as close to the bead as possible using flush cutters. -
Inspect connections:
Check both ends to ensure the loops are secure and the wire isn’t slipping before wearing.
Sorting Trick
Heishi beads can be uneven. Before stringing, lay them flat on a table and pick out only the ones with uniform thickness for a smoother, professional finish.
Now you have a stunning, textural bracelet ready to layer or wear solo.
Charm-Centered Bracelet Design
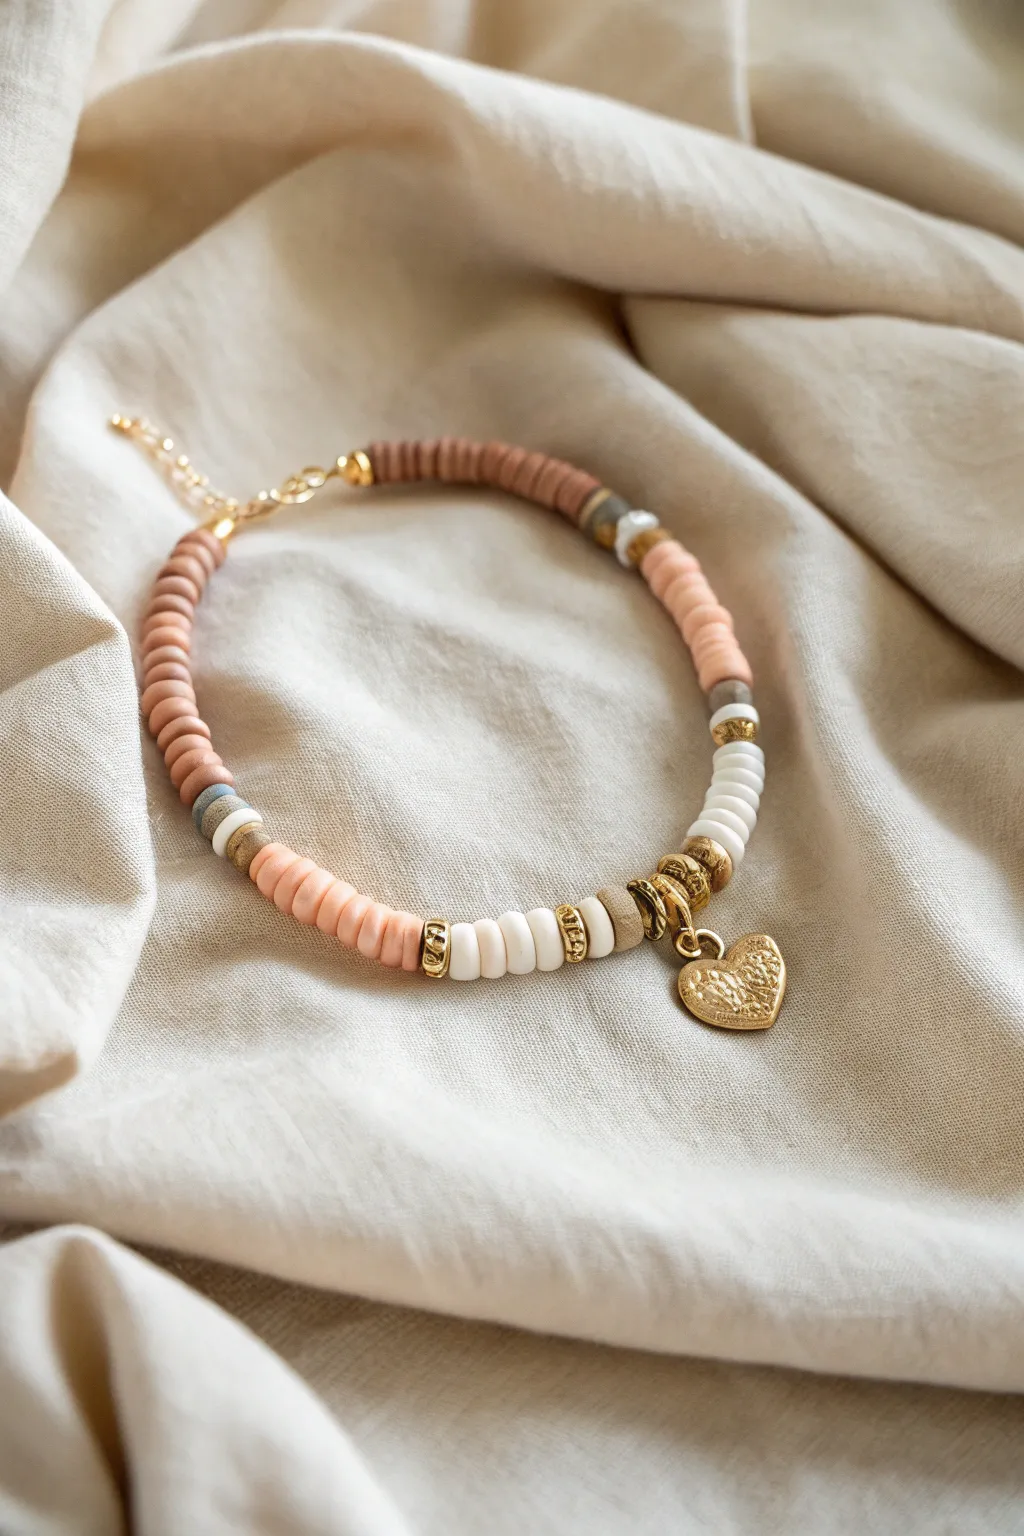
This elegant bracelet design elevates simple clay heishi beads by combining soft, earthy tones with gleaming gold accents and a romantic heart charm. The asymmetrical color blocking creates a sophisticated, boutique-style piece perfect for stacking or wearing solo.
How-To Guide
Materials
- Flat clay heishi beads (terracotta/muted rose)
- Flat clay heishi beads (white)
- Flat clay heishi beads (light peach)
- Flat clay heishi beads (grey/slate blue)
- Flat clay heishi beads (tan)
- Gold tone heishi spacer beads (textured or wheel style)
- Gold tone hammered heart charm
- Gold tone jump ring (6-8mm)
- Gold tone jump ring (4mm)
- Gold tone lobster clasp
- Gold tone extension chain
- Beading wire (flexible, 7-strand or 19-strand)
- 2 Crimp beads
- 2 Crimp covers (gold)
- Wire cutters
- Chain nose pliers
- Flat nose pliers or crimping tool
- Bead stopper or tape
Step 1: Preparing the Strand
-
Measure and Cut:
Cut a piece of beading wire approximately 9-10 inches long. This gives you plenty of extra room to work with the clasps without beads sliding off. -
Secure the End:
Place a bead stopper or a piece of masking tape on one end of the wire to prevent your beads from escaping while you work. -
The Foundation Color:
Begin threading your primary color. String about 2 inches of the terracotta/muted rose heishi beads. This section will sit near the clasp on one side.
Spacing Pro-Tip
Don’t string the beads too tightly! Leave a tiny bit of slack (about 1mm) before the final crimp so the bracelet curves naturally around the wrist without buckling.
Step 2: Creating the Pattern
-
First Transition:
Add a small visual break by stringing one grey bead, one gold spacer, and one tan bead. -
Peach Section:
String approximately 1 inch of the light peach heishi beads. Ensure they sit flush against each other for a seamless look. -
Gold Accent:
Slide on a textured gold spacer bead to mark the end of the peach section. -
White Contrast:
Add about 1 inch of white heishi beads. This bright section helps the gold elements pop. -
Second Transition:
Mirror the earlier transition style with a textured gold spacer followed by a few mixed neutral beads (tan and white).
Step 3: Adding the Focal Point
-
Prepare the Charm:
Using your chain nose and flat nose pliers, gently twist open the larger 6-8mm jump ring. Slide on the hammered gold heart charm and close the ring securely. -
Mounting the Charm:
Slide the jump ring with the charm directly onto the beading wire. Let it rest against the beads you just strung. -
Charm Spacers:
To keep the charm centered and highlighted, add one gold spacer bead immediately after the charm jump ring.
Level It Up
Add a personalized touch by hiding a single letter bead with an initial among the neutrals, or use a patterned gold bead cap on either side of the charm for extra texture.
Step 4: Finishing the Pattern
-
White Balance:
String another small section (about 0.5 to 0.75 inches) of white heishi beads. -
Third Transition:
Add a gold spacer, a grey bead, and a white bead to create a transition zone. -
Peach Continuation:
Add a 1-inch section of the light peach beads. -
Final Grey Accent:
String a grey bead, a white bead, and a gold spacer. -
Closing Terracotta:
Finish the strand with about 2 inches of the terracotta/muted rose beads, mirroring the start of the bracelet.
Step 5: Attaching the Hardware
-
First Crimp:
Remove the bead stopper. Slide a crimp bead onto the wire, followed by the loop of the extension chain. -
Looping Back:
Thread the wire back through the crimp bead and into the first few heishi beads. Pull tight so the loop is small but flexible. -
Securing the Wire:
Use your crimping pliers to flatten the crimp bead securely. I prefer to cover this with a crimp cover for a polished gold finish looks like a bead. -
Second Crimp:
Repeat the crimping process on the other end of the bracelet, this time attaching the lobster clasp. Ensure the beads aren’t too stiff before crimping. -
Trim Excess:
Trim any remaining wire ends close to the beads using your flush cutters.
Now you have a stunning, professionally designed bracelet ready to add warmth to any outfit
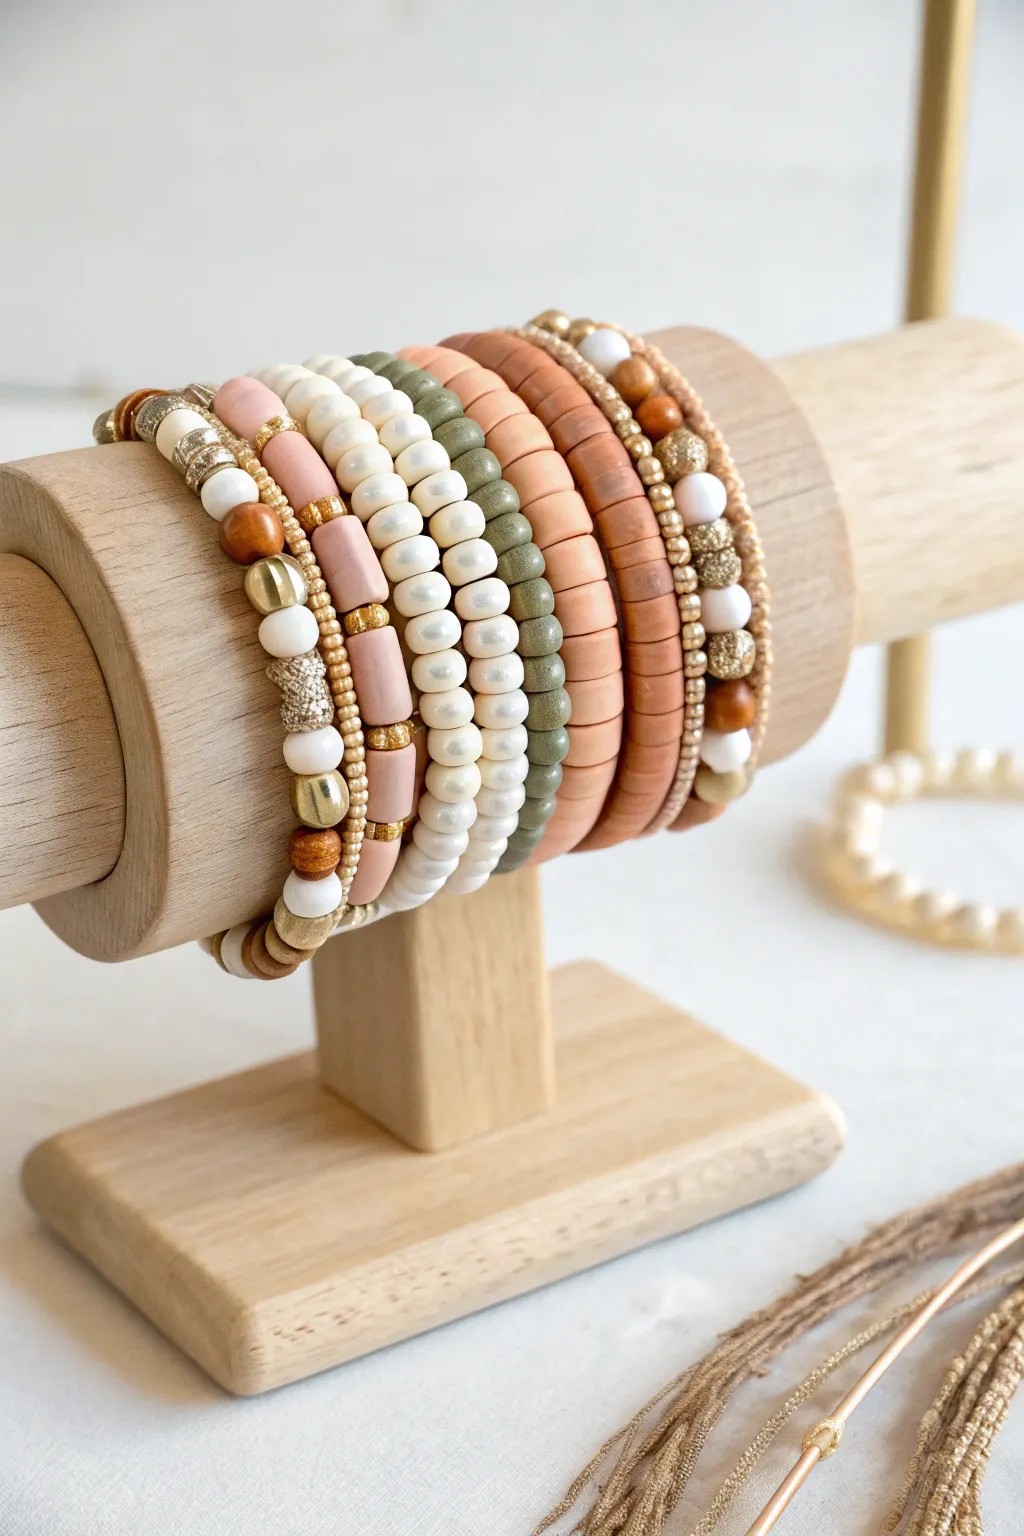
Neutral Boho Layers in Earth Tones
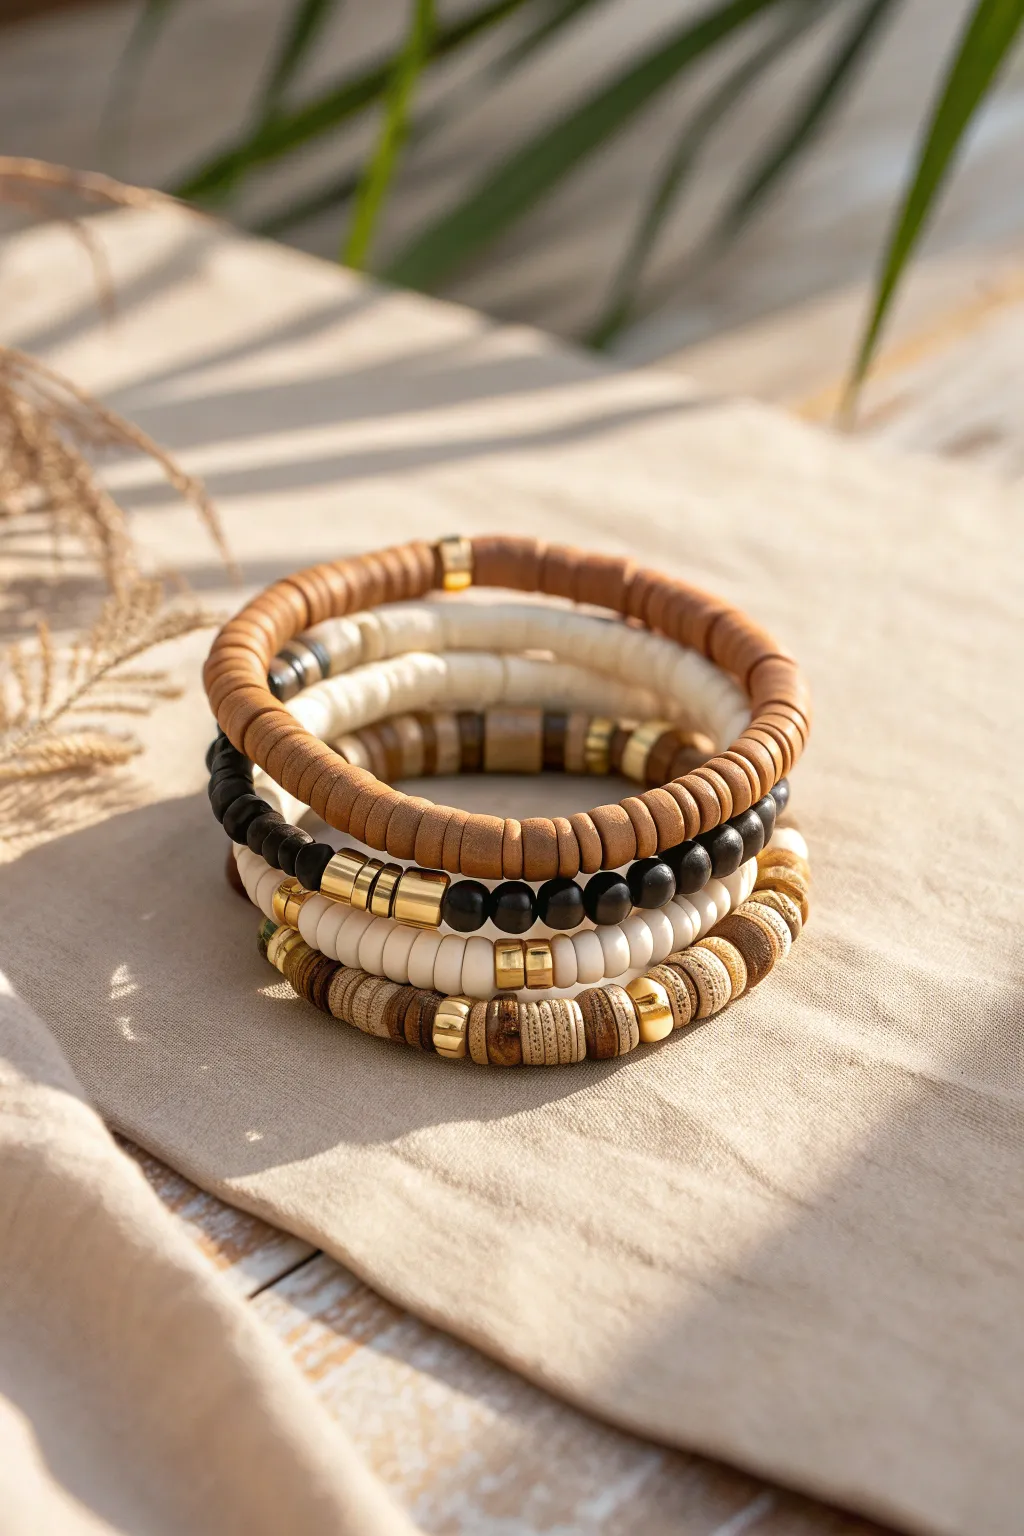
Capture the essence of laid-back luxury with this set of five coordinated bracelets. Featuring a blend of rustic wood, polymer clay heishi, and polished gold accents, these pieces are designed to be stacked together for a stunning, textured statement.
Step-by-Step
Materials
- 0.8mm clear elastic cord (high-quality stretch jewelry cord)
- 6mm khaki or light brown polymer clay heishi beads
- 6mm matte cream or off-white polymer clay heishi beads
- 6mm matte black polymer clay heishi beads
- Small wooden disc beads (coconut shell or brown wood)
- Black wooden round beads (6mm)
- Gold tube spacer beads (cylindrical)
- Gold hexagonal or disc spacer beads
- Jewelry glue or super glue
- Scissors
- Beading needle (optional but helpful)
- Clip or tape to secure the end of the string
Step 1: Preparation & Sizing
-
Measure your wrist:
Wrap a measuring tape loosely around your wrist. Add about half an inch to this measurement to ensure the heishi beads fit comfortably without pinching. -
Cut the elastic:
Cut five strands of elastic cord, each about 10-12 inches long. Having extra length makes tying the final knots much easier. -
Pre-stretch the cord:
Gently tug on each piece of elastic cord several times. This pre-stretching step helps prevent the bracelets from loosening permanently after the first wear. -
Secure the ends:
Place a bead stopper or simply use a piece of tape on one end of each cord to stop beads from sliding off while you work.
Double It Up
For extra security, use two strands of thinner elastic (0.5mm) threaded through the needle at once. If one snaps, the backup holds it together.
Step 2: Creating the Solid Tan Bracelet
-
String the base:
On your first cord, thread the 6mm khaki brown heishi beads continuously until you reach nearly half of your desired length. -
Add the focal point:
Slide on a single gold tube spacer or a small gold stack. Then, continue adding the khaki beads until the bracelet reaches the full length. -
Knot and secure:
Use a surgeon’s knot to tie the ends together. Add a tiny dab of glue to the knot, let it dry, and trim the excess cord.
Step 3: Designing the Mixed Patterns
-
The Cream & Gold layer:
For the second bracelet, use the cream heishi beads as your base. Create visual interest by inserting gold hexagonal spacers every inch or so, or group three gold spacers together as a centerpiece. -
The Black Contrast layer:
This bracelet adds depth. Alternate between groups of black heishi beads and gold tube spacers. I prefer doing a pattern of ten black beads followed by three gold discs for a rhythmical look. -
The Rustic Wood layer:
String the wooden coconut shell discs. Interperse them with the round wooden blacks beads or a gold accent bead every 5-6 beads to break up the texture. -
The Mixed Media layer:
For the final bracelet, mix your leftover cream and tan heishi beads with the wooden discs. Create a random, organic pattern that ties all the other color palettes together.
Make It Personal
Add a single gold letter bead to the center of the cream bracelet for a personalized touch that doesn’t disrupt the neutral boho aesthetic.
Step 4: Final Assembly
-
Check fit:
Before knotting the final four bracelets, wrap them around your wrist to ensure they aren’t too tight. -
Tie remaining knots:
Secure each bracelet with a surgeon’s knot, pulling tight enough to hide the elastic but not so tight that the beads pucker. -
Hide the knots:
If possible, tuck the glued knot inside the hole of a neighboring bead (the gold tube spacers work perfectly for this). -
Trim excess:
Once the glue is fully cured, snip off the tails of the elastic close to the bead.
Slide on your new stack and enjoy the effortless style these earth tones bring to any outfit
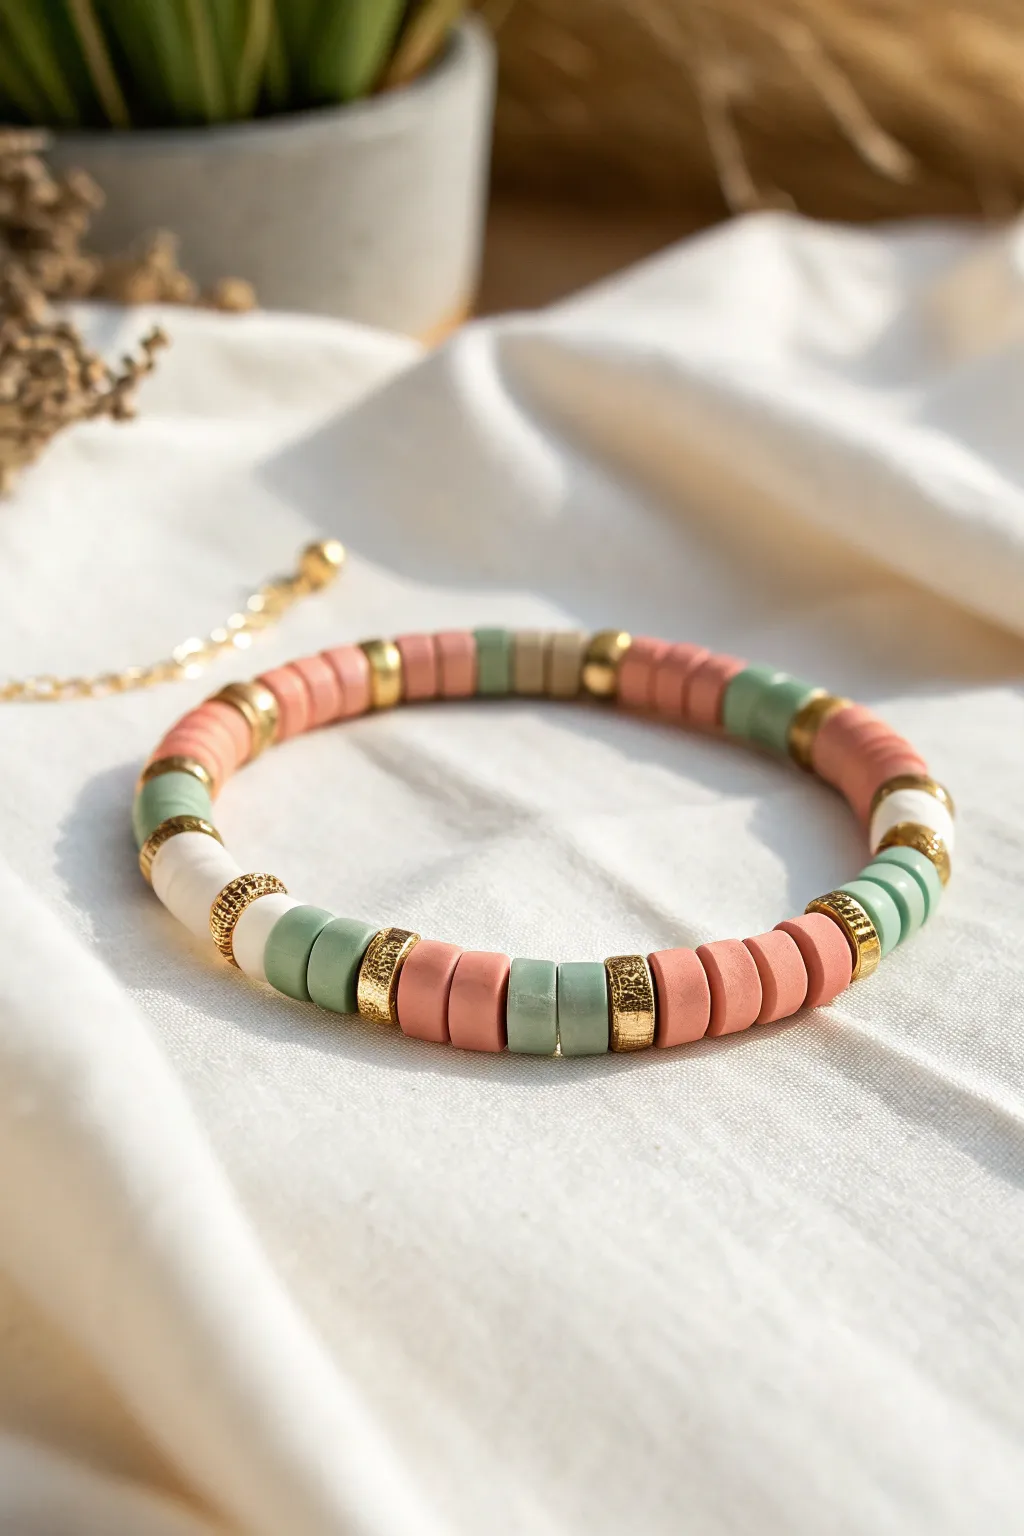
Preppy Pastels With Symmetry
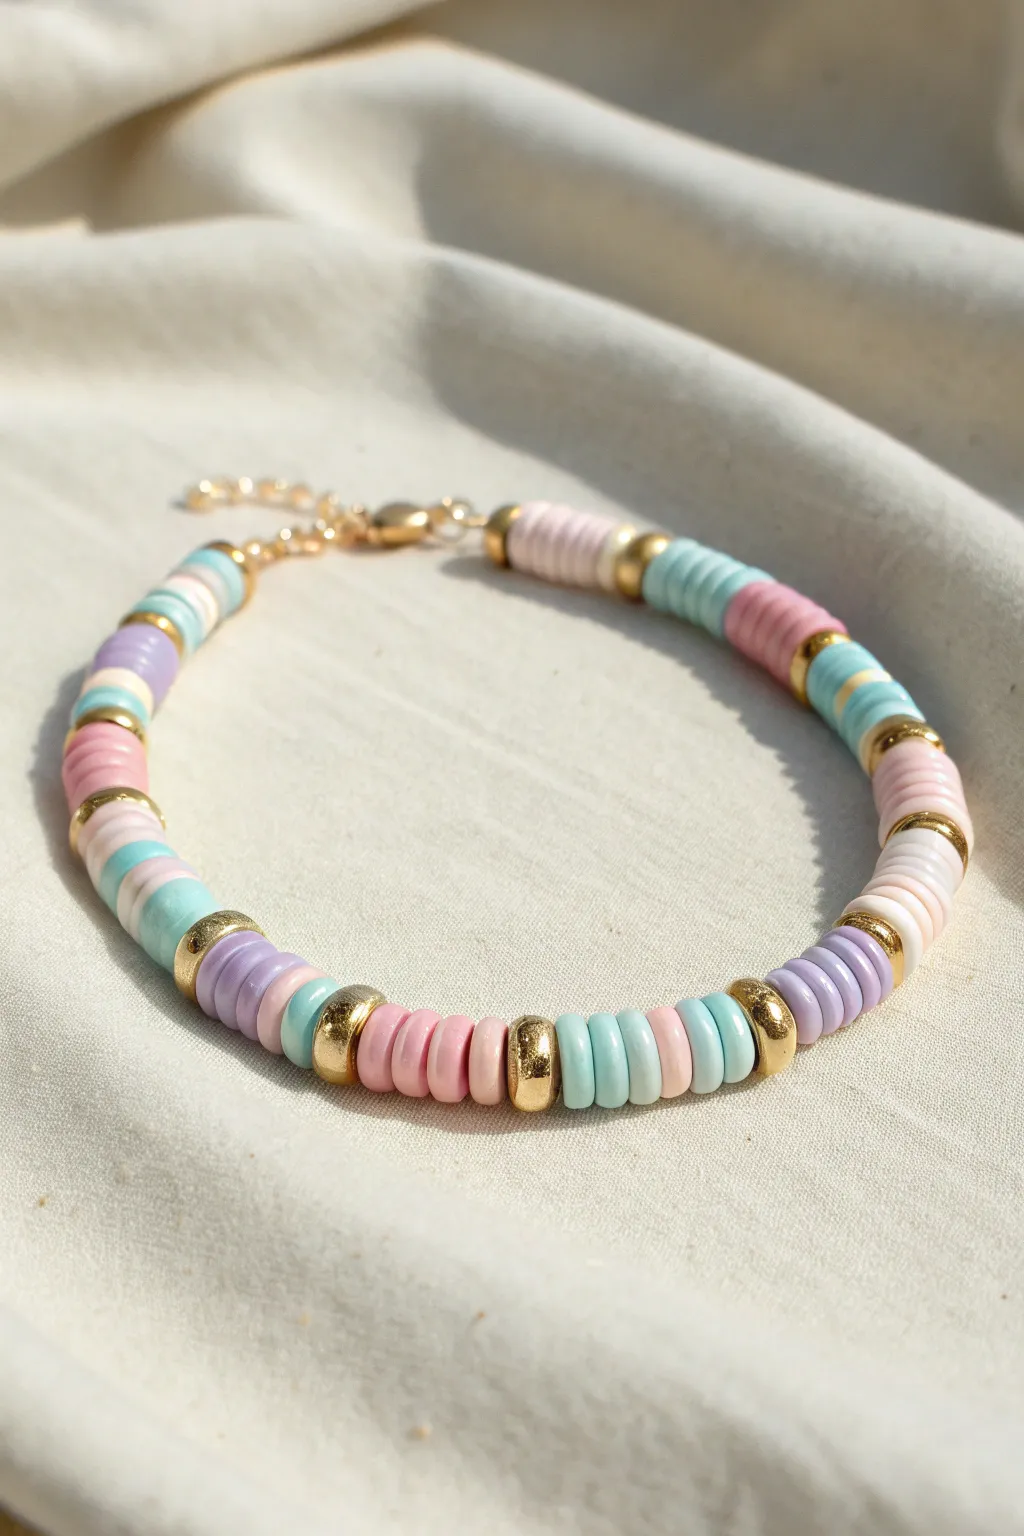
Embrace a soft and soothing aesthetic with this symmetrical heishi bead bracelet featuring a delightful mix of lilac, mint, pink, and cream. The gold spacer beads add a touch of warmth and luxury, elevating the simple pattern into a chic accessory perfect for stacking.
Detailed Instructions
Materials
- Polymer clay heishi beads (6mm or similar): Light Pink, Lavender/Lilac, Mint Green/Aqua, Cream/White, Darker Dusty Pink
- Gold spacer beads: smooth round bead (approx. 4mm) and disc/rondelle beads (approx. 6mm)
- Stretch cord (0.8mm) or beading wire with crimps (depending on preference)
- 2 Gold crimp beads (if using wire)
- 2 Gold wire guards (optional but recommended for wire)
- Gold lobster clasp
- Gold extender chain
- 2 Gold jump rings (4-6mm)
- Jewelry pliers (chain nose and flat nose)
- Scissors or wire cutters
- Bead design board or masking tape
Step 1: Planning the Pattern
-
Measure your wrist:
Before stringing, wrap a piece of string around your wrist to find your size, then add about half an inch for a comfortable fit. This ensures you don’t run out of beads mid-pattern. -
Lay out the centerpiece:
Start from the middle to ensure symmetry. Place a single gold round bead as your center point. On either side, lay down two mint green heishi beads, followed by two light pink heishi beads. -
Build the first symmetrical section:
Continuing outwards from the pink beads on both sides, add a gold round spacer bead. Follow this with a block of color: three light blue heishi beads, then three dusty pink heishi beads. -
Add gold disc accents:
Next, place a gold disc or rondelle bead. This thicker gold accent breaks up the color blocks nicely. Follow it with a section of cream or white beads—I’d use about four or five here to create a neutral breather. -
Introduce lavender:
After the cream section, add another gold disc bead. Now, bring in the lavender heishi beads. Use a stack of about five lavender beads to introduce a cool tone to the sequence. -
Create the outer segments:
Add a gold round spacer bead after the lavender. Then, create a mixed playful section: two mint beads, two cream beads, and two pink beads. This variation keeps the eye moving along the design. -
Finish the bead layout:
Continue repeating these small color blocks separated by gold spacers until you reach your desired length. End both sides with a gold crimp bead if using wire, or just prepare to knot if using elastic.
Step 2: Stringing and Securing
-
Prepare the wire:
Cut a length of beading wire about 10 inches long. This gives you plenty of room to work with the clasp without struggling. -
Attach the first clasp component:
Thread a crimp bead onto one end of the wire, followed by a wire guard. Loop the wire through the guard and hook on your lobster clasp. Thread the wire back through the crimp bead. -
Secure the start:
Use your flat nose pliers to flatten the crimp bead firmly. Give it a gentle tug to make sure it’s secure, then trim the excess short tail of wire. -
String the beads:
Transfer your laid-out design onto the wire one bead at a time. I find it easiest to pick up the heishi beads in small stacks rather than individually to speed up the process. -
Check the fit:
Once all beads are strung, wrap the bracelet around your wrist again. It should sit comfortably without pinching. Add or remove a few beads at the ends if necessary. -
Prepare the end closure:
Thread a crimp bead onto the open end, followed by a wire guard. Loop the wire through the guard and attach a jump ring. -
Close the loop:
Thread the wire back through the crimp bead and pull it tight so there is no slack in the beads, but not so tight that the bracelet becomes stiff. -
Final crimp:
Flatten the final crimp bead with your pliers. Trim the remaining wire tail close to the bead. -
Attach the extender chain:
Open the jump ring you just attached using two pairs of pliers (twist sideways, don’t pull apart). Slide on the extender chain loop and close the jump ring securely.
Uneven Tension?
If the bracelet feels stiff or kinks, you likely crimped it too tightly. Leave a tiny gap (about 1mm) of bare wire before crimping to let beads drape naturally.
Pattern Saver
Take a photo of your bead layout on the board before you start stringing. If you accidentally bump the table and scatter them, you’ll have a reference map!
Slip on your new pastel creation and enjoy the customized preppy style you just built by hand
Checkerboard Pixel Pattern Sections
Embrace a minimalist aesthetic with this checkerboard-style bracelet featuring tiny, soft-edged cube beads. The alternating pattern creates a satisfying pixelated look that mimics high-end tile work but wraps comfortably around your wrist.
How-To Guide
Materials
- Square polymer clay heishi beads (approx 4-5mm cubes) in Terracotta/Burnt Orange
- Square polymer clay heishi beads (approx 4-5mm cubes) in Matte White or Cream
- 0.8mm clear elastic stretch cord
- Hypo-cement or strong jewelry glue
- Scissors or jewelry snips
- Bead stopper or masking tape
- Optional: Bead design board
Step 1: Preparation
-
Measure your wrist:
Before cutting any cord, wrap a measuring tape loosely around your wrist. Add about half an inch to this measurement for a comfortable fit that isn’t too tight. -
Cut the cord:
Cut a piece of elastic cord roughly 10 inches long. I find it much easier to tie the final knot when I have plenty of excess string on both sides. -
Secure the end:
Attach a bead stopper to one end of your cut cord. If you don’t have a stopper, a piece of masking tape folded over the end works perfectly to stop beads from sliding off. -
Pre-stretch the elastic:
Gently pull on the elastic cord a few times before you start beading. This pre-stretching helps prevent the bracelet from sagging or loosening immediately after you wear it.
Step 2: Creating the Pattern
-
Inspect your beads:
Take a moment to sort through your cube beads. Discard or set aside any that are chipped or significantly different sizes, as uniformity is key to the checkerboard look. -
Start with a white bead:
Thread your first white cube bead onto the elastic. Pushing the needle or cord straight through the center is important so the cube sits flat. -
Add a terracotta bead:
Slide a terracotta-colored cube onto the string next. Ensure it sits flush against the white bead, matching flat side to flat side. -
Establish the rhythm:
Continue this strict 1:1 alternating pattern—one white, one terracotta. Pay attention to the orientation; you want the flat faces of the cubes touching, not the corners. -
Check the length often:
Periodically wrap the strand around your wrist to check the fit. Because cube beads can be bulky, you might need a slightly longer length than you would with standard round beads. -
End the pattern correctly:
Finish your strand so that the last bead creates a continuous pattern with the first bead. If you started with white, your last bead must be terracotta.
Twisty Issues?
If the cubes are twisting and not laying flat against each other, your elastic might be too thin. Try using two strands of thinner elastic or switch to a thicker 1mm cord for stability.
Step 3: Finishing Touches
-
Prepare the knot:
Remove the bead stopper or tape carefully, holding both ends of the elastic firmly so the beads don’t fly off. -
Tie a surgeon’s knot:
Cross the right end over the left, wrap it under, then wrap it under a second time. Pull tight. This extra loop adds significant security compared to a standard overhand knot. -
Secure with glue:
While holding the knot taut, dab a tiny drop of hypo-cement or jewelry glue directly onto the knot. I usually let this set for about 30 seconds before letting go. -
Hide the knot:
Once the glue is tacky but pliable, pull the elastic so the knot slides inside the hole of the nearest cube bead. This hides the mechanics completely. -
Trim the excess:
Using sharp scissors, trim the tails of the elastic cord as close to the bead hole as possible without nipping the knot itself. -
Final cure:
Allow the bracelet to sit undisturbed for at least 12 hours so the glue cures completely before its first wear.
Pattern Play
Swap the simple 1:1 alternating pattern for a 2:2 pattern (two orange, two white) to create longer ‘blocks’ of color for a chunkier visual effect.
Slip on your new geometric accessory and enjoy the modern, handmade touch it adds to your outfit
Terrazzo Confetti Heishi Beads
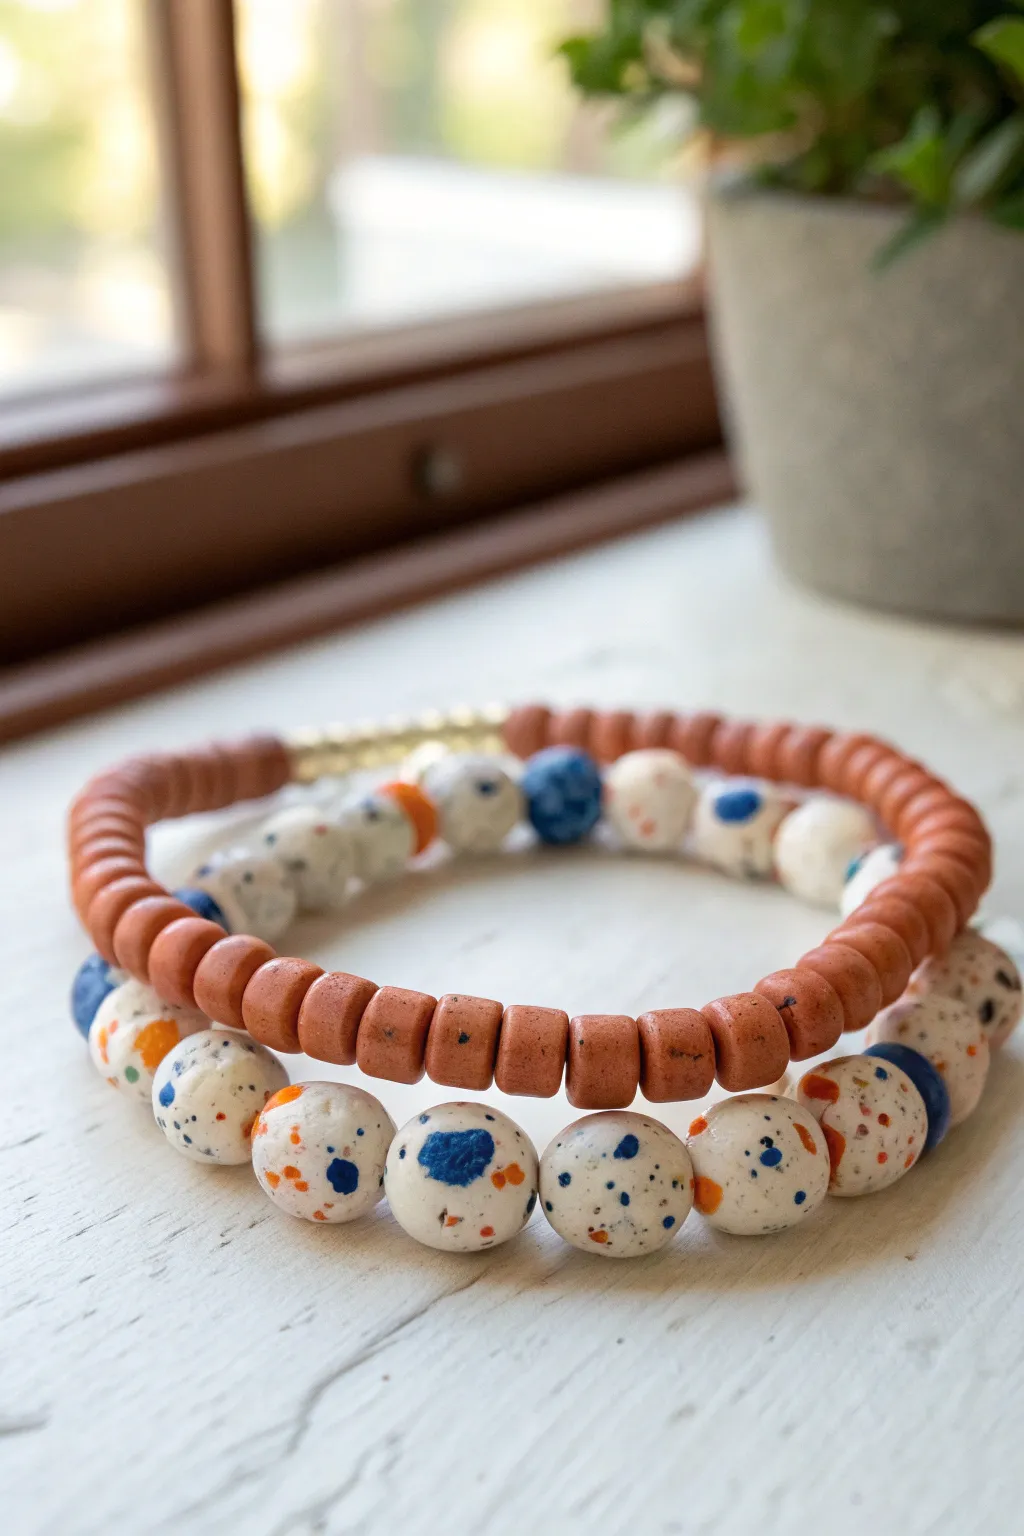
This chic bracelet stack combines the sleek uniformity of clay heishi beads with the artistic flair of hand-speckled terrazzo rounds. The contrast between the warm terracotta tones and the playful blue and orange confetti splatter makes for a modern, eye-catching accessory set.
Step-by-Step Tutorial
Materials
- Rust/terracotta colored polymer clay heishi beads (approx. 4-6mm)
- White or cream round polymer clay beads (approx. 8-10mm)
- Gold disc spacer beads
- Navy blue acrylic paint
- Bright orange acrylic paint
- Elastic clear stretch cord (.7mm or .8mm)
- Small stiff paintbrush or toothbrush
- Jewelry glue or super glue
- Scissors
- Toothpicks or wooden skewers
- Foam block or cardboard box (for drying)
Step 1: Creating the Terrazzo Confetti Beads
-
Prepare the beads for painting:
Mount your round white or cream beads onto toothpicks or wooden skewers. This will allow you to paint all sides without touching the wet surface and smudging your work. -
Secure the skewers:
Stick the ends of your skewers into a foam block or poke them through a small cardboard box so the beads are suspended in the air, ready for painting. -
Mix your paint:
Squeeze a small amount of navy blue and bright orange acrylic paint onto a palette. You may need to water them down just slightly so the paint flicks easily, but keep the pigment opaque. -
Splatter the first color:
Dip a stiff paintbrush or an old toothbrush into the blue paint. Hold it near the beads and run your thumb across the bristles to flick tiny specks of paint onto the bead surfaces. I find rotating the skewer as I flick ensures even coverage. -
Add the second color:
Clean your brush thoroughly or switch to a fresh one. Repeat the splatter process with the orange paint, aiming to fill in the empty white spaces without completely covering the blue specks. -
Paint larger spots (optional):
To mimic the ‘terrazzo’ look more closely, use a fine-tip brush or the end of a toothpick to manually dab on a few larger, irregular splotches of both blue and orange among the fine mist. -
Seal the design:
Let the paint dry completely. Once dry, you can apply a thin coat of matte or satin varnish to protect the paint from scratching off during wear.
Paint Splatter Chaos?
If your paint blobs are too big, dab them gently with a paper towel while wet. If paint is too runny, it won’t speckle well—let it thicken slightly on the palette first.
Step 2: Assembling the Heishi Bracelet
-
Measure the cord:
Cut a piece of elastic cord about 10-12 inches long. This extra length makes tying the knot at the end securely much easier than working with a short piece. -
Pre-stretch the elastic:
Give the cord a few gentle tugs. This pre-stretching helps prevent the bracelet from slacking and becoming loose after you wear it for the first time. -
String the heishi beads:
Begin threading the rust-colored heishi beads onto the cord. Continue until the strand is long enough to wrap around most of your wrist comfortably. -
Add the gold accent:
Thread on a small section of gold disc spacer beads—about 10 to 15 beads creates a nice focal bar that contrasts perfectly with the matte clay. -
Check the fit:
Wrap the strand around your wrist to check the size. Add or remove clay beads until the fit is snug but comfortable. -
Tie off the bracelet:
Tie a secure surgeon’s knot (right over left, left over right) and pull tight. Apply a tiny dot of jewelry glue to the knot for extra security.
Step 3: Assembling the Terrazzo Bracelet
-
Prepare the second cord:
Cut another 10-12 inch piece of elastic cord and pre-stretch it just as you did for the first bracelet. -
String the beads:
Thread your dry, custom-painted terrazzo beads onto the cord. For variety, you can intersperse a few solid blue or solid orange beads if you have them, or just keep it uniform. -
Final sizing:
Check the fit against your wrist. Since these beads are bulkier than the heishi discs, you might need a slightly larger circumference for it to sit comfortably. -
Secure the knot:
Tie a surgeon’s knot, pull tight, and hide the knot. If the hole of one bead is large enough, try to gently tuck the knot inside it before gluing for a seamless finish. -
Trim excess cord:
Once the glue is fully dry on both bracelets, use sharp scissors to trim the excess elastic tails as close to the knot as safely possible.
Mix Up The Texture
Intersperse smooth glass beads or raw wooden rounds between your painted terrazzo beads for an earthier, mixed-material vibe.
Stack your new creations together for a customized look that brings an artistic pop of color to any outfit
Statement Focal Bead Between Heishi Stacks
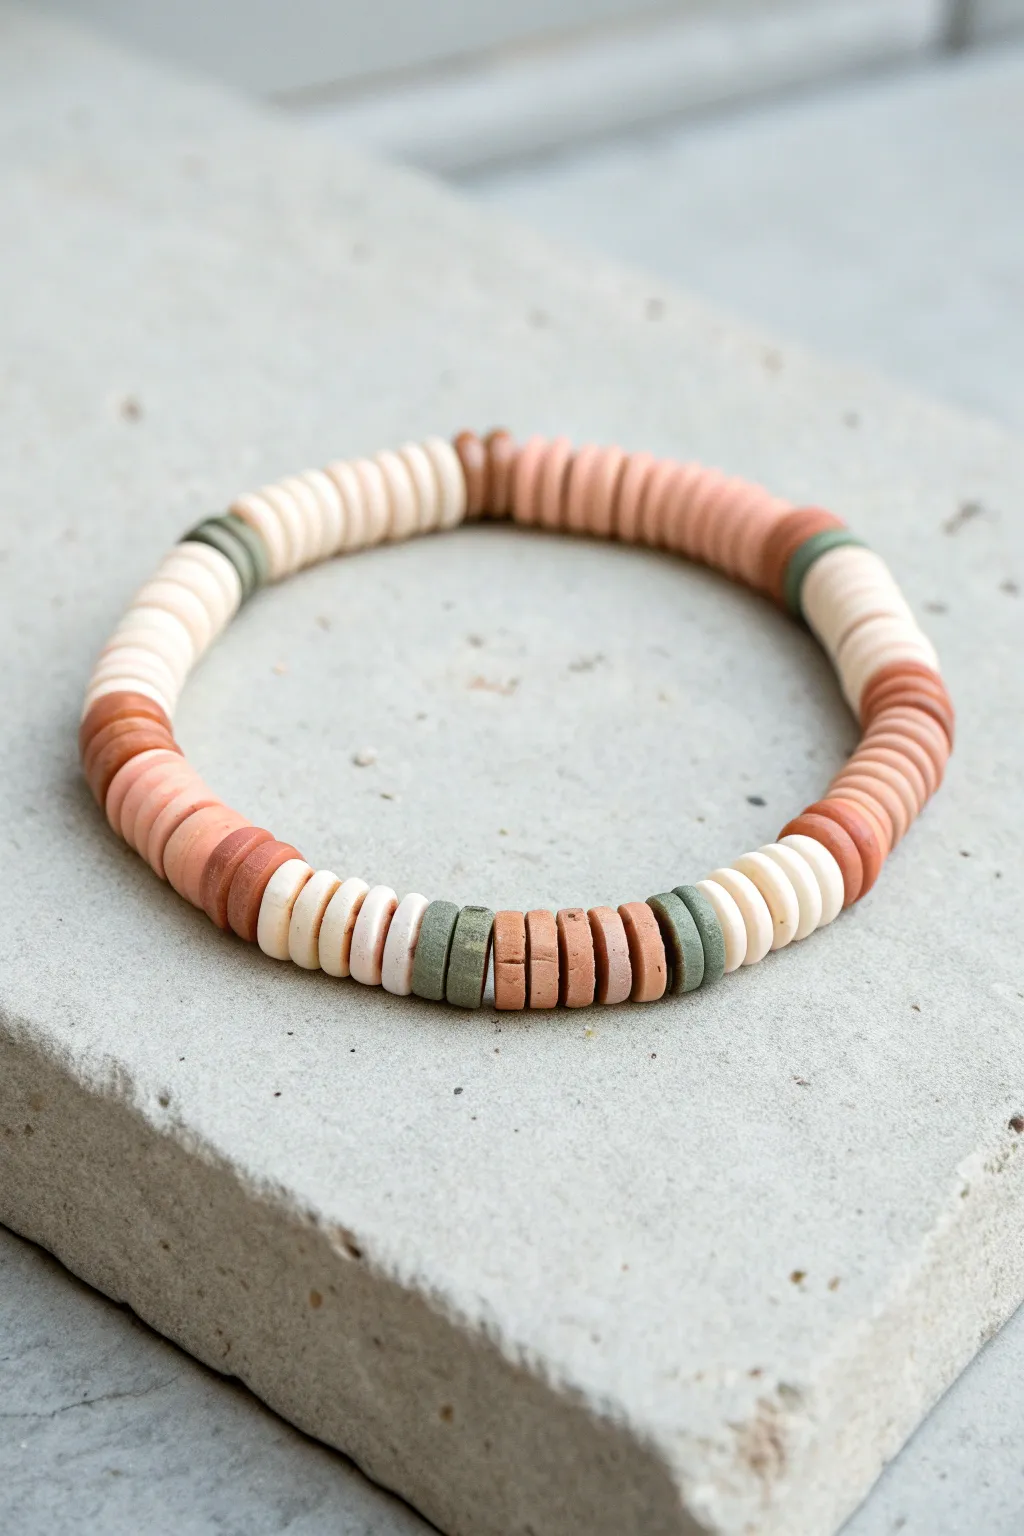
Embrace a natural, grounded aesthetic with this simple yet striking clay heishi bead bracelet. Featuring a soothing palette of rust, cream, and olive green, this piece uses strategic color blocking to create a harmonious accessory perfect for everyday wear.
Step-by-Step Guide
Materials
- Polymer clay heishi beads (6mm or 8mm disc beads) in cream/off-white
- Polymer clay heishi beads in terracotta/rust
- Polymer clay heishi beads in olive green
- Polymer clay heishi beads in tan/light brown
- Elastic beading cord (0.8mm or 1mm depending on hole size)
- Scissors or jewelry snips
- Super glue or jewelry cement
- Beading needle (optional but helpful)
- Bead stopper or tape
Step 1: Preparation & Planning
-
Measure your wrist:
Wrap a flexible measuring tape around your wrist to find your size. Add about 0.5 to 1 inch to this measurement depending on how loose you want the fit. -
Cut the cord:
Cut a length of elastic cord about 3-4 inches longer than your final bracelet size. This extra length is crucial for tying a secure knot later. -
Secure the end:
Place a bead stopper or a piece of tape on one end of the cord to prevent beads from sliding off while you design your pattern. -
Pre-stretch the elastic:
I always give the elastic cord a few gentle tugs before starting. This helps prevent the bracelet from stretching out permanently after the first few wears.
Step 2: Creating the Pattern
-
Start with the main cream section:
Begin by threading approximately 8 to 10 cream-colored beads onto the cord. This creates one of the larger light segments. -
Add a definition accent:
Slide on a single olive green bead. This acts as a spacer to separate the cream section from the next color block. -
Build the tan transition:
Thread on about 6 to 8 tan or light brown beads. This subtler tone bridges the gap between the bright cream and the darker rust colors. -
Create the focal rust block:
Add a stack of roughly 10 rust or terracotta beads. This warmer tone provides the visual weight of the design. -
Repeat the accent spacer:
Place another single olive green bead after the rust section to create consistency in your transitions. -
Form the mixed segment:
Create a unique focal point by alternating colors. Thread 6 tan beads, then 2 olive beads, then 6 rust beads. -
Add the second olive block:
Add a small block of just 2 olive green beads followed by a larger section of cream beads. -
Close the loop pattern:
Continue adding blocks of color—aiming for sections of 8-12 beads—separated occasionally by single green or tan beads until you reach the desired length.
Smoother Transitions
To fix crooked beads, roll the finished bracelet between your palms before gluing. This helps the flat discs settle flush against each other.
Step 3: Finishing Touches
-
Check the fit:
Wrap the unfinished strand around your wrist to ensure it fits comfortably. Add or remove a few beads if necessary, keeping the symmetry of your pattern in mind. -
Prepare the knot:
Remove the bead stopper carefully, holding both ends of the elastic firmly. -
Tie a surgeon’s knot:
Cross the ends, wrap one end around the other twice, and pull tight. Repeat this process to secure the bracelet. -
Secure with glue:
Apply a tiny drop of super glue or jewelry cement directly onto the knot. Let it dry for a few minutes to ensure the hold is permanent. -
Hide the knot:
Ideally, pull the knot gently so it slides inside the hole of one of the adjacent beads. This gives a professional, seamless finish. -
Trim excess cord:
Once the glue is fully dry, use scissors to trim the excess tail ends of the elastic cord close to the bead, being careful not to cut the knot itself.
Gold Glamour
Swap the single olive green spacer beads for gold-plated disc beads. The metallic shine adds an upscale, boutique feel to the earthy palette.
Slip on your new bracelet and enjoy the subtle pop of natural color on your wrist