If you’re trying to make something with clay that he’ll actually use, you’re in the right headspace. These clay gift ideas for him lean practical, personal, and hobby-friendly—nothing too fussy, just satisfying pieces with real everyday function.
Personalized Catchall Valet Tray
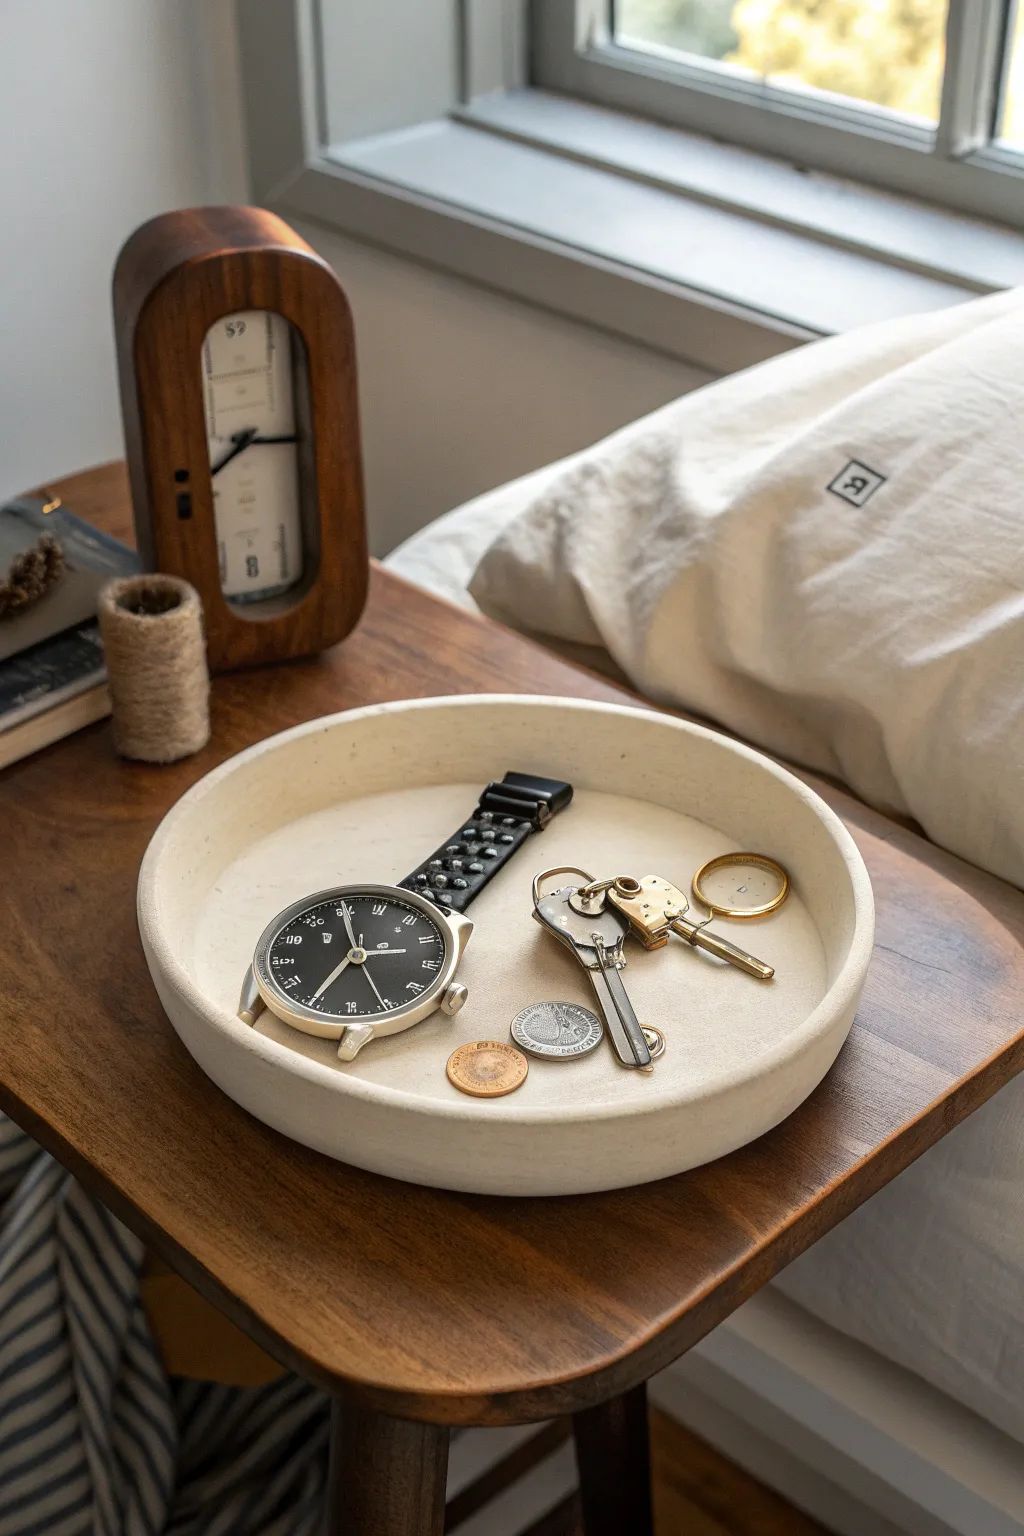
Create a sleek and functional home for keys, coins, and everyday essentials with this modern catchall tray. Its smooth matte finish and gentle organic curves give it a high-end boutique look without the designer price tag.
Step-by-Step Tutorial
Materials
- White or cream air-dry clay (1-2 lbs)
- Rolling pin
- Rolling guides or wooden slats (approx. 1/4 inch thick)
- Canvas mat or parchment paper
- Circle template (pot lid or large bowl, approx. 8-9 inches)
- X-Acto knife or needle tool
- Small bowl of water
- Clay sponge or soft paintbrush
- Fine-grit sandpaper (220 and 400 grit)
- Matte acrylic varnish or sealant
- Soft synthetic brush for sealing
Step 1: Shaping the Base
-
Prepare your workspace:
Lay down your canvas mat or parchment paper on a sturdy table to prevent sticking. Taking a moment to tape the edges down will keep your surface from shifting while you roll. -
Condition the clay:
Cut off a generous chunk of air-dry clay. Knead it in your hands for about 3-5 minutes until it feels warm, pliable, and free of any air pockets. -
Roll the slab:
Place your clay between two wooden slats or rolling guides. Roll the clay out into a smooth, even slab about 1/4 inch thick, ensuring the thickness is consistent across the entire surface. -
Cut the circle:
Place your circular template roughly in the center of the slab. Using your knife or needle tool, hold it perpendicular to the table and trace around the template to cut out a perfect circle. -
Smooth the edges:
Dip your finger in a little bit of water and run it along the cut edge of the circle to soften the sharp angle left by the knife.
Step 2: Building the Walls
-
Create the wall coil:
Take the remaining clay scraps and roll them into a long, even snake (coil). Aim for a thickness slightly thinner than your pinky finger. -
Flatten the coil strip:
Gently flatten this coil with the rolling pin until it becomes a long, flat ribbon about 3/4 inch tall. You may need to trim the edges to make them straight. -
Score and slip:
Use your needle tool to make hatch marks (scoring) around the top edge of your base circle and the bottom edge of your clay ribbon. Dab a little water or liquid clay (slip) onto the scored areas. -
Attach the wall:
Carefully stand the ribbon up along the edge of the base circle, pressing it firmly onto the scored area. Overlap the ends slightly and slice through both layers at an angle for a seamless join. -
Blend the seams:
Here I prefer to use a wooden modeling tool or just my thumb to drag clay from the wall down onto the base on the inside, and from the base up onto the wall on the outside. This creates a strong bond. -
Refine the shape:
Once blending is done, hold a slightly damp sponge against the rim and rotate the tray or move the sponge to smooth out fingerprints and ensure the wall stands straight up.
Smooth Operator
dip your finger in water and smooth the clay frequently while working. It’s much easier to fix imperfections while the clay is wet than to sand them away later.
Step 3: Finishing Touches
-
Slow drying:
Place the tray in a cool, dry spot away from direct sunlight. Let it dry slowly for 24-48 hours. Flipping it gently halfway through can help the bottom dry evenly and prevent warping. -
Sanding the surface:
Once bone dry, take your items outside or wear a dust mask. Use 220-grit sandpaper to remove major bumps, followed by 400-grit for a silky smooth finish. -
Clean the dust:
Wipe the entire piece thoroughly with a slightly damp cloth or a dry microfiber towel to remove every speck of clay dust before sealing. -
Apply the sealant:
Stir your matte varnish gently to avoid bubbles. Apply a thin, even coat to the inside and outside of the tray using a soft synthetic brush. -
Final cure:
Allow the first coat to dry according to the bottle instructions, then apply a second coat for extra durability. Let the tray cure fully before placing any metal items like keys inside.
Cracked Up?
If small drying cracks appear, mix a tiny bit of fresh clay with water to make a paste. Fill the crack, let it dry, and sand it smooth before sealing.
This refined tray is now ready to keep your essentials organized in style


Marbled Pocket-Dump Bowl
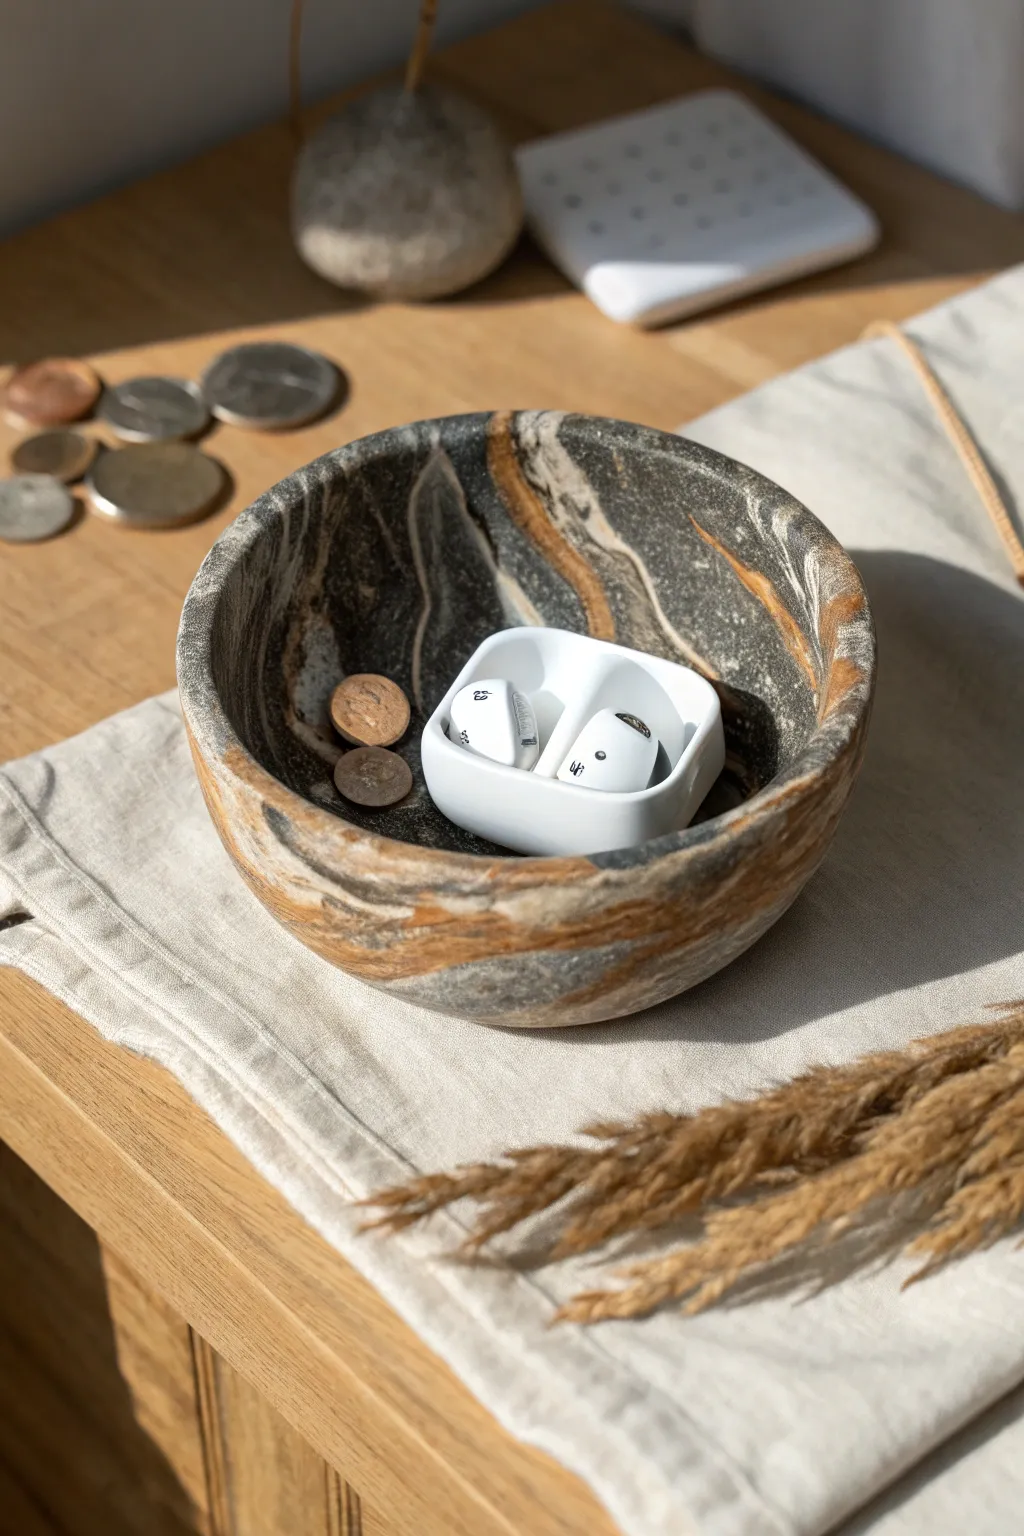
This sophisticated catch-all dish mimics the look of high-end striated stone with a mix of earthy clays. It’s the perfect size for keys, change, or earbuds and brings a touch of organic elegance to any nightstand.
Step-by-Step Tutorial
Materials
- Polymer clay (black or dark grey)
- Polymer clay (translucent or white)
- Polymer clay (ochre or gold granite)
- Acrylic rolling pin
- Small glass or ceramic bowl (to use as a mold)
- Craft knife
- Sandpaper (fine grit, 400-1000 wet/dry)
- Matte or satin polymer clay varnish
- Oven and baking sheet
Step 1: Prepping and Marbling
-
Condition the clay:
Start by kneading each block of clay separately until it is soft, pliable, and warm to the touch. This prevents cracking later. -
Create logs:
Roll each color into a long, snake-like log roughly half an inch thick. You’ll want about 50% dark grey, 30% white/translucent, and 20% ochre. -
Combine the ropes:
Gather your three colored logs and twist them together into one large rope, like pulling taffy. -
Fold and twist:
Fold the twisted rope in half, then twist it again. Repeat this ‘fold and twist’ motion about 3 or 4 times. Be careful not to over-mix, or the colors will turn to mud instead of distinct veins. -
Form a ball:
Once you have beautiful striations, roll the combined clay into a smooth, tight ball in the palms of your hands to eliminate air bubbles. -
Flatten the slab:
Using your acrylic rolling pin, flatten the ball into a disc about 1/4 inch thick. Roll from the center outward, rotating the clay frequently to keep it circular.
Fixing Muddy Colors
If you over-mixed and the veins disappeared, don’t scrap it! Chop the clay into small chunks and press them back together randomly to create a ‘terrazzo’ style pattern instead.
Step 2: Shaping the Bowl
-
Select your mold:
Choose an oven-safe glass or ceramic bowl that has the curve shape you want. I prefer using the outside of the bowl as a form. -
Drape the clay:
Gently lift your clay disc and drape it over the upside-down form. Determine which side of the marbling looks best and keep that facing ‘out’ or up. -
Smooth the shape:
Press the clay gently against the mold, working from the center bottom down the sides to ensure it hugs the shape without trapping air. -
Trim the rim:
Use your craft knife to slice off the uneven edges, creating a clean, flat rim. You can rotate the bowl while holding the knife steady for a consistent height. -
Soften the edge:
Run your finger along the cut rim to smooth out the sharpness. A little bit of water on your fingertip can help blend the cut edge perfectly.
Step 3: Baking and Finishing
-
Bake:
Place the clay-covered bowl (still on the mold) onto a baking sheet. Bake according to the manufacturer’s instructions for your specific brand of clay, usually around 275°F (135°C) for 15-20 minutes. -
Cool completely:
Let the piece cool completely before attempting to pop it off the mold. Removing it while hot can warp the shape. -
Wet sanding:
Once cool, take your wet/dry sandpaper and a little water. Sand the rim and the surface in circular motions to remove any fingerprints or imperfections. -
Buffing:
Dry the bowl thoroughly. Rub the surface vigorously with a piece of denim or heavy cotton cloth to bring out a natural sheen. -
Seal:
Apply a very thin coat of matte or satin varnish to protect the surface and deepen the contrast of the marbled colors.
Add Metallic Flair
Before baking, press flaked gold leaf onto the separation lines between colors. It will crackle as you roll it out, creating realistic mineral veins.
This sophisticated organizer is now ready to keep daily essentials tidy


Geometric Coaster Set
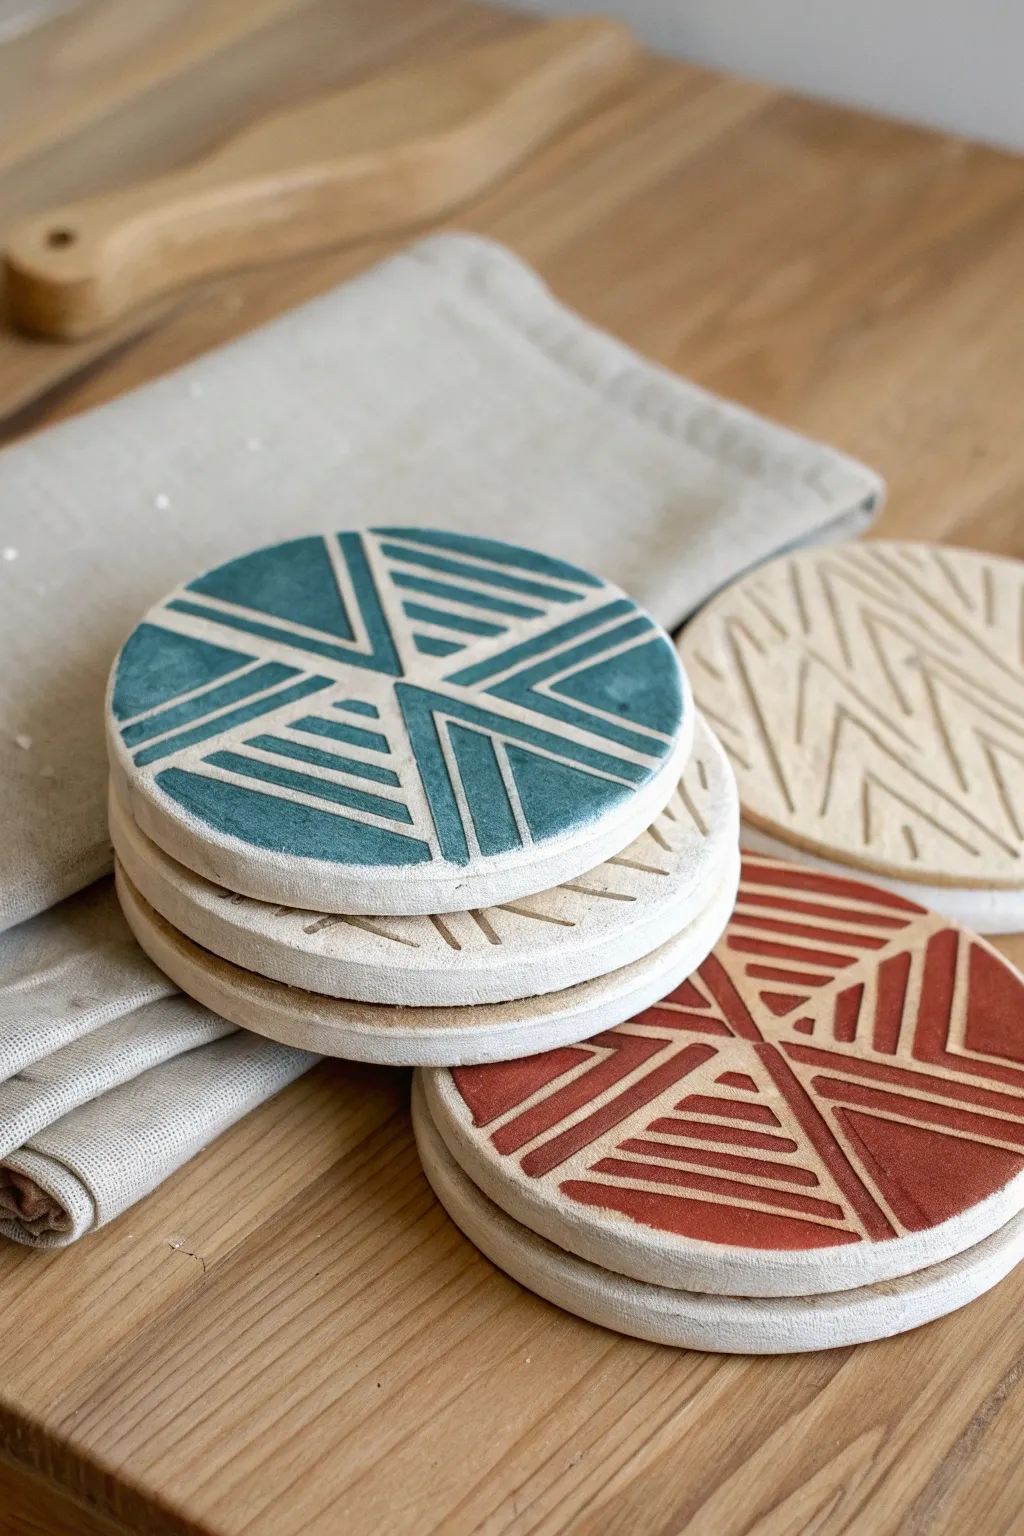
These stylish coasters combine clean lines with natural textures for a modern bohemian look. The bold geometric patterns are carved directly into air-dry clay before painting, creating a tactile and functional piece of art.
Step-by-Step
Materials
- White polymer clay or air-dry clay (approximately 1 lb)
- Acrylic rolling pin
- Precision knife or clay needle point tool
- Round cookie cutter (approx. 4 inches) or a bowl to trace
- Fine-grit sandpaper (220-400 grit)
- Acrylic paints (Teal, Burnt Orange, and Cream/White)
- Small flat paintbrushes
- Ruler
- Matte sealant or Mod Podge
- Felt backing or cork adhesive circles
Step 1: Shaping the Base
-
Prepare the Clay:
Begin by kneading your clay until it is soft, pliable, and free of air bubbles. This conditioning step is crucial to prevent cracks later on. -
Roll it Out:
Use your acrylic rolling pin to flatten the clay into an even slab. Aim for a thickness of about 1/4 to 1/3 inch—thick enough to be sturdy but not clunky. -
Smooth the Surface:
Take a moment to gently run your finger or a slightly damp sponge over the clay slab to remove any fingerprints or imperfections. -
Cut the Circles:
Using your large round cookie cutter or a bowl as a guide, cut out four identical circles. Peel away the excess clay. -
Clean the Edges:
Dip your finger in a little water and smooth the raw edges of your circles so they are perfectly round and soft to the touch.
Uneven Drying?
If your coasters curl while drying, place a flat, heavy book on top of them once they are partially dry (leather-hard) to force them flat as they finish curing.
Step 2: Carving the Design
-
Mark the Center:
Find the approximate center of your coaster. You can lightly press a small dot with your needle tool to guide your pattern. -
Divide into Quadrants:
Using a ruler and your needle tool, lightly score a large ‘X’ across the coaster, dividing the circle into four equal triangular sections. -
Carve Primary Lines:
Go back over your ‘X’ lines with a bit more pressure or a carving tool to create a deeper channel. This creates the main separation for your geometric shapes. -
Add Inner Triangles:
Inside each of the four main sections, carve a smaller triangle shape. Leave a small border between this new triangle and the main ‘X’ lines. -
Create Parallel Detail:
In two opposite quadrants (top and bottom), fill the inner triangle with horizontal parallel lines. In the left and right quadrants, fill them with vertical lines to create contrast. -
Clean Up Crumbs:
Gently brush away any loose balls of clay created by the carving process using a soft, dry brush. -
Dry Completely:
Allow the coasters to dry fully according to your clay package instructions. I prefer to let them sit for 24-48 hours, flipping halfway through for even drying.
Two-Tone Style
Instead of leaving the borders raw white clay, paint the embossed lines in metallic gold or copper for a high-contrast, luxurious finish.
Step 3: Finishing Touches
-
First Sanding:
Once fully cured, use fine-grit sandpaper to smooth the outer rim and the flat surface lightly, being careful not to sand away your carved texture. -
Paint the Pattern:
Load a small flat brush with teal or burnt orange paint. Carefully paint inside the carved geometric sections, leaving the raised ‘borders’ (the original clay color) unpainted. -
Clean Mistakes:
If paint gets onto the raised borders, quickly wipe it away with a damp cloth or wait for it to dry and gently sand it off. -
Seal the Work:
Apply two thin coats of matte sealant over the entire top and sides of the coaster to protect it from moisture. -
Add Protection:
Adhere a circle of felt or cork to the bottom of each coaster to prevent scratching your table.
Stack your new coasters on the coffee table and enjoy the handmade charm they add to your space


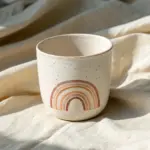
Handbuilt Coffee Mug With Matte Texture
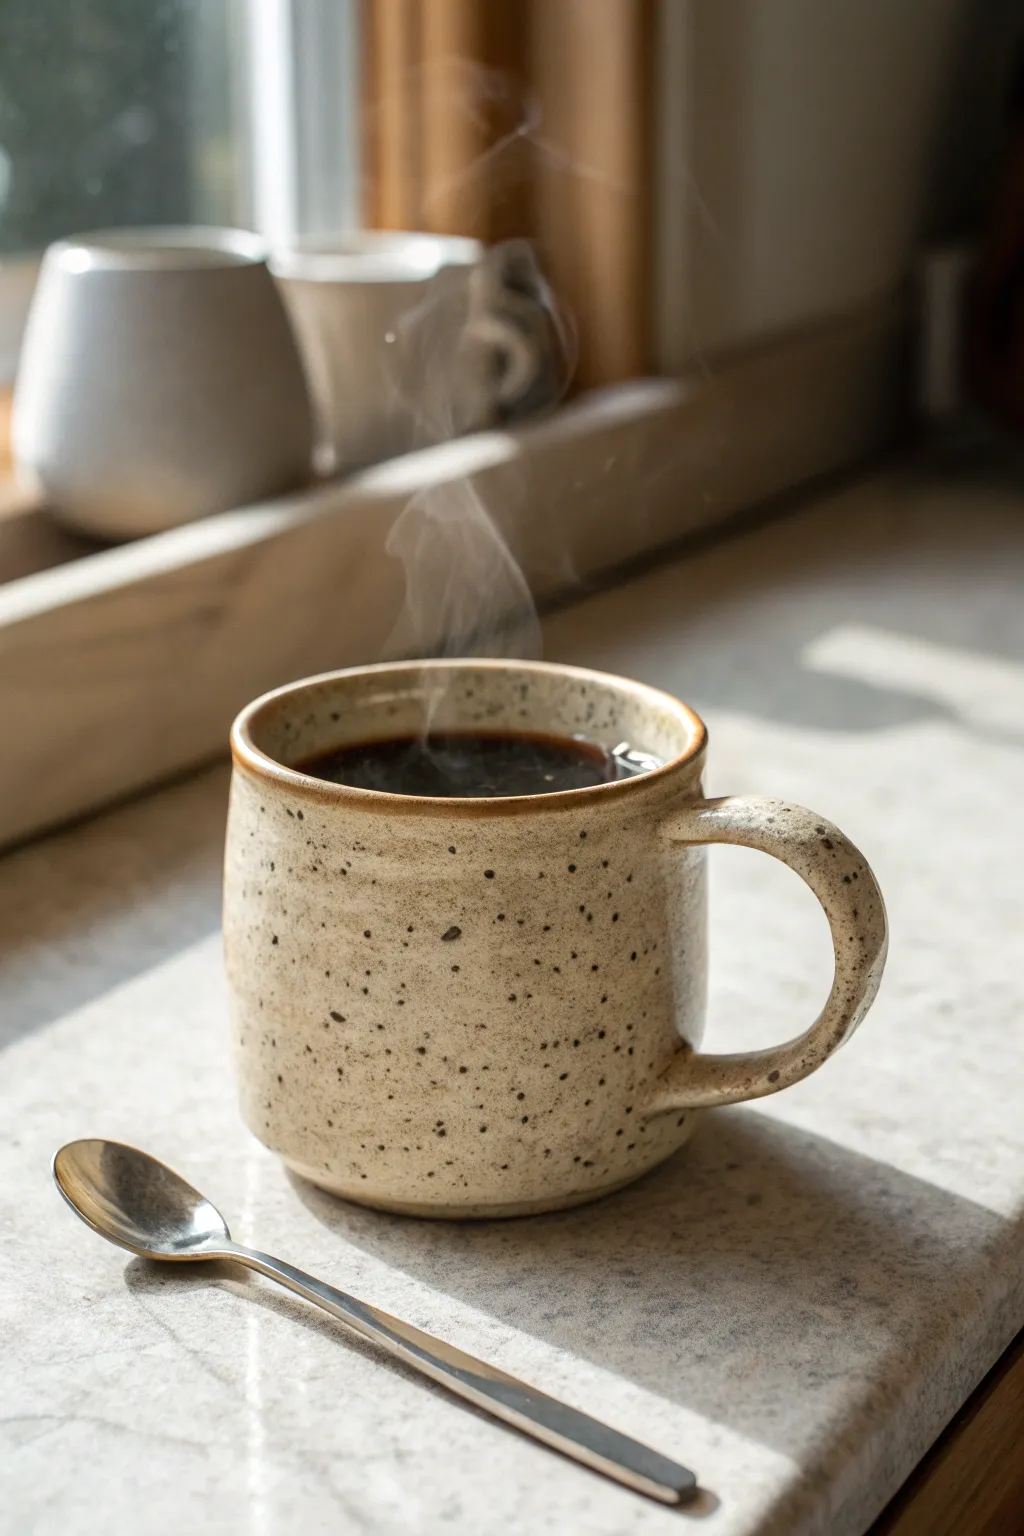
This rustic, handbuilt coffee mug features a cozy tapered shape and a beautiful matte speckled finish that feels wonderful in the hand. It’s the perfect size for a morning brew and makes a thoughtful, functional gift for anyone who appreciates earth tones and simple design.
Step-by-Step Tutorial
Materials
- Speckled stoneware clay (mid-fire)
- Rolling pin
- Canvas work surface
- Rectangular template (approx. 4″ x 10″)
- Needle tool or fettling knife
- Scoring tool (serrated rib)
- Slip (clay mixed with water)
- Wooden modeling tool
- Sponge
- Matte clear or matte oatmeal glaze
- Kiln access
Step 1: Forming the Body
-
Prepare the slab:
Begin by wedging your speckled clay to remove air bubbles. Roll it out on your canvas surface into an even slab, aiming for a thickness of about 1/4 inch to ensure the mug isn’t too heavy. -
Cut the rectangle:
Place your rectangular template onto the slab. Using your needle tool or fettling knife, cut out the main body of the mug. Save the excess clay for the base and handle. -
Bevel the edges:
On the short sides of your rectangle, cut a 45-degree angle bevel on opposite faces. This allows the seam to overlap cleanly without creating a thick lump. -
Score and slip:
Rough up the beveled edges with your scoring tool and apply a generous amount of slip. Gently curve the slab into a cylinder, pressing the scored edges together firmly. -
Secure the seam:
Use a wooden tool to blend the clay across the seam on both the inside and outside. I like to run a smooth rib over the outside seam to make it invisible. -
Create the base:
Roll out a small piece of leftover clay. Place your cylinder on top of it and trace a circle around the bottom with your needle tool. -
Attach the bottom:
Score and slip both the bottom edge of the cylinder and the edge of the circle base. Press them together firmly. -
Refine the shape:
Use your fingers or a sponge to gently push the walls slightly outward from the inside to create a subtle curve, slightly tapering the rim inward for that cozy look.
Cracking Handle?
Handles often dry faster than the body, causing cracks. Wax the handle (wax resist) or wrap just the handle in plastic to slow its drying speed down.
Step 2: Handle and Finishing
-
Pull the handle:
Take a small carrot-shaped lump of clay. Holding the thick end, wet your hand and stroke the clay downward to pull a smooth, uniform strap. Curve it into a ‘C’ shape and set it aside to stiffen slightly. -
Attach the handle:
Once the handle is leather hard (firm but flexible), score and slip the attachment points on the mug and the handle ends. Press the handle firmly onto the mug body. -
Clean the joints:
Roll a tiny coil of clay and wrap it around the handle attachment points if there are gaps. Smooth this wet clay into the joints with a modeling tool for a seamless look. -
Smooth the lip:
Use a damp sponge or a piece of plastic wrap folded over the rim to smooth the drinking edge. It should be rounded and comfortable for lips. -
Dry slowly:
Cover the mug loosely with plastic to let it dry slowly. This prevents the handle from cracking away from the body as the clay shrinks. -
Bisque fire:
Once bone dry, fire the piece in a kiln to the bisque temperature appropriate for your clay body (usually Cone 04 or 06). -
Glaze application:
Dip the mug into a matte clear or matte oatmeal glaze. Wipe the bottom of the mug clean with a sponge so it doesn’t stick to the kiln shelf. -
Final firing:
Fire the mug again to the clay’s maturity temperature (e.g., Cone 5 or 6). The heat will reveal the beautiful speckles through the matte glaze.
Smoother Sips
Compress the rim with a piece of chamois leather while finishing. This creates an incredibly smooth, professional drinking edge that sponges can’t match.
Enjoy your morning coffee in a mug that feels as grounded and natural as the earth it came from

The Complete Guide to Pottery Troubleshooting
Uncover the most common ceramic mistakes—from cracking clay to failed glazes—and learn how to fix them fast.
Desk Pen Cup and Tool Crock
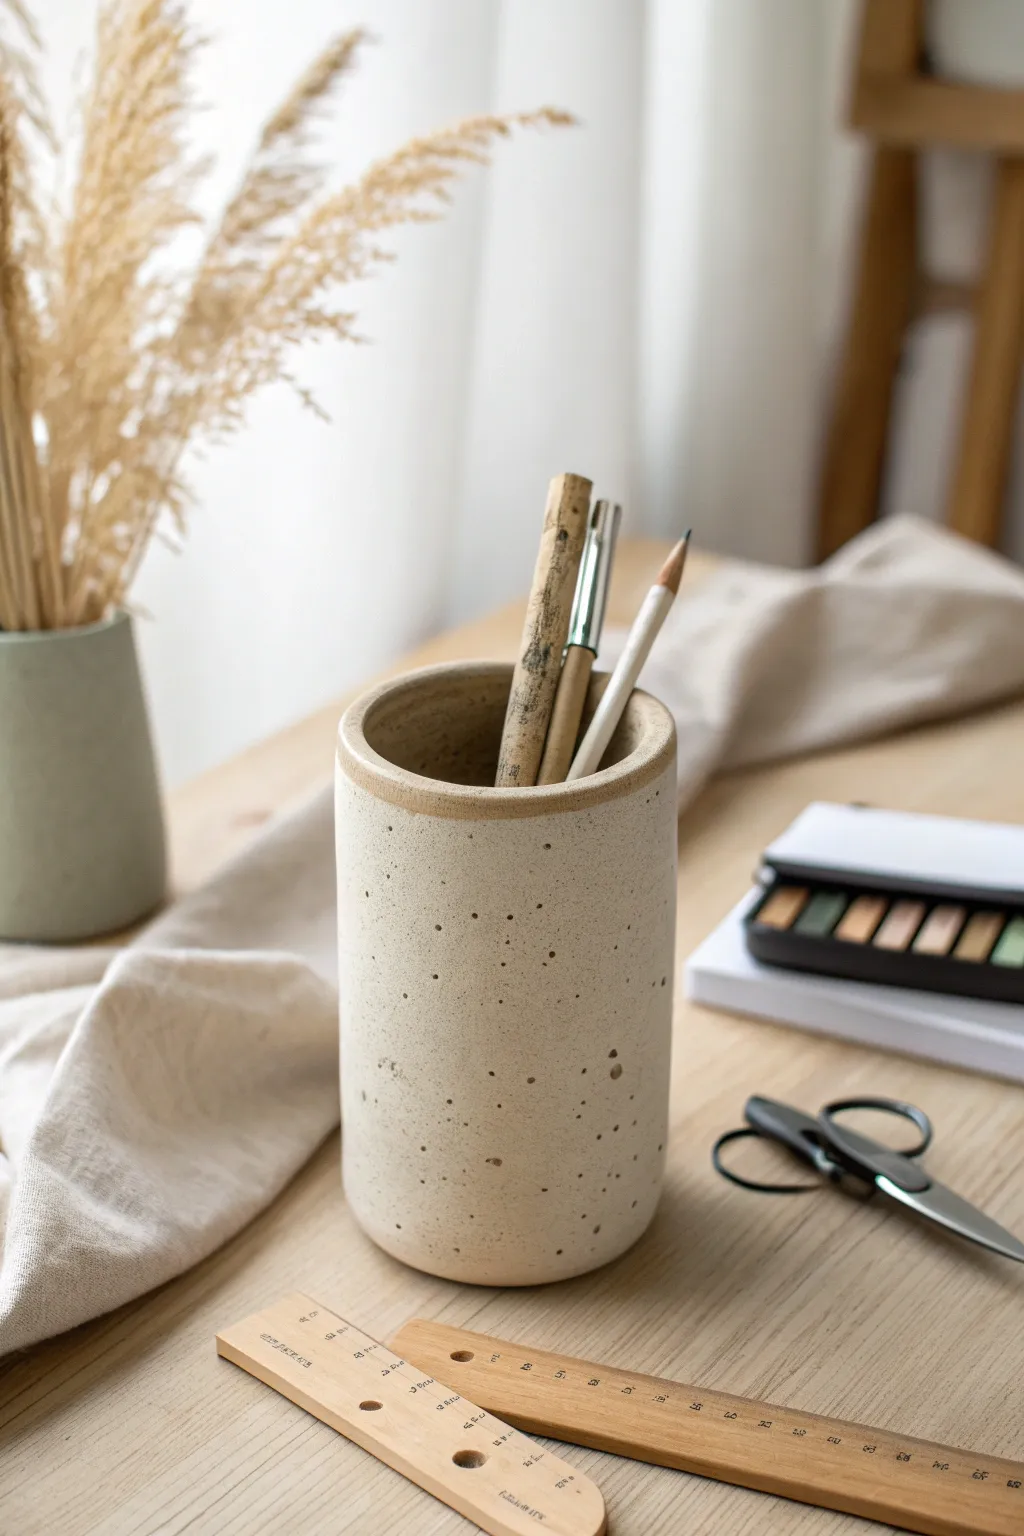
Simple, robust, and undeniably handsome, this speckled pen crock brings a touch of calm nature to any workspace. Its sturdy cylindrical form and natural clay texture make it a functional piece of art that feels as good as it looks.
Step-by-Step Guide
Materials
- Speckled stoneware clay (mid-fire)
- Rolling pin
- Canvas mat or slab roller
- Needle tool or fettling knife
- Ruler
- Scoring tool (or fork)
- Slip (clay mixed with water)
- Cylindrical mold or PVC pipe (approx. 3-4 inch diameter)
- Smooth red rib tool
- Sponge
- Clear matte glaze or transparent white glaze
Step 1: Creating the Slab
-
Roll out the clay:
Begin by wedging your speckled stoneware clay to remove air bubbles. Flatten it onto your canvas mat and use the rolling pin to create an even slab. Aim for a thickness of about 1/4 inch to ensure the walls are sturdy but not too heavy. -
Compress the slab:
Take your smooth rib tool and gently drag it across the surface of the clay in multiple directions. This compression step is crucial—it aligns the clay particles to prevent warping later and creates a nice, smooth canvas for the glaze. -
Measure the circumference:
If you are using a specific mold or pipe, measure its circumference with a flexible tape measure or piece of string. Add about a half-inch to this measurement to create a bevel overlap, or measure exactly if you plan to butt-join the seam. -
Cut the rectangle:
Using your ruler and needle tool, cut a clean rectangle from the slab. The height should be roughly 4.5 to 5 inches for a standard pen cup, and the length will be the circumference measurement you just took. -
Cut the base:
Cut a separate circle from the remaining slab for the base. It should be slightly larger than the diameter of your eventual cylinder to allow for blending.
Warped Walls?
If your cylinder turns into an oval during drying, it usually means the slab wasn’t compressed enough or the clay was too wet. Let the slab stiffen to soft leather-hard before building.
Step 2: Building the Form
-
Bevel the edges:
On the short sides of your rectangle, cut 45-degree angles in opposite directions. This allows the two ends to overlap seamlessly without creating a thick lump at the seam. -
Score and slip:
Rough up the beveled edges using your scoring tool and apply a generous amount of slip. Do the same to the bottom edge of the long rectangle and the outer perimeter of your circular base. -
Assemble the cylinder:
Wrap the rectangle around your cylindrical mold or PVC pipe support. Press the beveled ends together firmly. I like to start pressing from the bottom and work my way up to ensure it’s aligned perfectly. -
Secure the seam:
Remove the support mold carefully. Support the inside of the seam with one hand while using a wooden tool or your thumb to smooth the seam on the outside. Repeat on the inside to make the join invisible. -
Attach the base:
Place the cylinder onto the scored base circle. Press down firmly to connect them. Use a modeling tool to drag clay from the base up onto the wall, and then smooth it out with your rib tool.
Step 3: Refining and Finishing
-
Round the bottom:
To achieve the look in the photo, gently curve the bottom edge where the wall meets the table. Use a damp sponge or your thumb to soften this angle so it isn’t sharp. -
Smooth the rim:
The rim is a high-touch area, so ensure it feels pleasant. Use a piece of chamois leather or a damp sponge to round off the top lip of the cup. -
Dry slowly:
Cover the pot loosely with plastic and let it dry slowly over a few days to reach the bone-dry stage. This slow drying helps prevent the bottom crack that can happen with cylindrical forms. -
Bisque fire:
Fire the piece in a kiln to cone 04 (or your clay body’s bisque temperature). -
Wax resist:
Apply wax resist to the bottom and slightly up the side if you want an exposed clay foot, though the example image shows the glaze going very close to the bottom. -
Glazing:
Pour a transparent white or clear matte glaze inside the cup, swirl to coat, and pour out. Then, dip the exterior into the same glaze. If your clay doesn’t have enough natural iron speckles, you can flick iron oxide wash onto the raw glaze with a stiff toothbrush. -
Final smooth:
Once the glaze is dry, rub out any pinholes with your finger. If you want the rim to have that exposed clay look, wipe the very top edge clean with a damp sponge. -
Glaze fire:
Fire the gift to the maturity temperature of your clay and glaze (typically cone 5 or 6 for stoneware).
Add a Makers Mark
Stamp the recipient’s initials or a small personal symbol near the bottom edge before the clay gets too dry. It adds a bespoke, professional touch to the gift.
Fill it with some quality pens or pencils and wrap it up for a truly personalized desk accessory.
Ring Cone for His Daily Band
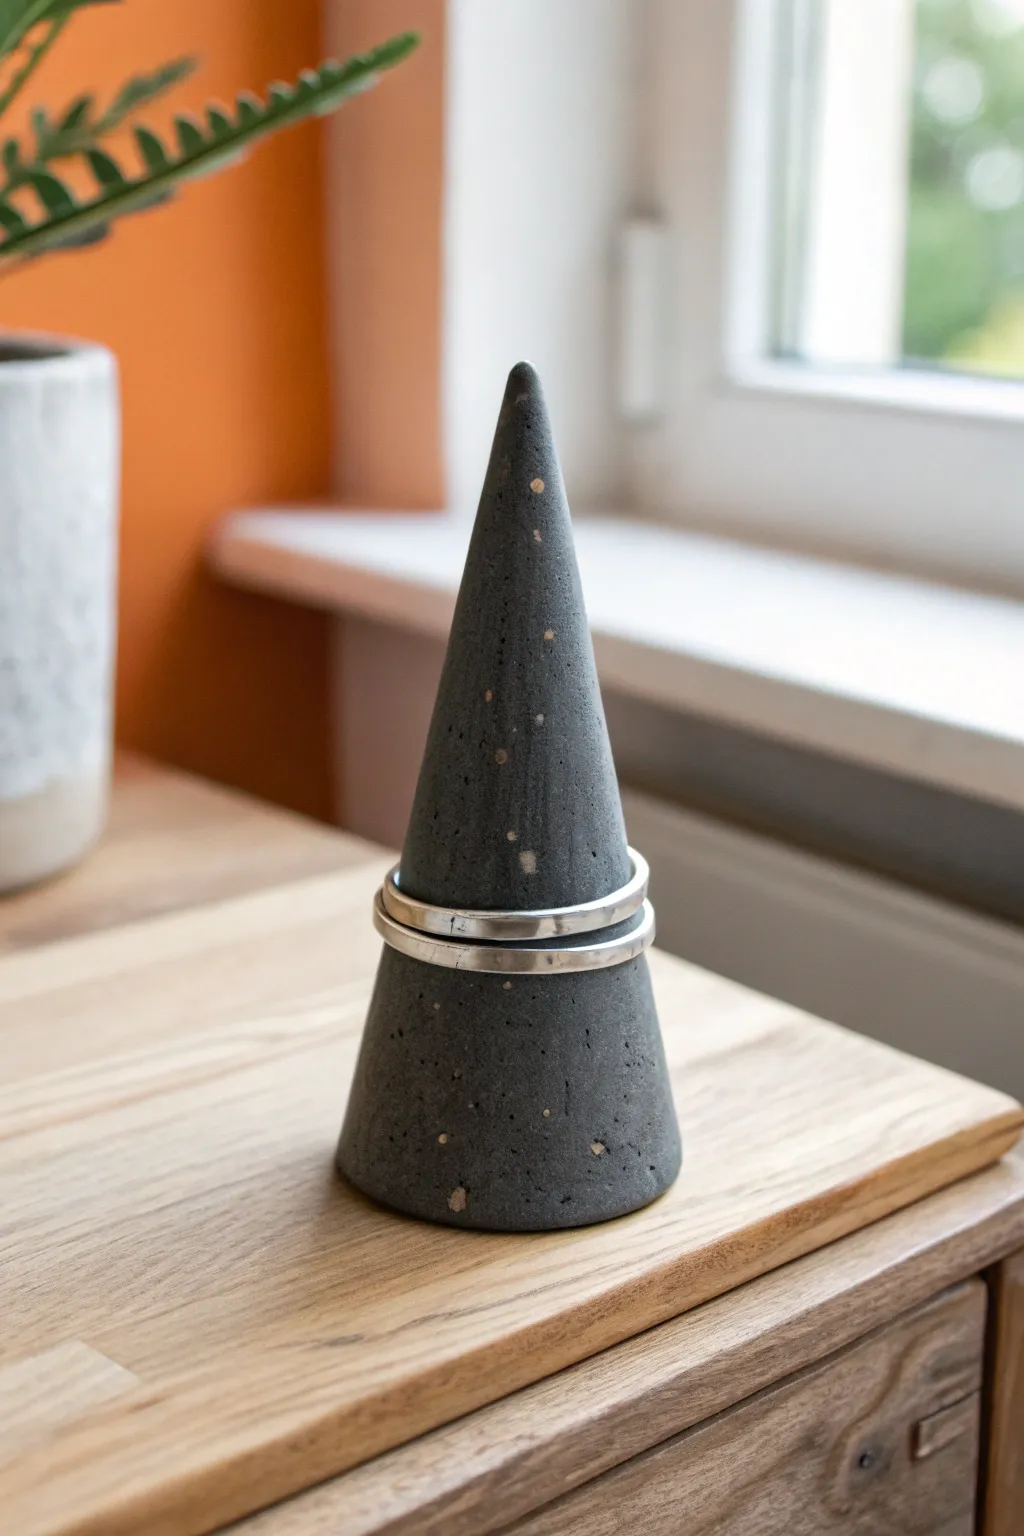
This sleek, cone-shaped ring holder features a masculine, industrial aesthetic with its deep charcoal base and subtle speckling. It mimics the look of polished granite or concrete, making it a sophisticated addition to a nightstand for keeping wedding bands safe.
Step-by-Step
Materials
- Polymer clay (black)
- Polymer clay (translucent or grey)
- Coarse ground black pepper or clean sand (for texture)
- Gold or copper metallic clay (very small amount)
- Acrylic rolling pin
- Tissue blade or craft knife
- Smooth work surface (glass or ceramic tile)
- Sandpaper (grits 400, 600, 1000)
- Oven
- Matte varnish or sealant (optional)
Step 1: Preparing the Faux Granite Clay
-
Condition the base:
Start by thoroughly conditioning a block of black polymer clay until it is soft and pliable. Use your hands to warm it up, rolling and kneading it to remove any air bubbles. -
Add dimension:
Mix in a small amount of translucent or dark grey clay—about one part to four parts black. Don’t blend it completely uniform; leaving slight streaks creates a more natural stone depth. -
Create the grit:
Flatten your clay mixture into a pancake shape. Sprinkle a generous pinch of coarse ground black pepper or fine, clean sand onto the surface. This adds organic texture that mimics real stone. -
Add metallic flecks:
Take a tiny amount of gold or copper metallic clay (no larger than a pea) and chop it into microscopic bits. Sprinkle these randomly over the black clay to replicate the mineral deposits seen in the reference image. -
Integrate the inclusions:
Fold the clay over to trap the pepper and metallic flecks, then roll and fold repeatedly. I like to cut the log in half and stack it occasionally to ensure the ‘stone’ particles are evenly distributed throughout the batch.
Uneven Bottom?
If your cone wobbles after baking, adhere a piece of coarse sandpaper to a flat table and rub the base of the cone in a circular motion until completely flat.
Step 2: Shaping the Cone
-
Form the initial shape:
Roll your mixed clay into a smooth ball, ensuring there are no visible seams or cracks. -
Roll into a log:
Gently roll the ball into a thick log or cylinder shape on your work surface. -
Taper the form:
Focus your rolling pressure on just one end of the cylinder. As you roll back and forth, angle your hand to press down more on the top, allowing the clay to elongate into a cone. -
Refine the tip:
Continue rolling until you have a tall, slender cone. The tip should be rounded but narrow enough to hold a ring, while the base remains wide for stability. -
Flatten the base:
Stand the cone upright and firmly press it down onto your work surface to create a perfectly flat bottom. Check that it stands vertically without leaning. -
Smooth the surface:
Use your finger to gently buff away any fingerprints. Because we want a stone look, slight irregularities are okay, but the general shape should be sleek.
Make it Heavy
To give the cone a premium, heavy feel, bury a small, non-galvanized metal weight or a crumpled ball of aluminum foil in the center of the base before shaping.
Step 3: Baking and Finishing
-
Preheat the oven:
Set your oven to the temperature recommended on your specific brand of polymer clay packaging (usually around 230°F to 275°F). -
Bake the piece:
Place the cone upright on a ceramic tile or baking sheet lined with parchment paper. Bake for approximately 30 minutes per ¼ inch of thickness. Since this is a solid cone, a bake time of 45-60 minutes is usually safer to ensure the center cures. -
Cool down:
Turn off the oven and let the cone cool down completely inside. This gradual cooling helps prevent cracking. -
Wet sand for texture:
Once cool, dip the cone in water and sand it generally with 400 grit sandpaper. This exposes the pepper and metallic flecks, bringing the ‘granite’ to life. -
Polish the surface:
Move sequentially to 600 and then 1000 grit sandpaper, sanding under running water. This will create the satiny, smooth finish seen in the photo. -
Dry and clean:
Wash the cone with a drop of dish soap to remove sanding residue and dry it thoroughly with a lint-free cloth. -
Seal (Optional):
If you want a slight sheen or extra protection, brush on a very thin layer of matte varnish, though the buffed clay often looks best left natural.
This refined accessory is now ready to hold his daily rings in style


What Really Happens Inside the Kiln
Learn how time and temperature work together inside the kiln to transform clay into durable ceramic.
Textured Soap Dish for Shaving Bar
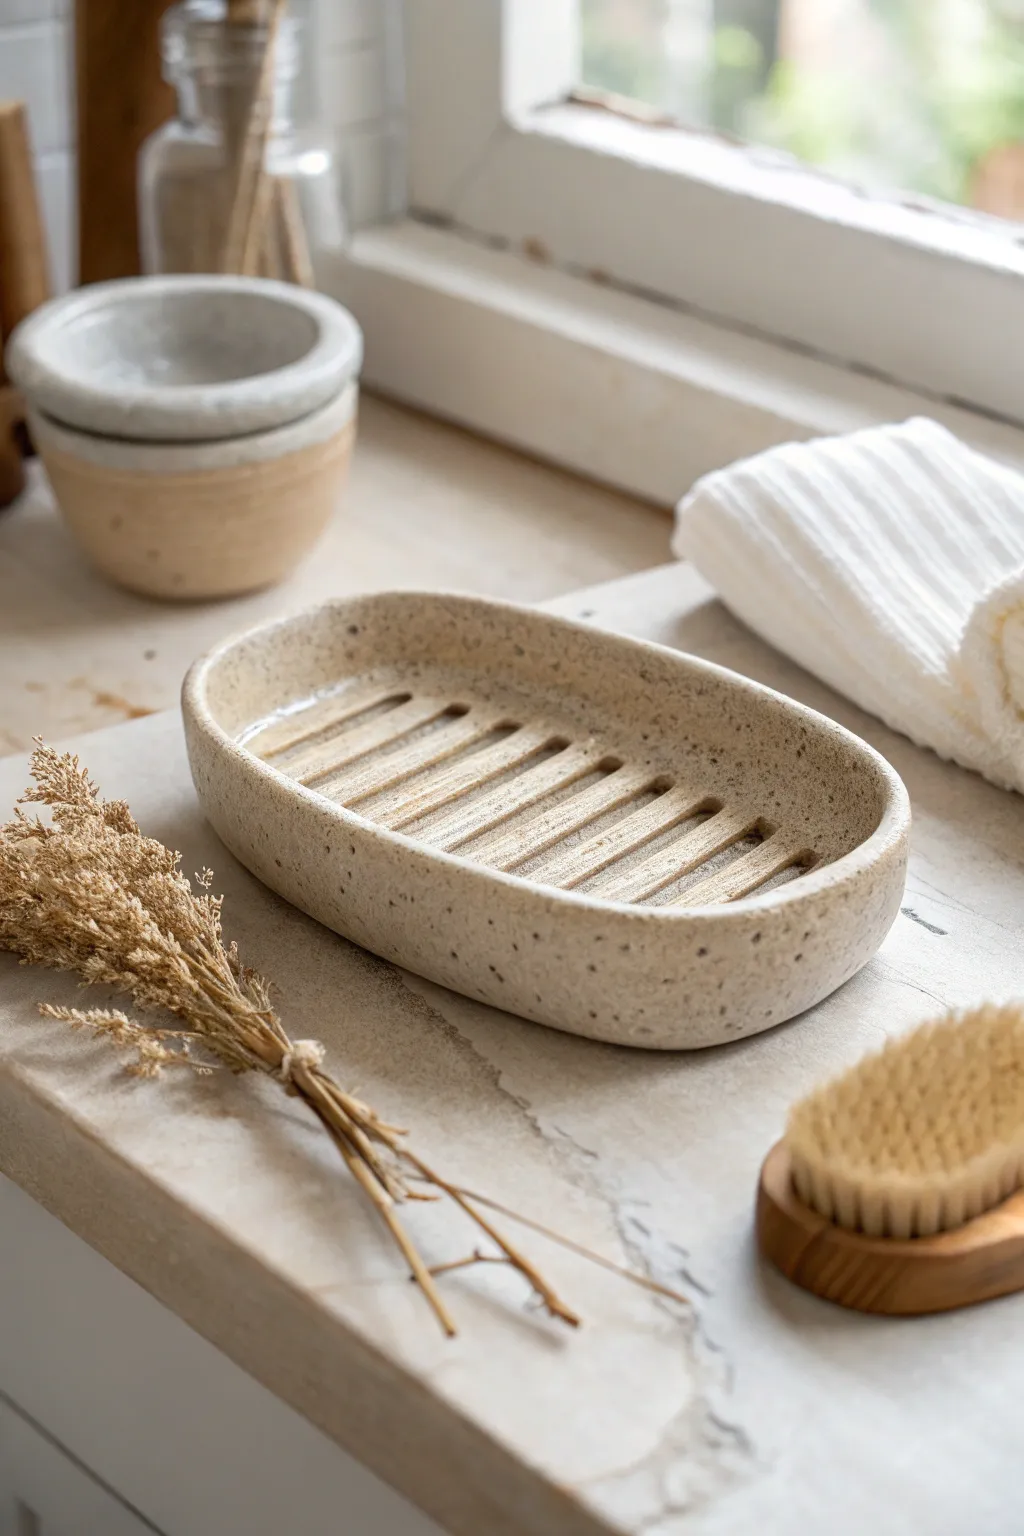
Create a rustic, masculine bathroom accessory perfect for holding a favorite shaving bar. This hand-built clay dish features a natural speckled finish and functional drainage ridges, combining earthy aesthetics with practical design.
How-To Guide
Materials
- Speckled stoneware clay (mid-fire or high-fire)
- Rolling pin
- Wooden guide strips (1/4 inch thick)
- Kidney scraper (smooth rib)
- Fetling knife or craft knife
- Oval paper template (approx. 4×6 inches)
- Small carving loop tool (square profile)
- Sponge
- Water cup
- Board for drying
- Matte transparent glaze
Step 1: Shaping the Base
-
Prepare the clay:
Begin by wedging a ball of speckled stoneware clay about the size of a large orange. Ensure there are no air bubbles trapped inside, which is crucial for structural integrity during firing. -
Roll the slab:
Place your wooden guide strips on either side of the clay. Roll the clay out into a consistent slab about 1/4 inch thick. I find rolling in multiple directions helps keep the clay tension even. -
Cut the oval:
Lay your oval paper template onto the slab. Using your fettling knife, cut vertically around the template to create the base of your dish. Smooth the cut edge gently with your finger. -
Form the coil:
Roll a separate piece of clay into a long, even coil, roughly the thickness of your pinky finger. This will become the wall of the dish. -
Score and slip:
Score the outer edge of the oval base and the bottom of your coil. Apply a generous amount of slip (clay and vinegar/water mix) to the scored areas. -
Attach the wall:
Place the coil onto the base edge. Press it down firmly to ensure a good bond. Trim any excess coil where the ends meet and join them smoothly.
Clean Lines
Use a damp paintbrush to smooth inside the carved ridges. It reaches tight corners better than a finger and ensures soap scum won’t get trapped in rough textures.
Step 2: Refining and Carving
-
Blend the coil:
Using your thumb or a wooden modeling tool, blend the coil downward into the base on both the inside and outside. The seam should completely disappear. -
Heighten and smooth:
Pinch the wall gently to shape it upwards, keeping it vertical but slightly organic. Use a kidney scraper to smooth the surface texture, revealing the natural grog and speckles of the clay. -
Draft the ridges:
Lightly sketch parallel lines on the interior floor of the dish using a needle tool. These will guide your carving for the drainage slats. -
Carve the channels:
Take your square-profile loop tool and carefully carve out the clay between your marked lines. Dig down about halfway through the thickness of the base—deep enough for drainage, but not through the bottom. -
Clean the edges:
Small crumbs of clay will form during carving. Wait for the clay to stiffen slightly to leather-hard, then brush these away with a soft brush rather than smearing them while wet. -
Soften the rim:
Run a damp sponge over the top rim of the dish to round it off. Sharp edges can be uncomfortable to touch and prone to chipping later. -
Final smooth:
Give the entire piece a final wipe with a barely-damp sponge to remove fingerprints. Pay attention to the carved ridges to ensure they are smooth for easy cleaning.
Step 3: Drying and Finishing
-
Slow drying:
Place the finished dish on a board and cover it loosely with plastic. Let it dry slowly for 2-3 days to prevent warping, then uncover to bone dry. -
Bisque fire:
Fire the piece in a kiln to bisque temperature (usually Cone 04/06 depending on your clay body). -
Glazing:
Once cool, dip the piece into a matte transparent glaze. This seals the clay while keeping the beautiful speckled beige tone visible. -
Re-fire:
Fire the glazed piece to the clay’s maturity temperature (often Cone 5 or 6 for stoneware). Check your clay packaging for the specific limit.
Level Up
Stamp initials or a maker’s mark into the underside of the base before drying for a personalized, professional touch on your handmade gift.
Wrap this rugged dish with a high-quality sandalwood shaving soap for a complete gift set he will use every morning
Succulent Planter in an Industrial Palette
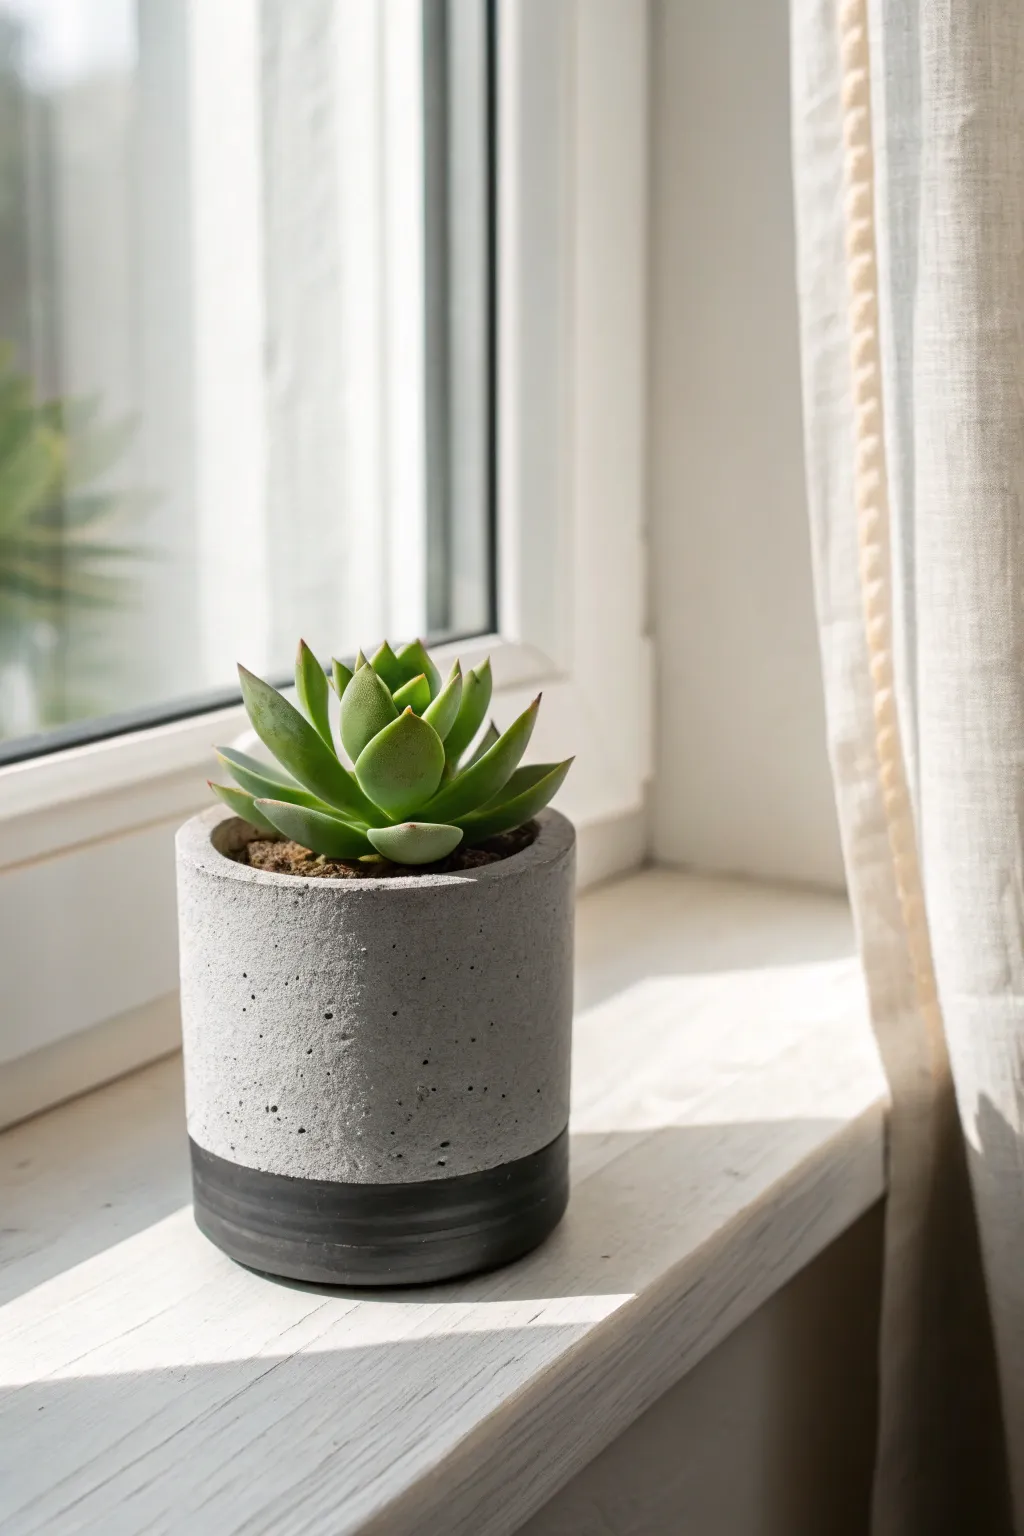
Embrace a minimalist, masculine aesthetic with this sleek concrete-style planter. Its raw grey texture paired with a bold, dipped black base makes it a perfect modern accent for any windowsill or desk.
Detailed Instructions
Materials
- Rapid-set cement or fine concrete mix
- Water
- Two nesting plastic containers (one slightly smaller than the other to act as a mold)
- Non-stick cooking spray or petroleum jelly
- Mixing bowl and spoon
- Sandpaper (medium and fine grit)
- Painter’s tape
- Matte black acrylic paint
- Wide flat paintbrush
- Weights (rocks or coins)
- Clear matte sealant spray (optional)
Step 1: Preparing the Mold
-
Select your containers:
Find two plastic containers. An empty yogurt tub works well for the outer mold, and a smaller plastic cup works perfectly for the inner void. Ensure the gap between them is at least half an inch for sturdy walls. -
Clean and prep:
Wash and dry both containers thoroughly. Smooth walls are best, so avoid containers with heavy ridges unless you want that texture transferred to your pot. -
Lubricate the molds:
Coat the inside of the larger container and the outside of the smaller container with cooking spray or a thin layer of petroleum jelly. This release agent is crucial for easy removal later.
Air Bubble Blues
Too many holes? Next time, vibrate the mold more vigorously after pouring. You can also patch large holes with a tiny bit of fresh cement paste.
Step 2: Mixing and Pouring
-
Mix the cement:
In your mixing bowl, combine the cement powder with water according to package instructions. Aim for a consistency similar to peanut butter or thick pancake batter. -
Eliminate clumps:
Stir thoroughly to break up any dry pockets. A smooth mix ensures a cleaner finish for the final industrial look. -
Pour the base:
Pour the concrete mixture into the larger container until it is about 1 to 1.5 inches deep. This will form the solid bottom of your planter. -
Insert the inner mold:
Place the smaller container into the center of the larger one, pressing it down gently into the wet concrete. Don’t push it all the way to the bottom; leave a thick base. -
Weigh it down:
The inner cup will want to float up. Fill it with rocks, coins, or sand to keep it weighed down in the correct position.
Level Up: Metallic Touch
Instead of black paint, use gold leaf or metallic copper paint for the bottom section to give the industrial concrete a luxurious, high-end twist.
Step 3: Setting and Refining
-
Fill the sides:
If the concrete hasn’t risen to your desired height, carefully spoon more mix into the gap between the two containers. Gently tap the outer container on the table to release air bubbles. -
Let it cure:
Set the mold aside on a level surface. Allow it to cure for at least 24 hours, or slightly longer if your environment is humid. -
Unmold the planter:
Once fully dry, gently wiggle and twist the inner container to remove it. Then, turn the outer container upside down and tap or squeeze to release your rough concrete pot. -
Sand the surface:
Use medium-grit sandpaper to smooth out any rough edges, especially around the rim. I like to switch to fine-grit paper afterward to polish the exterior while keeping those charming little air pockets visible.
Step 4: Adding the Design
-
Tape the line:
Measure about one-quarter of the way up from the bottom of the pot. Apply a strip of painter’s tape around the circumference, ensuring it is level and pressed down firmly to prevent paint bleed. -
Paint the base:
Using the wide flat brush, apply matte black acrylic paint to the area below the tape. Use long, horizontal strokes for an even finish. -
Apply a second coat:
Let the first coat dry for about 20 minutes, then apply a second coat for solid, opaque coverage. -
Reveal the line:
Carefully peel off the painter’s tape while the paint is still slightly tacky to achieve a crisp, clean edge. -
Seal (Optional):
If you plan to water your plants heavily, spray the inside and outside with a clear matte sealant to protect the concrete from water damage.
Place your favorite succulent inside and enjoy the modern, structured look you’ve created

TRACK YOUR CERAMIC JOURNEY
Capture glaze tests, firing details, and creative progress—all in one simple printable. Make your projects easier to repeat and improve.
Grill-Side Pinch Bowls for Spices
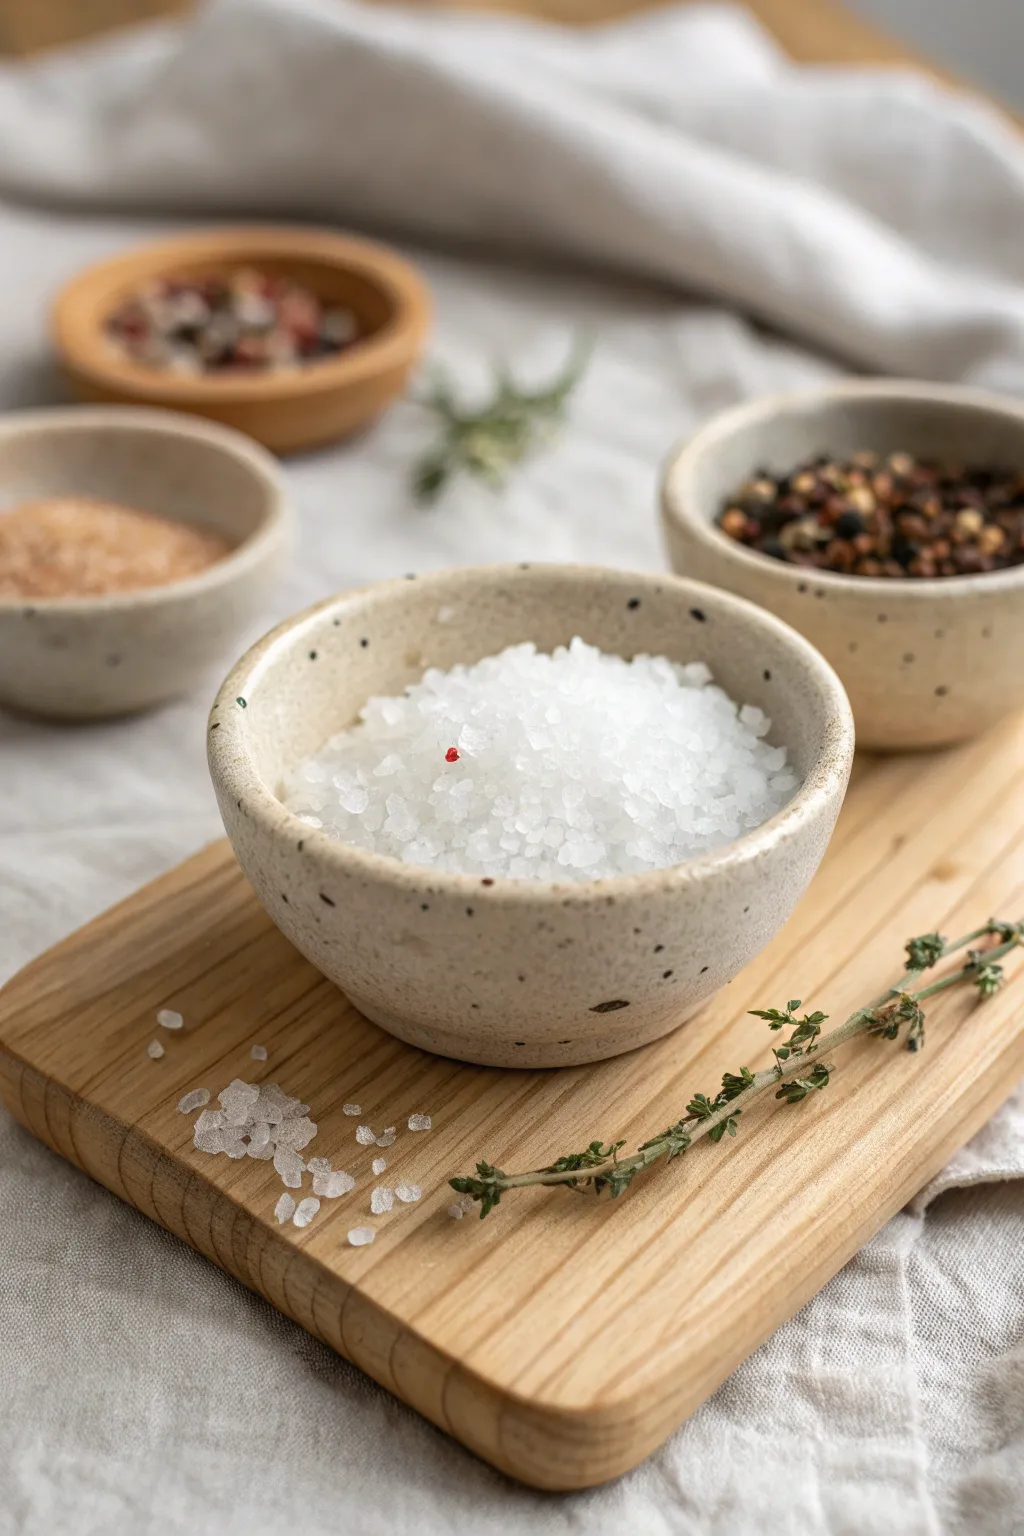
Craft a set of these charming, gritty pinch bowls, perfect for keeping salts and spices grill-side. Their organic shape and speckled clay body give them a rugged, handmade appeal that feels both modern and timeless.
Step-by-Step Guide
Materials
- Speckled stoneware clay (mid-fire or high-fire)
- Pottery sponge
- Bowl of water
- Wooden modeling tool or old credit card
- Needle tool
- Cutting wire
- Clear matte glaze (food safe)
- Kiln (or access to a firing service)
Step 1: Shaping the Clay
-
Prepare your clay balls:
Start by wedging your speckled clay to remove air bubbles. Divide the clay into small portions, about the size of a golf ball or a large tangerine for each bowl. -
Form the initial sphere:
Roll each portion briskly between your palms until you have a smooth, round ball. Getting this sphere symmetrical now helps the final shape immensely. -
Begin the pinch:
Hold the clay ball in your non-dominant hand. Gently press your thumb into the center, stopping about a half-inch from the bottom. This thickness is crucial for a sturdy base. -
Open the bowl:
With your thumb inside and fingers on the outside, gently pinch and rotate the clay. Work your way from the bottom up, thinning the walls gradually as you turn the form. -
Refine the walls:
Aim for a consistent wall thickness of about 1/4 inch. If the rim cracks slightly, simply compress it back together with your sponge; this adds to the rustic aesthetic. -
Flatten the bottom:
Once you are happy with the concave shape, gently tap the bowl on your work surface to create a flat, stable foot. This prevents it from wobbling on the counter.
Cracks on the rim?
If the rim splits while pinching, your clay might be too dry. Add a tiny drop of water and compress the rim downward with your thumb to heal the split.
Step 2: Refining and Drying
-
Smooth the interior:
Using a slightly damp sponge, wipe the inside of the bowl to smooth out fingerprints. I find this helps the glaze settle better later. -
Refine the rim:
Run a damp sponge or a chamois cloth over the rim to ensure it is smooth to the touch. -
Clean the exterior:
You can leave the exterior finger-textured for grip, or use a flexible rib tool to smooth it out for a cleaner look like the ones in the photo. -
Let them dry:
Cover the bowls loosely with plastic for a day to let them reach a leather-hard state, then uncover them and allow them to dry completely until they are bone dry.
Step 3: Firing and Glazing
-
Bisque fire:
Load your bone-dry bowls into the kiln for a bisque firing (usually Cone 04 or 06). This prepares the clay to accept glaze. -
Clean before glazing:
Once cool, wipe the bisque-ware with a damp sponge to remove any dust that might prevent the glaze from adhering. -
Review glaze choice:
For this specific look, select a transparent or semi-transparent matte glaze that allows the natural speckles of the clay body to show through. -
Apply the glaze:
Pour the glaze inside the bowl, swirl it quickly to coat, and pour out the excess. For the outside, you can dip the bowl or brush it on, leaving the bottom unglazed. -
Wipe the foot:
Use a wet sponge to wipe away any glaze from the very bottom of the bowl so it doesn’t fuse to the kiln shelf. -
Glaze fire:
Fire the bowls again to the temperature required by your specific clay and glaze combination (often Cone 5 or 6).
Make it a set
Create a matching wooden board with circular recessed areas to hold the bowls perfectly in place for carrying to the table.
Once cooled, fill these durable beauties with flake salt or peppercorns and they are ready for the grill master
Essential Oil Diffuser Stone for His Desk
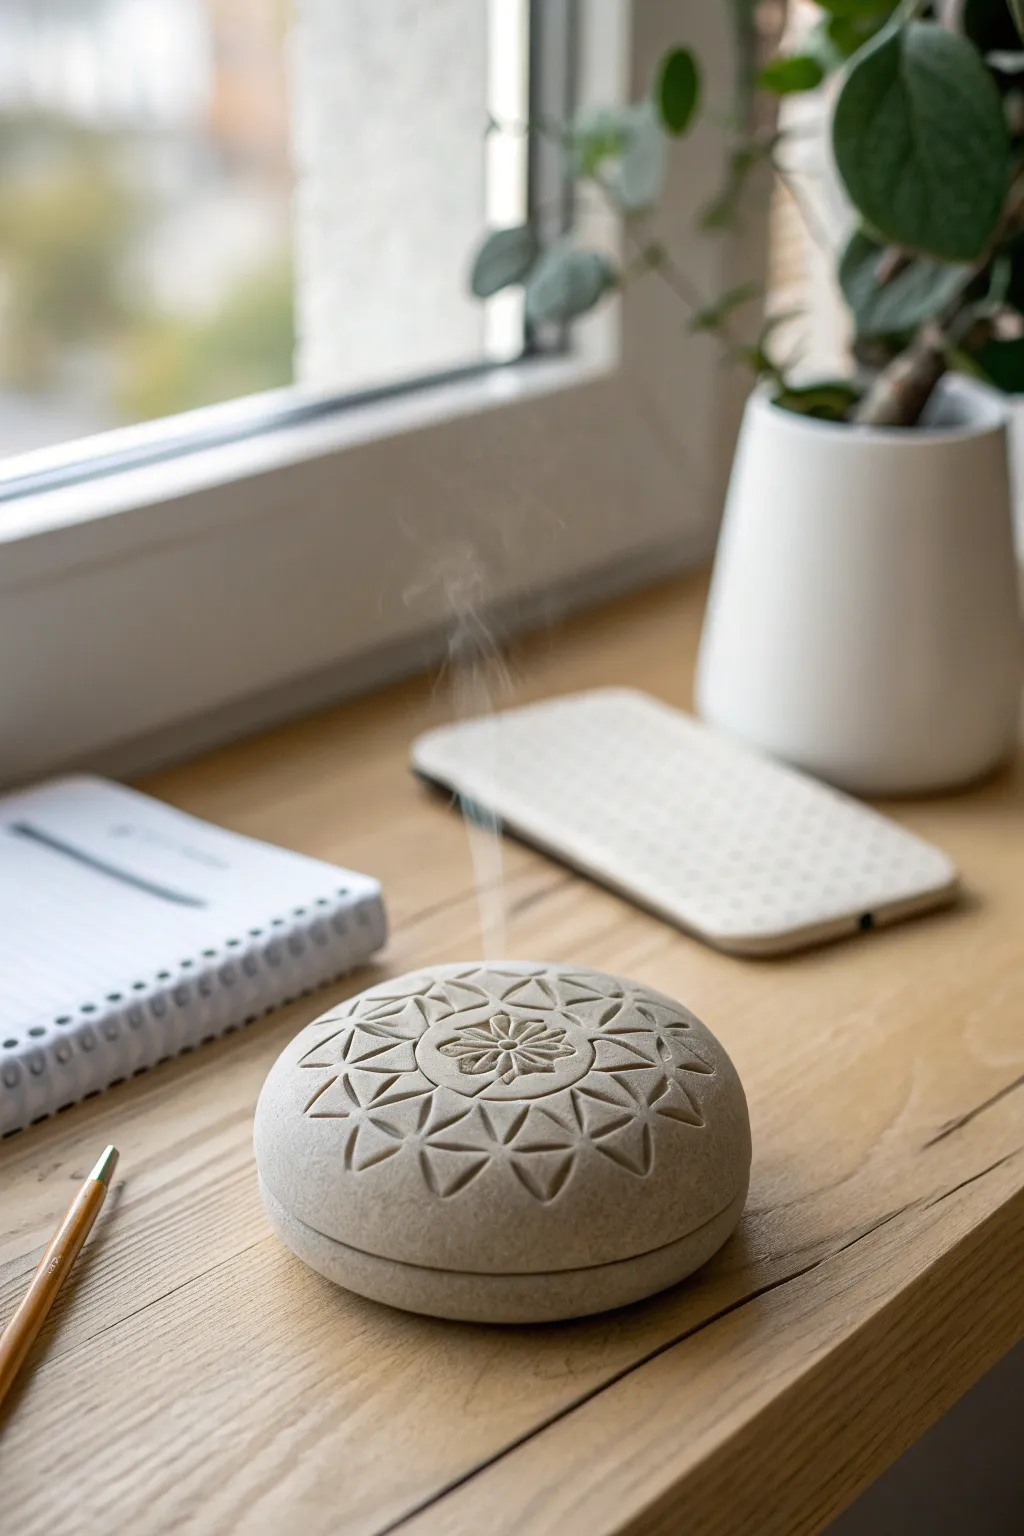
This understated, stone-effect diffuser brings a touch of calm to any workspace with its satisfying weight and clean, carved geometry. Crafted from absorbent clay, this two-piece vessel naturally diffuses essential oils without the need for electricity or water, making it a perfect low-maintenance desk companion.
Step-by-Step Tutorial
Materials
- Air-dry clay (white or light grey)
- Rolling pin
- Circle cutters (various sizes)
- Clay carving tools (needle tool, V-gouge)
- Fine-grit sandpaper (220 and 400 grit)
- Sponge and water
- Essential oils for testing
- Ruler or geometric stencil
- Plastic wrap
Step 1: Forming the Base Shape
-
Condition the clay:
Begin by kneading a substantial chunk of air-dry clay until it’s pliable and smooth. You want to remove any air bubbles that could crack later. -
Create the main puck:
Roll the clay into a smooth ball, then gently flatten it onto your work surface until it forms a thick disc, approximately 1.5 inches tall and 4 inches wide. I find gently cupping my hands around the edges helps keep it perfectly round. -
Split into two:
Using a wire cutter or a taut piece of dental floss, slice the disc horizontally. Make the cut about one-third of the way up from the bottom so you have a distinct lid and base. -
Hollow the interior:
Carefully scoop out the center of the bottom piece to create a small reservoir, leaving a thick wall (about 0.5 inches). Do the same for the lid piece, hollowing it out slightly so it’s not too heavy. -
Refine the fit:
Place the lid back onto the base. Smooth the seam with a damp finger to ensure the outer profile aligns perfectly before separating them again to dry slightly.
Clean Cuts Only
When carving leather-hard clay, clean your tool tip with a damp sponge after every single stroke. This prevents clay crumbs from clogging your geometric lines.
Step 2: Carving the Geometry
-
Map the center:
Once the clay is leather-hard (firm but still carveable), find the exact center of the lid. Mark it lightly with your needle tool. -
Draft the pattern:
Using a ruler or a geometric stencil, lightly lightly score a ‘Flower of Life’ or mandala grid. Start with radiating lines from the center, then map out the triangular sections. -
Carve the central flower:
Use a specialized V-gouge or small loop tool to carve the central eight-petaled flower deep into the clay. Keep your cuts clean and decisive. -
Execute the triangles:
Move outward to the larger geometric sections. Carve the triangular recesses, angling your tool to create sloped walls rather than straight drops, which catches the light beautifully. -
Add the vent hole:
Using a small drill bit or a straw, punch a clean hole directly through the center of the floral design. This is crucial for allowing the aroma to escape. -
Create the texture:
To mimic the stone look in the photo, gently tap the uncarved surfaces with a stiff-bristled toothbrush or a crumpled ball of aluminum foil.
Don’t Seal It!
Avoid varnishing the interior reservoir. The clay needs to remain porous (unsealed) to absorb the essential oils and naturally diffuse the scent slowly.
Step 3: Finishing Touches
-
Slow drying:
Cover the pieces loosely with plastic wrap and let them dry slowly for 24-48 hours. Flipping them occasionally ensures even drying and prevents warping. -
Initial sanding:
Once fully bone dry, use the 220-grit sandpaper to smooth the outer rim and the bottom. Be gentle effectively around the carved details to preserve sharp edges. -
Polish to stone:
Switch to 400-grit sandpaper for a final polish. The surface should feel incredibly smooth to the touch. -
Stone effect wash:
Mix a tiny drop of grey acrylic paint into a lot of water. Brush this wash over the piece and immediately wipe it back with a sponge. The pigment will settle into the texture and carving, enhancing the stone look. -
Final cure:
Let the piece dry completely from the wash. To use, simply place a few drops of oil on a cotton ball inside the vessel.
Place this handsome stone on a desk and enjoy the subtle shifts of shadow across the geometric carving
Game Night Tic-Tac-Toe Set
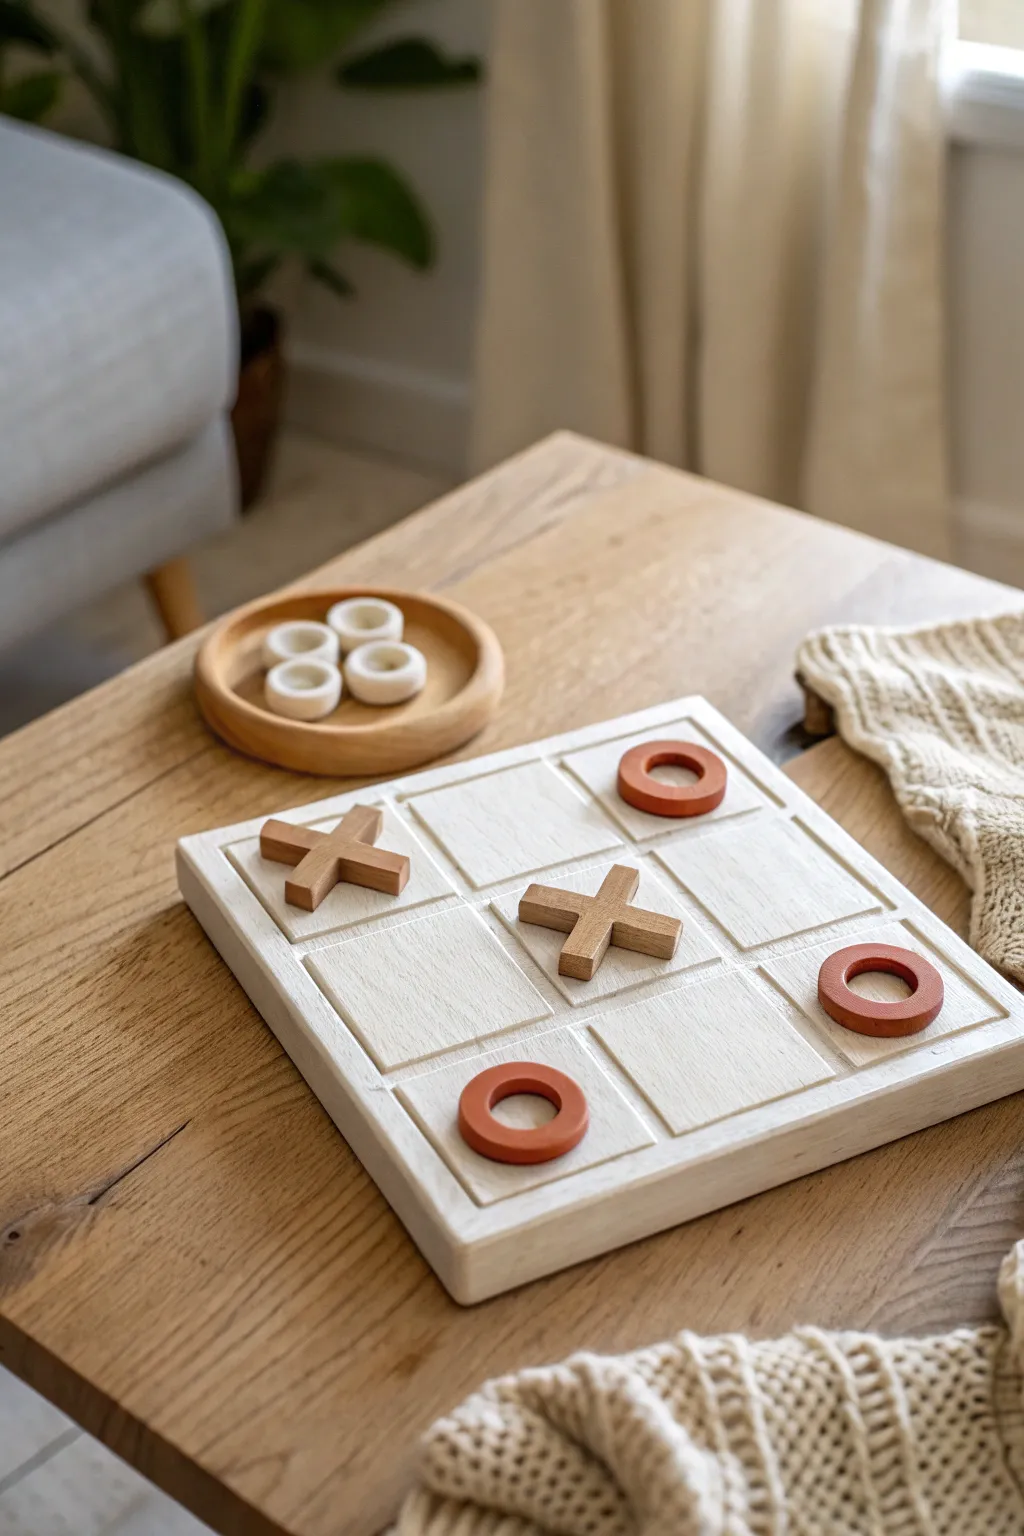
Elevate his coffee table decor with this sophisticated, handcrafted version of a classic game. Featuring chunky, geometric clay pieces and a clean, whitewashed wooden base, this set strikes the perfect balance between playful recreation and modern interior design.
How-To Guide
Materials
- Polymer clay (terracotta/burnt sienna color)
- Polymer clay (white or cream)
- Polymer clay (light wood tone or tan)
- Sturdy square wooden board (approx. 8×8 inches)
- Square dowel rods or balsa wood strips (approx. 1/4 inch thick)
- White acrylic paint (matte finish)
- Beige or off-white acrylic paint
- Paintbrushes (flat shader and detail brush)
- Clay roller or pasta machine
- X-Acto knife or sharp blade
- Circle cutters (approx. 1.5 inch diameter)
- Small circular cutter (approx. 1 inch diameter for inner rings)
- Wood glue or strong craft glue
- Ruler
- Fine-grit sandpaper
Step 1: Crafting the Playing Pieces
-
Conditioning the Clay:
Start by thoroughly kneading your terracotta-colored polymer clay until it is soft and pliable, ensuring there are no air bubbles trapped inside. -
Rolling the Sheets:
Roll the clay out into a thick, even slab, aiming for a consistent thickness of about 1/4 inch to give the pieces a substantial, high-quality feel. -
Cutting the ‘O’ Outer Rings:
Using your larger circle cutter, press firmly into the clay slab to cut out five circles. Twist slightly before lifting to ensure a clean edge. -
Creating the Inner Rings:
Take the smaller circle cutter and carefully center it inside each of the five circles you just cut. Press down to remove the centers, creating perfect ring shapes. -
Rolling Wood-Tone Clay:
Now, switch to your wood-tone or tan polymer clay. Condition it well and roll it out to the same 1/4 inch thickness as the rings. -
Drafting the ‘X’ Shape:
Using a ruler and a sharp blade, cut long strips of clay that are roughly 1/2 inch wide. You will need to cut these strips into smaller segments to form the crosses. -
Assembling the Crosses:
Cut ten equal lengths of your clay strips (approx. 1.5 inches long). Create five ‘X’ shapes by overlapping two strips at the center, gently pressing the intersection point to bond them. -
Smoothing Edges:
Use your fingertip or a clay tool to gently smooth the sharp edges of all your playing pieces for a finished look. I like to lightly texture the ‘X’ pieces with sandpaper before baking to mimic wood grain. -
Baking the Pieces:
Place all ‘X’ and ‘O’ pieces on a parchment-lined baking sheet and bake according to your specific clay package instructions (usually 275°F for 15-30 minutes).
Clay Conditioning Tip
If your clay feels too stiff or crumbly, mix in a drop of baby oil or clay softener. It makes rolling the thick slabs much easier and prevents cracking.
Step 2: Building the Game Board
-
Preparing the Base:
Take your square wooden board and sand the surface lightly to ensure it’s smooth and ready for painting. -
Measuring the Grid:
With a pencil and ruler, divide your board into a 3×3 grid. Mark the lines where your dividers will go. -
Cutting the Grid Lines:
Cut your square dowels or balsa wood strips to fit your pencil marks. You will need four longer strips for the outer frame and smaller segments for the inner grid lines. -
Attaching the Frame:
Use wood glue to attach the four outer strips around the perimeter of the board, wiping away any excess glue immediately showing. -
Gluing the Grid:
Glue the inner grid strips along your measured lines. Ensure they are spaced evenly so your clay pieces will fit comfortably inside the squares. -
First Coat of Paint:
Once the glue is fully dry, apply a base coat of white acrylic paint over the entire board, including the raised grid lines. -
Creating the Wash Effect:
Mix a small amount of beige paint with water to create a wash. Brush this hurriedly over the white base. -
Distressing the Finish:
Before the wash dries completely, gently wipe some of it back with a dry paper towel or cloth. This reveals the white underneath and gives it that rustic, textured look seen in the photo. -
Adding Extra Clay Pieces:
If you want the set to match the photo exactly, craft a few extra white ‘O’ rings using white polymer clay following the previous ring steps, providing alternate color options. -
Final Assembly:
Let everything dry and cure completely. Arrange your terracotta ‘O’s and wood-look ‘X’s on the board to test the fit and finish.
Level Up: Felt Bottoms
Glue small circles of felt to the bottom of each playing piece. This adds a premium feel and protects your beautiful painted board from scratches during play.
Now you have a stylish, functional game set that doubles as a conversation piece for his living room
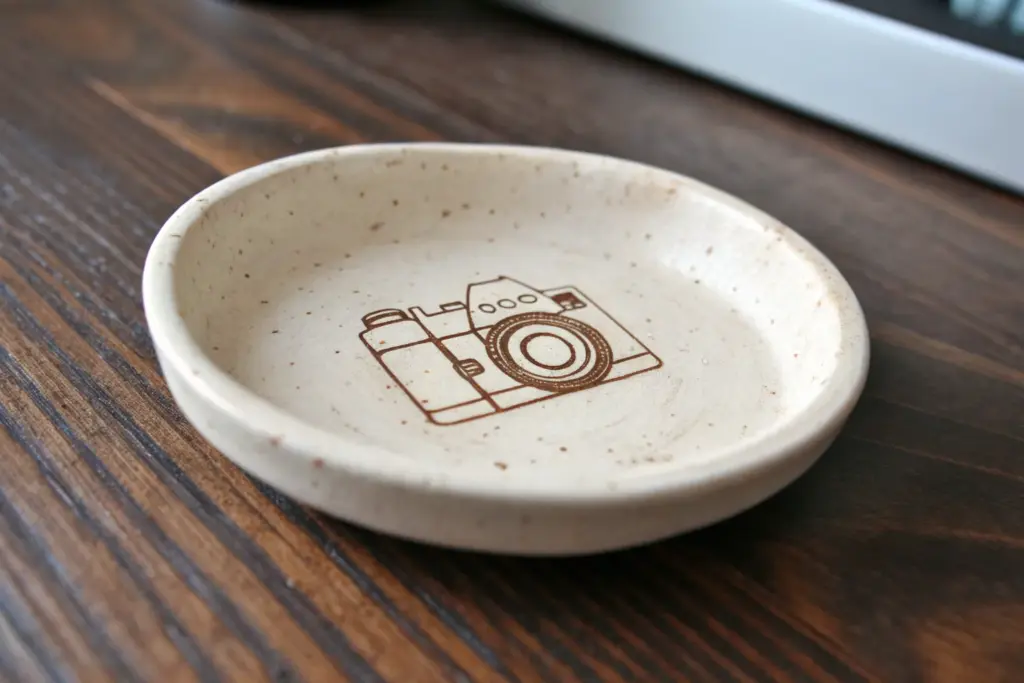
Hobby Token Charms Made Just for Him
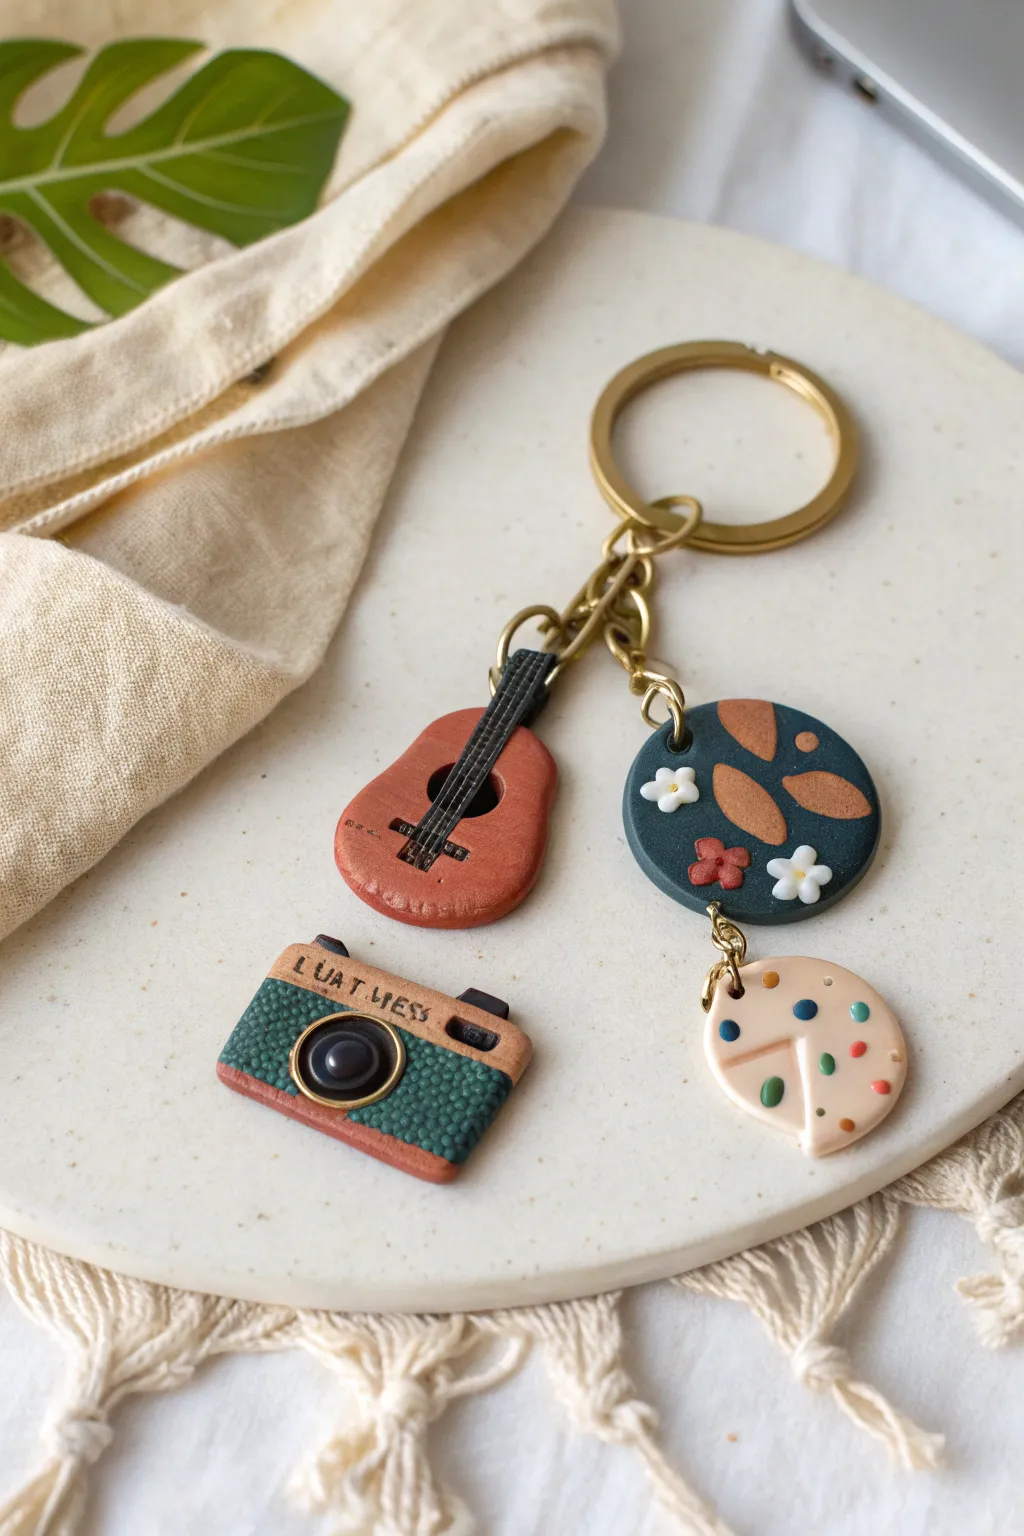
Celebrate his passions with this set of personalized polymer clay charms, featuring a miniature acoustic guitar, a vintage camera, and an artist’s palette. These tiny, detailed tokens are assembled onto a sturdy keychain, creating a thoughtful and functional gift that carries a bit of his personality wherever he goes.
Step-by-Step
Materials
- Polymer clay (terracotta/brown, teal/green, black, white, beige/tan, yellow, red, blue)
- Liquid polymer clay or bake-and-bond
- Acrylic roller or pasta machine
- X-Acto knife or clay craft blade
- Needle tool or toothpick
- Small circular cutters (various sizes)
- Texture tools (sandpaper or stiff bristle brush)
- Gold jump rings (6mm and 8mm)
- Gold keychain ring with chain
- Needle nose pliers
- Black acrylic paint (optional, for antiquing)
- Gloss glaze (optional)
Step 1: Sculpting the Guitar
-
Shape the body:
Condition a piece of terracotta-colored clay and roll it out to about 4mm thickness. Use a blade to freehand cut a classic guitar silhouette—essentially a figure-eight shape with a flatter bottom. -
Add the neck and bridge:
Cut a thin, rectangular strip of black clay for the fretboard. Press this gently onto the top of the body. Create a tiny rectangle of black clay for the bridge and place it on the lower body. -
String details:
Roll extremely thin threads of black clay (or use thin wire) for the strings. Lay them carefully from the bridge up the neck. Secure a tiny circle of black clay in the center for the sound hole before laying the strings. -
Smooth edges:
Gently tap the edges with your finger to round them slightly, removing any sharp cutting marks. Pierce a hole at the top of the headstock for the jump ring.
Step 2: Crafting the Camera
-
Form the base:
Create a rectangle from terracotta or brown clay for the camera bottom and top accents. Shape a slightly smaller rectangle from teal or green clay for the main body. -
Assemble the block:
Sandwich the teal block between a thin strip of brown clay on the bottom and a thicker strip on top. Press them together firmly. -
Texture the grip:
Using a needle tool, gently stipple the teal section to create a leatherette texture. This gives it that vintage camera feel. -
Lens assembly:
Place a small black circle in the center. Top it with a smaller black dome. Wrap a very thin snake of gold or yellow clay around the base of the lens for the metal ring. -
Final camera details:
Add a tiny black rectangle for the viewfinder and small knobs on top. I like to stamp a small word or name into the top tan strip using tiny letter stamps if available, or just scratch in faux text. Pierce a hole in the corner.
Sticky Situation?
If your clay gets too soft and fingerprints are showing, pop it in the fridge for 10 minutes. A firmer clay holds fine details like the camera texture much better.
Step 3: Making the Palette & Charm Disc
-
Shape the palette:
Flatten a ball of beige clay into a kidney bean shape or a circle with a notch cut out. Poke a thumb hole near the indentation. -
Add paint blobs:
Roll tiny balls of various colored clays (blue, red, green, yellow). Flatten them slightly onto the palette to look like fresh paint dabs. -
Create the background disc:
Cut a circle from dark teal clay. Decorate it with small terracotta leaf shapes and tiny white flowers made from five small balls of clay pressed together. -
Add attachment points:
Pierce holes near the top of both the palette and the floral disc. Ensure the holes are large enough for your jump rings.
Make it Personal
Customize the hobbies! Swap the guitar for a tiny book, a game controller, or a gardening trowel. Match the ‘paint’ colors on the palette to his favorite colors.
Step 4: Baking and Assembly
-
Bake:
Place all pieces on a ceramic tile or baking sheet lined with parchment paper. Bake according to your polymer clay package instructions (usually 275°F/135°C for 15-30 minutes). -
Cool and finish:
Let the pieces cool completely. If desired, brush a light coat of gloss glaze over the camera lens and paint blobs to make them look wet and glassy. -
Attach jump rings:
Open a jump ring using two pairs of pliers (twist sideways, don’t pull apart). Thread it through the hole in the guitar charm. -
Connect to keychain:
Attach the charm to the chain of the keyring. Repeat this process for the camera. For the floral disc and palette, link them together or hang them at varying lengths for visual interest. -
Secure everything:
Double-check that all jump rings are closed tightly so the heavy charms don’t slip off during daily use.
Now you have a rugged, personalized set of charms ready to organize his keys in style.