
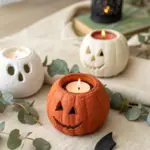
If you’ve ever lit a tea light and thought, “This deserves a cuter home,” you’re in the right place. I love how clay tea light holders can be quick, beginner-friendly, and still look like real-deal decor when you style them right.
Classic Pinch-Pot Tea Light Cup
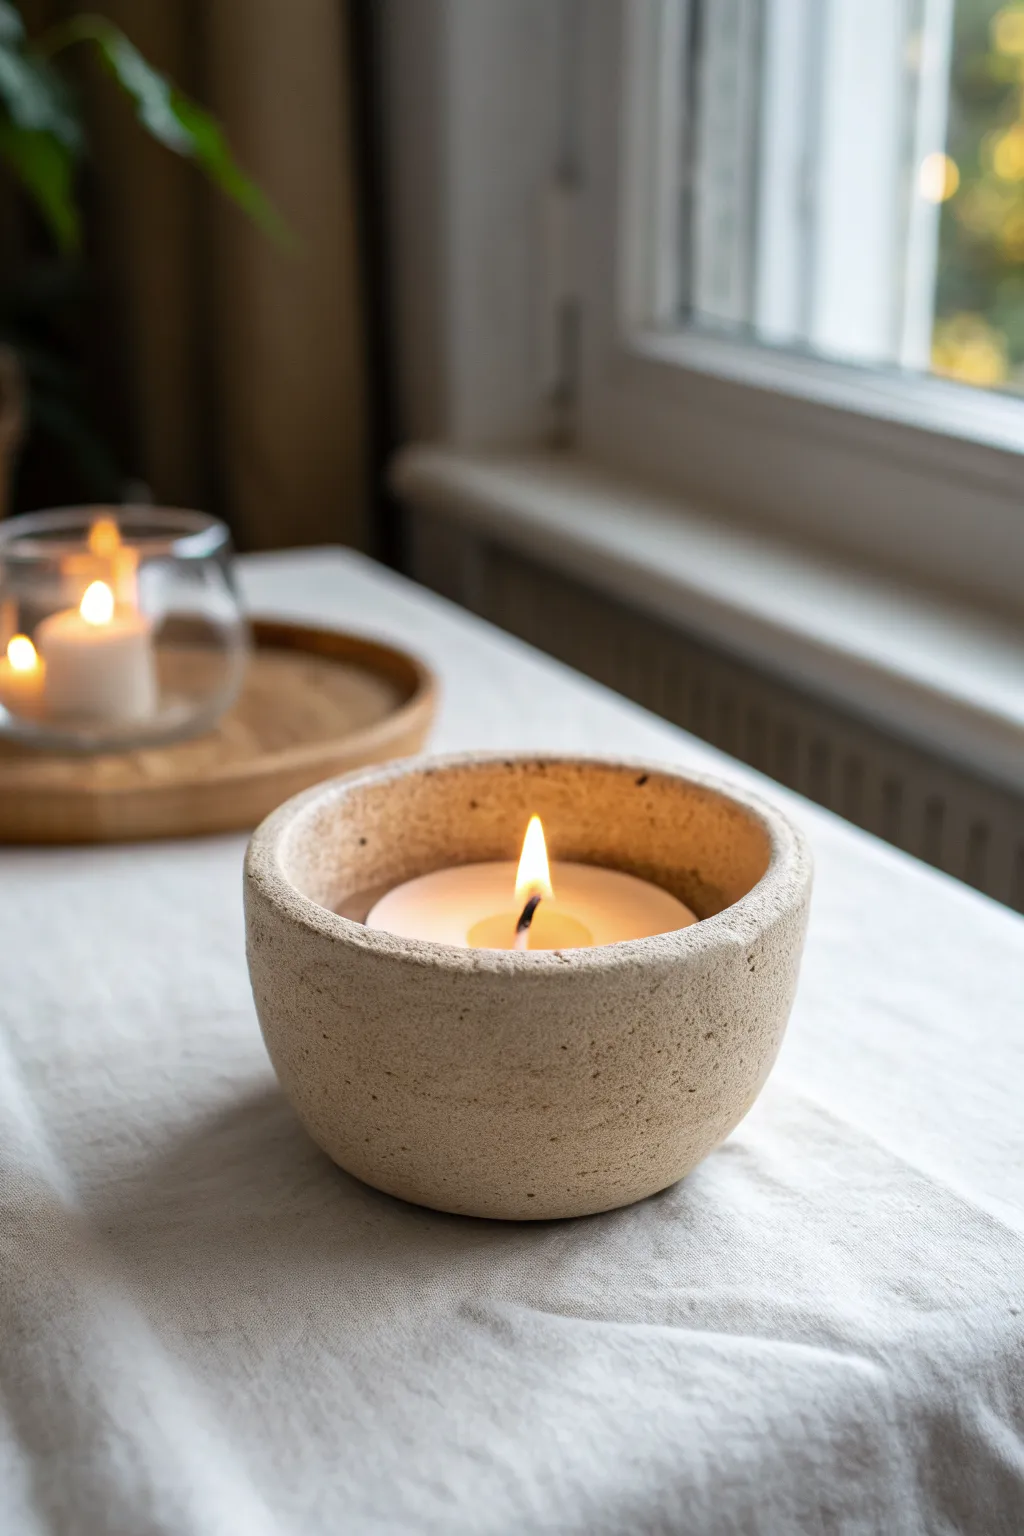
Embrace the natural beauty of stone without the heavy carving by creating this textured clay tea light holder. Its simple, organic shape and speckled sandy finish bring a calm, grounded atmosphere to any table setting.
Step-by-Step
Materials
- White air-dry clay or polymer clay
- Fine sand or used coffee grounds (for texture)
- Acrylic paints (beige, warm gray, white)
- Matte varnish or sealant
- Small bowl of water
- Fine-grit sandpaper
- Standard tea light candle for sizing
Step 1: Preparing the Clay Body
-
Condition the clay:
Start by taking a lump of white air-dry clay roughly the size of a tennis ball. Knead it thoroughly in your hands to warm it up and ensure there are no air bubbles trapped inside. -
Add texture:
To mimic that stony, speckled look seen in the photo, flatten your clay slightly and sprinkle in a teaspoon of fine sand or dried used coffee grounds. Fold the clay over and knead until the speckles are evenly distributed throughout the mass. -
Form a sphere:
Roll the textured clay between your palms to create a smooth, tight ball. Aim for a shape that is as perfectly round as possible to ensure the final pot sits evenly.
Crack Control
If small hairline cracks appear while drying, mix a tiny amount of fresh clay with water to make a paste (slip) and fill them in before painting.
Step 2: Shaping the Vessel
-
Start the pinch:
Hold the clay sphere in your non-dominant hand. Gently press your thumb into the center of the ball, pushing down about three-quarters of the way through, leaving a thick enough base. -
Open the walls:
Begin pinching the clay between your thumb (inside) and fingers (outside). Rotate the ball slightly with each pinch to open up the shape evenly. -
Check the thickness:
Aim for a wall thickness of about 1/4 inch (6-7mm). I like to feel around the entire circumference to make sure one side isn’t significantly thicker than the other. -
Flatten the rim:
Instead of a sharp edge, gently tap the rim of the pot upside down on your work surface to create a flat, substantial lip similar to the reference image. -
Flatten the base:
Press the bottom of the pot gently onto the table to create a stable flat base so it won’t wobble when the candle is lit. -
Size verification:
Place your actual tea light inside the hollow you’ve created. Ensure there is a comfortable gap around the candle (at least 5mm) to allow for heat dispersion and easy removal.
Weight It Down
For a heavier, more realistic stone feel, embed a heavy metal washer into the base of the clay while shaping the bottom.
Step 3: Refining and Drying
-
Smooth the surface:
Dip your finger in a little water and run it over the exterior and interior to smooth out fingerprints, but don’t over-polish; you want to keep some of that natural, earthy texture. -
Dry the piece:
Set your pot aside in a safe place. Allow air-dry clay to cure for at least 24-48 hours. Turn it over halfway through the drying process to let the bottom dry out completely. -
Sand for stone effect:
Once fully bone-dry, use fine-grit sandpaper to gently scuff the surface. This enhances the stone look and reveals more of the sand or coffee speckles you added earlier.
Step 4: Painting and Finishing
-
Base coat:
Mix a warm beige acrylic paint. Dilute it slightly with water to create a wash rather than a thick coat, and brush it over the entire piece. -
Stippling texture:
Using an old, stiff brush or a sponge, dab a slightly darker grey-brown mix lightly over the surface to create depth and imitate natural stone variations. -
Define the rim:
Take a very subtle lighter shade of beige and gently dry-brush the flat top rim to highlight the shape, just like the light catches it in the photo. -
Seal the work:
Apply a coat of ultra-matte varnish. Avoid glossy finishes, as the goal is a raw, unpolished stone aesthetic.
Light a candle and enjoy the warm, grounded glow of your new stone-effect vessel
Smooth Minimalist Cylinder Holder
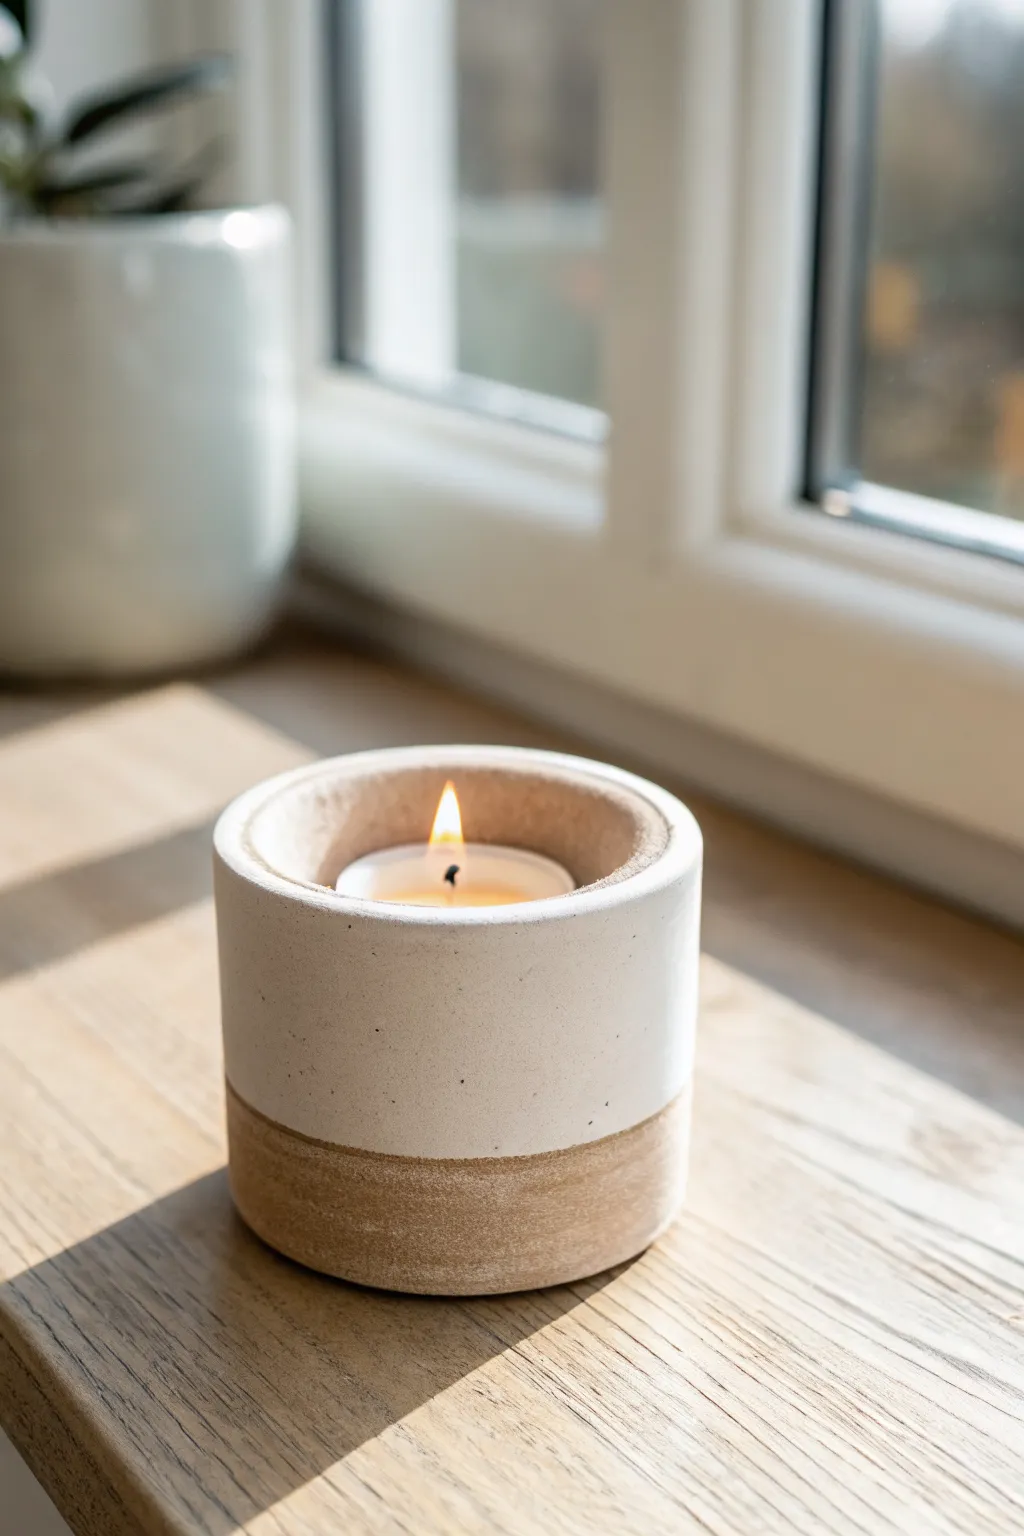
Embrace the beauty of simplicity with this dual-textured clay tea light holder. Its clean cylindrical shape and subtle contrast between raw earth tones and smooth white finish make it a perfect minimalist accent for any windowsill.
Detailed Instructions
Materials
- Air-dry clay (white or light grey)
- Tan/terracotta colored clay or acrylic paint
- Tea light candle (for sizing)
- Rolling pin
- Sharp crafting knife or clay wire
- Ruler
- Smooth work surface or silicone mat
- Sponge and water bowl
- Fine-grit sandpaper (220-400 grit)
- White matte acrylic paint (if using non-white clay)
- Clear matte varnish or sealant
- Painter’s tape
Step 1: Shaping the Base Cylinder
-
Prepare your workspace:
Begin by cleaning your work surface thoroughly to avoid dust getting into the clay. Lay down a silicone mat or a piece of parchment paper to prevent sticking. -
Roll out the primary clay:
Take a large chunk of air-dry clay and knead it until it is pliable and warm. Roll it into a thick log shape initially, pressing firmly to remove air bubbles. -
Create the cylinder shape:
You can either use a mould or sculpt by hand. For a handmade look, form the clay into a cylinder slightly wider than your tea light. Use your palms to roll the sides smooth against the table. -
Flatten the top and bottom:
Stand the cylinder up and tap it gently on the table to flatten the bottom. Flip it over and repeat for the top until it stands perfectly straight. -
Size the candle recess:
Take your actual tea light candle (metal casing included) and press it gently into the center of the cylinder top to mark the diameter. Remove the candle. -
Carve the hollow:
Using a loop tool or a small spoon, carefully carve out the clay inside the marked circle. Go deep enough so the top of the candle sits just below the rim of the holder. -
Check the fit:
Test the fit with your tea light periodically. You want a snug fit but enough room to easily remove the candle later. Smooth the inside walls of the hole with your finger.
Step 2: Refining and Drying
-
Create the two-tone texture:
To achieve the raw base look seen in the image, you can gently tap the bottom third of the cylinder with a coarse sandpaper or a rough stone before it dries. Keep the top smooth. -
Smooth the surfaces:
Dip your finger or a small sponge in water and run it over the top two-thirds of the clay. Smooth out any fingerprints, bumps, or seams until it looks flawless. -
Initial drying:
Place the piece in a cool, dry spot away from direct sunlight. Let it air dry for at least 24-48 hours. Rotate it occasionally so the bottom dries evenly. -
Sand for perfection:
Once fully dry, use fine-grit sandpaper to refine the shape. Focus on the rim and the top section, making them silky smooth. Leave the bottom section slightly rougher for textural contrast.
Uneven Drying?
If the clay creates cracks while drying, fill them with a ‘slip’ made of clay scraps mixed with water. Apply, let dry, and sand smooth.
Step 3: Painting and Finishing
-
Tape the boundary:
Measure about one-third up from the bottom of the cylinder. Apply a strip of painter’s tape tightly around the circumference to create a crisp horizontal line. -
Mix the base color:
If your clay isn’t naturally tan or terracotta, mix a small amount of acrylic paint to match that earthy hue shown in the photo. I prefer adding a drop of water to make it act like a stain. -
Paint the bottom section:
Apply the tan paint to the bottom third (below the tape). Use a dabbing motion with a sponge or stiff brush to enhance the textured look. -
Paint the top section:
If your clay isn’t bright white, apply a coat of matte white acrylic paint to the top two-thirds. Ensure the brush strokes are vertical and smooth. -
Reveal the line:
While the paint is still slightly tacky, carefully peel off the painter’s tape. This prevents the dried paint from cracking at the seam. -
Touch ups:
Use a tiny detail brush to fix any bleeding along the line where the two colors meet. A clean, wet brush can often wipe away small mistakes. -
Seal the piece:
Apply a coat of clear matte varnish over the entire piece, or just the inside of the candle holder to protect it from soot. Let it cure completely before use.
Level Up: Speckled Effect
Mix dried coffee grounds or fine sand into the white clay before shaping to create a natural, speckled ceramic texture.
Enjoy the cozy ambiance your new handcrafted holder brings to your space

Marbled Clay Tea Light Holder
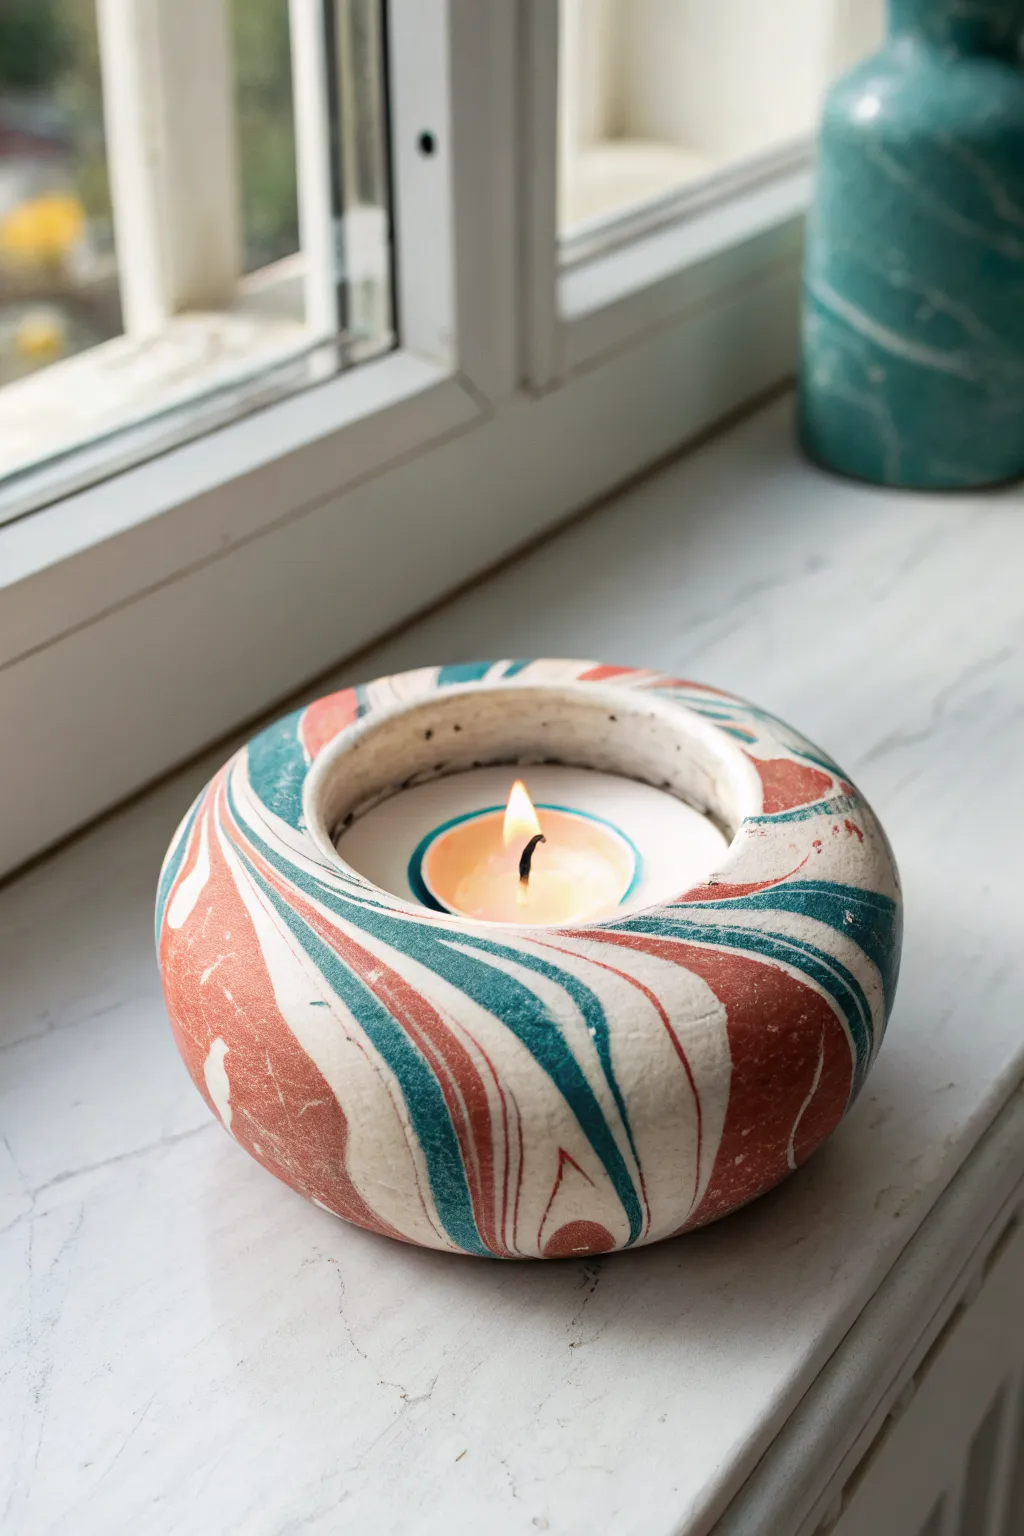
Bring a touch of modern artistry to your windowsill with this mesmerizing marbled tea light holder. The swirling pattern of earthy terracotta, teal, and creamy white creates a unique, stone-like finish that looks far more complex than it actually is.
Step-by-Step
Materials
- Polymer clay (White, Terracotta/Burnt Orange, Teal/Dark Turquoise)
- Tea light candle (for sizing)
- Acrylic roller or glass bottle
- Craft knife or clay slicer
- Ceramic tile or glass work surface
- Sanding sponge (fine grit)
- Clear matte varnish (optional)
- Round cookie cutter (slightly larger than tea light)
Step 1: Preparing the Clay
-
Condition the white clay:
Begin by taking a large block of white polymer clay. Knead it thoroughly in your hands until it becomes soft, pliable, and warm to the touch. This will be your base color, so you’ll need the largest amount of this. -
Condition colored clays:
Take smaller portions of the terracotta and teal clay—about a quarter of the amount of the white clay for each color. Condition them separately until soft. -
Create distinct ropes:
Roll each color family into a long, snake-like rope. The white rope should be thicker (about an inch diameter), while the colored ropes should be thinner (about half an inch).
Muddy Colors?
If your colors look brown instead of distinct, you over-mixed. Stop twisting earlier next time. The distinct lines come from barely mixing the clays together.
Step 2: Creating the Marble Pattern
-
Combine the ropes:
Lay the colored ropes alongside the white rope. Twist them all together gently to form one large, multi-colored log. -
Fold and twist:
Fold the twisted log in half and twist it again. Repeat this process of folding, rolling, and twisting about 3-4 times. Be careful not to over-twist, or the colors will blend into a muddy brown rather than distinct streaks. -
Form a smooth ball:
Once you are happy with the striations, roll the entire mass into a smooth ball. Check the surface to see the beautiful marbling emerging.
Step 3: Shaping the Holder
-
Flatten the base:
Place your marbled ball onto your work surface. Use the palm of your hand to gently flatten it into a thick disc shape, keeping the edges rounded and organic. -
Refine the shape:
Use your acrylic roller to smooth the top surface slightly, ensuring it is level. The puck should be roughly 1.5 to 2 inches tall. -
Create the center cavity:
Take your metal tea light casing (without the wax/wick) or a round cutter. Press it firmly into the center of the clay disc. Push down deep enough to hide the metal casing, but leave enough clay at the bottom so it doesn’t punch all the way through. -
Widen the opening:
Carefully remove the cutter or casing. I find using a small sculpting tool or your finger to gently widen the inner walls helps ensure the candle slides in easily after baking. -
Smooth the rim:
The pressure of creating the hole may have distorted the top rim. Gently pat and smooth the top edge so it curves inward slightly, mimicking the rounded ‘pebble’ look in the photo.
Pro Choice: Foil Core
To save clay and reduce weight, scrunch aluminum foil into a ball for the center, wrap your specialized marbled clay sheet around it, then press the candle hole.
Step 4: Finishing Touches
-
Check for imperfections:
Inspect the clay for any fingerprints or accidental nail marks. Rub them away gently with a fingertip dipped in a tiny bit of baby oil or water. -
Bake the clay:
Place your holder on a baking sheet lined with parchment paper. Bake according to the manufacturer’s instructions on your specific package of polymer clay (usually around 275°F/135°C for 15-30 minutes per 1/4 inch thickness). -
Cool down completely:
Turn off the oven and let the project cool down inside with the door slightly ajar. This prevents cracking. -
Sand for texture:
Once fully cool, use a fine-grit sanding sponge to lightly sand the exterior. This removes any shine and gives it that authentic, matte stone texture shown in the image. -
Seal the surface:
If you want extra protection, apply a very thin layer of matte varnish. Avoid glossy finishes if you want to maintain the natural, earthen look.
Pop in a vanilla-scented tea light and enjoy the warm glow against the swirling colors


Speckled Stoneware-Look Tea Light Cup
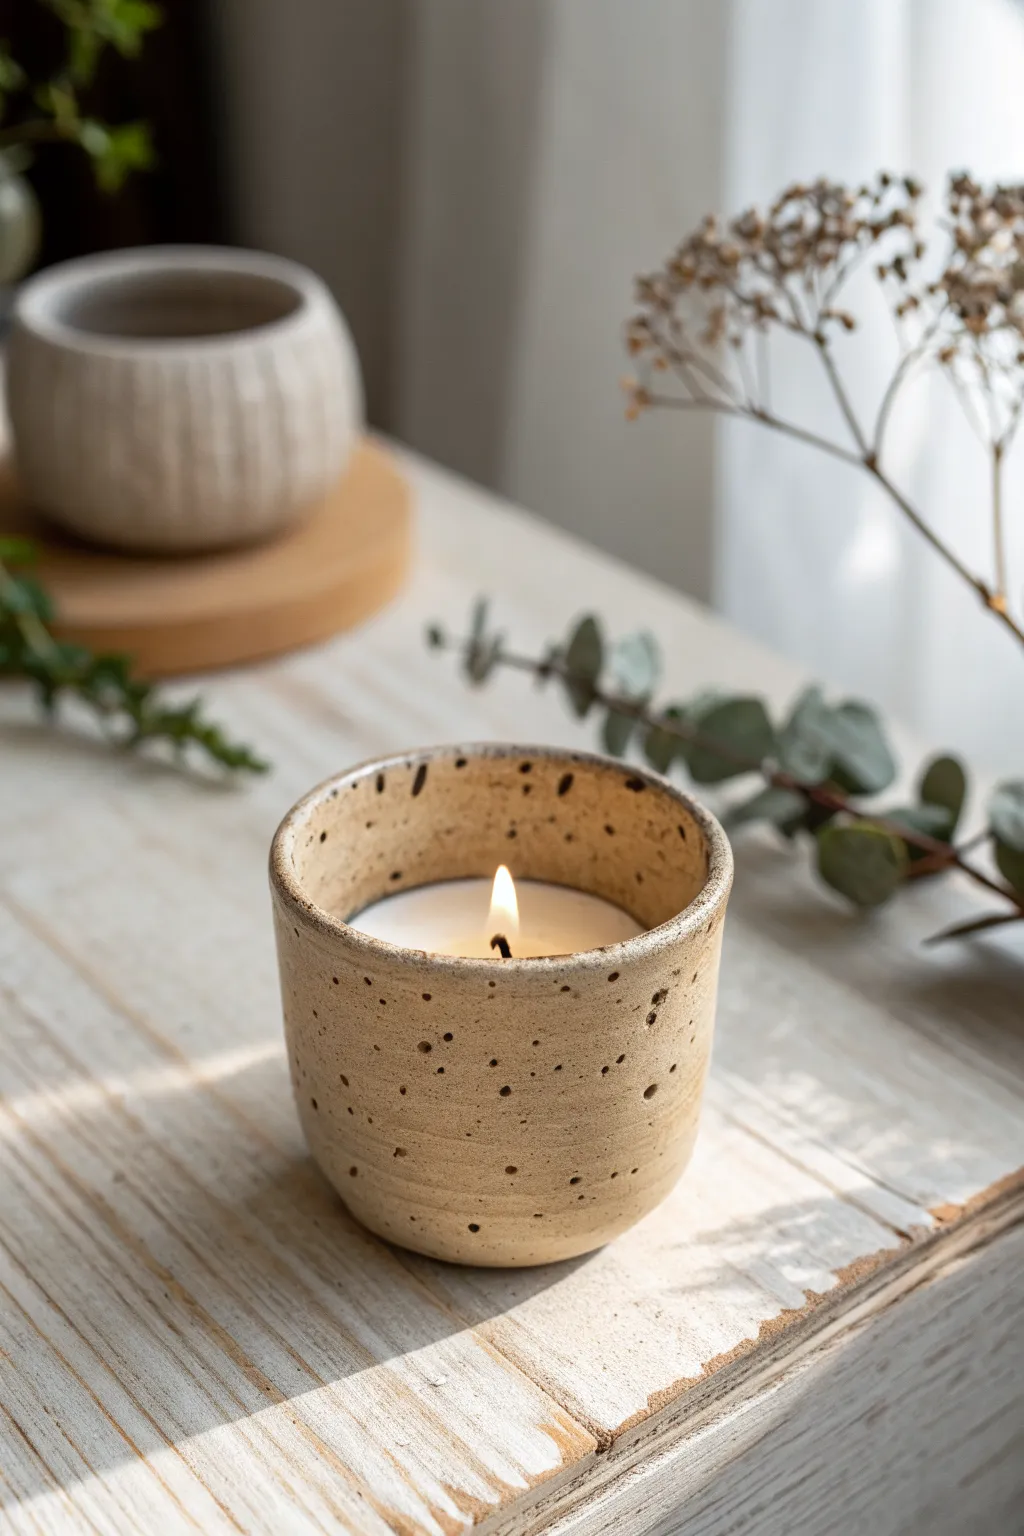
Achieve the rustic elegance of fired pottery without a kiln using air-dry clay and a clever painting technique. This project creates a cozy, minimalist vessel perfect for housing your favorite tea lights or poured candles.
Step-by-Step Guide
Materials
- White air-dry clay (approx. 250g)
- Small rolling pin
- Circular cookie cutter (approx. 3 inches)
- Sharp craft knife
- Small cup or jar (to use as a mold)
- Parchment paper
- Sandpaper (fine grit)
- Acrylic paints (Cream/Beige, Dark Brown, Black)
- Toothbrush (for speckling)
- Matte sealant or varnish
- Sponge or large brush
- Bowl of water
Step 1: Forming the Vessel
-
Condition the clay:
Begin by kneading a fist-sized ball of white air-dry clay until it is warm, pliable, and free of cracks. -
Roll out the base:
Roll a portion of the clay on parchment paper to a thickness of about 1/4 inch. Use your circular cutter to stamp out a perfect circle for the base. -
Create the sidewall slab:
Roll out the remaining clay into a long, rectangular strip. Aim for the same 1/4 inch thickness as your base to ensure even drying. -
Measure and cut:
Measure the circumference of your base circle. Cut the clay strip to this length with a little extra for the overlap, and trim the height to approximately 2.5–3 inches. -
Assemble the cylinder:
Wrap the rectangular strip around your circular base. Score (scratch) and moisten the edges where the clay meets the base and where the side seam overlaps. -
Blend the seams:
Use your thumb or a modeling tool to smooth the clay across the seams on both the inside and outside, making the join invisible. -
Shape against a mold:
If the shape feels wobbly, gently slide a parchment-wrapped glass or jar inside the cylinder to help it hold a perfect round shape while it firms up. -
Refine the rim:
Wet your finger and run it along the top rim to smooth it out. For this specific look, keep the rim slightly rounded rather than sharp. -
Dry thoroughly:
Let the piece dry completely for 24-48 hours. Remove the inner mold after the first few hours to allow air to circulate inside.
Uneven Seams?
If the vertical seam is visible after smoothing, add a tiny ‘snake’ of soft clay over the line and blend it outwards with water until it vanishes.
Step 2: Finishing and Decoration
-
Sand for smoothness:
Once bone dry, use fine-grit sandpaper to remove any fingerprints or rough bumps, focusing on the rim and the outer curve. -
Base coat application:
Mix a warm cream or beige acrylic paint. Apply two even coats to the entire vessel, allowing the first coat to dry before applying the second. -
Prepare the splatter paint:
Dilute a small amount of dark brown or black acrylic paint with water until it is the consistency of ink or thin milk. -
The speckle technique:
Dip an old toothbrush into the thinned paint. Hold it near the cup and run your thumb across the bristles to flick tiny droplets onto the surface. -
Vary the texture:
I find it helps to do a light mist of speckles everywhere, then move the brush closer in a few random spots to create larger, denser clusters of dots. -
Detail the rim:
Make sure to fleck some speckles onto the top rim and slightly inside the cup, so the stoneware effect looks authentic from all angles. -
Seal the piece:
After the paint is fully dry, apply a matte varnish to protect the surface. This gives it that soft, unglazed pottery feel. -
Add the candle:
Place a tea light or pour melted soy wax directly into the cup (only if you used a heat-safe, non-flammable sealant) to finish your project.
Splatter Control
Make a test splatter on a piece of paper first. If lumps fly off, your paint is too thick. If it runs immediately, it’s too watery.
Enjoy the warm glow of your handmade pottery piece in a cozy corner of your home

The Complete Guide to Pottery Troubleshooting
Uncover the most common ceramic mistakes—from cracking clay to failed glazes—and learn how to fix them fast.
Geometric Faceted Tea Light Holder
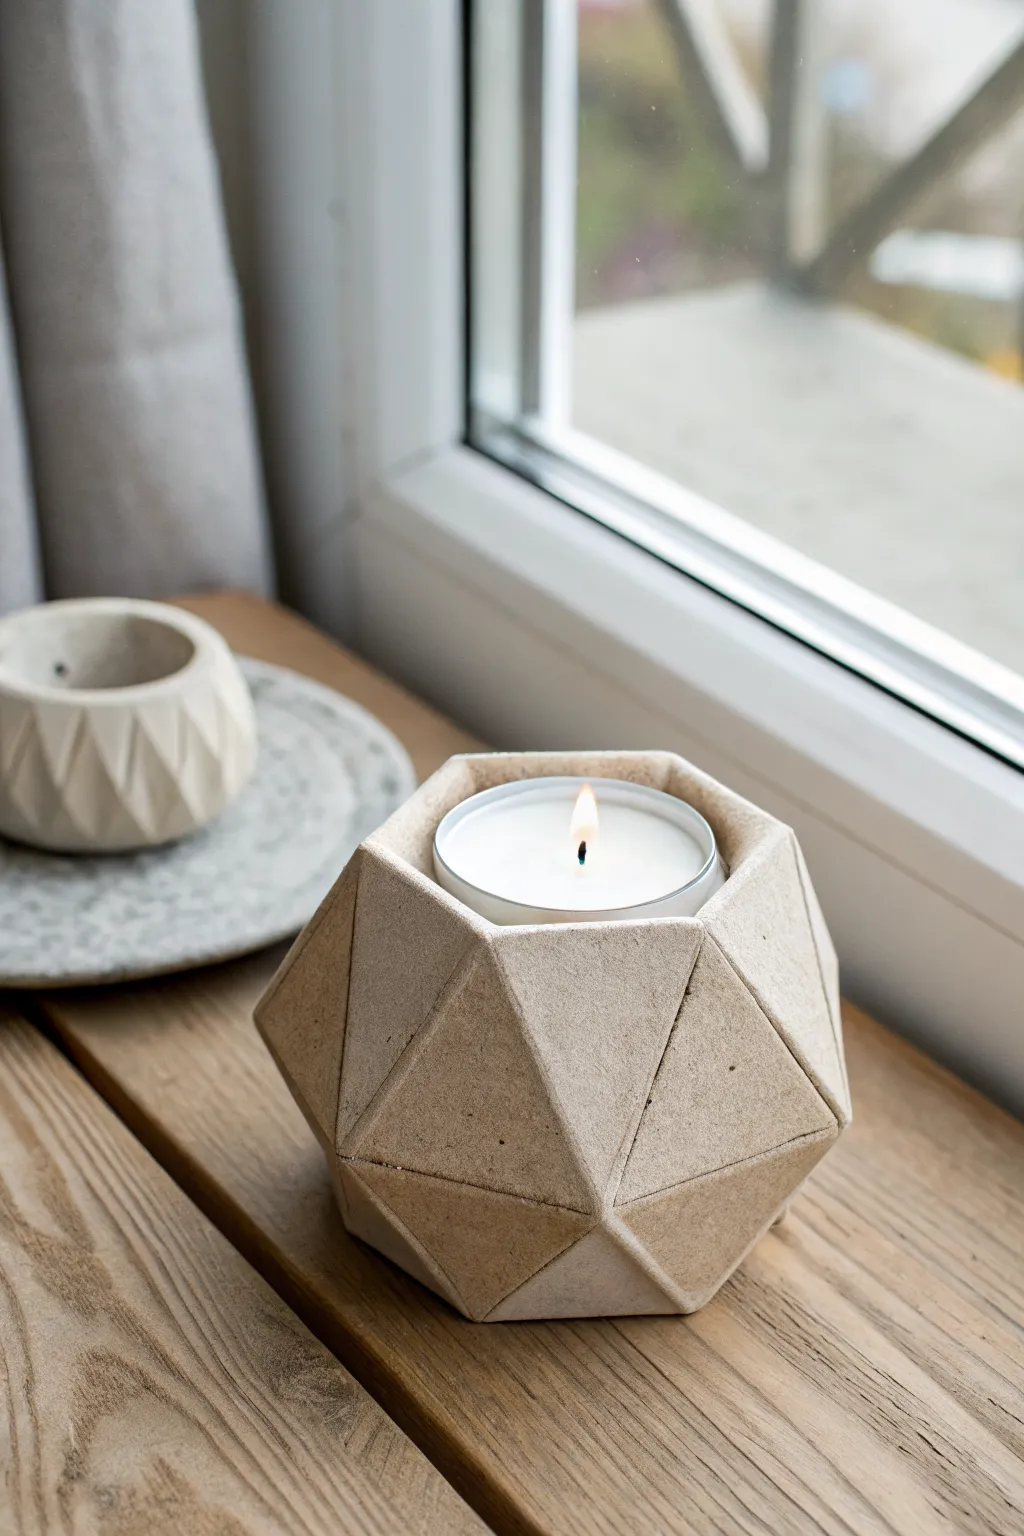
Embrace clean lines and architectural style with this faceted tea light holder that adds a modern touch to any windowsill. The rugged, stone-like texture contrasts beautifully with the warm glow of the candle flame, creating a piece that feels both grounded and elegant.
Step-by-Step
Materials
- Air-dry clay (stone effect or grey/beige) or polymer clay
- Rolling pin
- Sharp craft knife or scalpel
- Ruler
- Template paper and pencil
- Cardstock (for stencil)
- Votive candle (for sizing)
- Small bowl with water
- Fine-grit sandpaper
- Clear matte varnish (optional)
Step 1: Design and Preparation
-
Create the template:
Begin by sketching a pattern of connecting triangles on paper. For a dodecahedron-style shape like this, you will need a strip of identical equilateral triangles that meet point-to-point and base-to-base. -
Transfer to cardstock:
Once you are happy with the size of your triangles, transfer the shape onto sturdy cardstock and cut it out. This rigid template will ensure your clay cuts are crisp and uniform. -
Prepare the clay:
Roll out a slab of clay to an even thickness of about 1/4 inch (6mm). If the clay is too thin, the structure might collapse; too thick, and it becomes heavy and hard to fold.
Slumping Sides?
If the clay is too soft to hold the geometric shape, support the walls with crumpled paper or masking tape on the outside until it stiffens slightly.
Step 2: Cutting and Assembly
-
Cut the base shapes:
Using your cardstock template and a sharp craft knife, cut out the required number of triangles from the clay slab. Keep your cuts straight and clean. -
Score the edges:
Take your ruler and gently score the internal fold lines if you are cutting one large continuous net. If assembling individual triangles, score the edges of each piece where they will join. -
Apply slip:
Dab a small amount of water (or slip, if using kiln clay) onto the scored edges. This acts as the glue that bonds the geometric facets together. -
Begin assembly:
Start connecting the triangles at the base. Press the edges together firmly but gently, ensuring the seams are tight on the inside. -
Form the walls:
Work your way upward, angling the triangles inward to create the faceted sphere shape. Use the votive candle occasionally to check that the opening remains wide enough. -
Smooth the interior:
While the clay is still workable, use your finger or a smoothing tool to reinforce the seams from the inside. This structural integrity is crucial for the holder’s durability.
Sharper Facets
After initial assembly, let the clay set for 30 minutes. Once it’s ‘leather hard,’ use a metal rib or ruler edge to re-define and sharpen the creases.
Step 3: Refining and Finish
-
Sharpen the exterior seams:
Unlike the inside, you want the outside seams to be sharp. I like to delicately pinch the joined edges to emphasize the geometric definition. -
Check the rim:
Ensure the top opening is relatively level. You can gently tap the top triangles with a flat ruler to align them. -
Let it dry slowly:
Place the holder in a cool, dry spot away from direct sunlight. Geometric shapes can warp if they dry unevenly, so patience is key here. -
Sand the flaws:
Once fully cured, use fine-grit sandpaper to smooth out any fingerprints or rough burrs on the edges, paying special attention to the rim. -
Dust off debris:
Wipe the piece down with a slightly damp cloth or a dry soft brush to remove the sanding dust. -
Seal the surface:
Apply a coat of clear matte varnish if you are using air-dry clay. This protects the finish from heat and minor drips of wax.
Now you have a stunning architectural piece ready to hold a flickering light on your cozy evenings
Wavy Rim Modern Tea Light Holder
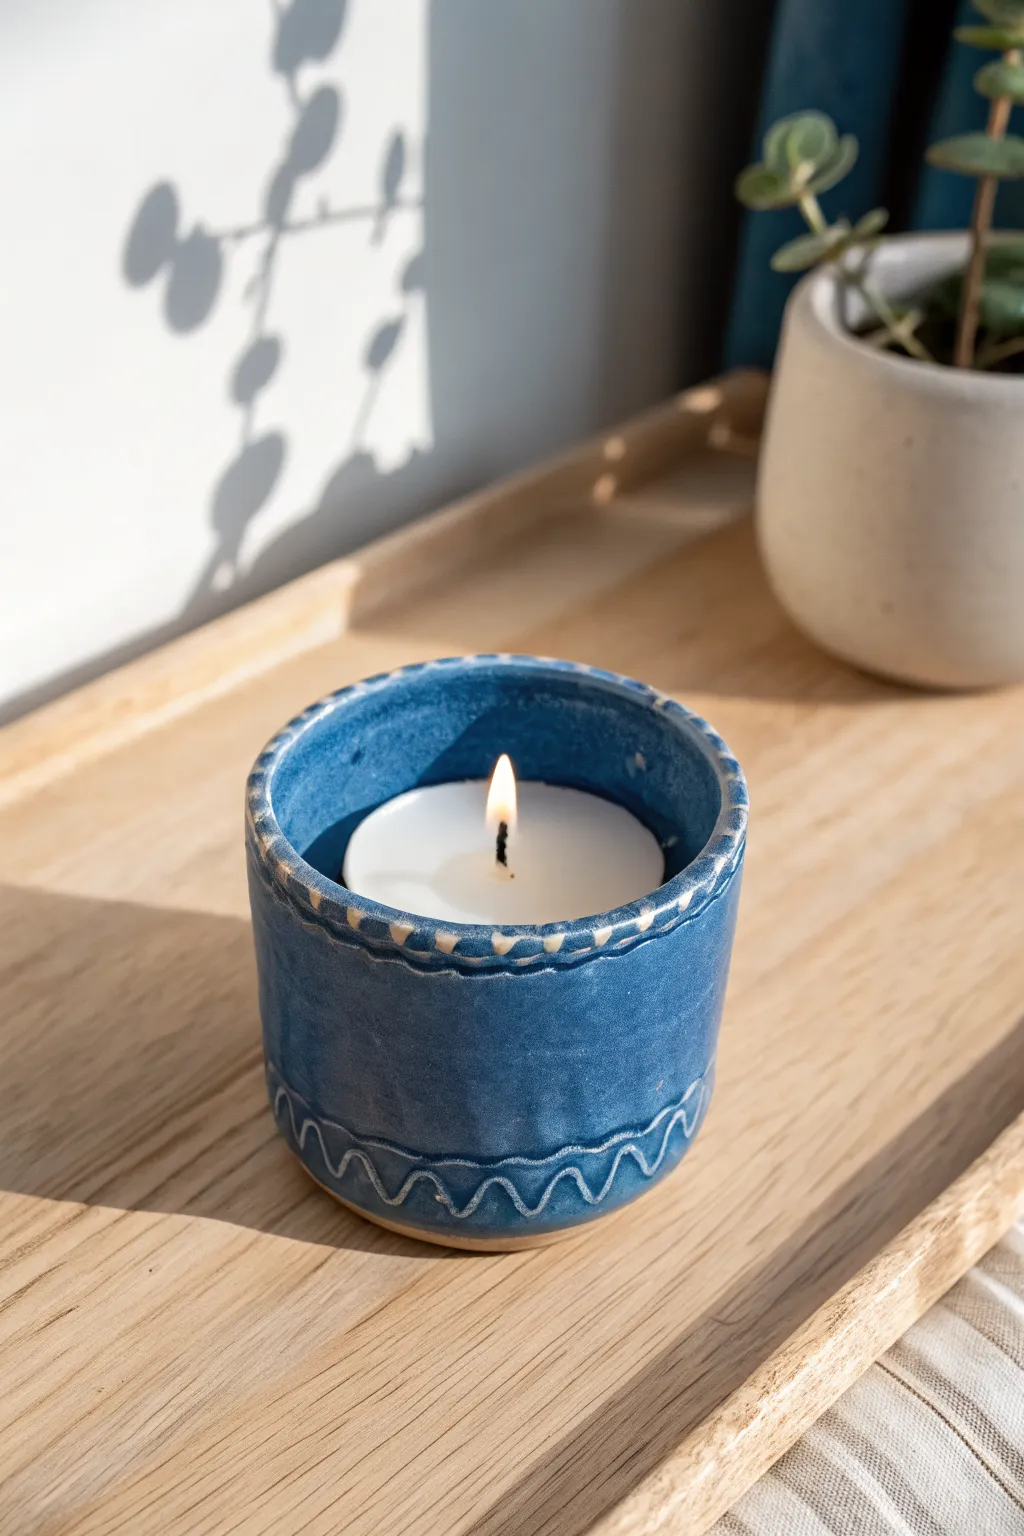
This charming tealight holder combines a deep cobalt blue glaze with playful sgraffito details to create a modern rustic look. The distinctive wavy line embellishments along the rim and base give it a handmade character that casts beautiful shadows when lit.
Step-by-Step
Materials
- White stoneware or air-dry clay
- Rolling pin
- Circle cutter (approx. 3-inch diameter)
- Rectangular template (clay slap measurer)
- Scoring tool or fork
- Slip (clay and water mixture)
- Small sponge
- Cobalt blue ceramic glaze (or acrylic paint if using air-dry clay)
- Clear gloss glaze
- Needle tool or sgraffito tool
- Small flat brush
- White tealight candle
Step 1: Forming the Base Cylinder
-
Roll the slab:
Begin by rolling out your clay to an even thickness of about 1/4 inch. If you want a perfectly uniform wall, use guide sticks on either side of your rolling pin. -
Cut the components:
Using a circle cutter or a jar lid as a guide, cut out a round circle for the base. Next, measure the circumference of your circle and cut a rectangular strip of clay slightly longer than that measurement and about 2.5 inches tall for the walls. -
Prepare the edges:
Score the outer edge of your circle base and the bottom edge of your rectangular strip using a scoring tool or a simple fork. Apply a generous amount of slip to these rough areas. -
Construct the wall:
Carefully wrap the rectangular strip around the circular base. Press the scored edges together firmly to create a bond. -
Seal the seam:
Where the two ends of the rectangle meet, score and slip the vertical seam. Overlap them slightly, cut through both layers for a clean join, and smooth the clay together inside and out until the seam disappears. -
Smoothing:
Take a slightly damp sponge and run it around the rim and walls to smooth out any fingerprints or rough texture. I like to pay special attention to the rim here to ensure it’s comfortable to touch.
Step 2: Glazing and Carving
-
First firing (if ceramic):
If using kiln-fire clay, let the piece dry slowly until bone dry, then bisque fire it according to your clay’s instructions. If using air-dry clay, allow it to dry completely for 24-48 hours. -
Apply base color:
Apply 2-3 coats of a deep cobalt blue underglaze or glaze. If you are using air-dry clay, use a high-quality blue acrylic paint. Ensure the coverage is solid and opaque. -
Carve the rim pattern:
Once the glaze is dry solely to the touch (but not fired), use a needle tool to scratch a dashed line pattern right along the top lip of the rim. Carve through the blue layer to reveal the white clay body underneath. -
Carve the base wave:
At the bottom of the vessel, about half an inch up from the base, use your sgraffito tool to carve a continuous wavy line all the way around the circumference. -
Add vertical details:
Between the peaks of your bottom wave and the base of the pot, carve small vertical lines or ‘U’ shapes to accentuate the rhythm of the wave pattern. -
Clean up:
Use a soft, dry brush to gently sweep away the clay crumbs created by your carving lines. Be careful not to smudge the blue glaze back into the white lines. -
Final clear coat:
If you used ceramic underglaze, apply a clear gloss glaze over the entire piece. For air-dry clay painted with acrylics, seal the work with a glossy varnish to mimic the ceramic look. -
Final firing or drying:
Fire the piece in the kiln for the final glaze firing, or let the varnish set completely according to the manufacturer’s directions.
Clean Lines
For sharper sgraffito lines, wait until the underglaze is ‘leather hard’—dry to the touch but with a tiny bit of moisture left in the clay.
Glaze Crawling?
If your glaze pulls away from the carved lines during firing, you likely applied the clear coat too thickly. Use thinner layers next time.
Place a simple white tealight inside and watch the flame illuminate the blue walls


What Really Happens Inside the Kiln
Learn how time and temperature work together inside the kiln to transform clay into durable ceramic.
Wildflower Pressed Tea Light Holder
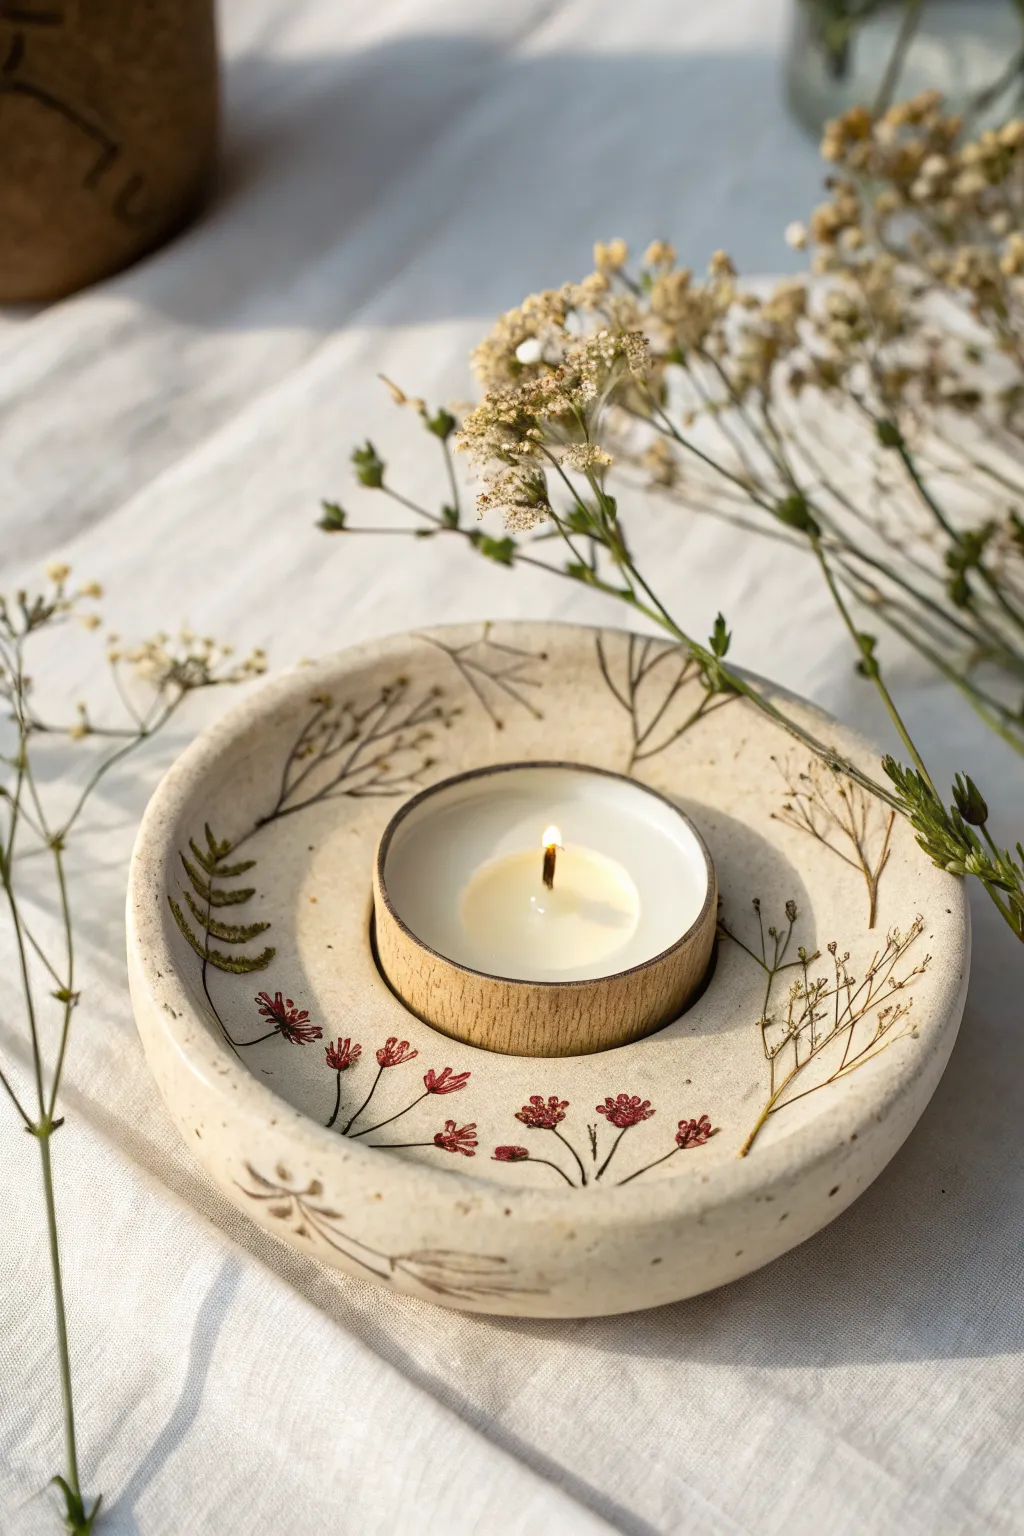
Bring the serene beauty of a meadow indoors with this charming clay tea light holder featuring delicate wildflower impressions. The combination of pressed botanical elements and soft ceramic textures creates a cozy, nature-inspired centerpiece perfect for quiet evenings.
Detailed Instructions
Materials
- Air-dry clay (white or cream)
- Small rolling pin
- Round cookie cutter or bowl (approx. 4-5 inches)
- Tea light candle (for sizing)
- Fresh or dried wildflowers (tiny blooms, ferns, baby’s breath)
- Fine-point paintbrush
- Acrylic paints (deep red, forest green, warm brown)
- Sponge or fine sandpaper
- Clear matte varnish or sealant
- Small bowl of water
- Modeling tool or butter knife
Step 1: Shaping the Clay Base
-
Condition the Clay:
Begin by taking a handful o f air-dry clay and kneading it in your hands until it becomes soft, pliable, and free of cracks. -
Roll the Slab:
Flatten the clay on a clean surface or mat. using your rolling pin, roll it out evenly to a thickness of about 1/2 inch to ensure sturdiness. -
Cut the Circle:
Press your large round cutter or place a bowl upside down on the clay and cut around it to create a perfect circle base. -
Create the Rim:
Gently pinch the outer edges of the circle upwards to create a slight lip or rim. You can smooth any jagged edges with a little water on your fingertip. -
Size the Center:
Take a tea light candle (metal or plastic casing perfectly fine) and press it firmly into the exact center of the clay disc. Gently wiggle it to ensure the indentation is wide enough, then leave it there momentarily as a placeholder.
Cracking Up?
If you notice small cracks forming as the clay dries, create a ‘slip’ paste by mixing a tiny bit of clay with water. Smooth this paste into the cracks with your finger to seal them before painting.
Step 2: Adding Botanical Details
-
Arrange the Flora:
Select your tiny wildflowers, fern fronds, or baby’s breath stems. Arrange them artfully on the flat surface of the clay surrounding the central candle spot. -
Press and Imprint:
Once happy with the layout, gently roll over the plants with your rolling pin applying light pressure. I prefer to lay a piece of wax paper over top first to prevent the plants from sticking to the pin. -
Remove the Plant Matter:
Carefully peel the plants away using tweezers if necessary. This will leave a beautiful, debossed impression in the clay surface. -
Smooth Imperfections:
If the pressing caused the rim to distort, reshape it gently. Dip your finger in water and smooth out any tiny cracks that may have formed near the impressions. -
Initial Drying:
Remove the central tea light placeholder now. Allow the piece to dry for 24-48 hours until completely hard and white. Turn it over halfway through to ensure the bottom dries evenly.
Step 3: Painting and Finishing
-
Sand for Smoothness:
Once fully dry, lightly sand any rough edges on the rim or bottom with fine-grit sandpaper or a dry sanding sponge. -
Enhance the Stalks:
Using a very fine brush and brown paint, trace the impressed lines of the stems to give them definition. -
Add Floral Color:
Mix a deep red acrylic paint. Carefully dab color into the flower head impressions. Don’t worry about perfect coverage; a slightly rustic look adds charm. -
Add Greenery Details:
Use a mossy green shade to fill in any leaf impressions, keeping the paint application light and translucent if possible to mimic a watercolor effect. -
Create Speckles:
To achieve the stone-like texture seen in the photo, dilute some brown paint with water. Dip a toothbrush or stiff brush into it and flick it gently over the piece to create tiny speckles. -
Seal the Holder:
Apply a coat of clear matte varnish to the entire piece. This protects the paint and prevents the clay from absorbing moisture. -
Final Test:
Once the varnish is dry, place a fresh tea light in the center indentation and enjoy your handmade botanical creation.
Add Some Sparkle
For a magical touch, mix a pinch of gold mica powder into your varnish before applying the final coat. The light from the candle will catch the subtle shimmer on the clay surface.
This lovely little holder makes a thoughtful handmade gift or a peaceful addition to your own bedside table
Heart Cutout Tea Light Lantern
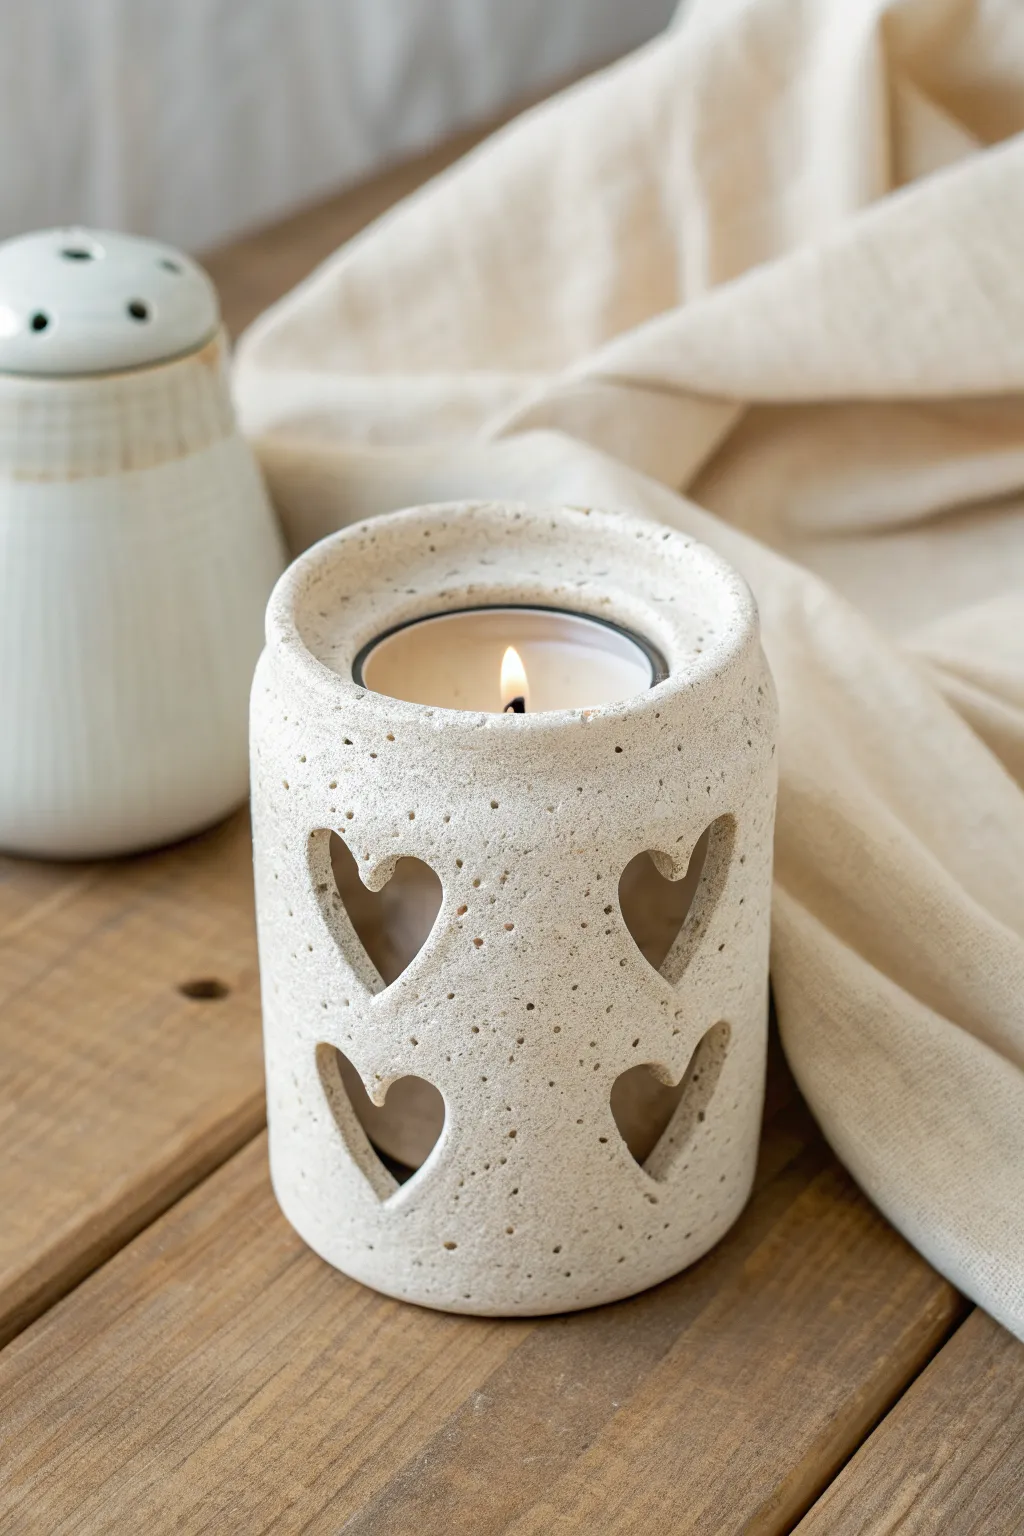
Create a warm and romantic atmosphere with this speckled clay lantern featuring charming heart-shaped cutouts. The natural texture of the clay combined with the soft glow of candlelight makes this a perfect centerpiece for cozy evenings.
Step-by-Step Guide
Materials
- Speckled stoneware clay (mid-fire)
- Rolling pin
- Canvas mat or slab roller
- Cylindrical form (like a PVC pipe or rolling pin) for shaping
- Small heart-shaped cookie cutter
- Needle tool
- Fettling knife
- Serrated rib tool
- Smooth rubber rib
- Slip (clay mixed with water)
- Sponge
- Clear matte glaze
Step 1: Preparing the Slab
-
Roll the clay:
Begin by wedging your speckled clay to remove air bubbles. Roll it out into a rectangular slab that is approximately 1/4 inch thick. Aim for an even thickness throughout to prevent cracking during drying. -
Smooth the surface:
Use a soft rubber rib to compress the clay slab on both sides. This aligns the clay particles, strengthens the slab, and creates that smooth, professional finish we want for the final lantern. -
Cut to size:
Measure and cut a rectangle from your slab. The length should be the circumference of your cylinder mold plus a little extra for the seam overlap, and the height should be about 4-5 inches.
Step 2: Creating the Design
-
Plan placement:
While the slab is flat, lightly mark where you want your heart cutouts to go. Staggering them in two rows creates a nice visual rhythm. -
Cut the hearts:
Press your heart-shaped cookie cutter firmly into the clay. If the clay sticks, you can gently pop the heart out. I find using a little cornstarch on the cutter helps release the shape cleanly. -
Initial clean up:
Gently smooth the edges of the heart cutouts with your finger or a slightly damp sponge to remove any sharp burrs left by the cutter.
Clean Cuts
Wait until the clay is leather-hard before doing final cleanup on the hearts. The clay will be firmer and crumbs will brush off easily without smearing.
Step 3: Forming the Cylinder
-
Bevel the edges:
Cut 45-degree angles on the two shorter ends of your rectangle. Bevel one end facing up and the other facing down so they will overlap seamlessly. -
Score and slip:
Score the beveled edges aggressively with your serrated tool and apply a generous amount of slip to both connection points. -
Join the seam:
Wrap the slab around your cylindrical form. Press the scored edges together firmly. Use a wooden modeling tool to blend the seam on both the inside and outside until the join is invisible. -
Shape the rim:
While the cylinder is still on the form or standing upright, gently curve the top rim slightly inward with your fingers to give it a softened, enclosed look.
Warping Issues?
If your cylinder creates an oval shape while drying, gently nudge it back to a circle every few hours during the drying phase to train the clay memory.
Step 4: Finishing Touches
-
Final smoothing:
Once the form is leather hard, go over the entire piece with a damp sponge. Pay special attention to the heart cutouts again to ensure they are perfectly smooth. -
Drying:
Let the piece dry slowly under loose plastic for the first day, then uncover it to dry completely. This slow drying helps prevent warping around the cutouts. -
Bisque fire:
Fire the bone-dry piece in a kiln to cone 04 (or according to your clay’s instructions) for the bisque firing. -
Glazing:
Dip the lantern into a clear matte glaze. This protects the piece while letting the beautiful natural speckles of the clay body shine through. -
Glaze firing:
Fire the piece a second time to the maturation temperature of your clay body (likely cone 5 or 6 for stoneware).
Now simply place a tea light inside and enjoy the playful shadows cast by the hearts

TRACK YOUR CERAMIC JOURNEY
Capture glaze tests, firing details, and creative progress—all in one simple printable. Make your projects easier to repeat and improve.
Starry Cutout Glow Tea Light Holder

This charming tea light holder brings the magic of a starry sky indoors with its simple cylindrical form and delicate cutout stars. The warm candlelight flickering through the star-shaped openings creates a cozy and serene atmosphere perfect for winter evenings.
Step-by-Step Tutorial
Materials
- White air-dry clay or stoneware clay (approx. 500g)
- Rolling pin
- Canvas mat or non-stick rolling surface
- Rectangular template (approx. 10cm x 28cm)
- Clay knife or fettling knife
- Star-shaped mini cookie cutters (various sizes)
- Slip (clay mixed with water) or vinegar
- Scoring tool or old toothbrush
- Sponge
- Fine-grit sandpaper
- Tea light candle
Step 1: Preparing the Slab
-
Wedge the clay:
Begin by wedging your clay thoroughly to remove any air bubbles, as these can cause cracking later. Form it into a smooth, rectangular block. -
Roll the slab:
Place your clay on a canvas mat. Using a rolling pin, roll the clay out into a long, even slab. Aim for a thickness of about 5-7mm to ensure the walls are sturdy enough to stand but thin enough to look delicate. -
Cut to size:
Lay your rectangular paper template gently over the slab. Use a sharp clay knife to cut around the template, creating a neat rectangle. Save the excess clay for the base. -
Check the surface:
Run a damp sponge lightly over the surface of the slab to smooth out any canvas textures or fingerprints before moving on to the design.
Sticky Cutter Fix
If clay gets stuck inside your star cutters, dip the cutter into cornstarch or flour before pressing it into the wet clay.
Step 2: Creating the Stars
-
Plan your placement:
Before cutting, gently lay your star cutters on the clay slab to visualize the pattern. A random scattering often looks more natural than rigid rows. -
Cut the stars:
Press the star-shaped cutters firmly into the clay slab and remove the cutout pieces. If the clay sticks inside the cutter, gently push it out with the back of a paintbrush. -
Refine the edges:
Once all stars are cut, smooth the inner edges of each star with a slightly damp finger or a tiny sponge. Sharp or ragged edges can look messy once the piece is dry. -
Bevel the connecting edges:
On the two short ends of your rectangle, cut a 45-degree bevel. This will help create a seamless join when you form the cylinder.
Step 3: Assembly
-
Form the cylinder:
Carefully lift the slab and curve it into a cylinder, bringing the two beveled edges together. Be gentle to avoid distorting the star shapes. -
Score and slip:
Score (scratch) the beveled edges with your tool and apply a generous amount of slip or vinegar. Press the edges firmly together. -
Blend the seam:
Use a modeling tool or your thumb to smooth the clay across the seam on both the inside and outside, making the join invisible. -
Cut the base:
From your leftover clay, roll a smaller slab. Place your cylinder on top of it and trace a circle around the base using a needle tool. -
Attach the base:
Score the bottom rim of the cylinder and the outer edge of the circular base. Apply slip, then press the cylinder onto the base. -
Seal the bottom:
I like to use a small coil of soft clay on the inside seam where the wall meets the floor to reinforce the connection. Smooth it down with a round tool.
Warped Walls?
To keep the cylinder perfectly round while drying, place a cardboard tube or soda can wrapped in paper inside as a temporary support.
Step 4: Finishing Touches
-
Final smoothing:
Give the entire piece a once-over with a damp sponge. Pay special attention to the rim, making sure it is level and smooth. -
Drying:
Le the holder dry slowly away from direct heat or sunlight. If using air-dry clay, this may take 24-48 hours. Turn it occasionally to ensure even drying. -
Sanding:
Once bone dry, use fine-grit sandpaper to gently buff away any remaining rough spots or sharp edges, particularly around the star cutouts. -
Seal or fire:
If using real pottery clay, fire it in a kiln. For air-dry clay, apply a matte acrylic sealer to protect the surface from dust and humidity.
Light a candle inside and watch the stars dance on your table surface once the project is fully complete
Cactus Tea Light Holder Trio
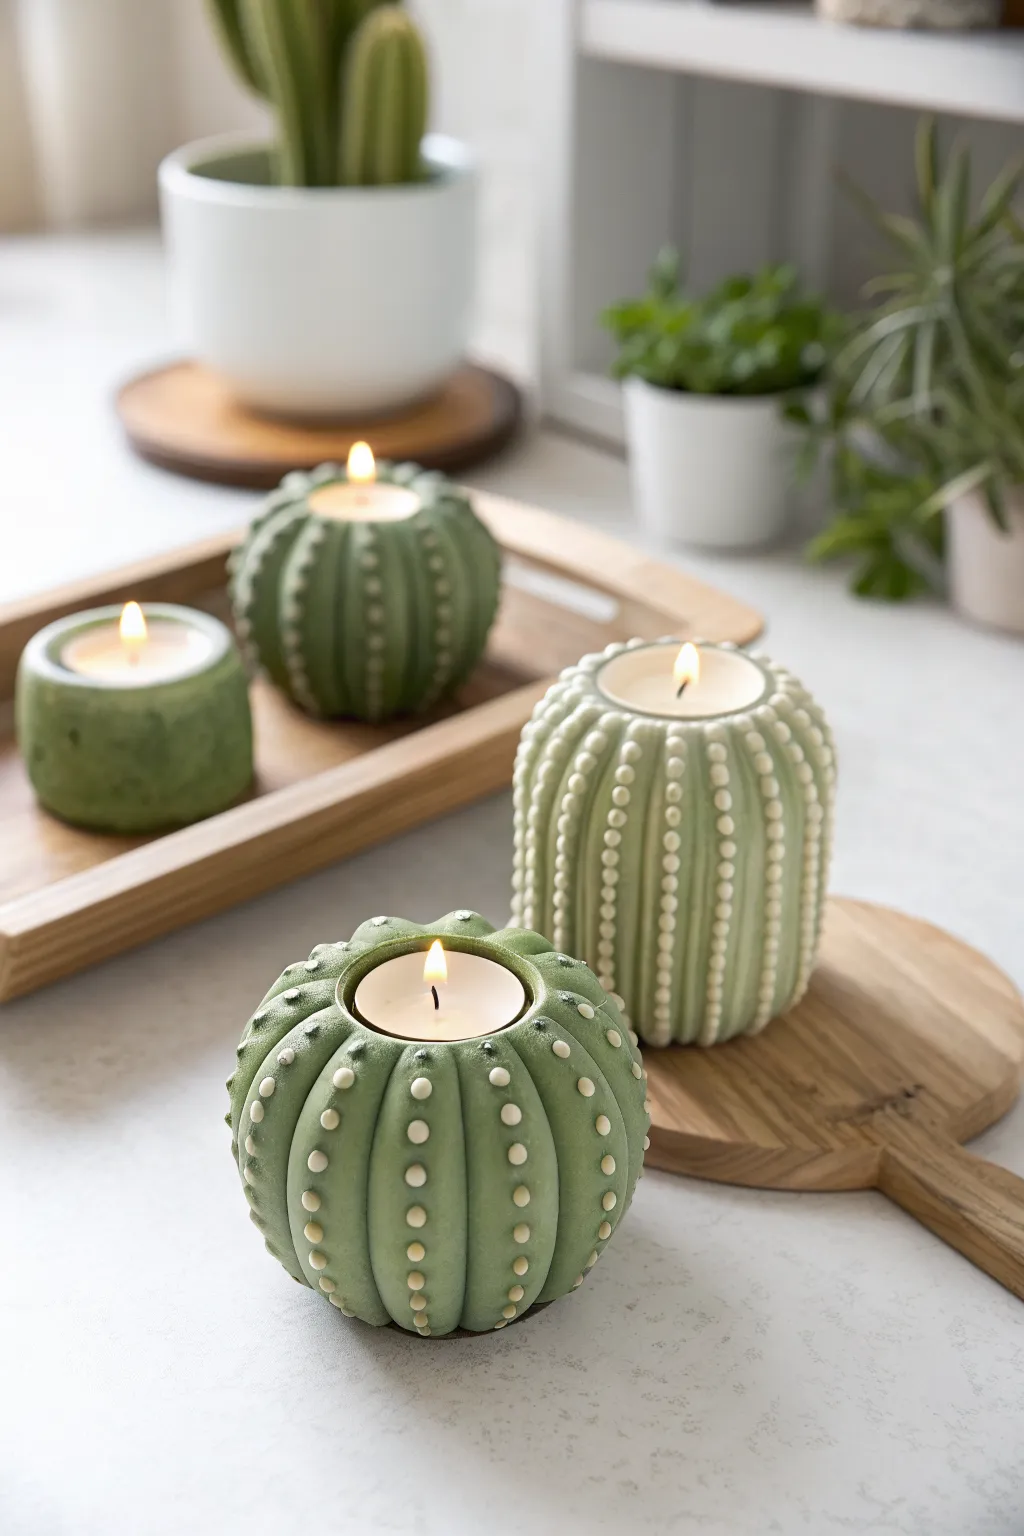
Bring a touch of the Southwest into your home with these charming cactus-shaped tea light holders. Modeled from air-dry clay and finished with a soft sage green, their textured ribs and delicate white dots create a cozy, whimsical glow.
Step-by-Step
Materials
- Air-dry clay (white or terracotta)
- Standard tea light candles (for sizing)
- Acrylic paints (sage green, dark green, white)
- Sculpting tools (needle tool, rib tool, or a butter knife)
- Rolling pin
- Small round paintbrush
- Fine detail paintbrush or dotting tool
- Water formatting and smoothing
- Sandpaper (fine grit)
- Matte varnish or sealant
Step 1: Shaping the Base Forms
-
Portion the clay:
Start by cutting your block of air-dry clay into three large chunks, varying the sizes slightly to create a diverse trio of holders. -
Form the spheres:
Roll each chunk of clay in your hands to form a smooth ball. Ensure there are no major cracks by dipping your fingers in a little water and smoothing them over as you roll. -
Create the candle well:
Take a metal tea light casing (remove the wick and wax first if you prefer) and press it firmly into the center of the top of each ball. Push down until the casing is flush with the clay surface, then wiggle it slightly to ensure the hole is loose enough for easy removal later. -
Refine the shapes:
For the taller cactus, gently roll the sphere into an elongated cylinder shape. For the rounder ones, press down slightly to flatten the bottom so they sit stable on your table.
Keep it Clean
Keep the metal tea light cup inside the hole while sculpting the ribs. This acts as a support structure so you don’t accidentally collapse the center opening while pressing on the sides.
Step 2: Sculpting the Textures
-
Marking vertical lines:
Using a needle tool or the back of a butter knife, lightly score vertical lines from the rim of the candle hole down to the base to mark where your ribs will go. -
Deepening the ribs:
Use a modeling tool or your fingers to press into those scored lines, creating deep vertical indentations. This pushes the clay outward between the lines, creating the puffed ‘ribs’ of the cactus. -
Smoothing the curves:
Dip your finger in water and run it along the puffed sections to round them off. I find this step crucial for getting that organic, soft look rather than sharp, geometrical edges. -
The smooth variant:
For the simpler cylindrical holder seen in the background, skip the deep ribbing and instead create a smooth, slightly textured surface by dabbing it gently with a crumpled piece of foil or a sponge. -
Final shaping check:
Pop a tea light back into the holes to ensure the shaping process didn’t warp the opening. Resize if necessary, then let the pieces dry completely for 24-48 hours away from direct heat.
Step 3: Painting and Detailing
-
Sanding imperfections:
Once fully dry and hard, use fine-grit sandpaper to gently smooth out any rough patches, especially around the rim of the candle opening. -
Base coat application:
Mix a sage green acrylic paint. Apply a solid base coat to the entire exterior of each holder. You may need two coats for full opacity. -
Adding depth:
Mix a slightly darker shade of green with a lot of water to create a wash. Paint this into the deep creases between the ribs, then wipe the raised areas with a paper towel. This accentuates the 3D shape. -
Painting the spines:
Using a fine detail brush or a dotting tool dipped in white paint, add small raised dots in vertical lines down the center of each rib. -
Varying the pattern:
For the taller cactus, create tightly packed rows of dots. on the rounder ones, you can space them out more for a different variety. -
Sealing the work:
Protect your paint job with a coat of matte varnish. This will give the holders a professional finish and make them easier to dust later.
Blooming Accents
Before the clay dries, form a tiny pinch pot flower or small clay balls and attach them near the rim to look like a cactus bloom. Paint it bright pink or yellow later for a pop of color.
Light your candles and enjoy the warm, desert-inspired atmosphere these little sculptures create
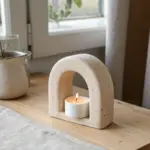
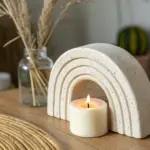
Hanging Wall Sconce Tea Light Pocket
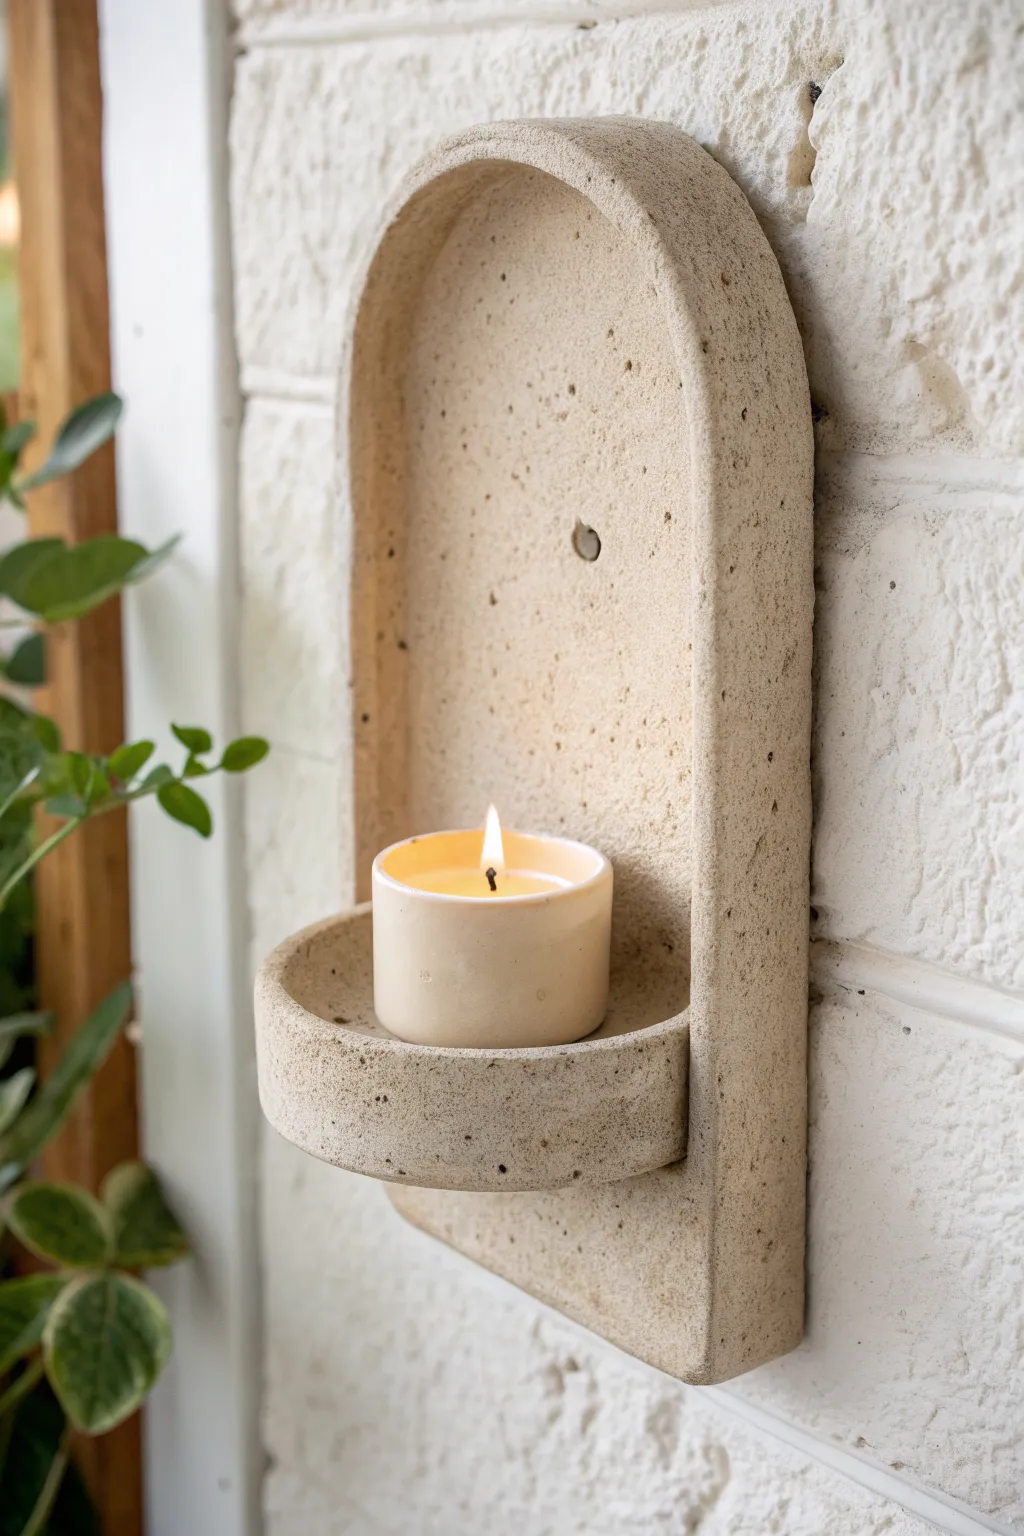
Bring a touch of minimalist tranquility to your walls with this sculptural, arch-shaped candle holder made to mimic the look of natural limestone. Its textured, speckled finish and warm beige tones create the perfect organic vessel for a flickering tea light.
Step-by-Step Guide
Materials
- Air-dry clay (white or light grey)
- Rolling pin
- Craft knife or clay cutter
- Cardboard or cardstock (for templates)
- Parchment paper or silicone mat
- Water in a small cup
- Slip (clay mixed with water into a paste)
- Sponge or scour pad
- Dried coffee grounds or coarse sand
- Acrylic paint (beige, cream, taupe)
- Baking soda (optional, for texture)
- Clear matte varnish
- Strong mounting adhesive or picture hanger hardware
Step 1: Shaping the Base
-
Create your template:
Sketch a long arch shape onto your cardboard. It should be approximately 8-10 inches tall and 4 inches wide. Cut this out to use as your guide. -
Prepare the clay:
Take a large chunk of air-dry clay and knead it until it is pliable. I like to mix in a pinch of dried coffee grounds right at this stage to bake speckles directly into the clay body. -
Roll the slab:
Roll the clay out on parchment paper to an even thickness of about 1/4 inch. Ensure it is flat and smooth. -
Cut the backplate:
Place your cardboard template onto the rolled clay. Use your craft knife to trace around the edge, cutting out the main arch shape cleanly. -
Smooth the edges:
Dip your finger in a little water and run it along the cut edges of the arch to soften any sharp corners.
Stone Effect Secret
Use a real stone or piece of coral to press texture into the wet clay. The natural irregularities create a far more convincing finish than synthetic tools.
Step 2: Building the Shelf
-
Cut the shelf piece:
From the remaining rolled clay, cut a semi-circle shape. The straight edge should match the width of your arch (about 4 inches), and it should protrude about 3 inches. -
Create the shelf wall:
Roll a long strip of clay, roughly 1 inch tall. Wrap this strip around the curved edge of your semi-circle base to create a small wall, securing it by scoring the clay and using slip. -
Blend the seams:
Use a modeling tool or your finger to smooth the seam where the wall meets the shelf base until it looks like one solid piece. -
Attach to the backplate:
Score (scratch) the back straight edge of your shelf and the spot on the main arch where it will sit. Apply a generous amount of slip to both scored areas. -
Secure the joint:
Press the shelf firmly against the lower section of the arch. Use a small coil of clay underneath the shelf to reinforce the joint, blending it smoothly into both the shelf and the backplate. -
Add a mounting hole:
Use a straw or a small circular cutter to create a hole in the upper center of the backplate for hanging later.
Make it Functional
Embed a small metal washer into the clay centered on the shelf bottom before drying. This helps magnets stick if you use magnetic LED candles later.
Step 3: Texture and Finishing
-
Texture the surface:
While the clay is still damp, take a course sponge or a ball of aluminum foil and gently press it all over the surface. This creates that authentic stone-like pitting. -
Let it dry:
Allow the piece to dry completely for 24-48 hours. Turn it over occasionally to ensure even drying and prevent warping. -
Sand imperfections:
Once fully bone dry, use fine-grit sandpaper to smooth out any unintentional bumps, but leave the texture you created intact. -
Mix textured paint:
Mix your beige and cream acrylic paints. To get the grainy limestone look shown in the photo, mix a teaspoon of baking soda into the paint. -
Apply the base coat:
Paint the entire sconce with your textured mix. Stipple the paint on (dabbing up and down) rather than brushing to enhance the rough look. -
Add speckling:
Load a toothbrush with watered-down brown or dark grey paint. Run your thumb over the bristles to flick tiny speckles onto the sconce. -
Seal the piece:
Finish with a coat of clear matte varnish to protect the surface without making it shiny. -
Install:
Hang the sconce securely on the wall, place your favorite LED or real tea light inside, and enjoy the glow.
Now you have a stunning, architectural piece of wall decor that looks like expensive hewn stone.