When I’m craving that polished, school-uniform-cute vibe in my jewelry, I reach for preppy Christmas clay bead bracelets in crisp reds, greens, and snowy whites. These ideas are all about easy-to-wear heishi beads, sweet holiday details, and just enough gold spacers to make the whole stack feel extra put-together.
Classic Candy Cane Stripe Heishi Stack
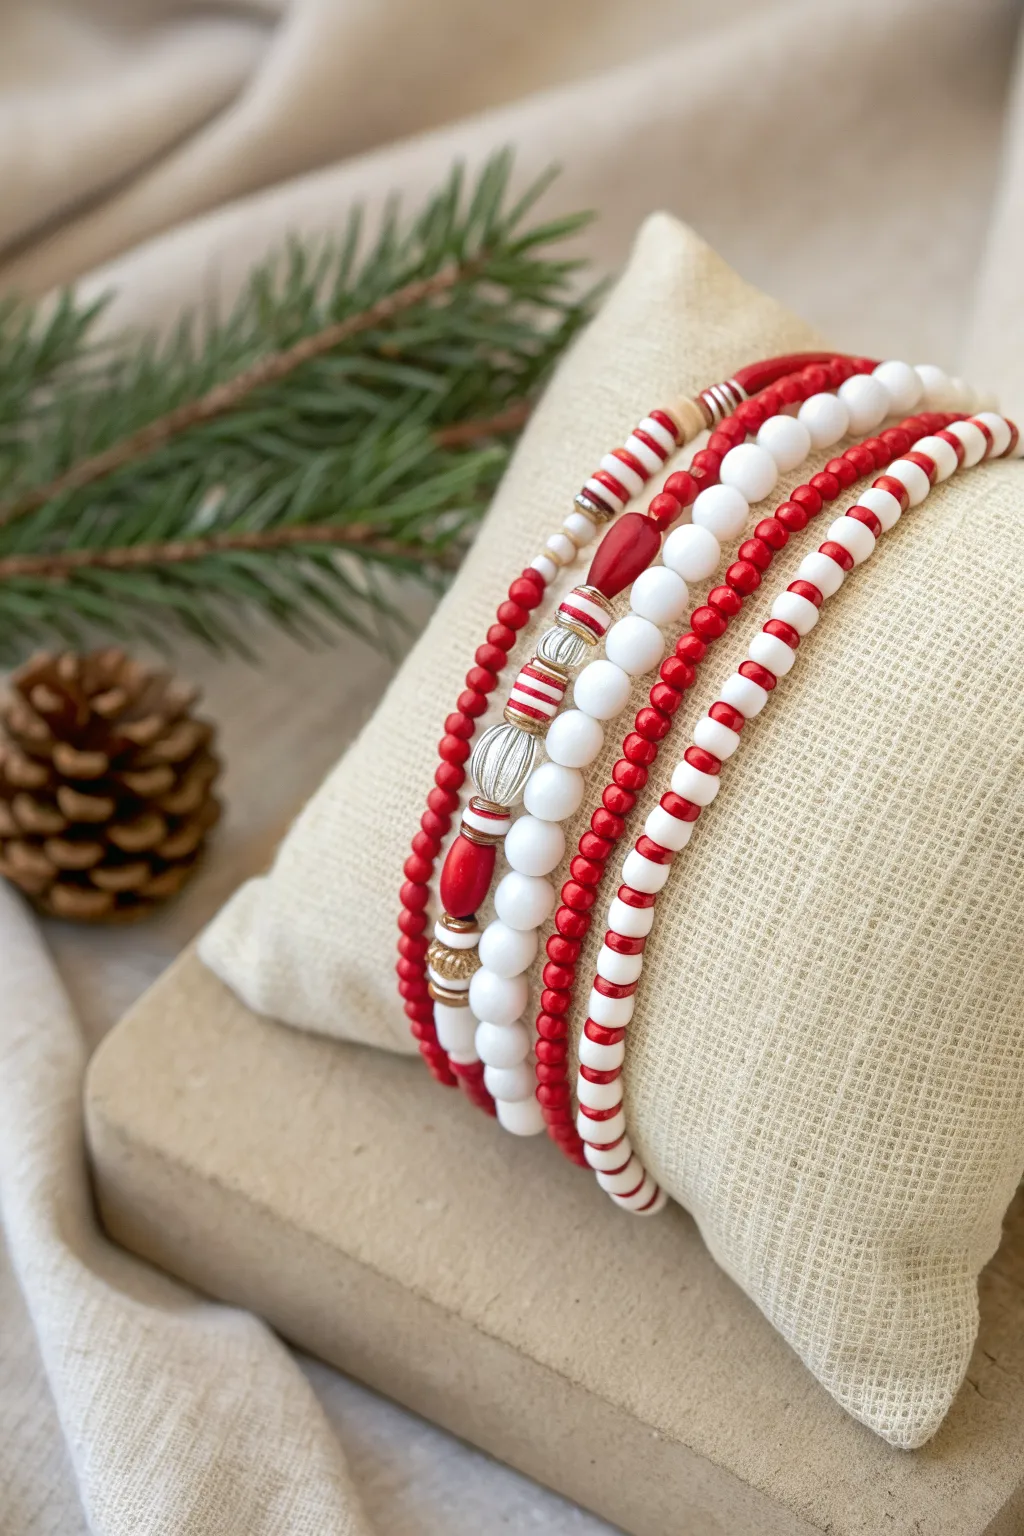
Embrace the classic palette of the season with this stunning four-strand bracelet stack that mixes varied textures and patterns. Combining smooth white rounds, tiny red seeds, and playful candy-stripe accents creates a sophisticated yet festive preppy look perfect for holiday parties.
Detailed Instructions
Materials
- Elastic beading cord (0.7mm or 0.8mm clear)
- Small red seed beads (approx. 2mm or 3mm)
- Medium white round glass or acrylic beads (6mm)
- Medium red round beads (4mm)
- Flat disc heishi beads (white)
- Flat disc heishi beads (red)
- Gold saucer spacer beads
- Silver ribbed/textured round beads
- Elongated teardrop red focal bead
- Large cylindrical red bead
- Clear jewelry glue (e.g., G-S Hypo Cement)
- Scissors or bead snippers
- Beading needle (optional but helpful for seed beads)
- Jewelry tape or bead stopper
Step 1: Strand 1: The Seed Bead Foundation
-
Prepare the cord:
Cut a piece of elastic cord about 10-12 inches long. Stretch it gently a few times to “pre-stretch” the elastic, which prevents the bracelet from loosening later. Secure one end with a piece of tape or a bead stopper. -
String the base:
Begin stringing your small red seed beads. These act as a simple but vibrant texture contrast to the larger beads in the other bracelets. -
Check the length:
Continue adding beads until you reach approximately 6.5 to 7 inches, or your desired wrist size. Wrap it around your wrist to check the fit, remembering that seed bead strands can feel tighter than larger beads. -
Tie it off:
Bring the ends together and tie a surgeon’s knot (looping the cord through twice before pulling tight). Add a tiny dot of glue to the knot. -
Finish strand one:
Let the glue dry for a moment, then trim the excess cord carefully. Hide the knot inside a bead if the hole is large enough.
Knot Security
Hide your knot inside the bead with the largest hole (usually the white rounds). Pull the knot in while the glue is tacky, not fully dry.
Step 2: Strand 2: The Candy Stripe Pattern
-
Pattern setup:
Cut another length of cord. For this strand, you are creating a ‘candy cane’ illusion using flat heishi beads. -
Create the segments:
String a pattern of five white heishi discs followed by one red heishi disc. Repeat this strictly to create the striped effect. -
Integrate spacers:
Every inch or so, swap the standard pattern for a gold saucer spacer to add a touch of metallic shine that breaks up the matte texture. -
Finish the second strand:
Once you’ve reached your length, tie off securely with a surgeon’s knot, glue, and trim as you did with the first strand.
Step 3: Strand 3: The Focal Mix
-
Start the third cord:
Prepare your third cord. This strand is the most complex, featuring a mix of textures and sizes. -
Build the back section:
Start with a sequence of small red seed beads and small red 4mm round beads to form the back half of the bracelet. -
Add texture:
Transition into the front focal section by adding a silver ribbed bead, followed by three gold saucer spacers for a mixed-metal look. -
Place the main focal:
String your elongated red teardrop bead. I like to frame this bead with a flat gold spacer on either side to make it pop. -
Add the secondary focal:
Next, add a few more small red spacer beads, then place the large red cylindrical bead and another silver ribbed bead to balance the design. -
Complete the loop:
Finish stringing until the strand matches the length of the others, ensuring the focal beads sit centered on the top of the wrist. Tie, glue, and trim.
Uneven Tension?
If one bracelet feels tighter, you didn’t pre-stretch the cord enough. Give the elastic 3-4 firm tugs before stringing beads to prevent sagging later.
Step 4: Strand 4: The White Pearl Accent
-
Prep the final cord:
Cut and pre-stretch your final piece of elastic. -
String the pearls:
Thread on your medium 6mm white round beads. These can be glass pearls, acrylic rounds, or even white jade for a heavier feel. -
Size consistency:
Ensure this strand sits comfortably alongside the others. Because the beads are larger, they take up more inner circumference, so you might need slightly fewer beads than the seed bead strand. -
Final closure:
Tie your final surgeon’s knot securely. Pull tight to ensure no gaps are visible between the larger white spheres. -
Hide the knot:
Gently tug the knot inside one of the white beads to conceal it completely. Add a final dab of glue if necessary.
Stack all four bracelets on a soft jewelry pillow or gift box to admire your classic holiday handiwork


Red, Green, and White Color-Block Bracelets
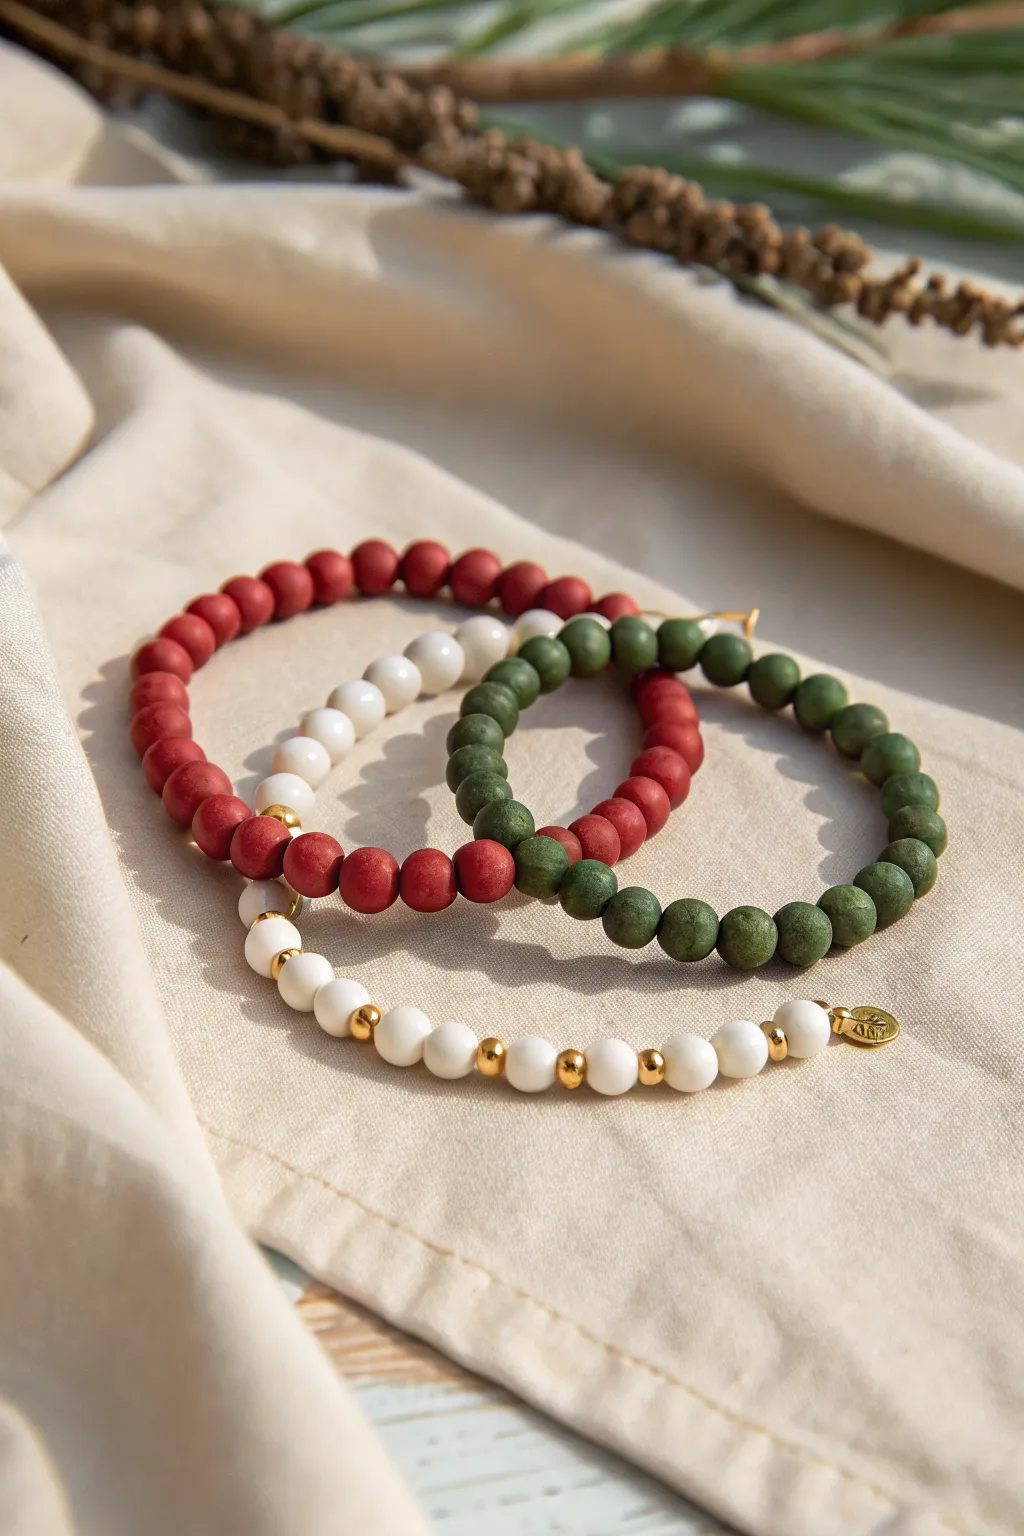
Embrace the understated elegance of the season with this trio of block-colored bracelets. Featuring a gorgeous contrast between matte red and green beads against polished white and gold accents, this stack is the perfect preppy addition to your holiday wardrobe.
Step-by-Step Tutorial
Materials
- Matte round beads (6mm or 8mm) in deep red
- Matte round beads (6mm or 8mm) in forest green
- Glossy round beads (6mm or 8mm) in creamy white
- Gold plated spacer beads (3-4mm rounds)
- Strong elastic stretch cord (0.8mm or 1mm)
- Jewelry glue or clear nail polish
- Scissors
- Small gold charm (optional, tree or star shape)
- Bead stopper or tape
Step 1: Preparation & Sizing
-
Measure your wrist:
Begin by wrapping a piece of string or a measuring tape around your wrist to find your comfortable size. Add about half an inch to this measurement to ensure the bracelets aren’t too tight. -
Cut the cord:
Cut three lengths of elastic cord, each about 10-12 inches long. This gives you plenty of extra room for tying knots later without struggling with short ends. -
Pre-stretch the elastic:
Before you add a single bead, give each piece of cord a firm tug several times. This pre-stretching prevents the bracelets from sagging or growing loose after the first few wears. -
Secure the end:
Attach a bead stopper or simply place a piece of tape on one end of each cord to stop your beads from rolling right off while you work.
Knot Security Tip
Use a surgeon’s knot for extra security: loop the elastic through twice on the first pass of the knot instead of once before pulling tight.
Step 2: The Red & Green Solids
-
String the red bracelet:
Start with the red bracelet. Thread your matte red beads onto the first cord one by one until you reach your desired length. Keep the tension consistent but not tight. -
Check the fit:
Wrap the strand around your wrist to verify the length. Add or remove a bead or two until the two ends meet comfortably without gaps. -
Tie the knot:
Tie a standard square knot (right over left, left over right). Pull the elastic tight so the knot is small and secure. -
String the green bracelet:
Repeat the exact same process with the matte green beads on your second cord. I like to double-check that it matches the length of the red bracelet by holding them side-by-side. -
Secure the green strand:
Tie off the green bracelet with another strong square knot, ensuring the tension matches the first bracelet.
Step 3: The White & Gold Accent
-
Plan the pattern:
For the white bracelet, you will alternate beads. The pattern shown uses a sequence of two or three white beads followed by a small gold spacer bead. -
Start beading:
Thread two creamy white beads, then one gold spacer bead. Repeat this pattern. This breaks up the white and adds that classic holiday shimmer. -
Add the charm:
If you are using a small gold charm (like the one shown on the white bracelet end in the photo), slide it on near where your knot will be, ensuring it’s flanked by gold spacers for a polished look. -
Finish the strand:
Continue until the bracelet matches the length of the red and green ones. End the pattern so that the knot will ideally be hidden inside a larger white bead rather than a tiny gold spacer.
Curling Elastic?
If your elastic keeps curling up while threading, run it under warm water or pull it taut against the edge of a table to straighten it out.
Step 4: Finishing Touches
-
Apply adhesive:
Place a tiny drop of jewelry glue or clear nail polish directly onto the knot of each bracelet. Let this dry completely before moving on. -
Hide the knots:
Once the glue is tacky but not fully set, gently tug the cord to pull the knot inside the nearest large bead hole. This makes the finish look professional and seamless. -
Trim excess cord:
Using your sharp scissors, trim the tails of the elastic cord as close to the bead hole as possible without nicking the knot itself. -
Final inspection:
Give each bracelet a final gentle stretch test to ensure the knots are holding firm and the beads are sitting correctly.
Stack these beauties together for a festive arm party or gift them individually to spread some holiday cheer


Gold Spacer Breaks for a Preppy Finish
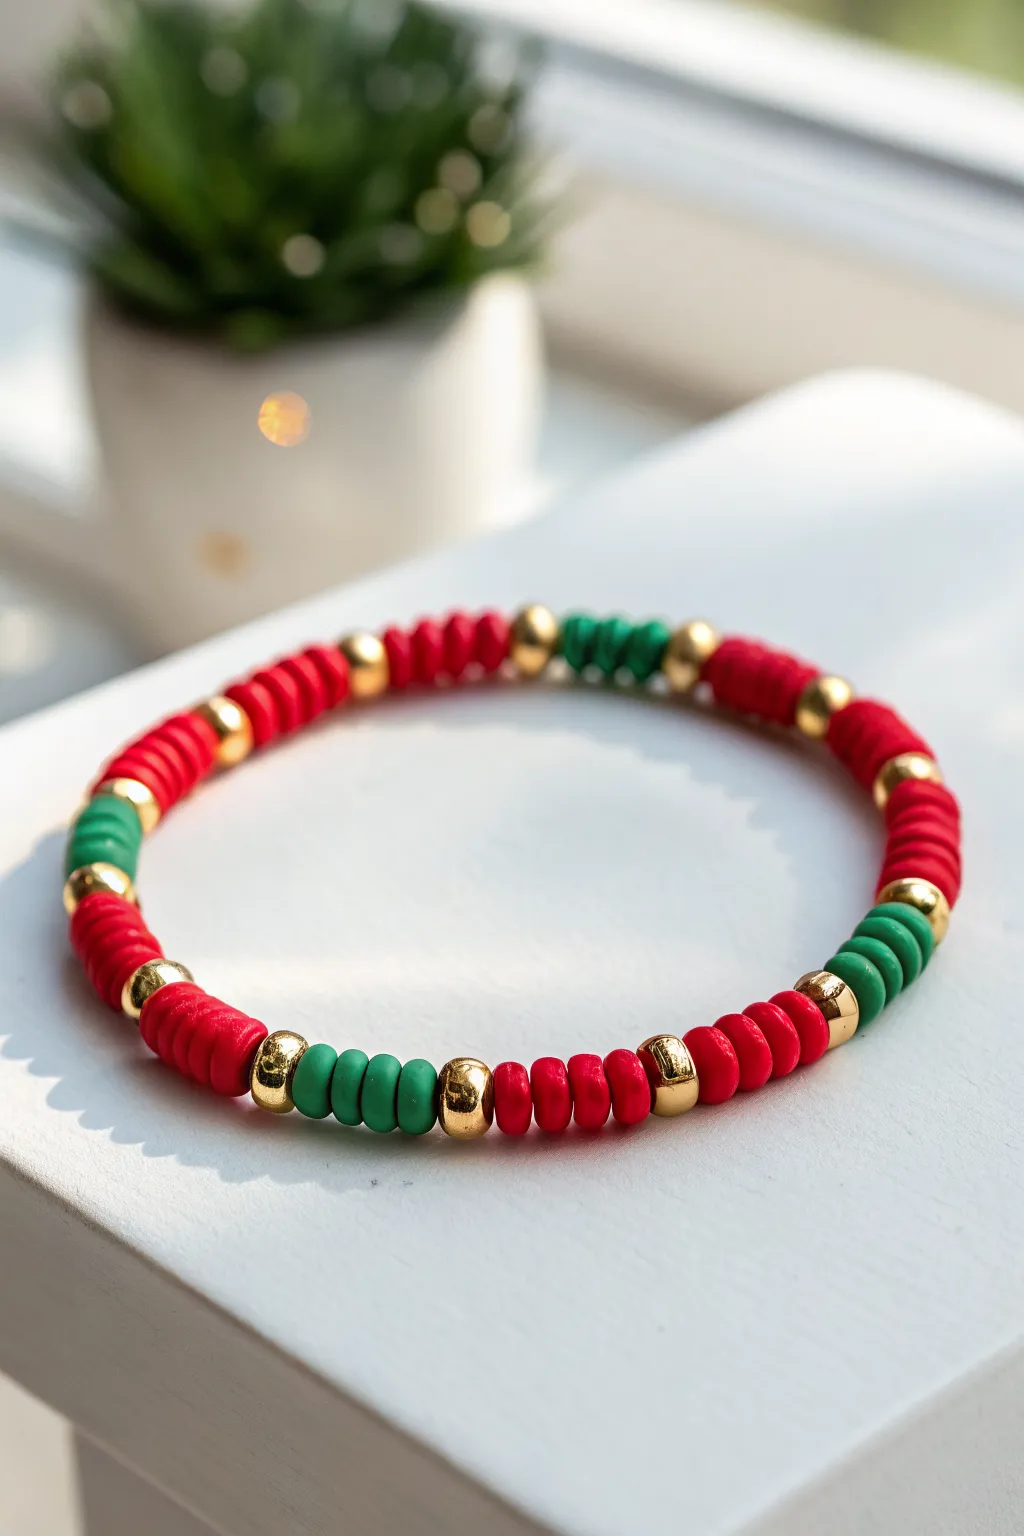
Enhance your holiday stack with this polished clay bead bracelet, featuring vibrant reds and emerald greens punctuated by gleaming gold spacers. The metallic accents break up the color blocks, giving the piece a high-end, store-bought finish that feels perfectly preppy.
How-To Guide
Materials
- Red polymer clay disc beads (heishi style)
- Emerald green polymer clay disc beads (heishi style)
- Gold round spacer beads (3-4mm)
- Elastic stretch cord (0.8mm recommended)
- Superglue or jewelry glue
- Scissors
- Bead stopper or tape
- Ruler
Step 1: Planning and Setup
-
Measure your wrist:
Wrap a measuring tape comfortably around your wrist to determine your size, then add about half an inch for a comfortable fit. -
Prepare the cord:
Cut a piece of elastic cord about 10-12 inches long. This extra length makes tying the knot at the end much easier. -
Secure the end:
Attach a bead stopper or simply tape down one end of the cord to your work surface to prevent beads from sliding off as you work. -
Plan your pattern style:
Examine the photo: the look relies on segments of color separated by single gold beads. Decide on a loose alternation, like a long red section, a gold bead, a shorter green section, and another gold bead.
Keep it Snug
If gaps appear between beads after wearing, you likely didn’t pre-stretch the cord. Give the elastic a few gentle tugs before knotting to remove slack.
Step 2: Beading the Pattern
-
Begin with a red segment:
Thread approximately 10 to 12 red clay discs onto the cord to start your first major color block. -
Add the first spacer:
Slide on one gold round spacer bead. Snug it up against the red stack to see that satisfying metallic pop. -
Create a contrast section:
Add a small section of contrasting color. Thread on about 4 to 5 green clay discs. -
Insert another spacer:
Add a second gold spacer bead after the green section. -
Build a mixed rhythm:
Continue this process, varying the length of your color blocks. For example, follow the green section with another long red segment of about 8 beads, a gold spacer, and then perhaps a very short red segment of 3 beads. -
Incorporate green accents:
Ensure you balance the dominant red with occasional green interruptions. Thread 3 green beads, add a gold spacer, and then switch back to red. -
Replicate the ‘random’ look:
Avoid a perfect mathematical pattern. The charm of this bracelet is in the varied segment lengths—some red sections should be longer than others. -
Check the length:
Periodically wrap the beaded cord around your wrist to check the sizing. Stop adding beads when the ends meet comfortably without stretching the cord.
Stack Attack
Make three variations: one dominant red, one dominant green, and one perfectly alternating. Wear them together for the ultimate holiday arm party.
Step 3: Finishing and Tying
-
Pre-stretch the cord:
Before tying, gently pull on both ends of the elastic. I find this helps relax the cord so the bracelet doesn’t stretch out and become loose later. -
Tie the first knot:
Remove the bead stopper and cross the ends to tie a simple overhand knot. Pull it tight, ensuring no gaps remain between the beads. -
Secure with a surgeon’s knot:
Tie a second knot, but loop the end through twice before pulling tight (this is a surgeon’s knot). This adds significant security. -
Apply adhesive:
Place a tiny drop of jewelry glue or superglue directly onto the knot. Be careful not to get glue on the surrounding clay beads. -
Hide the knot:
While the glue is still slightly tacky but not wet, slide a neighboring bead (preferably a gold spacer if one is close) over the knot to conceal it. -
Trim the excess:
Once the glue is fully dry, use your scissors to snip off the excess cord tails as close to the bead as possible.
Slip on your festive bracelet and enjoy the subtle sparkle it adds to your holiday outfits


“MERRY” Alphabet-Bead Centerpiece
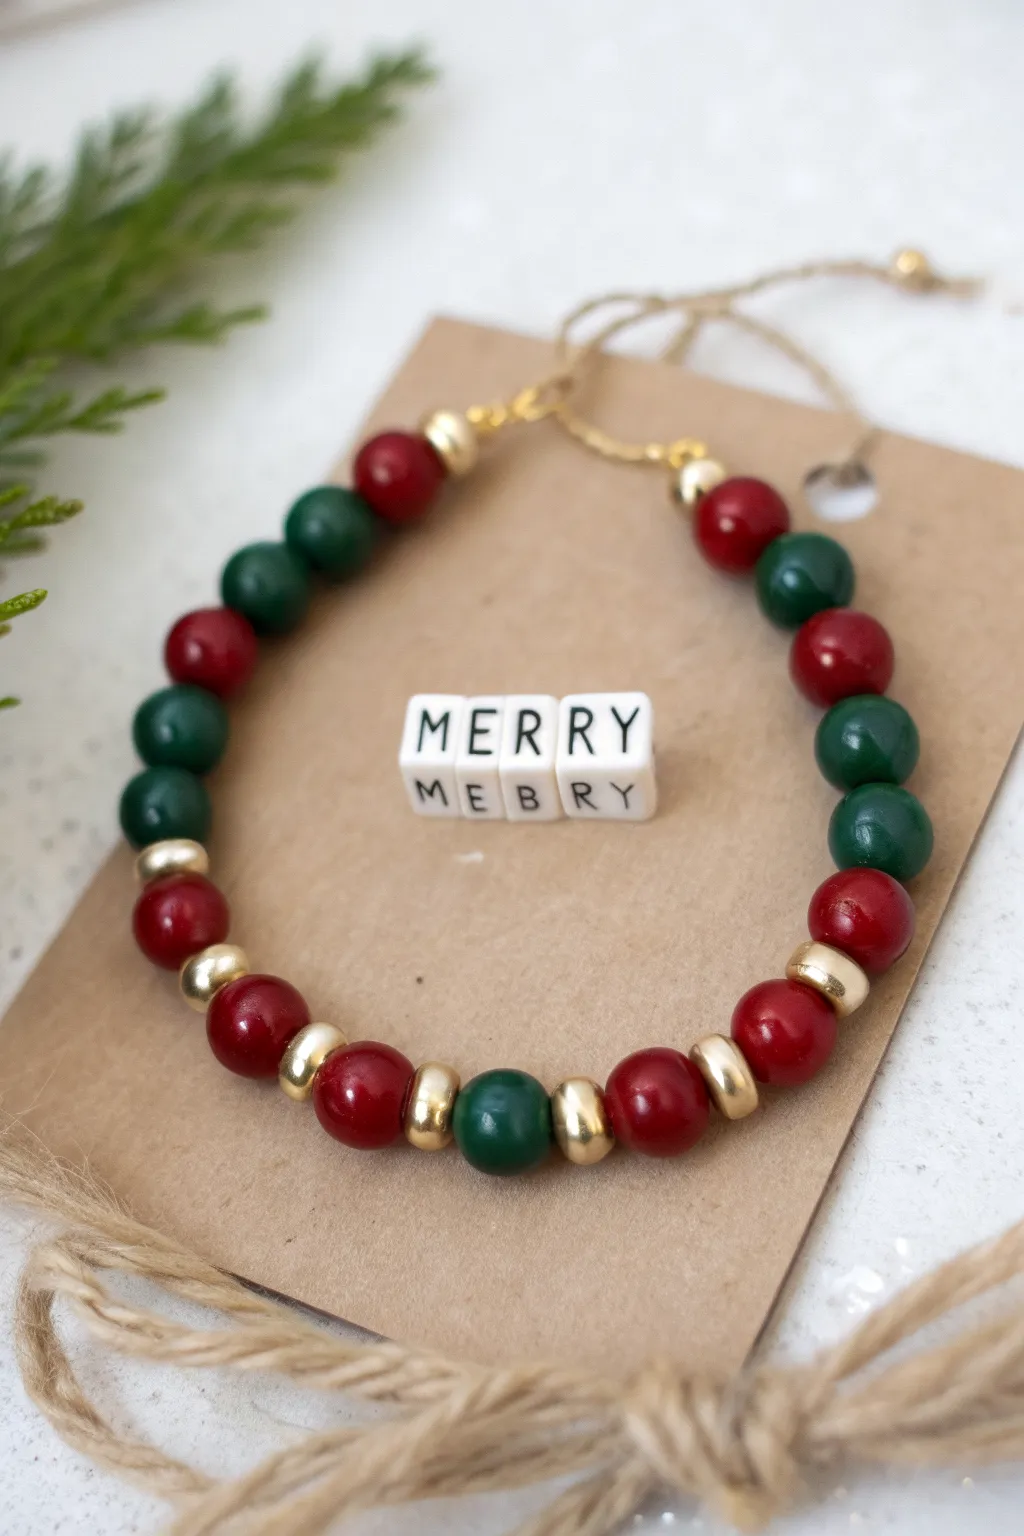
This elegant bracelet balances festive cheer with sophisticated style by combining rich red and deep green beads with gleaming gold accents. The unique double-stacked letter beads at the center add a playful twist to the classic holiday palette.
Step-by-Step Tutorial
Materials
- Red round beads (approx. 8mm, wood or polished stone)
- Deep green round beads (approx. 8mm, wood or polished stone)
- Gold saucer or spacer beads (metal or hematite)
- Square white alphabet beads (letters M, E, R, R, Y – two of each)
- Clear elastic cord (0.8mm or 1mm thickness)
- Scissors
- Jewelry glue or clear nail polish
- Bead stopper or masking tape
Step 1: Planning and Setup
-
Measure the cord:
Cut a piece of elastic cord about 10-12 inches long. This generous length makes it much easier to tie the final knot without struggling. -
Secure the end:
Attach a bead stopper or a piece of masking tape to one end of the cord to prevent your beads from sliding off as you work. -
Pre-arrange the pattern:
Lay out your beads on a table or bead board before stringing. This helps you visualize the asymmetry and ensure the lengths on either side of the centerpiece are balanced.
Knot Slipping?
Make sure to pre-stretch your elastic cord before stringing. Pull it firmly a few times; this prevents the bracelet from stretching out and becoming loose after you’ve tied the final knot.
Step 2: Stringing the Centerpiece
-
Create the letter stacks:
Instead of stringing letters in a single line, you will stack them. Thread the cord through the bottom ‘M’, then loop it back around and thread it through the top ‘M’ if your cord is thin enough, or simply string them side-by-side if they sit better that way. Note: In the image, the letters act as a focal point *inside* the bracelet loop, but for a wearable bracelet, you simply string them in order: M-E-R-R-Y. -
Wait, let’s look closer:
Looking at the finished photo, the ‘MERRY’ blocks are actually loose props in the center, not strung! The bracelet itself focuses purely on the pattern of colored beads. Let’s build that beaded loop.
Level Up: Card Display
Recreate the boutique look by cutting a rectangle of kraft cardstock. Punch two small holes at the top and thread hemp twine through to hold the bracelet, just like in the inspiration photo.
Step 3: Creating the Bead Pattern
-
The Bottom Section:
Start with the bottom-most section of the bracelet. Thread on a single green bead to act as the bottom center anchor. -
Add gold spacers:
Slide a gold spacer bead onto the cord on either side of that central green bead. I usually string one side fully first to keep things simple. -
Symmetrical red beads:
Add a red bead next to the gold spacer. Follow this immediately with another gold spacer. -
Repeat the gold-red rhythm:
Add another red bead, another gold spacer, and a third red bead. You should now have a sequence of three red beads separated by gold rings. -
Transition to green:
After the third red bead, place one final gold spacer. Now, switch to your green beads. Add two green beads consecutively. -
Continue the pattern:
Add a single red bead, followed by two green beads. This creates a playful, slightly irregular stripe pattern that feels organic. -
Finish the first side:
End this side with a single red bead followed by a green bead. -
Mirror the design:
Go back to your starting central green bead and repeat the exact same sequence on the other side of the cord so the bracelet is symmetrical. -
Check the fit:
Wrap the unfinished strand around your wrist. If it’s too short, add extra red or green beads to the ends (near where the clasp or knot will be) to reach your desired size.
Step 4: Finishing Touches
-
Prepare the knot:
Remove the tape or bead stopper. Bring the two ends of the elastic cord together, ensuring there is no slack between the beads. -
Tie a surgeon’s knot:
Cross the ends, wrap one side around the other twice, and pull tight. Repeat this process to secure the knot firmly. -
Secure with glue:
Place a tiny dot of jewelry glue or clear nail polish directly onto the knot. Let it dry for a few minutes to ensure it won’t slip. -
Hide the knot:
Trim the excess cord close to the knot. Gently tug the cord to pull the knot inside one of the adjacent beads so it’s hidden from view.
Now you have a classic holiday accessory ready for gifting or wearing to your next Christmas party

The Complete Guide to Pottery Troubleshooting
Uncover the most common ceramic mistakes—from cracking clay to failed glazes—and learn how to fix them fast.
Tiny Tree Charm With a Clean White Base
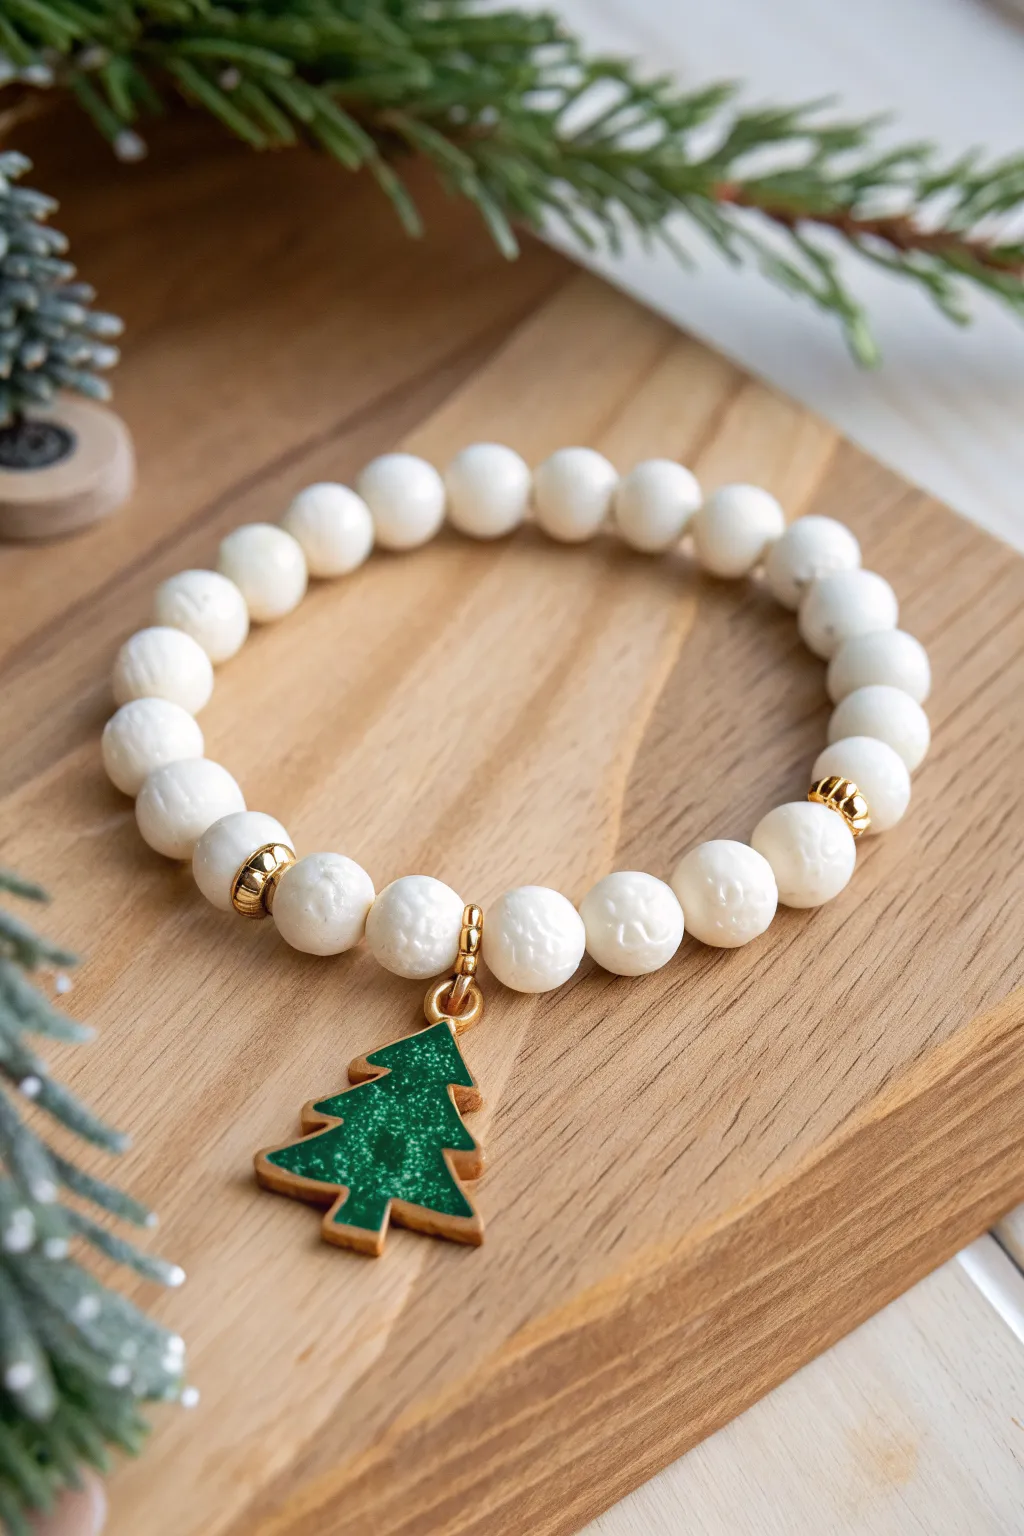
Embrace a minimalist holiday aesthetic with this elegant beaded bracelet featuring textured white beads and a striking green Christmas tree charm. The simple color palette highlights the golden accents, making it a perfectly preppy accessory for the festive season.
Step-by-Step
Materials
- White textured round beads (8mm or 10mm) – polymer clay, lava stone, or rustic ceramic
- Gold-tone spacer beads (small, rounded or saucer shape)
- Gold-tone jump ring (6mm or 8mm)
- Green Christmas tree enamel charm with gold edge
- Elastic jewelry cord (0.8mm or 1mm clear)
- Jewelry glue (e.g., G-S Hypo Cement or E6000)
- Scissors
- Bead stopper or tape
- Pliers (flat nose)
Step 1: Preparing the Base
-
Measure your wrist:
Wrap a piece of string around your wrist to find your size, then add about half an inch for a comfortable fit. Cut a piece of elastic cord about 10-12 inches long to give yourself plenty of room for tying knots. -
Secure the end:
Place a bead stopper or a piece of tape on one end of your elastic cord to prevent your beads from sliding off while you work. I always double-check this hold, as chasing beads across the floor is never fun. -
Pre-stretch the cord:
Gently pull on the elastic cord a few times. This pre-stretching helps prevent the bracelet from sagging or loosening permanently after the first time you wear it.
Step 2: Stringing the Design
-
Plan your pattern:
Lay your beads out on a bead board or soft cloth. The pattern shown uses a continuous string of white beads with two gold spacers acting as a focal frame for the charm. -
Start with white beads:
Begin threading the white textured beads onto the elastic. String about half of the total number of beads you need for your wrist size. -
Add the first gold accent:
After completing the first half of the white beads, slide on one gold-tone spacer bead. -
Create the charm gap:
Add three to four more white beads. These will sit directly ‘inside’ the gold spacers to separate them slightly and create a specific zone for the charm to hang. -
Add the second gold accent:
Slide on the second gold-tone spacer bead. Your focal section is now defined. -
Finish the bead strand:
Continue threading the remaining white beads until you reach your desired bracelet length. Wrap it around your wrist to check the fit before tying.
Knot Slipping?
If your elastic knot feels insecure, try clamping it with a crimp bead cover or adding a drop of clear nail polish if you don’t have jewelry glue handy.
Step 3: Attaching the Charm
-
Open the jump ring:
Using your flat nose pliers (or two pairs if the ring is stiff), gently twist the jump ring open laterally—pulling one side toward you and pushing the other away—rather than pulling it apart like a C. -
Connect the charm:
Slide the loop of your green Christmas tree charm onto the open jump ring. -
Attach to the bracelet:
Locate the center point between your two gold spacer beads. Hook the jump ring directly over the elastic cord between the beads in that center section. -
Close the ring:
Use your pliers to twist the jump ring back into a closed circle, ensuring the ends meet perfectly flush so the cord cannot slip out.
Texture Twist
Swap the white textured beads for frosted clear quartz or matte white agate to give the bracelet a colder, icy appearance that catches the light differently.
Step 4: Finishing Touches
-
Prepare the knot:
Remove the bead stopper or tape. Bring the two ends of the elastic together, making sure there is no slack in the beads. -
Tie a surgeon’s knot:
Create a loop like tying a shoe, but wrap the end through the loop twice instead of once. Pull tight. -
Secure with glue:
Dab a tiny drop of jewelry glue directly onto the knot. Be careful not to get glue on the visible parts of the beads. -
Hide the knot:
While the glue is still slightly tacky, pull the knot firmly inside the hole of the nearest white bead to conceal it. -
Trim excess:
Once the glue has fully dried (check your glue’s instructions), trim the excess elastic cord close to the bead hole using sharp scissors.
Enjoy wearing this festive little piece of winter wonder on your wrist
Dainty Jingle Bell Accent Bracelet
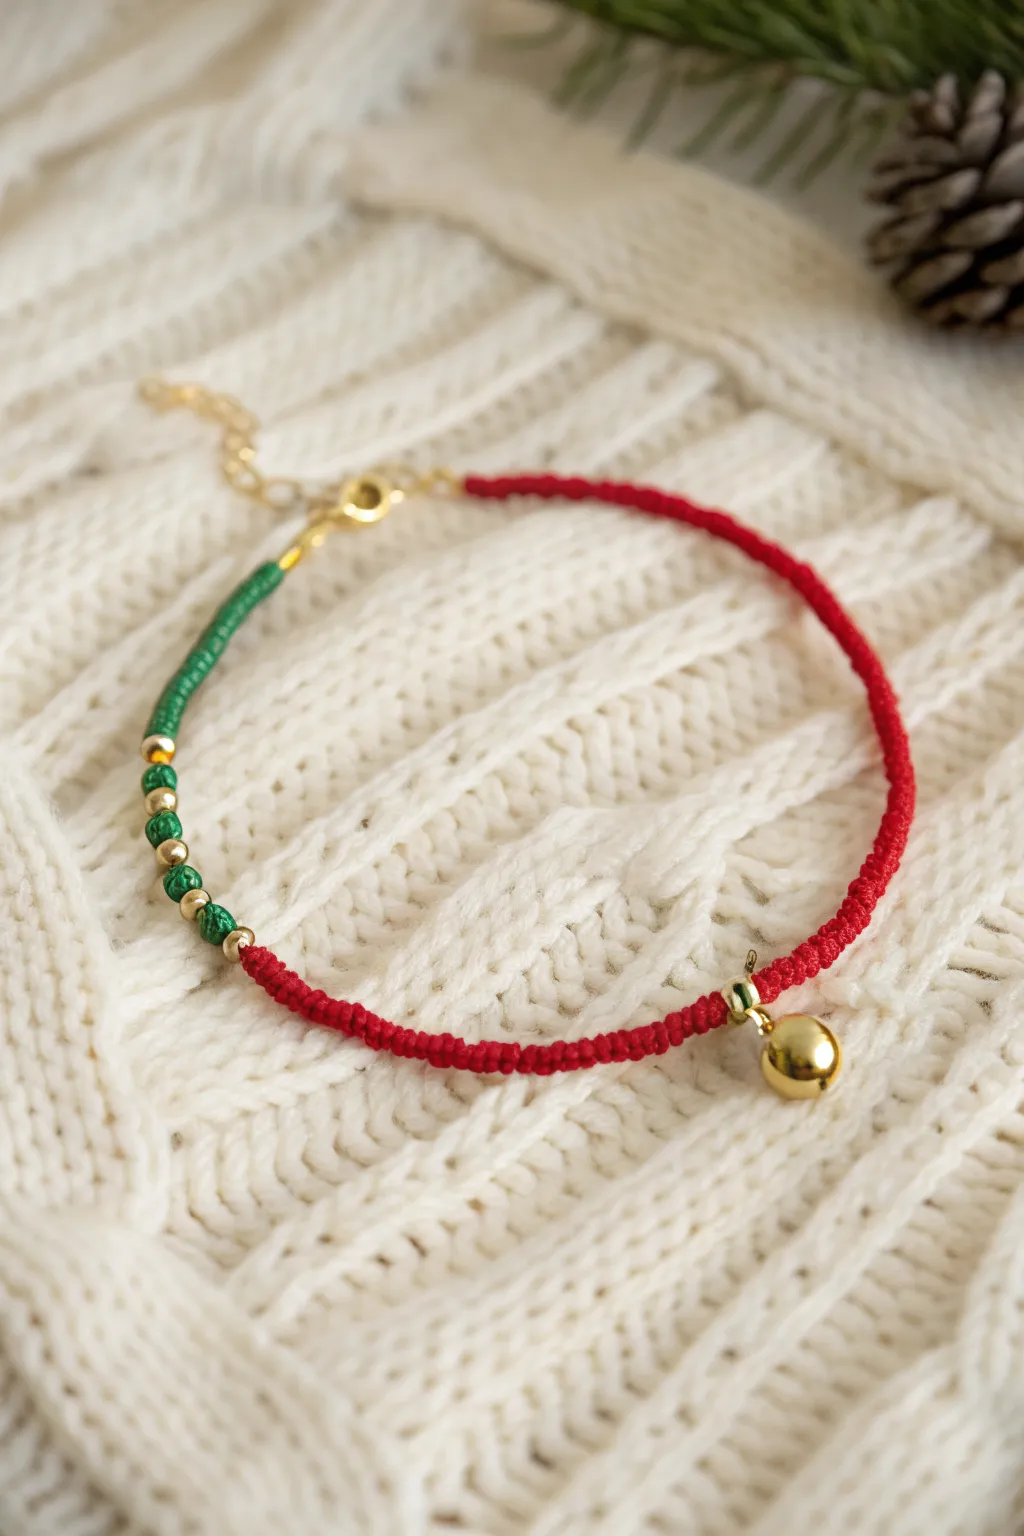
Embrace the festive spirit with this delicate micro-macramé bracelet that combines traditional Christmas colors with a chic, minimalist design. The charming golden bell adds just the right amount of jingle to your wrist stack, while the mixed textures of smooth cord and gleaming beads create an elegant finish.
How-To Guide
Materials
- Red nylon cord (0.5mm or 0.8mm)
- Green nylon cord (0.5mm or 0.8mm)
- Small gold spacer beads (approx. 2-3mm)
- Gold tone jingle bell charm with jump ring
- Gold tone lobster clasp
- Gold tone extension chain
- Gold tone crimp cord ends (small)
- Jewelry glue (E6000 or similar)
- Scissors
- Flat nose pliers
- Clipboard or macramé board for holding work
Step 1: Setting the Foundation
-
Prepare your cords:
Cut two lengths of red nylon cord. One will be your core strand (about 12 inches) and the other your working strand (about 40-50 inches). Cut similar lengths for the green section, though you will need much less working cord for the shorter green segment. -
Secure the start:
Tape or clip the top of your red core strand to your work surface. Leave about 2-3 inches of tail at the top to attach hardware later. -
Begin the knotting:
Take your long red working strand and center it under the core strand near the top. Tie a standard square knot to secure it in place. -
Create the red section:
Continue tying square knots (or a simple spiral knot if you prefer the twisted look shown) down the length of the core. Keep your tension consistent so the knots are tight and uniform.
Step 2: Adding the Feature Bell
-
Position the charm:
Once you have knotted approximately 4-5 inches of red cord (depending on your wrist size), pause your knotting. -
Insert the jump ring:
Slide the jump ring attached to your golden bell onto the core strand. Push it right up against your last knot. -
Secure the charm:
Continue your square knots immediately after the jump ring, ensuring the charm hangs freely and faces downward. -
Finish the red length:
Tie a few more inches of red knots until this section covers about 3/4 of your desired bracelet length. Trim the excess working threads and carefully melt or glue the ends to secure them.
Knotting Knowledge
If your macramé knots start twisting when you want them flat, you are likely tying the same half-knot repeatedly. Alternate left-over-right and right-over-left to keep it flat.
Step 3: Transitioning to Green
-
Join the cords:
To switch colors seamlessly, you can tie your green core strand to the end of the red cord, or simply start a fresh segment if you are using crimp ends to join them later. For the look in the image, the bead section creates a bridge. -
String the beads:
Thread a sequence of gold spacer beads and green knots onto your core cord. The pattern shown alternates between gold beads and short green knotted sections. -
Creating the bead pattern:
Slide on one gold bead. Then, using your green working cord, tie 2-3 square knots. repeated this: Bead, Knots, Bead, Knots, Bead. -
Final green segment:
After the last gold bead, continue knotting purely with the green cord for about 1-1.5 inches to finish the asymmetric design.
Sealing Secrets
When melting nylon cord ends, use the blue part of a flame (the base) rather than the yellow tip. This prevents the cord from turning black and sooty.
Step 4: Finishing Touches
-
Secure the ends:
Trim any remaining working threads very close to the knots. A tiny dab of jewelry glue on the cut ends prevents fraying. -
Attach crimp ends:
Slide a gold crimp cord end over the raw core strands at both ends of the bracelet. Use your flat nose pliers to squeeze the crimp tight, biting into the cord. -
Add the hardware:
Open a jump ring and attach the lobster clasp to one crimp end. Attach the extension chain to the other crimp end using another jump ring. -
Check the fit:
Test the clasp to ensure everything feels secure and the bell rings freely without getting caught in the threads.
Now you have a festive, custom-fitted accessory perfect for holiday parties or gifting to a friend


What Really Happens Inside the Kiln
Learn how time and temperature work together inside the kiln to transform clay into durable ceramic.
Santa Hat Charm on Red Heishi

Embrace the festive spirit with this minimalist yet charming bracelet featuring rustic red beads and a playful Santa hat charm. The rich red tones and gold accents make it a perfect accessory for holiday parties or a cozy night in.
Step-by-Step Tutorial
Materials
- Red round wooden or matte clay beads (approx. 4-6mm)
- Gold tone spacer beads (3-4mm round)
- Gold tone Santa hat enamel charm
- Gold tone jump ring (4-5mm)
- Strong elastic cord (0.5mm or 0.8mm clear)
- Jewelry glue or clear nail polish
- Scissors
Step 1: Preparation
-
Measure your wrist:
Wrap a piece of string or a soft measuring tape around your wrist to determine the circumference. Add about half an inch to this measurement to ensure the bracelet fits comfortably without being too tight. -
Prepare the elastic:
Cut a length of elastic cord about 10-12 inches long. Having this extra length makes it much easier to tie the final knot securely without fumbling. -
Pre-stretch the cord:
Hold both ends of your cut elastic and give it a few gentle tugs. This pre-stretching step helps prevent the bracelet from loosening up after you’ve worn it a few times. -
Prepare the charm:
Using your fingers or two pairs of pliers, carefully open the gold jump ring. Slide the Santa hat charm onto the ring, then loop the ring onto a gold spacer bead if the bead hole is large, or set it aside to attach directly to the cord later. I find attaching it directly between beads works best for this style.
Knot Security Tip
Use a surgeon’s knot for extra security: iterate the loop through twice on the first pass before pulling tight. It holds slippery elastic much better than a standard knot.
Step 2: Stringing the Design
-
Start the pattern:
Begin by threading about 10 to 12 of your red round beads onto the elastic cord. These beads have a lovely matte texture, so handle them gently to preserve their finish. -
Add the first accent:
Slide one gold round spacer bead onto the cord. This first touch of metal adds a nice break in the red pattern. -
Continue the red section:
Thread on a longer section of red beads. Depending on your wrist size, this should be about 20 to 25 beads. This will form the back part of the bracelet that sits opposite the charm. -
Place the second accent:
Add your second gold round spacer bead here. It balances the design, creating a symmetrical look with the first gold bead you placed. -
String more red beads:
Add another set of 10 to 12 red beads. You are now approaching the center focal point of the bracelet. -
Add the focal charm:
Thread the jump ring with the Santa hat charm onto the elastic. Make sure the charm is facing outward so the enamel detail is visible. -
Balance the center:
Immediately follow the charm with one or two more red beads to frame it, or simply let it hang freely between the existing red sections depending on your spacing preference.
Step 3: Finishing Touches
-
Check the fit:
Bring the two ends of the elastic together and carefully wrap the bracelet around your wrist. If it feels too tight or loose, add or remove a few red beads from the ends now. -
Tie the knot:
Tie a standard square knot (right over left, left over right). Pull the elastic tight to secure the knot close to the beads. -
Secure with glue:
Place a tiny drop of jewelry glue or clear nail polish directly onto the knot. Let this dry for a few minutes; I usually wait about 5-10 minutes just to be safe. -
Hide the knot:
Trim the excess elastic ends close to the knot, but not too close—leave about 1-2mm. Gently tug the bracelet so the knot slides inside the hole of the nearest red bead, hiding it completely from view.
Festive Stack
Create a stack by making two more bracelets: one entirely of gold beads and another with green and white alternating stripes to complement the Santa theme.
Now you have a festive piece of jewelry ready to wear all season long
Snowflake Charm With Mint and White
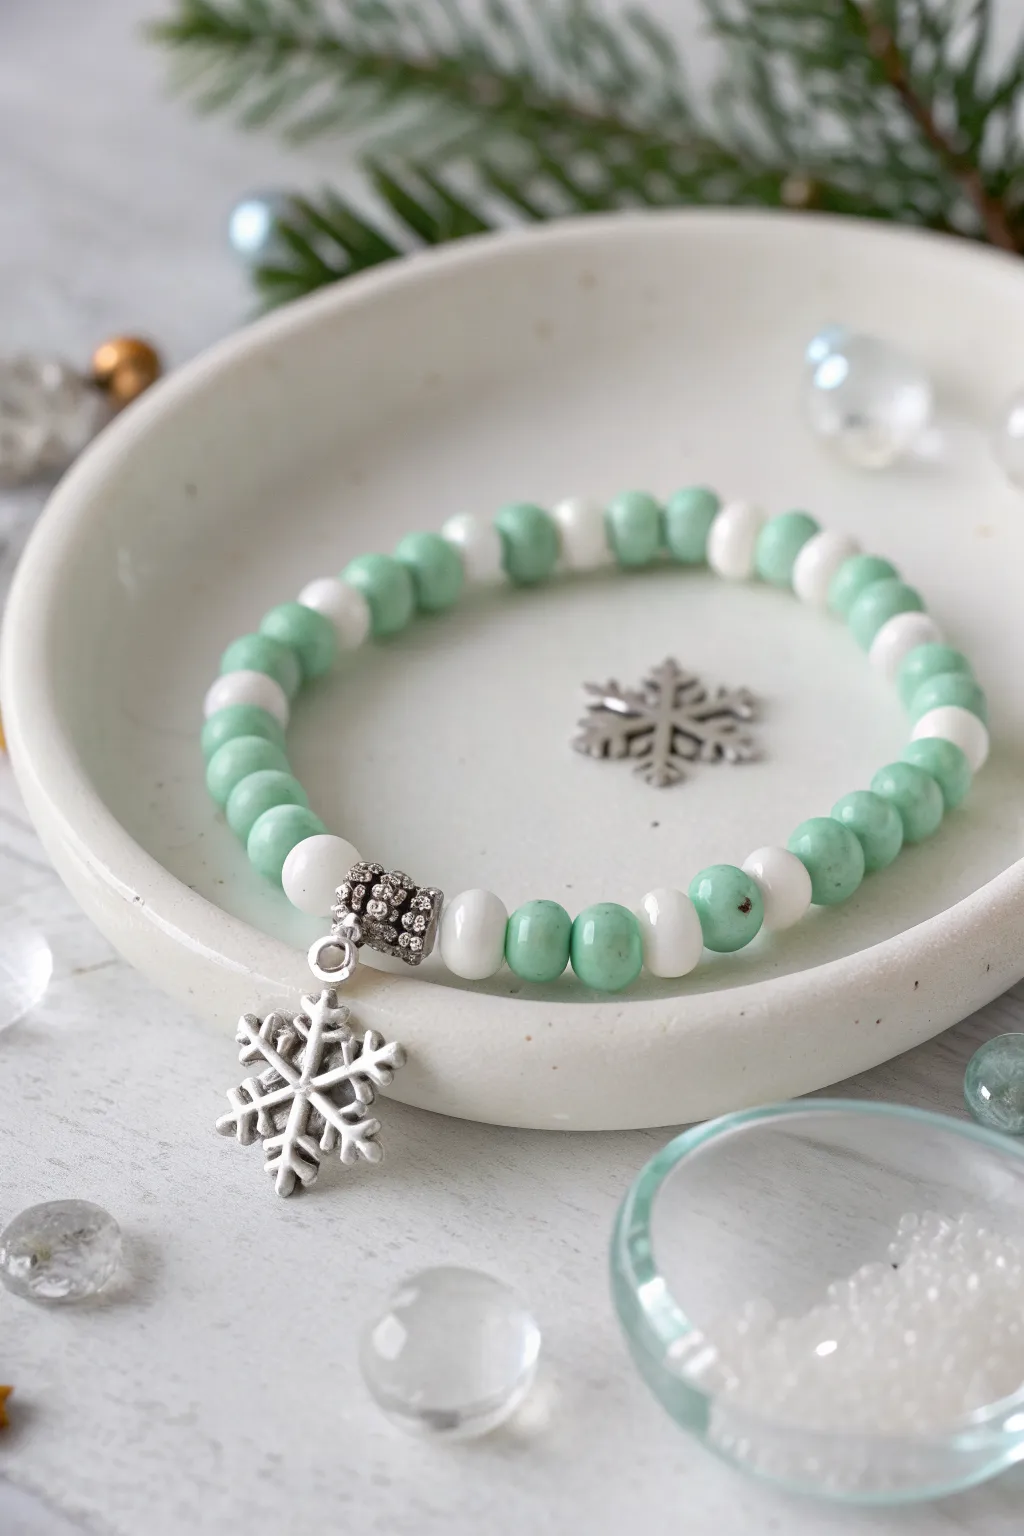
Capture the serene beauty of a winter morning with this elegant stretch bracelet featuring soft mint and polished white beads. The silver snowflake charm adds a delicate, seasonal focal point that perfectly balances the fresh color palette.
Step-by-Step Guide
Materials
- 6mm or 8mm round mint green beads (polished stone or ceramic look)
- 6mm or 8mm round opaque white beads
- Silver snowflake charm with loop
- Silver bail bead with a loop (to hang the charm)
- Elastic jewelry cord (0.7mm or 0.8mm)
- Hypo-cement or jewelry glue
- Scissors
Step 1: Planning and Prep
-
Measure your wrist:
Before cutting anything, wrap a piece of string or a soft measuring tape around your wrist to determine the correct length. Add about half an inch to this measurement for a comfortable fit. -
Cut the cord:
Cut a piece of elastic cord roughly 10-12 inches long. Having extra length makes the knotting process much easier and prevents beads from slipping off while you work. I like to pre-stretch the cord gently a few times to prevent sagging later. -
Secure the end:
Place a piece of tape or a bead stopper clamp on one end of your cord so your beads don’t roll away while stringing.
Knot Slipping?
If your elastic knot feels loose, try a drop of clear nail polish instead of glue in a pinch. Let it dry completely before sliding it inside a bead to avoid sticking the bead to the cord
Step 2: Stringing the Pattern
-
Begin the sequence:
Start by threading on two mint green beads followed by one white bead. This creates the primary repeating pattern for the bracelet. -
Continue the pattern:
Repeat the ‘two mint, one white’ sequence until you have completed about a third of your total bracelet length. -
Adjust the pattern side:
As you approach the middle sections, you can switch to a ‘three mint, one white’ sequence if you want the design to look organic, or strictly stick to the 2-to-1 ratio for perfect symmetry shown in the photo. -
Check length frequently:
Pause periodically to wrap the beaded strand around your wrist to gauge if you need more or fewer beads.
Step 3: Adding the Feature Piece
-
Prepare the bail:
Locate the middle point of your bracelet design. This is where your charm will hang. -
Thread the bail bead:
Slide the silver bail bead onto the elastic cord. Ensure the loop of the bail is facing outward. -
Attach the charm:
Using your fingers or small pliers, open the jump ring on the snowflake charm and attach it to the loop on the bail bead, then close it securely. Alternatively, if your bail has an open loop, attach the charm directly. -
Finish the bead stringing:
Continue stringing the remaining beads in your chosen mint and white pattern until the bracelet reaches your desired length.
Winter Sparkle
Add two small silver spacer beads on either side of the bail bead to frame the snowflake charm and add an extra touch of metallic shimmer to the design
Step 4: Finishing Touches
-
The surgeon’s knot:
Remove the tape or clamp. Bring both ends of the elastic together and tie a standard overhand knot, but do not pull it tight yet. -
Secure the knot:
Tie a second knot, looping the elastic through twice instead of once (this is a surgeon’s knot). Pull all four strands (the two tails and the two bracelet sides) firmly to tighten. -
Apply glue:
Dab a tiny drop of jewelry glue or hypo-cement directly onto the knot. This ensures it won’t unravel over time. -
Hide the knot:
Once the glue is tacky but drying, trim the excess cord ends close to the knot. Gently pull the elastic so the knot slides inside the hole of the nearest bead to hide it.
Now you have a frosty, festive accessory ready to wear all winter long

TRACK YOUR CERAMIC JOURNEY
Capture glaze tests, firing details, and creative progress—all in one simple printable. Make your projects easier to repeat and improve.
Preppy Plaid-Inspired Pattern Bracelet
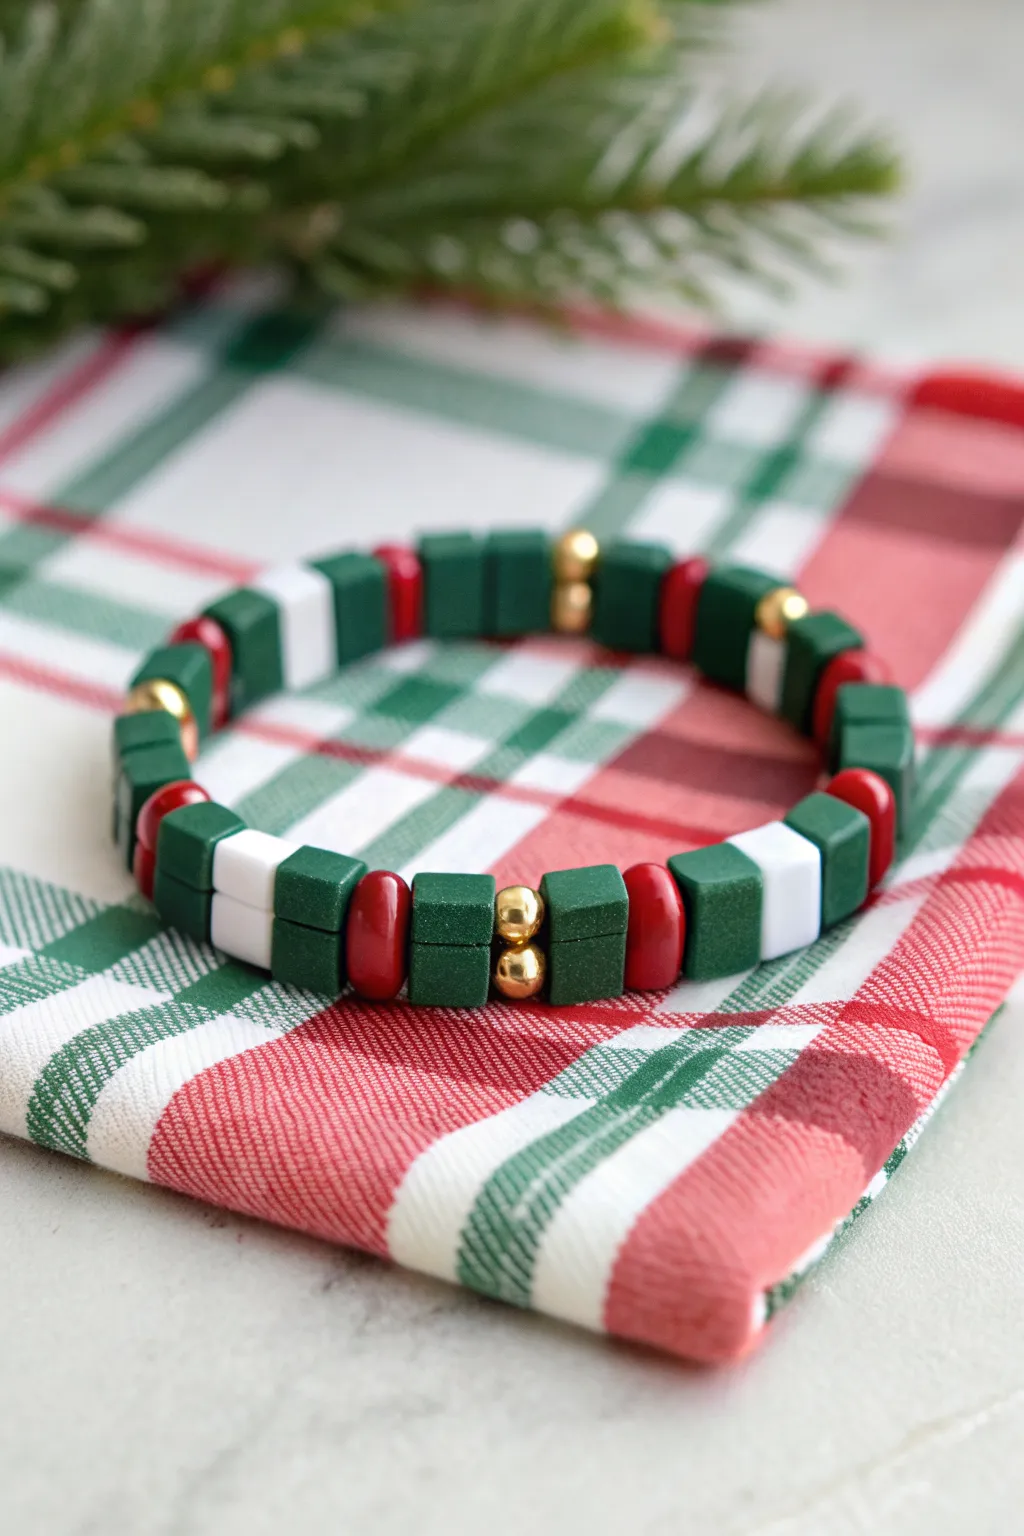
Capture the classic charm of holiday plaid with this sophisticated beaded bracelet. Featuring a repeating pattern of forest green, crisp white, deep red, and gold accents, this accessory perfectly complements festive winter outfits.
Step-by-Step
Materials
- Forest green square polymer clay heishi beads (approx. 4-6mm)
- White square polymer clay heishi beads
- Deep red rounder or disc-shaped spacer beads
- Gold spherical spacer beads (metal or coated acrylic)
- Stretchy beading cord (0.7mm or 0.8mm)
- Bead stopper or clip
- Jewelry adhesive or clear nail polish
- Scissors
Step 1: Preparation
-
Measure the Cord:
Cut a piece of stretchy beading cord to approximately 10-12 inches. This gives you plenty of extra length for knotting later. -
Secure the End:
Attach a bead stopper or a piece of tape to one end of the cord so your beads don’t slide off while you work. -
Pre-stretch the Cord:
Give the elastic a few gentle tugs. Pre-stretching helps prevent the bracelet from sagging or loosening immediately after you wear it.
Knot Slipping?
If your elastic knot feels insecure, try pre-stretching the cord ends firmly before tying. A surgeon’s knot is essential, but adding a teeny drop of clear superglue is the ultimate insurance policy.
Step 2: Creating the Pattern
-
Start with Green:
Thread on two forest green square beads to begin the foundational color of the plaid design. -
Add the Gold Center:
Slide on two small gold spherical beads. These act as the metallic highlight in the center of the motif. -
Close the Motif:
Add two more forest green square beads to sandwich the gold beads. -
Add Red Spacers:
Thread on one deep red spacer bead. This provides the bold vertical stripe element of our plaid interpretation. -
Create the Secondary Section:
Add a single forest green square bead. -
Insert the White Stripe:
Slide on one white square bead followed by another single forest green square bead. -
Complete the Repeat:
Finish this section of the pattern with one deep red spacer bead.
Level Up: Flat vs. 3D
Swap the round gold beads for tiny gold cube beads to match the shape of the clay squares. This creates a deeply satisfying, uniform geometric profile that looks very high-end.
Step 3: Assembly & Finishing
-
Repeat the Pattern:
Continue repeating the entire sequence (Green-Gold-Green section, Red separator, Green-White-Green section, Red separator) until you reach your desired length. -
Check the Fit:
Wrap the strand around your wrist to check the size. For an average fit, aim for about 6.5 to 7 inches of beaded length. -
Remove Stopper:
Carefully remove the bead stopper, holding both ends of the cord firmly. -
Tie the Knot:
Tie a surgeon’s knot (right over left, left over right, and loop through an extra time) to secure the bracelet. -
Tighten Normally:
Pull the cords tight from all four directions to cinch the knot down amidst the beads. -
Secure with Glue:
I like to dab a tiny drop of jewelry adhesive or clear nail polish onto the knot to prevent it from slipping over time. -
Hide the Knot:
Let the glue dry for a moment, then trim the excess cord and gently tuck the knot inside one of the larger square beads if possible.
Slip this festive bracelet on your wrist for an instant touch of holiday cheer that pairs perfectly with cozy plaids
Peppermint Swirl Clay Disc Focal Beads
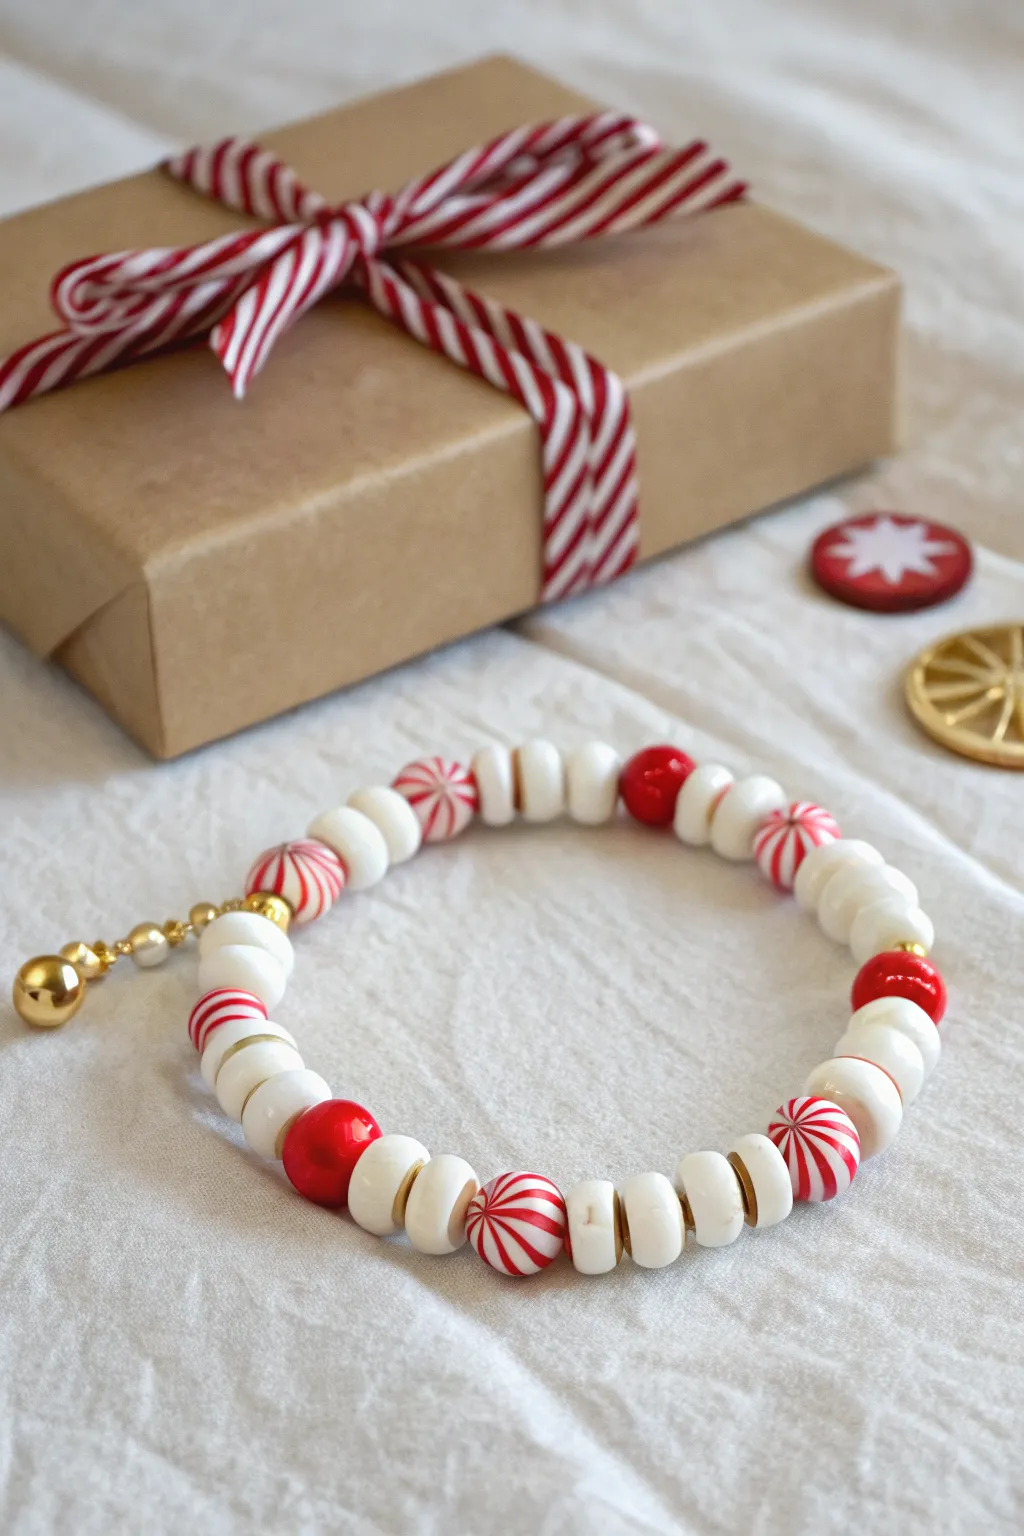
This festive accessory captures the sweet charm of peppermint candies with a sophisticated twist, blending playful clay patterns with elegant gold accents. The combination of swirling reds and crisp whites makes it the perfect preppy addition to any holiday outfit.
How-To Guide
Materials
- White polymer clay heishi beads (approx. 6mm)
- Peppermint swirl polymer clay round beads (8-10mm)
- Solid red round beads (polymer clay or acrylic, same size as swirl beads)
- Gold tone heishi spacer beads (thin discs)
- Gold tone crimp beads (2-3mm)
- Gold tone jump rings (4-6mm)
- Gold tone charm dangle (jingle bell or small sphere)
- Elastic beading cord (0.8mm clear stretch cord)
- Jewelry adhesive (e.g., E6000 or similar)
- Scissors or jewelry snips
- Bead stopper or tape
- Flat nose pliers (optional, for secure knotting)
Step 1: Preparation and Pattern Design
-
Measure and Cut:
Begin by cutting a piece of elastic cord approximately 10-12 inches long. This gives you plenty of extra room for tying knots later without struggling with slippery ends. -
Secure the End:
Attach a bead stopper to one end of your cord, or simply use a piece of tape to secure it to your work surface so beads don’t slide off while you work. -
Analyze the Pattern:
Take a moment to look at your bead selection. The pattern captured here relies on alternating groups of white heishi beads with larger focal beads (the swirls and solids), separated by gold accents. -
Establish the Rhythm:
Sort your beads into piles so you can grab them easily. The main sequence we will follow is: 3 white heishi beads, 1 gold spacer, 1 focal bead (either swirl or red), 1 gold spacer, 3 white heishi beads.
Knot Slipping?
If your elastic knot feels insecure, try clamping a crimp bead over the knot with pliers before hiding it. This mechanically locks the elastic in place.
Step 2: Stringing the Beads
-
Start the Sequence:
String your first section: thread on three white heishi beads followed by a thin gold spacer disc. -
Add a Solid Red Accent:
Next, slide on one of the solid red round beads. These serve as a bold anchor color against the white. -
Frame the Focal:
Add another gold spacer disc immediately after the red bead, followed by another set of three white heishi beads. -
Introduce the Peppermint:
Thread on a gold spacer, then one of the peppermint swirl clay beads, and finish this segment with another gold spacer. -
Repeat with Variation:
Continue this alternating pattern along the cord. I prefer to switch between the solid red beads and the peppermint swirl beads every other time to keep the design balanced visually. -
Check the Fit:
Once you have roughly 6.5 to 7 inches of beads strung (or your desired wrist size), wrap the strand carefully around your wrist to check the fit. Remember, elastic stretches, so a snug but not tight fit is ideal.
Step 3: Adding the Charm & Finishing
-
Prepare the Charm:
Locate your gold jingle bell or sphere charm. If it isn’t already attached to a jump ring, use your pliers to open a ring, slide the charm on, and close it securely. -
Thread the Charm:
Slide the charm onto the elastic cord at one end of your pattern. It looks lovely nestled near a red focal bead. -
Pre-stretch the Cord:
Before tying, gently tug on both ends of the elastic cord several times. This ‘pre-stretching’ prevents the bracelet from loosening up after the first time you wear it. -
Tie the Knot:
Remove the bead stopper and bring the two ends together. Tie a standard surgeon’s knot: cross right over left, loop it through twice, then pull tight. -
Secure with Glue:
While holding the knot taut, apply a tiny dot of jewelry adhesive directly onto the knot. This is crucial for longevity with elastic cord. -
Hide the Evidence:
Once the glue is tacky but pliable, if possible, slide the knot inside the hole of the nearest large focal bead to hide it. -
Trim the Excess:
Once the glue is fully dry (check your glue’s instructions), trim the excess cord ends close to the knot with sharp scissors.
Design Pro Tip
Vary the texture! Using matte white heishi beads next to glossy red round beads creates a high-end look compared to using all-matte or all-glossy finishes.
Now your wrist is ready to twinkle with holiday cheer all season long
Gingerbread-Inspired Neutrals With a Pop of Red
Capture the cozy warmth of gingerbread cookies and holiday cider with this elegant beaded bracelet. Featuring a soothing combination of natural wood tones, crisp white pearls, and vibrant pops of red, this accessory is the perfect understated festive touch for any outfit.
Step-by-Step Tutorial
Materials
- ~8mm natural sandalwood or brown wooden beads
- 8mm white pearl or acrylic beads
- 6mm red acrylic or glass beads
- Small gold spacer beads (flower or rondelle shape)
- Stretch cord (0.8mm or 1mm thickness)
- Jewelry adhesive or clear nail polish
- Scissors
Step 1: Planning and Prep
-
Measure your wrist:
Before you begin stringing, measure your wrist circumference with a measuring tape. Add about half an inch to this measurement to ensure a comfortable fit that isn’t too tight. -
Cut the cord:
Cut a piece of stretch cord about 10-12 inches long. Having this extra length makes it much easier to tie the finishing knots securely without fumbling. -
Pre-stretch the cord:
Gently pull on the ends of your cut cord a few times. This pre-stretching technique helps prevent the bracelet from sagging or loosening up after you’ve worn it for a few days. -
Secure the end:
Attach a piece of tape or a bead stopper to one end of the cord. This simple precaution saves you from the frustration of beads sliding right off while you work.
Knot Hiding Trick
If the hole of your wooden bead is too small to hide the knot, try hiding it inside one of the pearl beads instead, as they often have slightly larger drilling holes.
Step 2: Creating the Pattern
-
Start the focal point:
We will build the bracelet around the central decorative section first to ensure it ends up centered. Begin by sliding on one gold spacer bead. -
Add color accents:
Slide on one red bead followed by another gold spacer bead. This creates a rich, metallic-framed pop of festive red. -
Introduce the pearls:
String two white pearl beads next. These represent the icing on our gingerbread theme and add a touch of preppy elegance. -
Repeat the accent:
Mirror the pattern on this side by adding a small red bead (without gold spacers this time, per the asymmetrical design shown) or follow the specific sequence visible: Gold spacer, white pearl, white pearl, red bead. -
Build the second half of the focal:
Looking at the design in the photo, the focal section is asymmetrical. Let’s arrange it exactly: Start with a gold spacer, then a red bead, another gold spacer, then a white pearl. -
Complete the center motif:
Continue the sequence with: gold spacer, white pearl, gold spacer, red bead, gold spacer. This creates that intricate ‘candy cane’ inspired section.
Step 3: Adding the Base
-
Check the symmetry:
Decide if you want the focal point to be exactly centered or slightly offset. I usually verify the pattern length against my wrist measurement now. -
String the wooden beads:
Fill the rest of the cord with the brown wooden beads. These sandalwood-toned beads act as the ‘gingerbread’ base and neutralize the bright colors. -
Test the size:
Wrap the strand around your wrist to check the fit. Add or remove wooden beads until the two ends of the cord meet comfortably without stretching the elastic.
Make it a Set
Create a matching stack by making two more bracelets: one entirely of wooden beads and another using only pearls with red spacers for a complete holiday arm party.
Step 4: Finishing Touches
-
Prepare to tie off:
Remove the tape or bead stopper carefully, holding both ends of the cord firmly so no beads escape. -
Tie the first knot:
Tie a simple overhand knot, pulling it tight but being careful not to snap the cord. Pull the cords firmly to eliminate any gaps between the beads. -
Secure with a surgeon’s knot:
For extra security, tie a surgeon’s knot. This is just like a standard knot, but you loop the cord through twice before pulling tight. -
Apply adhesive:
Dab a tiny drop of jewelry glue or clear nail polish onto the knot. This seals the fibers and prevents the slippery elastic from undoing itself. -
Hide the knot:
Once the glue is tacky or dry, trim the excess cord close to the knot. Gently pull the bracelet so the knot slides inside the hole of one of the larger wooden beads.
Slip on your new bracelet and enjoy the cozy holiday vibes it brings to your day
Holly Berry Bead Trio With Gold Separators
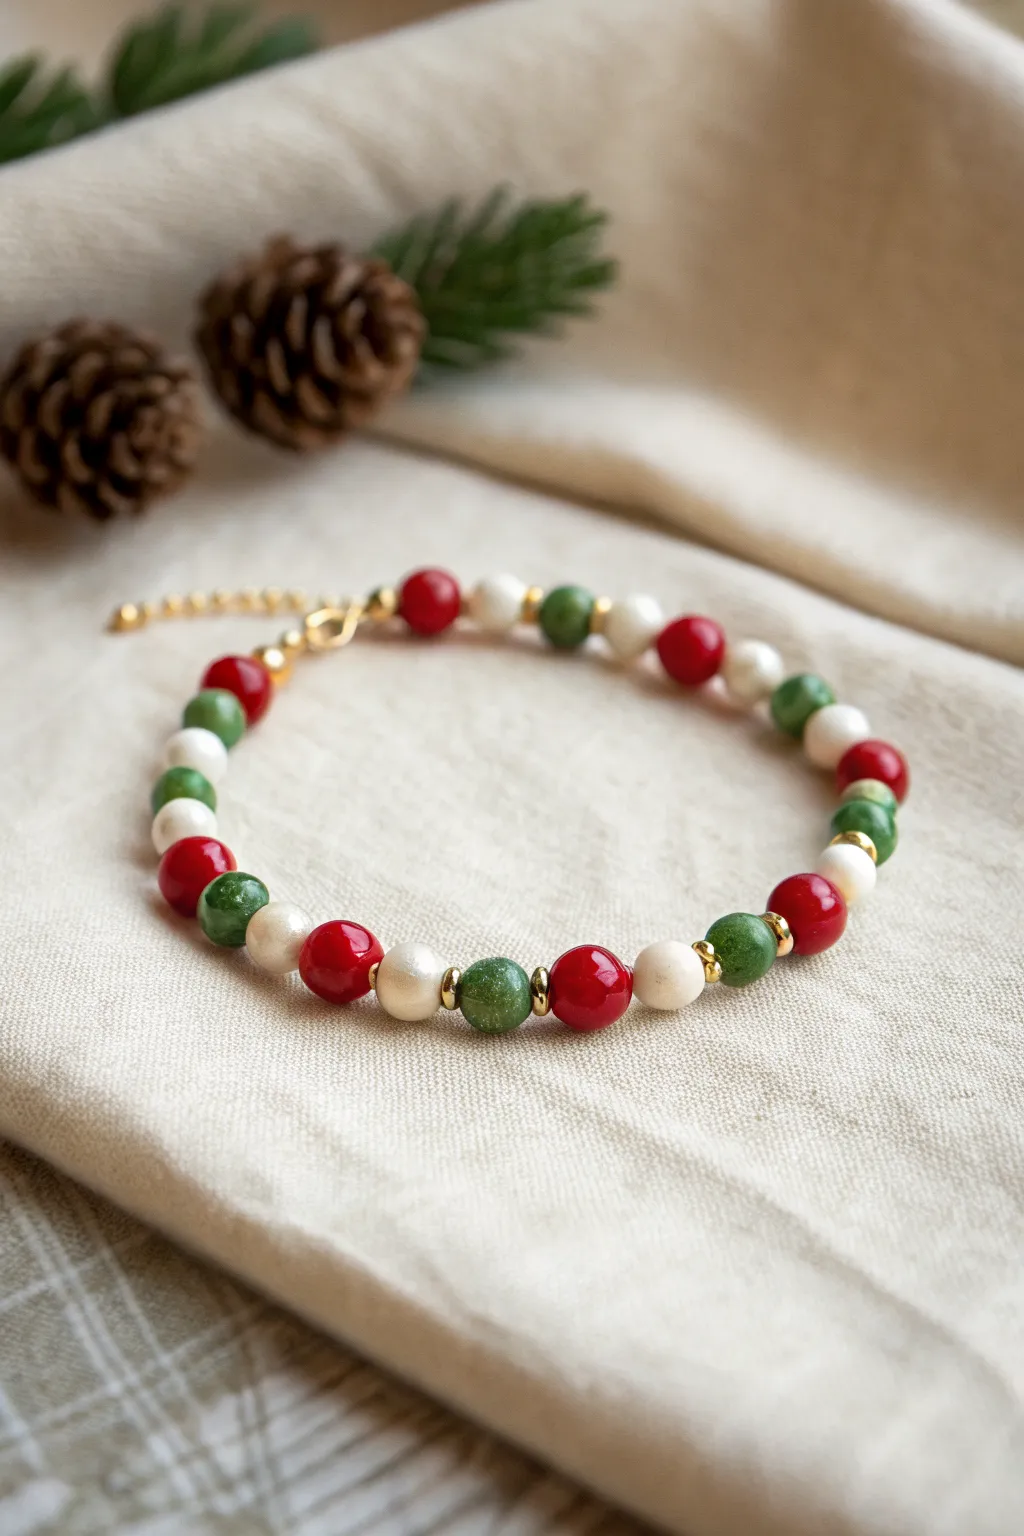
This festive bracelet captures the quintessential Christmas palette with a classic pattern of deep red, forest green, and snowy white beads. Small gold spacer beads add a touch of elegance and separation between the trios, giving the piece a refined, preppy finish perfect for holiday parties.
How-To Guide
Materials
- 8mm round polymer clay or acrylic beads (Red)
- 8mm round polymer clay or acrylic beads (Dark Green)
- 8mm round polymer clay or acrylic beads (White/Pearl)
- 3mm or 4mm gold spacer beads (round or disc shape)
- Strong elastic beading cord (0.7mm or 0.8mm)
- Gold tone crimp covers (optional)
- Gold tone jump rings and lobster clasp
- Jewelry glue (e.g., G-S Hypo Cement)
- Scissors or jewelry wire cutters
- Chain nose pliers
- Beading needle (optional, for easier threading)
- Knot cover or crimp bead (if not tying a standard knot)
Step 1: Setting up Your Workspace
-
Measure your wrist:
Before you begin, measure your wrist circumference and add about 1/2 inch to determine your ideal bracelet length. This style looks best when it isn’t too tight. -
Cut the elastic:
Cut a piece of elastic cord about 10-12 inches long. This generous length gives you plenty of room to knot securely without struggling with short ends. -
Pre-stretch the cord:
Hold the elastic firmly at both ends and give it a few gentle smooth pulls. Pre-stretching helps prevent the bracelet from sagging or loosening after you wear it a few times. -
Secure the end:
Attach a piece of tape or a bead stopper to one end of your cord to prevent your precious beads from sliding off while you work.
Loose Spacer Beads?
If gold spacers slip inside the larger bead holes, your spacer is too small. Use a 4mm spacer or add a tiny seed bead on either side as a ‘stopper’ to fix this.
Step 2: Creating the Bead Pattern
-
Start with the clasp hardware:
Thread a gold crimp bead (or simply use a jump ring) onto the cord first if you plan to use a traditional clasp closure. If making a continuous stretch bracelet, skip this and start beading. -
Begin the sequence:
Thread on your first trio of colored beads. Based on the photo, start with one red bead, followed by one white bead, and then one green bead. -
Add the separation:
After the green bead, slide on a single gold spacer bead. This small metallic accent is key to the design, breaking up the colors visually. -
Repeat the pattern:
Continue the sequence: Red, White, Green, then Gold Spacer. Keep the tension even but not tight, allowing the beads to sit naturally next to each other. -
Check the fit:
Periodically wrap the strand around your wrist. Stop adding beads when the ends touch comfortably without stretching the cord.
Step 3: Closing the Bracelet
-
Prepare for the knot:
Remove the tape or bead stopper. Bring the two ends of the elastic together carefully. -
Tie the knot:
Tie a surgeon’s knot (right over left, left over right, and loop through an extra time) to secure the bracelet. Pull the elastic tight so the knot sinks between beads. -
Secure with glue:
I always place a tiny dab of jewelry glue directly onto the knot. This ensures the slippery elastic won’t undo itself over time. -
Hide the knot:
If possible, gently tug the elastic so the knot slides inside the hole of one of the larger colored beads or a crimp cover if you used one. -
Trim the excess:
Once the glue is dry (give it a few minutes), use your sharp scissors to trim the excess elastic tails close to the bead, being careful not to snip the main cord. -
Add clasp (Optional):
If you started with hardware for a clasp, use your pliers to attach the jump rings and lobster clasp to the ends now, ensuring the crimps are flattened securely.
Pro Tip: Marble Effect
For a more organic look, use beads with slight marbling or variations in tone (like the green ones in the picture) rather than solid, flat glossy plastic colors.
Now you have a charming holiday accessory ready to stack with your watch or wear solo for a seasonal pop of color
Pearl-and-Heishi Mix for a Preppy Twist
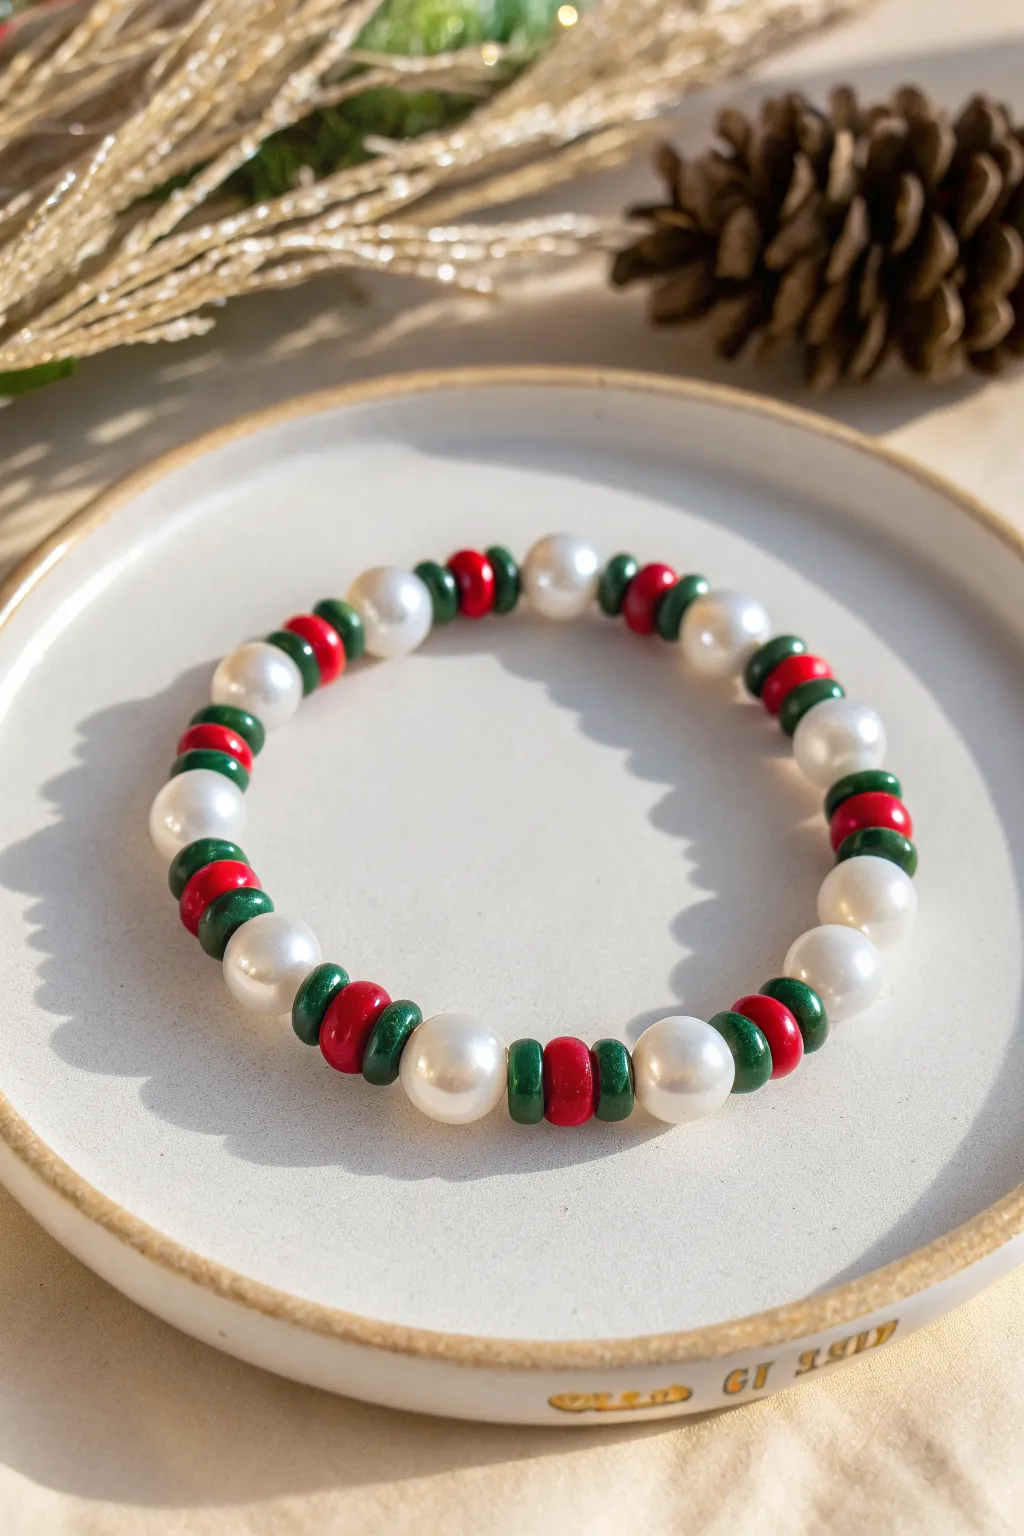
Elevate your holiday stacks with this sophisticated mix of festive colors and classic textures. This design pairs the timeless elegance of white faux pearls with the modern, playful vibe of red and green heishi beads for the perfect preppy Christmas accessory.
Step-by-Step Tutorial
Materials
- Elastic stretch beading cord (0.7mm or 0.8mm)
- 6mm or 8mm white faux pearl beads
- Red clay heishi beads (flat disc spacers)
- Green clay heishi beads (flat disc spacers)
- Jewelry glue or clear nail polish
- Scissors
- Bead stopper or masking tape
Step 1: Preparation
-
Measure your cord:
Cut a length of elastic cord about 10-12 inches long. This generous length gives you plenty of room to tie your knot securely without struggling against tension. -
Pre-stretch the elastic:
Hold the cord firmly at both ends and give it several good tugs. Pre-stretching is crucial because it prevents the bracelet from drooping or loosening up after you wear it a few times. -
Secure the end:
Attach a bead stopper to one end of the cord, or simply use a piece of masking tape to flag the end. This keeps your beads from sliding off while you design your pattern.
Knot Slipping Out?
If the knot keeps popping out of the pearl, try widening the bead hole gently with a bead reamer, or ensure you are using a thinner gauge elastic like 0.6mm.
Step 2: Creating the Pattern
-
Start the sequence:
Begin threading your beads with one white faux pearl. This will be the anchor of your repeating pattern. -
Add first color block:
Slide on one green heishi bead right next to the pearl. -
Add the center accent:
Follow the green bead with one red heishi bead. This creates the center of the color block. -
Complete the motif:
Finish this specific segment by adding another green heishi bead. Your pattern unit is now complete: Pearl, Green, Red, Green. -
Begin the repetition:
Add a new white pearl bead to separate this color block from the next one. -
Continue the pattern:
Repeat the sequence—Green Heishi, Red Heishi, Green Heishi, Pearl—continuously along the strand. -
Check the length:
Periodically wrap the strand around your wrist to check the fit. I usually aim for about 6.5 to 7 inches for an average adult wrist, but adjust based on your personal comfort. -
Verify symmetry:
Ensure your final bead is the last ‘Green Heishi’ in a sequence so that when you tie the knot, the pattern connects seamlessly to the first pearl you started with.
Pattern Variations
Switch the red and green positions for alternating blocks (Pearl-Red-Green-Red-Pearl) to add more dynamic visual interest to your stack.
Step 3: Finishing Up
-
Prepare for the knot:
Remove the bead stopper or tape carefully, ensuring you keep a firm grip on both ends of the elastic so no beads escape. -
Tie the first knot:
Bring the two ends together and tie a simple overhand knot, pulling it tight to bring the beads snugly together without buckling. -
Secure with a surgeon’s knot:
Tie a second knot, but this time loop the end through twice (a surgeon’s knot) before pulling tight. This adds extra friction and security. -
Apply adhesive:
Dab a tiny drop of jewelry glue or clear nail polish directly onto the knot. This prevents the elastic from slipping over time. -
Hide the knot:
While the glue is still slightly tacky but not wet, gently pull the elastic so the knot slides inside the hole of the nearest pearl bead. -
Trim the excess:
Once dry, use your scissors to snip off the excess cord as close to the bead hole as possible, being careful not to cut the main knot.
Enjoy wearing your crisp, festive bracelet or stacking it with gold bangles for a complete holiday look
Bow Charm With a Red or Green Tassel
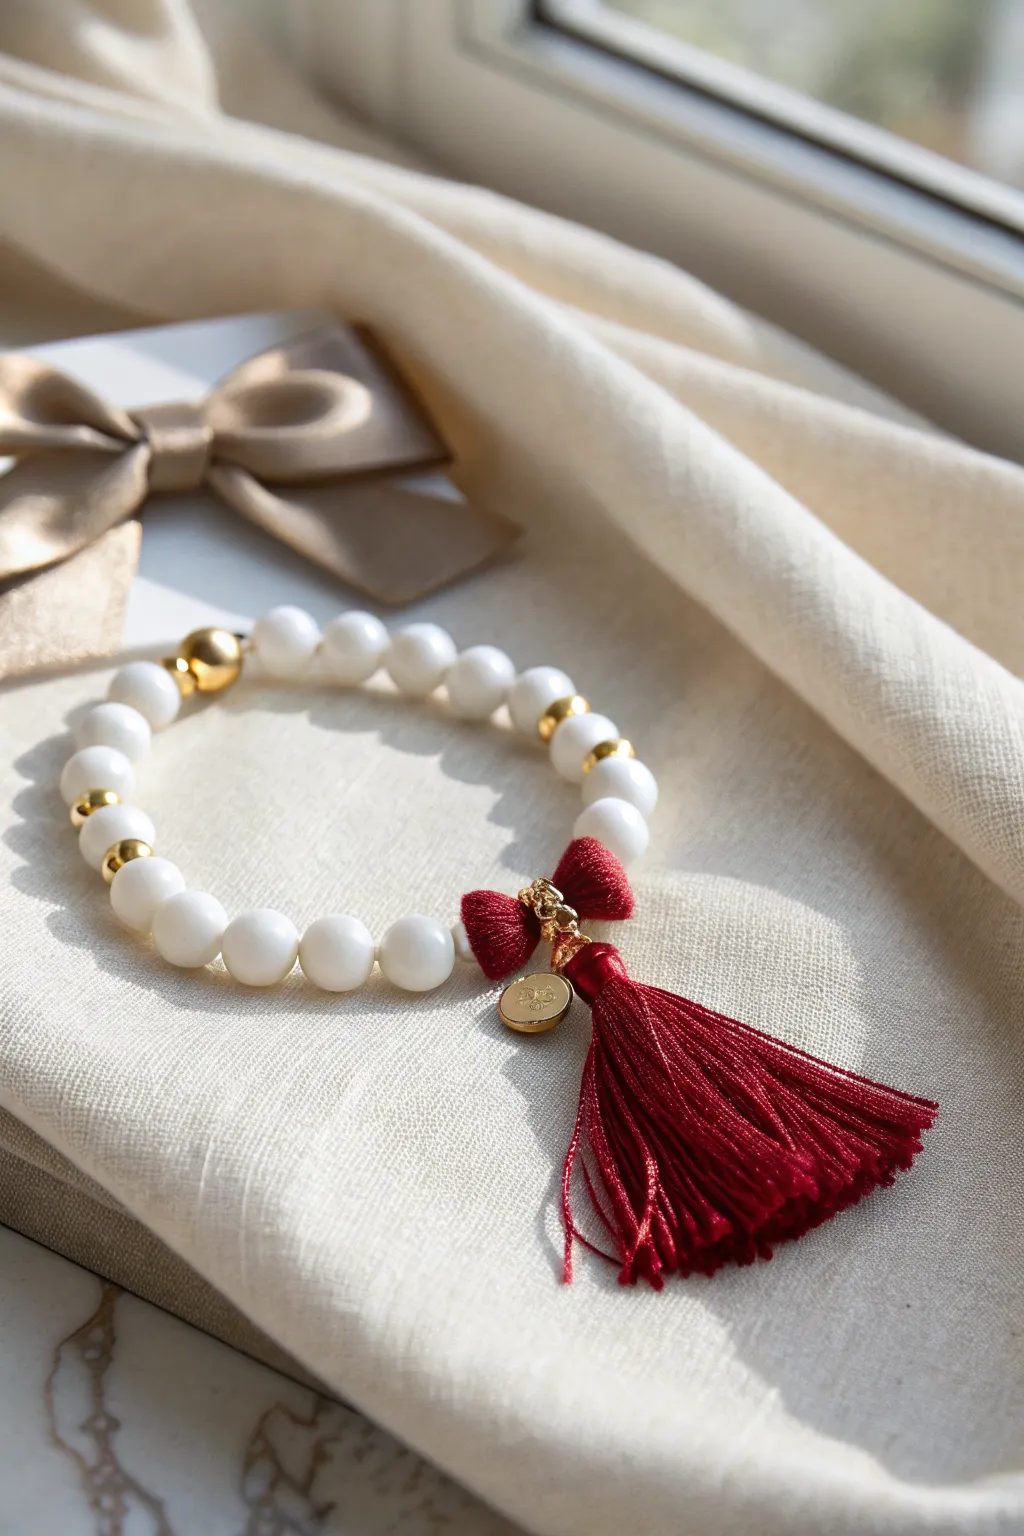
This sophisticated yet playful bracelet design marries the snowy simplicity of white beads with a festive pop of deep crimson. The combination of gold accents and a rich tassel charm creates a luxurious accessory perfect for holiday parties or everyday elegance.
Step-by-Step
Materials
- White round beads (8mm or 10mm, glass or semi-precious stone like white jade)
- Gold spherical spacer beads (4mm or 5mm)
- Strong elastic bead cord (0.8mm or 1mm)
- Deep red thread or embroidery floss (for the tassel)
- Deep red satin ribbon (1/4 inch wide)
- Gold jump rings (6mm)
- Gold circular logo charm or stamped tag
- Gold wire (24 gauge) or a gold headpin
- Jewelry pliers (round nose and chain nose)
- Scissors
- Super glue or jewelry cement
Step 1: Crafting the Tassel Charm
-
Wind the Tassel:
Cut a piece of cardboard about 1.5 inches wide to use as a template. Wrap your deep red embroidery floss around this template roughly 20-30 times, depending on how full you want your tassel to be. -
Secure the Top:
Slide a small piece of floss under the wrapped loops at one end of the cardboard and tie it tightly to secure the bundle together. Carefully slide the looped bundle off the cardboard. -
Create the Neck:
Cut another piece of floss and wrap it tightly around the bundle, about a quarter-inch down from the top tie. Knot it securely and trim the ends close to hide them inside the tassel head. -
Trim the Ends:
Using sharp scissors, cut through the bottom loops of the bundle to release the strands. Trim the bottom evenly so the tassel has a clean, blunt edge. -
Add the Cap:
If you wish to elevate the look, you can add a small gold bead cap over the top of the tassel before attaching the hardware, though wrapping with gold wire is also a beautiful finish.
Tassel Troubleshooting
If your tassel threads look frizzy or won’t lay flat, dampen them slightly with water, comb straight, and let dry hanging down.
Step 2: Creating the Bow Accent
-
Tie the Bow:
Take a short length of your red satin ribbon and tie a very small, tight bow. Adjust the loops so they are symmetrical and petite, no wider than an inch. -
Seal the Edges:
Trim the tails of the ribbon very short. To prevent fraying, lightly heat the raw edges with a lighter or dab extremely sparingly with clear nail polish. -
Attach Hardware:
Insert a jump ring carefully through the back knot of the ribbon bow. This jump ring will eventually hold the tassel and connect to the bracelet.
Step 3: Stringing the Bracelet
-
Prepare the Cord:
Cut a piece of elastic cord about 10 inches long. I usually stretch the cord firmly a few times before starting; this pre-stretching helps prevent the bracelet from sagging later. -
Start the Pattern:
Begin by stringing the white round beads. The pattern shown uses blocks of white beads separated by gold spacers. -
Insert Gold Spacers:
After every 4 or 5 white beads, slide on one gold spherical spacer bead. This breaks up the white and adds that necessary holiday sparkle. -
Check the Fit:
Continue the pattern until the strand wraps comfortably around your wrist with a little bit of slack. Aim for a total length of about 6.5 to 7 inches for an average wrist. -
Assemble the Focal Point:
Slide the jump ring (containing the bow) onto the cord. Attach a second jump ring holding your handmade tassel and the gold logo charm onto the same section of the cord, so they dangle together.
Pro Tip: Jump Rings
Always twist jump rings open sideways (like a door) rather than pulling them apart. This keeps the circle perfect when you close it back up.
Step 4: Finishing Touches
-
Knot the Cord:
Bring the two ends of the elastic cord together. Tie a surgeon’s knot (looping the cord through twice on the first pass) followed by a standard overhand knot. -
Secure the Knot:
Pull the knot very tight. Apply a tiny drop of super glue or jewelry cement specifically to the knot itself. Let it dry for a minute. -
Hide the Evidence:
Trim the excess cord ends to about 2mm. If possible, gently tug the cord to pull the knot inside one of the adjacent white beads to hide it completely.
Now you have a stunning piece of arm candy ready to pair with your favorite cozy sweater
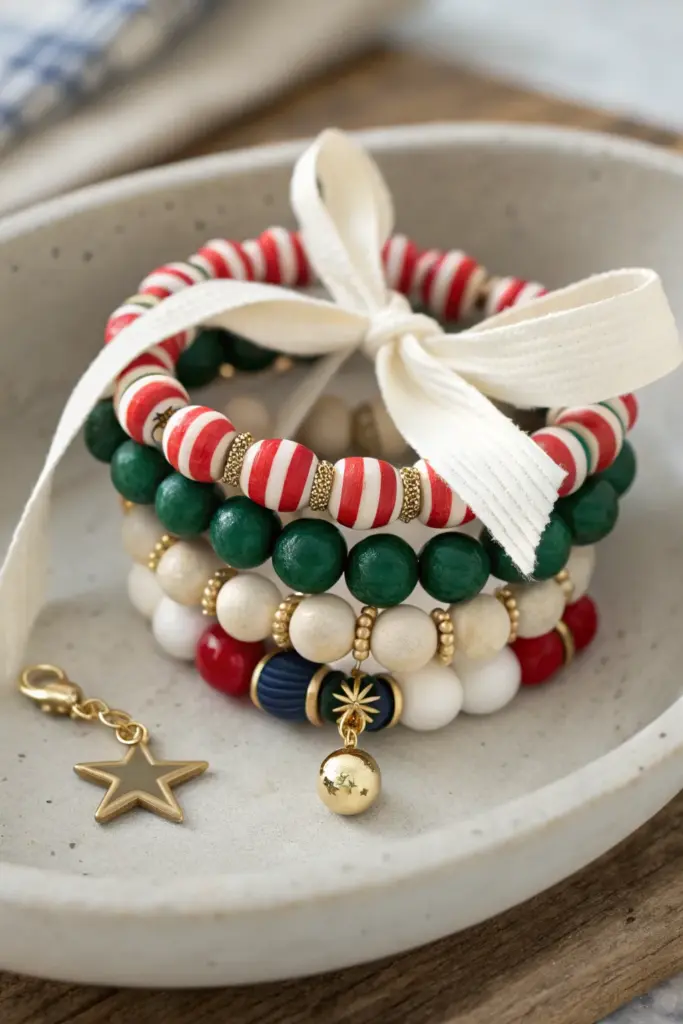
Gift-Ready Stack Recipes in Matching Sets
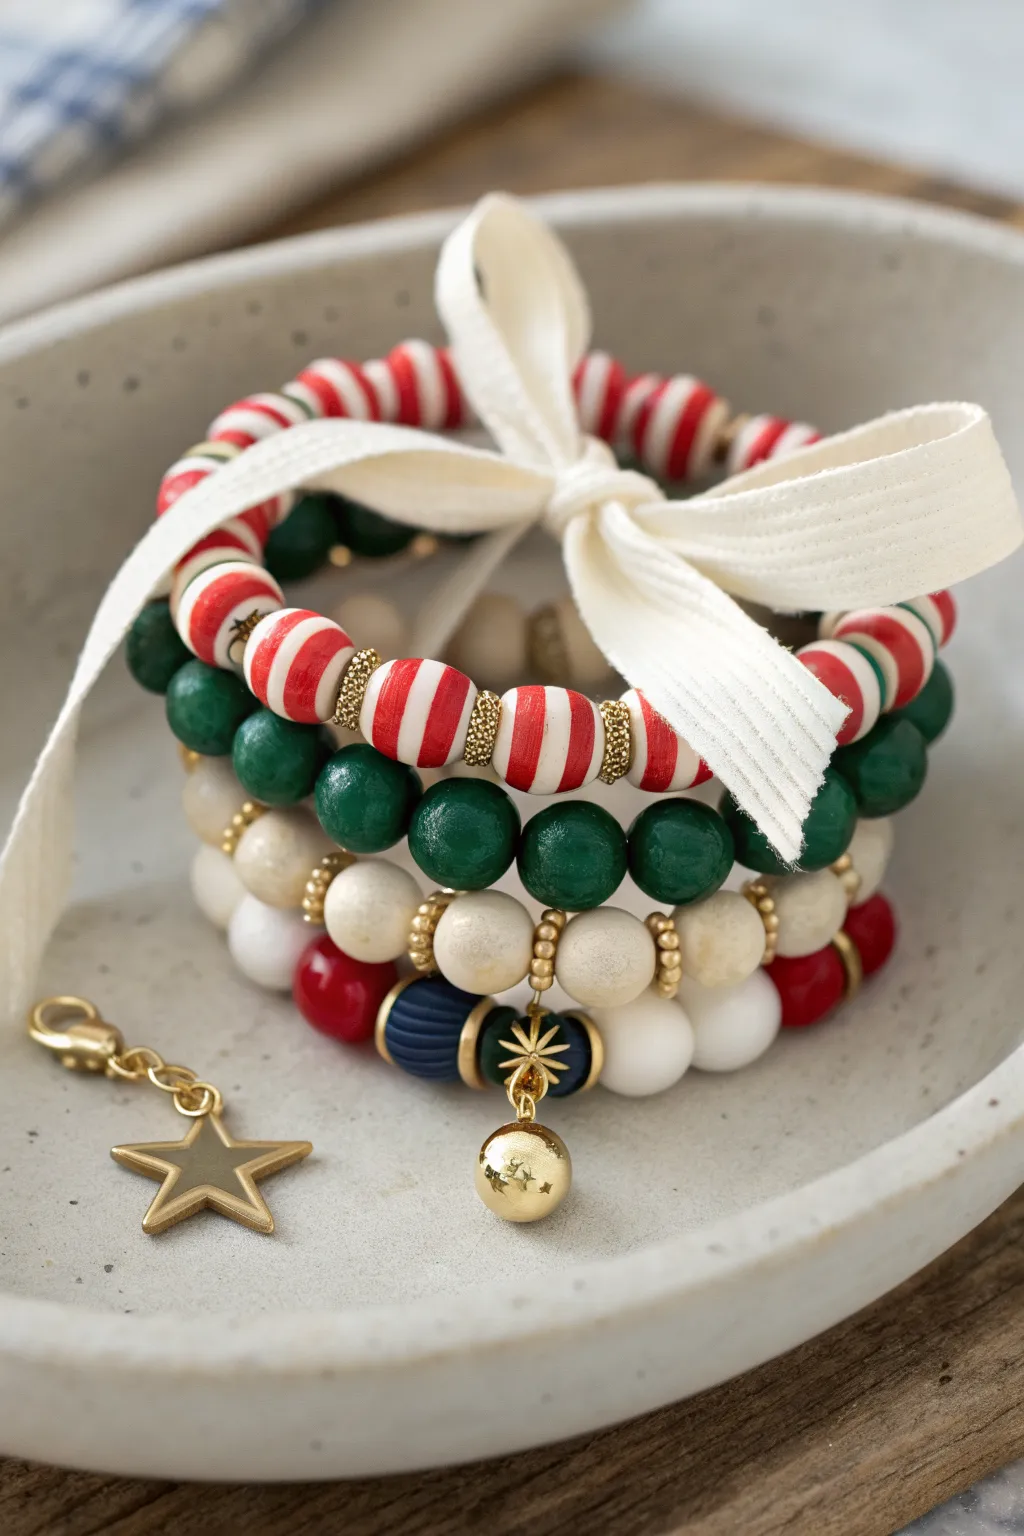
Embrace the festive season with this cohesive trio of bracelets that blends nostalgic candy stripe patterns with rich, evergreen tones. This stackable set uses varied bead textures and charming gold accents to create a gift-ready collection that looks professionally designed.
Step-by-Step Tutorial
Materials
- Elastic stretch cord (0.7mm or 0.8mm)
- Red and white striped polymer clay or resin beads (round, approx. 8-10mm)
- Deep forest green round beads (wood or acrylic, approx. 10mm)
- Cream or off-white round beads (wood or stone, approx. 10mm)
- Solid red round beads (acrylic or glass, approx. 10mm)
- Navy blue textured or grooved round beads (approx. 10mm)
- Gold daisy spacers or rondelle spacer beads
- Gold star charm with jump ring
- Gold globe or bauble charm with jump ring
- Jewelry glue (e.g., E600 or GS Hypo Cement)
- Scissors
- Cream ribbon (velvet or grosgrain)
- Gold lobster clasp (optional, for charm attachment)
Step 1: Planning the Stack
-
Measure your wrist:
Before cutting any cord, measure your wrist and add about 2-3 inches to give yourself plenty of room for knotting. Standard adult size is usually around 7 inches. -
Lay out the candy cane design:
For the top bracelet, arrange your red and white striped beads on a bead board or soft cloth. Place a small gold daisy spacer between every single bead to separate them and add a touch of sparkle. -
Prepare the evergreen strand:
Plan the middle bracelet using only the solid deep green beads. This simple layer acts as a visual anchor. You can keep it solid or add spacers every 3-4 beads if you prefer a bit more shine. -
Design the mixed texture bottom layer:
For the bottom bracelet, create a pattern. I like to alternate the cream beads with gold spacers, grouping them in sections, and then intersperse the solid red and navy blue textured beads as colorful accents.
Knot Security Tip
When pulling your surgeon’s knot tight, stretch the bracelet cord slightly away from the knot simultaneously. This helps lock the elastic fibers together.
Step 2: Stringing the Beads
-
Pre-stretch the cord:
Cut three lengths of elastic cord. Give each piece a firm tug several times to pre-stretch it; this prevents the bracelets from stretching out and sagging later. -
Secure the end:
Place a piece of tape or a bead stopper on one end of your first cord to keep beads from sliding off while you work. -
String the candy cane bracelet:
Thread the striped beads according to your layout, ensuring the gold spacers sit flat between them. Check the length against your wrist periodically. -
String the green bracelet:
Thread the green beads onto the second cord. Since these beads might be slightly larger, double-check that the fit feels consistent with the first bracelet. -
String the mixed accent bracelet:
Thread the final bracelet with the cream, red, and navy pattern. Make sure to place two gold spacers flanking the navy bead where you intend to hang the charm later.
Make It Personal
Swap the navy blue texture bead for a gold letter bead to add an initial for the recipient, turning this stylish stack into a custom monogrammed gift.
Step 3: Finishing Touches
-
Knot the ends:
For each bracelet, tie the ends together using a surgeon’s knot (right over left, left over right, looping through twice). Pull the elastic tight so the knot is compact. -
Apply adhesive:
Dab a tiny drop of jewelry glue onto each knot. Let this dry for a few minutes before trimming the excess cord. -
Hide the knots:
Ideally, pull the knot inside the hole of a neighboring bead to conceal it. If the bead holes are too small, just ensure the knot is trimmed neatly. -
Attach the charms:
Using pliers, open the jump ring (twist sideways, don’t pull apart) on your gold globe charm. Attach it to the bottom mixed bracelet, hooking it over the elastic between the navy bead and a spacer. Do the same with the star charm on the separate gold clasp component if desired. -
Bundle for gifting:
Stack the three bracelets together. Take a length of cream ribbon and tie them loosely together with a simple bow to hold the set in place.
Now your festive set is ready to wear or wrap up as the perfect handmade holiday surprise