When I’m craving that preppy preppy cute vibe, I reach for colorful clay heishi bead bracelets that look like pure summer on your wrist. Here are my favorite bracelet ideas for building playful, mix-and-match stacked arm candy you’ll actually want to wear every day.
Classic Rainbow Heishi Stack
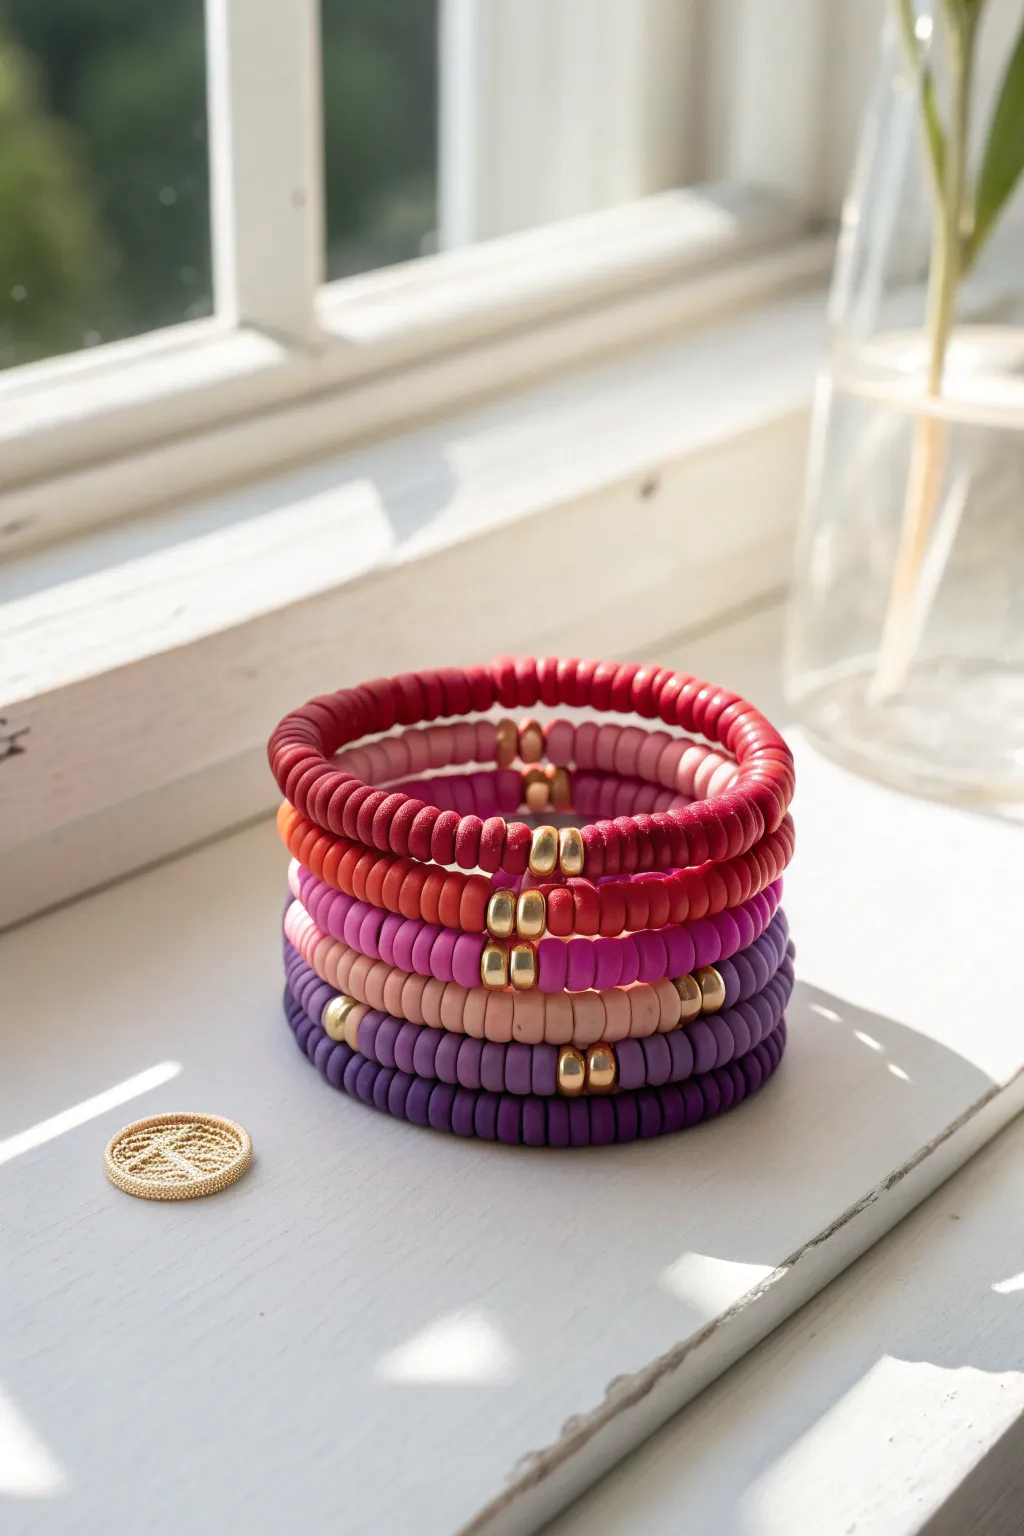
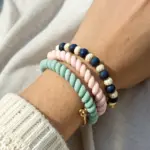
Capture the warmth of a sunrise with this stack of polymer clay disc bracelets, arranged in a satisfying gradient of purples, pinks, and warm reds. The addition of clustered gold accents gives these stretchy bands a polished, high-end look that’s perfect for stacking or wearing solo.
Detailed Instructions
Materials
- 6mm polymer clay heishi beads (dark purple, medium purple, blush pink, hot pink, red-orange, deep red)
- 4mm or 5mm gold rondelle spacer beads
- 0.8mm clear elastic stretch cord
- Jewelry glue or clear nail polish
- Scissors
- Bead stopper or masking tape
- Small dab of masking tape or painters tape
Step 1: Planning and Prep
-
Measure your wrist:
Wrap a piece of string or a measuring tape around your wrist to find your comfortable fit. Add about half an inch to this measurement to ensure the bracelets aren’t too tight. -
Prepare the cord:
Cut a piece of elastic cord roughly 10 inches long for your first bracelet. This extra length makes tying the knot much easier later on. -
Secure the end:
Place a bead stopper or a piece of folded masking tape on one end of the cord so your beads don’t slide right off while you work. I usually prefer tape because it lays flat on the table.
Knot Slipping?
If your elastic knot feels insecure, try a surgeon’s knot: wrap the cord through the loop twice instead of once before pulling tight. This adds extra friction.
Step 2: Creating the Bead Pattern
-
Start the first layer:
Begin with the darkest color, deep purple. Thread approximately 2-3 inches of purple clay beads onto the elastic cord. -
Add the gold focal point:
Slide on three gold rondelle spacer beads. These will act as the shiny focal point, breaking up the matte texture of the clay. -
Finish the color:
Continue adding the deep purple clay beads until the beaded section matches your wrist measurement. -
Check the symmetry:
Hold the two ends of the cord together to ensure the gold beads sit roughly in the center opposite where the knot will be. Adjust the number of beads on either side if necessary.
Step 3: Securing the Bracelet
-
Pre-stretch the cord:
Before tying, gently pull both ends of the elastic cord. This ‘pre-stretching’ prevents the bracelet from loosening up significantly after the first wear. -
Tie the first knot:
Cross right over left, then left over right to form a square knot. Pull it tight, but be careful not to snap the elastic. -
Secure with glue:
Put a tiny drop of jewelry glue or clear nail polish directly onto the knot. This is crucial for longevity. -
Encase the knot:
If possible, gently tug the cord so the knot slides inside the hole of one of the clay beads to hide it. -
Trim the excess:
After the glue has dried for a minute, trim the excess cord tails close to the bead, being careful not to cut the main knot.
Level Up: Lettering
Swap the central gold beads on one bracelet for letter beads to spell out a name or word like ‘HOPE’ or ‘LOVE’ for a personalized touch.
Step 4: Building the Stack
-
Repeat for color two:
Cut a new piece of cord and repeat the process with the medium purple clay beads, remembering to add the three gold spacers in the middle. -
Continue the gradient:
Move on to the blush pink beads for the third bracelet. The slight color shift creates that beautiful ombré effect when stacked. -
Build the warm tones:
Create the next bracelet using the hot pink or fuchsia beads. -
Add the coral layer:
String your red-orange or coral beads for the fifth bracelet in the stack. -
Finish with deep red:
Complete the final bracelet with the deep red heishi beads. This creates the ‘bookend’ effect with the dark purple at the bottom. -
Final arrangement:
Stack them all on your wrist, mixing the order slightly or keeping them in a strict gradient depending on your mood.
You now have a stunning set of custom-fit bracelets to brighten up any outfit


Pastel Sorbet Color Mix
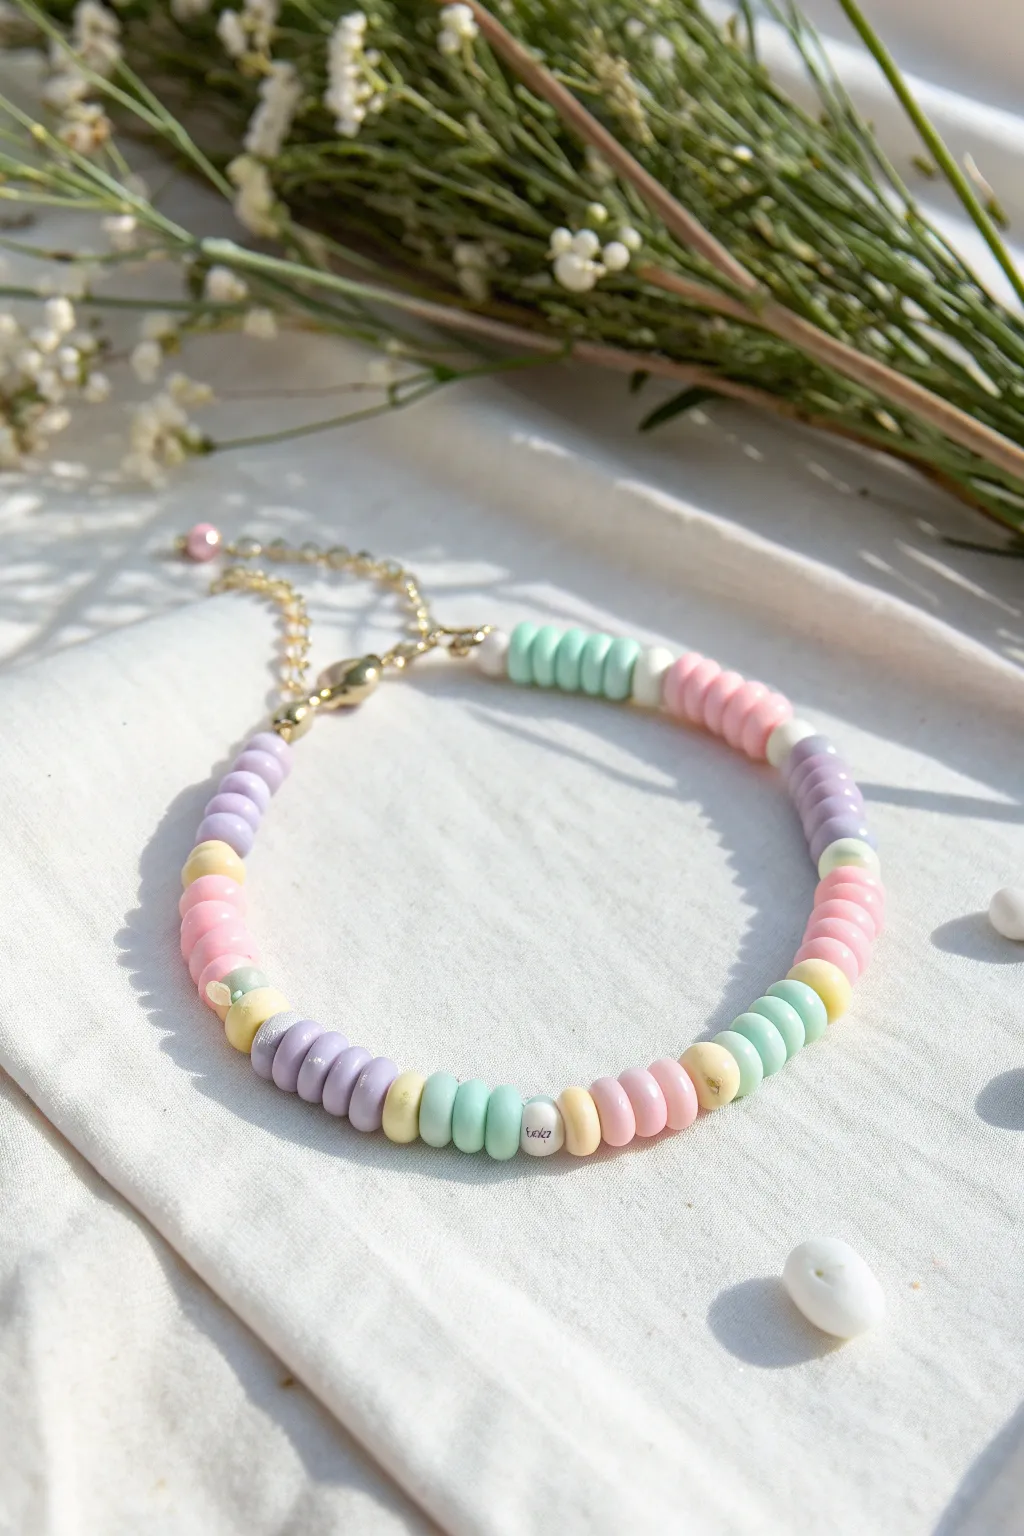
Embrace the soft sweetness of spring with this delightful pastel sorbet bracelet, featuring a dreamy mix of mint, lavender, pink, and yellow clay discs. The gentle color blocking creates a sophisticated yet playful accessory perfect for stacking or wearing as a subtle statement piece.
Step-by-Step
Materials
- Polymer clay heishi beads (6mm or 4mm) in pastel mint, lavender, baby pink, soft yellow, and white
- Gold-plated spacer beads (optional, small round)
- Small white letter bead (optional, for customization)
- Beading wire or strong stretch jewelry cord (0.8mm recommended)
- Gold tone lobster clasp
- Gold tone extension chain
- 2 Gold tone jump rings (4-6mm)
- 2 Crimp beads (gold tone)
- 2 Crimp bead covers (gold tone, optional)
- Jewelry pliers (flat nose and cutting pliers)
- Bead design board or masking tape
Step 1: Planning the Pattern
-
Measure your wrist:
Wrap a flexible measuring tape around your wrist to find your desired length. Add about half an inch to this measurement to account for the clasp and some breathing room. -
Lay out the design:
Using a bead board or a towel to prevent rolling, begin arranging your colors. The key to this ‘sorbet’ look is creating small blocks of color rather than a truly random mix. -
Create color blocks:
Group your beads into clusters of 3 to 5 discs of the same color. I find that sets of four usually create the most balanced look for this specific style. -
Separate with contrast:
Place a single contrasting bead—like a pale yellow or a white bead—between your larger color blocks to break up the pattern visually. -
Establish the sequence:
Verify your pattern repeats nicely. A good sequence here is: Lavender block, Single yellow, Pink block, White bead, Mint block, Single yellow… and repeat.
Step 2: Stringing the Beads
-
Prepare the cord:
Cut a piece of beading wire or stretch cord about 12 inches long. This extra length makes it much easier to tie knots or attach clasps later. -
Secure the end:
Place a piece of masking tape on one end of the cord or wire to stop beads from sliding off while you work. -
Begin stringing:
Start threading your beads onto the cord, following your laid-out design carefully. -
Incorporate the centerpiece:
If you are including a special bead, like the small white text bead shown in the image, add it near the center or slightly off-center for a casual vibe. -
Check the fit:
Once all beads are strung, carefully wrap the strand around your wrist to verify the size. Add or remove a color block if necessary to adjust the length.
Uneven Blocks?
Don’t stress if your color blocks aren’t perfectly identical in length. Slight variations in bead thickness are normal and add to the handmade organic charm.
Step 3: Attaching the Clasp
-
Add the first crimp:
Remove the tape. Slide a crimp bead onto the end of the wire, followed by a jump ring or the loop of your lobster clasp. -
Loop back:
Thread the wire back through the crimp bead, creating a small loop that holds the clasp or ring securely. -
Secure the crimp:
Using your flat nose pliers, squeeze the crimp bead firmly so it flattens and grips the wire tightly. -
Trim excess wire:
Cut off the short tail of the wire close to the crimp bead. If you can, tuck a tiny bit of the tail into the first heishi bead for a seamless look. -
Finish the other end:
Repeat the crimping process on the opposite end. Slide on a crimp bead, then the extension chain (or a jump ring for the chain). -
Tighten the slack:
Before flattening the second crimp, pull the wire tight enough so there are no gaps between beads, but loose enough that the bracelet remains flexible. -
Final crimp:
Flatten the second crimp bead securely with your pliers. -
Add decorative finish:
If you have crimp covers, gently close one over each flattened crimp bead to make them look like smooth gold balls. -
Attach the pink charm:
Using a small jump ring, attach a single pink bead or charm to the very end of the extension chain for a cute, dangling detail.
Add Some Shine
Replace the single separator beads (between the color blocks) with flat gold spacier discs or tiny freshwater pearls for a more luxe, expensive feel.
Now you have a refreshing wrist accessory that looks good enough to eat—but please don’t


Neon Pop With White Spacers

Bring a serious splash of color to your wrist with this vibrant, preppy-style bracelet featuring bold neon beads. The bright pinks, oranges, and greens are perfectly balanced by crisp white spacer beads and silver accents for a polished finish.
Step-by-Step Tutorial
Materials
- Neon pink round polymer clay beads (8mm-10mm)
- Neon orange round polymer clay beads (8mm-10mm)
- Neon lime green round polymer clay beads (8mm-10mm)
- White round polymer clay or acrylic beads (same size)
- Silver tone rhinestone spacer beads or rondelle spacers
- Elastic beading cord (0.8mm or 1mm thickness)
- Super glue or jewelry cement
- Scissors
Step 1: Planning Your Pattern
-
Measure your wrist:
Before you start stringing, wrap a piece of string or a flexible measuring tape around your wrist to determine the desired length. Add about half an inch to this measurement to ensure a comfortable fit that isn’t too tight. -
Sort your beads:
Pour your neon beads onto a bead mat or a soft cloth so they don’t roll away. Separate them by color: hot pink, neon orange, vibrant lime green, and crisp white. -
Lay out the design:
Arrange the beads in a circle on your working surface to visualize the pattern before stringing. Start with a segment of three pink beads, followed by a white bead, then a segment of pink/orange/orange, and continue mixing the colors freely. -
Incorporate silver spacers:
Place the silver spacer rings between specific beads to break up the color blocks. In the reference, they are often placed on either side of a single bead or between color transitions for a touch of sparkle.
Step 2: Stringing the Beads
-
Prepare the cord:
Cut a length of elastic cord about 10-12 inches long. This extra length will make tying the final knot much easier than struggling with short ends. -
Pre-stretch the elastic:
Give your elastic cord a few gentle tugs. Pre-stretching helps prevent the bracelet from loosening up and sagging after you wear it a few times. -
Secure the end:
Attach a bead stopper or simply tape one end of the cord to your table to prevent beads from slipping off while you work. -
Begin the sequence:
Start stringing your pattern. According to the image, you might start with the heavy pink section: thread a silver spacer, a pink bead, another silver spacer, and repeat for the desired block of color. -
Add the white spacers:
String a white bead after a color block. This acts as a visual palate cleanser between the intense neon sections. -
Create the multi-color section:
Move into the mixed section. Thread an orange bead, a white bead, then a green bead. Don’t worry about perfect symmetry here; the playful, random feel is part of the charm. -
Continue the pattern:
Keep adding beads following your laid-out design. Make sure to slide the silver spacers in flanking the focal beads, like the central single pink beads, to make them pop. -
Check the length:
Periodically wrap the strand around your wrist. You want the ends to meet comfortably without stretching the cord.
Knot Security
If you can’t hide the knot inside a bead hole, thread the tails through adjacent beads before trimming. It adds friction and hides the ends.
Step 3: Finishing Touches
-
Tie the first knot:
Once all beads are strung, remove the stopper or tape. Bring the two ends together and tie a simple overhand knot, pulling it snug against the beads but not so tight that the bracelet buckles. -
Secure with a surgeon’s knot:
Follow up with a surgeon’s knot for extra security. Loop the ends over each other twice before pulling tight. This type of knot is less likely to slip on elastic cord. -
Apply adhesive:
I like to dab a tiny drop of super glue or jewelry cement directly onto the knot. This ensures it stays permanently fused and won’t come undone during wear. -
Hide the knot:
Before the glue fully hardens, gently tug the cord so the knot slides inside the hole of the nearest bead. This makes the finish look professional and seamless. -
Trim the excess:
Once the glue is dry, use your scissors to trim the excess cord ends as close to the bead hole as possible without cutting the knot itself.
Level Up: Charm It
Attach a silver jump ring to one of the silver spacers and hang a small lightning bolt or smiley face charm for extra preppy flair.
Slip on your colorful new accessory and enjoy the bright energy it adds to your outfit


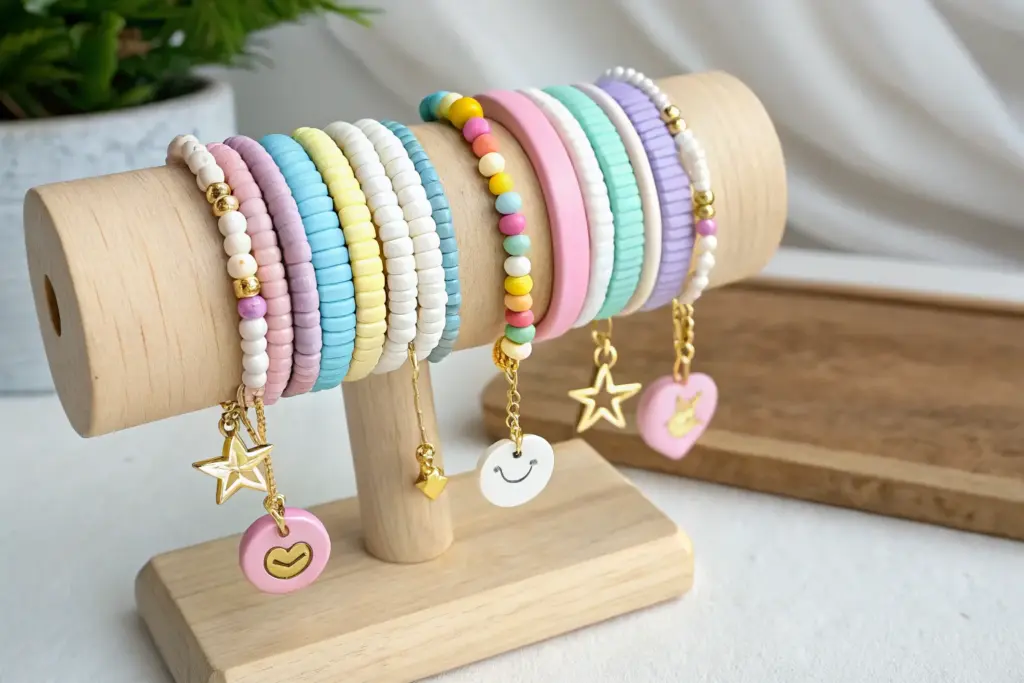
Smiley Face Centerpiece Bracelet

Bring a burst of positivity to your wrist stack with this cheerful design centered around a beaming yellow smiley face. Using a mix of vibrant polymer clay Heishi beads and playful silver accents, this accessory perfectly captures that trendy preppy aesthetic.
Detailed Instructions
Materials
- 6mm yellow smiley face polymer clay bead
- 6mm Heishi polymer clay beads in: White
- 6mm Heishi polymer clay beads in: Turquoise
- 6mm Heishi polymer clay beads in: Hot Pink
- 6mm Heishi polymer clay beads in: Purple
- 6mm Heishi polymer clay beads in: Soft Pink
- 6mm Heishi polymer clay beads in: Pastel Yellow
- Darker blue or teal heishi accent bead (optional)
- Silver rhinestone rondelle spacer beads (approx. 4-6mm)
- 0.8mm clear elastic beading cord
- Super glue or jewelry cement
- Scissors
Step 1: Planning and Prep
-
Measure your cord:
Cut a piece of elastic cord about 10-12 inches long. It’s always better to have too much cord than too little when trying to tie the knot later. -
Secure the end:
Place a piece of tape on one end of the cord or attach a binder clip to prevent your beads from sliding off while you work. -
Plan your focal point:
Lay out your central design on a bead board or flat surface first. Start with the yellow smiley face bead in the very center. -
Build the center frame:
Place one white Heishi bead on either side of the smiley face. This neutral buffer helps the yellow pop.
Step 2: Creating the Pattern
-
Add first color blocks:
Thread the smiley bead onto the center of your cord, followed by the white beads you just planned. -
Insert silver accents:
Slide a silver rhinestone rondelle spacer next to the white bead on the right side. Do the same on the left side to maintain symmetry. -
Start the turquoise section:
On the right side, add three turquoise Heishi beads. Repeat this step on the left side. -
Add pink contrast:
Next to the turquoise blocks on both sides, string on three hot pink Heishi beads. I find that grouping them in threes creates the perfect stripe width. -
Add purple section:
Continue the pattern by adding a block of purple beads on each side. You can vary the number—try two or three—to keep it dynamic. -
Incorporate white stripes:
Break up the colors by adding sections of white beads. In the reference, there are longer white sections (about 4-5 beads) mixed with single white spacer beads between colors. -
Mix in soft pastels:
As you move toward the back of the bracelet, introduce the soft pink and pastel yellow beads in small groups of 2 or 3. -
Create asymmetrical interest:
Don’t feel the need to be perfectly symmetrical near the back. Mix a single dark blue or purple bead into a white section for that carefree, handmade look. -
Check the length:
Wrap the beaded cord around your wrist to check the fit. Add or remove beads from the ends until it fits comfortably without stretching the elastic.
Loosey Goosey?
If the elastic feels slack after tying, you likely didn’t pre-stretch it. Give the cord a few gentle tugs BEFORE stringing to prevent it from sagging later.
Step 3: Finishing Touches
-
Prepare the knot:
Remove the tape or clip from the end. Bring both ends of the elastic together carefully. -
Tie a surgeon’s knot:
Cross the ends, wrap one side around the other twice, and pull tight. Repeat this process once more to secure the tension. -
Secure with glue:
Apply a tiny drop of super glue or jewelry cement directly onto the knot. Let it dry for a few minutes. -
Hide the knot:
If possible, slide one of the beads (the hole usually allows for this) over the knot to conceal it. -
Trim excess:
Using your scissors, trim the excess elastic cord close to the knot, being careful not to cut the main loop.
Pattern Play
Vary the width of your color blocks. Try mixing a single bead of one color between thick blocks of another for a ‘confetti’ look.
Wear your new smiley bracelet solo or stack it with gold chains for maximum happy vibes

The Complete Guide to Pottery Troubleshooting
Uncover the most common ceramic mistakes—from cracking clay to failed glazes—and learn how to fix them fast.
Gold Spacer Rhythm Bracelet
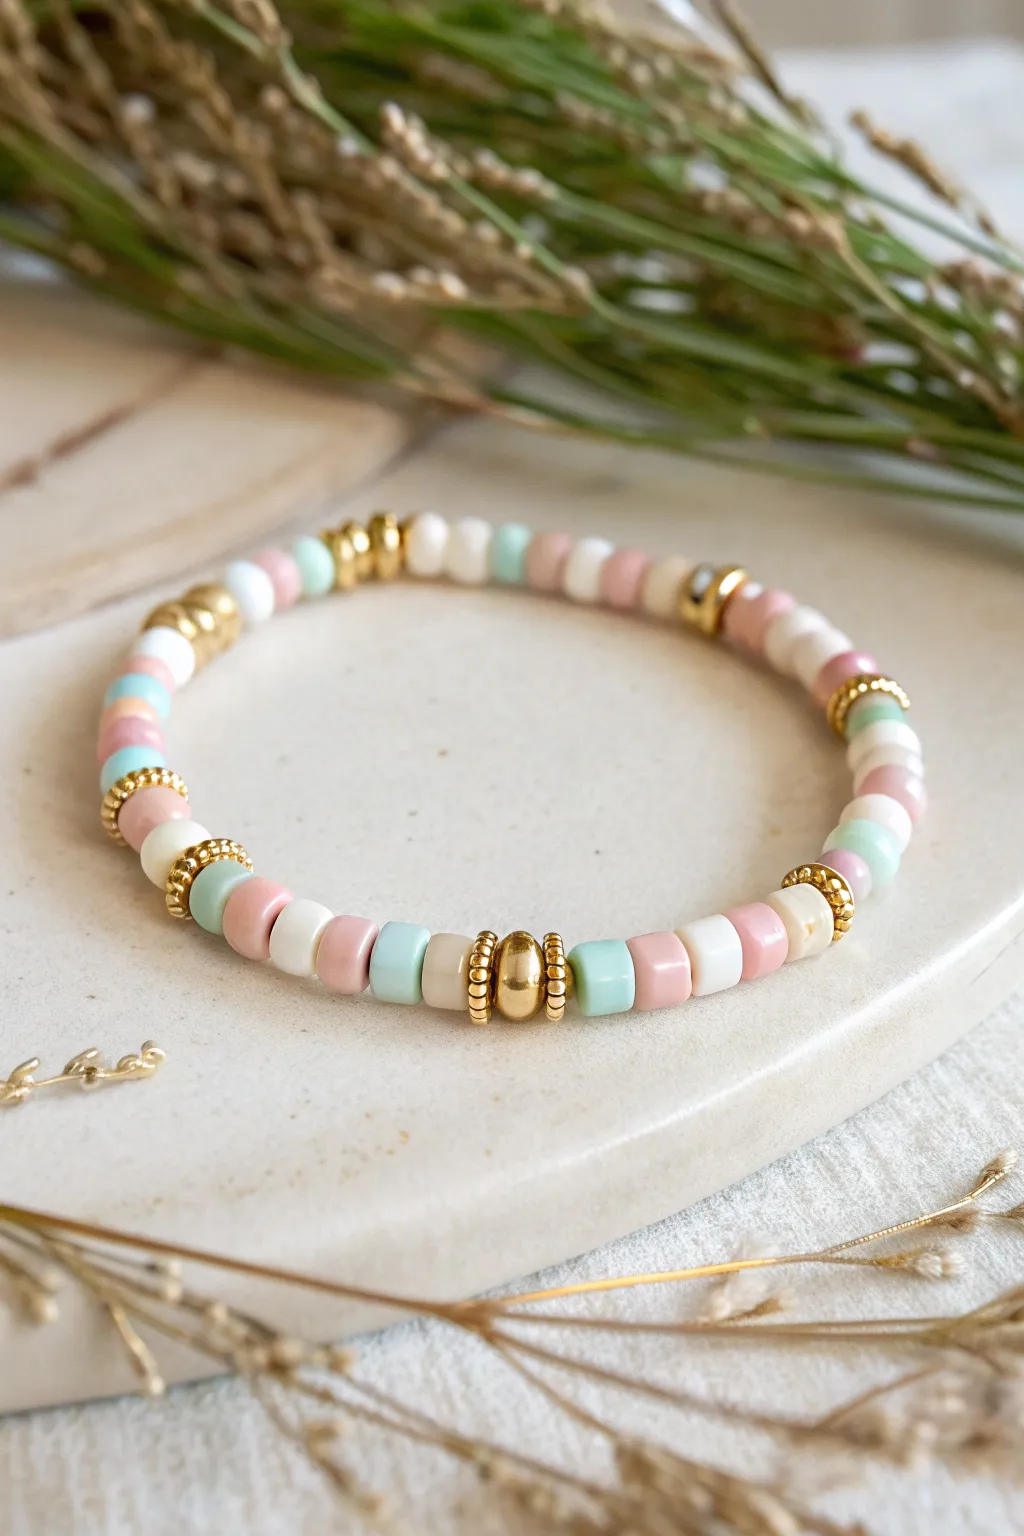
Embrace a subtle, luxurious aesthetic with this delicately patterned heishi bracelet. The alternating rhythm of pastel clay discs and shimmering gold accents creates a sophisticated accessory perfect for stacking or wearing solo.
Step-by-Step Guide
Materials
- 6mm polymer clay heishi beads (pastel pink, mint green, white, beige)
- Small gold nugget spacer beads (approx. 3-4mm)
- Larger gold round beads (approx. 6mm)
- Decorative gold rondelle spacers (textured/ridged)
- Elastic beading cord (0.7mm recommended)
- Jewelry glue or clear nail polish
- Scissors
Step 1: Preparation
-
Measure your wrist:
Wrap a piece of string around your wrist to find the circumference, then add about 1/2 inch to ensure a comfortable fit that isn’t too tight. -
Cut the cord:
Cut a length of elastic cord about 10-12 inches long. Having this extra length makes tying the knot at the end much easier. -
Pre-stretch the elastic:
Give your cord a few gentle tugs. This pre-stretching helps prevent the bracelet from loosening up after you’ve worn it a few times. -
Secure the end:
Place a piece of tape on one end of the cord or attach a bead stopper to prevent your beads from sliding off while you design.
Needle Trick
If the heishi bead holes are tricky to thread, cut the elastic tip at a sharp angle or use a collapsible eye beading needle.
Step 2: Creating the Pattern
-
Start with the focal point:
Thread on a ridged gold rondelle spacer, followed by a large 6mm gold round bead, and then another ridged gold rondelle. This will act as the shiny centerpiece opposite the knot. -
Begin the color sequence:
On the right side of the focal beads, thread on four heishi beads in this order: mint green, pastel pink, white, then beige. -
Add a gold accent:
Follow that four-bead sequence with one small gold nugget spacer. -
Repeat the sequence:
Thread another set of four heishi beads (now reversing or mixing the color order slightly to keep it organic, or sticking to a strict pattern if you prefer) followed by another gold nugget spacer. -
Build the first side:
Continue adding groups of 3-5 heishi beads separated by gold nugget spacers until you have covered about half of your desired length on this side of the focal bead. -
Mirror the design:
Return to the other side of your central gold bead and repeat the process, adding patterns of pastel heishi beads separated by the small gold nugget spacers. -
Add variance:
To match the photo accurately, occasionally swap a single gold nugget spacer for a sequence of smaller gold discs or a different texture to break up the uniformity. -
Check the length:
Periodically wrap the strand around your wrist. The ends should touch comfortably without stretching the elastic.
Step 3: Finishing Touches
-
Tie the knot:
Remove the tape or stop-bead. Bring both ends together and tie a standard square knot (right over left, left over right). -
Tighten securely:
Pull the elastic ends firmly to tighten the knot. I usually pull firmly enough to see the elastic stretch slightly, ensuring it won’t slip. -
Secure with glue:
Apply a tiny dab of jewelry glue or clear nail polish directly onto the knot. This is crucial for longevity. -
Hide the knot:
While the glue is still tacky, slide one of the beads (preferably a larger bead with a bigger hole) over the knot to conceal it. -
Trim the excess:
Once the glue is fully dry, trim the excess cord ends carefully with sharp scissors, getting as close to the bead as possible without cutting the knot.
Customize the Palette
Swap the pastels for navy, maroon, and forest green heishi beads with the same gold spacers for a darker, collegiate ‘preppy’ vibe.
Slip on your new creation and enjoy the subtle sparkle of gold mixed with soft clay tones
Mini Heart Accent Stack
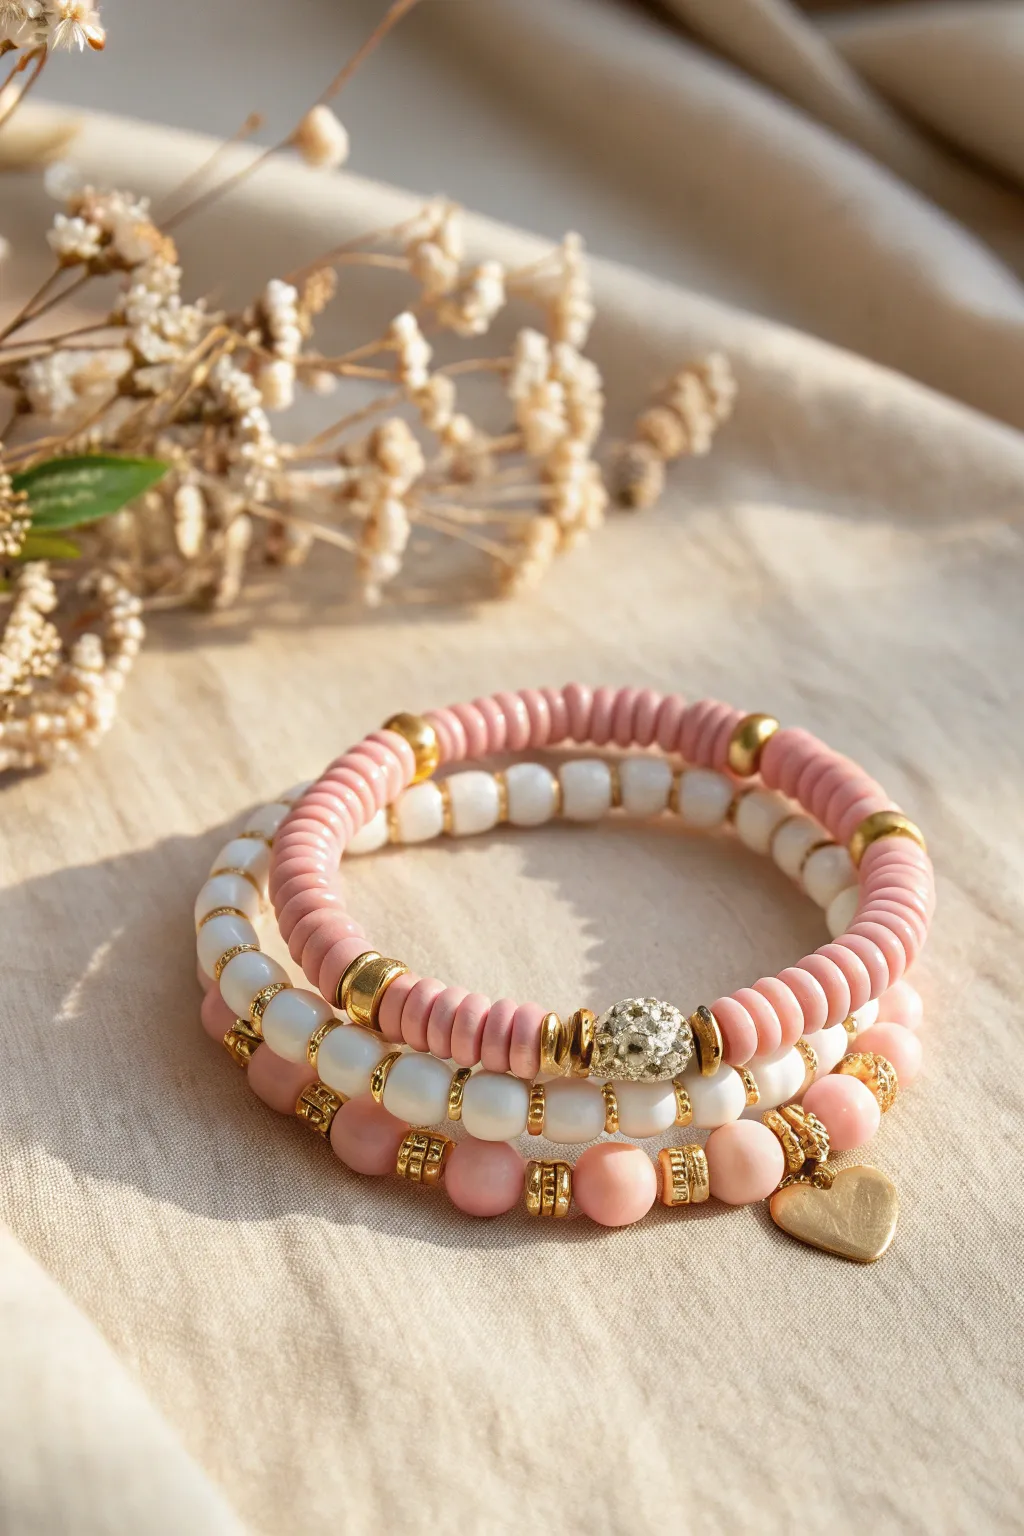
This charming trio combines the softness of matte pink heishi beads with the elegance of polished white rounds and gold accents. The dangling heart charm adds a sweet, personal touch to this perfectly curated stack that feels both preppy and sophisticated.
Detailed Instructions
Materials
- Pink flat clay heishi beads (approx. 4-6mm)
- White solid round beads (approx. 6mm, glass or acrylic)
- Pink polished round beads (approx. 6mm-8mm)
- Gold spherical spacer beads (smooth, approx. 3-4mm)
- Gold textured spacer beads (disc or rondelle shape)
- Gold tone heart charm with jump ring
- Sparkly rhinestone rondelle or pave bead (focal for top bracelet)
- Two gold bead caps (to frame the sparkly bead)
- Elastic beading cord (0.7mm or 0.8mm)
- Jewelry glue or clear nail polish
- Scissors
Step 1: The Pink Heishi Focal Bracelet
-
Measure and Cut:
Cut a piece of elastic cord about 10-12 inches long. I always like to give myself plenty of extra slack for tying the final knot comfortably. -
Start Beading:
Begin threading on your pink flat clay heishi beads. Thread about 2 inches worth of beads to start. -
Add Gold Accents:
Slide on one smooth gold spherical spacer bead. This breaks up the pink texture nicely. -
Continue the Pattern:
Add another section of pink heishi beads, then another gold spacer. Repeat this until you reach approximately the middle of your desired length. -
Create the Centerpiece:
For the focal point, thread on one gold bead cap (cup side facing inward), then your sparkly rhinestone pave bead, and finally the second gold bead cap (cup side facing the pave bead). -
Finish and Tie:
Continue the pattern of pink beads and gold spacers until the bracelet fits your wrist. Tie a secure surgeon’s knot, pull it tight, dab with glue, and trim the excess cord.
Knot Security
Pre-stretch your elastic cord by pulling it firmly a few times before beading. This prevents the bracelet from drooping or loosening after the first wear.
Step 2: The White & Gold Spacer Bracelet
-
Prepare the Cord:
Cut another length of elastic cord, keeping it consistent with the first length. -
Alternating Pattern:
This design relies on a strict pattern. Thread one white round bead, followed immediately by a gold textured disc spacer. -
Build the Strand:
Repeat the ‘one bead, one spacer’ pattern continuously. The textured spacers act as little separators that catch the light beautifully. -
Check fit:
Wrap the strand around your wrist to check the size. Since round beads are bulkier than flat clay ones, you might need slightly fewer beads than you expect. -
Secure the Knot:
Tie off this bracelet with a double surgeon’s knot. Hide the knot inside one of the white beads if the hole is large enough.
Wonky Spacers?
If your textured spacers look uneven or twist too much, ensure the hole size matches your cord. Loose spacers can sit at odd angles; a thicker cord helps stabilize them.
Step 3: The Pink Charm Bracelet
-
Set the Base:
Cut your final piece of elastic cord. -
Pattern Strategy:
Thread your slightly larger pink polished round beads onto the cord. Place a gold textured spacer between every second or third bead to vary the look from the white bracelet. -
Add Charm Hanger:
When you are about halfway through the bracelet, slide on a decorative gold bail or a jump ring that holds your heart charm. -
Complete the Circle:
Finish adding your pink beads and spacers until the bracelet meets the ends together. -
Final Tie Off:
Tie your final secure knot. Apply a tiny dot of glue to the knot and let it dry completely before snipping the ends. Tuck the knot into a bead adjacent to the charm for a clean finish.
Wear them all together for a full statement stack or mix and match them individually depending on your mood


What Really Happens Inside the Kiln
Learn how time and temperature work together inside the kiln to transform clay into durable ceramic.
Initials and Nickname Letter Beads
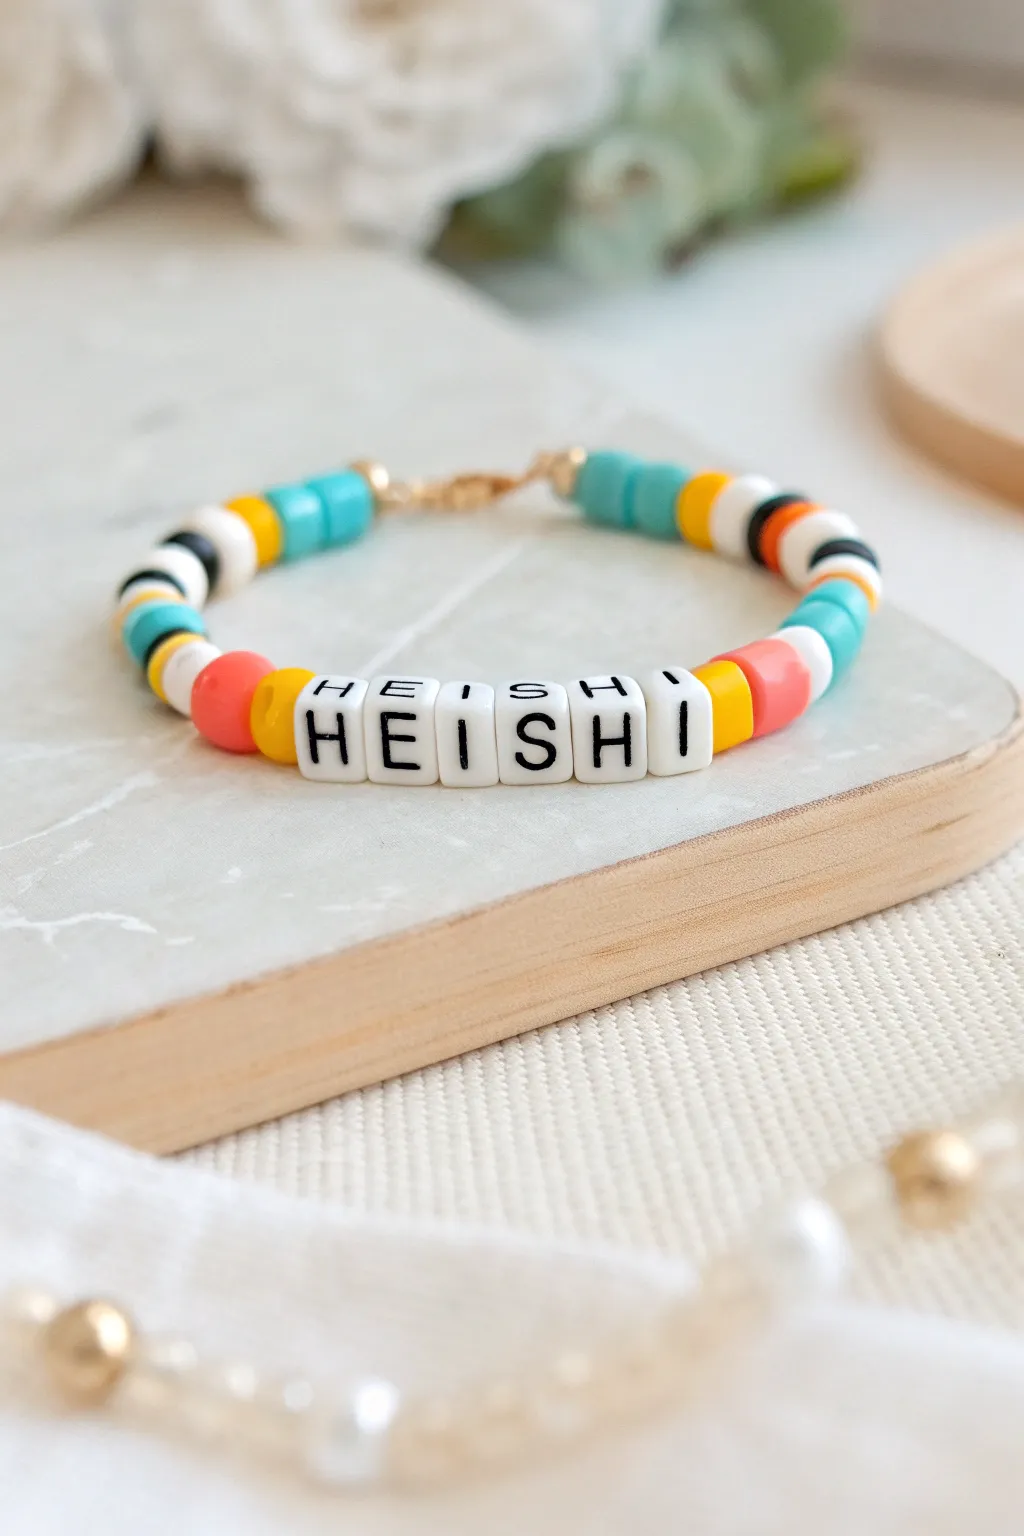
Embrace the fun and colorful ‘preppy’ aesthetic with this vibrant heishi bead bracelet. Featuring bold color blocking and square letter beads, this project is a perfect introduction to working with flat polymer clay discs and personalized jewelry making.
Step-by-Step Guide
Materials
- Polymer clay heishi beads (6mm or similar) in: Turquoise/Teal, Mustard Yellow, White, Black, Coral/Salmon Pink
- Square white alphabet beads with black lettering (spelling H-E-I-S-H-I)
- Gold beading wire or strong nylon cord (approx. 10 inches)
- 2 Gold crimp beads (2mm)
- 2 Gold wire guardians (optional but recommended for longevity)
- 2 Gold crimp bead covers (3mm)
- Gold lobster clasp
- Gold jump rings (open, 4-6mm)
- Chain nose pliers
- Flat nose pliers
- Flush cutters or scissors
Step 1: Preparation & Layout
-
Measure your wrist:
Wrap a measuring tape comfortably around your wrist to determine the desired length. Add about 1/2 to 1 inch to this measurement to account for the clasp and the thickness of the beads. -
Organize your letters:
Locate the square letter beads for your chosen word—in this case, H, E, I, S, H, and I. Lay them out on your bead board or felt mat to ensure they are clean and readable. -
Plan the color pattern:
Visualize the pattern shown in the image. You will be working outwards from the center word. Note the symmetry: small gold accents or a specific color sequence flanking the text. -
Cut the wire:
Cut a piece of beading wire approximately 10-12 inches long. Having extra length makes it much easier to finish the ends without frustration.
Step 2: Stringing the Design
-
Start the first side:
Attach a bead stopper or a piece of tape to one end of the wire to prevent beads from falling off. We will string one whole side first. -
Add the first colorful section:
String about 4-5 turquoise heishi beads, followed by 3-4 mustard yellow beads. -
Create the striped pattern:
Add a pattern of: one white, one black, one white. Then add 2-3 coral/salmon beads. -
Repeat until center:
Repeat a variation of this color blocking until you have covered nearly half the length of the bracelet minus the letter section. The image uses a mix of solid blocks and striped sections. -
Add the centerpiece:
String your yellow accent bead, then the letter beads H-E-I-S-H-I in order. Ensure they are all facing the correct direction so the word reads properly. -
Complete the second side:
String the second half of the bracelet, mirroring the pattern from the first half. Start with the yellow accent, then the coral, then the black/white stripe sequence, working your way to the turquoise end. -
Check the fit:
Carefully wrap the unfinished strand around your wrist. The ends should almost touch, leaving just a small gap for the clasp hardware.
Keep It Flexible
Don’t string heishi beads too tightly! Leave a tiny bit of wiggle room (about 1mm of slack) so the bracelet can drape naturally around the wrist without buckling or snapping.
Step 3: Finishing the Ends
-
Thread the first crimp:
Remove the tape/stopper from one end. Thread on a crimp bead followed by a wire guardian. -
Loop through the guardian:
Feed the wire up through one side of the horseshoe-shaped wire guardian and down the other. If you aren’t using a guardian, simply make a loop with the wire. -
Secure the wire:
Pass the wire back down through the crimp bead and through the first 1-2 heishi beads. Pull tight so the guardian sits flush against the beads, but not so tight the bracelet becomes stiff. -
Crimp the bead:
Use your crimping pliers to flatten the crimp bead securely. I always give a gentle tug to ensure it is locked in place. -
Cover the crimp:
Place a crimp cover over the flattened crimp bead. Gently squeeze it closed with pliers until it looks like a round gold bead. -
Repeat on the other side:
Repeat the crimping process on the other end of the bracelet. Be sure to pull out any slack in the wire before crimping the second side. -
Trim excess wire:
Use your flush cutters to trim the excess tail of the wire as close to the beads as possible so no sharp ends poke out.
Mix Up Textures
Add sophistication by placing small gold spacer discs or tiny pearl beads between every color change. This breaks up the matte clay look with a little pop of shine.
Step 4: Adding Hardware
-
Open a jump ring:
Using two pairs of pliers, twist open a gold jump ring. Do not pull it apart; twist the ends away from each other. -
Attach the clasp:
Slide the loop of the wire guardian (or wire loop) onto the open jump ring. Add the lobster clasp to the ring, then twist the jump ring closed. -
Add the extension chain:
On the other end of the bracelet, open another jump ring and attach a small length of extension chain or a closed jump ring for the clasp to hook onto.
Now you have a trendy, boutique-style bracelet ready to stack with your other favorite accessories
Candy Stripe Color Pattern
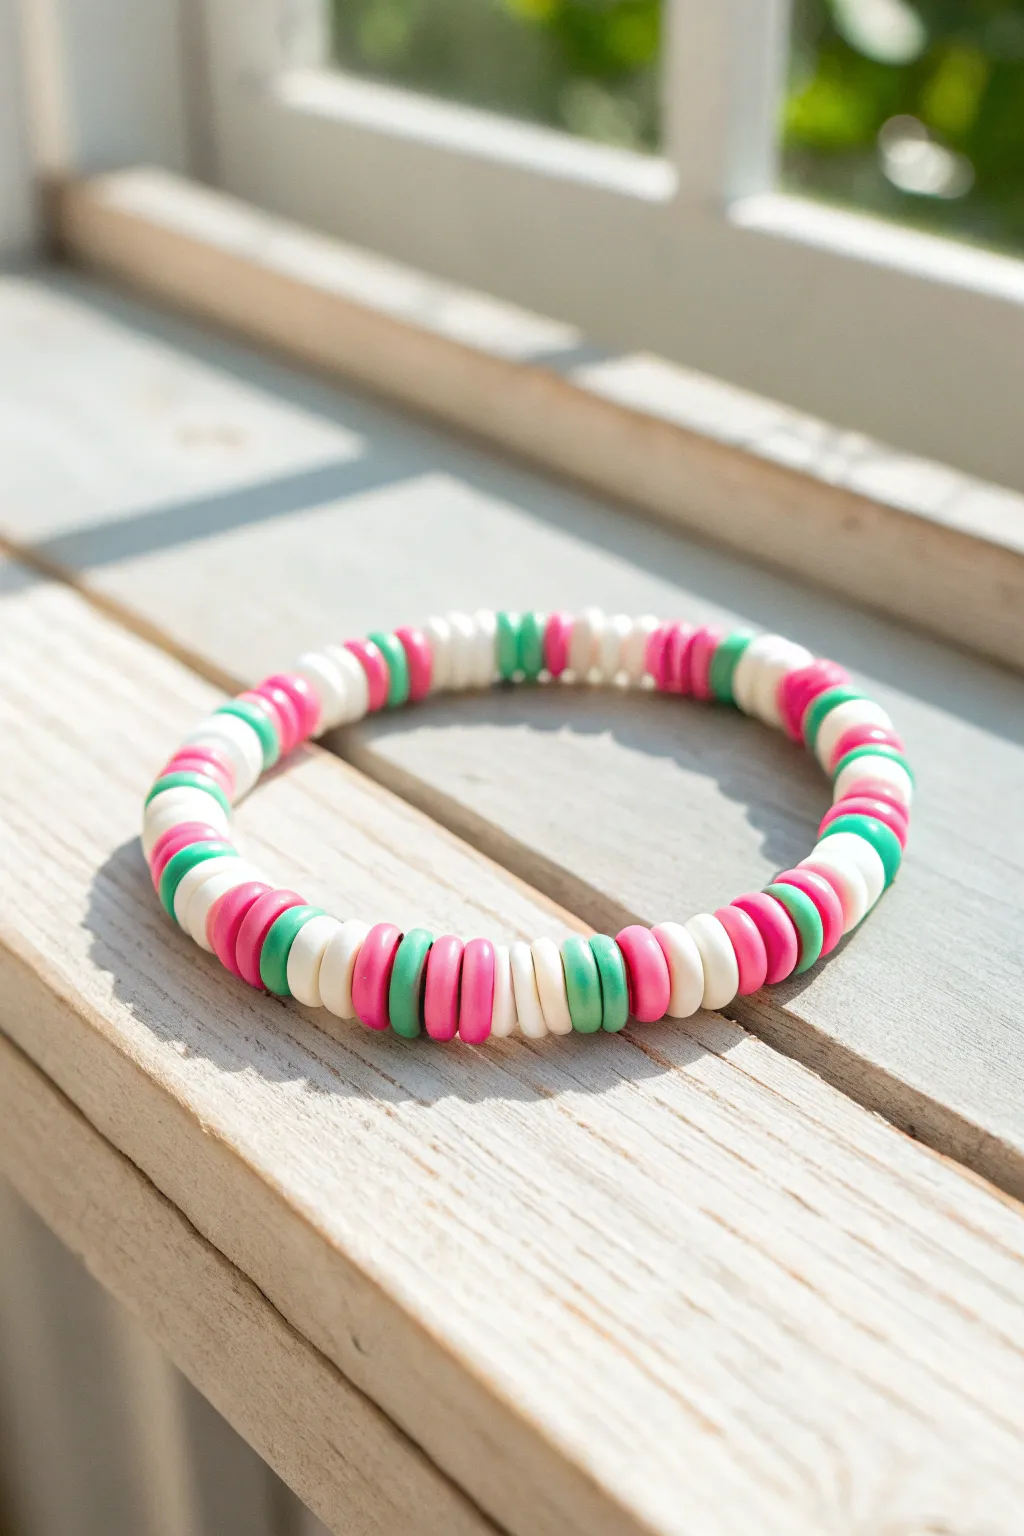
This delightful bracelet captures the sweet essence of candy buttons with its playful mix of bright pink, crisp white, and minty green discs. The flat Heishi clay beads stack perfectly to create a smooth, comfortable accessory that brings a pop of preppy color to any wrist stack.
Detailed Instructions
Materials
- 6mm flat clay Heishi beads (Bright Pink)
- 6mm flat clay Heishi beads (White)
- 6mm flat clay Heishi beads (Mint Green/Teal)
- 0.8mm clear elastic stretch cord
- Scissors
- Super glue or jewelry cement (optional)
- Bead stopper or tape
- Ruler or measuring tape
Step 1: Preparation and Setup
-
Measure your wrist:
Begin by measuring your wrist with a flexible measuring tape. For a comfortable fit that isn’t too tight, add about 0.5 to 1 inch to your actual wrist measurement. -
Cut the cord:
Cut a piece of clear elastic cord that is approximately 10-12 inches long. Having this extra length makes tying the final knots much easier than struggling with short ends. -
Pre-stretch the elastic:
I like to give the elastic cord a few gentle tugs before starting. This pre-stretching helps prevent the bracelet from loosening up immediately after you wear it for the first time. -
Secure the end:
Attach a bead stopper to one end of your cord. If you don’t have a stopper, a simple piece of tape folded over the end works perfectly to keep beads from sliding off.
Smoother Sorting
Pour your bead colors into small separate dishes or a flocked bead board before starting. It makes picking up thin discs much faster than digging in a bag.
Step 2: Beading the Candy Pattern
-
Start the sequence:
Begin your pattern by threading on a small block of color. Start with 2 pink beads, followed by 1 green bead. -
Add white accents:
Follow that initial block with 2 white beads. This creates separation and makes the colors pop. -
Build the first section:
Continue the pattern by adding 2 pink beads, then 1 green bead, and another 2 white beads. You are essentially creating small ‘stripes’ of color rather than alternating single beads. -
Vary the rhythm:
To mimic the organic look in the photo, allow for slight variations. Occasionally switch to a 1-1-1 pattern (1 pink, 1 green, 1 white) for a short segment to break up the uniformity. -
Main pattern block:
Return to the dominant motif seen in the center: stack 2 pink beads, 1 green bead, 2 white beads, and repeat. Keep the tension loose so the beads sit flat against each other. -
Check the length:
Periodically wrap the beaded cord around your wrist to check the fit. Stop adding beads when you are about 0.5 inches away from your target length, as the knot will take up a tiny bit of space. -
Finish the pattern:
End your beading sequence with a color that contrasts with your starting bead. If you started with pink, try to end with white or green so the seam is invisible.
Step 3: Finishing and Tying
-
Remove the stopper:
Carefully remove the bead stopper or tape while firmly holding both ends of the elastic cord so no beads escape. -
Tie the first knot:
Bring the two ends together and tie a simple overhand knot. Pull it tight gently to bring the beads together without making the bracelet buckle. -
Tie a surgeon’s knot:
For extra security, tie a surgeon’s knot next. Cross the ends like a standard knot, but loop the top strand through the circle twice before pulling tight. -
Tighten securely:
Pull on all four strands (the two loose ends and the two bracelet sides) to cinch the knot down as small and tight as possible. -
Secure with glue:
Place a tiny dot of super glue or jewelry cement directly onto the knot. Let this dry for a minute or two to ensure it won’t slip. -
Trim the ends:
Once the glue is dry, use your scissors to trim the excess elastic tails close to the knot, leaving about 2mm just to be safe. -
Hide the knot:
Gently slide the beads adjacent to the knot over it. Usually, the opening of these flat clay beads is large enough to tuck the knot inside, making it completely invisible.
Gaping Beads?
If you see gaps between beads, you likely didn’t pull the elastic tight enough while knotting. The beads should touch firmly but the bracelet shouldn’t curl.
Slip on your colorful creation and enjoy the cheerful vibe it adds to your day

TRACK YOUR CERAMIC JOURNEY
Capture glaze tests, firing details, and creative progress—all in one simple printable. Make your projects easier to repeat and improve.
Resort Color-Block Bands
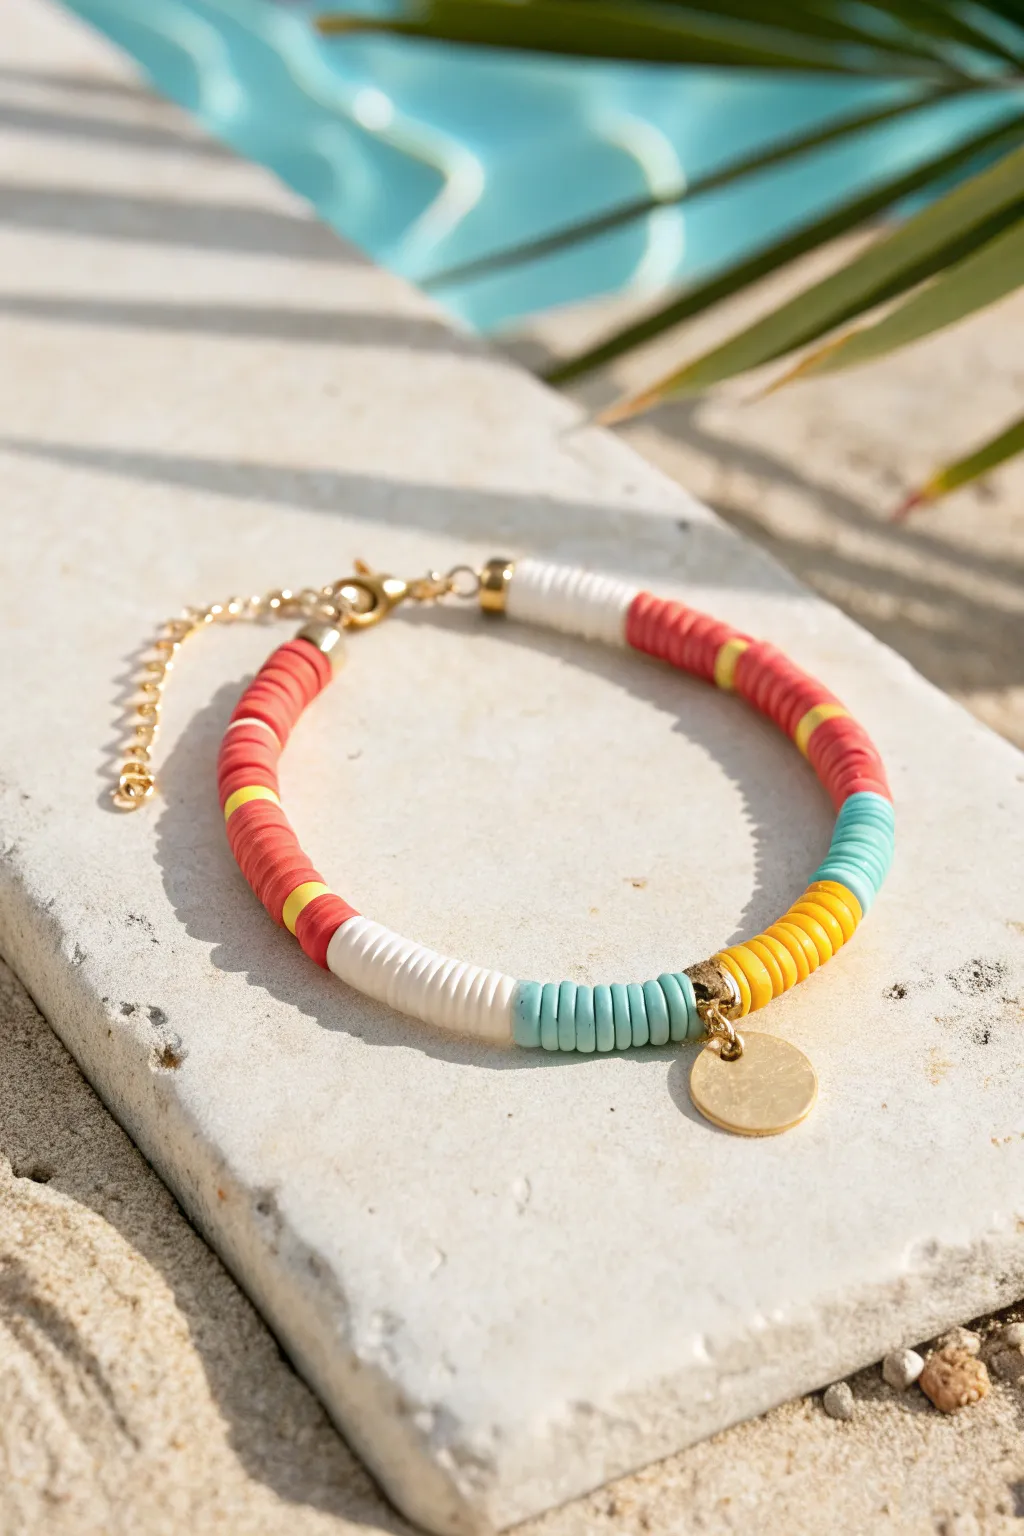
Capture the essence of a poolside vacation with this vibrant resort-style bracelet featuring bold color-blocking. The mix of coral, teal, and sunny yellow polymer clay beads, finished with a chic gold charm, makes it the perfect accessory for sunny days.
How-To Guide
Materials
- 6mm Polymer clay Heishi beads (Coral Red, White, Turquoise, Deep Yellow)
- Small gold disc spacer beads (approx. 4mm)
- Gold plated hammered disc charm (approx. 8-10mm)
- 0.8mm clear elastic cord or beading wire
- 2 Gold crimp beads (if using wire) or surgeon’s knot (if using elastic)
- 2 Gold jump rings (4mm)
- Gold lobster clasp
- Gold extension chain
- 2 Gold wire guards (optional, for a professional finish)
- Flat nose pliers
- Scissors or wire cutters
Step 1: Planning and Preparation
-
Measure your wrist:
Wrap a measuring tape loosely around your wrist to determine the desired length. For a standard fit, aim for about 6.5 to 7 inches total, keeping in mind the clasp will add some length. -
Cut the cord:
Cut a piece of beading wire or elastic about 10 inches long. This generous length gives you plenty of room to work without beads sliding off the ends unexpectedly. -
Secure the first end:
Thread a crimp bead and a wire guard onto one end of the wire. Loop the wire through the last link of your extension chain, back through the wire guard and crimp bead, then flatten the crimp bead with pliers to secure it.
Step 2: Create the Bead Pattern
-
Start with Coral:
Begin your pattern by stringing approximately 15-20 coral red Heishi beads. This creates the first major color block. -
Add a gold accent:
Slide on one gold disc spacer bead to separate the color sections cleanly. -
The Yellow sliver:
Add a very small section of deep yellow—just 2 or 3 beads—followed immediately by another gold disc spacer. -
Continue the Coral:
String another block of coral red beads, roughly half the length of your first section. -
Transition to White:
Add a gold spacer, then string a substantial block of white Heishi beads creates a crisp contrast. -
Introduce Turquoise:
After the white section, add a gold spacer and begin a block of turquoise beads. Aim for about 10-12 beads here. -
Attach the charm:
Slide your gold hammered disc charm onto the wire right in the middle of your turquoise section or between color blocks, wherever you want the focal point to sit. -
Finish the pattern:
Complete the bracelet by reversing or continuing your color block pattern—perhaps a section of yellow, followed by turquoise and more coral—until you reach your desired length.
Clean Lines Pro-Tip
Discard any irregular or chipped clay beads as you go. Polymer clay beads can vary in thickness; selecting uniform ones makes the color blocks look much sharper.
Step 3: Finishing Touches
-
Check the fit:
Wrap the unfinished bracelet around your wrist one last time to ensure the size is correct before sealing it off. -
Add the clasp hardware:
Thread on a crimp bead and a wire guard. Loop the wire through the loop of your lobster clasp. -
Thread back through:
Pass the wire back through the wire guard and down into the crimp bead. Pull everything tight so there is no slack, but allow a tiny bit of wiggle room so the bracelet remains flexible. -
Crimp to secure:
Use your flat nose pliers to firmly squash the crimp bead flat. Ensure it holds the wire securely. -
Trim excess wire:
I like to thread the tail end of the wire back through the first couple of clay beads before trimming it close with cutters for a neat finish. -
Final adjustment:
If you used jump rings to attach the charm separately, ensure they are closed completely flush so the charm doesn’t slip off during wear.
Stiff Bracelet?
If the bracelet feels rigid or kinks up, you crimped it too tightly. Leave a 1-2mm gap of exposed wire near the clasp before crimping to allow the beads to move.
Enjoy wearing your touch of handmade sunshine wherever you go
Sunset Ombre Fade
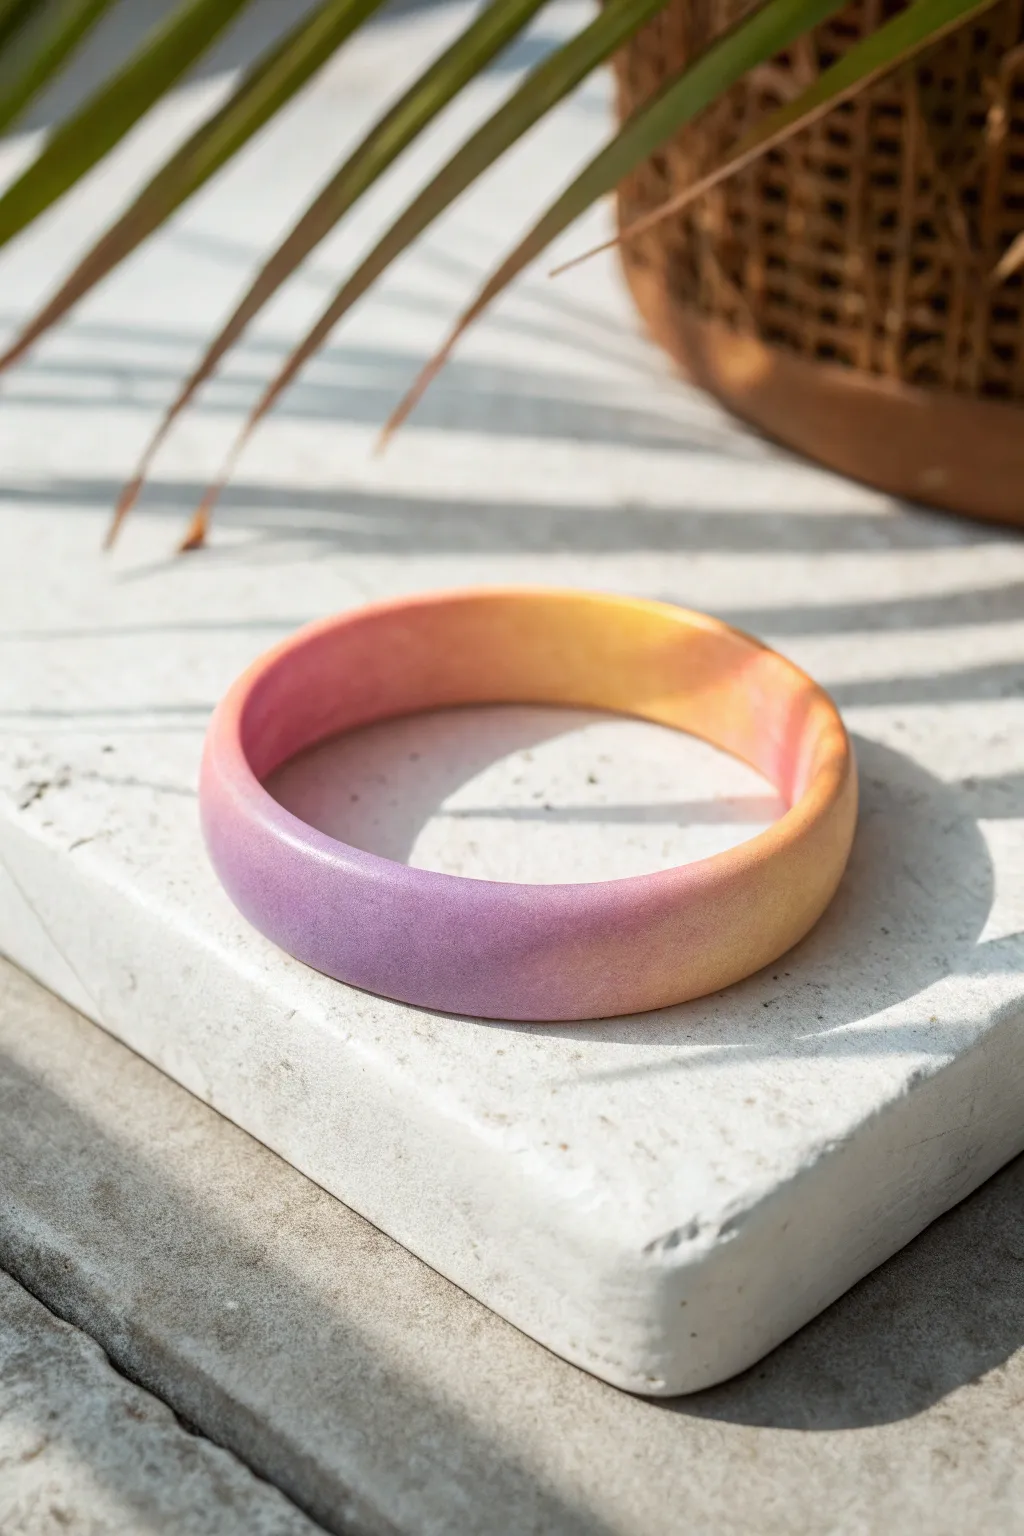
Capture the dreamy colors of twilight with this seamless sunset gradient bracelet. This solid polymer clay bangle blends warm yellows, creamy peaches, and soft purples into a sophisticated accessory that looks like it’s glowing from within.
Step-by-Step
Materials
- Polymer clay (colors: lemon yellow, peach/coral, lavender purple, and translucent)
- Acrylic roller or pasta machine
- Flexible tissue blade/slicing blade
- Drinking glass or round cookie cutter (bangle sizing)
- Bangle mold (optional, but helpful for shape)
- Wet/dry sandpaper (400 to 1000 grit)
- Soft buffing cloth or denim scrap
- Ceramic tile or glass work surface
- Oven
Step 1: Creating the Sunset Gradient
-
Condition the hues:
Begin by thoroughly conditioning your lemon yellow, peach, and lavender polymer clays until they are soft and pliable. I find adding a small pinch of translucent clay to each color helps give the final bangle that soft, gem-like depth shown in the photo. -
Form triangles:
Roll each conditioned color into a sheet of equal thickness, about 3mm (setting 1 on a pasta machine). Cut a right-angled triangle from each color sheet. -
Assemble the block:
Arrange the triangles into a rectangle where the hypotenuse of the yellow meets the peach, and the peach meets the purple. You want them to slightly overlap to encourage blending. -
The Skinner Blend technique:
Fold the clay rectangle in half, matching same-color to same-color. Feed this through your pasta machine (or roll with a rod) fold-side first. Repeat the folding and rolling process 15-20 times. -
Check the transition:
Continue blending until the harsh lines between colors disappear and you have a smooth, continuous gradient sheet ranging from yellow to purple.
Muddy colors?
If your gradient looks brown in the middle, you may have over-blended. Stop rolling as soon as the transition is smooth, or use “bridge” colors (like orange between yellow/red) to keep hues clean.
Step 2: Shaping the Bangle
-
Size the strip:
Measure the circumference of your hand at its widest point (tucked thumb) to ensure the bangle will slip on. Cut a long strip from your gradient sheet matching this length plus a tiny bit extra for the seam. -
Thicken the base:
To make the bangle sturdy like the image, form a ‘snake’ or core of scrap clay that matches the length. Wrap your beautiful gradient sheet around this core, ensuring the seam of the sheet is on the inside face of the bangle. -
Smooth the exterior:
Gently roll the clay snake on your work surface to smooth out the wrapped layer and remove any trapped air bubbles. -
Form the circle:
Bring the two ends of your snake together to form a ring. Slice through both ends simultaneously with your blade at a 45-degree angle to create maximum surface area for joining. -
Seal the join:
Press the cut ends together firmly. Use a smoothing tool or your finger to feather the clay across the seam until the join is completely invisible and the ombre pattern flows uninterrupted.
Step 3: Baking and Finishing
-
Refine the shape:
If you have a metal bangle form or a heat-safe glass jar of the right size, slide the clay ring onto it to ensure it bakes in a perfect circle. Otherwise, carefully shape it on your ceramic tile. -
Bake carefully:
Bake the bangle according to your clay manufacturer’s instructions. A common standard is 275°F (135°C) for 30-45 minutes. Tent foil over the bangle to prevent the yellow sections from scorching. -
Cool down:
Allow the bangle to cool completely inside the oven or on the counter. Do not try to flex it while it is still warm. -
Wet sand for matte finish:
Once cool, submerge the bangle in a bowl of water with a drop of dish soap. Sand the surface with 400-grit sandpaper to remove fingerprints, then progress to 600 and 1000-grit for a velvety smooth feel. -
Final buffing:
Vigorously rub the dried bangle with a piece of denim or a soft cloth. This creates the subtle, natural sheen seen in the photo without making it look plastic and glossy.
Pro Tip: Hidden Core
Use lightweight aluminum foil scrunched into a snake as your inner core instead of scrap clay. It makes the chunky bangle much lighter to wear and speeds up the baking time significantly.
Slide on your new sunset bangle and enjoy the warmth of golden hour on your wrist all day long
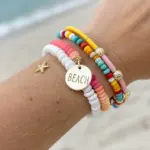
Shell Mix-in Beachy Prep
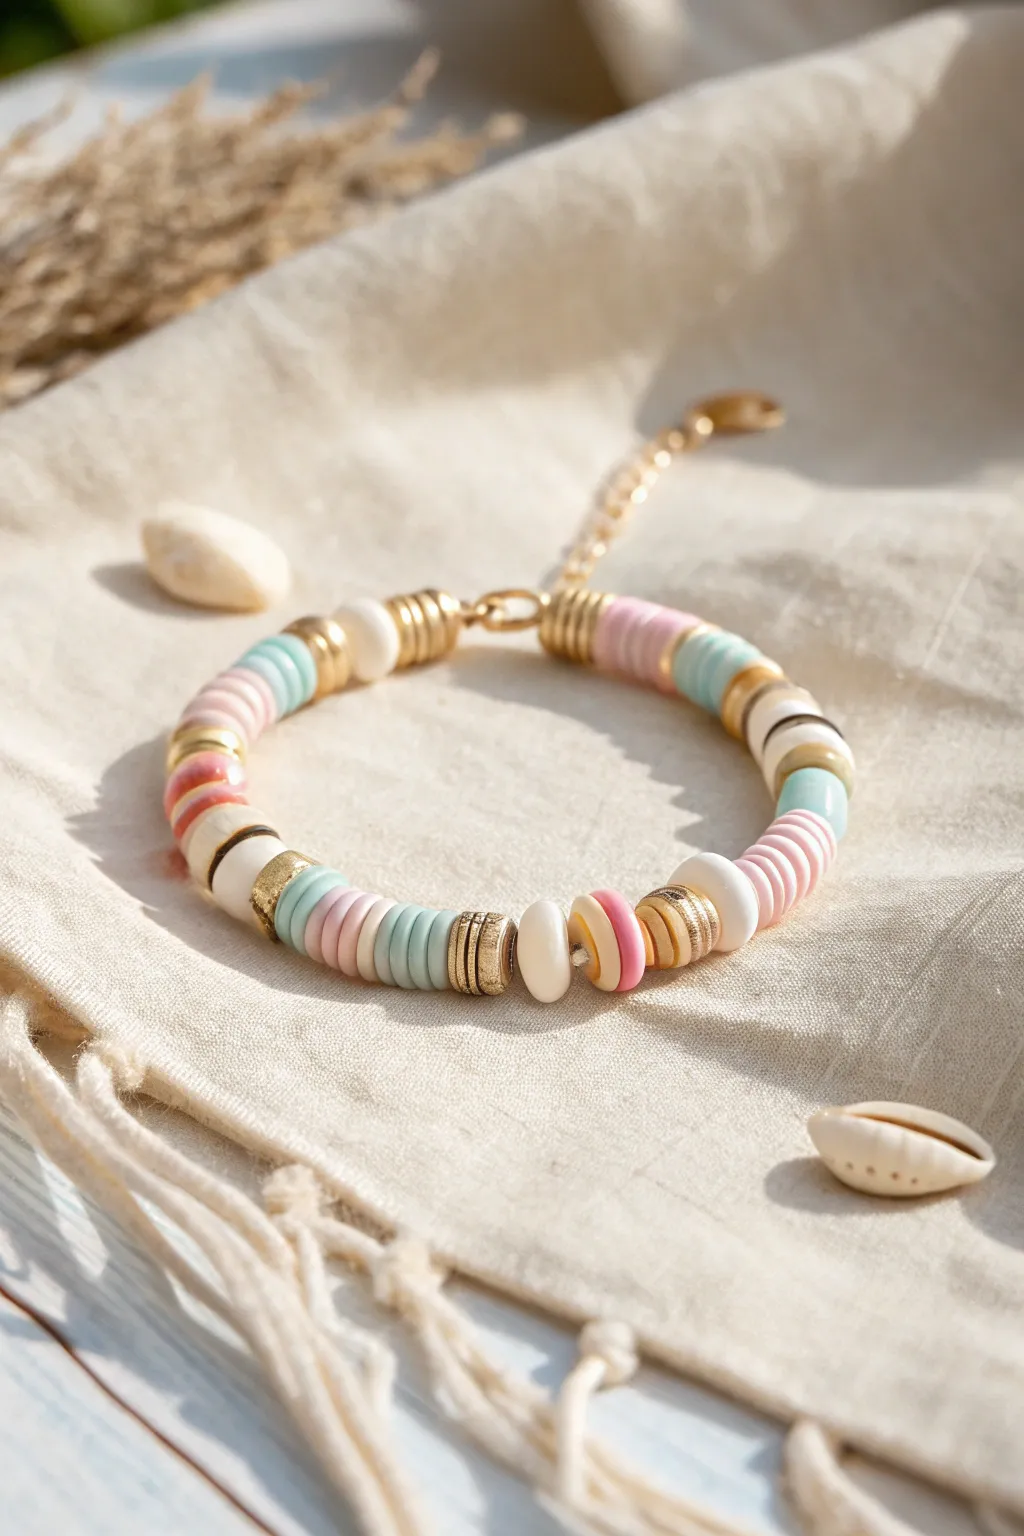
Capture the essence of a serene beach day with this elegant mixed-texture bracelet. Combining soft pastel heishi beads with organic shell accents and gold spacers creates a sophisticated yet relaxed preppy accessory perfect for stacking.
Step-by-Step Tutorial
Materials
- Polymer clay heishi disc beads (pastel pink, mint green, white, cream)
- Gold plated smooth spacer beads (heishi size)
- Gold plated textured/ribbed spacer rings
- Gold plated round beads (small)
- Natural white shell nuggets or irregular pearl beads
- Natural puka shell chips (optional)
- Strong elastic beading cord (0.8mm recommended)
- Jewelry glue (GS Hypo Cement recommended)
- Scissors
- Beading needle (optional but helpful)
- Tape or bead stopper
Step 1: Preparation & Planning
-
Measure the cord:
Cut a piece of elastic cord about 10-12 inches long. This gives you plenty of extra room for tying knots later without struggling. -
Pre-stretch the elastic:
Hold the cord firmly at both ends and give it several gentle tugs. This pre-stretching prevents the bracelet from sagging or becoming loose after you wear it a few times. -
Secure the end:
Place a bead stopper on one end or simply tape it down to your work surface so your beads don’t slide off mid-project. -
Sort your palette:
Lay out your beads on a design board or piece of felt. You’ll need small piles of pink, mint, and cream heishi beads, plus your gold spacers and varying sizes of white shell beads.
Step 2: Beading the Design
-
Start with the clasp hide:
Though this is a stretch bracelet, finish it professionally by threading on a gold crimp cover bead first (optional) or simply start with a cluster of gold rings to hide the final knot later. -
Create the first color block:
String on about 5-6 pastel pink heishi beads. Follow this immediately with a thin gold spacer disc to add a touch of shine. -
Add texture:
Thread on a ribbed gold ring spacer. These add a fantastic textural contrast to the smooth clay beads. -
Introduce the mint:
Add a sequence of mint green heishi beads. I usually do a slightly shorter section here, maybe 3 or 4 beads, to keep the pattern irregular and organic. -
Place a focal shell:
Select one of your irregular white shell nuggets or puka chips. Thread it on, framing it with a thin gold spacer on either side to make it pop. -
Repeat the pattern styling:
Continue building your strand by alternating color blocks of pink, mint, and cream clay beads with your gold spacers. -
Vary the gold accents:
Don’t just use one type of gold bead. Mix in the textured ribbed rings, small smooth round beads, and flat discs between the color sections. -
Mix bead orientations:
Notice in the reference image how some gold rings are thicker? Stack two thin gold spacers together occasionally to mimic this look. -
Midpoint check:
Wrap the strand around your wrist to check the length. Make sure the large shell beads are spaced out somewhat evenly so they don’t bunch up on one side. -
Finish the strand:
Continue beading until you reach your desired length (usually about 6.5 to 7 inches for an average wrist).
Smooth Seams Tip
Use a bead reamer or large needle to slightly widen the hole of the bead next to your knot. This makes it much easier to hide the knot inside for a seamless finish.
Step 3: Finishing Touches
-
Prepare to tie:
Remove the tape or stopper. Bring both ends of the elastic together carefully. -
The surgeon’s knot:
Tie a standard overhand knot, but loop the end through twice instead of once before pulling tight. This is a surgeon’s knot and is very secure for elastic. -
Tighten securely:
Pull the cords tight, stretching the elastic slightly as you do so to lock the knot in place. -
Add adhesive:
Apply a tiny drop of jewelry glue directly onto the knot. Let it dry for a few minutes before trimming. -
Trim the ends:
Cut the excess elastic tail close to the knot, leaving about 1mm visible. -
Hide the mechanism:
Gently tug the bracelet so the knot slides inside one of the larger beads or gold spacers, effectively making the closure invisible.
Level Up: Charm It
Attach a small gold starfish or sand dollar charm to one of the ribbed spacer rings using a jump ring for extra beachy flair.
Enjoy wearing your new beach-inspired accessory individually or as part of a summer stack
Pearl and Heishi Prep Twist
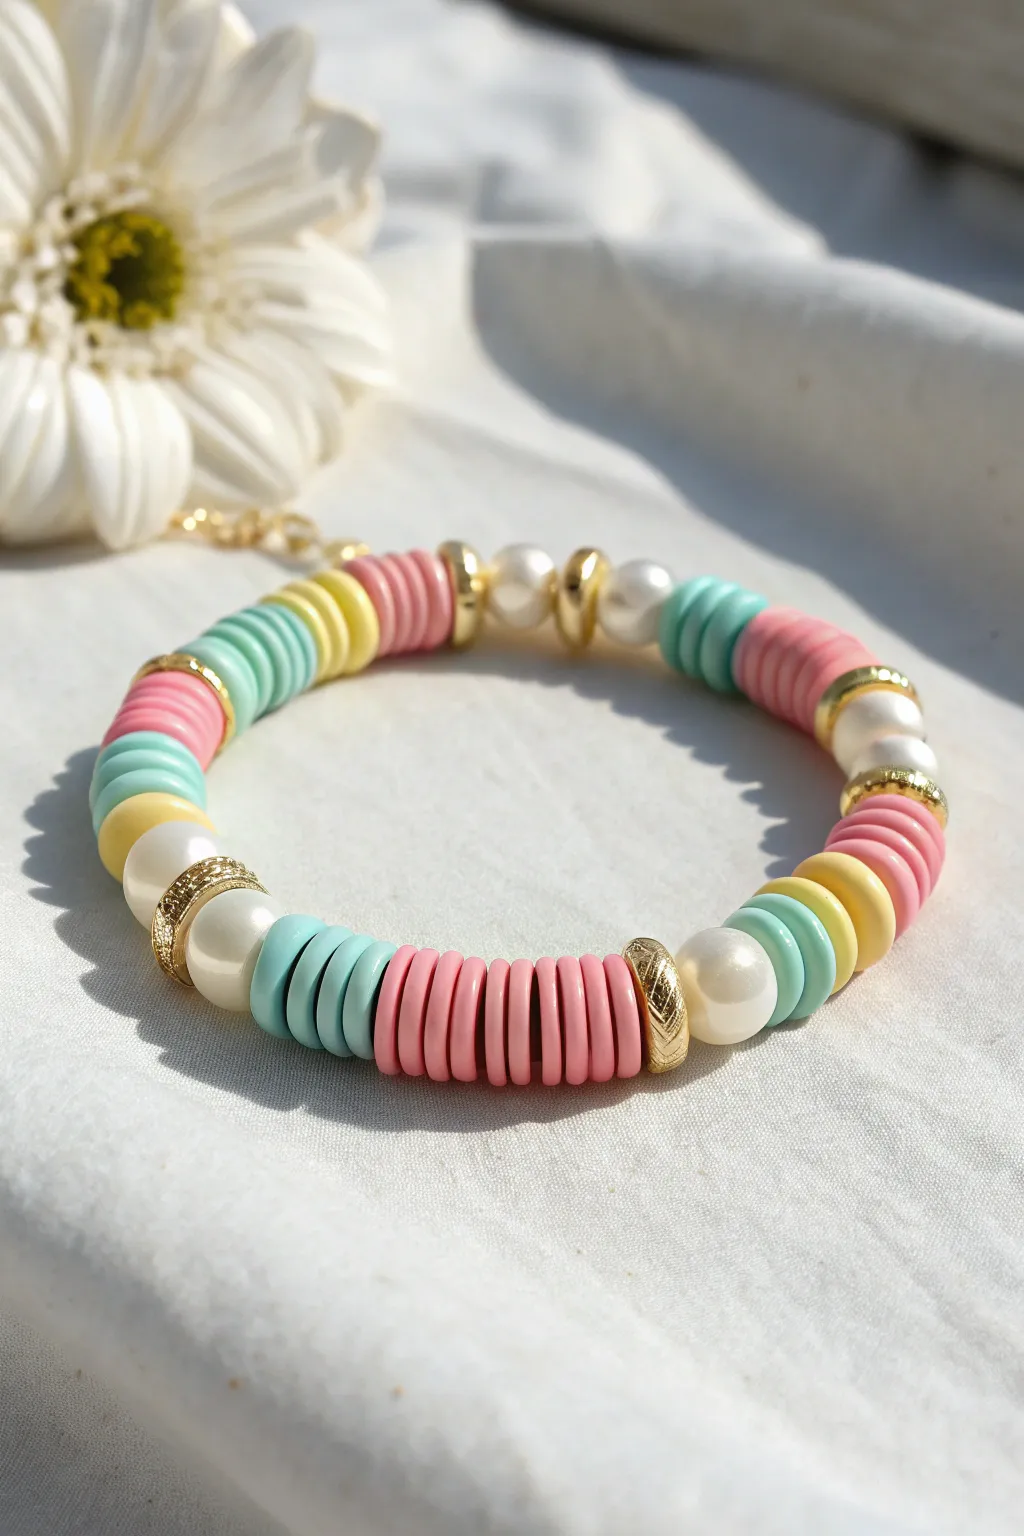
This trendy bracelet design elevates the classic clay bead look by incorporating elegant faux pearls and textured gold accents. The soft pastel palette of pink, mint, and yellow makes it a perfect accessory for adding a touch of sweetness to any outfit.
Detailed Instructions
Materials
- Polymer clay Heishi disc beads (pink, mint green, pastel yellow)
- 6mm or 8mm white faux pearl beads
- Gold tone textured barrel spacer beads
- Gold tone flat round spacer beads (heishi style)
- Stretch elastic cord (0.8mm recommended)
- Beading needle (optional but helpful)
- Super glue or jewelry cement
- Scissors
Step 1: Planning and Prep
-
Measure your wrist:
Before cutting anything, wrap a piece of string around your wrist to find your size, then add about half an inch for a comfortable fit. -
Cut the cord:
Cut a length of elastic cord about 10-12 inches long. This extra length helps immensely when it’s time to tie the final knot. -
Pre-stretch the elastic:
Gently tug on the elastic cord a few times. Pre-stretching prevents the bracelet from expanding and becoming loose right after you finish making it. -
Secure the end:
Place a piece of tape on one end of the cord or attach a bead stopper to prevent your beads from sliding off while you work.
Step 2: Creating the Pattern
-
Start with the main focal section:
Thread on a specific sequence: one pearl, one gold flat spacer, one pearl, one gold flat spacer, and one pearl. This creates a classic pearl cluster. -
Add first color block:
Thread on roughly 8-10 mint green Heishi beads. Following this, add about 3-4 yellow Heishi beads. -
Insert gold accent:
String one of the gold textured barrel spacer beads. This adds a nice metallic break in the soft clay texture. -
Pink section:
Add a longer block of pink Heishi beads, approximately 10-12 discs. -
Establish the pattern rhythm:
The pattern shown follows a loose rhythm rather than strict symmetry. Follow the pink block with a small section of 4-5 mint beads, then another gold barrel spacer. -
Partial pearl section:
Add a single pearl, flanked by gold flat spacers on either side. -
Continue beading:
Resume with color blocking. Add a section of yellow discs, then mint discs, then pink discs. Vary the number of discs slightly (between 5 and 10) to keep the organic, playful look. -
Check the length:
Periodically wrap the strand around your wrist. Continue adding repeat sections of color blocks and occasional pearls until you reach your desired circumference.
Knot Security
When tying your final knot, pull the elastic firmly but not so hard perfectly flat beads start to buckle. A surgeon’s knot is much more secure than a standard granny knot for elastic.
Step 3: Finishing Touches
-
Tie the knot:
Once the bracelet is the right size, remove the tape/stopper. Tie a standard surgeon’s knot (right over left, left over right) and pull it tight. -
Secure with glue:
Dab a tiny drop of super glue or jewelry cement directly onto the knot. I usually let this set for a few seconds before fully releasing tension. -
Hide the knot:
If the hole of one of your gold barrel beads or pearls is large enough, gently tug the elastic so the knot slides inside the bead to hide it. -
Trim excess:
Use your scissors to trim the excess cord ends close to the knot, being careful not to snip the main structural cord.
Uneven Blocks?
Don’t stress if your color blocks aren’t perfectly identical in count. The charm of this ‘preppy’ style comes from the varied segments. Just aim for visual balance rather than math.
Now you have a chic, stackable accessory ready to wear or gift to a friend
Tiny Fruit Charm Pop
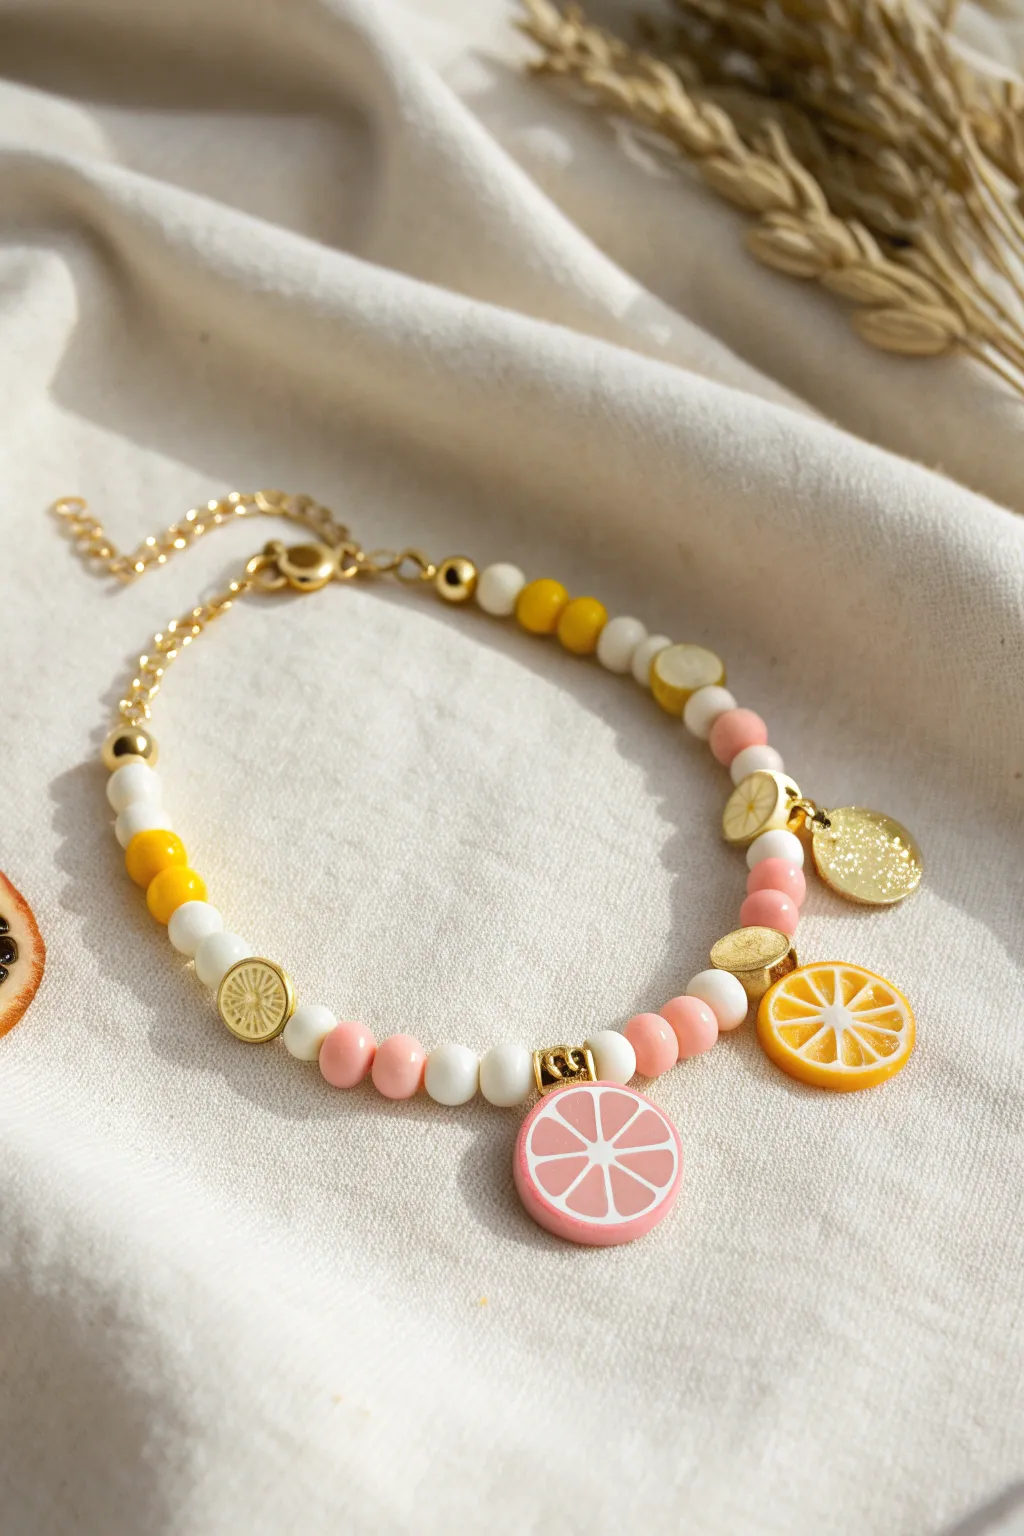
This refreshing bracelet combines pastel clay beads with vibrant citrus slice charms for a zesty, summer-ready look. With its mix of pink grapefruit, orange, and lemon accents, it’s the perfect accessory to brighten up any outfit.
Step-by-Step Guide
Materials
- Polymer clay (white, baby pink, sunny yellow, orange, translucent white)
- Small round cutter or straw
- Blade or craft knife
- Eye pins (gold)
- Jump rings (gold)
- Gold disc charms (textured or glitter finish)
- Round polymer clay beads (white, yellow, baby pink)
- Gold spacer beads
- Beading wire
- Crimp beads and crimp covers
- Lobster clasp and extension chain
- Jewelry pliers (round nose, flat nose)
- Wire cutters
- Gloss glaze (optional)
- Hand drill or pin vibe (if baking without holes)
Step 1: Crafting the Citrus Canes
-
Prepare the pith:
Start by conditioning your white polymer clay until soft. Roll out a thin sheet to use as the pith (the white part of the peel) for all your fruits. -
Create the segments:
Roll a log of colored clay (pink, orange, or yellow) into a cylinder about 1 inch thick. Cut it into 8 equal wedges. -
Wrap the wedges:
Place thin strips of the white clay sheet between the wedges to create the segment lines, then reassemble the cylinder. -
Wrap the cylinder:
Wrap the entire reassembled cylinder in a sheet of white clay, followed by a final sheet of the matching colored clay (yellow for lemon, orange for orange, etc.) to form the rind. -
Reduce the cane:
Gently squeeze and roll the cane to reduce its diameter to your desired charm size, usually about 1cm wide. Let the cane rest for 15 minutes to firm up. -
Slice the charms:
Use a sharp tissue blade to cut thin, even slices from your cane. Aim for about 3-4mm thickness for durability. -
Add eye pins:
Ideally, carefully insert a short eye pin into the top of each slice before baking. Alternatively, you can drill a hole later. -
Bake:
Bake the slices according to your clay package instructions (usually 275°F/135°C for 15-30 minutes). Let them cool completely.
Step 2: Assembling the Bracelet
-
Cut the wire:
Measure your wrist and cut a piece of beading wire about 3 inches longer than that measurement to allow for finishing. -
Secure the start:
String a crimp bead and one half of your clasp onto one end. Loop the wire back through the crimp bead and flatten it securely with pliers. -
Begin beading:
Start threading your round beads. Follow the pattern seen in the image: group colors together (like three yellows, then three whites) separated by gold spacer beads. -
Attach the fruit charms:
Using jump rings, attach your baked fruit slices to the wire at intervals. I like to space them out so they dangle freely between colored bead sections. -
Add gold discs:
Intersperse the gold disc charms near the fruit slices for extra sparkle and movement. -
Check the length:
Wrap the bracelet around your wrist to check the fit. Add or remove beads until you are happy with the sizing. -
Finish the end:
Thread a crimp bead and the extension chain onto the remaining wire end. Loop back through the crimp bead and the last few beads on the strand. -
Secure everything:
Flatten the final crimp bead tightly. Trim any excess wire flush with the beads using your wire cutters. -
Glaze (optional):
For a ‘freshly cut’ look, brush a thin layer of gloss glaze over the fruit slice charms to make them shine.
Fresh Advice
Chill your clay cane in the fridge for 20 minutes before slicing. This prevents the round shape from getting squashed while you cut.
Zest It Up
Mix translucent clay into your fruit colored segments before creating the cane to give the fruit a realistic, juicy appearance when held to light.
Enjoy wearing your handmade slice of summer all year round
Nautical Stripe and Charm
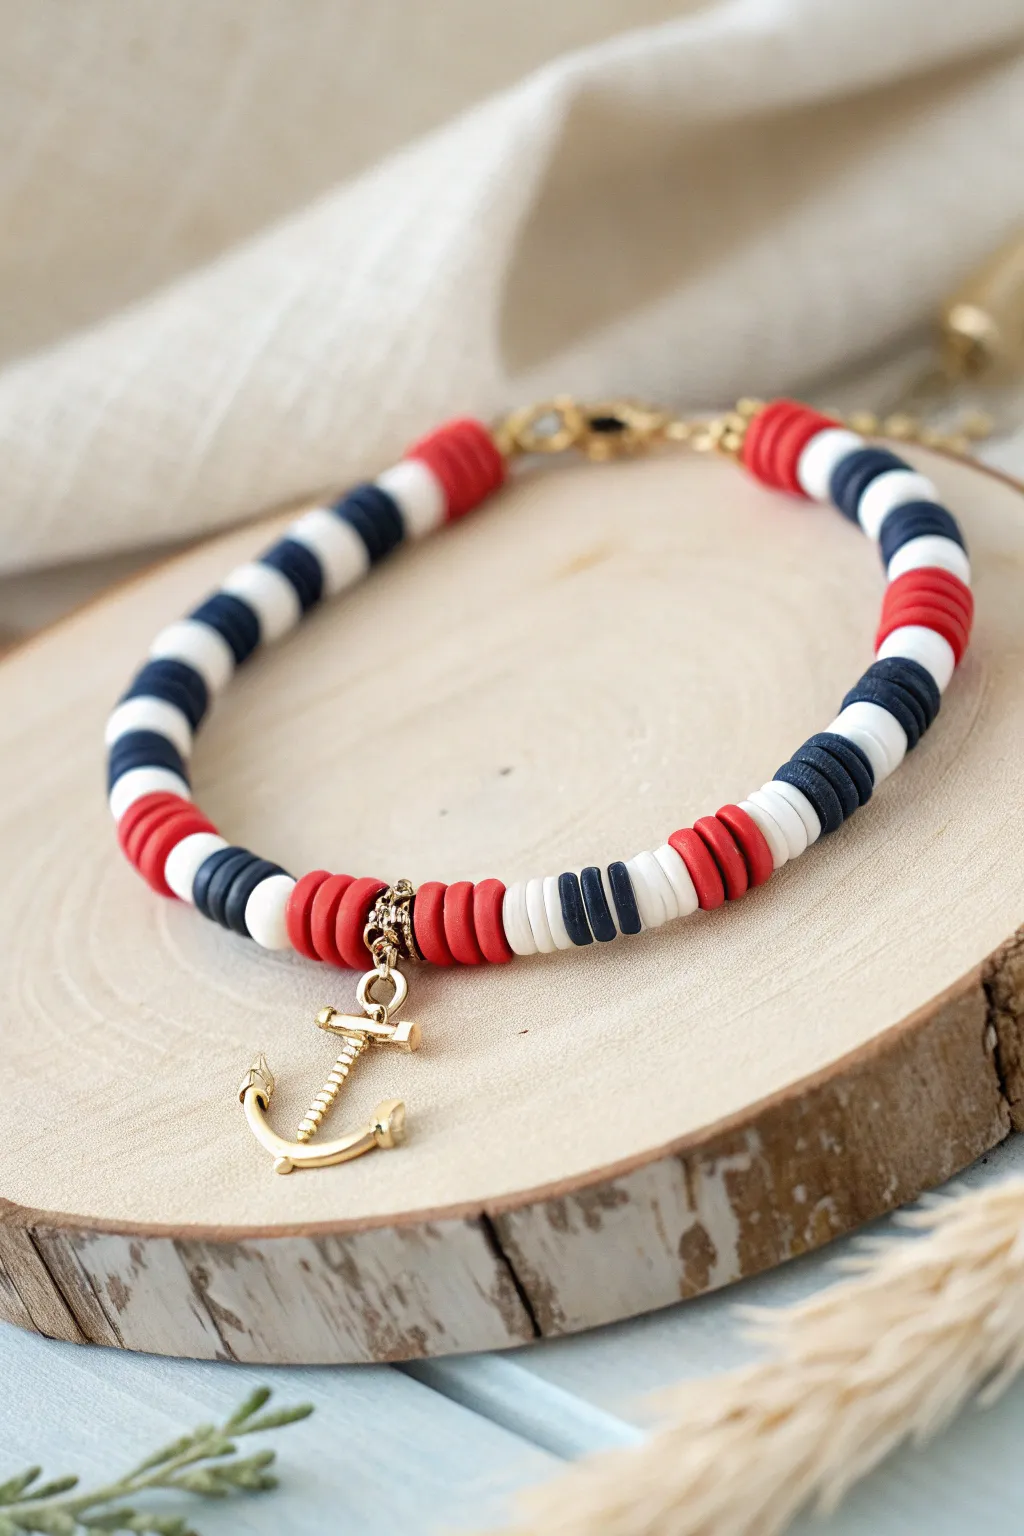
Channel dreamy ocean vibes with this nautical-inspired bracelet featuring classic red, white, and blue stripes. The golden anchor charm adds a polished finish that transforms simple clay discs into a sophisticated seaside accessory.
Step-by-Step
Materials
- Polymer clay heishi beads (flat disc beads) in Red, White, and Navy Blue
- Gold anchor charm with a top loop
- Gold jump ring (4-6mm)
- Elastic stretch cord (0.5mm or 0.8mm clear)
- Jewelry glue or clear nail polish
- Scissors
Step 1: Planning Your Pattern
-
Measure your wrist:
Wrap a piece of string around your wrist to find your comfortable size, then add about half an inch for a comfortable fit. Cut your elastic cord to this length plus 3 extra inches on each side for tying knots. -
Pre-stretch the cord:
Give your cut elastic cord a few gentle tugs. This is a crucial step that prevents the bracelet from drooping or stretching out permanently after you wear it a few times. -
Establish the stripe pattern:
Looking at the reference image, the pattern relies on blocks of color. Notice the repeating sequence: a block of red, a block of alternating blue/white, and then a solid block of blue and white. -
Secure the end:
Place a piece of tape over one end of your elastic cord or attach a binder clip. This stops beads from sliding off while you work on your design.
Step 2: Stringing the Beads
-
Start with the focal point:
We will build outwards from the center charm to keep things symmetrical. Thread on 4 red heishi beads, followed by your gold anchor charm (we’ll attach the charm properly with a jump ring later, or you can string the charm carrier directly now if it has a bail). -
Complete the center red section:
Add 4 more red heishi beads to the other side of where the charm sits. You should now have a block of 8 red beads total. -
Create the first stripe section:
String on a pattern of: 3 white, 3 navy blue, 3 white. This creates a crisp transition from the solid red block. -
Build the main body:
Continue the pattern by adding a larger block of color. Thread on about 6-8 navy blue beads, followed by 3 white beads, then 6-8 red beads. -
Repeat the pattern:
Continue recreating these blocky stripes—mixing short alternating sections (3 beads wide) with longer solid sections (6-8 beads wide)—until you reach almost half of your desired length. -
Repeat on the other side:
Remove your tape or clip carefully and repeat that same pattern on the other side of the starting red block, ensuring the design looks balanced on your wrist. -
Check the fit:
Wrap the unfinished strand around your wrist. The ends should touch comfortably without stretching the cord too tight. Add or remove a few beads from the back section if needed.
Pro Tip: Bead Smoothness
Check heishi beads for rough edges before stringing. Rotating rough ones to the back or discarding them keeps the bracelet feeling smooth against skin.
Step 3: Adding the Charm
-
Open the jump ring:
Using two pairs of pliers (or your fingers if the wire is soft), twist the gold jump ring open sideways—never pull it apart properly. -
Attach the anchor:
Slide the loop of your anchor charm onto the open jump ring. Then, loop the jump ring around the elastic cord right in the center of that first block of red beads. -
Close the ring:
Twist the jump ring closed again securely so the gap is completely flush. This allows the charm to dangle freely without falling off the cord.
Level Up: Hardware
Add two small gold spacer beads on either side of the red centerpiece section to frame the anchor charm and make the gold pop even more.
Step 4: Finishing Touches
-
Tie the knot:
Bring both ends of the elastic together. Tie a standard square knot: right over left and under, then left over right and under. Pull it tight. -
Secure with glue:
Dab a tiny drop of jewelry glue or clear nail polish directly onto the knot. I usually let this dry for about 10 minutes to ensure it’s fully secure. -
Hide the knot:
Once dry, trim the excess elastic tails close to the knot. Gently pull the adjacent beads over the knot to hide it inside one of the heishi beads.
Slip on your new nautical creation and enjoy the perfect accessory for your next beach day or boat trip
Starry Preppy Night Stack
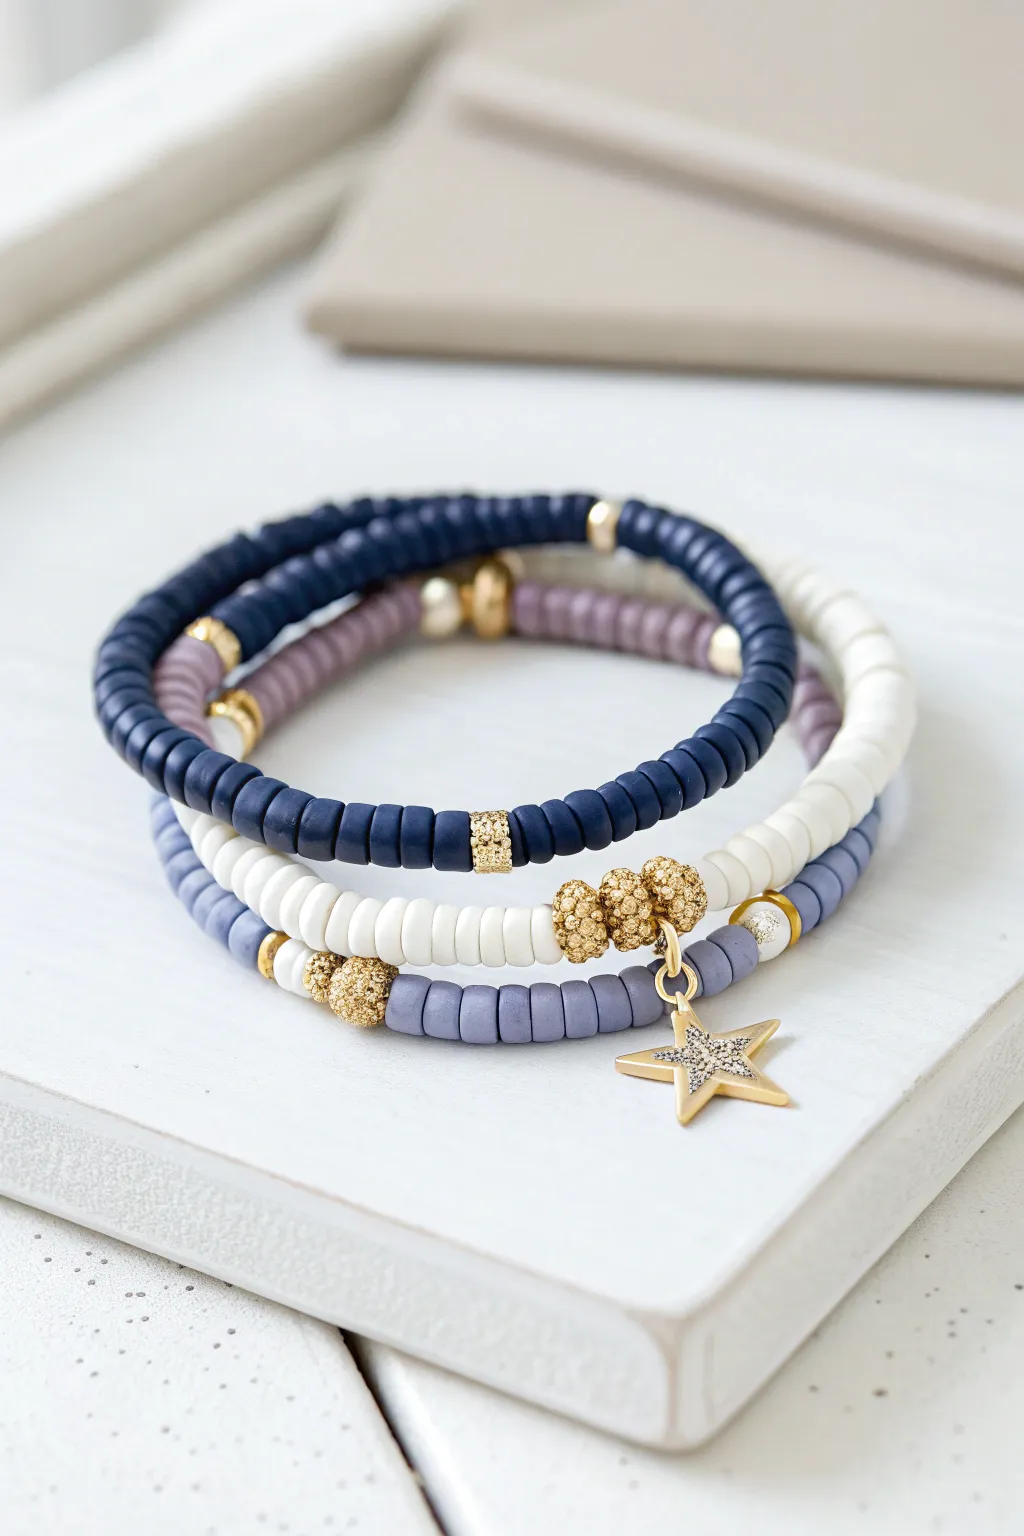
Capture the magic of a clear night sky with this chic stack of heishi bead bracelets featuring navy, slate blue, and crisp white tones. The golden accents and a sparkling star charm add just the right amount of celestial glimmer to elevation your wrist game.
How-To Guide
Materials
- Navy blue polymer clay heishi beads (6mm)
- Slate blue/periwinkle polymer clay heishi beads (6mm)
- White polymer clay heishi beads (6mm)
- Small gold spacer beads (flat disc style)
- Gold tone textured ball beads (approx 6-8mm)
- Pave star charm with gold jump ring
- Elastic stretch cord (0.8mm clear)
- Jewelry glue or clear nail polish
- Scissors
- Tape or bead stopper
Step 1: Preparation
-
Measure and cut:
Begin by measuring your wrist with a flexible tape measure. Add about 3 inches to this measurement to ensure you have plenty of cord for tying knots later. -
Prepare the strands:
Cut three separate lengths of elastic cord based on your measurement. Pre-stretch the elastic slightly by pulling on both ends gently; this prevents the bracelets from stretching out immediately after wearing them. -
Secure the ends:
Place a piece of tape or a bead stopper on one end of each cord so your carefully strung beads don’t slide off while you work.
Step 2: The Navy Strand
-
Start the pattern:
For the darkest bracelet, begin threading the navy blue heishi beads onto the first cord. -
Add gold accents:
Create visual interest by breaking up the solid navy color. Every 1.5 to 2 inches, insert a flat gold disc spacer or a small gold ball bead. -
Texture variation:
Near the center of the strand, I like to string a small textured gold cylinder bead to act as a focal point before continuing with the navy beads until the strand is full.
Knot Slipping?
If your elastic knot keeps coming undone before you can glue it, try a ‘surgeon’s knot.’ Loop the elastic through twice instead of once on the first pass of the knot for extra grip.
Step 3: The Slate Blue & Charm Strand
-
Begin the base:
On the second cord, start threading your slate blue or periwinkle polymer clay beads. -
Incorporate mixed sequins:
Intersperse flat gold spacers randomly throughout the blue beads to echo the style of the navy bracelet. -
Create the focal section:
Once you reach the middle of the strand, thread on three large textured gold ball beads in a row. -
Attach the star:
Open the jump ring on your pave star charm using pliers (or your fingers if it’s soft enough) and hook it onto the center gold ball bead or the cord between them, then close the ring securely. -
Finish the strand:
Complete the rest of the bracelet with the remaining slate blue beads.
Mix It Up
Swap the star charm for a moon or a lightning bolt to keep the celestial theme but add variety. You can also mix in letter beads to spell out ‘STAR’ or ‘NIGHT’ on the white strand.
Step 4: The White Strand
-
String the white beads:
For the final brightening layer, thread the clean white heishi beads onto your third cord. -
Highlight with gold:
Keep this strand simpler, perhaps only adding one or two gold disc spacers on opposite sides to balance the stack without overcrowding it. -
Check sizes:
Wrap all three unfinished strands around your wrist to ensure they sit comfortably together. Remove or add a few beads if necessary to perfect the fit.
Step 5: Closing the Stack
-
Knot the first bracelet:
Remove the tape from the navy bracelet. Bring the two ends together and tie a standard square knot (right over left, left over right). -
Secure the knot:
Pull the elastic tight to cinch the knot. For extra security, tie one more simple overhand knot on top of the square knot. -
Repeat for others:
Repeat the knotting process for both the slate blue charm bracelet and the white bracelet. -
Glue and trim:
Apply a tiny dab of jewelry glue to each knot. Let it dry completely before trimming the excess cord tails close to the knot. -
Hide the mechanism:
If the bead holes are large enough, gently tug the knot inside one of the adjacent beads to hide it from view.
Now you have a stunning set of celestial-inspired bracelets ready to elevate your everyday school outfits
Checkerboard Color Pop Pattern
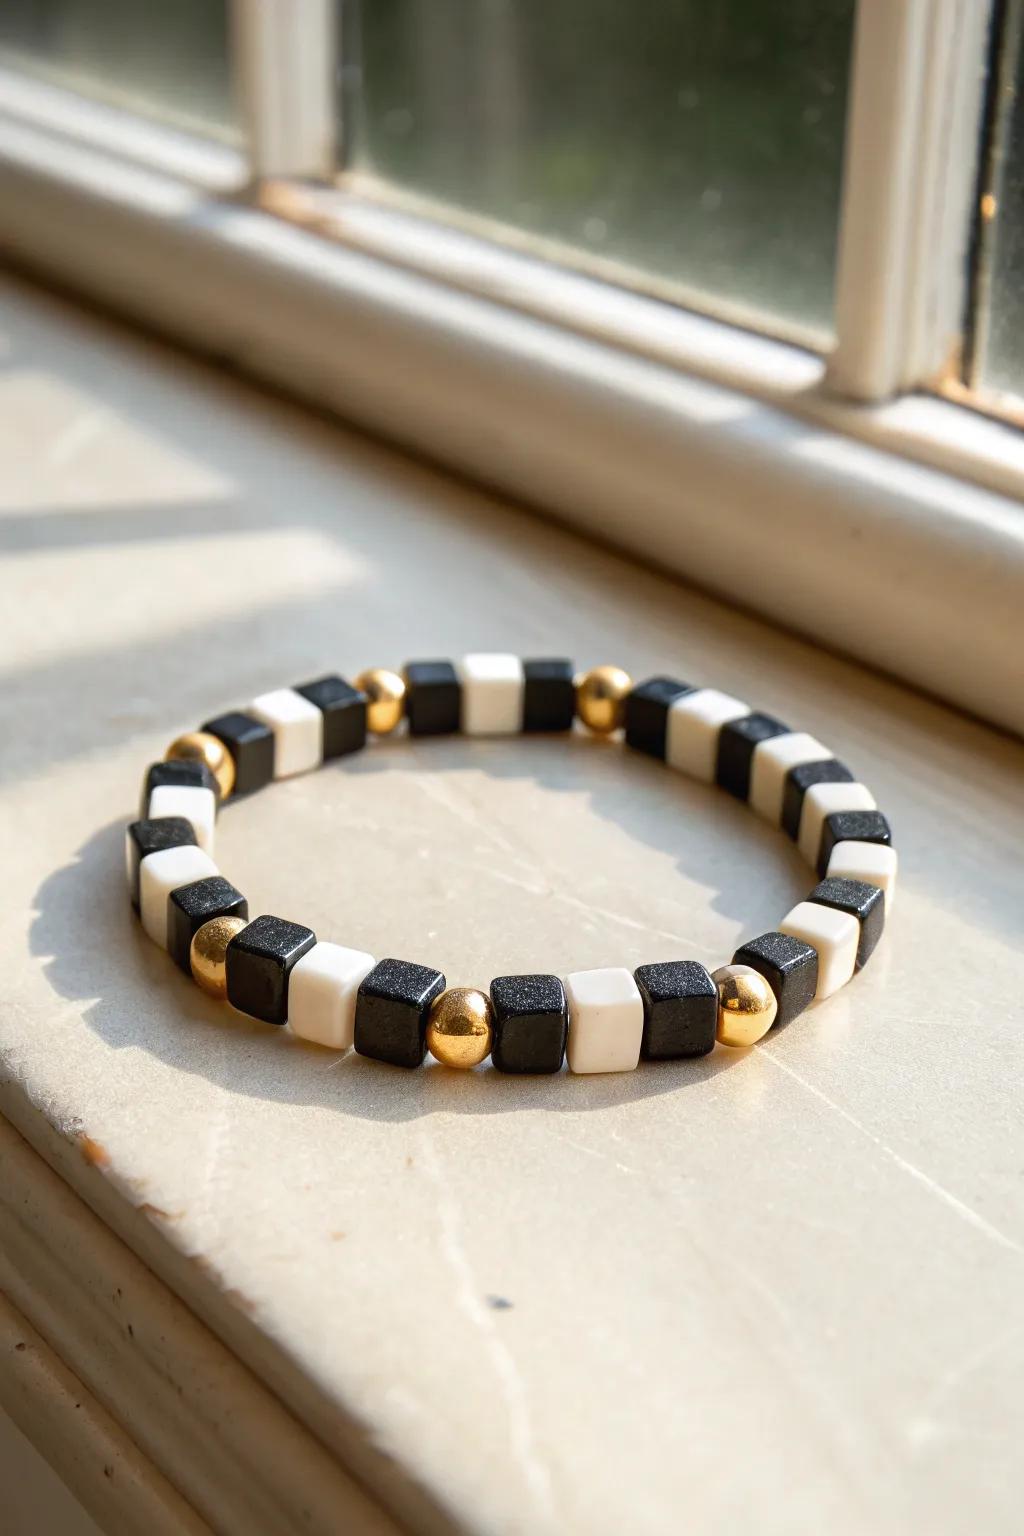
Elevate the classic black and white checkerboard trend with touches of metallic shine in this sophisticated stretch bracelet. The combination of matte sandstone finishes and high-polish gold creates a versatile piece that stacks perfectly with any preppy collection.
Detailed Instructions
Materials
- 0.8mm clear elastic stretch cord
- 6mm black square beads (matte or sandstone finish)
- 6mm white square beads (polymer clay or acrylic)
- 6mm gold spherical spacer beads (gold-plated or brass)
- Jewelry glue or clear nail polish
- Scissors
Step 1: Planning Your Pattern
-
Measure your wrist:
Before cutting any cord, wrap a measuring tape around your wrist to find your size. Add about 1/2 inch to this measurement for a comfortable fit. -
Cut the cord:
Cut a piece of elastic cord about 10-12 inches long. Having extra length makes the final tying process much easier and less frustrating. -
Pre-stretch the elastic:
Hold both ends of the cord and give it several gentle tugs. This is a crucial step that prevents the bracelet from stretching out permanently after wearing it for the first time. -
Secure the end:
Place a piece of tape or a binder clip on one end of the cord to stop beads from sliding off while you work.
Step 2: Stringing the Design
-
Start the sequence:
Begin your pattern by threading on one black square bead followed by one white square bead. -
Build the first block:
Continue this alternating pattern: black, white, black. You should use a total of five square beads for this segment before adding a metallic accent. -
Add the gold accent:
After your sequence involved approximately five to six square beads, slide on one gold spherical spacer bead. This breaks up the geometry and adds that luxe feel. -
Repeat the pattern:
Resume the checkerboard sequence with a black bead, then white, repeating the alternating square beads for another segment of five or six beads. -
Insert the next spacer:
Add your second gold bead. I like to visually check the bracelet at this point to ensure the spacing looks balanced. -
Continue beading:
Repeat these segments—alternating square beads followed by a single gold bead—until you reach your desired length. -
Check the fit:
Wrap the beaded strand around your wrist. The ends should meet comfortably without gaps, but it shouldn’t feel tight. -
Adjust as needed:
Add or remove a few square beads to perfect the size. Try to end the pattern so that when tied, the alternating color flow remains consistent.
Gold Bead Placement
Vary the number of square beads between the gold spacers (e.g., 5 beads, then 7 beads) to create an organic, less rigid look.
Step 3: Finishing Touches
-
Prepare to tie:
Remove the tape or clip from the end of the cord carefully, bringing both ends together. -
Tie the knot:
Tie a standard square knot (right over left, left over right). Pull the elastic tight so the beads snuggle close together. -
Secure with surgeon’s knot:
For extra security, follow up with a surgeon’s knot by looping the elastic through twice before pulling tight. -
Apply glue:
Dab a tiny drop of jewelry glue or clear nail polish directly onto the knot. This prevents it from unraveling over time. -
hide the mechanics:
While the glue is still slightly tacky, gently tug on the cord to slide the knot inside the hole of the nearest bead if possible. -
Trim the excess:
Once the glue is fully dry (usually 10-15 minutes), trim the excess cord ends close to the bead, being careful not to cut the main knot.
Knot Keeps Slipping?
If the elastic feels too slippery to hold a knot, coat the ends of the cord with a textured marker or rub with sandpaper lightly before tying.
Now you have a chic, geometric accessory ready to wear alone or stack with colorful clay beads
Gingham-Inspired Pink and Green
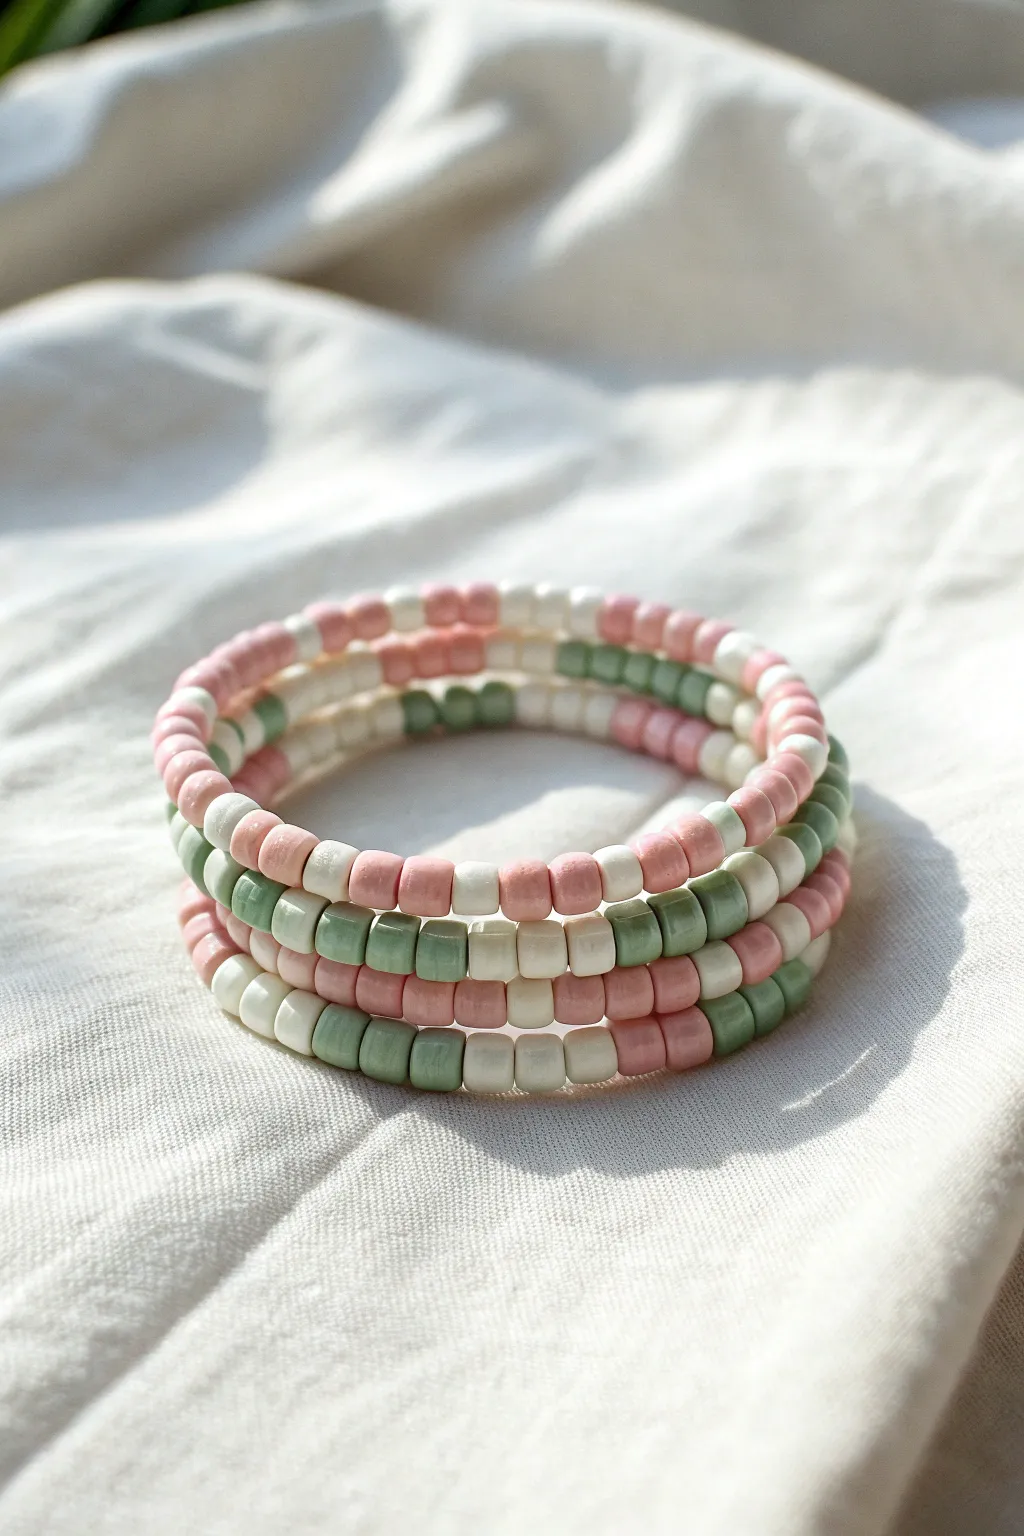
Capture the classic charm of a picnic blanket with this delightful set of three coordinated bracelets. Using a repeating pattern of soft pink, sage green, and white beads creates a faux-gingham effect that feels fresh and perfectly preppy.
How-To Guide
Materials
- Elastic stretch cord (0.8mm clear)
- 6mm polymer clay tube beads or thick heishi beads in soft pink
- 6mm polymer clay tube beads or thick heishi beads in sage green
- 6mm polymer clay tube beads or thick heishi beads in cream/white
- Scissors
- Super glue or clear beading glue
- Bead stoppers or masking tape
- Ruler or measuring tape
Step 1: Planning Your Pattern
-
Measure your wrist:
Before you begin stringing, wrap a measuring tape around your wrist to determine the circumference. Add about 0.5 inches to this measurement to ensure a comfortable fit that isn’t too tight. -
Prepare the cord:
Cut three lengths of elastic cord, each about 10-12 inches long. This generous length gives you plenty of room to tie knots later without struggling. I usually tape one end of each cord to my work surface or use a bead stopper so beads don’t slide off. -
Understanding the gingham logic:
The secret to the gingham look isn’t random mixing; it’s block coloring. You will be creating sections of solid color (3-4 beads) separated by sections of white, or alternating two colors. The photo shows varying patterns, so we will create three distinct designs that harmonize.
Tending to the Details
Use a bead reamer or a thick needle to gently widen the hole of the bead positioned next to your knot. This makes hiding the knot much easier and keeps the finish clean.
Step 2: Creating the Bracelets
-
Bracelet One: The Pink Check:
For the first bracelet, start with a pattern of three pink beads followed by three white beads. Repeat this sequence—3 pink, 3 white—until you reach your desired length. -
Check the length:
Wrap the strand around your wrist to check the fit. Add or remove a set of beads if necessary, aiming for the ends of the pattern to match up nicely. -
Bracelet Two: The Green Check:
For the second bracelet, follow the same logic but switch the colors. String three sage green beads followed by three white beads. Continue this alternating block pattern for the entire length. -
Bracelet Three: The Mixed Gingham:
This third bracelet ties the look together. Start with three pink beads, then three white beads, then three sage green beads, then three white beads again. This creates a rotating color story that mimics a complex plaid pattern. -
Adjusting the bead count:
If you are using thinner heishi beads rather than the thicker tube beads shown, you may need to increase your count to 5 or 6 beads per color block to get visible ‘stripes’ of color.
Make It Yours
Add a single gold spacer bead between every color block for a touch of sparkle, or swap the white sections for a pearlescent cream bead to create a warmer, vintage aesthetic.
Step 3: Finishing Touches
-
Pre-stretch the cord:
Before tying, gently pull on the ends of the elastic cord a few times. This pre-stretching step prevents the bracelet from sagging or loosening up immediately after you wear it. -
Tie the surgeon’s knot:
Remove the tape or stopper. Cross the ends, loop one under, and pull tight. Then, cross them again, loop under *twice*, and pull tight securely. This double-loop creates a surgeon’s knot which holds much better than a standard square knot. -
Secure with glue:
Apply a tiny dab of super glue or specialized jewelry glue directly onto the knot. Be careful not to get glue on the surrounding beads, as it can discolor the clay. -
Hide the knot:
While the glue is still slightly tacky but not wet, slide a bead over the knot to hide it inside. If the hole isn’t big enough, just trim the ends close to the knot after the glue is fully dry. -
Trim the excess:
Once the glue has cured completely, use sharp scissors to trim the excess elastic cord as close to the knot as safely possible without snipping the knot itself.
Enjoy wearing your stylish new stack or wrap them up as a thoughtful handmade gift
Varsity Number Bead Bracelet
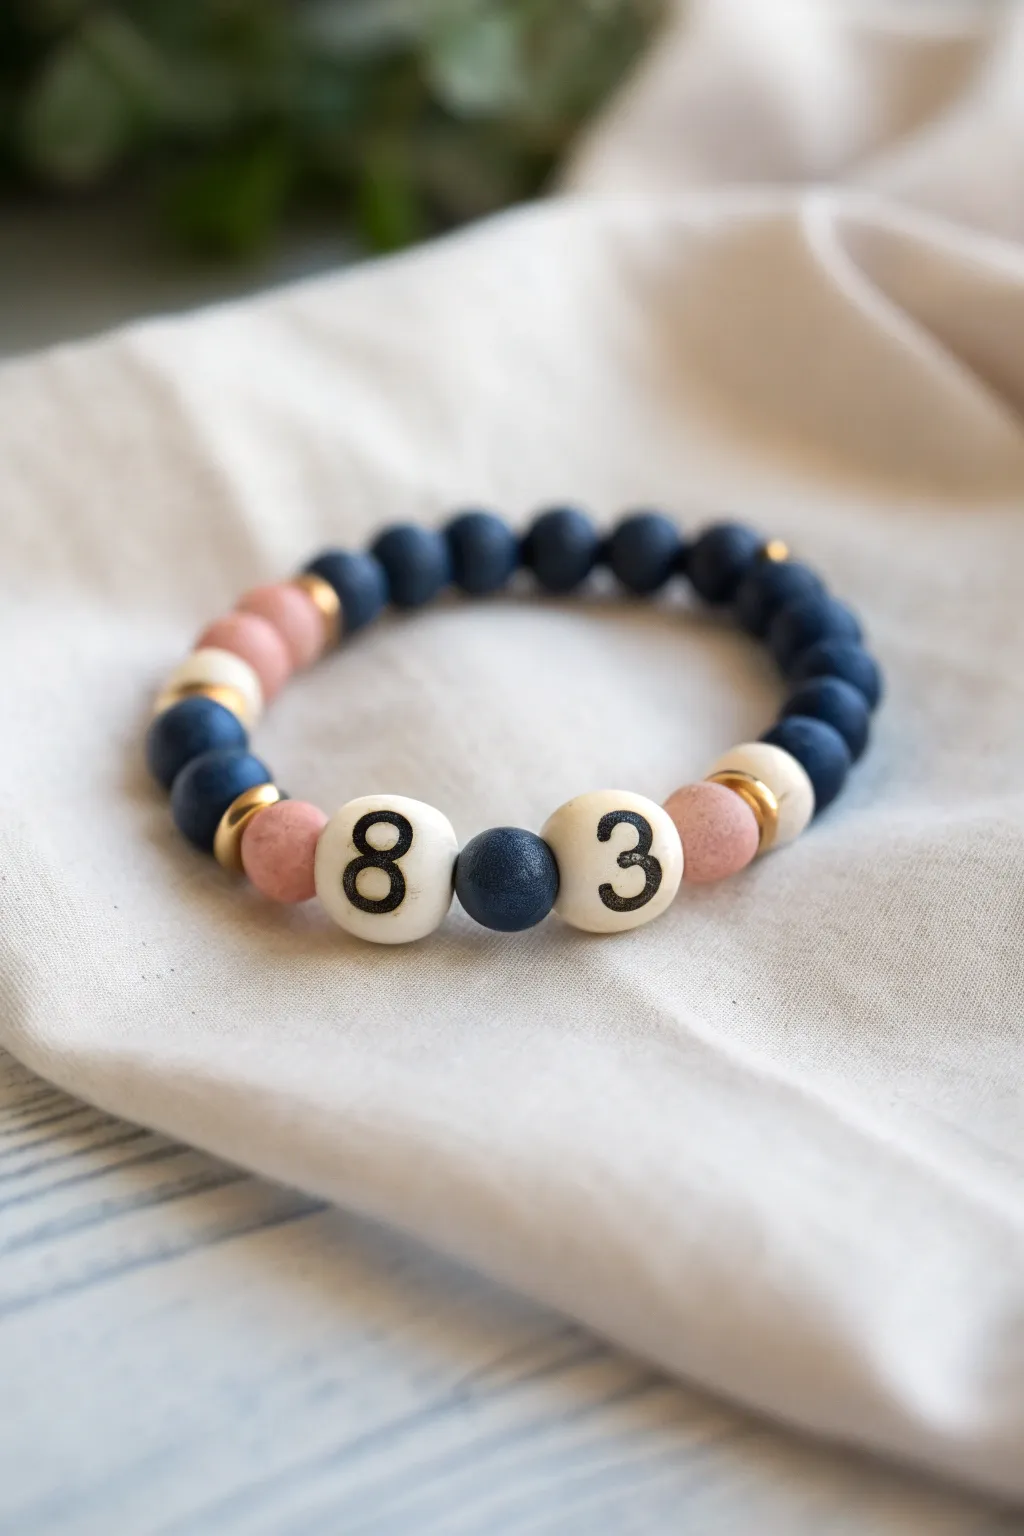
Show off your team spirit or commemorate a special jersey number with this sporty yet chic bracelet design. Combining deep blue and soft pink tones with classic numbered accents, this accessory strikes the perfect balance between athletic pride and preppy style.
Step-by-Step
Materials
- Matte round beads (8mm) in navy blue
- Matte round beads (8mm) in dusty rose/pink
- Matte round beads (8mm) in cream/off-white
- Two large white focal beads with black numbers (approx. 10-12mm)
- Small gold disc spacer beads or heishi spacers
- Strong elastic stretch cord (0.7mm or 0.8mm)
- Beading needle (optional, but helpful)
- Scissors
- Jewelry glue or clear nail polish
- Bead design board (or a soft towel)
Step 1: Planning and Preparation
-
Measure your wrist:
Start by wrapping the elastic cord loosely around your wrist to get a gauge of the size. I usually add about 3 inches extra on each end to ensure I have plenty of room for tying the knots later. -
Cut the cord:
Using your scissors, cut the desired length of elastic cord. Give it a gentle pre-stretch by pulling on both ends; this helps prevent the bracelet from stretching out permanently after you wear it a few times. -
Secure the end:
Place a piece of tape on one end of your cord or clamp it with a binder clip. This acts as a ‘bead stopper’ so your beautifully arranged beads don’t slide right off while you work. -
Lay out the pattern:
Visualize the symmetry before stringing. Place your two number beads (the ‘8’ and ‘3’) in the center of your workspace. Between them, place one navy blue bead to act as a separator.
Knot Slipping?
If your elastic knot keeps untying before you can glue it, try rubbing the clear nail polish on the cord ends *before* tying. The tackiness helps the knot grip itself better.
Step 2: Stringing the Focal Section
-
Start with the center blue bead:
Thread the single navy blue bead onto the cord first. This will sit right between your two numbers. -
Add the numbers:
Thread the number ‘8’ bead on the left side of the blue bead and the number ‘3’ bead on the right side. Ensure the numbers are facing the correct way up relative to each other. -
Add the pink accents:
On the outer side of each number bead, thread one dusty rose bead. This softens the transition from the bold white and black numbers to the rest of the bracelet. -
Add gold spacers:
Slide a thin gold disc spacer next to each pink bead. The metallic flash adds that varsity-jacket button aesthetic to the design.
Team Colors Pro Tip
Swap the navy and pink for your specific school or team colors. Using matte texture beads keeps the look modern and prevents it from looking like cheap plastic costume jewelry.
Step 3: Building the Sides
-
Create the cream section:
Next to each gold spacer, thread one cream-colored bead. This creates a varsity stripe effect. -
Add the second gold accent:
Place another gold disc spacer after each cream bead. Sandwiching the cream bead between spacers makes the color pop. -
Add secondary pink beads:
Continue the pattern by threading one pink bead on the left side and two pink beads on the right side (or adjust based on your specific symmetry preference, though the image shows slight asymmetry). -
Add final spacers:
Place one last gold spacer after the pink section on the left side.
Step 4: Finishing the Loop
-
Fill with navy blue:
Now, fill the remainder of the bracelet with the navy blue beads. String them onto both ends until the bracelet reaches your desired length. -
Check the fit:
Carefully wrap the strand around your wrist to check the sizing. The beads should touch comfortably without gaps, but shouldn’t dig into your skin. Add or remove navy beads as needed. -
Tie the first knot:
Remove the tape or clip. Bring the two ends of the cord together and tie a simple overhand knot, pulling it tight so the beads sit flush against one another. -
Secure with a surgeon’s knot:
Tie a second knot, but loop the cord through twice before pulling tight (this is a surgeon’s knot). This extra loop adds significant security to elastic jewelry. -
Apply adhesive:
Dab a tiny drop of jewelry glue or clear nail polish directly onto the knot. This prevents the elastic from slowly slipping undone over time. -
Hide the knot:
Once the glue is tacky but almost dry, slide the nearest bead (preferably one with a larger hole) over the knot to hide it inside. -
Trim the ends:
Using sharp scissors, trim the excess elastic cord close to the bead hole, being careful not to cut the main knot.
Slip on your personalized number bracelet and wear your team pride right on your sleeve
Preppy Neutrals With a Pop Charm
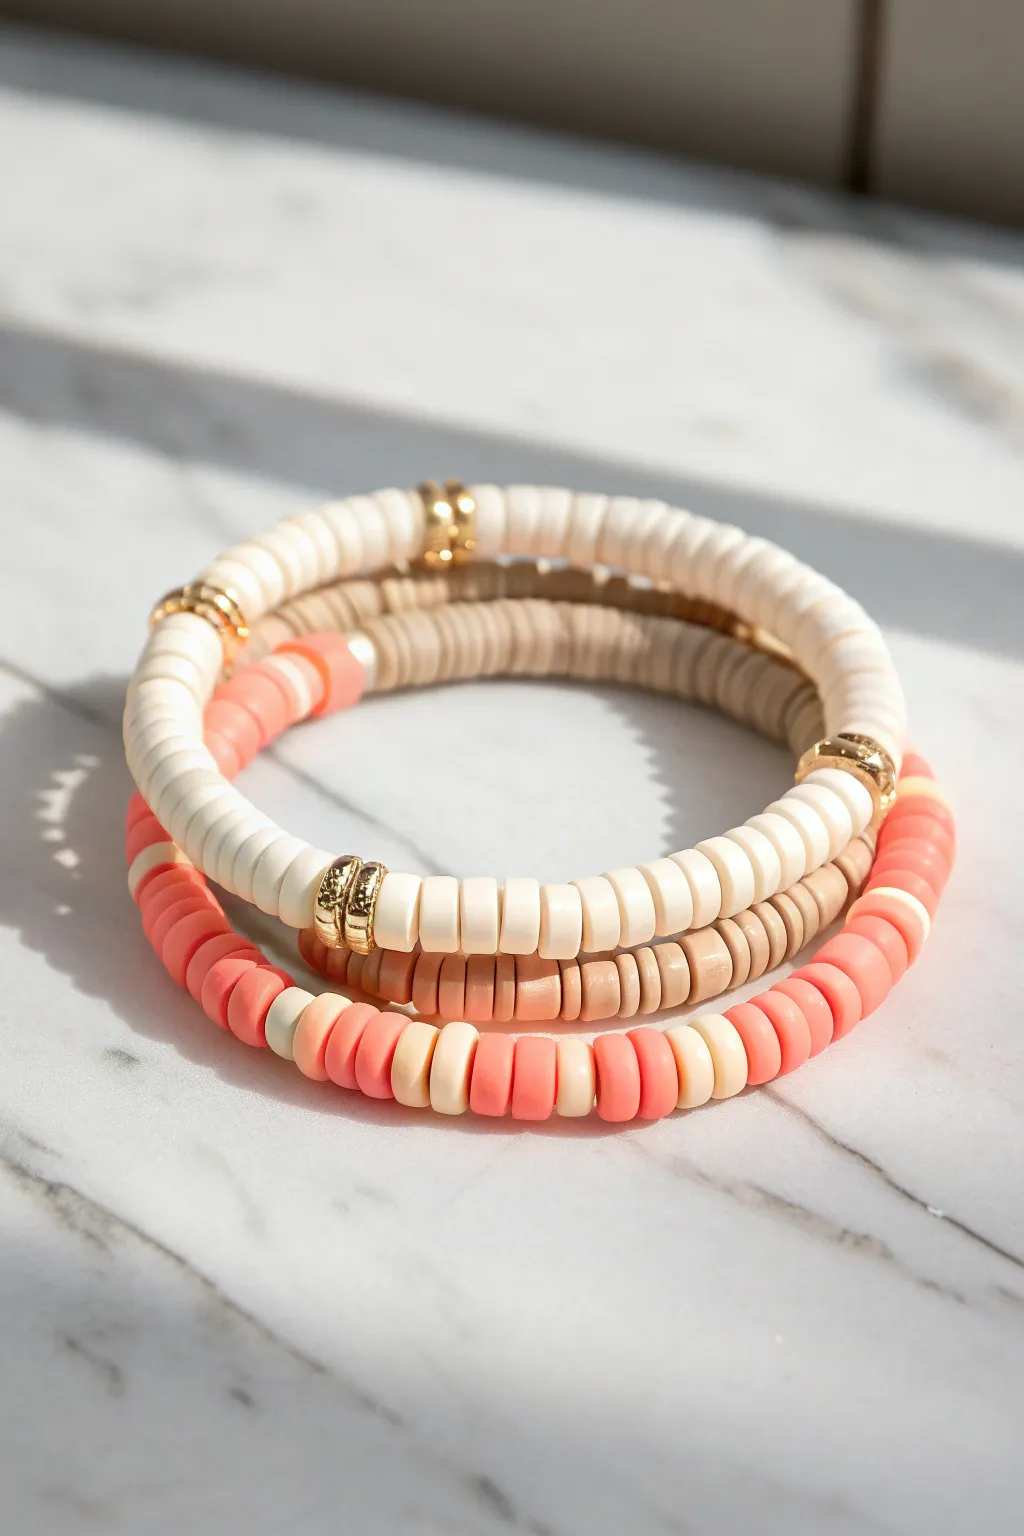
Embrace the effortless preppy aesthetic with this trio of stretch bracelets featuring a harmonious blend of cream, taupe, and coral clay disc beads. The addition of shiny gold accents elevates the look from simple beachwear to chic everyday jewelry.
Detailed Instructions
Materials
- Polymer clay Heishi disc beads (6mm) in Cream/White
- Polymer clay Heishi disc beads (6mm) in Taupe/Sand
- Polymer clay Heishi disc beads (6mm) in Coral/Peach
- Elastic cord (0.8mm clear stretchy string)
- Gold tone metal spacer beads (thin rondelle or disc shape)
- Small dab of jewelry glue (e.g., E6000 or Hypo Cement)
- Scissors
- Bead stopper or tape
- Ruler
Step 1: Preparation
-
Measure your wrist:
Wrap a piece of string or a soft measuring tape around your wrist to find your size. Add about 0.5 inches to this measurement for a comfortable fit. -
Cut the elastic:
Cut three strands of elastic cord, each about 10-12 inches long. Having extra length makes tying the final knots much easier. -
Secure the ends:
Attach a bead stopper or simply place a piece of tape on one end of each elastic strand so your hard work doesn’t slide off.
Knot Slipping?
If your slippery elastic knots won’t hold, try tightening them while the glue is wet. The liquid helps bind the plastic cord together instantly.
Step 2: Bracelet 1: The Cream & Gold Classic
-
Start the pattern:
Begin threading the cream-colored Heishi beads onto your first cord. I find it easiest to pick them up directly with the string rather than using fingers. -
Add gold accents:
After approximately every inch and a half of cream beads, slide on three thin gold spacer beads. -
Continue the sequence:
Repeat this pattern—cream sections separated by gold trios—until the bracelet reaches your desired length. -
Check sizing:
Wrap the strand around your wrist to ensure the ends meet comfortably without stretching the elastic too tight.
Pro Tip: Bead Loading
Don’t pick up beads one by one! Pour them onto a flat surface and ‘stab’ the cord downward into the hole to pick up 3-4 beads at a time.
Step 3: Bracelet 2: The Taupe Solid
-
Build the base:
For the second bracelet, thread a continuous strand of the taupe or sand-colored clay beads. -
Match the accents:
Use the same gold spacer bead grouping (three narrow gold beads together) but space them out differently than the first bracelet, perhaps placing them opposite where the cream bracelet’s gold sits for visual interest. -
Verify length:
Hold this bracelet up against the first one to ensure they are exactly the same length.
Step 4: Bracelet 3: The Patterned Pop
-
Create the alternating pattern:
This bracelet uses a ‘2-2’ pattern. Thread two coral/peach beads, followed by two cream beads. -
Build the rhythm:
Continue this alternating sequence: two peach, two cream, two peach, two cream. This creates a playful striped effect. -
Integrate gold (optional):
You can add a gold spacer section here too, or keep this strand purely about the color contrast as shown in the inspiration photo. -
Final length check:
Ensure this third bracelet matches the length of the previous two perfectly.
Step 5: Finishing Up
-
Pre-stretch the cord:
Before tying, give each bracelet a gentle tug. This pre-stretches the elastic so it won’t sag later. -
Tie the surgeon’s knot:
Remove the tape/stopper. Tie a standard overhand knot, but loop the end through twice instead of once before pulling tight. -
Repeat knotting:
Tie two or three more standard tight knots on top of the first one to secure it completely. -
Glue the knot:
Apply a tiny dot of jewelry glue to the knot. Let it dry for a few minutes before trimming the excess string close to the knot. -
Hide the knot:
If the hole of a nearby bead is large enough, gently slide the bead over the knot to conceal it.
Now you have a stunning, stackable set ready to wear or gift to a friend