Whenever I’ve got a plain clay pumpkin on my table, I think of it as a tiny round canvas that can handle way more detail than a real gourd. These pumpkin painting ideas are my go-tos for turning simple ceramic or bisque pumpkins into keep-forever fall decor.
Classic Jack-o’-Lantern Face

Capture the nostalgic spirit of Halloween with this classic Jack-o’-Lantern design on a textured clay pumpkin. By combining vibrant orange tones with a crisp black expression, you’ll create a piece of decor that feels both traditional and cheerful.
Detailed Instructions
Materials
- Bisque-fired clay pumpkin or air-dry clay pumpkin
- Acrylic paints: Bright Orange, Deep Orange (Terracotta), Black, Dark Brown, Tan/Ochre
- Medium soft flat brush
- Small round detail brush
- Painter’s tape (optional)
- Pencil
- Matte or satin sealant spray
Step 1: Base Coating
-
Prepare surface:
Ensure your clay pumpkin is clean and free of dust. If you made the pumpkin yourself from air-dry clay, ensure it is 100% dry and cured before starting. -
Apply base orange:
Using the medium flat brush, apply a solid coat of Bright Orange over the entire body of the pumpkin, avoiding the stem. Let this layer dry completely. -
Build opacity:
Apply a second coat of Bright Orange. Because orange pigments are often semi-transparent, this second layer is crucial for a rich, solid finish. -
Add depth:
Mix a tiny amount of Deep Orange or Terracotta with your Bright Orange. Lightly brush this darker shade into the deeper grooves of the pumpkin ribs to accentuate the texture. -
Highlight ribs:
Clean your brush and pick up pure Bright Orange again. Dry-brush the tops of the ribs to make the pumpkin’s shape pop against the darker grooves.
Clean Lines Hack
If you struggle with steady hands, outline your face shapes with a black fine-tip paint pen first, then fill in the centers with your brush and acrylic paint.
Step 2: Stem Detailing
-
Base coat stem:
Switch to a smaller brush and paint the entire stem with the Dark Brown paint. Be careful where the stem meets the orange skin. -
Add realism:
While the brown is still slightly tacky, mix a little Tan/Ochre into it right on the palette. -
Highlight ridges:
Using a relatively dry brush, sweep the lighter brown mix vertically up the ridges of the stem. This technique highlights the twisted texture of the clay. -
Detail the base:
Dab a tiny bit of the darker brown right at the connection point where the stem meets the fruit to create a shadow.
Uneven Coverage?
Orange paint is notoriously sheer. If your pumpkin looks streaky after two coats, apply a thin layer of white paint first, let it dry, and then apply the orange on top.
Step 3: Creating the Face
-
Sketch the design:
Once the orange paint is bone dry, use a pencil to very lightly sketch the face directly onto the pumpkin surface. -
Draft the eyes:
Draw two triangles for eyes, keeping the inner corners angled downward slightly. -
Draft the nose:
Sketch a smaller, simple triangle for the nose, centered below the eyes. -
Draft the mouth:
Draw a wide, crescent grin. Add two square ‘teeth’—one on the bottom left and one on the top right—into the outline of the mouth. -
Outline in black:
Load your small round detail brush with Black acrylic paint. Carefully outline your pencil marks to establish nice, crisp edges. -
Fill the shapes:
Fill in the eyes, nose, and mouth completely with black paint. I find it helpful to work from the center of the shape outward to avoid accidental smudges. -
Check for gaps:
The texture of the clay might leave small white or orange spots inside your black shapes. Dab extra paint into these crevices for a solid ‘carved’ look. -
Clean up edges:
If you wobble outside the lines, wait for the black to dry, then gently touch it up with a bit of the original orange paint.
Step 4: Finishing Touches
-
Let it cure:
Allow the entire pumpkin to dry for at least 24 hours to ensure all paint layers are set. -
Seal the work:
Spray the pumpkin with a clear matte or satin sealant. This protects the finish and unifies the sheen of the orange skin and black features.
Place your finished pumpkin on a windowsill or porch to enjoy that classic autumn glow all season long


Matte Black With a Metallic Stem
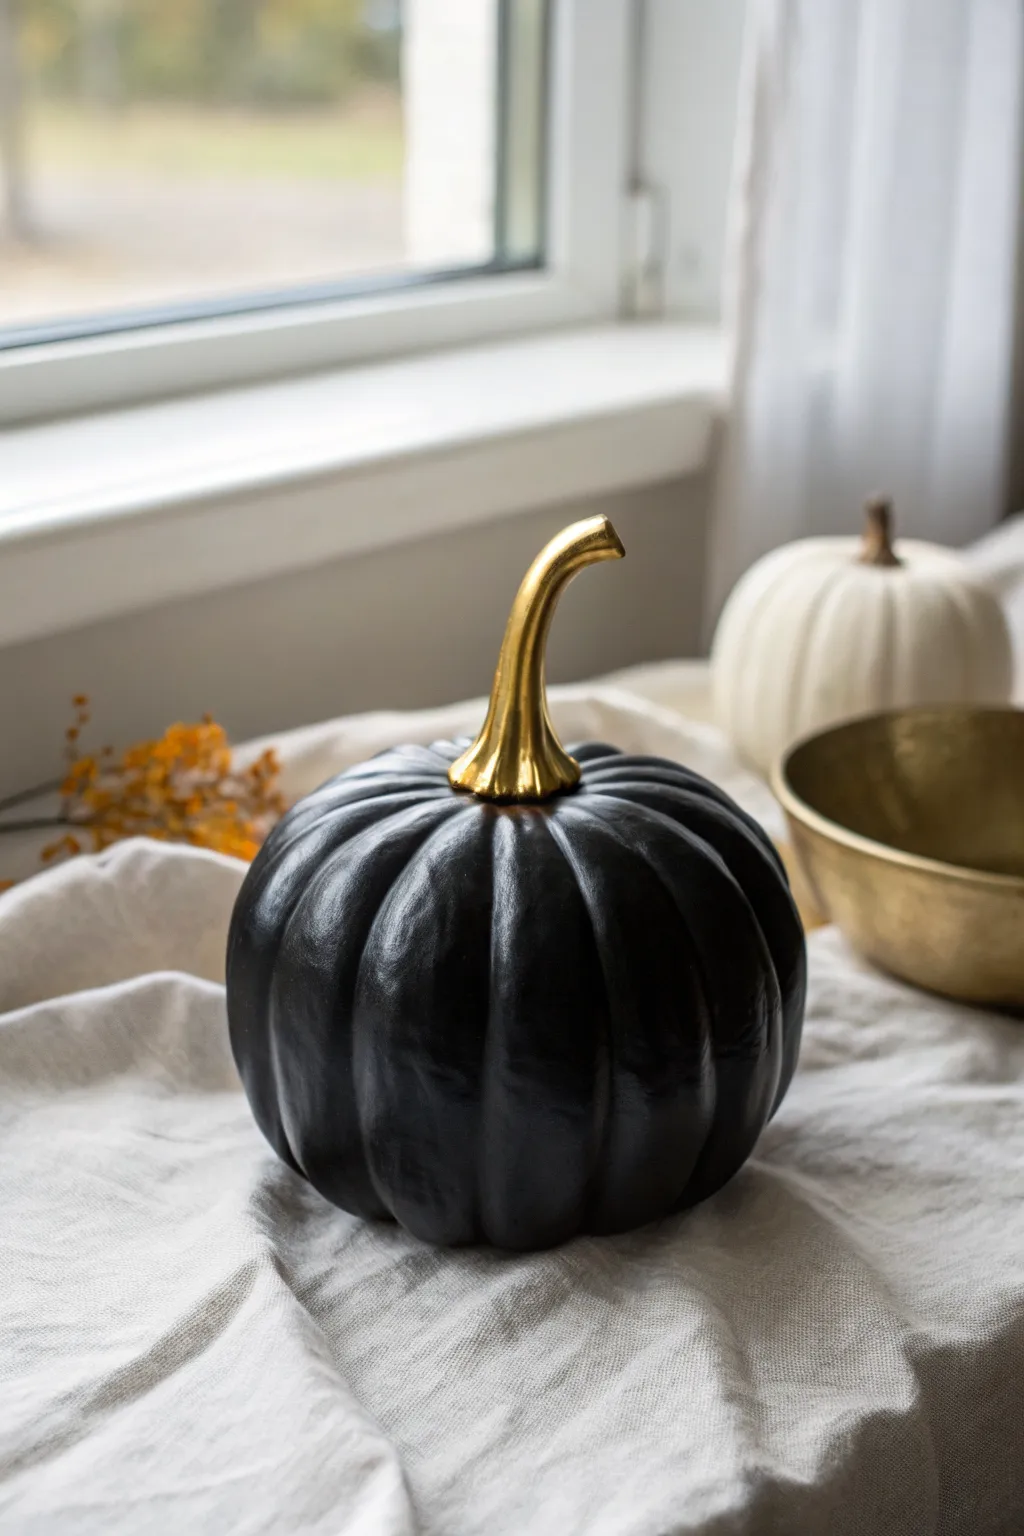
Transform a simple clay pumpkin into a modern, sophisticated decor piece by pairing a deep, velvety black body with a striking metallic stem. This high-contrast look feels upscale and dramatic, perfect for styling on a mantle or a bright window sill.
How-To Guide
Materials
- Bisque ceramic or air-dry clay pumpkin
- Matte black acrylic paint
- Liquid gold leaf or high-gloss metallic gold paint
- Medium flat synthetic brush
- Small round detail brush
- Painter’s tape (blue or green)
- Fine-grit sandpaper (optional)
- Matte spray sealant
- Palette or paper plate
- Water cup
Step 1: Prep & Base Coat
-
Clean and dust:
Begin by wiping down your clay pumpkin with a slightly damp cloth to remove any dust or debris from the surface. If you see any rough seams from the casting process, gently sand them down with fine-grit sandpaper for a smoother finish. -
Tape off the stem:
Carefully wrap a small piece of painter’s tape around the very base of the stem where it connects to the pumpkin body. This helps keep your gold section distinct later on. -
First black coat:
Squeeze a generous amount of matte black acrylic paint onto your palette. Using your medium flat brush, apply the first coat to the body of the pumpkin. Use long, vertical strokes that follow the natural grooves of the pumpkin shape. -
Work into crevices:
Make sure to push your brush bristles into the deep ridges between the pumpkin segments so no white clay peaks through. I like to dab the brush in these areas first, then smooth it out. -
Dry time:
Let this first coat dry completely for about 20-30 minutes. The clay might soak up the paint quickly, leading to a patchy look initially. -
Second black coat:
Apply a second layer of matte black paint. This layer will provide that rich, opaque finish. Ensure your brushstrokes are smooth to minimize texture. -
Check the bottom:
Once the sides are dry to the touch, flip the pumpkin over and paint the bottom to ensure a professional, finished look from every angle.
Step 2: The Golden Accent
-
Remove the tape:
Once your black base is perfectly dry, carefully peel away the painter’s tape from the stem. If any black paint bled under, touch it up or gently scrape it away. -
Prepare the gold:
Shake your liquid gold leaf or metallic paint vigorously to ensure the metallic pigments are well-mixed. Pour a small amount into a disposable cup or palette. -
Painting the stem base:
Switch to your small round detail brush. Carefully outline the base of the stem where it meets the black paint. Take your time here to get a crisp, clean line without getting gold on the black body. -
Fill in the stem:
Paint the rest of the stem with vertical strokes, moving upward toward the tip. Liquid gold leaf flows easily, so watch for drips. -
Handling the tip:
Pay special attention to the very top of the stem, covering the cut end completely for a solid, cast-metal appearance. -
Second metallic coat:
If using standard acrylic gold paint, you will likely need a second or third coat for full opacity. If using liquid gold leaf, one coat is usually sufficient, but check for missed spots. -
Dry thoroughly:
Allow the metallic section to dry completely. Liquid gold leaf can remain tacky for longer than acrylics, so give it at least an hour.
Sticky Situation
If liquid gold leaf feels sticky after drying, dust it lightly with cornstarch using a soft, fluffy makeup brush to set it without dulling the shine.
Step 3: Sealing & Finish
-
Protect the stem:
To keep the gold shiny and the black matte, you need to be careful with sealant. Wrap the dry gold stem in painter’s tape or foil to protect it. -
Spray sealant:
Take the pumpkin to a ventilated area and apply a light coat of matte spray sealant over the black body. This protects the paint from scratching and unifies the sheen. -
Remove protection:
Once the spray serves its purpose and dries (usually 15 minutes), remove the covering from the stem. -
Final inspection:
Look over the junction where gold meets black. If the line isn’t perfect, you can use a fine-tip black marker or a tiny brush with black paint to clean up the edge one last time.
Pro Tip: Liquid Gold
For that ultra-reflective ‘real metal’ look shown in the photo, skip acrylic gold paint and use liquid gold leaf (gilding liquid) instead. The difference is huge.
Place your elegant noir pumpkin near a window to let the natural light catch that brilliant gold stem


Soft Pastel Color-Blocked Pumpkins
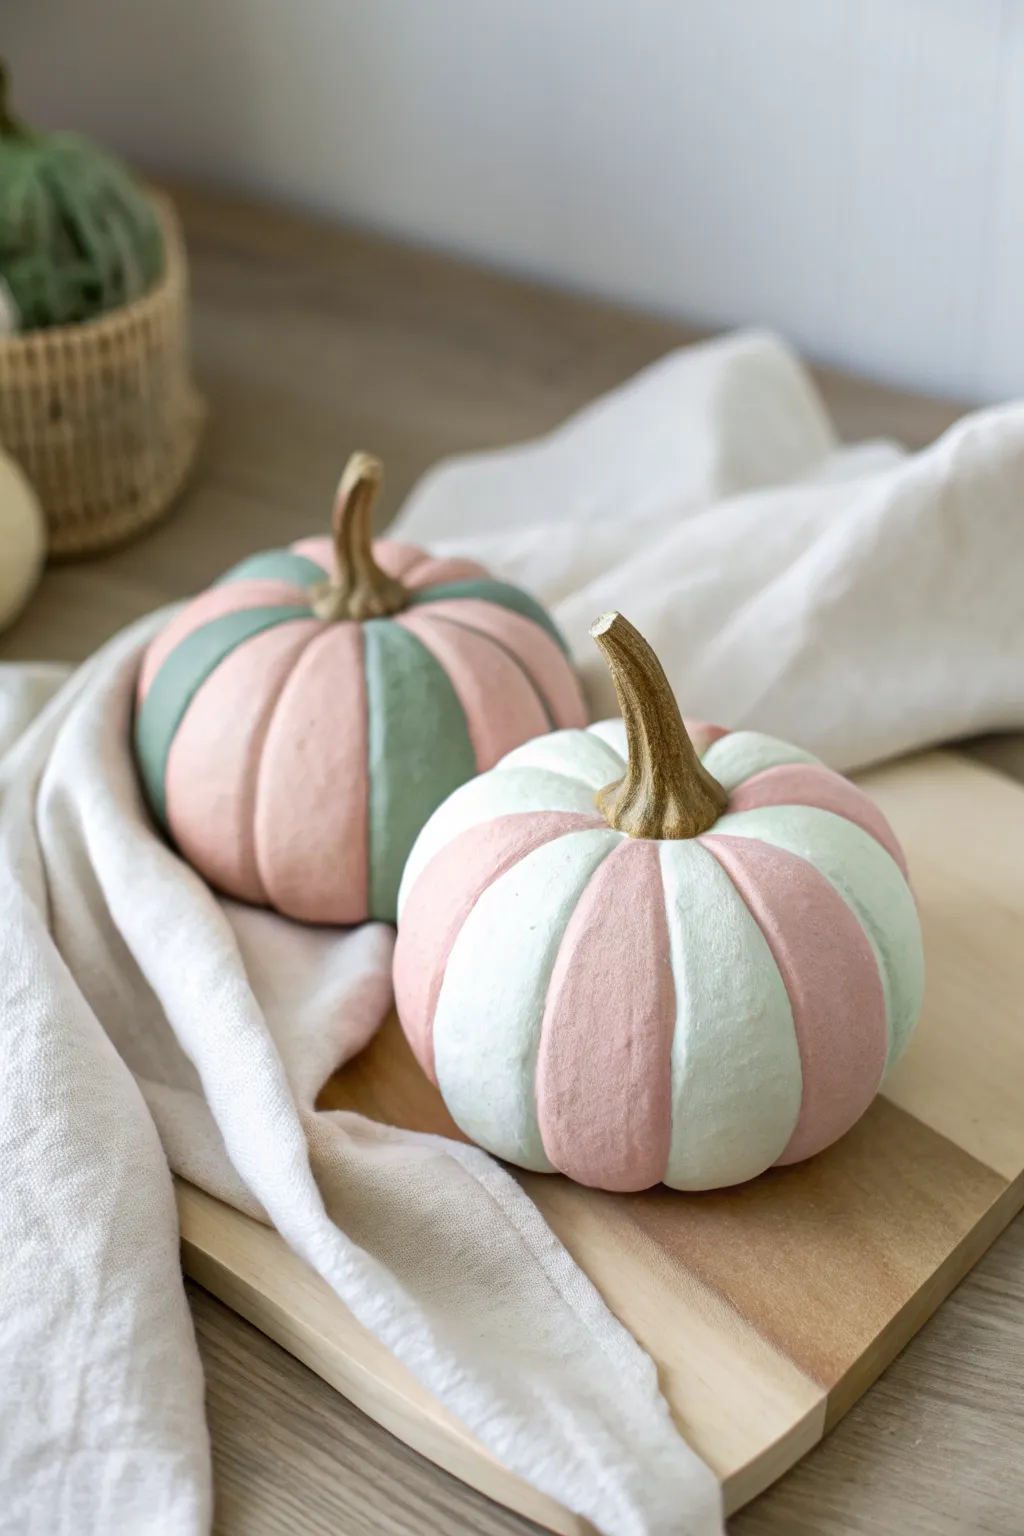
Embrace a gentler autumn palette with these charming, striped pumpkins painted in matte pastels. This project transforms standard faux pumpkins into sophisticated decor pieces featuring alternating segments of blush pink, sage green, and soft mint.
Step-by-Step Tutorial
Materials
- Faux craft pumpkins (paper maché or smooth foam)
- Acrylic craft paints (blush pink, sage green, pale mint/white)
- Small flat paintbrush (approx. 1/2 inch)
- Fine detail paintbrush
- Gold or brown acrylic paint (for stems)
- Matte finish spray sealant or varnish
- Palette or paper plate
- Paper towels
- Cup of water
Step 1: Preparation & Base Coat
-
Clean surface:
Begin by wiping down your faux pumpkins with a slightly damp cloth to remove any dust or manufacturing residue. Ensure they are completely dry before painting. -
Remove stems:
If the stems are removable, gently pop them out. If they are permanently attached, carefully tape them off with painter’s tape to protect them from the pastel colors. -
Select your dominant color:
Choose one of your pastel shades (like the blush pink) to act as a base or primer if your pumpkin is dark orange. If your pumpkin is already white or cream, you can skip a full base coat.
Uneven Lines?
If your segment lines look shaky in the grooves, use a very fine liner brush with the darker color to paint a thin pinstripe in the crevice, hiding the messy edge.
Step 2: Painting the Segments
-
Identify the ridges:
Follow the natural vertical ridges of the pumpkin to define your segments. Most faux pumpkins have distinct ‘slices’ that make this easy to follow without drawing guide lines. -
Start with color A:
Load your flat brush with the first color (e.g., blush pink). Paint every other segment, starting from the base of the stem and pulling the brush down toward the bottom center. -
Refine the edges:
Use the edge of your flat brush to carefully paint along the grooved indentations. Take your time here to keep the lines crisp where the segments meet. -
Let dry:
Allow the first set of stripes to dry completely. Acrylics dry fast, but I find waiting about 15-20 minutes prevents accidental smudging. -
Apply second coat:
If the coverage looks streaky or the original pumpkin color shows through, apply a second coat to these pink segments for a completely opaque, matte finish. -
Start color B:
Switch to your second color (like sage green or pale mint). Fill in the remaining clean segments, again stroking from top to bottom. -
Mind the gap:
When painting near the already-dried pink sections, use a steady hand. You can switch to a smaller detail brush for the deep grooves if your flat brush feels too wide. -
Check the bottom:
Don’t forget to flip the pumpkin over (once the top is dry) to ensure the stripes wrap neatly underneath and meet in the center.
Level Up: Texture
Mix a teaspoon of baking soda into your acrylic paint before applying. This creates a trendy ‘ceramic’ or terracotta texture that looks very high-end.
Step 3: Finishing Touches
-
Paint the stem:
If you removed the stem, paint it separately now. A mix of brown and ochre usually creates a realistic dried stem look. If it’s attached, remove the tape and touch up the base. -
Add stem texture:
For extra realism, dry brush a lighter tan or gold lightly over the ridges of the stem to highlight its texture. -
Reattach stem:
Once everything is dry, pop the stem back into firmly place. A drop of superglue can help if the fit has become loose. -
Seal the work:
To protect your paint job and unify the sheen, take the pumpkins to a well-ventilated area and give them a light coat of matte spray sealant. -
Style:
Arrange your duo on a wooden board or soft linen cloth to emphasize the cozy, natural aesthetic.
Enjoy the soft elegance these painted pumpkins add to your seasonal display


All-Over Tiny White Ghosts
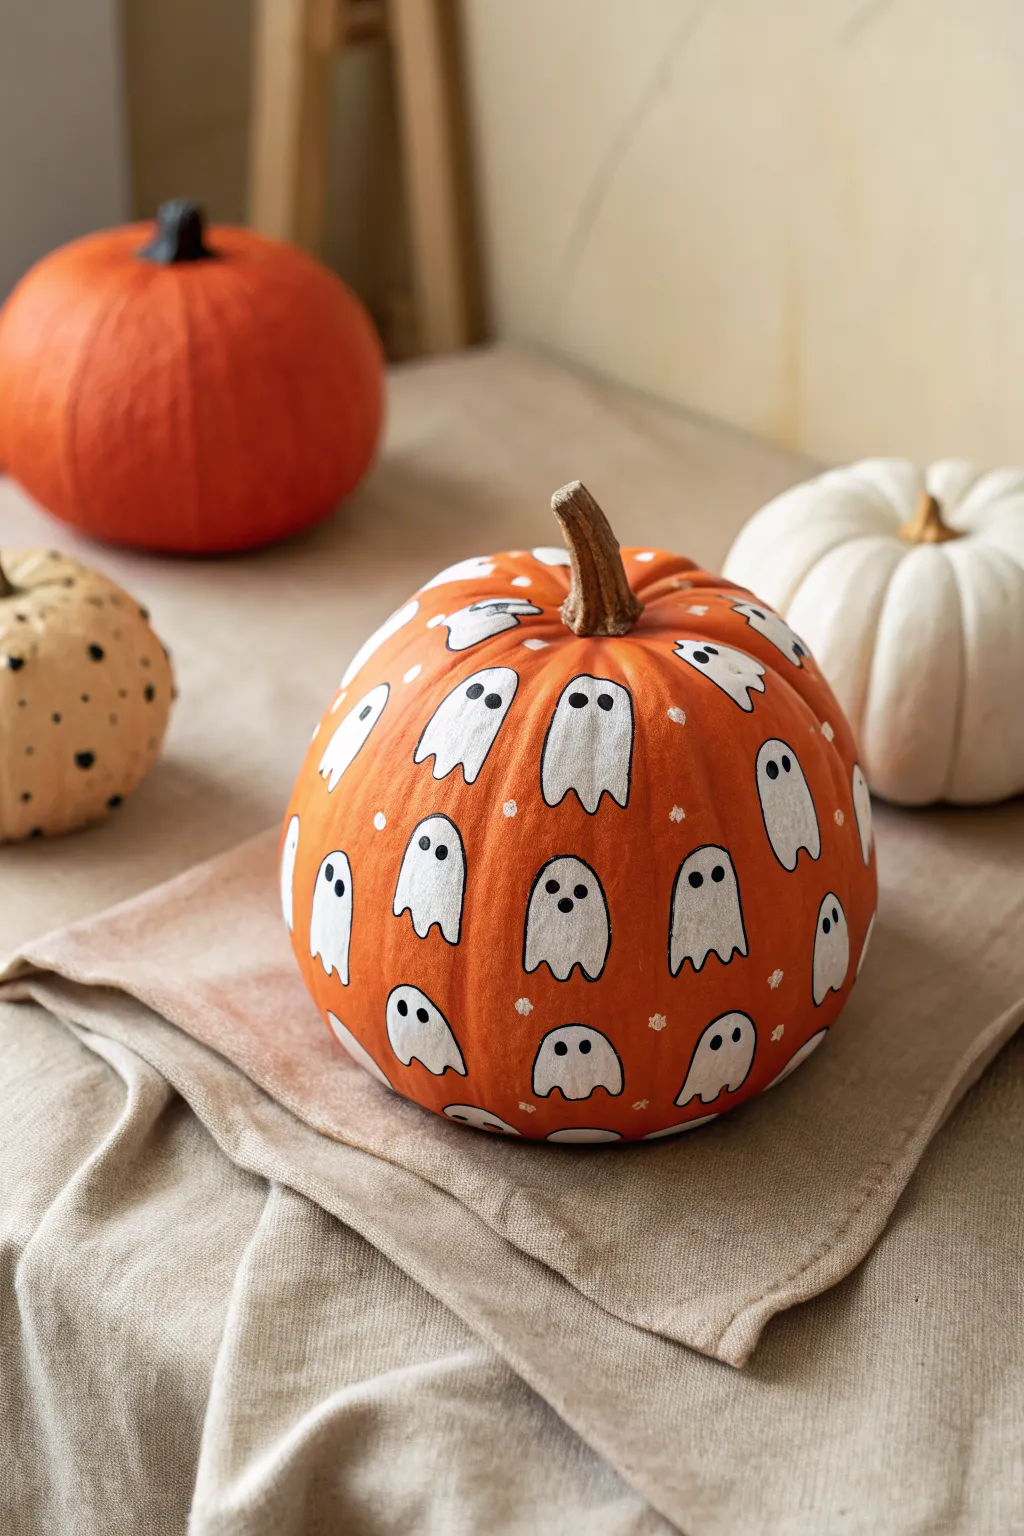
Transform a simple orange pumpkin into a spooky-sweet centerpiece with this repeating ghost pattern design. The contrast of the bright white phantoms against the classic orange skin creates a pop art feel that’s perfect for modern Halloween decor.
How-To Guide
Materials
- Faux clay or ceramic pumpkin (orange base)
- White acrylic paint (high opacity)
- Black acrylic paint or black paint marker
- Small round paintbrush (size 2 or 4)
- Very fine detail brush (size 0 or 00)
- Pencil (H or HB)
- Matte finish sealant spray
- Palette or paper plate
- Water cup and paper towels
Step 1: Preparation & Mapping
-
Prepare the surface:
Begin by wiping down your faux clay pumpkin with a slightly damp cloth to remove any dust or oils that might prevent the paint from adhering properly. Let it dry completely. -
Lightly sketch the layout:
Using a pencil, very faintly sketch out the placement of your ghosts. You don’t need to draw every detail, just mark where the center of each ghost body will go to ensure a staggered, brick-like pattern around the pumpkin’s circumference. -
Refine the ghost shapes:
Now, lightly draw the outline of each ghost using a simple ‘U’ shape for the top. For the bottom, draw a wavy line with three or four little scallops to look like a floating sheet. Keep them roughly the same size, about 1-1.5 inches tall.
Uneven Coverage?
If your white paint looks streaky over the orange, switch to a ‘heavy body’ acrylic or prime the ghost area with a layer of pale grey first to neutralize the orange base.
Step 2: Painting the Ghosts
-
Load your brush:
Squeeze out a dollop of white acrylic paint. Dip your size 2 or 4 round brush into the paint, ensuring it’s saturated but not dripping. If your paint is very thick, create a smoother consistency by adding a singular drop of water. -
Fill in the outlines:
Carefully paint inside your pencil sketched ghost shapes. Start from the center and push the paint out toward the edges to keep the lines crisp. Don’t worry about the black eyes yet. -
Check opacity:
Clay surfaces can sometimes absorb the first layer. If the orange shows through, let the first coat dry for about 10–15 minutes and apply a second coat for solid, bright white coverage. -
Clean up edges:
Once the white shapes are blocked in, use the tip of your brush to neaten any wobbly edges on the scalloped bottoms so they look distinct and curvy.
Paint Pen Trick
Struggling with the thin black outlines? Skip the brush entirely and use an ultra-fine tip acrylic Posca marker. It dries matte and gives you much more control.
Step 3: Adding Details
-
Outline the shapes:
This step requires a steady hand. Using your finest detail brush and black acrylic paint (or a black paint pen for easier control), trace the outer edge of every white ghost with a thin, consistent line. -
Add the eyes:
Dip the back end of a small paintbrush handle or a dotting tool into black paint. Press two small dots near the top of the ghost’s head for eyes. They should be close together but not touching. -
Create variation:
You can make some ghosts look slightly different by varying the eye size or placement slightly—maybe one looks left, while another looks straight ahead. -
Fill the gaps:
I like to take a step back here and look for large empty orange spaces between the ghosts. Identify where the pattern feels too open. -
Add teeny stars:
In those empty orange spaces, paint extremely small clusters of white dots. Group 3-4 tiny dots together to look like distant stars or magical dust. -
Seal the work:
Allow the pumpkin to dry for at least 24 hours. Because faux pumpkins can get scratched in storage, take the project outside and spray an even coat of matte sealant over the entire surface.
Now you have a delightfully spirited pumpkin ready to sit on your shelf or porch

The Complete Guide to Pottery Troubleshooting
Uncover the most common ceramic mistakes—from cracking clay to failed glazes—and learn how to fix them fast.
Buffalo Plaid Farmhouse Pattern
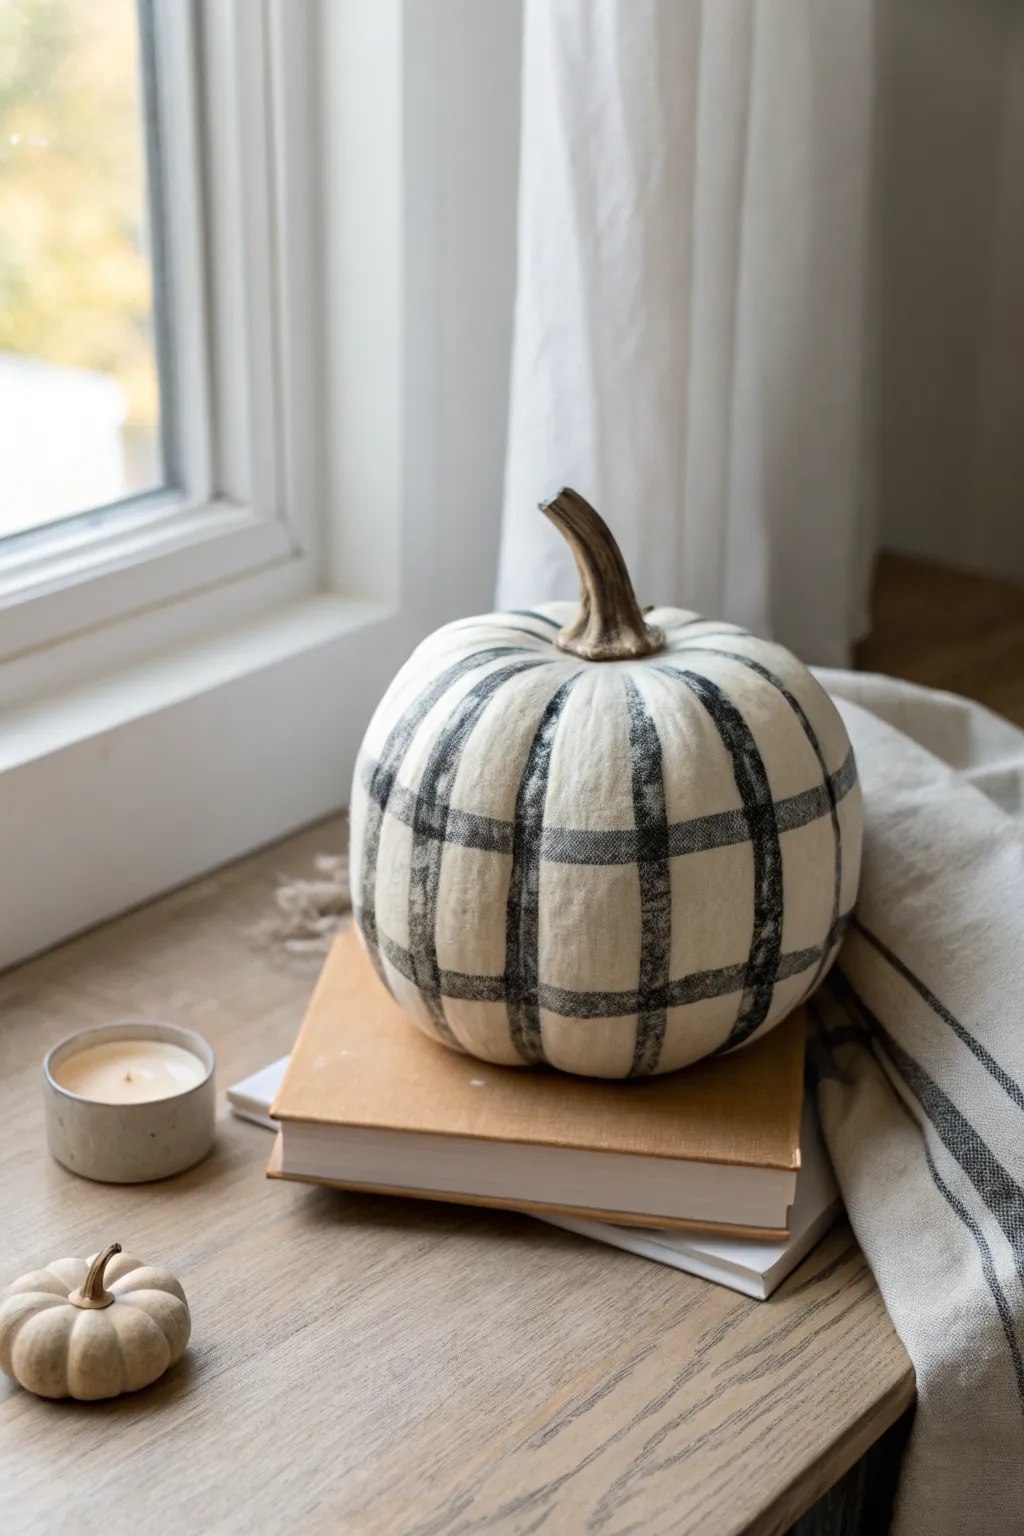
Bring a touch of modern farmhouse charm to your autumn display with this simple yet striking clay pumpkin design. By layering sheer washes of paint over a textured base, you’ll create a cozy faux-fabric look that feels warm and inviting.
Detailed Instructions
Materials
- Faux pumpkin (plaster, clay, or papier-mâché)
- White chalk paint or matte acrylic paint
- Black acrylic paint
- Grey acrylic paint (or mix black and white)
- Medium flat brush (approx. 1/2 inch)
- Small round brush for details
- Water cup for thinning paint
- Scrubby sponge or old stiff brush
- Matte clear sealer spray
Step 1: Base Preparation
-
Clean surface:
Begin by wiping down your pumpkin with a damp cloth to remove any dust or oils that might prevent the paint from adhering properly. -
Apply base coat:
Coat the entire pumpkin with white chalk paint. Chalk paint is ideal here because its matte finish mimics the look of fabric better than glossy acrylics. -
Create texture:
While the white paint is still slightly tacky, dab it gently with a dry sponge. This creates a subtle stippled texture that will help grab the plaid lines later. -
Dry completely:
Let the white base coat dry fully. If you’re in a rush, a hair dryer on a cool setting can speed this up significantly.
Dry-Brush Drama
Use an old, frayed brush for the black lines. The scraggly bristles naturally create inconsistent, textured strokes that look just like woven fabric threads.
Step 2: Painting the Vertical Stripes
-
Mix a sheer grey:
Dilute your grey acrylic paint with a small amount of water until it has an inky consistency. You want it to be semi-transparent, not opaque. -
Follow the ribs:
Using your flat brush, paint vertical stripes following the natural ribs of the pumpkin. Start from the stem and pull the brush down to the base. -
Skip sections:
Paint every other rib section grey, leaving alternating sections white. Don’t worry about perfect edges; a slightly rough edge adds to the woven flair. -
Feather the edges:
Before the grey paint dries, use a dry, clean brush to lightly feather the edges of your stripes, softening the transition between grey and white.
Cozy Up The texture
Before painting, wrap a piece of real burlap around the wet clay or plaster pumpkin to imprint a genuine fabric texture into the surface itself.
Step 3: Adding Horizontal Stripes
-
Visualize the grid:
Ideally, visualize where your horizontal bands will go. You generally want 2-3 horizontal bands around the pumpkin depending on its height. -
Paint grey bands:
Using the same diluted grey mix, paint horizontal bands around the pumpkin. These should cross over both the white and the previously painted grey vertical sections. -
Maintain transparency:
Keep your brush strokes light. The goal is for the underlying white to peek through slightly, reinforcing that fabric-like appearance. -
Dry time:
Allow the grey grid to dry completely. The paint must be dry before adding the darker accents to avoid muddying the colors.
Step 4: Defining the Plaid
-
Prepare black wash:
Thicken your black paint slightly or use it straight from the tube for a darker contrast, but keep a “dry brush” technique in mind. -
Target intersections:
Paint a square of black right where the vertical grey stripes and horizontal grey bands intersect. This represents the darkest part of a buffalo check pattern. -
Create texture lines:
Dip a stiff, small brush into black paint and wipe most of it off on a paper towel. Drag this dry brush lightly along the edges of your grey stripes to simulate woven threads. -
Add cross-hatching:
For extra realism, create tiny cross-hatch marks inside the grey and black square areas. This subtle detail truly sells the “flannel” illusion.
Step 5: Finishing Touches
-
Stem work:
Paint the stem a realistic brown or tan. I usually mix a little black into the brown to darken the crevices and give it an aged, dried look. -
Check for gaps:
Look over the pumpkin for any glaring white spots that disrupt the pattern and touch them up with your grey wash. -
Seal the work:
Once everything is bone dry, spray the entire pumpkin with a matte clear sealer. Avoid glossy sprays, as shine will ruin the soft, fabric effect.
Your charming plaid pumpkin is now ready to add a cozy, handmade feel to any windowsill or table setting
Simple Polka Dots in Fall Neutrals
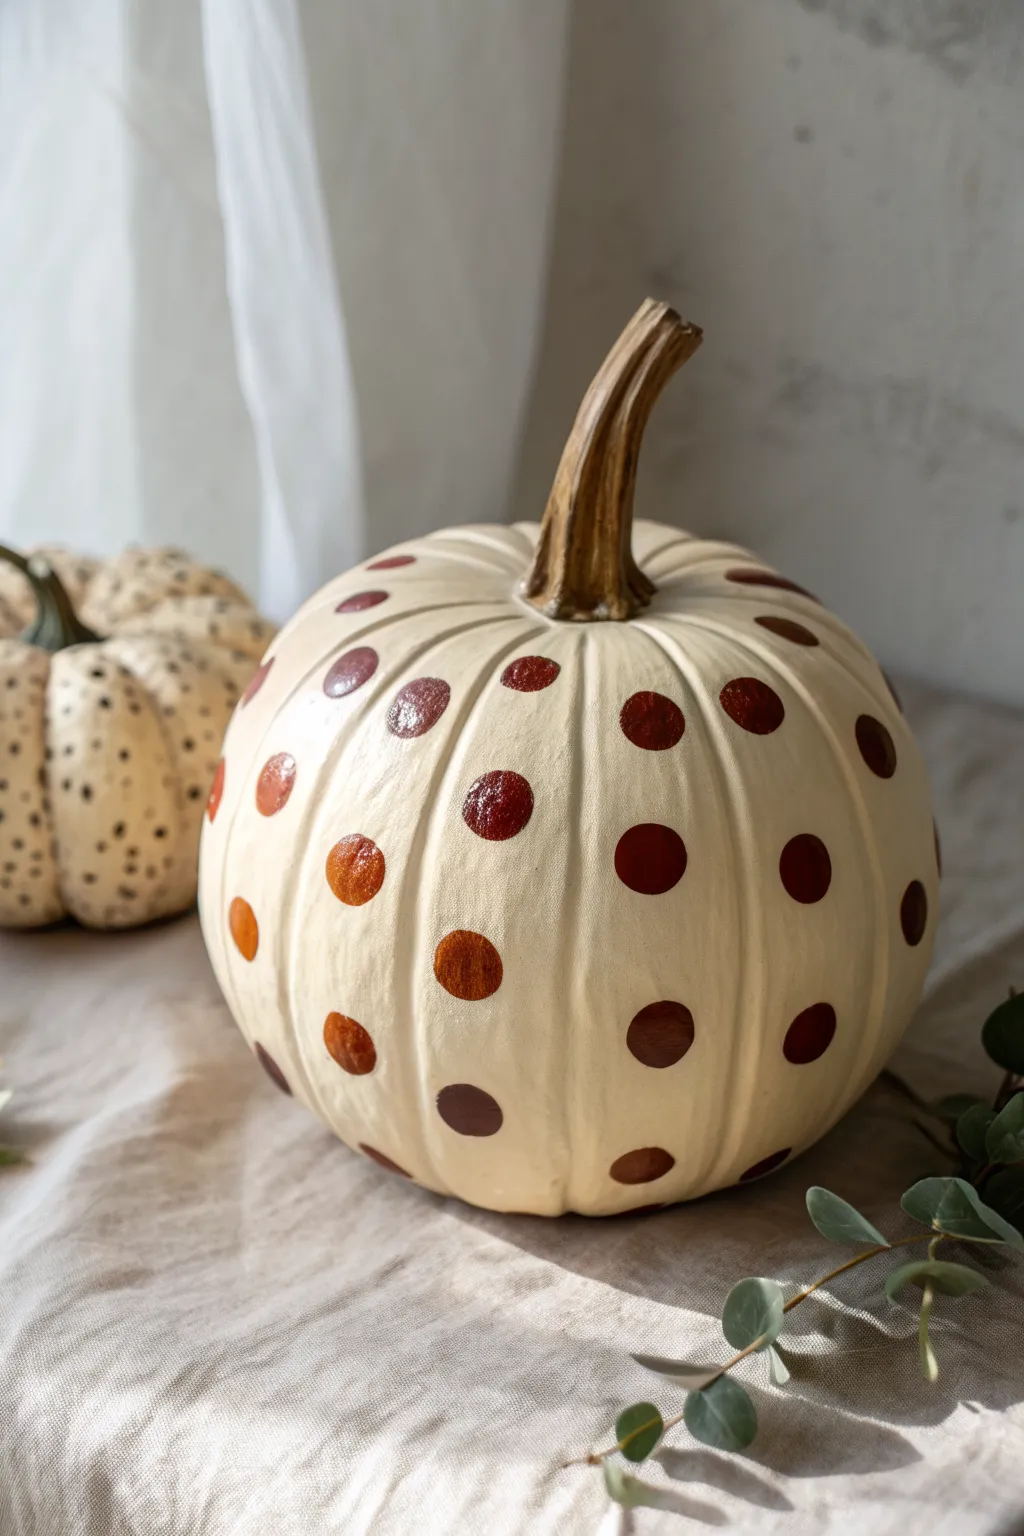
Embrace the understated elegance of autumn with this minimalist clay pumpkin project. Featuring warm rust and chocolate hues on a creamy base, this design proves that simple patterns can make a sophisticated statement.
Step-by-Step Tutorial
Materials
- Medium-sized faux or clay pumpkin (smooth surface)
- Cream or off-white acrylic paint (matte finish)
- Dark chocolate brown acrylic paint
- Rust or terracotta acrylic paint
- Medium flat paintbrush (approx. 1 inch)
- Round foam pouncer (approx. 0.75 inch diameter)
- Small round detail brush
- Paper plate or palette
- Paper towels
- Matte spray sealer (optional)
Step 1: Preparation & Base Coat
-
Clean surface:
Begin by wiping down your clay pumpkin with a slightly damp paper towel to remove any dust or oils that might repel the paint. -
First base layer:
Using your medium flat brush, apply a generous coat of cream or off-white acrylic paint over the entire surface of the pumpkin, avoiding the stem. -
Smooth coverage:
Work the paint into the vertical grooves of the pumpkin to ensure full coverage. Long, vertical strokes help minimize visible brush marks. -
Dry and repeat:
Let the first coat dry completely for about 20 minutes. Apply a second coat to ensure the color is opaque and mimicking a natural gourd skin. -
Stem detailing:
If your pumpkin’s stem looks plastic or unfinished, paint it with a mix of brown and a touch of cream. Use dry-brushing techniques to highlight the textured ridges.
Smudged Circle?
Don’t panic! Let the mistake dry completely, then paint over it with your base cream color. Once that dries, you can re-stamp the dot cleanly.
Step 2: Creating the Polka Dots
-
Load the pouncer:
Squeeze a quarter-sized amount of dark chocolate brown paint onto your palette. Press your round foam pouncer into the paint, dab it once on a clean spot to remove excess, and check for even coverage. -
First dot placement:
Identify the vertical ribbed sections of the pumpkin. Carefully press the pouncer onto the center of one section to create your first dot. Lift straight up to keep the edges crisp. -
Establish a pattern:
Work your way around the pumpkin, placing dots in a staggered pattern. I find it easiest to do one row around the middle first to set the spacing. -
Varying the tones:
Clean your pouncer or grab a fresh one. Now load it with the rust or terracotta paint. Add these lighter woven-in dots among the dark brown ones for visual depth. -
Custom mixing:
For a more organic look like the photo, mix a little rust into your dark brown to create a third, intermediate shade. Add a few dots in this color to random spots. -
Handling curved surfaces:
When stamping near the top or bottom curves, gently rock the pouncer in a circular motion to ensure the full circle makes contact with the sloped surface. -
Touch-ups:
Once the dots are dry, inspect the edges. If any circles look uneven or faint, use a small detail brush with the corresponding paint color to carefully fill them in.
Step 3: Finishing Touches
-
Inspect the spacing:
Step back and look at the pumpkin from a distance. If there are any large empty gaps, add a partial dot near the bottom or top edge to fill the visual space. -
Final dry:
Allow the polka dots to dry fully for at least an hour. Thick paint from pouncers can take longer to cure than brushed layers. -
Protect your work:
To protect the finish from chipping, take the pumpkin outside and apply a light mist of matte spray sealer.
Level Up
Before the dots dry, sprinkle fine copper glitter or embossing powder over the wet paint for a subtle metallic shimmer that catches the light.
Now style your playful pumpkin alongside some natural greenery for a cozy vignette


What Really Happens Inside the Kiln
Learn how time and temperature work together inside the kiln to transform clay into durable ceramic.
Floral Garland Around the Belly
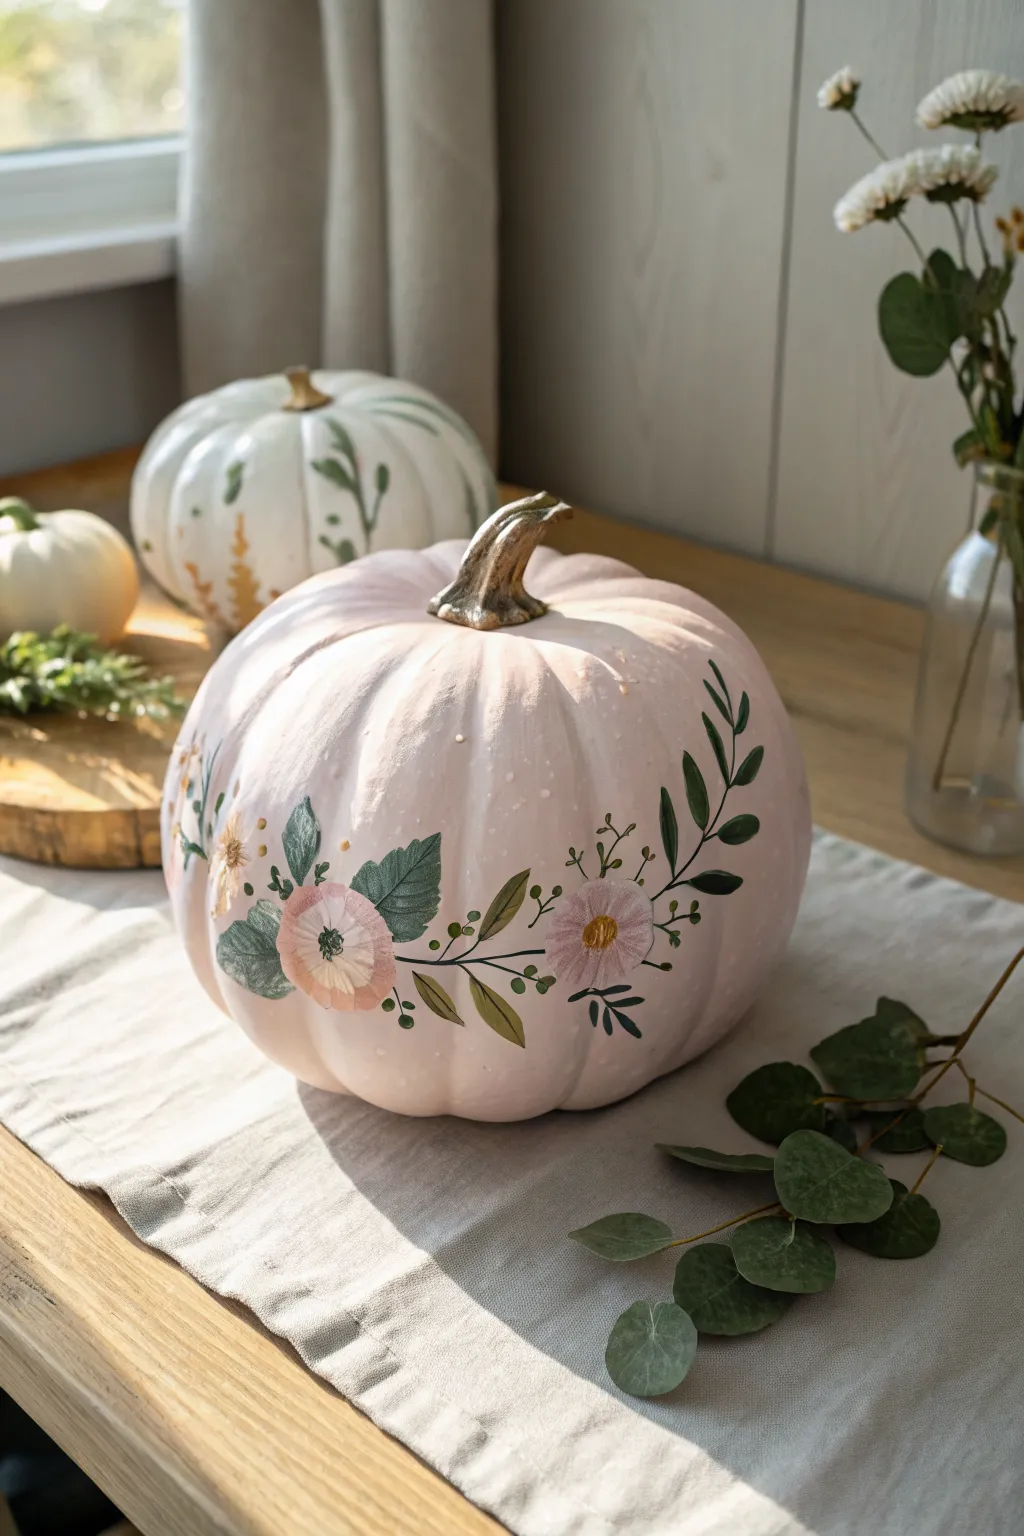
Transform a simple craft pumpkin into a soft, romantic centerpiece with this delicate floral design. The pale pink base and sweeping greenery create a sophisticated look that transitions perfectly from early autumn to Thanksgiving.
Step-by-Step
Materials
- Medium-sized craft pumpkin (foam or ceramic)
- Pale pink chalk paint or acrylic paint (matte finish)
- Metallic gold paint (for the stem)
- Acrylic paints: sage green, dark olive green, pale yellow, rose pink, white
- Small round brushes (sizes 2 and 4)
- Fine liner brush (size 0 or 00)
- Pencil
- Matte spray sealer
Step 1: Base Preparation
-
Clean the surface:
Wipe down your craft pumpkin with a damp cloth to remove any dust or oils. This ensures the paint adheres smoothly and prevents peeling later. -
Base coat application:
Apply a coat of pale pink chalk paint over the entire pumpkin body. Chalk paint is ideal here because its matte texture mimics the look of ceramic or clay. -
Finish the base:
Let the first coat dry completely, then add a second or third coat until the original orange or white color of the pumpkin is completely opaque. -
Gild the stem:
While the body dries, carefully paint the stem with metallic gold paint. I like to use a dry brushing technique here to let some of the stem’s texture show through for a vintage feel.
Paint Slipping?
If acrylic paint slides off the faux pumpkin surface, prime the area first with a clear matte medium or lightly sand the smooth plastic to give it ‘tooth’.
Step 2: Drafting the Design
-
Mark the center line:
Visually identify the ‘belly’ or widest part of the pumpkin. This is where your garland will sit. -
Sketch the main vines:
Using a pencil very lightly, draw a wavy, organic line wrapping horizontally around the pumpkin. Don’t make it a straight line; let it dip and rise with the pumpkin’s natural ridges. -
Place the flowers:
Sketch small circles along the vine where you want your main blooms to sit. Spacing them irregularly looks more natural than perfect symmetry.
Step 3: Painting the Florals
-
Paint the leaves:
Using a size 4 round brush and sage green paint, fill in leaf shapes radiating from your pencil vine. Vary the sizes, making some leaves broad and others slender. -
Add depth to greenery:
While the sage green is still slightly wet, dip the tip of your brush into dark olive green and paint small veins or darker leaves to create dimension. -
Create the blooms:
Mix a soft rose pink with a touch of white. Paint the flower circles using short, curved strokes that radiate from the center to mimic petals. -
Add flower centers:
Once the pink petals are dry, use a small dab of pale yellow in the center of each flower. Add tiny brown or gold dots around the yellow center for realistic detail.
Pro Tip: Shadowing
Mix a drop of water into gray paint to create a translucent wash. Paint a thin shadow under the main leaves to make the garland look like it’s lifting off the surface.
Step 4: Fine Details
-
Connect the garland:
Switch to your fine liner brush and dark olive paint. Carefully trace over your initial pencil vine line, connecting the flowers and leaves. -
Add wispy sprigs:
Paint very thin, arching lines coming off the main vine. Add tiny dots at the ends of these lines to represent buds or berries. -
Highlight the leaves:
Mix a tiny amount of white into your sage green. Add thin highlight strokes to the tops of the larger leaves to make them pop against the pink background. -
Clean up:
Check for any pencil marks that are still visible. If the paint is fully dry, gently erase them. -
Seal the artwork:
Take the pumpkin outside or to a well-ventilated area and apply a light mist of matte spray sealer to protect your handiwork from scratches or fading.
Place your finished pumpkin on a linen runner or a wooden tray to complete the cozy cottage aesthetic
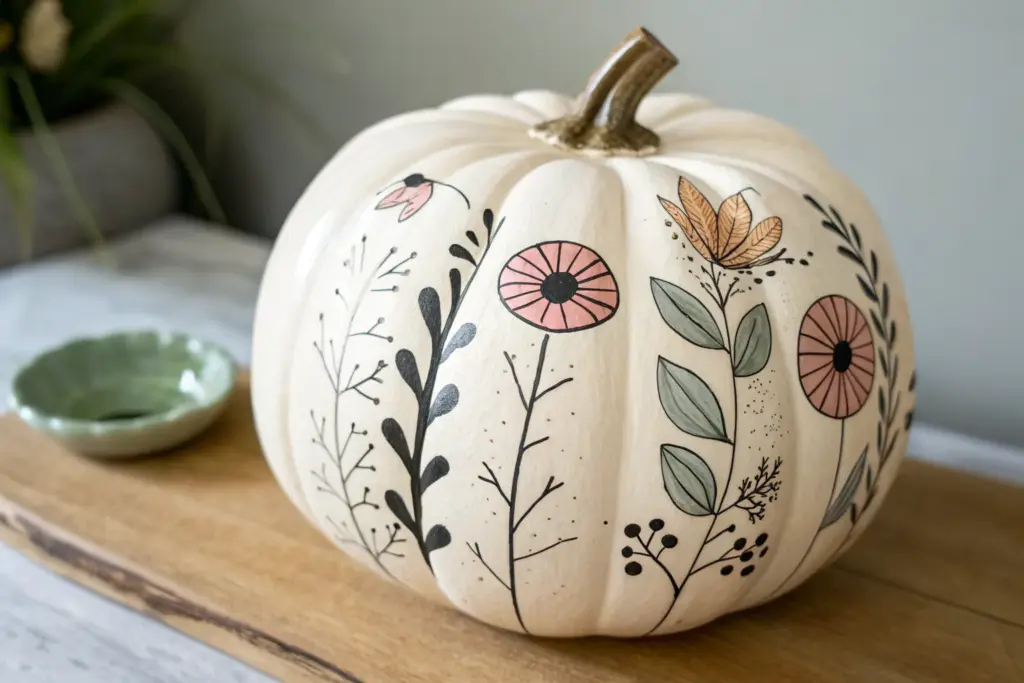
Minimal Botanical Line Art

Embrace the beauty of simplicity with this minimalist botanical design that transforms a plain pumpkin into a sophisticated centerpiece. Fine, sweeping lines of dark paint create delicate vines and leaves that contrast beautifully against a creamy matte surface.
How-To Guide
Materials
- White or cream faux pumpkin (clay, ceramic, or foam)
- Fine liner paintbrush (size 0 or 00)
- Black or very dark hunter green acrylic paint
- Pencil (light H or HB)
- Kneadable eraser
- Small round brush (size 2)
- Matte spray sealant
- Palette or small dish for mixing
- Water cup and paper towels
Step 1: Preparation & Planning
-
Clean the surface:
Before painting, wipe down your pumpkin with a slightly damp cloth to remove any dust, oils, or fingerprints. If your pumpkin is a raw bisque or unfinished clay, apply a base coat of matte cream acrylic paint first and let it dry completely. -
Study the pumpkin’s shape:
Take a moment to look at the natural ridges of your pumpkin. The botanical vines will look most organic if they follow these vertical grooves, flowing from the base upward or draping down from the stem. -
Sketch the main stems:
Using a pencil with a very light hand, draw the primary S-curves for your vines. Aim for a mix of simple, straight stalks and curved, whimsical lines that curl at the ends. Keep the layout airy; negative space is key to this look. -
Add leaf placements:
Lightly mark where your leaves will go along the stems. Vary the patterns: sketch some alternating small leaves, some paired leaves, and perhaps distinct, rounder berry shapes on others.
Shaky Hands?
Rest your pinky finger on the pumpkin surface while painting to stabilize your hand. This acts as a pivot point for smoother curves.
Step 2: Painting the Design
-
Prepare your paint:
Squeeze a small amount of dark green or black acrylic paint onto your palette. I like to add a tiny drop of water to improve the flow, making it ink-like so it glides smoothly off the liner brush. -
Paint the first stem:
Load your liner brush and begin at the bottom of one of your penciled lines. Apply gentle, consistent pressure to trace the main stem upward, lifting the brush slightly at the tip for a tapered end. -
Add the curling details:
For the vines that end in a spiral, use just the very tip of your brush. Rotate your wrist slowly to form the curl, ensuring the line remains crisp and doesn’t blob at the center. -
Paint simple leaves:
For basic leaves, press the belly of the brush down slightly where the leaf connects to the stem, then pull away quickly to create a sharp point. This creates a natural teardrop shape. -
Create detailed ferns:
On one of the vines, paint tiny, repetitive slash marks along the stem to mimic a fern-like or feathery texture. Keep these strokes short and very fine. -
Incorporate berry accents:
Switch to your size 2 round brush if needed to dab perfectly round dots at the end of some branches. These represent abstract berries or buds and add visual weight to the delicate lines. -
Vary the line weight:
To add visual interest, try to make the base of the stems slightly thicker than the tips. Go back over the lower portions carefully if you need to build up the thickness.
Gold Leaf Accents
Add tiny touches of gold leaf to the berry shapes or tips of the leaves for a luxurious, shimmering finish.
Step 3: Refining & Sealing
-
Check for gaps:
Rotate the pumpkin and look for any areas that feel too empty. You can add small, floating sprigs or extra curls to balance the composition without overcrowding it. -
Clean up sketches:
Once the paint is absolutely dry to the touch, gently dab—don’t rub—any visible pencil lines with your kneadable eraser to lift them away. -
Seal the artwork:
Take the pumpkin to a well-ventilated area. Hold your matte clear spray can about 12 inches away and apply a light mist. This protects the delicate line work from scratching or fading. -
Let it cure:
Allow the sealant to dry for at least 24 hours before handling extensively or placing it on your dining table.
Now you have a timeless piece of fall decor that looks effortlessly chic

TRACK YOUR CERAMIC JOURNEY
Capture glaze tests, firing details, and creative progress—all in one simple printable. Make your projects easier to repeat and improve.
Celestial Moons and Stars
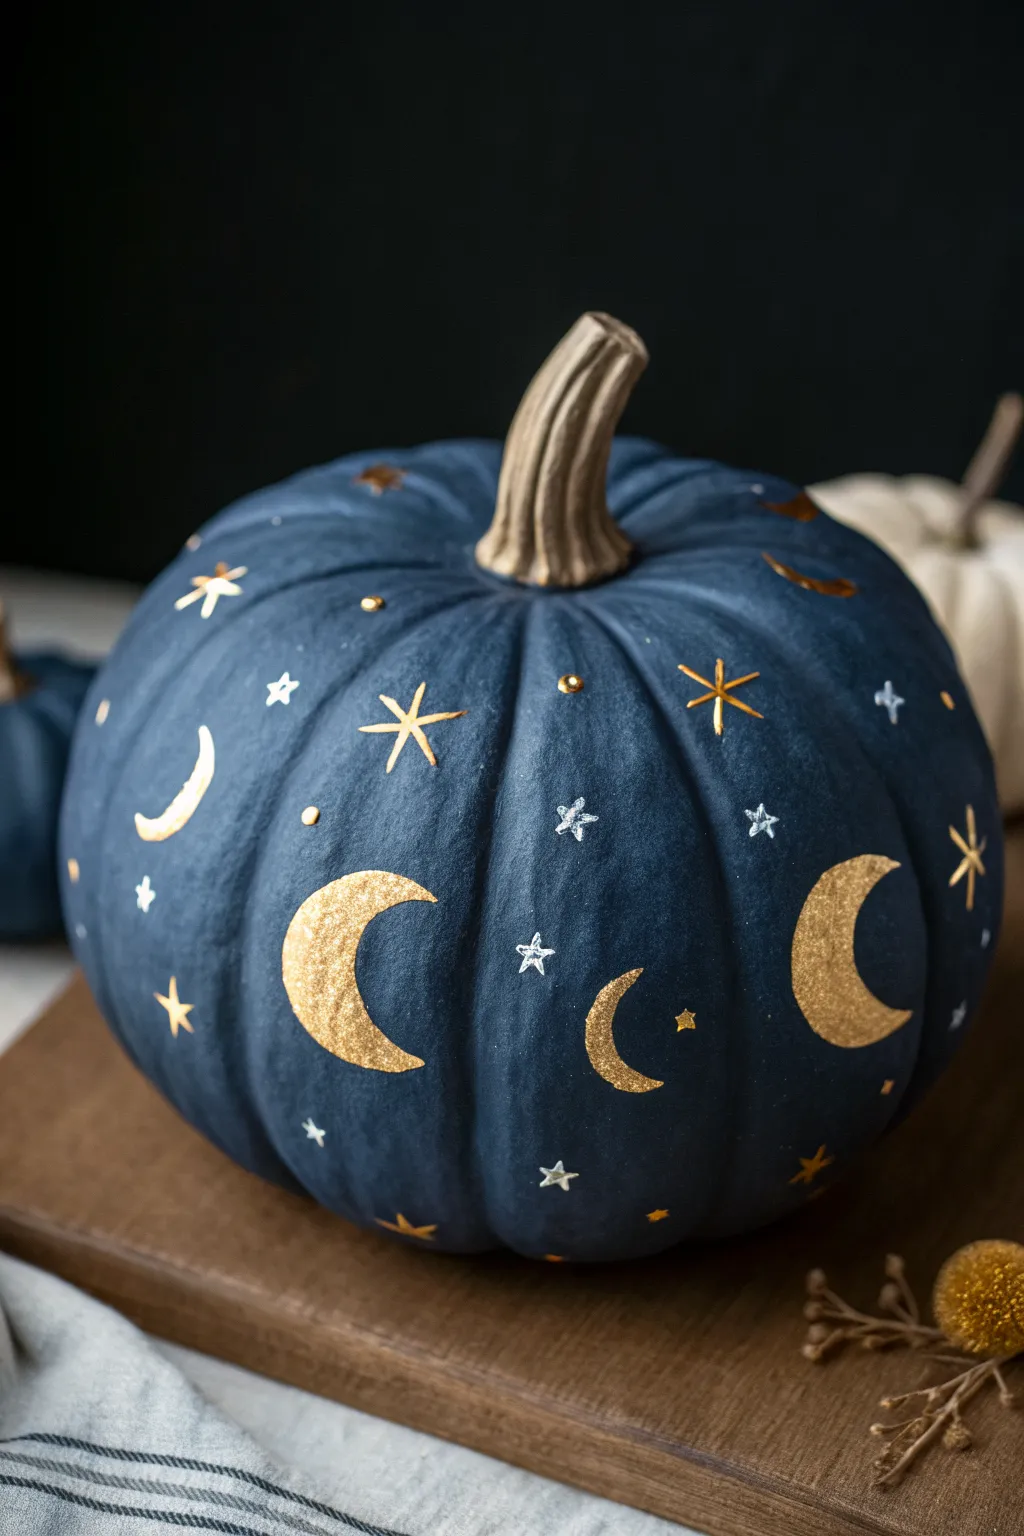
Transform a plain faux pumpkin into a magical night sky with this striking celestial design. The deep matte blue background creates the perfect contrast for shimmering gold moons and delicate silver stars.
Step-by-Step
Materials
- Faux pumpkin (smooth surface works best)
- Deep midnight blue matte acrylic paint
- Metallic gold acrylic paint
- Metallic silver acrylic paint
- Gold glitter paint (or fine loose gold glitter and Mod Podge)
- Medium flat paintbrush
- Fine detail liner brush (size 0 or 00)
- Small round brush
- Pencil for sketching
- Paint palette or paper plate
- Cup of water and paper towels
Step 1: Base Coating
-
Clean the surface:
Start by wiping down your pumpkin with a damp cloth to remove any dust or oils. This ensures the paint adheres smoothly and prevents peeling later on. -
Apply the first blue coat:
Using the medium flat brush, apply a layer of deep midnight blue acrylic paint over the entire pumpkin body, stopping just at the base of the stem. -
Let it dry completely:
Allow the first coat to dry for about 20-30 minutes. Dark colors often streak on the first pass, so patience is key here. -
Paint a second coat:
Apply a second coat of blue paint to achieve a rich, opaque finish. If your pumpkin was originally orange, you might even need a third thin coat to fully cover it. -
Paint the stem:
While the body dries, switch to a small round brush and paint the stem with metallic gold paint. Cover all grooved areas thoroughly and let dry.
Clean Lines Hack
Use a white chalk pencil instead of graphite for sketching on the dark blue paint. It shows up clearly and wipes away easily with a damp Q-tip if you make a mistake.
Step 2: Painting the Moons
-
Sketch the layout:
Once the blue base is bone dry, lightly sketch crescent moon shapes onto the pumpkin with a pencil. Vary their sizes and orientation for a natural, scattered look. -
Base coat the moons:
Fill in your moon outlines with the metallic gold acrylic paint using a small round brush. This creates a solid reflective base for the glitter. -
Add glitter texture:
Go over the gold moons with a layer of gold glitter paint. I find that dabbing the paint on rather than brushing it helps deposit more glitter sparkles. -
Refine edges:
If the glitter made the edges messy, use your fine liner brush with a tiny bit of blue base paint to touch up the borders and keep the crescents sharp.
Step 3: Adding Starts & Details
-
Paint large gold stars:
Use the liner brush and gold paint to create a few large, eight-pointed stars. Draw a simple cross first, then add smaller diagonal lines in between. -
Add silver accents:
Switch to metallic silver paint. Paint small five-pointed stars scattered between the moons. Keep these smaller than the gold ones for visual variety. -
Create tiny starbursts:
Paint tiny four-pointed starbursts (just simple crosses) in silver. Place these in the empty ‘dark’ spaces of the pumpkin. -
Apply floating dots:
Dip the non-brush end (the handle tip) of your paintbrush into gold or silver paint. Dot it onto the pumpkin to create perfect tiny circles resembling distant planets. -
Dry and seal:
Allow all detailed work to dry for at least an hour. Optionally, spray with a matte clear coat to protect your celestial artwork.
add texture
For a true 3D effect on the moons, mix baking soda into your gold paint before applying. It creates a crater-like texture that catches the light beautifully.
Display your celestial masterpiece on a mantle with some warm candlelight to make the gold shimmer.
Galaxy Swirl With Speckled Stars
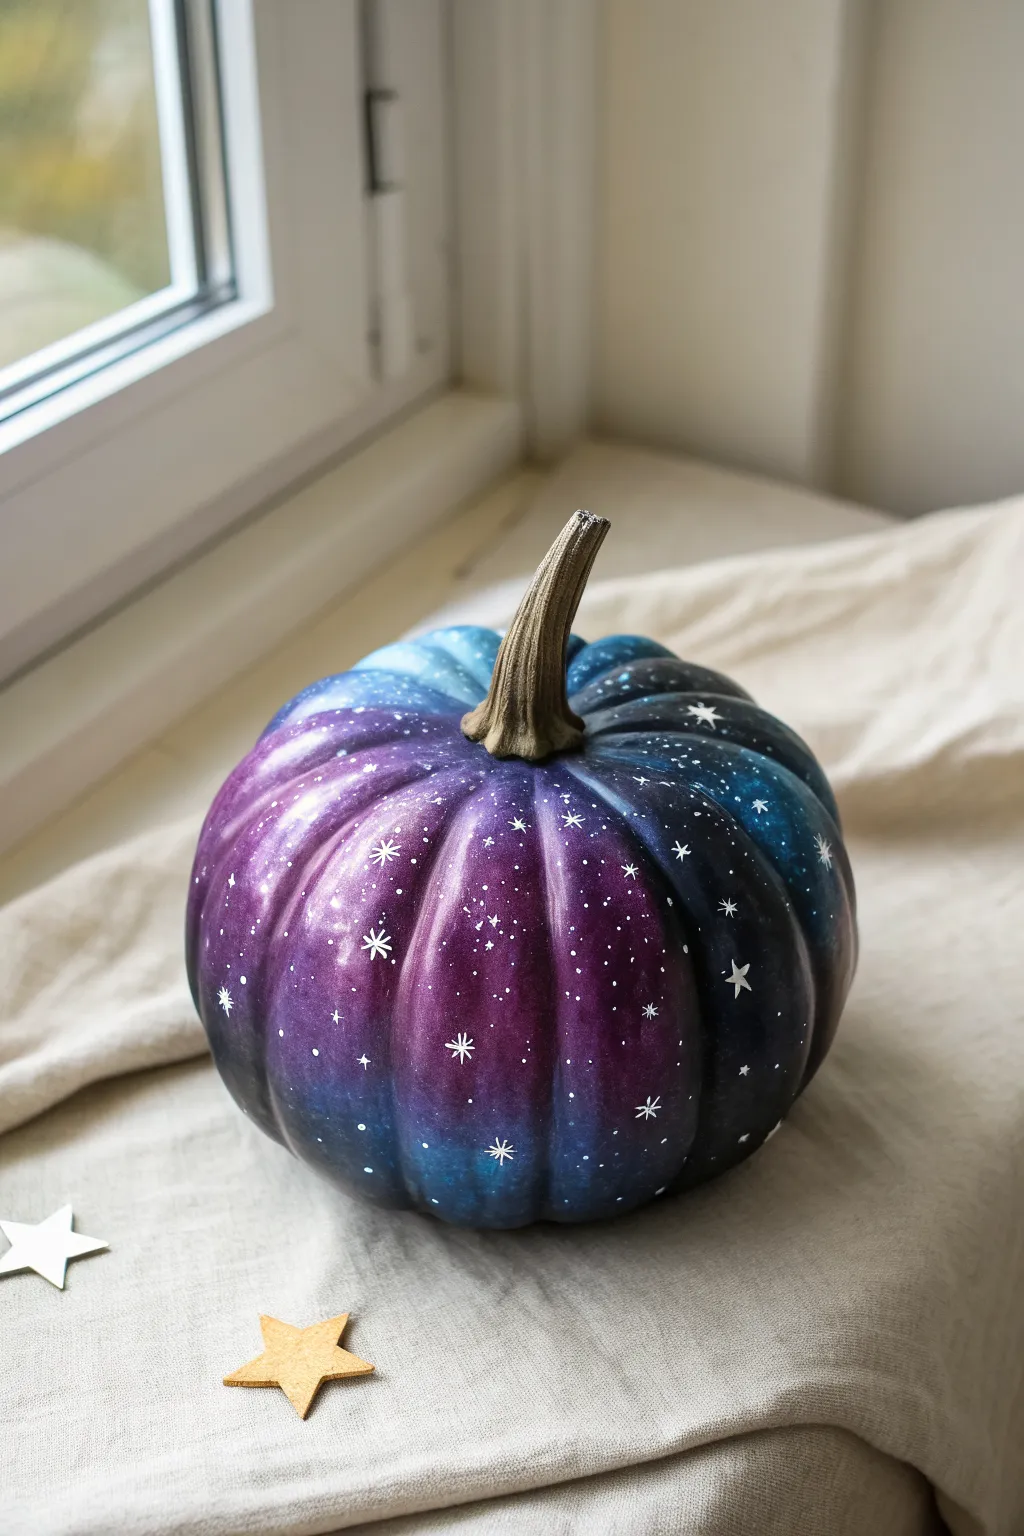
Transform a simple clay pumpkin into a mesmerizing piece of the cosmos with deep, swirling celestial colors. This galaxy-themed project uses blending techniques to create a stunning night sky effect, complete with twinkling stars.
How-To Guide
Materials
- Clay or ceramic bisque pumpkin (clean and dry)
- Acrylic paints: Black, Deep Purple, Phthalo Blue, Teal/Turquoise, White, Gold (optional for stem)
- Sponge applicators or cosmetic sponges
- Soft synthetic paint brushes (flat shader and fine liner)
- Old toothbrush (optional for spatter stars)
- Paper plate or palette
- Water cup and paper towels
- Gloss or satin varnish
Step 1: Base Coat Prep
-
Clean surface:
Begin by ensuring your clay pumpkin is free of dust or oils. Wipe it down with a slightly damp cloth and let it dry completely. -
Apply base color:
Using a flat brush or sponge, cover the entire pumpkin (except the stem) with a coat of black acrylic paint. This dark base is crucial for making the galaxy colors pop later. -
Dry thoroughly:
Allow the base coat to dry fully. If the coverage looks streaky, apply a second coat of black for a solid, opaque finish.
Nebula Nuance
For realistic blending, keep your sponge relatively dry. Too much paint creates blobs; thin, dry layers build a misty, airy nebula effect.
Step 2: Painting the Galaxy
-
Prepare your palette:
Squeeze out small amounts of Deep Purple, Phthalo Blue, Teal, and White onto your palette. Keep them separate for now. -
Sponge the dark blue:
Dampen a sponge slightly and dip it into the Phthalo Blue. Dab off the excess paint on your paper towel until the sponge is almost dry. -
Apply first layer:
Gently sponge the blue onto random sections of the pumpkin, creating cloud-like patches. Don’t cover the black entirely; let the dark background show through in between the clouds. -
Layer the purple:
Using a fresh part of the sponge (or a new one), pick up the Deep Purple. Dab this over and around the blue areas, blending the edges softly where the colors meet. -
Add teal highlights:
Take a very small amount of Teal on a sponge. Lightly dab this into the centers of your blue and purple clusters to create depth and a nebulous glow. Use a light hand here so it doesn’t overpower the dark tones. -
Blend the transitions:
If the edges of your colored clouds look too harsh, go back in with a tiny bit of black on a sponge to soften the transitions back into the shadows.
Cosmic Dust
Mix a tiny drop of iridescent medium or glitter glaze into your teal paint layer. It adds a subtle shimmer that only catches the light at certain angles.
Step 3: Adding the Stars
-
Create a spatter mix:
Mix a small amount of white paint with water until it reaches an ink-like consistency. It should be fluid but still opaque. -
Flick the stars:
Dip an old toothbrush or a stiff brush into the thinned white paint. create a spray of tiny stars by running your thumb across the bristles, aiming at the darker areas of the pumpkin. -
Paint larger stars:
Using your finest liner brush and pure white paint (undiluted), hand-paint specific star shapes. Start with a small dot and pull tiny lines outward to create four-point sparkles. -
Vary star sizes:
Add a few static dots of varying sizes with the tip of a brush handle or a dotting tool to represent distant planets or larger stars.
Step 4: Finishing Details
-
Paint the stem:
Paint the stem in a contrasting color. A metallic gold or a realistic brownish-green works well to frame the galaxy design. -
Dry completely:
Let all paint layers dry for at least an hour to ensure the thickest parts are set. -
Seal the artwork:
Apply a coat of gloss varnish over the entire pumpkin. The gloss finish mimics the shine of a glass marble and deepens the appearance of the galaxy colors.
Place your galactic pumpkin near a window to catch the light and enjoy the stellar view
Ombre Sunset Fade
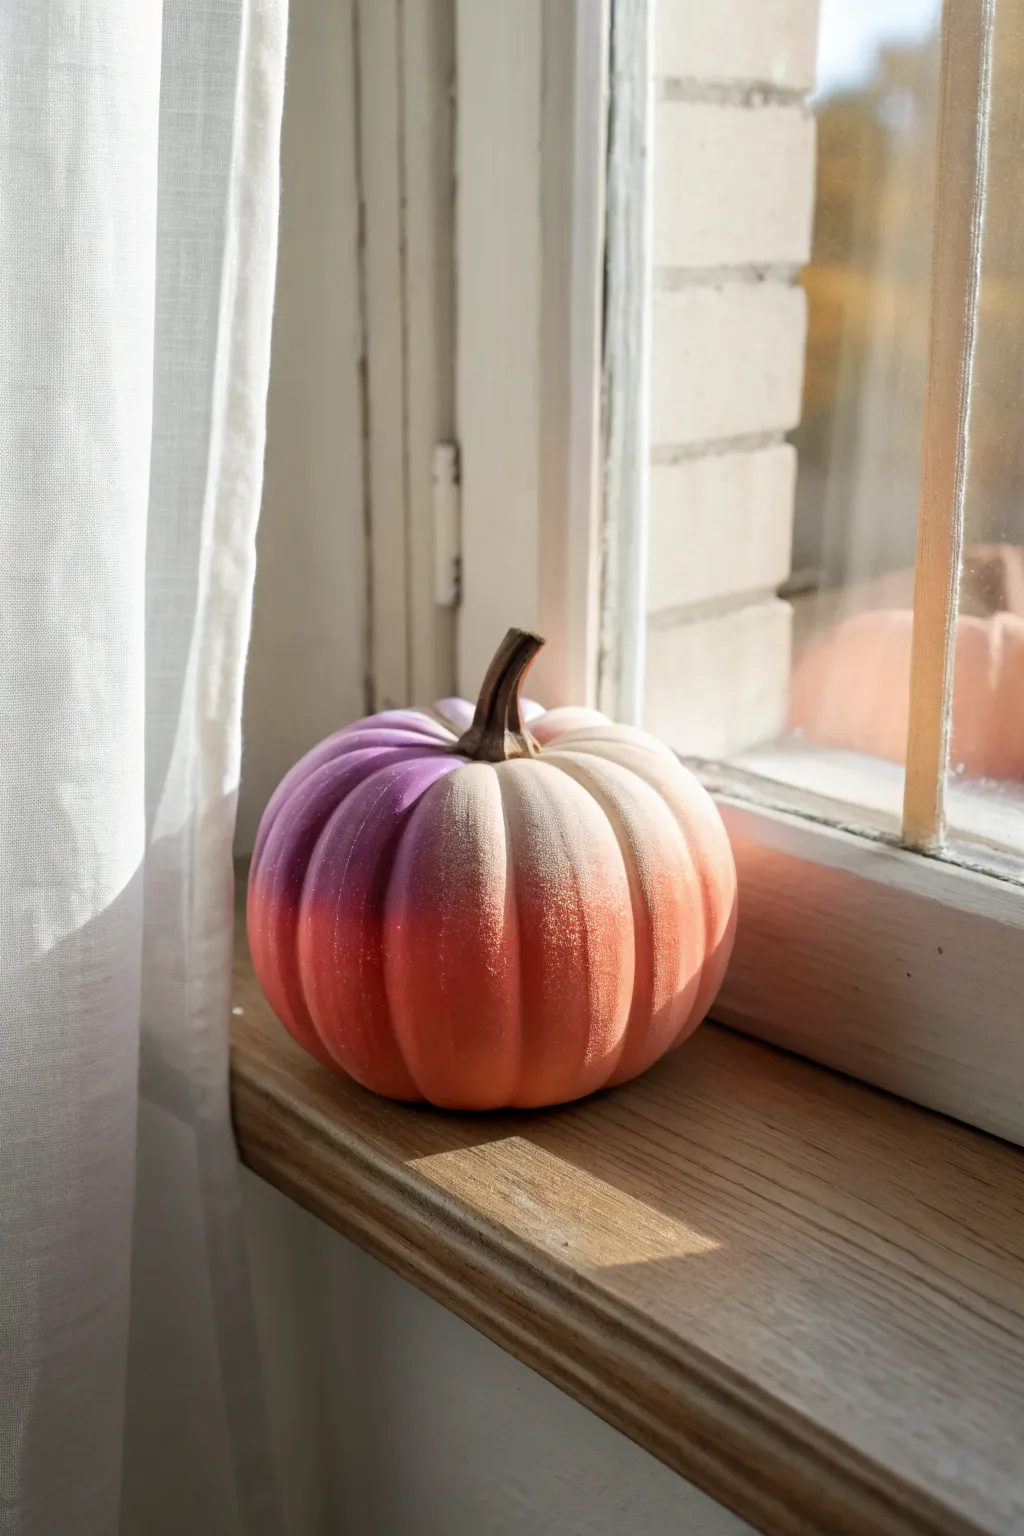
Capture the fleeting beauty of dusk with this stunning two-tone ombre pumpkin painting project. By blending a rich royal purple into a warm, soft peach, you can transform a plain clay pumpkin into a sophisticated piece of seasonal decor that glows on any windowsill.
Step-by-Step Guide
Materials
- Bisque ceramic or faux pumpkin
- Purple chalk or acrylic paint (matte finish)
- Flesh-toned or light orange chalk/acrylic paint
- Medium flat synthetic brush
- Makeup sponge wedge or blending sponge
- Painter’s palette or paper plate
- Dark brown or bronze acrylic paint (for stem)
- Small round detail brush
- Matte spray sealer (optional)
Step 1: Base Preparation
-
Clean surface:
Begin by wiping down your pumpkin with a slightly damp cloth to remove any dust or oils that might prevent the paint from adhering properly. -
Protect the stem:
If you are worried about getting paint on the stem, wrap a small piece of painter’s tape around the base of the stem where it meets the pumpkin body.
Step 2: Color Blocking
-
Apply the bottom coat:
Load your flat brush with the flesh-toned or light orange paint. Paint the bottom half of the pumpkin, stroking upward from the base. -
Set the horizon line:
Continue painting until you reach just past the halfway point of the pumpkin’s height. Don’t worry about a perfect straight line; an irregular edge actually helps with blending later. -
Apply the top coat:
Clean your brush thoroughly. Now, apply the purple paint to the top section, starting near the stem and painting downward. -
Meet the middle:
Bring the purple paint down until it just barely touches and slightly overlaps the wet orange edge. You want a distinct band of color, not a gap.
Muddy colors?
If the purple and orange mix into a murky brown, stop blending. Let it dry completely, then re-apply fresh bands of pure color and blend quickly while wet.
Step 3: Blending the Fade
-
Prepare the sponge:
Moisten your makeup sponge slightly and squeeze out almost all the water so it is barely damp. -
Load gradient colors:
Place a dab of purple and a dab of orange next to each other on your palette, mixing them slightly in the middle to create a transition tone. -
Start sponging:
Dip the sponge into the transition mix. Gently dab along the line where the two colors meet on the pumpkin using a rapid stippling motion. -
Refine the blend:
Work horizontally around the pumpkin. If the blend looks too stark, add a tiny bit more orange to move the gradient up, or purple to move it down. -
Soften the texture:
I prefer to use the clean side of the sponge to lightly tap over the freshly blended area, which removes brush strokes and creates that soft, airbrushed look. -
Dry and assess:
Let this first layer dry for about 15 minutes. Acrylics often darken as they dry, so wait to see the true color shift. -
Second pass:
If the coverage looks streaky, repeat the color blocking and sponging steps. A second coat adds depth and makes the colors pop.
Add some sparkle
While the paint is still tacky during the blending phase, gently blow extra-fine iridescent glitter onto the transition line for a magical twilight effect.
Step 4: Finishing Touches
-
Paint the stem:
Remove any tape you applied. Using the small round detail brush, paint the stem with dark brown or bronze paint. -
Add stem dimension:
For realism, you can dry-brush a tiny bit of the black or lighter brown onto the raised ridges of the stem to highlight the texture. -
Dry completely:
Allow the pumpkin to dry fully for at least an hour before handling it too much. -
Seal the work:
To protect that beautiful matte finish, take the pumpkin to a well-ventilated area and apply a light coat of clear matte spray sealer.
Place your finished pumpkin near natural light to really show off that gorgeous color transition
Blue-and-White Porcelain-Inspired Motifs
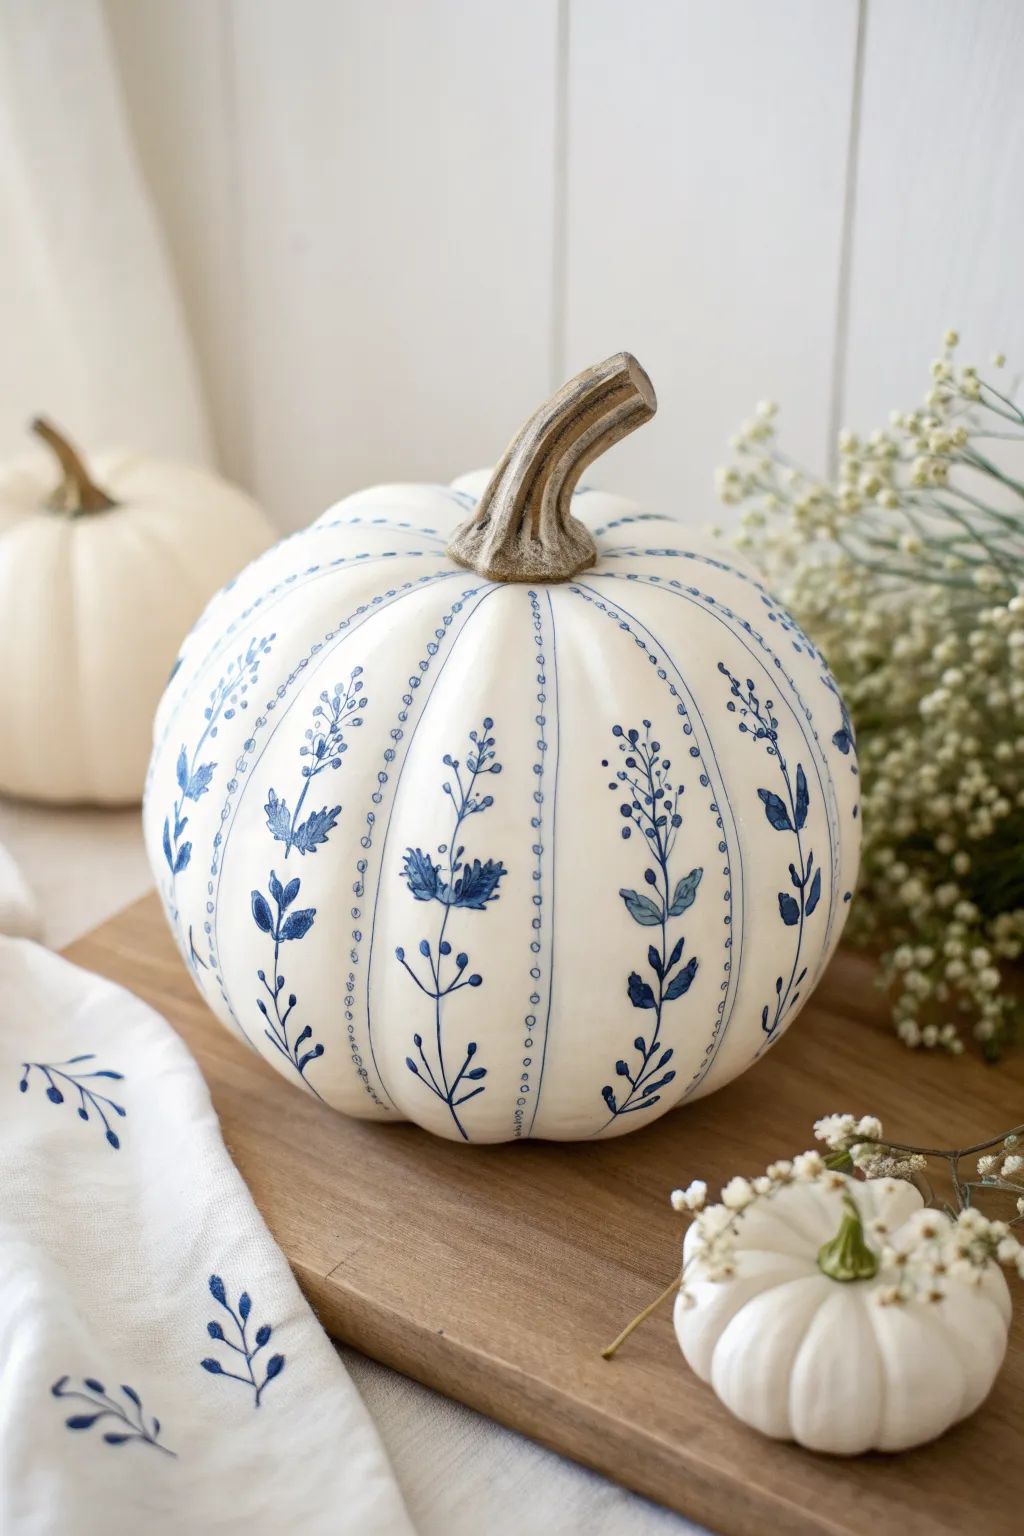
Elevate your autumn decor with this stunning blue-and-white porcelain-inspired pumpkin that blends traditional elegance with seasonal charm. The delicate botanical motifs painted on a crisp white background create a sophisticated centerpiece that feels both timeless and fresh.
Step-by-Step Tutorial
Materials
- Large faux pumpkin (smooth surface, preferably white)
- White matte acrylic paint (if pumpkin isn’t already white)
- Cobalt blue acrylic paint (high flow or fluid acrylics work best)
- Ultramarine blue acrylic paint (for darker accents)
- Fine liner brush (size 0 or 00)
- Small round brush (size 2)
- Pencil (light sketching)
- Palette or small dish
- Paper towels
- Clear matte or satin sealant spray
Step 1: Preparation and Base Coat
-
Prepare the surface:
Wipe down your faux pumpkin with a slightly damp cloth to remove any dust or oils. This ensures your paint adheres perfectly to the surface. -
Apply the base color:
If your pumpkin is orange or a creamy off-white, apply two to three coats of matte white acrylic paint. Let each coat dry completely. You want a finish that resembles clean ceramic. -
Protect the stem:
I prefer to carefully tape off the base of the stem with painter’s tape to keep it natural, or you can paint carefully around it later. -
Plan the sections:
Identify the natural ribs or indentations of the pumpkin. These vertical grooves will serve as the dividing lines for your pattern.
Step 2: Painting the Structure
-
Paint the dividing lines:
Load your fine liner brush with cobalt blue paint thinned slightly with water. Paint thin, vertical lines following the deepest part of each groove from the stem down to the base. -
Add the decorative dots:
Along both sides of your vertical blue lines, paint tiny, evenly spaced dots using the very tip of your liner brush. This creates a beaded border effect typical of vintage porcelain patterns. -
Create center guidelines:
Lightly sketch a very faint pencil line down the center of each protruding pumpkin ‘slice’ (the area between your dotted borders). This will act as the stem for your botanical design.
Paint Slipping?
If the blue paint beads up or slides off the pumpkin surface, the faux material is too slick. Lightly sand the area with fine-grit sandpaper or apply a layer of clear gesso first.
Step 3: Creating the Botanical Motifs
-
Paint the main stems:
Using your liner brush and the cobalt blue, paint a thin, waving line over your pencil guide. Don’t make it perfectly straight; a slight organic curve looks more natural. -
Start the leaves:
Switch to the small round brush. Press the belly of the brush down and lift up quickly to create teardrop-shaped leaves branching off the main stem. Alternate sides as you move up. -
Vary the shades:
Mix a tiny drop of ultramarine blue into your cobalt for some of the lower leaves to create depth. Porcelain painting often has subtle variations in ink saturation. -
Add floral clusters:
At the top of some stems, or branching off larger leaves, use the tip of the round brush to dab small clusters of dots or tiny petal shapes to represent flower buds. -
Detail the larger leaves:
For the larger leaves near the bottom, add a second stroke next to the first to widen them, creating a more fern-like appearance. -
Fill the negative space:
If a section feels too empty, add small, floating sprigs or tiny individual leaves between the main vine and the dotted border.
Pro Tip: Vintage Look
To mimic authentic aged porcelain, water down your blue paint significantly for the leaves. This creates a watercolor-effect where the edges are darker than the centers.
Step 4: Finishing Touches
-
Address the ends:
Ensure your vines taper off elegantly near the stem and the base of the pumpkin. They shouldn’t just stop abruptly. -
Clean up mistakes:
If you smudge any blue paint, wait for it to dry completely, then carefully touch it up with your white base paint. -
Let it cure:
Allow the painted designs to dry for at least 24 hours. Acrylic needs time to bond, especially on slick faux pumpkin surfaces. -
Seal the artwork:
Spray the entire pumpkin with a clear matte or satin sealant. This protects your hand-painted motifs and gives the pumpkin that final ceramic-like sheen. -
Style your centerpiece:
Arrange your masterpiece on a wooden board or linen runner, perhaps accompanied by smaller white pumpkins or dried baby’s breath to complete the look.
Enjoy the sophisticated atmosphere this hand-painted ceramic-style pumpkin brings to your seasonal display
Spider Web With Crisp Negative Space
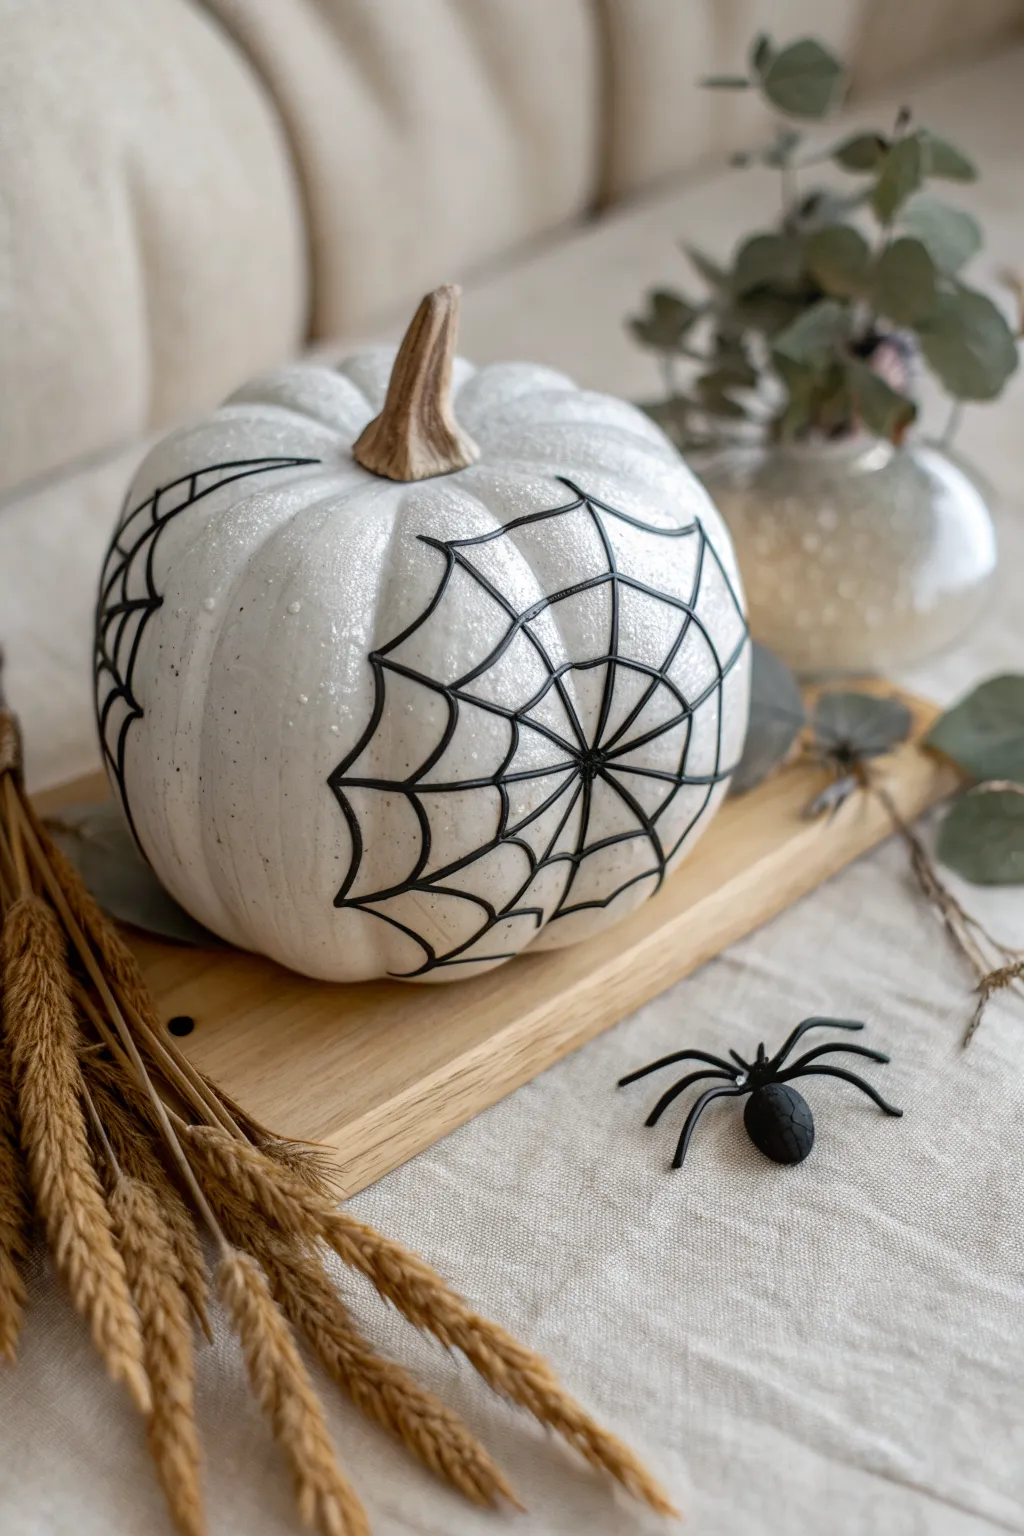
Transform a plain ceramic or craft pumpkin into a sophisticated Halloween centerpiece with this striking spiderweb design. The crisp black lines against a textured white background create a modern look that feels festive without being overly spooky.
How-To Guide
Materials
- White ceramic or faux craft pumpkin (smooth surface)
- White acrylic paint (matte or satin)
- Fine white glitter or shimmer dust (optional)
- Black 3D dimensional fabric paint or a fine-tip black paint marker
- Soft flat paintbrush
- Pencil (light H grade)
- Damp cloth
- Clear spray sealant (matte finish)
Step 1: Preparing the Base
-
Clean surface:
Begin by wiping down your pumpkin with a damp cloth to remove any dust, oils, or price tag residue. Let it dry completely. -
Base coat:
Apply a coat of white acrylic paint over the entire pumpkin, including the stem if you wish, though leaving a natural stem creates nice contrast. Use long, smooth strokes to minimize brush marks. -
Add shimmer (optional):
If you want the subtle sparkle seen in the photo, sprinkle a very fine dusting of white glitter over the wet paint immediately after applying the second coat. Alternatively, mix a little shimmer dust directly into the paint. -
Dry time:
Allow the base coat to cure fully for at least 2-3 hours. The surface needs to be perfectly dry so the black lines don’t bleed or smudge.
Shaky Hands?
Rest your pinky finger against the pumpkin surface while drawing lines. This acts as a stabilizer and gives you significantly better control over the curves.
Step 2: Designing the Web
-
Map the center:
Choose a focal point on the side of the pumpkin for the center of your main web. This shouldn’t be perfectly centered; slightly off-center looks more organic. -
Sketch radial lines:
Using a very light pencil touch, draw 6 to 8 straight lines radiating outward from your chosen center point, like cutting a pie. -
Extend over curves:
Let these radial lines follow the natural curvature of the pumpkin, extending almost to the top and bottom ridges. -
Connect the webbing:
Starting near the center, lightly sketch curved ‘U’ shapes connecting the radial lines. As you move outward, make the ‘U’ shapes wider and larger. -
Secondary web:
Sketch a partial web peeking out from another section of the pumpkin, perhaps near the side or back, to create visual interest from all angles.
Step 3: Inking the Details
-
Test flow:
If using dimensional (puffy) paint, squeeze a small amount onto a paper towel first to ensure there are no air bubbles and the flow is smooth. -
Trace radial lines:
Starting from the center point, carefully trace your pencil radial lines with the black paint or marker. I find it easier to pull the pen toward me rather than pushing it away. -
Anchor points:
Make the center point where the lines meet slightly thicker to create a solid anchor for the design. -
Trace the scalloped edges:
Trace the connecting curved lines. Try to do each curve in one continuous motion to keep the line crisp and fluid. -
Clean up:
If you make a small mistake with dimensional paint, use a toothpick to quickly lift the excess paint away before it sets. -
Let it set:
Allow the black design to dry completely. Dimensional paint often takes longer than standard acrylics—usually 4 to 6 hours—so be patient. -
Erase guidelines:
Once the black lines are rock hard, gently erase any visible pencil marks with a clean white eraser. -
Final seal:
Finish by misting the entire pumpkin with a clear matte spray sealant to protect your design from chipping and to lock in any glitter.
Clean Lines Pro Tip
For ultra-crisp lines without dimensional paint, use a black oil-based paint pen. It glides over textured surfaces better than water-based markers.
Now you have a chic, custom piece of autumn decor ready to display on your mantle or dining table
Monster Eye Pattern in Bright Colors
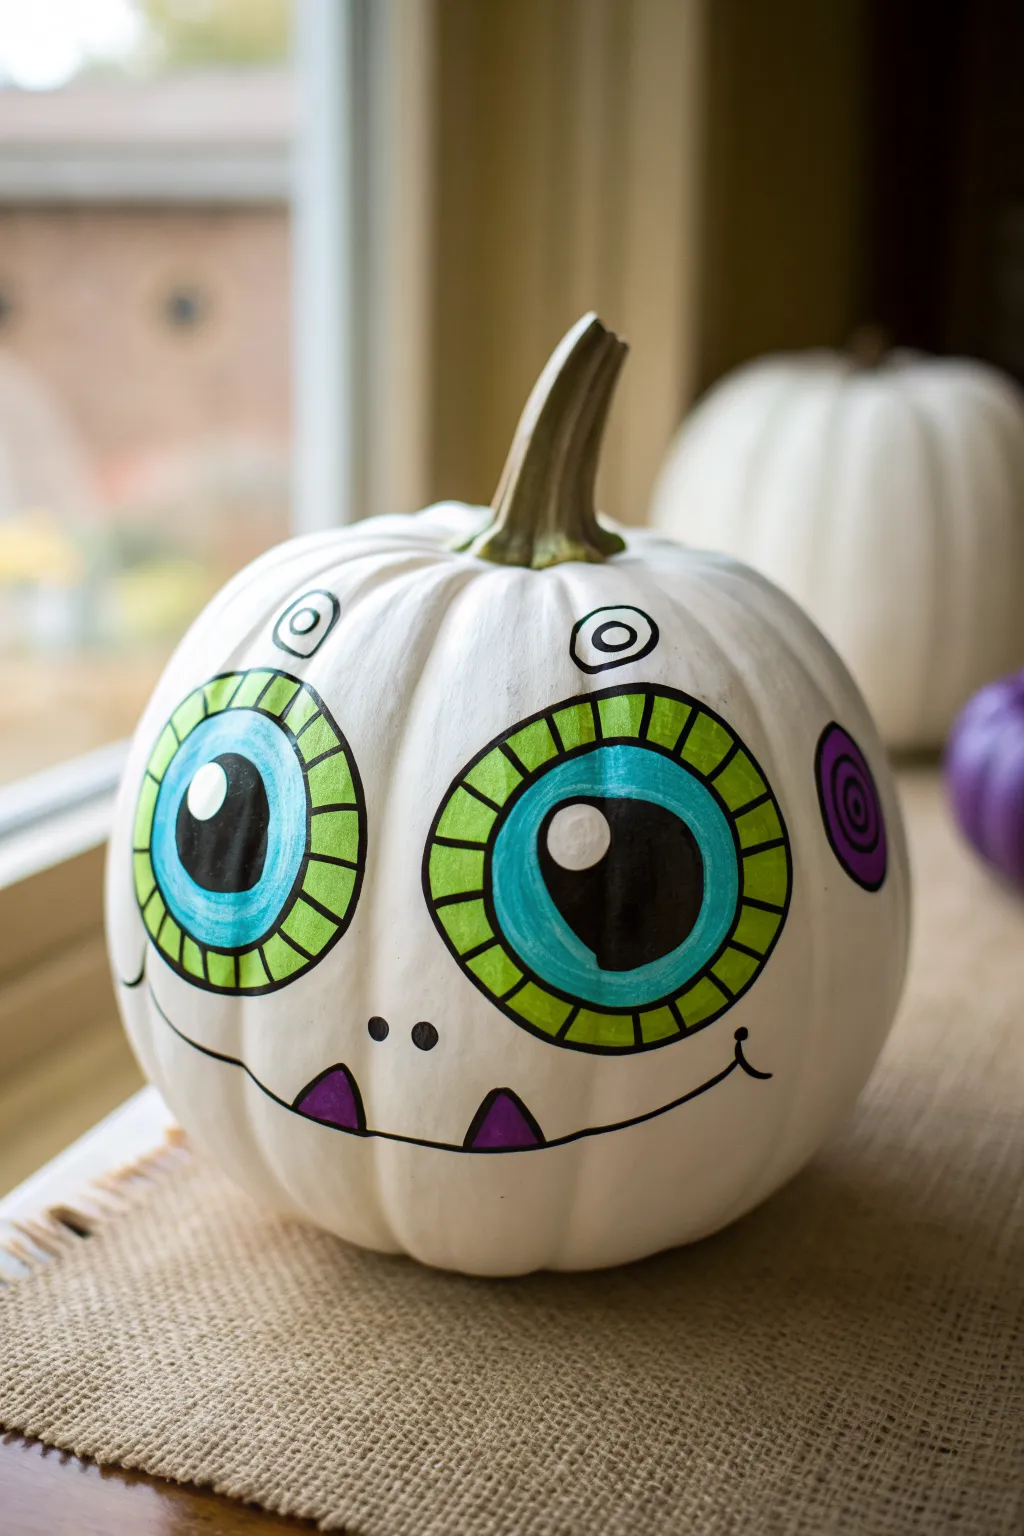
Transform a plain white pumpkin into a friendly little monster with oversized, colorful eyes. This playful pattern uses bright greens, blues, and purples to create a cartoonish expression that isn’t too scary for the little ones.
Detailed Instructions
Materials
- White clay or ceramic pumpkin (smooth surface)
- Acrylic paints (bright lime green, cyan blue, royal purple, white, black)
- Black paint pen (fine and medium tip)
- Pencil with eraser
- Round paintbrushes (size 2 and size 4)
- Cup of water and paper towels
- Palette or paper plate
Step 1: Drafting the Design
-
Clean surface:
Wipe down your pumpkin with a slightly damp cloth to remove any dust or oils, ensuring the paint adheres properly. -
Sketch the eyes:
Using a pencil, lightly draw two large circles for the eyes. They should take up a significant portion of the pumpkin’s face. Inside these, draw slightly smaller circles for the irises. -
Add pupils:
Sketch a large black pupil inside each iris, positioned slightly off-center to give the monster a goofy look. Add a small ‘highlight’ circle within each pupil. -
Create the segments:
Around the outer ring of the eye (the sclera area), draw radial lines to create segments, making it look like a wheel or a slice of kiwi. -
Draft the mouth and teeth:
Below the eyes, lightly sketch a wide, curved smile line. Add two small triangular teeth poking up from the bottom lip line.
Step 2: Painting the Base Colors
-
Paint the irises:
Using your cyan blue acrylic paint and a size 4 brush, fill in the large inner circle of both eyes. Be careful conflicting with the pupil area, though we will paint that black later. -
Fill the outer ring:
Switch to your bright lime green paint. Carefully fill in the segmented ring around the blue iris. You don’t need to paint the individual segments yet; just lay down a solid ring of green color. -
Second coat:
Allow the first layer of blue and green to dry for about 10 minutes. Apply a second coat to ensure the colors are opaque and bright against the white background. -
Paint the teeth:
Use a small brush and royal purple paint to fill in the two triangular teeth on the mouth line. -
Add cheek details:
Paint a small purple circle on the right side of the pumpkin, away from the eye, to act as a decorative cheek spot.
Smudge Patrol
If you smudge marker ink on the ceramic, quickly wipe it with a damp Q-tip before it sets. If it dries, paint over the mistake with white acrylic.
Step 3: Adding Details and Outlines
-
Black out the pupils:
Once the blue paint is completely dry, use black paint to fill in the large pupil circles. Be very careful to leave the small white highlight circle unpainted. -
Enhance the highlight:
If you accidentally painted over the highlight, or if the base ceramic color isn’t bright enough, add a dot of pure white paint to the pupil highlight. -
Outline the eyes:
Take your black paint pen (medium tip is best here). Carefully trace the outer edge of the green ring and the inner edge where the green meets the blue. -
Draw segment lines:
Use the paint pen to draw the radial lines over the green paint, creating the segmented ‘kiwi’ effect we sketched earlier. -
Trace the pupil:
Outline the black pupil and the white highlight with your paint pen to make the edges crisp. -
Define the mouth:
Trace the main smile line with the black marker. Add tiny perpendicular tick marks at the ends of the smile for dimples. -
Nose and teeth detail:
Place two small black dots between the eyes for nostrils. Outline the purple teeth triangles with the pen. -
Final decorative touches:
Draw small spirals or concentric circles above the eyes using the black pen. Add a spiral detail inside the purple cheek spot.
Glow Up
Use glow-in-the-dark acrylic paint for the lime green eye rings and the white eye highlights so the monster glows when the lights go out.
Place your finished monster pumpkin on a windowsill or porch to greet visitors with its silly stare
360-Degree Landscape Mural Pumpkin
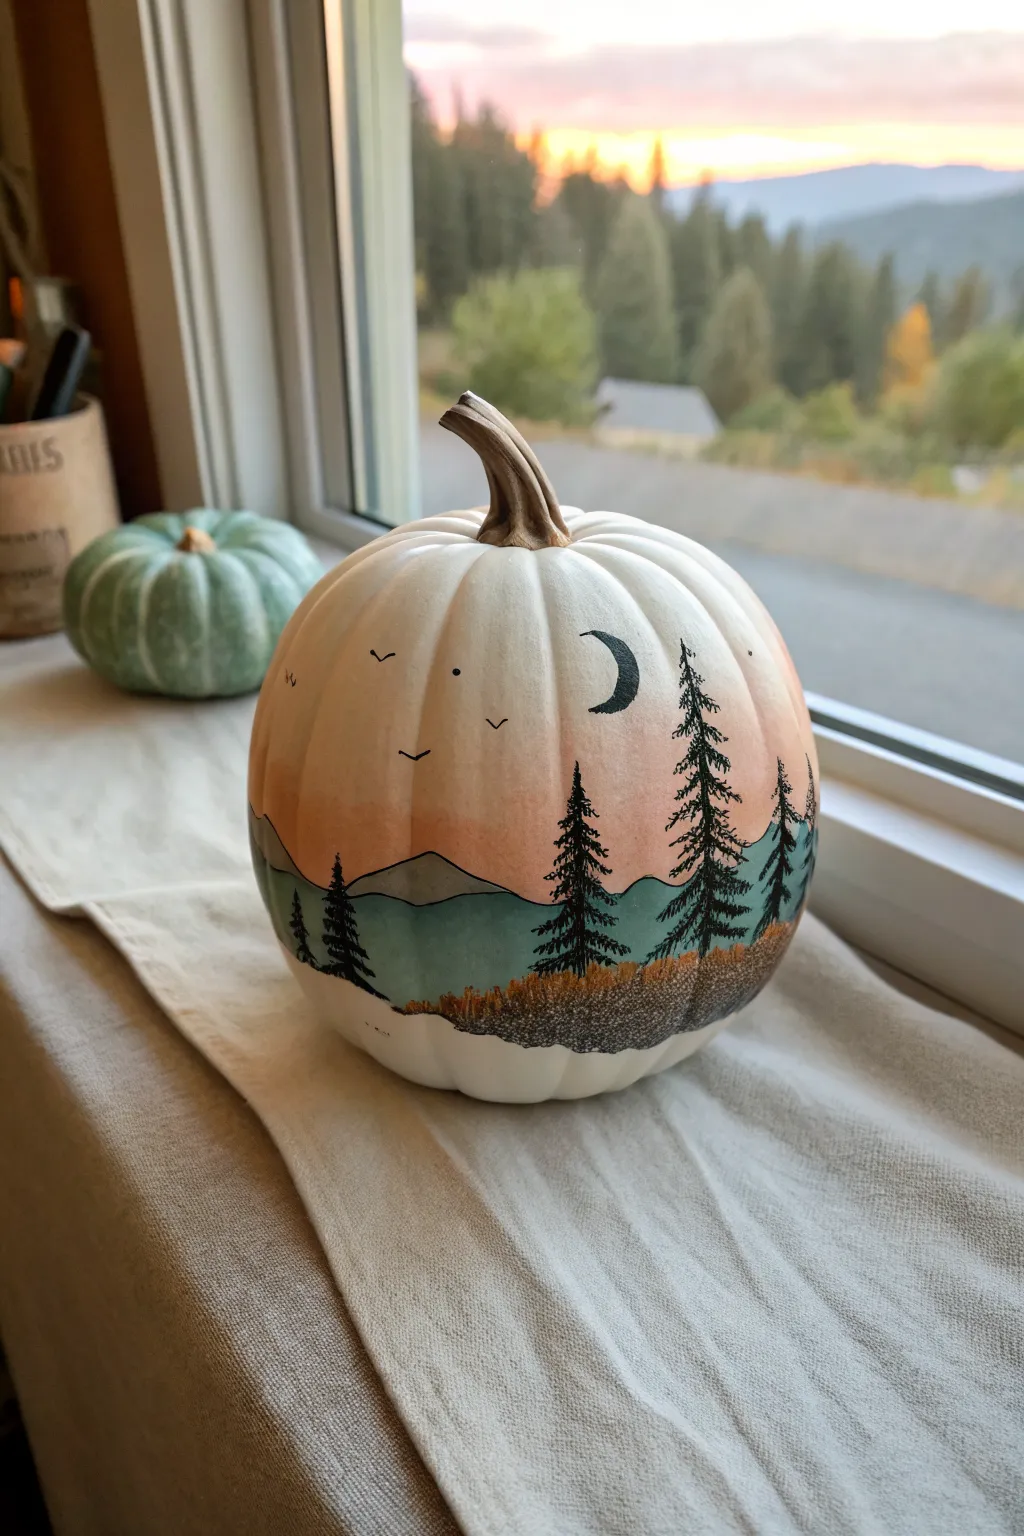
Transform a simple faux pumpkin into a stunning work of art with this serene 360-degree landscape mural. Featuring a soft peach sunset fading into misty teal mountains and crisp pine silhouettes, this piece brings the tranquil beauty of nature right to your windowsill.
How-To Guide
Materials
- Medium-sized white or cream faux pumpkin (smooth surface works best)
- Acrylic paints: Peach/Coral, White, Teal/Blue-Green, Black, Burnt Sienna/Brown
- Pencil (HB or lighter)
- Wide flat brush or sponge
- Small round detail brush (size 0 or 1)
- Fine-point black permanent marker or paint pen (optional)
- Water cup and paper towels
- Matte finish spray sealant
Step 1: Creating the Atmospheric Sky
-
Clean surface:
Begin by wiping down your faux pumpkin with a damp cloth to remove any dust or oils that might prevent the paint from sticking. -
Mix the sunset hue:
Mix a soft peach color using white and a small touch of coral or orange acrylic paint. You want this to be very pale and airy. -
Apply the wash:
With a damp sponge or wide brush, apply a thin, translucent wash of the peach color around the upper-middle section of the pumpkin. Keep the strokes horizontal and varied. -
Fade the edges:
Before the paint dries, use a clean, slightly damp brush to soften the top edge into the white of the pumpkin and the bottom edge where the mountains will be. This creates a dreamy gradient effect. -
Dry time:
Allow this sky layer to dry completely. Acrylics on plastic surfaces can smear easily if not fully set.
Smooth Surface Secret
Faux pumpkins often have prominent seams. Sand the seam line gently with fine-grit sandpaper before painting to ensure your horizon line isn’t interrupted by a plastic ridge.
Step 2: Painting the Mountain Range
-
Sketch the horizon:
Lightly sketch a rolling horizon line around the entire pumpkin with a pencil. Vary the height to create interesting peaks and valleys. -
Mix teal tones:
Create a muted teal color by mixing your blue-green paint with a bit of grey or white. It should look misty and atmospheric. -
Paint the background mountains:
Fill in the mountain shapes below your pencil line with the teal mixture. I find that slightly watering down the paint helps it flow over the pumpkin’s ridges smoothly. -
Add depth:
While the teal is wet, you can add tiny touches of darker blue to the bottom of the mountains to suggest shadow and form. -
Define the layers:
Once the first teal layer is dry, you can paint a second, lower ridge of mountains in a slightly darker shade if you want more depth, though a single layer works beautifully too.
Step 3: Detailing the Silhouettes
-
Ground the scene:
Mix a brownish-orange shade using burnt sienna and dabbing method at the very base of the mountains to create a textured, grassy foreground. -
Stipple texture:
Use an old, stiff brush to stipple small dots of black over the brown area to simulate low-growing shrubs and uneven terrain. -
Draw the tree trunks:
Using your smallest detail brush and black paint (or a paint pen), draw vertical lines for the tree trunks. Place them randomly, grouping some together for a natural look. -
Add pine branches:
Starting from the top of each trunk, use short, downward-flicking strokes to create the pine branches. Keep the top narrow and widen the tree as you move down. -
Vary sizes:
Make sure to paint trees of different heights. Some should be tall foreground trees, while others should be smaller to look further away. -
Painting the moon:
Paint a small, sharp crescent moon in the sky area using black paint. Position it near a tree top for compositional balance. -
Adding birds:
With the very tip of your brush or a fine pen, add tiny ‘v’ or check-mark shapes in the sky to represent distant birds. -
Clean up edges:
Check the bottom edge of your mural. If it looks messy, you can clean it up with a cotton swab dipped in rubbing alcohol or blend it into the white. -
Seal the artwork:
Once all paint is thoroughly dry (give it at least an hour), spray the entire pumpkin with a matte sealant to protect your landscape from scratching.
Golden Hour Glow
For a magical touch, mix a tiny amount of metallic gold paint into your peach sky wash or lightly dry-brush gold on the tips of the ‘grass’ texture for a shimmering sunset effect.
Place your finished pumpkin near a window to let the natural light complement your beautiful painted horizon