I love how air dry clay lets you make chic, grown-up pieces that actually look at home on your coffee table or bathroom vanity. Here are my favorite air dry clay craft ideas for adults—classic staples first, then the fun, unexpected upgrades.
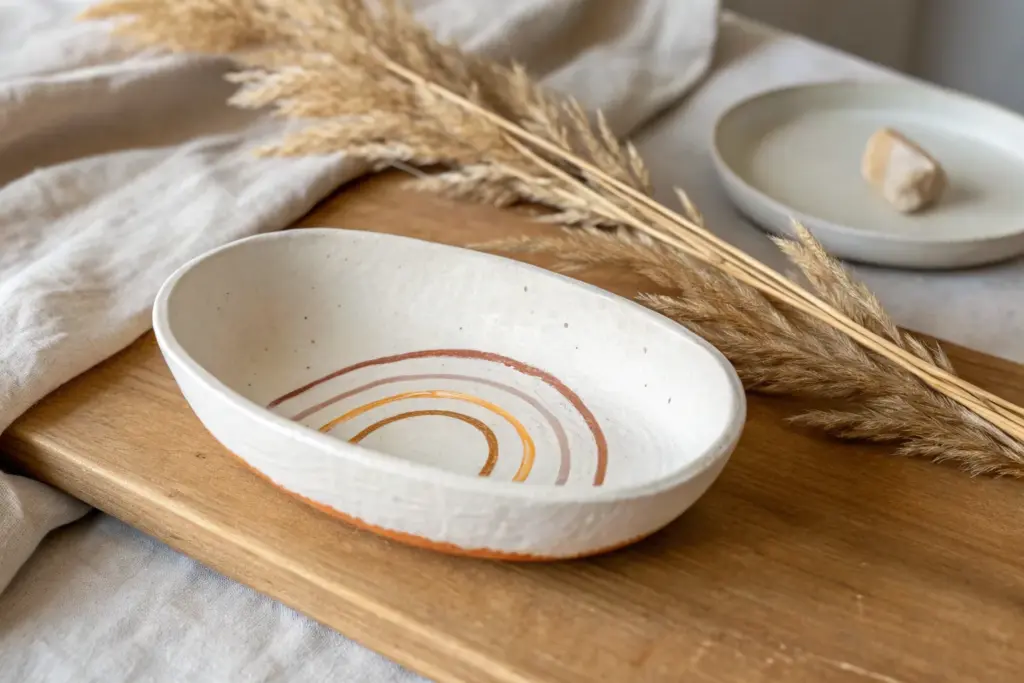
Minimal Stamped Trinket Dish
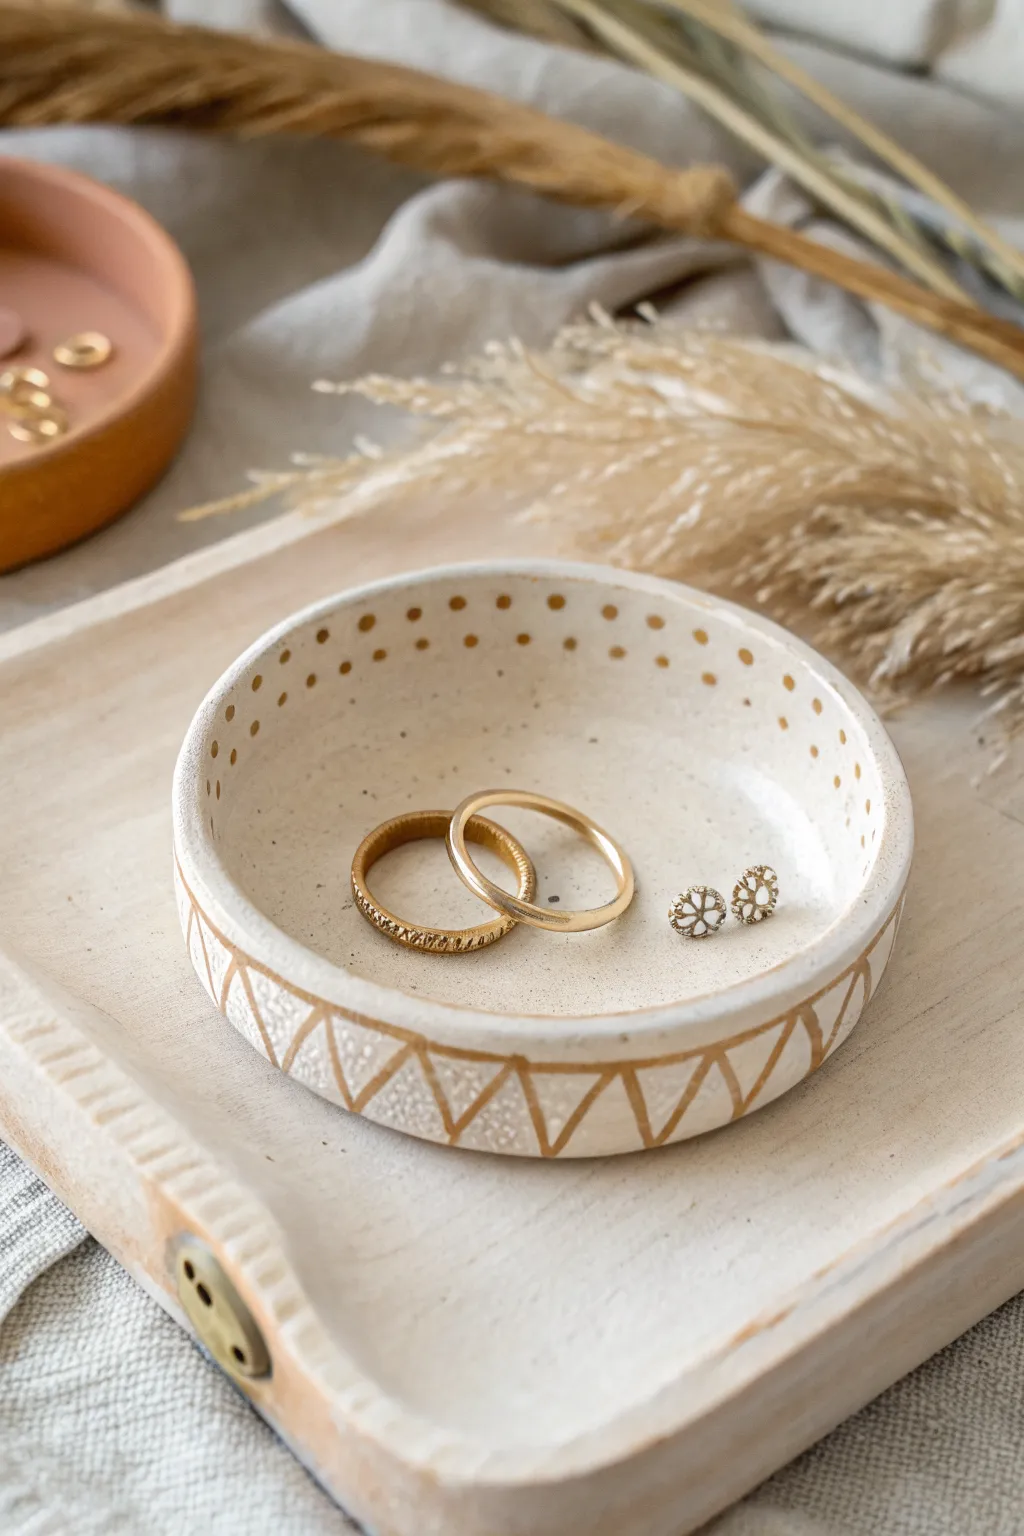
This charming, handmade dish blends a raw, natural clay texture with delicate gold detailing to create a unique display for your favorite rings. The simple stamped rim and hand-painted geometric patterns give it a lovely bohemian touch that looks far more expensive than it is.
Detailed Instructions
Materials
- White or natural air-dry clay
- Rolling pin
- Circle cutter (or a bowl/glass to trace)
- Small bowl (for shaping – slightly larger than intended dish)
- Craft knife
- Water and sponge
- Fine-grit sandpaper (220-400 grit)
- Gold acrylic paint or gold leafing pen
- Fine-point paintbrush
- Small tool for indentations (skewer or chopstick)
- Gloss or matte varnish (optional)
Step 1: Shaping the Base
-
Prepare the Clay:
Cut off a chunk of air-dry clay roughly the size of a tennis ball. Knead it in your hands for a minute until it feels warm, pliable, and free of air bubbles. -
Roll it Out:
Place the clay on a smooth surface or a silicone mat. Using your rolling pin, roll the clay out evenly until it is about 1/4 inch thick. Try to keep the thickness consistent across the entire slab. -
Cut the Circle:
Define the shape of your dish by pressing a large cookie cutter into the clay. If you don’t have a cutter, place a small bowl or wide-mouthed glass face down and carefully trace around it with a craft knife. -
Smooth the Edges:
Dip your finger into a little water and gently run it along the cut edge of the clay circle. This removes any harsh lines or jagged bits left by the cutting tool. -
Create the Dots:
While the clay is still flat, take your indentation tool (like the blunt end of a skewer or a small dowel). Press gently into the clay near the outer rim to create a row of small dots. I find spacing them about 1/4 inch apart creates a nice rhythmic pattern. -
Form the Dish Shape:
Carefully lift your clay circle and place it inside your shaping bowl. Gently press the center down so the clay takes on the slight curve of the bowl, lifting the edges naturally. -
Dry Completely:
Leave the clay in the bowl to dry. Depending on your humidity levels, this usually takes 24 to 48 hours. The clay should turn pure white and feel hard to the touch.
Clean Edges Trick
Use a damp makeup sponge instead of your finger to smooth the clay edges before drying. It provides a more uniform finish without leaving fingerprints embedded in the soft clay.
Step 2: Refining and Decorating
-
Sand for Smoothness:
Once fully dry, remove the dish from the mold. Use fine-grit sandpaper to gently buff the edges and any rough spots on the surface. Wipe away the dust with a barely damp cloth. -
Prepare the Gold Paint:
Shake your gold acrylic paint well or prime your gold leafing pen. If using paint, squeeze a small amount onto a palette. -
Paint the Dot Details:
Using a very fine paintbrush, carefully fill in the indented dots on the inside rim with gold paint. A small dot of paint in each depression makes them pop beautifully. -
Outline the Rim:
Paint a thin, steady line of gold along the very top edge of the dish rim. This frames the piece and gives it a polished look. -
Add the Zigzag Pattern:
On the exterior vertical edge of the dish, paint a continuous zigzag or triangle pattern. Start with the diagonal lines slanting one way, then connect them with lines slanting the opposite way. -
Fill the Bottom Line:
Paint a stripe around the bottom edge of the rim where the zigzag pattern ends, effectively ‘closing’ the geometric design. -
Let Paint Cure:
Allow the gold paint to dry completely according to the manufacturer’s instructions. -
Seal the Dish:
To protect your jewelry dish, brush on a coat of clear varnish. A matte finish keeps the natural clay look, while a gloss finish provides a ceramic-like shine.
Make it a Set
Create three dishes in graduating sizes that can stack inside one another. Paint the gold patterns slightly differently on each (dots, stripes, and zigzags) for a cohesive collection.
Place your favorite rings inside and enjoy your beautiful new vanity organizer


Ring Cone and Catch Dish Set
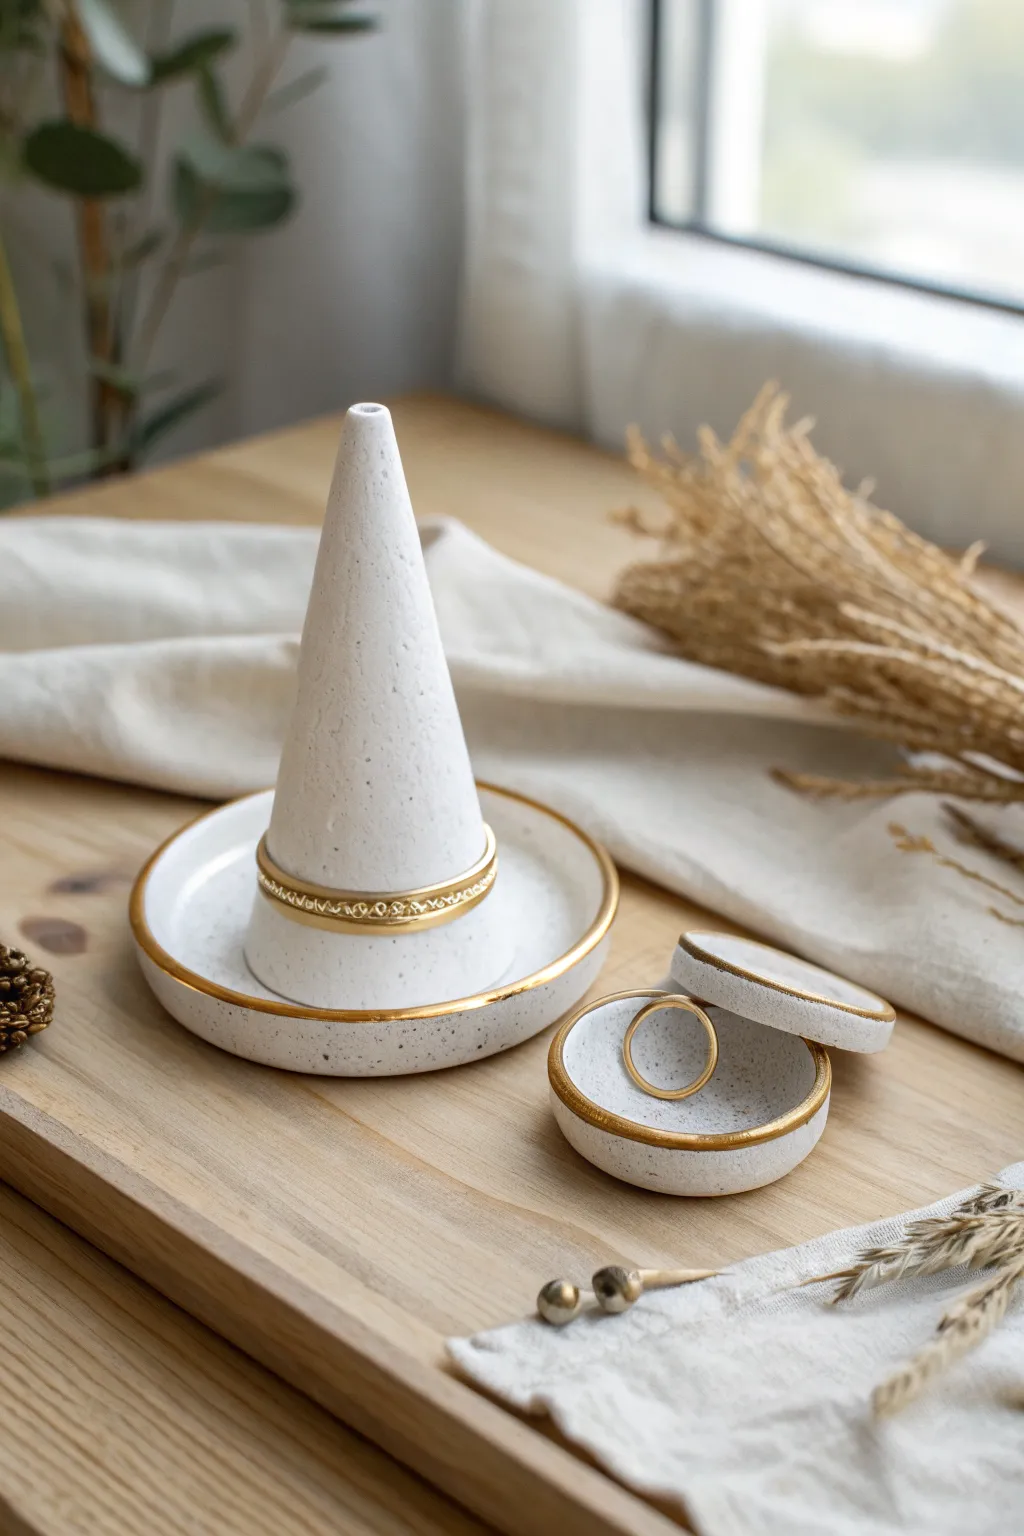
Elevate your vanity with this sophisticated white clay jewelry organizer featuring a sleek ring cone and a matching trinket box. The speckled stone texture and hand-painted gold rims give it a high-end, ceramic look without the need for a kiln.
Step-by-Step Tutorial
Materials
- White or speckled air dry clay
- Rolling pin
- Circle cutters (various sizes) or jar lids
- Sharp craft knife
- Small bowl of water
- Sponge or soft paintbrush
- Fine grit sandpaper (320-400 grit)
- Gold leaf paint or liquid gilding
- Fine detail paintbrush
- Gloss or satin varnish (optional for sealing)
Step 1: Creating the Ring Cone Dish
-
Roll the base:
Start by taking a generous ball of clay and rolling it out to an even thickness of about 1/4 inch. Use a large circle cutter or trace around a bowl to cut out the base for your main dish. -
Shape the rim:
To create the raised lip, gently pinch the outer edge of the circle upwards. Smooth the transition with a wet finger so the curve looks seamless rather than sharp. -
Form the cone:
Grab a separate lump of clay and roll it into a ball, then begin rolling it back and forth on your work surface while applying more pressure to one side. This will naturally form a cone shape. -
Refine the cone:
Stand the cone up and tap the base lightly on the table to flatten it. Use your fingers or a smoothing tool to ensure the tip is rounded, not needle-sharp, and the sides are symmetrical. -
Attach to base:
Score (scratch cross-hatch marks into) the bottom of the cone and the center of your dish. Add a dab of water to the scored areas and press the cone firmly into the center of the dish. -
Blend the seam:
Using a modeling tool or your finger, drag a little clay from the base of the cone down onto the dish to merge them. Smooth this connection with a damp sponge until the seam disappears completely.
Smooth Operator
Keep a small bowl of water nearby while working. If cracks appear, dip your finger in water and rub gently to create ‘slip,’ filling the gaps like spackle.
Step 2: Crafting the Trinket Box
-
Cut the box components:
Roll out more clay and cut two identical small circles. One will be the base of your trinket box, and the other will become the lid. -
Create the walls:
Roll a long snake of clay and flatten it into a long ribbon. The width of this ribbon determines the height of your box. -
Assemble the box:
Score the edge of one circle base. Wrap the flat ribbon of clay around this edge to create the walls. Cut off excess length and blend the vertical seam where the ribbon ends meet, as well as the bottom seam connecting it to the base. -
Form the lid lip:
For the lid to sit securely, you need an inner lip. Roll a very thin snake of clay and attach it to the underside of your second circle, slightly indented from the edge, so it fits snugly inside the box walls.
Texture Twist
Mix dried coffee grounds or black pepper into your white clay before rolling. This creates a stunning faux-granite speckled effect once sanded.
Step 3: Finishing Touches
-
Drying time:
Place all pieces on a clean, flat surface to dry. I find that flipping the flatter pieces occasionally helps prevent warping. Let them dry for 24-48 hours until they are completely white and hard. -
Sanding:
Once bone dry, take your fine-grit sandpaper and gently buff the surfaces. Focus on the rims and the cone tip to ensure everything feels professionally smooth. -
Clean up:
Wipe away all the sanding dust with a slightly damp cloth or a dry tack cloth. The surface needs to be dust-free for the gold paint to adhere properly. -
Gild the edges:
Dip a fine detail brush into your liquid gold or gold leaf paint. Carefully paint the top rim of the large dish, the rim of the trinket box, and the edge of the lid. -
Add detail:
For the look in the photo, add a decorative gold band around the base of the cone where it meets the dish. Use a steady hand to keep the line even. -
Seal (Optional):
If you want to protect the clay from moisture or tarnish, apply a clear varnish over the entire piece, avoiding the gold areas if you want them to remain extra metallic.
Display your favorite rings and studs on your new handcrafted vanity set and enjoy the organization


Geometric Coaster Set
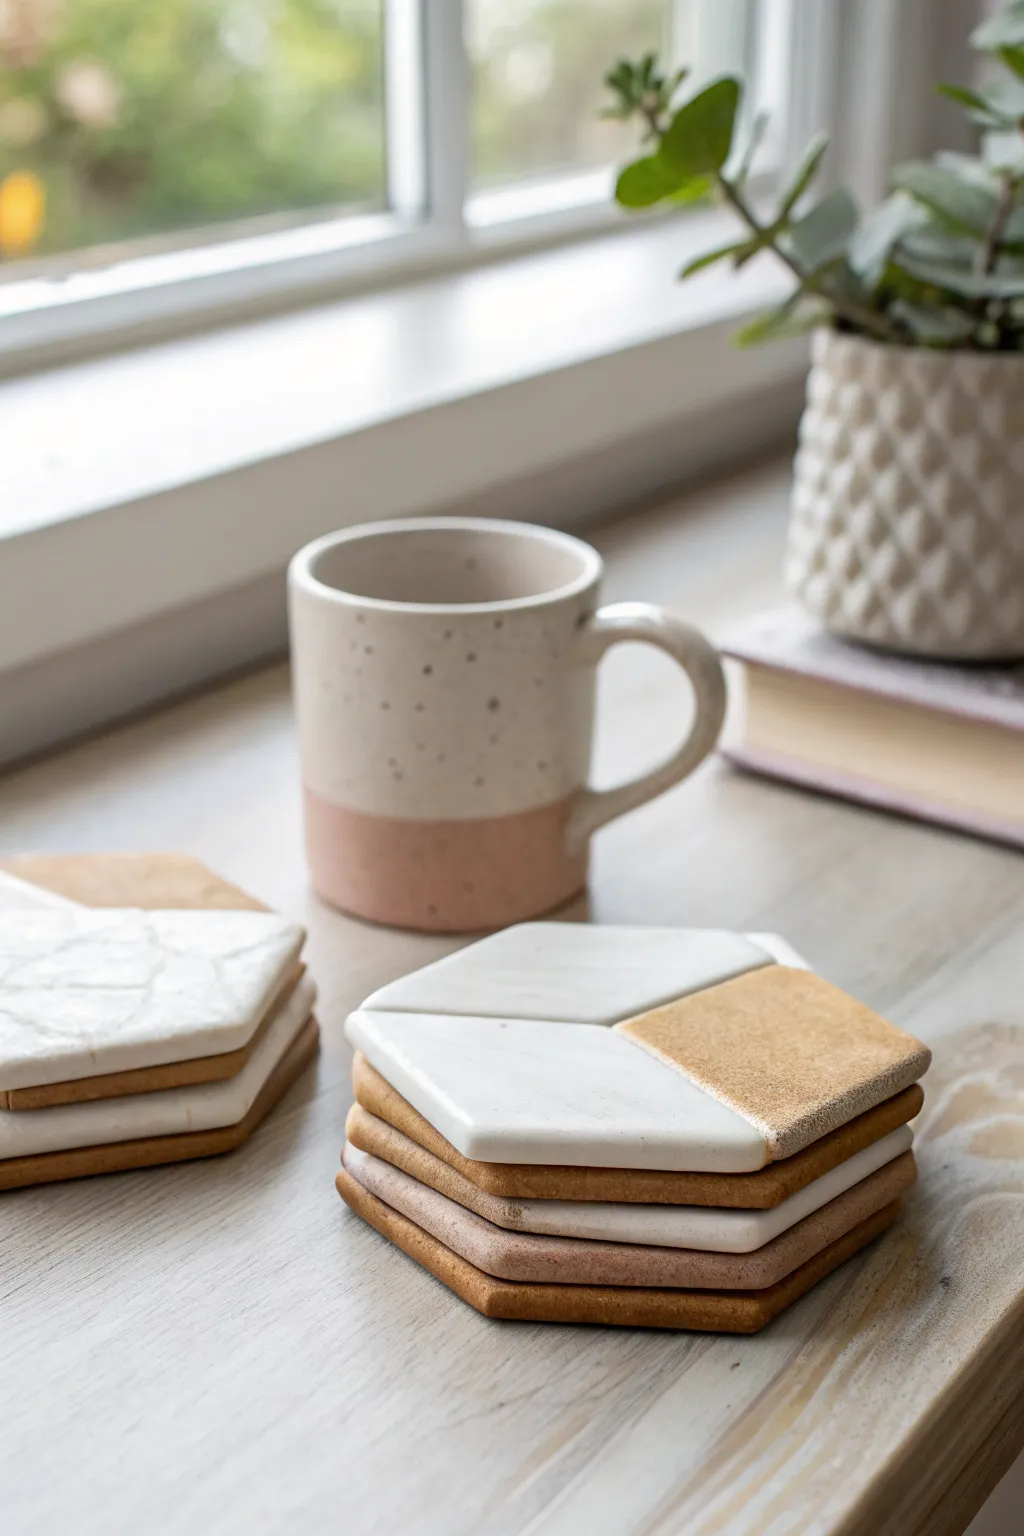
Bring a touch of modern elegance to your coffee table with this mixed-media inspired coaster set. Combining a sleek, marble-like white finish with warm, earthy metallic tones, these geometric clay pieces are both practical and strikingly beautiful.
How-To Guide
Materials
- White polymer-based air dry clay (for a smoother finish)
- Terra cotta or coloured air dry clay (optional, for the base)
- Gold metallic acrylic paint
- Rolling pin
- Hexagon cookie cutter (approx. 4 inches)
- Ruler and craft knife
- Fine grit sandpaper (320-400 grit)
- Glossy varnish or resin sealant
- Masking tape or painter’s tape
- Plastic wrap or parchment paper
Step 1: Shaping the Clay
-
Condition and roll:
Begin by kneading your white air dry clay until it is pliable and smooth. Roll it out on a non-stick surface or parchment paper to an even thickness of about 1/4 inch. For a more substantial coaster, I sometimes go slightly thicker, aiming for 1/3 inch. -
Cut the hexagons:
Press your hexagon cookie cutter firmly into the rolled clay. If you don’t have a cutter, print a hexagon template on paper, place it on the clay, and carefully trace around it with a sharp craft knife. -
Smooth the edges:
Dip your finger in a little water and gently run it along the cut edges of your clay hexagons to round them off slightly and remove any loose bits or sharpness. -
Add texture (optional):
Looking closely at the white sections, some have a subtle, crinkled texture. To replicate this, gently press a crumpled piece of plastic wrap or aluminum foil onto the surface of the wet clay before removing it. -
Dry thoroughly:
Place your clay shapes on a flat surface to dry. To prevent curling, weigh them down slightly with a book placed over parchment paper after they have surface-dried for an hour. Let them cure for 24-48 hours depending on humidity.
Warping Worries?
If clay coasters curl up while drying, flip them over every 6-8 hours. Drying them slowly under a light weight (like a hardcover book) ensures perfect flatness.
Step 2: Creating the Geometric Design
-
Initial specific sanding:
Once fully dry, use fine-grit sandpaper to buff the surface and edges. Focus on getting the top face completely flat so mugs will sit securely. -
Mark the sections:
Using a ruler and a light pencil mark, divide your hexagon. The design in the image uses a ‘Y’ shape or divides the hexagon into colorful geometric blocks. Draw straight lines connecting the center point to the vertices or midpoints depending on your desired pattern. -
Tape off areas:
Apply masking tape firmly along your pencil lines, covering the area you want to keep white. Press the tape edges down with your fingernail to prevent paint bleed. -
Create the faux-stone section:
For the earthy, darker section, mix a little brown acrylic paint with a touch of gold. Stipple this onto the exposed clay section using a sponge rather than brushing it on; this creates that stone-like texture visible in the photo. -
Add the metallic accent:
For the gold or metallic bronze sections, apply a pure metallic acrylic paint. Two thin coats are better than one thick coat to maintain a smooth texture. -
Layering the look:
If you want the stacked, multi-colored look seen in the bottom left stack, you can actually create thin sheets of different colored clay (white and terracotta) and laminate them together before cutting the hexagon shape in the first phase. Otherwise, paint the sides to mimic layers. -
Peel and reveal:
Carefully peel back the masking tape while the paint is still slightly tacky. This ensures a crisp, clean line between your painted geometric shapes and the white clay.
Pro Tip: Marble Magic
For a real stone look, twist a tiny snake of grey clay into your white clay before rolling. Stop kneading early to keep beautiful marble veins visible.
Step 3: Sealing and Finishing
-
Clean up lines:
If any paint bled under the tape, use the tip of your craft knife to gently scrape it away, or touch it up with white paint. -
Apply varnish:
To make these coasters functional and water-resistant, apply a coat of glossy varnish or a thin layer of resin. Work in a well-ventilated area and brush it on evenly to avoid pooling. -
Dry the sealant:
Allow the varnish to cure completely according to the manufacturer’s instructions. This usually takes another 24 hours. -
Add protective backing:
Cut a hexagon shape out of adhesive cork or felt slightly smaller than your coaster. Stick this to the bottom to protect your furniture from scratches.
Now you have a chic set of custom coasters ready to protect your surfaces in style


Textured Soap Dish for the Sink
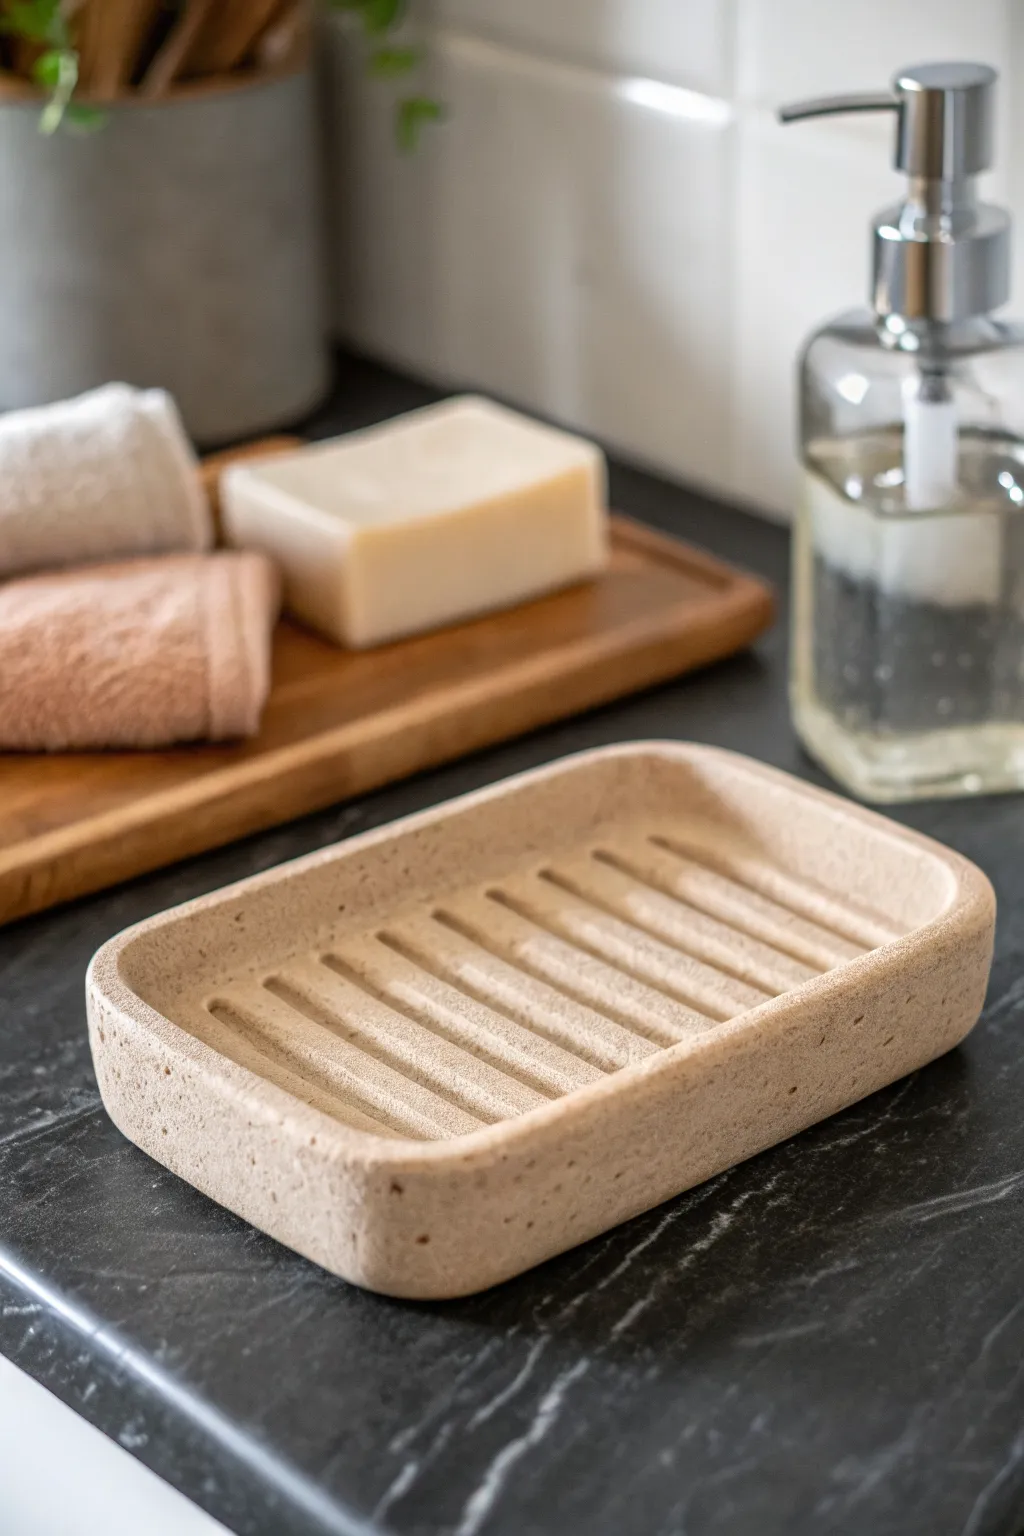
Elevate your bathroom counter with this minimalist, spa-inspired soap dish that mimics the look of natural sandstone. Using air dry clay and a clever texturing trick, you’ll create a functional piece with built-in drainage ridges to keep your favorite soaps dry.
Step-by-Step Tutorial
Materials
- Air dry clay (white or terra cotta)
- Used coffee grounds (dried)
- Rolling pin
- Parchment paper or canvas mat
- Rectangle cookie cutter or template
- Craft knife
- Ruler
- Wooden dowel (approx. 1/4 inch diameter)
- Sponge and water
- Sandpaper (fine grit)
- Acrylic varnish or clay sealer (waterproof)
Step 1: Preparing the Clay Base
-
Mix the Texture:
Begin by taking a large handful of plain air dry clay. To achieve that organic, speckled sandstone look seen in the photo, knead in about a teaspoon of dried used coffee grounds. Continue kneading until the specks are evenly distributed throughout the clay body. -
Roll the Slab:
Place your clay on a piece of parchment paper to prevent sticking. Use your rolling pin to roll the clay out into an even slab, aiming for a thickness of about 1/4 to 1/2 inch. You want it sturdy enough to hold weight without cracking. -
Cut the Shape:
Using a rectangular cookie cutter (or a paper template and a craft knife), cut out a clean rectangle. A standard size is roughly 3 inches by 4.5 inches, but feel free to adjust this based on the size of your favorite bar soap. -
Form the Walls:
Instead of attaching separate coils for the walls, we will lift the edges. Gently use your fingers to pinch and curl the outer perimeter of the rectangle upward. You are creating a lip about half an inch high to contain any soapy water. -
Refine the Corners:
As you lift the walls, the corners might become bunched or sharp. Use a wet finger to smooth the inside corners into soft, rounded curves rather than sharp angles, mimicking the gentle stone look. -
Smooth the Rim:
Dip your finger in a little water and run it along the top rim of the dish. I like to spend a little extra time here ensuring the lip is level and smooth, as this is the part you’ll see most often.
Step 2: Adding Functionality & Finishing
-
Mark the Ridges:
Take your wooden dowel and lay it gently inside the dish to gauge the spacing. You want to create several horizontal grooves across the bottom surface to allow air to circulate under the soap. -
Press the Texture:
Firmly press the wooden dowel into the bottom of the wet clay slab to create a deep indentation. Lift it carefully, move it over about half an inch, and press again. Repeat this from top to bottom until the entire floor of the dish is ridged. -
Clean Up Edges:
Pressing the dowel might bulge the side walls slightly. Gently push the walls back into a straight vertical position if they have bowed out, and smooth any rough bits of clay displaced by the dowel. -
Stone Texture:
For that matte, faux-stone finish, take an old toothbrush or a stiff bristle brush and gently tap the exterior and rim of the dish. This stippling effect breaks up the smooth surface and enhances the natural look. -
Slow Drying:
Place the dish in a cool, dry area away from direct sunlight. Let it air dry slowly for 24 to 48 hours. Drying too fast can cause warping, so be patient during this phase. -
Sanding:
Once fully dry and hard, use fine-grit sandpaper to buff away any sharp edges on the rim or the ridges. Do this lightly; you want to keep the organic texture, just remove the scratchy parts. -
Cleaning Dust:
Wipe the entire piece down with a barely damp cloth or a dry tack cloth to remove all sanding dust before sealing. -
Sealing is Crucial:
Since this will live near water, sealing is mandatory. Apply 2-3 coats of a high-quality waterproof varnish or polyurethane. Ensure you get the varnish deep into the ridges and on the bottom. -
Final Cure:
Allow the varnish to cure completely according to the manufacturer’s instructions—usually another 24 to 72 hours—before placing it on your sink and adding soap.
Stay Waterproof
Regular ‘Mod Podge’ isn’t waterproof enough for sitting water. Use a dedicated marine varnish or polyurethane sealer to ensure your soap dish lasts.
Drainage Holes
During the ridge-making step, use a straw to poke 2-3 holes completely through the floor of the dish between the ridges for actual water drainage.
Now you have a stunning, functional piece of décor that brings a touch of organic warmth to your daily routine

What Really Happens Inside the Kiln
Learn how time and temperature work together inside the kiln to transform clay into durable ceramic.
Taper Candle Holder Trio
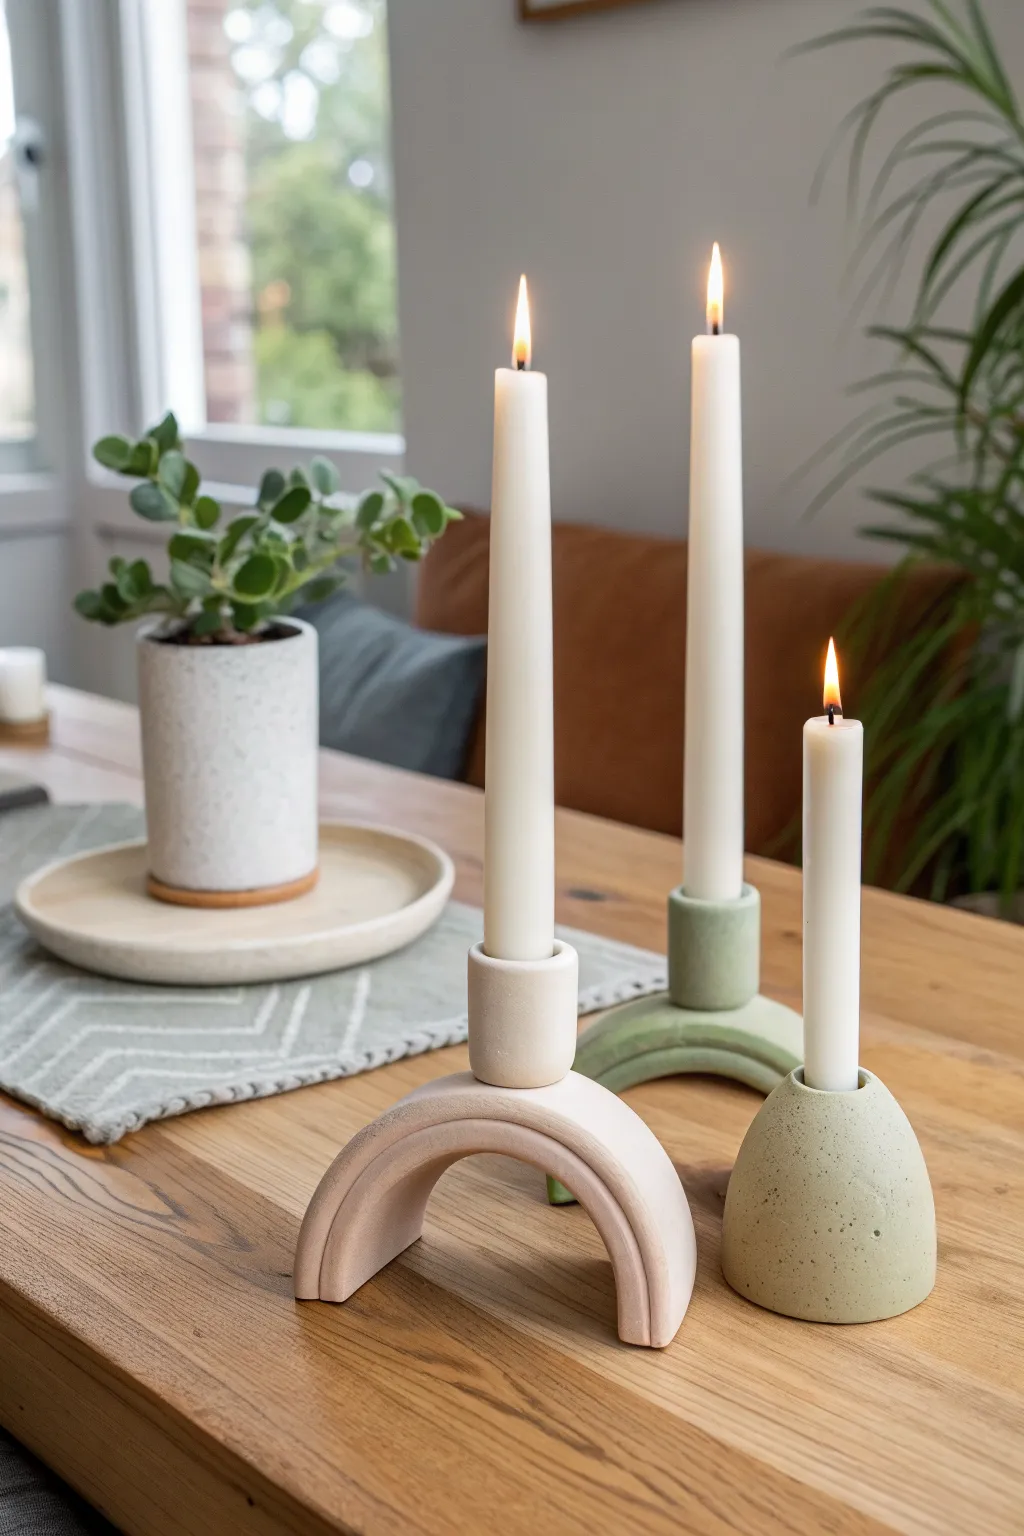
Elevate your dining table with this sophisticated trio of sculptural candle holders, featuring soft arches and organic domes in muted, earthy tones. The smooth, matte finish of air dry clay mimics the look of high-end ceramic stoneware without needing a kiln.
Step-by-Step Guide
Materials
- High-quality air dry clay (white or terracotta)
- Standard taper candles (for sizing)
- Acrylic rolling pin
- Sharp craft knife or clay slicing tool
- Small bowl of water and a sponge
- Fine-grit sandpaper (220-400 grit)
- Acrylic craft paints (sage green, beige/terracotta)
- Matte sealant or varnish
- Copper pipe cutter (optional, for making circle templates)
- Cardboard or cardstock for templates
Step 1: Preparation & Shapes
-
Condition the Clay:
Begin by taking a substantial chunk of clay and kneading it in your hands to warm it up. You want a smooth, pliable consistency without any hidden air bubbles. -
Create the Arches:
Roll out a thick slab of clay, approximately 3/4-inch thick. Cut two long strips of equal width (about 1.5 inches wide). These will form the arches for the two taller holders. -
Form the Arch Curve:
Gently bend the strips into a ‘U’ shape. You can drape them over a cylindrical object like a rolling pin or a sturdy glass jar to help them hold their shape while drying. One arch should be slightly taller or wider than the other for visual variety. -
Sculpt the Dome:
For the third holder, roll a ball of clay roughly the size of a tangerine. Place it on your work surface and flatten the bottom. Gently shape the sides upwards to create a smooth, rounded dome or mound shape. -
Size the Candle holes:
This is crucial: take your actual taper candle and press it gently into the top of the dome to create an indentation. Wiggle it slightly to ensure the hole is just a hair wider than the candle to account for clay shrinkage. -
Create Candle Cups for Arches:
Roll two smaller balls of clay into short cylinders (about 1-1.5 inches tall). Press your candle into the top of these cylinders just as you did with the dome to create the holders.
Step 2: Assembly & Refining
-
Score and Slip:
Once the arches have stiffened slightly but are still workable, attach the cylinder cups to the distinct top point of each arch. Deeply score (scratch) the bottom of the cup and the top of the arch, add water (slip), and press firm to join. -
Smoothing Seams:
Use a wet finger or a damp sponge to blend the clay where the cup meets the arch. The goal is to make it look like one seamless piece of stone. -
Detailing the Edges:
I like to run a slightly damp sponge along the outer edges of the arches to soften them. The image features a subtle groove detail; use a modeling tool to gently press an indentation following the curve of the arch if desired. -
Adding Texture (Optional):
For the speckled look seen on the dome, you can gently press a coarse brush or sandpaper onto the wet clay surface, or wait to add this effect with paint later. -
Initial Drying Phase:
Place your pieces in a cool, dry spot away from direct sunlight. Rotate them occasionally to ensure even drying.
Don’t Crack Under Pressure
To prevent structural cracking during the drying process, drape a slightly damp paper towel over the arches for the first 12 hours. This slows evaporation for a stronger bond.
Step 3: Finishing Touches
-
Sanding to Perfection:
Once fully dry (usually 24-48 hours depending on thickness), sand the pieces thoroughly. Focus on the base to ensure they sit flat and stable. -
Mixing the Colors:
Mix your acrylics to achieve those soft, trendy hues. For the sage green, mix a dab of green with plenty of white and a tiny dot of brown. For the beige, mix white with a touch of yellow ochre or brown. -
Painting:
Apply two coats of paint. For the speckled effect on the green holders, you can flick a toothbrush loaded with slightly darker green or brown paint over the dried base coat. -
Sealing:
Finish with a matte varnish or sealant. This not only protects the paint but gives that sophisticated stoneware feel.
Faux-Stone Finish
Mix baking soda into your acrylic paint before applying. This creates a grainy, gritty texture that looks exactly like real ceramic or stone when it dries.
Arrange your beautiful new candle trio on a dining table or mantle for an instant touch of modern elegance
Bud Vase With Faux Glazed Look
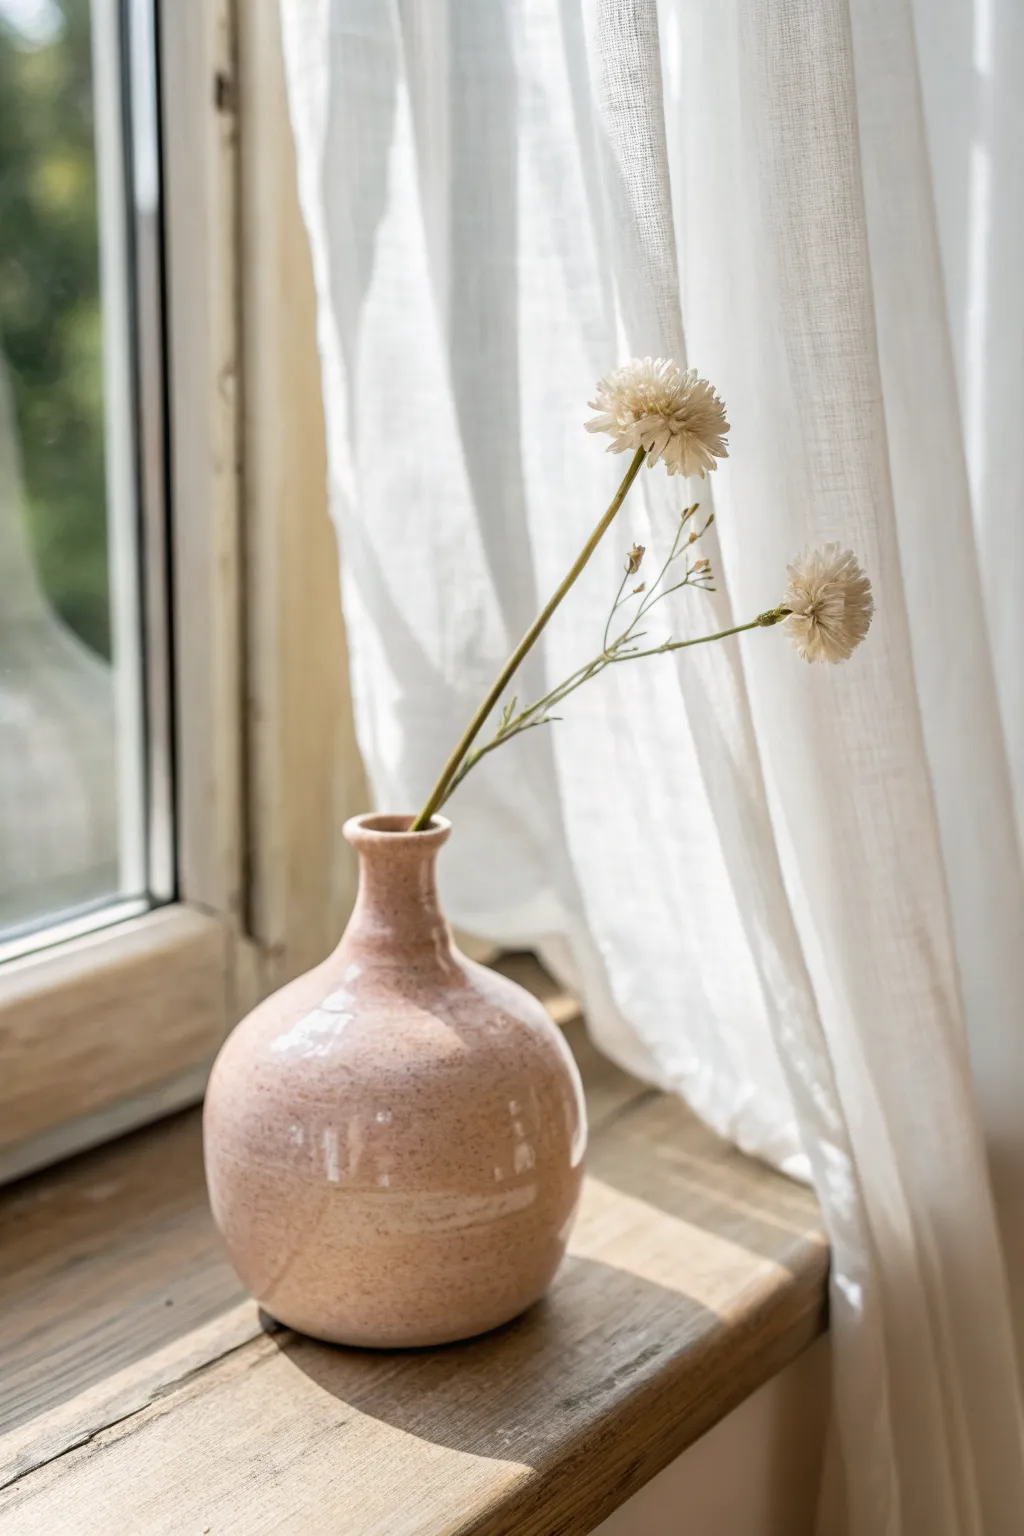
Achieve the high-end look of kiln-fired ceramics without a pottery wheel or oven using this clever air-dry clay technique. The speckled, glossy finish mimics a traditional glaze, making this charming bud vase a perfect accent for minimal or rustic decor.
Detailed Instructions
Materials
- Air-dry clay (white or terracotta)
- Acrylic paint (pale blush pink, white, terra cotta/brown)
- High-gloss varnish or polyurethane sealer
- Old toothbrush
- Rolling pin
- Small bowl of water
- Sponge
- Sandpaper (fine grit)
- Craft knife
- Paintbrushes (flat and round)
Step 1: Shaping the Clay Body
-
Condition the clay:
Begin by taking a large handful of air-dry clay and kneading it thoroughly until it feels warm and pliable. This removes air bubbles and prevents cracks during drying. -
Form the base sphere:
Roll the clay into a smooth, tight ball about the size of a grapefruit. Tap it gently on your work surface to create a slightly flattened bottom so the vase will stand securely. -
Create the opening:
Use your thumb to press a deep indentation into the center of the top of the sphere. Instead of pinching, rotate the ball in your hand while pressing down to keep the walls strictly even. -
Refine the bulb shape:
Gently smooth the exterior with damp fingers to create a perfectly round, bulbous lower section. The walls should be roughly 1/4 inch thick for stability.
Cracks while drying?
Mix a small amount of fresh clay with water to make a paste (slip). Fill any cracks, smooth over with a finger, and let dry again before sanding.
Step 2: Building the Neck
-
Roll a coil:
Roll a separate piece of clay into a thick snake or coil, roughly the thickness of your finger. -
Attach the neck:
Place the coil on top of your sphere’s opening. Using a small amount of water or slip (clay mixed with water), blend the clay from the coil downwards into the base until the seam completely disappears. -
Sculpt the profile:
Pull the clay of the neck upward gently to elongate it. I like to pinch inward slightly as I go up to create that elegant, tapered bottleneck shape seen in the photo. -
Flare the rim:
At the very top of the neck, gently press outward with your fingertip to create a subtle lip or flare. -
Smooth with water:
Dip a sponge in water and squeeze it out well, then drag it vertically over the entire vase to erase fingerprints and create a uniform surface texture.
Make it watertight
Air dry clay isn’t waterproof! Insert a small glass test tube or pill bottle inside the neck to hold real water for fresh flowers without ruining the clay.
Step 3: Drying and Refining
-
Slow drying process:
Place the vase in a cool, dry area away from direct sunlight. Let it dry for at least 24-48 hours. Turn it occasionally to ensure even airflow. -
Sand for perfection:
Once fully cured and bone dry, use fine-grit sandpaper to buff away any bumps or rough spots, paying special attention to the rim. -
Dust off:
Wipe the vase down with a barely damp cloth or dry brush to remove all sanding dust before painting.
Step 4: Faux Glaze Finish
-
Mix the base color:
Mix white acrylic paint with a tiny drop of terra cotta and a touch of blush pink to create a creamy, warm stone color. -
Apply base coats:
Paint the entire exterior of the vase. You will likely need two to three coats to get a solid, opaque finish, letting each layer dry in between. -
Prepare the speckle:
Dilute a darker brown or rust-colored paint with a little water until it has an inky consistency. -
Apply the speckles:
Dip an old toothbrush into this watery mixture. Run your thumb across the bristles to flick tiny droplets of paint onto the vase, creating that organic, speckled pottery effect. -
Seal for high gloss:
Once the paint is completely dry, apply a coat of thick, high-gloss varnish or polyurethane. This is the secret step that makes the clay look like glazed ceramic. -
Add a second gloss coat:
For maximum shine and depth, apply a second coat of gloss after the first has dried.
Place your finished vase on a sunny windowsill where the light can catch that glossy, faux-ceramic sheen


The Complete Guide to Pottery Troubleshooting
Uncover the most common ceramic mistakes—from cracking clay to failed glazes—and learn how to fix them fast.
Minimal Cachepot and Drip Tray
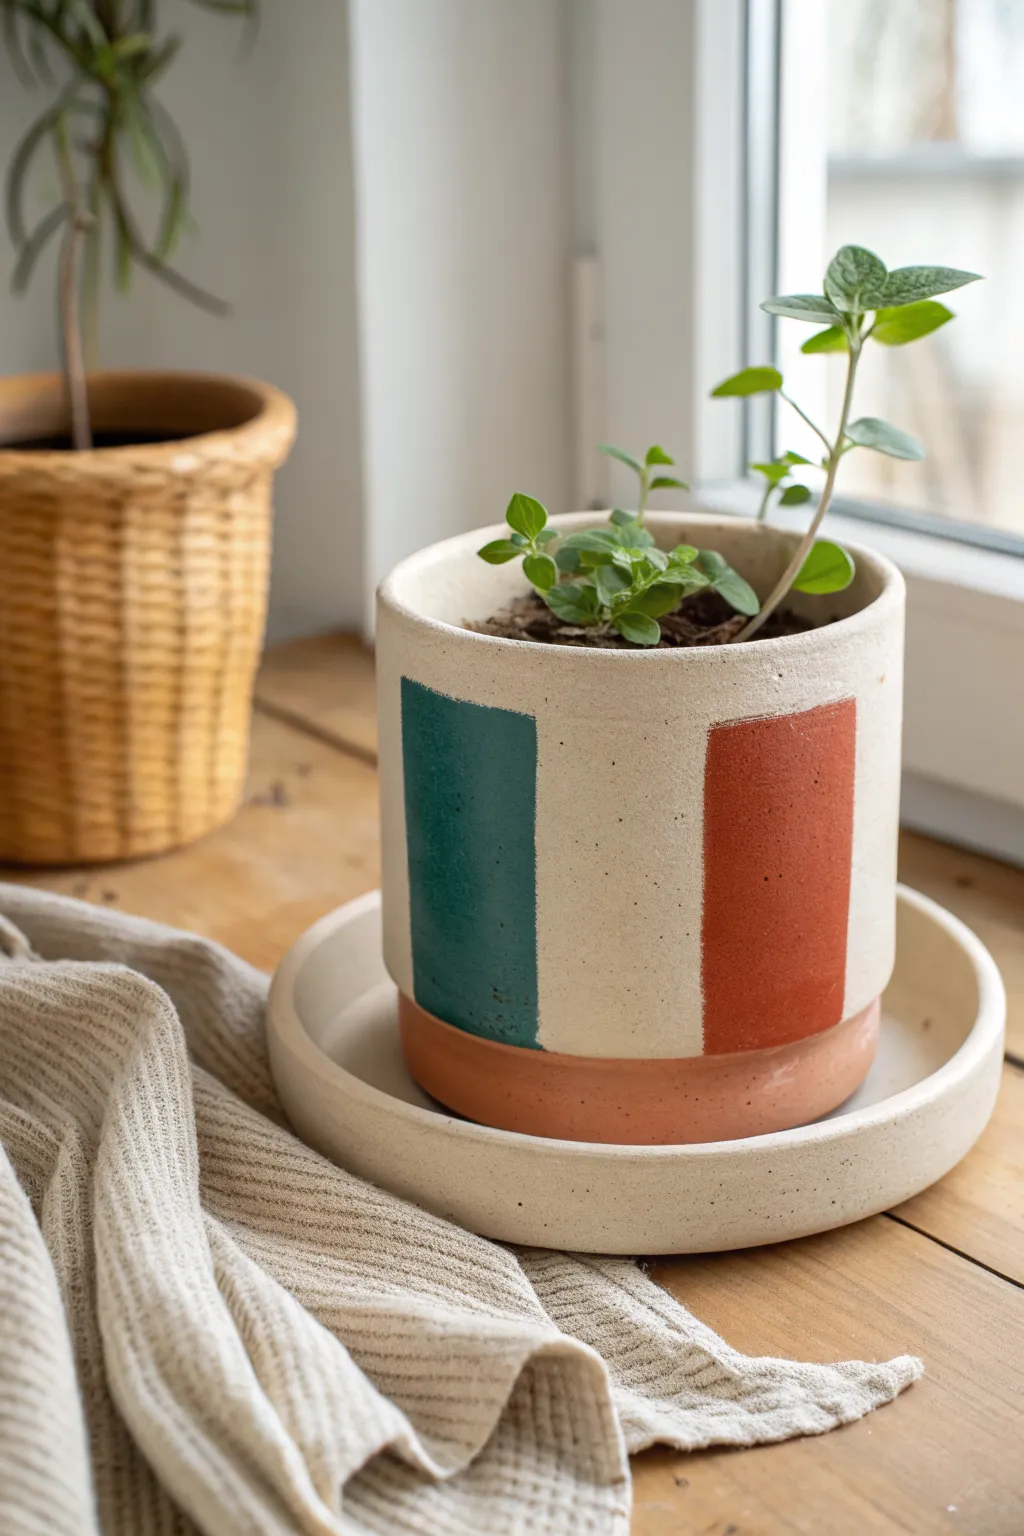
Embrace a modern, gallery-worthy aesthetic with this sleek air dry clay planter set. Featuring bold vertical stripes of teal and rust against a creamy speckled base, this cachepot and matching drip tray brings a sophisticated pop of color to any windowsill.
How-To Guide
Materials
- White or natural air dry clay (approx. 1kg)
- Rolling pin
- Clay knife or craft blade
- Cylindrical mold (like a large can or glass jar)
- Small bowl or circle template (slightly larger than your mold)
- Sandpaper (medium and fine grit)
- Acrylic paints (Cream/Off-White, Teal, Rust/Terracotta)
- Dark brown or black acrylic paint (for speckling)
- Painter’s tape or masking tape
- Flat paintbrush and an old toothbrush
- Matte sealant or varnish (waterproof)
Step 1: Forming the Pot
-
Roll out the base:
Start by conditioning your clay with your hands until it’s pliable. Roll out a portion of the clay to an even thickness of about 1/4 inch. Place your cylindrical mold onto the clay and trace around it with your knife to cut out the circular base. -
Prepare the walls:
Roll out a larger slab of clay into a long rectangular strip. Ensure the width matches the desired height of your pot and the length is sufficient to wrap fully around your mold with a little overlap. -
Construct the cylinder:
Wrap the long clay strip around your mold (you can wrap the mold in parchment paper first to prevent sticking). Where the ends meet, cut through both layers at an angle to create a seamless bevel joint. -
Join the seams:
Score the edges of the base and the bottom of your cylinder walls, adding a little water or slip to create a glue. Press the walls firmly onto the base. Blend the side seam and the bottom seam using your fingers or a modeling tool until smooth. -
Smooth the surface:
Dip your fingers in water and run them over the clay to smooth out any fingerprints or join marks. I find using a slightly damp sponge here really helps achieve that professional finish.
Cracked Clay Fix
If small cracks appear during drying, mix a tiny bit of fresh wet clay with white PVA glue to make a paste. Fill the cracks, smooth over, and sand once dry.
Step 2: Creating the Drip Tray
-
Cut the tray base:
Roll out another slab of clay. Use a bowl or template that is about 1 inch wider in diameter than your main pot to cut a large circle. -
Add a lip:
Roll a long, thin snake of clay. Place it on top of the circle’s outer edge. Blend the coil downwards on the inside and outside to create a raised lip for the tray, smoothing it seamlessly into the base.
Step 3: Refining and Painting
-
Dry completely:
Allow both pieces to dry for 24-48 hours. Turn them occasionally to ensure even drying and prevent warping. -
Sand for smoothness:
Once bone dry, use medium grit sandpaper to level out bumps, followed by fine grit for a silky finish. Wipe away all dust with a slightly damp cloth. -
Apply base coat:
Paint the entire exterior of the pot and the tray with your cream or off-white acrylic paint. You will likely need two coats for opaque coverage. -
Add the speckled effect:
Dilute a small drop of dark brown paint with water. Dip an old toothbrush into the mix, and use your thumb to flick the bristles, splattering tiny specks across the dried cream surface. Let this dry completely. -
Tape the design:
Use painter’s tape to mark off two vertical rectangular areas on the sides of the pot. Ensure the tape is pressed down firmly to prevent bleed-through. -
Paint the geometric blocks:
Fill one rectangular taped area with teal paint and the other with rust/terracotta. Use a flat brush and stroke away from the tape edge for crisp lines. -
Paint the bottom rim:
Paint the bottom 1/2 inch of the pot’s exterior in the same rust color to anchor the design visually. -
Peel and reveal:
Carefully remove the tape while the paint is still slightly tacky to avoid chipping the edges. -
Seal the deal:
Finish by applying two coats of waterproof matte varnish to both the pot and tray. This protects your artwork from moisture when watering your plant.
Make it Functional
Drill a hole in the bottom of the pot *after* the clay is fully dry but before painting. Use a standard twist drill bit and go slowly to prevent cracking.
Place your favorite succulent or herb inside and enjoy the organic modern vibe you’ve created
Wall-Mounted Air Plant Pocket
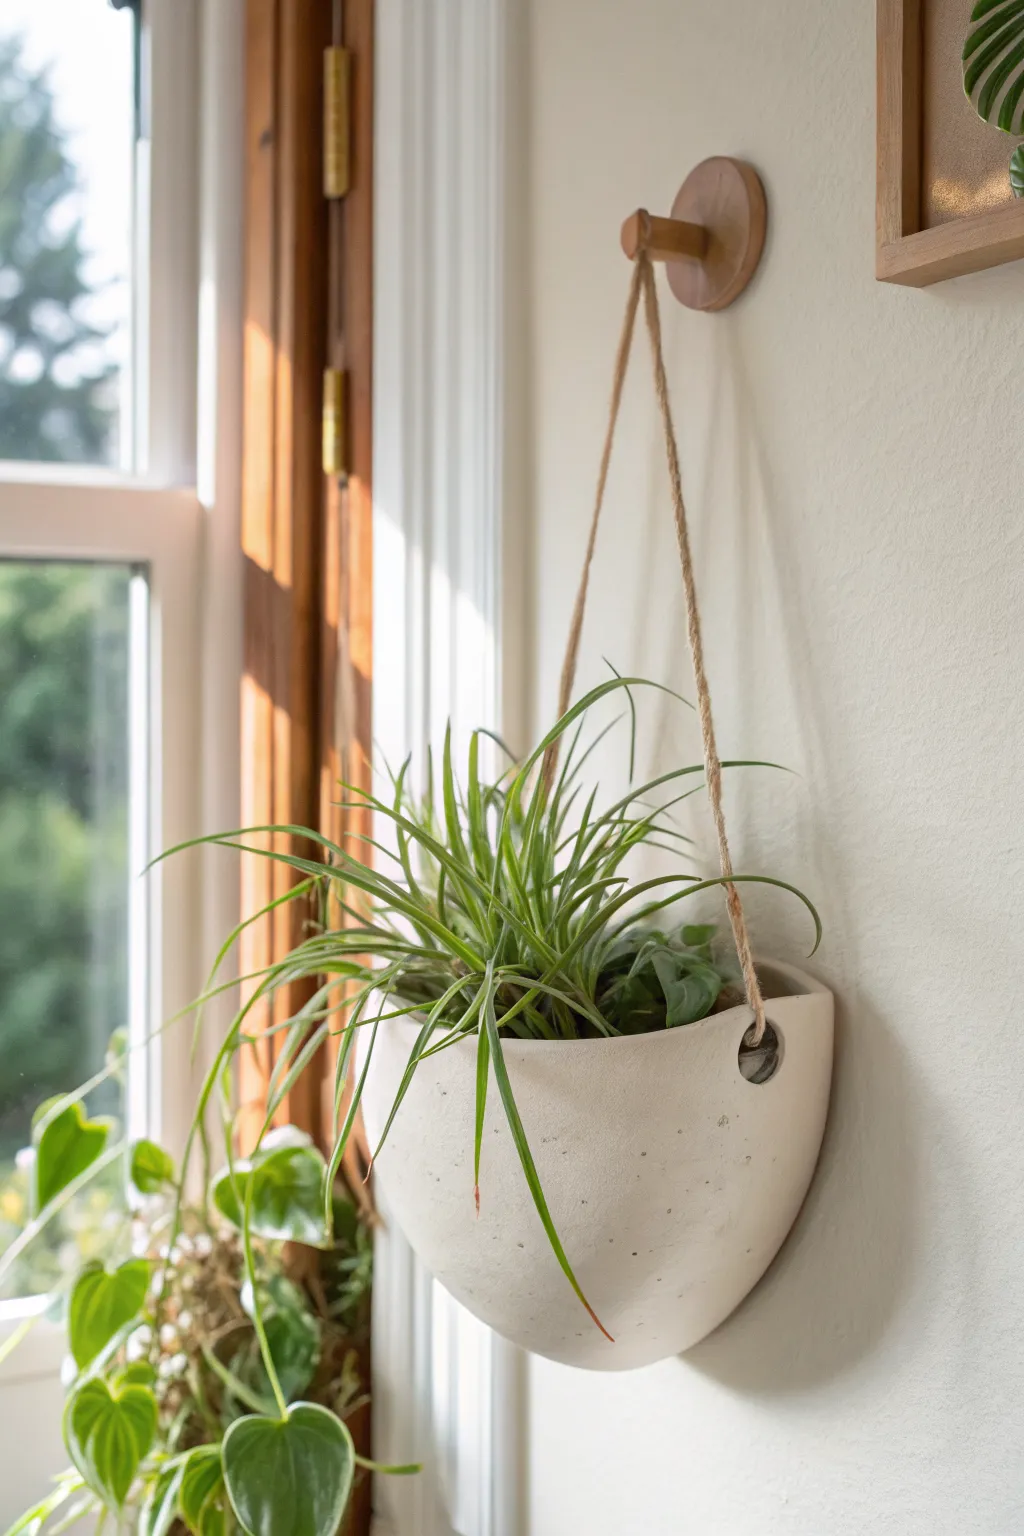
Bring a touch of minimal greenery to your vertical spaces with this sleek, half-moon wall pocket. The smooth white finish and natural twine suspension create a modern organic look perfect for showcasing airy plants near a sunny window.
Step-by-Step Tutorial
Materials
- White lush air-dry clay (approx. 500g)
- Rolling pin
- Parchment paper or canvas mat
- Large circular bowl or plate (approx. 6-7 inches diameter) for use as a template
- Sharp knife or clay cutting tool
- Small bowl or ball of foil (to serve as a hump mold)
- Water and a small sponge
- Circular cutter or straw (for hanging holes)
- Sandpaper (fine grit)
- White acrylic paint (optional)
- Matte spray sealant
- Jute twine or leather cord
- Wooden wall peg for hanging
Step 1: Shaping the Pocket
-
Prepare your workspace:
Lay down your parchment paper or canvas mat on a flat surface to prevent sticking. Take a large chunk of air-dry clay and knead it briefly until it feels warm and pliable, removing any air bubbles. -
Roll the clay slab:
Use your rolling pin to flatten the clay into a smooth, even slab. Aim for a thickness of about 1/4 inch (6mm)—too thin and it might crack, too thick and it becomes heavy. -
Cut the base circle:
Place your large circular template (like a dinner plate or bowl) onto the clay. Use your sharp knife to trace around the edge and cut out a perfect circle. -
Create the crescent shape:
Gently fold the bottom of the circle upwards. You aren’t folding it exactly in half; bring the bottom edge up about two-thirds of the way to create a roomy pocket, leaving a taller back panel exposed. -
Form the pocket volume:
Before sealing the edges, place a crumpled ball of foil or a small, shallow bowl inside the pocket part. This acts as a temporary internal support to ensure the pocket bulges outward nicely rather than drying flat. -
Seal the seams:
Press the outer edges where the front flap meets the back panel. Dip your finger in a little water and smooth the clay over the seam so the join becomes invisible. I find it helpful to use a modeling tool to firmly mesh the clay layers together first. -
Refine the back:
Look at the back of the planter. It needs to be flat to hang flush against the wall. If your manipulating has warped it, gently press the entire piece back down onto your flat work surface.
Slip & Score Secret
Before folding the pocket up, use a needle tool to scratch (score) the edges that will touch. Add water (slip) to these rough areas. This acts like superglue for clay.
Step 2: Details and Drying
-
Add hanging holes:
Using a small circular cutter or a sturdy straw, punch a hole on each side of the exposed back panel, near the point where the front pocket connects. Ensure the holes are at least half an inch from the edge to prevent tearing under weight. -
Smooth the surfaces:
Dip your sponge in a tiny amount of water and run it over the entire surface to erase fingerprints, cracks, or rough edges. The smoother you get it now, the less sanding you’ll do later. -
Texture (Optional):
If you want the subtle speckled look seen in the photo, you can lightly flick a stiff toothbrush with diluted grey paint over the wet clay, or simply wait to paint it later. -
Let it dry:
Allow the piece to dry completely. This usually takes 24-48 hours depending on humidity. Rotate it occasionally if safe to do so, ensuring air reaches the inside of the pocket. -
Remove supports:
Once the clay is visibly hardening and can hold its own shape (usually after about 12 hours), carefully remove the foil or bowl from the inside to let the interior dry fully.
Step 3: Finishing Touches
-
Sand for perfection:
Once the clay is bone dry and turns a chalky white, use fine-grit sandpaper to buff away any remaining rough spots or sharp edges, particularly around the rim and the hanging holes. -
Seal the piece:
Take your project to a well-ventilated area. Apply 2-3 light coats of matte spray sealant. This protects the clay from humidity, which is vital since it will hold a plant. -
Attach the suspension:
Cut a length of jute twine (about 24 inches, or to your preference). Thread one end through the left hole from front to back and knot it securely. Repeat on the right side. -
Hang and plant:
Hang the twine loop over your wooden wall peg. Place a lightweight air plant or a small pothos cutting inside your new handmade vessel.
Make It Speckled
To mimic stoneware, mix sterile dried coffee grounds or black pepper directly into your white clay ball before rolling it out for a natural, embedded texture.
Now you have a stylish, custom-made home for your favorite botanical accent that looks like boutique ceramic.

TRACK YOUR CERAMIC JOURNEY
Capture glaze tests, firing details, and creative progress—all in one simple printable. Make your projects easier to repeat and improve.
Photo and Card Holder Stand
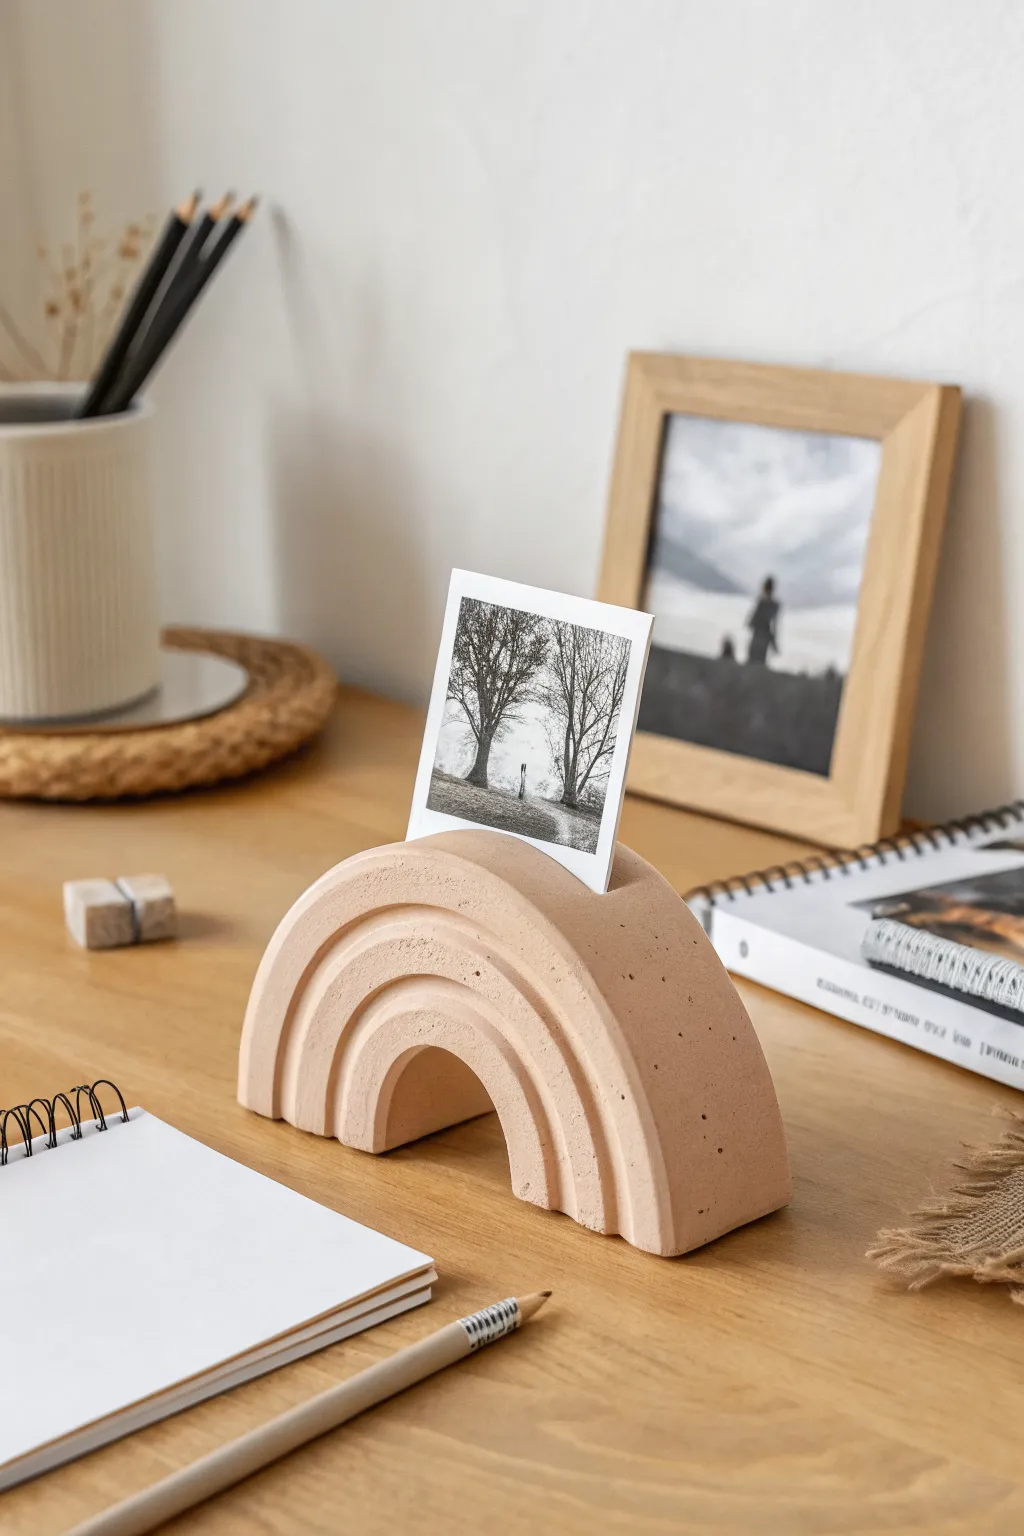
This chic, arched photo holder combines functional decor with minimalist sculptural art. Its terra cotta tone and soft curves make it the perfect desk accessory for displaying your favorite Polaroid or postcard.
Step-by-Step Guide
Materials
- Air dry clay (terracotta or white colored)
- Rolling pin
- Sharp craft knife or clay slicing blade
- Ruler
- Sandpaper (fine grit)
- Small bowl of water
- Acrylic paint (optional: nude/peach/terracotta mix)
- Matte sealant or varnish
- Clay carving tools or a loop tool
- Rectangular template (cardstock)
Step 1: Shaping the Base Block
-
Condition the clay:
Begin by taking a substantial chunk of air dry clay and kneading it thoroughly until it is warm, pliable, and free of cracks. -
Form the initial shape:
Roll and press the clay into a thick rectangular block. You want it to be approximately 1.5 to 2 inches thick to ensuring it can stand stably on its own. -
Create the semi-circle:
Using a cutting tool or a large circular cutter, trim the top corners of your rectangle to create a smooth, perfect semi-circle arch shape. Keep the bottom flat. -
Smooth the surfaces:
Dip your fingers in a little water and run them over the entire surface to smooth out any fingerprints or jagged cutting marks.
Uneven Drying?
If your rainbow starts to warp as it dries, place a light book on top of it (once it’s semi-dry/leather hard) to gently force it flat.
Step 2: Carving the Details
-
Mark the arches:
Lightly trace two concentric arches on the front face of your clay block using a needle tool. These will guide where you carve the rainbow layers. -
Carve the grooves:
Using a loop tool or carving tool, carefully dig out the clay along your traced lines. You want to create deep, distinct grooves that separate the three ‘bands’ of the rainbow. -
Cut the central void:
Now, use your knife to slice out the small semi-circle at the very bottom center to create the negative space ‘legs’ of the rainbow. -
Refine the edges:
Going back in with a slightly damp finger or a rubber clay shaper, smooth down the sharp edges inside the grooves you just carved so they look soft and molded. -
Make the photo slot:
Using a knife or a thin metal ruler, press straight down into the very top center of the arch. Wiggle it slightly to create a slot wide enough to hold a photo.
Step 3: Finishing Touches
-
Initial drying phase:
Set the piece aside in a cool, dry place. I usually lean it against a wall or book initially to ensure it doesn’t slump forward while the clay is wettest. -
Rotate while drying:
Over the next 24-48 hours, flip the piece onto its back or front occasionally to ensure even drying and prevent warping. -
Check dryness:
Wait until the clay is completely bone dry. It should feel room temperature to the touch, not cold. -
Sand for perfection:
Take your fine-grit sandpaper and gently buff the entire surface. Pay special attention to the bottom to ensure it sits perfectly flat. -
Dust off:
Wipe away all sanding dust with a dry, soft cloth or a large fluffy brush. -
Apply color (optional):
If you didn’t start with colored clay, mix a matte acrylic paint in a soft peach or terra cotta shade and apply two thin coats. -
Seal the piece:
Finish by applying a matte varnish or sealant. This protects the clay from humidity and gives it a professional, finished look without adding unwanted shine.
Speckled Stone Effect
Mix recycled coffee grounds or black pepper into the wet clay before shaping. When you sand it later, you’ll reveal a cool faux-stone texture.
Place your favorite memory in the slot and enjoy your handmade piece of art
Modular Desk Organizer Cups
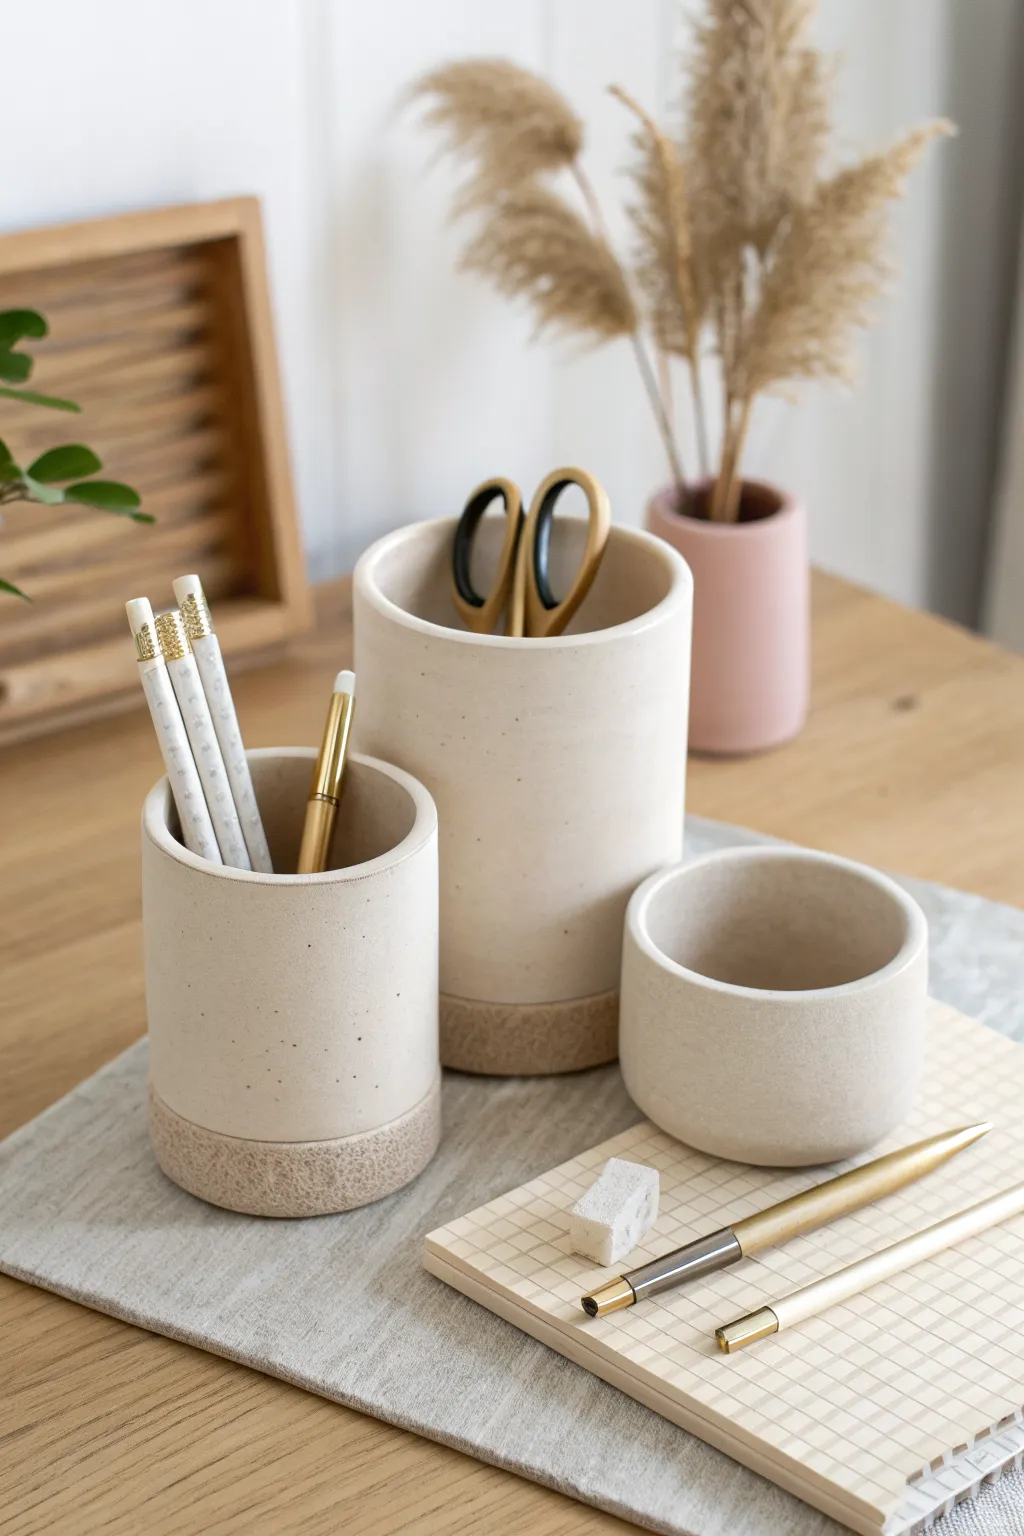
Elevate your workspace with this set of three modular organizer cups that mimic the look of high-end ceramic stoneware. Featuring a creamy speckled finish and a contrasting textured base, these durable containers are perfect for sorting everything from scissors to paperclips.
Detailed Instructions
Materials
- White air dry clay (approx. 1kg)
- Speckled clay additive or black pepper/sand
- Rolling pin with guide rings
- Three cylindrical molds (glass jars or PVC pipes in various diameters)
- Craft knife or scalpel
- Texturing tool (old toothbrush or stiff bristle brush)
- Sponge and water
- Sandpaper (fine grit)
- Clear matte acrylic varnish
Step 1: Preparation & Base Creation
-
Mix the clay:
If your air dry clay isn’t pre-speckled, knead in a small amount of black pepper, black sand, or dried coffee grounds to achieve that organic, stone-like appearance. Ensure the speckles are distributed evenly throughout the block. -
Roll out the slab:
Roll your clay out into a long, even slab approximately 5-6mm thick. Using rolling pin guide rings helps maintain a consistent thickness, which is crucial for structural integrity. -
Cut the bases:
Using your three selected cylindrical molds as guides, cut out three circular discs from the clay slab to serve as the bases for your cups. -
Prepare the walls:
Measure the circumference of each base and cut three rectangular strips from the remaining slab to match. Ensure the height of each strip corresponds to your desired cup sizes (e.g., tall, medium, short).
Crack Control
If you see hairline cracks while drying, mix a small paste of clay and water (slip) and fill them in immediately. Smooth with a damp finger and let dry again.
Step 2: Assembly & Shaping
-
Score and slip:
Use a needle tool or knife to cross-hatch (score) the edges where the walls will meet the bases and the side seams. Apply a little water or liquid clay (slip) to these roughened areas. -
Attach the walls:
Wrap the rectangular clay strip around the corresponding base. Press the scored edges together firmly to form a cylinder. -
Seal the seams:
Gently smooth the vertical seam and the connection between the wall and the base using your finger or a modeling tool. You want the clay to merge completely so the join is invisible. -
Refine the shape:
Place your mold inside the clay cylinder briefly to ensure it is perfectly round, but remove it afterward to prevent the clay from shrinking and cracking against the rigid form. -
Smooth the lip:
Dip your finger in water and run it along the top rim of each cup to soften any sharp edges and create a professional, rounded lip.
Faux Cork Base
For a hyper-realistic look, paint the textured base section with a wash of warm tan and brown acrylics to mimic the appearance of natural cork like in the photo.
Step 3: Texturing & Finish
-
Mark the texturing zone:
Lightly score a horizontal line around the bottom 1.5 inches of each cup. This will define the area for the textured base. -
Create the texture:
Using a stiff bristle brush, a ball of foil, or a texturing tool, firmly tap the clay below your marked line. You want to create a rough, pitted surface that contrasts with the smooth upper section. -
Initial drying:
Let the cups dry slowly away from direct sunlight for 24-48 hours. Turning them upside down halfway through helps the bases dry evenly. -
Sanding:
Once bone dry, use fine-grit sandpaper to polish the upper, untextured sections until they are silky smooth. Be careful to avoid sanding down your intentional texture at the bottom. -
Seal and protect:
Apply two coats of clear matte varnish inside and out. This seals the porous clay and protects the speckled finish from ink stains or dust.
Arranging your new handmade organizers will instantly make your desk feel calmer and more curated
Earring Display Arch Stand
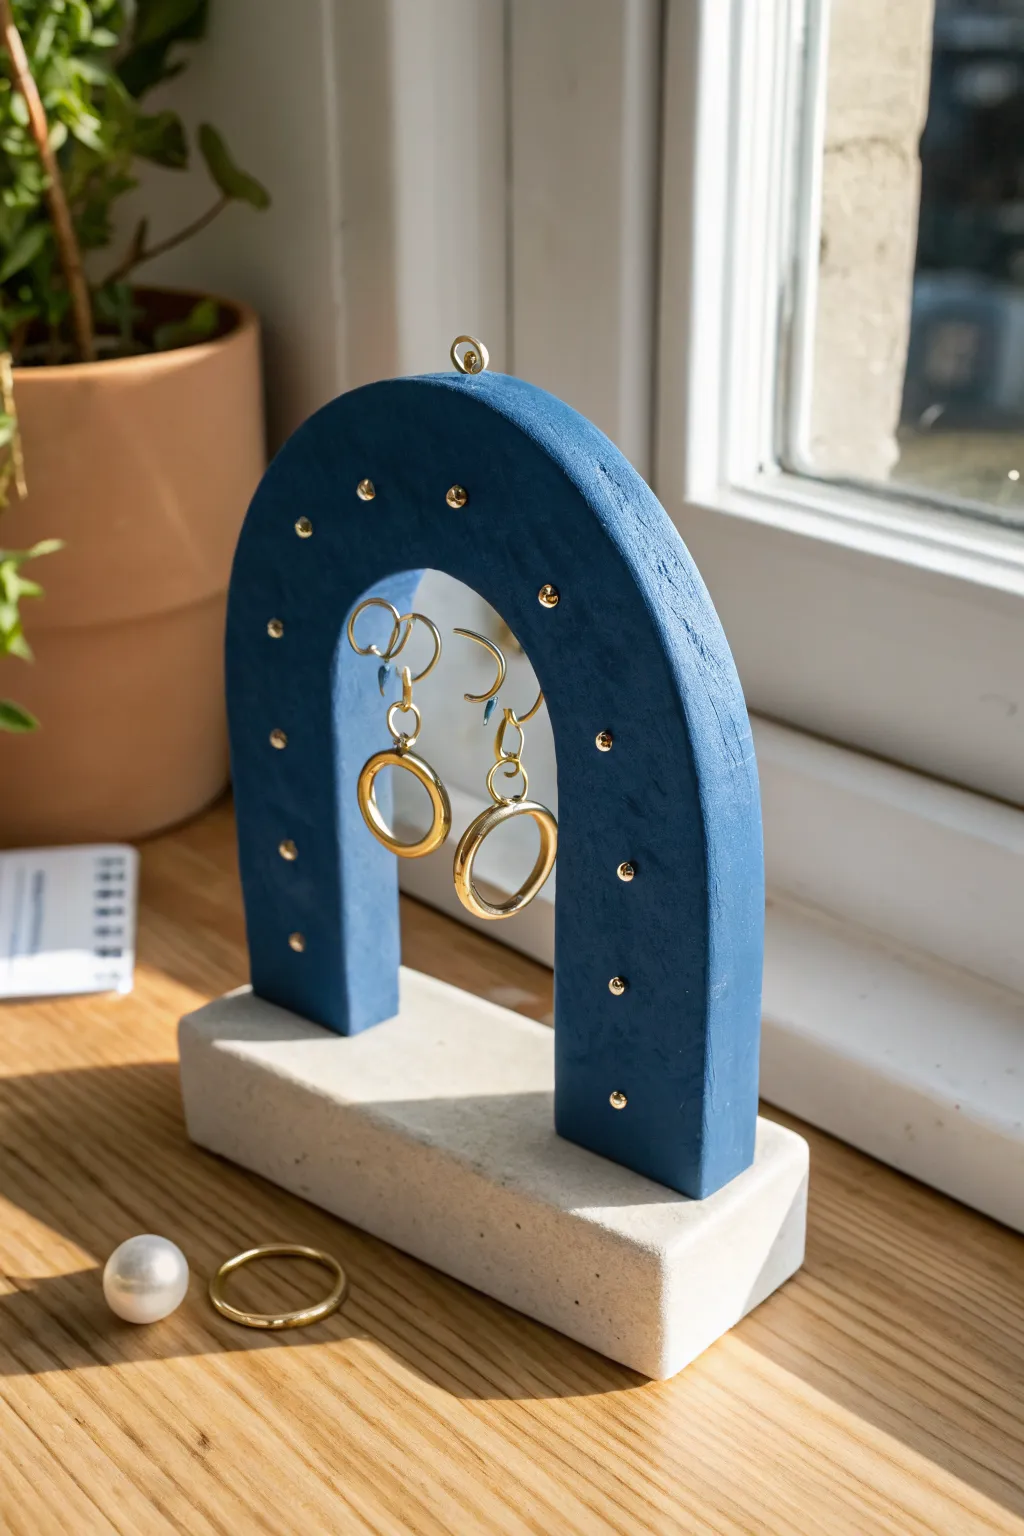
This elegant arched jewelry stand combines a modern geometric shape with a touch of celestial charm. Featuring a midnight blue arch studded with gold accents and a sturdy concrete-effect base, it is the perfect way to showcase your favorite dangling earrings.
Step-by-Step Tutorial
Materials
- Air dry clay (white)
- Acrylic paint (deep midnight blue)
- Acrylic paint (light grey or stone color)
- Small gold ball studs or adhesive gems
- Gold jewelry wire (20 gauge)
- Rolling pin
- Craft knife or scalpel
- Fine-grit sandpaper
- Ruler
- Strong craft glue or E6000
- Mod Podge or clear sealant (matte)
- Small needlenose pliers
- Parchment paper or silicone mat
- Small paintbrush
- Paper template (arch shape)
Step 1: Sculpting the Base
-
Prepare the Clay:
Start by conditioning a large chunk of white air dry clay. Knead it in your hands until it is pliable and free of cracks. -
Form the Base Block:
Take about two-thirds of your conditioned clay and form it into a rough rectangular block. This needs to be heavy enough to support the arch. -
Refine the Shape:
Place the block on your parchment paper and use your ruler or two flat objects to press the sides in, creating sharp, straight edges. Aim for a rectangle approximately 5 inches long, 2 inches wide, and 1 inch tall. -
Smooth the Surface:
Dip your finger in a little water and smooth out any fingerprints or imperfections on the top and sides of the block.
Clean Cuts Pro Tip
Before cutting your arch, let the rolled clay sit for about 10-15 minutes. Slightly dryer clay drags less under the knife, giving you much sharper edges.
Step 2: Creating the Arch
-
Make a Template:
Draw an arch shape on a piece of paper or cardstock that fits well within the dimensions of your base. Cut it out to use as a guide. -
Roll the Clay:
Roll out the remaining clay to an even thickness of about 1/4 to 1/2 inch. I find using guides (like two stacks of playing cards) on either side of the rolling pin helps keep the thickness consistent. -
Cut the Arch:
Place your paper template onto the rolled clay. Using a sharp craft knife, carefully trace around the template to cut out your arch shape. -
Add Wire Hooks:
Cut two small pieces of gold wire (about 1 inch long) and bend them into ‘U’ or hook shapes using pliers. Gently push the straight ends into the *underside* of the arch’s top curve while the clay is still wet, leaving the loop exposed. -
Top Loop Step:
For the decorative loop on top, form a small circle with the wire and insert the stem into the very top center of the arch. -
Dry Components:
Let both the base and the arch dry completely on a flat surface. This usually takes 24-48 hours. Flip them occasionally to ensure even drying.
Level Up: Terrazzo Base
Instead of painting the base grey, mix small chips of dried colored clay into your wet white clay block to create a trendy terrazzo stone effect.
Step 3: Assembly and Finish
-
Sand for Perfection:
Once fully dry, use fine-grit sandpaper to smooth any rough edges on the arch and the base, paying special attention to the cut sides. -
Paint the Arch:
Apply two coats of deep midnight blue acrylic paint to the arch. Allow the first coat to dry before adding the second for solid coverage. -
Stone Effect for Base:
Paint the rectangular base with a light grey or stone-colored paint. You can dab the brush slightly to create a textured, concrete-like appearance. -
Attach the Studs:
Using strong craft glue, carefully attach small gold ball studs or flat-back gems in a scattered pattern along the face of the blue arch. -
Join the Pieces:
Apply a generous amount of strong glue or E6000 to the bottom feet of the arch. Press it firmly onto the center of the base block. -
Support While Drying:
Prop up the arch with small objects (like spice jars) on either side to keep it perfectly upright while the glue cures completely. -
Seal the Project:
Finish by brushing a thin layer of matte Mod Podge or sealant over the painted areas to protect the finish.
Place your new stand on a vanity or windowsill to let the sunlight catch those gold accents
Entryway Key Tray With Lip
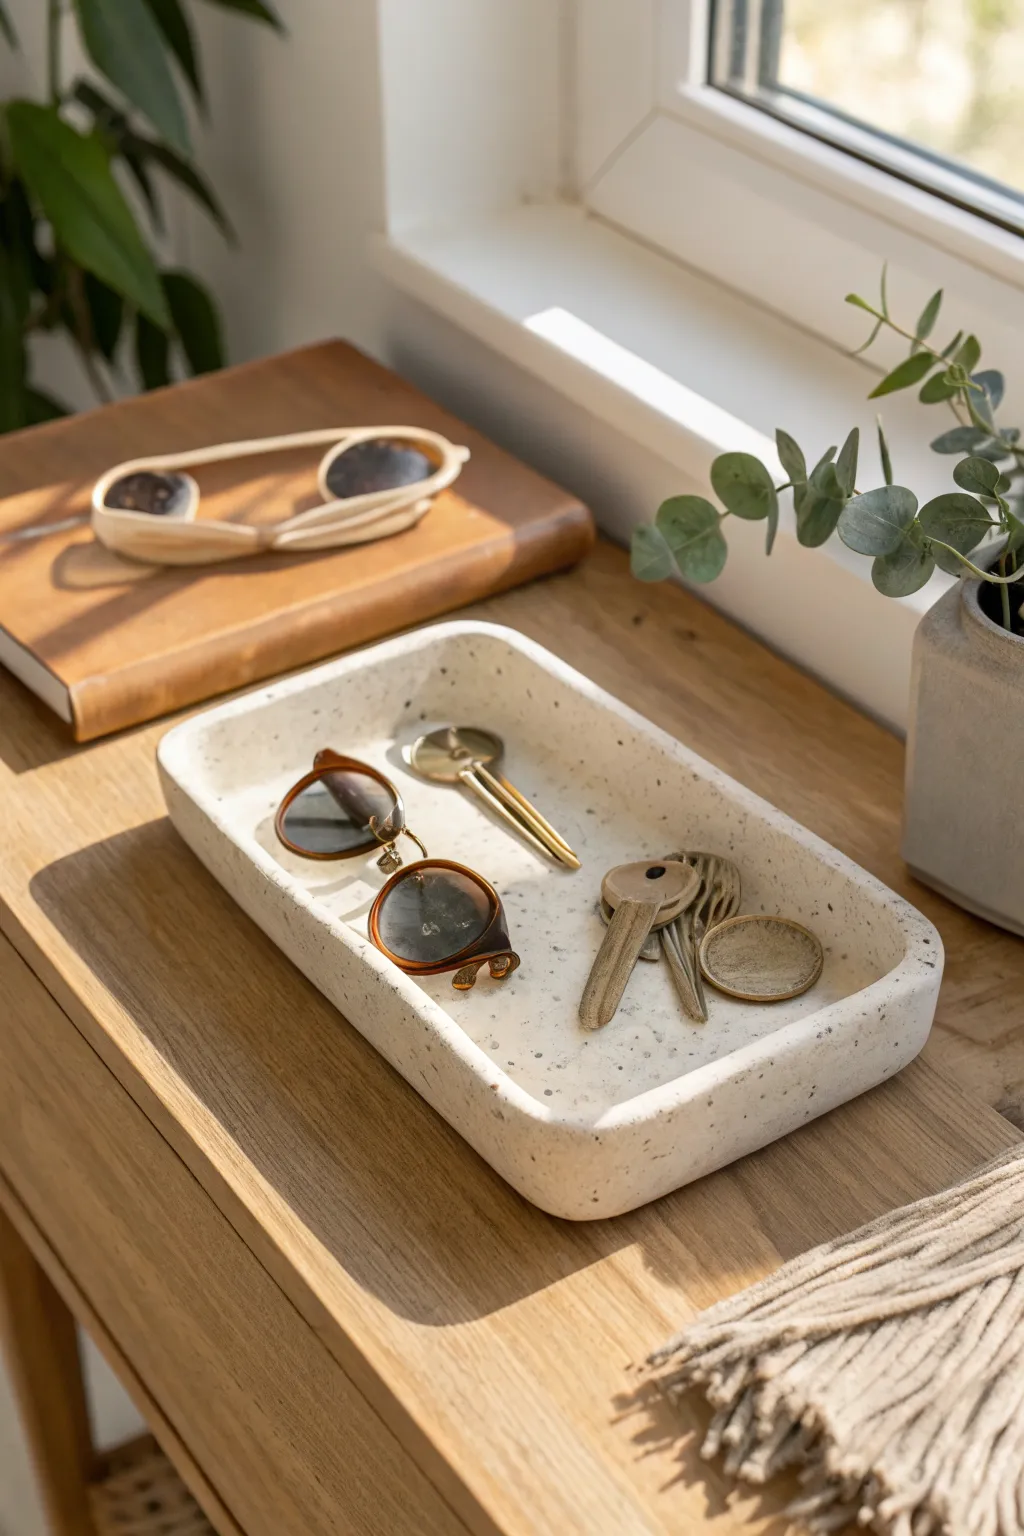
Upgrade your entryway organization with this minimalist tray that mimics the high-end look of speckled stone. Its shallow lip and spacious rectangular shape make it the perfect landing spot for keys and sunglasses the moment you walk through the door.
Detailed Instructions
Materials
- White air dry clay (approx. 500g-750g)
- Rolling pin
- Two wooden rulers or guide sticks (approx. 5-6mm thick)
- Sharp craft knife or clay blade
- Rectangular template (cardboard or paper, approx. 6×10 inches)
- Small bowl or cup with water
- Fine-grit sandpaper (220 and 400 grit)
- Acrylic paints (black, grey, and brown/tan)
- Old toothbrush or stiff bristle brush
- Matte sealant or varnish
- Parchment paper or canvas mat
Step 1: Shaping the Base
-
Prepare your workspace:
Lay down a sheet of parchment paper or a canvas mat to prevent sticking. Knead the clay in your hands for a few minutes to warm it up and ensure it is pliable and free of air bubbles. -
Roll the slab:
Place the clay between your two guide sticks. Using the rolling pin, roll the clay out into a large, even slab. The guides ensure your base has a consistent thickness, which helps prevent cracking. -
Cut the rectangle:
Place your rectangular template onto the clay slab. Use your craft knife to cut around the template cleanly. Don’t discard the excess clay, as you will need it for the walls. -
Smooth the edges:
Dip your finger in a little bit of water and run it along the cut edges of your base to soften any sharpness. You want rounded, organic corners rather than sharp 90-degree angles.
Cracks happen!
If small hairline cracks appear while drying, mix a tiny bit of fresh clay with water to make a paste. Fill the crack, smooth it over, and let it dry again before sanding.
Step 2: Building the Walls
-
Create clay coils:
Gather your remaining clay and roll it into a long, even snake or rope. Try to keep the thickness consistent, roughly the width of your pinky finger. -
Score and slip:
Using your craft knife or a needle tool, make small scratches (scoring) all along the top outer edge of your rectangular base. Do the same to one side of your clay coil. Apply a small amount of water (slip) to the scored areas. -
Attach the coil:
Press the coil firmly onto the edge of the base. If one coil isn’t long enough to go around the entire perimeter, join another piece by cutting the ends at an angle and smoothing them together. -
Blend the seams:
This is the most crucial part for strength. Use a modeling tool or your thumb to drag the clay from the coil down onto the base, both on the inside and outside. I like to support the wall with one hand while smoothing with the other. -
Refine the shape:
Once the coil is blended, use your fingers to pinch and shape the wall so it stands straight up. Run a damp sponge or finger along the mixture to smooth out any tool marks. -
Level the rim:
If the top edge looks uneven, gently trim it with your craft knife to get a straight line, then tap it gently with a flat tool or ruler to create a nice, flat lip.
Step 3: Finishing and Decoration
-
Let it dry:
Place the tray in a spot away from direct heat or sunlight to dry slowly. This usually takes 24-48 hours. Flip it gently halfway through to let the bottom breathe. -
Sand for perfection:
Once bone dry, use the 220-grit sandpaper to remove any bumps or unevenness. Follow up with the 400-grit for a silky smooth finish. Wipe away all dust with a slightly damp cloth. -
Prepare the splatter:
Dilute a small amount of black acrylic paint with water until it has an inky consistency. Do the same in separate containers for grey and a tiny bit of brown. -
Apply the speckles:
Dip your toothbrush into the diluted black paint. Hold it over the tray and run your thumb across the bristles to flick tiny specks onto the surface. Repeat this process with the grey, and sparsely with the brown to add warmth. -
Seal the piece:
Allow the paint to dry completely. Finally, apply 2-3 coats of a matte varnish to protect your tray from scratches and give it that finished, stone-like feel.
Natural Stone Look
For a more realistic granite look, focus the heaviest splatters in the corners and bottom creases, leaving the center slightly more open.
Now you have a chic, custom organizer ready to declutter your space in style
Lace-Imprint Wall Tile Art
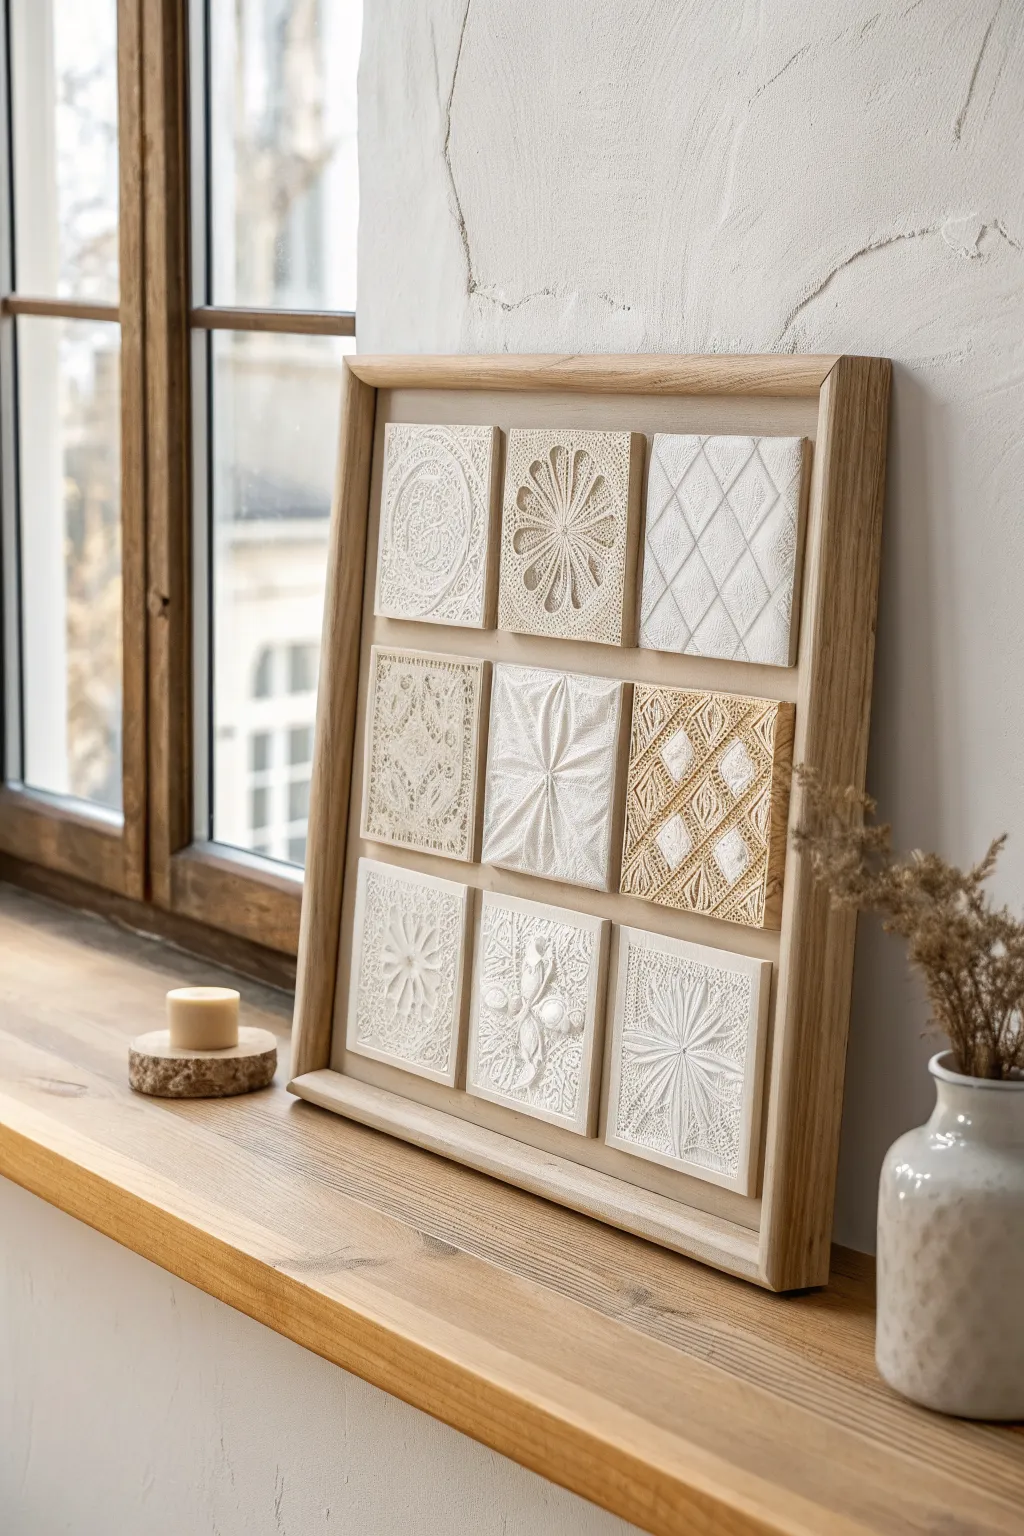
Bring sophisticated texture to your walls with this gallery of nine handmade clay tiles. By pressing vintage lace and patterned fabrics into simple air-dry clay, you create a captivating relief that looks like high-end plasterwork.
Step-by-Step Guide
Materials
- White air-dry clay (approx. 2-3 lbs)
- Wooden rolling pin
- Square cookie cutter or template (approx. 4×4 inches)
- Assorted lace scraps, crochet doilies, and textured fabric
- Ceramic tiles or glossy cardstock (for drying)
- Craft knife
- Sandpaper (fine grit)
- Parchment paper
- Deep-set wooden frame (shadow box style, sized for your grid)
- Acrylic paint (creamy white, metallic antique gold, beige)
- Wide flat paintbrush
- Soft cloth or sponge for wiping
- Strong craft glue or mounting tape
Step 1: Preparing the Clay
-
Condition the clay:
Begin by kneading your air-dry clay until it is warm, pliable, and free of air bubbles. If it feels too dry or cracks, dampen your hands slightly with water while working it. -
Roll out a slab:
Place the clay between two sheets of parchment paper or on a smooth work mat. Roll it out evenly to a thickness of about 1/4 inch. Try to keep the thickness consistent to ensure uniform drying. -
Prepare your textures:
Select your lace pieces or doilies. Arrange them nearby so you can work quickly while the clay is fresh. I find that stiffer, coarser lace leaves a deeper and more defined impression than fine tulle.
Step 2: Imprinting and Cutting
-
Press the texture:
Lay a piece of lace or textured fabric gently onto the rolled clay slab. Use your rolling pin to roll over the fabric once with firm, even pressure to embed the pattern. -
Reveal the pattern:
Carefully peel back the fabric to reveal the imprinted design. Check that the impression is deep enough to catch the light; if not, you may need to re-roll a fresh section of clay. -
Cut the tiles:
Using your square cutter or a template with a craft knife, cut out your tile shape directly over the most interesting part of the pattern. You will need nine square tiles total. -
Smooth the edges:
Dip your finger in a little water and gently run it along the cut edges of each square to smooth out any roughness or loose clay bits before they harden.
Fixing Curved Corners
If tile corners curl up while drying, it’s usually uneven shrinkage. Flip tiles frequently during drying. If already dry and warped, glue them down with extra-strong epoxy to force them flat.
Step 3: Drying and Refining
-
Initial drying phase:
Transfer the wet tiles onto a flat, non-porous surface like a ceramic tile or glass. This helps keep the backs flat. Let them sit undisturbed for 24 hours. -
Flip and finish drying:
After the first day, gently flip the tiles over to allow air to reach the bottom. Let them dry for another 24-48 hours until they are completely hard and room temperature to the touch. -
Sand for perfection:
Once fully cured, use fine-grit sandpaper to lightly sand the edges of each tile. This gives them a professional, crisp look.
Add Metallic Glamour
For a luxe look, lightly brush ‘Rub ‘n Buff’ or metallic wax over just the highest raised points of the texture. Gold or copper wax catches the light beautifully on the lace details.
Step 4: Finishing and Assembly
-
Apply base color:
Paint all the tiles with a layer of creamy off-white acrylic paint. This seals the clay and provides a uniform base color. -
Add dimension with a wash:
Mix a small amount of beige or antique gold paint with water to create a thin wash. Brush this over the textured areas of specific tiles (like the center and corner ones) to create variety. -
Wipe back:
Immediately after applying the wash, use a damp cloth to wipe the surface. This leaves the darker color in the deep crevices of the lace pattern while highlighting the raised areas. -
Prepare the frame backing:
Remove the backing board from your frame. If needed, paint it a neutral color that complements your tiles, or cut a piece of mat board to size. -
Do a dry run:
Arrange your nine tiles on the backing board to finalize the layout. Balance the heavily textured tiles with the simpler geometric ones. -
Mount the tiles:
Apply strong craft glue or heavy-duty double-sided mounting tape to the back of each tile. Press them firmly onto the backing board, using a ruler to ensure even spacing. -
Final framing:
Once the glue is dry, place the backing board with the mounted tiles back into the deep frame and secure it. Your textural art piece is ready to display.
Place your finished framed artwork near a window where natural light can play across the beautiful relief textures you created
Moon Phase Wall Hanging
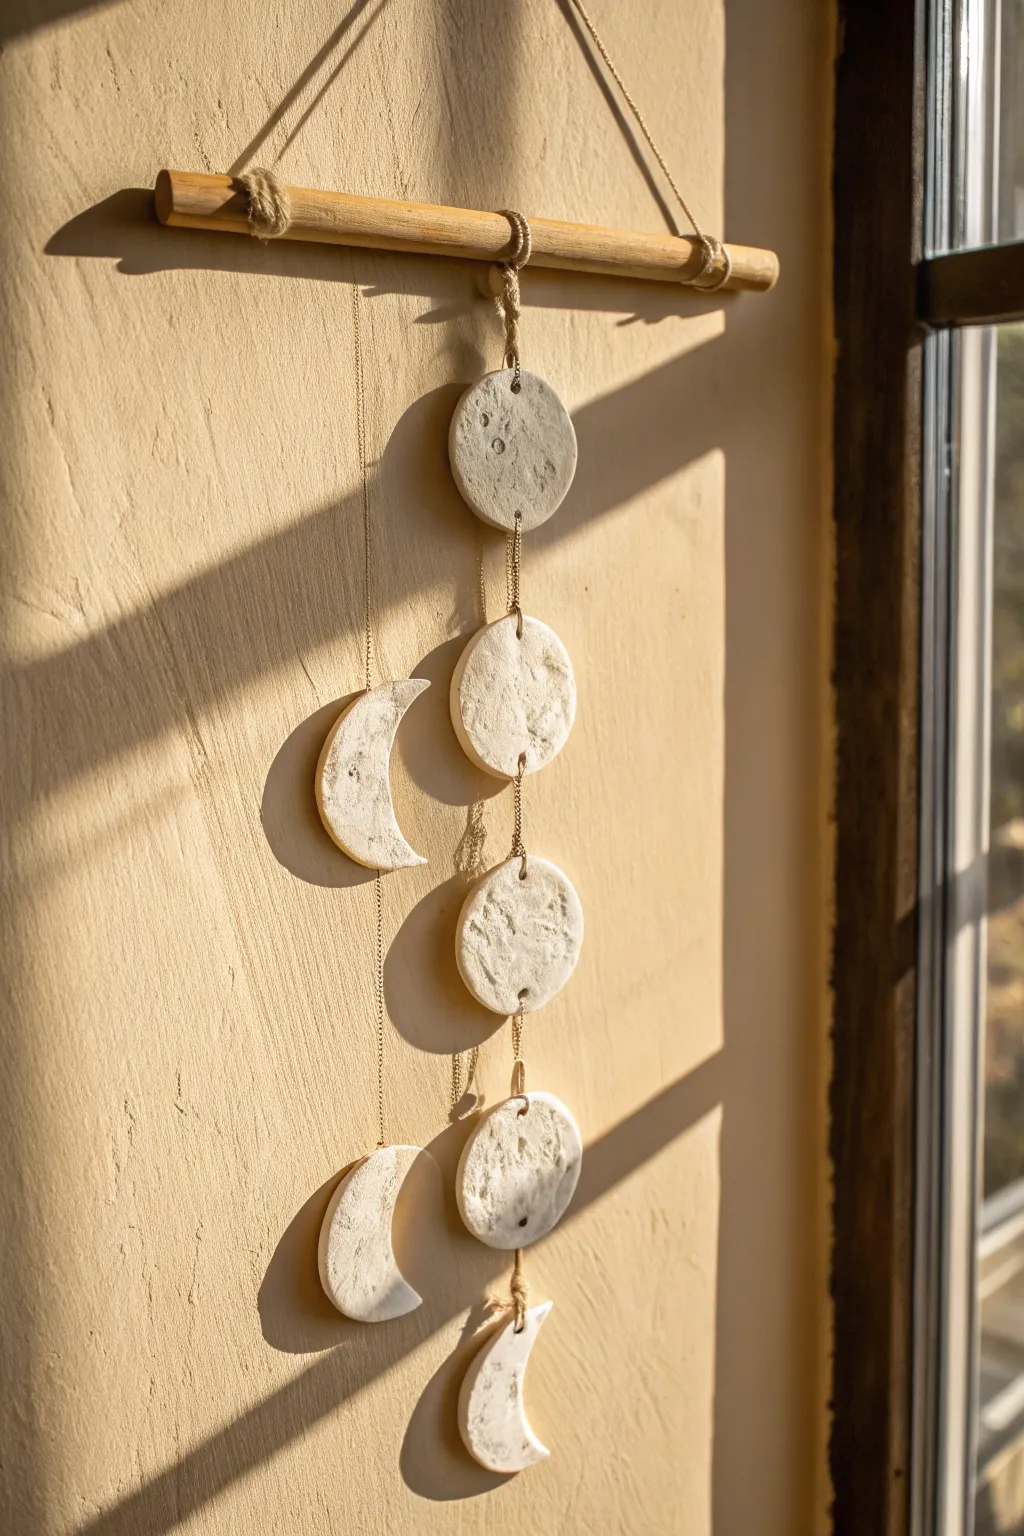
Bring a touch of celestial magic into your home with this rustic, textured moon phase wall hanging. The raw, organic finish of the air dry clay beautifully captures the cratered surface of the moon, making it a perfect statement piece for any sunlit corner.
Detailed Instructions
Materials
- White air dry clay
- Rolling pin
- Circle cookie cutter (approx. 2-3 inches)
- Small circle cutter (or bottle cap) for crescents
- Texturing tool (natural sponge, crumpled foil, or toothbrush)
- Wooden dowel (approx. 12 inches)
- Jute twine or gold jewelry chain
- Small eye hooks or jump rings (optional)
- Sandpaper (fine grit)
- Needle tool or toothpick
- Strong craft glue (if not using hooks)
Step 1: Shaping the Moons
-
Roll the Slab:
Begin by kneading your air dry clay to warm it up, then roll it out to a consistent thickness of about 1/4 inch. If the clay sticks, you can roll it out on a piece of parchment paper or a silicone mat. -
Cut the Full Moons:
Use your main circle cutter to punch out four complete circles. These will become your full moon and the base shapes for your crescent moons. -
Create Crescent Shapes:
Take two of the circles you just cut. Use the same circle cutter to slice a curve off the side of reach circle, creating a crescent shape. Adjust the placement of the cutter to make the crescent as thick or thin as you prefer. -
Add Texture:
Before the clay hardens, press a crumpled piece of aluminum foil or a coarse natural sponge gently into the surface of each shape. This creates that realistic, crater-like texture shown in the photo. -
Punch Holes:
Using a needle tool or toothpick, carefully poke holes where the connections will be. For the top and bottom circles, you need one hole; for the middle pieces, you need a hole at both the top and naturally opposite bottom point. Ensure the holes are wide enough for your twine or jump rings.
Step 2: Finishing and Assembly
-
Dry Completely:
Lay your clay pieces flat on a clean surface to dry. This typically takes 24-48 hours depending on humidity. Flip them over halfway through to ensure even drying and prevent curling. -
Sand Edges:
Once fully cured, use fine-grit sandpaper to gently smooth the rough edges of your shapes. I usually leave the surface texture alone to keep that rustic look, only focusing on the outlining rim. -
Prepare the Hanger:
Cut a piece of jute twine about 18 inches long. Tie one end to the left side of your wooden dowel and the other to the right side to create the main hanging loop. -
Cut Connecting Strands:
Decide on the spacing between your moons. Cut lengths of fine chain or jute twine for the connections. You will need roughly 3-inch segments between each shape, plus a longer piece to attach the top moon to the dowel. -
Attach Top Moon:
Thread your twine through the top hole of the first full moon circle. Tie it securely to the center of the wooden dowel. You can wrap the twine around the dowel a few times for a decorative knot. -
Connect the Phases:
Using jump rings or by tying knots with twine, connect the bottom of the first full moon to the top of a crescent moon. Continue this chain, alternating shapes or following a specific moon phase pattern. -
Check Balance:
Lift the dowel to see how the pieces hang. If they twist too much, you may need to adjust your knots or jump rings to ensure they lie flat against the wall. -
Secure Knots:
For extra durability, place a tiny dot of clear craft glue on each knot to prevent them from unraveling over time.
Clean Cuts
If your circle cutter leaves ragged edges, dip the cutter into a little bit of water or cornstarch before pressing it into the clay for a sharper release.
Add Some sparkle
Once dry, brush a very light layer of metallic gold acrylic paint over just the raised textures of the moon craters to catch the light beautifully.
Hang your new celestial art near a window and watch the shadows play across the textured surface throughout the day
Abstract Clay Mobile With Beads
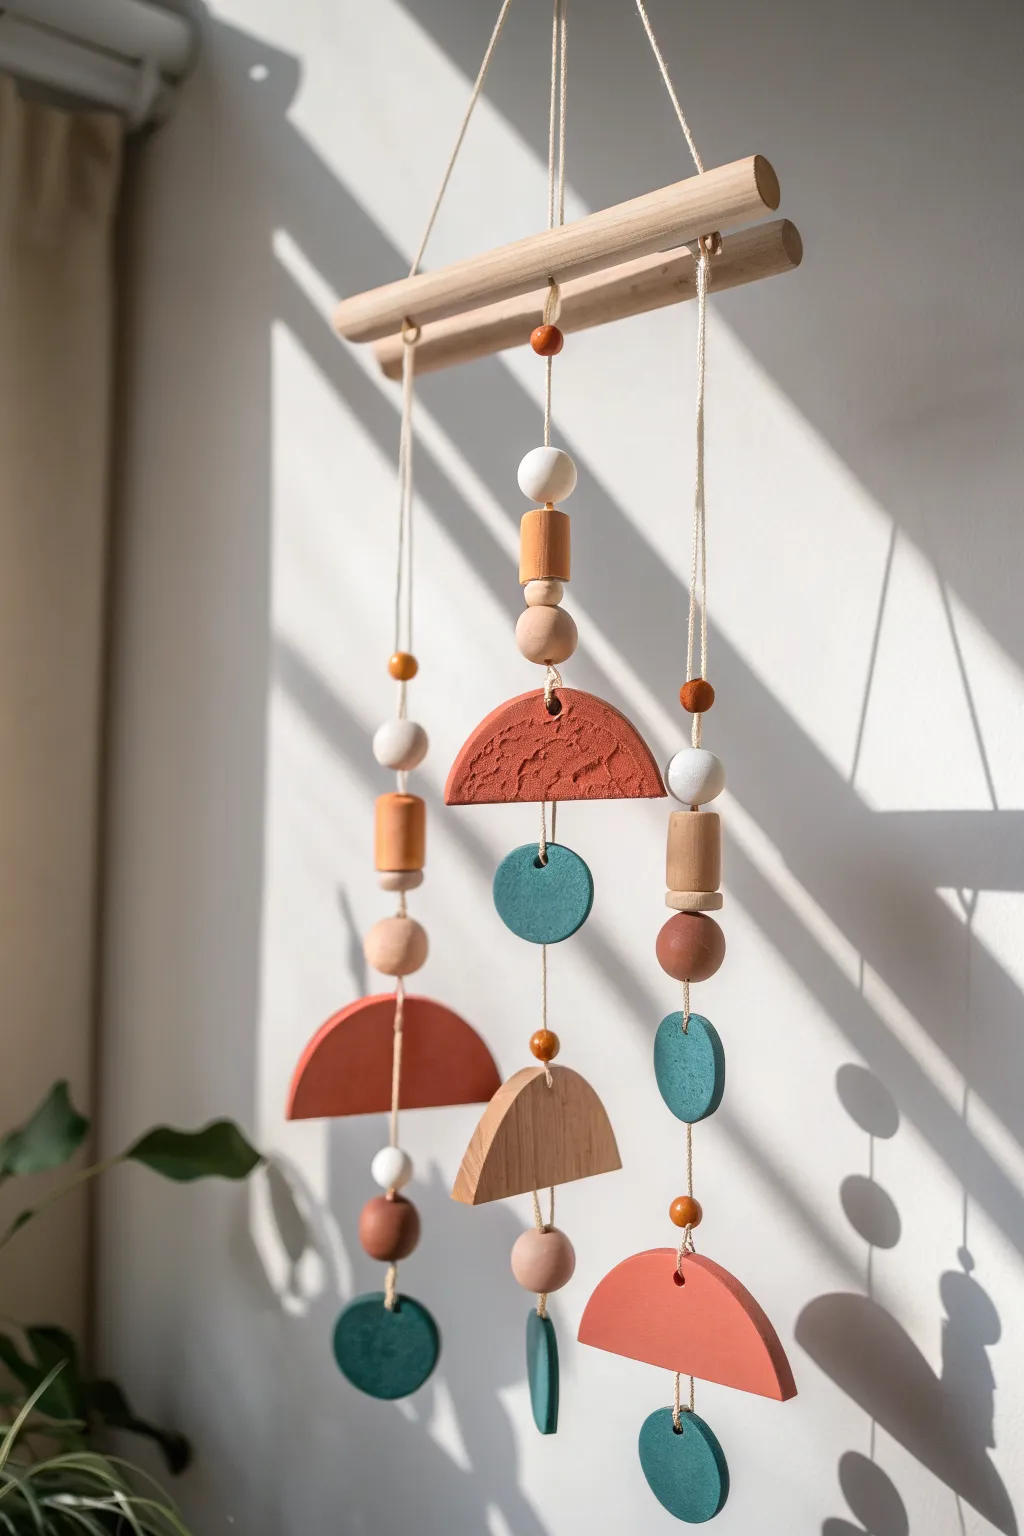
Add a touch of modern bohemian charm to your space with this stunning hanging mobile, featuring a mix of geometric clay shapes and wooden textures. The balance of terracotta, teal, and natural wood tones creates a calming, earthy aesthetic perfect for a sunny corner.
How-To Guide
Materials
- Air dry clay (white or terracotta)
- Rolling pin
- Circle cookie cutters (various sizes: approx. 2-inch and 1-inch)
- Knife or clay cutting tool
- Wooden dowel (approx. 10-12 inches long)
- Wooden beads (assorted shapes: round, geometric, cylindrical) in natural wood and colored finishes
- Acrylic paints (terracotta/burnt orange, teal/dark turquoise, white)
- Paintbrushes (flat and detail)
- Cotton twine or macramé cord (natural color)
- Skewers or toothpicks for making holes
- Sandpaper (fine grit)
- Clear varnish or sealant (optional)
- Textured object (like lace or a stamp) for the top semicircle
Step 1: Shaping the Clay Components
-
Roll out the clay:
Begin by kneading your air dry clay to soften it, then roll it out to an even thickness of about 1/4 inch on a clean, flat surface. -
Cut the semicircles:
Use your larger circle cutter to punch out three large circles. Use a sharp knife or cutting tool to slice each circle directly in half to create semicircle shapes. -
Create the texture:
For the feature piece (the top center semicircle), press a textured object like a piece of lace, a stamp, or even crumpled foil into the wet clay to create an organic, imprinted pattern. -
Cut the small circles:
Using the smaller circle cutter, punch out four small discs. These will serve as the teal accents at the bottom and center of your strands. -
Pierce the hanging holes:
While the clay is still wet, carefully use a skewer or toothpick to poke holes. The semicircles need a hole at the top center and bottom center (except the bottom-most ones, which only need a top hole). The small circles need holes at the top and bottom. -
Smooth and dry:
Dip your finger in a little water to smooth out any rough edges. Lay all pieces flat on parchment paper and let them dry completely according to the package instructions, flipping them halfway through to prevent curling.
Hole sizing tip
Make your holes slightly larger than you think you need! Clay shrinks as it dries, and trying to force a cord through a shrunken hole can crack your piece.
Step 2: Painting and Prep
-
Sand the edges:
Once fully dry, gently sand the edges of your clay pieces with fine-grit sandpaper to remove any sharp burrs or irregularities. -
Paint the terracotta pieces:
Paint the semicircles with your terracotta or burnt orange acrylic paint. For the textured piece, I like to use a slightly drier brush to ensure the paint doesn’t pool too thickly in the crevices. -
Paint the teal accents:
Paint the four small circular discs with a rich teal or dark turquoise color. Apply a second coat if needed for full opacity. -
Paint select beads:
While keeping most wooden beads natural, choose a few small round beads to paint in matching terracotta or white tones to tie the color palette together. -
Seal (Optional):
If you want a glossy finish or extra durability, apply a coat of clear varnish to the painted clay pieces and let them cure.
Add some shine
Mix a tiny amount of gold paint into your terracotta color or brush gold leaf onto the edges of the semicircles for a glamorous, high-end finish.
Step 3: Assembly
-
Cut the cords:
Cut three lengths of cotton twine. The center strand should be slightly longer than the two side strands. Leave plenty of extra length for knotting. -
Start the center strand:
Tie a knot at the bottom of your center cord and thread on a teal circle. Add a sequence of beads above it, tying knots under heavy beads if necessary to keep them in place. -
Add the main shapes:
Thread the cord through a bead, then into the bottom of a terracotta semicircle and out the top to stack them. Continue upward, adding the textured semicircle near the top of the center strand. -
Assemble side strands:
Repeat the process for the left and right strands, creating a pleasing rhythm by alternating between clay shapes and stacks of wooden beads. -
Attach to dowel:
Tie the top of each of the three finished strands securely to the wooden dowel. Adjust the spacing so they hang evenly without touching. -
Create the hanger:
Cut a final piece of twine and tie each end to the outer edges of the dowel to create a triangle hanger for the wall.
Hang your new mobile near a window to watch the geometric shadows dance across the wall throughout the day
Sculptural Bookends in Soft Neutrals
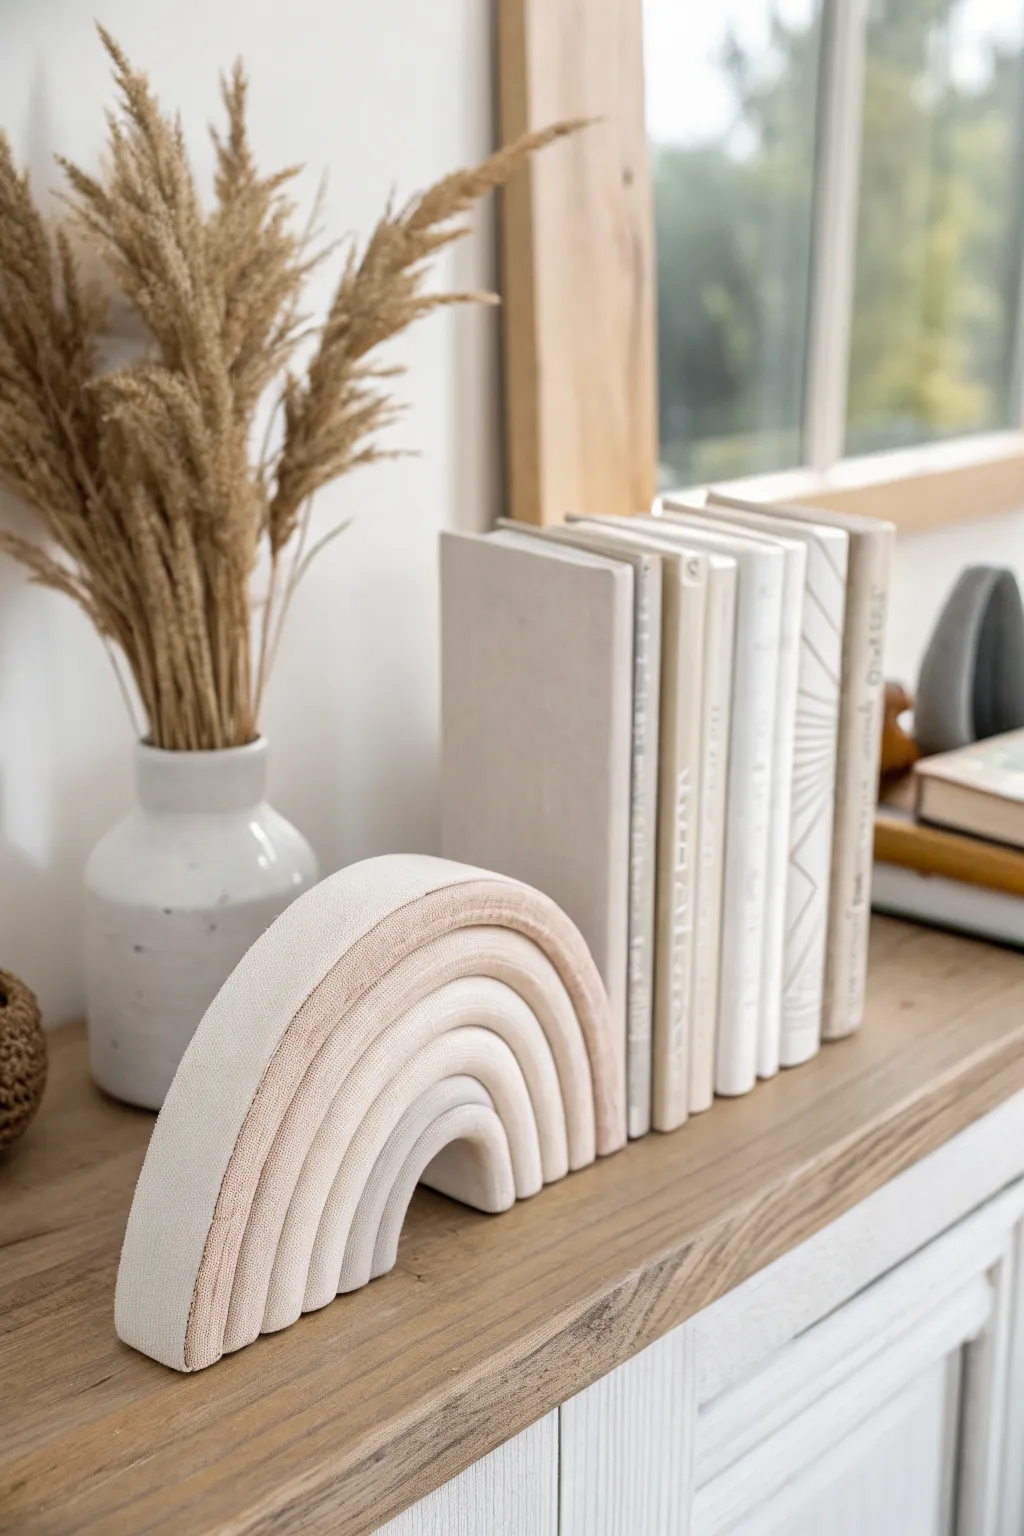
Bring a touch of modern calm to your bookshelf with this structural clay rainbow. Its soft, neutral palette and prominent ribbed texture mimic the look of woven fabric or carved stone, creating a sophisticated piece that feels far more expensive than its humble materials.
Step-by-Step
Materials
- Air dry clay (white or natural stone color)
- Rolling pin
- Sharp craft knife or clay slicer
- Ruler
- Water in a small cup
- Acrylic paints (sand, beige, cream, white)
- Medium flat paintbrush
- Texture tool (comb, fork, or serrated scraper)
- Fine-grit sandpaper (220 grit)
- Clear matte varnish or sealant
Step 1: Shaping the Arches
-
Prepare your workspace:
Lay down a non-stick mat or parchment paper to protect your table. Knead a large chunk of air dry clay until it is soft, pliable, and free of cracks. -
Roll the base slab:
Roll your clay out into a large, even slab approximately 1/2 inch to 3/4 inch thick. Consistency in thickness is key here, so consider using guide sticks on either side of your rolling pin. -
Cut the strips:
Using a ruler and a sharp craft knife, cut five or six long, straight strips of clay. These strips should be uniform in width, about 3/4 inch wide. -
Form the smallest arch:
Take one strip and gently bend it into a tight U-shape to form the center of your rainbow. Trim the bottom ends so they sit flush against the table. -
Layer the subsequent arches:
Take the next strip and drape it over the first arch. Gently press them together. If the clay is feeling dry, score the touching surfaces lightly and dab a tiny bit of water to act as glue. -
Build outward:
Continue adding strips one by one, ensuring each new layer hugs the previous one tightly without gaps. Trim the bottom of each strip as you go so the entire piece stands flat. -
Smooth the seams:
Once all layers are assembled, use your finger or a smoothing tool with a little water to blend the back of the rainbow so it becomes one solid unit for stability. Leave the front definition visible.
Fixing Cracks
If cracks appear during drying, mix a small amount of fresh clay with water to make a paste (slip). Fill the cracks, smooth it out, and let it dry again.
Step 2: Texturing and Refining
-
Add surface texture:
To create the ribbed, fabric-like effect seen in the photo, gently drag a texture tool, comb, or even a fork along the length of each arch strip. Follow the curve carefully to keep the lines parallel. -
Check stability:
Stand the rainbow up and ensure it doesn’t tip. If it’s wobbly, gently press it down onto the hard surface to flatten the base. -
Slow drying process:
Let the sculpture dry in a cool, dry place away from direct sunlight. This can take 48 to 72 hours depending on thickness. Flip it occasionally if possible to let air reach the bottom. -
Sand imperfections:
Once fully cured and hard, use fine-grit sandpaper to gently smooth any sharp edges on the bottom or back. Be careful not to sand away your ribbed texture on the front.
Step 3: Painting and Finishing
-
Mix your palette:
Prepare your acrylic paints. You want a gradient of neutrals: start with a base of white and mix in varying small amounts of brown or ochre to creative distinct shades of cream, sand, and taupe. -
Paint the gradient:
Paint each individual arch a slightly different shade. I like to keep the colors close in tone for that subtle, cohesive look shown in the image, rather than high-contrast distinct stripes. -
Apply a second coat:
Let the first layer dry, then apply a second coat if the clay requires it for opacity. Ensure you get paint into the little textured grooves. -
Seal the piece:
Finish with a clear matte varnish. This protects the paint and keeps that dusty, stone-like aesthetic without adding unwanted shine.
Weighted Base
To make this a functional heavy-duty bookend, hollow out the bottom slightly while wet and embed a few heavy washers or fishing weights before drying.
Place your finished rainbow on a shelf or mantel for an instant chic update to your decor
Terrazzo-Style Catchall Tray
Bring the trendy look of Italian terrazzo into your home with this surprisingly simple air-dry clay project. This chic catchall tray features organic chips of color embedded in a creamy white base, perfect for holding jewelry or keys.
How-To Guide
Materials
- White air-dry clay (approximately 500g)
- Acrylic paints (terracotta, teal, olive green, mustard yellow, black)
- Rolling pin
- Sharp craft knife or clay blade
- Small bowl using as a circle template (approx. 6-7 inches)
- Fine-grit sandpaper (220 and 400 grit)
- Cup of water
- Gloss or satin varnish sealant
- Paintbrush
Step 1: Creating the Terrazzo Chips
-
Mix your colors:
Take four small walnut-sized balls of white clay. Knead a different color of acrylic paint into each one—aim for a muted palette of terracotta, teal, mustard, and a tiny bit of black. -
Flatten the colored clay:
Roll each colored ball out into a very thin, organic slab, roughly 2-3mm thick. Don’t worry about shape; rough edges are fine. -
Quick dry:
Let these colored sheets sit out for about 20-30 minutes. You want them to firm up slightly so they cut cleanly rather than smushing, but they shouldn’t be fully hard. -
Chop into fragments:
Use your craft knife to chop the colored sheets into irregular, angular fragments. Create a variety of sizes, from tiny specks to larger jagged pieces.
Step 2: Forming the Tray Base
-
Prepare the base clay:
Take a large portion of fresh white clay and roll it into a ball. Flatten it with your palm to start the slab. -
Incorporate the chips:
Sprinkle your colored clay chips generously over the top of the white slab. Press them gently into the surface with your fingers so they stick. -
Roll it out:
Use the rolling pin to roll the slab out to about a 1/4 inch thickness. This pressure will embed the chips firmly into the white clay, creating a smooth surface. -
Cut the circle:
Place your bowl upside down on the speckled slab to act as a template. Trace around it with the craft knife to cut a perfect circle. -
Create the rim strip:
Roll out a long, rectangular snake of leftover white clay. Flatten it into a strip about 1 inch wide and long enough to wrap around the circumference of your circle base. -
Add chips to the rim:
Just as you did with the base, press more colored chips into this strip and roll it flat to embed them.
Cracks while rolling?
If the clay starts cracking while you embed the chips, dip your fingers in water and smooth the edges immediately. Keep the clay workable, not bone dry.
Step 3: Assembly and Finishing
-
Score and slip:
Use your knife to make small hatched marks (scoring) around the edge of the circular base and along the bottom edge of your rim strip. Dab a little water (slip) on the roughed-up areas. -
Attach the wall:
Wrap the strip around the base, pressing the scored edges together firmly. I find it helpful to overlap the ends of the strip slightly and slice through both layers for a seamless join. -
Smooth the seams:
Use a wet finger or a clay tool to smooth the seam on the inside and outside of the tray. Ensure there is no visible gap between the floor and the wall of the tray. -
Dry thoroughly:
Set the tray aside to dry completely. This usually takes 24-48 hours depending on humidity; turn it over carefully halfway through to let the bottom breathe. -
Reveal the pattern:
Once bone dry, sand the entire surface with fine-grit sandpaper. This is the magic step that removes the surface film of white clay and makes the colored chips pop vividly. -
Clean up dust:
Wipe away all sanding dust with a slightly damp cloth or paper towel. -
Seal for protection:
Apply two coats of gloss or satin varnish to seal the clay and give it a durable, ceramic-like finish.
Try a speckle effect
For a ‘cookies and cream’ look, mix used coffee grounds or cracked black pepper directly into the white base clay before adding your colorful chips.
Once sealed, place your new stylish tray on your dresser to organize your daily treasures
Statement Mirror Frame With Clay Texture
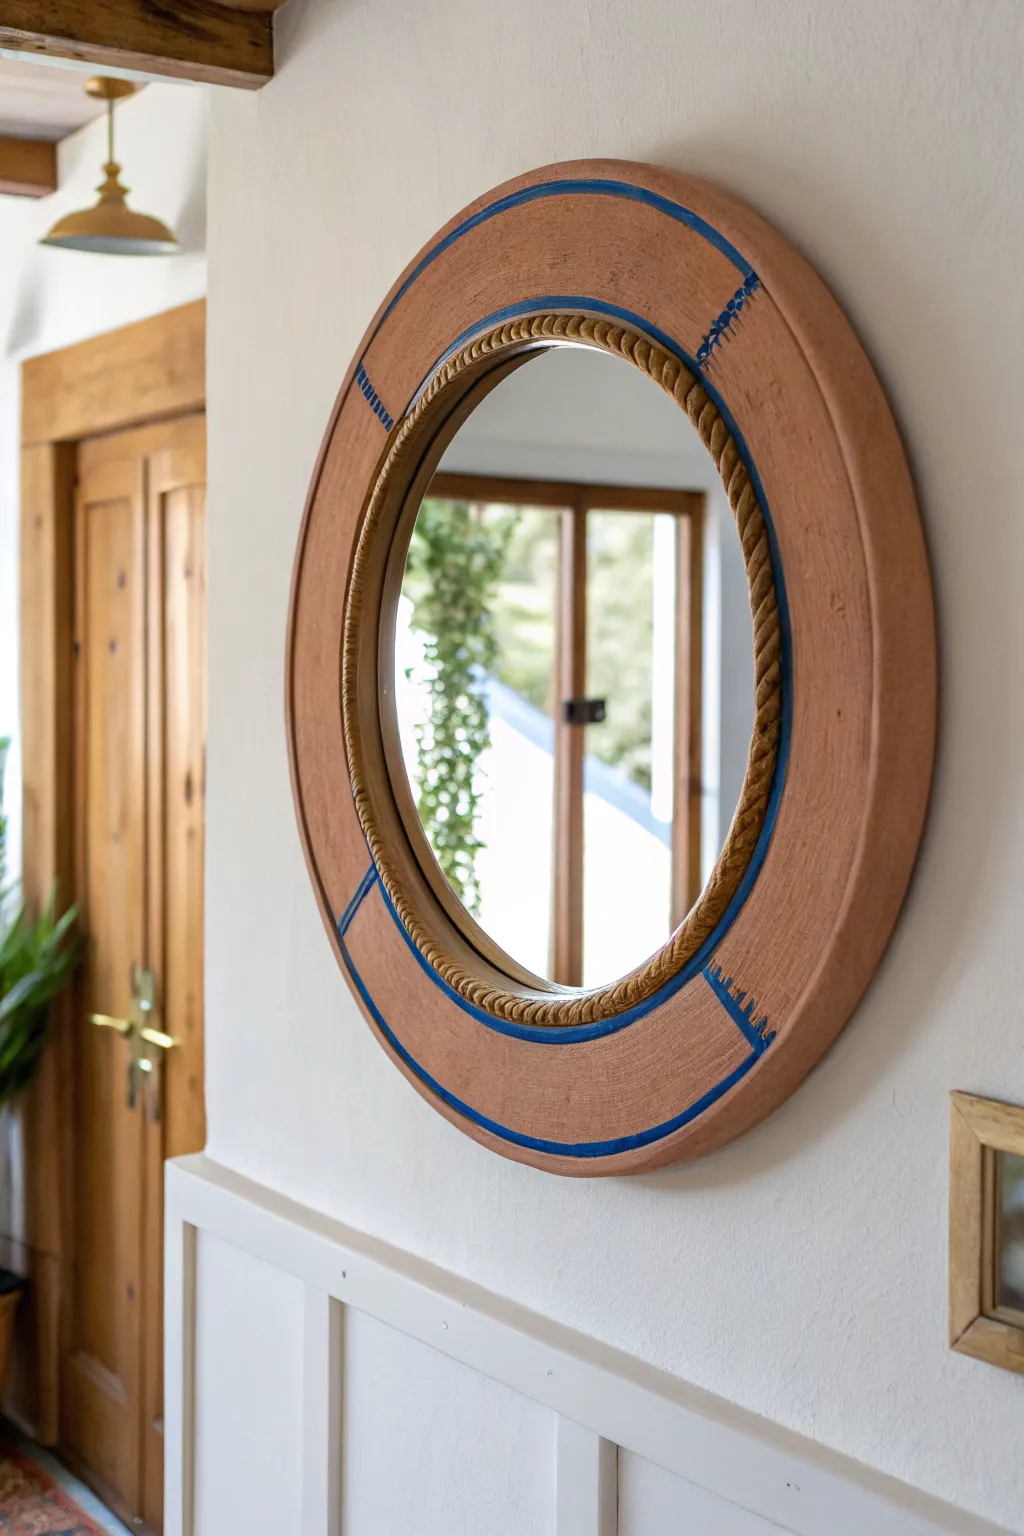
Transform a plain, inexpensive mirror into a high-end statement piece that mimics the warm, earthy look of traditional pottery. By combining air dry clay for the twisted rope detail and specialized paint techniques for the frame, you’ll achieve a stunning desert-modern aesthetic.
How-To Guide
Materials
- Round wooden mirror frame (flat profile)
- Air dry clay
- Water in a small cup
- Acrylic paint (terracotta/burnt sienna color)
- Acrylic paint (bright cobalt blue)
- Baking soda
- Paintbrush (medium flat brush)
- Fine detail paintbrush
- Strong craft glue or E6000
- Painter’s tape
- Sandpaper (medium grit)
Step 1: Creating the Rope Texture
-
Prepare surface:
If painting a pre-existing mirror, clean the frame thoroughly to remove dust or grease. If the surface is very glossy, scuff it lightly with medium-grit sandpaper to help the clay and paint adhere. -
Tape the glass:
Carefully apply painter’s tape to the mirror glass, tucking it right under the inner lip of the frame to protect the reflection from paint and glue. -
Condition clay:
Take a handful of air dry clay and knead it until it’s warm and pliable. This prevents cracking later. -
Roll coils:
Roll the clay into two long, thin snakes of equal thickness on a clean surface. They need to be long enough to span the circumference of your mirror’s inner edge. -
Twist the rope:
Gently twist the two clay snakes together to form a tight rope pattern. If the clay starts to dry or crack, dampen your fingers slightly with water. -
Attach the detail:
Apply a line of strong craft glue along the inner rim of the wooden frame. Press your twisted clay rope firmly into the glue, joining the ends together seamlessly by smoothing the clay with a wet finger.
Clay Cracking?
If your rope cracks while drying, don’t restart. Mix a tiny bit of fresh clay with water to make a paste (slip) and fill in the cracks, then smooth it over.
Step 2: Achieving the Faux Terracotta Finish
-
Dry the clay:
Let the clay rope dry completely according to the package instructions. This usually takes 24 hours, depending on thickness and humidity. -
Mix textured paint:
Mix your terracotta-colored acrylic paint with baking soda. Start with a 1:1 ratio, adjusting until you have a thick, fluffy consistency that resembles frosting or wet sand. -
Apply base coat:
Using a medium flat brush, paint the entire wooden frame and the clay rope detail with the textured mixture. Dab the brush rather than stroking it to create a rough, earthen surface. -
Let it cure:
Allow the first coat to dry completely. The baking soda mixture might dry faster than standard paint. -
Second coat:
Apply a second layer of the textured paint if needed to ensure full coverage and a rich, deep color. Ensure the clay rope is fully coated and integrates visually with the wood.
Pro Tip: Custom Colors
Can’t find the perfect terracotta paint? Mix orange with a touch of brown and a tiny dot of blue to dull the brightness for that natural clay hue.
Step 3: Adding Geometric Details
-
Plan the design:
Visualize where you want your blue accents. The design features an outer ring and intermittent geometric markings like dashes and cross-hatching. -
Paint the outer rim:
Dip a fine detail brush into the cobalt blue paint. Carefully paint a thin, consistent line following the curve near the outer edge of the frame. -
Paint the inner rim:
Paint a matching thin blue line just outside the textured rope section. -
Add connecting lines:
Choose random intervals to connect the inner and outer circles with straight perpendicular lines. -
Create latch marks:
Add character by painting small tally marks or cross-hatching near some of the perpendicular lines, embracing a hand-painted, imperfect look. -
Final touches:
Once all paint is fully dry, carefully peel away the painter’s tape from the mirror glass.
Hang your new textured mirror in a hallway or entryway to instantly add warmth and artisanal charm to the space