If you’ve got a little time and a lump of air dry clay, you’ve got everything you need to make something genuinely cute and useful. Here are my favorite air dry clay creation ideas—starting with the classics and sliding into the fun, unexpected projects that always get people asking, “Wait, you made that?”
Classic Ring Dish
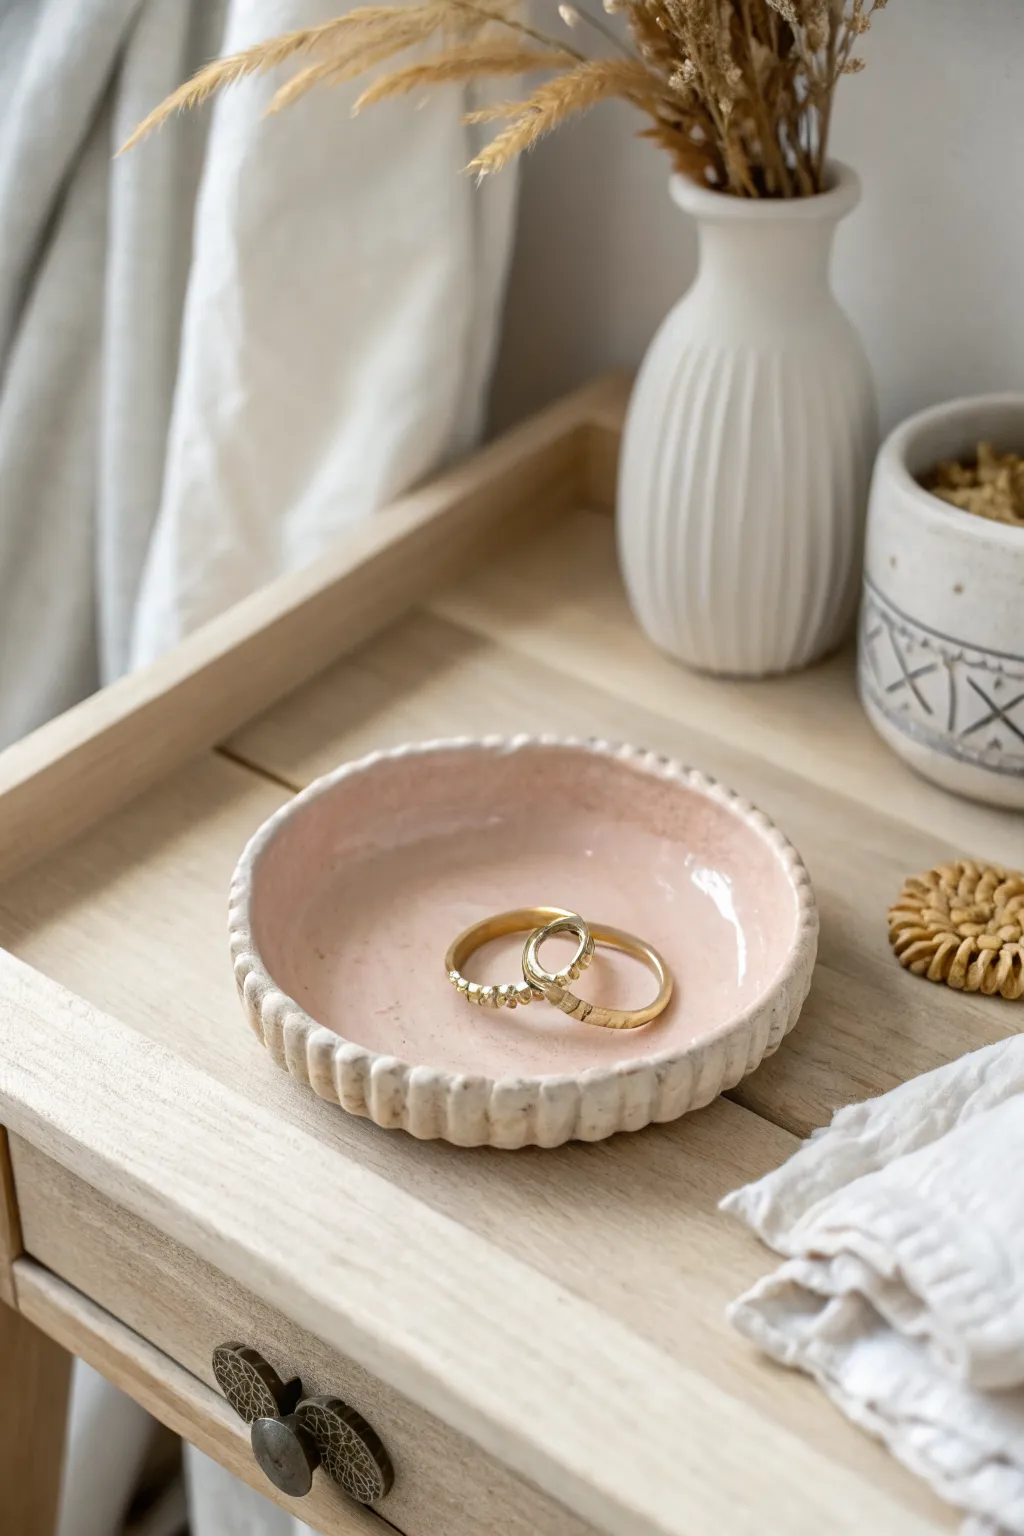
This charming ring dish combines a rustic, textured rim with a smooth, glossy interior glaze for a sophisticated finish. The fluted edges give it a delicate, flower-like appearance that looks beautiful on any bedside table.
Step-by-Step Guide
Materials
- Air dry clay (white)
- Acrylic paint (pale pink and white)
- Gloss varnish or clear sealant
- Rolling pin
- Circular cookie cutter or a bowl (approx. 4-inch diameter)
- Small modeling tool or dull butter knife
- Sponge or sandpaper
- Small bowl for shaping
- Paintbrushes
Step 1: Shaping the Clay
-
Condition the clay:
Start by taking a handful of air dry clay and kneading it in your hands until it feels soft, warm, and pliable. This prevents cracks later on. -
Roll it out:
Place the clay on a clean, flat surface. Use a rolling pin to flatten it into an even sheet, aiming for a consistent thickness of about 1/4 inch. -
Cut the circle:
Press a 4-inch circular cookie cutter or use a bowl as a template to cut a perfect circle from the clay sheet. Remove the excess clay. -
Shape the dish:
Gently lift the clay circle and place it inside a small bowl to give it a curved, dish-like shape. Press it lightly against the bottom so it sits flat.
Clean Lines
Use a damp Q-tip to clean up any pink paint that accidentally strays onto the raw clay rim before it dries.
Step 2: Adding Texture
-
Create the fluted rim:
Using a small modeling tool, a chopstick, or the back of a dull knife, press vertical indentations around the outer edge of the rim. -
Refine the fluting:
Space these indentations evenly, roughly every quarter inch. Press firmly enough to create a texture that resembles a gathered pie crust or a flower petal edge. -
Smooth the interior:
Dip your finger in a tiny bit of water and run it over the interior surface of the dish to erase any fingerprints or accidental marks. -
Maintain the edge:
As you smooth the inside, be careful not to flatten the beautiful fluted texture you just created on the outside rim. -
Dry completely:
Let the dish dry in a cool, dry place for at least 24-48 hours. I usually flip it over halfway through the drying process to ensure the bottom dries thoroughly.
Step 3: Painting and Finishing
-
Sand imperfections:
Once fully dry and hard, use fine-grit sandpaper to gently smooth any rough spots on the rim or bottom. -
Mix the glaze color:
Mix a small amount of pale pink acrylic paint with a drop of white to get a soft, pastel hue similar to the photo. -
Paint the interior:
Apply the pink paint strictly to the *inside* of the bowl. Leave the fluted rim and the exterior unpainted for that natural, contrasting look. -
Let paint dry:
Allow the paint to dry completely. Apply a second coat if the clay color is showing through the pastel pink. -
Apply varnish:
Finish by applying a high-gloss varnish over the painted pink interior. This gives it that ceramic-glaze look and protects the surface. -
Seal the exterior (optional):
If you want to protect the raw clay on the outside without adding shine, apply a matte sealant to the fluted rim and exterior.
Luxury Touch
Once the pink glaze is dry, paint a thin line of metallic liquid gold leaf along the very top edge of the fluted rim.
Now your lovely ring dish is ready to hold your favorite jewelry pieces


Leaf-Imprinted Trinket Tray
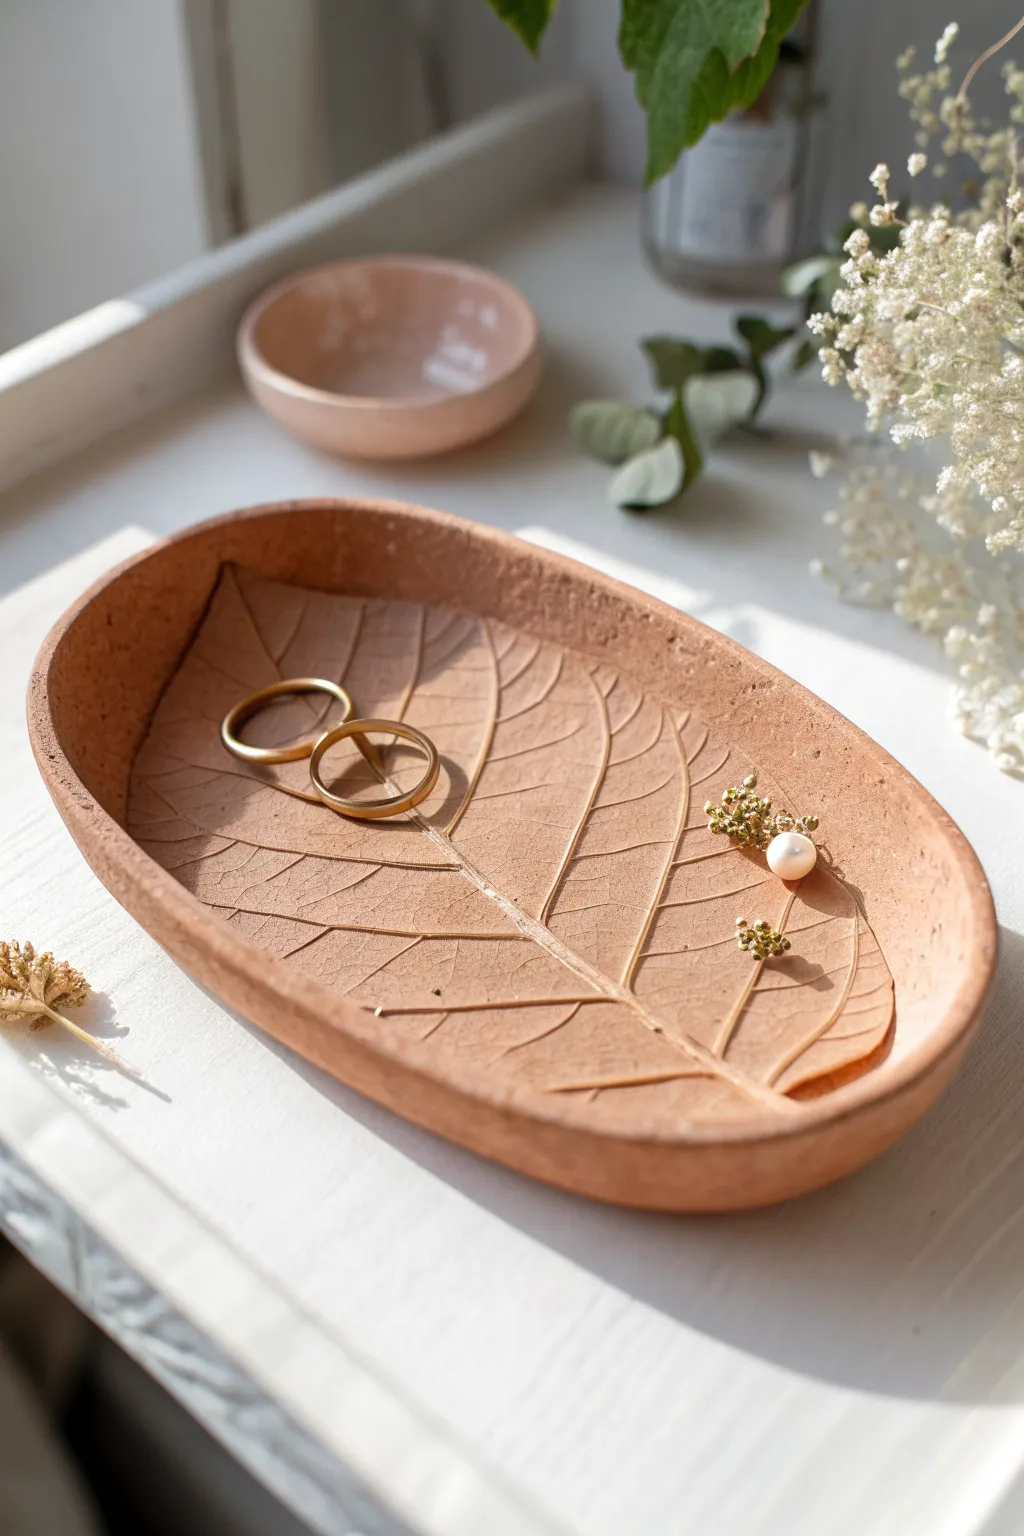
Capture the delicate details of nature forever with this terracotta-style trinket tray. By pressing a real leaf into clay, you’ll create a stunning, organic texture perfect for holding your favorite rings and small treasures.
Step-by-Step Tutorial
Materials
- Air dry clay (terracotta or reddish-brown color)
- A large, fresh leaf with prominent veins (e.g., hydrangea, grape, or catalpa)
- Rolling pin
- Parchment paper or canvas mat
- Craft knife or scalpel
- Small bowl of water
- Shallow oval bowl or dish (to use as a mold)
- Sandpaper (fine grit)
- Clear matte acrylic varnish or sealant
- Paintbrush
Step 1: Preparation & Imprinting
-
Prepare your workspace:
Lay down a sheet of parchment paper or a canvas mat to prevent sticking. Take a handful of terracotta-colored air dry clay and knead it until it is soft, pliable, and free of cracks. -
Roll out the slab:
Roll the clay out into an oval shape roughly 1/4 inch thick. Aim for an even thickness throughout to prevent warping later. -
Select and place the leaf:
Choose a fresh leaf with thick, sturdy veins on the underside. Place the leaf vein-side down onto the center of your clay slab. -
Imprint the texture:
Gently but firmly roll over the leaf with your rolling pin. I like to start from the center stem and roll outward to ensure every tiny vein leaves a mark without shifting the leaf. -
Remove the leaf:
Carefully lift the stem and peel the leaf away from the clay to reveal the botanical impression underneath.
Step 2: Shaping & Refining
-
Review the shape:
Decide on the final outline of your tray. The example shows a clean oval shape that frames the leaf pattern beautifully. -
Cut the perimeter:
Using a craft knife, cut a smooth oval around your imprinted design. Keep your knife perpendicular to the surface for a clean edge. -
Smooth the edges:
Dip your finger in a little water and run it along the cut rim to soften any sharp angles or rough crumbs left by the knife. -
Lift the clay:
Gently peel the clay slab off your work surface. If it sticks, slide a long blade or a piece of dental floss underneath to release it. -
Form the curve:
Place your clay slab inside a shallow oval bowl or dish. Let gravity help it settle into a gentle curve, pressing lightly so it takes the shape of the mold.
Cracking Clay?
If small cracks appear while the clay dries in the mold, dip your finger in a clay slip (water mixed with clay scraps) and smooth over the fissure immediately.
Step 3: Finishing Touches
-
Initial dry:
Leave the tray in the mold for about 24 hours so it holds its curved shape while the moisture evaporates. -
Remove from mold:
Once the top feels dry and leather-hard, carefully pop the tray out of the mold. Flip it over so the bottom can dry completely for another 24-48 hours. -
Check dryness:
The clay should feel room temperature (not cold) and look lighter in color when it is fully cured. -
Sand imperfections:
Use fine-grit sandpaper to gently smooth the rim of the tray further if needed. Be careful not to sand over the delicate leaf impression. -
Clean dust:
Wipe the piece with a slightly damp cloth or a dry soft brush to remove any sanding dust. -
Apply sealant:
Apply a thin coat of clear matte varnish to protect the clay from moisture and oils. -
Final cure:
Let the varnish dry completely according to the bottle instructions before placing any jewelry inside.
Golden Veins
Mix a tiny amount of gold mica powder or metallic acrylic paint with water and wash it over the veins, wiping the surface to leave gold only in the crevices.
Now you have a timeless piece of nature décor ready to organize your jewelry collection


Terrazzo-Style Coaster Set
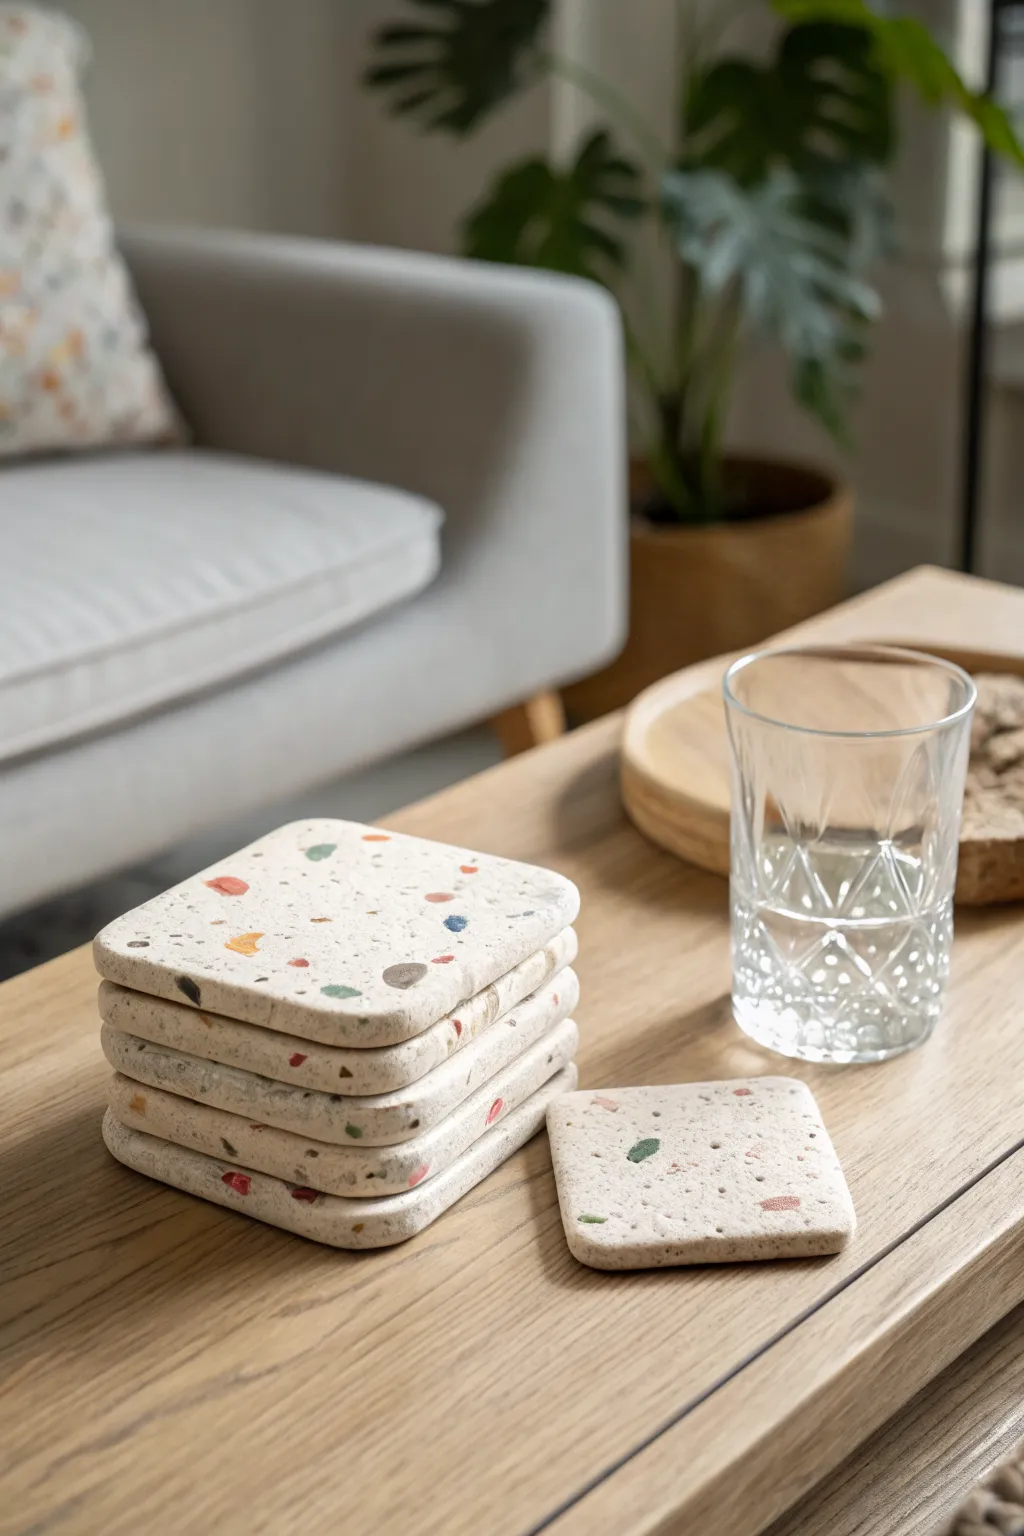
Bring the trendy look of terrazzo into your home with these deceptively simple air dry clay coasters. The speckled design, achieved with colorful clay chips embedded in a neutral base, adds a modern, artistic touch to any coffee table.
Step-by-Step Guide
Materials
- White or beige air dry clay (primary base)
- Small amounts of colored air dry clay (red, blue, green, yellow, grey)
- Acrylic rolling pin
- Square cookie cutter (approx. 4 inches) or a craft knife
- Parchment paper or silicone mat
- Bowl of water
- Fine-grit sandpaper (220 and 400 grit)
- Clear acrylic sealant or varnish (matte or satin finish)
- Felt pads (optional for bottom)
Step 1: Creating the Terrazzo Chips
-
Flatten colored clay:
Take small pinches of your various colored clays—reds, blues, greens, and greys work wonderfully together. Flatten each color into very thin, irregular sheets using your fingers or a rolling pin. -
Let them dry:
Set these thin colored sheets aside on a piece of parchment paper. Allow them to dry until they are firm but not fully hardened, usually about 20-30 minutes depending on the brand. -
Break into chips:
Once the colored sheets are semi-dry, tear or cut them into small, angular shards. Aim for varied sizes, from tiny specks to larger triangles, to mimic authentic aggregate.
Clean Cuts Pro Tip
Before cutting your squares, let the rolled slab sit for 10-15 minutes. Slightly drier clay drags less under the knife, giving you much sharper, cleaner edges.
Step 2: Forming the Base
-
Prepare the base clay:
Take a large chunk of your white or beige clay and condition it by kneading until it is smooth and pliable. You want to avoid any initial cracking. -
Roll out the slab:
Place the base clay on your working surface between two guides (like stacked rulers) or just roll it out evenly to a thickness of about 1/4 to 1/2 inch. Keep it slightly thicker than your desired final coaster. -
Scatter the chips:
Sprinkle your prepared colored chips randomly over the surface of the wet clay slab. I like to press a few gently with my finger first to hold them in place. -
Embed the design:
Using your rolling pin, roll over the slab firmly again. This will press the colored chips down into the base clay so they are flush with the surface.
Step 3: Cutting and Drying
-
Cut the shapes:
Use a square cookie cutter to stamp out your coasters. If you don’t have a cutter, place a square template over the clay and carefully trace around it with a sharp craft knife. -
Smooth the edges:
Dip your finger in a little water and gently run it along the cut edges of each square to soften any sharpness or burrs left by the cutting tool. -
Initial drying:
Transfer the coasters to a clean, flat surface lined with fresh parchment paper. Let them dry undisturbed for 24-48 hours. Turn them over halfway through to ensure even drying.
Warping Fix
If your coasters curl up while drying, gently dampen the concave side with a wet sponge and place a heavy book on top (with parchment in between) to flatten them back out.
Step 4: Finishing Touches
-
Sand the surface:
Once bone dry, take your 220-grit sandpaper and sand the top surface. This is crucial as it scrapes away a thin layer of the base clay to reveal the sharp, bright colors of the chips underneath. -
Polish for smoothness:
Switch to the 400-grit sandpaper to buff the surface until it feels silky smooth to the touch. -
Dust off:
Wipe the coasters thoroughly with a slightly damp cloth or a dry brush to remove all the fine clay dust generated by sanding. -
Seal for protection:
Apply a coat of clear acrylic sealant or varnish. This protects the clay from moisture (important for a coaster!) and deepens the colors of the terrazzo chips. -
Add backing:
For a professional finish and to protect your furniture, stick small felt pads to the four corners of the underside.
Now you have a stylish set of custom coasters ready to protect your surfaces


Easy Pinch Pots
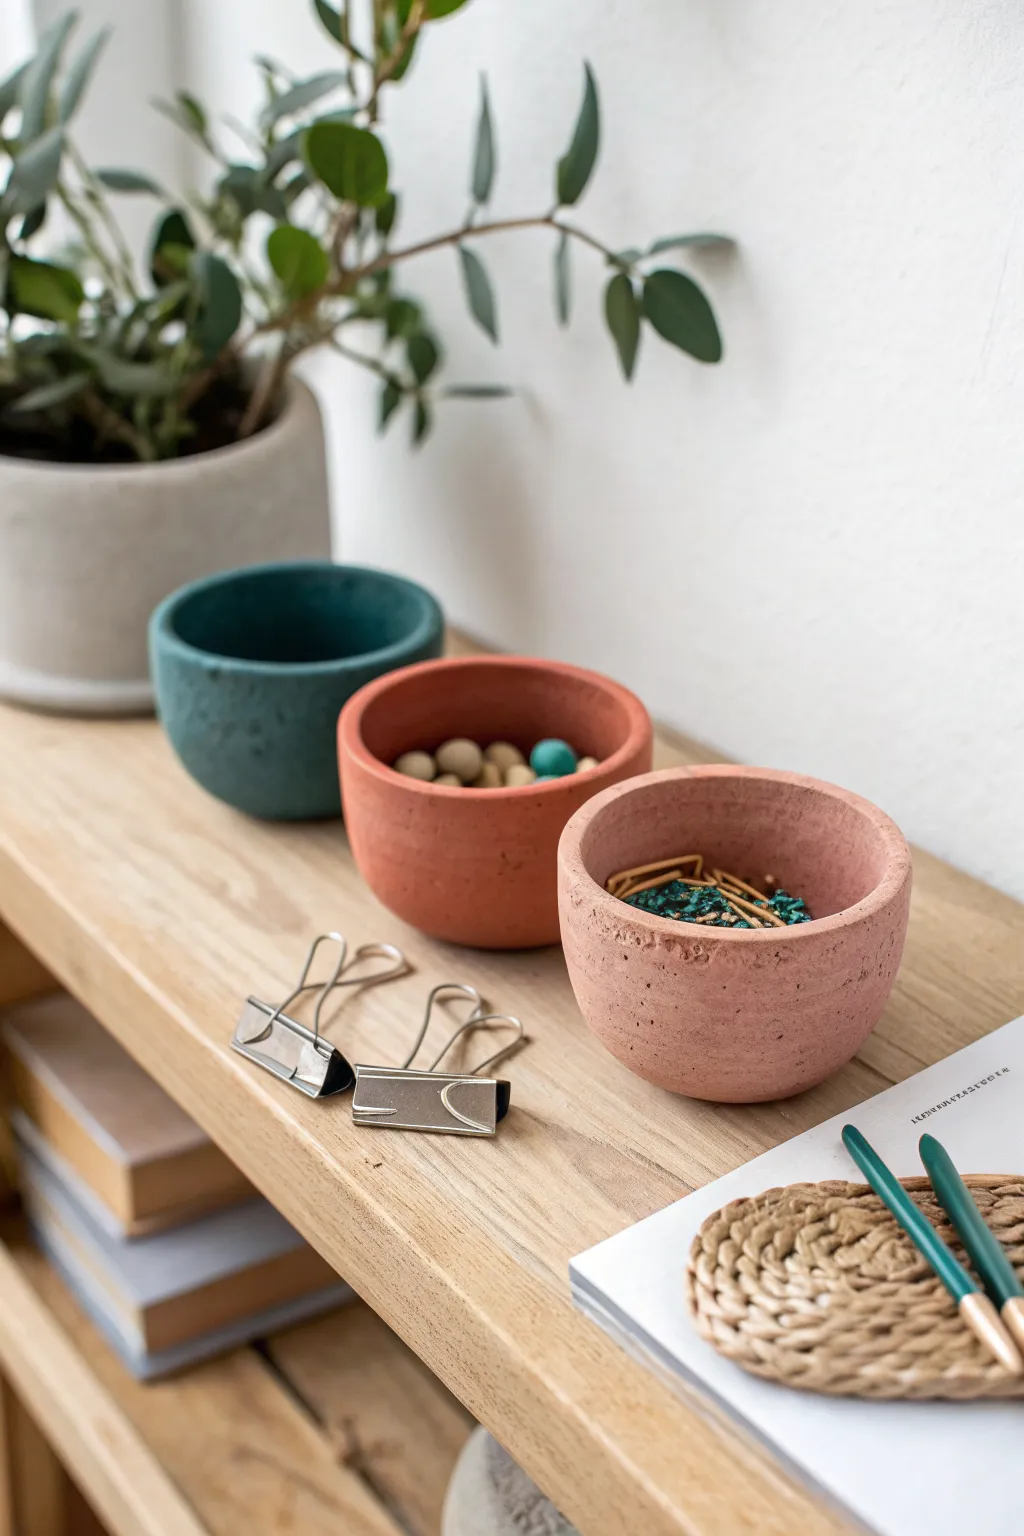
These charmingly rustic pinch pots feature a delightful matte finish that mimics the look of concrete or unglazed ceramic. Their simple, deep-walled shape makes them perfect minimal organizers for desk accessories like paper clips, beads, or small jewelry.
Step-by-Step Tutorial
Materials
- White air-dry clay (approximately 1 lb)
- Acrylic paints (Terracotta/Brick Red, Teal/Deep Green, Dusty Pink)
- Baking soda (for texture)
- Small bowl representing water
- Sponge or paper towel
- Fine grit sandpaper (220 grit)
- Matte spray varnish or Mod Podge Matte
- Mixing palette or small cups
Step 1: Shaping the Base Clay
-
Divide the clay:
Cut your block of air-dry clay into three equal portions, each slightly larger than a golf ball. Roll each piece firmly between your palms until you have three smooth spheres. If the clay feels dry, dab a tiny drop of water onto your hands. -
Start the pinch:
Take the first sphere and cradle it in your non-dominant hand. Press your thumb gently but firmly into the center of the ball, stopping about a half-inch from the bottom to create a thick base. -
Form the walls:
With your thumb still inside, use your fingers on the outside to pinch the clay walls upwards. Rotate the ball slightly with each pinch to ensure an even thickness all around. -
Straighten the sides:
Unlike a traditional bowl shape, these pots have steeper sides. Gently pat the outside walls with a flat object or your palm to straighten them, creating a more cylindrical, cup-like profile rather than a rounded bowl. -
Flatten the bottom:
Tap the bottom of the pot firmly against your table surface. This ensures it sits flat and stable. I find giving it a little twist while pressing down helps level it perfectly. -
Refine the rim:
Use your index finger to smooth the top rim. You can leave it slightly organic and uneven for that rustic look shown in the photo, or smooth it perfectly flat with a little water. -
Repeat the process:
Repeat these shaping steps for the remaining two balls of clay. Try to keep them roughly the same height and diameter to create a cohesive set. -
Dry completely:
Set the pots aside in a cool, dry place. Allow them to air dry for 24-48 hours. Turn them upside down halfway through the drying process so the bottoms dry evenly.
Cracks Appearing?
If small cracks appear while drying, mix a tiny bit of fresh clay with water to make a paste (slip). Fill the crack with this paste and smooth it over with your finger.
Step 2: Texturing and Painting
-
Sand imperfections:
Once fully bone-dry, take your fine-grit sandpaper and lightly buff away any sharp ridges or large bumps. Wipe away the dust with a slightly damp paper towel. -
Mix the texture paint:
To achieve that stony, concrete-like finish, we need to thicken the paint. Pour your terracotta paint into a mixing cup and stir in a teaspoon of baking soda. The mixture should feel fluffy and slightly gritty. -
Apply the first color:
Using a soft brush, dab the terracotta mixture onto the first pot. Instead of long strokes, use a stippling (dabbing) motion to deposit the texture onto the clay surface. -
Paint the interior:
Don’t forget the inside! Paint the interior walls and base with the same mixture, ensuring you get into the bottom crevices. -
Mix remaining colors:
Clean your brush and prepare two new mixtures: one with the teal/green paint and baking soda, and another with the dusty pink paint and baking soda. -
Finish painting:
Apply the teal texture mix to the second pot and the pink texture mix to the third pot using the same stippling technique. Let the first coat dry for about 20 minutes. -
Add depth:
If you want more visual texture, mix a slightly lighter shade of each color (add a drop of white) and very lightly dry-brush it over the raised areas of the texture. This mimics the mottled look of stone. -
Seal the work:
Because air-dry clay is porous, apply a coat of matte varnish or Mod Podge. This protects the finish without making it shiny, preserving that lovely raw aesthetic.
Pro Tip: Rustic Texture
For an even rougher, more aged stone look, gently press a piece of coarse sandpaper or a textured stone into the wet clay exterior before you set it aside to dry.
Once dry, arrange your trio on a shelf or desk to instantly add a touch of handcrafted warmth to your workspace

What Really Happens Inside the Kiln
Learn how time and temperature work together inside the kiln to transform clay into durable ceramic.
Minimal Cone Ring Holder
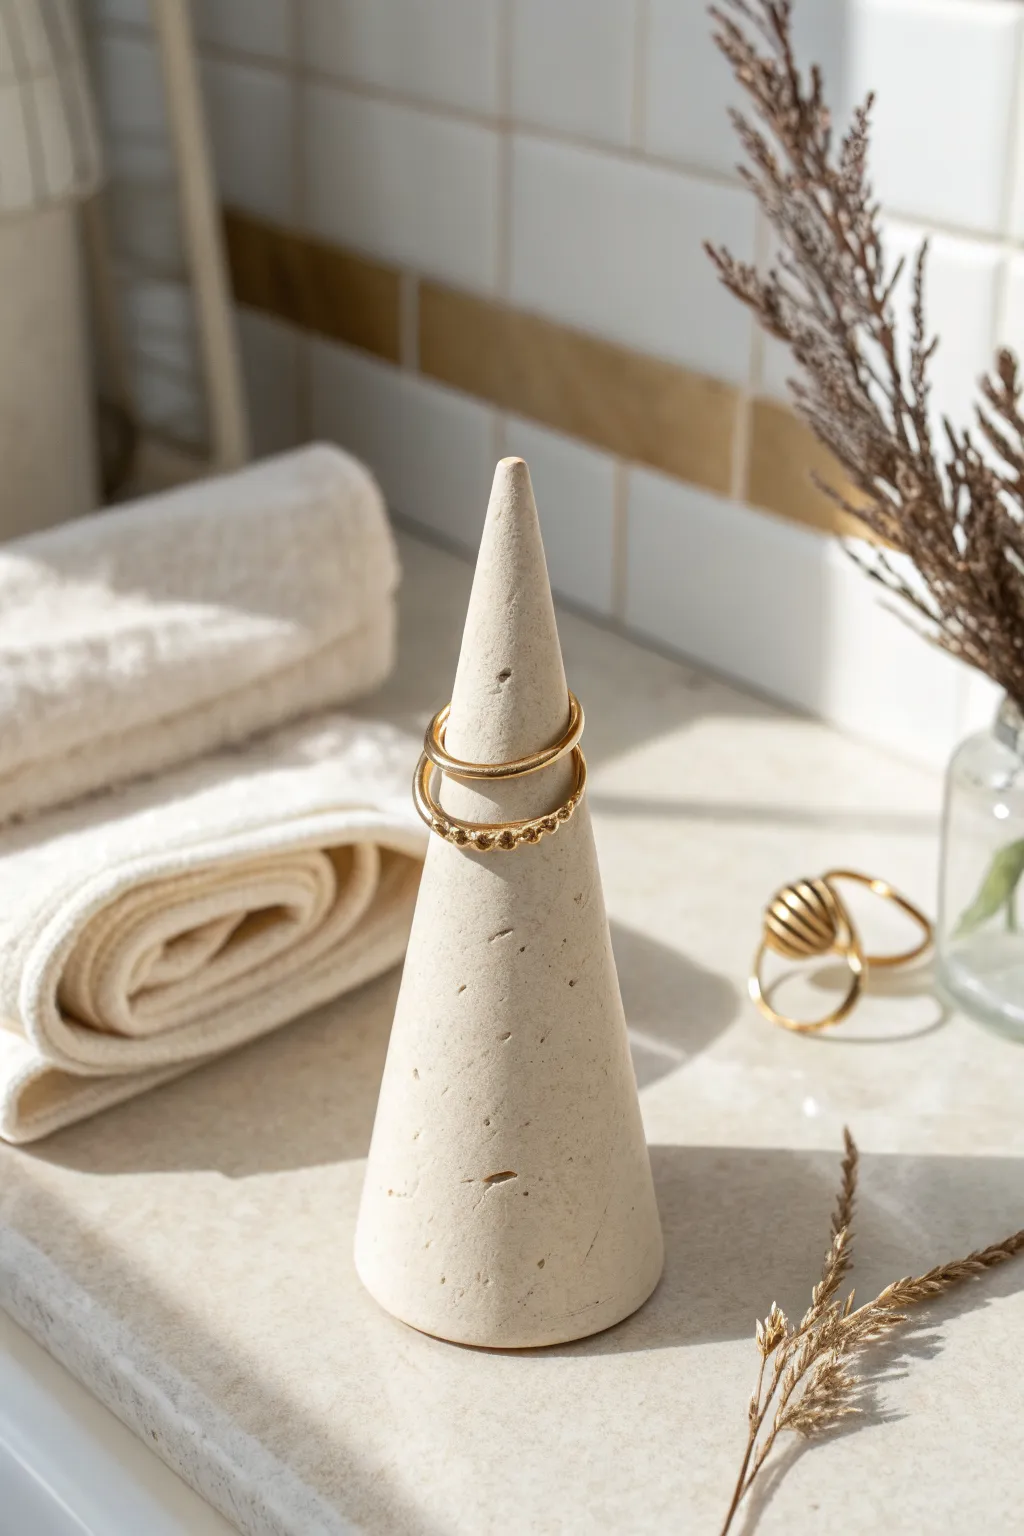
This elegant ring holder mimics the look of natural limestone or sandstone with its speckled, matte finish. It is the perfect minimalist accessory for organizing your jewelry while adding a touch of rustic charm to your vanity.
Step-by-Step
Materials
- White air dry clay
- Used coffee grounds (dried)
- Rolling pin
- Craft knife
- Ruler
- Water and sponge
- Fine grit sandpaper
- Matte varnish (optional)
Step 1: Preparing the Clay
-
Condition the clay:
Start with a handful of white air dry clay. Knead it thoroughly in your hands until it becomes soft, warm, and pliable to prevent cracking later. -
Add texture:
To achieve that speckled stone effect seen in the photo, sprinkle a very small pinch of dried used coffee grounds onto the clay. -
Integrate the specks:
Fold the clay over the grounds and knead again until the specks are evenly distributed throughout the white mass. -
Roll it out:
Roll your speckled clay into a smooth ball, ensuring there are no major seams or air pockets trapped inside.
Step 2: Shaping the Cone
-
Form the initial cone:
Place the ball on your work surface. Using the flats of your hands (not the fingers), begin rolling the ball back and forth while applying more pressure to one side. -
Refine the taper:
Continue rolling, focusing pressure on the top end to create a tapered point, while keeping the base wider. -
Flatten the base:
Once you have the basic cone shape, pick it up and firmly tap the wide bottom against the table to create a flat, stable standing surface. -
Check stability:
Set it down to ensure it stands perfectly straight. If it leans, tap the base again or gently press it down to level it out. -
Smooth the sides:
Dip your finger in a little water and run it over the surface of the cone to smooth out any fingerprints or deep ridges. -
Refine the tip:
Gently pinch and smooth the very top of the cone so it is rounded rather than dangerously sharp.
Natural Texture Hack
Instead of coffee, create a ‘granite’ look by mixing in black pepper or actual sand for a rougher, authentic stone texture.
Step 3: Finishing Touches
-
Add rustic details:
The cone in the image has small pits and imperfections. Use a toothpick or a stiff brush to gently poke a few random tiny holes or scratches into the surface for texture. -
Dry slowly:
Place the cone in a cool, dry spot away from direct sunlight. Let it dry for distinct 24-48 hours. I usually flip it on its side halfway through so the base dries completely. -
Sand for finish:
Once fully cured and hard, use fine-grit sandpaper to buff the surface. This removes any rough lumps and exposes the coffee specks more clearly. -
Dust off:
Wipe the piece with a slightly damp cloth or a dry brush to remove the white dust from sanding. -
Seal (Optional):
If you want to protect it from moisture in a bathroom setting, apply a coat of matte varnish. Keeping it matte preserves that raw stone look.
Cracking Issues?
If small cracks appear while drying, mix a tiny bit of fresh clay with water to make a paste and fill them in, then sand smooth once dry.
Now you have a chic, sculptural piece to display your favorite rings
Tiny Succulent Planter
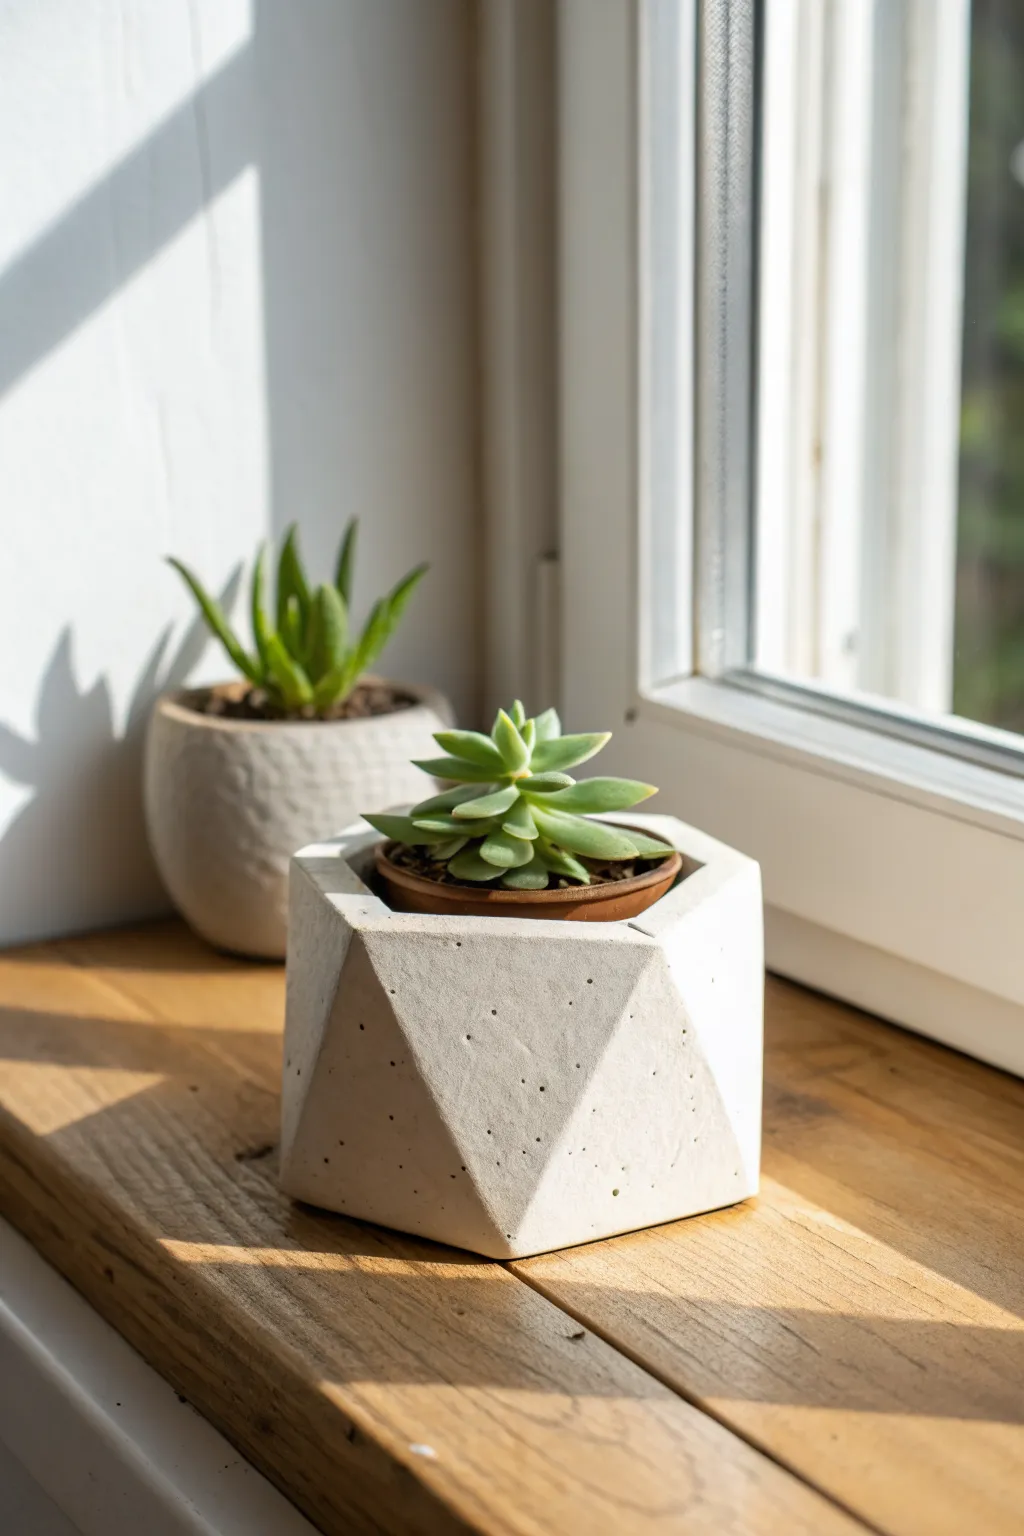
Give your tiny green friends a modern, architectural home with this faceted succulent planter. Its sharp lines and smooth white finish mimic the look of poured concrete but are easily achieved with simple air dry clay.
Step-by-Step Tutorial
Materials
- White polymer or air-dry clay (approx. 500g)
- Small plastic plant pot (for sizing/mold)
- Rolling pin
- Sharp craft knife or scalpel
- Ruler
- Paper template (hexagonal)
- Fine-grit sandpaper (220-400 grit)
- Acrylic rolling heavy roller or glass bottle
- Water slip (a little clay mixed with water)
- Sealant (acrylic varnish or clear resin)
- Parchment paper or non-stick mat
Step 1: Base Construction
-
Prepare the workspace:
Lay down your parchment paper or non-stick mat to prevent sticking. This makes it much easier to rotate your work without distorting the clay. -
Roll the slab:
Take a large chunk of clay and condition it by kneading until soft. Roll it out into a uniform slab about 1/4 inch (6mm) thick. Uniform thickness is key for strength. -
Cut the base:
Using a simple paper hexagon template (about 3-4 inches wide), trace and cut out a hexagonal base from your clay slab using the craft knife. Set this aside. -
Measure your inner pot:
Check the diameter and height of the small plastic pot you intend to put inside. Your clay walls need to be slightly taller and wider to accommodate it.
Sharpen Those Lines
Use a straight edge (like a credit card) to ‘slice’ away tiny bits of clay while it’s leather-hard. This carving technique creates much sharper, cleaner facets than molding wet clay alone.
Step 2: Forming the Walls
-
Create a long strip:
Roll out another long rectangular slab of clay, maintaining that same 1/4 inch thickness. Use your ruler to cut a long, straight strip that is tall enough to cover your plastic pot. -
Mark the facets:
Lightly score vertical lines on your strip to divide it into six equal sections, corresponding to the six sides of your hexagonal base. Do not cut all the way through. -
Add triangular relief:
To create the 3D ‘gem’ look, I like to cut separate triangular pieces of clay. Cut 6 tall triangles and 6 inverted triangles that fit the dimensions of your wall sections. -
Attach the triangles:
Score and slip the back of your triangles and press them onto the wall strip. Arrange them so the points meet, creating a faceted surface that thickens the wall in specific areas. -
Smooth the seams:
Gently blend the edges of your added triangles into the main strip so it looks like one solid, carved block rather than glued-on pieces. A wet finger works well here.
Faux Concrete Finish
Mix a tiny amount of black and grey pepper or fine sand into your white clay before rolling. The speckles will show through after sanding, perfectly imitating real stone.
Step 3: Assembly
-
Stand the walls:
Carefully lift your strip and wrap it around the hexagonal base. Match the six sections of the wall to the six sides of the base. -
Join the circle:
Where the two ends of the wall strip meet, score both edges, apply a little water or slip, and press firmly together. Smooth the seam inside and out until it vanishes. -
Attach to base:
Score the bottom edge of your wall and the perimeter of the base. Press them together firmly. Use a clay tool to drag clay from the wall down to the base to lock them together. -
Reinforce the interior:
Roll a thin snake of clay and press it into the bottom interior seam where the wall meets the floor. Smooth it out to ensure a watertight seal.
Step 4: Refining & Finishing
-
Sharpen the angles:
Once assembled, the clay might have softened. Use a flat ruler or block to gently press against the exterior facets, redefining those sharp geometric lines and planes. -
Add the rim detail:
If desired, slice the top rim at an angle or bevel it inwardly to create a thinner, more elegant profile, rather than a chunky blunt edge. -
Create texture:
Take a stiff bristle brush or a piece of sandstone and gently tap it against the clay surface. This mimics the porous, speckled texture of concrete seen in the photo. -
Dry slowly:
Let the planter dry away from direct heat or sunlight for 24-48 hours. Turn it over halfway through to ensure the bottom dries evenly. -
Sand and perfect:
Once bone dry, use fine-grit sandpaper to sharpen the edges of your facets even further and remove any fingerprints. -
Seal for protection:
Apply 2-3 coats of a matte waterproof sealer, especially on the inside, to protect the clay from moisture when watering your plant.
Enjoy the sleek, modern vibe this handmade piece brings to your windowsill.


The Complete Guide to Pottery Troubleshooting
Uncover the most common ceramic mistakes—from cracking clay to failed glazes—and learn how to fix them fast.
Hanging Character Planter
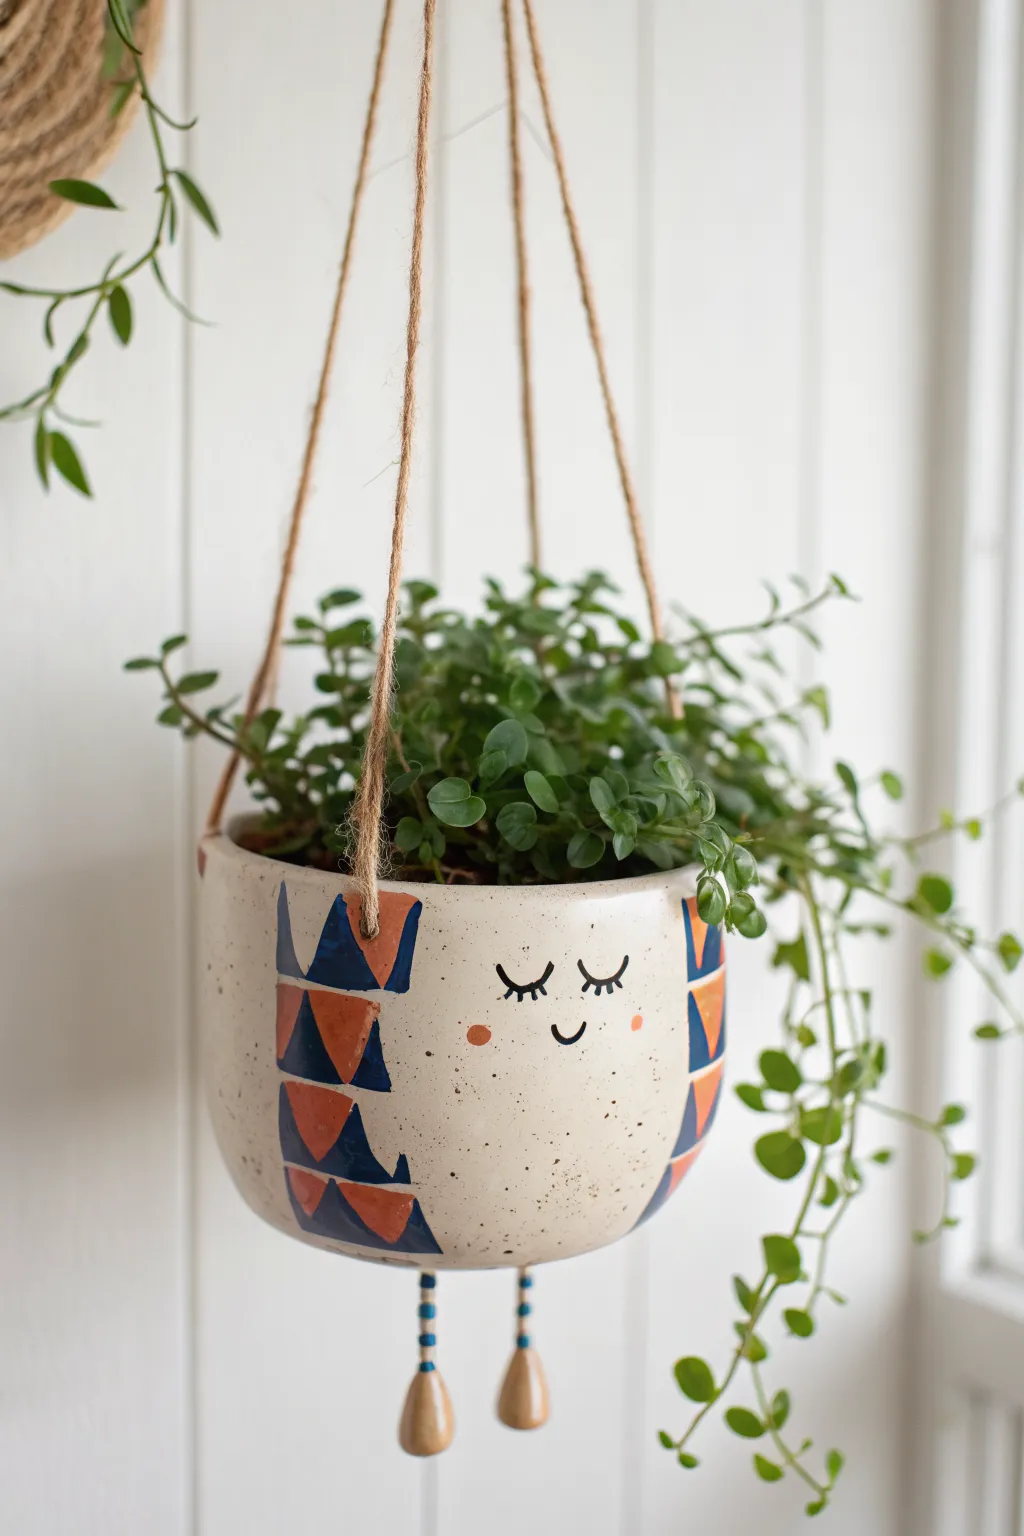
Bring a touch of personality to your indoor garden with this adorable hanging planter featuring a sleepy face and dangling legs. The combination of geometric patterns, raw clay texture, and simple line work creates a charming home for your favorite trailing succulents.
Step-by-Step
Materials
- Air dry clay (white or light grey)
- Rolling pin
- Circle template or bowl (approx. 6 inches diameter)
- Craft knife or clay cutter
- Acrylic paints (Navy Blue, Terra Cotta/Burnt Orange, Black, Pink)
- Fine detail paintbrush
- Medium flat paintbrush
- Jute twine
- 4 Wooden beads (2 small blue, 2 large natural wood tear-drop shape)
- Skewer or straw (for poking holes)
- Sandpaper (fine grit)
- Varnish or sealant (matte or satin finish)
- Water and sponge for smoothing
Step 1: Shaping the Planter Body
-
Roll out the clay:
Begin by conditioning your clay and rolling it out to an even thickness of about 1/4 inch. Creating a consistent slab ensures the pot will dry evenly and won’t crack. -
Cut the base:
Use your circle template or a bowl to cut out a round base for your planter. Set this aside on a piece of parchment paper. -
Form the walls:
Measure the circumference of your base. Roll out a long rectangular strip of clay that matches this length plus a little extra for overlapping, with a height of about 4-5 inches. -
Assemble the pot:
Score the edges of the base and the bottom edge of your wall strip. Apply a little water or slip, then wrap the wall around the base. Smooth the seams on both the inside and outside until they are invisible. -
Create suspension holes:
Using a straw or skewer, poke three evenly spaced holes about half an inch down from the top rim. Make sure these are large enough for your jute twine to pass through later. -
Add leg holes:
Carefully poke two smaller holes in the center of the bottom base. These will be used to attach the dangling legs. -
Smooth and dry:
Dip a sponge in water and gently smooth out any fingerprints or rough edges. Let the pot dry completely for 24-48 hours, turning it occasionally to ensure airflow.
Slumping Walls?
If the clay walls won’t stand up straight while wet, ball up some newspaper or plastic wrap and place it inside the pot to support the shape while it firms up.
Step 2: Painting and Decoration
-
Sand imperfections:
Once fully dry, lightly sand any rough spots, especially around the rim and the holes, to create a professional finish. -
Base coat (optional):
If you want a speckled look like the image, dilute some brown paint with water and flick it onto the pot with an old toothbrush. Let dry. -
Outline the pattern:
Lightly sketch two vertical bands on opposite sides of the pot where the geometric pattern will go. These columns will frame the face. -
Paint the geometric side details:
Using your flat brush, paint alternating triangles within your sketched columns. Use navy blue for the top and bottom triangles, and terra cotta for the middle ones to match the reference. -
Add the face:
With a fine detail brush and black paint, carefully draw two closed eyelids with eyelashes and a small ‘u’ shape for the mouth in the center of the unpainted area. -
Add cheeks:
Dip the end of a paintbrush or a dotting tool into pink or light terra cotta paint and dot on two rosy cheeks just below the eyes. -
Seal the project:
Coat the entire planter, inside and out, with a waterproof varnish. This step is crucial for longevity, especially if putting a real plant inside.
Waterproofing Tip
For real plants, line the inside with a plastic cup or use several coats of heavy-duty polyurethane. Air dry clay dissolves if it stays wet!
Step 3: Assembly
-
Create the legs:
Cut two short pieces of jute twine. Thread a small blue painted bead and then a large natural wooden bead onto each piece, knotting the bottom to secure them. -
Attach the legs:
Thread the top ends of the leg strings up through the holes in the bottom of the pot and knot them securely on the inside. -
Rig the suspension:
Cut three equal lengths of thick jute twine. Tie one end of each string securely through the three holes near the rim. -
Finish the hanger:
Bring the three strings together at the top, ensuring the pot hangs level, and tie them into a strong loop knot for hanging.
Hang your new little friend near a bright window and enjoy the cheerful vibe it adds to your room
Simple Bud Vase Wrap
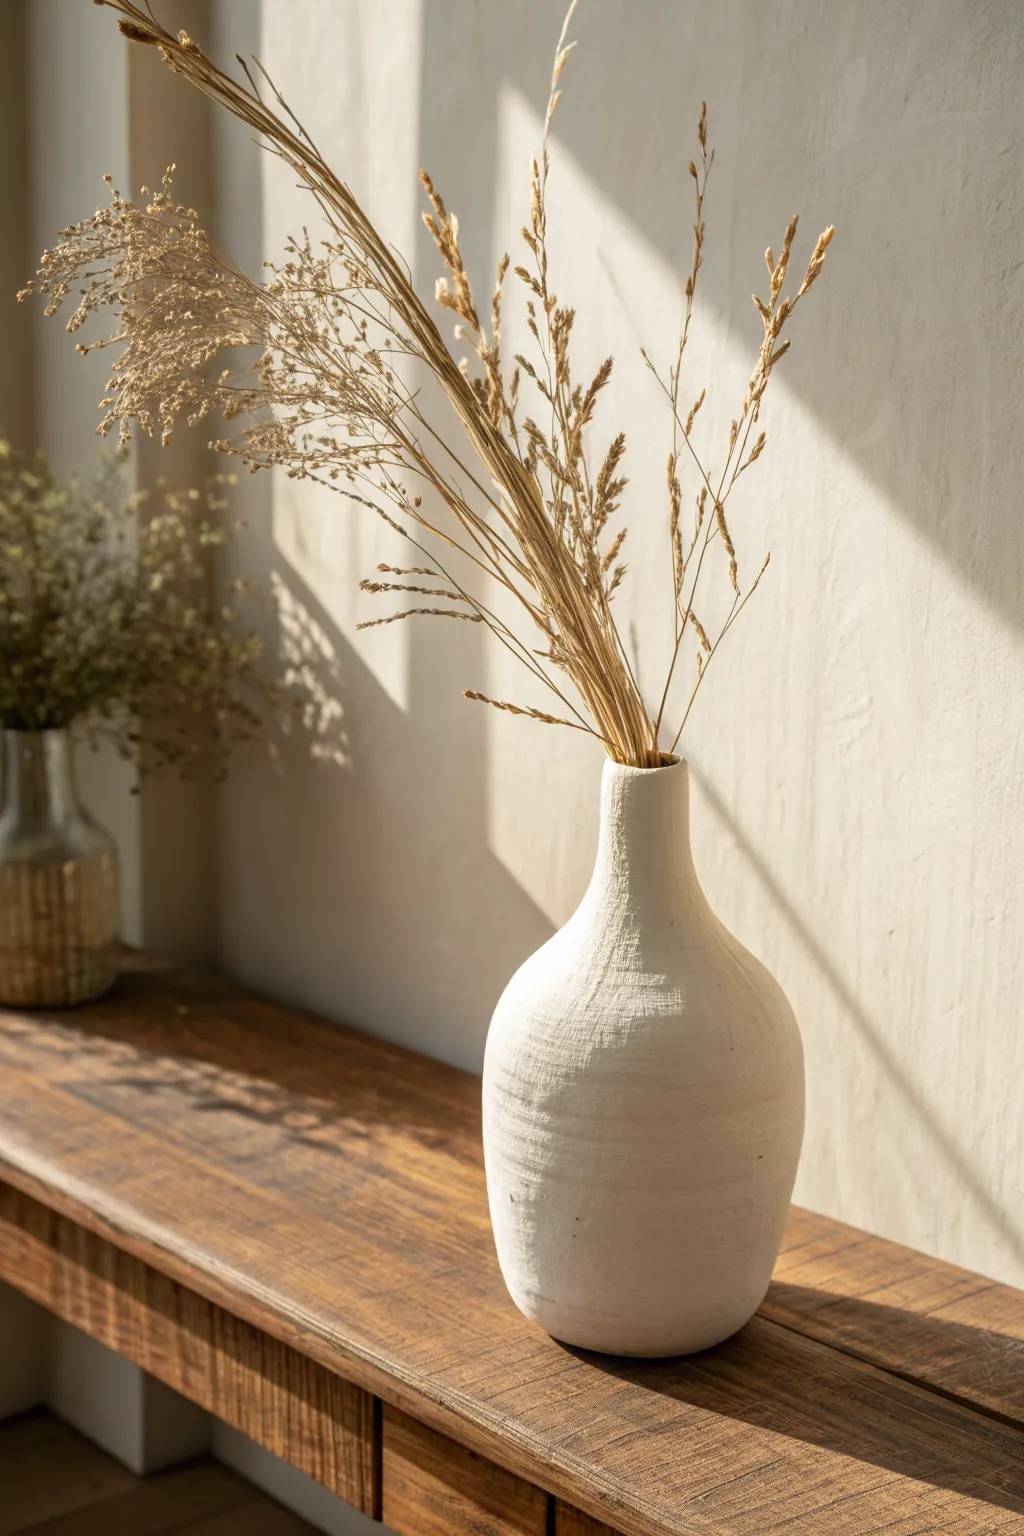
Transform an ordinary glass bottle into a piece of high-end decor with nothing more than air dry clay and a little patience. This project features a stunning vertical combed texture and a matte, stone-like finish that perfectly complements dried botanicals.
Step-by-Step Tutorial
Materials
- White air dry clay (approx. 500-700g)
- Clean glass bottle or jar (bud vase size)
- Rolling pin
- Parchment paper or craft mat
- Small cup of water
- Craft knife or clay cutter
- Stiff-bristled brush or old toothbrush
- Sponge
- Fine-grit sandpaper (optional)
- Matte sealant (optional)
Step 1: Preparing the Base
-
Clean the vessel:
Begin by thoroughly washing your glass bottle or jar to remove any labels, glue residue, or oils. Dry it completely to ensure the clay will adhere properly to the surface. -
Knead the clay:
Take a large chunk of air dry clay and knead it in your hands for a few minutes. This warms up the material, making it more pliable and less prone to cracking as you work. -
Roll out a slab:
Place the clay on parchment paper and use a rolling pin to flatten it into a long, rectangular slab. Aim for an even thickness of about 1/4 inch (4-5mm). -
Measure against the bottle:
Place your bottle on its side next to the slab to ensure the clay is wide enough to wrap around the entire circumference and tall enough to cover from the base to the rim.
Step 2: Wrapping the Form
-
Apply the clay:
Carefully lift the clay slab and wrap it around the glass bottle. Press it gently against the glass as you go to push out air pockets. -
Join the seam:
Where the two edges of clay meet, use your fingers to smudge the clay together. Score both edges if necessary, dab a little water, and blend until the seam is invisible. -
Trim the excess:
Use your craft knife to slice away any excess clay hanging off the bottom. For the top rim, you can fold the clay slightly inside the bottle mouth for a seamless look. -
Smooth the surface:
Dip your fingers or a sponge lightly in water and run them over the vase. Smooth out deep fingerprints or bumps, but don’t worry about perfection; rustic is the goal.
Shrinkage Tip
Since clay shrinks as it dries but glass doesn’t, allow a tiny gap at the seam or wrap slightly loosely. If it cracks, patch it with ‘slip’ (water/clay mix).
Step 3: Texturing and Finishing
-
Create the texture:
This is the defining step. Take a stiff-bristled brush or an old toothbrush. Drag it vertically from the base of the vase up to the neck in long, continuous strokes. -
Refine the lines:
Repeat the brushing process around the entire vase. Vary your pressure slightly to create that distinct, organic, linen-like appearance shown in the photo. -
Check the rim:
Gently tap the rim with your finger to soften any sharp edges created by the brush strokes, ensuring the top looks finished and deliberate. -
Let it dry:
Place the vase in a cool, dry spot away from direct sunlight. I usually let this dry for at least 24-48 hours. Rotate it occasionally so all sides dry evenly. -
Fix cracks:
Once fully dry, inspect for any shrinkage cracks. If you find small ones, mix a tiny bit of fresh clay with water to make a paste and fill them in. -
Sand gently:
If there are any overly sharp bits of clay sticking out, lightly run fine-grit sandpaper over them. Be careful not to sand away your beautiful vertical texture. -
Seal:
To protect the textured finish, apply a coat of matte varnish or sealant. This prevents the clay from re-absorbing moisture and makes dusting easier later.
Faux Stone Effect
Mix gritty black pepper or used coffee grounds into your white clay before rolling it out. This adds a speckled, natural stone look without painting.
Fill your new vase with tall dried grasses or wheat stalks to complete the serene, natural aesthetic

TRACK YOUR CERAMIC JOURNEY
Capture glaze tests, firing details, and creative progress—all in one simple printable. Make your projects easier to repeat and improve.
Textured Tealight Holder
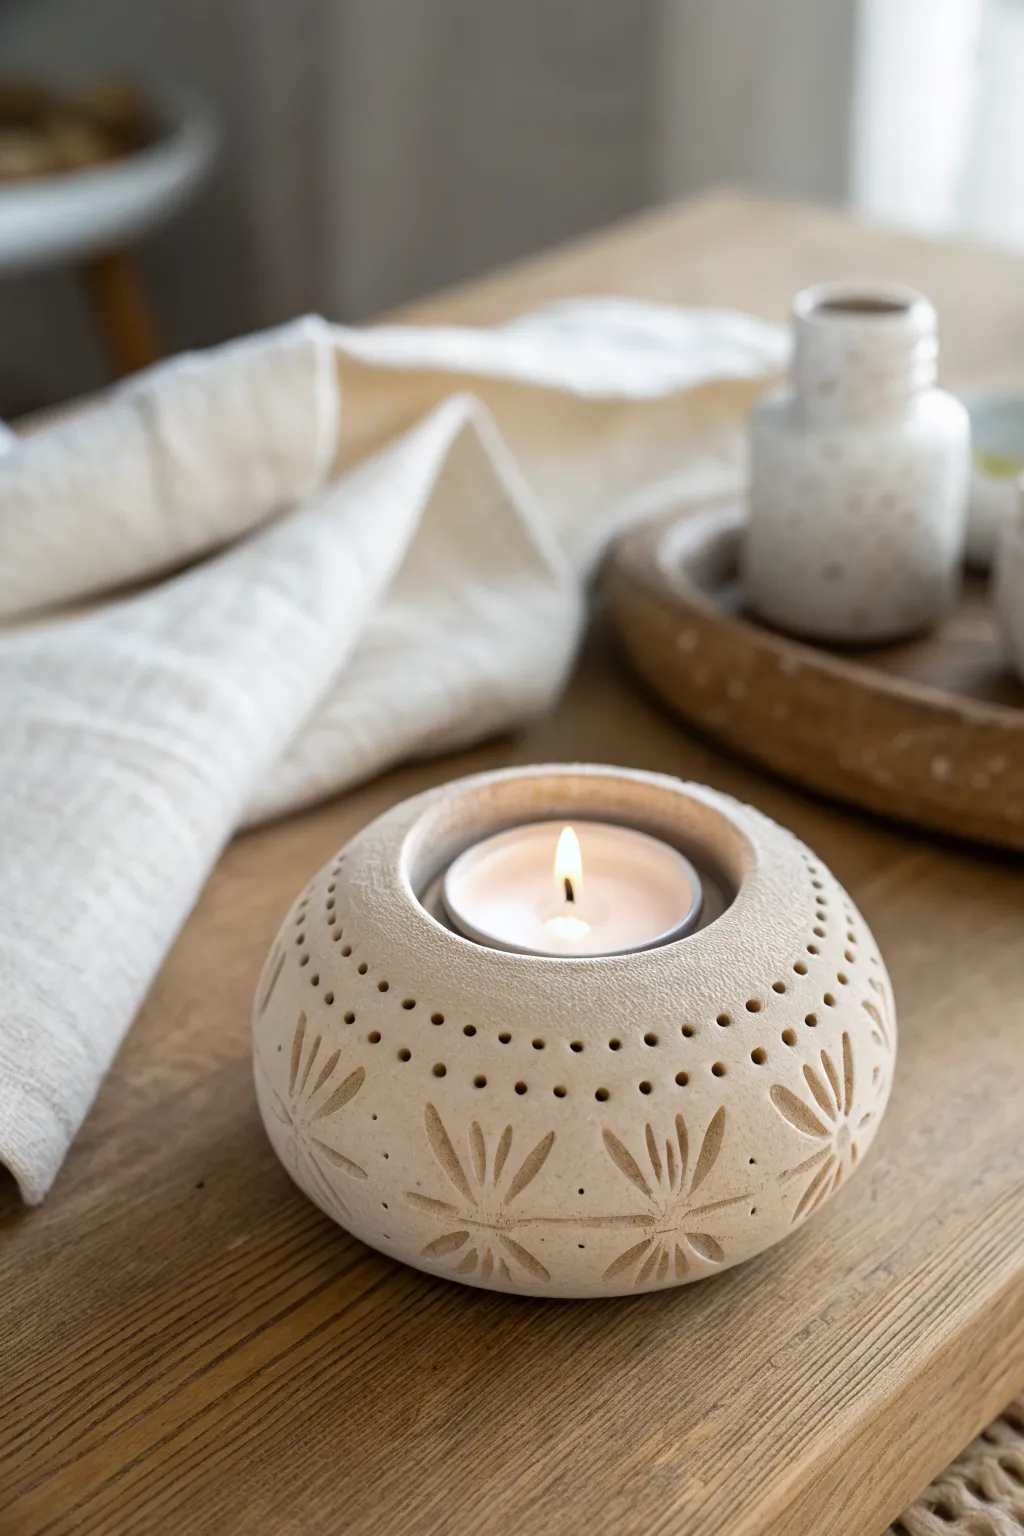
Transform simple air-dry clay into an elegant, stone-effect candle holder that features delicate pierced details and floral carvings. This rounded, dome-shaped vessel casts a warm, patterned glow when the tealight flickers inside.
Step-by-Step
Materials
- White or cream air-dry clay
- Tealight candle (for sizing)
- Small rolling pin
- Pottery sponge
- Needle tool or toothpick
- Small carving loop tool (or a linoleum cutter)
- Bowl of water
- Sandpaper (fine grit)
- Matte spray varnish (optional)
Step 1: Forming the Dome
-
Prepare the Clay:
Start by conditioning a fist-sized ball of air-dry clay. Knead it in your hands until it becomes warm, pliable, and free of air bubbles or cracks. -
Create the Basic Shape:
Roll the clay into a smooth sphere. Gently tap the bottom against your work surface to create a flat, stable base so the holder won’t wobble. -
Hollow the Center:
Use your thumbs to gently press into the top center of the sphere, opening up a recess. Press downwards and outwards, but keep the walls thick and substantial—at least half an inch thick. -
Size the Opening:
Take your tealight candle (the metal or plastic casing) and press it lightly into the recess to ensure it fits comfortably. The hole should be slightly wider than the candle to account for clay shrinkage as it dries. -
Shape the Shoulders:
Use your palms to smooth the outside, encouraging a rounded, pebble-like shoulder that curves inward toward the top opening. I like to keep the form slightly organic rather than perfectly geometric. -
Smooth the Surface:
Dip your sponge lightly in water and wipe down the exterior. Smooth away any fingerprints or small cracks until you have a pristine, blank canvas.
Step 2: Carving and Detailing
-
Mark Guidelines:
Lightly trace a faint horizontal line around the circumference of the dome with a needle tool to divide the upper pierced section from the lower carved section. -
Pierce the Dot Pattern:
Using a needle tool or a small drill bit, poke holes into the clay above your guideline. Create three concentric rows of dots, staggering them slightly for visual interest. Don’t press all the way through if you want surface texture, or go fully through for light to spill out. -
Draft the Radial Flowers:
Below the dotted section, use the needle tool to lightly scratch stick-figure star shapes. These will serve as the skeletons for your floral carvings. -
Carve the Petals:
using a small loop tool or v-gouge, carefully carve out the clay along your star lines. Start shallow at the center and press slightly deeper as you move outward to create a petal shape that tapers at the ends. -
Refine the Carvings:
Go back over each petal to clean up jagged edges. If small crumbs of clay stick to the grooves, brush them away with a soft, dry paintbrush. -
Add Accent Dots:
Between each carved flower, add a single poke with your needle tool to tie the design together with the upper section.
Clean Lines Hack
Wait until the clay is ‘leather hard’ (stiff but cool/damp) before carving. The clay won’t drag, giving you much sharper details.
Step 3: Finishing Touches
-
Initial Drying:
Let the piece sit for about 24-48 hours. Turn it upside down halfway through the process to ensure the bottom dries evenly. -
Sand for Perfection:
Once bone dry, take fine-grit sandpaper and gently sand the exterior. Focus on the rim of the tealight opening to make it perfectly smooth and rounded. -
Dust Off:
Wipe the entire piece down with a dry cloth or stiff brush to remove all the sanding dust from the carved crevices. -
Seal the Clay:
To protect against soot or minor heat, spray the holder with a matte varnish or apply a coat of diluted Mod Podge. This keeps the look natural while adding durability.
Gold Leaf Accents
After drying, paint just the inside of the carved petal grooves with liquid gold leaf for a hint of luxury.
Now you have a serene, handcrafted accent piece ready to light up your evening
Photo And Card Stand
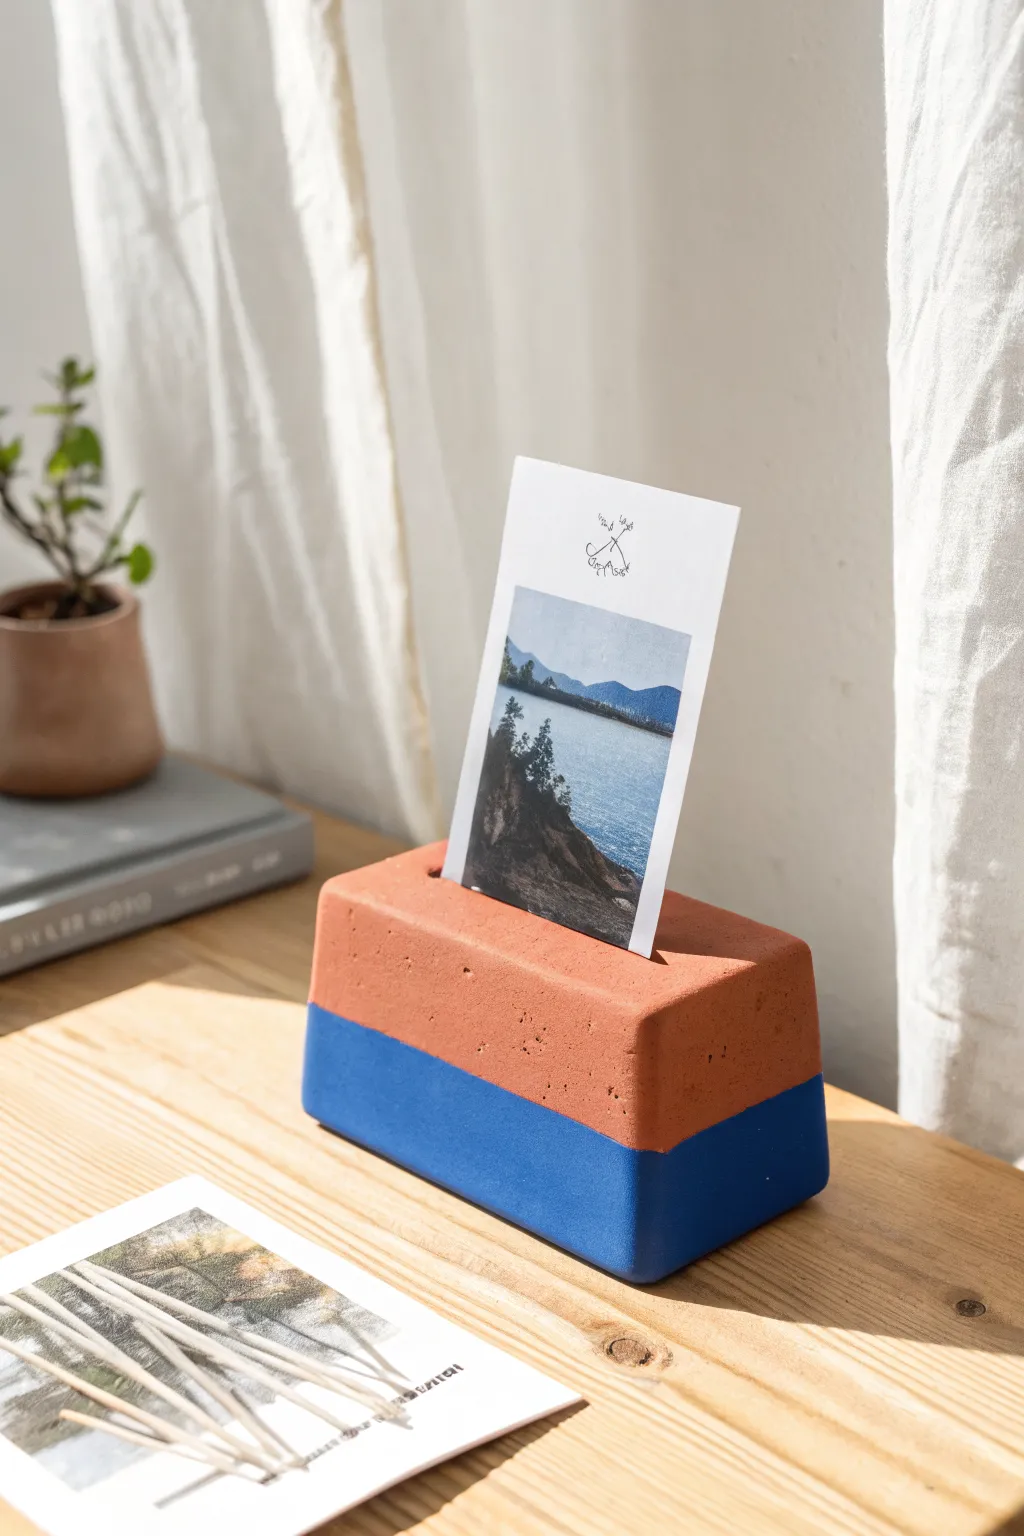
This minimalist photo stand combines industrial chic with a pop of modern color, making it a perfect desk accessory for displaying cherished memories. The two-tone design features a warm terracotta top resting on a bold cobalt blue base, mimicking the look of cast concrete.
Detailed Instructions
Materials
- Air dry clay (terracotta color preferred, or white)
- Rectangular mold (such as a small milk carton or silicone loaf mold)
- Rolling pin
- sharp knife or clay blade
- Ruler
- Sandpaper (medium and fine grit)
- Acrylic paint (Cobalt Blue)
- Painter’s tape or masking tape
- Paintbrush (flat, medium size)
- Matte sealant or varnish
- Cardstock or a thick piece of cardboard (for creating the slot)
Step 1: Shaping the Base
-
Prepare the clay:
Begin by conditioning a large block of air dry clay. Knead it thoroughly until it is warm, pliable, and free of cracks. If you are using white clay but want the top to be natural, you can knead in a small amount of acrylic paint now, or paint it later. -
Form the brick shape:
Shape the clay into a rough rectangular prism. To get sharp, geometric edges like the example, I find it easiest to press the clay firmly into a rectangular mold. Alternatively, you can shape it by hand and use a ruler to paddle the sides flat. -
Refine the surface:
If hand-shaping, use your rolling pin to flatten the top and sides gently. Slice off any uneven ends with your blade to ensure sharp 90-degree angles. -
Create the photo slot:
Take a piece of thick cardstock or cardboard (wrapped in plastic wrap to prevent sticking) and press it vertically into the center of the top face. Push it down about half an inch deep. Wiggle it slightly to ensure the opening is wide enough for a photo, then carefully remove it. -
Add texture (optional):
To mimic the stone-like texture in the image, lightly dab the surface with a coarse sponge or a crumpled ball of aluminum foil. This gives it that authentic ‘concrete’ feel. -
Initial drying:
Let the block sit undisturbed for 24 to 48 hours. Turn it over periodically to ensure even drying on all sides.
Tape Trick
Paint a thin layer of the *base* color (or clear matte medium) over the tape edge first. This seals the tape and ensures the blue line is razor-sharp.
Step 2: Finishing and Painting
-
Smooth the edges:
Once completely dry and hard, use medium-grit sandpaper to smooth out any major bumps, paying special attention to the corners. Follow up with fine-grit sandpaper for a polished finish. -
Clean dust:
Wipe the entire block down with a slightly damp cloth to remove all sanding dust. This is crucial for crisp paint lines. -
Tape the line:
Measure exactly halfway up the height of the block. Apply a strip of painter’s tape horizontally around the entire perimeter. Press the edge of the tape down firmly with your fingernail to prevent paint bleed. -
Paint the base:
Using your flat brush, apply the cobalt blue acrylic paint to the bottom half of the block. Use long, horizontal strokes for even coverage. -
Apply second coat:
Let the first layer dry to the touch, then apply a second coat of blue to ensure the color is opaque and vibrant. -
Paint the top (optional):
If you used white clay and want the terracotta look shown, paint the top half now with a burnt orange or terracotta shade. If you used terracotta clay, you can leave the top natural. -
Remove tape:
Carefully peel away the painter’s tape while the paint is still slightly tacky to reveal a sharp, crisp line. -
Seal the project:
Apply a coat of matte varnish or sealant over the entire piece. This protects the clay and unifies the sheen of the painted and unpainted sections. -
Final cure:
Allow the sealant to cure fully according to the bottle instructions before inserting your favorite photo or postcard.
Go Diagonally
Instead of a horizontal line, apply your tape at a steep angle for a dynamic, asymmetrical geometric look that feels even more modern.
Now you have a sturdy, stylish stand ready to showcase your favorite moments on your desk or shelf
Catchall Desk Organizer
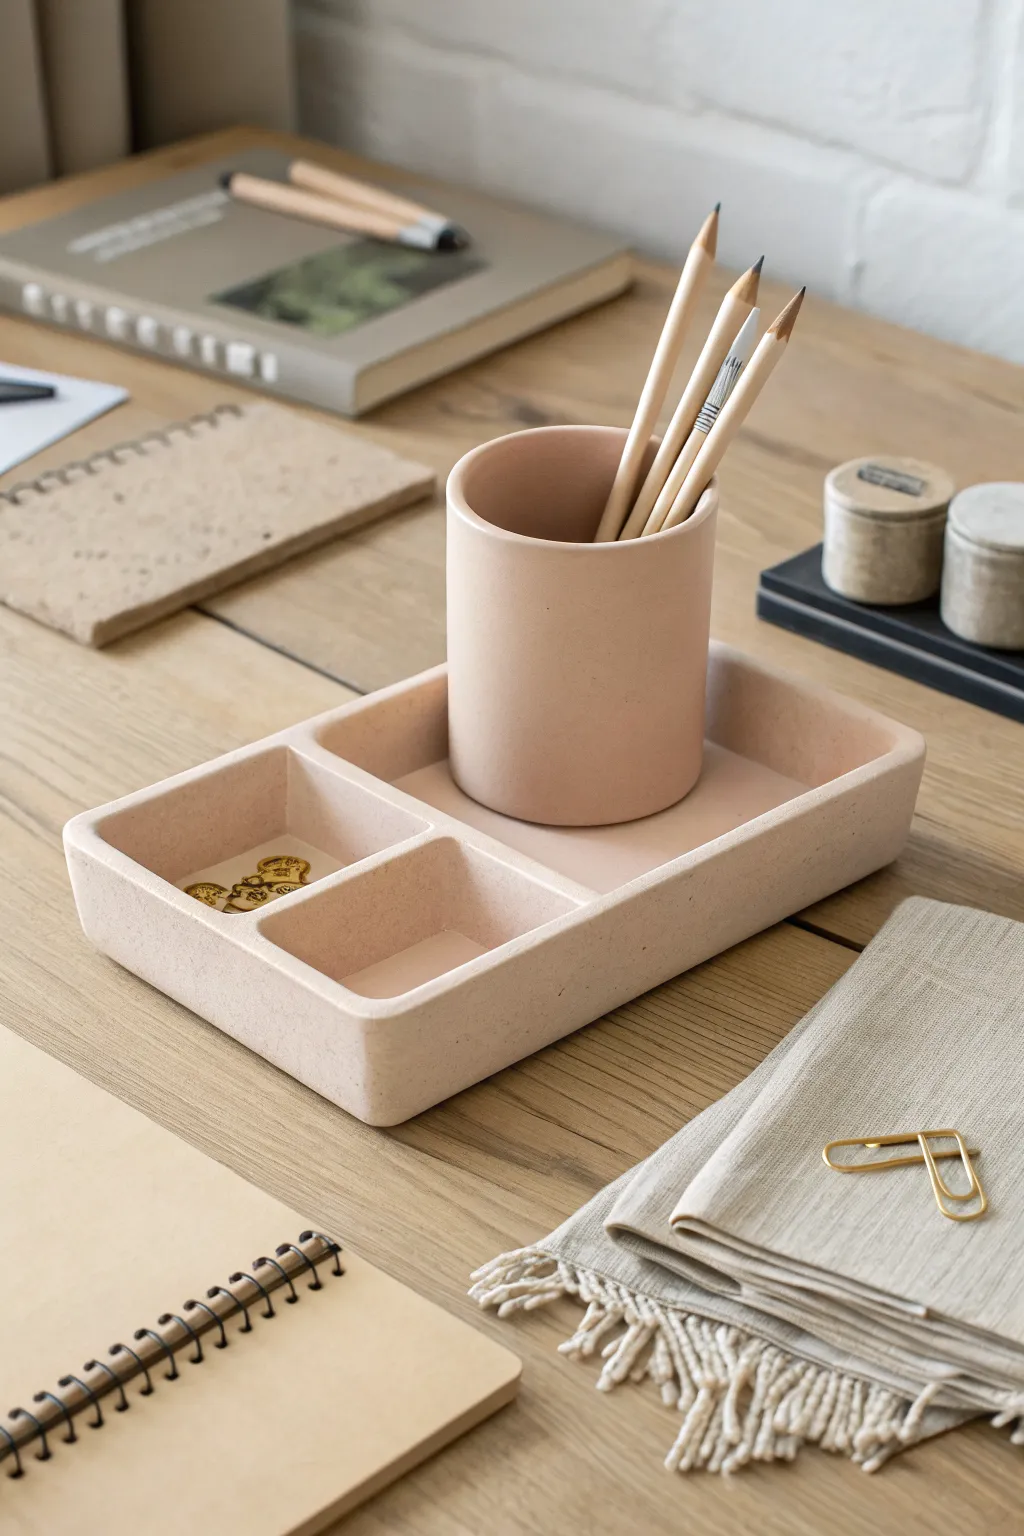
Bring a sense of calm to your workspace with this geometric, modular organizer. With its smooth matte finish and warm terracotta hue, this piece combines a structured tray with a removable pencil cup for ultimate versatility.
How-To Guide
Materials
- White or terracotta air-dry clay (approx. 1kg)
- Rolling pin
- Two long wooden slats (approx. 5mm thick) for guides
- Craft knife or clay cutter
- Ruler
- Small bowl of water
- Sponge or paintbrush
- Slip (clay scraps mixed with water)
- Sandpaper (medium and fine grit)
- Pink/terracotta acrylic paint
- Matte spray varnish
Step 1: Forming the Base Tray
-
Roll the foundation:
Begin by conditioning your clay. Knead it until soft and pliable. Place the clay between your two wooden slats and roll it out with the rolling pin. This ensures the base is perfectly even, which is crucial for a stable organizer. -
Cut the base rectangle:
Using your ruler and craft knife, measure and cut a clean rectangle for the tray bottom. A size of roughly 6×9 inches works well, but you can customize this to fit your desk space. -
Prepare the walls:
Roll out more clay to the same thickness using your slats. Cut long strips that are about 1 inch wide. These will form the outer walls and interior dividers of your tray. -
Attach the outer walls:
Score the edges of your base rectangle and the bottom edge of your wall strips with the craft knife (scratching hash marks). Apply a little slip (liquid clay) to the scored areas. I like to press the walls firmly onto the base, smoothing the seam with a finger or tool immediately to bond them. -
Create the compartments:
Measure the interior width of your tray. Cut a strip of clay to this exact length to create the main divider. Install it about one-third of the way across the tray, creating a designated spot for the pencil cup. -
Add the final divider:
Measure the smaller section you just created. Cut a small strip to divide this area in half, creating the two small square compartments shown in the reference image. Score, slip, and attach this divider perpendicular to the previous one. -
Smooth the edges:
Dip your sponge or brush in water and run it over all the joins and top edges. You want to soften the sharp angles slightly to get that seamless, molded look.
Smooth Seams
Use a damp paintbrush like an eraser to smooth out fingerprints and seam lines while the clay is wet. It works better than fingers for tight corners.
Step 2: Sculpting the Cup
-
Create the cylinder base:
Roll out a small circle of clay for the bottom of the pencil cup. Ensure its diameter fits comfortably inside the large compartment of your tray. -
Form the cylinder wall:
Roll a rectangular slab that is tall enough for your pencils (about 4 inches) and long enough to wrap around the circular base. -
Assemble the cylinder:
Wrap the rectangular slab around the circular base. Carefully join the vertical seam where the walls meet by scoring and blending the clay together until the line disappears. -
Refine the shape:
Place the cylinder on your work surface and gently verify it’s perfectly round. Smooth the top rim with a wet finger to match the rounded edges of the tray.
Terrazzo Twist
Mix small, colored chips of dried clay into your wet white clay before rolling. Sanding later will reveal a trendy, colorful terrazzo pattern.
Step 3: Finishing Touches
-
Slow drying:
Let both pieces dry slowly away from direct sunlight or heat sources. This usually takes 24-48 hours. Turn pieces occasionally if possible to ensure even airflow. -
Sanding for perfection:
Once fully bone dry, use medium-grit sandpaper to remove any major bumps. Follow up with fine-grit sandpaper to achieve an ultra-smooth, stone-like surface. -
Applying color:
Mix a warm, muted pink-terracotta shade using acrylics. Apply thin, even coats to both the tray and the cup. If your clay was already colored, you can skip this step or just add a wash to deepen the tone. -
Sealing the project:
To protect your organizer from graphite smudges and wear, finish with a coat of matte spray varnish. Avoid glossy finishes to maintain the modern aesthetic.
Place your sleek new organizer on your desk and enjoy the satisfaction of a clutter-free workspace
Cute Face Magnets
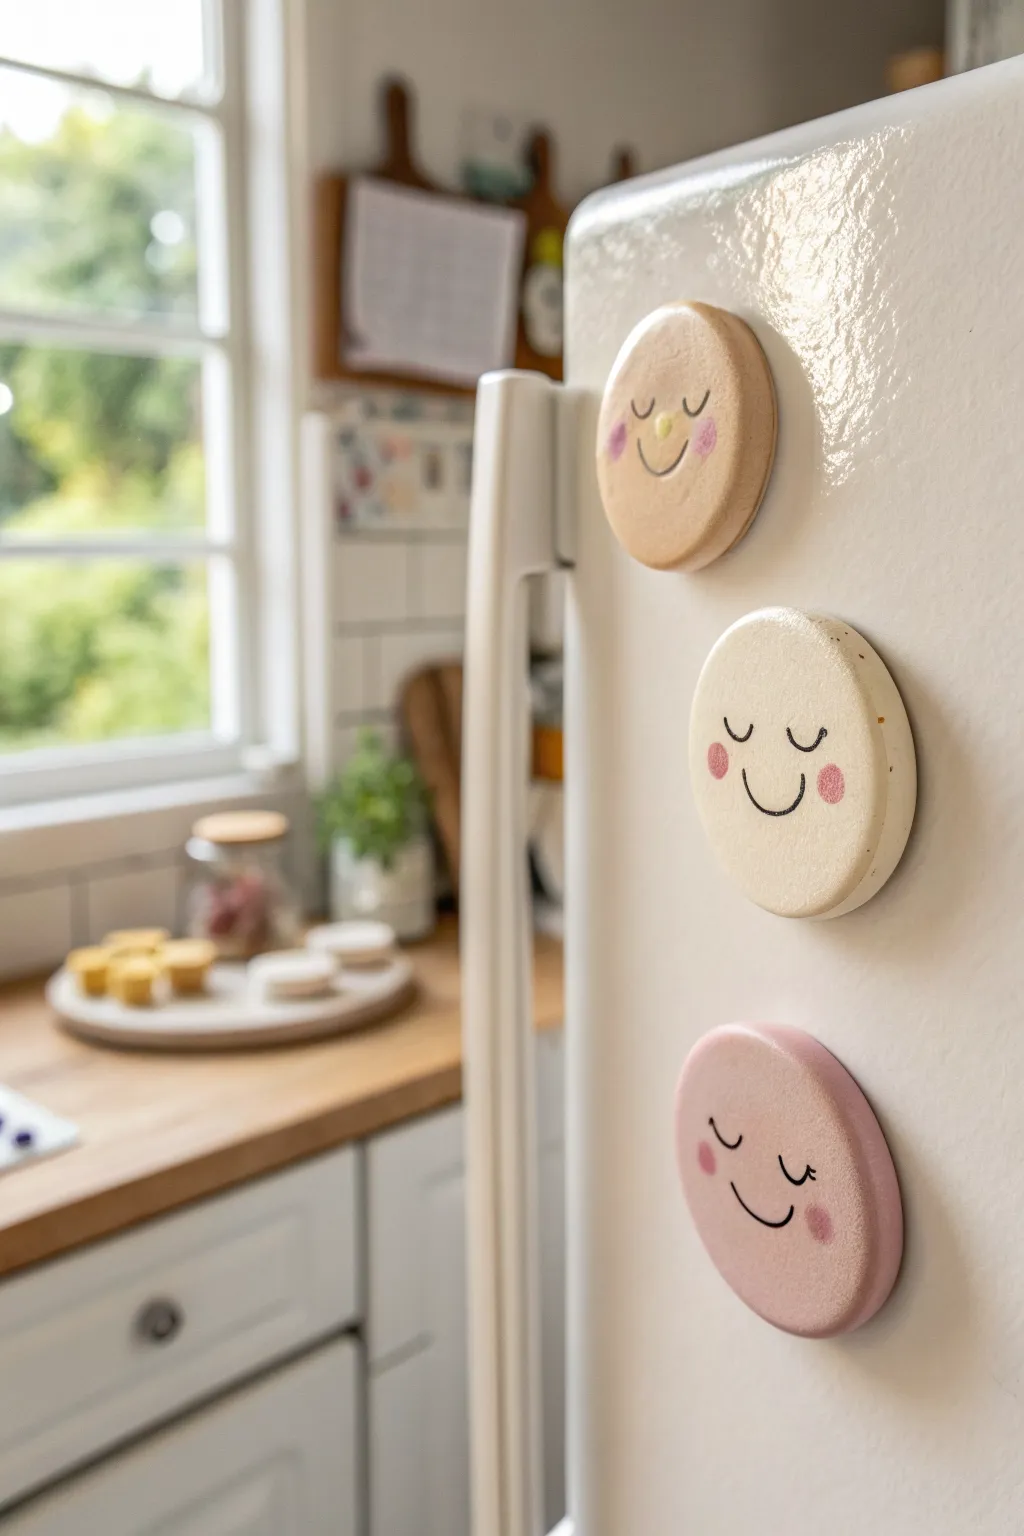
These charming, round magnets bring a gentle touch of personality to your kitchen with their serene, sleeping expressions. Crafted from smooth air-dry clay in soft pastel tones, they are a simple yet heartwarming project perfect for beginners.
Step-by-Step Tutorial
Materials
- Air-dry clay (white)
- Acrylic paints (beige, pale pink, cream, black)
- Round cookie cutter (approx. 2-3 inches)
- Rolling pin
- Parchment paper
- Fine grit sandpaper
- Fine-point black paint pen or liner brush
- Small round sponge dobber or q-tip
- Strong round magnets
- Super glue or E6000
- Matte spray varnish (optional)
Step 1: Shaping the Clay Base
-
Prepare your workspace:
Lay down a sheet of parchment paper to prevent sticking. Take a chunk of air-dry clay and knead it well in your hands until it becomes soft, pliable, and free of cracks. -
Roll out the slab:
Use your rolling pin to flatten the clay into an even slab. Aim for a thickness of about 1/4 inch (6mm)—thick enough to be sturdy but not so heavy that it slides down the fridge. -
Cut the circles:
Press your round cookie cutter firmly into the clay to cut out three perfect circles. Twist slightly before lifting to ensure clean edges. -
Smooth the edges:
Dip your finger in a little water and gently run it around the cut edges of each circle to smooth out any roughness or sharp ridges left by the cutter. -
Drying process:
Place the circles on a flat surface away from direct heat. Let them dry for 24-48 hours. I like to flip them over halfway through to ensure the bottom dries evenly and to prevent warping. -
Sand for perfection:
Once fully dry and hard, use a piece of fine-grit sandpaper to buff the surface and edges. The goal is a silky-smooth finish that feels like ceramic.
Smooth Operator Tip
To get a truly seamless surface, dip your fingertip in water and smooth out the clay surface immediately after rolling, before you even cut the circles.
Step 2: Painting and Decorating
-
Mix base colors:
Prepare your acrylic paints. You’ll need three distinct but soft shades: a warm beige, a creamy off-white, and a dusty rose pink. -
Apply the base coat:
Paint the front and sides of one circle with the beige, one with the cream, and one with the pink. Apply 2-3 thin coats for opaque coverage, letting each layer dry completely before adding the next. -
Draw the sleeping eyes:
Using a fine-point black paint pen, carefully draw two small, downward-curved arcs in the center of the face for closed eyelids. Add tiny lashes if you want extra detail, but keep it minimal. -
Add a smile:
Just below the eyes, draw a small, simple ‘U’ shape for a little smile. Try to center it to keep the expression balanced. -
Add the rosy cheeks:
Dip a small round sponge dobber or a q-tip into pink paint (use a slightly darker shade than the face color). Dab off excess paint on paper first, then gently press onto the cheeks to create soft, flushed circles. -
Detail the nose (optional):
For the beige face, you can add a tiny dot or small yellow circle for a nose to create variation, as seen in the inspiration image.
Step 3: Finishing Up
-
Seal the surface:
To protect your paint from chipping, take them outside and spray a light coat of matte varnish over the faces. This also unifies the sheen of the paint. -
Attach the magnets:
Flip the dry clay discs over. Apply a drop of strong adhesive like super glue or E6000 to the back center. -
Set the magnet:
Press a round magnet firmly into the glue. Hold it in place for 30 seconds to ensure a good initial bond. -
Final cure:
Allow the glue to cure fully according to the package instructions (usually overnight) before sticking them to your fridge.
Fixing Warped Discs
If your circles curl up while drying, lightly dampen the concave side and place them under a heavy book overnight to flatten them back out.
Now your fridge has three adorable new friends ready to hold your grocery lists and photos
Essential Oil Diffuser Pendant
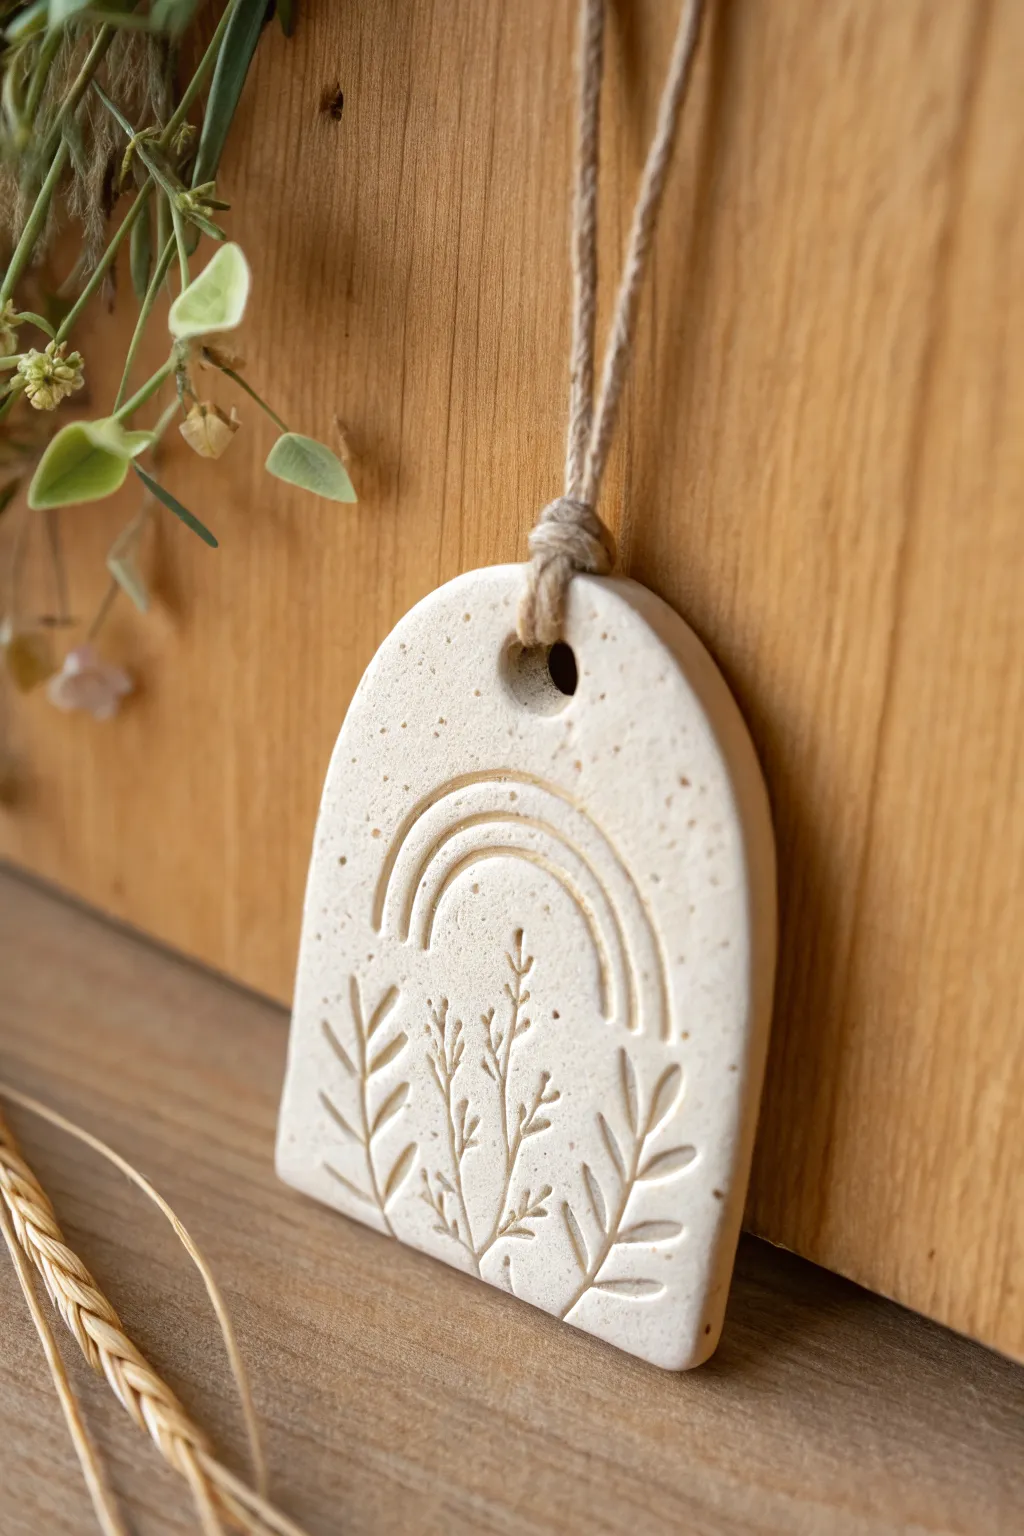
Bring a touch of nature inside with this beautifully textured clay pendant, featuring delicate engraved botanicals and a simple rainbow arch. Not only is it a lovely piece of minimalist decor, but its porous surface makes it perfect for diffusing your favorite essential oils.
How-To Guide
Materials
- White air dry clay
- Rolling pin
- Arch-shaped cutter (or a knife and cardboard template)
- Straw or small round cutter (for the hole)
- Needle tool or toothpick
- Small carving tool or clean linocut gouge
- Fine grit sandpaper
- Jute twine or hemp cord
- Essential oils (optional, for use after completion)
- A small bowl of water
- Parchment paper or canvas mat
Step 1: Shaping the Clay Base
-
Condition the clay:
Begin by taking a handful of air dry clay and kneading it in your hands until it becomes warm, pliable, and free of cracks. -
Roll out the slab:
Place your clay on a piece of parchment paper or a canvas mat to prevent sticking. Use your rolling pin to flatten the clay to an even thickness of about 1/4 inch (6mm). Aim for a smooth, level surface. -
Cut the arch shape:
Press your arch-shaped cutter firmly into the clay. If you don’t have a specific cutter, lightly trace a paper template onto the clay and carefully cut around it with a craft knife. -
Smooth the edges:
Dip your finger into a little water and gently run it along the cut edges of the pendant to soften any sharpness or potential burrs. This saves sanding time later. -
Create the suspension hole:
Use a straw or a small round cutter to punch a clean hole near the top center of the arch. Make sure it’s not too close to the edge to prevent the clay from breaking later.
Clay Cracking?
If small cracks appear while drying, mix a tiny bit of fresh clay with water to make a paste (slip) and fill them in, then sand smooth once dry.
Step 2: Carving the Design
-
Draft the rainbow:
With a very light touch, use a needle tool to sketch out two concentric arches in the center of the pendant. These will guide your deeper carving. -
Carve the rainbow lines:
Using a small carving tool or a slightly blunt needle tool, deepen the lines of the rainbow grooves. Press firmly enough to create a distinct channel, but be careful not to cut all the way through. -
Sketch the botanical stems:
Below the rainbow arch, lightly sketch three vertical lines fanning out slightly—one in the center and two flanking it. These serve as the main stems for your foliage. -
Add leaves to outer stems:
On the left and right stems, press your tool into the clay to create simple leaf shapes. Angle them upwards and alternate sides as you move up the stem. -
Detail the center stem:
For the middle stem, create smaller, more delicate markings to mimic a wildflower or grass texture. Small dots or tiny dashes work perfectly here. -
Clean up crumbs:
If the carving process created any little clay crumbs or rough edges, gently brush them away with a soft dry brush or blow them off.
Step 3: Finishing Touches
-
Let it dry:
Place the pendant on a clean, flat surface to dry. I find that flipping it over halfway through the drying process helps keep it perfectly flat. Allow 24-48 hours depending on humidity. -
Sand for perfection:
Once fully dry and hard, use fine-grit sandpaper to buff the surface and edges. This will give it that professional, stone-like finish. -
Add the hanger:
Cut a length of jute twine. Fold it in half to create a loop, thread the folded end through the hole from front to back, and pull the tails through the loop to create a lark’s head knot. -
Tie it off:
Knot the ends of the twine at your desired hanging length and trim any excess string. -
Infuse with scent:
To use as a diffuser, simply add 1-2 drops of essential oil onto the back or unglazed textured front of the clay. The porous material will hold the scent for days.
Make it Speckled
Knead coffee grounds or cracked black pepper into the wet clay before rolling it out to create a gorgeous, natural speckled stone effect.
Now hang your creation in a cozy corner and enjoy the subtle aroma
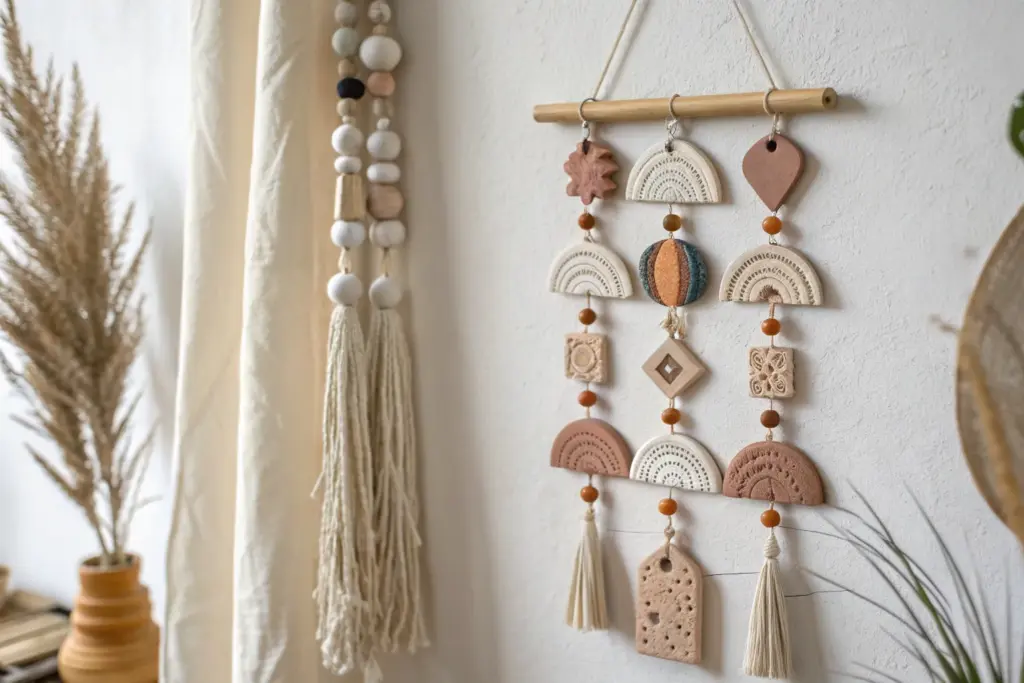
Moon Phase Wall Mobile
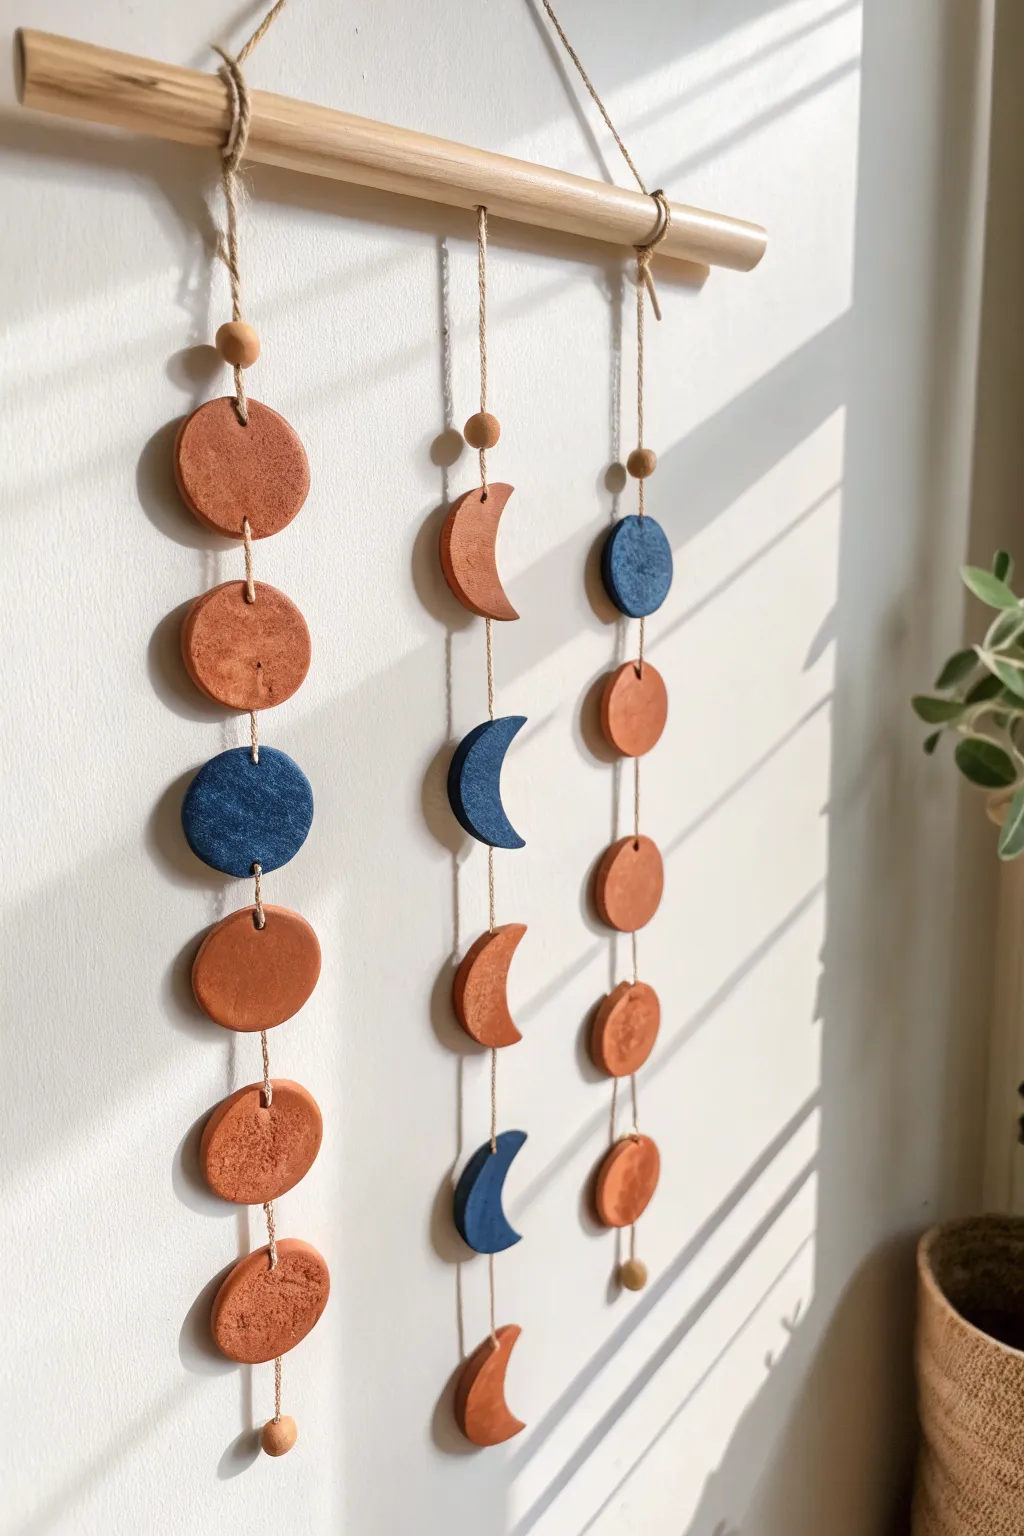
Capture the magic of the cosmos with this earthy, minimalist mobile featuring suspended clay moons and planets. Utilizing warm terracotta tones mixed with striking deep blue accents, this wall hanging brings a peaceful, celestial vibe to any room.
Detailed Instructions
Materials
- Air dry clay (white or terracotta)
- Acrylic paint (burnt sienna/copper, deep metallic blue)
- Wooden dowel (approx. 12-16 inches)
- Jute twine or hemp cord
- Rolling pin
- Circle cookie cutters (small and medium sizes)
- Drinking straw or skewer (for holes)
- Wooden beads (small, natural finish)
- Fine grit sandpaper
- Paintbrushes (flat and detail)
- Scissors
- Craft knife
Step 1: Shaping the Celestial Bodies
-
Roll the clay:
Begin by conditioning your air dry clay until it is soft and pliable. Roll it out on a flat, clean surface to an even thickness of about 1/4 inch. If you notice any air bubbles, smooth them out gently with your fingers. -
Cut the circles:
Using your medium-sized circle cutter, punch out roughly 11 circles. These will form the base for both the full moons and the crescents. You’ll need extra circles if you want to make the side strands longer. -
Create crescent shapes:
To make the crescent moons, take about 5 of your punched circles. Use the same circle cutter to cut into the side of each circle, removing a piece to leave behind a perfectly curved crescent shape. -
Smooth the edges:
Dip your finger in a little water and run it along the cut edges of every clay piece. This smooths down any roughness or jagged bits left by the cutters, giving a professional finish once dry. -
Pierce the hanging holes:
Using a straw or skewer, carefully poke a hole through the top and bottom of each piece. Ensure the hole is large enough for your twine to pass through easily. Specifically for the bottom-most piece of each strand, you only need one hole at the top.
Smooth Operator
For perfectly flat pieces, dry them under a heavy book sandwiched between parchment paper. This prevents the edges from curling upward as moisture evaporates
Step 2: Firing and Finishing
-
Allow to dry:
Place all your clay pieces on a flat surface lined with parchment paper. Let them dry completely for 24-48 hours, flipping them halfway through to ensure even drying and prevent curling. -
Sand imperfections:
Once fully hardened, use fine-grit sandpaper to gently buff the edges and surfaces. This is the stage where I like to check that the hanging holes are still clear of any crusty debris. -
Paint the terracotta tones:
Select the majority of your circles and crescents to be the earth tone. Mix burnt sienna with a touch of white or copper to mimic a natural clay look, and paint both sides, allowing the first side to dry before flipping. -
Apply the accent color:
Choose a few select pieces—like the center crescent and one or two circles on the side strands—to paint in deep metallic blue. This contrast creates the visual interest seen in the original design. -
Seal (Optional):
If you want extra durability or a specific sheen, apply a layer of matte or gloss varnish over the paint once it is totally dry.
Cosmic Texture
Mix baking soda into your acrylic paint before applying it. This creates a grainy, stone-like texture that makes the clay look like real terracotta pottery
Step 3: Assembly
-
Prepare the dowel strand:
Cut a long piece of twine to serve as the main hanger. Tie it securely to both ends of your wooden dowel so it can hang from the wall. -
Cut vertical cords:
Cut three long lengths of jute twine (approx. 3 feet each depending on desired length). Tie each one onto the wooden dowel using a lark’s head knot or simple double knot, spacing them evenly apart. -
Thread the first bead:
Starting with the left strand, thread a small wooden bead onto the twine and push it up towards the dowel. Tie a knot underneath the bead to hold it in place. -
Attach the first clay piece:
Thread the twine through the top hole of your first clay circle. Slide it down to the desired height (usually a few inches below the dowel) and tie a knot just above the hole to secure vertical placement. -
Continue the pattern:
Weave the twine behind the clay piece and bring it out through the bottom hole. Tie a small knot directly below the clay to secure it, then move down to the next shape. -
Assemble remaining strands:
Repeat the threading and knotting process for the middle and right strands. Refer to the photo to match the pattern of crescents versus full circles, and alternating colors. -
Finish the ends:
At the bottom of each strand, after the final clay piece, thread one last wooden bead. Tie a sturdy double knot below the bead and trim the excess twine for a neat tail.
Hang your mobile near a window to let the changing light play across the textured surfaces throughout the day
Handmade Domino Tiles
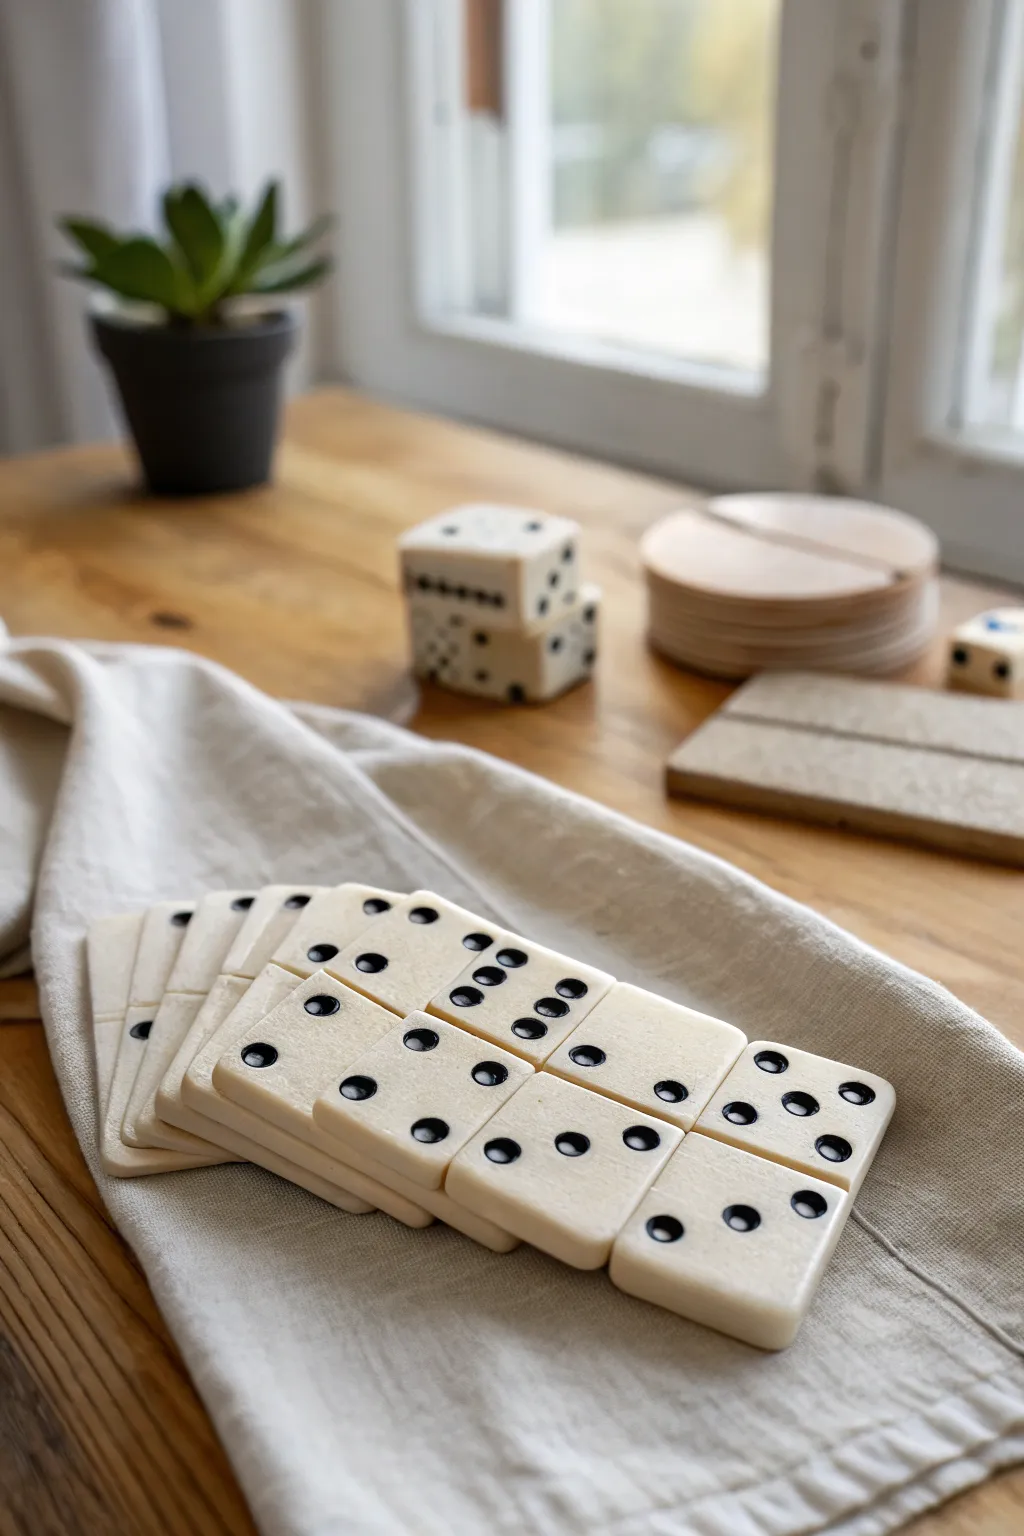
Create a timeless set of gaming tiles with a smooth, porcelain-like finish and satisfying weight. These handmade dominoes feature deep, indented pips and a creamy, natural tone that looks beautiful displayed on a coffee table or in play.
Step-by-Step
Materials
- White air dry clay (high quality)
- Acrylic rolling pin
- Two stir sticks or 1/4 inch wooden slats (for depth guides)
- Rectangular cookie cutter (approx. 1×2 inch) or craft knife and ruler
- Fine grit sandpaper (320 and 400 grit)
- Ball stylus tool or rounded chopstick end
- Black acrylic paint
- Small fine-point paintbrush
- Matte or satin spray varnish
Step 1: Shaping the Tiles
-
Prepare the clay:
Take a large chunk of air dry clay and knead it well in your hands to remove air bubbles and warm it up for smooth rolling. -
Set up guides:
Place your wooden slats or stir sticks on either side of your workspace. These will act as rails for your rolling pin to ensure every tile is perfectly uniform in thickness. -
Roll the slab:
Place the clay between the guides and roll it out with the acrylic roller until the pin rests flat on the wooden rails. Aim for a thickness of about 1/4 inch or slightly more for a nice weight. -
Cut the rectangles:
Using a rectangular cutter is easiest for consistency, but you can also measure and cut 1-inch by 2-inch rectangles using a ruler and craft knife. Cut out 28 tiles for a standard double-six set. -
Smooth the edges:
Dip your finger in a little water and gently run it along the cut edges of each wet clay rectangle to soften the sharp corners. The goal is a rounded, soft look rather than sharp geometric edges.
Prevent Warping
If tiles curl while drying, place a light book on top of them (with parchment paper in between) once they are leather-hard but not fully dry.
Step 2: Adding Details
-
Create the dividing line:
Use the back of a butter knife or a modeling tool to gently press a shallow indentation across the center of each tile, dividing it into two square halves. -
Mark the pips:
Using a ball stylus tool or the rounded end of a chopstick, press the dots (pips) into the soft clay. Press firmly enough to create a distinct divot but not so hard you warp the tile shape. -
Follow the pattern:
Work systematically through the standard domino numbering (Double 6 down to Double Blank) to ensure you don’t miss any combinations. -
Initial drying phase:
Place the tiles on a wire rack or clean mesh screen. This airflow is crucial to prevent warping. Let them dry for at least 24 hours. -
Flip and continue drying:
After the first day, flip the tiles over to ensure the backs dry evenly. I like to let this dry briefly for another 24 hours just to be safe; thicker clay holds moisture longer.
Step 3: Finishing Touches
-
Sand for perfection:
Once bone dry, take your 320 sandpaper and gently sand all surfaces. Pay special attention to the corners and edges to achieve that smooth, tumbled stone feel. -
Refine the finish:
Do a second pass with 400 grit sandpaper for a silky finish. Wipe away all dust with a slightly damp cloth or a dry soft brush. -
Paint the pips:
Dip a fine-point brush into black acrylic paint. Carefully fill in each indented dot. Don’t worry if you get a little paint outside the hole—we can fix that. -
Clean up overflow:
If any paint spilled onto the surface face, let it dry completely, then very lightly sand the surface again. The paint in the indentation will stay, but the surface smear will sand right off. -
Seal the set:
Lay all tiles flat and spray with a thin coat of matte or satin varnish. This protects the clay from oil and dirt during gameplay. Let dry, flip, and spray the backs.
Weighted Feel
For a luxe, heavy feel, knead a small amount of fine sand into the clay before rolling, or glue a thin magnet sheet to the back after drying.
Gather your finished tiles in a linen bag and enjoy your first game with this custom heirloom set