When I’m craving a cozy night in, I love turning clay time into a low-pressure, laugh-a-lot kind of date. These clay art date ideas are all about cute, doable projects you can finish in one sitting and keep as little reminders of your time together.
Mini Clay Figurines in Matching Pairs

These charming, glossy ducks bring a touch of farmhouse serenity with their pastel glazes and subtle speckled finish. Their smooth, rounded bodies and matched colors make them a perfect beginner-friendly project for creating a sweet, cohesive set.
Step-by-Step Tutorial
Materials
- Polymer clay (white or light beige)
- Acrylic paints (pastel sage green, pastel blush pink, burnt orange, black)
- Glossy clear varnish or UV resin
- Stiff bristled toothbrush or fan brush
- Sculpting tools (needle tool/ball stylus)
- Foil or sandpaper (for smoothing)
- Oven for baking (if using polymer clay)
Step 1: Sculpting the Base Forms
-
Prepare the Clay:
Condition about 2 ounces of white polymer clay per duck until it is soft and pliable. Divide this amount roughly into two parts: a larger portion for the body and a smaller portion for the head. -
Shape the Body:
Roll the larger portion into a smooth ball, then gently pull one side to create a tapered teardrop shape. This taper will become the duck’s tail. -
Flatten the Base:
Tap the bottom of the teardrop shape gently against your work surface. You want it to sit flat and stable without rocking. -
Form the Head:
Roll the smaller clay portion into a sphere. Make sure it is proportionate to the body—not too heavy, or it might squash the neck. -
Attach Head to Body:
Place the head sphere onto the rounded front part of the body. Press down firmly but gently to adhere the pieces. -
Blend the Seams:
Using a clay modeling tool or your finger, drag clay from the neck down to the body and from the neck up to the head to erase the seam. Smooth it out until the transition looks like one solid piece. -
Create the Beak:
Take a tiny pea-sized amount of clay and shape it into a small cone. Flatten the underside slightly and press it onto the center of the face. -
Refine the Tail:
Gently pinch and curve the tail end upwards slightly to give the duck its classic silhouette. -
Final Smoothing:
Before baking, I like to lightly buff the entire surface with a little baby oil on my finger to remove any fingerprints. Bake according to your clay package instructions.
Step 2: Painting and Finishing
-
Base Color Application:
Once cool, paint one duck entirely with pastel sage green and the other with pastel blush pink. Apply 2-3 thin coats for full opacity, letting them dry between layers. -
Paint the Beaks:
Using a small detail brush, paint the beaks with a burnt orange or terracotta color. Be careful to keep the edges crisp against the pastel face. -
Add the Eyes:
Dip the tip of a ball stylus or toothpick into black paint. Dot the eyes onto the sides of the head. Add a tiny white speck for a highlight if you want extra character. -
Create the Speckles:
Dilute a small amount of dark brown or grey paint with water. Dip an old toothbrush into this mixture, aim it at the ducks, and run your thumb across the bristles to flick tiny splatters for that ceramic look. -
Protect the Paint:
Allow the paint to dry completely, ideally overnight. This prevents smearing during the glazing step. -
Apply the Glaze:
Coat the entire duck with a thick layer of high-gloss varnish or UV resin. The thick gloss is essential to mimic the look of fired ceramic glaze. -
Cure or Dry:
Let the varnish dry fully or cure the resin under a UV lamp until the surface is rock-hard and glassy.
Clean Splatters
Test your splatter technique on paper first. If big globs land on your duck, wipe them away instantly with a damp Q-tip before they dry.
Weighted Bottoms
Before baking, insert a small flat washer or coin into the base of the clay. This gives the figurines unmatched stability and a high-quality feel.
Place your finished glossy ducks on a windowsill or shelf to enjoy their peaceful cottage vibe


His and Hers Tiny Pet Sculptures
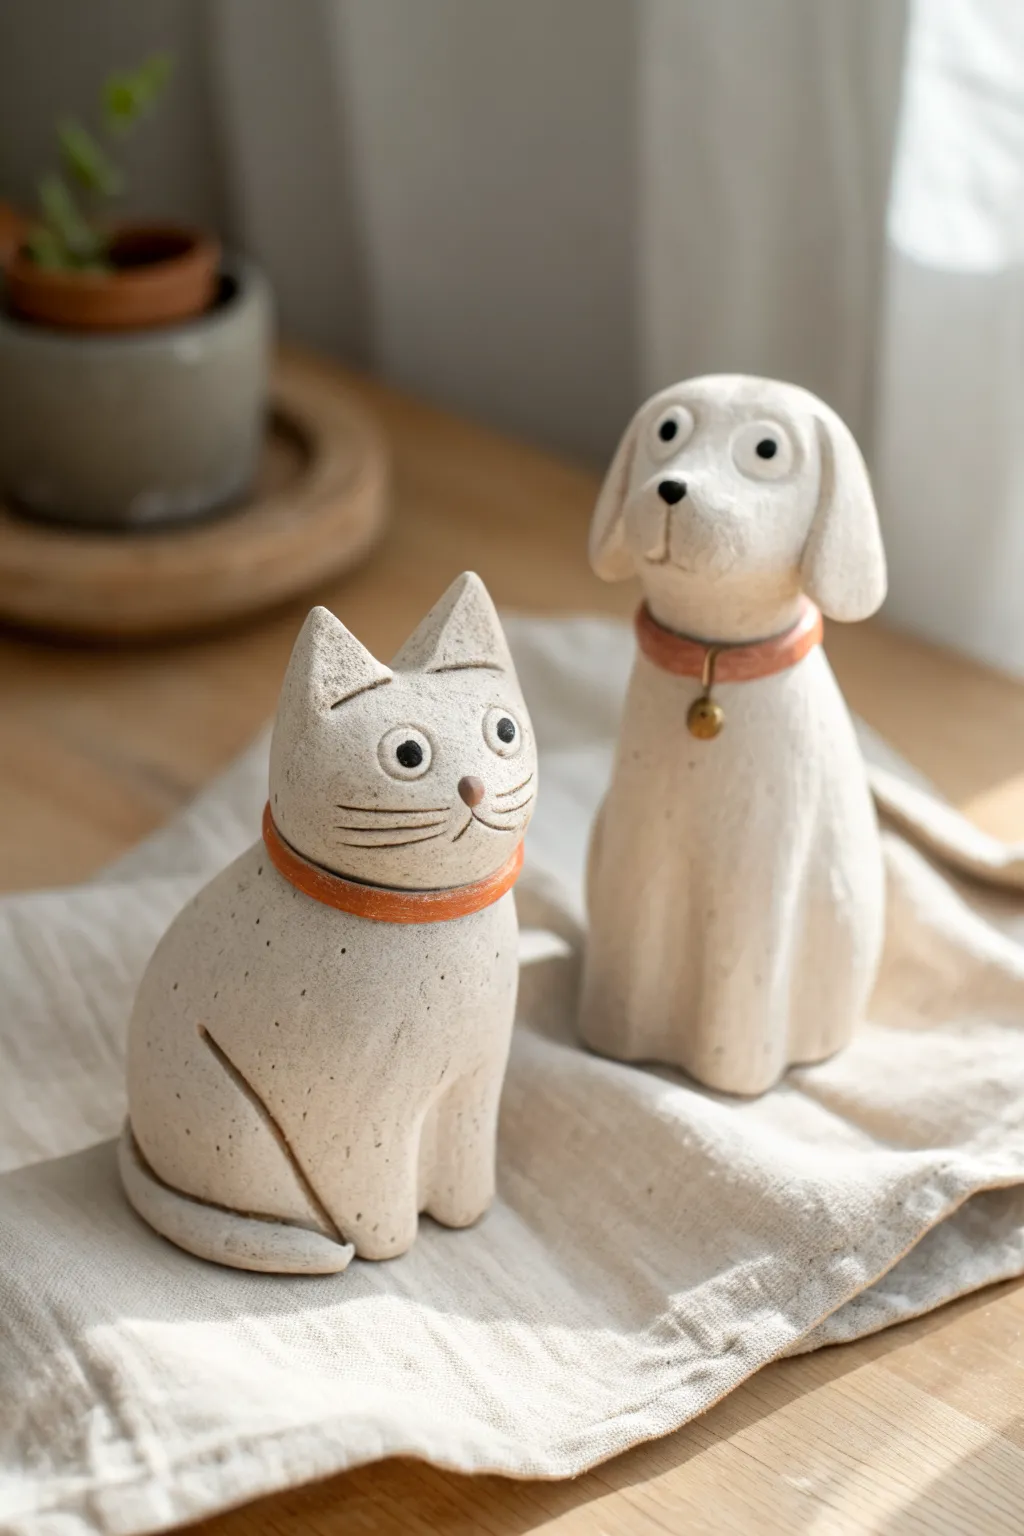
Immortalize your furry friends or simply enjoy crafting this charming pair of speckled ceramic-style cat and dog figurines. With their minimalist features, textured finish, and matching collars, these sculptures make for a delightful date night project that captures personality through simple shapes.
Step-by-Step
Materials
- Air-dry creative paper clay or white polymer clay
- Basic clay sculpting tools (needle tool, blending tool)
- Small cup of water (for smoothing)
- Acrylic paints (eggshell/creamy white, burnt orange, black, gold)
- Small stiff-bristled brush (for texturing)
- Fine detail paintbrush
- Matte varnish or sealant
- Old toothbrush (for speckling)
- Sandpaper (fine grit)
Step 1: Sculpting the Cat
-
Form the Base:
Start with a ball of clay roughly the size of a tangerine. Gently roll it into a smooth pear shape, flattening the bottom so it stands securely on your work surface. -
Define the Haunches:
Using a modeling tool or your thumb, gently press indentations on the lower sides of the pear shape to suggest the cat’s seated haunches. -
Sculpt the Head:
Create a slightly smaller, rounded shape for the head. Flatten the top slightly and pinch two triangles at the corners to form the ears, ensuring they are seamless with the head. -
Attach the Head:
Score the top of the body and the bottom of the head (scratch hatch marks) and apply a dab of water or liquid clay. Press them together firmly and smooth the seam completely until invisible. -
Tail and Details:
Roll a thin snake of clay for the tail. Wrap it around the base of the sculpture, blending the end into the body. Use a needle tool to carve the separation lines for the front legs. -
Create the Collar:
Roll a very thin, flat strip of clay. Wrap it around the neck area to create a distinct collar, smoothing the join at the back.
Step 2: Sculpting the Dog
-
Build the Body:
Similar to the cat, start with a pear shape, but elongate the neck area slightly more to give the dog a taller, more alert posture. -
Shape the Head:
Form a rounded oval for the head. Add a smaller ball of clay to the front to create the snout, blending the edges smoothly into the face. -
Add Floppy Ears:
Make two flat teardrop shapes for ears. Attach them to the sides of the head so they flop downwards, giving the dog a gentle expression. -
Neck Accessories:
Add a clay strip collar just like the cat’s. For the dog, roll a tiny ball and attach it to the front of the collar to simulate a bell or tag. -
Join and Smooth:
Attach the head to the body using the score-and-slip method. Use a wet finger to smooth out any fingerprints on both sculptures.
Head Keeps Falling Off?
If the head feels heavy or wobbly, insert a short piece of toothpick or wire into the neck and head connection acting as an internal armature for hidden support.
Step 3: Painting and Finishing
-
Drying Time:
Allow your sculptures to dry completely (24-48 hours for air-dry clay) or bake according to package instructions if using polymer. -
Base Coat:
Paint both figures entirely with an eggshell or creamy white acrylic paint. You may need two coats for opaque coverage. -
Adding Texture:
To mimic the stone-like look in the photo, dip an old toothbrush into watered-down black or brown paint. Run your thumb over the bristles to flick tiny speckles onto the dried white paint. -
Painting the Collars:
Use a small brush to paint the collars a warm burnt orange or terracotta color. Paint the dog’s bell tag gold. -
Facial Features:
With your finest brush, paint simple black circles for eyes. Add a tiny white dot in each eye for a ‘sparkle’ effect. Paint a small nose (black for the dog, brown for the cat). -
Whiskers and Lines:
I like to use a fine-tip black marker or very thinned black paint to carefully draw the cat’s whiskers and the mouth lines on both pets. -
Seal the Work:
Once all paint is bone dry, apply a layer of matte varnish to protect your sculptures and unify the sheen.
Make It Personal
Swap the terracotta collar color for your actual pet’s collar color, or gently carve your anniversary date into the bottom of the base before the clay dries.
Display your charming little duo on a shelf where they can sit side-by-side forever


Cute Mini Food Charms You Can Swap
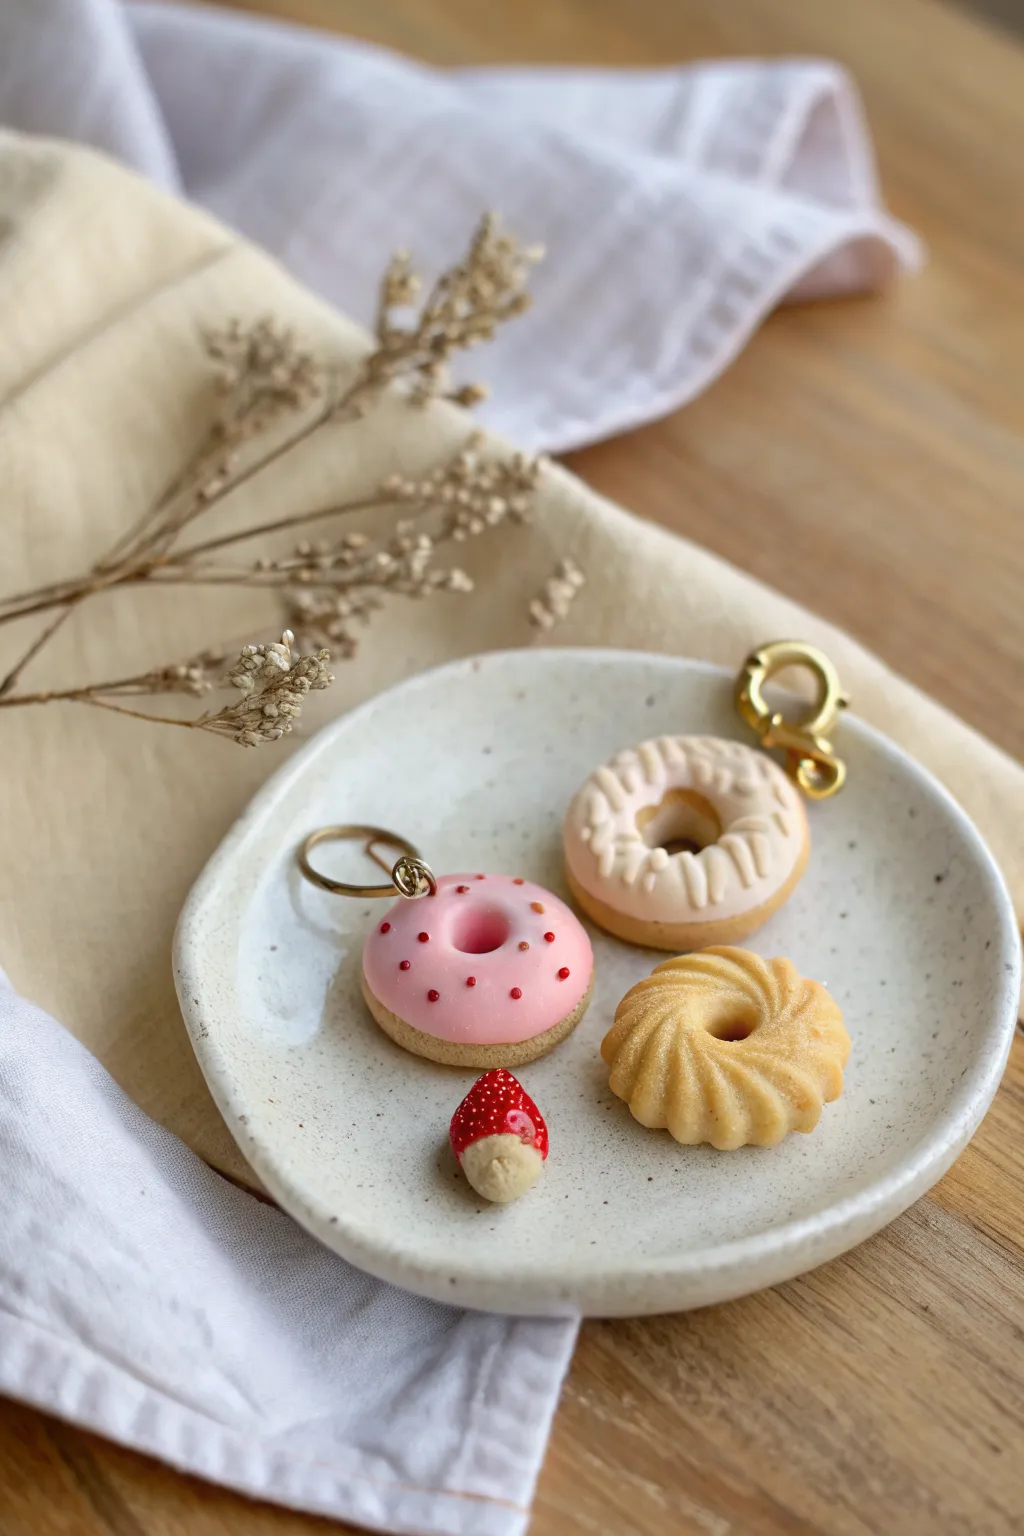
Create a set of irresistibly tiny pastry charms perfect for sharing with your favorite person. These realistic polymer clay donuts feature classic glazes, delicate textures, and gold hardware to turn your miniature bakery creations into wearable art.
Step-by-Step Tutorial
Materials
- Polymer clay (beige/tan, pink, white, red, translucent)
- Liquid polymer clay (Translucent or Bake & Bond)
- Chalk pastels (ochre, orange, brown)
- Soft paintbrush for shading
- Detailing tools (needle tool, ball tool)
- X-acto knife or clay blade
- Small round cutter (approx 1 inch)
- Miniature round cutter or straw (for donut holes)
- Gold eye pins
- Gold jump rings and lobster clasps/keyrings
- Gloss glaze (water-based polyurethane)
- Oven and baking sheet
Step 1: The Dough Base
-
Mix the Dough Color:
Blend beige clay with a tiny amount of translucent and white to achieve a realistic baked dough color. You want it to look like raw pastry dough before shading. -
Form the Donuts:
Roll your mixed clay into a snake roughly 1/2 inch thick, or flatten a sheet to that thickness. Use your medium round cutter to punch out three circles. -
Softening Edges:
Gently gently press down on the edges of your circles with your finger to round them off so they look like puffy fried dough rather than sharp-edged cylinders. -
Creating the Holes:
Use a small straw or a tiny circle cutter to punch the center out of two of the donuts. For the third one (the cruller), simply make an indentation in the center without punching all the way through initially. -
Texturing the Cruller:
For the swirled cruller donut, use the side of a needle tool or a dull knife to press diagonal indentations all around the ring, creating a twisted rope effect. -
Adding Dough Texture:
On all three donuts, gently tap the surface with an old toothbrush or a ball of aluminum foil to give the clay a realistic, porous cake texture. -
Shading for a Baked Look:
Scrape some ochre, orange, and brown chalk pastels into fine dust. I like to use a soft fluffy brush to dust the orange-brown mix around the outer edges and the bottom, leaving a lighter ‘tan line’ in the middle where the donut would float in oil.
Pro Tip: Tiny Bubbles
Pop any air bubbles in your liquid clay glaze with a needle tool before baking. This ensures a smooth, glassy finish rather than a pitted one.
Step 2: The Tiny Strawberry
-
Shape the Strawberry:
Take a tiny pea-sized ball of red clay and roll it into a teardrop shape. Flatten the bottom slightly. -
Texture the Surface:
Use a needle tool to poke tiny, shallow holes all over the red surface to mimic seeds. -
Add the White Tip:
Mix a tiny bit of white clay with translucent. Attach a very small amount to the bottom tip of the strawberry and blend it upwards slightly for a realistic unripe gradient.
Step 3: Glazing and Assembly
-
Pink Glaze:
Mix liquid polymer clay with pink clay (or pink chalk pastel) until it reaches a frosting consistency. Carefully apply it to the top of one donut using a needle tool, letting it drip naturally down the sides but not too far. -
White Drizzle Glaze:
Mix liquid clay with white clay. Apply this to the second donut, but instead of a smooth coat, use your tool to drag lines across the surface for a drizzled icing look. -
Adding Sprinkles:
Roll a very thin snake of darker red clay and cut it into microscopic pieces. Gently press these onto the wet pink glaze. -
Insert Hardware:
If making charms, trim your eye pins to size and insert them into the top of each donut and the strawberry. A dab of liquid clay on the pin helps secure it. -
Baking:
Bake the pieces according to your clay manufacturer’s instructions (usually 275°F for 15-30 minutes). Let them cool completely before handling. -
Varnishing:
Apply a coat of gloss glaze ONLY to the strawberry and the frosted parts of the donuts to make them look wet and sugary. Leave the dough parts matte. -
Final Assembly:
Use pliers to open your jump rings and attach the lobster clasps or keyrings to the eye pins.
Level Up: Scented Charms
Mix a tiny drop of vanilla or strawberry fragrance oil into the clay before baking. Your charms will smell as sweet as a real bakery.
Attach your new charms to a bag or swap them with your partner as a keepsake of your creative date


Fridge Magnets as a Date Night Collection
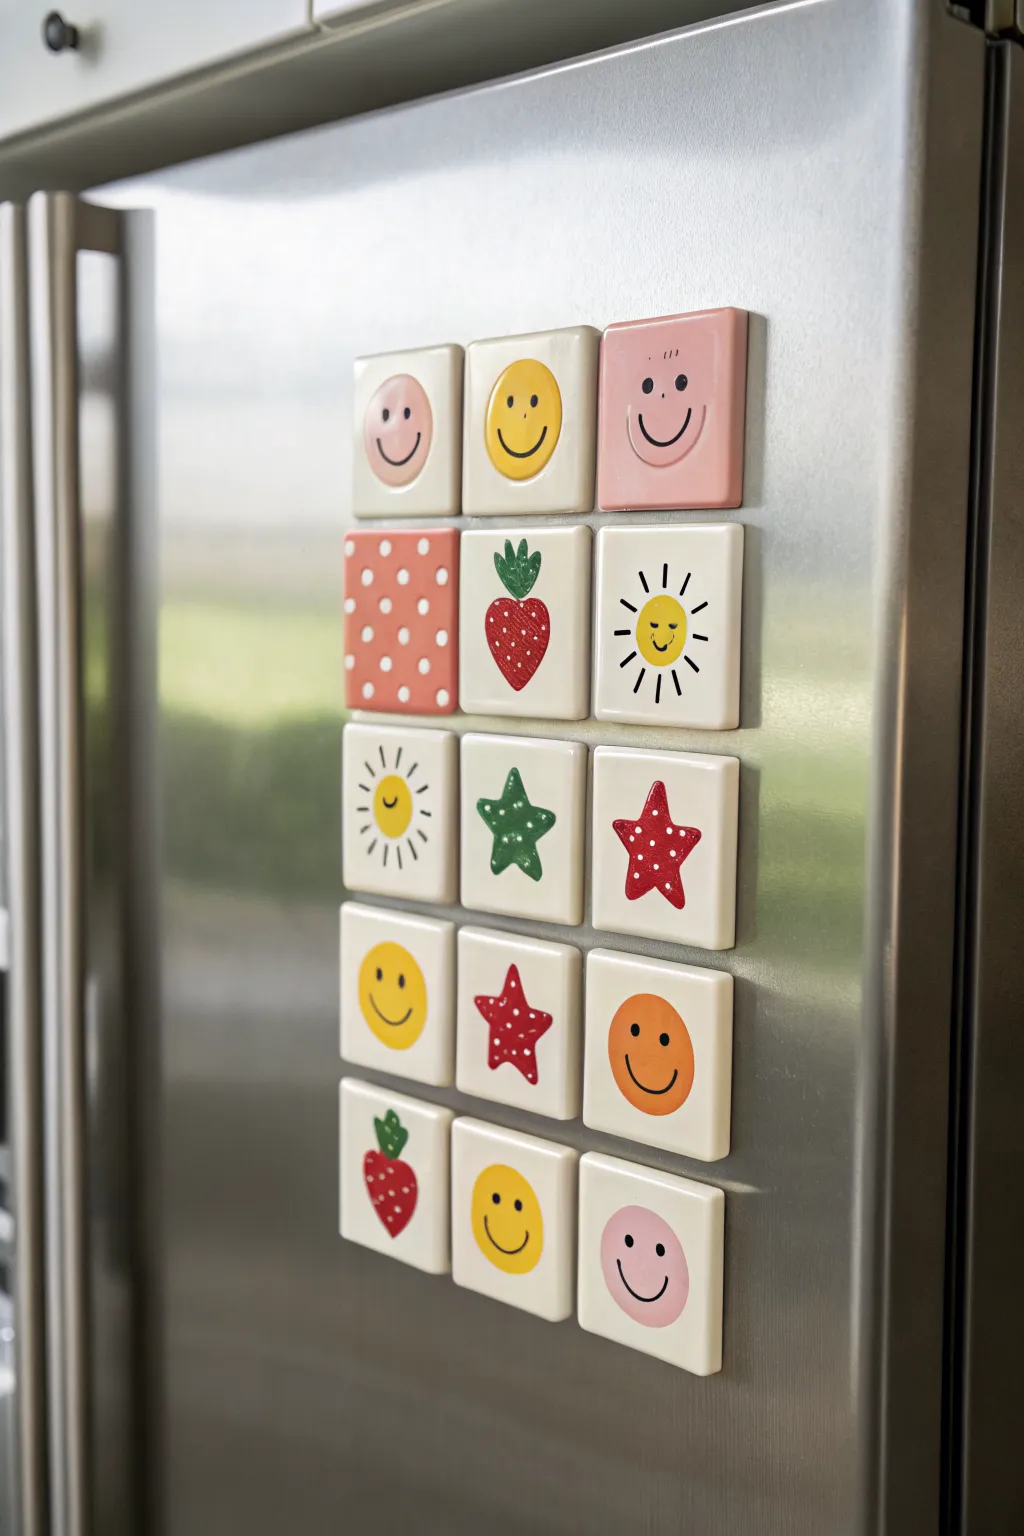
Transform a simple block of air-dry or polymer clay into a cohesive gallery of charming little tiles for your fridge. This project focuses on uniformity with a playful twist, featuring repeating motifs like smiling faces, stars, and strawberries in a clean, grid-style arrangement.
Step-by-Step Guide
Materials
- White polymer clay or air-dry clay
- Square cookie cutter (approx. 1.5 inches)
- Acrylic paints (primary colors, pink, white, black, green)
- Fine detail paintbrushes
- Rolling pin
- Two wooden paint stirrers or depth guides
- Sandpaper (fine grit)
- Glossy varnish or glaze
- Strong round magnets
- Super glue or E6000 adhesive
Step 1: Shaping the Base Tiles
-
Prepare your workspace:
Lay down a smooth work mat or parchment paper to prevent sticking. Clean your rolling pin to ensure no dust marks transfer to the white clay. -
Set up depth guides:
Place two wooden paint stirrers or depth guides parallel to each other on your work surface. These will ensure your clay is rolled out to a perfectly even thickness. -
Roll out the clay:
Place a ball of well-conditioned white clay between the guides and roll it flat. The guides will stop the rolling pin, resulting in a slab that is uniform and smooth. -
Cut the squares:
Using your square cookie cutter, punch out 15 identical squares. Press straight down and lift carefully to maintain crisp edges. -
Refine the edges:
With your finger dipped slightly in water (for air-dry) or baby oil (for polymer), gently smooth any sharp burrs or rough spots on the edges of each square. -
Dry or Bake:
If using air-dry clay, let the tiles dry flat for 24-48 hours, flipping them occasionally to prevent curling. If using polymer clay, bake according to the package instructions on a parchment-lined tray.
Keep it Clean
Keep a pack of wet wipes or a damp towel nearby to clean your hands between colors. Even a tiny smudge of red on white clay is hard to fix later.
Step 2: Painting the Motifs
-
Sand for smoothness:
Once fully cured or dry, lightly sand the surface of each tile with fine-grit sandpaper if there are any remaining bumps. Wipe away the dust with a barely damp cloth. -
Paint the background colors:
Select a few tiles to be fully colored blocks. Paint one square entirely in a muted pink and another in a soft coral red. I find applying two thin coats looks much smoother than one thick coat. -
Design the smileys:
On several white tiles (and the pink one), paint a large circle. Use yellow for standard smileys, orange for variety, or leave it merely as a face on the pink background. Let the base circle dry completely. -
Add facial features:
Using your finest brush and black paint, add simple, thin lines for the wide smiles and small dots for eyes. For the yellow smiley, add tiny pink ovals for cheeks. -
Create the strawberry tiles:
Paint a red heart-like shape in the center of a white tile. Once dry, add green leaves on top and tiny white specks for seeds. Create a variation by painting a full red fruit on the coral background tile with white polka dots. -
Paint the star icons:
Draw a star outline lightly with a pencil first if you’re nervous. Fill in the stars with red or green paint. Once dry, add tiny white dots inside the star for a textured look. -
Detail the sun icons:
Paint a yellow circle in the center of a tile. Add black radiating lines around it for sunbeams, and finish with a tiny smiling face in the center of the sun.
Step 3: Assembly and Finish
-
Seal the artwork:
Apply a coat of glossy varnish or glaze over the top and sides of each tile. This gives them that ceramic-like shine shown in the reference image and protects the paint from chipping. -
Attach the magnets:
Flip the tiles over. Apply a dab of super glue or E6000 to the back center of each tile and press a round magnet firmly into the glue. -
Final cure:
Allow the glue and varnish to cure completely undisturbed overnight before placing them on your refrigerator.
Make it 3D
Instead of painting the motifs flat, shape tiny stars, strawberries, or circles from colored clay and gently press them onto the white squares before baking.
Arrange your mini gallery in a neat grid on the fridge to enjoy your handiwork every time you reach for a snack

The Complete Guide to Pottery Troubleshooting
Uncover the most common ceramic mistakes—from cracking clay to failed glazes—and learn how to fix them fast.
Matching Pinch Pots for Snacks
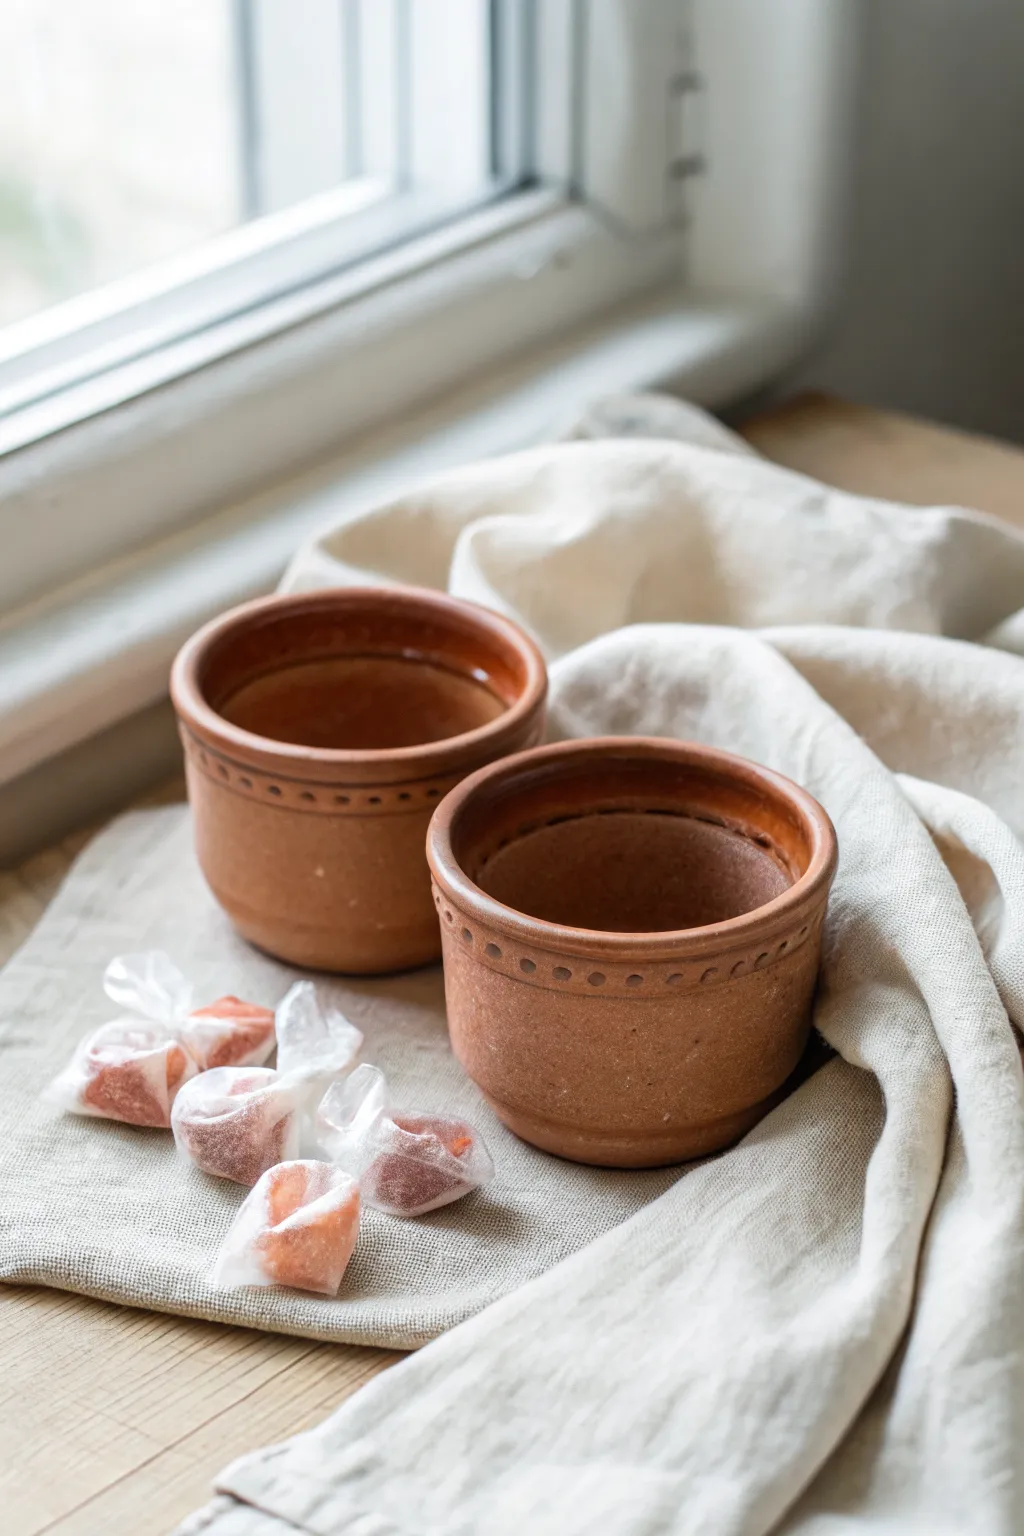
These charming twin pinch pots are made from warm terracotta clay, featuring a classic straight-walled shape and subtle dotted rim detailing. Their unglazed, matte finish gives them an earthy, primitive feel that is perfect for holding small treats like candies or nuts.
Detailed Instructions
Materials
- Red earthenware or terracotta clay (approx. 1 lb)
- Small bowl of water
- Pony sponge
- Needle tool or a small, round chopstick
- Wooden modeling tool or old credit card (for smoothing)
- Canvas mat or work board
- Potter’s wire or fishing line
Step 1: Forming the Base Pots
-
Divide the clay:
Start by cutting your block of clay into two equal portions using your wire tool. Roll each piece into a smooth, tight sphere about the size of a tennis ball. -
Start the pinch:
Hold one sphere in your non-dominant hand. Press your thumb directly into the center of the ball, stopping about a half-inch from the bottom to ensure a thick, sturdy base. -
Open the walls:
Begin pinching the clay between your thumb and fingers, rotating the ball slightly with each pinch. Keep your pressure even to maintain a consistent wall thickness. -
Shape the cylinder:
Unlike a round bowl, these pots have straighter sides. Gently pull the clay upwards rather than outwards as you pinch, aiming for a vertical, cylindrical shape. -
Flatten the bottom:
Once the basic shape is formed, tap the bottom of the pot firmly against your work surface to create a flat, stable base that won’t wobble. -
Refine the lip:
Pay attention to the rim. It should be relatively thick and rounded. If it’s uneven, you can trim it with a needle tool or gently tap the pot upside down to level it. -
Repeat for the twin:
Set the first pot aside and repeat the entire process with the second ball of clay. Place them side-by-side frequently to check that their height and width match.
Keep it uniform
To ensure your dots are perfectly spaced, lightly mark the North, South, East, and West points on the rim first, then fill in the gaps evenly between those anchors.
Step 2: Smoothing and Detailing
-
Smooth the exterior:
Drag a wooden modeling tool or a flexible rib up the outside walls to remove your fingerprints. I like to support the inside with my fingers while I do this to keep the walls straight. -
Refine with a sponge:
Dampen your sponge slightly—squeeze it out well—and run it over the surface to create that uniform, soft texture seen in the photo. Don’t use too much water, or the clay will weaken. -
Create the decorative rim:
Locate the top half-inch of the pot where the decoration belongs. Using the needle tool or a dull pencil, gently score a horizontal line all the way around the pot to act as a guide. -
Add the dots:
Using the blunt end of a small paintbrush or a chopstick, press a series of small, uniform indentations into the clay just below the rim. Space them evenly around the circumference. -
Define the separation:
Use your modeling tool to create a slight indentation or groove just below the dots, separating the rim section from the main body of the pot slightly. -
Check the interior:
Look inside the pot and smooth out any deep gouges or nail marks with your damp sponge. A smooth interior makes it much easier to clean crumbs later. -
Final drying check:
Let the pots sit until they are leather hard. At this stage, you can do one final burnishing rub with the back of a spoon if you want a slight sheen without glaze. -
Dry slowly:
Cover the pots loosely with plastic for the first day to ensure slow, even drying, which prevents cracks. Once bone dry, fire them according to your specific clay’s instructions.
Fixing cracks
If you see small cracks forming on the rim while you work, your clay is drying out. Dab a tiny amount of vinegar on the crack and smooth it over immediately.
Fill your new creations with your favorite snacks and enjoy the warmth they bring to your table
Handprint Keepsake Trinket Tray

Immortalize a special memory with this elegant, speckled trinket tray featuring sweet handprint impressions. Its warm terracotta base and creamy glazed finish create a sophisticated vessel for holding rings or keepsakes.
Step-by-Step Tutorial
Materials
- Air-dry clay or polymer clay (terracotta color)
- Creamy white acrylic paint
- Speckled tan or brown acrylic paint (for faux glaze effect)
- Glossy varnish or sealant (Mod Podge Gloss)
- Rolling pin
- Round cookie cutter or bowl (approx. 4-5 inches)
- Small handprint stamps or tools to sculpt hands
- Small alphabet letter stamps
- Fine grit sandpaper
- Toothbrush or stiff bristle brush
- Small flat paintbrush
- Bowl of water
Step 1: Sculpting the Base
-
Condition the clay:
Begin by taking a handful of terracotta-colored clay and kneading it in your hands until it becomes soft, pliable, and free of cracks. -
Roll the slab:
Place the clay on a smooth surface or mat. Using a rolling pin, flatten the clay into an even slab that is roughly 1/4 inch thick throughout. -
Cut the circle:
Press your round cookie cutter or inverted bowl firmly into the clay to cut out a perfect circle. Peel away the excess clay from the edges. -
Create the rim:
Gently pinch the outer edge of the circle upwards to create a raised lip. Rotate the tray as you go, smoothing the sidewall with a little water on your finger to join any seams or cracks. -
Smooth the surfaces:
Dip your finger in water and run it over the interior surface and the rim to ensure everything is perfectly smooth and level before creating impressions.
Step 2: Adding Impressions
-
Position the hands:
If using handprint stamps, position them carefully in the center roughly half an inch apart. Press firmly enough to leave a clear indentation but not so hard you warp the tray. -
Sculpting option:
I sometimes prefer to hand-sculpt the impressions if stamps aren’t available. Use a rounded tool to gently press in the shape of palms and fingers to mimic the stylized look in the image. -
Stamp the text:
Select the letters D-A-T-E (or your specific numeric date) from your alphabet set. Arrange them centered below the handprints and press gently into the clay. -
Refine the edges:
Lightly tap around the impressions with a smoothing tool to push down any clay ridges that may have raised up during stamping. -
Allow to dry:
Let the tray dry completely according to your clay package instructions. This usually takes 24-48 hours. Flip it occasionally to ensure even drying. -
Sand for smoothness:
Once fully cured, use fine-grit sandpaper to buff the rim and surface, removing any fingerprints or rough spots.
Cracked Clay Fix
If small cracks appear while the clay dries, make a paste using a tiny bit of clay and water. Fill the cracks, smooth over, and sand down once dry.
Step 3: Faux Glaze Finish
-
Paint the interior:
Apply a coat of creamy white acrylic paint to the inside surface of the tray only. Leave the outer rim and outside walls unpainted to show the terracotta color. -
Layer the color:
Allow the first coat to dry, then apply a second or third coat until the terracotta color is completely hidden on the interior floor. -
Create speckles:
Dip a toothbrush into a small amount of watered-down tan or brown paint. Use your thumb to flick the bristles, spraying tiny speckles across the white painted surface. -
Wait for speckles to dry:
Let the speckled effect dry completely to avoid smearing the dots during the sealing phase. -
Apply gloss varnish:
Finish by brushing a layer of glossy varnish or sealant over the entire piece—both the painted interior and the raw terracotta exterior—to give it that fired ceramic shine.
Make it Metallic
After the sealant dries, use a fine tip brush to paint gold leaf liquid inside the stamped letters for a luxurious, high-end finish.
Place your finished tray on a bedside table or shelf to keep your rings safe and your memories close


What Really Happens Inside the Kiln
Learn how time and temperature work together inside the kiln to transform clay into durable ceramic.
Coasters With Shared Texture Stamps
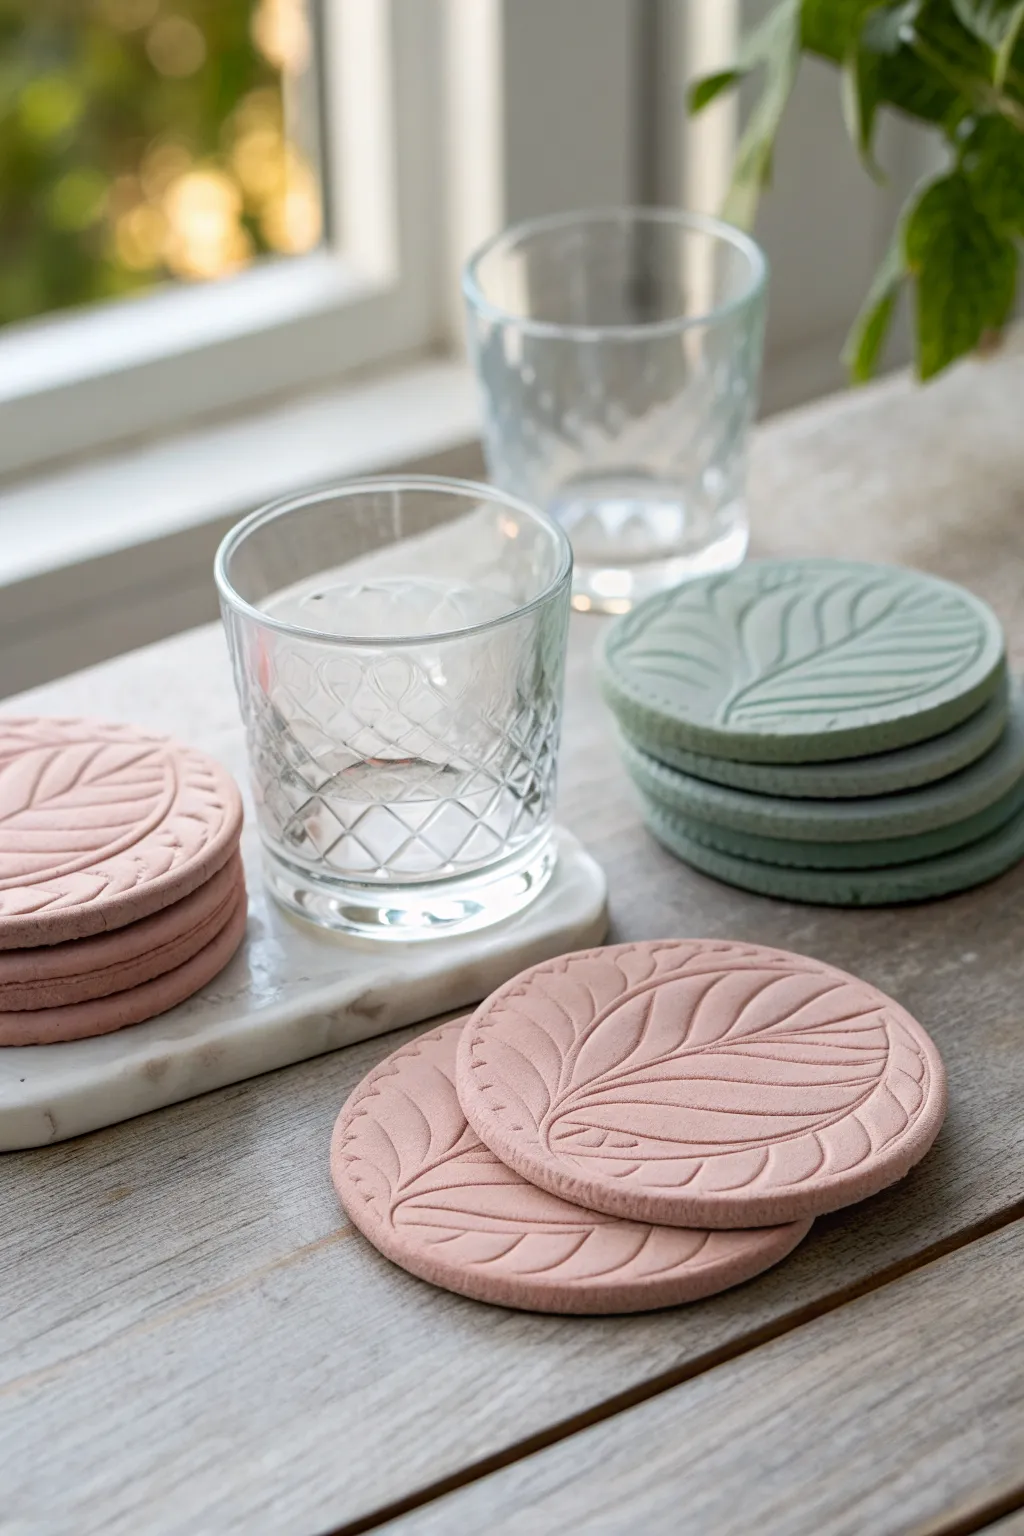
Create a unified set of modern, functional coasters perfect for adorning your coffee table or gifting to a loved one. These dusty pink and sage green clay discs feature a continuous botanical relief pattern that looks professional yet feels wonderfully handmade.
How-To Guide
Materials
- Air-dry clay (pink/terracotta and sage green colors) or polymer clay
- Rolling pin
- Circular cookie cutter (approx. 4 inches diameter)
- Leaf pattern rubber stamp or large texture sheet
- Wooden dowels or slat guides (approx. 1/4 inch thick)
- Fine-grit sandpaper (220-400 grit)
- Parchment paper or non-stick craft mat
- Matte acrylic varnish or clay sealant
- Soft synthetic brush
- Felt pads (optional, for coaster bottoms)
Step 1: Preparation & Rolling
-
Clean your workspace:
Begin by laying down a sheet of parchment paper or a non-stick craft mat. This is crucial because colored clays can stain surfaces and pick up unwanted dust or fibers. -
Condition the clay:
Take a generous handful of your first clay color (e.g., the dusty pink) and knead it well. The warmth of your hands will make it pliable and prevent cracks from forming later on. -
Set up thickness guides:
Place your wooden dowels or slats on either side of the clay ball. These will act as rails for your rolling pin to ensure every coaster is exactly the same thickness. -
Roll the slab:
Roll the clay out smoothly over the parchment paper until the rolling pin rests on your guides. Aim for an even slab about 1/4 inch thick for durability. -
Check for air bubbles:
Inspect the surface for any trapped air bubbles. If you see one, gently pierce it with a needle tool and smooth the area down with your finger.
Prevent Curling
To stop air-dry clay from warping as it dries, place a heavy book on top of the coasters (sandwiched between parchment paper) once they are leather-hard but not fully dry.
Step 2: Texturing & Cutting
-
Prepare the stamp:
Lightly dust your leaf-patterned rubber stamp or texture sheet with a tiny bit of cornstarch or baby powder to ensure it releases cleanly from the clay. -
Impress the design:
Press the stamp firmly and evenly into the rolled slab. I find it works best to stand up and use your body weight for a uniform impression depth. -
Cut the shape:
Position your circular cookie cutter over the textured area. Press down swiftly and cleanly to cut out the coaster shape. -
Remove excess clay:
Peel away the scrap clay from outside the circle before lifting the cutter. This prevents the circle from warping as you pull it free. -
Smooth the edges:
Dip your finger in a little water and gently run it along the cut edge of the circle (the rim) to soften any sharpness left by the cutter. -
Repeat the process:
Repeat these steps for the remaining pink clay, then clean your tools thoroughly before switching to the sage green clay to avoid color contamination.
Marble Effect
Before rolling, twist ropes of the pink and green clay together, fold, and twist again. Stop mixing before they blend fully for a stunning two-tone marble finish.
Step 3: Finishing Touches
-
Dry the coasters:
If using air-dry clay, move the coasters to a wire rack to dry for 24-48 hours, flipping them occasionally to prevent curling. If using polymer clay, bake according to the package instructions. -
Sand for perfection:
Once fully cured or dry, take your fine-grit sandpaper and lightly buff the edges. You can also very gently sand the top surface if you want a smoother, more matte stone look. -
Dust off:
Wipe the coasters down with a damp cloth or a dry brush to remove all sanding dust before sealing. -
Apply sealant:
Using a soft brush, apply a thin coat of matte acrylic varnish or clay sealant. This protects the coaster from moisture drips during use. -
Second coat:
Allow the first coat to dry completely, then apply a second thin coat for extra durability. -
Add backing (optional):
For extra furniture protection, stick small felt pads or a circle of cork to the bottom of each finished coaster.
Stack your new set on the table and enjoy the satisfaction of using your own handmade decor
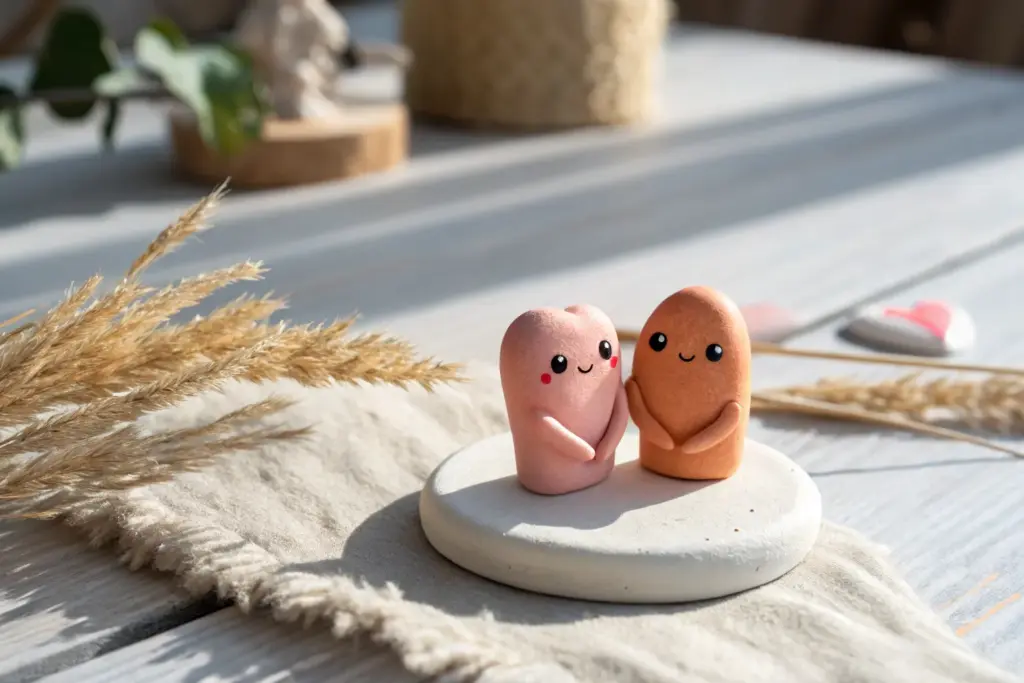
Two-Piece Heart Ornament That Fits Together
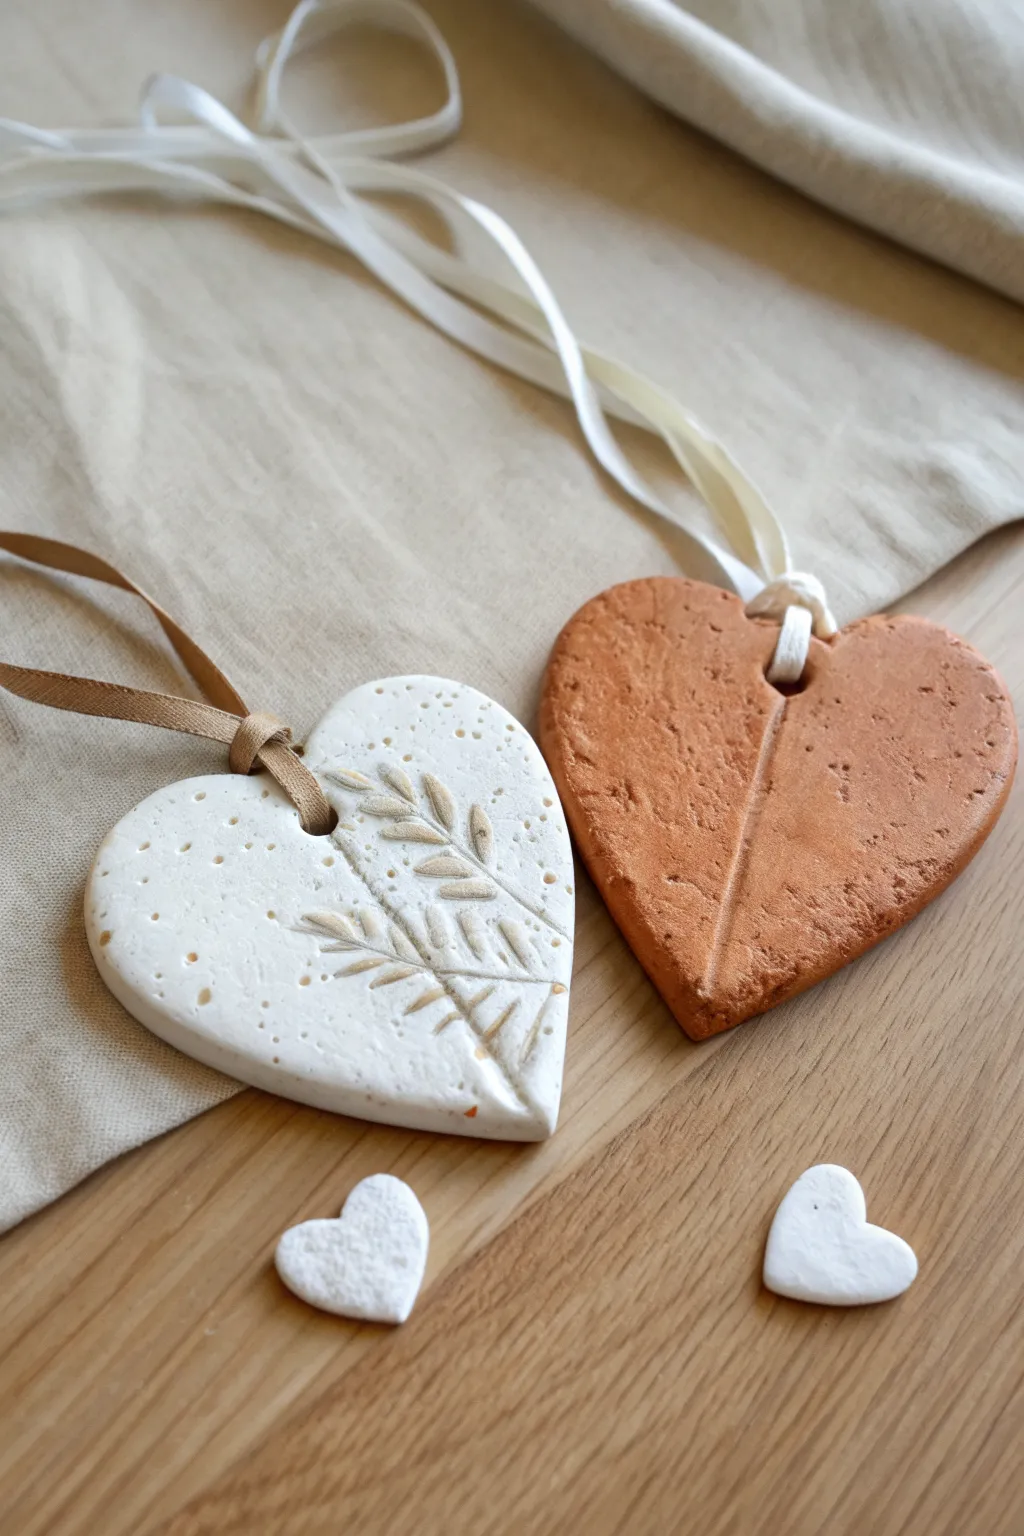
Celebrate your connection with this charming pair of handmade clay hearts, perfect for crafting side-by-side. One features a rustic terracotta finish while the other showcases delicate botanical impressions on white clay, creating a beautiful contrast that symbolizes two unique parts making a whole.
Step-by-Step Tutorial
Materials
- Air-dry clay (white)
- Air-dry clay (terracotta/brown) or acrylic paint to color white clay
- Rolling pin
- Heart-shaped cookie cutter (medium size)
- Heart-shaped cookie cutter (mini, optional for small hearts)
- Dried wheat stalks, lavender, or faux greenery for impressions
- Knife or clay needle tool
- Drinking straw or small circular cutter
- Sandpaper (fine grit)
- Satin ribbon (gold or beige)
- White or cream ribbon
- Matte varnish or sealant
Step 1: Shaping the Base Hearts
-
Prepare the workspace:
Lay down a piece of canvas, parchment paper, or a silicone mat to prevent the clay from sticking to your table. If you are using white clay for both hearts, separate a portion to mix with terracotta-colored acrylic paint if you want that natural earth tone, or simply use two different clay bodies. -
Roll out the clay:
Take a handful of clay and knead it briefly to warm it up. Roll it out to an even thickness of about 1/4 inch (6mm). Try to keep the surface smooth and free of air bubbles. -
Cut the shapes:
Using your medium heart-shaped cutter, press firmly into the clay to create two identical hearts. If you have extra clay, cut out a few mini hearts to use as table scatter or gift tags. -
Smooth the edges:
Dip your finger in a little water and run it along the cut edges of the hearts. This softens the sharp angles left by the cookie cutter and gives the finished piece a professional, polished look.
Step 2: Adding Texture & Detail
-
Create the botanical impression:
On the white heart, gently press a dried wheat stalk or leaf into the surface. Place it slightly off-center for an artistic touch. -
Secure the impression:
Use your rolling pin to roll *over* the plant material once with gentle but firm pressure. This embeds the texture deep enough to be seen clearly. -
Reveal the design:
Carefully lift the plant stem away from the clay using a needle tool or tweezers to avoid smudging the fresh impression. -
Add speckling (optional):
To mimic the speckled look in the photo, you can flick a toothbrush with diluted brown paint over the wet white clay, or gently press coarse sand into the surface. -
Detail the terracotta heart:
For the darker heart, use a dull knife or modeling tool to draw a vertical line down the center, creating a stylized leaf vein or abstract split. Add small pockmarks or texture using a crumpled ball of foil or a sponge. -
Create hanging holes:
Use a drinking straw to punch a clean hole near the top center of each heart. Ensure the hole is not too close to the edge to prevent tearing later.
Smooth Impressions
If the clay sticks to your botanical elements, dust the plant lightly with cornstarch or baby powder before pressing it into the wet clay.
Step 3: Finishing Touches
-
Dry the ornaments:
Place the hearts on a flat surface to dry. I find that flipping them over every few hours helps them dry flat without curling. Allow 24-48 hours depending on humidity. -
Sand for smoothness:
Once fully dry and hard, use fine-grit sandpaper to gently smooth any rough edges or bumps on the back and sides. -
Seal the clay:
Apply a coat of matte varnish or sealant to protect the clay from moisture and dust. This brings out the richness of the terracotta color. -
Attach the gold ribbon:
Cut a length of the darker gold or beige ribbon. Fold it in half, push the loop through the white heart’s hole from front to back, and pull the tails through the loop to secure it. -
Attach the cream ribbon:
Repeat the previous step with the white or cream ribbon for the terracotta heart. Tie the ends of both ribbons into a knot at the desired hanging length.
Scented Decor
Add a few drops of essential oil to the back of the unsealed dried clay. The porous material acts as a diffuser, making your ornaments smell amazing.
Hang these complementary ornaments together or keep one and gift the other to feel connected even when apart

TRACK YOUR CERAMIC JOURNEY
Capture glaze tests, firing details, and creative progress—all in one simple printable. Make your projects easier to repeat and improve.
Date Night Token Jar With Clay “Coupons”
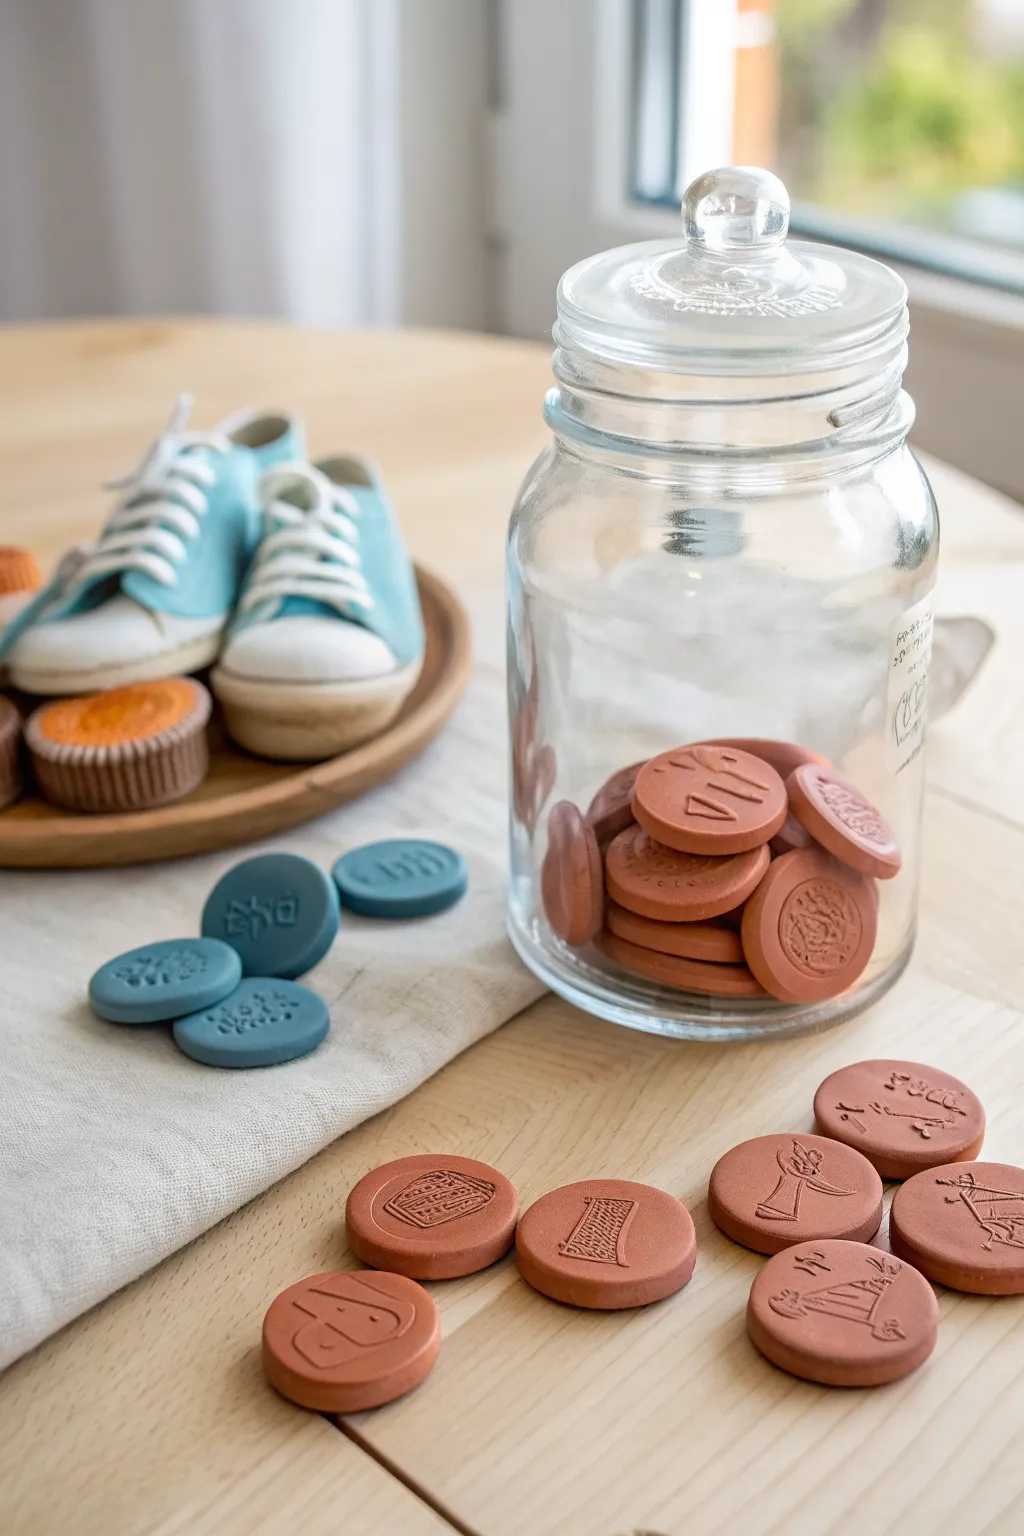
These charming, terracotta-style tokens turn undecided evenings into instant adventures. Stored in a classic glass jar, each stamped clay coin represents a fun date idea, creating a beautiful and functional keepsake for couples.
Detailed Instructions
Materials
- Air-dry clay (terracotta color)
- Air-dry clay (blue or teal color)
- Small round cookie cutter or bottle cap (approx. 1.5 inch diameter)
- Rubber stamps (icons or letters)
- Rolling pin
- Parchment paper or craft mat
- Fine-grit sandpaper
- Glass jar with lid
- Paper tag and string (optional)
- Clear matte varnish (optional)
Step 1: Preparing the Clay Base
-
Condition the clay:
Start by taking a chunk of your terracotta-colored air-dry clay. Knead it in your hands for a minute or two until it feels warm and pliable, which prevents cracking later. -
Roll it out:
Place your clay onto a piece of parchment paper to prevent sticking. Use a rolling pin to flatten the clay to an even thickness of about 1/4 inch (6mm). -
Smooth the surface:
If you notice any texture from the rolling pin or canvas, lightly run a damp finger over the surface to ensure it is perfectly smooth before cutting. -
Cut the circles:
Press your round cutter or bottle cap firmly into the clay. Twist it slightly before lifting to easier release the shape. -
Repeat the process:
Cut as many circles as you need for your date ideas. I like to make a few extra ‘blanks’ just in case a stamping experiment goes wrong.
Step 2: Stamping the Designs
-
Plan your icons:
Designate specific stamps for specific dates—for example, a coffee cup for a café date, a tent for camping, or simple geometric patterns for mystery dates. -
Test the pressure:
Practice stamping on a scrap piece of clay first. You want a clear impression without pushing so hard that you deform the circle shape. -
Stamp the tokens:
Press your chosen rubber stamp into the center of a clay circle. If the clay is sticky, you can lightly dust the stamp with cornstarch first. -
Create the blue set:
Repeat the rolling and cutting process with the blue or teal clay for a secondary category of dates, perhaps separating ‘staying in’ from ‘going out’ options. -
Detail the blue tokens:
Stamp the blue tokens with contrasting patterns or text to differentiate them visually from the terracotta set.
Clean Impressions
If your stamp gets stuck in the clay, lightly dip the rubber stamp face into vegetable oil or baby oil before pressing. This creates a release barrier.
Step 3: Finishing Touches
-
Refine the edges:
While the clay is still slightly damp, gently smooth any rough edges created by the cutter with your fingertip and a drop of water. -
Let them dry:
Arrange the tokens on a flat surface lined with parchment paper. Let them air dry for 24-48 hours, flipping them over halfway through to ensure even drying. -
Sand the imperfections:
Once fully dry and hard, use fine-grit sandpaper to gently buff away any remaining sharp burrs or fingerprints on the edges. -
Clean the dust:
Wipe each token with a dry cloth or soft brush to remove the sanding dust. -
Seal the tokens (optional):
For durability, you can apply a thin coat of clear matte varnish. This deepens the clay color slightly and protects against moisture. -
Prepare the jar:
Ensure your glass jar is clean and dry. You can add a handwritten label on the side as shown in the inspiration photo. -
Fill the jar:
Gently place your finished tokens into the jar, mixing the terracotta and blue colors for a nice visual variety.
Cracked Clay?
If small cracks appear while drying, don’t panic. Mix a tiny bit of fresh clay with water to make a paste and smooth it over the crack with your finger.
Now you have a jar full of possibilities ready to solve the eternal question of what to do tonight
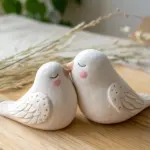
Simple Mini Planters With Buddy Faces
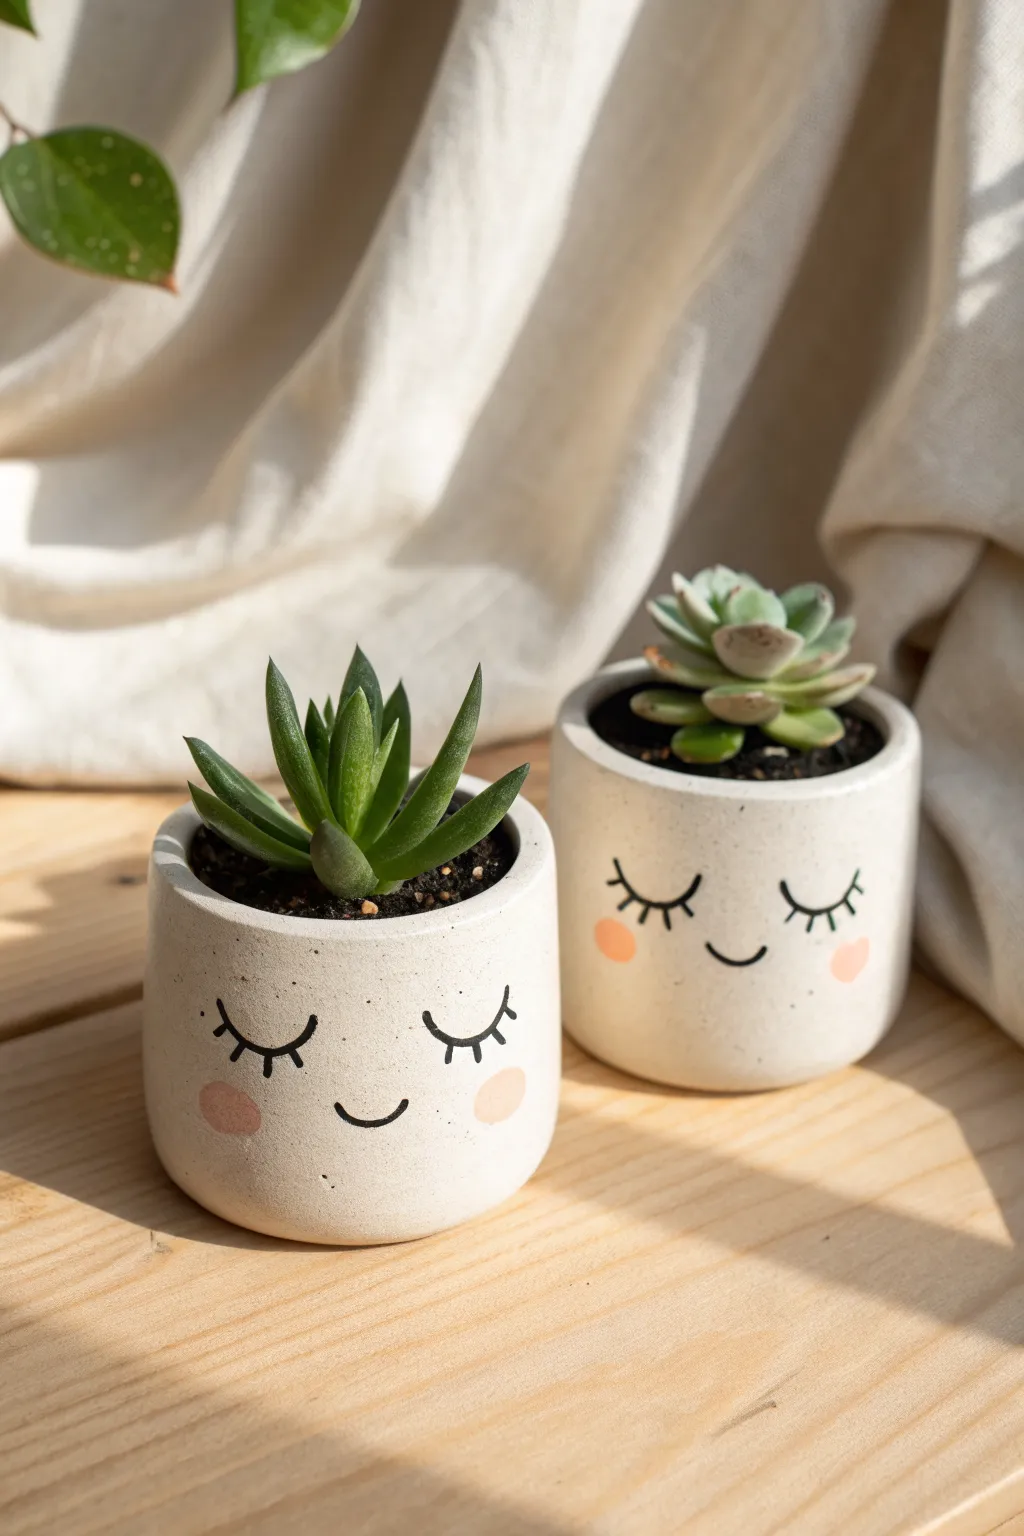
These adorable twin planters feature serene, sleeping faces that bring a sense of calm to any windowsill. The clean white finish combined with simple, hand-painted details makes this a perfect beginner project for a pottery date night.
Step-by-Step Tutorial
Materials
- Air-dry clay (white) or polymer clay
- Rolling pin
- Clay knife or craft blade
- Small circular cookie cutter (approx. 2.5-3 inches)
- Ruler
- Small cup or jar (to use as a mold)
- Water and sponge (for smoothing)
- Fine-grit sandpaper
- Black acrylic paint or paint pen
- Pink acrylic paint
- Fine detail paintbrush
- Matte sealant/varnish
Step 1: Forming the Cylinder
-
Prepare the clay slab:
Begin by rolling out your white clay on a clean, flat surface until it is about 1/4 inch thick. Aim for an even thickness throughout to ensure the pot stands straight. -
Cut the base:
Use your circular cookie cutter or trace around the bottom of your mold jar to cut out two perfect circles. These will be the bottoms of your planters. -
Measure the walls:
Wrap a piece of string around your circular base to find the circumference, or calculate it. Cut a rectangular strip of clay that is this length plus a tiny bit for overlap, and about 2.5 to 3 inches tall. -
Build the structure:
Place your circular base on the work surface. Carefully wrap the rectangular strip around the edge of the circle to form a cylinder. -
Seam the edges:
Where the two ends of the rectangle meet, score the clay (scratch cross-hatch marks) and dab a little water. Press the edges together firmly to create a seal. -
Blend the surface:
Use your finger or a modeling tool to smooth the vertical seam on both the inside and outside until it disappears. Do the same where the wall meets the base. -
Smooth imperfections:
Dip your sponge lightly in water and run it over the entire surface of the pot. This erases fingerprints and creates that smooth, modern look seen in the photo. I find taking extra time here really pays off later. -
Drainage hole check:
If you plan to put real plants directly inside, use a straw to poke a small drainage hole in the center of the bottom. -
Dry efficiently:
Let the pots air dry completely for 24-48 hours. Turn them upside down halfway through the process to ensure the bottom dries evenly.
Step 2: Painting the Faces
-
Sand for smoothness:
Once fully dry (and hard), gently sand any rough edges or bumps with fine-grit sandpaper. Wipe away the dust with a slightly damp cloth. -
Draft the face:
Lightly sketch the sleeping face design with a pencil. Place the eyes wide apart and low on the pot for a cute, ‘kawaii’ proportion. -
Paint the lashes:
Using a fine paintbrush or a black paint pen, carefully trace over your pencil lines. Draw the curved eyelids first, then add three small, vertical lashes to each eye. -
Add the smile:
Paint a very small, simple ‘U’ shape right between the eyes for the mouth. Keep the line weight consistent with the eyes. -
Apply the blush:
Dip a round sponge dabber or your fingertip into pink acrylic paint. Dab off the excess, then press gently onto the cheeks to create soft, rosy circles. -
Seal the artwork:
Finish by applying a coat of matte sealant or varnish. This protects the clay from moisture and keeps the paint from chipping. -
Add greenery:
Once the sealant is dry, fill your new buddy pots with soil and a small succulent, like the pointy-leafed variety or the rosette style shown in the example.
Smooth Seams Trick
Use a surprisingly generous amount of water (slip) specifically on the seams. Rub vigorously until the clay turns to mud, then smooth it back down for an invisible join.
Make it Speckled
To mimic a ceramic stoneware look, flick a toothbrush loaded with watered-down brown paint over the white pot before painting the face for a faux-speckle finish.
Set your new creations on a bright shelf and enjoy their peaceful expressions every day
Candle Holder Duo With Carved Patterns
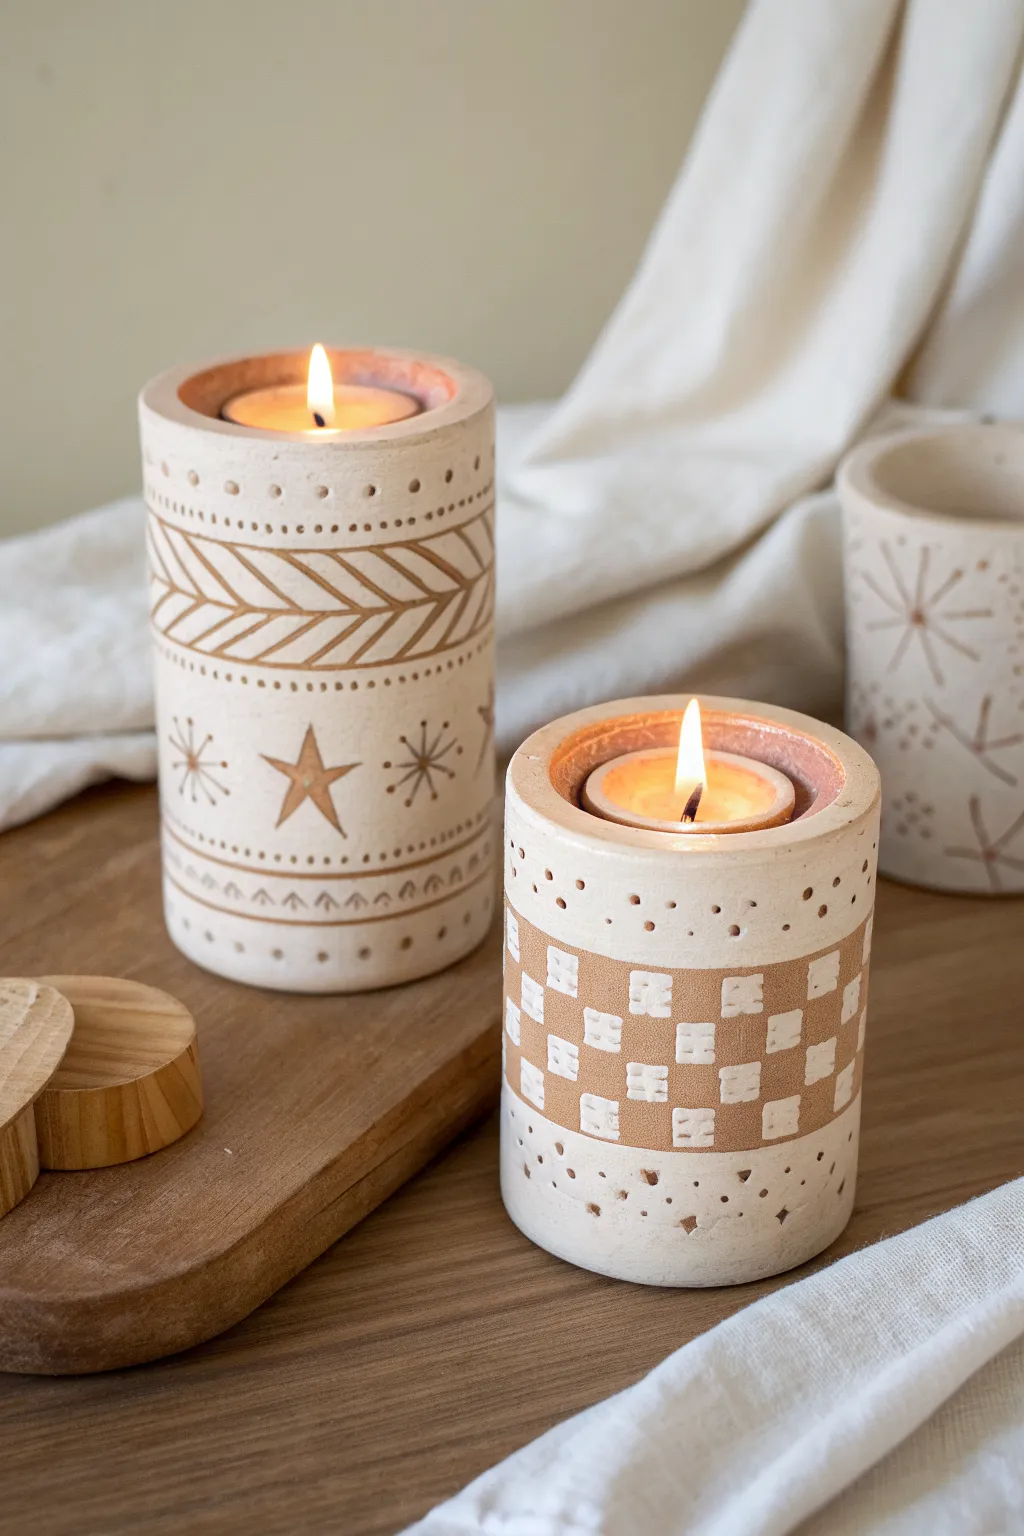
Create a cozy ambiance with this pair of cylindrical candle holders featuring intricate sgraffito-style carvings and warm earth tones. These sturdy vessels are designed to hold tea lights, casting a soft glow through their hand-carved geometric and celestial patterns.
How-To Guide
Materials
- White air-dry clay or polymer clay (stone effect preferred)
- Rolling pin
- Cardboard or plastic cylinder molds (e.g., mail tubes or PVC pipe)
- Craft knife or scalpel
- Needle tool or toothpick
- Carving tools (small loop tool)
- Warm brown acrylic paint or terracotta slip
- Sandpaper (fine grit)
- Tea lights for sizing
- Ruler
- Small paintbrush
- Matte sealant or varnish
Step 1: Forming the Base Cylinders
-
Prepare the clay:
Begin by conditioning your clay. If using air-dry clay, knead it until it’s pliable but not sticky. If using polymer, warm it in your hands. -
Roll the slab:
Roll out a consistent slab of clay approximately 1/4 inch thick. I find using guide sticks on either side of the roller helps keep the thickness perfectly even. -
Cut to size:
Measure the circumference and height of your chosen tube form. Cut a rectangle of clay that wraps fully around the form with a slight overlap for joining. -
Wrap the form:
Wrap the clay rectangle around your tube. Score (scratch) and slip (add water or liquid clay) the overlapping edges, then press them firmly together to create a seam. -
Smooth the seam:
Blend the clay over the seam line until it disappears completely, smoothing it with your finger or a damp sponge to make the cylinder seamless. -
Create the tea light well:
Roll a smaller slab and cut two circles slightly larger than the cylinder’s diameter. Place one on top of the cylinder to close it. Gently press a tea light into the center to create an indentation, but remove it before it gets stuck. -
Refine the top edge:
Smooth the connection between the top circle and the cylinder walls. The top rim should be flat and wide enough to support the intricate dot patterns later.
Clean Lines
When carving geometric shapes like the checkerboard, use a straight edge of a piece of thick paper or cardstock as a flexible ruler to guide your knife around the curve.
Step 2: Designing and Carving
-
Initial drying (if air dry):
Let the clay dry until it is leather-hard. This is crucial—if it’s too wet, the carving will look messy; too dry, and it will chip. -
Apply the base color:
Paint the specific areas where you want the brown pattern to appear (like the checkered section or the chevron band) with the warm brown acrylic or slip. Let this layer dry completely. -
Mark horizontal guides:
Using a ruler and a needle tool, lightly score horizontal lines around the cylinder to define your design bands (top rim, main pattern area, bottom border). -
Carve the tall cylinder:
For the taller holder, use a carving tool to scratch through the brown paint (if applied) or simply carve into the raw clay. Create the chevron arrows in the middle band and the stars and starbursts in the lower section. -
Carve the short cylinder:
For the shorter holder, carve a checkerboard pattern. Carefully remove squares of clay to reveal the lighter layer underneath or to create texture contrast against the painted sections. -
Add pierced details:
Use a small needle tool or drill bit to poke holes through the clay at the delicate top and bottom borders. This allows candlelight to twinkle through the base. -
Texture with dots:
Press the blunt end of a small paintbrush or dotting tool into the clay to create the rows of indented dots along the rim and separating bands.
Cracking Clay?
If you see hairline cracks while the clay dries around the mold, patch them immediately with a slurry of clay and water (slip), smoothing it with your finger.
Step 3: Finishing Touches
-
Final smooth:
Once fully dry (or baked, if using polymer), lightly sand any rough edges, particularly around the top rim and the bottom base. -
Enhance the contrast:
If your carving didn’t reveal enough contrast, you can do a light wash of watered-down brown paint over the textured areas and wipe the surface clean, leaving color in the recesses. -
Seal the piece:
Apply a coat of matte varnish or sealant to protect the clay and give it a finished, professional look. Avoid glossy finishes to maintain the natural stone aesthetic.
Place your tea lights inside and enjoy the warm, patterned shadows these holders cast across your table
Marbled Two-Color Bowls You Design Together
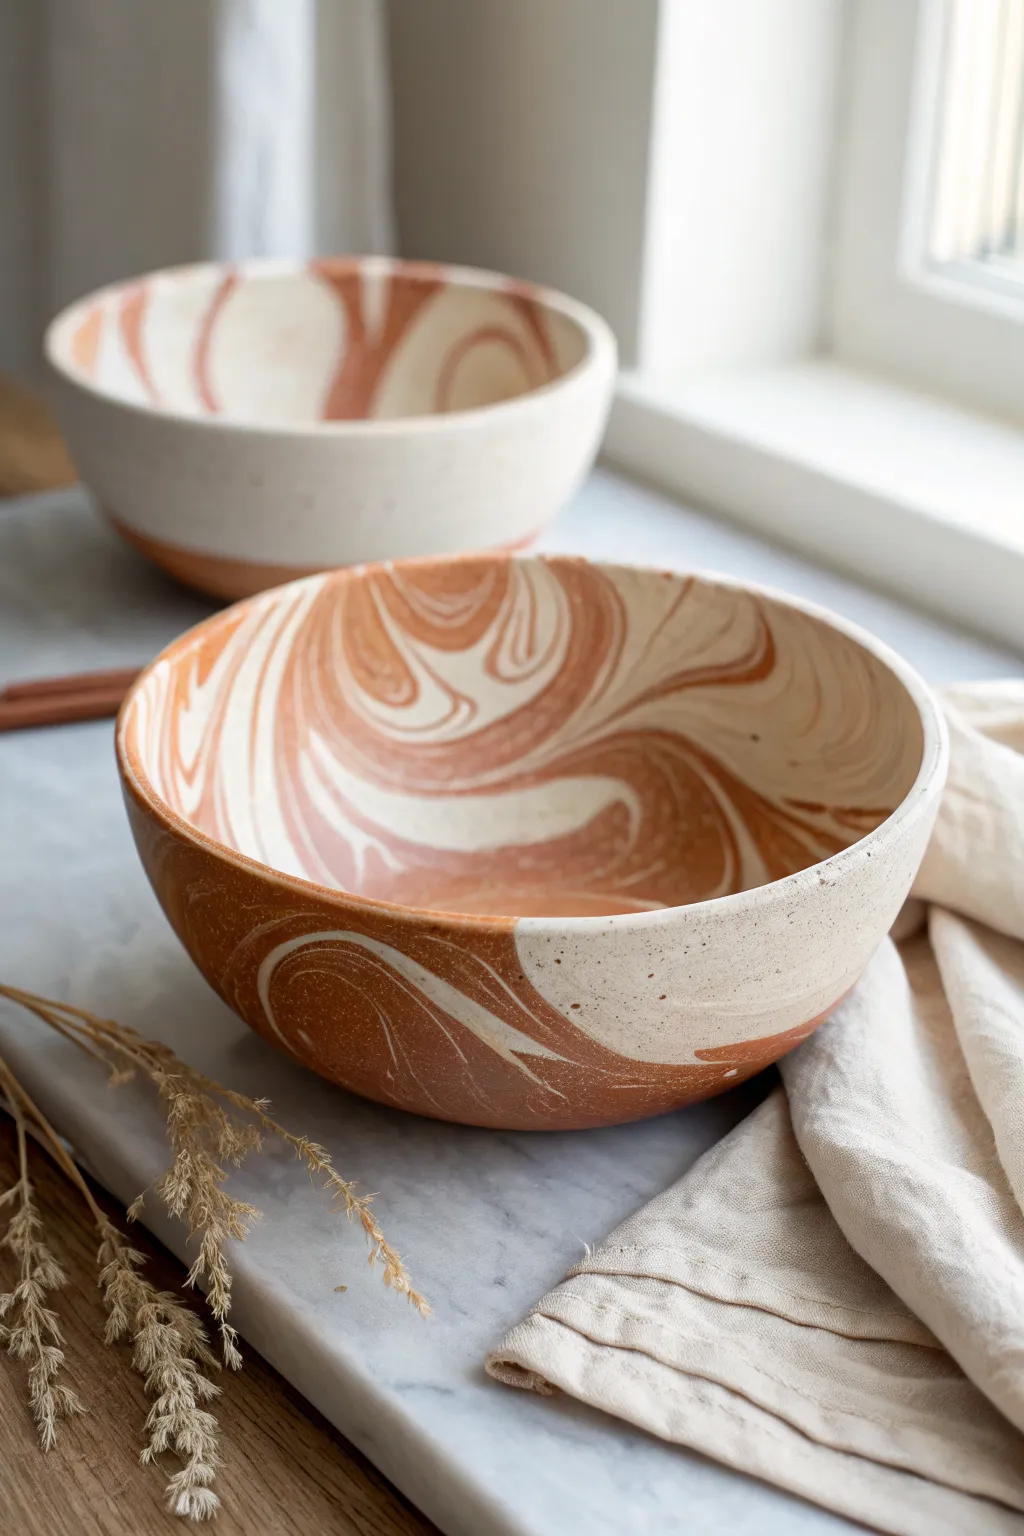
These stunning bowls capture the fluid beauty of mingling earth tones, featuring hypnotic swirls of terracotta and cream clay. The marbling technique creates a unique, organic pattern on every piece, ensuring that your finished bowl is truly one-of-a-kind.
Detailed Instructions
Materials
- Terracotta clay (low-fire or stoneware)
- White or cream stoneware clay
- Rolling pin
- Canvas or cloth work mat
- Bowl mold or a standard kitchen bowl for shaping
- Pottery knife or fettling knife
- Rib tool (rubber or metal)
- Sponge
- Clear dipping glaze (food safe)
- Small container of water
- Plastic wrap (optional)
Step 1: Preparing the Marbled Slab
-
Portion the clay:
Begin by cutting two equal-sized blocks of clay, one from the terracotta and one from the white stoneware. Aim for about a fist-sized amount of each to make a medium serving bowl. -
Form coils:
Roll each block of clay into a thick sausage or coil shape, roughly 1-2 inches in diameter. Keep them relatively even in length. -
Twist together:
Ideally, hold the two coils together and twist them around each other like a rope. This initiates the mixing process without blending the colors completely into a uniform brown. -
Fold and roll:
Take your twisted rope, fold it in half, and gently roll it into a ball. Be careful not to over-knead, as excessive handling will muddy the distinct colors. -
Slice the marble:
I like to slice the ball in half with a wire cutter to check the pattern inside. If the marbling looks too chunky, stack the halves and gently press them back together before rolling out. -
Roll the slab:
Place the marbled clay ball on your canvas mat. Using a rolling pin, roll the clay out into a slab approximately 1/4 inch thick. Turn the clay frequently to ensure an even thickness and circular shape. -
Smooth the surface:
Take a rubber rib tool and firmly compress the surface of the slab. This smooths out canvas texture and helps seal the two clay bodies together firmly.
Keep it Clean
Wipe your rib tool often while smoothing the slab. Smearing the red clay over the white sections can muddy the crisp contrast of your final design.
Step 2: Shaping and Finishing
-
Prepare the mold:
If you are using a kitchen bowl as a mold, cover it lightly with plastic wrap or dust it with cornstarch so the clay doesn’t stick. -
Drape the clay:
Gently lift your clay slab and drape it over (for a hump mold) or inside (for a slump mold) your chosen form. Let gravity help it settle initially. -
Press into shape:
Using a slightly damp sponge, press the clay firmly against the mold walls. Work from the center outward to avoid trapping air bubbles between the clay and the mold. -
Trim the rim:
Use your pottery knife to cut away the excess clay hanging off the edge of the mold. Hold the knife steady and rotate the bowl if possible for a clean line. -
Refine the edge:
Run a damp chamois or your wet finger along the cut rim to round it off. A sharp edge can become very brittle and sharp after firing, so smoothing it now is crucial. -
Dry slowly:
Allow the clay to dry to a ‘leather hard’ state while still on or in the mold. This usually takes a few hours to overnight. Rushing this can cause warping. -
Remove and dry:
Once the bowl holds its shape firmly, remove it from the mold. Let it air dry completely until bone dry, which usually takes several days depending on humidity.
Step 3: Firing and Glazing
-
Items for bisque fire:
Load the bone-dry bowl into the kiln for a bisque fire (usually Cone 04 or 06). This initial firing hardens the clay and prepares it for glaze. -
Check for dust:
After bisque firing, wipe the bowl down with a barely damp sponge to remove any kiln dust. Dust can prevent glaze from adhering properly. -
Apply clear glaze:
Dip the bowl into a clear, food-safe glaze. A clear glaze is essential here to make the clay non-porous while letting that beautiful two-tone marbling shine through. -
Wipe the foot:
Use a sponge to wipe the glaze completely off the bottom foot ring of the bowl so it doesn’t fuse to the kiln shelf. -
Final firing:
Fire the bowl a second time according to the temperature requirements of your chosen clay and glaze (typically Cone 5 or 6 for stoneware).
Date Night Upgrade
Carve your partner’s initials or the date into the bottom foot of the bowl while it’s leather hard for a hidden sentimental touch.
Once cooled, your marbled bowls are ready to be filled with snacks for your next movie night together
Mini “Our Place” House Sculptures
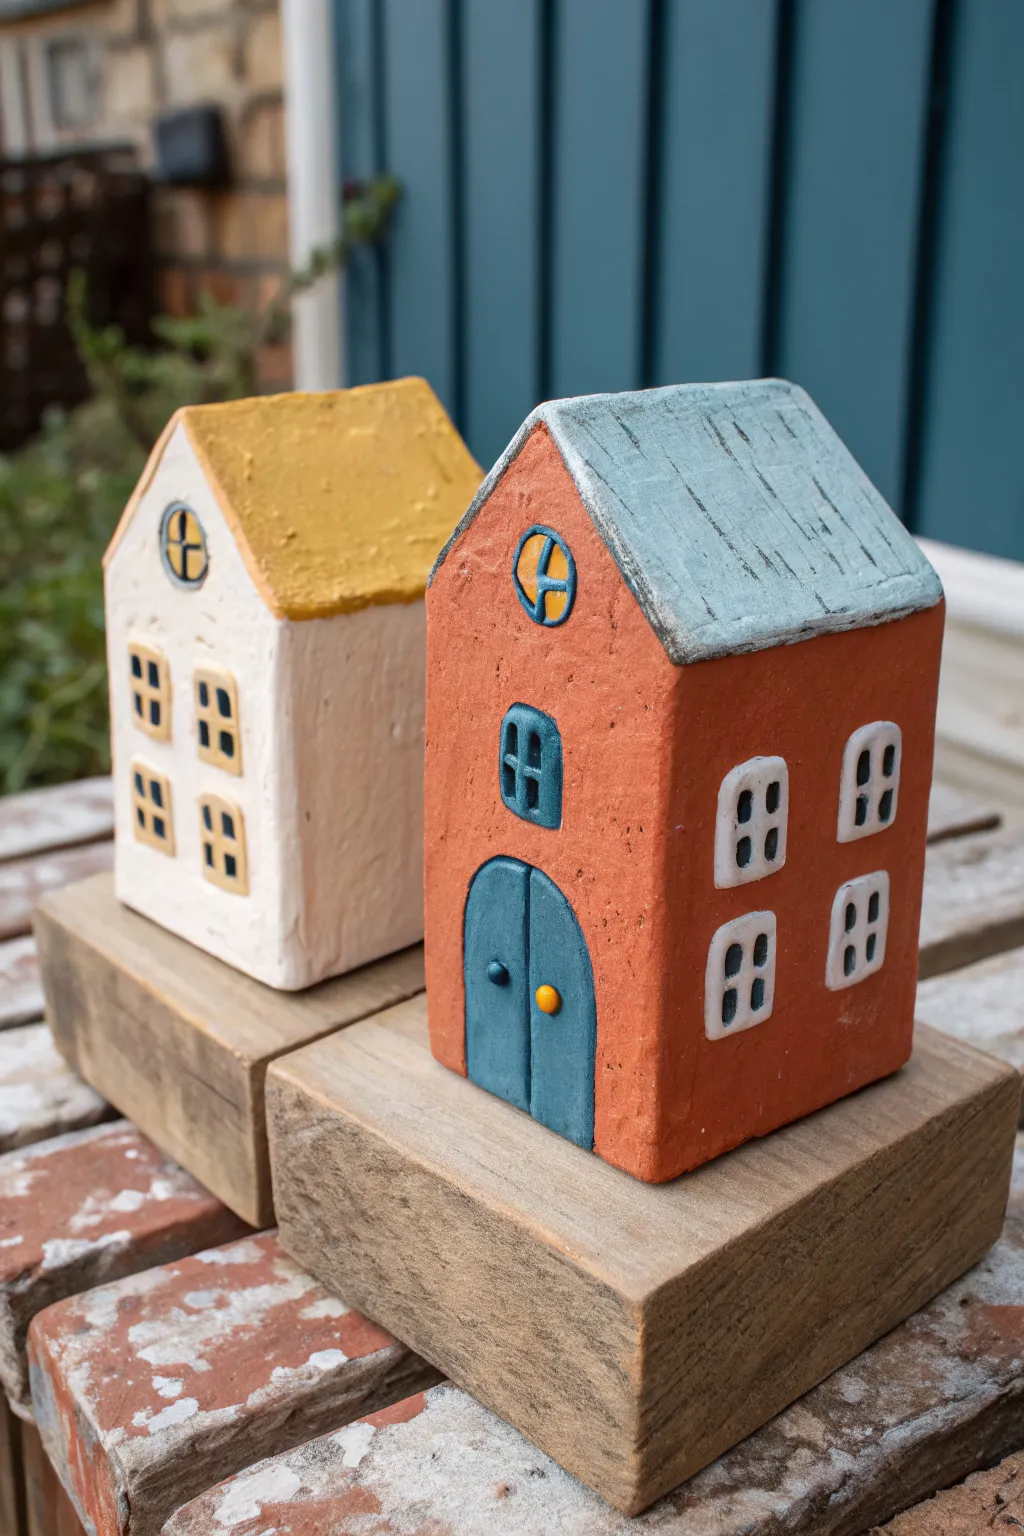
These charming, whimsical houses are crafted from air-dry clay and painted with a matte, rustic finish. Their simple geometric shapes and sweet details like circular windows and double doors make them perfect for beginners who want to build something special together.
Step-by-Step Guide
Materials
- Air-dry clay (white or terracotta)
- Rolling pin
- Sharp crafting knife or clay blade
- Ruler
- Clay sculpting tools (needle tool, smoother)
- Acrylic paints (terracotta orange, off-white, slate blue, mustard yellow, dark grey)
- Fine detail paintbrushes
- Small cup of water
- Slip (clay mixed with water into paste)
Step 1: Shaping the House Base
-
Prepare the Clay:
Start by kneading a large handful of air-dry clay until it is warm and pliable. This removes air bubbles and prevents cracking later. If the clay feels too dry, dip your fingers in a tiny bit of water. -
Roll the Slab:
Roll your clay out into a thick slab, aiming for a depth of about 2 to 2.5 inches. You want a solid block rather than thin walls for this specific style, as it gives the houses a delightful weightiness. -
Cut the Block:
Using a sharp blade and your ruler, cut a rectangular prism. For the taller orange house, aim for roughly 2.5 inches wide by 4 inches tall. For the smaller white house, make it slightly squatter. -
Shape the Roof:
Slice the top corners off your rectangle at a 45-degree angle to create the peak of the roof. Don’t worry about mathematical perfection; a slight asymmetry adds to the handmade charm. -
Smooth the Surfaces:
Dip your finger in water and gently run it over all sliced edges to soften the sharp corners. The surface should look smooth but can retain some texture for a rustic look.
Step 2: Adding the Architectural Details
-
Create the Roof Slabs:
Roll out a separate, thinner piece of clay (about 1/4 inch thick). Cut two rectangles that are slightly wider and longer than the angled sides of your house roof. -
Attach the Roof:
Score the angled top of your house block (scratch hatch marks) and apply a little slip. Press the two roof slabs onto the peak, smoothing the seam where they meet at the top ridge. -
Sculpt the Windows:
Roll out a very thin sheet of clay. Cut small squares for the standard windows and small circles for the attic windows. I like to pre-assemble these flat on the table before attaching them. -
Add Window Frames:
Roll tiny snakes of clay to create the frames around your window cutouts. Gently press these around the edges of your squares and circles. -
Make the Door:
Cut an arched shape for the main door. Use a needle tool to lightly score a vertical line down the center to create the look of double doors. -
Attach Features:
Using the score-and-slip method again, attach the windows and doors to the front facade of the house. Press gently to seal them without squashing the details. -
Add Tiny Hardware:
Roll incredibly small balls of clay for the doorknobs. Attach one on either side of the center door line. -
Dry Completely:
Let your sculptures dry for at least 24-48 hours. They should be hard to the touch and turn a lighter color when fully cured.
Cracks happen!
If small cracks appear as the clay dries, don’t panic. Mix a tiny bit of fresh clay with water to make a paste and fill the crack. Smooth it over with a finger and let it dry again.
Step 3: Painting and Finishing
-
Base Coat – House:
Paint the body of the taller house with a warm terracotta orange and the smaller house with a creamy off-white. You may need two coats for full opacity. -
Base Coat – Roof:
Paint the roof of the taller house a slate blue. For the smaller house, use a mustard yellow. Allow the base coats to dry fully. -
Detail the Windows:
Paint the window frames white on the orange house, and dark grey or blue on the white house. Paint the inner window panes a dark color to suggest depth. -
Paint the Doors:
Fill in the arched door with a deep teal or blue. Carefully paint the tiny doorknobs a contrasting color, like yellow or gold. -
Add Roof Texture:
Mix a tiny bit of water into dark grey or brown paint. Use a stiff brush to dry-brush some vertical streaks or hatch marks onto the roof to simulate weathering or shingles. -
Mounting (Optional):
If you have small blocks of wood, you can glue the finished clay houses onto them for an elevated display, just like in the inspiration photo.
Personalize it
Before the clay dries, use a needle tool to carve tiny initials or a special date into the bottom of the house or the back wall for a hidden sentimental touch.
Display your pair of houses side-by-side on a shelf as a sweet reminder of your time spent creating together
Tiny Love Notes Hidden Inside Clay Capsules

Create a charming, rustic vessel designed specifically to hold secret messages or tiny keepsakes. This project features a creamy, speckled finish and matching heart tokens, perfect for a thoughtful, handmade gift.
Detailed Instructions
Materials
- White stoneware clay (speckled or plain)
- Speckled glaze (if using plain clay)
- Clear glaze (if using speckled clay)
- Rolling pin
- Circle layout tool or cookie cutters (various sizes)
- Needle tool
- Sponge
- Scoring tool or old toothbrush
- Small paintbrush
- Slip (clay mixed with water)
- Kraft paper for the scroll
Step 1: Forming the Base
-
Roll the slab:
Begin by wedging your clay to remove air bubbles, then roll it out into an even slab approximately 1/4 inch thick. Use guide sticks if needed to maintain a consistent depth. -
Cut the bases:
Using a circle cutter or a template, cut out two identical circles. One will be the floor of your capsule, and the other will become the lid. -
Create the walls:
Cut a long rectangular strip from your slab. The height depends on how deep you want the capsule, but 2-3 inches is usually sufficient for a scrolled note. Ensure the length is enough to wrap around the circumference of your base circle. -
Attach the wall:
Score the outer edge of your base circle and the bottom edge of your rectangular strip. Apply a dab of slip to both scored areas. -
Seal the cylinder:
Wrap the strip around the base. Where the two ends of the wall meet, bevel cut them at a 45-degree angle for a stronger join, score, slip, and press firmly together. Smooth the seam inside and out with a rib tool or your finger.
Step 2: Creating the Lid
-
Make the flange:
Roll a smaller strip of clay, about half the height of your main wall. Form this into a ring that fits snugly *inside* the main capsule opening. This interior flange keeps the lid secure. -
Attach flange to lid:
Take your second circle (the lid) and score/slip the underside. Attach the flange ring you just made, centering it perfectly so the lid will sit flush on the capsule walls. -
Add a handle:
Roll a small ball or distinctive shape for the handle. Score the center of the lid’s top surface and attach the handle securely. -
Refining edges:
Once the clay is leather hard, use a damp sponge to smooth the rims of both the container and the lid. Sharp edges can become very sharp after firing, so round them off gently.
Clean Lid Fit
Dry the lid while it is sitting on the pot. Place a small piece of paper towel between them to prevent sticking. This ensures they warp together and fit perfectly.
Step 3: Finishing Touches
-
Heart tokens:
With your leftover slab scraps, use a small cutter or knife to shape two tiny hearts. I like to smooth these with a fingertip dipped in water to soften the look. -
Drying:
Allow all pieces—capsule, lid, and hearts—to dry slowly under loose plastic for a day, then uncover to bone dry completely before the first firing (bisque fire). -
Applying glaze:
Once bisque fired, apply your chosen glaze. If you used plain white clay, choose a glaze with brown suspended speckles (often called ‘Dalmatian’ or ‘Vanilla Speckle’). If your clay body already has speckles, a clear gloss or matte glaze will reveal them beautifully. -
Glaze wiping:
Carefully wipe the bottom of the capsule and the underside rim of the lid (where it touches the capsule) with a wet sponge to remove any glaze. This prevents the lid from fusing shut during firing. -
Final firing:
Fire the pieces in the kiln according to your glaze instructions. Usually, this is a Cone 5 or 6 firing for stoneware. -
Add the message:
Cut a strip of brown kraft paper. Write a heartfelt note, roll it tightly into a scroll, and place it inside your finished ceramic capsule along with the heart tokens.
Make it a Time Capsule
Stamp the date into the bottom of the clay before drying. Fill it with a note to be read on a specific future anniversary for a romantic surprise.
This little vessel preserves your words as a permanent keepsake
Blind Sculpt Challenge: Guess What I Made
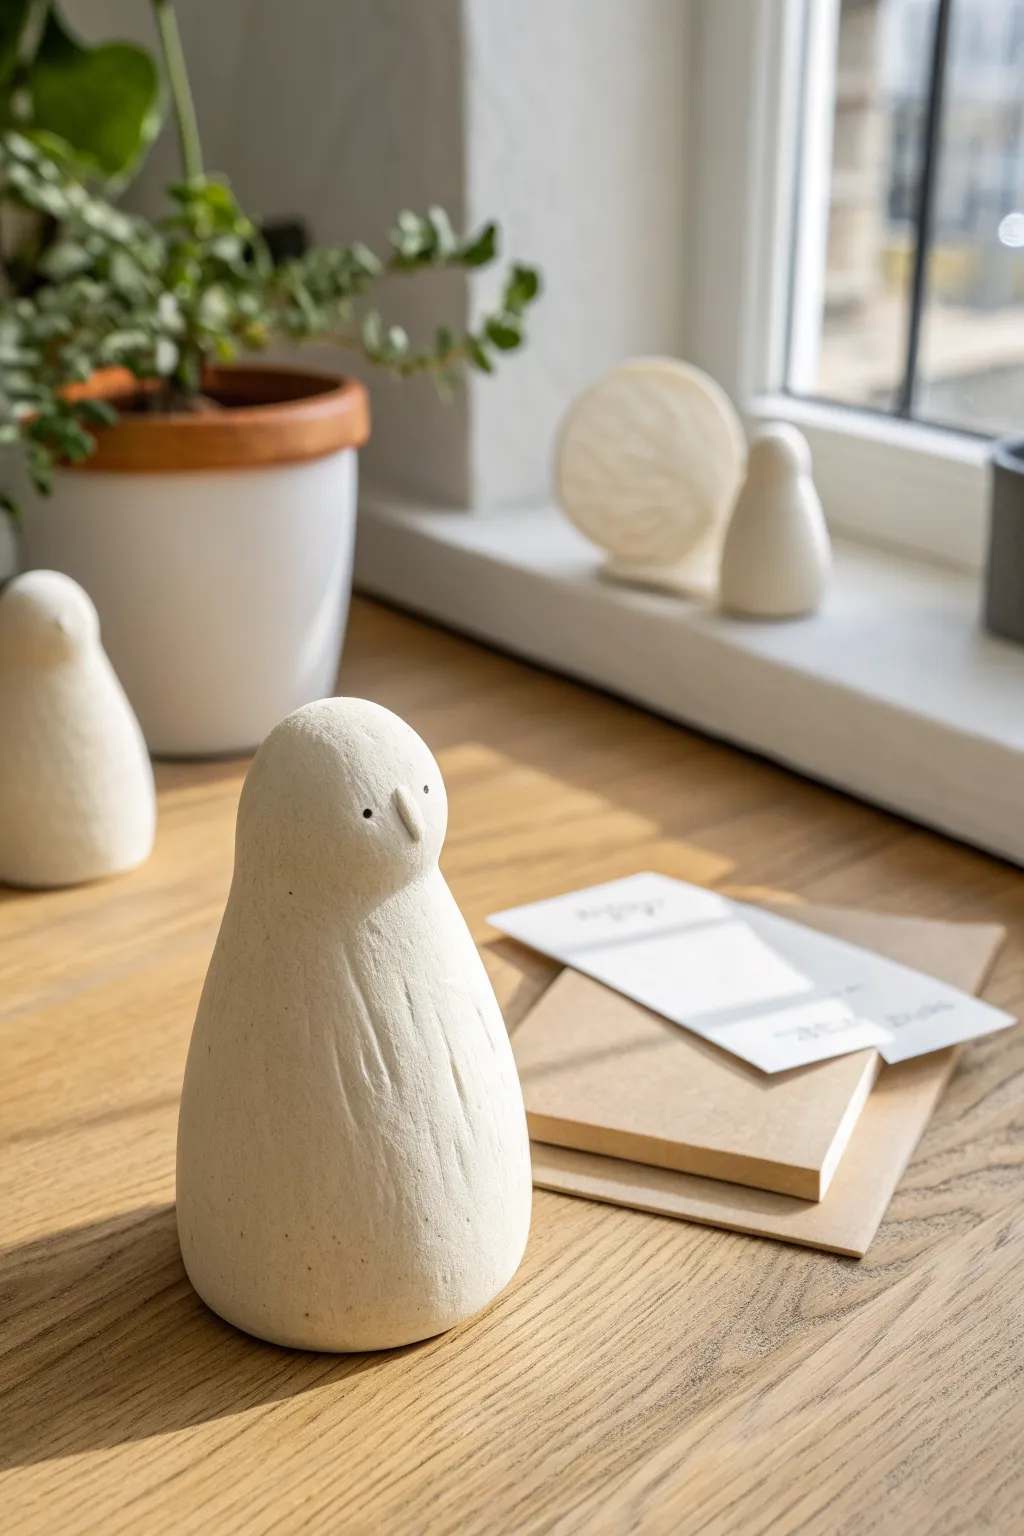
Embrace the charm of imperfection with these serene, minimalist clay spirits. These abstract figures feature smooth, pebble-like forms contrasting with raw textured markings and tiny, expressive eyes, creating a calm modern aesthetic perfect for a bookshelf.
How-To Guide
Materials
- White stoneware clay or air-dry modeling clay
- Small sponge
- Bowl of water
- Wooden sculpting tool with a sharp point
- Needle tool or toothpick
- Black acrylic paint (or underglaze if firing)
- Fine-grit sandpaper (optional)
- Clean work surface (canvas or wooden board)
Step 1: Forming the Base
-
Wedge the clay:
Begin by taking a handful of clay, roughly the size of a tennis ball. Knead and wedge it thoroughly to remove air bubbles and ensure the consistency is even and smooth. -
Shape the initial cone:
Roll the clay into a smooth ball between your palms, then gently roll it back and forth on your work surface to elongate it into a thick cone or teardrop shape. -
Create the heavy bottom:
Tap the bottom of the cone firmly against the table to create a flat, stable base. The figure should stand upright without wobbling. -
Define the head:
Using your thumb and forefinger, gently pinch slightly below the top of the cone to distinguish a head area from the body. Keep this transition very subtle; you don’t want a defined neck, just a slight curve. -
Smooth the contours:
Use a damp sponge to wipe over the entire form. This removes fingerprints and creates that seamless, stone-like surface that defines this style.
Smoother Surfaces
Keep a small bowl of water nearby, but use it sparingly. Too much water weakens clay; just a damp finger is usually enough to erase fingerprints.
Step 2: Adding Character
-
Sculpt the nose:
Take a tiny pinch of clay, no bigger than a grain of rice. Roll it into a small teardrop and press it into the center of the ‘face’ area. -
Blend the nose attachment:
With a damp finger or a small wooden tool, smooth the edges of the nose into the face so it looks like it emerged organically from the surface, rather than just being stuck on. -
Add vertical texture:
Using a wooden tool or the back of a knife, gently drag vertical lines down the body of the figure. I like to vary the pressure here, making some lines deeper than others to mimic natural wood grain or stone erosion. -
Roughen the surface:
For added organic feel, lightly tap the textured areas with a stiff brush or a crumpled ball of aluminum foil. This breaks up the perfection of the smooth clay. -
Create the eyes:
Using a needle tool or toothpick, poke two small, symmetrical holes on either side of the nose bridge. Don’t go too deep; these are just markers for later painting.
Step 3: Finishing Touches
-
Dry the piece:
Allow the sculpture to dry completely. If using air-dry clay, this takes 24-48 hours. If using ceramic clay, dry slowly under plastic before firing. -
Sand for smoothness:
Once bone dry (or bisque fired), take fine-grit sandpaper and gently sand the smooth areas of the head and base, avoiding the textured body markings. -
Paint the eyes:
Dip the very tip of a toothpick or a fine detail brush into black paint. carefully dot the paint into the eye divots you created earlier. -
Add a wash (optional):
To highlight the texture, you can mix a tiny bit of grey paint with lots of water. Brush it over the body texture and wipe it back immediately with a cloth, leaving darkness only in the crevices. -
Final seal:
If using air-dry clay, apply a matte varnish to protect the surface without adding unwanted shine. If ceramic, glaze with a matte white or leave raw if the clay body is suitable.
Try Speckled Clay
Use a speckled stoneware clay body. When fired, the iron spots will show through the white surface, giving it a natural bird’s egg appearance.
Place your finished trio near a window to let the natural light catch the subtle textures you created
Speed-Sculpt Roulette With Mini Prompts
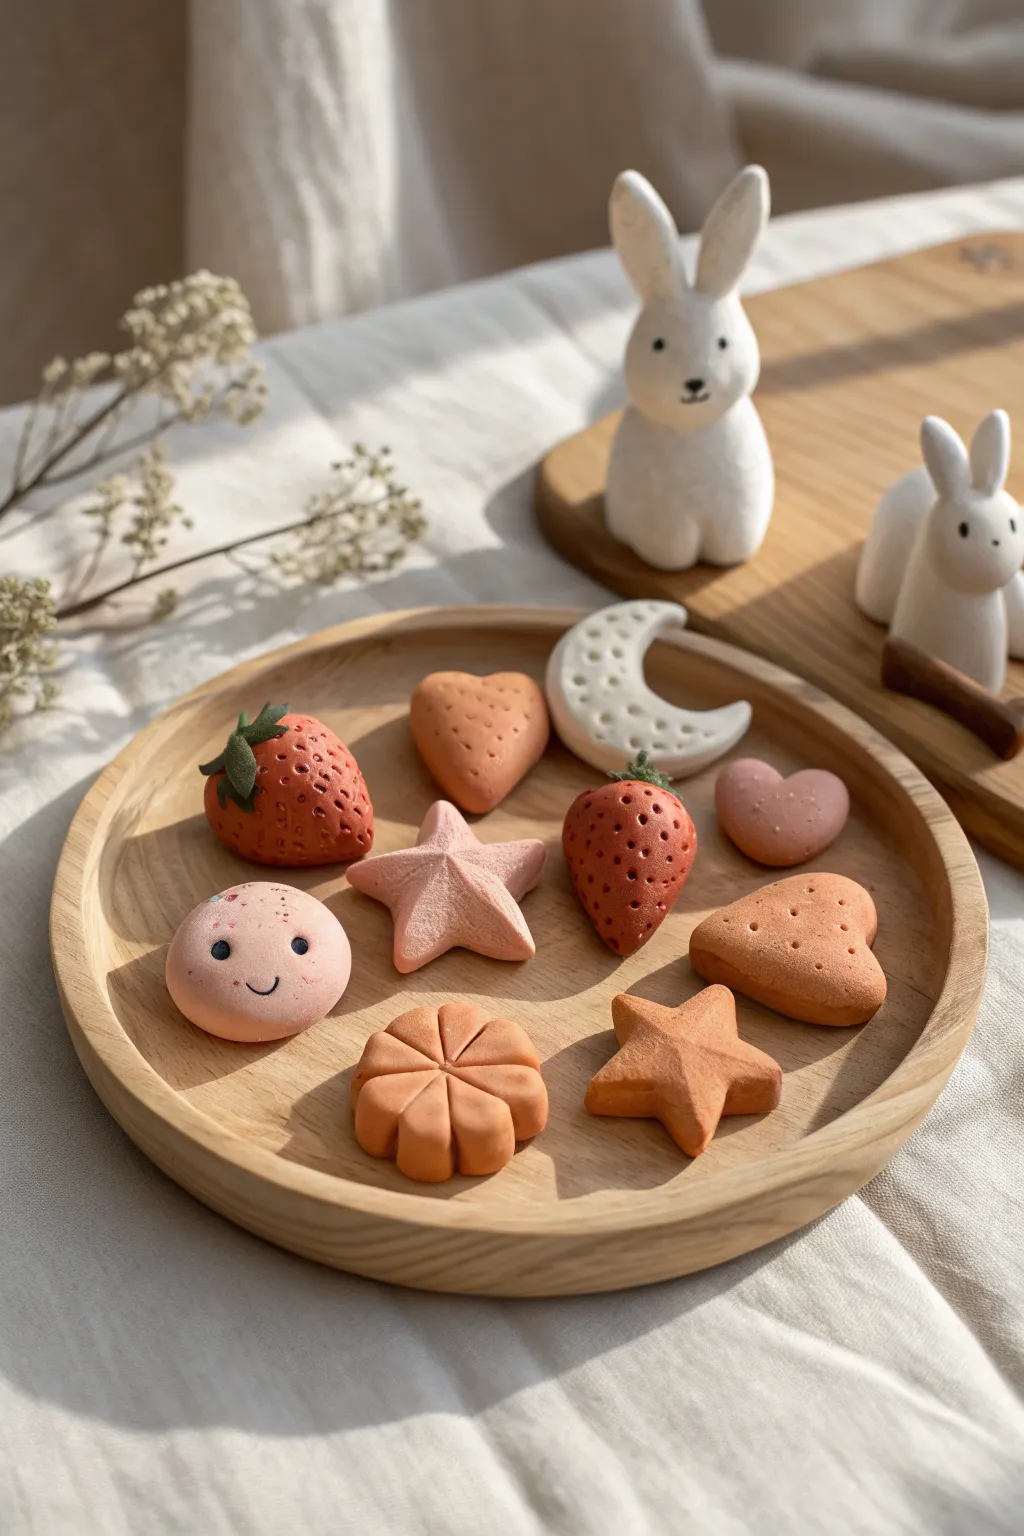
Create a delightful collection of miniature clay sculptures, including strawberries, hearts, stars, and friendly faces, perfect for a quick creative session. These small, matte-finished pieces have a soft, pastel aesthetic that looks wonderful displayed on a simple wooden tray.
Step-by-Step Guide
Materials
- Air-dry clay (white or pre-colored options)
- Acrylic paints (pastel pink, red, orange, white, black)
- Fine-grit sandpaper
- Sculpting tools (needle tool, ball stylus)
- Small paintbrush
- Mod Podge or matte varnish (optional)
- Toothbrush or texture sponge
Step 1: Preparation & Base Shaping
-
Condition the clay:
Start by kneading your air-dry clay until it is soft, pliable, and free of cracks. If the clay feels too dry, add a tiny drop of water to your fingers. -
Divide portions:
Pinch off roughly 8-10 small balls of clay, each about the size of a walnut or large marble. These will become your individual charms. -
Color mixing (optional):
If using white clay, you can knead a small dot of acrylic paint directly into the raw clay now for a uniform base color, or wait to paint them later. For this project, aim for soft pinks, terracottas, and creams.
Cracking Up?
If small cracks appear while the clay dries, mix a tiny bit of fresh clay with water to make a paste (slip) and fill in the cracks. Smooth over with a finger.
Step 2: Sculpting the Shapes
-
Form the strawberries:
Take a ball of red/pink clay and roll it into a rounded cone shape. Flatten the top slightly where the leaves will go. -
Texture the berries:
Use a needle tool or the tip of a toothpick to poke small, random indentations all over the cone to mimic seeds. -
Add strawberry leaves:
Roll tiny bits of green clay (or paint later) into teardrops, flatten them, and press them onto the top of the berry, smoothing the seams. -
Shape the hearts:
Form a smooth ball, flatten it slightly, and pinch the bottom into a point. Use a tool handles or your finger to press an indentation into the top center to create the heart lobes. -
Texture the biscuit hearts:
For the cookie-style heart, use a needle tool to poke three small holes in the center to look like a baked cracker. -
Create the celestial moon:
Roll a log of white clay, taper the ends, and curve it into a crescent shape. Use the end of a paintbrush handle to press craters into the surface. -
Mold the stars:
Flatten a ball of clay and use your fingers to pinch out five points. Gently curved the edges inward to make the star look puffy and soft. -
Sculpt the flower cake:
Make a thick, flat disc. Use the side of a credit card or a knife tool to press creating radial lines from the center to the edge, resembling flower petals or a segmented cake. -
Make the smiling face:
Roll a very smooth, round ball of pale pink clay. Flatten the bottom so it sits stable.
Step 3: Finishing Touches
-
Initial drying:
Let all your pieces sit for about 24-48 hours until completely hard. I find flipping them over halfway through helps them dry evenly. -
Sand imperfections:
Once dry, use fine-grit sandpaper to gently smooth out any fingerprints or rough edges. -
Paint the details:
If you didn’t pre-color the clay, paint your shapes now with matte acrylics. Use a dry-brush technique for a soft, dusty look on the strawberries. -
Add the face:
Using a very fine detail brush or a toothpick, paint two small black dots for eyes and a simple U-shape for the smile on the round pink charm. Add tiny blush cheeks if desired. -
Highlighting seeds:
If your strawberry seeds got lost in the painting process, use a dark wash to fill the holes, then wipe the surface clean to make the texture pop. -
Protective coat:
This step is optional, but for durability, apply a thin layer of matte varnish. Avoid glossy finishes to maintain the soft, natural aesthetic shown in the photo.
Turn Them Into Charms
Before the clay dries, insert a small metal eye pin into the top of your favorite shapes. Once dry, you can string them onto necklaces or keychains.
Arrange your finished miniatures on a tray to admire your handiwork or use them as sweet decor accents
A Shared Constellation Plaque for Your Night Sky

Capture the stars from a special night with this deep blue ceramic plaque, featuring intricate gold detailing and 3D textured elements. This project turns a simple slab of clay into a timeless keepsake that perfectly balances rustic charm with celestial elegance.
How-To Guide
Materials
- White air-dry clay or polymer clay (about 1 lb)
- Rolling pin
- Square template or ruler
- Exacto knife or clay cutting tool
- Sponge or fine-grit sandpaper
- Deep Prussian Blue acrylic paint
- Metallic Gold acrylic paint or gold leafing pen
- Fine detail paintbrush (size 0 or 00)
- Small dotting tool or toothpick
- Gloss varnish or sealant
- Printout of your chosen constellation
Step 1: Shaping the Clay Canvas
-
Determine your size:
Decide on the dimensions for your plaque. A 6×6 inch square works beautifully for this design, offering enough space for detail without being unwieldy. -
Roll the slab:
Roll out your white clay on a clean, flat surface to an even thickness of about 1/4 inch. If you want a smoother surface, roll the clay between two sheets of parchment paper. -
Cut the shape:
Place your square template over the clay or use a ruler to measure your dimensions. Cut the excess clay away using your craft knife to create a clean square or rectangle. -
Soften the edges:
While the clay is still damp, gently tap and smooth the sharp corners with a wet finger to create the rounded, organic edge seen in the photo. This prevents chipping later. -
Smooth the surface:
Dip a sponge in a little water and wipe it across the surface to remove any fingerprints or texture from the rolling pin. Let the piece dry completely according to package instructions—this usually takes 24-48 hours for air-dry clay.
Star Chart Precision
For uneven dots, use the tip of a bamboo skewer. The varying pressure creates natural size differences for the background stars.
Step 2: Creating the Midnight Sky
-
Sand imperfections:
Once the clay is bone dry, run a piece of fine-grit sandpaper over the edges and surface if needed to ensure a perfectly smooth base for your painting. -
Base coat application:
Apply a layer of deep Prussian Blue acrylic paint. You want this to look opaque and rich, like the night sky, so I usually apply two or three thin coats rather than one thick one. -
Rim detailing:
Don’t forget to paint the sides and just slightly over the rounded lip of the plaque to give it a finished, professional ceramic look. -
Spatter effect (Optional):
For a very faint texture like in the photo, you can dab the sponge very lightly with a slightly lighter shade of blue in random areas before the base coat fully dries, though solid blue works just fine too.
Fixing Paint Smudges
If you smudge gold on the blue, don’t wipe it! Let it dry completely, then paint over the mistake with your base blue color.
Step 3: Mapping the Stars
-
Transfer the constellation:
Lay your printed constellation map over the dried blue paint. Using a needle tool or sharp pencil, gently poke holes through the paper where the main stars are located to mark their positions on the plaque. -
Connect the dots:
Remove the paper. Using your finest brush and metallic gold paint, paint small, steady dots or dashes to connect the star points you marked. The dashed line style mimics vintage star charts. -
Paint main stars:
At the major intersection points (the ‘joints’ of the constellation), paint larger solid gold circles. Make these clearly distinct from the background stars. -
Add feature stars:
For the brightest stars in the constellation, paint small five-pointed star shapes instead of circles. Keep the points sharp and delicate. -
Create background galaxy:
Dip a toothpick or small dotting tool into the gold paint and add tiny, random dots all over the background to represent distant stars. vary the spacing so it doesn’t look like a grid. -
Gild the edges:
Using a relatively dry brush with gold paint, run the bristles along the very edge of the plaque. This creates a distressed, gilded frame effect. -
Add significance:
At the bottom center, carefully paint a meaningful date, such as an anniversary year or house number, using the same gold paint and fine brush. -
Seal the artwork:
Allow the gold paint to cure fully. Finish the piece by applying a coat of gloss varnish. This not only protects the paint but gives the piece the shine of fired glazed ceramic.
Display your celestial map on a shelf or use adhesive strips to mount it as a permanent romantic fixture