If you’re just getting started with air dry clay, the trick is picking projects that are small, forgiving, and still look totally polished when they’re dry. Here are my favorite beginner-friendly ideas—easy shapes first, then a few playful upgrades once you feel that “okay, I’ve got this” confidence.
Classic Pinch Pot Bowl
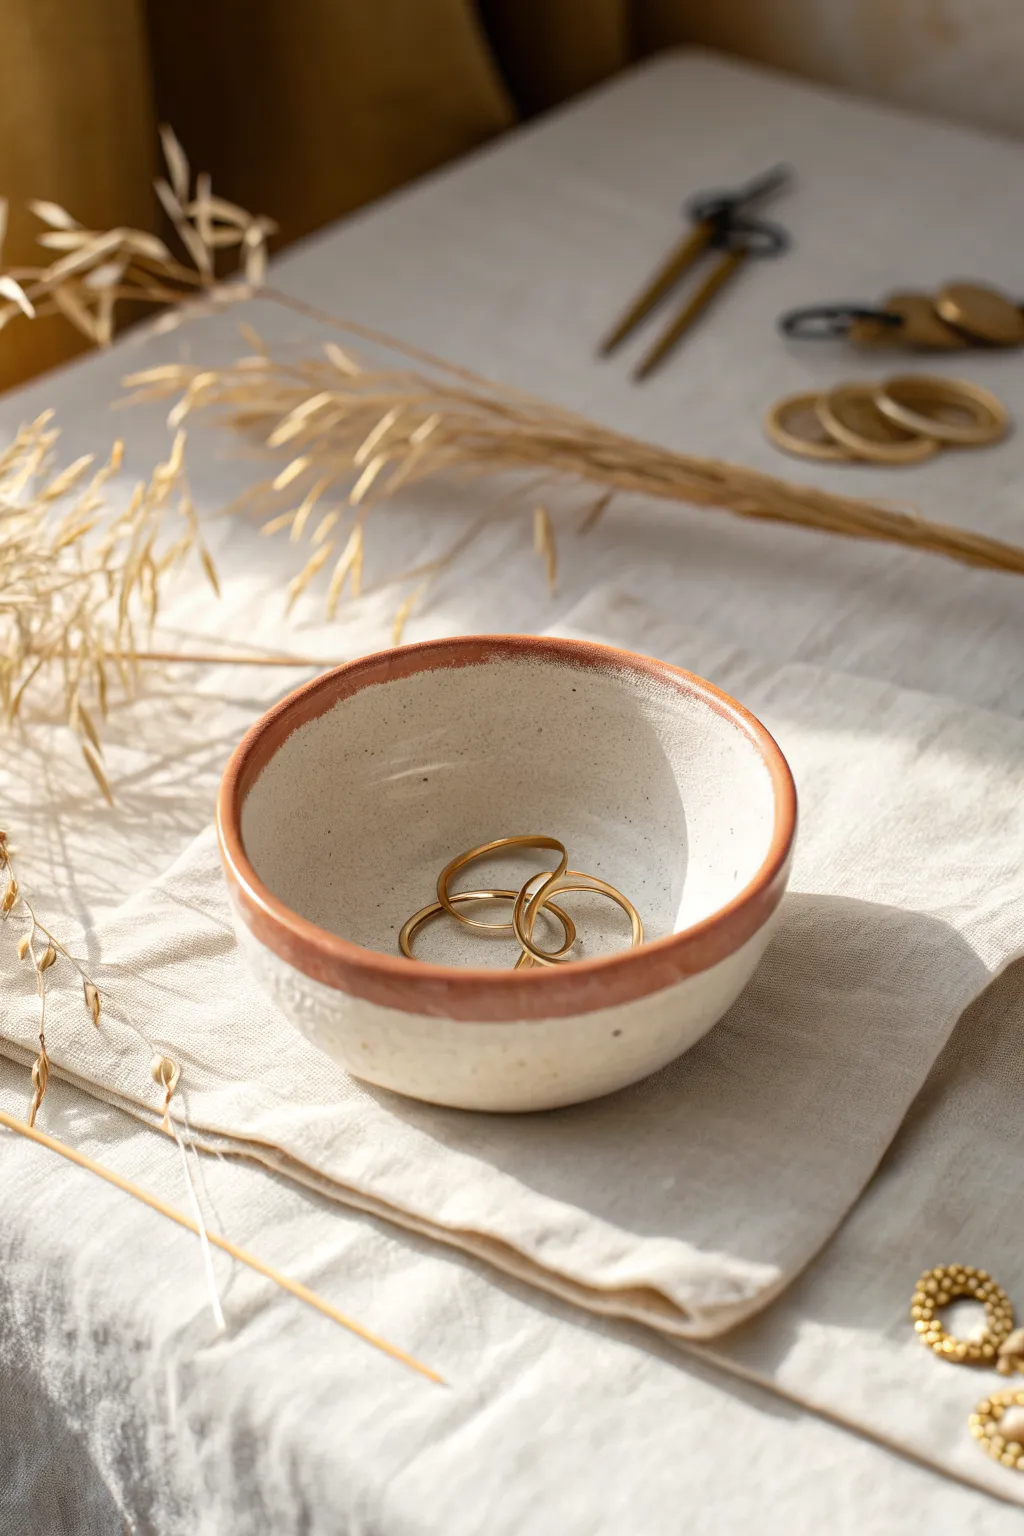
This charming, earthy bowl perfectly balances a speckled stone aesthetic with a warm terra cotta rim. It’s the ideal size for holding delicate rings or small treasures, offering a grounded, handmade feel to any vanity.
Step-by-Step Guide
Materials
- White or light grey air-dry clay (preferably with grog or speckles for texture)
- Small bowl of water
- Sponge
- Terracotta acrylic paint
- Small flat brush
- Gloss or satin varnish (optional for finish)
- Sandpaper (fine grit)
- Wooden sculpting tool or spoon back
Step 1: Forming the Base
-
Prepare the clay:
Start with a ball of clay roughly the size of a tangerine. Knead it in your hands for a minute to warm it up and ensure there are no air bubbles trapped inside. -
Start the pinch:
Hold the ball in your non-dominant hand. With your other thumb, gently press into the center of the ball, stopping about a half-inch from the bottom—you don’t want to poke all the way through. -
Pinch the walls:
Using your thumb on the inside and fingers on the outside, gently pinch the clay while rotating the ball. Make small, even pinches to start thinning the walls. -
Shape the curve:
Continue pinching while moving from the bottom up towards the rim. Aim to create a gentle, rounded bowl shape rather than straight vertical walls. -
Level the floor:
Press your thumb firmly against the bottom interior to flatten it slightly, ensuring your rings will have a stable place to rest. -
Check stability:
Gently tap the exterior bottom of the bowl on your work surface to create a flat foot so the bowl won’t wobble when finished.
Fixing Cracks
If small cracks appear while drying, mix a tiny bit of fresh clay with water to make a paste (slip). Fill the cracks with this paste and smooth it over.
Step 2: Refining and Smoothing
-
Even out the rim:
Inspect the top edge. If it’s very uneven, gently pat it down with a flat wooden tool or your finger to create a relatively level rim. -
Smooth the interior:
Dip your finger in a little water and run it along the inside of the bowl to erase any deep fingerprints or cracks. Don’t use too much water, or the clay will become sludge. -
Refine the exterior:
Repeat the smoothing process on the outside. I prefer keeping a little bit of the finger texture here to maintain that hand-formed, organic look shown in the photo. -
Let it dry:
Set the bowl aside to dry completely. This usually takes 24-48 hours depending on humidity. Rotate it occasionally so the bottom dries evenly. -
Sand for perfection:
Once fully dry and hard, use fine-grit sandpaper to gently smooth the rim and any sharp bits on the surface. Wipe away the dust with a slightly damp sponge.
Step 3: Painting and Finishing
-
Mix the color:
Prepare your terracotta acrylic paint. If the color feels too bright, mix in a tiny drop of brown or burnt sienna to achieve that earthy, natural clay tone. -
Paint the rim:
Load a small flat brush with paint. Carefully paint a band along the top rim, extending the color down the outside edge by about a quarter of an inch. -
Feather the edge:
While the paint is wet, you can wipe the bottom edge of the painted band slightly with a damp brush or finger to make the line look less manufactured and more organic. -
Add speckles (optional):
If your clay wasn’t pre-speckled, dilute a small amount of dark grey or black paint with water. Flick the bristles of a toothbrush to splatter tiny dots across the white interior. -
Seal the piece:
Once the paint is dry, apply a coat of satin or gloss varnish. This deepens the terracotta color and gives the white clay a finished, ceramic-like sheen. -
Final cure:
Allow the varnish to cure fully according to the bottle instructions before placing your jewelry inside.
Pro Tip: Consistency
To get walls of even thickness, keep checking the feel of the clay between your thumb and fingers constantly as you rotate. Trust your touch more than your eyes.
Enjoy styling your new handcrafted bowl with your favorite gold accessories or dried botanicals


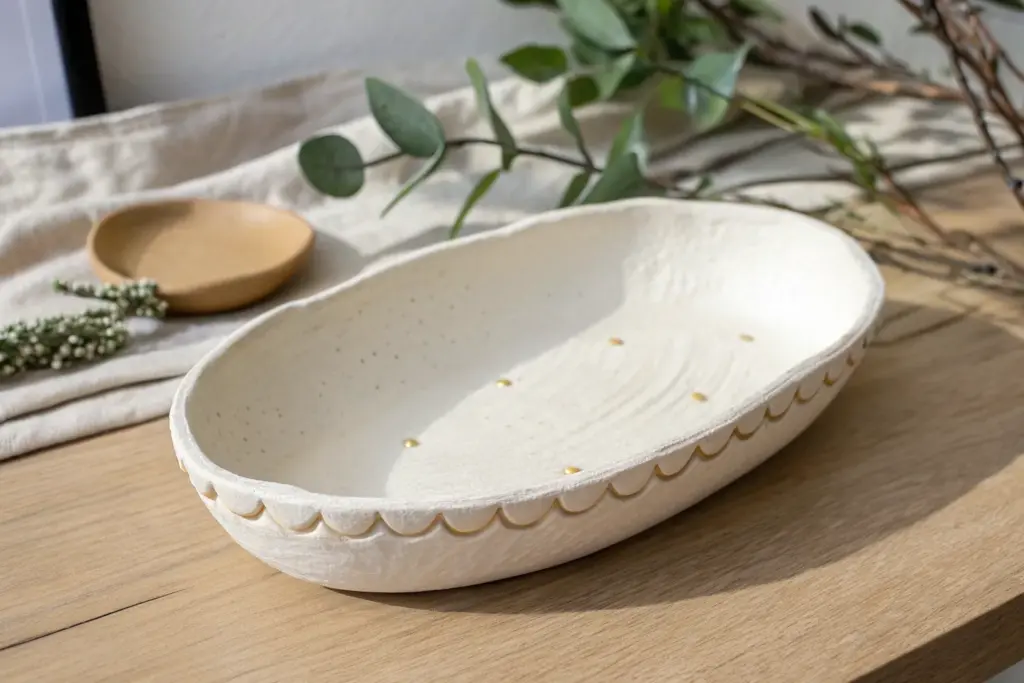
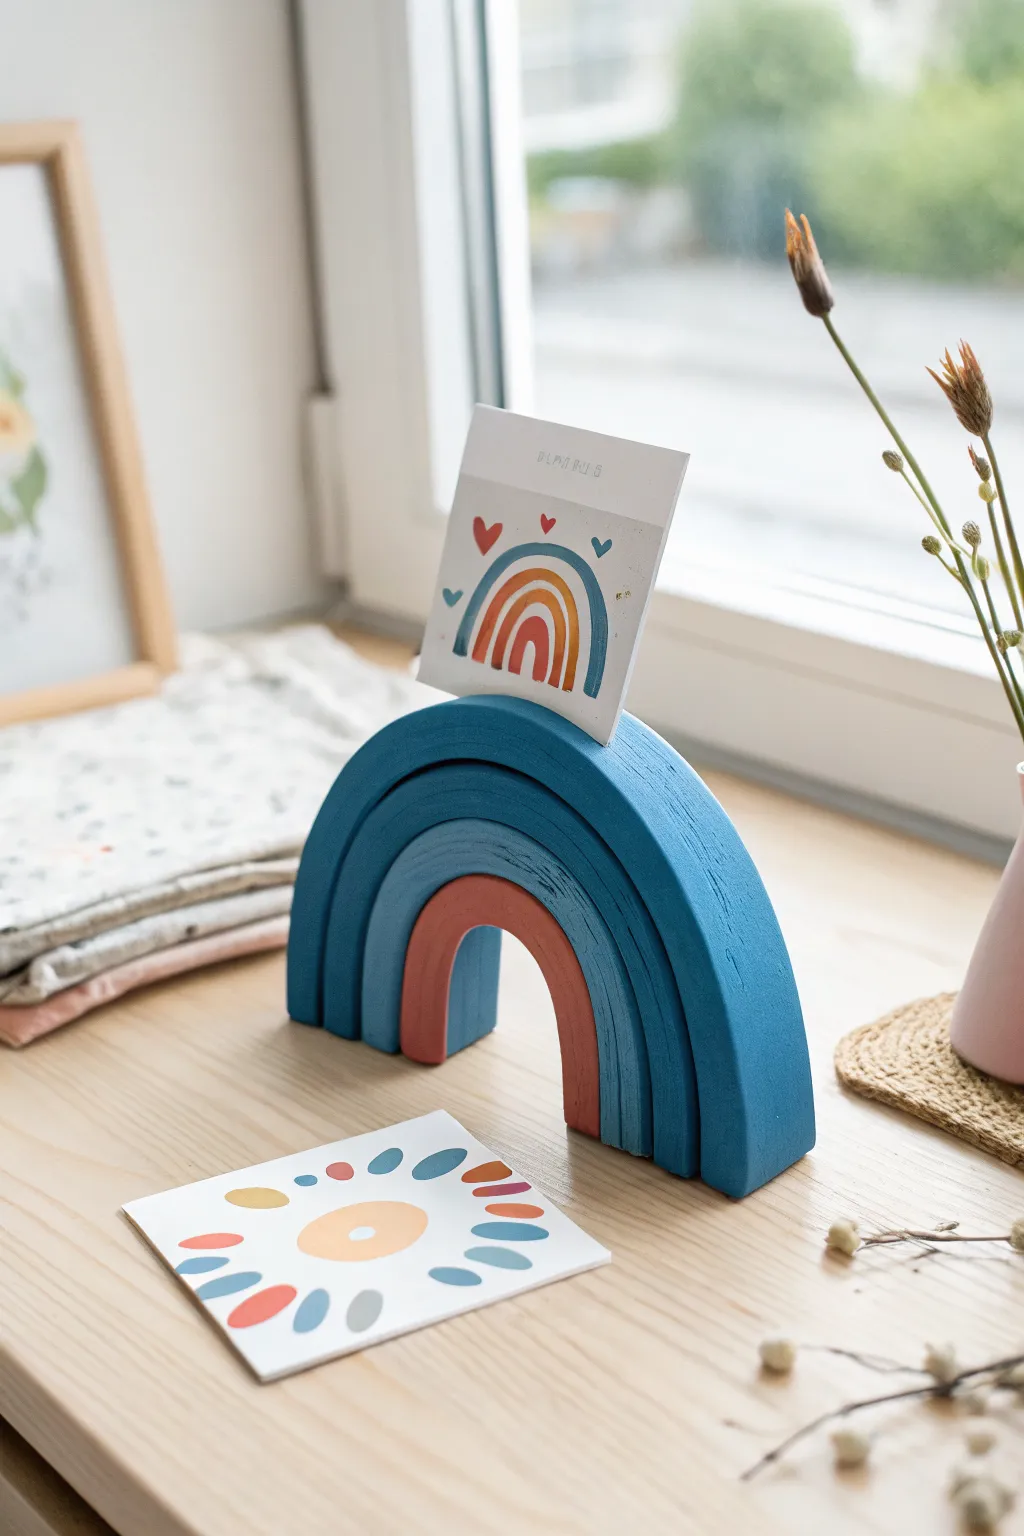
Simple Trinket Dish
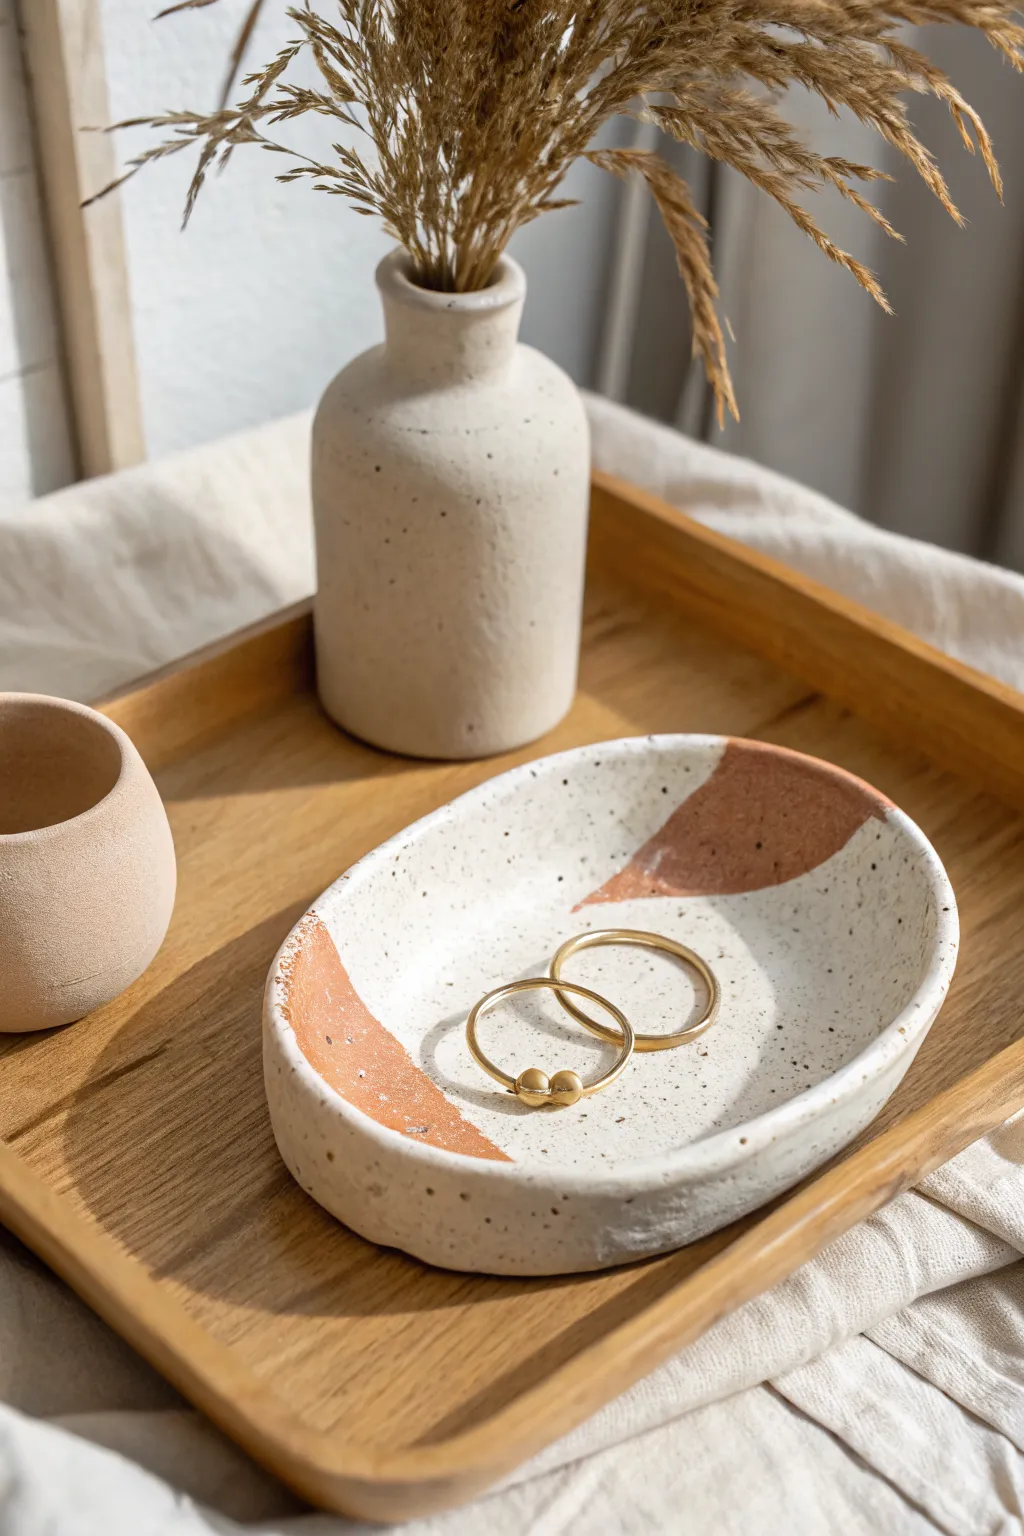
This minimal and earthy trinket dish features an organic oval shape with a natural speckled finish and warm terracotta accents. It’s the perfect beginner project for housing your favorite rings or daily jewelry pieces.
How-To Guide
Materials
- White air-dry clay
- Rolling pin
- Craft knife or clay cutter
- Small bowl of water
- Sponges (one for smoothing, one for texture)
- Fine-grit sandpaper
- Acrylic paints (Cream/Off-White, Burnt Sienna/Terracotta, Black)
- Old toothbrush
- Paintbrushes (flat and detail)
- Matte varnish or sealant
Step 1: Shaping the Base
-
Condition the Clay:
Begin by taking a handful of white air-dry clay and kneading it in your hands to warm it up. This makes it more pliable and reduces the chance of cracks forming later. -
Roll the Slab:
Place the clay on a clean, flat surface or canvas mat. Use your rolling pin to roll it out evenly until it is about 1/4 inch thick. Try to maintain a consistent thickness throughout. -
Cut the Oval:
Using a craft knife, lightly sketch an oval shape onto the clay surface. Once you’re happy with the proportions, cut through the clay to create your base shape. Remove the excess clay. -
Adding the Rim:
Take a small portion of the excess clay and roll it into a long, thin snake or coil. This should be long enough to go around the entire circumference of your oval base. -
Attach the Coil:
Score the top edge of your oval base and the bottom of your coil with the craft knife (scratching hash marks). Dab a little water or slip onto the scored areas and press the coil firmly onto the rim. -
Blend the Seams:
Using your thumb or a modeling tool, drag the clay from the coil down into the base, both on the inside and outside of the dish. I find using a slight downward stroking motion works best to make the seam disappear. -
Build Height:
Gently pinch the walls upwards to create a slight lip. The goal isn’t a deep bowl, but a shallow dish just deep enough so rings won’t slide off. -
Smooth the Form:
Dip your sponge lightly in water and run it over the entire surface. This smooths out fingerprints and uneven bumps. Pay special attention to the rim to ensure it feels soft and rounded. -
Let it Dry:
Place your dish in a safe spot to dry for 24-48 hours. flip it over gently halfway through the drying process to ensure the bottom dries evenly.
Fixing Cracks
If small hairline cracks appear during drying, mix a tiny bit of fresh clay with water to make a paste (slip) and fill the cracks. Smooth over and let dry again.
Step 2: Decorating and Finishing
-
Sand Imperfections:
Once fully dry and hard, take your fine-grit sandpaper and lightly buff away any rough edges or sharp points, particularly around the rim. -
Base Coat:
Paint the entire dish, inside and out, with a creamy off-white acrylic paint. You may need two coats for full opacity, letting the first coat dry completely before applying the second. -
Create the Speckles:
Dilute a tiny amount of black paint with water. Dip an old toothbrush into the mixture, aim it at the dish, and run your thumb across the bristles to flick tiny specks of paint onto the surface. -
Add Terracotta Accents:
Mix a warm burnt sienna or terracotta color. Using a flat brush, paint two organic, semi-circular patches on opposite ends of the internal oval. Don’t worry about perfect lines; a sketchy edge looks more natural. -
Dry the Paint:
Allow the paint layers to dry completely. The speckled effect needs to be thoroughly dry so it doesn’t smear during the sealing process. -
Seal the Dish:
Apply a coat of matte varnish over the entire piece to protect the paint and give it a finished look.
Make it Match
Create a matching set by making a tiny coordinating cup or vase using the coil method, painting it with the same speckled pattern for a full vanity set.
Now you have a stylish, handmade spot to keep your treasures safe


Ring Cone Holder
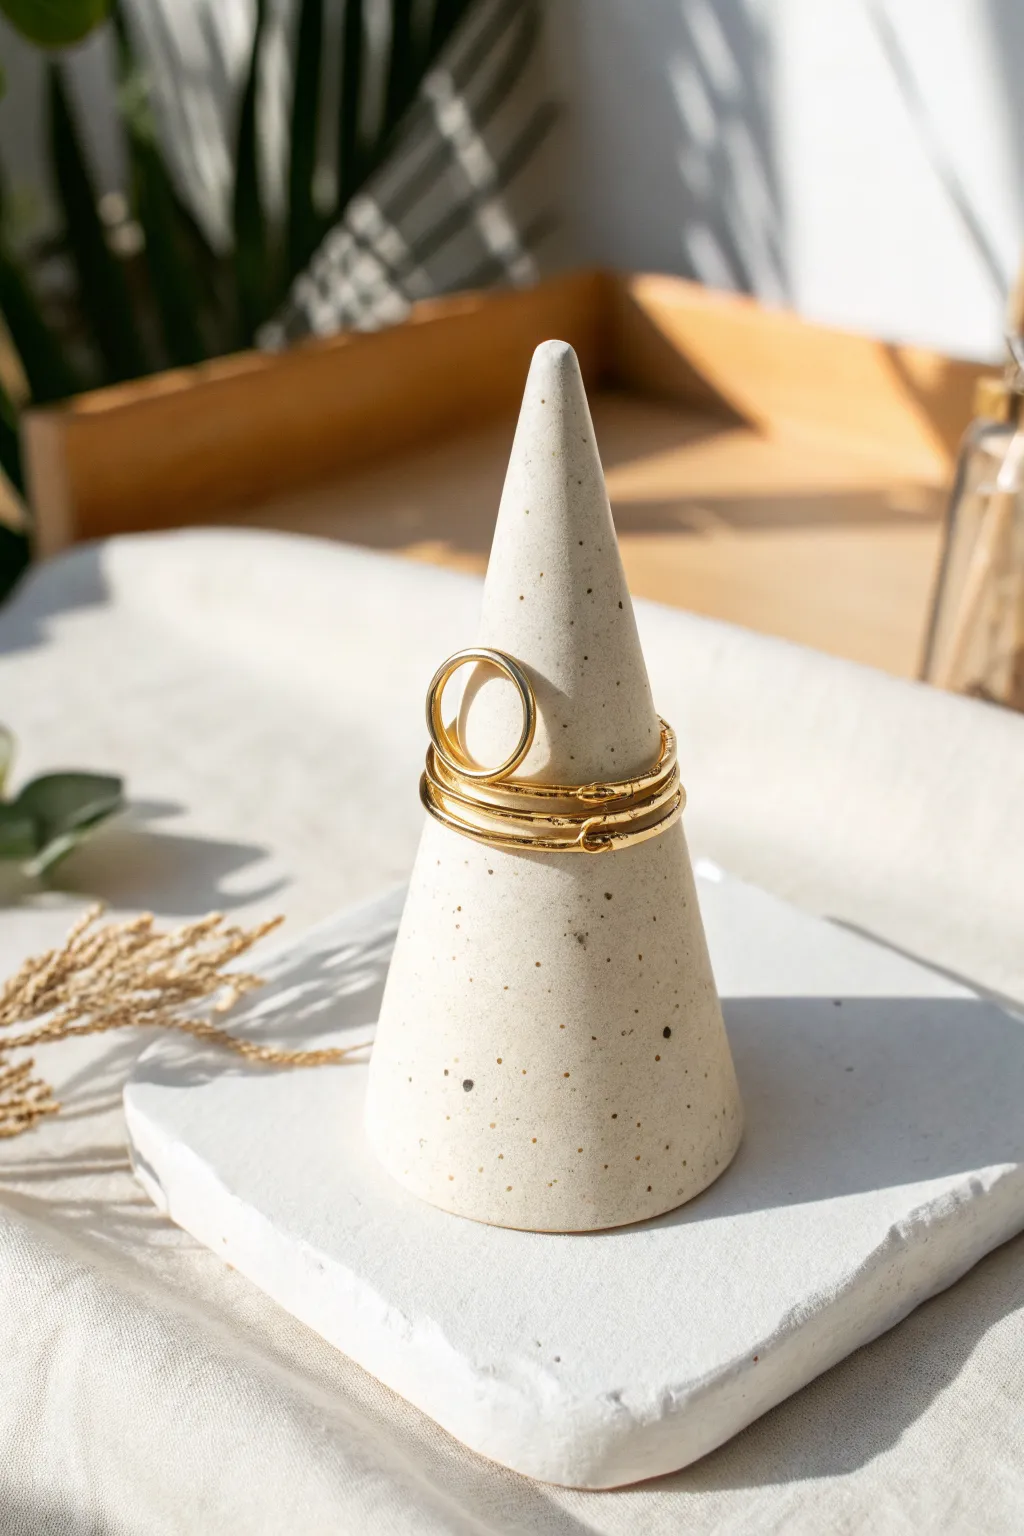
This minimalist jewelry holder combines a sleek cone shape with a rustic, speckled stone finish that looks incredibly high-end. It’s a two-part project featuring a functional ring stand and a matching square catch-all tray for stud earrings or delicate chains.
Step-by-Step Tutorial
Materials
- White air-dry clay
- Rolling pin
- Craft knife or clay blade
- Ruler
- Small bowl of water
- Sponge or fine sandpaper
- Paper cone template (DIY)
- Acrylic paint (black and brown)
- Old toothbrush or stiff bristled brush
- Matte varnish or sealant
- Tape
Step 1: Shaping the Cone
-
Prepare your clay:
Start by taking a handful of white air-dry clay. Knead it in your hands for a minute or two until it is warm, pliable, and free of any large air bubbles. -
Roll out a slab:
Using your rolling pin, flatten the clay on a clean surface to an even thickness of about 1/4 inch (approx. 5-6mm). If the clay sticks, you can roll it out on wax paper or parchment paper. -
Make a template:
On a piece of scrap paper, draw a fan shape (like a piece of pie with the bite taken out) that will roll up into a cone. Cut this out to use as your guide. -
Cut the clay shape:
Lay your paper template onto the rolled clay slab. Using your craft knife, carefully trace around the edges to cut out your semi-circle piece. -
Form the cone:
Gently lift the clay piece and bring the two straight edges together to form a cone. It doesn’t need to be perfect immediately, just get the basic shape established. -
Seal the seam:
Where the edges meet, use your finger dipped in a little water to smooth the clay together. I like to drag clay across the seam from both directions to ensure it binds tightly. -
Refine the shape:
Stand the cone upright on your work surface. If it leans, gently press it down to flatten the bottom rim. Smooth the entire surface with a damp sponge to remove fingerprints. -
Create the tip:
If the very top point is open or uneven, pinch it gently with wet fingers to close it and round it off slightly so it looks polished.
Step 2: Creating the Base Tray
-
Roll the second slab:
Take another portion of conditioned clay and roll it out, aiming for a slightly thicker slab this time—around 1/3 inch thick creating a substantial base. -
Cut a square:
Use a ruler and your blade to cut a perfect square. For this project size, a 4×4 inch square works well given the height of the cone. -
Soften the edges:
The image shows a natural, slightly organic edge rather than a sharp cut. Dip your finger in water and run it along the cut edges of the square to round them off gently. -
Texture the surface (optional):
If you want the base surface to have a more ‘stone’ texture, lightly tap it with a crumpled ball of aluminum foil before it dries. -
Dry thoroughly:
Set both the cone and the square base aside to dry. This usually takes 24-48 hours depending on humidity. Rotate them occasionally to prevent warping.
Cracks Appearing?
Mix a tiny bit of fresh wet clay with water to create a paste (slip). Fill any drying cracks with this paste, smooth it over with your finger, and let it dry again.
Step 3: Faux Stone Finish
-
Sand the imperfections:
Once fully dry, the clay will be white and hard. Use fine-grit sandpaper to buff away any remaining bumps on the cone or sharp corners on the base. -
Prepare the speckle paint:
Mix a small amount of brown and black acrylic paint with a few drops of water. You want a very fluid, inky consistency. -
The toothbrush technique:
Dip an old toothbrush into your watered-down paint mixture. Test on a paper towel first by running your thumb across the bristles to flick paint spray. -
Apply the effect:
Hold the brush about 6 inches away from your clay pieces and flick the bristles to create a fine mist of speckles. Turn the cone to get even coverage. -
Vary the speckles:
For a natural stone look, you want random sizes. Move the brush closer for denser spots and further away for a fine mist. Add a few distinct larger dots using a toothpick if needed. -
Seal the work:
Allow the paint flecks to dry completely. Finish by applying two thin coats of matte varnish to protect the clay and lock in the stone effect without adding unwanted shine.
Weighted Tip
To give the cone a heavier, high-quality feel, push a small ball of aluminum foil into the hollow inside of the cone while shaping. It adds stability and uses less clay.
Arrange your favorite gold bands on the cone and enjoy the satisfaction of seeing your handmade decor holding your treasures


Leaf-Imprint Coasters
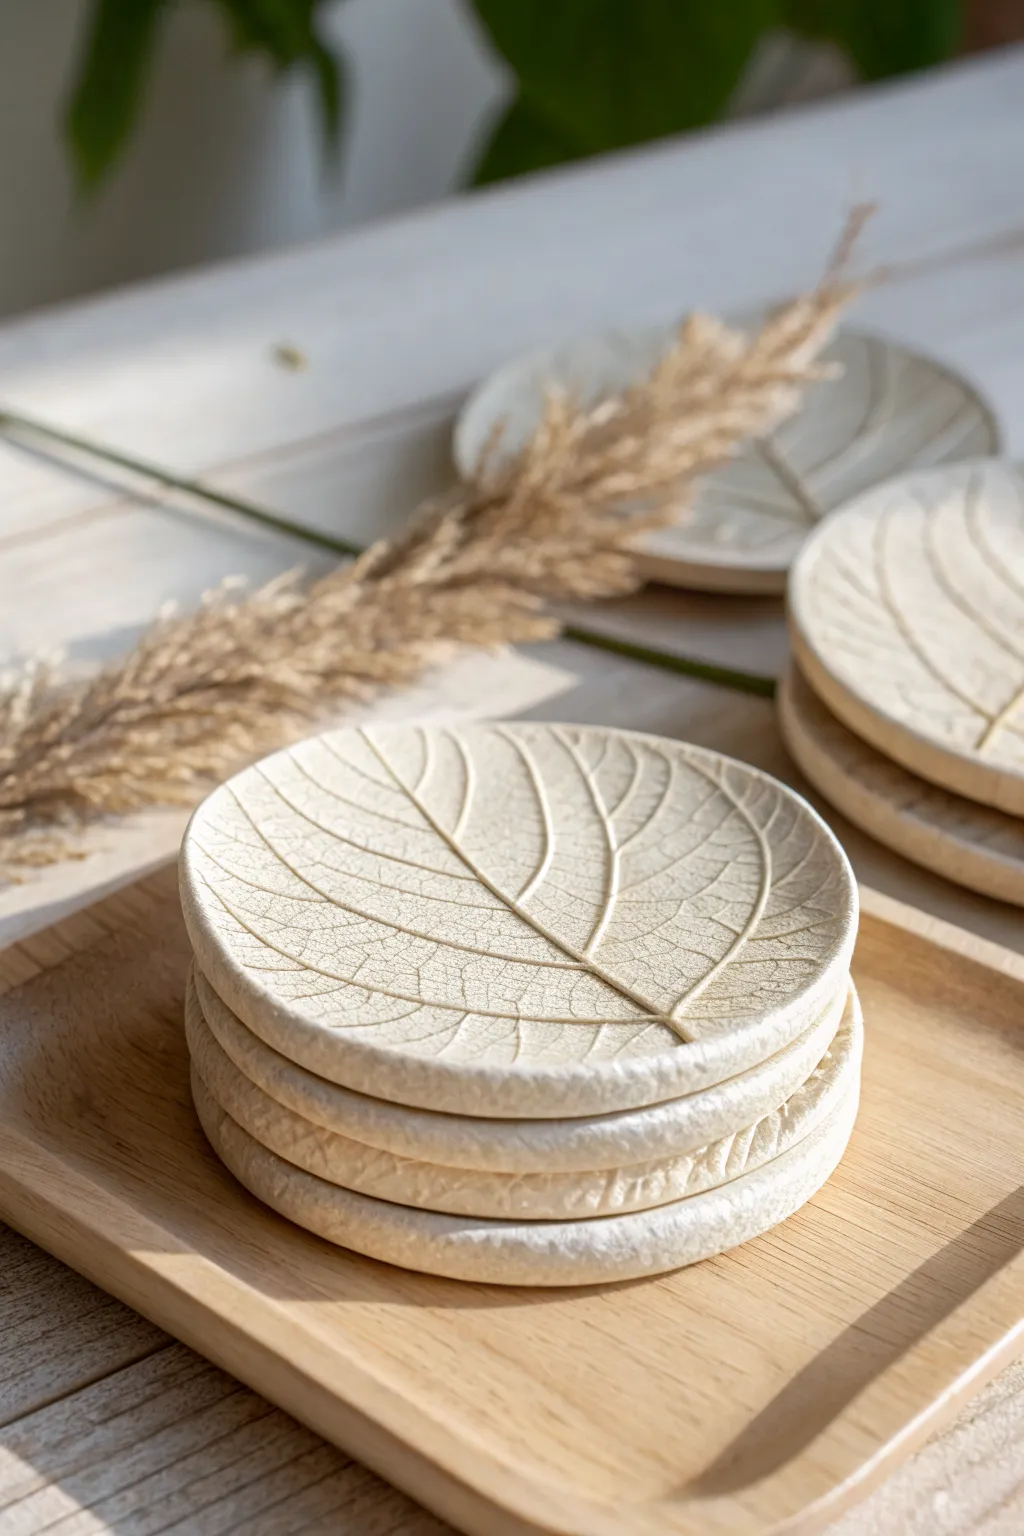
Bring a touch of the forest floor into your home with these deceptively simple air dry clay coasters. The deep vein impressions and naturally textured edges give them an artisan ceramic look without needing a kiln.
Step-by-Step Guide
Materials
- White or cream air dry clay
- Large, fresh leaves with prominent veins (like hydration or hosta)
- Rolling pin
- Round cookie cutter or bowl (approx. 4-inch diameter)
- Parchment paper or canvas working surface
- Sponge
- Small bowl of water
- Fine-grit sandpaper
- Sealant (matte varnish or dishwasher-safe sealant similar to Mod Podge)
Step 1: Preparation & Rolling
-
Prepare your workspace:
Lay down parchment paper or a canvas cloth to prevent the clay from sticking. This also helps you move the delicate pieces later without distorting them. -
Knead the clay:
Take a handful of air dry clay and knead it until it’s warm and pliable. This removes air bubbles and ensures the surface will be smooth enough to take a detailed print. -
Roll the slab:
Roll out the clay to a consistent thickness of about 1/4 inch. I find that going any thinner makes the coasters too fragile, especially if you plan to use them daily. -
Select your leaf:
Choose a fresh leaf that is slightly larger or the same size as your intended coaster. Ensure the back of the leaf has stiff, raised veins, as this side creates the strongest impression.
Step 2: Creating the Impression
-
Position the leaf:
Place the leaf vein-side down onto your clay slab. Arrange it so the central stem runs somewhat diagonally or vertically, creating a pleasing composition. -
Roll over the leaf:
Gently roll your rolling pin over the leaf once. Apply firm, even pressure to push the veins into the clay, but don’t press so hard that the leaf tears through. -
Peel and reveal:
carefully grab the stem of the leaf and peel it back slowly to reveal the intricate impression left behind in the clay. -
Cut the shape:
Place your round cutter or bowl over the most detailed section of the print. Press down firmly to cut out the circle. -
Remove excess clay:
Lift away the scrap clay from outside the circle, kneading it back into a ball to use for the next coaster. You should be left with just the printed round.
Freshness Matters
Use fresh leaves rather than dried ones. Dried leaves are brittle and will crumble into the clay, leaving debris that is difficult to pick out without ruining the smooth surface.
Step 3: Detailing & Drying
-
Refine the edges:
Dip your finger or a small sponge into water and gently smooth the cut rim of the coaster. To match the image, don’t make it perfectly smooth; dab it slightly to create a raw, stone-like texture. -
Add subtle texture:
If parts of the coaster outside the leaf print look too smooth, gently tap them with a dry sponge or a crumpled piece of aluminum foil to mimic the organic surface seen in the photo. -
Initial drying:
Place the cutouts on a wire cooling rack or a fresh sheet of parchment. Let them dry undisturbed for 24 hours. -
Flip for flat drying:
After the top is dry to the touch, flip the coasters over. This crucial step prevents the edges from curling upward as the moisture evaporates from the bottom. -
Full cure time:
Allow the clay to dry completely for another 24-48 hours. The clay will turn from a greyish off-white to a bright, chalky white when fully cured.
Go Botanical
Make a mismatched set by using different leaf types for each coaster—try fern, maple, and oak leaves for a complete forest collection.
Step 4: Finishing
-
Sand imperfections:
Once fully dry, take fine-grit sandpaper and lightly buff the edges to remove any sharp burrs left from the cutting process. -
Antique wash (optional):
The coasters in the image have a slightly aged look in the crevices. You can achieve this by watering down a tiny drop of brown paint, brushing it into the veins, and immediately wiping the surface clean with a damp cloth. -
Apply sealant:
Coat the top and sides with a matte varnish or dedicated clay sealant. Apply thin layers, letting each dry before adding the next. -
Waterproof the bottom:
Don’t forget the underside. Seal the bottom to prevent humidity from warping the coaster later on. Two coats are usually sufficient here.
Stack your finished set on a wooden tray or bundle them with twine for a beautiful handmade gift

The Complete Guide to Pottery Troubleshooting
Uncover the most common ceramic mistakes—from cracking clay to failed glazes—and learn how to fix them fast.
Terrazzo-Style Coaster Set
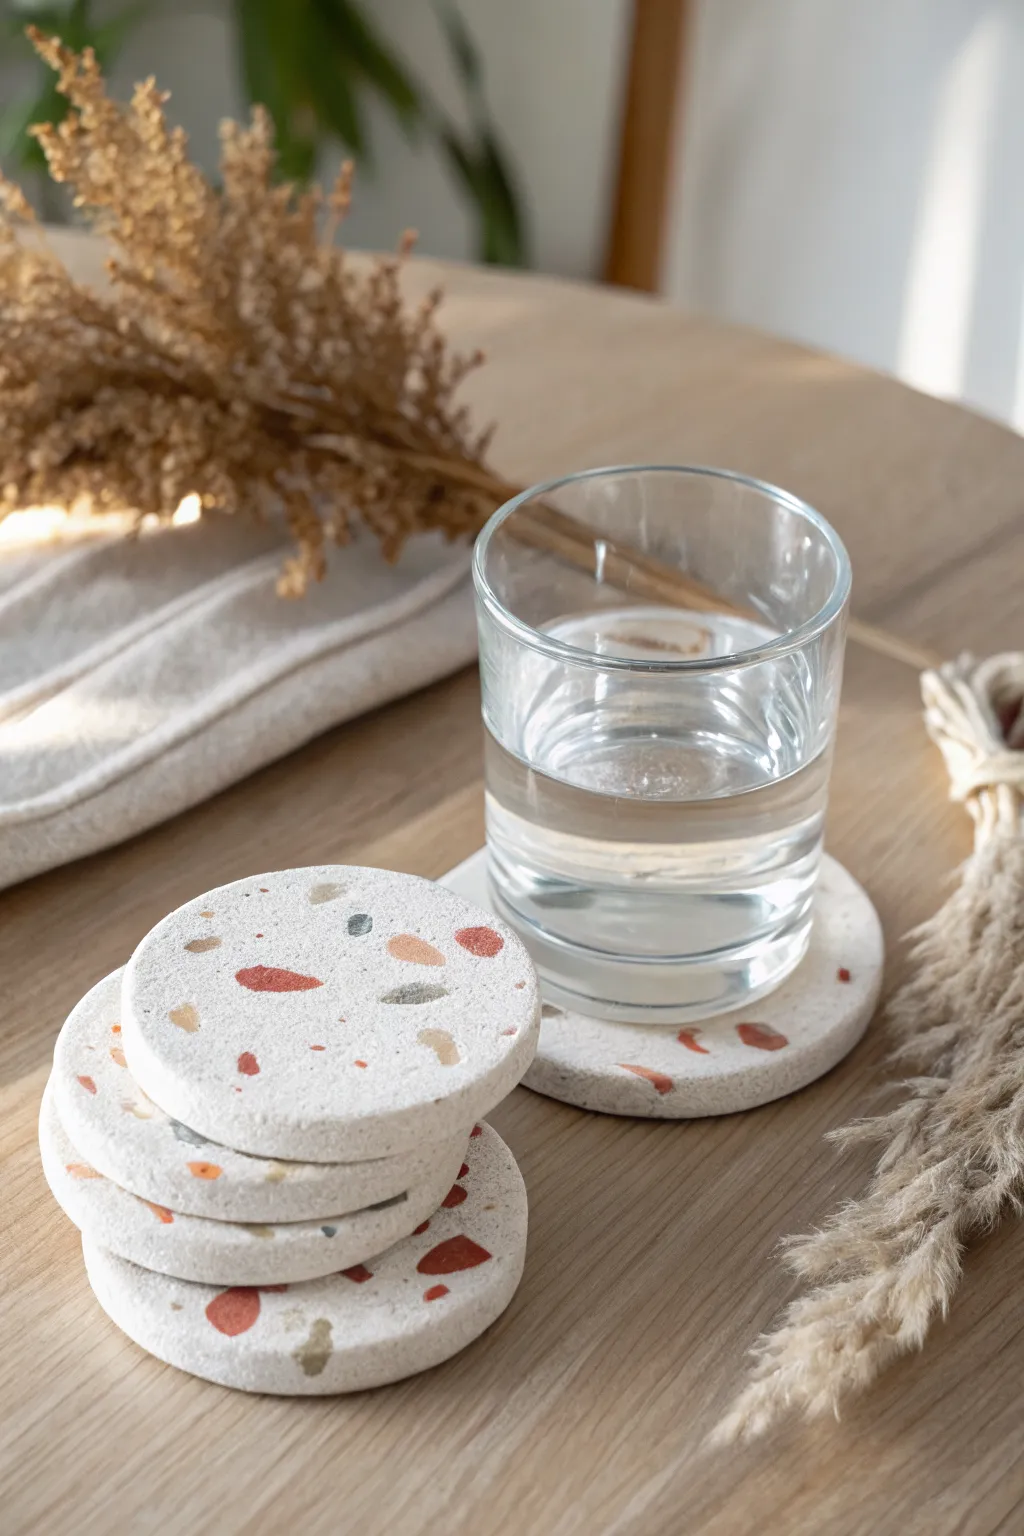
Achieve the high-end look of polished concrete terrazzo without the cement dust using simple air-dry clay. These chic coasters feature a crisp white base speckled with earthy tones of terracotta, slate blue, and sand, making them a modern addition to any coffee table.
Detailed Instructions
Materials
- White stone-effect air-dry clay (or standard white air-dry clay)
- Air-dry clay in accent colors (terracotta, grey-blue, beige)
- Acrylic rolling pin
- Round cookie cutter (approx. 4 inches) or a jar lid
- Sandpaper sheets (fine and medium grit)
- Bowl of water
- Clear acrylic sealant or waterproof varnish
- Paintbrush for sealing
- Cutting mat or parchment paper
Step 1: Prepping the Chips
-
Roll out accent colors:
Start by taking small amounts of your colored clays—the terracotta, slate blue, and beige. Roll each color out individually until they are very thin sheets, roughly 1-2mm thick. -
Dry the sheets:
Let these thin colored sheets sit out for about 20-30 minutes. You want them to firm up slightly so they are easier to handle, but they don’t need to be bone dry. -
Create the terrazzo chips:
Once the sheets are leathery, tear or cut them into irregular, jagged little pieces. Vary the sizes—some tiny specks and some larger chunks—to mimic the random nature of real stone aggregate.
Stone Effect
Use ‘stone effect’ clay for the base instead of plain white. It has a slight grit that mimics concrete texture beautifully.
Step 2: Forming the Coaster Base
-
Prepare the base:
Take a large handful of the white air-dry clay. Knead it in your hands to warm it up and make it pliable. -
Initial rolling:
Roll out the white clay on your mat or parchment paper until it is about 1/2 inch thick over a generous surface area. -
Scatter the chips:
Sprinkle your prepared colored chips onto the surface of the white clay. I like to scatter them densely in the center and sparsely at the edges, but a random full coverage works best. -
Embed the chips:
Using your rolling pin, gently roll over the clay again. This will press the colored chips down into the white base, merging them into a single flat sheet. Aim for a final thickness of about 1/4 inch. -
Flip and repeat:
Carefully flip the slab of clay over. If you want the terrazzo pattern on both sides, scatter more chips here and roll them in as well. This creates a more professional finish.
Metallic Pop
Mix small pieces of gold or copper leaf in with your clay chips before rolling to add flecks of luxurious shine.
Step 3: Shaping and Refining
-
Cut the circles:
Position your round cookie cutter or jar lid onto the most attractive sections of your terrazzo slab. Press down firmly to cut out your coaster shapes. -
Smooth the edges:
Release the circles from the excess clay. Dip your finger in a little water and run it along the cut edges to smooth out any roughness or loose clay drag marks. -
Check for warping:
Place the coasters on a flat, clean surface to dry. If possible, dry them on a wire rack to allow airflow underneath, which helps prevent the centers from bowing upwards. -
Let them cure:
Allow the coasters to dry completely. This usually takes 24 to 48 hours depending on humidity. Flip them occasionally to ensure even drying on both sides.
Step 4: Finishing Touches
-
Sand the surface:
Once bone dry, take your medium grit sandpaper and sand the top surface. This is the magic step that reveals the clean, sharp edges of the colored chips hidden just beneath the white clay film. -
Polish the finish:
Switch to fine-grit sandpaper to smooth out scratches from the initial sanding, leaving the surface silky to the touch. -
Clean dust:
Wipe the coasters thoroughly with a slightly damp cloth or tack cloth to remove all fine clay dust before sealing. -
Apply sealant:
Apply a coat of waterproof varnish or acrylic sealer. This is crucial for coasters, as unsealed air clay will dissolve when exposed to condensation from cold drinks. -
Second coat:
Let the first coat dry according to the bottle instructions, then apply a second coat for extra durability.
Stack your new coasters on the coffee table and enjoy a refreshing drink on your handmade art
Mini Bud Vase Sleeve
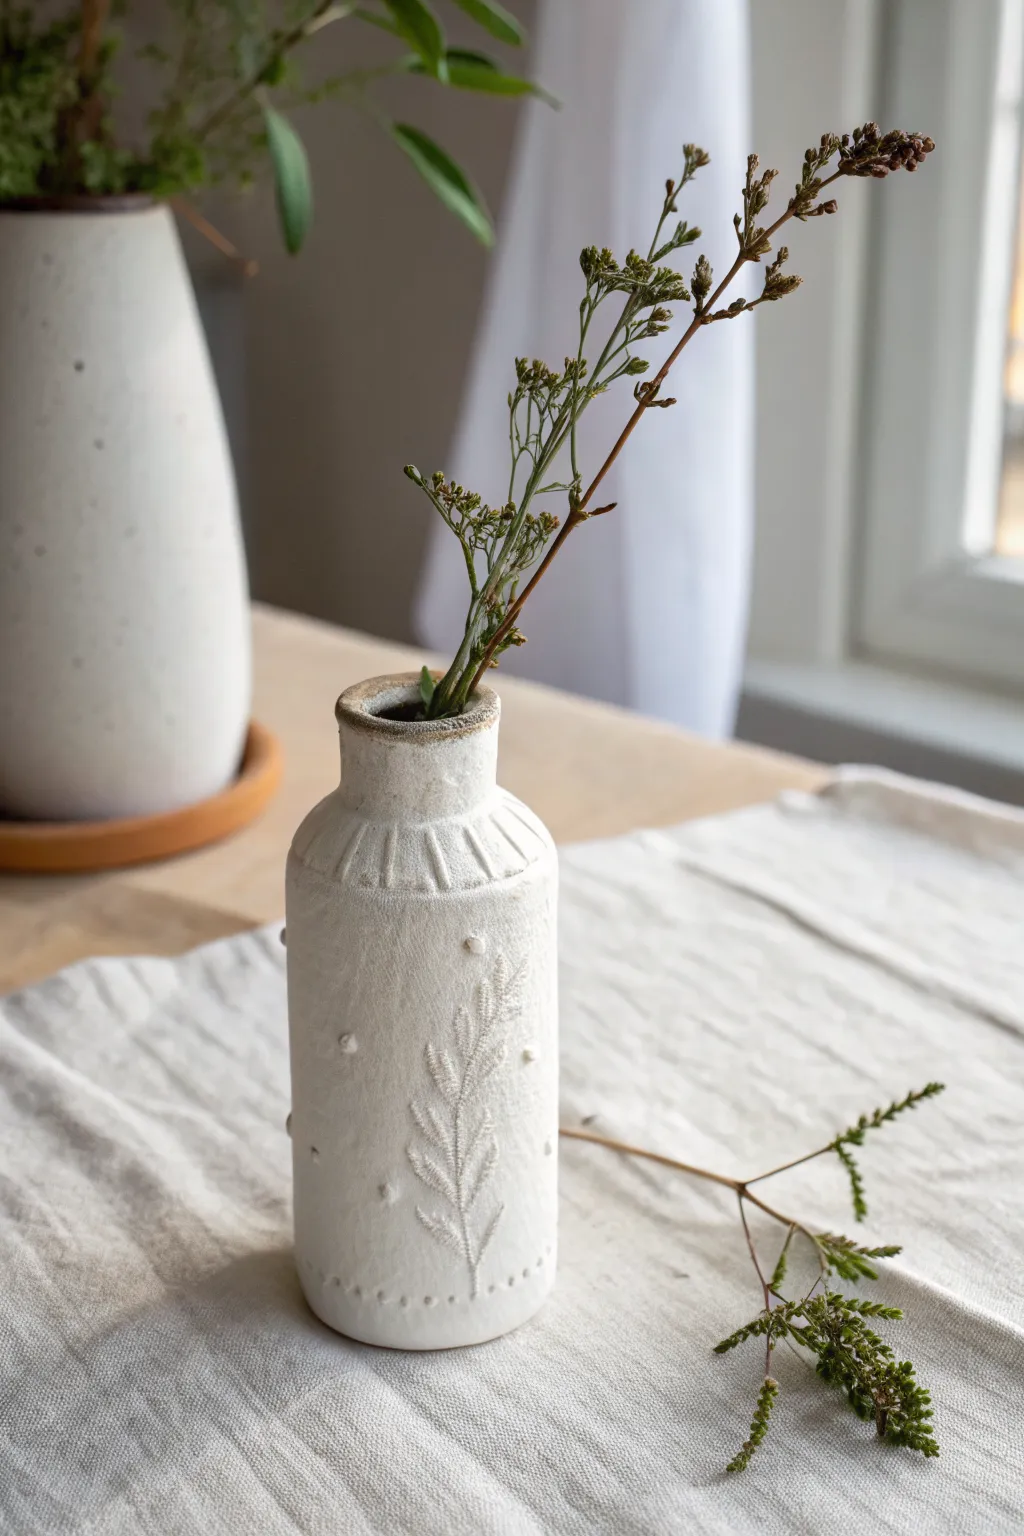
Transform a simple glass bottle or test tube into a charming, rustic vessel with this textured air dry clay sleeve. Featuring delicate botanical impressions and raised dot details, this project perfectly mimics the look of high-end artisanal pottery without the need for a kiln.
How-To Guide
Materials
- Air dry clay (white)
- Small glass bottle or large test tube (to serve as the waterproof insert)
- Rolling pin
- Real or artificial fern leaf (for impression)
- Craft knife or clay cutter
- Modeling tool with a small round tip (or a dull pencil)
- Small cup of water
- Fine grit sandpaper
- Acrylic paint (thinned brown or antique wax)
- Matte varnish or sealant
Step 1: Preparing the Sleeve
-
Roll the clay slab:
Begin by conditioning a handful of air dry clay until it is soft and pliable. Roll it out into an even rectangular slab, roughly 1/4 inch thick. Make sure the slab is long enough to wrap fully around your chosen glass insert with a little overlap, and tall enough to cover it from base to neck. -
Cut to size:
Use your craft knife to trim the clay into a clean rectangle. Test the fit by loosely wrapping it around your glass bottle; you want a snug fit but enough material to blend the seam. -
Create the botanical impression:
Before attaching the clay to the bottle, lay your fern leaf smoothly onto the center of the clay slab. Gently roll over it once with your rolling pin to press the veins into the surface. Carefully peel the leaf away to reveal the design. -
Add texture marks:
Using a needle tool or the tip of your knife, gently scratch vertical lines around the top edge of your rectangle. This will create the ribbed texture around the neck of the vase once assembled.
Clean Imprints
Apply cornstarch lightly to your leaf before pressing it into the clay. This prevents the leaf from sticking and tearing the clay when you peel it off.
Step 2: Assembly and Detailing
-
Wrap the form:
Stand your glass bottle upright. Carefully lift the clay slab and wrap it around the glass. Join the two ends together, scoring the overlapping edges and adding a drop of water to create a strong bond. -
Smooth the seam:
Use your finger or a damp sponge to smooth the vertical seam until it disappears. I prefer to position this seam at the back so the botanical print stays front and center. -
Shape the neck:
Gently press the clay in around the neck of the bottle to conform to its shape. If your glass bottle has a distinct shoulder, mold the clay accordingly to create that classic vase silhouette. -
Refine the rim:
At the very top opening, fold a tiny bit of clay over the glass rim or simply smooth it flush with the glass edge. Ensure the glass is not completely covered so you can still fill it with water later. -
Create raised dots:
Roll tiny spheres of fresh clay, about the size of a peppercorn. Dab a tiny amount of water onto the vase surface around the botanical print and press these small balls on to create raised dots. Space them randomly for an organic feel. -
Carve the leaves:
To make the botanical impression pop, use a needle tool to lightly re-trace the stems and veins of your imprint. This adds depth that will catch the paint later. -
Add base details:
Use your small round-tipped tool to press a row of small circles around the very bottom edge of the vase, creating a decorative border.
Antique Finish
After sealing, rub a little diluted brown paint over the textured leaves and wipe it back immediately. The dark color stays in the crevices for instant age.
Step 3: Drying and Finishing
-
Allow to dry:
Let the vase sit undisturbed in a dry area for 24-48 hours. Turn it occasionally to ensure even airflow. The clay should turn pure white and feel hard to the touch when fully dry. -
Sand imperfections:
Once bone dry, take your fine grit sandpaper and lightly smooth any rough fingerprints or sharp edges, particularly around the rim and seam. -
Paint the rim:
Mix a tiny amount of brown acrylic paint with water to create a wash. Use a fine brush to paint just the rim of the vase, giving it that exposed, earthy stoneware look seen in the photo. -
Seal the piece:
Apply a coat of matte varnish or sealant over the entire clay surface. This protects the air dry clay from humidity and accidental splashes when you water your flowers.
Place a single dried stem or fresh meadow flower in your new vase to enjoy a touch of nature indoors


What Really Happens Inside the Kiln
Learn how time and temperature work together inside the kiln to transform clay into durable ceramic.
Easy Incense Holder Dish
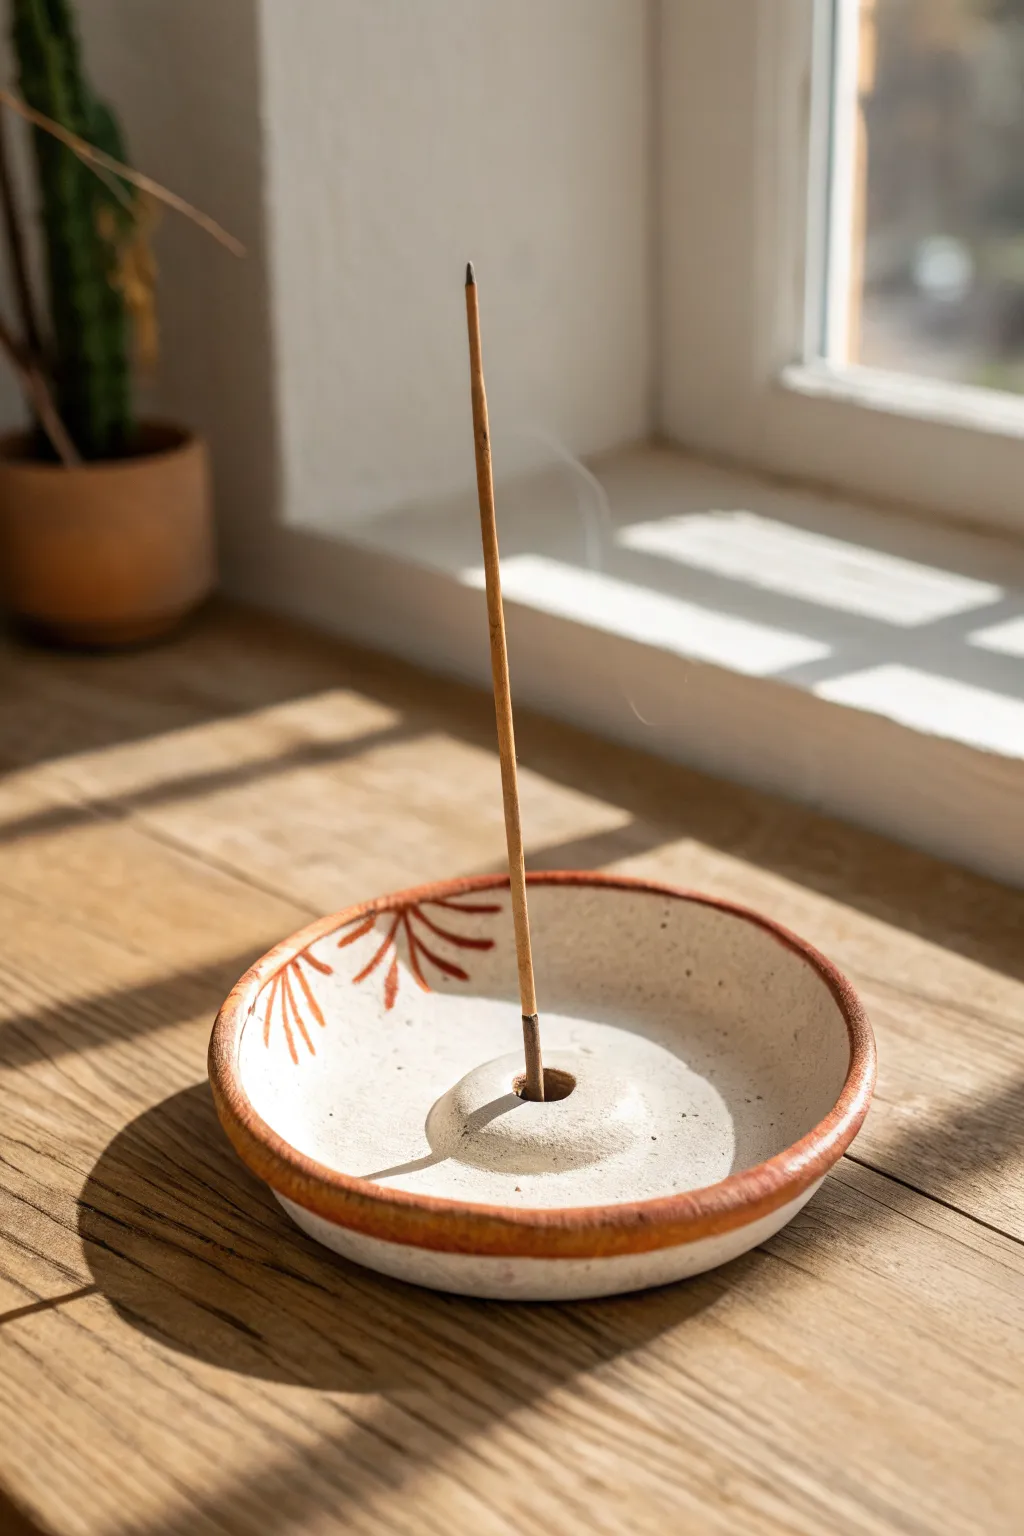
This charming, earthy incense holder brings a warm, artisanal touch to any corner of your home with its speckled finish and terracotta-colored rim. Its shallow bowl shape catches ash effectively while the raised center keeps your incense stick perfectly upright.
Step-by-Step Guide
Materials
- Air-dry clay (white or light grey)
- Small rolling pin or glass bottle
- Circle cutter or small bowl (approx. 4-5 inches diameter)
- Knife or clay tool
- Sponge and water
- Acrylic paint (warm terracotta/burnt sienna)
- Small paintbrush (fine tip)
- Incense stick (for sizing)
- Toothbrush (optional, for speckling)
- Black or brown acrylic paint (watered down for speckles)
- Sandpaper (fine grit)
- Matte varnish or sealant
Step 1: Shaping the Clay Base
-
Roll out the slab:
Start by kneading a handful of softened air-dry clay to remove air bubbles, then roll it out to an even thickness of about 1/4 inch on a clean surface. -
Cut the circle:
Place your circle cutter or an upside-down bowl onto the clay slab and cut around it to create a perfect disc shape. -
Soften the edges:
Dip your finger in a little water and gently run it along the cut edge of the circle to smooth out any sharpness or roughness. -
Form the rim:
Gently curve the outer edges of the circle upward to create a shallow dish shape; I like to use my thumbs to press the center down slightly while pulling the sides up.
Loose fit?
If the hole is too loose after drying, don’t worry. Put a tiny drop of dried glue or a small bead of wax at the bottom of the hole to help grip the stick.
Step 2: Creating the Center Holder
-
Roll a small ball:
Take a leftover piece of clay and roll it into a smooth ball, roughly the size of a large marble or a grape. -
Flatten the base:
Press the ball slightly against your work surface to create a flat bottom, turning it into a small dome shape. -
Score and slip:
Use a tool to scratch cross-hatch marks on the center of your dish and the bottom of the dome, then add a drop of water to join them securely. -
Blend the seam:
Using a clay tool or your finger, carefully smooth the clay from the base of the dome onto the dish so they become one solid unit. -
Create the hole:
While the clay is still wet, take an actual incense stick and press it straight down into the center of the dome to create the holding slot. -
Widen slightly:
Wiggle the stick strictly within the hole just a tiny bit to ensure the fit isn’t too tight once the clay shrinks during drying.
Try Texture
Before drying, press real dried flowers or textured fabric into the wet clay surface for an imprinted, fossil-like design instead of painting.
Step 3: Finishing and Decorating
-
Dry thoroughly:
Set your piece aside to dry for 24-48 hours, flipping it occasionally to ensure the bottom dries evenly. -
Sand imperfections:
Once fully dry and hard, use fine-grit sandpaper to smooth out any bumps on the rim or the center mound. -
Paint the rim:
Mix a warm terracotta or burnt sienna acrylic paint and carefully paint the very edge of the rim, letting the color bleed slightly down the outer side. -
Add the botanical detail:
Using a fine-tip brush and the same terracotta paint, draw simple, stylized palm fronds or leaf shapes extending from the rim toward the center on one side. -
Create the speckled effect:
Water down a tiny bit of black or dark brown paint, load it onto a toothbrush or stiff brush, and flick the bristles to spray fine speckles across the white clay. -
Seal the piece:
Finish by applying a coat of matte varnish to protect the clay from ash and dust.
Once dry and sealed, place your holder on a windowsill to catch the light and the fragrant smoke
Cute Face Magnets
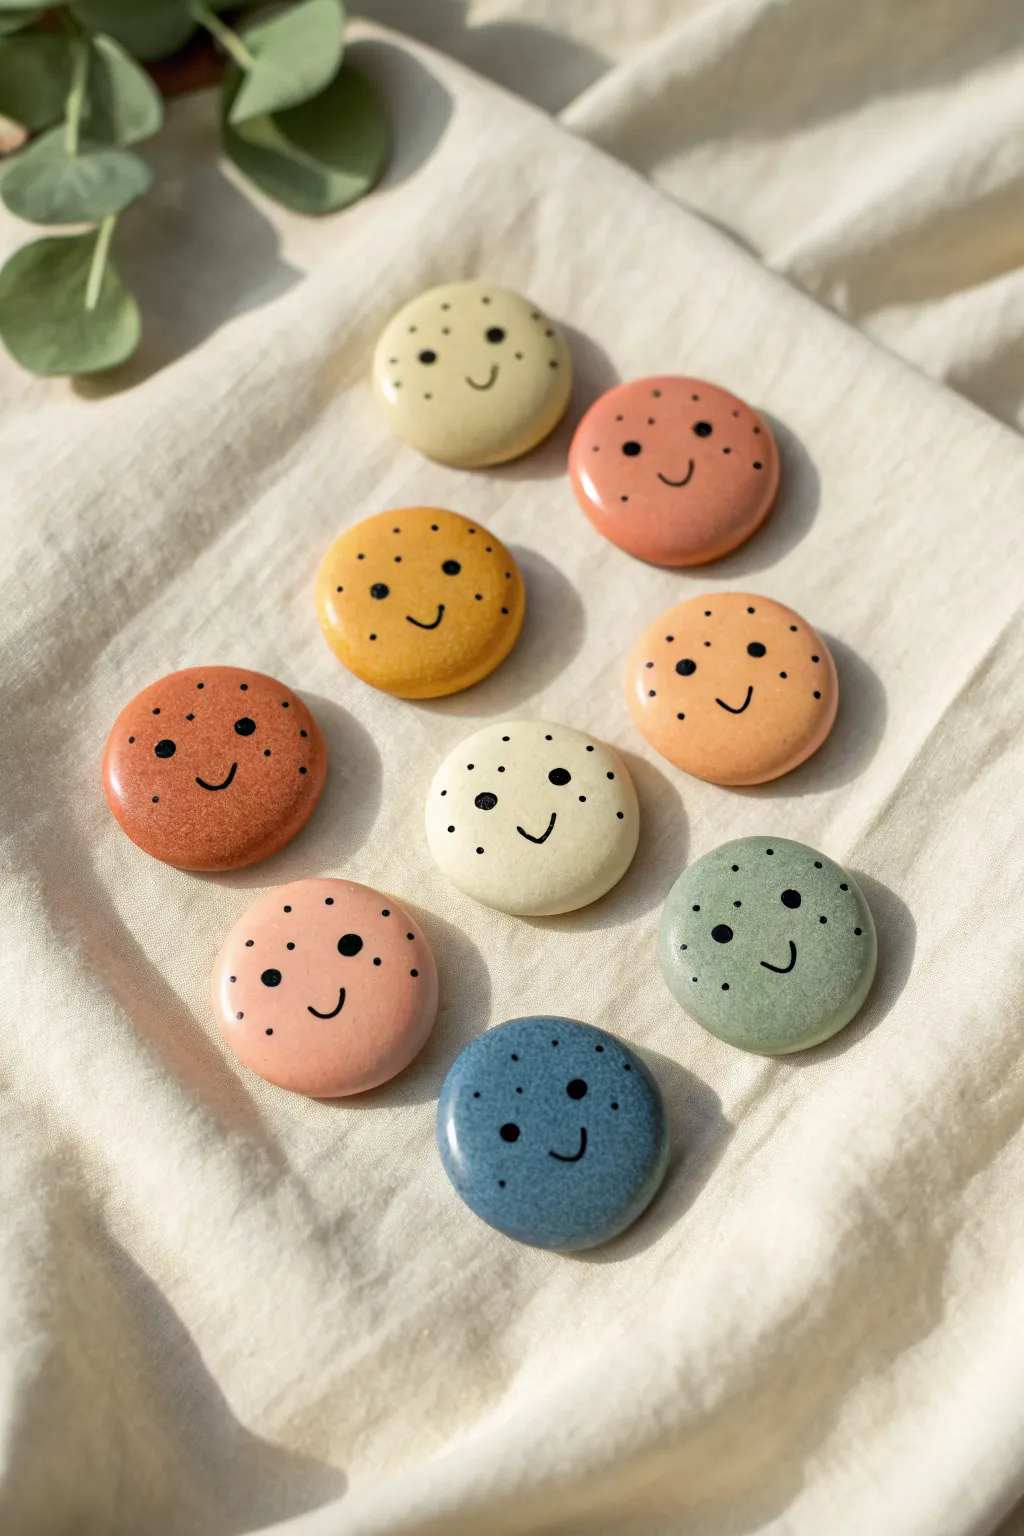
These charming little magnets bring a dose of cheer to your fridge with their earthy tones and simple, smiling expressions. They are a perfect beginner project for mastering smooth shapes and basic face-painting techniques on air-dry clay.
Step-by-Step Tutorial
Materials
- White air-dry clay
- Acrylic paints (terracotta, mustard yellow, sage green, cream, slate blue, dusty rose)
- Fine-grit sandpaper (220-400 grit)
- Small round paintbrush
- Extra fine black paint pen or liner brush with black acrylic paint
- Small round magnets
- Strong craft glue (e.g., E6000)
- Gloss or satin varnish (optional, for sealing)
- Rolling pin (optional)
- Cookie cutter (small circle) or a bottle cap
Step 1: Shaping the Clay
-
Prepare your clay:
Start by pinching off small amounts of air-dry clay. Knead each piece in your hands for a minute to warm it up and ensure it’s pliable and free of air bubbles. -
Form the balls:
Roll the clay between your palms to create smooth spheres. Aim for balls roughly the size of a large gumball or walnut so they aren’t too heavy for the magnets. -
Flatten into discs:
Gently press each sphere down onto your work surface. You can use the palm of your hand for a natural, slightly organic look, or use a flat object like a book to get a perfectly even surface. -
Shape the edges:
Use your finger and a tiny bit of water to smooth out the edges of your discs. Round them off so they look like soft, tumbled river stones rather than sharp-edged cookies. -
Dry thoroughly:
Place your clay discs on a wire rack or a piece of parchment paper. Let them dry completely for 24-48 hours, flipping them over halfway through so the bottoms dry evenly.
Smooth Surface Secrets
If your clay cracks while drying, apply a “slip” (a paste of clay and water) into the cracks, let dry, and sand it down again.
Step 2: Painting the Base
-
Sand for smoothness:
Once fully dry, check for any rough spots or fingerprints. Gently buff the surface with fine-grit sandpaper until it feels smooth to the touch. Wipe away the dust with a slightly damp cloth. -
Mix your palette:
Prepare your acrylic paints. I like to mix a tiny bit of white into bright colors to achieve those soft, matte pastel shades seen in the example. -
Apply the base coat:
Paint the top and sides of each clay disc. You’ll likely need two thin coats rather than one thick one to avoid brush strokes showing. Let the first coat dry completely before adding the second. -
Paint the back:
Don’t forget the underside! Once the tops are dry, flip them over and paint the backs to give the piece a professional, finished look.
Step 3: Adding the Faces
-
Outline the eyes:
Using your extra-fine black paint pen or a very thin liner brush, draw two small, solid black circles for eyes. Place them relatively wide apart for that cute ‘kawaii’ look. -
Draw the smile:
carefully draw a small, simple ‘U’ shape between and slightly below the eyes. Keep the line thin and delicate. -
Add freckles:
Dot tiny specks around the cheeks and forehead area using the tip of your pen or brush. Vary the pressure slightly so some freckles are smaller than others. -
Different expressions:
Feel free to mix it up—maybe one magnet is winking, or another has its eyes closed in a happy squint. Variety makes the set more interesting.
Glossy or Matte?
For a ceramic look, use a high-gloss varnish. For a modern, trendy look, stick to a matte varnish or leave the acrylic paint unsealed if handled gently.
Step 4: Finishing Up
-
Seal the artwork:
To protect the paint from chipping, apply a thin layer of satin or gloss varnish over the entire painted surface. This also makes the colors pop. -
Attach the magnet:
Put a dab of strong craft glue on the back center of the clay piece. Press your round magnet firmly into the glue. -
Final cure:
Let the glue cure according to the manufacturer’s instructions (usually overnight) before sticking them to your fridge.
Now you have a whole family of cheerful faces ready to hold up your grocery lists and photos

TRACK YOUR CERAMIC JOURNEY
Capture glaze tests, firing details, and creative progress—all in one simple printable. Make your projects easier to repeat and improve.
Initial or Number Tags
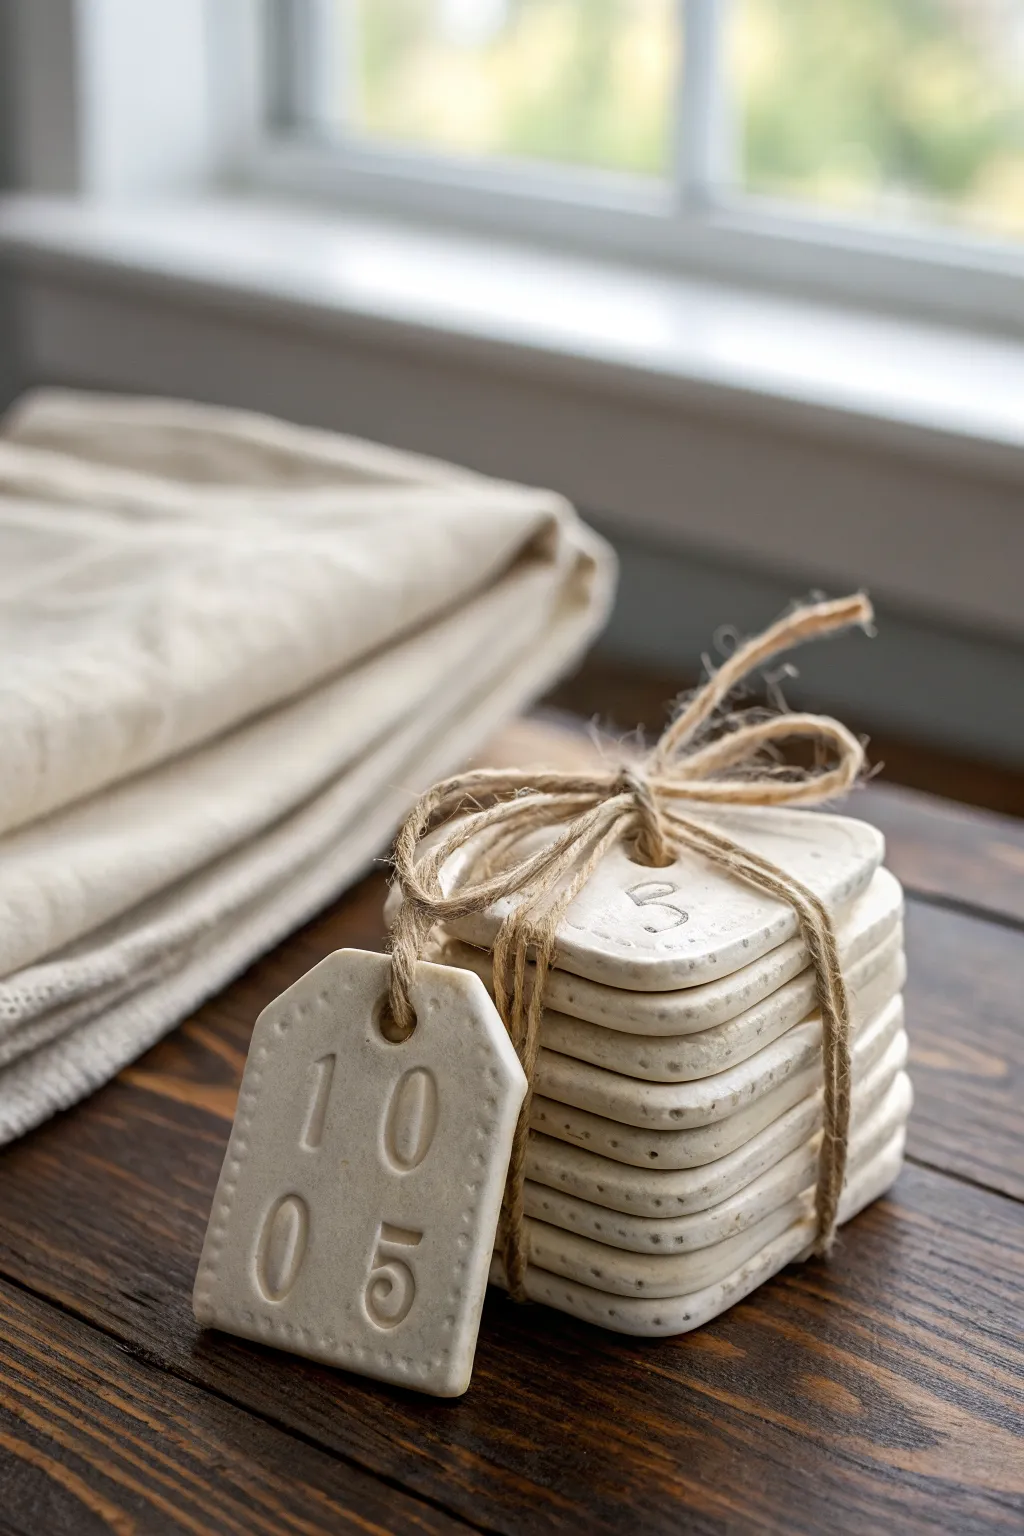
Create a set of charming, vintage-inspired clay tags that look like handmade ceramic pieces. These simple rectangular keepsakes feature stamped numbers and a lovely speckled finish, perfect for organizing or gifting.
Step-by-Step Guide
Materials
- White air-dry clay
- Rolling pin
- Parchment paper or craft mat
- Plastic card or clay knife
- Coarse black pepper or dried coffee grounds
- Number stamps
- Drinking straw or small circular cutter
- Fine-grit sandpaper
- Jute twine
- Water bowl
- Sponge
Step 1: Preparing the Clay
-
Condition the clay:
Start by taking a handful of white air-dry clay and kneading it in your hands to warm it up and make it pliable. -
Add texture:
To achieve that faux-ceramic speckled look, sprinkle a small pinch of coarse black pepper or dried coffee grounds onto your clay ball. -
Incorporate the speckles:
Fold the clay over the speckles and knead thoroughly until they are evenly distributed throughout the material. -
Roll it out:
Place the clay on parchment paper and use a rolling pin to flatten it to an even thickness of about 1/4 inch (6mm).
Fixing Cracks
If you see tiny hairline cracks appearing as the clay dries, mix a small amount of fresh clay with water to make a paste and fill them in immediately.
Step 2: Shaping and Stamping
-
Cut the rectangles:
Using a ruler and a clay knife or simply the edge of an old plastic card, cut out uniform rectangular shapes. For the look in the photo, aim for about 2 inches by 3 inches. -
Clip the corners:
To create the distinct tag shape, slice off the top two corners of each rectangle at a 45-degree angle. -
Smooth the edges:
Dip your finger in a little water and run it along the cut edges to soften any sharp ridges or burrs. -
Create the hole:
Use a drinking straw to punch a clean hole near the top center of the tag where the clipped corners meet. -
Position the stamps:
Select your number stamps. Plan your spacing by hovering them over the clay before pressing down. -
Impress the numbers:
Press the stamps firmly into the moist clay to leave a deep, clear impression of the digits. -
Add border detail:
If you want the subtle dotted border seen on the front tag, use a toothpick or a small stylus to gently poke a line of indentations around the perimeter.
Glossy Finish
For a more polished ceramic look, brush on a coat of gloss varnish or clear nail polish after the clay is fully dry to seal it and add shine.
Step 3: Drying and Finishing
-
Initial drying:
Lay the tags flat on a clean sheet of parchment paper in a safe spot away from direct heat. -
Flip them over:
After about 12 hours, flip the tags over to ensure the backs dry evenly and to prevent curling. -
Check dryness:
Wait another 12 to 24 hours until the clay is completely hard and turns a chalky white color. -
Sand the imperfections:
Take a piece of fine-grit sandpaper and very gently buff the edges and surface to remove any remaining roughness. -
Enhance the numbers:
If the numbers aren’t popping enough, I sometimes dilute a tiny drop of brown paint with water, brush it into the crevices, and immediately wipe the surface clean. -
Bundle them up:
Stack your finished tags together neatly. -
Tie the bow:
Wrap a length of jute twine around the stack several times and finish with a simple bow on top to complete the rustic presentation.
Now you have a set of personalized tags ready to label gifts or organize your pantry shelves
Stamp-Textured Catchall Tray
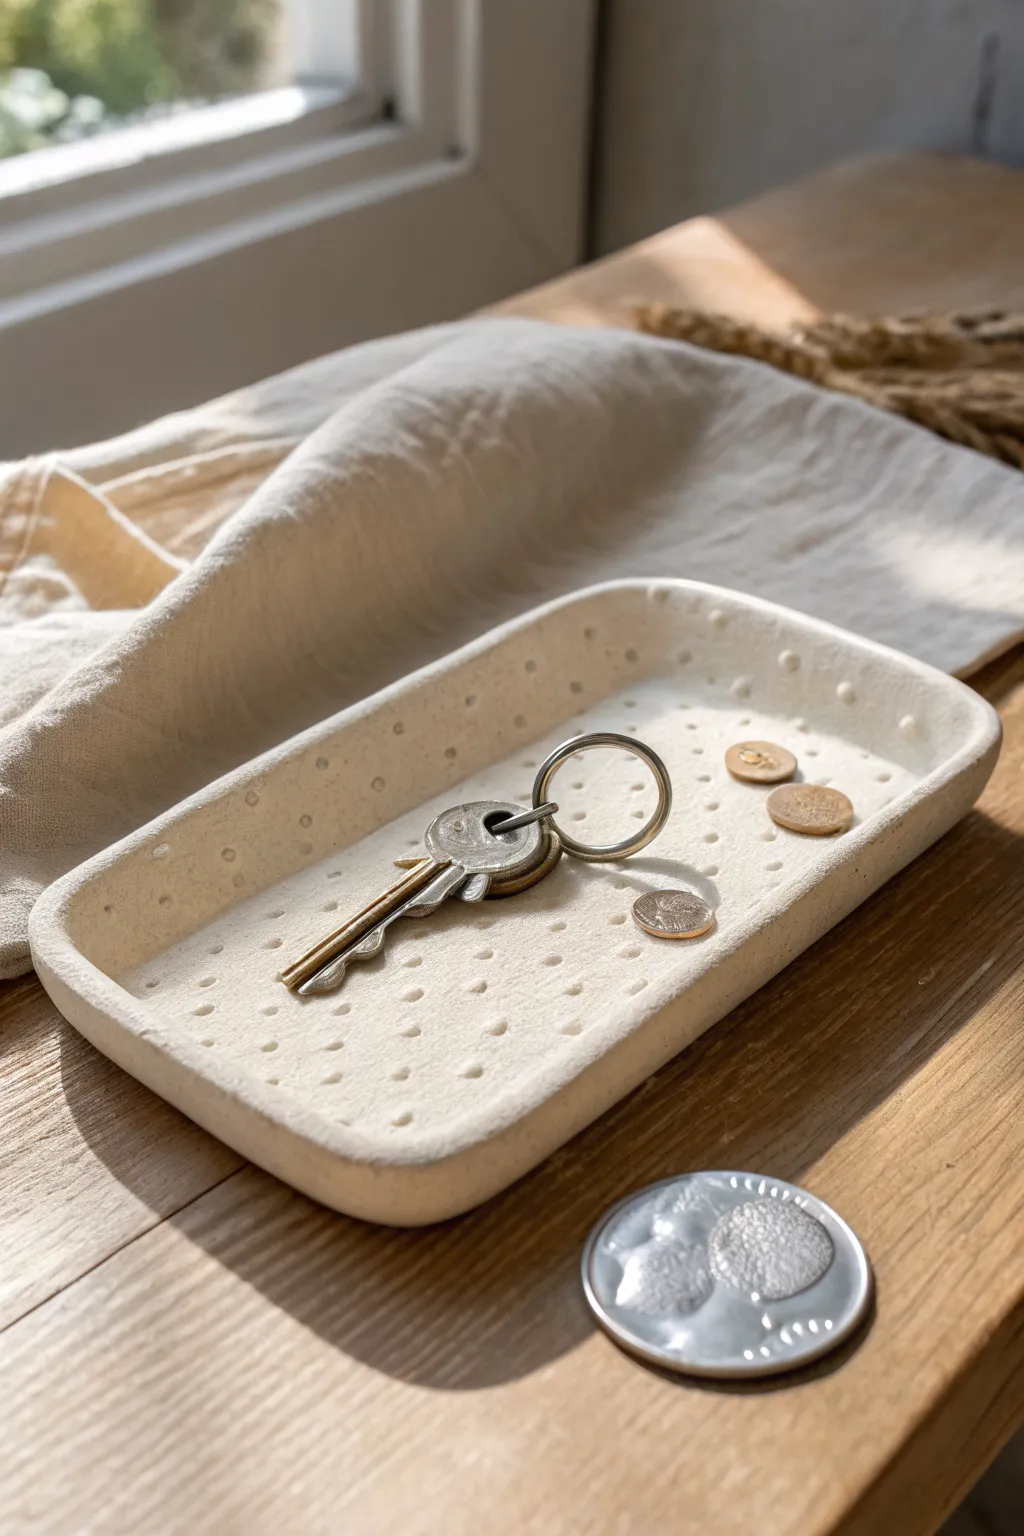
This understated catchall tray combines modern simplicity with tactile charm. The gentle, recessed dot pattern adds just enough visual interest to elevate this piece from purely functional to a beautiful decor element for your hallway or bedside table.
Step-by-Step Tutorial
Materials
- White or cream air-dry clay
- Rolling pin
- Parchment paper or canvas mat
- Rectangular template (cardboard or plastic)
- Craft knife or clay cutter
- Small bowl of water
- Small sponge or smoothing tool
- Blunt cylindrical tool (like the end of a paintbrush, a chopstick, or a dotting tool)
- Fine-grit sandpaper (optional)
- Matte spray varnish or sealant
Step 1: Shaping the Base
-
Prepare the clay:
Begin with a generous handful of air-dry clay. Knead it in your hands for a minute or two to warm it up and ensure there are no air bubbles trapped inside. -
Roll out the slab:
Place the clay on parchment paper or a canvas mat to prevent sticking. Use your rolling pin to flatten the clay into an even slab, aiming for a consistent thickness of about 1/4 inch (6mm) throughout. -
Cut the rectangle:
Lay your rectangular template on top of the slab. Using a craft knife, trace around the template to get clean, straight edges, then peel away the excess clay. -
Round the corners:
Instead of sharp 90-degree points, gently use your finger or a sculpting tool to round off the four corners of the rectangle. This gives the tray the soft, organic look seen in the photo. -
Create the rim base:
Lightly score a line about 1/2 inch from the edge all the way around the rectangle. This will serve as a guide for where the walls of the tray will begin to rise.
Step 2: Forming the Walls
-
Lift the edges:
Gently lift the edges of the clay slab upwards. You aren’t adding a separate coil here; simply pinch and mold the existing slab edges up to create a shallow wall. -
Smooth the transition:
Use your thumb to smooth the interior curve where the floor of the tray meets the wall. It should be a gentle slope, not a sharp angle. -
Refine the rim shape:
I like to dampen my fingertips slightly to smooth out any cracks on the rim. Adjust the height so it is even all the way around, gently pressing down on high spots and pinching up low ones. -
Initial smoothing:
Take a slightly damp sponge and wipe the entire surface of the tray—inside and out—to remove fingerprints and create a pristine canvas for your texture.
Clean Lines
To get perfectly straight wall edges, gently press a ruler against the outside of the clay walls while smoothing the inside instructions with your other hand.
Step 3: Adding Texture & Finishing
-
Test your tool:
Find a cylindrical tool with a flat or slightly rounded end, like the back of a paintbrush. Press it into a scrap piece of clay first to ensure it makes a clean, round indentation. -
Stamp the pattern:
Beginning in the center of the tray floor, press your tool straight down into the clay. Create rows of dots, spacing them somewhat randomly or in a loose grid, covering the floor and extending partially up the sides. -
Control depth:
Be careful not to press all the way through the bottom. You want dimples, not holes. -
Check the exterior:
Ensure that pressing the dots didn’t warp the straight lines of your outer walls. If they bulged out, gently push them back into a rectangular shape with your hands or a flat ruler. -
Slow drying:
Place the tray in a cool, dry spot away from direct sunlight. To prevent curling, you can loosely cover it with a plastic bag for the first 12 hours. -
Flip occasionally:
Once the top feels dry to the touch, gently flip the tray over to let the bottom dry evenly. This usually takes 24-48 hours total. -
Sand edges:
After the clay is bone dry, use fine-grit sandpaper to gently buff away any rough spots on the rim or sharp edges on the corners. -
Seal the piece:
Since this tray will hold metal keys and coins, protect the surface with two thin coats of a matte spray varnish.
Cracking Clay?
If you see tiny hairline cracks forming while shaping the walls, dip your finger in water and smooth a little clay slurry (water + clay paste) over the crack immediately.
Now you have a chic spot to drop your keys that looks like sophisticated stonewear
Wavy Edge Jewelry Dish
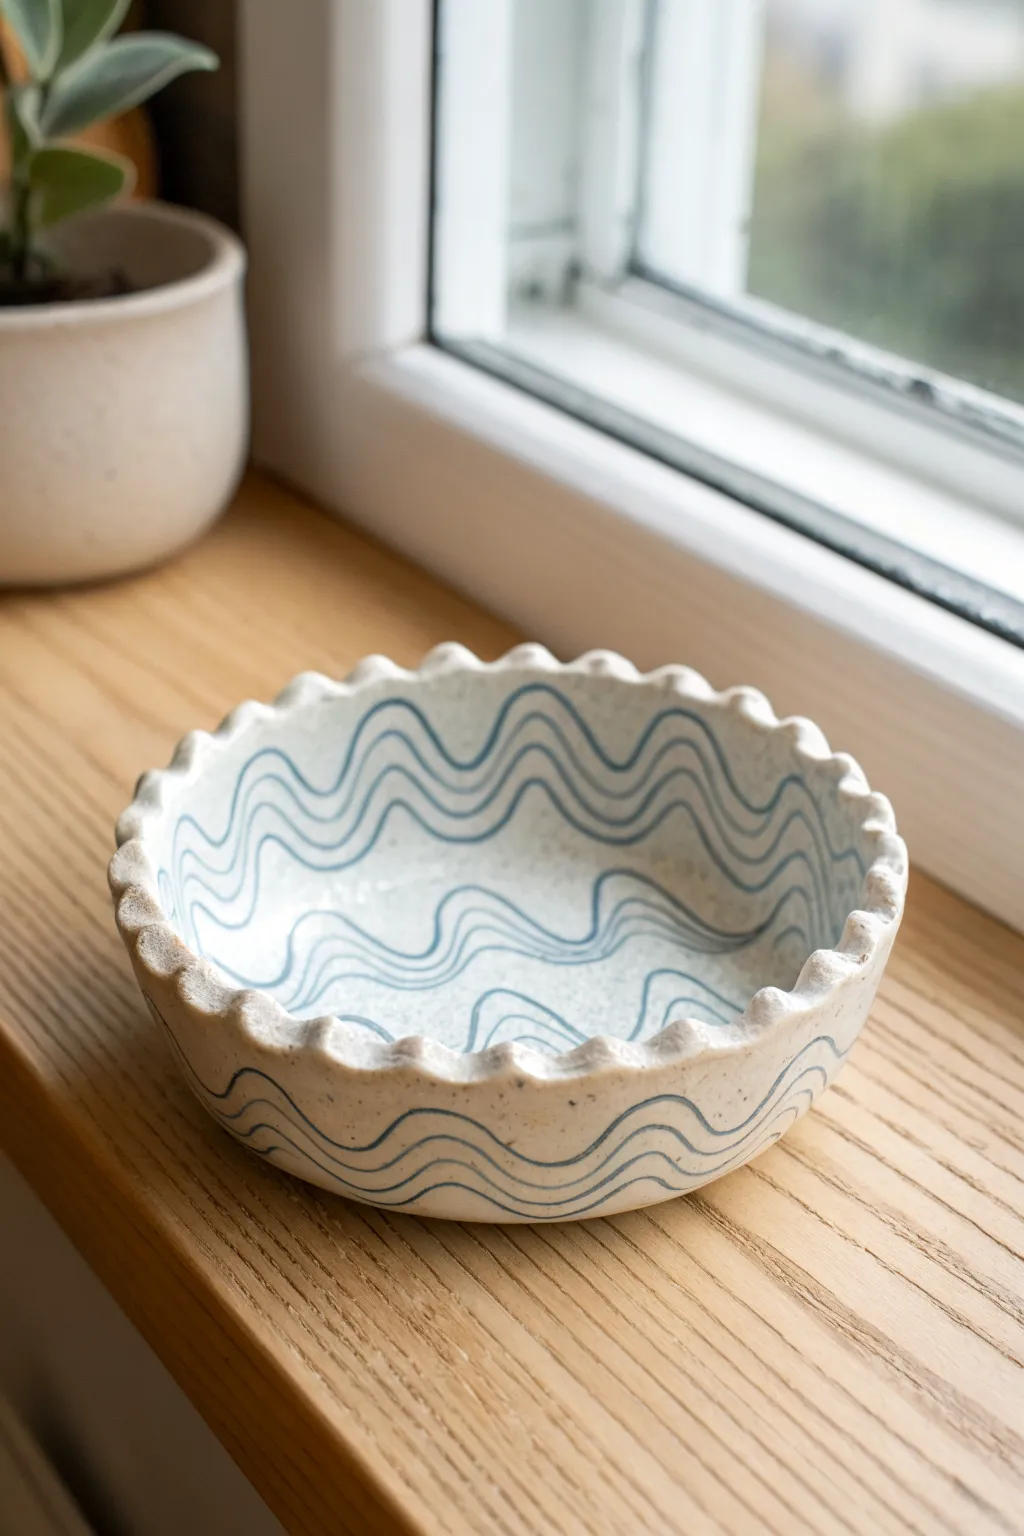
This charming trinket dish combines a trendy scalloped rim with a playful, hand-painted wave pattern. Its organic shape and speckles give it a convincing ceramic look without needing a kiln, making it a perfect functional accent piece.
Detailed Instructions
Materials
- White air-dry clay (stone effect or speckled preferred)
- Acrylic rolling pin
- Circle cutter or a round bowl to trace
- Craft knife or clay tool
- Small bowl (for shaping)
- Water and a sponge
- Fine-grit sandpaper
- Blue acrylic paint (denim or navy shade)
- Fine liner paintbrush
- Matte or satin varnish
Step 1: Shaping the Base
-
Roll the clay:
Begin by taking a handful of air-dry clay and kneading it until soft. Roll it out on a smooth surface to an even thickness of about 1/4 inch. If you want that speckled look but only have white clay, mix in some coarse black pepper or dried coffee grounds now. -
Cut the circle:
Place your circle cutter or an overturned bowl onto the clay slab to use as a template. Cut around it cleanly with a craft knife to create a perfect disc. -
Smooth the edges:
Dip your finger in a little water and run it along the cut edge of the clay disc. This removes any sharp angles and begins the finishing process before shaping. -
Form the bowl shape:
Gently drape your clay circle inside a small bowl lined with plastic wrap. Press it lightly so it takes on the curved shape of the bowl without sticking.
Step 2: Creating the Scalloped Rim
-
Mark the rim:
Using the back of a paintbrush or a rounded tool, gently press indentations into the clay rim at regular intervals. This acts as a guide for where your waves will go. -
Pinch the peaks:
Between each indentation, use your thumb and forefinger to pinch the clay upwards gently. This creates the ‘peaks’ of the scalloped edge. -
Refine the scallops:
Go around the rim a second time, smoothing the curves with a damp sponge. Ensure the peaks are relatively uniform in height, though a little irregularity adds to the organic charm. -
Dry partially:
Let the dish dry inside the bowl form for about 24 hours until it holds its shape on its own. It doesn’t need to be bone dry yet, just leather-hard. -
Remove and dry fully:
Carefully remove the clay from the bowl guide. Place it on a wire rack to allow air circulation underneath and let it dry completely for another 24-48 hours.
Cracking Up?
If small cracks appear while drying, don’t panic. Mix a tiny bit of fresh clay with water to make a paste (slip) and fill the crack, then sand it smooth once dry.
Step 3: Painting and Finishing
-
Sand for smoothness:
Once fully dry and white, use fine-grit sandpaper to smooth out any rough patches on the rim or the base. Wipe away the dust with a barely damp cloth. -
Prep the paint:
Load a fine liner brush with your chosen blue acrylic paint. You want a fluid consistency, so add a tiny drop of water if the paint feels too thick to drag smoothly. -
Paint the inner rim:
Starting near the top edge on the inside, paint a continuous wavy line that mimics the scallop of the rim. I find it easier to rotate the bowl with one hand while keeping my painting hand steady. -
Continue the pattern:
Paint 3-4 parallel wavy lines below the first one, maintaining roughly equal spacing. Let the waves flow naturally rather than trying to make them mathematically perfect. -
Paint the exterior:
Turn the bowl over or on its side and repeat the wavy line pattern on the outside walls, ensuring the style matches the interior. -
Seal the dish:
After the paint is completely dry, apply a coat of matte or satin varnish. This protects the paint from chipping and gives the clay a finish that feels more like fired ceramic.
Faux Ceramic Hack
To get the speckled stoneware look shown in the photo, flick a toothbrush loaded with watered-down brown paint over the dish before varnishing.
Place your new jewelry dish on a sunny windowsill or bedside table to enjoy your handiwork every day
Minimalist Photo Stand
This charming, multi-layered photo stand brings a touch of minimalist whimsy to any desk or shelf. By stacking simple concentric arches of painted air dry clay, you’ll create a functional piece that doubles as modern decor.
Step-by-Step
Materials
- Air dry clay (white or natural)
- Rolling pin
- Sharp crafting knife or clay cutter
- Ruler
- Sandpaper (fine grit)
- Acrylic paints (deep teal blue, muted medium blue, dusty terracotta)
- Paintbrushes (flat and detail)
- Small bowl of water
- Matte sealant or varnish (optional)
- Circular cookie cutters or household objects (optional templates)
Step 1: Shaping the Arches
-
Condition the Clay:
Begin by taking a substantial chunk of air dry clay and kneading it in your hands until it becomes warm, soft, and pliable. This prevents cracks later on. -
Roll It Out:
On a flat surface, roll the clay out to an even thickness of about 3/4 inch. You want it thick enough to stand stably on its edge without tipping over. -
create arc guides:
You will need to cut concentric arches. You can lightly sketch these onto the clay slab with a needle tool or use nesting circular cutters if you have them. Aim for an overall width of about 5-6 inches for the largest arc. -
Cutting the Outer Arch:
Using your sharp knife or clay cutter, slice out the largest, outermost arch shape. Keep your knife perpendicular to the table to ensure straight edges. -
Cutting Inner Arches:
From the remaining clay (or by re-rolling scraps), cut three successively smaller arches that fit neatly inside one another. There should be a small gap or a snug fit depending on your preference, but ensure they nestle together well. -
Create the Slot:
Take the largest, outermost arch. Carefully slice a thin, vertical slit into the very top center. This groove needs to be wide enough to hold a card or photo but tight enough to grip it securely. -
Smoothing Edges:
Dip your finger in a little water and run it along all the cut edges of your arches. Smooth out any roughness or sharp corners to give it that finished, professional look. -
Testing the Fit:
Before drying, stand all the arches up together to ensure they balance correctly. If the bottoms aren’t perfectly flat, gently press them down onto the table or trim slightly with your knife.
Straight Cuts Secret
If you struggle cutting smooth curves freehand, find bowls or cups in your kitchen to use as cutting templates. Simply trace around them with your knife for perfect arcs.
Step 2: Drying and Refining
-
Drying Phase:
Lay the pieces flat to dry on a wire rack or a piece of cardboard. Rotate them occasionally to ensure even airflow. Let them dry completely, which usually takes 24-48 hours depending on thickness. -
Sanding:
Once fully dry and hard, take fine-grit sandpaper and gently buff the surfaces. Focus on the flat faces and the curved edges to remove any fingerprints or bumps. -
Dusting Off:
Wipe the pieces down with a slightly damp cloth or a dry brush to remove all the clay dust before painting.
Make It Magnetic
Instead of gluing the arches together, embed small magnets into the sides of each arch while the clay is wet. This lets you click them together or separate them playfully.
Step 3: Painting and Assembly
-
Base Coat:
Start painting the largest two arches. Mix a deep teal or denim blue acrylic paint. Apply a smooth coat to all sides of the two outer arches, including inside the card slot. -
Second Layer Color:
For the third arch (second from the inside), mix a slightly lighter, muted blue shade. Paint this piece entirely and let it dry. -
Innermost Arch:
Paint the smallest, central arch a warm, dusty terracotta or reddish-brown color to create a striking contrast with the cool blues. -
Multiple Coats:
I usually apply 2-3 thin coats rather than one thick one to avoid brush strokes. Allow the paint to dry fully between layers. -
Optional Distressing:
For a rustic look like the example, you can very lightly sand the edges after the paint is dry to reveal a tiny bit of the white clay underneath. -
Final Assembly:
You can leave the arches loose to be rearranged, or glue them together. If gluing, apply a strong craft glue between the touching surfaces of the arches and clamp them gently until set. -
Sealing:
Finish firmly by applying a matte varnish or sealant spray. This protects the paint from chipping and gives the clay a durable finish.
Now you have a stylish spot to display your favorite memories or daily affirmations
Geometric Pencil Cup
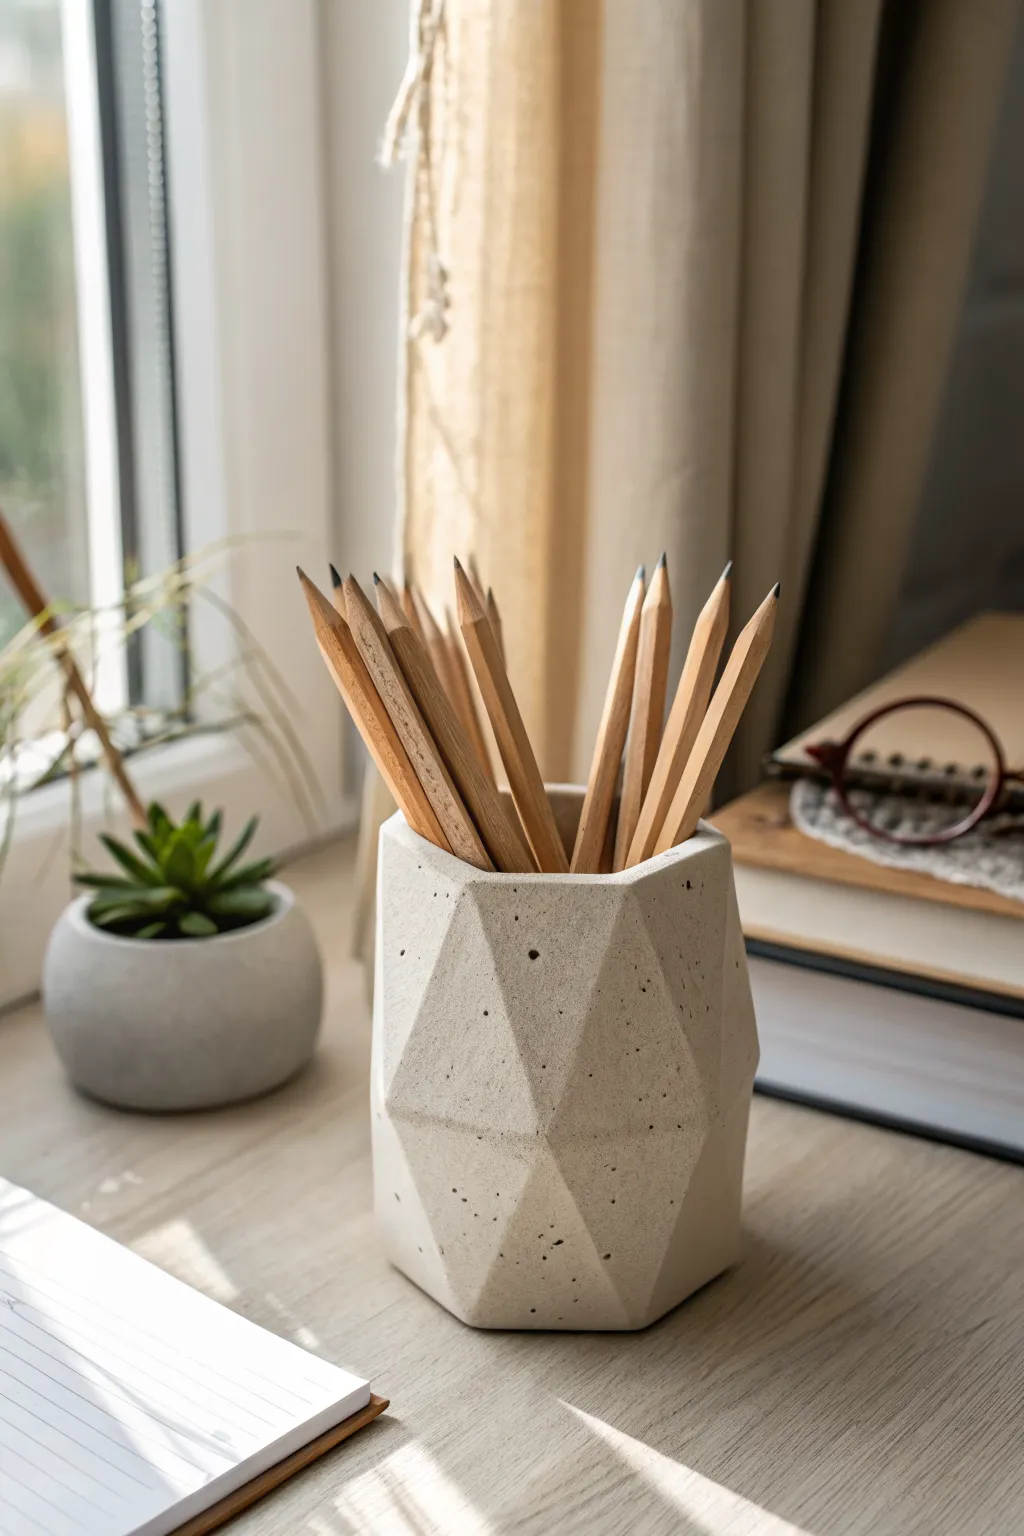
This modern, concrete-inspired pencil cup brings a sophisticated touch to your desk with its clean lines and angular facets. Using air dry clay, you can replicate this stylish geometric form that looks deceptively like heavy stone but is light and easy to craft.
Step-by-Step Guide
Materials
- White or light grey air dry clay (approx. 500g)
- Small cylindrical container (or cardboard tube) for the core
- Rolling pin
- Craft knife or clay blade
- Ruler
- Sanding sponge (fine grit)
- Optional: Black acrylic paint and old toothbrush (for speckles)
- Matte varnish or sealant
- Water in a small cup
- Smooth work surface or clay mat
Step 1: Building the Base Form
-
Prepare the core:
Find a clean cylindrical inner container, like an empty tin can or a sturdy cardboard tube. This will ensure your pencil cup is perfectly round on the inside and watertight if you choose to line it. -
Condition the clay:
Knead your chunk of air dry clay in your hands until it becomes warm, pliable, and free of cracks. If it feels too dry, dip your fingers in water and work the moisture in. -
Roll out a slab:
Using your rolling pin, flatten the clay into a thick, even slab. You want it to be substantially thicker than your final wall—aim for at least 1.5 cm (about 0.6 inches) thick to allow depth for carving the facets later. -
Cut the clay to size:
Measure the height and circumference of your core cylinder. Use a ruler to cut a rectangular strip of clay that is slightly taller and wider than the core to ensure full coverage. -
Wrap the cylinder:
Carefully wrap the thick clay slab around your cylinder core. Press it firmly against the surface so no air pockets remain between the core and the clay. -
Seal the seam:
Where the two edges of the clay meet, use your fingers or a modeling tool to blend the seam together until it becomes invisible. I find that using a tiny bit of water here helps smooth it out perfectly. -
Add the bottom:
Roll a small ball of clay flat for the base. Place your wrapped cylinder on top of it, trace around the edge, and trim away the excess. Blend the clay up from the base onto the walls to secure the bottom.
Uneven Facets?
Don’t panic if you slice too deep. Simply patch a small piece of fresh clay back onto the area, smooth it out with water, and re-slice once it firms up slightly.
Step 2: Sculpting the Facets
-
Initial shaping:
While the clay is still workable but slightly firm, use your hands to roughly form the shape into a slight taper if you want the rim slightly narrower than the body. -
Slice the first facet:
Take your sharp clay blade or craft knife. Starting near the top rim, slice downwards at an angle to remove a triangular or trapezoidal wedge of clay. The goal is a flat, sharp plane. -
Create the neighboring facet:
Rotate the cup slightly. Make another slice next to the first one, allowing the edges to meet sharply. Vary the angle of your knife to create different geometric shapes like triangles and diamonds. -
Carve the lower section:
Move to the bottom half of the cup. Slice upwards or sideways to intersect with the cuts you made on the top half. This intersection creates the distinctive ‘low poly’ geometric look. -
Refine the rim:
Carefully trim the top rim to be flat and even. You can leave it round or slice small angles into the outer edge of the rim to match the faceted theme. -
Check for symmetry:
Rotate the piece and look at it from all sides. If one facet looks too bulky, carefully shave off thin layers until the balance feels right. Remember, irregularity adds to the handmade charm. -
Smooth the planes:
Dip your finger in water and very lightly run it over the flat surfaces to remove knife drag marks, but be careful not to round over the sharp edges between the facets.
Level Up: Marble Look
Mix white clay with a small amount of grey or black clay. Knead briefly to create streaks, not a solid color. When sliced, the facets will reveal beautiful marble veins.
Step 3: Finishing Touches
-
Strict drying time:
Let the piece dry slowly away from direct sunlight or heat sources. Because the clay is thick, this may take 48 to 72 hours. Rotate it occasionally for even drying. -
Sanding for crispness:
Once bone dry, use a fine-grit sanding sponge to gently sand the flat planes. This sharpens the edges and gives the surface a professional, stone-like finish. -
Add the splatter effect:
To mimic the concrete look in the photo, dilute a tiny drop of black acrylic paint with water. Dip an old toothbrush in it and flick the bristles with your thumb to mist tiny speckles over the cup. -
Seal the project:
Apply two coats of matte varnish to protect the clay from moisture and dirt. This will also help secure your speckle details. -
Remove core (Optional):
If you used a plastic or metal core and didn’t glue it, you might be able to slide it out now, or you can leave it inside for extra structural strength.
Now your desk is organized with a piece of functional art that looks as solid as rock.
Moon Phase Hanging Pieces
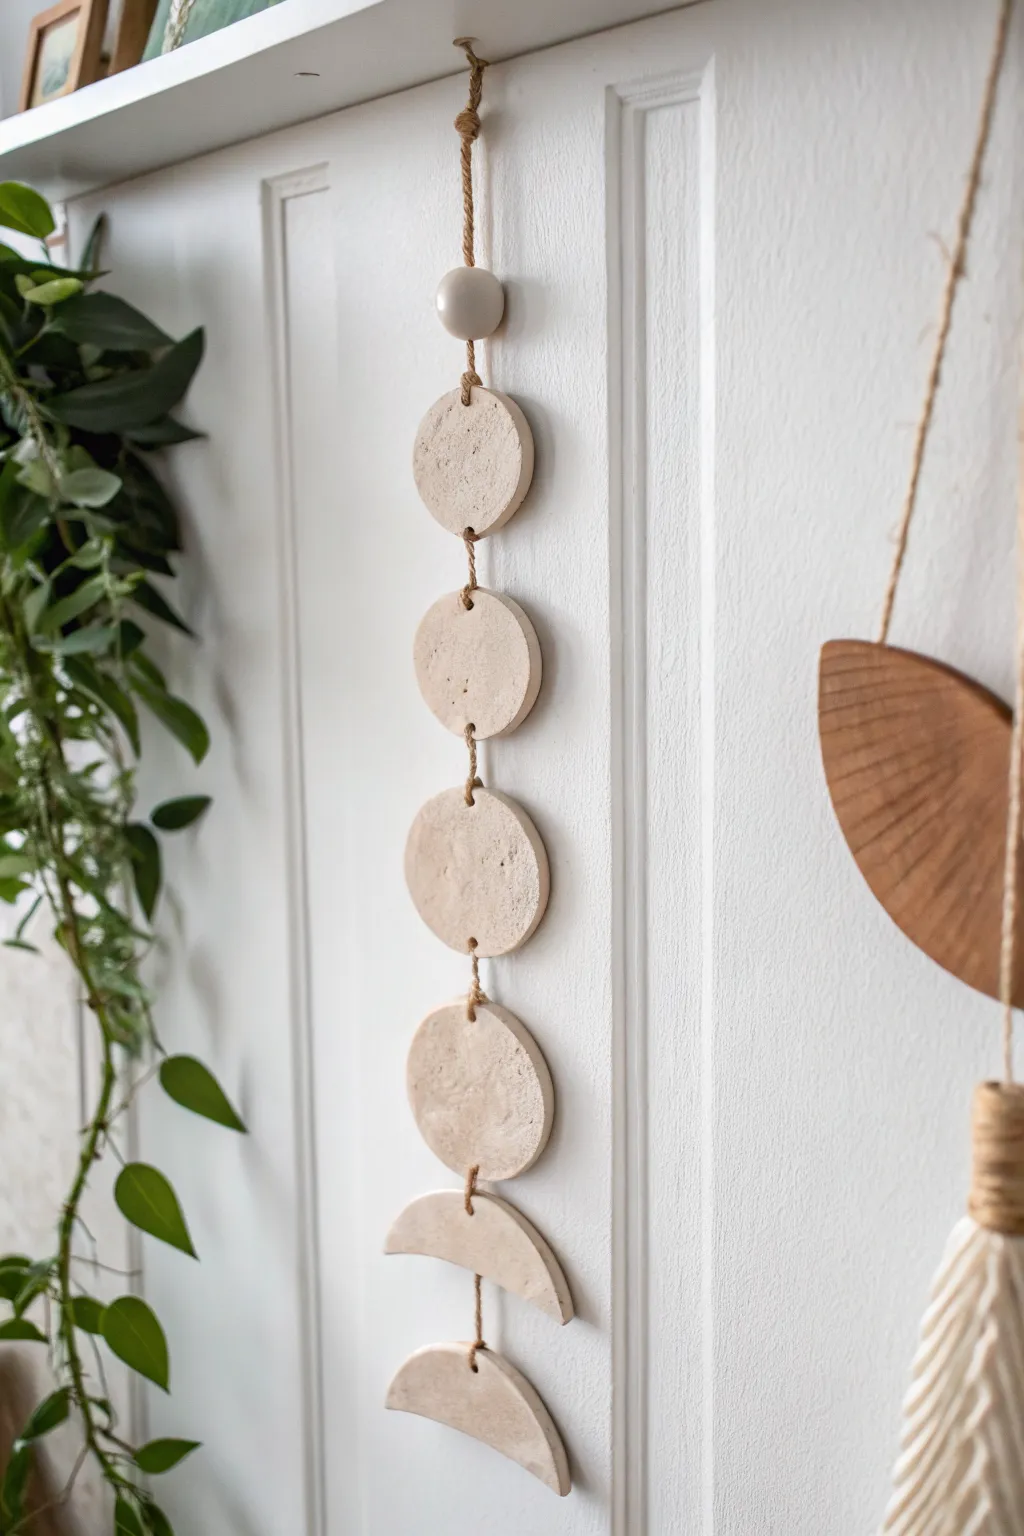
Bring celestial charm to your walls with this rustic moon phase mobile. Featuring textured clay discs and crescents strung on natural jute, this beginner-friendly project adds an organic, handmade touch to any room.
Step-by-Step
Materials
- Air dry clay (white or light grey)
- Rolling pin
- Circle cookie cutter (approx. 2.5-3 inches)
- Knife or clay tool
- Sandpaper (fine grit)
- Jute twine or hemp cord
- Wooden bead (optional, for top accent)
- Straw or skewer (for poking holes)
- Cup of water
- Parchment paper or silicone mat
Step 1: Shaping the Clay Elements
-
Prepare the Clay:
Take a large chunk of air dry clay and knead it in your hands until it becomes soft and pliable. This warms the material and prevents cracking later. -
Roll It Out:
Place the clay on a sheet of parchment paper. Use a rolling pin to flatten it to an even thickness of about 1/4 inch. If you want a smoother finish, lay guides (like magazines) on either side of the clay. -
Cut the Circles:
Using your circle cutter, press down firmly to cut out six identical circles. Remove the excess clay from around the shapes. -
Create the Crescents:
Take two of these circles to transform them into crescents. Use the same circle cutter and offset it on the clay round, cutting away an arc to leave behind a crescent moon shape. -
Smooth the Edges:
Dip your finger in a small cup of water and gently run it along the cut edges of all your shapes to smooth down any roughness or sharp bits. -
Add Texture (Optional):
To achieve the rustic look in the photo, lightly dab a crumpled piece of aluminum foil or a textured stone over the surface of the wet clay. -
Create Hanging Holes:
Using a straw or skewer, poke a hole at the very top and very bottom of the four full circles. Ensure the holes penetrate completely through. -
Piercing the Crescents:
For the crescent shapes, you only need one hole at the top center. The orientation matters, so make sure they will hang correctly. -
Make the Top Bead:
Roll a small amount of leftover clay into a sphere about the size of a marble. Poke a hole straight through the center to create the top bead shown in the image.
Step 2: Drying and Assembly
-
Let it Cure:
Arrange all pieces flat on parchment paper in a cool, dry place. Allow them to dry for at least 24-48 hours. Flip them over halfway through so the undersides dry evenly. -
Sand for Perfection:
Once fully hard and white, use fine-grit sandpaper to gently buff away any remaining sharp edges or irregularities on the silhouette. -
Cut the Twine:
Cut a long piece of jute twine, roughly 3 or 4 feet long. It’s better to have too much than too little, as knots take up length. -
Start at the Bottom:
Thread the twine through the hole of the bottom-most crescent shape and tie a knot underneath securely. Trim the excess tail close to the knot. -
Connect the Second Crescent:
Measure about 1-2 inches up the twine and tie a simple overhand knot. Thread the next crescent onto the string so it rests on this knot. -
String the Circles:
Repeat the process for the four full circles. Tie a knot, thread through the bottom hole, pull the string up across the back of the disc, and thread out through the top hole. -
Secure the Discs:
Alternatively, you can tie a knot above and below each hole if you want the discs to be fixed more rigidly, but running the string behind the disc is easier and minimal. -
Add the Top Bead:
After the final circle is attached, thread on your handmade clay bead (or a wooden one) and slide it down to meet the top circle. -
Create a Loop:
Tie a secure loop at the very top of the twine for hanging. Trim any remaining loose ends for a clean finish.
Natural Texture Hack
For that earthy, stone-like appearance, try mixing a small teaspoon of used coffee grounds or dried tea leaves into your clay before rolling it out.
Curling Edges?
If your circles start curling up while drying, place a lightweight book on top of them (with parchment paper in between) once they are semi-dry to flatten.
Hang your new moon phase creation near a window to catch the changing light throughout the day
Beginner Phone Rest
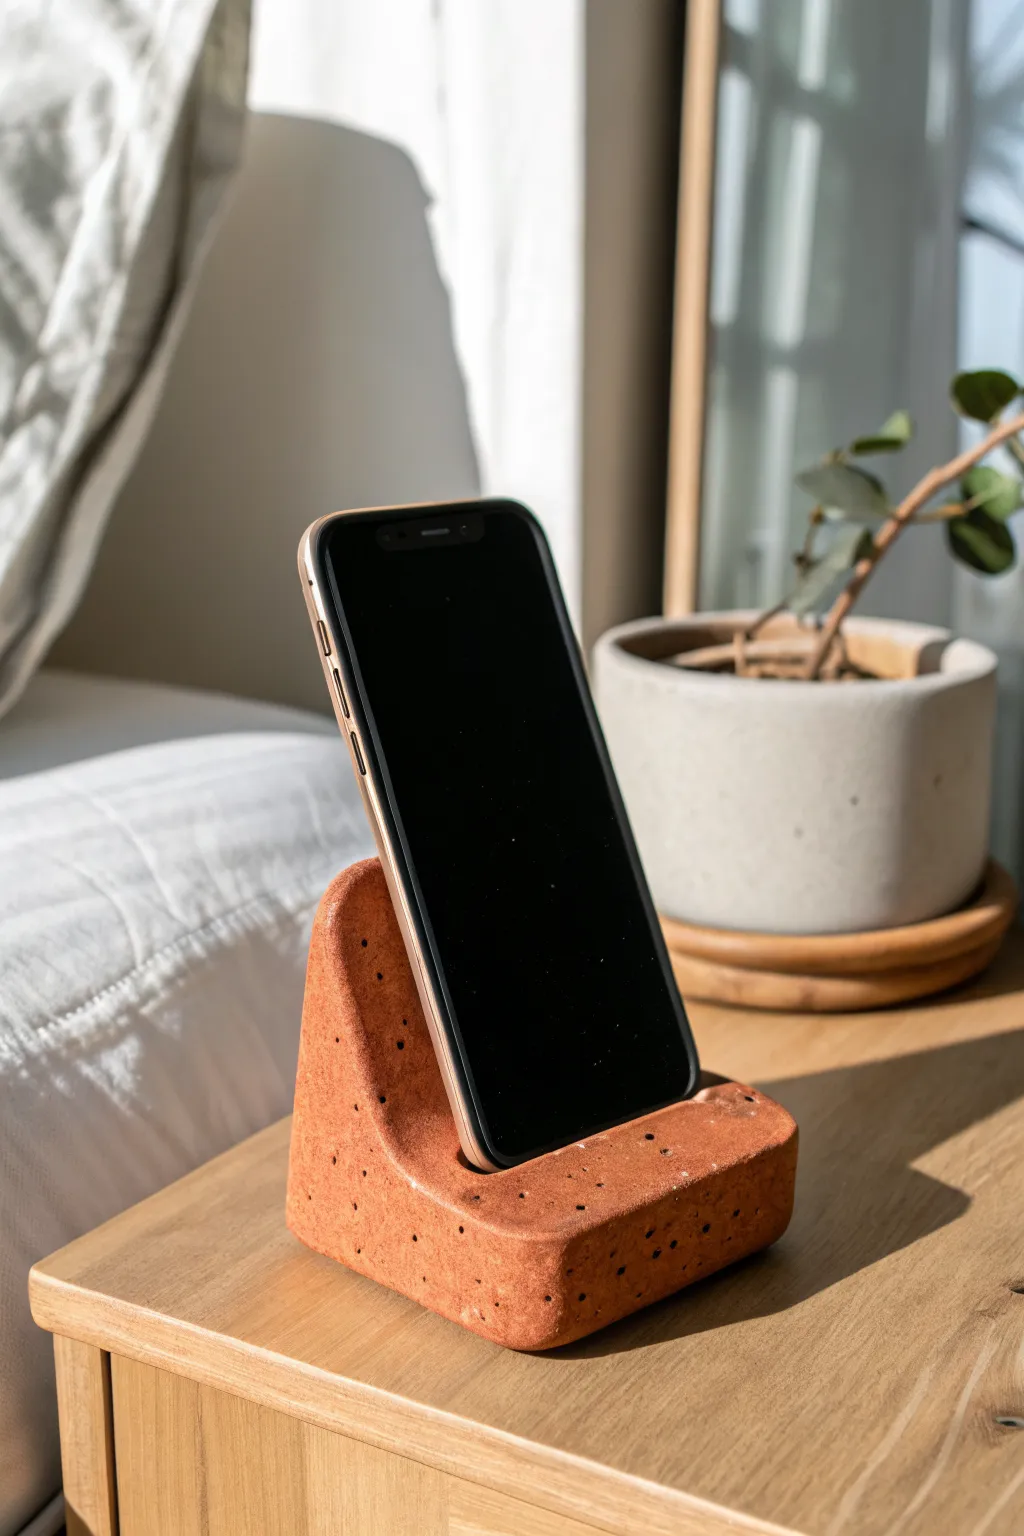
This rustic and functional phone stand combines a warm terracotta tone with a playful, cratered texture that adds visual interest to any nightstand. It is a deceptively simple project that uses basic shaping techniques to create a sturdy home for your device.
Detailed Instructions
Materials
- Air dry clay (white or terracotta color)
- Acrylic paint (burnt sienna, orange, and brown if mixing custom color)
- Dried coffee grounds or coarse sand
- Rolling pin
- sharp knife or clay cutting tool
- Toothpick or skewer
- Medium-grit sandpaper
- Matte varnish or sealant
- Small sponge for texturing (optional)
Step 1: Preparation and Mixing
-
Prepare your clay base:
Start with a generous block of air dry clay, roughly the size of a grapefruit. If you are using white clay, knead in acrylic paint now to achieve that warm terracotta base color found in the photo. Mixing paint into the raw clay gives a more natural finish than painting it later. -
Add the texture:
To recreate the speckled, organic look, sprinkle a tablespoon of dried coffee grounds or coarse sand onto your clay. Fold the clay over itself and knead thoroughly until the speckles are evenly distributed throughout the mass. -
Check consistency:
If the paint or coffee grounds made the clay too sticky, let it sit for ten minutes or dust it lightly with cornstarch. It should be firm enough to hold its shape.
Step 2: Shaping the Form
-
Form the initial block:
Shape your clay into a thick rectangular block. It should be slightly wider than your phone and about 4-5 inches deep. -
Create the slope:
Using your thumb, press gently into the top front third of the block to start creating an indentation. You want to create a smooth, curved ramp where the phone will lean back. -
Define the lip:
Mold the front edge upwards to create a distinct lip or stopper. This ridge is crucial as it keeps the bottom of the phone from sliding forward. -
Refine the back support:
Smooth the back section upwards into a triangular wedge shape. This needs to be tall enough to support the weight of the phone but doesn’t need to reach the top of the device. -
Test the fit:
Wrap your actual phone in plastic wrap (to protect it) and gently press it into the form to ensure the angle is comfortable for viewing. Adjust the front lip height if necessary.
Uneven Drying?
If cracks appear while drying, don’t panic. Mix a tiny bit of fresh clay with water to make a paste (slip) and fill the cracks, then smooth over.
Step 3: Detailing and Drying
-
Smooth the surfaces:
Dip your finger in a little water and run it over all edges to soften them. The look we want is organic and handmade, not machine-sharp. -
Add the crater details:
Take a toothpick or a small skewer and poke random holes all over the surface. Vary the depth slightly; some should be shallow divots, others small pinpricks. -
Enhance surface texture:
If the surface looks too smooth, lightly pat it with a dry sponge or a crumpled ball of foil to add extra microscopic texture that matches the coffee ground speckles. -
Begin drying process:
Place the stand on a wire rack or a piece of cardboard. Let it dry for at least 24-48 hours. I find flipping it on its side halfway through helps the bottom dry evenly.
Cable Management
Before drying, use a straw to poke a hole through the back of the stand or carve a groove in the bottom to feed a charging cable through neatly.
Step 4: Finishing Touches
-
Sand for stability:
Once fully dry and hard, place the stand on a flat surface to check for wobbling. Sand the bottom flat using medium-grit sandpaper until it sits perfectly still. -
Highlight the texture:
If the outer color faded during drying, you can do a very light wash of watered-down brown paint. Wipe it off immediately with a paper towel so the paint only stays in the little holes and texture crevices. -
Seal the piece:
Apply a coat of matte varnish or sealant. This protects the clay from moisture and prevents the coffee grounds from eventually molding or flaking off. -
Final cure:
Let the varnish cure completely according to the bottle instructions before trusting it with the weight of your phone.
This charming, speckled stand brings a touch of earthy calm to your desk setup while keeping your notifications in clear view
Tiny Animal Charms
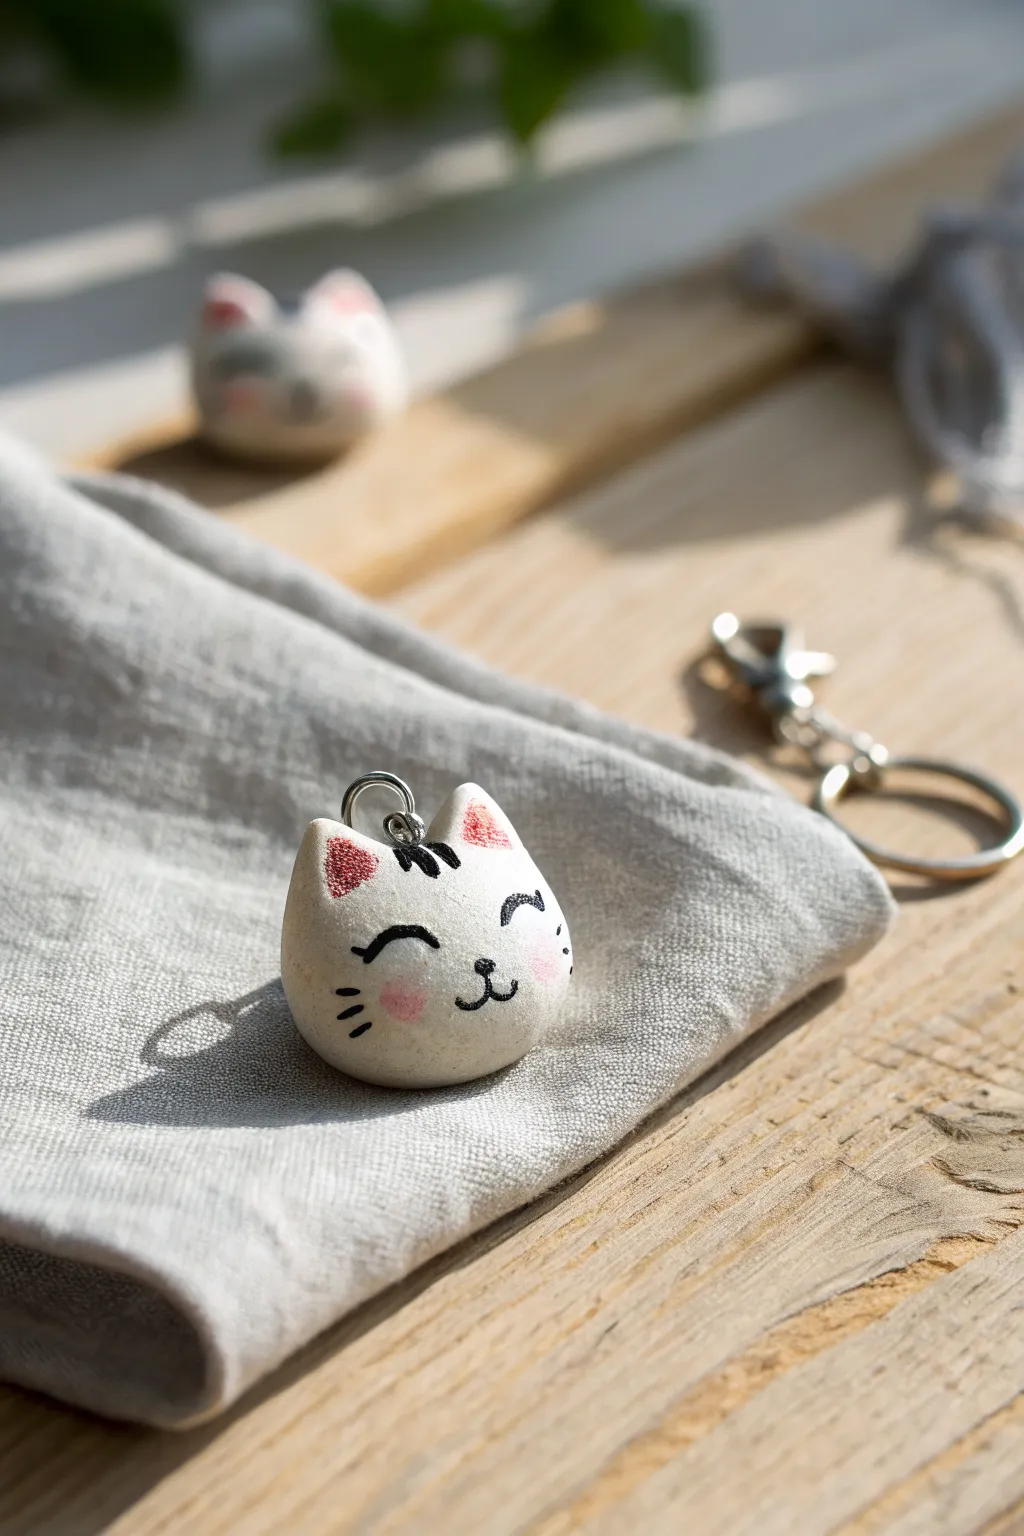
This adorable, slightly textured cat head charm is a perfect introduction to working with stone-effect air dry clay. With its simple spherical shape and sweet painted expression, it makes for a delightful keychain or zipper pull that captures a serene, happy mood.
Step-by-Step Guide
Materials
- White or stone-effect air dry clay (e.g., DAS stone or similar)
- Small rolling pin or acrylic roller
- Modeling tool or toothpick
- Small eye screw connection
- Jump ring
- Fine grit sandpaper (optional)
- Black fine-liner marker (waterproof) or acrylic paint
- Pink chalk pastel or pink acrylic paint
- Small detail paintbrush
- Matte varnish or sealant
Step 1: Shaping the Base
-
Prepare the Clay:
Take a walnut-sized amount of air dry clay and knead it in your hands until it becomes warm and pliable. If the clay feels too dry, you can wet your fingers slightly to add moisture. -
Roll a Sphere:
Roll the clay between your palms to create a smooth, tight ball. Aim for a diameter of about 1 inch (2.5 cm), trying to smooth out any major cracks or seams as you go. -
Flatten the Base:
Gently press the bottom of the sphere onto your work surface to create a flat base. This gives the charm slightly more stability and a pleasing weight. -
Form the Ears:
Using your thumb and forefinger, gently pinch the top left and right sides of the sphere to pull up two small triangles. These will become the cat’s ears. -
Refine the Shape:
Smooth the transition between the head and the ears with a dab of water on your finger. The ears should look like subtle peaks rising from the round head rather than separate pieces attached later. -
Insert Hardware:
While the clay is still wet, carefully screw a small metal eye pin or eye screw into the exact center of the top of the head, between the ears. I prefer to add a tiny dab of superglue to the threads before inserting for extra durability.
Cracks Appearing?
If small cracks appear while drying, mix a tiny bit of fresh clay with water to make a paste (slip) and fill the cracks. Smooth over with a finger.
Step 2: Drying and Refining
-
Let it Dry:
Place your charm in a safe, dry spot away from direct sunlight. Allow it to dry completely for at least 24 to 48 hours. The clay will turn a lighter, chalkier white when fully cured. -
Sand for Texture:
Once fully dry, inspect the surface. If you want a smoother finish, gently buff the surface with fine-grit sandpaper, but keep some of the natural stone-like texture visible for character. -
Clean the Dust:
Wipe the charm with a slightly damp cloth or a dry soft brush to remove any clay dust created during sanding. A clean surface is crucial for the painting step.
Add a Bell
For extra charm, attach a tiny jingle bell to the jump ring along with the keychain hardware. It adds a pleasant sound and fits the cat theme perfectly.
Step 3: Painting the Details
-
Draw the Eyes:
Using a waterproof black fine-liner pen or a very fine brush with black acrylic paint, draw two curving arches for the closed, happy eyes. Place them about halfway down the face. -
Add the Nose and Mouth:
Draw a tiny vertical line centered below the eyes, branching into a small ‘w’ shape to create the classic cat smile. Keep the lines delicate. -
Whiskers and Top Markings:
Add three short, floating whiskers on each cheek. Then, draw three small, vertical stripes on the very top of the forehead, between the ears. -
Blushing Cheeks:
To create the soft, diffused pink cheeks, scrape a little bit of pink chalk pastel into powder. Pick up the powder with a dry brush and gently dab it onto the cheek area creates a soft, airbrushed look. -
Coloring the Ears:
Using the same pink pastel dust or a very watered-down pink paint, gently tint the inner triangles of the ears. -
Seal the Charm:
Protect your artwork with a coat of matte varnish. This will prevent the marker from smudging and keep the pastel dust in place. -
Final Assembly:
Once the varnish is dry, use pliers to open a jump ring, thread it through the eye screw, and attach your keychain hardware.
Now you have a sweet, handmade companion ready to tag along on your keys or bag
Mini Fairy Door Decor
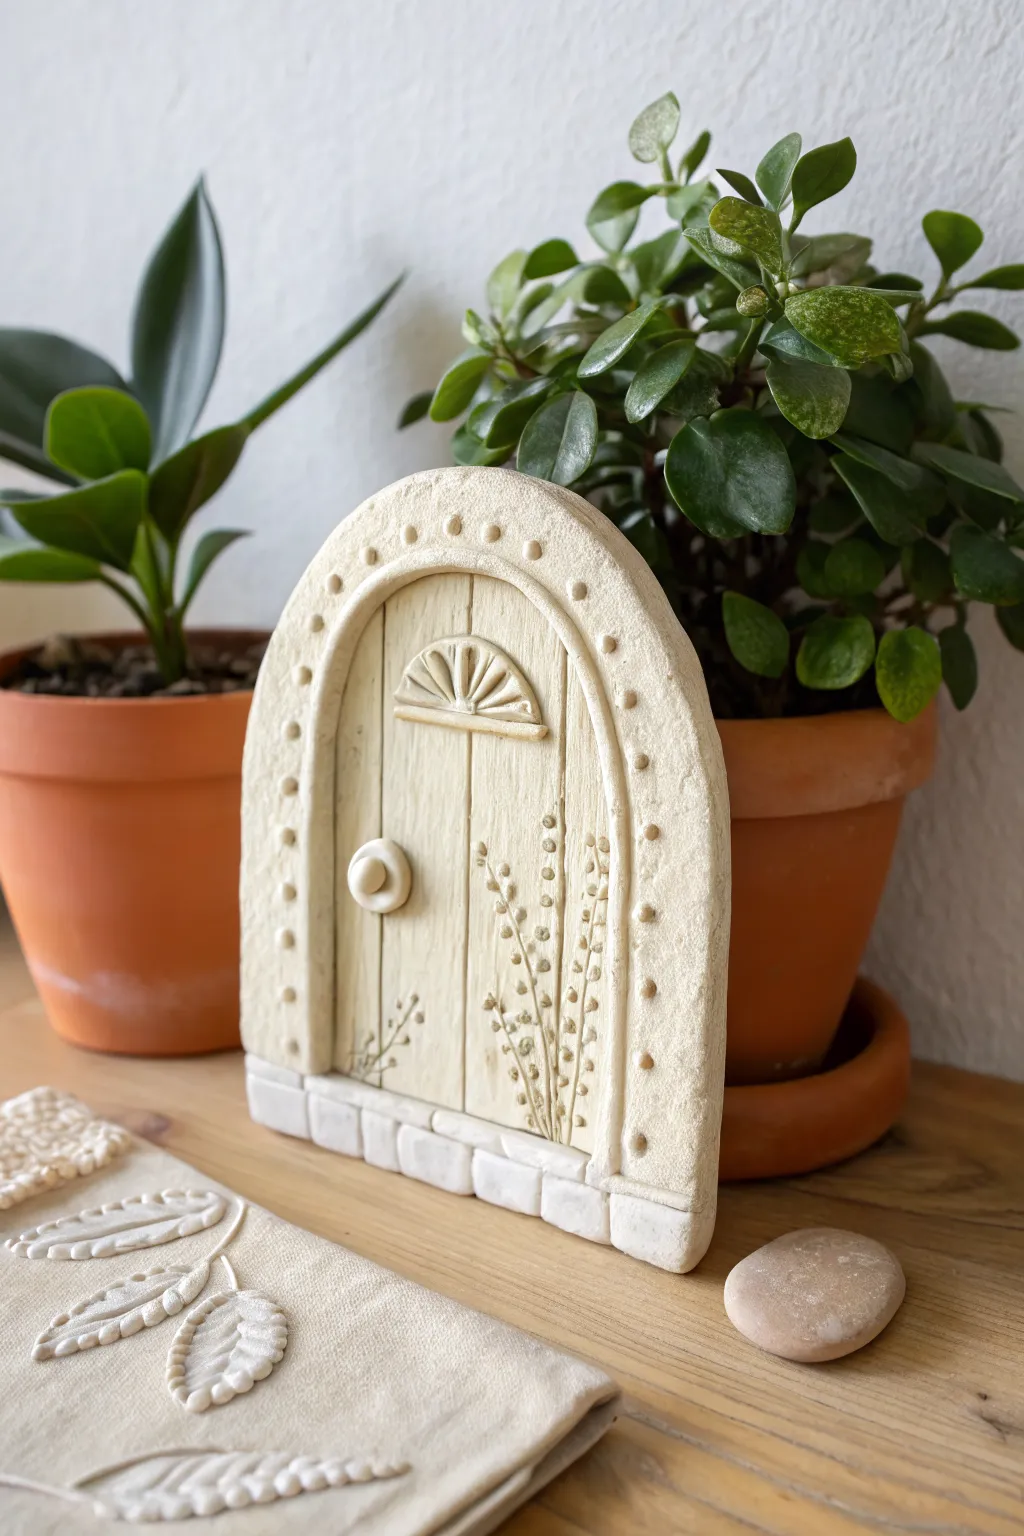
This charming, arched fairytale door brings a touch of magic to any bookshelf or potted plant setup. Crafted from air-dry clay left in its natural creamy tone, it features delicate floral engravings and a textured brick base that mimics the look of carved stone.
Step-by-Step Tutorial
Materials
- Air-dry clay (white or cream stone clay)
- Rolling pin
- Parchment paper or craft mat
- Craft knife or scalpel
- Modeling tools (ball stylus, needle tool)
- Small bowl of water
- Sandpaper (fine grit)
- Cardboard or cardstock (for template)
Step 1: Shaping the Base
-
Create a template:
Sketch a simple arched door shape onto a piece of cardstock and cut it out. This ensures your clay slab will be symmetrical. -
Roll the slab:
Roll out a portion of air-dry clay on parchment paper to a uniform thickness, about 1/4 to 1/2 inch thick. -
Cut the arch:
Place your template on the clay and carefully trace around it with a craft knife to cut out the main door shape. Smooth any rough edges with a wet finger. -
Form the frame:
Roll a long, thin snake of clay. Flatten it slightly and attach it around the curved upper edge of your door slab to create the arched door frame. Use a little water to score and slip the pieces so they bond securely.
Step 2: Adding Architectural Details
-
Create the threshold:
Roll a rectangular strip of clay for the base. Attach it to the bottom of the door. Use your knife to gently press vertical lines into this strip, creating a row of faux paving stones or bricks. -
Engrave the wood grain:
Using a needle tool or the back of your knife, lightly drag vertical lines down the center panel of the door to simulate wooden planks. Keep the lines slightly wavy for a rustic look. -
Make the window:
Form a small semi-circle of clay. Press it onto the upper center of the door. Use your knife to indent a fan shape or sunburst lines into it. -
Add the doorknob:
Roll a tiny ball of clay for the knob and a slightly larger, flatter circle for the backplate. Stack them and press onto the left side of the door. -
Detail the frame:
Take a small ball tool or the end of a paintbrush handle and press indents along the arched frame at regular intervals to create a decorative dotted border.
Clean Lines
Keep a small damp sponge nearby. Wiping your tools frequently prevents clay buildup and ensures your wood grain lines and decorative dots stay crisp.
Step 3: Floral Textures and Finishing
-
Scoring the vines:
I find it easiest to lightly sketch the path of your vines first with a needle tool, starting from the bottom right and curving upward. -
Adding leaves and buds:
Along your sketched vine lines, press tiny dots or teardrop shapes into the clay using a small stylus tool or needle to create the impression of climbing flowers. -
Refine textures:
Look over the piece and deepen any wood grain or brick lines that may have softened while you were working. -
Controlled drying:
Let the door dry on a flat surface away from direct heat. Flip it over carefully every few hours to prevent warping as moisture evaporates. -
Sanding:
Once fully dry (usually 24-48 hours), use fine-grit sandpaper to gently smooth the outer edges and the back of the piece for a professional finish. -
Optional wash:
If you want to highlight the textures without painting, apply a very watered-down brown acrylic wash and wipe it off immediately, leaving darker color only in the deep crevices.
Fairy Garden Setup
Make a small clay ‘kickstand’ attached to the back if you want the door to stand freely on a shelf, or glue a magnet on the back for fridge decor.
Place your finished door against the base of a houseplant to create an instant hidden world
Paint-First, Detail-Later Figures
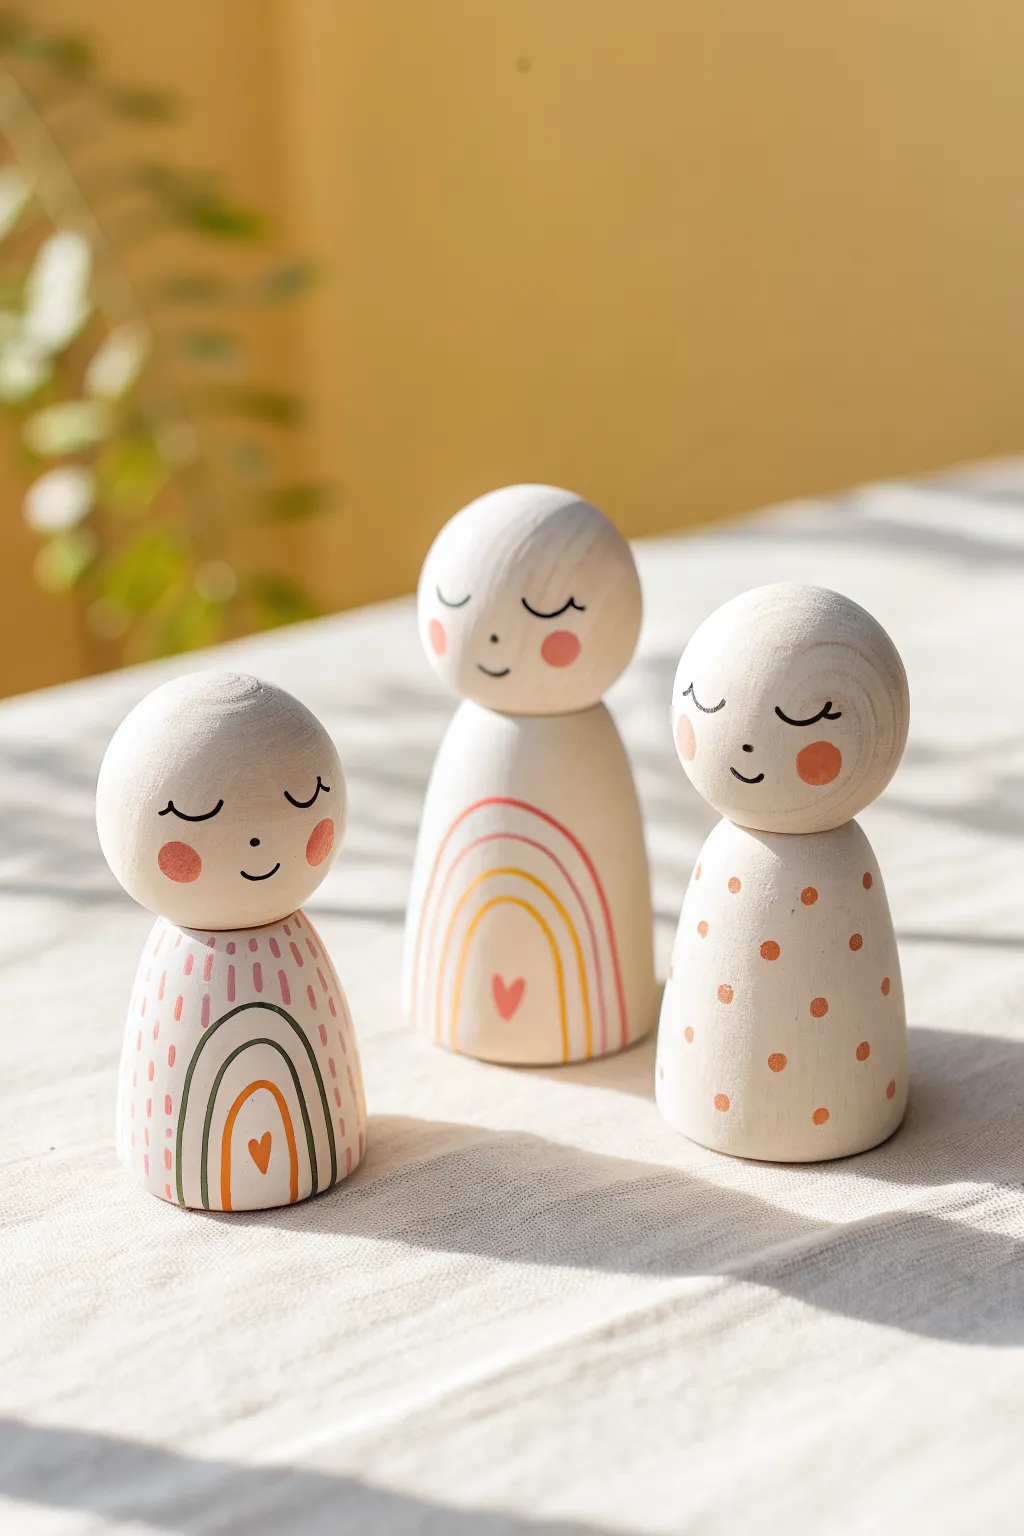
These charming minimalist figures feature smooth, rounded forms that mimic classic wooden peg dolls but allow for hand-sculpted customization. With their peaceful expressions and soft pastel palette, they make perfect nursery decor or gentle play companions.
Step-by-Step
Materials
- High-quality white air dry clay
- Rolling pin or smooth glass jar
- Water in a small cup
- Sponge or fine grit sandpaper
- Acrylic paints (White, Peach/Blush, Sage Green, Mustard, Terracotta, Soft Pink)
- Fine detail paintbrushes (Size 0 and 00)
- Black fine-tip paint pen or micron pen
- Matte finish clear varnish
Step 1: Sculpting the Base Forms
-
Prepare the clay:
Start by conditioning a handful of air dry clay, kneading it until it is warm, pliable, and free of air bubbles or cracks. -
Roll the body cylinder:
Take a portion of clay roughly the size of a golf ball and roll it into a smooth cylinder. Gently taper the top slightly so it resembles a cone with the tip cut off. -
Flatten the base:
Tap the bottom of your cylinder firmly against your work surface. You want a perfectly flat base so the figure stands up straight without wobbling. -
Create the head:
Roll a smaller ball of clay for the head. It should be proportional to the body, roughly 1/3 the height of the cylinder. -
Join the pieces:
Score (scratch) the top of the body and the bottom of the head. Apply a tiny dab of water or liquid clay slip to act as glue. -
Blend the seam:
Press the head onto the body. Unlike traditional wooden peg dolls, you can choose to smooth the clay at the neck slightly for a stronger bond, though keeping a distinct ‘neck’ line mimics the inspo image best. -
Refine the surface:
Dip your finger in water and smooth away any fingerprints or imperfections. The goal is a super-smooth, minimal finish. -
Full dry:
Allow your figures to dry completely for at least 24-48 hours. Turn them occasionally to ensure the bottom dries evenly.
Cracks happen?
If small cracks appear while drying, don’t panic. Mix a tiny bit of fresh clay with water to make a paste and fill the cracks, then sand smooth once dry.
Step 2: Sanding & Painting
-
Sand for perfection:
Once bone dry, use fine-grit sandpaper to buff the surface. I like to focus on the roundness of the head to get that perfect sphere look. -
Base coat:
Paint the entire figure with a creamy off-white or light beige acrylic paint. This creates a uniform ‘wood-like’ canvas for your designs. -
Paint the cheeks:
Mix a soft coral or blush pink. Using a round brush, paint two rosy circles on the face area. Keep them widely spaced for a sweet look. -
Draw the faces:
Using a fine-tip black paint pen (it’s easier than a brush for beginners), draw two curved lines for sleeping eyes and a tiny ‘u’ for a smile. -
Design 1: Polka Dots:
For the first doll, dip the non-brush end (the handle) of a paintbrush into terracotta paint. Dot it randomly over the body to create uniform polka dots. -
Design 2: Simple Rainbow:
For the second doll, paint a simple arch on the front bottom. Add nested arches inside in different colors—mustard, pink, and white—leaving space in the center for a tiny painted heart. -
Design 3: Detailed Arch:
For the third figure, paint a sage green arch outline. Fill the space above it with small vertical dashes in pink to create a textured rain effect. -
Seal the work:
Once the paint is fully cured, apply a coat of matte varnish. This removes the ‘chalky’ feeling of the clay and protects your delicate paint work.
Make it rattle
Before attaching the head, hollow out the body slightly and add a few dried beans or beads. Seal it up for a gentle sensory rattle toy.
Display your trio together on a shelf or windowsill to enjoy their calming presence