I love how air dry clay can turn into polished home decor without fancy tools or a kiln. These ideas are my go-to studio favorites when you want that clean, modern look with a little cozy, handmade soul.
Minimalist Trinket Dish Set
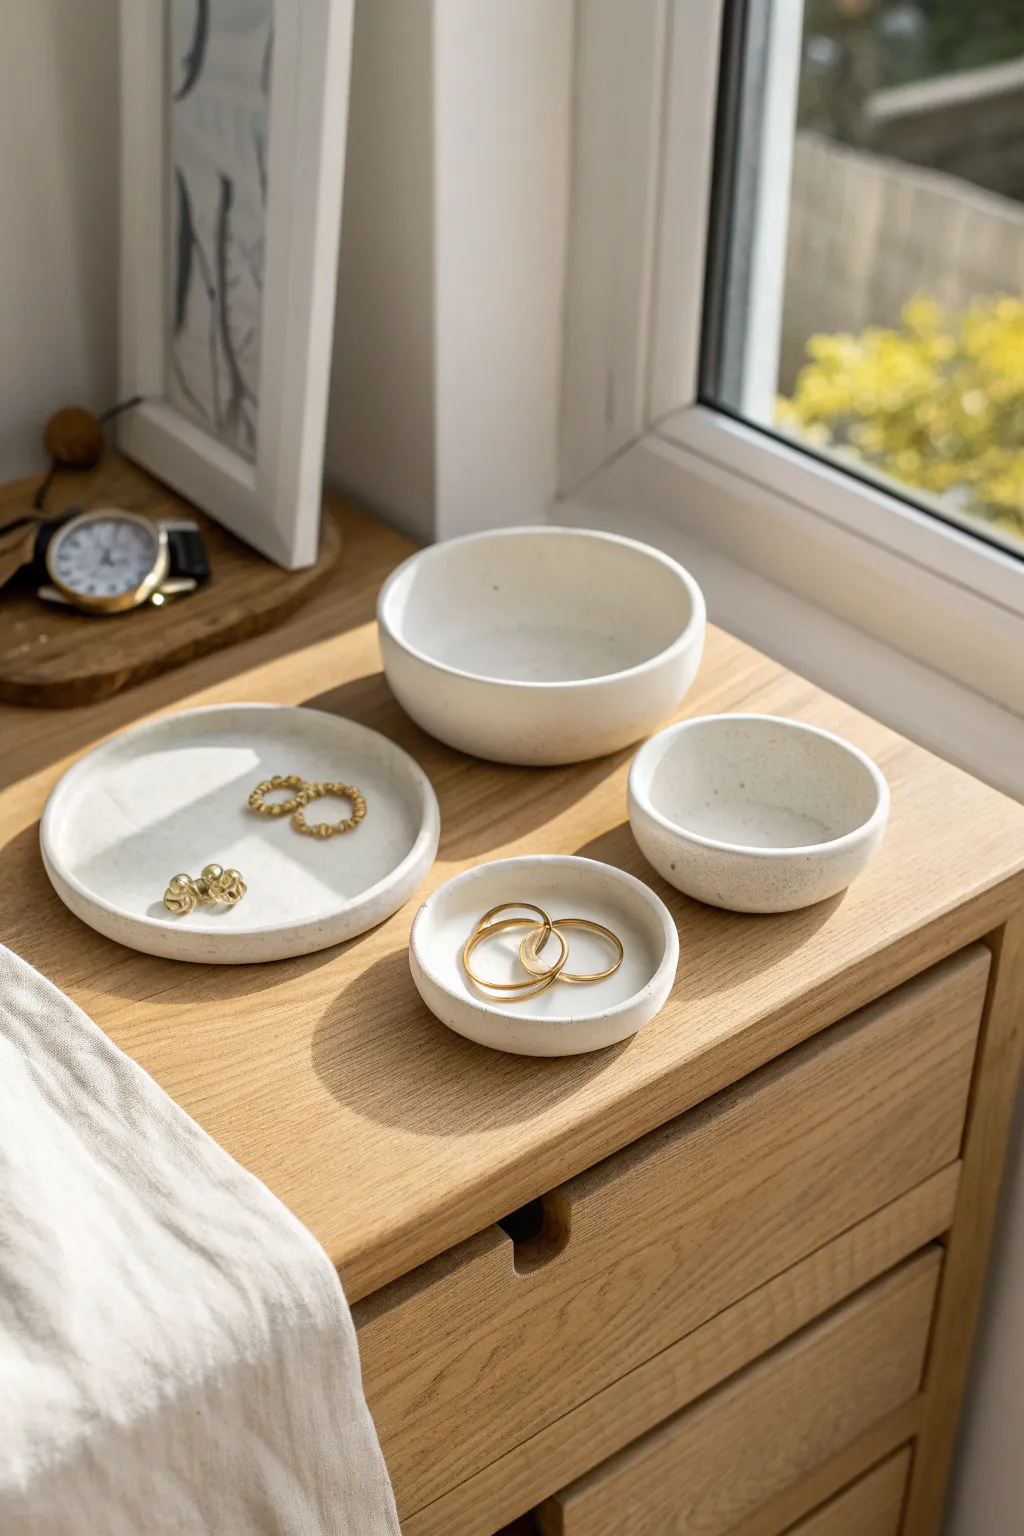
Bring a touch of Scandinavian simplicity to your dresser with this serene four-piece set of nesting organizers. Featuring a matte white finish and organic textures, these vessels are perfect for corralling everyday jewelry in a cohesive, minimalist display.
Step-by-Step
Materials
- White air-dry clay (fine grain)
- Acrylic rolling pin
- Circle cutters or round templates (various sizes)
- Small sponge
- Bowl of water
- Potter’s needle or craft knife
- Fine-grit sandpaper (220 and 400 grit)
- Matte white acrylic paint (optional)
- Matte varnish or sealant
Step 1: Shaping the Base Plates
-
Condition the clay:
Begin by taking a large chunk of air-dry clay and kneading it in your hands to warm it up. This conditioning process prevents cracks and makes the material more pliable for rolling. -
Roll out the slab:
Using your acrylic rolling pin, roll the clay out on a smooth, clean surface until it is approximately 1/4 inch thick. Try to keep the thickness consistent across the entire slab. -
Cut the circles:
Select four different sizes of circle cutters or templates to create your set. You’ll need one large circle (approx. 5-6 inches) for the tray, and three graduating sizes for the bowls. Cut them cleanly. -
Smooth the edges:
Dip your finger in a little water and run it along the cut edge of each clay circle to remove any sharpness or burrs left by the cutter.
Step 2: Forming the Vessels
-
Create the coils:
Roll out long, even snakes of clay on your work surface. These should be thinner than your base slab, roughly the thickness of a pencil. -
Score and slip:
Take your pottery needle and scratch hatch marks onto the outer rim of your first clay circle. Apply a tiny amount of water (slip) to the scratched area to act as glue. -
Attach the rim:
Gently press the clay coil onto the scored edge of the circle base. For the shallow tray, you only need one low coil. For the deeper bowls, layer two or three coils upward. -
Blend the seams:
This is crucial for the seamless look. Use your thumb or a modeling tool to smear the clay from the coil down onto the base, both on the inside and outside. I find using a downward dragging motion works best here. -
Refine the walls:
Once the seams are invisible, pinch the walls gently to thin them out and shape slightly upward. The large tray should have a straight vertical lip; curve the bowls slightly inward for a softer profile.
Cracks Appearing?
If tiny fissures appear while drying, mix a small amount of clay with water to make a paste (slip). Fill the cracks, let dry, and sand smooth again.
Step 3: Finishing Touches
-
Sponge smooth:
Dampen your small sponge and squeeze out almost all the water. Lightly drag it over the entire surface of each piece to erase fingerprints and create that unified texture shown in the photo. -
Slow drying:
Place your pieces on a wire rack or piece of paper away from direct sunlight. Let them dry for 24-48 hours. Turning them over halfway through helps the bottoms dry evenly. -
Initial sanding:
Once fully bone-dry, use the 220-grit sandpaper to remove any major bumps or unevenness on the rims. Wear a mask during this step to avoid inhaling dust. -
Polishing:
Switch to the 400-grit sandpaper for a final polish. The surface should feel incredibly smooth to the touch, almost like stone. -
Painting (Optional):
If your clay dried with a grayish tint, apply a thin coat of matte white acrylic paint to achieve the stark bright white look from the image. -
Seal the set:
Finish by applying two coats of matte varnish. This protects the clay from moisture and gives the pieces a finished, professional quality without adding unwanted shine.
Speckled Stone Effect
To mimic concrete or granite, dip an old toothbrush in diluted grey or black paint and flick fine speckles over the dried white vessels before sealing.
Arrange your new set on a bedside table to instantly create a calm, organized corner for your favorite accessories


Leaf-Imprinted Ring Bowls

Capture the delicate beauty of nature with this elegant bowl, featuring three deeply imprinted leaves radiating from the center. Its creamy white finish and organic shape make it a perfect catch-all for jewelry or a grounding decorative accent.
Detailed Instructions
Materials
- White or cream air dry clay
- Rolling pin
- Small bowl (approx. 5-6 inches diameter) to use as a mold
- Plastic wrap or cling film
- Craft knife or clay needle tool
- Sponge and water
- Fresh leaves with prominent veins (e.g., elm, mint, or sage)
- Fine-grit sandpaper (220-400 grit)
- Small pottery ribs or an old credit card
- Acrylic rolling pin or glass jar
- Matte finish varnish or sealant
Step 1: Preparation and Rolling
-
Condition the Clay:
Begin by taking a generous handful of air dry clay. Knead it in your hands for a minute to warm it up and ensure it’s pliable and free of air bubbles. -
Roll the Slab:
Place the clay on a clean, canvas-covered surface or a silicone mat. Roll it out into an even slab, aiming for a consistent thickness of about 1/4 inch. -
Smooth the Surface:
Before imprinting, take a barely damp sponge and gently wipe the surface of the clay slab to remove any canvas texture or rolling pin marks. This ensures a pristine canvas for your leaves. -
Arrange the Leaves:
Select three leaves of similar size. Arrange them in the center of your clay slab in a fan-like pattern, with the stems meeting in the middle, creating a focal point just like the inspiration image.
Fixing Cracks
If hairline cracks appear while drying, mix a tiny bit of fresh clay with water to make a paste (slip). Fill the crack, smooth it over, and let it dry again.
Step 2: Imprinting and Shaping
-
Pressing the Veins:
Gently roll over the leaves with your rolling pin once to embed them slightly. Then, use your thumb to press firmly along the spine and veins of each leaf to ensure a deep, crisp impression. -
Remove the Botanicals:
Carefully find the stem of each leaf and peel them away slowly to reveal the intricate designs underneath. Use tweezers if the stems are too short to grasp. -
Cut the Circle:
Place a bowl or circular template upside down over the imprinted area, ensuring the leaf design is centered. Use your needle tool or craft knife to cut closely around the template to create a perfect circle. -
Prepare the Mold:
Take your slump mold bowl and line the inside loosely with plastic wrap. This prevents sticking and makes it much easier to remove the clay later. -
Form the Bowl:
Lift your clay circle carefully and gently lower it into the lined mold. Allow gravity to pull it down, then softy press the clay against the mold walls to establish the curve. -
Adding Text Details:
If you wish to replicate the stamped text seen on the rim in the photo, use small letter stamps to press a word or date gently into the outer edge while the clay is still soft.
Color Wash
Mix a tiny drop of brown acrylic paint with water. Brush it into the leaf veins and wipe the surface immediately to darken just the imprinted lines.
Step 3: Refining and Finishing
-
Rim Smoothing:
Wet your finger slightly and run it along the cut rim of the bowl to soften the sharp edge. You want a rounded, organic lip rather than a harsh cut. -
Slow Drying:
Let the bowl dry inside the mold for at least 24 hours. Placing a light cloth over it can prevent it from drying too unevenly, which helps avoid cracking. -
Remove and Air Dry:
Once the clay is firm enough to hold its shape (leather hard), lift it out of the mold using the plastic wrap. Remove the plastic and let the bowl air dry completely for another 24-48 hours. -
Sanding:
Once bone dry, take your fine-grit sandpaper and gently sand the rim and the outside of the bowl. Be very careful around the interior leaf imprints so you don’t sand away the texture. -
Dust and Seal:
Wipe away all sanding dust with a dry brush or tack cloth. Apply a thin coat of matte varnish to seal the clay and protect it from moisture without adding unnatural gloss.
Place your finished bowl on a bedside table or entryway console for a serene touch of nature.


Geometric Catchall Tray
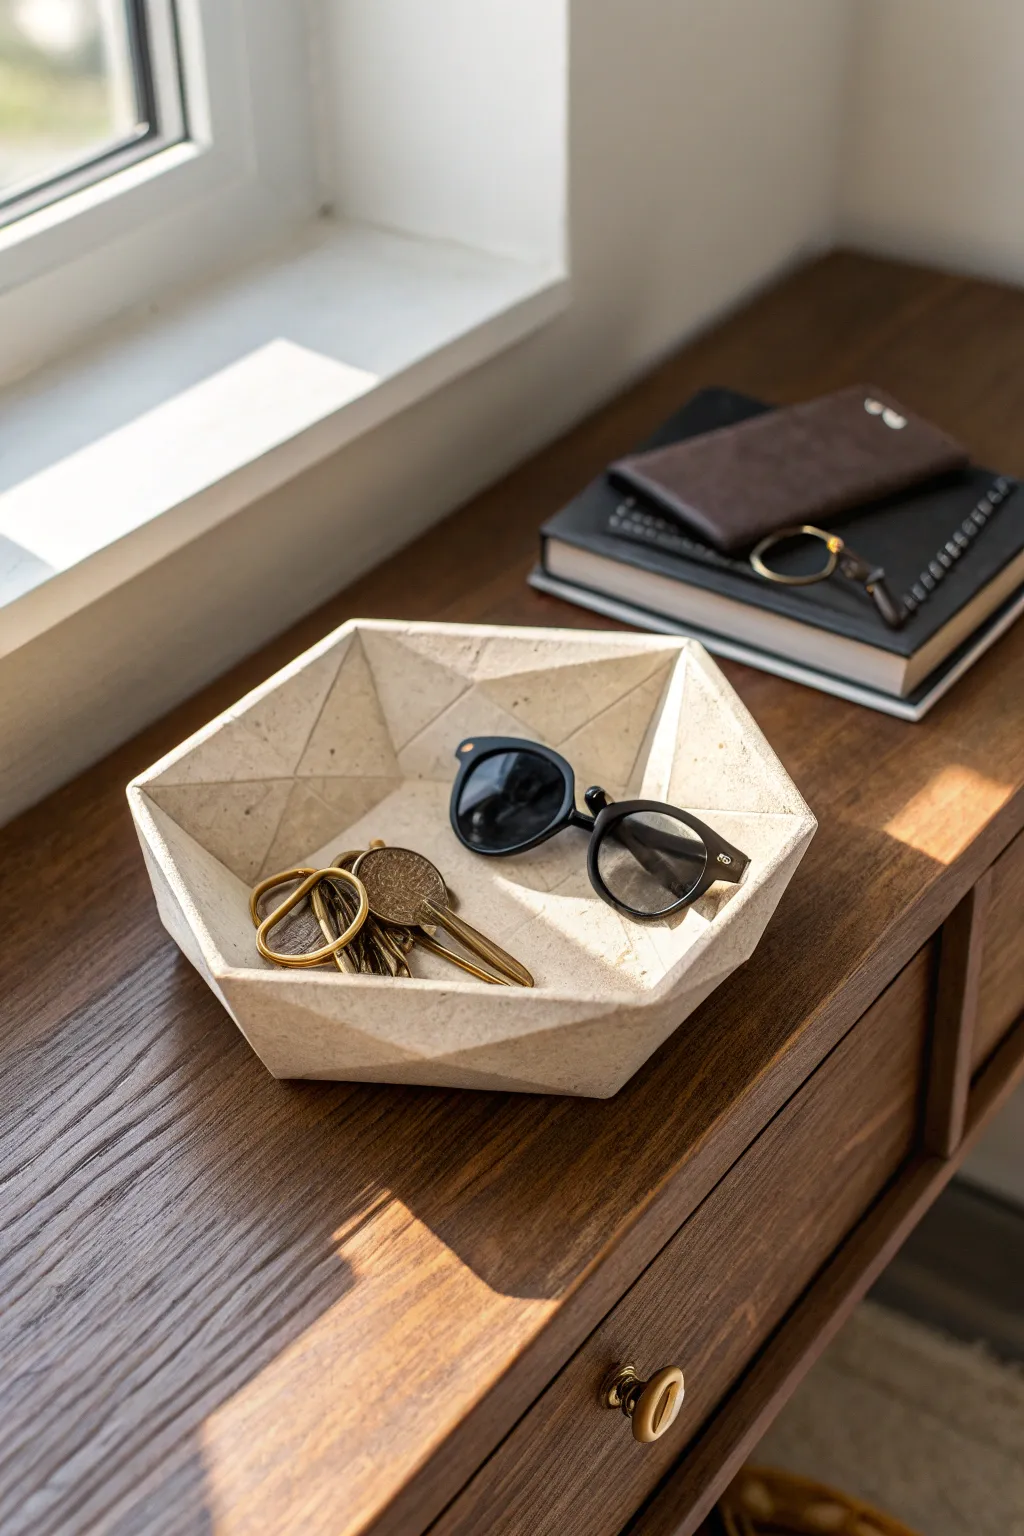
This striking hexagonal catchall tray looks like high-end carved stone but is surprisingly simple to craft from air dry clay. Its crisp geometric facets and natural finish make it the perfect minimalist organizer for your entryway console or bedside table.
Step-by-Step Tutorial
Materials
- White or sandstone air dry clay (approx. 1 lb)
- Rolling pin
- Paper template (printable hexagon)
- X-Acto knife or sharp craft blade
- Ruler or straight edge
- Cardboard (for creating a support mold)
- Tape (masking or painter’s)
- Small cup of water
- Fine-grit sandpaper (220-400 grit)
- Matte spray varnish
Step 1: Creating the Mold & Base
-
Prepare your template:
Start by drawing or printing a regular hexagon shape on paper, about 6-7 inches wide. Use this to cut a matching hexagon out of sturdy cardboard, which will serve as the base of your drying mold. -
Build the cardboard walls:
Cut six strips of cardboard, each about 2 inches tall and the exact length of one hexagon side. Tape these strips to the edges of your cardboard hexagon base, angling them slightly outward to create a shallow bowl shape. This form will support the clay while it dries. -
Roll out the clay:
Take a large chunk of air dry clay and knead it briefly to remove air bubbles. Roll it out on a smooth surface to an even thickness of about 1/4 inch. I like to flip the clay occasionally while rolling to ensure it doesn’t stick. -
Cut the clay base:
Place your original paper hexagon template onto the rolled clay. Using your ruler and craft knife, cut out the hexagon shape cleanly.
Keep it Sharp
To get super crisp internal lines, use a firm ruler or a plastic card to press into the facet seams while the clay is still soft, redefining the angles.
Step 2: Building the Geometric Facets
-
Cut the side panels:
From the remaining rolled clay, cut six trapezoid shapes. The bottom edge of each trapezoid should match the length of a hexagon side, the top edge should be slightly wider, and the height should be about 1.5 to 2 inches. -
Score and slip:
Score (scratch cross-hatch deviations) the edges of your clay hexagon base and the bottom edges of your side panels. Apply a dab of water or clay slip to these rough areas to act as glue. -
Assemble the tray:
Place the clay hexagon base into your cardboard mold. Press the side panels onto the base and against the cardboard walls, ensuring the seams line up perfectly at the corners. -
Reinforce the seams:
Roll a very thin snake of clay and press it into the interior seams where the walls meet the base and where the walls meet each other. Smooth this out with your finger to strengthen the bond.
Step 3: Sculpting the Interior
-
Add interior triangles:
To create that faceted, diamond-like interior seen in the photo, cut small triangles from thinly rolled clay. You will need enough to cover the interior walls, essentially creating a second layer. -
Position the facets:
Score and slip the back of these triangles and press them onto the interior walls. Arrange them so their points meet in the center of each wall panel, creating an ‘X’ or diamond pattern reliefs. -
Refine the edges:
Use a flat modeling tool or your knife to sharpen the lines between these new facet layers. The goal is to make the interior look carved, not lumpy, so distinct angles are key. -
Smooth the lip:
Run a slightly damp finger along the top rim of the tray to ensure it is flat and even. If the walls are uneven heights, trim them gently with your blade now while the clay is still soft.
Faux Granite Effect
Mix dried tea leaves or cracked black pepper into your clay before rolling it out. Sanding later will reveal speckles that look like real stone.
Step 4: Finishing Touches
-
Let it dry slowly:
Leave the tray inside the cardboard support mold for at least 24 hours. Drying too fast can cause cracking, so keep it away from direct heat or harsh sunlight. -
Remove and dry completely:
Once the clay is firm to the touch (leather hard), gently remove the cardboard support. Let the piece air dry for another 24-48 hours until it is bone dry and chalky white. -
Surface sanding:
Take your fine-grit sandpaper and gently sand the exterior and the flat top rim. Be very careful with the interior facets; just lightly touch up any sharp burrs without ruining your crisp geometry. -
Optional texture wash:
To mimic the stone look in the photo, you can dilute a tiny drop of grey or beige acrylic paint in water and brush it on, then immediately wipe it off. This settles pigment into the crevices. -
Seal the piece:
Finish by spraying the tray with a matte varnish. This protects the clay from moisture and gives it a professional, finished look without adding an unnatural shine.
Place your new geometric tray on a wooden surface to let the light catch those beautiful facets you sculpted


Scalloped Flower Coasters
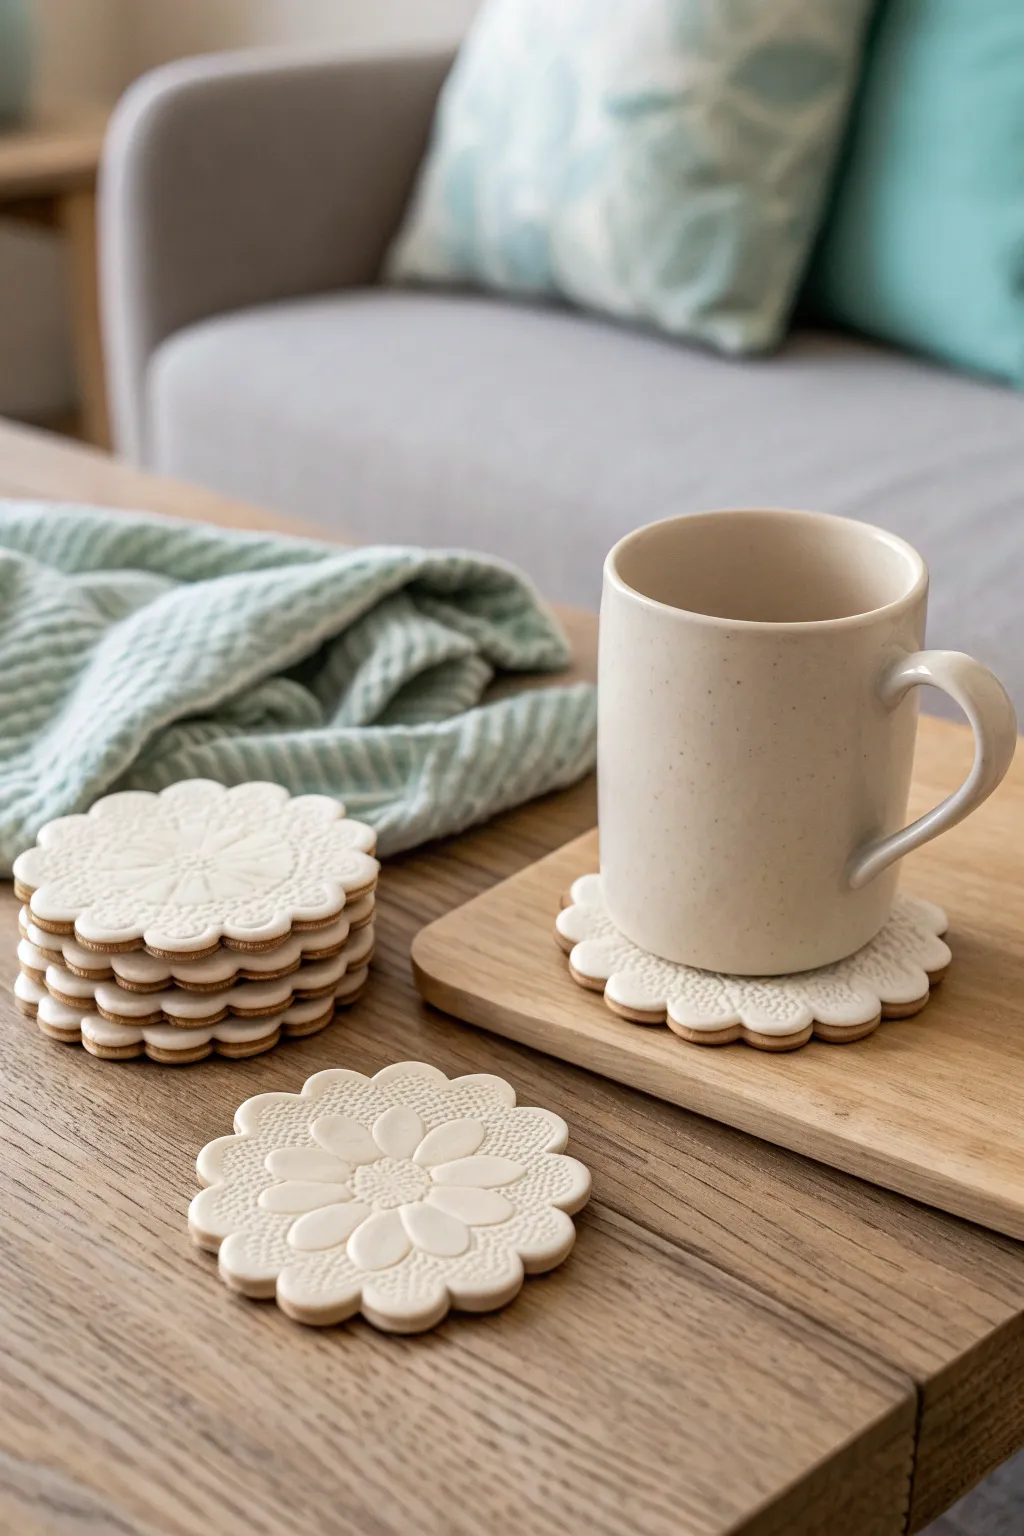
These charming coasters combine the rustic appeal of raw clay with delicate floral embossing, resulting in a functional piece of art for your coffee table. The daisy-like design, framed by soft scalloped edges and a textured background, creates a cozy yet elegant aesthetic perfect for any modern farmhouse or cottage-style home.
Step-by-Step
Materials
- High-quality white air dry clay
- Rolling pin
- Guide sticks or slats (approx. 5-6mm thick)
- Scalloped circle cookie cutter (approx. 3.5 inches)
- Textured rolling pin or embossing mat (small dotted pattern)
- Flower stamp or small smooth sculpting tool
- Cork sheet (approx. 2mm thick)
- Strong craft glue (e.g., E6000 or wood glue)
- Fine-grit sandpaper (220-400 grit)
- Matte acrylic varnish or sealant
- Bowl of water and sponge
Step 1: Shaping the Base
-
Prepare the Clay:
Begin by taking a handful of air dry clay and kneading it in your hands until it feels warm and pliable. If the clay feels too dry or cracks when you bend it, add a drop or two of water. -
Roll Out the Slab:
Place your clay on a smooth, non-stick surface or canvas cloth. Position your guide sticks on either side of the clay ball to ensure an even thickness. -
Achieve Uniform Thickness:
Use your rolling pin to flatten the clay, resting the ends on the guide sticks. You want a slab that is roughly 5mm to 6mm thick for durability. -
Add Texture:
Lightly mist your textured rolling pin or embossing mat with water to prevent sticking. Roll it gently across the clay surface just once with even pressure to imprint the small dotted background pattern without thinning the slab too much.
Step 2: Creating the Design
-
Cut the Shape:
Press your scalloped circle cookie cutter firmly into the textured clay. Give it a tiny wiggle to ensure a clean cut, then lift it away. Repeat for as many coasters as you wish to make. -
Smooth the Edges:
Dip your finger in a little water and very gently run it along the scalloped edge to soften any sharp ridges left by the cutter. Be careful not to smudge the texture on the top surface. -
Stamp the Center:
If you have a large flower stamp, press it into the center now. If not, use a small, smooth sculpting tool to manually indent petal shapes radiating from the center, pressing firmly to adhere them into the texture. -
Refine the Petals:
I like to use the back of a small paintbrush or a ball tool to deepen the center of the flower and smooth out the petals so they stand out against the dotted background.
Preventing Curling
Air dry clay loves to curl edges-up as moisture evaporates. Dry your coasters slowly away from direct heat and flip them every few hours for the flattest result.
Step 3: Drying and Finishing
-
Initial Drying:
Transfer the clay rounds to a wire rack or a piece of parchment paper. Let them air dry for at least 24 hours. Flip them over halfway through the drying process to prevent curling. -
Sanding:
Once completely bone dry and hard, take your fine-grit sandpaper and lightly buff the edges. You can also give the surface a very light pass if there are any unwanted sharp peaks, but try to preserve the texture. -
Sealing:
Apply a coat of matte acrylic varnish to the top and sides of the coaster. This is crucial for protecting the clay from moisture hitting it from cold drinks. -
Second Coin:
Allow the first coat of varnish to dry completely, then apply a second thin coat for extra durability. Ensure the sealant gets into the textured grooves.
Sticky Texture Tools?
If your stamp or texture roller keeps pulling clay up, dust the clay slab lightly with cornstarch or baby powder before pressing into it.
Step 4: Assembly
-
Cut the Cork:
Place your finished clay coaster onto the cork sheet and trace around it with a pen. Use scissors or a craft knife to cut out the cork shape slightly smaller than the clay outline so it remains hidden. -
Attach Backing:
Apply a strong craft glue to the back of the clay coaster. Press the cork cutout firmly onto the back. -
Final Press:
Place a heavy book on top of the coaster while the glue sets to ensure a tight bond and a perfectly flat finish.
Enjoy your beautiful new handmade coasters with your next warm cup of tea

The Complete Guide to Pottery Troubleshooting
Uncover the most common ceramic mistakes—from cracking clay to failed glazes—and learn how to fix them fast.
Tiny Bud Vases for Shelves
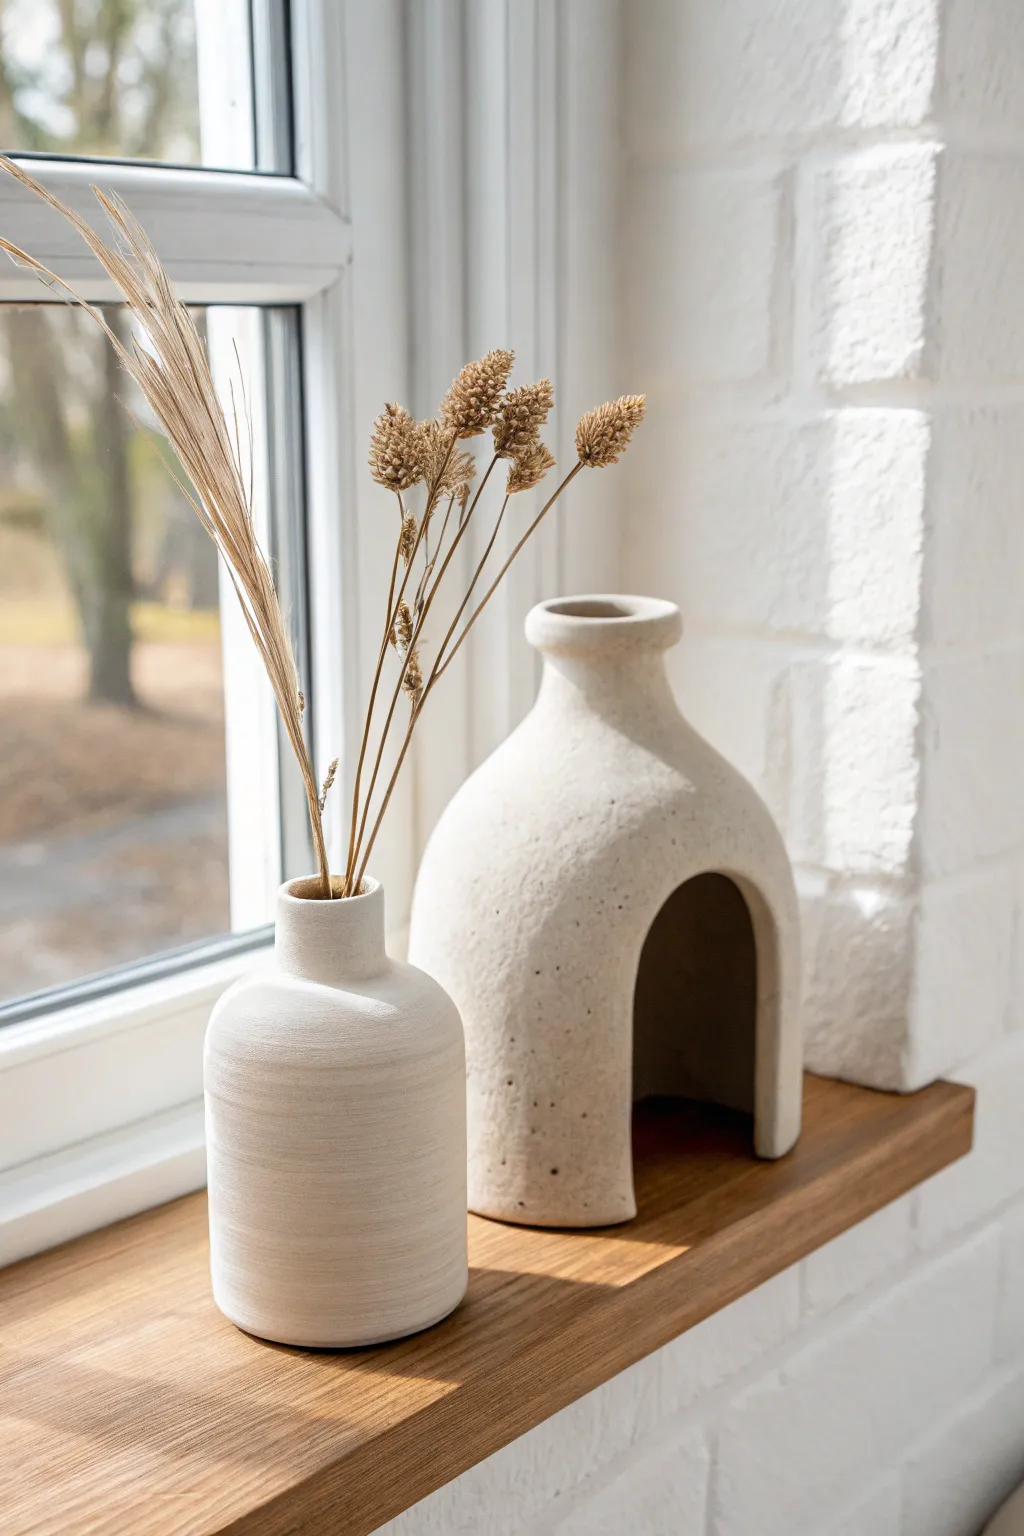
These minimalist, textured vases bring an architectural yet organic feel to any windowsill or shelf. This tutorial guides you through creating a simple bottle vase and a unique arched tunnel vessel that plays with negative space and light.
Step-by-Step Tutorial
Materials
- White air-dry clay (approximately 1kg)
- Rolling pin
- Clay cutting tool or craft knife
- Small sponge
- Bowl of water
- Sandpaper (medium and fine grit)
- Small round object (like a pill bottle or dowel) for forming the neck
- Slip (clay mixed with water to a paste consistency)
- Optional: Cardboard tube for arch support
- Matte sealant or varnish
Step 1: Creating the Bottle Vase
-
Base preparation:
Start by rolling a ball of clay roughly the size of a large orange. Flatten the bottom slightly on your work surface to create a stable base, then use your thumb to press a deep indentation into the center, stopping about a half-inch from the bottom. -
Pinching the walls:
Using the pinch pot method, gently squeeze the clay walls between your thumbs and fingers, rotating the piece as you go to ensure even thickness. Aim for walls about a quarter-inch thick, pulling the clay upward to create a cylinder shape. -
Forming the shoulder:
Once you have a cylinder about 4-5 inches tall, begin gently angling the clay inwards near the top to form the shoulder of the vase. Smooth the outside with a slightly damp sponge to merge any cracks. -
Adding the neck:
Roll a small coil of clay or a flat rectangle to create the neck. Score and slip the top opening of your vase body and attach the neck piece, blending the seams thoroughly with your finger or a modeling tool so the transition is seamless. -
Refining the shape:
Use a damp sponge to smooth the entire surface. While the clay is still plastic, gently tap the base on the table to ensure it sits flat, and check that the rim is even.
Cracks While Drying?
Mix a small amount of clay with vinegar to make a thick paste. Fill the cracks, smooth over, and let dry again. Vinegar helps old and new clay bond tightly.
Step 2: Building the Arched Vessel
-
Rolling the slab:
Roll out a large slab of clay to a uniform 1/4 inch thickness. You will need a long rectangular strip that is wide enough to form the deep body of the vase (about 4-5 inches wide). -
Creating the arch form:
Cut a strip of cardboard or find a round object to use as a temporary mold. Drape your clay slab over this form to create a U-shape or arch. This creates the ‘tunnel’ at the bottom. -
Sealing the arch:
For this specific shape, you need to close the top of the arch to add the neck. Pinch the top center of your U-shape together gently, or add a small slab on top to bridge the gap if your arch is wide. -
Attaching the neck:
Just like the first vase, form a small cylinder for the neck. Score and slip the top of your arched form and attach the neck. I often use a small dowel inside the neck to keep it perfectly round while I blend the clay. -
Adding side walls (optional):
If you want the vessel to hold dried flowers securely, you can add flat slabs to the front and back of the arch to enclose it more, or simply leave it as an open sculptural arch shape as seen in the inspiration photo. -
Texture application:
To mimic the stone-like finish in the photo, take a stiff bristle brush or a crumpled ball of aluminum foil and gently tap it all over the wet clay surface. This adds that lovely, earthy pitting.
Step 3: Finishing Touches
-
Slow drying:
Place both pieces in a spot away from direct sunlight or drafts. Cover them loosely with a plastic bag for the first 24 hours to prevent the thinner necks from drying too fast and cracking. -
Sanding:
Once bone dry (usually 48-72 hours), use medium-grit sandpaper to level the rims and bases. Follow up with fine-grit sandpaper to soften any sharp edges, though keeping some texture is desirable. -
Cleaning up:
Wipe away all the clay dust with a barely damp cloth. Be careful not to use too much water, or the surface will turn to mud again. -
Painting (Optional):
If your clay isn’t naturally off-white, you can apply a coat of matte acrylic paint in a warm cream or ‘stone’ color. Dab the paint on with a sponge rather than brushing to maintain the texture. -
Sealing:
Apply a matte varnish or sealant to protect the clay. Remember, air-dry clay isn’t waterproof, so these vases are strictly for dried botanicals like the wheat stems shown.
Faux Stone Look
Mix used coffee grounds or heavy black pepper into your clay before sculpting. When sanded later, these speckles appear, looking like real ceramic stoneware.
Arrange your dried stems inside and enjoy how the sunlight highlights the lovely texture of your new vases
Textured Succulent Planters
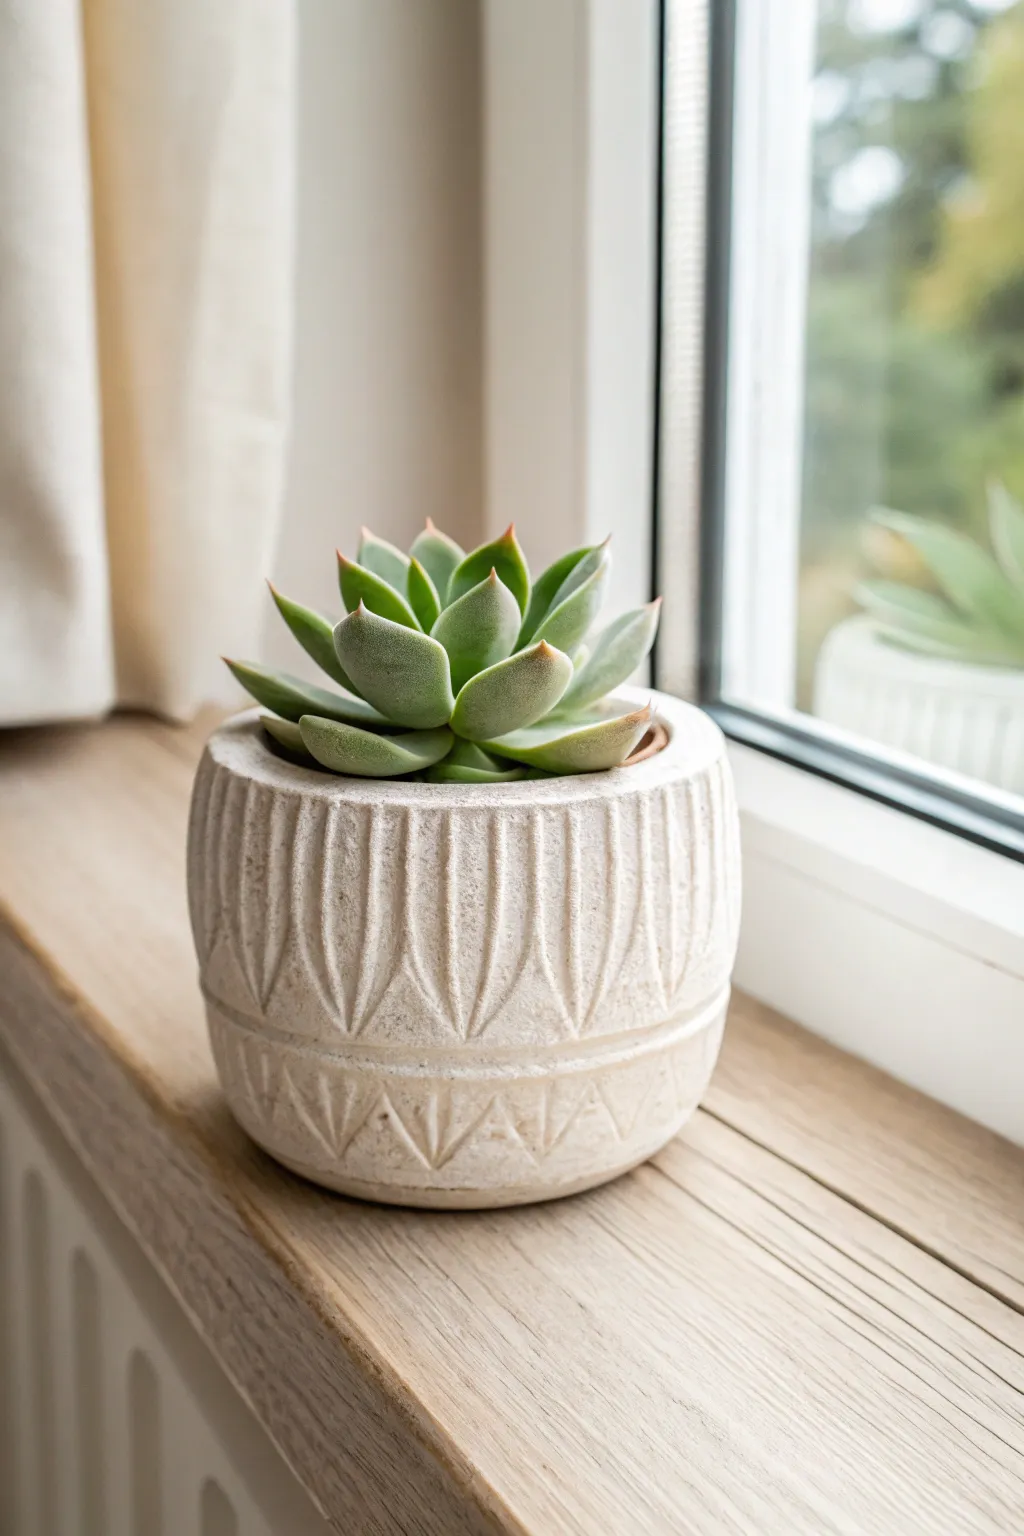
Elevate a simple plastic nursery pot into a high-end decor piece using nothing but air dry clay and simple carving tools. This textured planter features a repeating leaf motif and a natural stone finish that adds organic warmth to any windowsill.
How-To Guide
Materials
- Air dry clay (white or stone color)
- Small plastic planter pot (to use as a form)
- Rolling pin
- Parchment paper or canvas mat
- Craft knife
- Carving tool (V-gouge or linoleum cutter)
- Loop tool or small spoon
- Water in a small dish
- Sponge
- Fine-grit sandpaper
- Matte acrylic sealant
Step 1: Preparing the Base
-
Prepare your workspace:
Lay down parchment paper or a canvas mat to prevent sticking. Clean and dry the plastic planter pot you intend to use as your internal structure. -
Roll the clay slab:
Take a large chunk of air dry clay and knead it briefly to warm it up. Roll it out into a long rectangular slab, approximately 1/4 inch thick. Aim for a length that wraps fully around your plastic pot. -
Measure and cut:
Wrap the clay loosely around the pot to gauge the size. Use your craft knife to trim the excess clay at the top and bottom so it matches the height of the pot, leaving a little extra at the rim to fold over. -
Attach the clay:
Apply a small amount of slip (water mixed with clay) or just plain water to the outside of the plastic pot. Wrap the clay slab around it firmly. -
Seal the seam:
Where the two ends of the clay meet, score the edges with your knife, add a drop of water, and press them together. Smooth the seam with your finger or a modelling tool until it disappears. -
Refine the rim:
Fold the slight excess clay at the top over the rim of the plastic pot. Smooth it down into the inside edge for a seamless, professional look. -
Smooth the surface:
Dip your sponge lightly in water and run it over the entire surface of the pot to remove fingerprints and create an even canvas for your carving.
Step 2: Carving the Texture
-
Mark your guidelines:
Using a needle tool or toothpick, lightly sketch a horizontal line circumventing the pot about one-third of the way up from the bottom. This separates the two pattern zones. -
Carve the upper petals:
Using a V-gouge or linoleum cutter, carve vertical, elongated oval shapes (like wheat grains or slender leaves) in the top section. Start from the rim and carve downward, tapering the cut as you reach the guideline. -
Detail the upper section:
I like to add a central spine to each ‘leaf’ shape by pressing a little deeper in the center line, giving it that ribbed texture seen in the photo. -
Carve the lower border:
Below your horizontal guideline, carve a row of smaller, V-shaped patterns or inverted triangles. These should point downward, creating a geometric border around the base. -
Refine the grooves:
Go back over your carved lines with a slightly damp brush or your finger to smooth out any rough clay crumbs created during carving.
Keep it Clean
Keep a damp sponge nearby while carving. Periodically wiping your loop tool prevents clay buildup and ensures your carved lines stay crisp and deep.
Step 3: Finishing Touches
-
Let it dry completely:
Place the pot in a cool, dry spot away from direct sunlight. Let it cure for at least 24-48 hours. The clay will lighten significantly in color as it dries. -
Sand for texture:
Once bone dry, take fine-grit sandpaper and gently sand the surface. This highlights the stone-like texture and removes any sharp burrs from the carving process. -
Create the stone effect:
If you used plain white clay, you can dry-brush a mixture of beige and light gray acrylic paint over the surface. Wipe most of it off immediately with a rag so the paint only settles into the carved grooves. -
Seal the pot:
Apply two coats of matte acrylic sealant or varnish. This step is crucial to protect the clay from moisture when you water your plant. -
Final assembly:
Once the sealant is dry, place your succulent (kept in its nursery pot if possible, or planted directly if you drilled drainage holes) inside your beautiful new creation.
Cracking Issues?
If small cracks appear during drying, create a ‘clay paste’ with water and soft clay. Fill the cracks, smooth with a finger, and let dry again before sanding.
Now you have a stunning, custom-textured planter that looks like carved stone but was made right on your kitchen table


What Really Happens Inside the Kiln
Learn how time and temperature work together inside the kiln to transform clay into durable ceramic.
Wall Pocket for Dried Botanicals
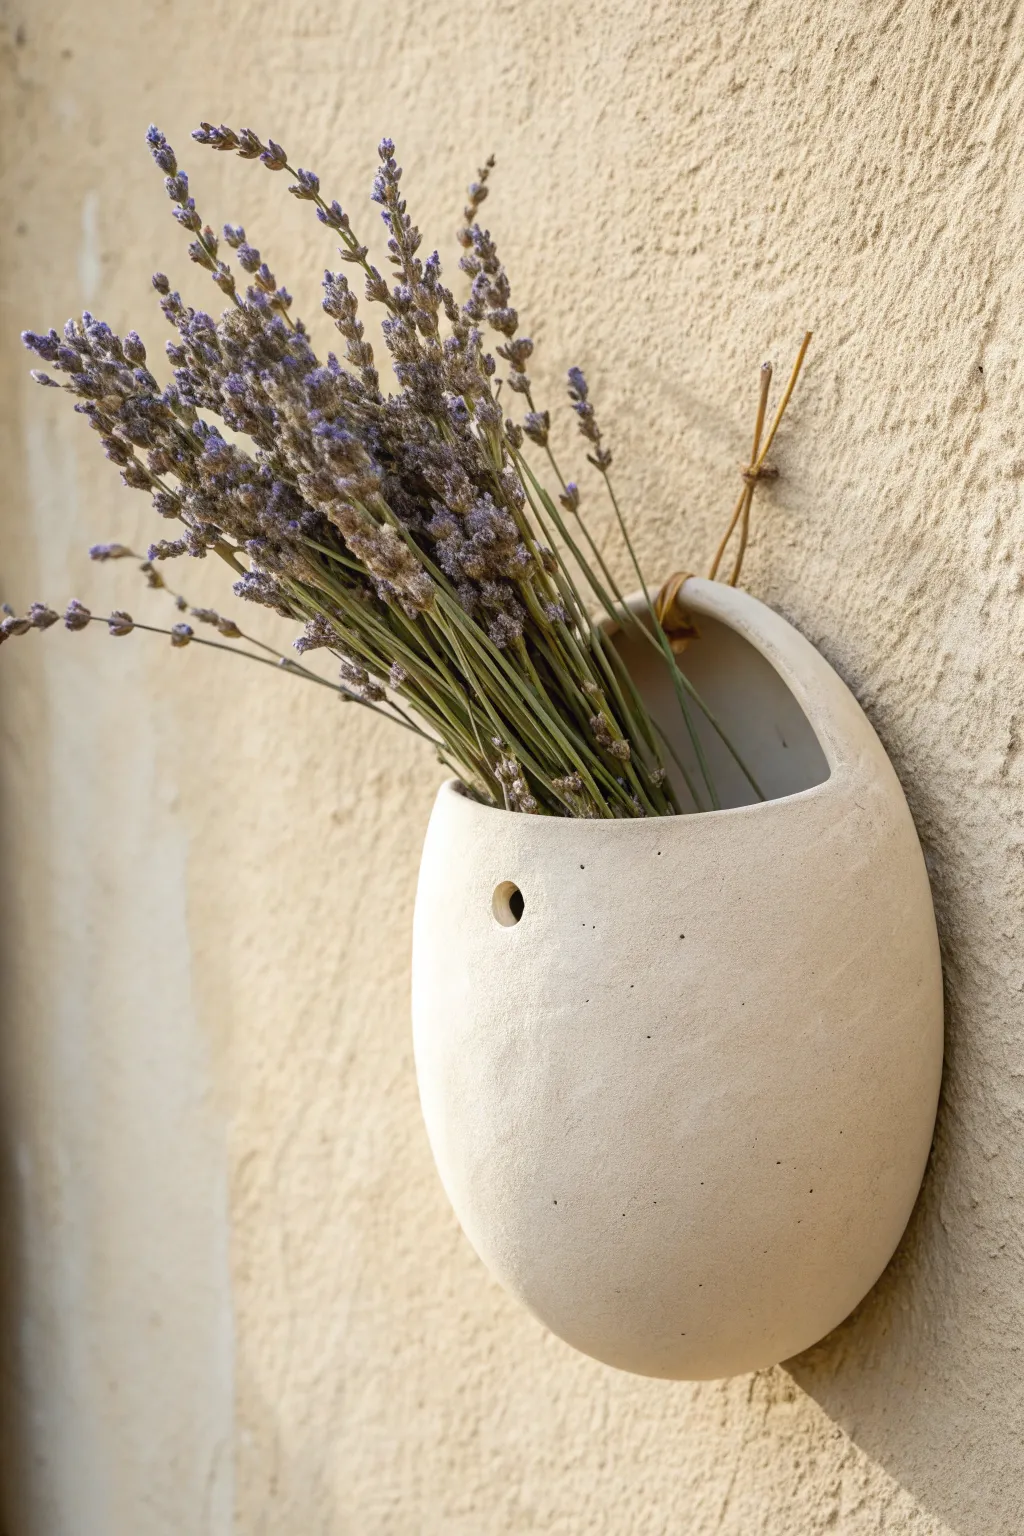
Bring a touch of organic serenity to your walls with this sculptural air dry clay vessel. Its rounded, asymmetrical form and speckled stone texture make it the perfect modern home for a fragrant bundle of dried lavender.
Detailed Instructions
Materials
- White air dry clay (approx. 500g)
- Small rolling pin
- Aluminum foil
- Masking tape
- Clay knife or fettling tool
- Sponge and small bowl of water
- Sandpaper (medium and fine grit)
- Drill bit or straw (for hole punching)
- Acrylic paints (white, beige, brown)
- Old toothbrush (for splattering)
- Matte spray varnish
- Leather cord or twine
- Dried lavender bundle
Step 1: Forming the Armature
-
Create the core shape:
Crumple aluminum foil into a large, elongated egg shape. This will act as the internal support for your clay so the pocket remains hollow and lightweight. Aim for a shape about 6-7 inches tall. -
Refine with tape:
Wrap the entire foil egg tightly with masking tape. This smooths out sharp foil ridges and prevents the clay from reacting with the aluminum while drying. -
Flatten the back:
Press one side of the taped egg firmly against your table to create a flat surface. This ensures the finished pocket sits flush against the wall.
Cracks happen!
If small cracks appear during drying, mix a small amount of fresh clay with water to make a paste (slip). Fill the cracks, let dry, and sand smooth.
Step 2: Sculpting the Vessel
-
Roll out the slab:
Roll your air dry clay out to a uniform thickness of about 1/4 inch on a smooth surface or canvas mat. -
Drape the clay:
Gently lift the clay slab and drape it over the front (rounded) side of your foil armature. Mold it around the curves, smoothing it down towards the flat back. -
Cover the back:
Fold the excess clay around to the flat back side. Trim away significant excess, but ensure the foil is completely encased. -
Smooth the seams:
Dip your finger in a little water and firmly smooth out any seams on the back until the surface is unified. I find using a slightly damp sponge here really helps erase fingerprints. -
Cut the opening:
On the upper front of the egg shape, use your clay knife to cut a slanted, semi-circular opening. This is where the flowers will sit. -
Remove the armature:
Carefully scoop out the foil impact from the inside. You might need to cut the foil with scissors and pull it out in pieces. Don’t worry if the inside is rough; only the outside needs to be perfect. -
Create the hanging hole:
Use a straw or a large drill bit to punch a clean hole through the back / top of the pocket, several inches below the rim. Ensure it goes all the way through to the hollow center. -
Refine the rim:
Dip your fingers in water and smooth the cut edge of the opening so it looks soft and rounded rather than sharp.
Weight Management
Keep the clay walls thin (approx 1/4 inch). If the pocket is too heavy, the hanging hole might tear over time. Thin walls equal a lighter, safer hang.
Step 3: Drying and Finishing
-
Let it dry:
Allow the piece to dry completely for 24-48 hours. Turn it occasionally so the back dries as evenly as the front. -
Sand for smoothness:
Once bone dry, sand the exterior. Start with medium grit to remove bumps, then switch to fine grit for a silky, stone-like feel. Wipe away dust with a barely damp cloth. -
Base coat painting:
Mix a warm off-white or cream acrylic paint. Apply two thin coats to the exterior, letting each dry fully. -
Add speckles:
Dilute a tiny amount of brown paint with water. Dip an old toothbrush into it, and flick the bristles with your thumb to spray fine speckles across the surface for a faux-ceramic look. -
Seal the work:
Spray the entire piece with a matte varnish. This protects the clay from humidity and prevents the paint from chipping. -
Attach the cord:
Thread a thin leather cord through the hanging hole and knot it securely. -
Add botanicals:
Arrange your dried lavender inside, letting the stems fan out naturally against the opening.
Hang your new sculptural pocket near a window to catch the light on those delicate speckles.
Cutout Tea Light Domes
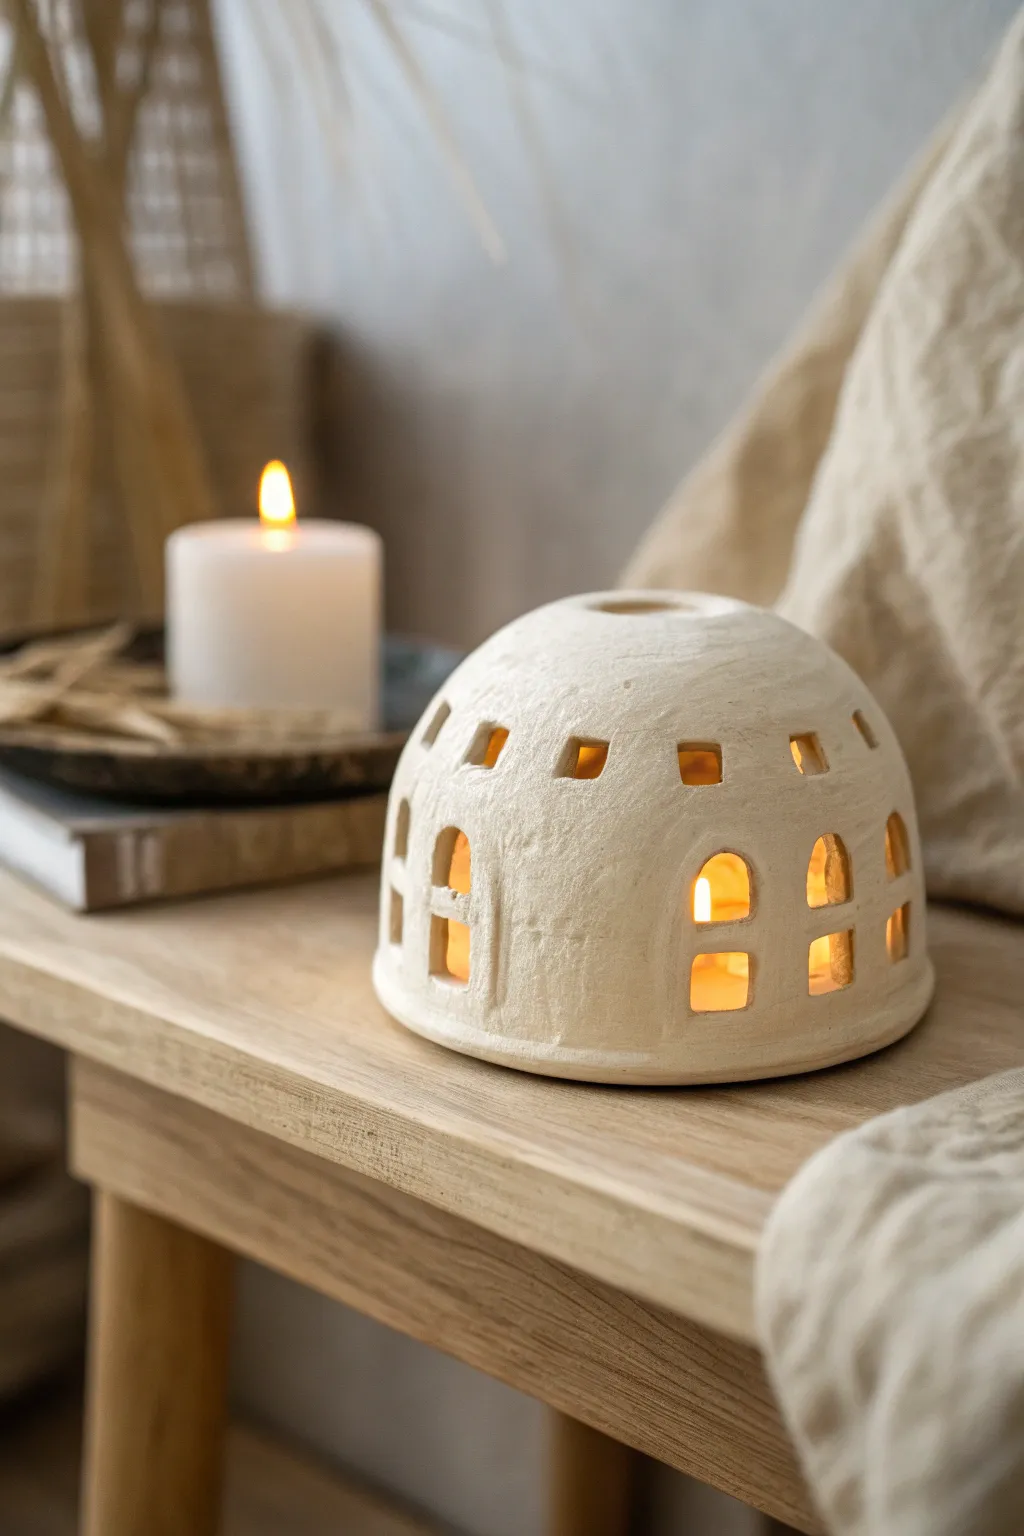
Transform simple air dry clay into a beautifully textured, architectural light piece that evokes ancient Roman buildings. This cozy dome shields a tea light, casting warm, geometric shadows through its charming arched windows.
Step-by-Step Tutorial
Materials
- White air dry clay (approx. 500g)
- Small bowl or balloon (for mold)
- Cling film (plastic wrap)
- Rolling pin
- Craft knife or scalpel (X-Acto)
- Small clay loop tool or straw
- Water in a small cup
- Sponge or paintbrush
- Medium grit sandpaper
Step 1: Shaping the Dome
-
Prepare the workspace:
Lay down a piece of parchment paper or a silicone mat to prevent sticking. If you are using a bowl as a mold, wrap the outside tightly with cling film to ensure easy release later. -
Condition the clay:
Take a generous chunk of air dry clay and knead it in your hands until it feels warm, pliable, and free of cracks. This conditioning step is crucial for preventing breakage. -
Roll the slab:
Roll out the clay on your work surface to a consistent thickness of about 1/4 inch (6mm). Avoid going too thin, as the walls need straight structural integrity to stand up. -
Form over the mold:
Gently drape your clay slab over the prepared bowl or balloon. Use the palms of your hands to smooth the clay down the sides, ensuring there are no air pockets trapped underneath. -
Trim the base:
Use your craft knife to slice away the excess clay at the base of the mold. Aim for a clean, straight edge so the finished dome will sit flat on a table. -
Create the top vent:
Locate the very center of the top of your dome. Using a small circular cutter or just your knife, cut a clean circle about 1 inch wide. This is essential for heat release when a candle is lit inside. -
Initial surface smoothing:
Dip your finger or a slightly damp sponge into water and gently buff the surface of the clay. You want to smooth out fingerprints, but don’t over-wet the clay or it may sag.
Step 2: Carving the Architecture
-
Plan the windows:
Before cutting, lightly sketch your window placement directly onto the clay with a toothpick. Plan for a bottom row of larger arches and a top row of smaller squares. -
Allow to firm up:
I like to let this dry briefly—maybe 30 to 60 minutes—before cutting. If the clay is too wet, the windows will distort; you want a ‘leather-hard’ texture. -
Cut the lower arches:
Using your sharp craft knife, carefully cut out the bottom row of windows. Create an arched shape: straight sides with a curved top. Remove the clay pieces gently. -
Add window panes (Optional):
For the look in the photo, leave a thin horizontal strip of clay across the middle of some arches to create a pane effect, or cut the window as one solid piece and add a tiny clay strip back in later using slip. -
Cut the upper squares:
Move to the upper section and cut a row of smaller, roughly square or rectangular holes. These should be staggered between the lower arches for continuous visual flow. -
Smooth the cut edges:
Dip a small paintbrush in water and run it along the inside edges of every window cutout. This softens sharp, jagged corners and gives the piece a finished, professional ceramic look. -
Texturize the surface:
To mimic the aged stone look in the photo, gently dab a dry sponge or crumpled foil over the exterior. This adds organic pitting and removes the ‘perfect’ smooth finish.
Leather-Hard Trick
Cutting clay when it’s fully wet drags and distorts the shape. Wait until it’s ‘leather hard’ (firm but cool) for the cleanest, sharpest window lines.
Step 3: Finishing Touches
-
Remove from mold:
Once the clay is firm enough to hold its own shape (usually after 4-6 hours, depending on humidity), carefully lift it off the mold. Remove the plastic wrap from the inside. -
Clean the interior:
Inspect the inside of the dome. If there are rough seams or crumbles from the cutting process, smooth them out with your damp sponge. -
Full drying time:
Place the dome in a cool, dry spot away from direct sunlight. Let it dry completely for 24 to 48 hours until it turns bone white and feels room temperature to the touch. -
Sanding:
For a polished base, lightly sand the bottom rim in a circular motion on a sheet of sandpaper. This ensures it sits perfectly level without wobbling. -
Final inspection:
Check for any sharp burrs on the windows and gently sand them off. Your dome is now ready to be placed over a battery-operated tea light or a small candle.
Cracks Appearing?
Small cracks while drying mean it’s drying too fast. Patch immediately with a ‘slip’ paste made of clay and water, then slow drying by covering loosely with plastic.
Enjoy the cozy, flickering atmosphere your handcrafted dome brings to the room

TRACK YOUR CERAMIC JOURNEY
Capture glaze tests, firing details, and creative progress—all in one simple printable. Make your projects easier to repeat and improve.
Modern Bookends With Soft Curves
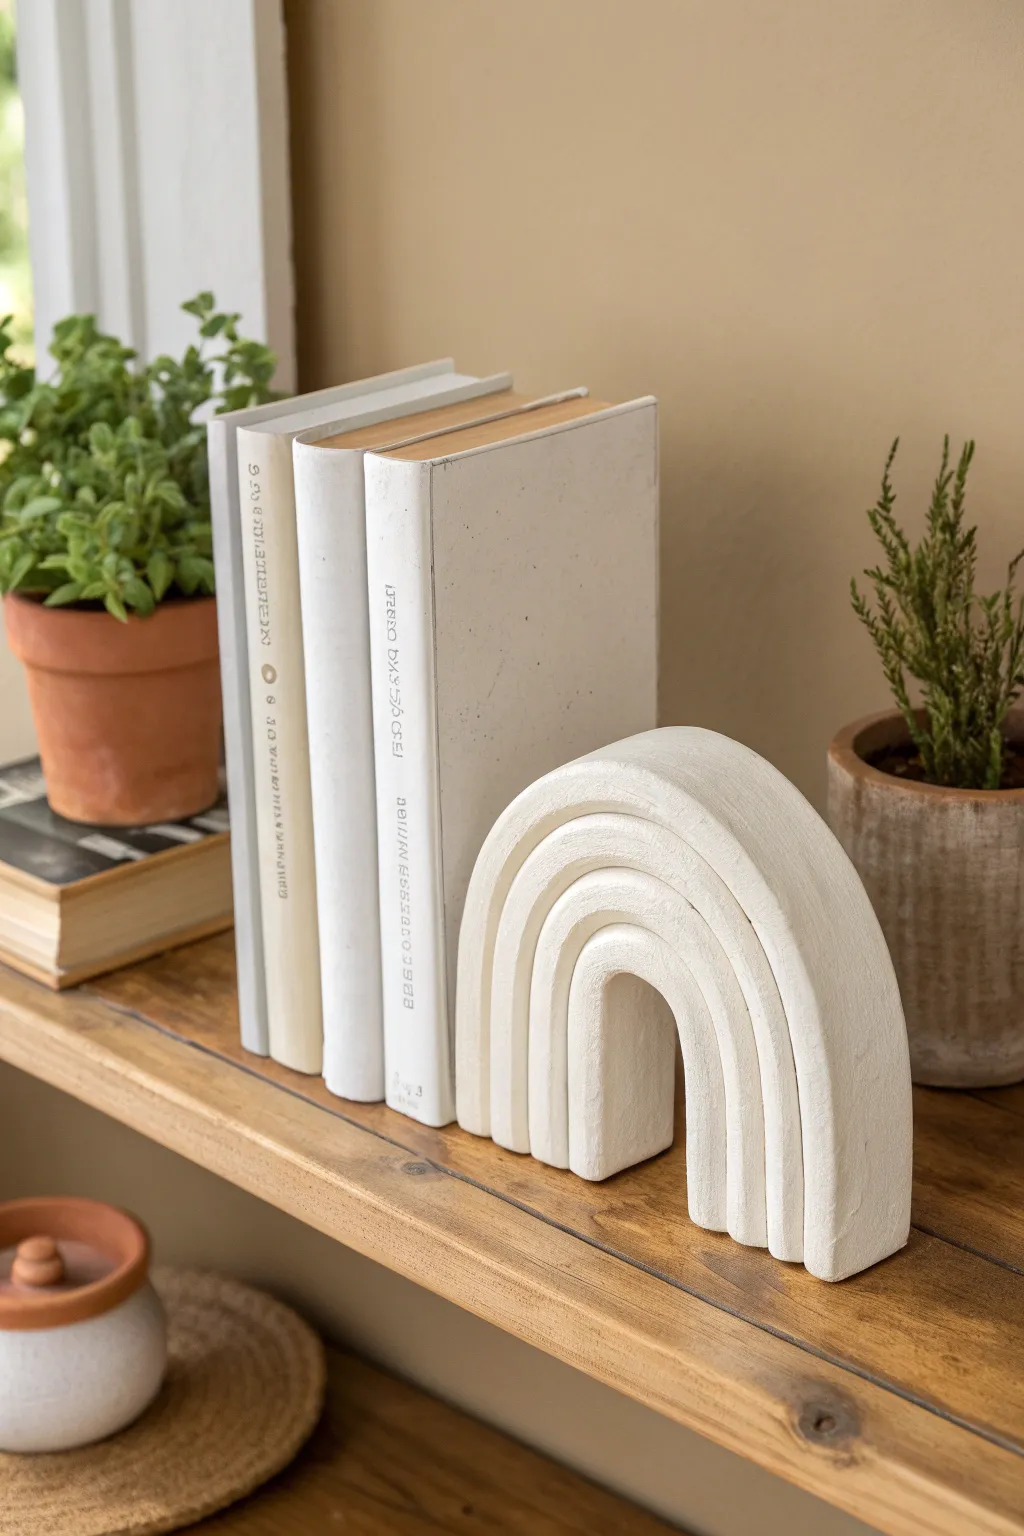
Add a touch of sculptural elegance to your bookshelf with this modern, arched bookend. Its soft curves and textured white finish create a minimalist focal point that is as functional as it is beautiful.
How-To Guide
Materials
- White air dry clay (approximately 1kg)
- Roller or rolling pin
- Sharp crafting knife or clay cutter
- Ruler
- Small bowl of water
- Heavy rectangular object (like a brick or wood block) for internal support
- Fine-grit sandpaper
- White acrylic paint (matte finish)
- Baking soda (optional, for texture)
- Paintbrush
Step 1: Forming the Base Structure
-
Prepare your workspace:
Lay down a clean, smooth surface like parchment paper or a silicone mat to prevent the clay from sticking. Knead the air dry clay thoroughly until it is warm, pliable, and free of air bubbles. -
Roll out the clay:
Using your rolling pin, roll about half of your clay into a long, thick slab. Aim for a thickness of about 1/2 inch to ensure the final piece is sturdy enough to hold heavy books. -
Cut uniform strips:
Use your ruler and craft knife to cut four long strips of equal width. The width should be roughly 1 inch, but you can adjust this depending on how deep you want your bookend to be. -
Create the support block:
Take your heavy rectangular object (like a wood block or even a taped-up box of heavy items) and cover it in plastic wrap. This will act as the core form to drape the clay over, ensuring the arch shape stays upright while drying.
Step 2: Sculpting the Arches
-
Shape the first arch:
Take the shortest clay strip and drape it over your support form to create the smallest, innermost arch. Trim the ends at the bottom so they sit flush with the table surface. -
Layer the second arch:
Take the next strip and place it directly over the first one. Apply a small amount of water or clay slip (water mixed with clay) between the layers to help them adhere to each other. -
Continue building upwards:
Repeat the process with the remaining strips, stacking them one by one to create the expanding rainbow shape. Gently press the layers together as you go to remove gaps. -
Smooth the exterior:
Once all layers are stacked, use your fingers and a little water to smooth the outer sides of the arch. While you want to keep the definition of the individual distinct arches on the front face, the sides should feel cohesive. -
Refine the front face:
Use a damp finger to soften the sharp edges on the front of each arch strip. This gives the piece that organic, ‘soft curve’ look rather than a sharp, geometric feel. -
Let it firm up:
Allow the clay to dry on the support form for at least 24 hours. Don’t remove the support too early, or the arches might sag.
Weight Matters
For a truly functional bookend, embed heavy fishing weights or washers into the wet clay at the very bottom of the legs to add stability.
Step 3: Finishing Touches
-
Remove the support:
Once the clay feels leathery and holds its shape on its own, carefully slide the support block out from the center. Let the piece continue drying for another 24-48 hours until completely hard and white. -
Sand for perfection:
Gently sand any rough patches, particularly at the bottom base where it was trimmed, ensuring it sits perfectly flat on a shelf. -
Mix textured paint:
To recreate the stone-like finish seen in the image, mix white acrylic paint with a teaspoon of baking soda. This creates a thick, chalky paste. -
Apply the first coat:
Paint the entire surface of the bookend with your textured mix. I like to use dabbing motions rather than long strokes to enhance the stone effect. -
Dry and repeat:
Let the first coat dry completely, then apply a second coat if needed for full coverage. -
Seal (optional):
If you want extra durability, apply a clear matte aesthetic sealer spray over the dry paint.
Color Pop
Instead of monochromatic white, paint the innermost arch in a soft terracotta or sage green for a subtle, unexpected accent.
Place your new sculptural creation on your shelf and enjoy the modern elegance it brings to your reading nook
Simple Photo and Note Holders
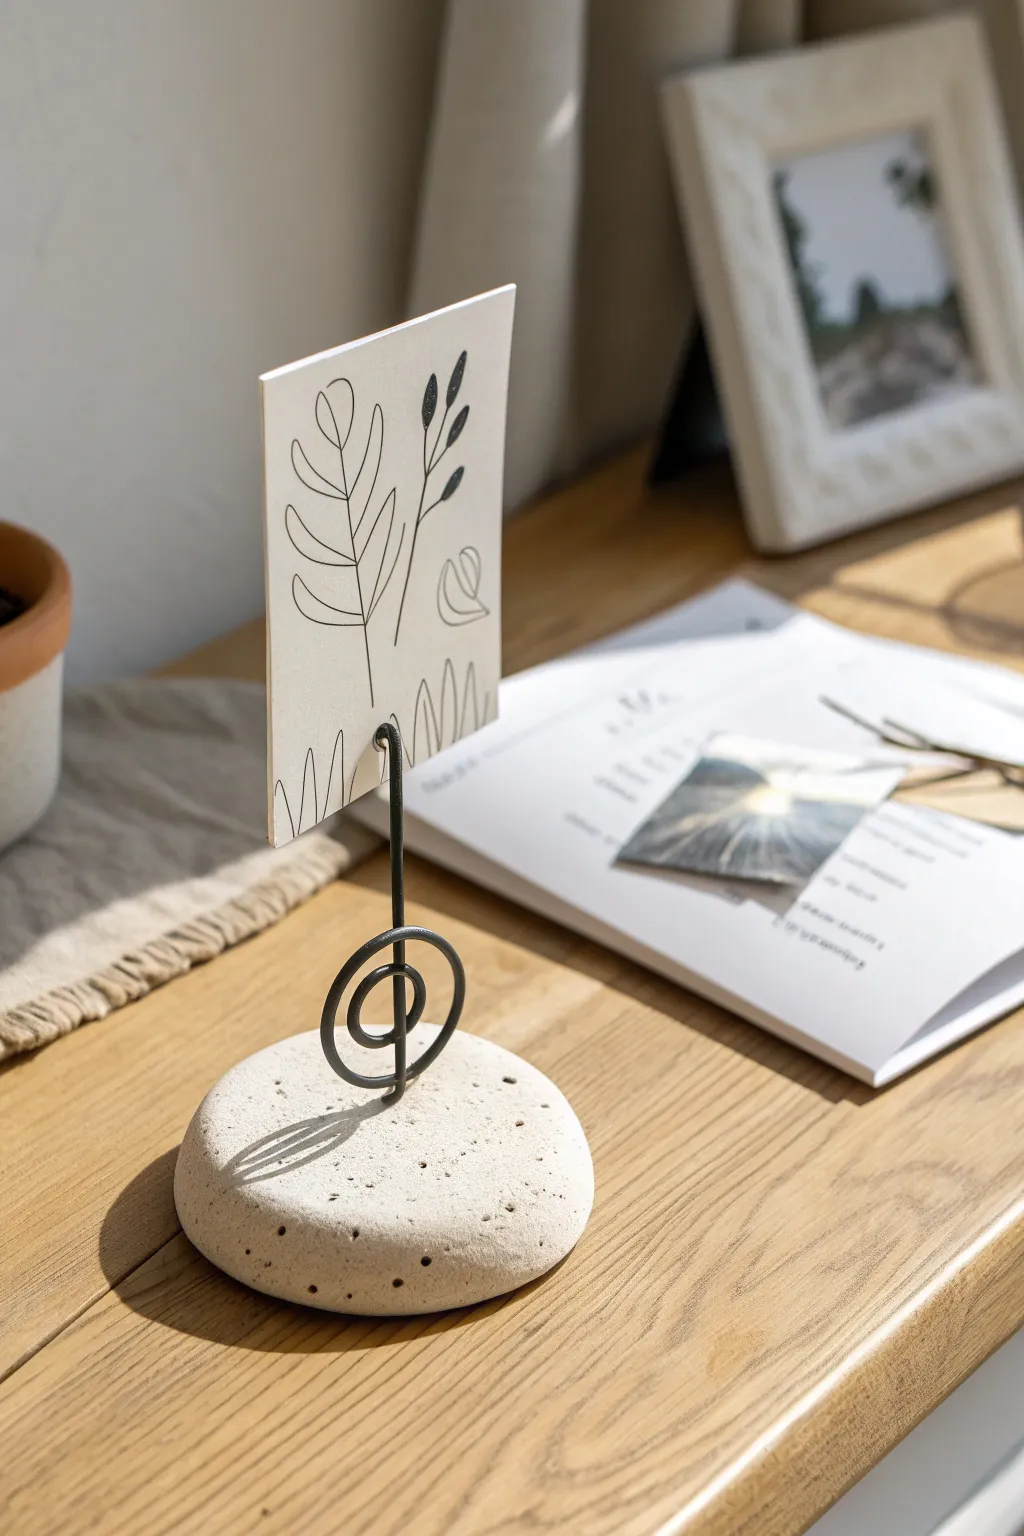
This minimalist photo holder combines the organic look of natural stone with sleek industrial wire, creating a perfect display for your favorite snapshots or postcards. The faux-stone effect is surprisingly easy to achieve using basic air dry clay and a little texture hack.
Step-by-Step
Materials
- White air dry clay
- Thick crafting wire (black, approx. 12-14 gauge)
- Black acrylic paint
- Old toothbrush
- Wire cutters
- Needle-nose pliers
- Round object (like a marker or dowel) for shaping wire
- Sandpaper (fine grit)
- Water
- Disposable gloves (optional)
Step 1: Shaping the Base
-
Prepare the clay:
Take a handful of white air dry clay, roughly the size of a tangerine. Knead it in your hands for a minute until it becomes soft, pliable, and free of cracks. -
Form the pebble shape:
Roll the conditioned clay into a smooth ball between your palms. -
Flatten the base:
Place the ball on your work surface and gently press down with the palm of your hand to create a flattened disc shape, about 1 inch thick. It should look like a smooth river stone. -
Smooth the edges:
Dip your finger in a little water and run it along the edges and top surface to smooth out any fingerprints or tiny cracks. -
Create the texture:
To mimic the porous look of stone, take an old, dry toothbrush and gently tap the bristles all over the surface of the clay. Vary the pressure to create random, natural-looking pitting. -
Add larger pores:
Use the end of the wire or a toothpick to poke a few deeper, distinct holes randomly around the sides and top, enhancing the volcanic rock aesthetic.
Loose Wire?
If the wire wobbles after the clay dries, remove it, add a drop of superglue into the hole, and reinsert. Let dry for a rock-solid hold.
Step 2: Creating the Wire Holder
-
Cut the wire:
Cut a piece of black crafting wire approximately 10-12 inches long using your wire cutters. -
Start the spiral:
Grip one end of the wire with your round-nose pliers and make a small loop. This will be the very center of your spiral design. -
Form the decorative coil:
Using your fingers, gently wrap the wire around that initial loop to create a flat spiral shape. Make about two full loosen rotations, similar to the treble clef design seen in the photo. -
Bend vertically:
Once the spiral base is formed, bend the remaining length of wire straight up at a 90-degree angle so it stands vertical. -
Create the clip:
At the top of the vertical wire (about 3-4 inches up), wrap the wire tightly around a narrow marker or pen twice to create a double-loop coil. This tension is what will hold your photo. -
Trim excess:
Trim any excess wire sticking out from the top coil so it looks neat and tidy.
Step 3: Assembly and Finishing
-
Insert the wire:
While the clay is still wet, push the straight bottom end of your wire structure continuously through the center of the clay base until it hits the table, then pull it back up just a millimeter so the base sits flat. -
Dry the clay:
Allow the clay to dry completely. This usually takes 24-48 hours depending on humidity; turn it over halfway through to let the bottom dry evenly. -
Clean up edges:
eOnce fully dry, lightly sand the bottom or any sharp edges with fine-grit sandpaper for a professional finish. -
Prepare the speckle paint:
Dilute a small drop of black acrylic paint with water until it has an inky consistency. -
Apply the speckles:
Dip your toothbrush into the diluted paint. Hold it over the clay base and run your thumb across the bristles to flick tiny specks of black paint onto the white stone. -
Seal the piece:
I usually protect the finish with a matte varnish spray to prevent the clay from absorbing moisture in the future, though this is optional.
Natural Texture Hack
Instead of a toothbrush, gently press a piece of real sandpaper or a rough stone into the wet clay to imprint an authentic grainy texture.
Now slide in your favorite illustration or photo to complete this charming desktop accessory
Moon Phase Wall Mobile
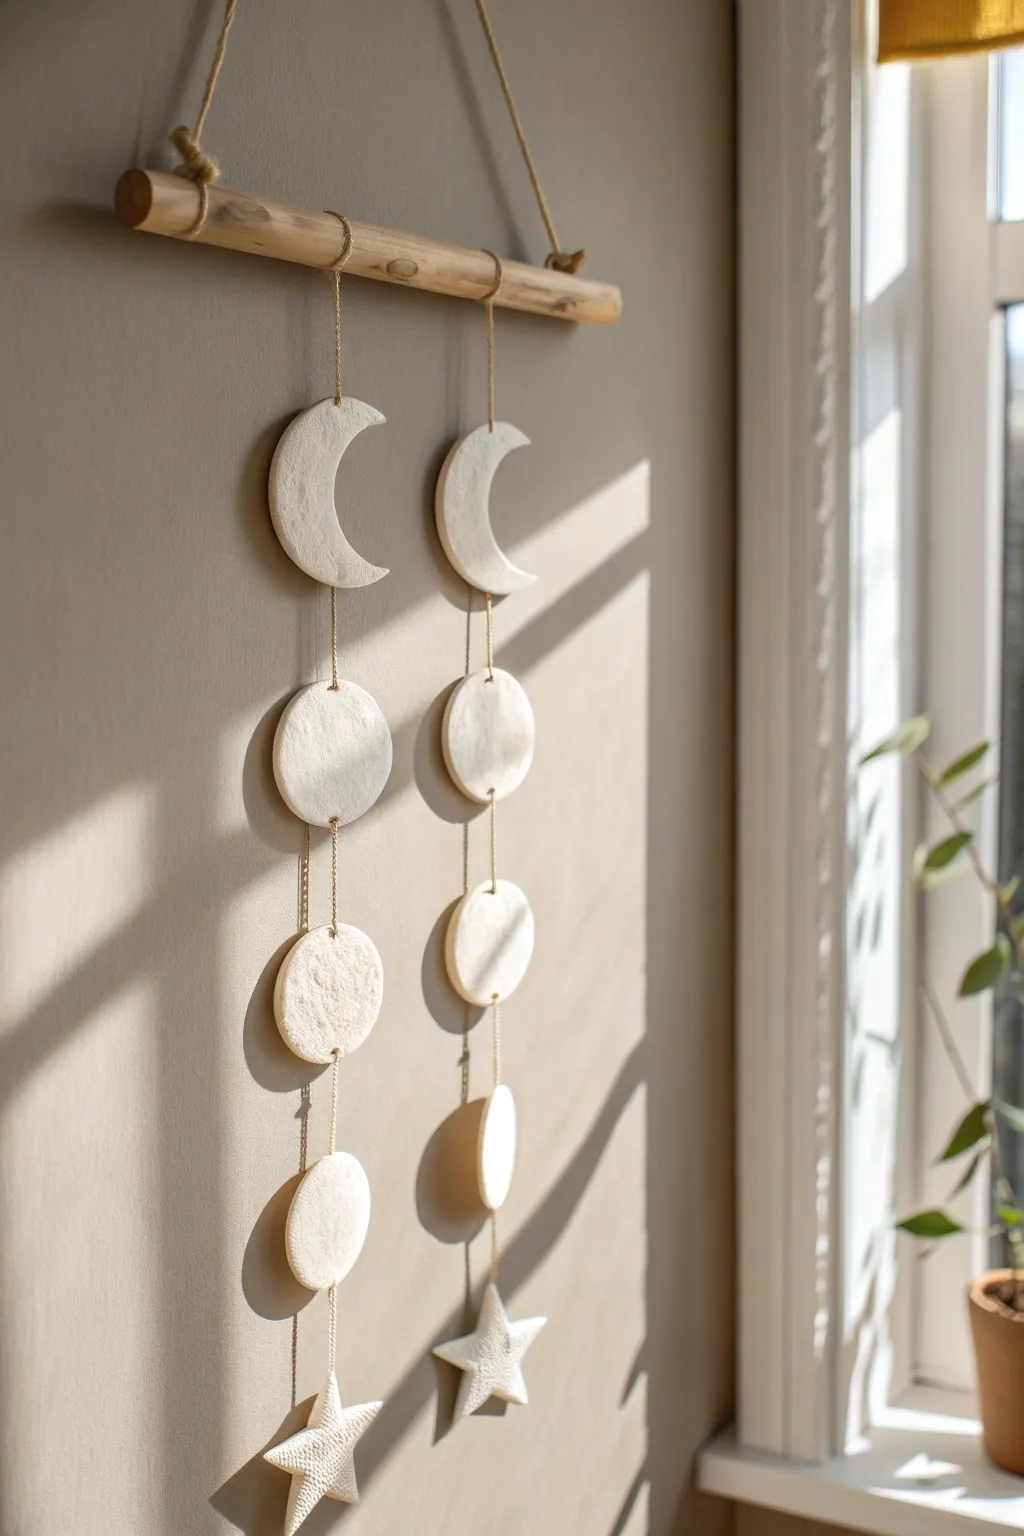
Bring the magic of the night sky indoors with this serene, minimalist mobile featuring suspended moons, planets, and stars. The white textured clay against natural wood and twine creates a calming, bohemian aesthetic perfect for a bedroom or nursery.
Step-by-Step
Materials
- White air-dry clay (approx. 500g)
- Wooden rolling pin
- Parchment paper or canvas mat
- Circular cookie cutters (or a glass)
- Small star cookie cutter
- Fettling knife or craft knife
- Skewers or a thick needle (for poking holes)
- Sandpaper (fine grit)
- Natural jute twine or light cord
- Thick wooden branch or dowel (approx. 12-15 inches)
- Sponge or texture tool (optional)
Step 1: Shaping the Elements
-
Prepare your workspace:
Lay down parchment paper or a canvas mat to prevent sticking. Take a handful of clay and knead it briefly until it is pliable and smooth. -
Roll the slab:
Roll the clay out to an even thickness of about 1/4 inch (5-6mm). Try to keep the surface relatively smooth, though a little texture adds to the organic look. -
Cut the full moons:
Use your circular cutter to stamp out six full circles. These will become your central planets or moon phases. -
Create the crescent moons:
Cut out two more circles, then use the same circular cutter to offset-cut into them, creating a perfect crescent shape. This ensures the curve matches your other circles. -
Cut the stars:
Use a star cutter to create two five-pointed stars. If you don’t have a cutter, you can freehand these with a craft knife or use a printed template. -
Add texture:
To mimic the lunar surface shown in the photo, gently dab a lightly dampened sponge or a crumpled piece of aluminum foil over the surface of the wet clay to create subtle craters. -
Smooth the edges:
Dip your finger in a little water and run it along the cut edges of every piece to remove any ragged bits or sharp corners.
Clay Curling Up?
If your clay shapes start curling at the edges while drying, place a light book or a flat board on top of them (once they aren’t sticky) to weigh them down flat.
Step 2: Assembly Prep
-
Create suspension holes:
Using a skewer, poke a hole through the top and bottom of the six central circles. Make sure the hole is wide enough for your twine to pass through easily. -
Finalize top and bottom pieces:
For the two crescent moons, only poke a hole at the top. For the two stars, poke a single hole near one of the points. -
Drying time:
Lay all pieces flat on a fresh sheet of parchment paper. Let them dry for 24-48 hours, flipping them halfway through to ensure they dry evenly without curling. -
Sanding:
Once bone dry, use fine-grit sandpaper to gently smooth out any rough spots on the edges or surface.
Step 3: Stringing the Mobile
-
Prepare the hanging branch:
Cut a long piece of heavy twine and tie it to both ends of your wooden branch to create the main hanger. -
Cut vertical strings:
Cut two long lengths of thinner twine for the vertical drops. Make them longer than you think you need; you can always trim them later. -
Tie the top crescents:
Thread the twine through the top hole of a crescent moon and tie it securely to the wooden branch. Repeat for the second crescent, spacing them evenly. -
Attach the middle circles:
Take a new piece of twine and tie it through the bottom hole of the crescent (Wait, actually these don’t connect directly). Let’s use a single long string method: Tie your long string to the branch. Thread it down *behind* the crescent moon and glue it, or carefully drill vertical holes if your clay allows. -
Alternative threading method:
For the look in the image where string is visible: Thread a string through the top of a circle, knotting it underneath the hole to hold the clay in place. Continue this, knotting at specific intervals to hold the next shape. -
Spacing the pieces:
Arrange the pattern: Crescent at the top, three circles in the middle, and the star at the bottom. Leave about 1-2 inches of string visible between each shape. -
Secure the knots:
Ensure each knot is tight and supports the weight of the clay piece above it. A dab of clear craft glue on the knot can add extra security. -
Attach the final stars:
Tie the star at the very bottom of the strand. Trim any excess string hanging below the star. -
Final adjustment:
Hang the branch on a wall hook and adjust the strands so the shapes hang straight and parallel to each other.
Pro Tip: Hidden Strength
I like to add a drop of superglue to the knots on the back of the clay pieces. It stops the knots from slipping through the holes over time.
Hang your new celestial creation near a window to catch the shifting daylight shadows.
Textured Wall Tiles as Art
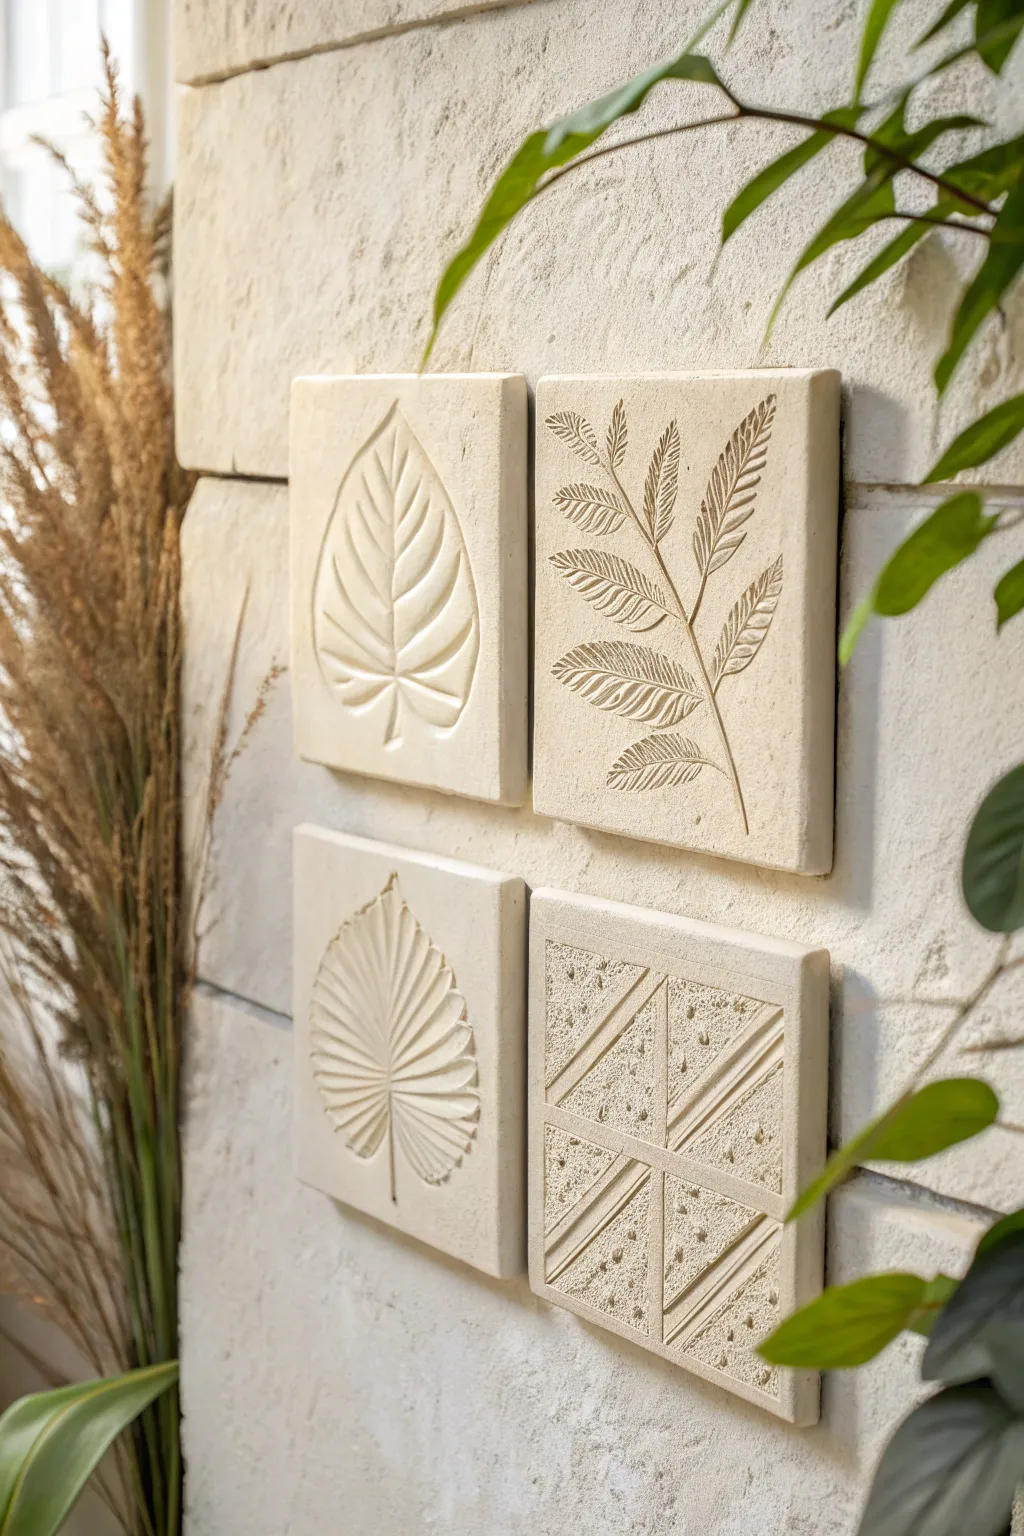
Capture the delicate beauty of nature with these minimalist textured wall tiles, featuring organic leaf impressions and geometric carvings. This project transforms simple air-dry clay into sophisticated, gallery-worthy pieces that add a serene, tactile element to any vertical space.
Detailed Instructions
Materials
- White air-dry clay (approx. 1kg for 4 tiles)
- Rolling pin
- Square cookie cutter (approx. 4-5 inches) or ruler and craft knife
- Two wooden guide strips (approx. 1/4 inch thick)
- Fresh or faux leaves with prominent veins (Monstera, Fern, Palm)
- Clay carving tools or a wooden skewer
- Sandpaper (fine grit)
- Water in a spray bottle
- Strong adhesive mounting tape or hanging hardware
- Acrylic matte sealer or varnish
Step 1: Preparing the Base
-
Condition the Clay:
Begin by kneading your air-dry clay thoroughly to warm it up and remove any air bubbles. It should feel pliable and smooth before you start rolling. -
Set Up Guides:
Place your wooden guide strips on either side of your workspace. These will ensure your clay is rolled to a perfectly uniform thickness, which is crucial for preventing warping. -
Roll the Slabs:
Place a ball of clay between the guides and use your rolling pin to flatten it until the pin rests on the wooden strips. Repeat this process until you have enough surface area for four tiles. -
Cut the Squares:
Using a square cutter or a ruler and craft knife, cut out four identical squares. I like to smooth the edges immediately with a damp finger to remove any sharp cutting lines.
Warping Woes?
If corners start curling up while drying, place a lightweight board or book gently on top of the tiles. Ensure the face is protected with paper.
Step 2: Creating the Impressions
-
Select Your Botanicals:
Choose leaves with thick, sturdy veins for the best impression. Specifically, look for a broad leaf (like a Hosta or Monstera) and a fern or multi-leaflet branch for variety. -
Position the Leaves:
Gently lay your chosen leaf onto the center of a clay square, vein-side down. Press it lightly with your hand to temporarily adhere it to the damp surface. -
Imprint the Texture:
Roll your rolling pin firmly over the leaf once. Apply steady, even pressure to push the veins deep into the clay without thinning the tile too much. -
Reveal the Design:
Carefully peel back the leaf by its stem. If any small pieces of plant matter get stuck, use tweezers to gently remove them without marring the surface. -
Carve the Geometric Tile:
For the geometric design, use a ruler to lightly score a grid of four smaller squares. Then, use a carving tool to dig out diagonal lines and stippled dots, creating a contrast to the organic shapes. -
Refine the Edges:
Check the sides of your tiles again. If the rolling or pressing process pushed the clay out of shape, carefully trim the excess to return to a perfect square.
Step 3: Drying and Finishing
-
Initial Drying Phase:
Place the tiles on a wire rack or a mesh screen to allow air to circulate underneath. This helps prevent the center from staying wet while the edges dry. -
Flip for Evenness:
After about 4-6 hours, gently flip the tiles over. Continue flipping them every few hours for the first day to ensure they dry flat and don’t curl at the corners. -
Sand for Smoothness:
Once the clay is bone dry (usually 24-48 hours), take your fine-grit sandpaper and gently buff the edges and flat surfaces. Be careful not to sand away the delicate vein details. -
Clean the Dust:
Wipe the tiles down with a slightly damp cloth or a dry soft brush to remove all sanding dust before sealing. -
Apply Sealer:
Brush on a coat of matte acrylic varnish to protect the clay from humidity and dust. A matte finish keeps the stone-like appearance authentic. -
Install the Artwork:
Apply heavy-duty mounting tape to the back of each dried tile. Measurements create impact, so use a level to ensure your grid arrangement is perfectly straight on your wall.
Level Up: Stone Effect
Mix a small amount of sand or dried coffee grounds into the clay before rolling to create a speckled, faux-travertine stone texture.
Step back and admire how the light catches the textures of your new custom wall relief set
Gold-Edged Trinket Pieces
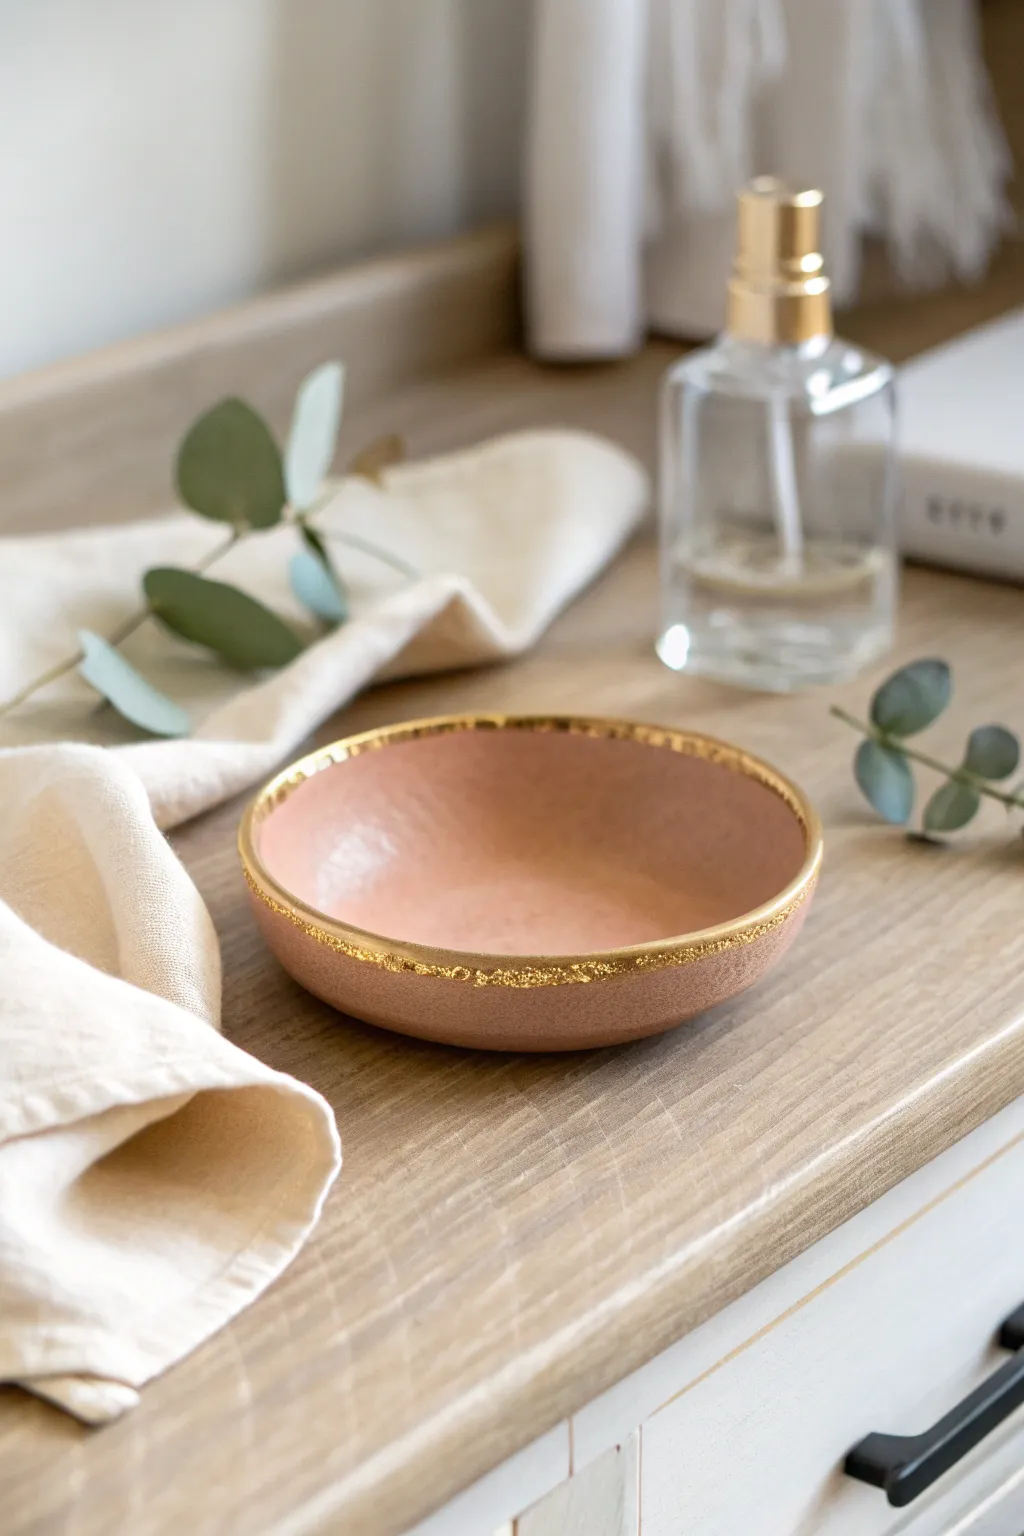
Elevate your vanity or bedside table with this sophisticated little catchall that looks far more expensive than it is. The soft, dusty pink hue combined with a jagged, luxurious gold rim creates a stunning contrast perfect for holding your favorite rings or earrings.
Step-by-Step
Materials
- Air dry clay (white)
- Acrylic paint (dusty rose/blush pink)
- Liquid gold leaf or gilding paint
- Rolling pin
- Small bowl (to use as a mold)
- Craft knife or clay tool
- Fine grit sandpaper (220 or higher)
- Soft paintbrushes (one for paint, one for gilding)
- Gloss varnish or sealant
- Plastic wrap
- Small sponge (optional for texture)
Step 1: Shaping the Clay
-
Condition the Clay:
Begin by taking a handful of white air dry clay and kneading it in your hands until it becomes warm, pliable, and free of cracks. -
Roll it Out:
Place the clay on a clean, flat surface and use a rolling pin to flatten it into a sheet about 1/4 inch thick. Aim for an even thickness throughout to prevent cracking during drying. -
Cut the Circle:
Find a circular object slightly larger than your intended bowl size (like a large mug or cereal bowl rim), place it on the clay, and trace around it with a craft knife to cut out a perfect circle. -
Prepare the Mold:
Take a small bowl from your kitchen to use as a mold. To ensure easy removal later, drape a piece of plastic wrap inside the bowl, pressing it smooth against the sides. -
Form the Shape:
Gently lift your clay circle and place it inside the plastic-lined bowl. Press it down softly so it takes the curved shape of the bottom, but don’t force it too hard or you might thin out the clay.
Step 2: Refining the Edges
-
Create the Raw Edge:
Instead of smoothing the rim perfectly, use your fingers or a clay tool to gently pinch and roughen the top edge. This uneven, organic texture is crucial for catching the gold paint later. -
Smooth the Interior:
Dip your finger in a tiny bit of water and run it over the inside surface of the clay to smooth out any fingerprints or imperfections. -
Initial Drying:
Let the clay sit in the mold for about 24 hours until it holds its shape on its own. It doesn’t need to be bone dry yet, just sturdy enough to handle. -
Remove and Dry Completely:
Carefully lift the clay dish out of the mold using the plastic wrap. Peel off the plastic and place the dish on a wire rack to dry completely for another 24-48 hours. I always flip it occasionally so the bottom gets air too. -
Sanding:
Once bone dry, take your fine-grit sandpaper and lightly buff the body of the bowl to get a silky smooth finish. Avoid sanding down the rough rim you created earlier.
Fixing Cracks
If small cracks appear while drying, don’t panic. Make a watery paste with a scrap of clay and water (called ‘slip’) and fill the cracks, then sand smooth once dry.
Step 3: Painting and Gilding
-
Base Color Application:
Paint the entire bowl—inside and out—with your dusty rose acrylic paint. You will likely need two or three thin coats to get an opaque, solid color. -
Drying Between Coats:
Ensure each coat of paint is fully dry before adding the next to avoid streaks or lifting the previous layer. -
Sealing the Color:
Apply a coat of gloss varnish or sealant over the pink paint. This protects the color and gives the ceramic-like sheen seen in the photo. -
Applying the Gold:
Shake your liquid gold leaf well. Using a smaller brush, carefully dab the gold along the rough, uneven rim of the bowl. -
Dripping Effect:
Allow the brush to deposit slightly more gold in the crevices of the rim, letting it extend just a tiny bit down the sides to emphasize the organic texture. -
Final Cure:
Let the gold leaf dry completely according to the manufacturer’s instructions before using the dish.
Level Up: Marbling
Before rolling, mix a tiny drop of red acrylic paint into your white clay but don’t blend fully. This creates a subtle marble effect under the gold rim.
Place your finished dish on your dresser and admire the elegant touch of gold catching the light
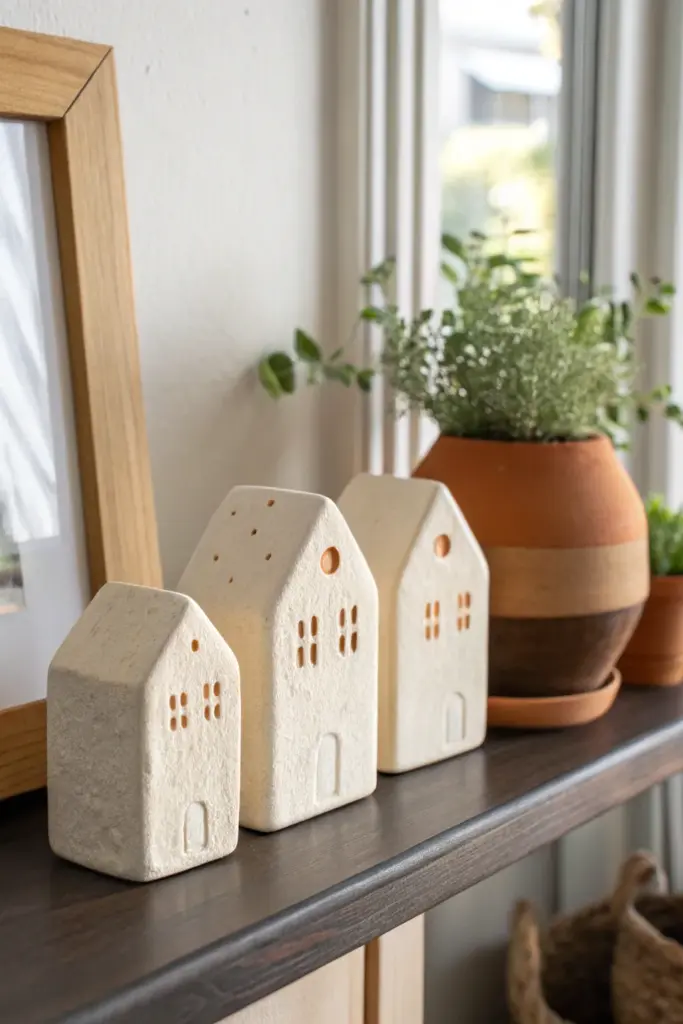
Mini House Shelf Sitters

Bring a touch of minimalist Scandinavian charm to your shelves with these simple, textured air dry clay houses. Their clean lines and warm, unglazed finish make them the perfect subtle accent for any modern home decor.
Step-by-Step Tutorial
Materials
- Air dry clay (white or light cream)
- Rolling pin
- Parchment paper or craft mat
- Sharp craft knife (X-Acto style) or clay cutting blade
- Ruler
- Square cookie cutters (optional, for uniform base shapes)
- Small straw or toothpick (for windows)
- Small circular tool or piping tip (for round attic windows)
- Sandpaper (fine grit)
- Small container of water
Step 1: Planning and Rolling
-
Prepare your workspace:
Lay down a sheet of parchment paper or use a silicone craft mat to prevent the clay from sticking to your table. Have a small bowl of water nearby for smoothing. -
Template creation:
Before touching the clay, sketch out simple house shapes on paper to use as templates. Design three variations: one small and squat, one medium with a steep roof, and one taller and narrow. Cut these paper templates out. -
Condition the clay:
Take a large chunk of air dry clay and knead it in your hands until it feels soft, warm, and pliable. This helps prevent cracking later on. -
Roll out the slab:
Use your rolling pin to flatten the clay into an even slab. Aim for a thickness of about 1/2 to 3/4 inch. You want these houses to be thick enough to stand stably on their own without tipping.
Clean Lines Pro Tip
To get perfectly straight vertical sides, use a metal ruler not just to guide your knife, but to gently press against the sides of the cut wet clay to square them up.
Step 2: Cutting and Shaping
-
Cut the silhouettes:
Place your paper templates onto the clay slab. Using a sharp craft knife and a ruler for guidance, slice straight down through the clay to cut out the perimeter of each house. Remove the excess clay. -
Refine the edges:
Dip your finger into a little water and run it along the cut edges of the houses to soften any sharp corners or ragged bits left by the knife. -
Create the doors:
Use your craft knife to gently imprint an arched door shape at the bottom center of each house. Press deep enough to make the outline visible, but don’t cut all the way through. -
Add window details:
Take a small, rectangular tool (or carve carefully with your knife) to create tiny rectangular windows. For the look in the photo, create pairs of vertical rectangles. -
Add attic accents:
On the taller houses, use a small circular cutter or the end of a piping tip to impress a round window near the peak of the roof. Alternatively, use a toothpick to poke a grid of tiny holes for a textural effect. -
Texture the surface:
To mimic the stone-like finish visible in the photo, take a ball of aluminum foil or a stiff-bristled brush and gently tap it against the front surface of the clay. This creates a subtle, organic texture.
Level Up: Illusions
Make them ‘glow’ by carving out the windows completely instead of just impressing them. Place a battery-operated tea light behind the house to let light shine through.
Step 3: Drying and Finishing
-
Let them dry:
Place the houses upright on a drying rack or a fresh sheet of parchment paper. Let them air dry completely. This usually takes 24-48 hours depending on humidity and thickness. -
Rotate frequently:
During the drying process, I like to flip them or lay them on their backs occasionally to ensure air circulates evenly, which prevents the clay from warping. -
Sanding:
Once fully dry and hard, use fine-grit sandpaper to smooth out any rough spots on the sides or back. Be gentle with the textured front face. -
Seal (Optional):
Keep the matte, raw look by leaving them as is, or apply a coat of ultra-matte varnish if you want to protect them from dust without adding shine.
Arrange your little clay neighborhood on a mantle or bookshelf for a serene, handmade display