
If you’ve got a little table space and a lump of air dry clay, you’re already set up for kid-level creative magic. These beginner kids ideas are all about simple shapes, bold color, and that satisfying “I made this!” moment.
Classic Pinch Pot Cups
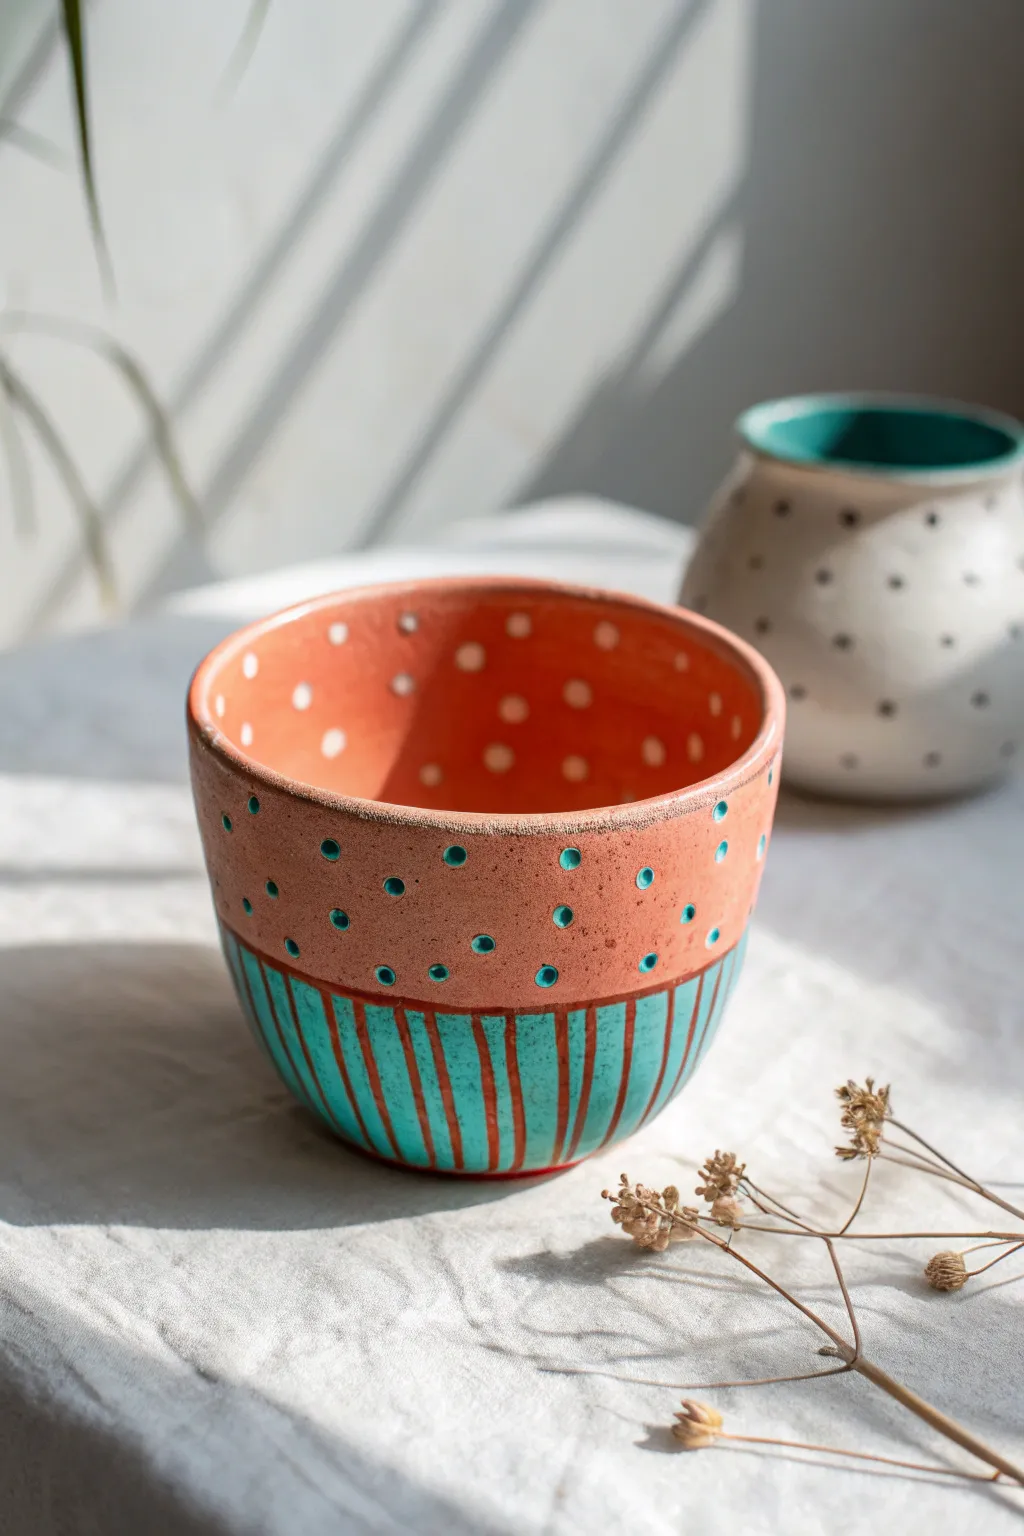
This charming little cup combines earthy terra cotta tones with splashy teal accents for a trendy, handmade look. Using a simple pinch pot technique, you’ll create a functional-looking decorative piece perfect for holding trinkets or dried flowers.
Step-by-Step Tutorial
Materials
- Air dry clay (white or terra cotta)
- Acrylic paints (Terra cotta orange, Teal/Turquoise, White)
- Clear gloss varnish or sealant (Mod Podge works well)
- Small round paintbrush
- Fine detail paintbrush
- Cup of water
- Sponge
- Toothpick or dotting tool
Step 1: Shaping the Cup
-
Form the base ball:
Start with a lump of air dry clay about the size of a tennis ball. Roll it firmly between your palms until it is a smooth, round sphere with no major cracks. -
Open the pot:
Hold the ball in one hand and focus on the center found with your thumb. Gently push your thumb into the center, pressing down about three-quarters of the way through—don’t poke through the bottom. -
Pinch the walls:
Using your thumb on the inside and fingers on the outside, gently pinch the clay while rotating the ball in your hand. Work your way from the bottom up to the rim. -
Even out thickness:
Continue pinching and turning until the walls are an even thickness all around, roughly a quarter-inch thick. If the rim gets uneven, gently tap the cup upside down on your table to level it. -
smooth the surface:
Dip your finger in a tiny bit of water and rub away any fingerprints or cracks on both the inside and outside. I like to use a barely damp sponge for a super smooth finish. -
Let it dry completely:
Set your cup aside to dry for 24-48 hours. It should turn white (or light gray) and feel hard and room temperature, not cool to the touch.
Cracks Appearing?
If small cracks appear while shaping, wet your finger slightly and smooth clay over the gap immediately. Pasting a little wet clay ‘slurry’ into the crack helps bond it.
Step 2: Painting the Base Layer
-
Apply the terra cotta base:
Paint the entire exterior and interior of the cup with a terra cotta orange acrylic paint. Use a larger brush for good coverage and let the first coat dry. -
Add a second coat:
Apply a second layer of orange to ensure the clay underneath doesn’t show through. This creates that rich, earthy pottery look. -
Paint the interior dots:
Mix a little white into your orange paint to make a lighter peach shade. Using the handle end of a paintbrush, dot this lighter color randomly around the inside of the cup.
Make it a Set
Make a second pinch pot but reverse the colors—paint the base teal with orange dots and stripes for a matching but distinct pair.
Step 3: Adding the Teal Designs
-
Mark the dividing line:
Imagine a line running horizontally around the cup, about one-third of the way up from the bottom. This will separate your polka dots from your stripes. -
Paint vertical stripes:
Using your teal paint and a fine brush, paint vertical stripes from the bottom center of the cup up to that imaginary line. Keep the spacing relatively loose and handmade. -
Fill the bottom section:
Go back and fill in the spaces between the orange lines with teal paint, so the bottom third becomes teal with thin orange stripes showing through. Alternatively, just paint teal stripes over the orange base. -
Create the exterior dots:
Dip the handle of a paintbrush or a dotting tool into the teal paint. Press dots onto the upper orange section of the cup’s exterior. -
Vary the dot placement:
Try to arrange the dots somewhat randomly, or in loose rows, ensuring they don’t look too rigid. -
Highlight the dots (optional):
Once the teal dots are dry, you can add a tiny speck of lighter blue or white to the center of a few dots to make them look dimensional like glazed ceramic.
Step 4: Finishing Touches
-
Clean up the rim:
Inspect the rim of the cup. If any paint smudged, touch it up with your orange paint to keep that clean, finished edge. -
Seal the project:
Brush a coat of glossy varnish or Mod Podge over the entire piece. This mimics the shine of a fired ceramic glaze and protects your paint.
Enjoy displaying your beautiful faux-ceramic cup on a sunny shelf or desk


Heart Trinket Trays
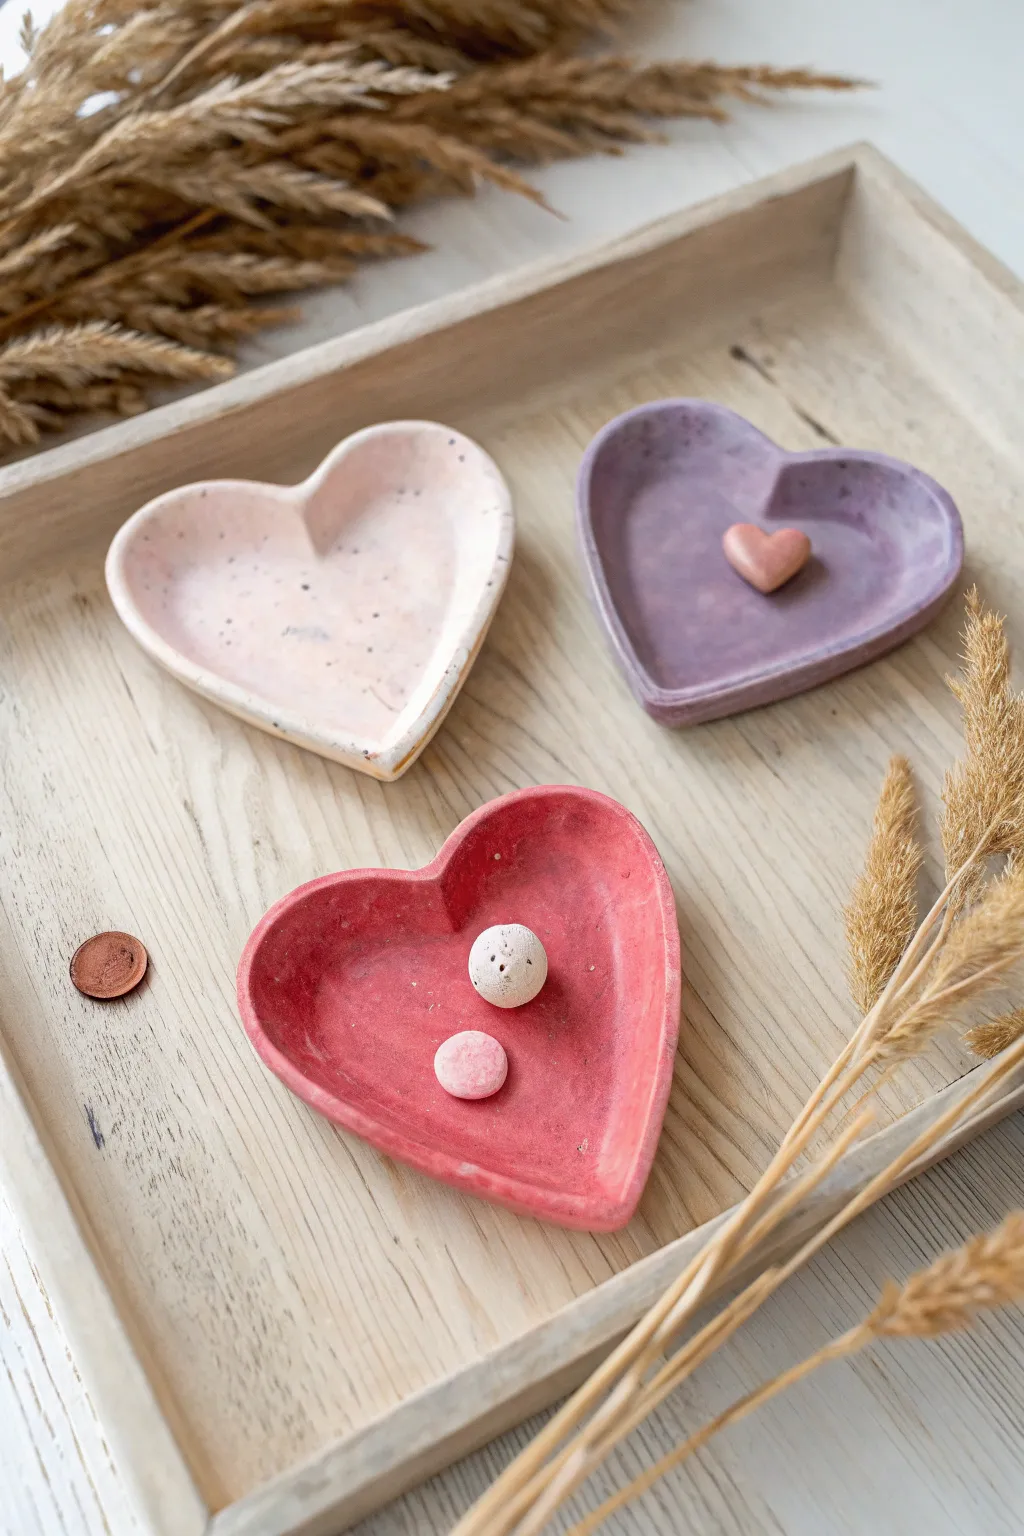
These charming heart-shaped trays are perfect for holding rings, coins, or tiny treasures. With their soft matte finish and playful speckles, they look like high-end ceramic pieces but are surprisingly easy to make with air-dry clay.
Step-by-Step Guide
Materials
- White or terracotta air-dry clay
- Rolling pin
- Heart-shaped cookie cutter (or a cardstock template)
- Craft knife or plastic clay knife
- Small bowl of water
- Sponge or fine-grit sandpaper
- Acrylic paints (pastel pink, purple, red, white, black)
- Old toothbrush (for speckling)
- Matte varnish or sealant
Step 1: Shaping the Clay
-
Prepare your workspace:
Lay down a silicone mat or a piece of parchment paper to prevent sticking. Take a ball of clay about the size of a lemon and knead it in your hands to warm it up and make it pliable. -
Roll out the slab:
Use your rolling pin to flatten the clay into an even slab. Aim for a thickness of about 1/4 inch (approx. 5-6mm). If it’s too thin, the edges might crack when you lift them later. -
Cut the heart shape:
Press your heart-shaped cookie cutter firmly into the clay. If you don’t have a cutter large enough, simply trace around a paper heart template with a craft knife to get the shape you want. -
Smooth the edges:
Remove the excess clay from around the heart. Dip your finger in a little bit of water and run it gently along the cut edge to smooth out any roughness or loose crumbs of clay. -
Create the rim:
This is the most crucial part. Gently pinch the edges of the heart upwards to create a raised rim. Work your way around slowly, lifting and smoothing the clay to form a shallow wall. -
Refine the shape:
Once the rim is lifted, use a damp sponge or your wet finger to smooth the transition between the base and the wall inside the dish. Make sure the ‘V’ at the top of the heart is distinct. -
Let it dry:
Place your finished heart shapes in a safe, dry spot away from direct sunlight. Let them air dry completely for 24-48 hours. They will turn a lighter color and feel hard when ready.
Cracking Up?
If small cracks appear while the clay is drying, don’t panic. Mix a tiny bit of fresh clay with water to make a paste (slip) and fill in the cracks, then smooth it over.
Step 2: Sanding and Painting
-
Sand for smoothness:
Once fully dry, inspect your tray. If there are any sharp bumps or uneven edges, lightly sand them down with fine-grit sandpaper until the surface feels smooth to the touch. -
Mix your base colors:
Prepare your acrylic paints. For the pink tray, mix white with a tiny dot of red. For the purple one, mix red and blue with plenty of white. You want a matte, opaque look. -
Apply the first coat:
Paint the entire heart dish—inside, outside, and the bottom. Let this coat dry for about 20 minutes. I usually prop them up on a small jar lids so the edges don’t stick to the table. -
Add a second coat:
Apply a second layer of paint to ensure solid coverage, hiding the original color of the clay completely. Let this dry thoroughly. -
Create the speckles:
Dilute a small amount of black or dark grey paint with water until it’s fluid. Dip an old toothbrush into this mixture. -
Flick the paint:
Hold the toothbrush over the dried trays and run your thumb across the bristles to flick tiny specks of paint onto the surface. Practice on a piece of paper first to control the spray. -
Seal the deal:
Once the paint and speckles are completely dry, apply a coat of matte varnish. This protects the clay from moisture and gives it a finished, durable quality.
Glazed & Confused
For a glossy ceramic look instead of matte, swap the matte varnish for a high-gloss Mod Podge or a dedicated gloss glaze. This makes the colors pop even more.
Fill your new handmade trays with jewelry or simply display them together for a lovely splash of color


Cookie-Cutter Animal Ornaments
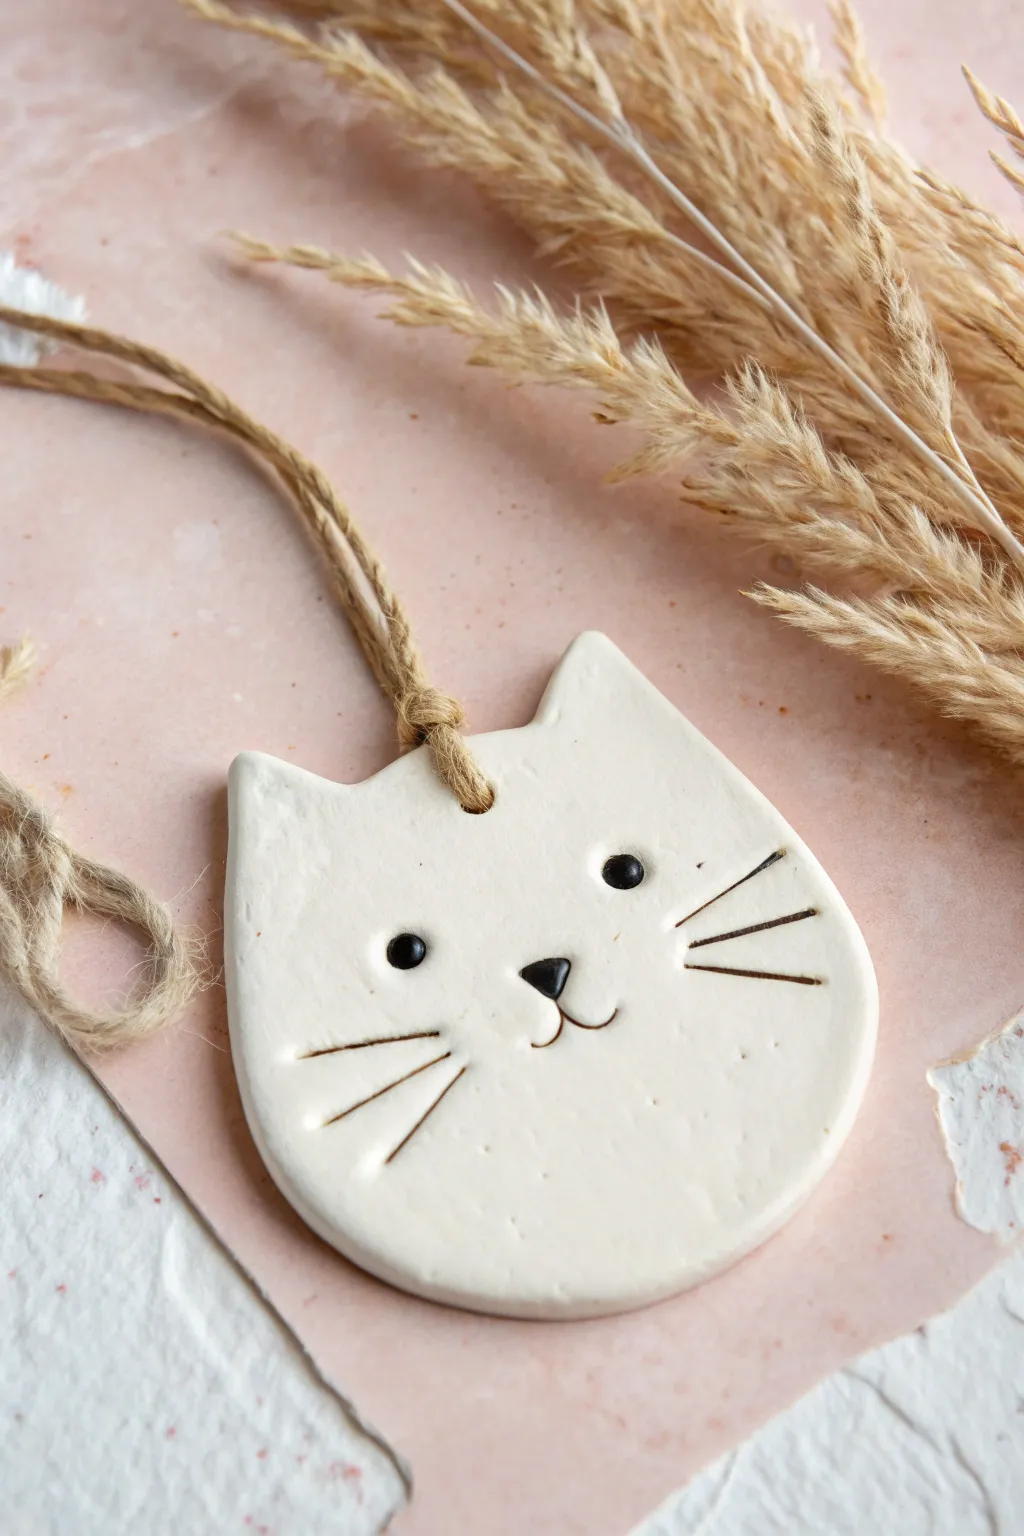
This adorable cat ornament is the purr-fect introduction to air dry clay, featuring a smooth, creamy finish and sweet minimalist details. The simple round shape and charming hand-painted face make it a timeless decoration that’s surprisingly easy to create.
How-To Guide
Materials
- White smooth air dry clay
- Rolling pin
- Parchment paper or craft mat
- Cat face cookie cutter (or round cutter + knife)
- Straw or skewer (for the hole)
- Small cup of water
- Fine grit sandpaper
- Black acrylic paint
- Very fine detail paintbrush (00 or 000 size)
- Jute twine or hemp cord
Step 1: Shaping the Base
-
Prepare your workspace:
Lay down a sheet of parchment paper or a non-stick craft mat to prevent the clay from sticking to your table. -
Roll out the clay:
Take a handful of white air dry clay and knead it gently until it’s pliable. Place it on your mat and use the rolling pin to flatten it to an even thickness, about 1/4 inch (5-6mm). -
Cut the shape:
Press your cat-shaped cookie cutter firmly into the clay. If you don’t have a specific cat cutter, cut a circle first and verify the thickness. -
Sculpt ears manually (optional):
If you are using a plain circle cutter, gently pinch the top two corners of the circle and pull them upwards slightly to form triangle ears, blending the clay with a little water so there are no seams. -
Smooth the edges:
Dip your finger into a small cup of water and gently run it along the cut edges of the clay to smooth out any ragged bits or roughness. -
Create the hanging hole:
Using a plastic straw or a skewer, poke a hole centered between the ears. Make sure it goes all the way through and is large enough for your twine to thread later. -
Final smoothing:
Look over the surface for any fingerprints. Lightly buffer them away with a tiny bit of water on your fingertip for a porcelain-like finish. -
Drying time:
Let the ornament dry flat on the parchment paper. I find it helps to flip the piece over after about 12 hours so the bottom dries evenly. Allow 24-48 hours total drying time until completely white and hard.
Smooth Surface Trick
Before cutting your shape, roll the clay out on a textured fabric or lace doily, then flip it over. The backside will be perfectly smooth while the textured side faces down.
Step 2: Painting & Finishing
-
Sand for perfection:
Once fully dry, take a piece of fine-grit sandpaper and very gently rub away any remaining rough edges on the sides or near the hole. -
Dust it off:
Wipe the ornament with a clean, dry cloth or soft brush to remove any clay dust before you start painting. -
Paint the eyes:
Dip the handle end of a paintbrush into black acrylic paint. Press it straight down onto the face to create two perfectly round dots for eyes. -
Paint the nose:
Using your fine detail brush, paint a small, inverted soft triangle for the nose just below and between the eyes. -
Add the mouth:
Carefully paint two small curved lines coming down from the bottom point of the nose to form the mouth anchors. -
Draw the whiskers:
With a steady hand and very little paint on the brush, flick three straight lines outwards on each cheek area for the whiskers. Keep the lines thin and tapered at the ends. -
Let the paint set:
Allow the acrylic paint to dry completely, usually about 20-30 minutes. -
Add the hanger:
Cut a length of jute twine or hemp cord, about 8 inches long. Fold it in half creating a loop. -
Creating a lark’s head knot:
Push the folded loop end through the hole in the clay from front to back. Then, thread the loose ends of the twine through that loop and pull tight to secure.
Add Some Sparkle
For a bit of holiday magic, wait for the black paint to dry, then apply a layer of glossy Mod Podge mixed with fine iridescent glitter over the entire surface.
Hang your new feline friend on a branch or use it as a personalized gift tag for a fellow cat lover


Chunky Bead Bracelets and Necklaces
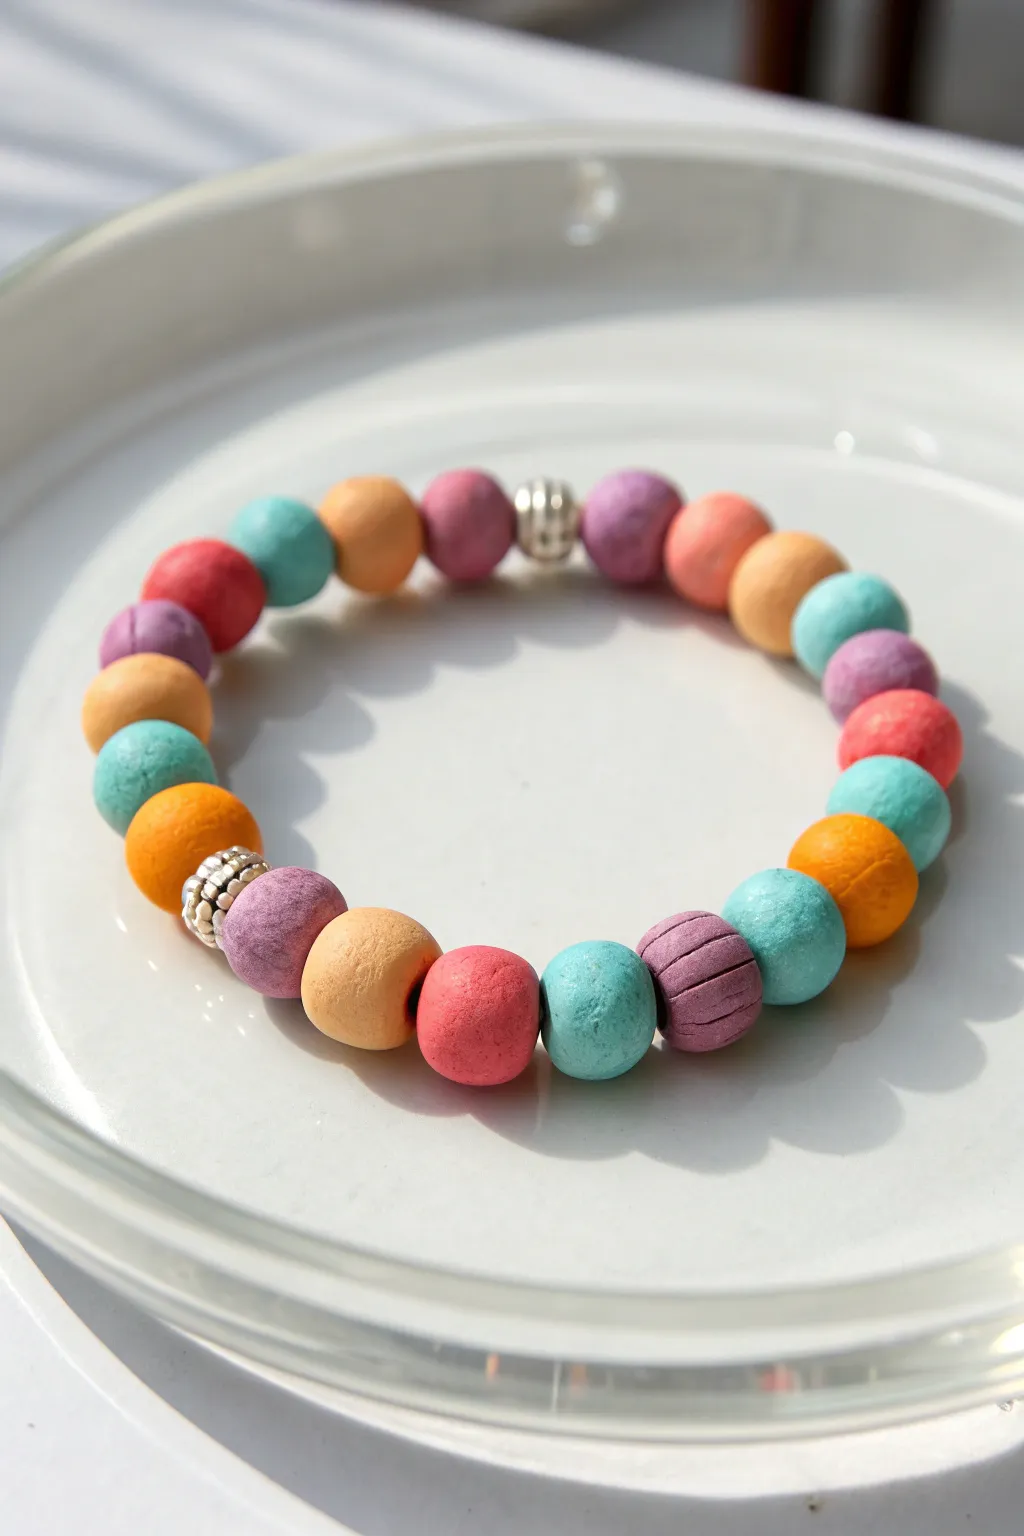
Create a vibrant, boho-chic accessory using simple air dry clay and a splash of color. This chunky bead bracelet features a cheerful mix of matte-finish clay spheres paired with silver accents, perfect for adding a pop of personality to any outfit.
Step-by-Step Tutorial
Materials
- Air dry clay (white)
- Acrylic paints (pink, orange, teal, purple, yellow-ochre)
- Elastic cord or jewellery string (0.8mm or 1mm)
- Toothpicks or a narrow skewers
- Silver spacer beads or large texture beads (metal or plastic)
- Fine grit sandpaper (optional)
- Clear matte sealant varnish (optional)
- Small paintbrushes
- Scissors
Step 1: Shaping the Beads
-
Portion the clay:
Start by pinching off small chunks of air dry clay. Aim for pieces that are roughly the size of a large marble or a grape so all your beads end up somewhat uniform. -
Roll into spheres:
Roll each chunk of clay vigorously between your palms. Don’t worry if they aren’t geometric perfection; a slightly organic, hand-rolled look adds to the charm of this project. -
Create the holes:
With the bead still slightly soft in your hand, gently push a toothpick or skewer directly through the center. Wiggle it slightly to widen the hole, ensuring it’s large enough for your elastic cord later. -
Smooth the edges:
As the toothpick exits the other side, the clay might push out slightly. Gently tap and smooth these rough edges back against the bead with your fingertip so the hole sits flush. -
Make enough beads:
Continue this process until you have about 18-22 clay beads, depending on your wrist size. I usually make a few extras just in case one breaks or gets lost. -
Let them dry:
Place your beads on a piece of parchment paper or a drying rack. Leave them to dry completely for at least 24 hours. Turning them over halfway through helps them dry evenly.
Hole Shrinkage?
Clay shrinks as it dries, which can close up your bead holes. Re-insert your toothpick gently when the clay is leather-hard (half-dry) to ensure the path stays clear.
Step 2: Adding Color
-
Sand imperfections:
Once bone dry, check your beads for any sharp bits or major lumps. A quick rub with fine-grit sandpaper will smooth them out nicely. -
Mix your palette:
Squeeze out your acrylic paints. You want a bright but slightly earthy palette: teal, warm pink, ochre yellow, light purple, and coral orange. -
Paint the beads:
Paint each bead a solid color. You can mount them back on toothpicks to hold them steady while painting, which keeps your fingers clean. -
Apply second coats:
Depending on your paint quality, you might need a second coat to make the colors opaque and vibrant. Let the paint dry fully between layers. -
Seal the surface (optional):
If you want the beads to last longer, brush on a layer of clear matte varnish. This protects the paint from chipping without making them overly shiny.
Step 3: Assembly
-
Measure the cord:
Cut a length of elastic cord about 10-12 inches long. This gives you plenty of extra room for tying knots without struggling. -
Pre-stretch the elastic:
Give your elastic cord a few firm tugs before stringing. This prevents the bracelet from loosening up immediately after you wear it. -
Plan your pattern:
Lay your beads out on the table to finalize the sequence. Try mixing the colors randomly rather than in a strict repeating pattern for that playful look. -
Start stringing:
Begin threading the beads onto the cord. Incorporate the silver spacer beads periodically—perhaps placing two silver spacers next to each other as a focal point, or scattering a single one every 6-7 clay beads. -
Check the fit:
Wrap the strung beads around your wrist to check the size. Add or remove beads until it sits comfortably without digging into your skin. -
Tie the knot:
Tie a strong surgeon’s knot (right over left, left over right, and loop through an extra time). Pull it tight and secure just the knot with a tiny dab of clear glue or nail polish. -
Trim the ends:
Once the glue is dry, trim the excess cord close to the knot. If possible, gently tuck the knot inside the hole of one of the adjacent beads to hide it.
Texture Play
Before drying, gently roll some of the soft clay beads over a textured surface like a comb or sandpaper to create subtle grooves, like the purple bead shown in the example.
Slip your new handmade bracelet onto your wrist and enjoy the burst of color you created yourself

The Complete Guide to Pottery Troubleshooting
Uncover the most common ceramic mistakes—from cracking clay to failed glazes—and learn how to fix them fast.
Smiley Face Magnets
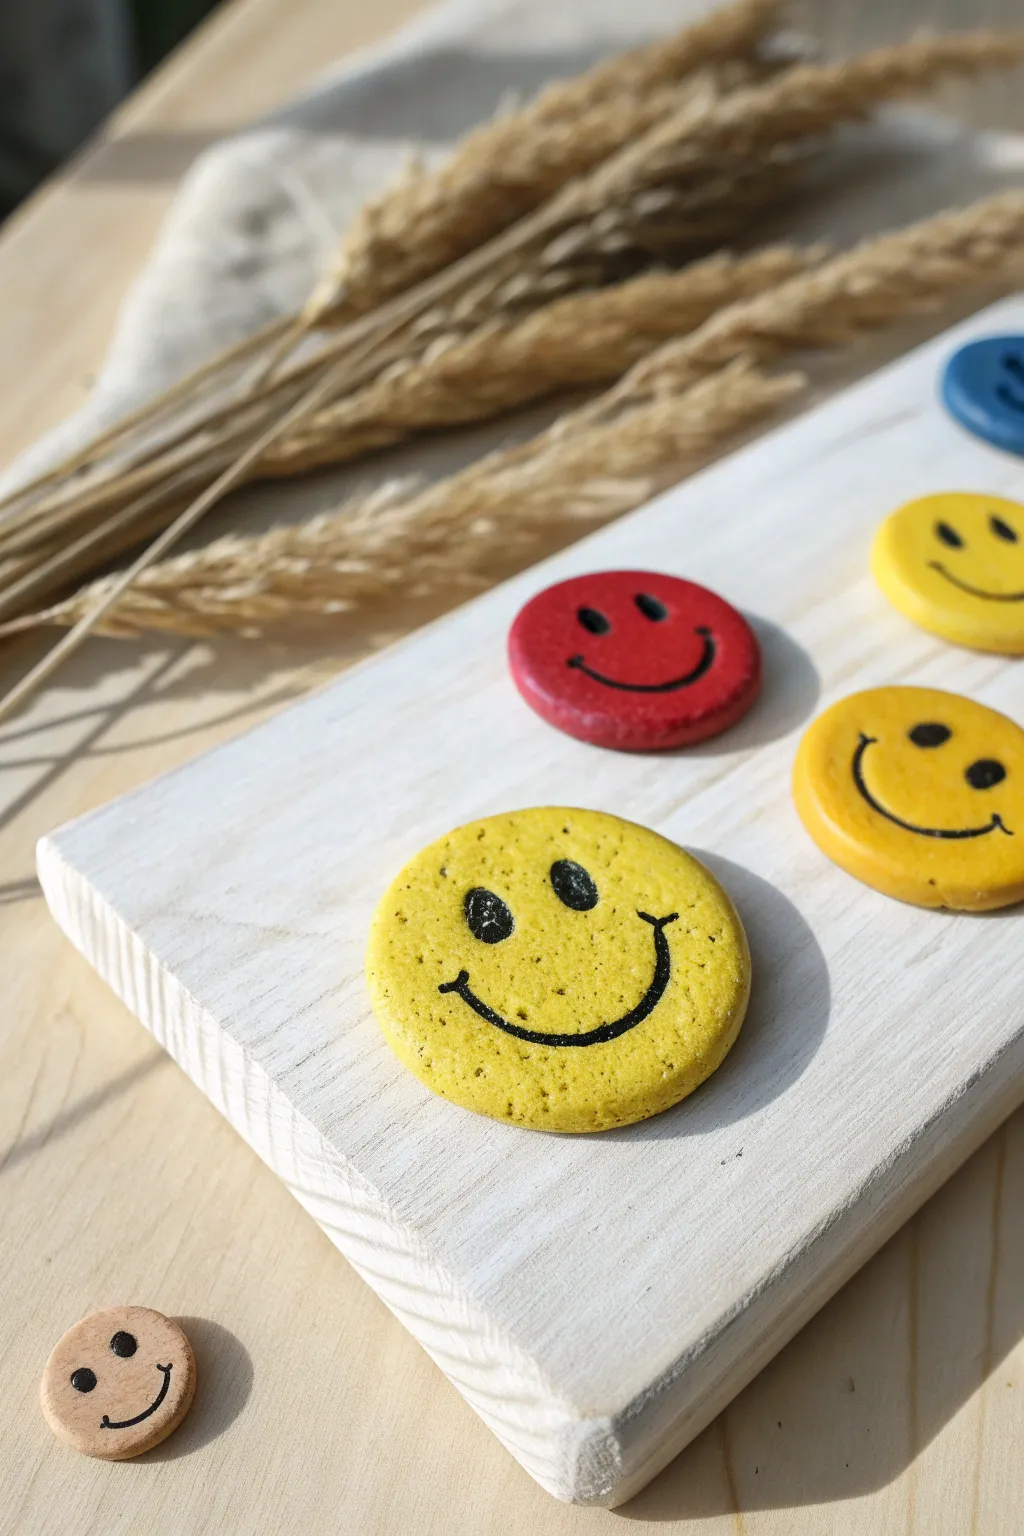
Brighten up your fridge or magnetic board with these cheerful, handcrafted magnets that are as fun to make as they are to look at. With just a few simple supplies, you can create a whole spectrum of happy faces that add a pop of positivity to any space.
Step-by-Step
Materials
- Air dry clay (white or terracotta)
- Rolling pin
- Small round cookie cutter or a small glass (approx. 1.5 – 2 inches diameter)
- Parchment paper or non-stick silicone mat
- Sandpaper (fine grit)
- Acrylic paints (Yellow, Red, Blue, Black)
- Paintbrushes (medium flat brush and fine detail brush)
- Clear varnish or sealant (matte or gloss)
- Small round magnets
- Strong craft glue (e.g., E6000) or hot glue gun
Step 1: Shaping the Clay
-
Prepare your workspace:
Lay down a sheet of parchment paper or a silicone mat on a flat surface to prevent the clay from sticking. -
Condition the clay:
Take a handful of air dry clay and knead it in your hands for a minute or two until it is warm, pliable, and free of cracks. -
Roll it out:
Place the clay on your mat and use the rolling pin to flatten it into an even slab. Aim for a thickness of about 1/4 inch—not too thin, or they might crack, but not too thick either. -
Cut the circles:
Press your round cookie cutter firmly into the clay to create perfect circles. You can wiggle it slightly to ensure a clean cut. -
Smooth the edges:
Gently lift the circles away from the scrap clay. Dip your finger in a little water and run it along the cut edges to smooth out any roughness or stray bits of clay. -
Dry completely:
Place your clay discs on a clean sheet of parchment paper in a safe spot. Let them air dry according to the package instructions, usually 24-48 hours. Flip them over halfway through to ensure even drying.
Smooth Surface Secret
Use a slightly damp sponge to wipe the raw clay surface before it dries. This smooths out fingerprints instantly.
Step 2: Painting and Finishing
-
Sand for perfection:
Once fully dry, lightly sand the edges and surface of each disc with fine-grit sandpaper to remove any bumps and create a smooth canvas for painting. -
Base coat application:
Using a flat brush, paint the front and sides of your discs with your chosen colors. I like to do two thin coats rather than one thick one for better coverage. -
Let the base dry:
Allow the base colors to dry completely before moving on to the details. This usually takes about 15-20 minutes for acrylics. -
Sketch the face:
If you are nervous about freehanding, lightly sketch the eyes and smile onto the painted surface with a pencil. -
Paint the features:
Dip a fine detail brush into black acrylic paint. Carefully paint two oval shapes for the eyes and a classic wide ‘U’ shape for the smile. -
Add smile details:
To give it that classic smiley look, add tiny perpendicular ticks at the ends of the smile line. -
Seal the artwork:
Once the face details are bone dry, brush on a layer of clear varnish. This protects the paint from chipping and gives it a finished look. -
Attach the magnet:
Flip the dry smiley face over. Apply a dab of strong glue to the back center of the disc and press a magnet firmly into it. -
Final cure:
Let the glue set completely according to the manufacturer’s instructions before placing your new creation on the fridge.
Textured Twist
Before cutting circles, press a piece of lace or canvas into the clay to give your smiley faces a cool, fabric-like texture.
Enjoy seeing your cheerful creations every time you walk into the kitchen
Leaf and Flower Imprint Medallions
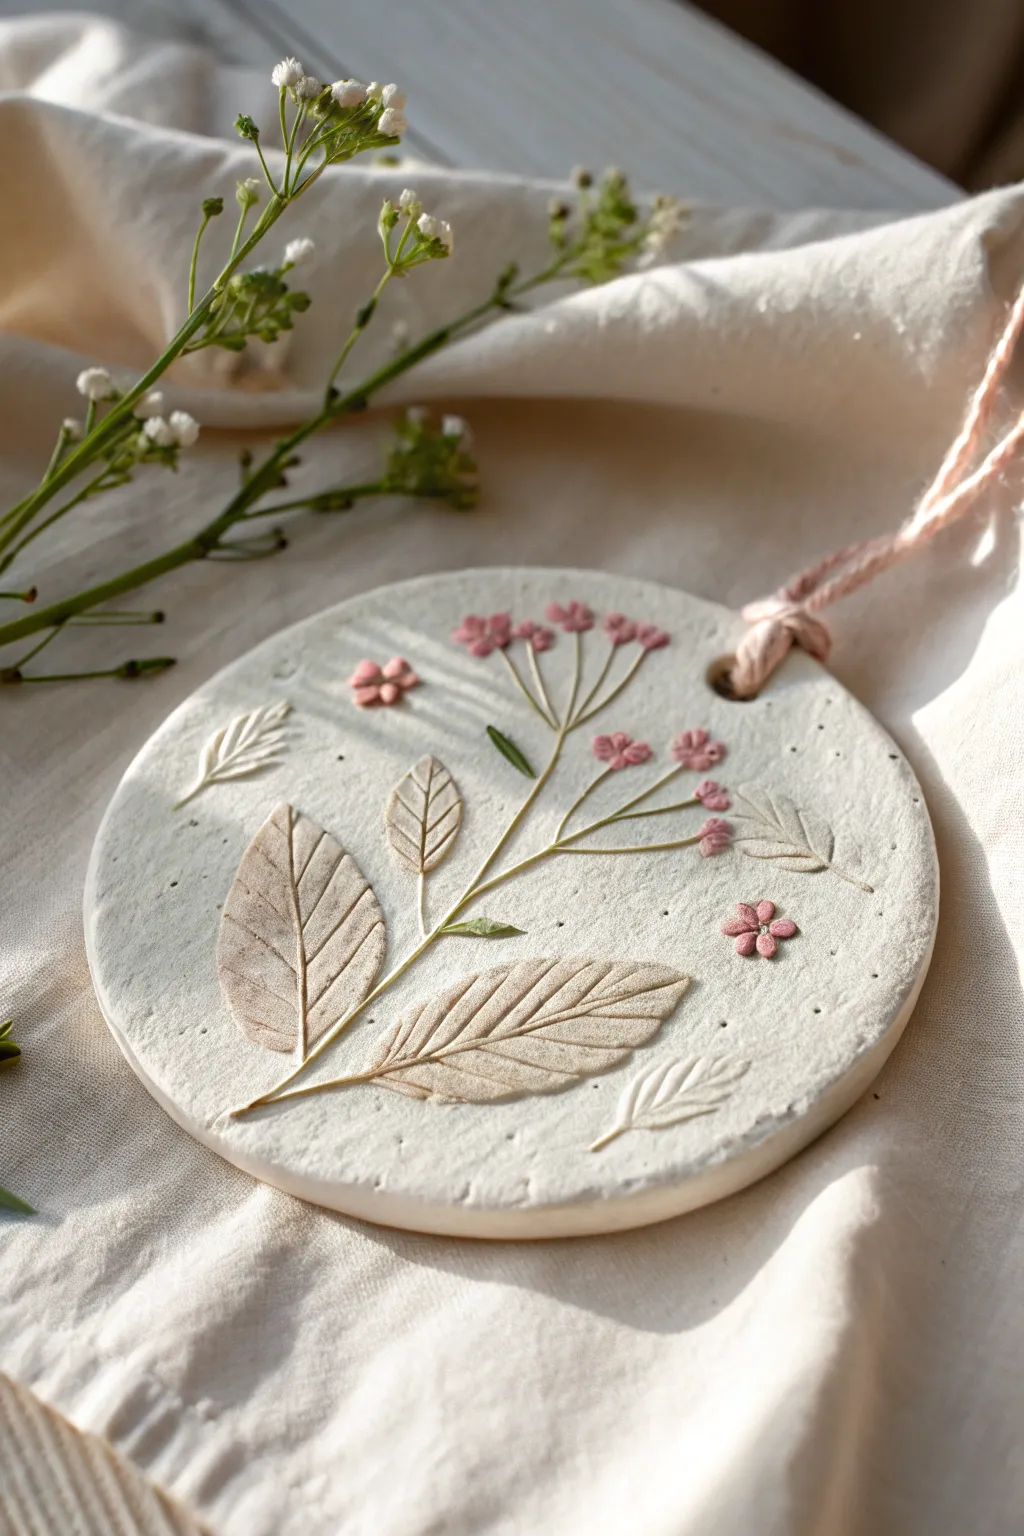
Capture the fleeting beauty of nature with this elegant clay medallion featuring imprinted leaves and soft pink floral accents. This project combines the simplicity of air dry clay with natural textures for a sophisticated yet beginner-friendly keepsake.
Detailed Instructions
Materials
- White air dry clay
- Rolling pin or smooth glass jar
- Circular cookie cutter (approx. 4-5 inches)
- Fresh leaves with prominent veins (e.g., beech or elm)
- Small pink faux flowers or dried flowers (optional: pink acrylic paint)
- Clay sculpting tool or toothpick
- Straw or skewer for the hanging hole
- Pink yarn or twine for hanging
- Fine grit sandpaper
- Matte finish sealant (optional)
Step 1: Preparing the Base
-
Condition the Clay:
Begin by taking a handful of white air dry clay and kneading it in your hands until it feels warm and pliable. This conditioning helps prevent cracks later on. -
Roll it Out:
Place the clay on a smooth surface or a silicone mat. Using a rolling pin, roll the clay out evenly until it is about 1/4 inch (6mm) thick. Rotate the clay occasionally to ensure an even circle. -
Cut the Circle:
Press your circular cookie cutter firmly into the rolled clay. If you don’t have a cutter large enough, you can trace around a small bowl with a knife. -
Smoothing the Edges:
Remove the excess clay from around the circle. Dip your finger in a little water and gently run it around the cut edge to smooth out any roughness.
Clearer Impressions
For sharper leaf veins, place a piece of parchment paper over the leaf before rolling. This prevents the roller from sticking and ensures even pressure.
Step 2: Creating the Botanical Design
-
Select Your Leaves:
Choose two medium-sized leaves with strong vein patterns. The deeper the veins, the better the impression will be. -
Arranging the Composition:
Lay the leaves onto the clay circle in a pleasing arrangement. Angle them slightly so they look like they are growing from a central stem. -
Imprinting the Leaves:
Use your rolling pin to gently roll over the leaves once. Apply firm, even pressure to push them into the clay, but don’t squash the medallion too thin. -
Reveal the Texture:
Carefully lift the leaves away by the stem to reveal the intricate vein patterns left behind in the clay. -
Adding the Stem:
Using a clay sculpting tool or the side of a toothpick, gently press a central line connecting the leaf impressions, creating a main stem that runs up the center. -
Creating Branch Lines:
Draw delicate thin lines branching out from the top of the main stem. These will serve as the stalks for your flowers.
Step 3: Adding Floral Details
-
Flower Placement:
If you are using small dried flowers or faux buds, press them gently into the ends of the branch lines you just drew. Alternatively, create tiny balls of clay, flatten them slightly, and press them onto the stems. -
Detailing Clay Flowers:
If using clay for flowers, use a needle tool to press a tiny center indentation or divide the petals for a realistic look. -
Painting (Optional):
If you used clay for the flowers, wait a few minutes for the surface to firm up, then carefully dab a tiny amount of soft pink acrylic paint onto the flower heads. -
Adding Texture:
For a rustic finish, lightly tap the bristles of a clean toothbrush or stippling brush onto the empty white spaces of the clay to create a subtle speckled texture. -
Create the Hanging Hole:
Use a straw to punch a clean hole near the top edge of the medallion. Make sure it isn’t too close to the edge to prevent tearing.
Upgrade With Metallic
Once the paint is dry, gently brush a tiny amount of gold leaf or metallic gold paint over the raised veins of the leaves for a luxurious shimmer.
Step 4: Finishing Touches
-
Drying Time:
Place the medallion on a wire rack to dry. I find that flipping it over gently after the first 12 hours helps it dry flat without warping. Allow 24-48 hours total. -
Sanding:
Once fully hard and white, use fine-grit sandpaper to smooth any rough edges around the rim. -
Sealing:
Apply a light coat of matte varnish or sealant to protect the clay from moisture and dust. -
Stringing:
Cut a length of pink yarn or rustic twine. Fold it in half, push the loop through the hole, and pull the ends through the loop to secure it.
Hang yours near a window where the natural light can highlight the delicate textures


What Really Happens Inside the Kiln
Learn how time and temperature work together inside the kiln to transform clay into durable ceramic.
Rainbow Plaques With Clouds
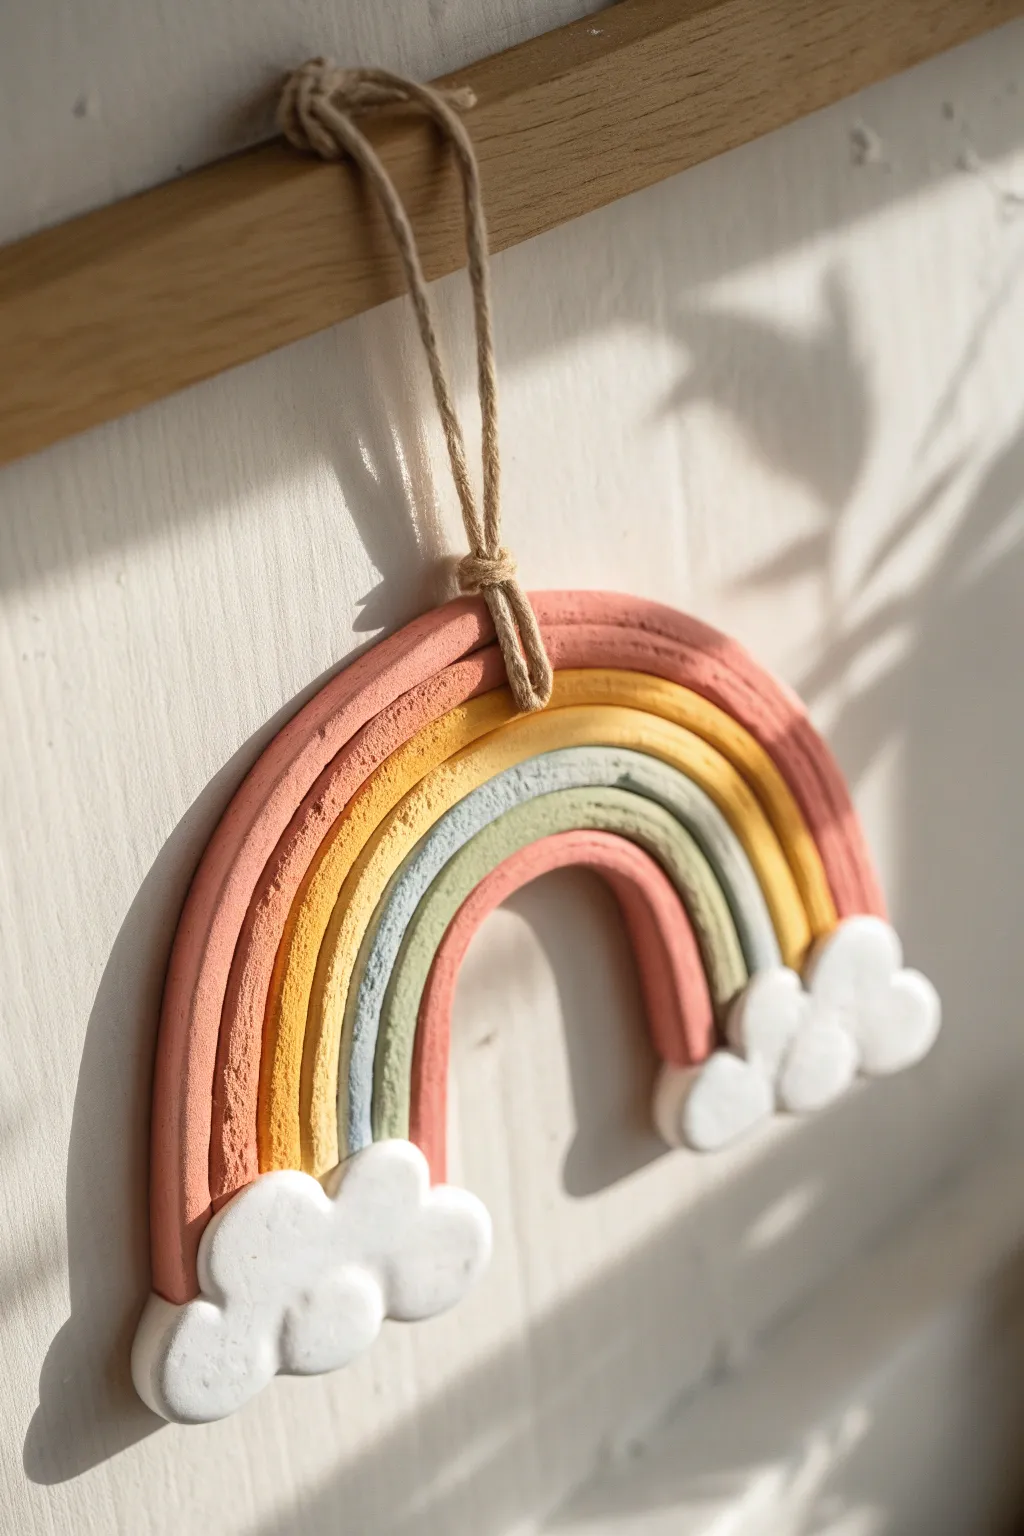
Create a charming, earthy wall hanging that brings a touch of warmth to any room. This project features four textured clay arches in a muted, boho palette, anchored by soft white clay clouds and suspended from rustic jute twine.
Step-by-Step Guide
Materials
- Air dry clay (white)
- Rolling pin
- Sharp crafting knife or clay cutter
- Acrylic paints (coral pink, mustard yellow, sage green/muted blue)
- Paintbrushes
- Jute twine
- Water in a small cup
- Parchment paper or silicone mat
- Strong craft glue (optional)
Step 1: Forming the Arches
-
Prepare your clay:
Start by kneading a large handful of air dry clay until it is soft, pliable, and free of cracks. This conditioning step is crucial to prevent breakage later. -
Roll the first snake:
Pinch off a chunk of clay and roll it on your work surface into a long, even snake. Aim for a thickness of about 1/2 inch to ensure sturdiness. -
Create the outer arch:
Curve the clay snake into an arch shape on your parchment paper. This will be the outermost layer, so make it the size you want your final rainbow to be. -
Make the inner arches:
Repeat the rolling process to create three more snakes of identical thickness. Fit each one snugly inside the previous arch, trimming the ends so they align perfectly at the bottom. -
Join the layers:
To adhere the arches together, gently score the touching sides with your knife, dab a tiny bit of water on the scored areas, and press them firmly against each other. I like to smooth the back seams slightly with my finger for extra stability. -
Add a hanging hole:
Use a skewer or the end of a paintbrush to poke a hole through the top center of the rainbow, right between the first and second arch. Make sure the hole fits your twine easily.
Step 2: Crafting the Clouds
-
Shape the cloud base:
Take two medium balls of clay and flatten them slightly into oval shapes. Place one at the bottom of each side of the rainbow arch. -
Create puffy texture:
To get that puffy look, roll several tiny balls of clay in varying sizes. Press these onto the front of your base cloud shapes, clustering them to look like fluffy cumulus clouds. -
Attach clouds to rainbow:
Score and wet the bottom ends of the rainbow arches and the back of your clouds. Press the clouds firmly onto the rainbow legs. Alternatively, you can glue them after drying, but attaching wet clay is often stronger. -
Smooth the edges:
Use a damp finger to smooth out any harsh fingerprints on the clouds, blending the tiny balls slightly so they look like one cohesive shape. -
Dry thoroughly:
Let the sculpture dry on a flat surface for at least 24-48 hours. Flip it over halfway through the drying time to ensure the back dries evenly.
Smooth Seams Tip
Use a slightly damp paintbrush to smooth the crevices between the arches while the clay is wet. It acts like an eraser for cracks.
Step 3: Painting and Assembly
-
Paint the outer arch:
Paint the largest, outermost arch with a muted coral pink acrylic paint. Use a small brush to get crisp lines between the grooves. -
Add the yellow layer:
Paint the second arch in a mustard or yellow ochre shade. If your paint is thin, apply two coats for solid coverage. -
Paint the cool tone:
For the third arch, mix a sage green or muted blue. This cool tone balances the warmth of the other colors perfectly. -
Finish the inner arch:
Paint the smallest, innermost arch in the same coral pink as the outer layer to create a symmetrical look. -
Paint the clouds:
Paint the clouds bright white. Even if your clay is white, a coat of white paint gives it a finished, professional ceramic look. -
Seal fully:
Wait for the paint to dry completely. If you want a slight sheen or extra protection, apply a matte varnish over the entire piece. -
Attach the twine:
Cut a length of jute twine. Thread it through the hole you made earlier at the top. -
Secure the hanger:
Tie a secure knot at the base of the twine near the clay, then tie another knot at the ends to form a loop for hanging.
Add Subtle Texture
Before drying, gently press a piece of canvas or fabric onto the rainbow arches to give the surface a woven, textile-like texture.
Hang your beautiful handmade rainbow in a nursery or sunny window to brighten your day
Ball-and-Snake Clay Animals
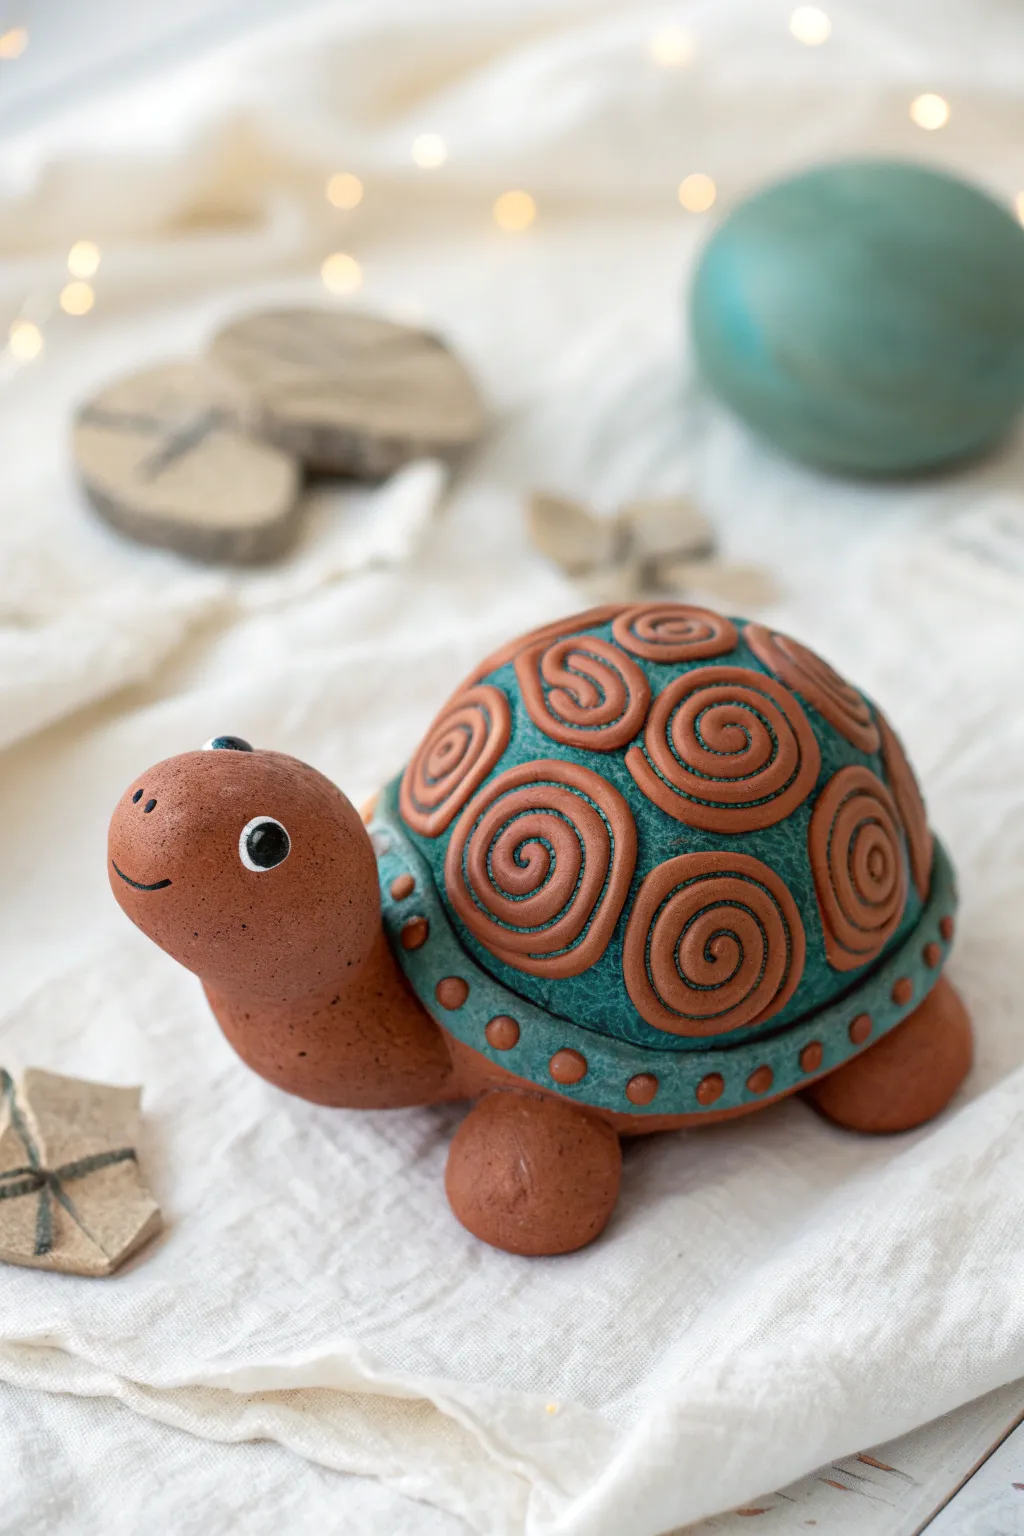
This charming turtle is built using simple shapes like balls and coils, making it a perfect project for getting comfortable with essential clay techniques. With its rustic terracotta finish and patterned teal shell, it looks like a timeless piece of pottery.
Detailed Instructions
Materials
- Air dry clay (terracotta color)
- Acrylic paints (teal/turquoise, black, white)
- Painting brushes (small detail brush and medium flat brush)
- Clay sculpting tools (needle tool or toothpick)
- Rolling pin
- Water in a small cup
- Sponge or paper towel
Step 1: Forming the Base
-
Create the shell dome:
Start with a large ball of terracotta clay about the size of a tangerine. Gently press it onto your work surface to flatten the bottom while keeping the top rounded to form a smooth dome. -
Shape the head:
Roll a smaller ball of clay, slightly teardrop-shaped. Position it at the front of the shell dome, lifting the narrower end upwards for the neck. -
Attach the head:
Score (scratch cross-hatch marks) both the neck area of the shell and the back of the head. Dab a little water on the scored areas and press firmly to join them. I like to smooth the clay over the seam with my finger to make it seamless. -
Make the flippers:
Roll four equal-sized small balls of clay. These don’t need to be flattened; keep them round and chubby for a cute, stylistic look. -
Attach the feet:
Place the four balls under the edges of the shell dome—two near the front and two near the back. Press the shell down gently so the feet stick securely.
Step 2: Sculpting the Details
-
Create the shell texture:
Using a needle tool, lightly sketch oversized circles all over the shell dome to map out where your spiral patterns will go. -
Make clay snakes:
Roll out several long, thin snakes of clay. Try to keep them even in thickness, roughly 3-4mm wide. -
Form the spirals:
Take a clay snake and coil it tightly into a flat spiral disc. You will need about 6-8 of these depending on the size of your turtle. -
Attach the spirals:
Score and wet the back of each spiral disc. Press them onto the shell dome, spacing them out slightly so there are small gaps between each swirl. -
Add the rim:
Roll a thicker snake of clay long enough to go around the entire base of the shell. Flatten it slightly into a strip. -
Secure the rim:
Wrap this strip around the bottom edge of the shell, just above the legs. Blend the bottom edge of the strip into the body so it stays put. -
Detail the rim:
Roll tiny little balls of clay—about the size of peppercorns—and press them onto the rim strip at equal intervals for decoration.
Keep it Clean
Wipe your hands with a damp cloth before rolling the white clay for the eyes, or the terracotta dust will stain it pink
Step 3: Face and Drying
-
Create the smile:
Use a tool with a curved edge (like a straw cut in half) or a needle tool to press a gentle, happy smile into the side of the head. -
Dry the sculpture:
Let your turtle dry completely in a safe spot. This usually takes 24-48 hours. The clay will become lighter in color and hard to the touch.
Create a Family
Make a tiny baby turtle by using just one single clay ball for the shell and skipping the added spirals, carving them in instead
Step 4: Painting
-
Paint the background:
Once dry, use a small brush to paint the spaces *between* the spirals with a teal or turquoise acrylic paint. Do not paint the spirals themselves; leave those the natural terracotta color. -
Paint the rim:
Paint the flat strip around the shell’s edge with the same teal color, carefully painting around the small raised dots. -
Add a wash (optional):
To make the teal look textured like leather or stone, you can dab it with a slightly damp sponge before it dries completely to reveal a hint of the clay underneath. -
Paint the eyes:
Paint two circles of white for the eyes. Let them dry, then add a smaller black circle inside, leaving a tiny white dot for a sparkle highlight. -
Seal (optional):
Brush a matte varnish over the painted areas if you want to protect the finish.
Now you have a sturdy little friend ready to decorate your desk or shelf

TRACK YOUR CERAMIC JOURNEY
Capture glaze tests, firing details, and creative progress—all in one simple printable. Make your projects easier to repeat and improve.
Goofy Little Clay Monsters
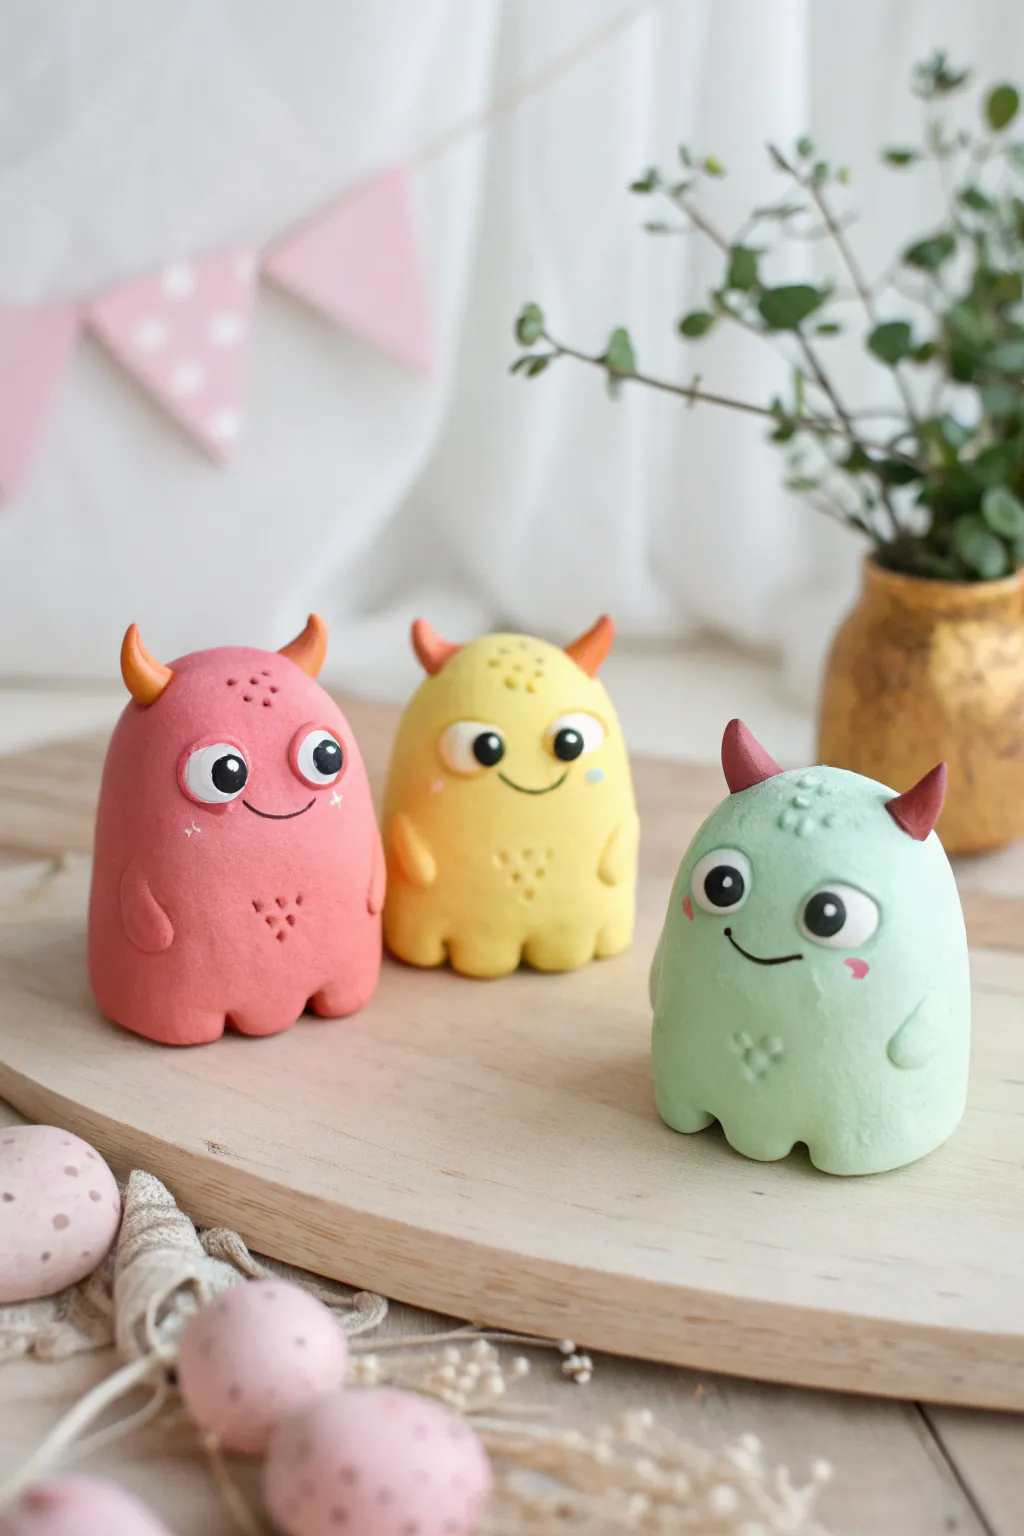
These adorable, stout little monster friends are perfect for brightening up a desk or shelf with their rounded bodies and sweet smiles. With their smooth, matte finish and tiny horns, they look almost like polished stones brought to life.
Step-by-Step Guide
Materials
- Air dry clay (white, pink, yellow, green)
- Acrylic paints (black, white, red, optional custom colors)
- Fine-tipped paintbrush or dotting tool
- Pointed sculpting tool or toothpick
- Small cup of water
- Smooth work surface or mat
- Clear matte varnish (optional)
Step 1: Shaping the Bodies
-
Prepare the clay:
Start by kneading your colored clay until it is soft and pliable. If you only have white clay, mix in a drop of acrylic paint or food coloring into separate balls to create pink, yellow, and pastel green shades. -
Roll the base:
Take a palm-sized amount of clay and roll it into a smooth, seamless ball. Rolling it between your palms in a circular motion helps eliminate any cracks. -
Form the shape:
Gently gently flatten the bottom of the ball against your work surface so it stands upright. Use your hands to smooth the sides upward, creating a slightly tapered, dome-like shape resembling a large gumdrop. -
Create the feet:
At the very base of the monster, use your thumb or a modeling tool to gently press indentations along the bottom edge, creating suggestion of little nubby feet or a wavy hem.
Step 2: Adding Character Details
-
Make the horns:
Take a tiny amount of contrasting colored clay (like orange for the pink monster, or reddish-brown for the green one) and roll two small cone shapes. -
Attach the horns:
Score the top of the monster’s head slightly with a toothpick, add a tiny dab of water, and press the horns firmly in place. Smooth the seam where the horn meets the head for a strong bond. -
Sculpt the arms:
Roll two small sausage shapes of clay in the same body color. Attach these to the sides of the body, curving them slightly forward so they look like little resting flippers. -
Add texture:
Using a needle tool or toothpick, gently poke small clusters of dots onto the forehead or tummy area to simulate freckles or textured skin. -
Let it dry:
Allow your monsters to air dry completely. This usually takes 24-48 hours depending on the thickness. Turn them occasionally so the bottom dries evenly.
Smooth Moves
Use a tiny bit of water on your finger to smooth out fingerprints before the clay dries. Don’t use too much or the clay gets slimy.
Step 3: Painting and Finishing
-
Paint the eye whites:
Once the clay is fully dry and hard, paint two large white circles for the eyes. I find two thin coats work better than one thick coat for solid coverage. -
Add pupils:
Using black acrylic paint and a fine detailed brush or a ball tool, add large black circles inside the white areas. Place the pupils glancing sideways or crossed slightly for a goofy expression. -
Add highlights:
Dip the very tip of a toothpick into white paint and add a tiny dot to each black pupil. This ‘catchlight’ brings the character to life instantly. -
Draw the mouth:
Paint a very thin, curved black line for the smile. Adding tiny cheek marks at the ends of the smile makes them look extra friendly. -
Rosy cheeks:
Dilute a tiny bit of red or pink paint with water and wash two small circles under the eyes for blush, or paint small solid hearts. -
Seal (Optional):
To protect your paint job, apply a coat of clear matte varnish over the entire figure once the paint is completely dry.
Monster Mash-Up
Give them unique accessories like a tiny clay bow tie, a party hat, or hold a small object like a heart or flower in their hands.
Group your finished monsters together for a colorful and quirky display
Starfish Beach Keepsakes
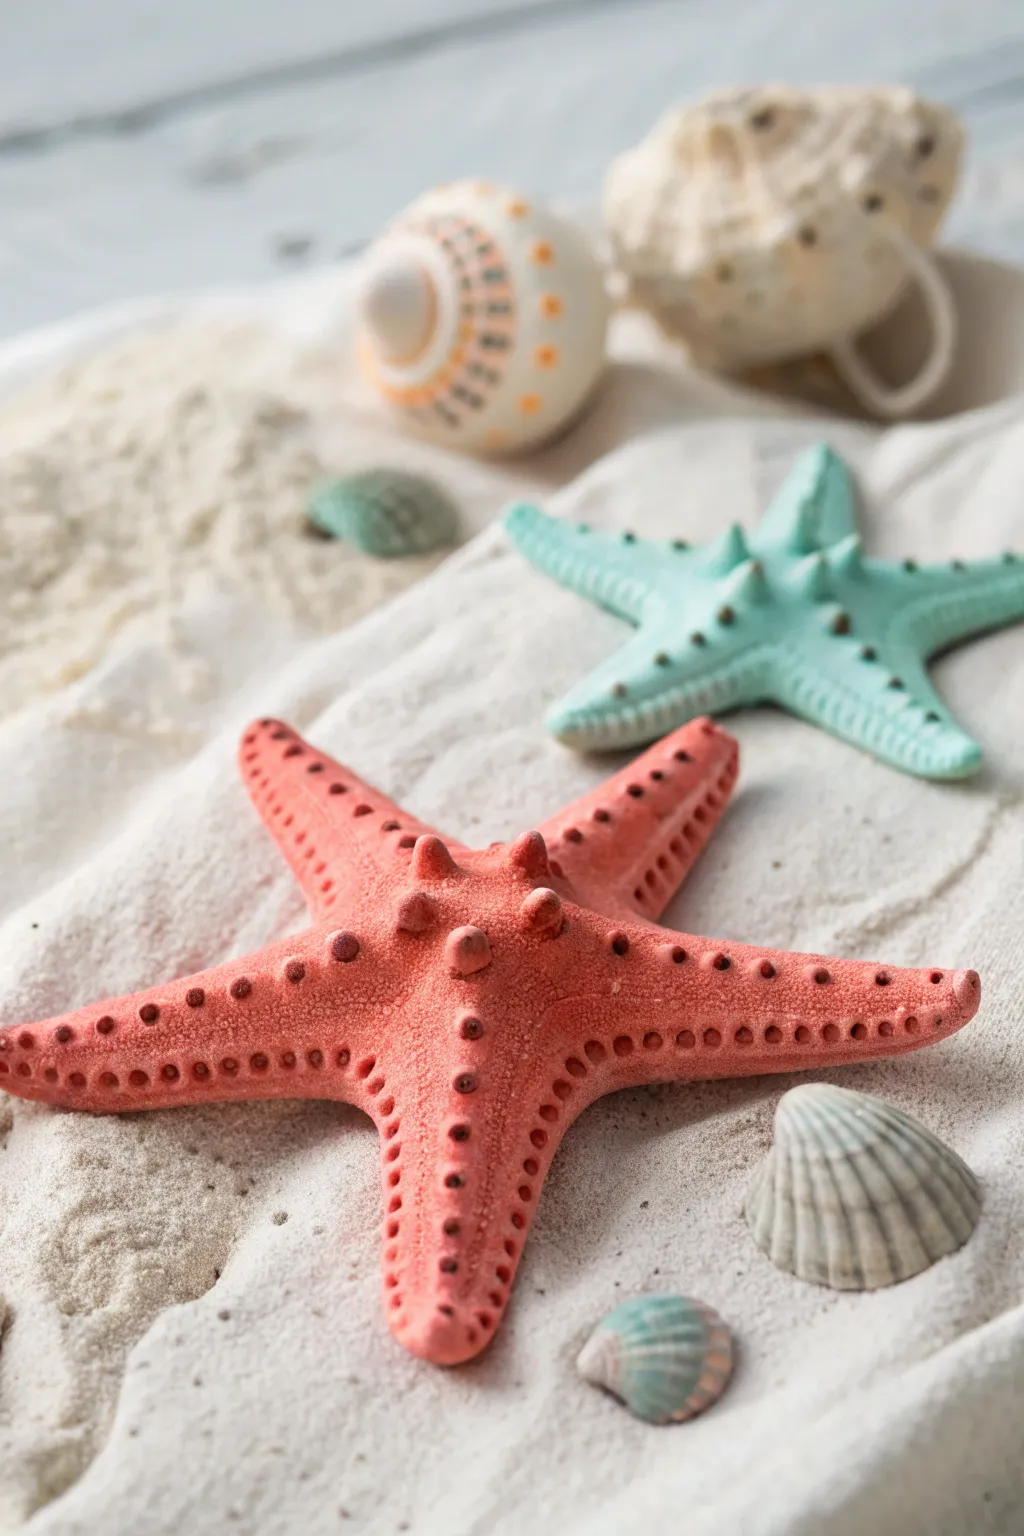
Bring the calming vibes of the ocean into your home with these deceptively realistic starfish charms. Using simple air dry clay, you’ll sculpt organic shapes featuring signature bumpy textures and vibrant, beachy colors that pop against white sand.
How-To Guide
Materials
- White air dry clay (or polymer clay)
- Acrylic paints (coral pink, mint green/teal, white)
- Sculpting tools (needle tool, small ball stylus, or a toothpick)
- Parchment paper or craft mat
- Small paintbrush
- Rolling pin (optional)
- Clear matte varnish (optional)
Step 1: Shaping the Base
-
Condition the Clay:
Start by taking a golf-ball-sized amount of air dry clay. Knead it in your hands until it becomes soft, warm, and pliable. This prevents cracks from forming later. -
Create a Star Shape:
Flatten the ball into a thick disk, then pinch the edges to pull out five distinct points. Don’t aim for geometric perfection; real starfish have slightly irregular, organic arms. -
Refine the Arms:
Gently roll and taper each arm between your fingers, making the tips slightly narrower than the center. Curve one or two arms slightly sideways to give the starfish a sense of movement. -
Smooth the Surface:
Dip your finger in a tiny bit of water and rub it over the clay to smooth out any fingerprints or harsh creases. The surface should be relatively uniform before you start adding details.
Step 2: Adding Texture
-
Mark the Center Lines:
Using a needle tool or the edge of a credit card, lightly press a central line running down the length of each arm. This guide helps with symmetric detailing but doesn’t need to be deep. -
Create the Spines:
Roll tiny, rice-sized bits of fresh clay. Press these onto the top center of the starfish body and down the midline of each arm to create the prominent knobby spines. -
Blend the Spines:
Use a small modeling tool or your finger to smooth the base of each knob into the main body so they look like they grew there, rather than just sitting on top. -
Detail the Sides:
Take a small ball stylus or the blunt end of a skewer and press rows of small indentations along the sides of each arm. I usually do two parallel rows of holes for a classic starfish look. -
Add Micro-Texture:
For that realistic sandy skin look, gently tap a clean toothbrush or stiff bristle brush over the entire surface of the clay (avoiding the deep holes you just made).
Cracks Appearing?
If you see hairline cracks while the clay dries, mix a tiny bit of fresh clay with water to make a paste (slip) and smooth it into the cracks with a brush.
Step 3: Color and Finish
-
Let it Dry:
Place your starfish on a piece of parchment paper and let it air dry completely. Depending on humidity and thickness, this usually takes 24 to 48 hours. Flip it halfway through for even drying. -
Base Coat:
Mix a vibrant coral color for one starfish and a soft mint teal for the other. Paint the entire surface, ensuring the paint gets into all the little nooks and crannies. -
Highlight the Texture:
Once the base coat is dry, mix a lighter version of your main color (add a little white). Use a ‘dry brush’ technique—wipe most paint off your brush—and lightly sweep over the raised spines and bumps. -
Define the Pores:
If the side holes got filled with too much paint, use a needle tool to gently re-poke them, or specific a tiny dot of darker paint inside each hole to create depth. -
Final White Dusting:
To mimic the chalky look of a dried sea creature, very lightly dry-brush pure white paint specifically on the very tips of the spines and the highest points of the texture. -
Seal (Optional):
If you want to protect your work, apply a coat of matte varnish. Avoid glossy finishes if you want to keep the natural, dry beach look shown in the inspiration photo.
Make it Sparkle
Mix very fine translucent glitter into your white highlighting paint. It gives the starfish a wet, sun-kissed shimmer without looking too crafty.
Now you have a collection of permanent beach treasures that capture the fragile beauty of the sea without harming any wildlife
Seashell Pendant Charms
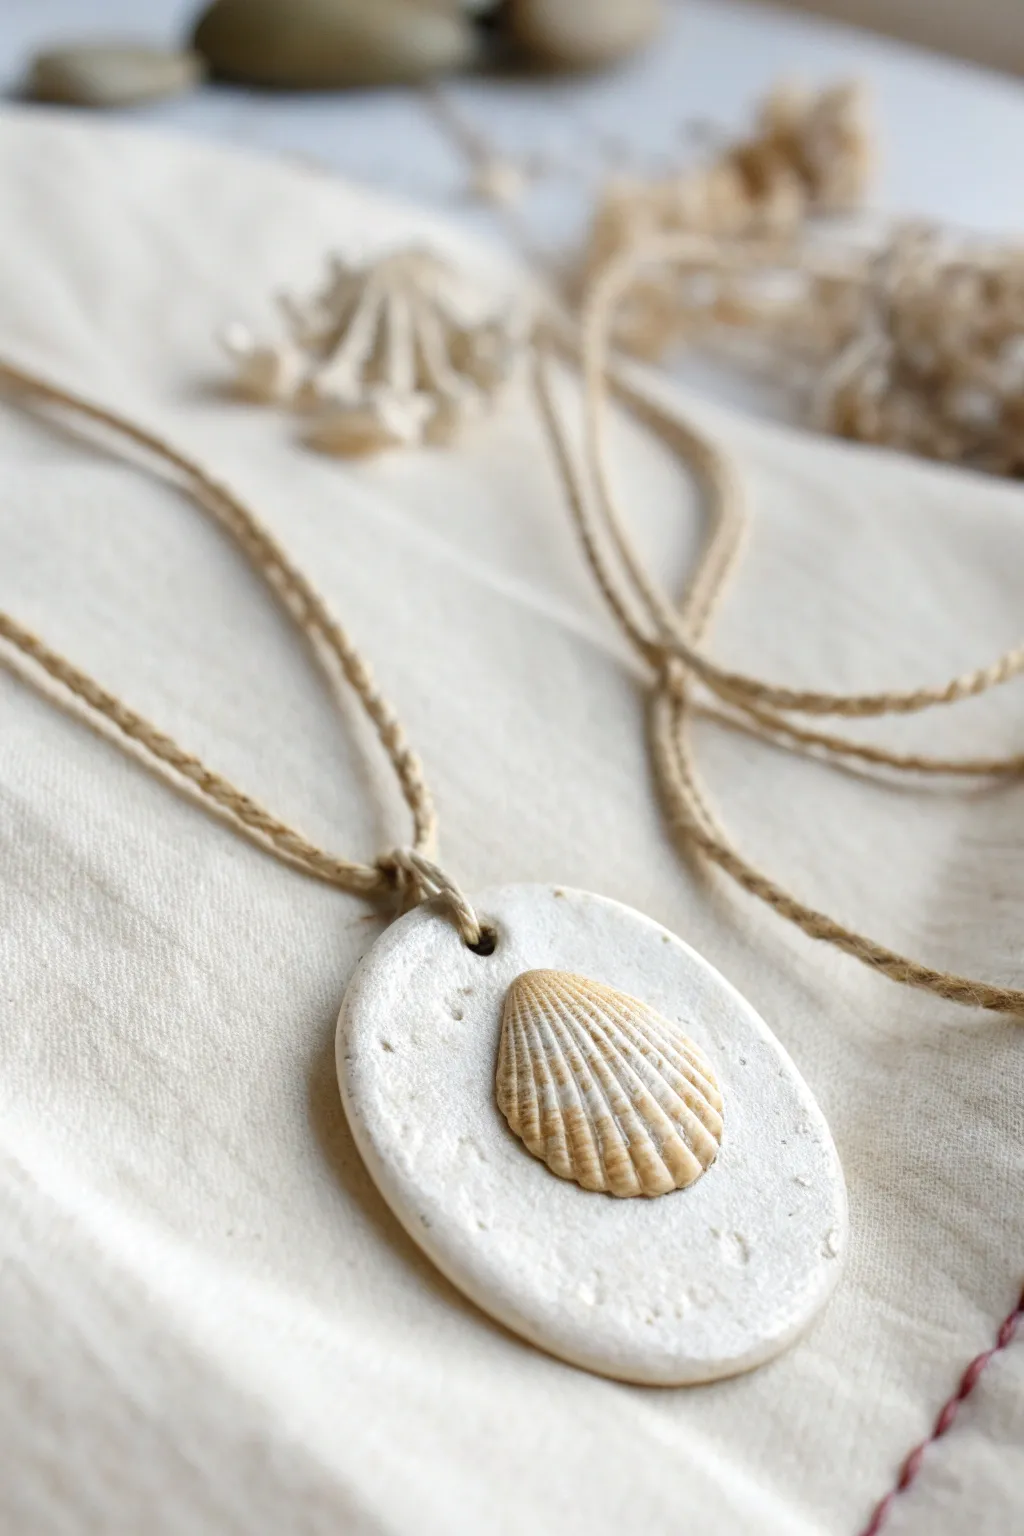
Capture the essence of a beach day with these elegant, rustic pendants that turn tiny treasures into wearable art. The combination of white air-dry clay and a natural seashell creates a simple yet stunning piece perfect for summer crafting.
Detailed Instructions
Materials
- White air-dry clay
- Small seashell (cleaned and dry)
- Rolling pin or smooth jar
- Oval cookie cutter (or a round one slightly flattened)
- Drinking straw or skewer
- Sandpaper (fine grit)
- Hemp cord or twine
- Parchment paper or craft mat
- Old toothbrush (optional for texture)
Step 1: Shaping the Base
-
Prepare the Clay:
Take a small ball of white air-dry clay, about the size of a walnut. Knead it in your hands until it is soft, pliable, and free of cracks. -
Roll it Out:
Place the clay on a sheet of parchment paper. Use your rolling pin to flatten it to an even thickness of about 1/4 inch (6mm). -
Cut the Shape:
Press your oval cutter firmly into the clay to create a clean shape. If you don’t have an oval cutter, you can use a round one and gently squish the sides afterwards. -
Smooth the Edges:
Dip your finger in a tiny bit of water and run it along the cut edges of the clay to smooth out any roughness or stray bits.
Stone Effect Trick
Mix a tiny pinch of used coffee grounds or black pepper into your white clay before rolling. This creates instant speckling that looks like real granite or beach stone.
Step 2: Adding the Shell Details
-
Position the Shell:
Take your clean seashell and experiment with placement. Center it on the oval clay slab, leaving room at the top for the hanging hole. -
Press It In:
Gently press the shell into the clay. You want it embedded deep enough to stick, but not so deep that it disappears. I like to wiggle it slightly to ensure a good bond. -
Create Texture:
To mimic the sandy look in the photo, lightly tap the surface of the clay around the shell with an old toothbrush or a crumpled piece of aluminum foil. -
Make the Hole:
Use a drinking straw or a skewer to poke a hole near the top edge of the pendant. Make sure the hole is big enough for your twine to pass through later. -
Let it Dry:
Set the pendant aside in a safe, dry place. Allow it to air dry completely for 24-48 hours, flipping it over halfway through to ensure the back dries evenly.
Step 3: Finishing Touches
-
Check Adhesion:
Once fully dry, gently check if the shell is secure. If the clay shrank away creating a gap, add a tiny drop of craft glue under the shell to secure it. -
Sand the Edges:
Use a piece of fine-grit sandpaper to buff the edges of the hardened clay, removing any sharp points or unevenness for a professional finish. -
Measure the Cord:
Cut a length of hemp cord or twine long enough to slip over your head comfortably, usually about 24 to 30 inches. -
Thread the Pendant:
Feed one end of the twine through the hole in the pendant. Pull it through until the pendant is centered on the cord. -
Secure the Loop:
If you want the pendant to sit flat, create a lark’s head knot right at the pendant hole, or simply tie a small overhand knot just above the pendant to keep it from sliding too much. -
Knot the Ends:
Bring the two loose ends of the cord together and tie a sturdy knot to close the necklace loop.
Shell Won’t Stick?
Clay shrinks as it dries, sometimes popping the shell out. If this happens, simply glue the shell back into the indentation with super glue or strong craft glue.
You now have a beautiful piece of coastal jewelry that carries the spirit of the ocean wherever you go
Dinosaur Fossil Stones
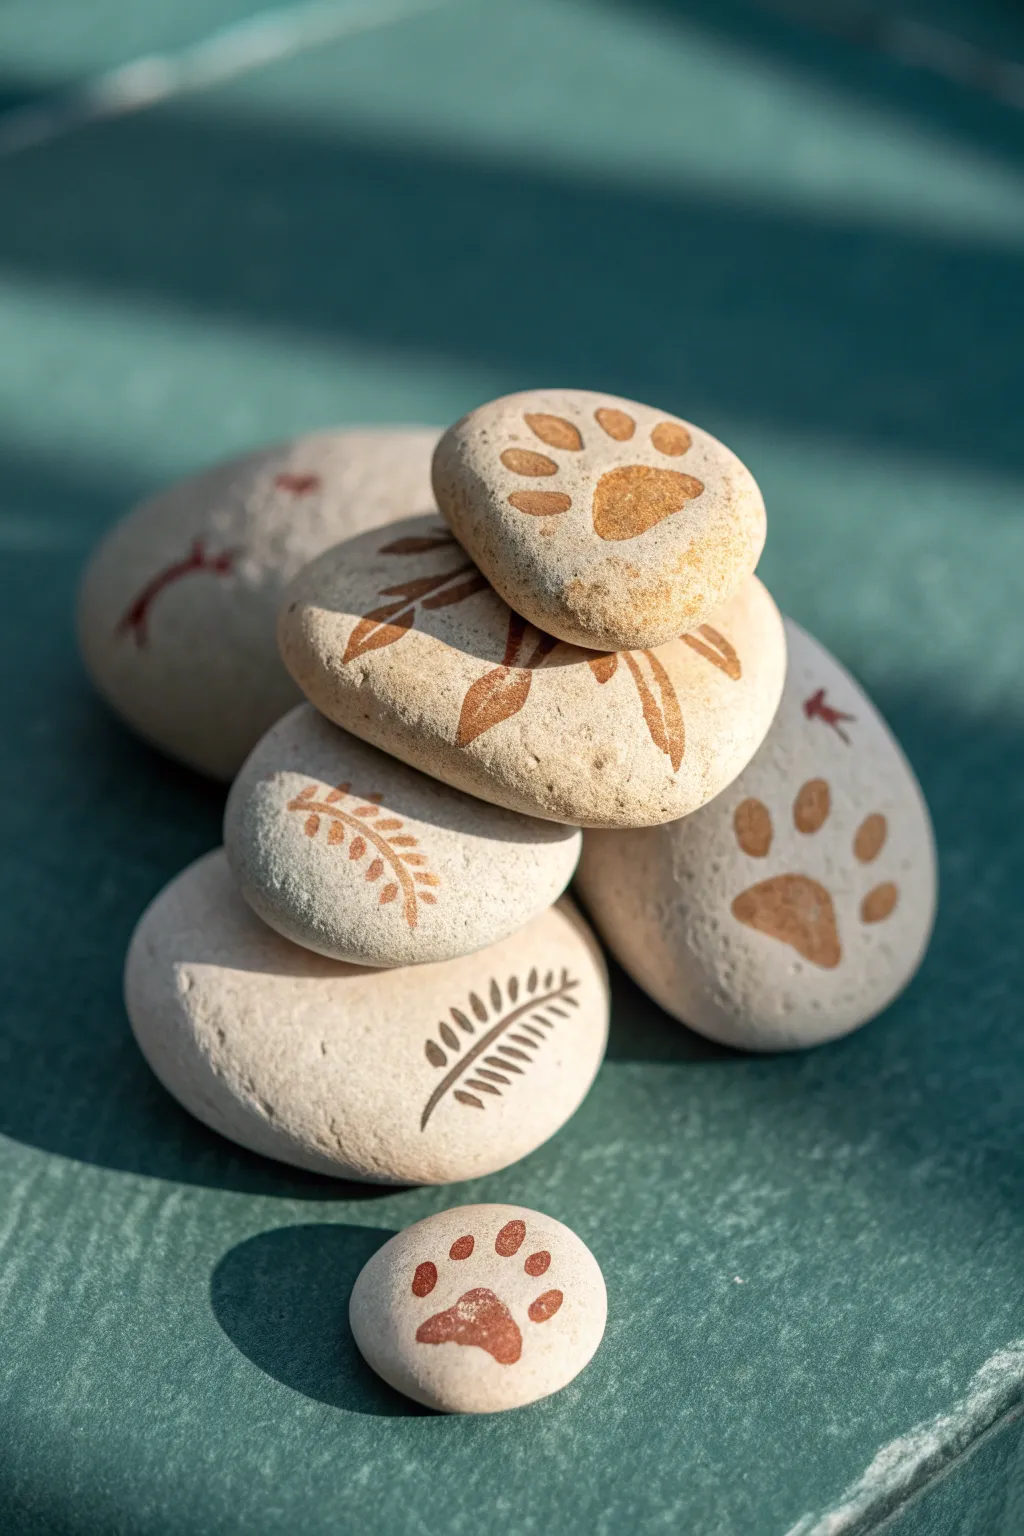
Transport your kids back to the Jurassic era with these remarkably realistic fossil stones. By layering warm, earthly hues and simple stamping techniques, you’ll create a collection that looks just like ancient treasures unearthed from the ground.
How-To Guide
Materials
- White or cream-colored air dry clay
- Acrylic paint (burnt sienna or reddish-brown)
- Small paintbrush or sponge applicator
- Rubber stamps (dinosaur feet, ferns, leaves)
- Alternatively: Plastic toy dinosaurs (for footprints) and real leaves
- Fine-grit sandpaper (optional)
- Matte varnish or sealant (optional)
Step 1: Shaping the Stones
-
Portion the clay:
Start by grabbing a handful of air dry clay. Break it apart into various sizes—some large for the base stones, some medium, and a few small pebbles to create a natural-looking collection. -
Roll into spheres:
Roll each portion of clay between your palms to form a smooth ball. Don’t worry about making them perfectly round; real rocks have organic imperfections. -
Flatten the stones:
Gently press the clay balls against your work surface to flatten them into discs. They should be thick enough to feel substantial, about half an inch to an inch thick. -
Smooth the edges:
Dip your finger in a tiny bit of water and run it along the edges and surface of the clay to smooth out any cracks or fingerprints. The smoother the surface, the more it will resemble a polished river rock.
Step 2: Creating the Fossils
-
Prepare your stamps:
Select your stamps. For this project, we are aiming for a mix of dinosaur footprints (three-toed theropod prints work great) and prehistoric plant life like ferns. -
Apply the paint:
Take your burnt sienna or reddish-brown acrylic paint. Instead of dipping the stamp, use a small brush or sponge to lightly dab paint onto the raised design of the stamp or the toy dinosaur’s foot. -
Test the impression:
Before stamping your actual stone, I like to do a quick test on a scrap piece of paper or spare clay to ensure the paint coverage is even but not gloppy. -
Stamp the clay:
Press the painted stamp firmly into the center of a wet clay stone. Apply even pressure to create a subtle indentation along with the color transfer, which mimics a real fossil impression. -
Lift carefully:
Lift the stamp straight up to avoid smudging the paint or dragging the clay surface. -
Vary the designs:
Repeat this process for all your stones. Try stamping some leaves so they wrap slightly around the curve of the stone for a dynamic look. -
Create a scatter:
Make sure to create a few tiny pebbles with just a single small print, like the one shown at the bottom of the photo, to add variety to your set.
Fix Smudged Prints
If a stamp smudges, don’t panic. Since the clay is still wet, just dip your finger in water, smooth the surface back to blank, let it dry briefly, and re-stamp.
Step 3: Drying and Finishing
-
Let them dry:
Place your finished stones on a piece of parchment paper or a wire rack. Allow them to dry completely for 24-48 hours, depending on the thickness of the clay and humidity. -
Flip occasionally:
Turn the stones over halfway through the drying process to ensure the bottoms dry evenly and don’t trap moisture. -
Sand imperfections:
Once fully dry, if there are any sharp ridges or rough spots on the edges, you can gently buff them away with fine-grit sandpaper. -
Seal the deal:
To protect the paint and give the stones a finished feel, apply a thin coat of matte varnish. This keeps the look natural while preventing the ‘fossil’ from rubbing off.
Textured Grip
For a grittier, sandstone texture, mix a pinch of real sand or dried coffee grounds into your white clay before shaping the rocks.
Arranged in a stack or scattered in a garden, these prehistoric creations are ready for discovery.
Backpack Name Tags
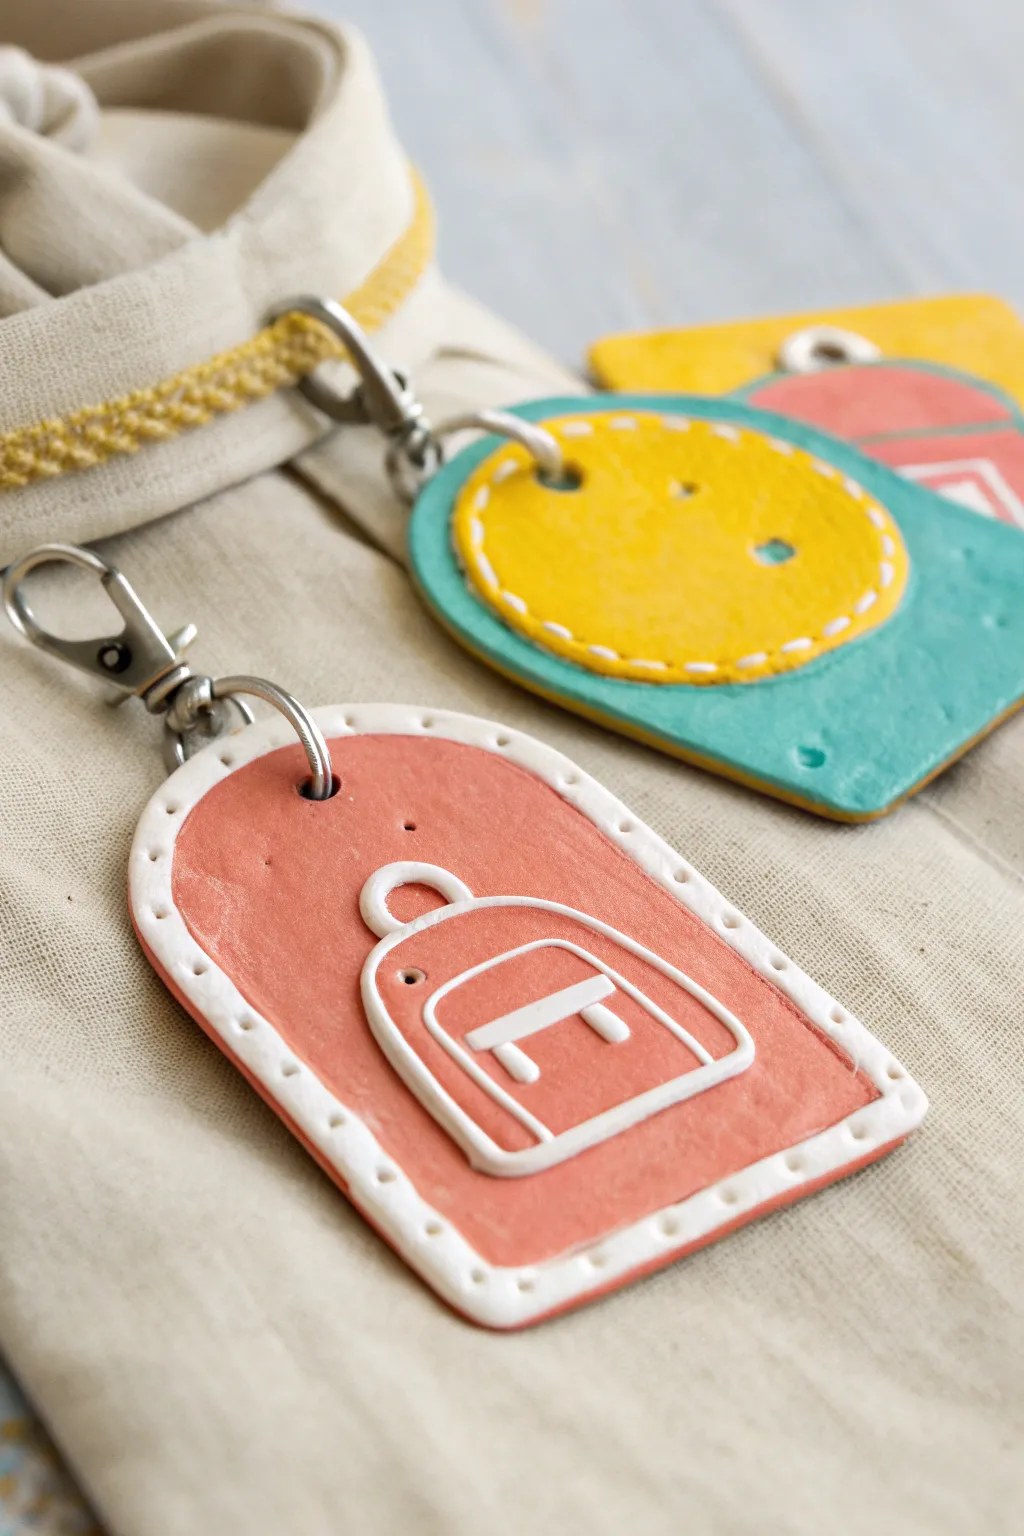
Add a personalized pop of color to any school bag with these charming clay tags featuring raised designs and faux-stitching details. They are sturdy, stylish, and perfect for ensuring a backpack never gets lost in the pile.
Step-by-Step
Materials
- Air dry clay (white)
- Acrylic paints (coral pink, turquoise, yellow, white)
- Rolling pin
- Clay sculpting tools or a plastic knife
- Circle cutter or small jar/lid
- Drinking straw (for punching holes)
- Fine-grit sandpaper
- Mod Podge or clear acrylic sealant
- Jump rings and lobster clasps
- Needle nose pliers
- Fine detail paintbrush
Step 1: Shaping the Base
-
Roll the slab:
Begin by taking a chunk of white air dry clay and conditioning it in your hands until soft. Roll it out on a flat surface to an even thickness of about 1/4 inch. -
Cut the rectangle:
Use a knife or clay tool to cut a rectangle shape, approximately 2 inches by 3 inches. You can round the top corners for a softer tag shape like the coral one shown. -
Cut the teal base:
For the second design, cut another rectangle of similar size, perhaps keeping the corners slightly sharper or rounded depending on your preference. -
Punch the hole:
While the clay is still wet, take your drinking straw and punch a hole near the top center of each tag. This ensures you have a clean opening for the hardware later. -
Smooth the edges:
Dip your finger in a little bit of water and run it along the cut edges of your rectangles to smooth out any roughness or stray clay bits.
Smooth Surface Secret
Use a tiny bit of water on your fingertip to smooth the clay coil joints together. This makes the raised backpack icon look like one seamless piece.
Step 2: Adding the Raised Details
-
Roll thin coils:
To create the backpack icon, roll a very thin snake or coil of clay. It should be consistent in thickness, almost like cooked spaghetti. -
Form the outline:
Lay the coil onto the wet coral rectangle to form the outline of a backpack shape—an arch for the top and a flat line for the bottom. Press gently to adhere it. -
Add inner details:
Use smaller segments of the coil to create the front pocket rectangle and a small arch for the handle loop at the top. -
Create the circle design:
For the teal tag, roll a flat piece of clay and cut out a circle using a cookie cutter or lid. Place this circle onto the center of the rectangle base. -
Emulate stitching:
Using a toothpick or a small needle tool, gently press indentation marks around the borders of your raised shapes (like the yellow circle) or around the perimeter of the tags to mimic sewing stitches. -
Let it dry:
Place your creations on a piece of parchment paper and let them dry completely. This usually takes 24-48 hours depending on humidity. Flip them halfway through to ensure even drying.
Step 3: Painting and Assembly
-
Sand imperfections:
Once fully dry, inspect your tags. If there are sharp edges, lightly sand them with fine-grit sandpaper until smooth. -
Base coat painting:
Paint the main rectangular background of the backpack tag with a coral pink acrylic paint. Use a small brush to get close to the raised clay coil without painting over it. -
Paint the second tag:
Paint the background of the second tag turquoise and the raised circular center a bright yellow. -
Highlight the details:
Once the base background color works are dry, carefully paint the raised coil backpack outline in white. This makes the design pop nicely against the coral. -
Add the stitching:
Dip a very fine brush or even a toothpick into white paint. carefully fill in the little indentation marks you made earlier to create the look of white thread stitching. -
Seal the deal:
Protect your hard work by applying a coat of Mod Podge or clear acrylic sealant over the entire tag. I usually like to do two thin coats for extra durability. -
Attach hardware:
Once the sealer is dry, use pliers to open a jump ring. Slide it through the hole in the tag and attach the lobster clasp, then close the ring securely.
Level Up: Name It
Before drying, use small alphabet stamps to impress your child’s name into the back of the tag for easy identification.
Clip these onto any zipper or strap and enjoy your custom accessory
Pencil Cup Desk Buddy
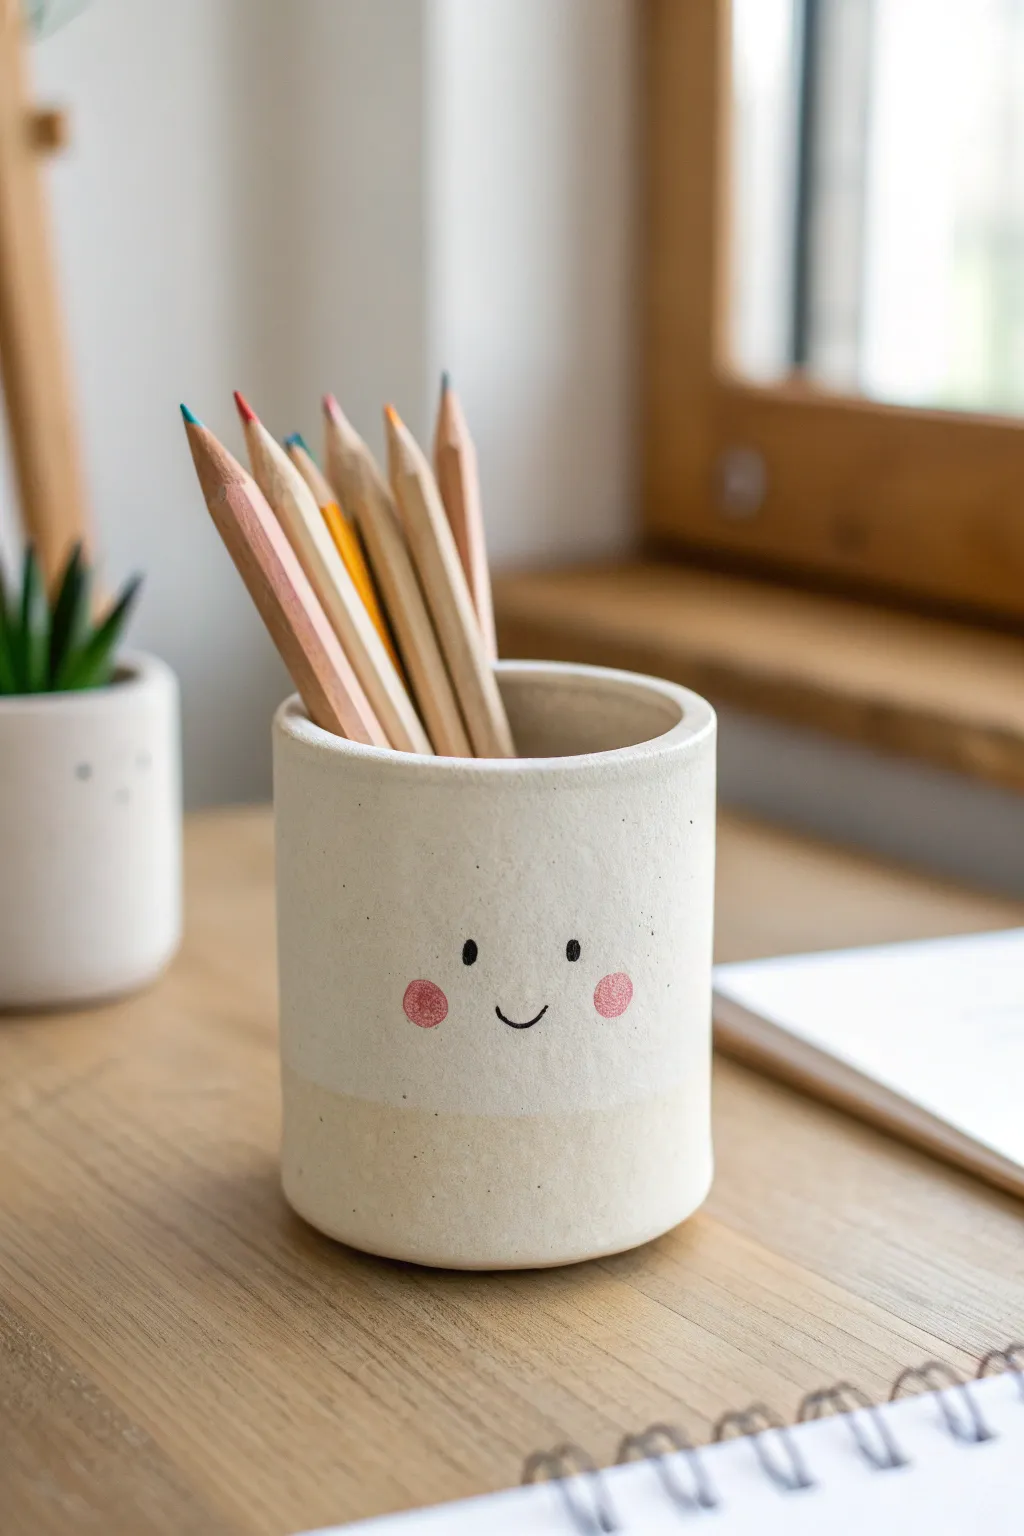
Brighten up your homework station with this adorable, minimalist pencil holder that looks just like expensive ceramic. Its simple cylindrical shape and sweet hand-painted face make it the perfect beginner project for practicing smooth clay techniques.
Detailed Instructions
Materials
- White air-dry clay (approximately 300-400g)
- Rolling pin
- Empty soup can or glass jar (to use as a mold)
- Parchment paper or plastic wrap
- Craft knife or clay cutter tool
- Bowl of water
- A sponge
- Sandpaper (fine grit)
- Acrylic paints (black, pink, and cream/beige)
- Small fine-point paintbrush
- Matte varnish or sealant
Step 1: Shaping the Cup
-
Prepare your mold:
Find a sturdy cylindrical object like a glass jar or soup can to use as a form. Wrap the outside tightly with parchment paper or plastic wrap; this barrier is crucial so the clay doesn’t stick to the mold later. -
Roll the slab:
Take a large ball of white air-dry clay and flatten it slightly. Using your rolling pin, roll it out into a long, even rectangular slab. Aim for a thickness of about 1/4 inch (6mm) to ensure the walls are sturdy. -
Cut to size:
Lay your wrapped jar on its side on the clay slab. Use your craft knife to trim the clay into a rectangle that is the same height as you want your cup to be, and just long enough to wrap around the jar with a tiny overlap. -
Wrap and join:
Carefully lift the clay rectangle and wrap it around the standing jar. Bring the two ends together. Slice through both layers of clay where they overlap to create a perfect butt joint, removing the excess scraps. -
Seal the seam:
Dip your finger in water and gently rub the seam line up and down to blend the clay together. You can use a sculpting tool to drag clay across the gap first if it’s stubborn. Smooth it until the line virtually disappears. -
Create the base:
Roll out a small separate piece of clay for the bottom. Place your wrapped cylinder on top of this piece and trace around the base with your knife. Remove the excess clay. -
Attach the bottom:
Score (scratch) the bottom edge of your cylinder and the outer edge of your circular base. Add a dab of water to turn the clay into slip, then press the pieces together firmly. Smooth the exterior seam with your finger or a sponge. -
Refine the rim:
Check the top rim of your pencil cup. If it’s uneven, trim it gently with the knife. Dip your finger in water and run it around the rim to round off any sharp edges for a softer look. -
Let it dry:
Allow the clay to dry while still on the mold for about 2-3 hours to hold its shape. Then, carefully slide the jar out and peel away the parchment paper. Let the clay try completely for another 24-48 hours until hard and white.
Smooth Seams Secret
Use a slightly damp sponge to smooth the clay while wet. It erases fingerprints and bumps much faster than just using your fingers.
Step 2: Decorating
-
Sand for smoothness:
Once fully dry, take a piece of fine-grit sandpaper and gently sand the outside of the cup. Focus on the vertical seam and the rim to get that professional, ceramic-like finish. -
Paint the base coat:
Mix a tiny drop of yellow or brown into white acrylic paint to create a warm cream color. Paint the entire exterior of the cup. I find two thin coats are better than one thick one for an even finish. -
Add the bottom detail:
To mimic the two-tone look in the photo, mix a slightly darker shade of beige. Paint the bottom third of the cup with this color, creating a subtle horizontal line where the colors meet. -
Paint the eyes:
Using your smallest detail brush and black paint, make two small vertical ovals for the eyes. Space them fairly wide apart to achieve that cute ‘kawaii’ proportion. -
Add the cheeks:
Dip a rounded brush or a Q-tip into pink paint. Dab it gently once on each side, just below and outside the eyes, to create soft, rosy cheeks. Blot the paint on paper first if it looks too heavy. -
Draw the smile:
With the fine liner brush and black paint, draw a tiny ‘U’ shape right in the center between the cheeks. -
Seal the project:
Once the face is completely dry, apply a coat of matte varnish. This protects your desk buddy from pencil marks and gives it that finished, store-bought texture.
Make it a Set
Make a smaller, shorter version to hold paperclips or erasers, creating a matching family of desk organizers.
Pop your colored pencils inside and enjoy your cheerful new workspace companion.
Simple Photo and Card Holders
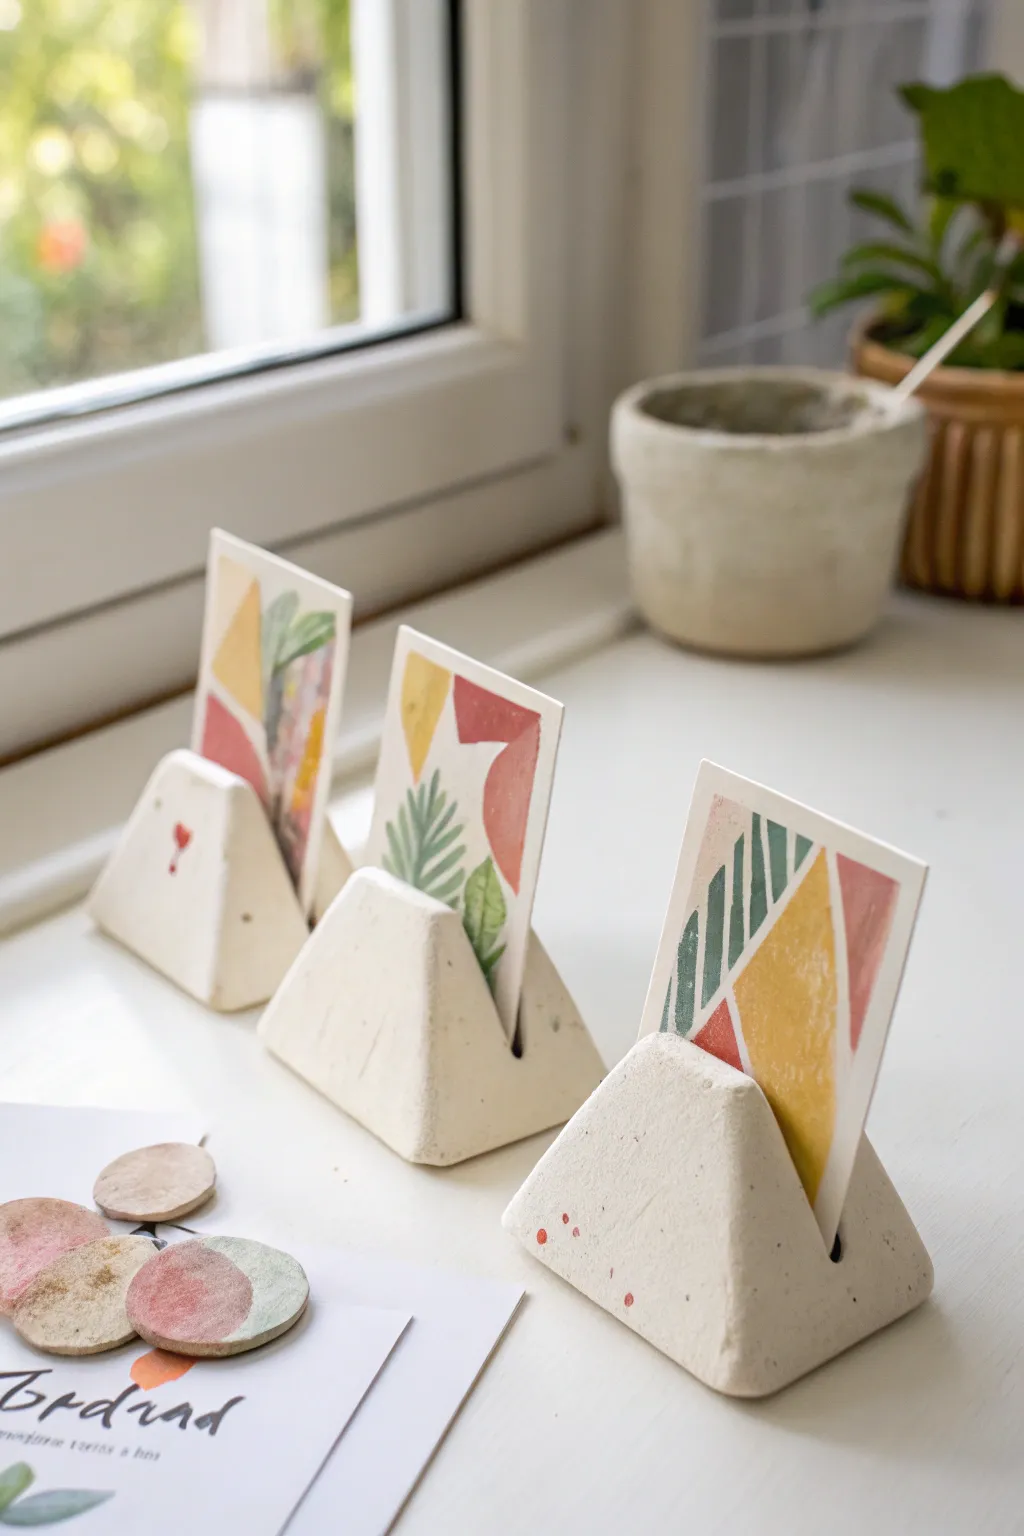
Create these minimalist, concrete-style photo holders using air-dry clay for a chic desk accessory. Their triangular shape offers sturdy support for polaroids or postcards, while the smooth white finish provides a clean canvas for subtle speckles or painted details.
Step-by-Step Guide
Materials
- White smooth air-dry clay
- Rolling pin
- Knife or clay cutting tool
- Ruler
- Cardstock or thick paper (for the slot template)
- Fine grit sandpaper
- Acrylic paint (red, yellow, green, pink, white)
- Paintbrushes (flat and fine tip)
- Toothbrush (for speckling)
- Sealant or varnish (matte finish)
Step 1: Shaping the Clay Base
-
Prepare the clay:
Begin by conditioning a chunk of white air-dry clay in your hands until it becomes soft and pliable, ensuring there are no cracks. -
Form a thick block:
Shape the clay into a triangular prism log. You can do this by rolling a thick cylinder first, then tapping three sides against your work surface to flatten them. -
Slice individual stands:
Using a knife or wire cutter, slice the triangular log into individual segments about 2 inches wide to create the stand shapes. -
Refine the shape:
Tap each cut side gently on the table to flatten the faces. Use your fingers to smooth out any sharp edges or fingerprints. -
Create the card slot:
Take a piece of thick cardstock or a doubled-over Playing card and press it firmly into the top ridge of the triangle. Press down deep enough to hold a card securely, about half an inch deep. -
Widen slightly:
Wiggle the cardstock slightly back and forth to ensure the slot isn’t too tight, as air-dry clay shrinks slightly when drying. -
Dry completely:
Set the triangles aside in a warm, dry place. Let them cure for at least 24-48 hours, flipping them occasionally to ensure even drying on the bottom.
Shrinkage Check
Air dry clay shrinks! Before drying, make the card slot slightly wider than you think necessary so your photos fit later.
Step 2: Finishing and Decoration
-
Sand for smoothness:
Once fully dry, use fine-grit sandpaper to gently smooth the surface. Focus on the corners and the flat faces to get that faux-concrete look. -
Clean dust:
Wipe the holders down with a slightly damp cloth or a dry brush to remove all sanding dust before painting. -
Add subtle splashes (Optional):
Dilute a tiny bit of red or pink acrylic paint with water. Dip a toothbrush in it and flick the bristles with your thumb to create tiny, delicate speckles on the white surface. -
Add painted details:
If you want the specific look from the photo, use a fine tip brush to paint a tiny heart or simple shape on the front face of one holder. -
Seal the work:
Apply a coat of matte varnish to protect the clay from moisture and stains, keeping the finish natural looking.
Marble Effect
Mix a tiny drop of black paint into the white clay but don’t blend fully. Stop early for a chic grey-veined marble look.
Step 3: Creating the Graphic Cards
-
Cut the cards:
Cut heavy watercolor paper or cardstock into rectangles sized to fit your holders, roughly 3×4 inches. -
Tape geometric zones:
Use washi tape or painter’s tape to block off random triangular and angular sections on the paper. -
Paint color blocks:
Fill the exposed areas with flat washes of mustard yellow, muted pink, and sage green acrylic paint or gouache. I like to keep the paint fairly opaque for a bold look. -
Add botanical details:
Once the base blocks are dry, paint simple leaf shapes or stripes over the top of the color blocks using a darker green. -
Remove tape:
Carefully peel away the tape to reveal crisp white lines separating your colored shapes. -
Final assembly:
Slide your finished mini-artworks into the slots of your clay stands.
Place these on a sunny windowsill or desk to display your favorite mini prints or daily affirmations
Tiny Bud Vases for One Flower
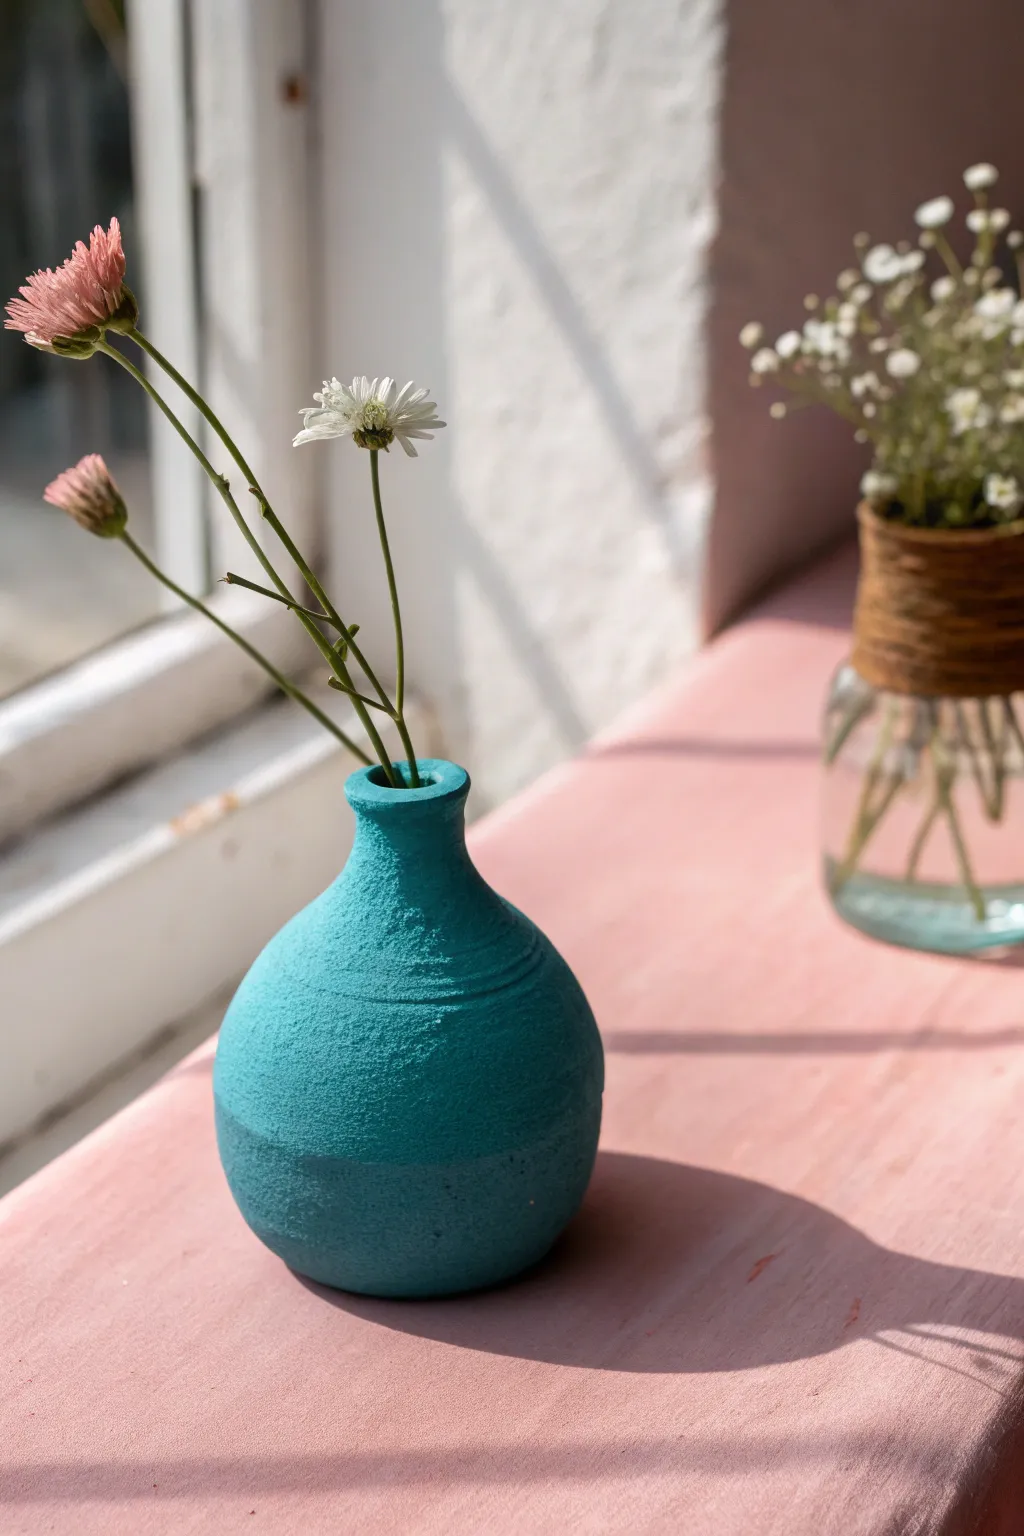
This charming little bud vase brings a pop of color to any windowsill with its vibrant turquoise hue and unique, rough texture. Perfect for displaying a single bloom or a small sprig of wildflowers, its rustic finish gives it a handmade pottery feel without needing a kiln.
Step-by-Step
Materials
- Air dry clay (white or terra cotta)
- Acrylic paint (bright teal or turquoise)
- Small paintbrush (flat)
- Texture tool (old toothbrush, stiff bristle brush, or crumpled foil)
- Sandpaper (fine grit)
- Water in a small cup
- Rolling pin or smooth glass jar
- Clay sculpting tools (or a butter knife)
- Varnish or sealant (matte or glossy)
- Plastic wrap (optional, for work surface)
Step 1: Shaping the Clay Base
-
Prepare your workspace:
Lay down plastic wrap or work on a clean, smooth surface to prevent the clay from sticking. Grab a chunk of air dry clay about the size of a tennis ball and knead it until it’s soft and pliable. -
Form the main sphere:
Roll the clay between your palms to create a smooth, round ball. Press it gently onto your work surface to create a flat bottom so the vase will stand securely on its own. -
Create the opening:
Using your thumb or a rounded tool handle, press directly into the center of the top of the ball. Push down about three-quarters of the way into the sphere, being careful not to breakthrough the bottom. -
Widen the interior:
Gently pinch the clay walls between your thumb (inside) and fingers (outside), turning the pot as you go to thin the walls and widen the belly of the vase slightly.
Waterproof Hack
Air dry clay melts in water! To use fresh flowers, insert a small plastic travel bottle or glass test tube inside the clay body while shaping it to hold actual water safely.
Step 2: Creating the Neck and Texture
-
Form the neck:
Gather the clay somewhat near the top opening and gently squeeze it inwards to narrow it down. You want to create a distinct transition from the round body to a narrower neck. -
Refine the rim:
Smooth the very top edge of the rim with a little water on your finger to ensure it is level. I usually tap it gently upside down on the table to flatten the top lip just a bit. -
Add the ridge detail:
Use a sculpting tool or the back of a knife to gently press a horizontal line or groove around the upper part of the vase’s shoulder, just before the neck starts. -
Apply texture:
This is the fun part—take your texturing tool, like an old toothbrush or a ball of crumpled foil, and tap it repeatedly all over the surface of the clay. Press firmly enough to leave little pockmarks. -
Refine the texture:
Ensure the texture covers the entire body, but leave the rim slightly smoother if you prefer a contrasting finish. -
Let it dry completely:
Place the vase in a safe spot away from direct heat. It will need 24 to 48 hours to dry completely, turning white or light gray when it’s ready.
Two-Tone Effect
Paint the top half a lighter teal and the bottom half a darker shade, blending them in the middle for a subtle ombre look that highlights the vase’s curves.
Step 3: Painting and Finishing
-
Smooth rough spots:
Once fully dry, lightly sand the bottom or the rim if there are any sharp jags, but try to avoid sanding away the lovely texture you created on the body. -
Apply the base coat:
Dip your brush into the teal acrylic paint. Apply a generous coat, making sure to wiggle the bristles into all the little textured crevices so no white clay shows through. -
Let the paint set:
Allow the first coat to dry for about 20 minutes. If the color looks uneven, apply a second coat for a deeper, more solid turquoise look. -
Highlight the texture (optional):
If you want to emphasize the rough surface, you can dry-brush a slightly lighter shade of teal lightly over the raised areas. -
Seal the vase:
Apply a coat of varnish or sealant to protect the paint. Since air dry clay isn’t waterproof, this step is crucial if you plan to use it near moisture, though it still won’t hold water directly. -
Add your blooms:
Pop in some dried flowers or faux stems once the varnish is dry. If using fresh flowers, hide a small glass vial or test tube inside to hold the water.
Enjoy styling your new handmade vase on a sunny sill or gifting it to a friend
Cutout Shape Suncatchers
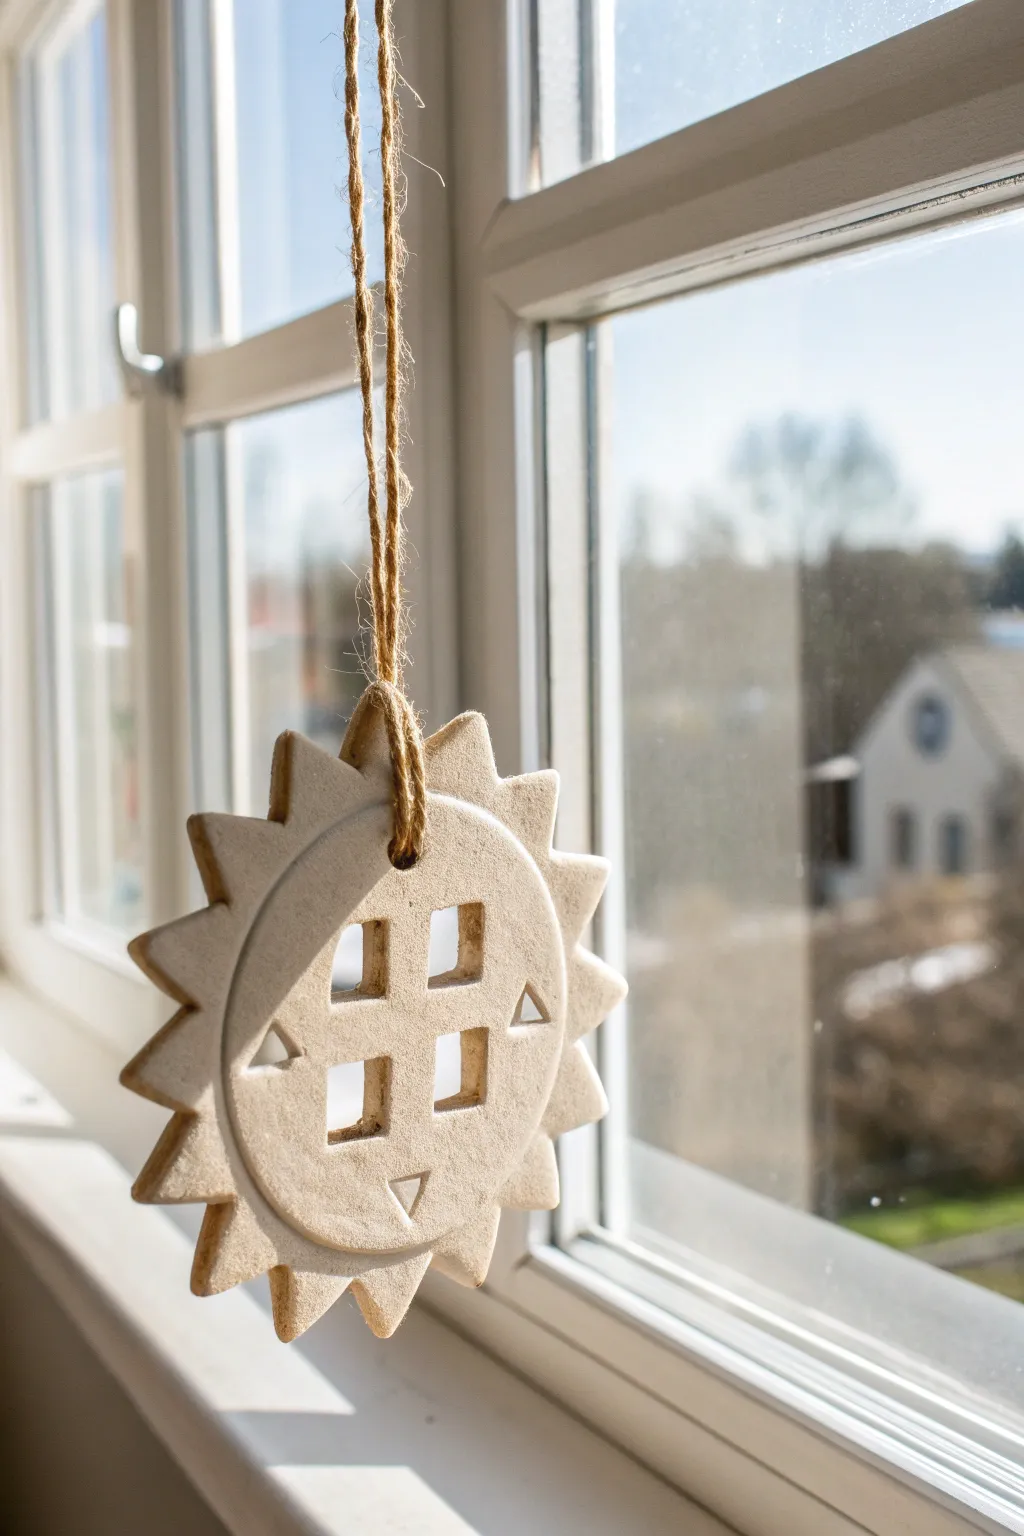
Brighten up any window with this cheerful, geometric sun ornament that captures the rustic charm of unpainted clay. The simple cutout design looks lovely on its own, but truly shines when natural light streams through its open center.
Step-by-Step Guide
Materials
- White or natural air dry clay
- Rolling pin
- Parchment paper or canvas mat
- Circle cookie cutter (approx. 3-4 inches)
- Small square cutter (or a craft knife)
- Small triangle cutter (or a clay tool/knife)
- Jute twine or hemp cord
- Straw or toothpick (for the hanging hole)
- Water in a small cup
- Fine grit sandpaper (optional)
Step 1: Shaping the Base
-
Prepare your workspace:
Lay down your parchment paper or canvas mat to prevent sticking. Take a handful of air dry clay and knead it briefly until it is soft and pliable. -
Roll the clay slab:
Using the rolling pin, roll the clay out to an even thickness of about 1/4 inch (6mm). You want it thick enough to be sturdy but thin enough not to be heavy. -
Cut the central circle:
Press your large circle cookie cutter firmly into the clay slab. Wiggle it slightly to ensure a clean cut, then remove the excess clay from around the outside.
Fixing Cracks
If tiny cracks appear while drying, don’t panic. Mix a tiny bit of fresh clay with water to make a paste (slip) and fill the crack, then smooth it over.
Step 2: Creating the Sun Rays
-
Plan the rays:
Before cutting, visualize triangle shapes radiating outward from the circle’s edge. You can lightly mark these with a toothpick first if you want perfect symmetry. -
Cut the triangles:
Using a craft knife or a triangle cutter, cut pointed triangular notches directly out of the circle’s perimeter. Aim for even spacing all the way around to create a sawtooth sun effect. -
Smooth the edges:
Dip your finger in a little bit of water and run it along the cut edges of the rays to smooth out any roughness or loose crumbs of clay.
Step 3: Detailing the Center
-
Mark the center grid:
Lightly trace a square in the very center of the sun using a needle tool or toothpick. Inside that square, sketch a cross to divide it into four smaller quadrants. -
Cut the windows:
Use your small square cutter or carefully use a craft knife to cut out the four small squares in the center grid. These negative spaces will let the light shine through. -
Add decorative impressions:
Using a small triangle stamp or the tip of a tool, press small triangles into the surface of the clay at the cardinal points (Top, Bottom, Left, Right) surrounding the central grid. Don’t press all the way through; just create an impression. -
Refine the border:
Use a round object or a clay tool to lightly impress a circular border line that frames the central grid, separating it slightly from the outer rays. -
Create the hanging hole:
At the top of the sun, punch a hole through one of the ray tips or just below it using a straw. Make sure the hole is big enough for your twine to pass through.
Add Color
Before sealing, dry brush a little gold or bronze acrylic paint over the stamped impressions to catch the light and emphasize the texture.
Step 4: Finishing Up
-
Initial drying:
Let the clay sit on the parchment paper for at least 24 hours. I usually flip the piece over halfway through the drying process to prevent it from curling at the edges. -
Sand for perfection:
Once fully dry and hard (it should feel room temperature, not cool to the touch), use fine-grit sandpaper to gently smooth any sharp edges on the rays or the window cutouts. -
Prepare the twine:
Cut a length of jute twine, about 12-15 inches long. Fold it in half to create a loop. -
Attach the hanger:
Push the folded end of the twine through the hole from front to back. Pull the loose ends through the loop and tighten gently to create a lark’s head knot. -
Tie it off:
Tie the two loose ends of the twine together in a simple knot at your desired hanging length.
Hang your new geometric sun in a sunny spot and enjoy the simple beauty of your handmade craft
Mini Tea-Light Ghost Covers
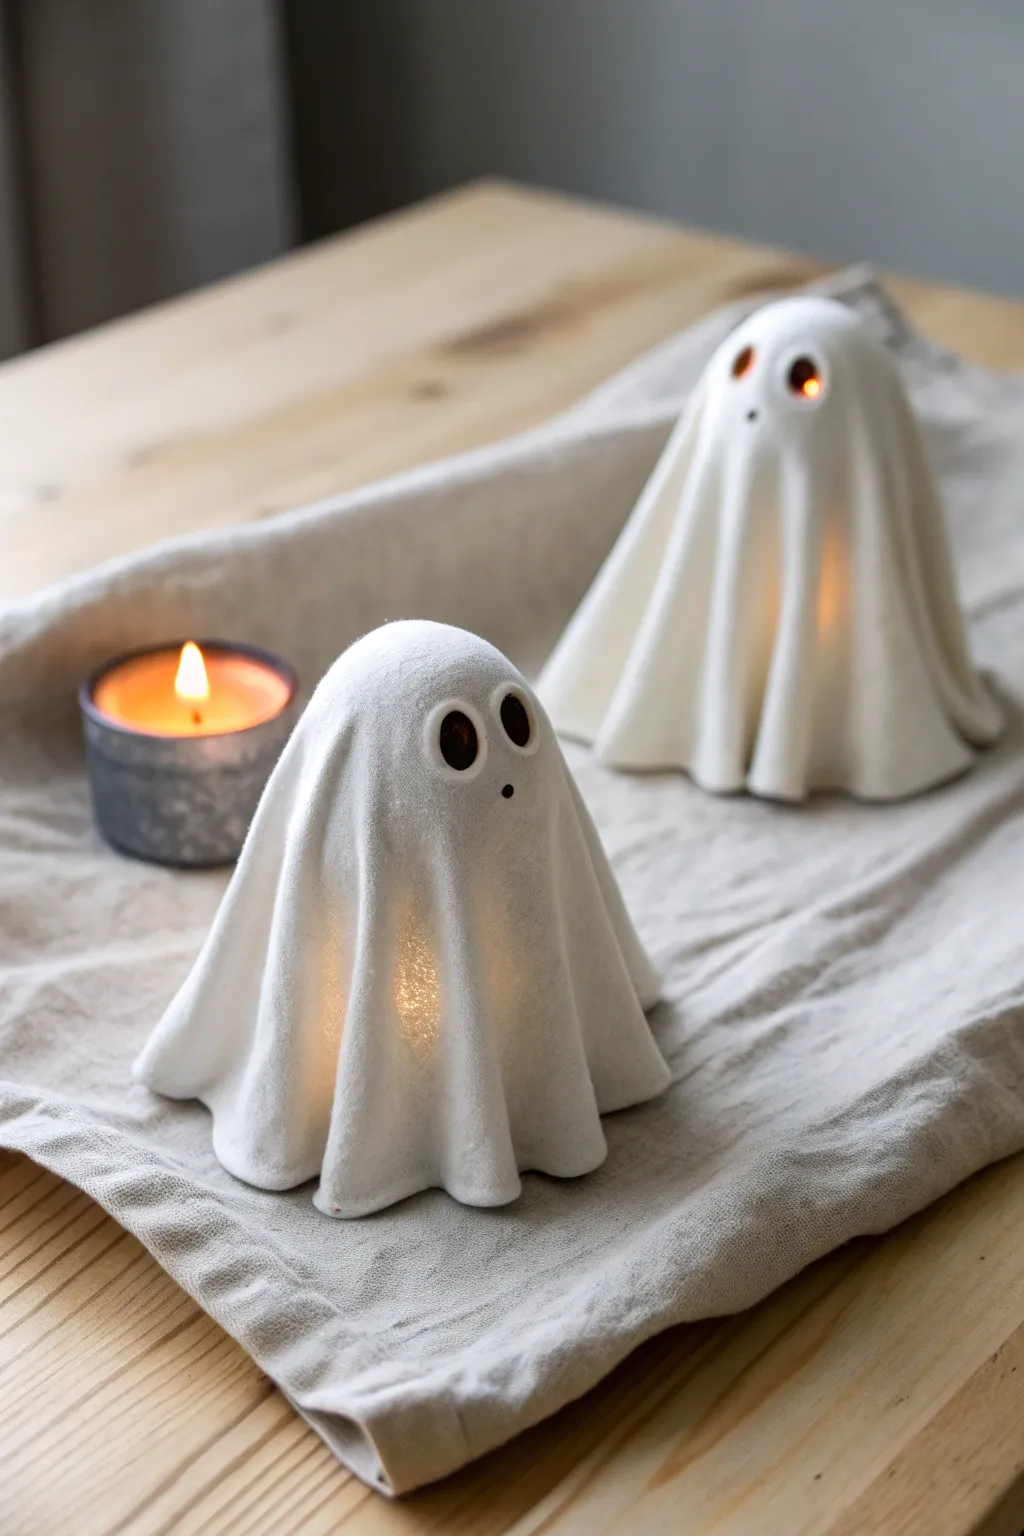
Transform simple white air dry clay into charmingly eerie ghost covers that glow warmly from within. These delightful spirits feature soft, draped folds and cute cutout eyes, making them the perfect kid-friendly project for adding a touch of haunting ambiance to your home.
How-To Guide
Materials
- White air dry clay
- Rolling pin
- Small round cutter or straw (for eyes)
- Aluminum foil
- Small ball or round object (like a ping pong ball or large marble)
- Clay knife or plastic sculpting tool
- Water in a small cup
- Paintbrush
- LED tea lights (flameless)
Step 1: Forming the Ghost Shapes
-
Prepare your workspace:
Lay down a clean mat or parchment paper to prevent sticking. Take a handful of air dry clay and knead it until it’s soft, pliable, and free of cracks. -
Create the support structure:
Crumple a piece of aluminum foil into a cone shape with a rounded top. This will be the mold that holds your ghost up while it dries. -
Top the mold:
Place your small ball or round object on top of the foil cone to give the ghost a perfectly round head shape. -
Roll out the clay:
Using your rolling pin, flatten the clay into a roughly circular pancake. Aim for a thickness of about 1/4 inch—not too thin, or it might tear. -
Drape the clay:
Gently lift your clay circle and drape it over the ball and foil structure. Let the excess clay fall naturally towards the table. -
Arrange the folds:
Use your fingers to gently guide the clay into undulating folds. You want it to look like a sheet floating in the air, so create distinct waves at the bottom hem. -
Refine the hem:
If the clay is too long, use your clay knife to trim the bottom edge so it sits evenly on the surface while maintaining those wavy folds. -
Smooth the surface:
I like to dip my finger in a little bit of water and rub it over the clay to smooth out any fingerprints or tiny cracks.
Step 2: Adding Details & Finishing
-
Mark the eyes:
Decide where you want the face to be. Use a tool to lightly mark two spots for the eyes to ensure they are level. -
Cut out the eyes:
Use a small round cutter or the end of a straw to punch out two clean circles for the eyes. Twist the tool slightly as you pull it out to get a clean edge. -
Add a mouth (optional):
If you want a surprised ghost, punch a smaller hole below the eyes. Alternatively, use a sculpting tool to indent a tiny mouth without cutting all the way through. -
Smooth the cutouts:
Dip a small paintbrush or your pinky finger in water and gently smooth the inner edges of the eye holes so they look polished, not jagged. -
Refine the folds again:
Check your drapes one last time. Ensure the folds are open enough at the bottom to allow light to flicker through. -
Let it dry:
Leave the ghost on its foil mold and allow it to air dry completely. This usually takes 24-48 hours depending on humidity. -
Remove the support:
Once the clay is fully hard and white, carefully slide the foil and ball out from underneath. Be gentle so you don’t chip the hardened edges. -
Sand for perfection:
If there are any rough spots, use a fine-grit sandpaper to lightly buff the surface until it’s silky smooth. -
Light it up:
Place a battery-operated LED tea light on the table and set your finished ghost cover over it to see it glow.
Keep it Clean
Keep a pack of baby wipes nearby. Clean hands prevent dust and dirt from getting kneaded into your pristine white clay.
Glittery Glow
Before the clay dries, lightly brush the surface with pearlescent mica powder for a shimmer that catches the candlelight.
Enjoy the cozy, flickering light of your friendly little phantom friends