
In my studio, I love how air dry clay turns into real little treasures with just a few simple moves—perfect for kindergarten kids. These ideas are made for little hands, easy shapes, and that proud “I made it!” feeling when they carry their creations home.
Pinch-Pot Treasure Bowls
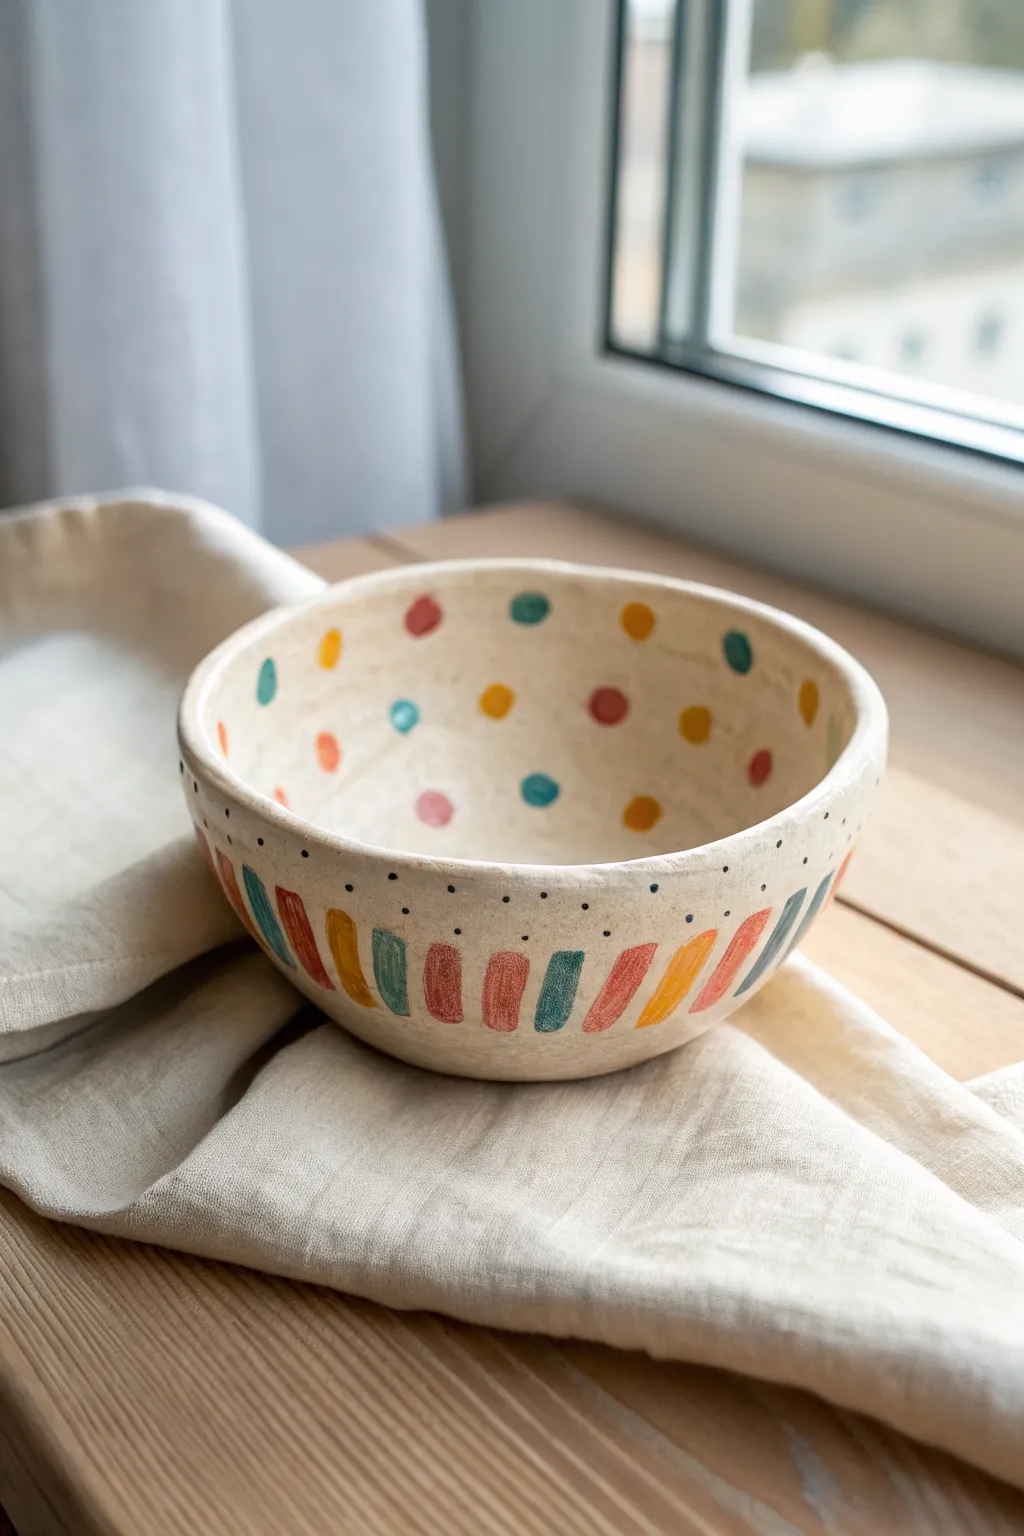
This charming little bowl serves as the perfect handmade catch-all for tiny treasures, loose change, or jewelry. With its warm, earthen look and playful hand-painted dots and stripes, it combines rustic texture with vibrant pops of teal, mustard, and rust red.
How-To Guide
Materials
- White or natural air dry clay
- Small bowl with water
- Acrylic paints (teal, mustard yellow, warm red/rust)
- Small round paintbrush
- Small flat paintbrush
- Fine point black permanent marker or black acrylic paint pen
- Matte or satin varnish/sealant
- Clay roller or smooth bottle (optional)
Step 1: Shaping the Clay
-
Prepare the Clay:
Start with a ball of air dry clay roughly the size of a tennis ball. Knead it in your hands for a minute to warm it up and make it pliable. -
Pinched Center:
Hold the ball in one hand and firmly press your thumb into the center of the ball. Create a deep dent, but be careful not to poke all the way through the bottom. -
Pinching the Walls:
Using your thumb on the inside and fingers on the outside, gently pinch the clay while rotating the ball. Work your way from the thick bottom up towards the rim. -
Even Thickness:
Aim for an even thickness of about a quarter-inch all around. If the clay directs itself into a wide, shallow plate, gently cup your hands around the outside to bring the walls upright again. -
Refining the Rim:
Tap the rim gently against your table surface to flatten it slightly if you want a cleaner look, or smooth it with a damp finger for a rounded edge. -
Smoothing the Surface:
Dip your finger in a tiny bit of water and rub away any harsh cracks or fingerprints on both the inside and outside. I find that less water is more effective here; you don’t want the clay to turn to mush. -
Drying Time:
Set the bowl aside in a dry, ventilated area. Allow it to dry completely for 24-48 hours until it turns white and feels hard and room temperature to the touch.
Step 2: Adding the Designs
-
Base Color:
If your dried clay has a grayish tint you don’t like, paint the entire bowl with a coat of cream or warm white acrylic paint. Let this dry fully before adding patterns. -
Painting Interior Dots:
Using the small round brush, dab spots of teal, mustard, and rust red on the inside of the bowl. Place them somewhat randomly for a confetti look. Don’t worry about making them perfect circles; organic shapes add charm. -
Painting Exterior Stripes:
Switch to your flat brush. Along the bottom half of the exterior, paint short, vertical rectangular dashes. Alternate your three main colors (teal, mustard, red) as you work your way around the bowl. -
Adding Tiny Polka Dots:
Once the colorful stripes are dry, use the black paint pen or a very fine brush to add a ring of tiny black dots just above the colorful stripes. -
Detailing the Rim:
Add a second row of scattered, tiny black dots just below the rim of the bowl on the outside. This subtle detail frames the project beautifully. -
Sealing the Artwork:
Once all paint is completely dry, apply a coat of matte or satin varnish. This protects the paint from chipping and gives the clay a lovely finished sheen.
Cracks happen!
If small cracks appear while drying, mix a tiny bit of fresh clay with water to make a paste (slip) and fill them in before painting.
Make it glitter
Mix a small amount of gold acyrlic paint into your yellow stripes or dots to make the bowl shimmer lightly in the sunlight.
Place your finished bowl on a sunny windowsill or use it to hold special trinkets on a bedside table


Fingerprint Heart Keepsake Tokens
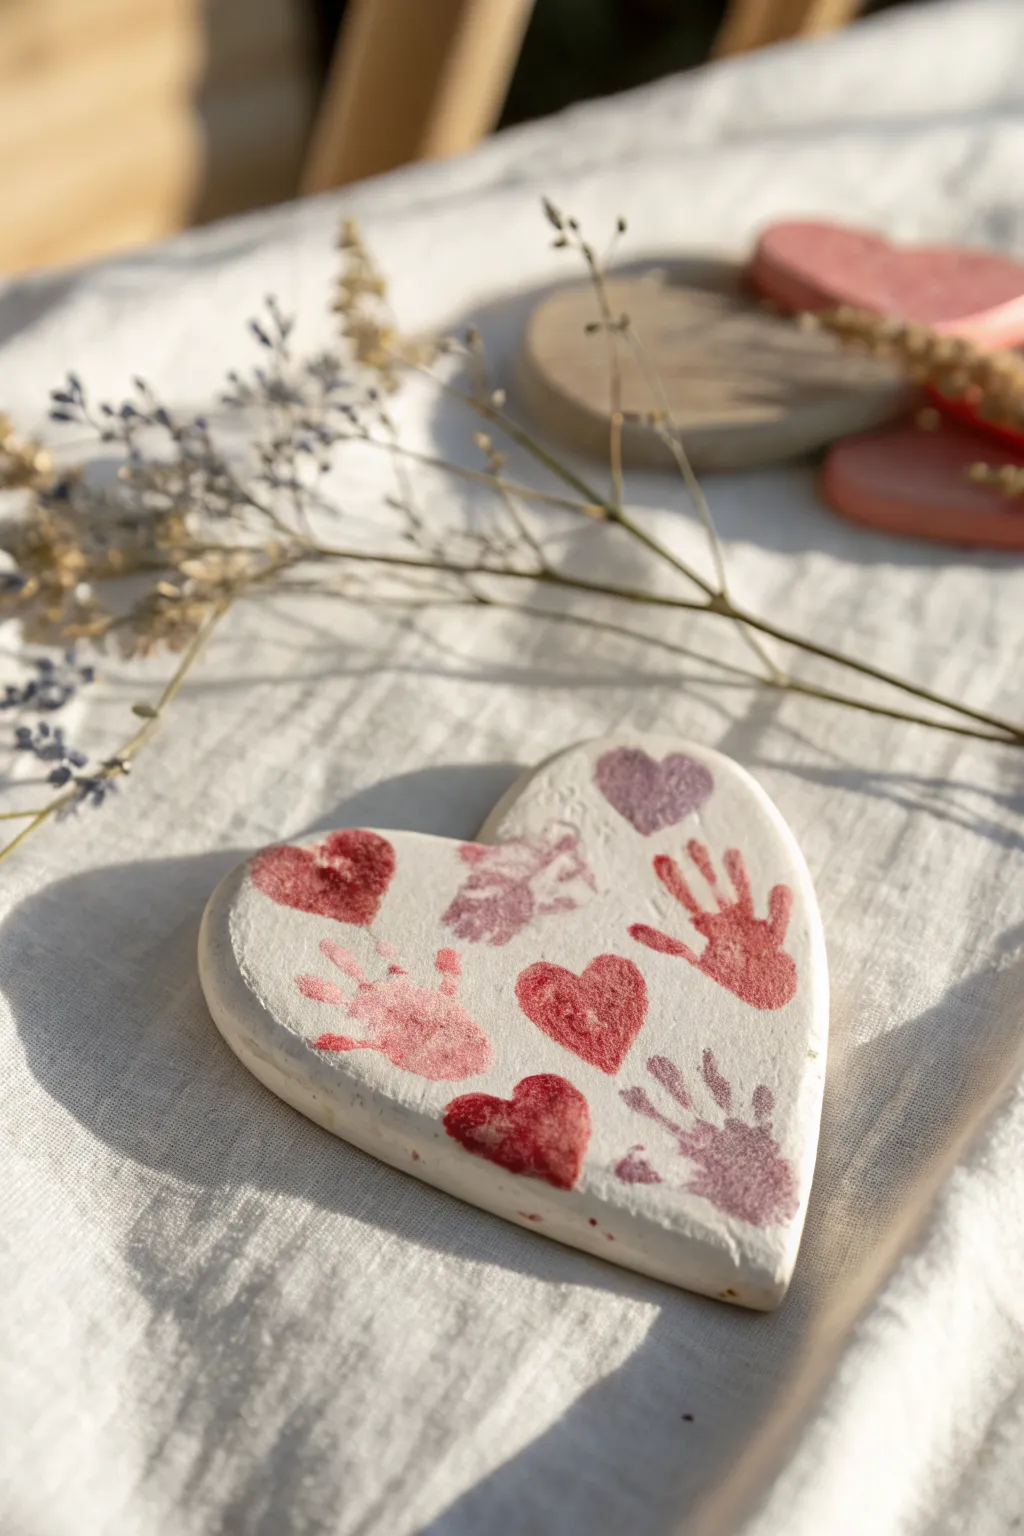
This charming keepsake captures fleeting moments with permanent impressions of little hands and hearts. Created from simple white clay, these tokens are stamped with red and purple ink to create a rustic, loving memento perfect for gifts.
Step-by-Step Tutorial
Materials
- White air dry clay
- Heart-shaped cookie cutter (large)
- Red ink pad
- Purple or burgundy ink pad
- Small heart stamps (sponge or foam texture)
- Clean rolling pin
- Parchment paper or craft mat
- Fine grit sandpaper (optional)
- Clear matte varnish (optional)
Step 1: Shaping the Base
-
Condition the clay:
Begin by taking a handful of white air dry clay and kneading it in your hands to warm it up. This conditioning makes the texture smoother and less prone to cracking as it dries. -
Roll out the slab:
Place the clay on a sheet of parchment paper. Use a rolling pin to flatten it into an even slab, aiming for a consistent thickness of about 1/4 inch to ensure durability. -
Cut the shape:
Press a large heart-shaped cookie cutter firmly into the rolled clay. Wiggle it slightly to ensure a clean cut all the way through, then lift the cutter away. -
Clean the edges:
Carefully peel away the excess clay from around the heart. If the edges of your heart look majestic or rough, dip your finger in a little water and gently run it along the rim to smooth it out.
Smudgy Prints?
If the ink blurs on wet clay, let the clay surface dry for just 15-20 minutes to form a ‘skin’ before stamping again. This keeps lines crisp.
Step 2: Stamping the Design
-
Prepare the handprint:
Ink a child’s hand (or use a realistic handprint stamp if preferred) using the red ink pad. Press the hand gently but firmly onto the right side of the clay heart to transfer the print. -
Add secondary prints:
Using a purple or burgundy ink pad, add a second, perhaps smaller handprint or fingerprint cluster near the bottom right to create visual variety. -
Stamp the hearts:
Take your foam or sponge heart stamps and press them into the ink pads. Stamp several hearts randomly across the clay surface, mixing the red and purple tones. -
Vary angle and pressure:
When stamping, rotate the heart stamps slightly for each impression so they aren’t all perfectly aligned. Varying the pressure creates that lovely faded, rustic look seen in the photo. -
Review the composition:
Step back and look at the spacing. If there are large empty white spaces, add a tiny partial print or a small heart stamp to balance the design.
Step 3: Finishing Touches
-
Initial Drying:
Move the parchment paper with the clay heart to a flat, safe location. Let it air dry undisturbed for 24 hours. Don’t rush this part or the clay might curl. -
Flip and continue drying:
After the top feels dry to the touch, carefully flip the heart over to let the bottom breathe and dry evenly. I find this usually takes another 12 to 24 hours depending on humidity. -
Sand edges:
Once fully hardened and bone dry, inspect the edges again. If they feel sharp, lightly buff them with fine-grit sandpaper for a professional finish. -
Seal the artwork:
To protect the ink from smudging over time, apply a thin coat of clear matte varnish or sealant over the top surface and let it dry completely.
Make it an Ornament
Before drying, use a straw or skewer to poke a hole near the top center. Once dry, thread some rustic twine through for hanging.
Now you have a timeless token of affection that freezes a moment in time forever


Animal Face Fridge Magnets
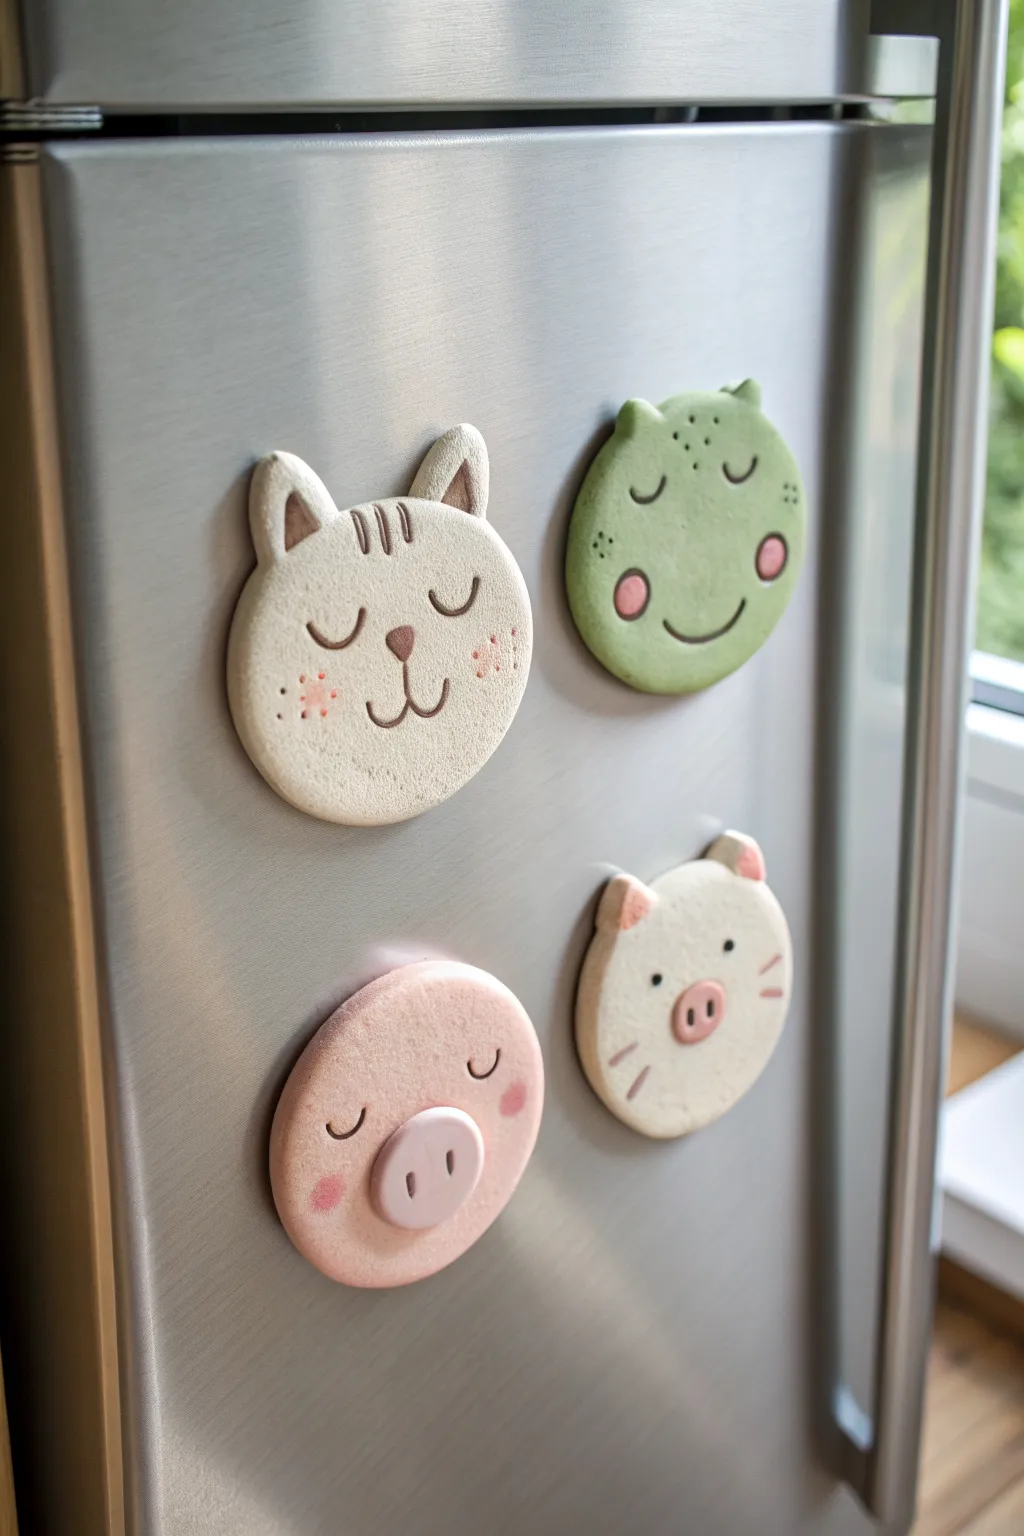
These adorable animal face magnets bring a touch of whimsy to any kitchen appliance with their soft pastel tones and sweet expressions. Made from air dry clay, they feature a lovely matte texture and simple molded details that are perfect for little hands to shape.
Step-by-Step
Materials
- White air dry clay
- Rolling pin
- Round cookie cutter (approx. 2-3 inches)
- Small magnets (round ceramic or neodymium)
- Strong craft glue (like E6000) or hot glue
- Modeling tools (or household items like toothpicks and spoon handles)
- Acrylic paints (white, pink, green, brown, black)
- Fine detail paintbrush
- Spray matte varnish (optional)
Step 1: Shaping the Base
-
Prepare the Clay:
Take a handful of white air dry clay and knead it until it’s soft and pliable. If the clay feels too dry, you can wet your hands slightly. -
Roll it Out:
Roll the clay out on a smooth surface to an even thickness of about 1/4 inch. You want it thick enough to be sturdy but not so heavy it slides down the fridge. -
Cut the Circles:
Use your round cookie cutter to punch out four circles. These will become the heads for your cat, frog, pig, and mouse. -
Smooth the Edges:
Dip your finger in a little water and gently run it around the cut edges of the circles to remove any sharpness or fraying from the cutter.
Smooth Operator
To get that super smooth, professional look, sand the edges of your dried clay pieces with a fine-grit sandpaper (like 400 grit) before you start painting.
Step 2: Adding Animal Ears
-
Cat Ears:
For the cat, pinch two small triangles of extra clay. Score the back of the triangles and the top of one circle, add a dab of water, and press them firmly onto the top edge to attach them. -
Frog & Pig Ears:
Repeat the process for the frog, but make the triangles slightly smaller and more rounded. For the pig (bottom left), make slightly floppy, folded-over triangles. -
Mouse Ears:
For the mouse (bottom right), roll two small balls of clay, flatten them slightly, and attach them to the top of the last circle. -
Blend the Seams:
Use a modeling tool or your thumb to smooth the clay where the ears meet the head so the connection is seamless and strong.
Cracking Up?
If small cracks appear as the clay dries, don’t panic. Mix a tiny bit of fresh clay with water to make a paste and smooth it into the cracks with your finger.
Step 3: Sculpting the Faces
-
Create Snouts:
For the pig, roll a small oval of clay and attach it to the center of the face. Press two small indentations into it for nostrils. Do the same for the mouse with a very small flattened ball for a nose. -
Indent Details:
Use a needle tool or toothpick to gently press details into the clay while it’s still wet. For the cat, press in three lines on the forehead. -
Add Texture:
To mimic the stone-like texture in the photo, you can gently tap the surface with a stiff-bristled toothbrush or a ball of aluminum foil. -
Dry Completely:
Set the animals aside on a flat surface to dry. Air dry clay typically takes 24-48 hours depending on humidity. Flip them halfway through so the back dries evenly.
Step 4: Painting and Finishing
-
Base Colors:
Once dry, paint the frog a soft sage green and the pig a pale dusty pink. Leave the cat and mouse a natural white or cream color. -
Add Blushing Cheeks:
Mix a very watery pink paint. Dab it onto the cheek areas of the cat, frog, and pig to create those soft, rosy circles. -
Paint Facial Features:
Using a very fine brush and dark brown or black paint, carefully draw on the sleeping eyes (curved U-shapes). Add whiskers for the cat and mouse. -
Detailed Accents:
Fill in the inner ears with a darker shade of the base color (brown for the cat, pink for the mouse). Paint the pig’s snout a slightly darker pink than its face. -
Attach the Magnet:
Flip the dried and painted faces over. Apply a strong dab of craft glue to the center of the back and press your magnet firmly into it. -
Seal (Optional):
If you want to protect the paint from kitchen splashes, give the fronts a light coat of matte spray varnish.
Now your fridge has a set of charming little guardians to hold up your grocery lists and artwork


Star and Heart Trinket Trays
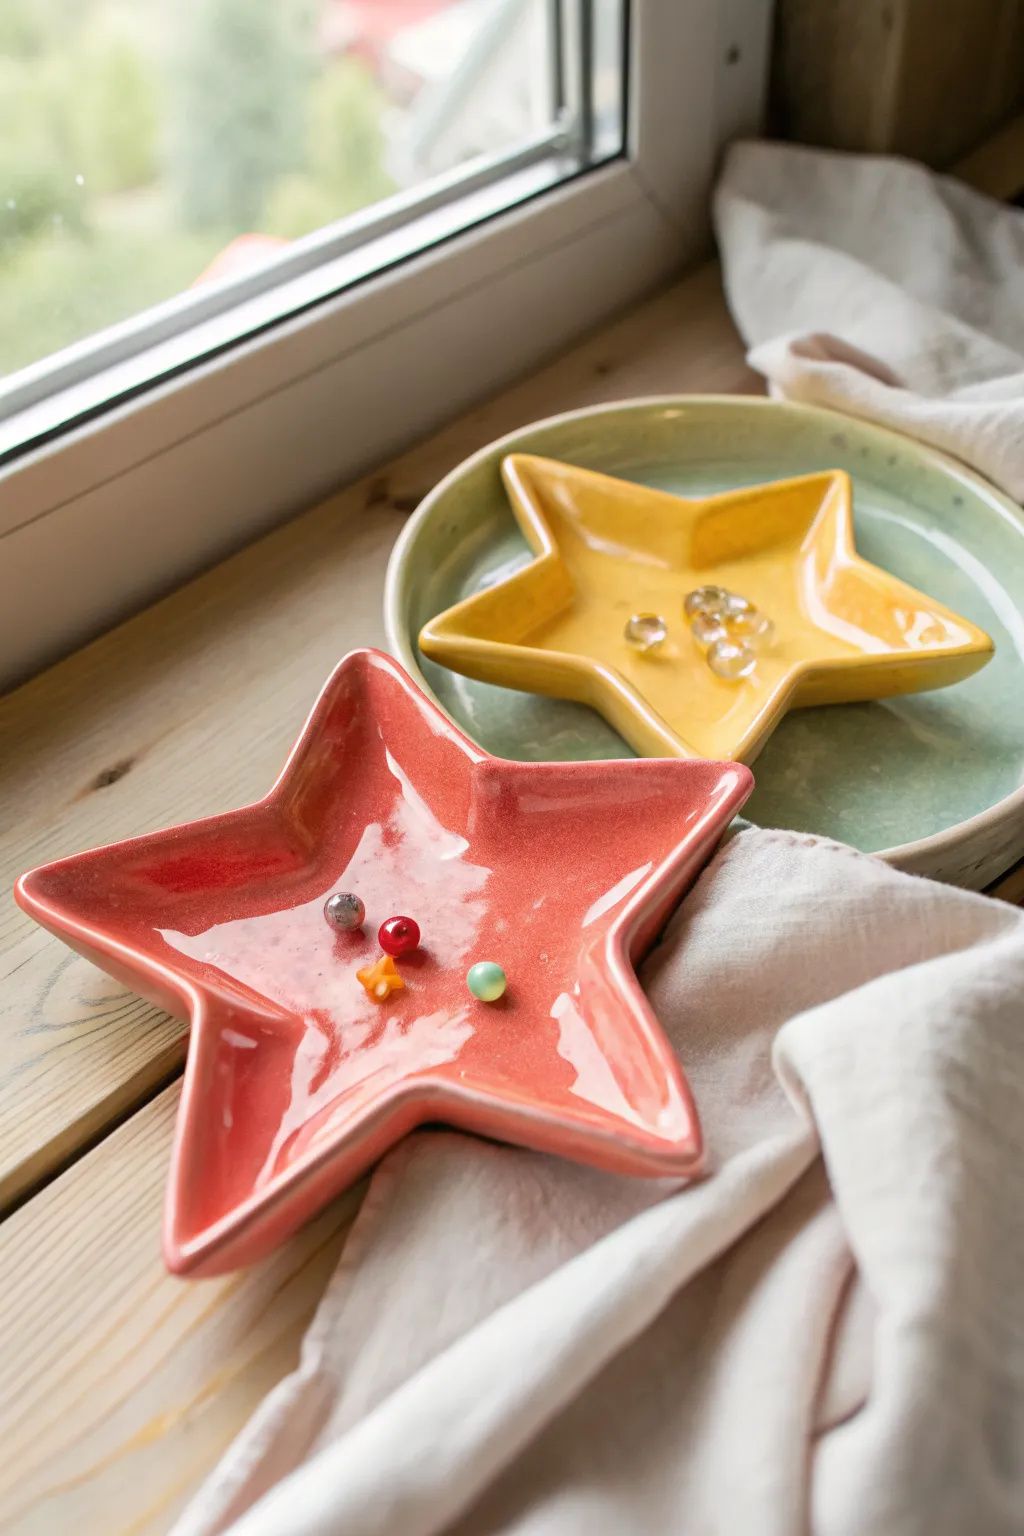
Brighten up any bedside table or desk with these charming star-shaped catch-alls. With their glossy glaze-like finish and vibrant colors, they look like professional ceramic pieces but are simple enough for little hands to shape.
Step-by-Step Tutorial
Materials
- Air dry clay (white)
- Star-shaped cookie cutters (crinkled or smooth edge)
- Rolling pin
- Parchment paper or canvas mat
- Small bowl of water
- Acrylic paints (coral pink, sunny yellow)
- High-gloss varnish or Mod Podge (gloss finish)
- Paintbrushes (flat and round)
- Fine grit sandpaper
Step 1: Shaping the Stars
-
Prepare the workspace:
Lay down your parchment paper or canvas mat to prevent the clay from sticking to your work surface. -
Roll out the clay:
Take a generous ball of air dry clay and warm it up in your hands. Roll it out into a slab that is roughly 1/4 inch thick. You want it sturdy, not paper-thin. -
Cut the shapes:
Press your large star-shaped cookie cutter firmly into the clay slab. Wiggle it slightly to ensure a clean cut before lifting it away. -
Smooth the edges:
Dip your finger into a small bowl of water and gently run it along the cut edges of the star to smooth out any roughness or crumbs left by the cutter. -
Create the rim:
Here comes the trickiest part: gently pinch and lift the edges of the star upward to create a rim. I find it easiest to use my thumb on the inside and pointer finger on the outside to mould the wall. -
Refine the points:
Pay special attention to the star points. Pinch them lightly so they stay defined and sharp rather than getting smushed during the lifting process. -
Smooth the interior:
Use a damp sponge or wet finger to smooth out the bottom inside the tray, ensuring a flat surface for trinkets to sit on.
Cracking Edges?
If you see small cracks forming while lifting the edges, smooth a drop of water over the crack immediately to seal it back together before drying.
Step 2: Drying and Refining
-
Let it dry completely:
Place your moulded stars in a safe, dry spot away from direct sunlight. Let them dry for 24-48 hours. Turn them over halfway through so the bottom dries evenly. -
Check for imperfections:
Once the clay is bone dry and hard, inspect the edges. If there are any sharp bits or uneven bumps, gently sand them down with fine-grit sandpaper until smooth. -
Wipe away dust:
Use a slightly damp cloth or a dry soft brush to remove all sanding dust before you start painting.
Adding Texture
Before lifting the edges, press a piece of lace or a textured rolling pin gently into the wet clay to create a patterned bottom for your tray.
Step 3: Adding Color and Shine
-
Base coat:
Paint the entire star (top and bottom) with a layer of white acrylic paint if your clay isn’t bright white. This makes the top colors pop vividly. -
Apply the main color:
Paint one star in a coral pink and the other in a sunny yellow, mimicking the photo. Use a flat brush for broad areas and a smaller round brush to get into the corners of the star. -
Add a second coat:
Let the first layer dry for about 20 minutes, then add a second coat of paint to ensure rich, opaque coverage with no streaks. -
Let the paint cure:
Allow the paint to dry completely. If the paint is still tacky, the varnish step won’t work as well. -
Glaze for a ceramic look:
Apply a thick coat of high-gloss varnish or Gloss Mod Podge over the entire piece. This is the secret to getting that shiny, ceramic-like finish seen in the image. -
Final dry:
Let the varnish dry fully according to the bottle instructions, usually overnight, before placing any beads or jewelry inside.
These lively little trays are now ready to catch rings, coins, or special found treasures

The Complete Guide to Pottery Troubleshooting
Uncover the most common ceramic mistakes—from cracking clay to failed glazes—and learn how to fix them fast.
Leaf-Imprint Nature Medallions
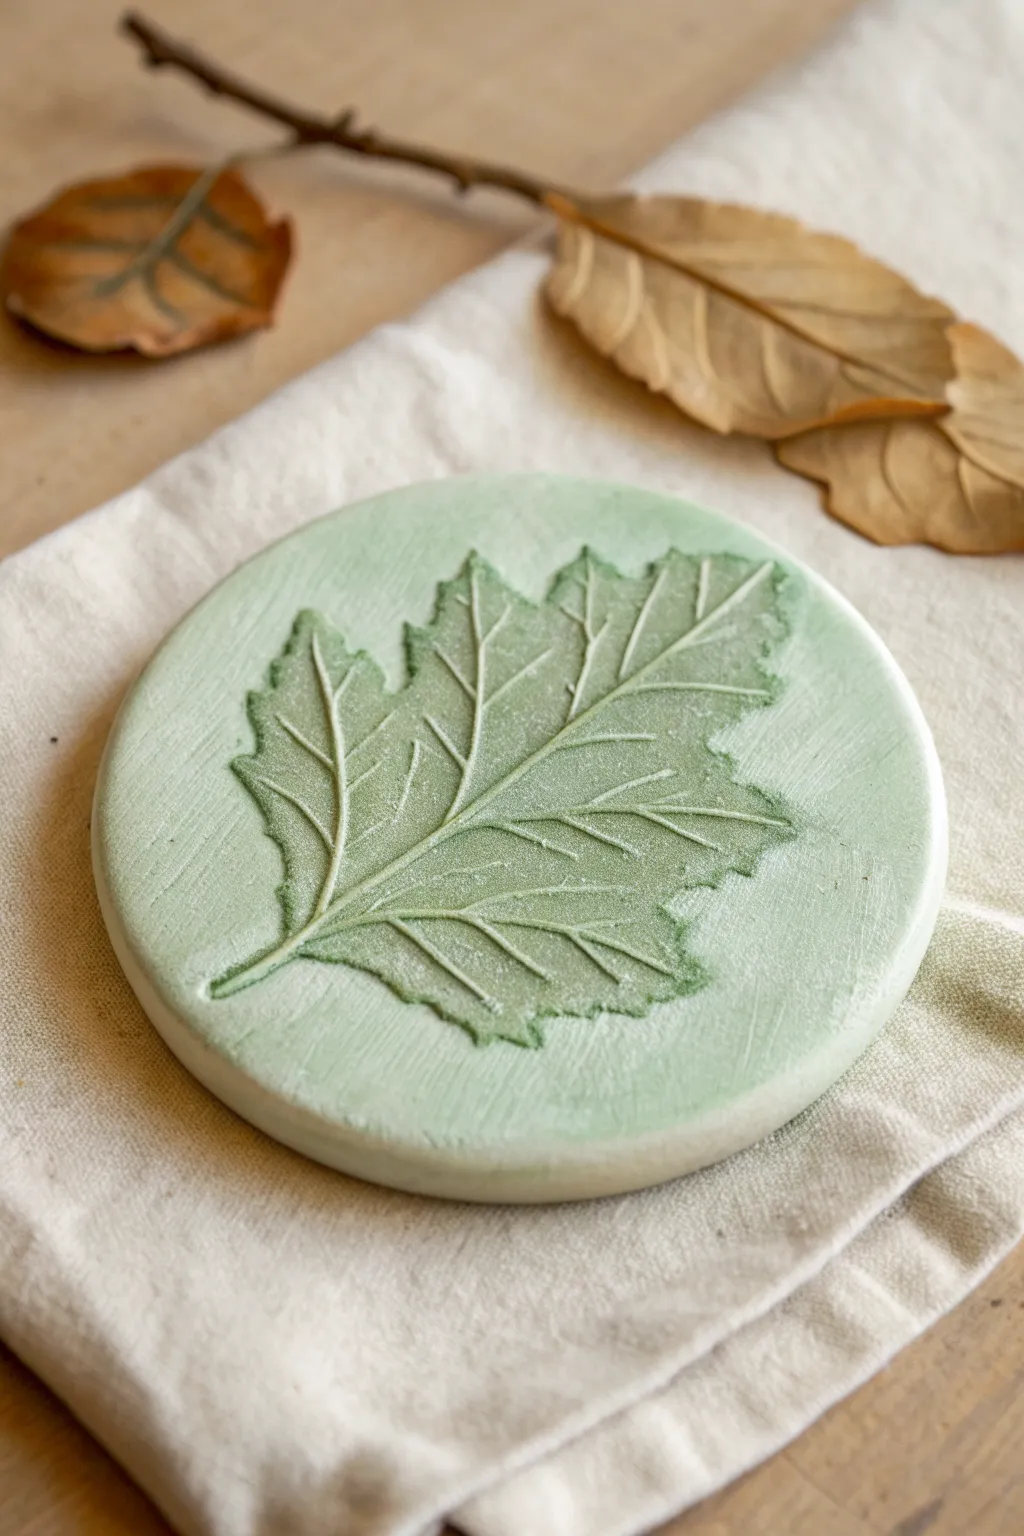
Capture the delicate details of nature with these soothing green clay medallions featuring intricate leaf impressions. This simple yet elegant project creates a lasting botanical keepsake with a soft, matte finish that highlights every vein and contour.
Detailed Instructions
Materials
- White air-dry clay
- Fresh leaves with prominent veins (oak or maple work well)
- Rolling pin or smooth glass jar
- Round cookie cutter (approx. 4 inches) or a bowl to trace
- Acrylic paint (Sage Green and White)
- Small mixing bowl or palette
- Fine grit sandpaper (optional)
- Soft sponge or paintbrush
- Wax paper or parchment paper
- Knife or clay tool
Step 1: Preparation & Clay Base
-
Prepare your workspace:
Lay down a sheet of wax paper or parchment paper to protect your table and prevent the clay from sticking. This also makes it easier to move the medallion later without distorting it. -
Condition the clay:
Take a handful of white air-dry clay and knead it in your hands until it becomes soft, warm, and pliable. This conditioning step is crucial to prevent cracks from forming later. -
Tint the clay (Optional Method A):
If you want the base color to be uniform throughout, mix a small drop of sage green acrylic paint directly into the raw clay. Fold and knead the clay repeatedly until the color is evenly distributed and matches the pale mint shade seen in the photo. Alternatively, keep it white and paint later. -
Roll out the slab:
Place the ball of clay on your parchment paper. Using a rolling pin, roll it out into a smooth, even slab that is about 1/4 to 1/3 inch thick. Try to keep the thickness consistent. -
Cut the shape:
Press a large round cookie cutter firmly into the clay to create a perfect circle. If you don’t have a cutter, place a small bowl upside down on the clay and carefully trace around it with a knife throughout the clay. -
Smooth the edges:
Dip your finger in a tiny bit of water and run it gently around the cut detailed edge of the circle. This smooths out any harsh lines or burrs left by the cutter.
Vein Definition Tip
For sharper details, choose leaves with hard, woody stems like oak or hydrangea. Soft, fleshy leaves often create shallow, blurry prints.
Step 2: Creating the Impression
-
Select and place the leaf:
Choose a fresh leaf with sturdy veins; dried leaves tend to crumble. Place the leaf vein-side down onto the center of your clay circle. The vein side down ensures the deepest, clearest impression. -
Roll the impression:
Gently roll over the leaf with your rolling pin. Apply firm, even pressure to push the leaf into the clay surface, but be careful not to distort the round shape of the medallion. -
Remove the leaf:
Find the stem of the leaf and carefully lift it vertically away from the clay. Do this slowly to ensure no bits of the leaf are left behind and to reveal the detailed veins. -
Dry the medallion:
Allow the clay to dry completely according to the package instructions. This usually takes 24-48 hours. flip it over halfway through the drying process to prevent curling.
Fixing Cracks
If small cracks appear while drying, make a paste of clay and water (slip) and smooth it into the cracks with your finger, then let dry again.
Step 3: Painting & Finishing
-
Prepare the paint wash:
If you didn’t tint the clay earlier, or just want to enhance the texture, mix sage green acrylic paint with a little bit of water to create a semi-transparent wash. -
Apply base color:
Brush the green wash over the entire surface of the dried medallion. The watery paint will naturally pool in the deep crevices of the leaf veins, making them appear darker and more defined. -
Dry brush highlights:
Once the base wash is dry, dip a dry paintbrush into a tiny amount of white paint. Dab most of it off onto a paper towel until the brush is almost clean. -
Whiten the surface:
Lightly sweep the dry brush over the raised surface of the clay and the leaf texture. This ‘dry brushing’ technique catches the high points, giving it that frosty, textured look seen in the image. -
Clean up edges:
If any paint dripped down the sides, you can either paint the rim a solid pale green or gently sand it clean for a crisp look. -
Final dry:
Let all paint layers dry completely before handling or displaying your artwork.
Display your botanical artwork on a small easel or use it as a decorative coaster to bring a touch of the outdoors inside
Butterfly Symmetry Plaques
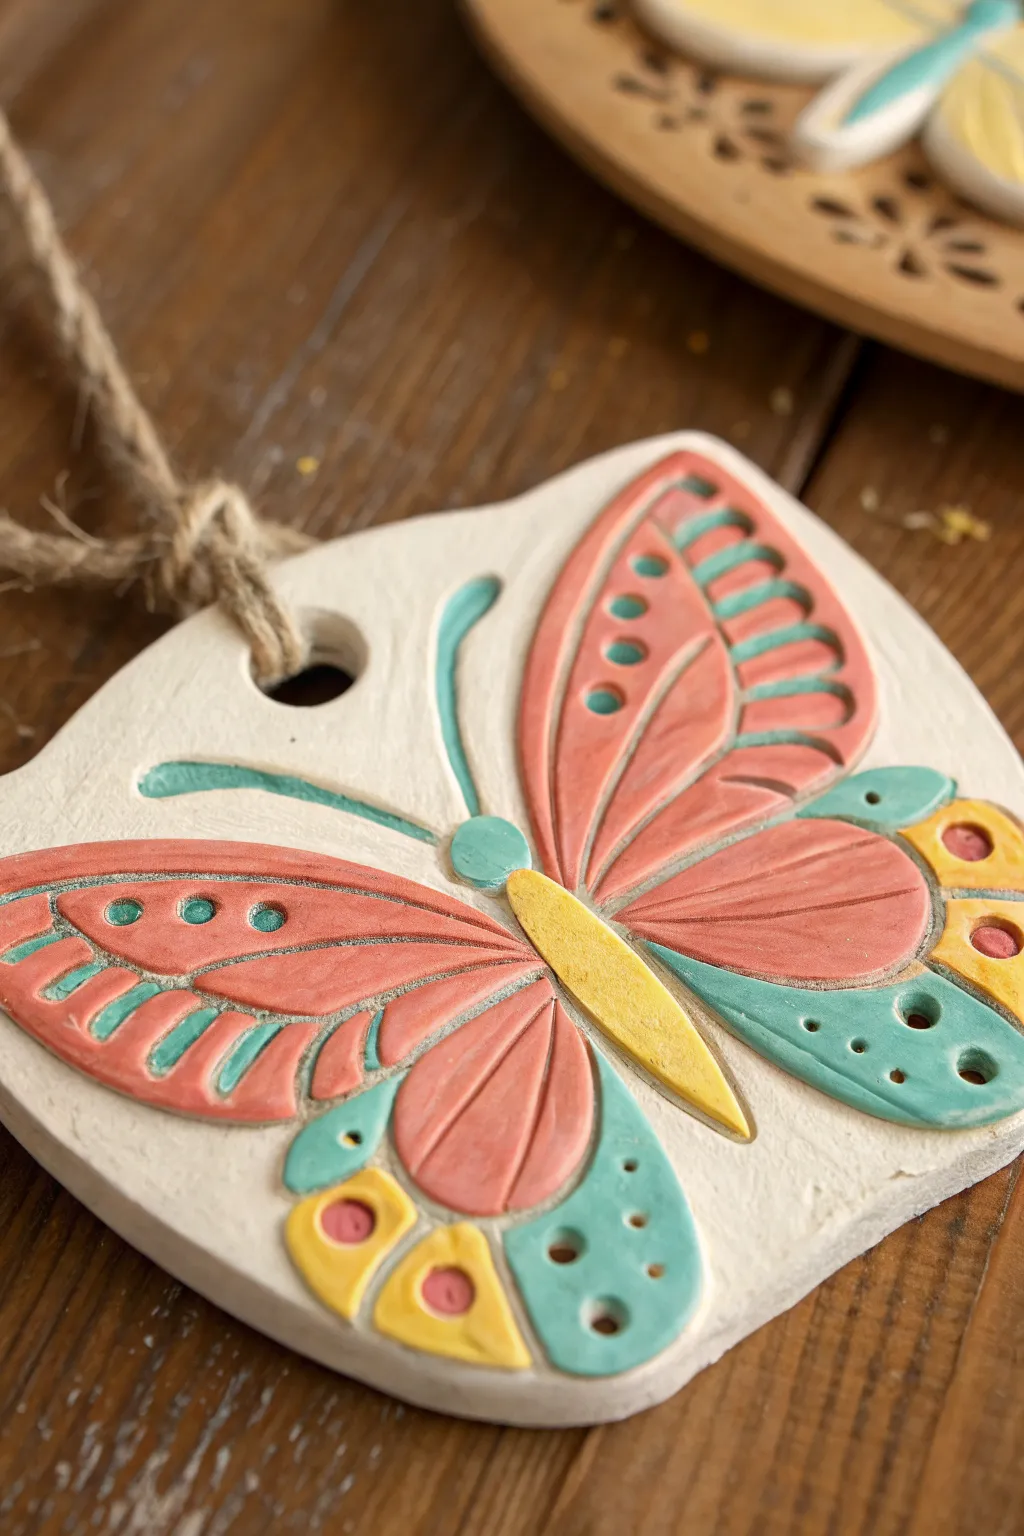
These charming clay plaques combine symmetry lessons with artistic expression, resulting in beautiful keepsakes perfect for hanging. The process uses simple carving and painting techniques to create a lovely raised relief effect that kindergarteners will be proud to display.
How-To Guide
Materials
- White air-dry clay (smooth texture)
- Roller or rolling pin
- Square cookie cutter (approx. 4-5 inches) or a knife
- Pencil or stylus tool
- Carving tools (plastic clay tools or toothpicks)
- Acrylic paints (Coral/salmon, teal/turquoise, pale yellow)
- Small round paintbrushes
- Jute twine or rustic string
- Drinking straw (for the hole)
- Fine-grit sandpaper (optional)
- Clear matte varnish (optional)
Step 1: Shaping the Base
-
Roll the Slab:
Begin by taking a generous handful of air-dry clay and rolling it out on a smooth surface until it is about 1/4 inch thick. Aim for an even thickness to prevent cracking during the drying process. -
Cut the Square:
Use a large square cookie cutter or a ruler and knife to cut out your plaque shape. You can gently curve the corners with your finger to soften the look, giving it a more organic feel. -
Add the Hole:
While the clay is still soft, take a drinking straw and press it into the top center of the square to create a clean hole for hanging. Twist the straw slightly as you pull it out to remove the clay plug. -
Smooth the Edges:
Dip your finger in a tiny bit of water and run it along the cut edges of the square and the hole to smooth out any roughness or loose crumbs of clay.
Fixing Cracks
Make a ‘slip’ paste by mixing a tiny bit of clay with water until it’s like yogurt. Smear this into any cracks that appear during drying, smooth it out, and let dry again.
Step 2: Designing the Butterfly
-
Outline the Body:
Using a pencil or a fine stylus tool, lightly sketch the central body of the butterfly vertically down the middle of the tile. Keep the pressure light so you can smooth it out if you make a mistake. -
Sketch the Wings:
Draw the upper and lower wings on one side first, then try to match them symmetrically on the other side. The upper wings should be larger and triangular, while the lower wings are smaller and rounded. -
Deepen the Lines:
Once you are happy with the symmetry, use a carving tool or a slightly blunt pencil to retrace your lines firmly. You want to create deep grooves that will separate the sections of the butterfly from the background. -
Add Wing Details:
Carve segments inside the wings to mimic veins. On the upper wings, draw long oval shapes; on the lower wings, add circle details or smaller segments near the edges. -
Texture and Clean Up:
Use a small ball tool or the end of a paintbrush to press small indented dots into the top corners of the wings for added texture. Gently brush away any clay crumbs created during carving. -
Dry Completely:
Set the plaque aside on a wire rack or a piece of parchment paper. Let it dry for at least 24-48 hours until it is completely hard and turns a bright white color.
Step 3: Painting and Finishing
-
Sand Rough Spots:
If there are any sharp peaks or rough edges after drying, gently sand them down with fine-grit sandpaper. Wipe away the dust with a barely damp cloth. -
Paint the Body:
Start by painting the central body and the antennae. I find a pale yellow works beautifully for the body, while a teal color highlights the head and antennae nicely. -
Color the Large Wings:
Using a coral or salmon pink paint, carefully fill in the largest segments of the upper and lower wings. Use a small brush to get close to the carved grooves without painting into them. -
Add Teal Accents:
Paint the outer edges of the wings and the lower segments in a soft teal or turquoise. This contrast makes the pink pop. -
Highlight with Yellow:
Fill in the small decorative circles or corner accents on the lower wings with the pale yellow paint to tie the color scheme together. -
Define the Grooves:
Leave the deep carved lines unpainted (white) to act as a natural outline, or if you accidentally painted them, carefully re-trace them with white paint to clean up the edges. -
Seal the Work:
Once the paint is fully dry, apply a thin coat of clear matte varnish to protect the surface and make the colors slightly more vibrant. -
Attach the Hanger:
Cut a length of jute twine, thread it through the top hole using a lark’s head knot or a simple loop, and tie it off securely.
Stamp It Up
For younger kids who struggle with freehand drawing, use rubber stamps to impress patterns into the clay wings before drying instead of carving lines manually.
Hang your beautiful butterfly creation near a window to let natural light highlight the lovely carved textures.


What Really Happens Inside the Kiln
Learn how time and temperature work together inside the kiln to transform clay into durable ceramic.
Silly Monster Buddy Figurines
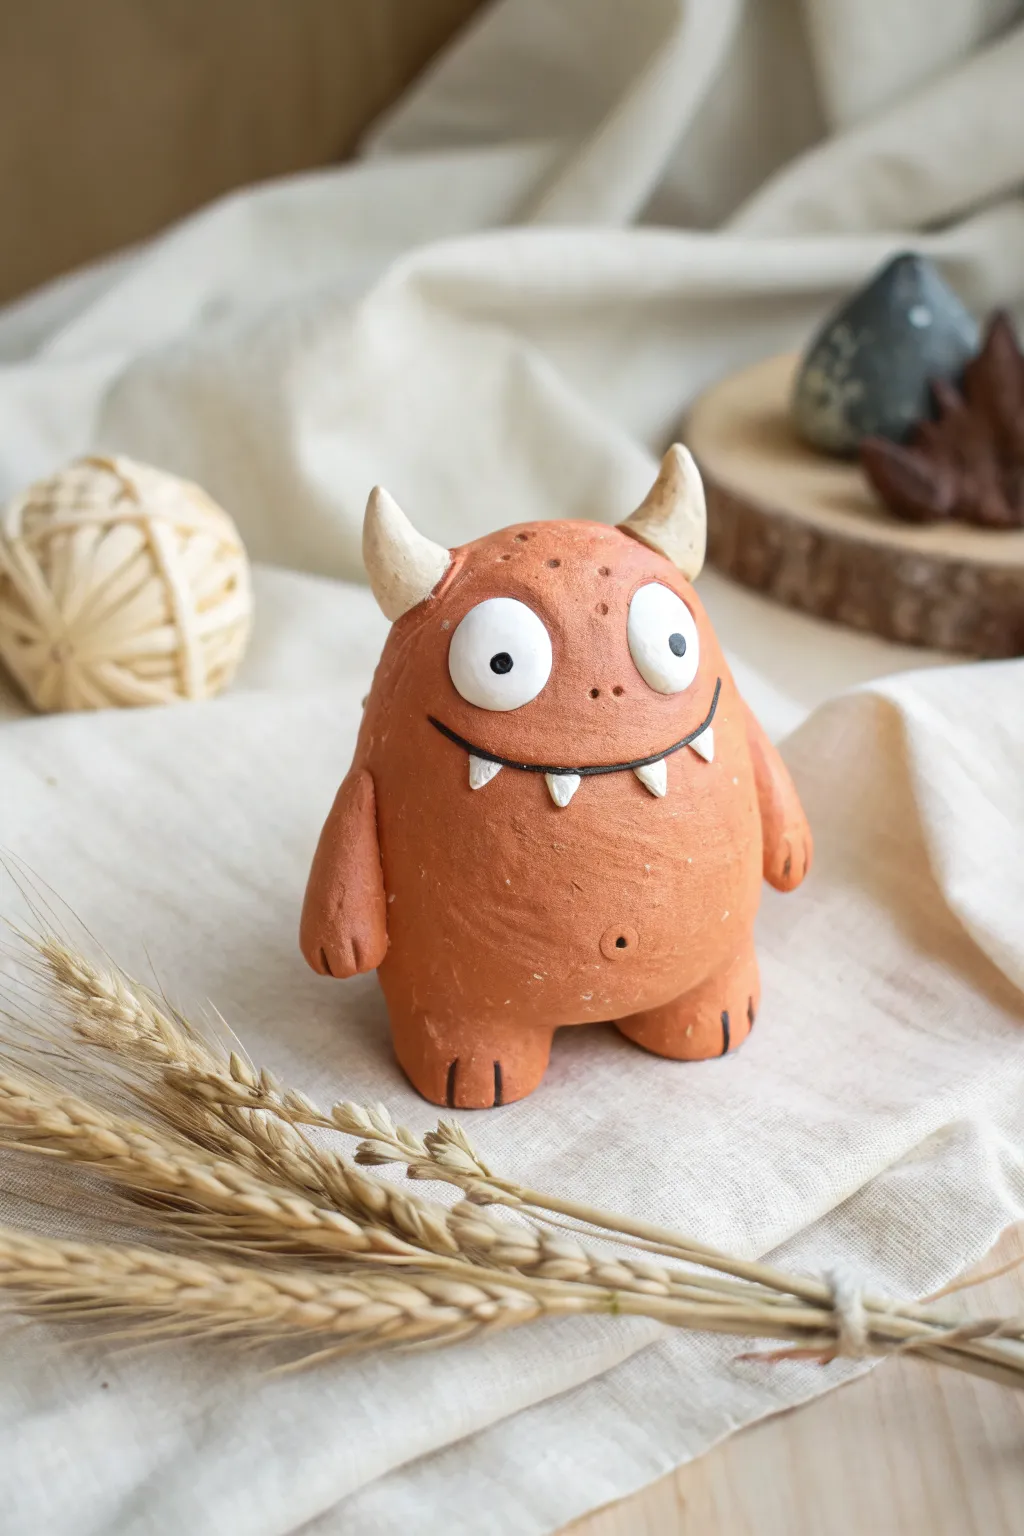
This charming little monster brings a friendly face to any shelf with its warm terracotta color and goofy toothy smile. Simple shapes and basic joining techniques make this the perfect project for little hands learning to sculpt.
Step-by-Step Guide
Materials
- Air dry clay (terracotta color)
- Air dry clay (white)
- Black acrylic paint or black marker
- Rolling pin
- Small cup of water
- Modeling tool or toothpick
- Clear matte varnish (optional)
Step 1: Body Building
-
Form the Base:
Start by grabbing a large handful of terracotta clay. Roll it between your palms until you have a smooth, firm ball about the size of an orange. -
Shape the Torso:
Gently tap the bottom of your sphere against your work surface to flatten it so it stands on its own. Use your hands to slightly narrow the top, creating a soft egg-like shape. -
Create Feet:
Take two smaller grape-sized pieces of terracotta clay. Roll them into balls and flatten them slightly into thick discs. -
Attach the Feet:
Score (scratch) the bottom of the body and the top of the feet. Dab a little water on the scratches and press the body firmly onto the feet. Smooth the seams with your finger so the clay blends together. -
Add Texture:
Using a modeling tool or just a fingernail, gently press three vertical lines into the front of each foot to create simple toes.
Step 2: Arms and Horns
-
Roll the Arms:
Roll two sausage shapes from the terracotta clay about the length of your pinky finger. Round off one end of each sausage. -
Make Hands:
On the rounded ends, use your tool to press indents for fingers, similar to how you made the toes. -
Attach Arms:
Score the sides of the body and the flat end of the arms. Use a drop of water as ‘glue’ and press the arms onto the sides of the body, letting them hang down casually. -
Shape the Horns:
Switch to your white clay. Roll two small cone shapes, keeping the tips slightly rounded so they aren’t too sharp. -
Position Horns:
Attach the white horns to the top of the head using the scoring and water method, placing them wide apart like little ears.
Keep it Clean
Wash your hands thoroughly between using terracotta and white clay. The red pigment stains easily and can turn your bright white horns pink.
Step 3: Face Details
-
Create Eyes:
Roll two flat circles of white clay for the eyes. This monster looks extra silly if one eye is slightly larger than the other. -
Place the Eyes:
Press the white circles onto the upper half of the face, spacing them apart slightly. Flatten them gently so they stick well. -
The Smile:
Roll a very thin ‘snake’ or noodle of black clay (if you have it) or simply use a tool to deeply carve a curved smile line connecting the area below the eyes. If carving, you’ll paint inside it later. -
Add Teeth:
Make tiny triangles from white clay. Carefully press these pointed teeth onto the smile line. I like to put two pointing down from the top lip and one pointing up from the bottom. -
Pupils and Polish:
Roll tiny specks of black clay for pupils or poke small holes in the center of the white eyes.
Clay Cracking?
If you see tiny cracks forming while you work, dip your finger in water and smooth them out immediately. Don’t use too much water or it gets slimy.
Step 4: Finishing Touches
-
Skin Texture:
To make the skin look organic, use a toothpick to poke a few scattered holes on the body and forehead for ‘freckles.’ Don’t forget a little belly button hole near the bottom. -
Drying Time:
Let your monster sit in a dry spot for 24-48 hours. The clay will become lighter in color and hard to the touch. -
Paint Details:
If you carved the mouth instead of using black clay, use a fine brush with black paint to fill in the smile line now. You can also paint the pupils if you didn’t sculpt them. -
Seal It:
Once any paint is fully dry, apply a coat of clear matte varnish to protect your new friend from moisture and dust.
Place your little monster buddy on a desk where he can keep you company while you work or play
Rainbow Hanging Decorations
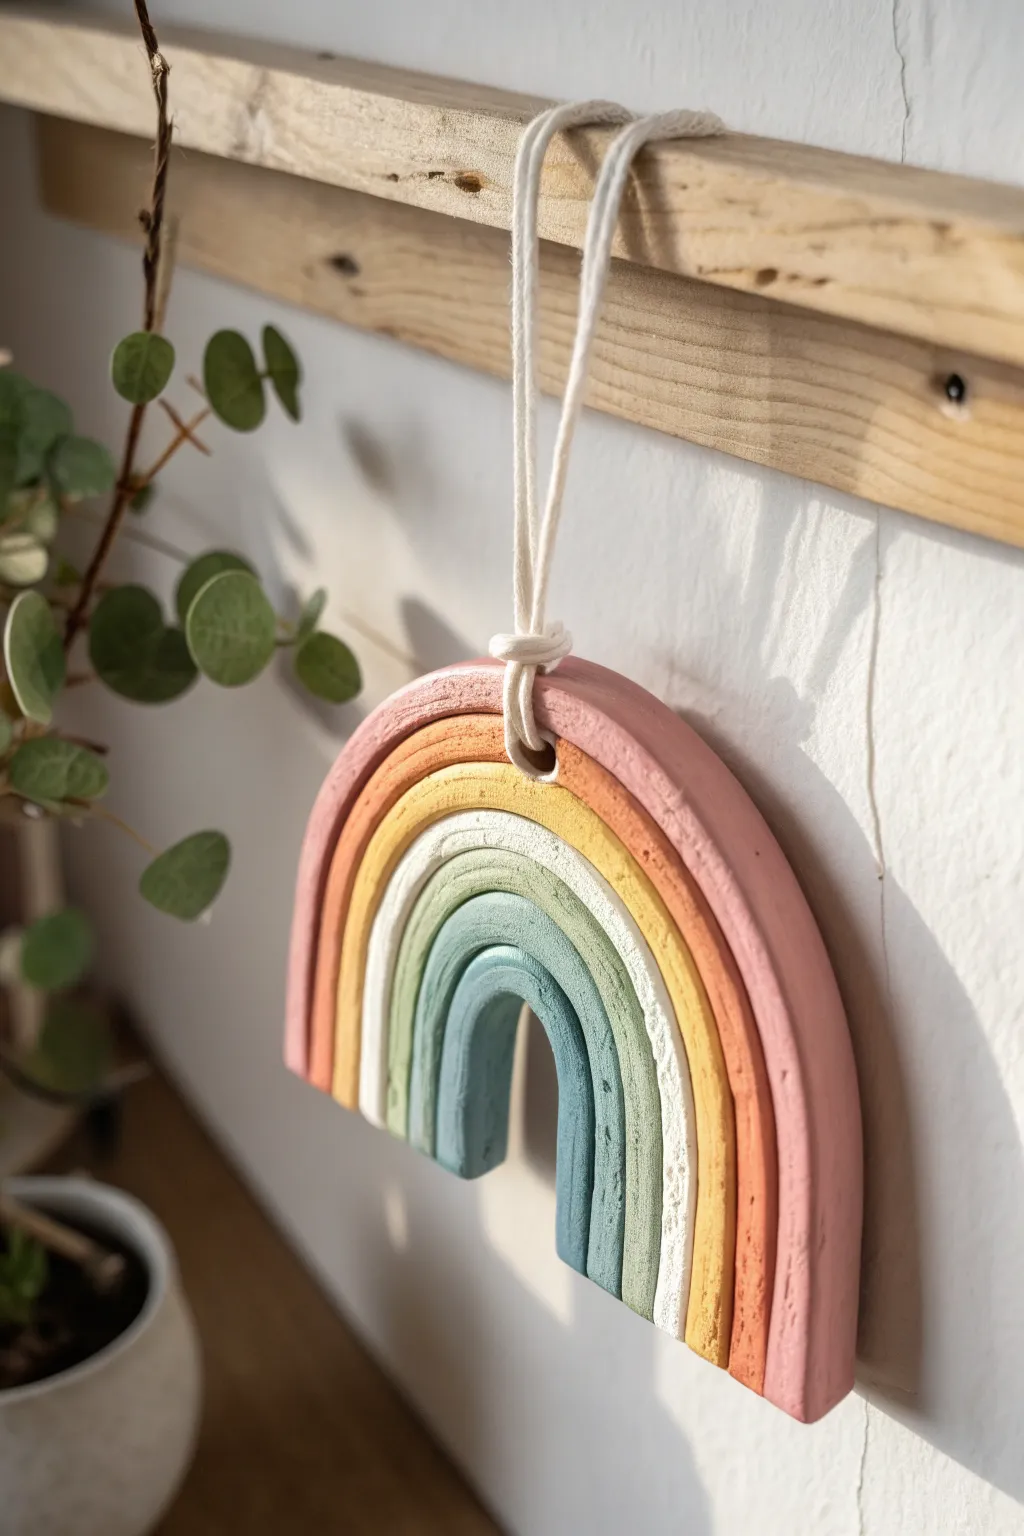
This charming, muted rainbow decoration brings a soft touch of whimsy to any space with its textured, earthy finish. Using air-dry clay, you’ll sculpt concentric arches in calming pastel tones to create a durable and stylish wall hanging.
Step-by-Step Tutorial
Materials
- Air dry clay (white or terracotta)
- Acrylic paints (pastel pink, terracotta, mustard yellow, white, sage green, slate blue)
- Rolling pin
- Sharp craft knife
- Water and a small sponge or brush
- Strong craft glue or slip (clay/water mix)
- Small wooden skewer or chopstick
- Cotton cord or twine for hanging
- Fine grit sandpaper
Step 1: Preparing the Arches
-
Condition the clay:
Start by taking a large chunk of air-dry clay and kneading it in your hands until it becomes warm, pliable, and free of cracks. -
Roll out coils:
Divide your clay into six portions. Roll each portion into a long, even snake or coil on a clean work surface. Aim for a thickness of about 0.5 inches (1.2 cm) for each coil. -
Flatten slightly:
Gently press down on each coil with the palm of your hand or a rolling pin just enough to create a flat front and back surface, while keeping the sides rounded. -
Form the smallest arch:
Take your first coil and bend it into a tight ‘U’ shape to form the innermost arch. This will be the blue one. Trim the bottom edges straight with your craft knife. -
Build outward:
Take the next coil and curve it snugly over the first arch. Continue this process, layering each coil over the previous one until you have all six arches stacked together. -
Check the fit:
Ensure there are no large gaps between the arches. You can gently press them together to ensure a good fit, but don’t glue them yet if you plan to paint them separately. -
Trim the base:
Once all arches are arranged, use your long craft knife or a ruler to cut straight across the bottom of the entire rainbow so all legs are perfectly flush and even. -
Create the hanging hole:
Identify the center of the topmost (largest) arch. Use a skewer or chopstick to pierce a clean hole through the top, front to back. Make it slightly larger than your cord, as clay shrinks when drying.
Seamless Joints
For a ‘solid piece’ look instead of separate coils, score and slip the wet clay coils together before drying, then smooth the seams with a damp finger.
Step 2: Drying and Refining
-
Initial drying:
Carefully separate the arches and lay them flat on a piece of parchment paper or a drying rack. Separating them ensures you can paint the sides cleanly later. -
Wait time:
Let the pieces dry completely for 24-48 hours. I like to flip them over halfway through the process to ensure the backs dry evenly and don’t warp. -
Smooth the edges:
Once bone dry, take fine-grit sandpaper and gently sand away any rough ridges, fingerprints, or sharp edges on each individual arch. -
Create texture (optional):
If you want that rustic, stone-like look seen in the photo, you can skip sanding perfectly smooth and instead lightly scratch the surface with sandpaper for more tooth.
Speckled Stone Effect
Mix dried used coffee grounds or black pepper into your white paint before applying. This creates a realistic, trendy faux-ceramic or speckled stone texture.
Step 3: Painting and Assembly
-
Select your palette:
Mix your acrylic paints to matching the photo: muted pink for the outer arch, terracotta orange, mustard yellow, white, sage green, and lastly slate blue for the center. -
Paint individual arches:
Paint each arch individually, covering the front, sides, and inner curves. You may need two coats for opaque coverage. Let them dry fully. -
Dry fit:
Arrange the painted arches back into the rainbow shape to ensure they still fit together well after painting. -
Gluing together:
Apply a strong craft glue to the inner curve of the largest arch and press the second arch into it. Repeat for all layers, working from the outside in or inside out. -
Final secure:
If needed, glue a piece of cardstock or felt across the back of the rainbow for extra stability, though strong glue between the arches is usually sufficient. -
Add the hanger:
Thread your cotton cord through the hole in the top arch. Tie a simple knot at the front or loop it through itself to secure it.
Hang your beautiful handmade rainbow on a hook or shelf to add a pop of gentle color to the room

TRACK YOUR CERAMIC JOURNEY
Capture glaze tests, firing details, and creative progress—all in one simple printable. Make your projects easier to repeat and improve.
Smiley Pencil Toppers

These charming, minimalist smiley faces bring a touch of natural warmth to any desk or shelf. With a satisfying stone-like texture and a simple wooden stand, this project is a perfect introduction to working with air-dry clay and basic woodwork.
Detailed Instructions
Materials
- White or beige air-dry clay (stone texture preferred)
- Wooden dowel (approx. 1/2 inch diameter)
- Wooden disk or coaster (for the base)
- Wood glue
- Sandpaper (medium grit)
- Sculpting tool or old pencil (texturing)
- Round sculpting tool or chopstick (for facial features)
- Clear matte varnish (optional)
Step 1: Creating the Base Structure
-
Prepare the dowel:
Cut your wooden dowel to your desired height, focusing on somewhere between 4 to 6 inches for a desktop display. -
Sand the edges:
Using medium-grit sandpaper, smooth both ends of the dowel so they are flat and free of splinters. -
Prepare the wooden disk:
Take your wooden disk base and ensure the center point is marked. If the wood is rough, give it a quick sanding. -
Glue the stand:
Apply a generous dab of wood glue to one end of the dowel and press it firmly onto the center of the wooden disk. Wipe away excess glue immediately. -
Dry the stand:
Let the wooden stand dry completely according to the glue instructions before adding any weight to it.
Instant Stone Texture
Mix a teaspoon of used coffee grounds or fine sand into your white clay before rolling. This creates instant speckles and grit for a realistic stone effect.
Step 2: Sculpting the Smiley Head
-
Condition the clay:
Take a handful of air-dry clay and knead it in your hands until it becomes pliable and warm. I like to add a tiny drop of water if it feels too crumbly. -
Roll a sphere:
Roll the clay between your palms to create a smooth, tight sphere about the size of a golf ball or slightly larger. -
Create the mounting hole:
While the clay is soft, gently press the sphere onto the top of your dried dowel stand to create an indentation, then remove it. Deepen this hole slightly with a tool so it fits securely later. -
Add surface texture:
To achieve that stone-like look, gently tap the surface of the sphere with an old toothbrush or a stiff-bristled brush. This removes the fingerprints and adds organic roughness. -
Indent the eyes:
Use a round sculpting tool or the back of a paintbrush to press two deep, vertical oval dents for the eyes. Wiggle the tool slightly to widen them. -
Carve the smile:
Use a curved sculpting tool or the edge of a plastic spoon to impress a wide, simple U-shape for the mouth. Press deep enough that the shadow will be visible. -
Refine the edges:
Smooth out any little clay crumbs that formed around the eyes and mouth during carving, but try to keep the overall rough texture intact.
Cracks appeared?
If small cracks form while drying, create a ‘slip’ by mixing a bit of clay with water into a paste. Rub this into the cracks and let dry again.
Step 3: Assembly and Finish
-
Dry the head:
Set the clay head aside to dry completely. This usually takes 24-48 hours depending on humidity; turn it occasionally so the bottom dries too. -
Test the fit:
Once hard, place the head back onto the dowel. It should sit snugly. -
Secure the head:
Apply a small amount of wood glue or strong craft glue to the top of the dowel and press the clay head into place. -
Seal (Optional):
For longevity, brush a thin coat of clear matte varnish over the clay. This prevents dusting and keeps the ‘stone’ look clean.
Now you have a cheerful companion to brighten up your workspace every time you sit down
Chunky Bead Necklaces
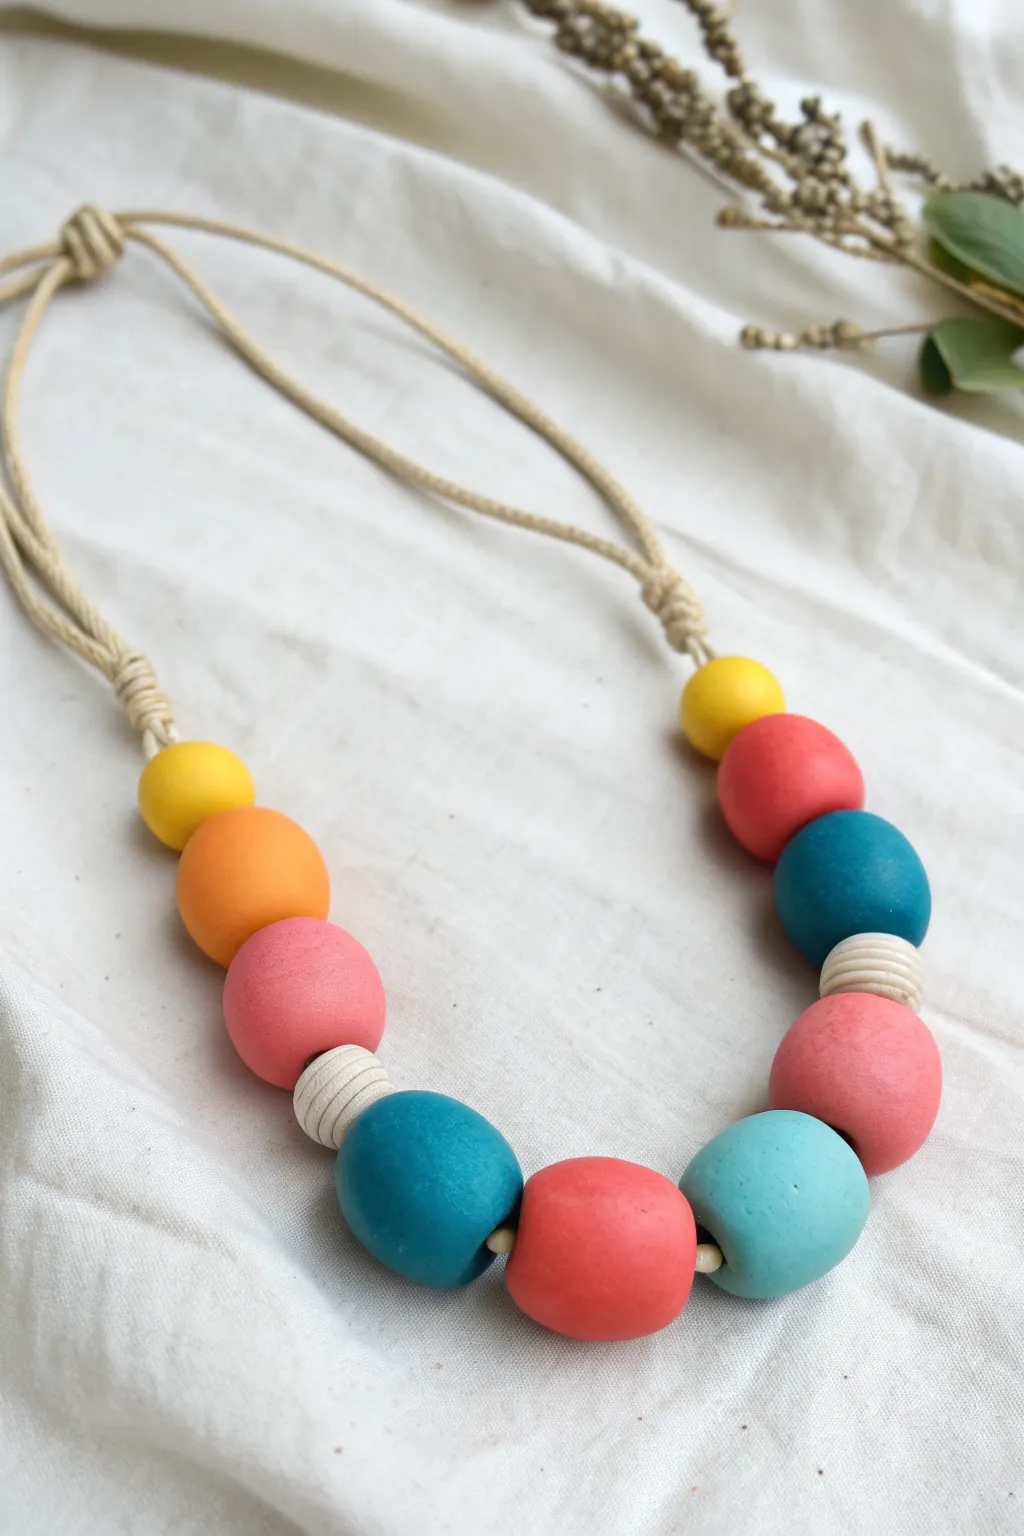
This colorful project creates a bold statement piece using simple hand-rolled beads that have a lovely organic, imperfect feel. The combination of vibrant matte colors and natural cord gives it a playful yet sophisticated bohemian look that is perfect for little hands to craft.
Step-by-Step
Materials
- White air dry clay
- Rolling pin (optional)
- Small wooden skewer or chopstick
- Acrylic paints (yellow, orange, pink/coral, dark blue, turquoise)
- Paintbrushes
- Natural beige hemp or cotton cord (approx. 3mm thick)
- Sandpaper (fine grit)
- Mod Podge or matte varnish (optional)
- Toothpick (for texture)
- Scissors
Step 1: Shaping the Beads
-
Portioning the clay:
Start by pinching off chunks of air dry clay. You will need about 9 to 11 pieces depending on your desired necklace length. Aim for clumps roughly the size of a large grape or a small walnut. -
Rolling spheres:
Roll the clay chunks between your palms to create smooth spheres. Don’t worry about making them perfectly round; a little irregularity adds to the organic charm of the finished necklace. -
Creating texture:
Select two of your spheres to be ‘accent beads.’ On these, gently press a toothpick into the side and roll the bead while holding the toothpick steady to create carved parallel grooves around the circumference. -
Drilling the holes:
Using your skewer or a chopstick, carefully pierce a hole through the center of each bead. Twist the tool gently as you push through to prevent the bead from squashing flat. -
Refining the holes:
Once the skewer pokes through the other side, wiggle it around slightly to widen the hole. Remember that clay shrinks when it dries, so make the hole larger than your cord’s thickness. -
Check for smooth edges:
Inspect the exit holes for any jagged bits of clay and smooth them down with a damp finger before setting the beads aside.
Cracked Beads?
If small cracks appear while drying, don’t toss them. Mix a tiny bit of fresh clay with water to make a paste (slip) and fill in the crack, then smooth it over with your finger.
Step 2: Drying and Painting
-
Letting them dry:
Place your beads on a piece of parchment paper or a drying rack. Allow them to dry completely for at least 24-48 hours, flipping them occasionally to ensure even airflow. -
Sanding imperfections:
Once bone dry, use a piece of fine-grit sandpaper to gently buff away any sharp ridges or rough areas on the surface of the beads. -
Planning the palette:
Lay out your beads in the order shown in the photo: yellow, orange, pink using the natural clay texture, dark blue, red/coral, turquoise, and pink. Leave the two textured beads unpainted for a natural contrast. -
Base coats:
Paint each bead in its designated color. I find it helpful to slide the bead onto a skewer to hold it steady while painting all sides without getting messy fingers. -
Adding coverage:
Let the first coat dry, then apply a second coat if the paint looks streaky. The colors should be solid and opaque for that bold kindergarten-art style. -
Sealing (Optional):
If you want the necklace to be water-resistant, coat the painted beads with a matte varnish or Mod Podge. This step is optional if you prefer the raw matte look of the acrylics.
Add Sparkle
For a ‘level_up’ twist, mix gold glitter into the sealer for the unpainted textured beads, or paint flexible geometric patterns like polka dots on the solid colored beads.
Step 3: Assembly
-
Cutting the cord:
Cut a long length of your natural hemp cord, roughly 30 to 36 inches long, depending on where you want the necklace to sit. -
Taping the end:
Wrap a small piece of masking tape tightly around one end of the cord. This creates a stiff ‘needle’ that makes threading the chunky beads much easier. -
Stringing the beads:
Thread the beads onto the cord in your planned color order. Arrange them so the larger beads sit towards the bottom center and the smaller ones taper up the sides. -
Securing the beads:
Tie a simple overhand knot in the cord immediately after the last bead on both the left and right sides. Push the knot close to the bead to keep the cluster tight and centered. -
Finishing the closure:
Determine the drop length you want, then tie the two ends of the cord together using a secure knot, like a surgeon’s knot, or create an adjustable sliding knot if you are feeling adventurous.
You now have a delightful, chunky accessory that captures the fun of childhood creativity
Mini Pinch-Pot Planters
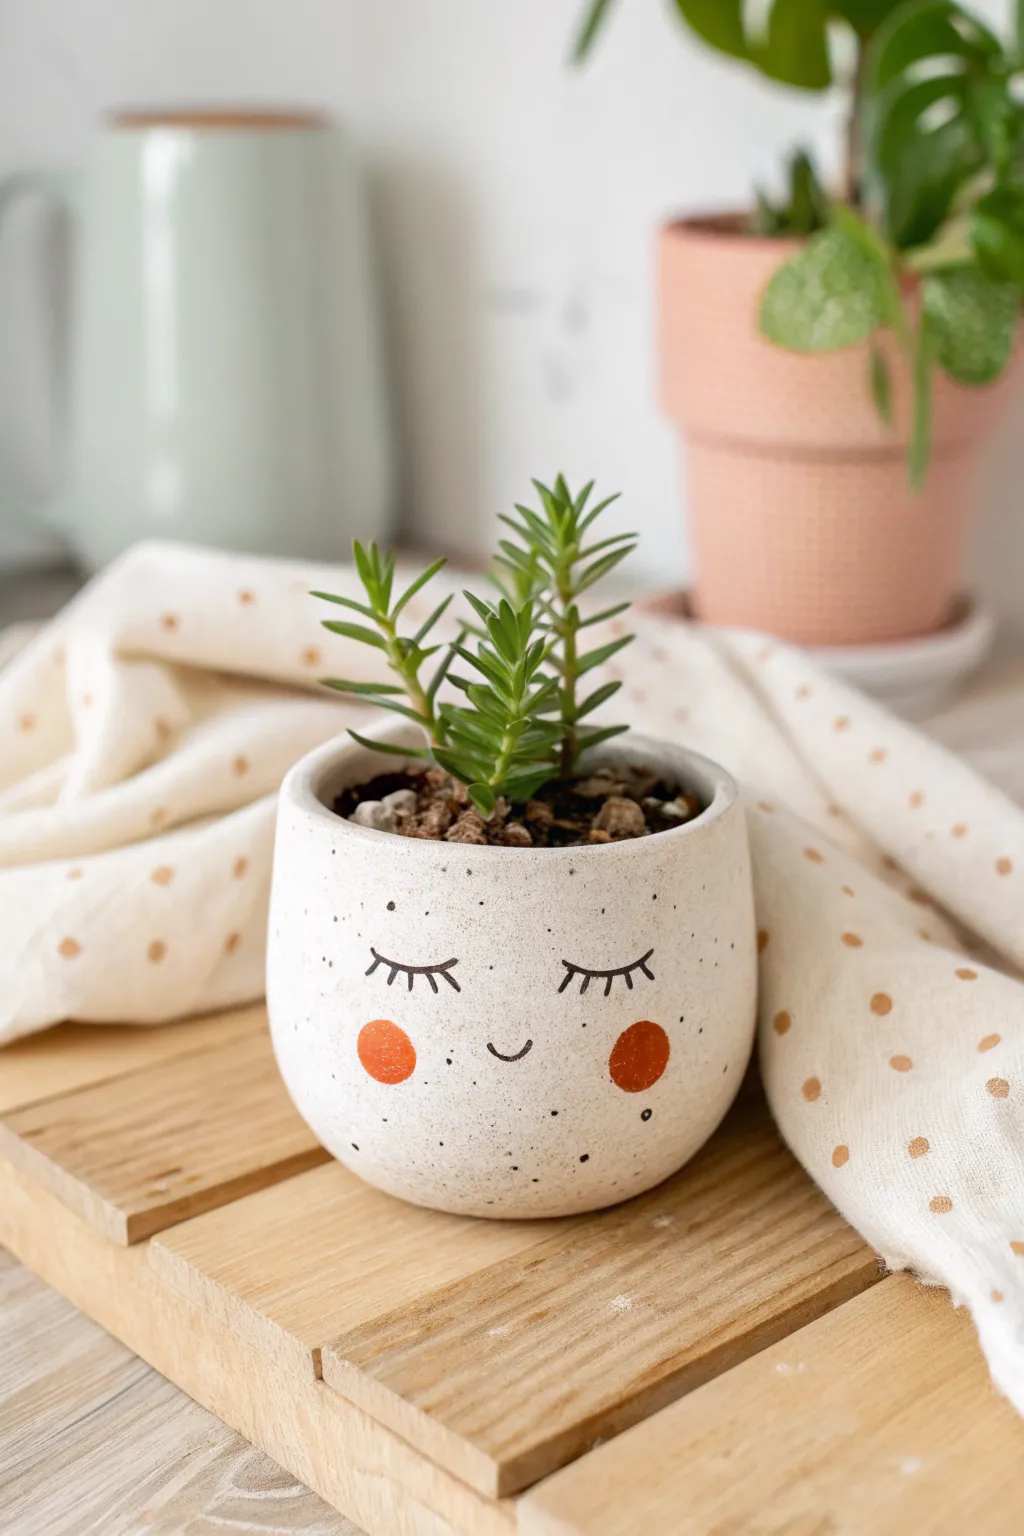
Transform a simple ball of clay into a charming little friend for your favorite succulents. This mini pinch-pot features a calming, sleepy face with rosy cheeks that brings a touch of serenity to any windowsill.
Step-by-Step Tutorial
Materials
- White air dry clay
- Small bowl of water
- Rolling pin (optional)
- Sandpaper (fine grit)
- Black fine-tip permanent marker or acrylic paint pen
- Orange or coral acrylic paint
- Small round paintbrush or cotton swab
- Clear acrylic sealant (matte or satin)
- Small succulent or cactus for planting
Step 1: Shaping the Pot
-
Form a ball:
Start by taking a handful of air dry clay, roughly the size of a tennis ball. Roll it enthusiastically between your palms until you have a smooth, uniform sphere without major cracks. -
Start the pinch:
Hold the clay ball in one hand and firmly press your thumb into the center, creating a deep indentation but stopping about a half-inch from the bottom. -
Widen the walls:
Using your thumb on the inside and fingers on the outside, gently pinch and rotate the clay. Work your way from the bottom up to thin out the walls evenly. -
Shape the curve:
Aim for a rounded, bowl-like shape. Gently tap the bottom of the pot against your work surface to create a flat, stable base so it won’t wobble later. -
Smooth the lip:
Dip your finger in a little water and run it along the rim of the pot to smooth out any cracks or uneven edges. I find this creates a much more professional finish than leaving raw edges. -
Refine the surface:
Use a damp sponge or wet finger to smooth the entire exterior of the pot. You want a nice, clean canvas for the face later.
Smooth Surface Secret
Use a literally ‘squeaky’ clean finger dipped in water to polish the clay before drying. The smoother the wet clay, the less sanding needed later.
Step 2: Drying and Refining
-
Let it dry completely:
Place your finished pot in a safe, dry spot away from direct sunlight. Allow it to air dry for 24-48 hours until the clay turns bright white and feels hard. -
Sand imperfections:
Once fully dry, take a piece of fine-grit sandpaper and gently buff the surface. Focus on any bumps or fingerprints to make the pot feel smooth like ceramic. -
Remove dust:
Wipe the pot down thoroughly with a slightly damp cloth or a dry brush to remove all the sanding dust before you start adding color.
Step 3: Painting the Details
-
Add speckles (optional):
To mimic the ceramic look in the photo, you can dilute a tiny drop of black paint and flick it onto the pot with an old toothbrush, or create tiny random dots with your marker. -
Draw the eyes:
Using your black fine-tip marker or paint pen, draw two downward-curving arcs for the closed eyes. Place them fairly wide apart near the middle of the pot. -
Add eyelashes:
Carefully draw three or four small vertical lashes extending downward from each eye curve. -
Create the smile:
Draw a tiny, simple ‘u’ shape directly between the eyes, placed slightly lower than the eyes to form a cute nose-mouth. -
Paint the cheeks:
Dip a circular paintbrush tip, the end of a paintbrush handle, or a cotton swab into orange or coral acrylic paint. -
Stamp the blush:
Press the paint tool gently onto the cheeks, just outside and slightly below the eyes. Try to make these circles solid and opaque for a bold pop of color.
Hairdo Upgrade
Before drying, shape tiny clay coils or balls and attach them to the rim to give your character hair, a hat, or flower crown accessories.
Step 4: Finishing Up
-
Seal the pot:
Once the paint is totally dry, apply a coat or two of clear acrylic sealant. This protects the clay from moisture when you water your plant. -
Add your plant:
Fill the pot with a little succulent soil and nestle your small plant inside to complete the look.
Now you have an adorable, handcrafted home for your tiniest green companion
Dinosaur Fossil Impression Tiles
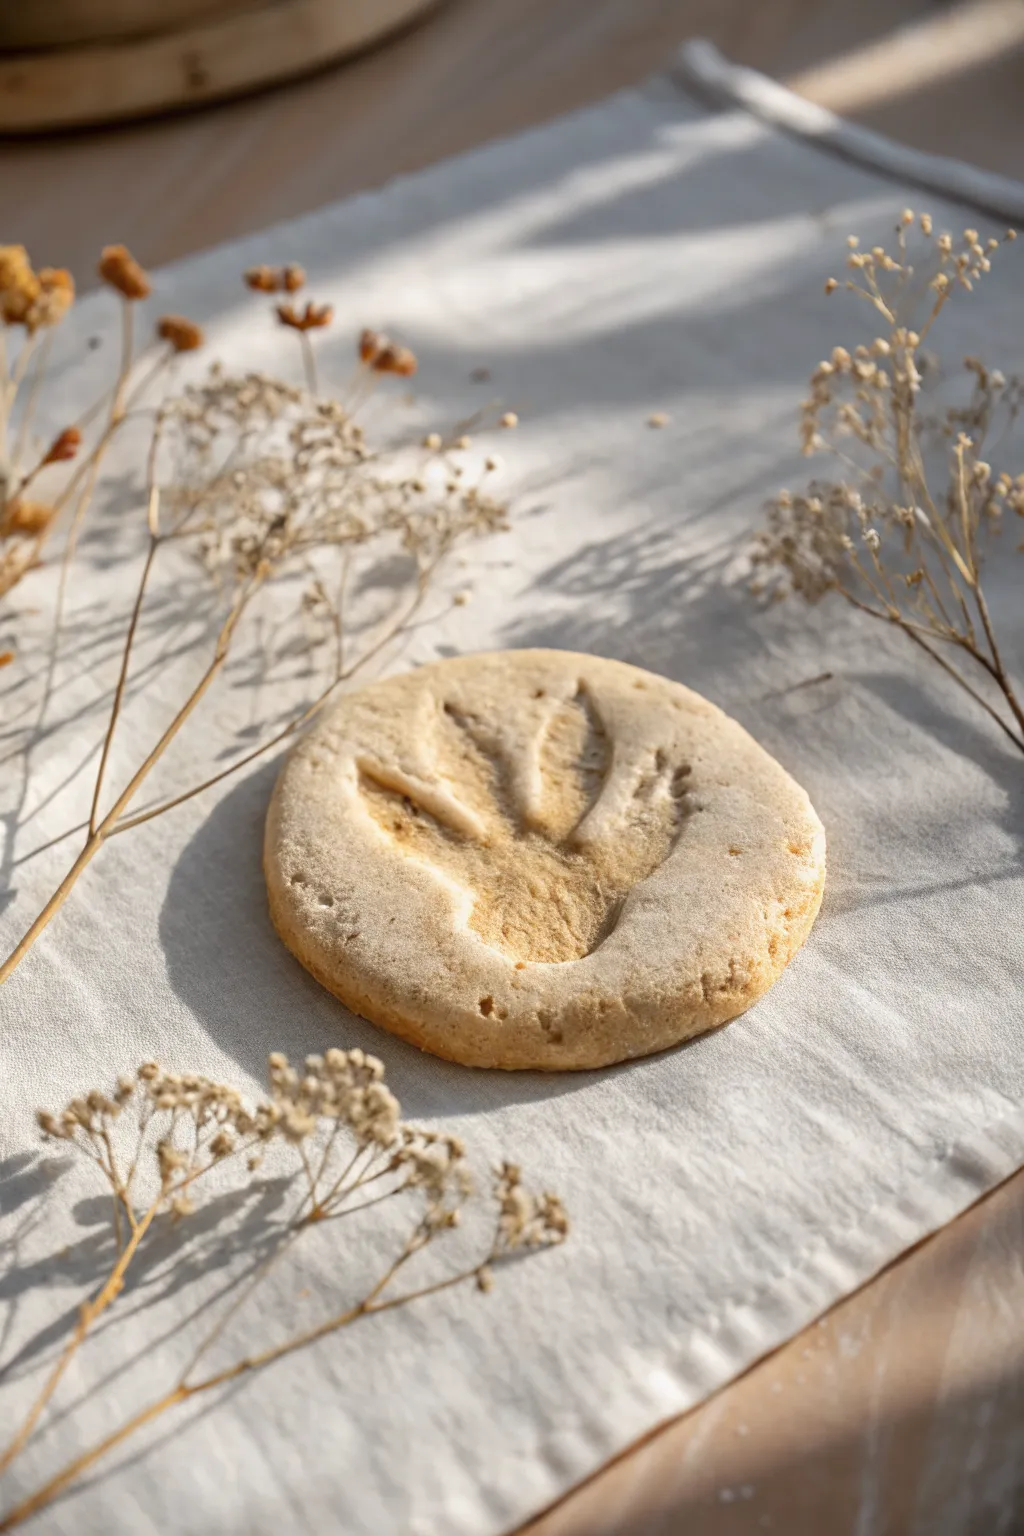
Go back in time with these authentic-looking fossil impression tiles that capture the rugged texture of ancient earth. This tactile project transforms simple clay into a museum-worthy discovery, perfect for young paleontologists eager to preserve their own dinosaur tracks.
Step-by-Step
Materials
- White or natural air-dry clay (or salt dough)
- Small plastic dinosaur toy with distinct feet
- Rolling pin
- Circle cookie cutter (approx. 3-4 inches diameter)
- Parchment paper or canvas mat
- Fine grit sandpaper (optional)
- Brown diluted watercolor or strong tea (for aging effect)
- Soft paintbrush
Step 1: Preparing the Base
-
Condition the Clay:
Begin by taking a handful of air-dry clay and kneading it in your hands until it becomes soft, warm, and pliable. This prevents cracks from forming later. -
Form a Ball:
Roll the conditioned clay between your palms to create a smooth, tight sphere. Aim for a ball roughly the size of a tangerine. -
Flatten the Dough:
Place your clay ball onto a piece of parchment paper. Using the palm of your hand, gently press down to flatten it into a thick pancake shape. -
Roll to Thickness:
Use a rolling pin to lightly roll over the clay. You want a slab that is consistent in thickness, about 1/2 inch thick—not too thin, or the footprint will press right through. -
Cut the Shape:
Take your large circle cutter and press firmly into the rolled clay to create a clean, perfect disc. Peel away the excess clay from the outside. -
Soften the Edges:
Dip your finger in a little bit of water and run it along the cut edge of the circle. This smooths out any sharpness leftover from the cutter and gives it a more eroded, natural stone look.
Natural Stone Texture
Mix a small amount of sand or coffee grounds directly into your white clay before rolling it out. This adds speckles and grit for an instant sedimentary rock effect.
Step 2: Creating the Fossil Impression
-
Select Your Dinosaur:
Choose a plastic dinosaur toy that has large, clearly defined feet. Theropods like T-Rex or Raptors work best for that classic three-toed look. -
Position the Foot:
Align one foot of the dinosaur directly over the center of your clay disc. I usually do a practice press on scrap clay first to find the best angle. -
Press and Wiggle:
Press the foot firmly into the clay. Rock the toy slightly forward and backward to ensure the toes and the heel make a deep, clear indentation. -
Remove Carefully:
Pull the toy straight up to avoid smearing the impression sides. You should be left with a crisp, deep fossil track. -
Add Texture:
To make the ‘stone’ look realistic, gently tap the surface of the clay around the footprint with a crumpled ball of aluminum foil or a stiff bristle brush. This removes the smooth manufactured look.
Step 3: Drying and Finishing
-
Initial Drying:
Leave the clay tile on a flat surface to dry. If using standard air-dry clay, let it sit for 24-48 hours. Flip it over halfway through to ensure the bottom dries evenly. -
Sand Extremities:
Once fully hard, check the edges. If there act burrs or sharp points, lightly sand them down with fine-grit sandpaper. -
Mix Aging Wash:
Create a very watery wash using brown watercolor paint, coffee, or strong tea. You want a tint, not an opaque paint. -
Apply the Wash:
Brush the wash over the entire fossil, letting the liquid pool slightly in the deep crevices of the footprint. This mimics accumulated dirt over millions of years. -
Wipe Back:
Immediately use a paper towel or rag to wipe the surface of the clay. This removes the darker color from the high points while leaving the shadow in the footprint impression. -
Final Seal (Optional):
If these will be handled frequently, you can apply a matte varnish spray to protect the surface without making it shiny.
Sticky Toy Feet?
If the clay sticks to the plastic dinosaur foot, lightly dust the foot with cornstarch or flour before pressing it down. Use a soft dry brush to sweep away excess powder after drying.
Display your new discovery on a shelf or bury it in a sandbox for a fun excavation game
Texture-Stamp Coaster Discs
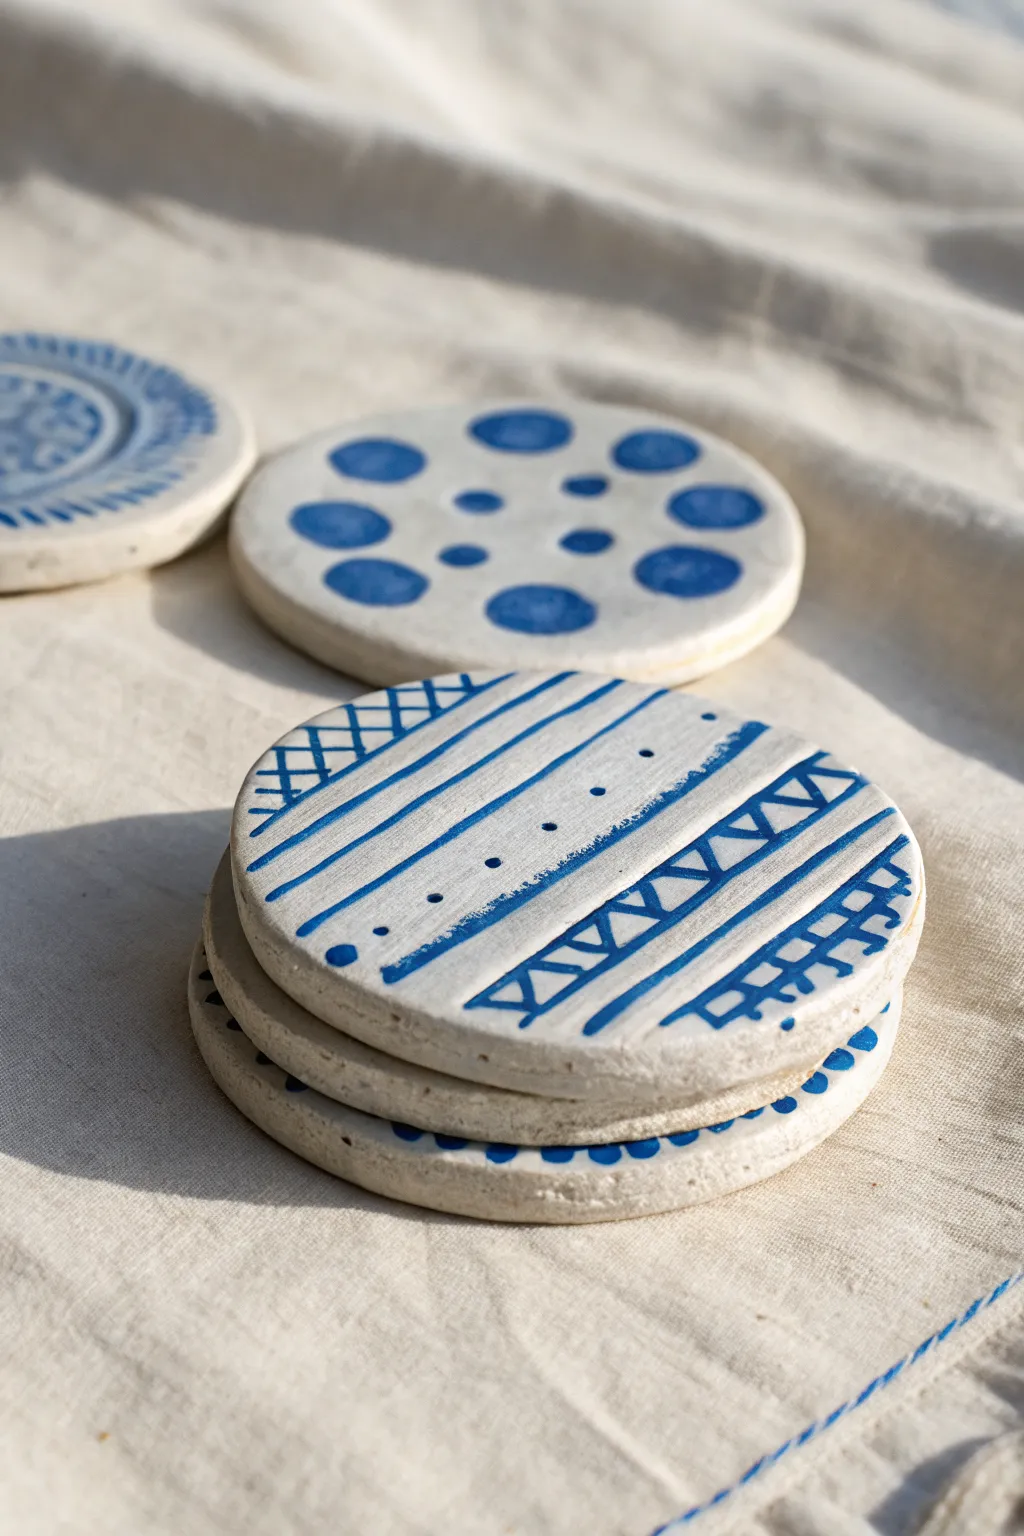
These charming coasters combine the simplicity of air-dry clay with striking geometric patterns painted in classic cobalt blue. They make wonderful handmade gifts and offer a perfect canvas for young artists to practice patterns and steady handwork.
Detailed Instructions
Materials
- White or cream air-dry clay
- Rolling pin
- Round cookie cutter (approx. 3-4 inches) or a glass
- Fine grit sandpaper
- Cobalt blue acrylic paint
- Small round paintbrush (size 0 or 2)
- Small flat brush (optional for wider lines)
- Pencil (for light sketching)
- Clear acrylic sealer or varnish (spray or brush-on)
- Parchment paper or craft mat
Step 1: Shaping the Clay Base
-
Prepare the workspace:
Lay down parchment paper or a craft mat to prevent the clay from sticking to your table. -
Roll out the clay:
Take a handful of air-dry clay and roll it out until it is an even slab, about 1/4 inch thick. Try to keep the thickness consistent so the coasters dry flat. -
Cut the circles:
Using your round cookie cutter or the rim of a glass, press firmly into the clay to cut out your coaster shapes. -
Smooth the edges:
Dip your finger in a little bit of water and gently run it along the cut edges of the clay circles to round them off and remove any stray clay bits. -
Initial Drying:
Place the clay texture discs on a flat surface away from direct heat to dry. Flip them over every few hours to prevent curling as moisture evaporates. -
Sand for smoothness:
Once the coasters are completely bone dry (usually 24-48 hours), take a piece of fine-grit sandpaper and lightly buff the surface and edges to create a perfect canvas for painting.
Step 2: Painting the Designs
-
Plan your pattern:
Before painting, you might want to lightly sketch your geometric ideas with a pencil directly on the dry clay. Think about combining different elements like grids, straight lines, wavy lines, and dots. -
Load the brush:
Dip your small round brush into the cobalt blue acrylic paint. You want a creamy consistency—not too watery, so the lines stay crisp. -
Paint horizontal stripes:
For the linear design, start by painting two or three bold horizontal stripes across the center of the coaster. -
Add detail lines:
In the spaces between your bold stripes, add finer details like a row of small dots. I find that dipping the non-brush end of the paintbrush into the paint makes perfect, uniform dots. -
Create geometric borders:
Add visual interest to the top and bottom sections by painting different patterns, such as a zig-zag line to create triangles. -
Fill the triangles:
If you painted a zig-zag, add a straight line through the center of the triangles to mimic the ‘texture-stamp’ look seen in the reference. -
Add a grid pattern:
On the very edges or in a remaining section, paint a simple cross-hatch or grid pattern to balance the design. -
Replicate the dot pattern:
For the spotted coaster variation, use a larger brush or a foam dabber to press large blue circles onto the clay, arranging them in concentric rings. -
Let the paint cure:
Allow the painted designs to dry completely. Acrylics dry fast comfortably, but give it an hour to be safe.
Keep it Flat
To ensure your coasters dry perfectly flat, place a light book on top of them once they are ‘leather hard’ (dry to the touch but still cool).
Step 3: Sealing and Finishing
-
Apply the first coat of sealant:
Since air-dry clay is porous and sensitive to water, apply a coat of clear acrylic sealer or varnish over the top and sides. -
Seal the bottom:
Once the top is dry, flip the coaster and seal the bottom as well to ensure it is fully protected from humidity. -
Final cure:
Let the sealant cure according to the manufacturer’s instructions before using them as real coasters.
Stamped Texture Effect
Instead of painting, press lace or stamps into the wet clay before drying. Then, paint over the texture and wipe the surface to reveal the pattern.
Now you have a set of stylish, classic coasters ready for gifting or brightening up your coffee table
Storytelling Picture Stones
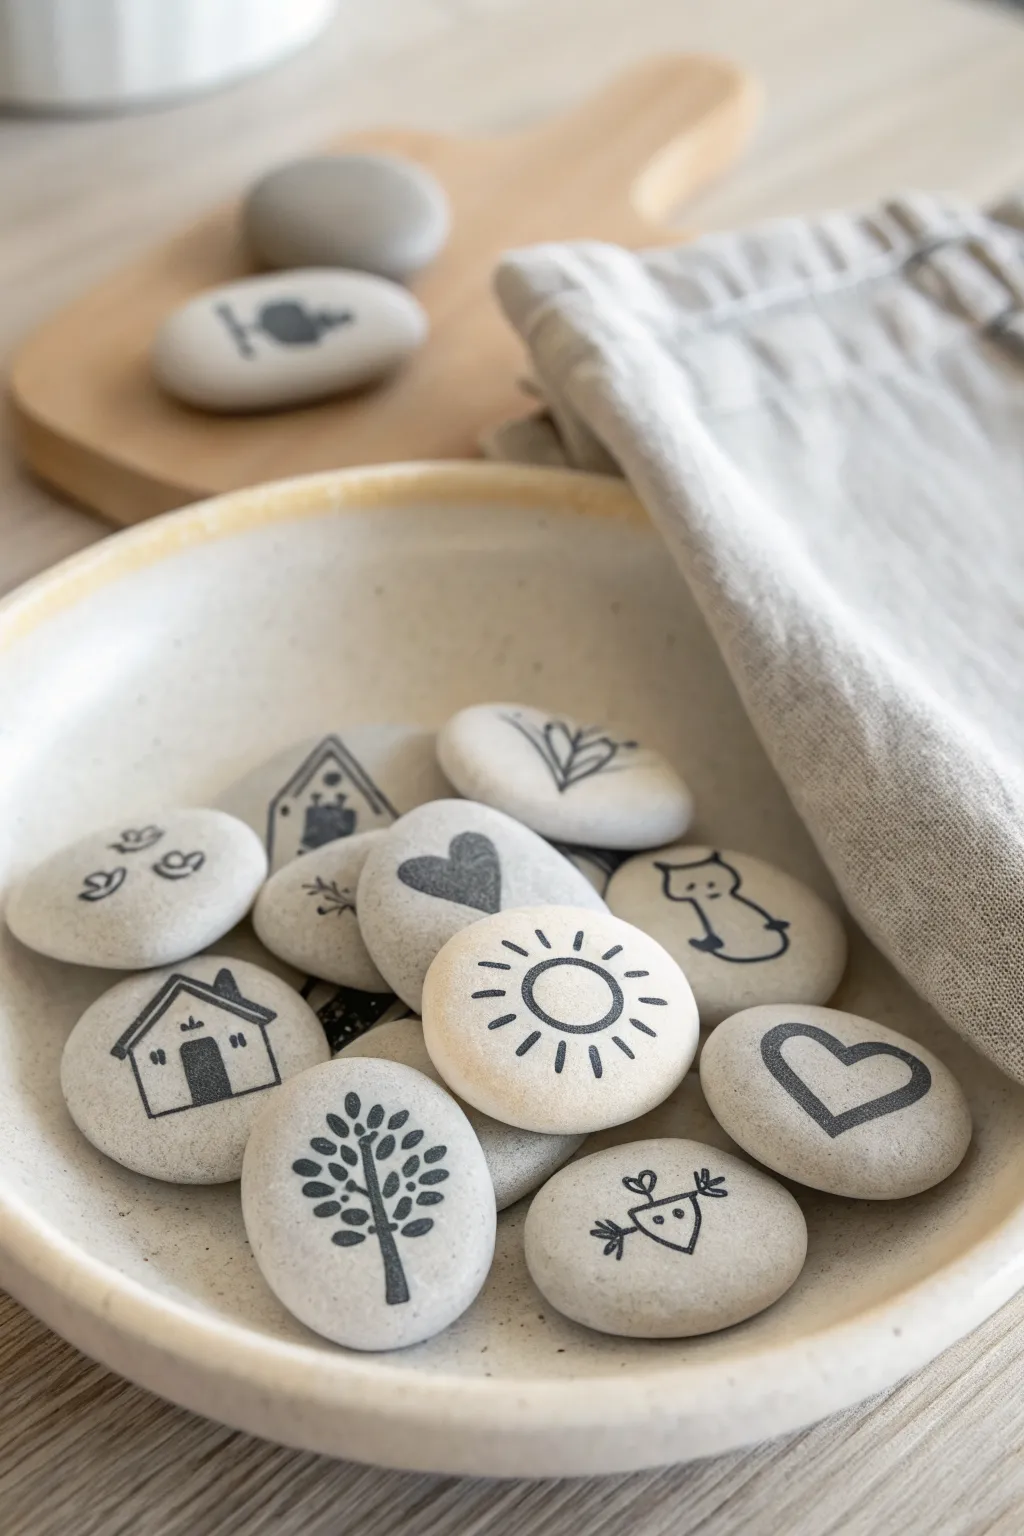
These charming, tactile stones feature simple iconography like suns, trees, and hearts, serving as open-ended prompts for imaginative storytelling. Their smooth, matte finish and minimalist black ink designs make them feel like a treasured, modern toy set that invites endless narrative possibilities.
Step-by-Step
Materials
- White or grey air dry clay (stone-effect clay works best)
- Fine-grit sandpaper (400-600 grit)
- Black permanent marker or fine-tip acrylic paint pen
- Clear matte varnish or sealant spray
- Small bowl of water
- Rolling pin (optional)
- Cloth or paper towel
Step 1: Shaping the Stones
-
Portion the clay:
Begin by pulling off small chunks of air dry clay, roughly the size of a golf ball or a large walnut. You want enough clay to form a comfortable, handheld stone. -
Roll into spheres:
Roll each chunk of clay firmly between your palms. The goal is to create a tight, smooth ball with no cracks. If the clay feels dry, dip your finger in water and smooth it over the surface as you roll. -
Flatten deeply:
Place the sphere on your work surface and press down gently with the palm of your hand. You aren’t making a pancake; you want a thick, flattened pebble shape, about 1/2 inch to 3/4 inch thick. -
Refine the edges:
Pick up the flattened stone and use your thumbs to round off the edges. Real river stones are rarely perfectly circular, so don’t worry about symmetry—slight irregularities add to the organic feel. -
Smooth with water:
Dip your finger into a little water and run it over the entire surface of the clay stone to erase fingerprints and tiny fissures. This is crucial for that polished look later. -
Dry completely:
Arrange the shaped stones on a clean surface to dry. I find turning them over halfway through the drying process helps them dry evenly. Depending on thickness and humidity, this takes 24-48 hours.
Stone Effect Trick
Mix a tiny pinch of black pepper or used coffee grounds into white clay before shaping. This mimics the speckled look of natural granite.
Step 2: Refining and Decorating
-
Touch up textue:
Once fully dry and hard, inspect your stones. If there are rough spots or sharp ridges on the edges, lightly sand them with fine-grit sandpaper until they feel smooth to the touch. -
Dust off:
Wipe each stone with a slightly damp cloth or paper towel to remove any clay dust from sanding. The surface needs to be creative-ready and dust-free for the ink to adhere properly. -
Plan your icons:
Think of simple nouns for your visual vocabulary: a house, a tree, a sun, a heart, a cat, a flower. Sketch these on scratch paper first to practice the simplified style shown in the photo. -
Draw the sun:
Take your black marker. For the sun stone, draw a circle in the center. Add small dashes radiating outward for rays. Keep the lines deliberate and steady. -
Draw the tree:
For the tree stone, draw a vertical line for the trunk. Add small teardrop or oval shapes clustering around the top half to represent leaves. Fill them in solid black for a bold graphic look. -
Draw additional symbols:
Continue with other stones. Draw a simple outline of a house with a window, a solid black heart, or a stick-figure style tulip. Vary between outline drawings and filled-in shapes for visual interest. -
Let ink set:
Allow the ink or paint pen to dry completely for at least an hour. This prevents smudging during the sealing phase. -
Apply sealant:
To protect the drawings from little hands, apply a coat of clear matte varnish. A spray varnish is easiest for an even coat that doesn’t smear the ink. Do one side, let dry, then flip and do the other.
Ink Bleeding?
If your marker bleeds into the clay, the surface is too porous. Seal the raw clay with a thin layer of white glue/water mix first, let dry, then draw.
Place your finished stones in a small cloth bag and watch as they spark new adventures during story time
Counting Dot Number Tokens
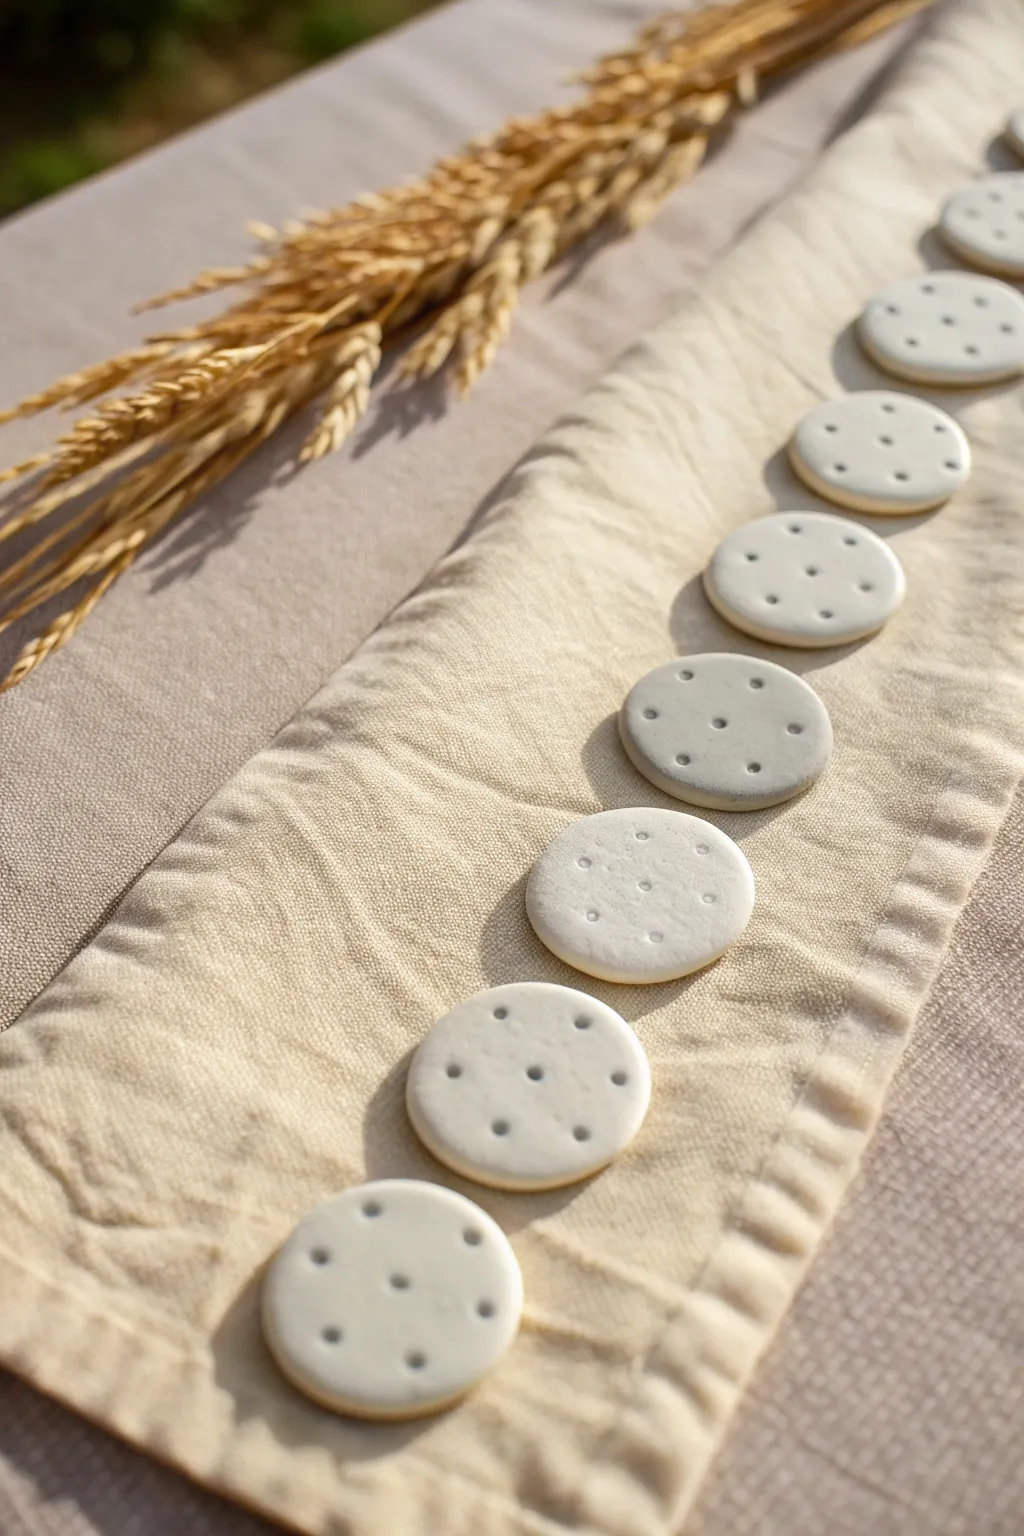
These charming, tactile number tokens look just like simple sugar cookies and are fantastic for early math games. Their smooth, white finish and clear dot patterns make counting practice a sensory delight for little hands.
Step-by-Step Tutorial
Materials
- White smooth air-dry clay
- Circle cookie cutter (approx. 2 inches)
- Rolling pin
- Parchment paper or non-stick silicone mat
- Small craft stick or blunt pencil (for making dots)
- Fine-grit sandpaper (optional)
- Matte acrylic sealer (optional)
Step 1: Preparation & Shaping
-
Prepare the workspace:
Lay down your parchment paper or silicone mat to create a clean, non-stick surface. This ensures your clay won’t pick up dust or stick to the table. -
Condition the clay:
Take a large handful of air-dry clay and knead it in your hands for a minute. The warmth from your palms will make it pliable and easier to roll without cracking. -
Roll it out:
Place the clay on your mat and use the rolling pin to flatten it into an even sheet. Aim for a thickness of about 1/4 inch—thick enough to feel substantial but thin enough to dry thoroughly. -
Cut the circles:
Press your circle cookie cutter firmly into the clay sheet. Twist slightly to ensure a clean cut before lifting. -
Remove excess:
Peel away the extra clay from around your cut circles. Ball this scrap clay up immediately and store it in an airtight bag so it doesn’t dry out while you work. -
Smooth the edges:
Dip your finger in a tiny bit of water and run it gently around the rim of each clay circle. This smooths out any harsh cutter lines and gives the token a soft, rounded biscuit look.
Clean Impressions
If your tool sticks to the clay while making dots, dip the tip into a tiny bit of cornstarch before pressing it down. This acts as a release agent.
Step 2: Adding the Dots
-
Plan your numbers:
Before pressing, visualize the dot patterns you want to create (like dice patterns 1 through 6). You might want to lightly mark the positions with a fingernail first. -
Imprint the dots:
Using the end of a small craft stick, a blunt pencil, or even a specialized ball tool, press vertically into the clay to create the indentations. -
Watch the depth:
Press deep enough to make a clear shadow, but be careful not to poke all the way through to the other side. -
Clean up the holes:
If the tool pulls up little ridges of clay around the hole, gently pat them down with a fingertip to keep the surface flat. -
Create a full set:
Continue this process until you have a complete set of numbers, perhaps making duplicates of common numbers for simple addition games.
Step 3: Drying & Finishing
-
Initial drying:
Leave the tokens on the parchment paper in a safe, dry place. Let them sit undisturbed for at least 24 hours. -
Flip them over:
Once the tops feel dry to the touch, flip the tokens over to expose the bottom side. This ensures the moisture escapes evenly and prevents warping. -
Check for total dryness:
Wait another 24 hours. The clay should turn a uniform matte white and feel room temperature, not cool to the touch. -
Sand for perfection:
If there are any rough spots on the edges, use a piece of fine-grit sandpaper to buff them away gently. -
Seal the deal:
To keep the white clay pristine during play, apply a thin coat of matte acrylic sealer. This protects them from sticky fingers without adding an unnatural shine.
Add Color
Once fully dry, use watercolor paints to fill in just the dot indentations. This creates a high-contrast look that helps younger children count.
Now you have a durable, custom set of counting manipulatives ready for classroom activities
Pretend-Play Mini Snacks
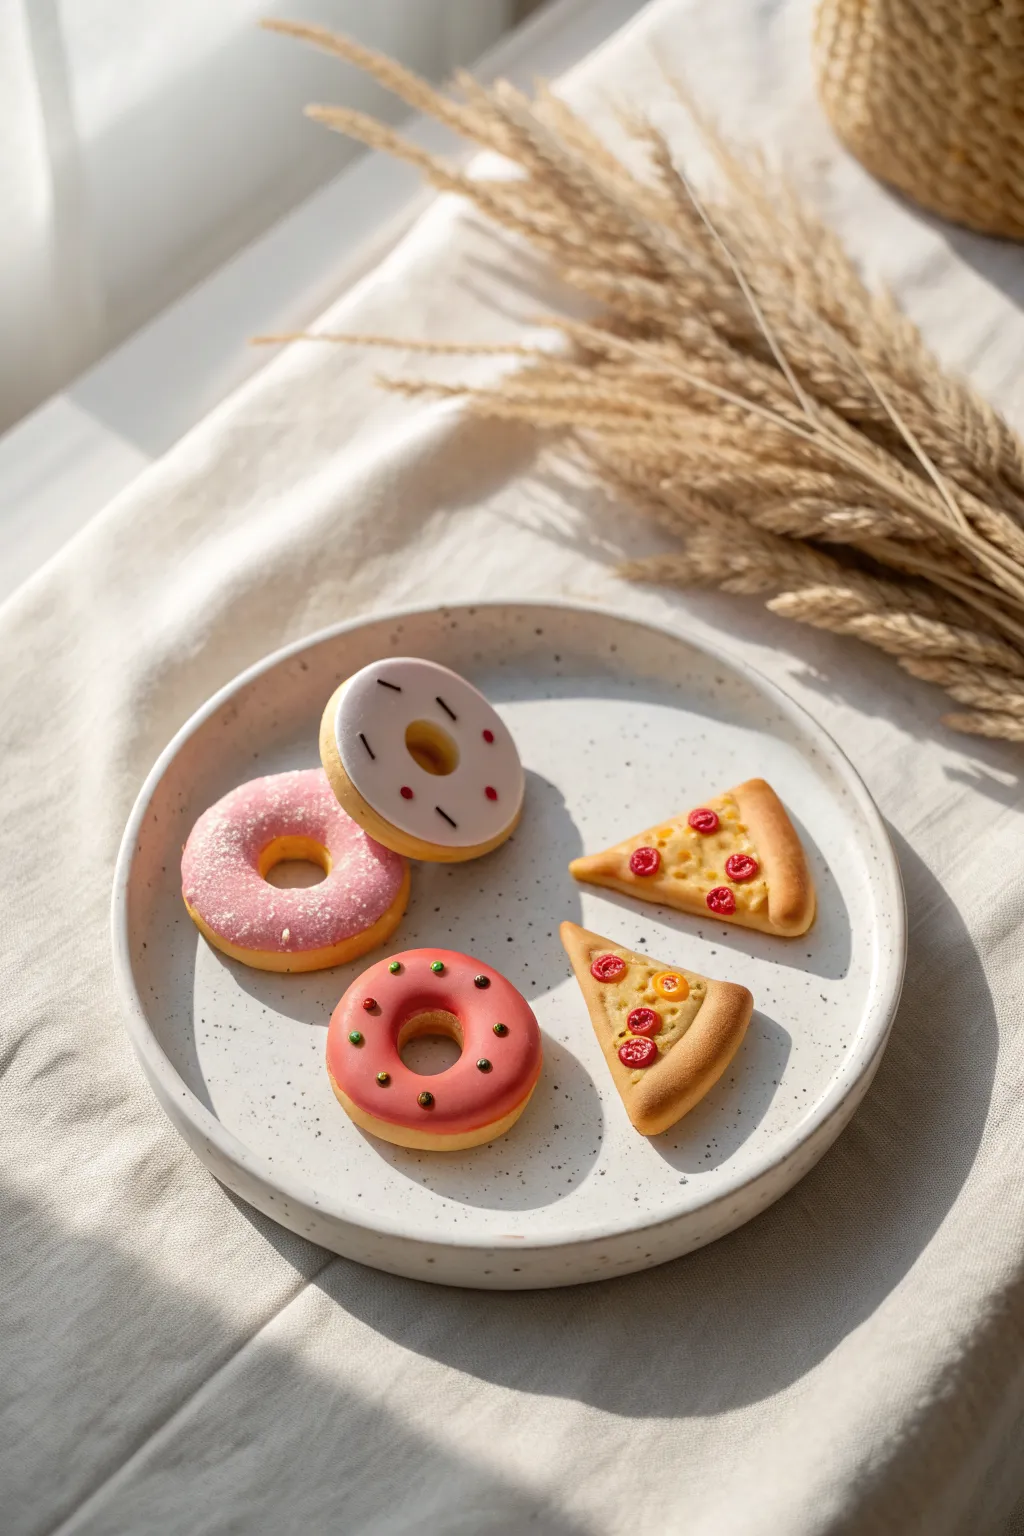
Transform simple air dry clay into an appetizing spread of miniature snacks perfect for pretend play or dollhouse dining. This project focuses on creating three classic donut styles and realistic-looking pizza slices, complete with tiny, colorful toppings.
Detailed Instructions
Materials
- White air dry clay (or beige/terra cotta)
- Acrylic paints (beige, pink, white, red, yellow, brown, dark green, black)
- Fine detail paintbrushes
- Rolling pin or smooth round marker
- Small round cutters (or bottle caps in two sizes)
- Sculpting tool or toothpick
- Gloss varnish or clear nail polish
Step 1: Shaping the Pizza Base
-
Mix dough color:
Start by mixing a tiny drop of yellow and brown paint into a ball of white clay until you achieve a warm, baked-dough beige color. Knead it thoroughly until the color is uniform. -
Form the triangles:
Flatten a small ball of your beige clay into a thick disk, then use a blade or ruler to cut out two triangular wedges. These will be your pizza slices. -
Create the crust:
Roll a very thin snake of the same beige clay using your palm. Gently press this snake along the wider, curved edge of your triangle to form a raised crust rim. -
Texture the dough:
Take a toothbrush or a crinkled ball of foil and lightly tap the surface of the clay (especially the crust) to give it a realistic, baked bread texture.
Fixing Broken Bits
If a pepperoni falls off after drying, don’t restart. just use a tiny dot of white PVA glue to reattach it. Paint over any visible glue once it dries clear.
Step 2: Topping the Pizza
-
Paint the cheese:
Mix yellow with a tiny touch of white paint. Carefully paint the inner triangle area of your slices, leaving the raised crust rim unpainted. -
Sculpt pepperoni:
Roll tiny balls of clay and flatten them into microscopic discs. Press 3-4 of these onto each pizza slice while the clay is still slightly damp so they adhere. -
Paint the toppings:
Paint the pepperoni discs with a vibrant red. Use a fine brush to add tiny dots of red or orange on the cheese to mimic sauce or spices. -
Add detail:
Once the red paint dries, use a toothpick dipped in a slightly darker red to dab tiny texture dots onto the pepperoni slices for realism.
Level Up: Display Time
Make a tiny clay plate by rolling a flat white circle and curving the edges up slightly. Use a toothbrush to splatter faint grey specks for a modern speckled ceramic look.
Step 3: Donut Delights
-
Shape the donuts:
Roll three balls of beige clay (same color as the pizza dough). Flatten them slightly into thick discs. -
Make the holes:
Use the end of a paintbrush or a small straw to punch a hole directly in the center of each disc. Smooth the edges with your finger so they look round and puffy. -
Base coat baking:
Allow the clay to dry completely. Once dry, if the clay looks too pale, give the donuts a light wash of watered-down brown paint to simulate a golden-brown exterior.
Step 4: Icing and Decoration
-
White glazed donut:
Paint the top half of one donut simply white. While the paint is wet, paint tiny thin rectangle lines using dark brown or black to mimic chocolate sprinkles. -
Add red dots:
On the same white donut, add a few small red dots interspersed with the sprinkles for a pop of color. -
Pink sprinkled donut:
Paint the top of the second donut a soft pastel pink. Use a dry brush with white paint to lightly stipple ‘sugar’ texture over the pink surface. -
Strawberry frosted donut:
Paint the third donut with a slightly deeper, coral-pink color. Once dry, use a toothpick to place tiny dots of green (pistachio) and gold or yellow paint around the ring as decorations.
Step 5: Finishing Touches
-
Seal the deal:
Coat the ‘sauce’ part of the pizza and the ‘icing’ part of the donuts with a gloss varnish. Leave the crusts and the donut bottoms matte for a realistic texture contrast.
Arrange your tiny feast on a plate and get ready to serve up the cutest imaginary lunch ever
Classroom Kindness Tile Mural
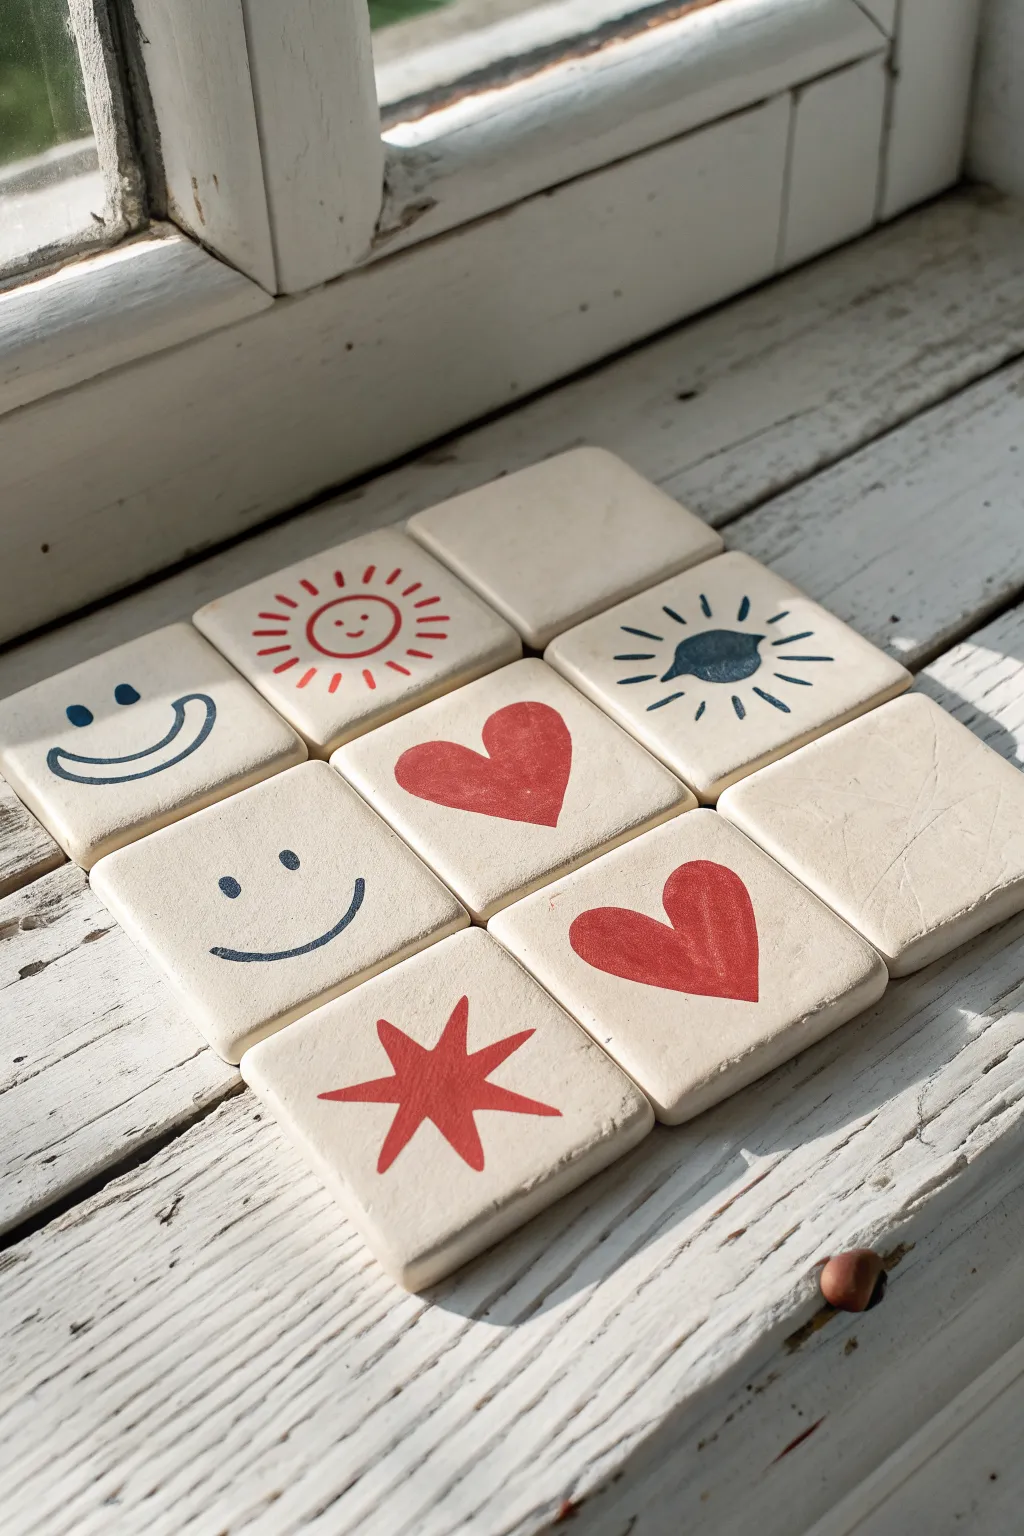
This rustic and charming tile grid is a perfect collaborative project for little hands, featuring simple symbols of positivity like hearts, suns, and smiles. The smooth, matte finish of the clay pairs beautifully with the bold red and navy painted designs for a timeless, folk-art aesthetic.
Step-by-Step Tutorial
Materials
- White air-dry clay (approx. 500g)
- Rolling pin
- Square cookie cutter (approx. 2-3 inches)
- Parchment paper or canvas working mat
- Fine-grit sandpaper (220 grit)
- Acrylic paint (Red, Navy Blue)
- Small round paintbrush (size 2 or 4)
- Fine liner paintbrush (size 0 or 00)
- Cup of water and paper towels
- Ruler (optional, for spacing guides)
Step 1: Shaping the Canvas
-
Prepare the workspace:
Lay down parchment paper or a canvas mat to prevent the clay from sticking. Tape the corners down so it doesn’t slide around while rolling. -
Roll out the clay:
Take a large chunk of white air-dry clay and knead it briefly to remove air bubbles. Roll it out into an even slab, aiming for a consistent thickness of about 1/4 inch (6mm) to ensure sturdiness. -
Cut the tiles:
Using your square cookie cutter, press firmly into the clay slab to cut out nine squares. If you don’t have a cutter, measure squares with a ruler and cut carefully with a clay knife. -
Smooth the edges:
Dip your finger in a tiny bit of water and run it gently along the cut edges of each square to soften any sharp corners or clay burrs. This makes them much nicer to hold later. -
Dry thoroughly:
Place the tiles on a wire rack or leave them on parchment paper to dry. This usually takes 24-48 hours depending on humidity; flip them halfway through so the bottoms dry evenly without warping.
Keep Them Flat
To prevent curling while drying, place a piece of parchment paper over the wet tiles and rest a light book on top for the first few hours.
Step 2: Refining the Surface
-
Sand for smoothness:
Once bone dry, take your fine-grit sandpaper and lightly sand the surface and edges of each tile. You want a smooth, matte finish that feels like stone. -
Wipe away dust:
Use a barely damp paper towel or a dry soft brush to remove all sanding dust. Paint won’t stick well if the surface is powdery.
Cracked Clay?
If you see small cracks appearing as the clay dries, mix a tiny amount of fresh clay with water to make a paste and smooth it into the cracks.
Step 3: Painting the Designs
-
Plan the layout:
Arrange your nine blank tiles in a 3×3 grid. Decide where you want your symbols to go. The reference image uses a mix of smiles, hearts, suns, and a few intentionally blank tiles for visual breathing room. -
Paint the red hearts:
Using the red acrylic paint and a small round brush, paint simple heart shapes on two or three tiles. You can vary the size or tilt them slightly for a playful look. -
Create the red sun:
On another tile, paint a small red circle outline in the center. Add small radiating lines all around it. Once the circle is dry, add a tiny smiley face inside if you like. -
Paint the red starburst:
For the star shape, paint a central point and pull the brush outward to create thick, bold rays. I find it easiest to paint a ‘plus’ sign first, then add the diagonal rays in between. -
Switch to navy blue:
Clean your brushes thoroughly. Switch to navy blue acrylic for the remaining designs to create high contrast. -
Paint the smiley faces:
Use a fine liner brush to paint simple, wide U-shapes for smiles on two tiles. Add two small dots for eyes. Keep the lines organic and hand-drawn rather than perfect. -
Add the eye motif:
On a central tile, paint a blue almond shape (an eye) and fill in the iris. Add radiating lines around it that look like eyelashes or sun rays. -
Final touches:
Leave one or two tiles completely blank if you want to match the reference exactly, or add very minimal dots to them. -
Let the paint set:
Allow the paint to dry completely for at least an hour. Air-dry clay absorbs acrylic quickly, so it should dry to a lovely matte finish.
Now you have a charming set of friendship tiles ready to display on a shelf or gift to someone special