If you’ve been craving cute, practical air dry clay projects that actually belong in the kitchen, you’re in the right headspace. These ideas are my go-tos for adding handmade kitchen decor without needing a kiln or fancy tools.
Stamped Air Dry Clay Coasters

These simple yet elegant coasters bring a touch of earthy, organic charm to your coffee table, perfectly mimicking the look of stoneware pottery without the need for a kiln. With their subtle speckled texture and smooth finish, they offer a sturdy resting place for your favorite mug while protecting your surfaces.
Step-by-Step
Materials
- White air dry clay
- Rolling pin
- Circle cookie cutter (approx. 4 inches)
- Sandpaper (fine grit)
- Acrylic paint (burnt umber or dark brown)
- Old toothbrush or stiff bristle brush
- Matte or satin varnish/sealant
- Parchment paper or canvas mat
- Small bowl of water
- Sponge
Step 1: Shaping the Clay
-
Prepare your workspace:
Lay down a sheet of parchment paper or a canvas mat to prevent the clay from sticking to your table. This will also make it easier to move the coasters later. -
Condition the clay:
Take a large chunk of air dry clay and knead it in your hands until it becomes warm, soft, and pliable. This helps prevent cracks from forming later. -
Roll it out:
Use your rolling pin to flatten the clay to an even thickness. Aim for about 1/4 inch thick to ensure the coasters are substantial enough to hold weight without being too bulky. -
Cut the circles:
Press your circular cookie cutter firmly into the rolled clay. If you don’t have a cutter large enough, trace around a wide mugs or bowl with a craft knife. -
Create the rim (optional):
For the top coaster that holds the mug, you can gently press your thumb around the inner edge to create a very subtle raised lip, though flat discs work perfectly well too. -
Smooth the edges:
Dip your finger into a small bowl of water and run it along the cut edges of each circle to smooth out any roughness or loose bits of clay.
Step 2: Drying and Refining
-
Initial drying:
Place the clay circles on a clean, flat surface to dry. Using a wire rack is ideal for air circulation, but parchment paper works if you flip them occasionally. -
Weight them down:
Air dry clay loves to curl as moisture evaporates. I like to place a heavy book over the coasters once they are semi-dry (leather hard) to keep them perfectly flat. -
Wait for full cure:
Let them dry completely for at least 24-48 hours. The clay should turn a lighter white color and feel room temperature, not cool to the touch. -
Sand for smoothness:
Once fully dry, take your fine-grit sandpaper and gently sand the edges and surface. Focus on creating a nice, rounded edge that feels pleasant to hold. -
Wipe away dust:
Use a slightly damp sponge or cloth to wipe away all the sanding dust to prepare the surface for decoration.
Pro Tip: No Warping
To guarantee flatness, flip your coasters every 6-8 hours while drying. Even drying on both sides prevents the ‘potato chip’ curling effect common with air dry clay.
Step 3: The Speckled Effect & Sealing
-
Prepare the speckle paint:
Dilute a small amount of burnt umber acrylic paint with water until it has an inky, fluid consistency. -
Apply the splatter:
Dip an old toothbrush into the watered-down paint. Hold it over the coasters and run your thumb across the bristles to flick tiny specks of paint onto the clay. -
Paint the sandwich edge:
To mimic the layered look seen in the photo, mix a light terracotta or darker beige paint. Carefully paint just the vertical side edge of the coaster, leaving the top and bottom surfaces white. -
Let paint dry:
Allow the splatter and edge paint to dry completely, which should only take about 20 minutes. -
Seal the top:
Apply a coat of matte or satin varnish to the top and sides. This is crucial for kitchen items to protect against moisture from sweating mugs. -
Seal the bottom:
Once the top is dry, flip them over and seal the bottom. This ensures moisture doesn’t seep in from underneath. -
Final cure:
Let the varnish cure according to the manufacturer’s instructions before using your new coasters.
Troubleshooting: Cracks
If small hairline cracks appear during drying, mix a tiny bit of fresh clay with water to make a paste (slip) and fill in the crack, then sand smooth once dry.
Enjoy your beautiful, handmade coasters with your next warm cup of coffee


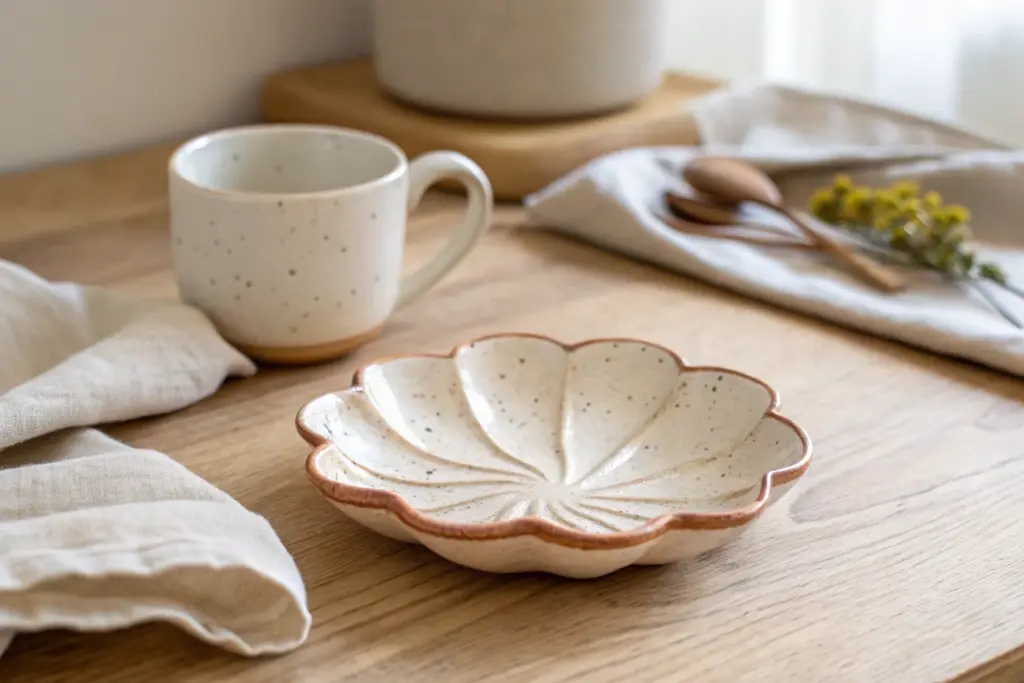
Cute Spoon Rest for the Stove
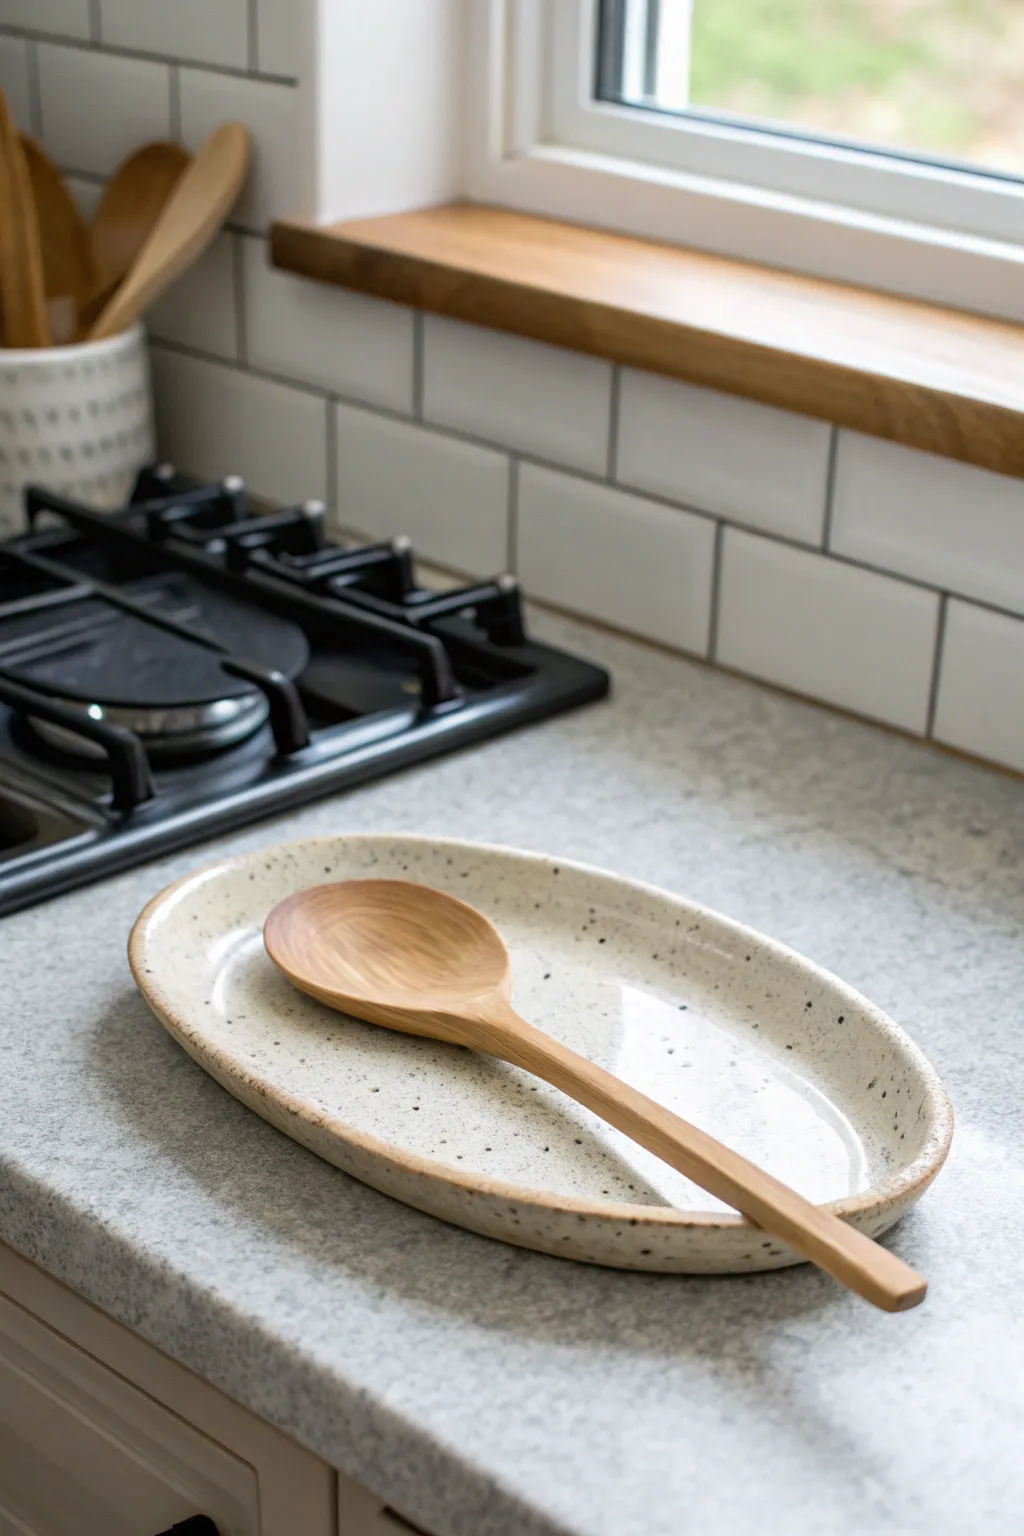
This charming, speckled spoon rest brings a modern ceramic look to your kitchen counter without the need for a kiln. Its simple oval shape and glossy finish make for a functional piece that keeps your stove clean while adding a touch of handmade elegance.
Detailed Instructions
Materials
- Air dry clay (white)
- Acrylic paint (cream or off-white)
- Acrylic paint (black)
- Glossy varnish or sealant (food-safe if possible, or gloss mod podge)
- Rolling pin
- Craft knife or clay tool
- Small bowl of water
- Fine grit sandpaper
- Old toothbrush
- Rolling guides or wooden slats (approx 1/4 inch thick)
- Soft paintbrush
Step 1: Shaping the Clay
-
Prepare the workspace:
Begin by setting up a clean, flat surface covered with parchment paper or a canvas mat to prevent sticking. Knead a generous handful of white air dry clay until it feels pliable and warm in your hands. -
Roll the slab:
Place your clay between two rolling guides (or wooden slats) to ensure an even thickness. Roll the clay out into a smooth slab that is roughly 1/4 inch thick. -
Cut the oval shape:
Using a craft knife, freehand a long oval shape into the clay slab. If you prefer precision, you can sketch an oval on a piece of paper first, cut it out, and use it as a template on top of the clay. -
Smooth the edges:
Dip your finger into a small bowl of water and gently run it along the cut edges of the oval. This smooths out any harsh lines or jagged bits left by the knife. -
Create the rim:
Gently pinch the outer edge of the oval upwards to create a slight lip or rim. You want the edge to rise just enough to contain any spoon drips. -
Refine the form:
Spend a moment smoothing the interior curve where the base meets the rim. I like to use a slightly damp sponge here to ensure the transition is seamless and organic. -
Dry completely:
Set the piece aside in a safe spot to air dry. This typically takes 24-48 hours. Flip the piece gently halfway through the drying process to ensure the bottom dries evenly and to prevent warping.
Step 2: Sanding and Painting
-
Sand for smoothness:
Once fully dry and hard, take a piece of fine-grit sandpaper and lightly buff the entire surface. Pay special attention to the rim to ensure it feels nice to the touch. -
Wipe down:
Remove all sanding dust with a slightly damp cloth or a dry tack cloth. A clean surface is crucial for a smooth paint application. -
Apply base color:
Paint the entire spoon rest (top, bottom, and sides) with a cream or off-white acrylic paint. You may need two or three coats for full opacity, letting each coat dry before applying the next. -
Prepare the splatter:
Dilute a small amount of black acrylic paint with a few drops of water. You want a fluid consistency, roughly like ink or heavy cream, so it splatters easily. -
Test the splatter:
Dip an old toothbrush into the thinned black paint. Hold it over a scrap piece of paper and run your thumb across the bristles to flick the paint. Practice until you get the speckle size you want. -
Apply speckles:
Hold the toothbrush over your painted spoon rest and flick the bristles to create the speckled pattern. Move your hand around to distribute the dots randomly and evenly. -
Seal the piece:
Allow the paint to cure completely. Finally, apply 2-3 coats of a high-gloss varnish or sealant. This gives it that ceramic-like shine and protects the paint from moisture.
Preventing Cracks
If you see tiny cracks appearing while drying, patch them immediately with a ‘slip’ mixture made of clay and water.
Make it Waterproof
For a truly functional kitchen item, use a specialized food-safe, waterproof resin instead of standard craft varnish.
Place your new spoon rest by the stove and enjoy the handmade character it adds to your cooking space


Mini Pinch Bowls for Salt and Spices
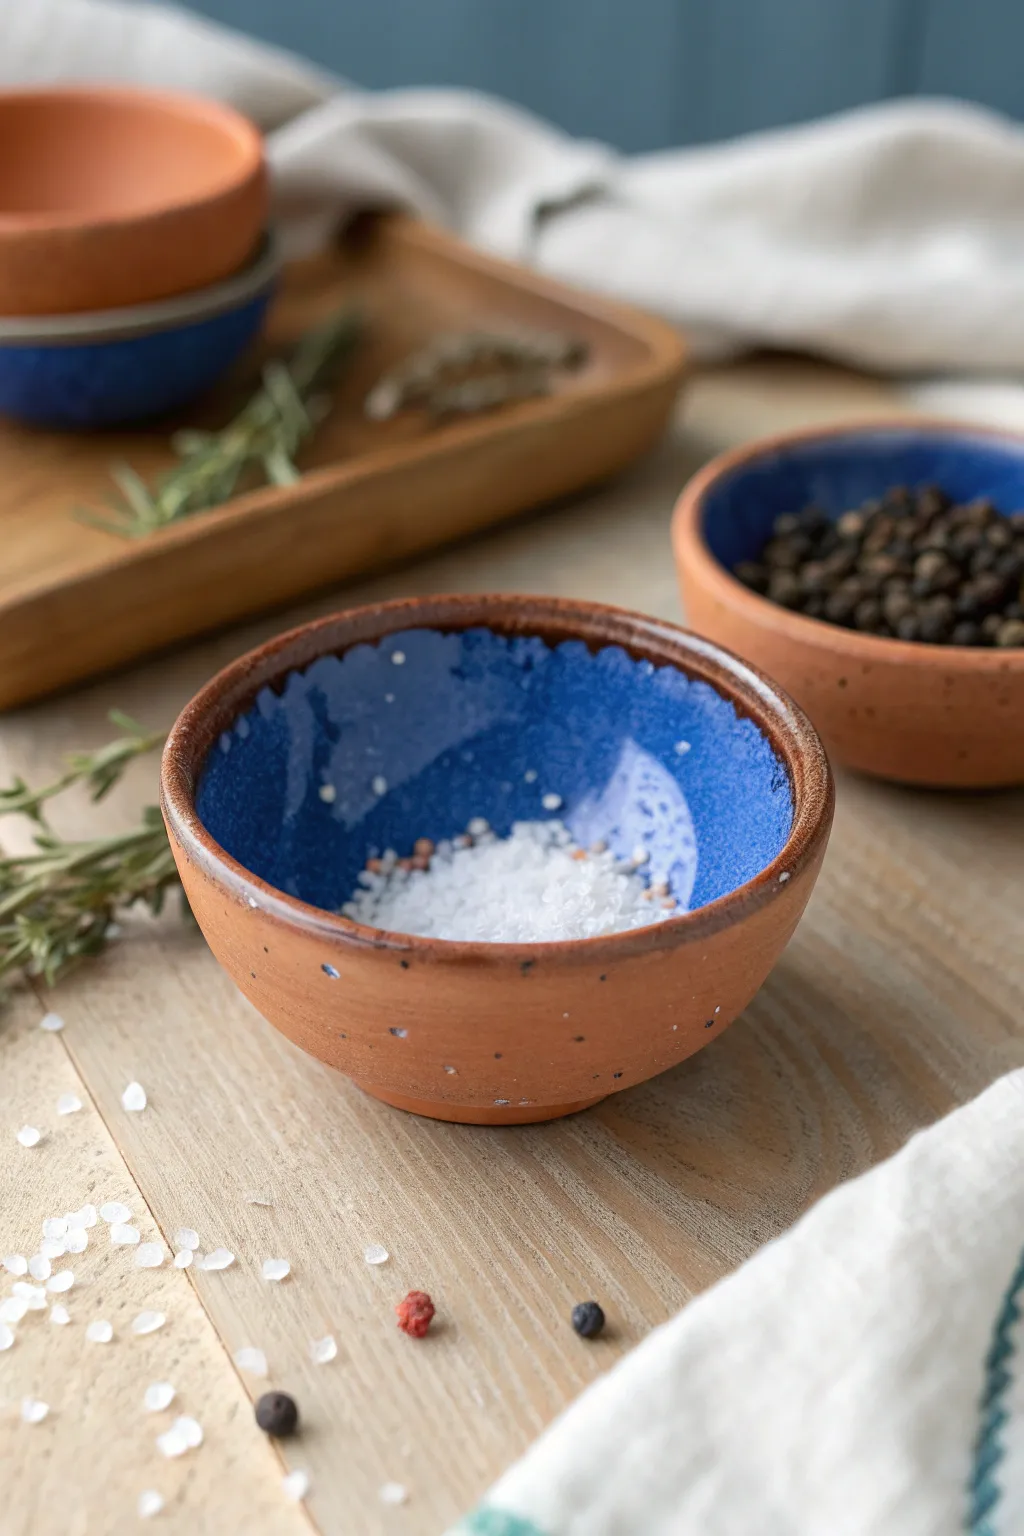
These charming miniature bowls combine the warm, earthy look of unglazed terracotta with a striking pop of glossy cobalt blue inside. They are perfect for holding pinch salts, peppercorns, or dried herbs right on your countertop.
Step-by-Step Tutorial
Materials
- Air dry clay (terracotta color or white)
- Acrylic paint (burnt sienna/terracotta if using white clay)
- Acrylic paint (cobalt blue or ultramarine)
- High-gloss varnish or generous layer of Mod Podge (gloss finish)
- Matte varnish (optional, for exterior)
- Fine grit sandpaper
- Small bowl of water
- Soft synthetic paintbrushes
- Sponge or paper towel
Step 1: Shaping the Clay
-
Prepare the Clay:
Start by pinching off a piece of air dry clay roughly the size of a golf ball. Knead it in your hands for a minute to warm it up and make it pliable, smoothing out any initial cracks. -
Roll a Sphere:
Roll the clay between your palms to create a smooth, tight sphere. The smoother you get it now, the less sanding you’ll have to do later. -
Begin the Pinch:
Hold the sphere in your non-dominant hand. Gently press your thumb into the center of the ball, but don’t push all the way through to the bottom. -
Shape the Walls:
Using a pinching motion with your thumb on the inside and fingers on the outside, slowly rotate the ball while pressing. Work your way from the bottom up to thin out the walls evenly. -
Flatten the Base:
Once you are happy with the rough shape, gently tap the bottom of the bowl on your work surface to create a flat, stable base so it won’t rock. -
Refine the Rim:
Dip your finger in a little water and run it along the rim to smooth it out. For this rustic look, don’t worry about making it perfectly level; a little waviness adds character. -
Smooth the Surface:
With a slightly damp finger or sponge, smooth away any fingerprints or major cracks on both the inside and outside surfaces. -
Let it Dry:
Place your bowl on a wire rack or piece of parchment paper. Allow it to air dry completely, which usually takes 24-48 hours depending on humidity. Flip it over halfway through to ensure the bottom dries evenly.
Cracked Clay?
If small cracks appear while drying, mix a tiny bit of fresh clay with water to make a paste (slip) and fill the cracks. Smooth over and let dry again.
Step 2: Painting and Finishing
-
Sand for Texture:
Once bone dry, take fine-grit sandpaper and gently rub the exterior. You want to remove rough burrs but keep some organic texture. -
Base Color (If Needed):
If you used white clay, mix burnt sienna with a touch of orange and brown to create a terracotta shade. Paint the entire exterior and rim, leaving the inside unpainted for now. I recommend two thin coats for opaque coverage. -
Speckling (Optional):
To mimic the look of natural fired clay, you can flick a toothbrush dipped in diluted dark brown paint lightly over the exterior to create tiny speckles. -
Paint the Interior:
Select a vibrant cobalt or ultramarine blue acrylic paint. Carefully paint the entire interior of the bowl. -
Define the Rim:
Bring the blue paint just up to the very edge of the rim, allowing it to meet the terracotta color naturally. It doesn’t need to be a razor-sharp line; a soft transition looks more handmade. -
Add Depth:
While the blue is wet, you can dab just a hint of a lighter blue or white in the center and blend slightly to give the illusion of depth and light reflection. -
Dry the Paint:
Allow the paint layers to dry completely before sealing. If the blue looks streaky, add a second coat for that deep, ceramic-glaze intensity. -
Gloss the Inside:
Apply a thick coat (or two) of high-gloss varnish or Triple Thick glaze only to the blue interior. This mimics the look of fired ceramic glaze. -
Seal the Outside:
Apply a matte varnish to the terracotta exterior to protect the paint while maintaining that earthy, unpolished pottery feel. -
Final Cure:
Let the varnish cure for at least 24 hours to ensure it is hard and non-tacky before adding your salt or spices.
Faux Ceramic Look
Mix a small amount of baking soda into your exterior terracotta paint. It adds a gritty, realistic stone texture that feels just like real earthenware.
Arrange these lovely little bowls on a wooden tray to bring an artisan touch to your next dinner party


Utensil Holder Crock With Texture
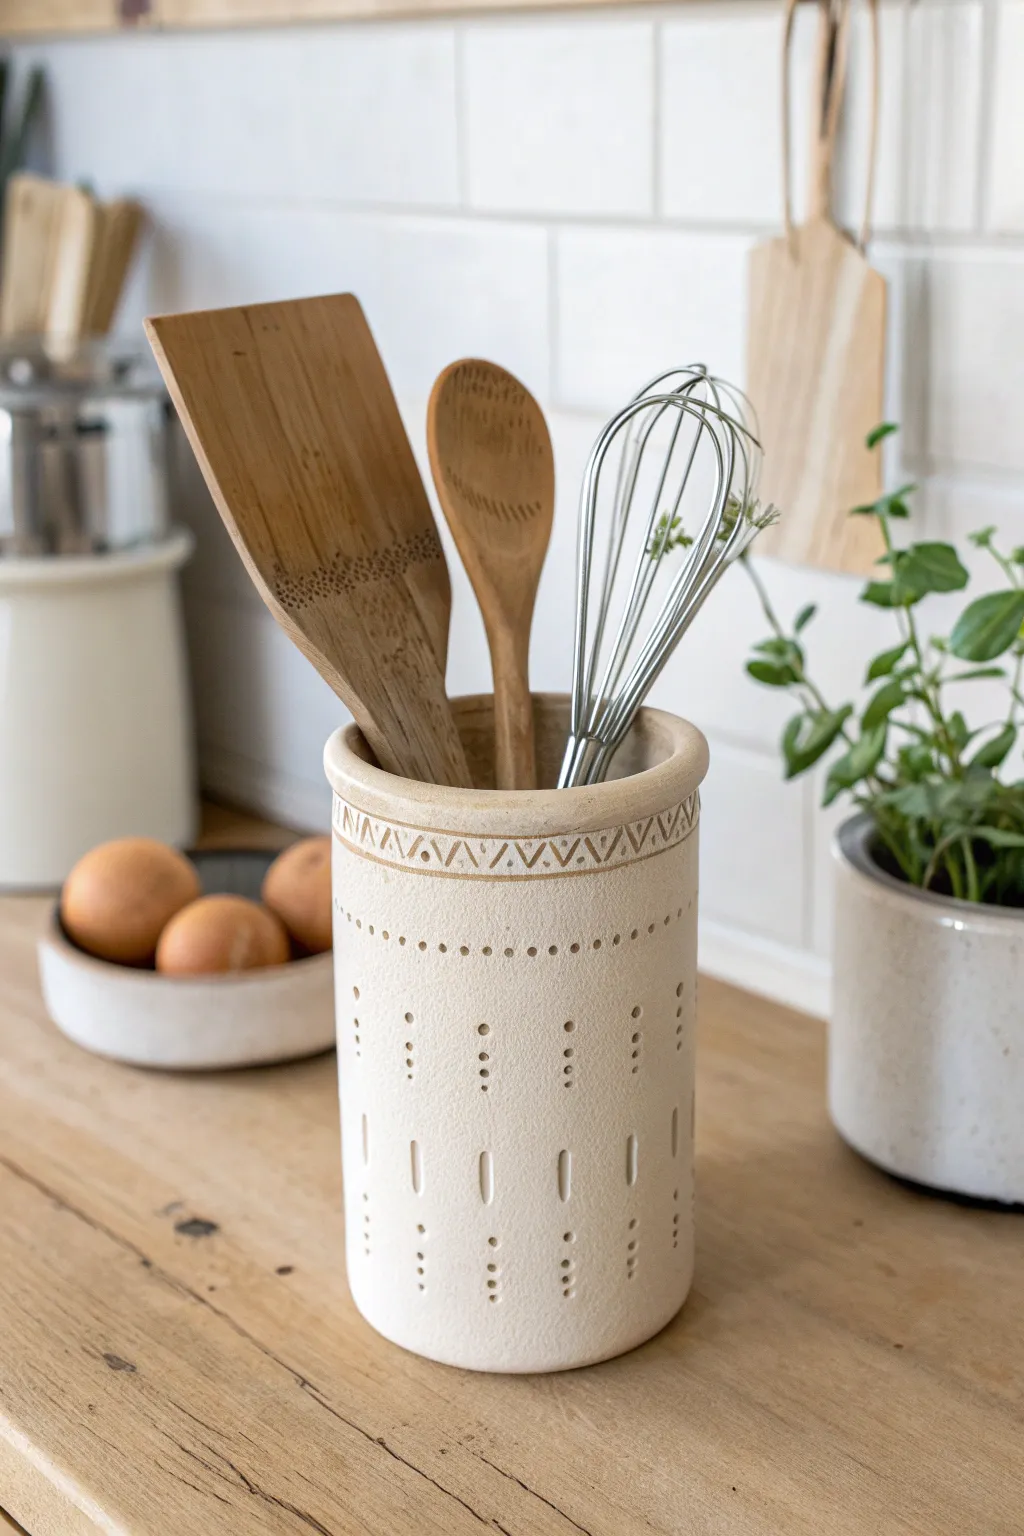
Bring a touch of handmade warmth to your countertop with this lovely textured utensil holder. While it mimics the look of wheel-thrown pottery, this rustic piece is built entirely by hand using slab techniques and simple tools to create patterns.
How-To Guide
Materials
- White or natural air-dry clay (approx. 1.5 – 2kg)
- Rolling pin
- Canvas mat or parchment paper (for rolling)
- Clay knife or fettling knife
- Slip (water mixed with clay scraps)
- Large cylindrical form (like a large oatmeal container or wide PVC pipe) for a mold
- Wooden skewers or toothpicks
- Small carving loop tool (optional)
- Small round stylus tool or the end of a paintbrush
- Sandpaper (various grits)
- Clear matte varnish or sealant (water-resistant)
Step 1: Forming the Base Structure
-
Prepare the workspace:
Set up a non-stick surface using a canvas mat or parchment paper. Knead your air-dry clay thoroughly to remove air bubbles and ensure it’s pliable. If the clay feels stiff, incorporate a tiny amount of water. -
Roll the main slab:
Roll out a large rectangular slab of clay. Aim for a consistent thickness of about 1/4 inch (6mm) to ensure stability for holding heavy utensils. -
Measure and cut:
Using your cylindrical mold as a guide, measure the circumference needed. Cut a clean rectangle from your slab that is tall enough for your utensils (about 6-7 inches) and long enough to wrap around the mold with a slight overlap. -
Cut the base:
Roll a smaller piece of clay to the same thickness. Place your mold on top and trace a circle around it. Cut this circle out; this will be the bottom of your crock. -
Score and slip:
Score (scratch) the edges of the circle and the bottom edge of your rectangular slab. Apply slip generously to the scored areas. This ‘glue’ is crucial for a strong bond. -
Assemble the cylinder:
Carefully wrap the rectangular slab around your mold. Join the vertical seam by scoring and slipping, then blending the clay together until the seam disappears. Attach the cylinder to the base circle, blending the clay downwards to seal the bottom. -
Smooth the form:
Once the basic cylinder is built, you can carefully slide out the mold if it’s rigid. If using a cardboard mold, you can leave it in briefly for support. Smooth the exterior walls with a damp sponge or rib tool to remove fingerprints. -
Add the rim:
Roll a coil of clay and attach it to the top edge to create a thickened rim. Flatten and smooth it so it integrates with the wall, creating a slightly flared lip.
Collapsing Walls?
If your clay walls won’t stand up, they are too thin or too wet. Leave the cardboard mold inside while you texture, or let the slab dry partially flat before assembling.
Step 2: patterning and Detailing
-
Mark the design zones:
Using a needle tool, lightly etch horizontal guidelines around the cylinder where you want your different pattern bands to sit. This ensures your patterns stay level. -
Carve the top band:
For the zig-zag pattern near the rim, use a small carving tool or a sharp skewer to carve a repeating triangular wave. Don’t cut all the way through; just displace the clay. -
Add vertical hatch marks:
Inside the zig-zag triangles, use a knife edge to press in small vertical hatch marks. Alternating the direction of these marks creates visual interest. -
Create the dot pattern:
Below the zig-zag, use a stylus or a blunt skewer to press a row of evenly spaced dots. I like to repeat this single dot line further down the jar as well to frame the main texture. -
Punctuate the body:
For the main body texture, use the blunt end of a small paintbrush or stylus. Press into the clay to create vertical columns of dots. In the photo, these are arranged in groups of four or five, stacked vertically. -
Carve the dashes:
Between the columns of dots, use a small loop tool or knife to carve vertical dashes. Stagger these relative to the dots to create a rhythm around the vessel. -
Clean up texture:
Gently brush away any clay crumbs created by the carving. Smooth the rim one last time with a slightly damp finger.
Level Up Your Texture
Use actual kitchen items to stamp texture! A fork tine makes great hatch marks, and the end of a chopstick creates perfect, uniform impressed dots.
Step 3: Finishing
-
Slow drying:
Loosely cover the crock with plastic wrap for the first 24 hours to prevent it from drying too fast and cracking. Remove the plastic and let it air dry completely for another 24-48 hours until bone dry. -
Sanding:
Once fully dry, use fine-grit sandpaper to smooth any rough edges on the rim or base. Be careful not to sand away your textured patterns. -
Sealing:
Apply 2-3 coats of a high-quality matte varnish. Since this will live in a kitchen, a water-resistant sealer is essential to protect it from humidity and splashes.
Now you have a custom, hand-textured piece that organizes your kitchen with organic style.

The Complete Guide to Pottery Troubleshooting
Uncover the most common ceramic mistakes—from cracking clay to failed glazes—and learn how to fix them fast.
Salt Cellar With a Tiny Scoop
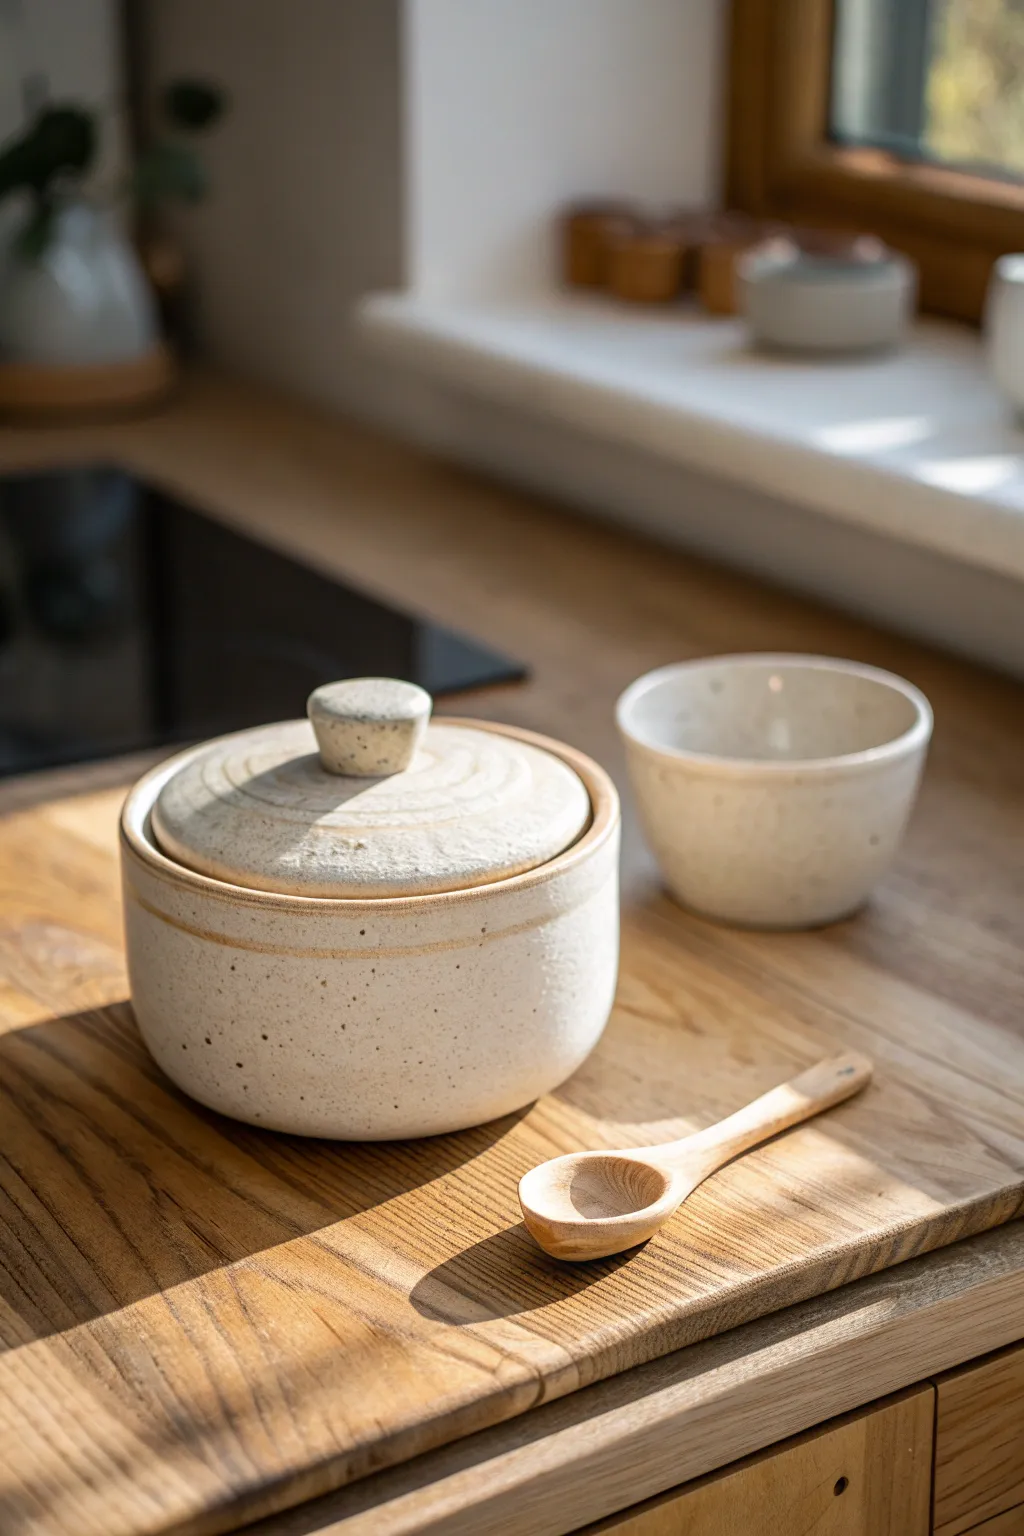
Bring earthy charm to your countertop with this hand-formed salt cellar and matching mini spoon. The speckled finish mimics high-fire stoneware, while the heavy lid keeps your finishing salt fresh and accessible.
Step-by-Step Tutorial
Materials
- White or cream-colored air-dry clay (approx. 1 lb)
- Rolling pin
- Circle cutters (various sizes) or jar lids
- Pottery sponge
- Needle tool or toothpick
- Slip (clay mixed with water)
- Sandpaper (fine grit)
- Acrylic paints: Cream/Off-white, Light Brown/Tan, Black
- Old toothbrush (for speckling)
- Clear sealant (food-safe varnish is ideal if touching food, otherwise standard polyurethane)
- Small carving tool or spoon for shaping wood texture
Step 1: Forming the Base
-
Roll the Slab:
Begin by rolling out a medium-sized ball of air-dry clay into an even slab, approximately 1/4 inch thick. Ensure the thickness is consistent to prevent cracking later. -
Cut the Base:
Use a circle cutter or a jar lid (about 4 inches in diameter) to cut out the circular base of your cellar. Set this disk aside on a piece of parchment paper. -
Create the Wall:
From the remaining slab, cut a long rectangular strip. Ideally, this should be about 2.5 inches tall and slightly longer than the circumference of your base circle. -
Attach the Wall:
Score the outer edge of your base circle and the bottom edge of your rectangular strip. Apply a little slip to the scratched areas. -
Seal the Seams:
Wrap the strip around the base, pressing the scored edges together gently. where the ends of the wall meet, bevel cut them at a 45-degree angle for a cleaner join. Smooth the seam inside and out using your finger or a tool. -
Refine the Shape:
Use a slightly damp sponge to smooth the outer walls, ensuring there is a slight, comfortable curve to the sides. I like to gently run a wet finger around the rim to soften the edge.
Step 2: Crafting the Lid
-
Measure and Cut:
Roll out a fresh slab of clay. Cut a circle that is slightly larger than your cellar’s opening so it can sit comfortably on top. -
Add the Flange:
Roll a small coil of clay and attach it to the *underside* of the lid circle, positioning it so it fits just inside the jar’s opening. This flange keeps the lid from sliding off. -
Texture the Top:
While the clay is still soft, use a modeling tool to gently press concentric circles into the top surface of the lid for that wheel-thrown look. -
Make the Knob:
Form a small, squashed cylinder of clay. Attach this to the center of the lid using the score-and-slip method. Smooth the transition so it looks like one cohesive piece.
Cracks Appearing?
If tiny cracks appear while drying, mix a small amount of fresh clay with water to make a paste and fill them in. Resand once dry.
Step 3: Sculpting the Spoon
-
Shape the Blank:
Roll a coil of clay about 3 inches long. Flatten one end slightly to create the bowl of the spoon. -
Hollow the Bowl:
Use your thumb or a rounded tool to impress a gentle hollow into the flattened end. Keep it shallow. -
Refine Handle:
Taper the handle end slightly and smooth any fingerprints.
Pro Tip: Weighted Lid
Make the lid slightly thicker than the walls. The extra weight gives it a luxurious, satisfying feel when you close the jar.
Step 4: Finishing Touches
-
Dry Completely:
Allow all pieces to dry for at least 24-48 hours. Turn them occasionally to ensure even drying. -
Sand Smooth:
Once bone dry, sand out any harsh ridges or uneven spots with fine-grit sandpaper. Wipe away all dust. -
Base Coat:
Paint the jar and lid with a matte cream or off-white acrylic paint. You may need two coats for full opacity. -
Add the Rim Detail:
Mix a diluted light brown paint. Carefully paint a thin band around the rim and the edge of the lid to simulate raw clay showing through glaze. -
The Speckle Effect:
Dilute a small amount of black or dark brown paint with water. Dip an old toothbrush into it and flick the bristles with your thumb to mist tiny speckles over the jar. -
Faux Wood Spoon:
Paint the spoon with a light tan base. Once dry, use a slightly darker shade to paint faint wood grain lines. -
Seal:
Finish with a varnish. Use a food-safe sealant if you plan to keep loose dry aesthetic items inside, though air-dry clay is generally not food-safe for wet ingredients.
Place your finished cellar on your counter or table for an instant touch of handmade warmth
Tea Bag Holder and Drip Tray
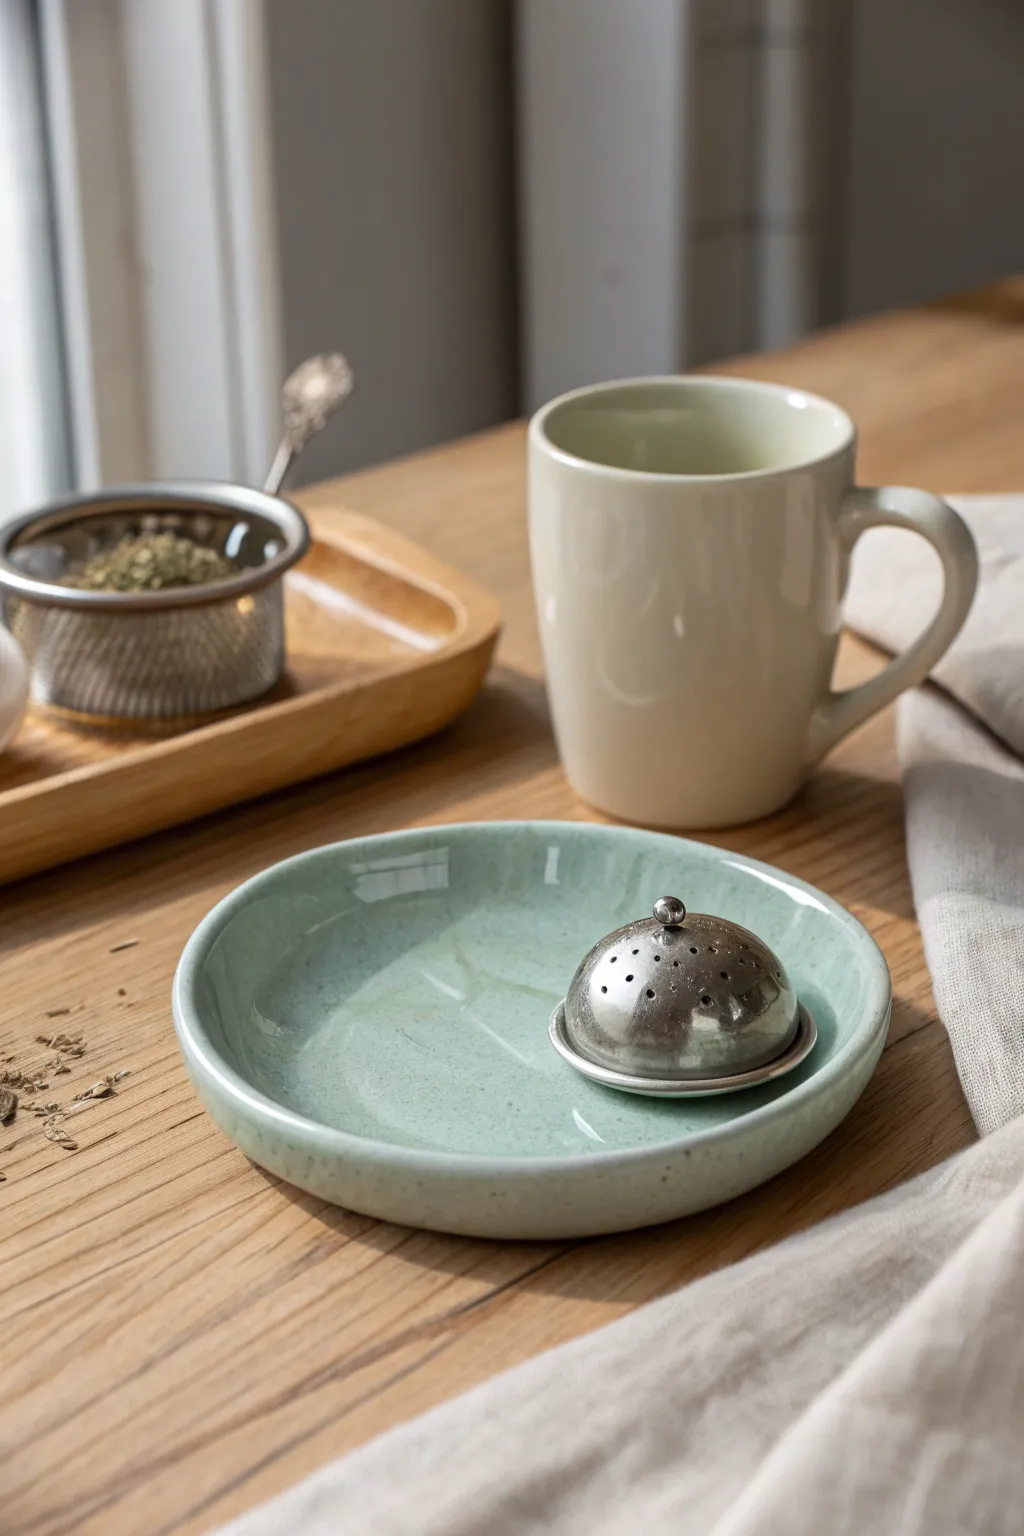
Keep your countertops clean with this charmingly rustic drip tray, perfect for resting wet tea bags or metal steepers. The soft sage green glaze and subtle speckling give it a professional ceramic look without needing a kiln.
How-To Guide
Materials
- White air dry clay
- Rolling pin
- Circle cookie cutter (approx. 4 inches) or a bowl to trace
- Small bowl of water
- Sponge or soft paintbrush
- Fine grit sandpaper
- Acrylic paints: sage green, white, dark brown or black
- Glossy varnish or sealant (water-resistant needed)
- Old toothbrush (for splattering)
- Palette or paper plate
Step 1: Shaping the Clay
-
Prepare the clay:
Take a handful of white air dry clay and knead it briefly in your hands to warm it up and make it pliable. -
Roll it out:
Using a rolling pin, flatten the clay on a smooth surface until it is about 1/4 inch thick. Aim for an even thickness throughout to prevent cracking later. -
Cut the circle:
Press your circle cutter or a small bowl firmly into the clay to cut out a perfect disc. Remove the excess clay from around the edges. -
Smooth the edges:
Dip your finger in a little water and run it along the cut edge of the circle to smooth out any roughness or sharp bits. -
Create the rim:
Gently pinch and lift the outer edge of the clay circle upward. Use your thumb on the inside and forefinger on the outside to mould a shallow vertical rim, about half an inch high. -
Refine the shape:
Rotate the dish slowly, ensuring the rim stands straight and is uniform in height all the way around. I like to tap the bottom gently on the table to flatten the base perfectly. -
Final smoothing:
Use a slightly damp sponge or soft brush to smooth away any fingerprints or tool marks on both the inside and outside surfaces.
Rim cracked while drying?
Cracks happen! Mix a tiny bit of fresh clay with water to make a paste (slip). Fill the crack, smooth it over, and let it dry again before sanding.
Step 2: Drying and Refining
-
Let it dry:
Place your tray in a safe, dry spot away from direct sunlight. Allow it to air dry completely for 24-48 hours. Turn it over halfway through to let the bottom dry evenly. -
Sand until smooth:
Once fully hardened, use fine-grit sandpaper to buff the surface. Focus on the rim and any bumps to achieve a ceramic-smooth finish. -
Dust off:
Wipe the entire piece with a dry cloth or soft brush to remove all fine clay dust before painting.
Texture Twist
Before the clay dries, press a piece of lace or a textured fabric into the wet clay surface. This creates a beautiful embossed pattern under the glaze.
Step 3: Painting and Sealing
-
Mix the base color:
On your palette, mix white acrylic paint with a small amount of sage green. You want a very pale, milky green tone similar to the reference photo. -
Apply the base coat:
Paint the entire dish—inside, outside, and bottom—with your sage mixture. Let it dry, then apply a second coat for opaque, even coverage. -
Prepare the speckles:
Water down a tiny dot of dark brown or black paint until it has an inky consistency. -
Splatter paint:
Dip an old toothbrush into the watered-down dark paint. Holding the brush over the tray, run your thumb across the bristles to flick tiny speckles onto the surface. -
Paint the rim:
For that finished ceramic look, paint the very top edge of the rim white. You can blend it slightly downwards into the green while the paint is still wet for a soft transition, or keep it crisp. -
Final drying:
Allow all paint layers to dry completely, preferably overnight, to ensure no moisture is trapped. -
Seal for protection:
Apply 2-3 coats of a high-quality glossy varnish. Since this is for kitchen use, ensure the sealant is water-resistant so it can handle damp tea bags.
Set this lovely little tray next to your kettle and enjoy a cleaner, more stylish tea time


What Really Happens Inside the Kiln
Learn how time and temperature work together inside the kiln to transform clay into durable ceramic.
Sink-Side Ring Dish for Cooking
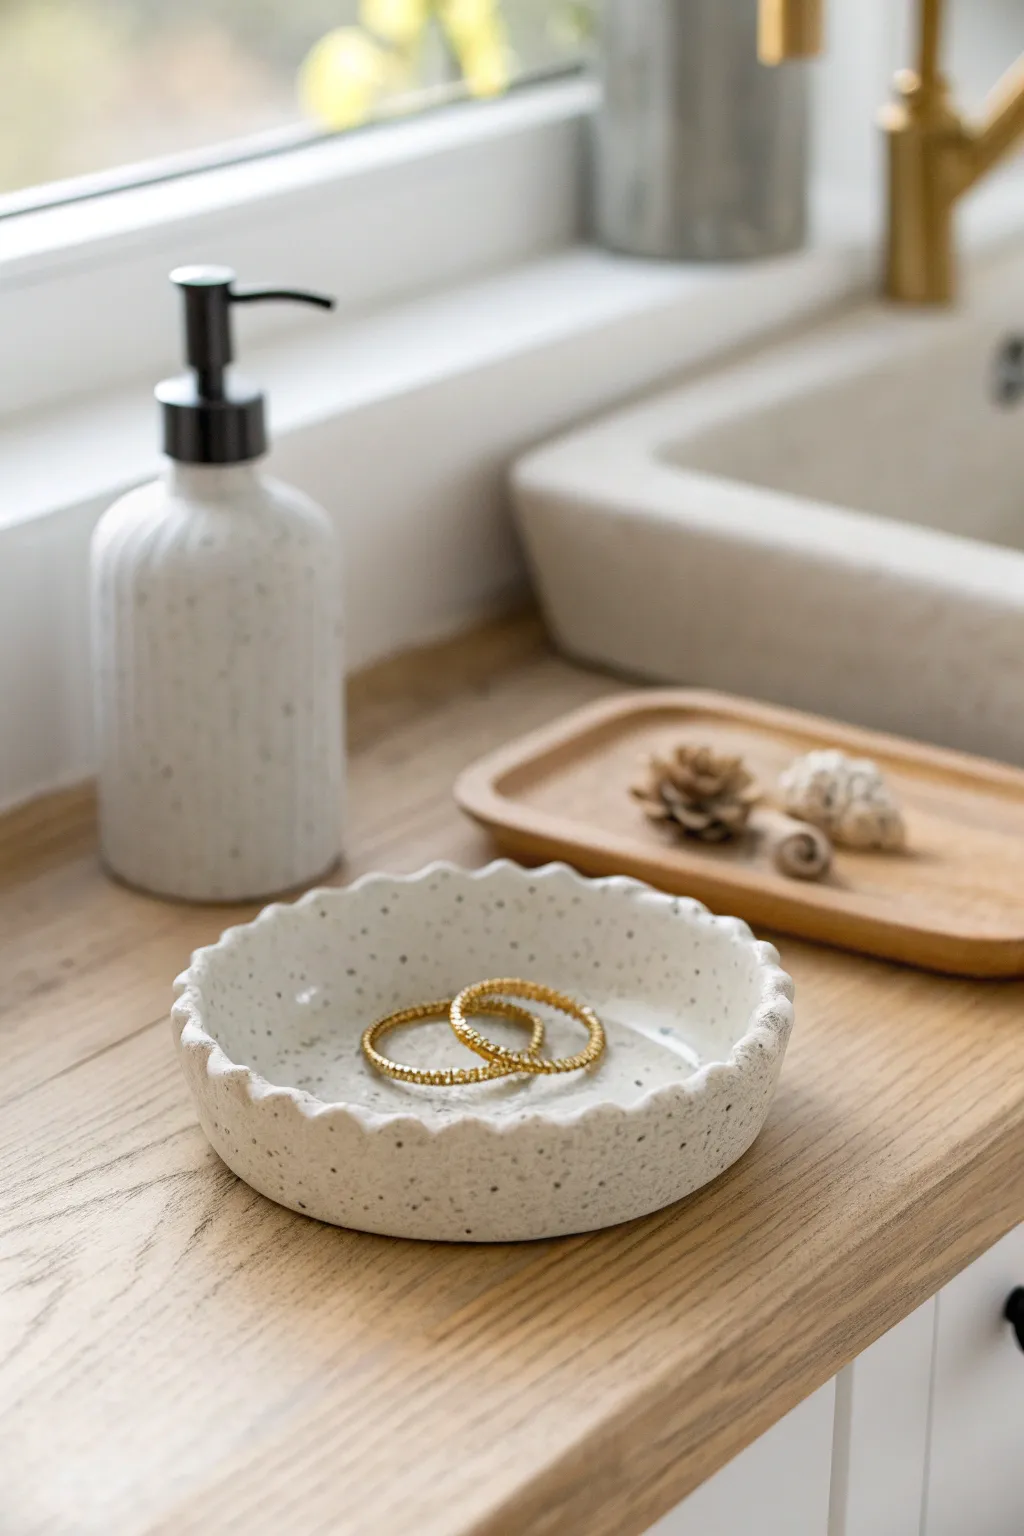
Keep your precious jewelry safe while washing dishes with this elegant, stone-effect ring dish. Its gentle scalloped edges and faux-ceramic finish bring a high-end, organic touch to your sink-side decor.
Step-by-Step
Materials
- White air dry clay
- Rolling pin
- Circle cutter or small bowl (approx. 4-5 inches)
- Craft knife
- Water and a small sponge
- Fine grit sandpaper
- Acrylic paint (black or dark grey)
- Old toothbrush or stiff bristle brush
- Matte varnish or sealant
- Small bowl for shaping (drying form)
Step 1: Preparation & Forming
-
Condition the Clay:
Begin by taking a handful of white air dry clay and kneading it in your hands until it becomes soft, pliable, and free of cracks. -
Roll it Out:
Place the clay on a smooth surface or canvas mat. Use a rolling pin to flatten it into an even slab, aiming for a thickness of about 1/4 inch to ensure durability. -
Cut the Circle:
Place your circle cutter or an overturned small bowl onto the clay slab to use as a template. Use a craft knife to trace around the edge and cut out a perfect circle. -
Smooth the Edges:
Dip your finger or a small sponge into a little water and run it along the cut edge of the clay circle to smooth out any rough bits or jagged cuts.
Step 2: Creating the Scallops
-
Pinch the Pattern:
To create the wavy rim, gently pinch the edge of the circle between your thumb and forefinger at regular intervals. -
Refine the Waves:
Work your way around the entire circumference. I like to go around a second time to push the indentations slightly deeper and ensure the spacing looks even. -
Lift the Edges:
Gently cup the clay circle in your hand to slightly curve the sides upward, transforming the flat disk into a shallow bowl shape. -
Refine the Form:
Place the clay into a slightly larger bowl to help it hold its curved shape while drying, or simply dry it flat if you prefer a tray style. Ensure the scalloped edge remains distinct.
Clean Edges Pro Tip
Can’t get even scallops? Use the rounded handle of a paintbrush or a marker cap. Press it into the side of the clay rim at intervals to create uniform indentations.
Step 3: Finishing & Effects
-
Let it Dry:
Allow the piece to dry completely for 24-48 hours. Turn it over halfway through the drying process to ensure the bottom dries evenly. -
Sand for Smoothness:
Once fully dry, take a piece of fine-grit sandpaper and lightly buff the entire surface, paying special attention to the rim to soften the tactile feel. -
Prepare the Speckle:
Dilute a small amount of black or dark grey acrylic paint with water until it is very runny and ink-like. -
Splatter Technique:
Dip an old toothbrush into the watered-down paint. Hold it over the dish and run your thumb across the bristles to flick tiny speckles onto the clay surface. -
Control the Density:
Layer the speckles gradually until you achieve a stone-like appearance similar to the photo. Let the paint dry completely. -
Protect the Piece:
Apply two thin coats of matte varnish to seal the clay. Since this will live near a sink, sealing is crucial to protect it from occasional splashes.
Level Up: Gold Rim
For an extra touch of luxury, use a fine detail brush to paint just the very top edge of the rim with metallic gold leaf paint after sealing.
Place your new ring dish next to your favorite soap dispenser for a functional art piece
Fruit Bowl With Citrus-Inspired Edges
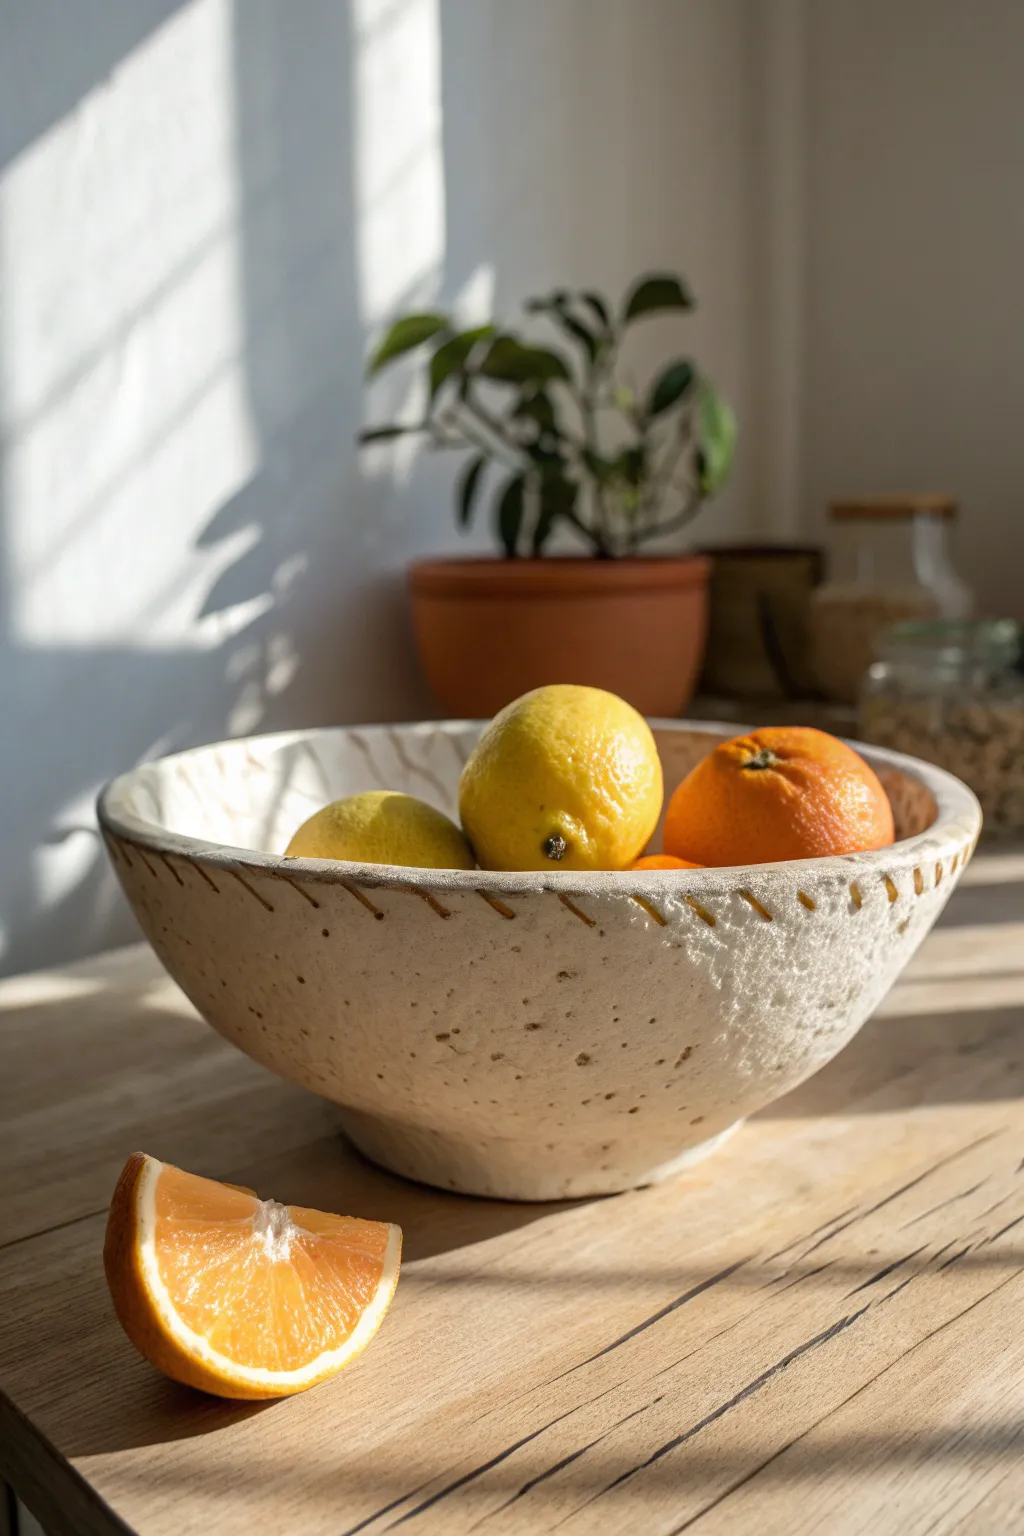
Embrace the imperfect beauty of handcrafted pottery with this stunning, rustic fruit bowl. Featuring a textured, speckled finish and a unique rim detail that evokes citrus segments, this project adds an earthy, artisanal touch to any kitchen counter.
How-To Guide
Materials
- White or cream air dry clay (2-3 lbs)
- Damp sponge
- Rolling pin
- Medium-sized mixing bowl (as a mold)
- Plastic wrap
- Wooden modeling tool or clay knife
- Small stiff-bristled brush (like an old toothbrush)
- Brown acrylic paint (diluted)
- Clear matte varnish or sealant (food-safe if possible, though air dry clay is for dry use only)
- Sandpaper (fine grit)
Step 1: Forming the Base
-
Prepare the workspace:
Begin by covering your work surface with canvas or a non-stick mat. Prepare your mold by lining the inside of your mixing bowl with plastic wrap; this prevents sticking and helps you lift the clay out later. -
Roll out the slab:
Take a large chunk of air dry clay and knead it briefly to remove air bubbles. Roll it out into a large, even circle, aiming for a consistent thickness of about 1/4 inch. -
Shape the bowl:
Gently lift your clay slab and drape it into the lined mixing bowl. Press it softly against the sides to take the shape of the mold. Don’t worry about the excess hanging over the edge yet. -
Create the foot:
Use a small separate ball of clay to create a flattened disk for the base. Score and slip (scratch and wet) the bottom of your bowl and attach this disk to create a sturdy foot, blending the seams smoothly. -
Trim the rim:
Using a needle tool or clay knife, trim the excess clay around the top edge of the bowl to create an even, level rim. Smooth this cut edge with a damp finger.
Step 2: Detailing and Texture
-
Add the citrus markings:
This is the signature detail. Use a wooden modeling tool or the dull edge of a knife to press diagonal indentations along the very top rim, spacing them evenly to mimic the pith of a citrus fruit. -
Create the rough texture:
To achieve that rustic, stone-like appearance, take your stiff-bristled brush or an old toothbrush. Gently stipple the outside surface of the bowl, pressing bristles into the clay to create microscopic pores and imperfections. -
Dry the form:
Let the bowl sit in the form for at least 24 hours until it’s leather-hard. Once it holds its shape on its own, carefully remove it from the mold and peel off the plastic wrap to let the inside dry. -
Final drying stage:
Allow the piece to dry completely for another 24-48 hours. The clay should turn a chalky white and feel room temperature, not cool to the touch. -
Refine the surface:
Once fully bone dry, use fine-grit sandpaper to gently smooth any sharp edges on the rim or the foot, but be careful not to sand away your intentional toothbrush texture.
Cracking Up?
Fine cracks often appear during drying. Don’t panic! Mix small bits of fresh clay with water to make a paste (slip) and fill the cracks. Smooth over with a finger and let dry again.
Step 3: Finishing Touches
-
Prepare the wash:
Mix a tiny drop of brown acrylic paint with a generous amount of water. You want a very watery, dirty wash, not opaque paint. -
Apply the speckle:
Dip your toothbrush into the watered-down brown paint. Hold the brush near the bowl and run your thumb across the bristles to flick tiny speckles onto the surface. I like to test this on paper first to control the spray. -
Highlight the rim:
Project the simple indented lines on the rim by using a very fine brush to run a weak wash of brown inside the grooves, emphasizing the ‘citrus’ pattern. -
Seal the piece:
Once the paint is totally dry, apply two coats of matte varnish. This protects the clay from humidity and gives it a finished look.
Make it Functional
Air dry clay isn’t food safe for wet foods. To make this a functional fruit bowl, line the interior with a beeswax wrap or simply stick to uncut, peel-on fruits like oranges and lemons.
Now you have a charming, organic centerpiece ready to hold your fresh produce

TRACK YOUR CERAMIC JOURNEY
Capture glaze tests, firing details, and creative progress—all in one simple printable. Make your projects easier to repeat and improve.
Chef Figurine Kitchen Mascot
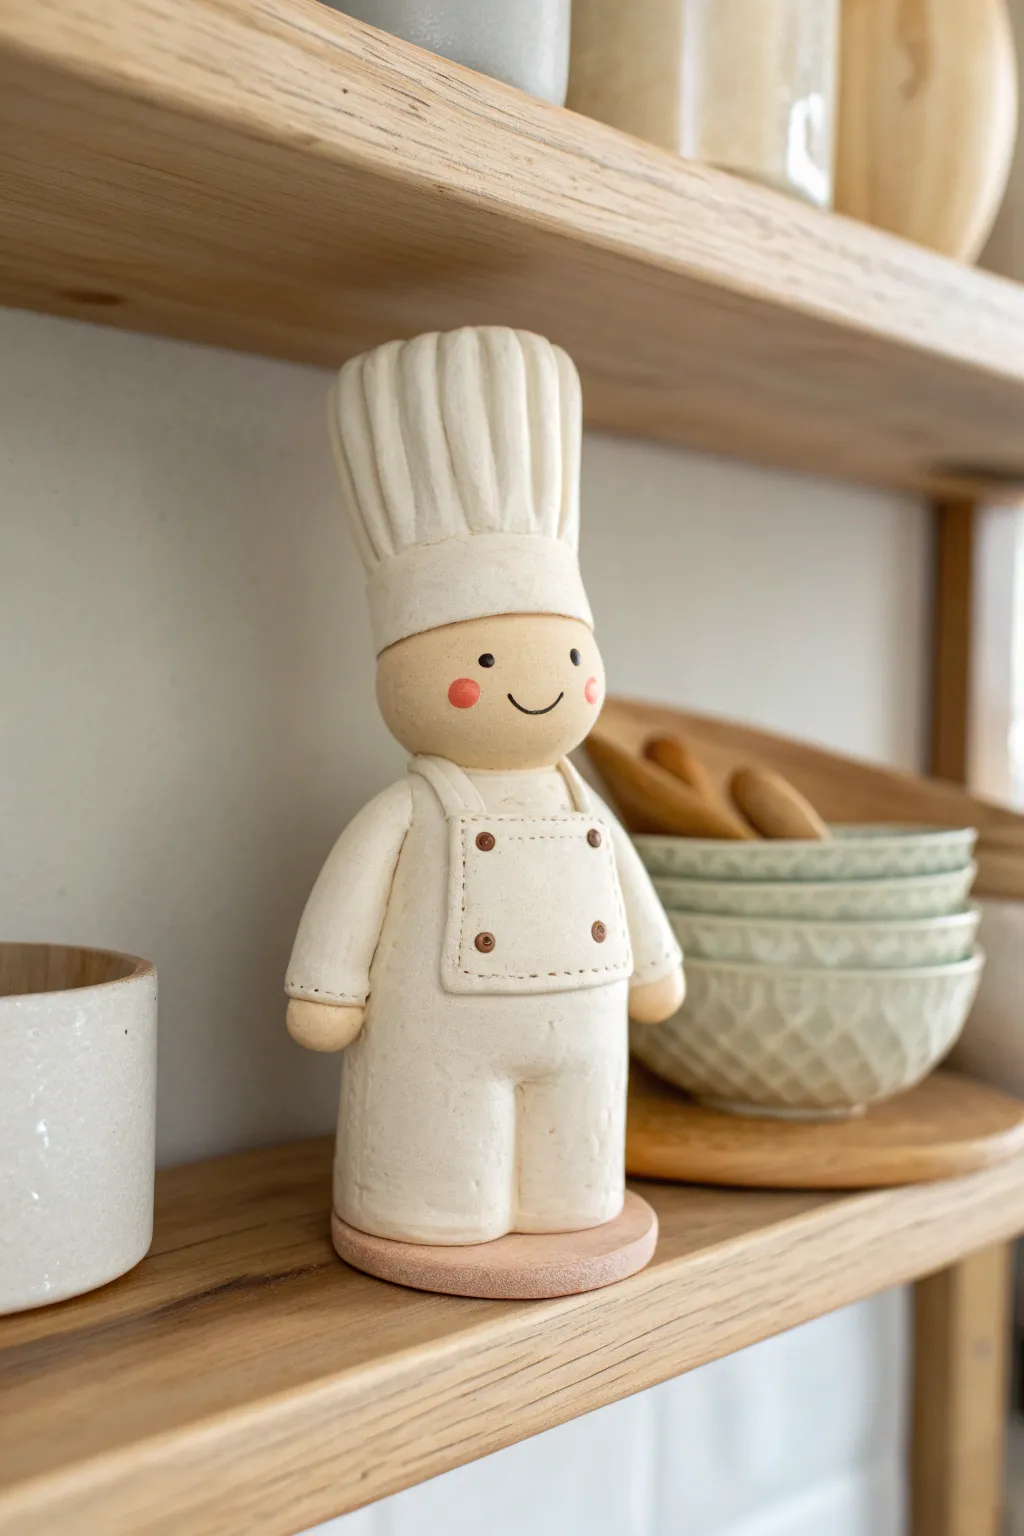
Add a pinch of charm to your kitchen shelves with this adorable handcrafted chef mascot. This minimalist figurine features a classic toque, a textured apron, and a sweet, simple expression that watches over your culinary adventures.
Step-by-Step Guide
Materials
- White air-dry clay (smooth texture)
- Clay rolling pin
- Modeling tools (needle tool, ball stylus)
- Small disk of wood or clay (for the base)
- Acrylic paints (black, rosy pink, warm white/oatmeal)
- Fine detail paintbrush
- Water cup and sponge
- Sandpaper (fine grit)
- Matte varnish
Step 1: Sculpting the Body and Head
-
Form the base cylinder:
Start with a generous handful of clay and roll it into a thick, sturdy cylinder for the body. The bottom should be slightly wider than the top for stability. Tap the base on your work surface to flatten it completely. -
Create the legs:
Using a knife tool or craft blade, cut a vertical slit halfway up the center of the cylinder’s bottom half. Gently round off the edges of this cut to define two separate legs, smoothing the clay so the ‘pants’ look seamless. -
Shape the head:
Roll a separate sphere of clay for the head. It should be slightly wider than the neck area of your body cylinder. Create a small indentation on top of the body and attach the head securely using a little water and scoring (scratching) both surfaces. -
Smooth the transition:
Use a modeling tool or your finger to blend the clay at the neck slightly, ensuring a strong bond, but keep the definition of a separate head shape visible.
Keep it Clean
Keep a pack of baby wipes nearby. Clean your hands constantly when switching between sculpting the body and touching the face to avoid transferring dust or debris into the white clay.
Step 2: Dressing the Chef
-
The apron bib:
Roll out a thin sheet of clay. Cut a small rectangle for the chest piece of the apron. Use a needle tool to press tiny dashed lines around the perimeter to mimic stitching. -
Attach the apron:
Score the back of the rectangle and press it onto the chest. Fashion two thin straps from rolled clay ropes and attach them from the top corners of the bib, wrapping over the shoulders to the back. -
Add buttons:
Roll four tiny balls of clay. Press them onto the corners of the apron bib to serve as buttons. If you like, prick the center of each button for extra detail. -
Sculpt the arms:
Form two teardrop shapes for arms. Attach them to the sides of the body so they hang naturally. Add small spheres at the end of the sleeves to represent hands.
Step 3: The Toque and Finishing Touches
-
Form the hat base:
Create a thick band of clay that fits the circumference of the head. Attach this band right above the forehead area where a hat brim would sit. -
Sculpt the tall hat:
Roll a cylinder of clay slightly wider at the top than the bottom. Attach this to the brim band, smoothing the seam. -
Texture the pleats:
Use a modeling tool to carve deep vertical grooves all around the tall part of the hat. These grooves simulate the classic pleats of a chef’s toque. Soften the ridges with a damp finger so they look like fabric folds. -
The base plate:
I prefer to mount my figures on a base for stability. Cut a circle from a rolled sheet of clay, slightly larger than the figurine’s footprint. Score and attach the chef to the center of this disk. -
Drying:
Allow the figurine to dry completely for at least 24-48 hours. Keep it away from direct heat to prevent cracking.
Cracks while Drying?
If hairline cracks appear during drying, make a ‘slurry’ paste by mixing a tiny bit of clay with water. Paint this heavy cream-like mixture into the cracks and smooth over.
Step 4: Painting and Sealing
-
Sanding:
Once bone dry, gently sand any rough fingerprints or sharp edges with fine-grit sandpaper until the surface is smooth specifically on the face area. -
Base tone:
Paint the skin areas (face and hands) with a warm beige tone. Leave the clothes and hat the natural white of the clay or paint them a soft creamy white for a uniform finish. -
Painting the face:
Using your smallest brush or a toothpick, dot two small black eyes wide apart. Paint a thin, simple black curve for the smile. -
Rosy cheeks:
Add two soft pink circles for cheeks right below the eyes. Paint the apron buttons a contrasting color like brown or bronze. -
Sealing:
Protect your kitchen buddy with a coat of matte varnish. This will keep moisture and kitchen grease from staining the porous clay.
Place your new sous-chef on the shelf and enjoy the friendly company while you cook