Air dry clay is my go-to when I want that satisfying sculpting moment without the kiln drama. If you’re craving projects that feel artsy but still totally doable on your kitchen table, these air dry clay sculpting ideas will keep your hands busy in the best way.
Minimalist Face Vase Sculptures
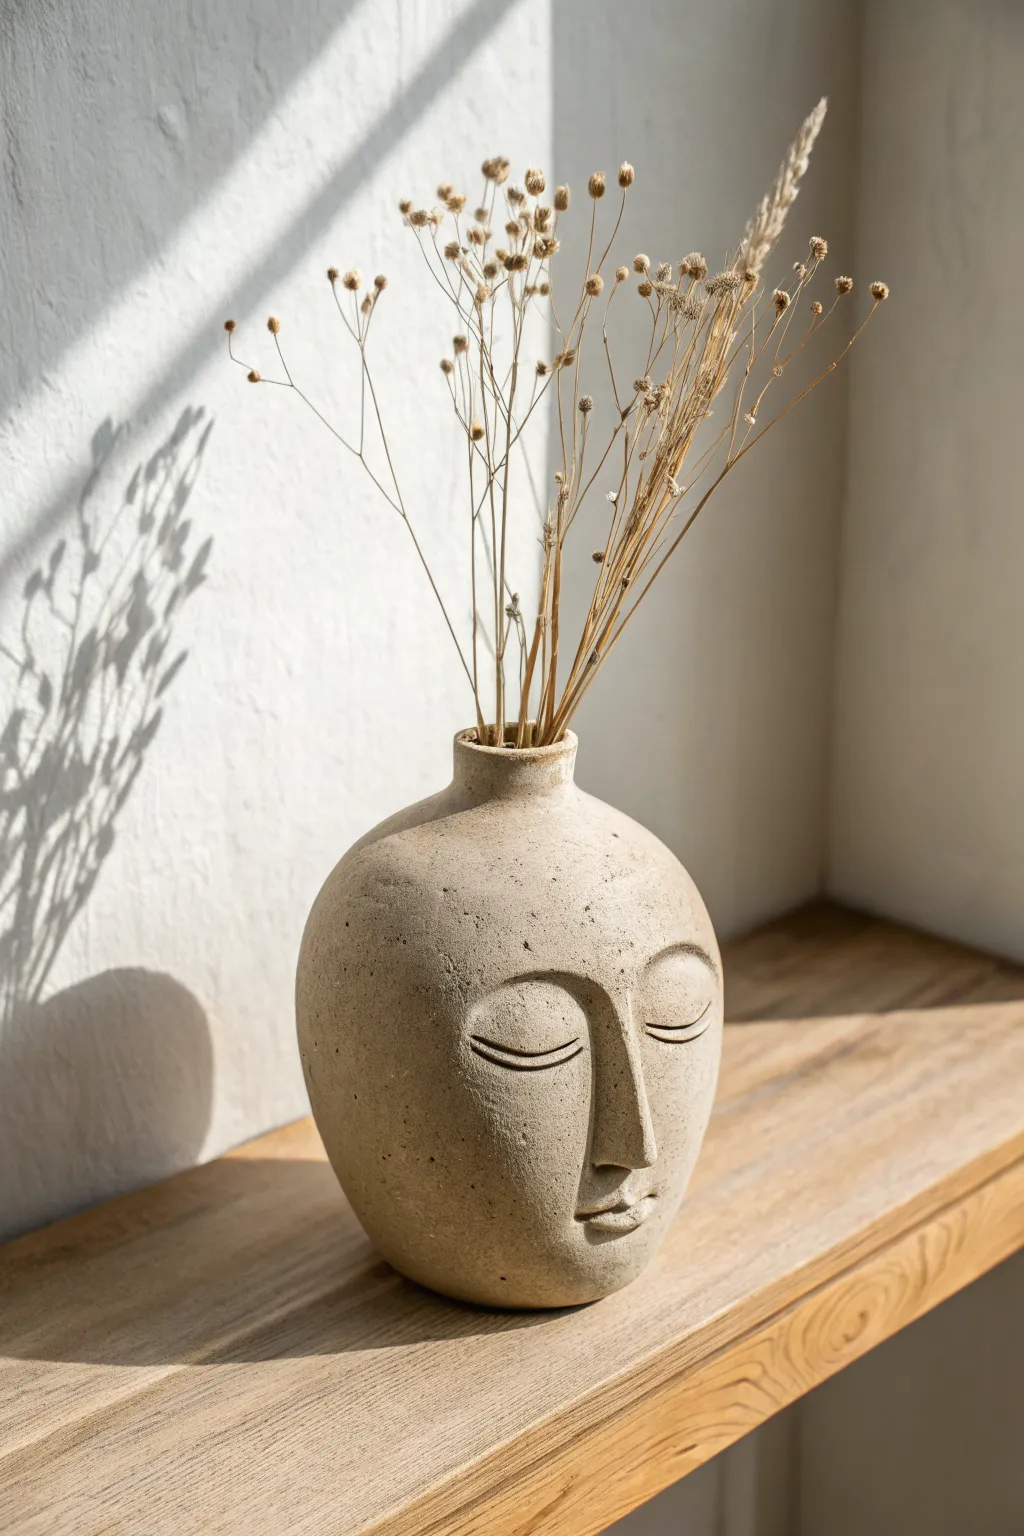
This project transforms simple air dry clay into a stunning, gallery-worthy piece that mimics the texture of carved sandstone. With its calming, closed-eye expression and organic shape, this minimalist vase brings a peaceful artistic touch to any shelf.
How-To Guide
Materials
- Air dry clay (white or light grey)
- Wide glass jar or bottle (as an armature)
- Rolling pin
- Clay sculpting tools (specifically a needle tool and a small loop tool)
- Sponge and water
- Pottery wire or dental floss
- Sandpaper (medium and fine grit)
- Acrylic paint (stone grey, beige, and white)
- Old toothbrush or stippling brush
- Matte spray varnish
Step 1: Building the Form
-
Prepare the armature:
Select a glass jar or bottle with a neck that roughly matches the desired silhouette. Clean and dry it thoroughly, as this will serve as the permanent internal support for your vase. -
Roll the slab:
Roll out a large slab of air dry clay to a consistent thickness of about 1/4 inch. Ensure it is wide and tall enough to wrap completely around your chosen glass vessel. -
Wrap the vessel:
Carefully lift the clay slab and wrap it around the glass jar. Press the seam edges together firmly. I like to score the edges—scratching them up a bit—and add a dab of water to ensure a tight bond. -
Smooth the seam:
Use your fingers or a modeling tool to blend the seam until it completely disappears. The surface should look continuous and smooth. -
Form the neck:
Gently gently mold the clay up and around the neck of the bottle. Create a slight inward curve at the shoulder and a small, raised rim at the very top opening. -
Shape the silhouette:
Add extra clay to the sides if needed to create a more bulbous, rounded shape that tapers toward the bottom, mimicking the curve seen in the reference image. Smooth everything with a damp sponge.
Seamless Blending
When adding facial features, use a ‘score and slip’ method (scratching both surfaces and adding water) to ensure pieces don’t pop off during drying.
Step 2: Sculpting the Features
-
Map out the face:
Use a needle tool to faintly sketch a vertical center line to guide symmetry. Mark horizontal lines for where the eyebrows, eyes, nose, and mouth will sit. -
Build the nose:
Roll a small snake of clay for the nose bridge. Attach it to the center line, blending the sides smoothly into the cheeks but keeping the bridge prominent and straight. -
Define the brows:
Add two curved snakes of clay for the eyebrows. Blend the top edges into the forehead completely, but leave the bottom edge slightly sharper to create the brow bone definition. -
Create the eyelids:
Roll two small, flattened ovals for the eyelids. Place them below the brows. Use a sculpting tool to carve a clean, curved line across the middle of each oval slightly to define the closed lid crease. -
Sculpt the lips:
Attach a small mound of clay under the nose. Use a small loop tool or knife to carve the separation between the lips, keeping the expression neutral and soft. -
Refine and smooth:
Dip your finger in water and smooth over all the features. The goal is a soft, integrated look rather than sharp, jagged additions. Ensure the transition from the nose to the brow is seamless.
Faux-Antique Look
After the base paint dries, do a light ‘whitewash’ with watered-down white paint, wiping most of it off immediately. It stays in the crevices for depth.
Step 3: Finishing and Texture
-
Add texture:
Before the clay dries, take an old toothbrush or a stippling brush and tap it gently all over the surface. This creates the porous, stone-like texture visible in the photo. -
Let it dry:
Allow the vase to dry completely. This usually takes 24-48 hours depending on humidity. Rotate it occasionally to ensure even drying. -
Mix the stone color:
Mix beige, white, and a tiny drop of grey acrylic paint to match the sandy limestone hue. -
Apply the base coat:
Paint the entire vase with your mixed color. I prefer using a dabbing motion rather than long strokes to preserve the texture you created earlier. -
Speckle effect:
Dilute a darker grey or brown paint with water. Dip a toothbrush in it and flick the bristles with your thumb to spray tiny speckles over the vase for that realistic gritty stone look. -
Seal the piece:
Finish with a coat of matte spray varnish to protect the paint and clay from moisture and dust.
Fill your new sculpture with dried grasses or bunny tails to complete the organic aesthetic


Pinch Pot Trinket Bowls
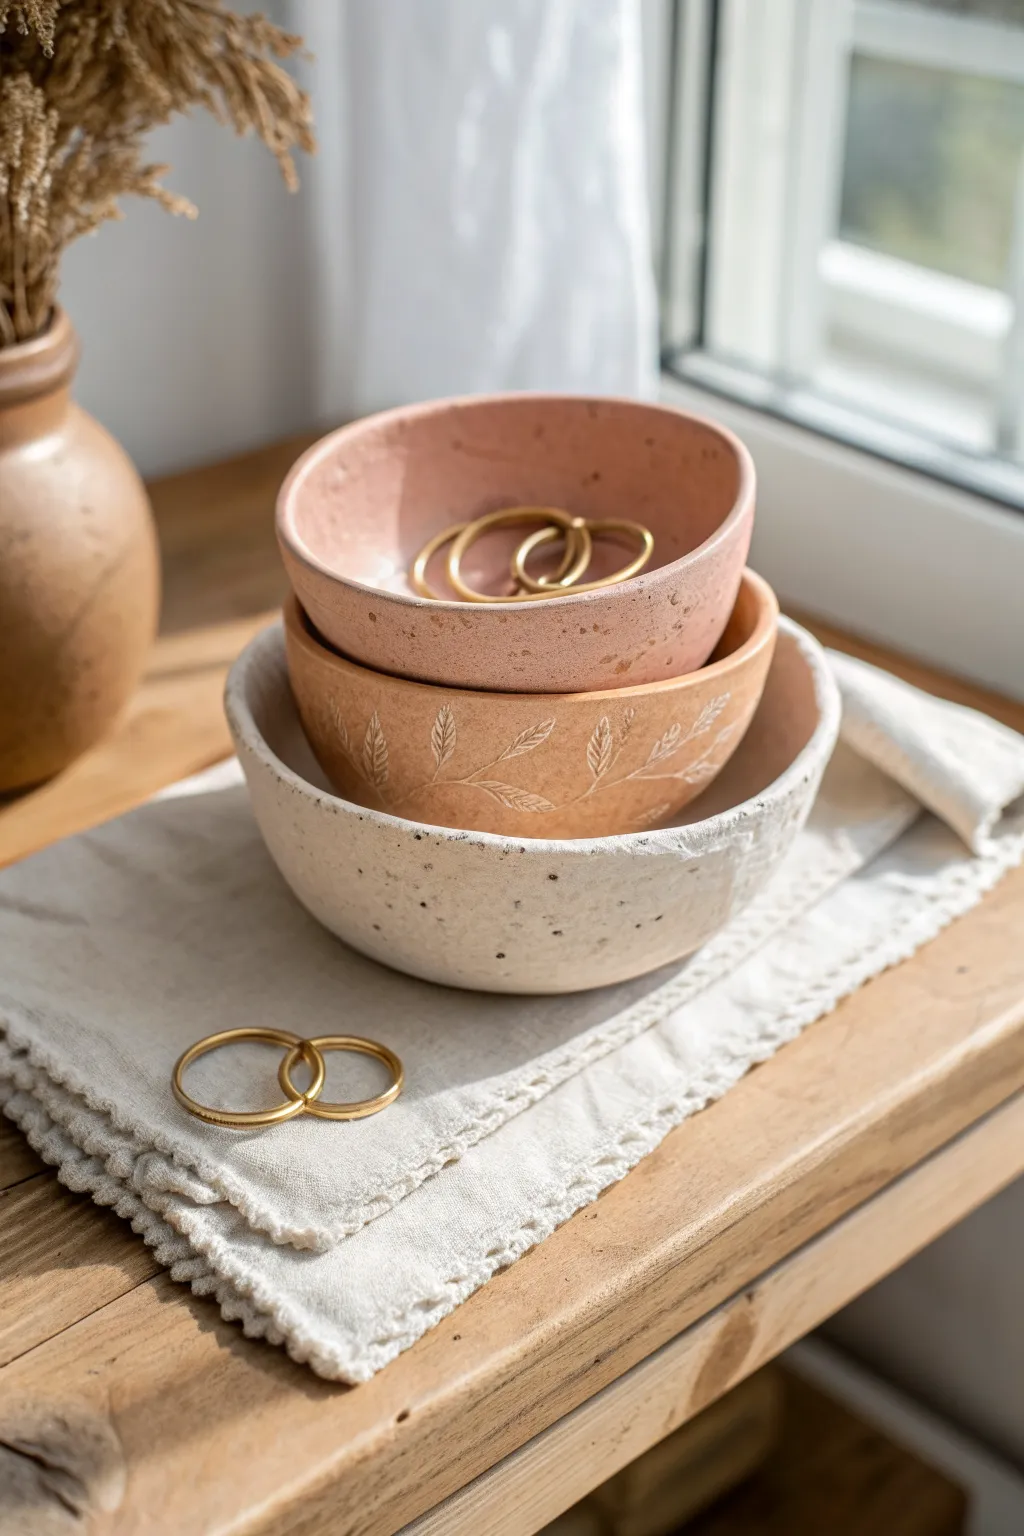
Create a charming set of three nesting trinket bowls using simple pinch methods and subtle textures. These earthy, organic vessels feature delicate engraving and a speckled finish that mimics high-end ceramic glaze.
Step-by-Step
Materials
- Air dry clay (white or natural)
- Acrylic paints (dusty pink, terracotta, oatmeal cream, brown)
- Toothbrush or stiff bristle brush
- Small needle tool or toothpick
- Sponge
- Fine grit sandpaper
- Bowl of water
- Matte or satin varnish
Step 1: Forming the Bowls
-
Prepare clay portions:
Cut three pieces of clay in graduating sizes. You want a small, medium, and large ball of clay to ensure the final bowls will nest inside one another comfortably. -
Start the pinch:
Take the largest ball and press your thumb into the center, stopping before you push all the way through to the bottom. -
Shape the walls:
Gently pinch and rotate the clay between your thumb and fingers, working from the bottom up. Aim for an even thickness of about a quarter-inch for a sturdy base. -
Refine the rim:
For the bottom bowl, keep the rim slightly organic and uneven to match the rustic look in the photo. Smooth out any major cracks with a damp finger. -
Repeat for nesting:
Form the medium and small bowls using the same technique. Test them as you go by placing the smaller ones inside the larger ones to check that they fit loosely.
Smooth Moves
Keep a small dish of water nearby while pinching. If cracks appear on the rim, a tiny drop of water on your finger smooths them instantly.
Step 2: Adding Texture & Engraving
-
Level the surfaces:
Once shaped, use a slightly damp sponge to smooth the interior of all bowls. The inside needs to be sleek to bold the rings or trinkets later. -
Draft the pattern:
On the medium-sized bowl, use a needle tool to very lightly scratch a flowing vine line around the exterior circumference. -
Engrave the leaves:
Press the needle tool deeper to carve small leaf shapes branching off your vine line. Use the tip to scratch tiny veins inside each leaf for added detail. -
Create the rough texture:
For the large bottom bowl, you can gently dab a dry sponge or balled-up foil against the exterior to give it a stone-like, pitted texture. -
Dry completely:
Set all three bowls aside to dry for 24-48 hours. I find it helps to rotate them occasionally so they dry evenly without warping.
Step 3: Painting and Finishing
-
Sand imperfections:
Once fully dry, lightly sand the rims and any sharp ridges. Wipe away the dust with a barely damp cloth. -
Base coat colors:
Paint the smallest bowl a soft dusty pink. Paint the medium (engraved) bowl a warm terracotta. Paint the largest bowl an oatmeal cream color. -
Highlight the engraving:
Mix a diluted wash of white or light cream paint. Brush it over the engraved leaves on the medium bowl, then quickly wipe the surface with a paper towel, leaving the light paint trapped in the carved lines. -
Prepare the speckle mix:
Dilute a small amount of dark brown acrylic paint with water until it is runny and ink-like. -
Apply the speckles:
Dip a toothbrush into the brown mixture. Use your thumb to flick the bristles over the pink and cream bowls to create fine, random speckles. -
Clean up interior:
Check the interior of the bowls. If the speckles are too heavy inside, you can touch them up with the original base color for a cleaner look. -
Seal the set:
Finish by applying two coats of matte or satin varnish to protect the paint and give the clay a professional ceramic feel.
Metallic Luxe
Paint the very top rim of the pink bowl with liquid gold leaf or metallic acrylic for a touch of elegance that matches your jewelry.
Stack your finished creations near a window to let the natural light highlight those lovely engraved textures or use them immediately to organize your favorite rings.


Leaf-Imprint Catchall Dishes
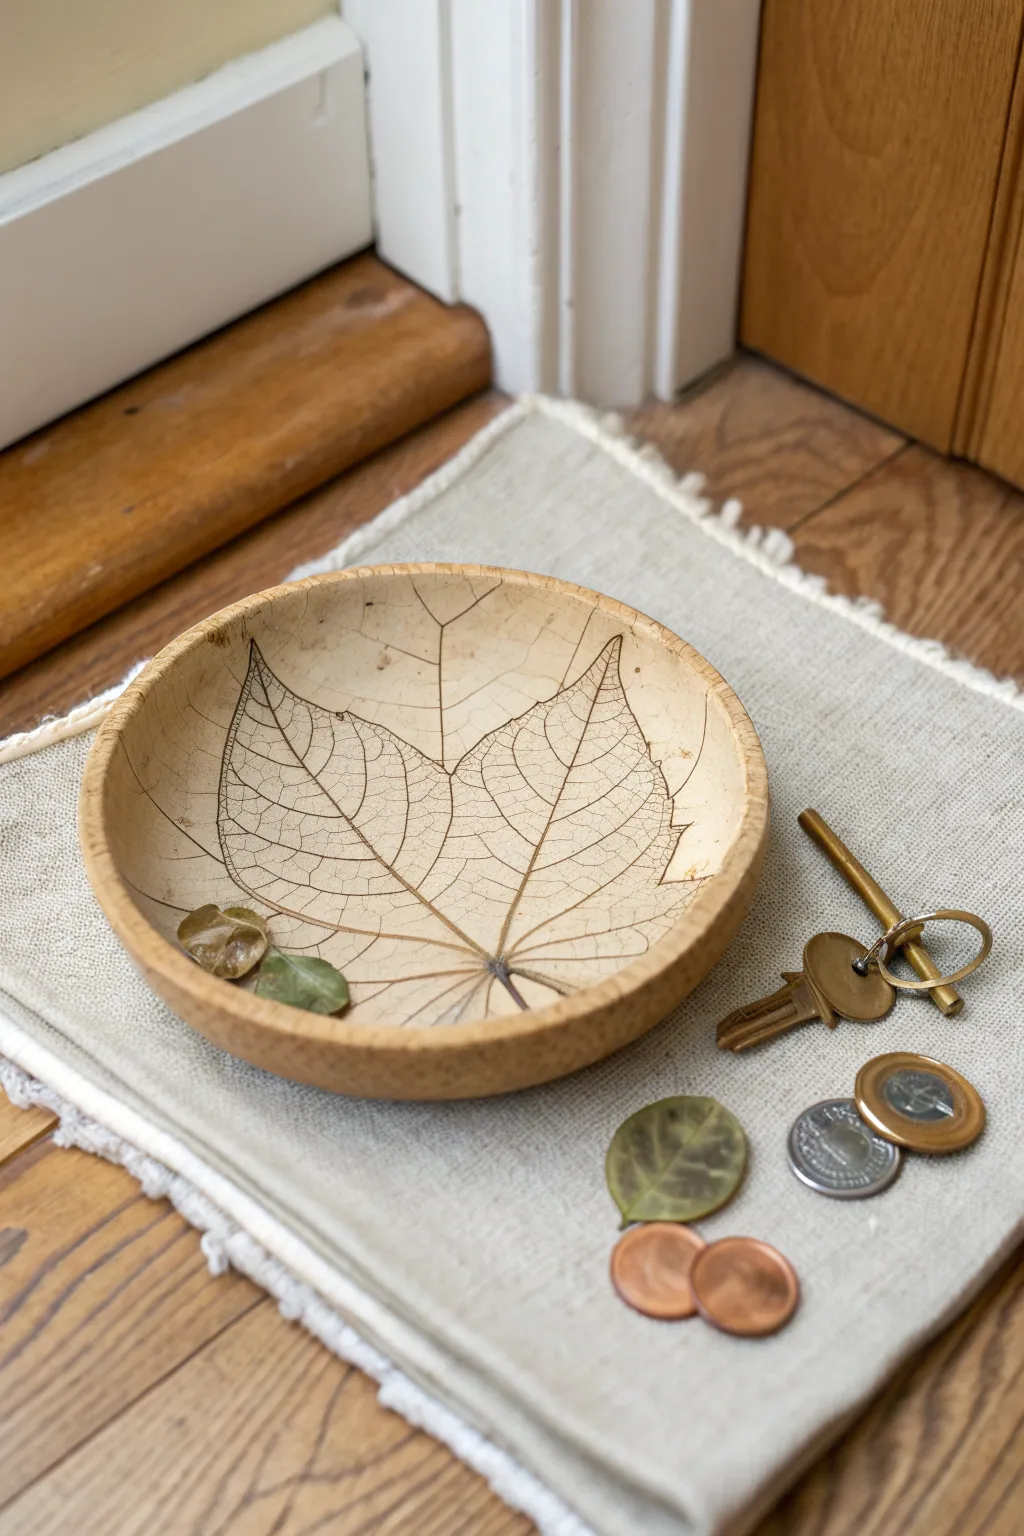
Bring the delicate beauty of nature indoors with this rustic, earth-toned catchall dish featuring a prominent leaf skeletal structure. The warm, golden-brown finish mimics the look of carved wood, making it a perfect spot for keys and loose change.
Step-by-Step Guide
Materials
- White or terracotta air dry clay
- Large, veined leaf (fresh or slightly dried)
- Rolling pin
- Small bowl (to use as a mold)
- Craft knife or clay trimming tool
- Fine-grit sandpaper
- Acrylic paints (burnt umber, raw sienna, cream)
- Fine detail paintbrush
- Small sponge
- Matte or satin varnish
Step 1: Preparation & Molding
-
Condition the clay:
Begin by kneading a ball of air dry clay until it is warm, pliable, and free of cracks. -
Roll out the slab:
Roll the clay out on a smooth surface to a thickness of about 1/4 inch. Aim for a circular shape slightly larger than the bowl you intend to use as a mold. -
Select your depressed texture:
Place your chosen leaf face down onto the center of the clay slab. The vein side should be pressing into the clay to get the best impression. -
Imprint the design:
Use the rolling pin to firmly roll over the leaf once or twice. Use enough pressure to embed the veins deep into the clay, but be careful not to make the slab too thin. -
Remove the botanical:
Carefully peel back the leaf by the stem to reveal the intricate impression left behind. -
Cut the shape:
Place a circular template (or a bowl rim) over the imprint and cut around it with a craft knife to get a clean, perfect circle. -
Form the curve:
Gently lift the clay circle and place it inside your molding bowl. Press it lightly so it takes on the curved shape of the bowl.
Vein Definition
Choose leaves with thick, protruding veins like hydrangeas or fig leaves. If the leaf is too fresh and flimsy, let it wilt for an hour to stiffen the veins.
Step 2: Refining & Drying
-
Smooth the edges:
Dip your finger in a little water and run it along the rim of the clay to smooth out any sharp edges or cutting marks. -
Initial drying:
Let the clay sit in the mold for about 24 hours until it holds its shape on its own. -
Final drying:
Remove the clay from the mold carefully and place it on a wire rack to dry completely. This usually takes another 24-48 hours depending on humidity. -
Sanding:
Once fully dry and hard, use fine-grit sandpaper to gently smooth the rim and the outside of the bowl. Avoid sanding the interior leaf texture.
Step 3: Painting & Finishing
-
Base coat:
Mix raw sienna with a touch of cream acrylic paint. Apply this base color to the entire bowl using a sponge for an even, matte coverage. -
Highlight the veins:
Dilute burnt umber paint with water to make a thin wash. Brush this into the leaf impression, ensuring it settles into the deep vein grooves. -
Wipe back excess:
Before the dark wash dries, wipe the raised surfaces of the clay with a slightly damp cloth or paper towel. The dark paint will remain in the crevices, highlighting the leaf structure. -
Detail work:
If the definition isn’t sharp enough, use a very fine detail brush and the dark brown paint to manually trace the main stem and primary veins. -
Dry brush texture:
Dip a dry brush into a tiny amount of cream paint and lightly whisk it over the rim and high points of the bowl to simulate wood grain highlights. -
Seal the piece:
Protect your work with two thin coats of matte or satin varnish. This is crucial for durability, especially if you plan to put keys in it.
Gilded Touch
Add a touch of elegance by painting just the very rim of the bowl or the central stem line with liquid gold leaf or metallic bronze paint.
Now you have a functional piece of art that keeps your entryway tidy and stylish


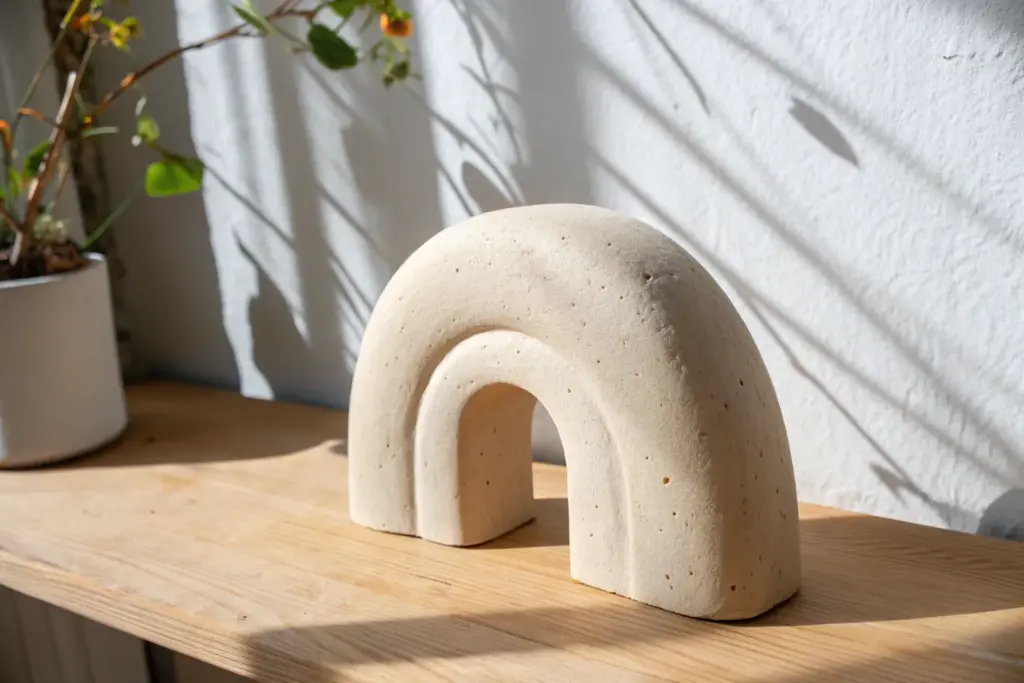
Geometric Incense Holder Sculptures
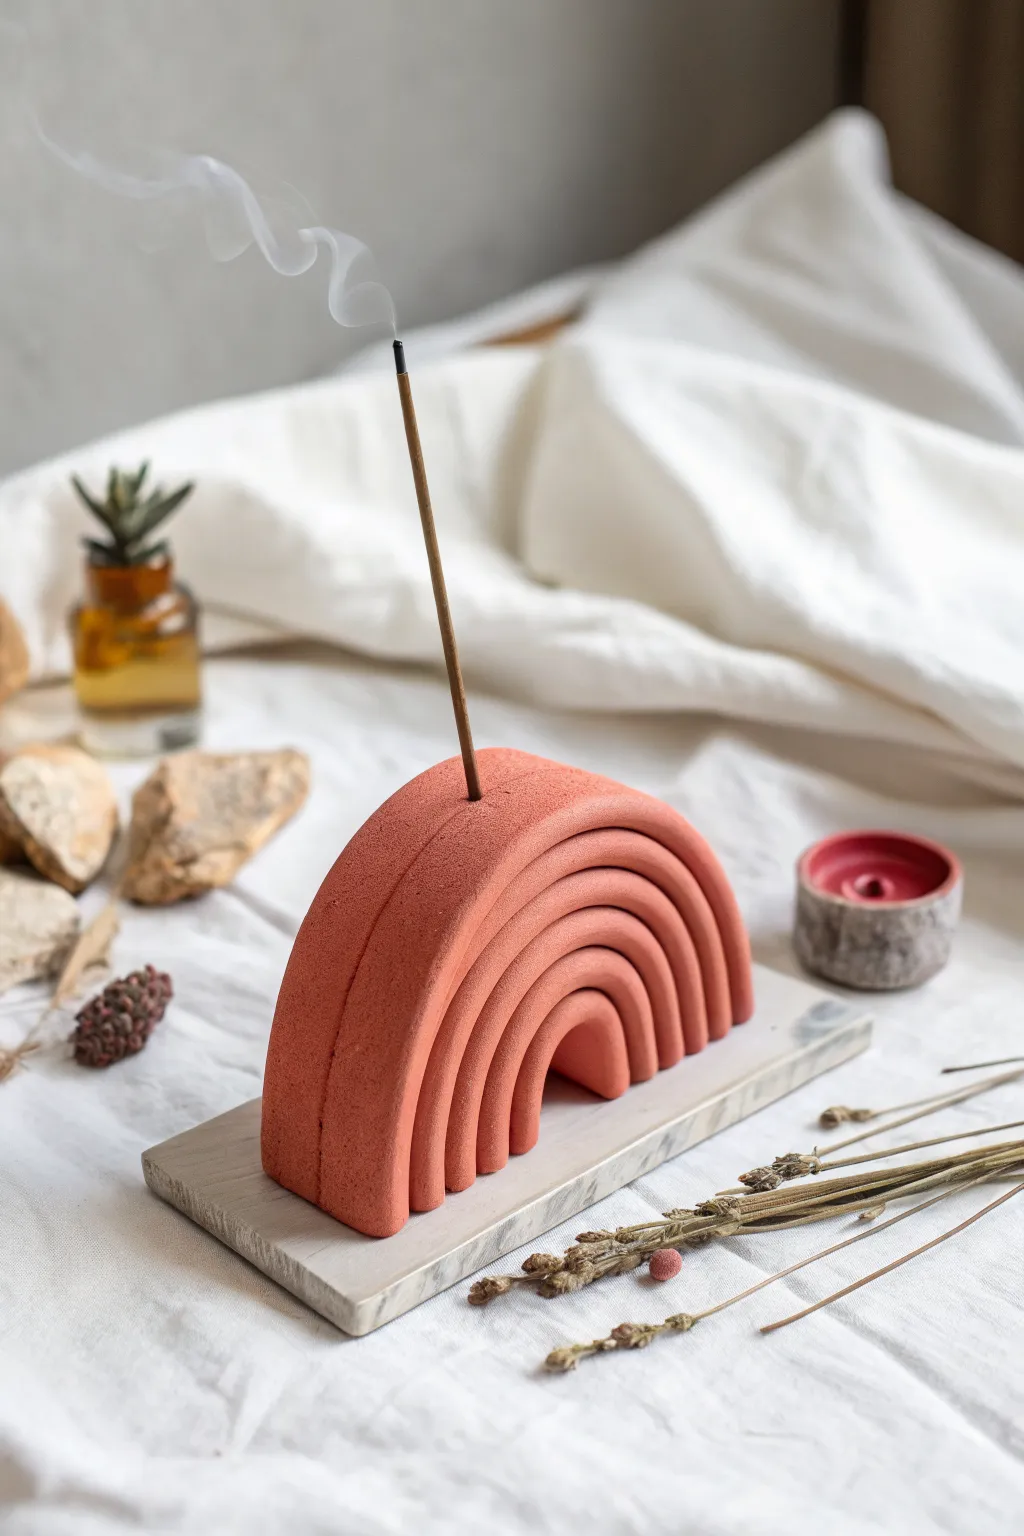
Bring a touch of modern bohemian warmth to your space with this stunning geometric incense holder. This project features a layered arch design with a rich, matte terracotta finish that beautifully contrasts with a sleek rectangular base.
How-To Guide
Materials
- Air dry clay (white or terracotta colored)
- Acrylic paint (terracotta, burnt sienna, or reddish-brown)
- Rolling pin
- Clay knife or craft knife
- Ruler
- Small bowl of water
- Sandpaper (fine grit)
- Incense stick (for sizing)
- Heavy book or flat board (for drying)
- Strong craft glue or E6000
- Paintbrush
- Baking soda (optional for texture)
Step 1: Creating the Base
-
Roll out the slab:
Begin by conditioning your air dry clay until it is soft and pliable. Roll it out into an even slab, approximately 1/4 inch thick, ensuring the surface is smooth and free of air bubbles. -
Cut the rectangle:
Using a ruler and a sharp clay knife, cut a clean rectangle for the base. A size of about 3 inches by 6 inches works well, but adjust based on the size of your intended arch. -
Smooth the edges:
Dip your finger in a little water and run it along the cut edges of the rectangle to soften any sharp corners and smooth out imperfections. -
Weight and dry:
Place the rectangular base on a flat surface. To prevent curling edges, which is common with flat slabs, place a heavy book or board on top of it while it dries.
Step 2: Forming the Arches
-
Roll the coils:
Take a fresh chunk of clay and roll it into a long, even snake or coil. You will need a thick coil about 3/4 inch in diameter. Roll it gently with flat palms to keep it consistent. -
Flatten the coil slightly:
Once rolled, gently press down on the coil with your hand or a rolling pin just enough to flatten two sides, creating a rectangular cross-section rather than a round one. This mimics the structured look in the photo. -
Form the first arch:
Bend this flattened strip into a tight U-shape to form the smallest, innermost arch. Cut the bottom ends flat so it stands upright on its own. -
Create subsequent layers:
Repeat the rolling and flattening process to create larger strips. Drape the second strip over the first arch, molding it snugly against the curve. Continue this until you have 4 or 5 concentric layers. -
Join the layers:
To ensure the rainbow stays together, slip and score between the layers. Scratch the touching surfaces with a tool, add a dab of water, and press them firmly together. -
Trim the bottom:
Once all layers are combined into a single solid rainbow unit, use your long blade to slice across the entire bottom. This creates a perfectly flat surface for the sculpture to stand on. -
Add the incense hole:
While the clay is still wet, take an incense stick (or a tool of similar thickness) and poke a hole straight down into the center of the top arch. Make the hole slightly larger than the stick to account for clay shrinkage.
Cracking Up?
If small cracks appear as the clay dries, mix a tiny amount of fresh clay with water to make a paste (slip) and fill the cracks. Smooth over with a finger and let dry again.
Step 3: Assembly and Finishing
-
Dry thoroughly:
Allow your rainbow arch to dry completely upright. This usually takes 24-48 hours depending on humidity. Rotate it occasionally for even airflow. -
Sand for perfection:
Once bone dry, use fine-grit sandpaper to smooth out any fingerprints or rough textures on both the arch and the base slab. Wipe away the dust with a slightly damp cloth. -
Create the texture mix:
Mix your terracotta paint. For that stony, matte texture seen in the image, I like to mix a teaspoon of baking soda into the acrylic paint. It gives a lovely faux-ceramic feel. -
Paint the arch:
Apply the textured paint to the rainbow arch, ensuring you get into the crevices between the layers. Let the first coat dry and apply a second for depth. -
Paint the base (optional):
You can paint the base a contrasting stone grey or white, or create a faux marble effect by swirling diluted grey paint over a white base coat. Alternatively, leave it natural if using white clay. -
Glue together:
Apply a strong craft glue to the bottom of the painted rainbow arch and press it firmly onto the center of the rectangular base. Let the glue cure fully before moving.
Level Up: Speckled Stone
Flick dilute black or dark brown paint off a stiff toothbrush onto the wet painted surface. This creates realistic speckling that mimics natural pottery or stone.
Now you have a functional piece of art ready to hold your favorite scents

What Really Happens Inside the Kiln
Learn how time and temperature work together inside the kiln to transform clay into durable ceramic.
Ring Holder Hands and Cones
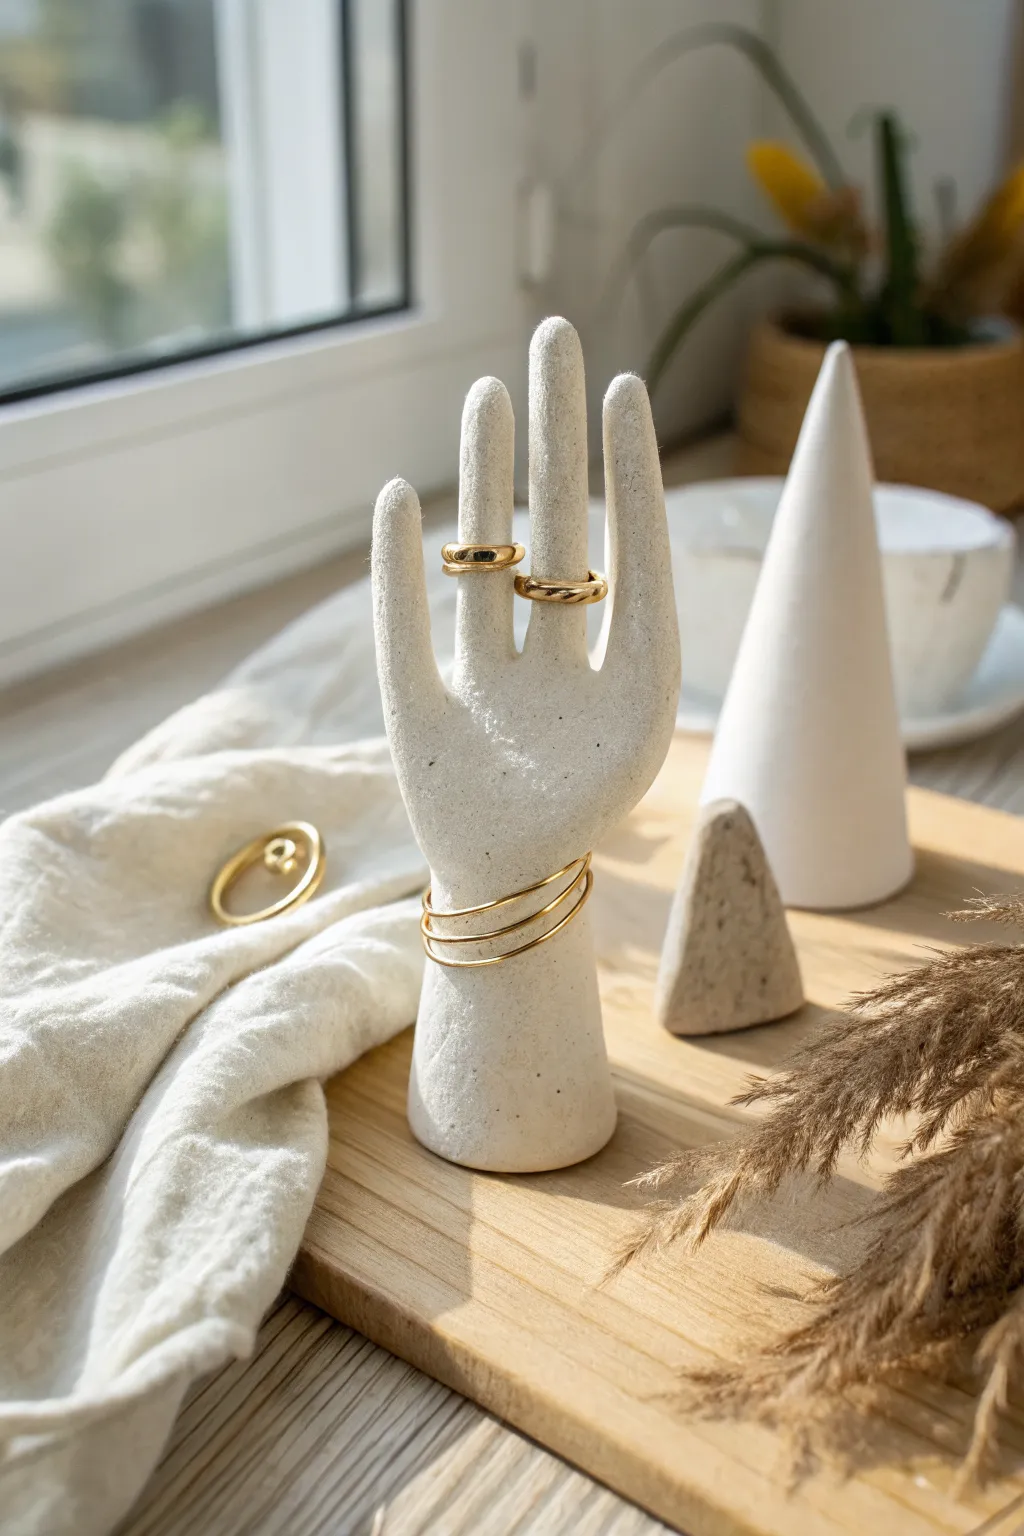
Create this elegant, minimalist jewelry display featuring a sculpted hand for rings and complementary geometric cones. The finished piece has a lovely speckled, stone-like texture that adds a modern touch to your vanity.
Detailed Instructions
Materials
- White air dry clay (2-3 lbs)
- Acrylic rolling pin
- Sculpting tools (needle tool, smoother)
- Small bowl or cup (for hand support)
- Sandpaper (fine and medium grit)
- Acrylic paint (white, cream, grey, black)
- Old toothbrush
- Water and sponge
- Matte spray varnish
Step 1: Sculpting the Hand Base
-
Condition the clay:
Start by kneading a large handful of air dry clay until it’s warm and pliable. If the clay feels dry, dip your fingers in water and work it in until smooth. -
Roll a cylinder:
Form the clay into a thick cylinder shape, about the thickness of your own wrist but slightly taller. -
Form the wrist flare:
Press one end of the cylinder firmly onto your work surface to create a flat, stable base. Gently flare the clay outward at the bottom so it stands securely without tipping. -
Flatten the palm area:
Using your palm or a rolling pin, flatten the upper two-thirds of the cylinder slightly to create the basic shape of the hand’s palm.
Step 2: Shaping the Fingers
-
Cut the fingers:
Use a needle tool or sharp craft knife to make four vertical cuts into the flattened top section. This creates the five separate segments for the fingers and thumb. -
Elongate the digits:
Gently pull and roll each cut segment between your fingers to lengthen and round them. Focus on making them slender enough to hold rings but sturdy enough not to break. -
Refine the thumb:
Position the thumb segment slightly lower and angled outward, just like a natural hand. Smooth the connection point back into the palm. -
Smoothing and drying:
Dip a sponge in water and smooth out all fingerprints and tool marks. I like to prop the hand against a cup or bowl while it dries to prevent it from slumping. Let it dry for 24-48 hours.
Fixing Cracks
Mix a small amount of fresh clay with water to create a paste (slip). Fill any cracks that appear during drying with this paste, let dry, and sand smooth.
Step 3: Sculpting the Cones
-
Form the tall cone:
Take a fresh ball of clay and roll it into a neat cone shape. Roll it back and forth on your table, applying more pressure on one side to create a tapered point. -
Flatten the base:
Tap the wider end of the cone repeatedly on the table to create a perfectly flat bottom. Check that it stands vertically without leaning. -
Create the mini cone:
Repeat the process with a much smaller piece of clay to make the shorter, stubbier cone shown in the foreground. -
Final smooth:
Use a damp finger to smooth the surface of both cones. Let these dry completely alongside the hand.
Elevate the Look
Paint the very tips of the fingers or the top of the cones with gold leaf or liquid gold paint for a luxurious, modern accent.
Step 4: Finishing & Decoration
-
Sand imperfections:
Once fully dry, use medium grit sandpaper to remove any bumps or rough edges. Switch to fine grit to create a velvety smooth finish on all pieces. -
Base coat:
Paint the hand and cones with a creamy off-white acrylic paint. You may need two coats for full coverage. -
Create the speckle effect:
Dilute a tiny amount of black or dark grey paint with water. Dip an old toothbrush into the mixture. -
Splatter technique:
Run your thumb over the bristles to flick tiny specks of paint onto the sculptures. Practice on paper first to control the spray. -
Seal the deal:
Once the paint is dry, spray the pieces with a matte varnish. This protects them from scratches and moisture.
Now you have a stylish and functional display for your favorite rings
Small Planters With Sculpted Feet
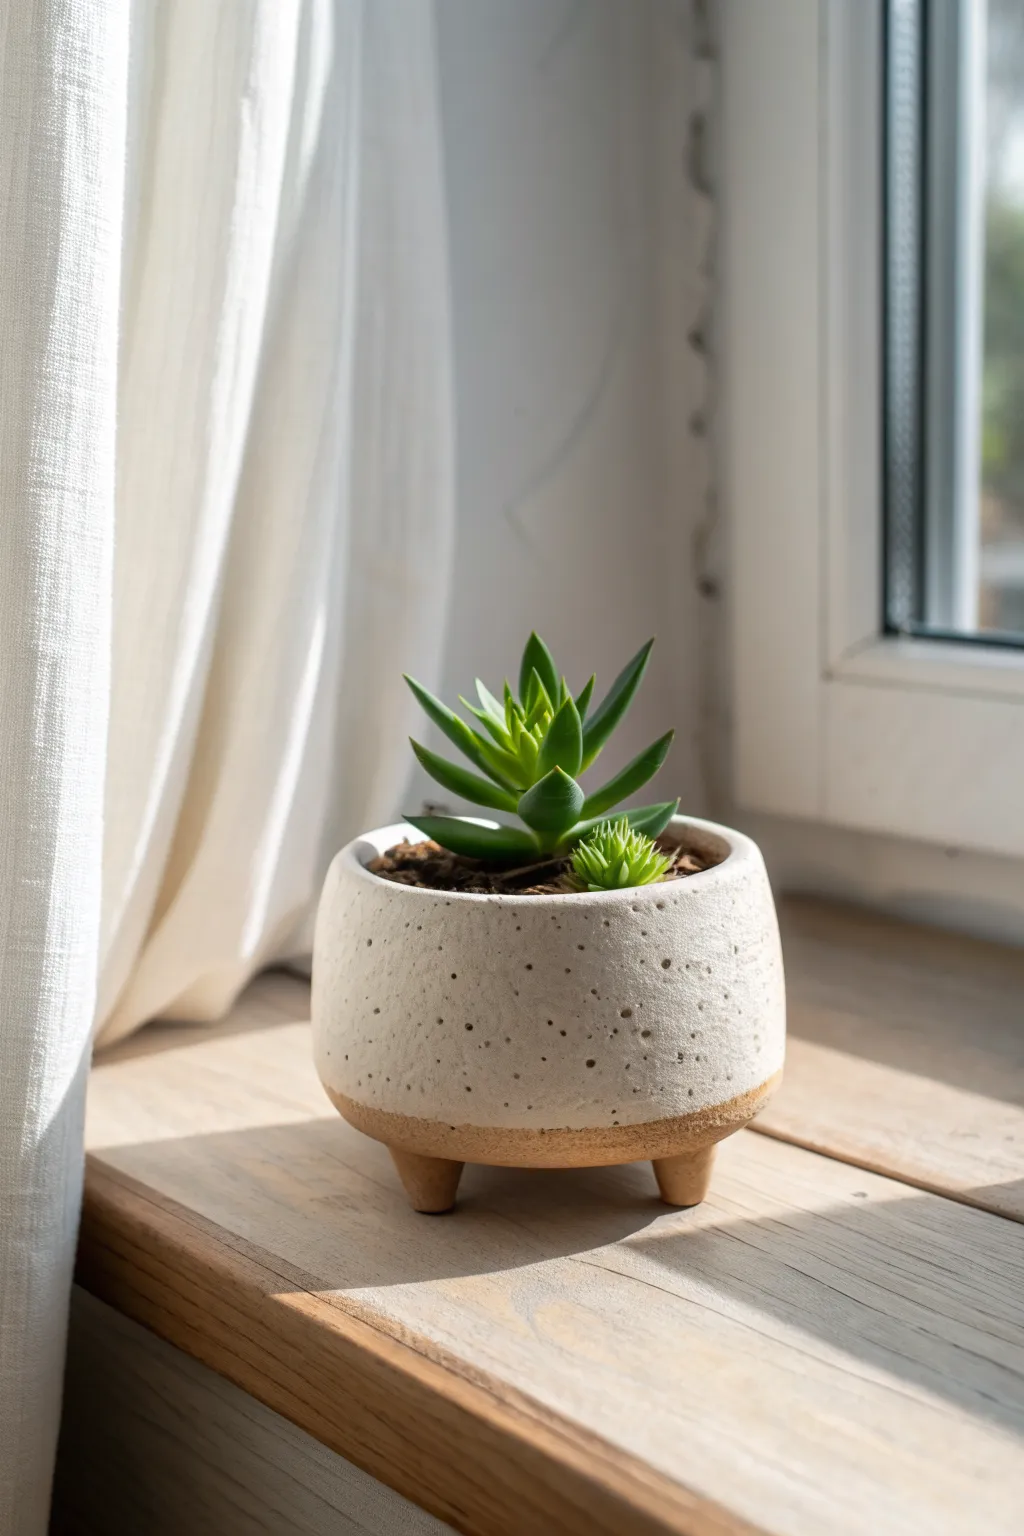
This charming, tripod-style planter mimics the look of high-fire ceramic with a textured, speckled finish and a contrasting raw clay base. Its compact size makes it perfect for housing small succulents or air plants on a sunny windowsill.
Step-by-Step Guide
Materials
- White or grey air dry clay
- Terracotta colored acrylic paint
- Cream or off-white acrylic paint
- Black acrylic paint (for speckles)
- Small rolling pin
- Round cookie cutter or bowl (approx. 4-inch diameter)
- Craft knife
- Small cup or jar (to use as a mold)
- Old toothbrush or stiff bristle brush
- Matte spray varnish or sealant
- Water and sponge
- Sandpaper (medium grit)
Step 1: Forming the Base Structure
-
Roll the slab:
Begin by conditioning your air dry clay until it is soft and pliable, then roll it out to a uniform thickness of about 1/4 inch. -
Cut the base:
Using a round cookie cutter or a bowl as a template, cut out a perfect circle from your rolled clay slab to serve as the pot’s bottom. -
Create the walls:
Roll out a separate long rectangular strip of clay, ensuring it is long enough to wrap around the circumference of your base circle. -
Assemble the pot:
Wrap the rectangular strip around your base circle. Score (scratch) and slip (wet) the edges where they meet, then press them firmly together to create a cylinder. -
Refine the shape:
Smooth out the seam on the side and the connection to the base using your fingers and a little water. Gently curve the walls inward slightly at the top for a rounded silhouette.
Step 2: Sculpting the Feet
-
Shape the feet:
Roll three equal-sized balls of clay, roughly the size of large marbles. Slightly flatten the top of each ball to create a stable attachment point. -
Attach the feet:
Flip your pot upside down. Score and slip the three attachment points on the base in a triangular formation, then press the feet firmly onto the pot. -
Blend the seams:
Use a modeling tool or your finger to smooth the clay from the feet onto the base of the pot so they look like one continuous piece, not just stuck on. -
Level check:
While the clay is still soft, flip the pot right-side up and gently press it down on a flat surface to ensure it stands evenly and doesn’t wobble.
Uneven Wobble?
If the pot dries unevenly and wobbles, adhere a disk of coarse sandpaper to a table. Rub the feet of the dried pot in a circular motion on the paper until they are perfectly level.
Step 3: Texturing and Finishing
-
Add surface texture:
Take a stiff bristle brush or an old toothbrush and gently tap it all over the exterior walls to create a subtle, pitted stone texture. -
Dry completely:
Let the pot air dry for 24-48 hours. I usually rotate it every few hours during the first day to ensure even drying and prevent warping. -
Sand for smoothness:
Once bone dry, lightly sand the rim and any rough patches to ensure a clean, professional finish. -
Paint the base:
Paint the three feet and the bottom 1/2 inch of the pot with terracotta acrylic paint to create the ‘dipped’ raw clay look. -
Paint the body:
Paint the upper portion of the pot with a cream or off-white acrylic, carefully creating a clean line where it meets the terracotta color. -
Create the speckles:
Dilute a tiny amount of black paint with water. Dip a toothbrush into it and run your thumb across the bristles to flick tiny speckles onto the white section. -
Seal the project:
Finish by coating the entire planter, inside and out, with a matte spray varnish to protect the paint and clay from moisture.
Waterproof Hack
Air dry clay isn’t 100% waterproof. To make this functional for real plants, simply place a small plastic condiment cup or nursery pot inside to hold the soil and water.
Now you have a stylish, modern planter ready to showcase your favorite greenery


The Complete Guide to Pottery Troubleshooting
Uncover the most common ceramic mistakes—from cracking clay to failed glazes—and learn how to fix them fast.
Body Positive Torso Sculptures
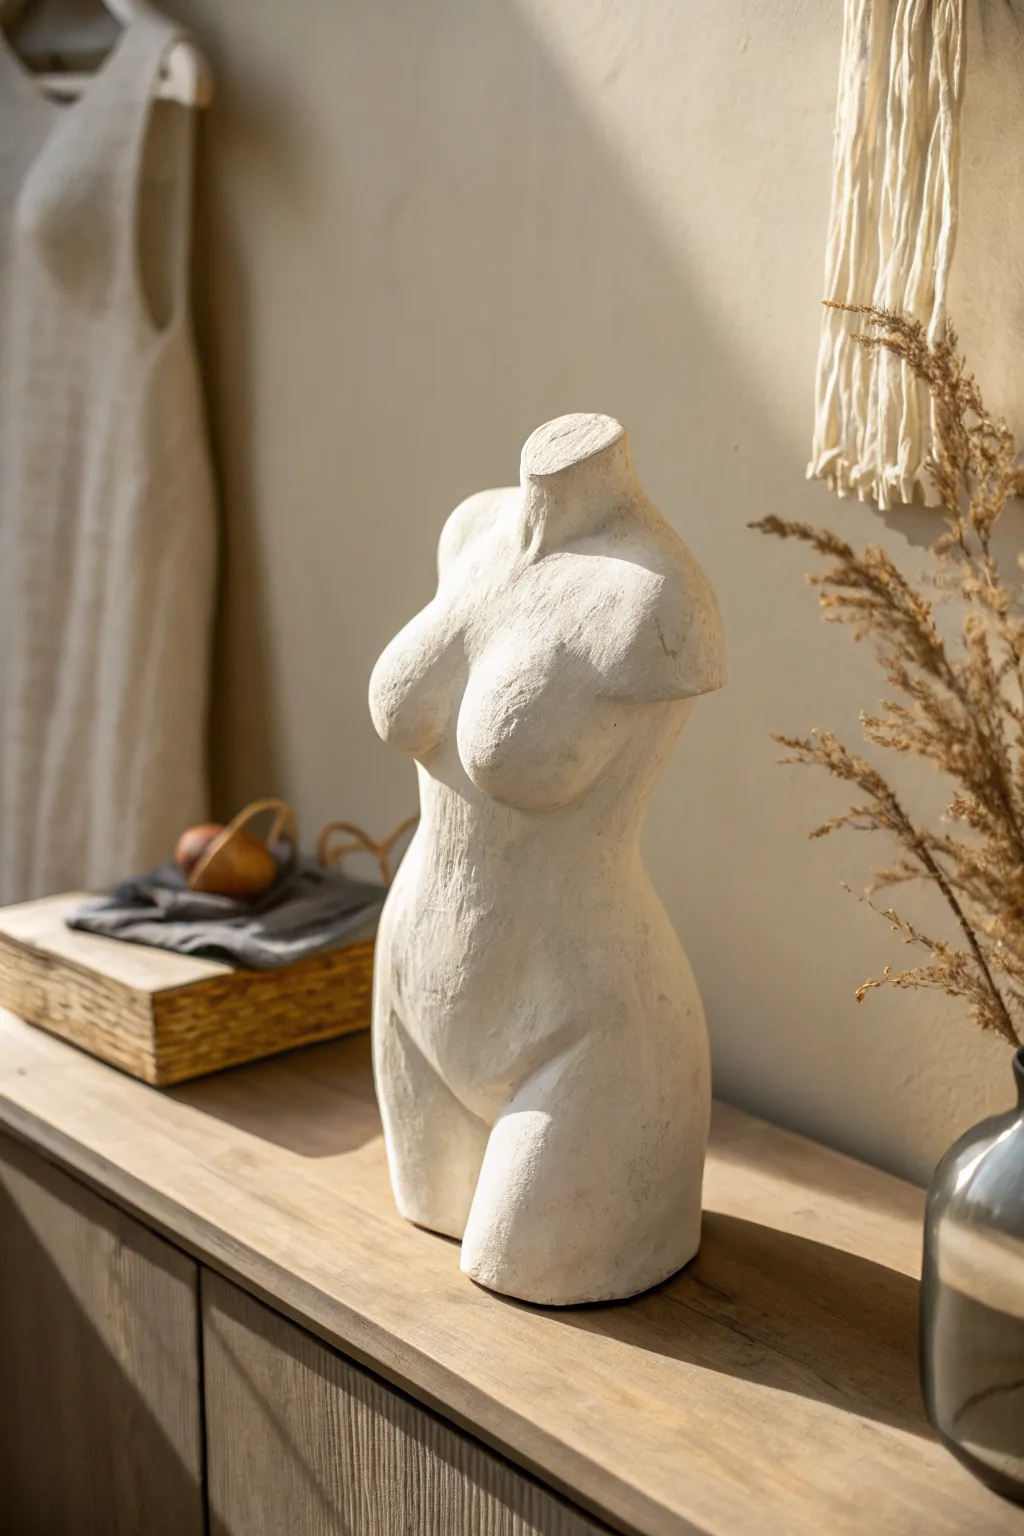
Celebrate the beauty of the human form with this minimalistic torso sculpture that captures the look of ancient carved stone. Using basic air-dry clay and clever texturing techniques, you can create a sophisticated decor piece that feels both modern and timeless.
How-To Guide
Materials
- Air-dry clay (white or light grey)
- Aluminum foil
- Masking tape
- Wire armature (medium gauge)
- Small wooden base or dowel (for support during sculpting)
- Sculpting tools (loop tool, wooden modeling tool)
- Sponge
- Water spray bottle
- Fine and medium grit sandpaper
- White acrylic paint (optional, for finishing)
Step 1: Building the Structure
-
Form the armature:
Begin by twisting your wire into a basic T-shape to represent the spine and shoulders. If you are using a wooden base support, attach the wire securely to it so your sculpture stands upright while you work. -
Create the bulk:
Crumple aluminum foil tightly around the wire armature. Shape two larger masses for the chest area and a wider section for the hips to establish the hourglass foundation. -
Refine the foil shape:
Compress the foil firmly to ensure it’s dense. The foil layer should be about 1/2 inch smaller than your final desired size to leave room for the clay layer. -
Secure with tape:
Wrap the entire foil form in masking tape. This smooths out sharp foil edges and gives the clay a better surface to grip onto than the slick aluminum.
Pro Tip: Crack Prevention
If small hairline cracks appear during drying, make a ‘slurry’ of clay and water (consistency of yogurt) and paint it into the cracks with a brush to seal them seamlessly.
Step 2: Adding the Clay
-
Apply the base layer:
Roll out a slab of clay about 1/4 inch thick. Wrap this sheet around the torso form, pressing firmly to eliminate air pockets between the tape and the clay. -
Build volume:
Add extra knobs of clay to the chest and hip areas to build up the specific anatomy. Don’t worry about smoothness yet; focus on getting the proportions correct. -
Merge the seams:
Use a little water on your fingers or a modeling tool to smear the added clay chunks into the base layer, ensuring there are no visible seams or weak points.
Step 3: Sculpting the Details
-
Define the chest:
Smooth the clay into rounded forms for the bust. Use a curved wooden tool to create the definition underneath the bust line and transition smoothly into the ribcage. -
Carve the waistline:
Use your thumbs to gently press inward at the waist to accentuate the curve. This sculpture relies on soft transitions rather than harsh lines, so keep your movements fluid. -
Shape the hips and thighs:
Build out the hips and the top of the thighs. The sculpture cuts off at the upper thigh, so round off the bottom edges neatly so the piece will sit flat once removed from the support. -
Define the neck stem:
Sculpt the neck area to look like a deliberate cut-off point, slightly concave or flat at the very top, mimicking a classical bust fragment. -
Refine the back:
Turn the piece around and construct usually ignored details like the slight indentation of the spine and the shoulder blades. I find this really adds realism even if the piece is displayed against a wall.
Level Up: Antique Look
Mix coffee grounds or fine sand into your clay before sculpting. When you sand the finished piece, speckles will appear, mimicking real granite or sandstone.
Step 4: Texturing and Finishing
-
Create surface texture:
Instead of smoothing everything perfectly with water, use a damp sponge to dab the surface gently. This creates a slightly pitted, organic texture similar to limestone or plaster. -
Initial drying:
Let the sculpture dry slowly away from direct heat or sunlight. Cover it loosely with plastic wrap for the first 24 hours to prevent cracking, then uncover to finish drying (2-3 days total). -
Remove support (optional):
If your internal support protrudes from the bottom and prevents it from sitting flat, carefully trim or remove it once the clay is leather-hard but not fully brittle. -
Sand for stone effect:
Once bone dry, use medium-grit sandpaper to gently knock back any high spots or fingerprints. Leave some roughness to maintain the ‘artifact’ aesthetic. -
Final finish:
If your clay dried a dull grey, apply a wash of watered-down white acrylic paint. Wipe it back with a rag immediately so the paint settles into the textures while leaving the high points natural.
Place your finished sculpture in a spot where the sunlight hits it to highlight those beautiful, organic curves
Modern Candle Holder Totems
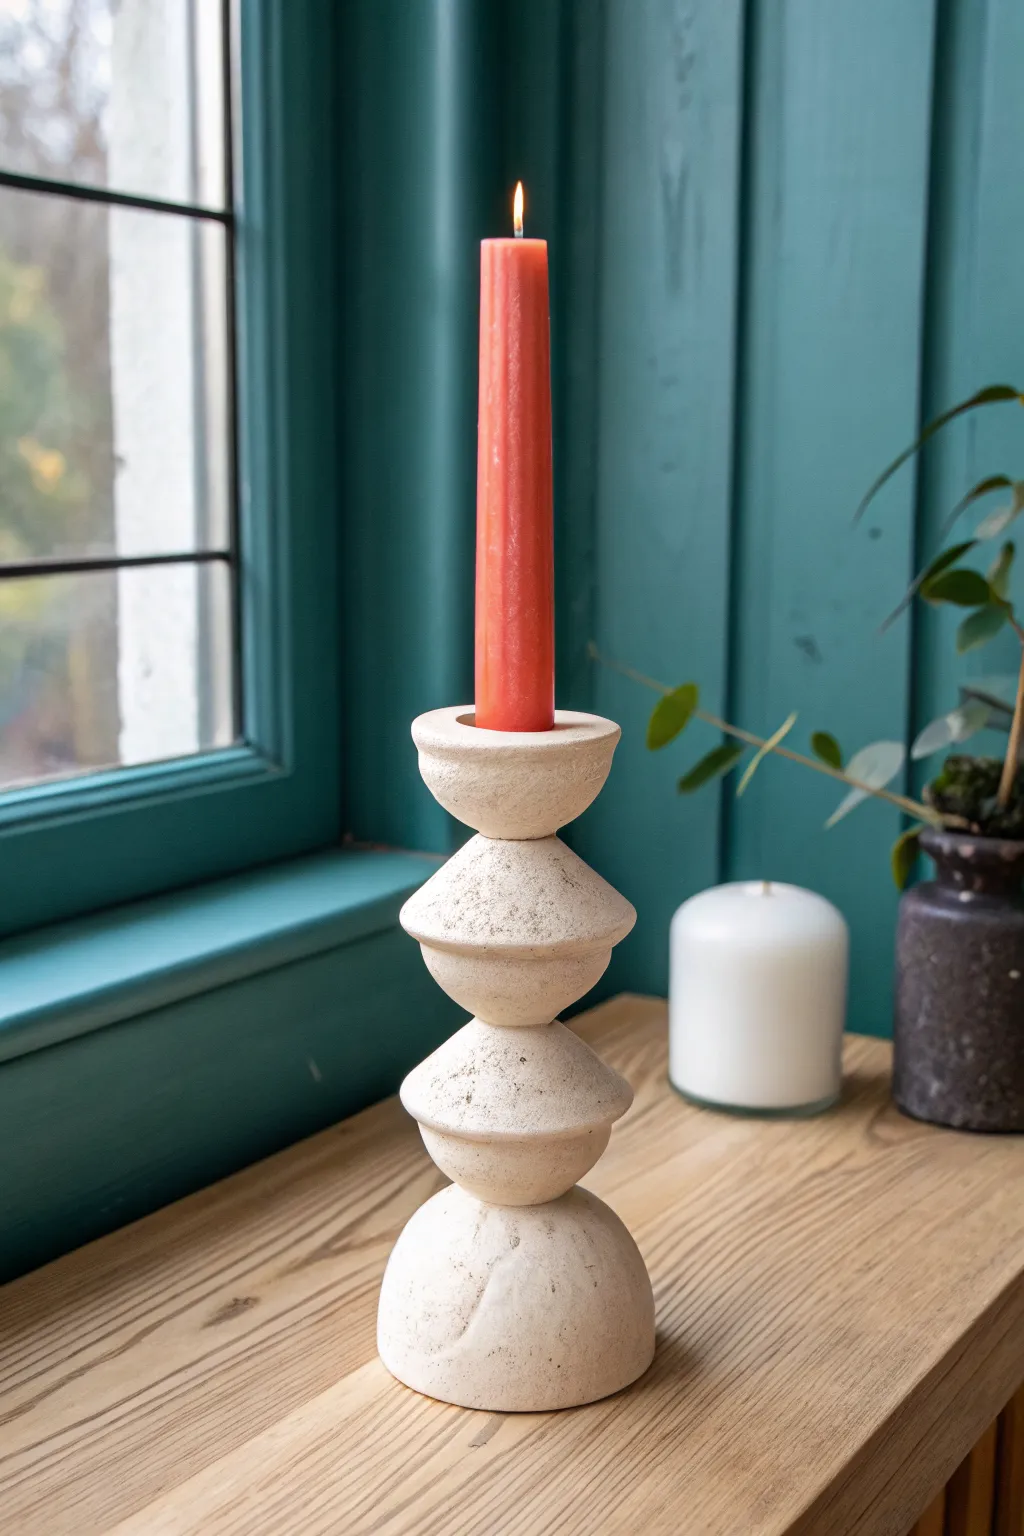
This sculptural totem candle holder brings a touch of modern brutalist design into your home with its organic, off-white texture. It features a stack of geometric shapes—domes and double-cones—that create a striking silhouette perfect for a taper candle.
Step-by-Step Guide
Materials
- White or stone-colored air-dry clay (approx. 1kg)
- Rolling pin
- Water and a small sponge
- Clay knife or fettling knife
- Slip (clay mixed with water to a paste)
- Sandpaper (fine and medium grit)
- A taper candle (for sizing)
- Circle cutters or templates (optional)
- Matte sealant or varnish
Step 1: Forming the Base Components
-
Condition the clay:
Begin by kneading a large chunk of your air-dry clay until it is warm, pliable, and free of air bubbles. This ensures the structure will be strong once dried. -
Shape the base dome:
Take a tennis-ball-sized amount of clay and roll it into a smooth sphere. Gently press it onto your work surface to flatten the bottom, creating a sturdy half-sphere dome for the foundation. -
Refine the base:
Use your fingers and a damp sponge to smooth out any cracks on the dome’s surface. The top needs to incurving slightly or be flattened just enough to support the next tier. -
Create the middle elements:
You will need to create two ‘double-cone’ shapes. Start by rolling two spheres, slightly smaller than your base. -
pinch the double-cones:
Gently pinch the equator of these spheres to create a ridge, then flatten the top and bottom poles slightly. They should look like two shallow bowls glued back-to-back. -
Refine the edges:
Using a knife or your fingers, sharpen the central ridge line of these geometric shapes so they look deliberate and architectural rather than just lumpy.
Tower Leaning?
If your totem keeps slumping while wet, insert a wooden skewer or dowel straight down through the center of all pieces to act as an internal spine while it dries.
Step 2: Creating the Candle Cup
-
Form the top cup:
Roll a final sphere, roughly the same size as your middle elements. Press your thumb into the center to create a hollow, forming a thick-walled bowl shape. -
Size the opening:
Take your actual taper candle and press it gently into the hollow to ensure the fit is correct. Wiggle it slightly to create just a hair of clearance for shrinkage. -
Shape the rim:
Flatten the top rim of the cup so it is level. I prefer to use a small wooden slat to tap it flat, ensuring a professional finish.
Add Speckles
Knead roughly ground black pepper or dried coffee grounds into your white clay before sculpting to achieve a natural, speckled stone texture without painting.
Step 3: Assembly and Finishing
-
Score and slip:
Before stacking, score (scratch) the contact points between the base dome and the first middle piece. Apply a generous dab of slip as glue. -
Stack the totem:
Press the pieces together firmly with a slight twisting motion to lock them. Repeat this process for the second middle piece and the top candle cup. -
Check alignment:
Stand back and look at your totem from all angles. Adjust the stack while the clay is wet to ensure it stands vertically straight and isn’t leaning. -
Blend hidden seams:
For extra stability, you can use a sculpting tool to smooth the clay slightly at the very center join points, though the design relies on the distinct separation of shapes. -
Initial texture smoothing:
Go over the entire piece with a barely damp sponge to remove fingerprints, but don’t over-wet the clay as it can cause cracking. -
Slow drying:
Let the piece dry slowly away from direct heat or sunlight. Cover it loosely with plastic wrap for the first 24 hours to equalize moisture, then uncover for another 24-48 hours. -
Sanding:
Once bone dry, use fine-grit sandpaper to smooth out rough patches. The goal is a matte, stone-like finish, so don’t polish it too perfectly. -
Distressing (optional):
If you want the weathered look seen in the photo, you can gently scratch a few random marks or lines into surface with a needle tool. -
Sealing:
Finish with a matte varnish or sealant to protect the clay from humidity and soot, keeping the raw aesthetic intact.
Place your finished totem on a windowsill or mantle and enjoy the quiet sculptural presence it adds to your room

TRACK YOUR CERAMIC JOURNEY
Capture glaze tests, firing details, and creative progress—all in one simple printable. Make your projects easier to repeat and improve.
Textured Bud Vases for Single Stems
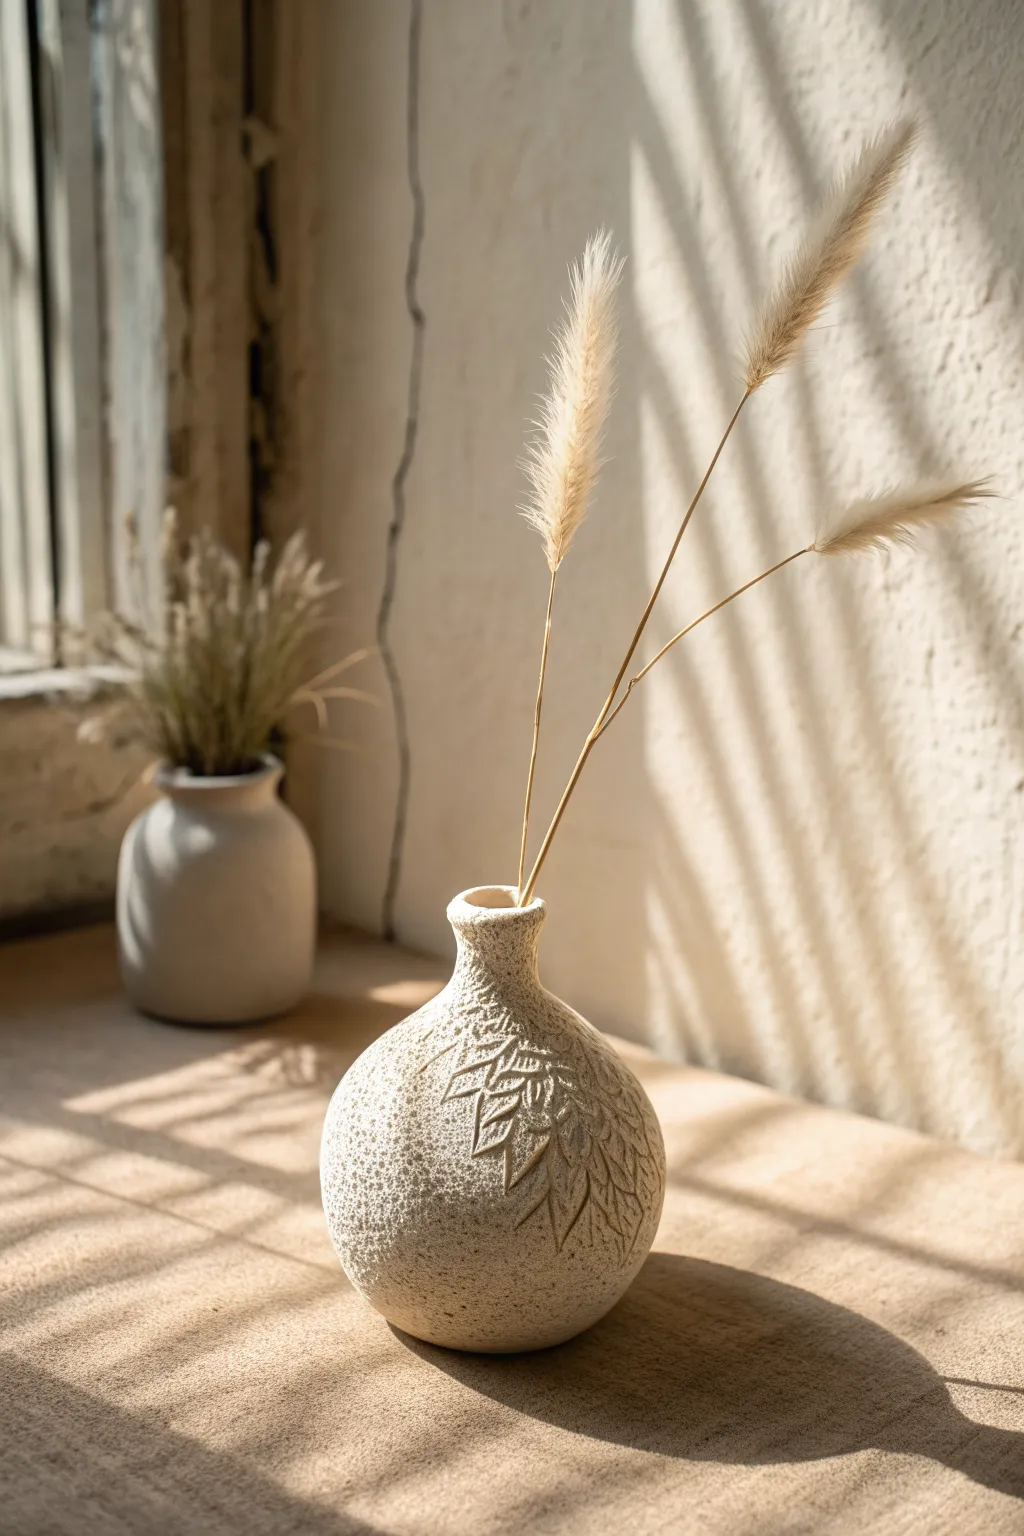
Capture the raw, natural beauty of stone and ceramic with this textured bud vase project. By combining a simple pinch pot form with clever surface detailing, you’ll create a perfectly imperfect vessel for showcasing delicate dried stems.
Step-by-Step
Materials
- White air dry clay
- Rolling pin
- Small bowl relative to hand (for water)
- Old toothbrush or stiff bristle brush
- Needle tool or toothpick
- Loop tool (optional for carving)
- Sponge
- Fine grit sandpaper
- Acrylic sealer (matte finish)
Step 1: Forming the Base Shape
-
Condition the Clay:
Start by taking a grapefruit-sized ball of air dry clay. Knead it thoroughly in your hands to warm it up and remove any trapped air bubbles, which helps prevent cracking later. -
Create the Sphere:
Roll the clay between your palms or on your work surface until you have a smooth, round sphere. Try to get it as symmetrical as possible, though a little organic irregularity is fine. -
Start the Pinch Pot:
Hold the sphere in one hand and gently press your thumb into the center, stopping about a half-inch from the bottom. This will be the interior of your vase. -
Shape the Walls:
Use your thumb and fingers to gently pinch and turn the clay, thinning the walls and expanding the interior. Aim for a rounded, bulbous belly shape while keeping the walls relatively thick for stability.
Stone Effect Texture
Mix a tiny amount of black sand or used coffee grounds into your white clay before sculpting to add authentic, gritty speckles.
Step 2: Refining the Neck
-
Gather the Opening:
Instead of widening the top, gently collar the clay inward at the opening. Use both hands to cup and squeeze the top section, narrowing it to form a distinct neck. -
Form the Rim:
Once the neck is narrowed, gently flare the very top edge outward just slightly to create a soft rim. Smooth this edge with a slightly damp finger to remove any cracks. -
Smoothing:
Use a damp sponge to glide over the main body of the vase. You aren’t trying to make it perfectly glass-smooth, but you want to remove obvious fingerprints before adding texture.
Level Up: Faux Glaze
Paint the inside of the engraved leaves with a watered-down white acrylic paint, then wipe the surface immediately to leave pigment only in the crevices.
Step 3: Texturing and Carving
-
Create the Stone Texture:
Take an old toothbrush or a stiff-bristled brush and firmly tap the bristles all over the surface of the clay. Vary your pressure to create a pitted, stone-like surface. -
Sketch the Leaf Pattern:
Using a needle tool or toothpick, very lightly scratch the outline of a fern or leaf branch onto the front of the vase. Keep the lines faint so you can correct them if needed. -
Carve the Main Stem:
Use your needle tool or a small loop tool to carve out the central vein of the leaf. I like to make this incision slightly deeper than the leaves to give it dimension. -
Detail the Leaves:
Carve the individual leaflets branching off the main stem. Instead of just drawing lines, remove small scoops of clay to create relief that catches the light. -
Enhance Texture Around Design:
Go back with your texture brush and tap around the edges of your carving. This helps blend the carved area naturally into the rough surface of the vase.
Step 4: Finishing Touches
-
Check Stability:
Gently tap the bottom of the vase on your table to flatten the base slightly. This ensures it won’t wobble once it’s filled with dried flowers. -
Slow Drying:
Place the vase in a cool spot away from direct sunlight. To prevent cracking, you can loosely drape a plastic bag over it for the first 24 hours to slow the drying process. -
Complete Drying:
Remove the plastic and let it dry completely for another 24 to 48 hours. The clay should turn a stark white and feel room temperature (not cold) when fully dry. -
Sanding:
Once bone dry, take fine-grit sandpaper and very gently go over the rim and any sharp edges where the clay might be jagged. Be careful not to sand away your toothbrush texture. -
Seal:
Apply a coat of matte acrylic sealer to protect the surface. Since this is air dry clay, remember it isn’t waterproof, so stick to dried stems and grasses for your display.
Place your favorite dried lagurus grass inside and enjoy the gentle shadows your carving creates
Cute Animal Mini Figurines
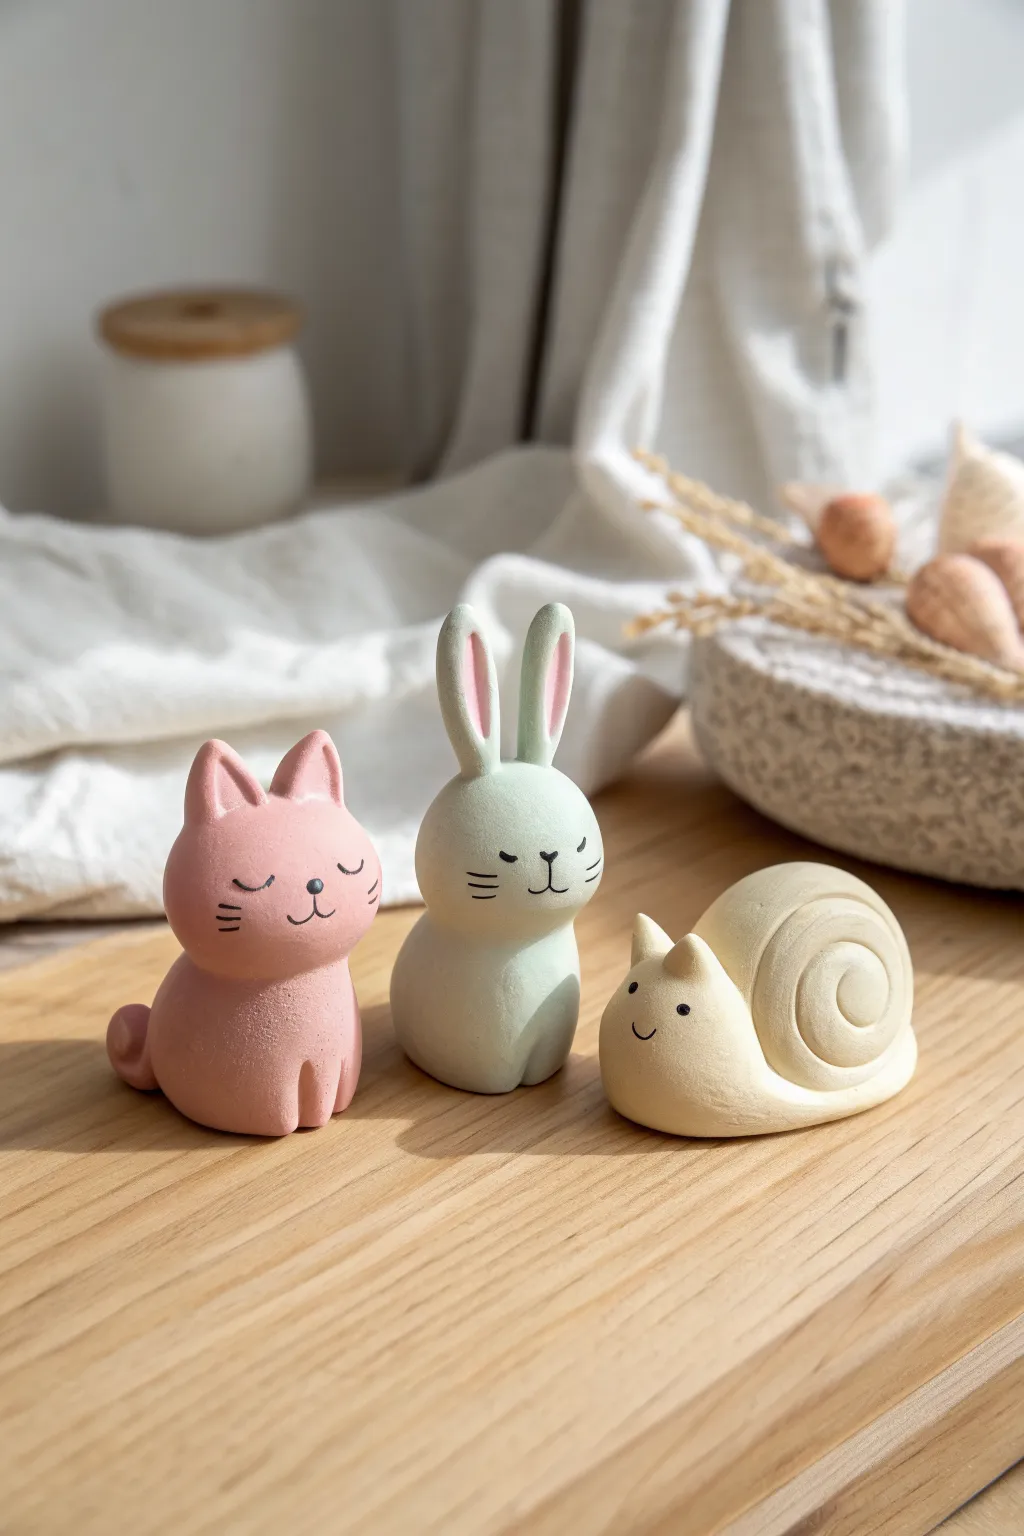
These delightfully smooth, matte-finish figurines are perfect beginner projects that rely on simple shapes and minimal details for maximum charm. You’ll create a serene pink cat, a mint green bunny, and a friendly cream snail to brighten up any desk.
How-To Guide
Materials
- Air dry clay (white)
- Acrylic paints (pastel pink, mint green, cream, white, black)
- Fine grit sandpaper
- Small bowl of water
- Needle tool or toothpick
- Soft synthetic brushes (flat and fine liner)
- Matte varnish or sealant
Step 1: Sculpting the Cat
-
Body Base:
Roll a ping-pong sized ball of clay into a smooth sphere, then gently flatten the bottom so it sits stable. Pull the top up slightly to create a subtle pear shape. -
Head Shape:
Roll a slightly smaller sphere for the head. Attach it to the top of the body using a dab of water and by smoothing the clay across the seam with your finger or a tool until the join is invisible. -
Ears and Tail:
Form two small triangles for ears and blend them onto the top of the head. For the tail, roll a small coil, curl it into a swirl shape, and press it firmly against the lower back side of the body. -
Leg Details:
Using a needle tool, gently impress vertical lines at the front base of the body to suggest front paws.
Cracks Appearing?
If small drying cracks appear, mix a tiny bit of fresh clay with water to make a paste (slip) and fill them in before painting.
Step 2: Sculpting the Rabbit
-
Primary Forms:
Similar to the cat, create a sturdy pear-shaped body and attach a round head. Use a bit of water to ensure a seamless connection. -
Long Ears:
Roll two elongated teardrop shapes. Flatten them slightly. Attach them to the top of the head, ensuring they stand upright. I prefer to blend the clay downwards into the head for extra stability. -
Defining Features:
Use the needle tool to gently carve the inner ear details. Add small indentations at the base for paws, similar to the cat.
Smooth Seams
Dip your finger in water and run it over clay seams repeatedly. This friction creates a polished surface that needs less sanding later.
Step 3: Sculpting the Snail
-
Shell Spiral:
Roll a long, even snake of clay. Starting from one end, coil it tightly around itself to create a classic shell spiral. Leave the end slightly loose. -
Snail Body:
Shape a teardrop for the body, lifting the wider end up to form the head area. Add two tiny triangles for the eye stalks/ears. -
Assembly:
Press the shell firmly onto the back of the body shape. Blend the clay subtly underneath where they meet to secure the bond.
Step 4: Refining & Painting
-
Drying:
Allow all three figures to dry completely for 24-48 hours away from direct sunlight to prevent cracking. -
Sanding:
Once dry, use fine-grit sandpaper to gently smooth out any fingerprints or bumps. This step is crucial for that matte, store-bought look. -
Base Colors:
Paint the cat with pastel pink, the rabbit with mint green, and the snail with a warm cream color. Apply 2-3 thin coats for opaque coverage, letting each layer dry. -
Ear Details:
Mix a slightly darker pink to paint the inside of the rabbit’s ears. -
Face Details:
Using your finest liner brush and black paint, carefully add the sleeping eyes, noses, and whiskers. Keep the lines very thin and delicate. -
Final Seal:
Finish with a coat of matte varnish to protect the paint without adding unnatural shine.
Now you have a trio of adorable companions ready to decorate your space
Sleepy Pet Sculptures on Pebble Bases
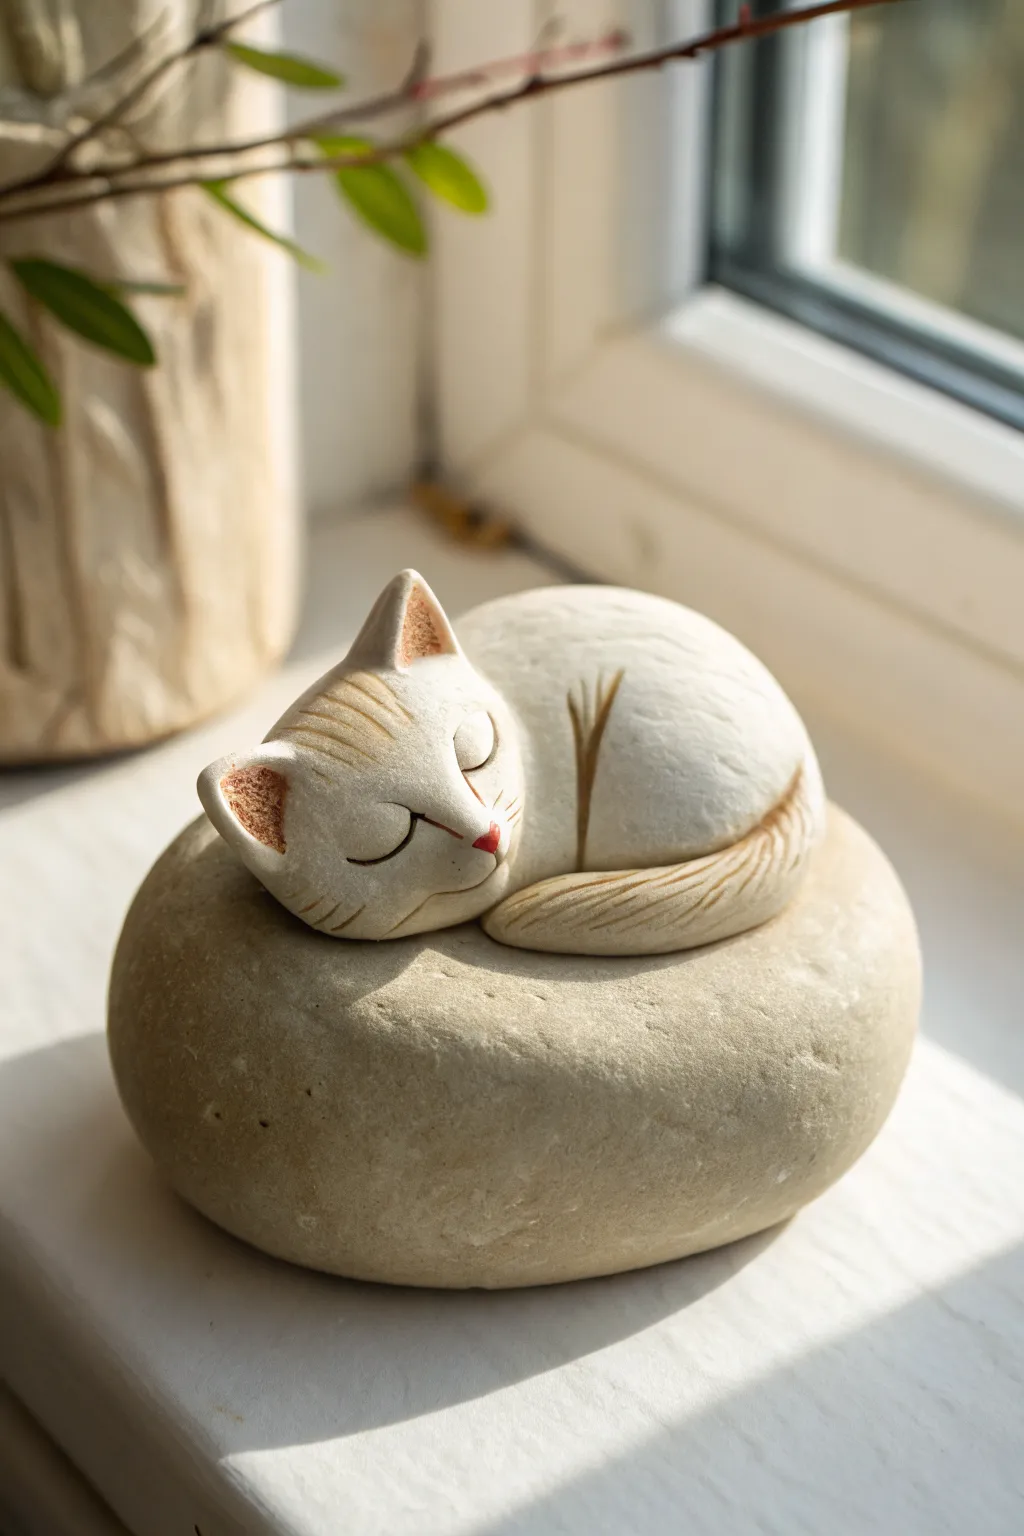
Capture the peaceful essence of a sleeping feline with this charming mixed-media project that combines the natural beauty of a river stone with smooth air-dry clay. The result is a minimalistic, zen-like sculpture perfect for a sunny windowsill or a desk companion.
Step-by-Step Tutorial
Materials
- White or cream air-dry clay (e.g., DAS or creative paperclay)
- Large, smooth, flat river stone (palm-sized)
- Sculpting tools (needle tool, small loop tool)
- Water in a small cup
- Acrylic paints (Soft brown, reddish-pink)
- Fine detail paintbrush
- Matte varnish or sealant
Step 1: Preparing the Base and Body
-
Select your stone:
Choose a rounded, smooth pebble that sits flat on a table without wobbling. Wash and dry it thoroughly to ensure the clay will adhere properly. -
Form the body base:
Take a lime-sized ball of clay and roll it into a smooth sphere. Gently press it into an oval shape. -
Attach to the stone:
Press the clay oval onto the top of your stone. Use a small amount of water on your finger to smooth the edges of the clay where it meets the rock, creating a seamless transition. You want it to look like the cat is melting onto the stone. -
Shape the back:
Smooth the top of the oval into a rounded, hunched shape, mimicking the curve of a curled-up sleeping cat.
Clay sliding off?
If the clay won’t stick to the smooth stone, apply a thin layer of PVA glue to the rock surface first and let it get tacky before pressing your clay base down.
Step 2: Sculpting the Head and Tail
-
Add the head:
Roll a smaller ball of clay for the head. Attach it to one end of the body, blending the clay at the neck area so there are no cracks. I like to tilt the head slightly downward so it rests on the stone or its own paws. -
Refine the face shape:
Gently pinch the sides of the head to create a slight angularity for the cheeks and jawline, keeping the overall look soft and round. -
Form the ears:
Create two small triangles of clay. Score the bottom of the triangles and the top of the head, dampen slightly, and press them into place. Smooth the seams with a clay tool. -
Create the tail:
Roll a tapered snake of clay. Wrap it around the base of the body, curving it so the tip rests near the face or tucks under the chin. -
Blend the tail seam:
While keeping the top of the tail distinct, blend the underside of the tail slightly into the body clay to ensure it doesn’t break off later.
Step 3: Adding Details and Finishing
-
Sculpt the fur texture:
Using a needle tool or a dull blade, gently carve shallow, flowing lines into the tail and the top of the head to mimic soft fur texture. Don’t overdo it; keep the rest of the body smooth. -
Define the face:
Use the needle tool to press two curved slits for the closed sleeping eyes. Add a tiny vertical line for the mouth. -
Initial drying:
Let the sculpture sit for at least 24-48 hours until completely dry and hard. Keep it away from direct heat to prevent cracking. -
Paint the details:
Once dry, use a very fine brush to paint thin brown lines inside the carved fur grooves on the head and tail to accentuate the texture. -
Add warmth:
Dilute a tiny bit of reddish-pink paint with water and carefully dab it onto the inner ears and the nose tip for a gentle blushing effect. -
Enhance the eyes:
Trace the carved eye lines with the finest tip of your brush using dark grey or brown paint. -
Seal the work:
Apply a coat of matte varnish over the clay portion to protect the paint and seal the clay against humidity.
Seamless Finish
Keep a small sponge damp with water nearby. Lightly wipe the clay surface before drying to remove fingerprints and achieve that pro-level smoothness.
Place your little sleeping guardian in a special spot where it can remind you to take a moment to rest
Whale and Frog Phone Stand Sculptures
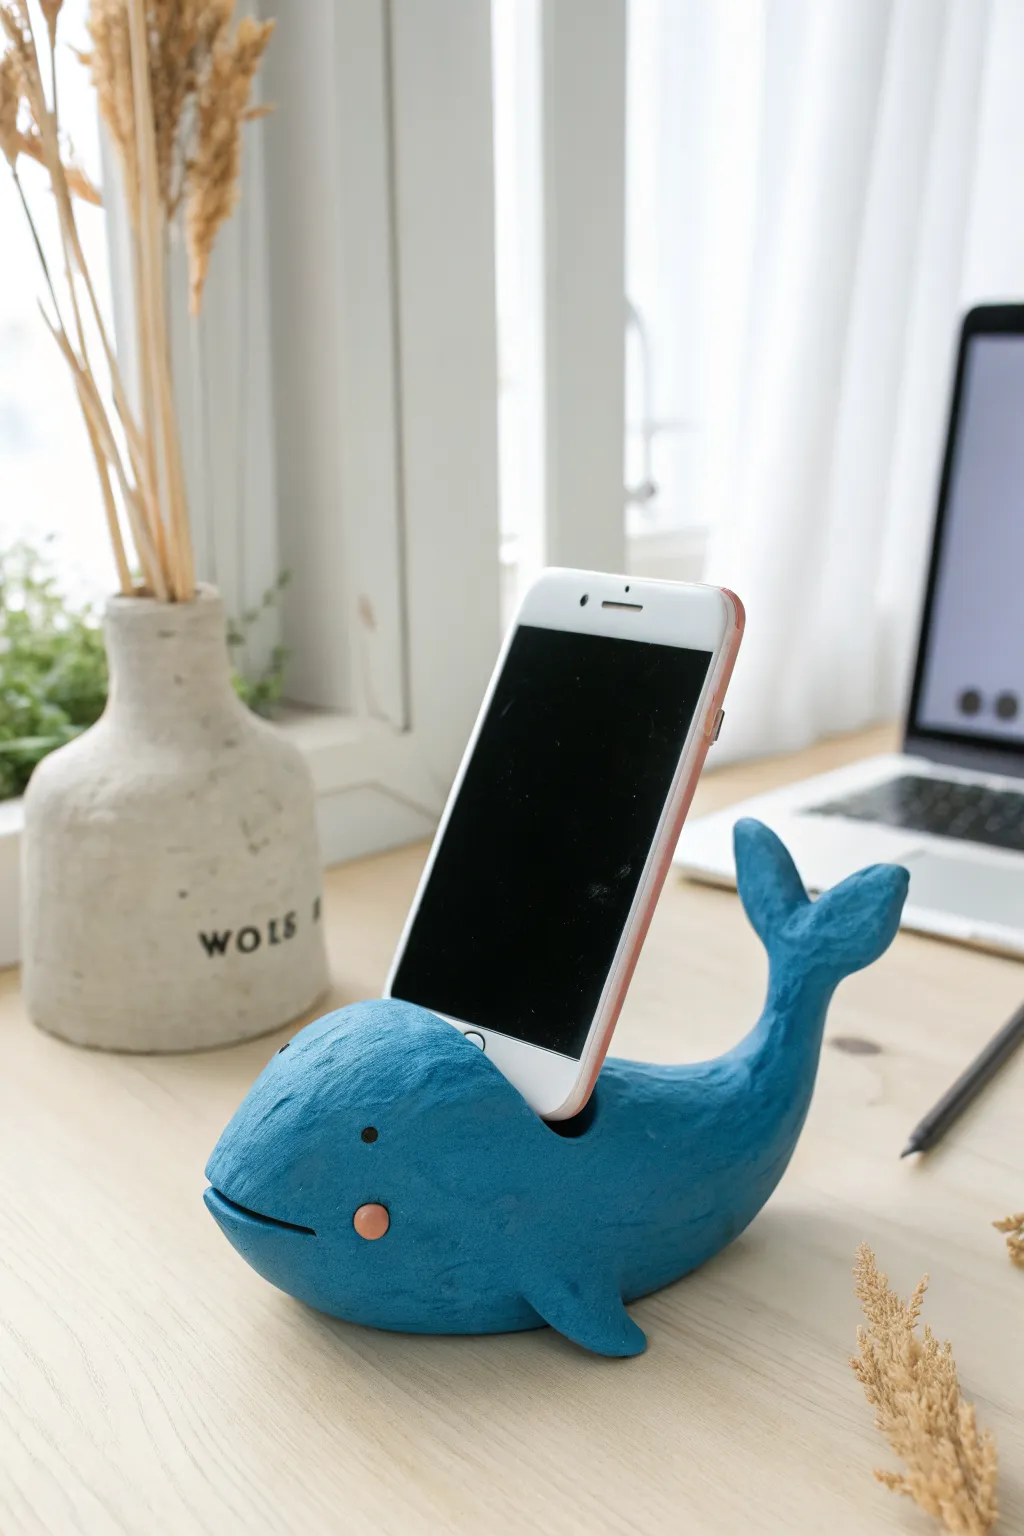
This charming, deep-blue whale isn’t just a cute desk companion; it’s a functional sculpture designed to hold your phone upright. With its textured finish and simple, kawaii face, this project combines practicality with playful, handmade character.
Detailed Instructions
Materials
- Air dry clay (white or grey)
- Phone (or cardboard template of phone size)
- Aluminum foil
- Acrylic paints (dark blue, teal, light pink, black)
- Sculpting tools (needle tool, smoothing tool)
- Sandpaper (fine grit)
- Varnish or sealant (matte finish recommended)
- Small paintbrush
- Water cup
Step 1: Forming the Core
-
Prepare the armature:
Crumple a piece of aluminum foil into a dense, elongated oval shape. This will serve as the inner core of the whale’s body, saving clay and reducing drying time. -
Cover with clay:
Roll out a slab of air dry clay to about 1/4 inch thickness. Wrap this completely around your foil core, smoothing the seams together with a little water until you have a solid, seamless oval. -
Shape the body:
Gently taper one end of the oval to be slightly narrower (the tail end) and keep the other end rounded and bulbous (the head).
Step 2: Sculpting the Features
-
Create the tail:
Take a separate lump of clay and shape it into a ‘Y’ or crescent moon shape. Flatten the tips to look like flukes. Score and slip the narrow base of the tail, then attach it securely to the tapered end of the body, blending the clay for a strong bond. -
Add the fins:
Form two small, flat triangles for the side fins. Attach these low on the sides of the body, curving them slightly backward so they look like they are swimming. -
Make the mouth:
Use a needle tool or a thin blade to slice a horizontal line across the front of the head to create a smiling mouth. I find gently pressing a sculpting tool into the corners helps deepen the expression. -
Create the phone slot:
This is the crucial step. Determine where your phone needs to sit—usually just behind the head. Press a wedge or a thick ruler into the clay to create a deep groove. -
Test the fit:
Wrap your phone (or a cardboard cutout of it) loosely in plastic wrap to protect it. Press it into the groove to ensure it is wide and deep enough to hold the device securely at a viewing angle. Wiggle it slightly to give wiggle room for shrinkage. -
Refine the slot:
Once the slot is formed, smooth the edges so they aren’t sharp. Ensure the clay wall behind the phone is high enough to support the weight without the whale tipping over.
Weight it Down
If your clay feels too light to hold a large phone, knead a few heavy metal washers or fishing weights into the bottom center of the clay body before drying for stability.
Step 3: Texturing and Drying
-
Add surface texture:
Instead of smoothing everything perfectly, use a stiff bristle brush or a crumpled ball of foil to dab texture over the whale’s skin. This gives it that stone-like, rustic appearance shown in the photo. -
Let it dry:
Set the sculpture in a cool, dry place. Allow it to air dry for at least 24-48 hours. Turn it over occasionally so the bottom dries evenly. -
Sand lightly:
Once fully cured, use fine-grit sandpaper to knock off any sharp burrs or jagged edges, especially around the phone slot, but leave the main body texture intact.
Make a Splash
Sculpt a small ‘spout’ of water coming out of the top of the head using twisted wire covered in clay, or paint tiny white barnacles on the tail for added detail.
Step 4: Painting and Finishing
-
Base coat:
Mix a deep ocean blue with a touch of teal. Paint the entire whale, getting into all the textured crevices. Let this coat dry completely. -
Dry brushing:
To highlight the texture, take a lighter shade of blue on a dry brush (wipe most paint off on a paper towel) and lightly sweep it over the surface. This catches on the raised bumps. -
Paint the face:
Use the handle end of a paintbrush dipped in black paint to perfect the small, round eye. Add a small circle of light pink below the eye for the cheek blush. -
Seal the work:
Protect your paint job with a coat of matte varnish. This prevents the paint from chipping when you slide your phone in and out.
Place your new whale friend on your desk and enjoy a hands-free view of your screen
Magnet Sets With Tiny Sculpted Faces
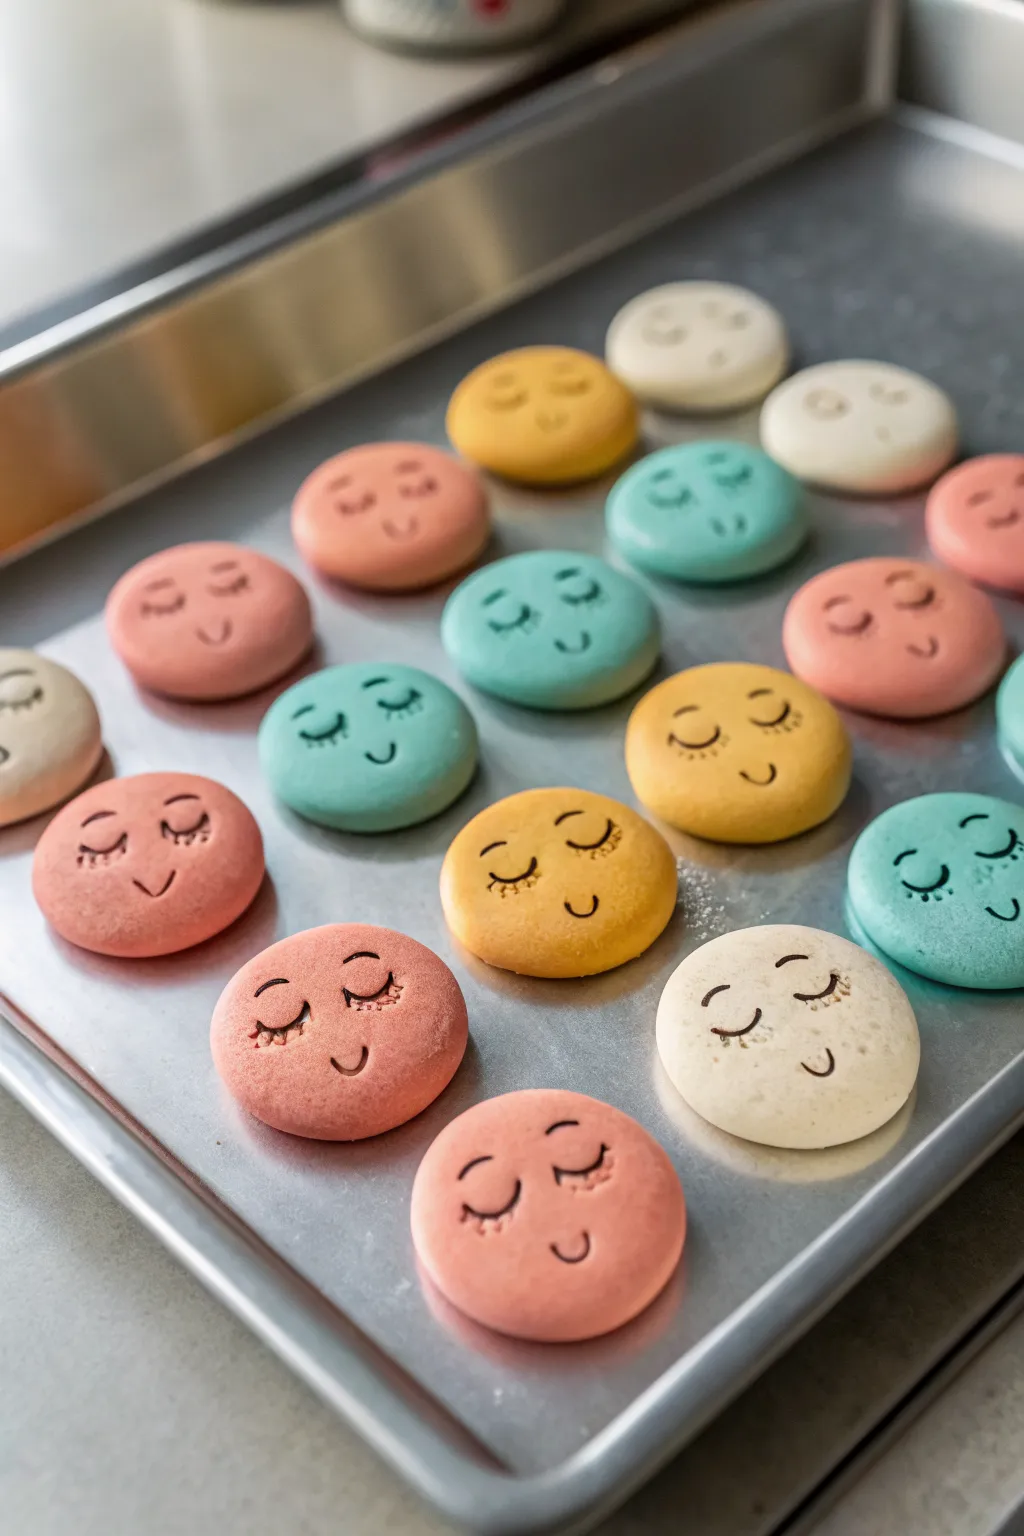
These charming little magnets look just like sweet, sleepy macarons fresh out of the oven. With their soothing pastel colors and peaceful expressions, they add a touch of calm whimsy to any fridge or magnetic board.
Step-by-Step
Materials
- White air dry clay
- Acrylic paints (pastel pink, peach, mint green, pale yellow, cream)
- Fine-point black permanent marker or fine liner pen
- Small rolling pin
- Circle cutter (approx. 1.5 inch)
- Fine grit sandpaper
- Strong round magnets
- Super glue or strong craft adhesive
- Semi-gloss or matte varnish (optional)
- Parchment paper or silicone mat
Step 1: Prepping the Clay Base
-
Condition the clay:
Start by kneading your white air dry clay until it is smooth, pliable, and free of any cracks. This ensures a flawless surface for the faces later. -
Roll it out:
Roll the clay onto a piece of parchment paper or a silicone mat. You want a consistent thickness of about 1/4 inch so the magnets have a nice, substantial feel without being too heavy. -
Cut the shapes:
Using your circle cutter, punch out as many discs as you can fit. If the edges stick or drag, you can dip the cutter into a little cornstarch or water before pressing down. -
Soften the edges:
Typically, cutters leave a sharp edge. Gently tap the edges of each circle with your fingertip to round them off slightly, giving them that soft, baked-good puffiness.
Step 2: Coloring and Drying
-
Tinting vs. Painting:
You have a choice here: you can either knead acrylic paint directly into the wet clay for a solid color before cutting (like I sometimes prefer for a uniform finish), or paint them after they are dry. Given the smooth finish in the photo, painting after drying is often easier for beginners. -
The drying phase:
Arrange your plain clay discs on a flat surface. Let them air dry completely for 24-48 hours, flipping them halfway through to prevent warping. -
Sand for smoothness:
Once fully dry and hard, lightly sand the surfaces and edges with fine grit sandpaper to remove any fingerprints or texture irregularities. -
Apply base colors:
Mix your acrylics into soft pastel shades—think strawberry milk, mint, butter yellow, and cream. Paint the top and sides of each disc. You may need two thin coats for full opacity. -
Let the paint set:
Allow the base coats to dry completely before moving on to the details. This usually takes about 20-30 minutes.
Smooth Surface Secret
Use a tiny bit of water on your finger to smooth the raw clay surface before it dries. It saves tons of sanding time later.
Step 3: Adding Personality
-
Draft the expressions:
If you are nervous about drawing directly with ink, lightly pencil in the faces first. Place the eyes slightly lower than the center line to achieve that cute ‘chibi’ aesthetic. -
Draw the sleepy eyes:
Using a fine-point black marker, draw two downward curves for closed eyes. Add three tiny lashes to the outer corner of each eye curve. -
Add the smile:
Draw a small, simple ‘U’ shape right between and slightly below the eyes. Keep the strokes delicate and thin. -
Seal the deal:
To protect the paint and ink from chipping, apply a thin layer of matte or semi-gloss varnish. This also gives them that finished, ceramic-like sheen. -
Attach the magnets:
Flip the discs over. Apply a dab of strong super glue to the center of the back and press a round magnet firmly into place. -
Final cure:
Let the glue cure according to the package instructions before sticking them to your fridge.
Warping Worries?
If clay edges curl up while drying, place a light book or board on top of them (sandwiching them between parchment) during the last few hours of drying.
Now you have an adorable set of sleepy faces to organize your notes
Mini House and Room Scene Sculptures
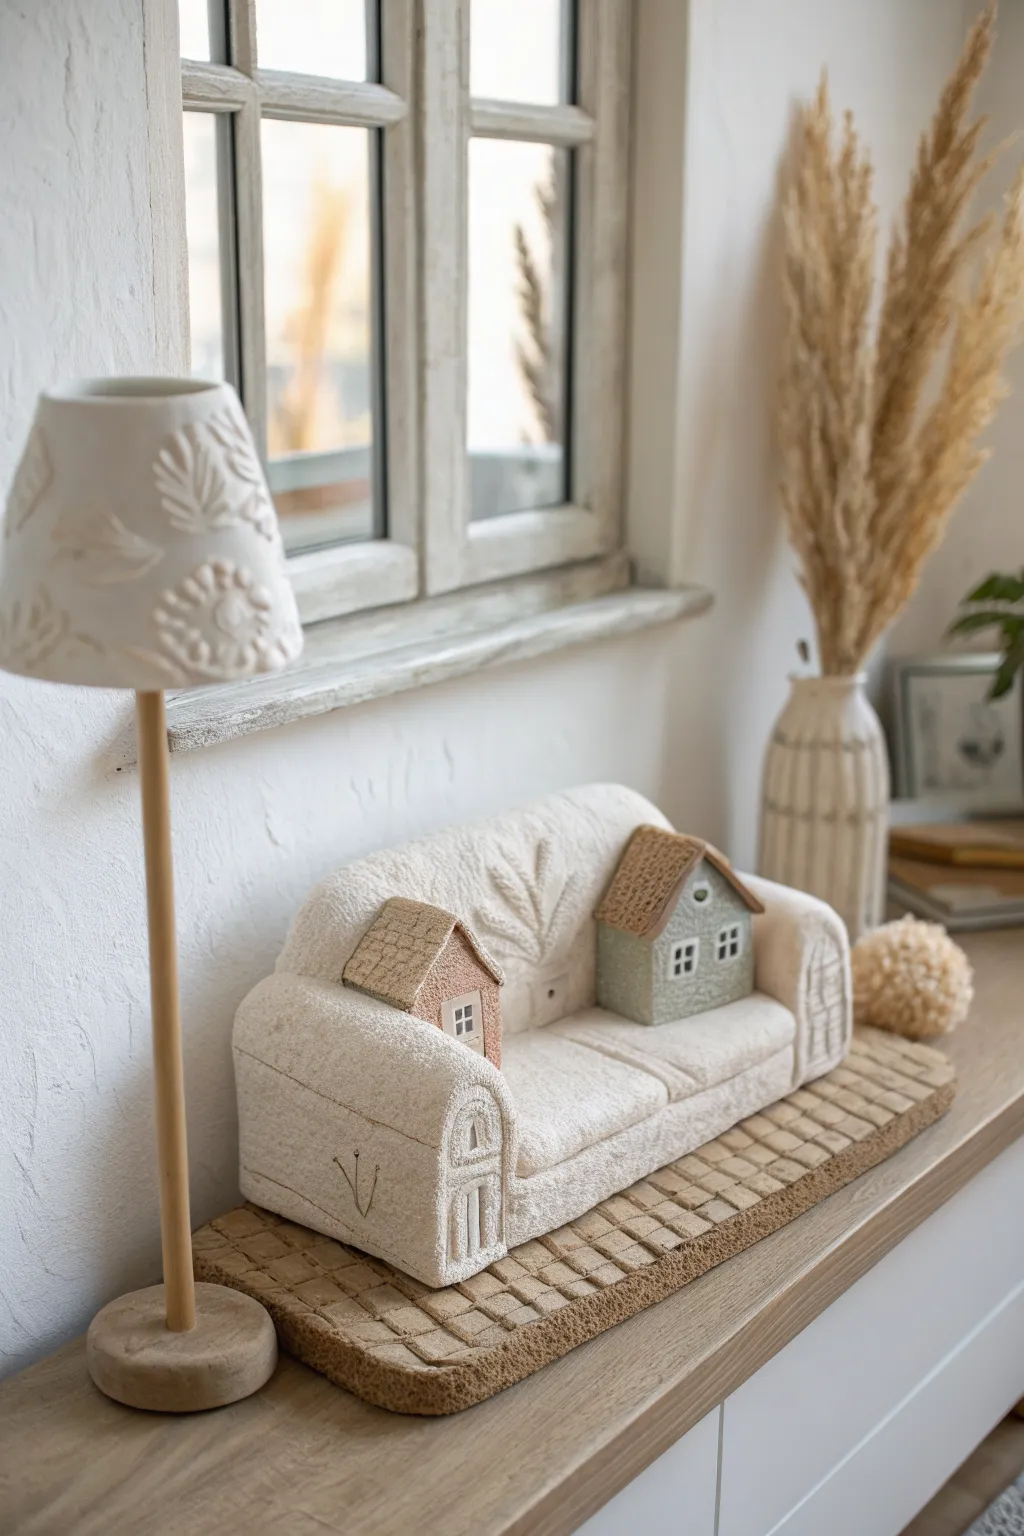
Create a charming miniature living room scene featuring a textured clay sofa adorned with tiny house ‘pillows’ and a matching rustic floor lamp. This project combines geometric sculpting with detailed surface texturing to achieve a warm, handcrafted aesthetic perfect for shelf decor.
How-To Guide
Materials
- White air dry clay
- Rolling pin
- Clay carving tools (needle tool, small loop tool)
- Texturing tools (stiff bristle brush, sandpaper, or fabric scrap)
- Acrylic paints (beige, sage green, terracotta, white, dark grey)
- Detail brushes
- Wooden dowel (approx. 5mm diameter)
- Small round wooden base or clay disk
- Craft glue
- Cardboard or foam core (for internal support armature if desired)
Step 1: Sculpting the Sofa Base
-
Form the main structure:
Start by shaping a solid block of clay into a rectangular sofa shape. You can also build it around a small cardboard box armature to save clay and reduce weight, keeping the clay layer about 1/4 inch thick. -
Shape the backrest:
Add a rolled cylinder of clay along the top back edge to form the rounded backrest. Smooth the seams downwards into the main block using a little water or slip so it looks like one cohesive piece. -
Define the cushions:
Using a modeling tool or the back of a butter knife, gently press a vertical line down the center of the seat and backrest to create the illusion of two separate cushions. -
Add overall texture:
Before the clay dries, press a stiff bristle brush or a scrap of coarse fabric repeatedly over the entire surface of the sofa. This stippling creates the fuzzy, upholstered texture characteristic of this piece. -
Emboss details:
Use a needle tool to gently carve a stylized leaf or botanical pattern into the center of the backrest. Keep the lines shallow so they look like embroidery rather than deep cuts.
Step 2: Creating the House Elements
-
Form the house shapes:
Shape two small cubes of clay and add triangular prisms on top for roofs. These should be sized to sit comfortably on the sofa where armrests or throw pillows would typically go. -
Detail the roofs:
Take a small loop tool or needle and fetchingly carve small ‘U’ shapes or a cross-hatch pattern onto the roof surfaces to simulate shingles or thatch. -
Carve windows and doors:
Press small square indentations for windows and a rectangle for the door. I find it helpful to let the clay firm up slightly before this step to keep the edges sharp. -
Add side details:
On the outer sides of the sofa base (the ‘arms’), carve decorative arches or window-like shapes to tie the architectural theme together. -
Attach the houses:
Score the bottom of the houses and the sofa seat, add a dab of slip or glue, and press the houses firmly into place on either side of the sofa.
Pro Tip: Seamless Texture
Use a slightly damp sponge to soften any sharp ridges created by your texturing tool. This makes the ‘fabric’ look worn and cozy rather than scratchy.
Step 3: The Floor Mat and Lamp
-
Make the textured mat:
Roll out a flat rectangle of clay slightly larger than the sofa. Use a ruler or knife to score a grid pattern across the whole surface to mimic a woven rug or tiled floor. -
Construct the lamp shade:
Mold a cone shape from a ball of clay. Hollow it out carefully with your thumb. Apply the same botanical relief pattern you used on the sofa to the exterior of the shade. -
Assemble the lamp stand:
Insert your wooden dowel into a small clay disk or wooden base. Place the clay shade on top of the dowel, using a bit of glue to secure it. Allow all pieces to dry fully for 24-48 hours.
Level Up: Lighting
Make the lamp hollow and hide a tiny battery-operated LED or ‘fairy light’ inside the shade to make the lamp actually glow in the dark.
Step 4: Painting and Finishing
-
Base coat the sofa:
Paint the entire sofa and the lamp shade in a creamy off-white or light beige. Let the paint settle into the textured crevices. -
Paint the houses:
Carefully paint one house in a muted terracotta and the other in a soft sage green. Leave the roofs a natural clay color or paint them a darker brown. -
Highlight the windows:
Use a fine detail brush with white paint to fill in the window frames, and add tiny dots of dark grey for the glass panes. -
Finish the mat:
Paint the floor mat in a warm, toasted brown color. Once dry, you can dry-brush a lighter beige over the raised grid lines to enhance the woven effect. -
Final assembly:
Place the finished sofa on top of the painted mat. You can glue it down for stability or leave it loose to rearrange your scene later.
Arrange your tiny scene on a bookshelf or desk for a delightful touch of miniature comfort
Wire-Armature Animal Sculpting Challenges
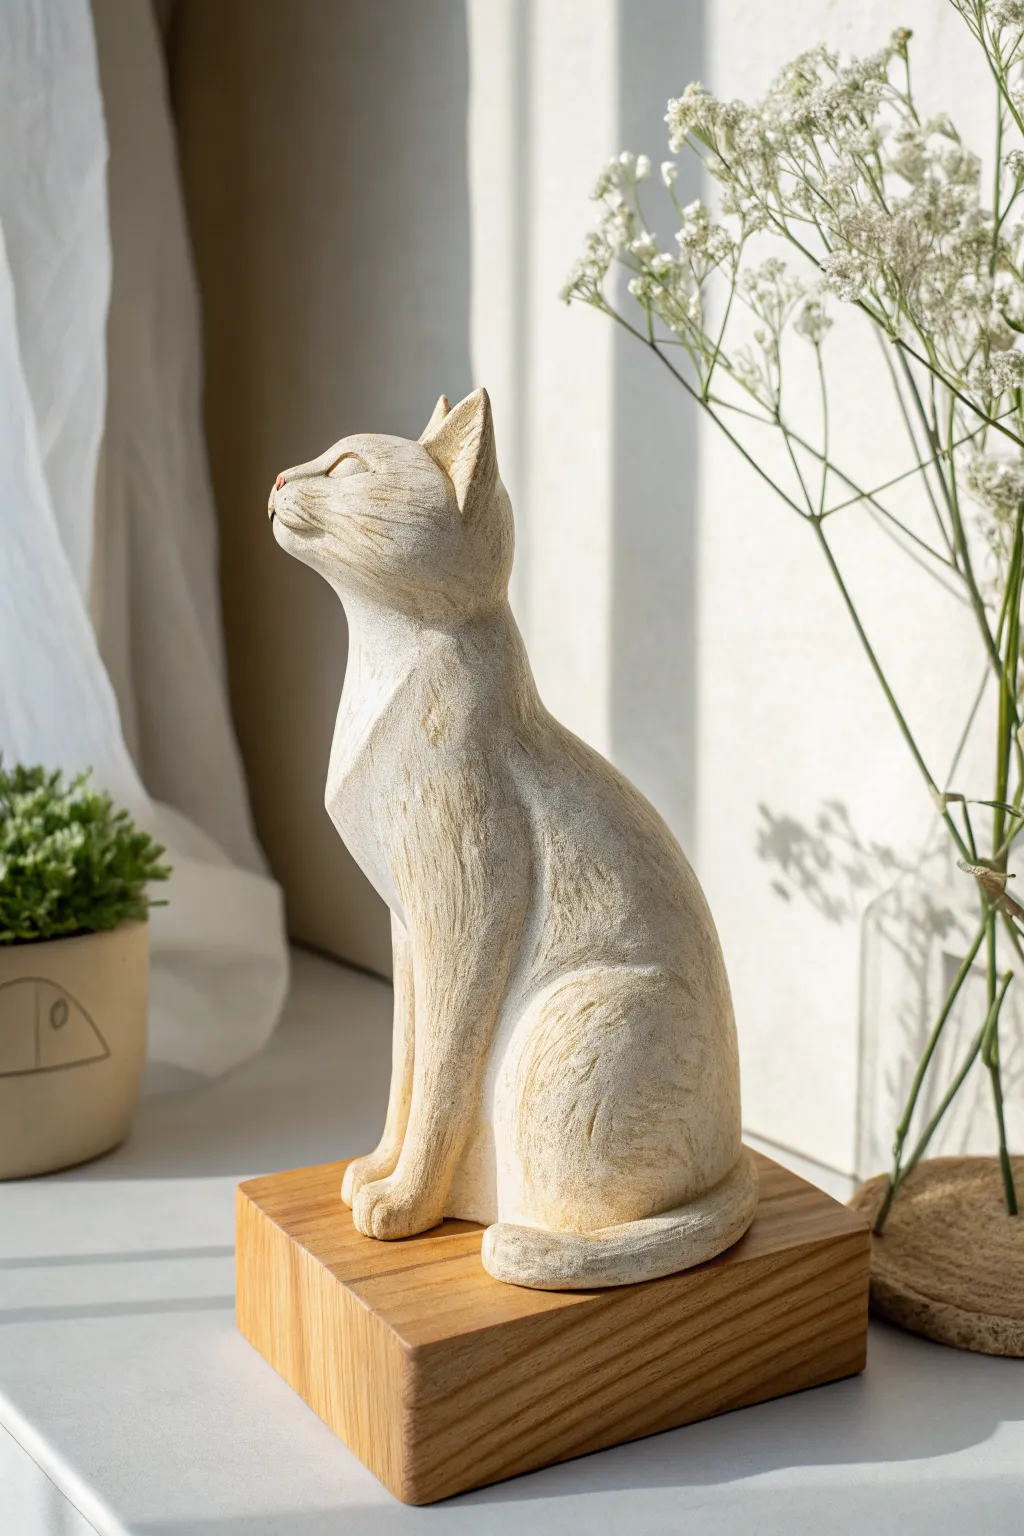
Capture the graceful stillness of a cat soaking up the afternoon sun with this textured air-dry clay project. This tutorial focuses on building a sturdy armature to support the elegant vertical pose while learning how to create a convincing carved-stone texture.
Step-by-Step Guide
Materials
- High-quality white air dry clay
- Aluminum crafting wire (2mm for main structure)
- Thinner binding wire (1mm)
- Aluminum foil
- Clay sculpting tools (specifically a needle tool and a small loop tool)
- Coarse bristle brush or toothbrush
- Sandpaper (fine and medium grit)
- Water in a small cup
- Acrylic paints (Titanium white, unbleached titanium or cream, raw sienna)
- Matte varnish
- Square wooden base (optional for display)
Step 1: Building the Armature
-
Shape the spine:
Cut a long length of 2mm wire. Bend it to create the vertical flow of the cat’s spine, curving gently for the neck and head, and extending down for the tail. Since the cat is sitting, the spine should be quite upright. -
Form the limbs:
Cut another piece of wire for the front legs and one for the hind legs. Twist the hind leg wire around the base of the spine, bending loops for the haunches. Attach the front leg wire higher up the spine, creating straight vertical lines for the forelegs. -
Bulk up with foil:
Crumple aluminum foil tightly around your wire skeleton. Focus on creating the teardrop shape of the torso and the rounder volume of the haunches. Keep the foil layer thinner than your final sculpture needs to be to allow room for the clay. -
Secure the foil:
Wrap thin binding wire around the foil to keep it compressed and tight. This prevents the foil from springing back and cracking your clay later.
Cracking Up?
If small cracks appear during drying, don’t panic. Mix a ‘slip’ of fresh clay and water until it’s a paste, fill the crack, and smooth it over with a wet finger.
Step 2: Sculpting the Form
-
Apply the base layer:
Flatten sheets of clay and press them firmly onto the foil armature. Use a little water to smooth the seams together as you go. -
Define the chest and neck:
Add extra clay to the chest area to create that proud, puffed-out look. Smooth the clay upwards into the neck, ensuring a continuous, elegant curve. -
Shape the head:
Form a simplified oval for the head. Pinch the clay at the top to form the triangular ears, keeping them alert and upright. Refine the chin so it tilts upward. -
Refine the legs:
Smooth clay down the front legs, merging them slightly at the chest but separating them at the paws. Add bulk to the rear haunches to suggest the folded leg muscle. -
Wrap the tail:
Roll a snake of clay for the tail. Wrap it snugly around the base of the sculpture, blending the clay where it meets the paws to make the cat look settled. -
Check symmetry:
Rotate your sculpture. Look at it from directly behind and directly in front to ensure the spine isn’t twisting unnaturally.
Make it Yours
Try a faux-bronze finish instead! Paint the cat black first, then dry-brush with metallic bronze or gold acrylics for a heavy, expensive metal look.
Step 3: Detailing and Texture
-
Scoring the fur:
Using a needle tool or a stiff bristle brush, gently scratch vertical lines following the direction of fur growth. Keep these subtle; we want a stylized, stone-carved look rather than realistic individual hairs. -
Carving the face:
Use a small loop tool to carve slight indentations for the closed eyes. This implies the cat is blinking slowly or sleeping. -
Adding ear details:
Hollow out the inner triangles of the ears slightly, leaving the edges crisp. -
Let it dry completely:
Allow the sculpture to air dry for at least 48-72 hours. Turn it occasionally so the bottom dries evenly.
Step 4: Textured Finish
-
Sand for imperfections:
Once bone dry, lightly sand any unintended bumps. Don’t smooth it perfectly; the slight roughness adds to the rustic aesthetic. -
Base coat:
Paint the entire sculpture with an unbleached titanium or cream acrylic paint. Let this dry fully. -
Dry brushing:
Dip a dry, coarse brush into a tiny amount of raw sienna mixed with white. Wipe almost all the paint off on a paper towel, then lightly brush over the textured surface to highlight the raised ‘fur’ details. -
Final wash:
Mix a very watery wash of raw sienna (1 part paint to 10 parts water) and paint it into the crevices (like the ears and leg folds), then immediately wipe the surface with a rag. This leaves shadow in the deep spots. -
Protect the work:
Finish with a coat of matte varnish to seal the paint and protect the clay without making it shiny. -
Mount (Optional):
Glue your finished cat to a simple wooden block for an elevated display.
Place your sculpture near a sunny window to mimic the original inspiration and enjoy the calm presence it brings to the room
Abstract Draped Figure Sculptures
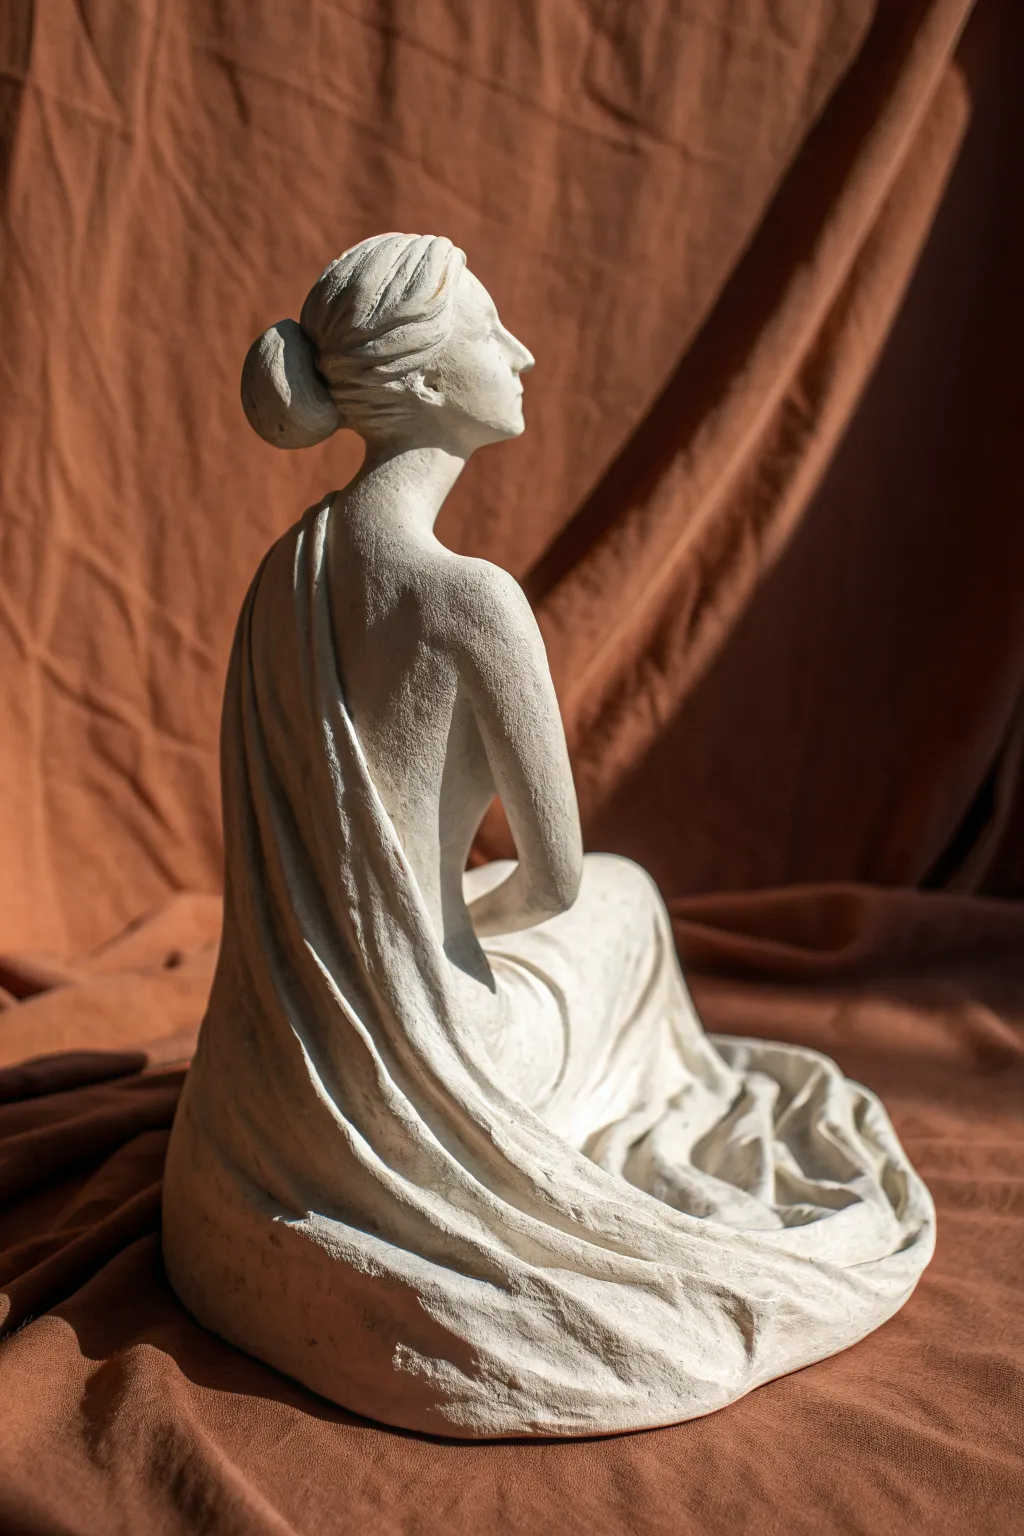
Capture the elegance of classical sculpture with this draped female figure, focusing on elongated lines and flowing fabric. The smooth, stone-like finish gives this air-dry clay piece the timeless sophistication of an ancient marble statue.
Step-by-Step
Materials
- High-quality white air-dry clay (fine grain)
- Strong armature wire (aluminum or galvanized steel)
- Aluminum foil
- Masking tape
- Sculpting tools (loop tool, needle tool, smoothing tool)
- Sponge and water cup
- Rolling pin
- Fine-grit sandpaper (220 and 400 grit)
- White gesso or acrylic primer
- Matte sealant spray
Step 1: Building the Core Structure
-
Wire Armature:
Create a skeleton using armature wire. Bend a loop for the head, a longer piece for the spine, and separate wires for the arms and folded legs. The figure is seated, so ensure the hip and knee bends are approximately 90 degrees or sharper to sit flat. -
Bulking with Foil:
Crumple aluminum foil tightly around the wire armature to create muscle mass and bulk. Focus on the torso and the large mass at the base where the legs and dress will be. -
Securing the Form:
Wrap the foil completely with masking tape. This smooths out sharp foil edges and gives the clay a surface to grip onto.
Step 2: Sculpting the Figure
-
Base Layer:
Roll out sheets of clay about 1/4 inch thick. Cover the entire armature, pressing firmly to remove air bubbles. Score and slip any seams where clay pieces join. -
Refining the Torso:
Add small clay coils to build up the back muscles and spine. Smooth them into the base layer. Establish the elongated, elegant neck leading up to the head. -
Shaping the Head and Hair:
Shape the head into a profile view. Add a small bun at the nape of the neck. Use a needle tool to gently carve hair strands, sweeping them back from the face into the bun. -
Arm Positioning:
Sculpt the right arm extending straight down, merging into the lap area. The anatomy here can be simplified since much will be obscured by the drape.
Cracking Issues?
Cracks often happen if clay dries too fast. Fill cracks with a ‘slip’ paste (clay mixed with watervinegar) and cover loosely plastic to slow remainder of drying.
Step 3: Creating the Drapery
-
Rolling the ‘Fabric’:
Roll out a large, thin sheet of clay for the dress. It should be thinner than the body clay—about 1/8 inch—to look like realistic cloth. -
Draping the Back and Shoulder:
Cut a long strip and drape it over the left shoulder, letting it hang down the back. Use water to adhere the clay to the shoulder and back, pressing it into the recessed spine area. -
Forming the Lap Folds:
Place a larger sheet over the legs and base. Gently manipulate the clay to create deep, cascading folds that pool at the bottom. I find lifting the clay slightly and letting gravity help creates the most natural curves. -
Connecting the Drapery:
Merge the shoulder drape into the mass of fabric at the base. Ensure the lines flow continuously from the shoulder down to the floor. -
Refining Folds:
Use a modeling tool to deepen the crevices in the fabric. Undercut edges slightly to create shadows that suggest thick, heavy cloth.
Pro Tip: Liquid Drapery
For ultra-realistic folds, dip a piece of actual thin cotton fabric into liquid clay slip and drape it over the figure. Let it dry hard, then refine with fresh clay.
Step 4: Finishing Touches
-
Texture and Clean Up:
While the clay is leather-hard (firm but cool), use a damp sponge to smooth out fingerprints on the skin areas (back, neck, and face). -
Pockmarking (Optional):
To mimic an aged stone texture, you can gently dab the surface with a coarse brush or stiff sponge, though keeping it smooth offers a more modern marble look. -
Drying:
Let the sculpture dry slowly under a loose plastic bag for 24-48 hours, then remove the bag and allow another 2-3 days for full drying. -
Sanding:
Once bone dry, sand the skin areas with 220 then 400 grit sandpaper for a porcelain-smooth finish. Leave the drapery slightly rougher for contrast. -
Priming:
Apply two thin coats of white gesso. This unifies the color and seals the clay. -
Sealing:
Finish with a matte spray sealant to protect the artwork without making it look plastic or shiny.
Place your finished sculpture near a window to let the natural light emphasize the beautiful shadows in the drapery folds