If you love the energy of game day, basketball clay bead bracelets are such a fun way to wear your spirit on your wrist. I’m sharing a bunch of easy, mix-and-match ideas using clay heishi beads, sporty colors, and a few basketball details that instantly read “hoops.”
Classic Orange, Black, and White Stack
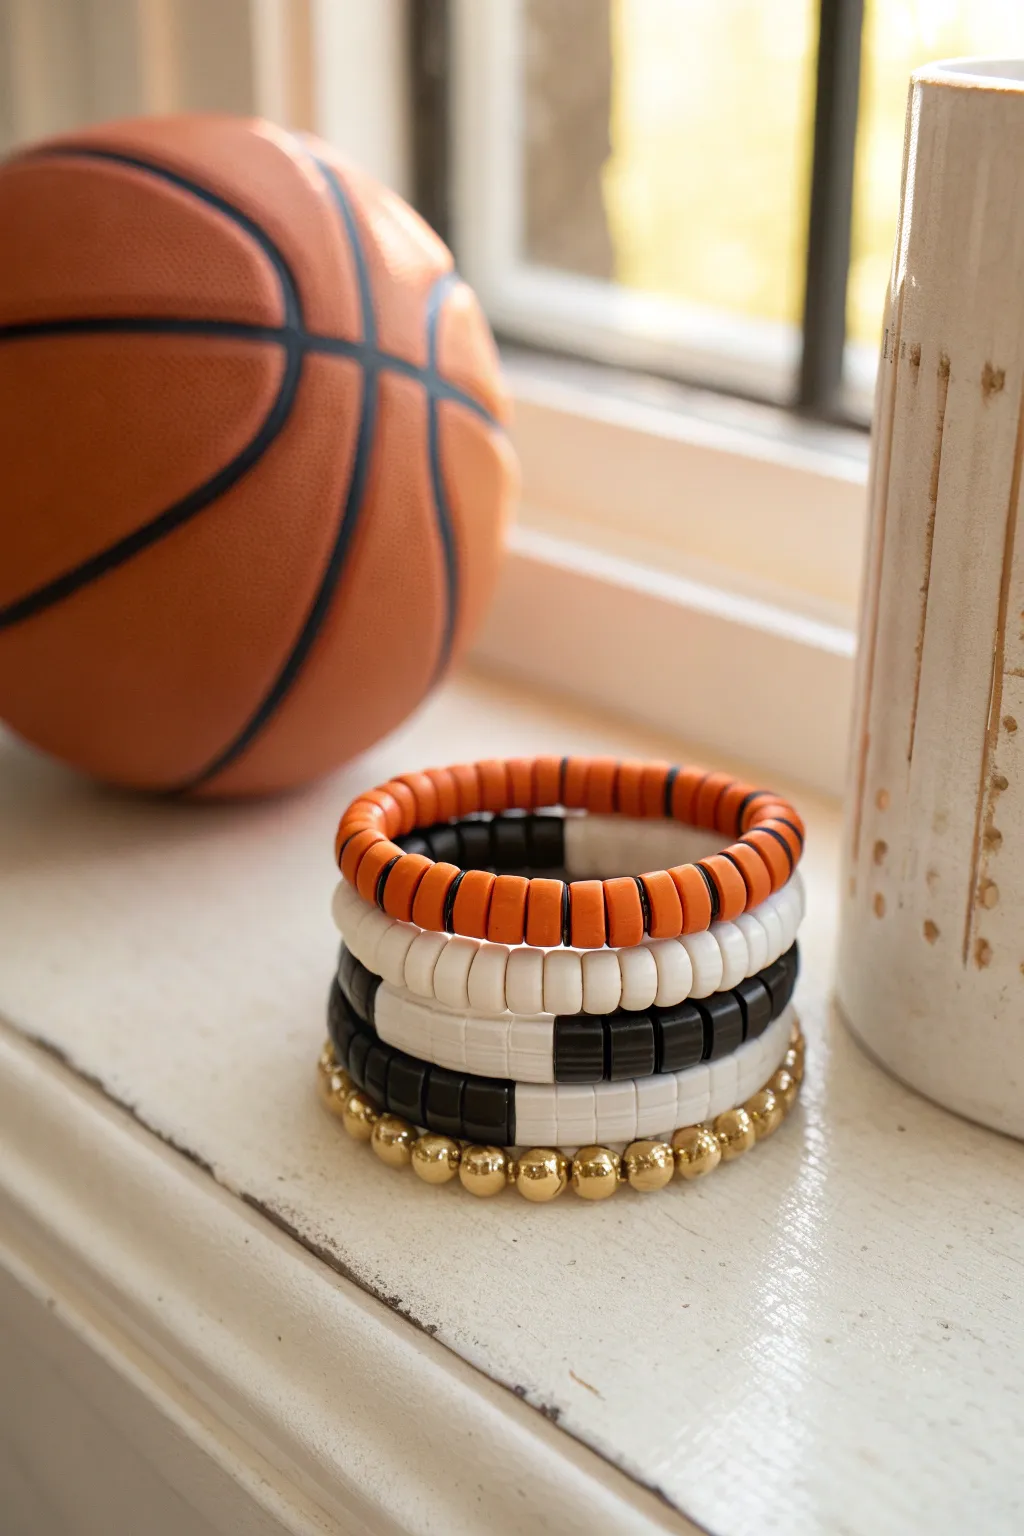
Capture the spirit of the game with this energetic five-piece bracelet set featuring a classic basketball color palette. By mixing textures—from matte heishi clay beads to shiny gold spheres—you create a dynamic stack that looks great on game day or any day.
Step-by-Step
Materials
- Orange polymer clay heishi beads (6mm)
- White polymer clay heishi beads (6mm)
- Black polymer clay heishi beads (6mm)
- Small black flat disc spacer beads (approx. 4mm)
- Gold spherical beads (6mm or 8mm)
- Grid-textured cube beads (white)
- Grid-textured cube beads (black)
- Elastic stretch cord (0.8mm recommended)
- Jewelry glue or clear nail polish
- Scissors
Step 1: The Playmaker (Top Orange Bracelet)
-
Prepare the cord:
Cut a piece of elastic cord about 10-12 inches long. Give it a gentle pre-stretch to prevent the finished bracelet from sagging later. -
Start the pattern:
Thread on one orange heishi bead followed immediately by one thin black spacer bead. -
Continue stringing:
Repeat this alternating pattern—orange bead, thin black spacer—until you reach your desired wrist length, usually about 6.5 to 7 inches. -
Close the loop:
Tie the ends securely using a surgeon’s knot (right over left, left over right twice). -
Secure the knot:
Add a tiny dab of jewelry glue to the knot, let it dry, and trim the excess cord close to the knot.
Step 2: The Home & Away Jerseys (Middle Three Bracelets)
-
White textural strand:
For the second bracelet down, string a continuous line of just white heishi beads. The uniformity here provides a calm visual break between the patterned pieces. -
Two-tone texture mix:
For the third bracelet (the middle one), we are creating a split design. String approximately 3 inches of white heishi beads first. -
Add the contrast:
Switch to the black grid-textured cube beads for the remaining half of the bracelet. -
Second split design:
For the fourth bracelet, reverse the previous concept. Start with about 3 inches of black heishi beads. -
Finish the split:
Complete the loop using white grid-textured cube beads. While stringing, I like to check the length against the first bracelet to ensure the stack sits evenly on the wrist. -
Knot and glue:
Tie off and glue each of these three bracelets individually, just as you did with the first orange one.
Knot Hiding 101
To hide your knot perfectly, thread one bead with a slightly larger hole right next to your tie-off point. Gently tug the knotted cord inside that bead before the glue fully hardens.
Step 3: The Championship Ring (Bottom Gold Bracelet)
-
Add the shine:
Cut your final piece of elastic cord. This layer adds a metallic pop to elevate the sporty look. -
String the gold:
Thread the gold spherical beads onto the cord. Since these beads are often heavier than clay, ensure your knot is extra tight at the end. -
Final assembly:
Once all five bracelets are tied, glued, and trimmed, roll them onto your wrist one by one to see the full effect.
Jersey Number Customized
Replace a small section of the white or black heishi beads with number beads representing your favorite player’s jersey number for a personalized touch.
Wear your new stack to the next game and show off your team spirit with style


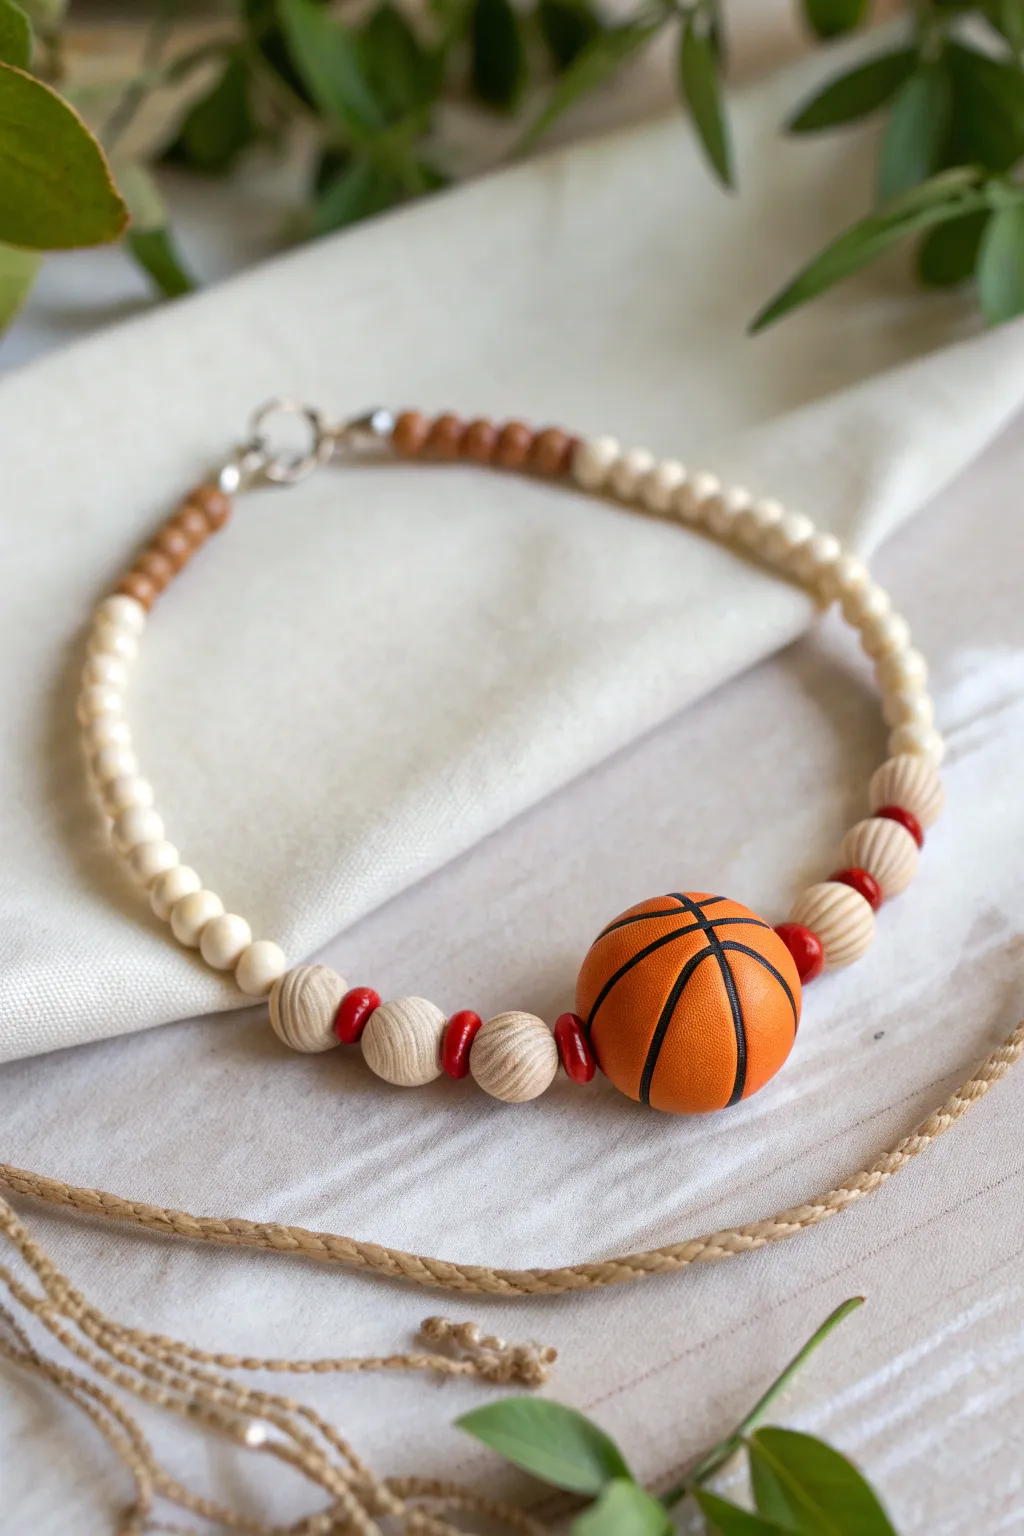
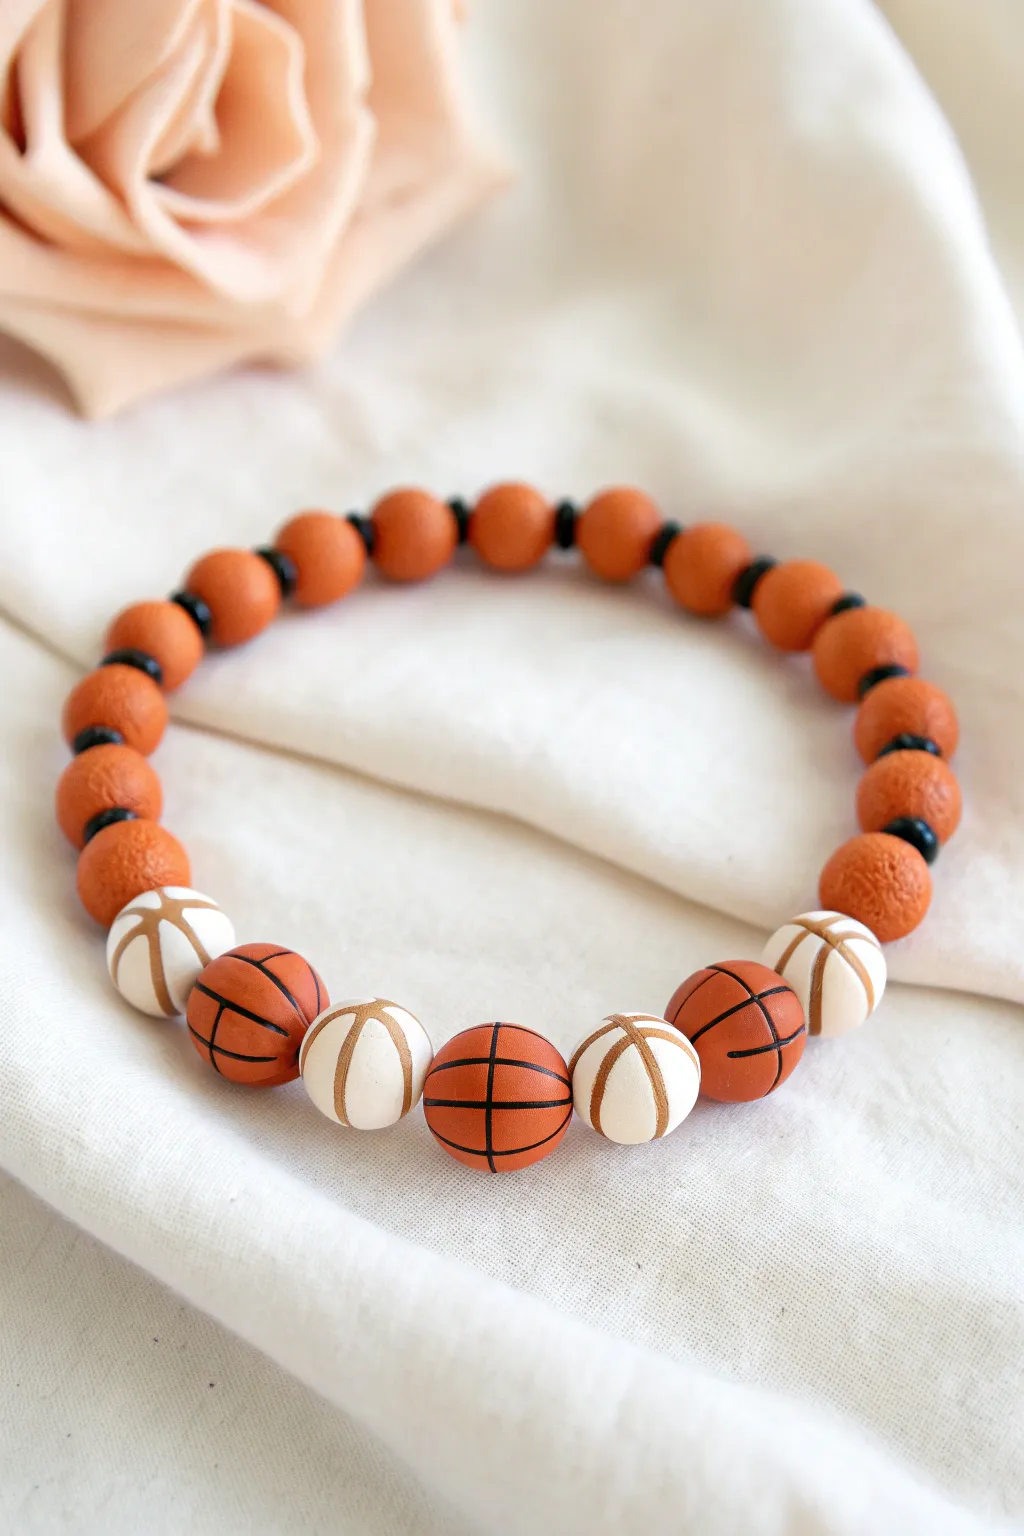
Single Basketball Focal Bead Centerpiece
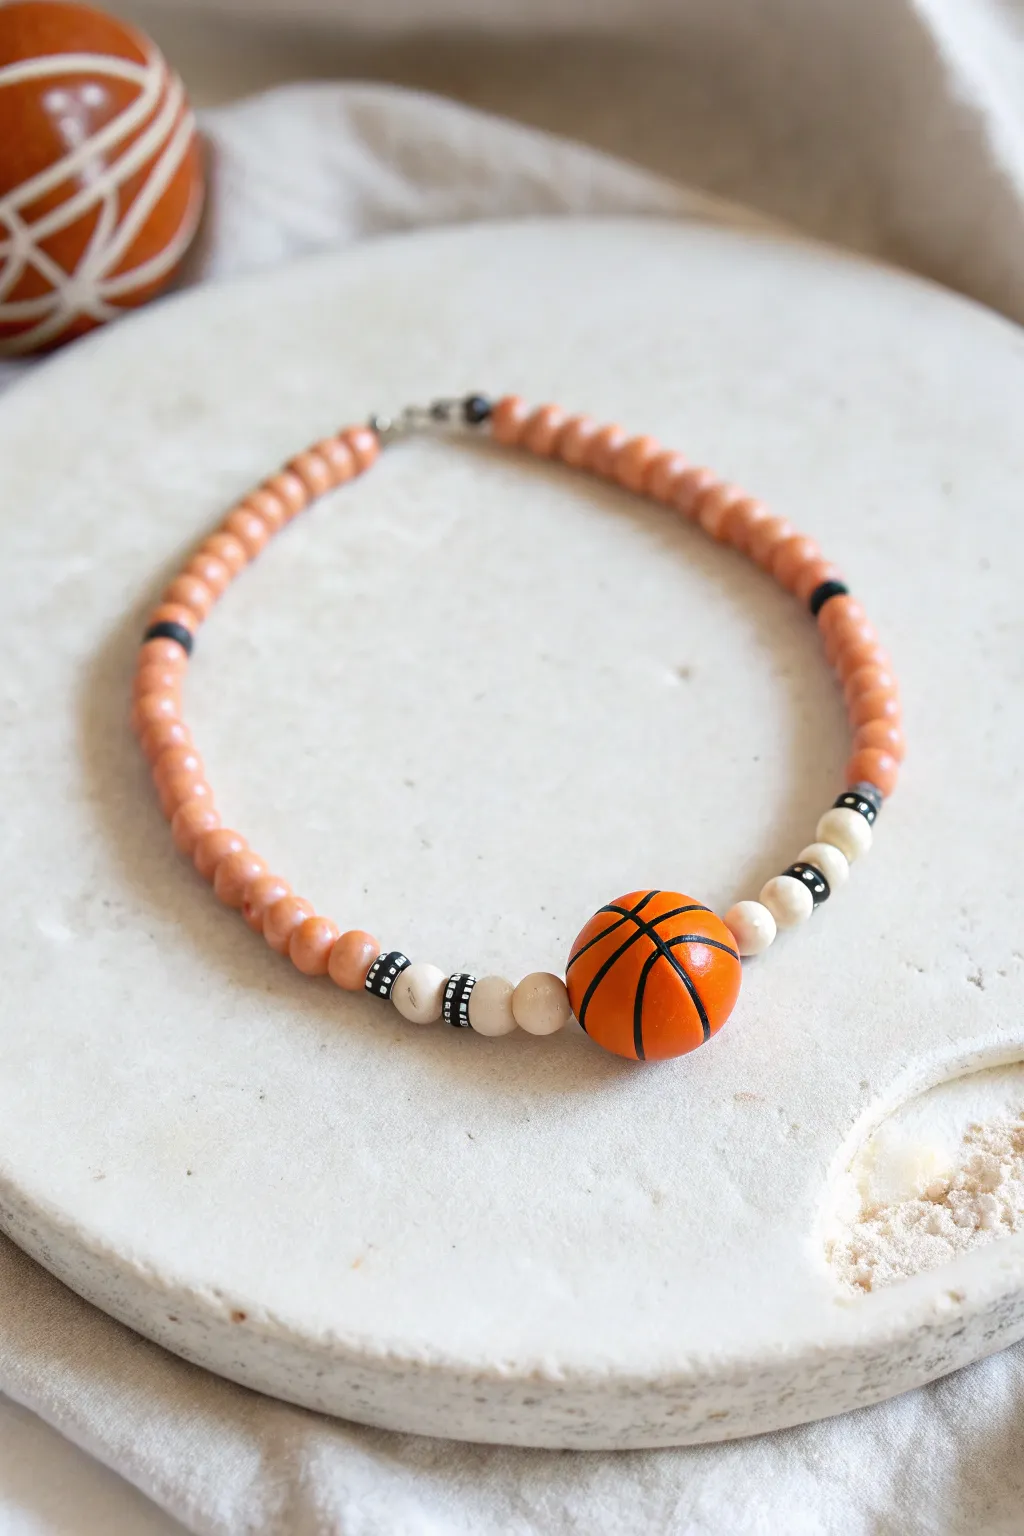
This sporty-chic bracelet design places a vibrant, handcrafted clay basketball right at the center of the action. Surrounded by a mix of natural wood and cream spacer beads with subtle black-and-white accents, it creates a balanced look that’s perfect for game day or everyday wear.
Detailed Instructions
Materials
- Orange polymer clay (basketball color)
- Black polymer clay (for lines)
- Small round cream/white spacer beads
- Peach or light orange wooden beads (approx. 6-8mm)
- Black and white striped or patterned spacer beads
- Elastic stretch cord (0.7mm or 0.8mm)
- Needle tool or toothpick
- Clay roller or acrylic rod
- Gloss glaze or varnish for polymer clay
- Jewelry adhesive (e.g., E6000 or knot cement)
- Scissors
Step 1: Sculpting the Basketball Focal Bead
-
Form the base sphere:
Begin by conditioning a chunk of orange polymer clay until it is soft and pliable. Roll it between your palms to create a smooth, perfect sphere about 15mm to 18mm in diameter, ensuring there are no cracks or seams. -
Create the black lines:
Condition a very small amount of black polymer clay. Roll it into an extremely thin snake—as thin as a thread. You want this to be delicate so it doesn’t overpower the orange sphere. -
Apply the first seam line:
Gently lay a strip of the black clay thread around the circumference of the orange ball, dividing it in half. Press it down very lightly so it adheres but doesn’t flatten completely. -
Add intersecting lines:
Place a second black thread perpendicular to the first, creating a cross. Then, carefully curve two additional threads on either side to mimic the classic swooping lines of a basketball. -
Smooth and integrate:
Once all lines are placed, gently roll the bead between your palms again. This will embed the black clay into the orange surface so the bead becomes smooth and round rather than bumpy. -
Pierce the bead:
Using a needle tool or toothpick, carefully pierce a hole through the center of the basketball. Rotate the tool as you push through to avoid distorting the shape. Ensure the hole is large enough for your elastic cord. -
Bake and glaze:
Bake the bead according to the polymer clay package instructions (usually around 275°F for 15-20 minutes). Once cooled, brush on a coat of gloss glaze to give it that shiny, authentic polished look.
Smoother Rolling
To avoid fingerprints on your clay basketball, lightly dust your palms with cornstarch before the final roll. This buffs out prints and creates a velvety finish.
Step 2: Assembling the Bracelet
-
Measure and cut cord:
Cut a piece of elastic stretch cord to about 10-12 inches. It is always better to have extra length to work with for tying the final knot. -
Pre-stretch the cord:
Give the elastic cord a few firm tugs. This pre-stretching step is crucial as it prevents the bracelet from drooping or loosening shortly after you wear it. -
Thread the focal bead:
Slide your finished basketball clay bead onto the center of the cord. -
Add flanking spacers:
On both sides of the basketball, thread two or three small round cream spacer beads. These neutral tones help the bright orange pop. -
Insert pattern accents:
Next to the cream spacers on each side, add one black-and-white patterned bead. This echoes the black lines on the basketball and adds a graphic touch. -
Add structural beads:
Continue the pattern by threading one more cream spacer bead after the patterned one, followed by another black-and-white patterned bead. -
Fill with main beads:
Fill the rest of the bracelet length on both sides using the peach-colored wooden beads. I like to check the fit against my wrist periodically to ensure it’s not getting too loose. -
Balance the design:
Ensure you have an equal number of wooden beads on each side so the basketball clasp stays centered on your wrist. -
Tie the knot:
Bring the two ends of the cord together. Tie a surgeon’s knot (right over left twice, then left over right) and pull tight. -
Secure and trim:
Apply a tiny drop of jewelry adhesive to the knot for extra security. Let it dry for a few minutes, then trim the excess cord tails close to the knot. If possible, hide the knot inside one of the larger wooden beads.
Uneven Lines?
If your black lines look shaky, use a flexible blade to gently nudge them straight before pressing them down. Don’t rush the embedding step.
Your court-side accessory is now ready to wear for the big game.


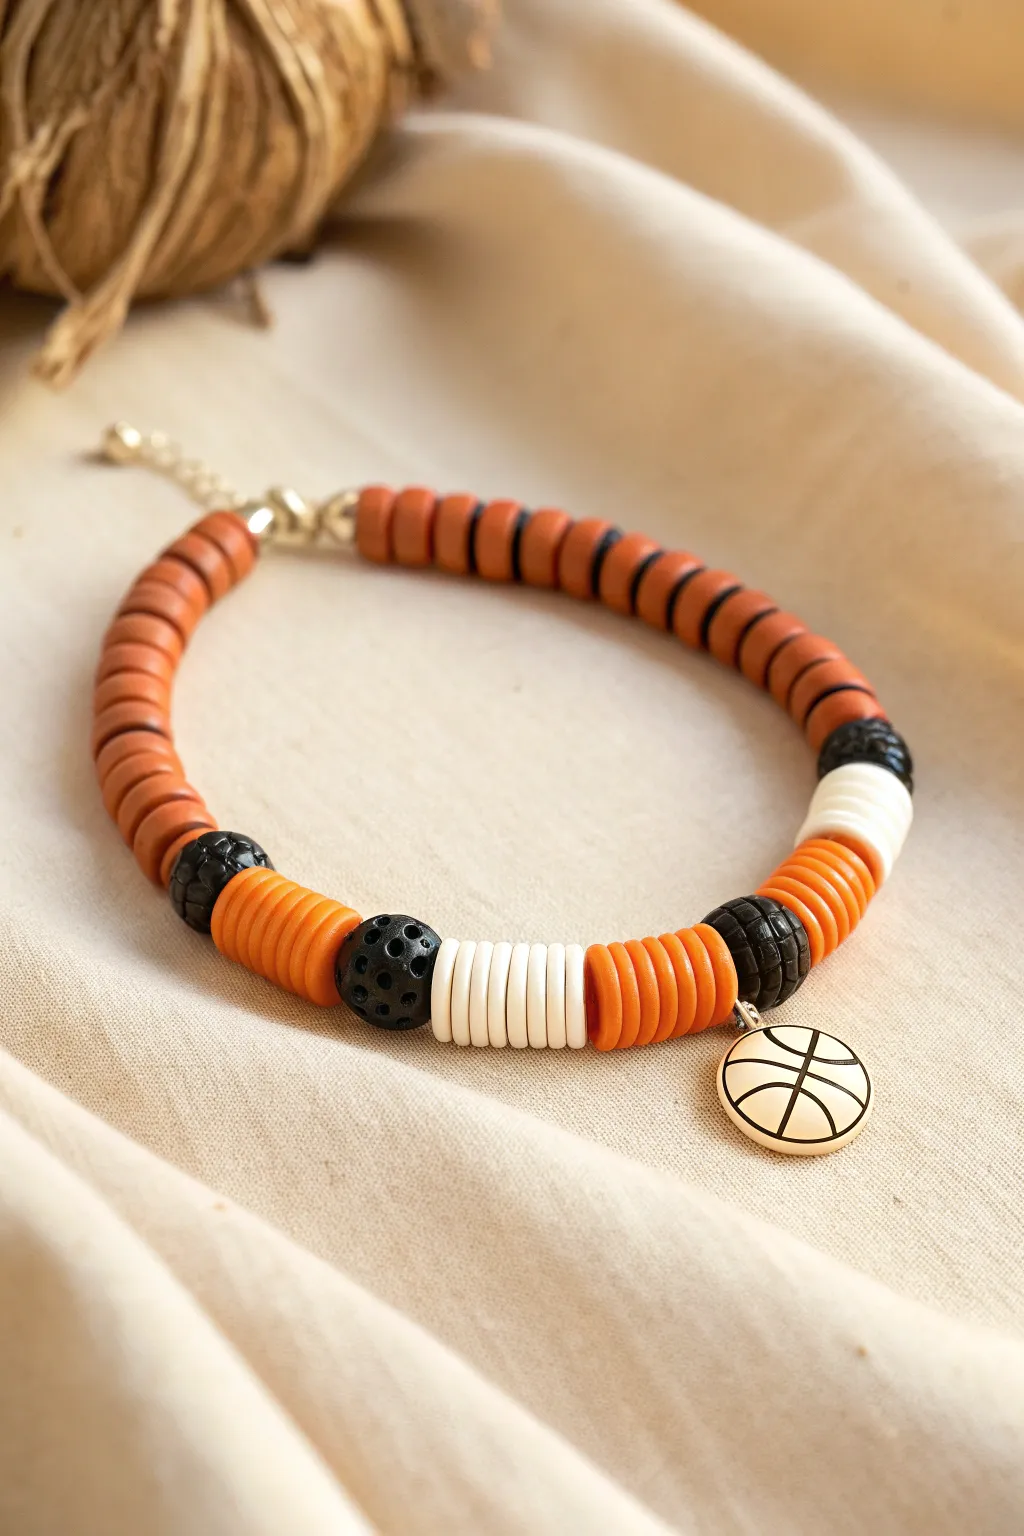
Team Color Block Sections
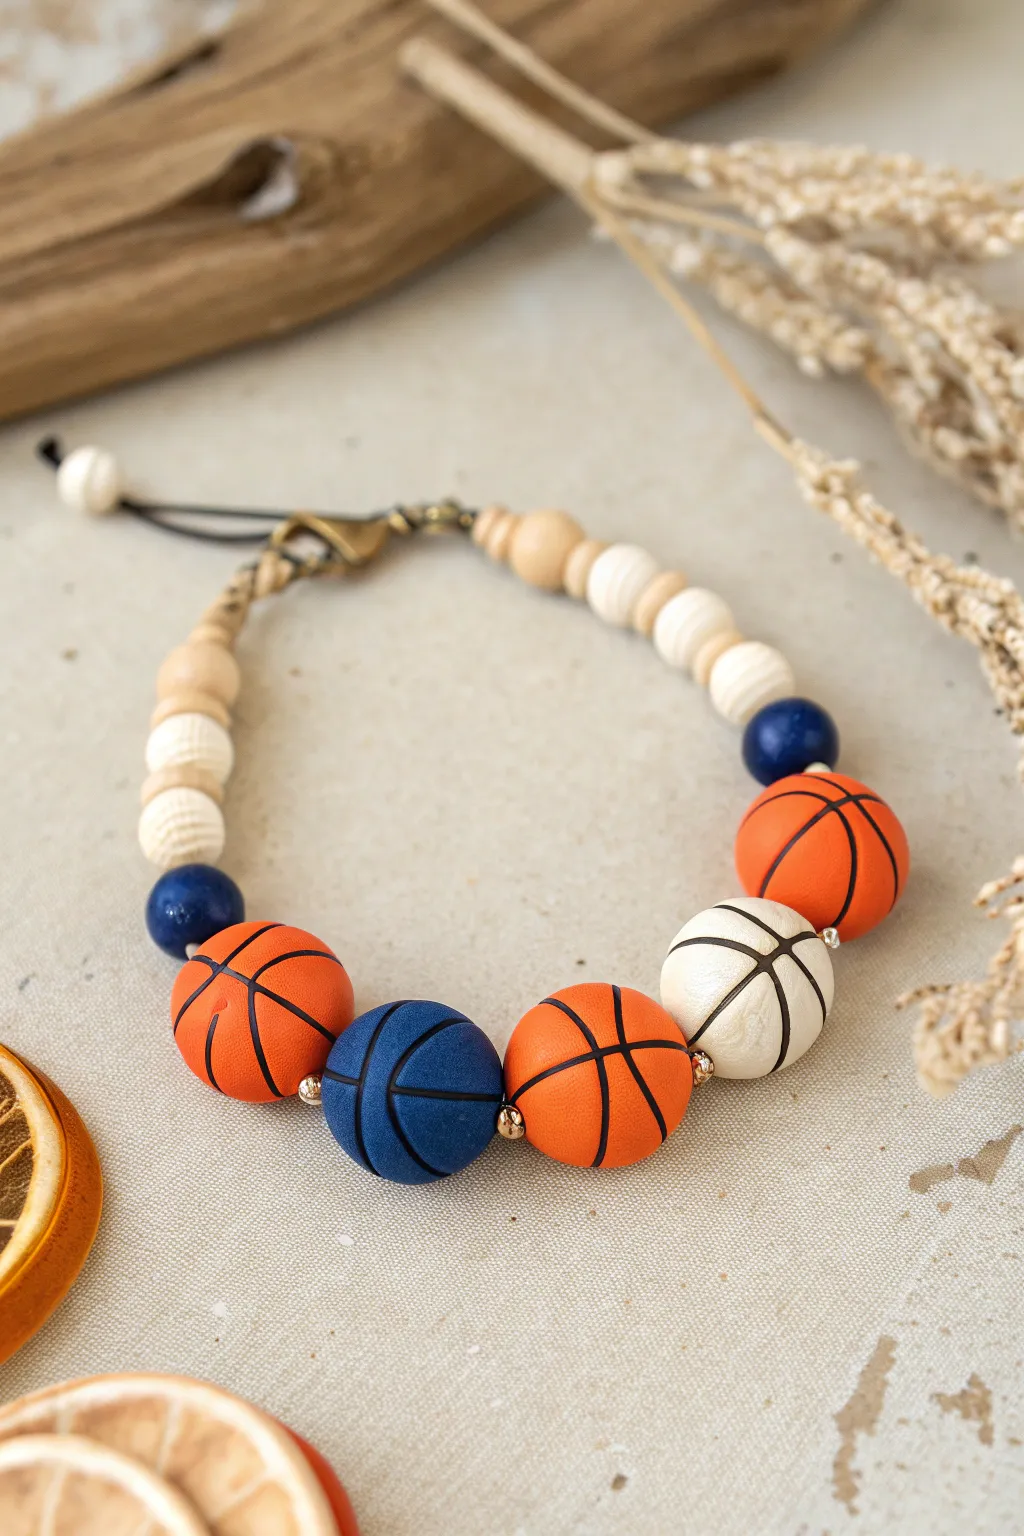
Celebrate your love for the game with this textured, team-spirited accessory featuring chunky basketball clay beads and natural wood accents. The design mixes bold athletic motifs with earthy tones for a stylish, stackable piece that isn’t just for game day.
How-To Guide
Materials
- Polymer clay (orange, black, white, royal blue)
- Clay tools (needle tool or fine detailing tool)
- Waxed cord or linen cord (black)
- Natural wood beads (8mm round)
- White grooved wooden beads (often called ‘beehive’ beads)
- Small gold spacer beads (metal or metallic coated)
- Lobster claw clasp and jump rings (antique brass finish)
- Scissors
- Jewelry pliers
- Large-eye beading needle
Step 1: Crafting the Clay Beads
-
Form the spheres:
Start by conditioning your orange, white, and royal blue polymer clay until pliable. Roll the orange clay into three large spheres (approx. 12-14mm), one white sphere of the same size, and two royal blue spheres. -
Add texture (Optional):
For a realistic basketball leather texture, gently roll the spheres over fine sandpaper or press a piece of rough fabric against them before adding the lines. -
Create the black lines:
Roll out incredibly thin ‘snakes’ of black polymer clay. You want these to be hairlines. carefully drape them over your colored spheres in the classic basketball pattern: one line encompassing the circumference, another crossing it at 90 degrees, and curved lines on the sides. -
Embed the lines:
Gently roll the beads between your palms to press the black lines flush into the base color without distorting the round shape. Poke a hole through the center with your need tool while the bead is still raw. -
Bake the beads:
Bake your custom beads according to the polymer clay package instructions (usually around 275°F for 15-30 minutes). Let them cool completely before handling.
Step 2: Stringing the Design
-
Prepare the cord:
Cut a length of waxing cord about 20 inches long. Fold it in half to create a doubled strand, which provides extra durability for these heavier clay beads. -
Start with the clasp side:
Thread the folded end through your lobster claw clasp and pull the loose ends through the loop to create a lark’s head knot, securing the clasp to the cord. -
Begin the bead pattern:
Thread your needle. String about 1.5 inches of beading pattern using the smaller beads first: alternate between the plain natural wood beads and the white grooved ‘beehive’ beads to create a tapered look near the clasp. -
Add the feature beads:
Now for the main event. Slide on a blue bead first. Then, add an orange basketball bead. -
Incorporate spacers:
Between the large clay focal beads, place a tiny metallic gold spacer bead. This adds a touch of shine and prevents the clay beads from rubbing against each other. -
Complete the center sequence:
Continue the pattern: Blue bead, gold spacer, orange basketball, gold spacer, white basketball, gold spacer, orange basketball. This creates the symmetrical ‘Team Color Block’ arrangement shown in the photo. -
Finish the second side:
Mirror the beginning of the bracelet by adding the mix of white grooved beads and natural wood beads until the beaded section is your desired length (usually about 6-7 inches total).
Smooth Lines Tip
Instead of rolling clay snakes for lines, use a clay extruder with a tiny round disc. This guarantees perfectly even thickness for every single black line on your basketballs.
Step 3: The Closure
-
Secure the end:
Once beading is done, tie an overhand knot right up against the last wooden bead to keep everything tight. -
Attach the jump ring:
Pass the remaining cord tail through a jump ring (which the lobster clasp will hook into). Fold the cord back on itself. -
Wrap the cord:
Use a spare piece of thinner cord or one of the tail strands to wrap tightly around the folded cord section, creating a neat finish similar to a tassel neck. -
Add the dangle accent:
Leave one strand of the tail long. Thread a single white grooved bead onto the end of this tail and knot it purely for decoration, trimming any excess.
Clay Bead Distortion?
If your beads flatten while piercing the hole, try waiting about 30 minutes after rolling them. Creating the hole when the clay is slightly cooler makes it firmer and holds shape better.
Now you have a custom piece of fan gear that looks great courtside or wherever your day takes you


Jersey Number Beads for Your Player
Show off your player’s jersey number with pride using this sporty, classic beaded bracelet. Featuring deep navy beads accented by vibrant orange pops and bold number charms, it’s a stylish way to support your favorite athlete on and off the court.
Step-by-Step Guide
Materials
- Dark navy blue round beads (6mm or 8mm, likely sodalite, lapis lazuli, or polished glass)
- Small orange round spacer beads (4mm or 6mm, agate or glass)
- Large white round acrylic or ceramic number beads (‘2’ and ‘3’ shown)
- Strong elastic beading cord (0.7mm or 0.8mm)
- Beading needle (optional but helpful)
- Scissors
- Hypo cement or clear jewelry glue
- Beading tray or soft cloth
- Measuring tape
Step 1: Preparation
-
Measure your wrist:
Wrap a measuring tape comfortably around your wrist where you want the bracelet to sit. Add about half an inch to this measurement to ensure the finished piece isn’t too tight. -
Cut the cord:
Cut a piece of elastic cord about 10 to 12 inches long. This extra length might seem excessive, but I find it makes tying the final knot significantly easier without fumbling. -
Pre-stretch the elastic:
Hold about 3 inches of the cord at each end and give it a few firm tugs. This pre-stretching prevents the bracelet from loosening up and sagging after you wear it a few times. -
Sort your beads:
Lay out your beads on a tray or cloth. Locate your specific jersey numbers—in this case, the white ‘2’ and ‘3’ beads—and separate your navy and orange accent beads.
Knot Slipping?
If your elastic is very slick, the knot might slip before you glue it. Try dabbing the knot area with a little clear nail polish or roughening the cord ends slightly before tying.
Step 2: Design & Stringing
-
Plan the pattern:
The focal point is the number section. Place the ‘2’ and ‘3’ beads in the center. Flank each side of the numbers with one orange bead to make them pop. -
Start the center sequence:
Thread one orange bead, followed by the number ‘2’ bead, then the number ‘3’ bead, and finally the second orange bead onto the elastic. Center this group roughly on the cord. -
Add side accents:
On the left side of the initial orange bead, add two navy beads, then an orange bead. Repeat this on the right side: two navy beads, then one orange bead. This creates a balanced frame. -
Continue the pattern:
Next, add three navy beads to the left side, followed by a trio of orange beads. This mimics the sporty stripe often seen on jerseys. -
Fill in the rest:
String the remaining navy beads onto both ends of the cord until the bracelet reaches your desired length. Periodically wrap it around your wrist to check the fit. -
Final symmetry check:
Before tying, look at the bracelet flat on the table. Ensure the numbers are reading correctly from left to right and that your accent beads are placed symmetrically.
Step 3: Finishing Touches
-
Prepare the knot:
Bring the two ends of the elastic together carefully so the beads don’t slide off. Remove any slack so the beads are touching but not bunching up. -
Tie a surgeon’s knot:
Make a simple overhand knot (right over left). Then, make a second loop, but pass the tail through the loop twice instead of once before pulling tight. -
Examine the tension:
Pull the knot tight, but gently. You want the elastic to stretch slightly to secure the knot, but not so much that it snaps. The beads should sit flush against each other. -
Secure with glue:
Apply a tiny dot of Hypo cement or jewelry glue directly onto the knot. This prevents it from slipping over time. -
Hide the knot:
While the glue is still slightly tacky, slide an adjacent navy bead (ensure it has a large enough hole) over the knot to conceal it inside. -
Trim the excess:
Once the glue is fully dry (wait about 15 minutes), use your scissors to trim the excess cord ends as close to the bead as possible without cutting the knot itself.
Level Up
Swap the plain navy beads for matte onyx or lava stones. You can add a drop of essential oil to the lava stones to turn your jersey bracelet into a subtle aromatherapy diffuser.
Slip on your custom jersey bracelet and cheer on your favorite player in style

The Complete Guide to Pottery Troubleshooting
Uncover the most common ceramic mistakes—from cracking clay to failed glazes—and learn how to fix them fast.
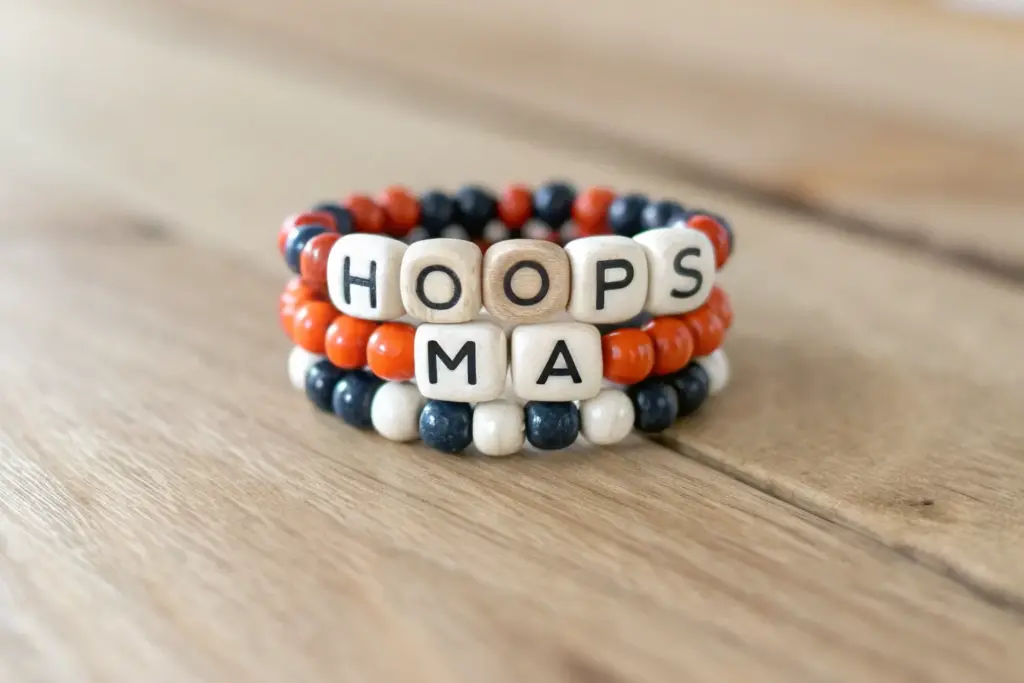
Name + Basketball Bead Combo
Celebrate your favorite player with this personalized basketball-themed bracelet, featuring a crisp white base accented by team colors. The standout realistic basketball charm and bold letter beads make it a perfect accessory for game day.
Detailed Instructions
Materials
- White polymer clay heishi beads (6mm)
- Black polymer clay heishi beads (6mm)
- Orange round smooth acrylic beads (8mm)
- White square letter beads with black text (spelling MIA)
- Small round gold spacer bead (faceted or textured, 6mm)
- Large basketball bead/charm (approx 12-14mm, wooden or acrylic)
- Elastic stretch cord (0.7mm or 0.8mm)
- Scissors
- Super glue or jewelry glue (optional)
- Bead stopper or painter’s tape
Step 1: Preparation
-
Measure the cord:
Cut a piece of elastic cord about 10-12 inches long. This generous length gives you plenty of room to tie knots without struggling to hold onto tiny ends. -
Secure the end:
Attach a bead stopper or a piece of tape to one end of the cord so your beads don’t slide right off while you work. -
Pre-stretch:
give the cord a few gentle tugs. This helps
Knot Hiding Trick
Drill the hole of the bead next to your knot slightly larger if the knot won’t fit inside. A bead reamer tool works perfectly for widening holes without cracking the bead.
Step 2: Beading the Pattern
-
Start the sequence:
Begin by threading on four white heishi beads followed by one black heishi bead. This creates a rhythmic, sporty stripe pattern. -
Continue the pattern:
Repeat this sequence—four white, one black—for about an inch and a half of the bracelet’s length. -
Add color accents:
Thread on two individual white heishi beads, then add one orange round bead, followed by two more white heishi beads to frame the upcoming gold accent. -
Insert the gold spacer:
Slide on the textured gold spacer bead. This adds a nice metallic pop that breaks up the matte colors. -
Mirror the side:
After the gold bead, add two white heishi beads, one orange round bead, and two more white heishi beads to mirror what you did on the other side. -
Resume the main pattern:
Go back to the main pattern: one black bead followed by four white beads. Continue this repeating sequence until you have covered about 3/4 of your desired wrist circumference.
Step 3: Creating the Focal Point
-
Prepare for the name:
String on one orange round bead. This will act as the left bumper for the name section. -
Spell the name:
Thread your letter beads to spell ‘MIA’ (or your chosen name). Make sure they are all facing the correct direction so the name reads clearly. -
Add the basketball:
Immediately after the last letter bead, slide on the large basketball charm bead. Its size creates an asymmetrical but balanced look next to the letters. -
Finish the focal section:
Add one last orange round bead after the basketball to bookend the entire focal design. -
Check the fit:
Wrap the unfinished strand around your wrist to check the sizing. If it’s too tight, add a few more white heishi beads near the ends; if too loose, remove a couple.
Team Spirit Swap
Customize the colors to match a specific jersey! Swap the orange accent beads for red, blue, or green while keeping the basketball bead constant as the sport indicator.
Step 4: Finishing Touches
-
Tie the knot:
Remove the tape or stopper. Bring the two ends of the cord together and tie a surgeon’s knot (loop the cord through twice before pulling tight). -
Tighten securely:
Pull the cords firmly to secure the knot. I find pulling gently on the beads adjacent to the knot helps snug everything together perfectly. -
Apply glue:
Dab a tiny drop of super glue or jewelry glue directly onto the knot. Let it dry for a minute or two. -
Hide the knot:
Trim the excess cord ends close to the knot, then gently pull the cord so the knot slides inside the hole of the large basketball bead or one of the adjacent orange beads to hide it.
Wear your new customized bracelet to the next big game and show off your team spirit with style
Coach or Basketball Mom Message
Show your team spirit and specific role with this stylish stack of three coordinating bracelets featuring basketball themes. Combining classic black and white beads with textured terracotta tones creates a sophisticated yet sporty accessory set perfect for game day.
Step-by-Step Guide
Materials
- 0.8mm elastic cord (clear)
- White round beads (8mm, glass or acrylic)
- Black round matte beads (8mm)
- Terracotta/Rust brown round beads (8mm, polished)
- Terracotta speckle-textured beads (8mm)
- Bright orange focal beads (10mm)
- White flat square alphabet beads with black letters
- Hypo-cement or jewelry glue
- Scissors
Step 1: Planning and Setup
-
Measure your wrist:
Before you begin stringing, measure your wrist and add about 1/2 inch to determine your ideal bracelet length, usually totaling around 7 inches for an average adult size. -
Cut the elastic:
Cut three strands of elastic cord, each about 10-12 inches long. Having this extra length makes the final knotting process much easier than working with short ends. -
Pre-stretch the cord:
Gently pull on each strand of elastic several times to pre-stretch it. This crucial step prevents the bracelets from stretching out and becoming loose after only a few wears. -
Sort your letters:
Locate the necessary letters for ‘COACH’, ‘BASKETBALL’ (note: the image shows a typo ‘BAKETBAL’, so you can choose to correct it or replicate the quirk!), and ‘MOM’.
Hiding the Knot
Use a bead reamer or large needle to slightly widen the hole of the bead next to your knot. Gently tug the elastic until the knot slips inside.
Step 2: The White ‘Mom’ Bracelet
-
Center the focal word:
Thread the letters M-O-M onto your first piece of elastic. Center them in the middle of the strand. -
Add flanking beads:
On either side of the word ‘MOM’, add the solid white 8mm round beads. -
Fill the length:
Continue adding white beads symmetrically to both sides until you reach your desired total length. -
Check the fit:
Wrap the strand around your wrist to verify the size. If it feels tight, add one more bead; if loose, remove one. -
Tie it off:
Tie a surgeon’s knot (right over left, left over right twice) and pull tight. Add a tiny dot of glue to the knot, let it dry, then trim the excess cord.
Step 3: The Black ‘Basketball’ Bracelet
-
String the long word:
Thread your ‘BASKETBALL’ letters onto the second cord. Because this word is long, it will curve slightly around the wrist. -
Add contrast spacers:
Place one white round bead on the immediate left and right of the word to create visual separation from the black beads. -
Start the dark pattern:
Begin threading the matte black beads onto the rest of the cord. -
Incorporate color accents:
Randomly or symmetrically intersperse 1-2 bright orange focal beads or white beads among the black ones if you want to break up the solid color, though keeping it mostly black makes the text pop. -
Secure the bracelet:
Repeat the knotting and gluing process used for the first bracelet, ensuring the knot is hidden inside a bead hole if possible.
Letter Placement
If you misspell a word or miss a letter, you don’t have to restart! Just undo the knot carefully with a safety pin rather than cutting the cord.
Step 4: The Terracotta ‘Coach’ Bracelet
-
Thread the title:
String the letters C-O-A-C-H onto the final piece of elastic cord. -
Add bright accents:
Place a bright orange focal bead on either side of the word ‘COACH’. This draws attention directly to the title. -
Start with texture:
Next to the orange beads, add 2-3 of the speckled terracotta beads. These mimic the texture of a basketball and add great visual interest. -
Finish with solids:
Fill the remainder of the strand with the smooth polished rust-brown/terracotta beads. -
Finalize the set:
Knot, glue, and trim the final bracelet. I always let the glue cure for at least 15 minutes before trying the full stack on.
Now you have a custom, coordinated set perfect for cheering from the sidelines or coaching on the court


What Really Happens Inside the Kiln
Learn how time and temperature work together inside the kiln to transform clay into durable ceramic.
Mascot Word in School Colors
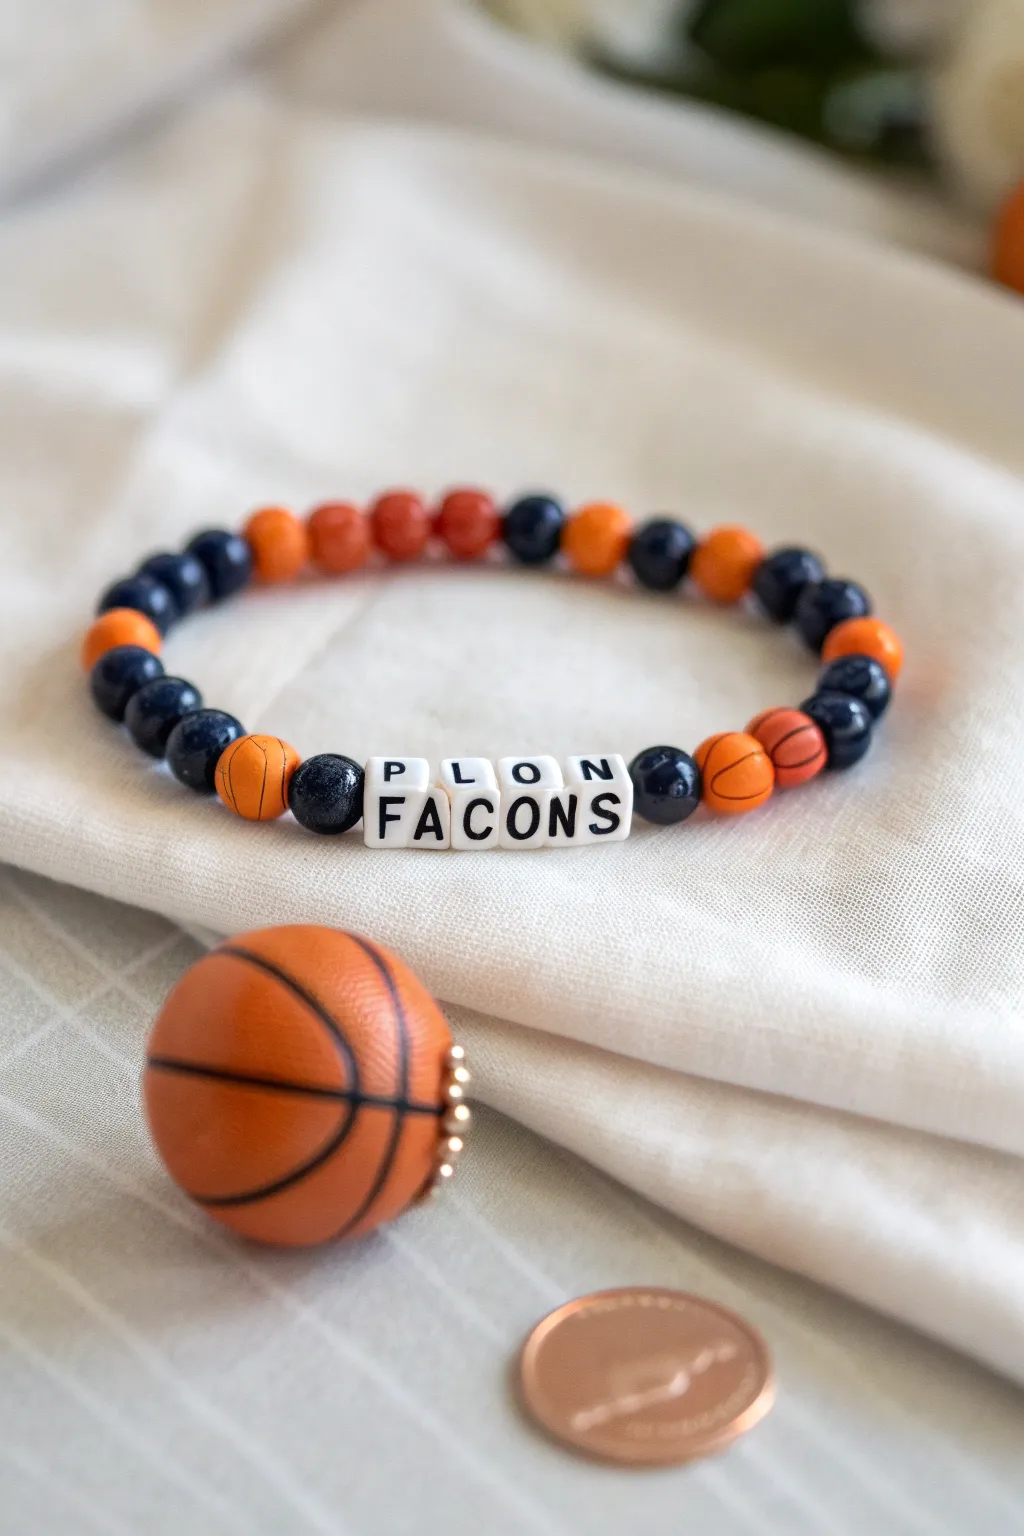
Show off your team pride with this custom beaded bracelet featuring your school mascot’s name and colors. The design combines sporty basketball beads with classic navy and orange accents for a spirited accessory that’s perfect for game day.
How-To Guide
Materials
- Stretch cord (0.8mm or 1mm thickness)
- Square white letter beads (spelling FACONS – likely intended to be FALCONS)
- Round navy blue beads (approx 8mm)
- Round orange beads (approx 8mm)
- Basketball texture beads (orange with black lines, approx 10mm)
- Super glue or jewelry glue
- Scissors
- Bead layout board (optional)
- Tape (optional)
Step 1: Preparation
-
Measure your wrist:
Wrap a piece of string around your wrist to find your size, then add about an inch for comfort. Cut your stretch cord to this length plus an extra 3-4 inches to make tying the knot easier. -
Secure the end:
If you don’t have a bead stopper, place a piece of tape on one end of your cut cord to prevent beads from sliding off while you work. -
Sort your beads:
Organize your beads by type: the letter cubes, the navy rounds, the standard orange rounds, and the special basketball-textured beads. -
Select your letters:
Pick out the white square letter beads needed to spell your mascot’s name. In this example, we are using the letters F, A, C, O, N, and S.
Step 2: Creating the Centerpiece
-
Start the center:
Begin threading by sliding on the letter beads in the correct order to spell your word. Double-check the spelling before moving on so you don’t have to restring later. -
Frame the word:
On both the left and right sides of your word, add one navy blue bead immediately next to the letters. -
Add basketball accents:
Next to those navy beads on both sides, thread on one of the larger textured basketball beads. This frames your mascot name nicely. -
Add contrast:
Place one more navy blue bead next to each basketball bead.
Knot Security Tip
Use a surgeon’s knot for extra security. Loop the elastic through twice on the first pass instead of once before pulling tight.
Step 3: Building the Pattern
-
Begin the alternating pattern:
Start creating the rest of the band by alternating colors. Add an orange bead, then a navy bead. -
Continue the sequence:
Repeat this pattern—orange, navy, orange, navy—working outward from the center piece on both ends of the string. -
Incorporate more basketballs:
Once you have about 3-4 standard rounds on a side, slide on another basketball bead to break up the pattern. Do this symmetrically on both sides of the bracelet. -
Check length:
Continue the alternating color pattern until the beaded section matches your wrist measurement. I prefer to wrap it around my wrist carefully to check the fit before tying. -
Balancing the design:
Make sure you end with a bead color that will look good next to the bead you started with (on the other side of the word) so the pattern flows seamlessly when connected.
Hole Size Mismatch
If the knot won’t hide inside a bead, ensure it sits between two beads of the same color so it’s less noticeable against your skin.
Step 4: Finishing Up
-
Prepare to tie:
Remove the tape from the end of the cord and bring the two ends together. -
Pre-stretch the cord:
Give the ends a gentle tug to pre-stretch the elastic slightly; this helps prevent the bracelet from stretching out permanently later. -
Tie the knot:
Tie a standard square knot (right over left, left over right). Make sure it is pulled tight but not so tight that the beads bunch up and buckle. -
Secure the knot:
Apply a tiny drop of jewelry glue or super glue directly onto the knot. Let this dry completely according to the glue instructions. -
Hide the knot:
Once dry, trim the excess cord ends close to the knot. If the hole of a neighboring bead is large enough, gently tuck the knot inside it for a seamless finish.
Now you have a personalized piece of fan gear ready to wear to the next big game
Gold Spacer Bead “Court Lights” Accents

Capture the energy of the game with this striking black and orange heishi bead bracelet. Featuring a standout basketball charm and gleaming gold accents, it’s the perfect accessory for game day or a gift for your favorite player.
Detailed Instructions
Materials
- Orange polymer clay heishi beads (6mm)
- Black polymer clay heishi beads (6mm)
- 2 Gold spherical spacer beads (6-8mm)
- Large basketball charm (polymer clay or resin)
- Gold beading wire or strong elastic cord
- 2 Gold crimp beads (if using wire)
- 2 Gold wire guardians (optional but recommended for wire)
- Gold lobster clasp
- Gold extender chain with jump ring
- Jewelry pliers (flat nose and cutting pliers)
- Small jump ring (for attaching the charm, if not pre-attached)
Step 1: Preparation
-
Measure your wrist:
Before cutting anything, wrap a flexible measuring tape around your wrist to find your size. Add about half an inch to this measurement to ensure a comfortable fit that isn’t too tight against the skin. -
Cut the wire:
Cut a length of beading wire or elastic cord about 3-4 inches longer than your final bracelet size. This extra length gives you plenty of room to work with the clasps and tie knots without frustration. -
Secure the start:
If using beading wire, thread a crimp bead and a wire guardian onto one end. Loop the wire through the guardian and back through the crimp bead to create a loop. -
Attach the clasp:
Slide your gold lobster clasp into the loop you just created. Use your flat nose pliers to firmly flatten the crimp bead, securing the wire. Give it a gentle tug to ensure it holds tight.
Uneven Blocks?
If your color blocks look uneven, count the beads in each section rather than eyeing it. Clay bead thickness varies, so precise counting ensures symmetry.
Step 2: Beading the Pattern
-
Begin the sequence:
Start threading your beads. The pattern shown uses alternating sections of color. Begin with about 5-6 black heishi beads. -
Switch to orange:
Follow the black section with an equal number of orange heishi beads. I find that keeping the counts consistent creates a cleaner, more professional look. -
Continue the pattern:
Repeat this alternating black and orange block pattern until you have beaded approximately half of the bracelet’s length. -
Add the first ‘light’:
Slide on one of your large gold spherical spacer beads. These represent the ‘stadium lights’ and add a touch of elegance to the sporty theme. -
Attach the centerpiece:
Thread your large basketball charm onto the wire so it sits directly next to the gold bead. Ensure the charm hangs freely and is facing the correct direction. -
Add the second ‘light’:
Immediately follow the basketball charm with the second gold spherical spacer bead. This frames the charm perfectly in the center. -
Resume the pattern:
Go back to your heishi beads. Start with the color opposite of what you finished with before the gold beads to maintain visual balance. -
Finish the length:
Continue alternating blocks of 5-6 orange and black beads until the bracelet reaches your desired length.
Step 3: Finishing Touches
-
Prepare the end:
Thread a crimp bead and a wire guardian onto the remaining tail of the wire. -
Add the extender:
Attach the jump ring of your gold extender chain into the loop created by the wire guardian. -
Secure the end:
Pass the wire tail back through the crimp bead and pull it taut, removing any slack in the bracelet, but leaving it flexible enough to drape nicely. -
Crimp and trim:
Use your pliers to flatten the final crimp bead securely. Trim the excess wire flush with the bead using your cutting pliers. -
Hide the tail:
If a tiny bit of wire tail remains, try to tuck it gently back into the hole of the nearest heishi bead to prevent scratching.
Jersey Numbers
Swap the gold spacer beads for gold number beads matching a favorite player’s jersey number for a personalized touch.
Now you have a stylish, court-side accessory ready to show off your team spirit

TRACK YOUR CERAMIC JOURNEY
Capture glaze tests, firing details, and creative progress—all in one simple printable. Make your projects easier to repeat and improve.
Alternating Orange and Black Heishi Rhythm
Celebrate your love for the game with this textured and rhythmic clay bead bracelet. Featuring a sporty basketball charm and a striking pattern of burnt sienna, bright orange, and graphic black and white, this accessory is the perfect game-day companion.
Step-by-Step
Materials
- Flat clay heishi beads (burnt orange/sienna)
- Flat clay heishi beads (bright orange)
- Flat clay heishi beads (white)
- Black lava stone beads or textured round clay beads (approx. 6mm)
- Basketball charm (enamel or metal)
- Gold or silver jump ring (4-6mm)
- Elastic stretch cord (0.8mm)
- Jewelry glue (GS Hypo Cement recommended)
- Scissors
Step 1: Preparation
-
Measure your wrist:
Before cutting anything, wrap a piece of string around your wrist to find your comfortable size. Add about half an inch to this measurement for the beads to sit comfortably without pinching. -
Cut the cord:
Cut a length of elastic cord about 10-12 inches long. This generous length gives you plenty of room to string beads and tie secure knots later without struggling. -
Secure the end:
Attach a piece of tape or a bead stopper to one end of your elastic cord. This prevents your hard work from sliding off while you build your pattern. -
Prep the charm:
Using pliers, open your jump ring slightly. Slide the basketball charm onto the ring, then carefully close it back up so the ends meet perfectly flush.
Pro Tip: Bead Sorting
Use a bead board or a piece of felt to lay out your pattern before stringing. It keeps round beads from rolling away.
Step 2: Stringing the Pattern
-
Start the sequence:
Begin by threading on the main body color. Slide on approximately 20-30 burnt orange heishi beads. This section will sit on the back or side of your wrist. -
Add first texture finish:
For a tactile break, slide on one black textured bead. This resembles the texture of a basketball and breaks up the smooth clay discs. -
Create an orange block:
Thread on about 6 to 8 bright orange heishi beads. This brighter pop color mimics the classic rim or ball color. -
Add second black accent:
Slide on another black textured bead to bookend the bright orange section. -
Build the center focal point:
Now, add a section of white heishi beads—about 8 to 10 discs. This high-contrast section will sit right near the charm, highlighting it. -
Mirror the pattern:
We are creating a symmetrical look. String on another black textured bead after the white section. -
Second orange block:
Slide on another set of 6 to 8 bright orange heishi beads, matching the length of the first orange section. -
Insert the charm:
Between the bright orange section and the final black bead, slide your basketball charm onto the cord by threading through its jump ring. -
Final black accent:
Place your last black textured bead next to the charm. -
Finish the loop:
Complete the bracelet by adding burnt orange heishi beads until you reach your desired total length. Check the fit by wrapping it around your wrist.
Troubleshooting: Uneven Loops
If the bracelet twists or doesn’t lay flat, check if the knot is too tight or if beads are jammed. Slight wiggle room is key.
Step 3: Finishing Touches
-
Pre-stretch the cord:
Gently pull correctly on both ends of the elastic. Pre-stretching helps prevent the bracelet from loosening up after you wear it for the first time. -
Tie the knot:
Remove the tape or stopper. Tie a square knot (right over left, left over right) and pull it tight. I usually add a surgeon’s knot (looping through twice) for extra security. -
Secure with glue:
Dab a tiny drop of jewelry glue onto the knot. Let it dry for a few minutes to ensure it won’t slip. -
Hide the knot:
Thread one of the tail ends back through the adjacent bead and pull gently until the knot slides inside the bead to hide it. -
Trim excess:
Snip off the excess cord close to the beads, being careful not to cut the main knot.
Slip on your new accessory and carry that team spirit wherever you go
Mini Hoop Charm Vibe in Clay Beads
Capture the spirit of the game with this stylish bracelet that places a detailed clay basketball center stage. Surrounded by natural textures and subtle team colors, it strikes the perfect balance between sporty and chic.
Step-by-Step Guide
Materials
- Polymer clay (orange, black)
- Small round wooden beads (approx. 6mm, natural unfinished)
- Small round wooden beads (approx. 6mm, brown stained)
- Larger round wooden beads (approx. 8-10mm, light wood grain)
- Small red cylindrical spacer beads (heishi or seed beads)
- High-quality beading wire or strong elastic cord
- Silver lobster clasp and jump ring
- Crimp beads (if using wire)
- Needle tool or toothpick
- Gloss glaze (optional for the basketball)
Step 1: Sculpting the Basketball Focal Bead
-
Roll the base:
Start by conditioning a chunk of orange polymer clay until it is soft and pliable. Roll it between your palms to create a perfect sphere, aiming for a size of about 15-18mm in diameter. -
Create the texture:
To mimic the leather texture of a real basketball, gently roll the sphere over fine sandpaper or lightly purpose-stipple the surface with a stiff toothbrush. -
Mark the lines:
Use a needle tool to gently etch the standard basketball line pattern into the clay. You want deep enough grooves to hold the black clay, but not so deep that you distort the sphere shape. -
Add the black detailing:
Roll an extremely thin snake of black polymer clay. Carefully lay this thin strand into the grooves you just created. I find it helpful to use the tip of a craft knife to guide the clay into the curves. -
Smooth the bead:
Once the lines are placed, gently roll the bead in your hands again to embed the black clay flush with the orange surface. -
pierce the hole:
Carefully twist your needle tool or a thick toothpick through the center of the basketball to create a bead hole. Ensure it goes through the ‘side’ perspective so the ball faces forward when strung. -
Bake the bead:
Bake the clay bead according to the manufacturer’s instructions for time and temperature. Let it cool completely before determining if you want to add a light coat of gloss glaze for shine.
Step 2: Assembling the Bracelet
-
Prepare the cord:
Cut a length of beading wire or elastic cord about 10 inches long to give yourself plenty of room to work. -
Start the clasp (if using wire):
Thread a crimp bead and your lobster clasp onto one end of the wire. Loop the wire back through the crimp bead and flatten it securely with pliers. -
Begin the pattern:
Start stringing from the clasp side. Begin with about 10-12 of the darker brown wooden beads, followed by a long section of the small cream/white wooden beads until you reach the midpoint area. -
Build the center showcase:
Now for the focal arrangement. Slide on one larger light wood bead, followed by one red spacer bead, then another large wood bead. -
String the basketball:
Thread your red spacer bead, followed by your handmade clay basketball, and then another red spacer bead to frame it. -
Complete the center mirror:
Finish the focal section by mirroring the previous step: One large wood bead, a red spacer, and a final large wood bead. -
Finish the strand:
Continue stringing the rest of the bracelet with the small cream/white wooden beads until you reach the desired length similar to the first side. -
Close the loop:
Add a crimp bead and a jump ring to the end. Loop the wire back through the crimp bead, pull it taut but flexible, and crush the crimp bead to secure the design. -
Hide the ends:
Trim any excess wire close to the crimp bead or thread the tail back through a few adjacent beads for extra security.
Keep it Round
If your pottery bead flattens while piercing the hole, refrigerate the clay ball for 10 minutes first to firm it up.
Level Up: Texture Match
Replace the plain red spacers with tiny faceted crystal beads in your team’s colors for a touch of unexpected sparkle.
Now you have a custom accessory perfect for game day or gifting to your favorite player
“Game Day” Phrase Bracelet
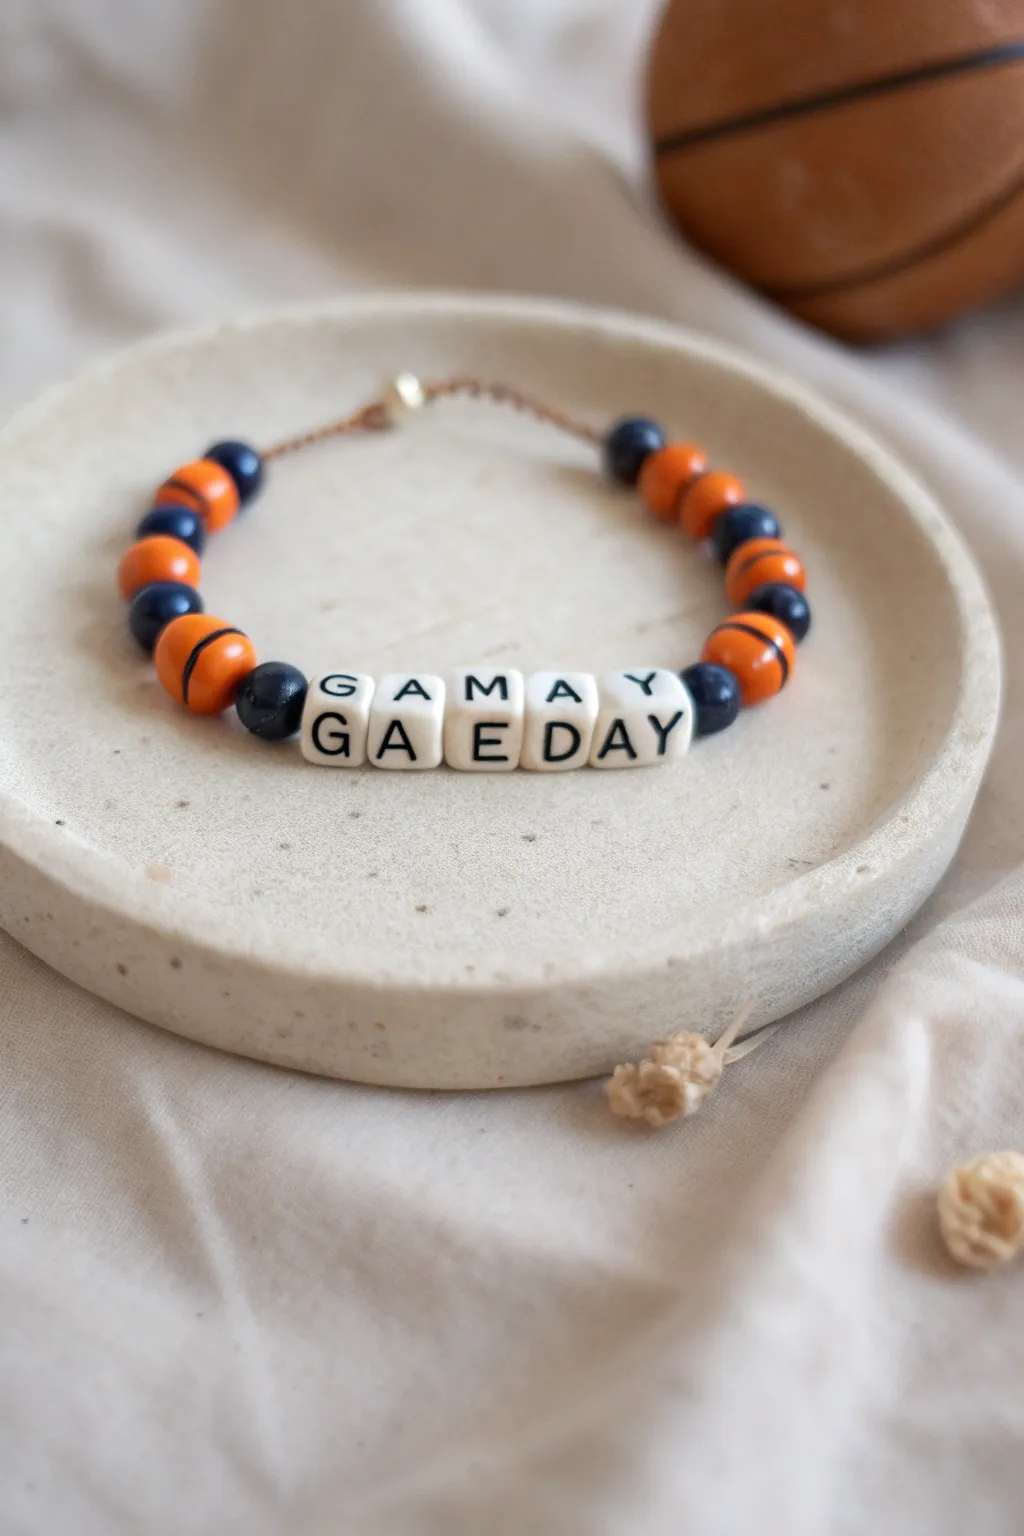
Show off your team spirit with this sporty, personalized accessory that pairs classic basketball motifs with sleek lettering. The design alternates between vibrant orange basketball beads, deep navy spacers, and a bold “GAMEDAY” centerpiece for an unmistakable fan statement.
Detailed Instructions
Materials
- Elastic stretch cord (0.7mm or 0.8mm)
- Square white letter beads (spelling G-A-M-E-D-A-Y)
- Small round orange basketball beads (approx. 8mm)
- Small round navy blue wood or acrylic beads (approx. 6mm)
- Jewelry glue or clear nail polish
- Scissors
- Tape or a bead stopper clip
- Beading needle (optional, for easier threading)
Step 1: Preparation and Centerpiece
-
Measure and cut:
Cut a piece of elastic cord about 10-12 inches long. Is usually like to cut a little extra just to be safe, as it makes tying the knot at the end much easier. -
Secure the end:
Place a piece of tape over one end of the cord or attach a bead stopper. This crucial step prevents your beads from sliding off while you work. -
Arrange the letters:
Lay out your square letter beads on a flat surface to spell “GAMEDAY”. You might need to check your bead stash; the image creates a stacked look by using two separate letter groupings, but a single line works perfectly too. -
String the phrase:
Thread the letter beads onto the cord in the correct order. Double-check the orientation to ensure they aren’t upside down relative to each other.
Letters Flipping?
If your square letter beads keep rotating and won’t sit flat, try using a slightly thicker elastic cord (0.8mm or 1.0mm) to fill the bead hole more snugly.
Step 2: Creating the Pattern
-
Start the pattern:
On the right side of your letter phrase, add one navy blue round bead. This acts as a visual separator between the text and the sport motif. -
Add a basketball:
Slide on one orange basketball bead next to the navy spacer. Ensure the black lines on the bead are visible and crisp. -
Establish the sequence:
Continue the pattern on this side: one navy bead followed by one basketball bead. Repeat this specific alternation about 3-4 times depending on your wrist size. -
Mirror the design:
Now, move to the left side of the letter phrase. Add a navy blue bead first to balance the design symmetrically. -
Complete the left side:
Repeat the alternating pattern—basketball, navy, basketball, navy—on the left side until the beaded length matches the right side. -
Check the fit:
Wrap the beaded cord around your wrist to check the size. Ideally, the ends should meet comfortably without stretching the elastic too tight. -
Add final spacers:
If you need a tiny bit more length but not enough for a full basketball bead, add an extra navy bead or two at the very ends of the pattern.
Step 3: Finishing Touches
-
Pre-stretch the cord:
Gently pull on both ends of the elastic cord a few times. This pre-stretching helps prevent the bracelet from loosening up after you wear it for the first time. -
Remove the stopper:
Carefully remove the tape or bead stopper from the end, holding the beads firmly so they don’t scatter. -
Tie the knot:
Tie a square knot (right over left, left over right) or a surgeon’s knot. Pull it tight, ensuring no gaps remain between the beads. -
Secure with glue:
Apply a tiny dot of jewelry glue or clear nail polish directly onto the knot. This seals the fibers and prevents slipping. -
Hide the knot:
Once the glue is tacky but not fully hard, slide one of the adjacent navy beads over the knot to hide it inside. -
Trim the excess:
Wait for the glue to dry completely, then use your scissors to trim the excess cord as close to the bead hole as possible.
Team Colors
Swap the navy blue spacer beads for your specific team’s secondary color—like forest green, maroon, or gold—to make this truly fan-specific.
Slip on your new game day accessory and get ready to cheer for your favorite team style
Split Message Set for Best Friends
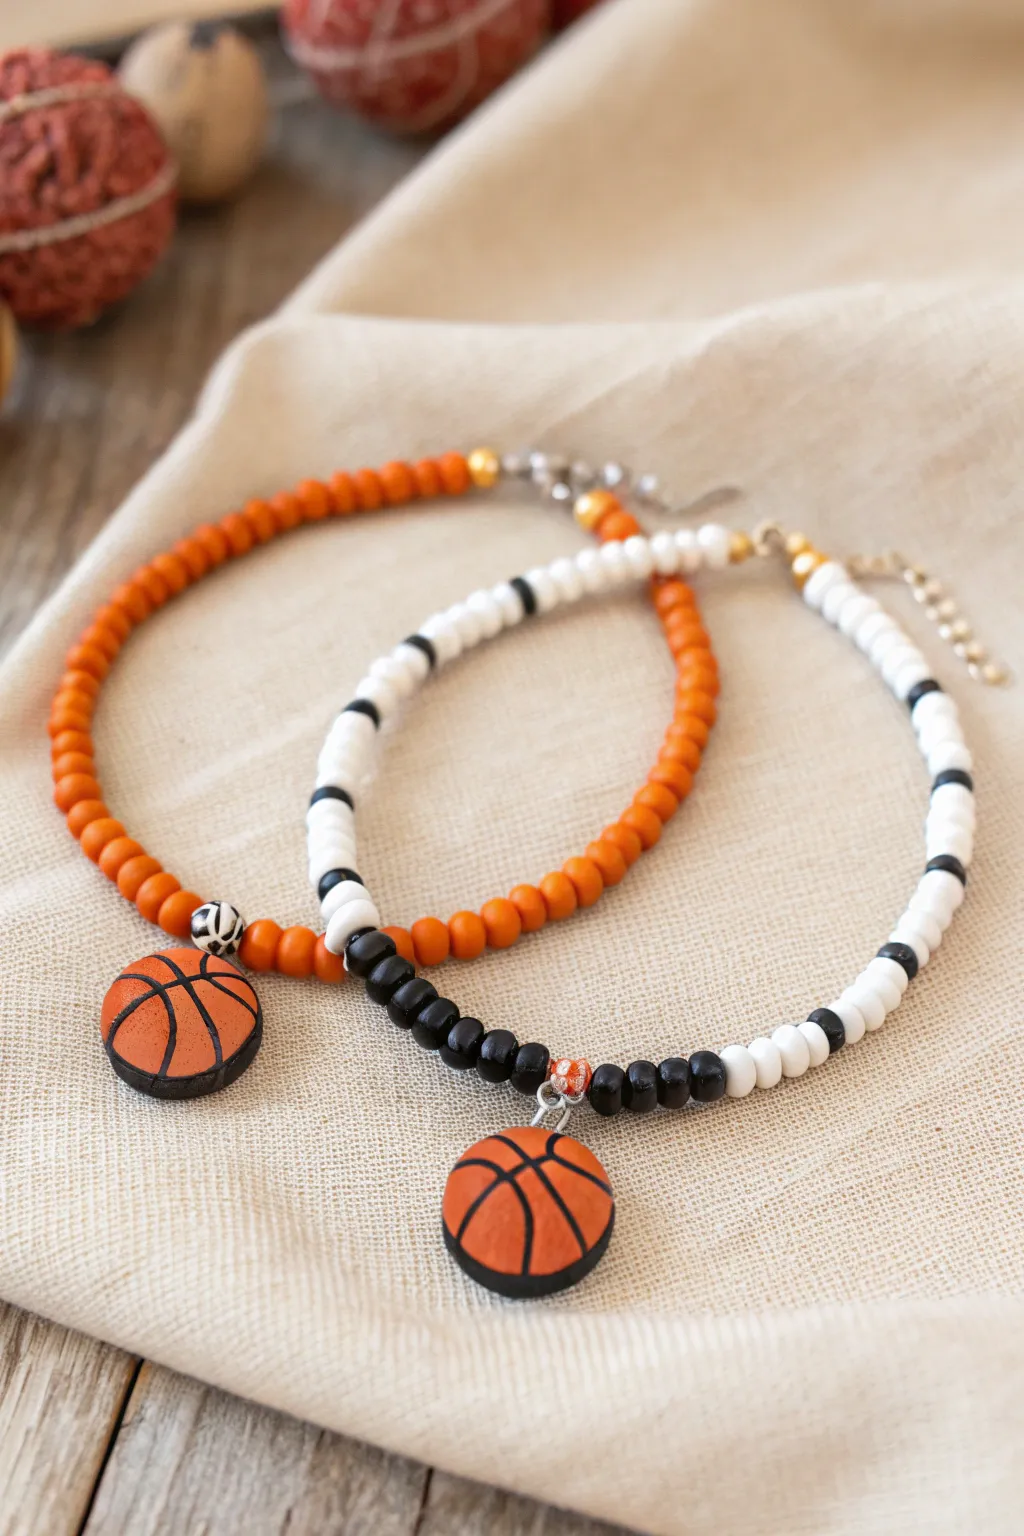
Celebrate your favorite dynamic duo on and off the court with this coordinated set of basketball charm bracelets. Featuring classic orange, black, and white clay heishi beads, these accessories are a slam dunk for best friends or teammates looking to show some unity.
Step-by-Step
Materials
- Orange polymer clay heishi beads (6mm)
- White polymer clay heishi beads (6mm)
- Black polymer clay heishi beads (6mm)
- Small gold or silver spacer beads
- 2 Flat round basketball charms (polymer clay or enamel)
- Elastic beading cord (0.8mm recommended)
- Jewelry glue or clear nail polish
- Scissors
- Tape or bead stopper
- Jump rings (4mm or 6mm)
- Jewelry pliers
Step 1: Planning the Layout
-
Measure and cut:
Cut two pieces of elastic cord to about 10-12 inches each. This gives you plenty of extra room for tying knots later. -
Pre-stretch:
Gently pull tightly on the elastic strings a few times to pre-stretch them; this prevents the bracelets from stretching out and becoming loose after you wear them. -
Secure the end:
Place a piece of tape or a bead stopper on one end of each string so your beads don’t slide off while you work.
Knot Hiding Trick
If the bead holes are too small to hide the knot, use a crimp recover bead over the knot for a polished, professional metal finish.
Step 2: Crafting the Orange Bracelet
-
Start strong:
Begin threading orange heishi beads onto your first cord. You will need enough to cover about 90% of the bracelet’s circumference. -
Add metallic accents:
If you like the look in the photo, slip on a small gold spacer bead near the ends where the clasp would traditionally be, or just scatter a few throughout the orange section for shine. -
Create the focal point:
Once the main orange section is done, thread on a special patterned bead or a sequence of black and white beads to create a visual break right before the center. -
Attach the charm:
Use your pliers to open a jump ring and attach it to the basketball charm, then slide the jump ring onto the cord so it sits right in the center. -
Finish the loop:
Add a few more accent beads to mirror the other side of the charm, ensuring the design looks balanced.
Step 3: Crafting the White Bracelet
-
Base pattern:
For the second bracelet, start with white heishi beads as your main color. -
Insert stripes:
Every inch or so, insert a single thin black heishi bead to create a striped, referee-style pattern. -
Build the center block:
When you reach the middle of the string, switch to solid black heishi beads for about one inch of length to create a bold contrast section. -
Add the metal spacer:
Thread a small silver or textured metal spacer bead right in the middle of this black section. -
Hang the charm:
Attach the second basketball charm using a jump ring directly next to that center metal spacer bead. -
Complete the circle:
Finish stringing the rest of the white and black striped pattern until the bracelet reaches the desired length.
Curling Issues?
If the bracelet curls up and doesn’t lay flat, loosen your knot slightly. Using too much tension creates a rigid circle instead of a flexible drape.
Step 4: Final Assembly
-
Check the fit:
Wrap the bracelets around your wrist to check the size. Add or remove a bead or two if needed for a perfect fit. -
Tie the knot:
Remove the tape and tie the ends together using a strong surgeon’s knot (right over left, left over right) or a triple square knot. -
Seal the deal:
Dab a tiny drop of jewelry glue or clear nail polish onto the knot to prevent it from slipping. -
Hide the mechanics:
Once the glue is dry, trim the excess string carefully and try to tuck the knot inside one of the adjacent beads if the hole is large enough.
Now you have a matching set perfect for game day or gifting to your MVP
Home vs. Away Colorway Pair
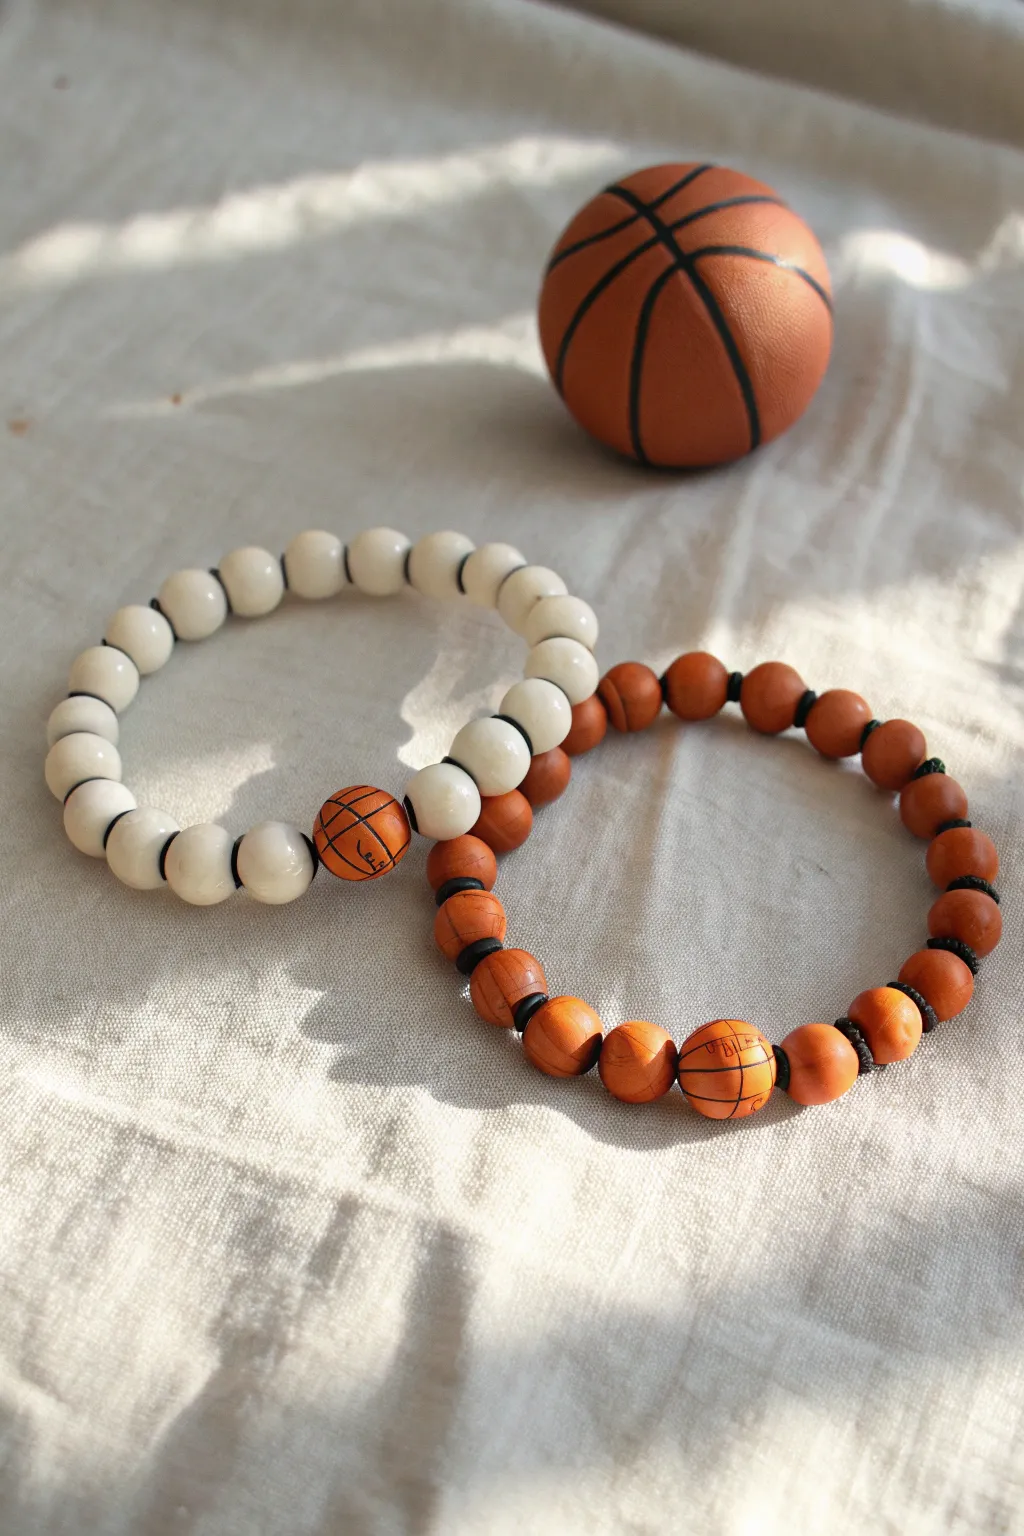
Celebrate every game, no matter where it’s played, with this striking pair of coordinating bracelets. One features creamy white beads for the ‘home’ jersey vibe, while the other rocks a textured orange for ‘away’ games, both anchored by custom hand-painted basketball focal beads.
How-To Guide
Materials
- Polymer clay (white and orange)
- Black acrylic paint
- Fine detail paintbrush (size 00 or 000)
- Stretch cord (0.8mm or 1mm)
- Small black spacer beads (heishi or seed beads)
- Beading needle (optional)
- Super glue or jewelry cement
- Scissors
- Toothpick or bead drying rack
- Gloss glaze (optional)
Step 1: Creating the Basketball Beads
-
Shape the clay:
Start by conditioning your orange polymer clay until it is soft and pliable. Roll two balls of clay purely for the basketball focal beads—aim for about 12mm in diameter so they stand out slightly against the other beads. -
Create the holes:
Using a toothpick or a thick needle tool, carefully pierce a hole through the center of each orange sphere. Rotate the bead as you push through to keep the shape round. -
Make the base beads:
For the ‘Away’ bracelet, roll approximately 20-22 smaller balls of orange clay (around 8-10mm). For the ‘Home’ bracelet, repeat this process with the white clay. Pierce holes in all of them. -
Bake the clay:
Arrange all your beads on a baking sheet or suspended on a bead rack. Bake according to your brand of polymer clay’s instructions (usually 275°F/135°C for 15-30 minutes). Let them cool completely before handling. -
Paint the lines:
Take your two focal beads. Using the finest detail brush and black acrylic paint, carefully draw the basketball lines. Start with a single vertical line, then a horizontal line crossing it. Add the classic curved lines on the sides to complete the basketball look. -
Seal the focal beads:
Once the paint is fully dry, I suggest applying a thin coat of gloss glaze over just the basketball beads to protect the paint and give them a realistic shine.
Step 2: Assembling the ‘Home’ Bracelet
-
Measure and cut:
Cut a piece of stretch cord about 10 inches long. This gives you plenty of slack for tying knots later. -
Start stringing:
Begin threading your white clay beads onto the cord. Between every single white bead, place a small black spacer bead. This high-contrast pattern mimics the piping on a jersey. -
Add the focal point:
Once you have strung about half of your white beads, thread on one of your hand-painted basketball beads. Follow it immediately with another black spacer. -
Finish the pattern:
Continue stringing the remaining white beads and black spacers until the bracelet reaches your desired length (usually about 6.5 to 7 inches for an average wrist). -
Tie it off:
Tie a secure surgeon’s knot (loop the cord through twice before pulling tight). Add a tiny drop of super glue to the knot, let it dry for a minute, and trim the excess cord.
Perfect Lines Tip
Struggling with wobbly basketball lines? Use an ultra-fine tip permanent marker instead of a paintbrush for more control on the curved surface.
Step 3: Assembling the ‘Away’ Bracelet
-
Prepare the cord:
Cut a second piece of stretch cord, again about 10 inches long. -
String the base:
Thread your smaller orange clay beads onto the cord. Just like the first bracelet, insert a black spacer bead between every orange bead. The black spacers help define the individual beads and prevent them from looking like one long orange tube. -
Insert the basketball:
At the halfway point, slide on the second hand-painted basketball focal bead. Because the surrounding beads are also orange, painting the black lines on this focal bead was crucial for it to be distinct. -
Complete the loop:
Finish stringing the rest of the orange beads and spacers until it matches the size of your ‘Home’ bracelet. -
Secure the knot:
Tie your surgeon’s knot firmly. Pull tight to ensure no gaps are showing between beads, apply a dab of glue, and trim the ends close to the knot.
Texture Play
Before baking, roll the orange clay balls over a piece of sandpaper or a textured sponge to give them that realistic pebbled leather feel.
Stack them together on game day or share one with a friend to show your team spirit
Marbled Orange “Basketball Leather” Beads
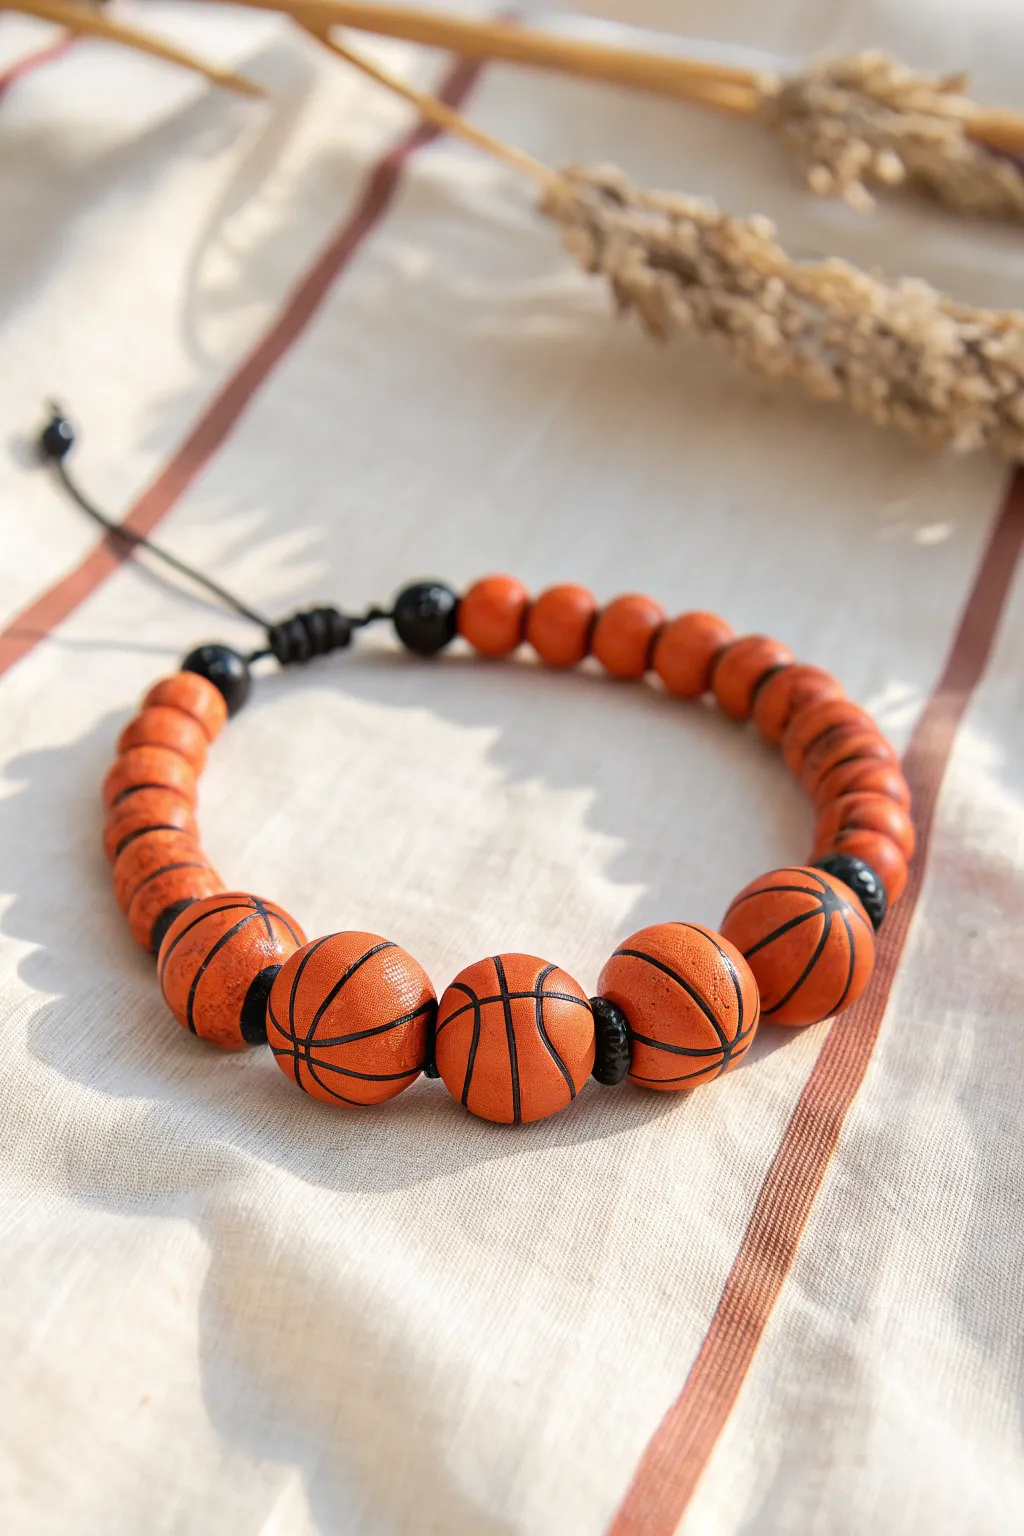
This sporty design mimics the texture of real basketball leather using polymer clay, creating a fun accessory perfect for game day. The combination of larger basketball beads and smaller textured spacers gives it a dynamic, thoughtful rhythm.
Detailed Instructions
Materials
- Orange polymer clay
- Black polymer clay
- Black acrylic paint
- Thin paintbrush (00 or 000 size) or fine-tip black paint pen
- Needle tool or toothpick
- Old toothbrush or sandpaper (for texturing)
- Black nylon cord (0.8mm or 1mm)
- Beading needle
- Gloss or matte glaze (optional)
Step 1: Creating the Basketball Beads
-
Condition the clay:
Start by warming up your orange polymer clay in your hands until it’s soft and pliable. This prevents cracking later on. -
Form the spheres:
Roll the clay into a log and cut off equal-sized portions to ensure your beads are uniform. Roll these pieces into five smooth balls, roughly 12-14mm in diameter. -
Add texture:
To mimic leather, gently roll each orange ball over a piece of sandpaper or press an old toothbrush bristles lightly against the surface. Rotate the bead to cover the entire area with a subtle dimpled texture. -
Pierce the holes:
Carefully insert your needle tool or toothpick through the center of each ball. Rotate the tool as you push through to avoid squishing the shape. Widen the hole enough to accommodate your cord doubled up later. -
Bake the beads:
Preheat your oven according to the clay manufacturer’s instructions (usually around 275°F/135°C). Place your five main beads on a baking sheet and bake for the recommended time, usually 15-30 minutes per 1/4 inch of thickness.
Clean Lines Hack
Struggling to paint straight curves? Lightly etch the basketball lines into the raw clay with a needle tool before baking. The groove guides your paintbrush perfectly.
Step 2: Making the Spacer Beads
-
Create orange spacers:
Roll smaller bits of the same orange clay into balls about 6-8mm wide. You’ll need roughly 16-20 of these, depending on your wrist size. -
Create black spacers:
Using the black clay, roll very tiny accent beads, about 4mm wide. You will need four of these: two to bracket the central basketballs and two for the closure tails. -
Texture the spacers:
Just like the basketballs, give the orange spacer beads a light texture with your toothbrush or sandpaper. I prefer to leave the tiny black spacers smooth for contrast. -
Bake the spacers:
Pierce holes in all spacer beads and bake them alongside or after your main beads, following the same package instructions.
Jersey Numbers
Personalize the bracelet by painting a tiny jersey number on the center basketball bead in white or gold paint instead of the standard lines.
Step 3: Painting the Details
-
Cool down:
Allow all your beads to cool completely before painting. Painting hot clay can make the paint dry too fast and become gummy. -
Paint the lines:
Using a very fine brush and black acrylic paint, carefully draw the traditional basketball lines on the five large beads. Start with a single continuous line around the circumference, then add the intersecting curves. -
Add faux marbling:
For a rugged, used-leather look, dilute a tiny drop of black paint with water. Use a paper towel to dab this wash onto the orange spacers and quickly wipe it off, leaving dark pigment only in the textured crevices. -
Seal (Optional):
Once the paint is fully dry, you may coat the beads with a matte varnish to protect the design without making them overly shiny.
Step 4: Assembly
-
Prepare the cord:
Cut a piece of black nylon cord about 24 inches long. Fold it in half if you want a double-cord look, but for this specific design, a single thick strand works best. -
String the center:
Thread your beads in this order: orange spacers, a black spacer, the five basketball beads, another black spacer, and the remaining orange spacers. -
Knot the ends:
Tie a simple overhand knot tightly against the last bead on each side to keep the beads centered on the cord. -
Create the sliding closure:
Overlap the two cord ends. Cut a separate 8-inch piece of cord and tie a series of square knots (macramé style) around the overlapped section to create a sliding mechanism. -
Finish the tails:
Thread one tiny black spacer onto each tail end of the cord, tie a knot to secure it, and trim any excess cord. Carefully melt the very tips with a lighter to prevent fraying.
Now you have a durable, custom piece of fan gear ready to wear to the next match or give to your favorite player
Black Line Details on Flat Clay Discs
Celebrate your love for the game with this detailed polymer clay bracelet featuring realistic basketball beads. The combination of classic orange basketballs and sleek white game balls creates a sporty accessory perfect for game day or everyday wear.
Step-by-Step Guide
Materials
- Orange polymer clay (basketball orange)
- White polymer clay
- Black polymer clay (or black acrylic paint)
- Gold or bronze acrylic paint (fine tip marker works too)
- Polymer clay tools (needle tool or toothpick)
- Elastic beading cord (0.8mm or 1mm)
- Tiny black spacer beads (seed beads or heishi beads)
- Super glue or jewelry cement
- Beading needle (optional but helpful)
- Oven for baking clay
Step 1: Sculpting the Basketballs
-
Condition the clay:
Start by warming up your orange and white polymer clay in your hands until it is soft and pliable. This conditioning step prevents cracks later on. -
Form the spheres:
Roll the orange clay into three perfectly round spheres, approximately 10-12mm in diameter. Repeat this with the white clay to create another three spheres of the same size. -
Create smaller filler beads:
Using the remaining orange clay, roll about 14-16 smaller spheres, slightly smaller than your main basketballs (around 8mm). I like to gently roll these over a piece of sandpaper or a toothbrush to give them a textured, ‘leather’ look. -
Pierce the beads:
Carefully twist a needle tool or toothpick through the center of every bead to create the stringing hole. Rotate the bead as you push to keep the shape round.
Smooth Moves
To get rid of fingerprints on your raw clay spheres, lightly dust your fingers with cornstarch or baby powder before the final roll.
Step 2: Adding the Details
-
Mark the lines:
On the six larger spheres (3 orange, 3 white), use your needle tool to gently etch the classic basketball line pattern. Start with one continuous line around the circumference, then add the cross line and the curves on the sides. -
Bake the clay:
Arrange all your beads on a baking sheet or tile. Bake according to your brand of polymer clay instructions (usually 275°F/135°C for 15-30 minutes). Let them cool completely. -
Paint the orange balls:
Once cool, use a very fine brush with black acrylic paint to carefully fill in the etched grooves on the orange basketballs. Wipe away excess surface paint with a damp cloth if you go outside the lines. -
Paint the white balls:
For the white basketball beads, fill the grooves with gold or bronze acrylic paint for a stylish contrast. Let the paint dry fully before moving on.
Step 3: Assembly
-
Plan the pattern:
Lay out your design on a bead board or soft cloth to stop them rolling away. The focal point is the alternating pattern: Orange Ball, White Ball, Orange Ball, White Ball, Orange Ball, White Ball. -
Prepare the spacers:
Between the main basketball beads, you won’t need spacers, but for the rest of the bracelet, place a tiny black spacer bead between every single small textured orange bead. -
String the beads:
Cut a piece of elastic cord about 10 inches long. Thread your needle if using one, and start stringing the focal basketballs first. -
Continue stringing:
Follow with the smaller textured orange beads, placing a black spacer between each one as planned. -
Check the fit:
Wrap the strand around your wrist to check the size. Add or remove the smaller textured beads to adjust the circumference until it fits comfortably. -
Tie the knot:
Once sized correctly, remove the needle and tie the ends of the elastic cord together using a strong surgeon’s knot (right over left, left over right). -
Secure and hide:
Apply a tiny drop of super glue or jewelry cement to the knot for security. Once dry, trim the excess cord and gently tug the knot inside one of the larger basketball beads to hide it.
Team Spirit Upgrade
Customize the white basketballs by painting the lines in your favorite team’s colors—like purple, red, or blue—instead of gold.
Now you have a slam dunk accessory to wear during the next big game season
Scoreboard-Inspired Number Pattern
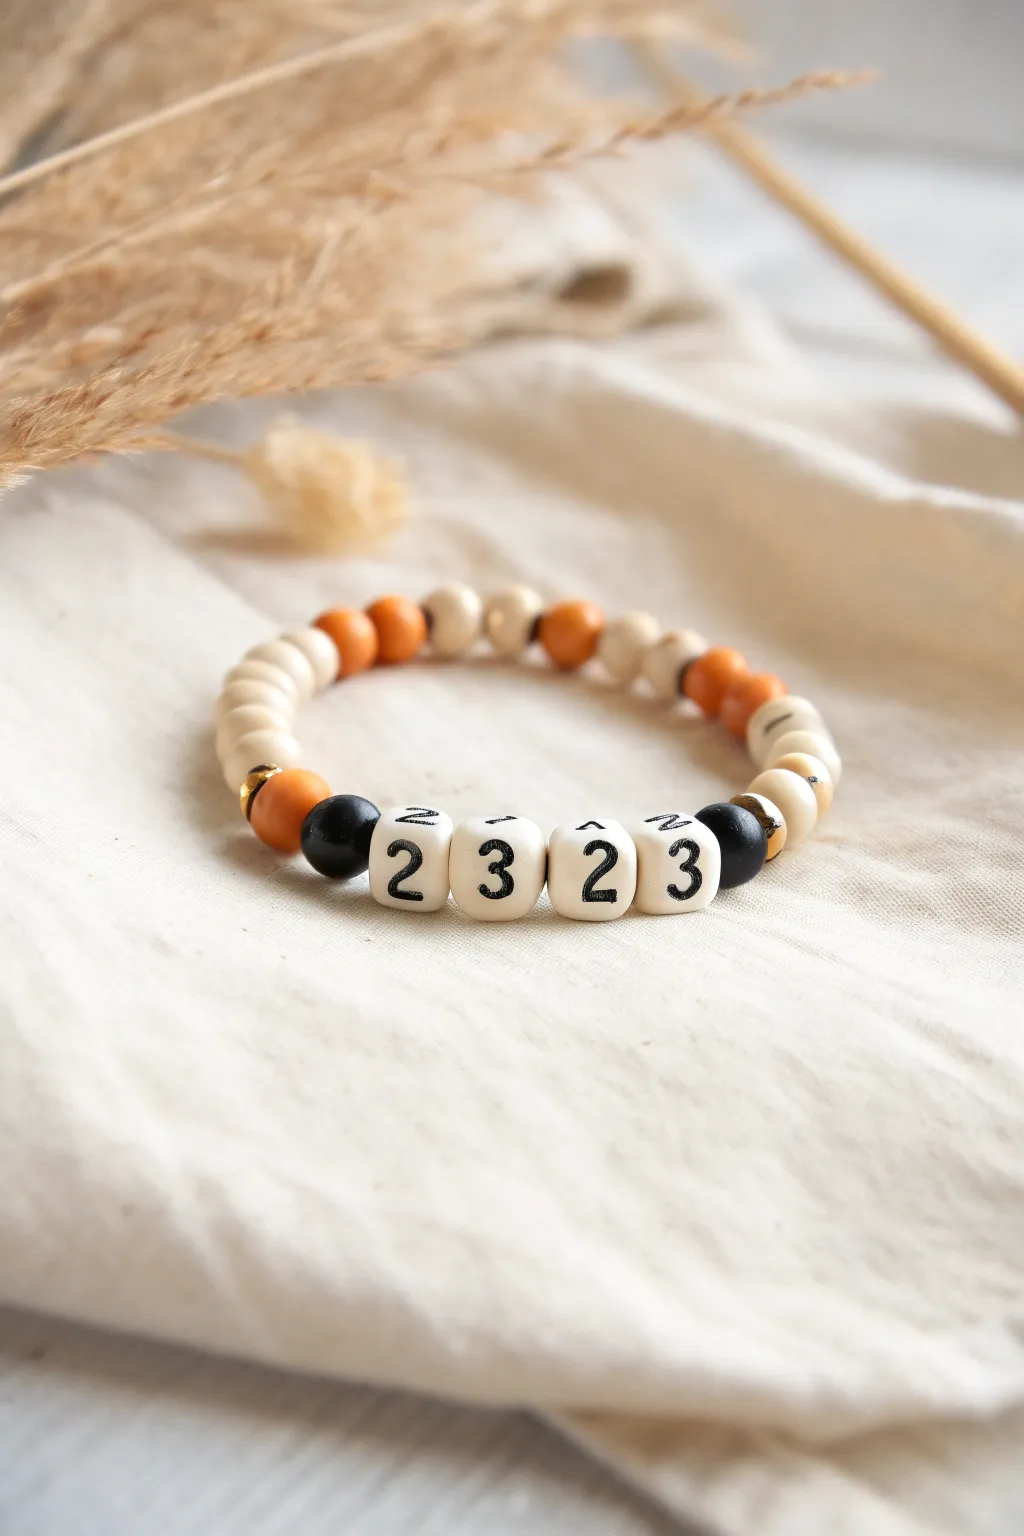
Capture the excitement of the game with this minimalist, scoreboard-inspired bracelet featuring a repeating number pattern. Using a mix of natural wood, bold orange, and distinct number beads creates a sporty yet earthy accessory perfect for showing team spirit.
Detailed Instructions
Materials
- Elastic stretch cord (0.8mm or 1mm)
- White square cube beads with black numbers (two ‘2’s and two ‘3’s)
- Round wooden beads (approx. 8mm) in natural beige
- Round wooden or acrylic beads (approx. 8mm) in orange
- Round wooden or acrylic beads (approx. 8mm) in black
- Scissors
- Super glue or jewelry cement (optional)
- Beading needle (optional, for easier threading)
- Clamp or tape (to hold the cord end)
Step 1: Planning the Pattern
-
Choose your numbers:
Identify the four-digit number sequence you want to feature. For this project, locate two ‘2’ beads and two ‘3’ beads to create the ‘2323’ pattern shown, or choose your own jersey numbers. -
Lay out the centerpiece:
Arrange your number beads on a flat surface or bead board in the order 2-3-2-3. This will be the focal point of the bracelet. -
Arrange the accents:
Place one black round bead on the immediate left of the first ‘2’ and one black round bead on the immediate right of the last ‘3’. -
Add the color pop:
Next to the left black bead, place one orange bead. Do the same on the right side, placing one orange bead next to the right black bead.
Sticky Situation
If the knot won’t hide inside a bead hole, use a larger bore wooden bead next to the knot, or simply dap clear nail polish on it to seal the ends neatly instead.
Step 2: Stringing the Beads
-
Prepare the cord:
Cut a piece of elastic cord about 10-12 inches long. This gives you plenty of extra slack for tying knots later. -
Secure the end:
Pre-stretch the elastic slightly by tugging it gently a few times. Then, place a piece of tape or a bead stopper on one end so your beads don’t slide off while you work. -
Thread the center section:
Start by threading your pre-arranged center section onto the cord. The order should be: Orange beat, Black bead, 2, 3, 2, 3, Black bead, Orange bead. -
Check orientation:
Pause to ensure all your number cubes are facing the same direction so the sequence is legible when worn. -
Fill the band:
Thread the natural beige wooden beads onto the cord behind the orange beads. -
Create the back pattern:
To mimic the sample, alternate your remaining beads. Add about 3-4 natural beads, then an orange bead, then another 3-4 natural beads. -
Adjust length:
Continue adding natural beads until the strand wraps comfortably around your wrist. A standard adult bracelet is usually about 7 inches long. -
Final symmetry check:
I always like to double-check that the number section sits exactly in the middle of the strand relative to the back pattern.
Step 3: Finishing Touches
-
Prepare to knot:
Remove the tape or clip from the end of your cord. Bring both ends of the elastic together carefully. -
Tie the first knot:
Tie a simple overhand knot, pulling the elastic tight enough that there are no gaps between beads, but not so tight that the bracelet buckles. -
Secure with a surgeon’s knot:
Tie a surgeon’s knot (loop the end through twice instead of once) directly over your first knot for extra security. -
Apply glue:
Place a tiny drop of super glue or jewelry cement onto the knot. This prevents the elastic from slipping over time. -
Hide the knot:
While the glue is still slightly tacky but not wet, pull the knot gently inside one of the adjacent large-hole wooden beads to hide it. -
Trim excess:
Once dry, use your small scissors to trim the excess cord ends as close to the bead hole as possible without cutting the knot itself.
Rim Rocker
Add two small gold spacer beads on either side of the black accent beads to give the bracelet a subtle champion-style shine.
Slip on your new court-side accessory and enjoy the personalized touch of team spirit on your wrist
Glow-Style Pop With Neon Team Accent
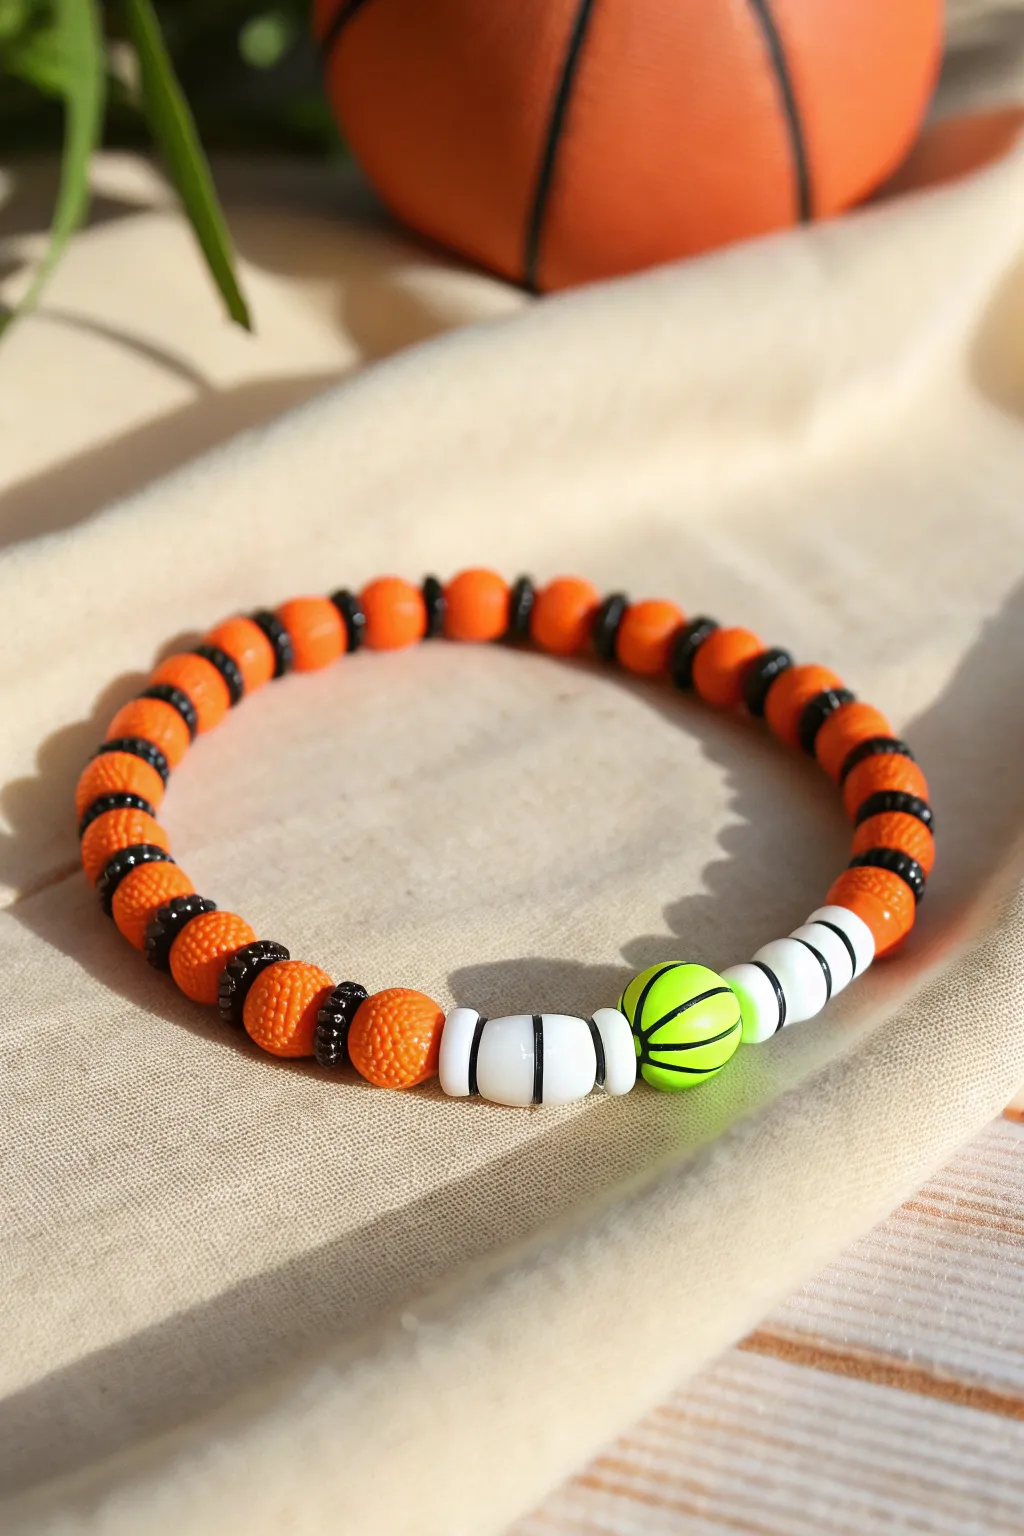
Bring some serious court-side energy to your wrist with this sporty design that mixes classic textures with a vibrant neon accent. The combination of textured orange beads and a striking lime green focal point makes this piece stand out from standard fan gear.
How-To Guide
Materials
- Textured orange basketball polymer clay beads (8mm-10mm)
- Black flat clay disc spacers or heishi beads (4mm-6mm)
- White tube beads with black stripe details
- Neon lime green basketball polymer clay bead (focal bead)
- Elastic stretch cord (0.8mm or 1mm)
- Super glue or jewelry cement
- Scissors
- Bead stopper or masking tape
Step 1: Preparation
-
Measure your cord:
Cut a length of elastic cord about 10-12 inches long. This gives you plenty of extra room for tying knots later without losing your beads. -
Secure the end:
Place a bead stopper on one end of the cord, or tape it down to your table. Trust me, there is nothing worse than watching your pattern slide right off the other side. -
Sort your beads:
Lay out your beads on a bead board or a piece of felt. Group your orange textured beads, black spacers, white tubes, and that single neon green star of the show.
Step 2: Creating the Pattern
-
Start the main sequence:
Begin threading your pattern with one textured orange basketball bead. -
Add spacing:
Slide on three or four thin black disc spacer beads immediately after the orange bead. This creates the contrast that mimics the black ribs on a basketball. -
Repeat the core rhythm:
Continue this alternating pattern: one orange bead, followed by the stack of black spacers. Repeat this until you have covered about three-quarters of your desired bracelet length. -
Check the fit:
Wrap the strand around your wrist to check the length. You want it to sit comfortably without stretching the cord yet. Adjust by adding or removing orange/black sections if needed.
Spacer Strategy
If the black spacers are very thin, use 4-5 between orange beads. If they are thicker heishi beads, 2-3 will suffice. Aim for a gap of about 3mm.
Step 3: The Focal Point
-
Transition to white:
Once the main orange section is done, slide on one of the white tube beads with the black stripe detail. -
Add inner spacing:
Place a single black spacer bead next to the white tube. -
Second white segment:
Add a second white tube bead. These white sections act as a bright frame for the neon center. -
The neon center:
Thread on your single neon lime green basketball bead. This unexpected pop of color is what gives this design its modern edge. -
Finish the focal section:
Mirror the pattern on the other side of the neon bead: add a white tube, a single black spacer, and then the final white tube.
Knot Slipping?
If your elastic knot keeps coming undone before you can glue it, try clamping it with a binder clip while you fetch your glue.
Step 4: Finishing Up
-
Prepare to tie:
Remove the bead stopper or tape carefully, bringing both ends of the elastic together. Ensure there are no gaps between the beads. -
Pre-stretch the cord:
Give the ends a gentle tug. Pre-stretching helps prevent the bracelet from sagging after you wear it a few times. -
Tie the knot:
Tie a secure surgeon’s knot. This is just a standard square knot, but you loop the thread through twice on the first pass for extra friction. -
Secure with glue:
Dab a tiny drop of super glue or jewelry cement onto the knot. Let it dry completely before touching it. -
Hide the knot:
Once dry, trim the excess cord close to the knot. If possible, gently pull the knot inside one of the larger beads to hide it.
Slip on your new customized accessory and show off your team spirit with that extra splash of neon flair
Surprise “Hidden Basketball” Bead Mix
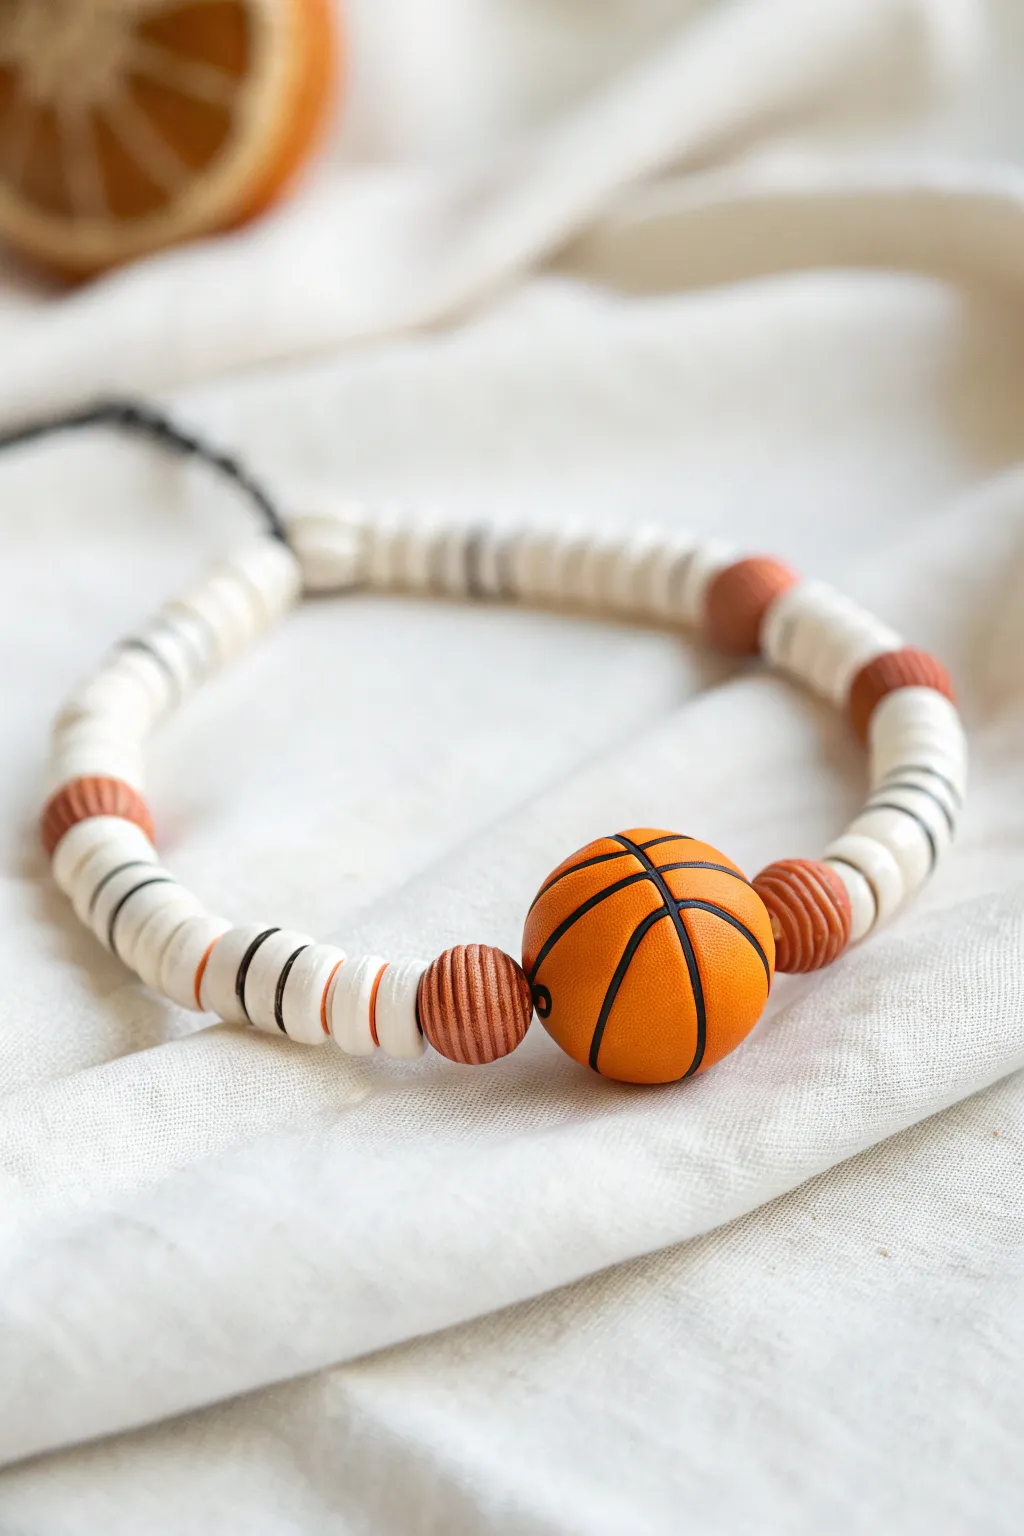
For a sleek and sporty accessory, this bracelet design pairs classic white clay discs with contrasting basketball-themed textures. The standout feature is a centralized basketball charm flanked by textured brown accents, creating a court-ready look that’s subtle enough for everyday wear.
Step-by-Step Tutorial
Materials
- Polymer clay Heishi beads (6mm, white)
- Black pattern Heishi beads (6mm, white with black stripes)
- Basketball focal bead (polymer clay or acrylic, approx 10-12mm)
- Textured brown spacer beads (round, ridged design, 6-8mm)
- Elastic stretch cord (0.8mm clear)
- Jewelry glue or clear nail polish
- Scissors
Step 1: Planning and Setup
-
Measure your wrist:
Start by measuring your wrist with a flexible tape measure. Add about half an inch to this measurement to ensure the bracelet fits comfortably without stretching the design too tightly. -
Cut the cord:
Cut a piece of elastic cord about 10-12 inches long. Having this extra length makes tying the final knots much easier than struggling with short ends. -
Pre-stretch the elastic:
Gently pull the elastic cord a few times to pre-stretch it. This crucial step prevents the bracelet from loosening up and sagging after you’ve worn it for a few days. -
Secure the end:
Place a piece of tape or a bead stopper on one end of the cord so your beads don’t slide off while you are working.
Knot Slipping?
If your knot keeps coming undone, try using a slightly textured elastic rather than smooth silicone, or roughen the cord ends slightly with sandpaper before tying.
Step 2: Creating the Focal Section
-
Thread the first spacer:
Begin your pattern by sliding on one of the textured brown ridged beads. This will act as a frame for current main attraction. -
Add the basketball:
Thread the main orange basketball focal bead onto the cord. Ensure the hole orientation allows the black lines to sit horizontally or vertically as desired. -
Close the focal point:
Slide on the second textured brown ridged bead immediately after the basketball. Center this group of three beads in the middle of your cord.
Pro Tip: Bead Sorting
Sort your Heishi discs by thickness before stringing. Discard super thin or wedge-shaped ones to keep the bracelet strand looking uniform and professional.
Step 3: Building the Strap
-
Start the white sections:
On the right side of your focal group, add about 4 to 5 plain white Heishi beads. -
Insert variation:
Add one of white-and-black striped Heishi beads to introduce a subtle graphical element. -
Continue the pattern:
Follow the striped bead with another small stack of plain white beads, then another textured brown bead if you have extras, or continue with the white pattern. -
Mirror the design:
Repeat the exact same sequence on the left side of the focal bead group. Keeping the design symmetrical highlights the basketball centerpiece effectively. -
Fill the length:
Continue adding plain white Heishi beads to both sides evenly until you reach your target wrist length. -
Check the fit:
Wrap the unfinished strand around your wrist to check the size. Ideally, the ends should touch comfortably without gaps.
Step 4: Finishing the Bracelet
-
Tie the first knot:
Remove the tape or bead stopper. profound Bring the two ends of the elastic together and tie a simple overhand knot, pulling it tight to bring the beads together. -
Secure with a surgeon’s knot:
Tie a second knot, but loop the end through twice before pulling tight (this is a surgeon’s knot). I like to pull the elastic taut while tightening to ensure it holds securely. -
Apply adhesive:
Dab a tiny drop of jewelry glue or clear nail polish directly onto the know to prevent it from slipping over time. -
Hide the knot:
Once the glue is tacky but not fully dry, slide one of the adjacent white Heishi beads over the knot to conceal it. -
Trim excess:
Wait for the glue to dry completely, then use sharp scissors to trim the excess cord ends close to the beads.
slip this bracelet on and enjoy your new court-side accessory