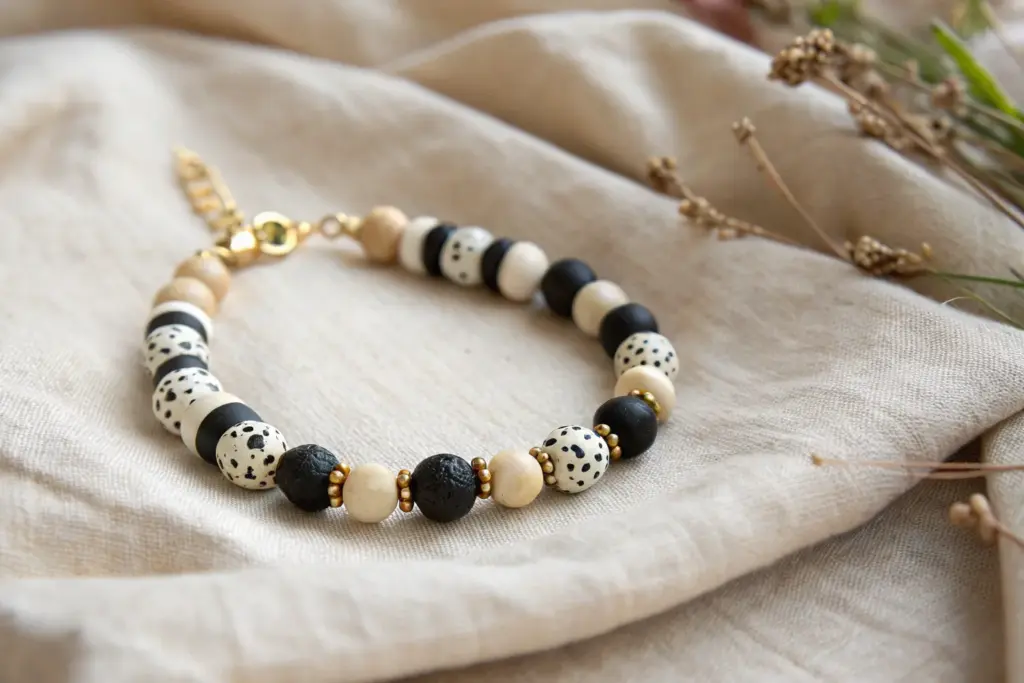
Whenever I’m craving something crisp and timeless, I reach for black and white clay bead bracelets—they’re effortless, graphic, and always look pulled together. Here are my favorite clay bead bracelet ideas that play with contrast, pattern, and a few fun focal details without getting fussy.
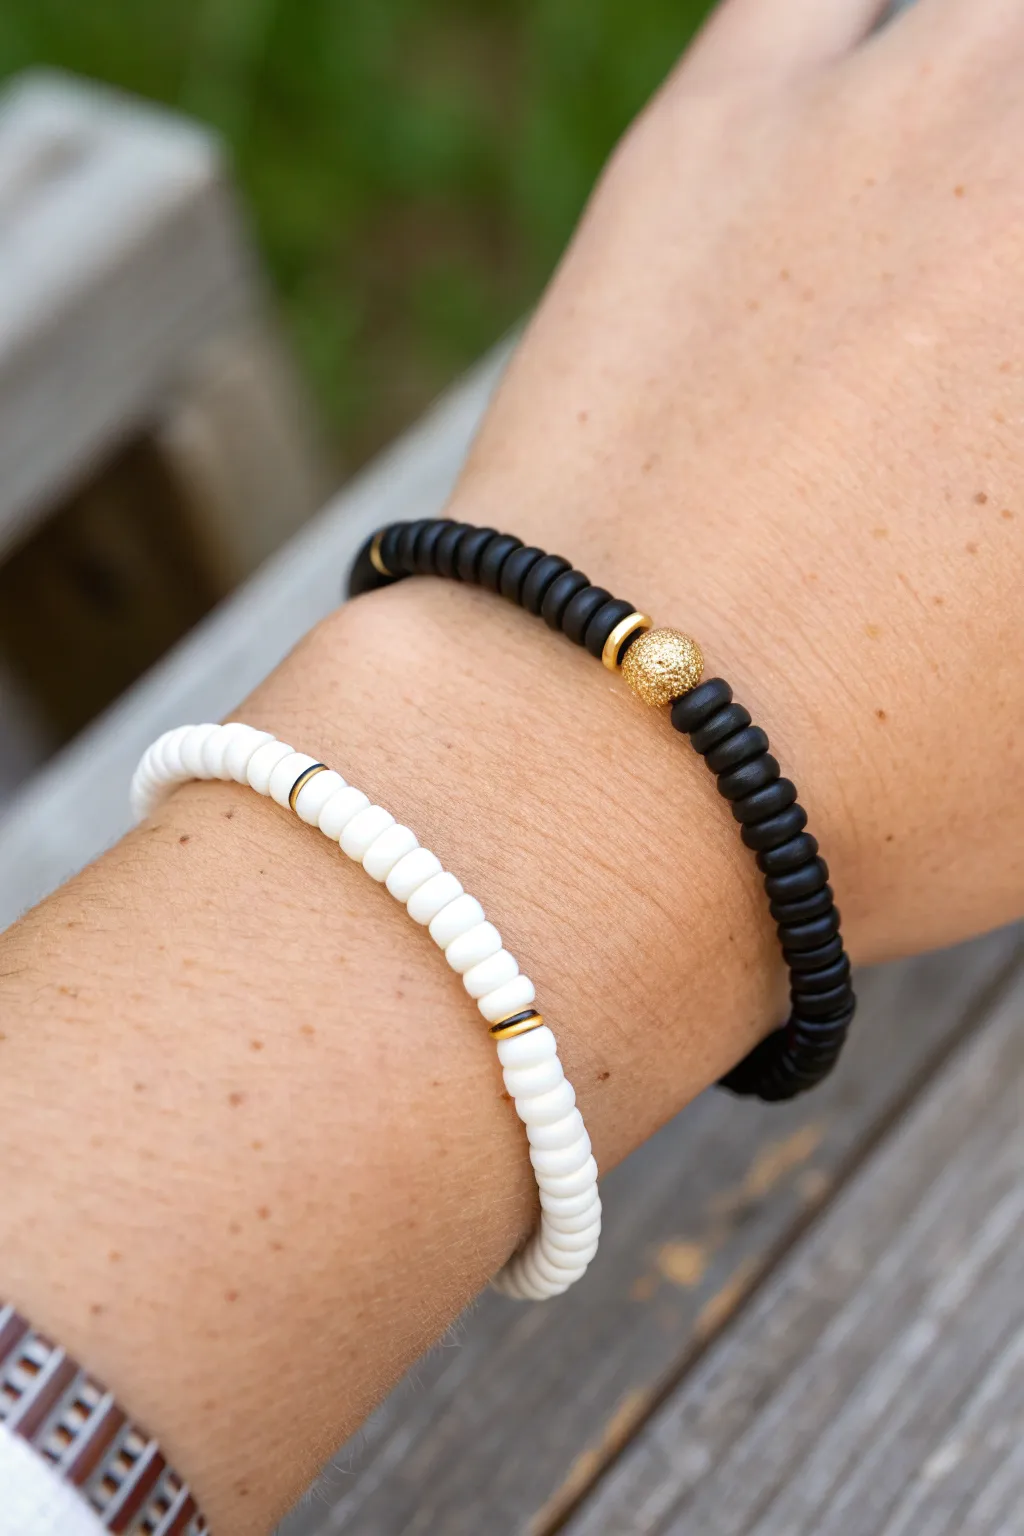
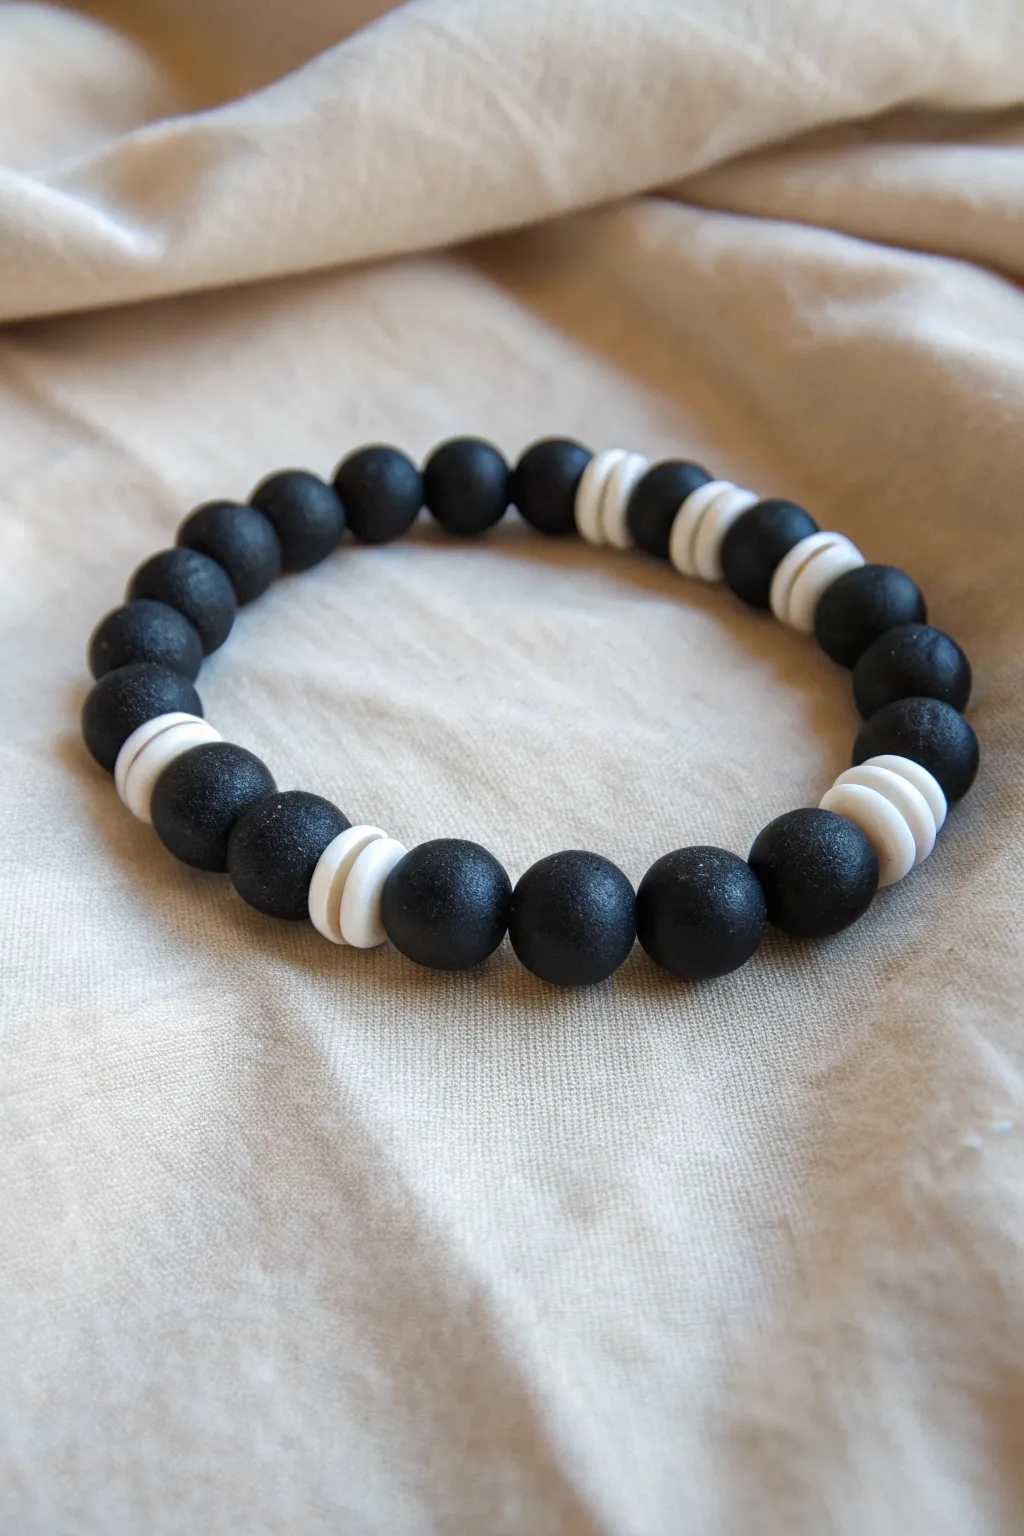
Classic Color-Block Segments
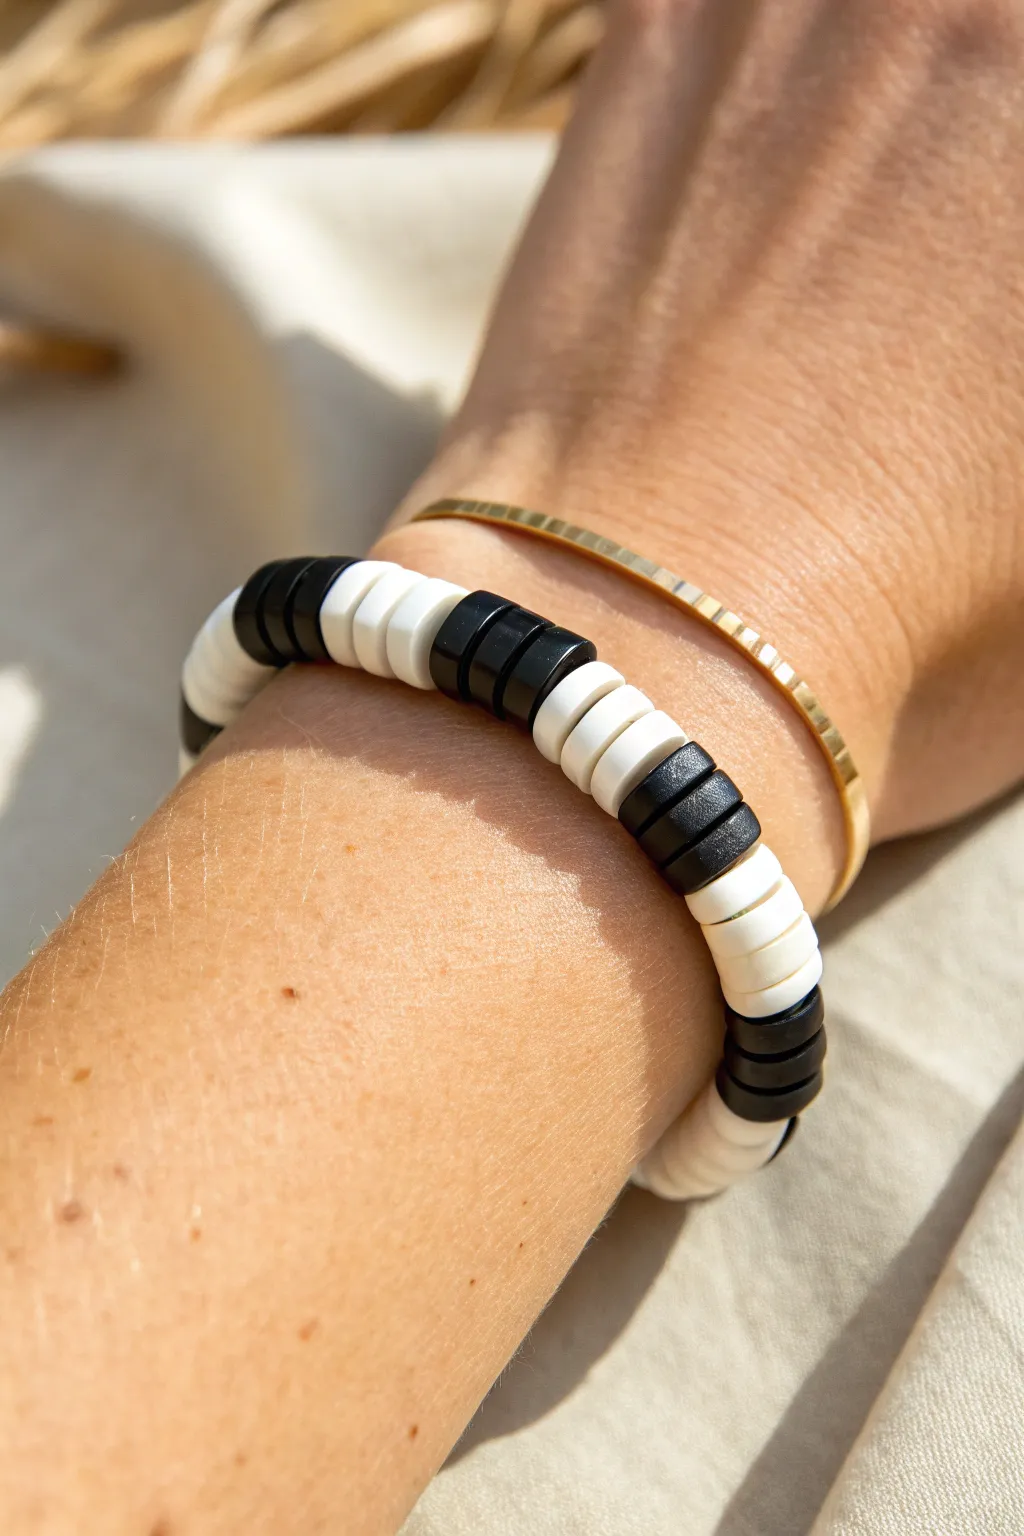
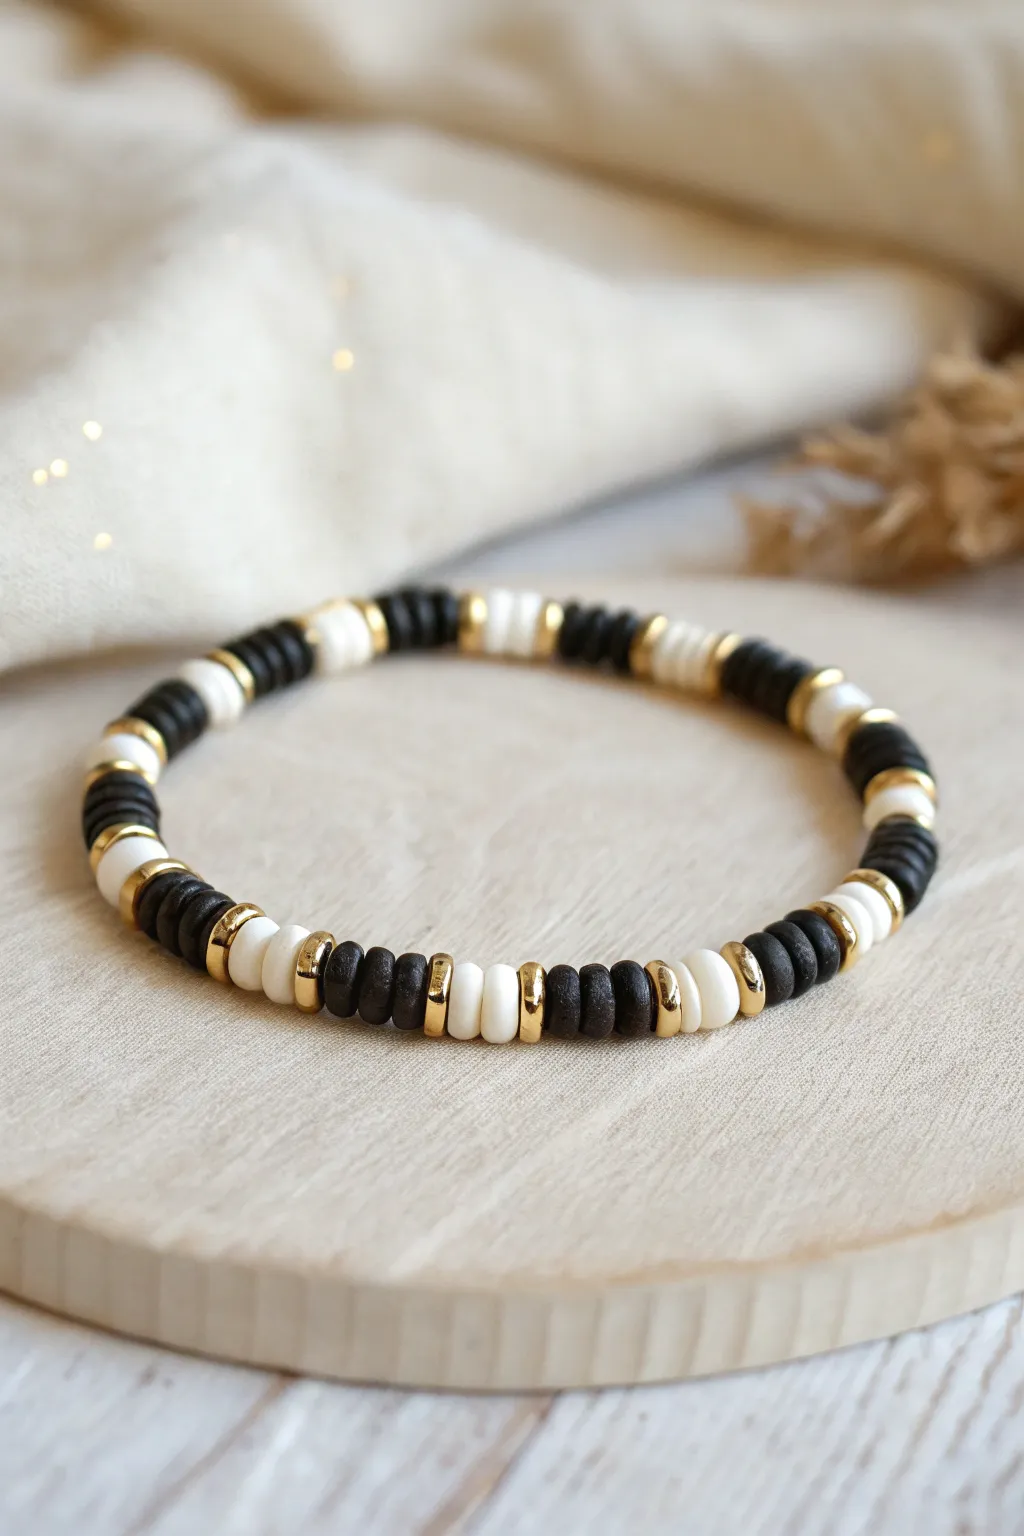
Embrace simplicity with this crisp, high-contrast bracelet featuring alternating segments of matte black and white heishi beads. This timeless design is perfect for stacking with gold metals or wearing solo for a modern, architectural look.
Detailed Instructions
Materials
- 6mm flat heishi polymer clay beads (matte black)
- 6mm flat heishi polymer clay beads (matte white)
- 0.8mm clear elastic stretch cord
- Jewelry glue or clear nail polish
- Scissors
- Bead stopper or tape
- Ruler or tape measure
Step 1: Preparation & Planning
-
Measure your wrist:
Wrap a flexible tape measure around your wrist where you want the bracelet to sit. Note the measurement and add about half an inch for a comfortable fit. -
Cut the cord:
Cut a piece of elastic cord roughly 10-12 inches long. Having this extra length makes tying the knot at the end much less frustrating than working with short tails. -
Pre-stretch the elastic:
Hold the cord firmly at both ends and give it several gentle tugs. Pre-stretching prevents the bracelet from loosening up and becoming baggy after the first few wears. -
Secure the end:
Attach a bead stopper or simply place a piece of tape over one end of your cord to stop your beads from sliding right off as you work.
Knot Slipping Out?
If the knot won’t hide inside a bead, carefully ream the hole of that specific bead with a needle or broad T-pin to widen it slightly.
Step 2: Creating the Pattern
-
Start with black:
Begin your pattern by threading three black heishi beads onto the cord. Ensure they sit flush against each other. -
Switch to white:
Add three white heishi beads next. Push them down to meet the black segment. The contrast should look sharp immediately. -
Check the count:
For this specific chunky block look, consistency is key. Verify you have exactly three beads in each color block before moving on. -
Continue the sequence:
Repeat the pattern—three black, three white—continuously. I find it helpful to lay out small piles of three beforehand to speed up the stringing process. -
Verify length:
Periodically wrap the strand around your wrist to check the fit. You want the beads to touch comfortably without gaps, but not dig into your skin. -
Finish the loop:
Stop stringing when you reach your desired length. For a seamless look, try to end on a color that is opposite to your starting color (e.g., if you started with black, try to end with white).
Add a Metallic Pop
Insert a single gold spacer bead between every third color block to break up the pattern and coordinate perfectly with gold bangles.
Step 3: Securing the Design
-
Remove the stopper:
Carefully remove the tape or bead stopper while pinched tightly on the end to prevent spillage. -
Tie the first knot:
Bring the two ends together and tie a simple overhand knot. Pull it gently to bring the beads into a circle, ensuring there are no gaps. -
Tie a surgeon’s knot:
For the main security, tie a surgeon’s knot. This is like a standard knot, but you loop the elastic through twice before pulling tight. -
Apply adhesive:
Dab a tiny drop of jewelry glue or clear nail polish directly onto the knot. This ‘welds’ the elastic together preventing slippage. -
Hide the knot:
While the glue is still slightly tacky, pull the elastic so the knot slips inside the hole of one of the adjacent beads. -
Trim excess:
Once the glue is fully dry, use your scissors to snip off the excess cord tails as close to the bead as possible without cutting the knot itself.
Now slip on your new accessory and enjoy the sharp, modern contrast it adds to your outfit


Simple Alternating Pattern
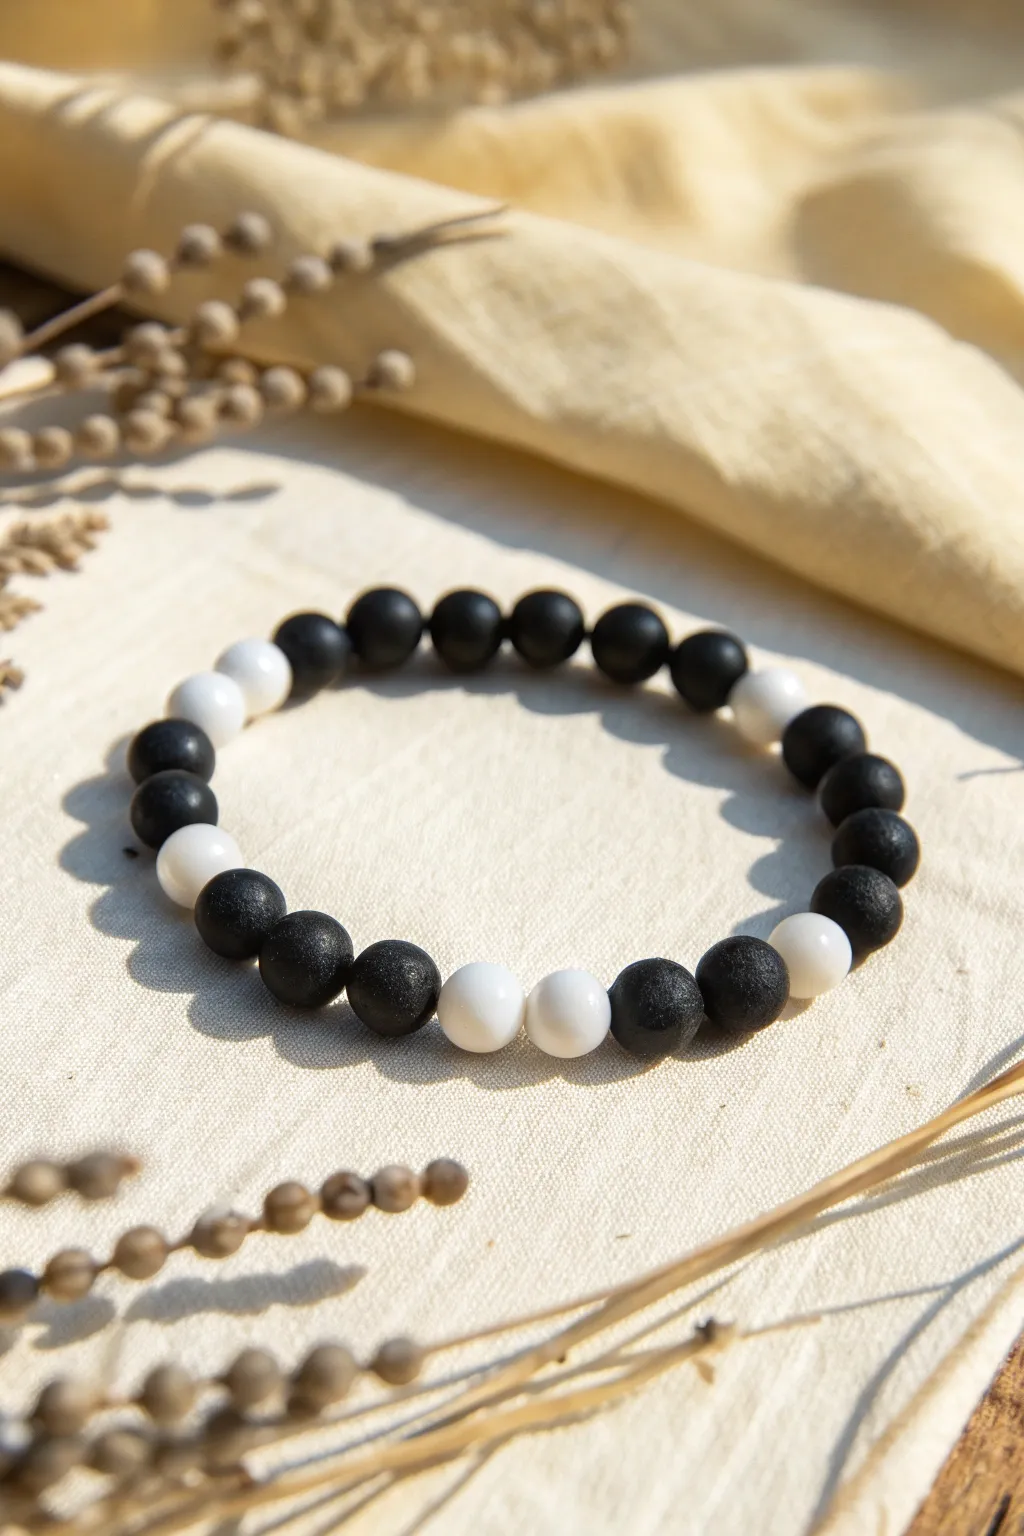
Achieve a look of effortless sophistication with this matte black and glossy white bead bracelet. The design uses asymmetrical grouping to create a striking visual rhythm that feels contemporary and grounded without being overly complicated.
Step-by-Step
Materials
- Matte black round polymer clay beads (8mm or 10mm)
- Glossy white round beads (ceramic, glass, or polished clay, 8mm or 10mm)
- Strong elastic display cord (0.8mm clear)
- Super glue or jewelry cement
- Scissors or wire cutters
- Measuring tape
- Bead stopper or tape
Step 1: Preparation & Planning
-
Measure your wrist:
Wrap a measuring tape comfortably around your wrist where you want the bracelet to sit. -
Calculate cord length:
Add about 4 to 6 inches to your wrist measurement. This extra length is crucial for tying the knot comfortably later. -
Cut the elastic:
Cut your elastic cord to the calculated length using your scissors. -
Pre-stretch the cord:
Hold the ends of the elastic and give it a few firm (but not breaking) tugs. I always do this to prevent the bracelet from stretching out permanently after the first wear. -
Secure one end:
Place a bead stopper or a piece of tape on one end of the cord so your beads don’t slide off while you work.
Hiding the Evidence
Make sure at least one bead next to your knot has a slightly larger hole size. This makes it much easier to pull the knot inside for a seamless, professional finish.
Step 2: Creating the Pattern
-
Study the sequence:
Look closely at the design: it relies on groups of three or four black beads separated by pairs of white beads. It is not a strict 1-to-1 pattern. -
String the first group:
Begin by threading three matte black beads onto the elastic. -
Add the contrast:
String two glossy white beads next. The contrast between the matte black and shiny white is key to this look. -
Continue the rhythm:
Follow with another group of three black beads. -
Build the length:
Add two more white beads, then three black beads. Continue this 3-black, 2-white cadence. -
Adjust for size:
Check the length against your wrist. If you need a slightly larger size, add a single black bead to each black section (making them groups of 4) rather than disrupting the white pairs. -
Check the fit:
Wrap the unfinished strand around your wrist to ensure the two ends meet comfortably without pinching or hanging too loose.
Texture Play
Swap the glossy white beads for white lava stone or porous ceramic. You can then add a drop of essential oil to the white sections to turn this into a functional aromatherapy diffuser.
Step 3: Finishing Touches
-
Prepare to tie:
Remove the bead stopper or tape carefully, holding both ends of the elastic securely. -
Tie the first knot:
Cross right over left and pull tight to create a simple overhand knot, bringing the beads together snugly. -
Secure with a surgeon’s knot:
Loop the elastic twice through the next knot before pulling it tight. This creates a much stronger bond than a standard double knot. -
Apply adhesive:
Place a tiny drop of super glue or jewelry cement directly onto the knot. Be careful not to stick the adjacent beads to the cord. -
Let it cure:
Allow the glue to dry completely according to the package instructions before trimming. -
Trim the excess:
Cut the loose ends of the elastic, leaving about 1-2mm of tail. -
Hide the knot:
Gently tug on the beads to slide the knot inside the hole of the nearest black bead to hide it from view.
Now you have a stylish, versatile accessory that pairs perfectly with almost any outfit you choose to wear


Wide Stripes and Thin Stripes
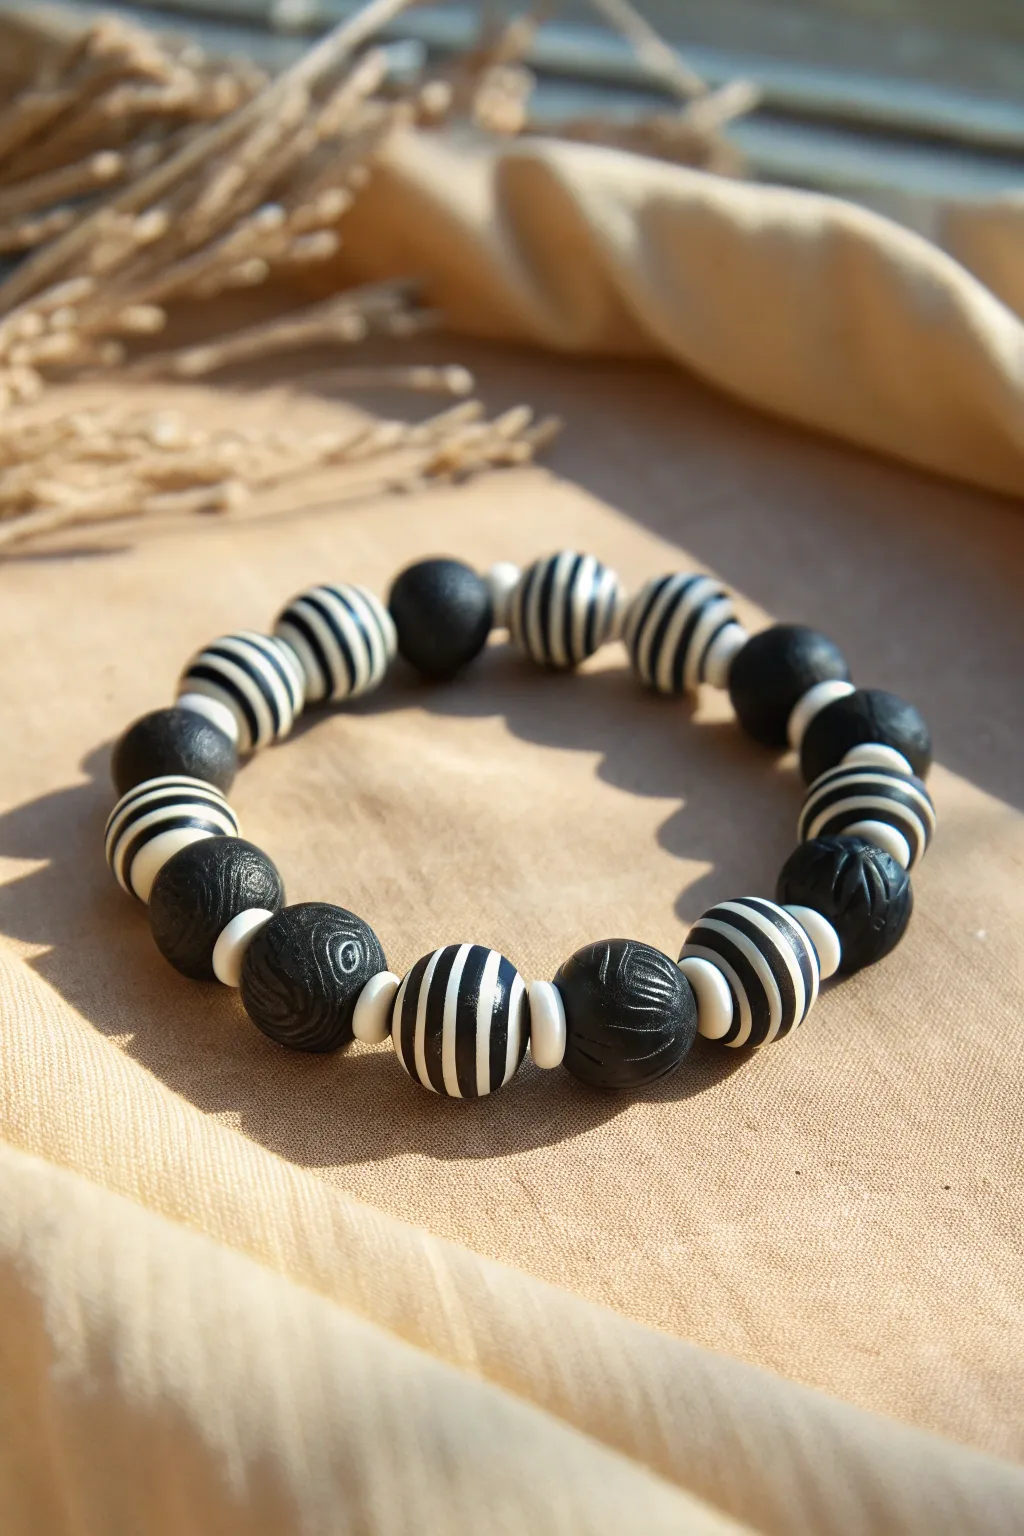
Contrast is key in this polymer clay project, pairing bold, graphic stripes with subtly textured black spheres. This pattern creates a sophisticated rhythm that feels modern yet handcrafted, perfect for adding a touch of drama to a neutral outfit.
Detailed Instructions
Materials
- Black polymer clay
- White polymer clay
- Ceramic bead roller (round)
- Acrylic roller
- Needle tool or toothpick
- Sharp tissue blade
- Texturing tool (rough sponge or stiff brush)
- Stretch cord (0.7mm or similar)
- Super glue or jewelry cement
- Wet sandpaper (optional for finishing)
- Gloss glaze (optional)
Step 1: Creating the Striped Beads
-
Condition the clay:
Begin by conditioning your black and white polymer clay separately until they are soft and pliable. Make sure your hands are clean when switching to white to avoid smudging. -
Roll out sheets:
Use an acrylic roller or pasta machine to roll out a sheet of black clay and a sheet of white clay. Aim for a medium thickness, around 2mm. -
Stack the layers:
Cut several squares from each sheet. Stack them in an alternating pattern—black, white, black, white—until you have a thick block. This creates the basis for your stripes. -
Compress the stack:
Gently press the stack from the top to adhere the layers. Use your acrylic roller to flatten the stack slightly, ensuring no air bubbles are trapped between the sheets. -
Slice the stack:
Turn the stack on its side so the stripes are vertical. Use your tissue blade to cut thin slices off the block. Each slice should show the clear striped pattern. -
Form the base beads:
Roll small balls of scrap clay (or solid black clay) to serve as the cores for your beads. These should be slightly smaller than your desired final bead size. -
Apply the stripes:
Wrap the striped slices around the base clay balls. Carefully smooth the seams with your fingers so the pattern wraps continuously around the sphere. -
Refine the shape:
Roll the covered beads gently in your palms or use a bead roller to make them perfectly round. The rolling action will also help merge the seams of the striped veneer.
Step 2: Creating the Solid & Textured Beads
-
Roll solid black beads:
Form several solid black clay balls, matching the size of your striped beads. You’ll need about 6-8 of these depending on your wrist size. -
Add subtle texture:
Before baking, give these black beads a unique surface. I like to gently press a rough sponge or a stiff brush against the clay to create tiny pits and swirls, giving them a matte, stone-like appearance. -
Create spacer beads:
Roll very small balls of white clay and flatten them slightly into discs or tiny rondelles. These will act as bright spacers between the larger beads. -
Pierce the beads:
Use a needle tool to create holes through the center of every bead—striped, textured black, and white spacers. Twist the tool gently as you push through to avoid distorting the shape.
Clean Start
Keep separate baby wipes for white and black clay. Wipe your hands thoroughly when switching colors to keep that white clay crisp and bright.
Step 3: Baking and Assembly
-
Bake the clay:
Arrange your beads on a baking sheet or tile. Bake according to the manufacturer’s instructions for your specific brand of polymer clay (usually around 275°F or 130°C for 15-30 minutes). -
Cool down:
Allow the beads to cool completely in the oven or on a heat-safe surface. Do not handle them while hot as they can be fragile. -
Arrange the pattern:
Lay out your design on a bead board or towel. The pattern shown uses an alternating sequence: Striped Bead, White Spacer, Textured Black Bead, White Spacer, repeat. -
String the beads:
Cut a length of stretch cord about 10-12 inches long. Thread your beads onto the cord following your laid-out pattern. -
Check the fit:
Wrap the strand around your wrist to ensure it isn’t too tight or too loose. Add or remove beads as necessary for a comfortable fit. -
Tie the knot:
Tie a secure surgeon’s knot (right over left, left over right, and loop through an extra time). Pull the cord tight to secure the tension. -
Secure and finish:
Place a tiny drop of jewelry cement or super glue on the knot. Let it dry, then trim the excess cord ends, tucking the knot inside a bead hole if possible.
Smudged Stripes?
If your stripes drag or blur while cutting the stack, chill the clay block in the fridge for 15 minutes. Firmer clay slices much cleaner.
Now you have a striking, modern accessory that perfectly balances pattern and texture


Half Black, Half White Split
This project creates a sophisticated duo of stretch bracelets featuring a striking high-contrast look. By pairing matte black and white clay disc beads with textural gold accents, you achieve a versatile set that looks just as good worn together as apart.
Step-by-Step
Materials
- Matte black polymer clay heishi beads (6mm)
- Matte white polymer clay heishi beads (6mm)
- 1 textured gold round bead (approx. 6-8mm)
- 2 smooth gold disc spacer beads (flat)
- 2-4 gold heishi spacer beads (thin)
- Strong elastic cord (0.8mm recommended)
- Scissors
- Jewelry glue or clear nail polish
- Bead stopper or tape
Step 1: Preparation
-
Measure your wrist:
Wrap a piece of elastic cord around your wrist to determine the comfortable length. Add about 3-4 inches of extra cord to this measurement to ensure you have plenty of room for tying the knots later. -
Cut the cord:
Cut two separate lengths of elastic cord based on your measurement, one for the black bracelet and one for the white bracelet. -
Secure the ends:
Attach a bead stopper or simply place a piece of tape on one end of each cord. This simple step saves you from the frustration of beads sliding right off while you work.
Step 2: Black & Gold Bracelet
-
Start basic beading:
Begin threading the black heishi beads onto your first cord. I usually string about half of the total length required for the wrist size before pausing to add the focal point. -
Add first gold spacer:
Slide on one of the smooth, flat gold disc spacer beads. This acts as a frame for the centerpiece. -
Add the textured bead:
Thread the large, textured gold round bead. The contrast between the rough gold texture and the smooth matte black clay is what defines this piece. -
Complete the center:
Add the second smooth gold disc spacer bead immediately after the textured bead to close the focal section. -
Finish black beading:
Continue threading the remaining black heishi beads until the bracelet reaches your desired length. -
Check the fit:
Wrap the strand around your wrist to verify sizing. The ends should meet comfortably without stretching the elastic too much.
Knot Slipping Out?
If the knot won’t hide inside a bead, gently use a toothpick to widen the hole of one clay bead slightly. Be careful not to crack the clay disc.
Step 3: White & Gold Bracelet
-
Begin white strand:
Pick up your second cord and start threading the white heishi beads. Thread about one-third of your total length. -
Insert gold accent:
Slide on a thin gold heishi spacer bead. Unlike the black bracelet, these accents are subtle interruptions rather than a main focal point. -
Resume white beading:
Continue adding white beads for another inch or so. I like to space these gold accents irregularly for a more organic feel, but you can measure exactly if you prefer symmetry. -
Add second accent:
Add another thin gold heishi spacer bead. -
Finish the strand:
Fill up the rest of the cord with white beads until it matches the length of your black bracelet.
Professional Polish
Use crimp covers over your knot instead of hiding it inside a bead. A gold crimp cover can look like just another intentional gold spacer bead.
Step 4: Finishing Up
-
Pre-stretch the cord:
Before tying, give both ends of the elastic a firm but gentle tug. This pre-stretching prevents the bracelet from loosening up after the first few wears. -
Tie the knots:
Remove the tape or stopper. Tie the ends together using a surgeon’s knot (right over left, left over right, and loop through an extra time) for maximum security. -
Secure with adhesive:
Apply a tiny dot of jewelry glue or clear nail polish directly onto the knot. Let this dry completely before moving on. -
Hide the knot:
Once dry, trim the excess elastic close to the knot. Gently pull the bracelet so the knot slides inside the hole of the nearest heishi bead to conceal it.
Now you have a chic, stackable set ready for daily wear

The Complete Guide to Pottery Troubleshooting
Uncover the most common ceramic mistakes—from cracking clay to failed glazes—and learn how to fix them fast.
Mostly Black With a White Pop
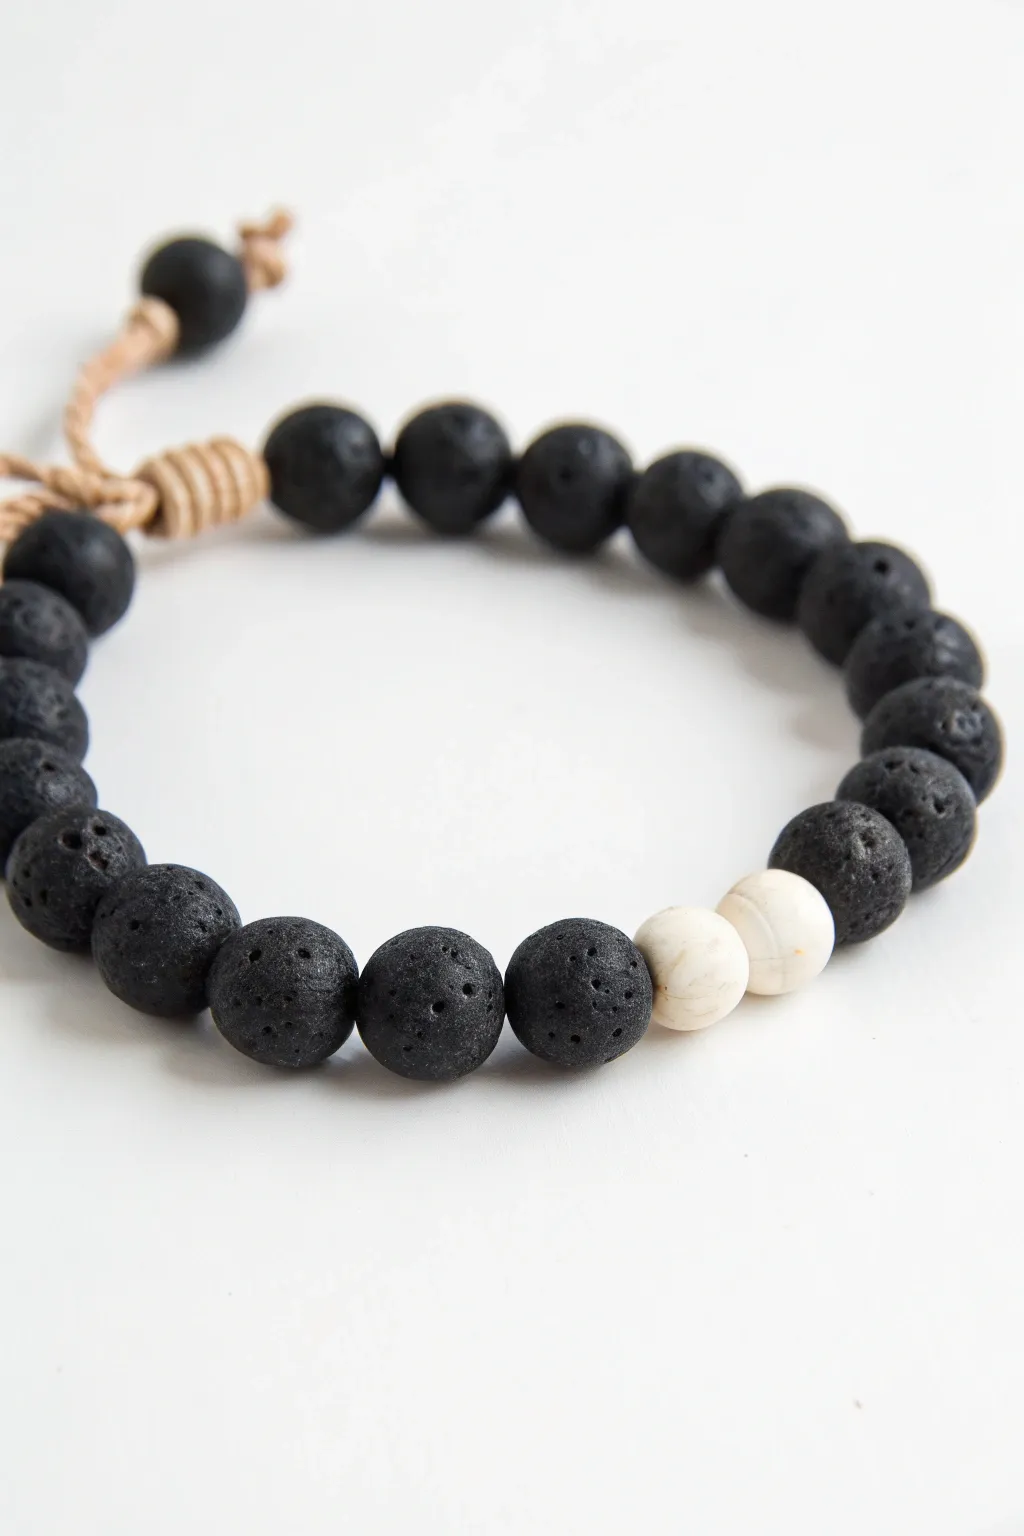
This chic bracelet combines the rugged texture of black lava beads with the smooth, calming presence of two cream-colored accent beads. The adjustable cord closure adds a rustic touch while making it easy to fit any wrist size.
Step-by-Step Tutorial
Materials
- 20-22 Black lava stone beads (8mm or 10mm)
- 2 White or cream smooth round beads (8mm or 10mm, matching the lava beads)
- Waxed cotton or hemp cord (1mm thickness, approx. 24 inches)
- Scissors
- Measuring tape
- Clear nail polish or jewelry glue (optional)
- Beading needle (optional, if cord is thick)
Step 1: Preparation
-
Measure and Cut:
Cut a length of your cord to approximately 24 inches. This generous length ensures you have plenty of room for stringing and knotting the adjustable closure. -
Prepare the Cord Ends:
To make stringing easier, stiffen the ends of your cord. You can do this by dipping the tips in a tiny bit of clear nail polish or glue and rolling them between your fingers to form a needle-like point. -
Plan Your Pattern:
Lay out your beads on a flat surface or a bead board. Arrange the black lava beads in a circle, leaving a gap where you want the focal point to be. -
Insert the Accents:
Place the two white cream beads side-by-side within the circle of black beads. This asymmetry creates the modern ‘pop’ of color seen in the photo.
Use Porous Beads
Lava beads are porous, making them perfect diffusers. Add a drop of essential oil to the black beads to carry a scent all day.
Step 2: Stringing
-
Start Stringing:
Thread your stiffened cord end through the first black lava bead. Continue adding black beads until you reach the point where your white accent beads should go. -
Add the Pop:
Slide on the two white accent beads. Make sure they sit snugly against the black ones. -
Finish Stringing:
Thread on the remaining black lava beads. I find it helpful to periodically wrap the strand around my wrist to check if the length is sufficient. -
Add the End Bead:
Select one final black lava bead and set it aside; this will be used for one of the pull-cord ends later. For now, just ensure your main loop fits your wrist with a little slack.
Swap the Pop
Instead of plain white beads, use marbled turquoise or a bright metallic gold bead for a completely different vibe.
Step 3: Creating the Closure
-
Align the Ends:
Center the beads on the cord so you have equal lengths of excess cord on both sides. Bring the two ends together to close the circle. -
Cross the Cords:
Lay the bracelet flat in a circle. Take the left cord end and the right cord end and cross them over each other. They should overlap by about 3-4 inches. -
Prepare a Secondary Cord:
Cut a fresh, smaller piece of cord, about 10 inches long. This will be used to create the sliding macramé knot. -
Start the Square Knot:
Place the short cord under the crossed bracelet threads. Tie a simple overhand knot to secure it around the bracelet cords. -
Tie Macramé Square Knots:
Tie a series of square knots (left over right, then right over left) around the central bracelet cords. Continue this for about half an inch to create the textured barrel closure seen in the image. -
Secure the Knot:
Pull the final knot very tight. Snip off the excess tails of the knotting cord (not the bracelet cords!) close to the knot. -
Seal the Knot:
Dab a tiny drop of glue or clear nail polish on the cut ends of the sliding knot to prevent fraying. Be careful not to glue the knot to the main bracelet cords—it needs to slide.
Step 4: Finishing Touches
-
Thread the End Beads:
Take one of the main bracelet cord tails. Thread a single black lava bead onto it. -
Tie the Stopper Knot:
Tie an overhand knot at the very end of the cord to keep the bead from sliding off. Trim any excess cord past the knot. -
Repeat on Other Side:
Repeat the previous step for the other cord tail: thread on a bead, tie a secure knot, and trim. -
Final Check:
Test the mechanism by gently pulling the two bead-ended strings to tighten the bracelet, and pulling the bracelet sides to loosen it.
Now you have a stylish, adjustable accessory that looks great stacked or worn solo
Mostly White With a Black Pop
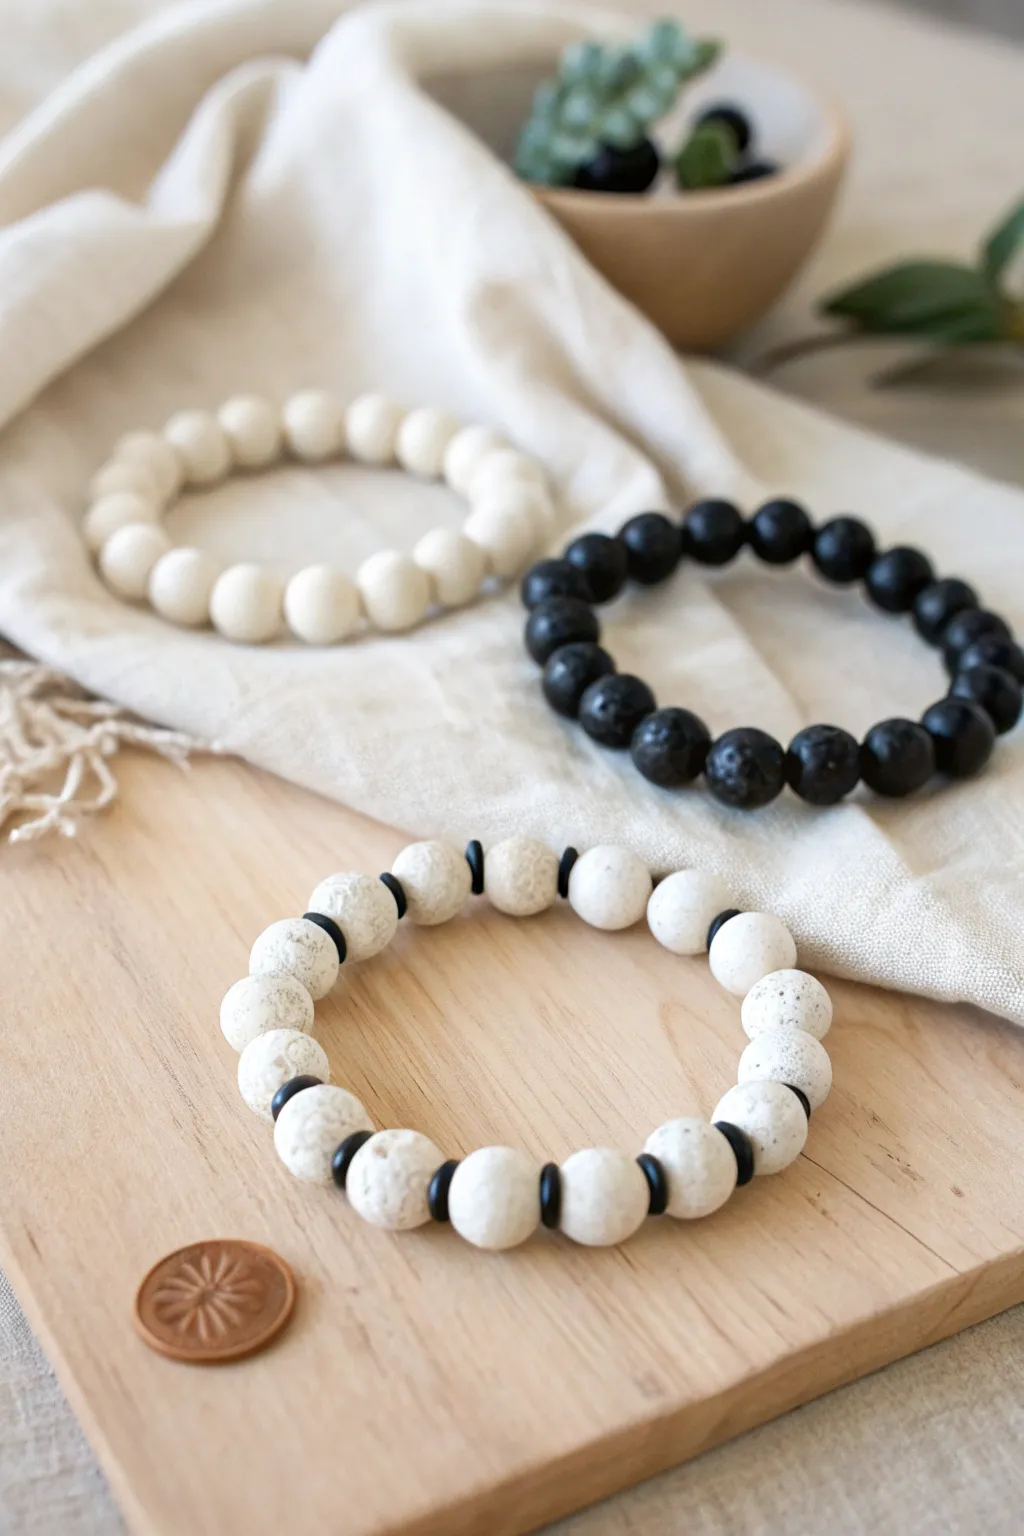
This striking design pairs creamy, white textured beads with sleek black spacers for a look that is both organic and modern. It relies on a simple repeating pattern to create a bold graphic statement piece that works beautifully alone or stacked.
Step-by-Step Guide
Materials
- 10mm – 12mm white round clay or lava stone beads (approx. 18-20 beads)
- Small black flat disc spacer beads (heishi style or polymer clay)
- Strong elastic jewelry cord (0.8mm or 1mm)
- Jewelry glue or clear nail polish
- Scissors
- Tape or bead stopper
- Bead design board (optional)
Step 1: Preparation & Design
-
Measure your wrist:
Wrap a flexible measuring tape around your wrist to find your size. Add about half an inch to this measurement to ensure the gathered beads fit comfortably without pinching. -
Prepare the cord:
Cut a piece of elastic cord about 10-12 inches long. Having this extra length makes tying the final knot much easier than fighting with short ends. -
Secure the end:
Place a piece of tape or a bead stopper on one end of your cut cord. This little safety measure prevents your beads from sliding right off while you work. -
Pre-stretch the elastic:
Give your elastic cord a few gentle tugs before you start stringing. I always do this to remove the initial slack, which helps the bracelet keep its shape over time.
Step 2: Stringing the Pattern
-
Start the pattern:
Looking at the design, the pattern is simple: one large white bead followed by one black spacer. Begin by threading on your first large white bead. -
Add the contrast:
Slide one black flat disc spacer onto the cord next to the white bead. Ensure it sits flush against the round surface. -
Repeat the sequence:
continue this alternating pattern: one white bead, one black spacer, one white bead, one black spacer. -
Check for consistency:
Pause occasionally to ensure you haven’t accidentally skipped a spacer. The rhythm of white-black-white is essential for that graphic ‘pop’ effect. -
Test the length:
Once you have strung enough beads to approximate your wrist size, wrap the strand around your wrist to check the fit. The beads should meet comfortably without gaps showing the cord. -
Adjust bead count:
Add or remove a bead-and-spacer set if the fit is too tight or too loose. Remember that the final knot will take up a tiny bit of space. -
Finish the sequence:
Ensure your pattern ends so that when the ends connect, the sequence continues unbroken. Usually, this means ending with a black spacer if you started with a white bead.
Knot Hiding Pro-Tip
If the knot won’t fit inside your white beads, try hiding it under one of the black spacers if the hole is large enough, or simply dab glue and trim closely without hiding.
Step 3: Finishing Touches
-
Prepare for the knot:
Remove the tape or stopper carefully, holding both ends of the elastic firmly. -
Tie the first knot:
Cross the ends and tie a simple overhand knot. Pull it tight, bringing the two ends of the bracelet together. -
Secure with a surgeon’s knot:
For the second knot, loop the elastic through twice instead of once before pulling tight. This creates a secure surgeon’s knot that resists slipping. -
Apply adhesive:
Dab a tiny drop of jewelry glue or clear nail polish onto the knot. This bonds the elastic fibers and prevents the knot from unraveling. -
Hide the knot:
While the glue is still slightly tacky, pull the elastic so the knot slides inside the hole of the nearest large white bead. This creates a seamless, professional finish. -
Trim the ends:
Once dry, use your scissors to trim the excess elastic cord close to the bead hole, being careful not to cut the main strand.
Design Level Up
Use textured white lava stone beads instead of smooth clay. You can then add a drop of essential oil to the porous stones for a wearable aromatherapy diffuser.
Now you have a chic, high-contrast accessory ready to elevate your everyday outfit


What Really Happens Inside the Kiln
Learn how time and temperature work together inside the kiln to transform clay into durable ceramic.
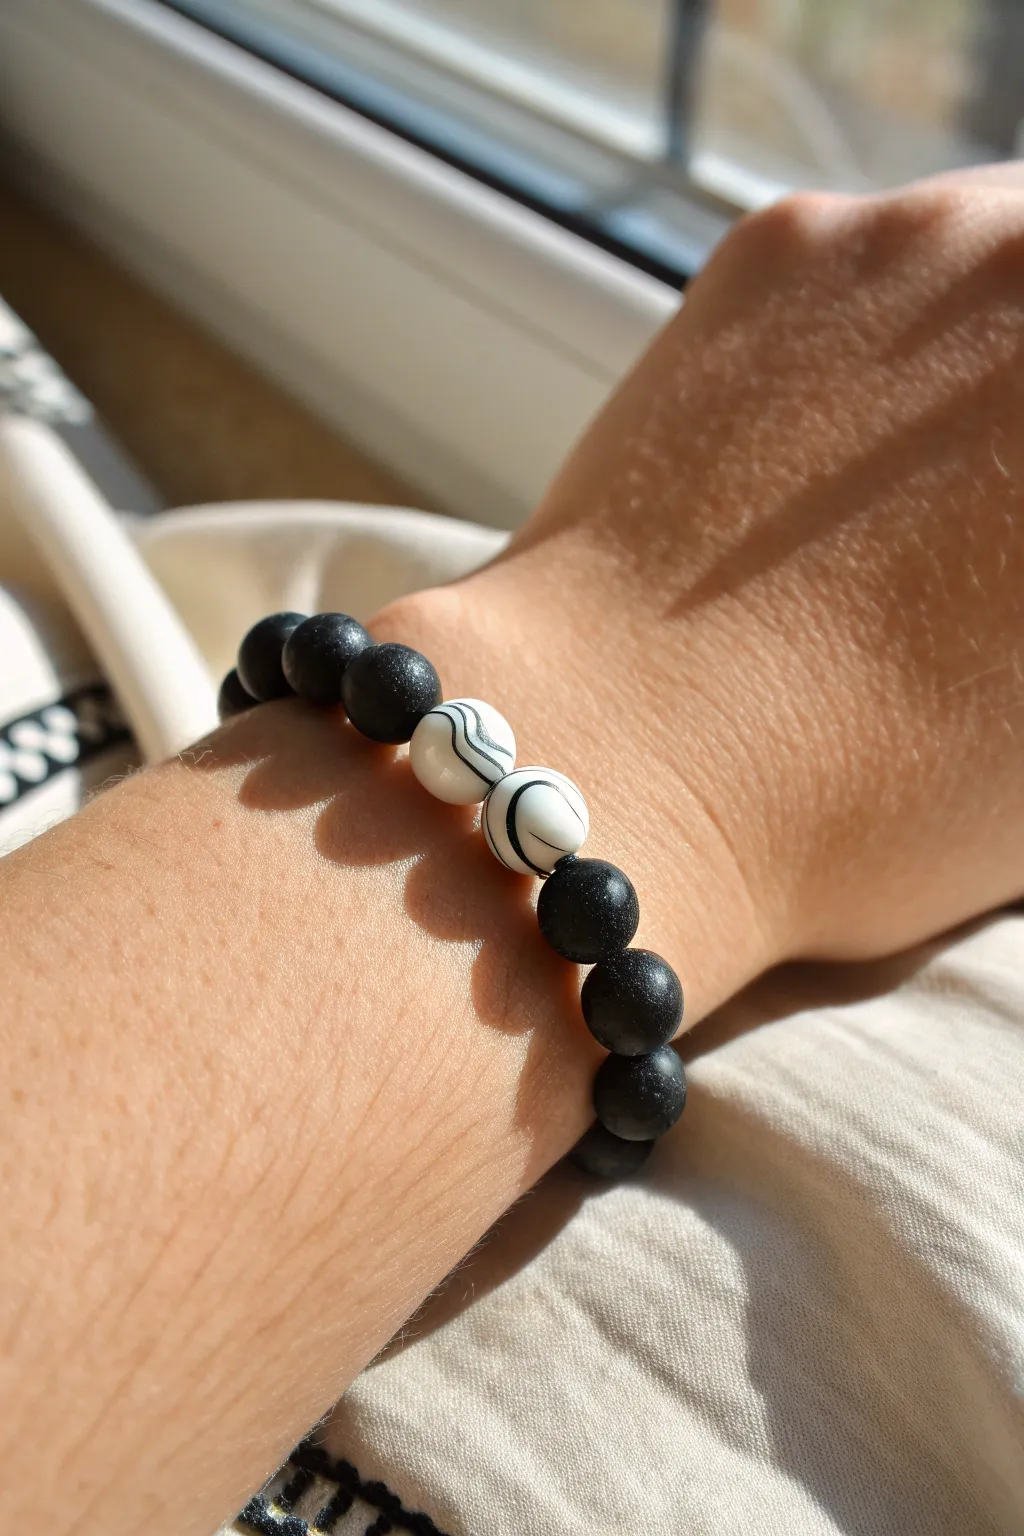
Black-White-Black Center Stripe
This striking design relies on the high contrast between matte black rounds and stark white disc beads to create a sophisticated, modern accessory. The pattern uses strategic spacing to create visual ‘stripes’ that give the piece a rhythmic, polished look perfect for stacking or wearing solo.
Step-by-Step Tutorial
Materials
- Matte black round polymer clay or lava stone beads (8mm or 10mm)
- White flat polymer clay heishi beads or disc spacers (approx. 4-6mm diameter)
- Elastic cord (0.8mm or 1.0mm depending on bead hole size)
- Bead stopper or masking tape
- Jewelry glue or clear nail polish
- Scissors
Step 1: Preparation
-
Measure your cord:
Cut a piece of elastic cord about 10-12 inches long. It’s always better to have extra length to work with when tying the final knot than to struggle with ends that are too short. -
Pre-stretch the elastic:
Firmly pull on the elastic cord several times. This pre-stretching prevents the bracelet from loosening up and creating gaps between beads after you’ve worn it a few times. -
Secure the end:
Attach a bead stopper to one end of the cord. If you don’t have one, a piece of masking tape folded over the end works perfectly to keep your beads from sliding off.
Uneven Stripes?
If your white disc beads vary in thickness (common with clay heishi), stack 3 thin ones instead of 2 to match the visual weight of other sections.
Step 2: Main Beading Sequence
-
Start with the black base:
Begin by stringing the solid black section. Looking at the design, thread approximately 8 to 10 black round beads onto the cord. This creates the solid back portion of the bracelet. -
Create the first stripe:
Add two flat white disc beads followed by a single black round bead. The thin white discs act as bright separators against the dark spheres. -
Complete the first motif:
Thread two more white disc beads after that single black bead. You should now have a sandwich pattern: white-black-white. -
Add the spacer section:
Now, thread three plain black round beads. These serve as a buffer zone before the next striped section begins. -
Build the second stripe:
Repeat the previous pattern: string two white discs, one black round bead, and two more white discs. -
Add the central focus:
String three black round beads. This section acts as the ‘front’ center of the bracelet between the striped accents. -
Form the third stripe:
Create the repeating motif again: two white discs, one black round bead, and two white discs. -
Add the final spacer:
Thread three black round beads to separate the final striped section. -
Finish the pattern:
Create the last stripe cluster: two white discs, one black round bead, and two white discs. -
Close the loop:
Add any remaining black beads needed to reach your desired wrist size. Check the fit by wrapping it around your wrist; it should be snug but comfortable.
Step 3: Finishing Touches
-
Check the tension:
Bring the two ends of the cord together. Ensure there are no gaps between the beads, but don’t pull so tight that the bracelet puckers or twists. -
Tie the knot:
Tie a surgeon’s knot (right over left, left over right, looping through twice). Pull the elastic tight to secure it. -
Secure with glue:
I prefer to place a tiny drop of jewelry glue or clear nail polish on the knot. Let it dry completely before trimming anything. -
Trim the ends:
Cut the excess elastic, leaving tails about 1-2mm long. -
Hide the knot:
Gently tug the bracelet so the knot slides inside the hole of the nearest black bead, hiding it from view for a seamless finish.
Make it Pop
Swap the center black bead in the ‘sandwich’ clusters for a matte gold or silver spacer bead to add a touch of luxury to the monochrome look.
Enjoy styling this versatile bracelet that pairs effortlessly with almost any outfit in your wardrobe
Monochrome “Checker” Mix
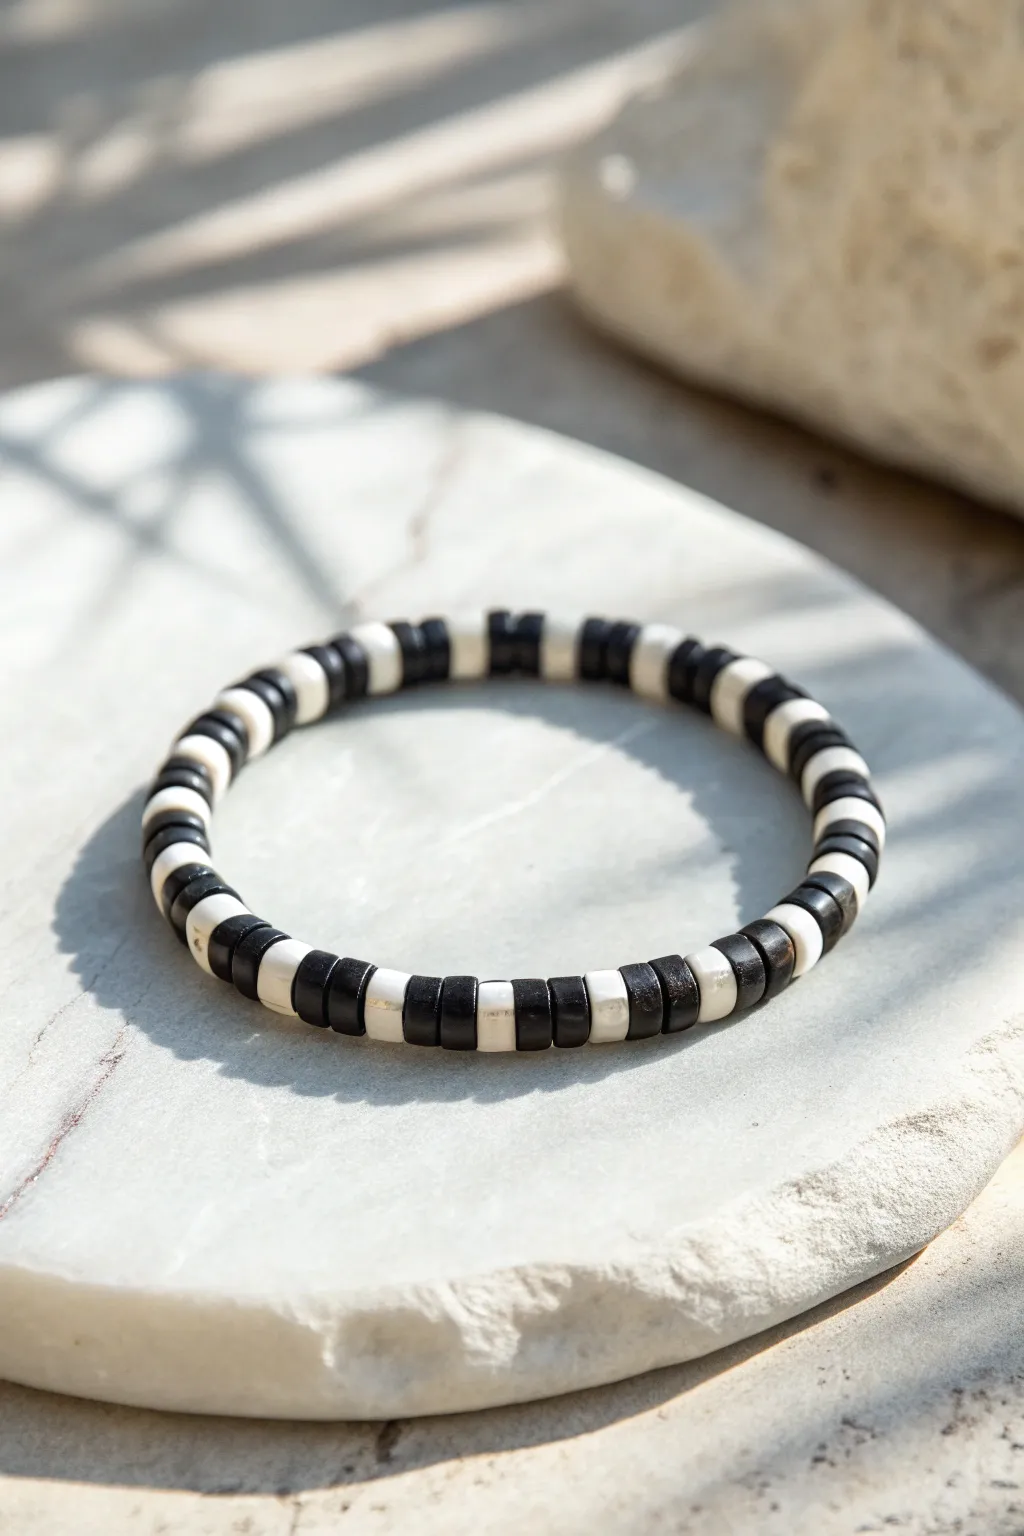
Embrace the timeless sophistication of black and white with this modern take on the classic heishi bead bracelet. Instead of a rigid checkerboard, this design uses varying bead counts to create a dynamic, organic rhythm that feels effortlessly chic.
Step-by-Step
Materials
- 6mm black polymer clay disc (heishi) beads
- 6mm white polymer clay disc (heishi) beads
- 0.8mm clear elastic stretch cord
- Jewelry glue or clear nail polish
- Scissors
- Bead stopper or masking tape
- Ruler or measuring tape
Step 1: Setting up the Workflow
-
Measure the cord:
Cut a piece of elastic cord about 10-12 inches long. This generous length gives you plenty of room to tie knots later without struggling with short ends. -
Secure the end:
Attach a bead stopper to one end of your cord. If you don’t have one, simply fold a small piece of masking tape over the end to prevent your beads from sliding right off while you work. -
Pre-stretch the elastic:
Give your cord a few gentle tugs before adding any beads. I like to do this to prevent the bracelet from stretching out permanently after the first few times you wear it.
Knot Slipping?
If the elastic feels slippery, rough it up slightly with sandpaper where you plan to tie the knot. This texture helps the knot grip itself better.
Step 2: Creating the Pattern
-
Start with black:
Begin threading your pattern by sliding on two black heishi beads. This establishes the dark base tone right away. -
Add a white contrast:
Follow the black beads with a single white bead. This 2-black, 1-white ratio forms the core ‘beat’ of your visual rhythm. -
Vary the sequence:
Continue adding beads, but don’t stick strictly to ‘2 black, 1 white’. Occasionally switch to ‘3 black, 1 white’ or ‘1 black, 1 white’ to create the organic look seen in the photo. -
Introduce larger blocks:
Every inch or so, thread on 3 or 4 black beads in a row to create a heavier dark section. -
Keep the white minimal:
Notice that the white beads act mostly as spacers. Try to keep white sections limited to just one or two beads at a time to maintain the dark, moody aesthetic. -
Check the fit:
Periodically wrap the beaded cord around your wrist. You want the beads to touch completely around your wrist without any gaps, but not feel tight. -
Fill the length:
Continue the irregular alternating pattern until you reach your desired length, usually about 6.5 to 7 inches for an average wrist. -
Symmetry check:
Look at your starting beads and your ending beads. If you started with black, try to end with white so the pattern flows seamlessly when connected.
Design Pro-Tip
Roll the finished bracelet between your palms for ten seconds. This helps settle the flat clay discs so they sit flush against each other perfectly.
Step 3: Finishing Touches
-
Prepare to tie:
Remove the bead stopper or tape carefully, holding both ends of the elastic firmly so no beads escape. -
The first knot:
Cross the ends and tie a simple overhand knot, pulling it down snug against the beads to eliminate slack. -
The surgeon’s knot:
For the second knot, loop the end through the circle twice (instead of just once) before tightening. This adds significant friction and security. -
Tighten securely:
Pull all four strands (the two loose ends and the bracelet loop itself) gently but firmly to lock the knot in place. -
Apply adhesive:
Dab a tiny drop of jewelry glue or clear nail polish directly onto the knot. Be careful not to get glue on the surrounding beads. -
Hide the knot:
While the glue is still slightly tacky, slide the knot inside the hole of the nearest black bead. This makes the finish look professional and seamless. -
Trim excess:
once the glue is fully dry, use your small scissors to trim the excess cord tails as close to the bead as possible.
Slip on your new monochrome accessory and enjoy the custom fit you created

TRACK YOUR CERAMIC JOURNEY
Capture glaze tests, firing details, and creative progress—all in one simple printable. Make your projects easier to repeat and improve.
Speckled White Beads for Texture
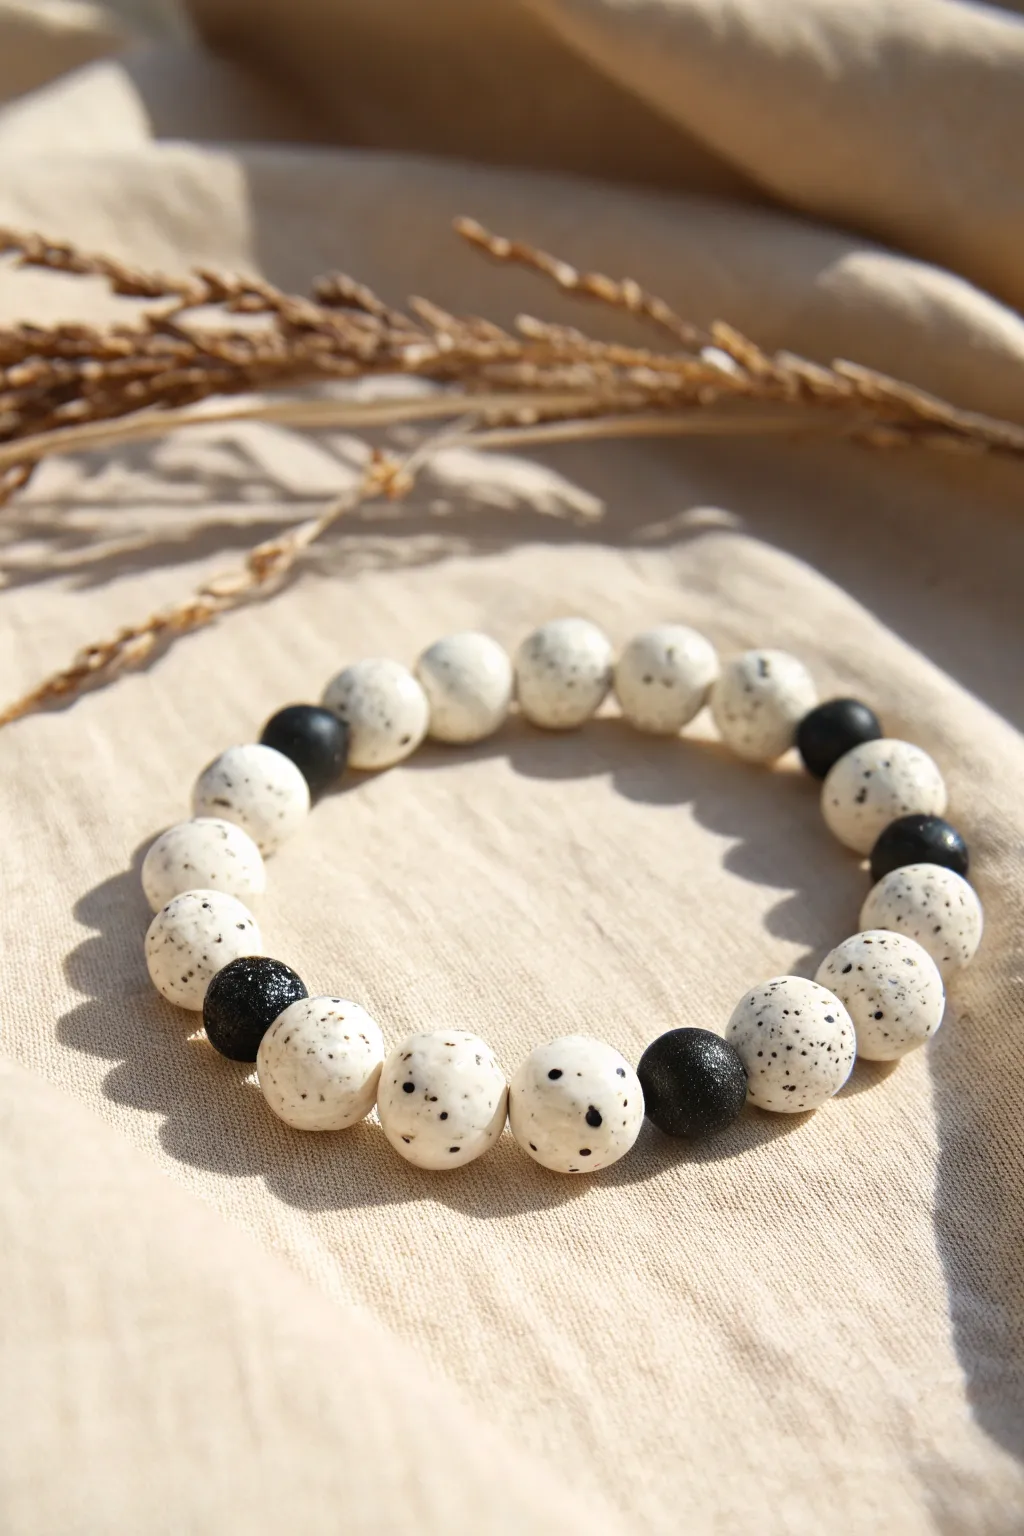
This elegant bracelet balances organic textures with modern contrast. By combining smooth matte black accents with hand-speckled creamy white beads, you create a sophisticated accessory that looks like polished stone.
How-To Guide
Materials
- White or beige polymer clay
- Black polymer clay
- Dried used coffee grounds or cracked black pepper (for speckling)
- Strong elastic bead cord (0.8mm or 1mm)
- Needle tool or toothpick
- Bead roller (optional, but helpful for uniformity)
- Sandpaper (fine grit, 400-800)
- Super glue or jewelry knot cement
- Oven for baking
Step 1: Preparing the Speckled Clay
-
Condition the white clay:
Begin by taking a block of white or slightly off-white polymer clay. Work it in your hands, kneading and rolling it until it is soft, pliable, and free of cracks. -
Add the texture:
Flatten the white clay into a pancake shape. To create that organic speckled look, sprinkle a small pinch of dried coffee grounds or coarsely cracked black pepper onto the surface. -
Mix gently:
Fold the clay over the speckles and knead it until they are evenly distributed throughout the batch. Don’t over-knead if you are using coffee, or the color might muddy the white clay too much. -
Check the spread:
Tear the clay in half to check the cross-section. You want visible specks throughout, not just on the surface.
Uneven Speckles?
If your specks are clumping, try mixing ground pepper with used, dried coffee grounds. The different particle weights help them distribute more evenly during kneading.
Step 2: Rolling and Forming Beads
-
Portion the clay:
Roll your speckled clay into a long, even snake or log shape. Use a tissue blade to slice it into equal-sized segments to ensure your beads will be uniform. -
Roll the white beads:
Take each segment and roll it between your palms to create spheres. Aim for a diameter between 10mm and 12mm. If you have a bead roller, this is the perfect time to use it for perfect spheres. -
Prepare the black clay:
Condition a smaller amount of black polymer clay until soft. Portion this into roughly 5 or 6 small segments, matching the size of your white beads. -
Roll the black beads:
Roll these segments into smooth, solid black spheres. I like to wipe my hands with a baby wipe before handling the black clay to avoid transferring any white residue. -
Create holes:
Using your needle tool or a toothpick, pierce the center of each bead. Twist the tool gently as you push through to avoid flattening the sphere. -
Refine the holes:
Once the needle pokes through, gently roll the bead back and forth on your work surface with the needle still inside to widen the hole slightly and smooth the edges.
Pro Tip: Hole Maintenance
Bake your beads directly on a dedicated bead baking rack or stiff wire. This keeps the holes perfectly round and prevents a flat spot from forming on the bottom.
Step 3: Baking and Finishing
-
Bake the beads:
Arrange the beads on a baking sheet or tile. Bake according to your polymer clay manufacturer’s instructions (usually around 275°F/135°C for 15-30 minutes). Let them cool completely. -
Sand for matte finish:
Once cool, lightly sand the beads under running water with fine-grit sandpaper. This creates that lovely stone-like matte texture and removes any fingerprints. -
Buff and dry:
Dry the beads thoroughly with a towel. You can buff them with a piece of denim or intense friction if you want a slight sheen, but the matte look is characteristic of this design.
Step 4: Assembly
-
Layout the pattern:
Arrange your beads on a layout board or towel. The pattern shown uses groups of 3-4 speckled white beads separated by single black accent beads. -
String the beads:
Cut a length of elastic cord about 10 inches long. String the beads onto the elastic, following your planned pattern. -
Check the fit:
Wrap the strung beads around your wrist to check the sizing. Add or remove beads as needed for a comfortable fit. -
Tie the knot:
Tie a strong surgeon’s knot (right over left, left over right). Pull the elastic tight to pre-stretch it slightly before tightening the knot fully. -
Secure and hide:
Apply a tiny dot of jewelry glue to the knot. Once dry, snip the excess cord closely and, if possible, gently tug the knot inside one of the bead holes to hide it.
Wear your new monochromatic creation solo or stacked with other bracelets for a curated look
Marbled Swirl Accent Beads
Achieve a sophisticated, modern look with this high-contrast bracelet design featuring matte black beads and custom-marbled accent pieces. The subtle, organic swirls on the white focal beads add just the right amount of artistic flair to an otherwise minimalist accessory.
Detailed Instructions
Materials
- Black polymer clay
- White polymer clay
- Elastic beading cord (0.8mm or 1mm)
- Bead rolling tool or acrylic block
- Needle tool or toothpick
- Jewelry glue (e.g., E6000 or G-S Hypo Cement)
- Ruler
- Clay blade or sharp craft knife
- Beading needle (optional)
- Oven for curing clay
- Sandpaper (fine grit, 400-1000)
Step 1: Creating the Solid Black Beads
-
Condition the clay:
Start by taking a block of black polymer clay and kneading it thoroughly until it is soft and pliable. This conditioning step is crucial to prevent cracks during baking. -
Portion the clay:
Roll the black clay into a uniform log or snake. Use your ruler and clay blade to cut equal-sized segments, aiming for pieces that will roll into beads roughly 8-10mm in diameter. -
Roll spheres:
Take each segment and roll it between your palms to form a rough ball. To get them perfectly round, I like to use an acrylic block or bead roller, moving it in a circular motion over the clay on your work surface. -
Texture the surface:
To achieve the matte, stone-like texture seen in the photo, gently roll the uncured beads over a piece of medium-grit sandpaper or tap them lightly with a stiff toothbrush. Avoid leaving fingerprints. -
Pierce the holes:
Gently insert a needle tool through the center of each black bead. Twist the needle as you push to avoid squishing the shape. Create roughly 18-20 black beads, depending on wrist size.
Smudged Lines?
If your black lines look gray or blurry, you over-rolled the bead. Use slightly firmer clay or chill the black threads briefly so they hold their shape better during rolling.
Step 2: Crafting the Marbled Accent Beads
-
Prepare the white base:
Condition a portion of white polymer clay. Roll two balls that are the exact same size as your black beads to serve as the base for the accents. -
Make thin black threads:
Take a very tiny amount of black clay and roll it into an incredibly thin, hair-like string. The thinner the string, the more delicate your swirl lines will be. -
Apply the lines:
Wrap the thin black threads randomly around the white clay balls. You want organic curves, not geometric stripes, so let the lines cross and wander naturally. -
Integrate the colors:
Gently roll the white balls between your palms again. This pressure will press the black threads flat into the white surface without fully blending the colors, creating that distinct sharp line effect. -
Refine the shape:
Continue rolling until the bead is perfectly smooth and round. If you want more distortion in the lines, twist the clay slightly before rolling it back into a ball. -
Pierce the accent beads:
Just like the black beads, carefully pierce a hole through the center of each marbled bead using your needle tool.
Step 3: Baking and Assembly
-
Bake the beads:
Arrange all your beads on a baking sheet lined with parchment paper. Bake according to your clay manufacturer’s specific instructions for time and temperature. -
Cool and inspect:
Allow the beads to cool completely inside the oven or on the counter. Once cool, check that the holes are clear; use a small drill bit or reamer if necessary. -
Prepare the cord:
Cut a piece of elastic cord about 10-12 inches long. Pre-stretch the elastic by pulling it gently a few times; this prevents the bracelet from loosening up later. -
Plan the layout:
Lay out your design on a bead board or towel. Place the two white marbled beads together in the center, flanked by the black beads on either side. -
String the beads:
Thread the beads onto the elastic cord. Start with half of the black beads, add the two accent beads, and finish with the remaining black beads. -
Check the fit:
Wrap the strung beads around your wrist to check the size. Add or remove black beads as needed for a comfortable fit. -
Tie the knot:
Tie a surgeon’s knot (right over left twice, then left over right) and pull tight. The elastic should be taut but not overstretched. -
Secure and finish:
Apply a tiny dab of jewelry glue to the knot. Let it dry partially, then tuck the knot inside the hole of an adjacent bead before trimming the excess cord.
Matte Finish Hack
To get that ultra-matte, stone-like finish on the black beads, lightly buff them with denim fabric after baking. It removes shine without polishing the clay.
Wear your new bracelet alone for a minimalist statement or stack it with others for a textured look
Monochrome Letter Bead Name
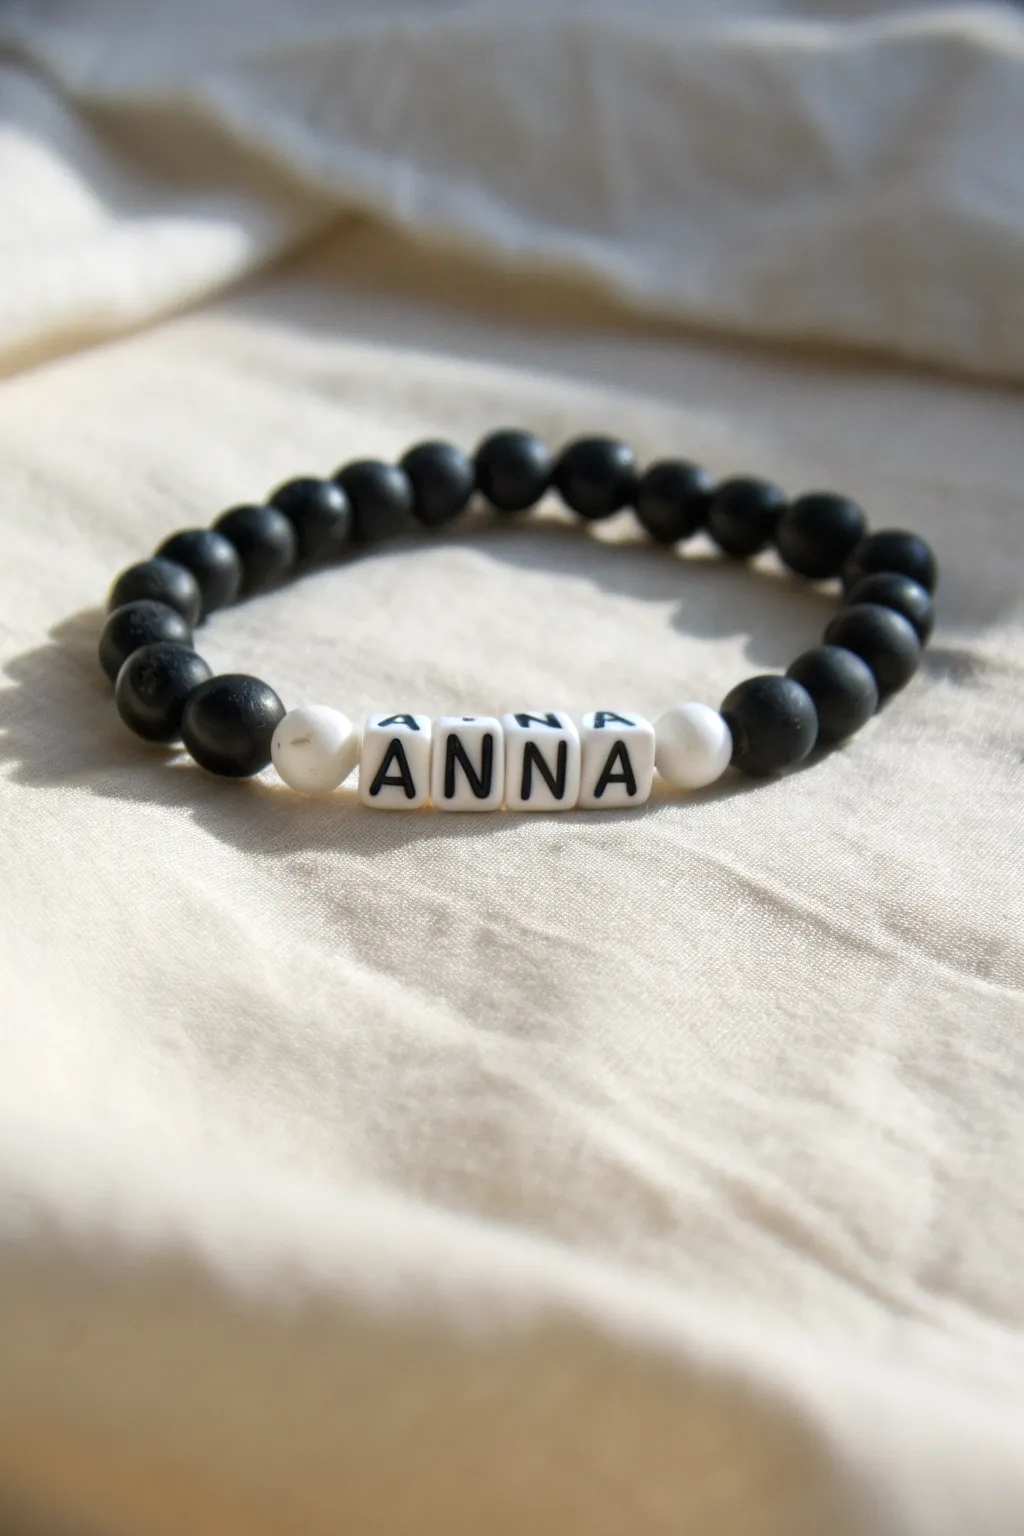
Create a sleek and personalized accessory with this high-contrast black and white design. Featuring smooth matte black beads and crisp letter blocks, this bracelet offers a modern, minimalist way to wear your name or a meaningful word.
Step-by-Step
Materials
- Matte black round polymer clay beads (6mm or 8mm)
- Two white round polymer clay beads (same size as black beads)
- White square letter beads with black text (spelling your chosen name)
- Strong elastic cord (0.8mm or 1mm)
- Jewelry glue or clear nail polish
- Scissors
- Bead stopper or tape
Step 1: Preparation and Design
-
Measure the cord:
Cut a piece of elastic cord about 10-12 inches long. This gives you plenty of extra slack for tying the knot later without struggling. -
Secure the end:
Attach a bead stopper or simply place a piece of tape folded over one end of the cord to prevent your beads from sliding off while you work. -
Plan your word:
Lay out your letter beads on a flat surface to spell ‘ANNA’ or your chosen name. Ensure the letters are all facing the correct way up before you begin threading. -
Determine sizing:
Measure your wrist and arrange the black matte beads in a line to matched that length, incorporating the space needed for the name segment.
Step 2: Stringing the Beads
-
Start the first half:
Thread approximately half of your matte black beads onto the elastic cord. These will form the back section of the bracelet. -
Add the first accent:
Slide on one of the white round clay beads. This acts as a visual spacer that highlights the start of the name section. -
String the name:
Carefully thread your letter beads in order. Double-check that ‘ANNA’ reads correctly from left to right as you hold the cord. -
Add the second accent:
Slide the second white round clay bead onto the cord immediately after the last letter bead to frame the name symmetrically. -
Finish the circle:
Thread the remaining matte black beads onto the cord. Bring the two ends together to check the fit around your wrist, adding or removing black beads if necessary.
Knot Security Tip
Use a surgeon’s knot for extra security. Loop the elastic through twice on the first pass instead of once before pulling tight.
Step 3: Finishing Touches
-
Pre-stretch the cord:
Gently pull tightly on both ends of the elastic cord a few times. This pre-stretches the material so the bracelet won’t sag or loosen after the first time you wear it. -
Tie the knot:
Tie a standard square knot (right over left, left over right). Pull the elastic taut to secure the beads tightly together without buckling. -
Secure with glue:
I like to dab a tiny drop of jewelry glue or clear nail polish directly onto the knot. This prevents the elastic from slipping over time. -
Let it dry:
Allow the glue to dry completely according to the manufacturer’s instructions before trimming anything. -
Trim the excess:
Use your scissors to trim the excess cord tail, leaving about 2-3mm sticking out. -
Hide the knot:
Gently tug on the beads adjacent to the knot to slide one of the black beads over the knot, hiding it inside the bead hole for a seamless finish.
Texture Twist
Swap the matte black beads for lava stone beads. You can add a drop of essential oil to them for a functional aromatherapy bracelet.
Now you have a stylish, custom bracelet perfect for stacking or wearing on its own
Yin-Yang Centerpiece Bracelet
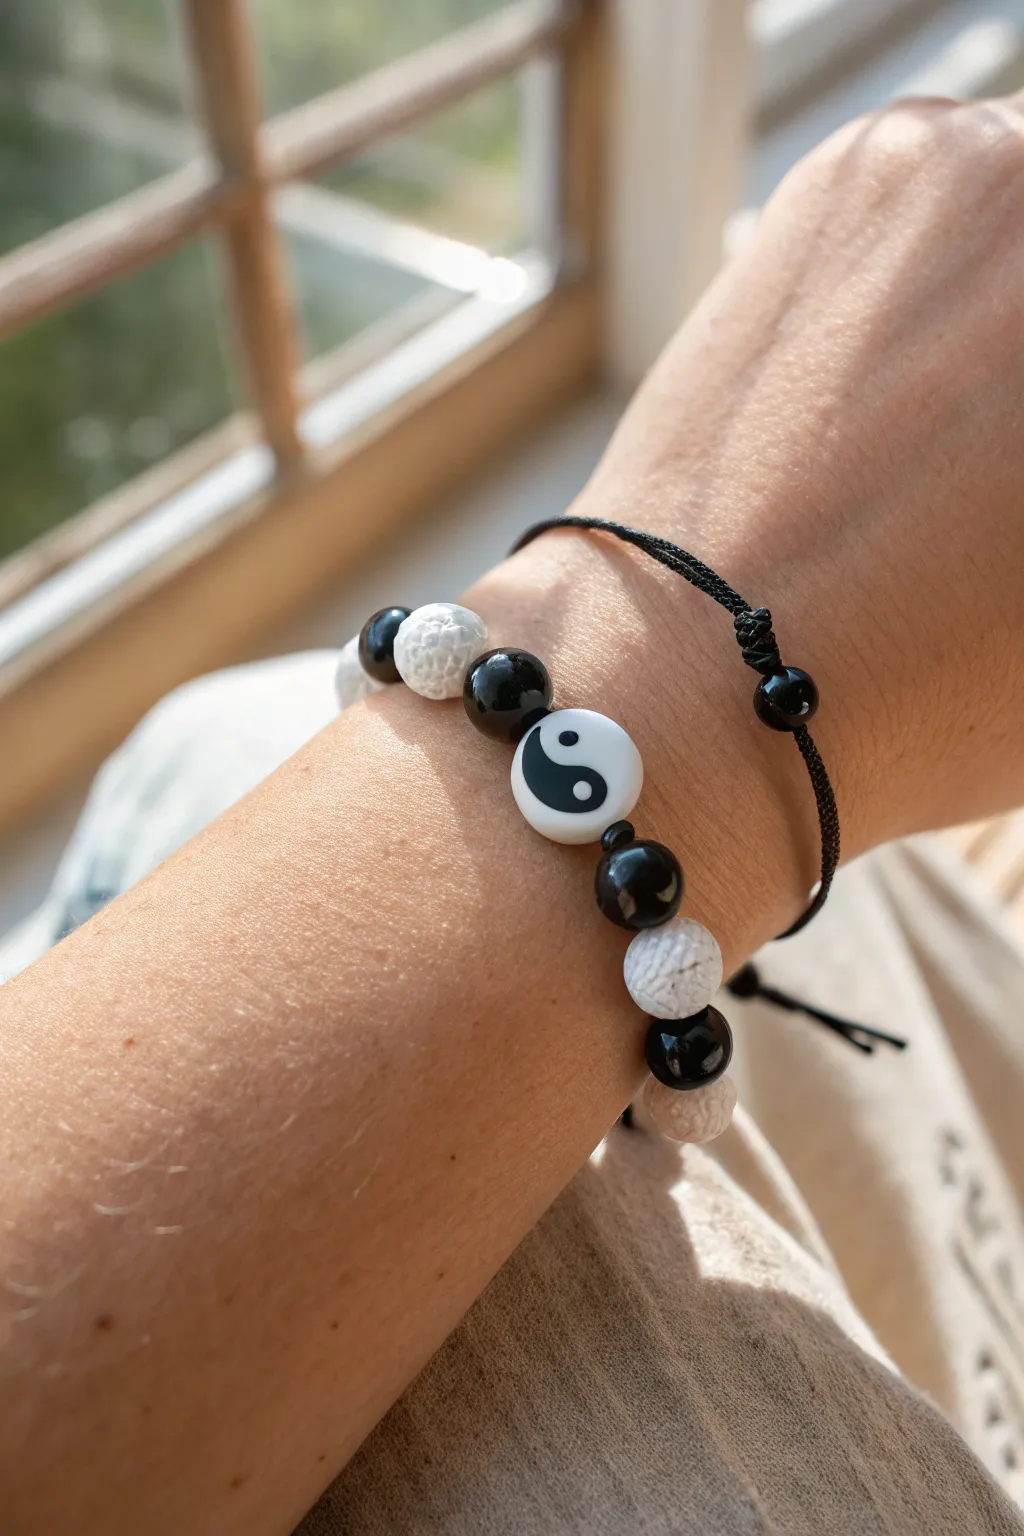
Find your center with this striking black and white beaded bracelet featuring a classic Yin-Yang focal bead. The combination of glossy black spheres and textured white lava stones creates a beautiful tactile contrast that looks great stacked or worn solo.
How-To Guide
Materials
- Elastic beading cord (0.8mm or 1mm thickness)
- Small tube of jewelry glue or clear nail polish
- Scissors
- Tape or bead stopper
- 1 large flat round Yin-Yang bead (polymer clay or ceramic)
- 8-10 glossy black round beads (8mm or 10mm)
- 8-10 white lava stone beads (8mm or 10mm)
- Small black spacer beads (optional)
- Thin black nylon cord (for the secondary bracelet, optional)
- 2 small black beads (for the secondary bracelet, optional)
Step 1: Setting the Foundation
-
Measure the Cord:
Cut a length of elastic cord about 10-12 inches long. This gives you plenty of extra room for tying knots without struggling against tension. -
Secure the End:
Place a piece of tape over one end of the cord or attach a bead stopper. This prevents your beads from sliding off while you design your pattern. -
Pre-stretch the Elastic:
Give the cord a few gentle tugs. Pre-stretching requires a delicate touch but ensures the bracelet won’t sag or expand permanently the first time you wear it.
Step 2: Designing the Pattern
-
Start with the Focal Point:
Thread the large Yin-Yang bead onto the cord first. This will act as the centerpiece, so the rest of the pattern will radiate out from here. -
Add Black Accents:
Slide one glossy black bead onto the cord on immediately the right side of the Yin-Yang bead. -
Mirror the Left Side:
Repeat the previous step on the left side, adding a glossy black bead so the Yin-Yang is framed perfectly by darkness. -
Introduce Texture:
On the right side, add one white lava stone bead next to the black one. I really love how the rough texture of the lava contrasts with the smoothness of the glass. -
Continue the Pattern:
Add a matching white lava stone bead to the left side to maintain symmetry.
Aromatherapy Hack
Lava stones are porous! Add a drop of essential oil (like lavender or peppermint) to the white beads. They will diffuse the scent for 1-2 days.
Step 3: Completing the Circle
-
Build the Strand:
Continue adding beads, alternating between the glossy black beads and the white lava stones. You can do a 1-to-1 pattern or group them like the photo, which uses pairs of black beads alternating with single lava beads. -
Check the Fit:
Periodically wrap the strand around your wrist. The ends should touch comfortably without stretching the elastic yet. -
The Final Bead:
Ensure your pattern ends so that when the loop connects, the color alternation remains consistent. If you started with black, try to end with white if possible, though a double black section at the back of the wrist is often unnoticeable. -
Remove the stopper:
hold both ends of the cord securely and remove your tape or bead stopper.
Loose Beads?
If the bracelet feels floppy, you likely didn’t pull the first knot tight enough against the beads. Undo carefully and pull the elastic taut while knotting.
Step 4: Closing the Bracelet
-
Tie the First Knot:
Cross the right end over the left and pull tight to create a simple overhand knot. Pull the elastic taught to bring the beads snugly together. -
The Surgeon’s Knot:
For the second knot, cross the strands again, but loop firmly through twice before pulling tight. This extra loop adds significant security handling the tension. -
Secure with Glue:
Apply a tiny dab of jewelry glue or clear nail polish directly onto the knot. Wait a moment for it to become tacky. -
Hide the Knot:
If one of your beads has a large enough hole (often the lava stones do), gently tug the elastic so the knot slides inside the bead, hiding it from view. -
Trim the Ends:
Once the glue is fully dry, snip off the excess cord carefully, getting as close to the bead hole as possible without cutting the knot itself.
Step 5: Bonus: The Companion Cord
-
Cut the Nylon:
To make the thin black bracelet shown in the image, cut a 10-inch piece of thin non-elastic nylon cord. -
Add Detail Beads:
Thread two small black beads onto the cord. -
Create Sliding Knots:
Create simple sliding knots on either side of the beads so the bracelet size is adjustable, or tie it permanently for a minimalist look.
Enjoy the calming balance your new accessory brings to your daily style
Smiley Face in Black and White
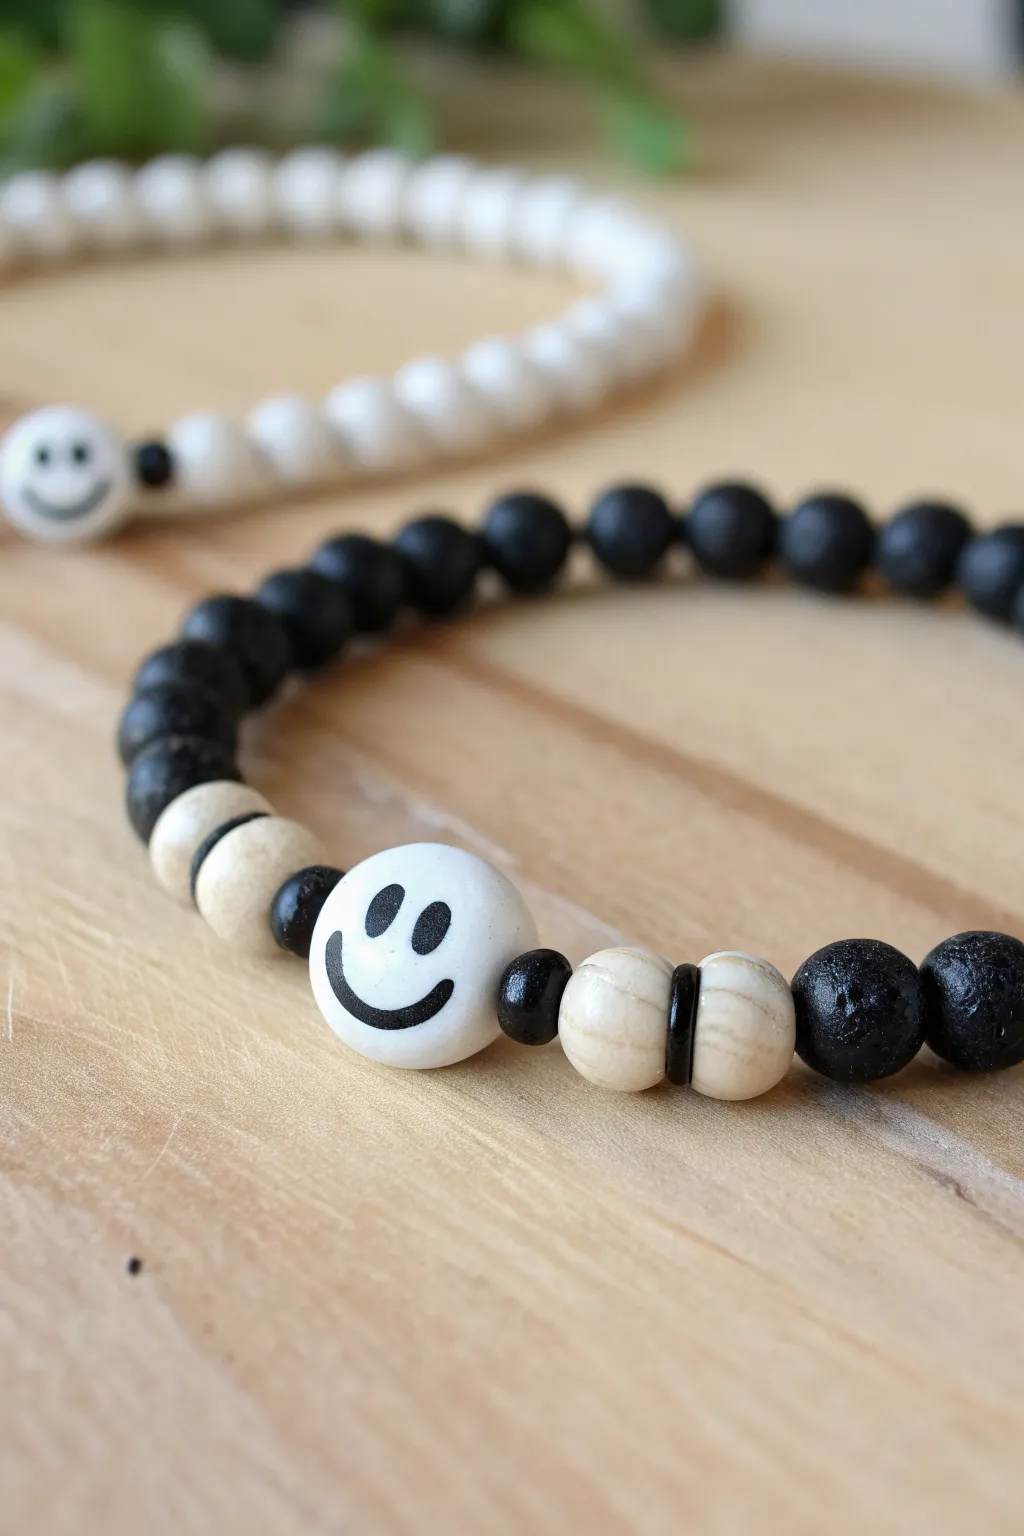
Embrace a little duality with this stylish bracelet that combines matte textures and natural tones. The focal point is a cheerful white smiley face bead, perfectly balanced by rugged black lava stones and soft cream wood accents.
Step-by-Step Tutorial
Materials
- One white acrylic or clay smiley face bead (approx. 10mm)
- Black lava stone beads (8mm)
- Cream/off-white round wooden beads (8mm)
- Small black Heishi or flat spacer beads (approx. 4-5mm)
- Tiny round black spacer beads (approx. 3mm)
- Elastic jewelry cord (0.8mm or 1mm gauge)
- Jewelry glue or clear nail polish
- Scissors
Step 1: Preparation
-
Measure your wrist:
Before cutting any string, wrap a piece of string or a soft measuring tape around your wrist to find your size. Add about half an inch to this measurement for a comfortable fit. -
Cut the cord:
Cut a length of elastic cord about 10-12 inches long. Having plenty of excess makes it much easier to tie the final knot without fumbling. -
Pre-stretch the elastic:
Hold both ends of your cut cord and give it a few gentle tugs. This pre-stretching helps prevent the bracelet from sagging or loosening up immediately after you finish making it. -
Secure the end:
Place a piece of tape or a bead stopper clip on one end of the cord so your beads don’t slide right off while you are working.
Loose Knot?
If your elastic knot feels slippery, try a triple knot instead of a double. Pull all four strands (the two tails and the bracelet loop sides) simultaneously to tighten it securely.
Step 2: Beading the Pattern
-
Start with the centerpiece:
Instead of starting at the back, we will build outward from the middle. Thread the white smiley face bead onto the center of your cord. -
Add tiny spacers:
Slide one tiny round black spacer bead onto the cord on the left side of the smiley face, and one onto the right side. -
Add cream wood beads:
Thread one cream-colored wooden bead next to the tiny spacer on the left side. Repeat this on the right side. -
Insert flat spacers:
Next, add one flat black heishi spacer bead next to the wooden bead on the left. Do the same on the right. These thin discs create a nice visual separation. -
Add the final wood accents:
String a second cream wooden bead onto the left side, followed by a second cream wooden bead on the right side. -
Finish the centerpiece:
Cap off the central design by adding one more tiny round black spacer bead to both the far left and far right ends.
Scent Infusion
Use the porous nature of the black lava beads to your advantage! Add a single drop of your favorite essential oil to one black bead for an aromatherapy bracelet that smells great all day.
Step 3: Completing the Loop
-
Fill with black stone:
Now that your focal section is established, fill the rest of the cord with your 8mm black lava stone beads. -
Even it out:
I usually alternate adding black beads to each side to keep the smiley face centered, but you can just string them all on one side if that’s easier. -
Check the fit:
Wrap the strand around your wrist to check the length. The ends should meet comfortably without stretching the elastic tight. -
Tie the knot:
Once you have the right number of beads, remove the tape or clip. Tie a strong surgeon’s knot (right over left, left over right) and pull tight. -
Secure the knot:
Apply a tiny dot of jewelry glue or clear nail polish to the knot to ensure it doesn’t slip over time. -
Hide the mechanics:
Allow the glue to dry for a moment, then trim the excess cord ends closely. Gently tug the standard beads so the knot slips inside the hole of one of the black lava beads, hiding it from view.
Slip on your new creation and enjoy the mix of textures on your wrist
Metal Spacer Beat (Silver or Gold Tone)
Elevate the humble polymer clay bead with this sophisticated design that pairs classic black and white heishi discs with gleaming gold spacers. The resulting piece is a modern, minimalist accessory that looks far more expensive than it is to make.
Step-by-Step
Materials
- 6mm black polymer clay heishi beads
- 6mm white polymer clay heishi beads
- 6mm gold-tone metal spacer beads (disc or rondelle shape)
- 0.8mm clear elastic cord
- Jewelry glue or clear nail polish
- Scissors
- Tape or a bead stopper clip
- Measuring tape
Step 1: Preparation
-
Measure your wrist:
Wrap a measuring tape loosely around your wrist to find your size. Add about half an inch to this measurement to ensure the bracelet fits comfortably without pinching. -
Prepare the cord:
Cut a piece of elastic cord about 10-12 inches long. Having extra length makes the final knotting process much easier and less frustrating. -
Pre-stretch the elastic:
Hold the ends of the cord and give it a few gentle tugs. This crucial step prevents the bracelet from sagging or stretching out permanently after you wear it a few times. -
Secure the end:
Place a piece of tape or a bead stopper clip on one end of the cord so your beads don’t slide right off while you work.
Step 2: Creating the Pattern
-
Identify the pattern unit:
Study the design: the repeating unit consists of a gold spacer, two white clay discs, a gold spacer, and a larger block of black clay discs. -
Start the sequence:
Thread on one gold metal spacer bead followed by exactly two white heishi beads. -
Complete the white section:
Slide on another gold metal spacer bead to bracket the white section. -
Add the black section:
Thread on six black heishi beads. This creates the darker, dominant segment of the pattern. -
Check the count:
Verify your first full segment looks correct: Gold – White (x2) – Gold – Black (x6). Adjust the number of black beads if you prefer a longer dark section. -
Repeat the pattern:
Continue this exact sequence along the cord. I find it helpful to lay out piles of the beads beforehand so I can just grab and go without counting every time. -
Check sizing periodically:
Wrap the beaded strand around your wrist occasionally. Stop adding beads when the ends touch comfortably around your wrist. -
End the pattern:
Try to finish the strand at the end of a black section so the pattern flows seamlessly when tied together.
Loose Pattern Fix
If you notice gaps between beads after tying, your knot wasn’t pulled tight enough against the beads. Before gluing, ensure the strand is taut so the pattern stays solid.
Step 3: Finishing Touches
-
Prepare for the knot:
Remove the tape or bead stopper carefully while holding both ends of the elastic securely. -
Tie the first knot:
Cross the left end over the right and pull tight to bring the beads together into a circle. Eliminate any gaps between beads. -
Secure with a surgeon’s knot:
Loop the ends as if tying a regular knot, but pass the tail through the loop a second time before pulling tight. This extra pass adds significant security. -
Apply adhesive:
Dab a tiny drop of jewelry glue or clear nail polish directly onto the knot. Be careful not to get glue on the surrounding beads, as it can discolor the clay. -
Let it cure:
Allow the glue to dry completely according to the manufacturer’s instructions before stressing the joint. -
Hide the knot:
Trim the excess cord ends close to the knot. If possible, gently tuck the knot inside the hole of one of the adjacent beads.
Stacking Style
Make two more bracelets to create a stack: one entirely of black beads with a single gold bead, and another entirely white. Wearing all three together looks luxe.
Enjoy styling your chic new accessory with everything from casual denim to evening wear
One Pearl Moment in the Mix

This elegant bracelet balances rough textures with smooth elegance by featuring a single, lustrous pearl amidst a sea of matte black lava-style clay beads. It creates a stunning high-contrast accessory that feels grounded yet sophisticated.
Step-by-Step Tutorial
Materials
- Black polymer clay (or pre-made black lava stone beads, approx 8mm)
- White pearl bead (approx 10-12mm)
- Two thin silver spacer rings or wire
- Elastic beading cord (0.8mm or 1mm)
- Superglue or jewelry adhesive
- Course sea salt (for texture if making beads)
- Toothpick or bead reamer
- Scissors
Step 1: Crafting the Clay Beads
-
Condition the Clay:
Begin by warming up your black polymer clay in your hands until it is soft and pliable. This prevents cracking and ensures smooth rolling. -
Portion the Clay:
Roll the black clay into a long, even log snake. Use a blade to slice the log into roughly 20 to 24 equal segments, depending on your wrist size. -
Roll the Spheres:
Take each segment and roll it between your palms to create smooth, round spheres of approximately 8mm in diameter. -
Texture the Surface:
To mimic the porous look of lava stone shown in the image, roll the unbaked clay spheres gently over coarse sea salt. Press lightly so the salt embeds slightly into the surface. -
Pierce the Holes:
Using a toothpick or a thick needle, carefully pierce a hole through the center of each bead. I like to rotate the bead as I push to keep the shape round. -
Bake the Beads:
Place the beads on a baking sheet and bake according to your polymer clay package instructions (usually 275°F/135°C for 15-30 minutes). -
Wash and Dry:
Once the beads have cooled completely, submerge them in warm water to dissolve the salt. This leaves behind the characteristic pitted ‘lava’ texture used in this design. Dry them thoroughly.
Sticky Salt Issue?
If salt doesn’t wash out easily, soak beads in warm water for 20 mins. Use an old toothbrush to gently scrub the surface and reveal the pits.
Step 2: Assembling the Design
-
Prepare the Cord:
Cut a piece of elastic cord about 12 inches long. Pre-stretch the elastic by pulling it gently a few times; this prevents the bracelet from stretching out later. -
Start Stringing:
Begin threading your black textured beads onto the cord. String about half of your total black beads first. -
Add the Silver Spacers:
Slide on the two thin silver spacer rings. In the image, these sit off-center, adding an asymmetrical industrial touch near the focal point. -
Complete the Black Bead Circle:
Continue stringing the remaining black lava-style beads until the strand is just shy of your wrist measurement. -
Add the Focal Pearl:
String the large white pearl last. Since it is slightly larger than the black beads, it will nestle prominently as the centerpiece. -
Check the Fit:
Wrap the unfinished strand around your wrist to ensure it fits comfortably without gaps. Add or remove a black bead if necessary. -
Tie the Knot:
Tie a surgeon’s knot (right over left, left over right) to secure the bracelet. Pull the elastic tight enough so the beads touch firmly but don’t buckle. -
Secure and Trim:
Apply a tiny dab of jewelry glue or superglue to the knot. Allow it to dry for a minute, then snip the excess cord close to the knot. -
Hide the Knot:
Gently tug the bracelet so the knotted section slides inside the hole of the large pearl bead or one of the black beads to conceal it completely.
Scent Diffuser Upgrade
Because the clay beads have a porous texture, add a drop of essential oil to the black beads. They will act as a personal aroma diffuser all day.
Wear your monochromatic bracelet solo for a minimalist statement or stack it with silver bangles for added shine
Heishi Plus Small Round Beads

Embrace the sleek contrast of black and white with this stylish three-piece bracelet stack. By combining flat heishi discs with small round beads, you create a sophisticated textural mix perfect for everyday wear.
How-To Guide
Materials
- White polymer clay heishi beads (approx. 4-6mm)
- Black polymer clay heishi beads (approx. 4-6mm)
- Small white round spacer beads (matte finish, approx. 3-4mm)
- Small black round spacer beads (matte finish, approx. 3-4mm)
- Elastic beading cord (0.5mm clear)
- Beading needle (optional but helpful)
- Scissors
- Clear jewelry glue or superglue
- Bead stopper or masking tape
Step 1: The All-White Round Bracelet
-
Measure and Cut:
Begin by measuring your wrist circumference. Cut a piece of elastic cord about 4-5 inches longer than this measurement to ensure you have plenty of room for tying knots. -
Secure the End:
Attach a bead stopper to one end of your cord, or simply tape it down to your work surface. This prevents your beads from sliding off as you work. -
String the White Rounds:
Thread your small white round beads onto the cord. Keep adding beads until the strand reaches your desired wrist length, usually around 6.5 to 7 inches for an average fit. -
Check the Fit:
Wrap the strand around your wrist to check the sizing. Because round beads occupy more volume than flat ones, you might need a slightly longer length than usual. -
Knot and Secure:
Once satisfied, tie a surgeon’s knot (right over left twice, then left over right twice). Pull tight to secure. -
Finish the Knot:
Apply a tiny dot of jewelry glue to the knot. Let it dry for a moment before trimming the excess cord close to the knot.
Knot Slipping?
If your elastic knots slip, try pre-stretching the clear cord before stringing. This removes slack and helps the knot bite into itself better.
Step 2: The All-Black Round Bracelet
-
Prepare the Cord:
Cut a second length of elastic cord, similar to the first one, and secure the end with your stopper or tape. -
String Black Beads:
Thread on the small black round beads. Aim for the exact same length as your white bracelet to ensure they stack neatly together. -
Tie it Off:
Repeat the knotting process: tie a secure surgeon’s knot, pull it taut, and apply a drop of adhesive for durability. -
Final Trim:
Trim the tails of the elastic cord once the glue is fully dry.
Step 3: The Mixed Heishi Pattern
-
Cut the Third Cord:
Prepare your final piece of elastic cord, securing the end as before. -
Start the Pattern:
Thread on three white heishi clay beads. Make sure they are sitting flat against each other. -
Add Contrast:
Follow the three white beads with three black heishi clay beads. This creates a bold, segmented stripe pattern. -
Establish Rhythm:
Continue this pattern—three white, three black—for the entire length of the bracelet. I prefer to double check the pattern occasionally to ensure I haven’t miscounted. -
Length Check:
Measure this strand against the first two bracelets. Heishi beads sit flatter against the skin, so ensure the fit feels comfortable alongside the round bead bracelets. -
Close the Loop:
Tie your surgeon’s knot securely. The flat surface of heishi beads can sometimes make knots tricky, so pull extra firmly. -
Hide the Knot:
Apply your glue dot. If the hole of one of the heishi beads is large enough, gently tug the knot inside beads to hide it before the glue sets completely.
Gold Upgrade
Replace one set of three black heishi beads with three gold spacer discs for a chic, metallic accent that elevates the monochromatic look.
Wear all three together for a modern, textured stack that matches everything in your wardrobe
Three-Bracelet Monochrome Stack
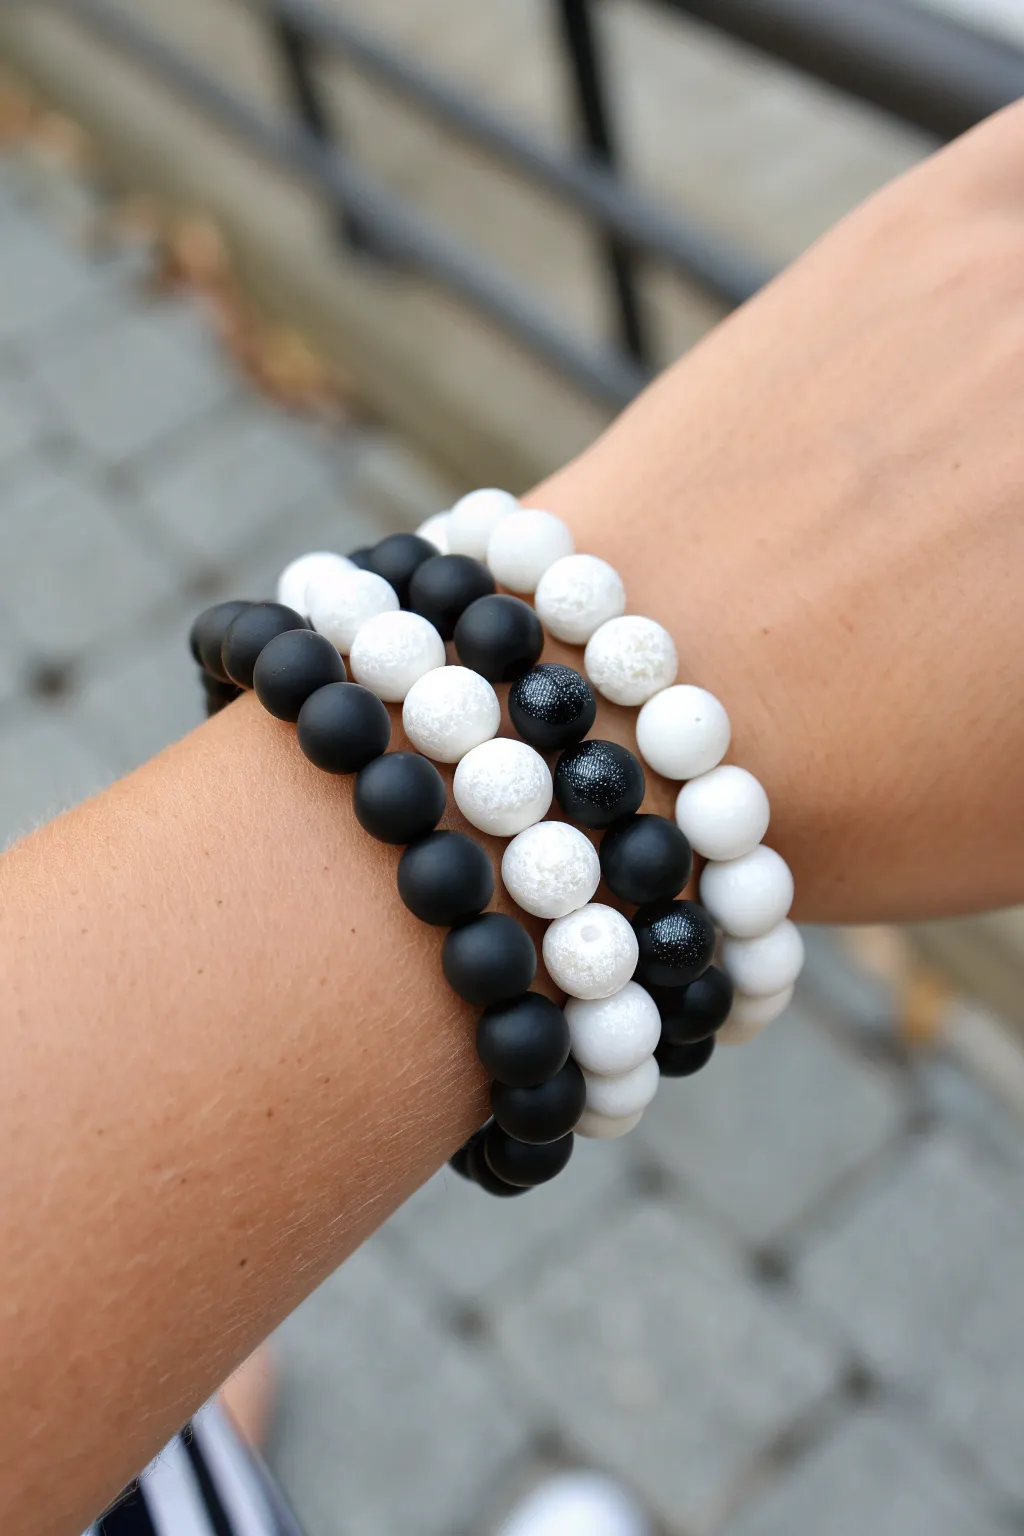
This striking monochrome stack balances matte black depths with textured white highlights for a sophisticated everyday look. By combining three distinct strand designs—solid, patterned, and textured—you create a cohesive set that looks professionally curated.
Step-by-Step
Materials
- 8mm matte black agate or onyx beads (approx. 35-40 beads)
- 8mm white lava stone or crackle quartz beads (approx. 10 beads)
- 8mm white tridacna or glossy white jade beads (approx. 20-25 beads)
- 8mm black textured lava stone beads (optional, for middle strand)
- 0.8mm clear elastic stretch cord
- Jewelry glue or clear nail polish
- Scissors
Step 1: Preparation
-
Measure your wrist:
Wrap a piece of string or a flexible measuring tape around your wrist where you want the bracelets to sit. Add about 0.5 to 1 inch to this measurement depending on how loose you like your fit. -
Cut the cord:
Cut three pieces of elastic cord, making each about 10-12 inches long. Having extra length makes tying the final knots much less frustrating than working with short ends. -
Pre-stretch the elastic:
Hold each segment of cord and give it a few firm tugs. This pre-stretching step prevents the bracelets from sagging or loosening up immediately after you finish making them.
Step 2: The Matte Black Strand
-
Secure the end:
Place a piece of tape or a binder clip on one end of your first cord so beads don’t slide off as you work. -
String the beads:
Thread your matte black beads onto the cord one by one. Check the length against your wrist occasionally until you reach your desired size—usually about 20-22 beads for an average wrist. -
Tie the knot:
Remove the tape or clip. Cross the two ends and tie a simple overhand knot, pulling tight. Then, tie a surgeon’s knot (looping the end through twice instead of once) for extra security. -
Secure and trim:
Apply a tiny dot of jewelry glue to the knot. Let it dry for a moment, then trim the excess cord, leaving about 1mm. Make sure to tug the knot inside the hole of a neighboring bead to hide it.
Knot Security
Use a surgeon’s knot (looping through twice) and pull all four strands tight—both the tail ends and the main loop. This locks the tension perfectly.
Step 3: The Contrast Pattern Strand
-
Plan the pattern:
For the middle bracelet, lay out your beads first to visualize the balance. You want an alternating pattern of black and white sections. -
The 2-by-2 method:
Start stringing by adding two matte black beads. Follow this with two white textured (lava or crackle) beads. -
Continue the sequence:
Repeat this 2-black, 2-white pattern until the strand is complete. If you have any black lava beads, mixing one or two into the black sections adds great tactile variety. -
Check symmetry:
Try to end on a color that opposes your starting color (e.g., start with black, end with white) so the pattern flows seamlessly when knotted. -
Finish the strand:
Tie off this bracelet using the same surgeon’s knot method, apply glue, hide the knot, and trim.
Add an Accent
Swap one black bead in the matte strand for a silver or gunmetal spacer bead to add a tiny flash of metallic shine to the monochrome set.
Step 4: The White Strand
-
Select your beads:
For the final bracelet, use your smooth, glossy white beads. These provide a clean visual break from the matte and textured beads in the other two strands. -
String completely:
Thread the white beads until this bracelet matches the length of the first two. -
Final knotting:
Perform the final tie-off with a surgeon’s knot. Be careful with white beads, as messy glue can sometimes show up more clearly; use a toothpick to apply the glue precisely. -
Hide the mechanism:
Pull the knot firmly inside a white bead. Because these beads are often translucent, ensure the knot is fully hidden to maintain that high-end look. -
Stack and style:
Roll the bracelets onto your wrist one by one—don’t stretch and pull them over your hand, as this weakens the elastic. Adjust them so the patterned bracelet sits in the middle.
Now you have a versatile, boutique-style set that matches almost any outfit
Dithered Fade From Black to White
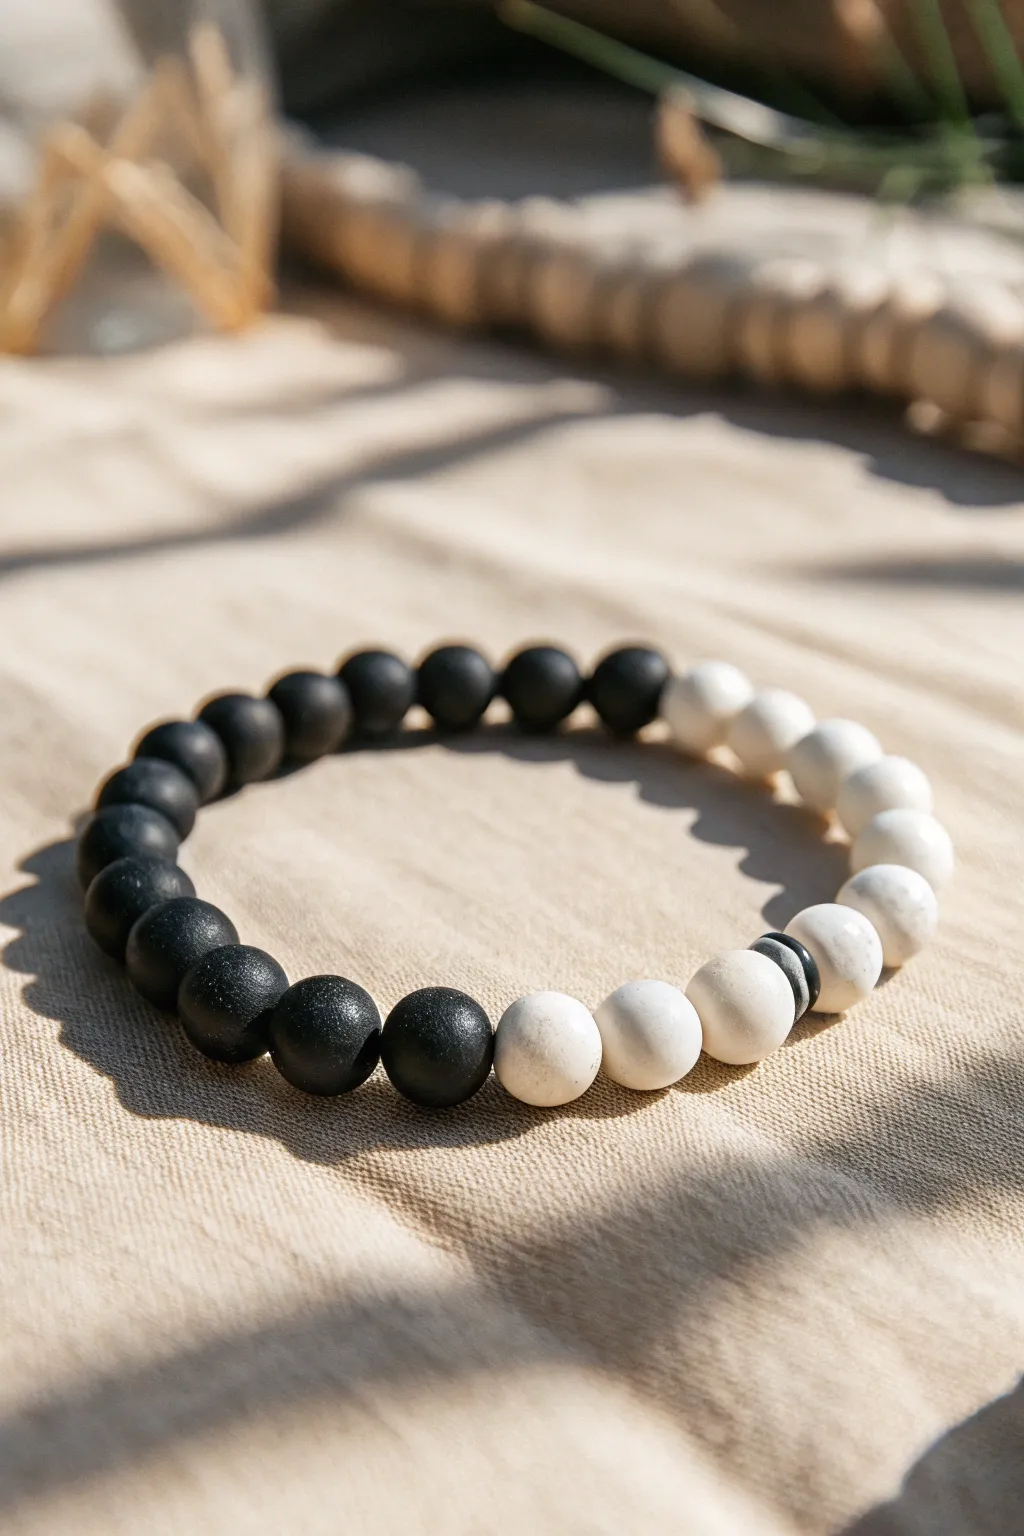
This striking bracelet uses the simplicity of black and white to create a sophisticated dithered fade effect, transitioning smoothly from distinct dark tones to creamy whites. The matte texture of the clay beads adds a contemporary, earthy feel that elevates this piece beyond simple stringing.
Detailed Instructions
Materials
- 10mm round black polymer clay beads (matte finish)
- 10mm round white polymer clay beads (matte finish)
- Small black flat heishi spacer beads (optional, for the transition)
- Strong elastic cord (0.8mm or 1mm)
- Scissors
- Hypo-cement or strong jewelry glue
- Bead design board or a soft towel
- Tape or binder clip
Step 1: Preparation & Planning
-
Measure your wrist:
Wrap a piece of string around your wrist to find your comfortable size, then add about half an inch for a comfortable fit. -
Prepare the workspace:
Lay out your bead design board or a soft towel. This prevents the round beads from rolling away while you plan your pattern. -
Cut the elastic:
Cut a piece of elastic cord about 10-12 inches long. Having extra length makes tying the final knot much easier than struggling with short ends. -
Secure the end:
Place a piece of tape or a binder clip on one end of the elastic cord to act as a stopper so beads don’t slide off as you work.
Knot Slipping?
If the elastic feels slippery, try a surgeon’s knot. Make an extra loop through the first part of your square knot for added friction before pulling tight.
Step 2: Creating the Dithered Pattern
-
Start with the dark side:
Begin by stringing approximately 10 to 12 solid black beads. This will form the solid black half of the bracelet. -
Begin the transition:
Now, string one white bead followed by one black bead. This simple alternation is the start of the ‘dithering’ effect where the colors mix. -
Add a unique accent:
I like to add a tiny visual break here. Between the next black and white bead, slip on a few thin black heishi spacer beads if you have them, which mimics the look of the striped bead seen in the photo. -
Complete the fade:
Finish the stringing pattern with the remaining solid white beads (another 10 to 12, depending on your wrist size) until you reach the desired length. -
Check the fit:
carefully wrap the beaded strand around your wrist to ensure it fits comfortably, adding or removing a bead from the solid color sections if needed to adjust the size.
Step 3: Finishing Touches
-
Pre-stretch the cord:
Before tying, give the elastic a gentle stretch. This pre-stretching prevents the bracelet from becoming loose and sagging after the first few times you wear it. -
Tie the knot:
Remove the tape or clip and tie a simple square knot (right over left, left over right). Pull the elastic tight so the beads sit snugly against each other. -
Secure the knot:
Apply a tiny dot of Hypo-cement or jewelry glue directly onto the knot. This is crucial for longevity with elastic bracelets. -
Hide the mechanics:
While the glue is still slightly tacky but not wet, gently pull the knot inside the hole of the nearest large bead to hide it from view. -
Final trim:
Once the glue is fully dry (wait at least 15 minutes), trim the excess elastic tail close to the bead hole carefully so you don’t nick the main cord.
Add Texture
Swap the single ‘transition’ beads for lava stone beads. Their pitted surface adds a tactile contrast to the smooth matte clay.
Now you have a stylish, minimalist accessory that matches almost any outfit