If you’re craving something sweet and sculptable, bunny clay ideas are the fastest way to turn a little lump of clay into instant joy. I’m sharing my favorite beginner-friendly projects—from tiny polymer clay cuties to cozy air dry clay decor—that all start with the same magical combo: round shapes and oversized ears.
Kawaii-Style Bunny Figurine
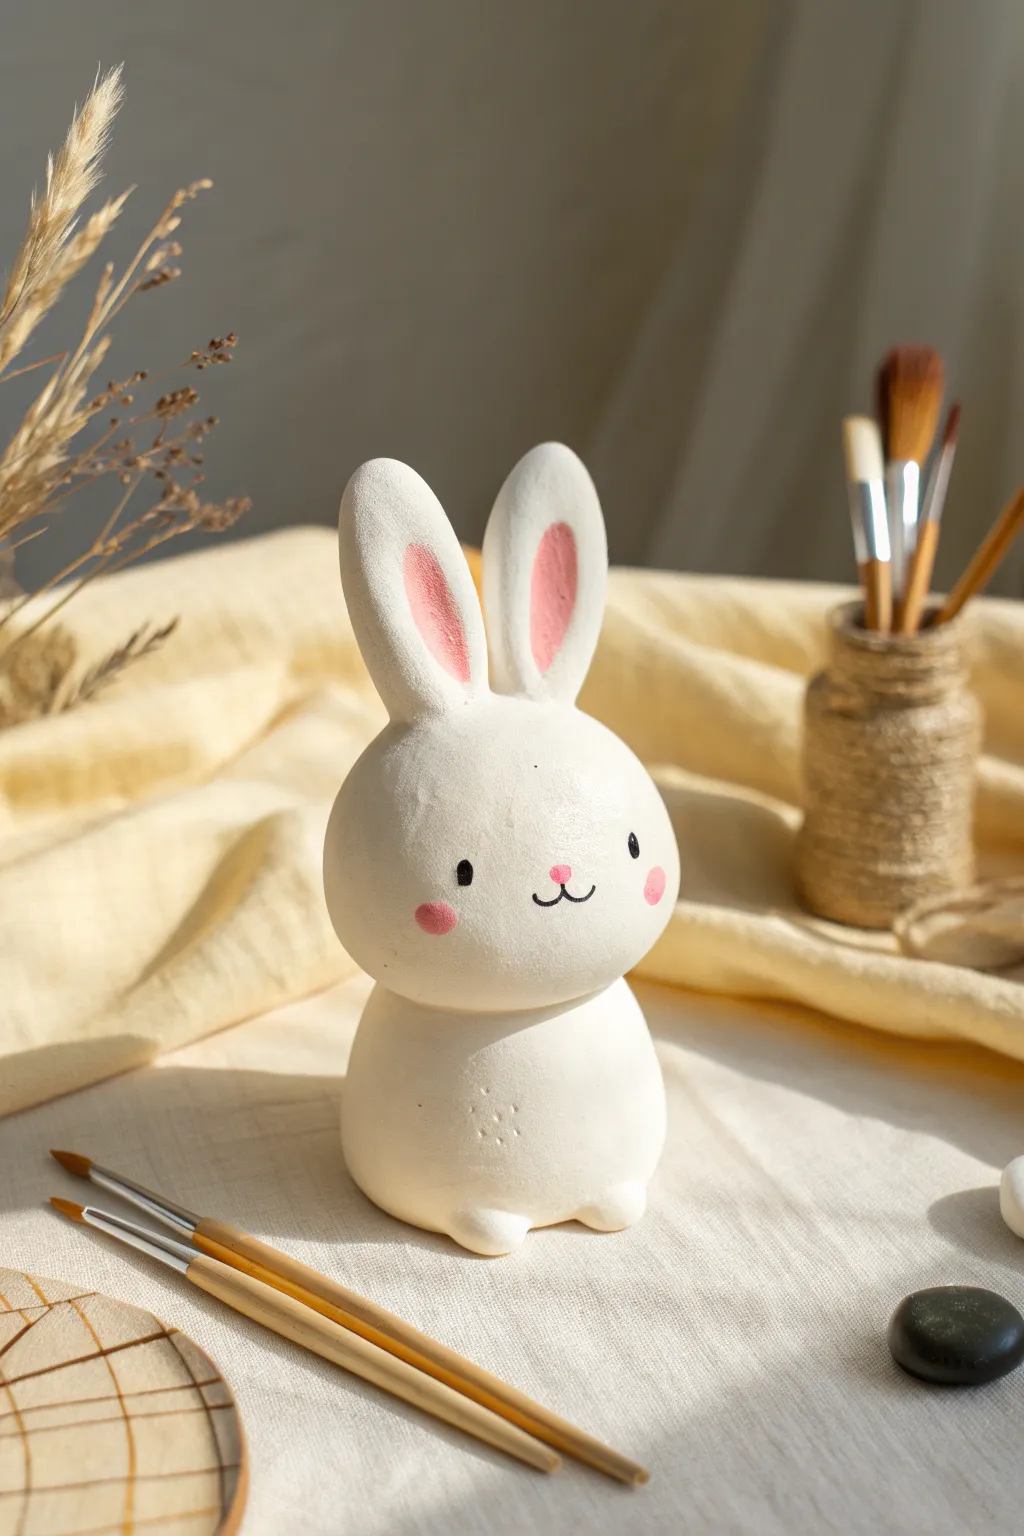
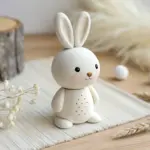
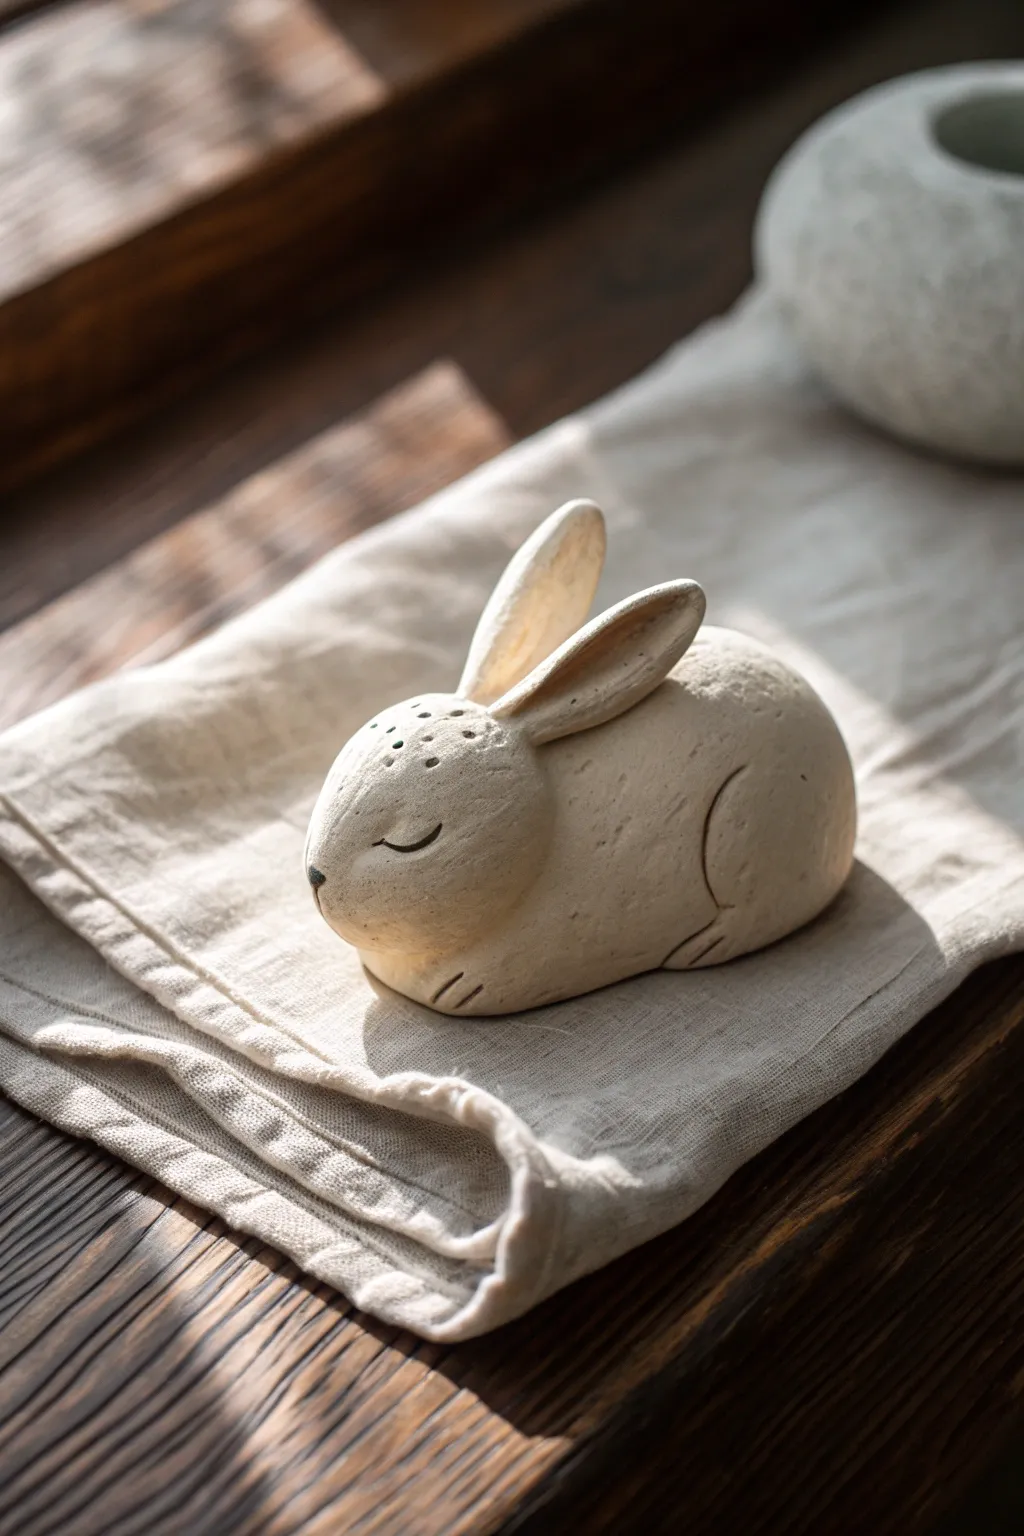
This adorable Kawaii-style bunny figurine is a charming project that focuses on simple, rounded shapes and minimalist facial features. Its smooth, matte finish and soft pink accents give it a gentle, professional look perfect for desk decor.
How-To Guide
Materials
- Air-dry clay (white) or polymer clay
- Aluminum foil (for armature core)
- Small rolling pin
- Sculpting tools (needle tool, smoothing tool)
- Water or liquid clay (for joining)
- Fine-grit sandpaper (400-600 grit)
- Acrylic paints: White, Bubblegum Pink, Black
- Paintbrushes: Fine detail brush (000) and small flat brush
- Matte varnish or sealant
Step 1: Forming the Body Structure
-
Create the Core:
Begin by crumpling a small piece of aluminum foil into a tight ball about the size of a golf ball. This reduces clay usage and weight. -
Wrap the Base:
Roll out a slab of white clay to about 1/4 inch thickness. Wrap this smoothly around your foil ball to create the body, rolling it between your palms until it creates a perfect, seamless sphere. -
Shape the Drop:
Gently gently taper the top of the sphere just slightly to give it a very subtle pear shape, creating a narrower neck area to support the head. -
Form the Head:
Roll a second ball of solid clay, slightly larger than the body section. Press it gently between your palms to flatten it just a fraction into a rounded oval shape rather than a perfect sphere. -
Join Head to Body:
Score the top of the body and the bottom of the head with a needle tool. Apply a dab of water (for air-dry) or liquid clay (for polymer) and press the head firmly onto the body. -
Smooth the Seam:
Use a smoothing tool or your finger to blend the clay at the neck seam together. You want a distinct separation but a secure bond.
Cracks Appearing?
If air-dry clay cracks while drying, mix a small amount of fresh clay with water to create a creamy paste. Fill the cracks with this ‘slip’, smooth it over, and let it dry again.
Step 2: Ears and Extremities
-
Shape the Ears:
Roll two equal logs of clay about 1.5 inches long. Flatten them gently into elongated teardrop shapes, keeping the bottom edges slightly thicker for attachment. -
Create the Inner Ear:
Using a small modeling tool or the back of a paintbrush, press an indentation into the center of each ear, leaving a raised border around the edge. -
Attach the Ears:
Score the attachment points on the top of the head. Press the ears on vertically, blending the clay at the base downward onto the skull for a seamless transition. -
Add Tiny Feet:
Roll two very small balls of clay. Flatten the bottoms slightly and attach them to the front base of the body so they poke out just enough to look like tucked-in paws. -
Refine the Surface:
Check the entire figure for fingerprints. Dip your finger in a little water and gently buff the surface until it is completely smooth. -
Drying or Curing:
If using air-dry clay, let the figure dry for 24-48 hours away from direct heat. If using polymer clay, bake according to the package instructions.
Pro Tip: Eye Spacing
For maximum cuteness (or ‘Kawaii’ appeal), place the eyes slightly wider apart than you think they should be, and align them horizontally with the nose.
Step 3: Painting and Finishing
-
Sand for Perfection:
Once fully cured or dry, use fine-grit sandpaper to gently remove any remaining bumps or lint, focusing on the back of the ears and the neck seam. -
Base Coat:
Apply two thin coats of white acrylic paint to the entire figure to ensure an even, opaque finish. Let the first coat dry completely before applying the second. -
Paint Inner Ears:
Mix a soft bubblegum pink. Carefully paint the indented sections of the ears, using a steady hand to keep the raised white borders clean. -
Add Facial Blush:
Using the same pink, paint two small circles on the cheeks. I like to dab excess paint off onto a paper towel first to keep the circles soft. -
Paint the Face:
Using your finest detail brush and black paint, add two small dots for eyes. Paint a tiny pink nose between them, and draw a thin ‘w’ shape directly underneath for the mouth. -
Seal the Figure:
Finish by applying a coat of matte varnish. This protects the paint and gives the clay that professional, soft ceramic look shown in the photo.
Place your little bunny on your desk or shelf and enjoy the serene vibes it brings to your space


Mini Bunny Charm
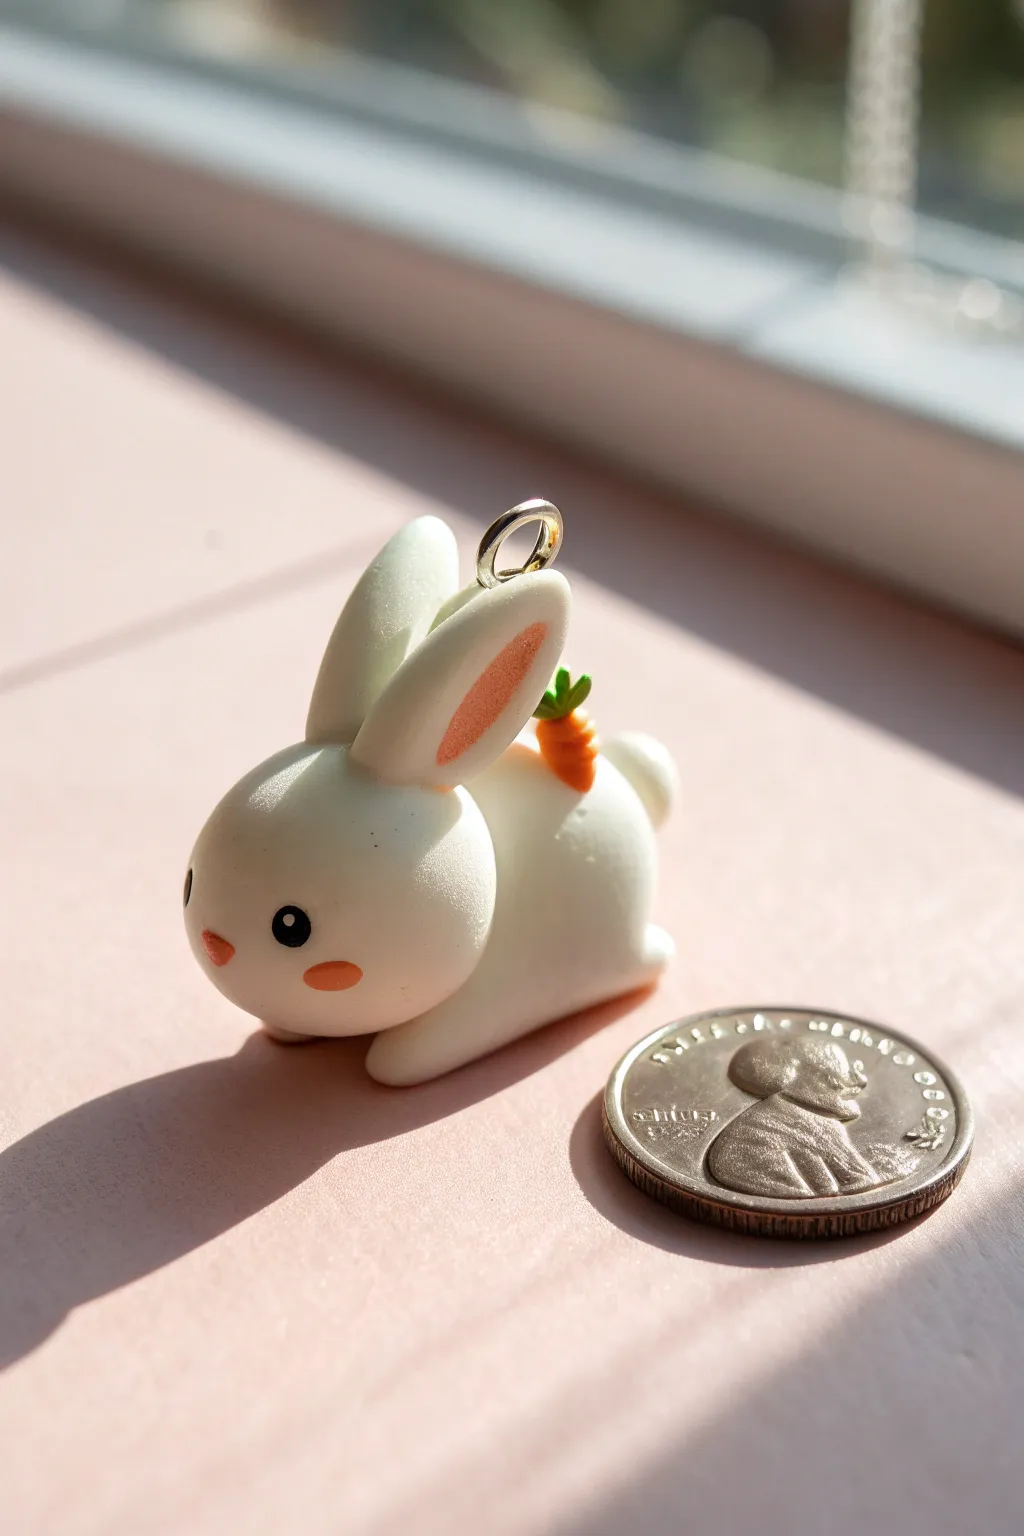
This adorable little bunny charm fits perfectly on a keychain or necklace and even carries a tiny carrot snack on its back. With its smooth white finish and sweet expression, it captures the gentle nature of a rabbit in miniature form.
Step-by-Step
Materials
- White polymer clay
- Orange polymer clay
- Green polymer clay
- Pink polymer clay or soft pastel chalk
- Black acrylic paint or clay
- Small dotting tool or toothpick
- Needle tool
- Metal eyepin or screw eye
- Gloss glaze (optional)
- Oven for baking
Step 1: Shaping the Head
-
Create the base:
Condition a piece of white clay until it is soft and pliable, then roll it into a smooth, crack-free ball about the size of a large marble. -
Form the head shape:
Gently press the ball onto your work surface to flatten the bottom slightly, creating a rounded dome shape for the bunny’s head. -
Refine the cheeks:
Using your thumb, lightly press the sides of the ball to give the face a bit of chubby cheek definition, keeping the overall shape rounded.
Sticky Dust Fix
White clay attracts dust like a magnet. Keep baby wipes nearby to clean your hands and tools often, or use a bit of rubbing alcohol on a Q-tip to wipe away lint before baking.
Step 2: Sculpting the Body
-
Roll the body:
Condition a slightly larger piece of white clay and roll it into a rounded oval or egg shape for the body. -
Attach head to body:
Press the head firmly onto the thicker end of the egg-shaped body. You can blend the seam slightly with a smoothing tool if you want a seamless look, or leave it distinct for a ‘chibi’ style. -
Add the tail:
Roll a very tiny ball of white clay and press it onto the rear of the body to make a fluffy tail. -
Create the feet:
Form two small, flattened ovals of white clay and attach them to the underside of the body so they peek out from the front, grounding the figure.
Make it a Set
Create a matching friend for your bunny in a light pastel gray or brown, and give the second one a tiny sculpted turnip or strawberry instead of a carrot.
Step 3: Ears and Accessories
-
Form the ears:
Roll two identical teardrop shapes out of white clay. Flatten them gently to create the long bunny ears. -
Add inner ear detail:
Take a tiny amount of pink clay (or shave some pink pastel chalk), roll it into a thin teardrop, and press it into the center of one or both white ears. -
Attach the ears:
Press the ears onto the top of the head. I like to pose them slightly differently—one straight up and one slightly tilted—to give the bunny more personality. -
Make the carrot:
Roll a tiny cone of orange clay. Using a needle tool or knife, gently indent horizontal lines across it to texture the carrot. -
Add carrot greens and place:
Add a speck of green clay to the wide end of the carrot for leaves, then press the finished carrot onto the bunny’s back or side. -
Insert hardware:
Carefully trim an eyepin to the right length and insert it vertically into the top of the head between the ears.
Step 4: Expression and Finishing
-
Create eye sockets:
Use a small ball tool to make shallow indentations where the eyes will go. -
Add the eyes:
Roll extremely tiny balls of black clay and press them into the sockets, or save this step for painting after baking. -
Blush the cheeks:
Applying a tiny bit of pink soft pastel dust to the cheeks with a small brush gives a soft, airbrushed blush effect. -
Bake the charm:
Bake the piece according to your clay manufacturer’s instructions (usually around 275°F for 15–30 minutes). -
Paint details:
Once cool, paint on the eyes if you didn’t use clay, add a tiny pink triangle nose, and add white highlights to the eyes for sparkle. -
Glaze:
Finish by applying a coat of water-based gloss glaze to protect the paint and give the bunny a ceramic-like shine.
This charming little rabbit is now ready to hop onto your bag or keyring and accompany you everywhere


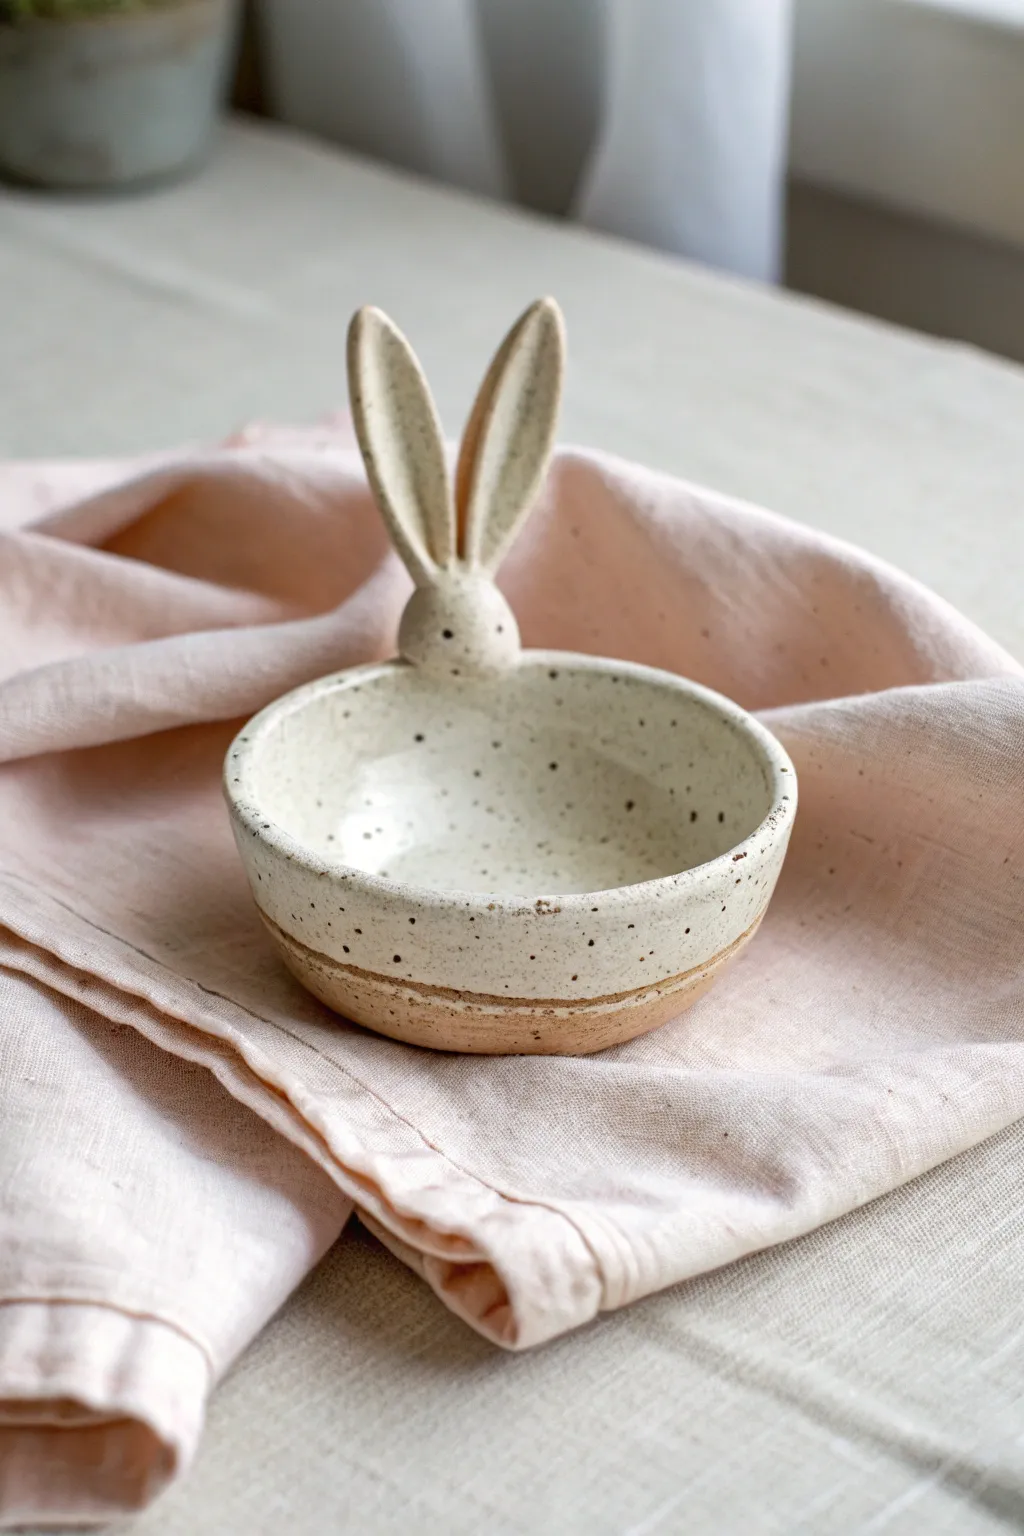
Bunny Face Ring Dish
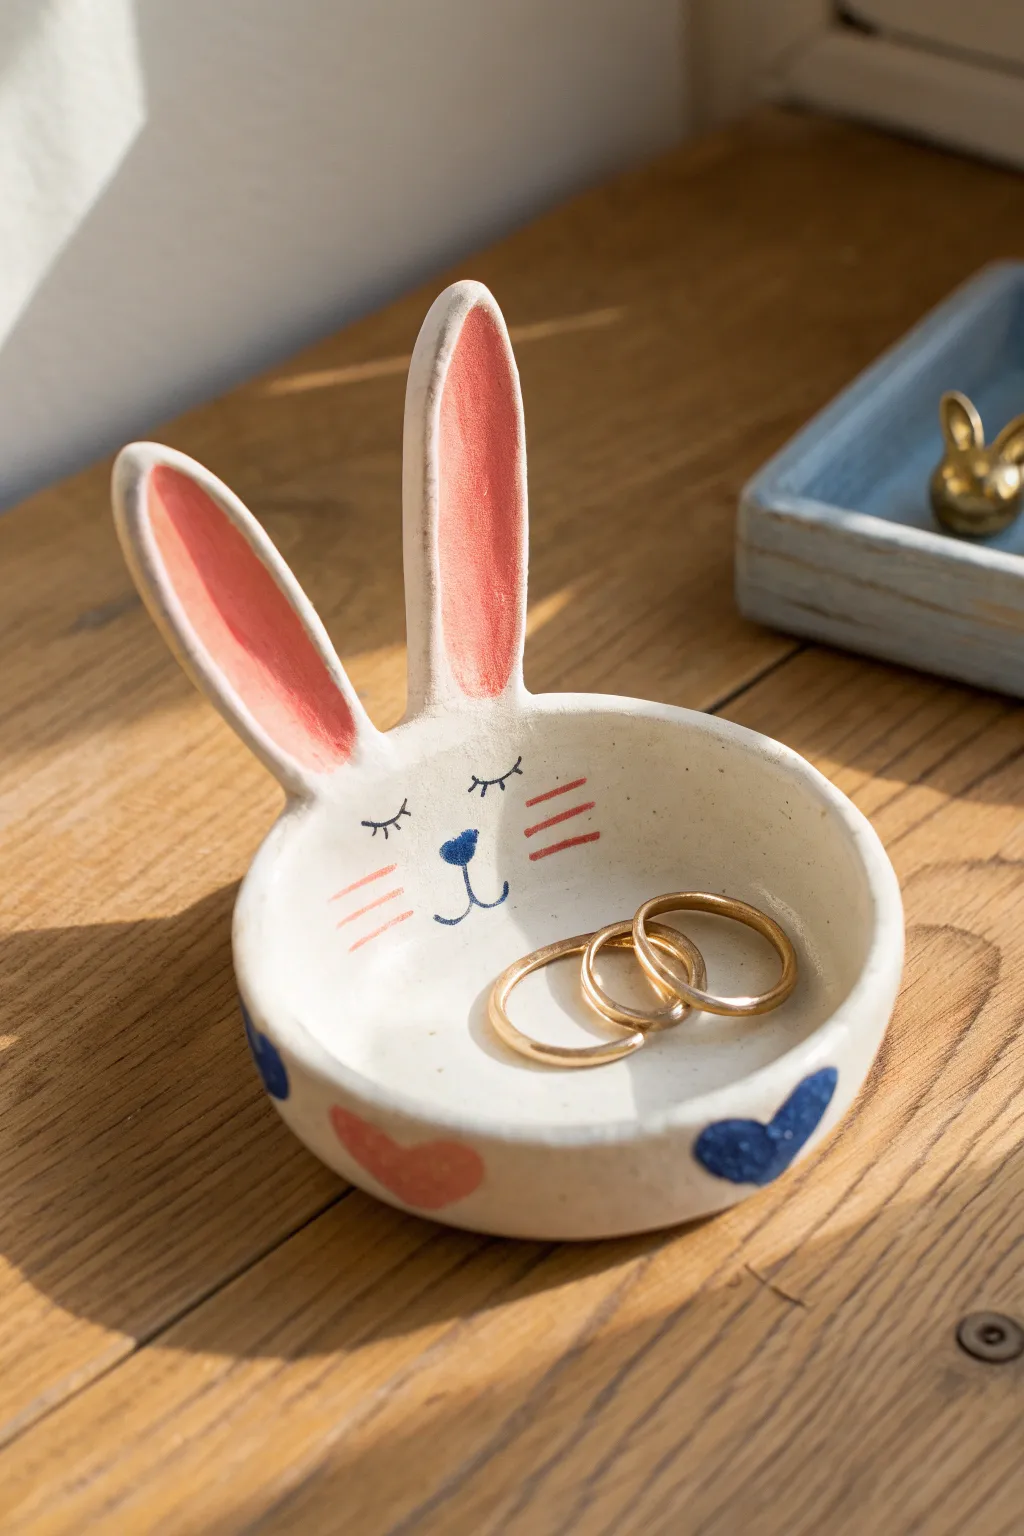
Keep your favorite rings safe in this charming handmade clay dish featuring a sweet bunny face and upright ears. The simple hand-painted details and playful heart accents make it a lovely addition to any bedside table.
How-To Guide
Materials
- Air-dry clay or polymer clay (white)
- Clay rolling pin
- Small bowl or round cutter (approx. 3-4 inches)
- Clay knife or craft blade
- Slip (water/clay mush mix) or liquid clay
- Fine-grit sandpaper
- Acrylic paints: Pink, navy blue, black
- Fine detail paintbrushes
- Gloss varnish or sealant
- Small sponge (optional for smoothing)
- Water cup
Step 1: Shaping the Base and Ears
-
Roll out the clay:
Start by conditioning your clay until it is soft and pliable, then roll it out on a smooth surface to an even thickness of about 1/4 inch. -
Cut the round base:
Use a round cutter or trace around a small bowl to cut a perfect circle for the dish body. Smooth the raw edges with a damp finger to remove any stray crumbs. -
Form the shallow bowl:
Gently pinch the edges of the circle upwards to create a shallow rim, curving the sides so it can hold jewelry securely. I like to press the center slightly with my thumb to deepen the well. -
Cut the ears:
From your remaining rolled clay, cut two long, tear-drop shaped ears. They should be roughly the same length as the width of your bowl for a balanced look. -
Check ear proportions:
Hold the ears up against the back of your bowl to ensure they aren’t too heavy, which could cause the dish to tip over backward.
Ears Flopping Over?
If the ears won’t stand up while the clay is wet, prop them up from behind with balled-up paper towels or a small cardboard wedge until the clay stiffens.
Step 2: Assembly and Refining
-
Score the attachment points:
Use your needle tool or knife to scratch cross-hatch marks on the bottom of the ears and the back rim of the bowl where they will connect. -
Attach the ears:
Apply a dab of slip or liquid clay to the scored areas and press the ears firmly onto the back of the rim. -
Blend the seams:
Using a clay tool or your finger, carefully smooth the clay across the seam where the ears meet the bowl. Do this on both the front and back to ensure a strong bond. -
Smooth the surface:
Dip a sponge or your finger in a little water and run it over the entire piece to erase any fingerprints or bumps. -
Dry or bake:
Let the clay dry completely according to package instructions (usually 24-48 hours for air-dry) or bake it if using polymer clay. -
Sand for perfection:
Once hardened, use fine-grit sandpaper to gently buff away any rough spots, especially around the rim and ear tips.
Step 3: Painting the Details
-
Paint the inner ears:
Mix a soft coral-pink acrylic paint and fill in the center of each ear, leaving a white border around the edges. -
Add the face features:
Using a very fine liner brush and black paint, carefully draw two closed eyes with eyelashes and a small anchor shape for the mouth. -
Paint the nose and whiskers:
Add a small inverted blue heart for the nose just above the mouth, then paint three short pink lines on each cheek for whiskers. -
Decorate the rim:
Paint alternating blue and pink hearts along the outer rim of the bowl for a sweet finishing touch. -
Seal the dish:
Finish by applying one or two coats of gloss varnish to protect the paint and give the ceramic a shiny, finished look.
Smoother Paint Lines
Thin your acrylic paint with a tiny drop of water before painting fine details like the eyelashes. This helps the paint flow smoothly off the brush without dragging.
Now you have an adorable spot to organize your daily jewelry pieces


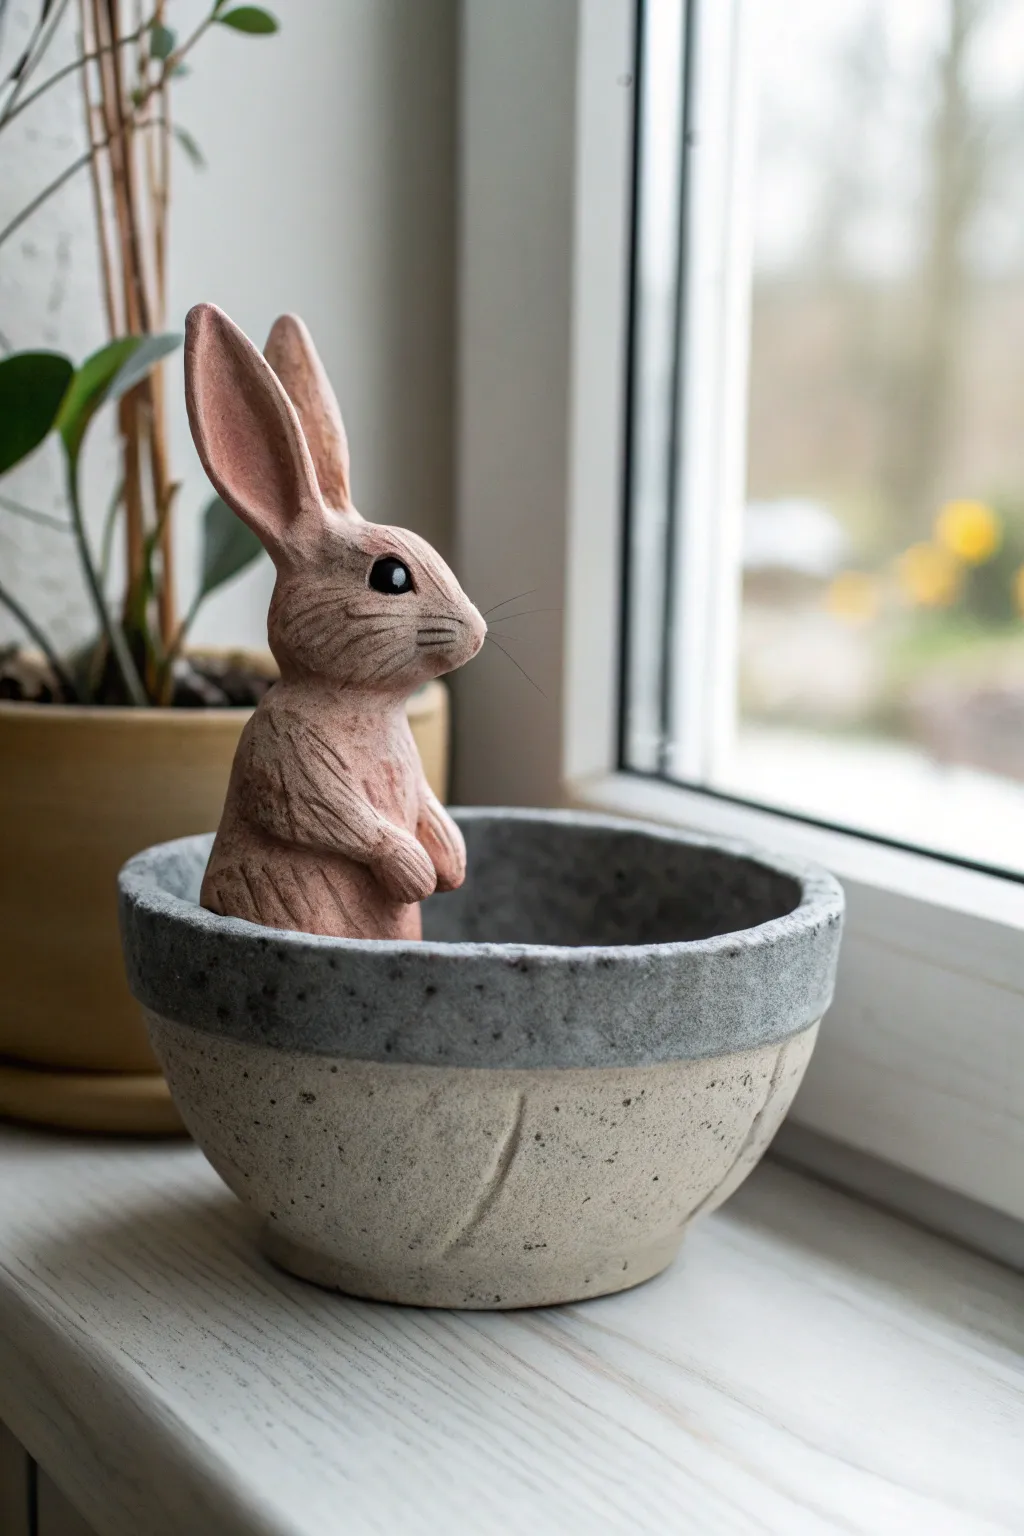
Bunny Ear Trinket Bowl
This charming little ceramic bowl features a pair of upright bunny ears perched on the rim, adding a touch of whimsy to a functional piece. The design highlights the natural beauty of speckled clay by leaving the base unglazed for a lovely textural contrast.
Step-by-Step
Materials
- Speckled stoneware clay (e.g., Laguma Speckle)
- Small bowl for use as a slump mold (optional)
- Pottery wheel (or rolling pin for hand-building)
- Needle tool
- Scoring tool (serrated rib or needle)
- Slip (clay and water mixture)
- Sponge
- Modeling tool or wooden knife
- Black underglaze
- Small detail brush
- Clear or white semi-opaque glaze
- Kiln
Step 1: Forming the Bowl Base
-
Prepare your clay:
Begin by wedging a ball of speckled stoneware clay to remove air bubbles. Since we want that lovely spotted finish shown in the photo, ensure your clay body has manganese speckles or grog mixed in. -
Form the main bowl:
You can either throw a small, consistent bowl on the wheel or roll out a slab. If hand-building, roll the slab to about 1/4 inch thickness and gently press it into a small bowl form to shape it, trimming the excess from the rim. -
Smooth the surfaces:
Whether thrown or hand-built, use a damp sponge to smooth the rim. The rim needs to be slightly flattened or broad enough to support the ears later. -
Refine the foot:
Once the clay is leather hard, trim the bottom. Create a distinct line about one-third of the way up the side of the bowl; this will be your glazing guide later to achieve the dipped look.
Pro Tip: Ear Stability
If the ears are drooping while wet, prop them up with a small piece of foam or a crumpled paper towel until the clay stiffens to leather hard.
Step 2: Sculpting the Bunny Ears
-
Create the ear blanks:
Roll two small coils of clay, slightly tapered at both ends. Gently flatten them to create the long, leaf-like shape of rabbit ears. -
Shape the inner ear:
Use your thumb or a modeling tool to press a shallow indentation into the center of each ear, giving them dimension and a natural curve. -
Form the head base:
Roll a very small ball of clay, roughly the size of a marble. This will serve as the connector between the ears and the bowl rim, acting as the bunny’s head. -
Join the ears to the head:
Score the bottom of the ears and the top of the small clay ball. Apply a dab of slip and press the ears firmly onto the ball. Smooth the seams with a modeling tool so they look like one continuous piece.
Step 3: Assembly and Detailing
-
Attach the bunny to the rim:
Choose a spot on the bowl’s rim. Score both the underside of the bunny head and the rim itself. Apply slip generously. -
Secure the bond:
Press the head firmly onto the rim. Use a wooden tool to blend the clay from the head downward onto the inner and outer walls of the bowl. This integration is crucial so the ears don’t pop off during firing. -
Refine the shape:
Once attached, check the angle of the ears. They should stand upright but can tilt slightly for character. Smooth away any excess slip with a slightly damp sponge. -
Add facial features:
Using a needle tool or a very fine brush with black underglaze, make three tiny dots on the ‘head’ sphere—two for eyes and one for the nose. Keep them minimal to match the aesthetic.
Troubleshooting: Cracking Ears
Ears cracking at the seam? You might be attaching clay with different moisture levels. Ensure the bowl and ears are equally damp before joining.
Step 4: Glazing and Firing
-
Bisque fire:
Allow the piece to dry slowly and completely. Bisque fire it in the kiln according to your clay body’s specifications (usually Cone 04 or 06). -
Wax the base:
Apply wax resist to the bottom third of the bowl exterior and the entire underside. This ensures the raw, speckled clay remains visible as seen in the reference image. -
Apply the glaze:
Dip the bowl into a clear or semi-opaque white glaze. The wax will prevent the glaze from sticking to the bottom. Ensure the ears are fully coated. -
Clean up:
Wipe away any stray glaze droplets from the waxed area with a damp sponge to keep that line crisp. -
Final glaze fire:
Fire the piece again to the maturation temperature of your clay and glaze (often Cone 5 or 6 for stoneware). The heat will bring out the dark speckles through the glaze.
Now you have a sweet, handmade vessel perfect for holding rings or small treasures.

The Complete Guide to Pottery Troubleshooting
Uncover the most common ceramic mistakes—from cracking clay to failed glazes—and learn how to fix them fast.
Bunny Planter Pot

This adorable bunny planter combines simple geometric shapes with charming hand-painted details to create the perfect home for a tiny succulent. With its matte white finish and prominent ears, it brings a touch of modern whimsy to any windowsill or desk.
Step-by-Step Guide
Materials
- White air-dry clay (or polymer clay)
- Small rolling pin
- Clay knife or craft knife
- Small bowl using as a mold (approx 3-inch diameter)
- Vegetable oil (for release)
- Slip (clay mixed with water)
- Sandpaper (fine grit)
- Matte white acrylic paint
- Black fine-point simple marker or acrylic paint pen
- Clear matte sealant spray
- Small succulent and soil
Step 1: Forming the Body
-
Prepare the workspace:
Start by cleaning a flat surface and lightly dusting it with cornstarch or laying down wax paper to prevent sticking. -
Roll out the base clay:
Take a large handful of white clay and roll it out until it’s about 1/4 inch thick. You want it sturdy enough to hold soil but not overly heavy. -
Mold the shape:
Lightly coat the outside of your small bowl with vegetable oil. Draper the rolled clay over the overturned bowl, gently pressing it down to take the shape of a rounded pot. -
Trim the edges:
Use your clay knife to trim the excess clay around the rim of the bowl to create a clean, straight edge. -
Flatten the bottom:
While the clay is still on the mold, gently press the very top (which will be the bottom of your pot) against the table to create a flat stable base so it won’t wobble. -
Initial drying:
Let the clay sit on the mold for about 2-3 hours until it’s firm enough to hold its shape, then gently wiggle the bowl out.
Smooth Seams
Dip your finger in a tiny bit of water while smoothing the ear connections. This melts the clay slightly, making the join invisible and much stronger.
Step 2: Sculpting the Ears
-
Shape the ears:
Roll two equal sausage shapes of clay, then flatten them into elongated ovals. Pinch the top ends slightly to create a tapered bunny ear shape. -
Create dimension:
I like to use my thumb to gently press an indentation down the center of each ear, giving them a slight curve rather than leaving them perfectly flat. -
Score and slip:
Use your knife to scratch cross-hatch marks (scoring) on the bottom of the ears and the rim of the pot where they will attach. Apply a dab of water or clay slip. -
Attach the ears:
Firmly press the ears onto the back rim of the pot. Smooth the clay at the join line with your finger or a tool until the seam disappears. -
Full cure:
Allow the entire piece to dry completely. For air-dry clay, this usually takes 24-48 hours depending on humidity.
Add a Tail
Roll a small ball of clay and attach it to the back of the pot as a fluffy tail. Texture it with a toothbrush for a realistic fur effect.
Step 3: Finishing Touches
-
Sand for smoothness:
Once bone dry, take fine-grit sandpaper and gently sand away any fingerprints, rough edges, or bumps to achieve that smooth ceramic look. -
Base coat:
Apply two thin layers of matte white acrylic paint to even out the color and texture, letting the first coat dry before applying the second. -
Draw the face:
Using a fine-point black paint pen, carefully draw two small vertical ovals for eyes, widely spaced apart. -
Nose and mouth:
Draw a small inverted triangle for the nose directly between the eyes, and add a small ‘w’ shape attached to the bottom point for the mouth. -
Add whiskers:
To finish the expression, draw three simple, straight horizontal lines on each cheek area for whiskers. -
Seal:
Spray the entire planter with a clear matte sealant to protect the paint and clay from moisture. -
Plant:
Once the sealer is dry, fill with cactus soil and tuck your small succulent securely into the center.
Now you have a sweet, handmade companion ready to brighten up your favorite corner
Bunny Pinch Pot Cup
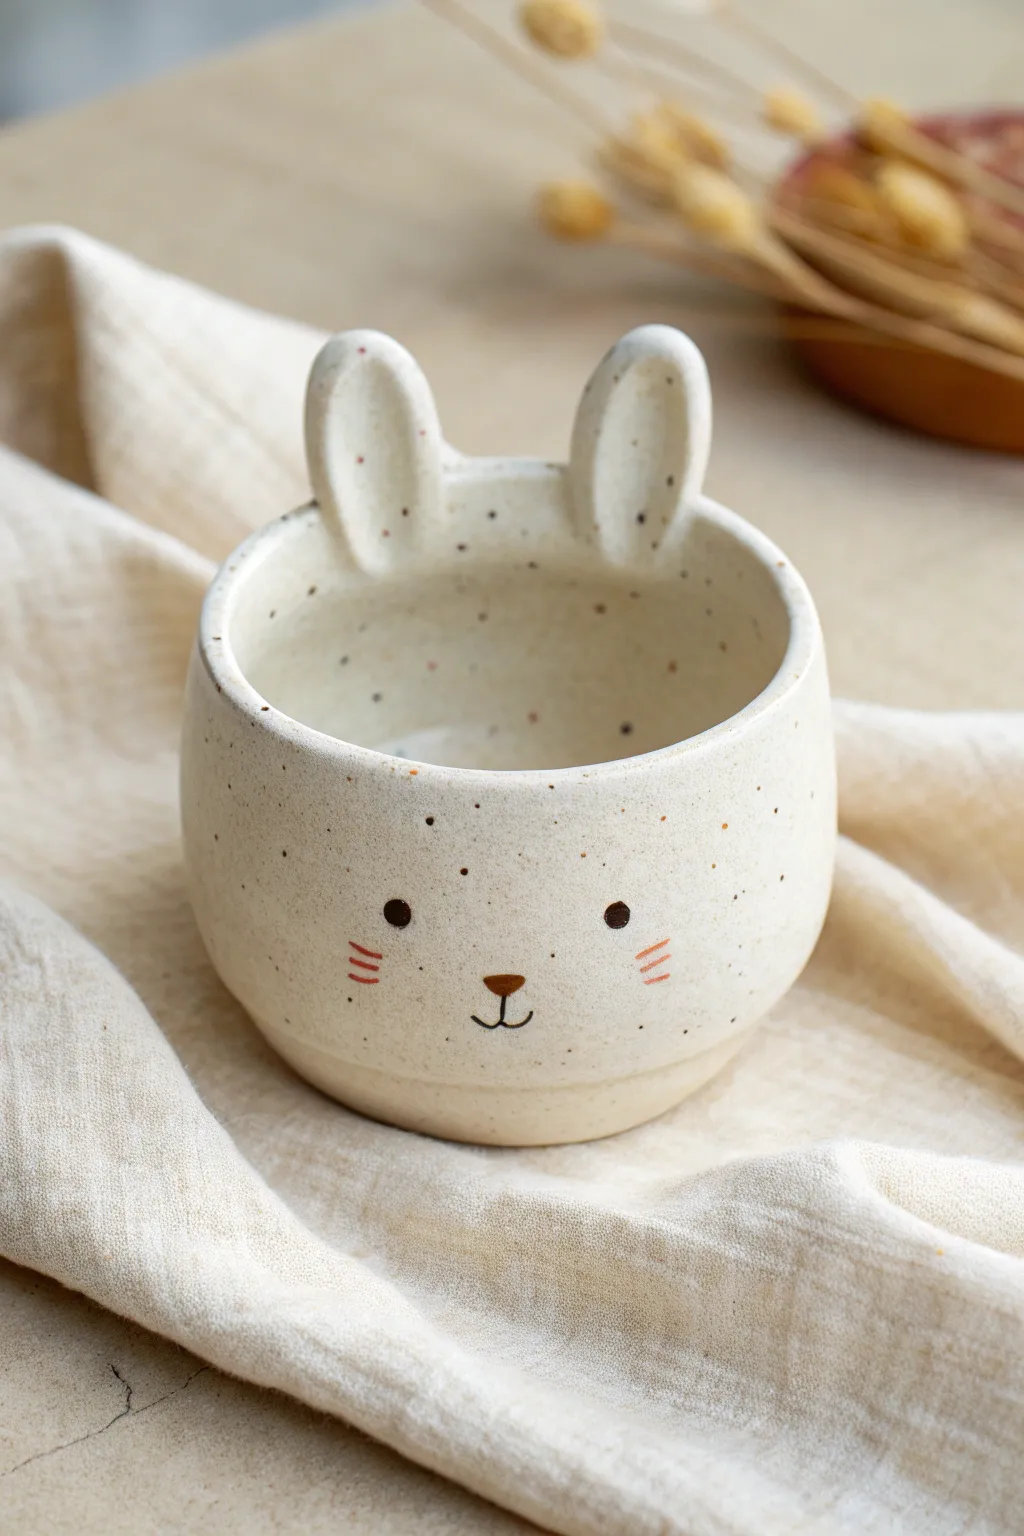
This adorable handmade cup features a sweet, minimalist bunny face and perky ears rising from the rim, all crafted from a lovely speckled clay body. The natural clay texture and simple hand-painted details make it a perfect beginner project that looks professionally thrown, even though it’s built by hand.
Detailed Instructions
Materials
- Speckled stoneware clay (e.g., Lagona speckled)
- Pottery tools (needle tool, rib, sponge)
- Small rolling pin
- Slip (clay mixed with water)
- Underglaze (Black, brown, pink/coral)
- Fine detail paintbrush
- Clear transparent glaze
- Kiln access
Step 1: Forming the Base Cup
-
Prepare the Clay:
Start with a ball of speckled clay about the size of a large orange. Wedge it thoroughly to remove air bubbles and ensure the speckles will distribute evenly during firing. -
Open the Pinch Pot:
Hold the ball in your non-dominant hand. Press your thumb into the center, stopping about a half-inch from the bottom. Gently pinch and rotate the clay between your thumb and fingers to open up the walls. -
Shape the Cylinder:
Continue pinching upwards to pull the walls higher rather than wider. Aim for a slightly rounded, cylindrical shape that mimics the curve of the cup in the photo. -
Refine the Bottom:
To get that distinct little foot seen at the base, tap the bottom of your pot gently against the table to flatten it slightly. You can use a wooden tool to define a subtle groove near the bottom edge. -
Check Wall Thickness:
Run your fingers up the sides to ensure even thickness, aiming for about 1/4 inch. Smooth the interior with your thumb or a damp sponge to remove any deep pinch marks. -
Smooth the Exterior:
Take a flexible metal or rubber rib and run it over the exterior while supporting the inside. This compresses the clay and gives it that smooth, wheel-thrown appearance.
Smooth Operator
To get a surface this smooth on a pinch pot, wait until the clay stiffens slightly, then burnish the outside with the back of a spoon.
Step 2: Adding Ears & Details
-
Create the Ears:
Roll out a small slab of clay (about 1/4 inch thick). Cut two elongated oval shapes for the ears. Gently curve them slightly to give them a natural, cupped look. -
Attach the Ears:
I like to slip and score both the bottom of the ears and the rim of the cup where they will sit. Press them firmly onto the rim, smooth the seams downwards into the cup wall so they are fully integrated, and tidy up the connection point. -
Smooth the Rim:
Go over the rim of the cup and the edges of the ears with a damp chamois or sponge. Everything should be rounded and soft to the touch. -
Dry to Leather Hard:
Let the piece dry slowly until it is leather hard. This is the perfect stage for painting because the clay is firm but still absorbent. -
Paint the Eyes:
Using a very fine liner brush and black underglaze, dab two small solid circles for the eyes. Keep them widely spaced for that cute, kawaii proportion. -
Add the Nose and Mouth:
Switch to a warm brown underglaze. Paint a tiny inverted triangle for the nose centered below the eyes. From the bottom point of the nose, draw a small anchor shape or ‘w’ for the mouth using a thin black line. -
Whiskers and Cheeks:
With a coral or pink underglaze, paint three small horizontal dashes on each cheek area for blush marks or stylized whiskers.
Level Up: Inner Surprise
Paint a tiny carrot or a second bunny face on the inside bottom of the cup using underglaze so it reveals itself as you finish your drink.
Step 3: Finishing
-
Bisque Fire:
Once bone dry, fire the piece in a kiln to bisque temperature (usually varying based on your clay body, often Cone 04). -
Apply Clear Glaze:
Dip the entire cup into a clear, glossy glaze. Shake off excess drips. The clear glaze will seal the cup and allow the clay’s natural speckles to pop through. -
Wipe the Foot:
Use a wet sponge to completely wipe the glaze off the bottom foot of the cup so it doesn’t stick to the kiln shelf. -
Final Fire:
Fire the piece again to the final glaze temperature appropriate for your stoneware clay (typically Cone 5 or 6).
Now you have a charming, food-safe mug ready for your morning tea or coffee


What Really Happens Inside the Kiln
Learn how time and temperature work together inside the kiln to transform clay into durable ceramic.
Bunny Spoon Rest
This adorable bunny spoon rest combines functionality with charm, featuring long ears and a sweet, hand-painted face. The speckled cream glaze and warm orange accents give it a cozy, artisanal feel perfect for keeping your kitchen counters tidy.
Step-by-Step Guide
Materials
- Stoneware clay (speckled buff recommended)
- Rolling pin with guide sticks (approx. 1/4 inch)
- Needle tool or fettling knife
- Bunny head paper template
- Sponge
- Rib tool (smooth wood or rubber)
- Loop tool for carving
- Underglazes: Jet Black, Warm Orange/Terracotta, Soft Pink
- Clear or Cream transparent glaze (food safe)
- Small round paintbrushes
- Kiln
Step 1: Shaping the Clay
-
Prepare the slab:
Begin by wedging your clay to remove air bubbles. Roll it out into a smooth slab approximately 1/4 inch thick. Using guide sticks here is helpful to ensure an even thickness throughout the piece, which prevents warping later. -
Cut the shape:
Place your bunny paper template onto the slab. Using a needle tool, carefully trace around the perimeter to cut out the main shape. Don’t worry about rough edges just yet; we will refine them. -
Smooth the edges:
Take a slightly damp sponge and run it along the cut edges to soften them. You want to remove any sharp angles or crumbly bits of clay left from the needle tool. -
Create the rim:
Gently curve the edges of the bunny face and ears upward. I like to pinch and smooth the clay upwards with my thumb and forefinger to create a shallow raised rim. This slight bowl shape is crucial for catching spoon drips.
Pro Tip: Clean Lines
If your hand shakes while painting the rim, rest your pinky finger on the center of the bunny for stability. This acts as a pivot point for smoother curves.
Step 2: Carving and Drying
-
Define the ears:
Using a small loop tool, gently carve out a shallow depression inside each ear shape. This creates a distinct area for the colored glaze later and adds nice dimension to the piece. -
Smooth the interior:
Use a rubber rib to compress and smooth the inside surface of the spoon rest. This ensures a nice, clean canvas for the face and makes the finished piece easier to clean. -
Slow drying:
Cover the piece loosely with plastic and allow it to dry slowly to leather hard. Once leather hard, you can sponge any final rough spots. Let it dry completely to bone dry before the bisque firing. -
Bisque fire:
Load your bone-dry bunny into the kiln and fire to witness cone 04 (or your clay body’s specifications). This prepares the clay for glazing.
Step 3: Glazing and Decorating
-
Paint the inner ears:
Using a soft brush, apply 2-3 coats of warm orange or terracotta underglaze into the carved depressions of the ears. Let each coat dry slightly before adding the next. -
Add the rim detail:
With a steady hand, run the same orange underglaze along the very top edge of the rim to frame the piece, matching the photo’s style. -
Paint the face details:
Switch to a very fine detail brush. Use black underglaze to paint two small oval eyes and three whiskers on each cheek. Paint a simple ‘w’ shape for the mouth. -
Add the nose:
Dab a small inverted triangle of pink or light terracotta underglaze for the nose, placing it just above the mouth center. -
Apply clear glaze:
Once the underglaze designs are dry, dip or brush the entire piece in a clear or semi-transparent cream glaze. If using a dipping glaze, give it a quick dip to avoid smearing the face details. -
Check the foot:
Wipe away any glaze from the bottom of the spoon rest with a damp sponge so it doesn’t stick to the kiln shelf. -
Final lettering (optional):
If you wish to add a maker’s mark or date on the back, now is the time to do it with an oxide pencil before the final firing. -
Glaze fire:
Fire the piece again, this time to the maturity temperature of your clay and glaze (often cone 5 or 6 for stoneware). Allow the kiln to cool completely before opening.
Level Up: Texture
Before drying, gently press a patterned fabric or lace into the back of the slab. This adds a hidden texture that makes the piece feel special when handled.
Place this charming bunny on your counter and enjoy a cleaner kitchen with a touch of handmade joy
Bunny Incense Cone Holder
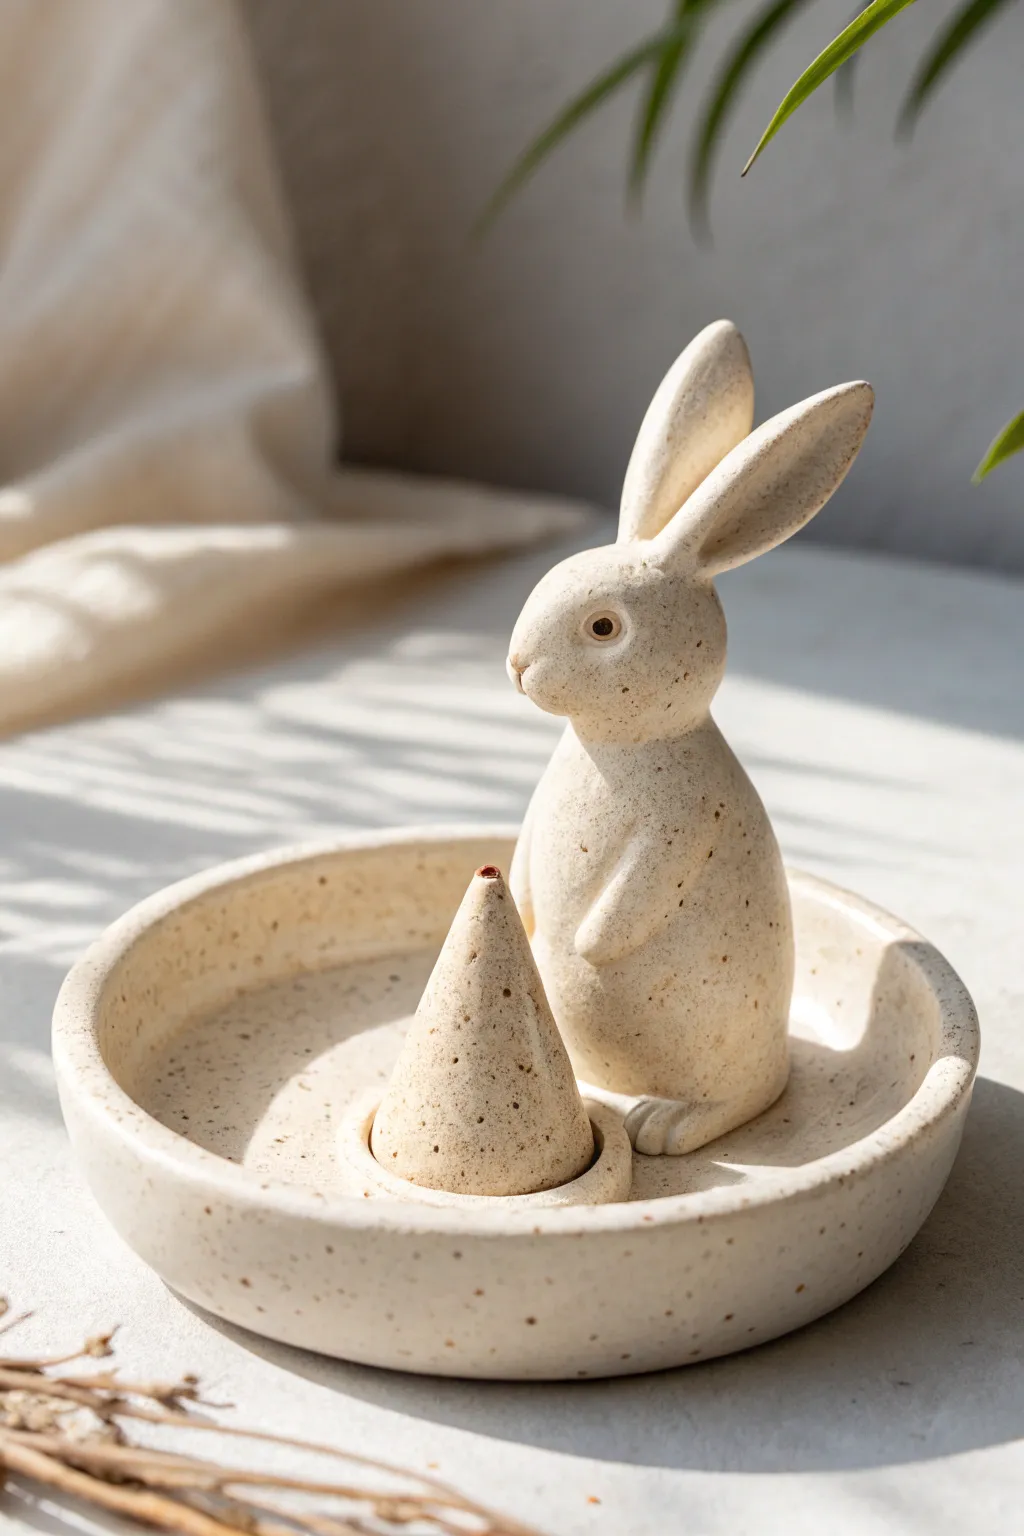
This charming incense holder combines functionality with adorable decor, featuring a standing bunny gazing at a matching clay cone. The neutral, speckled finish gives it a modern, organic look that fits beautifully in any calm corner of your home.
Detailed Instructions
Materials
- White polymer clay or air-dry clay
- Dried coffee grounds or fine black pepper (for speckling)
- Rolling pin
- Circle cutter (approx. 4-5 inches)
- Small circle cutter (approx. 1 inch)
- Clay sculpting tools (needle tool, smoothing tool)
- Water or liquid clay (for joining)
- Incense cone (for sizing)
- Fine grit sandpaper
- Matte varnish or sealant
Step 1: Preparation & Base
-
Create the speckled clay:
Start by conditioning your white clay until it is soft and malleable. To achieve the stone-like speckled effect seen in the photo, kneed in a small pinch of dried coffee grounds or fine black pepper. Keep folding and rolling until the speckles are evenly distributed throughout the batch. -
Roll out the slab:
Roll a portion of your speckled clay out on a smooth surface to a thickness of about 1/4 inch. Ensure the thickness is consistent so the base dries or bakes evenly without warping. -
Cut the base:
Use your large circle cutter to punch out the main dish shape. If you don’t have a cutter, trace around a bowl and cut carefully with a craft knife. -
Form the rim:
Roll a long snake of clay, roughly the same thickness as your base slab. Score the outer edge of your circular base and apply a little water or liquid clay bond. -
Attach and smooth the rim:
Place the clay snake onto the scored edge to create a raised wall. Use your thumb or a smoothing tool to blend the seam on the inside and outside until it looks like one solid piece of ceramic, then tap the rim gently to flatten it slightly.
Cracking Clay?
If using air-dry clay, cracking often happens if it dries too fast. Drape a slightly damp paper towel over the piece while it cures to slow down the drying process.
Step 2: Sculpting the Bunny
-
Shape the body:
Take a lump of clay and roll it into a pear shape for the bunny’s body. The bottom should be wide enough to stand stable, tapering up towards the neck area. -
Form the head:
Roll a smaller ball for the head and attach it to the top of the body using the score-and-slip method (or liquid clay). Smooth the neck seam thoroughly so the head looks integrated, not just stuck on. -
Sculpt the ears:
Shape two long tear-drop pieces of clay. Flatten them slightly and gently attach them to the top of the head. I like to pose them slightly back and angled, as if the bunny is listening intently. -
Add facial details:
Use a small ball tool to indent eye sockets and place tiny balls of clay inside for eyes, piercing the center for a pupil. Add a tiny triangle of clay for the nose and use a needle tool to create the mouth cleft. -
Create the arms:
Roll two small sausages of clay for the front paws. attach them to the chest area, blending the shoulder seam but leaving the paws distinct so they rest against the belly. -
Refine the feet:
At the base of the body, sculpt two small rounded tabs for feet. Use a knife tool to gently press in toe indentations.
Step 3: Assembly & Finish
-
Make the cone holder:
Roll a small cone of clay that mimics the shape of an incense cone but is slightly larger. Hollow out the bottom or create a deep indentation at the peak to hold the incense securely. -
Create the catch ring:
Using your smallest circle cutter, make a tiny ring of clay. Attach this to the main dish floor; this will act as a designated spot for the cone holder to sit. -
Attach the bunny:
Score the bottom of the bunny and the area on the dish where it will stand (opposite the incense spot). Press firmly to adhere and smooth any clay around the base to ensure a strong bond. -
Verify sizing:
Before the clay hardens, place a real incense cone into your holder spot to ensure the fit is correct and the bunny isn’t too close to the heat source. -
Final smoothing:
Dip your finger or a brush in a little water (or baby oil for polymer clay) and go over the entire piece to remove fingerprints and smooth out any rough textures. -
Dry or Bake:
Follow the specific instructions for your clay type. If using air dry clay, let it sit for 24-48 hours. If polymer, bake according to the package temperature. -
Sand and Seal:
Once fully cured, use fine-grit sandpaper to buff away any sharp edges. Finish with a coat of matte varnish to protect the surface and enhance the speckles.
Make it Functional
Make the cone shape hollow with a hole at the top. This turns it into a ‘chimney’—smoke will gently rise through the peak for a magical effect.
Enjoy the peaceful atmosphere your new speckled bunny friend brings to your space.

TRACK YOUR CERAMIC JOURNEY
Capture glaze tests, firing details, and creative progress—all in one simple printable. Make your projects easier to repeat and improve.
Bunny and Carrot Buddy Set
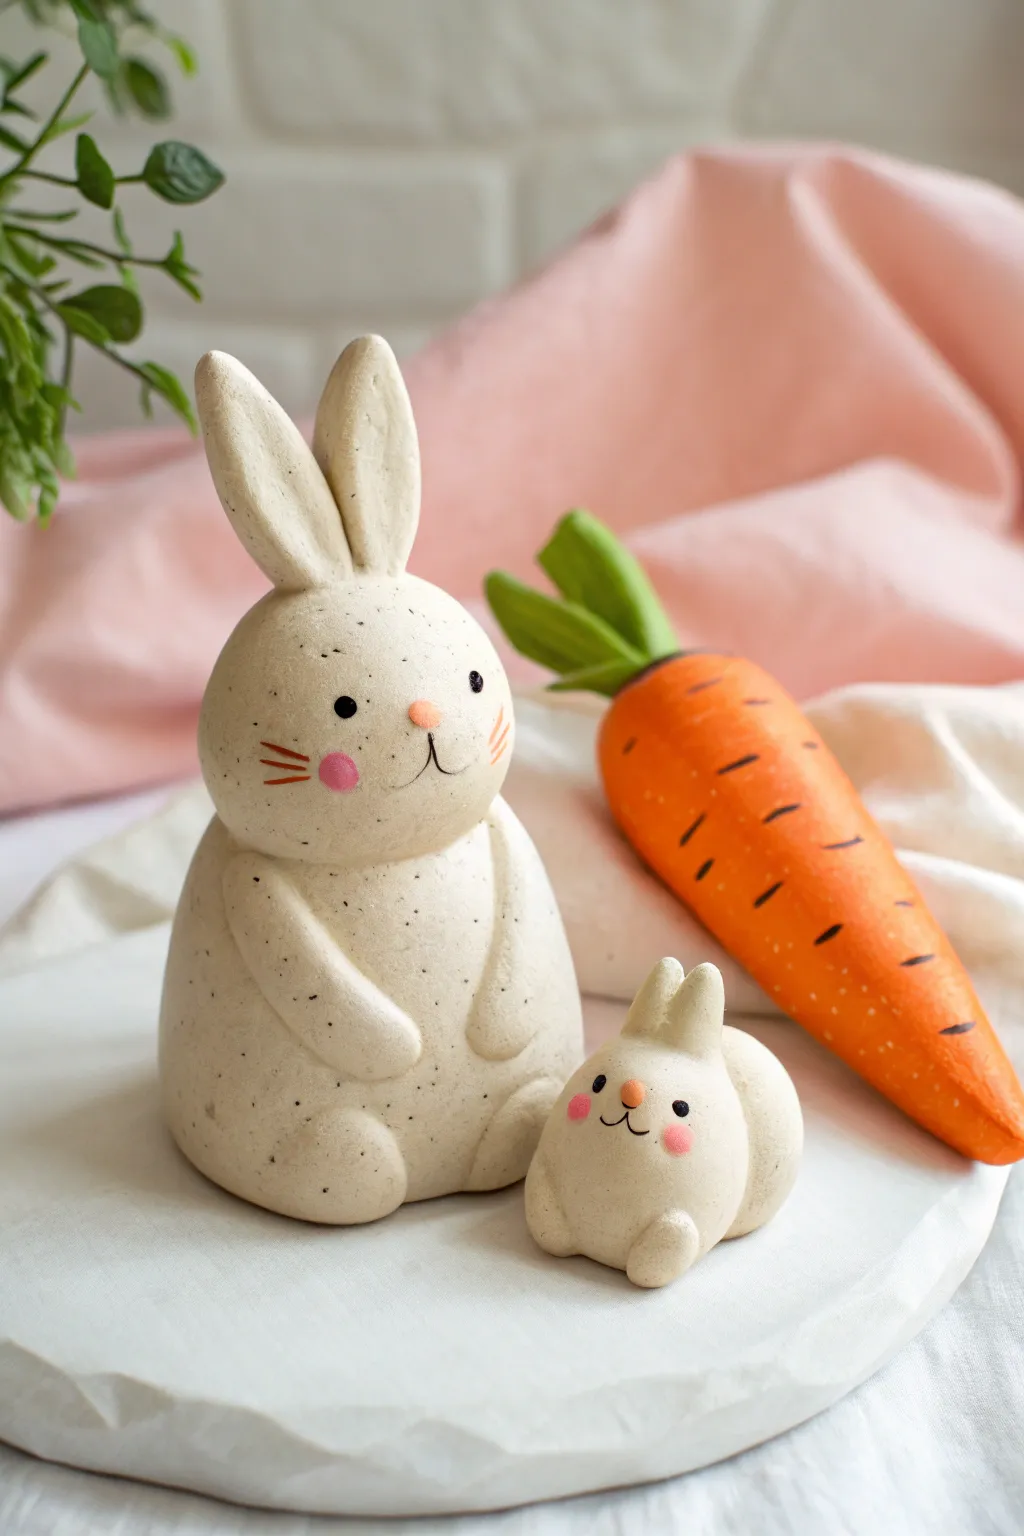
Create a charming springtime vignette with this trio featuring a large sitting rabbit, a tiny sleeping bunny, and a textured carrot. The speckled clay finish gives these figures a lovely organic, pottery-like appearance without needing a kiln.
How-To Guide
Materials
- Air-dry clay (stone effect or white mixed with black pepper/sand)
- Acrylic paints (orange, green, pink, black)
- Small detail brushes
- Modeling tools (ball tool, needle tool)
- Water bonding slip (clay mixed with water)
- Matte varnish or sealant
- Optional: Black pepper or fine sand for texture
Step 1: Sculpting the Large Bunny
-
Body Base:
Start by rolling a large ball of clay into a smooth, slightly tapered egg shape. Flatten the bottom gently on your work surface so it sits stability without wobbling. -
Adding the Head:
Roll a smaller sphere for the head. Score the bottom of the head and the top of the body with a needle tool, add a dab of water or slip, and press them firmly together. Smooth the seam with your finger or a clay tool until invisible. -
Shaping the Ears:
Create two elongated teardrop shapes for the ears. Flatten them slightly and score the bottoms. Attach them to the top of the head, blending the clay downwards to secure them. You can position them straight up or angled slightly for personality. -
Arm Details:
Roll two sausage shapes for the arms. Curved them slightly to follow the contour of the belly. Attach these to the sides of the body, pressing the top ‘shoulder’ part in well while letting the ‘hands’ rest on the tummy. -
Legs and Paws:
Form two small ovals for the feet. Attach them at the very bottom front of the body. Use a needle tool to gently impress two lines into each foot to create toes.
Step 2: Creating the Mini Bunny & Carrot
-
Mini Bunny Body:
For the little companion, roll a small, round ball. Pinch one side slightly to create a very subtle tail bump. -
Mini Head and Ears:
Attach a tiny sphere for the head to the front of the body. Add two very small, short ears on top, blending the seams carefully since the pieces are delicate. -
Carrot Form:
Take a new lump of clay and roll a thick cone shape, tapering it down to a rounded point. Smooth out any cracks. -
Carrot Greens:
Form 3-4 thick, leaf-like shapes. Press them together at their bases and attach this cluster to the broad top of the carrot. -
Carrot Texture:
Once the carrot shape is refined, use a knife tool to press random, short horizontal lines across the surface to mimic the natural ridges of a root vegetable.
Speckled Clay Hack
Don’t have stone-effect clay? Knead cracked black pepper or used (dried) coffee grounds into plain white clay before sculpting for instant texture.
Step 3: Finishing and Painting
-
Drying Time:
Allow all three pieces to dry completely. This usually takes 24-48 hours depending on thickness. Rotate them occasionally to ensure the bottoms dry evenly. -
Sanding:
If there are rough fingerprints, gently sand them away with fine-grit sandpaper. If you used plain white clay, you can now flick diluted black or brown paint onto the surface with a toothbrush to create the speckled stone look. -
Painting the Carrot:
Paint the body of the carrot with a bright orange acrylic. I like to mix a tiny bit of yellow in for vibrancy. Paint the leafy tops a solid meadow green. -
Carrot Details:
Once the orange is dry, use a fine brush with black or dark brown paint to highlight the indented ridge lines you carved earlier. -
Bunny Faces:
Using a dotting tool or the end of a paintbrush handle, dot on two black eyes for the large bunny. Paint a small triangular nose in pink or orange. Use a swift, thin stroke to paint the mouth lines and whiskers. -
Cheeks:
Apply soft pink circles for cheeks on both bunnies. The small bunny just needs wide-set eyes, a tiny nose, and pink cheeks to look sweet. -
Final Seal:
Protect your work with a coat of matte varnish. This seals the paint and gives the clay a professional, finished texture.
Loose Ears?
If the tall ears keep drooping while the clay is wet, insert a short piece of toothpick or wire inside the head and ear to act as an internal support dowel.
Arrange your charming trio together on a shelf or mantle for a perfect handcrafted display.
Sleeping Bunny Pocket Sculpt
Sculpt a serene little companion perfect for a desk ornament or a pocket-sized worry stone. This project focuses on simple, rounded forms and delicate carving techniques to create a smooth, speckled finish that feels lovely to hold.
Step-by-Step Guide
Materials
- Polymer clay (white or beige)
- Speckled clay inclusions or ground black pepper
- Pointed sculpting tool (needle tool)
- Small ball stylus
- Smoothing oil or baby oil
- Soft paintbrush
- Oven for baking
- Fine grit sandpaper
Step 1: Shaping the Base
-
Prepare the Clay:
Condition your white or beige clay until it is soft and pliable. To achieve the speckled look seen in the photo, kneed in a very small pinch of clay inclusions (like ‘granite’ effect powder) or even finely ground black pepper. -
Form the Body:
Roll a smooth ball of clay about the size of a golf ball. Gently elongate it into an oval or egg shape, flattening the bottom slightly so it sits stable without rolling over. -
Define the Head:
Using your thumb, gently press into the front third of the oval to distinguish the head from the body, keeping the transition smooth rather than creating a sharp neck. -
Shape the Ears:
Create two smaller flattened teardrop shapes for the ears. They should be relatively thick to avoid breakage. Gently curve them along their length to give them a natural, cupped appearance. -
Attach the Ears:
Score the top of the head slightly where the ears will go. Press the ears onto the head, angled slightly back. Use a blending tool to smooth the seam where the clay meets, ensuring a seamless connection.
Stone Effect
Mix translucent clay into your beige base (1:1 ratio) before adding speckles. This creates a deeply realistic ‘stoneware’ look that mimics ceramic glaze.
Step 2: Carving Details
-
Sculpt the Legs:
Instead of adding clay for legs, we will carve them into the main mass for a compact look. Use a modeling tool to press a curved line into the side of the body, suggesting the large rear thigh muscle. -
Define the Paws:
At the front base of the body, use a needle tool to etch two small lines to represent tucked-in front paws. Do the same near the back curve for the rear feet. -
Create the Face Shape:
Smooth the facial area with your finger. If needed, add a tiny bit more clay to the muzzle area to make it slightly rounder than the forehead. -
Carve the Eyes:
With a needle tool or very fine blade, press two crescent shapes into the face for closed, sleeping eyes. I find a gentle rocking motion makes a cleaner curve than dragging the tool. -
Add Eye Lashes:
If desired, create a tiny separate flick at the corner of the eye slit for an eyelash detail. -
Nose and Whiskers:
Press a tiny indentation for the nose using a small tool. Use the needle tool to prick several small dots on the muzzle area to suggest whisker follicles.
Dirty Clay?
White clay picks up lint easily. Keep a scrap piece of ‘waste clay’ nearby and roll it in your hands periodically to pull off dust before touching your project.
Step 3: Finishing Touches
-
Smooth the Surface:
Brush a light coat of baby oil over the entire sculpture with a soft brush or your finger. This removes fingerprints and creates that stone-smooth texture. -
Texture the Ears:
Use a subtle texturing tool or a clean tough brush inside the ear crevices to give a slightly different finish than the smooth body. -
Bake:
Bake the clay according to the manufacturer’s instructions. A lower, slower bake is often better for lighter colors to prevent scorching. -
Cool Down:
Let the bunny cool completely in the oven with the door slightly ajar to prevent thermal shock cracks. -
Final Sanding:
Once cool, use very fine-grit sandpaper (1000 grit or higher) under running water to polish any remaining rough spots or tool marks. -
Optional Wash:
If the carved lines are hard to see, paint a diluted brown acrylic wash over the piece and wipe it away immediately, leaving color only in the crevices.
Now you have a peaceful little sculpture ready to bring a moment of calm to your day
Peekaboo Bunny Rim Sitter
Add a touch of whimsy to your planters or bowls with this charming little rim-sitting bunny. Sculpted with lifelike fur texture and a sweet expression, this piece is designed to peer curiously over the edge of your favorite vessel.
How-To Guide
Materials
- Polymer clay (terra cotta or soft brown color)
- Black glass beads or small black clay balls (for eyes)
- Sculpting tools (needle tool, ball stylus, rubber shaper)
- Texture tool or stiff bristle brush
- Fine fishing line or black bristles (for whiskers)
- Acrylic paint (black, white, darker brown for wash)
- Matte varnish
- Strong craft glue (E6000)
- A bowl or pot rim to shape against (covered in parchment paper)
Step 1: Forming the Base Structure
-
Create the support shape:
Begin by selecting the bowl or pot you intend this bunny to sit in. Cover the rim area with a small strip of parchment paper or plastic wrap to prevent the clay from sticking to the vessel during the shaping process. -
Shape the torso:
Roll a medium-sized log of terra cotta-colored clay. This will form the main body. Gently bend it into a slight ‘L’ or curved bean shape. -
Test the fit:
Press the bottom half of your clay log against the protected rim of your bowl. You want the bottom to hook slightly inside the bowl while the upper torso leans forward over the edge. Adjust the curve until it sits securely without tipping. -
Add the head:
Roll a slightly smaller oval of clay for the head. Attach it to the top of the torso, blending the seam at the neck until it is completely smooth and invisible.
Sliding Subject?
If the baked bunny slides off the rim too easily, add a tiny dot of museum putty or poster tack under the base. It secures the piece but keeps it removable for cleaning.
Step 2: Sculpting Details
-
Form the ears:
Create two long, teardrop shapes for the ears. Flatten them slightly and use a sculpting tool to create the inner ear indentation. Attach them firmly to the top of the head, blending the clay at the base. -
Refine the face profile:
Pinch the front of the face gently to form a muzzle. Use a ball stylus to press indentations where the eyes will go. -
Insert eyes:
Press small black glass beads into the eye sockets. If you don’t have beads, roll tiny balls of black clay and insert them. Add tiny eyelids with thin snakes of clay to secure them. -
Create the front paws:
Roll two small sausages of clay for the arms. Attach them to the upper chest area. Position them so the paws look like they are resting on the rim or tucked up against the chest as shown in the reference. -
Add the hind legs:
Add rounded masses of clay to the lower sides of the body to suggest folded hind legs. Blend the edges into the main body so they look integrated rather than stuck on.
Garden Party
Make a matching set! Sculpt a pair of tiny paws gripping the rim a few inches away to make it look like a second bunny is hiding completely inside the pot.
Step 3: Texturing and Finishing
-
Initial fur texture:
Using a needle tool or a stiff texture brush, begin raking shallow lines across the entire surface of the bunny. Follow the natural direction that fur would grow—down the back, away from the nose, and up the ears. -
Deepen the details:
Go back over key areas like the cheeks, chest, and haunches with deeper strokes to create definition and shadows in the fur. -
Facial details:
Use your finest needle tool to etch tiny lines for the mouth and nose cleft. Ensure the texture around the eyes is very delicate. -
Bake the clay:
Carefully remove the bunny from the bowl rim. To maintain the curve, place it on a wad of foil or a curved oven-safe form that mimics the rim shape. Bake according to your clay manufacturer’s instructions. -
Cool and wash:
Once baked and fully cooled, apply a watered-down wash of dark brown acrylic paint. Wipe it off almost immediately with a damp cloth; the dark paint will stay in the fur grooves, highlighting the texture. -
Add highlights:
Dry brush a tiny amount of lighter clay-colored or cream paint over the raised areas of the fur, specifically on the chest and cheeks, to make the details pop. -
Eye shine:
Paint a tiny white dot on each black eye to give it life and a ‘wet’ look. I find a toothpick works best for this precise dot. -
Whiskers:
Dip the ends of short lengths of fishing line or stiff bristles into super glue. Carefully insert them into tiny pre-made holes in the muzzle (or glue directly to the surface) for whiskers. -
Final seal:
Coat the sculpture with a matte varnish to protect the paint wash, using a gloss varnish only on the eyes for realistic shine.
Place your finished bunny on a sunny windowsill planter and enjoy the cute companionship
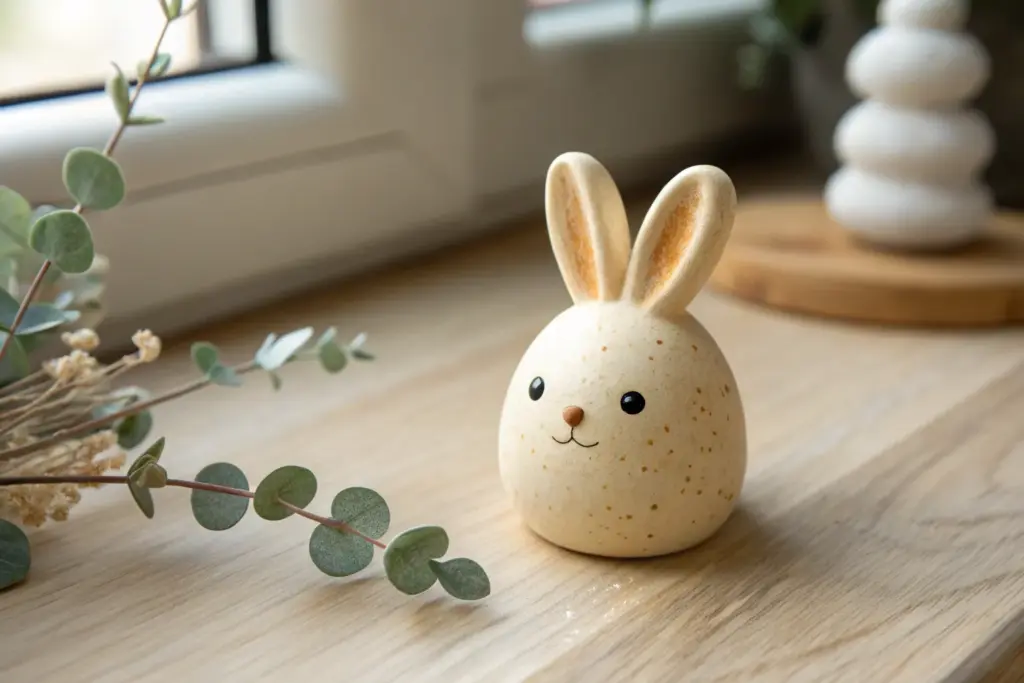
Textured Fluffy Bunny
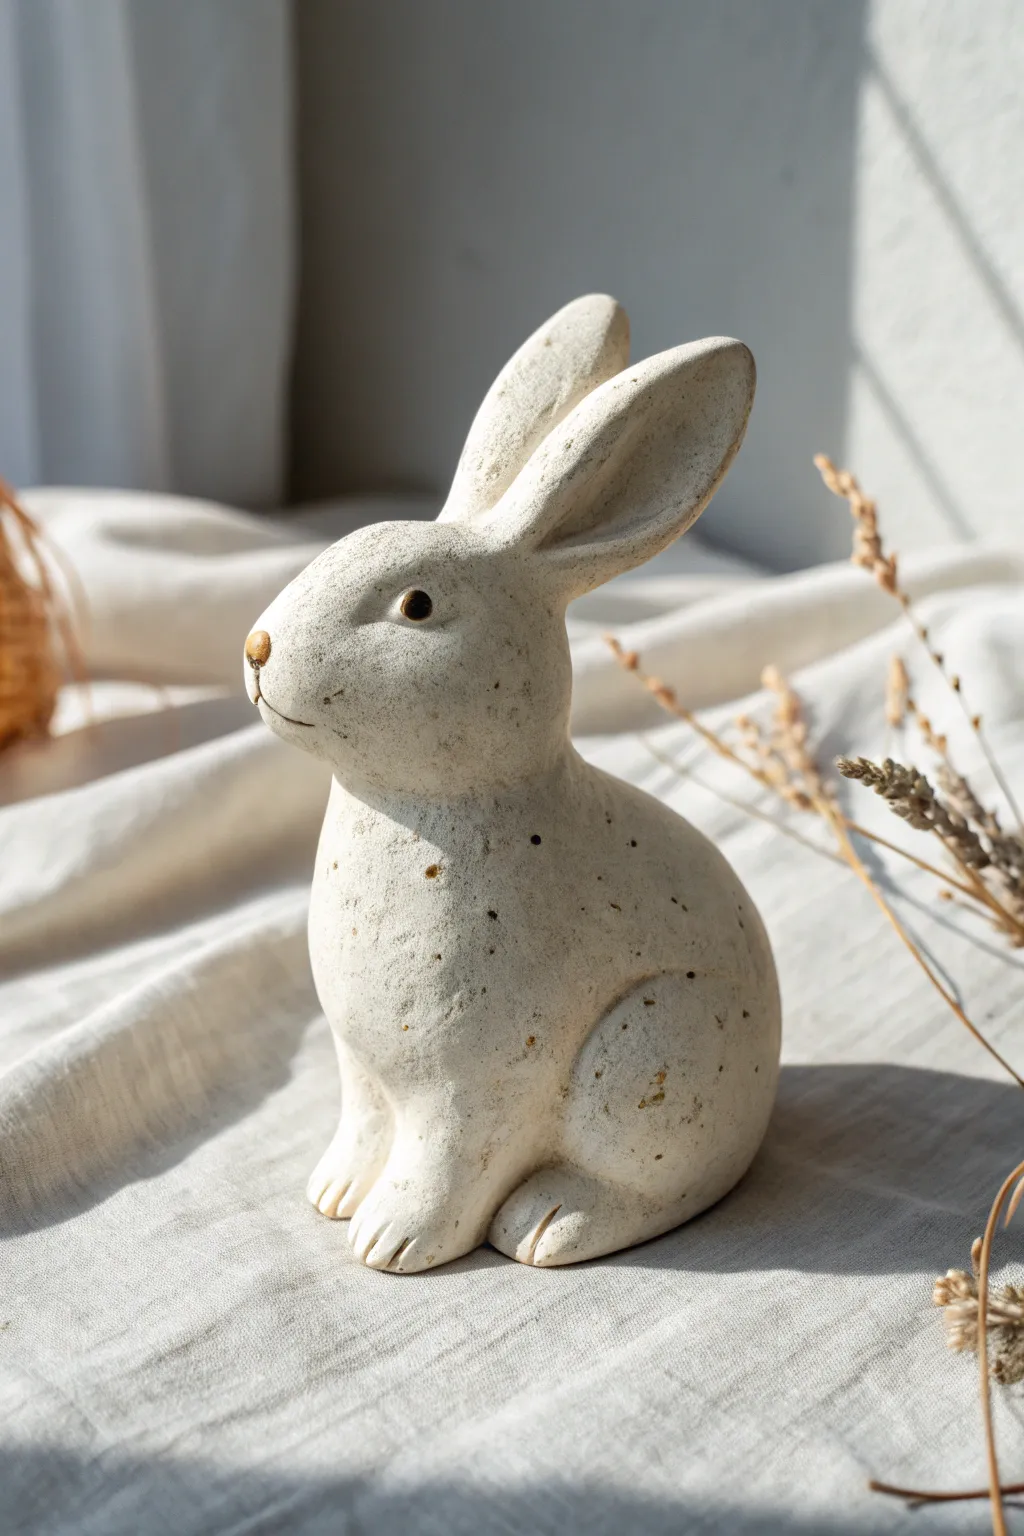
Embrace a minimalist aesthetic with this charming clay bunny that features a unique speckled finish resembling stone or eggshell. Its gentle curves and subtle textures make it a timeless piece of decor perfect for spring or year-round display.
Step-by-Step Guide
Materials
- Air-dry clay (white or off-white)
- Speckled clay additive (or finely ground dried tea leaves/coffee grounds)
- Basic sculpting tools
- Water in a small cup
- Aluminum foil
- Fine-grit sandpaper
- Gloss varnish or sealant (optional)
- Small detail brush
- Acrylic paint (brown, black)
Step 1: Preparing the Base
-
Mix the texture:
Begin by incorporating your speckling agent into the white air-dry clay. Knead a small amount of dried tea leaves or specialized clay speckles into the mass until they are evenly distributed, creating that signature stone-like look. -
Build the core:
Crumple a piece of aluminum foil into a pear shape. This will serve as the armature for the body, reducing drying time and the amount of clay needed. -
Form the body:
Flatten a large portion of your textured clay and wrap it completely around the foil armature. Smooth the seams with a little water on your finger so the foil is completely hidden. -
Shape the posture:
Mold the clay covered form into a seated tear-drop shape. The wider bottom will be the haunches, tapering up slightly towards where the neck will be.
Step 2: Sculpting Features
-
Add the head:
Roll a smaller ball of clay for the head. attach it to the top of the body using the score-and-slip method: scratch both connecting surfaces, add a dab of water, and press firmly together. -
Blend the neck:
Use a modeling tool or your thumb to drag clay across the seam between the head and body, smoothing it out until the transition is seamless and natural. -
Form the ears:
Shape two long, flattened teardrop shapes for the ears. Make them thick enough to stand up but thin enough to look delicate. -
Attach the ears:
Score and slip the top of the head and the base of the ears. Press them on, positioning them so they angle slightly backward. I like to blend the clay at the base thoroughly so they don’t look ‘stuck on’. -
Define the legs:
Add small ovals of clay to the front for paws and larger, flattened rounds to the sides for the rear haunches. Blend the edges into the main body.
Don’t Crack Under Pressure
To prevent cracking, dry the bunny slowly away from direct heat or sunlight. Cover it loosely with a plastic bag for the first 12 hours to slow moisture loss.
Step 3: Refining Details
-
Carve the paws:
Use a needle tool or a knife to gently press three indentations into the front paws to create toes. -
Shape the face:
Press gently into the sides of the head to define the eye sockets. Add a tiny triangle of clay for the nose. -
Create the mouth:
Use a thin blade to carefully incise a ‘Y’ shape under the nose to form the mouth and snout area. -
Surface texture:
Take a stiff bristle brush or a crumpled ball of aluminum foil and gently pat it all over the bunny’s surface. This removes fingerprints and enhances the ‘stone’ texture. -
Dry thoroughly:
Allow the sculpture to dry completely. This may take 24-48 hours depending on thickness and humidity. Flip it occasionally to let the bottom breathe.
Antique Wash
Apply a diluted brown paint wash all over the dried bunny and wipe it off immediately with a rag. The dark paint stays in the crevices for an aged look.
Step 4: Finishing Touches
-
Sand imperfections:
Once bone dry, use fine-grit sandpaper to gently smooth any sharp ridges or rough bumps, being careful not to sand away your intentional texture. -
Paint the eyes:
Using a very fine brush, paint small black circles for the eyes. Add a tiny dot of white reflection if you want a livelier look. -
Tint the nose:
Apply a wash of diluted brown paint to the nose area for a subtle, natural contrast. -
Enhance the speckles:
If the sanding faded your speckles, you can flick a toothbrush loaded with watered-down brown paint over the surface for extra dimension. -
Seal (Optional):
If you want a slight sheen, brush on a matte or satin varnish to protect the clay and deepen the colors.
Now you have a serene, handcrafted bunny that adds a touch of organic warmth to any shelf
Bunny Tile Coasters
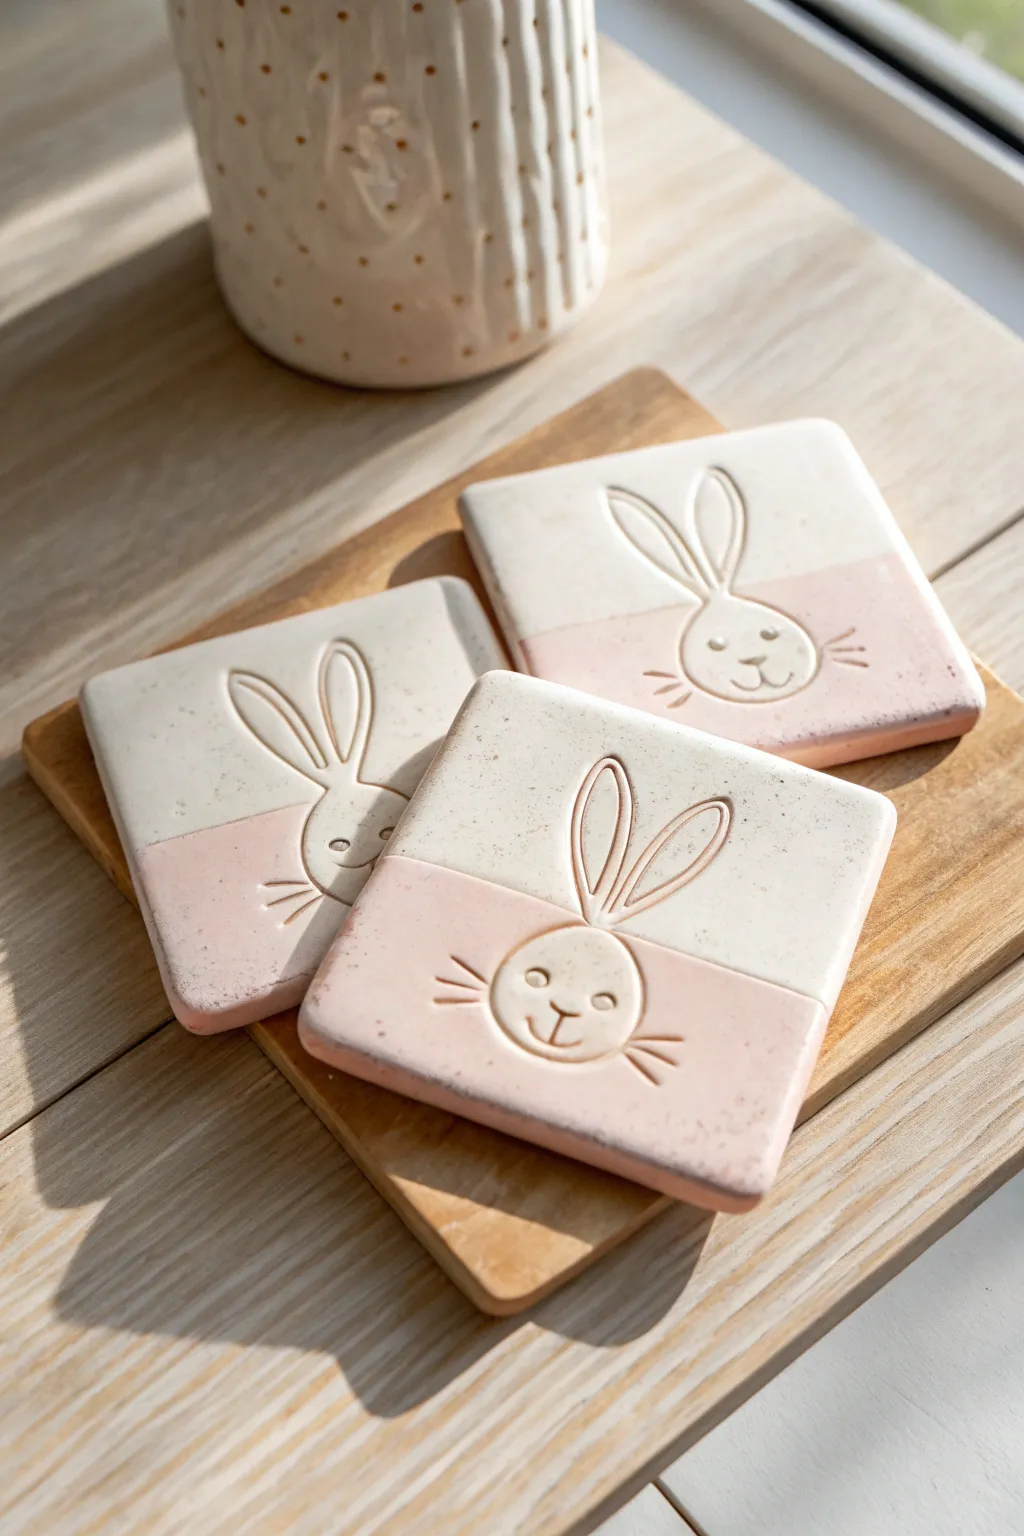
These charming ceramic coasters combine a minimalist aesthetic with playful bunny illustrations, perfect for brightening up any coffee table. The soft pink and speckled white design is achieved through careful glazing or tinted clay, while the impressed details give them a lovely tactile quality.
Detailed Instructions
Materials
- White air-dry clay or polymer clay (speckled variety preferred)
- Rolling pin
- Square cookie cutter (approx. 3.5 – 4 inches)
- Needle tool or clay sculpting tool
- Water and small sponge
- Pink acrylic paint or pink clay slip
- Masking tape or painter’s tape
- Matte spray sealant (if using air-dry clay)
- Sandpaper (fine grit)
- Ruler
Step 1: Shaping the Base
-
Preparation:
Begin by kneading your clay until it is soft and conditioned. If you want that lovely speckled granite look shown in the photo, mix a small amount of black pepper or crushed dried tea leaves into your white clay. -
Rolling out:
Roll the clay out onto a flat, non-stick surface or canvas mat. Aim for a consistent thickness of about 1/4 inch (6mm) to ensure your coasters are sturdy enough for daily use. -
Cutting shapes:
Using your square cookie cutter, cut out three squares. If you don’t have a cutter, use a ruler and a craft knife to measure and slice precise squares. -
Smoothing edges:
Dip your finger in a little water and gently run it along the cut edges. You want to soften the sharp corners slightly to achieve that comfortable, rounded look seen in the finished coasters.
Clean Lines Pro Tip
Run your fingernail or a credit card firmly along the edge of the masking tape before painting. This seals the gap and prevents the pink paint from bleeding under the tape.
Step 2: Creating the Bunny
-
Sketching lightly:
Before carving deep lines, use a very light touch with your needle tool to sketch the oval head shape in the center of the square. It should sit low enough that the ears can extend upwards. -
Carving the head:
Once happy with the placement, press firmly with your needle tool or a small ball-tip stylus to impress the oval outline of the bunny’s head. -
Adding ears:
Draw two long, looping ears extending from the top of the head. Add a smaller inner loop inside each ear for detail. Keep your pressure consistent so the lines are clearly visible. -
Facial features:
Press two small dots for eyes. Draw a small ‘Y’ shape for the nose and mouth, and add three horizontal whisker lines on each side of the cheeks. -
Initial drying:
Allow the clay to dry according to the package instructions. If using air-dry clay, I usually flip them over halfway through the drying process to prevent curling.
Level Up: Cork Backing
Cut a square of adhesive cork sheet slightly smaller than the clay square and stick it to the bottom. This prevents the ceramic from scratching your table and adds a professional finish.
Step 3: Decoration and Finish
-
Sanding:
Once fully dry (and fired if using kiln clay), use fine-grit sandpaper to smooth out any rough texture on the surface or edges, wiping away the dust with a slightly damp cloth. -
Taping the design:
Place a strip of masking tape horizontally across the middle of the coaster. The tape line should run exactly through the middle of the bunny’s face, just below the eyes but above the whiskers. -
Applying color:
Paint the bottom half of the coaster (below the tape) with a soft pastel pink acrylic paint. Use a pouncing motion with a sponge or brush to get into the carved lines of the mouth and whiskers. -
Second coat:
Apply a second coat of pink if necessary to get an opaque, solid color blocking effect. -
Reveal:
Gently peel away the masking tape while the paint is still slightly tacky to ensure a crisp, clean line between the white and pink sections. -
Filling the upper lines:
The carved lines in the white section might need definition. Use a very fine brush with a diluted light brown or grey wash to carefully fill the ear and eye indentations, then wipe the surface clean so pigment remains only in the grooves. -
Inking the whiskers:
Ensure the indented whiskers and mouth in the pink section are slightly darker so they pop. If the pink paint filled them too much, trace them again with a slightly darker shade of pink. -
Sealing:
Finish the project by applying a clear matte sealant spray. This is crucial for coasters to make them water-resistant against condensation from cold drinks.
Now you have a set of adorable handmade coasters ready to protect your surfaces with style
Bunny Wall Pocket
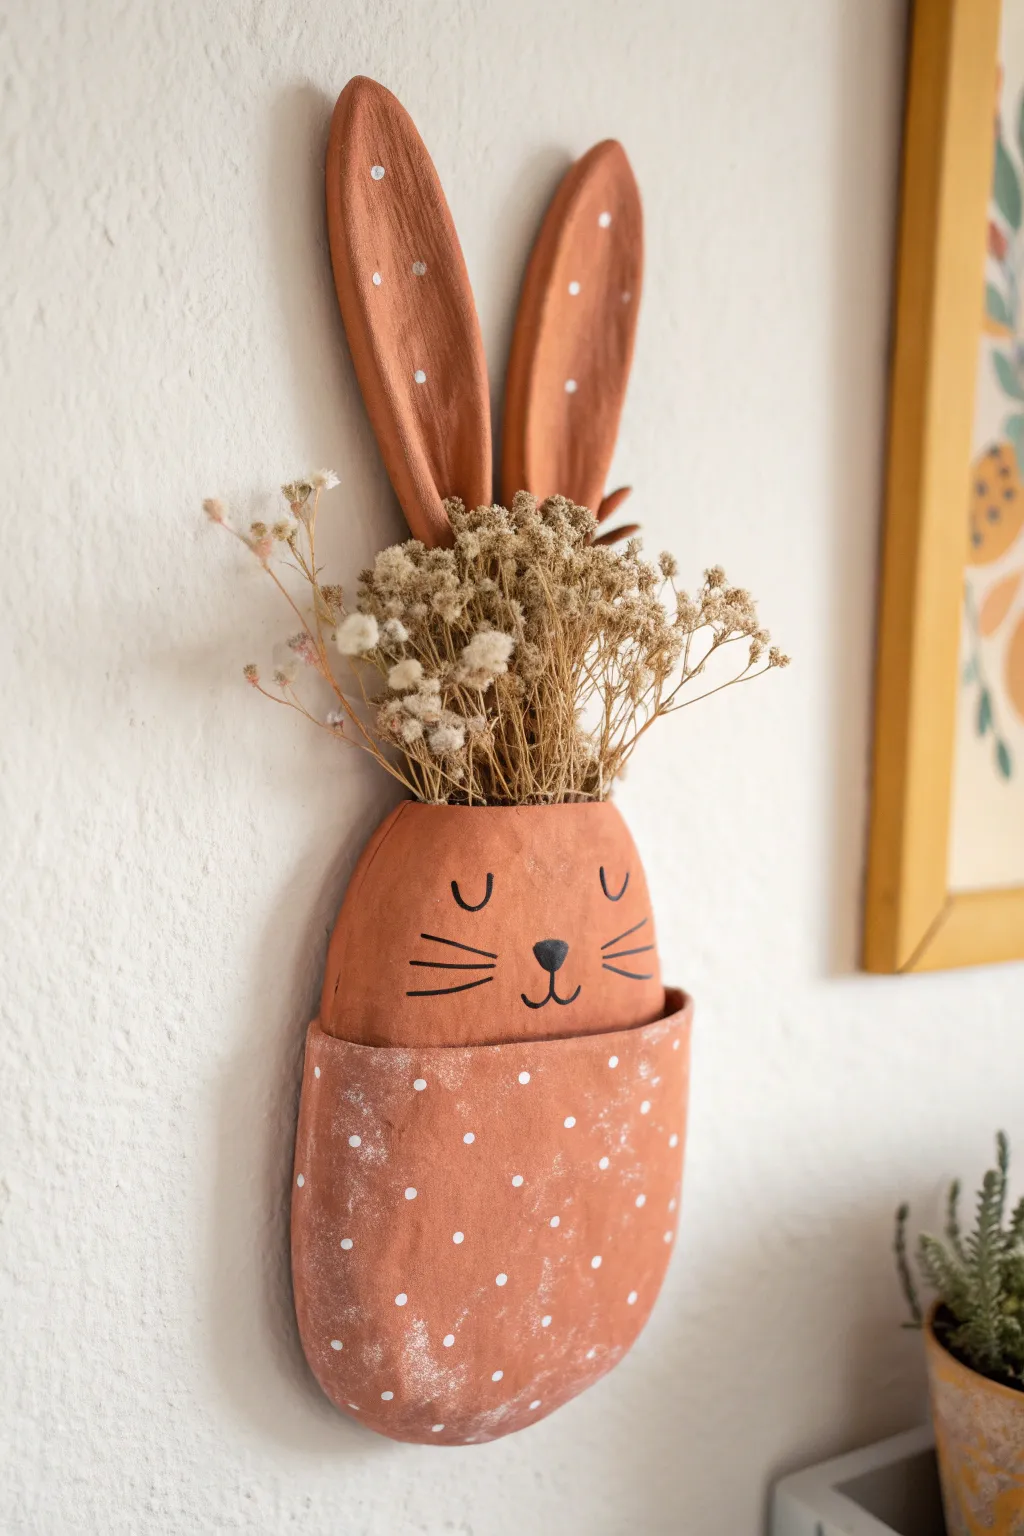
Bring a touch of whimsical spring decor to your walls with this earthy, handmade bunny pocket. Crafted from air-dry clay and painted to look like warm terracotta, it’s perfect for holding dried blooms or air plants.
Step-by-Step
Materials
- Air-dry clay (white or terracotta colored)
- Rolling pin
- Clay knife or craft knife
- Water in a small cup
- Sponge or smoothing tool
- Acrylic paint (warm terracotta/burnt sienna, white, black)
- Paintbrushes (flat brush and fine liner brush)
- Dried flowers (baby’s breath, dried grass)
- Parchment paper or canvas mat
- Sandpaper (fine grit)
Step 1: Shaping the Base
-
Roll the clay:
Begin by taking a large chunk of air-dry clay and rolling it out on parchment paper to an even thickness of about 1/4 inch. You want it sturdy enough to hold weight but not too heavy. -
Cut the back panel:
Using your clay knife, cut out the main silhouette. You need a rounded oval shape for the head that extends upwards into two long, slightly tapered bunny ears. The total height should be around 8-10 inches. -
Roll the pocket piece:
Roll out a second, slightly smaller piece of clay, also 1/4 inch thick. Cut a shape that looks like the bottom half of an oval—this will become the front pocket. -
Form the pocket curve:
To give the pocket volume for flowers, gently curve this second piece. You can drape it over a crumpled ball of foil or simply bow it slightly in your hands to create a convex shape.
Cracks happen?
If you see small cracks while drying, mix a tiny bit of fresh clay with water to make a paste and fill them in before painting.
Step 2: Assembly and Refining
-
Score the edges:
Use your knife to make small cross-hatch scratches (‘scoring’) along the outer edges of the back panel where the pocket will attach, and do the same on the inner edges of the pocket piece. -
Attach with slip:
Dab a little water or clay slip onto the scored areas. Press the pocket piece firmly onto the back panel, aligning the bottom curves. I like to support the inside of the pocket with a bit of crumpled paper towel while it bonds to keep the shape open. -
Blend the seams:
With a damp finger or a clay tool, smooth the clay where the two pieces meet until the seam disappears and it looks like one cohesive object. -
Punch a hanging hole:
Don’t forget the functionality! Use a straw or tool to punch a small hole near the top, centered between the ears or hidden behind them, so you can hang it on a nail later. -
Smooth the surface:
Dip a sponge in water and gently wipe over the entire piece to remove fingerprints and rough edges. Let the clay dry completely for 24-48 hours until hard.
Style it up
Try painting the pocket in a contrasting pastel color like sage green or pale blue for an Easter-dip-dyed effect.
Step 3: Painting and Finishing Details
-
Sand imperfections:
Once fully dry, lightly sand any rough edges or bumps with fine-grit sandpaper for a professional finish. -
Base coat:
Mix a warm terracotta hue using burnt sienna and a touch of white or yellow. Paint the entire bunny, front and back and inside the ears. You might need two coats for opaque coverage. -
Add texture:
To mimic the rustic look in the photo, you can sponge on a slightly lighter shade of terracotta in random patches to create a weathered, clay-pot texture. -
Paint the face:
Using a fine liner brush and black acrylic paint, draw two small closed eyelids with lashes, a cute triangular nose, whisker dots, and a small mouth curve. -
Add whiskers:
With a steady hand, paint three straight whiskers extending from each cheek area. -
Ear details:
Dip the handle end of a paintbrush into white paint to create small, evenly spaced polka dots inside the ears. -
Pocket pattern:
Continue the polka dot pattern onto the front pocket section, spacing the white dots randomly for a playful look. -
Fill with flora:
Once the paint is completely dry, arrange a small bouquet of dried flowers like baby’s breath or dried grasses inside the pocket.
Now you have a charming piece of handmade wall art ready to brighten up any corner of your home
Bunny Tea Light Luminary
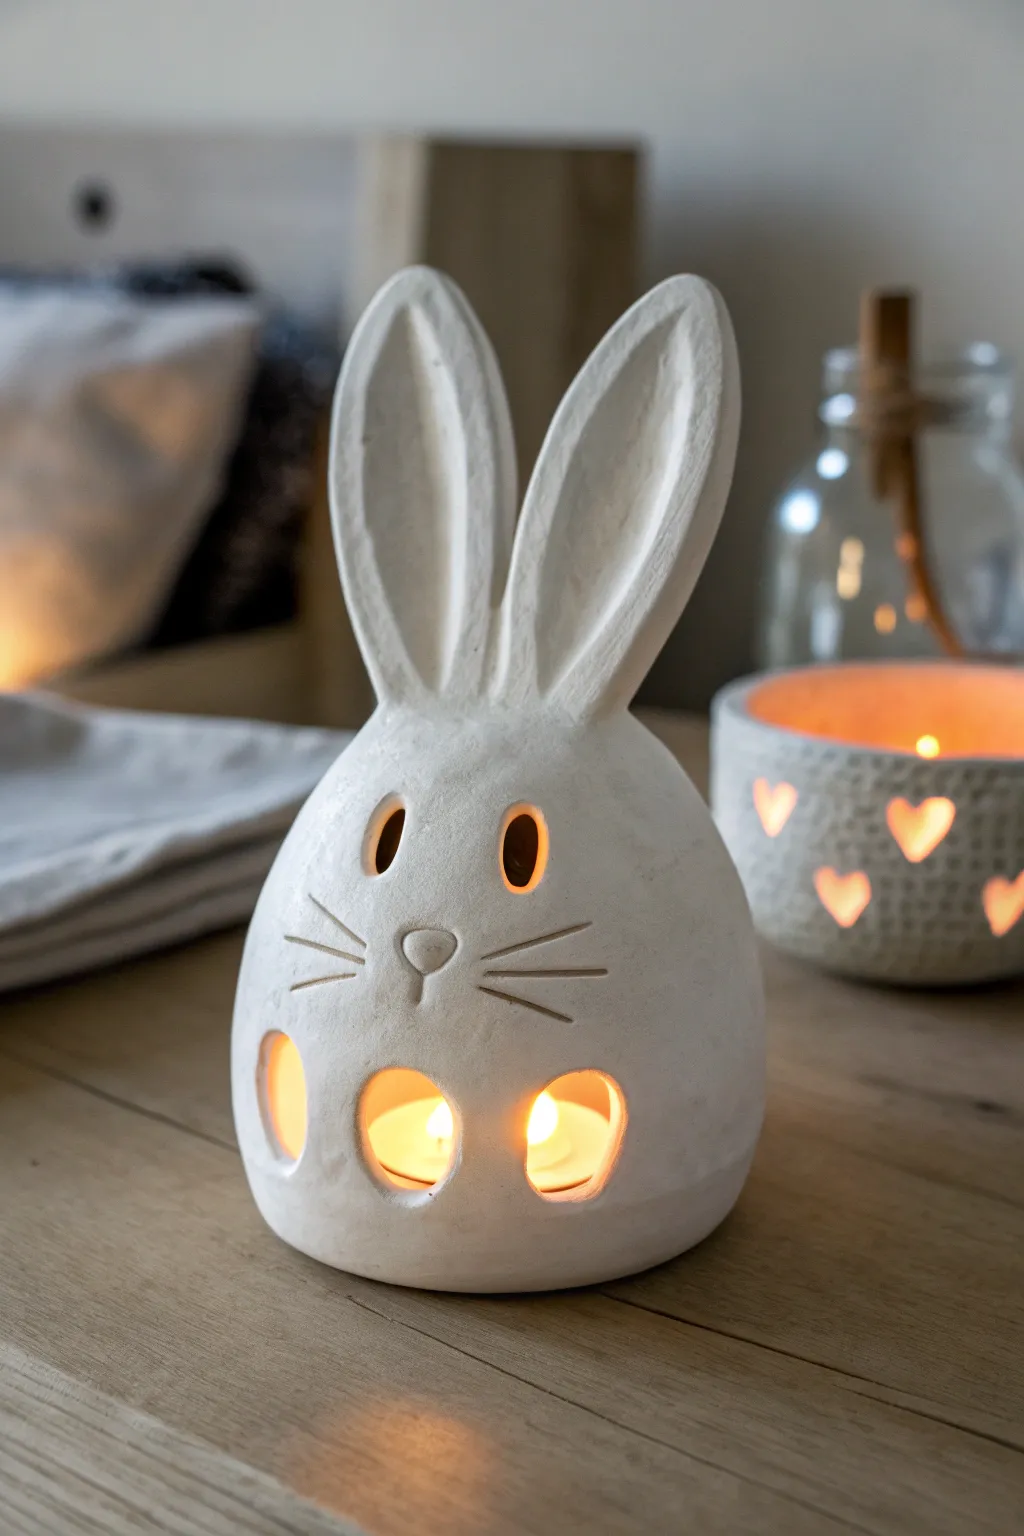
Brighten your space with this enchanting air-dry clay luminary shaped like a cozy bunny. Its hollow, egg-like form and cutout features allow candlelight to dance through, creating a warm, festive glow.
Step-by-Step Tutorial
Materials
- White sculpting clay (air-dry or polymer, approx. 500g)
- Small rolling pin
- Pottery knife or craft scalpel
- Small circular cookie cutters (or a bottle cap)
- Modeling tool (needle tool or toothpick)
- Small bowl or balloon (for forming the base shape)
- Water and a small sponge
- Fine-grit sandpaper
- Tea light candle
Step 1: Forming the Base
-
Prepare the clay:
Begin by kneading your white clay until it is soft, pliable, and free of air bubbles. Roll it out on a flat surface to a uniform thickness of about 1/4 inch (6mm). -
Shape the body:
Cut a large circle or rectangle, depending on your preferred method, and mold it over a small inverted bowl or a partially inflated balloon to create a hollow dome shape. This will be the bunny’s body. -
Close the form:
If you are hand-building without a mold, create a pinch pot by pushing your thumb into a ball of clay and pinching the walls up into a rounded, egg-like dome. -
Smooth the surface:
Use a damp sponge or your fingers dipped in water to smooth out any seams, cracks, or fingerprints on the exterior of the dome.
Airflow is Key
For a functional luminary, don’t skip the lower holes. They provide necessary oxygen for the flame and prevent the clay from getting too hot.
Step 2: Adding Features
-
Cut the eye holes:
Using a small, oval cutter or your craft knife, carefully cut out two vertical oval shapes for the eyes about halfway up the dome. -
Create the nose:
Roll a very small triangular piece of clay and attach it between and slightly below the eyes. Score the back of the nose and add a dab of water (slip) to ensure it sticks firmly. -
Carve the whiskers:
Take your needle tool and gently carve three whisker lines on each cheek, radiating outward from the nose area. Press deeply enough to see the lines clearly when lit, but don’t cut all the way through. -
Add the bottom openings:
Near the base of the bunny, use a small circular cutter or knife to remove three or four round holes. These allow airflow for the candle and let more light spill out.
Step 3: The Ears & Finish
-
Shape the ears:
Roll out two thick, elongated oval shapes from your remaining clay for the ears. They should be substantial enough to stand upright. -
Detail the ears:
Press your thumb or a modeling tool into the center of each ear to create a shallow depression, mimicking the inner ear structure. -
Attach the ears:
Score the bottom of the ears and the top of the head where they will attach. Apply a little water or slip and press them firmly onto the head, blending the clay at the seam so it looks seamless. -
Check stability:
If the ears are drooping, prop them up with crumpled paper towels or supports until the clay begins to firm up. -
Refine the edges:
Go over all your cutouts—eyes and bottom holes—with a wet finger or damp brush to soften any sharp or ragged edges. -
Dry thoroughly:
Allow the sculpture to dry completely according to your clay manufacturer’s instructions. This usually takes 24-48 hours for air-dry clay. -
Sand and smooth:
Once bone dry, use fine-grit sandpaper to gently sand away any remaining bumps or rough spots, resulting in a smooth, matte finish resembling porcelain.
Texture Time
Before the clay dries, gently press a piece of lace or burlap onto the ear surfaces for a subtle, beautiful texture.
Place a tea light inside your new bunny friend and enjoy the soft, comforting shadows it casts on your walls
Bunny Lidded Keepsake Box
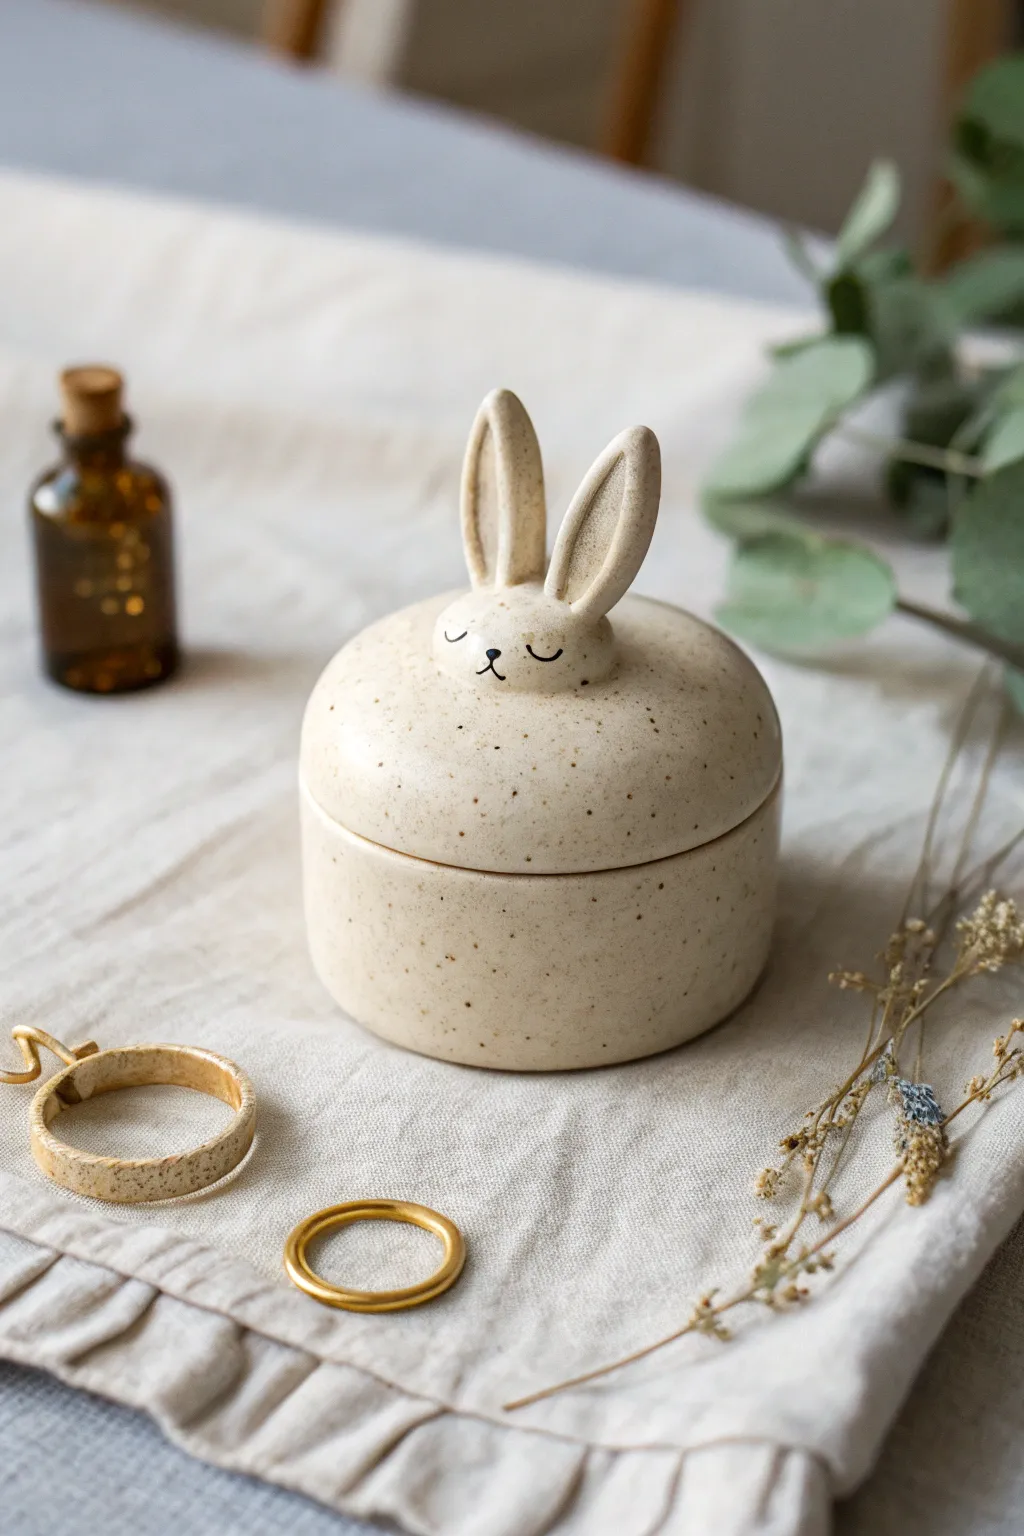
This charming speckled ceramic keepsake box features a sweet bunny face resting peacefully on the lid. Perfect for holding rings, small treasures, or secret notes, this project combines simple pinch pot techniques with delicate sculptural details.
Step-by-Step Guide
Materials
- Speckled stoneware clay (or polymer clay with faux granite effect)
- Needle tool
- Rolling pin
- Circle cutter (approx. 3-4 inches diameter)
- Scoring tool (or serrated rib)
- Slip (clay slurry)
- Modeling tool or wooden skewer
- Small sponge
- Black underglaze or acrylic paint (for face)
- Fine detail brush
- Clear glaze (if using ceramic clay)
Step 1: Forming the Base
-
Roll the Slab:
Begin by rolling out a medium-sized ball of speckled clay into a smooth slab about 1/4 inch thick. Aim for an even thickness to ensure the final box walls are sturdy but elegant. -
Cut the Base Circles:
Using your circle cutter, cut out two identical circles. One will become the floor of the box, and the other will serve as the starting point for the lid. -
Create the Wall Strip:
Roll a rectangular strip of clay that is long enough to wrap around the circumference of your base circle. The height determines how deep your box will be—about 1.5 to 2 inches is ideal for a trinket jar. -
Score and Slip:
Score the outer edge of the base circle and one long edge of your rectangular strip. Apply a generous amount of slip to the scored areas. -
Assemble the Walls:
Wrap the strip around the base circle, pressing the scored edges together firmly. Where the strip ends meet, cut them at a bevel for a seamless join, score, slip, and smooth them together. -
Smooth the Seams:
Use a modeling tool or your finger to blend the clay on both the inside and outside seams until they are invisible. Reinforce the joint with a thin coil of clay on the interior if needed.
Lid Balance
If the ears make the lid top-heavy while the clay is soft, prop them up with small pieces of foam or balled-up paper towels until the clay dries enough to hold its shape.
Step 2: Sculpting the Lid
-
Shape the Dome:
Take your second clay circle (the lid base) and gently gently pinch the edges inward while pressing the center outward to create a shallow dome shape. This doesn’t need to be high, just slightly rounded. -
Add the Inner Flange:
Flip the lid upside down. Roll a thin coil of clay and attach it to the underside of the lid, slightly inset from the edge. This flange will sit inside the box rim to keep the lid from sliding off. -
Test the Fit:
Carefully place the lid on the base to ensure the flange fits comfortably. Adjust by smoothing or trimming clay if it is too tight or too loose. -
Form the Bunny Head:
Roll a small ball of clay, slightly flattening the bottom. Attach this securely to the very center of the domed lid using the score and slip method. -
Blend the Neck:
I find it helpful to use a small tool to drag clay from the base of the head down onto the lid, smoothing it out so the head looks like it’s organically rising from the surface rather than just stuck on top.
Pro Tip: Flange Fit
Make the lid’s inner flange slightly looser than perfect. Clay shrinks during drying and firing, and lids often shrink differently than bottoms, so a little wiggle room prevents sticking.
Step 3: Adding Details & Finishing
-
Shape the Ears:
Roll two small carrot-shaped coils for the ears. Flatten them slightly and use a tool to create a shallow indentation running down the center of each ear. -
Attach the Ears:
Score and slip the top of the head and the base of the ears. Attach them upright, smoothing the clay at the join so they stand strong. -
Refine the Surface:
Once the clay is leather hard, use a damp sponge to wipe down the entire piece. This smooths out fingerprints and exposes the lovely gritty texture of the speckled clay. -
Paint the Face:
Using a very fine brush and black underglaze (or acrylic if using air-dry clay), paint two small U-shapes for sleeping eyes and a tiny ‘x’ or nose-and-mouth shape. Keep the lines incredibly thin for a delicate look. -
First Firing (Bisque):
If using ceramic clay, let the piece dry completely (slowly, to avoid warping) and fire it to bisque temperature. -
Glaze and Final Fire:
Dip the clear glaze over the bisque ware. Avoid getting glaze on the flange where the lid meets the box. Fire again to the clay body’s maturation temperature.
Once fired, you have a serene little guardian for your most precious small items.