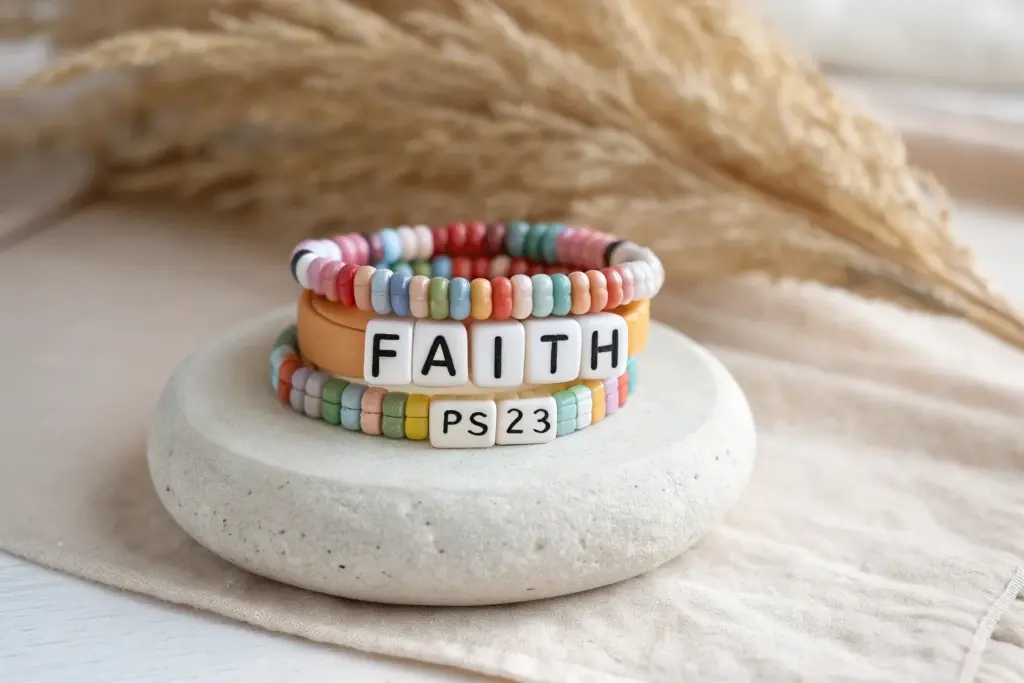
Christian clay bead bracelets are one of my favorite ways to wear faith in a simple, everyday kind of way. With just a few colors, some letter beads, and a little intention, you can create a bracelet stack that feels personal and uplifting.
Classic WWJD Heishi Bracelet
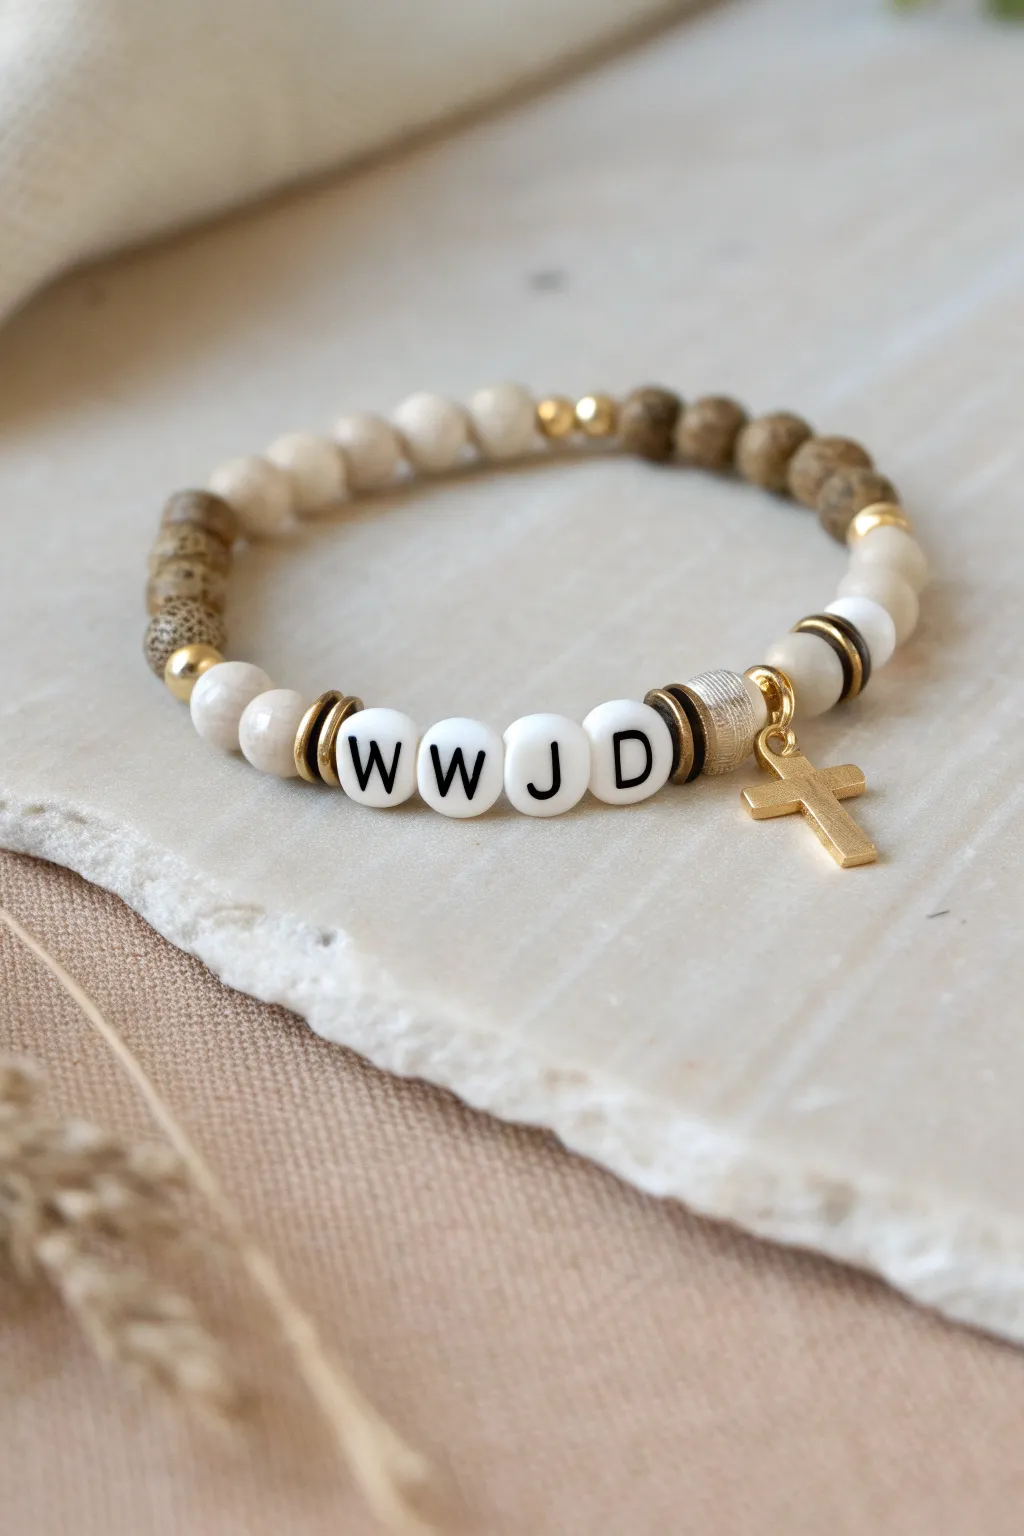
Revisit a classic statement of faith with an elegant, earthy twist using natural stone textures and gold accents. This sophisticated take on the nostalgic WWJD bracelet blends creamy neutrals with warm wood tones for a piece that is as stylish as it is meaningful.
How-To Guide
Materials
- 0.8mm clear stretch cord or elastic jewelry string
- 4mm round white letter beads (W, W, J, D)
- 6mm or 8mm cream/ivory natural stone beads (like Riverstone or White Jade)
- 6mm or 8mm textured brown/wood-look stone beads (like Picture Jasper or Wood Jasper)
- 3mm gold spacer beads (round)
- 4mm gold disc spacers or heishi beads
- 4mm antique gold or bronze ridged spacers
- Gold cross charm (small pendant)
- Gold jump ring (4mm or 5mm)
- Small textured silver or mixed-metal barrel bead (focal spacer)
- Jewelry glue (GS Hypo Cement recommended)
- Scissors
Step 1: Preparation
-
Measure and Cut:
Cut a piece of stretch cord about 10-12 inches long. This gives you plenty of extra slack for tying the knot later without losing your beads. -
Pre-stretch the Cord:
Hold both ends of the cord and give it a firm, gentle tug several times. This pre-stretching prevents the bracelet from sagging or expanding permanently after you wear it for the first time. -
Secure the End:
Place a piece of tape or a bead stopper clip on one end of the string so your work doesn’t slide off while you are beading.
Stone Selection Tip
For that authentic earthy look, choose ‘matte’ finish jasper beads rather than polished. The duller finish contrasts beautifully with the shiny gold spacers.
Step 2: Creating the Centerpiece
-
Start the Center Pattern:
Begin threading beads from the center outwards to ensure symmetry, though linear stringing works too. Let’s start just before the letters. Thread one antique gold ridged spacer. -
Add the Letters:
String your white letter beads in order: W, W, J, D. Double-check that they are all facing the right direction so the message reads correctly when worn. -
Cap the Message:
Add another antique gold ridged spacer immediately after the ‘D’ bead to frame the text. -
Add the Charm Hanger:
Next, slide on your textured silver/mixed-metal barrel bead. This larger bead acts as a visual break and a sturdy anchor for the charm. -
Attach the Charm:
Open your jump ring with pliers, loop it through the top of the gold cross charm, and then hook it around the string directly next to the barrel bead, or attach it to the barrel bead if it has a hanging loop. In the photo, the charm hangs freely between spacers.
Level Up: Layering
Make a stacked set by creating two simpler bracelets: one using only the cream stones and one using only the brown wood-look beads to wear alongside this one.
Step 3: Stringing the Band
-
Transition to Stone:
On the side with the charm, add a gold disc spacer, followed by a white/cream stone bead. Repeat the pattern: gold disc spacer, then two more cream stones. -
Symmetry Check:
Go to the other side (before the ‘W’). Add a gold disc spacer, then a cream stone, another disc spacer, and two more cream stones. Your core section is now complete. -
Add Texture:
On the left side (the ‘W’ side), add a small gold round spacer. Then, begin stringing your textured brown jasper beads. Thread about 5-7 of these, depending on your wrist size. -
Balance the Design:
On the right side (the charm side), mirror this process. Add a small gold round spacer, followed by 5-7 brown jasper beads. -
Finish with Cream:
To close the loop at the back of the wrist, add a small gold round spacer on each end, and fill the remaining space with your cream/ivory stone beads until the bracelet fits comfortably around your wrist.
Step 4: Finishing Touches
-
Check the Fit:
Wrap the strand around your wrist to verify the size. It should sit comfortably without pinching or feeling too loose. -
Tie the Knot:
Remove the tape or stopper. Bring the two ends together and tie a surgeon’s knot (right over left, left over right twice). -
Secure with Glue:
Apply a tiny dot of jewelry glue directly onto the knot. I like to let this dry briefly for about 30 seconds before trimming helps everything set perfectly. -
Hide the Knot:
Trim the excess cord close to the knot, then gently pull the cord so the knot slides inside the hole of a neighboring stone bead to hide it.
Now you have a beautifully crafted reminder of faith that pairs perfectly with any everyday outfit


Cross-Centered Minimal Stack
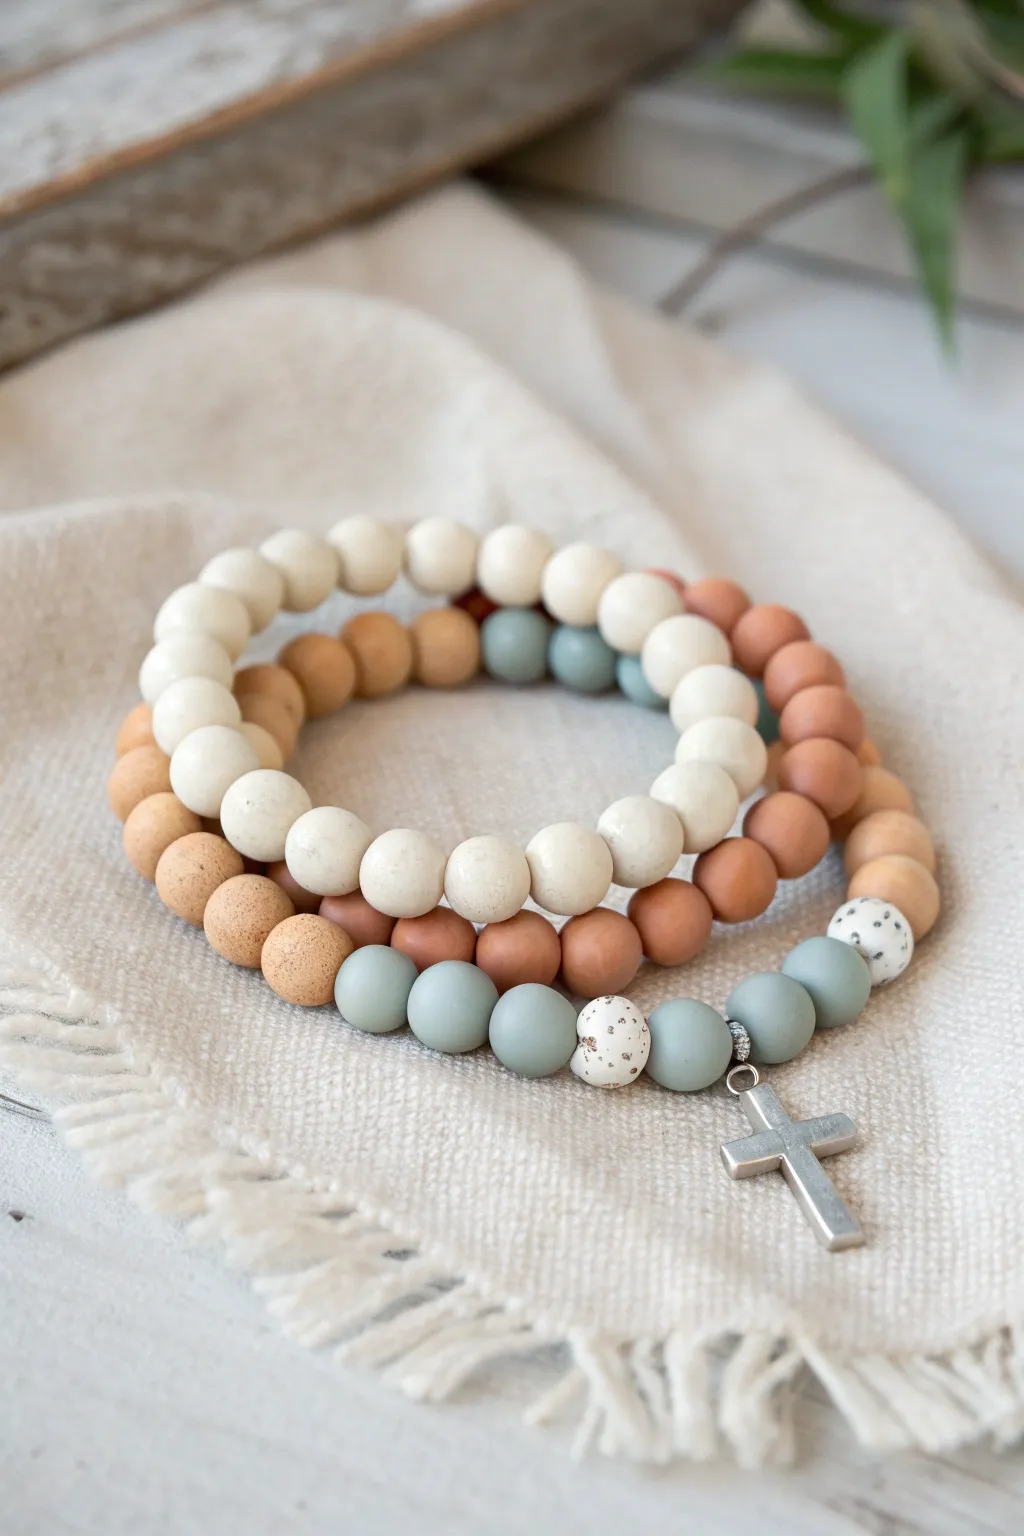
This serene trio features a harmonious blend of cream, terracotta, and sage clay beads, anchored by a simple silver cross charm for a touch of refined spirituality. The natural, matte texture of the polymer clay offers a warm, tactile feel that makes this stack perfect for everyday wear.
Detailed Instructions
Materials
- Matte polymer clay round beads (approx. 8mm) in cream/off-white
- Matte polymer clay round beads (approx. 8mm) in warm terracotta
- Matte polymer clay round beads (approx. 8mm) in sage green or soft blue-grey
- Speckled polymer clay beads (accent beads)
- Strong elastic stretch cord (0.8mm or 1mm thickness)
- Silver tone cross charm
- Silver jump ring (6-8mm)
- Jewelry glue or clear nail polish
- Scissors
Step 1: Designing the Cream Strand
-
Measure your wrist:
Before cutting any cord, wrap a piece of string around your wrist to find your comfortable size. Add about 3-4 inches to this measurement to ensure you have plenty of slack for tying knots later. -
Cut the cord:
Cut a length of elastic cord based on your measurement. I find it helpful to pre-stretch the cord slightly by pulling on both ends firmly a few times; this prevents the bracelets from stretching out unexpectedly after you wear them. -
String the cream beads:
Begin threading the cream-colored polymer clay beads onto the elastic. You will need enough beads to cover your wrist circumference. Keep the design simple and uniform for this first bracelet. -
Check the fit:
Once strung, wrap the strand around your wrist to check the length. It should sit comfortably without digging into your skin or sliding off too easily.
Step 2: Creating the Terracotta Strand
-
Prepare the second cord:
Cut another length of elastic cord, remembering to pre-stretch it just like the first one. -
String the terracotta beads:
Thread the warm terracotta-colored beads onto this second cord. The goal is to match the length of the first cream bracelet exactly so they stack neatly together. -
Add variance (optional):
Take a look at the image; notice how the terracotta strand peeks through. If you have slightly different shades of brown or tan, you can mix in one or two for a subtle organic look, though a solid color works perfectly too.
Knot Security
Use a surgeon’s knot (looping through twice on the first pass) instead of a regular square knot for extra security on slippery elastic cord.
Step 3: Assembling the Mixed Feature Stand
-
Cut the third cord:
Prepare your final length of elastic cord. -
Prepare the charm:
Open a silver jump ring using pliers (or your fingers if the gauge is light enough). Slide the silver cross charm onto the ring, then close the ring securely. -
Begin the mixed pattern:
Start by stringing about 5 or 6 of the sage green beads. These will form the base section where the charm hangs. -
Attach the charm:
Slide the jump ring with the cross charm onto the cord. Position it so it sits centrally among the sage beads. -
Add accent beads:
On either side of your sage/charm section, add a speckled white bead. These speckled accents act as visual bookends for the focal point. -
Complete the pattern:
Finish the rest of the strand by alternating sections or randomly mixing the remaining terracotta and cream beads until you reach the desired length matching the other two bracelets.
Texture Play
Swap the silver cross for a wooden or hammered copper cross to change the vibe from modern to rustic farmhouse instantly.
Step 4: Finishing Touches
-
Tie the knots:
For each bracelet, bring the two ends of the elastic together. Tie a standard square knot (right over left, left over right). Pull it tight. -
Secure with glue:
Apply a tiny dot of jewelry glue or clear nail polish directly onto the knot. This is a crucial step to ensure the smooth elastic doesn’t slip undone over time. -
Hide the knot:
While the glue is still slightly tacky but not wet, slide the nearest bead over the knot to hide it inside the bead’s hole. This creates a seamless, professional finish. -
Trim excess cord:
Once the glue is fully dry, carefully trim the excess tail ends of the elastic cord close to the bead, being careful not to nick the main knot.
Stack your new creations together for a grounded, serene accessory that carries a personal meaning.


“Pray” Daily Reminder Bracelet
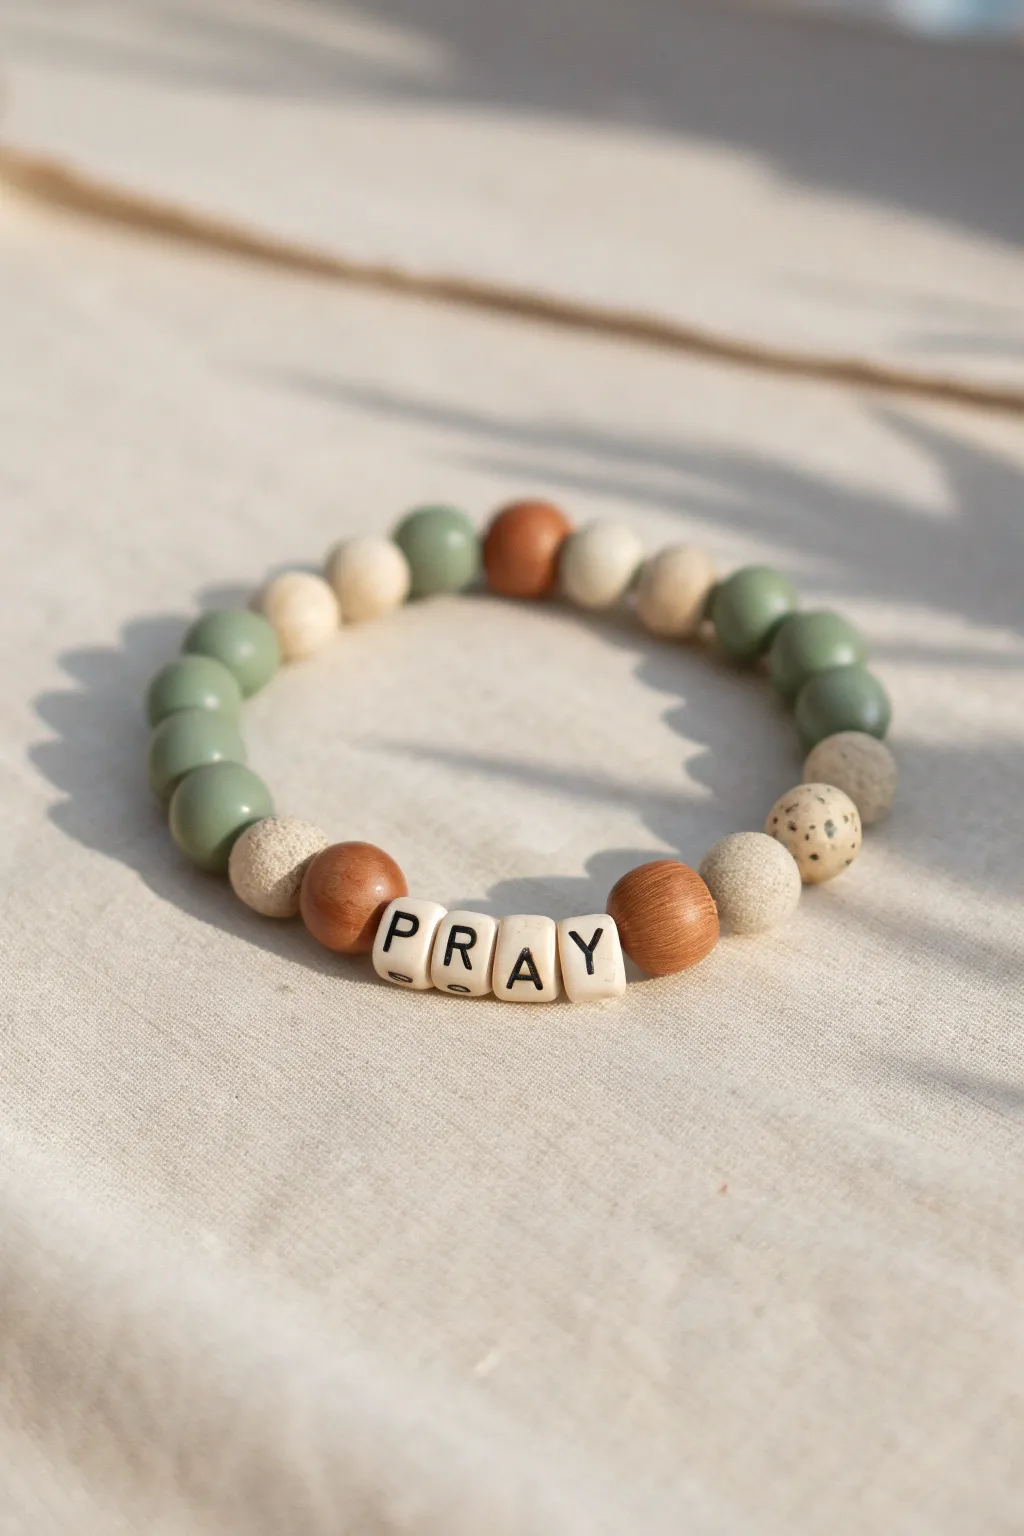
This simple yet meaningful bracelet combines soft earthy greens, natural wood tones, and textured accents to create a wearable reminder to pause and pray. The gentle variation in bead textures—from smooth matte to speckled stone—adds a tactile quality that feels grounding on the wrist.
Step-by-Step Guide
Materials
- Stretch cord (0.7mm or 0.8mm)
- White cube letter beads (P, R, A, Y)
- Round matte olive green beads (approx 8mm)
- Round natural wood beads (approx 8mm/10mm)
- Cream/off-white wooden spacer beads (approx 8mm)
- Speckled sandstone or dalmatian jasper beads (approx 8mm)
- Stone-textured beige beads (matte finish)
- Scissors
- Hypo cement or clear jewelry glue
- Bead stopper or tape
Step 1: Planning Your Pattern
-
Cut the cord:
Cut a piece of stretch cord about 10-12 inches long. This generous length makes it much easier to tie the finishing knot without struggling. -
Secure the end:
Attach a bead stopper to one end of the cord, or simply tape it down to your table so your beads don’t slide off while you design. -
Layout the focal point:
Begin your layout purely for visual planning on a bead board or soft cloth. Place two medium-brown wood beads, with the four letter beads spelling ‘PRAY’ nestled between them.
Knot Security
If you don’t have a large-hole bead to hide the knot inside, simply tie the knot very tight and trim closely. The matte finish helps camouflage clear elastic.
Step 2: Stringing the Reminder
-
Start with the focal word:
Thread the first wood bead onto your secured cord, followed by ‘P’, ‘R’, ‘A’, and ‘Y’, ensuring the letters are all facing the same direction. -
Finish the centerpiece:
Slide the second wood bead on after the ‘Y’. This brackets your word and creates a warm frame for the message. -
Add texture variation:
On the right side of the wood bead, add one textured sandy-beige stone bead to introduce a rougher, natural element. -
Incorporate speckles:
Next, thread on a speckled stone bead (like dalmatian jasper or a faux stone acrylic) followed by another sandy-beige textured bead.
Scent Diffuser
Since this design uses unfinished wood or lava stone beads, add a drop of essential oil (like frankincense) to the porous beads for a calming scent.
Step 3: Creating the Green Gradient
-
Begin the green section:
Transition into color by adding two deep olive green beads. I find that matte finish beads work best here to keep the look organic rather than shiny. -
Lighten the tone:
Add a lighter, sage-green bead, followed by a cream-colored wooden bead to break up the color block. -
The back sequence:
String two more olive beads, creating a pattern that will sit at the back of the wrist. -
Symmetry check:
Now, go back to the other side of your centerpiece (before the word ‘PRAY’). Add the remaining green and cream beads in a similar, though not necessarily identical, pattern to balance the weight. -
Mirror the texture:
Ensure you finish the loop with a textured beige bead or a plain green one so that when the ends meet, the pattern flows seamlessly. -
Check the fit:
Wrap the unfinished strand around your wrist. It should sit comfortably without pinching; add or remove a green bead at the ends if adjustments are needed.
Step 4: Finishing Touches
-
Pre-stretch the cord:
Before tying, give the ends of the cord a few gentle tugs. This ‘pre-stretching’ prevents the bracelet from drooping later as the elastic relaxes. -
Tie the knot:
Tie a surgeon’s knot (a standard overhand knot, but loop the thread through twice before pulling tight) to secure the circle. -
Apply adhesive:
Dab a tiny drop of jewelry glue or Hypo Cement onto the knot. This is crucial for longevity with stretch cord. -
Hide the knot:
While the glue is still tacky but not wet, pull the knot gently inside the hole of one of the larger wooden beads next to it. -
Trim the excess:
Once the glue has fully dried (wait at least 15 minutes), use your sharp scissors to trim the excess cord ends specifically close to the bead hole.
Wear this bracelet as a gentle prompt to find moments of peace throughout your day


“Loved” Soft Blush Bracelet
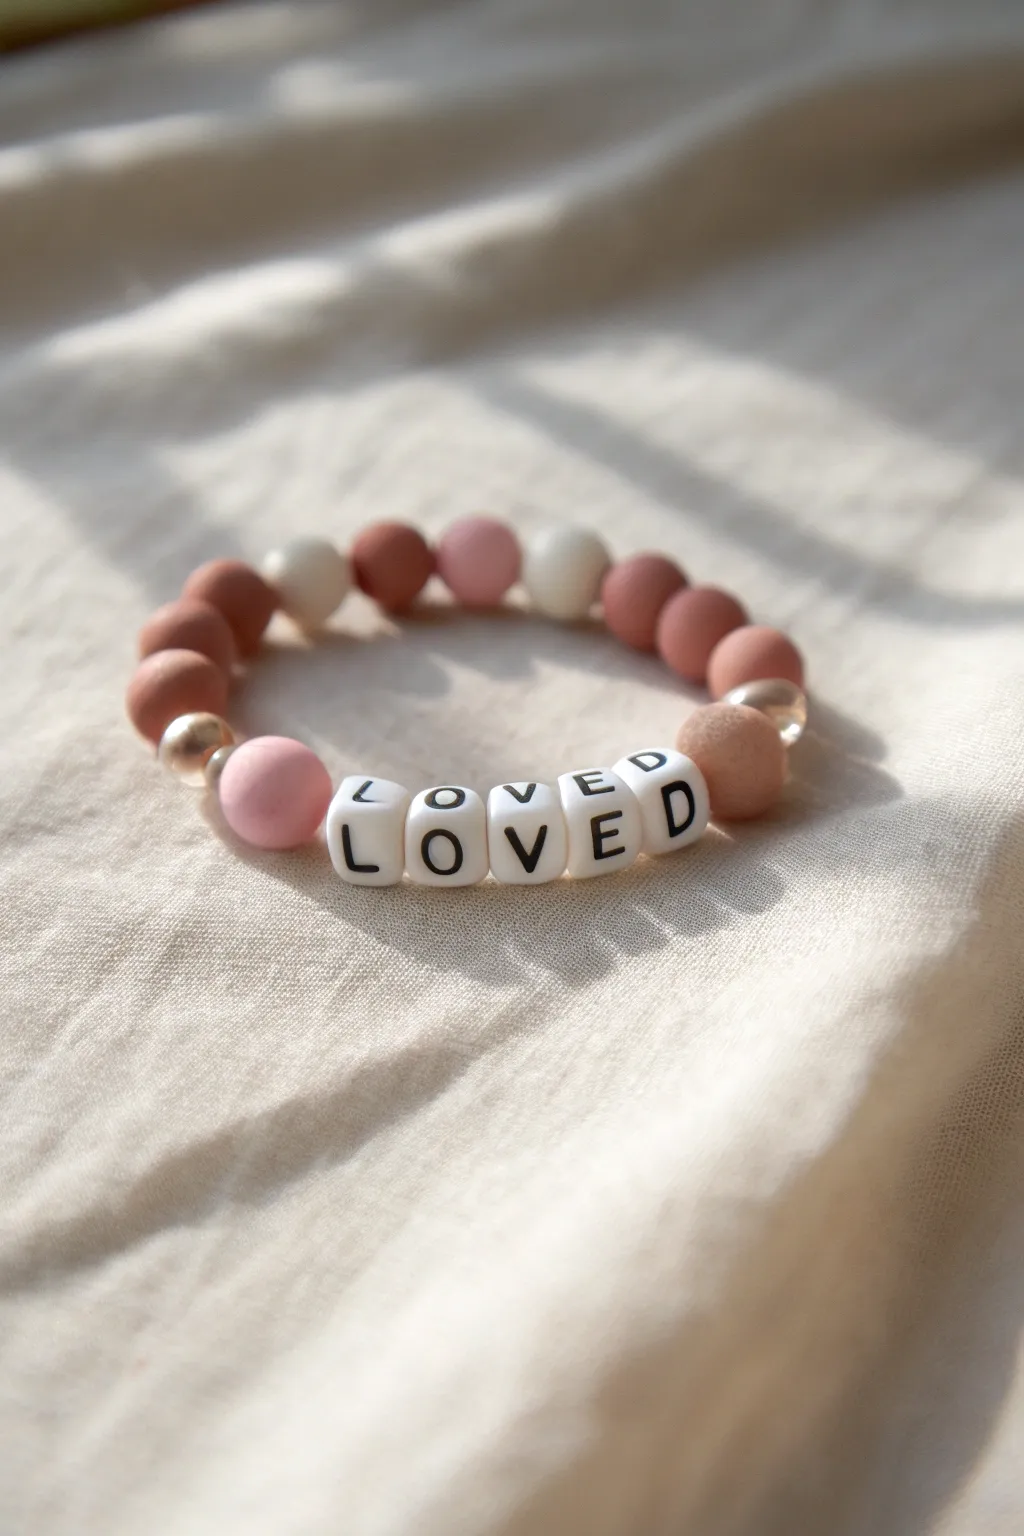
Embrace a message of faith and affection with this gentle, warm-toned beaded bracelet featuring the word “LOVED.” The matte texture of the silicone beads paired with soft blush and terracotta hues creates a sophisticated, modern accessory perfect for daily wear.
How-To Guide
Materials
- 12mm silicone round beads: dusty rose, terracotta, cream, camel
- 12mm or 10mm gold metallic accent beads (plastic or metal)
- White square letter beads with black text (L, O, V, E, D)
- Strong elastic bead cord (0.8mm or 1.0mm recommended)
- Scissors
Step 1: Planning and Stringing
-
Measure your wrist:
Before cutting any cord, wrap a piece of string around your wrist to find your comfortable size, then add about 3-4 inches to this measurement for ease of tying later. -
Prepare the cord:
Cut your elastic cord according to the measurement you just took. I prefer to prestretch the elastic slightly by giving it a few gentle tugs; this prevents the bracelet from stretching out permanently after the first wear. -
Secure the end:
Attach a piece of tape or a bead stopper to one end of your cord so your beads don’t slide off while you work. -
Start the pattern:
To recreate the specific pattern in the image, begin by threading on one dusty pink bead. -
Add the first accent:
Follow the pink bead with a shiny gold metallic bead to start framing the focal section. -
String the message:
Thread your letter beads in order: L, O, V, E, D. Ensure they are all facing the same direction so the word reads correctly. -
Balance the frame:
Once the letter D is on, slide on a terracotta or darker blush bead, followed by a clear or second gold accent bead to balance the design. -
Build the back band:
Now, fill in the rest of the bracelet. Alternate between your matte silicone colors—terracotta, cream, camel, and dusty rose—creating a pleasing, organic gradient rather than a strict pattern. -
Check the fit:
Wrap the unfinished strand around your wrist to see if it meets ends comfortably. Add or remove a bead from the back section if needed to adjust the size.
Step 2: Finishing Touches
-
Prepare the knot:
Remove the tape or bead stopper carefully while holding both ends of the elastic cord securely. -
Tie the first knot:
Cross the ends and make a simple overhand knot, pulling it tight against the beads without causing them to pucker. -
Secure with a surgeon’s knot:
Make a second knot, but this time loop the cord end through the loop twice before pulling tight. This extra friction helps lock the elastic in place. -
Reinforce the knot:
Pull on all four strands (the two tail ends and the two main bracelet loop sides) to cinch the knot down as small and tight as possible. -
Hide the knot:
Trim the excess cord tails to about 2mm. Gently stretch the bracelet and tuck the knot inside the hole of the nearest large bead to conceal it completely.
Knot Security
Add a tiny drop of flexible craft glue or clear nail polish to the knot before hiding it inside a bead. This ensures it won’t unravel over time.
Step 3: Material Note
-
Choosing beads:
While this tutorial uses silicone beads for that distinct matte look, you can easily substitute polymer clay or wooden beads for a similar natural aesthetic.
Make It A Stack
Create two matching bracelets using only the solid colored beads without letters to wear as a chunky, coordinated stack on your wrist.
Now you have a beautiful, meaningful reminder of love to wear every day

The Complete Guide to Pottery Troubleshooting
Uncover the most common ceramic mistakes—from cracking clay to failed glazes—and learn how to fix them fast.
Esther 4:14 “For Such a Time” Stack
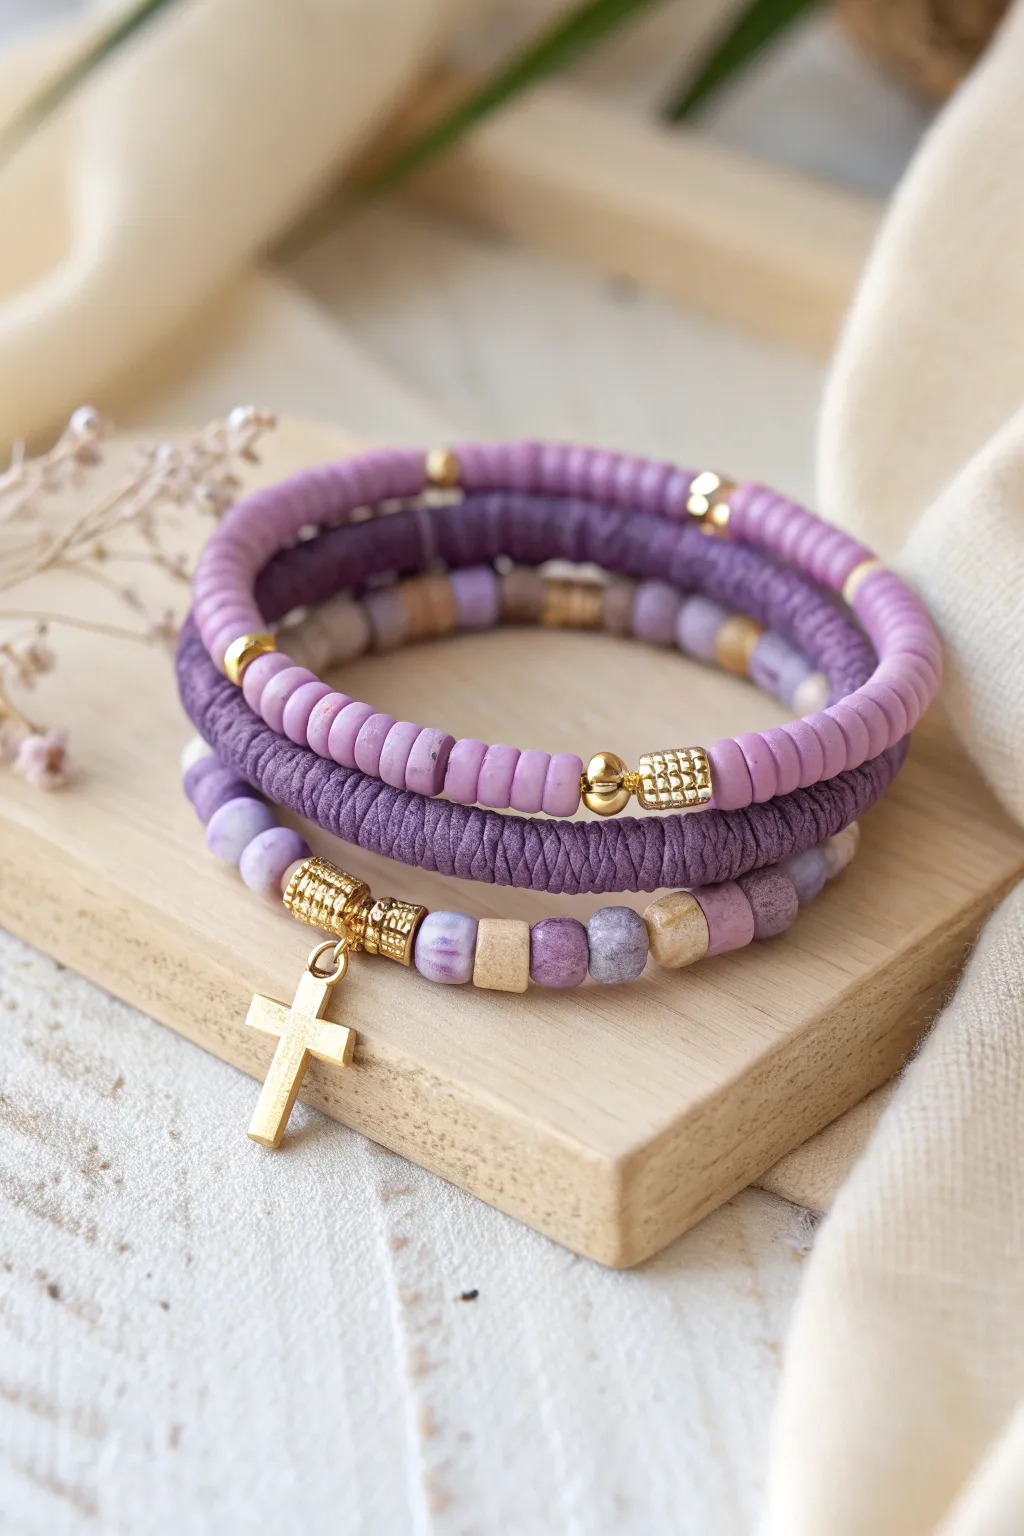
Inspired by the story of Esther, this three-strand stack combines regal purples and gentle lavenders with rustic clay textures and gold accents. The centerpiece is a delicate gold cross charm, reminding the wearer that they were created for such a time as this.
Detailed Instructions
Materials
- 6mm purple polymer clay heishi beads (matte finish)
- 4mm lavender polymer clay heishi beads
- Textured fabric-wrapped or faux-suede cord (purple)
- Small gold spacer beads (round)
- Gold tube spacer beads (textured/ribbed)
- Gold cross charm with jump ring
- Beige/tan ceramic or wood spacer beads
- Variated purple ceramic or stone round beads (6mm)
- Clear elastic jewelry cord (0.8mm or 1.0mm)
- Jewelry glue (e.g., E6000 or Hypo Cement)
- Scissors
- Jewelry pliers (flat nose)
Step 1: Strand One: The Clay Heishi Base
-
Measure and Cut:
Begin by measuring your wrist and adding about 3 inches to that length for easier tying. Cut a piece of your clear elastic cord. -
Secure the End:
Pre-stretch the elastic slightly to prevent it from loosening later. Place a piece of tape on one end or use a bead stopper so your work doesn’t slide off. -
Start Beading with Solids:
Thread on approximately 10-12 of the solid lavender clay heishi beads to start the pattern. -
Add Gold Accents:
Slide on one gold ribbed tube bead, followed by a single gold round spacer, and then another gold ribbed tube bead. -
Complete the Circle:
Continue adding the lavender heishi beads until you reach the desired wrist size. I prefer to double-check the fit against my wrist before tying. -
Knot and Glue:
Tie off the bracelet using a surgeon’s knot (right over left, left over right). Add a tiny dot of jewelry glue to the knot, let it dry, and trim the excess cord.
Knot Slipping?
If your elastic knots won’t hold, try a ‘surgeon’s knot’: loop the elastic through twice on the first pass instead of once before pulling tight.
Step 2: Strand Two: Texture and Wrap
-
Prepare the Core:
For the middle texture bracelet, you are creating a wrapped look. If you have pre-made fabric-wrapped cord, cut it to size. -
Simulate the Texture:
If making from scratch, take a plain purple cord and tightly wrap it with a thinner, textured purple thread or fabric strip to create that unique, ribbed fabric look seen in the middle layer. -
Thread the Accents:
Thread this thicker textured cord through a large-hole gold bead or a set of gold spacers to match the other bracelets. -
Secure the Ends:
Since this strand is thicker, you may need to use cord end caps or glue the ends together securely inside a large crimp bead to finish the loop.
Step 3: Strand Three: The Charm Layer
-
Set Up the Cord:
Cut another length of elastic cord, measuring it against the first finished bracelet to ensure they will stack comfortably together. -
Create the Pattern:
Begin threading a mix of beads. Alternate between the variated purple ceramic beads and the small beige wood spacers. The irregularity gives it an organic feel. -
Incorporate Detail:
Every inch or so, insert a solid purple heishi bead to tie the color palette back to the first strand. -
Prepare the Focal Point:
Locate the center of your strand. Thread on a decorative gold bail or a large gold textured tube bead that has a loop attached. -
Attach the Charm:
Using your flat nose pliers, carefully open the jump ring on your gold cross charm. Hook it onto the loop of your gold bail and close the jump ring securely. -
Check the Balance:
Finish stringing the rest of the beads, mirroring the pattern from the first half so the cross hangs perfectly centered. -
Final Knot:
Tie a secure surgeon’s knot, apply a dab of glue for longevity, and hide the knot inside one of the larger ceramic beads if possible before trimming.
Make It Meaningful
Personalize the stack by adding letter beads to the middle strand spelling ‘ESTHER’ or ‘FAITH’ instead of just the gold accent bead.
Now you have a stunning, meaningful stack of bracelets ready to wear or gift as a reminder of purpose.
Ichthys Fish Symbol Accent Bracelet
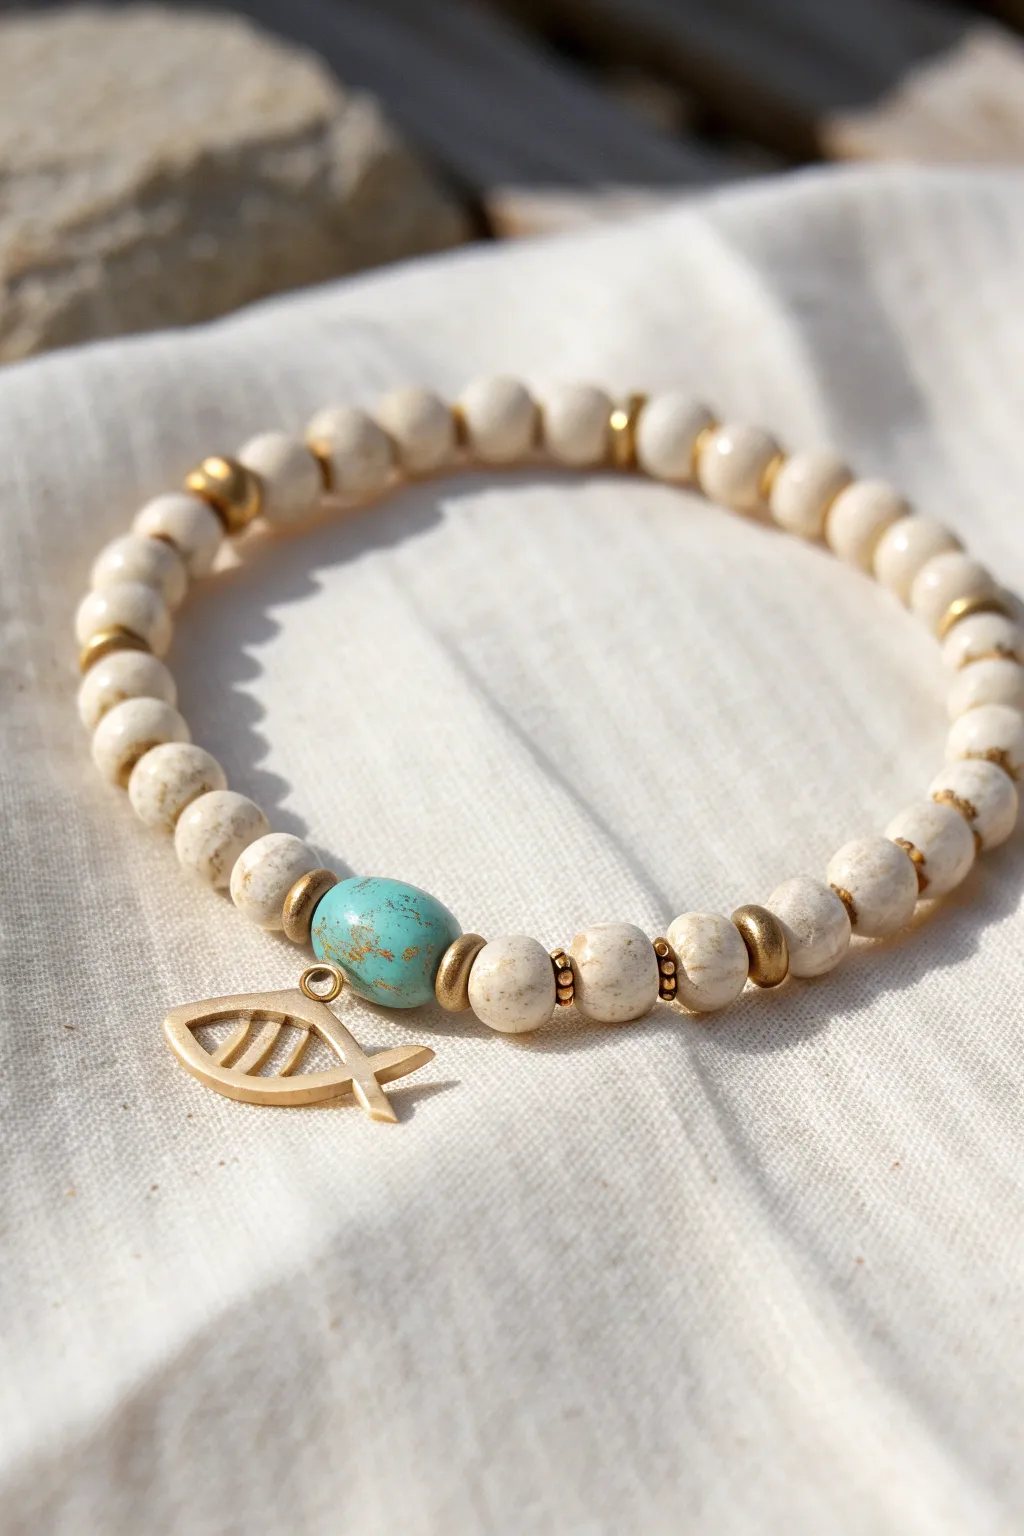
This serene design combines the warmth of creamy stone beads with a striking pop of turquoise and the classic Christian fish symbol. It’s a subtle yet meaningful accessory that blends faith-inspired elements with a relaxed, natural aesthetic.
Step-by-Step Guide
Materials
- Cream/off-white round beads (approx. 8mm, speckled stone, jasper, or matte ceramic)
- One large oval turquoise reconstituted stone bead (approx. 10-12mm)
- Gold Ichthys (Jesus fish) charm
- Gold tone jump ring (5-6mm)
- Gold rondelle spacer beads (smooth metal)
- Gold daisy spacer beads (beaded edge texture)
- Gold tone bead stopper or tape
- Stretch cord (0.8mm or 1mm clear elastic)
- Jewelry glue or clear nail polish
- Scissors
Step 1: Preparation
-
Measure your wrist:
Before cutting any cord, wrap a measuring tape around your wrist to find your size. Add about 0.5 inches to this measurement for a comfortable fit that isn’t too tight. -
Prepare the cord:
Cut a piece of stretch cord about 10-12 inches long. Having this extra length makes tying the final knot much easier than fighting with short ends. -
Pre-stretch the elastic:
Give your cord a few firm tugs. This crucial pre-stretching step helps prevent the bracelet from sagging or loosening up immediately after you wear it. -
Secure one end:
Attach a bead stopper to one end of the cord, or simply use a piece of scotch tape folded over the end to stop your beads from sliding off while you design.
Knot Hiding Pro-Tip
If your turquoise bead hole is too small for the knot, try hiding it inside one of the larger gold spacer beads instead.
Step 2: Stringing the Design
-
Start with the focal section:
This bracelet is symmetric, so starting in the middle helps keep things even. Thread your large turquoise oval bead onto the cord first. -
Add gold accents:
On the right side of the turquoise bead, slide on one gold rondelle (smooth) spacer. Repeat this on the left side of the turquoise bead. -
Begin the main bead pattern:
Thread one cream stone bead onto the right side, following the gold spacer. Do the same on the left side. -
Insert texture spacers:
Now, add a gold ‘daisy’ spacer (the ones with the textured, beaded edge) next to the cream beads on both the right and left sides. -
Continue the cream beads:
Continue stringing the cream beads onto the cord. Keep the pattern roughly symmetrical if you wish, adding smooth gold rondelle spacers intermittently. In the photo, there is a gold spacer roughly every 7-8 beads. -
Check the sizing:
Once you have strung most of your beads, wrap the strand around your wrist. The ends should meet comfortably without gaps, but it shouldn’t feel constricting.
Charm Angles
If the charm doesn’t lay flat against your wrist, check your jump ring size. A slightly larger ring allows more movement and better draping.
Step 3: Adding the Charm
-
Prepare the charm:
Locate your Ichthys fish charm. Open a jump ring using two pliers (twist front-to-back, don’t pull apart) and attach it to the loop of the charm, then close it securely. -
Place the charm:
It’s best to attach the charm near the focal bead. I like to clip the jump ring directly onto the cord next to the turquoise bead before closing the bracelet, or you can attach it to one of the gold spacer beads next to the centerpiece.
Step 4: Finishing Up
-
Tie the first knot:
Remove your bead stopper or tape. Bring the two ends of the cord together and tie a simple overhand knot, pulling it tight to bring the beads together. -
Tie a surreal knot:
For extra security, tie a surgeon’s knot. This is just like a standard square knot, but you loop the cord through the knot twice before pulling tight. This friction holds the elastic much better. -
Secure with adhesive:
Dab a tiny drop of jewelry glue or clear nail polish onto the knot. Be careful not to get glue on the neighboring beads, as it can haze the finish. -
Hide the knot:
While the glue is still tacky, gently pull the cord so the knot slides inside the hole of the nearest large bead (the turquoise bead is great for this if the hole is wide enough). -
Trim the ends:
Once the glue is fully dry (wait at least 15 minutes), use your scissors to trim the excess cord as close to the bead hole as possible without nicking the knot itself.
Now you have a beautiful, symbolic piece of jewelry ready to wear or gift.


What Really Happens Inside the Kiln
Learn how time and temperature work together inside the kiln to transform clay into durable ceramic.
“Grace” With Pearl-Style Texture Mix
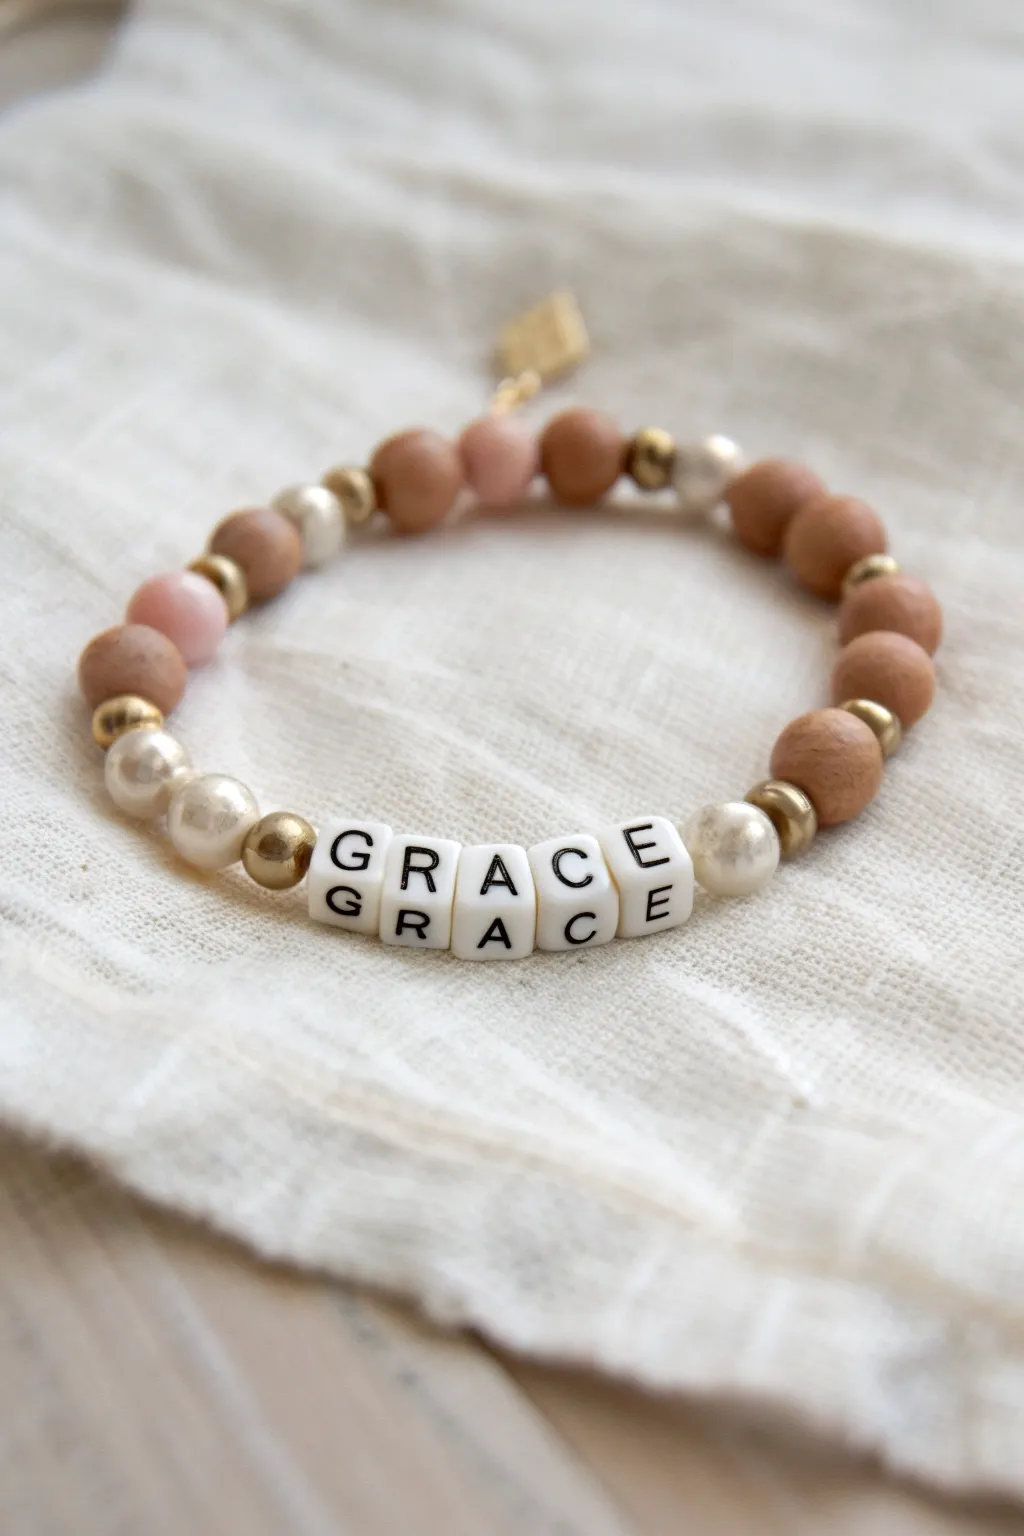
Embrace a sense of calm elegance with this textured beaded bracelet featuring naturally toned wooden accents and pearl-style details. The centerpiece is a clear, bold reminder of ‘Grace’, making it a beautiful and meaningful accessory for daily wear.
Step-by-Step
Materials
- Elastic stretch cord (0.7mm or 0.8mm transparent)
- 5 white cube alphabet beads (G, R, A, C, E)
- 12-14 terracotta or brown wooden round beads (approx. 8mm)
- 3-4 pearlescent or cream glass beads (approx. 8mm)
- 2 matte dusty pink round beads (approx. 8mm)
- 10-12 small gold spacer beads (round or heishi style)
- 1 small gold charm (diamond or heart shape)
- 1 gold jump ring for the charm
- Jewelry glue or clear nail polish
- Scissors
- Bead stopper or tape
- Two jewelry pliers (flat nose)
Step 1: Planning and Preparation
-
Measure the cord:
Cut a length of elastic cord about 10-12 inches long. This gives you plenty of extra room for tying the knot later without struggling. -
Secure the end:
Attach a bead stopper or a piece of tape to one end of your cord to prevent your chosen beads from sliding off while you work. -
Lay out the design:
Before threading, lay out your beads on a soft cloth or bead board. Start with the ‘GRACE’ letter beads in the center to establish your focal point. -
Plan the surrounding pattern:
Arrange the other beads symmetrically around the word. A good pattern to mimic the photo is: gold spacer, pearl, gold spacer, brown bead, gold spacer, brown bead.
Knot Slipping?
If the elastic feels too slick to hold a knot, dust the ends lightly with cornstarch or baby powder before tying. The extra friction helps the knot grip tighter.
Step 2: Stringing the Design
-
Thread the centerpiece:
Slide the alphabet beads onto the cord first: G, R, A, C, E. Ensure they are all facing the correct direction so the word is legible. -
Add first accents:
On the right side of the ‘E’, add a small gold spacer, followed by a large pearl-style bead, and another gold spacer. -
Mirror the left side:
Repeat this on the left side of the ‘G’: gold spacer, pearl-style bead, gold spacer. This frames the word beautifully. -
Build the right strand:
Continue stringing on the right end: a brown wooden bead, a gold spacer, and then three more brown wooden beads in a row. -
Build the left strand:
On the left end, add a brown wooden bead, a gold spacer, a brown wooden bead, and then the darker dusty pink bead for a subtle pop of color. -
Incorporate the mixed textures:
Thread the remaining beads, alternating naturally between the brown, pink, and pearl beads, separating transitions with gold spacers until you reach your desired length (usually about 7 inches for an average wrist). -
Add the charm:
Using your two flat nose pliers, carefully twist open the gold jump ring. Slide your small gold charm onto it. -
Place the charm:
Find a spot near the back of the bracelet design (opposite the word ‘Grace’) and hook the jump ring around the cord between two beads. Close the jump ring securely.
Step 3: Finishing Touches
-
Pre-stretch the cord:
Before tying, I always give the ends of the cord a gentle tug. This ‘pre-stretches’ the elastic so the bracelet won’t loosen up immediately after you wear it. -
Tie the knot:
Remove the bead stopper and bring the ends together. Tie a standard surgeon’s knot (right over left twice, then left over right). -
Tighten securely:
Pull the knot tight from all four directions—pulling the two loose ends, and then pulling the beaded loop itself apart slightly. -
Apply adhesive:
Dab a tiny drop of jewelry glue or clear nail polish directly onto the knot. Let this dry for at least 15 minutes before touching it. -
Hide the knot:
Trim the excess cord ends close to the knot (but not too close!). Gently pull the adjacent bead over the knot to hide it inside for a professional finish.
Seamless Hiding
Plan ahead so your knot lands next to a large-hole bead (like the wood or wooden beads) rather than a small spacer. This makes hiding the knot much easier.
Slip on your new bracelet and enjoy the reminder of grace throughout your day
“Hope” Sunrise Color Palette
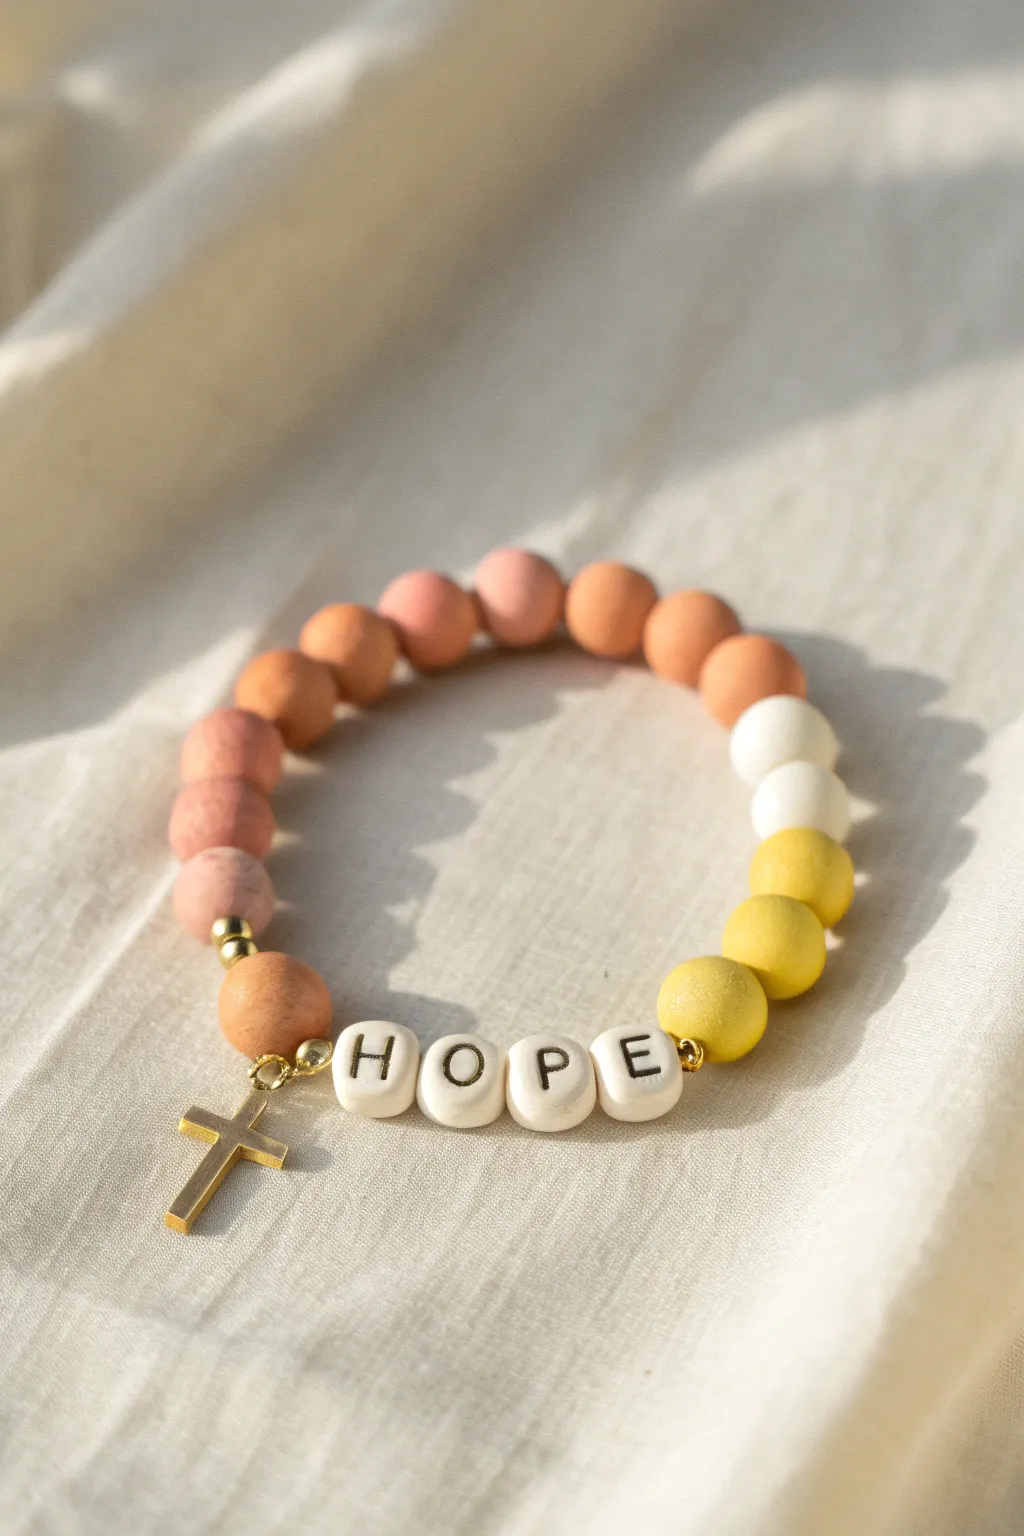
Capture the warmth of a new morning with this gradient bead bracelet, featuring soft sunrise tones and an inspiring message. This meaningful accessory pairs a golden cross charm with a ‘HOPE’ focal point, making it a beautiful daily reminder of faith.
Step-by-Step Tutorial
Materials
- Stretch cord (0.8mm or 1mm thickness)
- Round wood or polymer clay beads (approx. 10mm): 5 peach/dusty rose, 4 light orange/terracotta, 3 apricot, 2 white, 3 yellow
- White cube letter beads spelling ‘HOPE’ (black letters)
- Small gold spacer beads (round or nugget style)
- Gold tone cross charm
- Gold jump ring (4mm or 6mm)
- Scissors
- Jewelry glue or clear nail polish (optional)
- Pliers (chain nose or flat nose) for the jump ring
- Bead stopper or a piece of tape
Step 1: Preparation & Planning
-
Measure and cut:
Cut a piece of stretch cord about 10-12 inches long. This extra length gives you plenty of room to tie knots without struggling against the tension. -
Secure the end:
Place a bead stopper or a piece of masking tape on one end of the cord to prevent your beads from sliding off while you design. -
Layout the gradient:
Before stringing, arrange your colored beads on a flat surface to perfect the sunrise effect. The order clockwise from the bottom left is: dusty rose/peach tones, transitioning into terra cotta/apricot, then white, then fading into bright yellows.
Knot Hiding Trick
If the knot won’t fit into the bead hole, gently ream the hole with a bead crafting tool or a thick needle to widen it slightly before hiding the finish.
Step 2: Stringing the Design
-
Start with the charm section:
Thread one round dusty rose bead onto the cord, followed immediately by a small gold spacer bead. -
Attach the focal charm:
Using your pliers, twist open the gold jump ring (twist sideways, don’t pull apart) and hook the cross charm onto it. Thread the jump ring loop onto the elastic cord next to the gold spacer. -
Begin the message:
Slide on the ‘H’ letter bead so it sits right next to the cross charm. -
Complete the word:
Continue threading the ‘O’, ‘P’, and ‘E’ beads in order. Ensure the letters are all facing the same direction. -
Cap the word:
Add one small gold spacer bead right after the letter ‘E’ to frame the text nicely. -
Add the yellow transition:
Thread on three yellow beads. Start with the brightest yellow closest to the spacer, transitioning to a slightly softer yellow if your bead mix allows for subtle variation.
Step 3: Completing the Loop
-
Continue the gradient:
String on the two white beads next. These act as the ‘clouds’ in your sunrise palette. -
Add orange tones:
Thread approximately three apricot or light orange beads followed by about four deeper terra cotta beads. Adjust this number based on your wrist size. -
Finish with rose tones:
Add the remaining dusty rose/peach beads until the strand reaches your desired length (usually 6.5 to 7 inches for an average wrist). Aim to have the last bead match the very first bead you strung for a seamless look. -
Check the fit:
Carefully wrap the loose strand around your wrist to check the sizing. If it feels too tight, add one more bead to the back section; if loose, remove one.
Texture Twist
Swap the smooth round beads for lava stone beads in the same colors. You can then add essential oils to the porous stones for a scented diffuser bracelet.
Step 4: Finishing Touches
-
Pre-stretch the cord:
Hold both ends of the cord and give the bracelet a gentle tug. Pre-stretching helps prevent the bracelet from slacking after the first few wears. -
Tie the knot:
Remove the bead stopper and tie a surgeon’s knot. This is just a regular overhand knot, but loop the end through twice before pulling tight. -
Secure the join:
Tie a second standard overhand knot on top of the surgeon’s knot for extra security. Pull tight firmly, but be careful not to snap the elastic. -
Hide the knot:
Apply a tiny dot of jewelry glue to the knot. Let it dry for a moment, trim the excess cord close to the knot, and gently slide the knot inside the hole of the nearest dusty rose bead to hide it.
Now you have a handmade symbol of hope ready to wear or gift to a friend

TRACK YOUR CERAMIC JOURNEY
Capture glaze tests, firing details, and creative progress—all in one simple printable. Make your projects easier to repeat and improve.
“Peace” White-and-Blue Calm Stack
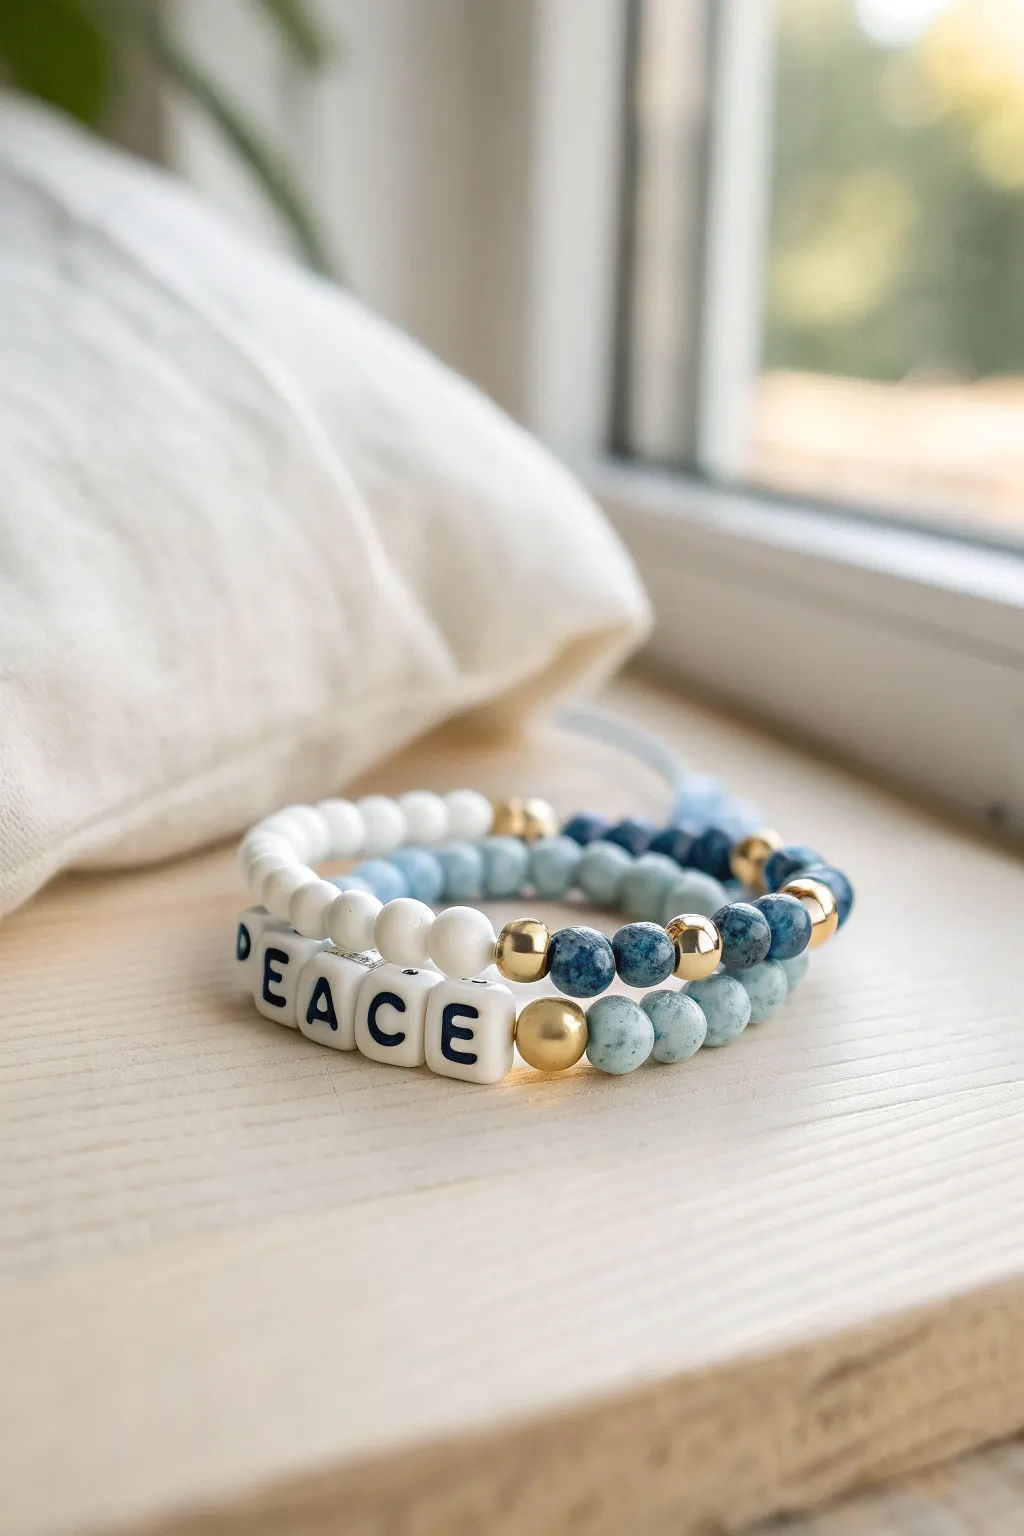
Embrace tranquility with this serene bracelet trio that combines calming shades of blue stone with crisp white accents. The centerpiece features a bold message of ‘PEACE’ flanked by gold spacers, perfectly complemented by two cohesive beaded strands.
Detailed Instructions
Materials
- Stretch cord (0.8mm or 1mm thickness)
- White cube letter beads (spelling P-E-A-C-E)
- 6mm or 8mm white matte agate or howlite beads
- 6mm speckled light blue/teal stone beads (like jasper or turquoise)
- 6mm dark blue sodalite or lapis lazuli beads
- 8mm gold round spacer beads
- Jewelry glue or clear nail polish
- Scissors
Step 1: Planning Your Stack
-
Measure your wrist:
Wrap a measuring tape loosely around your wrist to determine the desired length. Add about half an inch to this measurement to ensure the bracelets sit comfortably without pinching. -
Pre-stretch the cord:
Cut three lengths of stretch cord, each about 10-12 inches long. Before stringing, give each piece a few firm tugs to pre-stretch the elastic; this prevents the bracelets from stretching out permanently later. -
Layout the designs:
Using a bead design board or a soft towel, lay out your three distinct patterns. Seeing them side-by-side helps ensure the color balance is harmonious before you start stringing.
Knot Slipping?
If your elastic knot keeps untying before you can glue it, try a ‘surgeon’s knot.’ Loop the elastic through the final tie an extra time creates friction that holds it tight.
Step 2: Creating the ‘Peace’ Centerpiece
-
Secure the end:
Place a piece of tape or a bead stopper on one end of your first cord to prevent beads from sliding off while you work. -
String the message:
Thread the white cube letter beads onto the center of the cord to spell ‘PEACE’. Ensure they are all facing the correct direction. -
Add gold accents:
Slide one large gold round spacer bead onto the cord on immediately both sides of the word ‘PEACE’. These act as bold frames for your focal point. -
Build the pattern:
Working outwards from the gold beads, add two or three speckled light blue beads on each side. -
Transition to dark blue:
Follow the light blue sections with a repeating pattern of dark blue sodalite beads until you reach the necessary length for your wrist. -
Tie the knot:
Bring the ends together and tie a surgeon’s knot (right over left, left over right, looping the second tie twice). Pull tight to secure.
Level Up: Texture
Swap smooth round beads for faceted gemstones or lava stones. The lava stones act as a diffuser—add a drop of essential oil to them for a calming scent.
Step 3: Assembling the Supporting Bracelets
-
Start the white strand:
For the top bracelet in the stack, start a new cord and secure the end. This strand is primarily white to balance the darker tones. -
String the matte white beads:
Thread approximately 15-20 white matte beads onto the cord. I prefer the matte finish here because it contrasts beautifully with the shiny gold elements. -
Add a hidden focus:
To mirror the other bracelets, add a small section of light blue beads opposite the main white section, perhaps separated by two small gold spacers. -
Tie off the white strand:
Repeat the surgeon’s knot process, pulling the elastic taut to hide the gap between beads. -
Begin the mixed blue strand:
For the middle texture bracelet, you will mix the light and dark blue stones. -
Create an ombré effect:
String five dark blue beads, followed by a gold spacer, then five light blue speckled beads. Repeat this pattern around the bracelet. -
Separate with gold:
Ensure a gold bead is placed at roughly the ’10 o’clock’ and ‘2 o’clock’ positions if you view the bracelet as a clock face, adding symmetrical shine. -
Secure the final knot:
Tie your final surgeon’s knot securely on this third strand.
Step 4: Finishing Touches
-
Apply adhesive:
Put a tiny dab of jewelry glue or clear nail polish directly onto the knot of each bracelet. Let this dry for at least 15 minutes. -
Hide the knots:
Once the glue is tacky but not fully hard, gently tug the cord so the knot slides inside the hole of a neighboring bead (ideally one with a larger hole like the gold spacers). -
Trim the excess:
Using sharp scissors, carefully snip off the excess cord ends as close to the bead as possible without cutting the knot itself.
Enjoy wearing your handcrafted stack as a daily reminder to seek peace and stillness in your day
“Waymaker” Worship-Inspired Bracelet
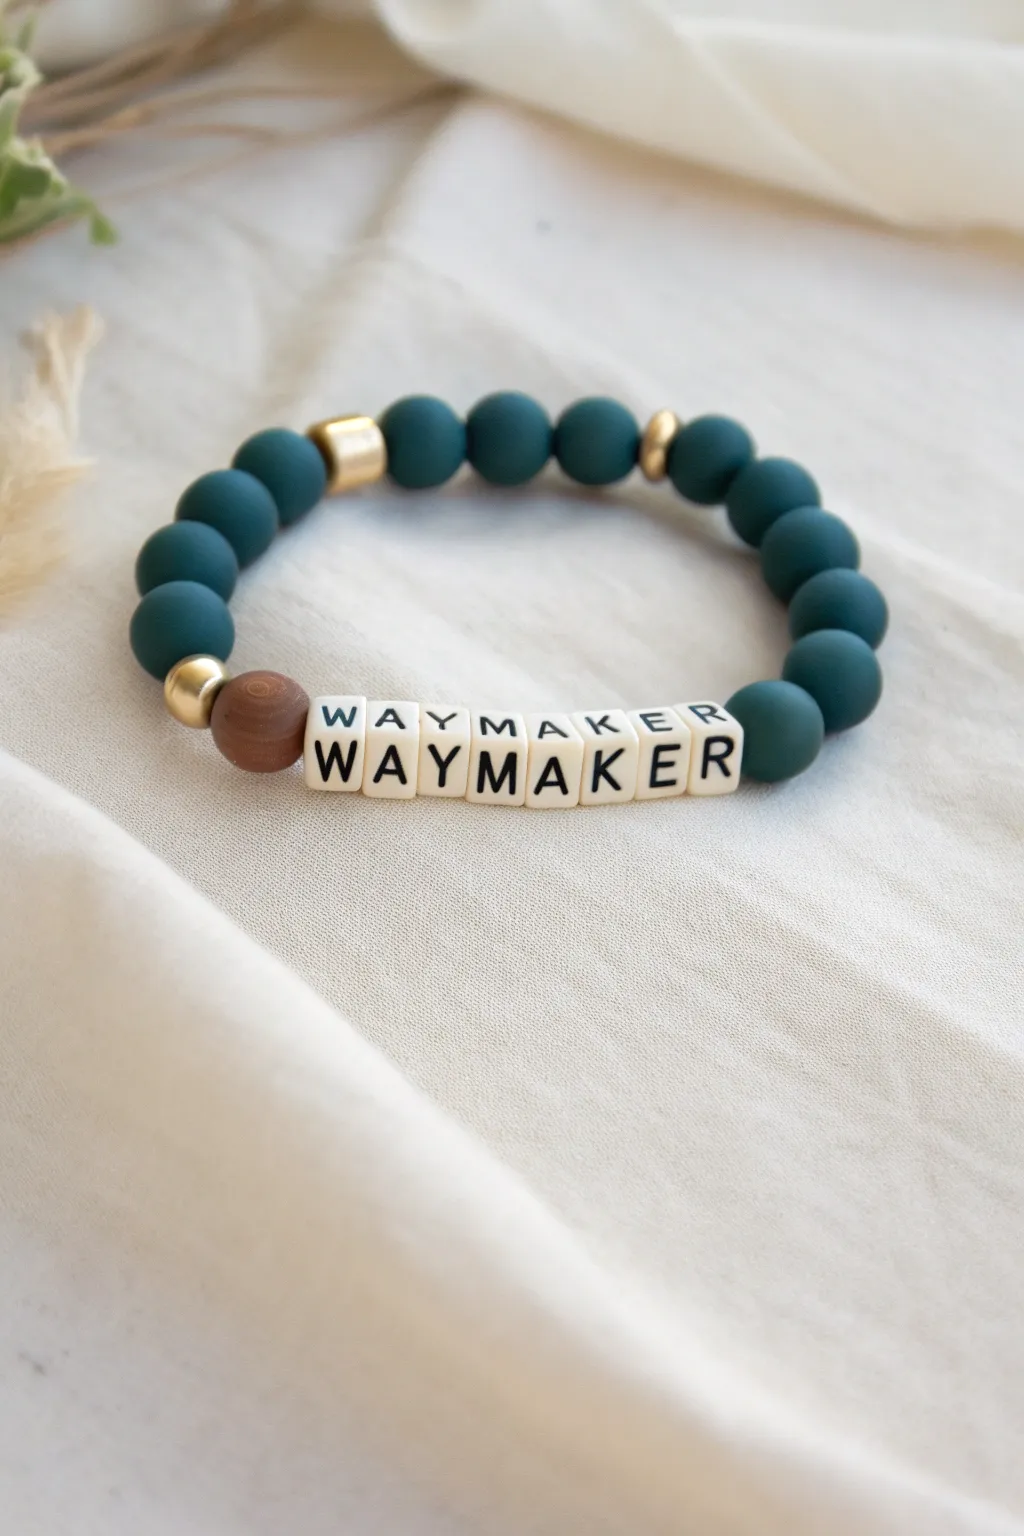
Carry a reminder of faith on your wrist with this beautifully simple beaded bracelet featuring the powerful word “WAYMAKER.” The matte texture of the deep teal beads pairs perfectly with the natural wood and gold accents for a modern, grounded look.
How-To Guide
Materials
- Stretch elastic cord (0.8mm or 1.0mm recommended)
- 8 square alphabet letter beads (Cream/White with black text) spelling “WAYMAKER”
- 12-14 matte round beads (10mm, deep teal/forest green color)
- 1 round wooden bead (10mm or 12mm, medium brown walnut stain)
- 3 gold metallic spacer beads (rondelle or drum shape, approx 6mm)
- Jewelry glue (GS Hypo Cement or E6000)
- Scissors
- Tape or a bead stopper clip
Step 1: Preparation
-
Measure and cut:
Begin by cutting a piece of stretch elastic cord to about 10-12 inches in length. This gives you plenty of extra room for tying knots without struggling. -
Secure the end:
Place a piece of tape or a bead stopper clip on one end of your cord to prevent beads from sliding off while you work. -
Pre-stretch the cord:
Give the elastic cord a few firm tugs before you start stinging. I find this pre-stretching step helps prevent the bracelet from loosening up after the first few wears.
Loose Word?
If your letter beads flip over constantly, string them on a slightly thicker cord (1.0mm) or use doubled-up thinner cord to fill the hole better.
Step 2: Stringing the Design
-
Start the message:
Thread the letter beads onto the cord in reverse order, starting with ‘R’, then ‘E’, ‘K’, ‘A’, ‘M’, ‘Y’, ‘A’, and finally ‘W’. This ensures the word reads correctly from left to right when finished. -
Add the first accent:
Slide on the single large wooden bead immediately after the ‘W’ letter bead. This creates a natural focal point transition. -
Place the gold highlight:
Thread one gold spacer bead next to the wooden bead. The metallic shine provides a nice contrast against the matte wood. -
String the matte beads:
Begin adding your deep teal matte round beads. String about 4 or 5 of these beads onto the cord. -
Add a mid-point accent:
Slide on a gold spacer bead. This breaks up the solid color block and adds visual interest to the back of the bracelet. -
Continue with matte beads:
Add another 3 or 4 teal matte beads after the gold spacer. -
Insert the final gold accent:
Place your third and final gold spacer bead onto the cord. -
Finish the bead stringing:
Thread the remaining teal matte beads until the strand reaches your desired wrist size (usually about 7 inches total for an average wrist). Check the fit by wrapping it around your wrist before knotting.
Knot Hiding Trick
Plan your layout so the knot lands next to the wooden bead. Wood beads usually have larger holes than stone or clay, making it easiest to hide the knot inside.
Step 3: Finishing Touches
-
Prepare to knot:
Remove the tape or clip from the end of the cord, carefully holding both ends so no beads escape. -
Tie the knot:
Tie a surgeon’s knot (right over left, left over right, and loop through an extra time) to secure the bracelet. Pull the elastic tight so there are no gaps between beads. -
Secure with glue:
Dab a tiny drop of jewelry glue directly onto the knot. Be careful not to get glue on the beads themselves, as it can ruin the matte finish. -
Hide the knot:
If one of your beads has a large enough hole (often the wooden bead or a letter bead works best), gently tuck the knot inside it while the glue is still tacky but set. -
Trim excess:
Once the glue is fully dry, use your scissors to trim the excess cord tails as close to the knot as possible without cutting the knot itself.
Wear your new creation as a daily encouragement or gift it to a friend who needs a reminder of the Waymaker
Secret Prayer Bracelet With Hidden Initials
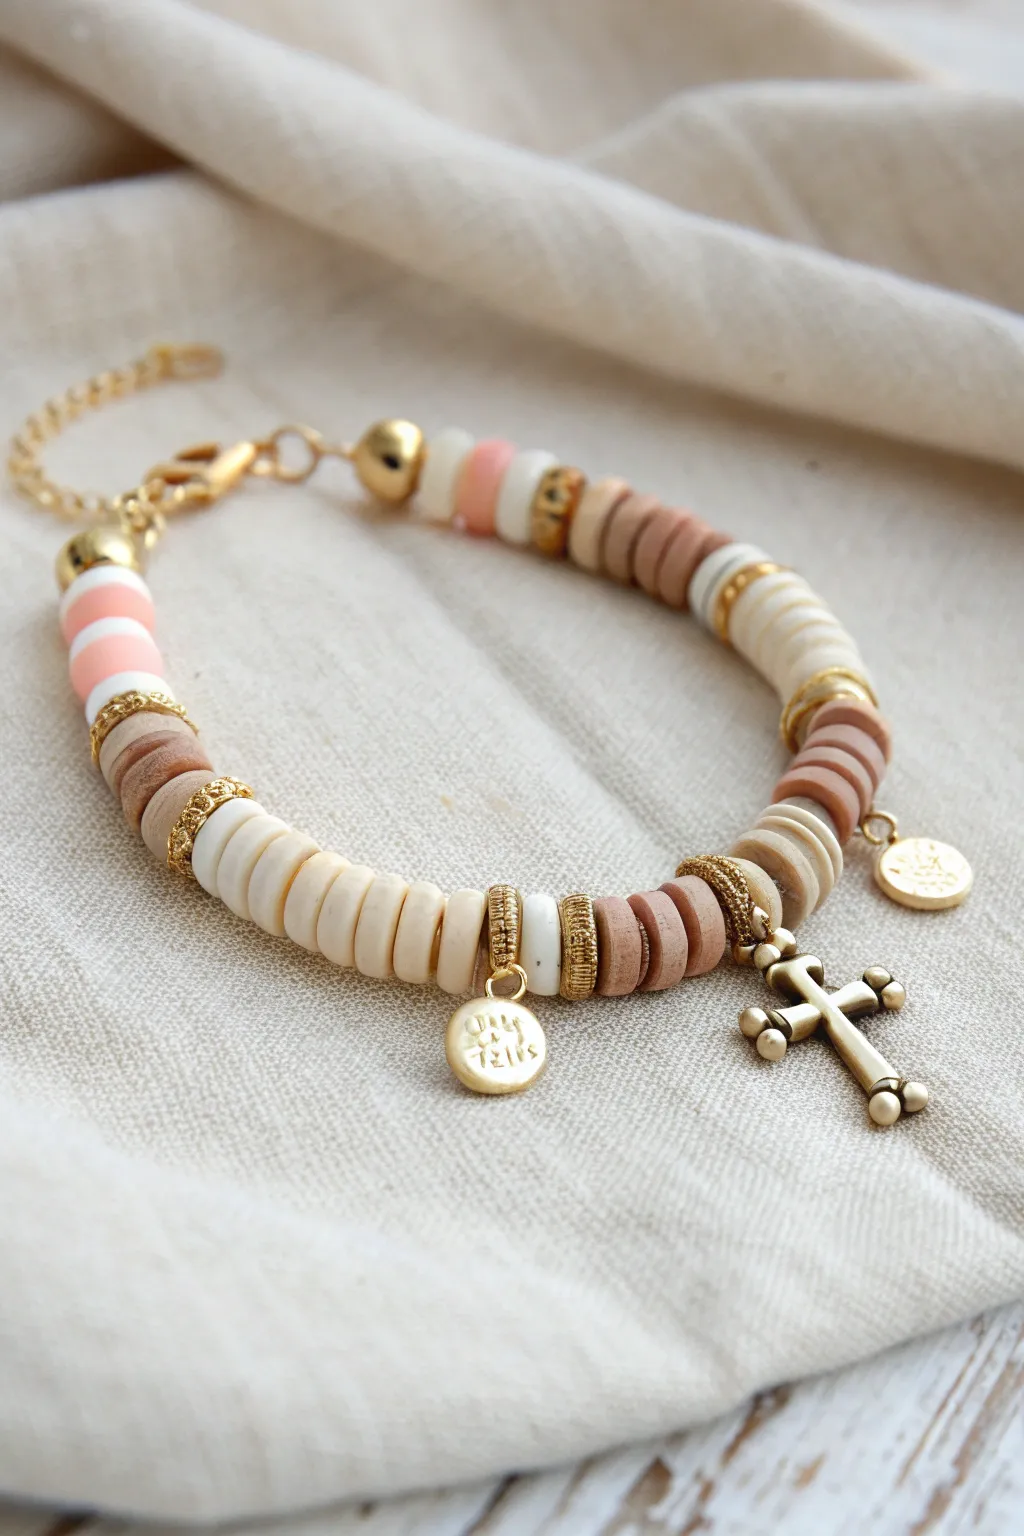
This elegant bracelet combines the earthy texture of polymer clay discs with the refined shine of gold accents, featuring a special hidden detail. The design balances soft neutrals like cream, peach, and tan with intricate spacers and thoughtful charms for a piece that feels both casual and meaningful.
Detailed Instructions
Materials
- 6mm or 8mm polymer clay heishi disc beads in cream/white
- 6mm or 8mm polymer clay heishi disc beads in light peach/pink
- 6mm or 8mm polymer clay heishi disc beads in light tan/brown
- Gold tone textured tube spacer beads (approx. 4-5mm width)
- Gold tone round beads (4mm and 6mm)
- Small gold disc charm (optional: personalized with initials)
- Gold cross charm
- Beading wire (0.38mm or 0.45mm)
- 2 Crimp beads
- 2 Crimp covers (optional but recommended for a polished look)
- 2 wire guards (gold tone)
- Lobster clasp and extension chain set
- Jump rings (4mm and 6mm)
- Flat nose pliers
- Wire cutters
- Crimping pliers
Step 1: Planning the Pattern
-
Lay out your design:
Before cutting any wire, lay your beads out on a bead board or a soft towel. The pattern shown relies on color blocking rather than a single repeating sequence. Create sections of 5-8 beads of the same color, separated by gold tube spacers or gold textured rings. -
Establish the focal section:
Identify the center of your bracelet. In this design, the focal point isn’t dead center but slightly offset where the charms hang. Plan to place a textured gold tube bead or a cluster of spacers here to anchor your charms later. -
Check the length:
Arrange enough beads to cover about 6 to 6.5 inches for a standard wrist, keeping in mind that the clasp and jump rings will add about 0.5 to 1 inch of length.
Uneven Tension?
If your bracelet feels stiff or kinks up, you likely pulled the wire too tight during the final crimping. Leave about 1-2mm of slack in the wire before crimping to ensure the beads can drape naturally around the wrist.
Step 2: Stringing the Beads
-
Prepare the wire:
Cut a piece of beading wire approximately 10-12 inches long. This gives you plenty of extra room to work with the ends comfortably. -
Secure the first end:
Thread a crimp bead onto one end of the wire, followed by a wire guard. Loop the wire through the guard and back down through the crimp bead. Attach one part of your clasp (either the jump ring for the chain or the lobster clasp itself) inside the wire guard loop before tightening. -
Crimp firmly:
Use your crimping pliers to flatten the crimp bead securely. I always give a gentle tug to ensure it holds before trimming the excess tail wire close to the bead. -
Begin with gold:
Start stringing by adding a 6mm gold round bead. This acts as a professional-looking buffer between the clasp hardware and the clay beads. -
Build the first color block:
Thread on your first section of clay heishi beads. The example starts with a mix of peach and white stripes (alternating one peach, one white) for about an inch. -
Add texture:
Slide on a textured gold tube spacer. These spacers break up the matte clay and add that crucial metallic shine. -
Continue the pattern:
Move to the next color block, perhaps solid tan or solid cream. Vary the lengths of these sections—some can be longer (10 beads), others shorter (5 beads)—to keep the design organic.
Step 3: Adding Charms and Finishing
-
Position the charm carriers:
When you reach the spot where you want your charms, use a slightly larger gold spacer or a dedicated bail bead if you have one. If using jump rings to attach charms later, ensure there is a sturdy gold spacer bead here to attach them to, rather than attaching directly to the fragile clay. -
Finish stringing:
Continue your pattern until you reach the desired length, ending with another 6mm gold round bead to mirror the beginning. -
Close the bracelet:
Thread on a crimp bead and a wire guard. Loop the wire through the clasp component (lobster claw or chain ring), back through the wire guard, and down through the crimp bead and the last few beads strung. -
Secure and trim:
Pull the wire taut so there are no gaps between beads, but not so tight that the bracelet becomes stiff. Crimp the bead flat and trim the excess wire flush. -
Cover the crimps:
For a sleek finish, place a crimp cover over each flattened crimp bead. Gently squeeze them closed with pliers until they look like plain round gold beads. -
Prepare the charms:
Open a 6mm jump ring using two pairs of pliers (twist sideways, don’t pull apart). Slide on your gold cross charm. -
Attach the cross:
Locate the gold spacer area you designated for the focal point. Hook the jump ring around the wire between two beads or onto a specific loop on your spacer, then close the ring securely. -
Add the secret message:
Take your small disc charm. If it isn’t already stamped, you can lightly scratch or stamp initials on the back for a hidden prayer or dedication. Attach this charm with a smaller 4mm jump ring near the cross or on a separate spacer section.
Hidden Meaning
Use metal stamps to impress initials or a short word like “HOPE” on the back of the small disc charm before attaching it. This keeps the message private against the wearer’s skin.
Wear your beautiful new creation as a daily reminder of faith and style