
Some days you just need a satisfying, squishy project that turns into something real you can hold in your hands. These clay activity ideas are my go-to favorites for easy wins, playful creativity, and that little spark of “I made this!” energy.
Pinch Pot Trinket Bowls
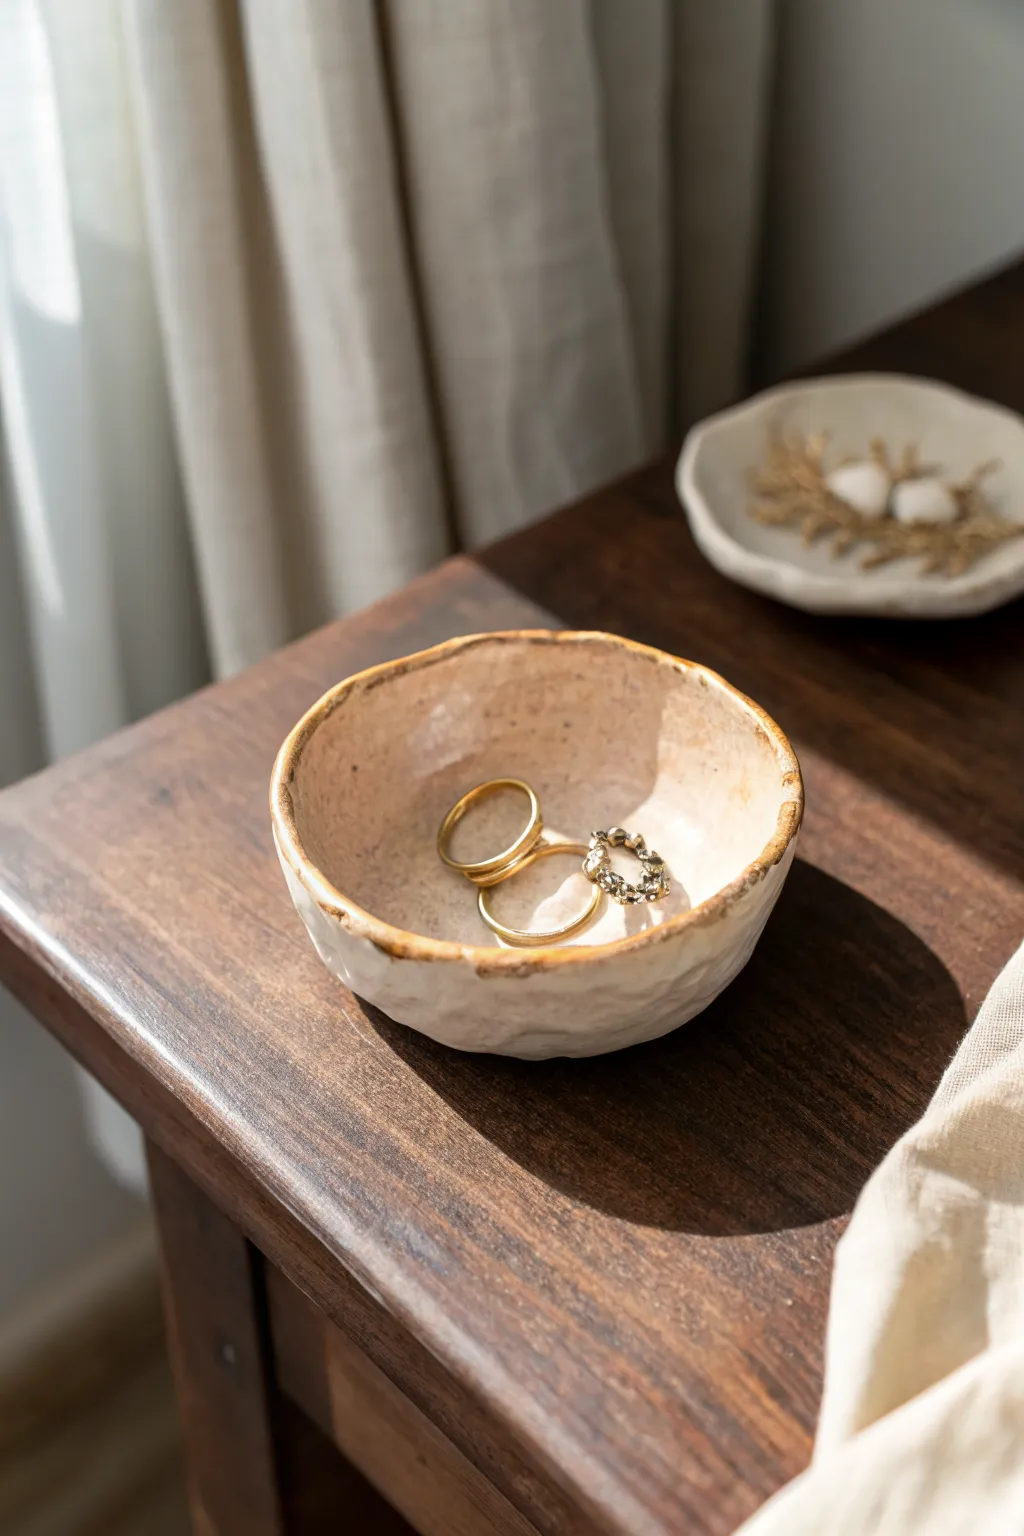
Create a charming home for your daily jewelry with this handcrafted pinch pot bowl. Featuring a natural, organic shape and a delicate golden-brown rim, this piece highlights the simple beauty of imperfect pottery.
Step-by-Step Tutorial
Materials
- Air-dry clay (white or cream)
- Small bowl of water
- Sponge or smoothing tool
- Clear acrylic gloss varnish or glaze
- Metallic gold or antique brown acrylic paint
- Fine detail paintbrush
- Sandpaper (fine grit)
- Rolling pin (optional)
- Clean work surface (canvas or wood board)
Step 1: Forming the Base
-
Prepare the Clay:
Start by grabbing a handful of air-dry clay, roughly the size of a tangerine. Knead it in your hands for a minute to warm it up and ensure there are no air bubbles trapped inside. -
Roll a Sphere:
Roll the clay between your palms or on your work surface until you have a smooth, round ball. -
Start the Pinch:
Hold the ball in one hand and gently press your thumb into the center, stopping about a half-inch from the bottom. This indentation will determine the depth of your bowl. -
Shape the Walls:
Using your thumb on the inside and fingers on the outside, begin pinching the clay walls. Rotate the ball slightly after every few pinches to ensure even thickness all around. -
Widen the Opening:
Continue pinching upward and outward to widen the bowl. Aim for walls that are roughly 1/4 inch thick—not too chunky, but sturdy enough to hold shape. -
Create the Texture:
Instead of smoothing the outside perfectly, allow your finger impressions to remain visible on the exterior surface. This gives the bowl that delightful ‘faceted’ handmade look seen in the photo.
Cracks appeared?
Mix a tiny amount of fresh clay with water to make a paste (slip). Fill the cracks with this paste, smooth it over with your finger, and let it dry again.
Step 2: Refining and Drying
-
Level the Bottom:
Gently tap the bottom of the pot against your table to create a flat base so it sits stable without wobbling. -
Refine the Rim:
Run a damp finger along the top edge. Don’t make it perfectly level; allow for gentle dips and waves to maintain the organic aesthetic, but ensure there are no sharp cracks. -
Smooth the Interior:
Take a slightly damp sponge to the inside of the bowl. While I like keeping the outside textured, smoothing the interior creates a nice contrast and a safe surface for delicate jewelry. -
Initial Drying:
Set the bowl aside in a spot away from direct sunlight. Let it dry slowly for 24-48 hours. If it dries too fast, it creates cracks, so patience is key here. -
Sanding:
Once bone dry and white, use fine-grit sandpaper to gently buff away any sharp jagged bits on the rim or rough patches inside the bowl. Wipe away the dust with a dry cloth.
Make it a Set
Create a matching, flatter dish like the one in the background by rolling your clay ball flat and simply curling up the edges rather than pinching deep walls.
Step 3: Painting and Glazing
-
Seal the Clay:
Apply a coat of clear gloss varnish or glaze over the entire bowl. This seals the porous clay and gives it that ceramic-like sheen. Let this coat dry completely according to the bottle instructions. -
Mix the Rim Color:
Prepare your rim color. To match the image, mix a metallic gold paint with a tiny dot of brown to create an ‘antique gold’ or bronze finish. -
Paint the Rim:
Dip a fine detail brush into your paint. Carefully run it along the very edge of the rim. -
Create the Bleed Effect:
Deliberately let the paint wobble slightly onto the inner and outer edge in random spots. This uneven application mimics the look of a kiln-fired glaze reaction. -
Final Coat:
Once the rim paint is dry, apply one final layer of high-gloss varnish over the entire piece. This protects the paint and creates that wet, glassy finish typical of fired ceramics. -
Full Cure:
Allow the final layer to cure for at least 24 hours before placing any rings or jewelry inside to ensure the finish doesn’t stay tacky.
Place your favorite rings inside your new custom bowl and admire your handiwork


Coiled Clay Mini Pots
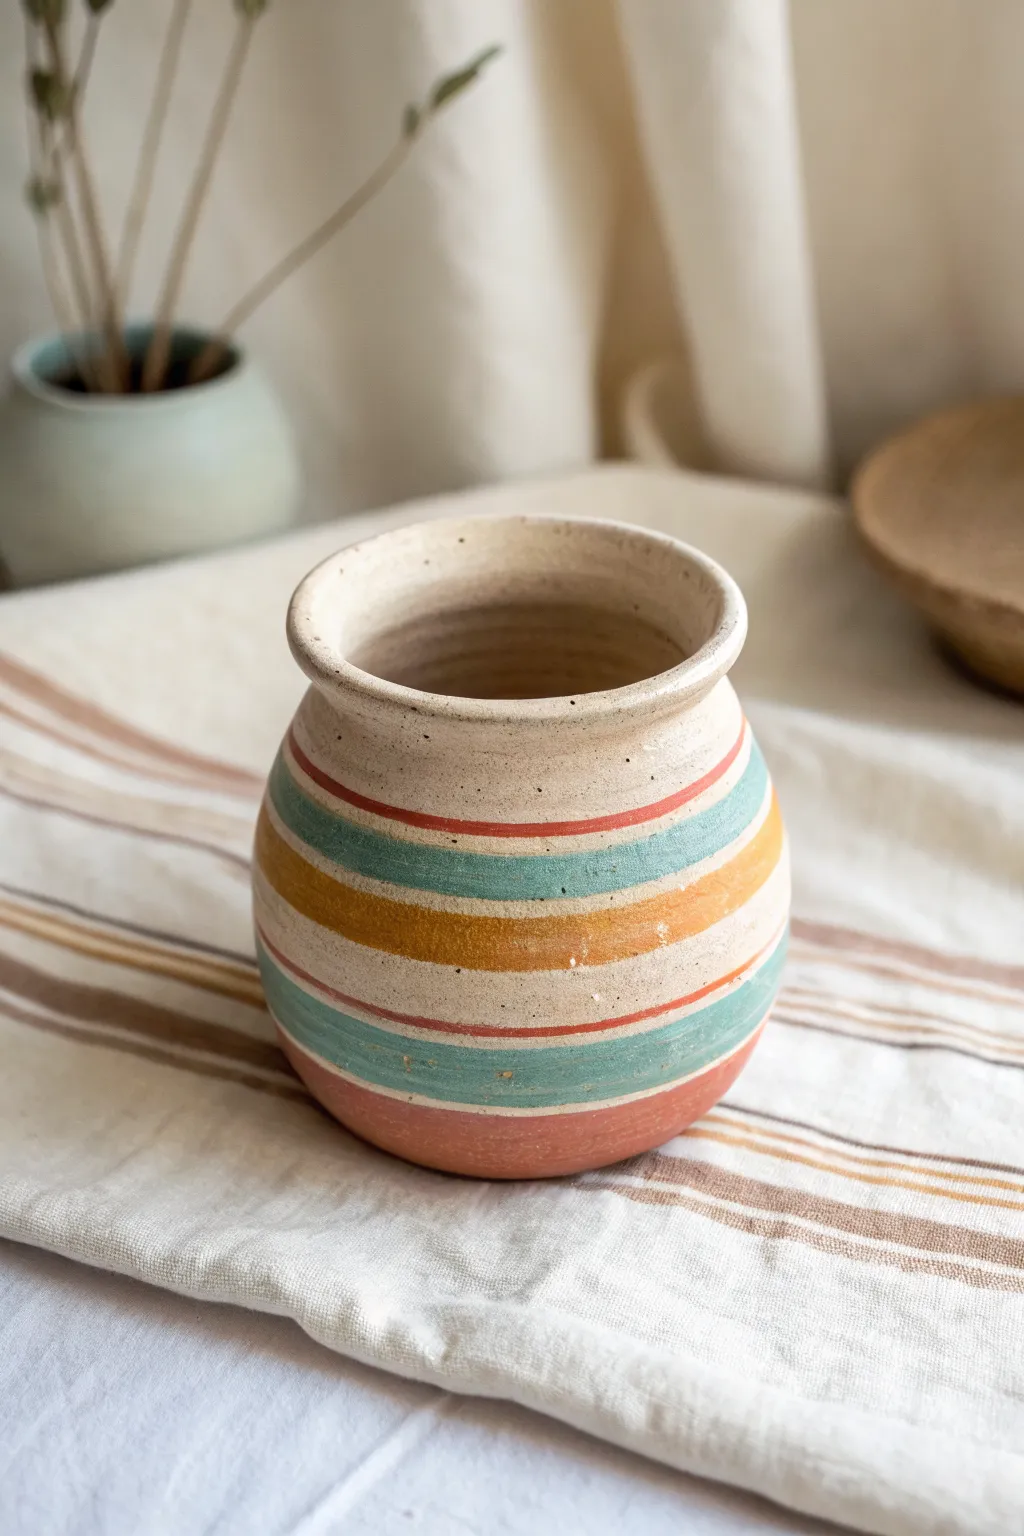
This charming, bulb-shaped vessel features a warm, earthy palette of rust, teal, and mustard yellow stripes against a speckled cream background. Using the classic coil-building method smoothed to perfection, you’ll create a functional piece of art with a delightful rustic-modern aesthetic.
Step-by-Step Guide
Materials
- Speckled buff stoneware clay (or white clay with grog)
- Pottery wheel (optional, but hand-building tools work too)
- Rib tool (metal or rubber)
- Needle tool
- Sponge
- Underglazes: Rust/Terracotta, Teal/Aqua, Mustard Yellow
- Clear matte glaze
- Flat shader brushes (medium and small)
- Kiln
- Scoring tool or serrated rib
- Slip (clay mixed with water)
Step 1: Forming the Base
-
Prepare the Clay:
Begin by wedging a ball of speckled buff clay, roughly the size of a large orange. Ensure all air bubbles are removed to prevent explosions in the kiln later. -
Create the Floor:
Flatten a small portion of clay into a disk about 3 inches in diameter. This will be the sturdy base of your pot. Score the outer edge of this disk and apply a little slip. -
Roll Your Coils:
Roll out several long, even snakes of clay, aiming for about the thickness of your pinky finger. Try to keep the thickness consistent for structural integrity. -
Stack and Build:
Lay your first coil onto the scored edge of the base. Gently pinch the clay downwards to blend it into the floor. Stack the next coil on top, scoring and slipping between layers. -
Create the Bulb Shape:
As you add coils, position each one slightly further outward than the last to create the belly of the pot. Blend the coils together thoroughly on both the inside and outside using your thumb or a wooden tool. -
Narrow the Neck:
Once you reach the widest point of the belly, begin placing your coils slightly inward to taper the form back toward the center. -
Form the Rim:
For the final coil, create a slightly flared rim. Smooth it carefully with a damp sponge or piece of chamois leather to ensure it’s comfortable to touch.
Uneven Walls?
If your coils are creating lumpy walls, use a paddle tool to gently tap the outside of the pot while supporting the inside with your hand to true up the shape.
Step 2: Refining and Drying
-
Smooth the Surface:
With the basic shape built, use a metal or rubber rib tool to scrape and compress the exterior walls. This removes the visible coil lines and creates the smooth canvas needed for your stripes. -
Refine the Profile:
Continue smoothing until the curve is continuous and organic. I find using a flexible rib tool works best here to hug the curves of the pot. -
Leather Hard Stage:
Allow the pot to dry slowly until it reaches the leather-hard stage. It should be firm enough to handle without deforming but still cool to the touch. -
Final Cleanup:
Use a damp sponge to wipe away any grog or rough patches on the rim and surface.
Use Wax Resist
For ultra-crisp lines between colors, paint thin lines of wax resist over your pencil guidelines before applying the underglaze. The glaze will bead off the wax.
Step 3: Decorating and Glazing
-
Bisque Fire:
Once the pot is bone dry, fire it in the kiln to cone 04 (or your clay’s specific bisque temperature). -
Paint the Base Bands:
Using a medium flat brush, apply the rust-colored underglaze in a wide band near the bottom and a thinner band near the top. Rotate the pot on a banding wheel if you have one for steadier lines. -
Add Teal Stripes:
Apply the teal underglaze. Paint a wider band beneath the top rust stripe, and a thinner accent band near the bottom rust section. Let the layers dry between coats. -
Paint the Mustard Center:
Fill the central area with a bold band of mustard yellow underglaze. Don’t worry if the edges are slightly imperfect; it adds to the hand-painted charm. -
Apply Thin Accents:
Using a fine brush, add very thin rust-colored lines bordering the teal and mustard sections to define the stripes clearly. -
Clear Glaze:
Once the underglaze is completely dry, dip the entire pot into a clear matte glaze. This will seal the clay while letting the speckled texture and matte underglaze colors shine through. -
Final Firing:
Load the pot into the kiln for the final glaze firing, typically to cone 5 or 6 depending on your clay body and glaze specifications.
Place your finished pot on a sunny shelf to hold dried flowers or pencils


Stamped Clay Ornaments
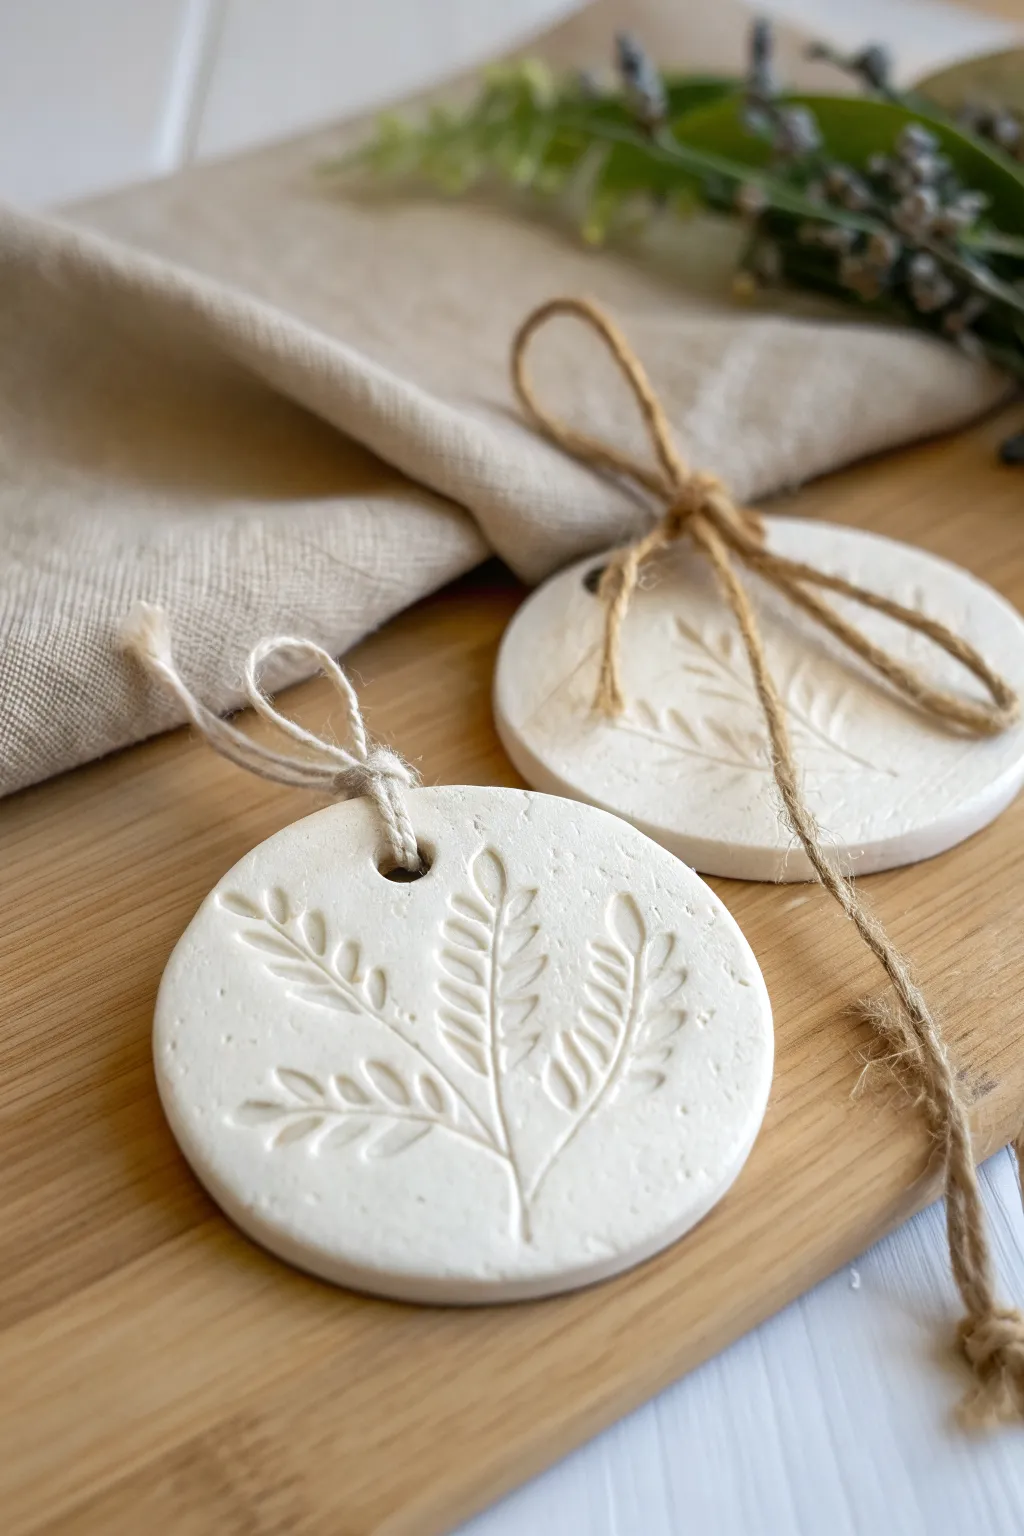
Capture nature’s delicate details with these elegant stamped clay ornaments. Their minimalist white finish and organic textures make them perfect for gift tags, holiday decor, or simple rustic accents.
How-To Guide
Materials
- Air-dry clay (white) or polymer oven-bake clay
- Rolling pin or smooth glass jar
- Circle cookie cutter (approx. 3 inches)
- Fresh greenery sprigs (fern, lavender, or rosemary work well)
- Drinking straw or small dowel
- Fine-grit sandpaper
- Clear matte varnish (optional)
- Natural jute twine
- Thin white cotton string
- Parchment paper or non-stick mat
Step 1: Preparing the Clay Canvas
-
Condition the clay:
Begin by taking a handful of your white clay and kneading it in your hands until it becomes soft, pliable, and warm to the touch. -
Roll it out:
Place the clay on a sheet of parchment paper to prevent sticking. Use your rolling pin to flatten the clay to an even thickness of about 1/4 inch. -
Check for smoothness:
Inspect the surface for any air bubbles or cracks. If you see creases, gently smooth them over with a damp finger before proceeding.
Fixing Cracks
If small cracks appear while drying, mix a tiny bit of fresh clay with water to make a paste (slip) and adhere it into the crack, then smooth over.
Step 2: Creating the Botanical Impression
-
Select your greenery:
Choose a sprig of greenery that is stiff enough to leave a mark but flat enough to press evenly. Fern tips or sturdy herbs are ideal choices. -
Position the sprig:
Lay the sprig gently onto the rolled-out clay where you want the design to be centered. I find it helpful to visualize the circle shape first to ensure the stem fits nicely. -
Press the design:
Using the rolling pin, roll firmly over the sprig one time. Apply consistent pressure to embed the plant material flush with the clay surface without distorting the slab too much. -
Remove the greenery:
carefully peel back the stem from the bottom up. It should lift away easily, leaving a crisp, detailed negative impression behind.
Add Color
After the impression is made but before drying, dust the indentation with gold mica powder or watercolor paint for a pop of subtle color.
Step 3: Cutting and Drying
-
Cut the shape:
Position your circle cookie cutter over the impression, centering the botanical design. Press down firmly and give it a tiny wiggle to separate the shape. -
Remove excess clay:
Peel away the scrap clay from around the outside of the cutter before lifting the cutter itself. This prevents the circle from warping. -
Create a hanging hole:
While the clay is still soft, use a drinking straw to punch a clean hole near the top center of the ornament. Twist the straw as you pull it out to remove the clay plug. -
Smooth the edges:
Dip your finger in a little water and run it gently around the cut rim of the circle to soften any sharp ridges left by the cutter. -
Initial drying:
Transfer the ornaments on their parchment paper to a flat board. Let them air dry for 24-48 hours, flipping them over halfway through so they dry evenly and don’t curl. -
Sanding:
Once fully cured and hard, use fine-grit sandpaper to buff away any remaining rough spots on the edges for a professional finish.
Step 4: Finishing Touches
-
Seal (Optional):
To protect the white surface from dust, you can apply a thin coat of clear matte varnish. Let this dry completely before handling. -
Add the hanger:
Cut a length of thin white cotton string or rustic jute twine, depending on the look you prefer. -
Tie the loop:
Thread the material through the hole. For the white string, tie a simple loop knot at the top. For the jute, wrap it through and tie a decorative bow at the base of the hole as shown in the example.
Hang your finished ornaments on a branch or use them to elevate your gift wrapping


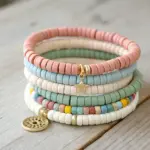
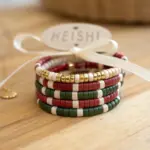
Clay Bead Bracelets and Necklaces
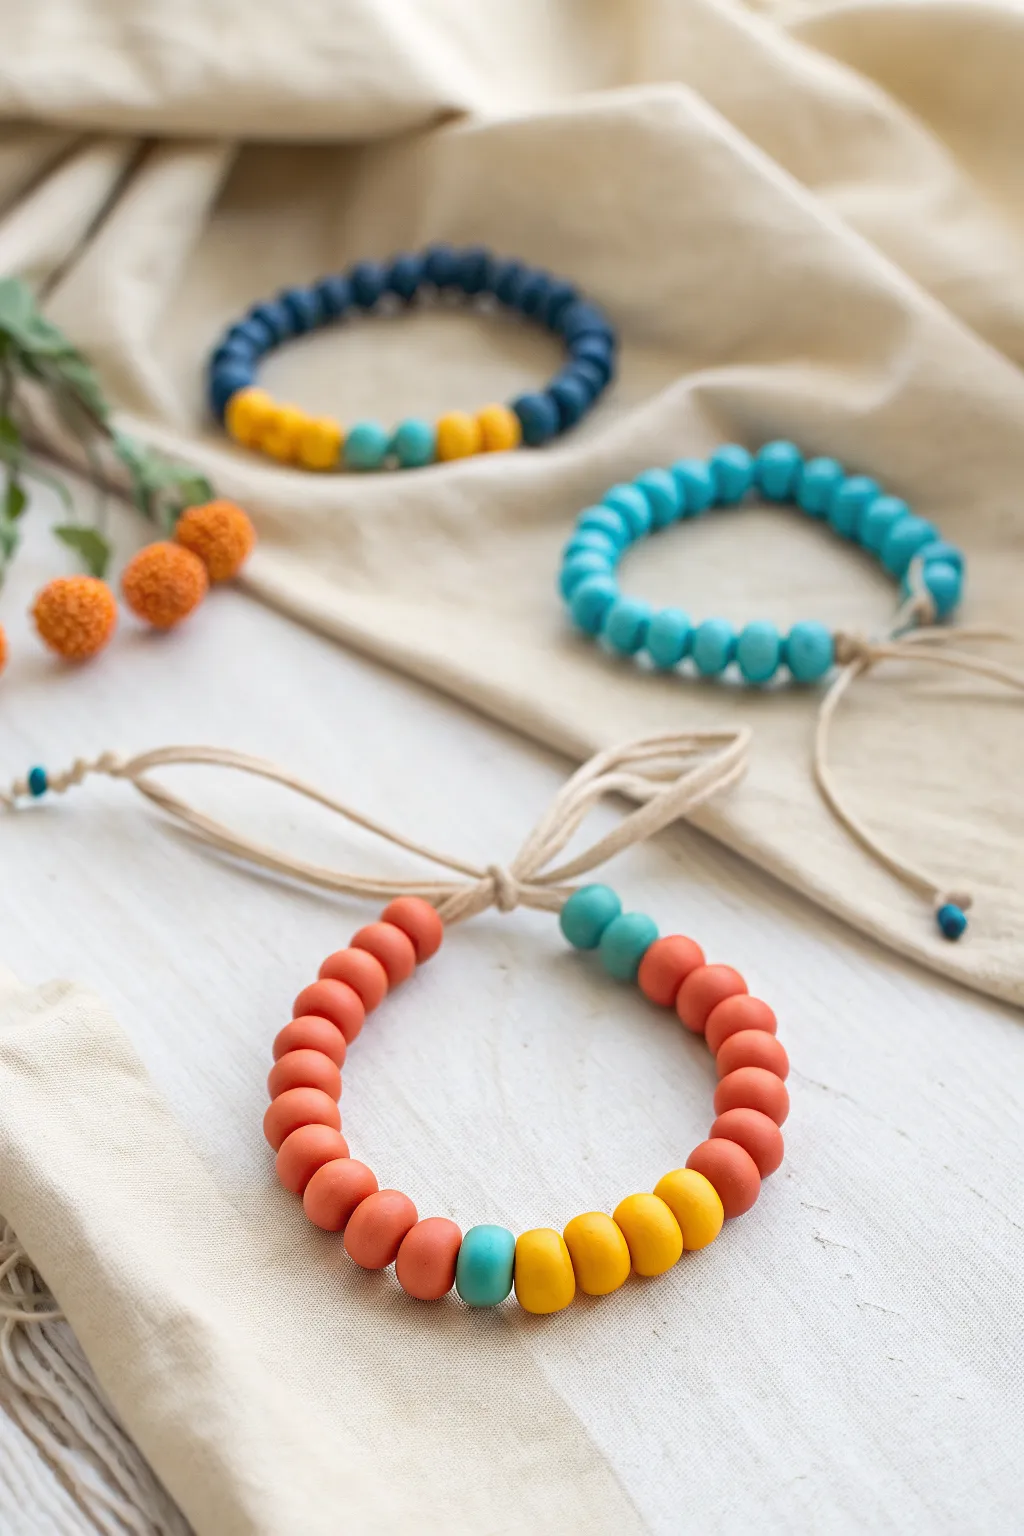
These charming, rustic bracelets feature handmade clay beads in earthy tones of terracotta, mustard, teal, and navy. Strung on simple cord with knotted closures, they offer a personalized accessory that is fun to roll, bake, and wear.
Step-by-Step
Materials
- Polymer clay (terracotta/burnt orange, mustard yellow, teal, navy blue)
- Beige suede lace or waxed cotton cord (1mm – 2mm thick)
- Toothpicks or a bamboo skewer
- Baking sheet
- Parchment paper
- Scissors
- Ruler
Step 1: Shaping the Beads
-
Model Your Clay:
Begin by conditioning the polymer clay in your hands until it is soft and malleable. You will need separate small balls for each color you plan to use. -
Create Uniform Portions:
Pinch off small pieces of the orange clay, aiming for chunks about the size of a large pea or small marble. To keep them consistent, I like to roll a long ‘snake’ of clay first and slice it into equal segments. -
Roll the Spheres:
Roll each segment between your palms to create a smooth, round sphere. Repeat this process for your accent colors (yellow and teal), making slightly fewer of these. -
Squash Slightly:
Gently press each sphere between your thumb and forefinger to flatten it just a tiny bit into a ‘rondelle’ shape, rather than a perfect ball. This helps them sit nicer on the wrist. -
Make the Holes:
Using a toothpick or skewer, pierce the center of each bead. Ideally, twist the tool as you push through to prevent squashing the bead’s shape. -
Check the Fit:
Ensure the hole is wide enough for your chosen cord to pass through easily. It’s better to make the hole slightly larger now, as clay doesn’t shrink much but tight fits are frustrating later.
Step 2: Baking and Assembly
-
Prepare for Baking:
Arrange your raw beads on a baking sheet lined with parchment paper, ensuring they aren’t touching each other. -
Bake the Beads:
Bake according to the manufacturer’s instructions on your clay package (usually around 275°F or 135°C for 15-30 minutes). Let them cool completely before handling. -
Cut the Cord:
Cut a length of suede or cotton cord approximately 12 inches long. This gives you plenty of room for knotting. -
Start Stringing:
Tie a simple overhand knot about 3 inches from one end of the cord to act as a stopper for the beads. -
Create the Pattern:
Thread your beads onto the cord. For the foreground style, use mostly orange beads, placing a pattern of teal-yellow-yellow-teal in the bottom center section. -
Secure the End:
Once you have enough beads to wrap around your wrist (usually about 6-7 inches of beading), tie another overhand knot tightly against the last bead to secure them in place. -
Create the Sliding Closure:
Bring the two loose ends of the cord together. You can either tie them in a standard bow for a simple closure or create a sliding square knot if you know macramé techniques. -
Add End Beads:
Thread one small teal bead onto the very tip of each loose cord end. -
Final Knots:
Tie a small knot at the very end of the cords to keep those tiny accent beads from falling off, then trim any excess cord.
Smooth Surface Trick
Before baking, lightly brush your unbaked beads with a tiny bit of cornstarch or baby powder. This smooths out fingerprints and gives the clay a lovely matte, stone-like finish.
Texture Twist
Before piercing the holes, roll your raw clay balls over a piece of sandpaper or a textured fabric to imprint a subtle, rugged surface onto the beads.
Now you have a custom set of earth-toned jewelry ready to stack and wear

The Complete Guide to Pottery Troubleshooting
Uncover the most common ceramic mistakes—from cracking clay to failed glazes—and learn how to fix them fast.
Cute Clay Animal Figures
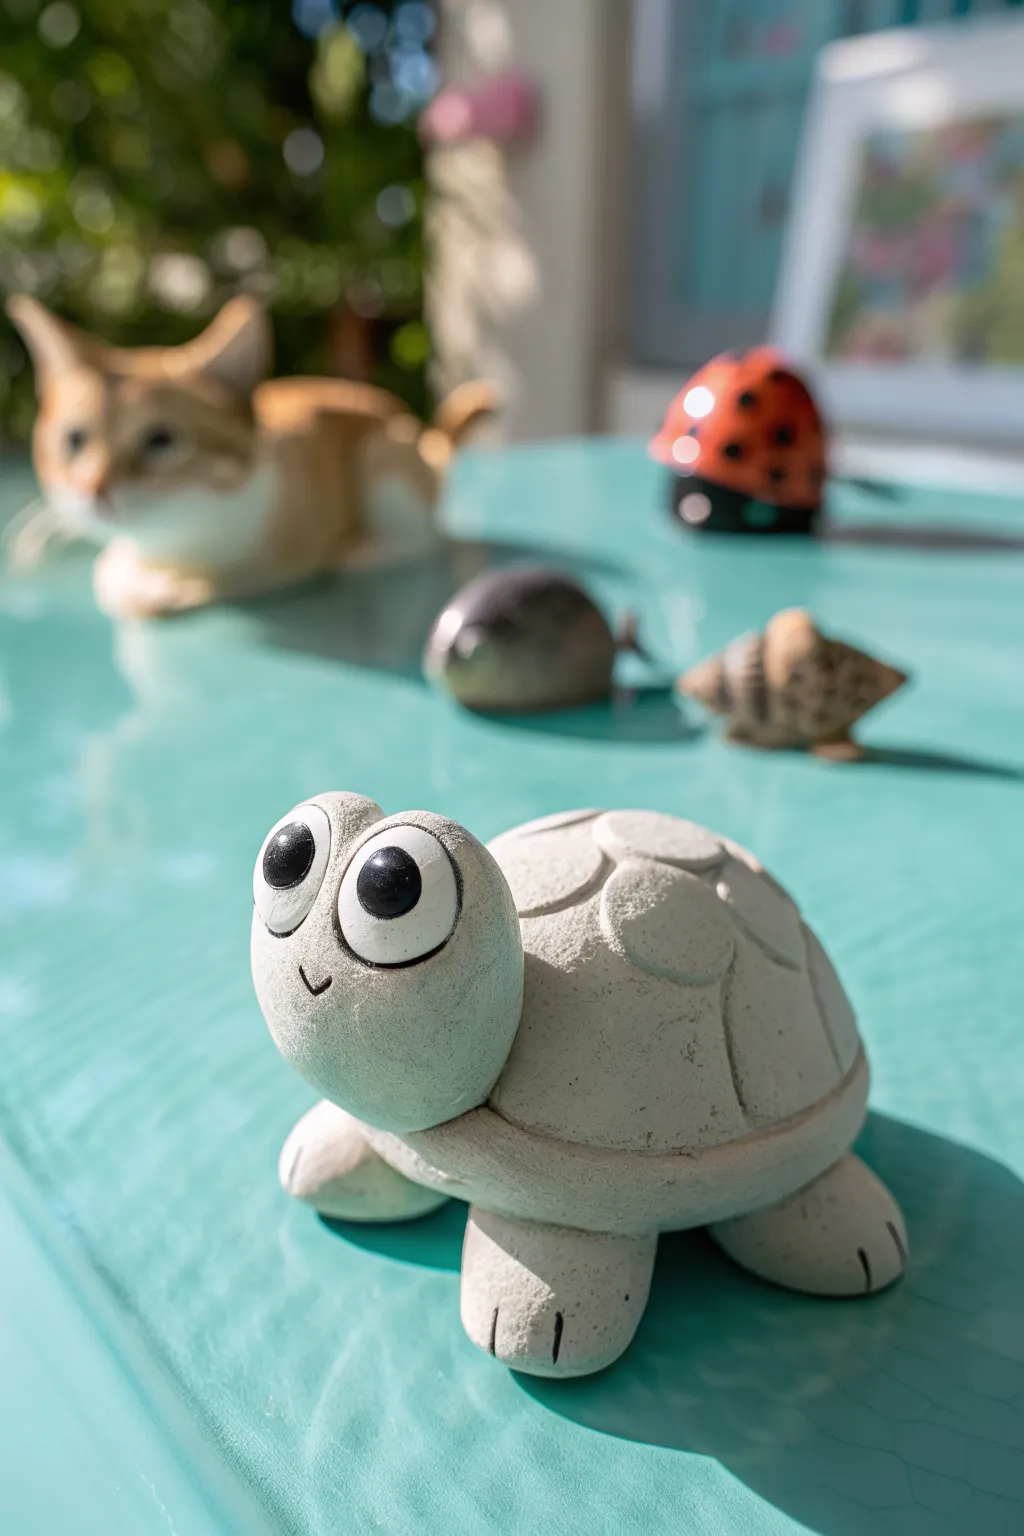
This adorable turtle figurine captures a charming, cartoonish style with its oversized eyes and textured shell. Crafted from simple white clay, its matte finish and expressive face make it a perfect desktop companion or garden accent.
Step-by-Step Guide
Materials
- White air-dry clay or polymer clay
- Basic sculpting tools (needle tool, ball tool)
- Small cup of water (for smoothing)
- Black acrylic paint
- Small detail paintbrush
- Rolling pin
- Toothpick or wire (for internal support)
Step 1: Sculpting the Body
-
Form the shell base:
Start by taking a golf-ball-sized chunk of clay and rolling it into a smooth sphere. Gently press it down onto your work surface to flatten the bottom, creating a dome shape. -
Create the shell rim:
Roll a thin snake of clay about the thickness of a pencil. Wrap this around the very bottom edge of your dome, blending the seam underneath so it looks like a distinct rim. -
Shape the head:
Roll a slightly smaller ball of clay for the head. Instead of a perfect sphere, taper it slightly on one side to form a subtle tear-drop shape where it will attach to the body. -
Attach the head:
Insert a short piece of toothpick or wire into the front of the shell dome. Push the tapered end of the head onto this support to secure it, blending the clay at the neck connection point. -
Make the legs:
Create four small, equal-sized balls of clay. Flatten them slightly into gumdrop shapes. -
Attach the legs:
Place the four legs under the rim of the shell—two in front and two in back. Press firmly to adhere them, using a little water if the clay feels dry. -
Detail the toes:
Using a needle tool or a dull knife, press two vertical indentations into the front of each foot to simulate simple toe lines.
Step 2: Adding Details & Finishing
-
Sculpt the shell pattern:
Roll out a flat sheet of clay and use a small round cutter (or a bottle cap) to cut out several circles. Gently press these flat circles onto the back of the shell dome, overlapping them slightly to create a segmented turtle shell texture. -
Create the eye sockets:
Use a large ball tool or your thumb to press two shallow indentations into the face where the eyes will go. -
Form the eyeballs:
Roll two white spheres of clay that fit snugly into the sockets you just made. They should bulge out significantly to give that wide-eyed, cartoon look. -
Add the pupils:
For the pupils, you can either press a tiny bit of black clay flat onto the center of the white eyes, or wait until the piece is dry to paint them. I prefer painting for a sharper edge. -
Carve the smile:
Use a needle tool or a small curved tool to impress a tiny ‘V’ or ‘U’ shape just below the eyes for the mouth. -
Texture the surface:
If you want a stone-like texture similar to the photo, gently dab the surface of the clay with a stiff bristle brush or a scrunched-up ball of aluminum foil. -
Let it dry:
Allow the figure to dry completely. For air-dry clay, this usually takes 24-48 hours depending on thickness. If using polymer clay, bake according to package instructions. -
Paint the eyes:
Once fully dry (or baked and cooled), use a fine brush to paint the large black pupils. Add a tiny white reflection dot in the upper corner of each pupil to bring the character to life.
Smoother Seams
dip your finger in water (or clay softener for polymer) and gently rub over any connection points. This creates a seamless, professional finish before texture is added.
Cracking Clay?
If you see tiny cracks forming as air-dry clay cures, mix a tiny bit of fresh clay with water to make a paste and fill the cracks, then smooth it over.
Enjoy the charm this little character brings to your space as it watches over your desk
Initial Keychains and Bag Charms
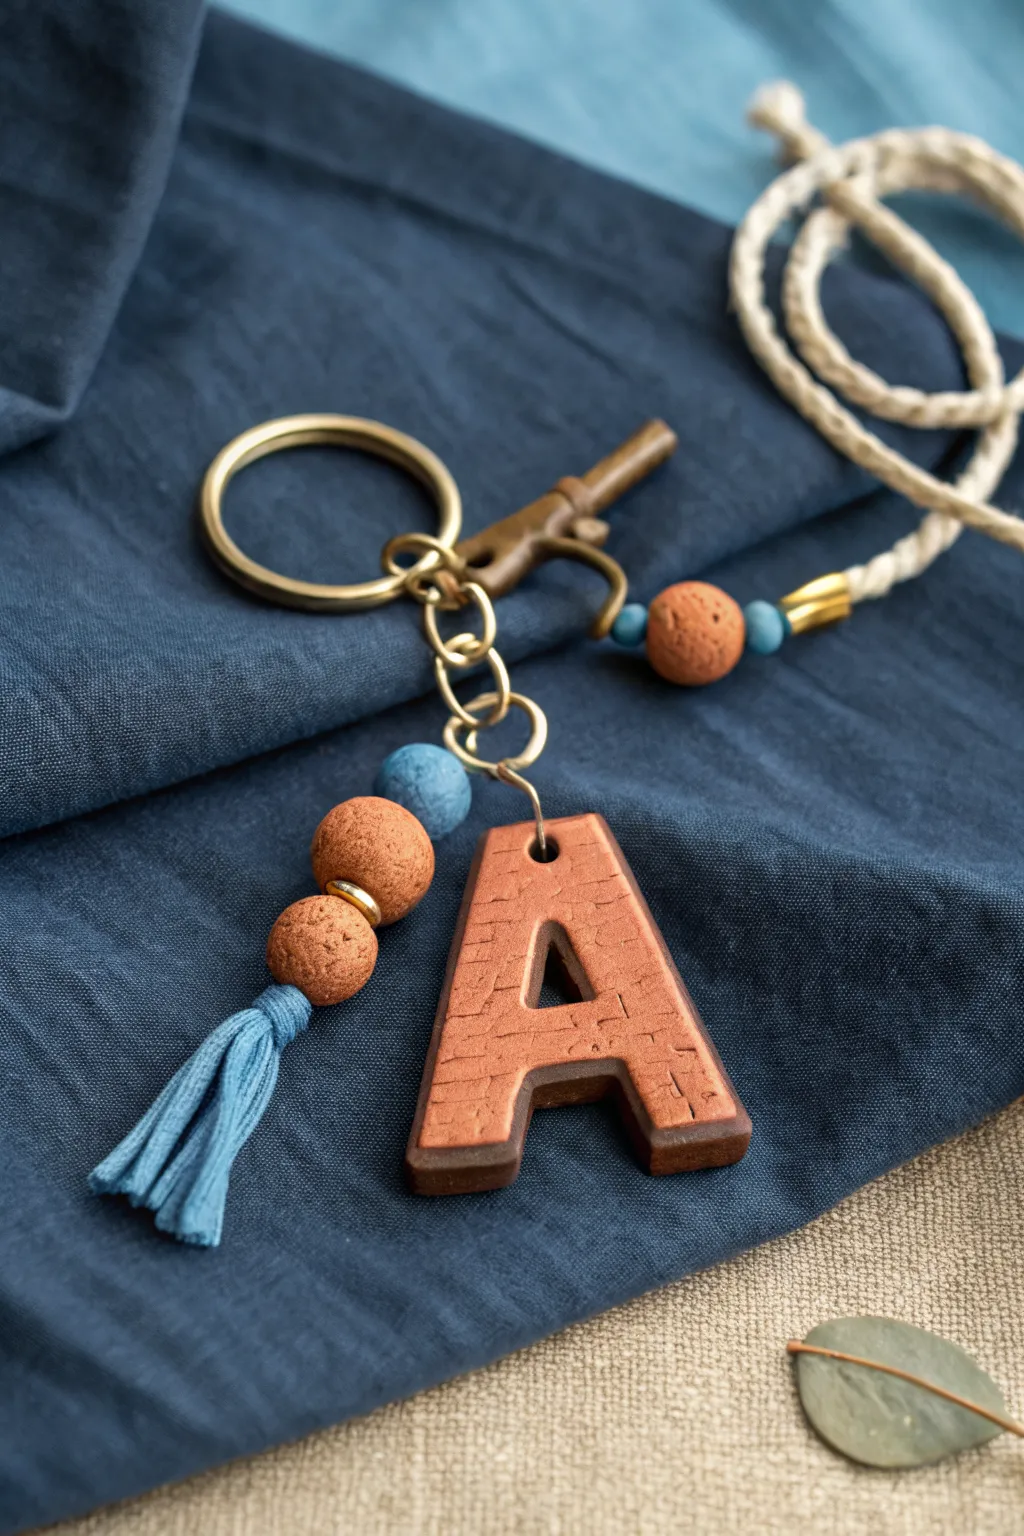
Create a personalized accessory that blends rustic charm with modern style. This keychain features a textured, brick-red clay letter mounted on a sturdy dark base, accented with matching beads and a soft blue tassel.
Step-by-Step Tutorial
Materials
- Polymer clay (Terra cotta/brick red color)
- Polymer clay (Dark brown/espresso color)
- Letter cookie cutter or craft knife
- Texture sheet (crackle or brick pattern) or crumpled foil
- Small circle cutter
- Rolling pin or pasta machine
- Needle tool or toothpick
- Blue embroidery floss
- Gold finish keychain hardware (ring and chain)
- Gold tone jump rings
- Brass or gold spacer beads
- Oven setup for baking
- Super glue or strong craft adhesive
- Small pliers
Step 1: Sculpting the Letter
-
Prepare the base:
Begin by conditioning the dark brown polymer clay until it is soft and pliable. Roll it out into a slab approximately 4-5mm thick. This will serve as the sturdy backing for your letter. -
Create the top layer:
Condition the terra cotta colored clay. Roll this piece slightly thinner than the base, perhaps around 3mm thickness. -
Add texture:
Before cutting the shape, press a texture sheet or a ball of crumpled aluminum foil firmly onto the terra cotta slab to create a rough, stone-like surface. I like to press quite hard here to ensure the pattern remains visible after baking. -
Cut the letters:
Using your letter cutter, cut one ‘A’ (or your chosen initial) from the dark brown slab and one from the textured terra cotta slab. -
Assemble the stack:
Gently place the textured terra cotta letter directly on top of the dark brown letter. Press them together lightly to adhere without distorting the shape. -
Drill the hole:
Use a needle tool or a small straw to create a hole at the very top center of the letter for the hardware. Ensure the hole goes cleanly through both layers.
Clean Edges
Before baking, gently rub a tiny bit of baby oil or cornstarch on your finger and smooth the sides of the clay letter to remove any harsh cutting lines.
Step 2: Forming Beads & Tassel
-
Shape clay beads:
Roll leftover terra cotta clay into three small spheres. Two should be about the size of a pea, and one slightly larger. -
Create a contrast bead:
Mix a tiny amount of blue pigment or use blue clay to create one small accent bead that complements the tassel color. Texture this bead slightly by rolling it on a textured surface. -
Pierce the beads:
Carefully poke a hole through the center of each bead using your needle tool. Twist the tool as you push through to prevent squashing the round shape. -
Bake the clay:
Arrange the letter and all beads on a parchment-lined baking sheet. Bake according to your brand of polymer clay’s instructions (usually 275°F/135°C for 15-30 minutes). Let them cool completely. -
Make the tassel:
While the clay bakes, wrap blue embroidery floss around three fingers about 20 times. Slide the loop off and tie a piece of floss tightly around the top neck to form the head. -
Trim the tassel:
Cut the bottom loops of the floss and trim the ends evenly so the tassel is short and neat, roughly 1 inch long.
Distressed Look
After baking, wipe a wash of diluted brown acrylic paint over the textured letter and quickly wipe it off. Ideally, paint stays in the cracks for an antique look.
Step 3: Final Assembly
-
Prepare the chain:
Attach a sturdy jump ring to the hole in your baked letter pendant. -
String the charm:
Thread a headpin or piece of wire through the tassel loop, followed by the clay beads and gold spacers. Alternate the terra cotta and blue beads for visual interest, placing gold spacers between the larger beads. -
Connect components:
Create a loop at the top of your beaded tassel stack using pliers. Attach this loop to the main chain connected to the keyring. -
Attach the letter:
Connect the letter pendant to the bottom of the chain using its jump ring. -
Secure everything:
Use pliers to double-check that all jump rings are closed tightly so pieces don’t slip off during daily use.
Now you have a custom, handcrafted accessory ready to organize your keys or decorate your favorite bag


What Really Happens Inside the Kiln
Learn how time and temperature work together inside the kiln to transform clay into durable ceramic.
Textured Clay Tiles

These elegant clay tiles capture the intricate details of nature and geometry through simple impression techniques. By alternating smooth, creamy clay with warm, earthy tones, you create a harmonious grid of textured squares perfect for coasters or wall art.
How-To Guide
Materials
- White or cream air-dry clay
- Terracotta or light brown air-dry clay
- Rolling pin
- Square cookie cutter (approx. 3-4 inches) or ruler and craft knife
- Fresh leaves with prominent veins (fern, mint, sage)
- Small wooden skewers or toothpicks
- Clean canvas or cloth mat for working
- Fine-grit sandpaper
- Matte spray varnish (optional)
Step 1: Preparing the Canvas
-
Condition the clay:
Begin by taking a chunk of your white clay and kneading it in your hands until it feels warm and pliable. Repeat this process with the terracotta clay. If the clay feels too dry or cracks when bent, add a drop of water and keep working it. -
Roll out the slab:
Place the white clay on your cloth mat. Use the rolling pin to flatten it into an even slab. You want a consistent thickness of about 1/4 inch (6mm) so the tiles are sturdy but not too heavy. -
Cut the squares:
Using your square cookie cutter, punch out several shapes. If using a knife, measure carefully to ensure all sides are equal. Create about five white squares and four or five terracotta squares to allow for testing. -
Smooth the edges:
Once cut, gently run your dampened finger along the cut edges of each square. This softens any sharp ridges left by the cutter and gives the tile a more finished, professional look before you start texturing.
Clean Release
If your stamp or leaf is sticking to the clay, lightly dust the surface with cornstarch before pressing. It acts as a release agent and brushes off easily once dry.
Step 2: Creating the Impressions
-
Select your botanicals:
Choose leaves that are stiff enough to leave a mark but flexible enough to lay flat. Ferns, as seen in the corner tile, work beautifully, as do leaves with deep veins like hydrangeas or mint. -
Pressing technique:
Lay a leaf on a tile, vein-side down. Gently roll over it once with your rolling pin. Don’t press too hard, or you’ll distort the square shape; just enough pressure to embed the veins is perfect. -
Remove the botanical:
Carefully lift the stem and peel the leaf away to reveal the impression. If any bits of leaf get stuck, wait for the clay to dry slightly and brush them away with a dry soft brush. -
Carving freehand veins:
For tiles like the large single leaf, use a modeling tool or dull skewer to lightly draw the leaf outline first. Then, press gently to create the interior ribs, mimicking the texture of a real leaf. -
Creating the geometric flower:
For the six-petaled flower design, lightly mark a center point. Press a leaf-shaped tool or a real small leaf radiating out from the center six times. Adding texture inside each petal with a needle tool adds depth.
Make it a Mosaic
Before drying, poke holes in the corners of each tile. After firing or drying, tie them together with hemp cord to create a hanging wall tapestry or wind chime.
Step 3: Adding Geometric Details
-
The dotting technique:
Take a terracotta square and a blunt skewer. Create a grid of dots by pressing straight down and lifting straight up. Vary the spacing—some tiles look great with a dense grid, others with a sparse pattern. -
Mixing textures:
I like to combine lines and dots. Try creating rows of dots alternating with impressed lines for a rhythmic pattern, similar to the bottom right tile in the example. -
Refine the surface:
Check all your tiles. If pressing the patterns caused the edges to bulge out, gently tap the square on the table on each side to regain the crisp square form.
Step 4: Drying and Finishing
-
Slow drying process:
Place the tiles on a wire rack or a clean, dry cloth. Keep them away from direct heat sources to prevent warping. Let them dry for at least 24-48 hours depending on humidity. -
Flip for flatness:
Halfway through the drying process, gently flip the tiles over. This ensures air reaches both sides equally, which is the secret to keeping flat tiles from curling at the corners. -
Sanding imperfections:
Once fully dry and hard, take a piece of fine-grit sandpaper and lightly buff the edges and corners. This removes any final burrs and makes the tile feel pleasant to hold. -
Sealing the work:
To protect against moisture and dirt, spray a thin coat of matte varnish over the tiles. This preserves the natural matte look of the clay while making them more durable.
Arrange your finished tiles in a grid to enjoy the beautiful interplay of shadow and texture you have created
Clay Relief Picture Scenes
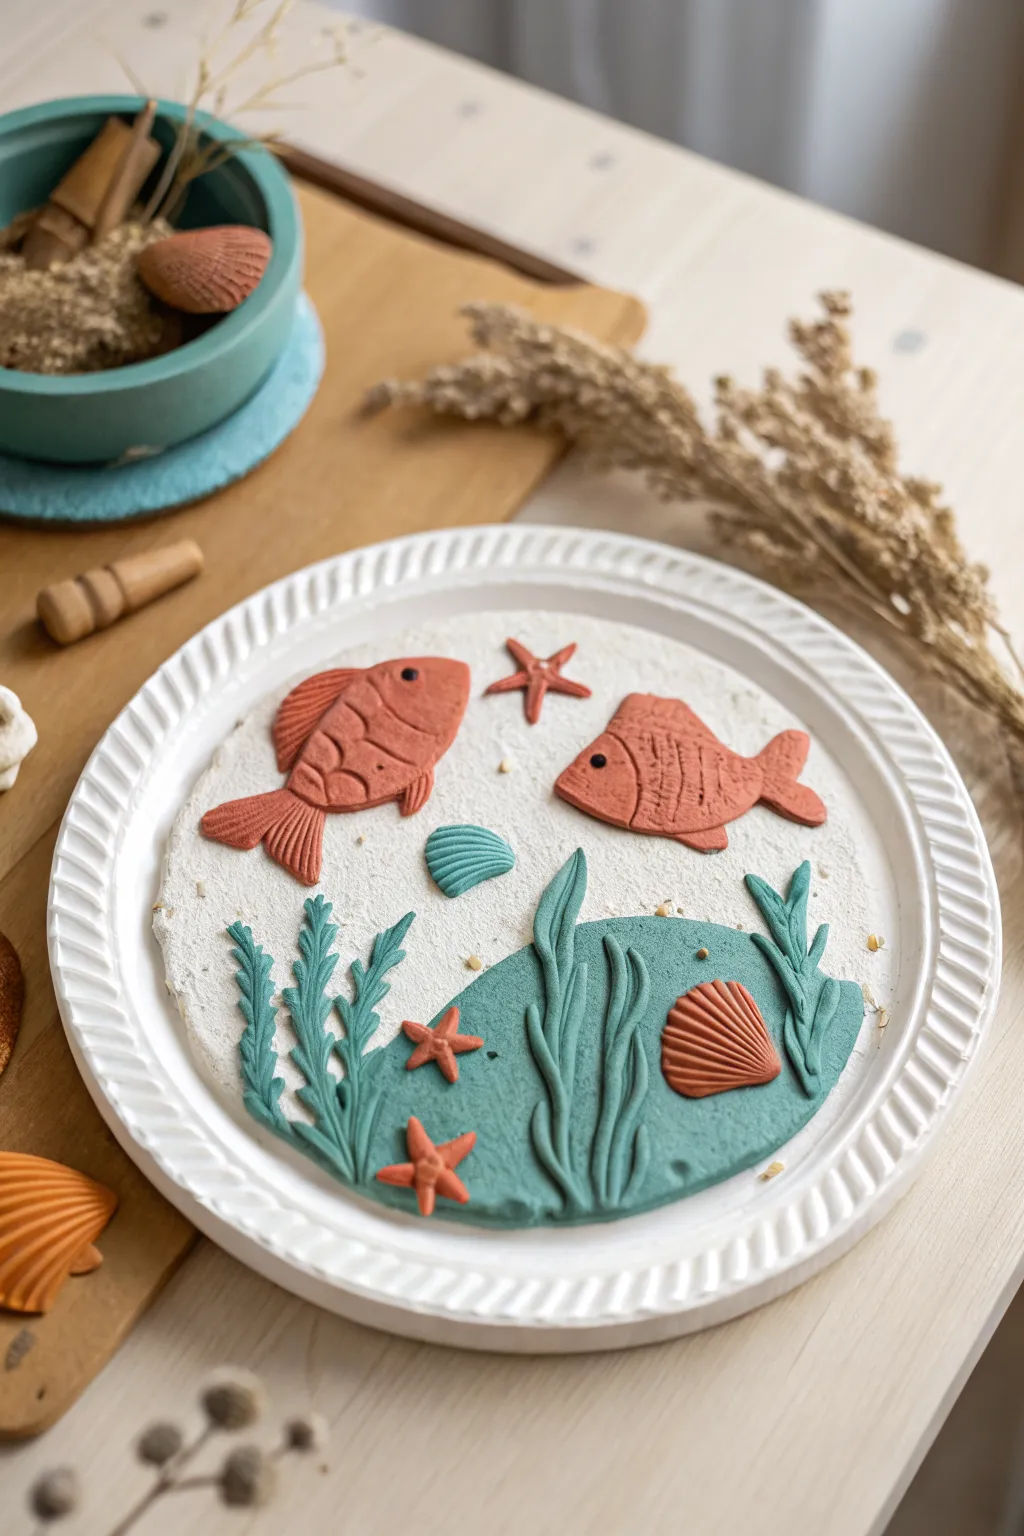
Dive into creativity with this charming underwater scene sculpted directly onto a textured clay base. Using simple shapes and carving techniques, you’ll bring friendly fish and swaying seaweed to life in a dimensional relief format.
Step-by-Step Tutorial
Materials
- White air-dry clay or polymer clay
- Terracotta or orange-brown clay
- Teal or sea-green clay
- Rolling pin
- Round plate (paper or plastic) for framing/texture
- Clay carving tools (needle tool, small knife)
- Small black beads or black clay (for eyes)
- Textured fabric or sponge (for base texture)
Step 1: Setting the Scene
-
Create the base:
Roll out a large slab of white clay to about 1/4 inch thickness. Use your round plate as a cutter or template to create a perfect circle. -
Add rim texture:
Press a fork or a ribbed tool around the entire outer edge of the white circle to mimic the fluted rim of a paper plate. -
texture the background:
Gently dab the center surface with a coarse sponge or a crumpled piece of foil to give the ‘water’ a sandy, grainy texture rather than leaving it perfectly smooth. -
Form the seabed:
Roll out a piece of teal clay into a flat, uneven hill shape. Place this at the bottom third of your white circle to represent the ocean floor.
Step 2: Sculpting the Sea Life
-
Shape the fish bodies:
Using the terracotta clay, flatten two oval shapes. Pinch one end of each oval slightly to form a tail base, then press them onto the upper half of the white background. -
Add tails and fins:
Cut small triangles of terracotta clay. Attach them to the back and top of your fish bodies to create dorsal fins and tail fins. Smooth the seams gently with your finger. -
Detail the fish:
Use a needle tool or knife to score lines across the bodies and fins. Add curved lines for gills and straight lines for fin texture. -
Give them sight:
Press a tiny black bead or a very small ball of black clay into the head area of each fish to create the eyes.
Clay Won’t Stick?
If your clay pieces aren’t adhering well to the base, score (scratch) both surfaces and add a tiny drop of water or liquid clay (for polymer) to act as glue.
Step 3: Adding Flora and Fauna
-
Create seaweed strands:
Roll thin snakes of teal clay. Flatten them slightly and twist or curve them to look organic. -
Plant the seaweed:
Press these green strands onto the teal seabed you created earlier, arranging them in clusters that reach upward. -
Make starfish:
Form small stars using five tiny logs of terracotta clay joined at the center. I find it easiest to assemble them right on the plate so they don’t break during transfer. -
Place the starfish:
Position a larger starfish floating near the top and smaller ones nestled into the seabed. -
Sculpt the shells:
Mold small fan shapes from both teal and terracotta clay. Use your knife tool to press radiating lines from the bottom center to the outer edge of each shell. -
Final arrangement:
Place one teal shell floating in the open ‘water’ and a terracotta shell resting on the seabed for balance. -
Finishing touches:
Check all edges are securely pressed down. If using air-dry clay, let it cure flat for 24-48 hours; for polymer, bake according to package instructions.
Add Some Sparkle
After the clay is fully dry, dry-brush a tiny amount of metallic gold or pearlescent acrylic paint over the textured fish scales and shell ridges for a magical shimmer.
Display your aquatic masterpiece on a shelf or attach a hook to the back to hang it on the wall

TRACK YOUR CERAMIC JOURNEY
Capture glaze tests, firing details, and creative progress—all in one simple printable. Make your projects easier to repeat and improve.
Story Stones for Pretend Play
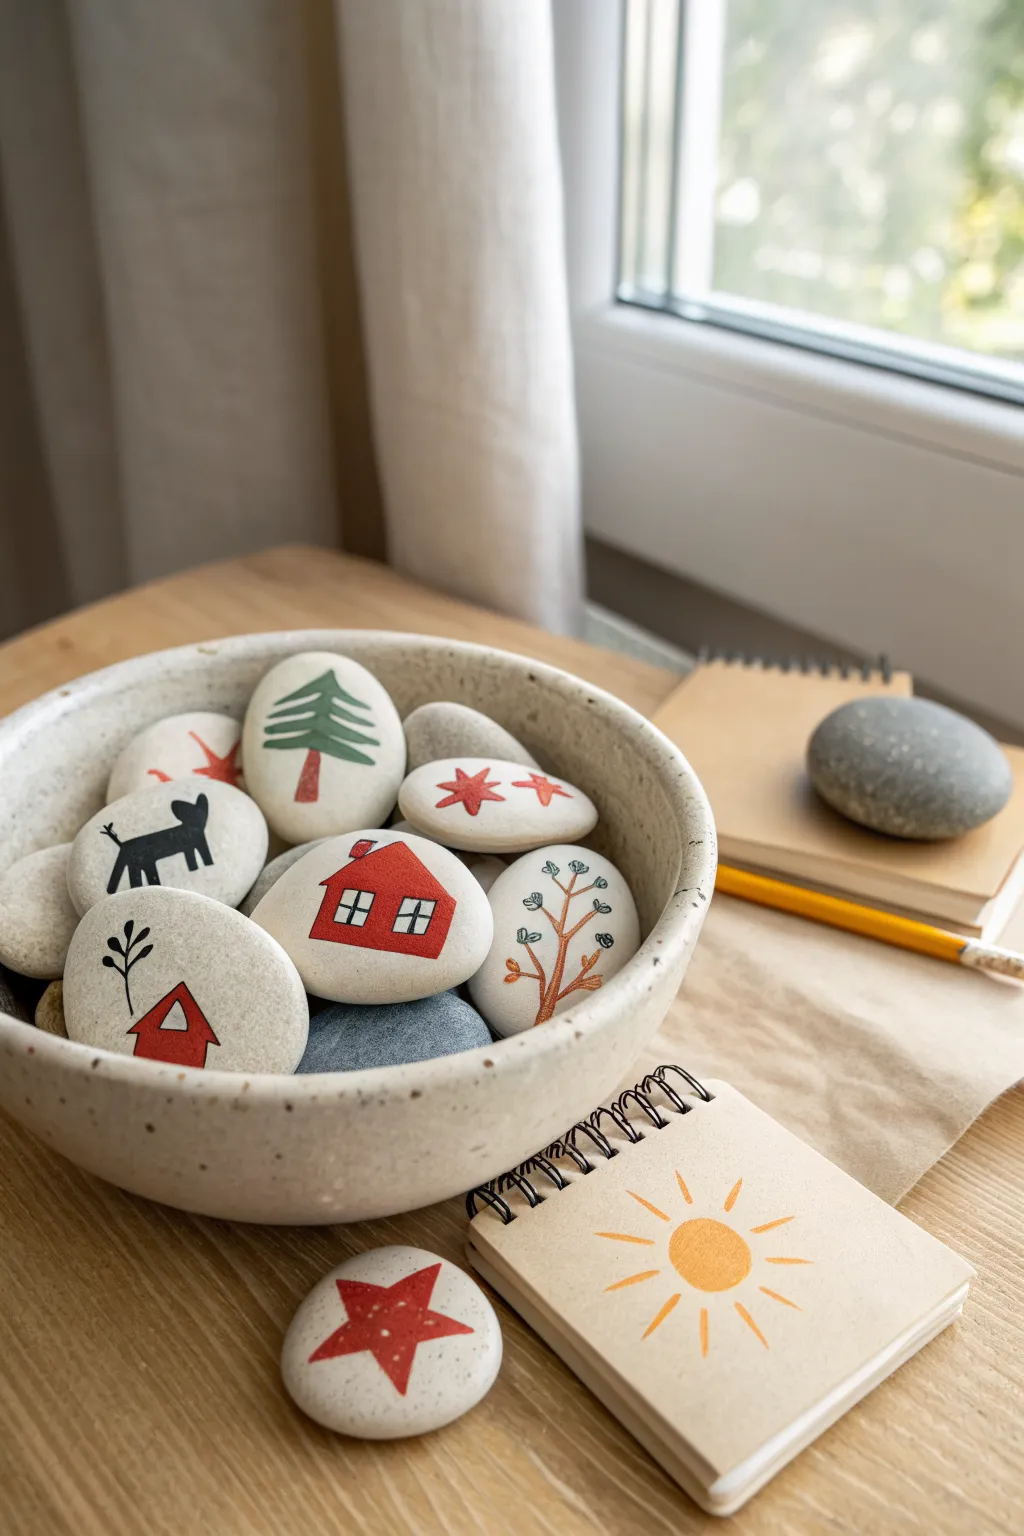
Transform smooth clay pebble shapes into a tangible library of characters and settings with this charming project. These tactile story stones feature simple, folksy illustrations like little red houses, pine trees, and stars, perfect for sparking imaginative tales.
Detailed Instructions
Materials
- Air-dry clay (white or light grey)
- Acrylic paints (red, green, black, orange/brown)
- Fine-tipped paint brushes (sizes 0 and 1)
- Black fine-liner pen (waterproof) or ultra-fine paint pen
- Matte spray varnish or Mod Podge
- Small bowl relative to stone size
- Sandpaper (fine grit)
- Small kraft paper notebook (optional for matching theme)
Step 1: Shaping the Canvas
-
Prepare the clay:
Begin by kneading a handful of white air-dry clay to warm it up and remove air bubbles. Even consistency is key for a smooth finish later. -
Form the pebbles:
Pinch off walnut-sized pieces of clay. Roll them into balls between your palms, then gently flatten them into smooth, oval ‘skipping stone’ shapes. -
Smooth the edges:
Dip your finger in a little water and run it along the edges of the stones to smooth out any cracks or fingerprints. Aim for a very organic, river-worn look. -
Dry completely:
Place your clay stones on a clean surface to dry. I find turning them over halfway through the drying process helps them dry evenly. Allow 24-48 hours depending on thickness. -
Sand the surface:
Once fully hard, use fine-grit sandpaper to gently buff the top surface of each stone. This creates the perfect texture for your paint to adhere to.
Step 2: Creating the Illustrations
-
Draft the designs:
Before painting, lightly sketch your motifs onto the stones with a pencil. Plan a mix of subjects: a house, a tree, an animal, and some abstract symbols like stars. -
Paint the red house:
Using a small brush and deep red acrylic paint, fill in the main body of the house shape. You may need two thin coats for solid opacity. -
Add the pine tree:
Mix a forest green shade. Paint a simple vertical line for the trunk, then add swooping, horizontal branches getting wider towards the bottom. -
Paint the starry stone:
On a smaller stone, paint two or three five-pointed stars using the red paint. Keep the lines crisp. -
Detail the autumn tree:
For the tree with leaves, paint a thin brown trunk and branches. Use the tip of your smallest brush to dab tiny green or orange dots on the branch ends. -
Silhouette the cat:
Using black paint or a black paint pen, carefully fill in the cat silhouette on a separate stone. Focus on the distinct tall ears and tail. -
Create the sun notebook:
If recreating the full set, take a small kraft notebook. Paint a solid orange circle in the center, and use a fine brush to add extending sensory rays in orange.
Paint Bleeding?
If your paint bleeds into the clay’s texture, your consistency is too watery. Use undiluted soft-body acrylics for crisper edges on porous clay.
Step 3: Finishing and Sealing
-
Add fine lines:
Once the base paint colors are completely dry, use a waterproof black fine-liner pen to add details. Draw the windows on the red house and the trunk on the pine tree. -
Outline the house:
Use the pen to add a chimney and outline the roof shape. Add a small sketched plant or simple line embellishment next to the house for extra charm. -
Erase pencil marks:
Check for any visible pencil sketch lines that didn’t get covered by paint and gently erase them, being careful not to rub the paint. -
Seal the artwork:
Apply a coat of matte varnish or clear sealant over the painted side of the stones. This prevents the acrylics from chipping during play. -
Arrange the set:
Once dry, place your finished story stones in a speckled ceramic bowl, ready to inspire new narratives.
Make it Interactive
Paint questions or prompts on the back of each stone (e.g., ‘Who lives here?’ or ‘What happens next?’) to help guide storytelling games.
Gather your new collection in a bowl and enjoy the endless stories waiting to be told
Clay Houses for a Mini Village
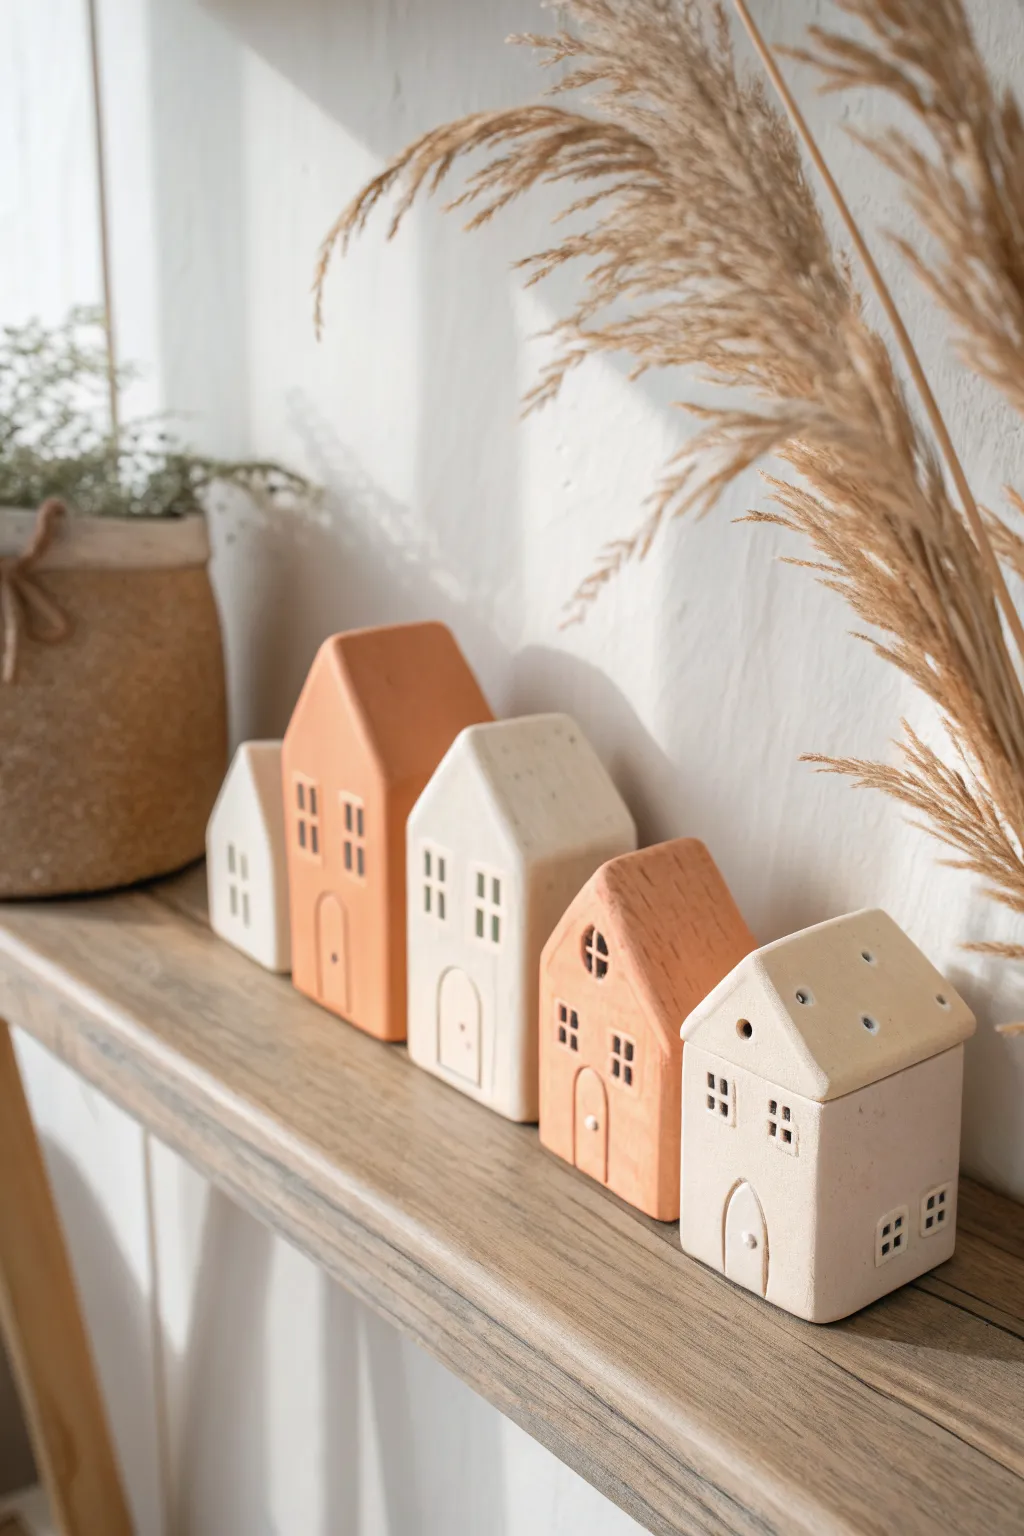
Create a charming row of miniature dwellings using simple slab-building techniques and varied natural tones. These minimalist houses feature sweet details like arched doors and tiny cutout windows, perfect for arranging on a mantle or shelf.
Step-by-Step
Materials
- White air-dry clay or polymer clay
- Terracotta colored clay (or orange pigment to mix)
- Acrylic rolling pin
- Sharp craft knife or scalpel tool
- Ruler
- Needle tool or toothpick
- Fine grit sandpaper
- Small square cutter (optional)
- Smooth work surface or mat
- Water cup (for smoothing)
Step 1: Preparing the Clay Slabs
-
Condition and Mix:
Begin by kneading your white clay until it is pliable and smooth. For the terracotta houses, either use pre-colored clay or knead burnt orange pigment into a portion of white clay until the color is uniform. -
Roll the Slabs:
Use your acrylic rolling pin to roll the clay out into an even slab. Aim for a thickness of about 1/4 inch (6mm) to ensure the houses can stand up stably on their own. -
Create Texture (Optional):
If you want a slightly more rustic finish like the tallest house in the image, you can gently press a piece of canvas or textured paper onto the surface before cutting, though smooth is classic and clean.
Uneven Standing?
If a house wobbles after drying, tape a sheet of sandpaper to a flat table. Rub the bottom of the house in figure-8 motions against it until the base is perfectly flat.
Step 2: Shaping the Houses
-
Cut the Basic Rectangles:
Using a ruler and craft knife, cut out rectangular blocks of varying heights. Don’t worry about the roofs yet; just establish the width and height of the walls. -
Create the Roof Angles:
Decide on your roof pitch. For a steep roof, find the center point of the top edge and cut diagonally down to the sides. For a shallower roof, make the angle wider. Varying these angles adds visual interest to the village. -
Smooth the Edges:
Run your finger dipped in a tiny bit of water along the cut edges. This softens the sharp corners and removes any burrs left by the knife, giving the clay a finished look. -
Add Dimension:
If you want the chunky block look shown here, ensure your slab remains thick. If you want a 3D hollow house, you would need to cut four walls and a roof piece, but these solid block style houses are sturdier and easier for beginners.
Step 3: Adding Architectural Details
-
Carve the Windows:
Use the tip of your craft knife or a tiny square cutter to gently impress window shapes. For the open windows, carefully cut the clay out completely and smooth the inner edges with a needle tool. -
Detailing the Panes:
For windows that aren’t cut all the way through, use the knife to lightly score a cross or grid pattern into the clay surface to mimic window panes without removing material. -
Form the Arched Doors:
Use a needle tool or the curved end of a paperclip to outline an arched door at the base. Press gently to indent the outline without cutting through. -
Add Door Details:
Roll a minuscule ball of clay for the doorknob and press it firmly onto the door area. You can score a vertical line down the center of the door for a double-door effect. -
Roof Accents:
On the smallest house, use a tool to poke small circular holes in the roof area for a whimsical touch, or add tiny circular windows near the peaks of others.
Crisp Window Corners
When cutting out tiny square windows, don’t drag the knife. Instead, press the blade straight down for each side of the square to keep corners sharp and clean.
Step 4: Finishing and Setting
-
Final Smoothing:
Do a final check for fingerprints. I like to lightly brush the surface with a slightly damp soft brush or fingertip to erase any handling marks before the drying phase begins. -
Drying Process:
Stand the houses upright on a clean surface. Let air-dry clay sit for 24-48 hours away from direct heat to prevent cracking. If using polymer clay, bake according to the package instructions. -
Sanding:
Once fully dry or cured and cooled, take a piece of fine-grit sandpaper and gently buff the sides and bottom. This ensures they sit perfectly flat and have a professional matte finish. -
Matte Varnish (Optional):
If you want to protect the finish, apply a coat of ultra-matte varnish. Avoid glossy finishes to maintain the natural, raw ceramic look seen in the photo.
Arrange your finished village on a wooden shelf with some dried botanicals for a cozy, modern display
Sculpted Clay Monsters With Personality
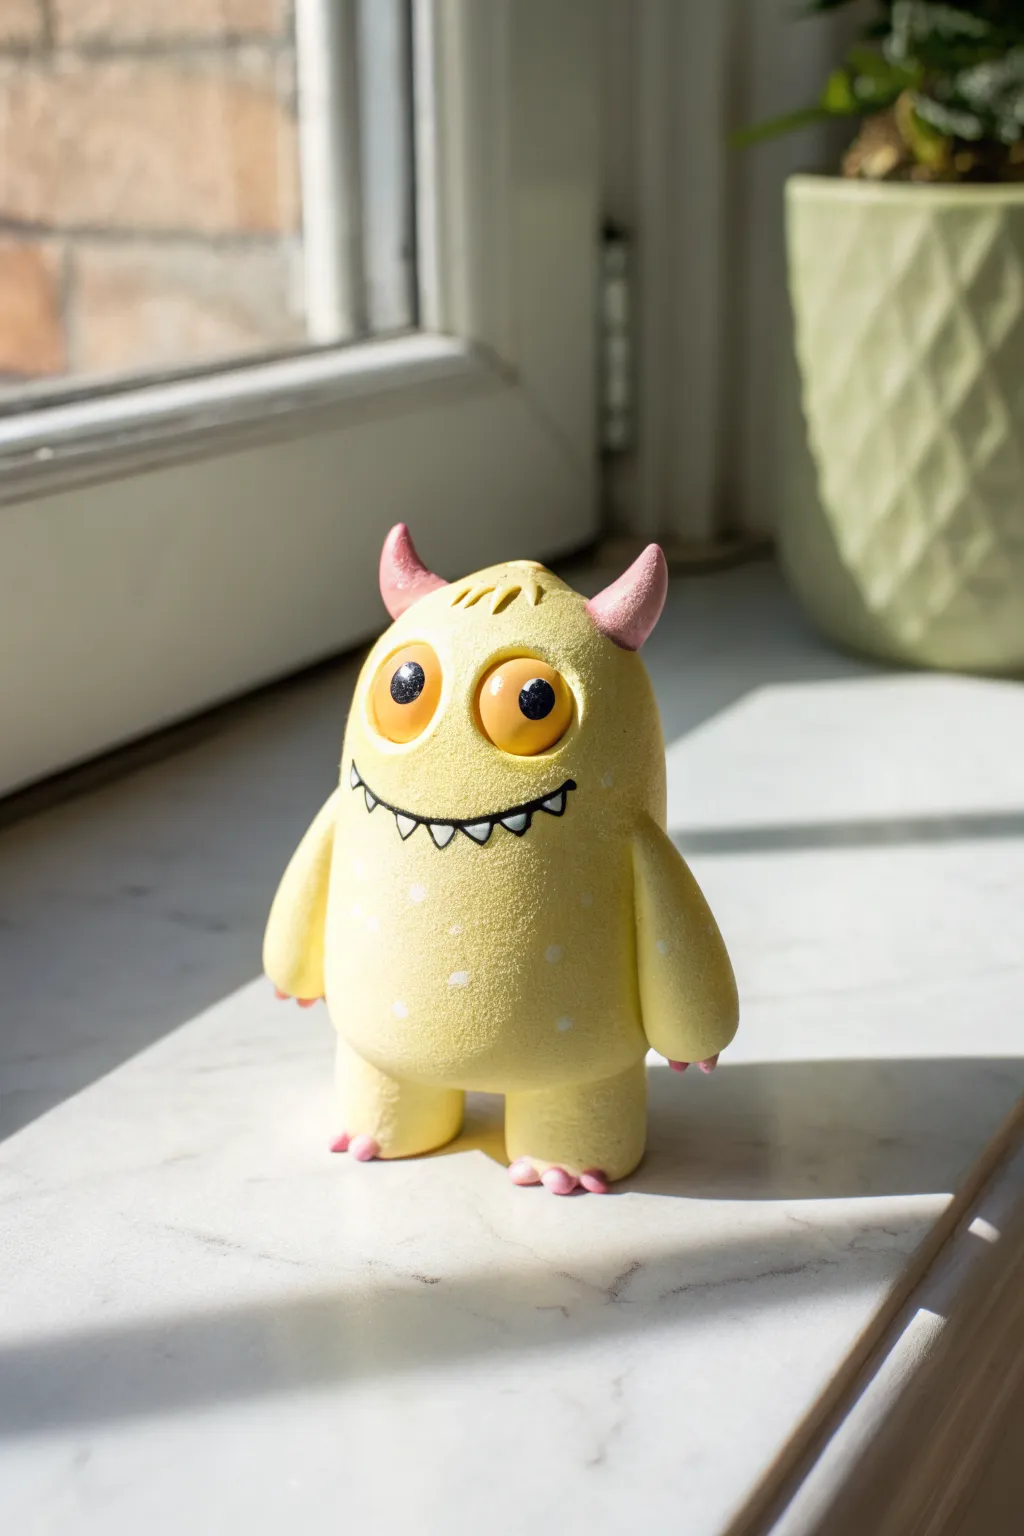
This cheerful yellow monster brings a ray of sunshine to any shelf with its bright body and wide, toothy grin. You’ll sculpt a simple capsule shape into a lovable character featuring contrasting pink horns and expressive eyes full of personality.
Detailed Instructions
Materials
- Bright yellow polymer clay (for the body)
- Pale pink polymer clay (for horns and toes)
- White polymer clay (for eyes and teeth)
- Black polymer clay (for pupils)
- Thin black clay snake or black acrylic paint (for the smile line)
- Basic sculpting tools (needle tool, ball stylus)
- Soft texture sponge or toothbrush
- Aluminum foil (for the core)
- Oven for baking
Step 1: Foil Core & Body Base
-
Form the core:
Begin by scrunching a piece of aluminum foil into a firm, rounded capsule shape; this saves clay and keeps the figure lightweight. -
Condition the yellow clay:
Take a large chunk of bright yellow clay and knead it until it is soft, warm, and pliable to prevent cracking later. -
Cover the foil:
Flatten the yellow clay into a sheet about 1/4 inch thick and wrap it completely around your foil core. -
Smooth the seams:
I like to gently roll the shape between my palms to erase any seams and ensure the surface is nice and smooth. -
Add texture:
Before adding features, gently tap a clean toothbrush or texture sponge all over the yellow body to give it a soft, fuzzy-looking skin texture.
Keeping It Clean
Yellow clay shows dirt easily! Keep baby wipes nearby to clean your hands and tools often, especially after handling the black clay for the mouth.
Step 2: Limbs & Horns
-
Create the legs:
Roll two short, thick cylinders of yellow clay for the legs and attach them to the bottom of the body, blending the seams upwards so they look seamless. -
Shape the toes:
Make six tiny balls of pale pink clay, pressing three onto the front of each yellow foot to create cute little toes. -
Form the arms:
Roll two tapered sausage shapes for arms; attach them to the sides of the body so they hang down naturally, blending the shoulder area smooth. -
Add fingertips:
Add tiny pink dots to the ends of the arms to match the toes. -
Sculpt the horns:
Shape two cones of pale pink clay, curving the tips slightly, and press them onto the top corners of the head. -
Add head tuft:
Place a small patch of yellow clay between the horns and use a needle tool to scratch in hair-like lines for a little tuft.
Glow Up
Use glow-in-the-dark clay for the white parts of the eyes and teeth. Your monster will look friendly by day but have a spooky surprise at night.
Step 3: Face & Details
-
Position the eyes:
Press two large indentations into the upper face where you want the eyes to sit using your thumbs or a large ball tool. -
Make the eyeballs:
Roll two balls of yellow clay (slightly smaller than the sockets) and flatten them inside the indentations to create the eyelids/sockets. -
Add the whites:
Place flattened white circles onto the yellow eye mounds. -
Place the pupils:
Add small black circles for pupils; placing them slightly off-center or looking in specific directions adds huge personality. -
Highlight the eyes:
Add a tiny speck of white clay to each pupil—this ‘catchlight’ brings the character to life instantly. -
Create the smile:
Roll an incredibly thin snake of black clay and press it onto the face in a wide, U-shaped curve. -
Add teeth:
Form tiny triangles of white clay and carefully attach them hanging down from the black smile line. -
White speckles:
Take very small bits of white clay and smear them randomly on the belly area for subtle spotted markings. -
Final bake:
Bake the finished monster according to your clay manufacturer’s instructions, usually at 275°F (130°C) for about 30 minutes per 1/4 inch of thickness.
Once cooled, your sunny little monster is ready to guard your windowsill or desk
Color-Mixed Clay Patterns
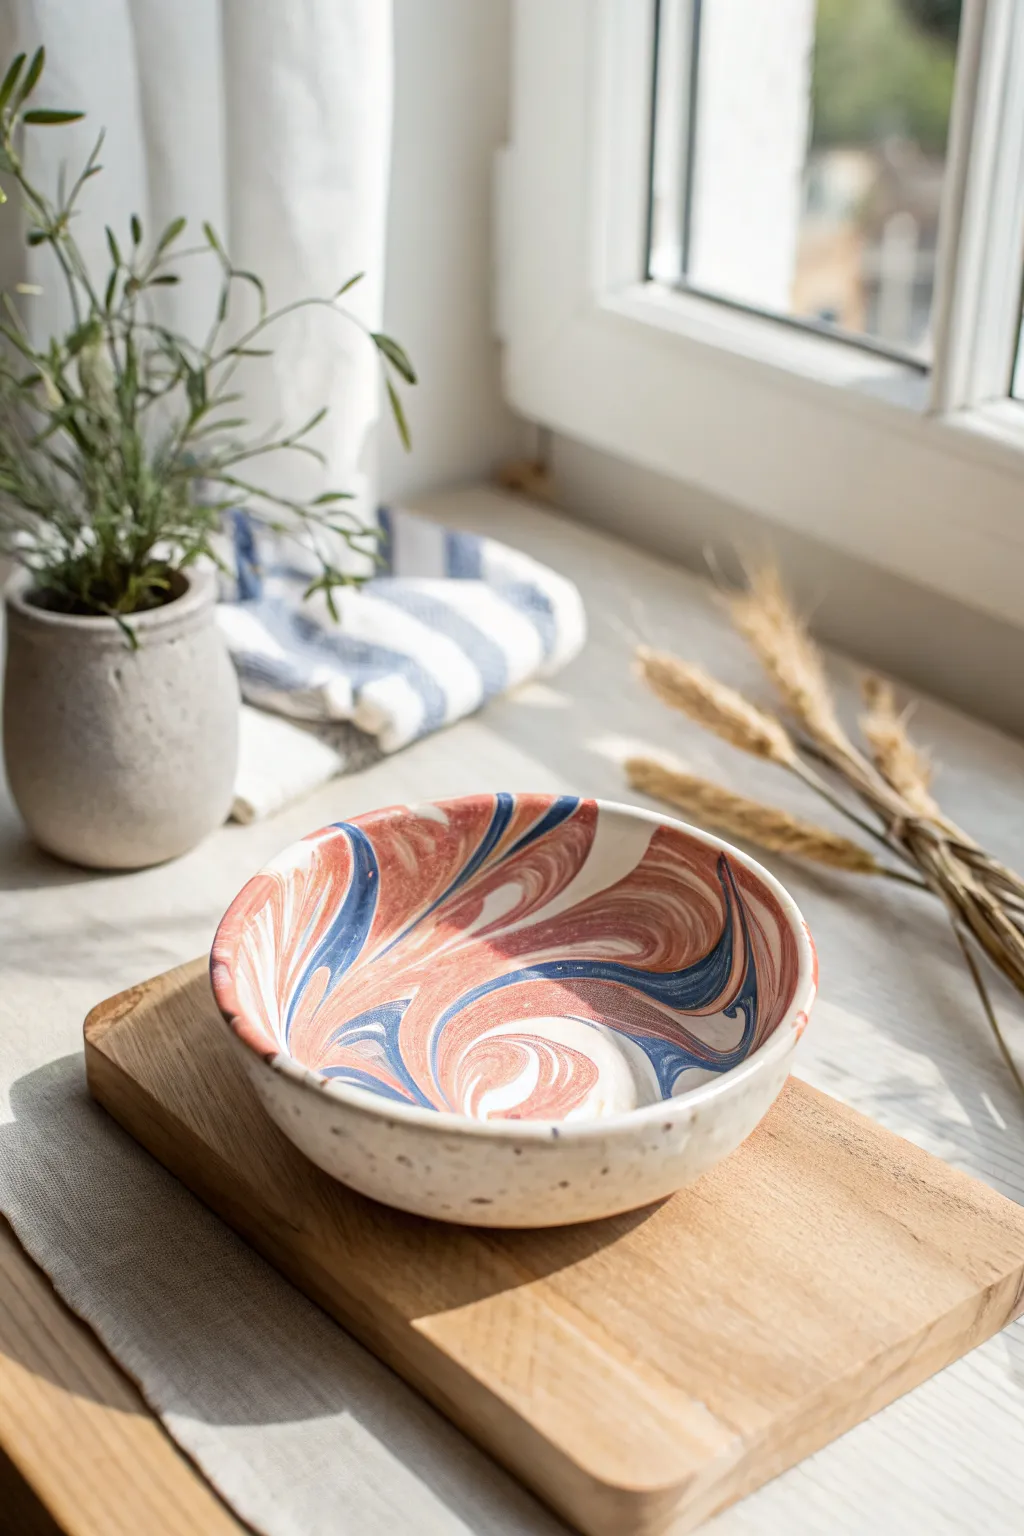
Capture the mesmerizing beauty of natural stone with this marbled clay bowl, featuring swirling ribbons of terracotta red, ocean blue, and creamy white. This project uses the nerikomi or agateware technique to build patterns directly into the clay body rather than painting them on the surface.
Step-by-Step Tutorial
Materials
- White stoneware clay (speckled or plain)
- Red earthenware or terracotta clay
- Blue mason stain (or pre-colored blue clay)
- Rolling pin
- Canvas mat or cloth
- Bowl mold or a simple kitchen bowl to use as a form
- Sponge
- Wire clay cutter
- Rib tool (metal or rubber)
- Clear transparent glaze
- Kiln access
Step 1: Preparing the colored clay
-
Mix the blue clay:
Start by taking a small handful of white clay. Create a well in the center and add your blue mason stain powder. Knead the clay thoroughly until the color is uniform and streak-free. Wear gloves to avoid staining your hands. -
Portion the clays:
Prepare three separate lumps of clay: your largest amount should be the white (or speckled white) clay, followed by a medium amount of the red terracotta, and a smaller amount of the blue clay you just mixed. -
Roll logs:
Roll each clay color into several thick logs or snakes of varying thicknesses. You want some variety here to create dynamic swirls later.
Shrinkage Rates
Ensure your different clays have similar shrinkage rates (check the package info). If they differ significantly, the bowl may crack while drying or firing.
Step 2: Creating the marble block
-
Stack the colors:
Gather your clay logs and twist them together into one large, thick rope. Fold the rope in half and twist it again. Be careful not to over-twist, or the colors will muddy together into a gray mess. -
Compress the block:
Slam the twisted clay onto your work surface a few times to compress it into a solid rectangular block, ensuring there are no air bubbles trapped between the different colored strands. -
Slice the slab:
Using your wire cutter, slice through the block vertically to reveal the cross-section of swirls. Lay these slices side-by-side on your canvas mat.
Step 3: Forming the bowl
-
Roll the slab:
Roll over your arranged slices firmly with a rolling pin to join them into a single, cohesive slab. Roll in alternating directions to stretch the pattern out nicely. -
Smooth the surface:
Take a rubber rib tool and drag it gently across the surface of the slab. I like to do this repeatedly to compress the clay particles and really bring out the definition of the colors. -
Drape over mold:
Cover your bowl mold with a layer of thin plastic or cling film to prevent sticking. Carefully lift your marbled slab and drape it over the mold (for a dropped rim effect) or press it inside the mold. -
Shape the vessel:
Gently press the clay against the form, starting from the center and working outward to avoid trapping air. Trim the excess clay from the rim with a needle tool or knife. -
Refine the rim:
Use a damp sponge to smooth the cut edge of the rim, rounding it over so it feels comfortable to the touch.
Nerikomi Inlay
Try embedding small balls of solid colored clay into the slab before final rolling to create focused ‘polka dot’ swirls within the marble pattern.
Step 4: Finishing and firing
-
Slow drying:
Let the bowl dry slowly on the mold until it is leather hard. Because you are mixing different clay bodies, slow drying is crucial to prevent cracks as they might shrink at slightly different rates. -
Bisque fire:
Once bone dry, fire the piece in the kiln to a bisque temperature (usually cone 04 or 06). This prepares it for glazing. -
Clear glaze application:
Dip or brush a clear, food-safe glaze over the entire interior. This will make the colors pop and look vibrant, just like wet river stones. -
Exterior consideration:
For the exterior, you can leave the raw speckled clay unglazed for a nice matte texture, or gaze it clear as well if you prefer a glossy finish. -
Final glaze fire:
Fire the bowl a second time to the maturation temperature of your specific stoneware clay (likely cone 5 or 6). Once cooled, your marbled masterpiece is ready.
Now you have a stunning, food-safe bowl that looks like a polished geological specimen.