When I’m making clay with kids in my studio, I lean hard on balls, coils, and flat slabs—the magic trio that turns a lump of clay into something instantly recognizable. These clay art ideas easy for kids are colorful, low-stress, and perfect for little hands that want quick, happy results.
Pinch Pot Animal Friends
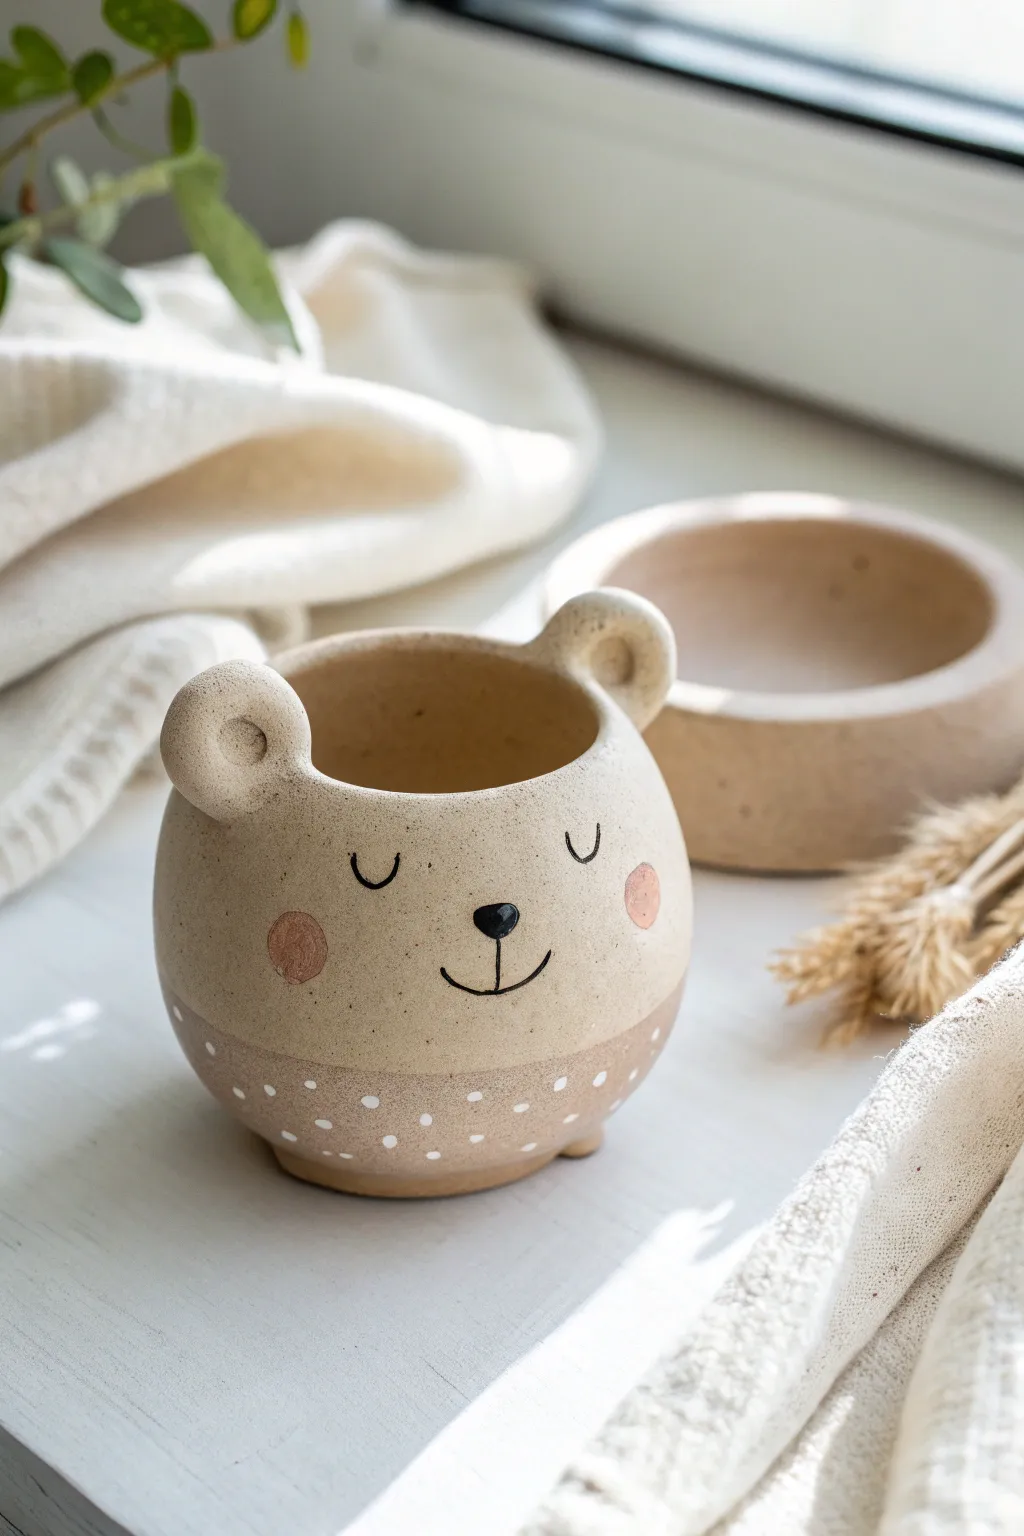
Transform a simple ball of clay into this adorable sleepy bear planter, perfect for holding tiny treasures or succulents. Its gentle face and polka-dotted tummy make it a sweet addition to any windowsill.
Step-by-Step Guide
Materials
- Air-dry clay or polymer clay (beige or white)
- Acrylic paints (black, pink, white, beige/light brown)
- Fine detail paintbrush
- Small sponge or foam brush
- Water cup
- Rolling pin (optional)
- Clay sculpting tools or a toothpick
- Clear varnish or sealant (matte or satin)
- Slip (clay mixed with water) if using air-dry clay
Step 1: Sculpting the Base
-
Form the pinch pot:
Start with a ball of clay about the size of a tennis ball. Push your thumb into the center, but not all the way through to the bottom. Gently pinch and rotate the clay between your thumb and fingers to widen the opening and create a deep bowl shape. -
Refine the shape:
Gently tap the bottom of your pot against the table to flatten it slightly so it sits securely without wobble. Smooth out any cracks on the surface with a tiny bit of water on your finger. -
Shape the rim:
Curve the upper edges of the bowl slightly inward to give it a rounder, more head-like appearance. The opening should be slightly narrower than the widest part of the bowl.
Step 2: Adding Bear Features
-
Make the ears:
Roll two small balls of clay equal in size. Press your thumb or a rounded tool into the center of each ball to create indents, shaping them into cute, cupped bear ears. -
Attach the ears:
Score (scratch) the bottom of the ears and the attachment points on the rim of the pot. Apply a little slip or water, then press the ears firmly onto the rim. Blend the clay at the seam downward for a seamless connection. -
Add feet:
Roll three tiny balls of clay for the feet. Attach them in a tripod formation on the bottom so the bear stands elevated just slightly. This gives it a charming, finished look. -
Smooth everything out:
Do a final pass with a damp sponge or finger to ensure the surface is silky smooth before letting it dry. Let the clay dry completely according to your package instructions—usually 24 to 48 hours for air-dry clay.
Cracks while drying?
If small cracks appear as the clay dries, don’t panic. Mix a tiny bit of fresh clay with water to make a paste and fill the cracks, then smooth it over.
Step 3: Painting & Decorating
-
Paint the two-tone base:
Mix a light beige or sandy brown paint color. Using a piece of painter’s tape or a steady hand, paint the bottom third of the pot in this darker shade to create the bear’s “sweater” or tummy area. Leave the top the natural creamy clay color or paint it a very pale off-white. -
Create rosy cheeks:
Dip your finger or a small round sponge applicator into pink paint. Dab off most of the paint onto a paper towel, then gently stamp round pink cheeks on either side of the face. -
Paint the face details:
Using your finest detail brush and black paint, carefully draw two ‘U’ shapes for the sleepy closed eyes. Add a small inverted triangle for the nose and a simple curved line for the mouth. -
Add the nose shine:
Once the black nose is dry, add a tiny dot of white paint to the upper corner of the nose to make it look wet and shiny. -
Decorate with polka dots:
Dip the handle end of a paintbrush into white paint. Dot it randomly over the bottom beige section to create the pattern. Try to keep the spacing somewhat even, but it doesn’t need to be perfect. -
Seal your work:
Once all paint is fully dry, apply a coat of matte or satin varnish to protect your new friend from moisture and dust.
Make it a set
Make a smaller version without face details to act as a matching water dish or trinket bowl, creating a cohesive desk set just like in the photo.
Now you have a charming little bear companion ready to brighten up your shelf


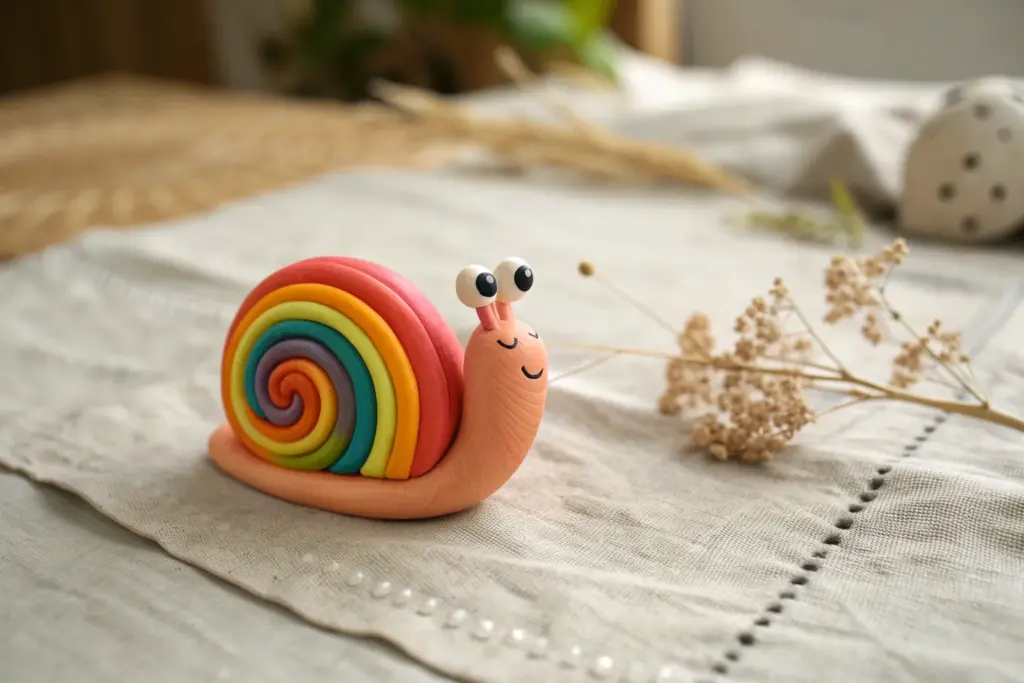
Coil Snakes and Spiral Snails
This cheerful little companion brightens up any windowsill with its warm, sunset-colored shell and curious expression. By combining simple coiling techniques with layered colors, you’ll create a sturdy snail friend that looks like it crawled right out of a storybook.
Step-by-Step Tutorial
Materials
- Polymer clay or air-dry clay (White, Pale Pink, Salmon/Terracotta, Deep Red/Coral, Beige/Cream)
- Clay carving tools or a plastic knife
- Rolling pin or smooth glass jar
- Black acrylic paint
- Small paintbrush or toothpick
- Gloss varnish (optional)
Step 1: Preparing the Snail’s Body
-
Form the base:
Start with a lump of beige or cream-colored clay about the size of a golf ball. Roll it into a smooth log shape, slightly thicker at one end for the head and tapering to a rounded point at the tail. -
Flatten the foot:
Gently press the log down onto your work surface to flatten the bottom. This creates the snail’s ‘foot’ and ensures it will sit stably without tipping over. -
Create the neck:
Pinch the thicker end gently to extend it upwards, creating a distinct neck and head area. Smooth out any fingerprints with a light touch. -
Add eye stalks:
Roll two tiny, thin sausages of the same beige clay. Attach them to the top of the head, blending the clay at the base so they stand up securely. Add tiny balls to the tips for the eyes.
Smooth Surface Secret
Before baking or drying, brush a tiny amount of baby oil (for polymer) or water (for air-dry) over the clay to erase fingerprints instantly.
Step 2: Building the Spiral Shell
-
Mix your colors:
Prepare four distinct colors for the shell: a pale pink center, a salmon/terracotta ring, a thin white separator strip, and a thick outer band of deep red or coral. -
Start the center coil:
Take a small amount of pale pink clay and roll it into a snake. Coil it tightly into a flat spiral to make the very center button of the shell. -
Add the second ring:
Roll a snake of the salmon or orange-toned clay. Wrap this snugly around your central pink spiral, gently pressing the seams together so they bond. -
Layer the white accent:
Roll a very thin snake of white clay. Wrap this generally around the orange layer. This high-contrast stripe really makes the shell colors pop. -
Complete the outer shell:
Create a thick, sturdy snake from your deep red or coral clay. Wrap this as the final, largest layer of the shell. I like to texture this outer layer slightly with a tool to give it an organic feel. -
Smooth the back:
Turn the shell over. If the coils feel loose, gently smudge the clay together on the *back* side only to lock the spiral structure together without ruining the front design.
Shell Won’t Stick?
If the shell keeps rolling off the body, insert a small piece of toothpick or wire between the body and shell to act as an internal skeleton.
Step 3: Assembly and Details
-
Mount the shell:
Place the finished shell vertically onto the back of the snail body. Press it down firmly so the bottom of the shell sinks slightly into the body clay. -
Secure the connection:
Use a modeling tool to blend a little bit of the body clay up against the bottom of the shell to act as a hidden anchor. -
Bake or dry:
If using polymer clay, bake according to the package instructions (usually 275°F/135°C for 15-30 minutes). If using air-dry clay, let it sit undisturbed for 24-48 hours. -
Paint the face:
Once fully cured or dry, use a toothpick or fine brush to dab two black dots on the eye stalks. Add rosy cheeks with a tiny bit of diluted red paint or pink chalk pastel. -
Add shine:
Finish by brushing the eyes and the colored shell with a coat of gloss varnish to make it look smooth and slimy in a cute way.
Now you have a charming snail friend ready to explore your garden or bookshelf


Silly Monster Face Tiles
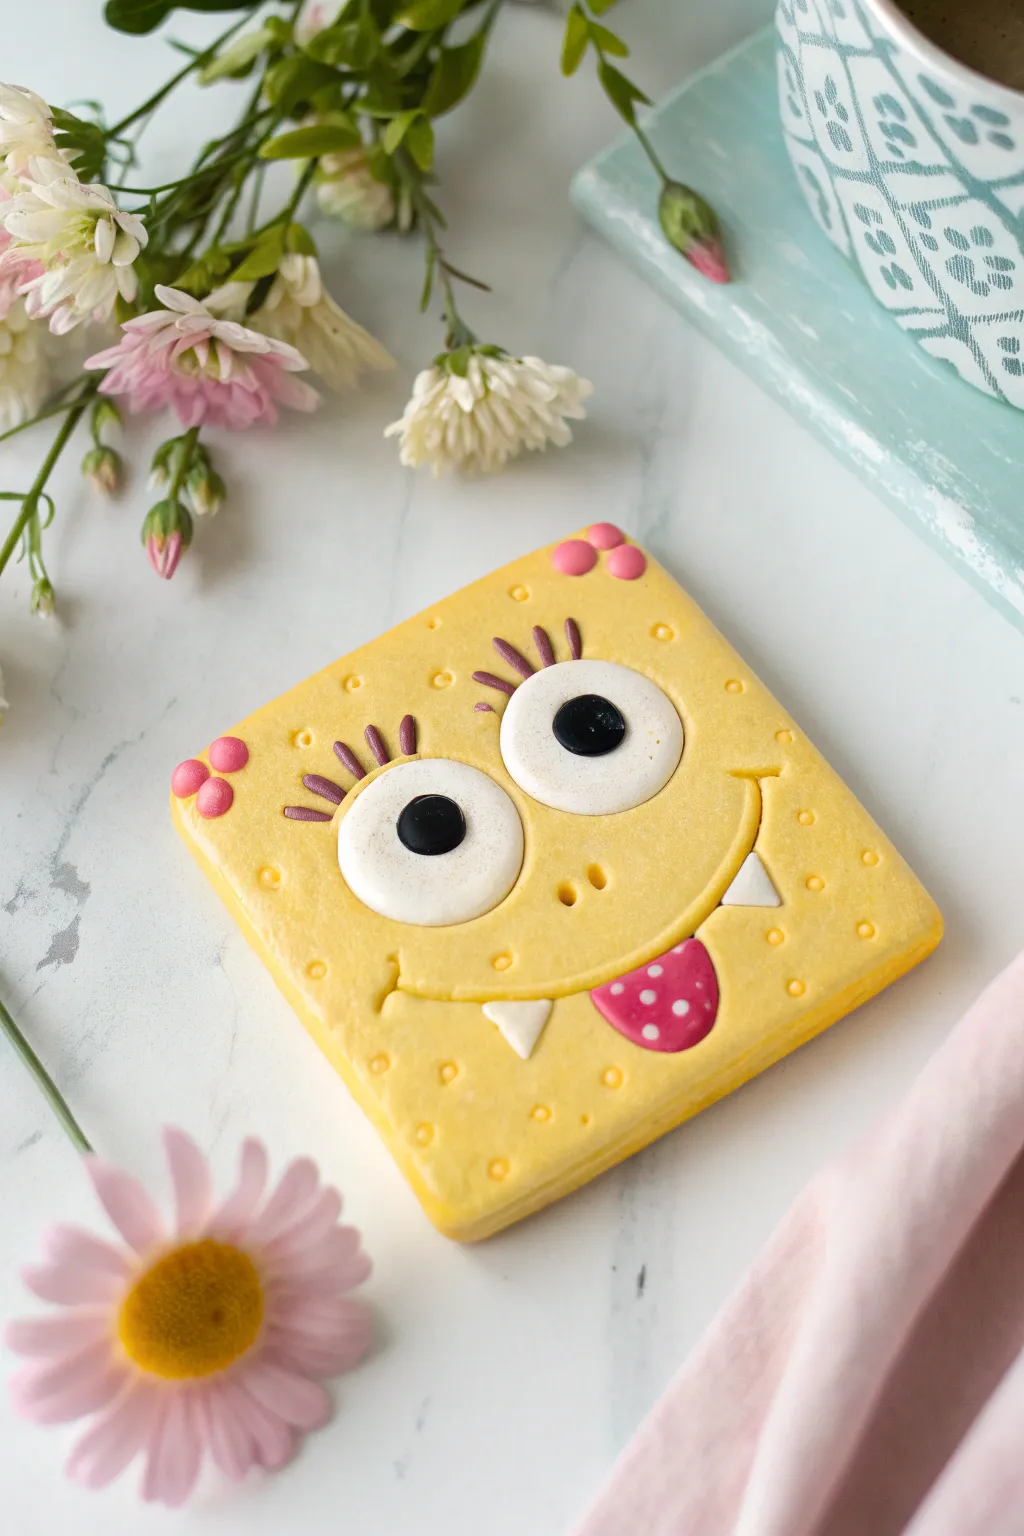
This cheerful little monster is a perfect beginner project that uses simple shapes to create a big personality. With its bright yellow base, silly wide eyes, and cheeky tongue, this clay tile makes a fun magnet or decorative accent.
Step-by-Step
Materials
- Yellow polymer clay (or air-dry clay)
- White clay
- Black clay
- Pink clay (or red mixed with white)
- Rolling pin
- Square cookie cutter (approx. 3-4 inches) or a knife
- Small dotting tool or toothpick
- Clay knife or craft blade
- Parchment paper
Step 1: Creating the Base
-
Condition the clay:
Start by warming up a good chunk of yellow clay in your hands. Knead it until it’s soft, pliable, and free of cracks. -
Roll it out:
Place the yellow clay on parchment paper and roll it out evenly. Aim for a thickness of about 1/4 inch so the tile is sturdy but not too heavy. -
Cut the square:
Press your square cookie cutter firmly into the rolled clay. If you don’t have a cutter, use a ruler and a clay knife to cut a perfect square shape yourself. -
Smooth the edges:
Gently run your finger along the cut edges of the square to soften any sharp corners or rough spots left by the cutter.
Step 2: Adding the Big Eyes
-
Make the whites:
Take two pieces of white clay and roll them into balls. Flatten these balls into thick discs. One should be slightly larger than the other for a goofy look. -
Place the eyes:
Press the white discs onto the upper half of the yellow square. Make sure they touch in the middle. -
Add pupils:
Roll two tiny balls of black clay. Flatten them slightly and press them onto the white discs usually looking in the same direction adds character. -
Create eyelashes:
Roll very thin, tiny snakes of purple or dark pink clay. Cut three small pieces for each eye and press them gently above the white discs to create lashes.
Clean Hands Trick
Keep baby wipes nearby! Yellow clay picks up dust easily. Wipe your hands and tools before touching the yellow clay, especially after using darker colors like black.
Step 3: The Smile and Details
-
Carve the mouth:
Use a clay tool or the edge of a spoon to gently press a wide, curved smile into the lower half of the face. -
Make the tongue:
Shape a small piece of dark pink clay into a teardrop shape. Flatten it and press it onto the bottom lip of the smile so it looks like it’s sticking out. -
Detail the tongue:
Use your smallest dotting tool or a toothpick to add tiny white clay dots onto the pink tongue for texture. -
Add teeth:
Cut two small triangles from white clay. Place one sticking up from the bottom lip and one designated for the top lip for a snaggle-tooth effect. -
Nose holes:
Use a toothpick or medium dotting tool to poke two nostrils right in the center of the face, below the eyes.
Sticking Issues?
If your clay pieces aren’t sticking to the base, add a tiny drop of liquid clay (for polymer) or a dab of water (for air-dry) to act as glue.
Step 4: Texture and Finishing
-
Add spots:
Gently press a small styling tool or the end of a paintbrush handle all over the yellow skin to create indented polka dots for texture. -
Pink corners:
Roll tiny balls of pink clay. Press three small ones into the top right corner and three into the top left corner. -
Final check:
Look over your monster to ensure all pieces are stuck down firmly. If using polymer clay, bake according to the package directions; for air-dry, let it sit undisturbed for 24-48 hours.
Once dry or baked, you can glue a magnet to the back to display your monster on the fridge


Mini Clay Donuts and Cookies
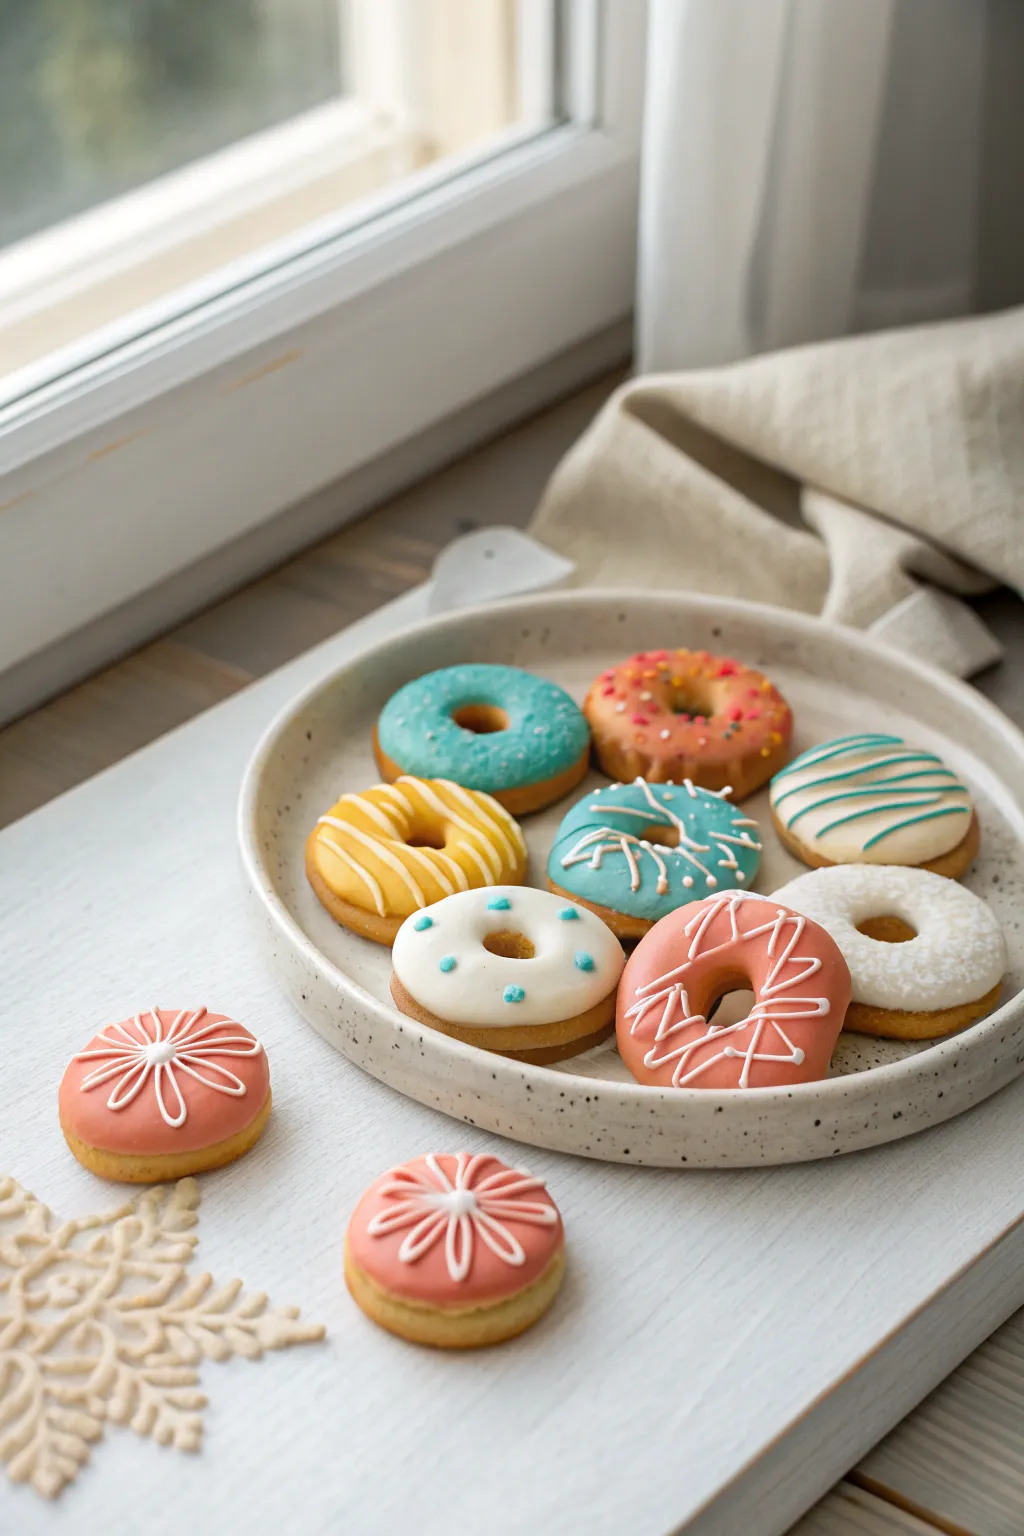
Create a charming bakery display right at your crafting table with these miniature clay donuts and cookies. This project features delightful pastel frosting details and intricate piping work that look good enough to eat but are designed for playful decoration.
How-To Guide
Materials
- Polymer clay (dough color: beige/tan)
- Polymer clay (frosting colors: pink, blue, yellow, white, orange)
- Liquid polymer clay (translucent)
- Basic sculpting tools (needle tool, dotting tool)
- Small round cutters (or bottle caps)
- Rolling pin
- Soft pastel chalks (brown/ochre)
- Small paintbrush
- Glossy glaze or varnish
- Baking sheet and parchment paper
Step 1: Shaping the Dough Base
-
Mix the dough color:
Start by conditioning your beige or tan clay until it is soft and pliable. If the color is too dark, mix in a little white clay; if it’s too pale, add a tiny speck of brown to get a realistic baked dough shade. -
Form the donut ring:
Roll a small ball of clay, about the size of a large marble, and flatten it slightly into a thick disc. Use the back of a paintbrush or a dotting tool to push a hole through the center, wiggling it gently to widen the opening. -
Soften the edges:
Use your fingertip to gently smooth the outer and inner edges of the donut so they are rounded and puffy, rather than sharp or flat. -
Create the cookie bases:
For the cookies shown in the foreground, roll smaller balls of dough clay. Flatten them into discs, keeping the edges slightly rounded. You don’t need a hole for these. -
Add baked texture:
Take an old toothbrush or a ball of aluminum foil and lightly tap it over the surface of your donuts and cookies to give them a realistic, porous cake texture. -
Shade with pastels:
For a golden-brown finish, shave a little brown and ochre pastel chalk into dust. Use a dry soft brush to dust the edges and bottoms of your clay pieces, mimicking a perfectly baked crust.
Step 2: Frosting and Decoration
-
Prepare the frosting:
To make realistic icing, mix small amounts of your colored clays (pink, blue, yellow, white) with a few drops of liquid polymer clay until you achieve a thick, spreadable consistency like real frosting. -
Apply the glaze base:
Using a toothpick or small tool, carefully spread your colored frosting mixture onto the top of the donuts. Let it drip slightly over the sides naturally, but keep the donut hole relatively clear. -
Create fine lines:
Roll extremely thin snakes of white or contrasting colored clay for the piped details. I find it easiest to roll these on a piece of glass to get them thread-thin without breaking. -
Decorate the yellow donut:
Lay thin white clay strings across the yellow frosted donut in a diagonal stripe pattern. Gently press them down so they adhere to the frosting. -
Design the pink cookies:
For the pink cookies in the foreground, center a small white dot of clay or frosting. Radiate thin white clay lines outward like flower petals or wheel spokes creating the flower pattern seen in the image. -
Add sprinkles:
Roll tiny specks of colored clay into minuscule balls or small logs. Press these gently onto the wet liquid clay frosting. Use tweezers for precise placement on donuts like the blue or speckled white ones. -
Pipe intricate details:
For the coral-colored donut, apply very thin white clay lines in a random zig-zag or geometric abstract pattern across the surface. -
Making the snowflake:
There is a decorative snowflake element in the scene. To make this, roll thin ropes of dough-colored clay and arrange them on your work surface in a star pattern, adding small V-shapes to the ends.
Uneven Frosting?
If your liquid clay frosting is too runny and drips too much, let it sit on a piece of paper for 10 minutes to leach out excess plasticizer before applying.
Step 3: Baking and Finishing
-
Bake the clay:
Arrange all your pieces on a baking sheet lined with parchment paper. Bake according to your clay manufacturer’s instructions (usually around 275°F or 130°C for 15-30 minutes). -
Cool down:
Allow the pieces to cool completely before handling. The liquid clay frosting will be translucent and rubbery while hot but hardens as it cools. -
Add a glossy shine:
Once cool, brush a coat of gloss glaze or varnish specifically over the frosted areas to make them look wet and sweet. Leave the dough parts matte for contrast.
Texture Master
Use a stiff-bristled toothbrush to texture the ‘baked’ parts of the dough before adding frosting. It makes the cake look incredibly realistic and fluffy.
Arrange your tiny treats on a miniature plate and enjoy your zero-calorie bakery display.

The Complete Guide to Pottery Troubleshooting
Uncover the most common ceramic mistakes—from cracking clay to failed glazes—and learn how to fix them fast.
Bottle-Cap Turtle Buddies
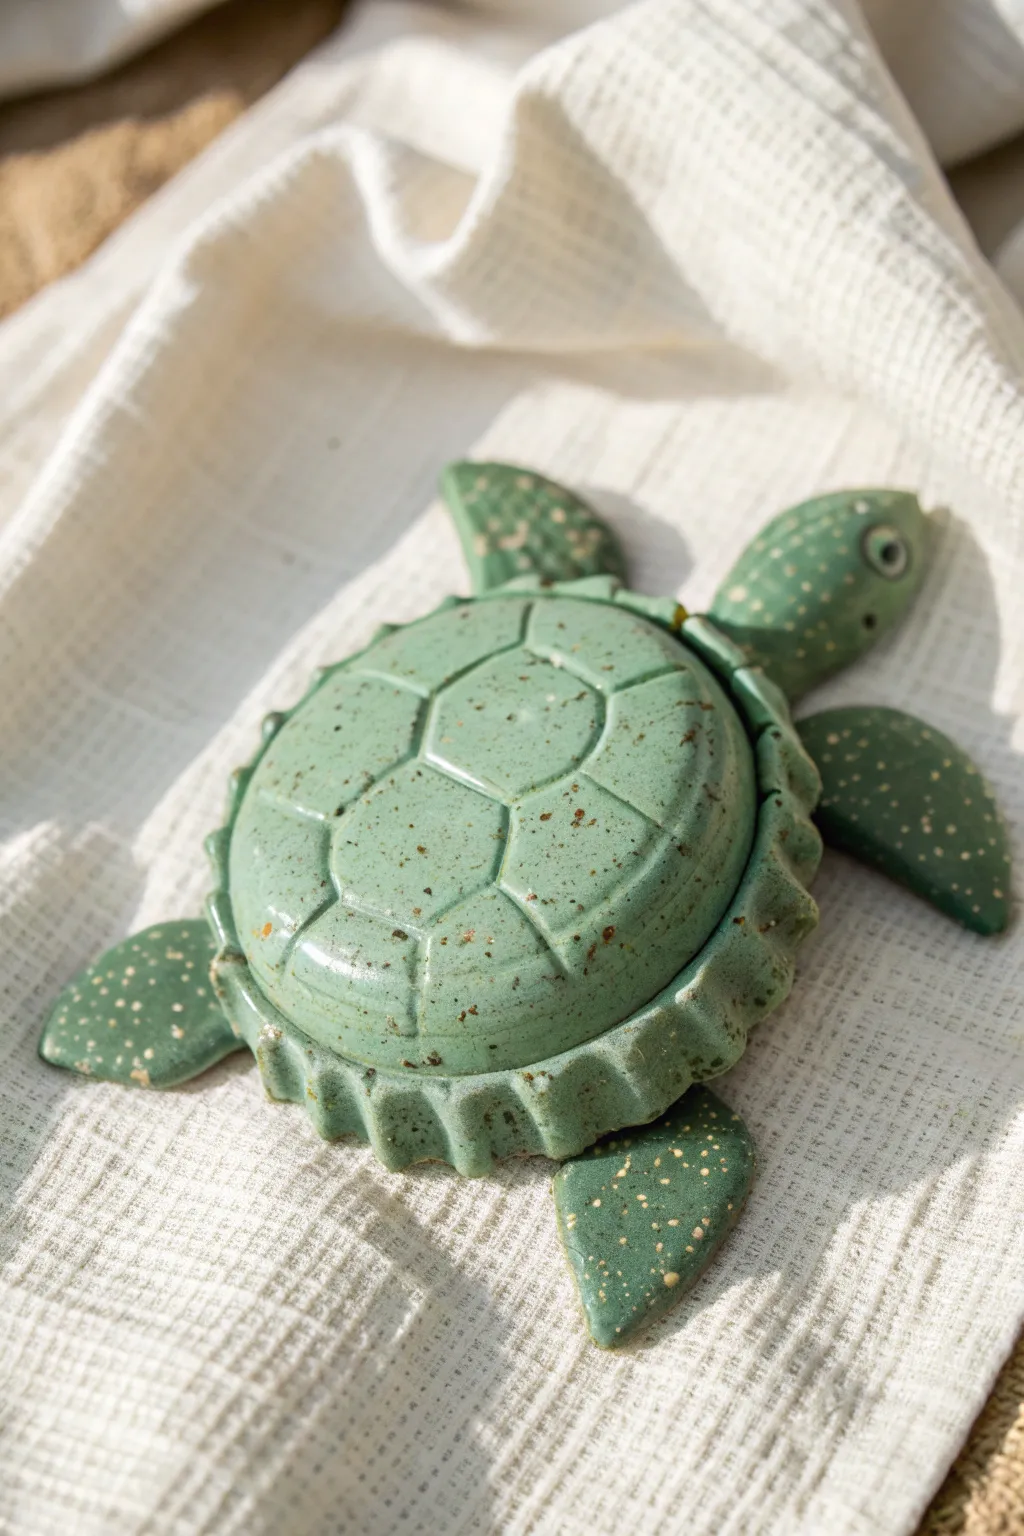
These adorable little sea turtles are the perfect way to upcycle an unexpected texture: the crimped edges of a large bottle cap. With their speckled green shells and friendly faces, they look like they’ve just crawled out of the sandy ocean surf.
Detailed Instructions
Materials
- Air-dry clay or polymer clay (white or light grey)
- Large metal bottle cap or jar lid with crimped edges (approx. 2-3 inches dia.)
- Rolling pin
- Clay knife or needle tool
- Small ball tool or toothpick
- Green acrylic paint (sage or seafoam shade)
- Brown or tan acrylic paint (for speckling)
- Gloss varnish or sealant
- Old toothbrush
- Water and sponge (for smoothing)
Step 1: Sculpting the Base
-
Roll the flippers:
Start by taking four small balls of clay, roughly the size of large marbles. Flatten them into teardrop shapes to create the flippers. Gently curve each one slightly to give them a swimming motion. -
Shape the head and tail:
From another piece of clay, roll a slightly larger tear-drop for the head and neck. Make a tiny, pointy triangle for the tail. -
Assemble the body:
Arrangement is key here. Place your four flippers, head, and tail onto your work surface in a turtle formation. Press them together gently where they meet in the center so they form a single flat ‘star’ shape. -
Prepare the shell core:
Roll a larger ball of clay, roughly the size of a tangerine, and flatten the bottom. This dome will support the detailed shell we are about to make. -
Mount the shell core:
Place this clay dome onto the center of your flipper assembly. Press it down firmly to bond everything together, smoothing the clay underneath with a little water if needed.
Step 2: Creating the Bottle-Cap Shell
-
Roll out the shell layer:
Roll a distinct slab of clay about 1/4 inch thick. It needs to be wider than your large bottle cap or crimped lid. -
Impress the texture:
Take your large crimped bottle cap and press it firmly into the clay slab to cut out a circle. Don’t remove the clay from the cap immediately; let the cap’s edges create those deep, wavy ridges around the rim. -
Refine the shape:
Gently push the clay out of the cap. You should now have a disc with perfect crinkled edges. Carefully drape this ‘bottle cap’ piece over the dome on your turtle’s back, pressing lightly so it retains its shape. -
Carve the scutes:
Using a needle tool or clay knife, lightly carve a hexagon in the very center of the shell dome. I find it easiest to start with the top line and work my way around. -
Complete the pattern:
Draw lines radiating from the corners of your central hexagon down towards the crimped edge to create the classic turtle shell pattern. -
Add facial details:
Use a small ball tool to press indentations for the eyes on either side of the head. Poke a tiny hole in the center of each eye socket for the pupil.
Clean Cuts
Dust your bottle cap or cutter with cornstarch before pressing it into the clay. This prevents sticking and ensures your crimped edges come out sharp and clean.
Step 3: Painting and Finishing
-
Dry thoroughly:
Allow the clay to dry completely according to package instructions. This usually takes 24-48 hours for air-dry clay. -
Base coat:
Paint the entire turtle with a solid coat of sage or seafoam green acrylic paint. Let this layer dry completely. -
Add the speckled texture:
Dilute a small amount of brown or tan paint with water. Dip an old toothbrush into this mixture, aim it at the turtle, and run your thumb over the bristles to flick tiny speckles across the shell and flippers. -
Define the eyes:
Paint the inside of the eye sockets white, and add a small black dot for the pupil once the white is dry. -
Seal for shine:
Finish with a coat of high-gloss varnish. This mimics the wet, ceramic look of the original inspiration and protects your paint job.
Natural Texture
Before painting, gently press a piece of coarse sandpaper or a rough stone against the flippers to give them a realistic, organic skin texture.
Once the varnish dries, you have a charming little keepsake that captures the spirit of the ocean
Handprint Keepsake Plaques
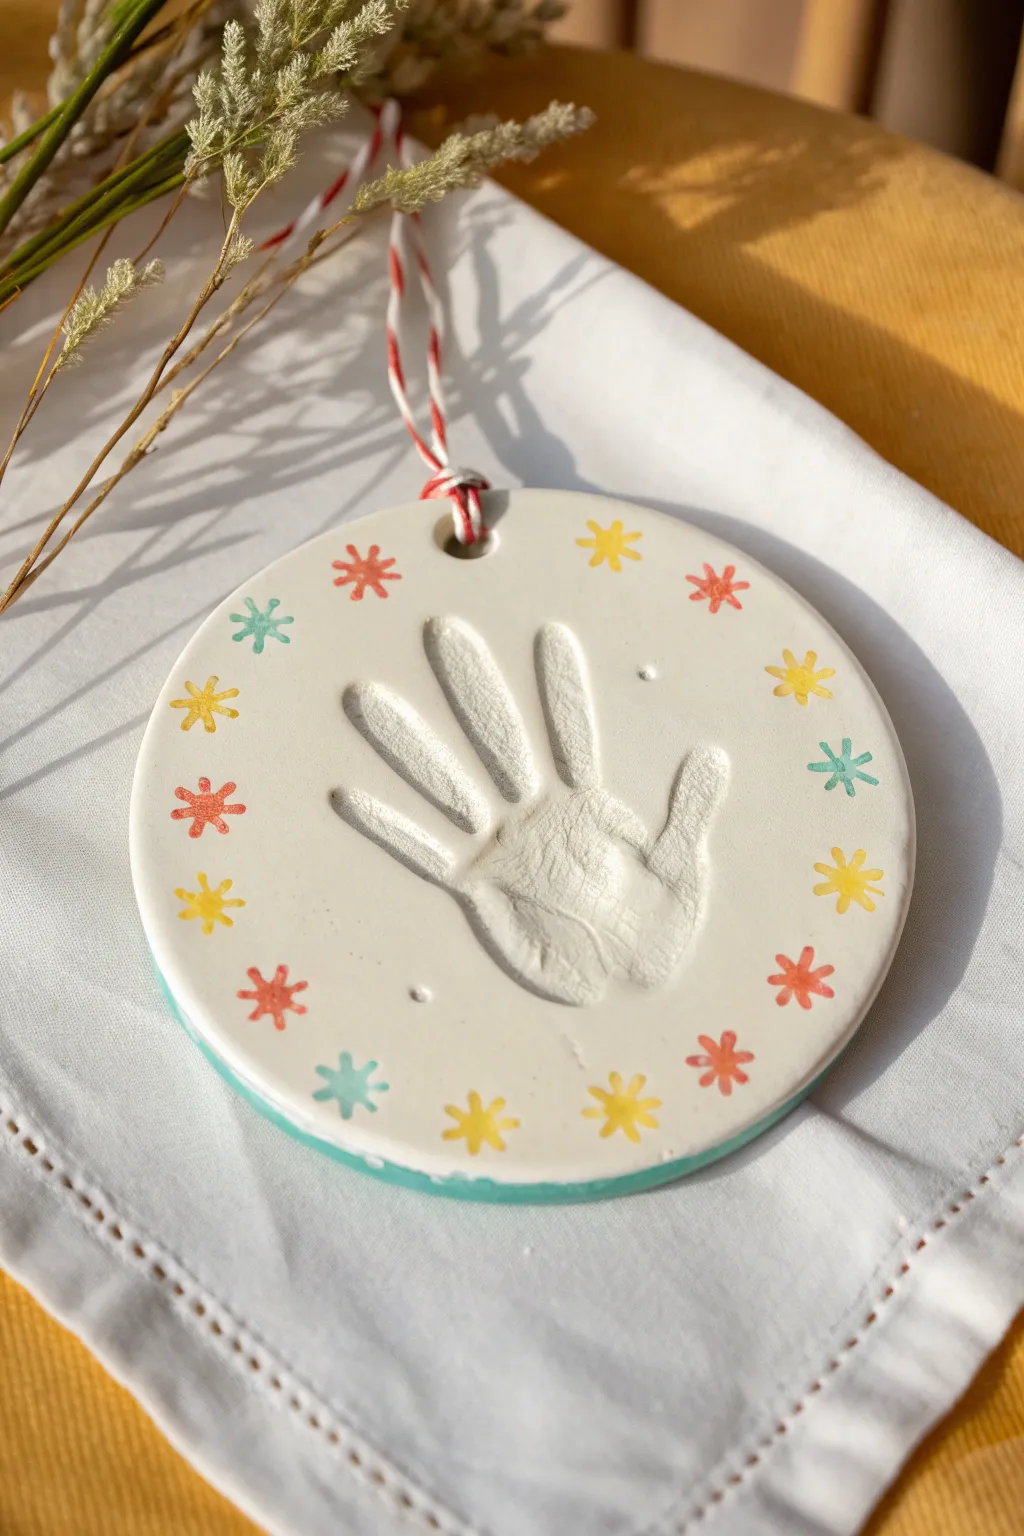
Capture a moment in time with this classic circular keepsake featuring a sweet handprint impression. The simple white clay design is elevated with cheerful, stamped starbursts and strung with baker’s twine for a nostalgic touch.
Step-by-Step Tutorial
Materials
- White classic air-dry clay or white polymer clay
- Rolling pin
- Circular cookie cutter or bowl (approx. 6-8 inches diameter)
- Small straw or skewer
- Small star or asterisk rubber stamp
- Acrylic paints (coral red, mustard yellow, teal)
- Fine detail paintbrush
- Red and white baker’s twine
- Fine-grit sandpaper
- Clear matte sealant spray (optional)
Step 1: Shaping the Base
-
Prepare the Clay:
Start with a generous handful of white air-dry clay. Knead it in your hands until it is soft, pliable, and free of any cracks. -
Roll It Out:
Place the clay on a smooth, non-stick surface or wax paper. Use a rolling pin to flatten it to an even thickness of about 1/4 to 1/2 inch. Avoid making it too thin, as it needs to be sturdy enough for the impression. -
Cut the Circle:
Position your large circular cutter or a bowl upside down over the clay. Press down firmly to cut a clean circle. Peel away the excess clay from the edges. -
Smooth the Edges:
Dip your finger in a little water and gently run it around the cut edge of the circle. This smooths out any roughness or sharp bits left by the cutter.
Clean Prints Only
Apply a tiny bit of lotion to the child’s hand before pressing it into the clay. This acts as a release agent, preventing sticky clay from lifting up and ruining the impression.
Step 2: Making the Impression
-
Position the Hand:
Have the child place their hand gently in the center of the circle. Spread the fingers slightly apart to create a nice, open shape. -
Press Down:
Press down firmly on each finger and the palm to ensure a deep, clear impression. Making sure the palm area gets enough pressure is key for a recognizable print. -
Lift Cleanly:
Hold the edge of the clay circle down with one hand while helping the child lift their hand straight up. Lifting slowly helps prevent the clay from distorting. -
Create the Hanging Hole:
Use a straw to punch a neat hole near the top edge of the circle. Twist the straw slightly as you pull it out to get a clean hole.
Step 3: Decorating & Drying
-
Stamp the Border:
While the clay is still soft, take your small star or asterisk stamp. Press it gently around the perimeter of the circle to create an indented pattern. -
Space the Stamps:
Leave about an inch of space between each stamp impression so they don’t look crowded. I find it helps to stamp ’12, 3, 6, and 9 o’clock’ first to keep spacing even. -
Initial Drying:
Let the clay dry completely according to the package instructions. This usually takes 24-48 hours. Flip it over gently halfway through so the bottom dries evenly. -
Sand Imperfections:
Once fully hard and dry, inspect the edges. Use a piece of fine-grit sandpaper to lightly buff away any rough spots on the rim or surface.
Make It 3D
Instead of just painting the rim, mix a small amount of fine glitter into your sealant spray for a subtle sparkle that makes the texture pop.
Step 4: Adding Color
-
Paint the Stamp Impressions:
Using a fine detail brush, carefully paint inside the stamped star indentations. Use a tiny amount of paint so you don’t flood the shape. -
Alternate Colors:
Create a pattern by alternating your colors—coral, yellow, teal, then repeat. This creates the playful rhythm seen in the example. -
Paint the Rim:
For a finished look, paint the very outer edge of the disc with the teal color. This frames the artwork beautifully. -
String It Up:
Cut a length of red and white baker’s twine. Thread it through the hole at the top and tie a secure knot to create a hanging loop.
Hang this charming plaque on the wall or a door handle to preserve a precious memory for years to come


What Really Happens Inside the Kiln
Learn how time and temperature work together inside the kiln to transform clay into durable ceramic.
Stamped Texture Heart Ornaments
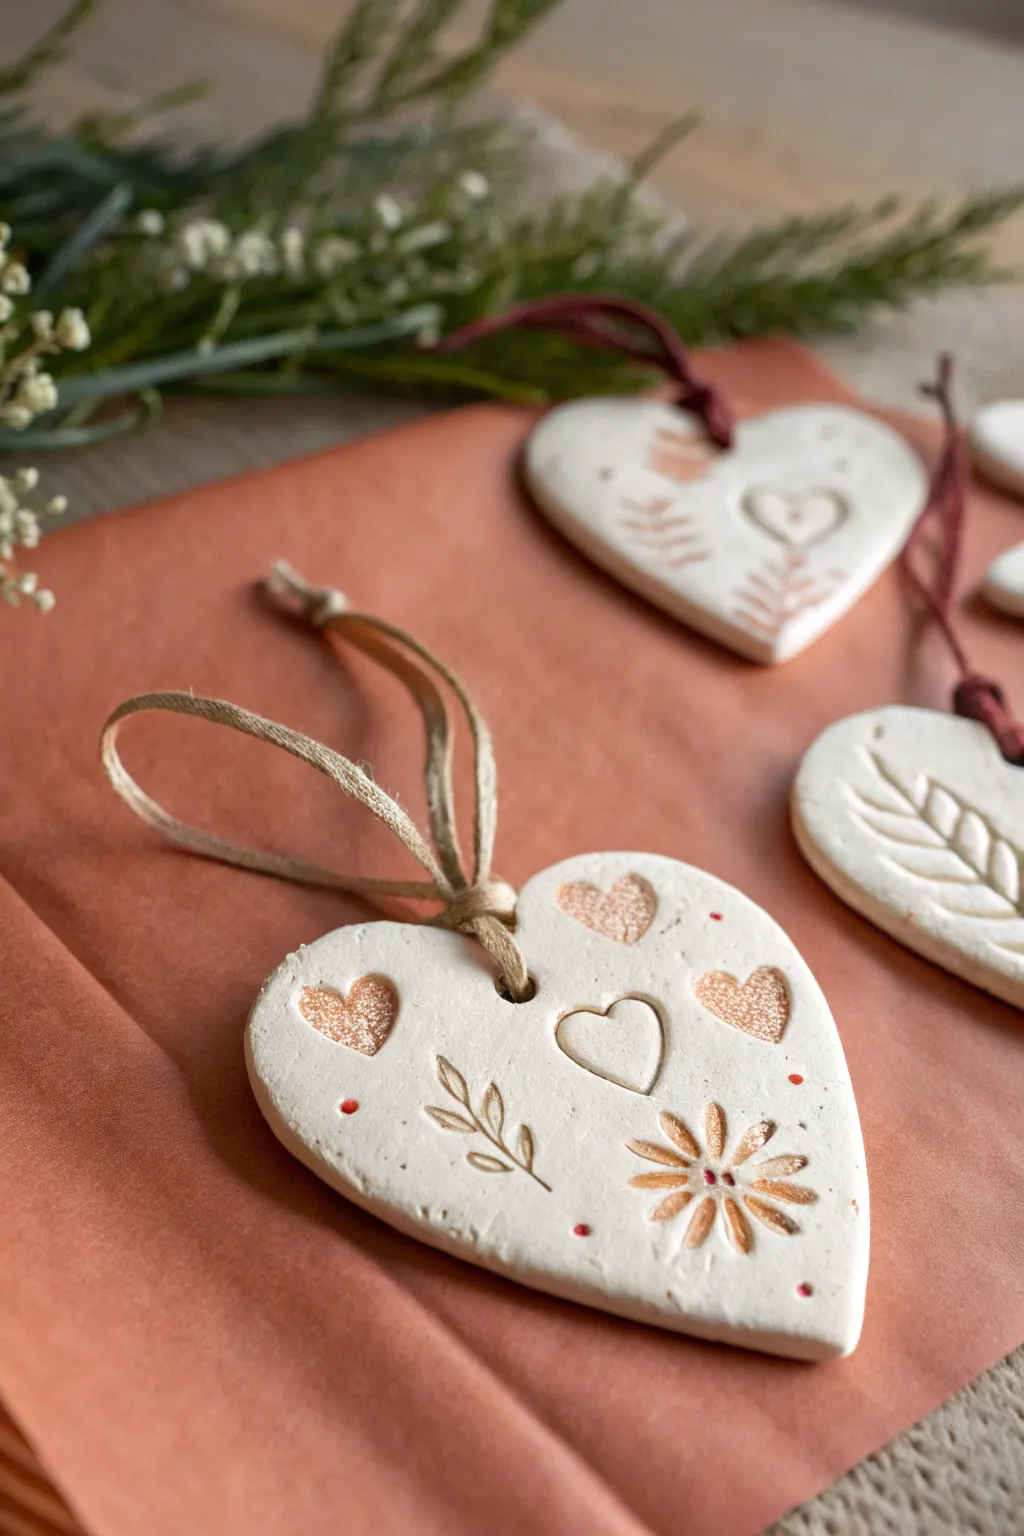
These charming air-dry clay ornaments are perfect for kids who love textures and patterns. With their natural white finish and delicate copper-toned accents, they make beautiful handmade gifts or whimsical decorations.
Step-by-Step Guide
Materials
- White polymer clay or air-dry clay
- Heart-shaped cookie cutter (medium size)
- Small stamps (hearts, flowers, leaves)
- Rolling pin
- Parchment paper or craft mat
- Plastic drinking straw or skewer
- Jute twine or rustic ribbon
- Copper or rose gold metallic paint/mica powder
- Small detail paintbrush
- Red fine-tip marker or acrylic paint (optional)
Step 1: Shaping the Base
-
Prepare the Clay:
Start by taking a handful of white clay and kneading it in your hands until it becomes soft and pliable. This warms it up and prevents cracking later. -
Roll it Out:
Place the clay on a sheet of parchment paper. Use a rolling pin to flatten the clay into an even slab, aiming for a thickness of about 1/4 inch (6mm). If the clay sticks to the roller, you can place another sheet of parchment on top. -
Cut the Hearts:
Press a heart-shaped cookie cutter firmly into the rolled clay. Wiggle it slightly to ensure a clean cut, then lift the cutter. Repeat for as many ornaments as you wish to make. -
Smooth the Edges:
Gently lift the clay hearts away from the excess clay. If the edges are a bit jagged, dip your finger in a little water and smooth them down softly. -
Create Hanging Holes:
Using a plastic drinking straw or a skewer, poke a hole near the top center of each heart. Make sure the hole goes all the way through and is wide enough for your twine to pass through later.
Step 2: Adding Texture & Design
-
Plan Your Pattern:
Before stamping, look at your stamps and decide on a layout. A central heart surrounded by smaller motifs like flowers or sprigs creates a balanced look. -
Stamp the Center:
Press a small heart stamp into the center of the clay heart. Don’t press all the way through; just create a clear indentation. -
Add Surrounding Motifs:
Stamp additional designs around the center. In the image, we see a daisy-like flower in the bottom corner and a leafy sprig on the side. Rotate your stamps to follow the curve of the heart. -
Add Border Details:
Fill in empty spaces with smaller heart stamps or tiny dots. I like to keep the design somewhat random but balanced for that rustic charm. -
Let it Dry:
Place your stamped hearts on a flat surface to dry. If using air-dry clay, this will take 24-48 hours. If using polymer clay, bake according to the package instructions.
Stamp Cleanliness
To keep clean lines, lightly dust your stamps with cornstarch or baby powder before pressing them into the clay to prevent sticking.
Step 3: Decoration & Assembly
-
Highlighting with Metallic:
Once dry and hard, dip a small detail brush into copper or rose gold metallic paint. Carefully paint inside the stamped indentations of the hearts and flowers to make the texture pop. -
Adding Tiny Accents:
For the smallest details, like the dots or the center of the flowers, use a fine tip to add a touch of red or a darker metallic shade. This adds depth to the design. -
Wipe Excess (Optional):
If you accidentally get paint on the flat surface, quickly wipe it away with a damp cloth or paper towel so the paint remains only in the recessed grooves. -
Initial Threading:
Cut a length of jute twine or ribbon, about 8 inches long. Fold it in half to create a loop. -
Secure the Loop:
Feed the folded end of the twine through the hole in the ornament from front to back. Pull the tails through the loop and tighten gently to create a cow hitch knot. -
Final Adjustments:
Tie the loose ends of the twine together in a simple overhand knot to close the hanger loop.
Cracked Clay Fix
If you see tiny cracks forming while drying, smooth a small amount of water mixed with fresh clay (slip) over the crack to seal it.
Hang these on a branch or wrapped gift to add a lovely handmade touch to your decor
Rainbow Clay Bead Necklaces
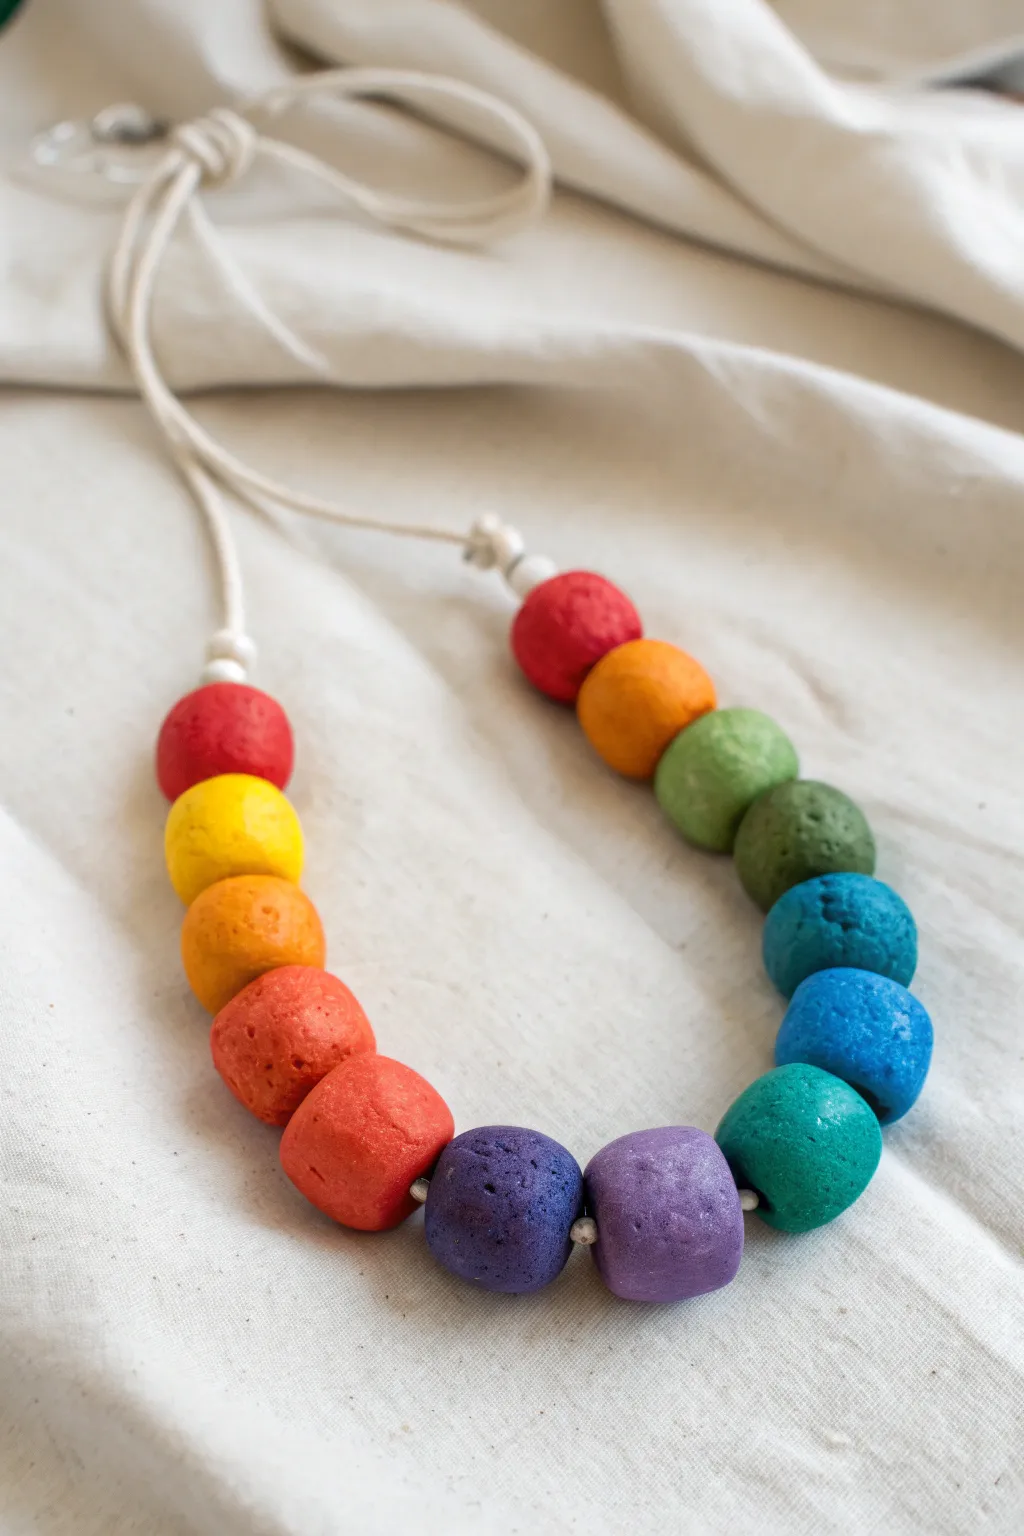
Create a bold and cheerful statement piece with these handmade clay beads that feature a delightful, rustic texture. This project is perfect for kids because the beads don’t need to be perfectly round, embracing a charmingly organic look along a simple cotton cord.
Detailed Instructions
Materials
- Air-dry clay (white)
- Acrylic paints (red, orange, yellow, green, dark green, blue, dark blue, purple, indigo)
- Cotton or hemp cord (natural/cream color)
- Skewer or toothpick (for poking holes)
- Paintbrushes (medium flat and small detail)
- Parchment paper or messy mat
- Clear sealant or Mod Podge (optional)
- Small cup of water
- Paper towels
Step 1: Shaping the Beads
-
Portion the clay:
Start by pulling off roughly equal semi-large chunks of air-dry clay. You will need about 13 pieces to recreate the pattern seen here. -
Roll into spheres:
Roll each chunk of clay in the palms of your hands to form a ball. Don’t worry about getting them perfectly smooth; part of the charm is the slight texture and unevenness. -
Create smaller accent beads:
Roll two much smaller balls of clay, about the size of a pea. These will act as the stopper beads near the knot later on. -
Pierce the holes:
While the clay is still wet, carefully push a skewer or toothpick through the center of each bead. Rotate the skewer gently to widen the hole enough for your cord to pass through easily. -
Check the hole size:
It is always better to make the holes slightly larger than you think you need, as clay can shrink slightly when drying. -
Let them dry:
Place all your formed beads on a piece of parchment paper. Let them air dry completely according to your clay package’s instructions, usually 24-48 hours. I like to flip them halfway through to ensure even drying.
Holes closing up?
If the clay shrinks and closes the hole while drying, gently use a small drill bit or a metal skewer to re-open the path carefully before painting.
Step 2: Painting the Rainbow
-
Prepare your palette:
Squeeze out your acrylic paints. You will need a full spectrum: bright red, warm orange, sunny yellow, light green, forest green, teal, deep blue, and various shades of purple. -
Paint the first bead:
Start with your first large bead and paint it solid red. You might need to hold it by the hole or create a little drying stand with a toothpick. -
Continue the gradient:
Paint the remaining beads in rainbow order. Following the image, the sequence moves from red to yellow, orange, red-orange, light purple, dark purple, teal, light blue, dark blue, light green, and dark green. -
Texture technique:
Use a slightly dry brush technique rather than globs of paint. This allows the natural porous texture of the clay to show through slightly, giving that matte, stone-like appearance. -
Paint the stopper beads:
Leave the two tiny accent beads white, or give them a quick coat of white paint if your clay has discolored. -
Dry and seal:
Allow the paint to dry completely. If you want durability, add a layer of matte varnish or Mod Podge, though staying unsealed keeps the rustic look.
Step 3: Assembly
-
Cut the cord:
Cut a long length of cotton cord, ensuring it is long enough to slip over the head plus extra for knots. -
Thread the beads:
String your painted beads onto the cord. Arrange them in the specific mixed-rainbow order shown: Red, Yellow, Orange, Red-Orange, Red-Orange, Light Purple, Dark Purple, Teal, Light Blue, Dark Blue, Light Green, Dark Green. -
Add the stopper beads:
After your main colorful beads are strung, thread one small white bead on each end of the bead cluster. -
Secure the beads:
Tie a simple overhand knot in the cord right next to each small white bead. This keeps the beads centered and creates a nice visual finish. -
Finish the necklace:
Tie the two loose ends of the cord together at the top with a strong knot to close the loop.
Pro Tip: Drying Rack
Stick your skewers into a cardboard box or foam block with the beads on them. This lets you paint the entire surface at once without smudging.
Enjoy wearing your vibrant, custom-colored creation with your favorite outfit

TRACK YOUR CERAMIC JOURNEY
Capture glaze tests, firing details, and creative progress—all in one simple printable. Make your projects easier to repeat and improve.
Decorated Mini Flower Pots
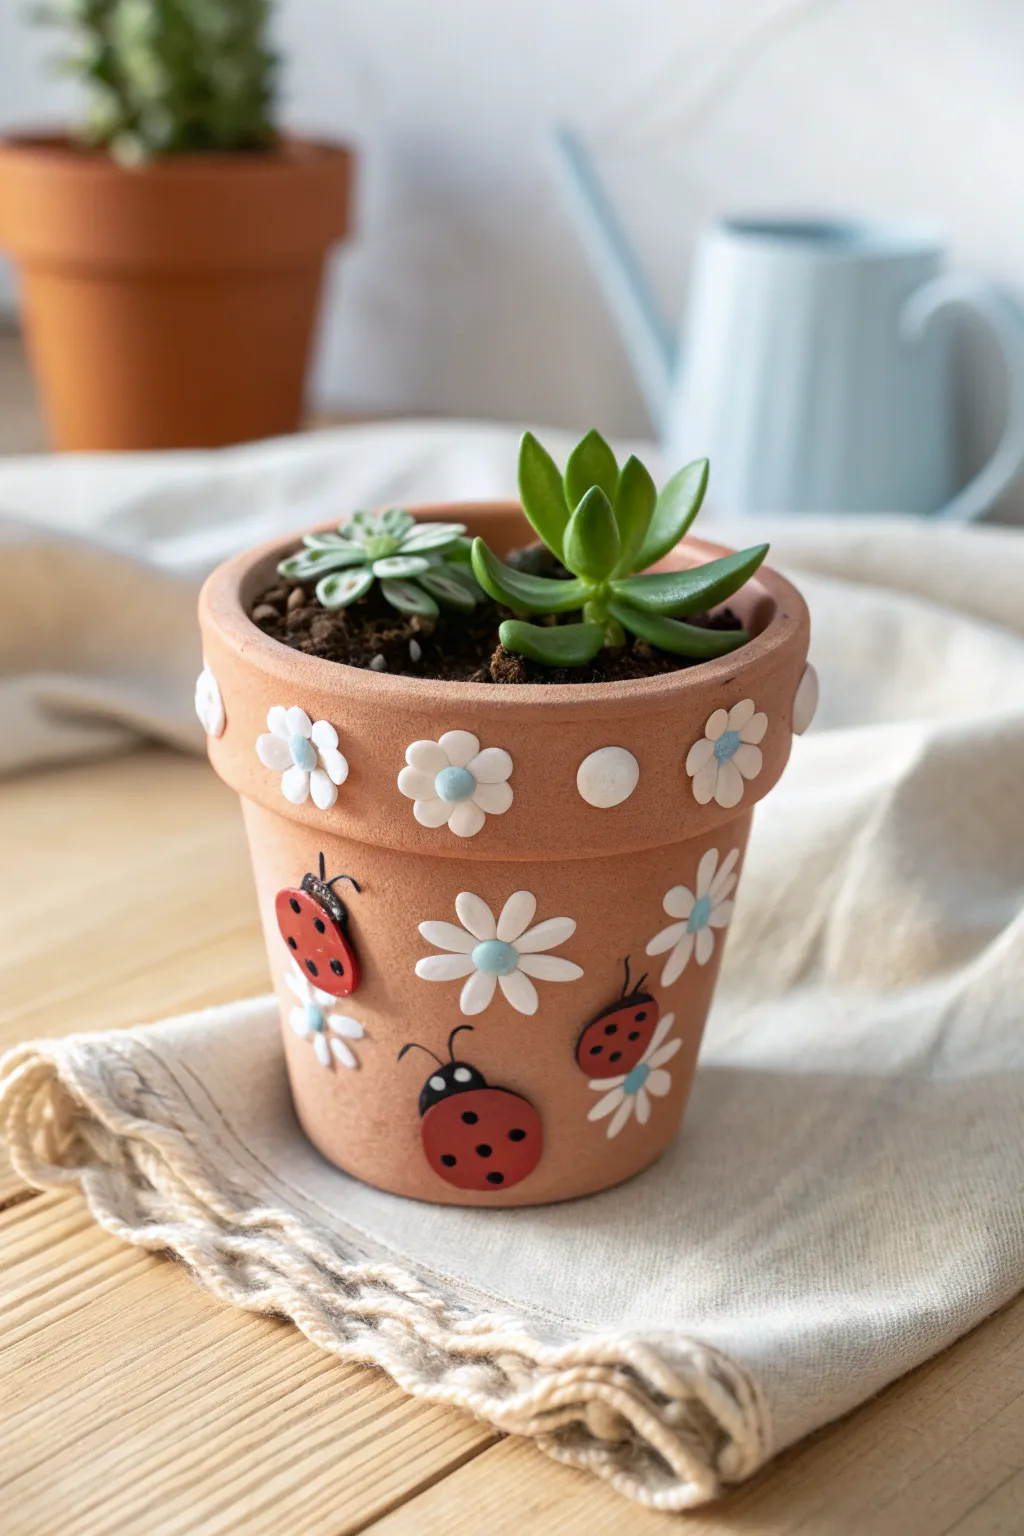
Transform a plain terracotta pot into a cheerful garden home with this adorable clay project. Featuring raised white daisies and friendly red ladybugs, this textured design adds a pop of whimsy to any windowsill or desk.
How-To Guide
Materials
- Small terracotta pot (clean and dry)
- Air-dry clay or polymer clay (white, red, black, light blue)
- Craft glue or strong adhesive (if using air-dry clay)
- Small rolling pin or smooth marker
- Detailing tools (dotting tool or toothpick)
- Acrylic sealer or varnish (optional)
Step 1: Prepping the Daisies
-
Roll tiny spheres:
Start with your white clay. Pinch off very small amounts and roll them into pea-sized balls between your palms. You will need about 5–6 balls for each flower you plan to make. -
Flatten into petals:
Gently press each white ball flat with your finger to create a small disc shape. I like to pinch one end slightly to give it a teardrop shape, making the petals look more natural. -
Arrange the flower shape:
On a flat surface, arrange five or six petals in a circle so their pointed ends meet in the center. Press them gently together so they embrace. -
Add the center:
Roll a tiny ball of light blue clay. Place it directly in the center of your petal ring and press down firmly to bond the pieces together. Use a toothpick to add a tiny dimple in the blue center for texture. -
Make the rim flowers:
Repeat this process to make smaller versions of these flowers for the upper rim of the pot. Alternating full flowers with simple white clay dots along the rim looks fantastic.
Adhesion Hack
Terracotta is porous! If using air-dry clay, brush a little water onto the spot on the pot before pressing wet clay on. It helps it grip significantly better.
Step 2: Creating the Ladybugs
-
Form the body:
Take a piece of red clay and roll it into a larger ball, then flatten one side against the table to create a dome shape. This will be the ladybug’s shell. -
Add the head:
Roll a small piece of black clay into a semicircle. Attach this to the front of the red dome to form the head. -
Create the spots:
Make very tiny balls of black clay. Press these flat onto the red shell to create the ladybug’s classic spots. Vary the sizes slightly for a playful look. -
Add antennae:
Roll two extremely thin threads of black clay. Curl them slightly and carefully attach them to the top of the black head piece. A toothpick comes in handy here to nudge them into place without squishing them. -
Detail the shell:
Use a modeling tool or the edge of a credit card to gently press a line down the center of the red back, suggesting slightly open wings.
Step 3: Assembly and Finishing
-
Plan your layout:
Before gluing anything, hold your clay pieces against the terracotta pot to see where they fit best. Staggering the ladybugs at different heights creates movement. -
Attach the rim decorations:
Apply a dab of craft glue to the back of your smaller flowers and dots. Press them firmly onto the thick upper rim of the pot. -
Attach the main features:
Glue your larger daisies and ladybugs around the main body of the pot. Hold each piece in place for a few seconds to ensure the glue tacks up before moving to the next. -
Add final details:
If you want extra detail, paint tiny white eyes on the ladybugs with a toothpick once the clay is dry. -
Seal the project:
Once the glue is fully cured (and if you baked your polymer clay beforehand), apply a coat of matte or satin varnish over the clay parts to protect them from moisture.
Level Up: Texture Time
Before attaching the ladybug’s red shell, press a piece of rough fabric or a clean toothbrush against the clay to give it a subtle, realistic insect texture.
Fill your new pot with soil and a hardy succulent for a perfect handmade gift
Ball-and-Coil Octopus
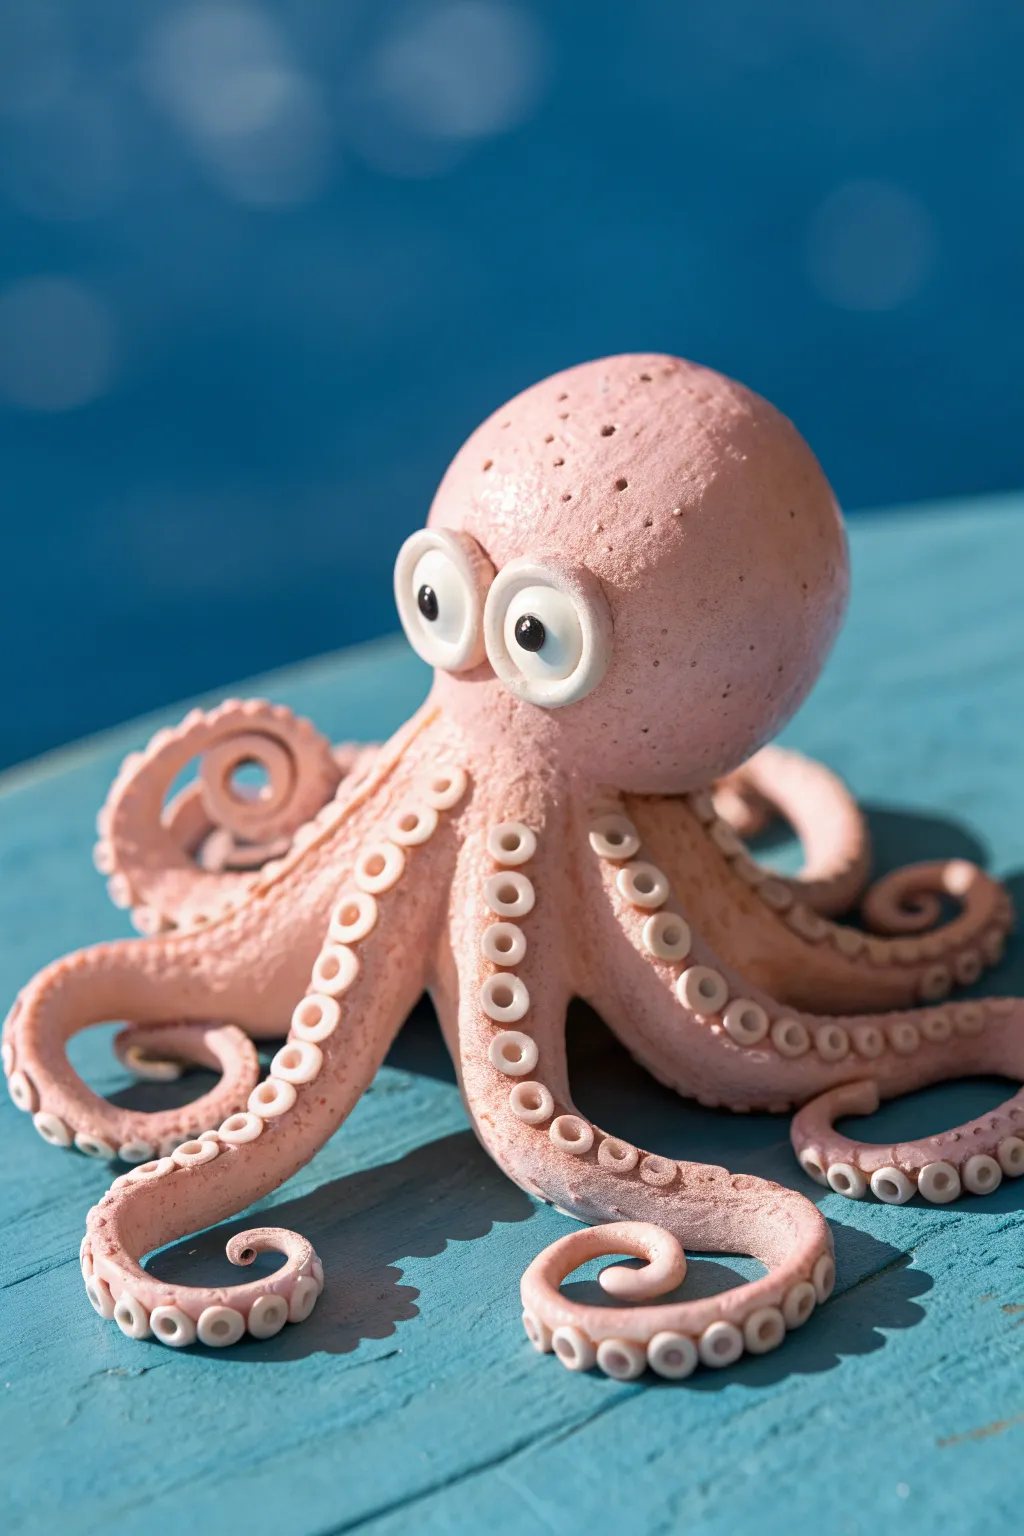
This charming octopus combines simple shapes into an intricate-looking sea creature with a lovely matte, speckled finish. It features large, expressive eyes and eight curling tentacles adorned with tiny, uniform suckers, making it a perfect project for patient hands.
Detailed Instructions
Materials
- Pale pink polymer clay (or air-dry clay)
- White clay (for eyes)
- Black clay described (for pupils)
- Small ball tool or round-tipped embossing stylus
- Large blending tool or smooth modeling tool
- Toothbrush or texturing sponge
- Acrylic rolling pin
- Needle tool
- Acrylic paint (brown or beige splatter optional for texture)
- Work surface (tile or mat)
Step 1: Forming the Base
-
Condition the Clay:
Start by kneading your pale pink clay until it strikes that perfect balance—soft and pliable, yet firm enough to hold its shape without slumping. -
Shape the Head:
Roll a generous amount of pink clay into a smooth sphere for the head. Shape it slightly into a bulbous teardrop or egg shape, keeping the top rounded. -
Texture the Skin:
Before attaching anything, gently tap a clean toothbrush or a texture sponge all over the head surface. This creates that realistic, organic skin texture rather than leaving it perfectly smooth. -
Create the Eye Sockets:
Using your thumbs or a large ball tool, press two shallow indentations into the front of the head where the eyes will eventually sit.
Step 2: Sculpting the Tentacles
-
Roll the Coils:
Roll out eight long snakes of pink clay. Try to taper them so they are thicker at one end (where they attach to the body) and pointier at the tip. -
Arrange the Arms:
Flip the head upside down or place it on a stand. Attach the thick ends of the tentacles to the base of the head, blending the clay seams upward so they disappear. -
Curl the Tips:
Once attached, pose the tentacles. I like to give each one a unique personality by curling the tips into tight spirals or gentle waves, making the octopus look like it’s in motion. -
Make the Suckers:
Roll a very thin snake of white or pale pink clay and slice it into many tiny, equal-sized discs. -
Attach the Suckers:
Press these small discs in two rows along the underside of every tentacle. This is the most time-consuming part, but it’s worth it for the detail. -
Indent the Suckers:
Take your small ball tool or stylus and press directly into the center of each small disc to create the ring-like sucker shape.
Droopy Tentacles?
If the arms sag while you work, prop them up with crumpled aluminum foil or foam pieces. Keep these props in place during baking or drying to maintain the gravity-defying curls.
Step 3: Adding the Eyes and Details
-
Prepare the Eyeballs:
Roll two medium-sized balls of white clay. Flatten them slightly so they look like thick discs rather than perfect spheres. -
Attach the Whites:
Place the white discs into the indentations you made on the head earlier, pressing gently ensuring they adhere well. -
Add the Pupils:
Roll two tiny specks of black clay and press them into the center of the white eyes for a focused, comical look. -
Refine the Connection:
Use a small snake of pink clay to create an eyelid or brow ridge over the top of the eyes if you want extra expression, blending it back into the head. -
Final Texturing:
Go back over any areas where your fingerprints might have smoothed out the texture, re-applying the toothbrush stippling gently.
Mastering Suckers
Instead of rolling dozens of tiny balls, roll a long thin snake, slice it into discs like a cucumber, and press those directly onto the arm. It ensures uniform size and saves time.
Step 4: Finishing Touches
-
Inspect and Clean:
Check your sculpture from all angles. If you see any lint or dust, use a bit of baby oil or rubbing alcohol on a brush to gently remove it. -
Bake or Dry:
If using polymer clay, bake according to the package directions (usually around 275°F/135°C for 15-30 minutes depending on thickness). If using air-dry clay, let it sit for 24-48 hours. -
Add Speckles (Optional):
To mimic the stone-like finish in the image, dilute a tiny bit of brown acrylic paint with water. Dip a toothbrush in it and flick the bristles to splatter tiny dots across the cured surface.
Place your finished octopus on a shelf or desk where its big eyes can keep you company all day long
Dinosaur Fossil Impressions

Create a tangible piece of prehistory with this realistic-looking dinosaur fossil pendant. Using simple air-dry clay and natural textures, you can craft a rustic keepsake that looks like it was just unearthed from an ancient digging site.
How-To Guide
Materials
- White or speckled air-dry clay (stone effect works best)
- Jute twine or hemp cord
- Rolling pin
- Circle cookie cutter or a glass
- Small dinosaur toy with distinct feet (or a sculpting tool)
- Straw or skewer (for the hole)
- Fine-grit sandpaper (optional)
- Acrylic matte sealer (optional)
Step 1: Shaping the Base
-
Prepare the Clay:
Start by taking a handful of air-dry clay. Knead it in your hands for a minute or two to warm it up and make it pliable, removing any air bubbles that might be trapped inside. -
Roll a Ball:
Roll the clay into a smooth sphere between your palms. It should be roughly the size of a golf ball, perhaps slightly larger depending on how big you want your final pendant. -
Flatten the Disc:
Place the ball on a smooth, clean surface. Using a rolling pin or the palm of your hand, gently flatten the ball into a disc shape. Aim for a thickness of about a quarter-inch—you want it thick enough to take a deep impression without cracking. -
Cut the Circle:
For a perfectly round shape, press a circle cookie cutter or the rim of a glass into the clay. Alternatively, for a more organic, ‘found fossil’ look like our example, simply shape the edges with your fingers to smooth out any cracks. -
Texturize the Surface:
To mimic real stone, gently tap the surface of the clay with a crumpled piece of aluminum foil or a stiff-bristled brush. This removes the manufactured smoothness and adds a gritty, realistic texture.
Stone Effect
Mix a small amount of coffee grounds or sand into white clay before rolling it out. This creates natural speckles throughout the dough for a genuine rock-like appearance.
Step 2: Making the Fossil
-
Position the Footprint:
Decide where you want the footprint. Off-centering it slightly can create a more dynamic, artistic composition. -
Press the Impression:
Take your dinosaur toy and firmly press one of its feet into the clay. Rock the foot slightly back and forth to ensure the toes and heel make a deep, clear mark. -
Sculpting Alternative:
If you don’t have a toy handy, I’ve found that using the back of a small spoon or a modeling tool works great to manually carve out a three-toed theropod shape. Use your finger to smooth the inside of the print. -
Create the Hanging Hole:
Using a straw or a wooden skewer, poke a hole near the top edge of the pendant. Make sure the hole is wide enough to accommodate your jute twine later, and not too close to the edge to prevent tearing. -
Refine the Edges:
Check the edges of your pendant. If the pressing caused the clay to bulge out unpleasantly, gently tap it back into a rounded shape with a damp finger.
Digsite Display
Instead of a necklace, hide the finished fossil in a sandbox for a dinosaur-themed scavenger hunt or birthday party activity.
Step 3: Finishing Touches
-
Drying Time:
Place the clay on a wire rack or a piece of parchment paper to dry. Let it sit indisturbed for 24 to 48 hours. Flip it over halfway through the drying process to ensure the back dries evenly. -
Sanding:
Once fully dry and hard, inspect the edges. If there are any sharp or rough spots, vary gently rub them with fine-grit sandpaper to soften the feel. -
Dusting for Age:
To enhance the ‘old bone’ look, you can lightly dust the pendant with a bit of brown chalk pastel powder or cinnamon, rubbing it into the deep crevices of the footprint, then wiping the surface clean. -
Sealing (Optional):
If this will be worn often, apply a thin coat of matte acrylic sealer to protect the clay from moisture and scratches. -
Stringing:
Cut a length of jute twine or hemp cord. Fold it in half and push the loop through the hole in your pendant. -
Securing the Knot:
Pass the loose ends of the twine through the loop and pull tight to create a lark’s head knot, which secures the pendant firmly and looks professionally finished.
Now you have a prehistoric artifact ready to wear or display in your personal museum collection
Fruit Slice Coasters
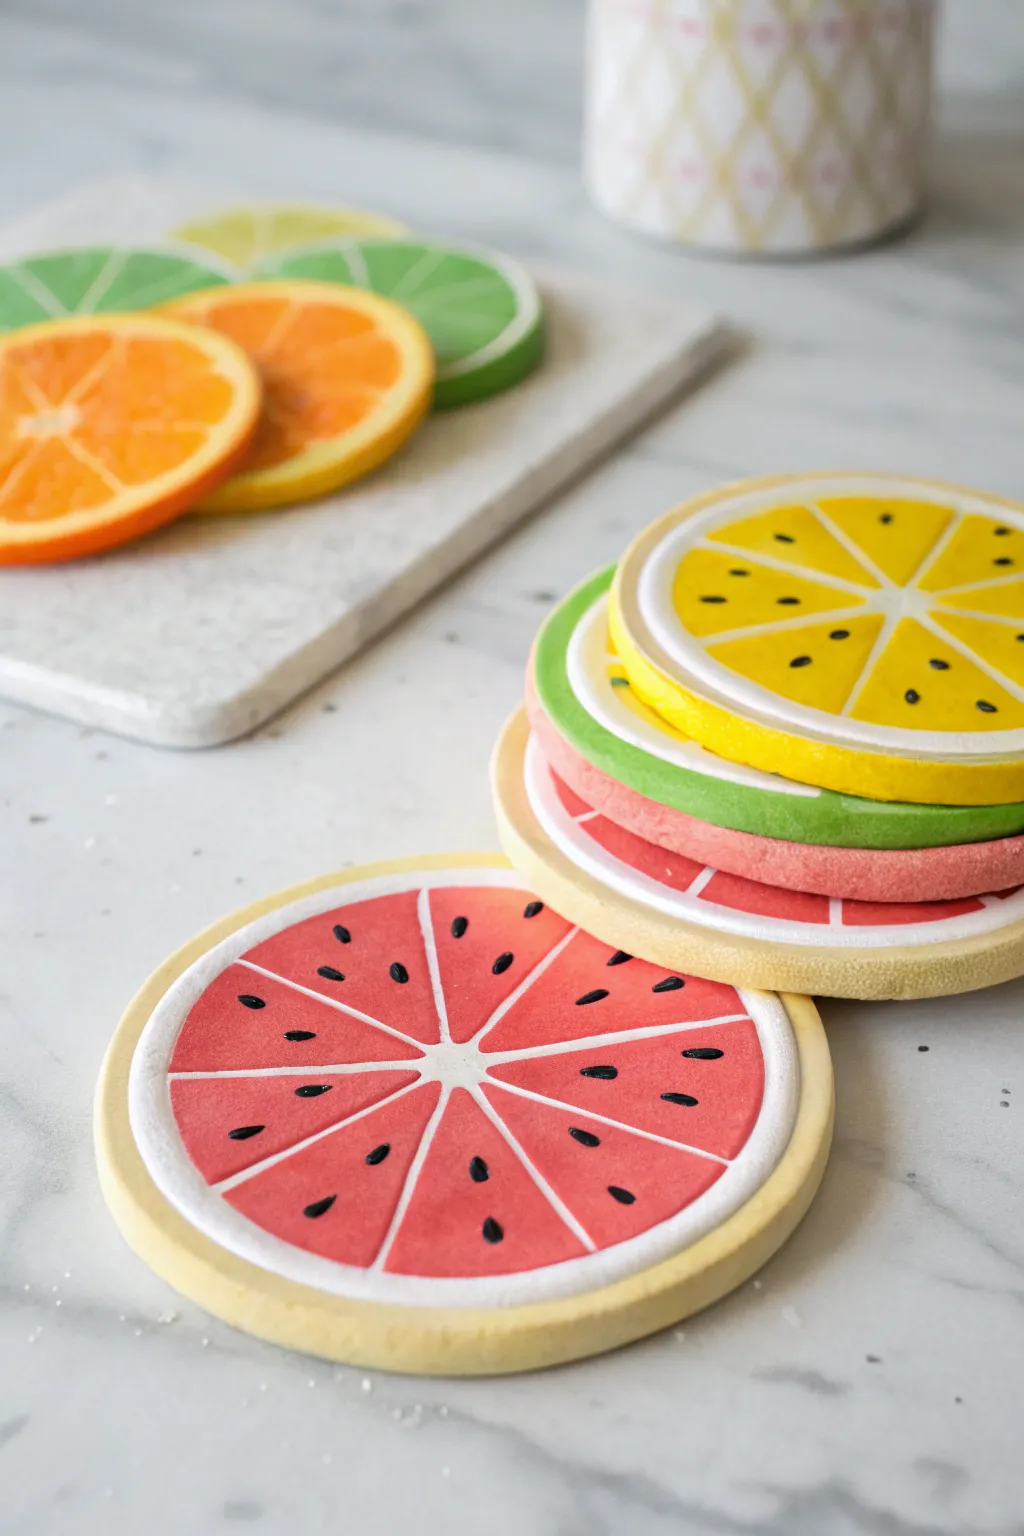
Brighten up your table setting with these juicy, vibrant fruit slice coasters made from clay. They feature realistic details like seeds and rind textures, making them a fun and functional project perfect for summer crafting.
Step-by-Step Tutorial
Materials
- Air-dry clay or polymer clay (white)
- Acrylic paints (red, yellow, orange, green, black, white)
- Rolling pin
- Circle cookie cutters (large and slightly smaller)
- Clay knife or plastic crafting tool
- Fine-grit sandpaper
- Paintbrushes (flat and fine-tip detail brush)
- Matte or glossy varnish/sealant
- Parchment paper or craft mat
Step 1: Shaping the Clay Base
-
Roll out the clay:
Start by conditioning your clay until it’s soft and pliable. Roll it out on a piece of parchment paper to an even thickness of about 1/4 inch. You want it sturdy enough to hold a cup but not too chunky. -
Cut the circles:
Using your largest circle cutter, punch out as many coasters as you’d like to make. If the edges look a little rough after cutting, smooth them gently with a droplet of water on your finger. -
Create the rim:
Take a slightly smaller circle cutter and press it gently into the surface of the clay—do not cut all the way through! This creates the guideline for the outer crust or rind. -
Define the segments:
Using a clay knife or a plastic modeling tool, lightly score lines radiating from the center of the circle out to your inner circle line. Think of slicing a pizza; create 8 even triangular segments. -
Dry the clay:
Allow your clay discs to dry completely according to the package instructions. For air-dry clay, flip them over halfway through the drying process to prevent curling.
Smooth Moves
To prevent air-dry clay from warping as it dries, place a heavy book on top of the clay discs once they are leather-hard (mostly dry to the touch).
Step 2: Painting the Fruit Details
-
Sand for smoothness:
Once fully dry, lightly sand the surface and edges with fine-grit sandpaper to remove any bumps or rough spots. Wipe away the dust with a barely damp cloth. -
Paint the background:
Paint the entire top surface of the coaster white. This acts as a primer to make the fruit colors pop and serves as the ‘pith’ color between the fruit segments. -
Add the crust color:
Paint the outer rim (the space outside your indented circle) in the appropriate rind color. Use pale yellow for lemons, bright green for limes, or a creamy yellow-green for watermelons. -
Fill the segments:
Using a small flat brush, carefully paint the triangular segments inside the white pith lines. Leave a thin white border between the colored fruit and the outer rind. -
Blend for realism:
I like to mix a tiny bit of white into my fruit color near the center of the coaster, blending it outward creates a slight gradient that mimics real fruit juice. -
Let the base colors dry:
Ensure all your base colors are completely dry before moving on to the final details.
Step 3: Final Touches and Sealing
-
Paint the seeds:
Dip a fine-tip detail brush or a toothpick into black paint. Add small teardrop shapes for watermelon seeds or smaller dots near the center for citrus seeds. -
Add highlights:
For an extra pop, add a tiny speck of white on top of the black seeds to simulate a light reflection, making them look wet and shiny. -
Seal the coaster:
To protect your artwork from moisture and condensation, apply a coat of waterproof varnish or sealant. Make sure to cover the sides and bottom as well. -
Final cure:
Let the sealant cure fully for at least 24 hours before setting any drinks on your new fruity creations.
Sticky Situation?
If your clay is sticking to the table or rolling pin, lightly dust your surface with cornstarch or use wax paper underneath while rolling.
Now you have a refreshing set of coasters ready for your next lemonade break
Paper Plate Clay Scene Art
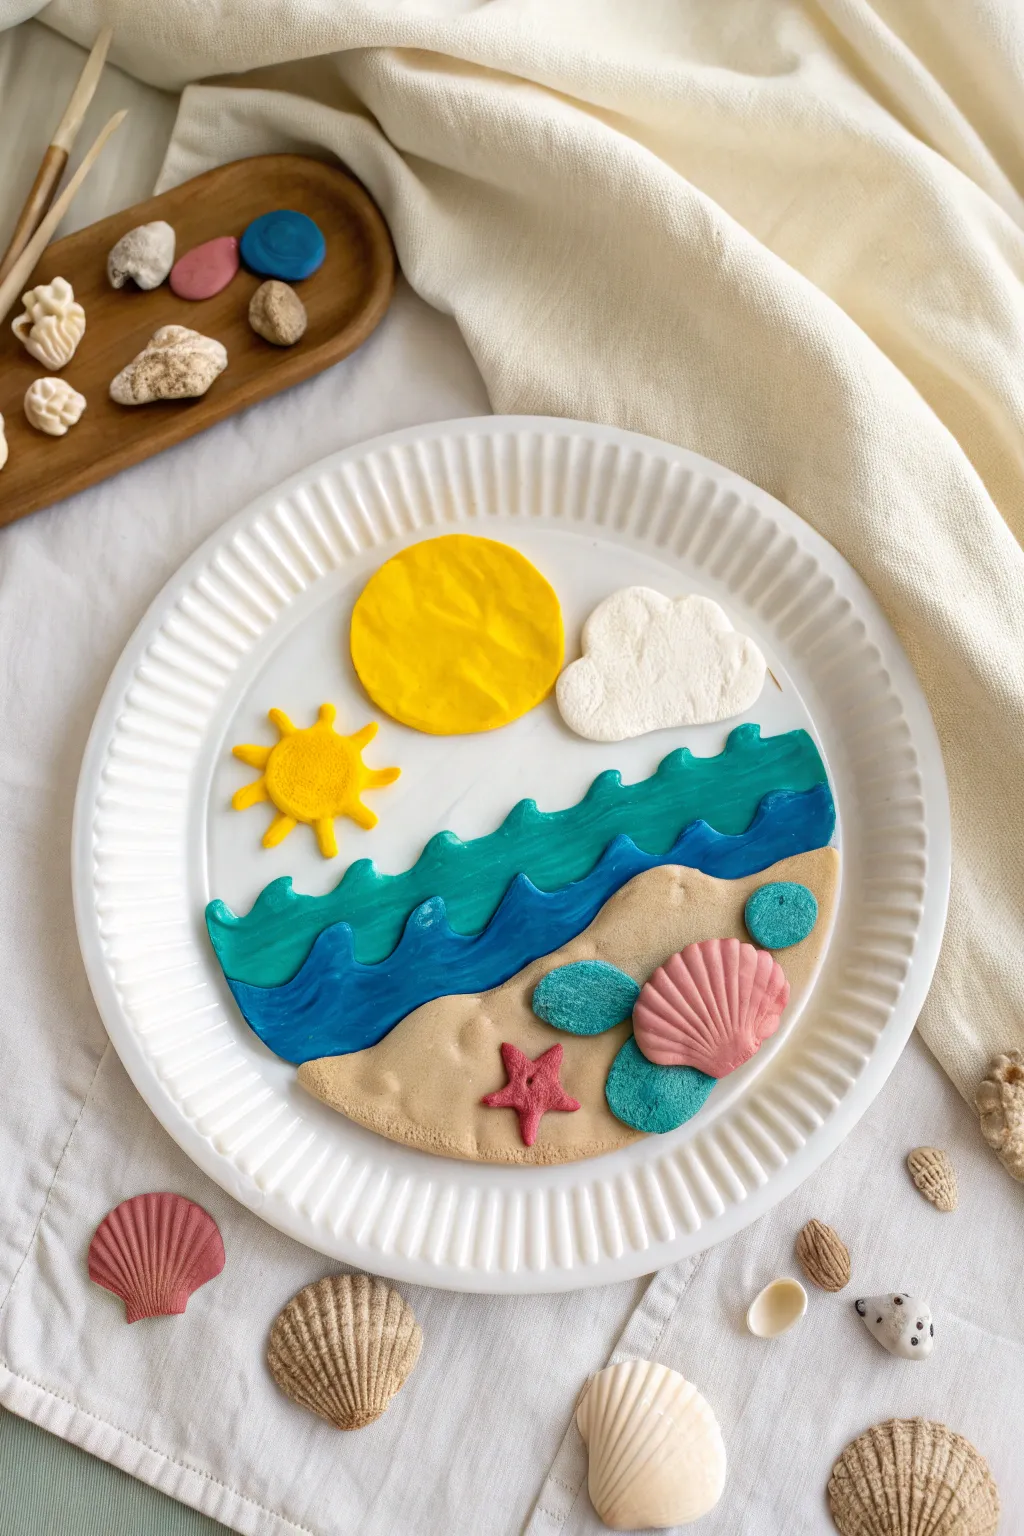
Transform a simple paper plate into a vibrant beach day with this textured clay scene. Using layers of colorful dough, you’ll build a 3D ocean view complete with crashing waves, soft sand, and tiny sea treasures.
Detailed Instructions
Materials
- Sturdy white paper plate (uncoated works best for adhesion)
- Air-dry clay or modeling dough (yellow, white, light blue, dark blue, tan/beige, pink, teal)
- Plastic rolling pin
- Plastic knife or clay sculpting tool
- Toothpick (optional, for texture)
- Glue (white school glue or tacky glue)
Step 1: Setting the Scene: Sky & Sun
-
Prepare the workspace:
Lay down your paper plate on a flat table. If you are using clay that doesn’t stick naturally to paper, have your glue ready. -
Create the main sun:
Take a chunk of bright yellow clay and roll it into a ball about the size of a walnut. -
Flatten the sun:
Press the yellow ball flat onto the upper center-left section of the plate. I like use my thumb to gently texture the surface so it isn’t perfectly smooth. -
Make the sunburst:
Roll a smaller piece of yellow clay into a ball and flatten it slightly underneath and to the left of the main sun. -
Add sun rays:
Roll tiny snakes or teardrops of yellow clay and press them radially around the smaller sun circle to create rays. -
Form a fluffy cloud:
Take white clay and flatten it into an irregular oblong shape. Press it onto the sky area to the right of the sun. -
Texture the cloud:
Use your fingertip or a rounded tool to press indentations into the white clay, making it look puffy and billowing.
Step 2: Building the Ocean
-
Create the horizon wave:
Roll a long ‘snake’ of teal or light blue clay. Flatten it into a strip about an inch wide. -
Shape the water edge:
Use your fingers or a plastic knife to scallop the top edge of this strip to look like rolling waves. -
Place the distant ocean:
Press this strip across the middle of the plate, overlapping the bottom of your sky area slightly. -
Create the deep ocean:
Repeat the process with dark blue clay, making a second wave strip. Cut the top edge into sharper wave peaks for contrast. -
Layer the waves:
Place the dark blue strip directly below the teal one, pressing the edges together so they fuse into a single body of water.
Clay Won’t Stick?
If using air-dry clay on a glossy plate, it might slide off. Scuff the plate surface with sandpaper first or use ample white glue under each piece.
Step 3: The Sandy Shore & Details
-
Lay the foundation:
Take a large amount of tan or beige clay and flatten it into a wide, crescent shape to fit the bottom of the plate. -
Connect sand to sea:
Press the sand layer onto the bottom third of the plate, shaping the top edge to curve naturally against the blue waves. -
Add texture to the sand:
Gently tap the tan clay with a toothbrush or just your fingertips to give it a grainy, sandy appearance. -
Sculpt the seashell:
Roll a pink ball of clay, slightly flatten it into a fan shape, and use a plastic knife to score lines radiating from the bottom edge to create a shell ridge. -
Make a starfish:
Create a tiny five-point star using pink or red clay. Use a toothpick to poke a small hole in the center for detail. -
Decorate with sea glass:
Roll small balls of teal or light green clay, flatten them into irregular circles, and press them into the sand around the shell. -
Final assembly:
Place your shell and starfish onto the sand bed, pressing firmly so they adhere (use a dab of glue if necessary).
Pro Tip: Hidden Texture
For realistic sand, press actual sandpaper onto the tan clay before placing it. For the shell, press a real seashell into the clay to make a mold.
Now let your seaside masterpiece dry completely before displaying it on your shelf
Alphabet and Shape Magnets
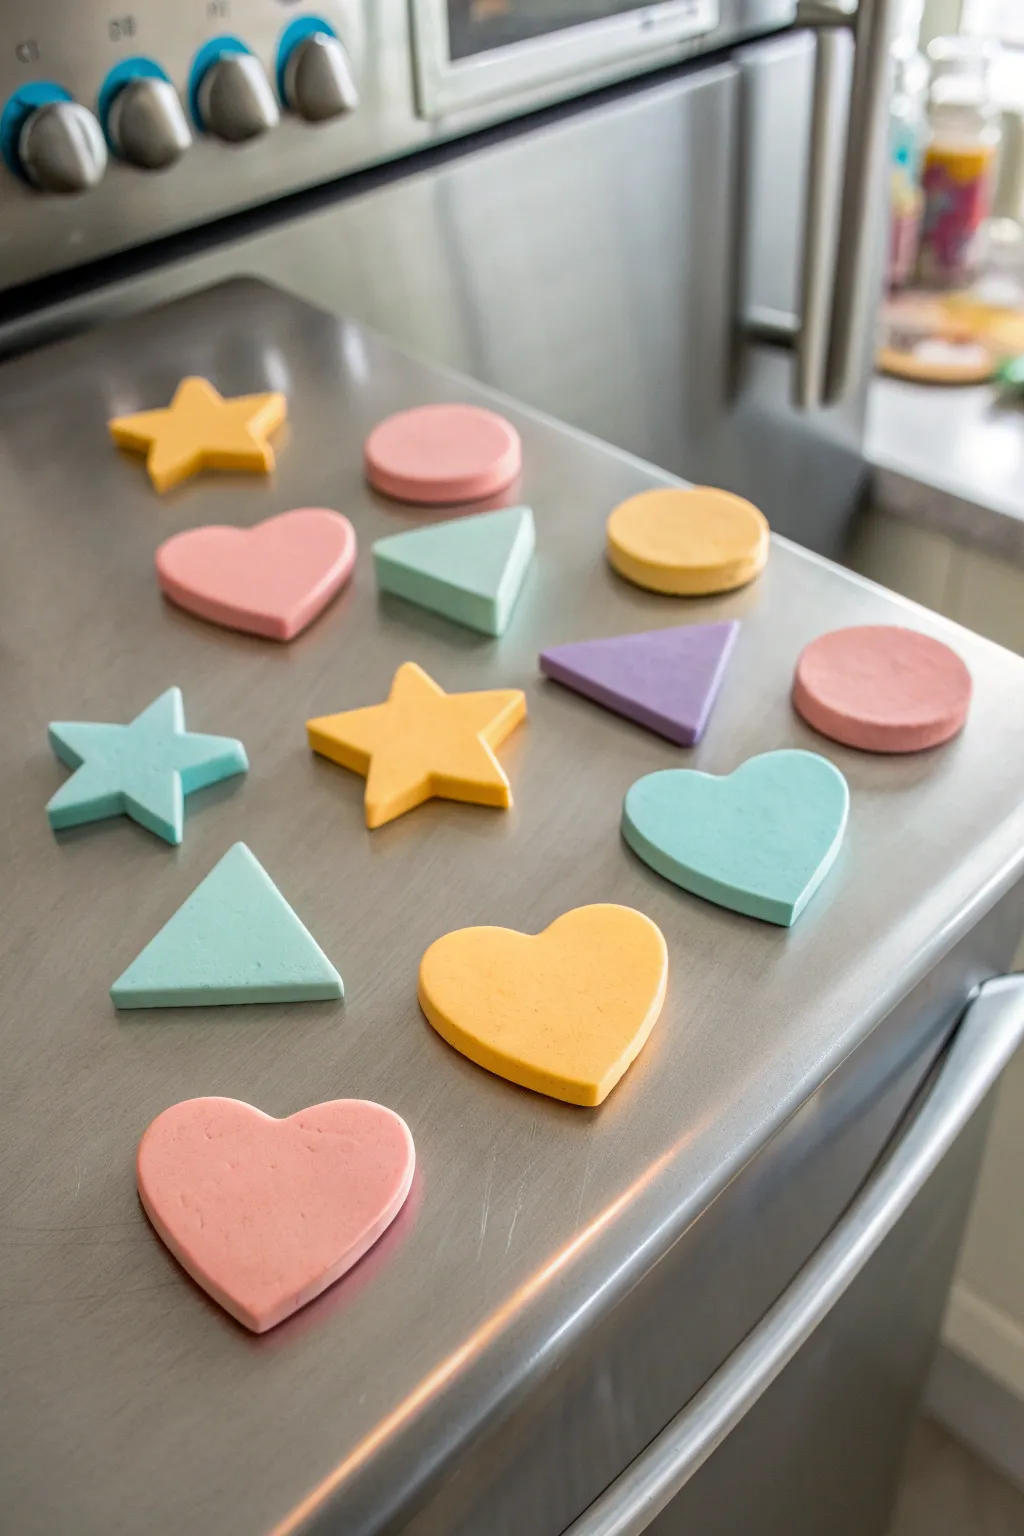
Turn simple geometric shapes into a functional and charming fridge gallery with these soft-hued magnets. Using air-dry clay and pastel colors, this project creates a smooth, matte finish that feels modern yet playful.
Step-by-Step Tutorial
Materials
- Air-dry clay (white)
- Small cookie cutters (hearts, stars, circles, triangles)
- Acrylic paints (pastel yellow, pink, mint green, lavender)
- Rolling pin
- Parchment paper or wax paper
- Fine-grit sandpaper (optional)
- Small round magnets
- Strong craft glue (E6000 or hot glue gun)
- Paintbrushes
- Clear matte sealant (optional)
Step 1: Shaping the Clay
-
Prepare your surface:
Lay down a sheet of parchment paper on a flat work surface to prevent the clay from sticking as you roll it out. -
Condition the clay:
Take a handful of air-dry clay and knead it in your hands until it feels soft, warm, and pliable. -
Roll it out:
Using a rolling pin, flatten the clay to an even thickness of about 1/4 inch. Try to keep it consistent so the magnets look uniform. -
Cut the shapes:
Press your cookie cutters firmly into the clay. Create a variety of shapes like stars, hearts, triangles, and circles to match the image. -
Release the shapes:
Gently wiggle the cutter to release the shape, or peel away the excess clay from around the cutter before lifting. -
Smooth the edges:
Dip your finger in a tiny bit of water and run it along the cut edges of each shape to smooth out any roughness or stray clay bits. -
Let them dry:
Arrange the cut shapes on clean parchment paper and let them dry completely. This usually takes 24-48 hours, depending on humidity; turn them over halfway through for even drying.
Smooth Surface Trick
Place plastic wrap over the clay before using the cookie cutter. This creates a rounded, pillowed edge instead of a sharp, flat cut.
Step 2: Painting and Finishing
-
Sand imperfections:
Once fully dry, check for any rough spots. I like to use a small piece of fine-grit sandpaper to gently buff the edges for a professional look. -
Mix your colors:
Prepare your palette with pastel shades. If you only have primary colors, mix them with plenty of white to achieve that soft, candy-like tone seen in the photo. -
First coat:
Paint the top and sides of each shape. Don’t worry about the back just yet. -
Apply second coat:
Allow the first layer to dry to the touch, then apply a second coat to ensure the color is solid and opaque. -
Seal (optional):
If you want extra protection, apply a thin layer of clear matte sealant. This helps keep them clean without adding too much shine. -
Flip and glue:
Turn the dry shapes over so their backs are facing up. Apply a pea-sized dot of strong craft glue to the center of each shape. -
Attach magnets:
Press a small round magnet firmly into the glue. Let the glue cure completely according to the package instructions before sticking them to your fridge.
Curling Issues?
If clay shapes curl while drying, flip them frequently. You can also place a light book on them once they are partially dry to keep them flat.
Now you have a cheerful set of custom magnets ready to organize your notes
Cutout Clay Lantern Jars
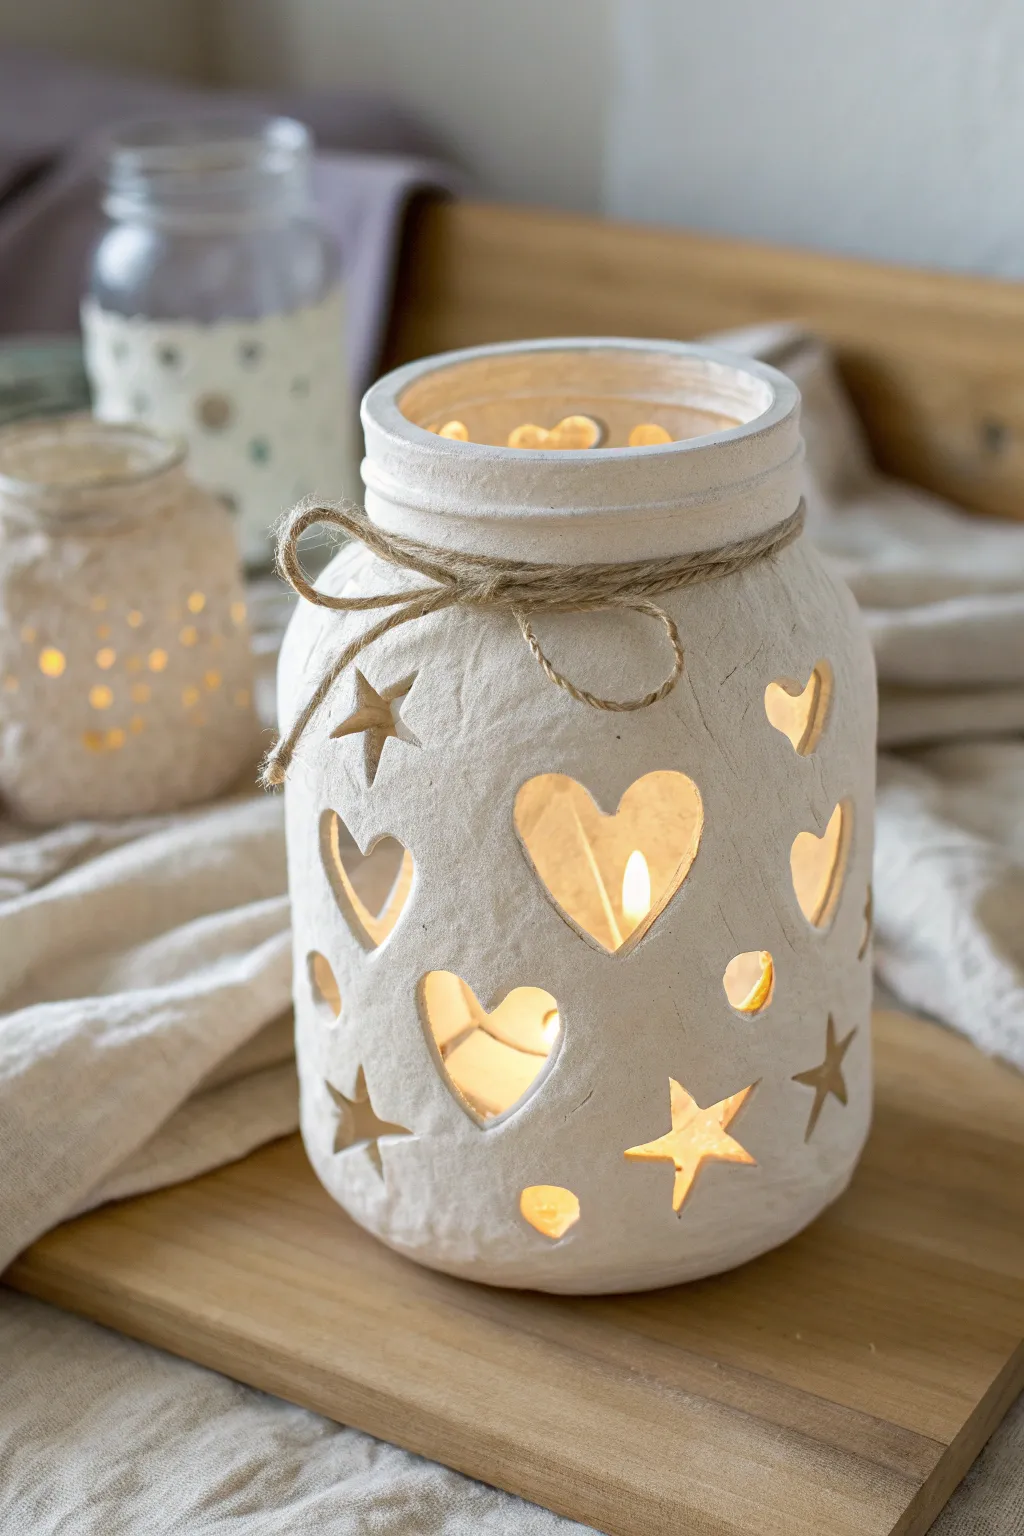
Transform a simple glass jar into a glowing masterpiece with this charming textured clay project. The soft white finish and playful cutouts cast a warm, whimsical light that is perfect for cozying up any corner of the room.
How-To Guide
Materials
- Clean glass mason jar (smooth sides work best)
- White or natural air-dry clay (textured or paper clay works well)
- Rolling pin
- Various small cookie cutters (hearts, stars, circles)
- Jute twine
- Small bowl of water
- Craft knife or toothpick (for detailing)
- Sandpaper (fine grit)
- Simple tealight or LED candle
Step 1: Preparing the Base
-
Clean the jar:
Start by thoroughly washing and drying your glass jar to remove any oils or sticker residue, ensuring the clay adheres properly. -
Roll the clay:
Take a large chunk of air-dry clay and knead it until it’s pliable. Roll it out on a flat surface into a long, rectangular slab about 1/4 inch thick. -
Check the size:
Lift your clay slab gently and wrap it around the jar just to measure. You want enough length to slightly overlap the seam and enough height to cover from the bottom edge to the rim.
Clean Cuts Hack
If cutout clay sticks deeply inside the cutter, let the clay on the jar dry for 15 minutes before cutting. It will slice cleaner and deform less.
Step 2: Wrapping and Cutting
-
Apply the clay:
Carefully wrap the clay slab around the glass jar. Press it firmly against the glass to remove air pockets, smoothing it as you go. -
Seal the seam:
Where the two ends of the clay meet, wet your finger slightly and smear the clay together until the line disappears and the surface looks seamless. -
Trim the edges:
Use a craft knife or a simple plastic tool to trim away excess clay at the very top rim and the bottom edge so the jar sits flat. -
Plan your design:
Look at your covered jar and visualize where you want your windows of light to be. Alternating shapes often looks best. -
Cut the shapes:
Press your small cookie cutters directly into the soft clay on the jar. Wiggle them slightly and pull out the clay plug to reveal the glass underneath. -
Refine the edges:
If the clay cutout looks ragged, dip your finger in water and gently smooth around the inside edges of the hearts and stars.
Step 3: Texturing and Finishing
-
Add texture:
To get that rustic, uneven look shown in the photo, lightly dab the surface of the clay with a crumpled piece of aluminum foil or a stiff-bristled brush. -
Dry partially:
Let the jar sit for about an hour until the clay is leather-hard but not fully dry. -
Double check shapes:
As clay dries, it can shrink or warp slightly. Go back and make sure your cutout shapes are still clear and the glass is clean inside the holes. -
Full dry:
Allow the project to dry completely for at least 24 hours. I usually place it in a dry, sunny spot to speed this up naturally. -
Sand smooth:
Once fully hard and white, use fine-grit sandpaper to gently knock down any sharp peaks or rough blobs, especially around the rim. -
Clean the glass:
Use a damp cotton swab to wipe any clay residue off the exposed glass within the cutouts so the light shines through clearly. -
Add the twine:
Wrap a length of jute twine around the neck of the jar three or four times, tying it off in a simple bow at the front. -
Light it up:
Place your LED candle or tealight inside the jar and enjoy the warm glow through your custom shapes.
Cracking Clay?
If small drying cracks appear, mix a tiny bit of fresh clay with water to make a paste (slip) and fill them in with your finger.
Watch how the flickering candlelight dances through your handmade stars and hearts, creating a cozy atmosphere anywhere you place it
Simple Clay Wind Chimes
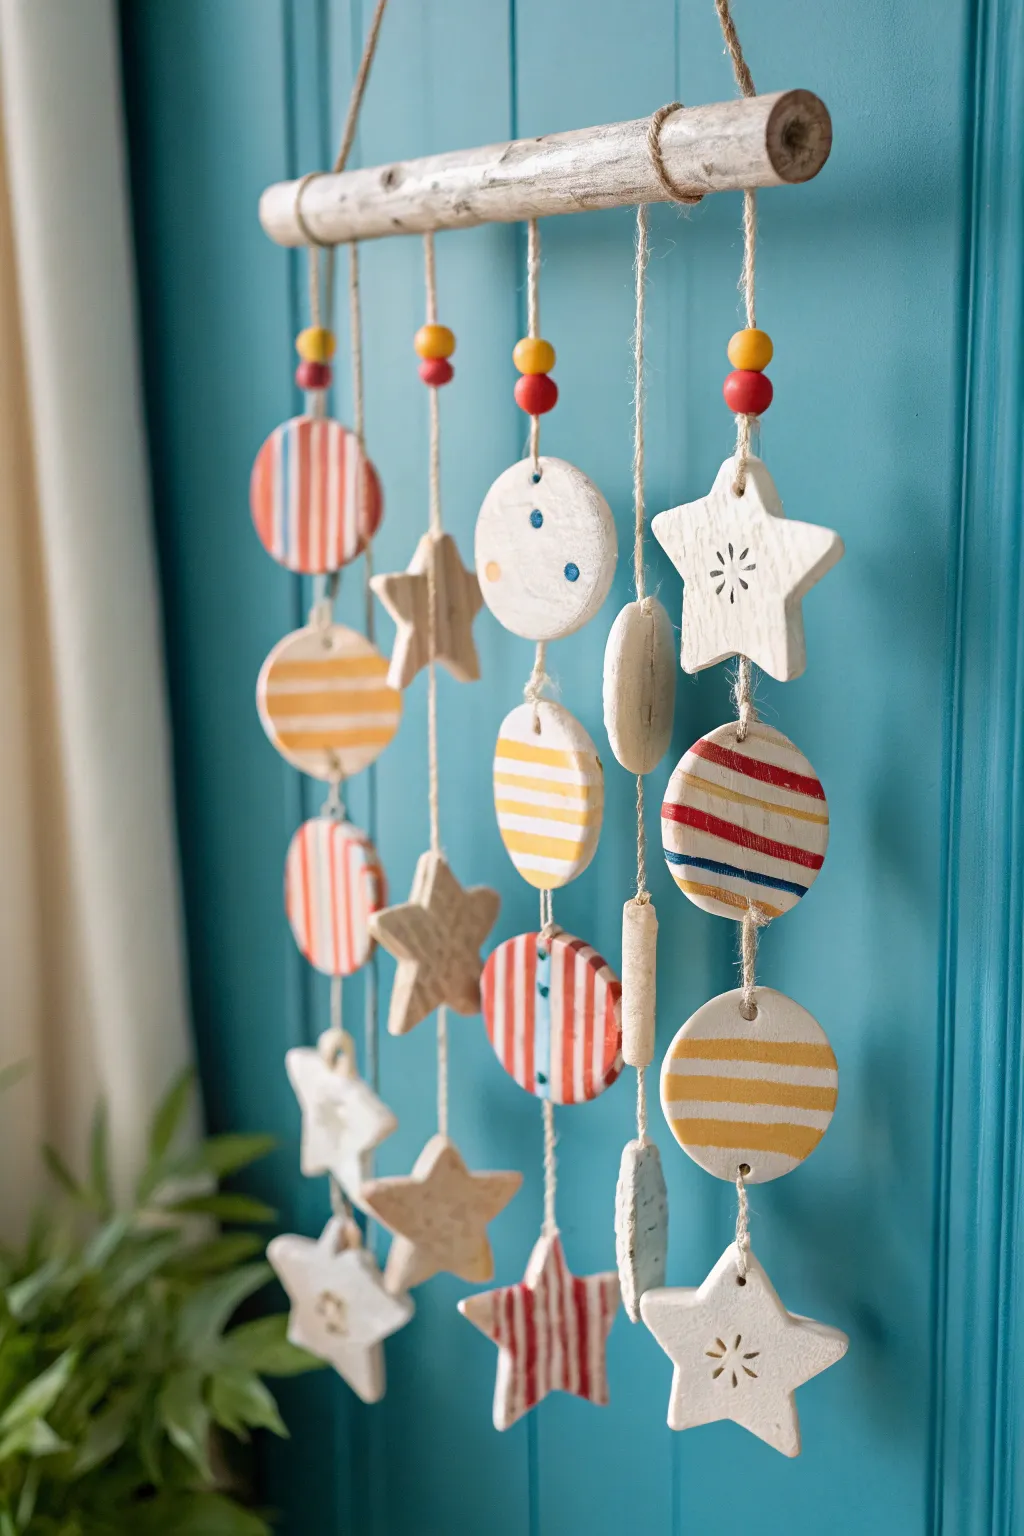
Create a cheerful hanging decoration that combines natural wood with colorful, hand-painted clay shapes. This charming wind chime features stars and circles strung on twine, perfect for brightening up a bedroom wall or a sheltered porch corner.
Step-by-Step Guide
Materials
- Air-dry clay (white)
- Rolling pin
- Cookie cutters (Circle and Star shapes)
- A sturdy wooden branch or driftwood piece (approx. 10-12 inches)
- Jute twine or hemp cord
- Acrylic paints (Red, yellow, blue, white, orange)
- Fine detail paintbrush
- Flat shader paintbrush
- Wooden beads (yellow and red)
- Drinking straw or skewer (for poking holes)
- Scissors
- Clear varnish or sealant (optional)
Step 1: Shaping the Clay Elements
-
Prepare your workspace:
Lay down parchment paper or a craft mat to prevent the clay from sticking to your table. Take a handful of air-dry clay and knead it until it is soft and pliable. -
Roll it out:
Use a rolling pin to flatten the clay to an even thickness, aiming for about 1/4 inch thick so the pieces are sturdy but not too heavy. -
Cut the shapes:
Press your circle and star cookie cutters into the clay. For this design, you will need approximately 6 circles and 6-7 stars of varying sizes if you have them. -
Create hanging holes:
Before the clay dries, use a drinking straw or a skewer to poke a hole through the top of each shape. For pieces that will hang in the middle of a strand, you will need a hole at the bottom as well. -
Add texture details:
On a few of the star shapes, use a toothpick or small tool to gently press a starburst pattern into the center for extra visual interest. -
Let them dry:
Place all your cut shapes on a flat surface to dry. Air-dry clay usually takes 24-48 hours depending on thickness; flip them halfway through to ensure the backs dry evenly.
Uneven Clay?
If your clay shapes curl up at the edges while drying, you can gently sand the back flat with fine-grit sandpaper once they are fully hardened.
Step 2: Painting the Patterns
-
Base coat the shapes:
Once fully dry, you can leave the background white for a fresh look, or paint a solid base coat if you prefer. Ensure the clay is free of dust before starting. -
Paint classic stripes:
Using a flat shader brush and red paint, carefully paint vertical stripes on a few of the circular pieces. I like to steady my hand on the table to keep the lines straight. -
Add yellow details:
On other circles, paint horizontal stripes using bright yellow or light orange paint. Vary the thickness of the lines to make each piece unique. -
Create a multi-color piece:
Select one prominent circle to be your ‘hero’ piece and paint thin, alternating stripes of red, blue, and yellow for a pop of primary color. -
Decorate the stars:
For the bottom-most stars, paint red vertical stripes on one to match the circles above. Leave the textured stars plain white to highlight the pressed design. -
Seal the artwork:
Allow the paint to dry completely. If you plan to hang this near a window or outdoors, apply a coat of clear varnish to protect the clay from moisture.
Make Some Noise
Add tiny metal bells to the bottom of the lowest stars. When the wind blows, your art piece will make a gentle, twinkling sound.
Step 3: Assembling the Chime
-
Prepare the main branch:
Take your wooden branch and tie a length of jute twine to both ends to create the main hanging loop. -
Cut suspension strings:
Cut four long pieces of twine, each about 24 inches long. These will hold your beads and clay shapes. -
Tie the strings to the branch:
Tie the four strings onto the branch, spacing them out evenly. Make sure the knots are tight and secure. -
Thread the beads:
Start each strand by threading a yellow wooden bead followed by a red wooden bead at the very top, just below the branch knot. -
Attach the first tier:
Thread the twine through the top hole of your first clay shape (like a striped circle) and out the bottom hole. Tie a small knot underneath the hole or loop it to keep the shape in place. -
Add middle elements:
Continue down the string, adding intermediate shapes like plain stars or small clay connectors about 2-3 inches apart. -
Secure the anchors:
Tie your final shapes (the stars) to the very bottom of each string. Trim any excess twine neatly for a polished finish.
Find the perfect spot to hang your creation and enjoy the charming colors swaying in the breeze