When I’m craving that salty-air, toes-in-the-sand vibe, I reach for clay bead bracelets that feel like summer you can wear. Here are my favorite summer beach bracelet ideas—classic first, then a few fun twists once you’re warmed up.
Classic Ocean Blue Heishi Stack
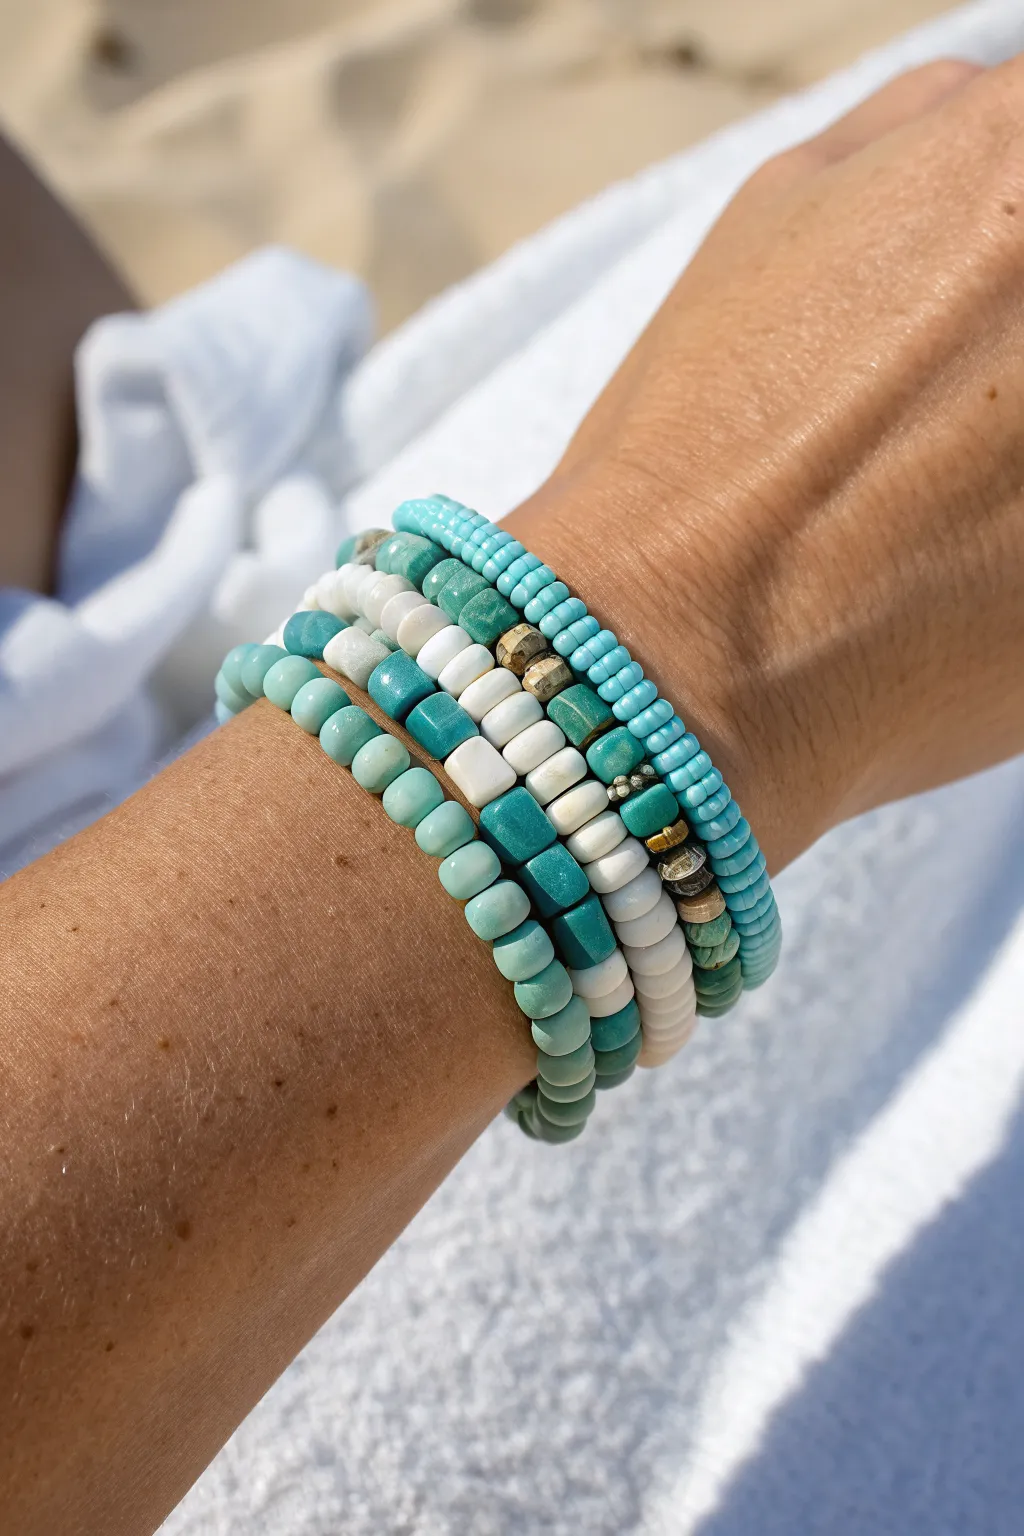
Capture the essence of crashing waves and sandy shores with this stunning four-piece bracelet stack. By mixing various shades of turquoise with crisp white and natural wood accents, you’ll create a layered accessory that feels effortlessly beachy.
Step-by-Step
Materials
- Elastic cord (0.7mm or 0.8mm clear stretch string)
- White heishi clay beads (6mm)
- Medium turquoise heishi clay beads (6mm)
- Deep teal/turquoise rectangular stone or glass beads
- Small aqua/mint seed beads (approx. size 6/0 or 8/0)
- Natural wood spacer beads or small gold spacer discs (optional)
- Small gold or brass accent beads
- Jewelry glue (GS Hypo Cement or similar)
- Scissors
- Tape or bead stopper
Step 1: Preparation
-
Measure and Cut:
Start by measuring your wrist with a flexible measuring tape. Cut four lengths of elastic cord, each about 10-12 inches long. This extra length gives you plenty of room for tying knots later. -
Secure the Ends:
Place a piece of tape or a bead stopper on one end of each string. This simple step prevents your beads from sliding off while you design your patterns.
Step 2: Bracelet 1: The Gradient Heishi
-
Design the Pattern:
For the bracelet closest to the hand, alternate sections of white heishi beads with turquoise ones. I find that grouping 5-7 beads of the same color before switching creates a nice blocky look. -
Add Accents:
Intermittently slide on a small gold spacer or a natural wood bead between color changes to add that organic, washed-up-on-the-beach texture. -
Check Length:
Wrap the strand around your wrist to check the fit. Add or remove beads until it sits comfortably without digging in.
Knot Slipping?
If your elastic knot feels insecure, try pulling all four tail ends tight simultaneously after tying. A second drop of glue adds extra safety.
Step 3: Bracelet 2: The Delicate Seed Bead
-
String the Seeds:
For the thinnest bracelet in the stack, use the small aqua or mint seed beads. Simply string them continuously until you reach your desired length. -
Create a Focal Point:
For visual interest, interrupt the solid color halfway through by adding three to five slightly darker or contrasting beads, or perhaps a tiny metallic charm.
Make it Luxe
Swap the plastic pony or clay beads for genuine gemstones like turquoise, howlite, and amazonite for a heavier, premium feel.
Step 4: Bracelet 3: The Bold Rectangles
-
Select Statement Beads:
This strand uses the larger, rectangular deep teal beads shown in the middle of the stack. These provide a geometric contrast to the round heishi beads. -
Mix in Whites:
To break up the heaviness of the dark teal, alternate these rectangular beads with single white heishi discs. This spacing brightens the strand significantly. -
Finish the Strand:
Continue the pattern until the bracelet matches the length of your previous creations.
Step 5: Bracelet 4: The Mixed Teal Classic
-
Create Texture:
For the final bracelet (furthest from the hand in the photo), focus on round turquoise beads. Mix slight variations of shade—some lighter, some deeper teal—to simulate the depth of ocean water. -
Incorporate Metallics:
Every inch or two, slide on a textured silver or brass nugget bead. These metallic interruptions catch the sunlight perfectly.
Step 6: Finishing Up
-
Pre-stretch the Cord:
Before tying, gently pull on the ends of each bracelet to pre-stretch the elastic. This crucial step prevents the bracelet from sagging after the first wear. -
Tie the Surgeon’s Knot:
Remove the tape and tie a surgeon’s knot for each bracelet. Cross right over left, then left over right, looping the top string through twice before pulling tight. -
Secure with Glue:
Dab a tiny drop of jewelry glue directly onto the knot. Let it dry completely according to the glue’s instructions. -
Trim and Hide:
Cut off the excess string close to the knot. If possible, gently tug the bracelet so the knot slides inside the hole of a neighboring bead to hide it.
Wear your new stack all together or mix and match individual pieces for endless summer variety


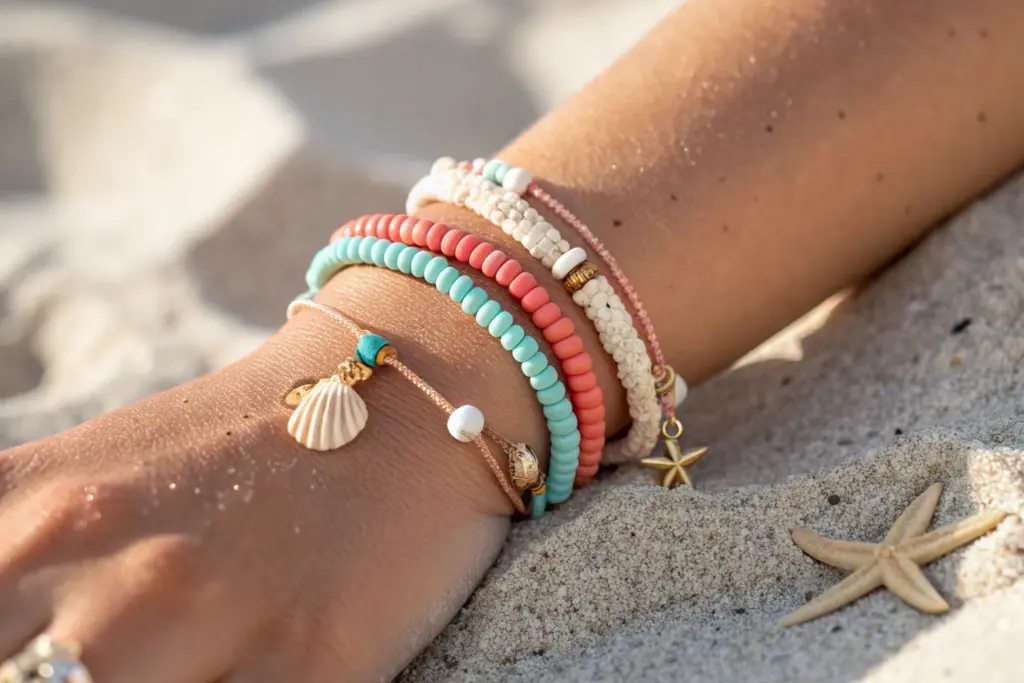
Sand And Sea Neutral Mix

Capture the essence of a serene beach day with this beautiful bracelet featuring a mix of neutral tones and soft turquoise accents. The combination of clay heishi beads, natural wood textures, and a golden seashell charm creates a sophisticated yet relaxed accessory perfect for summer.
Detailed Instructions
Materials
- Polymer clay heishi beads (cream/beige, sand mixed color)
- Polymer clay heishi beads (soft turquoise/teal)
- Small wooden disc beads (dark brown)
- Small wooden disc beads (light natural wood)
- Gold tone spacer beads (flat disc shape)
- Gold tone seashell charm
- Gold jump rings (4mm and 6mm)
- Beading wire or strong elastic cord (0.8mm Recommended)
- Crimp beads and crimp covers (if using wire)
- Lobster clasp and extender chain
- Jewelry pliers (flat nose and round nose)
- Wire cutters
- Bead stopper or tape
Step 1: Preparation & Charm Assembly
-
Prepare your workspace:
Lay out a bead design board or a soft towel to prevent your beads from rolling away. Sort your heishi beads by color: cream/beige, turquoise, light wood, and dark wood. -
Prep the charm:
Using your flat nose pliers and round nose pliers, gently twist open a small gold jump ring. Slide the gold seashell charm onto the ring. -
Close the charm ring:
Twist the jump ring back into a closed position, ensuring the ends meet perfectly flush so the charm doesn’t slip off later. Set this aside. -
Measure your wire:
Cut a piece of beading wire approximately 9-10 inches long. This gives you plenty of extra room to work with the clasp attachment on both ends.
Natural Texture
Mix materials! Combining soft polymer clay with real wood or coconut shell beads adds organic depth that mimics the variety of textures found on a sandy beach.
Step 2: Starting the Strand
-
Attach the first clasp component:
Thread a crimp bead onto one end of your wire, followed by the jump ring attached to your lobster clasp (or the clasp itself). -
Secure the wire:
Loop the wire back through the crimp bead. Use your flat nose pliers to squash the crimp bead firmly so the wire is locked in place. -
Cover the crimp:
Place a crimp cover over the smashed crimp bead and gently squeeze it shut with your pliers until it looks like a round gold bead. -
Start the pattern:
Begin threading your beads. Start with a section of the cream/beige heishi beads. Use about 8-10 beads for this first block to create a clean start near the clasp.
Stiff Bracelet?
If your finished bracelet feels too rigid, you likely pulled the wire too tight before crimping. Leave a tiny bit of slack (1mm) so beads can rotate and curve around the wrist.
Step 3: Creating the Pattern
-
Introduce color:
Add a single turquoise bead, followed by 3-4 cream beads, then another turquoise bead. This creates a subtle hint of sea-glass color before the main pattern shifts. -
Transition to wood tones:
Thread on a sequence mixing the cream beads with the light natural wood beads. Try a pattern like: 2 cream, 1 light wood, 2 cream. -
Build the focal section:
As you reach the center portion of the bracelet, introduce the darker brown wooden discs. I like to sandwich these between light wood or cream beads to make the dark brown pop. -
Add the charm:
Calculate the center of your strand. Slide the jump ring holding your seashell charm onto the wire right in the middle of a cream or light wood section. -
Mirror the pattern:
Continue beading the second half of the bracelet, reversing the pattern you created on the first side. Move from the wood/cream mix back to the turquoise accents. -
Finish the bead strand:
End with a solid block of 8-10 cream beads to match the beginning of your strand.
Step 4: Finishing Touches
-
Add final hardware:
Thread a crimp bead onto the end of the wire, followed by the jump ring attached to your extender chain. -
Close the loop:
Pass the wire back through the crimp bead and pull it taut, removing any slack in the bead line but leaving enough flexibility for the bracelet to curve. -
Secure the crimp:
Flatten the crimp bead firmly with your pliers. Trim the excess wire tail close to the bead using your wire cutters. -
Hide the mechanism:
Apply the final crimp cover over the flattened crimp bead and gently close it to finish the professional look.
Now you have a stunning, beach-ready accessory that carries the calm vibes of the ocean with you everywhere.


Sunset Coral And Peach Palette
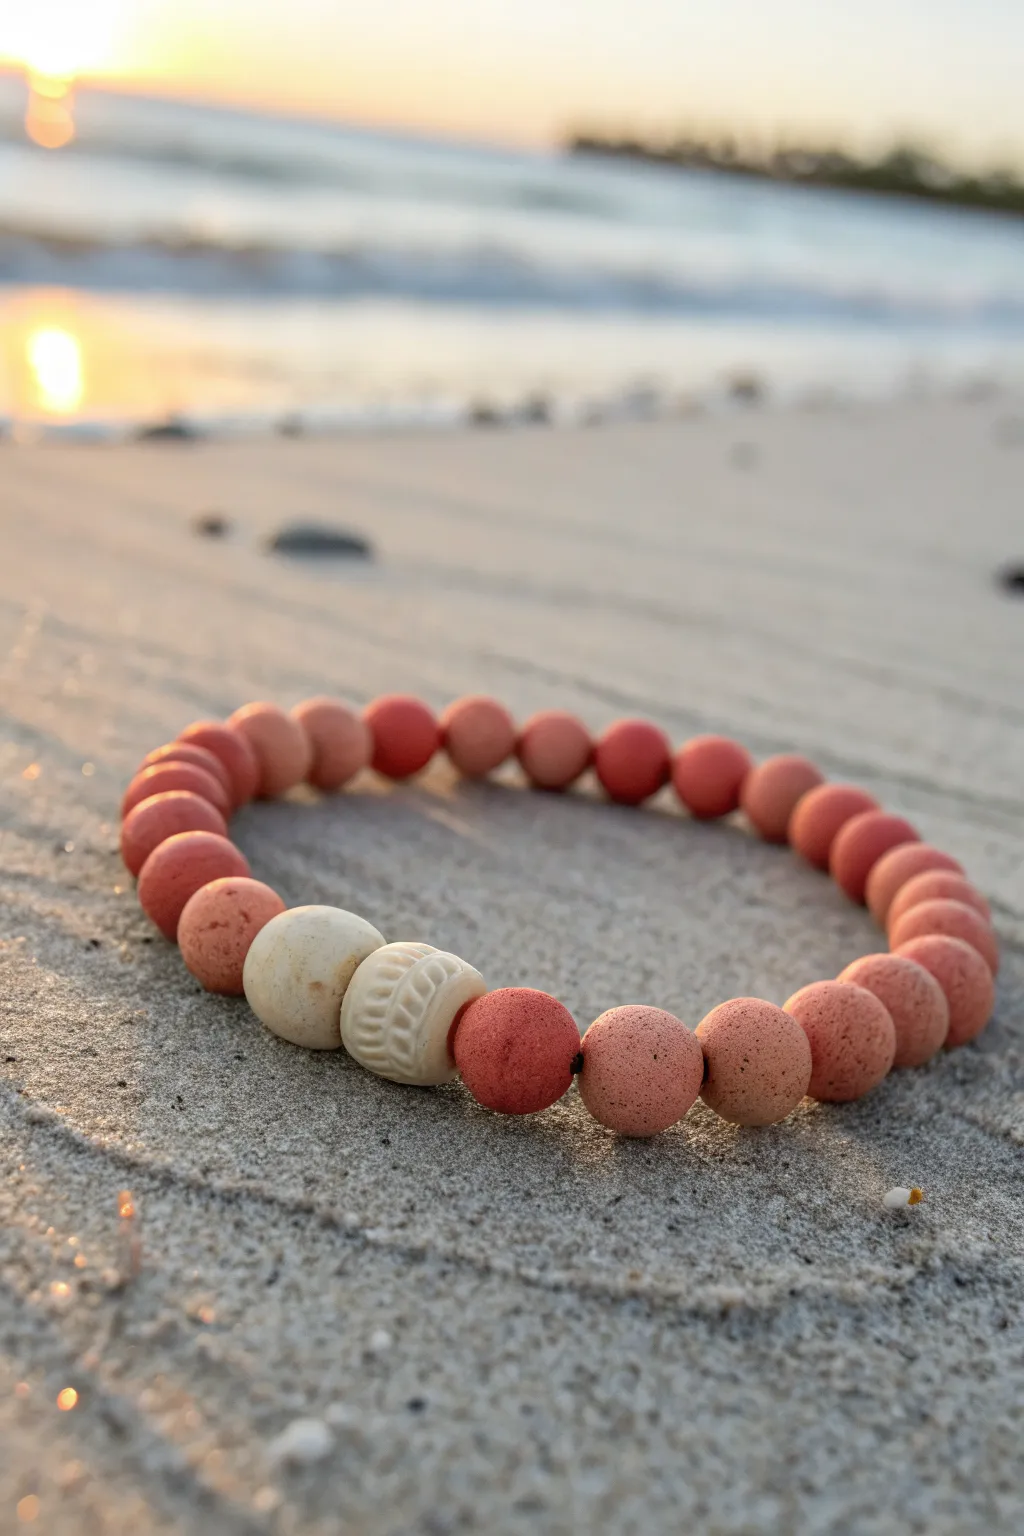
Capture the warmth of a fading sun with this earthy, textured bracelet that blends soft coral tones with creamy white accents. The porous, matte finish of the clay beads mimics the natural feel of beach stones and sand for a truly coastal vibe.
How-To Guide
Materials
- Approximately 22-26 round clay or terracotta beads (8mm-10mm) in a gradient of coral, peach, and terra-cotta red
- 1 round cream/off-white clay bead (10mm)
- 1 carved or patterned cream/bone bead (cylinder or round shape, approx 10mm)
- Strong elastic jewelry cord (0.8mm or 1mm thickness)
- Jewelry glue or clear nail polish
- Scissors
- Tape or bead stopper
- Beading needle (optional, for easier threading)
Step 1: Preparation & Sorting
-
Measure your wrist:
Wrap a flexible measuring tape around your wrist where you want the bracelet to sit. Add about half an inch to this measurement to ensure a comfortable fit that isn’t too tight. -
Cut the elastic:
Cut a piece of elastic cord roughly 10 inches long. I find having this extra length makes the final knotting process much less frustrating than working with short ends. -
Secure the end:
Place a piece of tape or a bead stopper on one end of the elastic cord to prevent your beads from sliding off into the sand while you work. -
Sort your colors:
Lay out your clay beads on a flat surface. Organize them by shade—group your deep terracotta reds, your medium corals, and your lighter peach tones together.
Knot Slipping?
If your elastic knot keeps slipping undone, try dotting the knot with glue immediately before pulling it tight. The wet glue acts as a lubricant to tighten it, then bonds it permanently as it dries.
Step 2: Designing the Gradient
-
Plan the focal point:
Identify your two unique cream beads. These will sit side-by-side as the central feature. Place the plain round cream bead next to the carved cream bead on your work surface. -
Arrange the red tones:
Select your darkest, most reddish-terracotta beads. Place one on the immediate right of your focal beads and one on the immediate left. -
Add the coral tones:
Next to the red beads, place your medium coral shades. Continue this pattern outward on both sides, transitioning slowly from dark red to medium coral. -
Finish with peach:
Use your lightest peach-colored beads for the back section of the bracelet. This creates a subtle ombré efffect that mimics a sunset fading into the horizon. -
Check the length:
Line up all the beads against your ruler to verify the total length matches your wrist measurement plus the added half-inch.
Step 3: Stringing & Finishing
-
Thread the first side:
Pick up the plain cream bead and slide it onto the elastic, pushing it down to the stopper. -
Add the carved bead:
Slide the carved cream bead on next. These two should sit tightly together. -
String the gradient:
Begin adding your colored beads, starting with the darkest red you planned for one side, moving through the corals to the peaches. -
Complete the circle:
Once you reach the end of the gradient on the first side, string the remaining beads in reverse order (peach to red) so that the darkest red will eventually meet the plain cream bead when circular. -
Pre-stretch the cord:
Before knotting, hold both ends of the elastic and give it a firm (but gentle) stretch. This pre-stretching prevents the bracelet from sagging or loosening after the first time you wear it. -
Tie the knot:
Remove the tape or stopper. Tie a simple overhand knot, bringing the beads together into a circle. Pull it tight. -
The surgeon’s knot:
For extra security, tie a surgeon’s knot. This is just like a standard square knot, but loop the elastic through twice before pulling tight. -
Secure with glue:
Place a tiny drop of jewelry glue or clear nail polish directly onto the knot. Let it dry for a few minutes to ensure it won’t slip. -
Hide the knot:
If size permits, gently tug the elastic so the knot slides inside the hole of one of the adjacent beads to conceal it. -
Trim the excess:
Using sharp scissors, trim the remaining tails of the elastic cord close to the bead, being careful not to nick the main knot.
Scent Diffuser Upgrade
Use unglazed terracotta or lava stone beads for the colored sections. You can add a drop of essential oil to these porous beads, turning your beach bracelet into a wearable aromatherapy diffuser.
Enjoy the relaxed, seaside energy of your new custom accessory every time you wear it


Cowrie Shell Centerpiece Bracelet
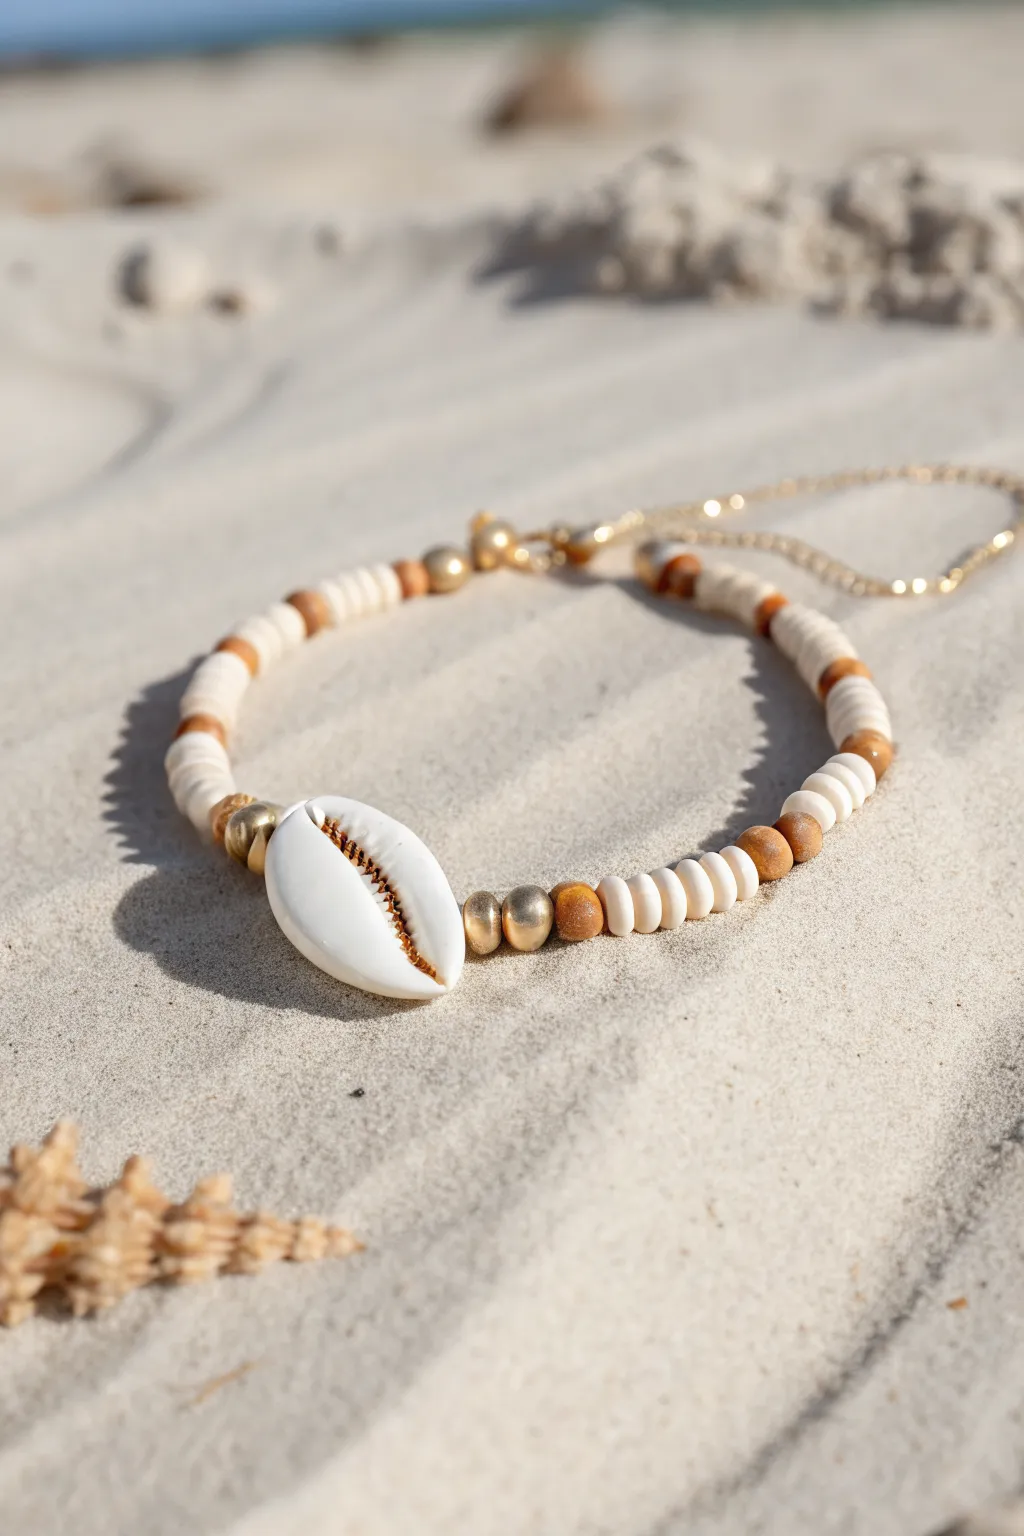
Capture the essence of a sun-soaked coastline with this elegant beaded bracelet, featuring a stunning cowrie shell focal point. The mix of creamy clay discs, warm wood accents, and metallic gold creates a sophisticated yet beach-ready accessory.
Step-by-Step Tutorial
Materials
- White or cream polymer clay heishi beads (approx. 4mm)
- Small round wooden spacer beads (approx. 3-4mm)
- Gold round metal beads (4mm and 6mm)
- Natural Cowrie shell with two holes (for stringing) and gold electroplated slit
- Jewelry beading wire or strong flexible beading cord
- Gold crimp beads
- Gold lobster clasp
- Gold jump rings
- Gold extension chain (optional)
- Flat nose pliers
- Wire cutters
- Crimping pliers
Step 1: Preparation
-
Measure your wrist:
Wrap a piece of string around your wrist to determine the desired length, adding about half an inch for a comfortable fit. -
Cut the wire:
Cut a length of beading wire about 10-12 inches long. This gives you plenty of extra room to work with the clasp and crimps. -
Secure one end:
Thread a crimp bead onto one end of the wire, followed by a jump ring or the loop of your extension chain. -
Crimp the end:
Loop the wire back through the crimp bead and use your crimping pliers to flatten it securely, locking the loop in place.
Step 2: Beading the Pattern
-
Start the sequence:
Begin stringing from the clasp end. Thread on roughly 5-6 white clay heishi beads to start the pattern base. -
Add first accent:
Slide on one wooden spacer bead followed by another set of about 3-4 white clay beads. -
Build the rhythm:
Continue this pattern: a small wooden bead, followed by a section of white clay beads. Vary the number of white beads slightly if you want a more organic feel, but usually, 4-5 beads create a nice spacing. -
Approach the center:
When you have completed nearly half the length of the bracelet, prepare for the focal point. Add a wooden bead, then string on a 4mm gold round bead. -
Add gold emphasis:
Next, add a slightly larger 6mm gold bead. This size graduation leads the eye perfectly toward the shell.
Shell Stability
If your cowrie shell flips over too easily while wearing, thread the wire through twice if the holes allow, or use a tiny drop of clear jewelry glue on the adjacent beads.
Step 3: The Centerpiece
-
Place the Cowrie shell:
Thread the wire through the holes of your cowrie shell. Ensure the shell sits face up with the gold-detailed slit visible. -
Mirror the gold beads:
Immediately following the shell, add a 6mm gold bead, followed by a 4mm gold bead to mirror the other side. -
Secure the center:
Push these beads snug against the shell so there are no gaps.
Anklet Upgrade
Make the strand longer (approx. 9-10 inches) to turn this into a chic beach anklet. Add small gold charms near the clasp for extra movement.
Step 4: Finishing Up
-
Complete the symmetry:
Resume your main pattern: add a wooden spacer bead, then your set of 4-5 white clay beads. -
Finish the strand:
Continue the pattern until the bracelet reaches your measured length, checking it against your wrist periodically. -
Add final crimp:
Thread a crimp bead onto the end of the wire, followed by the jump ring attached to your lobster clasp. -
Loop and secure:
Pass the wire back through the crimp bead and pull tight, leaving just enough wiggle room for the clasp to move freely. -
Double check tension:
Before crimping, make sure the beads aren’t too tight; the bracelet should flow around your wrist, not stand stiff. -
Final crimp:
Use your crimping pliers to secure the bead. I prefer to use a crimp cover here for a polished look, but a neat crimp works fine too. -
Trim excess:
Trim the excess wire tail close to the crimp bead using your wire cutters.
Slip on your new creation and enjoy the golden hour glow wherever you go

The Complete Guide to Pottery Troubleshooting
Uncover the most common ceramic mistakes—from cracking clay to failed glazes—and learn how to fix them fast.
Starfish Charm With Breezy Spacers
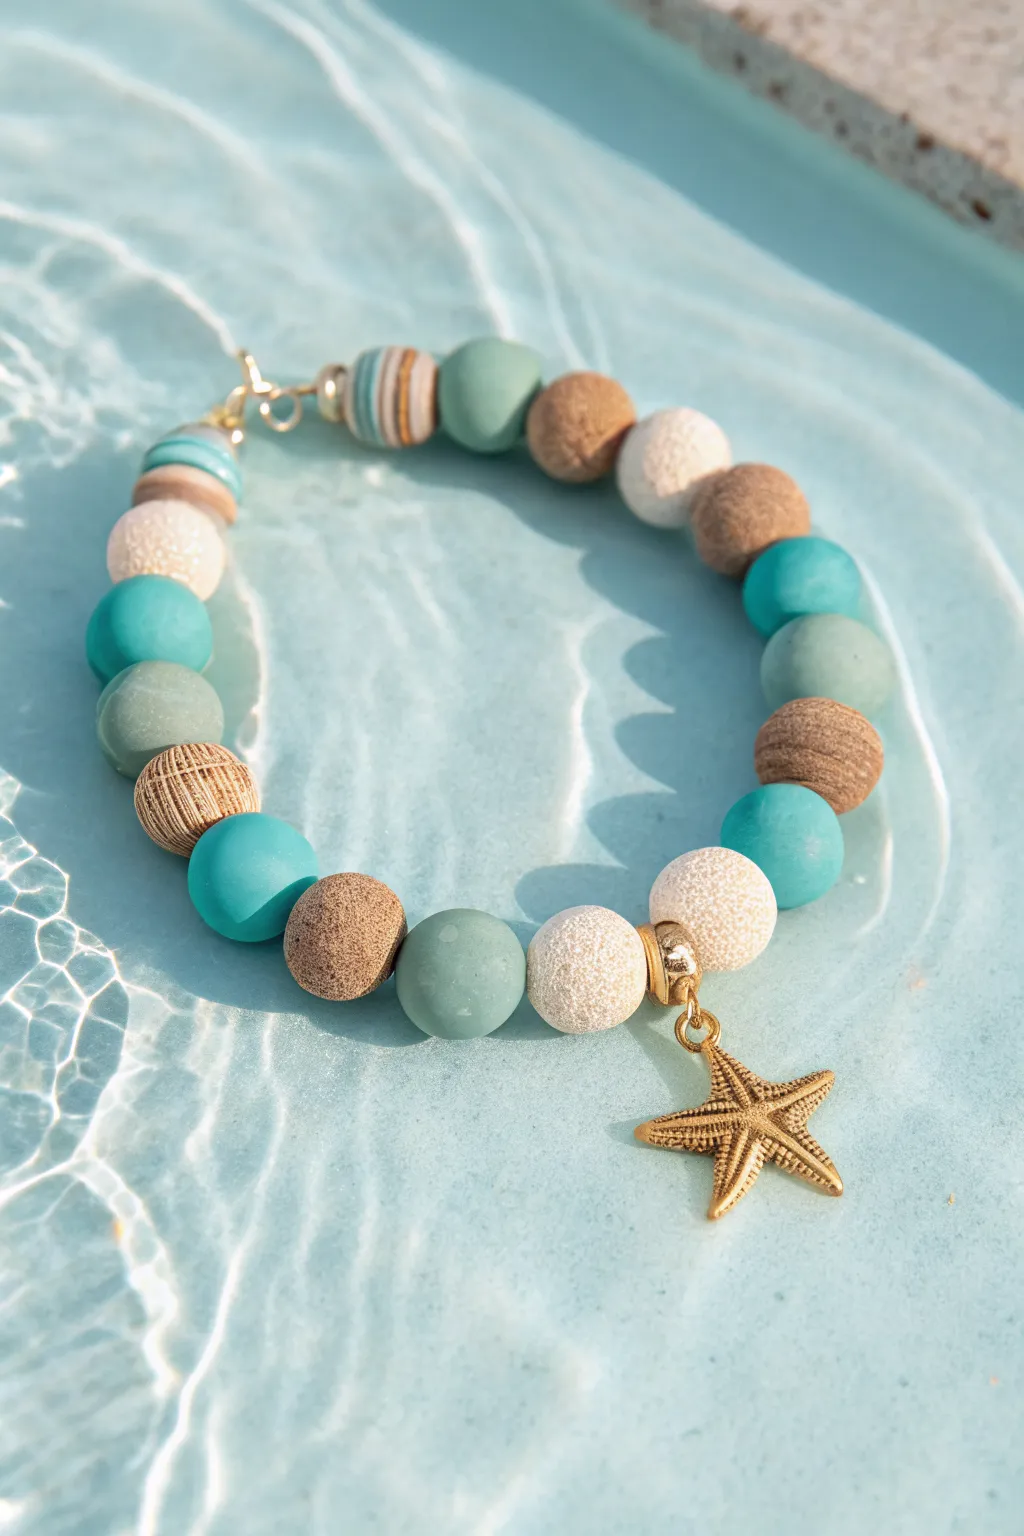
Capture the essence of a tranquil day at the shore with this breezy, matte-finish bracelet. Featuring a mix of polymer clay rounds, textured accent beads, and a striking gold starfish charm, this piece brings beach vibes to any outfit.
Step-by-Step
Materials
- Matte polymer clay round beads (10mm – 12mm) in teal, sage green, and light mint
- Textured white lava stone or stardust beads (10mm)
- Wood-grain texture resin or polymer clay beads (10mm)
- Small gold spacer beads or heishi beads
- Gold starfish charm
- Gold tone bail bead or charm hanger
- Gold jump ring (5mm or 6mm)
- Elastic beading cord (0.8mm or 1mm clear)
- Jewelry adhesive (e.g., G-S Hypo Cement)
- Scissors
Step 1: Planning and Layout
-
Measure your wrist:
Wrap a piece of string or measuring tape around your wrist to determine the desired length. Add about half an inch to this measurement to account for the bulkiness of the larger beads. -
Cut the cord:
Cut a piece of elastic cord about 10-12 inches long. This extra length makes tying the finishing knot much easier than struggling with short ends. -
Pre-stretch the elastic:
Hold the cord firmly at both ends and give it several gentle tugs. Pre-stretching prevents the bracelet from sagging or loosening shortly after you wear it. -
Secure the end:
Place a piece of tape or a bead stopper clip on one end of the elastic cord to prevent your carefully chosen beads from sliding off while you work. -
Design your pattern:
Lay out your beads on a bead board or a towel to visualize the sequence. Aim for an organic mix rather than a strict pattern; alternate between the sage, teal, and wood-grain beads to balance the colors.
Step 2: Stringing the Beads
-
Start the sequence:
Begin stringing your beads, following the layout you created. I usually like to start near where the focal point will be, but keep the charm for the middle. -
Add texture variation:
Intersperse the smooth matte clay beads with the textured white lava beads and the wood-grain beads. This contrast mimics the variety of textures found in sand and driftwood. -
Insert the centerpiece:
Once you have strung approximately half of your beads, slide on the gold bail bead. This hanger will hold your starfish charm securely in place. -
Complete the stringing:
Continue adding the remaining beads until the strand reaches your desired length. Check the fit by wrapping it around your wrist; the ends should touch comfortably without gaps.
Sticky Situation
If the knot won’t fit inside a bead hole, use a bead reamer or a thick needle to gently widen the opening of one bead before stringing. Do this carefully to avoid cracking the clay.
Step 3: Attaching the Charm
-
Open the jump ring:
Using two pairs of pliers (or your fingers if the metal is soft enough), gently twist the gold jump ring open sideways—never pull it apart outwards, as this weakens the metal. -
Connect the starfish:
Loop the open jump ring through the hole at the top of the starfish charm and then through the loop of the gold bail bead you already strung. -
Close the ring:
Twist the jump ring back into a closed position, ensuring the ends meet perfectly flush so the charm doesn’t slip off.
Scent of the Sea
Since you are using porous white lava beads, add a drop of essential oil like coconut or sea salt breeze to them. Your bracelet will act as a diffuser and smell like the beach all day!
Step 4: Finishing Touches
-
Tie the first knot:
Remove the tape or clip from the end of the cord. Bring the two ends together and tie a single overhand knot, pulling it tight against the beads. -
Secure with a surgeon’s knot:
For the main security, tie a surgeon’s knot. Make a loop like a standard knot, but pass the tail end through the loop twice instead of once before pulling tight. -
Apply adhesive:
Dab a tiny drop of jewelry adhesive directly onto the knot. Be careful not to get glue on the beads themselves, as it can spoil the matte finish. -
Hide the knot:
While the glue is still slightly tacky, gently pull the elastic so the knot slides inside the hole of the nearest large bead. This hides the mechanics for a professional look. -
Trim the excess:
Once the glue is fully dry, use sharp scissors to trim the excess elastic cord as close to the bead hole as possible without nicking the knot itself.
Enjoy wearing your new handcrafted accessory near the water or whenever you need a reminder of sunny days
Wave Pattern Color Blocking
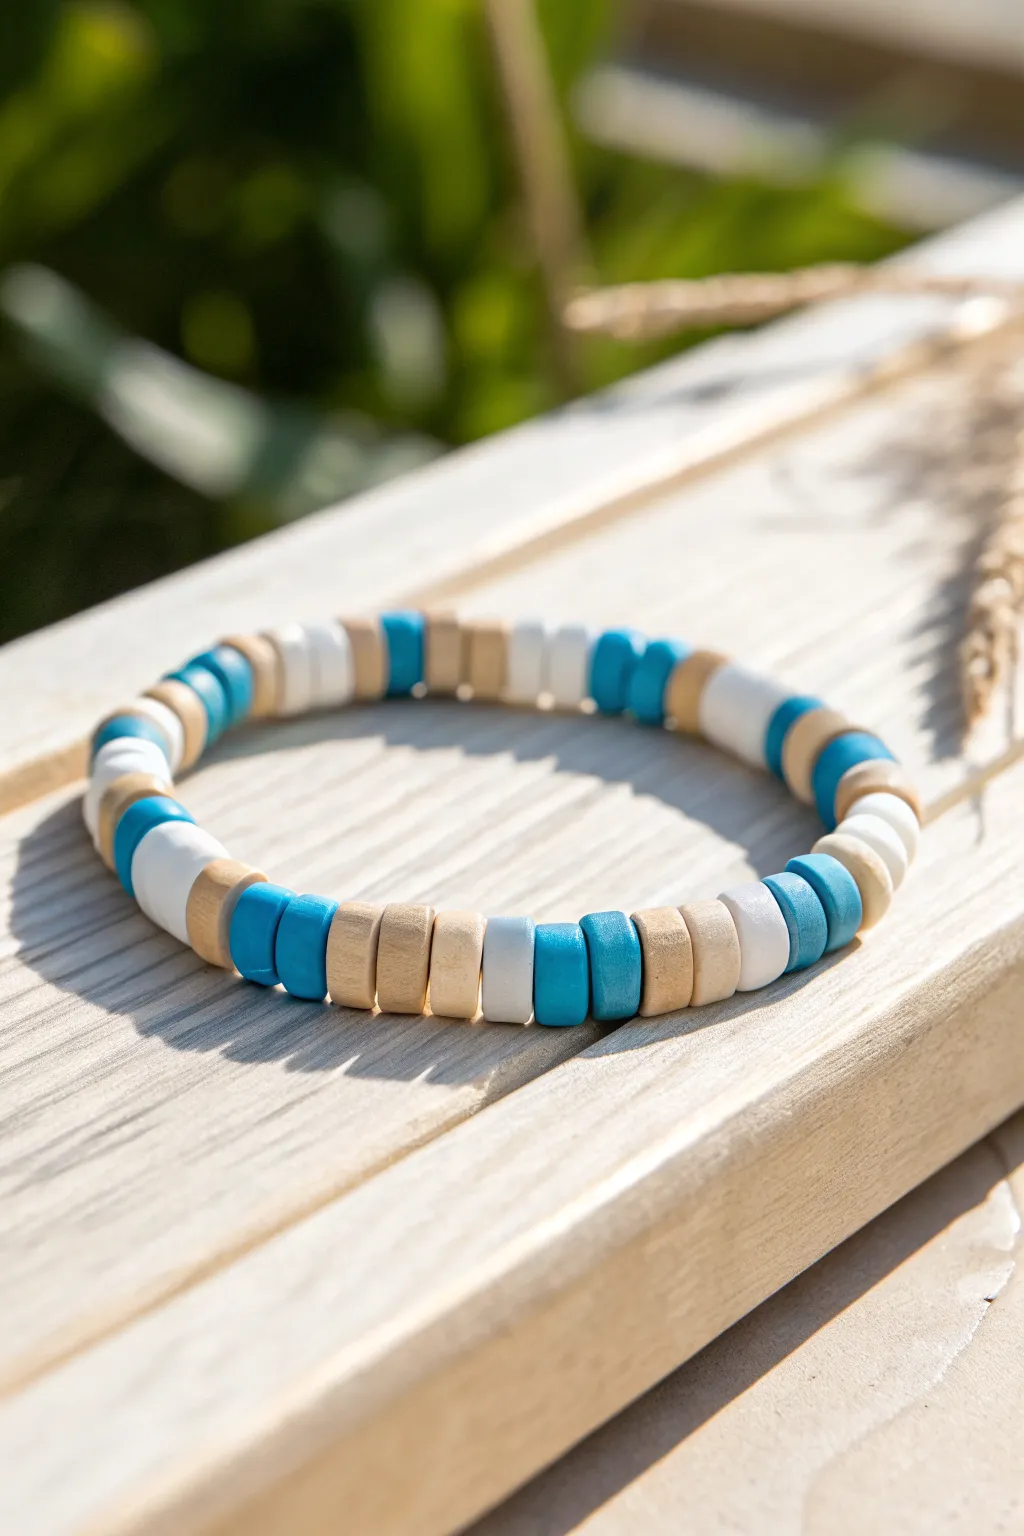
Capture the essence of a day at the shore with this relaxed heishi bead bracelet. Featuring a soothing palette of ocean blue, sandy beige, and crisp white, the irregular color blocking mimics the rhythm of crashing waves against the sand.
Step-by-Step Tutorial
Materials
- 6mm polymer clay heishi disc beads (Teal/Ocean Blue)
- 6mm polymer clay heishi disc beads (White)
- 6mm wooden disc beads or light beige clay beads
- 0.8mm clear elastic stretch cord
- Jewelry glue or clear nail polish
- Scissors
- Bead stopper or tape
- Ruler or measuring tape
Step 1: Preparation
-
Measure your wrist:
Wrap a measuring tape loosely around your wrist to determine the desired length. For an average adult size, aim for about 7 inches to ensure a comfortable fit. -
Cut the cord:
Cut a piece of elastic cord roughly 10-11 inches long. Having this extra length makes tying the final knot significantly easier and less frustrating. -
Stretch the elastic:
Hold both ends of the cord and give it a few gentle tugs. Pre-stretching like this prevents the bracelet from loosening up and sagging after you’ve worn it a few times. -
Secure the end:
Place a bead stopper on one end of the cord. If you don’t have one, a simple piece of tape folded over the end works perfectly to keep beads from sliding off.
Keep it Taut
When tying your final knots, keep tension on the cord so the beads sit flush. Gaps show the clear elastic and ruin the clean, solid look of the heishi stack.
Step 2: Beading the Pattern
-
Understand the pattern:
This design relies on ‘color blocking,’ which means grouping several beads of the same color together rather than alternating one-by-one. The blocks are irregular, creating an organic look. -
Start with wood tones:
Begin threading your beads with a small block of the wooden or beige beads. Thread about 3 to 4 of these discs onto the cord. -
Add a blue block:
Follow the wood tones with a contrasting block of ocean blue beads. You can use 2 or 3 beads here for a shorter pop of color. -
Introduce white:
Thread on a section of white clay beads. Vary the length slightly—maybe use 4 beads here to create a larger ‘whitecap’ wave effect. -
Repeat freely:
Continue this sequence: wood/tan, blue, white. However, I like to mix up the numbers in each block (e.g., 2 blue, then 5 wood, then 3 white) so the pattern feels natural and flowing, not rigid. -
Check the length:
periodically wrap the beaded section around your wrist. Stop adding beads when the ends touch comfortably without squeezing your skin.
Add a Charm
Slide a small gold starfish or seashell charm onto the cord between two color blocks to amplify the summer beach theme.
Step 3: Finishing Touches
-
Prepare for the knot:
Carefully remove the bead stopper or tape while holding the ends of the cord securely so no beads escape. -
Tie the first knot:
Bring the two ends together and tie a simple overhand knot. Pull it tight, ensuring there are no gaps between the beads. -
Secure with a surgeon’s knot:
Tie a second knot, but loop the end through twice before pulling tight. This is a surgeon’s knot and is much less likely to slip on elastic cord. -
Apply adhesive:
Dab a tiny drop of jewelry glue or clear nail polish directly onto the knot. This seals the elastic and ensures longevity. -
Hide the knot:
While the glue is still tacky, gently slide an adjacent bead over the knot to hide it inside the hole. This creates a seamless, professional finish. -
Trim the excess:
Once the glue is fully dry, use your scissors to snip off the excess cord ends as close to the bead as possible without cutting the knot.
Now you have a stylish, coastal-inspired accessory ready for your next beach trip


What Really Happens Inside the Kiln
Learn how time and temperature work together inside the kiln to transform clay into durable ceramic.
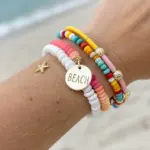
Beach Word Bracelet With Letter Beads
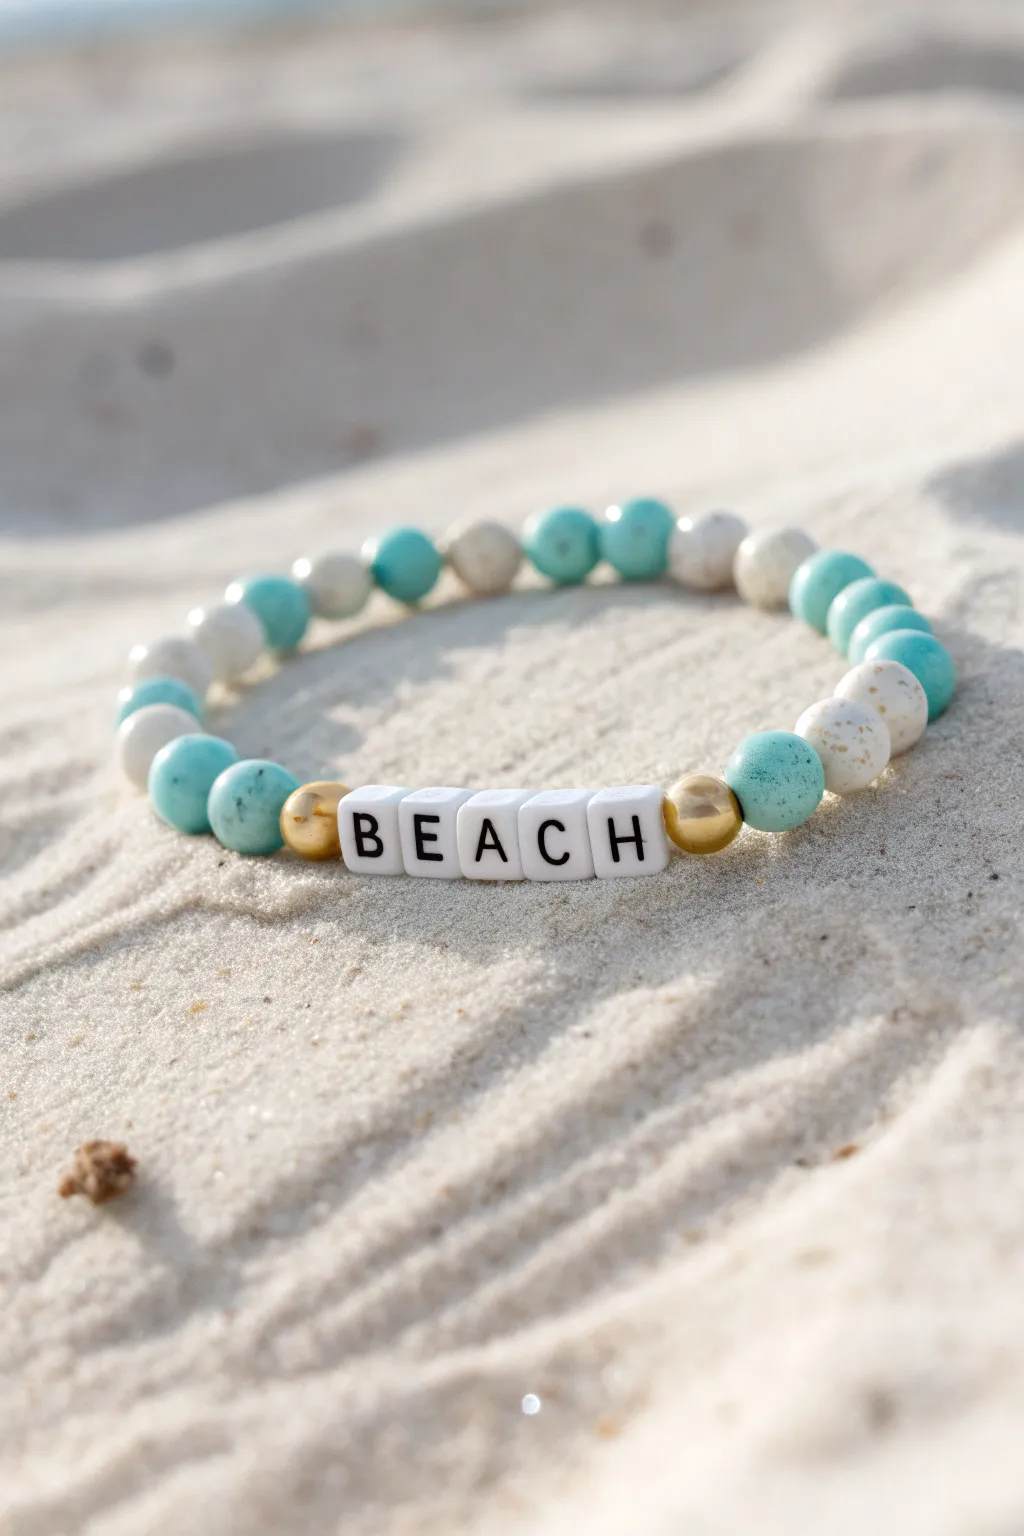
Capture the essence of a relaxing day by the ocean with this beach-themed strand. Combining cool turquoise tones, speckled white stones, and gold accents, this bracelet is a stylish reminder of sunny days and salty air.
Step-by-Step
Materials
- Elastic stretch cord (0.7mm or 0.8mm)
- Round turquoise or dyed magnesite beads (8mm)
- Round white howlite or speckled ceramic beads (8mm)
- Square white letter beads (black text) spelling B-E-A-C-H
- 2 Round gold accent spacer beads (6mm or 8mm)
- Scissors
- Jewelry glue or clear nail polish
- Bead stopper or decorative clip/tape
Step 1: Planning and Preparation
-
Measure your wrist:
Before cutting any cord, wrap a measuring tape loosely around your wrist to find your size. Add about 3-4 inches to this measurement to ensure you have plenty of slack for tying the final knot. -
Cut the cord:
Snip your elastic cord to length. I always like to pre-stretch the elastic slightly by giving it a few gentle tugs; this prevents the bracelet from stretching out permanently after the first wear. -
Secure the end:
Attach a bead stopper, a piece of tape, or a binder clip to one end of the cord. This crucial step stops your beads from sliding right off while you work.
Knot Slipping?
If your elastic knot feels loose, try a drop of GS Hypo Cement. It has a precision tip perfect for beads. Let it dry for 24 hours before wearing.
Step 2: Stringing the Design
-
Start the pattern:
Begin threading your beads from the back of the bracelet to keep the knot hidden later. Start with a pattern of alternating turquoise and white beads. -
Build the first half:
Thread approximately 7-9 round beads, alternating colors. In the reference image, the pattern isn’t strictly 1-to-1, but rather groups of colors, so feel free to group two turquoise beads together followed by a white one for an organic look. -
Add a gold accent:
Slide on your first gold round spacer bead. This will frame the word and add a touch of luxe shine. -
Spell it out:
Thread your letter beads in order: B, E, A, C, H. Double-check the orientation to make sure they are facing the correct way and not upside down relative to your pattern. -
Frame the word:
Add the second gold round spacer bead immediately after the letter ‘H’ to balance the design. -
Finish the strand:
Continue threading your round beads on the other side. Try to mirror the general color balance of the first side, using turquoise and white speckled beads until the strand reaches your desired length. -
Test the fit:
Carefully bring the two ends together and wrap the strand around your wrist. It should sit comfortably without pinching your skin or dropping too low on your hand.
Step 3: Finishing Touches
-
Prepare to knot:
Remove the bead stopper while firmly gripping both ends of the elastic cord. -
Tie the knot:
Tie a surgeon’s knot. This is done by crossing the right strand over the left, wrapping it twice, and pulling tight. Then cross left over right and pull tight again. -
Secure with glue:
Apply a tiny dot of jewelry glue or clear nail polish directly onto the knot. This seals the elastic and prevents it from slipping undone over time. -
Hide the knot:
Once the glue is tacky but not fully set, gently pull the cord so the knot slides inside the hole of the nearest large bead (preferably one of the gold spacers or a round stone). -
Trim the excess:
Using your sharp scissors, trim the remaining tails of the elastic cord close to the bead hole, being careful not to nick the main structural cord.
Add Some Texture
Swap the smooth round gold beads for gold lava rock or faceted hematite spacers to add distinct texture and extra sparkle to your layout.
Enjoy wearing your custom piece of the coast wherever you go
Surfboard Stripe Bracelet Colors
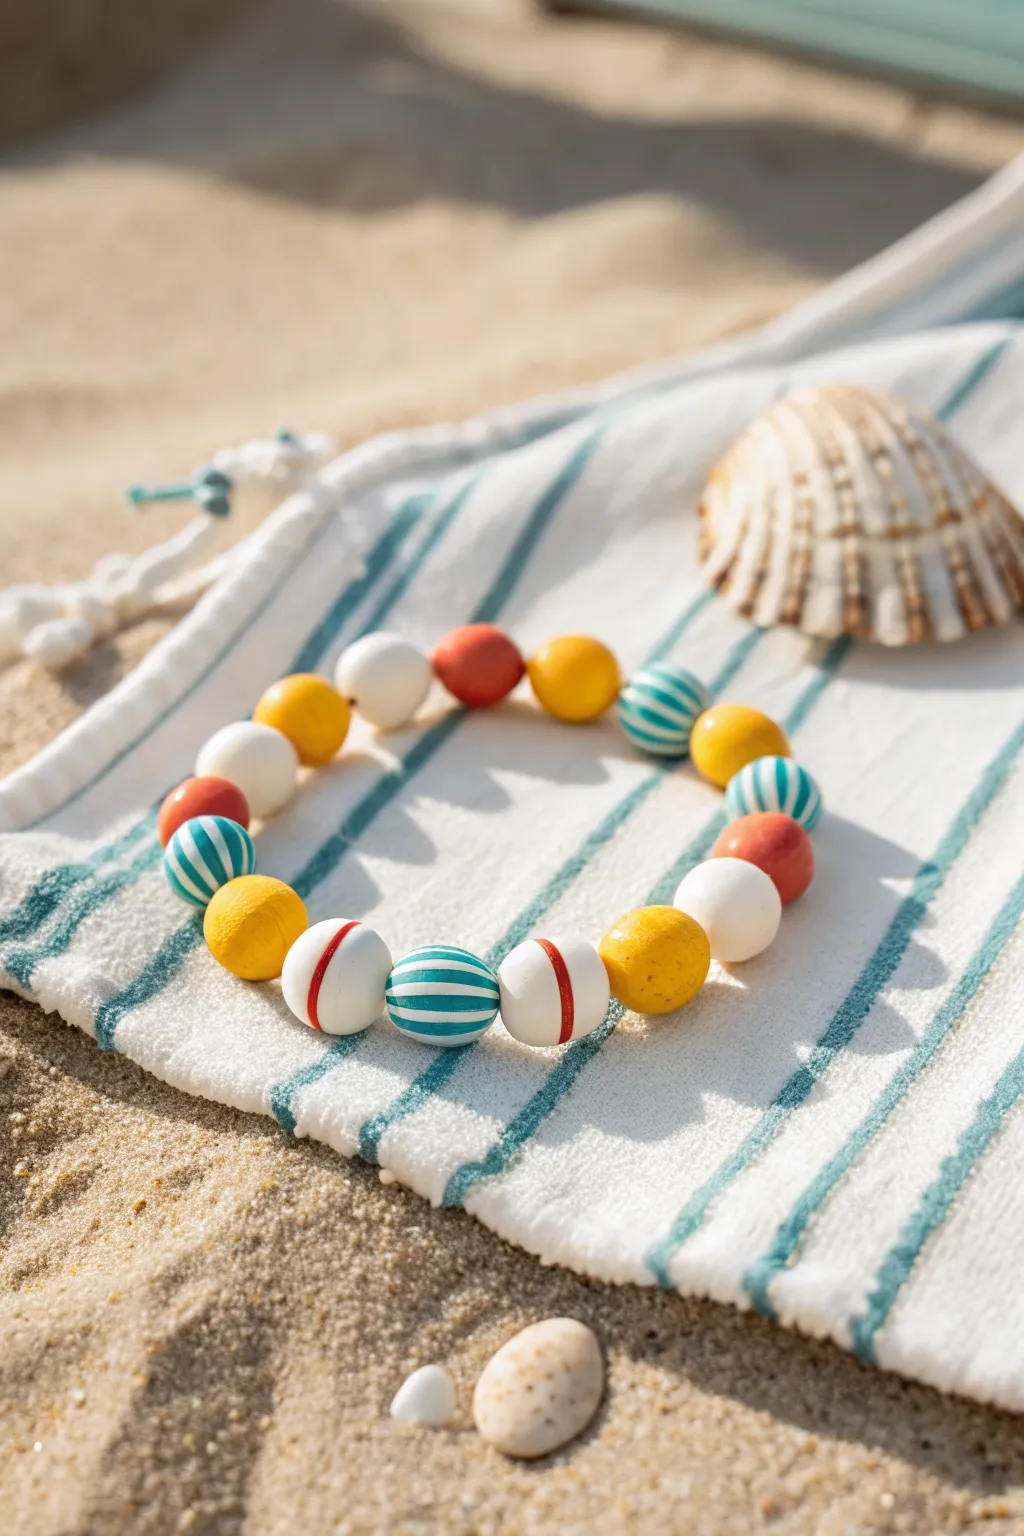
Capture the essence of a vintage summer holiday with this playful, striped bead bracelet. Featuring a cheerful mix of sunny yellow, crisp white, and ocean teal stripes, this accessory perfectly mimics the look of retro wooden beads and classic surfboard designs.
How-To Guide
Materials
- Polymer clay (Yellow, White, Teal/Turquoise, Red/Terracotta)
- Bead rolling tool or flat acrylic sheet
- Pin tool or toothpick
- Elastic jewelry cord (0.8mm or 1mm)
- Super glue or jewelry cement
- Oven for baking
- Baking sheet with parchment paper
- Optional: Clay gloss varnish
Step 1: Creating the Solid Beads
-
Prepare the Clay:
Begin by conditioning the yellow, white, red, and teal polymer clays separately. Knead them in your hands until they are soft, pliable, and free of cracks. -
Portion the Beads:
Roll each color into a long snake of even thickness. Cut equal-sized segments from the yellow, white, and red snakes to ensure your finished beads are uniform in size. -
Roll the Spheres:
Take each cut segment and roll it between your palms to create perfectly smooth spheres. You will need a good number of solid yellow and white beads, plus a few accent red ones. -
Pierce the Holes:
Using a pin tool or toothpick, carefully pierce a hole through the center of each sphere. Rotate the bead slightly as you push through to keep the shape round.
Step 2: Crafting the Striped Beads
-
Make the Teal and White Striped Beads:
Roll a sphere of teal clay. Roll a very thin snake of white clay. Wrap the thin white snake around the teal bead horizontally to create stripes. -
Smooth the Stripes:
Gently roll the striped bead between your palms again. This will embed the white clay flush into the teal surface, creating a smooth, integrated pattern rather than a raised texture. -
Create the White and Red Striped Beads:
Form a white sphere. Roll a thin snake of red clay. Wrap a single red strip around the vertical center (like an equator) of the white bead. -
Finish the Pattern:
Just like before, gently roll this bead to flatten the red stripe into the white surface until it looks like a painted wooden buoy. -
Piercing Striped Beads:
I find it helpful to re-check the shape before chilling. Pierce these patterned beads carefully, ensuring the hole goes through the axis that displays the stripes best.
Stripes Smearing?
If your stripes smear while rolling, chill the clay in the fridge for 10 minutes before slicing or rolling. This firms it up and keeps lines crisp.
Step 3: Baking and Assembly
-
Bake the Beads:
Arrange all your beads on a parchment-lined baking sheet. Bake according to your clay manufacturer’s instructions (usually 275°F/130°C for 15-30 minutes). -
Cool and Seal:
Let the beads cool completely. If you want a shiny, wet-look finish like the photo, apply a coat of gloss varnish and let it dry. -
Layout the Design:
Arrange your beads on a bead board or towel to plan the pattern. The image uses a random-but-balanced mix: groupings of solid yellows, interspersed with the special striped beads and white spacers. -
String the Bracelet:
Cut a piece of elastic cord about 10 inches long. Pre-stretch it by pulling it firmly a few times to prevent sagging later. Thread your beads onto the cord in your chosen pattern. -
Check the Fit:
Wrap the strung beads around your wrist to check the size. Add or remove beads as necessary for a comfortable fit. -
Tie the Knot:
Secure the bracelet with a surgeon’s knot (right over left, left over right, iterate twice). Pull the knot tight. -
Secure and Trim:
Place a tiny drop of super glue on the knot. Allow it to dry fully, then trim the excess cord ends close to the knot. Hide the knot inside a neighboring bead hole if possible.
Go Retro Matte
Skip the gloss varnish and lightly sand the baked beads with fine-grit sandpaper for a weathered, driftwood-style beach texture.
Enjoy wearing your vibrant surfboard-inspired bracelet on your next trip to the sandy shores

TRACK YOUR CERAMIC JOURNEY
Capture glaze tests, firing details, and creative progress—all in one simple printable. Make your projects easier to repeat and improve.
Sea Glass Greens And Aquas
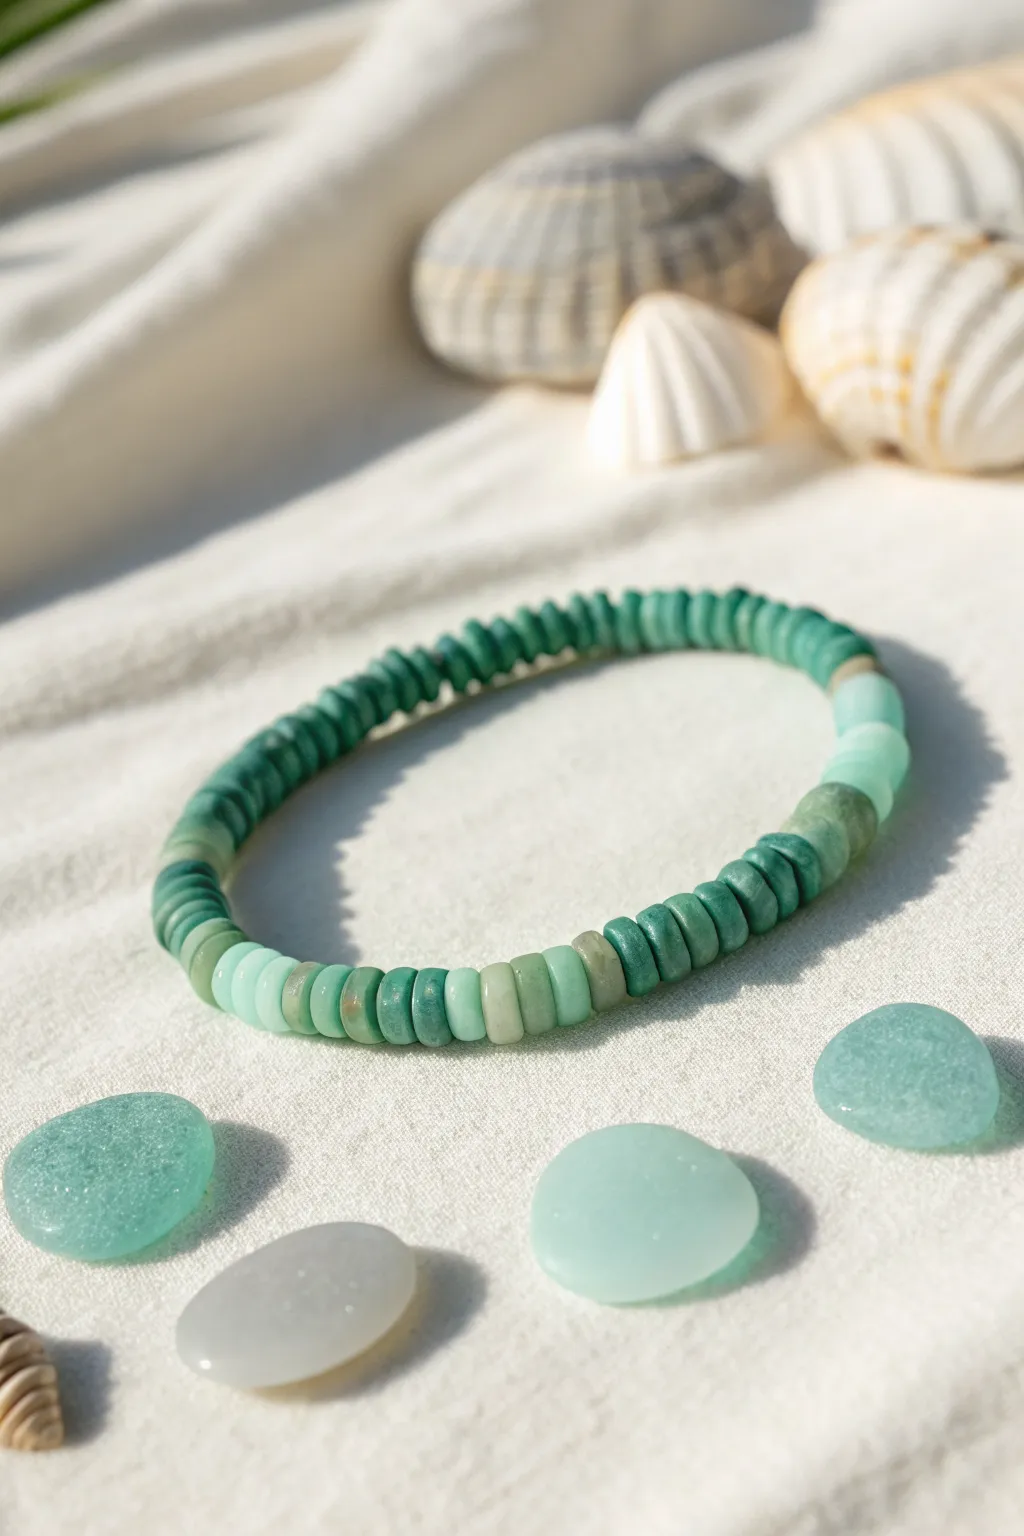
Capture the soothing essence of the tide with this simple yet stunning heishi bead bracelet. Featuring a relaxed gradient of dark teals, soft mints, and sea glass greens, this accessory brings a piece of the beach to your everyday style.
Step-by-Step
Materials
- 6mm flat heishi polymer clay beads (dark teal, medium turquoise, mint green, pale aqua)
- 6mm flat heishi polymer clay beads (sand/taupe/light brown for accents)
- 0.8mm clear elastic stretch cord
- Jewelry glue or clear nail polish
- Scissors
- Bead stopper or masking tape
- Ruler
Step 1: Planning Your Palette
-
Measure and Cut:
Cut a piece of elastic cord about 10-12 inches long. This generous length gives you plenty of room to tie knots later without struggling. -
Secure the End:
Attach a bead stopper to one end of your cord. If you don’t have one, a piece of masking tape folded over the end works perfectly to keep beads from sliding off. -
Sort Your Shades:
Lay out your heishi beads on a work surface or bead board. Separate them by color: dark teal, medium turquoise, soft mint, and the neutral sand accents. -
Visualize the Gradient:
This design relies on ‘color blocking’ rather than a standard pattern. Group your beads into piles to decide how long each color section will be. Aim for an organic, non-uniform look.
Step 2: Stringing the Beads
-
Start with Darkness:
Begin by stringing a substantial section of the darkest teal beads. Thread on about 1.5 to 2 inches of this solid color. -
First Transition:
To soften the transition, add just one or two beads of the medium turquoise, then switch back to a few dark teal beads, before fully committing to the next color block. -
Medium Turquoise Block:
String a section of the medium turquoise beads. Make this section slightly shorter than the first, perhaps around 1 inch. -
Adding Neutrals:
Insert a single sand or taupe bead here. This acts as a natural ‘pebble’ accent that breaks up the blues and greens. -
Minty Fresh:
Proceed with the mint green beads. String about an inch of this lighter, fresher shade. -
The Lightest Shade:
Transition into your palest aqua or sea glass color. String a section of these lighter beads. -
Create a Focal Mix:
About halfway through the bracelet, I like to create a mixed section. Alternate between mint, pale aqua, and a couple of sand beads randomly for about half an inch to mimic the chaotic beauty of sea glass on sand. -
Reverse the Gradient:
Begin working your way back to the darker colors. Add a section of mint, followed by the medium turquoise. -
Check the Length:
Wrap the strand around your wrist to check the fit. A standard bracelet is about 7 inches. If it’s too short, continue adding dark teal beads to the end until it meets the start comfortably.
Smooth Moves
To thread these flat disc beads faster, stack 4-5 beads on your finger or needle tip first, then push the elastic through all of them at once.
Step 3: Finishing Touches
-
Pre-stretch the Cord:
Before tying, gently pull on both ends of the elastic cord several times. This ‘pre-stretching’ prevents the bracelet from sagging or loosening after the first time you wear it. -
Tie the Knot:
Remove the bead stopper and bring the ends together. Tie a standard surgeon’s knot (right over left, left over right, looping the top strand through twice on the second pass). -
Secure with Glue:
Apply a tiny dot of jewelry glue or clear nail polish directly onto the knot. This ensures it stays fused and secure. -
Hide the Knot:
While the glue is still slightly tacky but not wet, slide a bead hole over the knot to hide it inside, if the hole is large enough. Otherwise, trim the excess cord close to the knot once fully dry.
Ocean Accents
Incorporate a real tiny sea shell or a freshwater pearl in the ‘mixed’ section for an authentic touch of beachcomber texture.
Now slip on your new accessory and enjoy that calm, beachy vibe wherever you go.
Pearl-Inspired Coastal Combo
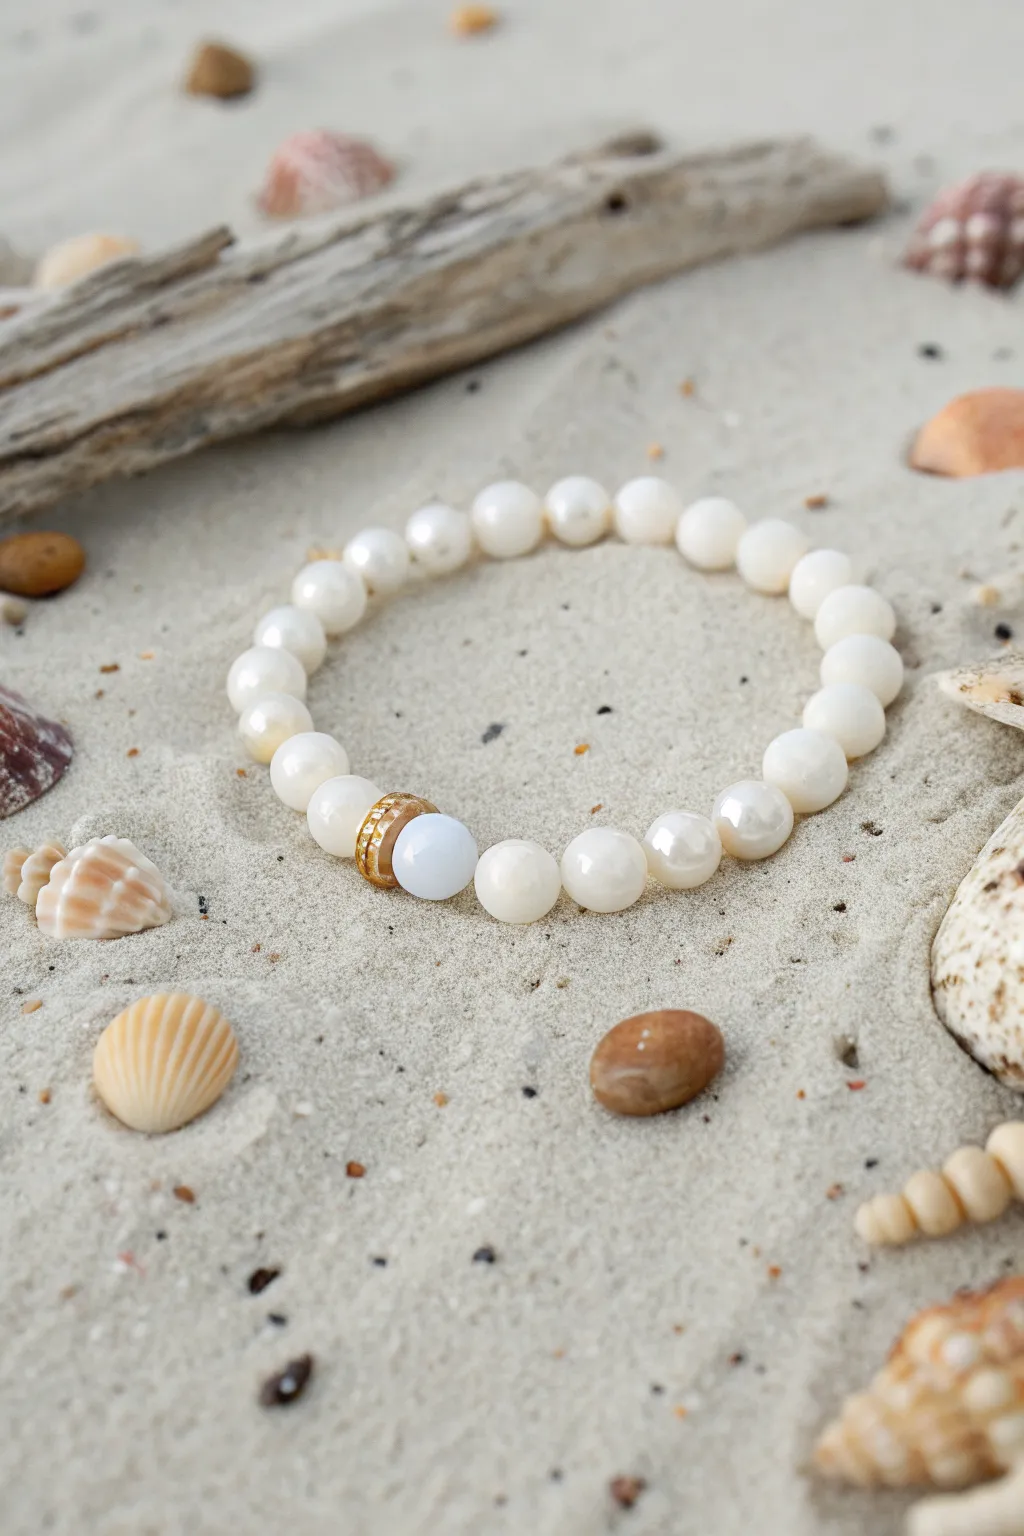
Capture the elegance of the shore with this sophisticated yet simple beaded bracelet. Featuring lustrous white pearls and a singular accent of sea-glass blue, this piece brings a touch of beachside luxury to any summer outfit.
How-To Guide
Materials
- White pearl beads (approx. 8mm, faux or freshwater)
- One light blue jade or agate round bead (8mm)
- One gold rhinestone rondelle spacer bead (approx. 6mm or 8mm)
- Elastic beading cord (0.8mm clear)
- Beading needle (collapsible eye)
- Jewelry glue or clear nail polish
- Scissors
Step 1: Preparation
-
Measure your wrist:
Wrap a flexible measuring tape around your wrist to determine your size. Add about half an inch to this measurement to ensure the bracelet fits comfortably without being too tight. -
Cut the cord:
Cut a piece of elastic cord roughly 10 to 12 inches long. Having this extra length makes tying the final knots much easier than struggling with short ends. -
Pre-stretch the elastic:
Hold both ends of your cut cord and give it a few firm tugs. Pre-stretching prevents the bracelet from drooping or becoming loose shortly after you wear it. -
Secure the end:
Attach a bead stopper or simply place a piece of tape on one end of the cord to stop beads from sliding off while you work.
Knot Slipping Out?
If the knot won’t stay inside the pearl, enlarge the bead hole gently with a bead reamer tool, or simply hide the knot inside the larger gold spacer bead instead.
Step 2: Beading the Design
-
Plan your layout:
Usually, a standard adult bracelet takes about 20-22 beads of this 8mm size. Lay them out on a bead board or towel first to check the length against your wrist measurement. -
Thread the needle:
Insert the non-taped end of your elastic cord into a collapsible eye needle. This tool is a lifesaver for getting thick elastic through bead holes easily. -
Start with pearls:
Begin stringing your white pearl beads. Add approximately half of your total white beads to the cord. -
Add the focal section:
Slide on the gold rhinestone rondelle spacer bead. This will add that touch of sparkle right next to the feature bead. -
Place the blue accent:
Thread the single light blue bead next. The contrast between the gold spacer and the soft blue creates the signature coastal look. -
Finish the strand:
String the remaining half of your white pearl beads. I prefer to double-check the length around my wrist one last time here before committing to the knot.
Step 3: Finishing Touches
-
Remove the needle:
Carefully take the needle off the cord. Remove the tape or bead stopper from the other end, holding both ends securely. -
Tie a surgeon’s knot:
Cross the ends, wrap one end around the other twice, and pull tight. This extra loop provides significantly more friction than a standard granny knot. -
Tighten the knot:
Pull the cords firmly to cinch the beads together, ensuring there are no gaps between the pearls, but don’t pull so hard that the elastic snaps. -
Secure with glue:
Dab a tiny drop of jewelry glue or clear nail polish directly onto the knot. This seals the fibers and prevents it from unraveling over time. -
Hide the knot:
While the glue is still tacky but not wet, gently pull the cord so the knot slides inside the hole of the nearest pearl bead. -
Trim the excess:
Once the glue is fully dry, use sharp scissors to trim the excess cord ends as close to the bead hole as possible without cutting the knot itself.
Mix It Up
Swap the single blue bead for a real freshwater pearl or a piece of tumbled sea glass for an even more authentic beach-comber vibe.
Now you have a stunning piece of jewelry that carries the calm spirit of the ocean wherever you go
Tropical Fruit Slice Accents
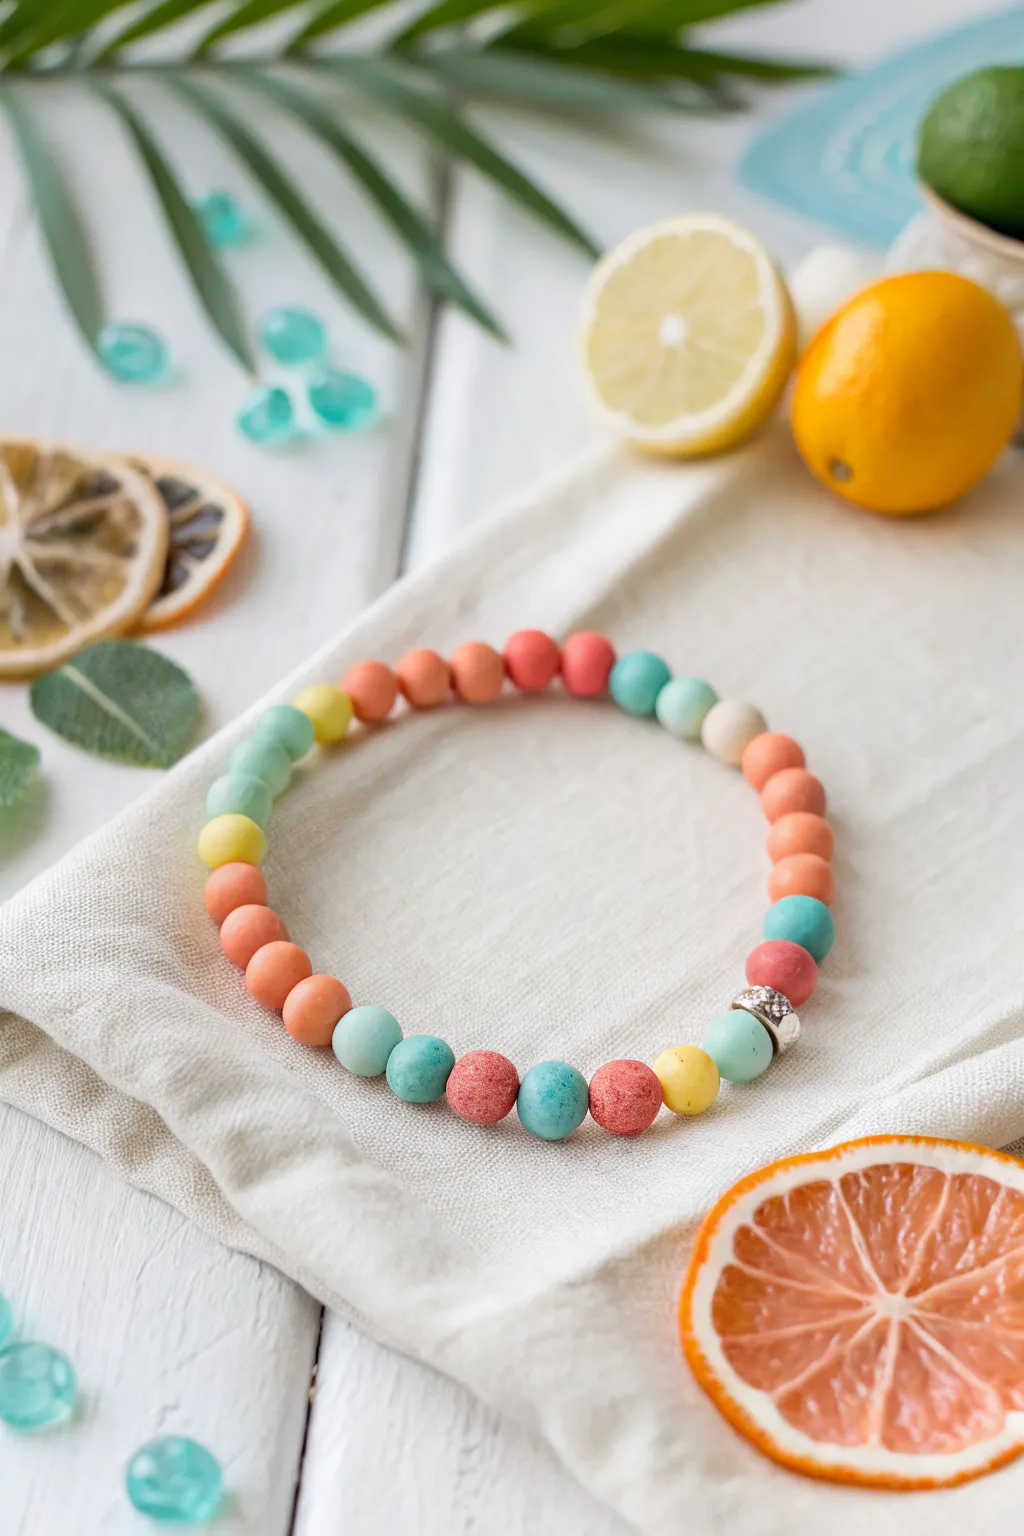
Capture the essence of a refreshing summer drink with this vibrant clay bead bracelet. Featuring a delightful mix of matte coral, teal, and yellow beads reminiscent of fruit slices, this accessory adds a juicy pop of color to any beach day outfit.
Detailed Instructions
Materials
- 10mm round matte porous beads (coral pink, teal blue, pale yellow, mint green, cream)
- Strong elastic jewelry cord (0.8mm or 1mm)
- One silver rondelle spacer bead (pave or rhinestone-encrusted)
- Jewelry glue or clear nail polish
- Scissors
- Tape or bead stopper
- Beading board or measuring tape
Step 1: Color Planning & Preparation
-
Clear your workspace:
Set up on a clean, flat surface. Using a beading board or a soft cloth, like the linen napkin in the photo, prevents your round beads from rolling away. -
Cut the cord:
Measure your wrist and add about 3-4 inches to that length. Cut a piece of elastic cord accordingly to give yourself plenty of room for tying knots later. -
Pre-stretch the elastic:
Hold the ends of your cut cord and give it a few firm tugs. This pre-stretching step is crucial because it prevents the bracelet from sagging or loosening after the first time you wear it. -
Secure the end:
Place a piece of tape or a bead stopper on one end of the cord so beads don’t slide off while you are working. -
Establish your pattern:
Lay out your beads before stringing. The design shown uses irregular blocks of color rather than a strict alternating pattern. Try grouping 3 coral beads, then a mint, then a yellow to create an organic, playful look.
Step 2: Stringing the Design
-
Begin with color blocks:
Start stringing your beads. Follow the visual flow: a section of coral tones, transitioning into a single yellow or mint bead. -
Add the cool tones:
Introduce the teal and mint beads. Mixing a teal bead next to a textured coral one creates a vibrant, high-contrast ‘tropical fruit’ effect. -
Insert neutral breaks:
Use the cream or pale beige beads sparingly to break up the bright colors, giving the eye a place to rest. -
Place the feature bead:
Add the silver rhinestone spacer bead. This acts as a focal point. I usually place this between a coral bead and a teal bead to make the metal really shine against the matte textures. -
Continue the organic pattern:
Keep stringing until you reach your desired length. Don’t worry about symmetry; the charm of this piece comes from its random, fruit-salad style arrangement. -
Check the fit:
Wrap the strung beads around your wrist to check the size. Ideally, the beads should touch comfortably without gaps, but not feel tight.
Knot Slipping?
If your elastic knot keeps slipping undone before you can glue it, ask a friend to hold his finger on the first knot while you tie the second one. It’s a lifesaver.
Step 3: Finishing Touches
-
Prepare to knot:
Remove the tape or bead stopper carefully, holding both ends of the elastic firmly. -
Tie the first knot:
Cross the ends and tie a simple overhand knot. Pull it tight, bringing the beads together so there is no slack in the cord. -
Secure with a surgeon’s knot:
For the second knot, make a loop but wrap the cord through twice instead of once before pulling tight. This extra friction helps hold the elastic securely. -
Add adhesive:
Apply a tiny dab of jewelry glue or clear nail polish directly onto the knot. This seals the elastic and prevents it from untying over time. -
Hide the knot:
While the glue is still slightly tacky, gently pull the cord so the knot slides inside the hole of the nearest large bead. -
Trim the excess:
Once the glue is fully dry (wait about 5-10 minutes), carefully trim away the excess cord ends with your scissors, getting as close to the bead hole as possible without cutting the knot.
Scent Infusion
Use porous lava stone or unfinished wood beads for a few of the accents. You can then add a drop of lemon or orange essential oil to them for a mood-boosting scent.
Enjoy the tropical vibes of your new accessory every time you glance at your wrist
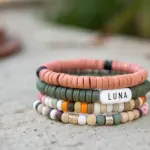
Palm Leaf Green Pop Bracelet
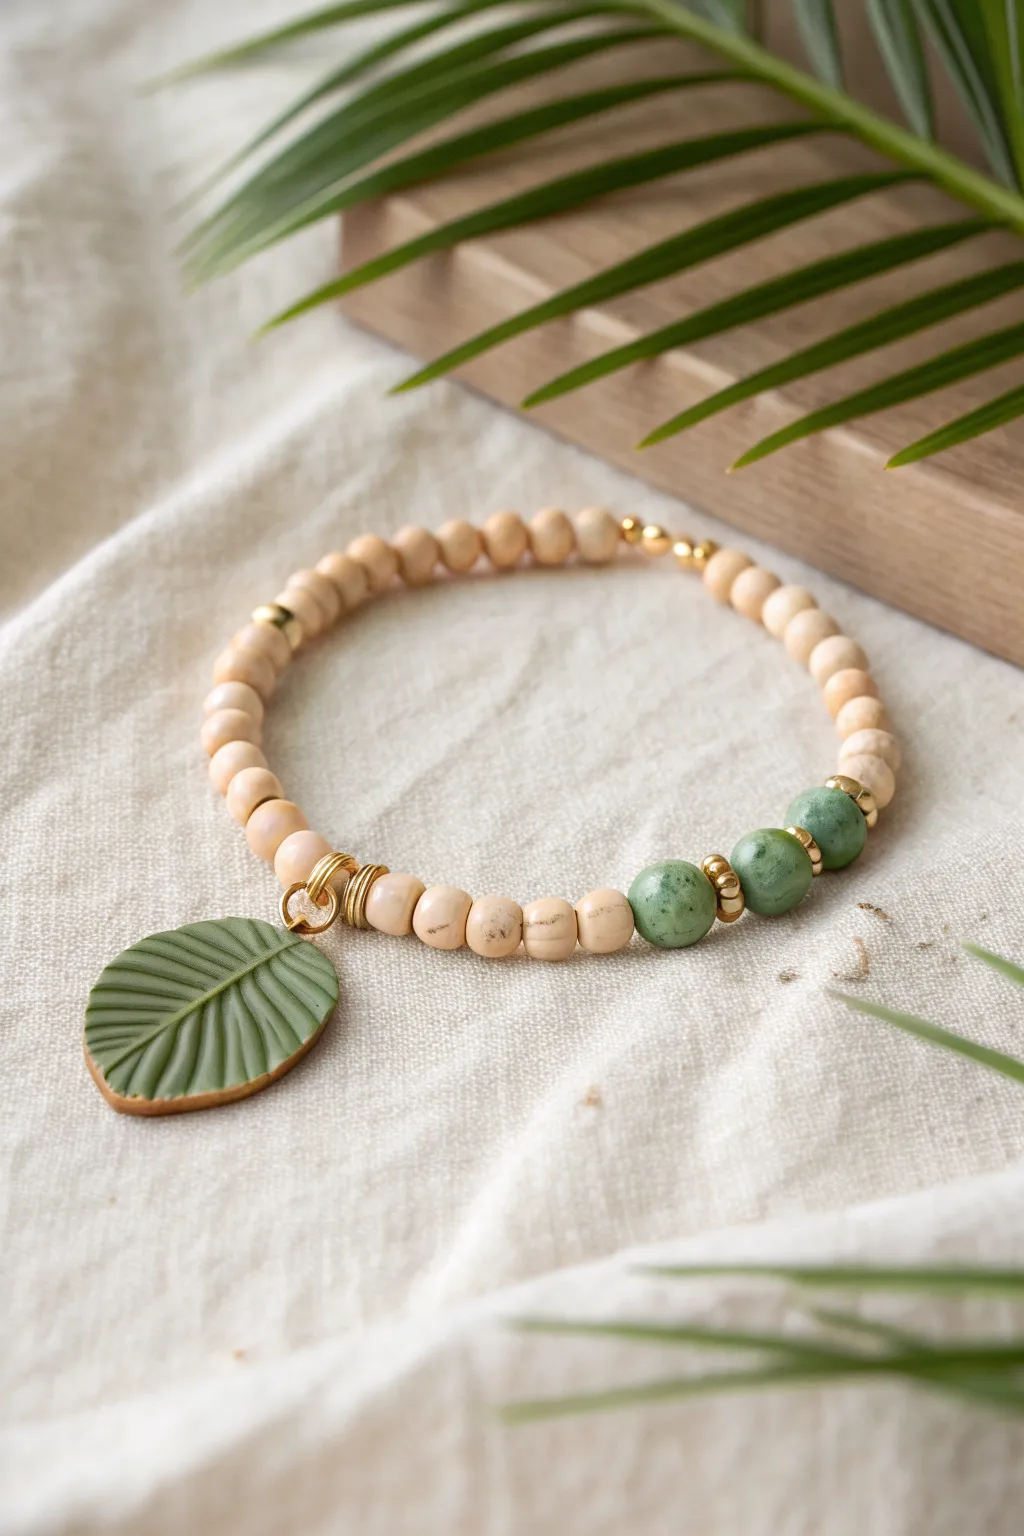
Capture the essence of a tranquil palm grove with this nature-inspired bracelet featuring a handmade clay leaf charm. The combination of natural wood tones, sage green accents, and subtle gold hardware creates a sophisticated yet earthy accessory perfect for beach days.
Step-by-Step Tutorial
Materials
- Polymer clay (sage green and light beige/sand)
- Light beige wooden round beads (approx. 6mm)
- Three sage green round stone or clay beads (approx. 8mm)
- Gold tone spacer beads (small rounds)
- Two gold tone jump rings (one large, one small)
- Elastic beading cord (0.8mm recommended)
- Jewelry glue
- Clay sculpting tool or needle tool
- Small circle cutter or craft knife
- Toaster oven (for baking clay)
- Sandpaper (fine grit)
- Gold acrylic paint and fine brush (optional for edge detail)
Step 1: Crafting the Leaf Charm
-
Condition the Clay:
Begin by taking a small amount of sage green polymer clay and kneading it in your hands until it becomes soft and pliable. -
Form the Base:
Roll the clay into a ball, then flatten it into a thick oval disc, roughly 2-3mm thick. -
Shape the Leaf:
Pinch one end of the oval to create a point and slightly flatten the other end to mimic the base of a tropical leaf. You can trim the edges with a craft knife for a cleaner silhouette. -
Create Texture:
Using a clay sculpting tool or the back of a knife, gently press a central line down the length of the leaf, stopping short of the edges. -
Add Veins:
Press angled lines radiating from the center line outward to the edges to create the ribbed texture of a palm leaf. -
Make the Hole:
Use a needle tool or toothpick to carefully pierce a hole at the top (wider end) of the leaf for the hardware. -
Bake the Charm:
Place the leaf on a baking sheet and bake according to your polymer clay manufacturer’s instructions, usually around 275°F (135°C) for 15-20 minutes. -
Finish the Edges:
Once cool, use a fine brush to apply a very thin line of gold paint or metallic wax along the rim of the leaf for a subtle glow.
Clay Texture Tip
Dust your clay tool with cornstarch before pressing the veins into the leaf. This prevents the tool from sticking and dragging the clay, ensuring crisp, clean lines.
Step 2: Assembling the Bracelet
-
Prepare the Cord:
Cut a length of elastic cord about 10 inches long. I always like to pre-stretch the elastic slightly by tugging on it a few times to prevent it from sagging later. -
Start Beading:
Thread on about 10–12 of the light beige wooden beads to start the foundation of the bracelet. -
Add Spacers and Accents:
Slide on a gold spacer bead, followed by one of the larger green accent beads, then another spacer. -
Center Section:
Thread the second green bead, another spacer, and the third green bead. This creates the colorful focal section opposite the charm. -
Complete the Circle:
Finish the strand by adding the remaining wooden beads until the bracelet reaches your desired wrist size. -
Add Charm Hangers:
Slide on two larger gold jump rings or gold tube beads right in the center of the wooden bead section where you want the leaf to hang. -
Tie the Knot:
Bring the ends of the elastic together and tie a secure surgeon’s knot (right over left, left over right, loop through twice). -
Secure the Knot:
Apply a tiny dot of jewelry glue to the knot, let it dry partially, and tuck it inside a neighboring wooden bead hole to hide it. -
Attach the Leaf:
Open a small jump ring using pliers, loop it through the hole in your clay leaf and onto the gold rings or tube beads you strung earlier, then close firmly.
Uneven Bead Tension
If the bracelet twists or buckles, your elastic is tied too tightly. It should be snug but flexible. Retie with just a tiny bit of slack to let beads sit naturally.
Wear your new botanical accessory to bring a serene, natural touch to any summer outfit
Dainty Anklet-Style Bracelet Look
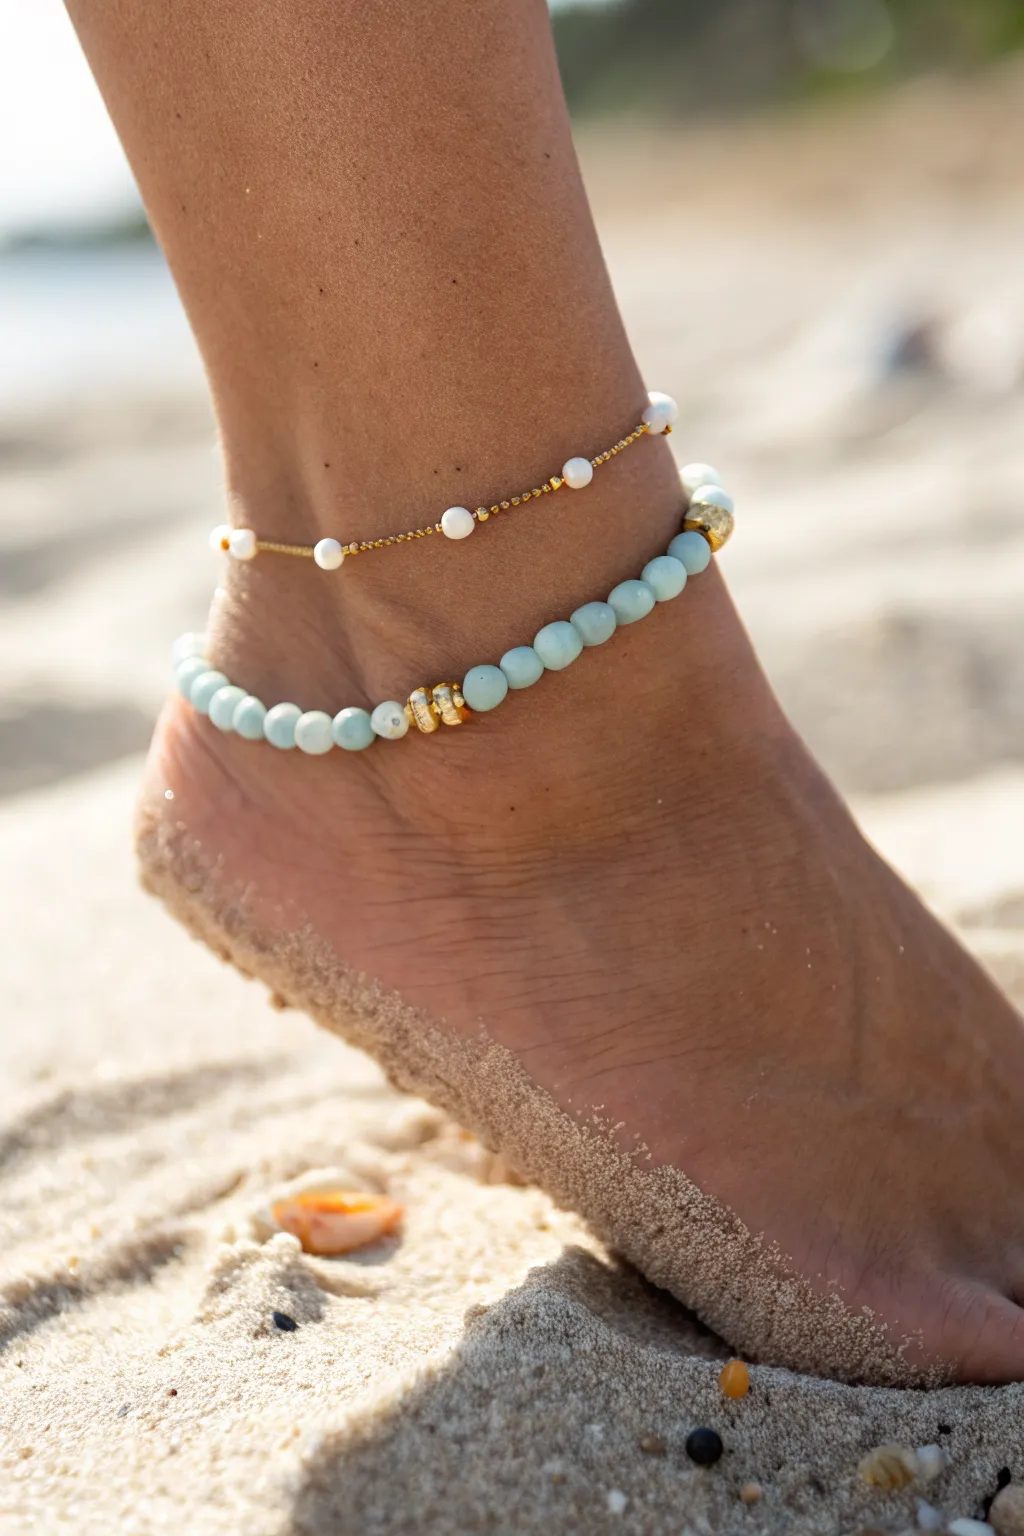
Capture the essence of a sun-soaked beach day with this layered anklet set featuring two distinct styles. You will create a delicate, pearl-accented gold chain and a bolder, aqua-beaded strand that stack perfectly to highlight your summer glow.
How-To Guide
Materials
- Fine gold-plated chain (approx. 10 inches)
- White seed beads or tiny freshwater pearls (2-3mm)
- Gold crimp beads or tiny gold spacer beads (2mm)
- Light aqua blue matte round beads (6mm)
- Gold heishi spacer beads or textured gold disc beads (4-5mm)
- Large gold nugget bead or accent bead (6-8mm)
- Elastic stretch cord (0.7mm or 0.8mm)
- Gold jump rings (4mm)
- Lobster clasp
- Jewelry pliers (chain nose and flat nose)
- Wire cutters
- G-S Hypo Cement or jewelry glue
- Measuring tape
Step 1: The Delicate Pearl Chain
-
Measure and cut chain:
Begin by measuring your ankle. Use a flexible measuring tape just below the ankle bone for a comfortable fit. Add about half an inch to this measurement for wiggle room, then cut your fine gold chain to this length. -
Prepare the chain intervals:
Lay the chain flat on your work surface. Since you can’t easily thread beads onto a pre-made chain, you will likely need to cut the chain into small segments—about 1 to 1.5 inches each—depending on how frequently you want the white beads to appear. -
Create beaded links:
Alternatively, if your chain links are large enough, threaded wire links work best. Cut a small piece of gold wire (approx 1 inch). Create a small loop on one end with round nose pliers. -
Thread the pearl accent:
Thread a tiny gold spacer bead, followed by a white seed bead (or pearl), and another gold spacer bead onto the wire pin. -
Close the link:
Create a loop on the other side of the bead cluster. Before closing it completely, hook it onto one segment of your cut chain. Do the same for the first loop on the other side. Repeat this process to reconnect all chain segments with these beaded links. -
Alternative method: Slidable beads:
If you are using a very fine snake chain or thin cord instead of link chain, simply thread the beads directly: one gold crimp, one white bead, one gold crimp. Flatten the crimps with pliers to hold the white bead in place at regular intervals. -
Add the clasp:
Open a small gold jump ring using two pairs of pliers to twist it sideways. Attach the lobster clasp to one end of the finished chain. -
Finish the closure:
Attach a closed jump ring or a short extender chain to the opposite end of the anklet to ensure it catches the clasp securely.
Knot Security Tip
When tying elastic cord, always pull the knot tight slowly to avoid snapping it. A dot of G-S Hypo Cement is ideal because it dries flexible.
Step 2: The Aqua Matte Beaded Strand
-
Pre-stretch the cord:
Cut a piece of elastic cord about 12 inches long. Give it a few firm tugs to pre-stretch it; this prevents the anklet from loosening up after you wear it. -
Secure the end:
Place a piece of tape or a bead stopper clip on one end of the cord so your beads don’t slide off while you work. -
Begin beading:
Thread about 2 to 3 inches of the matte aqua beads onto the cord. These 6mm beads provide the main color block for the design. -
Insert the gold accent:
Slide on three gold heishi spacer beads. Unlike round beads, these flat discs add a nice metallic texture and break up the blue pattern. -
Add a focal bead (optional):
If you want to mimic the image exactly, you might add a slightly larger, textured gold nugget bead near the back or side, or simply stick to the heishi spacers for a uniform look. -
Complete the strand:
Continue threading the remaining aqua beads until the beaded section matches your ankle measurement. Make sure the gold accent sits off-center or exactly where you want it. -
Check the fit:
Wrap the unfinished strand around your ankle. It should sit comfortably without digging into the skin, but not so loose that it slides under your heel. -
Tie the knot:
Remove the tape or clip. Bring the two ends of the elastic together and tie a surgeon’s knot (loop the cord through twice on the first pass, then tie a standard overhand knot on top). -
Secure with glue:
Pull the knot tight from all four directions (the two tails and the two loop sides). Apply a tiny dot of jewelry glue to the knot. -
Hide the knot:
I prefer to let the glue dry for just a moment until tacky, then slide an adjacent bead over the knot to hide it inside the bead hole. -
Trim excess:
Once fully dry, trim the excess elastic tail ends close to the bead, being careful not to cut the main knot.
Level It Up
Add a tiny starfish or seashell charm to the gold chain anklet near the clasp for an extra hidden detail that fits the beach theme perfectly.
Slip on both anklets and head out to the sand to show off your perfectly coordinated dual-texture set
Beach Bonfire Warm Mix
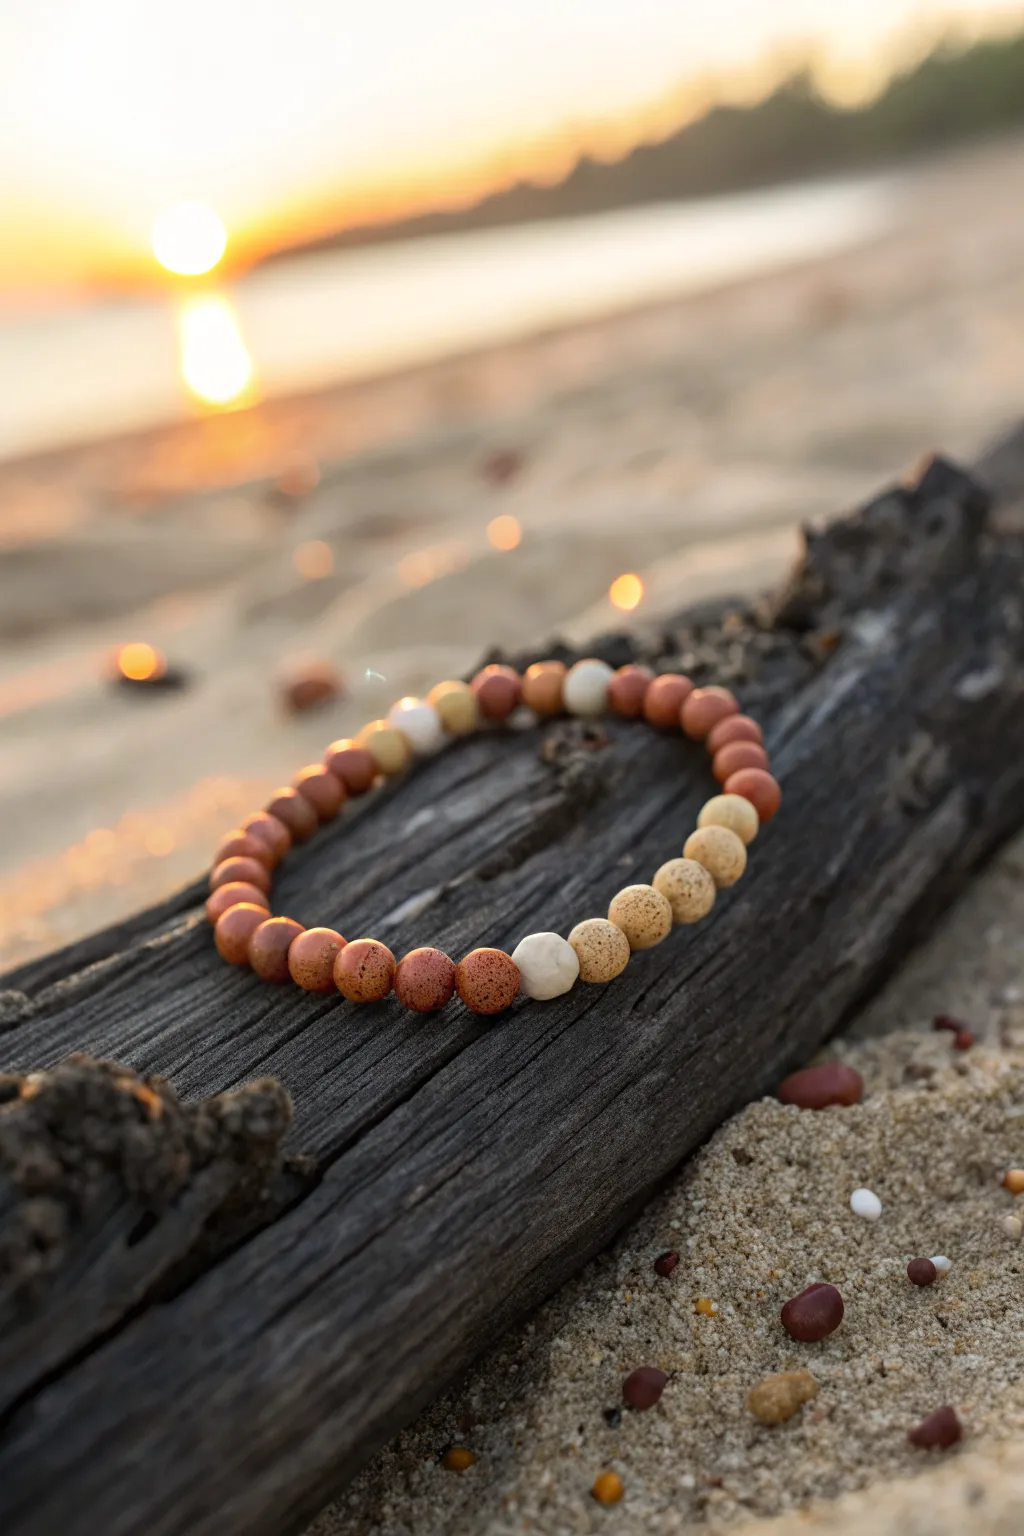
Capture the essence of a beach bonfire with this rustic clay bead bracelet. The warm terracotta tones blend seamlessly with sandy creams and tans, creating a piece that feels like a wearable sunset.
Step-by-Step
Materials
- Terracotta polymer clay (or pre-made terracotta beads)
- Beige/Sand polymer clay
- White/Cream polymer clay
- Coarse sea salt or sandpaper (for texturing)
- Beading elastic cord (0.8mm)
- Super glue or jewelry cement
- Scissors
Step 1: Preparing the Beads
-
Condition the Clay:
Begin by kneading your terracotta, beige, and white polymer clay separately until they are soft and pliable. This warmth makes them easier to shape without cracking. -
Roll Spheres:
Pinch off small, equal-sized pieces of clay roughly the size of a pea (about 8-10mm). Roll them between your palms to create smooth, round spheres. -
Create Texture:
To mimic the porous look in the photo, gently roll your raw clay beads over a piece of coarse sandpaper or lightly press them into coarse sea salt (which can be washed away after baking). This gives them that weathered, natural stone appearance. -
Pierce Holes:
Use a toothpick or a bead piercing pin to create a hole through the center of each sphere. Rotate the pin as you push through to avoid distorting the round shape. -
Bake:
Arrange your beads on a baking sheet or tile. Bake according to your clay manufacturer’s instructions (usually around 275°F/130°C for 15-30 minutes). Let them cool completely before handling.
Fix Sticky Texture
If your baked clay beads feel sticky or attract lint, seal them with a thin coat of matte varnish. This removes tackiness and protects the color.
Step 2: Designing the Pattern
-
Sort Your Colors:
Once cool, separate your beads into piles: the dark terracotta reddish-browns, the medium tans, and the few cream accent beads. -
Estimate Length:
Cut a piece of elastic cord about 10 inches long. This gives you plenty of extra room for tying knots later. -
Pre-stretch the Cord:
Give your elastic cord a few firm tugs. I normally do this to prevent the bracelet from stretching out and becoming loose after you wear it a few times. -
Plan the Gradient:
Lay out your beads on a mat before stringing. The design in the photo features a large section of terracotta beads (about 2/3 of the bracelet) and a focal section of lighter beads. -
Arrange the Focal Point:
For the lighter section, arrange about 4-5 tan/sand-colored beads, placing a single white or cream bead in the center or slightly off-center for a natural look.
Infuse a Scent
Since these beads are porous/textured, add a drop of essential oil (like sandalwood or coconut) to the light beads to make it an aromatherapy bracelet.
Step 3: Assembly
-
String the Dark Beads:
Start by threading the terracotta beads onto the elastic. You’ll likely need about 15-18 of these, depending on your wrist size. -
Add the Gradient:
Next, string your lighter tan beads. Add 2 on one side, then your white accent bead, followed by 2 more tan beads to complete the transition. -
Check the Fit:
Wrap the strung beads around your wrist to check the size. Ideally, it should sit comfortably without gaps, but not squeeze your skin. -
Correcting Size:
If it feels too tight, add another terracotta bead to the main section. If too loose, remove one. -
Tie the Knot:
Bring the two ends of the elastic together. Tie a simple overhand knot, but don’t pull it tight yet. -
Secure the Knot:
Tie a surgeon’s knot (loop the end through twice instead of once) over your first knot. Pull the elastic firmly from all four directions (the two tails and the loop itself) to cinch it tight. -
Glue and Finish:
Place a tiny drop of super glue or jewelry cement directly on the knot. Let it dry for a minute, then trim the excess cord ends close to the knot. -
Hide the Knot:
Gently slide a nearby bead over the knot to hide it inside the bead hole, giving your bracelet a seamless finish.
Slip on your creation and enjoy the warm, beachy vibes it brings to your outfit
Mermaid Pastels With Soft Shine
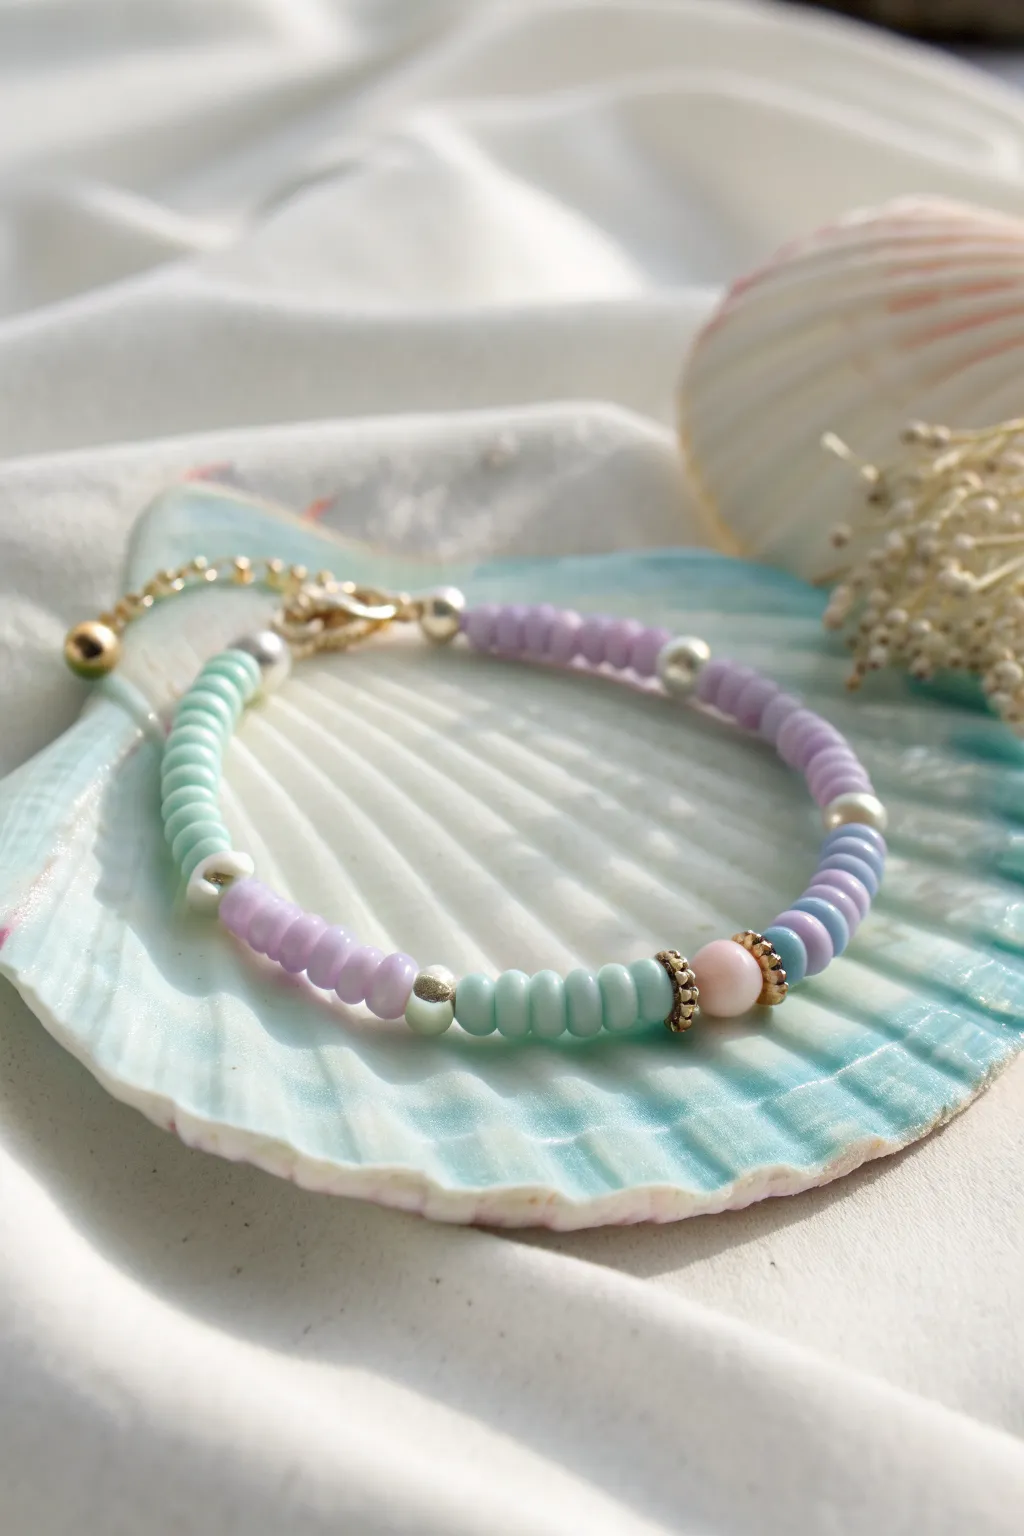
Capture the magic of an underwater palace with this dreamy bracelet featuring segments of soft lavender, mint green, and periwinkle. The addition of metallic spacers and a lustrous pink focal bead gives it that perfect touch of mermaid treasure elegance.
Step-by-Step Guide
Materials
- Lavender opaque seed beads (size 8/0)
- Mint green opaque seed beads (size 8/0)
- Periwinkle blue opaque seed beads (size 8/0)
- 1 Round pink shell or pearl bead (6mm or 8mm) for the center
- 2 Gold daisy spacers or rhinestone rondelles
- 2 Silver metallic round beads (3mm or 4mm)
- 2 White or cream accent beads (slightly larger than seed beads)
- Beading wire (such as Tiger Tail)
- 2 Crimp beads
- 2 Crimp covers (gold)
- Gold lobster clasp
- Gold extender chain with charm
- Wire cutters
- Crimping pliers
Step 1: Preparation and Centerpiece
-
Measure and cut:
Begin by cutting a length of beading wire approximately 10 to 12 inches long. This gives you plenty of extra room to manipulate the ends without struggling. -
Secure one end:
To stop your beads from sliding off while you design, place a piece of tape or a bead stopper on one end of your wire. -
Start the center:
Thread your focal point onto the wire: slide on one gold daisy spacer, followed by the large pink round pearl bead. -
Complete the focal:
Finish the central cluster by sliding on the second gold daisy spacer. Center these three pieces roughly in the middle of your wire length.
Tightness Check
Before crimping, curl the bracelet into a circle shape. If you pull the wire tight while it’s straight, the bracelet deeply stiffens and won’t drape nicely.
Step 2: Creating the Bead Pattern
-
Right side: Mint segment:
Working on the right side of the focal bead, string approximately 6 to 8 mint green seed beads. -
Add a silver accent:
After the mint green section, slide on one silver metallic round bead to break up the colors. -
Right side: Purple segment:
Continue on the right side by adding a long section of lavender seed beads. This section should be longer than the mint one, using roughly 15 to 20 beads depending on your wrist size. -
Right side: White accent:
Finish this side’s pattern by adding one small cream or white accent bead near where the clasp will sit. -
Left side: Blue segment:
Now switch to the left side of your focal bead. Thread on about 4 to 5 periwinkle blue seed beads. -
Left side: White accent:
Add a white or cream accent bead here to create asymmetry in the design. -
Left side: Purple return:
Follow the white bead with a long strand of lavender seed beads, mirroring the length of the purple section on the right side. -
Add the final silver bead:
Place the second silver metallic bead at the very end of this left lavender section. -
Left side: Mint finish:
Finish the left side beading with a final short segment of mint green beads (about 8-10 beads) to balance the start.
Step 3: Finishing Touches
-
Check the fit:
Wrap the unfinished strand around your wrist to verify the size. Add or remove purple beads from the main sections if you need to adjust the length. -
Attach the clasp:
On the right side, thread on a crimp bead followed by the lobster clasp. Loop the wire back through the crimp bead. -
Crimp firmly:
Use your crimping pliers to flatten the crimp bead securely, ensuring the wire is tight but the clasp can still wiggle freely. -
Attach the chain:
On the left side, thread the second crimp bead and the extender chain loop. Pass the wire back through the crimp bead and tighten. -
Final crimp:
Flatten this crimp bead securely with your pliers. I always give the wire a gentle tug here to make sure it won’t slip. -
Cover the crimps:
Place a gold crimp cover over each flattened crimp bead and gently close them with pliers to make them look like smooth gold beads. -
Trim excess wire:
Using your flush cutters, trim the excess wire tails as close to the beads as possible so no sharp ends poke out.
Oceanic Charms
Make it even more beachy by attaching a tiny starfish charm or a small sea glass chip to the end of the extender chain instead of a plain bead or ball.
Enjoy wearing your new pastel treasure on your next seaside adventure or sunny day out
Beachy Checkerboard Color Rhythm
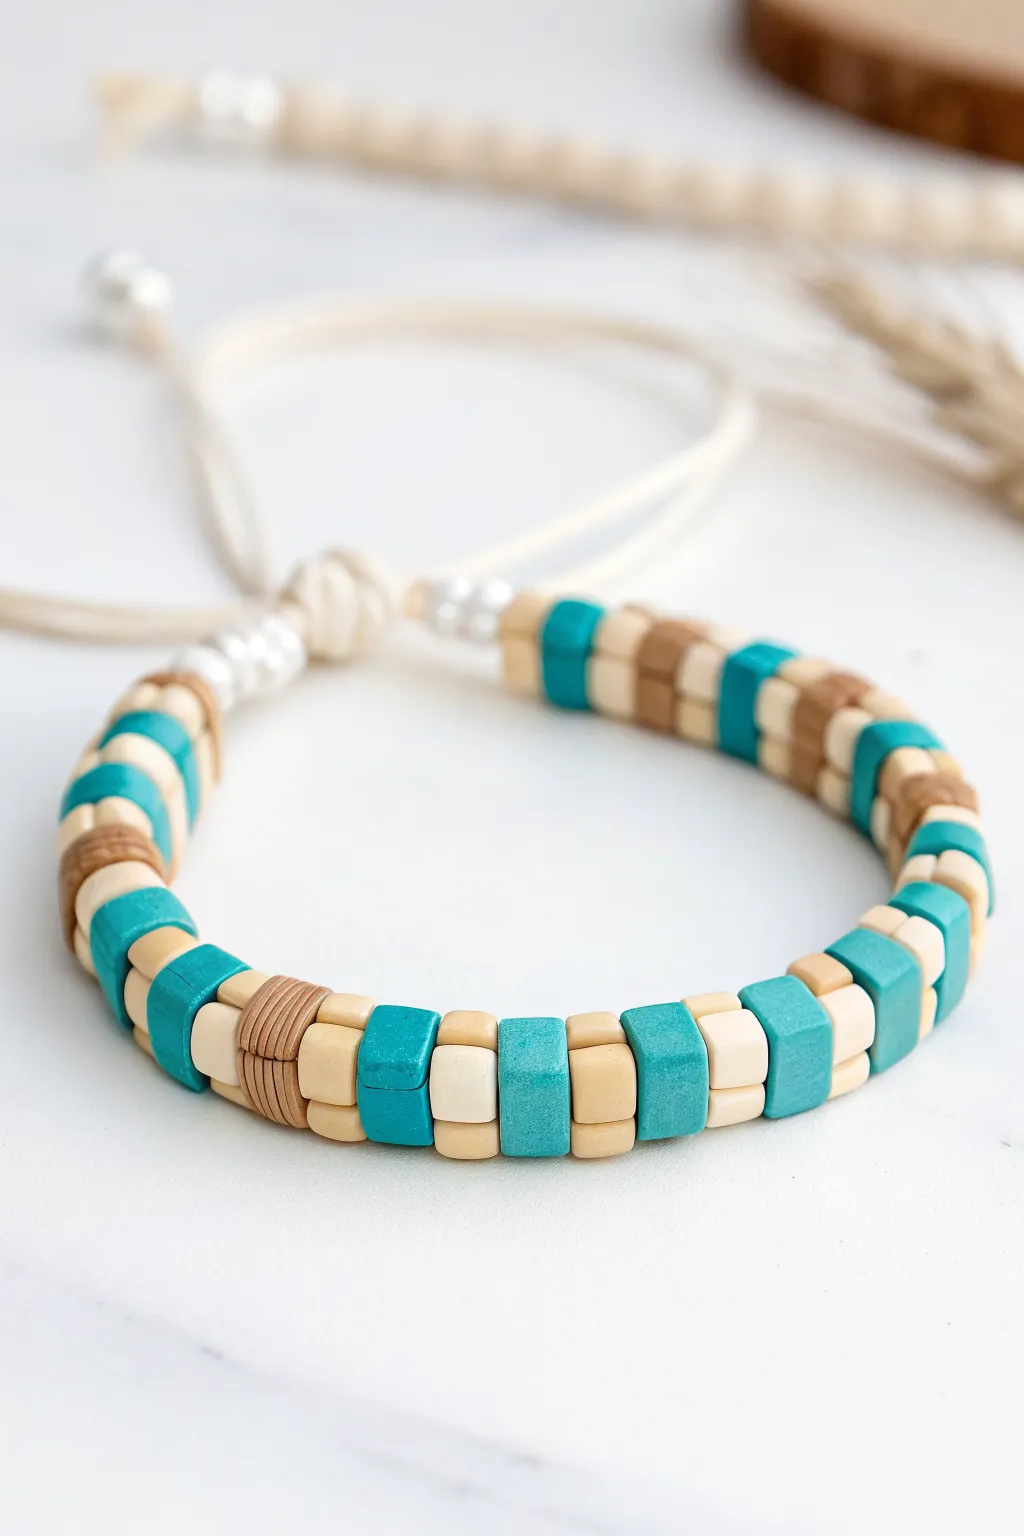
Capture the rhythm of lapping waves and sandy shores with this sophisticated take on the classic friendship bracelet. Using square polymer clay heishi beads creates a modern checkerboard texture that feels elevated enough for dinner yet sturdy enough for a day at the beach.
Step-by-Step
Materials
- Square polymer clay heishi beads (Teal/Turquoise)
- Square polymer clay heishi beads (Cream/Light Beige)
- Square polymer clay heishi beads (Tan/Light Brown)
- Silver spacer beads (small, round)
- White or cream nylon cord (0.8mm or 1mm thickness)
- Scissors
- Measuring tape
- Clip or tape (to secure cord while working)
- Lighter (optional, for sealing cord ends)
Step 1: Setting the Foundation
-
Measure and Cut:
Begin by measuring your wrist. Add about 6-8 inches to this measurement to allow plenty of room for the adjustable sliding knot closure. Cut your nylon cord to this length. -
Secure the End:
Fold the cord in half if you want a double-strand core for extra durability, or keep it single. Tie a loose overhand knot at one end leaving about 3 inches of tail. Tape this end down to your work surface. -
Silver Starter:
Thread three small silver spacer beads onto the cord. These will act as a decorative transition from the closure to the main bead pattern.
Step 2: Establishing the Pattern
-
The First Segment:
Start your pattern with the ‘sand’ section. Thread on five or six Tan/Light Brown square beads. Ensure they nestle flat against each other. -
Adding Contrast:
Next, add a ‘sea foam’ section creates the checkerboard look. Thread on three Cream beads followed by three Teal beads. -
Building the Rhythm:
Repeat that short sequence: add another three Cream beads, followed by three Teal beads. This alternating block creates the visual interest. -
Checking the Fit:
Pause here to push the beads snugly together. The square edges should line up to create a smooth, tile-like surface along the cord.
Uneven Checkerboard?
If your square beads are rotating and ruining the flat look, your cord might be too thin. Try using a double strand of thinner cord to fill the bead hole and keep them aligned.
Step 3: Creating the Centerpiece
-
The Focal Point:
For the middle section, we’ll extend the blocks slightly. Thread five Teal beads, followed by five Cream beads. -
Double Up:
Thread another set of five Teal beads. This larger block of color draws the eye to the center of the wrist. -
Textured Interrupt:
Add a small stack of Tan beads here—about four or five—to break up the cool tones with an earthy warmth. -
Mirror the Pattern:
Now, reverse your steps to mirror the first half. Add your alternating blocks of three Teal and three Cream beads, repeating until the bracelet reaches nearly your desired length. -
Closing Sequence:
Finish the beading with a final segment of five or six Tan/Light Brown beads to match the beginning.
Pro Tip: Tile Perfect
Slightly vary the bead thickness. If one square bead is very thin, pair it with a thicker neighbor. This creates a uniform seamless line rather than a jagged, gapping edge.
Step 4: Finishing Touches
-
Final Spacers:
Add three more silver spacer beads to bookend the design, mirroring the start of the bracelet. -
Secure the Beads:
Tie an overhand knot snugly against the last silver bead to keep all your hard work in place. -
Create the Closure:
Bring the two cord tails together, overlapping them. Using a scrap piece of cord (about 5 inches), tie a series of square macramé knots around the overlapped tails to create a sliding mechanism. -
Knot the Tails:
Tie a small knot at the very end of each cord tail to prevent them from slipping through the slider. I usually trim any excess cord and lightly singe the tips with a lighter to stop fraying.
Slide it on your wrist and enjoy the relaxed, stylish vibe of your new handmade accessory
Mixed Texture With Tiny Charm Dangles
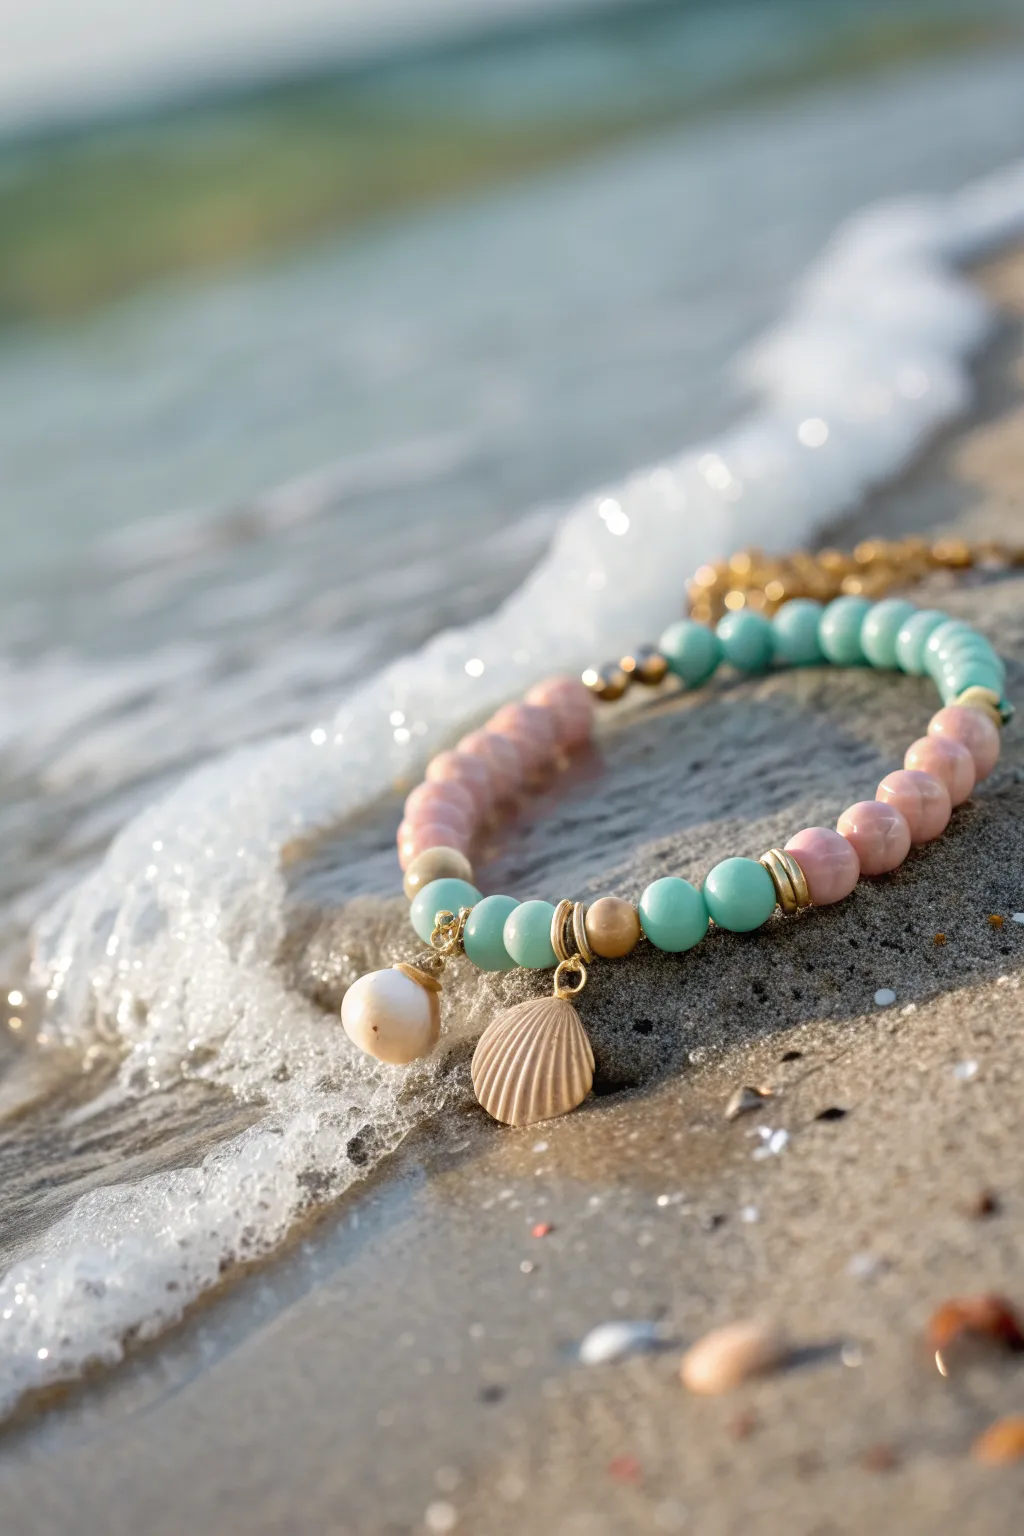
Capture the essence of a tranquil shoreline with this elegant beaded bracelet featuring soft pastels and delicate coastal charms. The mix of matte pink and glossy blue beads creates a beautiful texture contrast reminiscent of sun-warmed sand and rolling waves.
Step-by-Step Tutorial
Materials
- 8mm round gemstone or clay beads in pastel pink (matte finish)
- 8mm round gemstone or clay beads in aqua/turquoise (glossy finish)
- Gold tone spacer beads (small discs or rondelles)
- Gold tone crimp covers or large spacer rounds (6mm)
- Gold plated brass sea shell charm
- Faux pearl or shell drop charm
- Gold jump rings (4mm or 5mm)
- Strong elastic cord (0.7mm or 0.8mm)
- Jewelry glue (e.g., G-S Hypo Cement)
- Scissors
Step 1: Planning and Preparation
-
Measure your wrist:
Wrap a flexible measuring tape around your wrist to find your size. Add about 0.5 inches to this measurement to ensure the bracelet fits comfortably without being too tight. -
Cut the elastic:
Cut a piece of elastic cord approximately 10-12 inches long. Having this extra length makes tying the finishing knots much easier than struggling with short ends. -
Pre-stretch the cord:
Hold the ends of the elastic and give it a few firm tugs. This pre-stretching step prevents the bracelet from loosening up and sagging after you’ve worn it a few times. -
Prepare the charms:
Using pliers, carefully open two jump rings. Slide the gold shell charm onto one and the pearl drop onto the other. Close the jump rings securely so there is no gap for the cord to slip through.
Knot Slipping?
If your elastic knot feels slippery, try dusting it with a tiny bit of rosin powder before tightening, or use a crimp bead cover over the knot for extra mechanical security.
Step 2: Stringing the Coastal Pattern
-
Secure the end:
Place a bead stopper or simply a piece of strong tape on one end of your elastic cord to stop beads from sliding off while you work. -
Start the center focal point:
We will build the design from the middle outwards. Thread on the jump ring holding the gold shell charm first. This will be the centerpiece. -
Add the gold accents:
Slide a gold spacer bead immediately next to the shell charm. Then, thread on the jump ring with the pearl drop. Follow this with another gold spacer bead. -
Create the blue section:
On the right side of your centerpiece, thread on three aqua/turquoise glossy beads. Add a thin gold disc spacer after this group. -
Create the pink section:
On the left side of your centerpiece, thread on three matte pink beads. I usually like to check the color balance here to ensure the pastels complement each other nicely. -
Continue the pattern:
Continue adding beads to both sides, alternating between your pink and blue sections. You can break them up with gold spacers, or transition directly from one color block to another for a color-blocked look. -
Add texture variance:
Use the larger 6mm gold rounds occasionally between color sections to mimic the look of pebbles on a beach. -
Check the fit:
Once you have strung enough beads to reach your desired length, carefully wrap the strand around your wrist to check the fit. The ends should touch comfortably without stretching the cord.
Add Sparkle
Incorporate a few faceted crystal rondelles between the matte stones. The facets will catch the sunlight just like water droplets on the shore.
Step 3: Finishing Touches
-
Tie the first knot:
Remove the tape or bead stopper. Bring both ends of the elastic together and tie a simple overhand knot, pulling it tight so the beads sit flush against each other. -
Secure with a surgeon’s knot:
For the second knot, loop the elastic through twice instead of once before pulling tight. This is a surgeon’s knot and is much more secure for elastic jewelry. -
Apply adhesive:
Place a tiny drop of jewelry glue directly onto the knot. This prevents it from slipping over time. -
Hide the knot:
While the glue is still tacky, gently pull the elastic so the knot slides inside the hole of the nearest large bead (preferably one of the blue or pink 8mm beads). This hides the mechanics for a professional finish. -
Trim the ends:
Once dry, use sharp scissors to trim the excess elastic cord as close to the bead hole as possible without nicking the knot itself.
Now you have a breezy, beautiful accessory ready for your next beach day.
Mini Shell Cluster Statement Bracelet
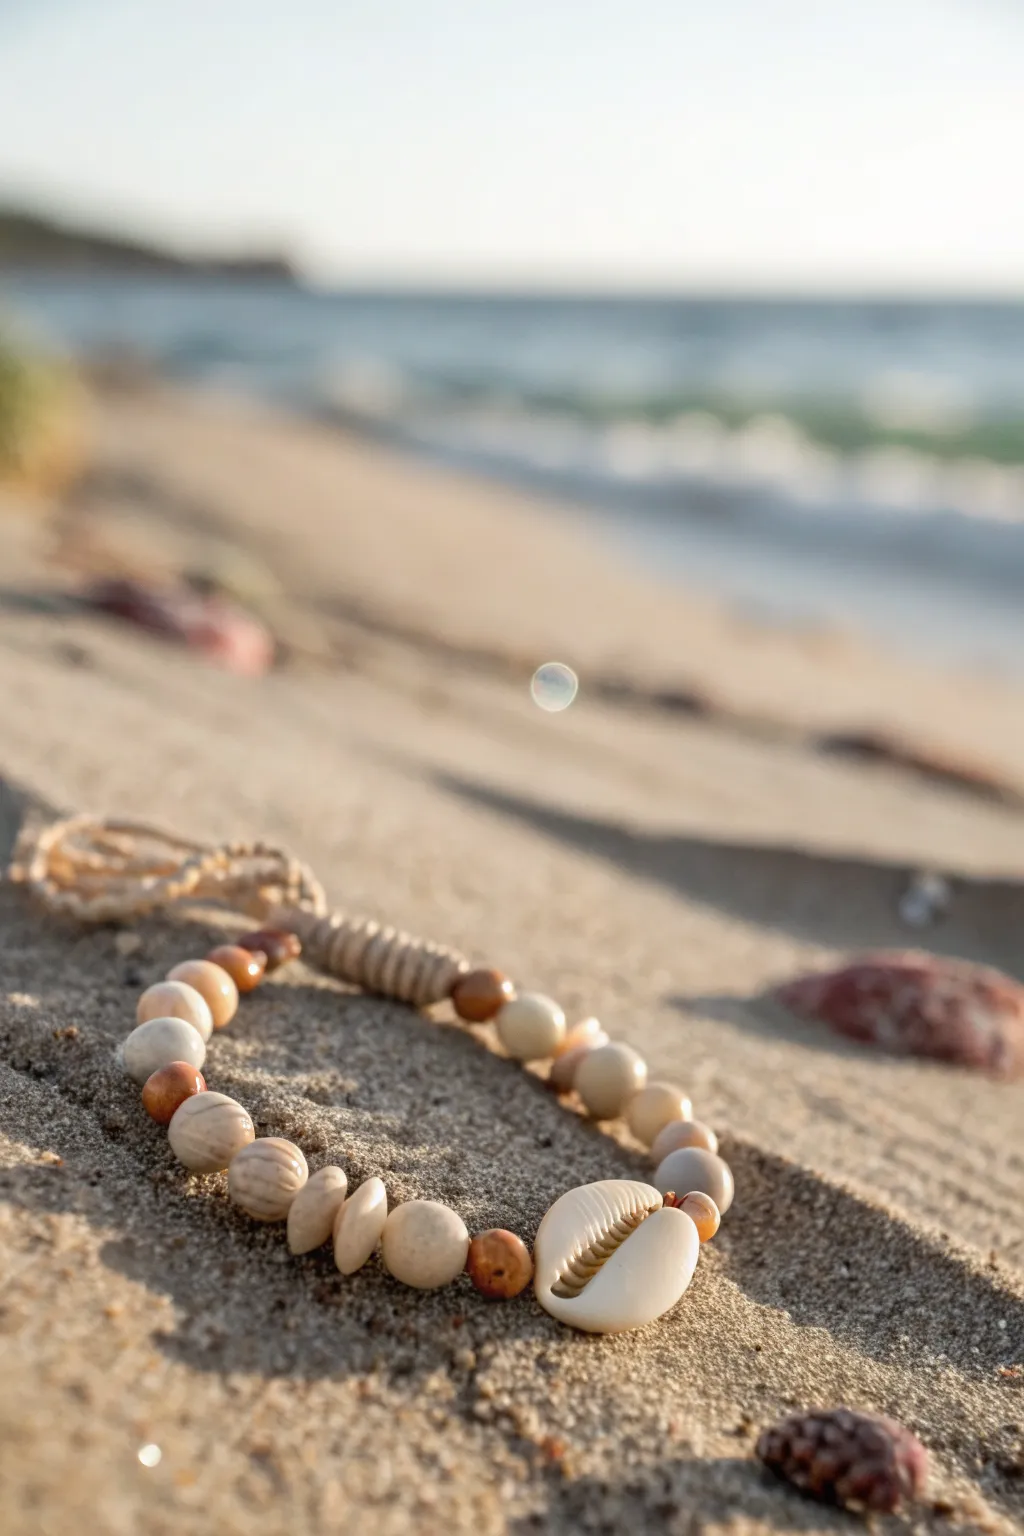
Capture the essence of a seaside sunset with this earthy, textured bracelet featuring rustic wooden beads and a striking cowrie shell centerpiece. The natural tones and sturdy macramé closure make it the perfect durable accessory for long summer days near the water.
How-To Guide
Materials
- 1mm to 1.5mm beige hemp or waxed cotton cord
- One large cowrie shell bead (pre-drilled or sliced back)
- Assorted round beige wooden or bone beads (approx. 8-10mm)
- Small round spacer beads in amber or rust color (approx. 4-6mm)
- Textured or striated round beads (approx. 8mm)
- Flat disc wooden beads or spacers
- Scissors
- Clipboard or tape (for securing work)
- Beading needle (optional, if cord is thick)
- Clear jewelry glue or lighter (optional for sealing knots)
Step 1: Preparation & Centerpiece
-
Measure the cord:
Cut a length of your hemp or waxed cotton cord to about 24 inches. This generous length gives you plenty of room for knotting the closure later. -
Secure the workspace:
Tape the top end of your cord to a table or clip it onto a clipboard. This tension helps keep things steady while you bead. -
Prep the cowrie shell:
Examine your cowrie shell. If it has a sliced back with a bar, threading is easy. If it’s a whole shell, ensure it has two holes drilled on either side for stringing. -
Center the shell:
Thread the cord through the cowrie shell and slide it to the very center of your cord length. This shell will sit on top of your wrist. -
Secure the shell:
Tie a simple overhand knot on the cord on both sides immediately next to the shell. This keeps the focal point from sliding around and adds a rustic touch.
Natural Polish Check
Before stringing, rub wooden beads with a tiny drop of essential oil or mineral oil. It deepens the color and gives them a slight, water-resistant sheen.
Step 2: Beading the Strand
-
Start the pattern:
On one side of the shell, thread a small rust-colored spacer bead first to introduce a pop of warmth next to the white shell. -
Add texture:
Follow the spacer with a larger, smooth beige wooden bead or bone bead. I like to vary the textures here, so try a bead with natural striations next. -
Create a sequence:
Continue stringing beads on this side, alternating between the smooth round beads, the textured striated ones, and the flatter disc spacers. Aim for about 2.5 to 3 inches of beading on this side. -
Repeat on the other side:
Move to the other side of the cowrie shell. Mirror your pattern exactly: start with the rust spacer, then the smooth bead, then the textured one. -
Check the length:
Once both sides are beaded, wrap the strand around your wrist. The ends of the beaded sections should almost touch, leaving a small gap for the closure knot. -
Knot the ends:
Tie a firm overhand knot snugly against the last bead on both ends of the bracelet. This locks all your beads in place.
Step 3: Adjustable Macramé Closure
-
Form a circle:
Bring the two cord ends together so they overlap parallel to each other, forming a circle shape with the bracelet. -
Cut a knotting cord:
Cut a fresh piece of cord, about 10 inches long. This will be used to create the sliding macramé knot. -
Start the square knot:
Place the 10-inch cord under the two overlapping bracelet ends. Tie a simple knot to secure it, centering it over the overlap. -
Create square knots:
Begin tying square knots (macramé flat knots) over the bracelet cords. Take the right free end over the center cords, and the left free end under, pulling through the loops. -
Continue knotting:
Continue making square knots for about half an inch. This creates a sturdy, barrel-like slider that allows the bracelet to expand and contract. -
Finish the closure:
Once the slider is long enough, pull the knotting cords tight. Trim the excess ends of the knotting cord close to the knot. -
Seal the knots:
Carefully dab a tiny amount of jewelry glue on the cut ends of the knotting cord (being careful not to glue the slider to the main bracelet cords) or lightly singe them if using synthetic cord. -
Final touches:
Tie a small stopper knot at the very end of each main bracelet cord so they can’t slip out of the slider. Trim any excess tail beyond these stopper knots.
Knot Slipping?
If your square knots unravel, make sure you are alternating leading sides (left over, then right over). Two same-side knots will spiral instead of laying flat.
Now you have a piece of wearable art that carries the relaxed vibe of the beach wherever you go
Beach Vacation Memory Color Story
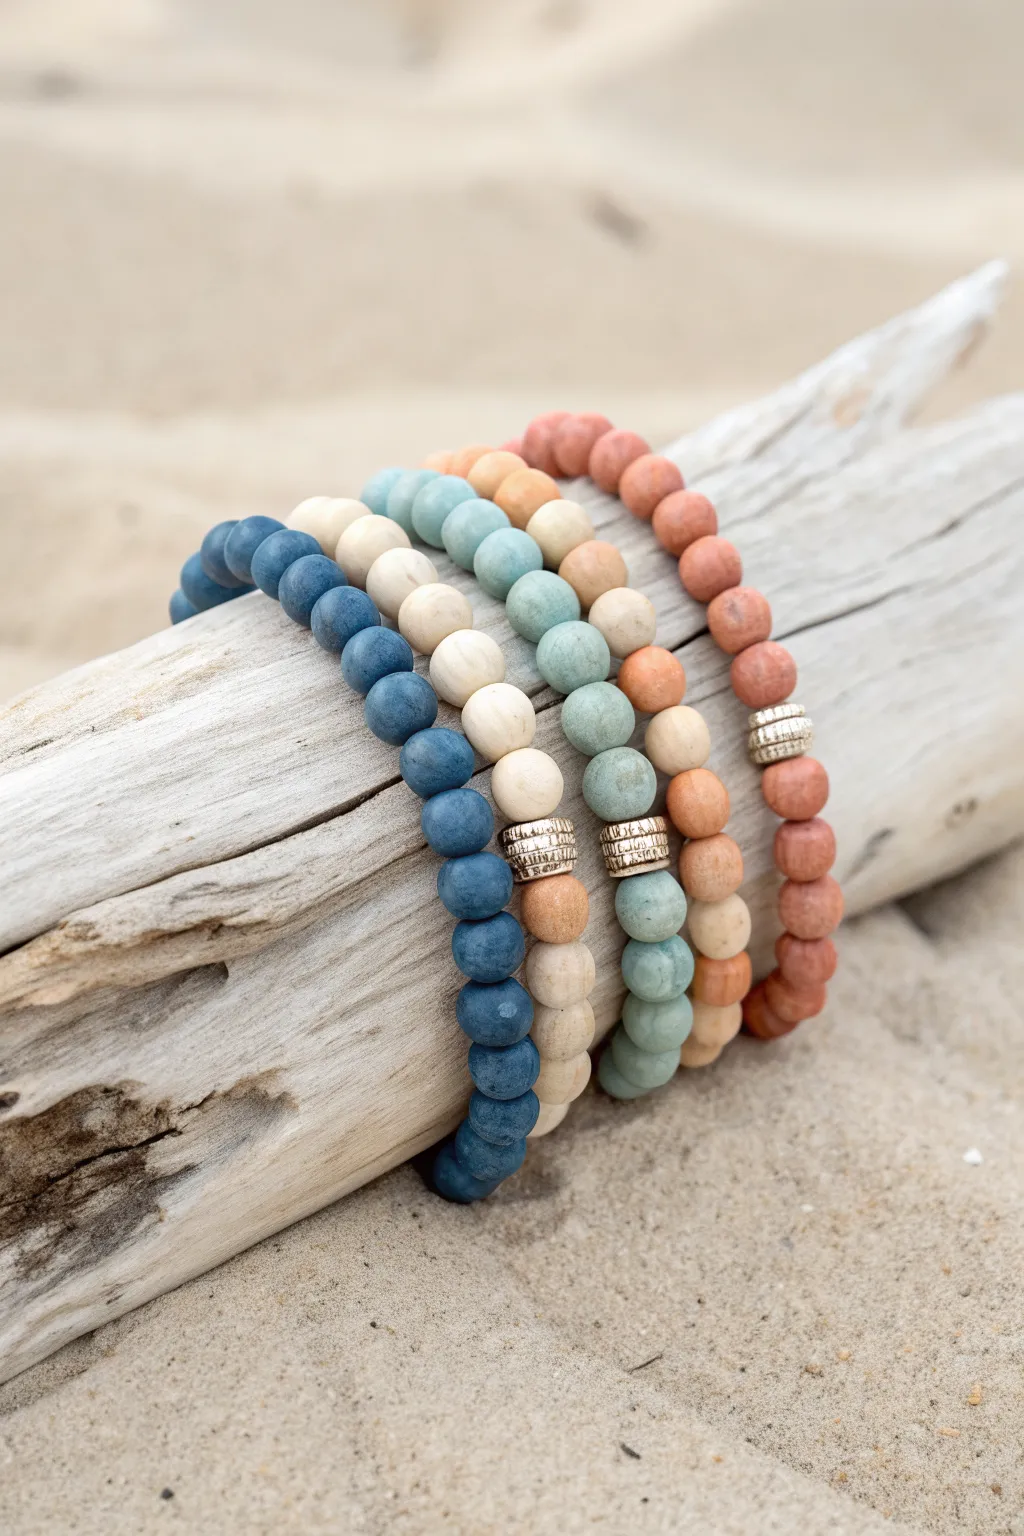
Capture the serene palette of a beachside vacation with this stack of four coordinating bracelets. Featuring matte clay beads in shades of deep ocean blue, sea foam green, sandy cream, and sun-baked terracotta, these accessories mimic the textures and tones found along the shoreline.
Step-by-Step Guide
Materials
- Matte round clay beads (8mm) in four colors: navy blue, cream/off-white, dusty teal/sage, terracotta orange
- Silver or gold metallic disc spacer beads (textured or ribbed)
- Strong elastic bead cord (0.8mm or 1.0mm recommended)
- Jewelry adhesive or clear nail polish
- Scissors
Step 1: Planning Your Palette
-
Measure your wrist:
Before you begin, wrap a piece of string around your wrist to find your comfortable size, adding about half an inch for a loose fit. -
Select your colors:
Lay out your four bead colors. The goal is to create four distinct monochromatic bracelets that harmonize together: one deep blue, one cream, one dusty teal, and one terracotta. -
Design the focal point:
Decide on the placement of your metallic accents. In this design, we use a small cluster of silver disc spacers to break up the matte color.
Knot Slipping?
If the elastic feels too slippery to hold a knot, rough up the ends slightly with sandpaper or an emery board before tying. This texture helps the knot grip itself better.
Step 2: Stringing the Navy Bracelet
-
Prepare the cord:
Cut a length of elastic cord about 10-12 inches long. Is pre-stretching the elastic gently before stringing helpful? Absolutely—it prevents the bracelet from loosening later. -
Start with beads:
Thread on approximately 10-12 navy blue matte beads. -
Add the metallic accent:
Thread on three to four textured metallic disc spacers. These add a nice industrial contrast to the soft matte finish of the clay. -
Finish the color:
Continue threading navy beads until the strand reaches your desired length.
Add a Charm
Personalize the stack by attaching a small sea-themed charm, like a starfish or shell, to the metallic spacer section using a simple jump ring.
Step 3: Creating the Coordinating Stack
-
Repeat for Cream:
Using the same method, create the second bracelet using only the cream/off-white beads and the metallic spacers. -
Repeat for Teal:
String the third bracelet using the dusty teal or sage green beads. -
Repeat for Terracotta:
Assemble the final bracelet with the warm terracotta orange beads. For a balanced look, try to keep the metallic spacer section consistent across all four bracelets. -
Check sizes:
Hold the unfinished strands around your wrist to ensure they are all roughly the same circumference before tying them off.
Step 4: Securing the Knots
-
Tie the first knot:
Take the ends of your first bracelet and tie a simple overhand knot, pulling it snug against the beads. -
Secure with a surgeon’s knot:
Follow up with a surgeon’s knot (loop the elastic through twice before pulling tight) for extra security. -
Apply adhesive:
Place a tiny drop of jewelry glue or clear nail polish directly onto the knot to seal it. -
Hide the knot:
Once the glue is tacky but not fully dry, gently tug the elastic so the knot slides inside the hole of the nearest bead. -
Trim excess:
Carefully trim the excess elastic tails with scissors, getting close to the bead hole without cutting the knot itself. -
Final assembly:
Repeat the tying and gluing process for the remaining three bracelets.
Wear your new beach-inspired stack together for a full color story or mix and match individually for a subtle pop of color