
If you’re making clay bead bracelets, picking the perfect name idea is half the fun—and sometimes the hardest part. I’ve pulled together my favorite tried-and-true words to spell on bracelets plus some catchy clay bead bracelet business name ideas for when you’re ready to sell.
Initials and Monograms
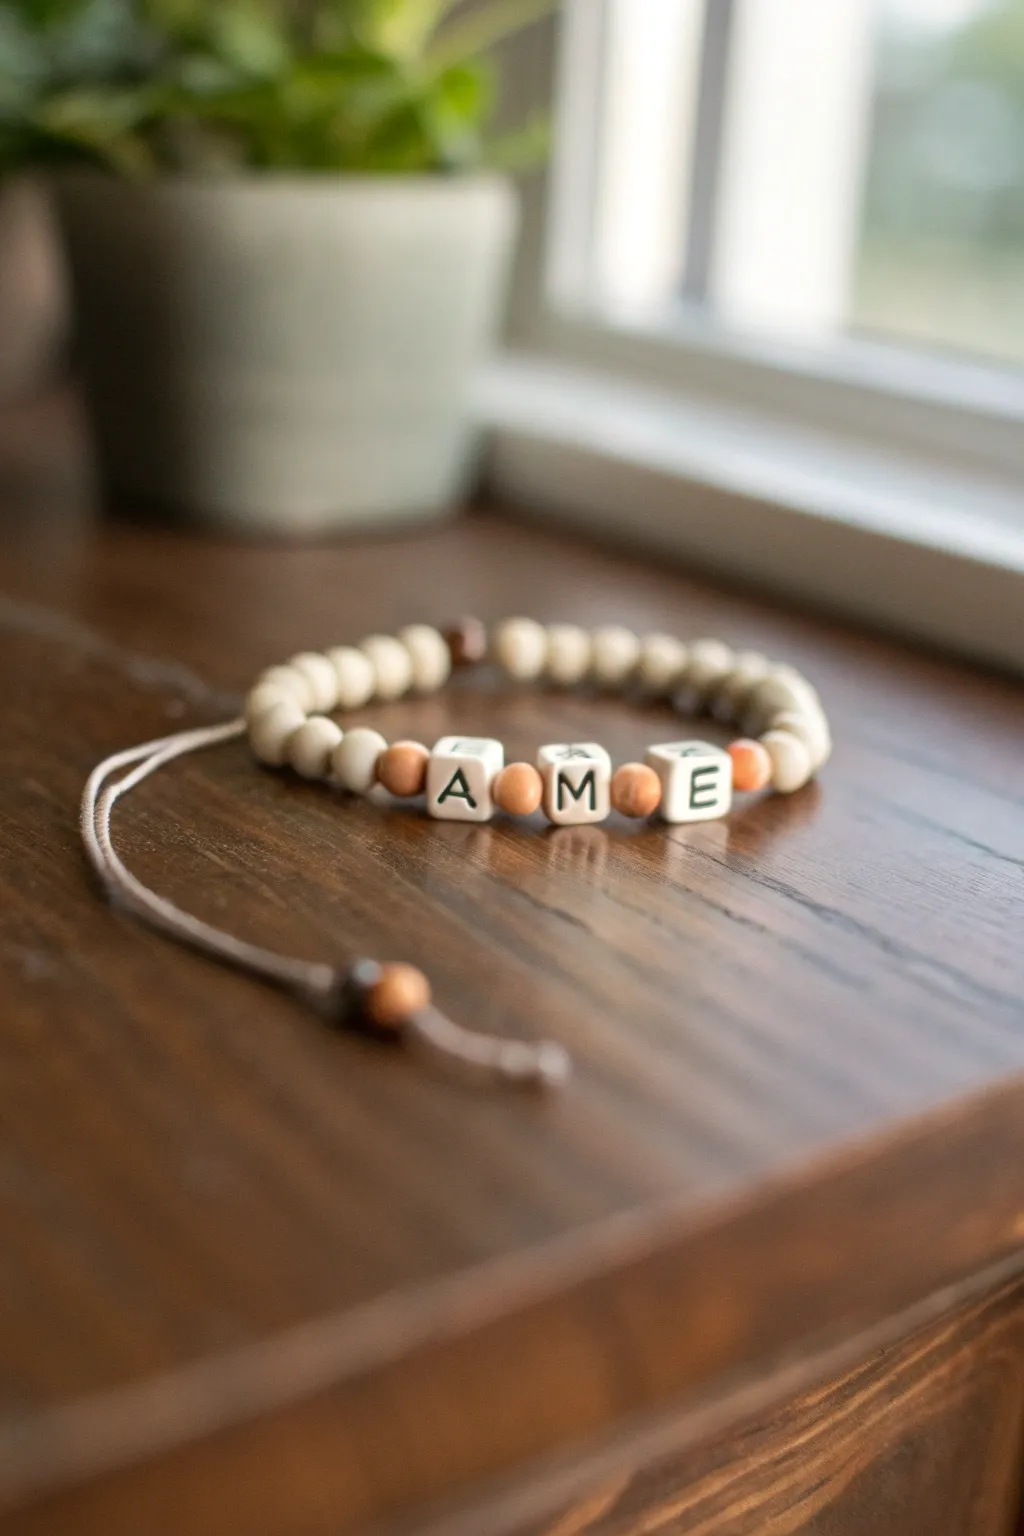
This elegant bracelet balances neutral wooden tones with bold letter blocks to create a personalized, sophisticated accessory. The design features a sliding knot closure, making it adjustable and perfectly suited for showcasing initials or a short monogram.
Step-by-Step Tutorial
Materials
- 1.5mm beige or light grey nylon macramé cord
- 8mm round natural wood beads (light cream/unfinished)
- 6mm round wood spacer beads (amber/caramel tone)
- Square white letter beads (A, M, E)
- Scissors
- Measuring tape
- Lighter or clear craft glue (for sealing ends)
- Small piece of tape (optional, for securing cord while beading)
Step 1: Cord Preparation and Centerpiece
-
Measure the cord:
Cut a length of nylon cord approximately 24 inches long. This generous length allows plenty of room for knotting and the adjustable sliding closure. -
Prepare the ends:
If your cord frays easily, quickly melt the very tips with a lighter or dab on a tiny bit of glue and roll them between your fingers to create stiff, needle-like ends for easier stringing. -
Start the center sequence:
Find the middle of your cord. Thread on the first square letter bead, which is the ‘M’ in this design. Center it on the cord. -
Add flanking spacers:
Slide one 6mm amber-colored wood spacer bead onto the right side of the ‘M’ and one onto the left side. -
Complete the name:
Add the ‘E’ block bead next to the right spacer, and the ‘A’ block bead next to the left spacer. Your centerpiece should now read ‘A – spacer – M – spacer – E’. -
Secure the letters:
Add one more 6mm amber spacer to the outer side of the ‘A’ and another to the outer side of the ‘E’. This frames your monogram perfectly.
Step 2: Main Bracelet Body
-
String the left side:
On the left side of your centerpiece, string approximately 10 of the 8mm light natural wood beads. I find that this number usually covers about half the wrist, but you can adjust based on size. -
String the right side:
Repeat the process on the right side, adding the same number of 8mm light wood beads to ensure symmetry. -
Add ending accents:
Finish both beaded sections by adding one final 6mm amber spacer bead on each end. This creates a visual bookend to the light wood section. -
Knot the ends:
Push all beads toward the center so they are snug but not stiff. Tie a simple overhand knot with the cord immediately after the last bead on both sides to keep everything in place.
Sliding Knot Won’t Budge?
If your adjustable clasp is too tight, gently massage the knot section between your fingers to loosen the fibers. If the knot melts into the pull cords, you’ll need to cut and re-tie.
Step 3: Sliding Closure
-
Cross the cords:
Lay the bracelet in a circle shape, crossing the left tail and right tail over each other parallel in the center gap. -
Cut a closure cord:
Cut a separate small piece of cord, about 8 inches long. This will be used to make the sliding square knots. -
Tie the first square knot:
Place the 8-inch cord under the two crossed bracelet tails. Tie a square knot (macramé knot) around both tails, pulling tight. -
Continue knotting:
Create 3-4 more square knots to form the sliding mechanism. Ensure the knots are tight enough to hold, but loose enough that the tail cords can slide through them when pulled. -
Trim closure ends:
Trim the excess lengths of the knotting cord (not the bracelet tails!) very close to the knot. Carefully singe the cut ends with a lighter to fuse them, pressing the melted nylon flat against the knot.
Level Up: Essential Oils
Use unfinished porous wood beads for the main body. Add a drop of essential oil to them, and your initials bracelet becomes a diffuse aromatherapy accessory.
Step 4: Finishing Touches
-
Measure the tails:
Try the bracelet on and open it to its widest necessary point (to fit over your hand). Determine how long you want the dangling tails to be. -
Add decorative beads:
Slide one 6mm amber spacer bead onto the end of each tail cord. -
Knot the tails:
Tie a secure overhand knot at the very end of each tail, below the decorative bead, to prevent it from sliding off. -
Final trim:
Cut off any excess cord below the tail knots and carefully singe the ends one last time to prevent fraying.
Now you have a beautifully understated custom bracelet ready to wear or gift


Mom, Mama, Dad, and Nana
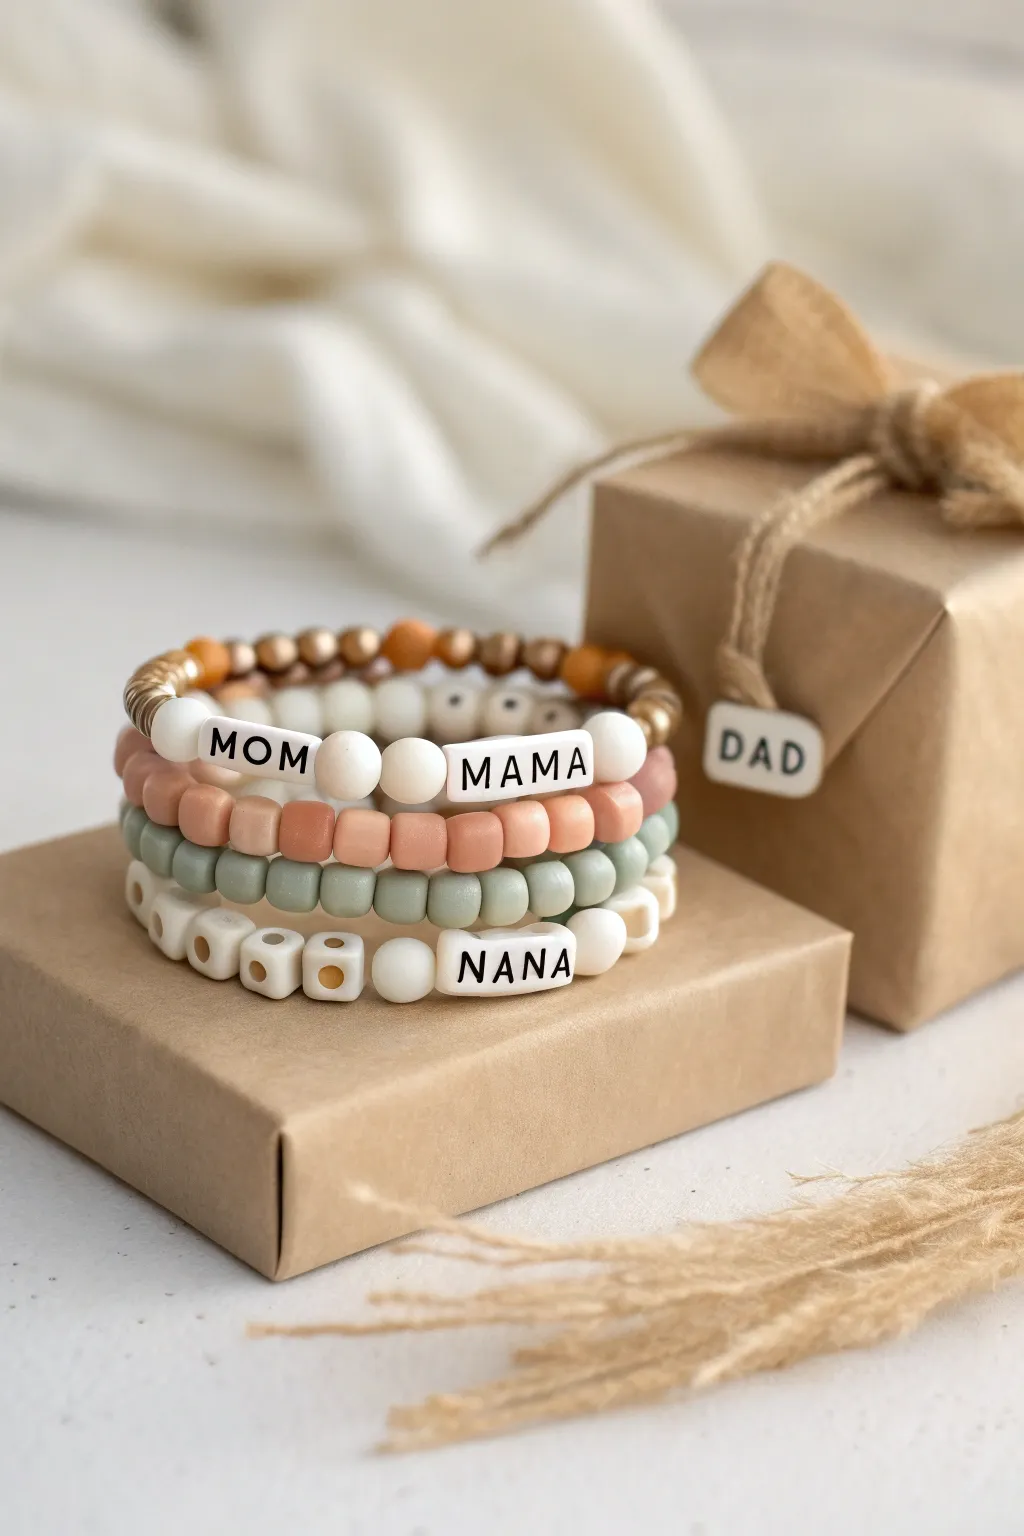
This set of coordinating bracelets makes a heartfelt gift, featuring soft, earthy tones and personalized names for Mom, Mama, and Nana. The combination of disc beads, rounds, and letter cubes creates a trendy, textured stack that looks beautiful worn together or separately.
Detailed Instructions
Materials
- Elastic stretch cord (0.8mm is standard)
- Small gold disc spacer beads
- Gold round smooth beads (4mm)
- Gold rondelle or textured spacer beads
- White round letter beads (black text) spelling MAMA and MOM
- White square letter beads (black text) spelling NANA
- Clay heishi beads in peach or terracotta
- Clay heishi beads in sage green
- White silicone or acrylic round beads (6mm)
- Creamy white heishi beads (for the Nana strand)
- Jewelry glue (e.g., G-S Hypo Cement or E6000)
- Scissors
Step 1: Planning Your Design
-
Measure the wrist:
Before cutting any cord, measure the recipient’s wrist with a flexible tape measure. Add about half an inch for a comfortable fit, or more if you prefer a looser bangle style. -
Cut the cord:
Cut four lengths of elastic cord, making each one about 10-12 inches long. This extra length makes tying the final knots much easier. -
Pre-stretch the elastic:
Give each piece of cord a few gentle tugs. This pre-stretching prevents the bracelets from sagging or loosening shortly after you finish them. -
Layout the MAMA strand:
For the top bracelet, arrange your pattern on a bead board or flat surface. Center the ‘MAMA’ letter beads. Flank them with white round beads, interspersed with gold spacers to break up the white. -
Layout the color strands:
For the peach and sage bracelets, simply pour out your heishi beads. These will act as solid color bands to ground the word bracelets. -
Plan the NANA strand:
The bottom bracelet uses square letter beads. Lay out ‘NANA’ and plan to use creamy white heishi beads or small white geometric beads for the rest of the band to contrast with the square letters.
Knot Security Tip
When tying elastic, pull it tight enough to slightly compress the heishi beads. This tension keeps the continuous ‘rope’ look and prevents hair from getting snagged between loose beads.
Step 2: Stringing the Bracelets
-
Secure the end:
Place a piece of tape or a binder clip on one end of your first cord to stop beads from sliding off while you work. -
Create the MAMA focal point:
Start by stringing the white round beads and the gold spacers. Slide on the letter beads spelling ‘MAMA’ or ‘MOM’ ensuring they face the correct direction. -
Finish the MAMA loop:
Complete the back of this bracelet using the small gold disc beads. This creates a two-tone look with white in front and gold in back, adding a touch of elegance. -
String the peach heishi bracelet:
For the second strand, thread the peach clay heishi beads one by one. You can stack them tightly for a uniform rope look. Periodically wrap it around your wrist to check the length. -
String the sage heishi bracelet:
Repeat the process with the sage green beads. Keep the tension even; you want the beads to sit flush against each other without buckling the cord. -
Assemble the NANA bracelet:
Thread your white beads for the main band, then add the square ‘NANA’ letter cubes. I like to add a subtle gold spacer on either side of the name to frame it nicely.
Fixing Rolling Letters
If your flat letter beads keep flipping upside down while wearing, place tight/snug spacer beads directly next to them. The pressure from the adjacent beads helps keep the letters facing outward.
Step 3: Finishing Touches
-
Check the fit:
Bring the ends of a bracelet together and test it around your wrist (or a sizing cone) one last time. Remove or add a couple of beads if necessary. -
Tie the surgeon’s knot:
Remove the tape/clip. Cross the ends like tying a shoelace, but loop the top strand through twice before pulling tight. Repeat this knot to secure it firmly. -
Hide the knot:
Apply a tiny dot of jewelry glue directly onto the knot. While the glue is wet, gently tug the knot inside the hole of a neighboring bead if the hole is large enough. -
Trim the excess:
Once the glue is tacky or dry, use sharp scissors to trim the excess cord as close to the bead as possible without snipping the knot. -
Repeat for all strands:
Follow the tying and gluing steps for the remaining three bracelets. Allow them to dry completely before wearing or boxing them up.
Stack these beautiful handmade bracelets on a small gift box for a personalized present that feels truly special


Classic Love Words
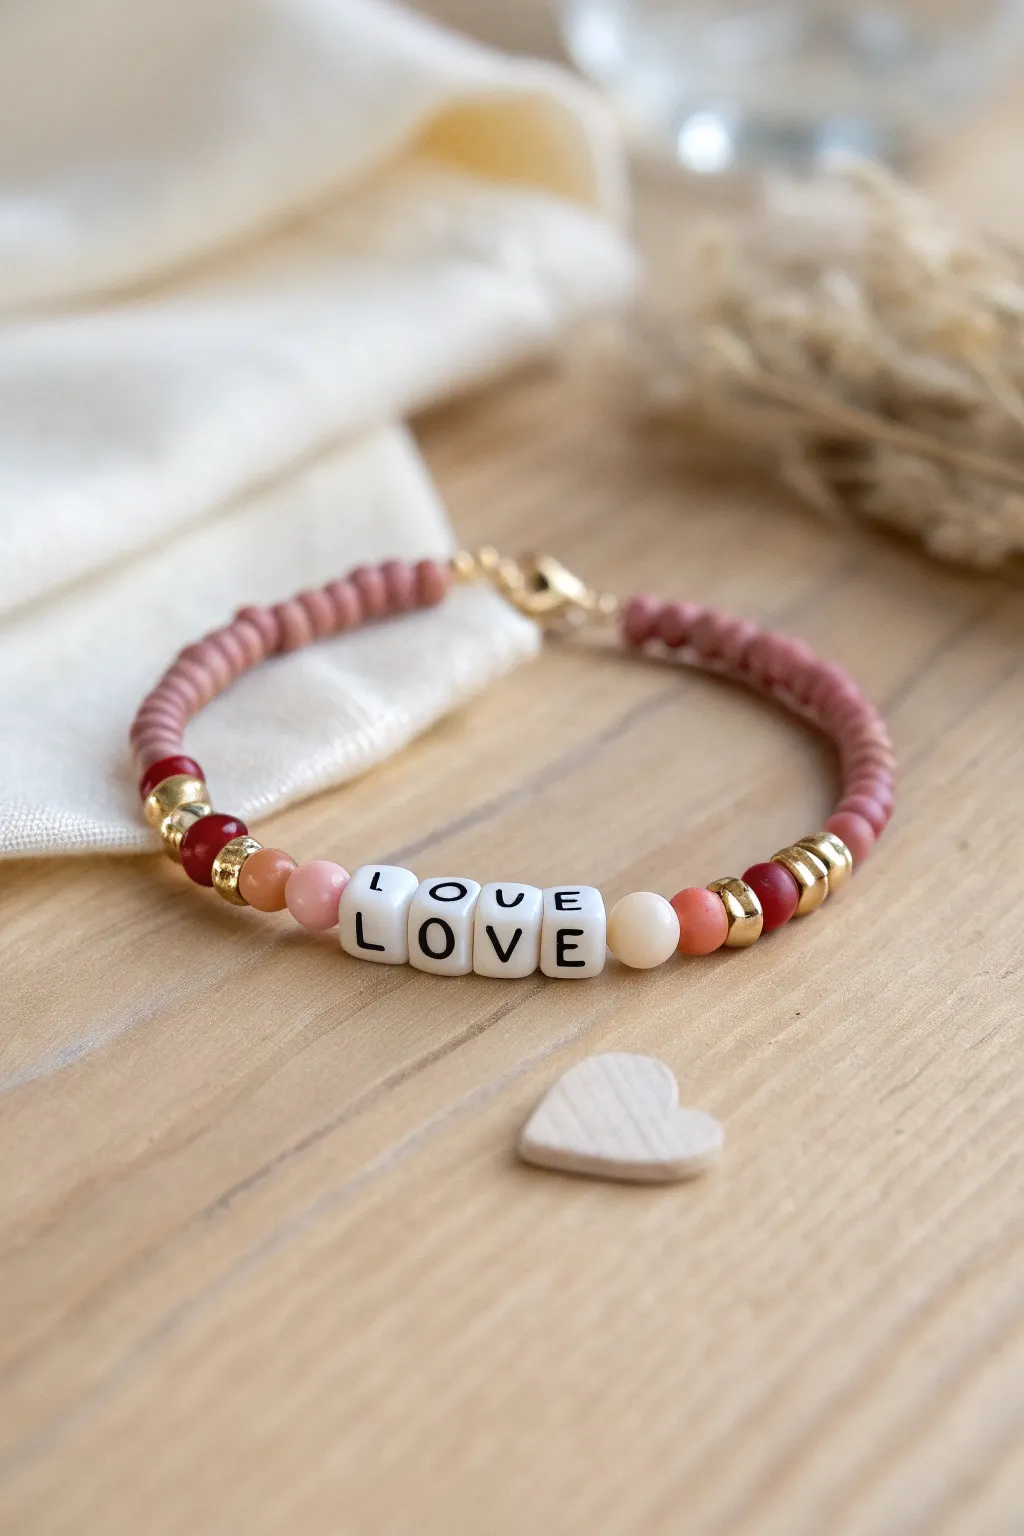
This elegant bracelet balances soft, earthy pinks with bright metallic accents and a classic message of affection. The mix of heishi disc beads and round beads creates a lovely texture that feels as good as it looks.
Step-by-Step Guide
Materials
- Dusty rose/mauve polymer clay heishi beads (approx 4-6mm)
- White square letter beads spelling ‘L’, ‘O’, ‘V’, ‘E’
- Metallic gold spacer beads (mix of small round and disc shapes)
- Deep red polished seed beads or small glass beads (approx 6mm)
- Peach/coral round bead (approx 6mm)
- Cream/off-white round bead (approx 6mm)
- Elastic beading cord (0.7mm or 0.8mm)
- Gold-tone jewelry clasp (lobster claw) and jump ring
- Crimp beads (gold tone)
- Flat nose jewelry pliers
- Scissors
Step 1: Planning and Preparation
-
Measure your wrist:
Cut a length of elastic cord about 10-12 inches long. This gives you plenty of extra room to work with so beads don’t slide off the end while you string. -
Secure the start:
Attach a piece of tape to one end of the cord or use a bead stopper. This prevents your first few beads from rolling off as you begin your design. -
Lay out the focus:
Arrange the word ‘LOVE’ with your letter beads on a flat surface. Flanking the word, we are going to create a symmetrical pattern, so lay out the beads for the center section first.
Too stiff?
If your bracelet feels stiff and won’t curve into a circle naturally, you’ve strung the beads too tightly. Leave a tiny bit of slack—about 1mm—before crimping the final end.
Step 2: Creating the Centerpiece
-
Right side accents:
To the right of the ‘E’, place a cream round bead, followed by a gold disc spacer, then a peach round bead. -
Adding bold contrast:
Next, add a gold spacer bead, followed by a deep red round bead. Finish this accent cluster with two or three stacked gold disc spacers. -
Left side accents:
Repeat the pattern in reverse order on the left side of the ‘L’. Start with a peach round bead, then gold spacer, then cream round bead. -
Completing the left symmetry:
Mirror the bolder accents by adding a gold spacer, a deep red round bead, and finishing with two gold round spacer beads. -
Stringing the center:
Once you are happy with the laid-out pattern, carefully thread these central beads onto your elastic cord in the exact order you arranged them.
Step 3: Building the Band
-
Adding the heishi base:
On both sides of your centerpiece, begin threading the dusty rose polymer clay heishi beads. I usually count them as I go to keep the word centered. -
Check the fit:
Continue adding the pink disc beads until the bracelet is nearly the circumference of your wrist. Wrap it around your wrist occasionally to check the sizing. -
Prepare the clasp:
Since this design uses a clasp rather than a simple knot, slide a crimp bead onto one end of the elastic, followed by the jump ring. -
Secure the first end:
Loop the elastic back through the crimp bead to create a small loop holding the jump ring. Use your flat nose pliers to firmly squash the crimp bead flat. -
Trim the excess:
Cut off the short tail of elastic near the crimped bead on this first side. -
Attach the clasp:
On the other end of the bracelet, slide on a crimp bead, followed by the lobster claw clasp. -
Close the loop:
Thread the elastic back through the crimp bead. Before flattening, pull the cord tight enough so there are no gaps between beads, but loose enough that the bracelet remains flexible. -
Final crimp:
Use your pliers to flatten the second crimp bead securely. Trim the remaining tail of elastic close to the bead.
Mix textures
Swap the plain gold spacers for gold crystal rondelles. The faceted glass adds a sophisticated sparkle that catches the light beautifully compared to plain metal.
Now you have a charming, personalized accessory ready to wear or gift to someone special


Calm and Cozy Reminder Words
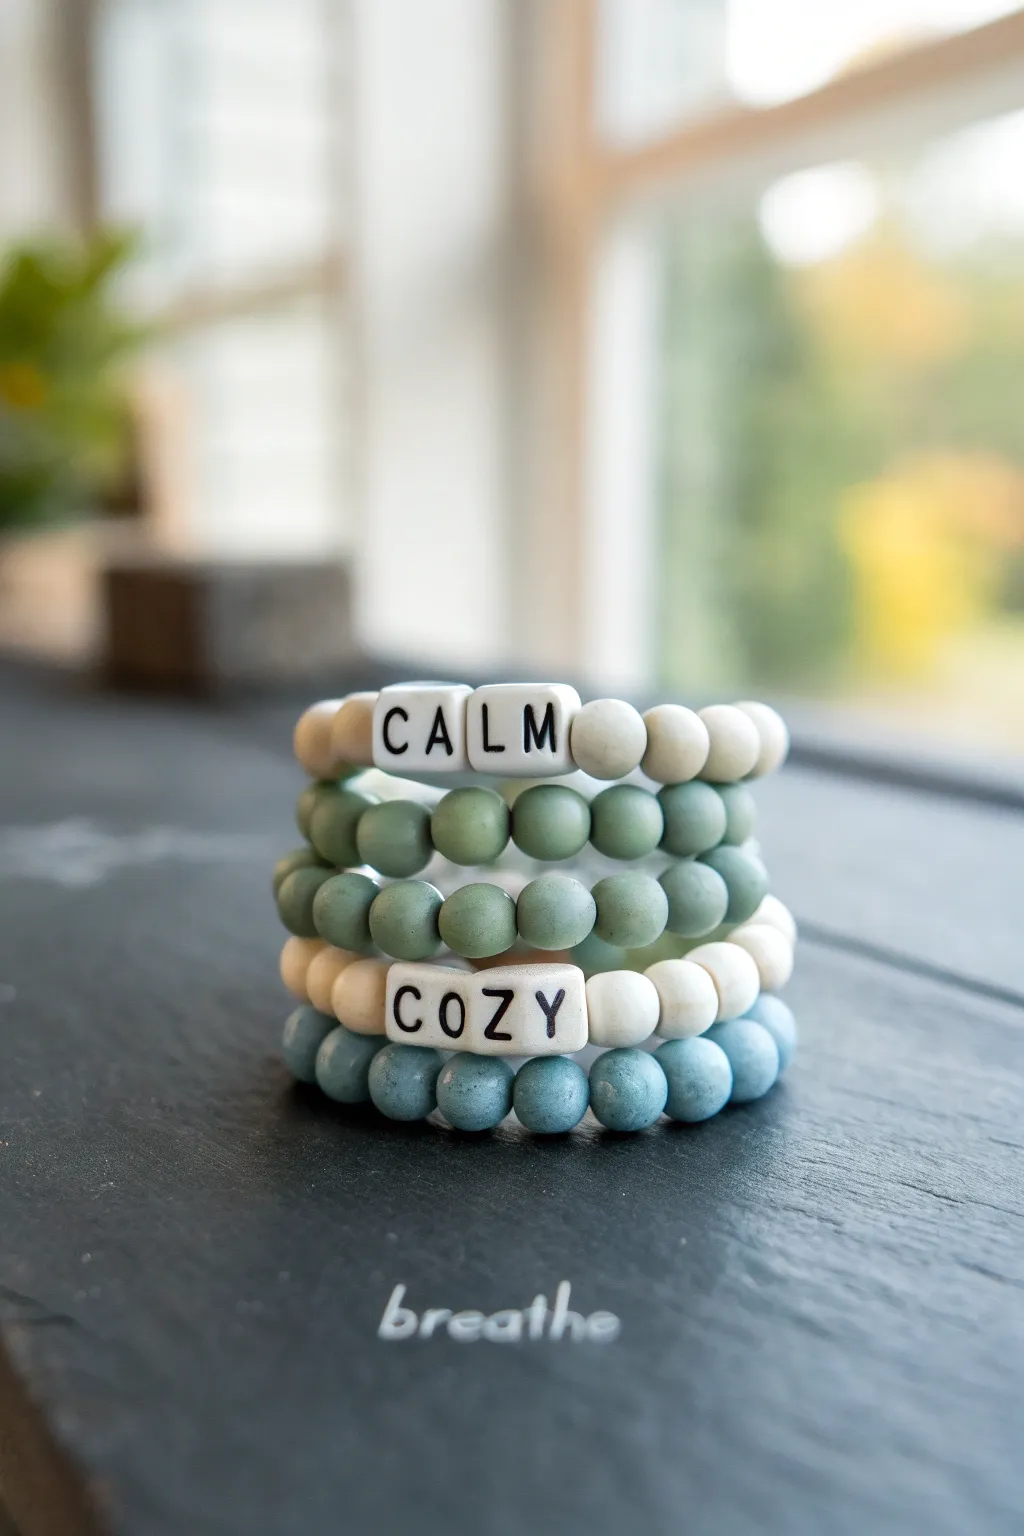
Capture the essence of tranquility with this set of five harmonious stretch bracelets, featuring a soothing palette of matte beads in cream, sage green, and dusty blue. Two of the strands incorporate customizable letter beads, spelling out gentle reminders to stay grounded and comfortable throughout your day.
Step-by-Step Tutorial
Materials
- 8mm matte round beads (cream/white)
- 8mm matte round beads (sage green)
- 8mm matte round beads (dusty blue)
- White cube letter beads with black text (C, A, L, M, O, Z, Y)
- Elastic stretch cord (0.8mm or 1.0mm diameter)
- Super glue or jewelry adhesive
- Scissors
- Bead stopper or tape
- Ruler or tape measure
Step 1: Planning the Palette
-
Measure your wrist:
Start by measuring your wrist with a flexible tape measure. Add about half an inch to this measurement to determine the final length needed for a comfortable fit. -
Sort your beads:
Separate your matte beads into three distinct piles: cream, sage green, and dusty blue. This project creates five separate bracelets that stack together, so ensure you have enough beads for approximately 7 inches of length per strand. -
Locate letter beads:
Find the specific letter cubes needed to spell ‘CALM’ and ‘COZY.’ Double-check that the print is crisp and black to match the aesthetic shown.
Knot Security Tip
Give your elastic cord a firm tug *before* you start beading. Pre-stretching the material prevents the bracelet from loosening up and creating gaps between beads after you wear it a few times.
Step 2: Stringing the ‘CALM’ Bracelet
-
Prepare the cord:
Cut a piece of elastic cord about 10-12 inches long. Isret a bead stopper on one end or tape it down to prevent beads from sliding off while you work. -
Start with cream beads:
String approximately 8 to 10 cream matte beads onto the cord. The exact number will depend on your wrist size, but you want the word to sit centered on the top of your wrist. -
Add the first word:
Thread the letter beads C-A-L-M. Ensure they are facing the correct direction so the word reads clearly from left to right. -
Finish the loop:
Continue adding cream matte beads to the other side of the word until the beaded portion reaches your target length. -
Tie the knot:
Pre-stretch the cord slightly to prevent future sagging. Tie a surgeon’s knot (right over left, left over right twice) and pull tight. Dab a tiny drop of jewelry glue on the knot. -
Hide the knot:
Once dry, trim the excess cord close to the knot. If the hole of a nearby bead is large enough, gently tug the knot inside to hide it.
Step 3: Creating the Solid Color Layers
-
String the green layers:
Prepare two new lengths of elastic cord. For these middle layers, use only the sage green matte beads. Fill both strands completely until they match the length of your first bracelet. -
Knot and secure:
Tie off both green bracelets using the same secure knotting and gluing method. I prefer to let the glue cure for a few minutes before trimming the ends to ensure maximum hold. -
String the blue layer:
Cut another length of cord and string it entirely with the dusty blue matte beads. Tie, glue, and trim this bottom layer.
Texture Twist
Swap the matte acrylic beads for natural wood or lava stone beads in similar shades. Lava stones can act as essential oil diffusers, adding an aromatherapy element to your ‘calm’ theme.
Step 4: The Final ‘COZY’ Strand
-
Begin the mixed strand:
For the fifth bracelet, start by stringing cream matte beads, but only use about 3 or 4 beads. -
Insert the word:
Thread the letters C-O-Z-Y onto the cord. -
Complete with cream beads:
Finish the rest of the strand with more cream beads. This creates a balanced look where two bracelets feature words and three provide solid blocks of color. -
Final assembly:
Knot and glue this final bracelet. Once all glue is fully dry, stack them on your wrist in the order: CALM (cream), Green, Green, COZY (cream), Blue for the complete gradient effect.
Enjoy the soothing tactile feel of your new bracelet stack throughout your busy day

The Complete Guide to Pottery Troubleshooting
Uncover the most common ceramic mistakes—from cracking clay to failed glazes—and learn how to fix them fast.
Brave, Bold, and Strong Words
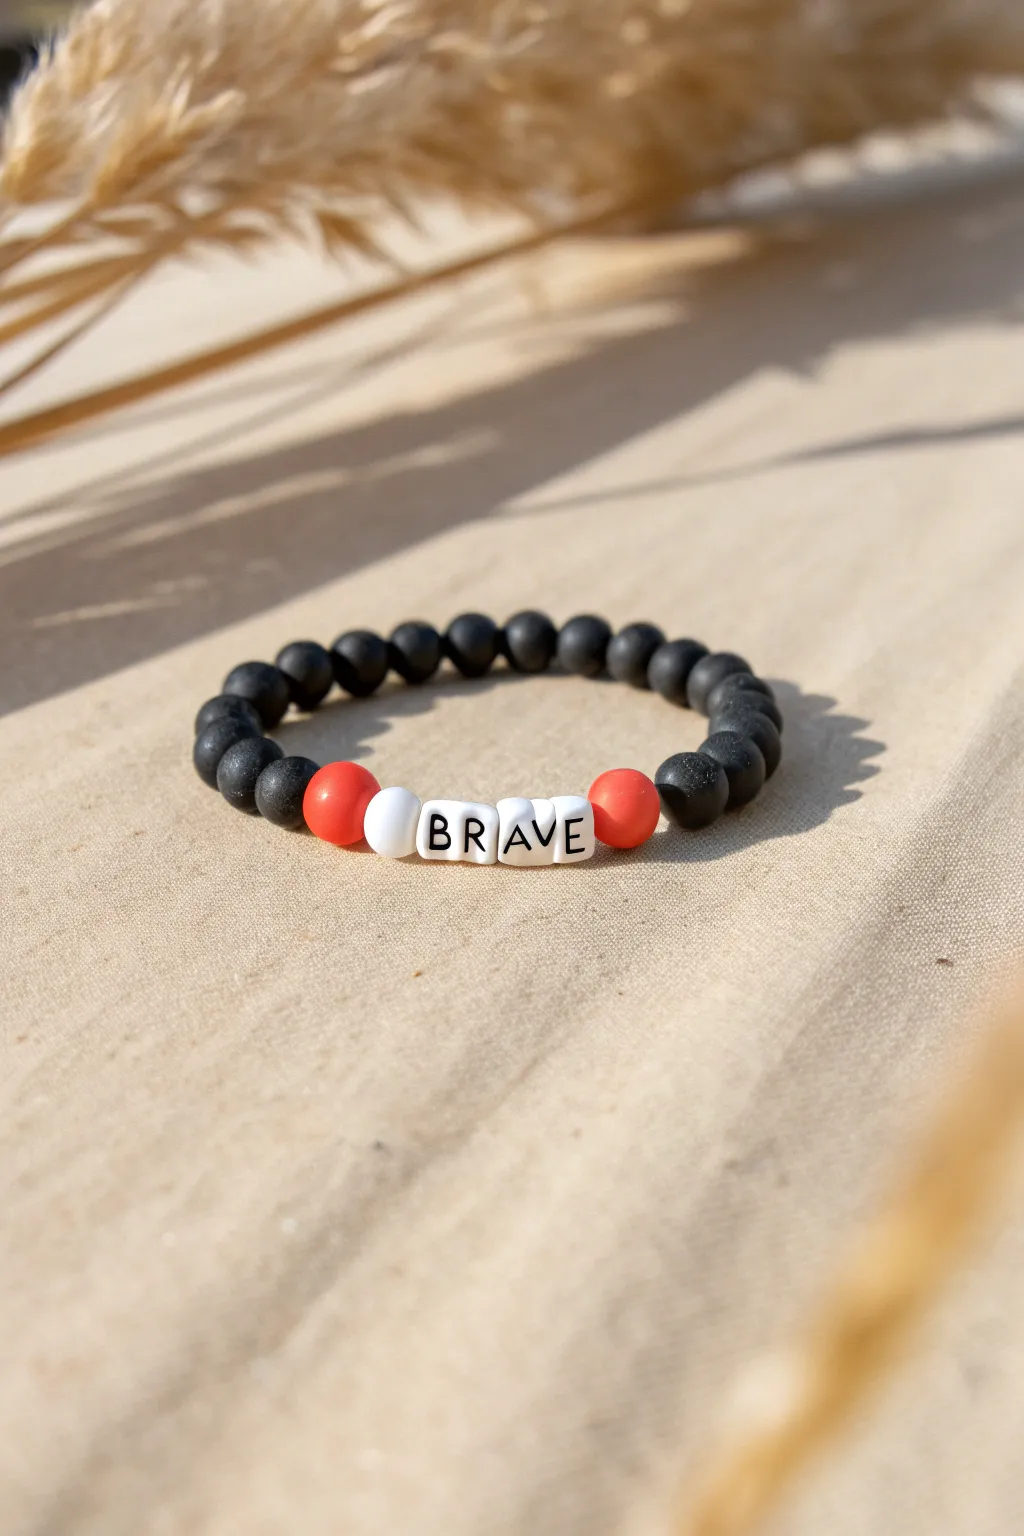
Capture a spirit of courage with this sleek, motivational bracelet featuring matte black beads and a pop of red. The design relies on high-contrast colors and a simple, powerful word to make a statement without being overwhelming.
Step-by-Step Guide
Materials
- Matte black round beads (6mm or 8mm, likely onyx or matte agate)
- White alphabet letter beads (cube style) spelling ‘BRAVE’
- Red round beads (same size as black beads, matte finish preferred)
- White round accent bead (slightly smaller, approx 4-6mm)
- Elastic stretch cord (0.8mm or 1mm)
- Jewelry glue or clear nail polish
- Scissors
Step 1: Planning and Measuring
-
Measure the wrist:
Wrap a flexible measuring tape or a piece of string around your wrist to find the circumference. Add about half an inch to this measurement to ensure the bracelet fits comfortably without pinching. -
Cut the cord:
Cut a length of elastic cord about 10-12 inches long. Having extra length makes it much easier to tie the finishing knots securely later on. -
Pre-stretch the elastic:
Hold both ends of the cut cord and give it a few gentle tugs. This pre-stretching step helps prevent the bracelet from loosening up permanently after you wear it a few times. -
Arrange the pattern:
Before threading, lay out your beads on a layout board or a soft towel. Place the ‘BRAVE’ letters in the center, flanked by the red and white accent beads, then fill the rest of the circle with the matte black beads until you reach your desired length.
Step 2: Stringing the Design
-
Start with the focal point:
Begin threading your beads onto the elastic cord. I prefer to start with the word section so it stays centered. Thread the white square letter beads in order to spell B-R-A-V-E. -
Add the spacers:
On the left side of the ‘B’, slide on one white round accent bead followed by one red round bead. -
Balance the right side:
On the right side of the ‘E’, slide on the second red round bead. Note that the design is asymmetrical; only the left side gets the small white spacer bead, creating visual interest. -
Thread the main beads:
Thread the matte black beads onto both ends of the cord, adding an equal amount to each side to keep the word centered, until the strand reaches the correct length. -
Check the fit:
Carefully wrap the un-tied strand around your wrist. The ends should touch comfortably without gaps between the beads, but it shouldn’t feel tight.
Knot Slipping?
If the knot keeps coming undone before you can glue it, try clamping the first loop with a binder clip while you tie the second loop.
Step 3: Finishing Touches
-
Prepare the knot:
Bring the two ends of the elastic cord together. Remove any slack by pushing the beads close together, ensuring there are no large gaps of exposed string. -
Tie the first knot:
Tie a simple overhand knot (like the first step of tying a shoelace) and pull it snug, but not so tight that the elastic puckers. -
Secure with a surgeon’s knot:
Loop the ends again, but this time loop one end through twice before pulling tight. This is a surgeon’s knot and is much stronger than a standard square knot. -
Apply adhesive:
Place a tiny drop of jewelry glue or clear nail polish directly onto the knot. This prevents the elastic from slipping over time. -
Hide the knot:
While the glue is still slightly tacky, gently tug the elastic so the knot slides inside the hole of the nearest black bead to conceal it. -
Trim the excess:
Once the glue is fully dry, use sharp scissors to trim the excess cord ends close to the bead hole. Be careful not to cut the main knot.
Matte Texture Care
Matte beads can absorb oils from lotions. Wipe them gently with a damp cloth occasionally to keep that soft, non-shiny finish looking fresh.
Wear your new bracelet as a daily reminder to stay strong and confident in everything you do