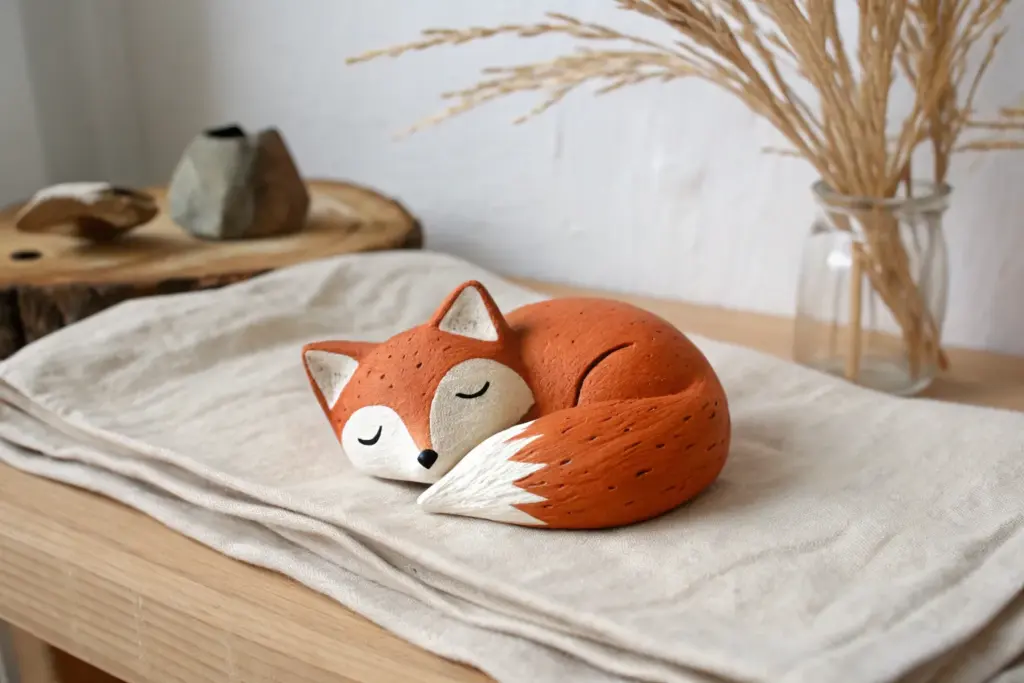
When you want clay design ideas that feel easy, the secret is sticking to simple shapes you can mash, roll, and stack without overthinking it. These projects are my go-to picks for quick wins in air-dry clay or polymer clay, especially when you just want something cute and satisfying fast.
Pinch Pot Trinket Dish
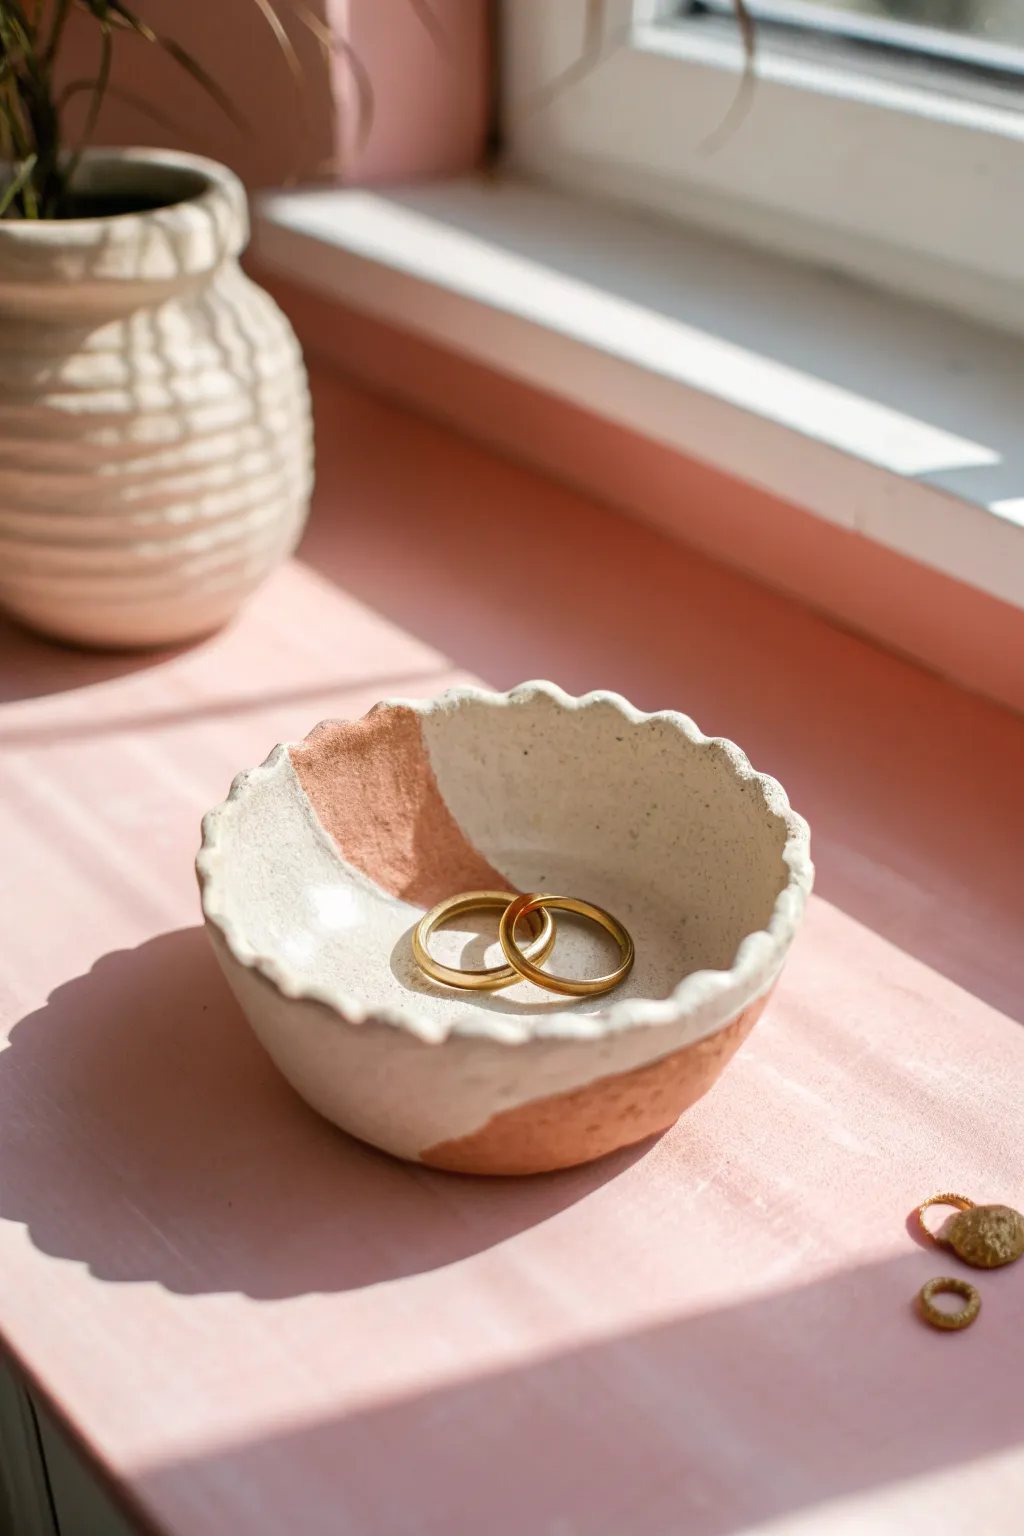
This charming trinket dish combines the warmth of raw terracotta with the clean elegance of a white glaze dip. The organic, wavy rim adds a handcrafted touch that makes it perfect for holding your favorite rings or earrings.
Step-by-Step
Materials
- Terracotta air-dry clay or polymer clay
- Glossy white acrylic paint (if using air-dry clay)
- Glossy white glaze (if using kiln-fire clay)
- Mod Podge or clear sealant (for air-dry clay)
- Small bowl or cup of water
- Rolling pin (optional)
- Sandpaper (fine grit)
- Masking tape (optional for crisp lines)
Step 1: Shaping the Clay
-
Prepare the Clay:
Start by taking a lump of terracotta clay about the size of a golf ball or slightly larger. Knead it in your hands until it feels soft, warm, and pliable, ensuring there are no air bubbles trapped inside. -
Form a Sphere:
Roll the clay between your palms on a flat surface to create a smooth, perfect sphere. This symmetry will help ensure your final bowl has an even shape. -
Start the Pinch Pot:
Hold the sphere in one hand and gently press your thumb into the center, stopping about a quarter-inch from the bottom. This indentation creates the base of your dish. -
Pinch the Walls:
Rotate the ball slowly in your palm while gently pinching the clay between your thumb (inside) and fingers (outside). Work your way from the bottom up to the rim, aiming for an even wall thickness of roughly 1/4 inch. -
Widen the Dish:
Continue pinching and turning until the opening widens into a shallow bowl shape. I like to press the clay slightly outwards to make it more of a dish than a cup. -
Flatten the Base:
Gently tap the bottom of your pot against your work surface to create a flat, stable base so the dish won’t rock or tip over when finished.
Step 2: Refining the Details
-
Create the Wavy Rim:
Instead of smoothing the rim perfectly flat, use your thumb and forefinger to gently pinch and undulate the edge. Create regular scallops around the circumference to replicate that organic, flower-petal look. -
Smooth Imperfections:
Dip your finger in a little bit of water and run it over the interior surface and the rim to smooth out any harsh fingerprints or small cracks. Don’t use too much water, or the clay might become sludge. -
Dry the Clay:
Set your dish aside to dry completely. For air-dry clay, this usually takes 24-48 hours depending on humidity. If using oven-bake clay, follow the manufacturer’s baking instructions. -
Sand for Finish:
Once fully dry (and cool, if baked), use fine-grit sandpaper to gently rub away any rough spots on the rim or surface, creating a professional-feeling texture.
Cracks Appearing?
If small fissures appear while shaping, dab a tiny drop of water (or clay slip) onto the crack and smooth it over with your finger immediately to bond it back together.
Step 3: Decorating
-
Plan the Dip Line:
To achieve the dipped look shown in the photo, visualize a diagonal line separating the bowl into two unequal sections. You can lightly mark this with a pencil or restrict the area with masking tape for a sharper edge. -
Apply White Base:
Paint the larger section of the bowl with glossy white acrylic paint. Be sure to paint both the interior and the exterior of this section so it looks like the entire bowl was dipped. -
Add a Second Coat:
Let the first layer dry, then apply a second or third coat of white until the terracotta color is completely covered and the white looks opaque and bright. -
Seal the Dish:
Once the paint is completely dry, apply a coat of glossy sealant or Mod Podge over the entire dish—both the painted white area and the raw terracotta section—to protect the clay and give it a unified sheen. -
Final Polish:
Allow the sealant to cure fully before placing any jewelry inside. The result should look like a partially glazed ceramic piece.
Make it Splashy
Instead of a clean line, try splattering the white paint over the raw terracotta with a toothbrush for a speckled, modern pottery effect.
Place your delicate new dish on a windowsill to catch the light and hold your treasures


Stamped Slab Coasters
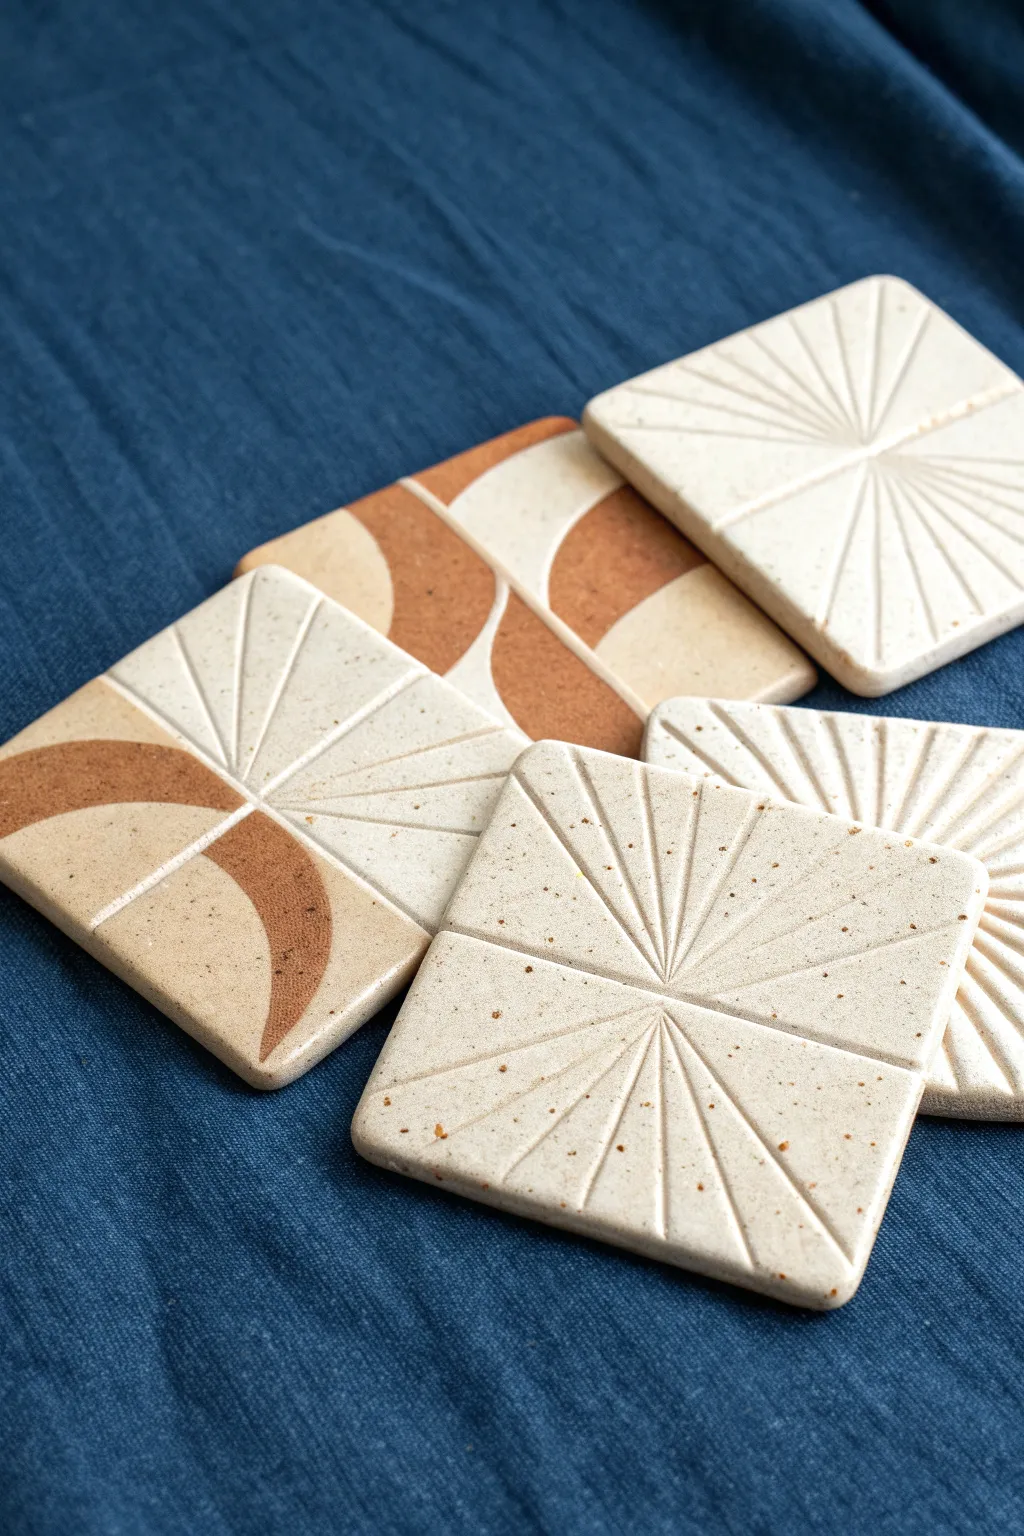
These elegant, boho-inspired coasters combine geometric sunburst patterns with warm, earthy tones for a sophisticated finish. Using simple slab-building techniques and easy stamping methods, you can create a functional set of home decor that looks professionally thrown.
Step-by-Step
Materials
- Polymer clay (white or speckled beige)
- Terra cotta or brown polymer clay
- Rolling pin or clay machine
- Square cookie cutter (approx. 4×4 inches)
- X-acto knife or clay blade
- Ruler or straight edge
- Small carving tool or toothpick
- Parchment paper
- Oven-safe baking sheet
- Fine grit sandpaper (optional)
Step 1: Preparing the Slab
-
Condition the Clay:
Start by warming your main base color (white or speckled beige) in your hands. Knead it thoroughly until it is soft, pliable, and free of any air bubbles. -
Roll the Slab:
Place the clay between two sheets of parchment paper. Use a rolling pin to flatten the clay into a smooth, even slab that is about 1/4 inch thick. Try to keep the thickness consistent. -
Cut the Base Shapes:
Use your square cookie cutter to punch out your coaster shapes. If you don’t have a cutter, measure a 4-inch square with a ruler and carefully slice it out with your clay blade. -
Smooth the Edges:
Dip your finger in a little water (or cornflour if the clay is sticky) and run it gently along the cut edges to soften any sharp corners.
Step 2: Applying the Design
-
Create the Color Blocks (Optional):
For the two-tone coasters, roll out a thin sheet of the terra cotta colored clay. Cut curved, organic shapes that mimic hills or moons. -
Inlay the Color:
Place the terra cotta shapes onto your white square base. Use the rolling pin to gently press them down until they are flush with the base surface, creating a seamless single layer. -
Mark the Center Point:
Find the spot where you want your sunburst to originate. Press a small dot gently into the clay to act as your guide. -
Impress the Horizontal Line:
Using the edge of a ruler or a dull knife, press a horizontal line straight across the coaster, passing through your center point. Don’t cut all the way through; just make a clean indentation. -
Stamp the Rays:
Using the same straight edge tool, press radiating lines outward from your center point. I find it helps to do the vertical line first, then fill in the diagonal rays to keep the spacing even. -
Refine the Lines:
If the clay displaced slightly during stamping, use your finger to gently pat the surface flat again without erasing your lines.
Uneven Lines?
If your straight edge sticks to the clay and pulls up ragged edges, dust the tool lightly with cornstarch or dip it in water before pressing into the clay.
Step 3: Finishing and Baking
-
Pre-Bake Check:
Inspect the surface for any lint or fingerprints. You can use a little rubbing alcohol on a brush or your finger to smooth these imperfections away. -
Bake the Clay:
Transfer the parchment paper and coasters onto a baking sheet. Bake according to the specific temperature and time instructions on your package of clay. -
Cool Down:
Allow the coasters to cool completely on the baking sheet before handling them, as the clay is still fragile when hot. -
Sand the Edges:
Once fully cooled, take a piece of fine-grit sandpaper and lightly buff the edges and corners to ensure they feel smooth to the touch. -
Seal (Optional):
If you plan to use these with very cold, sweaty drinks, apply a thin coat of matte polyurethane varnish to protect the surface from water spots.
Make it Organic
Mix dried tea leaves or black pepper into your white clay before rolling. This creates a speckled, stone-like pottery effect fake without needing a kiln.
Now you have a stunning set of modern coasters ready to protect your tabletops with style


Mini Pinch Pot Planters
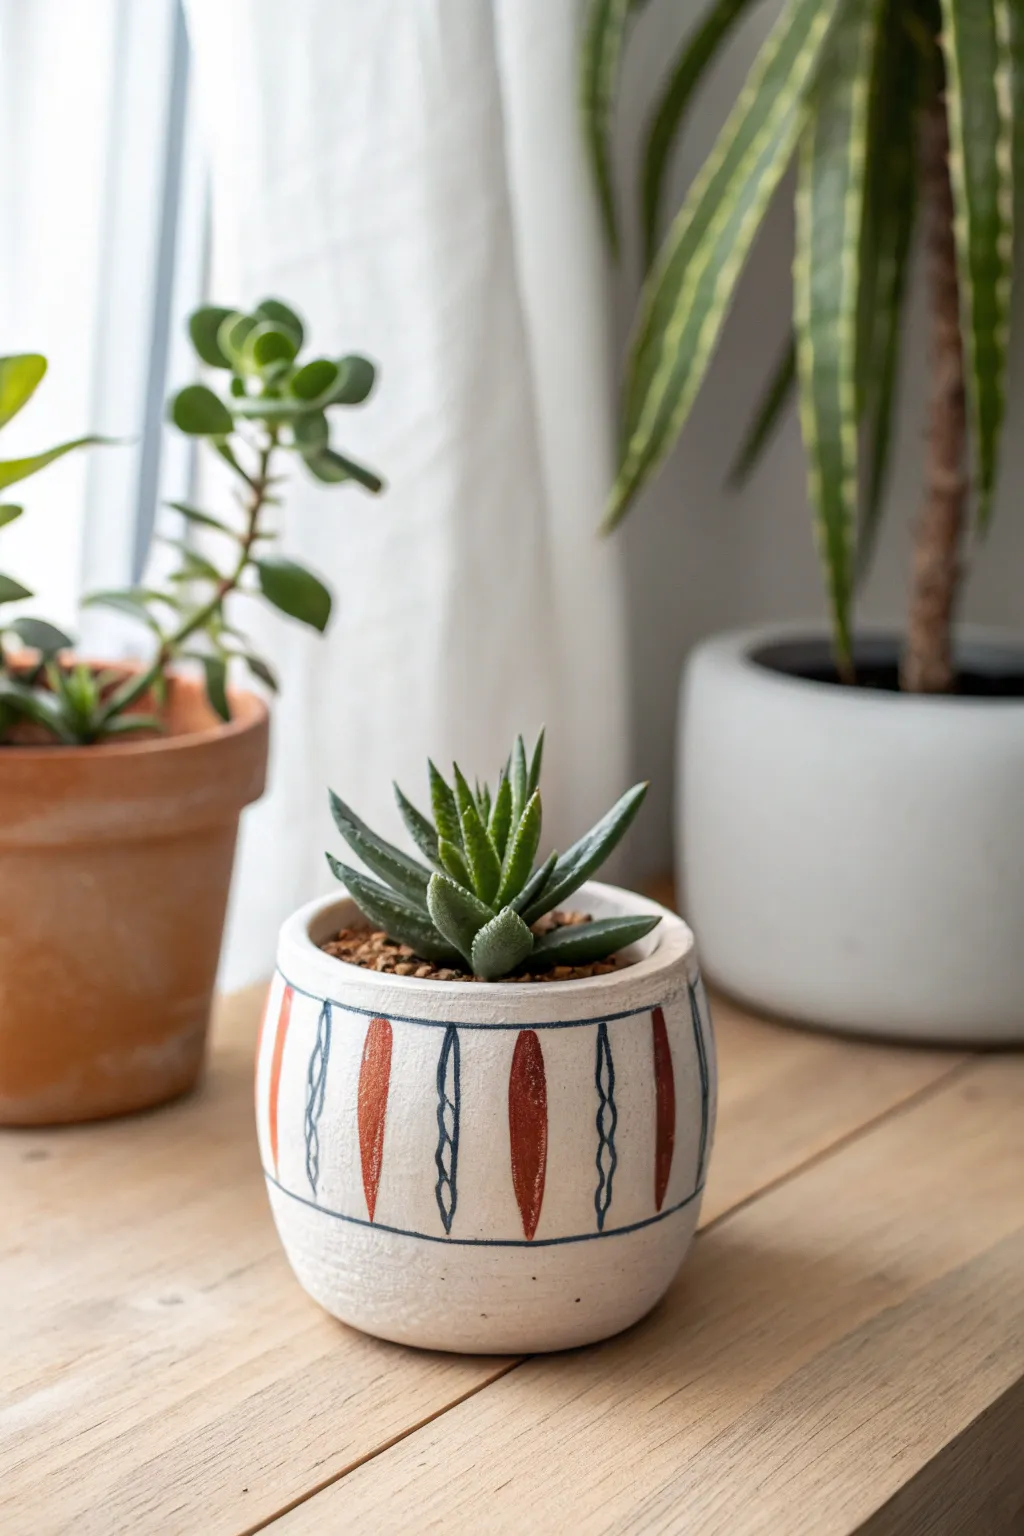
This charming, pot-bellied planter combines a rustic, hand-built feel with a precise geometric design, offering a perfect home for your favorite succulent. The white base provides a clean canvas for the alternating rust-orange teardrops and navy blue squiggles, creating a look that is both modern and grounded.
Step-by-Step Guide
Materials
- Air-dry clay or polymer clay (white)
- Acrylic paints (White, Rust/Burnt Orange, Navy Blue)
- Fine detail paintbrush (size 0 or 00)
- Medium flat paintbrush
- Rolling pin
- Small bowl of water
- Sponge or sandpaper (fine grit)
- Clear matte varnish sealant
- Modeling tools or a toothpick
Step 1: Sculpting the Form
-
Preparing the clay:
Begin with a ball of white clay about the size of a tennis ball. Knead it in your hands until it is pliable and warm, ensuring there are no air bubbles trapped inside. -
Creating the pinch pot base:
Push your thumb into the center of the ball, stopping about half an inch from the bottom. Slowly pinch the clay between your thumb and fingers, rotating the ball as you go to thin out the walls evenly. -
Shaping the belly:
Focus your pinching pressure on the middle section of the pot’s walls to gently puff them outward. You want a rounded, slightly bulbous silhouette rather than straight sides. -
Refining the rim:
Gently tap the rim upside down on your work surface to flatten it slightly. Then, use your fingers and a little water to smooth the edge so it is uniform and free of cracks. -
Smoothing the surface:
Dip your finger in water and run it over the entire exterior and interior. Make sure to erase any fingerprints or deep dents to create a smooth canvas for your painting later. -
Drying or baking:
If using air-dry clay, let the pot sit for 24-48 hours until completely hard and white. For polymer clay, bake according to the manufacturer’s temperature and time instructions.
Step 2: Refining and Base Coating
-
Sanding imperfections:
Once fully cured or dry, use fine-grit sandpaper to gently buff away any remaining lumps or uneven textures on the exterior. Wipe away the dust with a barely damp cloth. -
Priming the surface:
Even if your clay is white, I suggest applying a coat of white acrylic paint. This creates a uniform brightness and seals porous air-dry clay, making the details pop. -
Letting the base set:
Allow the white base coat to dry completely. It should feel dry to the touch and not tacky before you attempt any detail work.
Steady Hands
Rest your pinky finger against the pot while holding the brush. This acts as an anchor, giving you much better control for painting those fine horizontal lines.
Step 3: Adding the Geometric Design
-
Painting the horizontal borders:
Mix a small amount of navy blue paint with a tiny drop of water to improve flow. Using your fine detail brush, paint a thin, continuous horizontal line about half an inch below the rim. -
Adding the lower border:
Repeat this process near the bottom of the pot, painting a matching navy line about half an inch from the base. Try to keep your hand steady by resting the pot on the table while you rotate it. -
Drafting the vertical guides:
Visualize the space between your blue lines divided into even sections. Lightly mark vertical spacing with a pencil if you’re worried about symmetry. -
Painting the rust teardrops:
Using the rust or burnt orange paint, create long, vertical teardrop shapes in every other section. These should be elongated ovals that don’t quite touch the top or bottom blue lines. -
Painting the squiggle motifs:
Clean your fine brush thoroughly. Back with the navy paint, fill the empty spaces between the rust shapes with a vertical wavy line or two interlinked curves. -
Applying the final varnish:
Once all paint is perfectly dry, brush on a coat of clear matte varnish. This protects the design from moisture and gives the pot a professional, finished ceramic look.
Make It Drain
Before drying the clay, poke a hole in the bottom center with a straw. This adds drainage, crucial if you plan to plant real succulents directly inside.
Place your new creation on a sunny windowsill and enjoy the handmade warmth it brings to the room


Cute Face Clay Magnets
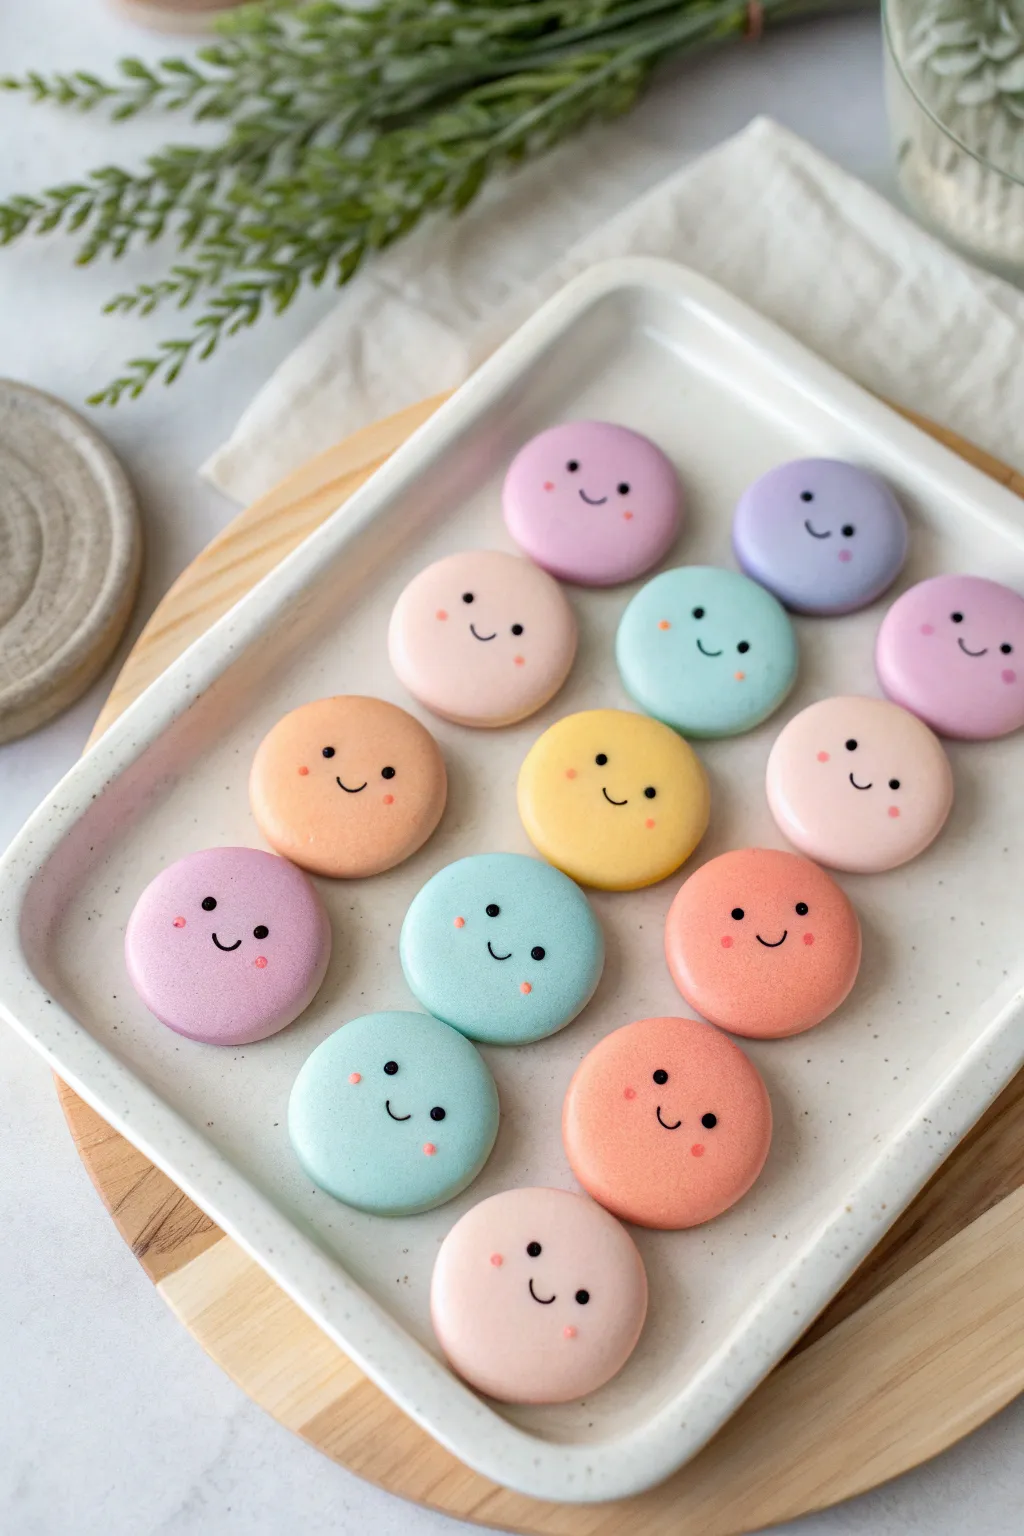
Brighten up your fridge or workspace with these irresistibly sweet clay magnets that look like pastel macarons. These cheerful little faces are incredibly easy to make and add a soft pop of color to any magnetic surface.
Step-by-Step Tutorial
Materials
- Polymer clay (white, plus assorted pastel colors like pink, lavender, mint, peach, light yellow)
- Acrylic rolling pin
- Small round circle cutter (approx. 1.5 inch diameter)
- Parchment paper or baking tile
- Black fine-tip paint pen or acrylic paint with a tiny detailing brush
- Pink paint marker or pink acrylic paint
- Dotting tool or toothpick
- Strong craft magnets (neodymium recommended)
- Strong adhesive (E6000 or super glue)
- Gloss or matte glaze (optional)
Step 1: Preparing the Clay Base
-
Condition the clay:
Start by taking small amounts of your pastel polymer clay colors. Knead each color in your hands until it becomes soft, pliable, and warm to the touch. -
Create custom shades:
If your colored clay is too vibrant, mix in a significant amount of white clay to achieve those soft, milky pastel tones seen in the photo. -
Roll out the slab:
Place your conditioned clay on parchment paper or a smooth work surface. Use your acrylic roller to roll the clay out to a consistent thickness, about 1/4 inch thick. You want them chunky enough to look like cookies. -
Cut the circles:
Press your round circle cutter firmly into the clay slab to create clean discs. Gently wiggle the cutter before lifting to separate the shape. -
Soften the edges:
Once you have popped the clay circle out of the cutter, gently tap the sharp top edges with your fingertip. This rounds them off slightly, giving that smooth, pillowy look. -
Prepare for baking:
Transfer your cut circles onto a parchment-lined baking sheet or a ceramic tile. Make sure they aren’t touching each other.
Step 2: Baking and Face Details
-
Bake the clay:
Follow the baking instructions on your specific brand of polymer clay packaging. Typically, this is around 230°F to 265°F (110°C to 130°C) for 15-30 minutes. Let them cool completely before handling. -
Plan the faces:
Visualize a simple face on the lower half of the circle. Keeping the features low and wide apart creates that cute ‘kawaii’ aesthetic. -
add the eyes:
Using a fine-tip black paint pen or a dotting tool dipped in black paint, place two small dots for eyes. Keep them relatively wide set. -
Draw the smile:
carefully draw a tiny, shallow ‘U’ shape right between the eyes. Keep the line thin and delicate. -
Add rosy cheeks:
For the finishing touch, dip a toothpick or small dotting tool into pink paint. Gently dab a small dot just below and to the outside of each eye.
Keep it Clean
Baby wipes are your best friend! Clean your hands and roller between colors to prevent dark lint or color transfer from ruining your light pastels.
Step 3: Assembly
-
Seal the surface:
If you want extra protection or a specific finish, brush a thin layer of polymer clay glaze over the front. I usually skip this for a matte look, but a gloss coat makes them look like glazed ceramic. -
Prepare the back:
Flip the cooled and dried clay discs over so the plain back is facing up. -
Attach the magnet:
Apply a small dab of strong adhesive, like E6000, to the center of the back. -
Secure and dry:
Press your magnet firmly into the glue. Allow the adhesive to cure fully according to the glue manufacturer’s instructions (usually 24 hours) before sticking them to your fridge.
Fixing Fingerprints
If you see fingerprints on your raw clay circles, lightly brush them with a tiny amount of baby oil or cornstarch before baking to smooth them out.
Now you have a charming set of smiley faces ready to hold up your most important notes and photos

The Complete Guide to Pottery Troubleshooting
Uncover the most common ceramic mistakes—from cracking clay to failed glazes—and learn how to fix them fast.
Geometric Clay Earrings
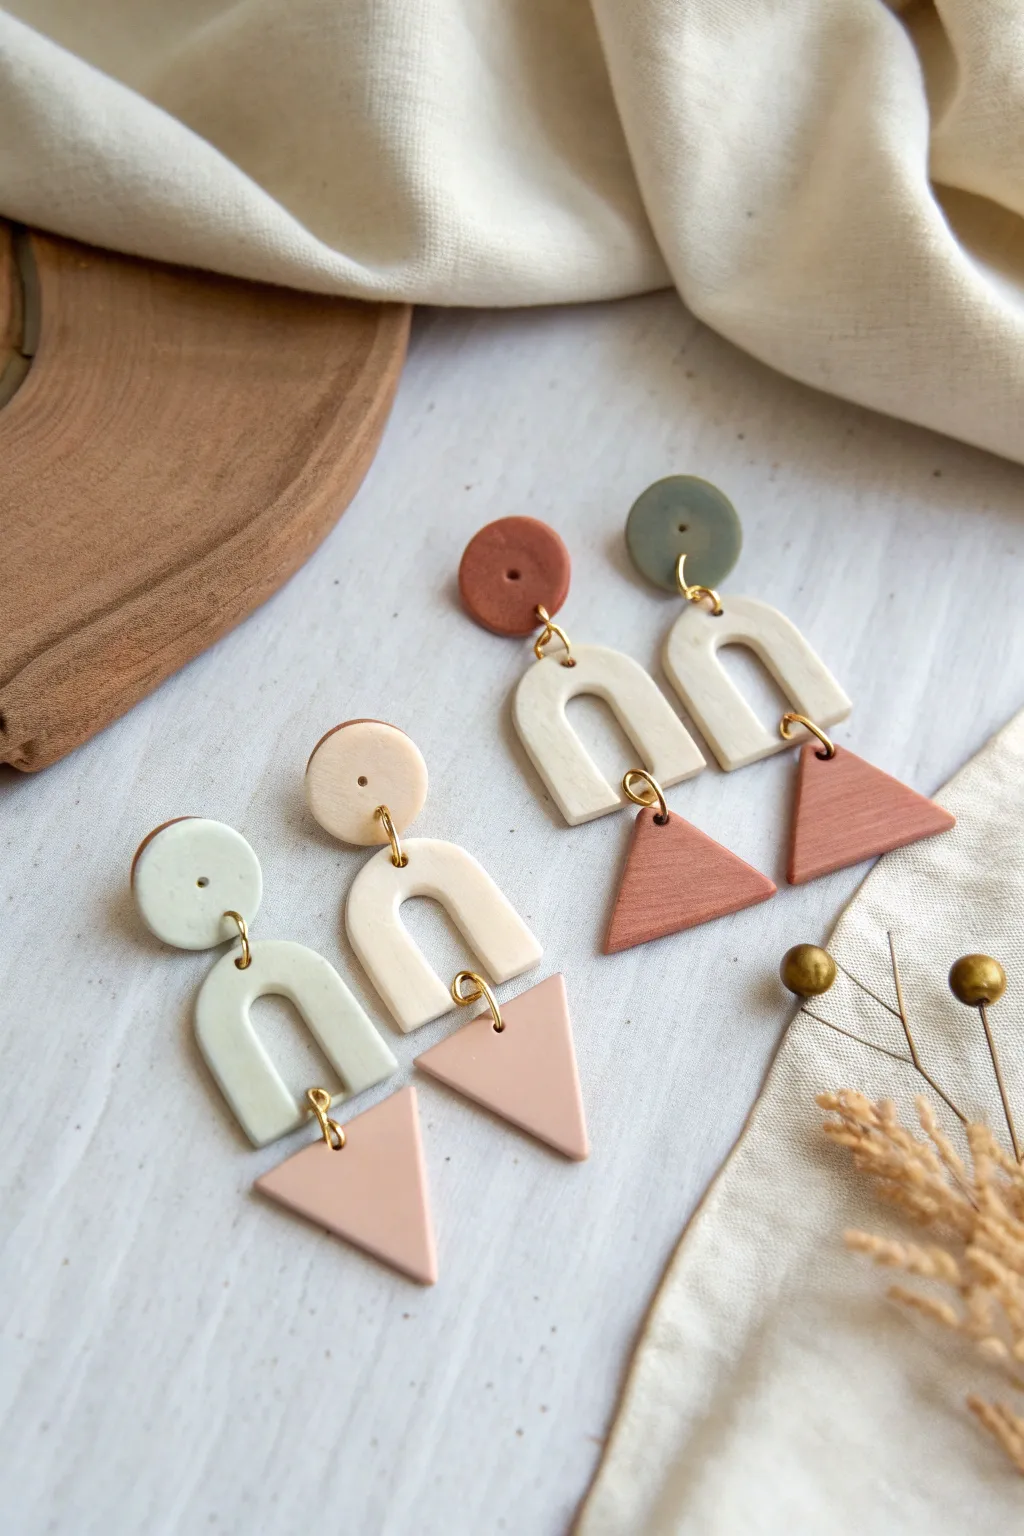
These trendy, three-tiered polymer clay earrings combine earthy tones with modern geometric shapes for a chic boho look. The design features a stud top, a classic arch connector, and a dangling triangle, all linked with delicate jump rings.
Step-by-Step
Materials
- Polymer clay in muted colors (sage green, cream/beige, terracotta, dusky pink)
- Acrylic rolling pin or pasta machine
- Clay cutters: small circle (approx. 10mm), arch shape (approx. 20mm), triangle shape (approx. 20mm)
- Texture sponge or sandpaper (optional typical matte finish)
- Needle tool or toothpick
- Small jump rings (gold finish)
- Earring posts and backs
- Jewelry pliers (flat nose and round nose)
- Super glue or liquid clay
- Ceramic tile or parchment paper for baking
- Oven
Step 1: Preparing the Clay
-
Condition the clay:
Start by warming up each color of polymer clay in your hands. Knead and roll it until it becomes soft and pliable, which prevents cracks during baking. You’ll need four distinct colors to match the image: a sage green, a neutral cream, a deep terracotta, and a soft blush pink. -
Roll out slabs:
Using your acrylic roller or pasta machine, roll each color out into flattened sheets. Aim for a distinct thickness of about 3mm to 4mm—you want them sturdy but not too heavy for ears. -
Add texture (optional):
The earrings in the photo have a lovely matte, organic texture. To mimic this, lightly press a piece of sandpaper or a texture sponge onto the surface of your clay sheets before cutting.
Step 2: Cutting and Piercing
-
Cut the circles:
Use your small circle cutter to punch out the top stud pieces. For the first pair, cut two circles from the sage green clay. For the second pair, cut two circles from the terracotta clay. -
Cut the arches:
Using the arch cutter, cut four identical shapes from the cream/beige clay. These will serve as the middle connectors for both pairs of earrings. -
Cut the triangles:
Finally, cut your bottom triangle dangles. Cut two triangles from the blush pink clay for the sage pair, and two from the terracotta clay (or a slightly darker rose shade) for the other pair. -
Smooth the edges:
Gently run your finger along the cut edges of every piece to smooth out any rough clay burrs or sharp corners left by the cutters. -
Pierce the holes:
Using your needle tool, carefully poke holes for the jump rings. The circle needs a hole at the bottom. The arch needs a hole at the very top center and another hole at the bottom of one leg (off-center). The triangle needs a hole at the top corner to matching the arch’s leg. -
Check alignment:
Before baking, lay the pieces out in their final arrangement to ensure your holes line up and the pieces will hang straight.
Fixing Burnt Edges
If your white clay yellows or burns slightly, simply use a nail buffer or fine-grit sandpaper to gently buff the surface until the discoloration disappears.
Step 3: Baking and Assembly
-
Bake the pieces:
Place all clay components on a ceramic tile or parchment-lined baking sheet. Bake according to your specific clay brand’s instructions (usually around 275°F/130°C for 30 minutes). -
Cool down:
Allow the pieces to cool completely inside the oven or on a wire rack. They are fragile while hot and harden fully as they cool. -
Attach earring posts:
Turn the small circle studs over. Use a dot of super glue or liquid clay (rebaking if using liquid clay) to attach the metal earring posts to the back of the circles. -
Open jump rings:
Using two pairs of pliers, twist your gold jump rings open sideways (never pull them apart outward) to preserve their shape. -
Connect circle to arch:
Slide an open jump ring through the hole in the bottom of the stud circle and the top hole of the cream arch. Close the ring securely. -
Connect arch to triangle:
Take a second jump ring and loop it through the hole at the bottom of the arch leg and the top hole of the triangle. Close the ring. -
Repeat for all earrings:
Repeat the assembly process for the remaining three earrings until both pairs are complete.
Pro Tip: Clean Cuts
Dip your cutters into cornstarch or water before pressing into the clay. This acts as a release agent and stops the clay from sticking inside the cutter.
Enjoy wearing your handcrafted geometric statement pieces that add a splash of artisan style to any outfit
Mini Food Charms With Faces
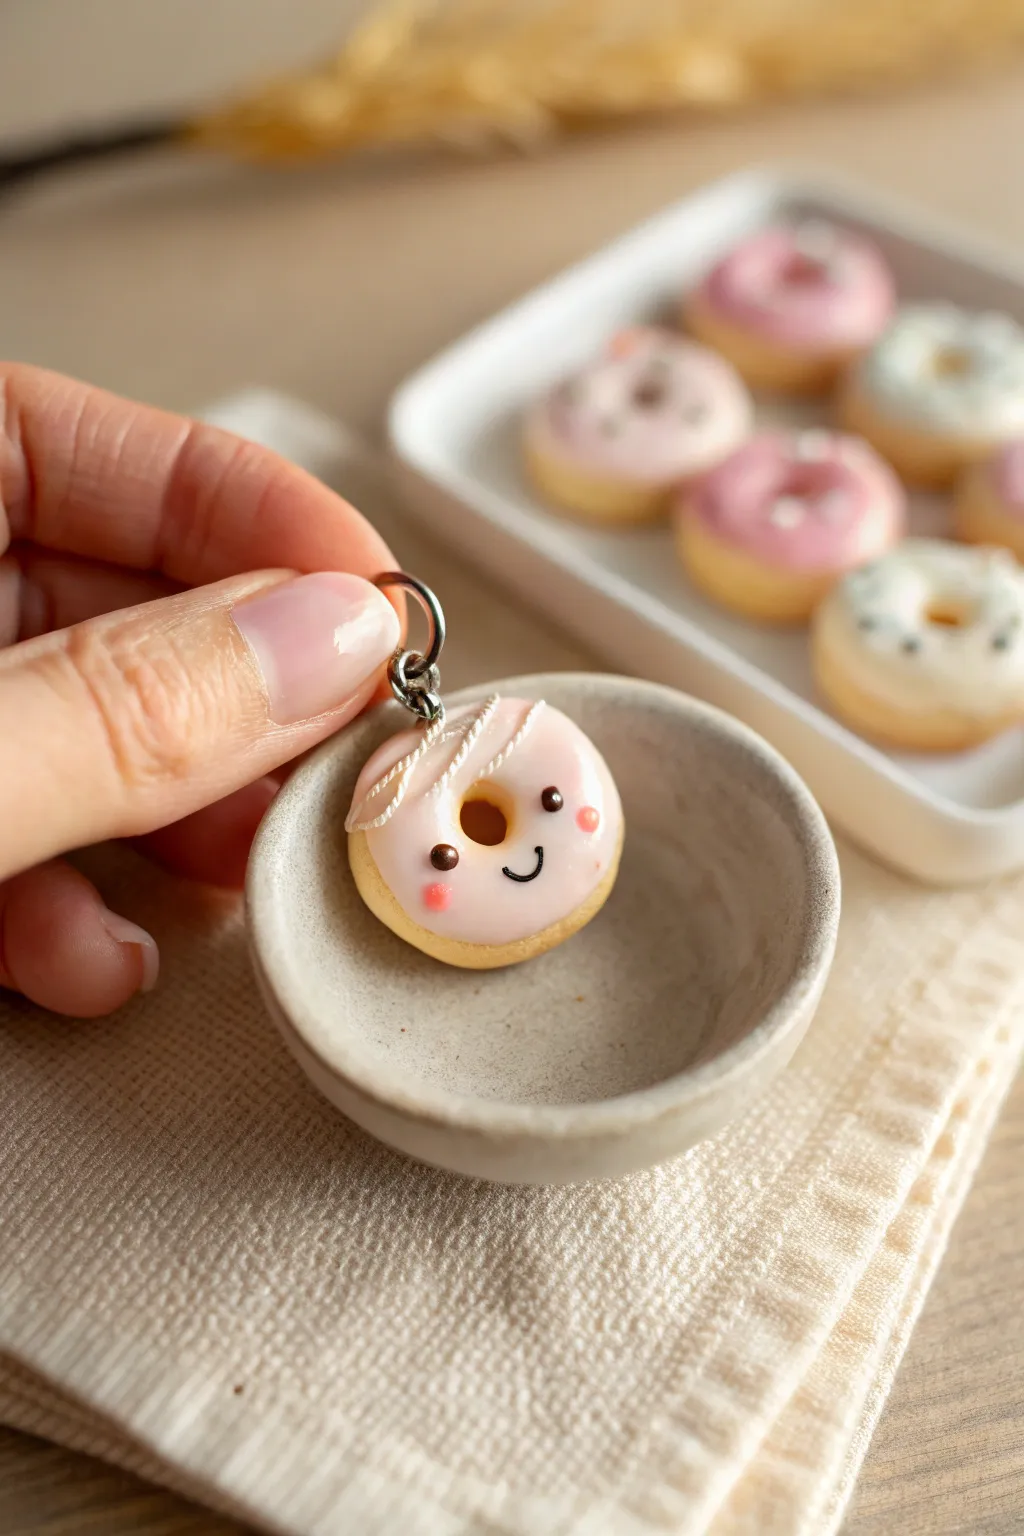
Transform polymer clay into an irresistibly cute accessory with this tiny smiling donut charm. Featuring soft pink icing, delicate drizzle details, and the sweetest little face, this project is perfect for beginners looking to practice miniature food sculpting.
Step-by-Step Guide
Materials
- Polymer clay (dough/beige color, pale pink, dark brown, white)
- Small metal jump ring and eye screw
- Liquid polymer clay (translucent or white)
- Dotting tool or toothpick
- Needle tool
- Small round cutter (approx. 2cm)
- Pastel chalks (orange-brown for shading, pink for blush)
- Soft paintbrush
- Gloss glaze (optional)
- Oven for baking
Step 1: Shaping the Base
-
Mix your dough color:
Start by mixing translucent white clay with a tiny bit of ochre or beige to achieve a realistic, slightly translucent dough color. Conditioning the clay well ensures no cracks appear later. -
Form the donut:
Roll a marble-sized ball of clay until smooth, then gently flatten it into a thick disc shape. Round off the edges with your finger so it looks puffy. -
Create the hole:
Use a the back of a paintbrush or a large dotting tool to push a hole through the center. Wiggle it slightly to widen the opening, smoothing the inner edges with your finger to keep that soft, baked look. -
Texture the dough:
Take a toothbrush or a ball of crinkled aluminum foil and gently tap it all over the surface of the recognizable dough area. This mimics the porous texture of a real fried donut. -
Shade for realism:
Scrape some orange-brown pastel chalk into a fine dust. Use a soft, dry brush to gently dust the outer edges and the bottom of the donut, giving it a golden-baked appearance.
Fixing Fingerprints
Smudged the smooth icing? Lightly brush a tiny amount of baby oil or clay softener over the surface with your finger before baking to melt away prints.
Step 2: Adding the Sweet Details
-
Prepare the icing:
Roll out a thin sheet of pale pink clay. Use a cutter (slightly smaller than your donut) or freehand a wavy circle shape that mimics poured icing. -
Apply the glaze:
Place the pink clay cutout on top of your donut base. Gently press the edges down so they hug the curves of the donut, smoothing any fingerprints as you go. Repierce the center hole if the pink clay covered it. -
Create the face indentations:
Before adding the features, use a small dotting tool to make shallow indentations where the eyes will go. This helps the tiny clay spheres sit securely. -
Add the eyes:
Roll two incredibly tiny balls of dark brown clay. carefully place them into the indentations you just made. I usually use a needle tool to pick these up since they are too small for fingers. -
Add the smile:
Roll a microscopic snake of dark brown clay. Curve it into a ‘U’ shape on your work surface first, then transfer it gently to the face using a needle tool, pressing it lightly to adhere. -
Give it a blush:
Dip a small dotting tool or the tip of a toothpick into pink pastel dust or acrylic paint. Dot two rosy cheeks onto the icing just below the eyes. -
Mix the drizzle:
Mix a small amount of white clay with liquid polymer clay (or use white liquid clay directly) until it reaches a stringy, icing-like consistency. -
Drizzle the decoration:
Using a needle tool, drag thin lines of the white liquid clay mix across one side of the donut in a diagonal zig-zag pattern to create the delicate sugar drizzle look.
Tiny Eye Hack
Instead of rolling clay for eyes, use black glass microbeads or seed beads pressed into the raw clay. They won’t melt and stay perfectly round!
Step 3: Assembly and Baking
-
Insert hardware:
If you want to hang this charm, screw a small metal eye pin into the top of the donut. For extra security, add a dab of liquid clay to the screw threads before insertion. -
Bake carefully:
Bake the charm according to your clay manufacturer’s instructions (usually around 275°F/130°C for 15-30 minutes). Use an oven thermometer to ensure you don’t scorch the light colors. -
Cool down:
Let the piece cool completely inside the oven or on the baking tray. Moving it while hot can distort the shape or loosen the eye pin. -
Add shine:
Once cool, brush a thin layer of gloss glaze strictly over the pink icing area and the eyes to make them look wet and sugary, leaving the dough matte. -
Attach the jump ring:
Open a jump ring with pliers, loop it through the eye pin, and close it securely. Your charm is ready to be worn.
Now you have an adorable, smiling pocket companion ready to sweeten up your keychain or necklace chain.


What Really Happens Inside the Kiln
Learn how time and temperature work together inside the kiln to transform clay into durable ceramic.
Stacked-Shape Animal Minis

This charming bear figurine relies on the natural beauty of speckled clay and simple geometric forms to create a heartwarming character. Its minimalist design makes it a perfect beginner project that looks surprisingly sophisticated once finished.
How-To Guide
Materials
- Speckled sandstone or beige polymer clay (with faux granite effect)
- Black acrylic paint or glaze
- Burnt orange chalk pastel or pigment powder
- Basic sculpting tools (needle tool, smoothing tool)
- Small soft paintbrush
- Clear matte varnish (optional)
Step 1: Forming the Base
-
Prepare the Clay:
Start by conditioning your speckled clay until it is soft and pliable. If you are using polymer clay, kneading it thoroughly is key to preventing cracks later. -
Shape the Body:
Roll a ball of clay roughly the size of a golf ball. Gently roll it on your work surface into a slightly tapered cylinder, wider at the bottom for stability and slightly narrower at the neck. -
Create the Head:
Roll a second sphere, slightly smaller than the body. Press it gently to flatten the bottom surface just a tiny bit so it sits flush against the neck area. -
Connect the Forms:
Place the head onto the body. I like to twist the head back and forth slightly as I press down to ensure a strong bond between the two shapes without distorting them. -
Blend the Seam:
Go around the neck seam with a smoothing tool. You don’t want to erase the distinction between head and body completely, but ensure they are securely joined.
Uneven Seams?
If the neck seam looks messy, roll a very thin ‘snake’ of clay, wrap it around the joint, and smooth it outwards in both directions to create a flawless transition.
Step 2: Adding Features
-
Make the Ears:
Roll two small pea-sized balls of clay. Flatten slightly and press a dotting tool or the rounded end of a paintbrush handle into the center of each to create the inner ear depression. -
Attach Ears:
Press the ears onto the top sides of the head. Use your smoothing tool to blend the back of the ears into the skull so they don’t pop off later. -
Form the Arms:
Roll two elongated teardrop shapes for the arms. Flatten them slightly against your work surface. -
Attach Arms:
Press the arms onto the sides of the body, starting just below the neck. Curve them slightly forward to follow the belly’s contour, blending the clay at the shoulder attachment point. -
Add Texture:
If your clay isn’t naturally speckled, you can gently prick the surface randomly with a needle tool to mimic the textural look of stone, but keep it subtle.
Try a New Look
Give your bear a friend by making a second one in a different size, or shape a tiny clay accessory like a scarf or a heart for the bear to hold in its paws.
Step 3: Face and Finishing
-
Sculpt the Snout:
The snout is very subtle on this design. Simply press gently with your thumb in the lower center of the face to create a slight protrusion, rather than adding a separate ball of clay. -
Paint the Inner Ears:
Before baking (if using pigment) or after (if using paint), apply a deep burnt orange color to the inside depressions of the ears. -
Create Rosy Cheeks:
Take your orange chalk pastel and scrape a little dust off it. Use a soft, dry brush to dab this powder onto the bear’s cheeks for a soft, blushing effect. -
Bake or Dry:
Follow the manufacturer’s instructions for your specific clay type. If using air-dry clay, let it sit for at least 24 hours. -
Paint Facial Details:
Using a very fine brush and black acrylic paint, add two small dots for eyes wide apart. Add a small oval nose right at the peak of the snout area. -
Add the Smile:
Paint a very fine, small curved line for the mouth just under the nose. -
Add Eyebrows:
Paint two tiny, slanted dashes above the eyes to give the bear a slightly curious or worried expression. -
Varnish:
Once the paint is fully dry, apply a thin coat of matte varnish to protect the surface while maintaining that stone-like finish.
Now you have a sweet, stony little companion to sit exclusively on your shelf or desk
Rainbow Arch Desk Decor

This minimalist desk accessory brings a calming, organic touch to any workspace with its muted earth tones and substantial, blocky shape. Unlike a traditional thin wire rainbow, this project uses thick slabs of clay to create a freestanding, sculptural piece that looks beautiful from every angle.
Detailed Instructions
Materials
- Air-dry clay (white or light grey)
- Rolling pin with guide rings (or wooden dowels)
- Ruler
- Craft knife or clay wire tool
- Sandpaper (fine and medium grit)
- Acrylic paints (terracotta, beige, sage green, cream)
- Matte sealant or varnish
- Paintbrushes (flat and detail)
- Water cup
Step 1: Prepping and Shaping the Arches
-
Prepare your workspace:
Lay down a clean canvas cloth or parchment paper to prevent the clay from sticking to your table. Take a substantial chunk of air-dry clay and knead it until it’s pliable and smooth, removing any air bubbles. -
Roll out a thick slab:
Roll your clay out into a thick, even slab. For this chunky look, you want a depth of at least 1 inch (2.5 cm). Using guide rings on your rolling pin or placing equal-sized wooden slats on either side of the clay helps keep the thickness perfectly uniform. -
Cut the clay strips:
Using a ruler and a sharp craft knife, cut four long strips of clay. These should all be the same width (from front to back), roughly 1 inch to match the thickness, creating a square cross-section for each strip. -
Form the smallest arch:
Take your first strip and gently curve it into a tight U-shape. This smallest arch forms the solid core of the rainbow. Stand it up on its ends to ensure the base is flat against the table. -
Layer the second arch:
Place the second strip over the first one, molding it gently to follow the curve. Press them together lightly just to check the fit, but don’t bond them yet if you plan to paint them separately for crisper lines. I prefer to shape them together but separate them for drying. -
Complete the rainbow stack:
Repeat the process with the remaining two strips, ensuring each one drapes smoothly over the previous layer without cracking. If the clay starts to crack, smooth a little water over the fissure with your finger. -
Trim the base:
Once all four arches are stacked, the outer legs will likely be longer than the inner ones. Use your long blade or wire tool to slice straight across the bottom of the entire stack, creating a perfectly flat, flush base for standing.
Crack Control
If cracks appear while drying, don’t panic. Mix a tiny bit of fresh clay with water to make a paste (slip) and fill the crack, then sand smooth once dry.
Step 2: Drying and Refining
-
Separate and dry:
Carefully separate the arches slightly or completely so air can circulate between them. Place them on a wire rack or a porous surface. Let them dry for 24-48 hours until completely hard and white. -
Sand for smoothness:
Once fully dry, use medium-grit sandpaper to remove any major bumps or sharp edges. Pay special attention to the front and back faces to ensure they are flat. -
Fine tune the finish:
Switch to fine-grit sandpaper for a final polish. The surface should feel very smooth to the touch, like unglazed ceramic. -
Clean off dust:
Wipe every piece down with a slightly damp cloth or a dry tack cloth to remove all sanding dust. Dust can prevent paint from adhering smoothly.
Go Big
Scale this up by using 2-inch thick slabs to create a heavy-duty bookend rather than just a decorative object. Add weight inside the clay for stability.
Step 3: Painting and Assembly
-
Mix your palette:
Prepare your acrylics. You want muted, earthy tones: a deep terracotta for the outer arch, a warm beige, a soft cream, and a muted sage green for the smallest inner arch. -
Paint the arches:
Paint each arch individually. Apply thin, even coats, letting each layer dry before adding the next. Two or three coats usually provide the solid, opaque finish seen in the photo. -
Create the speckled effect:
To mimic the stone-like texture in the image, dip an old toothbrush into diluted dark brown or grey paint. Run your thumb over the bristles to flick tiny speckles onto the painted arches. Practice on paper first to control the spray. -
Glue the stack:
Once the paint is totally creating, apply a strong craft glue or heavy-duty adhesive to the contact points between the arches. Press them together firmly on a flat surface to ensure the bottom remains flush. -
Seal the piece:
Apply a coat of matte spray varnish or brush-on matte sealant. This protects the paint and gives the piece a finished, professional look without adding unwanted glossy shine. -
Final cure:
Let the glue and varnish cure undisturbed for another 24 hours before placing it on your desk.
Enjoy the calm vibe your new handmade sculpture brings to your space

TRACK YOUR CERAMIC JOURNEY
Capture glaze tests, firing details, and creative progress—all in one simple printable. Make your projects easier to repeat and improve.
Simple Textured Incense Holder
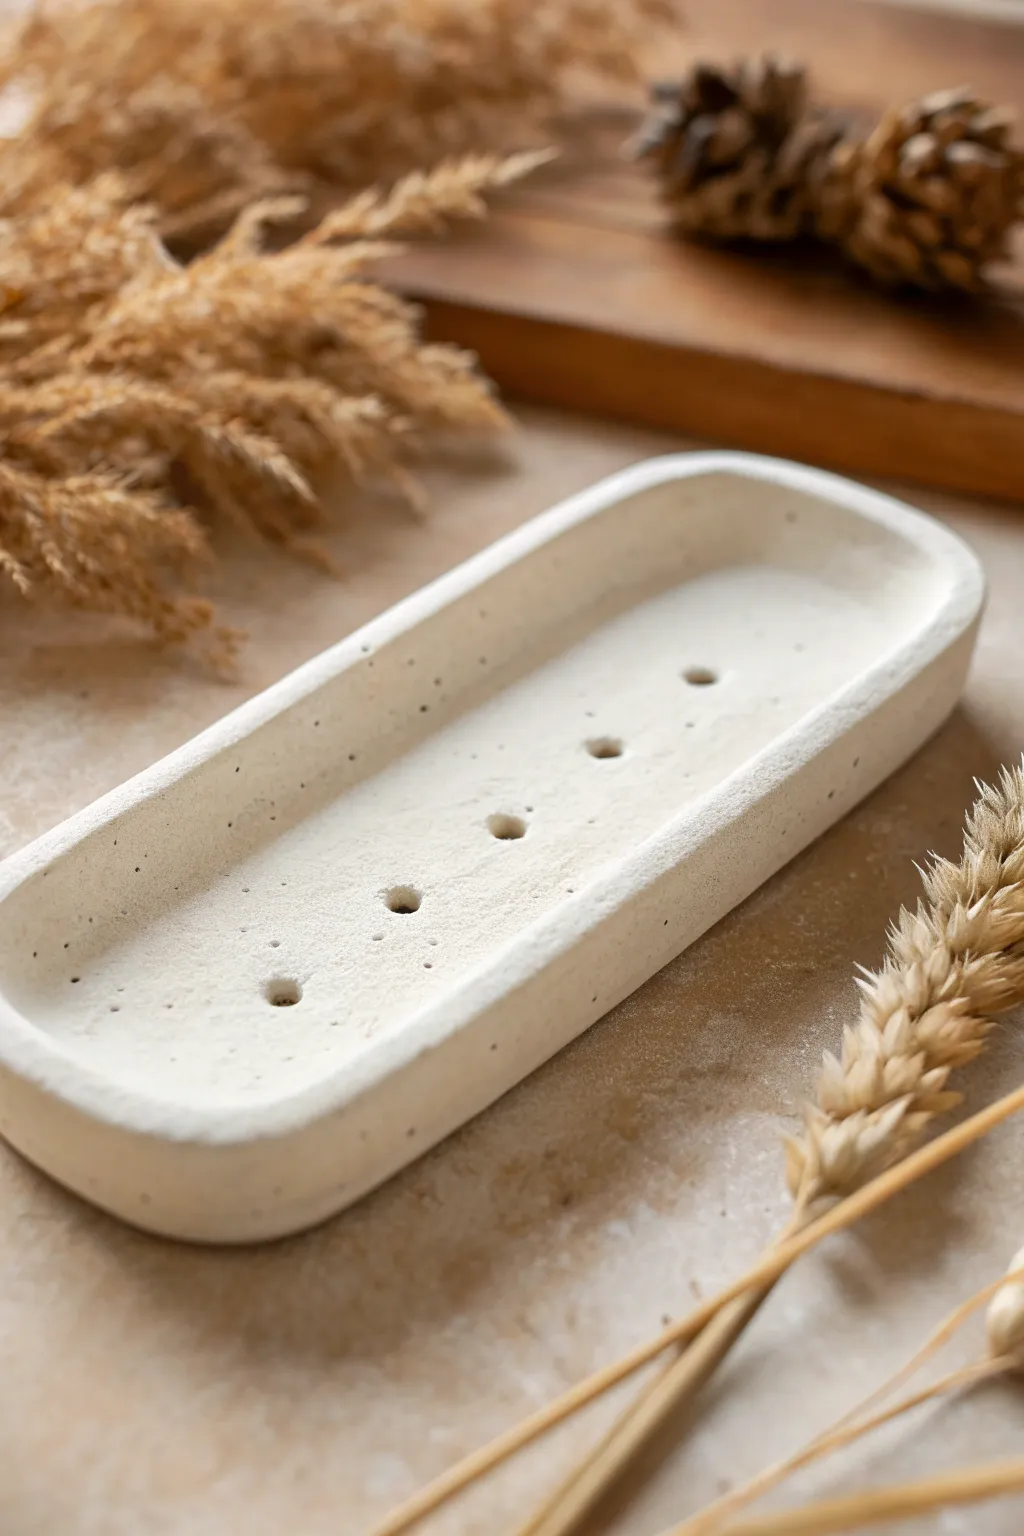
This elegant incense holder combines modern minimalism with organic texture, featuring a lovely elongated oval shape and subtle speckling. Its shallow basin and deliberate perforations make it both a functional ash catcher for multiple sticks and a serene decorative object.
Step-by-Step Guide
Materials
- White air-dry clay or polymer clay
- Rolling pin
- Sharp craft knife
- Sandpaper (fine grit)
- Used coffee grounds or coarse black pepper (for creating speckles)
- Small bowl of water
- Drinking straw or skewer
- Ruler
- Paper template (optional)
Step 1: Preparation & Shaping
-
Prepare the speckled clay:
Start by conditioning your white clay until it is soft and pliable. To achieve that beautiful stone-like look, sprinkle in a pinch of dried used coffee grounds or cracked black pepper. Knead the clay thoroughly until the speckles are evenly distributed throughout the batch. -
Roll out the slab:
Place your clay on a smooth surface or canvas mat. Roll it out into an even slab, approximately 1/4 inch thick. Try to keep the thickness consistent, as this ensures the tray will dry evenly and lay flat. -
Cut the base shape:
You can either freehand an elongated oval shape or sketch a paper template first for precision. Place your template on the clay slab and carefully cut around it using a sharp craft knife. The shape should be a long pill-shape with rounded ends. -
Smooth the cut edges:
Dip your finger into a little water and gently run it along the cut edge of your oval base. This softens the sharp angles left by the knife and prepares the surface for attaching the rim.
Warping Woes?
If the tray curls up while drying, place a light book on top of it once it’s ‘leather hard’ (dry to touch but still cool). This weight keeps the base flat.
Step 2: Building the Rim
-
Create a coil:
Take the remaining clay and roll it into a long, even snake or coil. aiming for a thickness of about 1/3 inch. The coil needs to be long enough to go around the entire perimeter of your oval base. -
Score and slip:
Using your knife or a needle tool, make small scratches (scoring) along the outer top edge of your base and one side of your coil. Dab a little water (slip) onto the scored areas to act as glue. -
Attach the coil:
Place the coil onto the edge of the base, pressing down gently to secure it. If the coil is too long, cut the excess and blend the two ends together seamlessly so the join is invisible. -
Blend the seams:
Now comes the blending. Use your thumb or a modeling tool to smudge the clay from the coil down onto the base, both on the inside and the outside. You want the rim and base to become one solid piece of clay. -
Refine the walls:
With the seams blended, use your fingers to pinch and shape the walls upwards. Aim for a smooth, vertical rise. I find using a damp sponge here helps to smooth out fingerprints and create that sleek, professional finish.
Organic Edge
Instead of a perfect rim, use your thumb to gently press uneven dents along the top edge. It gives the piece a more hand-built, wabi-sabi aesthetic.
Step 3: Detailing & Finishing
-
Mark hole positions:
Using a ruler, lightly mark a straight line of dots down the center of the tray’s interior. Space them evenly apart—about an inch or so depending on the total length of your tray. -
Create the incense holes:
Take a skewer or a tool with a diameter slightly larger than an incense stick. Press straight down into your marked spots. Don’t go all the way through the bottom; create a deep indentation that will hold the stick upright. -
Check fit:
If you have an incense stick handy, test the holes gently to ensure they are wide enough. Clay shrinks slightly as it dries, so making the holes just a tiny bit larger than necessary is a good precaution. -
Final smoothing:
Give the entire piece one last look. Smooth any rough edges around the new holes with a damp brush and ensure the rim is level. -
Drying:
Place the finished tray on a wire rack or a piece of parchment paper in a cool, dry place. Let it air dry completely for 24-48 hours. Turn it over halfway through the drying process to help the bottom dry evenly. -
Sanding:
Once bone dry, take fine-grit sandpaper and gently sand the rim and edges. This removes any final bumps and gives the piece that matte, stone-like texture visible in the photo. -
Sealing (Optional):
If using air-dry clay, apply a matte varnish to protect it from humidity and ash stains. If using polymer clay, bake according to package instructions first, then sand.
Once dry and sanded, your textured tray is ready to bring a moment of calm to your daily routine
Minimal Photo or Card Holder
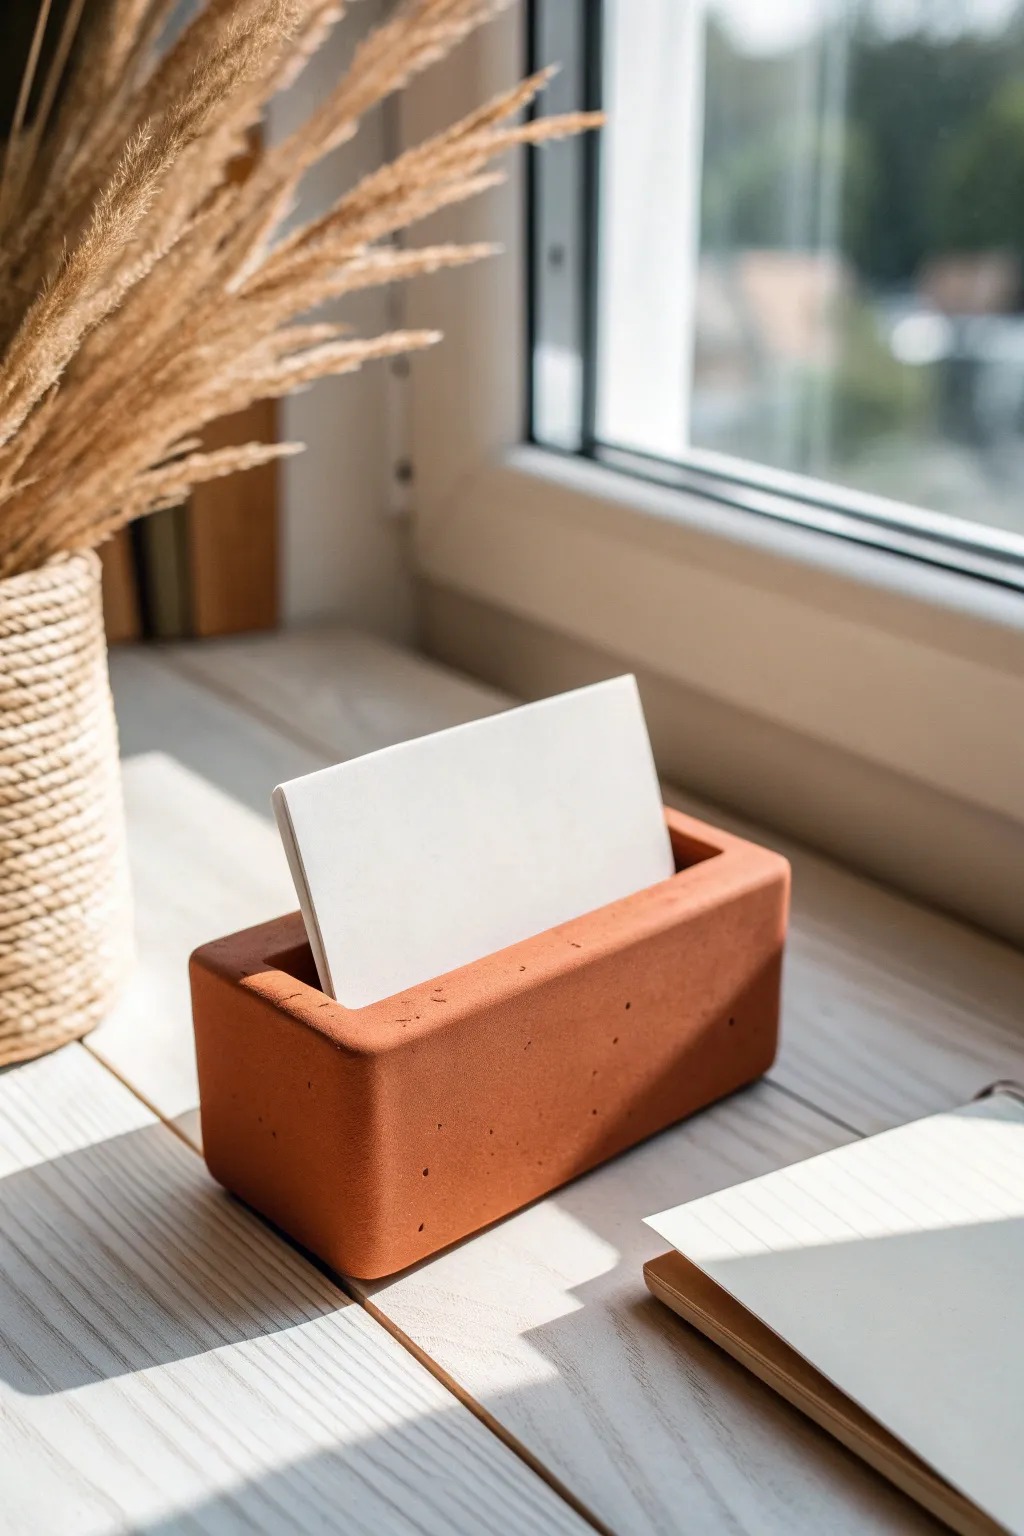
This minimalist card holder brings a touch of warm, earthy texture to any desk or shelf. Its clean geometric lines and terracotta finish make it the perfect functional sculpture for displaying photos or important notes.
Step-by-Step Tutorial
Materials
- White or grey crafting cement/concrete mix
- Terracotta liquid pigment or powdered oxide
- Cardboard or foam board (for the mold)
- Packing tape
- Cooking oil or release spray
- Mixing bowl and stir stick
- Fine-grit sandpaper (220-400 grit)
- Small piece of thick foam or wood (for the slot insert)
- Hot glue gun
- Utility knife
Step 1: Building the Mold
-
Determine dimensions:
Decide on the size of your block. The example looks roughly 4 inches long by 1.5 inches wide and 1.5 inches tall. Sketch these dimensions onto your cardboard or foam board. -
Cut the mold walls:
Using a utility knife and a straight edge, cut out the base and four walls for your mold. Ensure your cuts are perfectly straight to achieve that sharp geometric look. -
Tape the interior:
Cover what will be the *inside* surfaces of your mold with smooth packing tape. This is crucial for a smooth finish and prevents the moist concrete from warping the cardboard. -
Assemble the box:
Use hot glue or tape to assemble the walls onto the base. Make sure the taped sides are facing inward and that all seams are tightly sealed so the liquid mix won’t leak out. -
Create the slot insert:
Cut a piece of thick foam or scrap wood that is slightly narrower than your mold’s width (about 3.5 inches long) and about 5-6mm thick. This will create the negative space for the card slot. -
Position the insert:
Wrap this insert piece in packing tape for easy removal later. Glue it thoroughly to the bottom center of your mold box. Since we are pouring upside down, this ‘bottom’ will eventually become the top slot.
Air Bubble Issues?
If you see too many large holes after demolding, you can make a thick paste of your cement remnants and rub it into the holes, then sand smooth once dry.
Step 2: Mixing and Pouring
-
Prepare the dry mix:
Measure out your crafting cement into a disposable mixing bowl. For a piece this size, about 1.5 to 2 cups of dry mix should suffice. -
Add pigment:
Add your terracotta pigment to the water before combining it with the cement. I find dissolving the color in the liquid first ensures a much more even, streak-free tone. -
Mix the concrete:
Gradually add the colored water to the dry mix. Stir continuously until you reach a consistency similar to thick pancake batter or melted ice cream. -
Grease the mold:
Lightly coat the inside of your mold and the central insert with cooking oil or release spray. Wipe away any excess pools of oil so the surface doesn’t get bubbly. -
Pour the mixture:
Slowly pour the cement mixture into the mold, guiding it around the central insert. Fill it to just below the rim of your cardboard walls. -
Release air bubbles:
Tap the mold firmly against your table surface repeatedly for about a minute. You want to see bubbles rising to the top; this step creates the dense, smooth finish seen in the photo.
Vibrate for Smoothness
For a smoother finish, tape your mold to a board and hold a vibrating sander against the board (not the mold directly) for 30 seconds after pouring.
Step 3: Demolding and Finishing
-
Let it cure:
Allow the concrete to set undisturbed for at least 24 hours. Don’t rush this part, or the corners might crumble. -
Remove the mold:
Carefully peel away the tape and cardboard walls. If the central insert is stuck, use a pair of pliers to gently wiggle and pull it out. -
Initial sanding:
Use fine-grit sandpaper to smooth out any sharp ridges on the bottom or edges where the mold seams were. Sanding under running water reduces dust and gives a polished effect. -
Detailing texture:
If you want to replicate the slightly porous look in the image, hold back on sanding the sides too heavily. Let those tiny natural air pockets remain visible. -
Final drying:
As concrete dries, the color will lighten. Let the piece sit in a dry, ventilated area for another day or two until the terracotta color looks uniform and chalky. -
Seal the surface:
Apply a matte concrete sealer if you want to protect the surface from oils or stains, though leaving it raw preserves that authentic earthy feel.
Place your favorite photo or note in the slot and enjoy the classic simplicity of your new creation
Easy Pen Cup With Cutouts
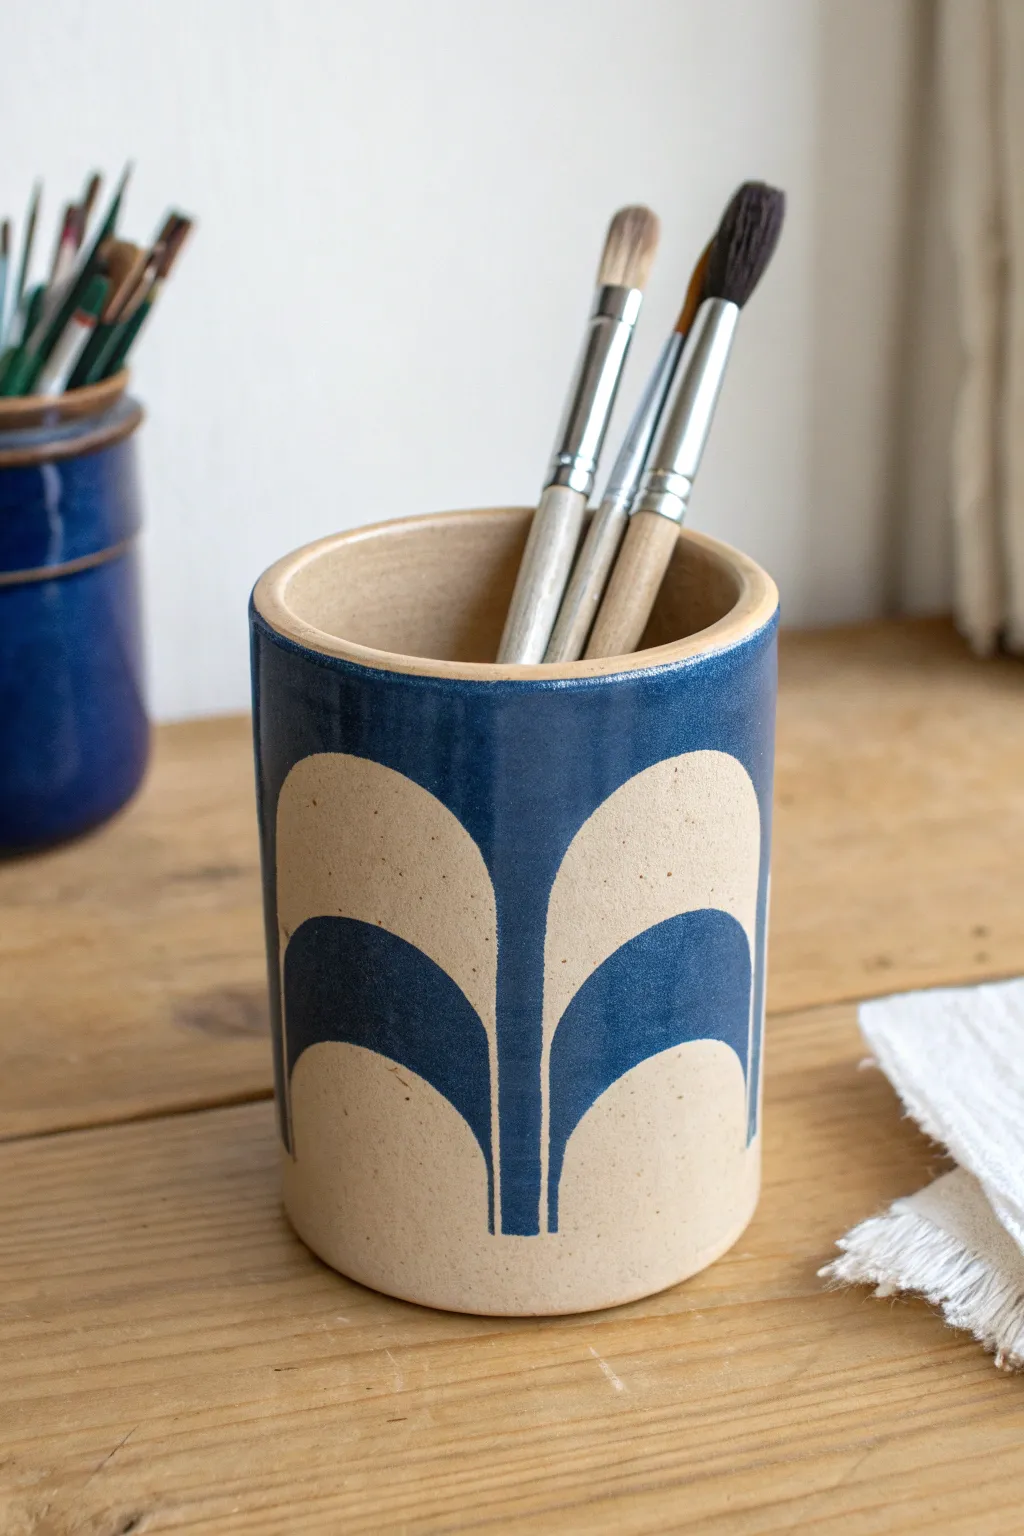
This charming ceramic pencil holder features a classic cylindrical shape adorned with a modern, repeating arch motif. The contrast between the raw, speckled clay and the glossy, deep blue glaze creates a timeless piece that organizes your desk in style.
Step-by-Step
Materials
- Stoneware clay (speckled or buff)
- Rolling pin
- Canvas working mat
- Rectangular template (approx. 4″ x 10″)
- Circle template (approx. 3″ diameter)
- Fettling knife or needle tool
- Scoring tool or fork
- Slip (clay and water mixture)
- Sponge
- Wax resist emulsion
- Paintbrush for wax
- Cobalt blue or navy underglaze (or glaze)
- Clear transparent glaze (optional, for fully glazed look)
- Kiln
Step 1: Forming the Cylinder
-
Roll out the slab:
Begin by wedging your clay to remove air bubbles, then roll it out on your canvas mat to an even thickness of about 1/4 inch. I like to flip the slab over halfway through rolling to ensure the canvas texture is minimal and even on both sides. -
Cut the components:
Using your rectangular template, cut a clean strip of clay. This will become the walls of your cup. Next, use the circular template to cut out the base. Make sure the length of your rectangle matches the circumference of your circle perfectly. -
Smooth the rims:
Before joining, gently run a damp sponge or your finger along the top edge of the rectangular strip. It is much easier to smooth this rim now while it is laying flat than after the cup is constructed. -
Score the edges:
Score the short ends of your rectangle and the perimeter of your circular base. Scoring means scratching the surface to create texture so the clay bonds securely. -
Apply slip:
Dab a generous amount of slip onto all the scored areas. The slip acts as the glue that will hold your pottery together during firing. -
Form the cylinder:
Curve the rectangular slab into a tube, overlapping the scored ends slightly or butting them against each other depending on your preference. Press the seam firmly together from both the inside and outside to seal it. -
Attach the base:
Place your cylinder onto the scored circular base. Use a modeling tool to blend the clay from the slab down onto the base, ensuring there are no gaps where the wall meets the floor. -
Clean and refine:
Use a rib tool or a barely damp sponge to smooth out your seam line until it disappears. Check the rim of the cup again to ensure it is perfectly round and smooth.
Clean Lines Pro Tip
For ultra-crisp lines on your arches, use automotive pinstripe tape instead of brush-on wax. Apply the tape to the bisque ware, glaze over it, and peel it off before firing.
Step 2: Creating the Design
-
Bisque fire:
Allow your piece to dry slowly and completely. Once bone dry, fire it in the kiln to bisque temperature (usually cone 04). This hardens the clay and makes it ready for glazing. -
Wipe clean:
After the piece comes out of the kiln, wipe it down with a damp sponge to remove any dust that might interfere with the wax or glaze application. -
Mark geometric guides:
Lightly sketch vertical lines around the cylinder using a pencil to space out your arches evenly. The graphite will burn off in the kiln, so don’t worry about marks remaining. -
Apply wax resist:
Dip a brush into your wax resist. Carefully paint the negative shapes—the arches themselves—where you want the raw, speckled clay to remain visible. The wax will prevent glaze from sticking to these areas. -
Outline interior arches:
Paint a second, smaller arch shape inside your main arches with the wax resist. This creates the ‘double arch’ look seen in the photo. -
Let wax dry:
Wait for the wax resist to dry completely. It usually turns darker or slightly transparent when it’s ready.
Step 3: Glazing and Finishing
-
Dip or brush glaze:
Dip the entire cup into your dark blue glaze, or brush on three even coats. Because of the wax resist, the glaze will bead up and roll off the arch shapes you painted earlier. -
Clean the resist areas:
Use a damp sponge to gently wipe any beads of glaze off the waxed areas. You want those clay sections to be completely clean so the edges of your blue design are crisp. -
Check the interior:
Decide if you want a clear glaze on the inside for easier cleaning. If so, pour clear glaze inside, swirl it around to coat, and pour out the excess before the exterior glaze dries fully. -
Wipe the foot:
Always wipe the bottom of your pot clean with a sponge to prevent it from fusing to your kiln shelf during the final firing. -
Glaze fire:
Place the cup back in the kiln for the final glaze firing (often cone 5 or 6 for stoneware). This will melt the glaze into that beautiful glossy deep blue surface.
Level Up: Texture
Carve the arched lines into the clay surface when it’s leather hard. This adds a tactile groove that helps guide your glazing later.
Once cooled, your new organizer stands ready to hold brushes, pens, or tools with artistic flair
Tiny Bud Vase Set

Create a stunning collection of tiny, matte-finish vases that perfectly capture the trend of Scandinavian minimalism. This project teaches you how to hand-build three distinct shapes—a tall speckled bottle, a classic terracotta cone, and a squat pink bulb—united by their earthy texture and muted palette.
Step-by-Step Guide
Materials
- Air-dry clay (white or light grey)
- Acrylic paints (beige, terracotta/coral, sage green, dusty pink, brown)
- Baking soda (to create texture)
- Fine-grit sandpaper
- Rolling pin
- Small sponge
- Clay carving tools or a butter knife
- Small bowl of water
- Paintbrushes (soft bristle)
- Matte spray sealant (optional)
Step 1: Shaping the Vases
-
Prepare your clay:
Start by conditioning your clay, kneading it until it is soft and pliable. Break off three separate balls of clay about the size of a tangerine for the taller vases, and a smaller plum-sized ball for the small pink pot. -
Form the tall bottle base:
Take your first large ball and roll it into a thick cylinder. Gently tap the bottom on your work surface to create a flat, stable base. This will become the tall beige speckled vase. -
Pinch the neck:
Begin gently squeezing the upper third of the cylinder, rotating it as you go to elongate the neck. You want a gradual taper rather than a sharp angle. -
Refine the rim:
Use your thumb to create an opening at the top, pressing down into the neck. Smooth the lip outward slightly to create a gentle flair, then dip your finger in water to smooth out any cracks. -
Sculpt the terracotta cone:
For the second vase, shape your clay into a cone. Flatten the bottom similarly to the first vase, but focus on keeping the body wider at the base and tapering straight up to a narrow neck. -
Shape the small bulb vase:
Take the smallest ball of clay and roll it into a perfect sphere. Gently press it onto the table to flatten the bottom. -
Add the collar:
Instead of pulling the neck from the ball, roll a small coil of clay for the bulb vase. Attach this coil to the top of the sphere to create a distinct, raised collar rim. Blend the clay downwards on the inside for a seamless connection. -
Create the sage green vase:
Form the final piece similarly to the first bottle but give it a slightly more bell-like curve at the bottom, narrowing sharply towards the neck. -
Smooth and dry:
Dip a sponge in water and wipe down all surfaces to remove fingerprints. Let the pieces dry completely for 24-48 hours until they are hard and white.
Natural Texture Hack
If the baking soda paint dries too clumpily, try mixing in dry used coffee grounds into the beige paint instead. It adds instant ‘speckles’ and great texture.
Step 2: Texturing and Painting
-
Sand imperfections:
Once fully dry, use fine-grit sandpaper to gently smooth any rough ridges or uneven rims. Wipe away the dust with a barely damp cloth. -
Mix the textured paint:
To achieve that ceramic look without a kiln, mix your acrylic paints with baking soda. I generally use a 1:1 ratio of paint to baking soda for a thick, gritty texture. -
Paint the tall bottle:
Mix a warm beige color with baking soda. Apply two coats to the first vase. While the second coat is wet, use an old toothbrush to flick tiny specks of watered-down brown paint onto it for the speckled effect. -
Apply the terracotta hue:
Mix a coral or terracotta paint with baking soda and paint the cone-shaped vase. Brush in vertical strokes to mimic thrown pottery lines. -
Finish the sage Vase:
Mix a muted sage green with your baking soda texture agent and cover the third tall vase completely. -
Detail the small pink bulb:
Paint the body of the small bulb vase with a textured dusty pink mix. For the rim, use a slightly darker brown or unmixed beige paint to create contrast, making it look like exposed raw stoneware. -
Seal the work:
Since air-dry clay isn’t waterproof, apply a matte spray sealant if you plan to keep them in a humid area, though remember these are for dried florals only.
Cracks while drying?
Small hairline cracks often appear as clay shrinks. Make a ‘slip’ paste of water and clay, fill the crack, let it dry, and then sand it smooth before painting.
Enjoy arranging your new miniature pottery collection on a shelf or windowsill
Beaded-Edge Trinket Bowl
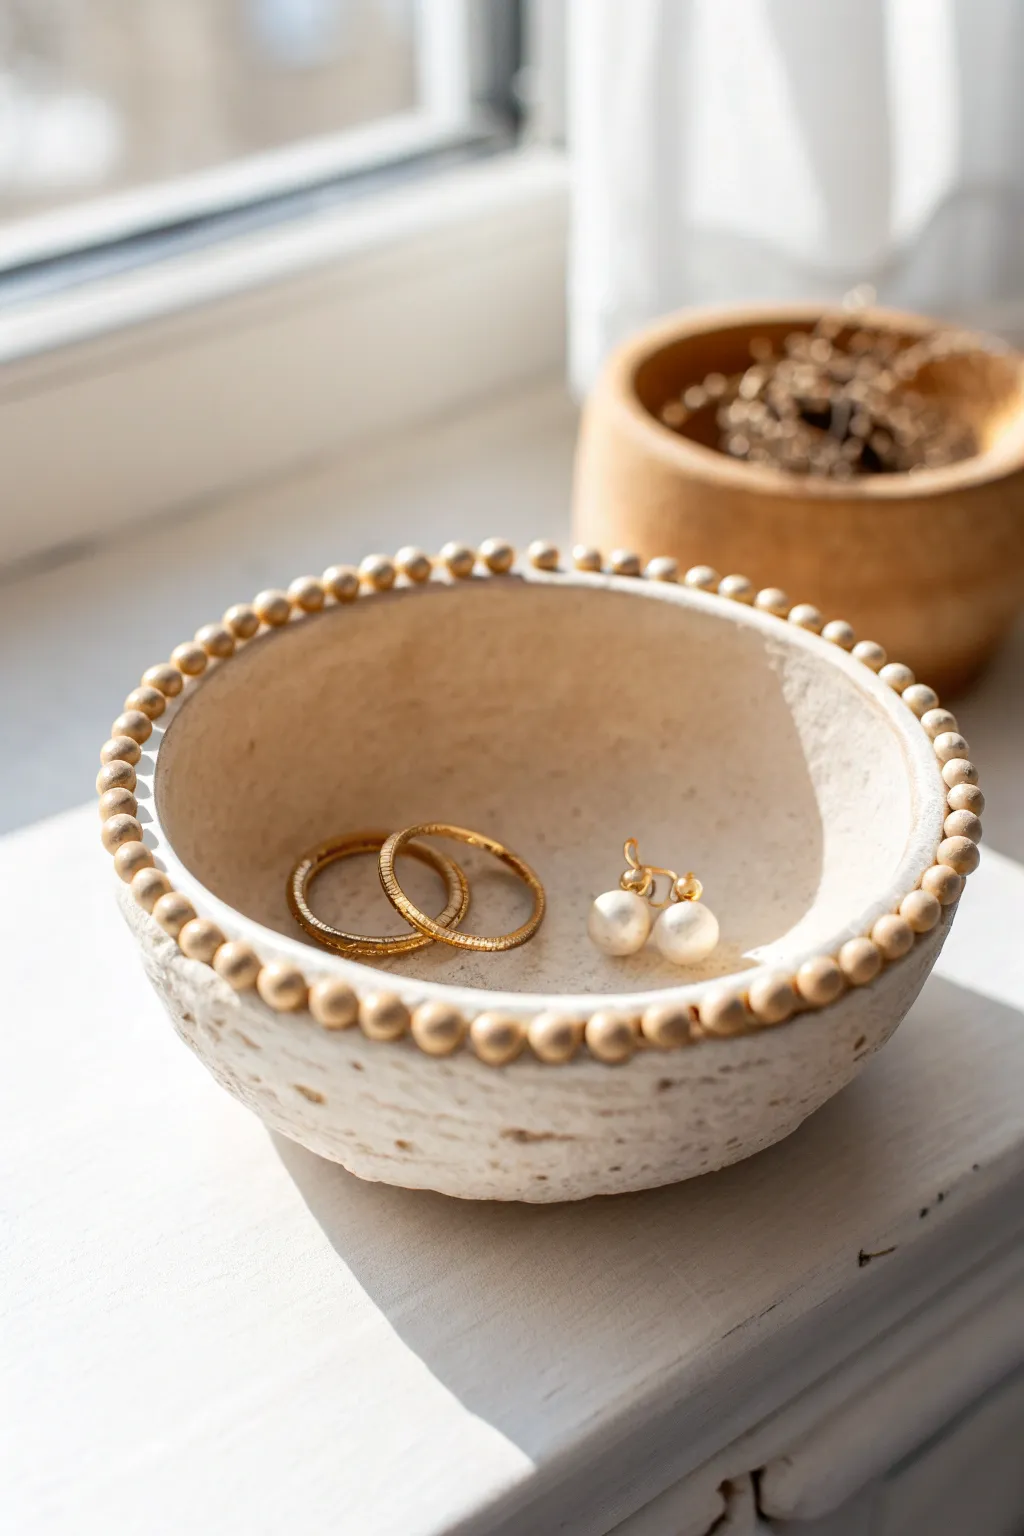
Capture the elegance of simplicity with this charming trinket bowl, featuring a delicate rim of gold beads. It’s the perfect size for your favorite rings or pearl studs, adding a touch of handmade luxury to any windowsill or vanity.
Detailed Instructions
Materials
- Air-dry clay (white or cream)
- Small bowl (to use as a mold)
- Plastic wrap (cling film)
- Rolling pin
- Small round cutter or a knife
- Sponge or sandpaper (fine grit)
- Gold acrylic paint or gold leaf pen
- Small detail paintbrush
- Small cup of water
- Sealant or varnish (matte or satin)
Step 1: Shaping the Base
-
Prepare your workspace:
Lay down a smooth surface like a silicone mat or parchment paper to prevent the clay from sticking. Knead a handful of air-dry clay until it is soft, pliable, and free of cracks. -
Roll out the slab:
Using your rolling pin, flatten the clay into an even slab. Aim for a thickness of about 1/4 inch (5-6mm) to ensure the bowl is sturdy but not too heavy. -
Cut the circle:
Place your selected mold bowl upside down on the clay to trace, or simply use a large circular cookie cutter to cut out a perfect circle. This will form the main body of your trinket dish. -
Prepare the mold:
Take your mold bowl and wrap the outside of it smoothly with plastic wrap. This step is crucial so your clay doesn’t get stuck to the mold as it dries. -
Form the shape:
Gently drape your clay circle over the plastic-wrapped mold. Press it down lightly so it takes on the curved shape, smoothing out any uneven areas or air bubbles with your fingers.
Step 2: Creating the Beaded Rim
-
Roll tiny spheres:
Pinch off very small amounts of the remaining clay and roll them between your fingers to create tiny spheres. You will need enough to circle the entire rim of your bowl. -
Match the sizes:
Try to keep the little beads relatively consistent in size, though slight variations add to the organic, handmade charm. They should be roughly the size of a peppercorn or a small pea. -
Score the rim:
Use a needle tool or a toothpick to gently scratch (score) the rim of the bowl where the beads will sit. This roughened texture helps the fresh clay adhere securely. -
Attach the beads:
Dab a tiny amount of water or clay slip onto the scored rim. Press each clay bead gently onto the rim, placing them side-by-side until the entire circumference is covered. -
Secure the bond:
Once all beads are placed, I like to gently run a wet finger over the top of the beads to smooth them slightly and ensure they are firmly bonded to the bowl edge.
Smooth Seams
To prevent beads popping off later, use a toothpick to gently blend the underside of each bead into the bowl rim while the clay is wet.
Step 3: Finishing Touches
-
Let it dry:
Allow the clay to dry completely while still on the mold. This usually takes 24-48 hours depending on humidity. Don’t rush this, or the bowl might warp. -
Remove and refine:
Once bone dry, carefully lift the clay bowl off the mold and peel away the plastic wrap. Check for any rough edges. -
Smooth the surface:
Using a slightly damp sponge or fine-grit sandpaper, gently smooth out any imperfections on the rim or the inside of the bowl to get that professional finish. -
Paint the beads:
Dip a fine-tip brush into gold acrylic paint. Carefully paint each individual bead, covering the tops and sides, while leaving the main bowl white for contrast. -
Seal the piece:
After the paint is fully dry, apply a coat of matte or satin varnish over the entire bowl. This protects the clay from moisture and gives it a finished sheen.
Stone Effect
Mix coffee grounds or speckled sand into your white clay before rolling it out to create a trendy, faux-stone ceramic texture.
Place your new creation near a window to catch the light and show off that golden sparkle
Letter and Number Tags
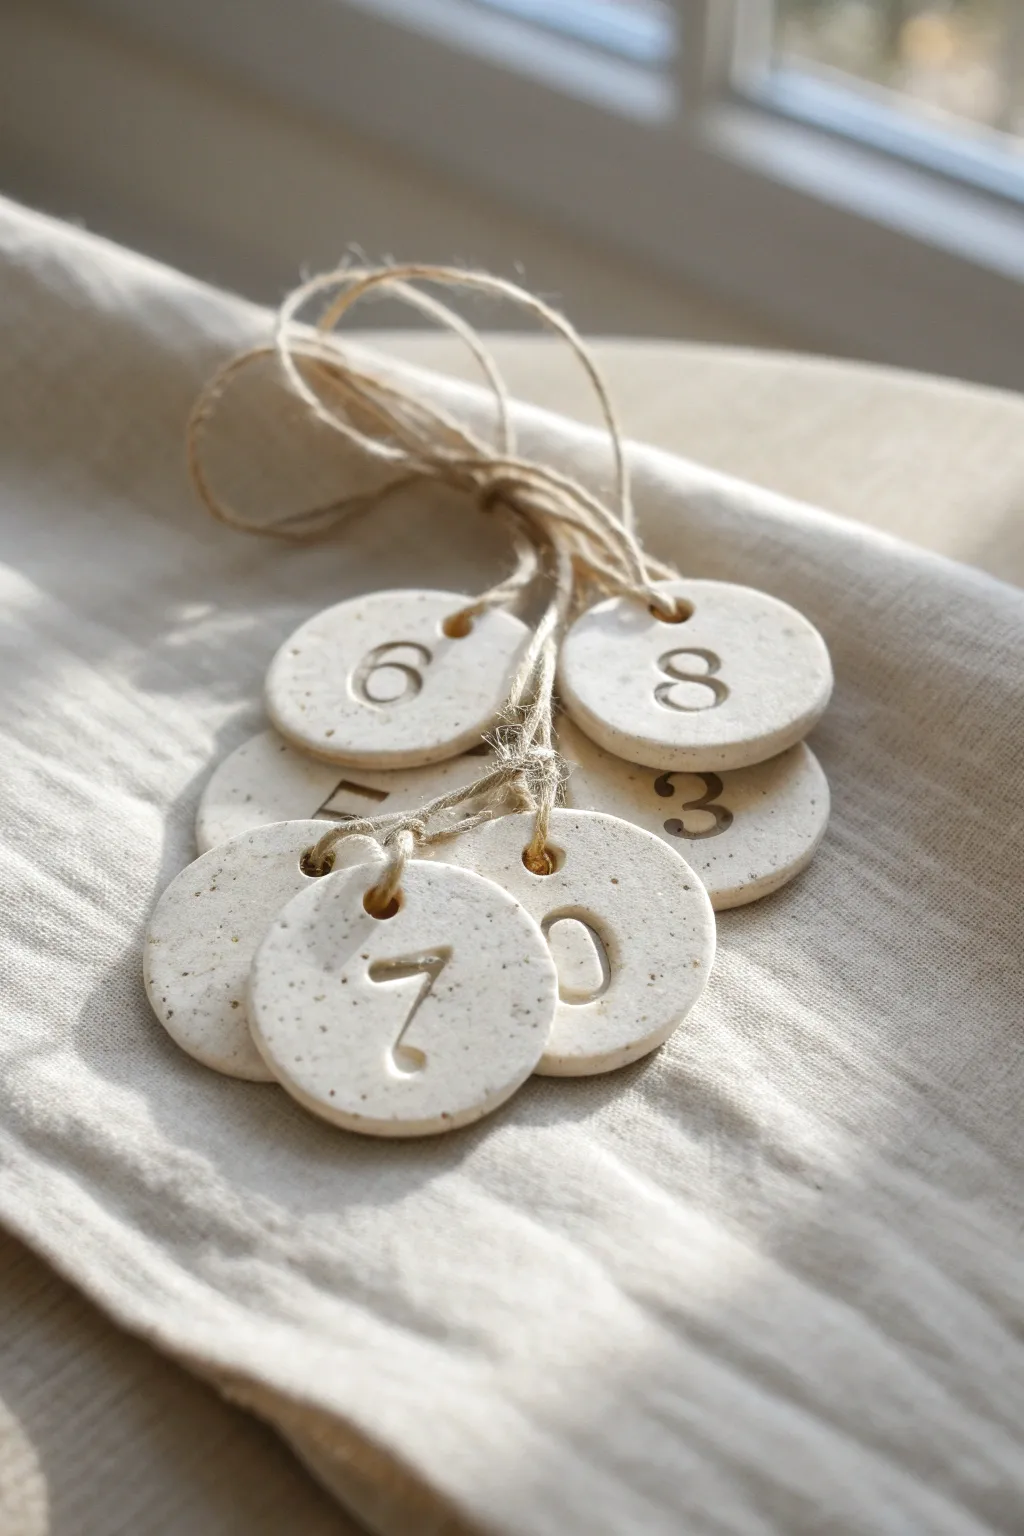
Create these rustic yet refined number tags that beautifully mimic the look of speckled stoneware pottery. With their organic round shape and crisp numbering, they add a charming handmade touch to gifts, table settings, or home organization.
Step-by-Step
Materials
- White or beige polymer clay
- Coarse black pepper or dried coffee grounds (for speckling)
- Small round cookie cutter (approx. 1.5 inches)
- Rolling pin
- Number stamps (serif font recommended)
- Straw or small circular tool (for hole punching)
- Fine-grit sandpaper
- Jute twine
- Baking sheet
- Parchment paper
Step 1: Preparing the Faux-Stone Clay
-
Condition the clay:
Start by warming up your white or beige polymer clay in your hands. Knead it thoroughly until it is soft, pliable, and free of any cracks. -
Add the speckles:
Flatten your conditioned clay into a pancake shape. Sprinkle a small pinch of coarse black pepper or dried coffee grounds onto the surface. -
Incorporate the texture:
Fold the clay over to trap the speckles inside and continue kneading. Repeat the folding and kneading process until the specks are evenly distributed throughout the batch, giving it that authentic stoneware appearance. -
Roll it out:
Place the clay on a clean, flat work surface. Use your rolling pin to roll the clay out to an even thickness of about 1/4 inch (6mm). Using depth guides or playing cards stacked on either side can help ensure a uniform slab.
Clean Release Tip
If your stamps are sticking to the raw clay, lightly dust the stamp surface with cornstarch or dip it in water before pressing it down.
Step 2: Shaping and Stamping
-
Cut the rounds:
Using your small round cookie cutter, press firmly into the clay slab to cut out your circles. Depending on how many numbers you need, you may need to re-roll the scraps. -
Soften the edges:
Gently pick up each clay circle. Use your fingertip to lightly smooth the sharp cut edges, rounding them off slightly for a softer, more ceramic-like finish. -
Position the stamps:
Select your first number stamp. Hover it over the center of a clay circle to gauge alignment before committing to the impression. -
Impress the number:
Press the stamp straight down into the clay with firm, even pressure. Rock it very slightly to ensure the entire number registers, then lift straight up to avoid distorting the shape. -
Create the hanging hole:
Take a drinking straw or a small circular cutter tool. Punch a hole near the top edge of the tag, ensuring you leave at least 3-4mm of clay above the hole for structural integrity.
Go for Gold
For a luxe upgrade, use a fine detail brush to paint liquid gold leaf into the impressed number grooves after baking.
Step 3: Baking and Finishing
-
Prepare for baking:
Transfer all your stamped tags onto a baking sheet lined with parchment paper. Leave a little space between each one to allow air to circulate. -
Bake the clay:
Bake in a regular oven according to the specific temperature and time instructions on your package of polymer clay. I generally recommend baking slightly longer at a lower temp to prevent scorching the white clay. -
Cool down:
Once the baking time is up, remove the tray from the oven and let the tags cool completely on the pan before handling them. -
Sand for perfection:
If there are any rough spots or fingerprints, dip the cured tag in water and gently sand the surface with fine-grit wet/dry sandpaper. This polishes the faux-stone finish beautifully. -
Add the twine:
Cut lengths of jute twine, about 8 inches each. Fold a piece in half to create a loop. -
Secure the hanger:
Thread the loop end through the hole in the tag from front to back. Pull the loose ends through the loop and tighten to create a larks head knot.
Enjoy using your custom tags to organize your space or add a special detail to your next gift wrapping
Easy Relief Clay Medallions
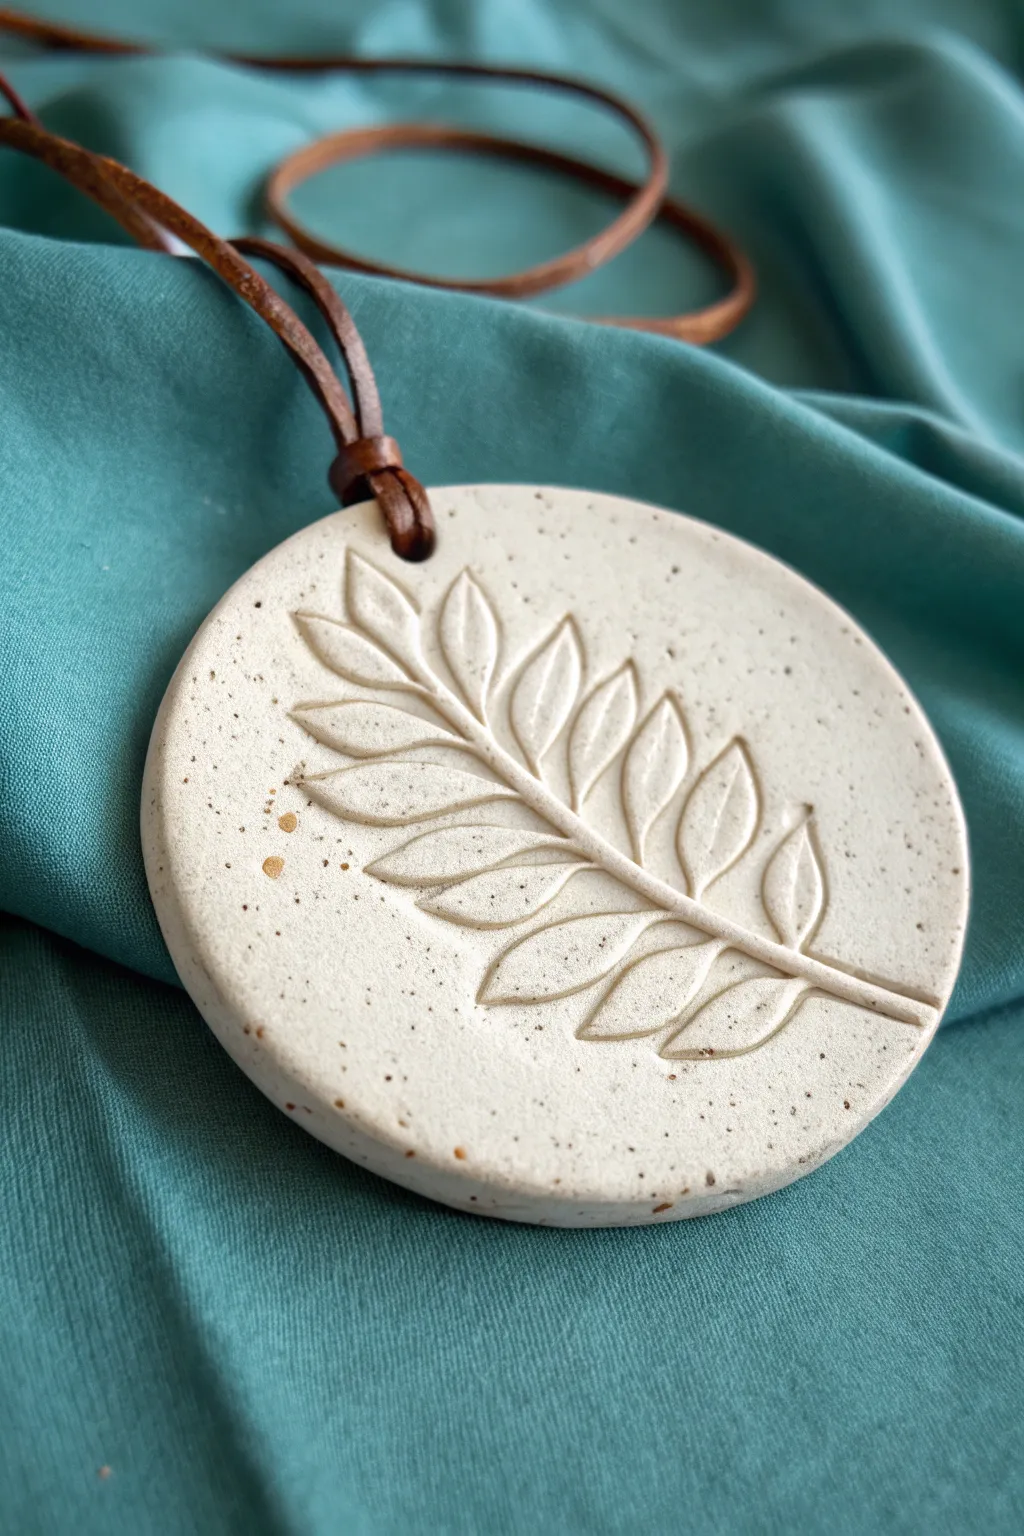
Create a stunningly simple piece of wearable art with this botanical relief pendant. Using speckled clay and a steady hand, you’ll carve a delicate fern design that feels organic and timeless, highlighted by a natural leather cord.
How-To Guide
Materials
- Speckled white polymer clay (or air-dry clay)
- Circle cutter (approx. 2-3 inches diameter)
- Small carving tool or large needle tool
- Rolling pin
- Parchment paper or work mat
- Sandpaper (fine grit)
- Leather cord (brown)
- Small drill bit or straw (for the hole)
- Oven (if using polymer clay)
Step 1: Preparation and Base Shape
-
Condition the Clay:
Begin by kneading your speckled clay until it is soft and pliable. If you are using plain clay and want this specific look, knead in a small amount of black pepper or craft sand to create the speckles. -
Roll the Slab:
Place the clay on your parchment paper and roll it out into an even slab. Aim for a thickness of about 1/4 inch (6mm) to ensure the pendant feels substantial but not too heavy. -
Cut the Circle:
Press your circle cutter firmly into the clay to create the medallion shape. Twist slightly before lifting to ensure a clean cut. -
Smooth the Edges:
Before the clay hardens, run your finger gently around the circumference to soften the sharp cut edge created by the cutter. -
Create the Hanging Hole:
Use a straw or a small tool to punch a hole near the top edge. Make sure it is wide enough to accommodate your leather cord later.
Step 2: Carving the Design
-
Mark the Stem:
Using your needle tool, lightly sketch a curved line starting from the bottom right and reaching toward the upper left to establish the main fern stem. -
Carve the Central Stem:
Once happy with the placement, deepen this line by dragging your carving tool through the clay, creating a distinct groove. -
Outline the Leaves:
Working from the bottom up, lightly scratch the outline of paired leaves extending from the stem. Keep them angled upwards. -
Carve Leaf Depth:
Press your tool into the center of each leaf outline and carve slightly deeper, tapering the pressure as you reach the leaf tip to create a 3D relief effect. -
Refine the Edges:
Go back over the leaf outlines to ensure they are crisp. I find using a slight scooping motion helps separate the leaf visually from the background. -
Clean Up Debris:
Use a soft brush or your finger to gently sweep away any little crumbs of clay produced by the carving process.
Uneven Carving Lines?
If your carving tool drags or creates jagged edges, dip the tip in a tiny bit of water (for air-dry clay) or baby oil (for polymer clay) to help it glide smoothly.
Step 3: Finishing and Assembly
-
Bake or Dry:
If using polymer clay, bake according to the package instructions (usually 275°F for 15-30 minutes). If using air-dry clay, let it sit in a dry place for 24-48 hours. -
Cool Down:
Allow the piece to cool completely before handling it further to prevent fingerprints or warping. -
Sanding:
Check the edges and the back of the pendant. Use fine-grit sandpaper to buff away any roughness or sharp spots. -
Prepare the Cord:
Cut a length of leather cord to your desired necklace length. Fold it in half to find the center loop. -
Attach the Pendant:
Thread the folded loop through the hole in the pendant from front to back. -
Secure the Knot:
Pass the loose ends of the cord through the loop you just pushed through the hole (a classic Lark’s Head knot) and pull tight to secure the pendant.
Add a Wash
After baking, apply a diluted brown acrylic paint wash into the grooves and wipe the surface clean. This darkens the recesses and makes the relief pop.
Wear your handcrafted botanical pendant with pride or gift it to a nature-loving friend
Boho Hanging Shape Mobile
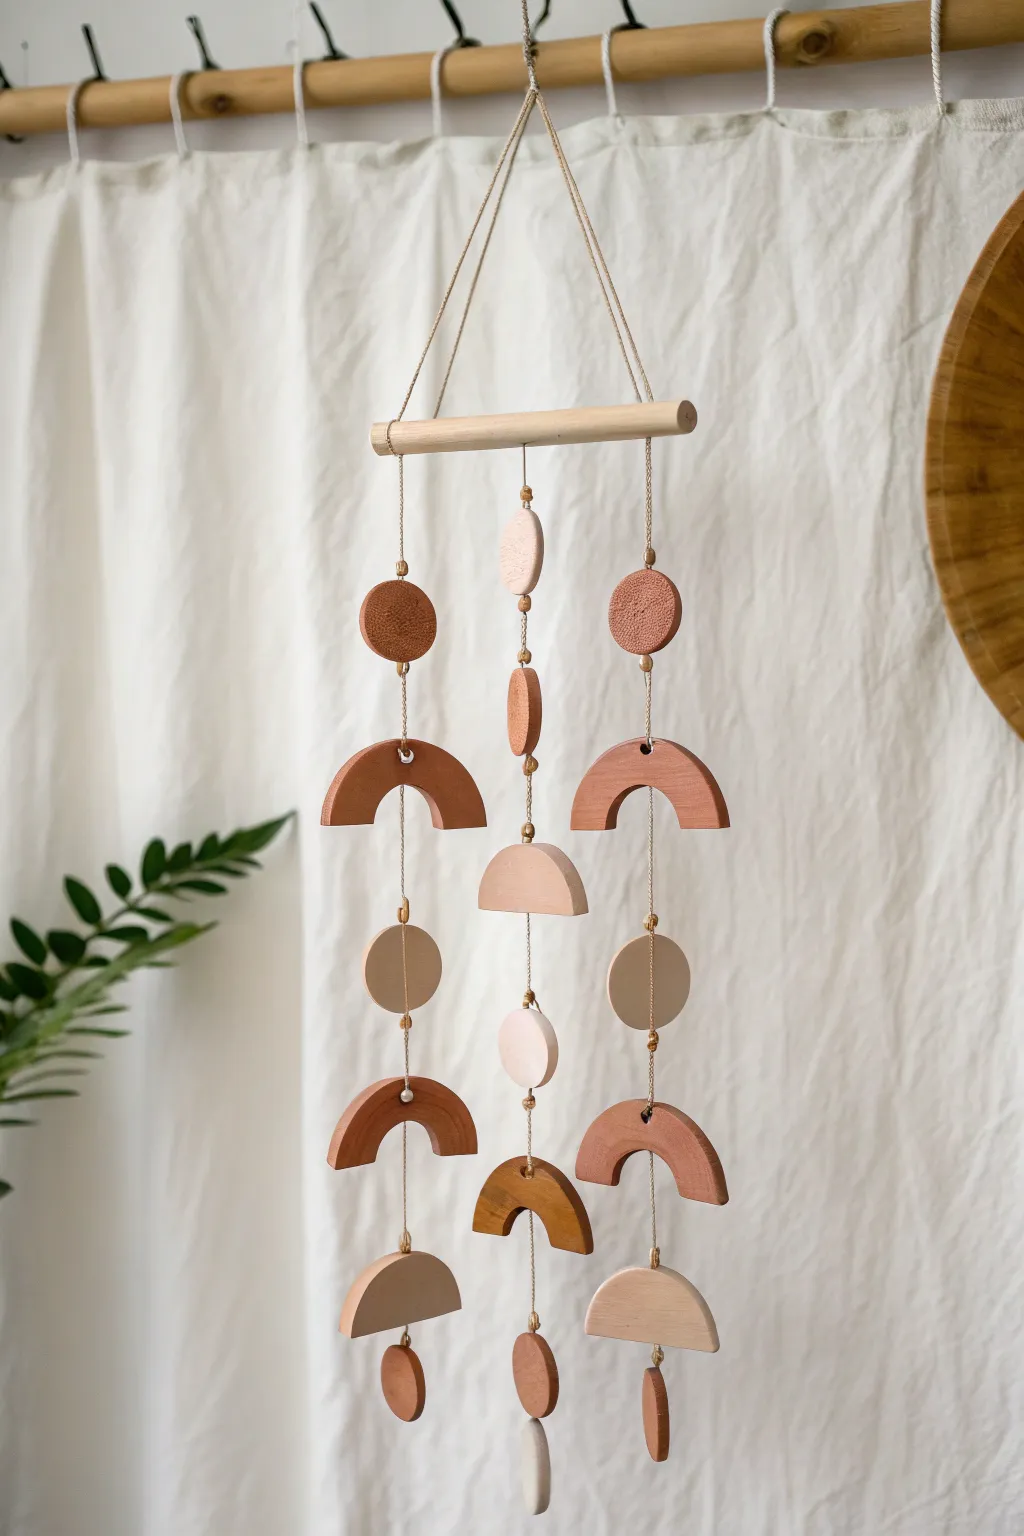
Bring earthy warmth to any corner of your home with this trendy, minimalist mobile featuring geometric clay shapes. Using a palette of terracotta, sand, and cream, you’ll create a sophisticated hanging piece that looks like high-end boutique decor.
Step-by-Step Tutorial
Materials
- Polymer clay (terracotta, beige, white, brown)
- Rolling pin or clay machine
- Circle cutters (various sizes)
- Craft knife or clay blade
- Wooden dowel (approx. 8-10 inches)
- Strong cotton twine or macrame cord (thin)
- Small wooden beads (optional spacers)
- Needle tool or toothpick
- Sandpaper (fine grit)
- Baking sheet and parchment paper
- Oven
Step 1: Prepping and Cutting Shapes
-
Condition the clay:
Begin by warming up your clay in your hands until it’s soft and pliable. Mix colors if desired to achieve custom shades like pale blush or deep rust. -
Roll out slabs:
Roll each clay color into an even sheet, approximately 1/4 inch thick. A consistent thickness creates a more professional finish, so take your time here. -
Cut the circles:
Use your circle cutters to punch out varied sizes. You will need about 6-8 full circles for the main vertical elements. -
Create the semi-circles:
Cut a large circle, then use your blade to slice it perfectly in half to create semi-circles. These act as the visual anchors at the bottom of the strands. -
Form the arches:
To make the rainbow arches, cut a large circle, then use a smaller circle cutter to punch a hole in the center (offset slightly downward creates a taller arch). Cut the resulting ring in half. Alternatively, you can hand-cut an arch shape with your craft knife. -
Smooth the edges:
Dip your finger in a little cornstarch or water and gently rub the raw edges of your cut shapes to smooth out any harsh lines or fingerprints. -
Pierce holes:
Using a needle tool, poke holes for hanging. Most pieces need a hole at the top and bottom. The bottom-most pieces (weights) only need a top hole. Ensure the hole is large enough for your twine to pass through easily.
Clean Cuts Hack
If your clay is sticking to the cutter, place a piece of plastic cling wrap over the clay sheet before pressing the cutter down. This creates beveled, rounded edges that need zero sanding.
Step 2: Baking and Assembly
-
Bake the pieces:
Arrange your shapes on a parchment-lined baking sheet. Bake according to your clay package instructions (usually 275°F for 15-30 minutes). Let them cool completely before handling. -
Sand for perfection:
Once cool, lightly sand the edges with fine-grit sandpaper if there are any remaining rough spots. -
Prepare the hanging strands:
Cut three long lengths of twine (about 24-30 inches each) for the vertical drops. -
String the center strand:
Start with the center strand. Tie a knot at the bottom of your first shape (the weight). Thread the twine up through the shape. -
Add spacers:
Tie a knot a few inches above the first shape to hold the next piece in place. I sometimes add a tiny wooden bead here to act as a stopper and add texture. -
Build the side strands:
Repeat the knotting and threading process for the left and right strands, varying the order of circles, arches, and semi-circles to create visual balance. -
Attach to the dowel:
Tie the top of each completed strand to your wooden dowel. The middle strand should be slightly longer or hung lower to create a staggered look. -
Secure the knots:
Put a tiny dab of super glue on the knots at the dowel to ensure they don’t slip or unravel over time. -
Create the hanger:
Cut a final piece of twine and tie it to both ends of the wooden dowel to create a triangle for hanging.
Textured Finishes
Before baking, gently press a piece of coarse sandpaper, canvas fabric, or sea sponge into the raw clay surface to give your shapes a stone-like or organic matte texture.
Hang your new mobile near a window to watch the earth tones gently rotate in the light