
If you’ve been itching to make a clay dragon, you’re in exactly the right creative mood—dragons are basically the perfect mix of cute and epic. Here are my favorite clay dragon ideas I keep coming back to when I want something fun, doable, and totally display-worthy.
Mini Chibi Dragon Figurine
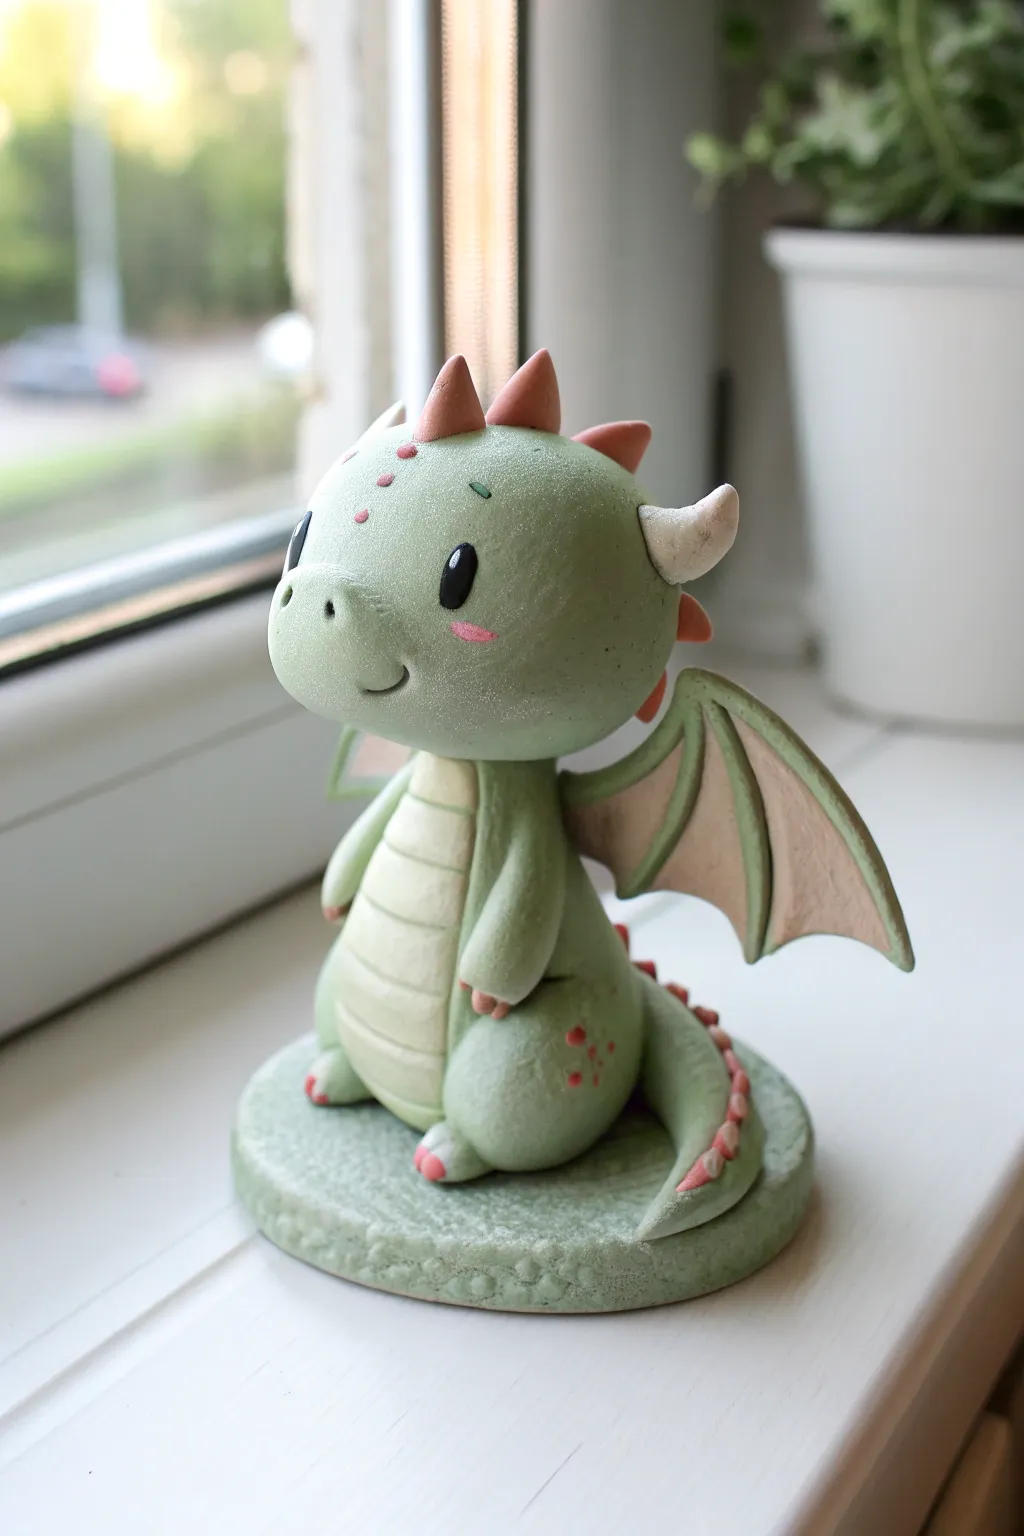
Create your own mythical companion with this adorable chibi dragon tutorial, featuring soft pastel greens and gentle pink accents. This palm-sized figurine boasts oversized eyes, tiny wings, and a textured base, making it a perfect guardian for your windowsill or desk.
Detailed Instructions
Materials
- Polymer clay (Sage Green, Light Cream/Beige, Salmon Pink, White, Black)
- Aluminum foil (for armature)
- Needle tool and dotting tools
- Acrylic rolling pin
- Soft pastel chalks (specifically pink) and a soft brush
- Liquid polymer clay (Bake and Bond)
- Sponge or texture mat
- Gloss varnish (optional, for the eyes)
- Craft knife
Step 1: Shaping the Base & Body
-
Texture the base:
Begin by rolling a ball of Sage Green clay and flattening it into a thick disc about 2.5 inches wide. Use a rough sponge or a crumpled ball of aluminum foil to press a stone-like texture into the entire surface. -
Form the core:
Create a small, pear-shaped core using aluminum foil. This saves clay and keeps the figurine lightweight. Cover the foil pear with a smooth layer of Sage Green clay, tapering the top slightly for the neck. -
Attach the body:
Press the wide bottom of your pear shape firmly onto the center of the textured base. Use a blending tool or your fingertip to smooth the seam where the body meets the base so they become one unit. -
Add the belly:
Roll a thin sheet of Light Cream clay. Cut an oval shape and press it onto the front of the dragon’s belly. Use a needle tool to gently impress horizontal lines across the belly for a segmented reptile look.
Step 2: Creating the Chibi Head
-
Shape the head:
Roll a large ball of Sage Green clay—make it slightly larger than the body to achieve that classic chibi proportion. Press it gently to flatten the bottom where it will sit on the neck. -
Sculpt the snout:
Pinch the front of the face slightly to create a rounded snout area. Use a medium ball tool to press two small indentations for the nostrils. -
Add the eyes:
Press two deep oval indentations for the eye sockets. Fill these with smooth ovals of black clay. Add a tiny white dot of clay to the upper corner of each eye for a sparkling reflection. -
Blush the cheeks:
Before baking, use a soft brush to apply a tiny amount of shaved pink pastel chalk dust directly under the eyes and on the snout for a sweet, blushing effect. -
Attach the horns:
Form small cones from Salmon Pink clay. Attach three along the center of the head as a mohawk spike, and two slightly larger curved cream-colored cones on the sides for ears or horns.
Clean Clay Pro-Tip
Keep baby wipes or hand sanitizer nearby. Clean your hands thoroughly before switching from the dark green clay to the light cream belly to prevent color contamination.
Step 3: Limbs, Tail & Assembly
-
Form the legs:
Roll two thick sausages of green clay for the legs. Press them against the sides of the body at the bottom. Use a tool to mark tiny toes at the feet. -
Attach the arms:
Create two smaller tear-drop shapes for arms. Attach them higher up on the body, resting gently against the belly. I find adding a drop of liquid clay here helps them stay secure. -
Making the tail:
Roll a long, tapered snake of green clay. Wrap it around the base of the dragon, curling it towards the front. Blend the starting point into the back of the body. -
Spine details:
Roll very tiny balls of Salmon Pink clay. Starting from the back of the neck down to the tip of the tail, press these onto the spine and pinch them slightly to form triangular ridges. -
Connect the head:
Insert a piece of wire or a toothpick into the body’s neck to act as a support rod. Push the head onto the rod, securing it with a dab of liquid clay.
Level Up: Magical Glow
Mix glow-in-the-dark powder into your Light Cream clay for the belly and wings. Your little dragon will act as a gentle nightlight after sitting in the sun.
Step 4: Wings & Finishing
-
Construct the wings:
Roll out a thin sheet of Light Cream clay and cut two triangular/bat-wing shapes. Outline these with thin snakes of Sage Green clay to create the wing ‘bones’ or structure. -
Attach the wings:
Press the assembled wings onto the back of the dragon. You may need to prop them up with some tissue paper while baking so they don’t droop. -
Texture details:
Double-check your dragon for fingerprints. Use your sponge to lightly re-texture any green areas that got smoothed out during handling, giving it a soft, matte skin texture. -
Bake and varnish:
Bake the figurine according to your clay manufacturer’s instructions (usually 275°F/130°C for 15-30 mins). Once fully cool, apply a drop of gloss varnish to the black eyes to make them look wet and alive.
Enjoy your new adorable desktop guardian, ready to bringing a little magic to your space


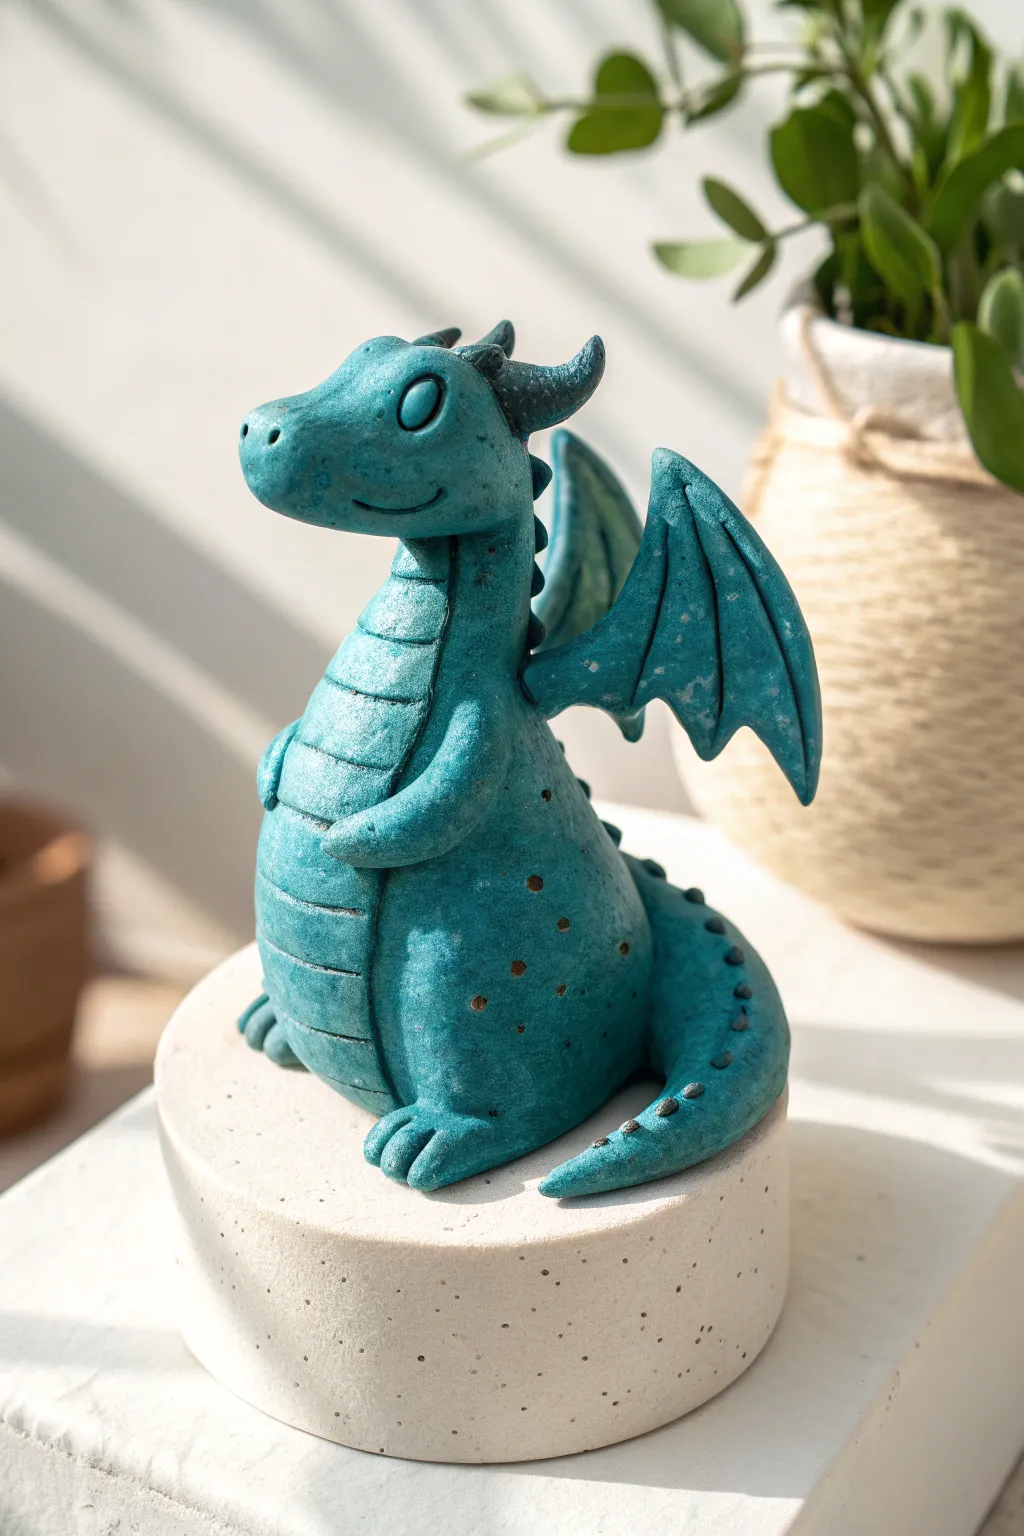
Curled Sleeping Dragon Pose
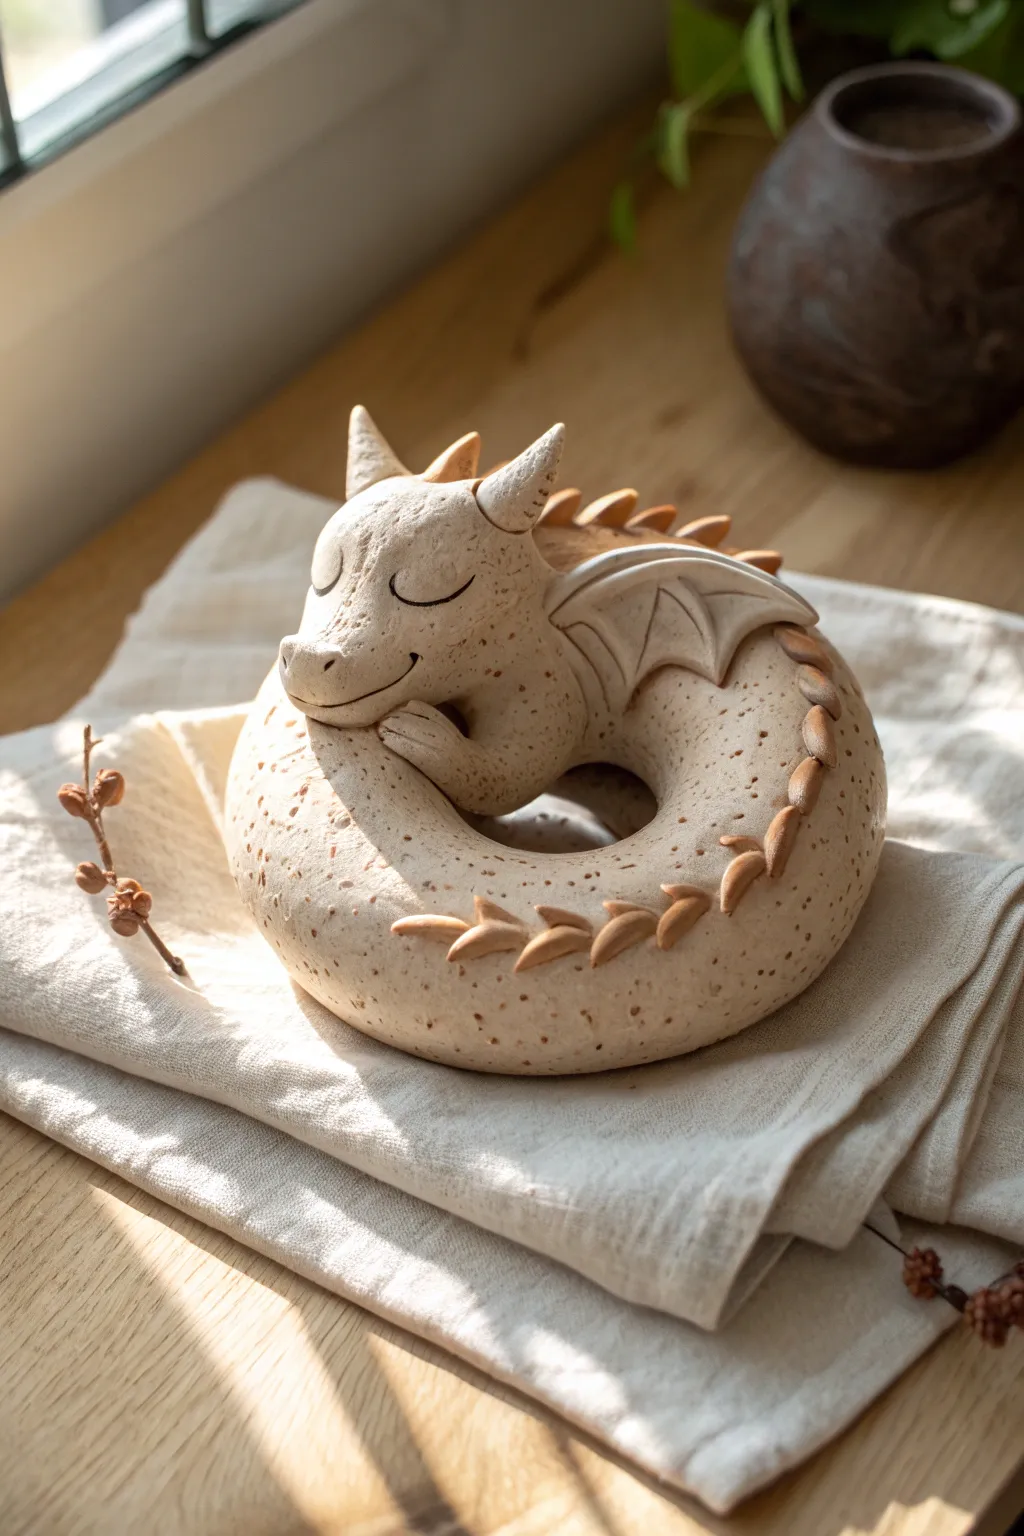
Capture the peaceful serenity of a sleeping dragon with this charming sculpture, posed in a perfect, cozy circle. The speckled clay texture adds a natural, stone-like warmth to the creature’s resting form.
Step-by-Step Tutorial
Materials
- Speckled beige polymer clay or stoneware clay (approx. 500g)
- Clay sculpting tools (needle tool, small ball stylus, rubber shaper)
- Acrylic rolling pin
- Small knife or clay blade
- Sponge (if using ceramic clay) or baby oil (for polymer smoothing)
- Scoring tool or toothbrush (for ceramic clay joining)
Step 1: Forming the Base
-
Prepare the main body:
Start by conditioning your clay until it is pliable. Roll a large portion into a thick, even snake about 8-10 inches long and roughly 1.5 inches in diameter. -
Create the tapered tail:
Gently roll one end of the snake to taper it gradually into a point. This will become the tail section that wraps around the dragon’s side. -
Shape the coil:
Curl the clay snake into a circle, bringing the tapered tail end to rest gently against where the neck will start.
Cracking at the Seams
If the clay cracks where the head meets the body, create a small ‘band-aid’ patch of thin clay, place it over the seam, and blend outwards until invisible.
Step 2: Sculpting the Head and Neck
-
Form the head shape:
Take a separate ball of clay slightly larger than a golf ball. Shape it into a rounded teardrop to form the dragon’s head and snout. -
Attach the head:
Join the head to the thicker end of your body coil. If using ceramic clay, score and slip deeply; for polymer, blend the seams smooth with your thumb or a modeling tool. -
Position the resting pose:
Tilt the head downwards so the chin rests comfortably on the body coil. The snout should point towards the center of the doughnut shape.
Metallic Accent
After baking or firing, brush a tiny amount of gold luster or metallic acrylic paint onto just the tips of the spine scales and wing ridges for a magical glow.
Step 3: Adding Details and Features
-
Carve the face:
Use a needle tool or small knife to gently carve a curved line for the sleeping mouth. Use a ball stylus to press shallow indentations for the nostrils at the tip of the snout. -
Create the eyes:
For the sleeping eyes, carve two symmetrical U-shaped curves on the face. I find a light touch works best here to keep the expression peaceful. -
Add front arms:
Roll two small sausages of clay for the arms. flattened slightly at one end for paws. Attach them under the chin so the dragon looks like it’s tucking them in while sleeping. -
Sculpt the ears:
Shape two small triangles of clay. Attach them to the top of the head, blending the base into the skull, and use a tool to create a slight hollow inside each ear.
Step 4: Wings and Scales
-
Make the wings:
Roll out a flat sheet of clay and cut two triangular wing shapes. Use a clay knife to impress lines radiating from one corner to mimic bat-like wing structure. -
Attach the wing:
Attach the visible wing to the dragon’s shoulder area, curving it slightly over the body as if it’s protecting the dragon while it sleeps. -
Create spine scales:
Roll a very thin rope of clay and cut it into many tiny, uniform triangle segments. These will be your dorsal scales. -
Apply the scales:
Starting from the back of the head and working down to the tail tip, attach the small triangles in a single row along the spine. Press them gently to adhere. -
Refine the texture:
Use a damp sponge or fingers with a drop of baby oil to smooth out any fingerprints. Ensure the transition between the scales and the body looks organic.
Now you have a tranquil companion ready to guard your desk or bookshelf


Seated Puppy-Style Dragon

This adorable dragon figurine captures the innocent posture of a puppy waiting for a treat, complete with a tilted head and an expressive gaze. With its textured, unglazed finish and simple shapes, this project is perfect for sculptors looking to add a touch of whimsy to their windowsill.
Detailed Instructions
Materials
- Stoneware clay or polymer clay (terracotta or brown)
- Small sculpting tools (ball stylus, needle tool)
- Rib tool or smooth sponge
- Slip (if using air-dry or ceramic clay)
- Scoring tool or toothbrush
- Small amount of darker clay or oxide wash (optional for eyes)
- Wire cutter
Step 1: Forming the Base
-
Shape the Body:
Start with a ball of clay roughly the size of a tangerine. Roll it into a pear shape, flattening the bottom slightly so it sits stable on your work surface. This will be the dragon’s torso. -
Create the Haunches:
Roll two smaller balls of clay for the rear legs. Press them gently against the sides of the lower body, blending the seams at the back and underneath so they look integrated rather than just stuck on. -
Sculpt the Paws:
For the front legs, roll two thick coils. Attach them vertically to the front of the body. Use a modeling tool to press three indentations into the bottom of all four limbs to define the adorable rounded toes. -
Add the Tail:
Roll a tapered coil for the tail. attach the thicker end to the rear of the body, curving it around the side so the tip rests near the back foot. Blend the connection point smoothly.
Air Pocket Prevention
If making the head or body thick relative to the clay type, hollow them out slightly from the bottom before attaching to prevent cracking in the kiln.
Step 2: Character and Head
-
Form the Head Shape:
Create a slightly elongated oval for the head. It should be proportional to the body but slightly large to enhance the ‘cute’ factor. Nudge the front into a gentle snout shape. -
Attach the Head:
Score and slip the top of the neck area and the bottom of the head. Position the head at an upward angle, looking toward the sky. I like to tilt it slightly to the side for extra personality before blending the neck seam. -
Define the Mouth:
Take a sharp needle tool or knife and cut a long, curved smile line deeply into the snout. Use a smoothing tool to round off the harsh edges of the cut so the smile looks soft and natural. -
Sculpt the Nostrils:
Press two small indentations into the front of the snout with a small ball stylus to create the nostrils. -
Create the Eyes:
Press deep sockets into the face with your thumb or a large ball tool. Roll two small balls of clay and place them into the sockets. For the eyelids, form thin crescents of clay and lay them over the top half of the eyeballs.
Step 3: Wings and Details
-
Make the Ears:
Shape two triangular wedges. Attach them behind the eyes, pointing backward. Press a tool into the center of each ear to create the inner canal and fold. -
Form the Chest Plates:
Roll a small, thin sheet of clay and cut a teardrop shape. Attach this to the dragon’s chest and use a knife to score horizontal lines across it, creating the look of segmented belly scales. -
Construct the Wings:
Flatten two pieces of clay into triangle shapes. I find it easiest to thicken the top edge to resemble the ‘arm’ of the wing. Attach these firmly to the shoulder blades. -
Detail the Membrane:
Use a tool to press lines into the wing surface, radiating from the shoulder to the wing tips, simulating the folded skin between the bones. -
Spikes and Texture:
Roll tiny cones of clay for the spinal ridge. Attach them in a line starting from the top of the head, down the neck, and stopping at the tail. Vary the sizes, making them smaller as they reach the tail. -
Final Texturing:
Take a stiff brush or a textured sponge and gently dab the entire surface of the dragon (except the eyes and belly) to give it a rough, stone-like skin texture. -
Eye Detail:
If adding color now, paint a mixture of dark oxide or underglaze into the pupil area to make the eyes pop against the brown clay body.
Loose Limbs?
If the front legs keep sliding off, insert a small piece of toothpick (for polymer) or dry spaghetti (for ceramic) as an internal dowel for support.
Once fired or baked, place your new friend in a sunny spot to watch the world go by


Simple Coil Body Dragon
This charming project involves sculpting a plump, friendly dragon with a distinctive matte teal finish and stone-like texture. The seated pose and simple shapes make it an approachable challenge for sculptors looking to refine their character work.
How-To Guide
Materials
- Teal polymer clay (pre-colored or mixed)
- Black acrylic paint (for antiquing)
- Foil or scrap clay (for internal armature)
- Basic sculpting tools (ball stylus, needle tool, rubber shapers)
- Paper towels or sponge
- Dark grey polymer clay (for horns/spikes)
- Texture sponge or toothbrush
- Oven for baking
Step 1: Forming the Base
-
Create the core:
Start by crumpling a piece of aluminum foil into a pear shape. This will be the armature for the dragon’s body, saving clay and reducing weight. The shape should be wider at the bottom for that cute, seated belly look. -
Cover with clay:
Roll out a sheet of your main teal clay. Evenly wrap it around the foil armature, smoothing all seams until you have a seamless pear shape. -
Shape the neck:
Pull and gently pinch the top of the pear shape upwards to elongate it slightly, forming the neck area where the head will attach. -
Add texture:
Use a rough sponge or an old toothbrush to gently dab the entire surface of the body. This creates the stone-like, non-glossy skin texture seen in the reference.
Step 2: Sculpting the Body Details
-
Attach the belly:
Roll a thinner, oval sheet of teal clay—perhaps slightly lighter in tone if you wish, though the original uses the same color. Press this onto the front of the body. -
Create belly ridges:
Using a needle tool or a dull knife, score horizontal lines across the belly patch to create the segmented look of dragon scales. -
Form the legs:
Roll two thick, short logs of clay for the legs. Attach them to the bottom sides of the body, blending the upper connection point smooth so they look integrated. -
Define the feet:
Flatten the ends of the legs slightly against your work surface. Use a sculpting tool to press vertical indentations to separate the toes. -
Add the arms:
Roll two smaller, tapered logs for arms. Attach them higher up on the body, curving them inwards so the hands rest gently on the top of the belly. -
Add the tail:
Roll a long, tapered snake of clay. Attach the thick end to the lower rear of the body and curl it around the dragon’s side, resting the tip near the front foot. Blend the seam well.
Weight Distribution
To keep the head from drooping while baking, prop the chin up with a small ball of polyester fiberfill or a crumpled paper towel.
Step 3: Head and Features
-
Shape the head:
Form a rounded rectangle or large bean shape for the head. It should be relatively large compared to the neck for a ‘chibi’ style. -
Facial features:
Press indentations for nostrils at the end of the snout. Use a curved tool to create a wide, simple smile line. -
Eyes:
Attach two flat ovals of teal clay to the sides of the head. Outline them deeply with a needle tool to make them pop out. -
Attach head to body:
Place the head onto the neck. I like to use a small piece of wire or a toothpick inserted into the neck as a dowel for extra stability before pressing the head down. -
Horns and ears:
Using darker grey clay, sculpt two small curved horns and attach them to the top of the head. Add two small teal triangles behind the jaw for ears.
Cracks in Clay?
If you see cracks forming while attaching limbs, use a drop of baby oil or clay softener on your finger to massage and smooth the area.
Step 4: Wings, Spines, and Finishing
-
Create the wings:
Flatten two triangles of teal clay. Cut a scalloped edge on the bottom of each to mimic bat wings. Use a tool to impress lines radiating from the top corner to the scallops. -
Attach wings:
Press the wings firmly onto the upper back of the dragon. You may need to blend the clay at the attachment point to ensure they stay upright during baking. -
Spine details:
Roll tiny balls of the dark grey clay. Press them in a line running from the back of the head, down the spine, and all the way to the tip of the tail. -
Baking:
Bake your sculpture according to the manufacturer’s instructions for your specific brand of polymer clay. Let it cool completely. -
Antiquing wash:
Dilute a small amount of black acrylic paint with water. Brush it over the entire dragon, getting into the cracks, and immediately wipe off the surface with a paper towel. This leaves dark paint in the crevices to highlight the texture.
Once the paint wash is dry, your stoic little dragon is ready to guard your desk or bookshelf

The Complete Guide to Pottery Troubleshooting
Uncover the most common ceramic mistakes—from cracking clay to failed glazes—and learn how to fix them fast.
Dragon With Big Sparkly Eyes
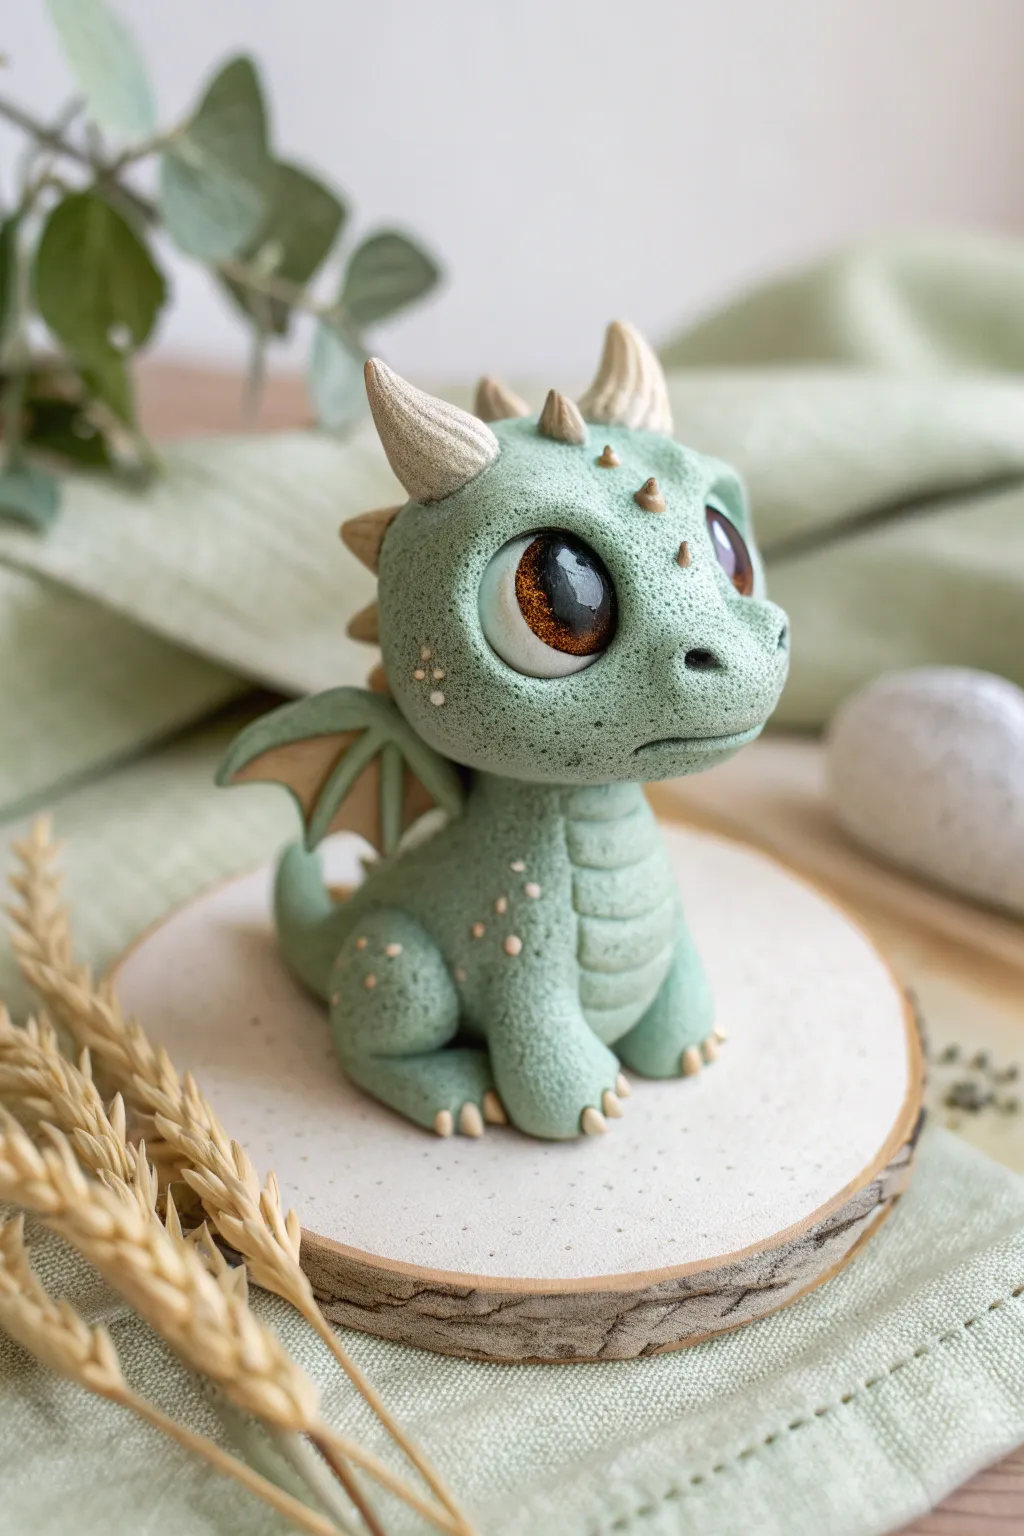
This adorable little guardian captures hearts with its enormous, sparkling eyes and soft, textured green scales. Crafted from polymer clay, this dragon features gentle cream accents and a unique stone-like finish that makes it feel like a tiny, magical statue.
How-To Guide
Materials
- Polymer clay (Sage Green, Cream/Beige, White, Black)
- Glass cabochons (10mm – 12mm round)
- Metallic acrylic paint (Copper/Gold) and fine glitter
- Ball stylus tools (various sizes)
- Silicone sculpting tools
- Needle tool
- Texture sponge or stiff toothbrush
- Liquid polymer clay (Fimo Liquid or Sculpey Bake & Bond)
- Gloss varnish or UV resin
- Small wooden slice base
Step 1: Creating the Magical Eyes
-
Prepare the irises:
Before touching the clay, prepare your glass cabochons. Paint the flat back of each cabochon with a mix of copper acrylic paint and fine gold glitter. This creates the deep, sparkly iris effect. -
Add the pupil:
Once the metallic layer dries, paint a large black pupil in the center on top of the gold. Let this dry completely before sealing the back with a thin layer of white paint to make the colors pop.
Loose Eye Syndrome?
If the glass eyes won’t stick in the sockets, add a tiny drop of liquid polymer clay or Bake & Bond into the socket before pressing the eye in. This acts as a bakeable glue.
Step 2: Sculpting the Head and Body
-
Form the core shapes:
Start with a ball of sage green clay for the head (about the size of a walnut) and a slightly smaller pear shape for the body. This slightly oversized head adds to the cuteness factor. -
Join the pieces:
Insert a short piece of wire or a toothpick into the top of the body and press the head onto it to secure the connection. Smooth the clay around the neck seam using a silicone tool so it looks like one continuous piece. -
Texture the skin:
Gently dab the entire surface of the green clay with a texture sponge or a clean, stiff toothbrush. Do this delicately; you want a visible stone-like texture, not deep gouges. -
Eye sockets:
Using a large ball tool, press two deep indents into the face where the eyes will go. Place your painted cabochons into these sockets, pressing them in firmly so they sit slightly recessed. -
Eyelids and expression:
Roll thin snakes of green clay for the upper and lower eyelids. Place them around the glass eyes and smooth the edges into the head, blending the seams perfectly. I like to make the top lid slightly heavier to give a gentle expression. -
Snout and mouth:
Add a small oval of clay to the front of the face for the snout. Blend it seamlessly. Use a needle tool to poke two nostrils and carve a simple, horizontal line for the mouth just below the snout.
Step 3: Limbs and Details
-
Legs and feet:
Form two chunky logs for legs and two rounded triangles for feet. Press the legs onto the sides of the body and the feet at the bottom. Use a needle tool to create small indentations for toes, then add tiny cream-colored cones for claws. -
Belly scales:
Roll a small oval of sage green clay, flatten it, and apply it to the belly area. Use a needle tool to press horizontal lines across it, creating a segmented chest plate look. -
Horns:
Shape two larger cones from cream clay for the main horns and texture them with fine horizontal lines using a needle tool. Attach these to the top of the head. -
The wings:
Create the wings using green clay for the arm structure and flat triangles of cream clay for the membranes. Assemble them flat first, then press them onto the back of the dragon. -
Spikes and spots:
Add a row of small cream spikes running down the back of the head and spine. Finally, press tiny balls of cream clay onto the cheeks and thighs to create cute speckles.
Level Up: Galaxy Eyes
Instead of copper, paint the back of the cabochons with dark blue and purple nail polish, then sprinkle silver holographic glitter before adding the black pupil for a cosmic look.
Step 4: Finishing Touches
-
Final check:
Look over your dragon for any fingerprints. Gently re-texture any areas that got smoothed down during handling using your sponge. -
Baking:
Bake the piece according to your polymer clay manufacturer’s instructions (usually 275°F/130°C for 15-30 minutes). Let it cool completely. -
Mounting:
Glue your finished dragon onto the small wooden slice using strong craft glue or epoxy. -
Adding the shine:
If your glass eyes got dull or smudged during baking, clean them with alcohol. Apply a drop of UV resin or high-gloss varnish strictly to the eyes to restore that wet, sparkly look.
Now you have a charming little desk companion ready to guard your creative space with its watchful gaze.
Dragon Holding a Crystal Orb
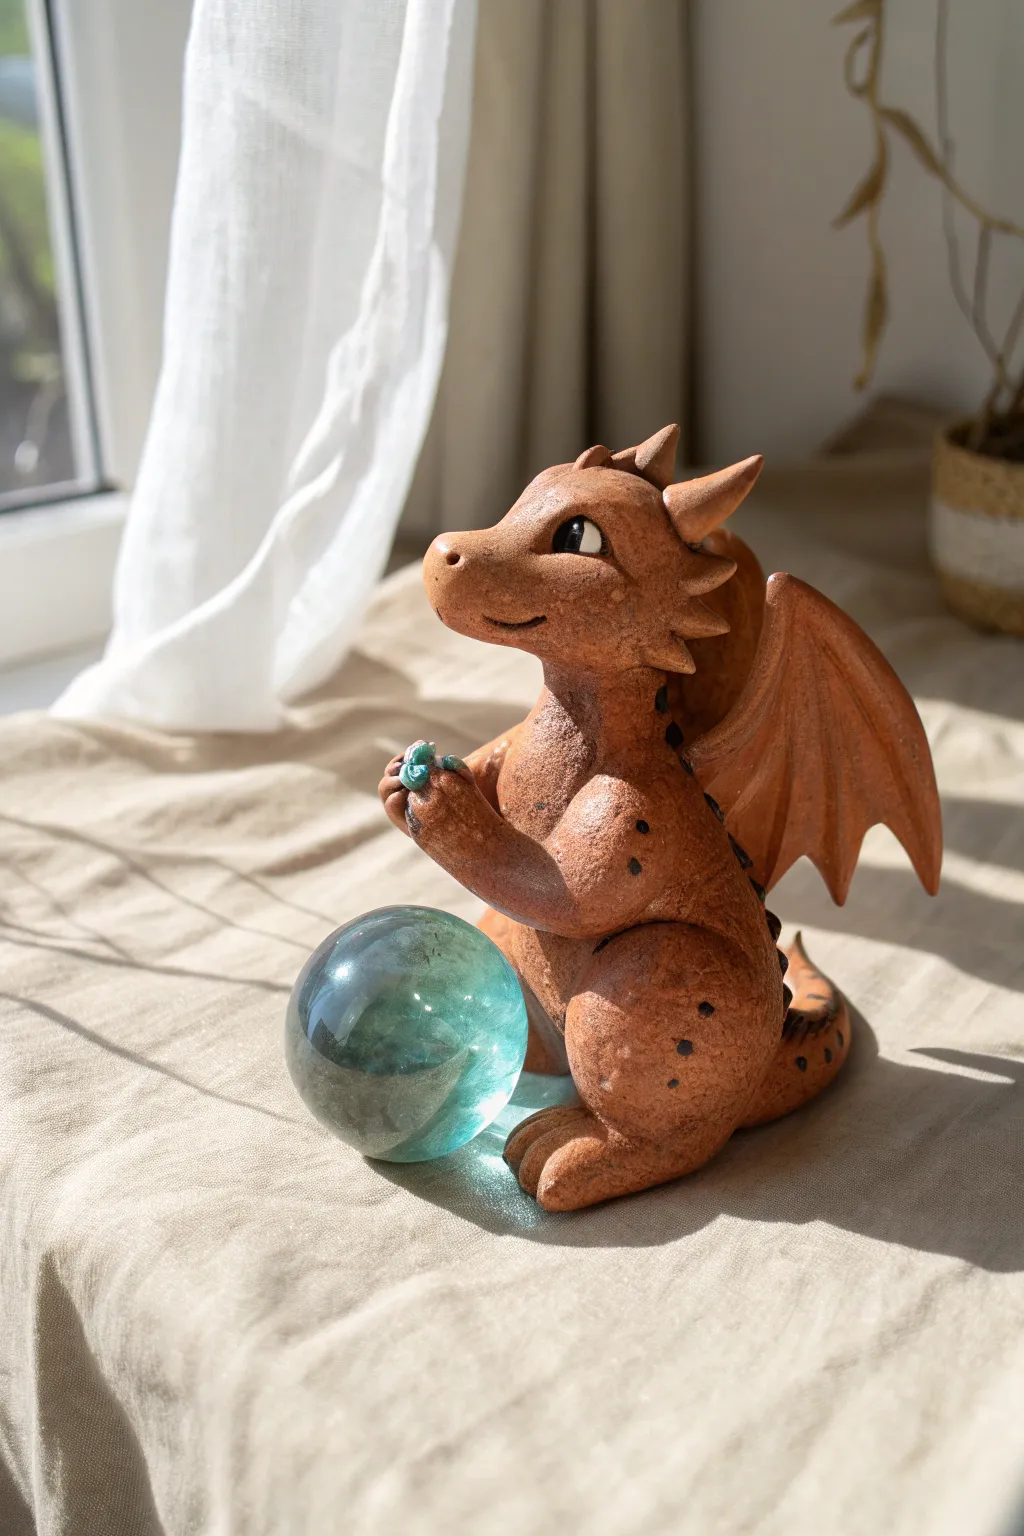
This charming project captures the essence of a friendly guardian with a warm, spotted terracotta finish and expressive eyes. The dragon sits protectively beside a large crystal orb, clutching a tiny treasure, making it a perfect decorative piece for a sunny windowsill.
Step-by-Step Tutorial
Materials
- Polymer clay (terracotta or reddish-brown)
- Small amount of white and black clay
- Large clear glass marble or crystal sphere (approx. 1-1.5 inch diameter)
- Small teal or blue bead (for the held treasure)
- Needle tool or toothpick
- Ball stylus tool
- Black acrylic paint
- Small detail paintbrush
- Matte varnish (optional)
Step 1: Sculpting the Body
-
Base form:
Start by conditioning your terracotta clay until it’s pliable. Roll a large ball for the body and a slightly smaller oval for the head. Gently press them together to form a pear-like seated shape. -
Adding legs:
Roll two thick sausages of clay for the rear legs. Bent them into a ‘V’ shape and attach them to the lower sides of the body, blending the seams at the hip so they look natural. -
Shaping the feet:
Flatten the ends of the legs slightly to make paws. Use your needle tool to press three distinct indentations into each paw to create toes. -
Creating the tail:
Roll a tapered snake of clay for the tail. Attach the thick end to the dragon’s lower back and curve it around the side of the body so it rests near the front paws. -
Arms and hands:
Form two smaller log shapes for the arms. Attach them at the shoulders, positioning them forward as if holding something precious. Flatten the ends and use the needle tool to define fingers.
Step 2: Head and Details
-
Snout definition:
Gently pull the clay on the face forward to create a snout. Use the side of your thumb to smooth the transition from the forehead to the nose. -
Mouth and nostrils:
Use a sharp tool to cut a friendly smile line into the snout. Use a small ball tool to press two nostril indentations at the tip of the nose. -
Setting the eyes:
Roll two small balls of white clay and press them into the face. Add tiny black clay pupils, placing them slightly off-center to give the dragon a curious, sideways glance. -
Spikes and horns:
Create several small triangles of clay. Attach two larger ones as ears/horns on top of the head, and run a line of smaller spikes down the back of the neck and spine. -
Wing structure:
Flatten two larger pieces of clay into triangular sheets. Use your tool to impress lines radiating from one corner to mimic bat-like wing bones. -
Attaching wings:
Attach the wings to the shoulder blades. I like to smooth the clay downward onto the back to ensure a strong bond that won’t break after baking.
Loose Limbs?
If the arms or head droop while you work, prop them up with crumpled aluminum foil or cornstarch. Remove these supports only after the clay has been baked and cooled.
Step 3: Finishing Touches
-
Adding the treasure:
Press the small teal bead or a tiny ball of contrasting clay gently into the dragon’s cupped hands. -
Texture and spots:
Before baking, you can lightly texture the skin with a sponge or brush. Once ready, bake the figurine according to your clay package instructions. -
Painting spots:
After the dragon has cooled completely, dip a fine brush or toothpick into black acrylic paint. Dot small speckles randomly over the shoulders, back, and legs. -
Positioning the orb:
The large glass orb isn’t baked into the clay. Instead, once the figure is finished, place the orb snugly in the curve of the dragon’s tail and belly for display.
Glow Up
Swap the crystal orb for a battery-operated LED tea light or a glow-in-the-dark sphere to turn your little dragon guardian into a magical ceramic nightlight.
Place your finished guardian near a window to catch the light through the crystal orb


What Really Happens Inside the Kiln
Learn how time and temperature work together inside the kiln to transform clay into durable ceramic.
Dragon Perched on a Rock Base
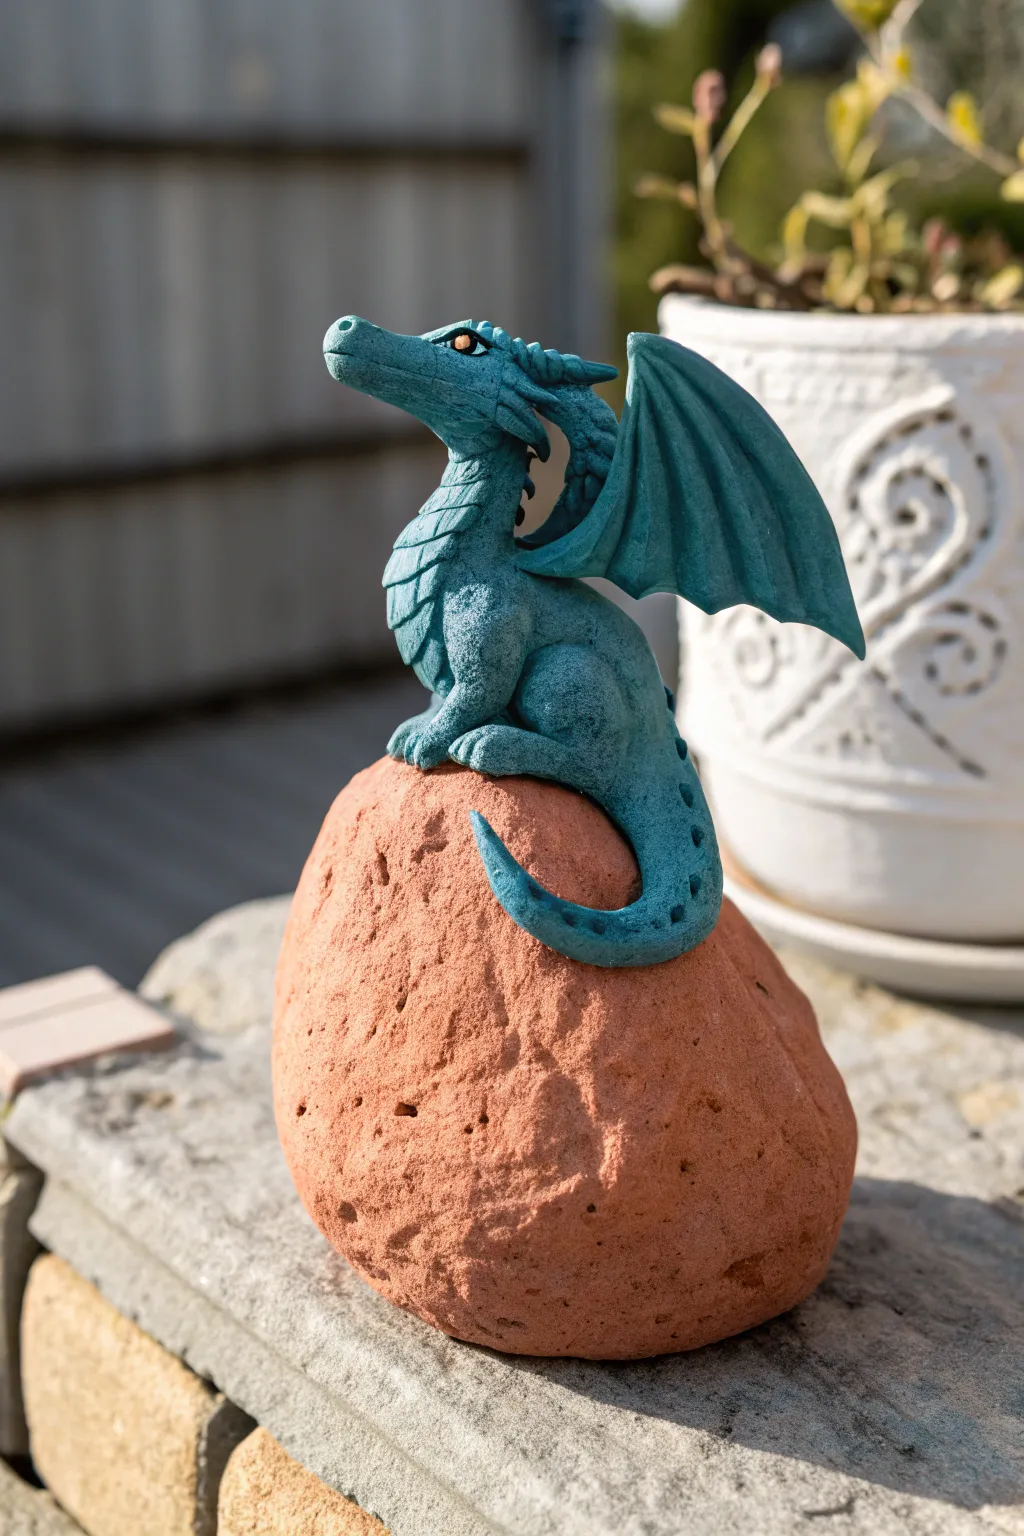
This whimsical project combines natural elements with fantasy, featuring a textured teal dragon resting atop a rugged reddish stone. The contrast between the smooth yet scaled dragon and the porous rock base creates a striking display piece perfect for garden pots or shelves.
Step-by-Step Guide
Materials
- Teal polymer clay (pre-colored or mixed)
- Black and white acrylic paint (for eyes and wash)
- Medium-sized porous reddish rock (cleaned and dry)
- Gold or amber glass eye beads (or clay for eyes)
- Sculpting tools (needle tool, ball tool, silicone shaper)
- Wire armature (18-gauge)
- Liquid polymer clay (Bake & Bond)
- Texture sponge or stiff brush
- Soft paintbrush
- Oven for baking
Step 1: Preparing the Base and Armature
-
Select the Rock:
Choose a rock with a flat bottom for stability and a slightly rounded top for the dragon to sit on. Scrub it clean to remove dust and let it dry completely so the clay adheres properly. -
Create the Core:
Form a simple wire armature that follows the S-curve of the dragon’s spine, neck, and tail. Twist a loop at the bottom where the hips will be to create a stable anchor point. -
Anchor to the Rock:
Apply a dab of strong adhesive or a small pad of clay to the rock where the dragon will sit. Press the wire loop into this anchor so the armature stands upright. -
Bulk Out the Body:
Using foil or scrap clay, build up the basic teardrop shape of the body around the wire. This saves your colored clay and reduces baking time. Coat this core with a thin layer of liquid polymer clay.
Step 2: Sculpting the Dragon Body
-
Apply the Teal Clay:
Sheet out your teal clay and wrap it smoothly around the foil core. Blend the seams until invisible, ensuring the clay is firmly pressed against the rock surface to create a natural ‘sitting’ weight. -
Form the Hind Legs:
Roll two thick teardrops of teal clay. Press them onto the sides of the hips, bending the wider part to form the thigh and flattening the bottom for the foot. Use a needle tool to press in three toe indentations. -
Shape the Front Legs:
Create two thinner logs for the front arms. Position them so they look like they are supporting the dragon’s upright posture, resting gently on the thighs or the rock itself. -
Extend the Tail:
Roll a long, tapered snake of clay. Attach it to the base of the spine and curl it around the side of the rock, tapering it to a fine point. I prefer to curve the tip upward slightly for a dynamic look. -
Add Surface Texture:
Gently tap a texture sponge or coarse brush all over the body (avoiding the belly) to create a skin-like, porous texture similar to the reference photo.
Stone Cold Tip
Pre-bake your rock in the oven at a low temp for 20 minutes before sculpting. This ensures any trapped moisture evaporates, preventing cracks during the final bake.
Step 3: Head and Wings
-
Sculpt the Head:
Form a distinct head shape with a defined snout. Use a ball tool to create sockets for the eyes. Insert the gold/amber beads or small balls of clay into the sockets. -
facial Details:
Add small eyelids over the top of the beads to give the dragon a sleepy or wise expression. Use a needle tool to carve nostrils and a mouth line. -
Create the Neck Scales:
Roll tiny balls of clay, flatten them, and layer them like shingles down the front of the neck and chest to create the plated underbelly visible in the design. -
Construct the Wings:
Cut two triangle shapes for wings. Use a tool to impress lines radiating from a central point to mimic wing bones. Curve them slightly for a natural, folded appearance. -
Attach Wings & Ears:
Secure the wings to the shoulder area using liquid clay. Add small triangular ear-fins behind the jawline to balance the head shape. -
Add Spikes:
Create a row of tiny triangular spikes running from the back of the head down the spine. Blend the base of each spike into the main body.
Heavy Head Help
If the head keeps drooping while you sculpt, prop it up with a small customized smooth cardboard stand or a crumpled paper towel until the clay is baked firm.
Step 4: Finishing Touches
-
Baking:
Bake the entire piece, rock and all, according to your clay package instructions. The rock acts as a heat sink, so you may need to add a few extra minutes. -
Cooling:
Let the sculpture cool completely inside the oven. Removing it too quickly can cause thermal shock and cracks. -
Applying a Wash:
Mix a tiny amount of black acrylic paint with water. Brush it over the textured dragon skin and immediately wipe off the excess with a paper towel. This highlights the textures we created earlier. -
Dry Brushing:
Lightly brush a lighter teal or white paint over the raised areas (knees, brow, spine) to make the details pop against the darker wash.
Place your newly hatched dragon on a sunny windowsill where the rock can warm up in the light
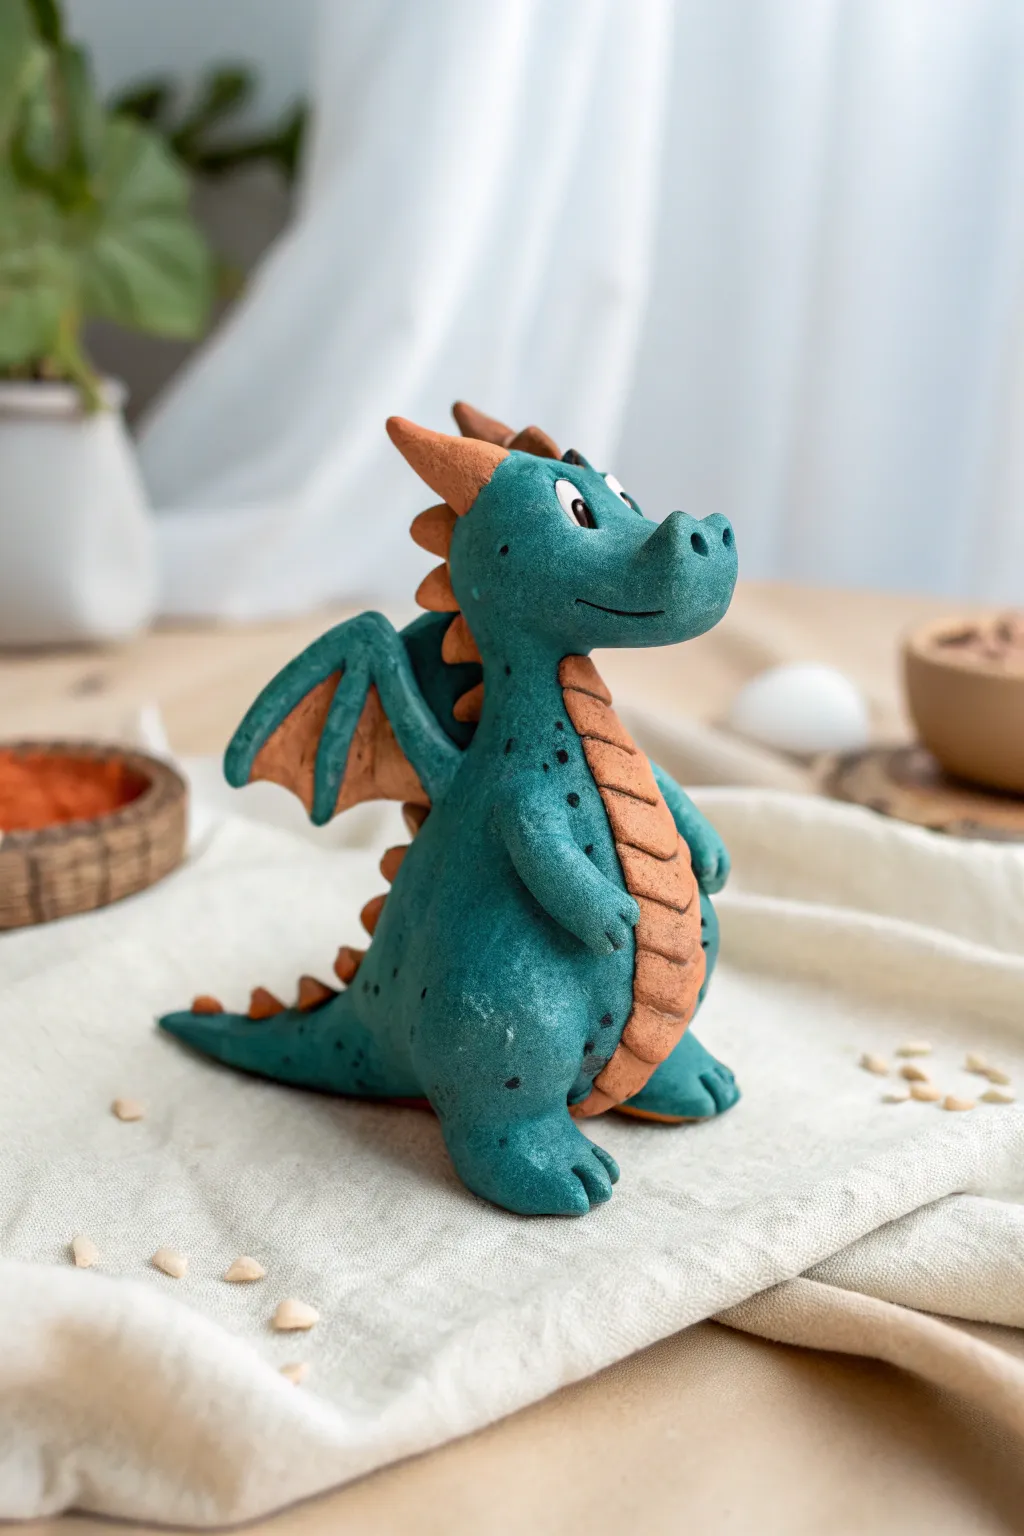
Dragon Egg Companion Piece
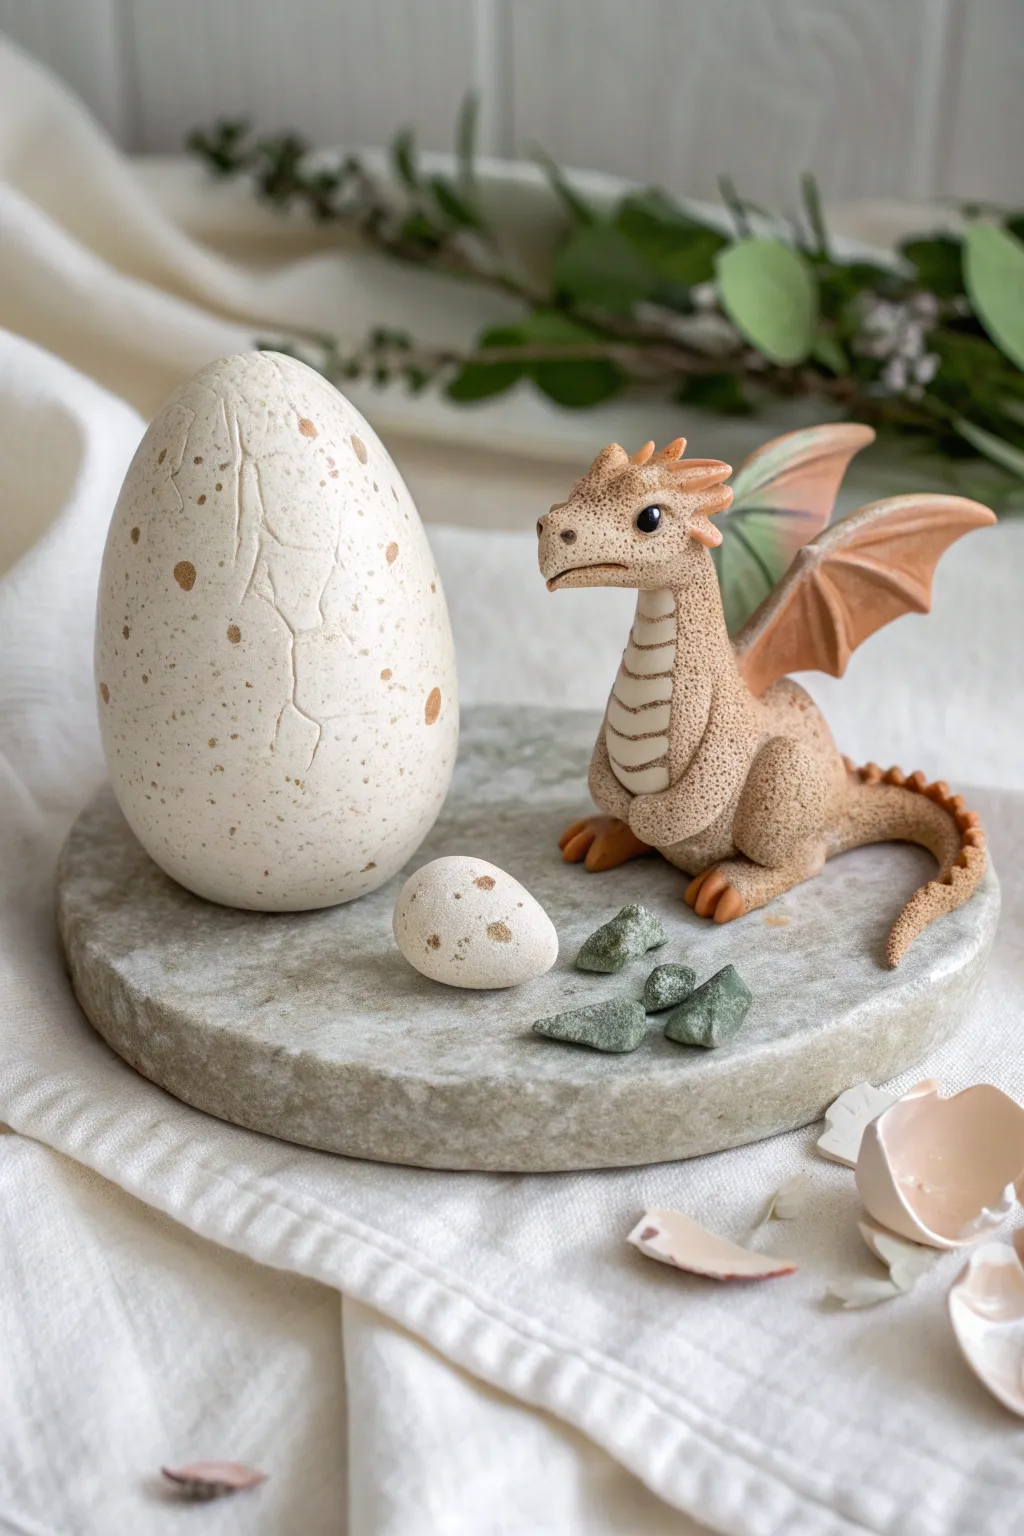
Create a charming scene of new beginnings with this polymer clay dragon and its speckled egg companion. The textured skin and realistic eggshell finish give this fantasy duo a warm, organic look perfect for shelf display.
Step-by-Step Tutorial
Materials
- Polymer clay (beige/tan, translucent white, soft orange/brown)
- Acrylic paints (brown, white)
- Needle tool or dental pick
- Ball stylus tools (various sizes)
- Stiff bristle brush or toothbrush (for texturing)
- Wire armature wire (20 gauge)
- Aluminum foil
- Liquid polymer clay or Bake & Bond
- Matte varnish
- Round stone or clay base
Step 1: Sculpting the Dragon
-
Form the armature:
Create a simple wire skeleton for the dragon’s body, neck, and tail to provide strength. Crumple a small amount of aluminum foil around the body section to save clay and reduce weight. -
Body basics:
Cover the armature with your beige conditioned clay. Smooth it out to form a pear-shaped body that tapers into a long, curved tail and extends up into a thick neck. -
Adding texture:
Before adding limbs, use a stiff toothbrush or a stippling sponge to gently press a porous texture into the skin surface. This mimics a leathery hide. -
Legs and positioning:
Roll two thick sausages for the hind legs and shape them into haunches. Attach them to the lower body, blending the seams perfectly. Form the feet with three toes each, attaching small orange clay cones for claws. -
Front arms:
Create smaller, slightly thinner arms. Position them resting on the belly or knees for a cute, contemplative pose. Add tiny claws to match the feet. -
Head shaping:
Roll a ball of beige clay for the head. Pinch the front to form a rectangular snout. Use a ball tool to indent eye sockets and insert small black glass beads or clay balls for eyes. -
Facial details:
Sculpt the mouth line with a needle tool. Add a distinct brow ridge and small nostrils. Using the orange clay, create small spikes and ears for the back of the head. -
Belly scales:
Roll a thin sheet of lighter beige clay. Cut oval shapes and layer them up the dragon’s chest and neck to create the belly plates (scutes). -
Wings assembly:
Form the wing structure using thin snakes of beige clay. Fill the spaces with flattened, translucent, or slightly orange-tinted clay for the membrane. Attach these securely to the dragon’s back. -
Spine details:
Run a row of tiny orange triangular spikes down the spine from the neck to the tip of the tail.
Step 2: Creating the Eggs
-
Egg core:
For the large egg, ball up a significant amount of aluminum foil into an egg shape. This is essential for proper baking. -
Covering the egg:
Roll out a sheet of off-white or cream clay. Cover the foil completely, smoothing the seams until invisible. Create a smaller, solid clay egg for the companion piece. -
Cracking the surface:
On the large egg, use a sharp craft knife to carefully carve irregular crack lines. Deepen these cracks slightly to make it look like the shell is splitting. -
Shell fragments:
Roll a very thin sheet of the same egg-colored clay. Tear it into jagged pieces and curve them slightly. Bake these separately to scatter around the base later.
Drooping Wings?
If the clay wings sag before baking, support them with balls of polyester batting or crumpled tissues. These won’t leave marks and can be baked safely.
Step 3: Finishing Touches
-
Pre-bake shading:
Using soft pastels or very watered-down acrylics, add subtle brown shading to the dragon’s scales and the recesses of the egg cracks. -
Speckling:
Dilute brown acrylic paint with water. Load a toothbrush and flick the bristles to splatter fine brown spots over both the dragon and the eggs for a natural, organic pattern. -
Baking:
Bake all dragon and egg components according to your clay manufacturer’s instructions (usually 275°F/130°C for 15-30 minutes per 1/4 inch thickness). -
Assembly:
Once cooled, arrange the dragon and eggs on your stone base. Glue the loose shell fragments near the base for a realistic hatching scene.
Realistic Speckles
Practice your splatter technique on paper first! Vary the distance of the brush to get a mix of tiny dots and larger blotches for a natural eggshell look.
Now you have a mythical nursery scene ready to bring a touch of magic to your desk

TRACK YOUR CERAMIC JOURNEY
Capture glaze tests, firing details, and creative progress—all in one simple printable. Make your projects easier to repeat and improve.
Dragon With Leafy Forest Details
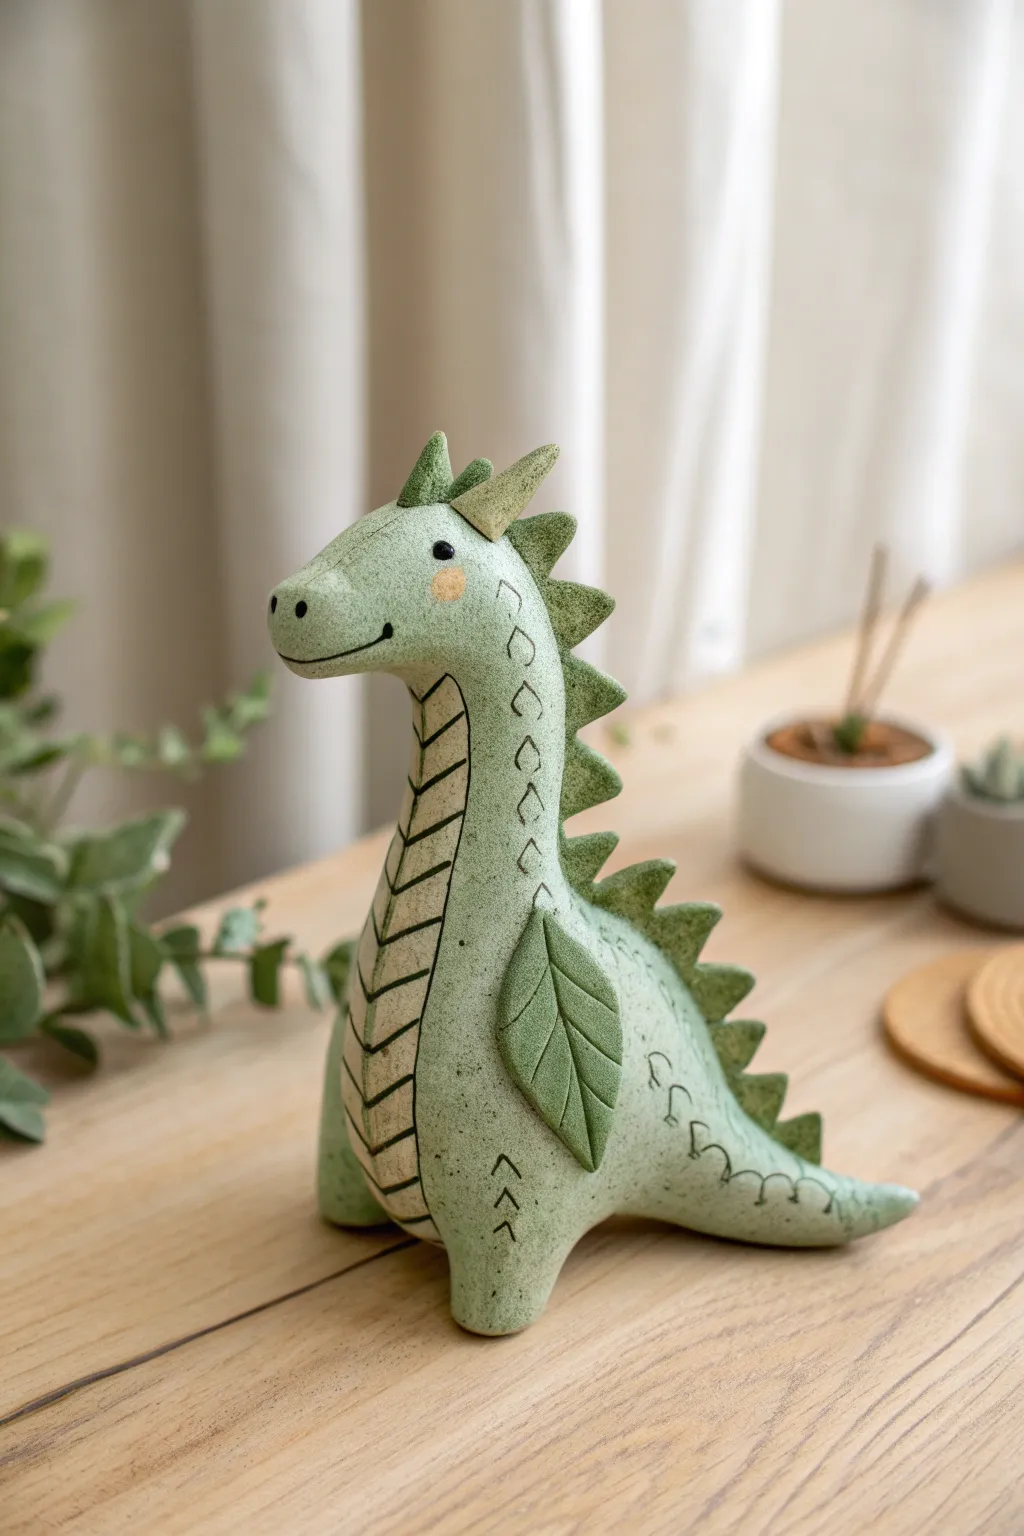
Sculpt a charming guardian of the forest with this textured clay dragon, featuring clever leaf-shaped wings and organic details. The matte, speckled green finish gives it an earthy, handmade ceramic feel perfect for plant shelves.
Step-by-Step Tutorial
Materials
- Polymer clay or air-dry clay (Speckled Green or Sage Green)
- Small amount of Beige/Cream clay (for belly and horns)
- Black acrylic paint or clay (for eyes/mouth)
- Blush pink pastel or paint (for cheeks)
- Clay sculpting tools (needle tool, ball stylus)
- Rolling pin
- Leaf texture stamp or real leaf
- Craft knife
- Matte varnish (optional)
Step 1: Forming the Body Base
-
Condition the clay:
Begin by thoroughly conditioning your speckled green clay until it is soft and pliable. If you don’t have pre-speckled clay, you can mix black pepper or craft sand into plain green clay for that earthen look. -
Shape the torso:
Roll a large ball of green clay and gently elongate it into a pear shape. Flatten the bottom so it sits stably on your work surface; this will support the entire structure. -
Create the neck and head:
Pull the narrower top part of the pear shape upwards to form a thick, sturdy neck. Bend the top slightly forward to create the head, smoothing the transition so there are no seams. -
Refine the snout:
Gently pinch and shape the front of the head to form a rounded, friendly snout. It should look slightly blunt rather than sharp. -
Add sturdy legs:
Roll two small, thick logs of green clay for the front legs and two slightly smaller nubs for the back legs. Blend these seamlessly into the bottom of the body so the dragon looks like it is sitting comfortably.
Step 2: Adding the Belly and Texture
-
Prepare the belly strip:
Roll out a thin sheet of beige or cream clay. deeply cut a long, tapering strip that will fit from the dragon’s chin down to the bottom of its belly. -
Attach the belly:
Press the beige strip onto the front of the dragon. Smooth the edges down so it looks integrated, not just stuck on top. -
Detail the belly scales:
Using a needle tool or a craft knife, score diagonal lines across the beige strip to create a chevron or ‘V’ pattern, mimicking belly plates. -
Add side texture:
Use a specialized texture tool or the tip of a small clean stamp to impress arrow-head shapes or small scales onto the green clay on the sides of the body for extra detail.
Clean Texture Tip
To keep the speckled clay looking stone-like, avoid smoothing it too perfectly. Use a stiff toothbrush to tap the surface lightly for a varied, matte texture.
Step 3: Sculpting the Leafy Features
-
Create the spines:
Flatten a strip of green clay and cut out a series of small triangles. Attach these running down the spine from the back of the head to the tail. -
Texture the spines:
I like to use a needle tool to scratch small vertical lines into each spine triangle, giving them a grassy, organic texture. -
Make the leaf wings:
Roll two teardrop shapes of green clay and flatten them. Use a knife to carve a central vein and branching veins to make them look exactly like leaves. -
Attach the wings:
Press the leaf-wings onto the sides of the body where the arms would be. Curve the tips slightly backward to follow the body’s contour. -
Form the horns:
Using the beige clay, roll two very small cones. Attach these to the top of the head ensuring they sit symmetrically.
Seasonal Switch
Change the leaf wings to match the seasons: use orange maple leaves for autumn or white snowflake shapes for a winter ice dragon.
Step 4: Defining the Face and Tail
-
Extend the tail:
If your base shape didn’t include a long tail, add a cone of green clay to the back and blend smoothly. Curve it around the side of the body. -
Detail the tail:
Carve swirling patterns or loop-de-loop lines along the side of the tail using a needle tool. -
Add facial features:
Use a small ball stylus to make indentations for the eyes. Insert tiny balls of black clay or paint them black after baking. Carve a simple curved line for the smile. -
Apply finishing touches:
Add a soft pink blush to the cheeks using chalk pastel powder or diluted paint. Add tiny nostril indents on the snout.
Once baked or dried, your earthy little friend is ready to guard your favorite potted plant
Lava Ridge Fire Dragon
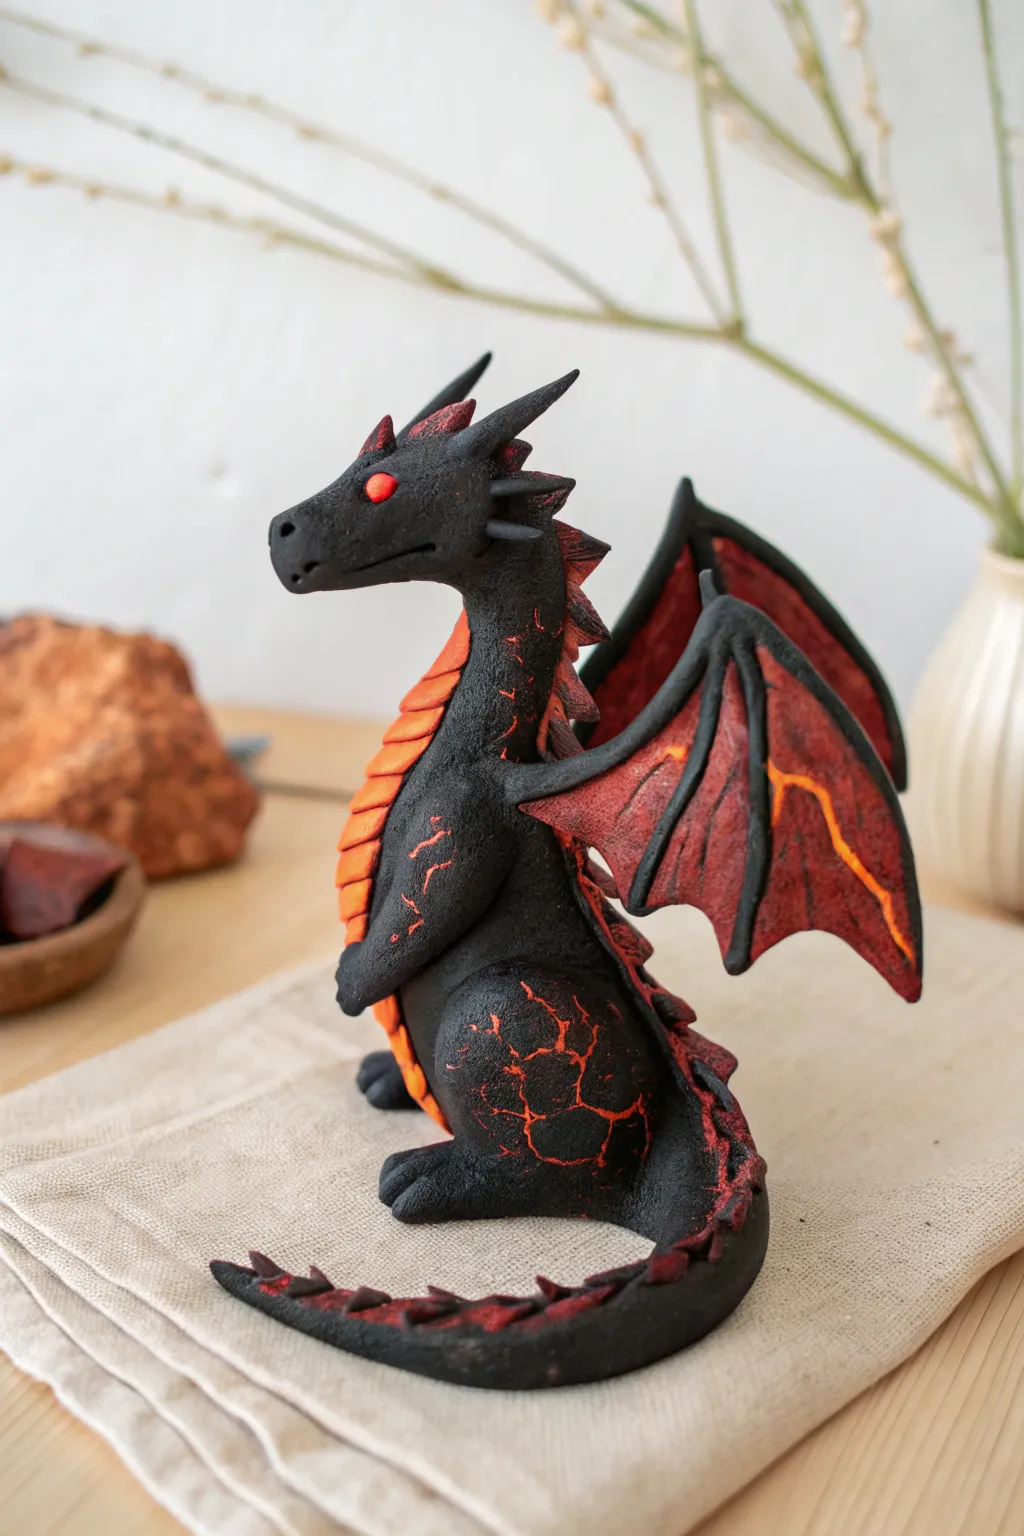
Summon the heat of a volcano with this striking polymer clay dragon, featuring a textured obsidian-black skin broken by veins of fiery magma. This intermediate project uses clever layering and texture techniques to create the illusion of cooling lava rock.
Detailed Instructions
Materials
- Black polymer clay (firm consistency recommended)
- Red polymer clay
- Orange polymer clay
- Yellow polymer clay
- Wire armature wire (16 or 18 gauge)
- Aluminum foil for bulking
- Needle tool and clay sculpting tools
- Texture sponge or stiff brush
- Acrylic paints (bright orange, yellow, red)
- Thin detail paintbrush
- Oven for baking
Step 1: Forging the Core
-
Prepare the Armature:
Twist two lengths of wire together to form the basic skeleton: a spine that extends into a tail, a loop for the head, and two shorter wires twisting off for the legs. Crumple aluminum foil tightly around this wire frame to bulk out the body shape, keeping it slightly smaller than the final dragon will be. -
Mix the Magma Base:
Create a gradient blend of red, orange, and yellow clay. Don’t mix it fully; leave it marbled so it looks like churning lava. Flatten this sheet and cover the stomach area, the undersides of the wings, and patches on the thighs where you want the lava cracks to show through later. -
Cover with Obsidian Skin:
Roll out a thin sheet of black clay. Carefully drape this over the foil and the marbled underlying clay. Smooth it down, ensuring there are no air bubbles trapped between the layers. -
Sculpt the Head:
Shape a wedge of black clay for the head. Use your needle tool to carve a mouth line and small nostrils. Add two small balls of bright red or orange clay for the eyes, pressing them gently into sockets.
Step 2: Designing the Body
-
Form the Chest and Belly:
Roll a small snake of orange clay and flatten it. Press this onto the front of the dragon’s chest and belly to create the ribbed underbelly scales. Use a tool to texture horizontal lines across this strip for a segment effect. -
Create the Lava Cracks:
This is the crucial step. Take a sharp needle tool and carve jagged, wandering lines into the black clay primarily on the thighs and shoulders. Carve deep enough to reveal the colored ‘magma’ clay underneath or create grooves you can paint later. -
Texture the Skin:
Gently tap a coarse texture sponge or stipple with a stiff brush over the black sections of the skin. This gives it a porous, volcanic rock appearance rather than smooth plastic. -
Add Limbs and Spines:
Sculpt simple, sturdy legs from black clay and attach them to the body, blending the seams. Create a series of small, sharp triangles from black clay and run them down the back of the neck and spine as dorsal spikes.
Magma Core Trick
If carving to reveal color is too hard, just make the whole dragon black first. Use bright orange acrylic paint in the cracks after baking for an easier glow effect.
Step 3: Wings and Final Details
-
Construct Wing Frames:
Use wire to form the shape of the wings. Cover these wires with thin snakes of black clay to create the ‘bones’ or fingers of the wing structure. -
Fill the Wing Membranes:
Roll out a sheet of red clay mixed with a bit of black for a charred look. Cut triangular panels to fit between the wing bones and press them into place. Texture these membranes with subtle lines radiating from the ‘elbow’ of the wing. -
Paint the Veins:
Once the wings are assembled, use a very fine brush to paint jagged lightning-bolt lines of bright orange and yellow across the red membrane, mimicking the look of active lava flowing through the wings. -
Attach the Wings:
Press the wire ends of the wings into the shoulder area of the dragon. Smooth clear bits of black clay over the join to secure them firmly. I like to support the wings with small props made of scrap clay or cardboard so they don’t droop. -
Detail the Tail:
Continue the dorsal spikes all the way down to the tip of the tail. Using your sponge, ensure the tail texture matches the rough body. -
Bake the Dragon:
Bake your creation according to the instructions on your specific brand of polymer clay. Usually, this is around 275°F (130°C) for 15-30 minutes per 1/4 inch of thickness. -
Highlighting:
After baking and cooling, dry brush a tiny amount of grey acrylic paint over the highest points of the black ‘rock’ skin to emphasize the texture.
Smoke Effect
After painting the lava cracks, stretch wisps of cotton wool and glue them near the dragon’s nostrils or rising from the back spikes for a smoking volcano look.
Place your dragon on a shelf where the light can catch those fiery details and enjoy your miniature beast
Ice Spiked Frost Dragon
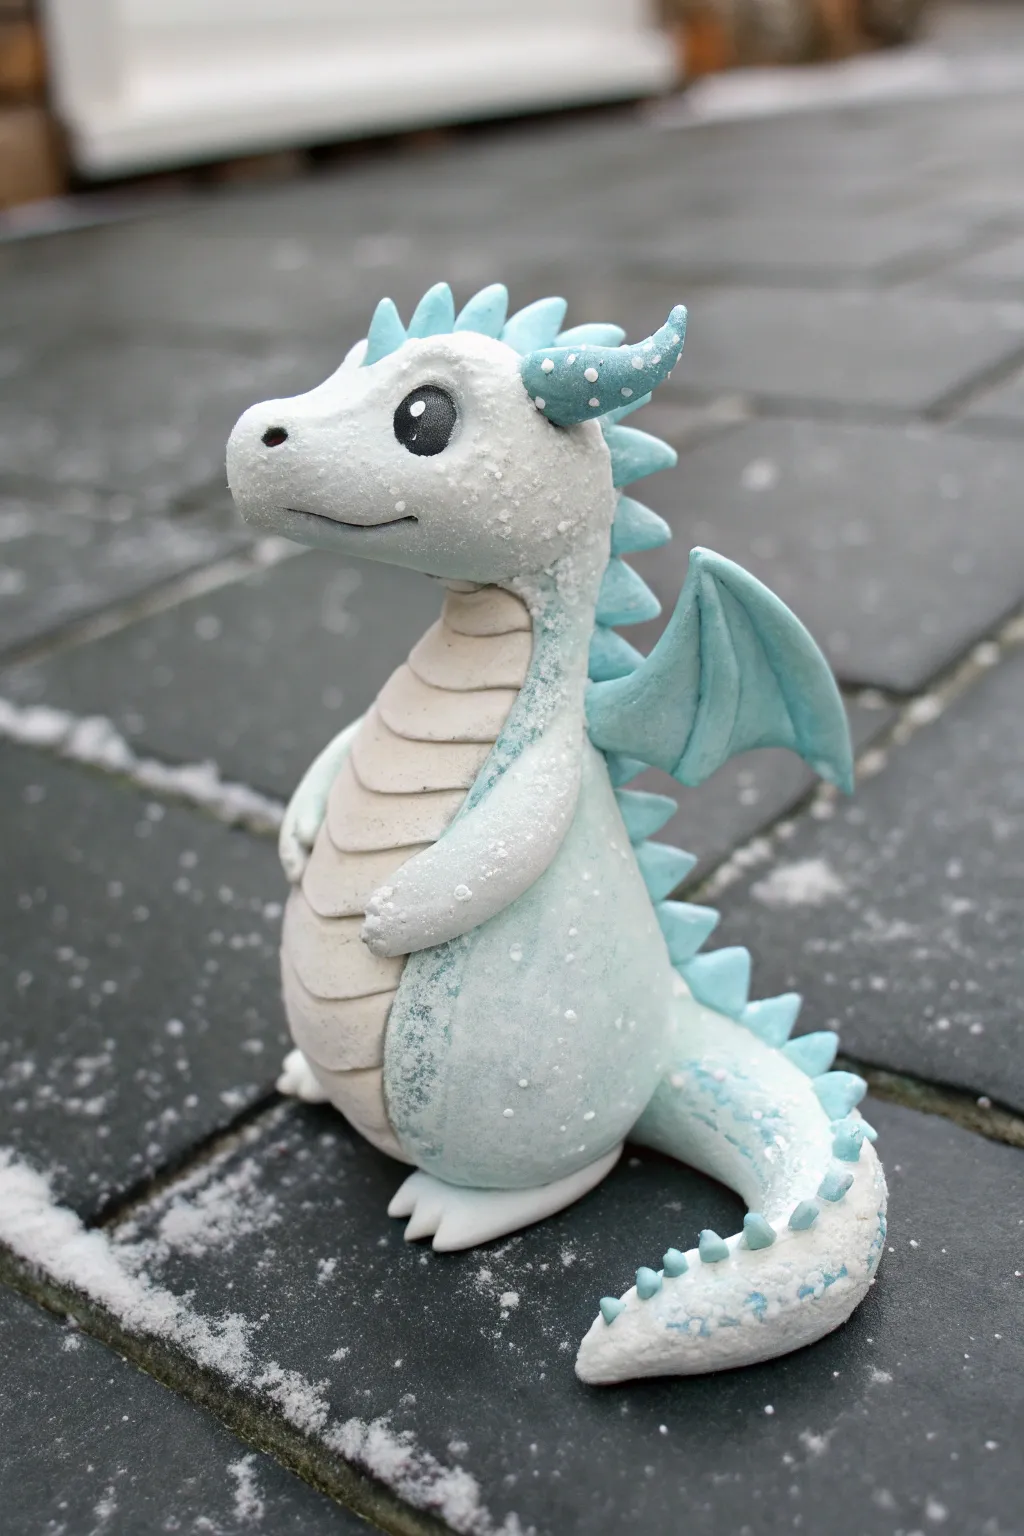
This adorable little frost dragon captures the sparkle of a fresh snowfall with its shimmering finish and cool blue tones. Sculpted in polymer clay, this project features delicate spikes, tiny wings, and a magical dusting of faux snow that brings the character to life.
Step-by-Step
Materials
- Polymer clay (White, Translucent, Pearl, Pale Blue)
- Aluminum foil (for armature)
- Sculpting tools (ball styluses, needle tool, rubber shapers)
- White or iridescent glitter/embossing powder
- Liquid polymer clay (Translucent or White)
- Black glass beads (for eyes)
- Soft pastel chalks (Blue, Teal)
- Brush for shading
- Oven for baking
Step 1: Body & Head Construction
-
Mix the Core Color:
Create a ‘frost’ blend by mixing white polymer clay with a significant amount of translucent and a touch of pearl. You want a color that looks like packed snow rather than flat plastic. -
Form the Base:
Crumple a small piece of aluminum foil into a pear shape for the body’s core. This saves clay and keeps the figurine light. Cover the foil completely with your frost clay blend, smoothing out any seams until you have a smooth, chubby pear shape. -
Sculpt the Head:
Roll a separate ball of the frost clay for the head. Pinch one side gently to pull out a short, rounded snout. Blend the neck area onto the top of the pear-shaped body using a rubber shaper tool to ensure a secure connection. -
Add Facial Features:
Use a medium ball tool to press two sockets for the eyes. Insert small black glass beads into the sockets, pushing them deep enough to look secure. Use a needle tool to create a simple, smiling mouth curve and two nostrils on the snout.
Step 2: Details & Limbs
-
Create the Belly:
Roll a thin sheet of white clay. Cut an oval shape and press it onto the front of the dragon’s body. Use a knitting needle or tool handle to impress horizontal lines across the belly, making it look segmented. -
Attach the Limbs:
Form two small teardrops for the arms and attach them to the sides of the belly. Shape two larger teardrops for the feet, flatten the bottoms slightly, and use a knife tool to mark three toes on each foot. Attach these to the base of the body. -
Sculpt the Tail:
Roll a tapered snake of frost clay. Attach the thick end to the back of the body and curl the tail around towards the front feet. Blend the seam smoothly into the body. -
Shade the Dragon:
Before adding spikes, use a soft brush and shavings from a blue pastel chalk to gently shade the back, the tail, and the areas around the scales. I like to focus the blue near the spine to give it depth.
Sticky Situation?
If the clay gets too soft and fingerprints are showing, pop the sculpture in the freezer for 5 minutes. The firmer clay is easier to smooth out with a drop of baby oil.
Step 3: Ice Spikes & Wings
-
Make the Spikes:
Mix white clay with a tiny bit of pale blue. Roll tiny cones of varying sizes. Starting from the top of the head and working down to the tail tip, press these spikes along the spine. -
Add Horns:
Create two slightly larger, curved cones in a darker blue shade for the main horns. Texture them slightly with a needle tool if desired and attach them behind the eyes. -
Form the Wings:
Cut two small triangles of pale blue clay. Use a tool to press indentations that radiate from one corner, simulating wing bones. Pinch the top edge to create a ‘claw’ or joint. -
Attach Wings:
Press the wings firmly onto the upper back of the dragon. You may need to prop them up with a bit of scrap clay or foil while the clay is raw so they don’t droop.
Make It Sparkle
Mix glow-in-the-dark powder into your translucent clay blend. In daylight, it looks like regular frost, but turn out the lights and your dragon will have a ghostly winter glow.
Step 4: Snowy Finish
-
Apply ‘Snow’ Adhesive:
Dab small amounts of liquid polymer clay onto the tops of the head, the spikes, the tops of the wings, and the tail. Think about where snow would naturally land. -
Frost the Dragon:
Sprinkle white embossing powder or very fine iridescent glitter over the areas with liquid clay. This creates the crystallized, frozen texture seen in the photo. -
Bake:
Bake the dragon according to your polymer clay package instructions (usually around 275°F/135°C for 15-30 minutes depending on thickness). Let it cool completely inside the oven to prevent cracking. -
Dotting Details:
Once cool, create tiny dots on the horns or body using white acrylic paint or a white gel pen to mimic falling snowflakes.
Now you have a frosty little companion ready for display on a shelf or desk
Wing Style Sampler Dragon
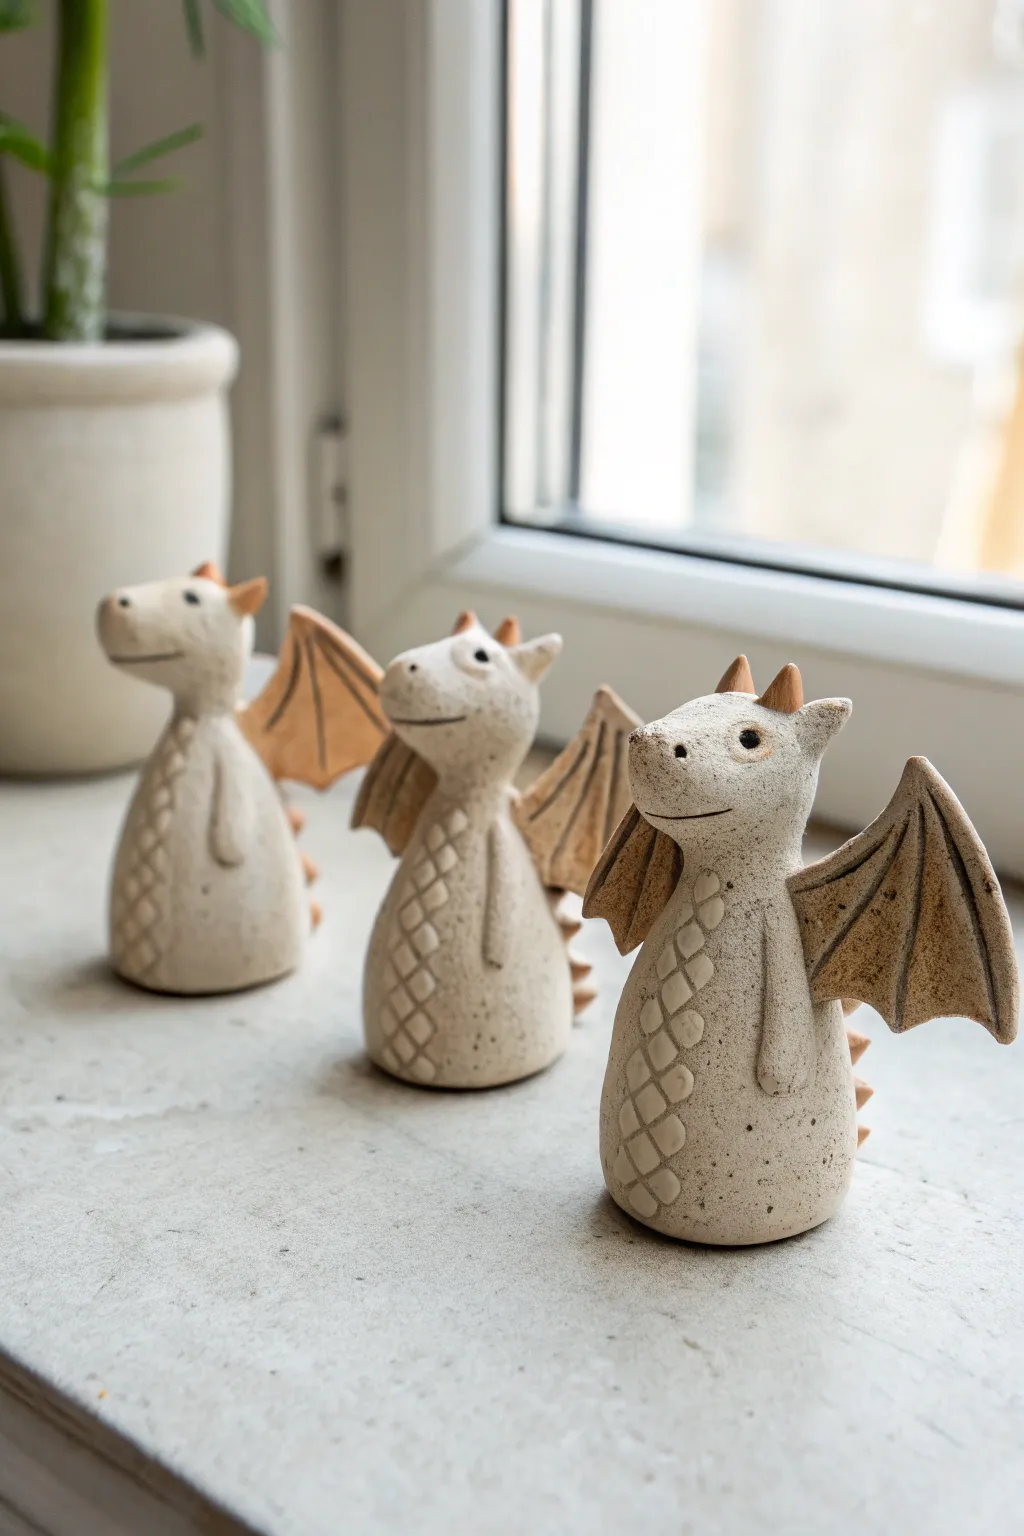
These charming, minimalist dragons feature a distinctive bell shape and geometric wing style that highlights the natural beauty of speckled clay. Their uniform design makes them perfect for practicing consistency in hand-building, resulting in a delightful set of windowsill guardians.
Detailed Instructions
Materials
- Speckled stoneware clay (mid-fire recommended)
- Needle tool
- Small rolling pin
- Scoring tool or serrated rib
- Slip (clay and water mixture)
- Small sponge
- Wooden modeling tool
- Fettling knife
- Clear or translucent matte glaze
- Kiln
Step 1: Forming the Body
-
Prepare the clay:
Begin by wedging your speckled clay thoroughly to remove any air bubbles. Divide the clay into three equal portions if you plan to make the full trio, ensuring each ball is roughly the size of a large tangerine. -
Shape the base cone:
Take one portion and roll it into a smooth ball. Gently taper one end to create a cone or pear shape. The wide bottom will be the belly, while the tapered top will eventually become the head. -
Refine the silhouette:
Tap the wide bottom of the cone on your work surface to flatten it so the dragon stands stably. Smooth the sides upward, slightly elongating the neck area to distinguish the head from the body without separating them completely. -
Define the head:
Gently pinch and pull the top of the cone forward to create the snout. Use your thumb to smooth the transition under the chin, giving the dragon a distinct, slightly upturned muzzle.
Step 2: Adding Details & Texture
-
Create the belly scales:
Using a needle tool or a small loop tool, lightly carve a grid pattern onto the front of the belly. I prefer drawing diagonal lines crossing each other to create diamond-shaped scales. Keep the lines shallow for a subtle look. -
Add the arms:
Roll two small, thin coils of clay for the arms. Attached them vertically along the sides of the belly using slip and scoring. Blend the top of the arm into the body, leaving the bottom rounded to suggest paws resting at the side. -
Sculpt the face:
Use the back of a needle tool or a small straw to press two eye sockets into the head. Add tiny balls of clay for the pupils or simply poke holes for a more stylistic look. Scribe a simple, curved line for the smile. -
Attach the horns:
Roll two tiny cones of clay for the horns. Score the top of the head and attach them firmly. You can leave these unglazed later to highlight the raw clay texture, or glaze them with the rest of the body.
Drooping Wings?
If the wings sag while the clay is wet, prop them up with crumpled paper towels or small pieces of foam. Leave these props in place until the clay is leather hard and can support its own weight.
Step 3: Wings & Finishing
-
Roll the wing slab:
Roll out a small slab of clay to about 1/4 inch thickness. Cut out two identical triangles for the wings. These dragons feature ‘sampler’ style geometric wings, so keep the edges sharp and straight. -
Detail the wings:
Using a blunt tool, press lines into the wings to simulate the bone structure. The lines should radiate from the corner that will attach to the body outward to the wide edge. -
Attach the wings:
Score the back of the dragon aggressively and apply slip. Press the wings firmly onto the back, blending the clay at the attachment point so they don’t crack off during firing. Angle them slightly backward. -
Add dorsal spikes:
Roll tiny triangles or pinch small bits of clay and attach them in a line running down the dragon’s spine, starting from the back of the head down to the tail area. -
Smooth and sponge:
Wipe the entire piece down with a slightly damp manufacturing sponge. This removes any sharp burrs or clay crumbs and brings the grog (speckles) to the surface. -
Dry slowly:
Loosely cover the dragons with plastic to let them dry slowly. Because the wings are thin and the body is thick, slow drying prevents warping. -
Bisque fire:
Once bone dry, fire the pieces to bisque temperature (usually cone 04) to prepare them for glazing. -
Glaze application:
Dip the dragons into a clear or semi-transparent white glaze. If you want the horns or wing tips to look rustic, wipe the glaze back from those high points with a sponge. -
Final firing:
Fire to the maturity temperature of your clay (likely cone 5 or 6). This will melt the glaze and bring out the iron speckles in the clay body.
Pro Tip: Speckle Pop
To get more pronounced speckles, wipe the bisque-fired dragon with a damp sponge right before glazing. This cleans dust and slightly exposes the grog, helping the iron spots burn through the glaze.
Arrange your finished trio on a window ledge where the light can catch the subtle texture of their scales and wings
Horn and Crest Mix-and-Match Dragon
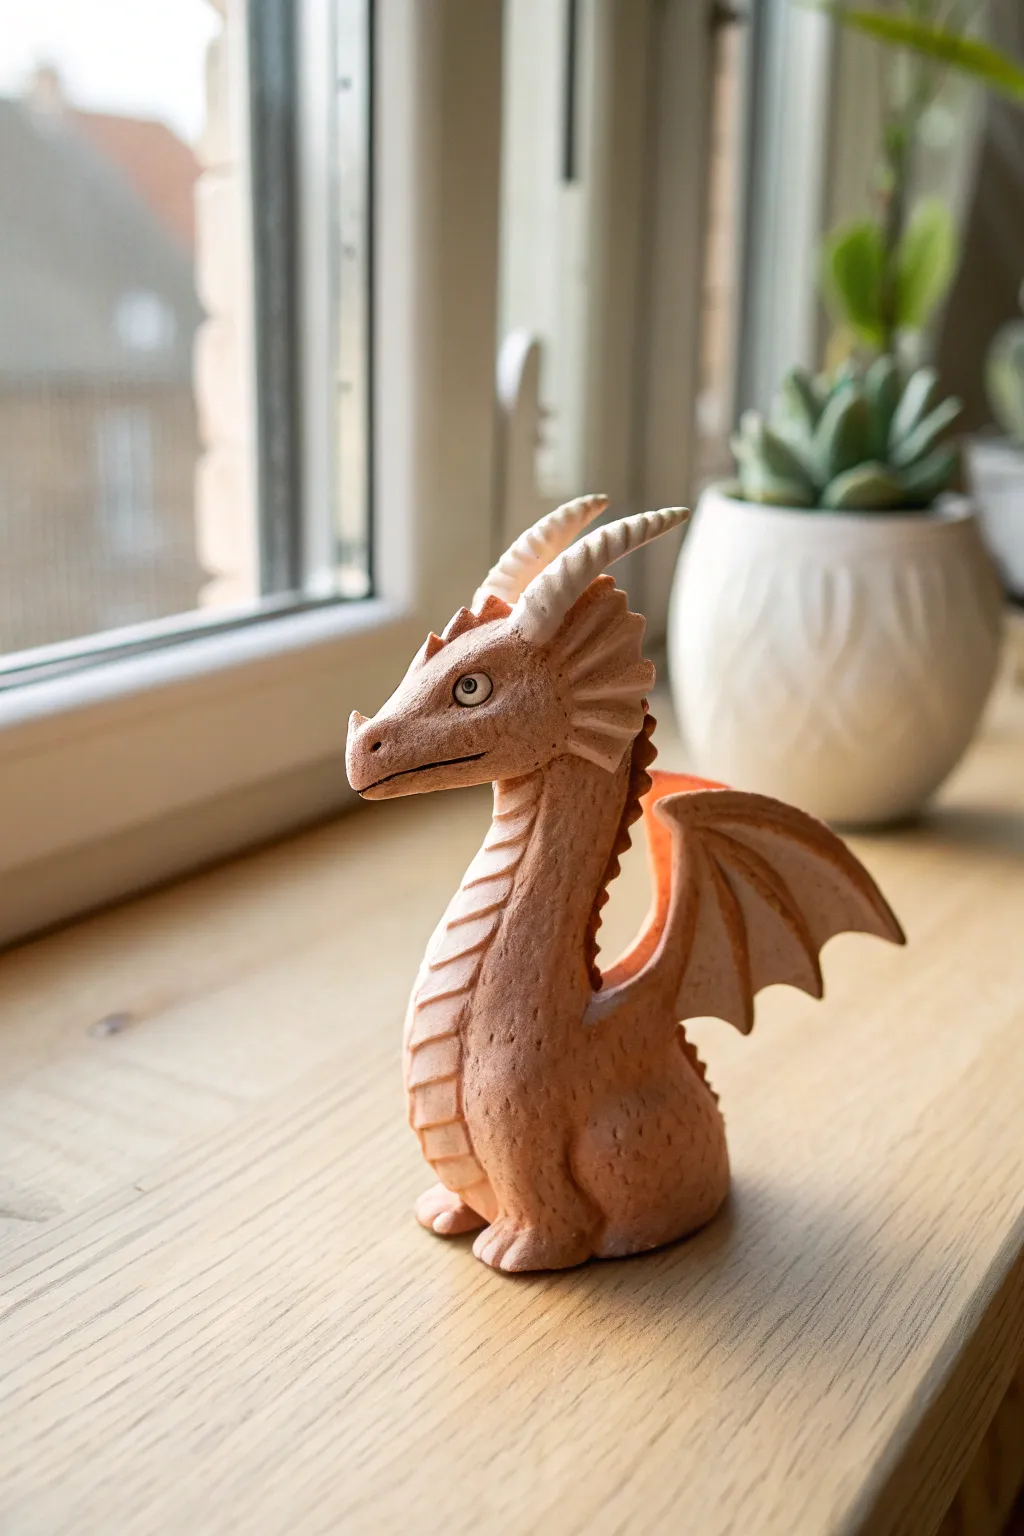
This charming, handheld dragon sculpture features a warm, earthy finish that mimics the look of carved sandstone or terracotta. With its expressive crest and distinct twin horns, it’s a perfect project for practicing texture and proportion in your sculpting.
Step-by-Step
Materials
- Terracotta-colored polymer clay (or air-dry clay)
- White or translucent polymer clay (for horns)
- Needle tool
- Ball stylus tool set
- Wire armature wire (16 or 18 gauge)
- Aluminum foil
- Small glass beads or black clay (for eyes)
- Texture sponge or stiff brush
- Flexible blade or craft knife
- Acrylic paints (brown wash, optional)
Step 1: Building the Body
-
Prepare the core:
Crumple a small amount of aluminum foil into a teardrop shape for the body and a smaller oval for the head. This saves clay and keeps the figure lightweight. -
Insert the armature:
Cut a piece of wire and insert it connecting the head foil to the body foil, bending it slightly to create an S-curve for the neck. -
Cover with clay:
Condition your terracotta clay until pliable. Roll out a sheet and wrap it completely around the foil forms, blending the seams until smooth. -
Shape the neck and chest:
Add extra clay to the neck area to build a smooth transition. I like to thicken the chest slightly to give the dragon a proud, puff-chested posture. -
Form the base:
Flatten the bottom of the body so the dragon sits stably. Add two thick, rounded stumps for the rear legs and blend them seamlessly into the body.
Fixing Top-Heavy Models
If the head droops during sculpting, the neck is too soft. Insert a stiff toothpick alongside the wire armature for temporary support until the clay firms up.
Step 2: Sculpting the Head & Face
-
Profile shaping:
Pinch the snout to elongate it slightly. Use your thumb to create shallow indentations on the side of the head where the eyes will sit. -
Adding the eyes:
Press your beads or small balls of black clay into the sockets. Roll tiny snakes of terracotta clay to create eyelids above and below, blending the outer edges into the face. -
Mouth details:
Use a craft knife or needle tool to slice a horizontal line for the mouth. Curve it slightly upwards at the back for a gentle expression. -
Nostril placement:
Poke two small holes at the tip of the snout for nostrils. You can add a tiny ‘horn’ or bump on the very tip of the nose for extra character.
Seamless Blending
To make attached limbs look natural, use a rubber-tipped sculpting tool. It smears the clay joins smoothly without leaving harsh fingerprints or tool marks.
Step 3: Adding the Defines Features
-
Create the belly scales:
Roll a thin strip of clay and flatten it against the front of the neck and chest. Use a needle tool to press horizontal lines all the way down, creating a segmented belly texture. -
Attach the crest:
Form a flat, triangular piece of clay. Attach it behind the head, blending the bottom edge. Use a tool to cut ridges into it, fanning them out like a fin. -
Make the horns:
Using the lighter colored clay, roll two tapered cones. Twist them slightly to create a spiral texture. Press these firmly onto the top of the head. -
Sculpt the wings:
Create two flat triangles of terracotta clay. Cut a jagged bottom edge to mimic wing membranes. Score lines radiating from the ‘shoulder’ to the tips. -
Attach wings and spine:
Press the wings onto the back of the dragon. Add a row of tiny clay triangles running down the spine, starting from behind the crest. -
Overall texturing:
Take a stiff brush or a texture sponge and gently tap it over the entire surface of the dragon’s skin (avoiding the belly plates and horns). This creates that stone-like, pitted look. -
Final touches:
Check the feet; use a needle tool to press in toe separations. Ensure the sculpture is balanced. -
Bake or Dry:
Follow your specific clay’s instructions for baking or drying. If using polymer, tent with foil to prevent scorching.
Once cooled or dried, your dragon is ready to guard your bookshelf with quiet dignity
Textured Scale Stamp Dragon
Sculpt your own whimsical companion with this project featuring a soft matte finish and playful spotted textures. This gentle teal dragon stands upright with a charmingly rounded belly and contrasting earthy orange accents, perfect for brightening up any desk or shelf.
Step-by-Step Guide
Materials
- Polymer clay (Teal/Deep Green, Earthy Orange, White, Black)
- Aluminum foil (for armature)
- Sculpting tools (ball styluses, needle tool, rubber shapers)
- Acrylic roller or pasta machine
- Liquid polymer clay (Bake & Bond)
- Old toothbrush or stiff bristle brush
- Black acrylic paint (for speckles)
- Matte varnish
Step 1: Forming the Body Structure
-
Build the core:
Start by crumpling a tight ball of aluminum foil into a pear shape. This saves clay and keeps the figurine lightweight. The wider bottom will be the belly and hips, tapering up slightly for the chest. -
Cover with teal:
Condition your teal clay until it is pliable. Roll it into a sheet about 1/4 inch thick. Wrap the sheet completely around your foil pear, smoothing all seams with your thumbs until the surface is seamless and uniform. -
Shape the head:
Roll a separate, slightly smaller ball of teal clay for the head. Pinch the front gently to pull out a rounded snout. Use a ball tool to create shallow indents for the eyes and nostrils. -
Connect head and body:
Insert a short piece of wire or use a toothpick as a connector. Apply a dab of liquid clay to the neck area and press the head firmly onto the body, blending the clay at the neck seam with a rubber shaper tool so it looks like one piece. -
Add the legs:
Create two thick, short logs of teal clay for the legs. Press them onto the bottom sides of the body to form a stable base. Use a needle tool to press in three lines for toe separations on each foot. -
Attach the arms:
Roll two smaller teardrop shapes for arms. Attach them high on the sides of the belly. I find giving them a slight curve makes the dragon look like it’s resting its hands on its tummy.
Droopy Clay?
If the wings or head slump while creating, prop them up with polyester fiberfill or a folded paper towel while baking. Remove the support once cool.
Step 2: Adding Details and Accents
-
Create the belly scales:
Roll a snakes of orange clay and flatten it into a long strip. Attach this down the center of the chest and belly. Use a needle tool to score horizontal lines across the strip to create the segmented belly plates. -
Sculpt the tail:
Roll a cone of teal clay for the tail. Attach the wider end to the lower back, blending the seam thoroughly. Curve the tip of the tail around so it rests near the feet. -
Form the wings:
Cut two triangle shapes from flattened teal clay. Add a smaller triangle of orange clay inside each teal wing for the membrane. Shape the top edge into a curve and attach them to the upper back. -
Spikes and horns:
Make several small triangles of orange clay. Run a line of liquid clay down the spine and the top of the tail, then place the orange triangles in a row. Add two slightly larger orange cones to the top of the head for horns. -
Facial features:
Fill the eye sockets with white clay ovals. Add tiny black clay pupils. Use a needle tool to carve a simple, curved smile line under the snout.
Add Some Whimsy
For a magical touch, brush a tiny amount of mica powder (gold or pearl) onto the orange belly scales and spikes before baking for a gentle shimmer.
Step 3: Texturing and Finishing
-
Add skin texture:
Before baking, gently tap the teal sections of the clay with an old toothbrush or a ball of crumpled foil. This removes fingerprints and gives the skin a realistic, organic pore texture. -
Bake the dragon:
Bake the sculpture according to your clay manufacturer’s instructions (usually 275°F/135°C for 15-30 minutes depending on thickness). Let it cool completely. -
Apply speckles:
Dilute a tiny drop of black acrylic paint with water. Dip a stiff brush in it and flick the bristles with your finger to splatter tiny black dots onto the dragon’s skin for a speckled egg effect. -
Seal the work:
Once the paint is totally dry, apply a thin coat of matte varnish to protect the surface without making it shiny.
Now you have an adorable desk guardian ready to keep you company
Galaxy Marble Dragon Color Blend

Capture the magic of the night sky with this adorable galaxy-themed dragon figurine. Using polymer clay and careful painting techniques, you’ll create a seamless blend of deep blues and purples adorned with shimmering stars.
Step-by-Step Guide
Materials
- Polymer clay (midnight blue, violet, black, and white)
- Acrylic paints (white, metallic silver)
- Fine glitter (silver or holographic)
- Clay sculpting tools (ball stylus, needle tool)
- Aluminum foil (for the core)
- Detailed paintbrushes (fine liner)
- Gloss glaze or polyurethane varnish
- Baking sheet and oven
Step 1: Creating the Cosmic Base
-
Prepare the foil core:
Crumple a piece of aluminum foil into a teardrop shape to form the main body and a smaller oval for the head. This saves clay and keeps the figurine lightweight. -
Mix the galaxy color:
Knead midnight blue clay with small amounts of black and violet to create a deep, rich indigo base. Add a pinch of fine silver glitter directly into the clay for an embedded sparkle effect. -
Cover the armature:
Flatten your galaxy clay into a sheet and wrap it smoothly around the foil body and head shapes. Blend the seams until invisible. -
Form the gradient belly:
Mix a lighter shade of purple clay. Roll it flat and carefully press it onto the chest and belly area, blending the edges into the darker body clay to create a soft, gradient transition.
Starry Splatter
For a dense star field, load a stiff brush with white paint and flick the bristles with your finger to spray tiny dots.
Step 2: Sculpting the Dragon
-
Attach the head and neck:
Connect the head to the body using a short piece of wire or toothpick for support if needed. Smooth the clay at the neck join to make it look like one continuous piece. -
Shape the legs:
Roll two thick logs for the hind legs and shape them to look like the dragon is sitting. Add three small balls of white or light grey clay to the tips for claws. -
Add the arms:
Create two smaller, tapered logs for the front arms. Position them resting against the belly and add tiny claws to match the feet. -
Sculpt the face:
Use a ball tool to indent eye sockets. Add a small muzzle shape to the front of the face and use a needle tool to mark the nostrils and a gentle smile. -
Create the tail:
Roll a long, tapered snake of the galaxy clay. Attach the thicker end to the base of the spine and curl the tail around the dragon’s feet.
Fingerprints?
If you see prints on the raw clay, lightly brush the surface with a little bit of baby oil or cornstarch before baking.
Step 3: Wings and Spines
-
Craft the wings:
Cut two triangle shapes from the galaxy clay. Indent the ‘bones’ of the wings to give them structure, ensuring the purple gradient from the belly is echoed on the inner wing membranes. -
Make the spines:
Using violet clay, create a series of small triangles. Attach them in a row running from the top of the head down the back and tail. -
Add the horns:
Roll two small cones of light grey clay. Press them gently onto the back of the head, curving them slightly backward. -
Bake the figurine:
Follow the baking instructions on your specific brand of polymer clay. Allow the dragon to cool completely before moving to the painting phase.
Step 4: Painting the Cosmos
-
Paint the eyes:
Paint the eye sockets solid black. Add a white crescent shape to the side and a tiny white dot for a life-like reflection. -
Add the nebulae:
Dry brush a tiny amount of metallic purple or blue paint on the edges of the wings and the tops of the thighs to heighten the glowing effect. -
Paint the stars:
Using your finest brush and white paint, carefully dot ‘stars’ all over the dark blue sections of the body. Vary the size of the dots. -
Detail the constellations:
Paint a few four-pointed or five-pointed stars among the dots to serve as brighter focal points in your galaxy pattern. -
Seal the magic:
Once the paint is fully dry, coat the entire dragon in a gloss glaze. This deepens the dark colors and protects the delicate star details.
Place your finished dragon near a light source to watch the galaxy sparkle