There’s just something magical about making clay fairy doors—tiny portals that instantly turn a plain shelf or garden corner into a story. I pulled together my favorite designs you can recreate with polymer clay or air-dry clay, from classic wood-and-stone looks to wild, whimsical twists.
Classic Faux Wood Plank Fairy Door
Transform a plain block of clay into a charming, weathered oak entryway complete with realistic grain textures and an arched frame. This project uses clever sculpting techniques to mimic aged timber without needing a single saw or nail.
Step-by-Step
Materials
- Polymer clay (beige, white, and a darker brown)
- Acrylic rolling pin
- Modeling tools (specifically a needle tool and a blade)
- Texture sheet or a stiff toothbrush (for wood grain)
- Hobby knife
- Acrylic paints (burnt umber, cream, ivory, and black)
- Assorted texture sponges
- Matte varnish
- Oven (for baking polymer clay)
Step 1: Building the Core Structure
-
Create the base slab:
Begin by conditioning your beige polymer clay until it is soft and pliable. Roll it out into a thick, even slab about 1/4 inch thick. This will serve as the main body of the door. -
Cut the arch shape:
Use a paper template or freehand sketch an arched door shape onto the clay slab. Using your sharp blade, cut out the main door silhouette, keeping the lines clean and vertical. -
Form the base step:
Roll a separate, slightly thicker rectangular slab for the doorstep. Cut it to be just wider than the door itself. Stack two thinner rectangles underneath to create a tiered stone or wood step effect, pressing them gently together to adhere.
Step 2: Sculpting the Wood Texture
-
Mark the planks:
Use the back of your blade to gently press vertical lines into the main door slab. Don’t cut all the way through; just create deep indentations to represent separate wooden planks. -
Engrave the grain:
Take your needle tool and scratch vertical, wavy lines into each ‘plank.’ vary the pressure to create deep fissures and light surface scratches. I find adding a few knot holes by twisting the tool in a circle adds instant realism. -
Add the door frame:
Roll out two long snakes of clay and flatten them slightly. Press these onto the sides of the door as jambs. Create an arched piece for the top, ensuring it overhangs slightly like a heavy timber header. -
Detail the frame:
Use a modeling tool to carve deep grooves along the length of the frame pieces, mimicking carved molding or stacked trim. Puncture the sides with small holes to suggest old nail marks or wormholes.
Needle Tool Trick
When making wood grain, wiggle the needle tool slightly as you drag it down. Perfectly straight lines look artificial, while shaky lines look organic.
Step 3: Hardware and Finishing Touches
-
Create the hinges:
Roll tiny balls of clay and flatten them into triangles. Press these onto the left side of the door, one near the top and one near the bottom. Use a needle tool to press textured hatched lines into them to look like hammered metal. -
Fashion the handle:
Roll a small sphere of darker brown clay (or paint it later). Press it firmly into the right side of the door. Add a tiny indentation in the center to look like a keyhole or screw. -
Sculpt the accent flower:
Make four tiny teardrop shapes and press them together in the upper center of the door to form a small wooden flower relief. Add a textured center dot. -
Baking:
Preheat your oven according to the manufacturer’s instructions on your specific brand of clay. Place the door on a ceramic tile or baking sheet and bake for the recommended time. Allow it to cool completely before painting.
Clay Is Too Soft?
If your clay gets too soft and sticky while sculpting details, pop it in the fridge for 10 minutes to firm it up before continuing.
Step 4: Painting the Faux Finish
-
Base coat:
Mix a wash of burnt umber acrylic paint with a little water. Brush this over the entire piece, ensuring it gets into all the deep grooves and texture lines. -
Wipe back:
Before the wash dries completely, use a damp paper towel or sponge to wipe the surface. This removes paint from the high points but leaves the dark color in the cracks, instantly revealing the wood grain. -
Dry styling:
Dip a dry, stiff brush into cream or ivory paint. Offload almost all the paint onto a paper towel, then lightly flick the brush over the raised surfaces. This ‘dry brushing’ highlights the wood texture and frame molding. -
Seal the work:
Once all paint layers are fully dry, apply a coat of matte varnish. This removes the ‘plastic’ sheen of the clay and protects your weathered paint job.
Set your finished door against a skirting board or bookshelf to invite a little magic into the room


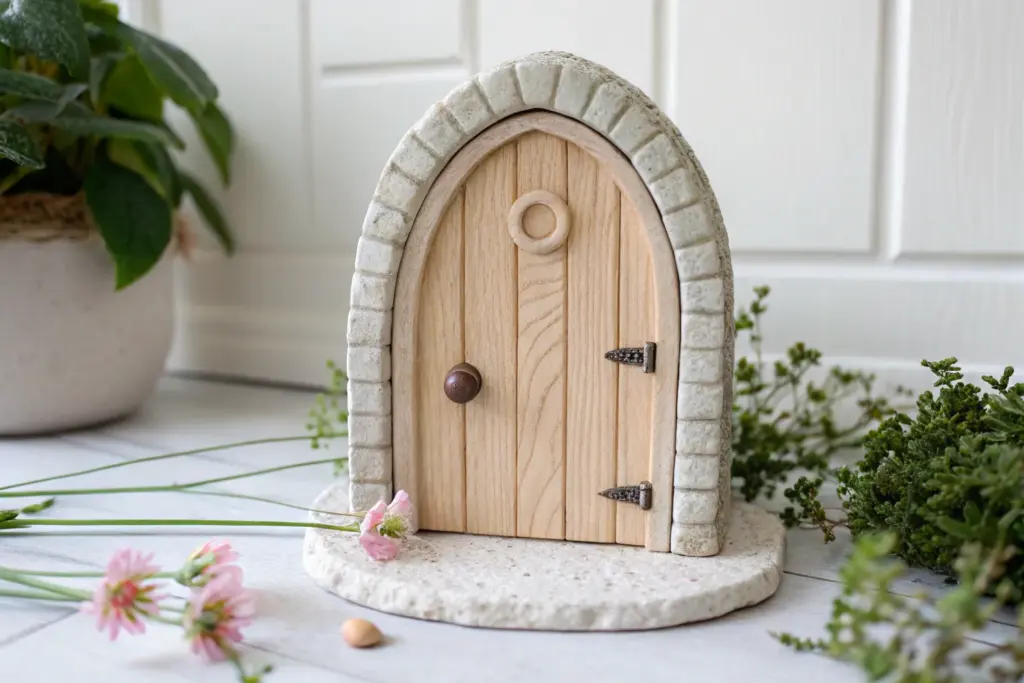
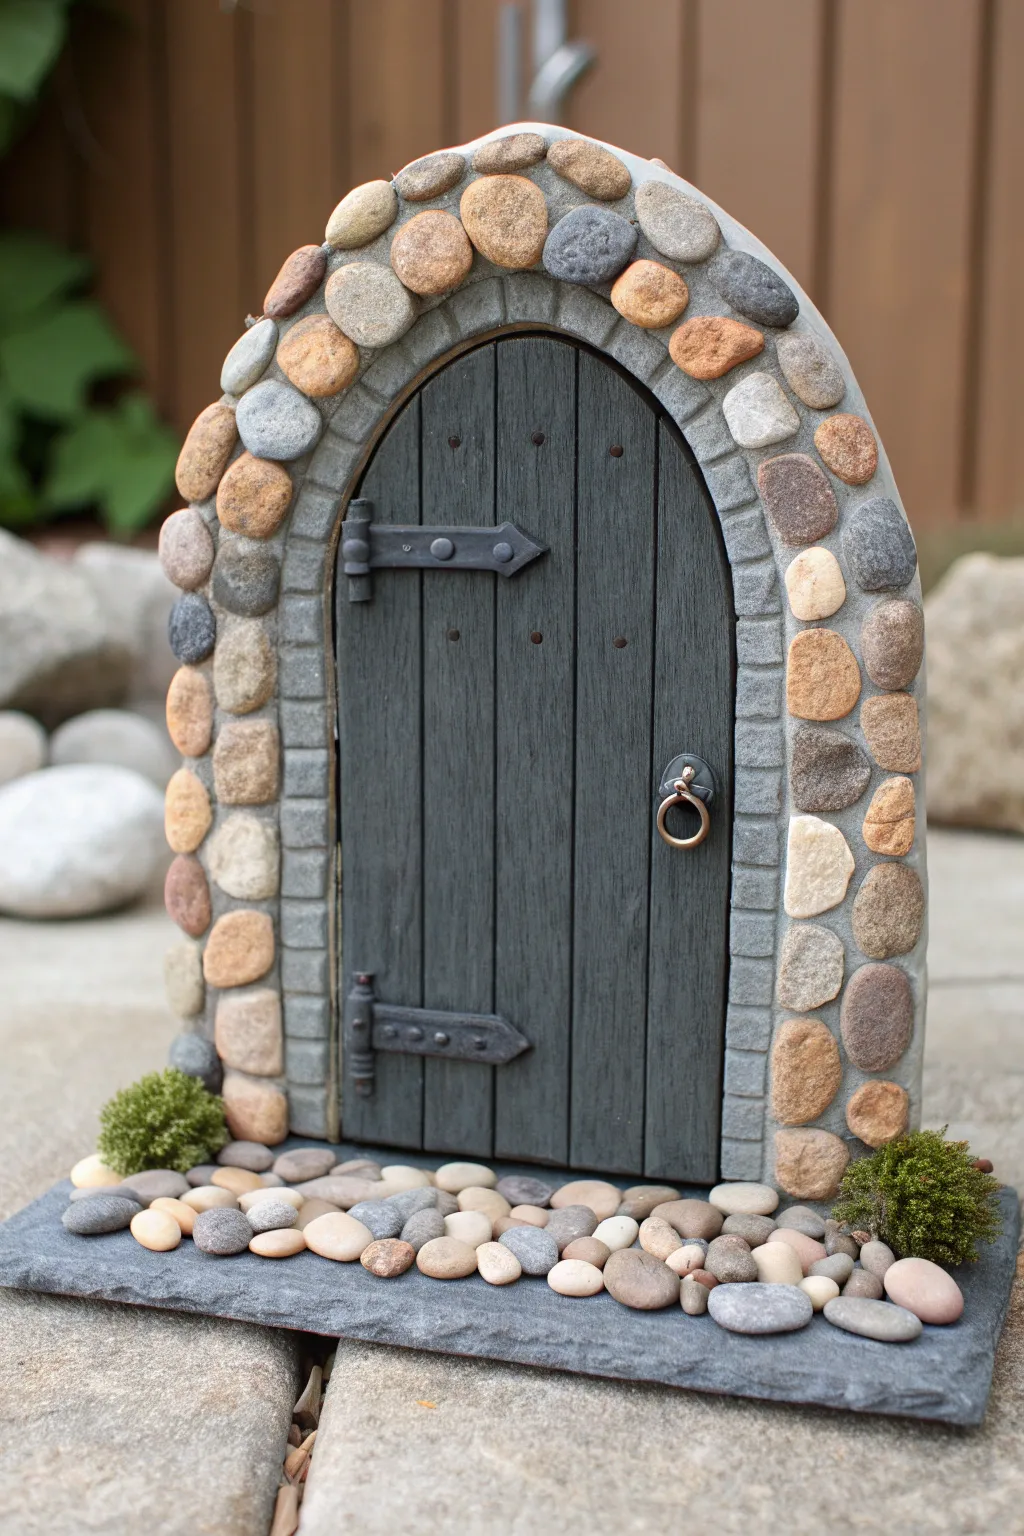
Stone Arch Frame Around a Simple Door
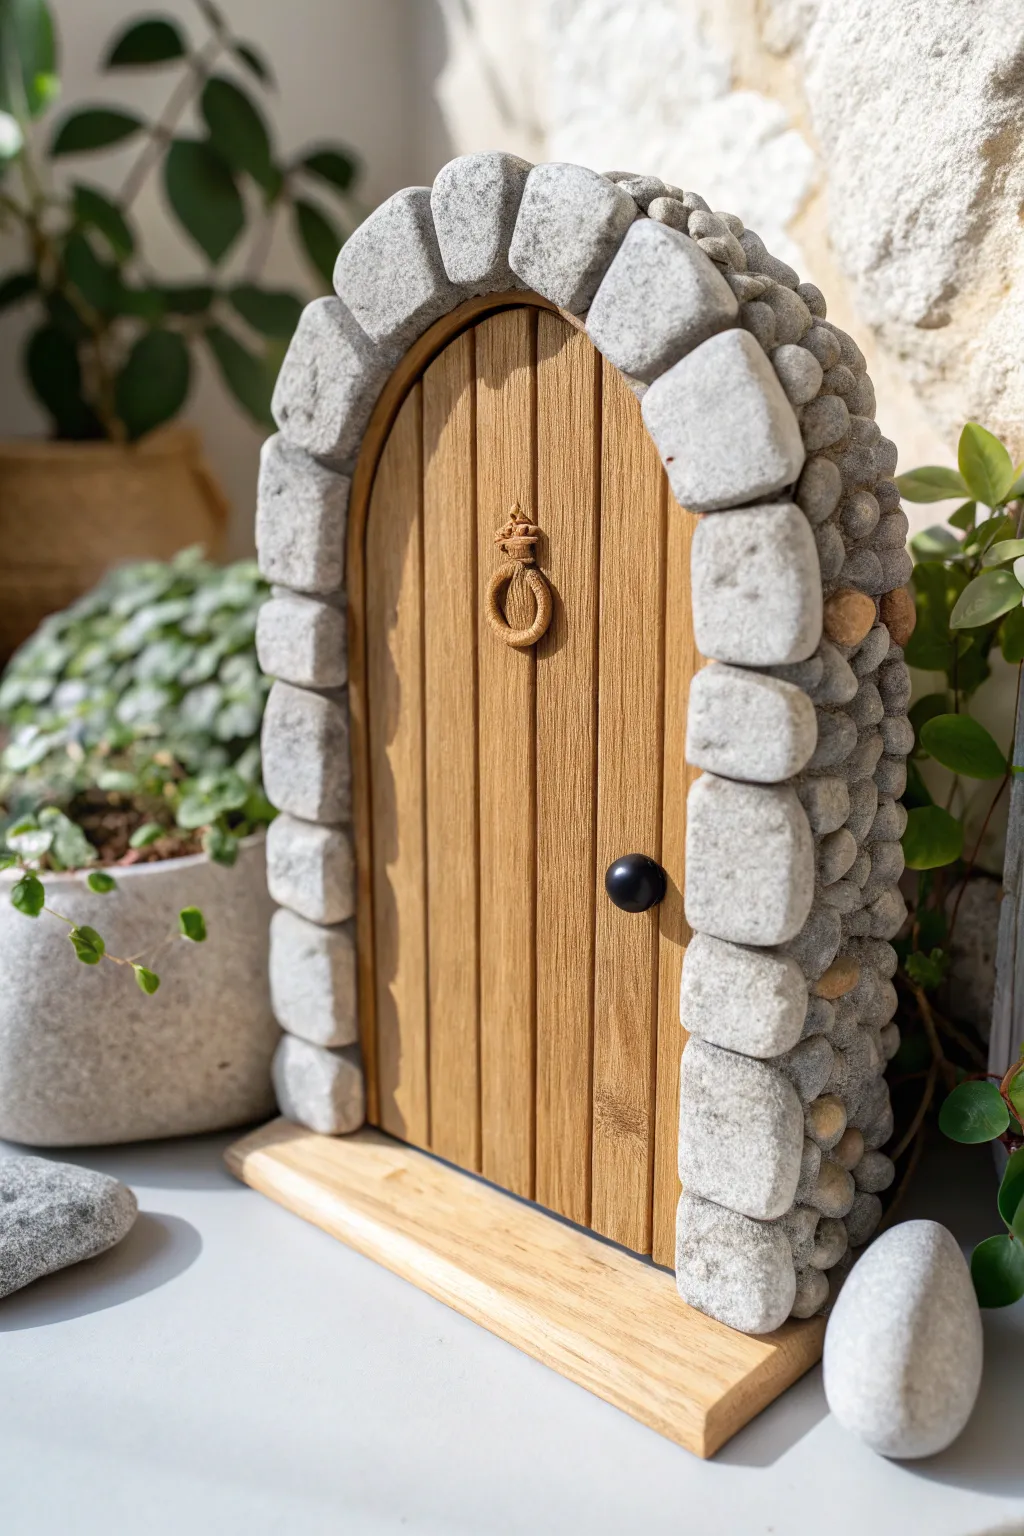
This charming project features a realistic wood-grain door nestled inside a sturdy arch of faux grey stones. It combines the warm texture of timber with the cool, solid look of masonry for a delightful garden or shelf accessory.
Step-by-Step Tutorial
Materials
- Polymer clay (wood brown, granite grey, lighter grey, black)
- Small rolling pin or clay machine
- Sculpting tools (needle tool, ball stylus)
- Texture sheet or stiff bristle brush (for stone)
- Toothpick or stiff wire brush (for wood grain)
- Translucent liquid clay or bake-and-bond
- Small black bead or black clay (for knob)
- Gold or bronze mica powder (optional)
- Craft knife
- Oven and baking tray
Step 1: Crafting the Wood Door
-
Roll the base:
Start by conditioning your wood-brown polymer clay and rolling it out into a flat, even slab about 1/4 inch thick. Cut this into a rectangle with a rounded arch at the top to serve as your door shape. -
Score vertical planks:
Using a needle tool or the back of a craft knife, gently score vertical lines down the length of the door to simulate individual wooden planks. -
Texture the grain:
Take a stiff wire brush or a toothpick and scratch fine, irregular lines into each ‘plank’ to create a realistic wood grain texture. Vary the pressure to show natural knots and weathering. -
Create the frame:
Roll a thin snake of the same brown clay and flatten it slightly. Apply this around the curved top edge of the door to create a distinct wooden frame, pressing it gently to adhere.
Stone Sagging?
If the heavy stones are sliding down the frame while working, bake the wooden door part first for 10 minutes to stiffen it, then add the raw clay stones.
Step 2: Building the Stone Arch
-
Prepare stone mixtures:
Mix granite grey clay with small amounts of white or translucent clay to create slight marbling. You want a natural, uneven stone color rather than a solid flat grey. -
Form the large arch stones:
Shape individual blocks of the grey clay into roughly rectangular shapes with rounded edges. These should look like tumbled cobblestones. -
Texture the stones:
Before attaching, roll a crumpled ball of aluminum foil or a stiff bristle brush over each stone to give it a pitted, rocky surface texture. -
Attach the keystone:
Apply a small amount of liquid clay to the top centermost point of the door frame. Place your largest ‘keystone’ block here first to anchor the arch design. -
Complete the arch:
Work your way down both sides of the door, attaching the stone blocks one by one. Ensure they fit snugly against the wooden frame and each other. -
Add side pillars:
Continue stacking stones down the straight sides of the door to form the supporting pillars. I like to vary the size of the stones slightly to keep it looking organic. -
Fill the gaps:
Roll tiny balls of darker grey or mixed scrap clay to act as smaller pebbles or heavy mortar. Press these into the crevices between the larger stones along the outer edges to add depth and stability.
Mossy Realism
After baking, dab watered-down green acrylic paint or glue tiny bits of dried craft moss into the cracks between stones for an aged, garden look.
Step 3: Adding Hardware & Base
-
Make the base:
Create a wooden threshold by rolling out a thick strip of brown clay. Texture it to match the door and attach it to the bottom of the entire structure. -
Attach the handle:
Press a small, round ball of black clay onto the right side of the door to serve as the knob. You can also use a small black bead if you prefer a shinier finish. -
Sculpt the knocker:
Roll a tiny extracting of brown clay into a ring shape. create a small mounting plate and attach the ring to the upper center of the door. -
Highlight the metal:
If you want a metallic look, brush a tiny amount of gold or bronze mica powder onto the knocker before baking. -
Final inspection:
Check all connection points, especially where the stones meet the wood. Smooth out any unwanted fingerprints with a drop of baby oil. -
Bake:
Bake the project according to your clay manufacturer’s instructions (usually 275°F/130°C for 15-30 minutes). Let it cool completely inside the oven to prevent cracking.
Place this sturdy little portal against a tree trunk or skirting board to invite magical guests into your home

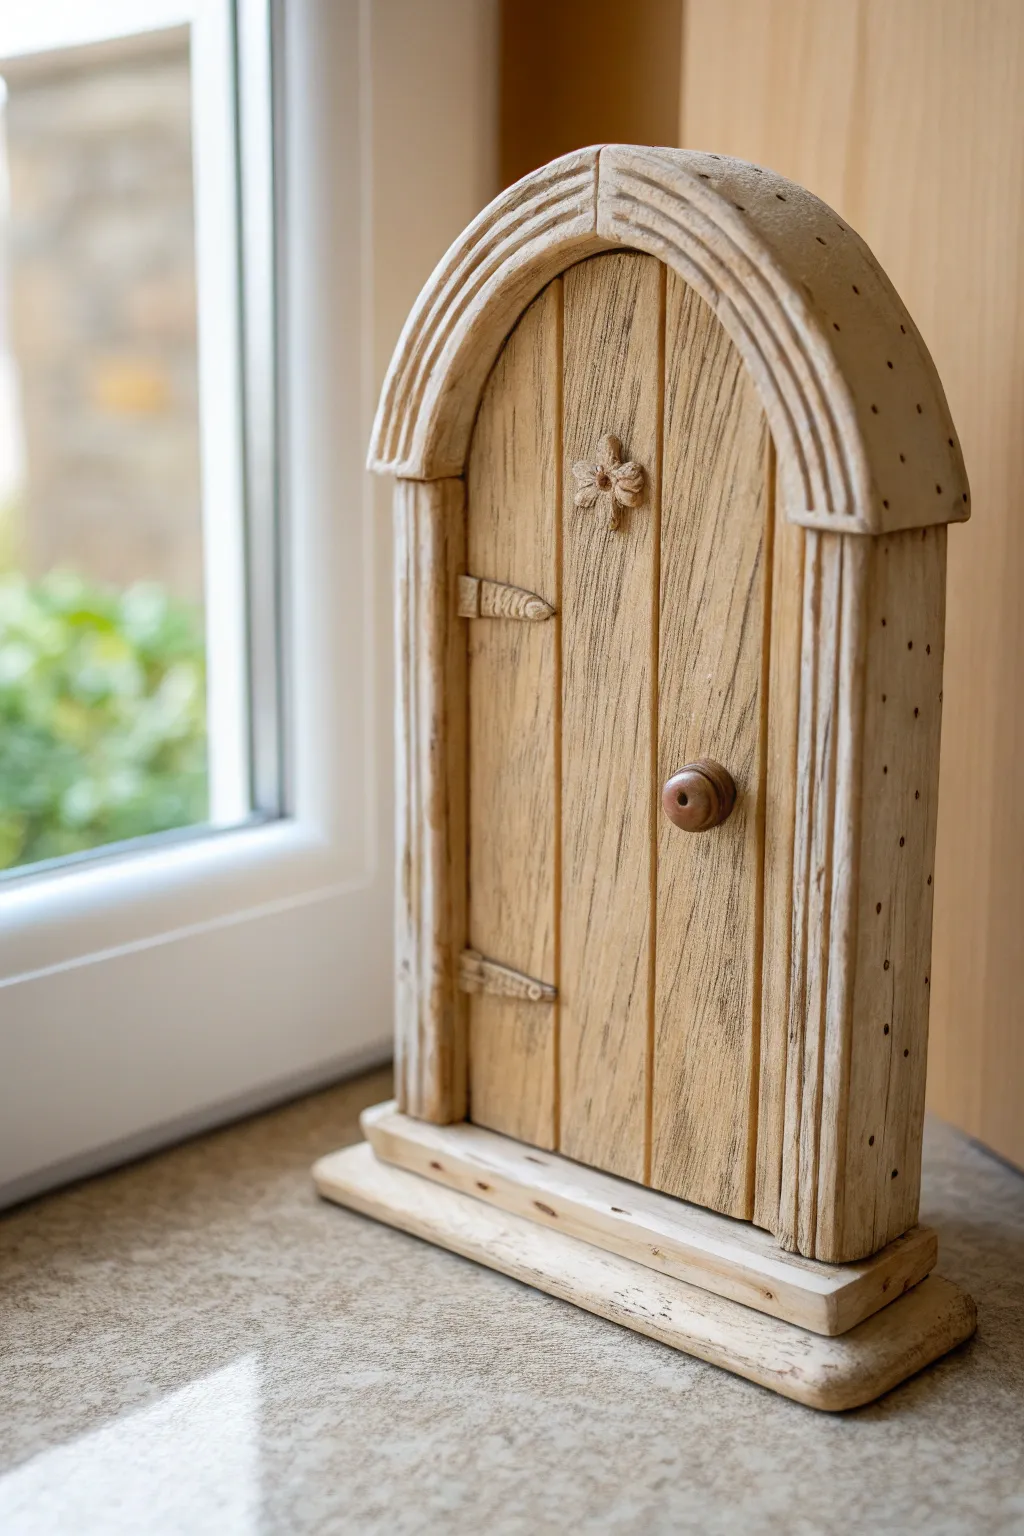
Curved Top Fairy Door With Wonky Charm
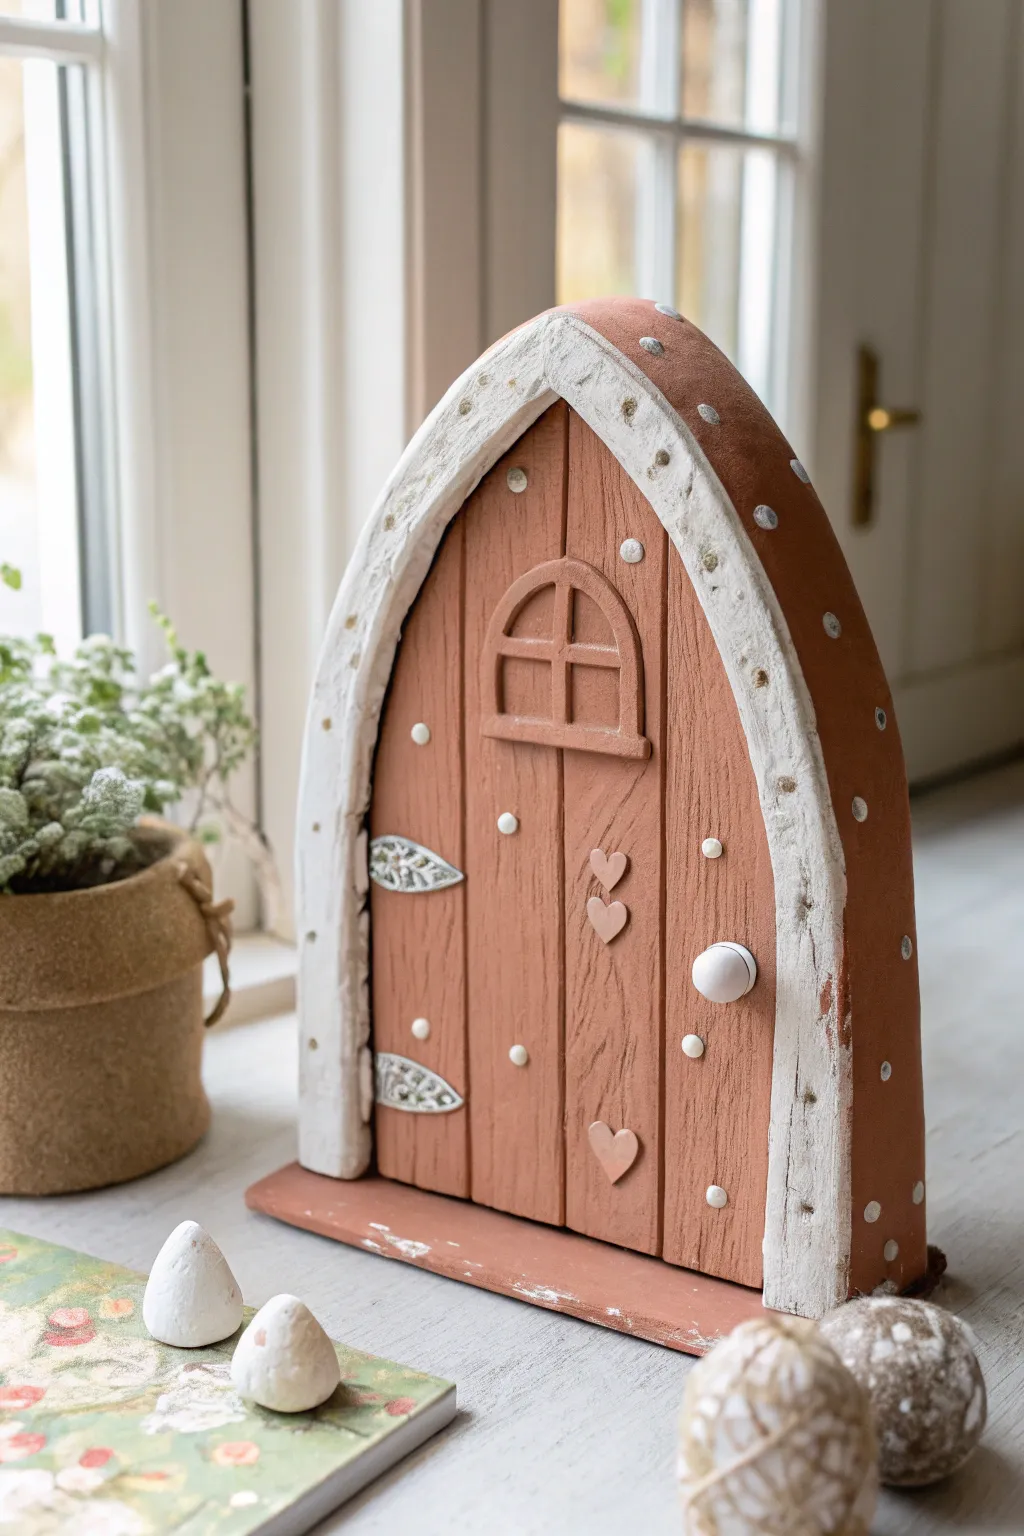
Bring a touch of magic to your shelves with this charming, slightly wonky fairy door made from air-dry clay. Its warm terracotta tones and rustic white trim give it the cozy feel of a woodland cottage entrance.
Step-by-Step
Materials
- Terracotta-colored air-dry clay (or polymer clay)
- White acrylic paint
- Rolling pin
- Clay knife or craft scalpel
- Sculpting tool with a small ball end
- Texture tool (or a stiff-bristled toothbrush)
- Small round cutter (for the handle)
- Heart-shaped plunger cutters or a tiny knife
- Water and a small brush (for joining)
- Sandpaper (fine grit)
- Matte varnish (optional)
Step 1: Shaping the Base and Door
-
Roll the main slab:
Start by rolling out a thick slab of terracotta clay, roughly 1 cm thick. This needs to be sturdy enough to stand upright, so don’t go too thin. -
Cut the arch shape:
Freehand cut a tall, pointed arch shape using your clay knife. Imperfection is key here to achieve that ‘wonky’ charm, so don’t worry if the curves aren’t perfectly symmetrical. -
Create the wood plank texture:
Use the back of your knife or a sculpting tool to score vertical lines down the front of the door. Vary the pressure to mimic natural wood grain grooves. -
Add the floor base:
Roll a separate rectangular strip of clay for the base. Score the bottom of the door and the top of the strip, apply a little water as slip, and press the door firmly onto this base so it stands.
Cracking Clay?
If cracks appear while drying, don’t panic. Mix a tiny bit of fresh clay with water to make a paste and fill the cracks, then sand smooth once dry.
Step 2: Adding the Trim and Details
-
Form the door frame:
Roll out a long, flat strip of clay, slightly thinner than your door slab. Drape this over the arched top edge of the door to create the stone trim. -
Secure the frame:
Press the trim firmly onto the main door piece, blending the clay at the back if necessary for strength. The front edge should slightly overhang or sit flush. -
Texture the stone trim:
Use a stiff brush or a crumpled ball of foil to tap texture into the white trim, giving it a rough, stony appearance compared to the smooth wood. -
Make the window:
Create a small semi-circle of clay for the window. Roll tiny snakes of clay to form the windowpane crossbars and press them onto the semi-circle before attaching the whole piece to the upper center of the door. -
Install the hinges:
Shape two small, leaf-like triangles for the hinges. Press a textured object (like lace or a stamp) into them to create the intricate metalwork pattern seen in the left side. -
Add charming details:
Cut out tiny clay hearts and attach them vertically near the center. Roll a small ball for the doorknob and press it onto the right side. -
Create the ‘nails’:
Roll tiny spheres of clay and press them along the door planks and trim to look like iron studs or nails.
Make it Glow
Cut the window completely out of the door slab before adding the crossbars. Place a battery-operated tea light behind it for a glowing nightlight effect.
Step 3: Finishing Touches
-
Dry the sculpture:
Allow the piece to dry completely according to your clay package instructions. This usually takes 24-48 hours for a piece this thick. -
Paint the trim:
Use white acrylic paint to color the arched frame. I like to apply it somewhat unevenly or dab it with a sponge to keep that rustic, weathered look. -
Highlight the details:
Paint the tiny ‘nails’ on the door white to make them pop. You can also lightly dry-brush white paint over the hinges to bring out the texture. -
Paint the side dots:
Add small white dots along the side and back edges of the main terracotta arch for a whimsical border pattern. -
Sand and seal:
Once the paint is dry, gently sand any sharp edges on the base if needed. Finish with a matte varnish to protect your magical portal.
Place your new door on a skirting board or bookshelf to welcome tiny visitors into your home
Tiny Flowers and Vines Climbing the Frame
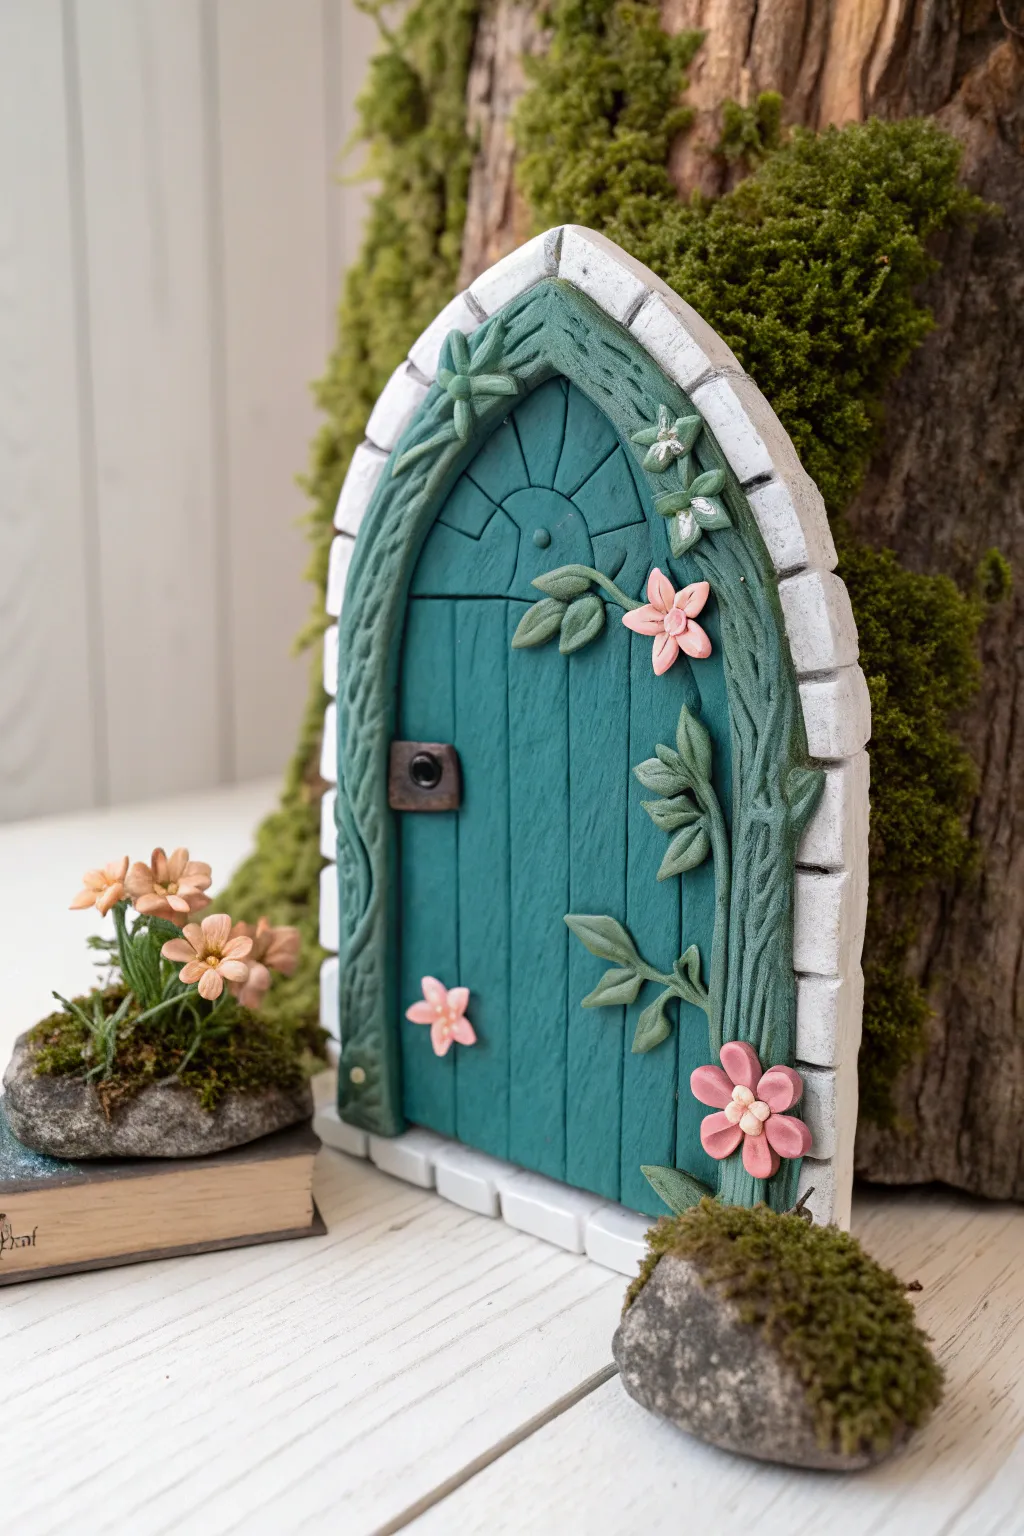
Transport your garden to a magical realm with this charming polymer clay fairy door. Featuring a textured stone archway, rustic wooden planks, and delicate vines climbing soft teal wood, this project is a delightful addition to any miniature scene.
Step-by-Step Tutorial
Materials
- Polymer clay: white, teal/dark green, brown, light pink, green
- Clay roller or pasta machine
- Craft knife or scalpel
- Needle tool or detailing pick
- Texture tools (or crumpled foil/toothbrush)
- Liquid clay or oven-bake adhesive
- Small flower cutter (optional)
- Black acrylic paint (for antiquing)
- Small paintbrush
- Oven and baking sheet
Step 1: Constructing the Base and Door
-
Prepare the stone arch:
Roll out a thick slab of white clay, roughly 1/4 inch thick. Cut it into a tall arch shape with a pointed Gothic top. Smooth the edges with your finger. -
Create the bricks:
Use a needle tool or craft knife to score deep lines into the white arch to mimic stone blocks. Press a crumpled ball of aluminum foil or a stiff toothbrush over the surface to give the ‘stones’ a realistic, pitted texture. -
Form the door shape:
Roll out a slab of teal clay slightly thinner than the arch. Cut it to fit snugly inside the white stone frame you just created. Ensure the top matches the pointed Gothic curve. -
Add wood grain texture:
Using a needle tool, score vertical lines down the teal clay to represent wooden planks. Add finer grain details by lightly dragging the tool between the main plank lines. -
Detail the top panel:
Score a horizontal line about 1/4 of the way down from the top point. In the top section, scribe a sunburst pattern radiating from a small central semi-circle. -
Assemble the structure:
Apply a thin layer of liquid clay to the inner edge of the white frame and press the teal door firmly inside. Smooth the back seam to bond them.
Loose Vines?
If your skinny clay vines won’t stick to the door, score the back of the vine slightly and use a drop of ‘Bake & Bond’ or liquid clay as glue before pressing down.
Step 2: Sculpting Vines and Flowers
-
Twist the vines:
Roll thin snakes of green clay. Twist two strands together loosely to create a gnarled vine effect. Drape these ‘vines’ along the seam where the door meets the stone frame, pressing them gently to adhere. -
Add texture to the greenery:
Use a needle tool to scratch bark-like textures into the green vines. This helps them look organic rather than like smooth plastic. -
Shape the leaves:
Form tiny teardrops of green clay. Flatten them slightly and use a needle tool to impress a central vein. Attach these leaves sporadically along the vines. -
Create the blossoms:
Using pink clay, create small five-petal flowers. You can do this by hand-shaping tiny balls or using a micro-cutter. Gently press a small indentation in the center of each flower. -
Attach the florals:
Place the pink flowers onto the vines using a dot of liquid clay. Add tiny white or yellow centers to the flowers for extra detail. -
Add the hardware:
Create a small rectangle of brown clay for the handle plate. Indent the center and add a tiny black clay circle for the keyhole or knob. Attach this to the left side of the door.
Step 3: Finishing Touches
-
Bake the project:
Place your door on a baking sheet and bake according to your clay manufacturer’s specific time and temperature instructions. Let it cool completely. -
Apply an antique wash:
Dilute a small amount of black acrylic paint with water. Brush this wash over the white stone frame and the teal door, ensuring it gets into the crevices. -
Wipe back the wash:
Immediately wipe the surface with a damp paper towel or cloth. The dark paint will remain in the cracks (mortar lines and wood grain), accentuating the texture while leaving the high points clean. -
Highlight the details:
I find that adding a tiny touch of silver or white paint to the very tips of the leaves makes them pop against the darker door.
Glow in the Dark
Mix glow-in-the-dark powder into your white clay for the stone frame or the pink flower centers to make the door softly illuminate your garden at night.
Once sealed with a matte varnish, your magical doorway is ready to be nestled against a tree stump or bookshelf baseboard

The Complete Guide to Pottery Troubleshooting
Uncover the most common ceramic mistakes—from cracking clay to failed glazes—and learn how to fix them fast.
Mushroom-Flanked Fairy Door Entry
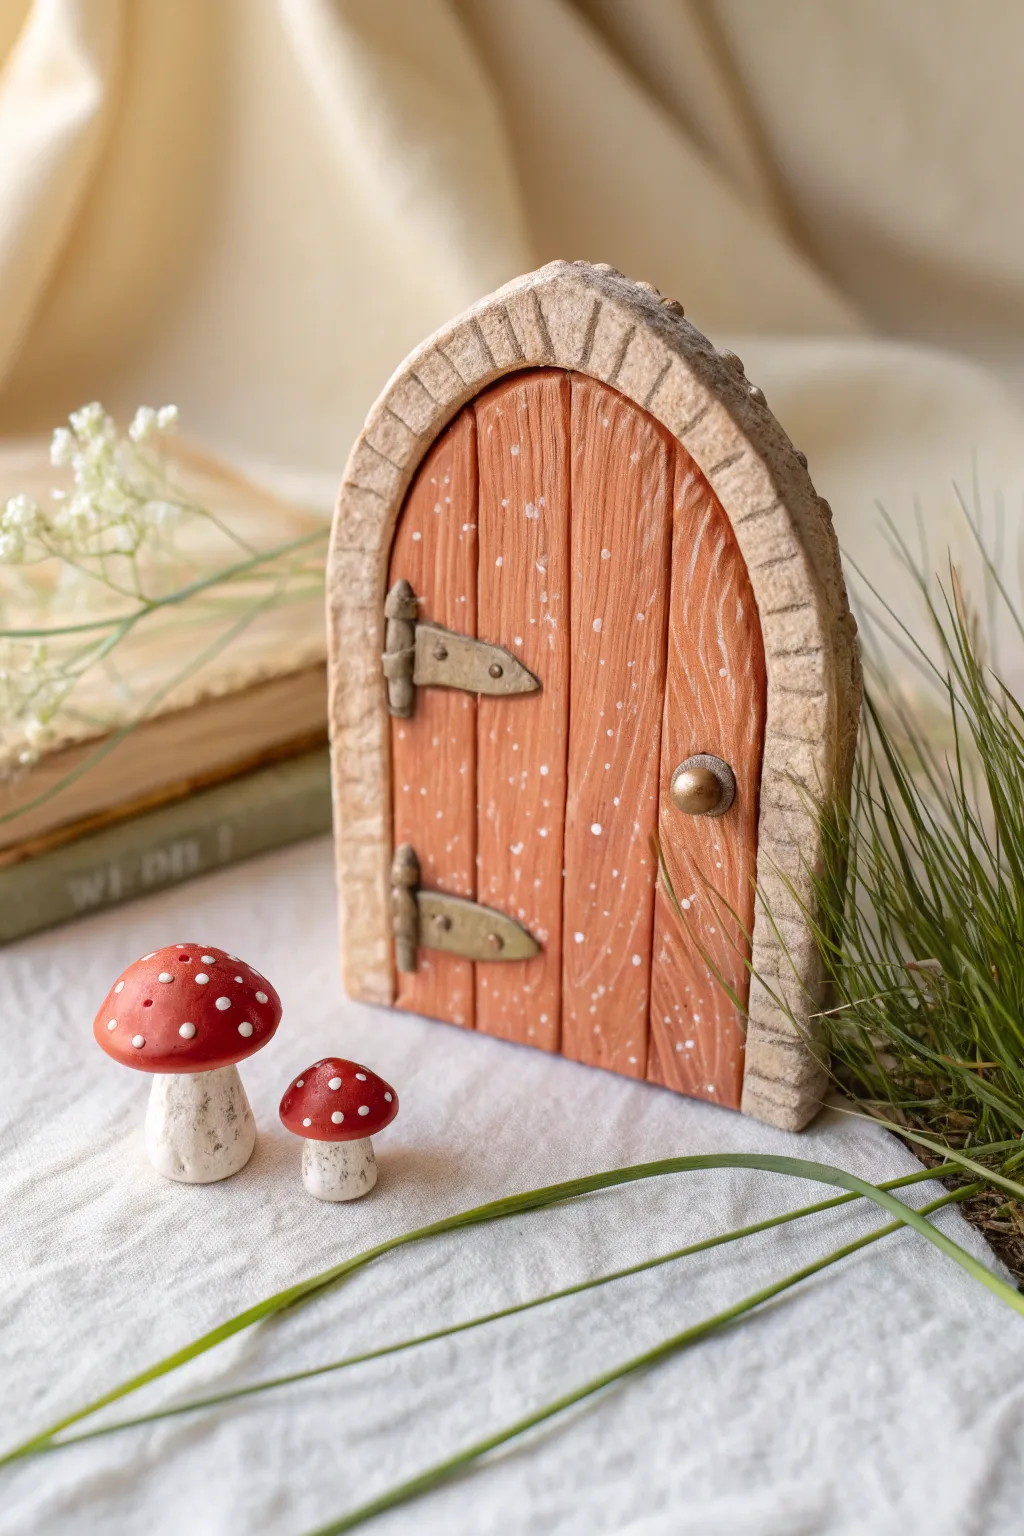
This charming arched fairy door features a distinct wood-grain texture and a snowy, speckled finish paired with a rugged stone frame. Complete the whimsical scene with a couple of handcrafted red mushrooms to welcome any magical visitors.
Detailed Instructions
Materials
- Polymer clay (white, terracotta/orange, red, beige)
- Texture tool or needle tool
- Rolling pin
- Aluminum foil (for armature)
- Blade or craft knife
- Gold acrylic paint
- White acrylic paint
- Small paintbrush
- Toothbrush (for speckling)
- Gloss glaze (optional)
Step 1: Shaping the Door
-
Prepare the base:
Roll out a slab of terracotta or orange-brown polymer clay to about 1/4 inch thickness. Use a template or freehand cut an arch shape that is flat at the bottom and rounded at the top. -
Score the planks:
Using a needle tool or the back of a craft knife, press vertical lines into the clay to simulate wooden planks. Don’t make them too perfect; slight waviness adds character. -
Add wood grain:
Gently drag your needle tool vertically between the plank lines to create a wood grain texture. Varying the pressure creates deeper knots and grooves.
Foil Texture Trick
Use a tightly crumpled ball of aluminum foil to texture the stone arch. Roll it firmly over the raw clay for an instant, realistic rock surface.
Step 2: Creating the Stone Arch
-
Form the frame:
Roll a snake of beige or light stone-colored clay. Flatten it slightly so it becomes a long rectangular strip, wide enough to frame your door. -
Attach the frame:
Wrap this strip around the curved edge of your door slab. Trim any excess at the bottom flush with the door base. Press gently to bond the two clays. -
Texturize the stone:
Use a crumpled ball of aluminum foil to press texture into the beige frame. This gives it a realistic, rough-hewn stone appearance. -
Carve the stones:
With your needle tool or knife, press indented lines across the frame at regular intervals to create individual stone blocks.
Step 3: Hardware & Details
-
Make the hinges:
Shape two small triangles from scrap clay. Press them flat onto the left side of the door. Add a tiny cylinder on the vertical edge of each triangle to mimic the hinge barrel. -
Add rivets:
Using a very small dotting tool or needle tip, make tiny indentations on the hinges to look like nails or rivets. -
Create the doorknob:
Roll a small ball of clay and press it onto the right side of the door. You can flatten a tiny disc behind it to make a backplate. -
Bake the project:
Bake the door according to your clay manufacturer’s instructions (usually 275°F/135°C for 15-30 minutes per 1/4 inch thickness). Let it cool completely.
Fairy Garden Base
Glue a small piece of preserved moss to the bottom of the door frame or tuck it around the mushrooms to seamlessly integrate them into a display.
Step 4: Painting & Finishing
-
Highlight the grain:
Mix a very watery wash of white acrylic paint. Brush it over the door and immediately wipe off the surface with a paper towel. The white paint will stay in the deep wood grain grooves. -
Speckle effect:
Dip an old toothbrush into white paint, then run your thumb across the bristles to flick tiny splatters of ‘snow’ or ‘magic dust’ onto the door and frame. -
Paint the hardware:
Carefully paint the hinges and doorknob with opaque gold or brass metallic paint. -
Enhance the stone:
I like to dry-brush a tiny bit of darker beige or grey over the stone arch to enhance the foil texture you created earlier.
Step 5: Making the Mushrooms
-
Form the stems:
Roll two short, thick logs of white clay for the mushroom stalks. Flare the bottoms slightly so they stand upright easily. -
Texture the stalks:
Roll the stalks gently over sandpaper or press them with your foil ball to give them an earthy, organic texture. -
Add the caps:
Shape two domes from red clay. Place them on top of the stalks, pressing down lightly to secure the bond. -
Dot the caps:
You can either press tiny balls of white clay onto the red caps before baking, or paint white dots on after baking on a separate tray.
Once dry, this enchanting doorway is ready to lean against a tree trunk or sit on a bookshelf to invite a little magic into your home
Round Burrow-Style Fairy Door
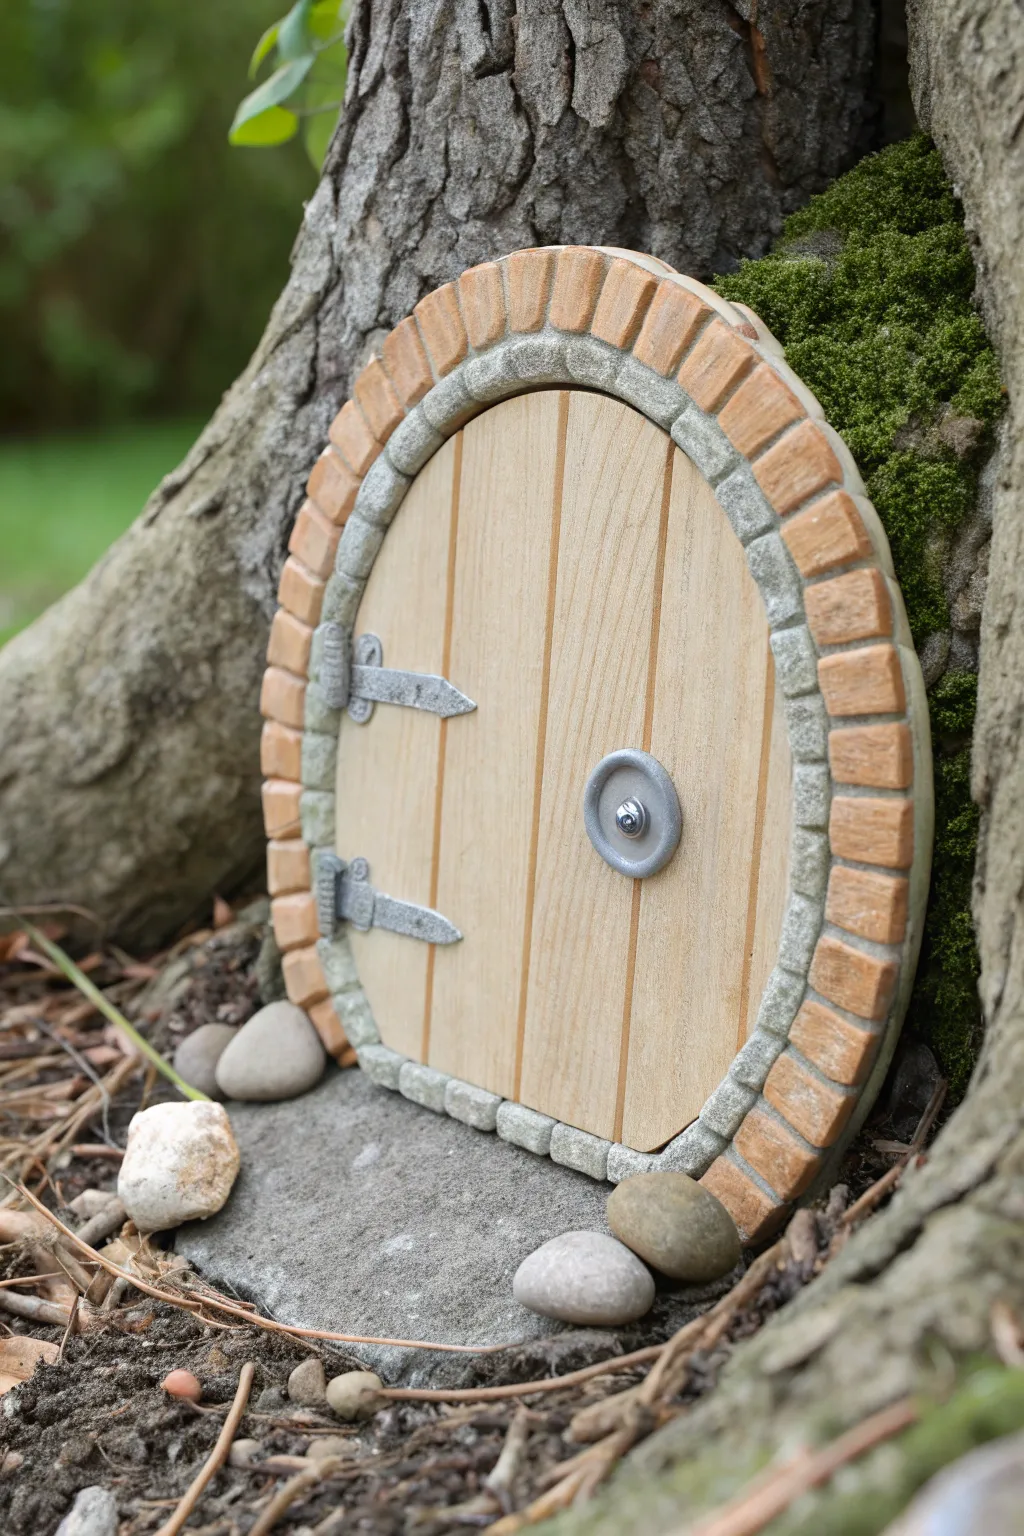
This charming, hobbit-inspired entryway features a classic round design with realistic textures. The contrast between the warm wood grain, cool grey stone, and earthy brick arch makes it a perfect addition to the base of any garden tree.
Step-by-Step Guide
Materials
- Polymer clay (colors: beige/tan, grey, terracotta, silver/metallic)
- Circular cookie cutter or jar lid (approx. 4-5 inches)
- Craft knife or scalpel
- Sculpting needle tool
- Toothbrush or aluminum foil ball (for texture)
- Acrylic rolling pin
- Liquid polymer clay (optional)
- Acrylic paints (black, brown, white for weathering)
- Fine detail paintbrush
- Matte UV-resistant varnish
Step 1: Forming the Base & Door
-
Roll the base slab:
Begin by conditioning your beige or light tan clay until it’s pliable. Roll it out into a smooth slab about 1/4 inch thick. This will serve as the main door. -
Cut the shape:
Use a large circular cookie cutter or trace around a jar lid to cut a perfect circle. Gently flatten the bottom edge slightly with your blade so the door sits level on the ground. -
Create wood planks:
Using a ruler and a sculpting tool, lightly score vertical lines down the door to simulate planks. I find that varying the width just slightly makes it look more handmade and rustic. -
Add wood grain texture:
Take a needle tool and drag it gently down each ‘plank’ to create grain lines. Add a few small knots or swirls for authenticity, but keep the pressure light so you don’t cut through.
Clean Cuts Pro Tip
Chill your rolled clay slab in the fridge for 10 minutes before cutting bricks or shapes. Firm clay distorts much less than warm clay when sliced.
Step 2: Building the Stonework Frame
-
Roll the stone coil:
Condition grey clay and roll it into a long, even snake that wraps comfortably around the curved edge of your door slab. -
Attach the inner frame:
Press the grey snake against the outer edge of the wood circle. Flatten it slightly so it frames the door, but retains a rounded profile. -
Texture the stone:
Using a crumpled ball of aluminum foil or an old toothbrush, tap firmly all over the grey clay to give it a rapid, realistic pitted stone texture. -
Carve the mortar lines:
With your needle tool or knife, press indented lines into the grey strip at regular intervals to separate the individual ‘stones’ of the inner arch. -
Create the brick arch:
Roll out terracotta-colored clay and cut it into small, uniform rectangular bricks. It helps to make a long strip first, cut it to width, and then slice the individual bricks. -
Apply the bricks:
Arrange the terracotta rectangles around the outside of the grey stone arch. Press them firmly so they bond with the frame, leaving tiny gaps between them for the ‘mortar’ look.
Step 3: Hardware & Finishing Details
-
Sculpt the hinges:
Roll tiny amounts of silver or grey clay into thin triangular shapes for the hinge straps. Place two on the left side of the door, pressing the wide end against the stone frame and the point onto the wood. -
Make the hinge barrels:
Roll two very small cylinders of the same metallic clay and place them vertically where the strap meets the stone frame to mimic the hinge mechanism. -
Add the doorknob:
Create a small ring of silver clay and place it centrally on the right side. Add a tiny ball inside the ring to complete the knob assembly. -
Bake the project:
Place your creation on a ceramic tile or baking sheet. Bake according to your polymer clay package instructions (usually 275°F/130°C for 15-30 minutes per 1/4 inch of thickness). -
Cool and wash:
Allow the piece to cool completely. Gently wash it with cool water and soap to remove any finger oils before painting.
Level Up: Night Mode
Mix glow-in-the-dark powder into the light yellow clay for the door panels. By day it looks like wood, but at night, light will shine through the ‘cracks’!
Step 4: Weathering & Sealing
-
Apply a black wash:
Mix a small dab of black acrylic paint with plenty of water. Brush this wash over the entire door, ensuring it sinks into the wood grain grooves and stone crevices. -
Wipe away excess:
Immediately use a damp paper towel to wipe the surface. The dark paint will stay in the recessed areas, making the texture pop instantly. -
Dry brush highlights:
Dip a dry brush into a tiny amount of white or light grey paint. Offload most of it on a paper towel, then lightly whisk it over the grey stones and brick edges to catch the texture. -
Seal the door:
Once the paint is fully dry, apply two thin coats of matte UV-resistant varnish. This protects the clay from sun and rain if you plan to keep your fairy door outside.
Set up your finished door against a tree trunk or on a mossy shelf to invite a little magic into your home


What Really Happens Inside the Kiln
Learn how time and temperature work together inside the kiln to transform clay into durable ceramic.
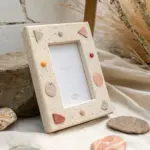
Little Window Cutout for a Peek Inside
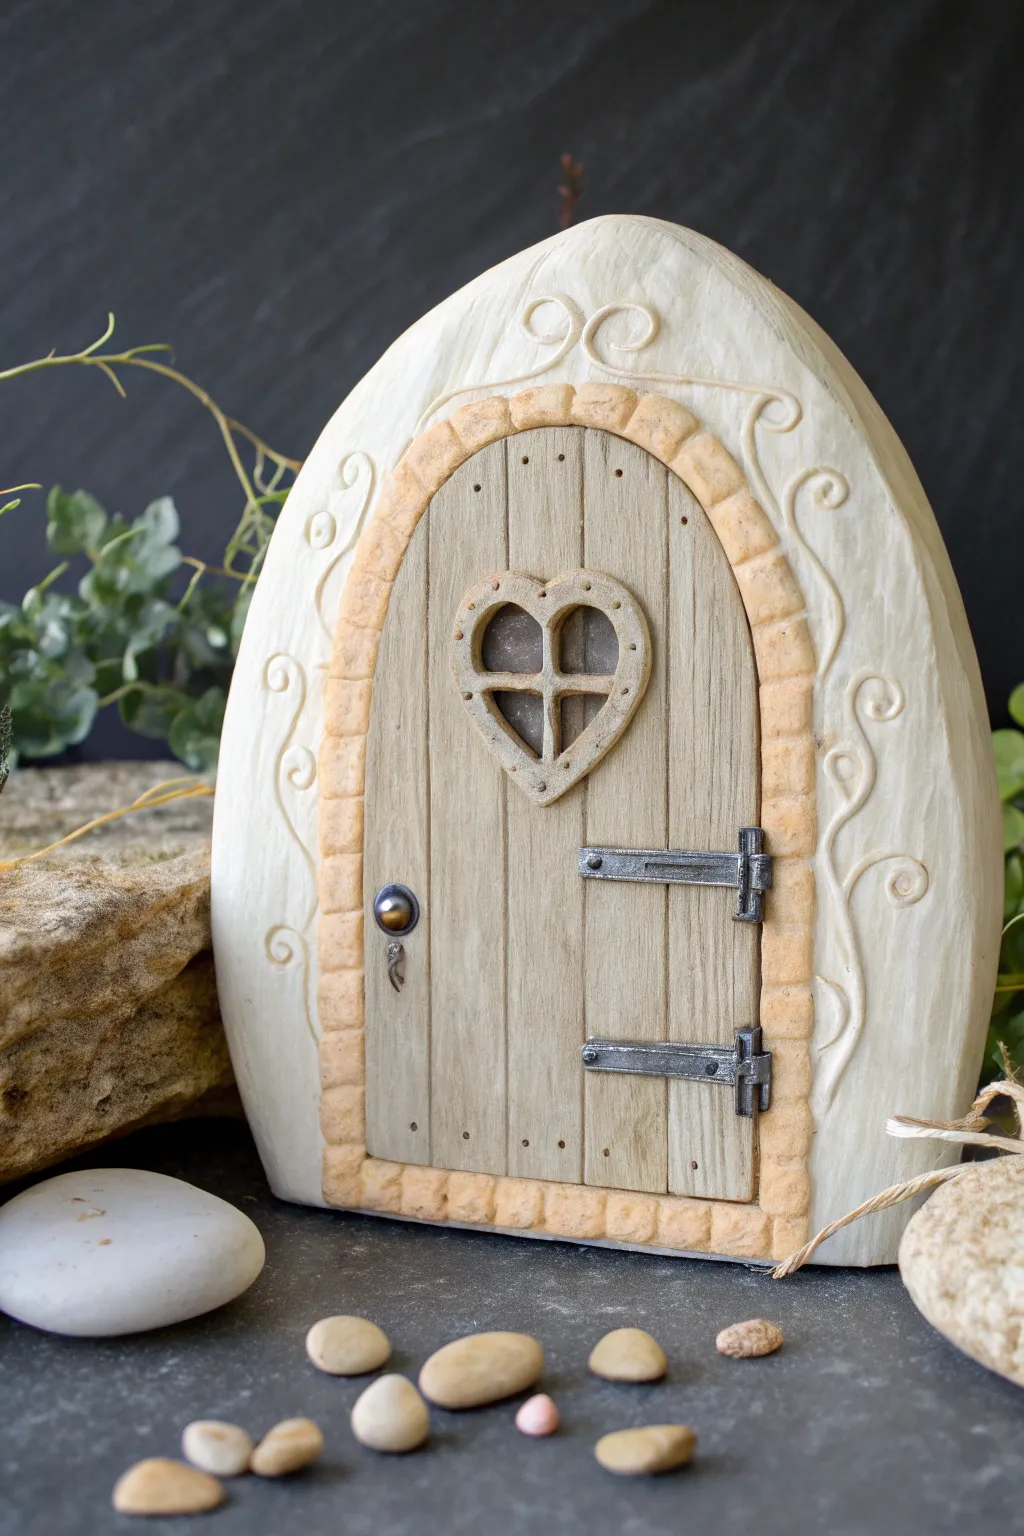
This elegant freestanding fairy door features a soft white plaster-like finish adorned with delicate swirls and a charming heart-shaped window. The centerpiece is a realistic wood-grain door set within a cobblestone arch, inviting magical creatures to take a peek inside.
Step-by-Step
Materials
- Polymer clay (white, beige/tan, brown)
- Aluminum foil
- Rolling pin or pasta machine
- Ball stylus tools (various sizes)
- Needle tool or X-acto knife
- Texture sheet or coarse sandpaper (for stone texture)
- Acrylic paints (black, silver, dark brown)
- Small paintbrushes
- Heart-shaped cutter (small)
- Liquid clay or Bake and Bond
Step 1: Shaping the Base
-
Prepare the core:
Crumple a large piece of aluminum foil into a tight, flattened arch shape. It should be thick enough to stand on its own, resembling a small tombstone. This saves clay and keeps the door lightweight. -
Cover with clay:
Roll out a sheet of white polymer clay to about 1/4 inch thickness. Wrap this sheet over the front and sides of your foil form, smoothing the seams at the back or bottom. -
Smooth the surface:
Use your fingers or a flat tool to gently smooth out any fingerprints on the white clay surface. For a stone-like matte finish, you can press a piece of coarse sandpaper gently against the clay.
Clean Clay Tip
White clay picks up lint easily. Keep a pack of baby wipes nearby to clean your hands and tools often, or wear latex gloves while working on the base.
Step 2: Creating the Wooden Door
-
Make the door slab:
Roll out a piece of beige or light tan clay. Cut it into a smaller arch shape that fits comfortably inside the white base, leaving a wide border for the stone frame. -
Add wood grain:
Use a needle tool to score vertical lines down the beige arch to simulate planks. Add shorter, finer scratches between the main lines to mimic wood grain. -
Cut the window:
Use a small heart-shaped cutter to remove a section from the upper center of the door. -
Create window panes:
Roll very thin snakes of the same beige clay. Lay them across the heart opening in a cross pattern to create window panes, securing them on the back side with a dab of liquid clay. -
Frame the heart:
Roll a thin snake of beige clay and flatten it slightly. Outline the heart cutout with this strip. Use a needle tool to poke tiny holes around it, simulating nail holes. -
Attach the door:
Apply a thin layer of liquid clay to the back of your wooden door piece and press it firmly onto the center of the white base.
Step 3: Details & Hardware
-
Build the stone arch:
Roll a snake of light orange or peach-tinted clay. Flatten it slightly and wrap it around the edge of the wooden door. -
Texturize the stones:
Use a knife to impress lines into this border, dividing it into individual ‘stones.’ Use a crumpled ball of foil to tap texture onto each stone. -
Add decorative swirls:
Roll very thin strings of white clay. Arrange them on the white base outside the stone arch in swirling, vine-like patterns. Press them gently to adhere. -
Sculpt hinges:
Cut two small strips of dark grey or black clay for the hinges. Place them on the right side of the door. Add tiny balls of clay to the ends to look like bolts. -
Add the handle:
Form a small ball of dark clay for the doorknob on the left side. Beneath it, add a tiny teardrop shape for a keyhole. -
Bake:
Bake the project according to your clay manufacturer’s instructions (usually 275°F/135°C for 15-30 minutes depending on thickness).
Window Won’t Stick?
If cross-panes won’t stick to the heart window, place a tiny scrap of clay across the back of the heart opening to serve as an anchor point for the delicate strips.
Step 4: Finishing Touches
-
Antique the wood:
Once cool, water down some brown acrylic paint. Brush it over the wooden door and then quickly wipe the surface with a paper towel. The paint will stay in the grooves, highlighting the wood grain. -
Highlight the hardware:
Use a dry brush with a tiny amount of silver paint to lightly graze the hinges and doorknob. This gives them a metallic, weathered look. -
Seal (Optional):
If this door will be living outside, seal the entire piece with a matte outdoor varnish to protect the paint and clay.
Place your finished door against a tree trunk or skirting board to welcome the fairies home
Mini Knob, Keyhole, and Hinge Details
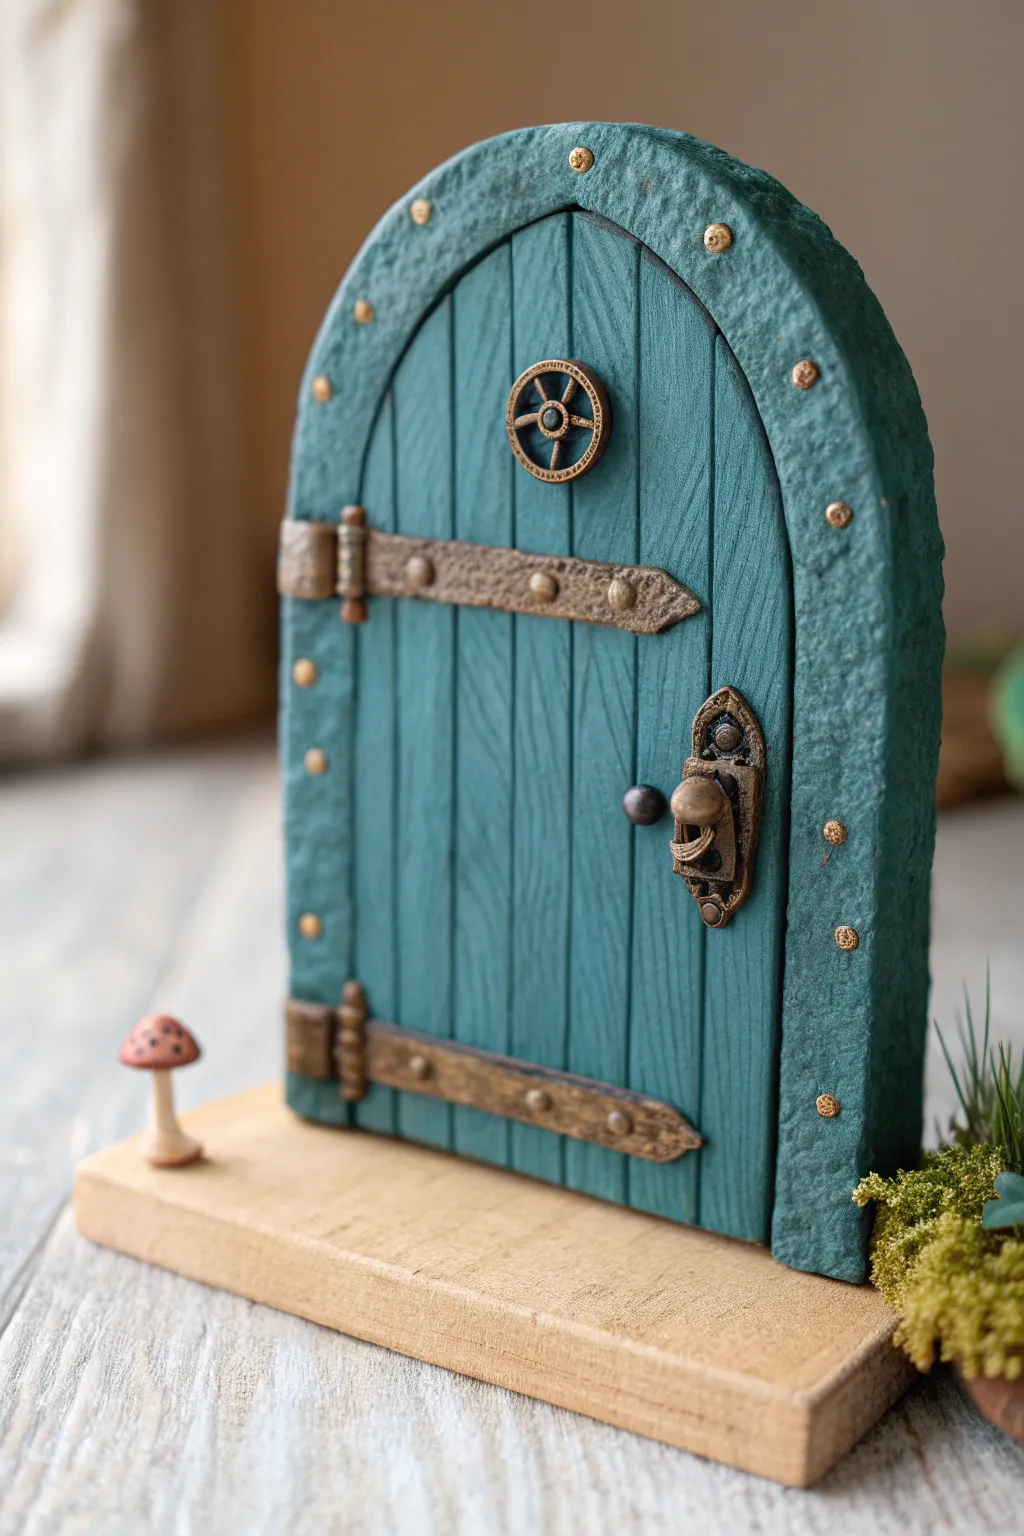
Transport your garden or bookshelf to a magical realm with this beautifully detailed arched fairy door. Featuring convincing wood grain textures, antique-style hardware, and a rustic stone frame, this project creates a charming illusion of a hidden world.
Step-by-Step Guide
Materials
- Polymer clay (Teal/Green, Grey, Antique Gold/Bronze, Brown, Red, Beige)
- Clay roller or pasta machine
- Cutting blade or craft knife
- Needle tool or toothpick
- Ball stylus tool
- Texture sheet or rough sponge (for stone effect)
- Liquid clay (TLS) or strong craft glue
- Rectangular wooden base
- Small jump rings or tiny metal findings (optional)
- Black and brown acrylic paint (for antiquing)
- Detail paintbrush
- Matte varish (optional)
Step 1: Shaping the Door Structure
-
Roll the base slab:
Begin by conditioning your teal-green clay and rolling it into a flat slab approximately 1/4 inch thick. This ensures the door is sturdy enough to stand on its own. -
Cut the arch shape:
Use a template or freehand a tall arch shape with a craft knife. This piece will serve as the actual door, so make sure the edges are clean and smooth. -
Create the wood grain:
Using a needle tool, lightly score vertical lines down the entire length of the green door to simulate individual wooden planks. Vary the spacing slightly for realism. -
Add wood texture:
Between the vertical plank lines, scratch in finer, wiggly grain lines and occasional knots using the tip of your needle tool; I find that pressing a real piece of rough wood bark onto the clay also works wonders. -
Form the stone frame:
Roll a snake of teal-green clay (slightly lighter or darker than the door for contrast) and flatten it into a long strip. Wrap this strip around the curved arch of your door piece. -
Texture the stone:
Press a rough sponge, sandpaper, or a crumpled foil ball firmly into the frame strip to create a pitted, stone-like texture. Use a ball stylus to indent small ‘rivets’ or decoration points along the frame’s edge.
Sticky Situation?
If your clay gets too soft and fingerprints are showing, pop the piece in the fridge for 10 minutes. The firmer clay will be much easier to smooth out before baking.
Step 2: Crafting the Hardware
-
Make the hinges:
Roll out a thin sheet of brown or bronze clay. Cut two long, pointed strap shapes for the hinges and press a texture tool into them to give them a hammered metal look. -
Attach the hinges:
Place the straps horizontally across the door. Create the hinge barrel by rolling small cylinders of clay and placing them where the strap meets the stone frame. Add tiny balls of clay along the strap to mimic nail heads. -
Construct the handle assembly:
Shape a complex escutcheon plate using a tiny flattened teardrop of bronze clay. Add a U-shaped piece for the handle pull and a tiny sphere for the latch. Use a needle tool to add intricate carvings or indentations to the metalwork. -
Create the window detail:
Form a small ring of bronze clay and place it near the top center of the door. Add thin spokes inside the ring to resemble a ship’s wheel or decorative grate.
Step 3: Assembly and Finishing
-
Bake the clay:
Follow the manufacturer’s instructions for your specific brand of polymer clay to bake the door. Ensure it is supported on a flat surface to prevent warping. -
Antique the details:
Once cool, apply a wash of watered-down black or dark brown acrylic paint over the entire piece, especially into the wood grain and stone texture. Wipe off the excess with a paper towel immediately to leave shadows in the deep recesses. -
Highlight the metal:
Dry brush a tiny amount of gold or metallic bronze paint onto the raised areas of the hinges, handle, and window wheel to make them pop. -
Prepare the base:
Take your wooden rectangular base and sand any rough edges. You can stain it for a darker look or leave it natural as shown in the inspiration. -
Attach the door:
Use strong glue or heavy-duty adhesive to mount the finished clay door upright onto the wooden base. -
Add nature elements:
Sculpt a tiny mushroom from red and beige clay (bake it separately or with the door) and glue it to the base. Finish by gluing small tufts of preserved moss around the right side of the door frame.
Pro Tip: Liquid Gold
Mix a tiny bit of gold mica powder into liquid clay (TLS) and paint it over your hardware before baking. It creates a smoother, more realistic metallic finish than paint.
Place this little masterpiece on a shelf or among your potted plants to invite some everyday magic into your home

TRACK YOUR CERAMIC JOURNEY
Capture glaze tests, firing details, and creative progress—all in one simple printable. Make your projects easier to repeat and improve.
Cobblestone Path and One Tiny Step
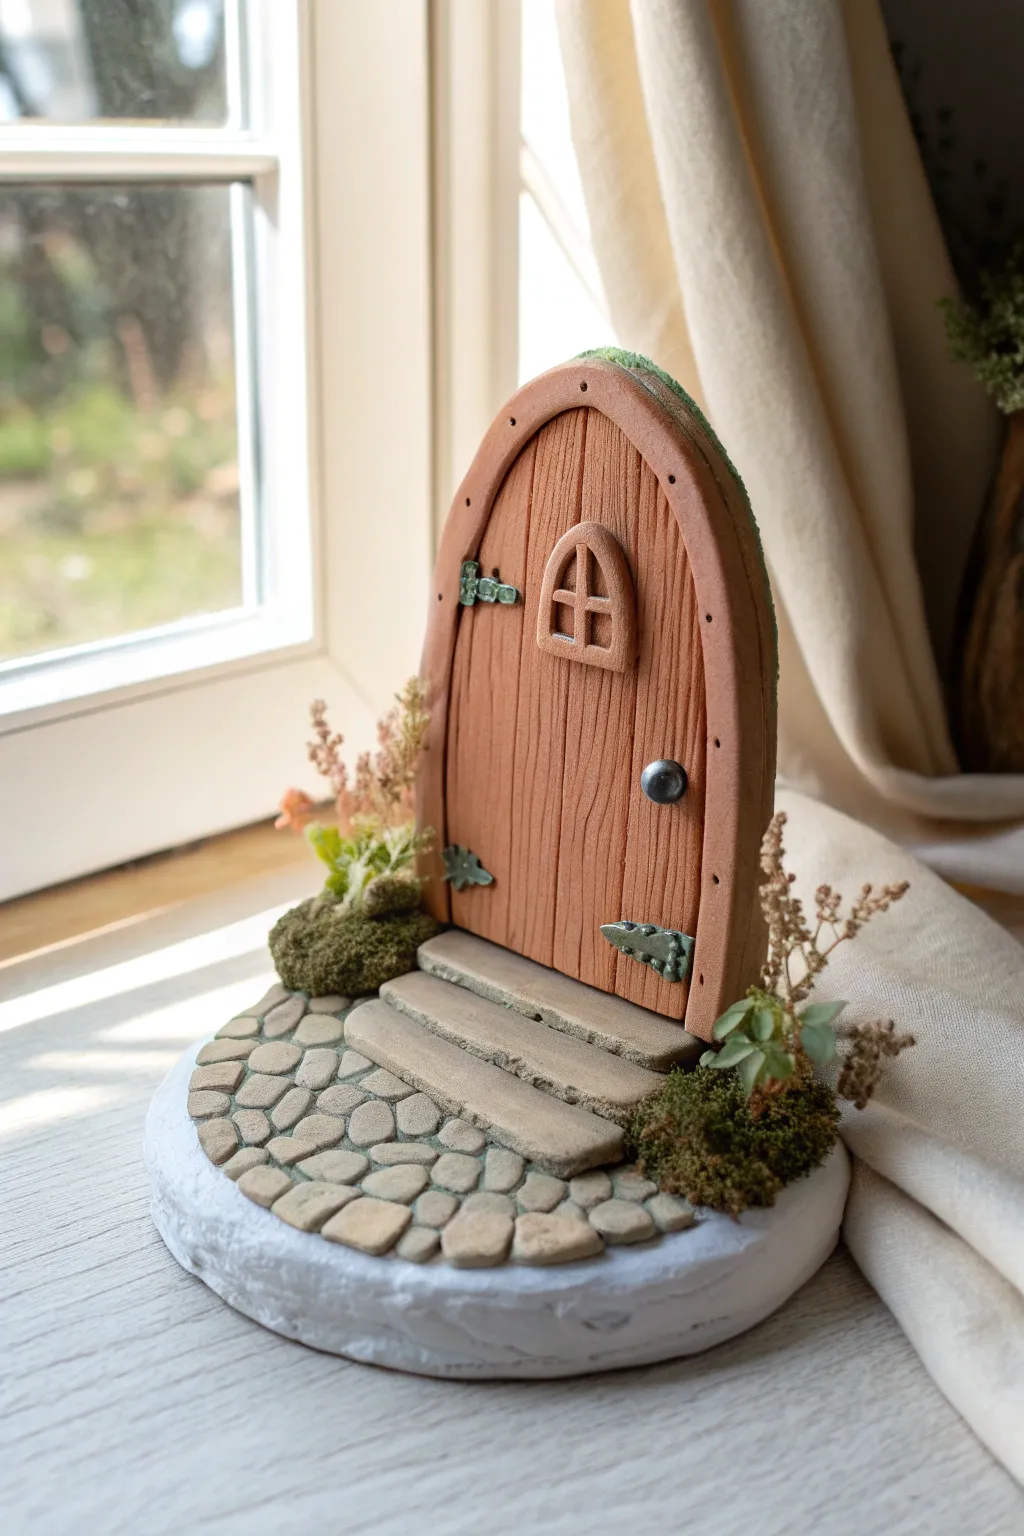
This charming project features a wood-texture arched door nestled on a circular base with a delightful cobblestone path leading up to it. The attention to detail, from the mossy accents to the tiny window, makes this a perfect addition to any hidden nook or shelf.
Step-by-Step
Materials
- Polymer clay (terracotta/brown, stone gray, dark gray, white)
- Aluminum foil
- Rolling pin
- Texture tools (needle tool, toothbrush, or stiff brush)
- Clay knife or craft blade
- Liquid polymer clay (optional)
- Dried moss (preserved)
- Small dried flowers or tiny faux plants
- Acrylic paints (black, brown wash)
- Gloss varnish (for doorknob)
- Super glue or strong craft glue
Step 1: Base and Door Structure
-
Form the core:
Create a thick circular base using scrap clay or aluminum foil compressed tightly to save on clay weight. Roll out a sheet of white or light gray clay and cover this base completely, smoothing the edges to create a stone-like slab foundation. -
Shape the door frame:
Roll out a slab of terracotta-colored clay to about 1/4 inch thickness. Cut out an arched shape for the door. Using a needle tool, score vertical lines down the front to mimic wood planks. I like to wobble the lines slightly so they look like hand-hewn timber. -
Add wood texture:
Press a stiff brush or a crumpled ball of aluminum foil gently onto the ‘wood’ surface to give it a realistic grain. Use a blade to scrape deeper grooves along the vertical plank lines. -
Create the frame border:
Roll a long, flat strip of the same terracotta clay. Wrap this around the arched edge of your door to create a raised frame. Use a dotting tool or a toothpick to poke small holes along the frame, simulating nail holes.
Uneven Footing?
If your cobblestones aren’t sticking to the base, brush a thin layer of liquid polymer clay or ‘Bake and Bond’ onto the base area before pressing the stones down.
Step 2: Steps and Stonework
-
Sculpt the steps:
Mix gray and a touch of white clay to get a concrete stone color. Shape two flat rectangular slabs, one slightly smaller than the other. Stack them leading up to the door position to create a short staircase. -
Texture the steps:
Use a toothbrush to stipple the surface of the steps, giving them a rough, weathered stone appearance. -
Lay the cobblestones:
Roll small balls of gray clay in varying shades (mix in tiny bits of black or brown for variety). Flatten them into irregular ovals and press them onto the white base in front of the steps, fitting them close together like a puzzle. -
Grout the path:
Gently press the stones down so they embed slightly into the base. If needed, brush a little liquid clay between gaps to secure them, though firm pressure usually works well.
Welcome Home
Add a tiny ‘Welcome’ mat using a thin rectangle of textured clay, or fashion a microscopic lantern from beads and wire to hang next to the door frame.
Step 3: Details and Assembly
-
Craft the window:
Make a tiny arch from terracotta clay. Create a cross-shape with thin strips of clay for the window panes and attach this to the upper center of the door. -
Add hardware:
Roll a tiny ball of dark gray or black clay for the doorknob. Create two small decorative hinge shapes for the left side of the door and press them into place. Use a needle tool to add tiny texture divots to the metalwork. -
Bake the clay:
Preheat your oven according to your clay manufacturer’s instructions (usually around 275°F or 130°C). Bake the entire piece on a ceramic tile or baking sheet for the recommended time, usually 15-30 minutes per 1/4 inch of thickness. -
Cool down:
Allow the project to cool completely in the oven with the door cracked open. This prevents cracking from thermal shock.
Step 4: Finishing Touches
-
Apply a wash:
Mix a small amount of black or dark brown acrylic paint with water. Brush this wash over the cobblestones and the wood door, letting it seep into the crevices. Wipe away the excess with a paper towel to highlight the textures. -
Add greenery:
Once the paint is dry, use super glue to attach small clumps of preserved moss to the sides of the steps and the base of the door frame. -
Plant the garden:
Glue tiny dried flower sprigs or miniature faux plants into the moss clumps to create wild, overgrown landscaping. -
Gloss the knob:
Apply a tiny drop of gloss varnish or clear nail polish to the doorknob to make it look like polished metal.
Place your finished fairy door near a window or skirting board to invite a little magic into your home
Tree Trunk Fairy Door With Bark Texture
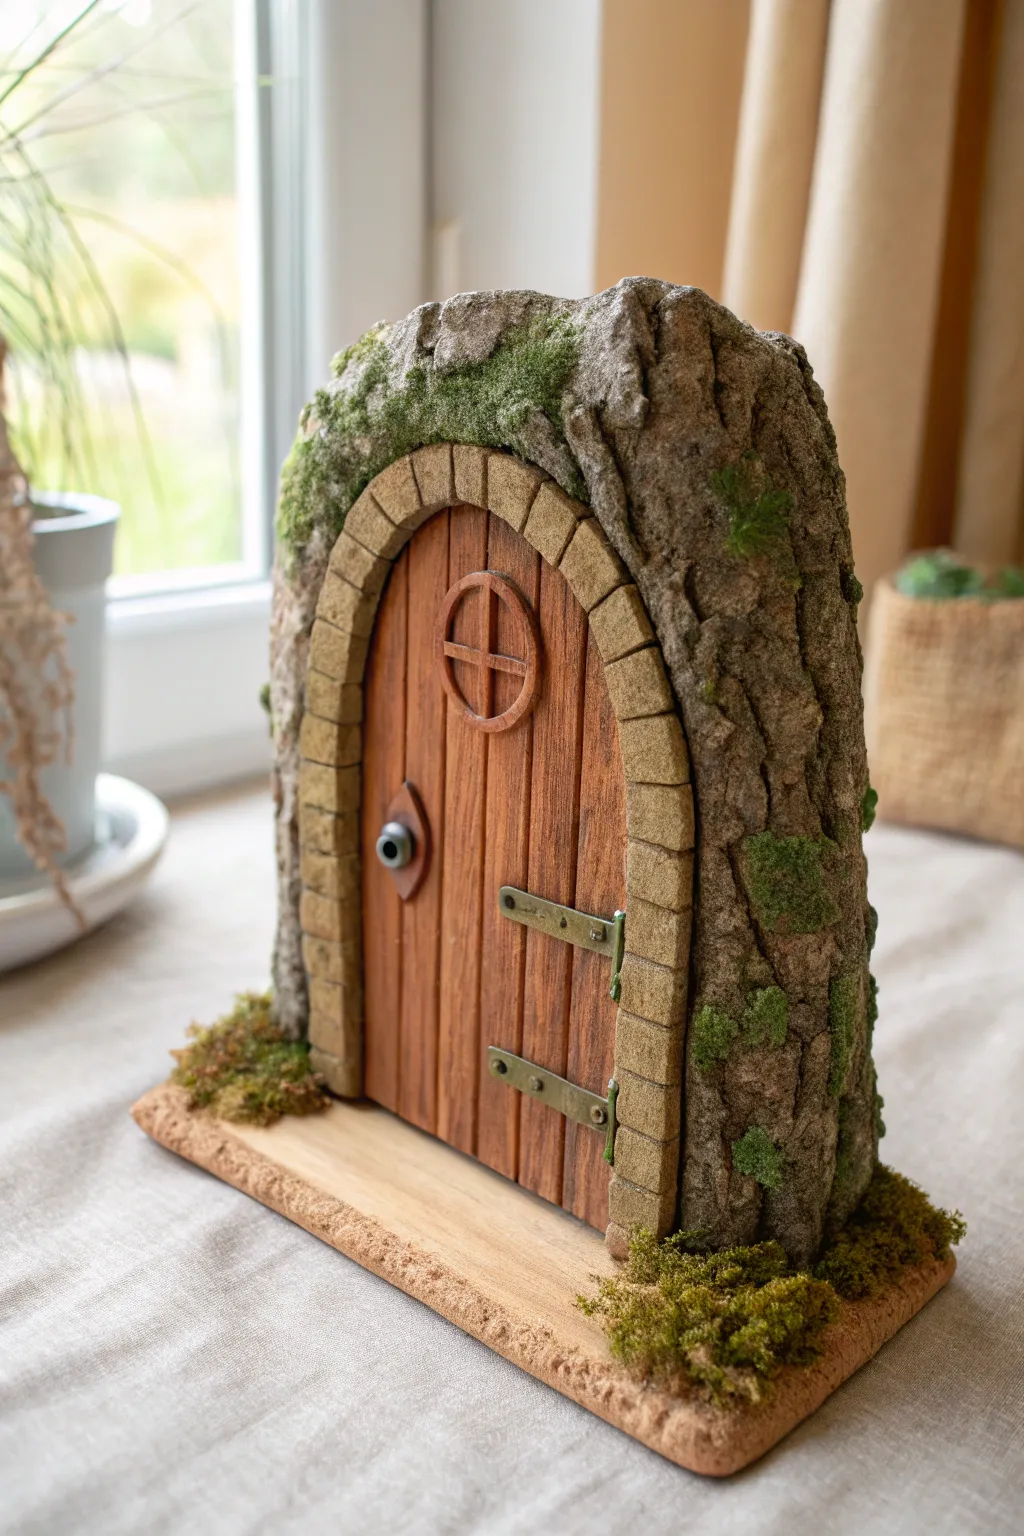
Bring a touch of woodland magic indoors with this robust tree trunk fairy door sculpture. Featuring realistic bark textures, a charming plank door, and tiny mossy details, this standalone piece is perfect for a shelf or mantel display.
How-To Guide
Materials
- Air-dry clay or polymer clay (brown and terracotta colors)
- Aluminum foil
- Cardboard or stiff wire armature
- Rolling pin
- Sculpting tools (needle tool, ball stylus)
- Texture tools (wire brush, crumpled foil, or real bark)
- Acrylic paints (dark brown, ochre, grey, green, black)
- Paintbrushes (flat wash, fine detail, old stiff brush)
- Craft moss or flocking powder
- Strong craft glue (PVA or superglue)
Step 1: Building the Structure
-
Form the Core:
Begin by creating a sturdy armature for your standing door. Crumple aluminum foil into a thick, upright arch shape—roughly the size of a large grapefruit cut in half vertically—and flatten the bottom. -
Base Support:
To ensure stability, you may want to tape your foil shape to a small piece of cardboard or use a wire loop inside the foil for rigidity. The base needs to be flat and wide enough so the heavy clay won’t tip over. -
Basic Clay Layer:
Roll out a sheet of brown clay to about 1/4 inch thickness. Drape this over your foil armature, pressing it firmly to adhere and smoothing out any seams where the clay joins. Leave the front face somewhat flat for the door area.
Natural Texture Hack
Press a real rock or piece of coral against the damp clay for the stone arch to get instant, hyper-realistic pitting and texture without manual sculpting.
Step 2: Sculpting Details
-
Create the Door:
Roll out a slab of terracotta-colored clay and cut it into a tall arched shape that fits the front of your trunk. Using a needle tool to score vertical lines to mimic wooden planks. -
Wood Grain Texture:
Add realistic wood grain to the door planks by dragging a needle tool or stiff brush gently down the surface, varying the pressure to create knots and striations. -
Stone Archway:
Roll a snake of light brown or grey clay. Flatten it and wrap it around the edge of the door. Use a blade to press indentations every half-inch to separate individual ‘stones,’ then texture each stone by tapping it with a toothbrush or crumpled foil. -
Bark Texture:
Now, add bulk to the main trunk body. Adding extra uneven clay lumps helps create the gnarly look of an old tree. Use a wire texture tool or a real piece of rough bark to stamp deep crevices into the clay. -
Deepening the Grooves:
I particularly like using a sculpting tool to deeply under-cut some of the bark layers, making them look like peeling or thick ridges standard on old oak trees. -
Hardware Details:
Fashion tiny hinges, a door handle, and a round window frame from small bits of clay. Press the window frame near the top of the door and attach the hinges on one side. -
The Base Platform:
Create a separate flat slab for the ground base. Texture it to look like dirt or stone, and press the trunk structure onto it firmly (scratch and moisten the joining surfaces to ensure a bond).
Step 3: Finishing Touches
-
Curing:
Allow your piece to dry thoroughly (for air-dry clay) or bake it according to the manufacturer’s instructions (for polymer clay). -
Base Coat:
Paint the entire bark area with a dark brown acrylic wash to get into all the deep crevices. Paint the stones a base grey or beige. -
Dry Brushing:
Once the dark coat is dry, lightly dip a stiff brush in lighter grey or tan paint. Wipe most of it off, then brush over the raised bark textures to highlight them. This brings out the 3D effect instantly. -
Door Details:
Paint the hinges and door handle with a metallic bronze or black paint. Add a lighter brown wash over the door planks to enhance the wood grain. -
Adding the Moss:
Apply dab of craft glue into the nooks of the bark, the corners of the stone arch, and around the base. Press small tufts of craft moss or sprinkle green flocking powder onto the glue to give it that ancient, forest-floor look. -
Sealing:
Finish with a matte varnish spray to protect the paint and keep the moss secure.
Glow-in-the-Dark
Mix just a pinch of glow-in-the-dark powder into the paint used for the window panes or lantern details. It creates a magical soft light when the room gets dark.
Now you have a secret portal ready to welcome mystical guests into your home
Pastel Painted Fairy Door With Panel Lines
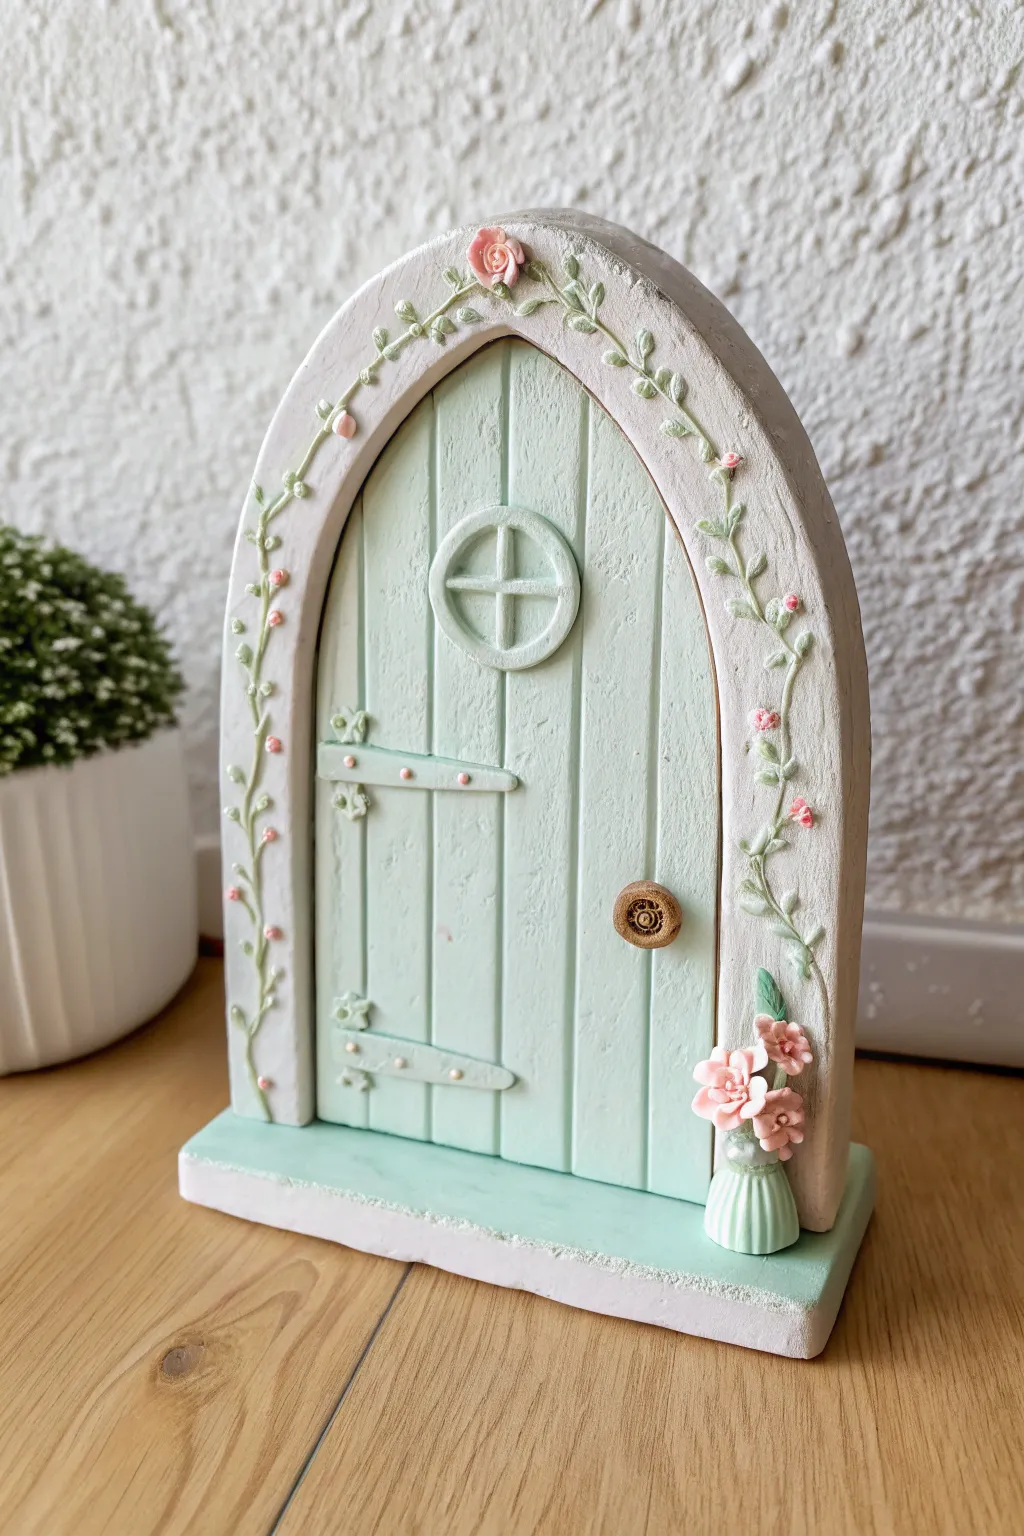
Soft mint green and delicate climbing vines make this arched fairy door a charming addition to any shelf or skirting board. The textured white stone effect trim contrasts beautifully with the smooth paneling, creating a piece that feels both rustic and magical.
Step-by-Step Tutorial
Materials
- Air-dry clay (white or light grey base)
- Rolling pin
- Cutting tool or craft knife
- Modeling tools (or a toothpick)
- PVA glue or clay slip
- Mint green acrylic paint
- White acrylic paint
- Soft pink and dark green acrylic paints (for details)
- Small flat brush
- Fine detail brush
- Small wooden button (approx. 5-8mm)
- Sandpaper (fine grit)
- Water
Step 1: Shaping the Base and Door
-
Roll the main slab:
Start by rolling out a thick slab of air-dry clay, approximately 1-1.5cm thick. This will form the sturdy backing and arch of your door. -
Cut the arch shape:
Using a craft knife, cut a tall arch shape. You can create a paper template first to ensure symmetry, or freehand it for a more organic feel. Keep the discarded clay aside for details. -
Define the door inset:
Roll a second, slightly thinner slab of clay. Cut this into a smaller arch shape that fits inside your first piece, leaving about a 1.5cm border all around. This inner piece will be the actual ‘door’. -
Create the wood panels:
On the inner door piece, use a ruler and a modeling tool to score deep vertical lines. These mimic wooden planks. Don’t worry if the lines aren’t perfectly straight; a little wobble adds character. -
Add wood grain texture:
Lightly scratch shorter, fainter vertical lines between the deep grooves to simulate wood grain texture. You can also press lightly with sandpaper for extra roughness before the clay dries.
Pro Tip: Hidden Strength
Insert a toothpick vertically through the vase and into the door frame while the clay is wet. It acts as an internal armature, preventing the fragile vase from snapping off later.
Step 2: Adding Details and Trim
-
Attach the frame:
Using clay slip or water, attach the textured door panel onto the center of your larger backing slab. Smooth the edges of the backing slab so they frame the door like stone. -
Sculpt the hinges:
Cut two thin, tapered strips of clay for the horizontal hinges. Press them onto the left side of the door. Use the tip of a tool to poke small indentations that look like nails or rivets. -
Add the window:
Roll a small ball of clay, flattened into a disc. Cut out the center or press deep indentations to create a four-pane window design. Attach this to the upper center of the door. -
Secure the doorknob:
Take your small wooden button—or make a clay replica—and press it securely into the right side of the door while the clay is still damp. Glue it later if it doesn’t stick well. -
Create the platform:
Roll a rectangular slab to serve as the base step. It should be slightly wider than the door frame. Score the surface where the door will sit and attach the upright assembly using slip. -
Form the flower vase:
Shape a tiny bulbous vase from a scrap of clay and attach it to the bottom right of the door frame, resting on the step. I like to secure this well so it supports the flowers later. -
Sculpt the vines:
Roll extremely thin snakes of clay. Wind them up the sides of the stone arch frame. Press them gently so they adhere but retain their rounded shape. -
Add leaves and buds:
Press tiny tear-drop shapes of clay along the vine for leaves. Roll minuscule balls for rosebuds and attach them sporadically along the vines and in the vase.
Troubleshooting: Warping
If the flat base creates curling edges while drying, flip the piece over gently halfway through the drying process. Weighting the edges lightly can also help keep it flat.
Step 3: Painting and Finishing
-
Dry completely:
Allow the entire structure to dry thoroughly. This usually takes 24-48 hours depending on humidity. Sand any sharp or unwanted rough edges gently. -
Base coat the door:
Paint the inner wood-paneled section with a lovely mint green acrylic. You may need two thin coats for opaque coverage, ensuring you get paint into the deep grooves. -
Paint the stone frame:
Paint the outer arch frame and the step base in white. For a stony look, you can dab the paint on with a sponge rather than stroking it, creating a slight texture. -
Paint the vines:
Using a very fine detail brush, paint the vines and leaves a muted olive green. Keep a steady hand to avoid getting green on the white stone. -
Highlight the flowers:
Dot the tiny rosebuds and the flowers in the vase with soft pink. Add a tiny white highlight to the center of the petals for depth. -
Paint the hinges:
Paint the horizontal hinges and the window frame in the same mint green as the door to make them look like painted wood furniture. -
Seal the project:
Once all paint is dry, apply a matte varnish to protect the finish, especially if the door will be placed near the floor.
Now your miniature entryway is ready to welcome tiny guests into your home
Twiggy Frame Look in Clay
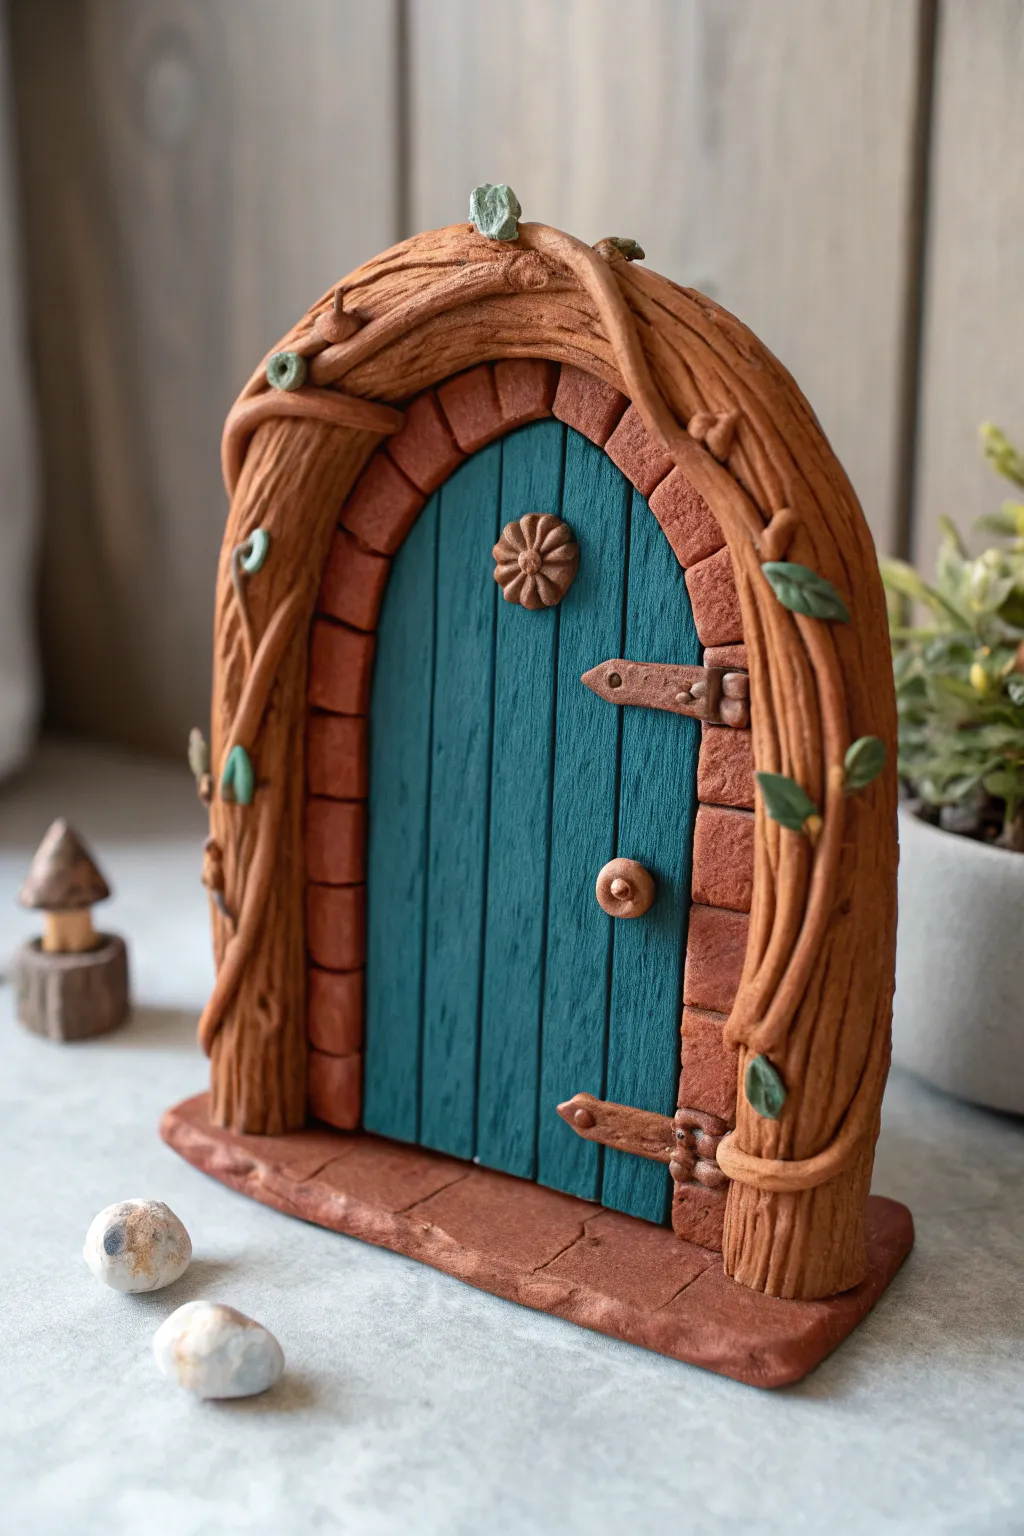
Bring a touch of magic to your garden or shelf with this delightful fairy door, featuring a realistic wood-grain texture and a charming brick archway. The twisted vine frame adds an organic, forest-found feel that makes it look like it grew right out of an old tree.
Detailed Instructions
Materials
- Polymer clay (Terracotta, Teal/dark turquoise, Beige/light brown)
- Clay sculpting tools (Needle tool, ball stylus)
- Rolling pin or pasta machine
- Craft knife or tissue blade
- Aluminum foil (for armature)
- Texturing tool (toothbrush or stiff bristle brush)
- Acrylic paint (black or dark brown for antiquing)
- Matte varnish
Step 1: Base and Stone Arch
-
Prepare the Clays:
Condition your terracotta and teal clays until they are soft and pliable. Mix a touch of black into a small amount of terracotta to create a slightly darker shade for the bricks if desired. -
Create the Backing:
Roll out a sheet of scrap clay or terracotta about 1/4 inch thick. Cut it into a tall arch shape to serve as the sturdy base for your entire door assembly. -
Form the Doorstep:
Create a flat, rectangular slab of terracotta clay slightly wider than your arch base. Attach the arch to the back edge of this slab, blending the seams on the back so they fuse together. -
Texture the Step:
Using a knife, lightly score irregular lines onto the doorstep to mimic large flagstones. Tap the surface with a crumpled ball of aluminum foil to give it a convincing stone texture. -
Lay the Brickwork:
Roll a snake of terracotta clay and flatten it slightly. Cut uniform rectangular pieces to act as bricks. Place these around the curved edge of your base backing to form the arch frame. -
Detail the Bricks:
Texture each brick individually with a stiff brush or foil. Use a needle tool to deepen the gaps between them, ensuring they look like separate stones rather than a single piece.
Texturing Trick
Use a real stiff-bristled toothbrush to tap textures onto the ‘bark’ frame. It creates tiny, random pores that make the clay look surprisingly like organic wood.
Step 2: The Teal Door
-
Cut the Door Insert:
Roll out the teal clay. Cut an arch shape that fits snugly inside your creating brick frame. It should be slightly recessed compared to the bricks. -
Add Wood Grain:
Before installing the teal piece, use a needle tool to score vertical lines resembling wooden planks. Vary the depth and add small knots or wiggles for a natural, weathered wood effect. -
Install the Door:
Gently press the textured teal arch into the center of the brick frame. If necessary, use a tiny bit of liquid clay or bake-and-bond to ensure it sticks to the backing. -
Sculpt the Flower Medallion:
Make a tiny disc of light brown clay. Use a blade to impress radial lines from the center outward, looking like flower petals, and attach this near the top center of the door. -
Add Hardware:
Fashion two small horizontal strips of light brown clay for hinges. Texture them with tiny dots to look like hammered iron and attach them to the right side of the door. -
Attach the Doorknob:
Roll a small ball of light brown clay, flatten it slightly, and press a smaller ball into the center. Attach this below the flower medallion as a rustic handle.
Step 3: The Twiggy Frame
-
Create Main Branches:
Roll several long, tapered snakes of light brown clay. These should be thickest at the bottom and thin out towards the top. -
Apply the Frame:
Wrap these clay snakes around the outer edge of the brick arch. Allow them to curve and overlap naturally. I like to twist two strands together gently before applying for extra dimension. -
Texture the Bark:
Drag a needle tool deeply along the length of the ‘branches’ to create deep furrows simulating tree bark. The rougher, the better. -
Add Greenery:
Create tiny teardrop shapes from green clay. Flatten them and press a vein down the center. Attach these sporadic leaves to the vine frame, clustering a few near the top.
Glow Up
Mix glow-in-the-dark powder into the teal door clay before rolling it out. At night, the magical entrance will softly illuminate your garden path.
Step 4: Finishing Touches
-
Final Inspection:
Check all seams and attachments. Ensure the bottom is flat so the door will stand upright after baking. -
Bake:
Bake carefully according to your specific clay manufacturer’s instructions. Usually, this is around 265°F to 275°F (130°C) for 30 minutes per 1/4 inch of thickness. -
Antique Wash:
Once cool, mix a little black acrylic paint with water. Brush it over the entire piece and immediately wipe off the excess with a paper towel. This will settle into the wood grain and brick textures, popping the details.
Now you have a charming entryway ready to welcome the fae folk into your home or garden
River-Rock Mosaic Border Fairy Door
Bring a touch of rugged nature to your fairy garden with this sturdy, arched portal featuring a convincing wood-grain door and a painstakingly arranged pebble border. The dual-textured frame combines brick-like detailing with the organic beauty of smooth river stones for a truly magical entrance.
Step-by-Step Tutorial
Materials
- Polymer clay (black, dark grey, light grey, and brown)
- Small smooth river rocks or pebbles (varied earth tones)
- Real slate coaster or flat slate piece (rectangular base)
- Texture tools (needle tool, toothbrush, aluminum foil ball)
- Polymer clay adhesive or liquid clay
- Acrylic paints (black wash, dry brush highlights)
- Strong craft glue (E6000 or similar)
- Small moss tufts (dried or artificial)
- Black wire and small jump rings (for the handle)
- Gloss varnish (optional)
Step 1: Crafting the Base Structure
-
Form the backing slab:
Begin by rolling out a thick slab of scrap clay or grey clay into a tombstone arch shape. This needs to be sturdy enough to support the weight of real stones, so aim for at least 1/4 inch thickness. -
Create the door panel:
Cut a smaller arch shape from black or very dark brown clay that fits inside your main slab, leaving a wide border for the stonework. Press this onto the center of your backing slab. -
Texture the wood grain:
Use a needle tool or a blunt knife to score vertical lines down the door panel to resemble wooden planks. Vary the spacing slightly for realism. -
Add wood details:
Press a crumpled ball of aluminum foil gently over the ‘wood’ to give it a porous texture, then use your needle tool to add deeper grain lines and knots. -
Sculpt the inner frame:
Roll a snake of grey clay and flatten it into a strip. Apply this around the immediate edge of the door, creating a separation between the wood and where the rocks will go. -
Texture the inner frame:
Use a small square cutter or a knife to impress a brick or block pattern into this grey strip. Tap it with a toothbrush to give it a rough, stony grit.
Step 2: The Mosaic Work
-
Embed the stones:
To ensure the stones stay put, I like to spread a thin layer of liquid clay or bake-and-bond adhesive on the wide outer border. Press your river rocks firmly into the clay border, fitting them together like a puzzle. -
Fill the gaps:
If there are large gaps between your stones, fill them with tiny bits of grey clay, textured with a toothbrush to look like mortar. Ensure the stones protrude enough to look distinct. -
Add hardware details:
Fashion two strap hinges from black clay. Cut them into arrow shapes and press small indents with a dot tool to mimic bolts or nails. -
Attach the handle:
Create a backplate for the handle using black clay. Insert a small metal jump ring into a loop of black clay to create a swinging knocker, and press this firmly onto the door. -
Bake the project:
Bake the entire piece according to your polymer clay manufacturer’s instructions. Remember that the stones will hold heat, so let it cool down inside the oven slowly to prevent cracking.
Stone Selection Tip
Wash and fully dry your river rocks before starting. Oily residue or dust on real stones can prevent the polymer clay or glue from adhering properly during baking.
Step 3: Assembly & Finishing
-
Prepare the slate base:
Take your rectangular slate piece. Using strong craft glue, adhere the baked door vertically near the back edge of the slate. -
Create the patio:
Spread a layer of glue on the slate in front of the door. Arrange flat, smooth pebbles to create a stepping-stone path or patio area leading up to the threshold. -
Apply a wash:
Mix black acrylic paint with water to create a thin wash. Brush this over the wood door and the grey inner frame, wiping away the excess quickly to let the dark paint settle into the crevices. -
Highlight the stones:
If your mortar looks too flat, lightly dry-brush a lighter grey paint over the ‘grout’ areas between the main river rocks to make the texture pop. -
Install greenery:
Glue small tufts of moss at the corners where the door meets the slate base to soften the transition and add a pop of life.
Hidden Hiding Spot
Make the door freestanding but hollow in the back before attaching to the slate. You can then hide a spare house key inside the cavity behind the door!
Place your finished portal against a tree trunk or garden wall and watch the magic unfold
Night-Sky Blue Fairy Door With Swirly Trim
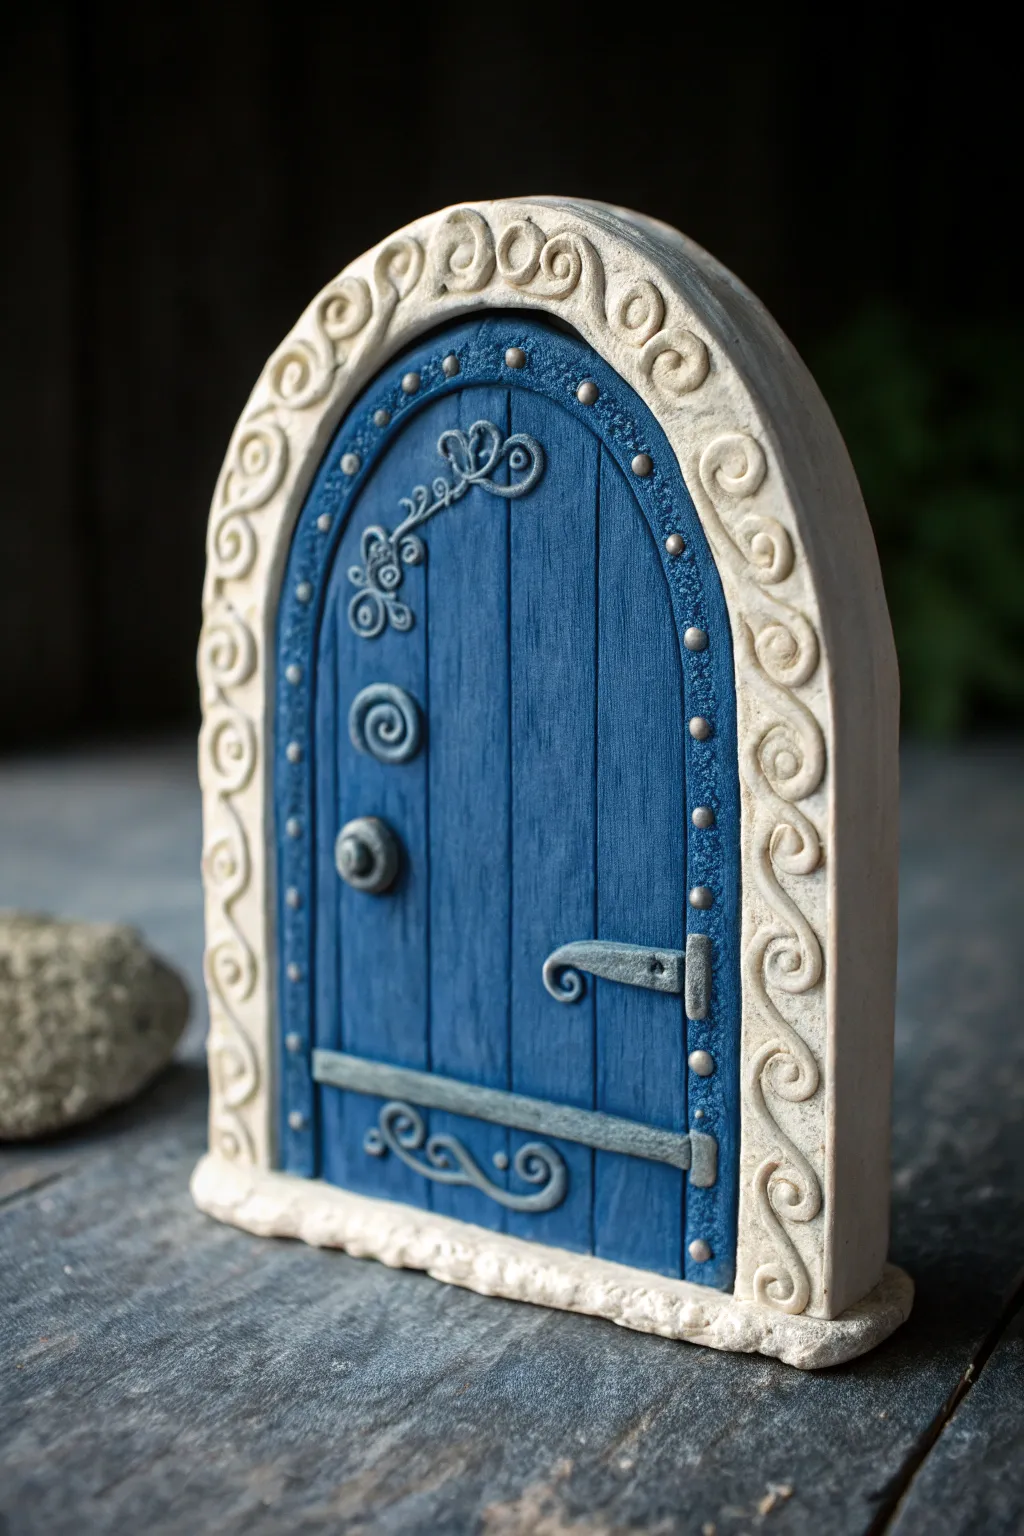
This whimsical fairy door features a deep, celestial blue entrance framed by an elegant arch of cream-colored swirls, perfect for adding magic to a bookshelf or garden. The contrast between the simulated wood grain texture and the smooth, stone-like trim makes this a standout piece.
How-To Guide
Materials
- Polymer clay (Deep Blue, Cream/Beige, Metallic Silver)
- Clay rolling pin
- Blade or X-Acto knife
- Needle tool or toothpick
- Ball stylus tool
- Texture tools (optional: rough sponge or toothbrush)
- Liquid clay (Bake and Bond)
- Oven and baking tray
- Acrylic paint (black or dark brown for antiquing)
- Matte finish varnish
Step 1: Creating the Door Base
-
Roll the base slab:
Start by conditioning your deep blue clay until it’s soft and pliable. Roll it out into a slab about 1/4 inch thick to serve as the main door. I like to keep this layer sturdy since it holds everything else. -
Cut the arch shape:
Using a blade, cut a tall rectangle, then round off the top into a smooth semi-circle arch. Smooth any rough edges with your finger. -
Texture the wood:
Use a needle tool or the back of a knife to press vertical lines into the blue clay. Vary the pressure to create a realistic wood plank effect. Don’t make the lines perfectly straight; a little wobble adds character. -
Add wood grain details:
Between the main vertical lines, gently scratch smaller, fainter lines to mimic wood grain texture.
Keep it Clean
Use baby wipes or hand sanitizer to clean your hands between colors. Blue pigment can easily stain the pristine cream clay meant for the stone arch.
Step 2: Building the Stone Archway
-
Form the frame:
Roll a long snake of cream or beige clay. Flatten it slightly so it’s about 1/2 inch wide and wrap it around the curved top and sides of your blue door. -
Create the swirl pattern:
Roll out a very thin snake of the same cream clay. Cut small segments and curl them into tight spirals. Press these spirals onto the flat arch frame you just created, covering the entire surface with a repeating scroll pattern. -
Texture the stone:
Take a toothbrush or a piece of rough texture sponge and dab it gently all over the cream archway. This takes away the ‘plastic’ look of the clay and gives it a stony, aged appearance. -
Add the base sill:
Create a rectangular strip of cream clay texture it similarly, and attach it to the bottom of the door as a stone threshold.
Step 3: Decorative Ironwork & Details
-
Make the hinges:
Using metallic silver or grey clay, shape two long, horizontal straps. Press them onto the door—one near the bottom and one as a shorter latch mechanism on the right side. -
Sculpt the floral detail:
Roll extremely thin threads of silver or light blue clay. Curl them into delicate vines and loops to create the decorative flourish near the top left of the door. -
Add a doorknob:
Form a small ball of silver clay, flatten it slightly, and press a smaller ball into the center to create a tiered knob. Attach this to the middle-left area of the door. -
Stud the frame:
Roll tiny spheres of silver clay. Carefully place them along the inner edge between the blue door and the cream frame, spacing them evenly like rivets. -
Enhance texturing:
Use a ball stylus to indent small rivets into the hinges and the centers of the decorative swirls for extra dimension.
Sticky Situation?
If your thin clay snakes for the swirls keep breaking, add a drop of clay softener or baby oil to the clay and knead well to improve elasticity.
Step 4: Finishing Touches
-
Bake the project:
Bake according to your polymer clay package instructions (usually 275°F / 135°C for 15–30 minutes). Let it cool completely. -
Antique for realism:
Dilute a small amount of black or dark brown acrylic paint with water. Brush it over the entire piece, getting into the cracks of the wood grain and swirls. -
Wipe away excess:
Immediately wipe the wet paint off the raised surfaces with a damp paper towel or baby wipe. The dark paint will remain in the recesses, highlighting the textures beautifully. -
Seal the work:
Apply a coat of matte varnish to protect the surface and eliminate any unnatural shine from the clay.
Place your finished door against a tree trunk or skirting board to invite magical guests into your home
Glowing Keyhole Magic Fairy Door
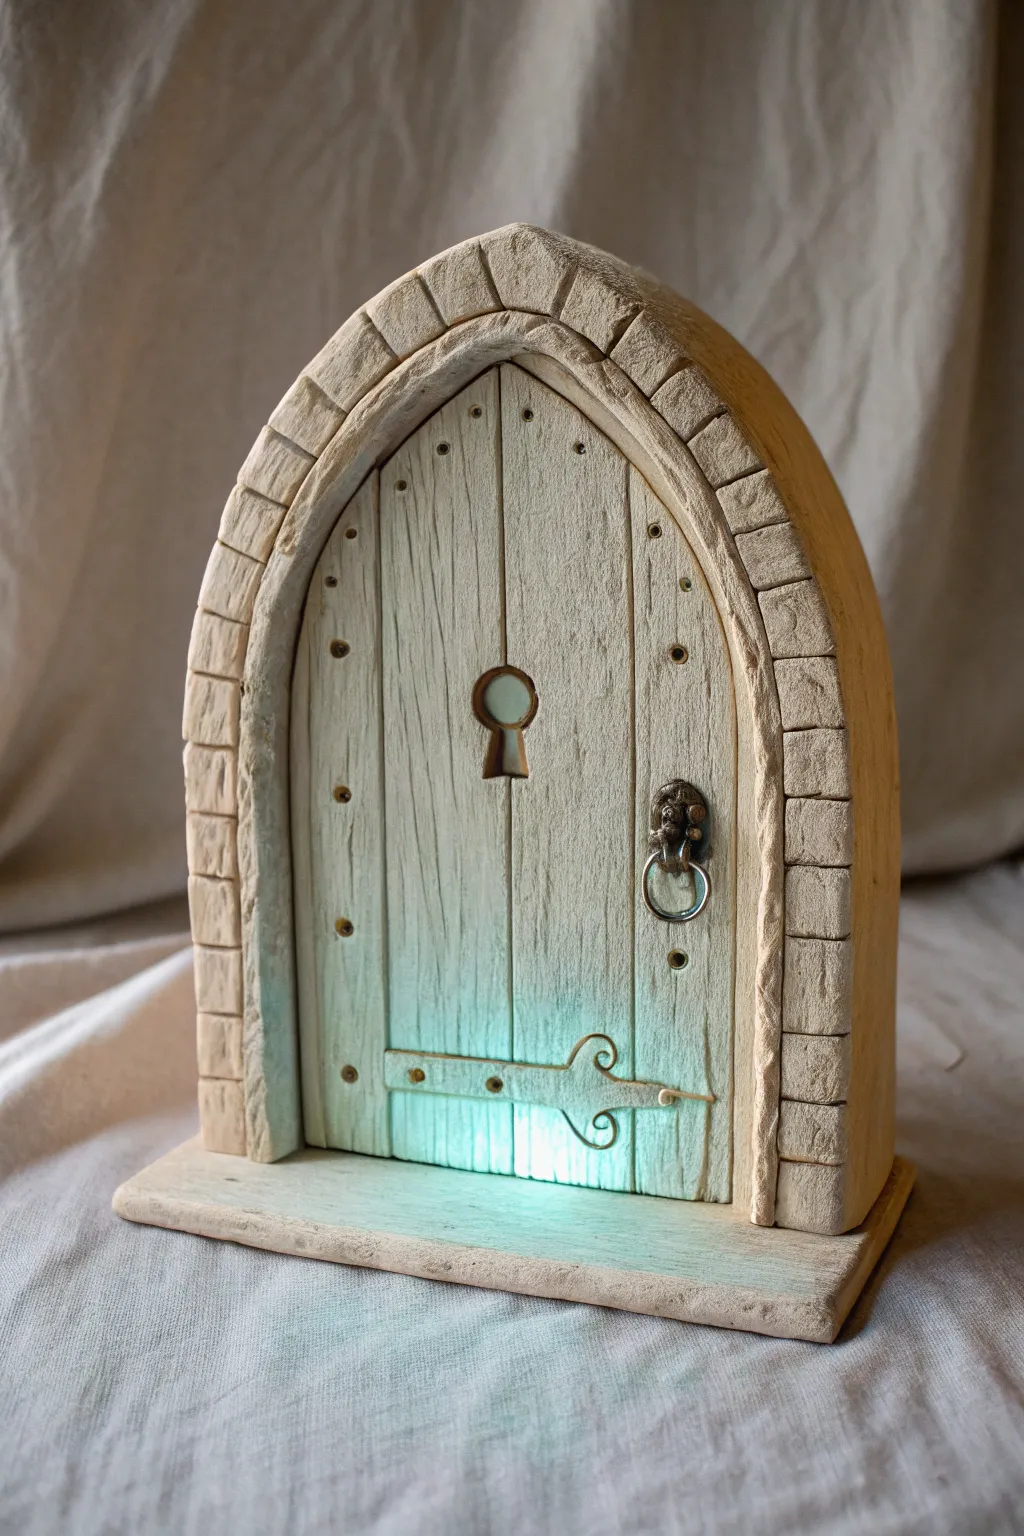
This enchanting fairy door combines the rustic charm of weathered wood with the mystery of ancient stone. The secret to its magic is a subtle internal lighting effect that makes it look like there’s a world glowing just behind the timber.
Step-by-Step
Materials
- Polymer clay (stone grey, white, beige)
- Small piece of scrap wood or aluminum foil (for the core structure)
- Mod Podge or PVA glue
- Acrylic paints (teal, white, brown wash, black wash)
- Small LED light or battery-operated tea light
- Texture tools (needle tool, stiff bristle brush, toothbrush)
- Clay carving tools
- Rolling pin
- Craft knife
- Small metal jump rings (for the knocker)
- Translucent liquid clay (optional)
Step 1: Building the Core Structure
-
Prepare the base:
Cut a thick piece of clay or use a small wooden block as your core armature. It should be a rectangular shape with a rounded, gothic-style arch at the top. This provides the internal support so your door is sturdy. -
Create the platform:
Roll out a textured slab of grey-beige clay about 1/4 inch thick to form the base platform. Place your core structure on top of this base, ensuring there is a lip extending out the front to act as a doorstep. -
Adding the light source:
If you are using a tea light, hollow out a small cavity at the bottom back of your structure now, or plan to embed a small LED right behind where the door gap will be. The glow needs to shine upwards from the bottom crack.
Uneven Glow paint?
If your painted glow looks blotchy, use a makeup wedge sponge instead of a brush. Dab thin layers of teal to build up a smooth gradient.
Step 2: Woodworking with Clay
-
Roll the planks:
Mix white and beige clay to get a pale, bleached-wood color. Roll this into a thin sheet. Using a craft knife, cut vertical strips to resemble individual wooden planks. -
Apply the texture:
Before attaching them, use a needle tool to scratch delicate wood grain lines into each strip. I like to add a few ‘knots’ by making small spirals or concentric circles in the clay. -
Assemble the door:
Press the clay planks onto the front of your core structure. Leave a microscopic gap between them so the dark wash can settle there later. Trim the top into the arch shape. -
Add the keyhole:
Cut a classic keyhole shape out of the center. If you want the light to shine through here too, make sure this hole goes deep enough to reach your light source cavity.
Make it Real
Skip the painted glow and leave the bottom gap open. Place the finished door over a real LED tealight for an actual illuminating effect.
Step 3: Stonemasonry
-
Form the archway:
Roll a snake of stone-coloured clay and flatten it slightly. Wrap this around the outer edge of your wooden door to create the jamb. -
Carve the bricks:
Using a blunt tool or the back of a knife, press indentations into the archway to define individual stone blocks. Vary the sizes slightly for a realistic, hand-built look. -
Texture the stone:
Take a crumpled ball of aluminum foil or a stiff toothbrush and press it firmly into the stone clay. This removes fingerprints and gives it a porous, realistic rock texture. -
Add rivets:
Roll tiny balls of metallic-colored clay (or paint them later) and press them into the wood planks as nail heads.
Step 4: Hardware and Details
-
Sculpt the hinge:
Roll a thin strip of clay for the decorative hinge at the bottom. Curl the ends into a scroll shape and attach it horizontally across the lower part of the door. -
Create the knocker:
Fashion a small lion’s head or simple geometric shape for the knocker plate. Insert a small metal jump ring into the clay before baking so it can swing freely. -
Bake the project:
Bake the entire piece according to your clay manufacturer’s instructions. Usually, this is around 275°F (135°C) for 15-30 minutes depending on thickness.
Step 5: Painting and Illumination
-
Apply the wash:
Once cool, water down some brown and black acrylic paint. Brush it over the entire piece and immediately wipe it off with a damp cloth. The dark paint will stay in the wood grain and stone cracks. -
Dry styling:
Use a dry brush with a tiny amount of off-white paint to highlight the raised edges of the stone and the wood texture. -
The glowing effect:
This is the crucial step. Mix a bright teal or aqua paint with a little white. Paint the very bottom edge of the door and fade it upwards, using a dry brush to feather it out. This simulates the light casting onto the wood. -
Intensify the light:
Paint the center of the bottom crack and the inside of the keyhole almost pure white, blending out into the teal. This makes the ‘light’ look incredibly bright.
Place this mysterious portal against a skirting board or bookshelf and watch as the painted light brings the scene to life
Crystal Cluster Door Handle Accent
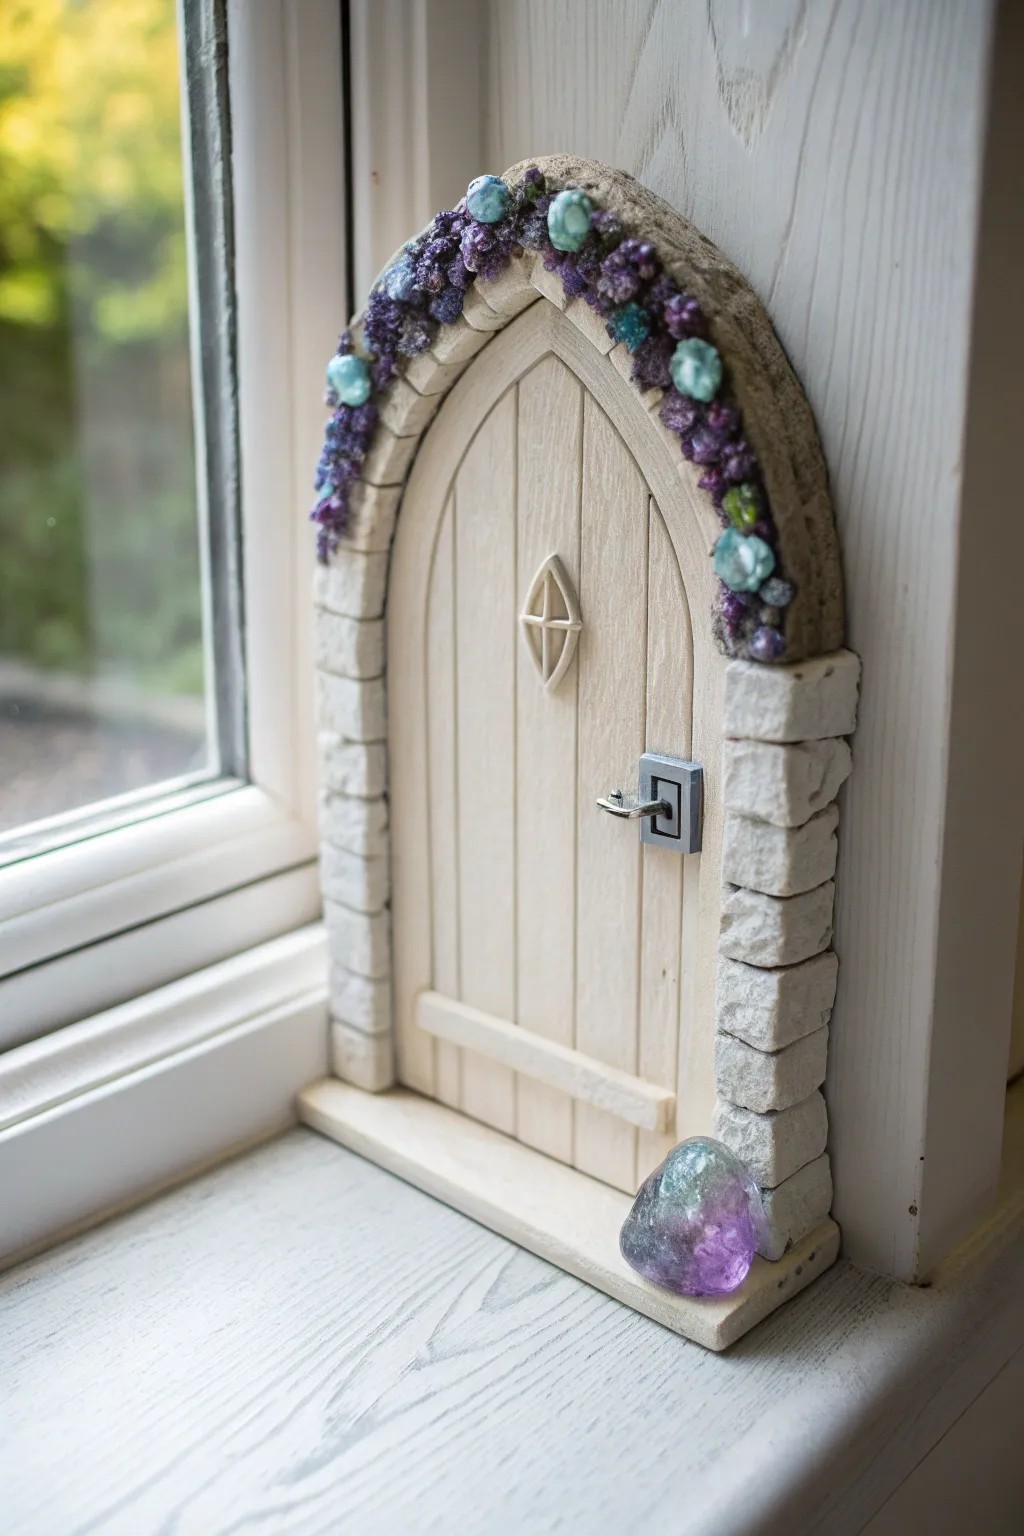
Transform a simple corner of your home into a magical gateway with this enchanting fairy door project. Featuring a realistic wood-grain texture and a sparkling archway adorned with faux amethyst and teal crystals, this piece brings a touch of fantasy to any window ledge.
Step-by-Step Tutorial
Materials
- Polymer clay (beige/tan, grey, white)
- Texture tools (needle tool, toothbrush, old credit card)
- Faux crystal chips (purple amethyst, teal/turquoise)
- Liquid polymer clay (translucent or bakeable adhesive)
- Grey acrylic paint (for washing)
- Metallic silver paint
- Small craft brushes
- Rolling pin or pasta machine
- Craft knife
- Cardboard or foil (for structural support)
- Gloss varnish
Step 1: Constructing the Door Base
-
Prepare the Base Shape:
Roll out a sheet of beige or light tan polymer clay to about 1/4 inch thickness. Cut a tall arch shape with a flat bottom; this will serve as your main door panel. -
Create Wood Texture:
Use a needle tool or the back of a craft knife to lightly score vertical lines down the length of the door to simulate individual wooden planks. -
Add Grain Detail:
Taking your needle tool again, scratch delicate, wavy lines within each plank to mimic wood grain. I find that varying the pressure creates a more natural, aged look. -
Create Cross-Beam:
Cut a thin strip of the same beige clay and attach it horizontally across the bottom of the door as a kick-plate, texturing it to match the vertical planks. -
Sculpt the Diamond Window:
Roll a very thin snake of beige clay. Form a diamond shape in the upper center of the door and add a cross inside it to create a mullioned window effect.
Step 2: Building the Stone Archway
-
Form the Arch Frame:
Roll a thick snake of grey clay, flatten it slightly, and drape it over the top curved edge of your wooden door. Ensure it frames the sides down to the base. -
Create Stone Bricks:
Use a rigid blade or craft knife to press horizontal indentations into the grey clay at regular intervals. Then, stagger vertical indentations to create a classic brick-laying pattern. -
Texture the Stone:
Gently tap the surface of the bricks with an old toothbrush or a ball of crinkled aluminum foil to give the clay a rough, stony appearance. -
Add the Keystone:
At the very top center of the arch, sculpt a slightly larger, prominent stone piece to serve as the keystone.
Loose Crystals?
If crystal chips fall off after baking, simply reattach them with a dot of strong cyanoacrylate superglue or E6000 for a permanent hold.
Step 3: Crystal Embellishment and Hardware
-
Apply Adhesive Layer:
Brush a thin layer of liquid polymer clay or bakeable adhesive along the upper curve of the stone archway where the crystals will sit. -
Embed the Crystals:
Press small chips of purple and teal faux crystals into the adhesive. Cluster them densely near the top and let them taper off as they go down the sides, resembling climbing vines or moss. -
Sculpt the Handle Plate:
Form a small square from grey clay and press a rectangular indentation into the center. Attach this to the right side of the door. -
Creating the Handle:
Bend a small piece of wire into an L-shape or sculpt a tiny clay hook painted silver to act as the lever handle. Insert this into the square plate.
Glow Up
Mix glow-in-the-dark powder into the translucent liquid clay before adhering the crystals. Your fairy door will magically illuminate at night.
Step 4: Finishing Touches
-
Baking the Piece:
Bake the entire creation according to your polymer clay package instructions (usually 275°F/135°C for 15-30 minutes). Let it cool completely. -
Applying a Wash:
Dilute grey acrylic paint with water. Brush it over the stone arch and wood grooves, then immediately wipe away the excess with a paper towel. This highlights the textures. -
Highlighting the Hardware:
Use a fine brush to paint the door handle and backplate with metallic silver paint for a realistic metal finish. -
Final Varnish:
Apply a gloss varnish only to the crystals to make them shine, keeping the wood and stone matte for contrast.
Now you have a charming entryway ready to welcome the fae folk into your home
Stacked Books Portal Fairy Door
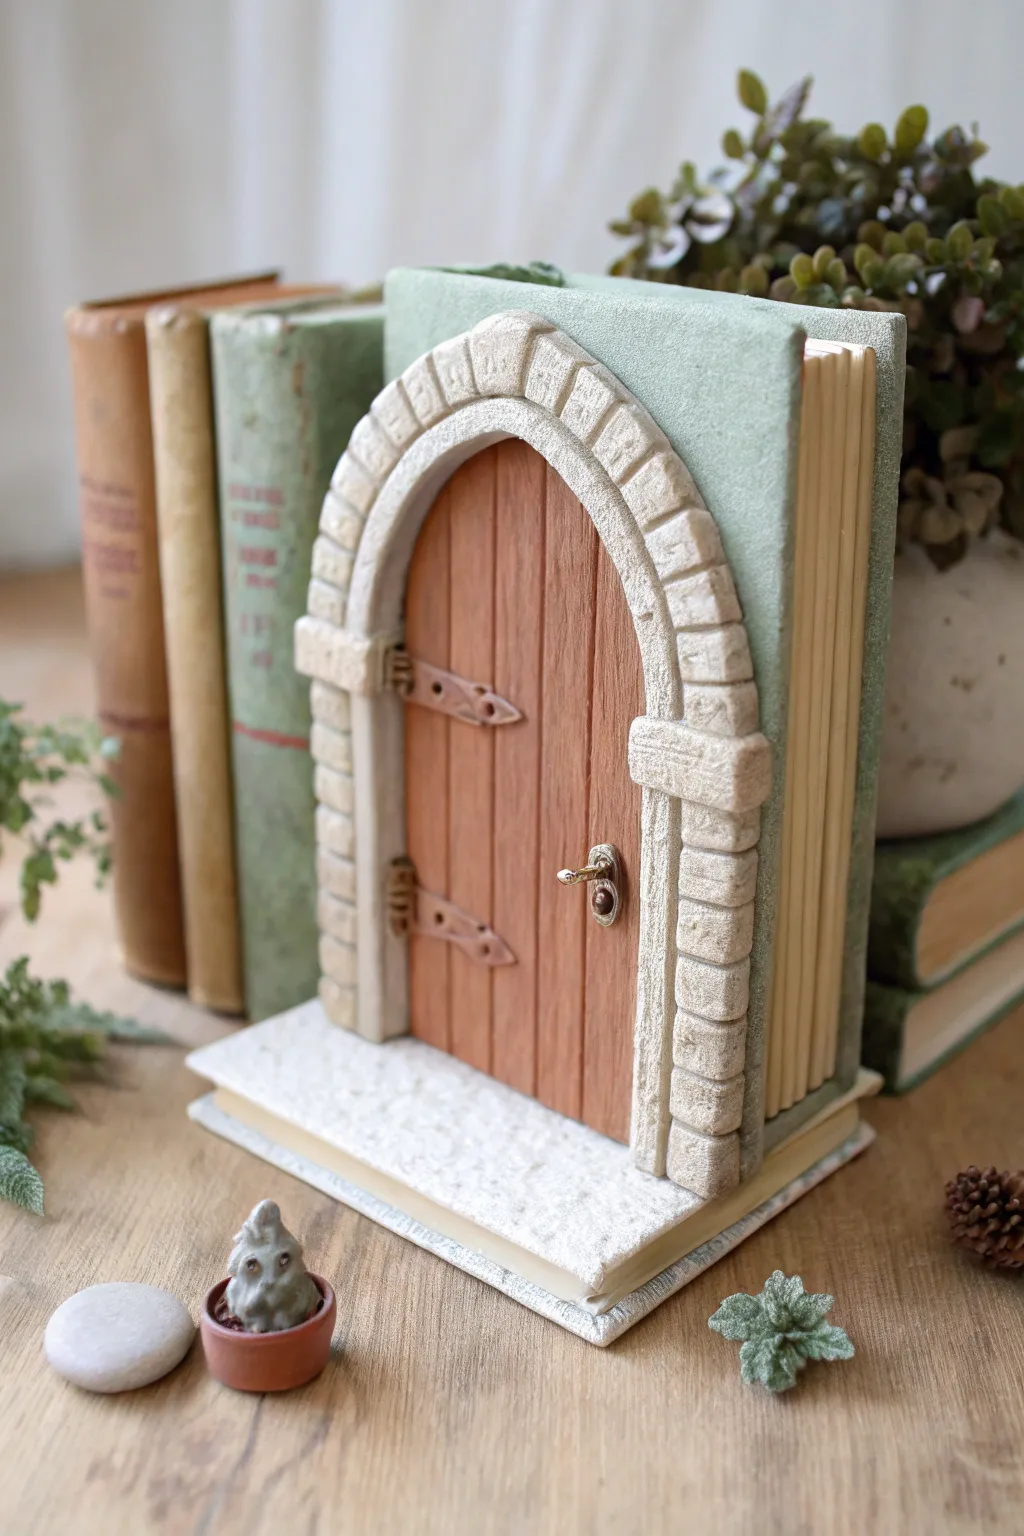
Transform a simple wooden blank or recycled hardcover book into a magical gateway with this clever trompe-l’œil design. By sculpting blending clay stones around a wooden door insert, you create the illusion that a secret entrance exists right within the pages of a library volume.
Detailed Instructions
Materials
- Hardcover book (discarded) or book-shaped wooden box
- Polymer clay (stone gray, white, beige)
- Balsa wood sheet or craft sticks
- Acrylic paints (browns, greens, cream, antique gold)
- Textured rolling pin or sandpaper
- Craft knife
- Wood glue or heavy-duty craft adhesive
- Sculpting tools (needle tool, ball stylus)
- Matte sealant spray
- Miniature hinges and door handle (brass)
- Gesso or primer
Step 1: Preparing the Foundation
-
Base Construction:
If using a real book, glue the pages together into a solid block using diluted PVA glue painted along the edges. If using a wooden blank, sand it smooth. Glue a slightly larger rectangular base (like a thick piece of cardstock or wood) to the bottom to represent the bottom cover extending out. -
Door Positioning:
Decide where your door will sit on the front cover. Measure a tombstone-style arch shape and mark it lightly with a pencil. -
Creating the Wooden Door:
Cut vertical strips of balsa wood to fit inside your marked arch. Glue them side-by-side onto the book cover to form the door planks. Don’t worry about the edges being perfect; the stone arch will cover them.
Stone Texture Trick
Press a piece of coarse sandpaper or a real rough rock against your raw clay stones. This imitates the porous look of limestone far better than drawing tools can.
Step 2: Sculpting the Stonework
-
Mixing the Stone Clay:
Mix your gray polymer clay with a little white and beige to get a varied, natural limestone color. I like to leave it slightly unmixed for a realistic marbled effect. -
Forming the Arch Base:
Roll a snake of clay and press it around the curved perimeter of your wooden door. Flatten it slightly to form the foundation of the arch. -
Carving Individual Stones:
Using a craft knife, score lines into the clay arch to define individual voussoirs (the wedge-shaped stones). Press a real stone or a ball of crinkled foil against the clay to texture the surface. -
Adding the Columns:
Create two vertical pillars of clay on either side of the door. Score horizontal lines to create a stacked brick look, matching the texture of the arch stones. -
Keystone Detail:
Add a slightly larger, prominent clay shape at the very top center of the arch to act as the keystone. Bevel the edges slightly for depth. -
Sculpting the Threshold:
Cover the bottom extended base with a thin layer of white or very light gray clay. Texture it heavily to look like rough-hewn pavement or a stone step.
Step 3: Texturing the Book
-
Cover Texture:
Apply a thin layer of gesso or texture paste to the front ‘cover’ area surrounding the stone arch. Stipple it with a stiff brush to mimic the feel of an old cloth-bound book. -
Faux Pages:
On the side of the project (the thickness of the book), use a ruler and a scoring tool to etch fine, parallel vertical lines. This creates the illusion of stacked paper pages.
Make It Secret
Build this on a hollow ‘book safe’ box instead of a solid block. The fairy door becomes the decoration for a secret compartment where you can hide keys or notes.
Step 4: Painting and Patina
-
Wood Stain Effect:
Paint the balsa wood door with a wash of burnt sienna and raw umber. Wipe away excess paint quickly so the wood grain shows through. -
Stone Washing:
Apply a watered-down black or dark brown acrylic wash over the dried (or baked, if using polymer) clay stones. Wipe the surface with a damp cloth, leaving the dark paint only in the cracks and crevices. -
Dry Brushing:
Dip a dry brush into cream or white paint and lightly whisk it over the raised textures of the stone and the green book cover. This highlights the details instantly. -
Painting the Book:
Paint the textured cover area in a muted sage green. Paint the ‘pages’ on the side in a creamy off-white, adding a subtle yellow wash near the spine for an aged look.
Step 5: Final Hardware Details
-
Hinges and Handle:
Glue the miniature brass hinges onto the left side of the wooden door. Place them so they look like they connect to the stone frame. -
The Lock:
Attach the tiny door handle or knob on the right side. A drop of superglue works best here for metal-to-wood adhesion. -
Protective Seal:
Once all paint is completely dry, spray the entire piece with a matte sealant to protect the finish and unite the different textures.
Place your mystical literary portal on a bookshelf among real volumes and wait for a tiny visitor to move in
Underwater Mermaid Garden Fairy Door
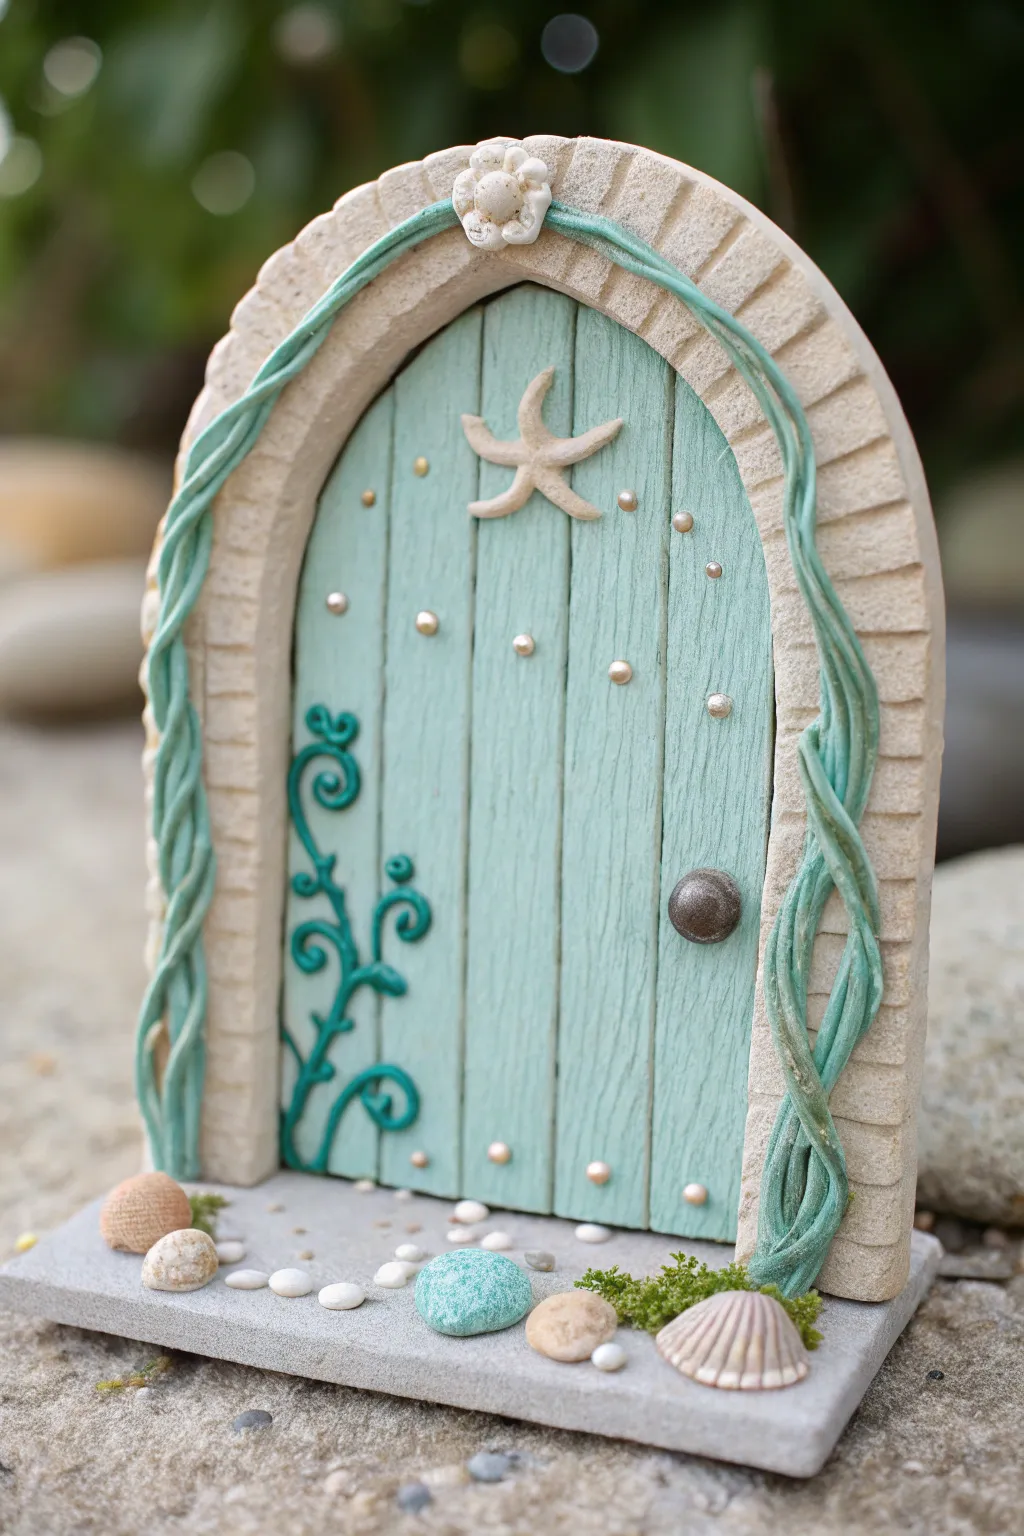
Bring the magic of the ocean to your fairy garden with this enchanting underwater-inspired door. Featuring a weathered turquoise finish, climbing sea vines, and delicate shell accents, this polymer clay project captures the whimsical spirit of a mermaid’s secret hideaway.
Step-by-Step
Materials
- Polymer clay (stone gray, white, pale turquoise, teal green, metallic bronze)
- Clay roller or pasta machine
- Arched clay cutter or craft knife
- Needle sculpting tool
- Ball stylus tool
- Liquid polymer clay (clear)
- Small real seashells and stones (for the base)
- Texturing tool (toothbrush or stiff bristle brush)
- Oven and baking tray
Step 1: Constructing the Base and Door
-
Roll the foundation:
Begin by conditioning your stone gray clay and rolling it out to a thickness of about 1/4 inch. Cut a rectangular base that extends slightly wider than your intended door size to provide stability. -
Cut the door shape:
Roll out the pale turquoise clay. Using an arched cutter or a paper template with a craft knife, cut out the main door shape. This will be the colorful wooden center of your piece. -
Create the wood texture:
Use a needle tool or the back of a craft knife to gently score vertical lines down the turquoise clay to mimic wooden planks. Vary the pressure slightly for a natural, weathered driftwood look. -
Form the stone arch:
Roll a snake of stone gray clay and flatten it slightly. Wrap this around the curved edge of your turquoise door. Use your fingers to merge the seam where the backing meets the arch, ensuring they stick together. -
Texture the stonework:
Use a toothbrush or stiff brush to tap texture into the gray arch. Then, use a needle tool to score horizontal lines at regular intervals, creating the look of individual stone blocks.
Sticky Situation?
If your clay gets too soft to hold the door upright, pop the unbaked pieces in the fridge for 10 minutes. The chilled clay stiffens up, making assembly much easier without warping.
Step 2: Adding Oceanic Details
-
Sculpt the climbing vines:
Mix white and teal clay to create a pale sea-foam green. Roll two very thin snakes of this clay and twist them together. Drape this twisted vine over the stone arch, letting it trail down the sides naturally. -
Create the seaweed flourish:
Using a slightly darker teal clay, roll a tiny snake and curl it into scrolling fern or seaweed shapes. Press this onto the bottom left corner of the turquoise door for an elegant organic detail. -
Fashion the starfish:
Take a tiny pinch of white or beige clay. Shape a five-pointed star and gently curve the arms to look like a dancing starfish. Attach this to the upper center of the door. -
Add pearlescent rivets:
Roll tiny spheres of white or pearl clay. Press them gently onto the ‘wood’ planks using a consistent pattern, perhaps focusing on the upper arch or random scattering for a magical effect. -
Attach the doorknob:
Roll a small ball of metallic bronze clay. Press it firmly onto the right side of the door to serve as the handle. You can add a tiny dimple in the center for extra detail. -
Top the arch:
Create a small flower or barnacle shape from white clay and place it at the very peak of the arch, covering the point where the two vines meet.
Glow Up
Mix glow-in-the-dark powder into the white clay used for the rivets and starfish. This will make your fairy door magically illuminate when the lights go down at night.
Step 3: Assembly and Finishing
-
Mount the door:
Stand the door vertically on the gray rectangular base prepared in the first phase. Blend the clay at the back of the door into the base to ensure it stands upright securely. -
Decorate the threshold:
Press small real seashells, tiny pebbles, or clay ‘stones’ into the base clay in front of the door. I like to push them deep enough so they look embedded in the sand. -
Apply texture to the ground:
Use your texture brush again on the gray base around the shells to simulate sandy ground, hiding any fingerprints left during assembly. -
Secure detailed elements:
If any small elements like the starfish or rivets feel loose, apply a tiny drop of liquid polymer clay as an adhesive before baking. -
Bake the project:
Bake the entire piece according to your clay package instructions (usually 275°F/135°C for 15-30 minutes). Let it cool completely in the oven to prevent cracking. -
Add mossy accents:
Once cool, glue tiny bits of preserved moss near the base or along the vines for a soft, realistic underwater garden texture.
Place your finished door in a terrarium or garden nook to invite magical sea creatures into your home
Interchangeable Seasonal Decor Fairy Door
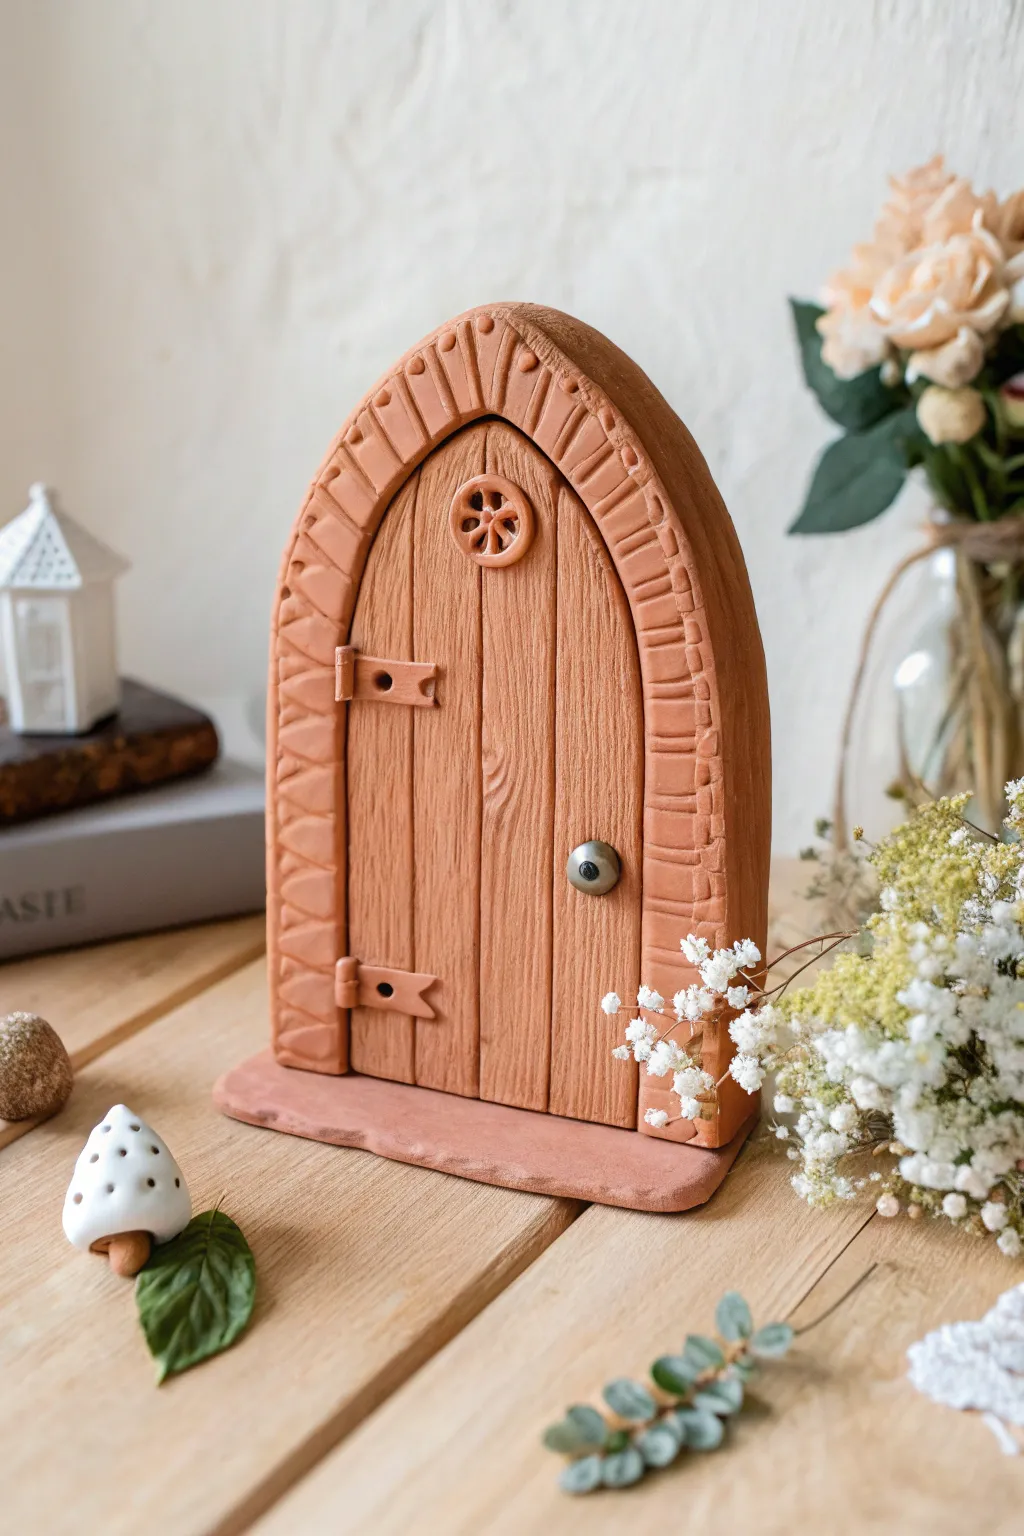
This charming, freestanding fairy door brings a touch of magic to any shelf or garden nook with its warm terracotta tones and classic arched design. The sturdy stone-look frame encases a rustic planked door, complete with tiny hinges and a circular window.
Detailed Instructions
Materials
- Terracotta-colored polymer clay (or air-dry clay painted later)
- Clay rolling pin or pasta machine
- Sharp craft knife
- Pointed sculpting tool or needle tool
- Small round cutter (approx. 1cm)
- Small metal bead or ball of silver clay (for doorknob)
- Texture tool or rough stone/sandpaper
- Heavy cardboard or chipboard for template
- Oven for baking (if using polymer clay)
Step 1: Creating the Base and Frame
-
Prepare your template:
Sketch a simple arch shape on cardboard, roughly 5-6 inches tall, and cut it out. This will ensure your door remains symmetrical as you work. -
Roll the base slab:
Roll out a thick slab of terracotta clay, about 1/4 inch thick. Use your template to cut out the arched back panel that will support the entire structure. -
Form the stone frame:
Roll a long snake of clay and flatten it slightly to create a strip about 1/2 inch wide. Lay this strip along the curved edge of your base slab to form the doorframe. -
Texture the stones:
Use a knife to press deep indentations into the frame strip at regular intervals, mimicking individual stone blocks. Gently round the edges of each ‘stone’ with your fingers for a worn look. -
Add surface detail:
Press a rough stone or texture sponge lightly against the frame stones to give them a realistic, pitted texture. -
Create the threshold:
Roll a separate, rectangular slab for the bottom stand. Texture the edges to look like rough-hewn stone, then attach the upright door arch to this base. I find scoring the clay first helps it bond securely.
Slumping Arch?
If the upright arch leans while drying or baking, prop it up from behind with a crumpled ball of aluminum foil or a supportive cardboard wedge until it sets fully.
Step 2: Crafting the Wood planks
-
Roll the door insert:
Roll a thinner slab of clay that fits snugly inside your stone arch frame. Trim it carefully so it sits flush against the back panel. -
Score wood grain:
Using a needle tool, draw vertical lines to separate the wooden ‘planks’. Vary the width slightly for realism. -
Add wood texture:
Draw wavy lines and the occasional knot hole within each plank section to simulate wood grain. Don’t worry about being perfect; rustic creates character. -
Insert the circular window:
Near the top of the door, use a small round cutter to gently indent a circle. Don’t cut all the way through; just create a recessed area. -
Detail the window:
Roll tiny snakes of clay to create the spokes of the wheel window and place them inside the recessed circle. Add a thin ring of clay around the edge for trim.
Seasonal Swaps
Embed small magnets behind the frame before baking. This lets you attach seasonal decor like tiny clay wreaths, autumn leaves, or snow drifts to the door later.
Step 3: Finishing Touches
-
Make the hinges:
Cut two small, rectangular strips of clay. Cut a notch in one end to create a visually interesting hinge shape. -
Attach the hardware:
Press the hinges onto the left side of the door, bridging the gap between the wood and the stone frame. Use a needle tool to poke tiny holes for ‘nails’. -
Install the doorknob:
Press a small metal bead or a ball of metallic-colored clay into the right side of the door. Ensure it is firmly embedded. -
Final inspection:
Check the entire piece for fingerprints and smooth them out. Ensure the door stands upright on its base correctly. -
Bake or dry:
Follow the manufacturer’s instructions for your specific clay. If using polymer, bake on a tile to keep the base flat. If using air-dry, let it cure for at least 24 hours.
Now you have a sturdy, magical portal ready to welcome tiny visitors to your home