Whenever I’m teaching kids, I lean hard into simple shapes and goofy charm—because that’s where the confidence (and the fun) lives. Here are my favorite clay figures ideas for kids that start super classic and get more imaginative as you go.
Chubby Clay Cat
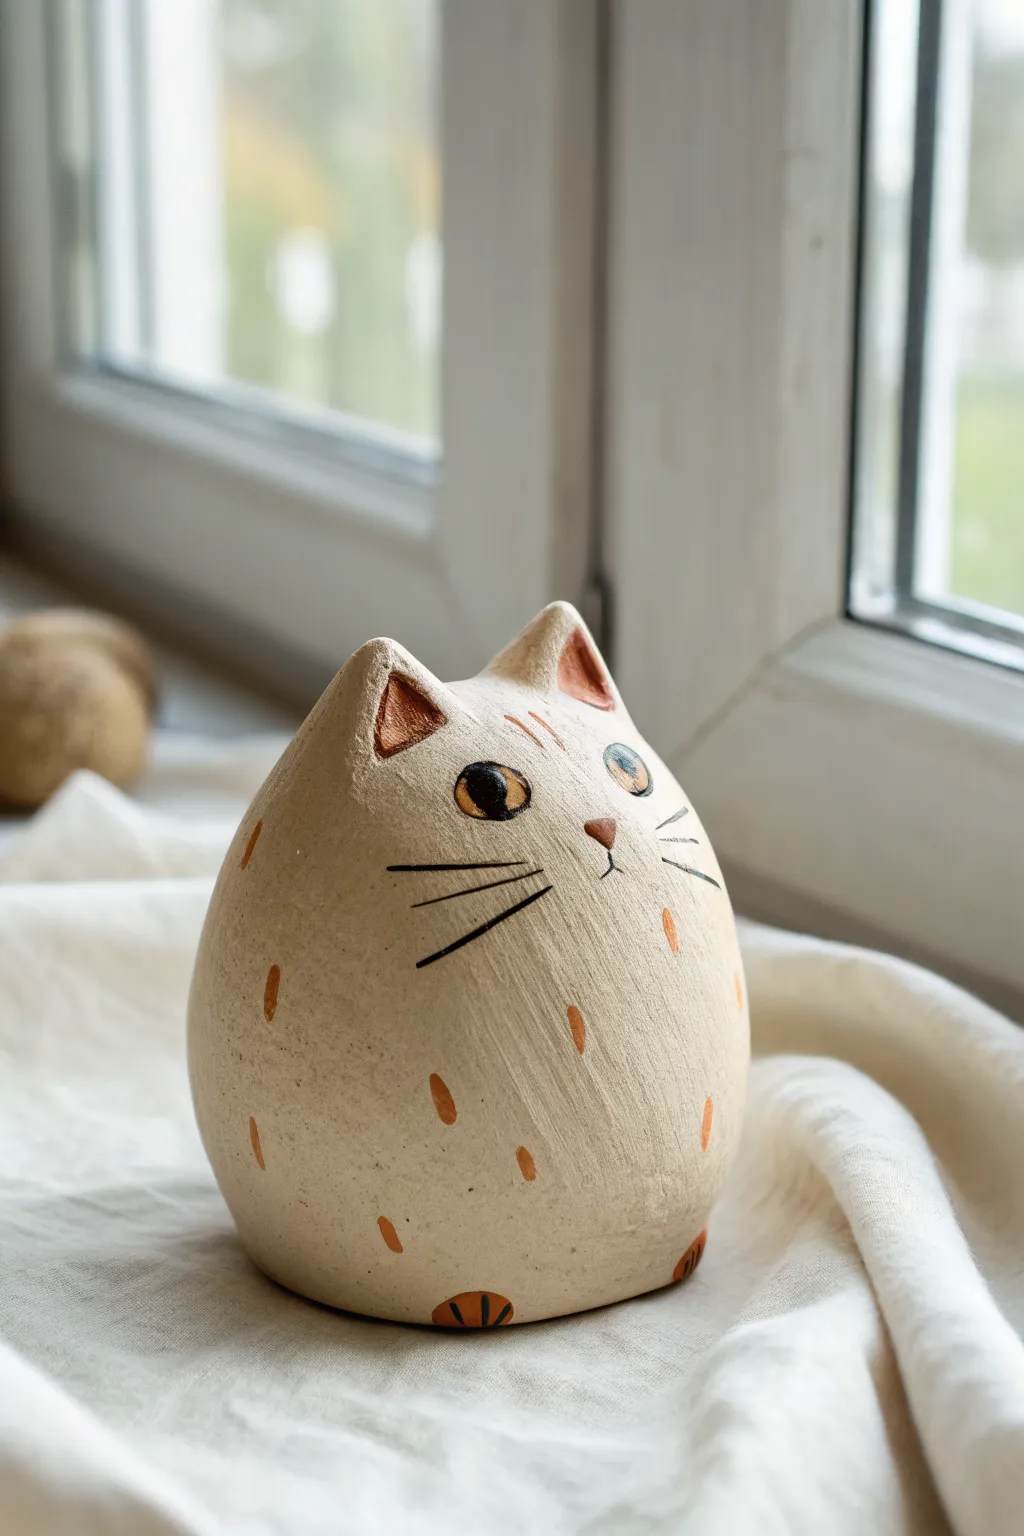
This adorable, egg-shaped cat figurine is the perfect blend of minimalist charm and rustic texture. Its solid, rounded form makes it sturdy and satisfying to hold, while the simple painted details give it a sweet, curious expression.
Step-by-Step Guide
Materials
- White air-dry clay or polymer clay (approx. 1/2 lb)
- Small bowl of water
- Modeling tools (or a toothpick and a popsicle stick)
- Acrylic paints: Orange-brown, black, white, and teal
- Fine detail paintbrush
- Matte varnish or sealant (optional)
- Sandpaper (fine grit)
Step 1: Shaping the Base Form
-
Condition the Clay:
Start by kneading your clay thoroughly until it’s warm, pliable, and free of air bubbles. A smooth starting texture is key for that flawless surface later on. -
Roll a Ball:
Roll your lump of clay into a large, smooth sphere between your palms. Aim for something about the size of a large orange or a grapefruit. -
Create the Egg Shape:
Gently taper the top of the sphere to create a wide egg or pear shape. The bottom should remain wide and heavy to keep the figure stable. -
Flatten the Base:
Tap the bottom of your egg shape firmly against your work surface. You want a completely flat bottom so the cat sits securely without wobbling. -
Refine the Surface:
Dip your finger in a little water and smooth out any fingerprints or cracks on the body. I like to spend an extra minute here to ensure the curve is continuous and organic.
Step 2: Sculpting the Features
-
Pinch the Ears:
At the tapered top of the shape, pinch two triangles of clay upwards to form the ears. Keep them integrated with the body rather than attaching separate pieces for a seamless look. -
Shape the Ear Hollows:
Use the rounded end of a modeling tool or your pinky finger to gently press indentations into the front of each ear triangle, creating depth. -
Smoothing the Transition:
Use your thumb to smooth the clay at the base of the ears back down into the head, ensuring there’s no harsh line where the ears begin. -
Check Symmetry:
Rotate your figure to look at it from all angles. Make sure the ears are roughly the same size and the body hasn’t become lopsided. -
Dry the Figure:
Let the clay dry completely according to the package instructions. Air-dry clay usually takes 24-48 hours for a piece this thick. Don’t rush this step.
Cracks while drying?
If you see hairline cracks forming as the clay dries, mix a tiny bit of fresh clay with water to make a ‘slip’ paste and fill them in immediately, then smooth over.
Step 3: Painting and Finishing
-
Sanding:
Once bone dry, lightly check for rough spots. Use fine-grit sandpaper to buff away any unintentional bumps, wiping away the dust with a slightly damp cloth. -
Painting the Ears:
Mix a warm orange-brown acrylic paint. Carefully paint the inside triangles of the ears. -
Adding Coat Details:
Using the same orange-brown, paint two small stripes between the ears and scattered, short vertical dashes all over the body to represent fur texture. -
Drawing the Face:
Switch to black paint and a very fine brush. Paint two almond shapes for eyes, a small triangular nose, and long, straight whiskers. -
Adding Eye Color:
Fill the iris of the eyes with the orange-brown paint (or a mix of orange and teal for heterochromia like the photo). Add a tiny black pupil in the center. -
The Tiny Paws:
At the very bottom edge of the front, paint two small semi-circles in orange-brown. Once dry, add three tiny black lines on each for toes. -
Highlights:
Add a tiny dot of white paint to the upper corner of each eye to bring the cat to life. -
Sealing:
Apply a coat of matte varnish to protect your paint job and give the clay a finished, professional feel.
Smoother blending
When pinching the ears, keep your fingers constantly moist (but not dripping wet). This prevents the clay from tearing and creates that seamless, stone-like silhouette.
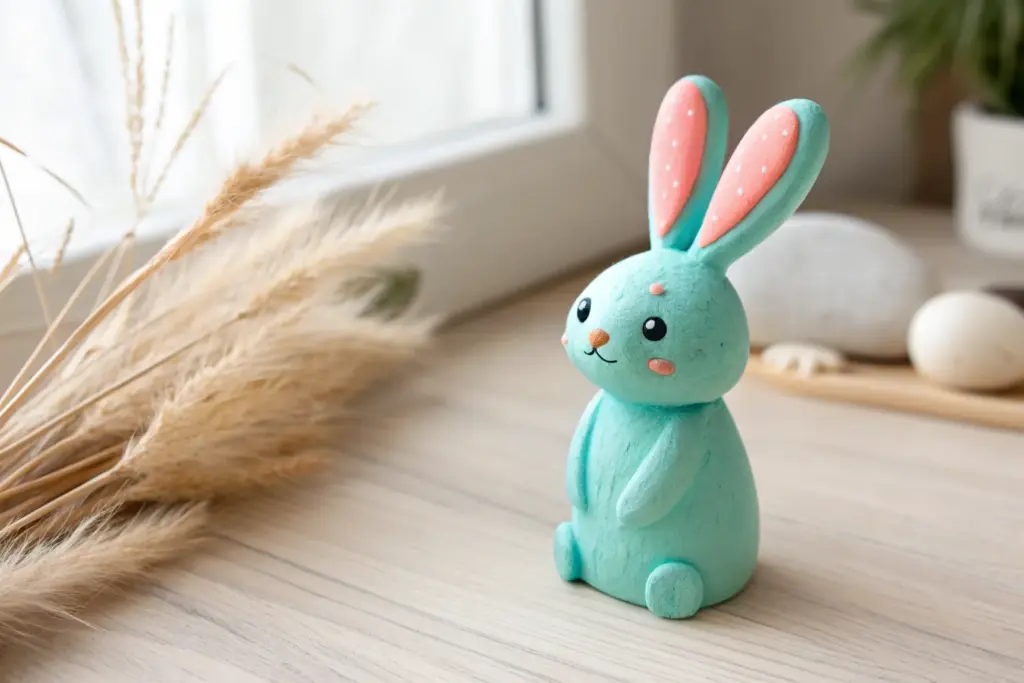
Place your new chubby feline friend on a sunny windowsill where it can watch the world go by


Puppy With Floppy Ears
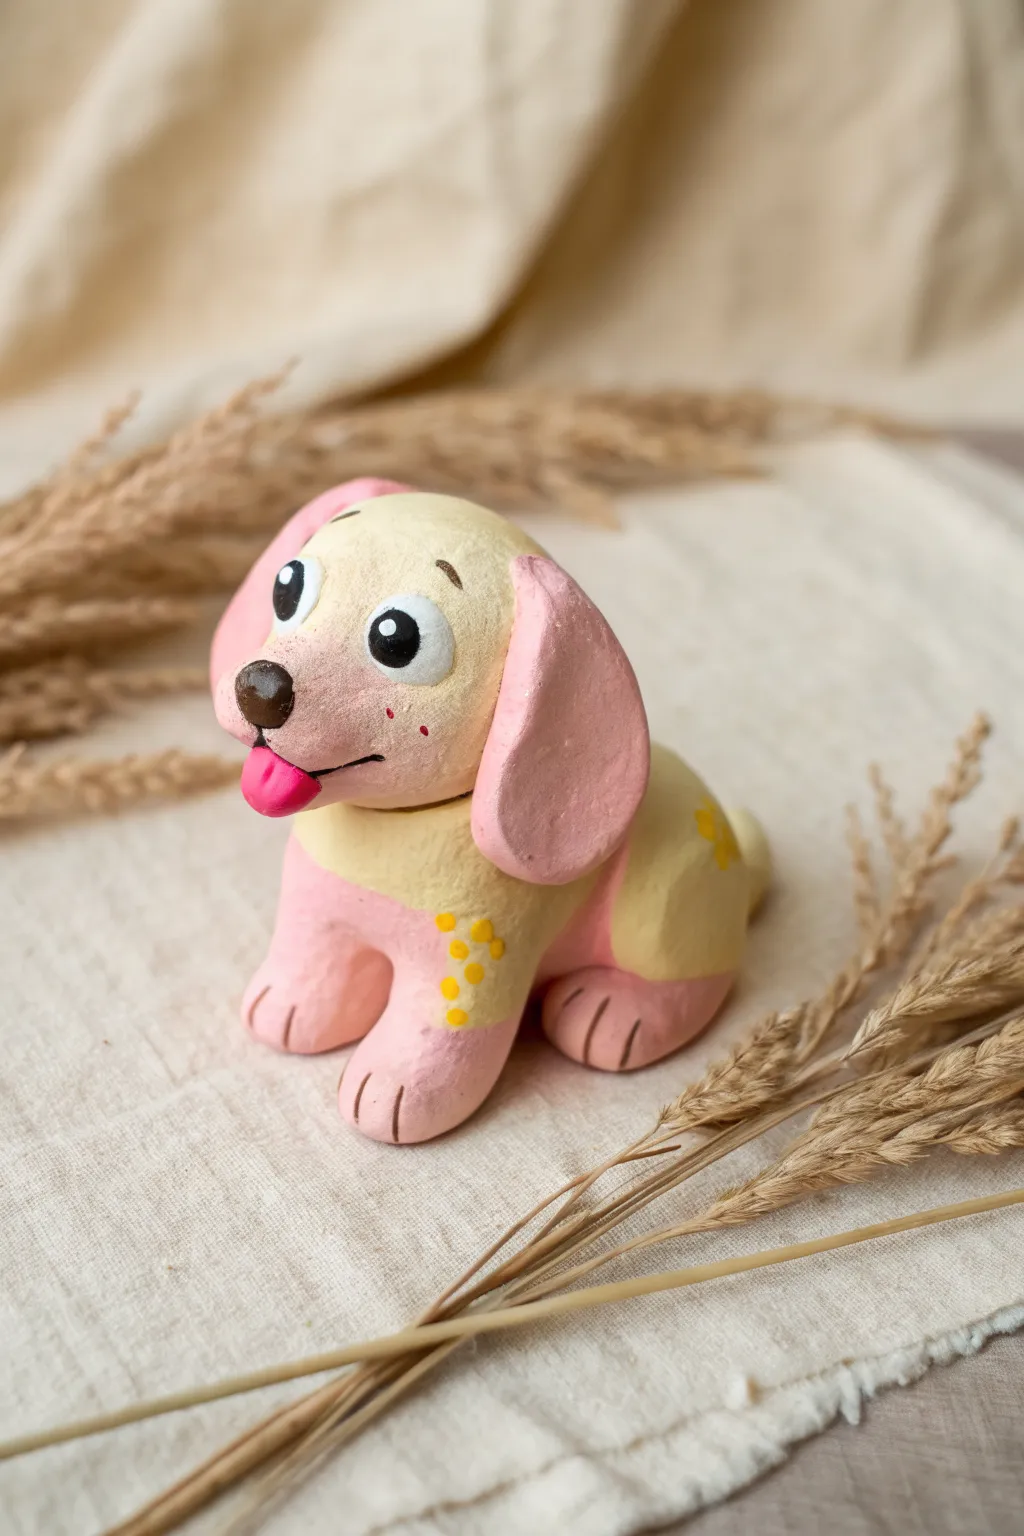
This adorable clay puppy features soft, floppy ears and a sweet, panting expression that children will instantly love. Painted in gentle pastel yellow and pink tones with playful polka dots, it makes for a perfect beginner sculpture project.
Detailed Instructions
Materials
- Air-dry clay (white) or polymer clay
- Acrylic paints (pale yellow, light pink, black, brown, bright pink)
- Fine-grit sandpaper
- Small paintbrushes (flat and detail)
- Sculpting tools (needle tool and ball stylus)
- Cup of water
- Clear matte varnish or sealant
Step 1: Sculpting the Body
-
Form the Torso:
Start with a lime-sized ball of clay and roll it into a smooth, slightly elongated pear shape. This will serve as the puppy’s body. -
Create the Front Legs:
Pinch and pull two stout sections from the wider bottom part of your pear shape to create the front legs. They should be thick and sturdy to support the figure. -
Add Rear Paws:
Roll two smaller balls of clay and flatten them slightly. Press these firmly onto the back sides of the body to form the haunches and rear paws. -
Detail the Paws:
Using a knife tool or a toothpick, gently press vertical lines into the bottom of each paw to create the toes. -
Attach the Tail:
Roll a small, short cone of clay for the tail. Attach it low on the back end, blending the clay seams until invisible so it doesn’t fall off later.
Smooth Operator
Before the clay dries, dip your finger in water and gently run it over your sculpture. This smooths out bumps and fingerprints instantly.
Step 2: Shaping the Head
-
Mold the Head Shape:
Roll another ball of clay slightly smaller than the body. Gently press it into a rounded oval shape. -
Add Floppy Ears:
Flatten two teardrop-shaped pieces of clay to make the ears. Attach one to each side of the head, letting them drape downwards. I like to curve the tips slightly outward for extra character. -
Sculpt the Snout:
Add a small, flattened oval of clay to the lower front of the face to build up the muzzle area. -
Create the Nose:
Roll a tiny ball of clay into a triangular shape and press it onto the top of the muzzle for the nose. -
Add the Tongue:
Form a tiny, flat U-shape and attach it hanging slightly out from under the muzzle to look like a panting tongue. -
Connect Head to Body:
Attach the finished head to the neck area of the body. You may need to score (scratch) both surfaces and use a little water or slip to ensure a strong bond.
Step 3: Painting and Details
-
Dry and Sand:
Allow the clay to dry completely (24-48 hours for air-dry clay). Once hard, gently sand any rough fingerprints with fine-grit sandpaper. -
Base Color Blocking:
Paint the legs, ears, and lower face with a soft, light pink acrylic paint. Paint the top of the head and the back with a pale yellow. -
Define the Features:
Paint the nose dark brown and the tongue a bright, vibrant pink. Use black paint to carefully outline a smiling mouth line. -
Paint the Eyes:
Using a detail brush or the back of a paintbrush handle, dot on two large circles of white, then smaller black pupils inside them. -
Add Highlights:
Add a tiny white speck inside each black pupil to bring the puppy to life. -
Decorative Dots:
Using the tip of a brush handle, dip into yellow paint and create a small cluster of decorative dots on the pink leg area. -
Seal the Project:
Once all paint is dry, apply a coat of matte varnish to protect your new friend.
Head Won’t Stay?
If the head keeps tilting or falling off, insert a toothpick halfway into the body and mount the head onto the protruding part for an internal skeleton.
Display your cheerful pup on a shelf or desk where its happy face can brighten your day


Penguin With Tiny Wings
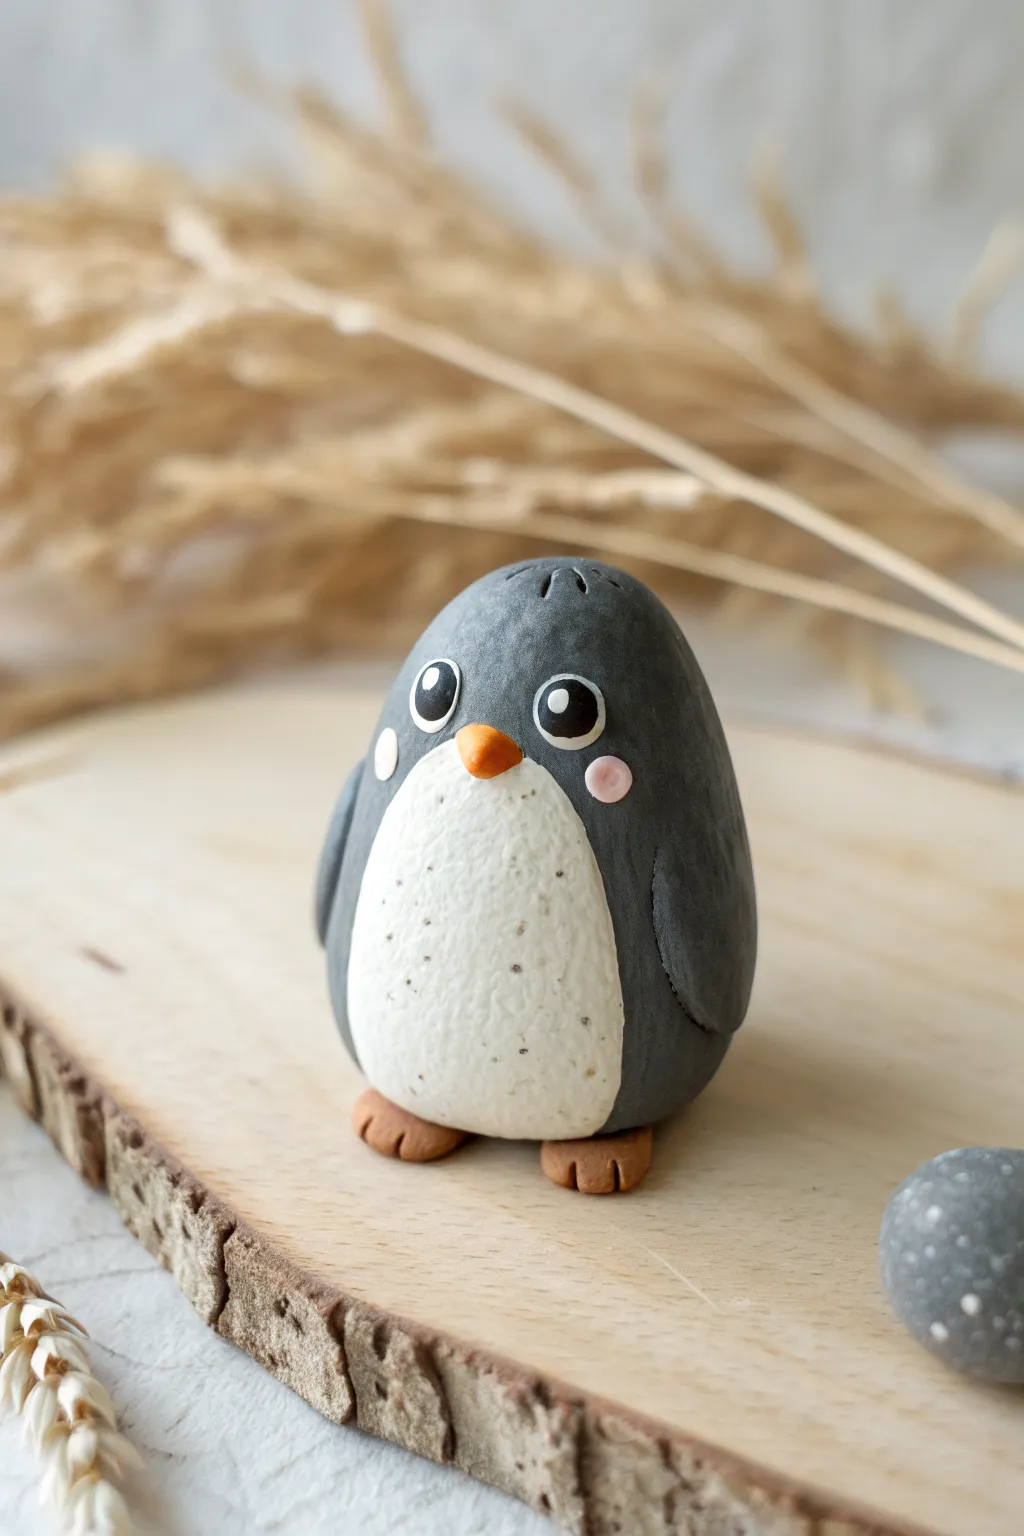
This adorable penguin figure captures hearts with its simple, speckled design and rounded shape. It features a charmingly oversized belly, sweet little feet, and wings tucked neatly against its sides, making it a perfect beginner-friendly clay project.
Step-by-Step
Materials
- Dark grey or charcoal polymer clay
- White polymer clay
- Orange or terracotta polymer clay
- Black polymer clay (tiny amount)
- Pink polymer clay (tiny amount)
- Small dotting tool or toothpick
- Clay smoothing tool
- Coarse sandpaper or an old toothbrush (for texture)
- Soft paintbrush
- Oven (for baking, follow clay package instructions)
Step 1: Shaping the Body Design
-
Form the base:
Start with a medium-sized ball of dark grey clay. Roll it between your palms until it’s smooth, then gently gently shape it into a rounded egg shape, slightly flatter on the bottom so it stands up on its own. -
Create the tummy:
Take a smaller piece of white clay and flatten it into a thin oval. It should be large enough to cover the front of the penguin from the neck down to just above the bottom. -
Attach the white patch:
Press the white oval onto the front of the grey body. Gently smooth the edges with your finger or a smoothing tool so the white clay looks like it is part of the body, not just sitting on top. -
Add texture:
To get that speckled, realistic eggshell look, gently dab the surface of the white clay with coarse sandpaper or the bristles of an old toothbrush. Don’t press too hard; you just want a subtle matte texture.
Step 2: Adding the Appendages
-
Make the wings:
Roll two small balls of the dark grey clay. Flatten them into teardrop shapes to form the wings. -
Attach the wings:
Press one wing onto each side of the body. Angle them slightly downward so they curve along the penguin’s round shape, smoothing the top seam where the wing meets the shoulder. -
Shape the feet:
Roll two small balls of orange clay. Flatten them slightly into disks for the feet. -
Add toe details:
Using a toothpick or a small knife tool, press two indentations into the front edge of each orange disk to simulate webbed toes. -
Connect the feet:
Place the feet under the front edge of the body. Press the penguin down gently onto them to ensure a secure bond.
Sticky Situation?
If your white clay is getting dirty from the grey clay on your hands, keep a pack of wet wipes or a damp cloth nearby to clean your fingers between color switches.
Step 3: Facial Features
-
Create the beak:
Shape a tiny piece of orange clay into a small cone. Press this onto the center of the face, right where the grey meets the top of the white tummy. -
Add the eyes:
Roll two small balls of black clay. Flatten them onto the face above the beak, spacing them widely apart for a cute expression. -
Add the sparkle:
Roll extremely tiny specks of white clay and place one on the upper right side of each black eye. This ‘catchlight’ brings the penguin to life. -
Rosy cheeks:
Take two tiny pieces of pink clay, flatten them into circles, and press them onto the cheeks just below the eyes. -
Head details:
Using a toothpick, gently press two tiny lines into the very top center of the head to mimic a little tuft of feathers. -
Speckle the belly:
For the final touch seen in the photo, take minuscule crumbs of grey clay and press them randomly onto the white belly to enhance the texture.
Arctic Accessories
Make your penguin a winter friend by crafting a tiny scarf from red clay, or create a small grey pebble for it to sit on to make a complete diorama.
Step 4: Baking
-
Final check:
Look over your figurine for any fingerprints. Gently smooth them away with a finger or a soft brush if necessary. -
Bakie time:
Place your penguin on a baking sheet lined with parchment paper. Bake according to the specific temperature and time directions on your brand of polymer clay. -
Cool down:
Let the figure cool completely before handling it, as warm clay can be fragile.
Once cooled, your little penguin is ready to waddle onto a bookshelf or desk as a charming decoration


Smiley Snail With Swirl Shell

This cheerful terracotta-colored snail features a bright turquoise spiral shell decorated with playful dots and dashes. Its friendly expression and raised antennae make it an adorable companion for a desk or shelf.
How-To Guide
Materials
- Air-dry clay (terracotta color preferred, or white clay + acrylic paint)
- Acrylic paints (turquoise/teal, yellow, pink, white, black)
- Fine detail paintbrushes
- Water cup and palette
- Rolling pin or smooth jar
- Clay sculpting tools or a toothpick
- Paper clip or wire (optional for internal support)
- Matte varnish (optional)
Step 1: Sculpting the Snail Body
-
Roll the main body:
Start with a medium-sized ball of terracotta-colored clay. Roll it into a thick ‘slug’ shape, making one end slightly fatter and rounder for the head and tapering the other end into a gentle point for the tail. -
Flatten the base:
Gently press the bottom of your snail body onto your work surface to flatten it slightly. This ensures your figure sits stably without rolling over. -
Lift the head:
Curve the fatter end of the clay upwards to form the snail’s chest and head. Use your thumb to smooth the curve so it looks natural and organic. -
Create the shell base:
Roll a separate, large ball of clay and flatten it into a thick disk. It shouldn’t be perfectly round; a slightly oval shape works well. This will be the canvas for the spiral shell. -
Attach the shell:
Score (scratch) the side of the snail’s body and the back of the shell disk where they will touch. Add a dab of water to form ‘slip’ and press the shell firmly onto the side of the body. Smooth the seams with your finger or a tool so it looks like one solid piece. -
Add antennae:
Roll two small, thin snakes of clay for the eye stalks. Attach two tiny balls to the tops of these stalks. Press these gently onto the top of the head, using a little water to secure them. -
Let it dry completely:
Set your snail aside in a dry, ventilated area. Depending on the thickness and brand of your clay, this usually takes 24 to 48 hours. The clay must be bone dry before painting starts.
Fixing Cracks
If small cracks appear as the clay dries, mix a tiny bit of fresh clay with water to make a paste. Fill the cracks, smooth it over, and let it dry again.
Step 2: Painting and Decoration
-
Base coat (if needed):
If you didn’t use terracotta-colored clay, paint the entire dried sculpture with an orange-brown acrylic paint to mimic the look in the photo. If you used colored clay, skip this step. -
Paint the main swirl:
Using a bright turquoise or teal paint, draw a large spiral on the shell disk. Start from the outer edge and work your way inward, but leave a distinct gap of unpainted clay between the spiral lines. -
Add the yellow accent:
Once the turquoise is dry, use a thin brush to paint a yellow stripe alongside the turquoise spiral, filling in some of the gaps you left. This adds a nice pop of contrast. -
Decorate with dots:
Dip the non-brush end of your paintbrush into yellow paint to create perfect dots along the inner curve of the turquoise spiral. I find this dotting technique much easier than trying to paint circles freehand. -
Paint petal details:
Mix a soft pink color and use a very fine brush to paint small petal or leaf shapes along the outer edge of the turquoise spiral. Add white highlights or faint lines inside these pink shapes for texture. -
Add white accents:
Paint tiny white dashes or curved lines on the upper part of the turquoise spiral to give the shell a patterned, decorative look. -
Paint the face:
Use white paint to make two oval shapes for eyes on the face, and paint the tiny balls on the antennae black. Once the white eyes are dry, add black pupils looking to the side. -
Draw the smile:
Using your thinnest brush or a black paint marker, draw a simple, curved smile and thin eyebrows above the eyes to give the snail a happy personality. -
Seal the project:
Protect your paint job with a coat of matte varnish if you want the figure to last longer, especially if it will be handled.
Glossy Shell
Make the shell look slimy (in a good way!) by applying a high-gloss varnish only to the painted shell area, keeping the body matte.
Place your colorfully painted snail near a potted plant to give it a natural little home

The Complete Guide to Pottery Troubleshooting
Uncover the most common ceramic mistakes—from cracking clay to failed glazes—and learn how to fix them fast.
Turtle With a Textured Shell
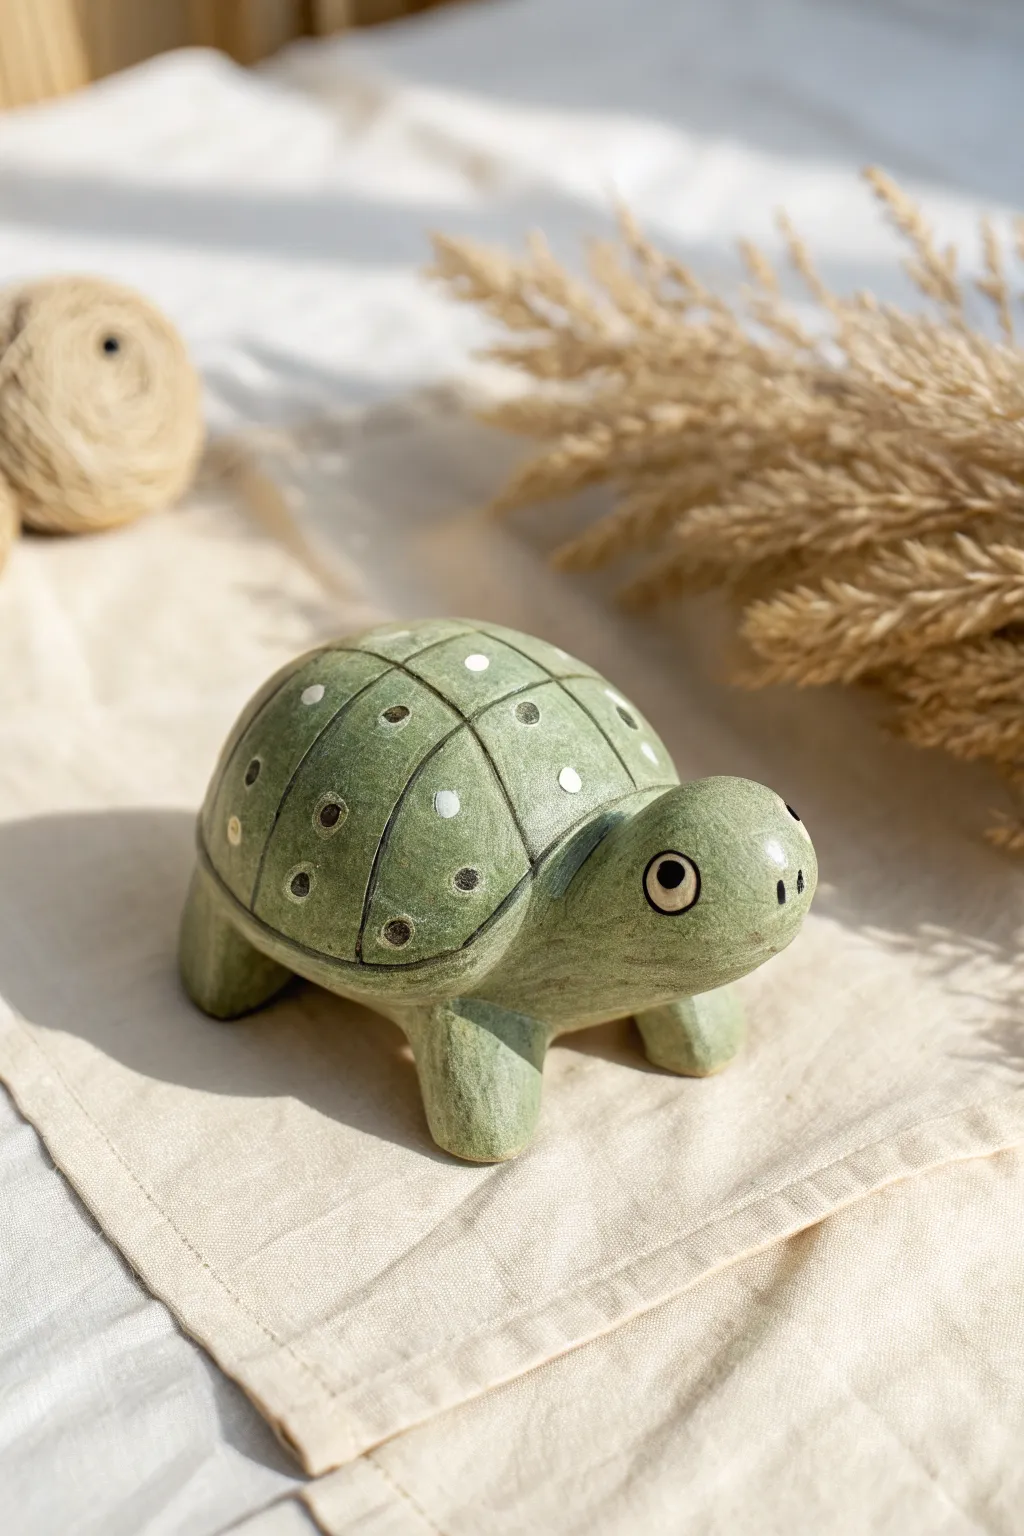
This charming, smooth-shelled turtle features a beautiful green finish with delightful carved details and painted accents. It’s a wonderful project for learning how to combine sculpting basic shapes with carving techniques to create texture and depth.
Step-by-Step Tutorial
Materials
- Air-dry clay (stone effect or standard white)
- Acrylic paints (olive green, moss green, white, black, dark brown)
- Modeling tools (or a plastic knife and toothpick)
- Small rolling pin
- Fine-grit sandpaper
- Paintbrushes (medium flat and fine liner)
- Small bowl of water
- Sponge
Step 1: Sculpting the Base Form
-
Form the shell:
Begin by taking a large handful of clay and rolling it into a smooth ball. Gently press it down onto your table to flatten the bottom, creating a dome shape for the turtle’s shell. -
Create the head:
Roll a smaller ball of clay, slightly elongating it into an oval. Smoothly blend one end of this oval onto the front of the shell dome so the head appears to be peeking out naturally. -
Shape the legs:
Create four thick, sausage-like cylinders for the legs. Position them under the corners of the shell, bending them slightly so they look like sturdy feet supporting the weight. -
Attach the legs:
Score the clay where the legs meet the body (make little scratches) and add a dab of water to act as glue. Press the legs firmly into place and smudge the clay seams until the connections are invisible. -
Blend and smooth:
Dip your finger in a little water and run it over the entire sculpture. Focus on smoothing out any fingerprints or cracks, ensuring the transition from the shell to the head and legs is seamless.
Legs Keep Squishing?
If the heavy shell causes the legs to collapse, prop the turtle’s belly up on a small block of wood or a wad of crumpled foil while the legs dry enough to hold the weight.
Step 2: Carving Details
-
Outline the shell segments:
Use a modeling tool or a toothpick to carefully draw a grid pattern on the shell. Draw several lines across the back and intersecting lines down the length to create individual shell ‘scutes’ or plates. -
Deepen the varying lines:
Go back over your grid lines with slightly more pressure to deepen them. This deep carving helps distinctively separate the sections of the shell. -
Add circular indentations:
In the center of each shell segment, press the rounded end of a paintbrush handle or a small ball tool to create a shallow circular indentation. Vary the sizes slightly for a natural look. -
Create smaller decorative dimples:
Around the main central circle in some segments, carefully poke smaller dots using a toothpick to add extra texture. -
Define the face:
On the head, press in two small indentations for the nostrils at the very front. For the eyes, I like to press a small circular tool into the sides of the head to create the sockets. -
Dry completely:
Let the sculpture dry for at least 24-48 hours. It needs to be rock hard before painting.
Smooth Stone Finish
To get that polished stone look, burnish the clay before it dries. Rub the surface gently with the back of a spoon when the clay is ‘leather hard’ (stiff but cool).
Step 3: Painting and Finishing
-
Sand for smoothness:
Once fully dry, use fine-grit sandpaper to gently buff the surface of the clay, removing any rough texture or bumps. -
Apply base color:
Paint the entire turtle with a coat of olive green acrylic paint. You might need two layers to get solid coverage, letting the first layer dry before adding the second. -
Wash with darker color:
Mix a little water with dark brown or black paint to create a ‘wash.’ Brush this into the carved lines of the shell, then immediately wipe the surface with a damp sponge. The dark paint will stay in the cracks, highlighting the carving. -
Dry brush texture:
Dip a dry brush into a lighter moss green or yellowish-green. Wipe most of the paint off on a paper towel, then lightly whisk it over the raised parts of the shell to create a weathered, stone-like look. -
Paint the decorative dots:
Using a fine brush or a dotting tool, carefully paint the circular indentations inside the shell segments. Use white for some and dark brown/black for others to match the photo. -
Detail the eyes:
Paint the eye sockets white. Once dry, add a large black circle in the center, and a tiny white reflection dot to bring the turtle to life. -
Final touches:
Add two tiny black dots for the nostrils at the front of the snout to complete the face.
Place your finished turtle on a shelf or desk as a peaceful, handmade companion
Easy Octopus With Curl Arms
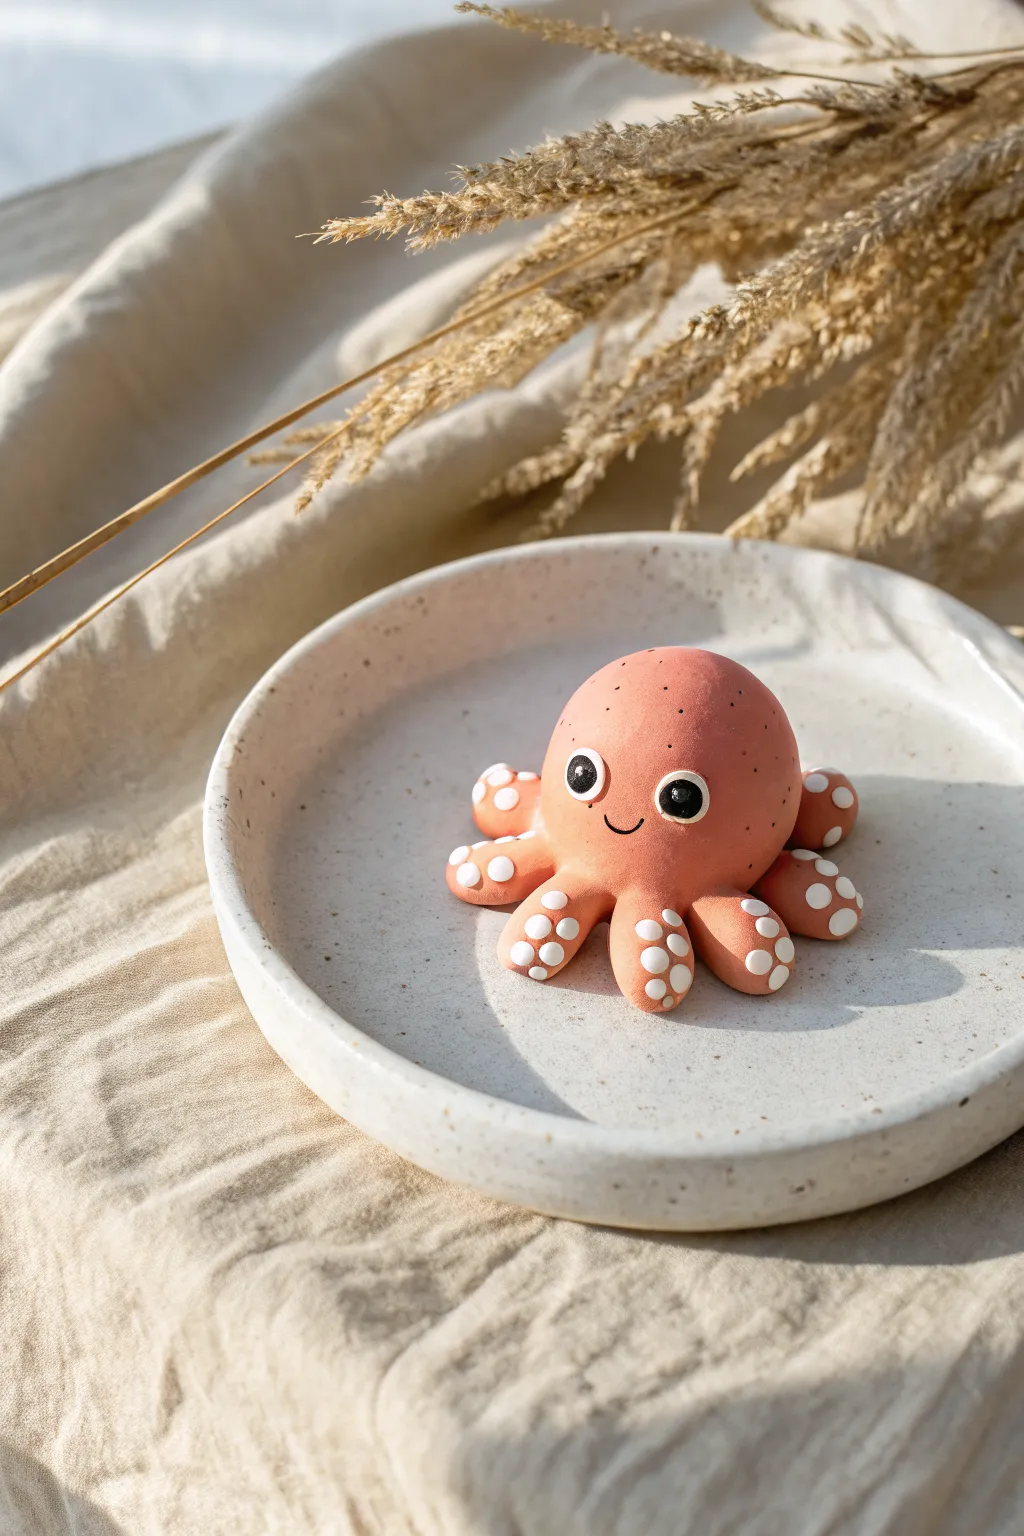
Make a splash with this adorable clay octopus, featuring a smooth, round head and eight playful tentacles dotted with tiny white suction cups. Its cheerful expression and soft coral color make it a delightful desk companion or a cute handcrafted gift.
Detailed Instructions
Materials
- Polymer clay or air-dry clay (coral/salmon pink)
- White clay
- Black clay
- Clay sculpting tools (needle tool or toothpick, rolling tool)
- Clean work surface
- Gloss glaze (optional, for eyes)
Step 1: Body Basics
-
Form the head:
Start by conditioning your coral pink clay until it’s soft and pliable. Roll a significant portion into a smooth, seamless ball about the size of a golf ball to form the main head. -
Shape the base:
Gently press the ball onto your work surface to flatten the bottom slightly so it sits stable without rolling away. -
Prepare the tentacles:
Take eight smaller pieces of the same pink clay. Roll each one into a tapered log or cone shape, thicker at one end and slightly pointed at the other. -
Attach the arms:
I like to attach the thicker end of each tentacle to the bottom perimeter of the head. Press and blend the clay seams upward into the head so they join securely. -
Create the curl:
Gently curl the pointed tips of the tentacles upward or outward to give them a lively, moving appearance.
Keep it Clean
Wash your hands thoroughly before switching to the white clay for the suction cups. Even a tiny bit of pink residue can stain the white clay.
Step 2: Adding Details
-
Make the suction cups:
Roll tiny, uniform balls of white clay. These will be the suction cups for the tentacles. -
Attach suction cups:
Press the tiny white balls onto the underside and curled tips of the tentacles. Flatten them gently as you press so they look like discs. -
Texture the head:
If you want the speckled look from the photo, you can lightly flick a toothbrush with diluted brown paint over the body, or knead in some ground pepper/spices before baking if using polymer clay.
Ocean Diorama
Create a whole seabed scene by making tiny clay starfish, coral branches, or rocks to arrange around your octopus on a blue paper base.
Step 3: Face & Finishing
-
Form the eyes:
Roll two small balls of black clay and flatten them into discs. Press these onto the front of the head, spacing them widely apart for a cute look. -
Add highlights:
Roll two minuscule specks of white clay. Place one on the upper right corner of each black eye to create a spark of life. -
Carve the smile:
Use a curved tool or the side of a straw to gently impress a small, U-shaped mouth right between the eyes. -
Final smooth:
Check for any fingerprints. Gently rub them away with your finger or a little baby oil if using polymer clay. -
Bake or dry:
Follow the manufacturer’s instructions for your specific clay to bake or air-dry your octopus completely.
Enjoy displaying your charming sea creature on a shelf or giving it to a friend


What Really Happens Inside the Kiln
Learn how time and temperature work together inside the kiln to transform clay into durable ceramic.
Caterpillar With Rainbow Segments
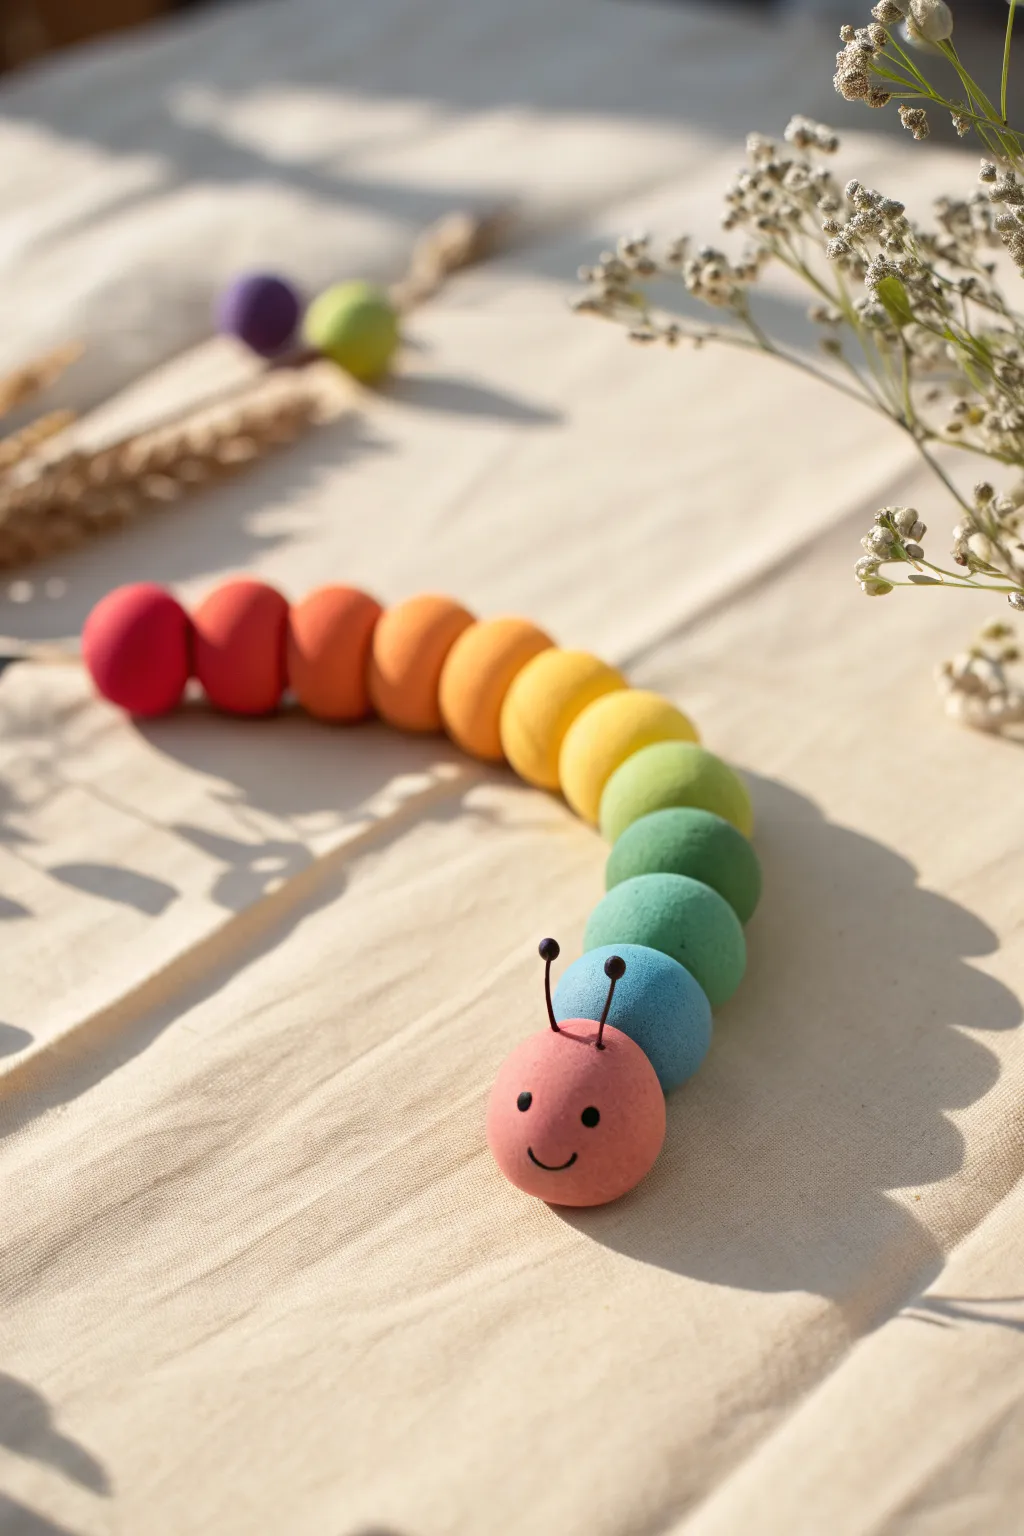
This cheerful caterpillar winds its way across the table with a body made of perfectly round, vibrant segments. With a gentle gradient of rainbow colors and an adorable smiling face, it’s a delightful project that brightens up any room.
How-To Guide
Materials
- Air-dry clay or polymer clay (white or pre-colored)
- Acrylic paints (red, orange, yellow, green, blue, purple, light pink)
- Small paintbrushes (flat and fine tip)
- Two small black map pins or short lengths of black wire (for antennae)
- Black fine-point marker or black paint
- Toothpicks or a short length of floral wire (optional, for structure)
- Rolling tool or smooth surface for rolling
- Parchment paper or craft mat
Step 1: Creating the Segments
-
Portion the clay:
Start by dividing your clay into roughly 12 pieces of equal size. You want enough segments to create a nice, long body that can curve. -
Roll the spheres:
Take each piece of clay and roll it between your palms. Use a gentle circular motion to create smooth, perfect spheres. If you notice any cracks, dip your finger in a tiny bit of water (for air-dry clay) and smooth them out. -
Size check:
Line up your spheres to check their sizes. They should be mostly uniform, though it looks quite cute if the tail end tapers off with slightly smaller balls. -
Reserve the head:
Choose one of your smoothest, best-looking spheres to be the head and set it aside for now so it doesn’t get squished.
Step 2: Coloring the Body
-
Plan the rainbow:
Arrange your unpainted spheres in the order you want the colors to flow. A classic rainbow order works best: Red, Red-Orange, Orange, Yellow-Orange, Yellow, Yellow-Green, Green, Blue-Green, Blue, Indigo, Violet. -
Mixing custom shades:
To get that smooth transition seen in the photo, you will need to mix your paints. For example, mix a little red into your orange for the second segment, and a little yellow into your orange for the fourth. -
Paint the red section:
Start painting the first body segment a deep, vibrant red. I like to skewer the clay ball on a toothpick to hold it while painting so my fingers stay clean. -
Paint the warm tones:
Continue painting the next few spheres in your orange and yellow gradients. Apply two thin coats rather than one thick one for the smoothest finish, letting them dry slightly in between. -
Paint the cool tones:
Move on to the greens and blues. Ensure the transition from yellow to green is gradual by mixing a lime green shade for the middle connection. -
Paint the tail:
Finish the body segments with your deepest blue and purple shades. Let all the painted spheres dry completely on a piece of parchment paper. -
Paint the head:
Paint the reserved head sphere a soft, warm pink color. This contrasts nicely with the bright body colors and makes the face look friendly.
Loose Segments?
If the clay spheres won’t stick together, use a small piece of a toothpick dipped in white glue as a connector pin between each ball for a stronger hold.
Step 3: Assembly and Details
-
Connect the segments:
Once the paint is dry, arrange the balls in a winding ‘S’ shape. To join them, you can simply press them firmly together if the clay is still slightly tacky, or use a tiny dab of strong craft glue between each segment. -
Secure the curve:
If you want a permanent curve, you can run a piece of flexible floral wire through the centers of the balls while the clay is still soft, but gluing them after painting works just as well for a stationary figure. -
Insert antennae:
Take your two black map pins. Push them gently into the top of the pink head piece, spacing them slightly apart. -
Angle the antennae:
Angle the pins slightly backward to give the caterpillar a sense of movement. -
Draw the eyes:
Using a fine-point black marker or a tiny dotting tool with black paint, add two small, wide-set eyes halfway down the face. -
Add the smile:
Carefully draw a simple, small ‘U’ shape between the eyes for the smile. Keep the line thin and delicate for the cutest expression. -
Final drying:
Let the entire caterpillar sit undisturbed for several hours to ensure the glue sets and the paint cures fully.
Make it Matte
The caterpillar in the image has a lovely matte finish. To achieve this, mix a tiny bit of cornstarch into your paint or spray the finished piece with a matte varnish.
Place your colorful creation on a shelf or desk to bring a smile to your face every single day
Mini Dinosaur With Spikes
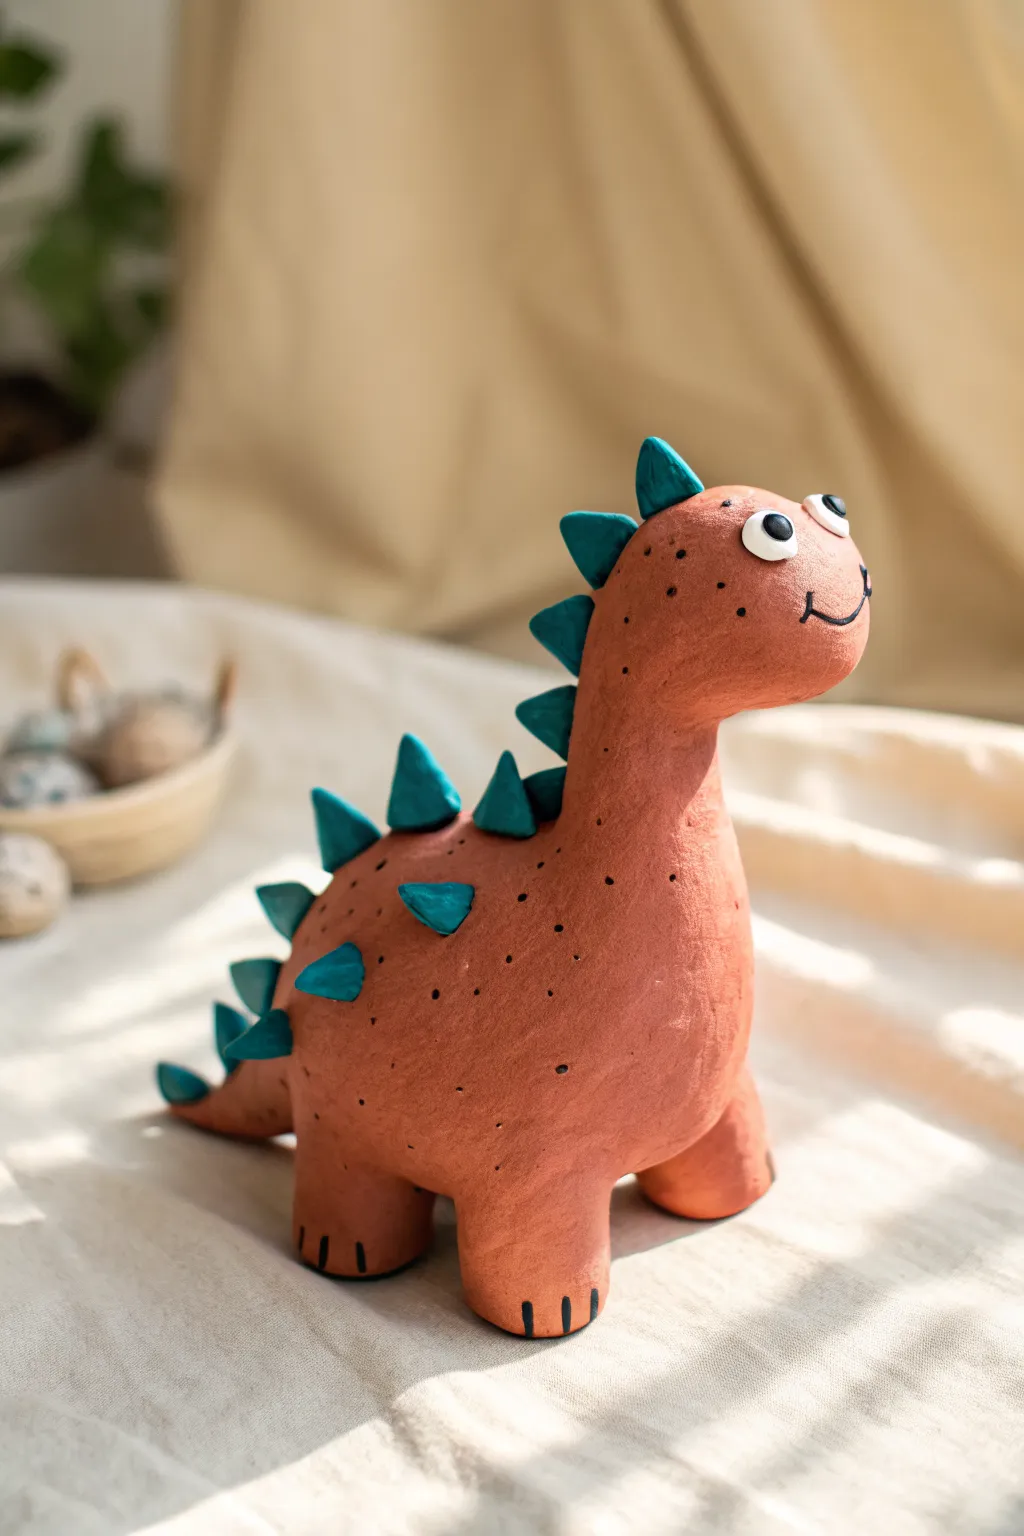
This charming, rustic dinosaur figure brings a touch of prehistoric fun to your shelf with its warm terracotta tones and playful teal spikes. The simple, rounded shapes make it an approachable project for beginners, resulting in a delightfully textured keepsake.
Detailed Instructions
Materials
- Terracotta-colored air-dry clay (or polymer clay)
- Teal or turquoise clay (for spikes)
- White clay (small amount for eyes)
- Black clay or black acrylic paint (for pupils and mouth)
- Modelling tools (needle tool, small ball tool)
- Water (for smoothing air-dry clay) or baby oil (for polymer)
- Toothpicks or wire (for internal support)
- Fine-point black marker (optional, for freckles)
- Varnish or sealant (matte finish)
Step 1: Shaping the Base
-
Create the main body:
Start with a large ball of terracotta clay about the size of a tennis ball. Roll it into a smooth sphere, then gently elongate it into a thick oval or egg shape to form the dinosaur’s torso. -
Form the legs:
Roll four smaller balls of terracotta clay of equal size. Flatten the tops slightly and press them onto the bottom of the body. You want these to be stout and cylinder-like to support the weight. -
Secure the legs:
Blend the clay from the top of the legs into the body using your thumb or a modeling tool. Ensure the seams disappear so the legs look like they are growing out of the torso. -
Make the neck and head:
Take another piece of terracotta clay and roll it into a thick sausage shape that tapers slightly. Bend the top portion forward to create the head shape. -
Attach the neck:
To ensure the neck doesn’t droop, I like to insert a toothpick halfway into the body where the neck will go. Push the neck piece onto the toothpick and blend the clay at the base firmly into the shoulders. -
Shape the tail:
Pull and pinch a small amount of clay from the rear of the body to form a short, pointed tail. You can also attach a separate small cone shape and blend it in if that feels easier.
Sticky Spikes
If using air-dry clay, score (scratch) both the clay body and the bottom of the spike, then add a drop of water or slip (liquid clay) before pressing them together for a permanent bond.
Step 2: Adding Details & Spikes
-
Create the spikes:
Using the teal clay, create 10-15 small cone shapes. Vary their sizes slightly, making some larger for the back and smaller for the tail and head. -
Attach the spine spikes:
Starting from the top of the head and working down the spine to the tail, press the teal cones firmly onto the back. For better adhesion, score the attachment points slightly with your needle tool first. -
Add side spikes:
Place a few additional teal spikes randomly on the sides of the dinosaur’s back for extra texture and a unique look. -
Make the eyes:
Roll two small balls of white clay and flatten them into discs. Press these onto the sides of the head. Add tiny black clay balls (or paint later) to the center for pupils. -
Create the mouth:
Roll a very thin snake of black clay and curve it into a smile. Press this onto the muzzle area. Alternatively, you can carve a smile line now and paint it black after drying. -
Sculpt the toes:
Use a needle tool or knife to gently press three vertical indentations into the bottom of each foot to represent toes. Paint these lines black later if you want them to pop.
Head Drooping?
If the neck keeps slumping forward while building, cut a toothpick or piece of wire to size and insert it as an internal spine connecting the chest to the head for invisible support.
Step 3: Texturing and Finishing
-
Refine the surface:
Look over your dinosaur for any fingerprints. Smooth them out with a little water (if using air-dry clay) on your finger. -
Add skin texture:
Use a needle tool to poke shallow, random dots all over the terracotta skin. This stippling effect gives the dinosaur a wonderful, organic texture. -
Dry or bake:
Follow the instructions for your specific clay. If air-drying, let it sit for at least 24-48 hours in a cool, dry place. -
Final details:
Once fully dry or baked and cooled, use a fine-point black marker or paint to add tiny freckles on the cheeks and darken the toe indentations. -
Sealing:
Apply a coat of matte varnish to protect your new friend. This unifies the sheen and keeps the clay colors vibrant.
Place your little dinosaur on a desk or windowsill where its friendly smile can brighten your day

TRACK YOUR CERAMIC JOURNEY
Capture glaze tests, firing details, and creative progress—all in one simple printable. Make your projects easier to repeat and improve.
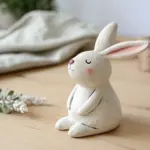
Bunny Holding a Carrot
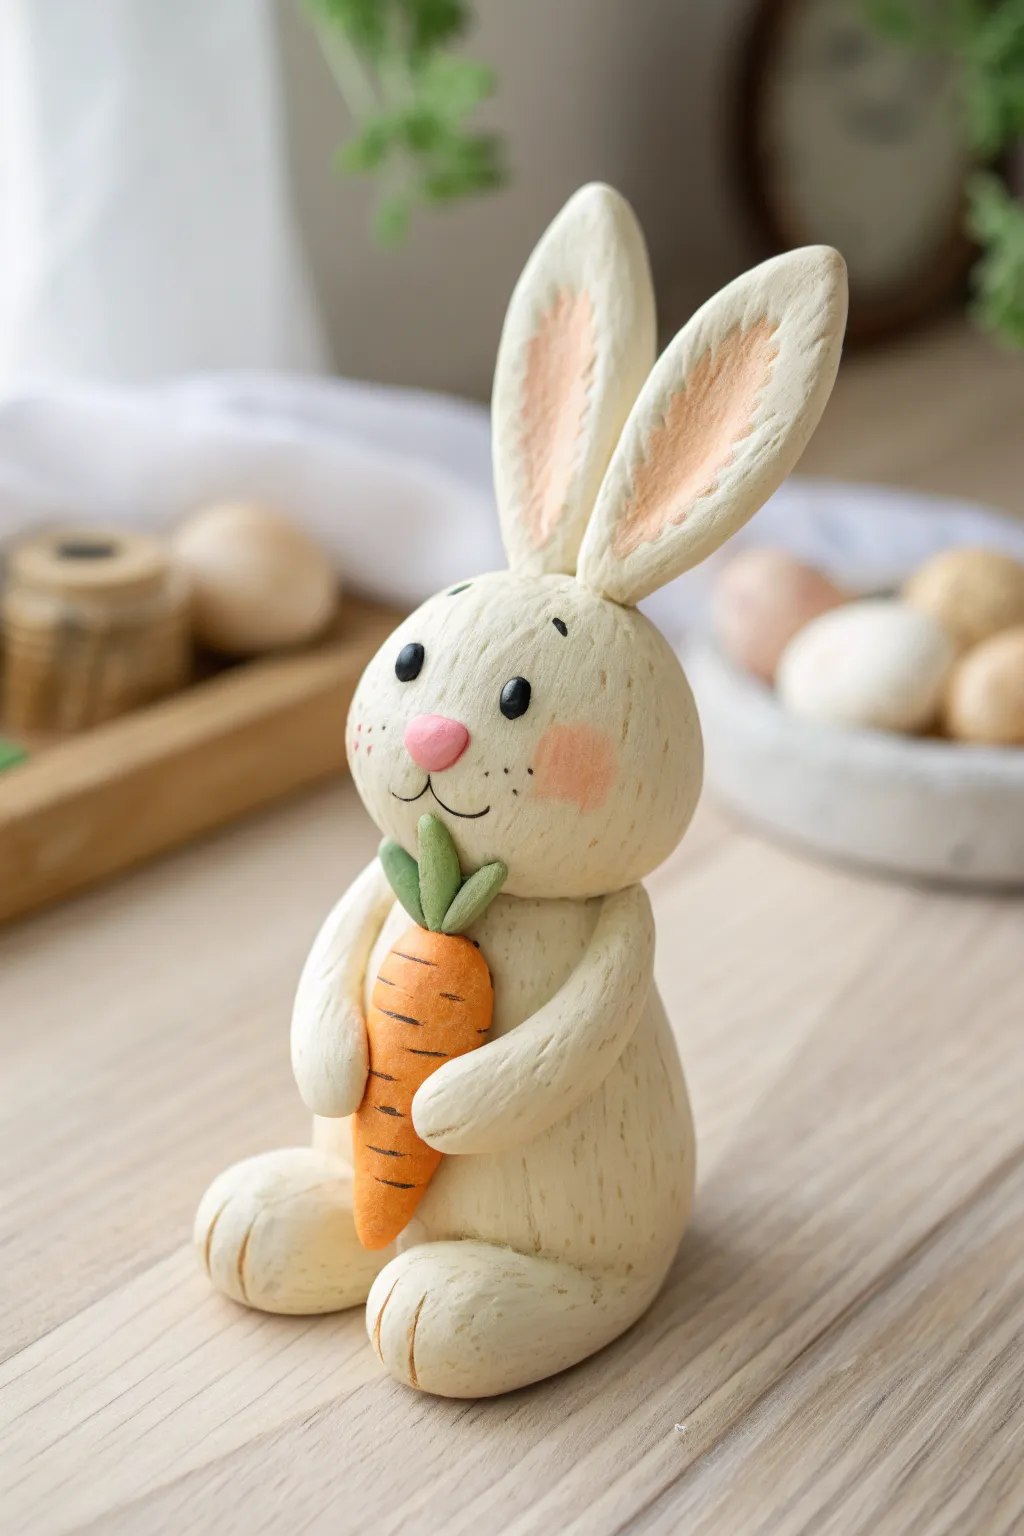
Sculpt a gentle, cheerful bunny friend who looks ready to snack on a sweet carrot treat. With its textured fur effect and soft, warm cream color, this clay figure makes a delightful spring decoration or a cute desk companion.
How-To Guide
Materials
- Air-dry clay or polymer clay (cream/off-white)
- Small amount of orange clay
- Small amount of green clay
- Small amount of pink clay
- Acrylic paints (black, white, peach)
- Basic sculpting tools (needle tool, modeling tool)
- Texture tool or stiff bristle brush
- Wooden toothpick (for structure)
- Detail paintbrush
Step 1: Body & Head Basics
-
Form the Base:
Start by rolling a medium-sized ball of cream clay into a smooth egg shape. This will be the bunny’s body, so make sure the bottom is flattened slightly so it can sit securely on your table. -
Texture the Body:
Before adding limbs, gently scratch shallow, short vertical lines all over the body using a needle tool or a stiff brush to mimic the look of soft fur texture. -
Create the Head:
Roll a slightly smaller ball of cream clay for the head. Shape it into a rounded oval, making it slightly wider at the cheeks for a cute, chubby look. -
Connect Head to Body:
Insert a half-toothpick into the top of the body for support, then press the head firmly onto the toothpick. Smooth the seam slightly, though the neck definition is good to keep. -
Sculpt the Legs:
Roll two small sausage shapes of cream clay for the feet. Flatten one end of each and press them against the bottom front of the body so the bunny looks like it is sitting. -
Add Toes:
Use a modeling tool or the side of a toothpick to press two indentations into the front of each foot to create cute little bunny toes. -
Texture Head and Feet:
Continue your fur texture technique on the head and the feet, ensuring the scratch marks generally flow in the same direction.
Fur Texture Tip
For realistic fur, drag a wire brush or stiff toothbrush over the clay surface gently before the clay hardens. It creates dozens of tiny lines instantly.
Step 2: Ears & Facial Details
-
Shape the Ears:
Roll two long logs of cream clay, tapering them at the top. Flatten them gently to form the iconic long bunny ears. -
Paint the Inner Ear:
Paint a long, soft peach-colored oval inside each ear. I find it easier to do this before attaching them, but you can also do it after if you prefer. -
Attach the Ears:
Press the base of the ears firmly onto the top of the head. You can pose them straight up or angle one slightly for personality. Blend the clay at the attachment point. -
Make the Face:
Roll a tiny ball of pink clay for the nose and press it into the center of the face. Use a needle tool to draw a simple anchor shape below it for the mouth. -
Add Eyes and Cheeks:
Use a dotting tool or the end of a paintbrush to apply two small black dots of paint for the eyes. Add white highlights if you like. Paint faint rosy circles on the cheeks. -
Add Whiskers and Details:
With a fine-tip marker or very thin brush, add three tiny freckle dots on each cheek area and draw small eyebrows above the eyes.
Level Up: Garden Scene
Make smaller clay eggs in pastel colors and arrange them around the bunny’s feet to turn this figure into a full Easter centerpiece.
Step 3: The Carrot Snack
-
Form the Carrot:
Take your orange clay and roll a cone shape. Keep the top rounded and taper it down to a point. -
Add Carrot Texture:
Using a knife tool or needle, press horizontal lines across the carrot to give it those realistic little ridges. -
Attach the Greens:
Shape three tiny teardrops from green clay. Press them together and attach them to the top of the wide end of the carrot. -
Position the Arms:
Roll two long ‘noodle’ shapes from cream clay for the arms; texture them with fur lines. -
Assemble the Pose:
Place the carrot vertically against the bunny’s tummy. Attach the arms at the shoulders and curb them around so the hands hold the carrot securely.
Now your adorable bunny is ready to bring a touch of charm to your shelf
Koala Hugging a Leaf
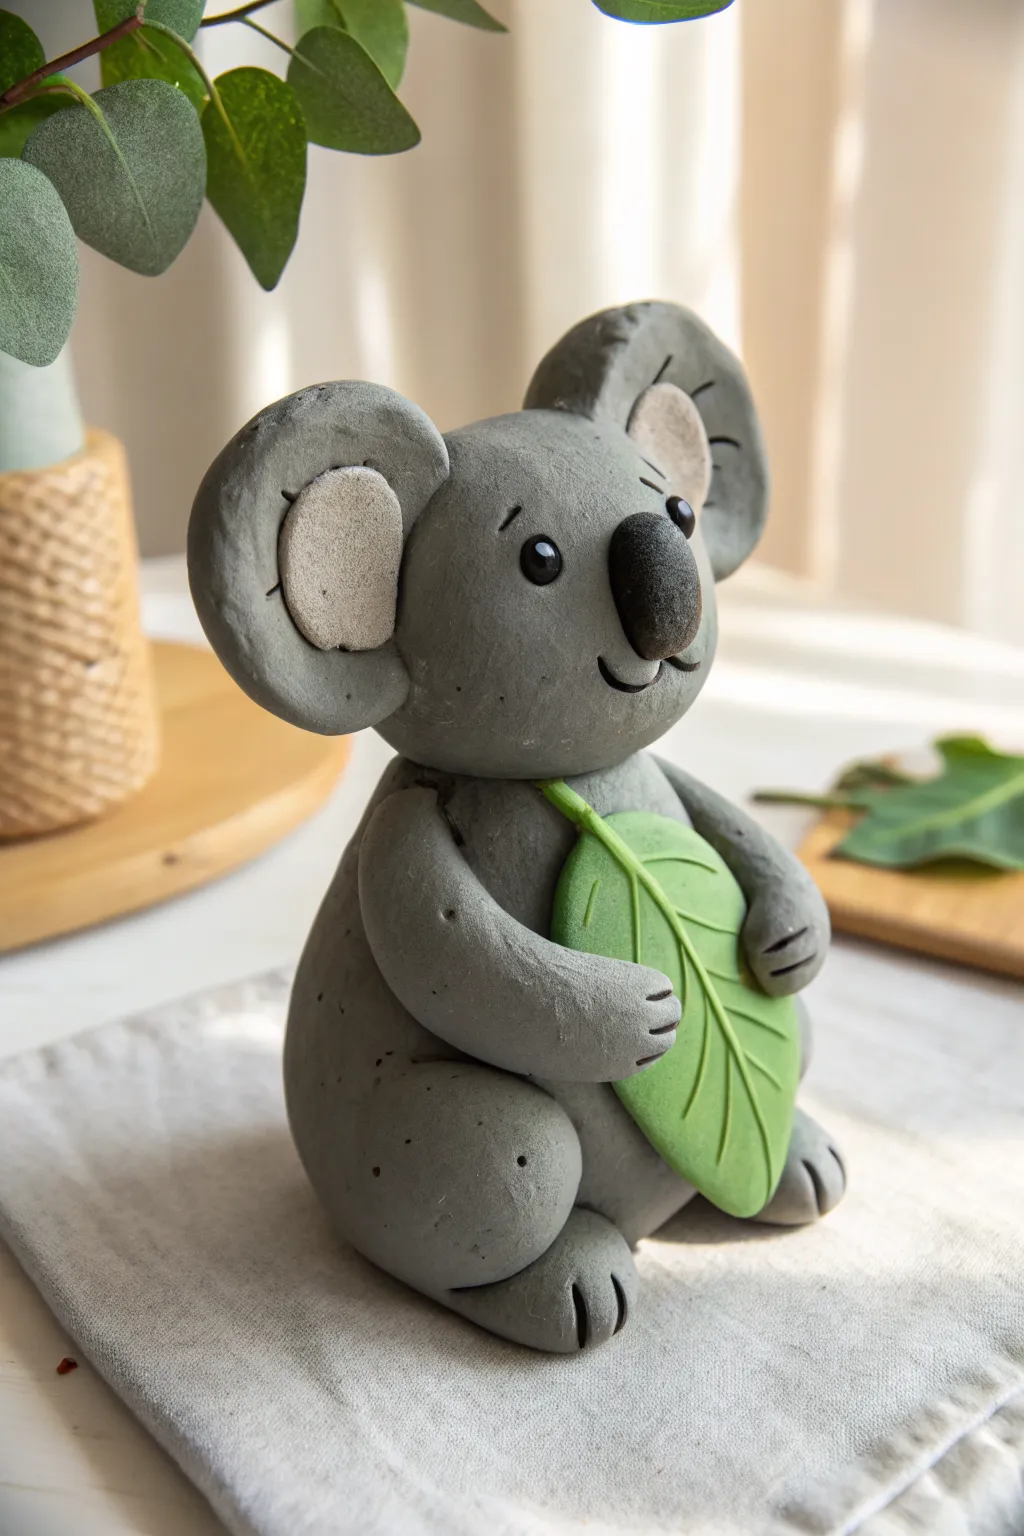
This adorable grey koala makes a perfect desk companion, sitting sweetly while clutching a vibrant green eucalyptus leaf. With its big round ears and curious expression, this project captures the gentle nature of these beloved marsupials using simple shapes.
Step-by-Step Tutorial
Materials
- Grey polymer clay (or air-dry clay)
- Light beige or off-white clay
- Green clay
- Black clay
- Clay sculpting tools (needle tool, ball tool)
- Rolling pin
- Aluminum foil (optional, for armature)
- Toothpick or wire (for structural support)
Step 1: Shaping the Body and Head
-
Form the torso:
Start by rolling a large ball of grey clay and shaping it into a smooth pear shape. Flatten the bottom slightly so it sits stable on your work surface. This will be the koala’s body. -
Create the head:
Roll a second ball of grey clay, slightly smaller than the body but still substantial to give it that cute, oversized-head look. Keep it slightly oval-shaped horizontally. -
Connect the pieces:
Insert a short piece of toothpick or wire into the top of the pear-shaped body. Push the head onto the protruding end to secure it. Blend the clay slightly at the neck seam if you want a smoother look, or leave it distinct.
Step 2: Legs and Paws
-
Shape the legs:
Roll two thick sausages of grey clay for the hind legs. Bend them slightly into a curved kidney bean shape to mimic a sitting posture. -
Attach the legs:
Press the legs firmly onto the lower sides of the body. The rounded ‘knee’ part should point upward. -
Add toe details:
Using a needle tool or a dull knife, gently press two or three indentations into the front of each foot to create toes. -
Form the arms:
Roll two smaller snake shapes for the arms. They should be long enough to reach around the front of the belly. -
Position the arms:
Attach the arms near the top of the body, just under the head. Curve them forward as if they are ready to hold something. Add similar toe indentations on the paws.
Smooth Operator
Before baking or drying, dip your finger in a little baby oil (for polymer) or water (for air-dry) and gently rub the clay to remove fingerprints for a professional finish.
Step 3: Facial Features
-
Make the ears:
Create two flat, thick circles of grey clay. Press a smaller, flattened circle of light beige clay into the center of each grey circle for the inner ear. -
Attach the ears:
Press the ears onto the top sides of the head. I find using a ball tool to meld the clay at the attachment point helps them stay put. -
Sculpt the nose:
Roll a relatively large oval of black clay. Press it firmly onto the center of the face, positioning it vertically. -
Add the eyes:
Roll two tiny balls of black clay. Use a small ball tool to make divots on either side of the nose, then press the black balls into these sockets. Add a minuscule dot of white clay or paint for a highlight. -
Create the mouth:
Use a needle tool or a curved sculpting tool to impress a small smile into the clay just below the nose. -
Add texture:
Use a needle tool to gently scratch tiny fur marks around the ears or eyebrows if you want a more textured look.
Branch Out
Instead of a single leaf, create a small brown branch for the koala to cling to. You can even use a real twig from outside if you seal it first.
Step 4: The Eucalyptus Leaf
-
Roll the leaf:
Take a piece of green clay and flatten it into a long oval shape that comes to a point at one end. -
Detail the veins:
Use a needle tool to draw a line down the center of the leaf. Then, draw diagonal lines branching out from the center line to create veins. -
Make the stem:
Roll a very thin snake of green clay and attach it to the rounded bottom of the leaf. -
Position the leaf:
Place the leaf vertically against the koala’s belly. Carefully bend the koala’s arms so the paws overlap the edge of the leaf, making it look like it’s hugging it tight.
Once hardened, your little koala is ready to bring a touch of the Australian bush to your shelf
Ice Cream Cone Buddy
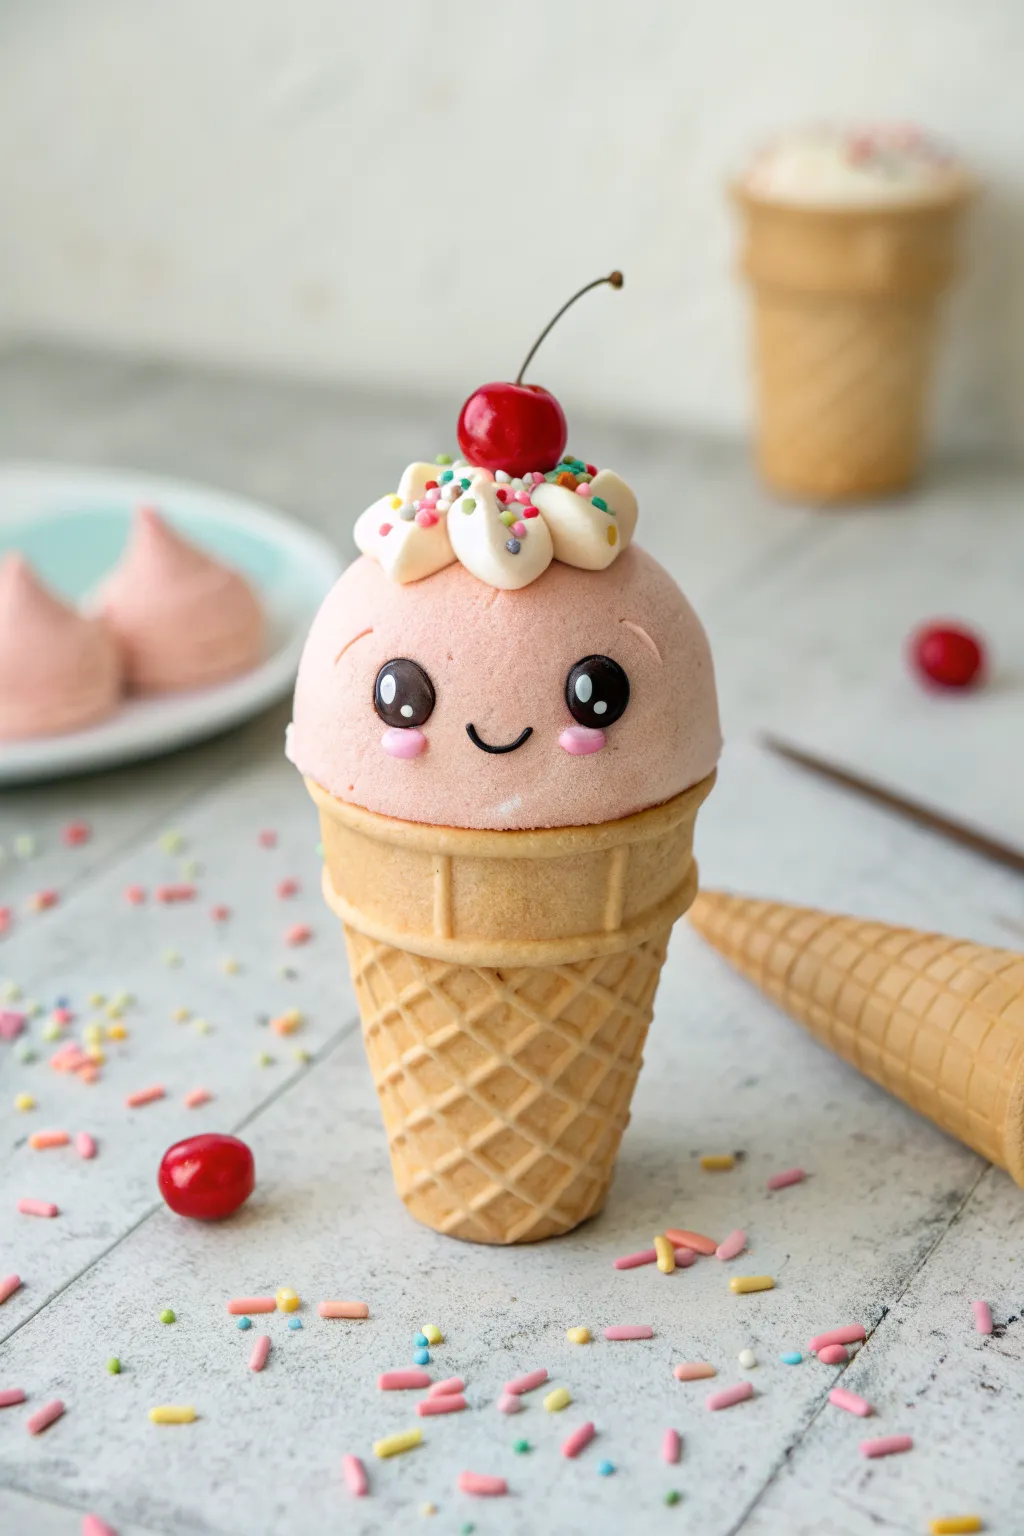
This adorable clay figure combines the realistic texture of a waffle cone with a kawaii-style character you simply can’t resist. With a perfectly round pink scoop, a cheerful face, and a cherry on top, it creates a whimsical figurine that looks almost good enough to eat.
Detailed Instructions
Materials
- Polymer clay (beige, pink, white, black, red)
- Set of soft pastel chalks (specifically pink)
- Soft paintbrush
- Ball stylus tool
- Pointed sculpting tool or toothpick
- Texturing tool (plastic grid or sharp knife)
- Liquid polymer clay or strong craft glue
- Thin crafting wire
- Gloss varnish
Step 1: Shaping the Cone
-
Form the base:
Start by taking a medium-sized chunk of beige clay. Knead it until it’s pliable, then roll it into a neat cone shape with a flat top. -
Texture the waffle:
To mimic the waffle pattern, use the back of a knife or a specialized clay texturing tool to gently press diagonal lines across the cone surface. Rotate and repeat in the opposite direction to create little diamonds. -
Create the rim:
Roll a separate snake of beige clay and flatten it slightly into a ribbon. Wrap this ribbon around the top edge of your cone. -
Detail the rim:
Use your pointed sculpting tool to press vertical indentations into the rim every few millimeters, giving it that classic structured cone look.
Step 2: Creating the Scoop
-
Roll the ball:
Take a generous amount of pink clay and roll it into a very smooth, perfect sphere. It should be slightly wider than the top of your cone. -
Texture the surface:
For a realistic ice cream texture, take a stiff toothbrush or a crumpled ball of aluminum foil and gently tap it all over the surface of the pink sphere. This removes the plastic shine and makes it look frosty. -
Add rosy cheeks:
Before baking, use a soft brush to apply a tiny amount of pink pastel dust to the cheek area. Then, press two tiny flattened ovals of lighter pink clay right in the center of the dusted areas. -
Make the eyes:
Roll two small balls of black clay and flatten them onto the face. Use your ball stylus to add tiny white dots—one large and one small—to each eye for that sparkling kawaii reflection. -
Add the smile:
Roll an incredibly thin thread of black clay. Use a needle tool or toothpick to curve it into a ‘U’ shape and gently press it between the cheeks. -
Assemble the body:
Apply a small dab of liquid polymer clay or bake-and-bond to the top of the cone and press your pink scoop firmly onto it.
Texturing Trick
To make the pink scoop look truly frosty like sorbet, lightly dab the raw clay with a clean, stiff toothbrush, then dust with cornstarch before baking to kill any shine.
Step 3: Toppings & Finishing Touches
-
Create whipped cream:
Roll a snake of white clay. Twist it gently to look swirled, then coil it into a small mound on top of the pink head. I find pressing the edges down with a tool helps it merge seamlessly. -
Add the sprinkles:
Take tiny scraps of various clay colors—blue, yellow, pink—and roll them into microscopic logs. Gently press these ‘sprinkles’ into the white whipped cream. -
Form the cherry:
Roll a small ball of bright red clay. Press a small indentation into the top where the stem will go. -
Make the stem:
Take a short piece of thin crafting wire or a dark brown bristle. Insert one end into the cherry and bend it slightly for a natural curve. -
Place the cherry:
Secure the cherry onto the center of the whipped cream pile using a dot of liquid clay. -
Bake the figure:
Bake your creation according to your specific clay manufacturer’s instructions. Usually, this is around 230°F to 275°F for 15-30 minutes. -
Glaze the details:
Once fully cooled, brush gloss varnish onto the cherry, the black eyes, and the mouth. Leave the cone and pink scoop matte for contrast.
Sad, Droopy Stem?
If the wire stem won’t stay in the cherry, dip the tip of the wire in super glue or liquid clay before inserting it into the red sphere. Let it set before attaching to the head.
Place your happy little cone on a shelf or desk where its cheerful smile can brighten your day
Donut Friends With Sprinkles
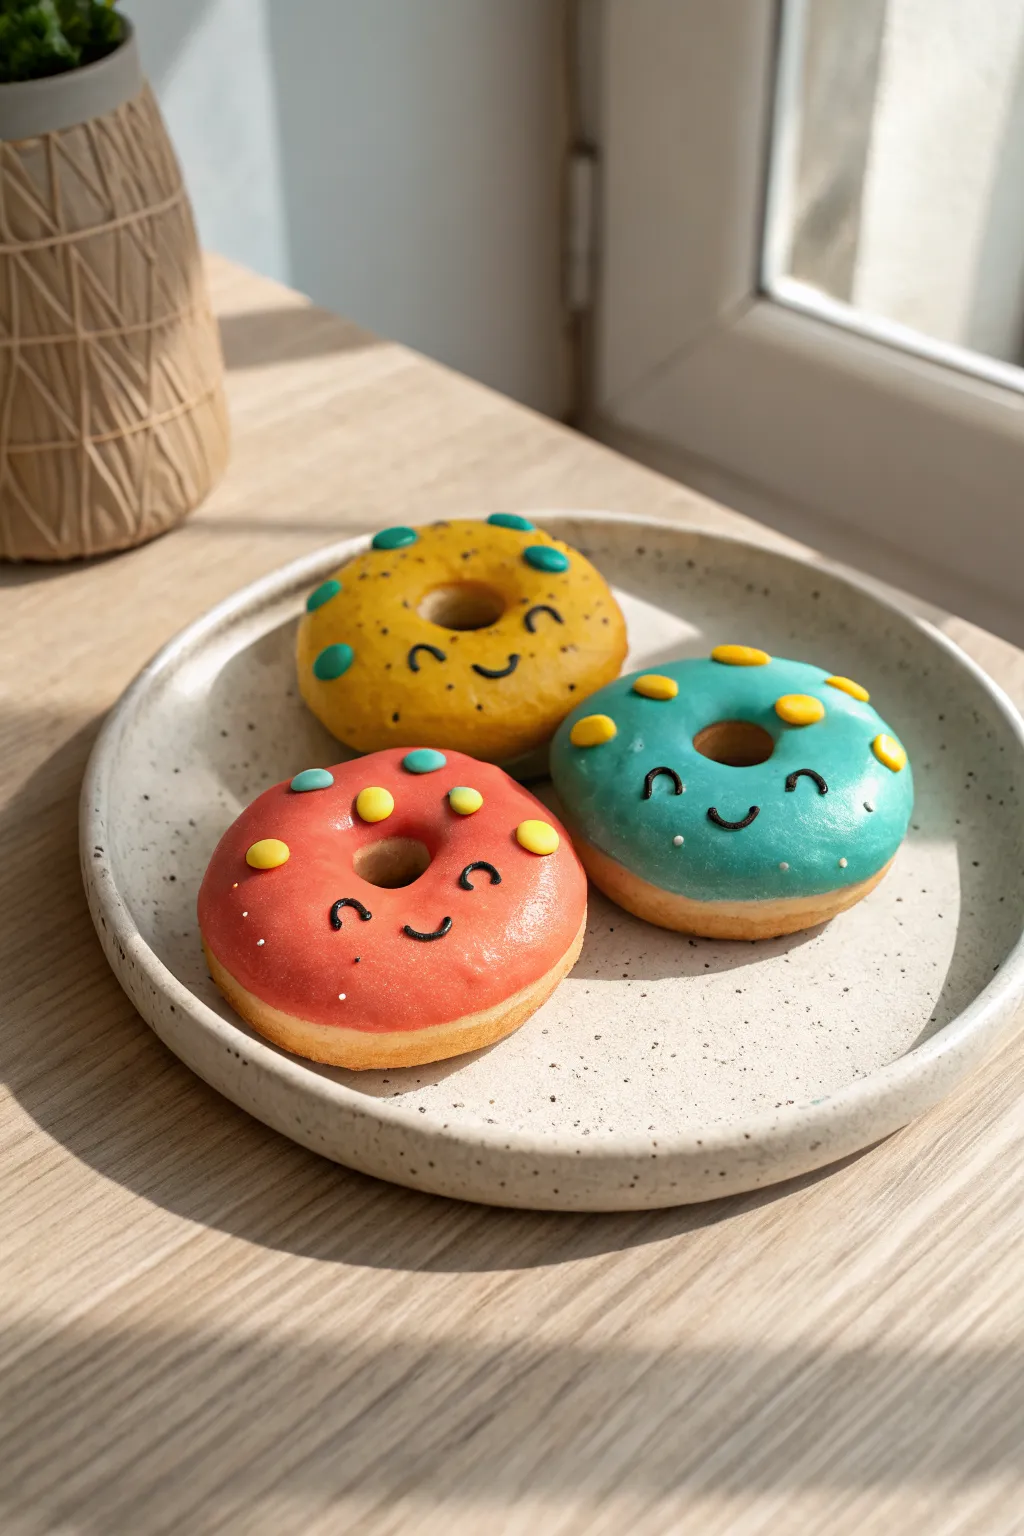
These adorable little donut buddies are sure to bring a smile to your face with their sweet expressions and colorful glaze. Using simple clay shaping techniques, you can create a trio of treats that look good enough to eat—but are definitely just for decoration.
How-To Guide
Materials
- Light tan or beige polymer clay (for the dough)
- Red, yellow, and teal polymer clay (for glaze)
- Black polymer clay (very small amount for faces)
- Yellow and teal polymer clay (for sprinkles)
- Clay sculpting tools (rolling pin, small circle cutters)
- Toothpick or needle tool
- Gloss glaze or varnish
- Soft paintbrush
- Oven and baking sheet (if using polymer clay)
Step 1: Shaping the Dough Base
-
Roll the dough:
Start by taking your light tan or beige clay and conditioning it until it’s soft. Divide it into three equal portions to ensure your donuts are all the same size. -
Form the spheres:
Roll each portion of tan clay into a smooth, tight ball between your palms. Make sure there are no cracks on the surface. -
Flatten slightly:
Gently press down on each ball to flatten it into a thick disc shape. You want them to look puffy, like a freshly risen yeasted donut, not like a flat cookie. -
Create the hole:
Use the back of a paintbrush or a small circle tool to press a hole through the center of each disc. Wiggle the tool slightly to widen the hole and smooth the inner edges with your finger.
Uneven Glaze Edges?
If the wavy edges of your glaze look too sharp or rigid, gently rub them with your finger. The heat from your skin will soften the clay and make the drips look more natural.
Step 2: Adding the Glaze
-
Prepare colored clay:
Roll out thin sheets of your red, yellow, and teal clay. These should be much thinner than the donut bases. -
Cut the glaze shapes:
Use a round cutter slightly larger than your donuts to cut circles from the colored sheets. Alternatively, you can shape irregular wavy edges by hand for a more natural drippy look. -
Apply the glaze:
Place a colored circle on top of each tan donut. Gently press and smooth the edges down the sides so it looks like the icing has melted over the curves. -
Open the center:
Poke through the glaze where the donut hole is underneath and smooth that clay down into the hole for a seamless finish.
Step 3: Decorating the Faces
-
Make the eyes:
Roll extremely thin, tiny snakes of black clay. Cut two small curved pieces for each donut to create happy, squinting eyes. -
Position the eyes:
Carefully place the eyes on the lower half of the donut face using a toothpick or needle tool to position them symmetrically. -
Add a smile:
Cut a slightly smaller curved piece of black clay for the mouth. Place it centered between and slightly below the eyes. -
Secure the features:
Once you are happy with the expressions, gently tap the black clay with your finger to bond it to the glaze layer without squishing the shapes.
Pro Tip: Clean Clay
Work with the lightest colors (tan and yellow) first and black last. Black clay residue sticks to fingers easily and can smudge your bright yellow icing.
Step 4: Sprinkles and Finishing
-
Create round sprinkles:
Roll tiny balls of contrasting clay colors (yellow on teal and red; teal on yellow). Flatten them into small discs. -
Apply the sprinkles:
Press these colorful dots onto the glaze around the faces, avoiding the eyes and mouth area so the expression stays clear. -
Texture the dough:
If you want extra realism, use a toothbrush to gently tap the exposed tan clay near the bottom to mimic a bread texture. -
Bake:
Place your donuts on a baking sheet lined with parchment paper. Bake according to your clay manufacturer’s specific temperature and time instructions. -
Cool down:
Let the donuts cool completely before handling them, as hot clay is fragile. -
Add shine:
I like to finish these by brushing a coat of gloss glaze over just the colored icing parts. This makes them look sticky and sweet while keeping the dough matte.
Now you have a charming set of donut friends ready to brighten up your desk or shelf
Taco, Fries, and Hot Dog Trio
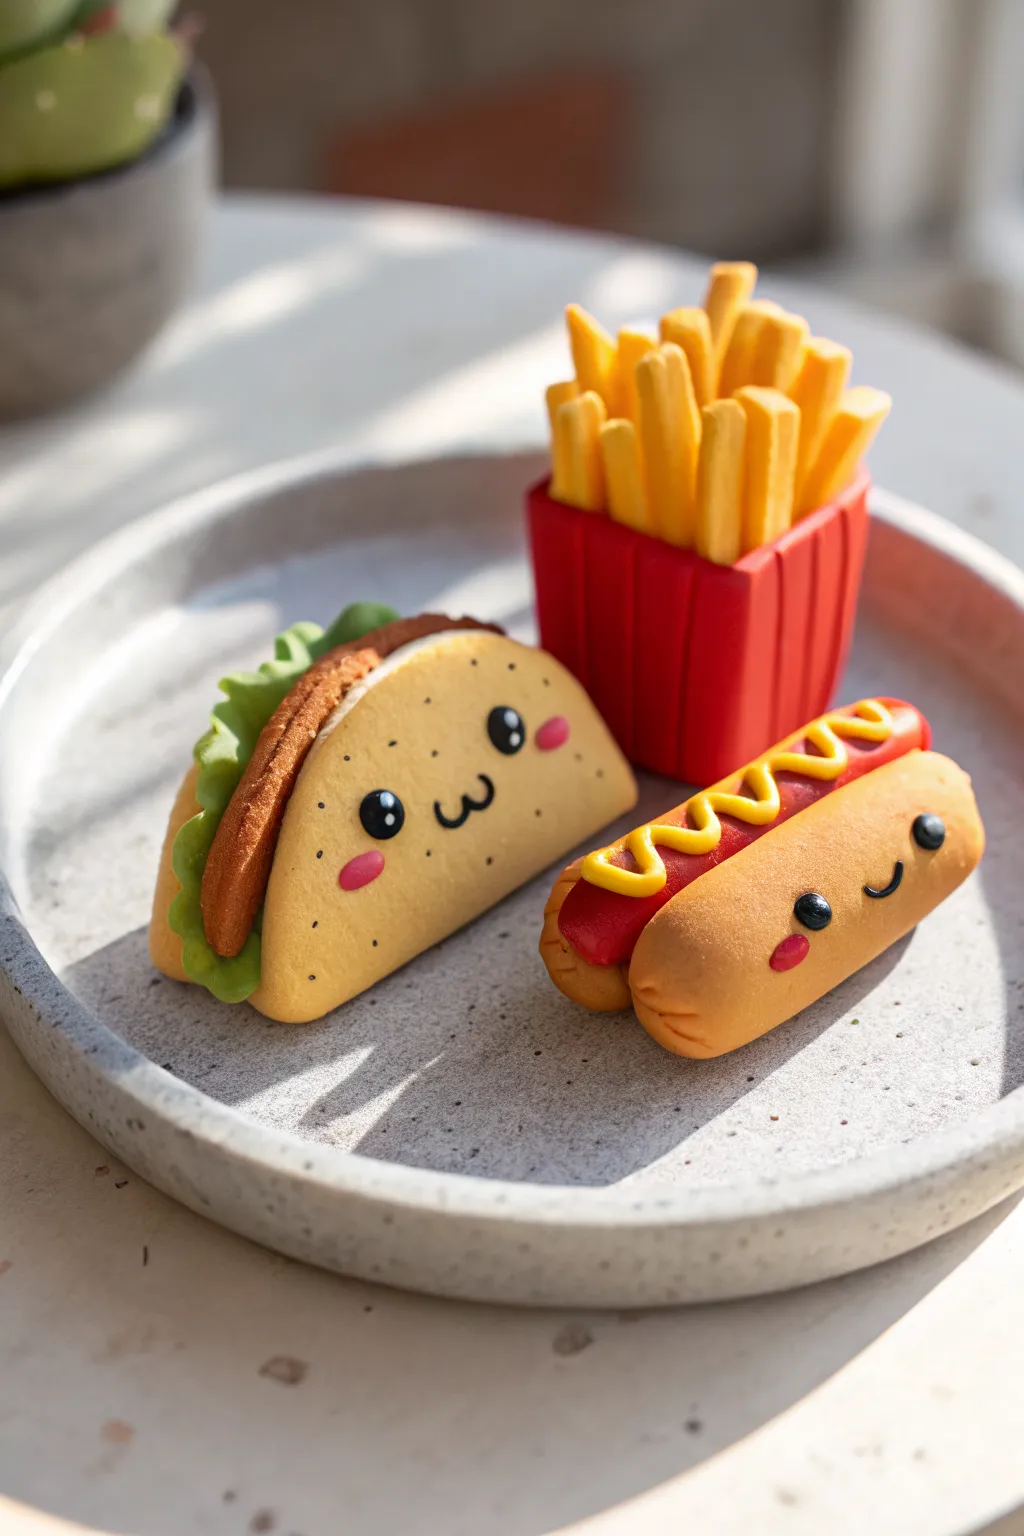
Serve up some smiles with this adorable trio of miniature junk food favorites, featuring charming little expressions and bright, appetizing colors. This polymer clay set includes a crunchy-looking taco, crispy fries in a classic red box, and a hot dog topped with the perfect mustard squiggle.
Step-by-Step Guide
Materials
- Polymer clay (tan/dough color, yellow, red, brown, green, black, pink)
- Clay sculpting tools (needle tool, ball stylus)
- Rolling pin or pasta machine
- Blade or craft knife
- Liquid clay or bake and bond (optional)
- Gloss glaze (optional for finish)
- A clean ceramic plate or tile for working
Step 1: The Crunchy Taco
-
Prepare the shell:
Roll out a flat circle of tan clay, about 2-3 inches in diameter. Gently create a dot texture all over the surface using a needle tool or an old toothbrush to mimic a corn shell texture. -
Add the filling base:
Create a thick half-circle of brown clay to act as the ‘meat’ filling. Place this on one half of your flat shell circle. -
Create the lettuce:
Roll out a thin strip of green clay. Use your fingers to ruffle the edges, creating a wavy, organic look. Lay this strip over the curve of your brown meat filling. -
Fold the taco:
Carefully fold the other half of the tan shell over the filling. Press gently at the bottom edge to secure it, but leave the top open so the lettuce peeks out beautifully. -
Shape the face:
Roll two tiny black balls for eyes and press them into the center of the shell. Roll a microscopic black snake for the ‘w’ shaped mouth. Add tiny pink ovals for blush cheeks. -
Detail the eyes:
Use a needle tool or white paint to add a tiny white reflection dot to each black eye for that classic kawaii sparkle.
Clean Clay Tip
Work from lightest colors to darkest to avoid staining your yellow fries with black clay residue. Wipe hands with baby wipes between colors.
Step 2: The Fries Box
-
Form the box base:
Shape a block of red clay into a rectangular prism, slightly narrower at the bottom than the top. -
Texture the box:
Use a flat tool or the back of a knife to press vertical indentations around the red block, giving it that classic folded cardboard texture. -
Make the fries:
Roll yellow clay into a long snake and cut it into various lengths, approximately 1 inch long. Square them off slightly by pressing them gently on a flat surface. -
Assemble the fries:
Start sticking the yellow fry sticks into the top of the red box. I find it works best if you cluster them tightly in the middle and angle the outer ones slightly outward. -
Create the crispy ends:
Using a darker yellow or light brown pastel chalk (shaved into dust), lightly brush the tips of the fries to make them look perfectly fried and crispy.
Step 3: The Happy Hot Dog
-
Shape the bun:
Form a tan log of clay that is rounded at both ends. Use a modeling tool to create a deep slit down the lengthwise center, opening it up slightly to receive the frankfurter. -
Insert the frankfurter:
Roll a red or dark pink cylinder of clay. Place it snugly into the slit of the bun, ensuring it sticks up a little bit above the bread. -
Add the mustard:
Roll a very thin, long snake of bright yellow clay. Carefully drape it in a zig-zag pattern along the top of the sausage. -
Sculpt the face:
Just like the taco, add two small black clay balls for eyes on the side of the bun. Create a small u-shaped mouth from a thin black snake and add pink cheeks. -
Final baking and finishing:
Check your clay packaging for baking instructions (usually 275°F/135°C for 15-30 minutes). Once cooled, you can add a touch of gloss glaze to the mustard and eye highlights for a wet look.
Make it a Meal Deals
Create a tiny sculpting soda cup with a straw to complete the set, or turn these figures into keychain charms by inserting eye pins before baking.
Display your new mini feast on a small plate or shelf to bring a touch of whimsy to your room
Fruit Characters With Faces
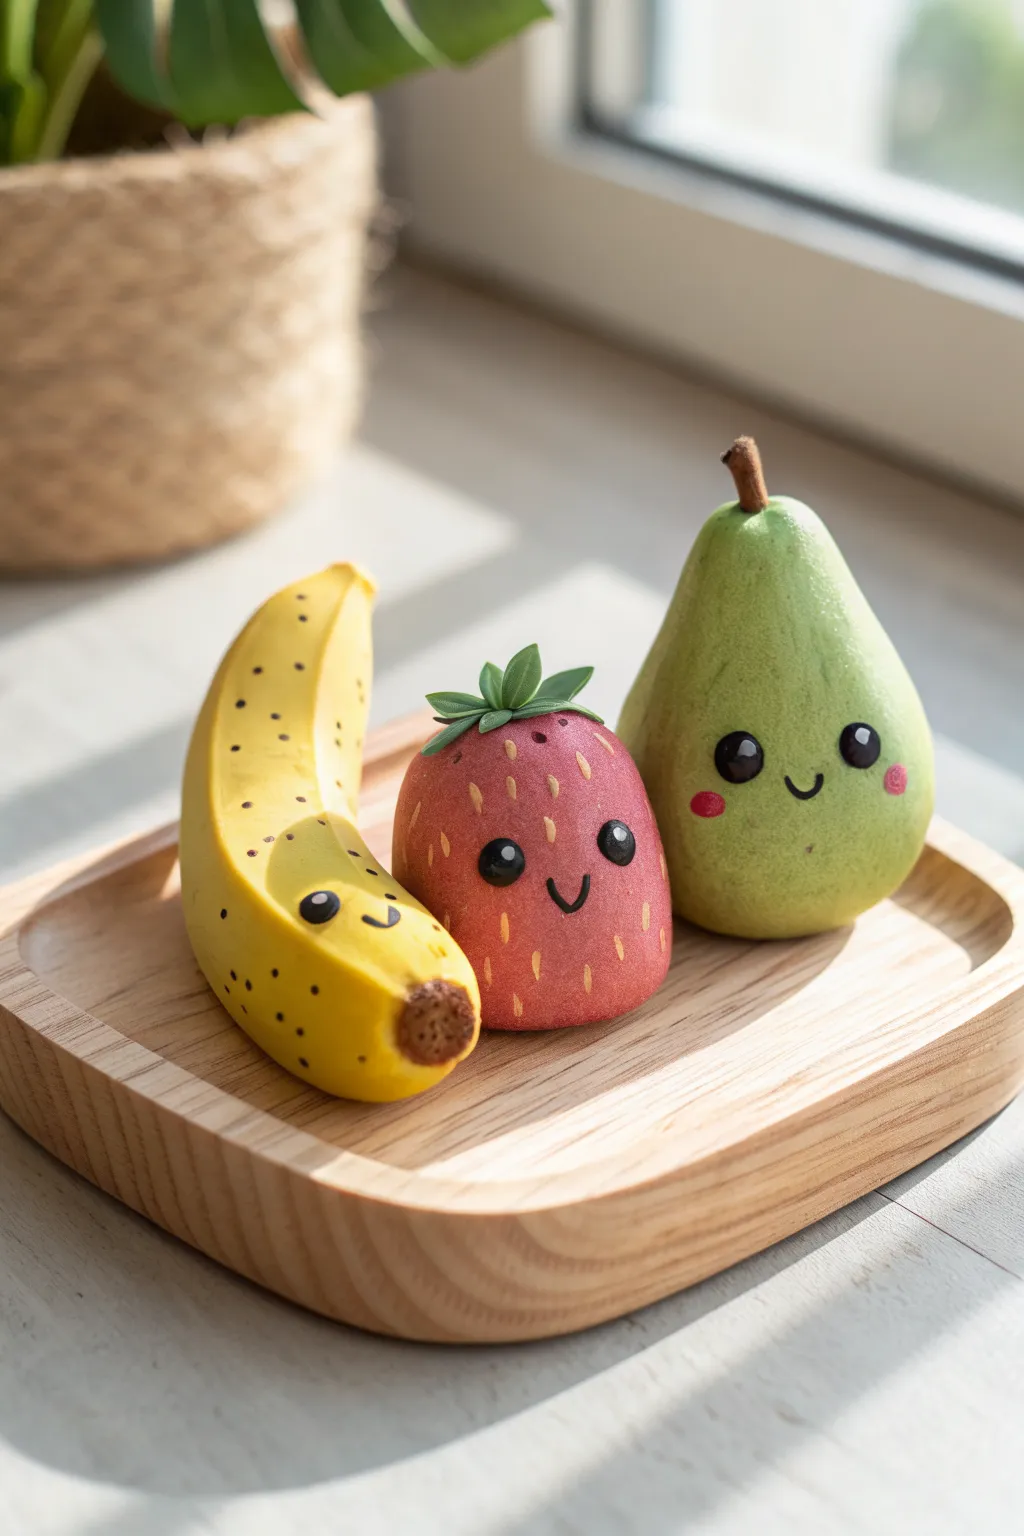
Brighten up your desk with this adorable set of kawaii fruit characters made from polymer clay. These sunny friends—a banana, strawberry, and pear—feature simple shapes brought to life with sweet painted expressions and charming realistic textures.
Step-by-Step
Materials
- Polymer clay (yellow, red, light green, dark green, brown)
- Acrylic paints (black, pink, white, muted yellow)
- Fine detail paintbrush
- Dotting tool or toothpick
- Clay texture tools (needle tool, small ball tool)
- Aluminum foil (optional for core)
- Matte varnish or sealant
Step 1: Sculpting the Banana
-
Shape the Base:
Start by conditioning a chunk of yellow clay until it’s soft and pliable. Roll it into a thick log, slightly tapering both ends to create a classic banana curve. -
Form the Stem:
On the top end, pinch the clay to extend it into a squared-off stem shape. You want this to look slightly cut, rather than perfectly round. -
Detail the Tip:
On the bottom end, flatten the tip slightly and press a small piece of brown clay onto it to mimic the banana’s blossom end. Use a texture tool or toothpick to stipple this brown area for a rough look.
Step 2: Creating the Strawberry
-
Mold the Berry Body:
Take a ball of red clay and roll it into a rounded cone shape with a flat bottom so it can stand upright on its own. -
Leafy Topper:
Roll out a small amount of dark green clay. Cut out five or six small teardrop or star shapes, then press them onto the top of the berry, curling the tips slightly upward for a natural look. -
Add Texture:
To give the strawberry its seeded texture, use a needle tool or toothpick to gently press tiny indentations all over the surface, leaving a smooth space in the center for the face. -
Seed Painting Prep:
I prefer to pre-mix a creamy yellow paint color now so it’s ready for the tiny seeds later, though we will apply it after baking.
Smooth Operator
Before baking, use a tiny bit of baby oil or cornstarch on your fingertips to smooth out any stubborn fingerprints on the clay surface.
Step 3: Forming the Pear
-
Shape the Pear:
Condition light green clay and roll it into a ball. Gently roll the top half between your fingers to narrow it, creating the distinctive pear silhouette with a wide bottom and tapered neck. -
Smooth the Surface:
Rub your finger lightly over the clay to remove any fingerprints, ensuring the pear is smooth and rounded. -
Insert the Stem:
Make a tiny indentation at the very top. Create a small, thin cylinder from brown clay and press it into the indentation to act as the stem.
Wobbly Fruit?
If your pear or banana won’t stand up, gently tap the bottom of the raw clay figure against your table to create a flat base before baking.
Step 4: Baking and Decorating
-
Bake the Clay:
Place all three figures on a baking sheet lined with parchment paper. Bake according to your clay manufacturer’s instructions (usually 275°F/135°C for 15-30 minutes). -
Cool Down:
Allow the figures to cool completely before painting. Painting on warm clay can make the paint dry too fast and become clumpy. -
Paint the Faces:
Using a fine detail brush and black acrylic paint, add two small circles for eyes and a small ‘U’ shape for a smile on each fruit. For the strawberry, place the face low on the body. -
Add Eye Sparkles:
Once the black paint is dry, use a toothpick dipped in white paint to add a tiny dot to the upper corner of each eye for a cute, shiny effect. -
Rosy Cheeks:
Dip a cotton swab or a dry brush into pink paint and dab off the excess on a paper towel. Gently apply rosy cheeks next to the smiles on the pear and banana. -
Strawberry Seeds:
Using a very fine brush and cream or pale yellow paint, fill in the small indentations you made on the strawberry earlier to create seeds. -
Banana Spots:
Mix a watery brown paint and lightly flick or dot tiny specks onto the yellow banana skin to give it a realistic, ripe appearance. -
Seal the Projects:
Finish by applying a coat of matte varnish to protect the paint and give the clay a professional, finished look.
Enjoy your sweet new collection of smiling fruit friends displayed on a shelf or desk
Silly One-Eyed Monsters
Meet this lovable, lumpy monster who proves that having one giant eye is twice as fun! With his stubby little horns and spotted belly, this clay figure is a fantastic starter project for learning how to attach limbs and add fine details.
Step-by-Step Tutorial
Materials
- Polymer clay or air-dry clay (Red-orange, White, Black, Light Green, Cyan/Teal)
- Clay sculpting tools (plastic knife, dotting tool)
- Toothpick or needle tool
- Rolling pin (optional)
- Clean work surface (parchment paper or silicone mat)
Step 1: Shaping the Body
-
Roll the main form:
Start with a generous ball of red-orange clay. Roll it between your palms until it’s smooth and free of cracks. -
Create the gumdrop shape:
Gently tap the bottom of the ball against your work surface to flatten it so it stands on its own. Use your fingers to slightly taper the top, creating a rounded cone or gumdrop shape for the monster’s body. -
Form the feet:
Take two small balls of the same red-orange clay. Flatten them slightly into ovals and attach them firmly to the bottom front of the body. -
Detail the toes:
Use a plastic knife or a toothpick to press two or three small indentations into the front of each foot to create toes. Smooth the seam where the feet join the body so they don’t fall off.
Seamless
To ensure limbs don’t fall off during baking, use a blending tool to drag a bit of clay from the arm onto the body across the seam.
Step 2: The Big Eye
-
Make the eyeball base:
Roll a medium-sized ball of white clay and flatten it into a thick disc. Press this onto the upper center of the body. -
Add the iris:
Roll a smaller ball of light green clay, flatten it, and place it directly in the center of the white disc. -
Add the pupil:
Finally, take a tiny piece of black clay, roll it into a ball, and press it into the center of the green iris to complete the eye. -
Create the highlight:
For a bit of life, add a minuscule dot of white clay to the black pupil to make the eye look shiny.
Texture Time
Before baking, use an old toothbrush to gently tap the red skin areas. It gives the monster a realistic, bumpy skin texture
Step 3: Face and Details
-
Carve the mouth:
Use a sculpting tool to gently carve a curved, smiling line below the eye. Don’t cut too deep; just mark the surface. -
Add the teeth:
Roll extremely tiny cones of white clay. Carefully press these small triangles along the mouth line—some pointing up, some pointing down—to give him a goofy grin. -
Make the horns:
Roll two small cones of orange clay. I find it helpful to twist them slightly as I roll to keep the point sharp. -
Stripe the horns:
Take a tiny thread of black clay and wrap it around the horns to create stripes, or use a fine-tip black marker after baking if that’s easier. Attach the finished horns to the top of the monster’s head.
Step 4: Limbs and Spots
-
Form the arms:
Roll two sausage shapes of red-orange clay. Slightly taper one end of each for the shoulder. -
Attach the arms:
Press the tapered ends onto the sides of the body. You can pose them hanging down or waving. Use your tool to mark little fingers at the end of each arm. -
Create the spots:
Roll several small balls of cyan or teal clay. Flatten them into thin circles of varying sizes. -
Apply the spots:
Press these teal dots randomly all over the monster’s body—on his belly, sides, and back. Make sure to press them flat so they become part of the ‘skin’. -
Smooth everything out:
Give the whole figure a once-over, smoothing out any fingerprints. If using polymer clay, bake according to the package instructions. If using air-dry clay, let it sit undisturbed for 24 hours.
Enjoy your new desk buddy and remember that perfection is overrated when making monsters
Little Robots With Button Details
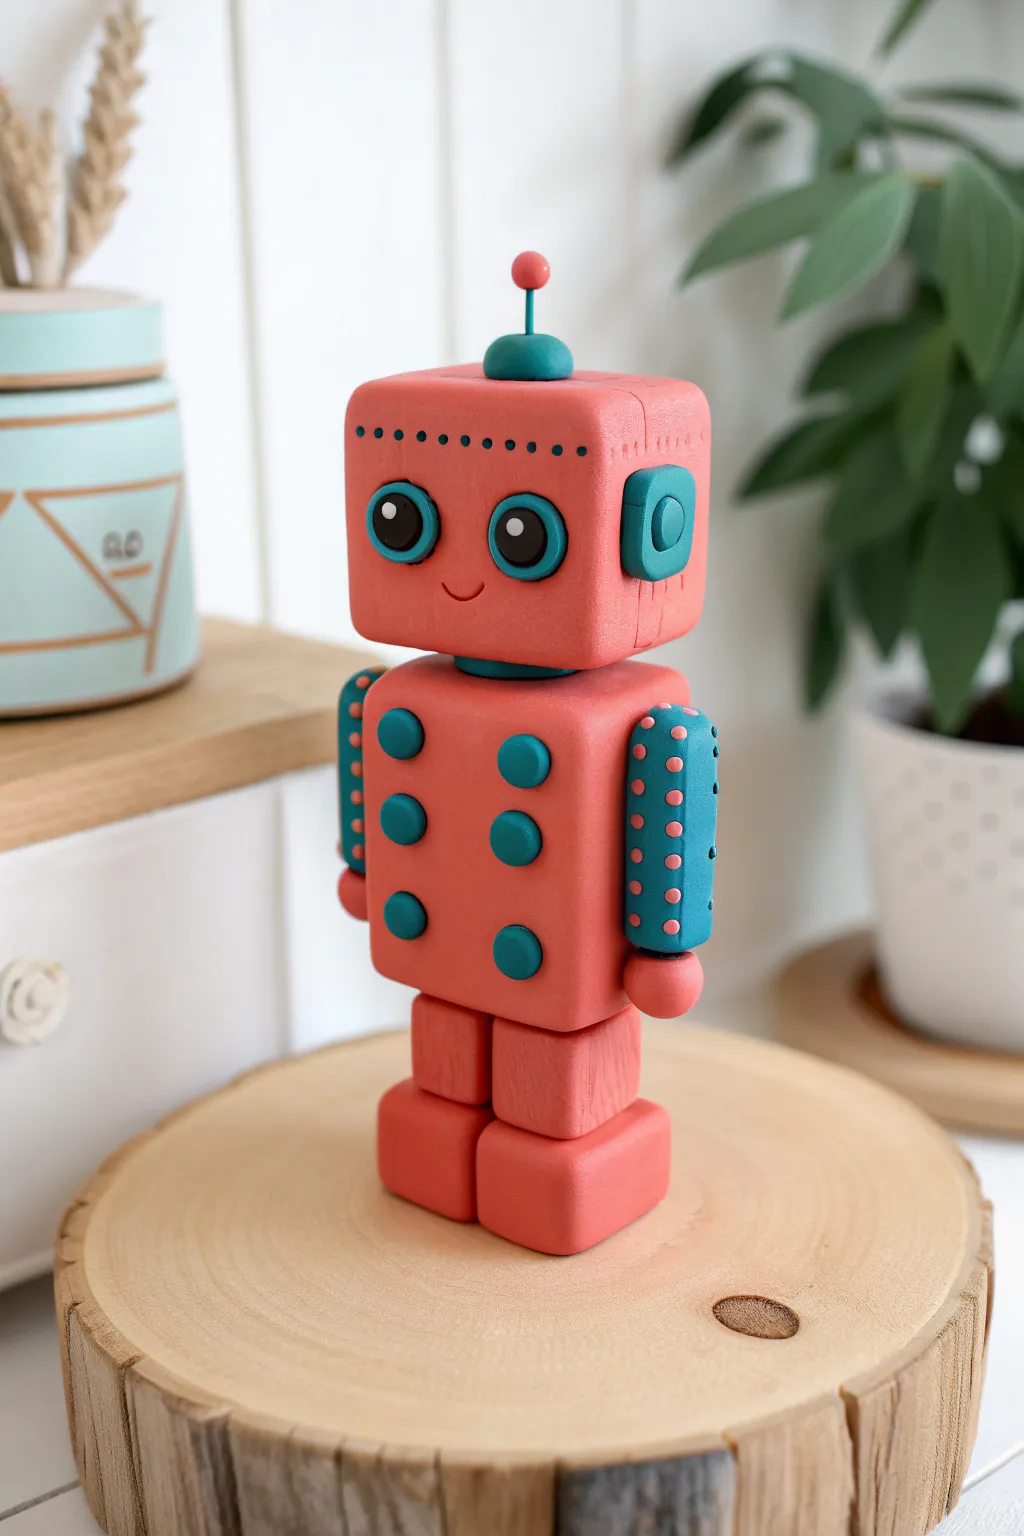
This charming little robot brings a vintage vibe to your shelf with its soft coral pink and teal color scheme. The smooth, cube-like design features adorable button “controls” and a friendly face that’s perfect for a desktop companion.
Step-by-Step
Materials
- Polymer clay (coral pink, teal/turquoise, black, tiny bit of white)
- Clay sculpting tools (knife tool, dotting tool, flattening roller)
- Toothpick or small wire for support
- Baking sheet and parchment paper
- Small circle cutter or straw (optional)
Step 1: Building the Head
-
Shape the Cube:
Start with a generous block of coral pink clay. Condition it by kneading until soft, then shape it into a smooth cube with slightly rounded corners for the head. -
Create Eye Sockets:
Roll two small balls of teal clay. Flatten them into discs and press them firmly onto the front of the cube where you want the eyes to go. -
Add the Eyes:
Make two slightly smaller balls of black clay. Press these into the center of the teal discs. Add a tiny speck of white clay to the top right of each black pupil for a life-like shine. -
Sculpt the Mouth:
Use a curved sculpting tool or the edge of a small spoon to gently impress a simple, happy smile between the eyes. -
Add Head Details:
For the ‘ears,’ shape small teal rectangles and press them onto the sides of the head. Add a small teal ball inside. Lastly, execute a row of tiny indentations across the forehead using a needle tool. -
The Antenna:
Form a small teal dome for the top of the head. Stick a short piece of wire or stiff toothpick into it, and top it with a tiny coral ball.
Fixing Fingerprints
Using polymer clay often leaves fingerprints. Before baking, lightly brush your sculpt with a little baby oil or cornstarch to smooth them out perfectly.
Step 2: Constructing the Body
-
Form the Chest:
Shape a second block of coral clay into a rectangle that is slightly taller and narrower than the head. This will be the main torso. -
Attach the Buttons:
Roll six equal-sized balls of teal clay. Flatten them slightly and arrange them in two vertical columns of three on the robot’s chest to look like control buttons. -
Make the Neck:
Create a flat teal disc, slightly smaller than the width of the body, to serve as the neck connector. -
Shape the Arms:
Roll two cylinders of teal clay for the arms. They need to be long enough to reach from the shoulder to the hips. Flatten the sides slightly against the body. -
Decorate the Arms:
Roll very tiny snakes of coral clay or use small flattened dots to create a repeating pattern down the length of the teal arms. -
Add Hands:
Attach small coral spheres to the bottom of the teal arm pieces to represent the robot’s hands.
Step 3: Legs and Assembly
-
Create the Legs:
Form two small cubes of coral clay for the upper legs. Attach these to the bottom of the torso. -
Form the Feet:
Make two slightly larger, flatter rectangular blocks for the feet. Attach these securely to the bottom of the leg cubes to ensure the robot can stand. -
Internal Support:
Insert a toothpick or wire vertically through the neck piece, halfway into the body and halfway sticking out. -
Final Assembly:
Gently press the finished head onto the exposed neck support. Ensure the seal is tight so the head doesn’t wobble. -
Bake:
Place your robot on parchment paper and bake according to your polymer clay package instructions (usually around 275°F/135°C for 15-30 minutes per 1/4 inch thickness).
Make It Glossy
After baking and cooling, coat just the black parts of the eyes and the teal buttons with a water-based glossy varnish to make them shine like real glass or plastic.
Once cooled, your little coral helper is ready to stand guard on your desk
Tiny Gnomes and Mushroom Pals

Bring a touch of forest charm to your bedroom shelf with these adorable, minimalistic clay gnomes and their tiny mushroom friend. This project focuses on simple geometric shapes and subtle textures to creating a rustic, handmade look that feels timeless.
Step-by-Step Guide
Materials
- Air-dry clay (white or terracotta)
- Acrylic paints (beige, dusty pink, white, brown)
- Fine grit sandpaper
- Small cup of water
- Clay sculpting tools (needle tool, small knife tool)
- Paintbrushes (medium flat and fine liner)
- Optional: Matte varnish sealant
Step 1: Shaping the Bodies
-
Roll the bases:
Start by rolling two balls of clay, roughly the size of a golf ball. Gently roll them into thick cylinders, tapping the bottom on your table to create a flat, stable base for each gnome’s coat. -
Form the heads:
Roll two slightly smaller spheres for the heads. Attach them firmly to the top of your cylinders. I find that scoring both joining surfaces with a needle tool and adding a dab of water works best to keep them secure. -
Create the hats:
For the signature hats, roll two cones of clay. Make them tall and slender. Hollow out the bottom slightly so they sit snugly on top of the round heads. -
Blend the seams:
Use your finger or a smoothing tool to gently blend the clay where the hat meets the head, or leave a distinct rim if you prefer the look of a separate hat piece.
Cracks happen!
If small cracks appear as the clay dries, don’t panic. Mix a tiny bit of fresh clay with water to make a paste and fill the gaps, then sand smooth once dry.
Step 2: Adding Details
-
Sculpt the noses:
Roll tiny little balls of clay for the noses. Attach them right in the center of the face, pressing firmly so they don’t fall off as the clay shrinks. -
Carve the faces:
Using a needle tool or a toothpick, poke two small holes for the eyes. Carefully carve a wide, curved line for the smile to give them a cheerful expression. -
Define the arms:
Instead of adding separate pieces, carve vertical lines into the sides of the cylinder to suggest arms tucked against the body. This keeps the look sleek and modern. -
Add coat buttons:
For the beige gnome, use a small tool to press three vertical indentations down the center of the body to look like buttons. -
Make the mushroom:
Don’t forget the mushroom pal! Create a thick stalk and a separate cap, attach them, and smooth the clay to make it look organic and slightly uneven. -
Create the pumpkin:
Roll a small ball and flatten it slightly. Use a knife tool to press vertical ridges all around the sides to mimic pumpkin sections, then add a tiny stem on top.
Make it a set
Create different sizes to make a whole family. Try making a tiny baby gnome by using a marble-sized ball of clay for the body and a thimble-sized hat.
Step 3: Finishing Touches
-
Dry thoroughly:
Let your figures dry completely for at least 24 to 48 hours. They should feel light and room temperature to the touch when ready. -
Sand for texture:
Once dry, lightly sand the surfaces. This removes any rough fingerprints and gives the clay that stone-like, rustic finish seen in the photo. -
Paint the beige gnome:
Mix a watery wash of beige and brown acrylic paint. Brush it over the entire gnome, then wipe most of it off with a paper towel. This technique, called antiquing, leaves color in the carved lines and textures. -
Paint the pink gnome:
Paint the hat and body of the second gnome in a soft, dusty pink. Leave the face natural or paint it a light beige tone. -
Add polka dots:
Using the wrong end of a paintbrush, dip it in white paint and add tiny, random dots to the pink gnome’s coat for a festive texture. -
Detail the accessories:
Paint the mushroom cap a soft grey-brown and add tiny orange specs if desired. Give the little pumpkin a wash of grey or brown to match the rustic theme.
Now you have a charming little clay family ready to sit on your windowsill or join a holiday display
Mix-and-Match Build-a-Figure Squad
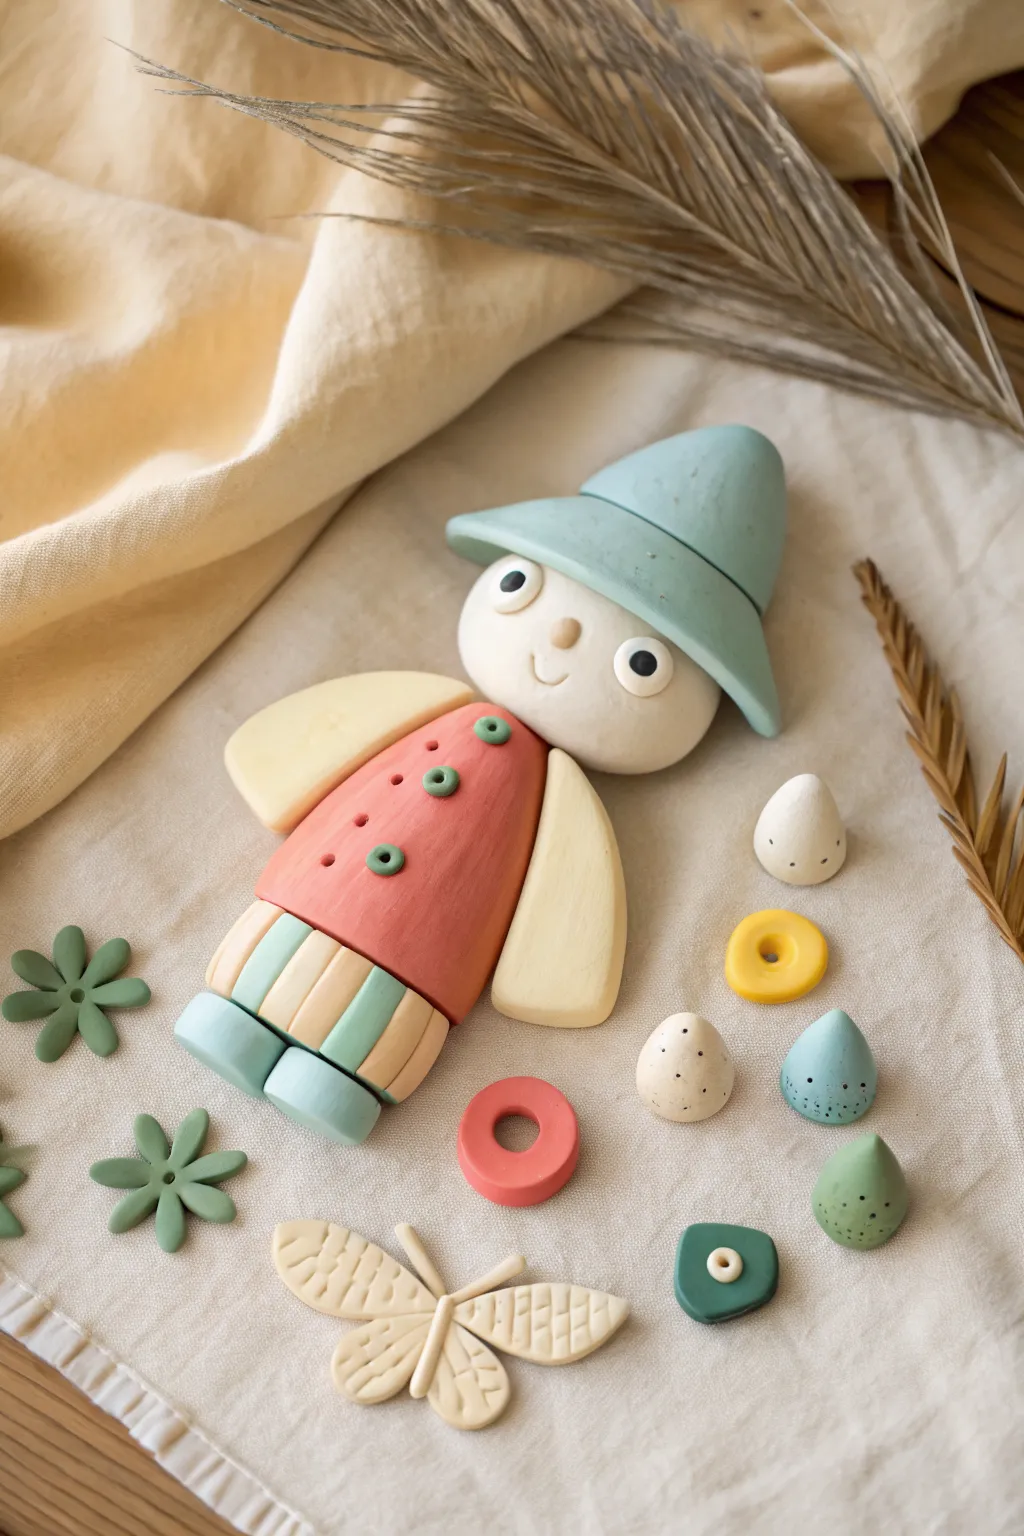
Create an adorable, mix-and-match character with movable parts that resembles a friendly garden scarecrow. This project uses smooth, matte clay in a soft pastel palette to build a figure that feels like a modern toy heirloom.
Step-by-Step Tutorial
Materials
- Polymer clay or smooth air-dry clay (colors: pale blue, cream/white, terracotta/red, pale yellow, sage green)
- Clay roller or cylindrical object
- Modeling tools (dotting tool, needle tool, plastic knife)
- Small round cutter (optional)
- Sandpaper (fine grit)
- matte varnish (optional)
Step 1: Sculpting the Head & Hat
-
Form the head base:
Start with a generous ball of cream-colored clay. Roll it until it is perfectly smooth and slightly flatten it so the face is a wide oval shape. -
Add facial details:
Using a small bead of clay, create a tiny nose in the center. Use a needle tool or small curved tool to impress a simple, happy smile below the nose. -
Create the eyes:
Lay down two small circles of white clay for the eyes. Add tiny black clay dots (or paint them later) to the center for pupils to give the character expression. -
Shape the hat brim:
Roll out pale blue clay into a sheet about 1/4 inch thick. Cut out a circle, roughly 1.5 times the width of the head, and gently curve the edges downward to form a floppy brim. -
Form the hat peak:
With the same blue clay, shape a soft cone. Smooth the bottom of the cone onto the top of your brim piece to complete the hat, then place it gently on the head to check the fit.
Step 2: Building the Body Segments
-
Sculpt the torso:
Take your terracotta or soft red clay and shape a rounded trapezoid for the shirt. It should be narrower at the top and wider at the bottom. -
Add button details:
Press three small divots down the center of the torso. Place tiny green clay balls into these divots and pierce the center of each with a needle tool to mimic buttons. -
Create the skirt or pants:
For the bottom section, create a thick, rectangular block. I find it easiest to slice vertical strips of alternating cream and pale blue clay, press them together, and then smooth it into a single striped cylinder shape. -
Add feet:
Roll two blue cylinders for the feet and slightly flatten one side so the figure can stand or lay flat without rolling.
Clean Clay Genius
Use baby wipes to clean your hands and tools between colors. This prevents the red clay from accidentally staining your pristine cream or pale blue pieces.
Step 3: Arms & Accessories
-
Shape the arms:
Roll pale yellow clay into two tear-drop shapes. Flatten them slightly to look like simple, stylized sleeves or arms. -
Assemble the butterfly:
Roll a thin worm shape for the butterfly body. Attach four flattened tear-drop shapes (two large, two small) as wings, using a needle tool to etch a grid pattern into the wings for texture. -
Make the flowers:
Create simple green flowers by arranging five teardrop shapes in a circle, meeting at the center. Press a dent in the middle of each with a dotting tool. -
Create geometric accents:
Use leftover clay to make simple cones, small mounds with speckled details, and rings. These act as little garden elements or toys for your figure.
Magnetic Magic
Embed small neodymium magnets inside the connecting points of the head, torso, and arms before baking so the pieces snap together and stay poseable.
Step 4: Finishing Touches
-
Bake or dry:
If using polymer clay, bake according to the package instructions (usually around 275°F/135°C for 15-30 minutes). If using air-dry clay, allow pieces to dry fully for 24-48 hours. -
Sand and smooth:
Once fully cured, gently sand any rough fingerprints or edges with fine-grit sandpaper to achieve that matte, professional toy look. -
Seal (optional):
Apply a very light coat of matte varnish if you want to protect the clay from dust, though leaving it raw preserves the soft texture shown in the photo.
Arrange your figure alongside its little accessories for a charming display that invites play